1
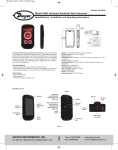
Bulletin P-DCGII
Series DCGII Digital Calibration Pressure Gage
Specifications - Installation and Operating Instructions
DCGII-105
DIGITAL PRESSURE GAGE
Ø3-5/8
[92.20]
POWER: DC9V (6LR61 ALKALINE BATTERY)
DWYER INSTRUMENTS, INC.
Ø4-3/8
[111.51]
PEAK
UNITS
ZERO
(0 to XX PSIG)
2-5/8
[66.97]
1/2 NPT
The Series DCGII Digital Calibration Pressure Gage offers a complete
pressure gage with calibration capabilities. With a precise 0.05% full scale
accuracy and large 5 digit resolution, this gage can be used in critical
industrial applications where precision is most important. This versatile
gage only requires one 9V battery or power adapter and can operate up
to 5,000 working hours. The Series DCGII 0.05% Digital Pressure Gage
can display percent pressure for a quick visual reference. This pressure
gage comes complete with eleven selectable pressure units, backlight and
zeroing capability.
CAUTION
To prevent sensor damage, do not allow the pressure to exceed
120% of full scale. The DCGII has 11 different pressure units to
switch. However, in order to avoid the reading overflow or too low to read; only some
of pressure units are selected. To prevent damage, do not use the imposition of torque
between the shell and the pressure quick connect coupling. Do not connect the
communication label with DCGII in a hazardous atmosphere.
SPECIFICATIONS
Service: Compatible, non-combustible liquids and gases.
Wetted Materials: 316 SS.
Other Materials: Housing: Aluminum alloy; Display: Acrylic MR200;
Buttons: Silicon gel; Back plate: 304 SS; Back seal: Oil-proof latex.
Accuracy: 0.05% FS; ±1 least significant digit.
Temperature Accuracy: ±1°C.
Pressure Limits: 120% of FS.
Temperature Limits: 14 to 122°F (-10 to 50°C).
Compensated Limits: 32 to 122°F (0 to 50°C).
Process Connection: 1/2˝ male NPT.
Display: 5-digit LCD with blue backlight.
Power Requirements: One 9V alkaline battery or power adapter.
Battery Life: Up to 10,000 hours (600 working hours @ default 3
times/s).
Auto Shut-off: Backlight: On/off, 10 s, 20 s, 30 s.
Weight: 1.28 lb (0.58 kg).
Agency Approval: CE.
Operating Instructions
Power ON/OFF
Analog dial:
Pressing it shortly to select the % indication, swing (fluctuation)
and low/high alarm; Pressing it longer to enter into the menu of
adjusting low/high alarm.
Peak Value:
Pressing it shortly to switch the indication among max Peak, min
Peak and quit Peak; Pressing it longer to enter the menu of MENU
OPTION.
Backlight:
Pressing it shortly to turn on of turn off the backlight; Pressing it
longer to select the backlight display time (10 s, 20 s and 30 s),
and loosen it for selection.
Pressure units: Pressing it shortly to switch the different pressure
units; Pressing it longer to enter into the temperature display
menu.
Zeroing:
Pressing it for zeroing function (The absolute type DCGII should
be press longer).
DWYER INSTRUMENTS, INC.
P.O. BOX 373 • MICHIGAN CITY, INDIANA 46360, U.S.A.
Phone: 219/879-8000
Fax: 219/872-9057
www.dwyer-inst.com
e-mail: [email protected]
Data Inputing Introduction
①
(←),
Basic Function
Power on/off
(→)
Move decimal digit left and right;
Press
to turn on or turn off the DCGII. The instrument does a self test
and then shows all applicable data.
②
(↑),
③
(↙)
Confirm the inputting data;
④
(ESC)
Cancel the inputting data.
(↓)
Increase/ decrease the pressure value;
Menu Operation Introduction
①
(Menu)
Pressing it longer to enter the MENU OPTION
(calibration/setting);
Figure 2: The First Screen
②
(↑),
(↓)
Move menu upper or down;
③
(↙)
Enter function;
④
(ESC)
Show the previous menu.
Screen Area
Figure 3: Pressure Measurement Interface
Pressure Measure
Press the buttons to enter the pressure measure menu, the displayed content
includes:
• Battery icon
• Pressure measure value
• Pressure units
• Analogue dial indication
Figure 1: Screen Area
Battery Icon: The battery icon (
) is the indication of full battery; The
battery icon (
) is the indication of low battery (<25%). However, the
DCGII can continually work till it powers off automatically.
Pressure Unit Area: Total 11 units for selection;
In order to avoid the readings overflow or too low to read, only some of pressure
units are selected.
Calibration Icon: The mark or symbol of operating calibration.
Pressure Peak: The mark or symbol of displaying peak value.
Higher Limit: The mark or symbol of high limit pressure
Lower Limit: The mark or symbol of lower limit pressure
Temperature Unit: C, Celsius.
Data Display Area: To display all data or menu.
Analog Dial: Includes 3 types indication: pressure % indication, pressure
swing, overpressure alarm.
The content of the area as below:
① % Indication: The current pressure percentage;
② Pressure Swing: The indication of the pressure fluctuation;
③ Overpressure Alarm: The alarm indication for overpressure (less or more
the limit);
④ Sector Pointer Area: Including 51 segments bars or pointers;
⑤ Scale Bar Graph: It has different definitions under the different operation
condition;
⑥ Scale Midpoint: The middle position of Scale bar graph.
Note: Initially, these register values are set to the factory calibration values.
If the pressure is over 120% × FS, the whole screen will flash to alarm. To
prevent damage of sensor, please release the pressure immediately. While
the alarm happened, the measure speed of DCGII automatically changes to
3 x 1 s for catching up the pressure changing. When the alarm is over, the
speed will go back to normal.
Zeroing
Connect the DCGII with atmosphere via connector coupling. If the current
pressure is in the range of (-1% ~ +1%) × FS, press
button for zeroing
step. Figure 4 shows the zeroing sequence of gage pressure.
Figure 4: The Zeroing Sequence for Gage Pressure DCGII
Pressure Units
Set Alarm Limit
Press
button to switch different pressure units. The sequence is kPa >
kgf/cm2 > inH2O > mmH2O > inHg > mmHg > psi > mbar > bar > Mpa.
The setting process as follows:
Peak Detection
(1) Record maximum/minimum peak value
Press
(1) Press
button to display the higher limit (
) and lower limit (
in turn, please move the cursor left or right direction by pressing the
button.
(2) Press
(
).
button to adjust the alarm higher limit (
)
) or lower limit
button to record the peak value.
----------------Show the maximum pressure
(3) After the high limit is adjusted, the menu will automatically enter the
lower limit, and then to quit the menu.
The sequence is: High limit > Low limit > Quit.
----------------Show the minimum pressure
<No Icon>-------- Automatically record the actual pressure value.
(4) The DCGII automatically checks the validity for inputting data. If there is
a problem, the setting is not effective.
(2) Reset the Peak Values
Temperature Measure
Press
button to cancel the previous peak value and save the current
peak value.
Press
button longer to enter the menu of temperature measure, press
again to go back to the pressure measure menu.
The temperature measure range is -30°C to 90°C, the minimum resolution
is ±0.1°C.
Backlight
Press
button to power on/off the backlight. Hold button to set auto
on/off to 10 s, 20 s and 30 s.
Menu Option (Calibration/Setting)
Enter the Menu
Analogue dial
The password to enter the menu is “211”. The operation steps as follows:
Includes three indications: % indication, pressure swing and overpressure
alarm
Press
Press
Input password “211”.
button to switch each other.
The analogue dial includes:
① Percent pressure (%) ② Pressure swing ③ Overpressure alarm
④ Sector pointer area
⑤ Scale bar graph ⑥ Scale midpoint
longer to enter into the password menu.
Note: If the password is wrong, the menu will return to the previous menu.
Menu Option:
There are 4 options, as shown.
Percent Pressure
% indication: show the current pressure percentage;
Sector pointer area: show the pressure range as sector shape;
Scale bar graph: 0%~100%, the minimum scale is 2%;
Scale midpoint: point to 50%.
Pressure Swing
Pressure swing icon: The indication of the pressure fluctuation;
Sector pointer area: By using 1 pointer, to show the fluctuation degree of 2
seriate pressure value;
Scale bar graph: Range is (-0.25%~0.25%) × FS, the minimum scale is
0.01% × FS;
Scale midpoint: Point to 0.01% x FS position.
Description:
(1)
To enter into the calibration menu;
(2)
The DCGII has been calibrated already;
Overpressure Alarm
The DCGII hasn’t been calibrated yet;
Overpressure alarm icon: The indication of the overpressure;
Sector pointer area: By using 2 pointers to show the high/low alarm limit,
the 3rd pointer to show the current pressure %
Scale bar graph: (0%~100%) × FS, minimum scale is 2% × FS;
Scale midpoint: Point to 50%.
Note: If user implements this step, all pressure calibration will be
cancelled. Please be careful with this option.
(3)
To cancel the previous zeroing operation;
(4)
To set measure speed (or display update).
Enter/Cancel the Calibration
To enter the calibration.
To cancel the calibration.
Cancel the Wrong Zeroing
(2) To calibrate lower limit point: Press
pressure value is stable.
button to confirm till the actual
To cancel the previous zeroing operation.
(3) Display higher limit point: Input the desired data if user needs to modify
the calibration value. Otherwise, press
button to confirm.
Measurement Speed
Select
to enter the selectable menu of measure speed, as
follows:
1━3 (3 x 1 s) 1━2 (2 x 1 s) 1━1 (1 x 1 s) 2━1 (1 x 2 s)
(4) To calibrate higher limit point: Press
actual pressure value is stable.
button to confirm until the
3━1 (1 x 3 s) 4━1 (1 x 4 s) 5━1 (1 x 5 s) 6━1 (1 x 6 s)
(5) The screen returns to the calibration menu, the 2nd option changes to
. That shows the calibration is finished and effective.
7━1 (1 x 7 s) 8━1 (1 x 8 s) 9━1 (1 x 9 s) 10━1 (1 x 10 s)
Cancel Calibration
The factory default is 3 x 1 s.
Select
Calibration Function
.
Replacing the Battery
It is recommended the DCGII is re-calibrated once a year by a skilled
professional. Otherwise, the random operation may be effects the inner
parameter and weaken the measure performance. The DCGII should be
pressurized to full scale then release all pressure. In order to achieve the
best calibration condition, please do the pre-pressurizing at least three
times.
to cancel the calibration, then the screen displays
Please replace with spare battery if the DCGII powered off automatically;
Replace the approved battery.
Approved battery: Lithium ion 3.6 V size AA
Unscrew the bolt and remove the battery cover, install the new battery.
Note: There is a spare battery for the DCGII.
Calibration Conditions
(1) Environment: Temperature: 20 ± 2°C; Relative humidity: (45-75% RH);
Atmosphere pressure: (25.4-31.3 in Hg).
(2) Standard pressure source.
Calibration Process
Select Menu
to enter the calibration menu.
(1) Select
and press
button to display the calibration value of
lower limit, as Figure 5. If you need to modify this calibration value, please
input the desired value. Otherwise, please press
button to confirm.
Lower limit point display menu
Higher limit point display menu
MAINTENANCE/REPAIR
Upon final installation of the Series DCGII, no routine maintenance is
required. The Series DCGII is not field serviceable and should be returned
if repair is needed. Field repair should not be attempted and may void
warranty.
WARRANTY/RETURN
Refer to “Terms and Conditions of Sales” in our catalog and on our website.
Contact customer service to receive a Return Goods Authorization number
before shipping the product back for repair. Be sure to include a brief
description of the problem plus any additional application notes.
Lower limit calibration menu
Higher limit calibration menu
Figure 5: Limits
©Copyright 2014 Dwyer Instruments, Inc.
Printed in U.S.A. 9/14
DWYER INSTRUMENTS, INC.
P.O. BOX 373 • MICHIGAN CITY, INDIANA 46360, U.S.A.
Phone: 219/879-8000
Fax: 219/872-9057
FR# R9-443902-00 Rev. 4
www.dwyer-inst.com
e-mail: [email protected]