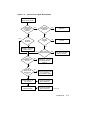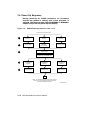
1
VAX 6000 Model 600 Service Manual
Order Number EK–660EA–MG.001
This manual is intended for Digital customer service
engineers and licensed self-maintenance customers. It
covers processor-specific and troubleshooting information. This manual is to be used with the VAX 6000
Platform Service Manual.
digital equipment corporation
maynard, massachusetts
First Printing, January 1992
The information in this document is subject to change without notice and should not be
construed as a commitment by Digital Equipment Corporation.
Digital Equipment Corporation assumes no responsibility for any errors that may appear in
this document.
The software, if any, described in this document is furnished under a license and may be used
or copied only in accordance with the terms of such license. No responsibility is assumed
for the use or reliability of software or equipment that is not supplied by Digital Equipment
Corporation or its affiliated companies.
Copyright ©1992 by Digital Equipment Corporation.
All Rights Reserved.
Printed in U.S.A.
dt
The following are trademarks of Digital Equipment Corporation:
DEC
DEC LANcontroller
DECnet
DECUS
DWMVA
PDP
ULTRIX
UNIBUS
VAX
VAXBI
VAXcluster
VAXELN
VMS
XMI
FCC NOTICE: The equipment described in this manual generates, uses, and may emit
radio frequency energy. The equipment has been type tested and found to comply with the
limits for a Class A computing device pursuant to Subpart J of Part 15 of FCC Rules, which
are designed to provide reasonable protection against such radio frequency interference when
operated in a commercial environment. Operation of this equipment in a residential area
may cause interference, in which case the user at his own expense may be required to take
measures to correct the interference.
Contents
Preface
xiii
Chapter 1 Introduction
1.1
1.2
System Functional Description . . . . . . . . . . . . . . . . . . . . . . .
Troubleshooting Flowcharts . . . . . . . . . . . . . . . . . . . . . . . . . .
1–2
1–4
Chapter 2 Diagnostics
2.1
2.2
2.3
2.4
2.4.1
2.4.2
2.4.3
2.5
2.6
2.7
2.7.1
2.7.2
2.7.3
2.7.4
2.7.5
2.7.6
2.7.7
2.8
2.8.1
2.8.2
2.8.3
Diagnostic Overview . . . . . . . . . . . . . . . . . . . . . . . . . . . . . . .
KA66A Self-Test and Power-Up Test . . . . . . . . . . . . . . . . . . .
Self-Test and Power-Up Test Console Display . . . . . . . . . . . .
Diagnostic Display on Module LEDs . . . . . . . . . . . . . . . . . . .
Overview of KA66A LEDs . . . . . . . . . . . . . . . . . . . . . . . . .
Determining Failing Power-Up Test from LEDs . . . . . . . . .
Determining Failing Console Firmware Test from LEDs . .
Power-Up Test Results in XBER and XGPR Registers . . . . . .
Invoking ROM-Based Diagnostics . . . . . . . . . . . . . . . . . . . . .
ROM-Based Diagnostics — RBD 0 through 5 . . . . . . . . . . . . .
KA66A Processor Self-Test — RBD 0 . . . . . . . . . . . . . . . . .
CPU/Memory Interaction Diagnostic — RBD 1 . . . . . . . . .
DWMBB and DWMVA/A Diagnostic — RBD 2 . . . . . . . . .
DWMBB and DWMVA/A Diagnostic — RBD 2 Subtests . .
MS65A Memory Diagnostic — RBD 3 . . . . . . . . . . . . . . . .
KA66A Processor Cache Diagnostic — RBD 4 . . . . . . . . . .
Multiprocessor Diagnostic — RBD 5 . . . . . . . . . . . . . . . . .
VAX Diagnostic Supervisor Programs . . . . . . . . . . . . . . . . . .
Running VAX/DS in Standalone Mode . . . . . . . . . . . . . . . .
Running VAX/DS in User Mode . . . . . . . . . . . . . . . . . . . . .
Sample VAX/DS Standalone Session . . . . . . . . . . . . . . . . .
2–2
2–4
2–6
2–8
2–10
2–12
2–14
2–16
2–18
2–20
2–22
2–26
2–28
2–30
2–32
2–36
2–38
2–40
2–42
2–44
2–46
iii
2.8.4
VAX/DS Diagnostics . . . . . . . . . . . . . . . . . . . . . . . . . . . . . . 2–50
Chapter 3 KA66A Processor
3.1
KA66A Physical Description and Specifications . . . . . . . . . .
3.2
KA66A Configuration Rules . . . . . . . . . . . . . . . . . . . . . . . . .
3.3
KA66A Functional Description . . . . . . . . . . . . . . . . . . . . . . .
3.4
Overview of the NVAX CPU Chip . . . . . . . . . . . . . . . . . . . .
3.5
Automatic Boot Processor Selection . . . . . . . . . . . . . . . . . . .
3.6
Power-Up Sequence . . . . . . . . . . . . . . . . . . . . . . . . . . . . . . .
3.7
ROM-Based Diagnostics . . . . . . . . . . . . . . . . . . . . . . . . . . . .
3.8
VAX/DS Diagnostics . . . . . . . . . . . . . . . . . . . . . . . . . . . . . . .
3.9
Console Commands . . . . . . . . . . . . . . . . . . . . . . . . . . . . . . .
3.10 Replacing Defective Processors or Adding New Ones . . . . . .
3.10.1 How to Replace the Only Processor . . . . . . . . . . . . . . . . .
3.10.2 How to Replace or Add Processors in a Multiprocessor
System . . . . . . . . . . . . . . . . . . . . . . . . . . . . . . . . . . . . . . .
3.10.3 Using EVUCA to Apply Current ROM and PCS Patches .
3.11 KA66A Registers . . . . . . . . . . . . . . . . . . . . . . . . . . . . . . . . .
.
.
.
.
.
.
.
.
.
.
.
3–2
3–4
3–6
3–10
3–12
3–14
3–18
3–20
3–22
3–24
3–26
. 3–28
. 3–30
. 3–38
Chapter 4 MS65A Memory
4.1
4.2
4.3
4.4
4.5
4.6
4.7
4.8
4.9
4.10
iv
MS65A Physical Description . . . . . . .
MS65A Configuration Rules . . . . . . . .
MS65A Specifications . . . . . . . . . . . . .
MS65A Functional Description . . . . .
MS65A Interleaving . . . . . . . . . . . . . .
Console Commands for Interleaving .
MS65A Addressing . . . . . . . . . . . . . . .
Memory Self-Test . . . . . . . . . . . . . . . .
Memory Self-Test Errors . . . . . . . . . .
MS65A Control and Status Registers .
.
.
.
.
.
.
.
.
.
.
.
.
.
.
.
.
.
.
.
.
.
.
.
.
.
.
.
.
.
.
.
.
.
.
.
.
.
.
.
.
.
.
.
.
.
.
.
.
.
.
.
.
.
.
.
.
.
.
.
.
.
.
.
.
.
.
.
.
.
.
.
.
.
.
.
.
.
.
.
.
.
.
.
.
.
.
.
.
.
.
.
.
.
.
.
.
.
.
.
.
.
.
.
.
.
.
.
.
.
.
.
.
.
.
.
.
.
.
.
.
.
.
.
.
.
.
.
.
.
.
.
.
.
.
.
.
.
.
.
.
.
.
.
.
.
.
.
.
.
.
.
.
.
.
.
.
.
.
.
.
.
.
.
.
.
.
.
.
.
.
.
.
.
.
.
.
.
.
.
.
4–2
4–4
4–5
4–6
4–8
4–10
4–12
4–14
4–16
4–18
Chapter 5 DWMBB I/O Adapter
5.1
5.1.1
5.1.2
5.2
5.3
5.4
DWMBB Physical Description . .
Physical Layout . . . . . . . . . . .
Specifications . . . . . . . . . . . . .
DWMBB Configuration Rules . .
DWMBB Functional Description
DWMBB Registers . . . . . . . . . . .
.
.
.
.
.
.
.
.
.
.
.
.
.
.
.
.
.
.
.
.
.
.
.
.
.
.
.
.
.
.
.
.
.
.
.
.
.
.
.
.
.
.
.
.
.
.
.
.
.
.
.
.
.
.
.
.
.
.
.
.
.
.
.
.
.
.
.
.
.
.
.
.
.
.
.
.
.
.
.
.
.
.
.
.
.
.
.
.
.
.
.
.
.
.
.
.
.
.
.
.
.
.
.
.
.
.
.
.
.
.
.
.
.
.
.
.
.
.
.
.
.
.
.
.
.
.
. 5–2
. 5–2
. 5–4
. 5–6
. 5–8
. 5–10
Appendix A ROM-Based Diagnostic Monitor Program
A.1
A.2
A.3
A.4
A.5
A.6
A.7
A.8
A.9
RBD Monitor Control Characters . . . . . . . . . . . . .
DEPOSIT and EXAMINE Commands . . . . . . . . .
START Command . . . . . . . . . . . . . . . . . . . . . . . .
START Command Qualifiers . . . . . . . . . . . . . . . .
RBD Test Printout, Passing . . . . . . . . . . . . . . . . .
RBD Test Printout, Failing . . . . . . . . . . . . . . . . .
SUMMARY Command . . . . . . . . . . . . . . . . . . . . .
Sample RBD Session . . . . . . . . . . . . . . . . . . . . . .
Running ROM-Based Diagnostics on I/O Devices .
.
.
.
.
.
.
.
.
.
.
.
.
.
.
.
.
.
.
.
.
.
.
.
.
.
.
.
.
.
.
.
.
.
.
.
.
.
.
.
.
.
.
.
.
.
.
.
.
.
.
.
.
.
.
.
.
.
.
.
.
.
.
.
.
.
.
.
.
.
.
.
.
.
.
.
.
.
.
.
.
.
A–2
A–4
A–6
A–7
A–10
A–12
A–14
A–16
A–22
.
.
.
.
.
.
.
.
.
.
.
.
.
.
.
.
.
.
.
.
.
.
.
.
.
.
.
.
.
.
.
.
.
.
.
.
C–1
C–2
C–2
C–3
Module Handling . . . . . . . . . . . . . . . . . . . . . . . . . . . . . . . . . .
D–2
Appendix B Console Error Messages
Appendix C Boot Status and Error Messages
C.1
C.2
C.3
C.4
Ethernet Boot Messages . . . .
Local Disk Boot Messages . .
Local Tape Boot Messages . .
CI and DSSI Boot Messages .
.
.
.
.
.
.
.
.
.
.
.
.
.
.
.
.
.
.
.
.
.
.
.
.
.
.
.
.
.
.
.
.
.
.
.
.
.
.
.
.
.
.
.
.
.
.
.
.
.
.
.
.
.
.
.
.
.
.
.
.
.
.
.
.
Appendix D Handling Modules
D.1
v
Appendix E VAX 6000 Model 600 Configuration Rules
E.1
Configuration Rules . . . . . . . . . . . . . . . . . . . . . . . . . . . . . . . .
E–2
Appendix F Parse Trees
Appendix G Restoring a Corrupted EEPROM
Appendix H Interpreting the VMS Error Log
H.1
H.2
H.2.1
H.2.2
H.2.3
H.2.4
H.2.5
H.2.6
H.3
H.3.1
H.3.2
H.3.3
H.3.4
H.3.5
H.3.6
H.3.7
H.4
H.4.1
H.4.2
H.4.3
H.4.4
H.4.5
H.4.6
H.5
H.5.1
vi
Producing the Listing . . . . . . . . . . . . . . . . . . . . . . . . .
Types of Error Log Entries for KA66A CPU . . . . . . . .
Machine Check Exception Entries . . . . . . . . . . . . .
INT60 (Hard) Error Interrupt Entries . . . . . . . . . .
INT54 (Soft) Error Interrupt Entries . . . . . . . . . . .
Lastfail Error Entry . . . . . . . . . . . . . . . . . . . . . . . .
Memory Soft Error (CRD) Entry . . . . . . . . . . . . . .
Memscan Entry . . . . . . . . . . . . . . . . . . . . . . . . . . .
Format of Machine Check Error Log Entry . . . . . . . .
Header . . . . . . . . . . . . . . . . . . . . . . . . . . . . . . . . . .
Software Flags . . . . . . . . . . . . . . . . . . . . . . . . . . . .
Overview Information . . . . . . . . . . . . . . . . . . . . . .
CPU Error and Status Registers . . . . . . . . . . . . . .
Machine Check Stack Frame . . . . . . . . . . . . . . . . .
Additional Error Information . . . . . . . . . . . . . . . . .
Sample Error Log Entry for a Machine Check . . . .
Format of INT54 (Soft) Error Log Entry . . . . . . . . . .
Header . . . . . . . . . . . . . . . . . . . . . . . . . . . . . . . . . .
Software Flags . . . . . . . . . . . . . . . . . . . . . . . . . . . .
Overview Information . . . . . . . . . . . . . . . . . . . . . .
CPU Error and Status Registers . . . . . . . . . . . . . .
Additional Error Information . . . . . . . . . . . . . . . . .
Sample Error Log Entry for an INT54 (Soft) Error
Format of INT60 (Hard) Error Log Entry . . . . . . . . .
Header . . . . . . . . . . . . . . . . . . . . . . . . . . . . . . . . . .
.
.
.
.
.
.
.
.
.
.
.
.
.
.
.
.
.
.
.
.
.
.
.
.
.
.
.
.
.
.
.
.
.
.
.
.
.
.
.
.
.
.
.
.
.
.
.
.
.
.
.
.
.
.
.
.
.
.
.
.
.
.
.
.
.
.
.
.
.
.
.
.
.
.
.
.
.
.
.
.
.
.
.
.
.
.
.
.
.
.
.
.
.
.
.
.
.
.
.
.
.
.
.
.
.
.
.
.
.
.
.
.
.
.
.
.
.
.
.
.
.
.
.
.
.
.
.
.
.
.
.
.
.
.
.
.
.
.
.
.
.
.
.
.
.
.
.
.
.
.
H–2
H–4
H–4
H–5
H–5
H–5
H–5
H–5
H–6
H–6
H–6
H–8
H–9
H–9
H–9
H–12
H–28
H–28
H–28
H–31
H–31
H–31
H–32
H–36
H–36
H.5.2
Software Flags . . . . . . . . . . . . . . . . . . . . . . . . . . . . .
H.5.3
Overview Information . . . . . . . . . . . . . . . . . . . . . . .
H.5.4
CPU Error and Status Registers . . . . . . . . . . . . . . .
H.5.5
Additional Error Information . . . . . . . . . . . . . . . . . .
H.5.6
Sample Error Log Entry for an INT60 (Hard) Error
H.6 Format of Lastfail Error Log Entry . . . . . . . . . . . . . . .
H.7 Format of Memscan Error Log Entry . . . . . . . . . . . . . .
H.8 Format of Memory Soft Error (CRD) Error Log Entry .
.
.
.
.
.
.
.
.
.
.
.
.
.
.
.
.
.
.
.
.
.
.
.
.
.
.
.
.
.
.
.
.
.
.
.
.
.
.
.
.
H–36
H–38
H–38
H–39
H–40
H–44
H–48
H–50
Power-Up Test Display . . . . . . . . . . . . . . . . . . . . . . . . . . . . . .
XGPR Register After Power-Up Test Failure . . . . . . . . . . . . .
Using the TEST Command to Run RBDs . . . . . . . . . . . . . . . .
Sample START Command . . . . . . . . . . . . . . . . . . . . . . . . . . .
KA66A Self-Test (RBD 0) Showing Error . . . . . . . . . . . . . . . .
Running KA66A Self-Test (RBD 0) on a Secondary Processor
CPU/Memory Interaction Diagnostic — RBD 1 . . . . . . . . . . .
DWMBB Diagnostic — RBD 2 . . . . . . . . . . . . . . . . . . . . . . . .
DWMVA/A Diagnostic — RBD 2 . . . . . . . . . . . . . . . . . . . . . .
RBD 3 Test on All Memory Modules . . . . . . . . . . . . . . . . . . .
RBD 3 Diagnostic on a Memory Module in Slot A . . . . . . . . .
RBD 3 Diagnostic with Module Error . . . . . . . . . . . . . . . . . .
RBD 3 Diagnostic with Confirm Switch . . . . . . . . . . . . . . . . .
KA66A Cache Tests — RBD 4 . . . . . . . . . . . . . . . . . . . . . . . .
Multiprocessor Tests — RBD 5 . . . . . . . . . . . . . . . . . . . . . . .
Running VAX/DS in Standalone Mode . . . . . . . . . . . . . . . . . .
Running VAX/DS in User Mode . . . . . . . . . . . . . . . . . . . . . . .
Sample VAX/DS Session, Part 1 of 2 . . . . . . . . . . . . . . . . . . .
Sample VAX/DS Session, Part 2 of 2 . . . . . . . . . . . . . . . . . . .
Sample Self-Test and Power-Up Test Display . . . . . . . . . . . . .
2–6
2–16
2–18
2–19
2–22
2–23
2–26
2–28
2–28
2–32
2–32
2–33
2–33
2–36
2–38
2–42
2–44
2–46
2–48
3–8
Glossary
Index
Examples
2–1
2–2
2–3
2–4
2–5
2–6
2–7
2–8
2–9
2–10
2–11
2–12
2–13
2–14
2–15
2–16
2–17
2–18
2–19
3–1
vii
3–2
VAX/DS Commands for Running Standalone Processor
Diagnostics . . . . . . . . . . . . . . . . . . . . . . . . . . . . . . . . . . . . . .
3–3 Relevant System Parameters from a SHOW FIELD Display
3–4 Replacing a Single Processor . . . . . . . . . . . . . . . . . . . . . . . .
3–5 Replacing Processors in a Multiprocessor System . . . . . . . .
3–6 Using VAX/DS to Run EVUCA to Patch EEPROM on All
Modules (Part 1) . . . . . . . . . . . . . . . . . . . . . . . . . . . . . . . . .
3–7 Using VAX/DS to Run EVUCA to Patch EEPROM on All
Modules (Part 2) . . . . . . . . . . . . . . . . . . . . . . . . . . . . . . . . .
3–8 Using VAX/DS to Run EVUCA to Patch EEPROM on All
Modules (Part 3) . . . . . . . . . . . . . . . . . . . . . . . . . . . . . . . . .
3–9 Using VAX/DS to Run EVUCA to Patch EEPROM on All
Modules (Part 4) . . . . . . . . . . . . . . . . . . . . . . . . . . . . . . . . .
4–1 SET MEMORY and INITIALIZE Commands . . . . . . . . . . . .
4–2 MS65A Memory Module Results in Self-Test . . . . . . . . . . . .
4–3 MS65A Memory Module Node Exclusion . . . . . . . . . . . . . . .
A–1 DEPOSIT and EXAMINE Commands . . . . . . . . . . . . . . . . .
A–2 START Command . . . . . . . . . . . . . . . . . . . . . . . . . . . . . . . .
A–3 RBD Test Printout, Passing . . . . . . . . . . . . . . . . . . . . . . . . .
A–4 RBD Test Printout, Failing . . . . . . . . . . . . . . . . . . . . . . . . .
A–5 SUMMARY Command . . . . . . . . . . . . . . . . . . . . . . . . . . . . .
A–6 Sample RBD Session, Part 1 of 3 . . . . . . . . . . . . . . . . . . . . .
A–7 Sample RBD Session, Part 2 of 3 . . . . . . . . . . . . . . . . . . . . .
A–8 Sample RBD Session, Part 3 of 3 . . . . . . . . . . . . . . . . . . . . .
A–9 Running RBDs on I/O Devices . . . . . . . . . . . . . . . . . . . . . . .
G–1 Restoring a Corrupted EEPROM, Part 1 of 2 . . . . . . . . . . . .
G–2 Restoring a Corrupted EEPROM, Part 2 of 2 . . . . . . . . . . . .
H–1 Obtaining a Selective Error Log Listing . . . . . . . . . . . . . . . .
H–2 Machine Check Error Log Report . . . . . . . . . . . . . . . . . . . . .
H–3 Machine Check Error Log Report—Continued . . . . . . . . . . .
H–4 Machine Check Error Log Report—Continued . . . . . . . . . . .
H–5 Machine Check Error Log Report—Continued . . . . . . . . . . .
H–6 Machine Check Error Log Report—Continued . . . . . . . . . . .
H–7 Machine Check Error Log Report—Continued . . . . . . . . . . .
H–8 Machine Check Error Log Report—Continued . . . . . . . . . . .
H–9 Machine Check Error Log Report—Continued . . . . . . . . . . .
H–10 INT54 Error Log Report . . . . . . . . . . . . . . . . . . . . . . . . . . . .
viii
.
.
.
.
3–20
3–24
3–26
3–28
. 3–30
. 3–32
. 3–34
.
.
.
.
.
.
.
.
.
.
.
.
.
.
.
.
.
.
.
.
.
.
.
.
.
3–36
4–10
4–14
4–16
A–4
A–6
A–10
A–12
A–14
A–16
A–18
A–20
A–22
G–2
G–4
H–2
H–12
H–14
H–16
H–18
H–20
H–22
H–24
H–26
H–33
H–11
H–12
H–13
H–14
H–15
INT60 Error Log Report . . . . . . . . . . .
Lastfail Error Log Entry . . . . . . . . . .
Lastfail Error Log Entry—Continued .
Memscan Error Entry . . . . . . . . . . . .
Memory Soft Error (CRD) Entry . . . .
.
.
.
.
.
.
.
.
.
.
.
.
.
.
.
.
.
.
.
.
.
.
.
.
.
.
.
.
.
.
.
.
.
.
.
.
.
.
.
.
.
.
.
.
.
.
.
.
.
.
.
.
.
.
.
.
.
.
.
.
.
.
.
.
.
.
.
.
.
.
.
.
.
.
.
.
.
.
.
.
.
.
.
.
.
.
.
.
.
.
H–40
H–44
H–46
H–48
H–50
.....
.....
.....
.....
.....
.....
.....
.....
.....
.....
.....
.....
.....
.....
.....
.....
.....
.....
.....
.....
.....
.....
.....
.....
.....
.....
.....
Card
.....
1–2
1–4
1–7
1–8
1–9
1–10
1–11
2–2
2–4
2–8
2–10
3–2
3–4
3–6
3–10
3–12
3–14
3–16
4–2
4–4
4–6
4–8
4–12
5–2
5–3
5–6
5–8
Figures
1–1
1–2
1–3
1–4
1–5
1–6
1–7
2–1
2–2
2–3
2–4
3–1
3–2
3–3
3–4
3–5
3–6
3–7
4–1
4–2
4–3
4–4
4–5
5–1
5–2
5–3
5–4
D–1
VAX 6000 Model 600 System Architecture . . . . . . . . . .
Power-Up . . . . . . . . . . . . . . . . . . . . . . . . . . . . . . . . . . .
Control Panel Lights Do Not Work . . . . . . . . . . . . . . .
System Shutdown 30 Seconds After Power-Up . . . . . . .
No Console Output, Control Panel Fault LED Is On . .
No Console Output, Control Panel Fault LED Is Off . .
DWMBB or DWMVA/A Fails Power-Up Test . . . . . . . .
Module-Resident and Loadable Diagnostics . . . . . . . . .
Determining Power-Up Test Results . . . . . . . . . . . . . .
Status LEDs on KA66A and Test-Related Modules . . .
KA66A LEDs After Power-Up Tests . . . . . . . . . . . . . . .
KA66A Module . . . . . . . . . . . . . . . . . . . . . . . . . . . . . . .
Typical KA66A Configuration . . . . . . . . . . . . . . . . . . . .
KA66A Block Diagram . . . . . . . . . . . . . . . . . . . . . . . . .
NVAX Mbox, Cbox, and Primary and Backup Cache . .
Selection of Boot Processor . . . . . . . . . . . . . . . . . . . . . .
KA66A Power-Up Sequence, Part 1 of 2 . . . . . . . . . . . .
KA66A Power-Up Sequence, Part 2 of 2 . . . . . . . . . . . .
MS65A Module . . . . . . . . . . . . . . . . . . . . . . . . . . . . . . .
MS65A Configuration . . . . . . . . . . . . . . . . . . . . . . . . . .
MS65A Block Diagram . . . . . . . . . . . . . . . . . . . . . . . . .
MS65A Interleaving . . . . . . . . . . . . . . . . . . . . . . . . . . .
MS65A Addressing . . . . . . . . . . . . . . . . . . . . . . . . . . . .
DWMBB/A XMI Module . . . . . . . . . . . . . . . . . . . . . . . .
DWMBB/B VAXBI Module . . . . . . . . . . . . . . . . . . . . . .
VAX 6000 Slot Numbers . . . . . . . . . . . . . . . . . . . . . . . .
DWMBB XMI-to-VAXBI Adapter Block Diagram . . . . .
Inserting and Removing Modules to and from the XMI
Cage . . . . . . . . . . . . . . . . . . . . . . . . . . . . . . . . . . . . . . .
D–2
ix
E–1
F–1
F–2
F–3
H–1
Configuration Rules for VAX 6000 Model 600 Systems
Parse Tree for Machine Check Exceptions . . . . . . . . . .
Parse Tree for INT60 (Hard) Error Interrupts . . . . . . .
Parse Tree for INT54 (Soft) Error Interrupts . . . . . . . .
Stack Contents for a Machine Check Exception . . . . . .
.
.
.
.
.
.
.
.
.
.
.
.
.
.
.
.
.
.
.
.
. E–2
. F–2
. F–12
. F–17
. H–10
Tables
1
2
3
2–1
2–2
2–3
2–4
2–5
2–6
2–7
2–8
2–9
2–10
2–11
2–12
2–13
2–14
2–15
2–16
2–17
2–18
2–19
2–20
3–1
3–2
3–3
3–4
3–5
x
VAX 6000 Series Documentation . . . . . . . . . . . . . . . . . . . . . .
VAX 6000 Model Level Documentation . . . . . . . . . . . . . . . . .
Associated Documents . . . . . . . . . . . . . . . . . . . . . . . . . . . . . .
ROM-Based Diagnostics on the KA66A Module . . . . . . . . . . .
Reading Module Status LEDs . . . . . . . . . . . . . . . . . . . . . . . .
KA66A Red LEDs: KA66A Problems . . . . . . . . . . . . . . . . . . .
KA66A Red LEDs: DWMBB or DWMVA/A Problems . . . . . .
KA66A Status LEDs: Console Errors . . . . . . . . . . . . . . . . . . .
XMI Base Addresses . . . . . . . . . . . . . . . . . . . . . . . . . . . . . . .
Interpreting XGPR Failing Test Numbers . . . . . . . . . . . . . . .
RBD Monitor Commands to Run Tests . . . . . . . . . . . . . . . . .
KA66A ROM-Based Diagnostics . . . . . . . . . . . . . . . . . . . . . . .
Subtests in the KA66A Self-Test — RBD 0 . . . . . . . . . . . . . .
Subtests in the CPU/Memory Interaction Diagnostic — RBD
1. . . . . . . . . . . . . . . . . . . . . . . . . . . . . . . . . . . . . . . . . . . . . . .
RBD 2 Subtests — DWMBB and DWMVA/A Diagnostic . . . .
Subtests in the Memory Diagnostic — RBD 3 . . . . . . . . . . . .
RBD 3 Parameters . . . . . . . . . . . . . . . . . . . . . . . . . . . . . . . . .
Subtests in the KA66A Cache Diagnostic — RBD 4 . . . . . . . .
Subtests in the Multiprocessor Diagnostic — RBD 5 . . . . . . .
RBD 5 Parameters . . . . . . . . . . . . . . . . . . . . . . . . . . . . . . . . .
VAX Diagnostic Program Levels . . . . . . . . . . . . . . . . . . . . . . .
VAX/DS Documentation . . . . . . . . . . . . . . . . . . . . . . . . . . . . .
VAX Diagnostic Supervisor Programs . . . . . . . . . . . . . . . . . .
KA66A Specifications . . . . . . . . . . . . . . . . . . . . . . . . . . . . . . .
KA66A ROM-Based Diagnostics . . . . . . . . . . . . . . . . . . . . . . .
KA66A VAX/DS Diagnostics . . . . . . . . . . . . . . . . . . . . . . . . . .
Console Commands . . . . . . . . . . . . . . . . . . . . . . . . . . . . . . . .
KA66A Internal Processor Registers . . . . . . . . . . . . . . . . . . .
xiv
xv
xvi
2–3
2–9
2–12
2–13
2–14
2–17
2–17
2–18
2–20
2–23
2–27
2–30
2–34
2–35
2–37
2–39
2–39
2–40
2–40
2–50
3–3
3–18
3–20
3–22
3–38
3–6
3–7
4–1
4–2
5–1
5–2
5–3
5–4
5–5
5–6
A–1
A–2
A–3
B–1
B–2
H–1
H–2
H–3
H–4
H–5
H–6
H–7
H–8
H–9
KA66A Registers in XMI Private Space . . . . . . .
XMI Registers for the KA66A . . . . . . . . . . . . . .
MS65A Specifications . . . . . . . . . . . . . . . . . . . . .
MS65A Control and Status Registers . . . . . . . . .
DWMBB/A Specifications . . . . . . . . . . . . . . . . . .
DWMBB/B Specifications . . . . . . . . . . . . . . . . . .
DWMBB Cables . . . . . . . . . . . . . . . . . . . . . . . . .
DWMBB Configuration . . . . . . . . . . . . . . . . . . .
VAXBI Registers . . . . . . . . . . . . . . . . . . . . . . . .
DWMBB XMI Registers . . . . . . . . . . . . . . . . . . .
RBD Monitor Control Characters . . . . . . . . . . . .
DEPOSIT and EXAMINE Command Qualifiers .
START Command Qualifiers . . . . . . . . . . . . . . .
Console Error Messages Indicating Halt . . . . . .
Standard Console Error Messages . . . . . . . . . . .
Types of Error Log Entries for KA66A CPU . . . .
Software Flags for Machine Check Entries . . . .
Resource Disable Bits . . . . . . . . . . . . . . . . . . . .
Stack Contents for a Machine Check Exception .
Software Flags for INT54 Errors . . . . . . . . . . . .
Resource Disable Bits . . . . . . . . . . . . . . . . . . . .
Software Flags for INT60 Errors . . . . . . . . . . . .
Resource Disable Bits . . . . . . . . . . . . . . . . . . . .
ECC Syndrome Code . . . . . . . . . . . . . . . . . . . . .
.
.
.
.
.
.
.
.
.
.
.
.
.
.
.
.
.
.
.
.
.
.
.
.
.
.
.
.
.
.
.
.
.
.
.
.
.
.
.
.
.
.
.
.
.
.
.
.
.
.
.
.
.
.
.
.
.
.
.
.
.
.
.
.
.
.
.
.
.
.
.
.
.
.
.
.
.
.
.
.
.
.
.
.
.
.
.
.
.
.
.
.
.
.
.
.
.
.
.
.
.
.
.
.
.
.
.
.
.
.
.
.
.
.
.
.
.
.
.
.
.
.
.
.
.
.
.
.
.
.
.
.
.
.
.
.
.
.
.
.
.
.
.
.
.
.
.
.
.
.
.
.
.
.
.
.
.
.
.
.
.
.
.
.
.
.
.
.
.
.
.
.
.
.
.
.
.
.
.
.
.
.
.
.
.
.
.
.
.
.
.
.
.
.
.
.
.
.
.
.
.
.
.
.
.
.
.
.
.
.
.
.
.
.
.
.
.
.
.
.
.
.
.
.
.
.
.
.
.
.
.
.
.
.
.
.
.
.
.
.
3–43
3–43
4–5
4–18
5–4
5–5
5–5
5–7
5–10
5–11
A–2
A–4
A–7
B–1
B–3
H–4
H–6
H–9
H–11
H–28
H–31
H–36
H–38
H–51
xi
Preface
Intended Audience
This manual is written for Digital customer service engineers and licensed
self-maintenance customers servicing the VAX 6000 Model 600 system.
Document Structure
This manual presents information in small units (enough to do one task) on
facing pages, so that you do not have to flip pages in the middle of changing
a module, for example. The left-hand page begins with an abstract and is
followed by a figure or an example. The right-hand page elaborates on the
material in the left-hand page. For example, the right-hand page may fully
describe the steps in installing a module, where the left-hand page has a
drawing showing one part of the process.
This manual has five chapters and eight appendixes, as follows:
•
Chapter 1, Introduction, gives an overview of the VAX 6000 Model
600 system architecture and flowcharts for troubleshooting the system.
•
Chapter 2, Diagnostics, describes the VAX 6000 power-up test, ROMbased diagnostics, and software diagnostics that run under the VAX
Diagnostic Supervisor.
•
Chapter 3, KA66A Processor, Chapter 4, MS65A Memory, and
Chapter 5, DWMBB I/O Adapter, give information on module
specifications, configuration rules, and registers.
•
Appendix A describes the commands provided by the ROM-Based
Diagnostic (RBD) Monitor program. Appendix B lists the console error
messages. Appendix C contains the boot status and error messages.
Appendix D shows how to handle modules. Appendix E gives general
configuration rules for the system. Appendix F gives the parse trees
for the KA66A processor. Appendix G is a procedure for restoring
a corrupted EEPROM. Appendix H tells how to interpret error log
printouts. A Glossary and Index provide additional reference support.
xiii
Conventions Used in This Document
The icons shown below are used in illustrations for designating part
placement in VAX 6000 series systems. A shaded area in the icon shows
the location of the component or part being discussed.
FRONT
REAR
VAX 6000 Series Documents
There are two sets of documentation: manuals that apply to all VAX 6000
series systems and manuals that are specific to a VAX 6000 model. Table
1 lists the manuals in the VAX 6000 series documentation set.
Table 1: VAX 6000 Series Documentation
Title
Order Number
Operation
VAX 6000 Series Owner’s Manual
EK–600EB–OM
VAX 6000 Series Vector Processor Owner’s Manual
EK–60VAA–OM
VAX 6000 Vector Processor Programmer’s Guide
EK–60VAA–PG
Service and Installation
VAX 6000 Platform Technical User’s Guide
EK–600EA–TM
VAX 6000 Series Installation Guide
EK–600EB–IN
VAX 6000 Installationsanleitung
EK–600GB–IN
VAX 6000 Guide d’installation
EK–600FB–IN
VAX 6000 Guia de instalacion
EK–600SB–IN
VAX 6000 Platform Service Manual
EK–600EA–MG
xiv
Table 1 (Cont.): VAX 6000 Series Documentation
Title
Order Number
Options and Upgrades
VAX 6000: XMI Conversion Manual
EK–650EB–UP
VAX 6000: Installing MS65A Memories
EK–MS65A–UP
VAX 6000: Installing the H7236-A Battery Backup Option
EK–60BBA–IN
VAX 6000: Installing the FV64A Vector Option
EK–60VEA–IN
VAX 6000: Installing the VAXBI Option
EK–60BIA–IN
Manuals specific to models are listed in Table 2.
Table 2: VAX 6000 Model Level Documentation
Title
Order Number
Model 600
VAX 6000 Model 600 Mini-Reference
EK–660EA–HR
VAX 6000 Model 600 Service Manual
EK–660EA–MG
VAX 6000 Model 600 System Technical User’s Guide
EK–660EA–TM
VAX 6000: Installing Model 600 Processors
EK–660EA–UP
Model 500
VAX 6000 Model 500 Mini-Reference
EK–650EA–HR
VAX 6000 Model 500 Service Manual
EK–650EA–MG
VAX 6000 Model 500 System Technical User’s Guide
EK–650EA–TM
VAX 6000: Installing Model 500 Processors
EK–KA65A–UP
Models 200/300/400
VAX 6000 Model 300 and 400 Service Manual
EK–624EA–MG
VAX 6000: Installing Model 200/300/400 Processors
EK–6234A–UP
xv
Associated Documents
Table 3 lists other documents that you may find useful.
Table 3: Associated Documents
Title
Order Number
System Hardware Options
VAXBI Expander Cabinet Installation Guide
EK–VBIEA–IN
VAXBI Options Handbook
EB–32255–46
System I/O Options
CIBCA User Guide
EK–CIBCA–UG
CIXCD Interface User Guide
EK–CIXCD–UG
DEC LANcontroller 200 Installation Guide
EK–DEBNI–IN
DEC LANcontroller 400 Installation Guide
EK–DEMNA–IN
DSSI VAXcluster Installation Guide
EK–DVCLU–IN
InfoServer Installation Guide
EK–DIS1K–IN
KDB50 Disk Controller User’s Guide
EK–KDB50–UG
KDM70 Controller User Guide
EK–KDM70–UG
KFMSA Module Installation and User Manual
EK–KFMSA–IM
KFMSA Module Service Guide
EK–KFMSA–SV
RRD42 Disc Drive Owner’s Manual
EK–RRD42–OM
RA90/RA92 Disk Drive User Guide
EK–ORA90–UG
RF31/RF72 Integrated Storage Element Installation Manual for
BA200-Series Enclosures
EK–RF72D–IM
RF31/RF72 Integrated Storage Element User Guide
EK–RF72D–UF
RF31/RF72 Integrated Storage Element Service Guide
EK–RF72D–SV
SA70 Enclosure User Guide
EK–SA70E–UG
SF2xx Storage Array Installation Guide
EK–SF200–IG
xvi
Table 3 (Cont.): Associated Documents
Title
Order Number
System I/O Options
SF7x Storage Enclosure and SF2xx Storage Array Cabinet
Service Guide
EK–SF72S–SG
TF85 Cartridge Tape Subsystem Owner’s Manual
EK–OTF85–OM
TF857 Magazine Tape Subsystem Service Manual
EK–TF857–OM
VAX 6000/SF2xx Embedded Storage Installation Guide
EK–EMBED–IN
Operating System Manuals
Guide to Maintaining a VMS System
AA–LA34B–TE
Guide to Setting Up a VMS System
AA–LA25A–TE
Introduction to VMS System Management
AA–LA24A–TE
ULTRIX–32 Guide to System Exercisers
AA–ME96B–TE
VMS Networking Manual
AA–LA48A–TE
VMS System Manager’s Manual
AA–LA00B–TE
VMS Upgrade and Installation Supplement: VAX 6000 Series
AA–LB36C–TE
VMS Version 5.5 Upgrade and Installation Manual
AA–NG61D–TE
VAXclusters and Networking
DECbridge 500 Installation Guide
EK–DEFEB–IN
DEMFA Installation Guide
EK–DEMFA–IN
Fiber Distributed Data Interface Description
EK–DFSLD–SD
Guidelines for VAXcluster System Configurations
EK–VAXCS–CG
H4000 Digital Ethernet Transceiver Installation Manual
EK–H4000–IN
HSC Installation Manual
EK–HSCMN–IN
VAXcluster Principles
EK–VAXCP–TM
VMS VAXcluster Manual
AA–LA27B–TE
xvii
Table 3 (Cont.): Associated Documents
Title
Order Number
Peripherals
Installing and Using the VT420 Video Terminal
EK–VT420–UG
RV20 Optical Disk Owner’s Manual
EK–ORV20–OM
SC008 Star Coupler User’s Guide
EK–SC008–UG
TA78 Magnetic Tape Drive User’s Guide
EK–OTA78–UG
TA90 Magnetic Tape Subsystem Owner’s Manual
EK–OTA90–OM
TK70 Streaming Tape Drive Owner’s Manual
EK–OTK70–OM
TU81/TA81 and TU/81 PLUS Subsystem User’s Guide
EK–TUA81–UG
VAX Manuals
VAX Architecture Reference Manual
EY–3459E–DP
VAX Systems Hardware Handbook — VAXBI Systems
EB–31692–46
VAX Vector Processing Handbook
EC–H0739–46
xviii
Chapter 1
Introduction
This chapter is an overview of the VAX 6000 Model 600 system. Sections
include:
•
System Functional Description
•
Troubleshooting Flowcharts
Introduction
1–1
1.1 System Functional Description
The VAX 6000 Model 600 system supports multiprocessing
with up to six KA66A processors. The system uses the XMI
bus as the system and I/O bus. Adapters on the XMI also
allow use of the VAXBI and VME I/O buses.
Figure 1–1: VAX 6000 Model 600 System Architecture
MEMORY
PROCESSORS
XMI
DWMBB/A
DWMVA/A
DEMNA
KDM70
KFMSA
DEMFA
DWMBB/B
DWMVA/B
VAXBI BUS
VME BUS
OPTION
CIXCD
FDDI
OPTION
DISKS
ETHERNET
AND CD SERVER AND TAPES
DISKS
AND TAPES
DUAL RING
NETWORK
STAR
COUPLER
msb-0310B-91
1–2 VAX 6000 Model 600 Service Manual
The XMI bus is the system and I/O bus; the VAXBI and VME bus can
also be used for I/O. The XMI bus is a 64-bit bus1 that interconnects the
processors, memory modules, and I/O adapters. The XMI bus has three
types of nodes: processor nodes (KA66A), memory nodes (MS65A), and I/O
adapter nodes.
A Model 600 processor node is a single-board processor called the
KA66A. The KA66A offers highly pipelined instruction execution on a single
CPU chip, an architecture that significantly increases performance over
earlier models in the VAX 6000 series. The system supports symmetric
multiprocessing with up to six processors.
A memory node is an MS65A module. Memory is a global resource equally
accessible by all processors on the XMI bus. Each MS65A module has 32,
64, or 128 Mbytes of memory, consisting of MOS 1-Mbit or 4-Mbit dynamic
RAMs, ECC logic, and control logic. Memory access is automatically
interleaved between modules. An optional battery backup unit protects
memory in case of power failure.
I/O adapters for the XMI bus provide access to I/O devices (KDM70 and
KFMSA), other systems in a cluster (CIXCD), other buses (DWMBB and
DWMVA), and networks (DEMNA and DEMFA). The system supports two
other buses. For a VAXBI bus, the DWMBB adapter is used to connect
VAXBI I/O adapters to the XMI bus. For a VMEbus, the DWMVA adapter
connects VME I/O adapters to the XMI bus.
1
The XMI bus has a 64-nanosecond bus cycle, with a maximum throughput of 100 Mbytes
per second.
Introduction
1–3
1.2 Troubleshooting Flowcharts
The following flowcharts reference sections in this manual
and in the VAX 6000 Platform Service Manual.
Figure 1–2: Power-Up
POWER
ON
CONTROL
PANEL
LIGHTS
NO
SEE
FIGURE 1-3
YES
CONSOLE
OUTPUT
NO
CONTROL
PANEL FAULT
LED ON
YES
CHECK POWER-UP TEST
RESULTS. SEE
SECTION 2.2.
NO
SEE
FIGURE 1-6
YES
SEE
FIGURE 1-5
A
Figure 1–2 Cont’d on next page
1–4 VAX 6000 Model 600 Service Manual
msb-0775-92
Figure 1–2 (Cont.): Power-Up
A
NO
SEE SECTION 3.10;
REPLACE PROCESSOR
NO
SEE SECTION 4.9;
REPLACE MEMORY
NO
SEE
FIGURE 1-7
NO
SEE MANUAL FOR
APPROPRIATE I/O
DEVICE
PROCESSORS
PASS
YES
MEMORIES
PASS
YES
DWMBB OR DWMVA
PASS
YES
I/O ADAPTERS
PASS
YES
B
msb-0776-92
Figure 1–2 Cont’d on next page
Introduction
1–5
Figure 1–2 (Cont.): Power-Up
B
YES
CONSOLE
WARNINGS
SEE
APPENDIX B
NO
CONSOLE
STATUS ERROR
MESSAGES
YES
SEE
APPENDIX B or C
NO
NO
VMS BOOTS
SEE
APPENDIX B or C
YES
SYSTEM BOOTS
SUCCESSFULLY
msb-0776A-92
1–6 VAX 6000 Model 600 Service Manual
Figure 1–3: Control Panel Lights Do Not Work
CONTROL PANEL
LIGHTS DO NOT WORK
HEAR H405
CLICK WHEN KEY
TURNED TO
ENABLE
NO
AC PANEL
BOX BREAKER
TRIPPED
YES
YES
SET
BREAKER
NO
PLUG IN
SYSTEM
YES
SEE SECTION 5.14 OF
VAX 6000 PLATFORM
SERVICE MANUAL
NO
YES
SYSTEM
PLUGGED
IN
BLOWER
TURNS ON
NO
YES
BLOWER MAY BE
BROKEN. CONTINUE
POWER CHECK.
NO
H7206-B
GREEN LEDs ON,
RED OFF
NO
H405 CIRCUIT
BREAKER TRIPPED
SEE SECTION 5.10.2 &
APPENDIX E, VAX 6000
PLATFORM SERVICE
MANUAL
YES
POWER
REGULATOR
GREEN LEDs
ON
NO
BAD REGULATOR OR
CABLING. SEE SECTIONS
5.4-5.9, VAX 6000
PLATFORM SERV. MANL.
YES
CHECK CABLING TO
XTC MODULE
SEE SECTIONS 4.3, 4.4,
VAX 6000 PLATFORM
SERVICE MANUAL
CHECK CABLING TO
CONTROL PANEL
SEE SECTIONS 4.5, 4.6,
VAX 6000 PLATFORM
SERVICE MANUAL
msb-0773-92
Introduction
1–7
Figure 1–4: System Shutdown 30 Seconds After Power-Up
SYSTEM SHUTDOWN 30
SECONDS AFTER POWER−UP
CHECK AIRFLOW SENSOR
SEE SECTION 6.3
VAX 6000 PLATFORM
SERVICE MANUAL
CHECK BLOWERS. LOOK
FOR OBSTRUCTED OR NO
MOTION. CHECK BLOWER
POWER AND CABLES.
SEE SECTIONS 6.5,
6.6, 6.7 VAX 6000
PLATFORM SERVICE
MANUAL
msb−p381−90
1–8 VAX 6000 Model 600 Service Manual
Figure 1–5: No Console Output, Control Panel Fault LED Is On
NO CONSOLE OUTPUT.
CONTROL PANEL FAULT
LED IS ON.
CHECK LEDs ON KA66A.
SEE SECTION 2.4.
KA66A
FAILURE
YES
REPLACE CPU. SEE
SECTION 3.10.
YES
CHANGE POWER SUPPLY.
SEE SECTION 5.10,
VAX 6000 PLATFORM
SERVICE MANUAL
NO
POWER SUPPLY
LEDs SHOW
FAILURE
NO
SEE SECTIONS 5.10..2 &
APPENDIX E, VAX 6000
PLATFORM SERVICE
MANUAL
CHECK H7206-B
LEDs
NEW INSTALL OR
UPGRADE
YES
VERIFY CONFIGURATION.
SEE APPENDIX E.
NO
USE SET CPU COMMAND
TO FORCE PROMPT.
RUN RBDs.
msb-0774-92
Introduction
1–9
Figure 1–6: No Console Output, Control Panel Fault LED Is Off
NO OUTPUT ON CONSOLE,
CONTROL PANEL FAULT
LED IS OFF
CHECK BAUD RATE.
PRESS BREAK KEY UNTIL
CORRECT BAUD RATE IS
ATTAINED
CHECK CABLING TO
CONSOLE TERMINAL
SEE TERMINAL
OWNER’S MANUAL
CHECK THE CONSOLE
TERMINAL
SEE TERMINAL
OWNER’S MANUAL
msb−p383−90
1–10 VAX 6000 Model 600 Service Manual
Figure 1–7: DWMBB or DWMVA/A Fails Power-Up Test
DWMBB OR DWMVA/A
FAILS POWER-UP TEST
CHECK MODULE
SEATING ON BUS
CHECK CABLING
BETWEEN MODULES
SEE SECTIONS 2.5-6, 3.5,
VAX 6000 PLATFORM
SERVICE MANUAL
CHANGE BOOT PROCESSOR WITH SET CPU
COMMAND; RUN RBD2
SEE
SECTION 2.7.3
msb-0777-92
Introduction
1–11
Chapter 2
Diagnostics
This chapter describes diagnostics for the VAX 6000 Model 600 system.
Sections include:
•
Diagnostic Overview
•
KA66A Self-Test and Power-Up Test
•
Self-Test and Power-Up Test Console Display
•
Diagnostic Display on Module LEDs
Overview of KA66A LEDs
Determining Failing Power-Up Test from LEDs
Determining Failing Console Test from LEDs
•
Power-Up Test Results in XBER and XGPR Registers
•
Invoking ROM-Based Diagnostics
•
ROM-Based Diagnostics—RBD 0 through 5
KA66A Processor Self-Test—RBD 0
CPU/Memory Interaction Diagnostic—RBD 1
DWMBB and DWMVA/A Diagnostic—RBD 2
MS65A Memory Diagnostic—RBD 3
KA66A Processor Cache Diagnostic—RBD 4
Multiprocessor Diagnostic—RBD 5
•
VAX Diagnostic Supervisor Programs
Running VAX/DS in Standalone Mode
Running VAX/DS in User Mode
Sample VAX/DS Standalone Session
VAX/DS Diagnostics
Diagnostics
2–1
2.1 Diagnostic Overview
Diagnostics described in this manual help find problems in
the VAX 6000 Model 600 hardware. Some are located on
the modules of the XMI and VAXBI; these diagnostics isolate
problems in these modules.
Other diagnostics are loadable; they can be run using
the VAX Diagnostic Supervisor (VAX/DS), which can run
under operating system control or in console mode. These
diagnostics extend I/O testing and include exercisers that
can help reproduce intermittent problems.
Figure 2–1: Module-Resident and Loadable Diagnostics
MODULE TESTS
CPU, MEMORY,
I/O ADAPTER
LOADABLE TESTS
EXTEND TESTING
TO DEVICES
TEST
MODULES
TEST
MODULES
AND
DEVICES
msb-0771-91
2–2 VAX 6000 Model 600 Service Manual
Module-Resident Diagnostics: Testing Modules on the Buses
Problem modules on the XMI and VAXBI buses can be quickly identified by
diagnostics located on the modules themselves.
On the KA66A, six ROM-based diagnostics (RBDs) are available in ROM on
the module. Table 2–1 briefly describes which modules the RBDs test and
what features or operations are tested. Four RBDs are run automatically
whenever the system is powered up, reset, booted, or initialized. All six
can be run in console mode using the TEST command.
Table 2–1: ROM-Based Diagnostics on the KA66A Module
Number1
Run at
Power-Up
Description
0
Yes
CPU self-test
1
Yes
CPU/memory interaction test
2
Yes
DWMBB or DWMVA/A test
3
No
Additional memory tests
4
No
CPU cache test
5
Yes
Multiprocessor test
1 This
number identifies the diagnostic test when you run the RBD monitor program to execute the diagnostic, as described in Section 2.6.
Loadable Diagnostics: System-Level Testing
The VAX Diagnostic Supervisor (VAX/DS) program can run under operating
system control or from the console prompt, and lets you run tests that help
isolate system-level problems.
Like RBDs, the loadable diagostics test modules, but they also test the logic
and function of peripheral devices. These diagnostics include exercisers,
which help evoke (and diagnose) intermittent faults, occurring only once or
twice over a long period of time.
Diagnostics
2–3
2.2 KA66A Self-Test and Power-Up Test
When the system is powered up, booted, initialized, or reset,
a series of tests are run. These tests include individual
module self-tests and extended tests in ROM on the KA66A
processor. The results of these tests can be determined in
three ways.
Figure 2–2: Determining Power-Up Test Results
XBER
XGPR
CONSOLE TERMINAL
MODULE LEDs
CPU REGISTERS
msb-0770-91
2–4 VAX 6000 Model 600 Service Manual
You can see the results of the power-up tests in three places:
•
Console terminal. A summary report of the power-up tests appears on
the console terminal. This summary report is described in Section 2.3.
•
Module LEDs. The LEDs on the XMI modules also display the results
of the tests run at power-up, as described in Section 2.4.
•
XBER and XGPR Registers. When a failure occurs during power-up
and the failing test number cannot be found in the module LEDs, you
can check the XBER and XGPR registers, as described in Section 2.5.
Types of Power-Up Tests
Three types of tests run at system power-up:
•
Individual Module Self-Tests. Each module on the XMI bus (except
the DWMBB/A and DWMVA/A) has its own self-test, resident on the
module itself. This self-test checks the module’s functions independent
from its interaction with other modules.
Module self-tests are quick and complete; the processor self-test, for
example, tests the module logic, ROMs, EEPROMs, and so forth, within
10 seconds.
•
•
Module Interaction Tests. In addition to its self-test, ROMs on the
KA66A (CPU) module include tests for module interactions:
–
CPU/memory interaction tests.
These tests ensure that the
processors can access memory. They also test some CPU logic that
can be checked only by accessing memory.
–
Multiprocessing tests. These tests check functions associated with
multiprocessing, such as memory interlocks and bus arbitration.
DWMBB, DWMVA/A and VAXBI Module Tests. The XMI module
that connects to a VAXBI bus or a VMEbus – called DWMBB/A for the
XMI bus and DWMVA/A for the VMEbus – does not contain its own selftest. This logic is included on the KA66A. For a VAXBI bus, this logic
tests the DWMBB and then queries the VAXBI options for the results
of their self-tests. For a VMEbus, the RBD tests only the DWMVA/A
module.
The tests run during power-up can also be run by invoking the RBD monitor
program using the TEST console command, as described in Section 2.6. You
also use this means to invoke the RBDs not run at power-up.
Diagnostics
2–5
2.3 Self-Test and Power-Up Test Console Display
The power-up console display includes the results of module
self-tests and extended testing.
Example 2–1: Power-Up Test Display
#123456789 0123456789 0123456789 0123456789 012345#
F
.
!
E
D
C
B
A
9
8
7
6
5
4
3
2
1
A
o
.
.
.
A
+
.
.
.
.
.
.
.
.
.
.
.
.
.
.
.
.
.
.
M
+
.
.
.
M
+
.
.
.
M
+
.
.
.
M
+
.
.
.
A
o
.
.
.
.
.
.
.
.
P
+
E
+
B
P
+
D
+
D
P
+
B
E
.
.
.
.
.
.
+
+
+
.
+
.
.
+
.
.
.
.
.
.
.
.
.
.
A4
64
A3
64
A2
64
A1
64
.
.
.
.
.
.
.
.
.
.
Console = V1.00
>>>
RBDs = V1.00
EEPROM = 1.00/1.00
0
NODE #
"#
$%
&
TYP
STF
BPD
ETF
BPD
.
'
VME 5 +
XBI E +
ILV
256 Mb
(
SN = GA14012345
The console display contains the following information:
!
"
The first line of the display is the progress trace. This line prints if a
KA66A processor module is in slot 1. The trace line prints as the tests
are run, letting you see that something is happening. The numbers
correspond to the 45 tests in the KA66A ROM (Section 2.7.1). When
these 45 tests pass, the line prints as in Example 2–1. If a test fails,
display stops with the failing test number. For example, if test 14 fails,
the line is printed as follows:
#123456789 01234
This line indicates the type (TYP) of module at each XMI node.
Processors are type P, memories are type M, and I/O adapters are type
A. In this example, processors are at nodes 1, 2, and 3, memories at
nodes 6 through 9, and I/O adapters in nodes 5, D, and E.
2–6 VAX 6000 Model 600 Service Manual
#
This line shows self-test fail status (STF), which are the results of onboard self-test. Possible values for modules are:
+ (pass)
– (fail)
$
%
&
'
(
The "o" in slots E and 5 indicates no onboard self-test (a DWMBB/A and
DWMVA/A module, respectively). All modules with onboard self-tests
passed this phase of testing in this example.
The BPD line indicates boot processor designation. When the system
completes on-board self-test, the processor with the lowest XMI ID
number that passes self-test and is eligible is selected as boot processor
— in this example, the processor at node 1. The results on the BPD
line indicate:
•
The boot processor (B)
•
Processors eligible to become the boot processor (E)
•
Processors ineligible to become the boot processor (D)
During extended test (ETF) all processors run additional tests, which
include CPU/memory interaction and multiprocessor tests. On line
ETF, results are reported for each processor in the same way as on
line STF—a plus sign (+) indicates that extended test passed and a
minus sign that extended test failed. In this example, the processor
at node 1 (originally selected boot processor) failed the CPU/memory
interaction tests.
Another BPD line is displayed, because it is possible for a different
CPU to be designated boot processor before the system actually boots.
This occurs in this example, because the processor at node 1 failed
the extended test. The lowest-numbered processor that passed both
tests is the processor at node 2. However, a previous SET CPU/
NOPRIMARY command has made this processor ineligible to be boot
processor (indicated by the designation D on the BPD line). Therefore,
the processor at node 3 is designated boot processor.
A plus sign at the right of the VME line means the DWMVA/A passed
testing. On the XBI line, it means both the DWMBB/A and DWMBB/B
modules passed testing. Plus signs to the left of ‘‘XBI’’ mean VAXBI
options at those nodes in the VAXBI passed their self-tests.
The bottom line of the power-up test display shows the ROM and
EEPROM version numbers and the system serial number.
Diagnostics
2–7
2.4 Diagnostic Display on Module LEDs
You can check diagnostic results in the lights on the
modules. Before module status LEDs can be checked, the
control panel switch must be set to Enable.
Figure 2–3: Status LEDs on KA66A and Test-Related Modules
0
Standby
Run
Enable
Battery
Secure
Fault
Update
Halt
Auto Start
Restart
FRONT
GREEN
POWER-ON
LED
XMI
CORNER
YELLOW
SELF-TEST
LED
RED LEDS
YELLOW
SELF-TEST
LED
RED ERROR
SUMMARY
LED
RED LED
DWMBB/A
or DWMVA/A
MS65A
KA66A
msb-0452D-92
2–8 VAX 6000 Model 600 Service Manual
Table 2–2 lists the LED self-test status of the three modules tested by
power-up tests on the KA66A processor.
Table 2–2: Reading Module Status LEDs
Module
Self-Test Passed
Self-Test Failed
KA66A boot processor
Yellow ON
Top two red ON and
bottom red OFF
Yellow OFF
Some red ON
KA66A secondary processor
Yellow ON
Top two red ON and
bottom red ON
Yellow OFF
Some red ON
MS65A memory
Yellow ON
Green ON
Yellow ON
Green ON
DWMBB/A and DWMVA/A
adapter
Yellow ON
Yellow OFF
1
1 The yellow LED on the memory module is used to indicate only that self-test has completed, since even when parts of a memory module fail, the parts of memory still working can be used. Problems in memory modules are best identified by examining the detailed RBD displays and by VAX/DS testing.
Diagnostics
2–9
2.4.1 Overview of KA66A LEDs
System power-up testing and console firmware testing
results are displayed on the KA66A and DWMBB LEDs.
Figure 2–4: KA66A LEDs After Power-Up Tests
POWER-UP TESTS PASSED
RED
YELLOW
ON
ON
Console
Test
Results
OFF
ON
BOOT CPU
ON
ON
Console
Test
Results
ON
ON
SECONDARY CPU
POWER-UP TESTS FAILED
MOST
SIGNIFICANT
BIT
FAILING
TEST NUMBER
(BINARY-CODED
DECIMAL)
OFF (Indicates
failure in KA66A tests )
ON (With DWMBB yellow
LED off, indicates failure in
DWMBB tests)
msb-0710D-91
2–10 VAX 6000 Model 600 Service Manual
The large yellow LED at the bottom of the KA66A LEDs lights when the
KA66A modules pass the power-up tests, where a CPU module is tested
individually (self-test), followed by CPU/memory interaction tests and CPU
multiprocessing tests.
The KA66A power-up tests also check DWMBB and DWMVA/A modules,
if any. If both DWMBB modules or the DWMVA/A module passes testing,
the DWMBB/A or DWMVA/A yellow light and the KA66A yellow light are
on. If the DWMBB modules or the DWMVA/A module fails testing, the
DWMBB/A or DWMVA/A yellow light is off and the KA66A yellow light is
on.
When power-up tests pass, the red lights of the KA66A are set as shown in
the left-hand part of Figure 2–4. The bottom red light of the KA66A is off
if the KA66A is the boot processor, and on if it is a secondary processor.
If power-up tests fail for the KA66A, DWMBB, or DWMVA/A modules, the
eight red LEDs contain an error code that corresponds to the number of the
failing test. The test number is represented in binary-coded decimal, with
the most significant bit at the top. A bit is ONE if the light is ON.
For example, assume a processor fails power-up tests (yellow LED is OFF)
and shows the following pattern in the eight red LEDs:
TOP
(MSB) off
off
on
on
0
0
1
1
off
off
on
(LSB) off
BOTTOM
0
0
1
0
=
3
=
2
The failing test number decodes to 0011 0010 (binary-coded decimal 32).
Section 2.4.2 gives more detail on the failing power-up tests indicated by
the KA66A red LEDs.
When power-up tests run without errors, console firmware tests for
conditions necessary to make its environment workable. The results of
these tests are described in Section 2.4.3.
Diagnostics
2–11
2.4.2 Determining Failing Power-Up Test from LEDs
When power-up tests fail, the red LEDs on the KA66A
identify the failing test and subtest numbers.
Table 2–3: KA66A Red LEDs: KA66A Problems
KA66A
Diagnostic and
Red LEDs Test Number
Device Failing
Power-Up
Test Line
1–45
CPU self-test (RBD 0)
T0001–T0045
KA66A
STF
51–65
CPU/memory test - Memory 1
(RBD 1) T0001–T0015
KA66A or MS65A 1 (module
with lowest XMI node number)
ETF
70
CPU/memory test - Memory 2
(RBD 1) T0003
(equivalent to ST1/T=3)
MS65A 2 (module with nextlowest XMI node number1 )
ETF
71
CPU/memory test - Memory 3
MS65A 3
ETF
72
CPU/memory test - Memory 4
MS65A 4
ETF
73
CPU/memory test - Memory 5
MS65A 5
ETF
74
CPU/memory test - Memory 6
MS65A 6
ETF
75
CPU/memory test - Memory 7
MS65A 7
ETF
76
CPU/memory test - Memory 8
MS65A 8
ETF
81–87
Multiprocessor test
(RBD 5) T0001–T0007
KA66A
ETF
1 Values
70–76 show a failure of RBD 1 Test 3 in a particular memory module. The tests on
modules proceed from right to left, so a value of 70 indicates the module with the secondlowest XMI node number; 71, the third-lowest, and so forth.
2–12 VAX 6000 Model 600 Service Manual
When you cannot read power-up test results from the console terminal, you
can see results from LEDs on the KA66A and DWMBB/A or DWMVA/A.
KA66A Yellow LED Off. If a processor’s yellow LED is OFF and the red
LEDs show an error code in the range 1–45, the processor’s self-test failed
and the processor board is bad.
After the self-tests, each processor runs the CPU/memory interaction tests
and the multiprocessor tests. The LEDs display error codes for failing CPU/
memory tests with numbers ranging from 51 to 65, which is the failing CPU/
memory test number (1 through 15) plus 50. For failing multiprocessor
tests, the LEDs display numbers ranging from 81 to 87, which is the failing
multiprocessor test number (1 through 7) plus 80.
Each processor, after completely testing interaction with the first memory,
runs CPU/memory interaction test T0003 on every other good memory
module. If a failure occurs, it probably means that the memory module
is bad, even though the processor’s yellow light is OFF and the memory
module’s yellow light is ON. The yellow light on a memory module indicates
only that its self-test completed, since even when parts of a memory module
fail, the parts that are working can still be used.
So, if a processor is running self-test and multiprocessor tests, but failing
CPU/memory interaction tests, the chances are that the problem lies with
the memory. If several processors fail on the same memory, that memory
module is certainly bad. Try using SET MEMORY to configure the bad
module out of the interleave set.
KA66A Yellow Led ON, DWMBB/A or DWMVA/A Yellow LED Off. If
the DWMBB/A or DWMVA/A yellow LED is off, the module has failed
testing. The yellow LED of the KA66A will be on, and the KA66A red
LEDs give the number of the failing test, as shown in Table 2–4.
Table 2–4: KA66A Red LEDs:
lems
DWMBB or DWMVA/A Prob-
KA66A
Red LEDs
Diagnostic and
Test Number
Device Failing
Power-Up
Test Line
1–44
DWMBB test T0001–T0044
DWMBB
XBI
1–19
DWMVA/A test T0001–T0019
DWMVA/A
VME
Diagnostics
2–13
2.4.3 Determining Failing Console Firmware Test from LEDs
After power-up tests run without errors, console firmware
tests for conditions necessary to make its environment
workable.
Table 2–5: KA66A Status LEDs: Console Errors
No Errors
Red
LED
Primary Secondary
No
No
Primary Memory
No
No
CCA
XMI
8
1
1
1
1
1
1
7
1
1
1
1
1
1
6
0
0
0
0
0
0
5
0
0
0
0
0
1
4
0
0
0
0
1
0
3
0
0
0
1
0
0
2
0
0
1
0
0
0
1
0
1
X1
X1
X1
X1
1X
indicates that the LED can be on or off.
2–14 VAX 6000 Model 600 Service Manual
KA66A Yellow LED On, DWMBB/A Yellow LED On. After power-up
tests run without errors, the red LEDs on the KA66A show either that
the console firmware has detected no errors or one of four console-detected
errors:
•
No primary. The console cannot locate any processor that is eligible
to be the boot processor. In this case the bottom red LED is invalid;
that is, it does not indicate whether a processor is the primary or a
secondary.
•
No memory. The console cannot locate any system memory on the
XMI bus.
•
No CCA. The console cannot locate the console communications area
(CCA) in system memory. The CCA is used for communication among
the console programs running on each processor in a multiprocessor
system.
•
No XMI. A machine check exception occurred while console error
handling code was attempting to access registers on XMI adapters. In
this case, the bottom red LED does not indicate whether a processor is
the primary or a secondary.
Diagnostics
2–15
2.5 Power-Up Test Results in XBER and XGPR
Registers
You can check power-up test results in the console display,
in the lights on the modules, or in the XBER and XGPR
registers. Use the XBER and XGPR registers when a failure
occurs during power-up and the failing test number cannot
be found in the module LEDs.
Example 2–2: XGPR Register After Power-Up Test Failure
>>> E/P/L E190000C
E190000C 30xxxxxx
>>> E/P/L E1900004
E1900004 xxxxx4xx
>>> E/P/L E188000C
E188000C 13xxxxxx
>>> E/P/L E1880004
E1880004 xxxxx0xx
!
!
!
!
!
!
!
Examine the longword at physical address
E190000C, the address of the XGPR
register of the KA66A processor in slot 2.
Then examine the XBER register (bit 10
set). The result indicates that test 30
of the KA66A self-test failed. See
Table 2-7 to interpret the data returned.
!
!
!
!
!
Examine the XGPR register of the KA66A
processor in slot 1. Derivation of the
address is explained below.
Then examine the XBER register (bit 10
clear). DWMBB or DWMVA/A test 13 failed.
When a failure occurs in a power-up test, you can examine the XGPR
register to determine the failing test number. The XGPR register of the
KA66A processor that failed self-test, CPU/memory interaction testing, or
multiprocessor testing (or, if the DWMBB or DWMVA/A test failed, the boot
processor) contains the failing test number. If all power-up tests pass (as
indicated by the console display or the LEDs on the modules), the XGPR
register contains other data and should be ignored.
To examine the XGPR register, first see Table 2–6 to determine the base
address (BB) of the KA66A processor’s node. Then calculate the address of
the XGPR register by adding 0C (hex) to the base address.
The failing test number is derived from the upper byte (bits <31:24>) of
the longword returned. For self-test, the upper byte contains the failing
test number. If a CPU/memory interaction test fails, this byte contains the
failing test number plus 50. If a multiprocessor test fails, this byte contains
2–16 VAX 6000 Model 600 Service Manual
the failing test number plus 80. All numbers are expressed in binary-coded
decimal (BCD). See Table 2–7.
Table 2–6: XMI Base Addresses
Slot
Node
Base Address (BB)
1
2
3
4
5
6
7
8
9
10
11
12
13
14
1
2
3
4
5
6
7
8
9
A
B
C
D
E
E188 0000
E190 0000
E198 0000
E1A0 0000
E1A8 0000
E1B0 0000
E1B8 0000
E1C0 0000
E1C8 0000
E1D0 0000
E1D8 0000
E1E0 0000
E1E8 0000
E1F0 0000
Table 2–7: Interpreting XGPR Failing Test Numbers
Failing Diagnostic
XBER <10>
XGPR <31:24>
(BCD)
Test
Numbers
Self-test (RBD 0)
Set
1–45
1–45
CPU/memory interaction test
(RBD 1 for Memory 1)
Clear
51–65
1–15
CPU/memory interaction tests
(RBD 1 for for Memories 2, 3 ...)
Clear
70–80
3
Multiprocessor test (RBD 5)
Clear
81–87
1–7
DWMBB or DWMVA/A
test (RBD 2)
Clear
1–44
1–44
Diagnostics
2–17
2.6 Invoking ROM-Based Diagnostics
You can run RBDs at any time in console mode. Use the
TEST command to invoke the RBD Diagnostic Monitor. You
can then type RBD monitor commands that run tests and
display test output at the console terminal.
Example 2–3: Using the TEST Command to Run RBDs
>>>
T/R
!
!
!
!
!
!
RBD1> ST 0
This is the abbreviation for TEST/RBD.
RBD1 indicates that the processor running
the RBD monitor program is in XMI slot 1.
The user types ST 0 to start RBD 0, the
CPU self-test.
Table 2–8: RBD Monitor Commands to Run Tests
Command
Function
ST[ART]n
Starts RBD n, where n is the number of the RBD program:
n
Description
0
CPU self-test
1
CPU/memory interaction test
2
DWMBB or DWMVA/A test
3
Additional memory tests
4
CPU cache test
5
Multiprocessor test
SU[MMARY]
Prints a summary report of the last RBD program run
QU[IT]
Exits the RBD monitor and returns control to the console program
2–18 VAX 6000 Model 600 Service Manual
The Diagnostic Monitor lets you run RBDs1 whenever it may seem
necessary, not just at power-up. You can also run more tests than are
run at power-up. To run RBD tests:
•
Type T/R to start the RBD monitor program, as shown in Example 2–3.
•
At the RBDn> prompt, you can type any RBD monitor command. The
START, SUMMARY, and QUIT commands outlined in Table 2–8 are the
basics for running RBDs.
All START command qualifiers are described in Appendix A. Four helpful
ones are outlined here.
•
Trace (/TR) Qualifier. If you use this qualifier with the START
command, a trace of each individual test is displayed.
•
Halt-on-Error (/HE) Qualifier. By default, the RBDs continue to
execute after an error is encountered. Use the /HE qualifier to cause
the program to halt when the first error occurs. (You can stop testing
at any time by pressing CTRL/C.)
•
Specific-Test (/T=n[:m]) Qualifier. The RBDs each have a number of
subtests (see Section 2.7). You can select subtests with the /T qualifier.
•
Number of Passes (/P=n) Qualifier. You can request that a test be
repeated with this qualifier.
Example 2–4: Sample START Command
RBD1 ST2/TR/T=2:4/P=3 E
;XBIP TST
;T0002
!Starts RBD 2 for the DWMBB/A at XMI node E
!with trace, tests 2-4 only, and 3 passes.
1.0
T0003
T0004
T0002
T0003
T0004
T0002
T0003
T0004
;
P
1
8087
3
; 00000000 00000000 00000000 00000000 00000000 00000000 00000000
1
The Diagnostic Monitor provides other capabilities, including the capability to set and
display registers for interactive debugging. The Diagnostic Monitor is described in full in
Appendix A.
Diagnostics
2–19
2.7 ROM-Based Diagnostics — RBD 0 through 5
The KA66A diagnostic ROM has six diagnostics: RBD 0 tests
the processor; RBD 1 tests processor/memory interaction;
RBD 2 tests the optional DWMBB or DWMVA/A adapter; RBD
3 tests MS65A memories; RBD 4 tests the KA66A cache; and
RBD 5 tests multiprocessor interaction.
Table 2–9: KA66A ROM-Based Diagnostics
RBD
Number
Total
Tests
Power-Up Callable
Default
Default
Description
45
451
45
CPU self-test
1
16
122
16
CPU/memory interaction test
2
44
44
44
DWMBB or DWMVA/A test
0
3
14
0
73
Additional tests on main memory
Cache coherency tests
Multiprocessor test
4
3
0
04
5
7
7
7
1 Although
the same number of tests are run for the processor at power-up as when
RBD 0 is run, subtest 2, the EEPROM test, is much less comprehensive at powerup than when RBD 0 is called using the Diagnostic Monitor program.
At powerup, only the first and last locations are read from EEPROM. When run from the Diagnostic Monitor, all locations are read from EEPROM.
2 Tests 1, 2, 13, and 16 of RBD 1 are skipped when the test is run automatically at powerup.
3 You must use the /C qualifier to run tests 1, 5, 9, 11–14, as these tests alter memory content.
4 You have to request specific subtests with the /T=n[:m] qualifier for RBD 4.
2–20 VAX 6000 Model 600 Service Manual
The following paragraphs summarize the callable ROM-based diagnostics.
RBD 0 — Processor Self-Test
RBD 0 is the KA66A self-test. You may wish to run RBD 0 through
several passes (using the /P=n qualifier) when a processor fails self-test
intermittently. Running RBD 0 executes the diagnostic on the processor
currently selected as the boot processor. To test other processors, use the
console command SET CPU n, where n is the hexadecimal number giving
the XMI slot location of the desired processor (see Example 2–6).
RBD 1 — CPU/Memory Interaction Test
RBD 1 tests CPU/memory interaction. As with RBD 0, executing several
passes of RBD 1 may help pin down intermittent CPU/memory interaction
failures. Running RBD 1 also executes more tests than are done at powerup.
RBD 2 — DWMBB or DWMVA/A Test
RBD 2 tests both modules of the DWMBB adapter (for VAXBI connections)
or the DWMVA/A adapter (for VMEbus connections). (The DWMBB/A and
DWMVA/A have no on-board self-test.) Section 2.7.3 has an example of this
diagnostic and a list of tests.
RBD 3 — Additional Memory Tests
RBD 3 is a set of XMI memory tests that sizes and runs extended tests on
all of memory. RBD 3 is not run at power-up, since its use requires some
care. Section 2.7.5 shows examples of this RBD and lists the tests.
RBD 4 — Processor Cache Coherency Tests
RBD 4 is a set of tests you can run following system crash to check for
cache coherency. Section 2.7.6 has an example of this diagnostic and a list
of tests.
RBD 5 — Multiprocessing Tests
RBD 5 tests the interaction of multiple KA66A processors. Running
multiple passes of RBD 5 can help pinpoint specific multiprocessing errors.
Section 2.7.7 includes an example of this RBD and a list of its tests.
Diagnostics
2–21
2.7.1 KA66A Processor Self-Test — RBD 0
RBD 0 is the KA66A self-test. More EEPROM testing is done
in RBD mode than for power-up testing. Otherwise, the tests
are the same.
Example 2–5: KA66A Self-Test (RBD 0) Showing Error
>>> T/R
RBD1> ST0/TR/HE
; XNP_ST
; T0001
; T0011
; T0021
;
;
;
! Command to enter RBD monitor program.
! Runs the KA66A self-test on boot processor
! Trace prints each test number; halt on error
1.00
T0002
T0012
T0022
"
T0003
T0013
T0023
T0004
T0014
T0024
T0005
T0015
T0025
T0006
T0016
T0026
#
!
T0007
T0017
T0027
T0008
T0018
T0028
T0009
T0019
T0029
!
T0010
T0020
F
1
8087
1
HE BR_PRED
XX
T0029
28 5555AAAA A8AAAAAA 00000000 E1008000 E008C410 08
;
F
1
8087
1
; 00000000 00000001 00000000 00000000 00000000 00000000 00000000
RBD1>
In Example 2–5:
!
"
#
Test 29 failed. The /HE switch causes execution to stop when the error
is encountered.
F indicates failure.
The diagnostic ran for one pass.
2–22 VAX 6000 Model 600 Service Manual
Example 2–6: Running KA66A Self-Test (RBD 0) on a Secondary
Processor
!
"
#
RBD1> QUIT
>>> SET CPU 2
>>> T/R
RBD2> ST0/TR
;XNP
;
;
;
;
;
T0001
T0011
T0021
T0031
T0041
1.00
T0002
T0012
T0022
T0032
T0042
T0003
T0013
T0023
T0033
T0043
T0004
T0014
T0024
T0034
T0044
T0005
T0015
T0025
T0035
T0045
T0006
T0016
T0026
T0036
T0007
T0017
T0027
T0037
T0008
T0018
T0028
T0038
T0009
T0019
T0029
T0039
T0010
T0020
T0030
T0040
;
P
2
8087
1
;00000000 00000000 00000000 00000000 000000000 00000000 00000000
In Example 2–6:
!
"
#
If you are in the RBD monitor, use QUIT to return to the console
monitor.
The SET CPU command causes the KA66A module at node 2 to become
the primary processor.
The RBD2> prompt indicates that the CPU at node 2 is now the primary
processor. The ST0 command runs RBD 0 on this processor.
Table 2–10: Subtests in the KA66A Self-Test — RBD 0
Test
Function
T0001
KA66A ROM Test
T0002
KA66A PCS logic and EEPROM Test
T0003
Scratchpad RAM Byte Access Test
T0004
Output Ports Test
T0005
Console UART External Loopback Test
T0006
NEXMI Console UART Internal Loopback Interrupt Test
T0007
NEXMI Input Port Test
Diagnostics
2–23
Table 2–10 (Cont.): Subtests in the KA66A Self-Test — RBD 0
Test
Function
T0008
NEXMI Programmable Interval Clock Test
T0009
NEXMI Time-of-Day Register (TODR) Test
T0010
WATCH Chip Test
T0011
Virtual Instruction Cache Tag Test
T0012
Virtual Instruction Cache Data Test
T0013
Virtual Instruction Cache Parity Error Test
T0014
Primary Cache Tag Store Test
T0015
Primary Cache Data RAM March Test
T0016
Backup Tag Store Test
T0017
Backup Cache Data Line Test
T0018
Backup Cache Data RAM March Test
T0019
Cache Mask Write Test
T0020
Flush Cache Test
T0021
Data Parity Logic Test
T0022
NDAL Parity Error Test
T0023
ECC Logic Test
T0024
ECC RAM March Test
T0025
8KB RAM Test
T0026
XDEV Register Test
T0027
CPUID Register Test
T0028
SID Register Test
T0029
Branch Prediction Register Test
T0030
XBER and XBEER Registers Test
T0031
XFADR and XFAER Registers Test
T0032
XGPR Register Test
T0033
XCR Register Test
2–24 VAX 6000 Model 600 Service Manual
Table 2–10 (Cont.): Subtests in the KA66A Self-Test — RBD 0
Test
Function
T0034
NSCSR Register
T0035
CNAK and TTO Read Test
T0036
CNAK and TTO Write Test
T0037
CNAK and TTO IVINTR Test
T0038
Interprocessor IVINTR Test
T0039
Write Error IVINTR Test
T0040
Software Interrupt Test
T0041
Multiple Interrupt Test
T0042
Processor Chip Critical Path Test
T0043
Fbox Test
T0044
Disable Fbox Test
T0045
Fbox Critical Path Test
Diagnostics
2–25
2.7.2 CPU/Memory Interaction Diagnostic — RBD 1
RBD 1 is the CPU/memory interaction test. Subtests 1, 2,
13, and 16 are not run on power-up. They are only run in
callable mode due to the errors they can cause on other
processors in the system.
Example 2–7: CPU/Memory Interaction Diagnostic — RBD 1
>>> T/R
! Command to enter RBD monitor program
RBD3> ST1/TR/HE
! Runs the CPU/memory interaction RBD with
! trace and halt on error.
;CPUMEM
; T0001
; T0011
1.00
T0002
T0012
!
T0003
T0013
T0004
T0014
T0005
T0015
T0006
T0016
T0007
"
T0008
T0009
3
8087
1
;
P
;000000000 00000000 00000000 00000000 00000000 00000000 00000000
RBD3>
In the example above:
!
"
P means that the diagnostic ran successfully.
One pass was completed.
2–26 VAX 6000 Model 600 Service Manual
T0010
Table 2–11: Subtests in the CPU/Memory Interaction Diagnostic — RBD 1
Test
Function
T0001
Parity Error CNAK Read Test
T0002
Parity Error CNAK Write Test
T0003
Cache Disable Test
T0004
Interlock Instruction Cache Disable Test
T0005
Cache Read Fill Test
T0006
Cache Location Displacement Test
T0007
Interlock Instruction Cache Test
T0008
Invalidate Bus Test
T0009
Error Transition Mode Test
T0010
High-Speed Cache Access Address Bit Test
T0011
Upper Address Bit Test
T0012
Single-Bit ECC Error Test
T0013
Double-Bit ECC Error Test
T0014
Memory Write Merge Test
T0015
Backup Cache Tag Test
T0016
P-cache Critical Path Test
Diagnostics
2–27
2.7.3 DWMBB and DWMVA/A Diagnostic — RBD 2
For VAXBI connections, RBD 2 checks functions of both
DWMBB modules. For VMEbus connections, RBD 2 checks
functions only of the DWMVA/A.
Example 2–8: DWMBB Diagnostic — RBD 2
RBD1> ST2/TR E
;XBI+_RBD
!
! START for RBD 2 requires XMI node number (hex)
1.00
; T0001 T0002 T0003 T0004 T0005 T0006 T0007
; T0011 T0012 T0013 T0014 T0015 T0016 T0017
; T0021 T0022 T0023 T0024 T0025 T0026 T0027
; T0031 T0032 T0033 T0034 T0035 T0036 T0037
; T0041 T0042 T0043 T0044
;
P
3
8087
1
;000000000 00000000 00000000 00000000 00000000
"
#
T0008
T0018
T0028
T0038
T0009
T0019
T0029
T0039
00000000
T0010
T0020
T0030
T0040
00000000
Example 2–9: DWMVA/A Diagnostic — RBD 2
RBD1> ST2/TR 5
;XBI+_RBD
; T0001
; T0011
! START for RBD 2 requires XMI node number (hex)
1.00
T0002
T0012
;
P
;000000000
!
T0003
T0013
"000000003
T0004
T0014
T0005
T0015
8087
00000000
T0006
T0016
1
00000000
T0007
T0017
#00000000
2–28 VAX 6000 Model 600 Service Manual
T0008
T0018
T0009
T0019
00000000
T0010
00000000
The DWMBB/A and DWMVA/A are the same module (T2018). When
connected to a DWMBB/B in a VAXBI, the module is called a DWMBB/
A. When connected to a DWMVA/B module in a VMEbus, the module is
called a DWMVA/A.
The DWMBB/A and DWMVA/A modules have no on-board self-test. The
boot processor ROM code tests the modules during power-up. It first finds
all the DWMBB/A–DWMVA/A modules and then serially tests each one.
On the VAXBI, both DWMBB modules are tested. For the VMEbus, the
ROM code only tests to see if the DWMVA/B is there, and then runs tests
on the DWMVA/A.
!
"
#
When invoking RBD 2, the START command requires a parameter: the
XMI node number (in hex) of the DWMBB/A or DWMVA/A to be tested.
This diagnostic ran successfully.
One pass was completed.
Further information on the DWMBB is given in Chapter 5. The DWMVA is
discussed in two manuals: the DWMVA VME Adapter Installation Guide,
Order No. EK–DWMVA–IN–001, and the DWMVA VME Adapter Technical
Manual, Order No. EK–DWMVA–TM–001.
Diagnostics
2–29
2.7.4 DWMBB and DWMVA/A Diagnostic — RBD 2 Subtests
RBD 2 runs test T0001–T0044 for a DWMBB. A subset of these
tests (T0001–T0019) are run for a DWMVA/A.
Table 2–12: RBD 2 Subtests — DWMBB and DWMVA/A Diagnostic
Test
Function
T0001
DWMBB/A and DWMVA/A CSR Test
T0002
DWMBB/A and DWMVA/A Loopback Transaction Test
T0003
DWMBB/A and DWMVA/A Loopback DMA Buffer Test
T0004
DWMBB/A and DWMVA/A Loopback Nonexistent Memory
Interrupt Test
T0005
XMI Parity Error Test
T0006
Retry Timeout Interrupt Test
T0007
Timeout Disable Test
T0008
Data NO ACK Test
T0009
RER Error Interrupt Test
T0010
ECC Syndrome Test
T0011
PMR ECC Error Interrupt Test
T0012
Quick PMR Memory Test
T0013
DMA ECC Error Interrupt Test
T0014
ECC Disable Test
T0015
Extended Addressing Test
T0016
34-Bit Addressing Test
T0017
Invalid PFN Interrupt Test
T0018
Failing Command and Mask Test
T0019
Responder Request Test
—
(Following tests do not apply to DWMVA/A)
T0020
DWMBB/B CSR Test
2–30 VAX 6000 Model 600 Service Manual
Table 2–12 (Cont.): RBD 2 Subtests — DWMBB and DWMVA/A Diagnostic
Test
Function
T0021
BIIC Loopback Transaction Test
T0022
BIIC Transaction Test
T0023
Illegal I/O Command Test
T0024
VAXBI Window Space Test
T0025
DMA Test
T0026
DMA Loopback DMA Buffer Test
T0027
XMI Parity Error Interrupt Test
T0028
Write Sequence Error Interrupt Test
T0029
Return Vector/Multiple Interrupt Test
T0030
I/O Buffer C/A Fetch Parity Error Interrupt Test
T0031
I/O Buffer Data Fetch Parity Error Interrupt Test
T0032
DMA Buffer Data Fetch Parity Error Interrupt Test
T0033
DMA-A Buffer C/A Load Parity Error Interrupt Test
T0034
DMA-A Buffer Data Load Parity Error IVINTR/INTR Test
T0035
DMA-B Buffer Command/Address Load Parity Error Interrupt Test
T0036
DMA-B Buffer Data Load Parity Error IVINTR/INTR Test
T0037
I/O Buffer Data Load Parity Error Interrupt Test
T0038
BCI Parity Error Test
T0039
Nonexistent Memory Interrupt Test
T0040
CRD Error Interrupt Test
T0041
VAXBI Interrupt Test
T0042
VAXBI IP Interrupt Test
T0043
Control Reset Test
T0044
No Stall Timeout Test
Diagnostics
2–31
2.7.5 MS65A Memory Diagnostic — RBD 3
RBD 3 sizes memory, runs extended memory tests, and
indicates any failing tests. Some tests must be explicitly
selected, since they alter memory contents.
Example 2–10: RBD 3 Test on All Memory Modules
>>> T/R
! Command to enter RBD monitor program
RBD3> ST3/TR
! Runs the default MS65A RBD
! test with trace.
;XMA2_RBD
; T0002
T0003
1.00
T0004
T0006
T0007
T0008
T00010
;
P
3
8087
1
;00000000 00000000 00000000 00000000 00000000 00000000 00000000
Example 2–11: RBD 3 Diagnostic on a Memory Module in Slot A
RBD3> ST3/TR A
;XMA2_RBD
; T0002
T0003
! Runs the MS65A RBD test
! on memory module in slot A only.
1.00
T0004
T0006
T0007
T0008
T00010
;
P
3
8087
1
;00000000 00000000 00000000 00000000 00000000 00000000 00000000
2–32 VAX 6000 Model 600 Service Manual
Example 2–12: RBD 3 Diagnostic with Module Error
RBD3> ST3/TR
;XMA2_RBD
; T0002
;
;
;
T0003
! Runs the default MS65A RBD
! test; hard error in memory in slot 8
1.00
T0004
T0006
T0007
T0008
T00010
F
3
8087
1
HE XMA2_ERR
08
T0010
00 00000000 00000000 00000000 00000000 20073E32
01
;
F
3
8087
1
;00000000 00000001 00000000 00000000 00000000 00000000 00000000
Example 2–13: RBD 3 Diagnostic with Confirm Switch
RBD3> ST3/TR/T=5:12 A /C
;XMA2_RBD
; T0005
;
;
T0006
!
!
!
!
Runs RBD tests T0005 through T0012 on
memory module in slot A. Confirm (/C)
required on tests T0005, T0009, T00011,
and T0012.
1.00
T0007
T0008
T0009
T0010
T0011
S
XX
3
RAM
8087
XX
1 ! Test status prints out every
T0011 ! 60 sec until tests are completed;
! /DS disables test status printout.
; T0012
;
S
;
XX
3
RAM
8087
XX
1
T0012
;
P
3
8087
1
;00000000 00000000 00000000 00000000 00000000 00000000 00000000
RBD3>
>>>
QUIT
! Exit from RBD monitor program
! Console prompt returns
Diagnostics
2–33
Table 2–13: Subtests in the Memory Diagnostic — RBD 3
Test
Function
Approximate Run Time
(For 32-Mbyte Module)
T00011
Memory Self-Test
17 sec2
T00023
CSR Addressability Test
<1 sec
T00033
CSR Read/Write, Write 1 to Clear Test
<1 sec
T00043
SEADR Register Test
<1 sec
T00051
Parity Error Test
<1 sec
T00063
Error Correction Code Circuit Test
<1 sec
T00073
Data Path Test
<1 sec
T00083
Write Mask Logic Test
<1 sec
T00091
Block State Test
<1 sec
T00103
EEPROM Update Test
<1 sec
T00111
Interleave Address and Boundary Test
30 sec
T00121
ECC RAM March Test
4 min
T00131
March Test
1.5 min
T00141
Modified MOVI Test
21 min
1 The
/C qualifier is required for these tests.
self-test has not completed in 60 seconds, self-test fails.
3 Tests T0002–T0004, T0006–T0008, and T0010 are run by default.
2 If
2–34 VAX 6000 Model 600 Service Manual
Tests T0002, T0003, T0004, T0006, T0007, T0008, and T0010 are run by
default. All other tests must be selected by the user, since they alter data
in memory.
Tests are performed on all MS65A modules unless the user specifies a single
MS65A. Parameters specified in the command line (refer to Table 2–14)
allow one or all memory modules to be tested. These parameters also allow
RBD tests to be run from main memory or ROM for RBD tests T0013 and
T0014.
Table 2–14: RBD 3 Parameters
Parameter1
Function
00
Run tests T0013 and T0014 from main memory (RAM) and test all memory modules
0n
Run tests T0013 and T0014 from main memory (RAM) and test memory module n only
10
Run tests T0013 and T0014 from ROM and test all memory modules
1n
Run tests T0013 and T0014 from ROM and test memory module n only
1 Where n is the memory module backplane slot number that is specified in hex parameters 0n and 1n.
Diagnostics
2–35
2.7.6 KA66A Processor Cache Diagnostic — RBD 4
RBD 4 tests backup cache on a processor module. A test
number must be supplied to run any of the three tests. You
can limit the amount of backup cache checked in test 3 by
specifying the Mbytes (in hex) to be tested.
Example 2–14: KA66A Cache Tests — RBD 4
>>> T/R
! Command to enter RBD monitor program
RBD4>
! RBD monitor prompt, where 4 is the hexa! decimal node number of the processor
! that is currently receiving your input.
!
RBD4> ST4/TR
;XNP_BC
;
;
1.00
"
S
4
XX NoTstSel
#
8087
XX
1
T0000
4
8087
1
;
P
;00000000 00000000 00000000 00000000 00000000 00000000 00000000
$
RBD4> ST4/TR/T=1
;XNP_BC
%
; T0001
1.00
&
;
P
4
8087
1
;00000000 00000000 00000000 00000000 00000000 00000000 00000000
RBD4>
2–36 VAX 6000 Model 600 Service Manual
!
"
#
$
%
&
RBD 4 is started without specifying a test number.
No tests are run, and a status message is given that no test was
selected.
Since no tests were run, no failures were detected.
The command to run RBD 4 is reissued, this time with a test number.
Test 1, as requested, is run.
Test 1 passes.
Table 2–15: Subtests
RBD 4
in
the
KA66A
Test
Function
T0001
Parity Error Test
T0002
Cache Coherency Checker
T0003
Memory Locked Location Test
Cache
Diagnostic
Diagnostics
—
2–37
2.7.7 Multiprocessor Diagnostic — RBD 5
RBD 5 tests multiprocessor interaction.
Example 2–15: Multiprocessor Tests — RBD 5
>>> T/R
! Command to enter RBD monitor program
RBD3>
! RBD monitor prompt, where 3 is the hexa! decimal node number of the processor
! that is currently receiving your input.
!
RBD3> ST5/TR
;XNP_MP
; T0001
1.00
T0002
"
T0003
T0004
T0005
T0006
#
T0007
3
8087
1
;
P
;00000000 00000000 00000000 00000000 00000000 00000000 00000000
RBD3>
In the example above:
!
"
#
RBD 5 is run with trace set.
The diagnostic ran successfully.
One pass was completed.
2–38 VAX 6000 Model 600 Service Manual
Table 2–16: Subtests in the Multiprocessor Diagnostic — RBD 5
Test
Function
T0001
Interprocessor Interrupt Test
T0002
Write Error Interrupt Test
T0003
Cache Invalidate Test
T0004
XMI Bus Arbitration Test
T0005
XMI Bus Arbiter Collision Test
T0006
XMI Suppress Assertion Test
T0007
Memory Lock and Interrupt Exerciser Test
Table 2–17: RBD 5 Parameters
Parameter
Function
No parameter
When no parameter is specified, all processors that have passed powerup test will be tested.
xxxx
Specifies a hexadecimal bit mask indicating slot positions of the processors to be tested.
For example, a parameter of 322 indicates that processors in slots 1, 5, 8, and 9 will be tested. All processors specified are tested, even those that did not pass powerup test.
Diagnostics
2–39
2.8 VAX Diagnostic Supervisor Programs
The VAX Diagnostic Supervisor (VAX/DS) is a monitor that
controls operation of diagnostic programs. You can use
VAX/DS in one of two modes: standalone mode (exclusive
use of the system) or user mode (under the VMS operating
system).
Table 2–18: VAX Diagnostic Program Levels
Level
Type of Test
Run-Time Environment
1
System exercisers
Runs under the VMS operating system without VAX/DS
2R
Function tests of peripheral devices
Runs under the VMS operating system with VAX/DS
2
Exercisers and function tests of
peripheral devices and processors
Runs under VAX/DS in user mode and
standalone mode
3
Function tests and logic tests of
peripheral devices and processors
Runs under VAX/DS in standalone
mode
Table 2–19: VAX/DS Documentation
Document
Order Number
VAX Diagnostic Supervisor User’s Guide
AA–FK66A–TE
VAX Diagnostic Software Handbook
AA–F152A–TE
VAX Diagnostic Design Guide
AA–FK67A–TE
VAX Systems Hardware Handbook
EB–31692–46
2–40 VAX 6000 Model 600 Service Manual
The VAX Diagnostic Supervisor (VAX/DS) can be run in interactive mode.
You type commands in response to the VAX/DS program prompt:
DS>
VAX/DS lets you load diagnostic programs into system memory, select
devices to be tested, and run the programs. The VAX/DS command
language also lets you control the execution of diagnostic programs; you
can specify which tests or sections of a program should run, and how many
passes it should run. You can also show the current state of parameters
that affect the operation of diagnostic programs. The programs report their
results through VAX/DS to the terminal.
VAX/DS supports three types of diagnostic programs:
•
Logic tests
Test a specific section of a device’s logic circuitry. Logic tests provide the
greatest degree of detail in determining the location of faulty hardware.
•
Function tests
Test the functions of the device. For example, a function test for a disk
drive would test the drive’s reading and writing capabilities. Function
tests can detect the location of faulty hardware, although the results
may be less exact than those of a logic test.
•
Exercisers
Test entire systems or subsystems and verify that a system can function
properly over a period of time. Exercisers can detect both hardware
faults resulting from the simultaneous use of a system’s numerous
devices and intermittent faults occurring only once or twice over a long
period of time.
VAX/DS also supports EVUCA, the utility which is used to install EEPROM
patches and console boot primitives.
Table 2–20 lists the VAX/DS programs available for the VAX 6000 Model
600 system. Each program has a HELP file available. To access the help
files for any diagnostic, at the VAX/DS prompt, type:
DS>
HELP [VAX/DS diagnostic program name]
Diagnostics
2–41
2.8.1 Running VAX/DS in Standalone Mode
You can use VAX/DS in one of two modes: standalone mode
(exclusive use of the system) or user mode (under VMS).
Example 2–16: Running VAX/DS in Standalone Mode
>>> BOOT /XMI:A /FILENAME:ISL_LVAX_F /R5:10 EX0
[Initial Display]
Network Initial System Load Function
Version 1.1
FUNCTION
ID
1
2
3
4
5
-
FUNCTION
Display Menu
Help
Choose Service
Select Options
Stop
Enter a function ID value: 3
OPTION
ID
1
2
-
"
OPTION
Find Services
Enter known Service Name
Enter an Option ID value:
1
#
Servers found:: 2
Service Name Format:
Service Name
Server Name
Ethernet ID
#1
NSS_SYSDISK
ESS_08002B15FCE1
08-00-2B-15-FC-E1
$
#2
6000_DIAG_F
ESS_08002B15FCE1
08-00-2B-15-FC-E1
Enter a service number or <CR> for more: 2
[Diagnostic Supervisor Banner prints]
DS>
2–42 VAX 6000 Model 600 Service Manual
%
!
!
Boot VAX/DS from the diagnostic media (part number AG-PDWWxRE, where x is the revision letter). This example shows a boot from
an Ethernet-based compact disk (CD) server connected by a DEMNA
(indicated by EX0) located at XMI node A. The /FILENAME qualifier
identifies the Initial System Load (ISL) program needed for booting
from CD servers. The general form for the file name is ISL_LVAX_x,
where x is the revision letter noted on the diagnostic CD.
For a CD server connected to a DEBNI or DEBNA, an example is:
"
#
$
%
>>> BOOT /XMI:A /FILENAME:ISL_LVAX_F /BI:6/R5:10 ET0
The system prompts, Enter a function ID value:. Enter 3 to choose
service.
The system displays the service options menu and a prompt. Enter 1
see a listing of identification information for each of the CDs on the
Ethernet CD server. In this example, two CDs were found.
The diagnostic disk name is 6000_DIAG_F, where F is the revision letter
for the CD. (If many CDs were available on the server, and you did not
see the right name among those first listed, you could type a carriage
return <CR> to continue the listing of CDs available.)
At the prompt, enter the number of the service with the Diagnostic
Supervisor CD. If more than one service name of the form 6000_DIAG_*
is given, choose the one where the revision letter is the highest. This
will be the most recent version of the diagnostic media.
Diagnostics
2–43
2.8.2 Running VAX/DS in User Mode
You can use VAX/DS in one of two modes: standalone mode
(exclusive use of the system) or user mode (under VMS).
Example 2–17: Running VAX/DS in User Mode
$
! At the operating system prompt, run
$ RUN EXSAA
! the VAX/DS program.
[VAX/DS banner prints, as in example above]
DS>
! VAX/DS prompt appears.
! Run VAX/DS level 2R or 2 programs.
DS> EXIT
! Type EXIT to exit VAX/DS
$
! Operating system prompt returns.
2–44 VAX 6000 Model 600 Service Manual
Table 2–18 describes the levels of VAX/DS programs. Check Table 2–20 for
the programs you wish to run, and determine if you will run VAX/DS in
standalone or user mode.
In both standalone and user mode, VAX/DS functions the same way.
Typically a program running in user mode provides less detailed results
than one running in standalone mode. For more information on VAX/DS,
see the documents listed in Table 2–19.
Diagnostics
2–45
2.8.3 Sample VAX/DS Standalone Session
When you run the VAX/DS programs in standalone mode, run
the system autosizer program EVSBA first. This program,
which takes several minutes to execute, will save you time
as you proceed with other tests. Certain conditions cause
the generation of an unexpected trap or interrupt. Use the
method shown to avoid these conditions.
Example 2–18: Sample VAX/DS Session, Part 1 of 2
>>> SET BOOT DIAG /XMI:9/R5:10 DU1
>>> BOOT DIAG
!
[self-test results print]
Loading system software
*
*
*
*
*
Initializing adapter
Specified adapter initialized successfully
Connecting to boot disk
Reading bootblock from disk
Passing control to transfer address
Copyright Digital Equipment Corporation
1989, 1990.
All Rights Reserved.
"
DIAGNOSTIC SUPERVISOR. ZZ-EXSAA-V14.7-142
DS> LOAD EVSBA
DS> DEATTACH/ADAPTER=HUB ALL
DS> START
[banner prints]
.. Program: EVSBA - AUTOSIZER
at 11:43:33.20.
14-NOV-1991 11:39:12
level 3, revision 7.0, 3 tests,
.. End of run, 0 errors detected, pass count is 1,
time is 14-NOV-1991 11:44:59.66
2–46 VAX 6000 Model 600 Service Manual
!
"
The SET BOOT command stores a nickname for a set of parameters to
the BOOT command. (The lower key switch on the control panel must
be set to Update when this command is issued.) This BOOT command
loads VAX/DS from disk. For more information on the BOOT and SET
BOOT commands, see the VAX 6000 Series Owner’s Manual.
The off-line autosizer program EVSBA identifies hardware on your
system and builds a database for the VAX Diagnostic Supervisor.
The autosizer eliminates the need for you to type in the name and
characteristics of the hardware you intend to test under VAX/DS with
level 3 diagnostic programs.
Diagnostics
2–47
Example 2–19: Sample VAX/DS Session, Part 2 of 2
#
DS> SHO DEV
_DUA
KDM70
HUB
61C80000
Bus Request Level (4 - 7) =5.
_DUA1
RA70
_DUA
72000000
_KA0
KA66A
HUB
61980000
_DUA2
RA70
_DUA
72000000
_EXA0
DEMNA
HUB
61D80000
_PAA0
CIXCD
HUB
61E00000
CI Node Number (0 to 224) =1.
_DWMBA0 DWMBA
HUB
61E80000
BI Node Number (HEX)=00000002(X)
_TXA
DHB32
_DWMBA0 7A006000
_SLA
DSB32
_DWMBA0 7A01E000
_DWMBB0 DWMBB
HUB
61F00000
BI Node Number (HEX)=00000001(X)
_BLA0
DWBLA
_DWMBB0 7C004000
_MUB0
TU81
_BLA0
7C4BF940
_TXB
DMB32
_DWMBB0 7C006000
_DUB
KDB50
_DWMBB0 7C008000
_DUB0
RA70
_DUB
7C500000
_MUC
TBK70
_DWMBB0 7C00C000
_MUC6
TK70
_MUC
7C580000
_ETD
DEBNA
_DWMBB0 7C018000
_ETD0
LANCE
_ETD
7C700000
DS> SELECT ALL
DS> SET TRACE
DS> RUN EVKAQ
XMI Node Number (1 to E) =00000009(X)
XMI Node Number (1 to E) =00000003(X)
XMI Node Number (1 to E) =0000000B(X)
XMI Node Number (1 to E) =0000000C(X)
XMI Node Number (1 to E) =0000000D(X)
BI Node Number (HEX) =00000003(X)
BI Node Number (HEX) =0000000F(X)
XMI Node Number (1 to E) =0000000E(X)
BI Node Number (HEX)=00000002(X)
CSR=774500(O) VECTOR=000260(O) BR=5.
BI Node Number (HEX) =00000003(X)
BI Node Number (HEX)=00000004(X)
BI Node Number (HEX)=00000006(X)
BI Node Number (HEX)=0000000C(X)
$
[banner prints]
.. Program: ZZ-EVKAQ, VAX Basic Instructions Exerciser, revision 3.5, 92
tests, at 11:46:11.90.
Testing: _KA0
Test 1: BRB Instruction Test
Test 2: BRW Instruction Test
Test 3: BBC Instruction Test
.
.
.
Test 90: XORL2 Instruction Test
Test 91: XORL3 Instruction Test
Test 92: ROTL Instruction Test
.. End of run, 0 errors detected, pass count is 1,
time is 14-NOV-1991 11:46:09.88
DS>
2–48 VAX 6000 Model 600 Service Manual
#
$
You can use the autosizer to print a list of system hardware by running
the program EVSBA under VAX/DS and typing the VAX/DS command
SHOW DEVICE. The command lists system devices, similar to the
SHOW CONFIGURATION command in console mode.
#
SELECT ALL selects all devices listed in . SET TRACE enables
printing of test numbers and names when the diagnostic runs.
Diagnostics
2–49
2.8.4 VAX/DS Diagnostics
Table 2–20 lists the VAX Diagnostic Supervisor tests
currently available for the VAX 6000 Model 600 system.
Table 2–20: VAX Diagnostic Supervisor Programs
Diagnostic
Level
EXSAA1
Diagnostic Title
VAX 6000 Model 600 Diagnostic Supervisor
EVSBA
3
VAX Standalone Autosizer
EVUCA
3
VAX 6000 EEPROM Utility
KA66A-Specific Diagnostic
EXKAX1
3
Manual Tests
VAX CPU Cluster Exerciser
EVKAQ
2
VAX Basic Instructions Exerciser, Part 1
EVKAR
2
VAX Basic Instructions Exerciser, Part 2
EVKAS
2
VAX Floating-Point Instruction Exerciser, Part 1
EVKAT
2
VAX Floating-Point Instruction Exerciser, Part 2
EVKAU
3
VAX Privileged Architecture Instruction Test, Part 1
EVKAV
3
VAX Privileged Architecture Instruction Test, Part 2
CIBCA-BA Diagnostics
EVGEE
3
CIBCA-B Repair Level Diagnostic, Part 1
EVGEF
3
CIBCA-B Repair Level Diagnostic, Part 2
EVGEG
3
CIBCA-B Repair Level Diagnostic, Part 3
EVGAA
3
CI Functional Diagnostic, Part 1
EVGAB
3
CI Functional Diagnostic, Part 2
1 Diagnostic
software with file names beginning with EX are tests created specifically for the VAX 6000 Model 600 system. This software is not transportable.
2–50 VAX 6000 Model 600 Service Manual
Table 2–20 (Cont.): VAX Diagnostic Supervisor Programs
Diagnostic
Level
Diagnostic Title
CIBCA-BA Diagnostics
EVGAC
3
Standalone CI Exerciser
EVGDA
3
CIBCA EEPROM Update Utility
CIE100
1
VAX CI Exerciser
CIXCD Diagnostics
EVGAA
3
CI Functional Test, Part 1
EVGAB
3
CI Functional Test, Part 2
EVGAC
3
Standalone CI Exerciser
CIE100
1
VAX CI Exerciser
EVGEA
3
XCD Repair Level Diagnostic
EVGEB
3
XCD Firmware Loader Program
DEC LANcontroller 200 Diagnostics
EVDYD
2R
DEBNI Online Functional Diagnostic
EVDWC
2R
VAX NI Exerciser
DEC LANcontroller 400 Diagnostics
EVDYE
2R
DEMNA NI Functional Diagnostic
EVGDB
2
DEMNA EEPROM Update Utility
EVDWC
2R
VAX NI Exerciser
DHB32 Diagnostics
EVDAR
3
DHB32 Diagnostic
EVDAS
2R
DMB32/DHB32 Asynchronous Diagnostic
DMB32 Diagnostics
Diagnostics
2–51
Table 2–20 (Cont.): VAX Diagnostic Supervisor Programs
Diagnostic
Level
Diagnostic Title
DMB32 Diagnostics
EVDAJ
2R
DMB32 Online Asynchronous Port Test
EVDAK
3
DMB32 Standalone Functional Verification
EVDAL
2R
DMB32 Online Synchronous Port Test
EVDAN
2R
DMB32 Online Data Communications Link
DRB32 Diagnostics
EVDRH
3
DRB32-M, -E Functional Diagnostic
EVDRI
3
DRB32-W Functional Diagnostic
DSB32 Diagnostics
EVDAP
3
DSB32 Level 3 Diagnostic
EVDAQ
2R
DSB32 Level 2R Diagnostic
DWMVA Diagnostics
EVCLA
3
VAX DWMVA Level 3 Diagnostic
EVCLC
3
DWMVA Radstone Diagnostic
KDB50 Diagnostics
EVRLF
3
UDA50/KDB50 Basic Subsystem Diagnostic
EVRLG
3
UDA50/KDB50 Disk Drive Exerciser
EVRLB
3
UDA/KDB50 Basic Disk Formatter
EVRLJ
3
VAX UDA50-A/KDB50/KDM70 Exerciser
EVRLK
3
VAX Bad Block Replace Utility
EVRLL
3
VAX Disk Resident Error Log Utility
EVRAE
2R
Generic MSCP Disk Exerciser
2–52 VAX 6000 Model 600 Service Manual
Table 2–20 (Cont.): VAX Diagnostic Supervisor Programs
Diagnostic
Level
Diagnostic Title
KDM70 Diagnostics
EVRAE
2R
Generic MSCP Disk Exerciser
EVRLJ
3
VAX UDA50/KDB50/KDM70 Exerciser
EVRLN
3
DUP Control Program
KFMSA Diagnostics
EVRAE
2R
Generic MSCP Disk Exerciser
EVMDA
2R
VAX Generic Tape Exerciser
EVCXD
3
DSSI Repair Level Diagnostic
EVCXE
3
Customer DSSI Configuration and DUP Utility
EVCXF
3
DSSI Configuration and DUP Diagnostic
EVUCM
3
KFMSA Code Update Utility
KLESI-B/TU81 Diagnostics
EVMBA
2R
VAX TU81 Data Reliability
EVMBB
3
VAX Front-End/Host Functional Diagnostic
MS65A Online Memory Diagnostic
EVKAM
2R
VAX Memory User Mode Test
RV20 Diagnostics
EVRVA
3
RV20 Level 3 Functional Diagnostic
EVRVB
2R
RV20 Level 2R Diagnostic
EVRVC
2R
RV60/20 Level 2R DUP Diagnostic
EVRVG
3
VAX RV64 Level 3 Diagnostic
TBK Diagnostic
EVMDA
2R
VAX TK50/TK70/TF83/TF85 Exerciser
Diagnostics
2–53
Table 2–20 (Cont.): VAX Diagnostic Supervisor Programs
Diagnostic
Level
Diagnostic Title
TM32 Diagnostics
EVMEA
2R
TM32 L2R Reliability Diagnostic
EMMEB
3
TM32 L3 Functional Diagnostic Part 1
EMMEC
3
TM32 L3 Functional Diagnostic Part 2
2–54 VAX 6000 Model 600 Service Manual
Chapter 3
KA66A Processor
This chapter contains the following sections:
•
KA66A Physical Description and Specifications
•
KA66A Configuration Rules
•
KA66A Functional Description
•
Overview of the NVAX CPU Chip
•
Automatic Boot Processor Selection
•
Power-Up Sequence
•
ROM-Based Diagnostics
•
VAX/DS Diagnostics
•
Console Commands
•
Replacing Defective Processors or Adding New Ones
How to Replace the Only Processor
How to Replace or Add Processors in a Multiprocessor System
Using EVUCA to Apply Current ROM and PCS patches
•
KA66A Registers
KA66A Processor 3–1
3.1 KA66A Physical Description and Specifications
The KA66A is a single-module VAX processor. The module
designation is T2054. VAX 6000 Model 600 systems include
up to six KA66A processors, which use the 100 Mbyte/second
XMI system bus to communicate with memory. Figure 3–1
shows the KA66A module.
Figure 3–1: KA66A Module
NEXMI
OSCILLATOR
XMI
CORNER
HEAT
SINK
LEDs
ZIF
CONNECTOR
SEGMENTS
YELLOW
SELF-TEST
LED
BACKUP
CACHE
TAG RAMs
(on other side)
UART
NVAX
CPU CHIP
(Underneath
Heat Sink)
WATCH
CHIP
BACKUP CACHE
DATA RAMs
EEPROM
3–2 VAX 6000 Model 600 Service Manual
DIAG2
ROM
CONSOLE
ROM
DIAG1
ROM
msb-0767-92
Table 3–1: KA66A Specifications
Parameter
Description
Module Number:
T2054
Dimensions:
23.3 cm (9.2") H x 28.0 cm (11.0") D x 0.23 cm (0.093") W
Temperature:
Storage Range
-40o C to 70o C (-40o F to 151o F)
Operating Range
15o C to 32o C (59o F to 90o F)
Relative Humidity:
Storage
10% to 95% noncondensing
Operating
10% to 95% noncondensing
Altitude:
Storage
Up to 9 km (30,000 ft)
Operating
Up to 2.4 km (8000 ft)
Current:
8.3A at +5.0V
6.7A at +3.3V
Power:
63.4W
Diagnostics:
ROM-based diagnostics 0, 1, 4, and 5
VAX/DS diagnostics, see Section 3.8
KA66A Processor 3–3
3.2 KA66A Configuration Rules
KA66A modules will operate in any slot of the XMI card cage;
however, processors usually go on the right, beginning with
slot 1.
Figure 3–2: Typical KA66A Configuration
XMI CARD CAGE
E
D C B A 9
8
7 6 5 4 3
2
1
PROCESSOR
SLOTS
msb-0054-88
3–4 VAX 6000 Model 600 Service Manual
KA66A modules are generally installed right to left, beginning with the
first available slot on the right. If the system is an H9657-CX upgrade, the
T2019 module must be in slot 2, and slot 1 must be empty. Thus, KA66A
modules would begin in slot 3 and proceed to the left.
KA66A Processor 3–5
3.3 KA66A Functional Description
The KA66A processor has three functional sections (see
Figure 3–3): the CPU section, the backup cache, and the
NEXMI chip and its associated XMI interface and system
support sections.
Figure 3–3: KA66A Block Diagram
XMI BUS
NVAX CPU
CHIP
12 ns Cycle Time
2KB VI Cache
8KB P-Cache
NDAL
NEXMI
CHIP
XMI SS
INTERFACE
XMI
CORNER
XCI
7 XLATCH
1 XCLOCK
Std Cells
2-Mbyte
BACKUP
CACHE
ROM BUS
256K x 72
ADRS
ROM
384K X 8
EEPROM
32K X 8
RAM
8K X 8
IPORT
OPORT
UART
TOY
CLOCK
msb-0772A-92
3–6 VAX 6000 Model 600 Service Manual
The KA66A processor module consists of three major sections:
•
NVAX central processing unit (CPU) chip
•
Backup cache
•
NVAX-to-XMI (NEXMI) chip and its associated XMI interface and
system support sections
NVAX Central Processing Unit (CPU)
The NVAX CPU chip is a VAX CPU which implements the 242-instruction
VAX base instruction group and associated data types, full VAX memory
management, and a 4-Gbyte virtual address space, which, when 32bit addressing is enabled and handled by the software, translates to a
maximum of 3.5 Gbytes of physical memory and .5 Gbyte of I/O space.
Otherwise, 30-bit addressing is used, translating to .5 Gbyte of physical
memory.
High-speed execution in the NVAX results from its implementation
of micropipelining and macropipelining, the means by which a VAX
instruction can be split into separate subtasks that can be executed in
parallel with succeeding instructions’ subtasks. The processor chip, and
how it implements micropipelining and macropipelining in separate logic
boxes, is described in more detail in Section 3.4. On-chip caches, which
also improve execution speed by reducing memory access time, are also
discussed in that section.
Backup (Secondary) Cache
The backup cache (sometimes called secondary cache) is a 2-Mbyte
writeback cache, which holds data being passed between primary cache
(on the CPU chip itself) and memory.
Unlike a writethrough cache, where data is always written through to
its ultimate destination, memory, data is only written from the KA66A
writeback backup cache to memory when it is needed (when the memory
location is read by another node on the XMI) or when the block is displaced
from the cache (when the cache space is needed for more recent data
transfers).
NVAX-to-XMI (NEXMI) Interface
The NVAX-to-XMI (NEXMI) interface chip controls the transfer of data
between the CPU and the XMI bus. Data transfer between the NVAX CPU
chip and the NEXMI chip is made over an internal data bus called the
NDAL. The NEXMI also interfaces to a system support section, described
on the next page.
KA66A Processor 3–7
Example 3–1: Sample Self-Test and Power-Up Test Display
#123456789 0123456789 0123456789 0123456789 012345#
F
.
E
A
o
.
.
.
D
.
.
.
.
.
C
A
+
.
.
.
B
A
+
.
.
.
A
A
+
.
.
.
9
M
+
.
.
.
8
M
+
.
.
.
7
M
+
.
.
.
6
M
+
.
.
.
5
.
.
.
.
.
4
P
+
E
+
E
3
P
+
E
+
E
2
P
+
E
+
E
1
P
+
B
+
B
0
.
+
.
.
+
+
.
.
+
+
.
.
.
.
+
.
.
.
.
.
.
.
.
.
.
A4
64
A3
64
A2
64
A1
64
.
.
.
.
.
.
.
.
.
.
Console = V2.00 RBDs = V1.00 EEPROM = 1.00/2.01
!
"
NODE #
TYP
STF
BPD
ETF
BPD
XBI E +
ILV
256 Mb
SN = GA140123456
The KA66A CPU module contains the following system support features:
•
ROM. Three 128-Kbyte read-only memories (ROMs) contain the
onboard firmware for the KA66A. This code provides the fundamental
user interface when the system is not running under control of an
operating system. It provides basic functions such as booting and
diagnostic aids that can be requested from the console terminal.
Two of the ROMs, called the diagnostic ROMs, contain the ROMbased diagnostics and the Diagnostic Monitor program described in
Chapter 2 and Appendix A. The other ROM, called the console ROM,
contains the console program, which handles initializing, executing
console commands, and bootstrapping the system.
Major revisions to ROMs are handled by physically replacing the ROM
units on the module. Example 3–1 shows a power-up test display in
which the console ROM has been replaced (see , showing Console =
V2.0).
!
•
EEPROM. One 32-Kbyte electrically erasable programmable ROM
(EEPROM) is provided to hold information that can change, including
parameters for the console, such as the system serial number, bootstrap
information, and loadable bootstrap primitives.
In addition, EEPROM is designed to hold changes (patches) for the
diagnostic and console ROMs and PCS. When changes are needed to
any of these components, a console patch image will be distributed on
console storage device media containing the most recent revision of all
3–8 VAX 6000 Model 600 Service Manual
three components. The EVUCA program (see Section 3.10.3) is used to
update the EEPROM.
"
Callout
shows two EEPROM version numbers separated by a slash
(/). The first is the format version of the EEPROM. This version is
changed only when the internal structure of the EEPROM is modified.
The second number is the revision of ROM patches that have been
applied to the EEPROM. The major number in this revision (before the
decimal point) corresponds to the major number of the ROM revision .
The minor number indicates the actual patch revision. In this example,
the EEPROM has been patched to V2.01.
!
•
RAM. The KA66A contains 8 Kbytes of random-access memory (RAM),
used for local storage and stack by the console and diagnostics code and
VMS error handling.
•
Iport/Oport. These are registers used to control the KA66A LEDs, to
pass information to the user when the console terminal is not available
for output.
•
UART. The Universal Asynchronous Receiver Transmitter (UART) is a
separate chip that runs the console terminal.
•
TOY Clock. The Time-of-Year (TOY) clock consists of a ‘‘watch’’
chip that enables the NVAX CPU chip to keep time through a power
outage or system shutdown that lasts up to 100 hours. Then, in
normal operation, software reads the watch chip during the bootstrap
operation.
KA66A Processor 3–9
3.4 Overview of the NVAX CPU Chip
The NVAX CPU chip has five logic boxes that implement
macropiplining of the VAX instruction set and instruction
and data transfer between caches on the chip and backup
cache over the internal NDAL bus. Figure 3–4 shows the
interaction between some of these elements.
Figure 3–4: NVAX Mbox, Cbox, and Primary and Backup Cache
P-CACHE
MBOX
NVAX CHIP
CBOX
BACKUP CACHE
NDAL
TAG RAMs
DATA RAMs
NEXMI
XMI BUS
msb-0760-92
3–10 VAX 6000 Model 600 Service Manual
The NVAX is a macropipelined design. That is, VAX macroinstructions
are decoded into segments such as operand fetch, execute, and result
store. These segments can then be executed in parallel with succeeding
macroinstruction segments. Separate logic units, or boxes, handle this
macropipelining.
Where possible, micropipelining is implemented within the individual
boxes. For example, the Mbox (see below) performs address translation
and cache lookup in two cycles that are pipelined for greater efficiency.
The NVAX instruction boxes are listed and described briefly below.
Figure 3–4 illustrates the interaction between the Mbox, Cbox, primary
and backup cache, and memory.
•
The Ibox, or instruction box, decodes VAX instructions and parses
operand specifiers, prefetching instruction stream data for the Ebox
into a prefetch queue using a 2-Kbyte dedicated instruction-stream only
cache called the virtual instruction cache (VIC). If the Ibox cannot find
the instruction in the VIC, it sends a request to the Mbox. Data stream
requests are sent directly to the Mbox.
•
The Ebox, or execution box, and the Microsequencer do the
actual work involved in executing an instruction (an add operation,
for instance). They dequeue instruction and operand information
provided by the Ibox. The microsequencer handles fetches of the
microinstructions constituting a VAX macroinstruction for execution by
the Ebox.
•
The Fbox, or floating-point box, implements a four-stage micropipelined
execution unit for the floating-point and longword-length integer multiply instructions. Operands are supplied from and returned to the Ebox.
•
The Mbox, or memory box, arbitrates read requests from the Ibox (both
instructions and data) and read and write requests from the Ebox (data
only), queueing those that cannot be filled. The Mbox houses an 8Kbyte, write-through primary cache, or P-cache, holding instructions
and data transferred from the backup cache (see Figure 3–4). Being
on the chip, P-cache provides even faster access for the Ibox and Ebox.
The Mbox also uses a 96-entry translation buffer to remember—and
reuse—recent virtual-to-physical address translations.
•
The Cbox, or cache control box, controls data flow between the backup
cache and memory, providing the interface to the NDAL, the internal
bus connecting the NVAX chip to the NEXMI chip, where data requests
for the XMI are handled.
The NVAX also includes a special maintenance feature: a storage area to
allow patches to the chip itself. This area is called the patchable control
store, or PCS.
KA66A Processor 3–11
3.5 Automatic Boot Processor Selection
In the VAX 6000 Model 600 system all KA66A processors
share system resources equally. The processor controlling
the console at any given time is designated as the primary or
boot processor. The others are called secondary processors.
The system selects the boot processor automatically during
the power-up sequence.
Figure 3–5: Selection of Boot Processor
CPU WITH
LOWEST
XMI NODE ID
N
ELIGIBLE
CPU WITH NEXT
LOWEST
XMI NODE ID
Y
PASSED
BOTH POWER-UP
TESTS
N
Y
BOOT PROCESSOR
msb-0051-90
3–12 VAX 6000 Model 600 Service Manual
Using boot code stored in its ROM or EEPROM, the boot processor reads the
boot block from a specified device. Booting may be triggered by a command
issued to the boot processor from the console, or by a system reset with the
bottom key switch in the Auto Start position.
The boot processor also communicates with the system console terminal,
using the common console lines on the backplane. When you change system
parameters in the EEPROM using SET commands, the boot processor
automatically copies some of the new values to the EEPROMs on the
secondary processors. (It does not copy those parameters set with ‘‘hidden’’
commands, preceded by ESC DEL .) If you swap in a new KA66A module,
it should be configured as a secondary processor. Then you can use the
UPDATE command to copy the boot processor’s EEPROM1 to the new
secondary. See the VAX 6000 Series Owner’s Manual for a description of
the UPDATE command.
Usually the processor with the lowest XMI node number (which is also
the lowest slot number) is selected as the boot processor. However, if this
processor does not pass all its power-up tests, the next higher-numbered
processor is selected. This is one way the boot processor can change.
The user can also use the SET CPU command to select a boot processor
explicitly. SET CPU can also declare a processor ineligible for selection as
boot processor. See the VAX 6000 Series Owner’s Manual for a description
of the SET CPU command.
You can see the boot processor selection three ways:
•
In the self-test and power-up display, the boot processor is indicated by
a B on the second line labeled BPD.
•
In console mode, the command SHOW CPU displays the boot processor
as "Current primary."
•
The bottom red LED is off on the boot processor module. It is lit on
secondary processors.
1
UPDATE does not copy information specific to a particular EEPROM, such as its repair
history, diagnostic errors, and so forth.
KA66A Processor 3–13
3.6 Power-Up Sequence
During power-up for KA66A processors, all processors
execute two phases of testing, and a boot processor is
selected. The boot processor tests the DWMBB or DWMVA/A
adapter and prints the power-up test display.
Figure 3–6: KA66A Power-Up Sequence, Part 1 of 2
Power-up or system reset (cold)
1
2
CPU 1
Self-Test
Determine
Boot Processor
CPU 2
Self-Test
...
Determine
Boot Processor
CPU n
Self-Test
...
Determine
Boot Processor
Boot Processor prints
self-test results
3
Boot Processor signals
all CPUs to start CPU/MEM tests
4
5
CPU 1
CPU/MEM and
MP tests
CPU 2
CPU/MEM and
MP tests
...
CPU n
CPU/MEM and
MP tests
Determine
Boot Processor
Determine
Boot Processor
...
Determine
Boot Processor
A
NOTE: The second determination of the boot processor
occurs even if the original boot processor passes all
memory and multiprocessor tests.
3–14 VAX 6000 Model 600 Service Manual
msb-0047A-90
!
"
#
$
%
All CPUs execute their on-board self-tests at the beginning of the powerup tests. On line STF of the power-up test display, a plus sign (+) is
shown for every module whose self-test passes (see Section 2.3).
The boot processor is determined as described in Section 3.5. On the
first BPD line, the letter B corresponds to the processor selected as
boot processor. Because the processors have not yet completed their
power-up tests, the designated processor may later be disqualified from
being boot processor. For this reason, line BPD appears twice in the
power-up test display.
The boot processor prints the results of self-test, lines NODE, TYP,
STF, and BPD on the power-up test display. The boot processor then
signals all CPUs to start running the extended test.
All CPUs execute an extended test using the memories. On line ETF
of the power-up test display, a plus sign (+) is shown for every module
that passes extended test.
If all CPUs pass the extended test, the original boot processor selection
is still valid. Lines STF and ETF would be identical for all the
processors.
The yellow LED and the top two red LEDs are lit on all processor
modules that pass both power-up tests. On the secondary processors,
the bottom red LED is also lit. On the boot processor, this red LED is
off (see Figure 2–4).
If the original boot processor fails the extended test (indicated by a
minus sign (–) on line ETF), a new boot processor is selected. On
the second BPD line, the letter B corresponds to the processor finally
selected as boot processor.
KA66A Processor 3–15
Figure 3–7: KA66A Power-Up Sequence, Part 2 of 2
A
6
Boot Processor prints
CPU/MEM and MP
test results
7
Boot Processor
executes DWMBB and DWMVA tests
Boot Processor prints
DWMBB and DWMVA test results
Boot processor configures
memory and prints configuration
Boot Processor halts in console
mode or boots operating system
If Boot Processor is booting
operating system, starts all attached
CPUs after boot processor has booted
CPU 1
running
CPU 2
running
...
CPU n
running
msb-0048D-91
3–16 VAX 6000 Model 600 Service Manual
&
The boot processor prints line ETF and the second BPD line of the
power-up test display. If none of the processors is successfully selected
as the boot processor, no power-up test results are displayed and the
console hangs for a minute. You can identify this hung state by
examining the LEDs on the processor modules (see Section 2.4.1). All
yellow LEDs will be OFF. The eight red LEDS indicate the failing test
number in binary-coded decimal. After a minute has passed, you can
force selection of a boot processor by typing
>>n
'
where n is the XMI node number of the processor to be selected. You
will then get the console prompt (>>>) from that processor.
The boot processor tests the DWMBB or DWMVA/A and queries VAXBI
modules for their self-test results.
For VAXBI, test results are indicated on the lines labeled XBI on the
power-up test display. A plus sign (+) at the extreme right means that
the DWMBB/A adapter test passed; a minus sign (–) means that the
DWMBB/A adapter test failed. Self-test results for VAXBI modules are
shown as plus or minus signs on the rest of the XBI line. In this case,
the node numbers under which the plus or minus signs appear refer to
the VAXBI, rather than the XMI.
For the VMEbus, DWMVA/A test results are displayed by a plus or
minus sign at the extreme right of the VME line.
KA66A Processor 3–17
3.7 ROM-Based Diagnostics
The ROM-based diagnostics that test the KA66A processors
are listed in Table 3–2.
See Sections 2.6 and 2.7 for
instructions on running RBDs.
Table 3–2: KA66A ROM-Based Diagnostics
Diagnostic
Description
0
CPU self-test
1
CPU/memory interaction test
4
Cache coherency test
5
Multiprocessor interaction test
3–18 VAX 6000 Model 600 Service Manual
The KA66A diagnostic ROM contains six diagnostics, four of which test
the KA66A. (The other two test the DWMBB I/O adapter and MS65A
memory.) You can run these diagnostics using the boot processor’s RBD
monitor program, as described in Section 2.6 and Appendix A. Descriptions
of these diagnostics are in Section 2.7.
KA66A Processor 3–19
3.8 VAX/DS Diagnostics
The KA66A software diagnostics that run under the VAX
Diagnostic Supervisor (VAX/DS) are listed in Table 3–3. An
example follows. See Section 2.8 for instructions on running
the supervisor.
Table 3–3: KA66A VAX/DS Diagnostics
Program
Description
EVSBA
VAX Standalone Autosizer
EVKAQ
VAX Basic Instructions Exerciser, Part 1
EVKAR
VAX Basic Instructions Exerciser, Part 2
EVKAS
VAX Floating Point Instruction Exerciser, Part 1
EVKAT
VAX Floating Point Instruction Exerciser, Part 2
EVKAU
VAX Privileged Architecture Instruction Test, Part 1
EVKAV
VAX Privileged Architecture Instruction Test, Part 2
EVUCA
VAX 6000 EEPROM Update Utility
EXKAX
Manual Tests
Example 3–2: VAX/DS Commands for Running Standalone Processor
Diagnostics
!
DS> RUN EVSBA
"
DS> SEL KA0
#
DS> RUN EXKAX
$
DS> EXIT
3–20 VAX 6000 Model 600 Service Manual
The callouts in Example 3–2 are explained below:
!
"
#
$
Run the standalone autosizer; then you do not need to attach devices
to the supervisor explicitly. However, if you want to know how to use
the ATTACH command for a specific diagnostic, enter:
DS> HELP diagnostic_name ATTACH
The instruction and manual tests run on the boot processor. If the
boot processor is the CPU with the lowest XMI node number (which
is usually the case), issue the command to select KA0. The Diagnostic
Supervisor numbers the processors consecutively. For example, if the
KA66A module with the second-lowest XMI node number were boot
processor, you would select KA1.
This example runs the manual tests (EXKAX), which include powerfail,
machine check, restart, and EEPROM functions. The diagnostic prints
messages, and you must manually intervene using console switches.
Exit from VAX/DS.
KA66A Processor 3–21
3.9 Console Commands
Table 3–4 summarizes the console commands. The VAX
6000 Series Owner’s Manual gives a full description of these
commands, their qualifiers, and examples.
Table 3–4: Console Commands
Command
Function
BOOT
Initializes the system, causing power-up tests to run, and begins the boot program.
CLEAR EXCEPTION
Cleans up error state in XBER, XBEER, and CEFSTS registers.
CONTINUE
Begins processing at the address where processing was interrupted by a CTRL/P console command.
DEPOSIT
Stores data in a specified address.
EXAMINE
Displays the contents of a specified address.
FIND
Searches main memory for a page-aligned 256-Kbyte block of
good memory or for a restart parameter block.
HALT
Null command; no action is taken since the processor has already halted in order to enter console mode.
HELP
Prints explanation of console commands.
INITIALIZE
Performs a system reset, including power-up tests.
REPEAT
Executes the command passed as its argument.
RESTORE EEPROM
Copies the TK tape’s EEPROM contents to the EEPROM of
the processor executing the command. (Valid only for systems that have a TK tape.)
SAVE EEPROM
Copies to the TK tape the contents of the EEPROM of the processor executing the command.
(Valid only for systems that have a TK tape.)
SET BOOT
Stores a boot command by a nickname.
SET CPU
Specifies eligibility of processors to become the boot processor.
SET LANGUAGE
Changes the output of the console error messages between numeric code only (international mode) and code plus explanation (English mode).
3–22 VAX 6000 Model 600 Service Manual
Table 3–4 (Cont.): Console Commands
Command
Function
SET MEMORY
Designates the method of interleaving the memory modules; supersedes the console program’s default interleaving.
SET TERMINAL
Sets console terminal characteristics.
SHOW ALL
Displays the current value of parameters set.
SHOW BOOT
Displays all boot commands and nicknames that have been
saved using SET BOOT.
SHOW CONFIGURATION
Displays the hardware device type and revision level for
each XMI and VAXBI node and indicates self-test status.
SHOW CPU
Identifies the primary processor and the status of other processors.
SHOW ETHERNET
Locates all Ethernet adapters on the system and displays their addresses.
SHOW FIELD
Displays saved boot commands, console terminal parameters, console language mode, memory configuration, type of
power system, and system serial number.
SHOW LANGUAGE
Displays the mode currently set for console error messages, international or English.
SHOW MEMORY
Displays the memory lines from the system self-test and powerup test display, showing interleave and memory size.
SHOW TERMINAL
Displays the baud rate and terminal characteristics functioning on the console terminal.
START
Begins execution of an instruction at the address specified in the command string.
STOP
Halts the specified node.
TEST
Passes control to the power-up test diagnostics; /RBD qualifier invokes ROM-based diagnostics.
UPDATE
Copies contents of the EEPROM on the processor executing the command to the EEPROM of another processor. This command will not work if the console ROMs are not
all of the same revision level.
Z
Logically connects the console terminal to another processor on the XMI bus or to a VAXBI node.
!
Introduces a comment.
KA66A Processor 3–23
3.10 Replacing Defective Processors or Adding
New Ones
Replacing or adding processsors requires that system
parameters be set on the new processors, and recent patches
be installed.
Example 3–3: Relevant System Parameters from a SHOW FIELD Display
>>> SHOW FIELD
Saved boot specifications:
DEFAULT /XMI: E /BI: 4 DU0
DIAG /XMI: E /BI: 4 /R5:10 DU0
!
"
Console error message language mode:
#
English
Console terminal parameters:
/SCOPE
/SPEED: 9600 /BREAK
Memory configuration:
F
E
D
C
B
A
.
.
.
.
.
.
.
.
.
.
/INTERLEAVE:DEFAULT
9
A2
64
8
A1
64
7
.
.
Power system: C
$
System serial number:
SG01234567
6
.
.
5
.
.
4
.
.
3
.
.
2
.
.
1
.
.
0
NODE #
ILV
128 Mb
%
When you add a new processor or replace a defective processor in a system,
you must set certain system parameters in the new processor’s EEPROM.
The steps for accomplishing this vary slightly according to whether you are
replacing the only processor in the system, the boot processor, a secondary
processor, or adding a new processor.
Also, in multiprocessor systems, once you have used SET commands
to update console parameters on one processor, you can then choose to
repeat the SET commands for other processors, or you can use UPDATE.
SET will always work, but you must issue a separate SET command for
each parameter, and for each parameter on each new or added processor.
UPDATE will copy all the parameters (indeed all the EEPROM, except for
information specific to a particular EEPROM, such as its repair history
3–24 VAX 6000 Model 600 Service Manual
and diagnostic errors) for an existing processor to a new one. UPDATE
will not work, however, if the ROM revision levels are different on the boot
processor and the new processor.
Major new capabilities or fixes are included in revisions to the ROM code,
so ideally all processors should have the latest (highest-numbered) ROM
revisions. However, the console code does not inhibit running processors
with different ROM revisions.
If you decide to bring the system up with processors with different ROM
revisions, you will then have to use individual SET commands to set
the system serial number and other parameters on each newly installed
processor.
The relevant parameters that need to be set on newly installed processors
should be available from a previously stored printout of a SHOW FIELD
command for the old system, saved in the Site Management Guide. A
SHOW FIELD output is shown in Example 3–3. Specifically, you will need
to set the following parameters:
!
"
#
$
%
Boot specifications. To make the new processor consistent with the
system, these specifications should be defined as shown in the SHOW
FIELD.
Console terminal speed. If other than the default of 1200 baud, this
is another parameter that must be set to be consistent across processors
in a system.
Console error message language. If other than the default of
English, it too must be set for the new processor(s).
Power system. If the system has been upgraded to a VAX 6000 Model
600 system using an H9657-CX or -CU upgrade kit, you must set the
power conversion information in EEPROM. The SET POWER command
accepts three options:
A—Power system upgraded with an H9657-CX kit
B—Power system includes a battery backup system
C—Power system upgraded with an H9657-CU kit (default)
System serial number. This must also be set for the new processor(s).
Sections 3.10.1 and 3.10.2 tell how to set parameters when you are replacing
or adding a new processor.
In addition to setting system parameters, you should install the latest
EEPROM patches on the new processors, as described in Section 3.10.3.
KA66A Processor 3–25
3.10.1 How to Replace the Only Processor
When replacing the processor in a single-processor system,
you must use the SET command to set parameters in the
EEPROM of the new processor.
Example 3–4: Replacing a Single Processor
#123456789 0123456789 0123456789 0123456789 012345#
F
.
E
D
C
B
A
9
8
7
6
5
4
3
2
1
A
o
.
.
.
A
+
.
.
.
.
.
.
.
.
.
.
.
.
.
.
.
.
.
.
M
+
.
.
.
M
+
.
.
.
.
.
.
.
.
.
.
.
.
.
.
.
.
.
.
.
.
.
.
.
.
.
.
.
.
.
.
.
.
.
P
+
B
+
B
.
.
.
.
.
.
+
+
+
.
+
.
.
+
.
.
.
.
.
.
.
.
.
.
A2
64
A1
64
.
.
.
.
.
.
.
.
.
.
.
.
.
.
Console = V1.00
RBDs = V1.00
EEPROM = 1.00/1.00
)
Update EEPROM? (Y or N) >>> Y
?0073 System serial number updated
>>> SET BOOT DEFAULT XMI:E /BI:4 DU0
>>> SET BOOT DIAG /XMI:E /BI:4 /R5:10 DU0
[Run EVUCA to install patches]
>>> BOOT
3–26 VAX 6000 Model 600 Service Manual
NODE #
'
'
TYP
STF
BPD
ETF
BPD
.
XBI E +
ILV
128 Mb
SN = 0000000000
?004F System serial number has not been initialized
>>> SET TERMINAL/SPEED:9600
>>> SET LANGUAGE ENGLISH
>>> ESC DEL SET POWER
Power system>>> C
Power system read as: C
Update EEPROM? (Y or N) >>> Y
?011B Power system identification updated
>>> ESC DEL SET SYSTEM SERIAL
System Serial Number>>> GA14012345
Serial number read as: GA14012345
0
1. Turn the upper key switch to the Off position (0).
2. Set the console terminal baud rate to 1200, the default when the console
program comes up with the new processor.
CAUTION: See Appendix D for KA66A module handling procedures.
3. Remove the defective processor module and temporarily insert it in an
unused XMI slot or place it on an ESD mat.
4. Remove the new processor module from the ESD box and insert it in
the XMI card cage. Place the old processor module in the ESD box.
5. Close the clear XMI door and front cabinet door.
6. Turn the lower key switch to Halt. Turn the upper key switch to Enable.
7. Check the power-up display for the processor (see Example 3–4). If the
processor (shown by a P on the TYP line) shows a plus sign (+) on both
lines STF and ETF, it passed the power-up tests. See .
'
8. Turn the lower key switch to Update.
9. Use SET commands to enter the console terminal speed, language, and
system serial number (see ). If the system is an H9657-CX or -CU
upgrade, you will also need to use the SET POWER command. You also
need to define any boot paths that were recorded in the EEPROM of
the old processor.
)
A hard copy of this information from a SHOW FIELD printout should
have been saved in the Site Management Guide.
10. Run EVUCA to install any EEPROM patches. See Section 3.10.3.
11. Turn the lower key switch to the Auto Start position.
12. Boot the operating system.
KA66A Processor 3–27
3.10.2 How to Replace or Add Processors in a
Multiprocessor System
When replacing or adding a processor in a multiprocessor system,
use SET or UPDATE to set necessary parameters, depending on
whether the processors have different ROM revisions.
Example 3–5: Replacing Processors in a Multiprocessor System
#123456789 0123456789 0123456789 0123456789 012345#
F
E
D
C
B
A
9
8
7
6
5
4
3
2
1
A
o
.
.
.
A
+
.
.
.
.
.
.
.
.
.
.
.
.
.
.
.
.
.
.
M
+
.
.
.
M
+
.
.
.
M
+
.
.
.
M
+
.
.
.
.
.
.
.
.
P
+
E
+
E
P
+
E
+
E
P
+
E
+
E
P
+
B
+
B
0
NODE #
[Continued power-up display and console messages]
___
| >>> SET CPU 3 ! Set boot to replaced processor so SETs apply
| >>> SET TERMINAL SPEED: 9600
| >>> SET LANGUAGE ENGLISH
| >>> ESC DEL SET POWER
| Power system>>> C
| Power System read as C
|
| Update EEPROM? (Y or N) >>> Y
| ?011B Power system updated
| >>> ESC DEL SET SYSTEM SERIAL
| System Serial Number>>> GA14012345
| Serial number read as: GA14012345
|
| Update EEPROM? (Y or N) >>> Y
| ?0073 System serial number updated
|
| >>> SET BOOT DEFAULT /XMI:E /BI:4 DU0
| >>> SET BOOT DIAG /XMI:E /BI:4 /R5:10 DU0
|___
'
(
___
| >>> SET CPU 2 ! Only if you are replacing the boot processor
| >>> UPDATE 1
|___
[ Run EVUCA to install patches ]
>>> BOOT
3–28 VAX 6000 Model 600 Service Manual
&
&
TYP
STF
BPD
ETF
BPD
1. Turn the upper key switch straight up to the Off position (0).
2. If you are replacing the boot processor, set the console terminal
baud rate to 1200 (the console default with the new boot processor).
CAUTION: See Appendix D for KA66A module handling procedures.
3. Remove the defective processor and temporarily put it in an unused
XMI slot or on a static pad. Remove the new processor from the ESD
box and insert it in the XMI card cage. Put the old processor in the
ESD box.
4. Close the clear XMI door and front cabinet door.
5. Turn the lower key switch to Halt and the upper key switch to Enable.
&
6. Check the power-up test display for the new processor (see ). A
plus sign (+) on the STF and ETF lines means that the processor you
installed passed self-test and extended testing. If you see the ?0052
console message, there is a ROM revision mismatch. Proceed with Step
7. Otherwise, go to Step 8.
7. ROM Revisions Mismatch: If you are replacing a secondary
processor, use the SET CPU command to set the boot processor to
the one you just replaced, so the following SET commands apply to
that processor. Turn the lower key switch to Update. Then use
SET commands to enter the console terminal speed, language, power,
system serial number, and boot paths for the new CPU (see ). This
information from a SHOW FIELD command should have been saved in
the Site Management Guide. Go to Step 11.
'
8. ROM Revisions Match: If you are replacing the boot processor, make
one of the secondary processors the boot processor temporarily, using
the SET CPU command. See .
(
9. Turn the lower key switch to Update.
10. Use UPDATE to copy the EEPROM for the new module from the
temporary boot processor. See . UPDATE takes several minutes.
(
11. Run EVUCA to install any EEPROM patches. See Section 3.10.3.
12. Turn the lower key switch to the Auto Start position.
13. Boot the operating system.
KA66A Processor 3–29
3.10.3 Using EVUCA to Apply Current ROM and PCS
Patches
You must run EVUCA to ensure that all modules are up to the
latest patch revision. Boot the VAX Diagnostic Supervisor
(VAX/DS), run the autosizer EVSBA, and load and run the
EVUCA program.
Example 3–6: Using VAX/DS to Run EVUCA to Patch EEPROM on All
Modules (Part 1)
>>> BOOT /XMI:A /R5:10 /FILENAME:ISL_LVAX_B EX0
[Initial Display]
Network Initial System Load Function
Version 1.1
FUNCTION
ID
1
2
3
4
5
-
FUNCTION
Display Menu
Help
Choose Service
Select Options
Stop
#
Enter a function ID value: 3
OPTION
ID
1
2
"
OPTION
-
Find Services
Enter known Service Name
Enter an Option ID value: 1
$
Working
3–30 VAX 6000 Model 600 Service Manual
!
EVUCA Functions
EVUCA checks the patch revision level on the latest diagnostic CD or tape
against the EEPROM patch revision level on the processors in the system
that you select for such checking.
If EVUCA finds different patch revision levels, it prompts you to ask if the
patches should be made; that is, if the revisions on the diagnostic media
should be written to EEPROM on the processors where it will be used
to augment or correct code in the console and diagnostic ROMs and PCS
(patchable control store) on the processor chip itself.
A higher patch number means a later revision. For example, Revision 1.06
is a later version than 1.01, and includes the most complete changes.
This section shows a sample console session, starting with booting the VAX
Diagnostic Supervisor (VAX/DS) from the console prompt. EVUCA runs
under VAX/DS.
!
Boot VAX/DS from the diagnostic media. This example shows a
boot from an Ethernet-based compact disk (CD) server connected to
a DEMNA (indicated by EX0) located at XMI node A. The /FILENAME
qualifier identifies the Initial System Load (ISL) program needed for
booting from CD servers. The general form for the file name is ISL_
LVAX_x, where x is the revision letter noted on the diagnostic CD.
For a CD server connected to a DEBNI or DEBNA, an example is:
>>> BOOT/XMI:m/FILENAME:ISL_LVAX_B/BI:n/R5:10 ET0
An example of booting from a TK50, TK70, or TF85 console load device
is:
"
#
$
>>> BOOT/R5:10 CSA1
For CD servers only: the ISL program prompts for responses to load
and run VAX/DS. These prompts are discussed in items
through .
If you boot from another device, VAX/DS is booted and run immediately;
go to Step .
'
#
&
The ISL program presents options; type 3 to select a service.
You can select a service in two ways: Option 1 lists the services
available. Option 2 lets you enter a known service name.
KA66A Processor 3–31
Example 3–7: Using VAX/DS to Run EVUCA to Patch EEPROM on All
Modules (Part 2)
%
Servers found:: 6
Service Name Format:
Service Number
Service Name
Server Name
Ethernet ID
#1
NSS_SYSDISK
ESS_08002B15FCE1
08-00-2B-15-FC-E1
#2
6000_DIAG_B
ESS-08002B15FCE1
08-00-2B-15-FC-E1
Enter a Service Number or <CR> for more: 2
&
Copyright Digital Equipment Corporation
1991.
All Rights Reserved.
DIAGNOSTIC SUPERVISOR.
DS> RUN EVSBA
'
ZZ-EXSAA-X15.0-191
1-JAN-1991 00:00:13
*********************************************************************************
Copyright Digital Equipment Corporation
1981, 1989, 1990, 1991.
All Rights Reserved.
********************************************************************************
.. Program: EVSBA - AUTOSIZER
at 00:02:04.68.
level 3, revision 7.65, 3 tests,
.. End of run, 0 errors detected, pass count is 1,
time is 1-JAN-1991 00:02:54.36
3–32 VAX 6000 Model 600 Service Manual
%
&
'
In this example, the ISL program finds six CDs on the Ethernet CD
server. ISL then lists identification information for each CD. In this
example, two of the six CDs are listed and a prompt asks you to choose
between selecting one of the two CDs listed or seeing more identification
information for the remaining CDs. The diagnostic disk name in this
example is 6000_DIAG_B, where B is the revision letter for the CD.
So, the user typed "2" to select 6000_DIAG_B. (If no name beginning
6000_DIAG_n had yet been displayed, the correct response would have
been a carriage return, to see the rest of the CD names.)
The ISL program loads the VAX Diagnostic Supervisor (VAX/DS) and
runs it. VAX/DS displays its diagnostic banner.
Type RUN EVSBA (the autosizer program) to tell VAX/DS how the
system is configured.
KA66A Processor 3–33
Example 3–8: Using VAX/DS to Run EVUCA to Patch EEPROM on All
Modules (Part 3)
DS> LOAD EVUCA
(
[Copyright banner prints]
DS> SELECT ALL
DS> SET TRACE
DS> START
)
+>
+?
.. Program: EVUCA - VAX 6000 EEPROM Update Utility, revision 2.0, 5 tests,
at 00:04:03.27.
Testing: _KA0
Please put the front panel switch in the update position.
Press <RET> when ready.
Test 2: Load data from media
Data file? <EXUCA.BIN>
+A
Searching for data file...
Data file loaded.
Looking for patch for CPU 01 - ROM 1.00 EEPROM 1.00.
Patch image is revision 01.01
Do you really want to apply this patch [(No), Yes] YES
Test 3: Determine Typecodes Updated
Test 4: Update EEPROM data
Getting selectable boot primitives for CPU 01, ROM 1.00
Updating CPU 01
Primary CPU 01 Done
3–34 VAX 6000 Model 600 Service Manual
+B
+@
(
)
+>
+?
+@
+A
+B
Load the EVUCA program to check for patch revision and request patch
updates.
Type SELECT ALL to request that all processors be checked. In this
case, there is only one at XMI node 1, as will appear later in the listing.
The SET TRACE command requests that VAX/DS display information
on the console terminal so that you can tell when a test is running.
Type START to begin execution of the EVUCA program.
This request only appears if the front panel switch is not in the Update
position. The program waits until you turn the switch, and then press
RETURN to continue the program.
Press RETURN to select EXUCA.BIN, the name of the file on the
diagnostic media containing the patches for the processors. The file
is loaded, and its information checked against current information in
EEPROM. In this case, the EEPROM revision is 1.00 and the patch on
the diagnostic media is 01.01, a later revision.
EVUCA prompts to see if you want to apply the patch. The default is
No. Type Yes to apply the patch.
In the example, the patch is made to CPU 01 (the only one in this
example), and EVUCA displays status information to that effect.
KA66A Processor 3–35
Example 3–9: Using VAX/DS to Run EVUCA to Patch EEPROM on All
Modules (Part 4)
Test 5: Show Boot primitives
+C
ROM boot primitives for CPU 01, revision 01.01 are:
1
This boot primitive supports the following:
- boot primitive designation DU
Device KDB50, device type 010E
Device KDM70, device type 0C22
2
This boot primitive supports the following:
- boot primitive designation ET
Device DEBNI, device type 0118
Device DEBNA, device type 410F
3
This boot primitive supports the following:
- boot primitive designation EX
Device DEMNA, device type 0C03
4
This boot primitive supports the following:
- boot primitive designation FX
Device DEMFA, device type 0823
No boot primitives found in EEPROM for CPU 01
The primary cpu was succesfully updated.
Current ROM and EEPROM revisions for each CPU are:
CPU 01 - ROM 1.00 EEPROM 01.01
.. End of run, 0 errors detected, pass count is 1,
time is 1-JAN-1991 00:07:10.93
DS> EXIT
+E
3–36 VAX 6000 Model 600 Service Manual
+D
+C
+D
+E
The EVUCA listing shows the boot primitives available in ROM and
EEPROM for the system. A boot primitive is a routine to read the
system bootstrap program, VMB, from a particular device into memory
and start it running.
This information, then, tells what devices you can boot from with a
particular CPU. In this example, four boot primitives exist in ROM on
CPU 01 and none in EEPROM.
EVUCA displays the current ROM and EEPROM revisions. Note that
the EEPROM has been patched; the revision level is 1.01.
Type EXIT to terminate VAX/DS and return to console mode.
KA66A Processor 3–37
3.11 KA66A Registers
The KA66A processor registers are listed in Table 3–5 and
Table 3–6. XMI registers are in Table 3–7.
The IPRs are explicitly accessible to software only by the Move To Processor
Register (MTPR) and Move From Processor Register (MFPR) instructions,
which require kernel mode privileges. From the console, EXAMINE/I and
DEPOSIT/I commands read and write the IPRs.
Table 3–5: KA66A Internal Processor Registers
Address
Dec (Hex) Register
Mnemonic Type1
I/O
Class2 Address
0 (0)
Kernel Stack Pointer
KSP
R/W
1
1 (1)
Executive Stack Pointer
ESP
R/W
1
2 (2)
Supervisor Stack Pointer
SSP
R/W
1
3 (3)
User Stack Pointer
USP
R/W
1
4 (4)
Interrupt Stack Pointer
ISP
R/W
1
8 (8)
P0 Base
P0BR
R/W
1
9 (9)
P0 Length
P0LR
R/W
1
10 (A)
P1 Base
P1BR
R/W
1
11 (B)
P1 Length
P1LR
R/W
1
1 Register
2 Key
access: R/W=read/write, RO = read only, WO = write only
to Classes:
1 = Implemented by the KA66A CPU module as specified in the VAX Architecture Reference Manual.
2 = Implemented uniquely by the KA66A CPU module.
3 = Accessible, but not fully implemented; accesses yield UNPREDICTABLE results.
n Init = The register is initialized on a KA66A CPU module reset (power-up, system reset, and node reset).
NOTE: Per-process registers, loaded by LDPCTX (load process context instruction), are the following IPRs (in decimal): 0, 1, 2, 3, 8, 9, 10, 11, 19, and 61. The remainder of the registers are not affected by LDPCTX.
3–38 VAX 6000 Model 600 Service Manual
Table 3–5 (Cont.): KA66A Internal Processor Registers
Address
Dec (Hex) Register
Mnemonic Type1
I/O
Class2 Address
12 (C)
System Base
SBR
R/W
1
13 (D)
System Length
SLR
R/W
1
14 (E)
CPU Identification
CPUID
R/W
2 Init
16 (10)
Process Control Block Base
PCBB
R/W
1
17 (11)
System Control Block Base
SCBB
R/W
1
18 (12)
Interrupt Priority Level
IPL
R/W
1 Init
19 (13)
AST Level
ASTLVL
R/W
1 Init
20 (14)
Software Interrupt Request
SIRR
WO
1
21 (15)
Software Interrupt Summary
SISR
R/W
1 Init
24 (18)
Interval Clock Control and Status3
ICCS
R/W
1 Init
E1000060
NICR
WO
2
E1000064
25 (19)
Next Interval
Count3
Count3
26 (1A)
Interval
ICR
RO
2
E1000068
27 (1B)
Time-of-Day4
TODR
R/W
1
E100006C
28 (1C)
Console Storage Receiver Status
CSRS
R/W
3 Init
E1000070
29 (1D)
Console Storage Receiver Data
CSRD
RO
3 Init
E1000074
30 (1E)
Console Storage Transmitter Status
CSTS
R/W
3 Init
E1000078
31 (1F)
Console Storage Transmitter Data CSTD
WO
3 Init
E100007C
1 Register
2 Key
access: R/W=read/write, RO = read only, WO = write only
to Classes:
1 = Implemented by the KA66A CPU module as specified in the VAX Architecture Reference Manual.
2 = Implemented uniquely by the KA66A CPU module.
3 = Accessible, but not fully implemented; accesses yield UNPREDICTABLE results.
n Init = The register is initialized on a KA66A CPU module reset (power-up, system reset, and node reset).
3 Interval
timer requests are posted at IPL 16 with a vector of C0 (hex).
The interval timer is the lowest priority device at the IPL. A subset of ICCS is implemented in the NVAX chip.
NICR and ICR can be used, depending on the settings in the Ebox Control Register.
4 TODR is maintained during power failure by the XMI TOY BBU PWR line on the XMI backplane.
KA66A Processor 3–39
Table 3–5 (Cont.): KA66A Internal Processor Registers
Address
Dec (Hex) Register
Mnemonic Type1
I/O
Class2 Address
32 (20)
Console Receiver Control and
Status
RXCS
R/W
2 Init
E1000080
33 (21)
Console Receiver Data Buffer
RXDB
RO
2 Init
E1000084
34 (22)
Console Transmitter Control and
Status
TXCS
R/W
2 Init
E1000088
35 (23)
Console Transmitter Data Buffer
TXDB
WO
2 Init
E100008C
38 (26)
Machine
mary
MCESR
WO
2
42 (2A)
Console Saved Program Counter
SAVPC
RO
2
43 (2B)
Console Saved Processor Status Longword
SAVPSL
RO
2
55 (37)
I/O Reset
IORESET
WO
2
56 (38)
Memory Management Enable
MAPEN
R/W
1 Init
57 (39)
Translation Buffer Invalidate
All
TBIA
WO
1
58 (3A)
Translation Buffer Invalidate
Single
TBIS
WO
1
62 (3E)
System Identification
SID
RO
2
63 (3F)
Translation Buffer Check
TBCHK
WO
1
64 (40)
IPL 14 Interrupt ACK
IAK14
RO
1
E1000100
65 (41)
IPL 15 Interrupt ACK
IAK15
RO
1
E1000104
66 (42)
IPL 16 Interrupt ACK
IAK16
RO
1
E1000108
67 (43)
IPL 17 Interrupt ACK
IAK17
RO
1
E100010C
68 (44)
Clear Write Buffer
CWB
R/W
1
E1000110
Check
Error
Sum-
E10000DC
1 Register
2 Key
access: R/W=read/write, RO = read only, WO = write only
to Classes:
1 = Implemented by the KA66A CPU module as specified in the VAX Architecture Reference Manual.
2 = Implemented uniquely by the KA66A CPU module.
3 = Accessible, but not fully implemented; accesses yield UNPREDICTABLE results.
n Init = The register is initialized on a KA66A CPU module reset (power-up, system reset, and node reset).
3–40 VAX 6000 Model 600 Service Manual
Table 3–5 (Cont.): KA66A Internal Processor Registers
Address
Dec (Hex) Register
Mnemonic Type1
I/O
Class2 Address
122 (7A)
Interrupt System Status
INTSYS
R/W
2
124 (7C)
Patchable Control Store Control
PCSCR
R/W
2
125 (7D)
Ebox Control Register
ECR
R/W
2
160 (A0)
Cbox Control
CCTL
R/W
2 Init
162 (A2)
Backup Cache Data ECC
BCDECC
WO
2 Init
163 (A3)
Backup Cache Error Tag Status
BCETSTS
R/W
2
164 (A4)
Backup Cache Error Tag Index
BCETIDX
RO
2
165 (A5)
Backup Cache Error Tag
BCETAG
RO
2
166 (A6)
Backup Cache Error Data Status
BCEDSTS
R/W
2
167 (A7)
Backup Cache Error Data Index
BCEDIDX
RO
2
168 (A8)
Backup Cache Error Data ECC
BCEDECC
RO
2
171 (AB)
Cbox Error Fill Address
CEFADR
RO
2
172 (AC)
Cbox Error Fill Status
CEFSTS
R/W
2
174 (AE)
NDAL Error Status
NESTS
R/W
2
176 (B0)
NDAL Error Output Address
NEOADR
RO
2
178 (B2)
NDAL Error Output Command
NEOCMD
RO
2
180 (B4)
NDAL Error Data High
NEDATHI
RO
2
182 (B6)
NDAL Error Data Low
NEDATLO
RO
2
1 Register
2 Key
access: R/W=read/write, RO = read only, WO = write only
to Classes:
1 = Implemented by the KA66A CPU module as specified in the VAX Architecture Reference Manual.
2 = Implemented uniquely by the KA66A CPU module.
3 = Accessible, but not fully implemented; accesses yield UNPREDICTABLE results.
n Init = The register is initialized on a KA66A CPU module reset (power-up, system reset, and node reset).
KA66A Processor 3–41
Table 3–5 (Cont.): KA66A Internal Processor Registers
Address
Dec (Hex) Register
Mnemonic Type1
I/O
Class2 Address
184 (B8)
NDAL Error Input Command
NEICMD
RO
2
208 (D0)
VIC Memory Address
VMAR
R/W
2
209 (D1)
VIC Tag
VTAG
R/W
2
210 (D2)
VIC Data
VDATA
R/W
2
211 (D3)
Ibox Control and Status
ICSR
R/W
2
212 (D4)
Ibox Branch Prediction Control
BPCR
R/W
2
214 (D6)
Ibox Backup PC
BPC
RO
2
215 (D7)
Ibox Backup PC with RLOG Unwind
BPCUNW
RO
2
231 (E7)
Physical Address Mode
PAMODE
R/W
2
232 (E8)
Memory Management Exception Address
MMEADR
RO
2
233 (E9)
Memory Management Exception PTE Address
MMEPTE
RO
2
234 (EA)
Memory Management Exception Status
MMESTS
RO
2
236 (EC)
TB Parity Address
TBADR
RO
2
237 (ED)
TB Parity Status
TBSTS
R/W
2
242 (F2)
P-Cache Parity Address
PCADR
RO
2
244 (F4)
P-Cache Status
PCSTS
R/W
2
248 (F8)
P-Cache Control
PCCTL
R/W
2
1 Register
2 Key
access: R/W=read/write, RO = read only, WO = write only
to Classes:
1 = Implemented by the KA66A CPU module as specified in the VAX Architecture Reference Manual.
2 = Implemented uniquely by the KA66A CPU module.
3 = Accessible, but not fully implemented; accesses yield UNPREDICTABLE results.
n Init = The register is initialized on a KA66A CPU module reset (power-up, system reset, and node reset).
3–42 VAX 6000 Model 600 Service Manual
Table 3–6: KA66A Registers in XMI Private Space
Register
Mnemonic
Address
NDAL Control and Status
NCSR
E000 0000
TOY Clock Registers
E018 3000 – E018 300D
BBU RAM
E018 300E – E018 303F
NEXMI Input Port
IPORT
E018 4000
NEXMI Output Port0
OPORT0
E018 5000
NEXMI Output Port1
OPORT1
E018 6000
UART Registers
E018 7000 – E018 700F
IPR Address Space
E100 0000 – E100 03FF
IP IVINTR Generation
IPINTR
E101 0000 – E101 FFFF
WE IVINTR Generation
WEINTR
E102 0000 – E102 FFFF
Table 3–7: XMI Registers for the KA66A
Register
Mnemonic
Address
Device Register
XDEV
BB1 + 00
Bus Error
XBER
BB + 04
Failing Address
XFADR
BB + 08
XMI General Purpose
XGPR
BB + 0C
Node-Specific Control and Status
NSCSR
BB + 1C
XMI Control Register
XCR
BB + 24
Failing Address Extension
XFAER
BB + 2C
Bus Error Extension
XBEER
BB + 34
Writeback 0 Failing Address
WFADR0
BB + 40
Writeback 1 Failing Address
WFADR1
BB + 44
1 BB
= base address of a node, which is the address of the first location in nodespace.
KA66A Processor 3–43
Chapter 4
MS65A Memory
This chapter discusses the MS65A memory module. Sections include:
•
MS65A Physical Description
•
Specifications
•
Functional Description
•
Configuration Rules
•
Interleaving
•
Console Commands for Interleaving
•
Addressing
•
Memory Self-Test
•
Memory Self-Test Errors
•
Control and Status Registers
MS65A Memory
4–1
4.1 MS65A Physical Description
The MS65A memory module is a metal-oxide semiconductor
(MOS), dynamic random access memory (DRAM). The
memory module is designed for use with the VAX 6000
through the XMI bus.
Figure 4–1: MS65A Module
BLOCK STATE
BUFFER
DRAMS
DATA
MUXs
MEMORY CONTROL
GATE ARRAY
EEPROM
XMI
CORNER
GREEN
POWER
LED
ZIF
CONNECTOR
SEGMENTS
YELLOW
SELF-TEST
LED
SMALL
RED
LED
DRAM
CONTROL/ADDRESS
BUFFERS
DRAMS
DATA
MUXs
4–2 VAX 6000 Model 600 Service Manual
DRAMS
msb-0454A-90
The MS65A memory module has the following features:
•
The memory module contains MOS dynamic RAM (DRAM) arrays
which provide up to 128 Mbytes of storage; a CMOS memory control
gate array that contains error correction code (ECC) logic and control
logic; an EEPROM storage element; and an XMI interface known as
the XMI Corner.
•
ECC logic detects single-bit and double-bit errors and corrects single-bit
errors on 64-bit words.
•
Memory self-test checks all RAMs, the data path, and control logic on
power-up.
•
Quadwords, octawords, and hexwords can be read from or written to
memory.
•
Memory is configured by the console program for 2-, 4-, 8-way or no
interleaving.
MS65A memory modules are used in all VAX 6000 series systems. Model
500 and 600 systems require the MS65A. Earlier model systems can use the
MS65A along with the MS62A memory modules. MS65A memory modules
used in Model 200, 300, or 400 systems provide higher density memory
modules with a capacity of up to 128 Mbytes per module.
VAX 6000
MS65A
MS62A
Both MS65A
and MS62A
Models 500, 600
Yes
No
No
Models 200, 300, 400
Yes
Yes
Yes
MS65A Memory
4–3
4.2 MS65A Configuration Rules
Figure 4–2 shows the order of placement of MS65A modules
in the XMI backplane.
Figure 4–2: MS65A Configuration
XMI CARD CAGE
E
D C B A 9
2
8
7 6 5 4 3
Memory Slots
2
1
1
msb-0133D-90
Memory modules are configured after I/O adapter and processor modules.
!
"
Install the first memory module in slot 9. Fill all available slots left to
right from slot 9 to slot 1.
Install any additional memory modules right to left in available slots
from slot A to slot E.
4–4 VAX 6000 Model 600 Service Manual
4.3 MS65A Specifications
Table 4–1 gives the MS65A memory module specifications.
Table 4–1: MS65A Specifications
Parameter
Description
Module Number:
T2053
Dimensions:
23.3 cm (9.2") H x 28.0 cm (11.0") D x 0.23 cm (0.093") W
Memory Size:
MS65A-BA
MS65A-CA
MS65A-DA
Addresses:
16-Mbyte boundaries
32 Mbytes
64 Mbytes
128 Mbytes
Starting Address
0 to 512 Gbytes
Ending Address
0 to 512 Gbytes
Technology:
DRAMS
1 or 4 Mbit dynamic RAMs
Gate Arrays
CMOS gate array
Interleave:
2-, 4-, 8-way or none
Error Correction Code:
Detects single- and double-bit errors and corrects singlebit errors
Temperature:
Storage Range
Operating Range
–40o C to 70o C (–40o F to 151o F)
15o C to 32o C (59o F to 90o F)
Relative Humidity:
Storage and Operating
10% to 95% noncondensing
Altitude:
Storage
Up to 9 km (30,000 ft)
Operating
Up to 2.4 km (8000 ft)
Current:
10A active, 3.8A standby, max.
Power:
50W active, 19W standby, max.
MS65A Memory
4–5
4.4 MS65A Functional Description
The MS65A module consists of an XMI Corner, a memory
control gate array, address and control drivers, block state
DRAMs, DRAM arrays, and an EEPROM.
Figure 4–3: MS65A Block Diagram
Bank 2
Data
DRAMs
Bank 3
Data
DRAMs
Bank 0
Data
DRAMs
Bank 1
Data
DRAMs
MUX
MUX SEL
Block
State
DRAMs
To DRAM Array
Buffers
Address/Control
EEPROM
Memory
Control
Array
Diag Test Bus
PROM Bus
XCI
XMI
Corner
XMI Bus
msb-0730-90
4–6 VAX 6000 Model 600 Service Manual
The XMI Corner is located on the MS65A module and contains interface
logic.
The memory control gate array transfers data between the XMI Corner
and the DRAMs. The memory control gate array also controls address
multiplexing, command decoding, arbitration, and CSR logic functions.
Address and control logic modifies address bits received from the XMI
Corner. These modified address bits are used to control the selection of
the DRAMs during reading and writing.
Memory is arranged in four (fully populated) or two (half populated) banks
of DRAMs. A fully populated MS65A contains 299 DRAMS, and a half
populated MS65A contains 155 DRAMs.
The data in the memory EEPROM is used to initialize the memory control
gate array. After a power-up or system reset, the data in the EEPROM
is loaded into the memory control gate array, which contains logic that
controls access to and transfer of data to and from the memory module.
MS65A Memory
4–7
4.5 MS65A Interleaving
Interleaving optimizes memory access time and increases
the effective memory transfer rate by operating memory
modules in parallel.
Figure 4–4: MS65A Interleaving
32 Mb
32 Mb
32 Mb
2-WAY INTERLEAVE SET
(32, 32)
32 Mb
64 Mb
2-WAY INTERLEAVE SET
(32 + 32, 64)
64 Mb
32 Mb
128 Mb
128 Mb
128 Mb
32 Mb
32 Mb
4-WAY INTERLEAVE SET WITH ONE MEMORY NOT INTERLEAVED
(128, 128, 128, 64 + 32+32) interleaved and (32) not interleaved
msb-0717A-91
4–8 VAX 6000 Model 600 Service Manual
Memory supports 2-, 4-, 8-way or no interleaving. Up to eight memory
modules of the same size can be interleaved. Memory modules of different
sizes can also be interleaved. Figure 4–4 shows three examples of
interleaving. The first is a two-way set (32, 32); two arrays of the same size
are interleaved. The second two-way set (32 + 32, 64) consists of different
size arrays. The interleave set at the bottom of Figure 4–4 is a four-way
set consisting of several array sizes.
Interleaving is done on hexword boundaries. Interleaving addresses are set
in the Starting and Ending Address Registers by the console program (see
Section 4.7). The MS65A does not check for valid or invalid interleaving
configurations.
NOTE: Memory modules that fail self-test due to multiple bit errors are not
included in the interleave set.
When different sizes of memory modules are installed in a Model 600
system, the console interleaves the memory modules according to size and
sets as follows.
•
Sorts memory modules into groups by size.
•
Interleaves the largest size memory modules first.
•
Stacks remaining sets of modules into sets that equal the largest size
memory modules and interleaves them with the largest size memory
modules.
•
Stacks remaining modules into sets of the next largest size memory
modules and interleaves them.
•
Continues stacking and interleaving memory modules until all memory
modules have been configured (including noninterleaved modules).
Unless the system requires a specific, dedicated memory use, you should
run the default interleave rather than setting interleaving manually. In
default, the console program chooses the optimal configuration for the
system. Manual interleaving requires more operator attention.
MS65A Memory
4–9
4.6 Console Commands for Interleaving
The SET MEMORY and SHOW MEMORY commands are
useful for setting the interleave to a memory configuration
other than the default interleave.
This is not usually
advisable, but occasional customer use will warrant
overriding the original console setting of the interleave. The
INITIALIZE command causes the VAX 6000 Model 600 system
to execute MS65A self-tests.
Example 4–1: SET MEMORY and INITIALIZE Commands
>>> SET MEMORY
>>> SHOW MEMORY
F
E
.
.
D
.
.
C
.
.
!
/INTERLEAVE:DEFAULT
! For a system with one 64-Mbyte and two
! 32-Mbyte memory modules, it creates a 2-way
! interleave of 64-Mbyte memory modules
! (1x64-Mbyte and 2x32-Mbyte memory modules)
! located at XMI nodes 9, 8, and 7.
"
B
.
.
! Displays the memory lines from self-test.
A
.
.
9
A2
32
8
A2
32
7
A1
64
6
.
.
/INTERLEAVE:DEFAULT
>>> SET MEMORY
D
.
.
C
.
.
3
.
.
2
.
.
1
.
.
0
NODE #
ILV
128Mb
#
$
>>> SHOW MEMORY %
E
.
.
4
.
.
/INTERLEAVE:(7, 8+9)
! Explicitly specifies what is created
! as requested by the user (two interleave
! sets with modules in nodes 7, 8, and 9).
! Initializes the system.
>>> INITIALIZE
F
5
.
.
B
.
.
! Displays the memory lines from self-test.
A
.
.
9
B2
32
8
B1
32
7
A1
64
6
.
.
5
.
.
/INTERLEAVE:(7, 8+9)
>>>
4–10 VAX 6000 Model 600 Service Manual
4
.
.
3
.
.
2
.
.
1
.
.
0
NODE #
ILV
128Mb
The callouts in Example 4–1 are explained below.
!
"
#
$
%
Shows the SET MEMORY command that configures interleaving with
the console program. This command invokes the default interleaving
configuration. It is recommended that this default be used, rather than
trying to interleave memory manually.
The SHOW MEMORY command displays the node number (node #),
interleave (ILV), and total usable memory (xxMb) lines from the selftest results.
Shows the SET MEMORY command that creates a 2-way interleave
as requested by the user. In this example the user explicitly specified
how to interleave the memory modules. Each interleaving set must
contain the node number of the memory module. If there is more than
one memory module in a set, they are joined by a + sign. Each set of
interleaved memory modules must be separated by a comma.
The system is initialized, self-test is run, and the >>> prompt returns.
Section 4.8 describes the memory self-test and shows test results.
The SHOW MEMORY command displays the configuration set in
#.
NOTE: Refer to Chapter 5 of the VAX 6000 Series Owner’s Manual
for detailed information on the SET MEMORY and SHOW MEMORY
commands.
The SET MEMORY command does not change memory interleaving; it
just modifies the memory configuration in the EEPROM. The memory
configuration specified by the SET MEMORY command takes place when
the system is initialized (by a power-up or INITIALIZE command).
MS65A Memory
4–11
4.7 MS65A Addressing
Memory addressing is set on hexword boundaries and
depends on the interleaving sets organized by the console.
Starting and ending addresses are determined by the
console regardless of how interleaving is done (by the user
or by the console).
Figure 4–5: MS65A Addressing
TOTAL MEMORY SIZE: 256 Mb
ENADR = 00000400
ENADR = 00000400
INTLV = 00000021
STADR = 00000200
ENADR = 00000200
INTLV = 00000021
STADR = 00000100
64 Mb
INTLV = 00000001
32 Mb
128 Mb
ENADR = 00000100
INTLV = 00000021
STADR = 00000000
32 Mb
STADR = 00000000
msb-0717B-92
4–12 VAX 6000 Model 600 Service Manual
Figure 4–5 shows the starting address (STADR), ending address (ENADR),
and interleave (INTLV) registers of a sample interleave set. The contents
of these registers are set by the console.
The memory shown in Figure 4–5 is divided into two interleaving sets and
totals 256 Mbytes. Set 0 consists of one 128-Mbyte array. Set 2 consists of
two 32-Mbyte arrays and one 64-Mbyte array.
The starting address of the first array is 0. The ending address is
determined by multiplying the density of the array by the interleave factor
(number of sets). For example, the starting address of the first array in set
0 is 0, and the ending address is 100 hex (64 decimal, which is equal to 32
multiplied by 2). The starting address of the second array is the same as
the ending address of the first.
Each array’s interleave register indicates the set it belongs to (bits <7:5>)
and the total number of interleave sets (bits <1:0>). The interleave register
for the 128-Mbyte array indicates that the array is set 0 (bits <7:5>=000)
of two interleave sets (bits <1:0>=01).
MS65A Memory
4–13
4.8 Memory Self-Test
The MS65A performs an initialization and self-test sequence
on power-up or when the sequence is requested by a
console command. During memory self-test the array chip is
initialized, all memory locations are tested, and the control
and status registers are initialized.
Example 4–2: MS65A Memory Module Results in Self-Test
#123456789 0123456789 0123456789 0123456789 012345#
F
E
A
+
.
.
.
D
A
+
.
.
.
C
.
.
.
.
.
B
.
.
.
.
.
A
.
.
.
.
.
9
M
+
.
.
.
8
M
+
.
.
.
7
M
+
.
.
.
6
M
+
.
.
.
5
.
.
.
.
.
4
.
.
.
.
.
3
P
+
E
+
E
2
P
+
E
+
E
1
P
+
B
+
B
.
.
.
.
.
.
.
.
.
.
A4
64
A3
64
A2
64
A1
64
.
.
.
.
.
.
.
.
.
.
Console = V1.00
RBDs = V1.00
EEPROM = 1.00/1.00
>>>
4–14 VAX 6000 Model 600 Service Manual
0
!"
NODE #
TYP
STF
BPD
ETF
BPD
ILV
256Mb
SN = GA14012345
#$
The callouts in Example 4–2 are explained below.
!
"
#
$
The TYP line shows that memory modules are installed in XMI slots 6
through 9 as indicated by the M in this row.
The STF line shows if memory modules pass self-test, as indicated by
the + in this row. If a module fails self-test, a – is indicated, but the
console still tests all pages within the module. The failing module is
included in the configuration, and the addresses that fail self-test are
not used by the system.
The ILV line indicates the memory array modules are 4-way
interleaved.
This system contains a total usable memory of 256 Mbytes (four 64Mbyte memory modules).
If all MS65A nodes pass self-test, CPU/memory interaction tests are
performed on the MS65A by the CPU, and reported on the ETF line of
the power-up test display. The console executes a simple read/write test to
a small portion of memory. Since there are no errors from the self-test, the
memory bitmap is set with all pages as good.
MS65A Memory
4–15
4.9 Memory Self-Test Errors
If an MS65A node fails self-test, an explicit memory test is
run on the failing module and console error messages are
displayed. The failing module is still included in the memory
configuration.
Example 4–3: MS65A Memory Module Node Exclusion
>>> SET MEMORY /INTERLEAVE:(7+8, 9)
>>> INITIALIZE
[Self-test display prints]
>>> SHOW MEMORY
F
E
D
C
B
A
9
.
.
.
.
.
B1
.
.
.
.
.
64
/INTERLEAVE:(7+8, 9)
8
A2
64
7
A1
64
6
.
5
.
.
4
.
.
3
.
.
2
.
.
1
.
.
0
NODE #
ILV
192Mb
If an MS65A node fails self-test, then the console executes an explicit
memory test during the building of the bitmap. Failing memory modules
are included in the configuration, although they are interleaved by
themselves. The only way to exclude a memory module from interleaving
is to use the SET MEMORY command without designating the node you
want to exclude. Example 4–3 shows how to exclude the memory module
at node 6.
During the explicit memory test, any number of the following console
messages might be displayed to aid the customer service engineer in
diagnosing the problem.
?0037
Explicit interleave list is bad. Configuring
all arrays uninterleaved.
This means that the explicit set of memory arrays for the explicit interleave
includes no nodes that contain memory array. All memory arrays found
in the system are unconfigured (the SET MEMORY command may have
specified nodes that did not contain memory modules).
?0046
Memory interleave set is inconsistent: n n ...
This means that the listed nodes (n n) do not form a valid memory interleave
set. One or more of the nodes might not be a memory array or the set
contains an invalid number of memory arrays. Each listed memory array
4–16 VAX 6000 Model 600 Service Manual
that is valid will be configured uninterleaved; any memory array that is
not included in the set will not be interleaved.
?0047
Insufficent working memory for normal operation.
This means that less than 256 Kbytes per processor of working memory
were found. There may be insufficient memory for the console to function
or for the operating system to boot.
?011E
Uncorrectable memory errors discovered -- long memory
test must be performed on node n
This means that a memory array contains an unrecoverable error. The
console must perform a slow test to locate all the failing locations.
?004A
Memories not interleaved due to uncorrectable errors.
This means that the listed arrays would normally have been interleaved
(by default or an explicit request). Because one or more arrays contained
unrecoverable errors, this interleave set will not be constructed.
NOTE: Refer to Appendix B for a list of console error messages. See also
Section 6.6 in the VAX 6000 Series Owner’s Manual for more information
on these errors.
When self-test has finished running on the module, the yellow LED (located
at the center of the module’s edge farthest from the XMI backplane) lights.
After self-test, starting and ending addresses are set by the boot processor.
MS65A Memory
4–17
4.10 MS65A Control and Status Registers
The memory contains 19 control and status registers (CSRs)
to control the memory and log errors. All CSRs are 32
bits long and respond only to longword read and write
transactions. Only full writes are performed to the CSRs. If
a parity error occurs during a write operation, the operation
is aborted and the contents of the CSRs are unchanged.
The CSRs start at an address dependent upon the node ID. All CSR
addresses are designated as BB + n, where n is the relative offset of the
register.
Table
4–2: MS65A Control and Status Registers
.
Register
Mnemonic
Address
Device Register
XDEV
BB1 + 00
Bus Error Register
XBER
BB + 04
Memory Control Register 1
MCTL1
BB + 14
Memory ECC Error Register
MECER
BB + 18
Memory ECC Address Register
MECEA
BB + 1C
Memory Control Register 2
MCTL2
BB + 30
TCY Tester Register
TCY
BB + 34
Block State ECC Error Register
BECER
BB + 38
Block State ECC Address Register
BECEA
BB + 3C
Starting Address Register
STADR
BB + 50
Ending Address Register
ENADR
BB + 54
Segment/Interleave Control Register
INTLV
BB + 58
Memory Control Register 3
MCTL3
BB + 5C
Memory Control Register 4
MCTL4
BB + 60
Block State Control Register
BSCTL
BB + 68
Block State Address Register
BSADR
BB + 6C
1 "BB"
refers to the base address of an XMI node (2180 0000 + (node ID x 8000))
4–18 VAX 6000 Model 600 Service Manual
Table 4–2 (Cont.): MS65A Control and Status Registers
Register
Mnemonic
Address
EEPROM Control Register
EECTL
BB + 70
Timeout Control/Status Register
TMOER
BB + 74
MS65A Memory
4–19
Chapter 5
DWMBB I/O Adapter
This chapter discusses the DWMBB adapter, the interface to an optional
VAXBI I/O channel. Sections include:
•
DWMBB Physical Description
Physical Layout
Specifications
•
Configuration Rules
•
Functional Description
•
Registers
DWMBB I/O Adapter
5–1
5.1 DWMBB Physical Description
5.1.1 Physical Layout
The DWMBB/A is an XMI module (T2018) with the standard
XMI Corner, an XMI self-test OK LED indicator, IBUS
drivers/receivers and transceivers, timeout logic, and a gate
array that controls the DWMBB/A. Most of the components
on the DWMBB/A are surface-mounted.
Figure 5–1: DWMBB/A XMI Module
GATE ARRAY
YELLOW
SELF-TEST
LED
RED
XMI
CORNER
ZIF
CONNECTOR
SEGMENTS
LED
msb-0060B-91
5–2 VAX 6000 Model 600 Service Manual
The DWMBB/B is a standard VAXBI (T1043) module with a
VAXBI Corner, including a BIIC interface chip, the primary
interface between the VAXBI bus and the DWMBB/B node
logic, a clock driver, and a clock receiver. The DWMBB/B
gate array is used mostly for data path logic. The VAXBI selftest OK LED is on the VAXBI Corner, and the module selftest OK LED is at the module edge opposite the connector
edge.
Figure 5–2: DWMBB/B VAXBI Module
MASTER
SEQUENCER
VAXBI
CORNER
YELLOW
SELF-TEST
LED
BIIC
SLAVE
SEQUENCER
YELLOW
SELF-TEST
LED
GATE
ARRAY
CLOCK
RECEIVER
ZIF
CONNECTOR
SEGMENTS
CLOCK
DRIVER
msb-0061-89
DWMBB I/O Adapter
5–3
5.1.2 Specifications
The following specifications apply to the DWMBB modules.
Table 5–1: DWMBB/A Specifications
Parameter
Description
Module Number:
T2018
Dimensions:
23.3 cm (9.2") H x 28.0 cm (11.0") D x 0.23 cm (0.093") W
Temperature:
Storage Range
-40o C to 70o C (-40o F to 151o F)
Operating Range
15o C to 32o C (59o F to 90o F)
Relative Humidity:
Storage and operating
10% to 95% noncondensing
Altitude:
Storage
Up to 9 km (30,000 ft)
Operating
Up to 2.4 km (8000 ft)
Current:
6A at +5V
Power:
16W
5–4 VAX 6000 Model 600 Service Manual
Table 5–2: DWMBB/B Specifications
Parameter
Description
Module Number:
T1043
Dimensions:
20.3 cm (8") H x 23.3 cm (9.2") D x 0.23 cm (0.093") W
Temperature:
Storage Range
-40o C to 66o C (-40o F to 151o F)
Operating Range
5o C to 50o C (41o F to 122o F)
Relative Humidity:
Storage and operating
10% to 95% noncondensing
Altitude:
Storage
Up to 4.8 km (16,000 ft)
Operating
Up to 2.4 km (8000 ft)
Current:
6A at +5V
10mA at -12V
Power:
30W
Table 5–3: DWMBB Cables
Part Number
Description
17-01569-01
DWMBB to H7206-B power OK cable
17-01897-01
15’ DWMBB cables for expander cabinet, from XMI slots 1, 2, 3, and
4 as needed (segments D and E) to VAXBI cages 2, 3, 4, and 5 (segments D and E). Two per DWMBB.
17-01897-02
7" DWMBB cables, from XMI slot E (segments D and E) to VAXBI cage 1
slot 1 (segments D and E). Two per DWMBB.
DWMBB I/O Adapter
5–5
5.2 DWMBB Configuration Rules
This section describes the configuration rules for the
DWMBB/A module in the XMI card cage and for the
DWMBB/B module in the VAXBI card cage.
Figure 5–3: VAX 6000 Slot Numbers
XMI CARD CAGE
VAXBI CARD CAGE
12 11 10 9 8 7
6
5 4 3
2
1
E
D C B A 9
8
7 6 5 4 3
2
1
msb-0040B-90
5–6 VAX 6000 Model 600 Service Manual
DWMBB/A modules are placed in the order shown in Table 5–4.
Table 5–4: DWMBB Configuration
XMI Node No.
VAXBI Channel
Location
E
1
System cabinet
1
2
Expander cabinet
2
3
Expander cabinet
3
4
Expander cabinet
4
5
Expander cabinet
Configuration rules are as follows:
•
The first VAXBI channel is the 12-slot channel in the system cabinet.
The DWMBB/A module is placed in XMI slot E; the corresponding
DWMBB/B module is placed in the system VAXBI cage, slot 1 (the
rightmost slot). See Figure 5–3.
•
Any additional VAXBI channels are 6-slot channels in the expander
cabinet. The DWMBB/B module is placed in slot 1 of each. The
corresponding DWMBB/A module is placed in the XMI slot listed in
Table 5–4.
DWMBB I/O Adapter
5–7
5.3 DWMBB Functional Description
The DWMBB adapter provides an information path between
the XMI bus and I/O devices on the VAXBI bus. The DWMBB
consists of two modules: the DWMBB/A and the DWMBB/B.
The DWMBB/A resides on the XMI bus, and the DWMBB/B
resides on the VAXBI bus. Four 30-pin cables, which make
up the IBUS, connect the two modules.
Figure 5–4: DWMBB XMI-to-VAXBI Adapter Block Diagram
VAXBI
CORNER
(BIIC)
DWMBB/A
MODULE
LOGIC
IBUS
XMI
CORNER
T2018 MODULE
XMI
DWMBB/B
MODULE
LOGIC
T1043 MODULE
VAXBI
msb-0062A-90
5–8 VAX 6000 Model 600 Service Manual
The DWMBB/A contains the XMI Corner, the register files, XMI required
registers, DWMBB/A-specific registers, page map registers, and the control
sequencers for the XMI interface.
The DWMBB/B contains the BIIC interface chip, interconnect drivers,
control sequencers to handle the control of the data transfer, status bits to
and from the DWMBB/A module’s register files and the BIIC, DWMBB/Bspecific registers, decode logic for direct memory access (DMA) operation,
and VAXBI clock-generation circuitry.
The DWMBB/A and DWMBB/B modules are connected by four cables of 30
wires each. These 120 wires make up the IBUS, which transfers data and
control information between the two modules.
The DWMBB uses I/O and DMA transactions to exchange information. I/O
transactions originate from the KA66A modules and are presented to the
DWMBB from the XMI bus with the processor as the XMI commander and
the DWMBB as the XMI responder.
DMA transactions originate from VAXBI nodes that select the DWMBB as
the VAXBI slave. These are read or write transactions targeted to XMI
memory space or are VAXBI-generated interrupt transactions that target a
KA66A processor module module. For DMA transactions, the DWMBB is
the XMI commander, and the MS65A module is the XMI responder.
The DWMBB can be both a master and a slave on the VAXBI. As a master,
it carries out transactions requested by its XMI devices. As a slave, it
responds to VAXBI transactions that select its node.
DWMBB I/O Adapter
5–9
5.4 DWMBB Registers
Two sets of registers are used by the DWMBB adapter:
VAXBI registers (residing in the BIIC) and DWMBB registers
(residing on both modules of the DWMBB). The DWMBB
registers include the XMI required registers and DWMBBspecific registers addressed in DWMBB private space.
Table 5–5: VAXBI Registers
Name
Mnemonic
Address1
Device Register
DTYPE
bb+00
VAXBI Control and Status Register
VAXBICSR
bb+04
Bus Error Register
BER
bb+08
Error Interrupt Control Register
EINTRSCR
bb+0C
Interrupt Destination Register
INTRDES
bb+10
IPINTR Mask Register
IPINTRMSK
bb+14
Force-Bit IPINTR/STOP Destination Register
FIPSDES
bb+18
IPINTR Source Register
IPINTRSRC
bb+1C
Starting Address Register
SADR
bb+20
Ending Address Register
EADR
bb+24
BCI Control and Status Register
BCICSR
bb+28
Write Status Register
WSTAT
bb+2C
Force-Bit IPINTR/STOP Command Register
FIPSCMD
bb+30
User Interface Interrupt Control Register
UINTRCSR
bb+40
General Purpose Register 0
GPR0
bb+F0
General Purpose Register 1
GPR1
bb+F4
General Purpose Register 2
GPR2
bb+F8
General Purpose Register 3
GPR3
bb+FC
1 The
abbreviation "bb" refers to the base address of a VAXBI node (the address of the first location of nodespace).
5–10 VAX 6000 Model 600 Service Manual
Table 5–5 lists the VAXBI registers. The VAXBI registers are described in
Chapter 5 of the VAXBI Options Handbook. Table 5–6 lists the DWMBB
registers.
Table 5–6: DWMBB XMI Registers
Name
Mnemonic1
Address2
Device Register
XDEV
BB+00
Bus Error Register
XBER
BB+04
Failing Address Register
XFADR
BB+08
Responder Error Address Register
AREAR
BB+0C
Error Summary Register
AESR
BB+10
Interrupt Mask Register
AIMR
BB+14
Implied Vector Interrupt Destination/Diagnostic
Register
AIVINTR
BB+18
Diagnostic 1 Register
ADG1
BB+1C
Utility Register
AUTLR
BB+20
Control and Status Register
ACSR
BB+24
Return Vector Register
ARVR
BB+28
Failing Address Extension Register
XFAER
BB+2C
VAXBI Error Address Register
ABEAR
BB+30
Control and Status Register
BCSR
BB+40
Error Summary Register
BESR
BB+44
Interrupt Destination Register
BIDR
BB+48
Timeout Address Register
BTIM
BB+4C
Vector Offset Register
BVOR
BB+50
Vector Register
BVR
BB+54
Diagnostic Control Register 1
BDCR1
BB+58
Reserved Register
BRSVD
BB+5C
1 If
the first letter of the mnemonic is "X" or "A," it indicates that the register resides on the DWMBB/A module; a first letter of "B" indicates that the register resides on the DWMBB/B module.
2 The
abbreviation "BB" refers to the base address of an XMI node (the address of the first location of nodespace).
DWMBB I/O Adapter
5–11
Table 5–6 (Cont.): DWMBB XMI Registers
Name
Mnemonic1
Address2
Page Map Register (first location)
PMR
BB+200
PMR
BB+401FC
.
.
.
Page Map Register (last location)
5–12 VAX 6000 Model 600 Service Manual
Appendix A
ROM-Based Diagnostic Monitor
Program
This appendix describes the RBD monitor program, in the following
sections:
•
RBD Monitor Control Characters
•
DEPOSIT and EXAMINE Commands
•
START Command
•
START Command Qualifiers
•
RBD Test Printout, Passing
•
RBD Test Printout, Failing
•
SUMMARY Command
•
Sample RBD Session
•
Running ROM-Based Diagnostics on I/O Devices
ROM-Based Diagnostic Monitor Program A–1
A.1 RBD Monitor Control Characters
Several control characters are supported by the RBD
monitor program. These characters manage the program
process as shown in Table A–1.
Table A–1: RBD Monitor Control Characters
Character
Environment
Function
CTRL/C
Test running
Stops the execution of an RBD test and executes cleanup code.
DELETE
RBD command line
Use for deleting erroneous characters entered on the
command line.
CTRL/Q
Test running
Resumes output to terminal that was suspended with
CTRL/S .
CTRL/R
At RBD prompt
Refreshes the command line; useful when characters are deleted.
CTRL/S
Test running
Suspends output to the terminal until
typed.
CTRL/T
Test running
Displays informational status line about currently
running diagnostic.
CTRL/U
At RBD prompt
Disregards previous input.
CTRL/Y
Test running
Stops the execution of an RBD test and does not execute any cleanup code.
CTRL/Z
At RBD prompt
Exits RBD monitor program and enters console program; same effect as the QUIT command.
A–2 VAX 6000 Model 600 Service Manual
CTRL/Q
is
When CTRL/C is entered from the console terminal that began execution
of the RBD test, the diagnostic stops execution, runs cleanup code, and
returns control to the RBD monitor program. This happens immediately
when running RBD 0, RBD 1, or RBD 2; there may be a wait of up to one
minute for a response when RBD 3 is running. If CTRL/C is typed at the
RBD monitor prompt, it has the same effect as CTRL/U.
When you use the DELETE key (or rubout key), characters being deleted
are preceded by a backslash ( \ ) and print as they are rubbed out. When
the next valid character is typed, it is preceded by a backslash ( \ ) to
delineate the deleted characters. You can use CTRL/R to refresh the line.
When a CTRL/T is received by the RBD monitor program from the console
terminal that began execution of the RBD test, the diagnostic displays an
informational status line and continues test execution. A CTRL/T entered
at the RBD prompt is ignored.
When the RBD monitor program receives a CTRL/U, the program
disregards all previous input typed and returns the RBD prompt. If a
test is running when CTRL/U is entered, CTRL/U is ignored.
When a CTRL/Y is received by the RBD monitor program from the console
terminal that began execution of the RBD test, the diagnostic stops
execution and returns control to the RBD monitor program. No cleanup
code is run, and the unit under test is left in an indeterminate state.
A CTRL/Y entered at the RBD monitor prompt has the same effect as
CTRL/U.
When the RBD monitor program receives a CTRL/Z, the program exits and
control is returned to the console program. The next prompt is the console
prompt. CTRL/Z has the same effect as the QUIT command. If CTRL/Z
is entered while an RBD test is running, CTRL/Z has the same effect as
CTRL/C: it halts the test and executes cleanup code.
ROM-Based Diagnostic Monitor Program A–3
A.2 DEPOSIT and EXAMINE Commands
The DEPOSIT command deposits data to the address
specified, and the EXAMINE command displays the data
stored at the specified address.
Example A–1: DEPOSIT and EXAMINE Commands
>>> T/R
RBD2> D 20 0
RBD2> E/G A
0000000A
!
!
Examine a word of data starting at address
300. (/W changes default to word length.)
!
!
!
Examine a word of data starting at address
302. (The previous address is incremented
by the default length.)
!
!
!
!
!
!
!
Deposit the word-length hexadecimal value
1234 starting at the last requested address,
in this case 302.
Deposit the longword-length hexadecimal value
5678AABB starting at the last requested
address incremented by the default length (in
this case, the address is 304).
FFFF
RBD2> E
00000302
Command to enter RBD monitor program.
Deposit the value zero to address 20; the
boot processor is at node 2.
Examine GPR R10.
00000000
RBD2> E/W 300
00000300
!
!
!
!
FFFF
RBD2> D/W * 1234
RBD2> D/L + 5678AABB
Table A–2: DEPOSIT and EXAMINE Command Qualifiers
Qualifier
Meaning
/B
Defines data size as a byte.
/G
For the EXAMINE command only; shows a copy of the contents of general registers R0 through R11 when the diagnostic halted.
/L
Defines data size as a longword.
/W
Defines data size as a word.
A–4 VAX 6000 Model 600 Service Manual
The command syntax is:
D[/qualifier] <address> <data>
E[/qualifier] <address>
The qualifiers must be placed immediately following the command.
The variable <data> is a numeric value to be stored. The value must fit in
the data size to be deposited. In the RBD program, addresses are always
considered to be physical addresses, not register references. You can only
examine the register contents (using E/G in RBD mode); you cannot deposit
to the registers.
The variable <address> is a 1- to 8-digit hexadecimal value or one of the
following:
•
+, the location immediately following the last location you referenced
in an E or D command. For memory, the referenced location is the
last location plus the size of the reference (1 for byte, 2 for word, 4
for longword). When examining general purpose registers (GPRs), the
location is incremented by 1.
•
–, the location immediately preceding the last location you referenced
in an E or D command. For memory, the referenced location is the last
location minus the size of the reference (1 for byte, 2 for word, 4 for
longword). When examining GPRs, the location is decremented by 1.
•
*, the last location you referenced in an E or D command.
The D command directs data into the specified address. If you do not
specify any address or data size qualifiers, the defaults are based on the
last address or data size specified in a D or E command. After processor
initialization, the default address space is physical memory, the default
data size is longword, and the default address is zero. Data cannot be
deposited into a GPR.
The address and data must be entered as hexadecimal characters. The data
specified must be able to fit into the current data length: 2 hex digits for
byte length, 4 for word length, and 8 for longword length.
If an E command is followed by a Return (E<CR>), the RBD program
interprets it as an E+ command.
When using the /G qualifier with a /B, /W, or /L qualifier, the /G must be
first.
ROM-Based Diagnostic Monitor Program A–5
A.3 START Command
The RBD monitor START command invokes a specific RBD
program. It takes an argument indicating the RBD program
to be run and can take any of 13 qualifiers.
Example A–2: START Command
>>> T/R
! Command to enter RBD monitor program.
RBD3>
! RBD monitor prompt, where 3 is the hexa! decimal node number of the processor
! that is currently receiving your input.
RBD3> ST0/TR
! Runs the CPU tests, testing the KA66A
! at XMI node number 3. Test results
! are written to the console terminal.
RBD3> ST1/HE/IE/BE
!
!
!
!
!
Runs the default tests in the CPU/memory
interaction RBD, halting on the first
error encountered, inhibiting error output,
ringing the bell when the first error is
encountered.
The START command syntax is:
STn[/qualifier] [parameter]
where:
•
n is the RBD to be run (see Table 2–9).
•
[/qualifier] is one of those listed in Section A.4.
•
[parameter] is a program-specific value used in RBD 2, 3, or 4. (For
the meaning of this parameter, see Section 2.7.4, Section 2.7.5, or
Section 2.7.6.)
A–6 VAX 6000 Model 600 Service Manual
A.4 START Command Qualifiers
The START command has qualifiers that allow you to control
the output of the tests—to run portions of a test, to run
nondefault tests, and to loop on tests.
Table A–3: START Command Qualifiers
Qualifier
Default
Function
/BE
Disabled
Bell sounds when an error is encountered
/C
Disabled
Destructive test confirmation
/DS
Disabled
Disable status reports
/HE
Disabled
Halt on the test that incurs a hard error
/HS
Disabled
Halt on the test that incurs a soft error
/IC
Disabled
Inhibit cleanup
/IE
Disabled
Inhibit all error output
/IS
Disabled
Inhibit summary reports
/LE
Disabled
Loop on the test that incurs a hard error
/LS
Disabled
Loop on the test that incurs a soft error
/P=n
Enabled
Make n passes of the test or tests indicated
/QV
Disabled
Quick verify mode
/T=n[:m]
Enabled
/T=n runs test n; /T=n:m runs a range of tests from n
through m
/TR
Disabled
Print a trace of test numbers, as they run
NOTE: A qualifier is valid only for the command with which it is issued.
Qualifiers do not remain in effect for the session once they are issued.
See Example A–2 for examples and a description of the START command
syntax.
With /BE, the RBD monitor program rings the bell on the console terminal
whenever an error is encountered. This is useful when error printout is
inhibited and a loop is being performed on an intermittent error (/LE).
ROM-Based Diagnostic Monitor Program A–7
/C enables execution of destructive tests. See Section 2.7.5 for information
on the destructive tests.
/DS disables printout of the diagnostics test results. The summary report
is run, unless it is specifically disabled.
/HE halts on hard error and stops execution of tests as soon as the first
hard error is encountered. (In this context, a hard error is defined as a
recoverable, repeatable error, for example, a ROM checksum error. This
differs from a fatal error, which is an unrecoverable fault, for example,
an unexpected interrupt or exception. A fatal error is always cause for
program abortion, regardless of the state of the /HE or /LE qualifier.) The
test number is printed, and a summary indicating failure of the RBD is
printed to the console terminal. Also the RBD monitor prompt is returned.
Continue on error is the default condition, so if you want to halt on error,
you must specifically invoke it in your command line.
/HS halts on soft error and stops execution of tests as soon as the first soft
error is encountered. (In this context, a soft error is defined as a recoverable
error that goes away after retry, for example, a corrected read data memory
error.) The test number is printed, and a summary indicating failure of the
RBD is printed to the console terminal. Also the RBD monitor prompt is
returned. Continue on soft error is the default condition, so if you want to
halt on soft error, you must specifically invoke it in your command line.
/IC inhibits the cleanup code that normally executes after an RBD has
completed. This is useful during debugging to prevent the cleanup of error
bits in registers.
/IE inhibits all error output, suppressing printing of RBD results. This
qualifier is used primarily for module repair, in conjunction with the /LE
or /LS qualifier. Errors are counted even when the printing is disabled.
/IS suppresses printout of RBD summary after the end of the last pass
performed by the RBD.
/LE loops on the test where the first hard error is detected. Even if the
error is intermittent, looping continues on the test indicated. To terminate
/LE, enter CTRL/C, CTRL/Z, or CTRL/Y. After entering one of these control
characters, a summary report is printed. A fatal error causes the program
to abort, regardless of the state of this qualifier.
/LS loops on the test where the first soft error is detected. Even if the
error is intermittent, looping continues on the test indicated. To terminate
/LS, enter CTRL/C, CTRL/Z, or CTRL/Y. After entering one of these control
characters, a summary report is printed.
/P=n runs n number of passes of the RBD test invoked, where n is a decimal
number. If n is 0, all selected tests run for an infinite number of passes.
A–8 VAX 6000 Model 600 Service Manual
If the /P qualifier is not used, the program defaults to one pass of the test
invoked. When used with the /T=n:m qualifier, you run a range of tests. To
terminate /P=n, enter CTRL/C, CTRL/Z, or CTRL/Y. After entering one of
these control characters, a summary report prints out and the RBD monitor
prompt returns.
/QV selects the quick verify version of any selected test that supports this
mode.
/T=n[:m] selects individual tests (/T=n) or a range of tests (/T=n:m) where
n and m are decimal numbers. For example, to run tests T0005 through
T0008, use /T=5:8. If no /T qualifier is used, the diagnostic runs its default
suite of tests.
/TR prints each test number as it is completed. This qualifier allows you to
trace the progress of the diagnostic as it runs. Without the /TR qualifier,
just the summary line is printed.
One parameter field can be appended to the START command string to
control aspects of the diagnostic that are not covered by the qualifiers. The
parameter must be appended after any qualifiers specified and separated
from the qualifiers by a space. The format of the parameter field is one to
four hexadecimal characters.
ROM-Based Diagnostic Monitor Program A–9
A.5 RBD Test Printout, Passing
The RBD printout results are different when the RBD tests
pass and when they fail. Example A–3 shows a passing
printout, and Example A–4 is a sample failure printout.
Example A–3: RBD Test Printout, Passing
>>> T/R
!
!
!
!
!
RBD3>
RBD3> ST2/TR E
! Runs the XBI self-test, testing the DWMBB
! at XMI node number E. Test results
! written to the console terminal:
!
"
1.00
; XBI+_RBD
;
;
;
;
;
T0001
T0011
T0021
T0031
T0041
T0002
T0012
T0022
T0032
T0042
$
Command to enter RBD monitor program at
console prompt.
RBD monitor prompt, where 3 is the hexadecimal node number of the processor
that is currently receiving your input.
T0003
T0013
T0023
T0033
T0043
%
T0004
T0014
T0024
T0034
T0044
&
T0005
T0015
T0025
T0035
T0006
T0016
T0026
T0036
T0007
T0017
T0027
T0037
T0008
T0018
T0028
T0038
#
T0009
T0019
T0029
T0039
'
T0010
T0020
T0030
T0040
(
;
P
3
8087
1
; 00000000 00000000 00000000 00000000 00000000 00000000 00000000
)
RBD3> QU
! RBD prompt returns; test ran successfully.
! Exit RBD program.
>>>
The callouts in Example A–3 are explained below.
!
"
This entry designates which test is being run. Here it is XBI+_RBD,
the test for the DWMBB or DWMVA/A.
XNP_ST indicates RBD 0, the CPU tests
CPUMEM indicates RBD 1, the CPU/memory interaction tests
XBI+_RBD indicates RBD 2, the DWMBB and DWMVA/A tests
XMA2_RBD indicates RBD 3, the Memory tests
XNP_BC indicates RBD 4, the cache tests
XNP_MP indicates RBD 5, the multiprocessor tests
This field lists the revision number of the RBD program.
A–10 VAX 6000 Model 600 Service Manual
#
$
%
&
'
(
)
These T00nn fields appear only with the /TR qualifier; each entry
corresponds to a test being run and prints out as the test starts running.
In a passing RBD, the final T00nn number corresponds to the last test
run.
This field indicates whether the RBD passed or failed; P for passed, F
for failed.
This field is the XMI node number of the boot processor executing the
RBD. It matches the number in your RBD prompt.
This field is always 8087—the device type of the boot processor.
This field displays the total number of passes (in decimal) executed by
the RBD. The default number of passes is 1. If you use the START
command with the qualifier /P=5, for example, then this field will show
5, indicating 5 passes were completed.
This line contains the summary of the RBD failures. In a successful
RBD run, the line will contain all zeros as shown here. Currently
only the second and third fields are used. The second field contains the
number of hard errors detected during the run. The third field contains
the number of soft errors detected during the run.
The console prompt is usually returned in response to the RBD QUIT
command, as shown in this example. However, when tests that cause
parity errors are run, the response to QUIT is a system reset. The
power-up test is then run, and the results are printed. The tests that
cause a system reset are tests 1, 2, and 4 of RBD 1; tests 2, 3, 4, 30,
and 31 of RBD 2; and tests 5 and 9 of RBD 3.
ROM-Based Diagnostic Monitor Program A–11
A.6 RBD Test Printout, Failing
The RBD printout results are different when the RBD passes
and when it fails. Example A–4 is a sample failure printout,
and Example A–3 shows a passing printout.
Example A–4: RBD Test Printout, Failing
>>> T/R
!
!
!
!
!
!
RBD2>
RBD2> ST0/TR
; XNP_ST
; T0001
; T0011
; T0021
Command to enter RBD monitor program at
console prompt.
RBD monitor prompt, where 2 is the hexadecimal node number of the processor
that is currently receiving your input.
Execute RBD 0 (CPU test) and trace results.
1.00
T0002
T0012
T0022
"
&
+>
T0003
T0013
T0023
T0004
T0014
T0024
T0005
T0015
T0025
T0006
T0016
T0026
T0007
T0017
T0027
T0008
T0018
T0028
T0009
T0019
T0029
!
T0010
T0020
# 8087$
1%
'
XX(
T0029)
+? T0033
A8AAAAAA+@ 00000000+A E1008000+B E008C410+C 08+D
T0034 T0035 T0036 T0037 T0038 T0039
T0043 T0044 T0045+E
;
F
1
8087
1+F
; 00000000 00000001+G 00000000 00000000 00000000 00000000 00000000
;
F
2
;
HE
BR_PRED
;
28
5555AAAA
; T0030 T0031 T0032
; T0040 T0041 T0042
RBD2>
RBD2> QUIT
>>>
! RBD prompt returns; test completed.
! Exit RBD program.
! Console prompt reappears.
The callouts in Example A–4 are explained below. (See also Example A–3
for explanation of other fields of the printout.)
!
"
These T00nn fields appear only with the /TR qualifier; each entry
corresponds to a test being run. The entry prints out as the test starts
running. This T00nn number is the number of the failing test and is
followed by a failure report. In this example, test 29 failed. The /HE
qualifier was not used, so testing continues.
F indicates failure of the previous test listed, test 29.
A–12 VAX 6000 Model 600 Service Manual
#
$
%
&
'
(
)
+>
+?
+@
+A
+B
+C
+D
+E
+F
+G
This field is the XMI node number of the boot processor executing the
RBD. It matches the number in your RBD prompt.
This field is always 8087—the device type of the boot processor.
This field displays the total number of passes (in decimal) executed by
the RBD. The default number of passes is 1.
The class of error is displayed here. HE indicates that the error was
a hard error. SE means the error was a soft error, and FE indicates a
fatal error. (See Section A.4 for a definition of these errors.)
This field describes the failing logic. Here, the branch prediction logic
has failed.
This field is the unit number used in memory, multiprocessing, and
DWMBB and DWMVA/A tests.
This field lists the number of the test that failed; test 29 failed here.
This is a two-digit (decimal) generic error code.
The expected data is listed here.
expected.
5555AAAA is the data test 29
The received data is listed here.
received.
A8AAAAAA is the data test 29
This field shows any unexpected interrupt vectors.
This is the address in memory where the referenced error is found.
This is the address of the failing PC at the time of error.
This is the error number within the failing test. In this example, the
failure was detected at failure point 8 in T0029. This is a decimal field.
This final T00nn number corresponds to the last test run.
This entire line is the summary line, and a repeat of the failure
summary. It lists the pass/fail code (P or F), the node number and
device type number of the boot processor executing the RBD, and the
number of passes of the RBD.
This is the number of hard errors detected.
ROM-Based Diagnostic Monitor Program A–13
A.7 SUMMARY Command
The RBD monitor SUMMARY command displays a summary
of the last diagnostic run.
Example A–5: SUMMARY Command
>>> T/R
RBD1> ST0/IE/IS/P=100
; XNP_ST
! Command to enter RBD monitor program
! Execute RBD 0 (CPU test), inhibiting
! error outputs and summary report.
1.00
RBD1> SU
; XNP_ST
! Request a summary.
!
1.00
"
#
$
%
1
8087
100
;
P
; 00000000 00000000 00000000 00000000 00000000 00000000 00000000
RBD1>
A–14 VAX 6000 Model 600 Service Manual
The callouts in Example A–5 are explained below.
!
"
#
$
%
This field indicates whether the RBD passed or failed; P for passed, F
for failed.
This field is the XMI node number of the boot processor executing
the RBD. It will match the number in your RBD prompt, which also
indicates the node number of your boot processor.
This field is always 8087, the device type number for the KA66A
processor; in this case the boot processor.
This field displays the total number of passes executed by the RBD.
This line contains the summary of the RBD failures. Presently only the
second and third fields are used. The second field contains the number
of hard errors detected during the run. The third field contains the
number of soft errors detected during the run.
ROM-Based Diagnostic Monitor Program A–15
A.8 Sample RBD Session
Examples A–6, A–7, and A–8 show a sample RBD session.
Example A–6: Sample RBD Session, Part 1 of 3
!
"
>>> T/R
RBD1> ST0/TR
;XNP_ST
;
;
;
;
;
T0001
T0011
T0021
T0031
T0041
1.00
T0002
T0012
T0022
T0032
T0042
T0003
T0013
T0023
T0033
T0043
T0004
T0014
T0024
T0034
T0044
T0005
T0015
T0025
T0035
T0045
T0006
T0016
T0026
T0036
T0007
T0017
T0027
T0037
T0008
T0018
T0028
T0038
T0009
T0019
T0029
T0039
T0010
T0020
T0030
T0040
;
P
1
8087
1
;00000000 00000000 00000000 00000000 00000000 00000000 00000000
#
RBD1> ST1/TR/HE
;CPUMEM
; T0001
; T0011
1.00
T0002
T0012
T0003
T0013
T0004
T0014
T0005
T0015
T0006
T0016
T0007
T0008
T0009
;
P
1
8087
1
;00000000 00000000 00000000 00000000 00000000 00000000 00000000
$
RBD1> ST2/TR 5
;XBI+_RBD
;
;
;
1.00
F
1
8087
1
HE NO_UNIT
XX
T0000
52 00000000 00000000 00000000 E1880000 E007AF8E 01
;
F
1
8087
1
;00000000 00000001 00000000 00000000 00000000 00000000 00000000
A–16 VAX 6000 Model 600 Service Manual
T0010
!
"
#
$
Enter RBD mode from console mode. The RBD prompt appears and
indicates you are operating from the boot processor at node 1.
Run RBD 0 and trace the tests.
successfully.
The CPU test runs all 45 tests
Run RBD 1, trace it, and halt on the first hard error found. All CPU/
memory interaction RBD tests run and pass.
Run RBD 2, testing the DWMBB at XMI node 5. The value NO_UNIT
on the third line of output indicates that the node value of node 5 is not
correct; no DWMBB was found at this node.
ROM-Based Diagnostic Monitor Program A–17
Example A–7: Sample RBD Session, Part 2 of 3
%
RBD1> ST2/TR/T=2:4/P=3 E
;XBI+_RBD
; T0002
1.00
T0003
T0004
T0002
T0003
T0004
T0002
T0003
T0004
;
P
1
8087
3
;00000000 00000000 00000000 00000000 00000000 00000000 00000000
&
RBD1> ST3/TR/T=1
RBD1> ST3/TR/T=1
'
RBD1> ST3/TR/T=1 /C
;XMA2_RBD
0.80
; T0001
;
P
1
8087
1
;00000000 00000000 00000000 00000000 00000000 00000000 00000000
(
RBD1> ST4/TR/T=1
;XNP_BC
1.00
; T0001
;
P
1
8087
1
;00000000 00000000 00000000 00000000 00000000 00000000 00000000
)
RBD1> ST5/TR
;XNP_MP
; T0001
1.00
T0002
T0003
T0004
T0005
T0006
T0007
;
P
1
8087
1
;00000000 00000000 00000000 00000000 00000000 00000000 00000000
+>
RBD1> QUIT
[power-up test results may be displayed here]
A–18 VAX 6000 Model 600 Service Manual
%
&
Run RBD 2, testing the DWMBB at XMI node E; trace the tests as
they run, and run tests 2 through 4 of RBD 2; make 3 passes over
these selected tests.
Note that the T00nn line lists each of the three tests three times, since
the /P=3 called for 3 passes of the tests. And the final parameter in the
summary line is a 3, indicating that 3 passes completed.
Run RBD 3, trace it, and run only test 1 of this RBD. This test is one of
the memory tests that is not part of the default suite of tests. This test
corrupts memory. You must add a /C qualifier to the START command,
to indicate that you do indeed intend to run this destructive test.
The /C qualifier was not given in this example. The command line is
echoed, waiting for /C to be typed.
'
(
)
+>
At this point you can press Return to return to the command prompt
(RBD1>), or you can type the /C qualifier followed by Return.
Run RBD 3, trace the tests as they run, run only test 1, and /C allows
the test to run. In this example, the test completed with no errors.
Run RBD 4, test 1, with trace set.
Run RBD 5 and trace the tests. All tests pass.
Exit from RBD mode and enter console mode. The console prompt is
usually returned in response to the RBD QUIT command; however,
when tests that cause parity errors are run, the response to QUIT is
a system reset. The power-up test is then run, and the results are
printed. The tests that cause a system reset are tests 1, 2, and 4 of
RBD 1; tests 2, 3, 4, 30, and 31 of RBD 2; and tests 5 and 9 of RBD 3.
ROM-Based Diagnostic Monitor Program A–19
Example A–8: Sample RBD Session, Part 3 of 3
+?
RBD2> ST0/TR+@
>>> SET CPU 2
>>> T/R
;XNP_ST
;
;
;
;
;
T0001
T0011
T0021
T0031
T0041
1.00
T0002
T0012
T0022
T0032
T0042
T0003
T0013
T0023
T0033
T0043
T0004
T0014
T0024
T0034
T0044
T0005
T0015
T0025
T0035
T0045
T0006
T0016
T0026
T0036
T0007
T0017
T0027
T0037
T0008
T0018
T0028
T0038
T0009
T0019
T0029
T0039
;
P
1
8087
1
;00000000 00000000 00000000 00000000 00000000 00000000 00000000
A–20 VAX 6000 Model 600 Service Manual
T0010
T0020
T0030
T0040
+?
+@
Make another processor the primary processor so that RBD 0 can be
run on it.
Run RBD 0 and trace the tests. All 45 tests run successfully.
ROM-Based Diagnostic Monitor Program A–21
A.9 Running ROM-Based Diagnostics on I/O
Devices
Some XMI and VAXBI devices can be tested from the console
terminal with their on-board ROM-based diagnostics. The Z
console command is used to send commands to these nodes.
Example A–9: Running RBDs on I/O Devices
!
>>> SHOW CONFIGURATION
Type
Rev
1+ KA66A
(8087) 0006
2+ KA66A
(8087) 0006
4+ MS65A
(4001) 0084
8+ MS65A
(4001) 0084
D+ DEMNA
(0C03) 0601
E+ DWMBB/A (2002) 0001
XBI
1+
4+
6+
8+
>>> Z
?0033
T/R
#
E
DWMBB/B (210F) 000A
KDB50
(010E) 132E
TBK70
(410B) 0307
CIBCA-B (0108) 41C2
D
Z connection successfully started
"
$
RBDD> ST0/TR
;Selftest
; T0001
; T0011
3.00
T0002
T0012
T0003
T0013
T0004
T0014
T0005
T0015
T0006
T0016
T0007
T0017
T0008
T0018
T0009
;
P
D
0C03
1
;00000000 00000000 00000000 00000000 00000000 00000000 00000000
%
RBDD> QUIT
^P
?0031 Z connection terminated by ^P
&
>>> Z/BI:6 E
?0033 Z connection successfully started
T/R
'
RBD6> ST 0/TR
;T1035_St
1.00
Example A–9 Cont’d on next page
A–22 VAX 6000 Model 600 Service Manual
T0010
Example A–9 (Cont.): Running RBDs on I/O Devices
; T01
; T15
T02
T16
T03
T17
T04
T05
T06
T07
T08
T09
T10
T11
T12
T13
T14
;
P
6
410B 00000001
;00000000 00000000 00000000 00000000 00000000 00000000 00000000
(
;
PUDR: 5FF43FDF
RBD6> QUIT
^P
?0031 Z connection terminated by ^P
>>>
The callouts in Example A–9 are explained below.
!
"
#
$
%
&
'
(
The SHOW CONFIGURATION console command shows that this
system includes a DEMNA at node D of the XMI bus and a
TBK70 at node 6 of the VAXBI attached at XMI node E. (See VAX
6000 Series Owner’s Manual for more information on the SHOW
CONFIGURATION command.)
The Z command is typed at the console prompt. A connection is
established to XMI node D. The console returns a message confirming
that the connection has been made.
"
After the console message is returned in , no prompt is printed.
Typing T/R invokes the RBD monitor on the adapter being tested and
returns the RBD monitor prompt. Note that the D in the RBD prompt
refers to the XMI node.
The RBD is started with trace set.
The QUIT command exits the RBD monitor. The Z connection remains
until CTRL/P is entered.
"
%
Steps
through
are repeated to run the RBD of the TBK70 at node
6 of the VAXBI attached at XMI node E.
The START command for VAXBI RBDs requires a space before the 0.
When run with the /TR qualifier, test traces are printed.
The last line of the summary report indicates the contents of the PowerUp Diagnostic Register. To interpret the contents of this register, refer
to the technical manual for the device being tested.
ROM-Based Diagnostic Monitor Program A–23
Appendix B
Console Error Messages
Table B–1 lists messages that appear when the processor halts and the
console gains control. Most messages are followed by:
•
PC = xxxxxxxx — program counter = address at which the processor
halted or the exception occurred
•
PSL = xxxxxxxx — processor status longword = contents of the register
•
–SP = xxxxxxxx — –SP is one of the following:
ESP executive stack pointer
ISP interrupt stack pointer
KSP kernel stack pointer
SSP supervisor stack pointer
USP user stack pointer
Table B–2 lists other console error messages.
Table B–1: Console Error Messages Indicating Halt
Error Message
?0002 External halt (CTRL/P, break, or external halt).
Meaning
CTRL/P
or STOP command.
?0003 Power-up halt.
System has powered up, had a system reset, or an XMI node reset.
?0004 Interrupt stack not valid during exception processing.
Interrupt stack pointer contained an invalid address.
?0005 Machine check occurred during exception processing.
A machine check occurred while handling another error condition.
?0006 Halt instruction executed in kernel mode.
The CPU
tion.
executed
a
Halt
Console Error Messages
instruc-
B–1
Table B–1 (Cont.): Console Error Messages Indicating Halt
Error Message
Meaning
?0007 SCB vector bits <1:0> = 11.
An interrupt or exception vector in the
System Control Block contained an invalid address.
?0008 SCB vector bits <1:0> = 10.
An interrupt or exception vector in the
System Control Block contained an invalid address.
?000A CHMx executed while on interrupt stack.
A change-mode instruction was issued
while executing on the interrupt stack.
?0010 ACV/TNV occurred during machine check
processing.
An access violation or translation-notvalid error occurred while handling another error condition.
?0011 ACV/TNV occurred during kernel-stacknot-valid processing.
An access violation or translation-notvalid error occurred while handling another error condition.
?0012 Machine check occurred during machine check processing.
A machine check occurred while processing a machine check.
?0013 Machine check occurred during kernelstack-not-valid processing.
A machine check occurred while handling another error condition.
?0019 PSL <26:24>= 101 during interrupt
or exception.
An exception or interrupt occurred while
on the interrupt stack but not in kernel mode.
?001A PSL <26:24>= 110 during interrupt
or exception.
An exception or interrupt occurred while
on the interrupt stack but not in kernel mode.
?001B PSL <26:24>= 111 during interrupt
or exception.
An exception or interrupt occurred while
on the interrupt stack but not in kernel mode.
?001D PSL <26:24> = 101 during REI.
An REI instruction attempted to restore a PSL with an invalid combination of access mode and interrupt stack bits.
?001E PSL <26:24> = 110 during REI.
An REI instruction attempted to restore a PSL with an invalid combination of access mode and interrupt stack bits.
?001F PSL <26:24> = 111 during REI.
An REI instruction attempted to restore a PSL with an invalid combination of access mode and interrupt stack bits.
B–2 VAX 6000 Model 600 Service Manual
Table B–2: Standard Console Error Messages
Error Message
Meaning
?0020 Illegal memory reference.
An attempt was made to reference a virtual address (/V) that is either unmapped or is protected against access under the current PSL.
?0021 Illegal command.
The command was not recognized, contained the wrong number of parameters, or contained unrecognized or inappropriate qualifiers.
?0022 Illegal address.
The specified address was recognized as
being invalid, for example, a general purpose register number greater than 15.
?0023 Value is too large.
A parameter or qualifier value contained too many digits.
?0024 Conflicting qualifiers.
A command specified recognized qualifiers that are illegal in combination.
?0025 Checksum did not match.
The checksum calculated for a block of X
command data did not match the checksum received.
?0026 Halted.
The processor is currently halted.
?0027 Item was not found.
The item requested in a FIND command could not be found.
?0028 Timeout while waiting for characters.
The X command failed to receive a full
block of data within the timeout period.
?0029 Machine check accessing memory.
Either the specified address is not implemented by any hardware in the system, or an attempt was made to write
a read-only address, for example, the address of the 33rd Mbyte of memory on a 32-Mbyte system.
?002A Unexpected machine check or
interrupt.
A valid operation within the console
caused a machine check or interrupt.
?002B Command is not implemented.
The command is not implemented by this
console.
?002C Unexpected exception.
An attempt was made to examine either a nonexistent IPR or an unimplemented register in RSSC address range
(20140000—20140800).
Console Error Messages
B–3
Table B–2 (Cont.): Standard Console Error Messages
Error Message
Meaning
?002D For Secondary Processor n.
This message is a preface to second message describing some error related to a secondary processor. This message indicates which secondary processor is involved.
?002E Specified node is not an I/O adapter.
The referenced node is incapable of performing I/O or did not pass its selftest.
?0030 Write to Z command target has timed out.
The target node of the Z command is not
responding.
?0031 Z connection terminated by ^P.
A CTRL/P was typed on the
board to terminate a Z command.
?0032 Your node is already part of a Z
connection.
You cannot issue a Z command while executing a Z command.
?0033 Z connection successfully started.
You have requested a Z connection to a
valid node.
?0034 Specified target already has a Z
connection.
The target node was the target of a previous Z connection that was improperly terminated. Reset the system to clear this
condition.
?0036 Command too long.
The command length exceeds 80 characters.
?0037 Bad explicit interleave list — configuring all arrays uninterleaved.
The list of memory arrays for explicit interleave includes no nodes that
are actually memory arrays.
All arrays found in the system are configured.
?0039 Console patches are not usable.
The console patch area in EEPROM
is corrupted or contains a patch revision that is incompatible with the console ROM.
?003B Error encountered during I/O
operation.
An I/O adapter returned an error status
while the console boot primitive was performing I/O.
?003C Secondary processor not in console mode.
The primary processor console needed to
communicate with a secondary processor, but the secondary processor was not
in console mode. STOP the node or reset the system to clear this condition.
B–4 VAX 6000 Model 600 Service Manual
key-
Table B–2 (Cont.): Standard Console Error Messages
Error Message
Meaning
?003D Error initializing I/O device.
A console boot primitive needed to perform I/O, but could not initialize the I/O
adapter.
?003E Timeout while sending message to
secondary processor.
A secondary processor failed to respond to a message sent from the primary.
The primary sends such messages to perform console functions on secondary processors.
?0040 Key switch must be at "Update" to
update EEPROM.
A SET command was issued, but the
key switch was not set to allow updates to the EEPROM.
?0041 Specified node is not a bus adapter.
A command to access a VAXBI node specified an XMI node that was not a bus
adapter.
?0042 Invalid terminal speed.
The SET TERMINAL command specified an unsupported baud rate.
?0043 Unable to initialize node.
The INITIALIZE command failed to reset the specified node.
?0044 Processor is not enabled to BOOT or
START.
As a result of a SET CPU/NOENABLE
command, the processor is disabled from
leaving console mode.
?0045 Unable to stop node.
The STOP command failed to halt the
specified node.
?0046 Memory interleave set is
inconsistent: n n ...
The listed nodes do not form a valid memory interleave set.
One or more
of the nodes might not be a memory array or might be of a different size, or the set could contain an invalid number of members. Each listed array that is a valid memory will be configured uninterleaved.
?0047 Insufficient working memory for normal operation.
Less than 256 Kbytes per processor of
working memory were found. There is insufficient memory for the console to function normally or for the operating system to boot.
?0049 Memory cannot be initialized.
The specified operation was attempted
and prevented.
Console Error Messages
B–5
Table B–2 (Cont.): Standard Console Error Messages
Error Message
Meaning
?004A Memories not interleaved due to
uncorrectable errors:
The listed arrays would normally have
been interleaved (by default or explicit request). Because one or more of them contained unrecoverable errors, this interleave set will not be constructed.
?004B Internal logic error in console.
The console encountered
cally impossible condition.
?004C Invalid node for Z command.
The target of a Z command must be a CPU
or an I/O adapter and must not be the primary processor.
?004D Invalid node for new primary.
The SET CPU command failed when attempting to make the specified node the
primary processor.
?004E Specified node is not a processor.
The specified node is not a processor, as required by the command.
?004F System serial number has not been
initialized.
No CPU in the system contains a valid
system serial number.
?0050 System serial number not initialized on
primary processor.
The primary processor has an uninitialized system serial number. All other processors in the system contain a valid serial number.
?0051 Secondary processor returned bad
response message.
A secondary processor returned an unintelligible response to a request made
by the console on the primary processor.
?0052 ROM revision mismatch. Secondary
processor has revision x.xx.
The revision of console ROM of a secondary processor does not match that of
the primary.
?0053 EEPROM header is corrupted.
The EEPROM header has been corrupted.
The EEPROM must be restored from the TK tape drive.
?0054 EEPROM revision mismatch.
Secondary processor has revision x.xx/y.yy.
A secondary processor has a different revision of EEPROM or has a different set of EEPROM patches installed.
?0055 Failed to locate EEPROM area.
The EEPROM did not contain a set of
data required by the console. The EEPROM may be corrupted.
B–6 VAX 6000 Model 600 Service Manual
a
theoreti-
Table B–2 (Cont.): Standard Console Error Messages
Error Message
Meaning
?0056 Console parameters on secondary processor do not match primary.
The console parameters are not the same
for all processors .
?0057 EEPROM area checksum error.
A portion of the EEPROM is corrupted.
It may be necessary to reload the EEPROM from the TK tape drive.
?0058 Saved boot specifications on secondary
processor do not match primary.
The saved boot specifications are not the
same for all processors.
?0059 Invalid unit number.
A BOOT or SET BOOT command specified a unit number that is not a valid hexadecimal number between 0 and FF.
?005A System serial number mismatch.
Secondary processor has xxxxxxxx.
The indicated serial number of a secondary processor does not match that of
the primary.
?005B Unknown type of boot device.
The console program does not have a boot
primitive to support the specified type
of device or the device could not be accessed to determine its type.
?005C No HELP is available.
The HELP command is not supported
when the console language is set to International.
?005D No such boot spec found.
The specified boot specification was not
found in the EEPROM.
?005E Saved boot spec table full.
The maximum number of saved boot specifications has already been stored.
?005F EEPROM header version mismatch.
Processors have different versions of EEPROMs.
?0061 EEPROM header or area has bad
format.
All or part of the EEPROM contains inconsistent data and is probably corrupted. Reload the EEPROM from the TK
tape.
?0062 Illegal node number.
The specified node number is invalid.
?0063
vice.
Unable
to
locate
console
tape
de-
The console could not locate the I/O
adapter that controls the TK tape.
?0064 Operation only applies to secondary
processors.
The command can only be directed at a
secondary processor.
?0065 Operation not allowed from secondary
processor.
A secondary processor cannot perform this
operation.
Console Error Messages
B–7
Table B–2 (Cont.): Standard Console Error Messages
Error Message
Meaning
?0066 Validation of EEPROM tape image failed.
The image on tape is corrupted or
is not the result of a SAVE EEPROM command. The image cannot be restored.
?0067 Read of EEPROM image from tape failed.
The EEPROM image was not successfully read from tape.
?0068 Validation of local EEPROM failed.
For a PATCH EEPROM operation, the
EEPROM must first contain a valid image before it can be patched. For a RESTORE EEPROM operation, the image was written back to EEPROM
but could not be read back successfully.
?0069 EEPROM not changed.
The EEPROM contents were not changed.
?006A EEPROM changed successfully.
The EEPROM contents were successfully patched or restored.
?006B Error changing EEPROM.
An error occurred in writing to the EEPROM. The EEPROM contents may be corrupted.
?006C EEPROM saved to tape successfully.
The EEPROM contents were successfully written to the TK tape.
?006D EEPROM not saved to tape.
The EEPROM contents were not completely written to the TK tape.
?006E EEPROM Revision = x.xx/y.yy.
The EEPROM contents are at revision x.xx with revision y.yy patches.
?006F Major revision mismatch between tape
image and EEPROM.
The major revision of tape and EEPROM do not match. The requested operation cannot be performed.
?0070 Tape image Revision = x.xx/y.yy.
The EEPROM image on the TK tape is
at revision x.xx with revision y.yy patches.
?0073 System serial number updated.
The EEPROM has been updated with the
correct system serial number.
?0074 System serial number not updated.
The EEPROM has not been changed.
?0075 /CONSOLE_LIMIT value too small for
proper operation. Value ignored.
No change has been made.
?0076 Error writing to tape. Tape may be
write-locked.
Tape has not been written. Check to see
if tape is write-locked.
B–8 VAX 6000 Model 600 Service Manual
Table B–2 (Cont.): Standard Console Error Messages
Error Message
Meaning
?0077 CCA not accessible or corrupted.
Attempt to find the console communications area (CCA) failed.
The console then builds a local CCA, which does
not allow for interprocessor communication.
?007C I/O adapter configuration error at node
n
The I/O adapter at node n is configured improperly.
?0083 Loading system software.1
The console is attempting to load the operating system in response to a BOOT command, power-up, or restart failure.
?0084 Failure.1
An operation did not complete successfully. Should be issued with another message to clarify failure.
?0085 Restarting system software.1
The console is attempting to restart the inmemory copy of the operating system following a power-up or serious error.
?00A0 Initializing system.1
The console is resetting the system in response to a BOOT command.
?00A1 Now updating the EEPROM of node n1
The console is updating the EEPROM.
?00A6 Console halting after unexpected machine check or exception.1
The console executed a Halt instruction to reset the console state after processing an unexpected machine check.
?00A7 RCSR <WD> is set. Local CCA must be
built.1
When the <WD> bit is set, writes to memory are disabled.
?00A8 Bootstrap failed due to previous error.1
The previous attempt to bootstrap the system failed.
?00A9 Restart failed due to previous error.1
The previous attempt to restart the system failed.
Node n: ?xxxx
Error message ?xxxx was generated on secondary processor n and was passed
to the primary processor to be displayed.
?0104 Filename format error.
Period and semicolon characters are improperly used within the filename specified for a MOP boot.
1 No
numbered prefix appears with these messages in English language mode. These numbers are used for these messages in International mode.
Console Error Messages
B–9
Table B–2 (Cont.): Standard Console Error Messages
Error Message
Meaning
?0105 Illegal character(s) in filename.
For filename specified in a MOP boot.
?0106 Filename cannot contain nested blanks or
tabs.
For filename specified in a MOP boot.
?0107 Filename can be no longer than 16 characters.
For filename specified in a MOP boot.
?011E Uncorrectable memory errors discovered long memory test must be performed on node n
Memory array in node n contains an uncorrectable error. The console must perform a full test to locate all the failing locations.
?0120 Unsupported memory module found, will
not be configured.
One or more MS62A memory modules are installed but will not be used.
Only MS65A memory modules are compatible with Model 500 and higher.
?0121 Patch command no longer implemented—
use the diagnostic utility EVUCA.
An invalid PATCH command was issued; use the EVUCA program to update the EEPROM.
?0201 One or more power-up tests have been bypassed.
A test normally run by the processor at power-up has been bypassed.
?0203 Hardware compatibility group mismatch—
secondary/primary: x/y.
Hardware version mismatch between the
primary CPU and an indicated secondary CPU.
?0205 Error locating ROM boot code, run diagnostics.
The console had a problem reading the
CPU’s ROM code.
?0206 EEPROM in error or contains unsupported PCS, processor disabled.
The EEPROM image is the wrong version or is faulty. Use the EVUCA program to upgrade the EEPROM for the indicated CPU.
B–10 VAX 6000 Model 600 Service Manual
Appendix C
Boot Status and Error Messages
This appendix lists status and error messages for Ethernet boots, local disk
and tape boots, and cluster boots. Status messages are shown in the order
they would appear after the boot command is issued. Listed after each
status message are the error messages that could appear during each boot
subprocess.
C.1 Ethernet Boot Messages
1. [Start boot]
?002E Specified node is not an I/O adapter
?0100 Specified adapter failed self-test
?010B Illegal adapter specified for NI boot
2. * Initializing adapter
?0119 Failure to initialize specified adapter
3. * Specified adapter initialized successfully
4. * "Request Program" MOP message sent—waiting for service from
remote node
?0113 No traffic was detected on the Ethernet—aborting boot
procedure
?0115 Aborting boot process—adapter failed attempting to execute
port command
?011F Aborting boot process—adapter failed attempting to execute
boot command
5. * Still waiting for assistance—reissuing "Request Program" message
6. * Remote service link established
7. * Reading boot image from remote node
?010F Failed to receive image from remote server
8. * Passing control to transfer address
Boot Status and Error Messages C–1
C.2 Local Disk Boot Messages
1. [Start Boot]
?002E Specified node is not an I/O adapter
?0100 Specified adapter failed self-test
?010A Illegal adapter specified for disk boot
2. * Initializing adapter
?0119 Failure to initialize specified adapter
3. * Specified adapter initialized successfully
4. * Connecting to boot disk or
* Reading bootblock from disk
?0102 Controller error detected—aborting
?0103 Drive error detected—aborting
?010E Specified unit offline — No media mounted or disabled via
RUN/STOP switch setting
?0114 Serious exception reported—aborting
?0116 Specified unit is inoperative
?0117 Specified unit offline
?0118 Specified unit offline—Unit unknown, online to another
controller or port disabled via A,B switches
5. * Passing control to transfer address
C.3 Local Tape Boot Messages
1. [Start boot]
?002E Specified node is not an I/O adapter
?0100 Specified adapter failed self-test
?010C Illegal adapter specified for tape use
2. * Initializing adapter
?0119 Failure to initialize specified adapter
3. * Specified adapter initialized successfully
4. * Connecting to tape or
* Reading bootblock from tape or
* Rewinding tape
?0101 BVP port error reported—aborting
?0102 Controller error detected—aborting
?0103 Drive error detected—aborting
C–2 VAX 6000 Model 600 Service Manual
?010E Specified unit offline—No media mounted or disabled via
RUN/STOP switch setting
?0114 Serious exception reported—aborting
?0116 Specified unit is inoperative
?0117 Specified unit offline
?0118 Specified unit offline—Unit unknown, online to another
controller or port disabled via A,B switches
5. * Passing control to transfer address
C.4 CI and DSSI Boot Messages
1. [Start boot]
?002E Specified node is not an I/O adapter
?0109 Illegal adapter specified for CI boot
?011A Illegal adapter specified for DSSI boot
2. * Initializing adapter
?0119 Failure to initialize specified adapter
3. * Specified adapter initialized successfully
4. * Connecting to storage controller
5. * Previous operation failed—retrying CI boot
6. * Previous operation failed—retrying DSSI boot
7. * Port received a "no path" error—retrying the init sequence
?0110 Port received a "no path" error after 6 retries—aborting the
boot process
8. * Connecting to MSCP server layer
9. * Previous operation failed—retrying CI boot
10. * Connecting to boot disk or
* Connecting to shadow unit—will fail over to physical after 6
attempts.
?0102 Controller error detected—aborting
?0103 Drive error detected—aborting
?010E Specified unit offline—No media mounted or disabled via
RUN/STOP switch setting
?0114 Serious exception reported—aborting
?0116 Specified unit is inoperative
?0117 Specified unit offline
Boot Status and Error Messages C–3
?0118 Specified unit offline—Unit unknown, online to another
controller or port disabled via A,B switches
11. * Failure to connect to shadow unit—retrying on physical unit
12. * Reading bootblock from disk
?0102 Controller error detected—aborting
?0103 Drive error detected—aborting
?010E Specified unit offline—No media mounted or disabled via
RUN/STOP switch setting
?0114 Serious exception reported—aborting
?0116 Specified unit is inoperative
?0117 Specified unit offline
?0118 Specified unit offline—Unit unknown, online to another
controller or port disabled via A,B switches
13. * Passing control to transfer address
C–4 VAX 6000 Model 600 Service Manual
Appendix D
Handling Modules
This appendix tells how to handle a module so as not to damage the
components on the module.
Handling Modules D–1
D.1 Module Handling
Use an antistatic wrist strap and take as much care
as possible to not touch components when handling the
processor, memory, and I/O modules.
Figure D–1: Inserting and Removing Modules to and from the XMI Card
Cage
ANTISTATIC WRIST STRAP
msb-0762B-91
D–2 VAX 6000 Model 600 Service Manual
To insert or remove modules in the XMI card cage:
1. Always wear an antistatic wrist strap.
2. Raise the XMI card cage lever on the appropriate slot and make sure
it is set firmly in the up position.
3. Do not let any module touch other modules or cables when you are
putting it in or taking it out of the XMI card cage.
When you swap out an old module, you can temporarily place it in an
unused XMI slot, if one is available, or put it in an ESD box or on an
ESD mat before you install the new module.
CAUTION: If you temporarily leave a module in an unused XMI slot,
be sure to remove the module before powering up the system.
If you put the module on an ESD mat, make sure the mat is on a stable,
uncluttered surface. Do not put it on the top of the system cabinet. And
never slide the module across any surface.
4. Before removing the new module from its ESD box, place the box on a
clean, stable surface.
5. To remove a module from the ESD box, grasp it firmly by the back
corners, lift it and rotate it to vertical, and insert it in the slot in the
XMI card cage, as shown in Figure D–1.
6. Make sure that the module is seated firmly in the XMI slot and engaged
with the XMI backplane. Then lower the lever to close the connector.
Handling Modules D–3
Appendix E
VAX 6000 Model 600 Configuration
Rules
This appendix gives general configuration rules for the installation of VAX
6000 Model 600 modules. It does not include rules for systems using
the H9657-CX upgrade. See the manual VAX 6000: Installing Model 600
Processors for configuration rules for systems using the H9657-CX kit.
VAX 6000 Model 600 Configuration Rules E–1
E.1 Configuration Rules
Figure E–1 gives the general XMI configuration rules for VAX
6000 Model 600 systems.
Figure E–1: Configuration Rules for VAX 6000 Model 600 Systems
XMI CARD CAGE
1
E
2
D C B A 9
I/O Slots
8
3
7 6 5 4 3
2
1
I/O Slots
4
Processor Slots
5
Memory Slots
E–2 VAX 6000 Model 600 Service Manual
msb-0133H-91
Figure E–1 gives an overview of the general rules for installing modules in
the XMI card cage.
! " An XMI module must be in either slot E or slot 1 for electrical reasons
(to provide XMI termination). See Figure E–1, at callouts ! and ". Note
that the KDM70 adapter cannot be in slots D and E if slot 1 is empty,
because the T2023 module of the KDM70 does not provide XMI termination.
# I/O adapters should be configured first, from left to right, in I/O slots E
through A and then in slots 1 through 5.
$ Processors should be configured next. Start with the rightmost available
slot and continue right to left, installing each processor in the next available
slot.
% Memories are installed last. Fill available slots from left to right, slots
9 through 1, and then right to left, slots A through E.
VAX 6000 Model 600 Configuration Rules E–3
Appendix F
Parse Trees
This appendix shows parse trees for the following:
•
KA66A Machine Checks
•
KA66A Hard Error Interrupts
•
KA66A Soft Error Interrupts
Parse Trees F–1
Figure F–1: Parse Tree for Machine Check Exceptions
(select one)
MCHK_UNKNOWN_MSTATUS
(01 hex)
Unknown memory management
status error
MCHK_INT.ID_VALUE
(02 hex)
Illegal interrupt ID value
MCHK_CANT_GET_HERE
(03 hex)
Presumed impossible microcode
address reached
MCHK_MOVC.STATUS
(04 hex)
MOVCx status encoding error
MCHK_ASYNC_ERROR
S_TBSTS<Lock>
(select all, at least one)
(05 hex)
<0>
(select all, at least one)
S_TBSTS<DPERR>
<1>
S_TBSTS<TPERR>
<2>
TB PTE data parity error
TB tag parity error
none of the above
Inconsistent status (no TBSTS
error bits set)
S_ECR<Timeout Occurred> <4>
Stage 3 STALL timeout error
none of the above
Inconsistent status (no asynchro−
nous machine check error bit set)
MCHK_SYNC_ERROR
S_ICSR<Lock>
(06 hex)
(select all, at least one)
<2>
(select all, at least one)
S_ICSR<DPERR>
<3>
VIC (virtual instruction cache)
data parity error
S_ICSR<TPERR>
<4>
VIC tag parity error
none of the above
Inconsistent status (no ICSR
error bits set)
1
2
Figure F–1 Cont’d on next page
F–2 VAX 6000 Model 600 Service Manual
msb−p590−91
Figure F–1 (Cont.): Parse Tree for Machine Check Exceptions
1
2
S_BCEDSTS<Lock> <0>
(select one)
and not
S_PCSTS<PTE ER> <10>
S_BCEDSTS<BAD ADDR> <3>
(select one)
S_BCEDSTS<DR CMD> <11:8> = DREAD (0111)
B−cache data RAM addressing error
on D−stream read or read lock
S_BCEDSTS<DR CMD> <11:8> = IREAD (0011)
B−cache data RAM addressing error
on I−stream read
otherwise
Not a synchronous machine check
cause (see soft and hard error
interrupt events)
S_BCEDSTS<UNCORR> <2>
(select one)
S_BCEDSTS<DR CMD> <11:8> = DREAD (0111)
B−cache data RAM uncorrectable
ECC error on D−stream read
or read lock
S_BCEDSTS<DR CMD> <11:8> = IREAD (0011)
B−cache data RAM uncorrectable
ECC error on I−stream read
otherwise
Not a synchronous machine check
cause (see soft and hard error
interrupt events)
none of the above
Inconsistent status (no BCEDSTS
unrecoverable error bits set)
S_BCEDSTS<LOST ERR> <4>
1
2
and not S_PCSTS<PTE ER> <10>
Lost unrecoverable B−cache data
RAM error
msb−p591−91
Figure F–1 Cont’d on next page
Parse Trees F–3
Figure F–1 (Cont.): Parse Tree for Machine Check Exceptions
1
2
S_CEFSTS<Lock> <1>
(select one)
and not
S_PCSTS<PTE ER> <10>
S_CEFSTS<Timeout> <2>
(select one)
(S_NESTS<PERR> <3> and
S_NCSR<NRTAE> <29> and
S_NEICMD<CMD> <3:0> = (RDRx or RDE)
S_NEICMD<ID> <6:4> = (000 or 001) )
and
or S_NSCSR0<RQOVFL> <7>
(select one)
S_CEFSTS<TO MBOX> <9> and
not S_CEFSTS<REQ FILL DONE> <14>
(select one)
S_CEFSTS<IREAD> <6>
I−stream NDAL read timeout error
S_CEFSTS<OREAD> <7>
D−stream NDAL ownership read
timeout error
otherwise
D−stream NDAL read timeout error
(read only operand)
otherwise
Inconsistent status (no legitimate
cause for timeout)
otherwise
Not a synchronous machine check
cause (see soft and hard error
interrupt events)
1
2
3
Figure F–1 Cont’d on next page
F–4 VAX 6000 Model 600 Service Manual
msb−p592−91
Figure F–1 (Cont.): Parse Tree for Machine Check Exceptions
1
2
3
S_CEFSTS<RDE> <3>
(select one)
(S_XBER<TTO> <13>
(S_NCSR<SSCIR> <8>
(S_XBER<TTO> <13>
(S_XBER<TTO> <13>
(S_XBER<RER> <16>)
and
and
and
and
S_XBER<CNAK> <15>) or
S_CEFSTS<Count> <16:15> = 11)
S_XBEER<OLR> <1>) or
S_XBER<NRR> <18>) or
(select one)
S_CEFSTS<TO MBOX> <9> and
(not S_CEFSTS<REQ FILL DONE> <14>)
S_CEFSTS<Count> <16:15> = 00
and
(select one)
S_CEFSTS<IREAD> <6>
I−stream NDAL read data error
S_CEFSTS<OREAD> <7>
D−stream NDAL ownership read
data error (modify operand or
read lock)
otherwise
D−stream NDAL read data error
(read only operand)
otherwise
Not a synchronous machine check
cause (see soft and hard error
interrupt events)
otherwise
Inconsistent status (no legitimate
RDE reason)
1
2
3
msb−p593−91
Figure F–1 Cont’d on next page
Parse Trees F–5
or
Figure F–1 (Cont.): Parse Tree for Machine Check Exceptions
1
2
3
S_CEFSTS<Unexpected Fill> <21>
Not a synchronous machine check
cause (see soft error interrupt
events)
otherwise
Inconsistent status (either
CEFSTS<RDE> <3>, CEFSTS<Timeout> <2>,
or CEFSTS<Unexpected Fill> <21>
should be set)
and not S_PCSTS<PTE ER> <10>
Lost B−cache fill error
S_CEFSTS<LOST ERR> <4>
S_NESTS<NO ACK> <0>
(select one)
and not S_PCSTS <PTE ER> <10>
S_NCSR<NDPE> <31>
or
S_NCSR<NWQFL> <1>
(select one)
S_NEOCMD<CMD> <3:0> = IREAD
Unacknowledged I−stream NDAL
read
S_NEOCMD<CMD> <3:0> = DREAD
Unacknowledged D−stream NDAL
read (read only operand)
S_NEOCMD<CMD> <3:0> = OREAD
Unacknowledged D−stream NDAL
read (modify operand or read lock)
S_NEOCMD<CMD> <3:0> = WRITE OR WDISOWN
Not a synchronous machine check
cause (see hard error interrupt
events)
otherwise
Inconsistent status (invalid
command in NEOCMD<CMD>)
otherwise
Inconsistent status (no legitimate
reason for NO ACK)
S_NESTS<LOST OERR> <2>
1
and not S_PCSTS<PTE ER> <10>
Lost unrecoverable NDAL output
error
2
Figure F–1 Cont’d on next page
F–6 VAX 6000 Model 600 Service Manual
msb−p594−91
Figure F–1 (Cont.): Parse Tree for Machine Check Exceptions
1
2
S_BCEDSTS<Lock> <0>
(select one)
and
S_PCSTS<PTE ER> <10>
S_BCEDSTS<BAD ADDR> <3> (select one)
S_BCEDSTS<DR CMD> <11:8> = DREAD (0111)
B−cache data RAM addressing
error on PTE read
S_BCEDSTS<DR CMD> <11:8> = IREAD (0011)
(select one)
S_BCEDSTS<LOST ERR> <4>
Multiple errors in context
of PTE read error
otherwise
B−cache data RAM error addressing
error on I−stream read
S_BCEDSTS<LOST ERR> <4>
Multiple errors in context of
PTE read error
otherwise
Not a synchronous machine check
cause (see soft and hard error
interrupt events)
S_BCEDSTS<UNCORR> <2>
(select one)
S_BCEDSTS<DR CMD> <11:8> = DREAD (0111)
B−cache data RAM uncorrectable
ECC error on PTE read
S_BCEDSTS<DR CMD> <11:8> = IREAD (0011)
(select one)
S_BCEDSTS<LOST ERR> <4>
Multiple errors in context
of PTE read error
otherwise
B−cache data RAM error uncorrectable
error on I−stream read
S_BCEDSTS<LOST ERR> <4>
Multiple errors in context of
PTE read error
1
2
3
4
msb−p595−91
Figure F–1 Cont’d on next page
Parse Trees F–7
Figure F–1 (Cont.): Parse Tree for Machine Check Exceptions
1
2
3
4
otherwise
Not a synchronous machine check
cause (see soft and hard error
interrupt events)
none of the above
Inconsistent status (no BCEDSTS
unrecoverable error bits set)
S_CEFSTS<Lock> <1>
and
S_CEFSTS<Timeout> <2>
S_PCSTS<PTE ER> <10> (select one)
(select one)
( S_NESTS<PERR> <3> and S_NCSR<NRTAE> <29> and
S_NEICMD<CMD> <3:0> = (RDRx or RDE) and
S_NEICMD<ID> <6:4> = (000 or 001) ) or
S_NSCSR<RQOVFL> <7>
(select one)
S_CEFSTS<TO MBOX> <9> and not
S_CEFSTS<REQ FILL DONE> <14>
S_CEFSTS<IREAD> <6>
(select one)
(select one)
S_CEFSTS<LOST ERR> <4>
Multiple errors in context of
PTE read error
otherwise
I−stream NDAL read timeout error
S_CEFSTS<OREAD> <7>
(select one)
S_CEFSTS<LOST ERR> <4>
Multiple errors in context of PTE
read error
otherwise
D−stream NDAL ownership read
timeout error
1
2
3
4
5
6
Figure F–1 Cont’d on next page
F–8 VAX 6000 Model 600 Service Manual
msb−596−91
Figure F–1 (Cont.): Parse Tree for Machine Check Exceptions
1
2
3
4
5
6
otherwise
D−stream NDAL read timeout error
(PTE read)
S_CEFSTS<LOST ERR> <4>
Multiple errors in context of
PTE read error
otherwise
Not a synchronous machine check
cause (see soft and hard error
interrupt events)
otherwise
Inconsistent status (no legitimate
timeout reason)
S_CEFSTS<RDE> <3>
(select one)
(S_XBER<TTO> <13>
(S_XBER<TTO> <13>
(S_XBER<TTO> <13>
(S_NCSR<SSCIR> <8>
(S_XBER<RER> <16>)
and S_XBER<CNAK> <15>) or
and S_XBEER<OLR> <1>) or
and S_XBER>NRR> <18>) or
and S_CEFSTS<Count> <16:15> = 11)
(select one)
S_CEFSTS<TO MBOX> <9> and not
S_CEFSTS<REQ FILL DONE> <14> (select one)
S_CEFSTS<IREAD> <6>
(select one)
S_CEFSTS<LOST ERR> <4>
Multiple errors in context of
PTE read error
otherwise
I−stream NDAL read data error
S_CEFSTS<OREAD> <7>
(select one)
S_CEFSTS<LOST ERR> <4>
Multiple errors in context of
PTE read error
otherwise
D−stream NDAL ownership read
data error
1
2
3
4
5
6
msb−p597−91
Figure F–1 Cont’d on next page
Parse Trees F–9
or
Figure F–1 (Cont.): Parse Tree for Machine Check Exceptions
1
2
3
4
5
6
otherwise
D−stream NDAL read timeout
error (PTE read)
S_CEFSTS<LOST ERR> <4>
Multiple errors in context of
PTE read error
otherwise
Not a synchronous machine check
cause (see soft and hard error
interrupt events)
otherwise
Inconsistent status (no legitimate
reason for RDE)
S_CEFSTS<Unexpected Fill> <21> (select one)
S_CEFSTS<LOST ERR> <4>
Multiple errors in context of PTE
read error
otherwise
Not a synchronous machine check
cause (see hard error interrupts)
otherwise
Inconsistent status (either
CEFSTS<RDE> <3>, CEFSTS<Timeout> <2>,
or CEFSTS<Unexpected Fill> <21>
should be set)
S_NESTS<NO ACK> <0>
S_NCSR<NDPE> <31>
and
or
S_PCSTS<PTE ER> <10> (select one)
S_NCSR<NWQFL> <1> (select one)
S_NEOCMD<CMD> <3:0> = IREAD
(select one)
S_NESTS<LOST OERR> <2>
Multiple errors in context
of PTE read error
otherwise
Unacknowledged I−stream NDAL read
1
2
3
4
Figure F–1 Cont’d on next page
F–10 VAX 6000 Model 600 Service Manual
msb−p598−91
Figure F–1 (Cont.): Parse Tree for Machine Check Exceptions
1
2
3
4
S_NEOCMD<CMD> <3:0> = DREAD
Unacknowledged D−stream NDAL
read (PTE read)
(select one)
S_NEOCMD<CMD> <3:0> = OREAD
S_NESTS<LOST OERR> <2>
Multiple errors in context of
PTE read error
otherwise
Unacknowledged D−stream NDAL
read (modify operand or read lock)
S_NEOCMD<CMD> <3:0> = (WRITE or DISOWN)
(select one)
S_NESTS<LOST OERR> <2>
Multiple errors in context of
PTE read error
otherwise
Not a synchronous machine check
cause (see hard error interrupts)
otherwise
Inconsistent status (invalid
command in NEOCMD<CMD>)
otherwise
Inconsistent status (no legitimate
reason for NO ACK)
none of the above
Inconsistent status (no cause found
for synchronous machine check)
otherwise
Inconsistent status (unknown
machine check code)
msb−p599−91
Parse Trees F–11
Figure F–2: Parse Tree for INT60 (Hard) Error Interrupts
(select all, at least one)
S_BCEDSTS<Lock> <0>
(select one)
S_BCEDSTS<BAD ADDR> <3>
S_BCEDSTS<DR CMD> <11:8> = RMW (0010)
B−cache data RAM addressing
error on a write or write
unlock from Mbox
otherwise
Not a hard error interrupt
cause (see soft error interrupt
events)
S_BCEDSTS<UNCORR> <2>
S_BCEDSTS<DR CMD> <11:8> = RMW (0010)
B−cache data RAM uncorrectable
ECC error on a write or write
unlock from Mbox
otherwise
Not a hard error interrupt cause
(see soft error interrupt events)
none of the above
Inconsistent status (no BCEDSTS
unrecoverable error bits set)
S_BCEDSTS<LOST ERR> <4>
Lost unrecoverable B−cache data
RAM error
1
Figure F–2 Cont’d on next page
F–12 VAX 6000 Model 600 Service Manual
msb−p600−91
Figure F–2 (Cont.): Parse Tree for INT60 (Hard) Error Interrupts
1
S_CEFSTS<Lock> <1>
S_CEFSTS<Timeout> <2>
(select one)
(select one)
[ S_NESTS<PERR> <3> and
S_NCSR<NRTAE> <29> and
S_NEICMD<CMD> <3:0> = (RDRx or RDE) and
S_NEICMD<ID> <6:4> = (000 or 001) ]
or [ S_NSCSR<RQOVFL> <7> ]
(select one)
[ S_CEFSTS<REQ FILL DONE> <14> and
S_CEFSTS<WRITE> <8> and
S_CEFSTS<OREAD> <7> and
S_CEFSTS<Count> <16:15> not 00 ]
NDAL timeout on OREAD for
write from Mbox after write
data merged with fill data
in cache
S_NSCSR<RQOVFL> <7>
(select one)
S_PCSTS<PTE ER> <10>
PTE fill data timeout error
otherwise
Read fill timeout error
otherwise
Inconsistent status (no hard
error reason for timeout)
otherwise
Inconsistent status (no
legitimate cause for timeout)
1
2
msb−p601−91
Figure F–2 Cont’d on next page
Parse Trees F–13
Figure F–2 (Cont.): Parse Tree for INT60 (Hard) Error Interrupts
1
2
S_CEFSTS<RDE> <3>
(select one)
[ S_XBER<RER> <16> ] or
[ S_XBER<PE> <23> ] or
[ S_XBER<TTO> <13> ]
(select one)
[ S_CEFSTS<REQ FILL DONE> <14> and
S_CEFSTS<WRITE> <8> and
S_CEFSTS<OREAD> <7> and
S_CEFSTS<Count> <16:15> not 00 ]
NDAL read data error on OREAD
for write from Mbox after write
data merged with fill data in
cache
[ S_XBER<PE> <23> ] or
(select one)
[ S_XBER<TTO> <13> ]
S_PCSTS<PTE ER> <10>
PTE fill read data error
otherwise
Read fill read data error
otherwise
Inconsistent status (no hard error
reason for RDE)
otherwise
Inconsistent status (no legitimate
cause for RDE)
S_CEFSTS<Unexpected Fill> <21>
Unexpected NDAL fill received
otherwise
Not a hard error interrupt cause
(see soft error interrupt events)
S_CEFSTS<LOST ERR> <4>
Lost B−cache fill error
1
Figure F–2 Cont’d on next page
F–14 VAX 6000 Model 600 Service Manual
msb−p602−91
Figure F–2 (Cont.): Parse Tree for INT60 (Hard) Error Interrupts
1
S_NESTS<NO ACK> <0>
[ S_NCSR<NDPE> <31> ] or
[ S_NCSR<WBQFL> <2> ] or
[ S_NCSR<NWQFL> <1> ]
(select one)
(select one)
S_NEOCMD<CMD> <3:0> = WRITE
NO ACK on WRITE command or
data cycle
S_NEOCMD<CMD> <3:0> = WDISOWN
NO ACK on WDISOWN command or
data cycle
otherwise
Not a hard error interrupt cause
(see soft error interrupt events)
otherwise
Inconsistent status (no legal
reason for NO ACK)
S_NESTS<LOST OERR> <2>
Lost NO ACK error
1
msb−p603−91
Figure F–2 Cont’d on next page
Parse Trees F–15
Figure F–2 (Cont.): Parse Tree for INT60 (Hard) Error Interrupts
1
S_XBER<WEI> <25>
Write error interrupt
S_XBER<IPE> <24>
XMI inconsistent parity error
S_XBER<WSE> <22> and S_XBER<PE> <23>
XMI write sequence error
S_XBER<TTO> <13>
XMI transaction timeout
S_XBEER<WTTOn>
n=1, <24>;
n= 0, <16>
XMI writeback transaction
timeout
S_XBEER<WSEOn>
n=1, <21>;
n=0, <13>
XMI second writeback error
occurred
(select one)
S_XBEER<URR> <2>
[ S_XBER<PE> <23> and
S_XBER<RSE> <17> and S_CEFSTS<RDE> <3> and
S_CEFSTS<Count> <16:15> not 11 ]
Recoverable unexpected read
response
otherwise
Inconsistent unexpected read
response
S_XBEER<SEO> <0>
XMI second error occurred
S_NCSR<NDIPE> <30>
NDAL inconsistent parity error
S_NCSR<NWSE> <27>
NDAL write sequence error
S_NCSR<SSCIW> <9>
SSC illegal write
otherwise
Inconsistent status
msb−p604−91
F–16 VAX 6000 Model 600 Service Manual
Figure F–3: Parse Tree for INT54 (Soft) Error Interrupts
(select all, at least one)
S_ICSR<Lock> <2>
(select all, at least one)
S_ICSR<DPERR> <3>
VIC (virtual instruction cache)
data parity error
S_ICSR<TPERR> <4>
VIC tag parity error
none of the above
Inconsistent status (no ICSR
error bits set)
S_PCSTS<Lock> <0>
(select all, at least one)
S_PCSTS<DPERR> <1>
P−cache data parity error
S_PCSTS<Right Bank> <2>
P−cache tag parity error in
right bank
S_PCSTS<Left Bank>
<3>
P−cache tag parity error in
left bank
otherwise
Inconsistent status (no
PCSTS error bits set)
S_BCETSTS<Lock> <0>
S_BCETSTS<UNCORR> <2>
(select one)
(select one)
S_BCETSTS<TS CMD> <9:5> = DREAD
(00111)
B−cache tag store uncorrectable
ECC error on D−stream read
S_BCETSTS<TS CMD> <9:5> = IREAD
(00011)
B−cache tag store uncorrectable
ECC error on I−stream read
S_BCETSTS<TS CMD> <9:5> = OREAD
(00010)
B−cache tag store uncorrectable
ECC error on write or read lock
S_BCETSTS<TS CMD> <9:5> = WUNLOCK (01000)
B−cache tag store uncorrectable
ECC error on write unlock
(done only in ETM)
S_BCETSTS<TS CMD> <9:5> = R_INVAL (01101)
B−cache tag store uncorrectable
ECC error on writeback request
type of NDAL operation
1
2
3
msb−p605−91
Figure F–3 Cont’d on next page
Parse Trees F–17
Figure F–3 (Cont.): Parse Tree for INT54 (Soft) Error Interrupts
1
2
3
S_BCETSTS<TS CMD> <9:5> = O_INVAL
(01001)
B−cache tag store uncorrectable
ECC error on writeback−and−
invalidate type of NDAL operation
S_BCETSTS<TS CMD> <9:5> = IPR_DEALLOCATE (01010)
B−cache tag store uncorrectable
ECC error on software forced
deallocate)
otherwise
Inconsistent status (invalid
command)
S_BCETSTS<BAD ADDR> <3>
(select one)
S_BCETSTS<TS CMD> <9:5> = DREAD
(00111)
B−cache tag store addressing error
on D−stream read
(00011)
S_BCETSTS<TS CMD> <9:5> = IREAD
B−cache tag store addressing error
on I−stream read
(00010)
S_BCETSTS<TS CMD> <9:5> = OREAD
B−cache tag store addressing error
on write or read lock
S_BCETSTS<TS CMD> <9:5> = WUNLOCK (01000)
B−cache tag store addressing error
on write unlock (done only in ETM)
S_BCETSTS<TS CMD> <9:5> = R_INVAL (01101)
B−cache tag store addressing error
on writeback request type of NDAL
operation
S_BCETSTS<TS CMD> <9:5> = O_INVAL (01001)
B−cache tag store addressing error
writeback−and−invalidate type of
NDAL operation
S_BCETSTS<TS CMD> <9:5> = IPR_DEALLOCATE (01010)
B−cache tag store addressing error
on software forced deallocate
otherwise
Inconsistent status (invalid command)
otherwise
Inconsistent status (no BCETSTS
error bits set)
S_BCETSTS<LOST ERR> <4>
Lost unrecoverable B−cache tag
store error
1
Figure F–3 Cont’d on next page
F–18 VAX 6000 Model 600 Service Manual
msb−p606−91
Figure F–3 (Cont.): Parse Tree for INT54 (Soft) Error Interrupts
1
S_BCETSTS<CORR> <1>
(select one)
S_BCETSTS<Lock> <0>
S_BCETSTS<TS CMD> <9:5> =
S_BCETSTS<TS CMD> <9:5> =
S_BCETSTS<TS CMD> <9:5> =
S_BCETSTS<TS CMD> <9:5> =
S_BCETSTS<TS CMD> <9:5> =
S_BCETSTS<TS CMD> <9:5> =
S_BCETSTS<TS CMD> <9:5> =
Lost B−cache tag store
correctable error
DREAD
(00111)
B−cache tag store correctable
ECC error on D−stream read
(00011)
IREAD
B−cache tag store correctable
ECC error on I−stream read
OREAD
(00010)
B−cache tag store correctable
ECC error on write or read lock
WUNLOCK
(01000)
B−cache tag store correctable
ECC error on write unlock
(done only in ETM)
(01101)
R_INVAL
B−cache tag store correctable
ECC error on writeback request
type of NDAL operation
(01001)
O_INVAL
B−cache tag store correctable
ECC error on writeback−and−
invalidate NDAL operation
IPR_DEALLOCATE (01010)
B−cache tag store correctable
ECC error on software forced
deallocate
otherwise
Inconsistent status (invalid command)
1
msb−p607−91
Figure F–3 Cont’d on next page
Parse Trees F–19
Figure F–3 (Cont.): Parse Tree for INT54 (Soft) Error Interrupts
1
S_BCEDSTS<CORR> <1>
S_BCEDSTS<Lock>
(select one)
<0>
S_BCEDSTS<DR CMD> <11:8> =
S_BCEDSTS<DR CMD> <11:8> =
S_BCEDSTS<DR CMD> <11:8> =
S_BCEDSTS<DR CMD> <11:8> =
Lost B−cache data RAM correctable
error
DREAD
(0111)
B−cache data RAM correctable error
on D−stream read
IREAD
(0011)
B−cache data RAM correctable error
on I−stream read
WRITEBACK (0100)
B−cache data RAM correctable error
on writeback
RMW
(0010)
B−cache data RAM correctable error
on read−modify−write for write or
write unlock
otherwise
Inconsistent status (invalid command)
S_BCEDSTS<Lock>
<0> and not S_PCSTS<PTE ER> <10>
S_BCEDSTS<UNCORR> <2>
(select one)
(select one)
(0111)
S_BCEDSTS<DR CMD> <11:8> = DREAD
B−cache data RAM uncorrectable
ECC error on D−stream read
(or P−cache fill for read lock)
S_BCEDSTS<DR CMD> <11:8> = IREAD
(0011)
B−cache data RAM uncorrectable
ECC error on I−stream read
S_BCEDSTS<DR CMD> <11:8> = WBACK
(0100)
B−cache data RAM uncorrectable
ECC error on writeback
otherwise
Inconsistent status (all other
cases cause hard error interrupt)
1
2
Figure F–3 Cont’d on next page
F–20 VAX 6000 Model 600 Service Manual
msb−p608−91
Figure F–3 (Cont.): Parse Tree for INT54 (Soft) Error Interrupts
1
2
S_BCEDSTS<BAD ADDR> <3>
(select one)
S_BCEDSTS<DR CMD> <11:8> = DREAD (0111)
B−cache data RAM addressing error
on D−stream read (or P−cache fill
for read lock)
S_BCEDSTS<DR CMD> <11:8> = IREAD (0011)
B−cache data RAM addressing error
on I−stream read
S_BCEDSTS<DR CMD> <11:8> = WBACK (0100)
B−cache data RAM addressing error
on writeback
otherwise
Inconsistent status (all other
cases cause hard error interrupt)
otherwise
Inconsistent status (no error
bits set in BCEDSTS)
S_BCEDSTS<LOST ERR> <4> and not S_PCSTS<PTE ER> <10>
S_NESTS<BADWDATA> <1> or S_NESTS<LOST OERR> <2>
Lost unrecoverable B−cache data
RAM error with possible lost
writeback error
otherwise
Lost unrecoverable B−cache data
RAM error
S_CEFSTS<Lock> <1> and not S_PCSTS<PTE ER> <10> (select one)
S_CEFSTS<Timeout> <2>
1
2
3
(select one)
msb−p609−91
Figure F–3 Cont’d on next page
Parse Trees F–21
Figure F–3 (Cont.): Parse Tree for INT54 (Soft) Error Interrupts
1
2
3
S_NESTS<PERR> <3> and
S_NCSR<NRTAE> <29> and
S_NEICMD<CMD> <3:0> = (RDRx or RDE) and
S_NEICMD<ID> <6:4> = (000 or 001) (select one)
S_CEFSTS<OREAD> <7>
(select one)
S_CEFSTS<WRITE> <8> and
not S_CEFSTS<TO MBOX> <9>
(select one)
S_CEFSTS<REQ FILL DONE> <14>
Inconsistent status (should
cause hard error interrupt)
otherwise
D−stream NDAL ownership read for
Mbox write timeout error before
write data merged with fill data
S_CEFSTS<TO MBOX> <9>
D−stream NDAL ownership read
timeout error (modify operand
or read lock)
otherwise
Inconsistent status (either WRITE
or TO MBOX, but not both, should
be set)
S_CEFSTS<IREAD> <6>
I−stream NDAL read timeout error
S_CEFSTS<TO MBOX> <9>
D−stream NDAL read timeout
error (read only operand)
otherwise
Inconsistent status (TO MBOX
should be set)
otherwise
Inconsistent status (no
legitimate reason for timeout)
1
2
Figure F–3 Cont’d on next page
F–22 VAX 6000 Model 600 Service Manual
msb−p610−91
Figure F–3 (Cont.): Parse Tree for INT54 (Soft) Error Interrupts
1
2
S_CEFSTS<RDE> <3>
NOT S_XBER<TTO> <13>
(select one)
(select one)
S_CEFSTS<OREAD> <7> and
[ S_XBER<RER> <16> or
(S_XBER<RSE> <17> and
S_XBER<PE> <23>
and S_CEFSTS<Count> <16:15> = 11) ] (select one)
S_CEFSTS<WRITE> <8>
and not S_CEFSTS<TO MBOX> <9>
(select one)
S_CEFSTS<REQ FILL DONE> <14>
Inconsistent status (should
cause hard error interrupt)
otherwise
D−stream NDAL ownership read
for Mbox write read data
error before write data merged
with fill data
S_CEFSTS<TO MBOX> <9>
D−stream NDAL ownership
read data error (modify
operand or read lock)
otherwise
Inconsistent status (either
WRITE or TO MBOX, but not both,
should be set)
[S_NCSR<SSCIR> <8> and S_CEFSTS<Count> <16:15> = 11] or
[S_XBER<RSE> <17> and S_XBER<PE><23> and
S_CEFSTS<Count> <16:15> = 11] or S_XBER<RER> <16> (select one)
S_CEFSTS<IREAD> <6>
I−stream NDAL read data error
S_CEFSTS<TO MBOX> <9>
D−stream NDAL read data error
(read only operand)
otherwise
Inconsistent status (TO MBOX
should be set)
1
2
3
4
msb−p611−91
Figure F–3 Cont’d on next page
Parse Trees F–23
Figure F–3 (Cont.): Parse Tree for INT54 (Soft) Error Interrupts
1
2
3
4
otherwise
Inconsistent status (should be
hard error interrupt)
otherwise
Inconsistent status (should be
hard error interrupt)
otherwise
Inconsistent status (either
CEFSTS<RDE> <3> or CEFSTS<Timeout>
<2> should be set or, if
CEFSTS<Unexpected Fill> <21> is
set, it should cause a hard
error interrupt)
S_CEFSTS<LOST ERR> <4> and not S_PCSTS<PTE ER> <10>
Lost B−cache fill error
S_NESTS<NO ACK> <0> and not S_PCSTS<PTE ER> <10> (select one)
S_NCSR<NDPE> <31> or S_NCSR<NWQFL> <1>
(select one)
S_NEOCMD<CMD> <3:0> = IREAD
Unacknowledged I−stream
NDAL read
S_NEOCMD<CMD> <3:0> = DREAD
Unacknowledged D−stream
NDAL read (read only operand)
S_NEOCMD<CMD> <3:0> = OREAD
Unacknowledged D−stream
NDAL read (modify operand
or read lock)
S_NEOCMD<CMD> <3:0> = WRITE or WDISOWN
Inconsistent status (should
cause hard error interrupt)
otherwise
Inconsistent status (invalid
command in NEOCMD<CMD>)
otherwise
Inconsistent status (no
legitimate reason for NO ACK)
S_NESTS<LOST OERR> <2> and not S_PCSTS<PTE ER> <10>
Lost NDAL output error
1
Figure F–3 Cont’d on next page
F–24 VAX 6000 Model 600 Service Manual
msb−p612−91
Figure F–3 (Cont.): Parse Tree for INT54 (Soft) Error Interrupts
1
S_BCEDSTS<Lock> <0> and S_PCSTS<PTE ER> <10>
S_BCEDSTS<UNCORR> <2>
(select one)
(select one)
S_BCEDSTS<DR CMD> <11:8> = DREAD
(0111)
B−cache data RAM uncorrectable
ECC error on PTE read
S_BCEDSTS<DR CMD> <11:8> = IREAD
S_BCEDSTS<LOST ERR>
(0011)
(select one)
<4>
Multiple errors in context
of PTE read error
otherwise
B−cache data RAM uncorrectable
ECC error on I−stream read
S_BCEDSTS<DR CMD> <11:8> = WBACK
(0100)
(select one)
S_BCEDSTS<LOST ERR> <4>
Multiple errors in context
of PTE read error
otherwise
B−cache data RAM uncorrectable
ECC error on writeback
otherwise
Inconsistent status (all other
cases cause hard error interrupt)
S_BCEDSTS<BAD ADDR> <3>
(select one)
S_BCEDSTS<DR CMD> <11:8> = DREAD (0111)
B−cache data RAM addressing error
on PTE read
1
2
3
msb−p613−91
Figure F–3 Cont’d on next page
Parse Trees F–25
Figure F–3 (Cont.): Parse Tree for INT54 (Soft) Error Interrupts
1
2
3
S_BCEDSTS<DR CMD> <11:8> = IREAD
(0011)
(select one)
S_BCEDSTS<LOST ERR> <4>
Multiple errors in context of
PTE read error
otherwise
B−cache data RAM addressing
error on I−stream read
S_BCEDSTS<DR CMD> <11:8> = WBACK
(0100)
(select one)
S_BCEDSTS<LOST ERR> <4>
Multiple errors in context
of PTE read error
otherwise
B−cache data RAM addressing
error on writeback
otherwise
Inconsistent status (all
other cases cause hard error
interrupt)
otherwise
Inconsistent status (no
error bits set in BCEDSTS)
S_CEFSTS<Lock> <1> and S_PCSTS<PTE ER>
S_CEFSTS<Timeout> <2>
<10>
(select one)
(select one)
S_NESTS<PERR> <3> and S_NCSR<NRTAE> <29> and
S_NEICMD<CMD> <3:0> = (RDRx or RDE) and
(select one)
S_NEICMD<ID> <6:4> = (000 or 001)
S_CEFSTS<OREAD> <7>
1
2
3
4
5
Figure F–3 Cont’d on next page
F–26 VAX 6000 Model 600 Service Manual
(select one)
msb−p614A−91
Figure F–3 (Cont.): Parse Tree for INT54 (Soft) Error Interrupts
1
2
3
4
5
S_CEFSTS<WRITE> <8> and not
S_CEFSTS<TO MBOX> <9>
(select one)
S_CEFSTS<REQ FILL DONE> <14>
Inconsistent status (should
cause hard error interrupt)
S_CEFSTS<LOST ERR> <4>
Multiple errors in context of
PTE read error
otherwise
D−stream NDAL ownership read
for Mbox write timeout error
before write data merged
with fill data
S_CEFSTS<TO MBOX>
<9>
(select one)
S_CEFSTS<LOST ERR> <4>
Multiple errors in context
of PTE read error
otherwise
D−stream NDAL ownership read
timeout error (modify operand
or read lock)
otherwise
Inconsistent status (either
WRITE or TO MBOX, but not both,
should be set)
S_CEFSTS<IREAD> <6>
(select one)
S_CEFSTS<LOST ERR> <4>
Multiple errors in context of
PTE read error
otherwise
I−stream NDAL read timeout
error
S_CEFSTS<TO MBOX> <9>
D−stream NDAL read timeout
error (PTE read)
otherwise
Inconsistent status (TO MBOX
should be set)
otherwise
Inconsistent status (no evidence
of recoverable Cbox timeout)
1
2
msb−p614B−91
Figure F–3 Cont’d on next page
Parse Trees F–27
Figure F–3 (Cont.): Parse Tree for INT54 (Soft) Error Interrupts
1
2
S_CEFSTS<RDE> <3>
not S_XBER<TTO> <13>
S_CEFSTS<OREAD> <7> and S_XBER<RER> <16>
S_CEFSTS<WRITE> <8>
and not S_CEFSTS<TO MBOX> <9>
(select one)
(select one)
(select one)
(select one)
S_CEFSTS<REQ FILL DONE> <14>
Inconsistent status (should cause
hard error interrupt)
S_CEFSTS<LOST ERR> <4>
Multiple errors in context of
PTE read error
otherwise
Read data error on a D−stream NDAL
ownership read for Mbox write
before write data merged with
fill data
S_CEFSTS<TO MBOX> <9>
(select one)
S_CEFSTS<LOST ERR> <4>
Multiple errors in context of
PTE read error
otherwise
D−stream NDAL ownership read
data error (modify operand
or read lock)
otherwise
Inconsistent status (either WRITE
or TO MBOX, but not both, should
be set)
(S_NCSR<SSCIR> <8> and S_CEFSTS<Count> <16:15> = 11)
or (S_XBER<RER> <16> and S_CEFSTS<Count> <16:15> = 00)
(select one)
1
2
3
4
5
Figure F–3 Cont’d on next page
F–28 VAX 6000 Model 600 Service Manual
msb−p615−91
Figure F–3 (Cont.): Parse Tree for INT54 (Soft) Error Interrupts
1
2
3
4
5
S_CEFSTS<IREAD> <6>
(select one)
S_CEFSTS<LOST ERR> <4>
Multiple errors in context of
PTE read error
otherwise
I−stream NDAL read data
S_CEFSTS<TO MBOX> <9>
D−stream NDAL read data error
(PTE read)
otherwise
Inconsistent status
(TO MBOX should be set)
otherwise
Inconsistent status
(hard error interrupt)
otherwise
Inconsistent status
(hard error interrupt)
otherwise
Inconsistent status (either
CEFSTS<RDE> <3> or CEFSTS<Timeout>
<2> should be set or, if
CEFSTS<Unexpected Fill> <21>
is set, it should cause a hard
error interrupt)
S_NESTS<NO ACK> <0> and S_PCSTS<PTE ER> <10> and
(select one)
[ S_NCSR<NDPE> <31> or S_NCSR<NWQFL> <1> ]
S_NEOCMD<CMD> = IREAD
<3:0>
(select one)
S_NESTS<LOST OERR> <2>
Multiple errors in context
of PTE read error
otherwise
Unacknowledged I−stream
NDAL read
1
2
msb−p616−91
Figure F–3 Cont’d on next page
Parse Trees F–29
Figure F–3 (Cont.): Parse Tree for INT54 (Soft) Error Interrupts
1
2
S_NEOCMD<CMD> = DREAD
<3:0>
Unacknowledged D−stream NDAL
read (PTE read)
S_NEOCMD<CMD> = OREAD
<3:0>
(select one)
S_NESTS<LOST OERR> <2>
Multiple errors in context
of PTE read error
otherwise
Unacknowledged D−stream NDAL
read (modify operand or read lock)
S_NEOCMD<CMD> = WRITE or WDISOWN <3:0>
Inconsistent status (should
cause hard error interrupt)
otherwise
Inconsistent status (invalid
command in NEOCMD<CMD>)
(select one)
S_NESTS<PERR> <3>
S_NESTS<INCON PERR> <4>
NDAL inconsistent parity error
otherwise
NDAL parity error
S_NESTS<LOST PERR>
<5>
Lost NDAL parity error or
inconsistent parity error
S_XBER<CC> <27> and
not S_XCR<CCID> <6>
Corrected XMI confirmation
S_XBER<PE> <23>
XMI parity error
S_XBER<CRD> <19> and
not S_XCR<CRDID> <5>
XMI corrected read data
S_XBER<RSE> <17>
XMI read sequence error
S_NCSR<NDPE> <31>
NDAL parity error
S_NCSR<WBQFL> <2>
Inconsistent status (hard error
interrupt)
none of the above
Inconsistent status (possible machine
check or hard error interrupt during
soft error interrupt processing)
msb−p617−92
F–30 VAX 6000 Model 600 Service Manual
Appendix G
Restoring a Corrupted EEPROM
Use this procedure to restore a corrupted EEPROM. A corrupted EEPROM
is indicated by any of the following console errors:
?0053
?0055
?0057
?0061
?006B
EEPROM header is corrupted.
Failed to locate EEPROM area.
EEPROM area checksum error.
EEPROM header or area has bad format.
Error changing EEPROM.
CAUTION: You must wear an antistatic wrist strap attached to the
cabinet when you handle any modules. See Appendix D for processor
module handling instructions.
1. Use the commands SET CPU n and ESC DEL SHOW MANUFACTURING
for each CPU module in the system, noting the module serial number
and revision level of each CPU module.
2. Turn the control panel’s lower key switch to Update.
3. If the console terminal is set to a speed other than the default speed of
1200 baud, press BREAK until the >>> prompt prints. Alternatively, set
the console terminal to 1200 baud.
4. Follow the steps shown in Examples G–1 and G–2.
Restoring a Corrupted EEPROM
G–1
Example G–1: Restoring a Corrupted EEPROM, Part 1 of 2
!"
>>> SET CPU 1
>>> JSB E0040044
This procedure will format the EEPROM on the primary processor,
destroying the system serial number, saved boot specifications,
terminal characteristics, console and diagnostic patches, etc.
Do you want to format the EEPROM [No]? Y
#
Zeroing EEPROM (approximately 15 seconds)
Writing data to EEPROM (approximately 15 seconds)
Move lower keyswitch from UPDATE to write-protect EEPROM
%
>>> SET CPU 2
>>> JSB E0040044
.
.
.
>>> SET CPU 1
>>> ESC DEL SET MANUFACTURING
Module Serial Number>>> NI000200007
Module Revision>>> D02
DC595 Revision>>>
FPU Revision>>>
SSC Revision>>>
Fields are as follows:
Module serial number:
Module revision:
DC595 revision:
FPU revision:
SSC revision:
&
'
Update EEPROM? (Y or N) >>> Y
?0071 Manufacturing parameters updated
>>> ESC DEL SET POWER
Power system>>> A
Power system read as: A
(
Update EEPROM? (Y or N) >>> Y
?011B Power system identification updated
>>> ESC DEL SET SYSTEM SERIAL
System Serial Number>>> AG02915081
Serial number read as: AG02915081
)
Update EEPROM? (Y or N) >>> Y
?0073 System serial number updated
>>> SET CPU 2
+>
G–2 VAX 6000 Model 600 Service Manual
$
!
"
#
$
%
&
'
(
)
+>
Make the CPU in the lowest-numbered slot the primary processor.
Enter the command JSB E0040044. This command blasts the default
EEPROM image into the current primary’s EEPROM.
Type Y in response to the question. You do not need to press
ENTER .
RETURN
or
Leave the key switch in the Update position until this procedure is
finished.
Make each CPU in turn the primary processor and repeat
" and #.
Again make the first CPU the primary processor.
The ESC DEL SET MANUFACTURING command prompts you for
information. Enter the module serial number and module revision in
response to the first two prompts. (You noted this information before
starting this procedure.) Press RETURN in response to the rest of the
prompts. Type Y to terminate the command.
The ESC DEL SET POWER prompts for the power system type. You can
find this information in the SHOW FIELD listing that was saved for
this system in the Site Management Guide or in another safe place.
Type Y to terminate the command.
Enter the ESC DEL SET SYSTEM SERIAL command. The system serial
number is also in the SHOW FIELD listing. Type Y to terminate the
command.
'(
Make each CPU in turn the primary processor and repeat , , and
ESC DEL do not propagate
to other processors, so they must be entered for each processor in the
system.
). The SET commands that are preceded by
Restoring a Corrupted EEPROM
G–3
Example G–2: Restoring a Corrupted EEPROM, Part 2 of 2
+?
+@
>>> SET CPU 1
>>> SET BOOT DEFAULT /XMI:E/BI:2 DU0
>>> SET BOOT NIDI /XMI:C/FILENAME:ISL_LVAX_D /R5:10 EX0
>>> SET BOOT TK70 /XMI:E/BI:C MU0
>>> SET CPU /PRIMARY/ALL
>>> SET LANGUAGE INTERNATIONAL
>>> SET TERMINAL /SCOPE/SPEED:9600
>>> SET MEMORY /INTERLEAVE:DEFAULT
>>> BOOT /XMI:C/R5:110 EX0
.
.
.
>>> INITIALIZE
+A
+B
+C
#123456789 0123456789 0123456789 0123456789 012345#
F
.
E
A
o
.
.
.
D
.
.
.
.
.
C
A
+
.
.
.
B
.
.
.
.
.
A
.
.
.
.
.
9
M
+
.
.
.
8
M
+
.
.
.
7
.
.
.
.
.
6
.
.
.
.
.
5
.
.
.
.
.
4
.
.
.
.
.
3
P
+
E
+
E
2
P
+
E
+
E
1
P
+
B
+
B
0
.
.
.
+
.
.
.
.
.
+
.
+
.
.
+
.
.
.
.
.
.
.
.
.
.
A2
32
A1
32
.
.
.
.
.
.
.
.
.
.
.
.
.
.
Console = V2.00 RBDs = V2.00 EEPROM = 2.00/2.00
G–4 VAX 6000 Model 600 Service Manual
SN =
NODE #
TYP
STF
BPD
ETF
BPD
XBI E +
ILV
64 Mb
GA140123456
+?
+@
+A
+B
+C
Make the first CPU the primary processor.
Use the SET BOOT command to set the boot specifications entered in
the Site Management Guide.
Enter the rest of the information saved in the Site Management Guide.
Use the EVUCA utility to update all the processors’ EEPROMs. See
Section 3.10.3.
Initialize the system and verify there are no messages regarding console
patches, corrupt EEPROMs, or system number mismatches. If the
console prints any of these messages, verify that you installed the
latest revision of patches. If they are the latest revision, follow the
troubleshooting flowchart in Figure 1–2.
Restoring a Corrupted EEPROM
G–5
Appendix H
Interpreting the VMS Error Log
This appendix tells how to produce and interpret the VMS error log entries
produced for the KA66A CPU.
Sections include:
•
Producing the Listing
•
Types of Error Log Entries for the KA66A CPU
•
Format of Machine Check Error Log Entry
•
Format of INT54 (Soft) Error Log Entry
•
Format of INT60 (Hard) Error Log Entry
•
Format of Lastfail Error Log Entry
•
Format of Memscan Error Log Entry
•
Format of Memory Soft Error (CRD) Error Log Entry
There are three components of the VMS system error logging facility:
•
Various error logging software routines, such as SYSLOA in the
executive and routines within device drivers, that handle errors and
events and write relevant information into error log buffers.
•
The ERRFMT process, which periodically empties the error log buffers,
writing the information to the error log file on the system disk.
•
The Error Log Utility, which invokes the Error Log Report Formatter
(ERF), which prints selected reports using information from the error
log file.
Interpreting the VMS Error Log H–1
H.1 Producing the Listing
Copy the existing error log file to avoid interference with
current logging. Use the ANALYZE/ERROR_LOG command
with options to produce a listing selecting displays for
suspected types of errors.
Example H–1: Obtaining a Selective Error Log Listing
$ COPY ERRLOG.SYS ERR11_12_91.SYS
!
$ ANALYZE/ERROR_LOG/SINCE=10-NOV-1991/OUTPUT= ERR.TXT ERR11_12_91.SYS
.
.
.
$ ANALYZE/ERR/INCLUDE=(CPU_ENTRIES, MACHINE_CHECKS) ERR11_12_91.SYS
"
#
In general, the VMS error logging facility logs errors and system events
to an error log file named SYS$ERRORLOG:ERRLOG.SYS. The types of
events logged include:
•
Errors—Device errors, device timeouts, machine checks, bus errors,
memory errors, asynchronous write errors, undefined interrupts, and
bugchecks
•
Volume changes—Volume mounts and dismounts
•
System events—Cold start-ups, warm start-ups, system failure
(crash) start-ups, messages from the Send Message to Error Logger
($SNDERR) system service, and time stamps
The operating system will continue writing to this file indefinitely, so
regular maintenance procedures involve periodically renaming the error
log file. (The new file names should use some kind of record-keeping
conventions, such as including the date the file was renamed.) The renamed
file can then be archived for whatever period is deemed to be relevant.
In this way, the current error log file always contains the most timely
information.
H–2 VAX 6000 Model 600 Service Manual
The practices used in maintaining error log files will vary from site to site,
so it is useful to know how to limit the information produced in an error
log report. Otherwise, you could get a listing of entries many inches thick.
Example H–1 shows how to limit the entries produced to a certain time
period or by the type of entries recorded.
!
"
Copy the error log file to another location, so that the system file can
be used to log new errors while you are working. If you do not, error
entries may be lost while you are working with the system error log
file. In the example, ERRLOG.SYS is copied to ERR11_12_91.SYS.
The ANALYZE/ERROR_LOG command produces the error log display.
In the example, the ERR11_12_91.SYS file is the binary file to be
analyzed.
The /SINCE qualifier is useful to limit the time period for the errors
displayed. You may want to examine only the errors for recent days or
even hours, depending on your understanding of what has happened at
the site.
#
The /OUTPUT qualifier directs the error log output text to the file
you name. Without it, the display is directed to the terminal you are
working on.
You may want to restrict the listing to certain types of entries. In the
example, the user selects CPU entries and machine check errors for
the error log display. The display will appear on the terminal since no
/OUTPUT qualifier was used.
For a discussion of how to maintain an error log file, see the VMS manual
Guide to Maintaining a VMS System. The VMS Error Log Utility Manual
describes the ANALYZE/ERROR_LOG command and all its qualifiers.
Interpreting the VMS Error Log H–3
H.2 Types of Error Log Entries for KA66A CPU
There are six types of KA66A error log entries: machine
check report, INT60 report, INT54 report, lastfail report,
memory soft error (CRD) report, and memscan report.
Table H–1 lists the types of error log entries produced for the KA66A.
Succeeding sections describe the entries in more detail.
Table H–1: Types of Error Log Entries for KA66A CPU
Type
Description
Machine check
Produced when a CPU machine check exception occurs.
INT60
Produced when a CPU interrupt 60 occurs.
INT54
Produced when a CPU interrupt 54 occurs.
Lastfail
Last error(s) detected before the system terminates the session.
Memory soft error
(CRD)
Produced at shutdown or when error buffers are full; a summary of all CRD errors.
Memscan
Produced when operating system poll of memory adapter error registers shows an error.
H.2.1 Machine Check Exception Entries
A machine check exception occurs when the processor detects an error in
the context of the instruction currently being executed. Depending on the
severity of the error, the operating system code that handles machine check
exceptions may correct the error, abort the executing process, or crash the
system. An error log entry will appear in all cases.
In addition to the hardware-specific information logged for the error, the
machine check exception entry also contains what is called the machine
check stack frame, which contains information about the software executing
at the time the exception occurred. The type of error as well as the contents
of the PC and PSL registers and other contextual information are given in
the machine check stack frame. Section H.3.5 describes the contents of the
stack frame; item
in Example H–5 shows this portion of the machine
check entry.
,C
H–4 VAX 6000 Model 600 Service Manual
H.2.2 INT60 (Hard) Error Interrupt Entries
An INT60 (hard) error interrupt indicates an error occurred asynchronously
with instruction execution. Typically, this type of error is of such a
magnitude that machine state has been corrupted and that retry is not
possible. The error handling routines log the condition and crash the
system.
H.2.3 INT54 (Soft) Error Interrupt Entries
INT54 (soft) error interrupts report errors that were detected but did
not affect instruction execution. An example is a CRD (corrected read
data) error. Such single-bit data errors can be detected and corrected
by hardware; however, an error entry noting the error is logged for
examination.
H.2.4 Lastfail Error Entry
The lastfail error entry displays the last errors detected before the system
terminates a session. If, for example, an error occurs that requires the
session to be terminated, the system will log the error and, before shutting
down, will perform one last check of the registers on the XMI modules. If
the system discovers that an error or errors have occurred since the fatal
error, it will format the error registers for the XMI adapter(s) and log them
as a lastfail error entry.
H.2.5 Memory Soft Error (CRD) Entry
The memory soft error (CRD) entry is a summary of all the corrected read
data (CRD) errors that the system experienced during the session. This
report is produced when the system shuts down or when CRD buffers are
full. This information can reveal that a significant number of corrected
errors occurred on a particular memory module, and you can then check
previous entries for further indications of problems with this module.
H.2.6 Memscan Entry
Memory modules cannot themselves interrupt, but some memory errors are
noted within the registers on the memory module. So, the operating system
error handling code periodically polls memory modules (hence the name
‘‘memscan’’), checking error registers and logging memory errors detected.
This error log entry, called memory controller error, is produced for such
an error.
Interpreting the VMS Error Log H–5
H.3 Format of Machine Check Error Log Entry
The machine check error log entry contains the following information.
H.3.1 Header
The header to the error log entry gives the entry number (there can be many
errors logged in any given error log file) and other general information about
the system, date and time, and so forth. Item
in Example H–2 shows
the format and typical content of the header for an error log entry.
!
H.3.2 Software Flags
The software flags are longwords whose bit settings indicate the particular
conditions detected by the error handler. Item
in Example H–2 shows a
sample: four longwords for machine check errors. The formatter presents
a synopsis of the error flags set in a particular entry, as shown in
of Example H–2. Table H–2 gives the software flags for machine check
entries.
"
#
Table H–2: Software Flags for Machine Check Entries
Bit
Definition
0
Inconsistent. Multiple error signals with overlapping syndromes.
1–5
Used internally by the VMS error handling routines; used for debug purposes.
18
Asynchronous errors were not found in conjunction with this machine check exception.
19
Synchronous errors were not found in conjunction with this machine check exception.
20
An unknown machine check code, not in the range 1–6.
21
Machine check code 1. Unknown memory management fault.
22
Machine check code 2. Illegal interrupt ID value.
23
Machine check code 3. Illegal microcode dispatch.
24
Machine check code 4. Illegal combination of state bits detected during string instruction.
25
Machine check code 5. Asynchronous hardware error.
26
Machine check code 6. Synchronous hardware error.
27
Translation buffer data parity error.
H–6 VAX 6000 Model 600 Service Manual
Table H–2 (Cont.): Software Flags for Machine Check Entries
Bit
Definition
28
Translation buffer tag parity error.
32
Virtual instruction cache (VIC) data parity error.
33
Virtual instruction cache (VIC) tag parity error.
34
B-cache data uncorrectable data error.
35
B-cache data recoverable error lost. A second uncorrectable error or bad address error occurred for which state was not saved. (BCEDIDX and BCEDECC were
locked by the first error.)
36
B-cache data uncorrectable error during a PTE reference.
37
B-cache data uncorrectable error during which a PTE was lost.
38
B-cache data bad address.
39
B-cache data bad address PTE.
40
B-cache data bad address lost PTE.
48
Cache fill error timeout.
49
Cache fill error IDENT read data error.
50
Cache fill error read data error.
51
Cache fill error lost.
53
Cache fill error timeout PTE.
54
Cache fill error read data error PTE.
55
NDAL NO ACK error.
56
NDAL OLOST error.
57
NDAL NO ACK PTE.
95
Reserved last error.
96
XMI information on all adapters present.
97
Detailed MS65A (memory) register information present.
98
Detailed log adapter register information present.
99
Disabled list present (see Table H–3).
101
P-cache tag present.
102
P-cache data present.
Interpreting the VMS Error Log H–7
Table H–2 (Cont.): Software Flags for Machine Check Entries
Bit
Definition
103
I-cache (VIC) tag present.
104
I-cache (VIC) data present.
105
Unlock
set.
106
Memory unlock fail.
set.
107
Log adapter (LA) not locked.
108
The adapter at fault did not have a log adapter routine coded.
109
Adapter does not exist.
110
All enabled. No features of error logging have been disabled.
111
No XMI errors occurred.
112
No memory errors occurred.
116
Memory does not exist.
117
RDS (Read Data Substitute) page replaceable.
118
RDS (Read Data Substitute) page found.
119
Recovery block.
120
Double machine check error occurred.
122
Log a memory soft error (CRD) report.
123
Inhibit logging.
124
Remove CPU.
125
Loop.
126
Abort.
127
Bugcheck.
fail.
Error
bits
in
CPU
error
registers
could
not
be
re-
Error bits in memory error registers could not be re-
H.3.3 Overview Information
After the software flags, some overview information is presented, such as
the node name and system serial number (see
in Example H–2). Most
of the information in this region is self-explanatory. However, one word of
resource disable bits tells what facilities have been disabled as a result of
an error. Table H–3 gives these bit settings.
%
H–8 VAX 6000 Model 600 Service Manual
Table H–3: Resource Disable Bits
Bit
Meaning
0
CPU disabled
1
VIC disabled
2
P-cache disabled
3
B-cache disabled
4
Corrected read data interrupts disabled
5
Single-bit error correction disabled
6–11
Unused
12–14
Reserved
15
CPU not started
H.3.4 CPU Error and Status Registers
CPU error and status register contents are displayed, along with
explanatory text. The particular registers presented depend on the type
of entry. In Examples H–3 through H–5, items through
illustrate this
section of error log output.
&
,B
NOTE: In this section, uppercase letters in explanatory text is used to draw
attention to error conditions. Lowercase letters indicate status information.
To spot problems, then, you can scan this section of the report for uppercase
information. (The XDEV, XBE, XFADR, and XFAER register information
is an exception to this rule.)
H.3.5 Machine Check Stack Frame
The next information displayed in the machine check error log entry is the
machine check stack frame. Item
in Example H–5 shows an example of
the information displayed in the error log entry. Figure H–1 and Table H–4
briefly describe values placed on the stack and consequently displayed in
the error log entry when a machine check exception occurs.
,C
H.3.6 Additional Error Information
Depending on the error found, additional information is presented in the
machine check error log entry:
Interpreting the VMS Error Log H–9
•
Error Counters. The entry report includes counters showing the total
number of errors (of the type flagged in the first 95 bits software flags)
logged since this operating system session began.
•
P-cache and VIC Tag and Data Parity Errors. If parity errors
occurred in the P-cache or VIC data or tag areas, the operating system
attempts to find the good and bad data. A short display of the good
and bad data will appear next if applicable. No such error occurred in
Example H–2.
•
XMI Node Data. General register contents on individual XMI bus
adapter modules. An example is shown in
in Example H–6.
•
XMA Node Data. Contents of MS65A memory module error registers.
An example is shown in
in Example H–8.
•
Log Adapter Data. Contents of the error registers on an XMI module
showing errors. This log adapter information will usually help isolate
the reason for the failure(s) detected. An example for a KDM70 adapter
is shown in
in Example H–9.
,E
-C
-G
Figure H–1: Stack Contents for a Machine Check Exception
3
1
2 2
4 3
1 1
6 5
8 7
0
Parameter Byte Count (18 hex)
AST
x
MCHK Code
:SP
x
CPUID
INT.SYS Register
:SP + 8
SAVEPC Register
:SP + 12
VA Register
:SP + 16
Q Register
Rn
x
Mod
:SP + 4
Opcode
:SP + 20
x
V
x
:SP + 24
PC
:SP + 28
PSL
:SP + 32
msb−p503A−92
H–10 VAX 6000 Model 600 Service Manual
Table H–4: Stack Contents for a Machine Check Exception
Location
Value (hex) or
<bit range>
Description
(SP)
18
Size of stack frame in bytes, not including PSL, PC, or byte
count longword
(SP)+4
<31:29>
Current value of the ASTLVL register
<23:16>
Machine check code. Possible values (hex):
01—Unknown memory management fault
02—Illegal interrupt ID value
03—Illegal microcode dispatch
04—Illegal combination of state bits detected during string instruction
05—Asynchronous hardware error
06—Synchronous hardware error
<7:0>
Current value of the CPUID register
(SP)+8
<31:0>
Current value of the INT.SYS register
(SP)+12
<31:0>
Current value of the SAVEPC register
(SP)+16
<31:0>
Current value of the Ebox VA register
(SP)+20
<31:0>
Current value of the Ebox Q register
(SP)+24
<31:28>
Current value of the Rn register.
<25:24>
Mode; a copy of PSL<CUR_MOD>
<23:16>
Bits <7:0> of the instruction opcode. The FD bit is not included.
<7>
VAX Restart bit. If set, no architectural state has been
changed by the instruction that was executing when the error was detected. If this bit is not set, the architectural state was modified by the instruction.
(SP)+28
Contents of the program counter (PC) when the exception occurred
(SP)+32
Contents of the processor status longword (PSL) when the
exception occurred
Interpreting the VMS Error Log H–11
H.3.7 Sample Error Log Entry for a Machine Check
A machine check exception occurs when an error is detected
in the context of the instruction currently being executed.
Example H–2: Machine Check Error Log Report
V A X / V M S
SYSTEM ERROR REPORT
!****************************** ENTRY
ERROR SEQUENCE 49.
DATE/TIME 9-OCT-1991 08:08:59.97
SYSTEM UPTIME: 0 DAYS 00:14:21
SCS NODE: MTBF
MACHINE CHECK
"
$
%
KA66 CPU FW REV# 1.
XMI NODE # 8.
SW FLAGS
COMPILED 25-OCT-1991 11:08:22
PAGE 1.
1. *****************************
LOGGED ON:
SID 13001401
SYS_TYPE 02060101
VAX/VMS V5.5
CONSOLE FW REV# 0.6
04000000
00040000
00000000
00004007
machine check code 6 bit<26>
cfe rde bit<50>
xmi present bit<96>
xma present bit<97>
adapter present bit<98>
all enabled bit<110>
LOGGING OFF
ACTIVE CPUS
HW REVISION
SYS SERIAL NUM
00000000
00000000
00000000
00000000
00000300
08000000
30303030
20202020
544D2020
4642
SYS SERIAL NUM =
SERIAL NUMBER
30303030
30303030
3030
RESRC DISABLE
0000
MTBF
SERIAL NUMBER = 0000000000
PHYS ADDRESS
E1C00000
H–12 VAX 6000 Model 600 Service Manual
#
This machine check error log example was chosen because it shows several
of the additional sections (Section H.3.6) that can appear when error
conditions indicate such information would be useful. In addition to the
header and general CPU register information, the XMI, memory, and log
adapter sections are included in this report. There are two basic problems
with this machine: many memory CRD errors and a failed KDM70 adapter.
The following discussions describe the report, and show how you might
examine the report and discover the problems.
!
"
All error log entries begin with a self-explanatory header section. See
the VMS Error Log Utility Manual for more detail. The last two
lines name the type of error (machine check in this case), the module
handling the error (KA66) and its current firmware revision levels, and
the XMI node number of the module.
The first device-specific information given for machine check errors are
the ‘‘software flags,’’ four longwords whose bits indicate that specific
problems have been diagnosed. Each bit set is spelled out in the
column to the right (see ). Table H–2 defines the possible software
flags in a machine check error report. In general, for machine check
errors, the first three longwords summarize problems that can be
further pinpointed by examining the contents of the CPU and XMI error
through
on following pages). A bit set in the last
registers (see
longword indicates that more information on the error was compiled
through ).
and appears at the end of the error report (see
#
&
#
$
%
,?
,E
-G
This column briefly describes the problems noted by the bit settings
in the software flag longwords. In general, this section serves as a
roadmap to other parts of the error log that pinpoint the cause of
the error. In this case, the error is a machine check error, code 6, a
synchronous hardware error.
The next bit set indicates a cache fill error (cfe) read data error (rde).
The read data error indicates a problem on an XMI transfer; the XMI
section of the error log provides further information on the problem.
Not currently used.
Identifying information on the KA66A module is presented here:
hardware revision, system serial number, resource disable, and physical
address (for this XMI node). The resource disable field bits are defined
in Table H–3.
Interpreting the VMS Error Log H–13
Example H–3: Machine Check Error Log Report—Continued
V A X / V M S
&
__
|
|
|
|
|
|
|
|
|
|
|
|
|
|
|
|
|
|
|
|
|
|
|
|__
__
|
|
|
|
|
|
|
|
|
|
|
|
|
|
|
__
&
+?
+?
XDEV
SYSTEM ERROR REPORT
COMPILED 25-OCT-1991 11:08:22
PAGE
2.
00008087
KA66A
DEVICE REV = 0.
XBE
9008A200
TRANSACTION TIMEOUT
COMMAND NOACK
CORRECTED READ DATA
XMI BAD
ERROR DETECTED
XFADR
'
61980004
FAILING ADDR = 8001980004(X)
FAILING LENGTH = 1.
XFAER
(
100000F0
)
TRANSACTION BYTE MASK = 00F0(X)
READ CMD
XGPR
NSCSR0
00000000
00000020
boot processor
NVAX rev = 00
XCR0
00000020
XBEER0
WFADR0
WFADR1
NCSR
00000000
01ADC7C0
01ADC7C0
00000801
crd interrupt disabled
SECURE CONSOLE
set cntrol-p enable
ICSR
00000001
VMAR
000007E0
enable VIC
longword select
= 00
sub_block select
= 00
row index
= 1F
Bank Select
= 01
Tag
= 00
VTAG
VDATA
ECR
80504672
D65756F2
00000080
iccs ext
pmf pmux
pmf emux
H–14 VAX 6000 Model 600 Service Manual
= 00
= 00
+>
Next, the error log lists the pertinent registers of the CPU module
experiencing the machine check error. Registers are defined in detail in
the VAX 6000 Model 600 System Technical User’s Guide.
Note that the register section of the reports show explanatory text for errors
in uppercase letters, to draw your attention to the errors. Status and other
information is shown in lowercase letters. (The XDEV, XBE, XFADR, and
XFAER register information is the exception to this rule.)
&
The first group of CPU registers listed in a machine check error log are
NEXMI status and error registers. This example shows problems with
XMI transactions.
'
(
)
+>
+?
The XBE (XMI Bus Error Register) shows ‘‘transaction timeout’’
and ‘‘command noack’’ indicating an incomplete XMI transaction.
(The failing address can be found in the XFADR register (see ,
below.) ‘‘Corrected read data’’ indicates that a data read required
correction.
(
The XFADR (XMI Failing Address Register) shows a failing address
in I/O space (bit <29> = 1). This address is associated with XMI
node 3.
The XFAER (XMI Failing Address Extension Register) shows the
failing command was a read.
The XCR0 (XMI Control Register) shows that the corrected read
data interrupt has been disabled. That is, the operating system
has handled an excess of these errors and has disabled corrected
read data interrupts.
The Ibox registers appear next in the error log. A quick scan shows no
problems are indicated here.
Interpreting the VMS Error Log H–15
Example H–4: Machine Check Error Log Report—Continued
V A X / V M S
__
|
PAMODE
|
|
MMEADR
|
MMEPTE
|
MMESTS
|
|
|
|
TBADR
|
TBSTS
|
|
|
PCADR
|
PCSTS
|
|
PCCTL
|
|
|
___
CCTL
|
|
|
|
|
|
|
|
BCETSTS
|
|
BCETIDX
|
BCETAG
|
|
BCEDSTS
|
|
BCEDIDX
|
BCEDECC
|
|
|
CEFADR
|
CEFSTS
|
|
|
|
__
+@
+@
+D
+D
SYSTEM ERROR REPORT
COMPILED 25-OCT-1991 11:08:22
PAGE
3.
00000000
8037EFFF
00000000
1C008004
+A
30 bit physical address mode
corresp ref had write/mod intent
lock 0
tnv fault
00000000
800001D0
FFFFFFF8
FFFFF800
+B
+C
s5 cmd corresp to tb perr = 1D
source of ref causing tb perr = 04
no operation
FFFFFC13
d-stream enabled
i-stream enabled
parity checking enabled
tb hit rate, p0/p1 sp i-stream reads
+E
00000037
00000000
+F
00000000
00000000
00000000
+G
bcache enabled
tag speed = 01
data speed = 01
size = 03
bcache coherency access
bcache hit
tag store cmd being processed = 00
ecc
tag
= 00
= 0000
data rams cmd at time of err = 00
00000000
00000000
E1980000
0001920A
,>
ecclo
ecchi
= 00
= 00
REGISTER LOCKED
READ DATA ERROR, FILL FAILED
data returned to mbox
do not fill
count = 03
H–16 VAX 6000 Model 600 Service Manual
+@
The next group of registers relate to the Mbox, including P-cache and
translation buffer information.
+A
+B
+C
+D
The MMEADR, MMEPTE, and MMESTS (memory management
exception registers) indicate no problems. The lock bits <31:29> in
MMESTS are 0, indicating that these registers are not locked. (If
they were locked, they would contain valid error information that
should not be written over.)
Likewise, the TBADR and TBSTS (translation buffer registers) do
not indicate problems; the lock bit <0> of TBSTS is 0.
The P-cache registers (PCADR, PCSTS, and PCCTL) do not indicate
any problems in this area. The lock bit <0> of PCSTS is 0, and
PCCTL simply indicates the settings that control the functions of
the primary cache.
The next group of registers in the error log relate to the Cbox (the
control box for the backup cache).
+E
+F
+G
,>
The CCTL (Cbox Control Register) in this example shows status
only; neither hardware nor software has disabled the backup cache
due to uncorrectable errors, which would be the case if bits <31> or
<30> were set.
The BCETSTS, BCETIDX, and BCETAG (backup cache error tag
registers) are clear, indicating no errors in the B-cache tag store.
Likewise, the BCEDSTS, BCEDIDX and BCEDECC (backup cache
error data registers) are clear, indicating no errors in the B-cache
data RAM transactions.
The CEFADR (Cbox Error Fill Address Register) and CEFSTS
(Cbox Error Fill Status Register) indicate problems with an
outstanding read in I/O space.
Interpreting the VMS Error Log H–17
Example H–5: Machine Check Error Log Report—Continued
V A X / V M S
,?
___
|
|
|
|
|
|
|
|
|
|
|
|
|
|
|
___
STACK
SYSTEM ERROR REPORT
NESTS
NEOADR
NEOCMD
00000000
01AE08E0
00000F05
NEDATHI
00000000
NEDATLO
NEICMD
COMPILED 25-OCT-1991 11:08:22
PAGE
4.
,@
,A
,B
ndal command = 05
commander id = 00
byte enable = 0F
length of ndal transaction
byte enable = 0000
length = 00
00000000
00000000
ndal command
commander id
parity = 00
,?
FRAME
= 00
= 00
= 00
,C
BYTE COUNT
MCHK TYPE
00000018
80060008
AST LEVEL = 00(x)
06 sync hardware error occurred
INT SYS REG
SAVEPC REG
VA REG
Q REG
OPCODE
000001C1
801DAF20
0000035C
805A5D79
00050080
vax restart bit
OPCODE = 05(x)
PC REG
ERROR PSL
ERROR COUNTERS
805A5D79
041F0008
N-BIT
INTERRUPT PRIORITY LEVEL = 31.
PREVIOUS MODE = KERNEL
CURRENT MODE = KERNEL
INTERRUPT STACK
FIRST PART DONE CLEAR
,D
code_6
cfe_ident_rde
cfe_rde
04
03
01
H–18 VAX 6000 Model 600 Service Manual
,?
The NDAL error registers appear next in the machine check error log.
,@
,A
,B
,C
,D
The NESTS (NDAL Error Status) register is clear; none of the six
errors recognized and flagged here have occurred.
The NEOADR (NDAL Error Output Address) register is non-zero,
but this signifies an error address only when the NO ACK bit <0>
in the NESTS register is set. The NEOCMD (NDAL Error Output
Command) register is set in the same fashion, so the data logged in
this case does not indicate an error.
The next three registers are loaded when a parity error occurs. No
parity error has occurred; if there had, the PERR bit <3> in the
NESTS register would be set.
The machine check stack frame is shown here.
These error counters show the total number of errors logged since this
operating system session began (not just this entry).
Interpreting the VMS Error Log H–19
Example H–6: Machine Check Error Log Report—Continued
V A X / V M S
SYSTEM ERROR REPORT
COMPILED 25-OCT-1991 11:08:22
PAGE
5.
,E
____
|
|
|
XMI NODE DATA
|
PHYS ADDR
E1C00000
|
XDEV VALID
5F00
|
XBE VALID
5F00
|
XFADR VALID
5300
|
XFAER VALID
1300
|
NODE PRESENT
5F08
|
|
|
XMI NODE #3.
|
XDEV
00000C22
|
|
|
|
|
|
|
XMI NODE #8.
|
XDEV
00008087
|
|
|
XBE
9008B200
|
XFADR
61980004
|
|
|
XFAER
100000F0
|
|
|
|
XMI NODE #9.
|
XDEV
00028087
|
|
|
XBE
90080240
|
XFADR
01ADC7DC
|
|
|
XFAER
100000FF
|
|
|
-- [continues on next page]
,F
,G
KDM70
DEVICE REV = 0.
ADAPTER registers not readable
->
KA66A
DEVICE REV = 0.
FAILING ADDR = 8001980004(X)
FAILING LENGTH = 1.
TRANSACTION BYTE MASK = 00F0(X)
READ CMD
->
KA66A
DEVICE REV = 2.
FAILING ADDR = 0001ADC7DC(X)
FAILING LENGTH = 0.
TRANSACTION BYTE MASK = 00FF(X)
READ CMD
,E
H–20 VAX 6000 Model 600 Service Manual
,E
This section contains the XMI subpacket information, provided when
XMI-related errors occur.
XMI modules contain four consistently formatted registers: XDEV
(XMI Device Register), XBE (XMI Bus Error Register), XFADR (XMI
Failing Address Register), and XFAER (XMI Failing Address Extension
Register). If errors occur here, the VMS error handling routines create
and store error information for all the XMI nodes, to help pinpoint XMI
problems.
,F
First, the error log displays the physical I/O address of the CPU
that called the routine to log the XMI subpacket resulting in this
section of the report. The error log displays general information
on the modules present on the XMI and the validity of the register
information. The NODE PRESENT line indicates which XMI slots
contained modules at boot time. In this case, 5F08 (hex) translates
to 0101 1111 0000 1000 (binary), indicating nodes 3, 8, 9, 10, 11,
12, and 14 are filled.
The preceding four lines indicate the validity of the various error
register information for these nodes. Basically, this tells whether
the error register could be read. For example, the XDEV and XBE
registers are shown as valid for node 10, but memory modules do
not support the XFADR and XFAER registers. So, the valid bits are
not set, and the detailed listings in
do not show these registers.
-?
,G
->
The XDEV valid bits are an exception. If an XDEV register is not
readable, a memory-resident copy of its contents will be used so
that the error log can show what type of module is at that XMI
node. So, even when the XDEV valid bit for that node is 0, the
device type given in the error log is accurate. The device revision
will not be included, as that information is not available in the
memory-resident copy. XMI node 3 represents this case (see ).
,G
XMI node 3 was shown to be present in the NODE PRESENT LINE
of , but not valid in the XDEV VALID line. Here, the device
name is shown from information stored in memory, but remaining
registers were not readable and hence are not displayed.
,F
This system is a dual-processor system; two KA66As are in XMI
nodes 8 and 9. Both indicate read errors.
Interpreting the VMS Error Log H–21
Example H–7: Machine Check Error Log Report—Continued
V A X / V M S
,E
SYSTEM ERROR REPORT
COMPILED 25-OCT-1991 11:08:22
PAGE
6.
___
[continued from previous page]
|
|
XMI NODE #10
|
XDEV
00834001
|
MS65A
|
DEVICE REV = 131.
|
XBE
80001000
|
|
XMI NODE #11
|
XDEV
06A20C05
|
CIXCD
|
HW REV = L2
|
FW REV = V0.6
|
XBE
000002C0
|
|
XMI NODE #12
|
XDEV
06060C03
|
DEMNA
|
HW REV = F
|
EEPROM FW REV = 6.
|
XBE
80080304
|
XFADR
80008F40
|
FAILING ADDR = 0000008F40(X)
|
FAILING LENGTH = 2.
|
XFAER
700000FF
|
TRANSACTION BYTE MASK = 00FF(X)
|
WRITE MASKED CMD
|
|
XMI NODE #14
|
XDEV
00022001
|
DWMBA
|
DEVICE REV = 2.
|
XBE
80080388
|
XFADR
00020100
|
FAILING ADDR = 0000020100(X)
|
FAILING LENGTH = 0.
|
XFAER
00000000
|
TRANSACTION BYTE MASK = 0000(X)
___
-?
-@
-A
-B
,E
H–22 VAX 6000 Model 600 Service Manual
-?
-@
-A
-B
The XBE register for the MS65A memory at node 10 shows that bit
<31> is set, indicating that errors have occurred. Bit <12> is also set,
indicating that further information is contained in the memory error
status registers, presented in the next subpacket of information in the
error log. (The XFADR and XFAER registers are not present in the
MS65A, since this module is not a commander node on the XMI.)
The CIXCD at node 11 shows no XMI errors, thus XFADR and XFAER
are not locked and hence are not shown in the display.
XMI node 12 is a DEMNA adapter; the XBE register shows the
corrected read data (CRD) bit <19> set, indicating the DEMNA received
corrected read data from the memory, indicating that the memory
detected and corrected a single-bit error.
Likewise, the DWMBA at node 14 shows a CRD.
Interpreting the VMS Error Log H–23
Example H–8: Machine Check Error Log Report—Continued
V A X / V M S
-C
SYSTEM ERROR REPORT
___
| XMA NODE # 10.
|
PHYS ADR
E1D00000
|
|
XDEV
00834001
|
|
|
XBE
80001000
|
|
|
SEADR
02000000
|
|
|
|
MCTL1
82024000
|
|
|
|
|
MECER
60243073
|
|
|
|
|
MECEA
00004120
|
|
MCTL2
00000005
|
|
|
|
TCY
00000000
|
BECER
00000000
|
|
|
|
|
|
BECEA
00000000
|
|
STADR
00000000
|
|
ENADR
00000080
|
-- [continues on next page]
COMPILED 25-OCT-1991 11:08:22
PAGE
7.
NODE 10.
MS65A
DEVICE REV = 131.
NODE SPECIFIC ERROR DETECTED
ERROR DETECTED
-D
NO INTERLEAVE
STARTING ADR = 0. MByte
ENDING ADR = 32. MByte
-E
MEMORY VALID
ERROR DETECTED
MEMORY SIZE = 0. MB ARRAY
RAM TYPE = 1MB
CMD = OWNERSHIP READ
COMMANDER ID = 36.
DATA CRD ERROR
SECOND DATA ERROR OCCURRED
-F
ERROR ADDRESS = 00000824(X)
SUP ASSERTION WHEN < 5 FREE ENTRIES
REFRESH RATE = 15.6uS
ENABLE HOLD FOR EACH SINGLE DATA PKT
BLOCK SYNDROME = 0.
BLOCK STATE ID = 0.
BLOCK STATE CODE = 0.
CMD CODE = 0.
COMMANDER ID = 0.
BLOCK ERROR ADDR = 00000000(X)
STARTING ADR = 0. MByte
ENDING ADR = 32. MByte
-C
H–24 VAX 6000 Model 600 Service Manual
-C
This section contains memory module error register information.
During the process of finding the reason for the machine check error,
the VMS error handling routines examined the XBE register in all the
XMI modules. In addition to the XMI I/O space read error found in the
CPU XBE and XFADR register (see and ), errors were found in the
memory module at XMI node 10, and this information was logged.
'
-D
-E
-F
(
The XBE register shows a node specific error was detected, and that
the nature of the error can be determined by examining the error
registers.
The MCTL1 register is an error summary register; bit <31> is set,
indicating that an error was detected.
The Memory ECC Error Register (MECER) indicates a data CRD
error, and a second data error occurred before the previous one was
cleared from the buffer.
The remaining memory registers, shown here and continuing on the
next page, show status information and no other errors. This memory
is causing the CRD errors.
Interpreting the VMS Error Log H–25
Example H–9: Machine Check Error Log Report—Continued
V A X / V M S
SYSTEM ERROR REPORT
-C| -- [continued
from previous page]
INTLV
00000000
|
|
|
|
|
|
|
|
|
|
|
|
____
-C
COMPILED 25-OCT-1991 11:08:22
PAGE
8.
INTERLEAVE MODE = 0.
INTERLEAVE ADDR = 0.
SEGMENT = 0.
MCTL3
MCTL4
00000000
00008000
MODULE POPULATION
MEMORY SIZE = 32. MByte
FREE STATE
BSCTL
BSADR
EECTL
TMOER
40000000
00000000
05030000
00000000
-G
____
|
|
| LOG ADAPTER DATA
|
|
| XMI NODE #3.
|
|
PHYS ADR
E1980000
|
|
XDEV
00000C22
|
|
|
XBE
00000000
|
|
XFADR
00000000
|
XFAER
00000000
|
|
XCOMM
00000000
|
SSP_IP
0000
|
SSP_SA
0000
|
PDR
00000000
|
PER
0000
|___
ANAL/ERR/OUT=ERRLOG.TXT ERRLOG.SYS
NODE 3.
KDM70
DEVICE REV = 0.
COMMANDER ID = NODE #00(X)
TRANSACTION BYTE MASK = 0000(X)
-G
H–26 VAX 6000 Model 600 Service Manual
-G
This is an example of a log adapter subsection in an error entry. This
information is displayed when an XMI error shows a problem with
a specific adapter node. The contents of the adapter registers are
displayed.
In this case, the KDM70 module is broken; the error log routine could
not read the contents of the registers on the adapter module. The device
name was taken from information stored in memory, as described in
item . This further substantiates the problem reported in the CPU
registers (see ) of not being able to read node 3’s XBE CSR register.
,F
(
Interpreting the VMS Error Log H–27
H.4 Format of INT54 (Soft) Error Log Entry
The format of an error log entry for an INT54 error is similar to a machine
check error log entry. The major differences are in the software error flags,
which indicate the different conditions causing INT54 errors, and that there
is no machine check stack frame.
H.4.1 Header
The header to the error log entry gives the entry number (there can be many
errors logged in any given error log file) and other general information about
the system, date and time, and so forth. Item
in Example H–10 shows
the format and typical content of the header for an error log entry.
!
H.4.2 Software Flags
As with machine check errors, the software flags are longwords whose bit
settings indicate the particular conditions detected by the error handler.
Example H–10 gives the software flags for INT54 entries. Item
in
Example H–10 shows an example of this type of output.
"
Table H–5: Software Flags for INT54 Errors
Bit
Definition
0
Inconsistent. Multiple error signals with overlapping syndromes.
1–10
Used internally by the VMS error handling routines; used for debug purposes.
17
The error formatter cannot find a recognizable error condition from its interpretation of the module registers.
18
Error syndrome not found.
24
CRD (corrected read data) error detected on the XMI.
25
XMI CC (corrected confirmation); a single-bit CC error on an XMI transfer was corrected.
26
XMI parity error detected.
32
VIC data parity error.
33
VIC tag parity error.
36
P-cache data parity error.
37
P-cache right bank tag parity error.
38
P-cache left bank tag parity error.
H–28 VAX 6000 Model 600 Service Manual
Table H–5 (Cont.): Software Flags for INT54 Errors
Bit
Definition
40
B-cache data addressing error.
41
B-cache data addressing error during a PTE (page table entry) reference.
42
B-cache data addressing error during which a PTE was lost.
43
B-cache data correctable data error.
44
B-cache data correctable data error lost.
A correctable data error occurred, but an uncorrectable error occurred before it could be corrected, and
the data that would determine the location of the correctable error (BCEDIDX) has been overwritten.
45
B-cache data uncorrectable data error.
46
B-cache data unrecoverable error lost. A second uncorrectable error or bad address error occurred for which state was not saved. (BCEDIDX and BCEDECC
were locked by the first error.)
47
B-cache data uncorrectable error during a PTE reference.
48
B-cache data uncorrectable error during which a PTE was lost.
56
B-cache tag addressing error.
57
B-cache tag correctable data error.
58
B-cache tag correctable data error lost. A correctable tag error occurred, but an uncorrectable error occurred before it could be corrected, and the data that would determine the location of the correctable error has been overwritten.
59
B-cache tag uncorrectable error.
60
B-cache tag unrecoverable error lost. A second uncorrectable error or bad address occurred for which state was not saved.
64
Cache fill error timeout.
65
Cache fill error timeout during a PTE reference.
66
Cache fill error read data error.
67
Cache fill error read data error during a PTE reference.
68
Cache fill error lost.
80
NO ACK on the NDAL internal data bus.
81
NO ACK on the NDAL internal data bus during a PTE reference.
82
Parity error on an NDAL transfer.
Interpreting the VMS Error Log H–29
Table H–5 (Cont.): Software Flags for INT54 Errors
Bit
Definition
83
Inconsistent parity errors on an NDAL transfer.
84
NDAL parity error lost.
85
NDAL OLOST error.
95
Reserved last error.
96
XMI information present in the error log entry.
97
Memory information present in the error log entry.
98
Log adapter information present in the error log entry.
99
Disabled list present.
101
P-cache tag information present in the entry.
102
P-cache data information present in the entry.
103
VIC tag information present in the entry.
104
VIC data information present in the entry.
105
Unlock
set.
106
Memory unlock fail.
set.
107
Log adapter (LA) not locked.
108
No log adapter routine. The adapter at fault did not have a routine to log register contents.
109
Adapter does not exist.
110
All enabled. No features of error logging have been disabled.
111
No XMI errors occurred.
112
No memory errors occurred.
122
Log a memory soft error (CRD) entry report.
123
Inhibit logging.
124
Remove CPU.
125
Loop.
126
Abort.
127
Bugcheck.
fail.
Error
bits
in
CPU
error
registers
could
not
be
re-
Error bits in memory error registers could not be re-
H–30 VAX 6000 Model 600 Service Manual
H.4.3 Overview Information
After the software flags, some overview information is presented, such as
in Example H–10). Most
the node name and system serial number (see
of the information in this region is self-explanatory. However, one word of
resource disable bits tells what facilities have been disabled as a result of
an error. These bit settings are given in Table H–6.
$
Table H–6: Resource Disable Bits
Bit
Meaning
0
CPU disabled
1
VIC disabled
2
P-cache disabled
3
B-cache disabled
4
Corrected read data interrupts disabled
5
Single-bit error correction disabled
6–11
Unused
12–14
Reserved
15
CPU not started
H.4.4 CPU Error and Status Registers
CPU error and status register contents are displayed, along with
explanatory text. The particular registers presented depend on the type
of entry. The format of this information is the same as for machine check
shows this section of error log output.
errors. In Example H–10, item
%
NOTE: In this section, uppercase letters in explanatory text is used to draw
attention to error conditions. Lowercase letters indicate status information.
To spot problems, then, you can scan this section of the report for uppercase
information. (The XDEV, XBE, XFADR, and XFAER register information
is an exception to this rule.)
H.4.5 Additional Error Information
Depending on the error found, additional information is presented in the
INT54 error log entry:
Interpreting the VMS Error Log H–31
•
Error Counters. The entry report includes counters showing the total
number of errors (of the type flagged in the first 95 bits of the software
flags) logged since this operating system session began.
•
P-cache and VIC Tag and Data Parity Errors. If parity errors
occurred in the P-cache or VIC data or tag areas, the operating system
attempts to find the good and bad data. A short display of the good
and bad data will appear next if applicable. No such error occurred in
Example H–10.
•
XMI Node Data. General register contents on individual XMI bus
adapter modules. The format of this information is the same as for
machine check entries.
•
XMA Node Data. Contents of MS65A memory module error registers.
The format of this information is the same as for machine check entries.
•
Log Adapter Data. Contents of the error registers on an XMI module
showing errors. This log adapter information will usually help isolate
the reason for the failure(s) detected. The format of this information is
the same as for machine check entries.
H.4.6 Sample Error Log Entry for an INT54 (Soft) Error
Example H–10 shows an INT54 error log entry. The report format is similar
to that for machine checks. At , the header for the INT54 error is shown.
Items , , and show the software flags, the unused ‘‘logging off’’ region,
and the overview information.
"#
%
$
!
Region
shows the CPU registers. A quick scan of this area (looking for
the uppercase letters) shows that a B-cache data correctable ECC error
occurred ( ). In this error case, the operating system has determined an
excess of B-cache ECC errors has occurred and has disabled the B-cache.
shows the error
The resource disable bits indicate this condition. Item
counters for this session.
&
H–32 VAX 6000 Model 600 Service Manual
'
Example H–10: INT54 Error Log Report
V A X / V M S
SYSTEM ERROR REPORT
!**************************** ENTRY
ERROR SEQUENCE 304.
DATE/TIME 29-AUG-1990 14:04:31.95
SYSTEM UPTIME: 0 DAYS 02:21:35
SCS NODE: THERUT
INT54 ERROR
"
#
$
KA66 CPU FW REV# 1.
XMI NODE # 1.
SW FLAGS
COMPILED 25-OCT-1991 08:58:44
PAGE
1.
1. ****************************
LOGGED ON:
SID 13001401
SYS_TYPE 02060101
VAX/VMS V5.5
CONSOLE FW REV# 0.6
00000000
00000800
00000000
00004000
bdata corr bit<43>
all enabled bit<110>
LOGGING OFF
ACTIVE CPUS
HW REVISION
SYS SERIAL NUM
00000000
00000000
00000000
00000000
00000042
08000000
33304220
30303030
30303030
3030
SYS SERIAL NUM = 0000000000
SERIAL NUMBER
33314147
31303033
3431
RESRC DISABLE
0008
SERIAL NUMBER = GA13300114
scache disabled
%
___
PHYS ADDRESS
E1880000
XDEV
00028987
|
|
|
XBE
000001C0
|
XFADR
61B80008
|
|
-- [continued on next page]
%
KA66A
DEVICE REV = 2.
FAILING ADDR = 8001B80008(X)
FAILING LENGTH = 1.
Example H–10 Cont’d on next page
Interpreting the VMS Error Log H–33
Example H–10 (Cont.): INT54 Error Log Report
V A X / V M S
SYSTEM ERROR REPORT
COMPILED 25-OCT-1991 08:58:44
PAGE
2.
%| -- [continued
from previous page]
XFAER
100000F0
|
|
|
|
|
|
|
|
|
|
|
|
|
|
|
|
|
|
|
|
|
|
|
|
|
|
|
|
|
|
|
|
|
|
|
|
|
|
|
|
|
|
|
|
|
|
TRANSACTION BYTE MASK = 00F0(X)
READ CMD
XGPR
NSCSR0
00000000
00000000
XCR0
XBEER0
WFADR0
WFADR1
NCSR
00000000
00000000
038D8DA0
038D8D80
00000801
NVAX rev
= 00
SECURE CONSOLE
set cntrol-p enable
ICSR
VMAR
00000000
000007E0
longword select
= 00
sub_block select
= 00
row index
= 1F
Bank Select
= 01
Tag
= 00
VTAG
VDATA
ECR
8021FEB0
D0051351
00000082
fbox enable
iccs ext
pmf pmux
= 00
pmf emux
= 00
PAMODE
00000000
MMEADR
MMEPTE
MMESTS
80000EF4
0000000C
1C00C004
30 bit physical address mode
corresp ref had write/mod intent
lock 0
m=0 fault
TBADR
TBSTS
00000000
800001D0
s5 cmd corresp to tb perr = 1D
source of ref causing tb perr = 04
PCADR
PCSTS
FFFFFFF8
FFFFF800
PCCTL
FFFFFC00
CCTL
00000036
no operation
tb hit rate, p0/p1 sp i-stream reads
% --[continued on next page]
tag speed = 01
data speed = 01
Example H–10 Cont’d on next page
H–34 VAX 6000 Model 600 Service Manual
Example H–10 (Cont.): INT54 Error Log Report
V A X / V M S
SYSTEM ERROR REPORT
%| -- [continued from previous page]
|
|
|
BCETSTS
|
|
|
BCETIDX
|
BCETAG
|
|
|
|
|
BCEDSTS
|
|
|
BCEDIDX
|
BCEDECC
|
|
|
CEFADR
|
CEFSTS
|
|
|
|
|
NESTS
|
NEOADR
|
NEOCMD
|
|
|
|
|
NEDATHI
|
|
|
NEDATLO
|
NEICMD
|
|
|___
ERROR COUNTERS
%
COMPILED 25-OCT-1991 08:58:44
PAGE
3.
size = 03
bcache coherency access
bcache hit
00000140
tag store cmd being processed = 0A
01400020
81C16E00
valid
owned
ecc
= 2D
tag
= 040E
&
00000702
BCACHE DATA CORRECTABLE ECC ERROR
data rams cmd at time of err = 07
001E8DC0
03000200
ecclo
ecchi
= 08
= 0C
E1880000
00019220
ndal identification
data returned to mbox
do not fill
count = 03
00000000
03E0A4EC
00000F15
ndal command = 05
commander id = 01
byte enable = 0F
length of ndal transaction
= 00
00018001
byte enable = 0180
length = 00
00018001
0000000C
'
ndal command
commander id
parity = 00
= 0C
= 00
bdata_corr
10
ANAL/ERR/OUT=TEST29.TXT TEST29.SYS
Interpreting the VMS Error Log H–35
H.5 Format of INT60 (Hard) Error Log Entry
The format of an error log entry for a INT60 error is similar to a Machine
Check error log entry. The major differences are the software error flags,
which indicate the different conditions causing INT60 errors, and that there
is no machine check stack frame.
H.5.1 Header
The header to the error log entry gives the entry number (there can be many
errors logged in any given error log file) and other general information about
the system, date and time, and so forth. Item
in Example H–11 shows
the format and typical content of the header for an error log entry.
!
H.5.2 Software Flags
As with machine check errors, the software flags are longwords whose bit
settings indicate the particular conditions detected by the error handler.
Table H–7 gives the software flags for INT60 entries.
Item
in
Example H–11 shows an example of this type of output.
"
Table H–7: Software Flags for INT60 Errors
Bit
Definition
0
Inconsistent. Multiple error signals with overlapping syndromes.
1–5
Used internally by the VMS error handling routines; used for debug purposes.
17
The error formatter cannot find a recognizable error condition from its interpretation of the module registers.
18
Error syndrome not found.
32
B-cache data uncorrectable error.
33
B-cache data addressing error.
34
B-cache data unrecoverable error lost. A second uncorrectable error or bad address error occurred for which state was not saved. (BCEDIDX and BCEDECC
were locked by the first error.)
48
Cache fill error timeout.
49
Cache fill error read data error.
50
Cache fill error unexpected fill.
64
NO ACK on the NDAL internal data bus.
H–36 VAX 6000 Model 600 Service Manual
Table H–7 (Cont.): Software Flags for INT60 Errors
Bit
Definition
65
OLOST on the NDAL internal data bus.
66
NDAL IPE error.
67
NDAL WSE error.
68
NDAL SSCIW error.
80
XMI WEI error.
81
XMI IPE error.
82
XMI WSE error.
84
XMI TTO error.
85
XMI URR error.
86
XMI SEO error.
87
Writeback failure.
95
Reserved last error.
96
XMI information present in the error log entry.
97
Memory information present in the error log entry.
98
Log adapter information present in the error log entry.
105
Unlock
set.
107
Log adapter (LA) not locked.
108
No log adapter routine. The adapter at fault did not have a routine to log register contents.
109
Adapter does not exist.
110
All enabled. No features of error logging have been disabled.
fail.
Error
bits
in
CPU
111
No XMI errors occurred.
112
No memory errors occurred.
120
Imbedded vector interrupt not found.
123
Inhibit logging.
124
Remove CPU.
125
Loop.
error
registers
could
not
be
re-
Interpreting the VMS Error Log H–37
Table H–7 (Cont.): Software Flags for INT60 Errors
Bit
Definition
126
Abort.
127
Bugcheck.
H.5.3 Overview Information
After the software flags, some overview information is presented, such as
in Example H–11.) Most
the node name and system serial number (see
of the information in this region is self-explanatory. However, one word of
resource disable bits tells what facilities have been disabled as a result of
an error. These bit settings are given in Table H–8.
$
Table H–8: Resource Disable Bits
Bit
Meaning
0
CPU disabled
1
VIC disabled
2
P-cache disabled
3
B-cache disabled
4
Corrected read data interrupts disabled
5
Single-bit error correction disabled
6–11
Unused
12–14
Reserved
15
CPU not started
H.5.4 CPU Error and Status Registers
CPU error and status register contents are displayed, along with
explanatory text. The format of this information is the same as for machine
check errors. In Example H–11, item
shows this section of error log
output.
%
NOTE: In this section, uppercase letters in explanatory text are used to draw
attention to error conditions. Lowercase letters indicate status information.
To spot problems, then, you can scan this section of the report for uppercase
H–38 VAX 6000 Model 600 Service Manual
information. (The XDEV, XBE, XFADR, and XFAER register information
is an exception to this rule.)
H.5.5 Additional Error Information
Depending on the error found, additional information is presented in the
INT60 error log entry:
•
Error Counters. The entry report includes counters showing the total
number of errors (of the type flagged in the first 95 bits of the software
flags) logged since this operating system session began.
•
XMI Node Data. General register contents on individual XMI bus
adapter modules. The format of this information is the same as for
machine check entries.
•
XMA Node Data. Contents of MS65A memory module error registers.
The format of this information is the same as for machine check entries.
•
Log Adapter Data. Contents of the error registers on an XMI module
showing errors. This log adapter information will usually help isolate
the reason for the failure(s) detected. The format of this information is
the same as for machine check entries.
Interpreting the VMS Error Log H–39
H.5.6 Sample Error Log Entry for an INT60 (Hard) Error
Example H–11 shows an INT60 error log entry. We will not go into the
detailed analysis of individual registers that was done for the machine
check example (Example H–2). The report formats are similar. At , the
header for the INT60 error is shown. Items , , and show the software
flags, the unused ‘‘logging off’’ region, and the overview information.
"#
!
$
%
Region
shows the CPU registers. A quick scan of this area (looking for
the uppercase letters) shows that an error occurred on an XMI writeback
transaction: a transaction timeout caused by a command NO ACK (see ).
This is a hard error. For this error, the CPU or memory can be at fault. The
WFADR0 register
shows the failing address. In this case, the address
(1FFFFFE0) is far out of range for the available memory, indicating that
the processor is probably causing the problem.
&
'
Example H–11: INT60 Error Log Report
V A X / V M S
SYSTEM ERROR REPORT
!**************************** ENTRY
ERROR SEQUENCE 24.
DATE/TIME 15-AUG-1991 14:35:51.87
SYSTEM UPTIME: 0 DAYS 00:09:42
SCS NODE: THERUT
INT60 ERROR
"
#
$
KA66 CPU FW REV# 1.
XMI NODE # 1.
SW FLAGS
COMPILED 25-OCT-1991 08:58:07
PAGE
1.
1. ****************************
LOGGED ON:
SID 13001401
SYS_TYPE 02060101
VAX/VMS V5.5
CONSOLE FW REV# 0.6
00000000
00000000
00800000
80004000
writeback failure bit<87>
all enabled bit<110>
bugcheck bit<127>
LOGGING OFF
ACTIVE CPUS
HW REVISION
00000000
00000000
00000000
00000000
00000002
08000000
32304220
Example H–11 Cont’d on next page
H–40 VAX 6000 Model 600 Service Manual
Example H–11 (Cont.): INT60 Error Log Report
V A X / V M S
SYSTEM ERROR REPORT
SYS SERIAL NUM
20202020
46464F43
4545
SERIAL NUMBER
32314147
30303030
3135
RESRC DISABLE
0000
COMPILED 25-OCT-1991 08:58:07
PAGE
2.
SYS SERIAL NUM =
COFFEE
SERIAL NUMBER = GA12000051
%
___
PHYS ADDRESS
E1880000
|
XDEV
00028087
|
|
|
XBE
80001040
|
|
|
XFADR
61880008
|
|
|
XFAER
100000F0
|
|
|
XGPR
00000036
|
NSCSR0
00000020
|
|
|
XCR0
00000020
|
|
XBEER0
00014000
|
|
|
WFADR0
1FFFFFE0
|
WFADR1
03873BC0
|
NCSR
00000801
|
|
|
ICSR
00000001
|
|
VMAR
000007E0
|
|
|
|
|
-- [continued on next page]
KA66A
DEVICE REV = 2.
NODE SPECIFIC ERROR DETECTED
ERROR DETECTED
FAILING ADDR = 8001880008(X)
FAILING LENGTH = 1.
TRANSACTION BYTE MASK = 00F0(X)
READ CMD
boot processor
NVAX rev = 00
crd interrupt disabled
'
%
&
WBACK0 COMMAND NOACK
WBACK0 TRANSACTION TMO
SECURE CONSOLE
set cntrol-p enable
enable VIC
longword select
= 00
sub_block select
= 00
row index
= 1F
Bank Select
= 01
Tag
= 00
Example H–11 Cont’d on next page
Interpreting the VMS Error Log H–41
Example H–11 (Cont.): INT60 Error Log Report
%|
V A X / V M S
|
|
|
|
|
|
|
|
|
|
|
|
|
|
|
|
|
|
|
|
|
|
|
|
|
|
|
|
|
|
|
|
|
|
|
|
|
|
|
|
|
|
|
VTAG
VDATA
ECR
SYSTEM ERROR REPORT
COMPILED 25-OCT-1991 08:58:07
PAGE
3.
8051C600
D655D600
00000082
fbox enable
iccs ext
pmf pmux
= 00
pmf emux
= 00
PAMODE
00000000
30 bit physical address mode
MMEADR
MMEPTE
MMESTS
00077DF0
0000000C
1C00C004
corresp ref had write/mod intent
lock 0
m=0 fault
TBADR
TBSTS
00000000
800001D0
s5 cmd corresp to tb perr = 1D
source of ref causing tb perr = 04
PCADR
PCSTS
FFFFFFF8
FFFFF800
PCCTL
FFFFFC13
no operation
d-stream enabled
i-stream enabled
parity checking enabled
tb hit rate, p0/p1 sp i-stream reads
CCTL
00000037
bcache enabled
tag speed = 01
data speed = 01
size = 03
bcache coherency access
bcache hit
BCETSTS
00000140
BCETIDX
BCETAG
01400020
8040F600
tag store cmd being processed
= 0A
valid
owned
ecc
= 1E
tag
= 0402
BCEDSTS
00000400
% -- [continued on next page]
data rams cmd at time of err
Example H–11 Cont’d on next page
H–42 VAX 6000 Model 600 Service Manual
= 04
Example H–11 (Cont.): INT60 Error Log Report
V A X / V M S
SYSTEM ERROR REPORT
%| -- [continued
from previous page]
BCEDIDX
00000020
|
BCEDECC
|
|
|
CEFADR
|
CEFSTS
|
|
|
|
NESTS
|
NEOADR
|
NEOCMD
|
|
|
|
|
NEDATHI
|
|
|
NEDATLO
|
NEICMD
|
|
|
______
ERROR COUNTERS
COMPILED 25-OCT-1991 08:58:07
PAGE 4.
03800000
ecclo
ecchi
= 00
= 0E
E1F80000
00019200
data returned to mbox
do not fill
count = 03
00000000
03E6F1E0
00000F06
ndal command = 06
commander id = 00
byte enable = 0F
length of ndal transaction
= 00
00018001
byte enable = 0180
length = 00
00018001
0000000C
%
ndal command
commander id
parity = 00
= 0C
= 00
writeback_failur
01
ANAL/ERR/OUT=TEST20.TXT TEST20.SYS
Interpreting the VMS Error Log H–43
H.6 Format of Lastfail Error Log Entry
The Lastfail error entry displays the errors found in XMI module registers
before the system terminates a session.
The lastfail error log entry resembles log adapter data in machine check,
INT54, and INT60 entries, and can have data from one or many XMI nodes.
Here, two nodes are shown with XMI corrected read data (CRD) latched.
Example H–12: Lastfail Error Log Entry
V A X / V M S
SYSTEM ERROR REPORT
!**************************** ENTRY
ERROR SEQUENCE 32.
DATE/TIME 9-OCT-1991 07:48:34.36
SYSTEM UPTIME: 0 DAYS 00:06:49
SCS NODE: INT54
CPU LASTFAIL
KA66 CPU FW REV# 1.
XMI NODE # 8.
XMI NODE #3.
COMPILED 25-OCT-1991 10:03:45
PAGE
1.
1. ****************************
LOGGED ON:
SID 13001401
SYS_TYPE 02060101
VAX/VMS V5.5
CONSOLE FW REV# 0.6
"
PHYS ADR
E1980000
XDEV
18110C22
NODE 3.
#
KDM70
DEVICE REV = 6161.
XBE
800800C0
$
COMMANDER ID = NODE #03(X)
CORRECTED READ DATA
ERROR DETECTED
XFADR
C00074D4
FAILING ADDR = 00000074D4(X)
FAILING LENGTH = 3.
XFAER
C00075D4
TRANSACTION BYTE MASK = 75D4(X)
GET VAX LOCK CMD
XCOMM
SSP_IP
SSP_SA
PDR
PER
00000000
0000
0000
00020100
0000
H–44 VAX 6000 Model 600 Service Manual
!
"
#
$
The header of the lastfail report contains the same general information
as the other KA66A reports.
XMI node 3 experienced an error after the error causing the shutdown
to occur.
The adapter experiencing the problem is a KDM70.
The error is a corrected read data error. Note that corrected read data
errors do not latch the XFADR. For more information on CRD errors,
look for the CRD entries in the error log (described in Section H.8).
Interpreting the VMS Error Log H–45
Example H–13: Lastfail Error Log Entry—Continued
V A X / V M S
XMI NODE #8.
&
SYSTEM ERROR REPORT
PHYS ADDRESS
XDEV
COMPILED 25-OCT-1991 10:03:45
PAGE
2.
E1C00000
00008087
'
(
Device type = KA66A
Device revision = 0000
XBE
80080200
CORRECTED READ DATA
ERROR DETECTED
XFADR
61C00008
FAILING ADDR = 8001C00008(X)
FAILING LENGTH = 1.
XFAER
100000F0
TRANSACTION BYTE MASK = 00F0(X)
READ CMD
NSCSR0
00000020
boot processor
NVAX rev = 00
XBEER0
WFADR0
WFADR1
NCSR
00000000
01ADD4E0
01ADD4E0
00000801
SECURE CONSOLE
set cntrol-p enable
ICSR
ECR
00000000
00000080
iccs ext
pmf pmux
pmf emux
TBADR
TBSTS
= 00
= 00
00000000
800001D0
s5 cmd corresp to tb perr = 1D
source of ref causing tb perr = 04
PCSTS
FFFFF830
PCCTL
FFFFFC00
CCTL
00000036
d-stream quadword pcache fill
tb hit rate, p0/p1 sp i-stream reads
tag speed = 01
data speed = 01
size = 03
bcache coherency access
bcache hit
BCETSTS
00000000
BCEDSTS
00000000
CEFSTS
00019200
tag store cmd being processed
data rams cmd at time of err
Example H–13 Cont’d on next page
H–46 VAX 6000 Model 600 Service Manual
= 00
= 00
Example H–13 (Cont.): Lastfail Error Log Entry—Continued
data returned to mbox
do not fill
count = 03
NESTS
00000000
ANAL/ERR/OUT=TEST_LASTFAIL3.TXT TEST_LASTFAIL3.SYS
&
'
(
XMI node 8 also experienced an error after the shutdown error.
The node was a KA66A. Note that the list of registers here is a subset of
the CPU list of registers printed for a machine check, INT54, or INT60
error.
The error is a CRD error. Note that the CRD does not latch the XFADR
register. For more information on CRD errors, look for CRD error
entries (described in Section H.8).
Interpreting the VMS Error Log H–47
H.7 Format of Memscan Error Log Entry
The Memscan error entry displays error registers of memory modules
showing errors discovered when the operating system polls memory.
As shown in Example H–14, the memscan error log entry resembles the
XMA node data information that can appear in machine check, INT54, and
INT60 error log entries.
!
In this particular case, the error shows up at , an ownership sequence
error. Bit <11> of MCTL4 is set; this indicates that an UWMASK (Unlock
Write Mask) command was sent to memory when the block state status
was inappropriate for such an action. (The block was either free, owned,
or tagged bad, none of which allow for an Unlock Write.) This is a system
protocol problem.
Example H–14: Memscan Error Entry
V A X / V M S
SYSTEM ERROR REPORT
**************************** ENTRY
ERROR SEQUENCE 28.
DATE/TIME 15-AUG-1991 14:45:44.97
SYSTEM UPTIME: 0 DAYS 00:07:01
SCS NODE: THERUT
MEMORY CONTROLLER ERROR
XMA NODE # 5.
PHYS ADR
COMPILED 25-OCT-1991 09:00:36
PAGE
1.
1. ****************************
LOGGED ON:
SID 13001401
SYS_TYPE 02060101
VAX/VMS V5.5
KA66 CPU FW REV# 1.
XMI NODE # 1.
CONSOLE FW REV# 0.6
E1A80000
NODE 5.
XDEV
00844001
MS65A
DEVICE REV = 132.
XBE
80001000
NODE SPECIFIC ERROR DETECTED
ERROR DETECTED
SEADR
02000000
NO INTERLEAVE
STARTING ADR = 0. MByte
ENDING ADR = 32. MByte
MCTL1
0202C000
MEMORY VALID
INHIBIT CRD STATUS
MEMORY SIZE = 0. MB ARRAY
RAM TYPE = 1MB
MECER
00000000
CMD = NULL
Example H–14 Cont’d on next page
H–48 VAX 6000 Model 600 Service Manual
Example H–14 (Cont.): Memscan Error Entry
COMMANDER ID = 0.
MECEA
00000000
MCTL2
00000005
ERROR ADDRESS = 00000000(X)
SUP ASSERTION WHEN < 5 FREE ENTRIES
REFRESH RATE = 15.6uS
ENABLE HOLD FOR EACH SINGLE DATA PKT
TCY
BECER
00000000
00000000
BLOCK SYNDROME = 0.
BLOCK STATE ID = 0.
BLOCK STATE CODE = 0.
CMD CODE = 0.
COMMANDER ID = 0.
BECEA
00000000
STADR
00000000
ENADR
00000080
INTLV
00000000
BLOCK ERROR ADDR = 00000000(X)
STARTING ADR = 0. MByte
ENDING ADR = 32. MByte
INTERLEAVE MODE = 0.
INTERLEAVE ADDR = 0.
SEGMENT = 0.
MCTL3
MCTL4
00000000
80008800
OWNERSHIP SEQUENCE ERR
MODULE POPULATION
ERROR SUMMARY
MEMORY SIZE = 32. MByte
FREE STATE
!
BSCTL
40000000
BSADR
00000000
EECTL
02EF0000
TMOER
00000000
ANAL/ERR/OUT=TEST_MEMSCAN.TXT TEST_MEMSCAN.SYS
Interpreting the VMS Error Log H–49
H.8 Format of Memory Soft Error (CRD) Error Log
Entry
The memory soft error (CRD) entry is a summary of all the corrected read
data (CRD) errors that the system experienced during the session. It is
produced when the system shuts down or when the CRD buffers are full.)
Example H–15: Memory Soft Error (CRD) Entry
V A X / V M S
SYSTEM ERROR REPORT
**************************** ENTRY
ERROR SEQUENCE 44.
DATE/TIME 2-OCT-1991 17:29:37.43
SYSTEM UPTIME: 0 DAYS 00:35:24
SCS NODE: THERUT
CORRECTABLE MEMORY ERROR
!
XMI NODE 12.
MEMORY BANK
ECC SYND
LOWEST ADR
HIGHEST ADR
CRD COUNT
XMI NODE 12.
MEMORY BANK
ECC SYND
LOWEST ADR
HIGHEST ADR
CRD COUNT
COMPILED
1. ****************************
LOGGED ON:
SID 13001401
SYS_TYPE 02060101
VAX/VMS V5.5
KA66 CPU FW REV# 1.
XMI NODE # 1.
01
8073
0000DEA0
0000DEA0
00000001
"#
$
%
9-JAN-1992 15:21:47
PAGE
1.
CONSOLE FW REV# 0.6
MS65A
data ecc syndrome
CRD COUNT = 1.
00
8073
00010000
00A00000
00000009
$
%
MS65A
data ecc syndrome
CRD COUNT = 9.
ANAL/ERR/OUTPUT=229.TXT 229.SYS
H–50 VAX 6000 Model 600 Service Manual
!
"
#
This is the node experiencing the error.
This item identifies the memory bank within the node experiencing the
error.
The ECC syndrome word is formatted as shown in Table H–9.
Table H–9: ECC Syndrome Code
Bit
Meaning
0–13
Syndrome code. In this case, a data ecc syndrome.
14
Indicates block state ECC (bit 14=1) or memory data state ECC (bit 14 = 0)
15
Indicates the type of memory; 1 indicates a MS65A memory. A 0 would indicate a MS62A memory.
$
%
The lowest/highest address fields represent an address window where
errors have occurred within this module during this operating system
session. If the lowest and highest addresses are identical, a single
memory cell had a CRD error. If the lowest and highest addresses
show a range, a series of locations are experiencing CRD errors.
For XMI node 12, one location (0000DEA0) experienced one CRD error.
The next entry shows that nine CRD errors occurred in a series of cells
ranging from locations 00010000 through 00A00000.
Interpreting the VMS Error Log H–51
Glossary
Adapter
A node that interfaces other buses, communication lines, or peripheral
devices to the XMI bus or the VAXBI bus.
Address space
The 1 terabyte of physical address space that the XMI bus is capable of
supporting; currently the XMI bus supports 1 gigabyte of physical memory.
Asymmetric multiprocessing
A multiprocessing configuration in which the processors are not equal in
their ability to execute operating system code. In general, a single processor
is designated as the primary, or master, processor; other processors are
the slaves. The slave processors are limited to performing certain tasks,
whereas the master processor can perform all system tasks. Contrast with
Symmetric multiprocessing.
Bandwidth
The data transfer rate measured in information units transferred per unit
of time (for example, Mbytes per second).
Boot device
Contains the bootblock and typically also contains the virtual memory boot
program (VMB). A VAX 6000 series system can be booted from one of four
boot devices: the console load device, a local system disk, a disk connected
to the system through a CI adapter, or a disk connected to the system
through the Ethernet.
Boot primitives
Small programs stored in ROM on each processor with the console program.
Boot primitives read the bootblock from boot devices. There is a boot
primitive for each type of boot device.
Boot processor
The CPU module that boots the operating system and communicates with
the console.
Glossary–1
Bootblock
Block zero on the system disk; it contains the block number where the
virtual memory boot (VMB) program is located on the system disk and
contains a program that, with the boot primitive, reads VMB from the
system load device into memory.
CIBCA
VAXBI CI port interface; connects a system to a Star Coupler.
CIXCD
XMI CI port interface; connects a system to a Star Coupler.
Cold start
An attempt by the primary processor to boot a new copy of the operating
system.
Compact disk server
Ethernet-based CD server; provides access to CD-ROMs for software
installation, diagnostics, and on-line documentation.
Console communications area (CCA)
Segment of system main memory reserved by the console program.
Console mode
A mode of operation where the processor is not running the operating
system but allows a console terminal operator to communicate with nodes
on the XMI bus.
DEBNI
VAXBI adapter; Ethernet port interface.
DEMFA
XMI adapter to the FDDI (fiber distributed data interface).
DEMNA
XMI adapter; Ethernet port interface.
DHB32
VAXBI adapter communication device; supports up to 16 terminals.
DMB32
VAXBI adapter interface for 8-channel asynchronous communications for
terminals, one synchronous channel, and a parallel port for a line printer.
Glossary–2
DRB32
VAXBI adapter; parallel port.
DSB32
VAXBI adapter communication device; provides two synchronous lines.
DSSI
Digital Storage System Interconnect. A Digital Storage Architecture
interconnect used by the KFMSA adapter and RF and TF series integrated
storage elements to transfer data and to communicate with each other.
DWMBB
The XMI-to-VAXBI adapter; a 2-module adapter that allows data transfer
from the XMI to the VAXBI; DWMBB/A is the module in the XMI card cage,
and DWMBB/B is the VAXBI module. Every VAXBI on a VAX 6000 series
system must have a DWMBB adapter.
Ethernet-based compact disk server
The RRD compact disk drive, a console load device, functions as a server
on the Ethernet.
Interleaving memory
See Memory interleaving.
KDB50
VAXBI adapter for RA disks; enables connection to disk drives.
KDM70
XMI adapter for RA disks; enables connection to disk drives.
KFMSA
XMI adapter for RF disks and TF tapes; enables connection to nodes on a
DSSI bus. Each KFMSA adapter supports two DSSI buses.
ISE (integrated storage element)
All DSSI storage devices, such as RF disks and TF tapes, are ISEs.
Memory interleaving
Method to optimize memory access time; the VAX 6000 series console
program automatically interleaves the memories in the system unless the
SET MEMORY command is used to set a specific interleave or no interleave
(which would result in serial access to each memory module). Interleaving
causes a number of memories to operate in parallel.
Glossary–3
Memory node
Also called the MS65A. Memory is a global resource equally accessible by
all processors on the XMI. See also MS65A.
Module
A single XMI or VAXBI card that is housed in a single slot in its respective
card cage. XMI modules (11.02" x 9.18") are larger than VAXBI modules
(8.0" x 9.18").
MS65A
XMI memory array; a memory subsystem of the XMI. Memory is a global
resource equally accessible by all processors on the XMI. A memory module
can have 32, 64, or 128 Mbytes of memory, consisting of MOS 1-Mbit or
MOS 4-Mbit dynamic RAMs, ECC logic, and control logic.
Node
An XMI node is a single module that occupies one of the 14 logical and
physical slots on the XMI bus. A VAXBI node consists of one or more
VAXBI modules that form a single functional unit.
Node ID
A hexadecimal number that identifies the node location. On the XMI bus,
the node ID is the same as the physical location. On the VAXBI, the source
of the node ID is an ID plug attached to the backplane.
Pended bus
A bus protocol in which the transfer of command/address and the transfer
of data are separate operations. The XMI bus is a pended bus.
Primary processor
See Boot processor.
Processor node
A VAX processor that contains a central processor unit (CPU), executes
instructions, and manipulates data contained in memory.
RBD
ROM-based diagnostics.
RBV20/RBV64
VAXBI adapter for write-once-read-many (WORM) optical disk drive. The
RBV20 and RBV64 controllers use the KLESI–B adapter.
Glossary–4
Secured terminal
Console terminal in program mode while the machine is processing.
Shadow set
Two disks functioning as one disk, each shadowing the information
contained on the other, controlled by an HSC controller under the VMS
operating system.
Symmetric multiprocessing
A multiprocessing system configuration in which all processors have equal
access to operating system code residing in shared memory and can perform
all, or almost all, system tasks.
System root
In a BOOT commmand, the argument to the /R5 qualifier.
TBK70
VAXBI adapter connecting the TK tape drive to the system.
TU81E
VAXBI adapter for a local (nonclustered) tape subsystem.
controller uses the KLESI–B adapter.
The TU81E
VAX Diagnostic Supervisor (VAX/DS)
Software that loads and runs diagnostic and utility programs.
VAXBI bus
The 32-bit bus used for I/O.
VAXBI Corner
The portion of a VAXBI module that connects to the backplane and provides
an electrically identical interface for every VAXBI node.
VMB
The virtual memory boot program (VMB.EXE) that boots the operating
system. VMB is the primary bootstrap program and is stored on the boot
device. The goal of booting is to read VMB from the boot device and load
the operating system.
XBI
Lines in the self-test display that show the status of DWMBB adapters and
of VAXBI nodes. See also DWMBB.
Glossary–5
XMI
The 64-bit, high-speed system bus.
XMI Corner
The portion of an XMI module that connects to the backplane and provides
an electrically identical interface for every XMI node.
Glossary–6
Index
A
Architecture, 1–2
Autosizer program, 2–46, 3–33
B
Backup cache, 3–7
Booting
boot error messages, C–1 to C–4
boot status messages, C–1 to
C–4
from CD server, 3–31
from console load device, 3–31
over Ethernet, 2–42
Booting VAX/DS, 3–30
Boot primitives, 3–37
Boot processor, 3–12 to 3–13
how to replace, 3–28
BPD
in power-up test display, 2–6
Buffers
error log, H–1
C
Cache
backup, 3–7
primary, 3–11
secondary, 3–7
virtual instruction cache, 3–11
writeback, 3–7
writethrough, 3–7
CCA, 2–15
CD server, 2–43
CIXCD adapter, 1–3
Configuration rules
DWMBB/A adapter, 5–6 to 5–7
Configuration rules (Cont.)
general, E–1 to E–3
memory, 4–4
processor, 3–4 to 3–5, E–2
Console commands, 3–22 to 3–23
for interleaving, 4–10 to 4–11
Console Communications Area
(CCA), 2–15
Console display, 2–6 to 2–7
Console errors, 2–14
CPU chip, 3–7, 3–10
D
DEMFA adapter, 1–3
DEMNA adapter, 1–3
Diagnostics
design, 2–2
overview, 2–2 to 2–3
ROM-based, 2–2, 2–20 to 2–39
VAX/DS, 2–2, 3–20
Diagnostic Supervisor, 3–30 to 3–37
See VAX/DS
DWMBB/A adapter
configuration rules, 5–7
DWMBB adapter, 1–3, 5–1 to 5–12
configuration rules, 5–6
functional description, 5–8 to
5–9
physical description, 5–2 to 5–3
registers, 5–10 to 5–12
ROM-based diagnostic, 2–28
specifications, 5–4 to 5–5
DWMVA/A adapter
ROM-based diagnostic, 2–28
DWMVA adapter, 1–3
Index–1
E
K
EEPROM, 3–8
patching, 3–31
restoring corrupted, G–1 to G–5
using EVUCA to install patches,
3–31
version number, 3–9
ERF
See Error Log Report Formatter,
H–1
ERRFMT, H–1
Error log buffers, H–1
Error Log Report Formatter (ERF),
H–1
Error Log Utility, H–1
Error messages
console, B–1
ETF
in power-up test display, 2–6
EVSBA, 2–46, 3–33
EVUCA, 2–41, 3–30
functions, 3–31
Exception
machine check, H–12
Extended test, 3–15
KA66A processor, 3–1 to 3–43
LEDs, 2–15
See also Processor, 1–3
KDM70 adapter, 1–3
KFMSA adapter, 1–3
F
Fatal error, defined, A–8
H
Hard error, defined, A–8
I
I/O adapters, 1–3
Initial System Load (ISL) program,
3–31
Interleaving, 4–8 to 4–11
default, 4–9
manual, 4–9
Iport/Oport, 3–9
ISL program, 3–31
Index–2
L
LEDs
processor error, 2–15
status, 2–8 to 2–9
M
Machine check exceptions, H–12
Machine check stack contents, H–9
Memory
See MS65A memory
Module handling, D–1 to D–3
MS65A memory, 1–3, 4–1 to 4–19
addressing, 4–12 to 4–13
configuration rules, 4–4
features, 4–3
functional description, 4–6 to
4–7
good and bad memory pages,
4–17
interleaving, 4–8 to 4–11
physical description, 4–2 to 4–3
power-up, 4–14
registers, 4–18 to 4–19
self-test, 4–14 to 4–17
self-test errors, 4–16 to 4–17
specifications, 4–5
yellow LED, 4–17
MTPR/MFPR instructions, 3–38
N
NDAL data bus, 3–7
NEXMI, 3–7
NVAX CPU chip, 3–10
P
R
Parse trees, F–1 to G–1
Patchable control store
See PCS
Patching ROM and PCS, 3–30
P-cache, 3–11
PCS, 3–11
PCS patching, 3–30
Power-up
processor, 3–14 to 3–17
sequence, 3–14
test, 3–14
Power-up test
console display, 2–6
general definition, 2–4
module LEDs display, 2–8
results in XBER and XGPR
registers, 2–16
Primary cache, 3–11
Primary processor
See Boot processor
Processor, 1–3, 3–1 to 3–43
boot, 3–12 to 3–13
configuration rules, 3–4 to 3–5,
E–2
console commands, 3–22 to 3–23
functional description, 3–6 to
3–11
how to add, 3–24
how to replace, 3–24
how to replace boot, 3–28
how to replace only, 3–26
LEDs, 2–8 to 2–9, 2–15
machine checks, H–9
physical description, 3–2
power-up, 3–14 to 3–17
registers, 3–38 to 3–43
self-test, 3–15
specifications, 3–3
XMI interface, 3–7
Processor chip, 3–7
Progress trace, 2–6
RAM, 3–9
RBDs
See ROM-based diagnostics
Registers
DWMBB adapter, 5–10 to 5–12
MS65A memory, 4–18 to 4–19
processor, 3–38 to 3–43
VAXBI, 5–10
Reset, A–11
ROM, 3–8
ROM-based diagnostics, 2–20 to
2–39, 3–18
cache tests, 2–36 to 2–37
callable tests, 2–18, 2–20
commands, 2–18
DEPOSIT, A–4 to A–5
EXAMINE, A–4 to A–5
QUIT, A–11
START, A–6 to A–9
SUMMARY, A–14 to A–15
control characters, A–2 to A–3
CPU/memory interaction tests,
2–26 to 2–27
DWMBB adapter, 2–28 to 2–31
DWMVA/A adapter, 2–28
entering RBD mode, 2–19
I/O devices, A–22 to A–23
memory, 2–32 to 2–35
multiprocessor tests, 2–38 to
2–39
operator-invoked, 2–20 to 2–21
overview, 2–2
program, 2–18
run at power-up, 2–17
sample session, A–16 to A–21
self-test, 2–22 to 2–25
system reset in, A–11
test printout
explanation, A–10 to A–13
failing, A–12 to A–13
passing, A–10 to A–11
sample, A–16 to A–21
Index–3
S
Secondary cache, 3–7
Self-test
console display, 2–6
display, 3–15
general definition, 2–5
processor, 3–15
Serial number, 3–26
SET MANUFACTURING command,
G–2
SET POWER command, G–2
SET SYSTEM SERIAL command,
G–2
Single processor
how to replace, 3–26
Soft error, defined, A–8
Specifications
processor, 3–3
Stack contents
on machine check, H–9
STF
in power-up test display, 2–6
System
architecture, 1–2
functional description, 1–2 to
1–3
serial number, 3–26
System reset, A–11
T
Troubleshooting flowcharts, 1–4 to
1–11
TYP
in power-up test display, 2–6
U
UART, 3–9
UPDATE command, 3–13
V
VAX/DS, 2–3, 2–40 to 2–54, 3–30
to 3–37
description, 2–41
Index–4
VAX/DS (Cont.)
diagnostics, 2–50 to 2–54, 3–20
documentation, 2–40
exerciser tests, 2–41
explanation of levels, 2–40
function tests, 2–41
HELP in, 2–41
logic tests, 2–41
running in user mode, 2–44 to
2–45
running standalone, 2–42 to
2–43
sample session, 2–46 to 2–49
types of diagnostic programs,
2–41
VAXBI nodes, running RBD, A–22
VAXBI registers, 5–10
VAX Diagnostic Supervisor, 3–30 to
3–37
See VAX/DS
VIC, 3–11
Virtual instruction cache
See VIC
VMEbus
See DWMVA adapter
W
Writeback cache, 3–7
Write-through cache, 3–7
X
XBER register, 2–16 to 2–17
XGPR register, 2–16 to 2–17
XMI configuration rules, E–2 to
E–3
XMI interface, 3–7
XMI nodes, running RBD, A–22
XMI-to-VAXBI adapter, 1–3
See also DWMBB adapter