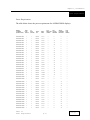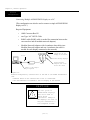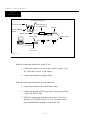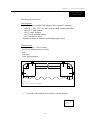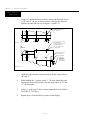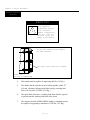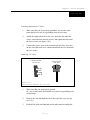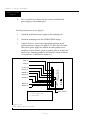
1
ALPHAVISION
Service Manual
&
Installation Guide
© 1995 Adaptive Micro Systems, Inc.
9702-0011
Issue Date 9/95
T ABLE
1.
OF
C ONTENTS
INTRODUCTION
Using This Manual . . . . . . . . . . . . . . . . . . . . . . . . . . . . . . . . . . . . . . . . . . . . . . . . . . . . . . .
Safety warnings, defined and listed . . . . . . . . . . . . . . . . . . . . . . . . . . . . . . . . . . . . . . . . . . .
Power requirements . . . . . . . . . . . . . . . . . . . . . . . . . . . . . . . . . . . . . . . . . . . . . . . . . . . . . .
Safety and Emissions Standards/Agency approval . . . . . . . . . . . . . . . . . . . . . . . . . . . . . . .
Physical sizes and weights . . . . . . . . . . . . . . . . . . . . . . . . . . . . . . . . . . . . . . . . . . . . . . . . .
2.
1.1
1.2
1.3
1.7
1.9
GENERAL OPERATION
Theory of Operation
Schematic Diagrams . . . . . . . . . . . . . . . . . . . . . . . . . . . . . . . . . . . . . . . . . . . . . . . . . .
Wiring . . . . . . . . . . . . . . . . . . . . . . . . . . . . . . . . . . . . . . . . . . . . . . . . . . . . . . . . . . . . .
Grounding . . . . . . . . . . . . . . . . . . . . . . . . . . . . . . . . . . . . . . . . . . . . . . . . . . . . . . . . . .
Serial Interface . . . . . . . . . . . . . . . . . . . . . . . . . . . . . . . . . . . . . . . . . . . . . . . . . . . . . .
Incoming Power . . . . . . . . . . . . . . . . . . . . . . . . . . . . . . . . . . . . . . . . . . . . . . . . . . . . .
Turbo Data Circuit . . . . . . . . . . . . . . . . . . . . . . . . . . . . . . . . . . . . . . . . . . . . . . . . . . .
Exhaust Fans . . . . . . . . . . . . . . . . . . . . . . . . . . . . . . . . . . . . . . . . . . . . . . . . . . . . . . . .
Switching Power Supplies . . . . . . . . . . . . . . . . . . . . . . . . . . . . . . . . . . . . . . . . . . . . . .
Transformers . . . . . . . . . . . . . . . . . . . . . . . . . . . . . . . . . . . . . . . . . . . . . . . . . . . . . . . .
Power Distribution Boards . . . . . . . . . . . . . . . . . . . . . . . . . . . . . . . . . . . . . . . . . . . . . .
Turbo Loop Back Boards . . . . . . . . . . . . . . . . . . . . . . . . . . . . . . . . . . . . . . . . . . . . . . .
Display Driver Boards . . . . . . . . . . . . . . . . . . . . . . . . . . . . . . . . . . . . . . . . . . . . . . . . .
LED Display Cubes . . . . . . . . . . . . . . . . . . . . . . . . . . . . . . . . . . . . . . . . . . . . . . . . . . .
Micro-controller Board . . . . . . . . . . . . . . . . . . . . . . . . . . . . . . . . . . . . . . . . . . . . . . . .
Environmental Requirements . . . . . . . . . . . . . . . . . . . . . . . . . . . . . . . . . . . . . . . . . . . .
2.1
2.1
2.2
2.2
2.3
2.3
2.4
2.4
2.4
2.5
2.5
2.5
2.6
2.6
2.6
Network Configurations
PC System Requirements . . . . . . . . . . . . . . . . . . . . . . . . . . . . . . . . . . . . . . . . . . . . . .
Networking Notes . . . . . . . . . . . . . . . . . . . . . . . . . . . . . . . . . . . . . . . . . . . . . . . . . . . .
Network Installation Guidelines . . . . . . . . . . . . . . . . . . . . . . . . . . . . . . . . . . . . . . . . .
Connecting a Single ALPHAVISION display to a PC . . . . . . . . . . . . . . . . . . . . . . . . .
Connecting Multiple ALPHAVISION displays to a PC . . . . . . . . . . . . . . . . . . . . . . . .
Connecting Single or Multiple ALPHAVISION displays to a PC via Modem . . . . . . .
2.7
2.7
2.8
2.9
2.10
2.13
3.
SERVICE PROCEDURES
Case Assembly and Disassembly . . . . . . . . . . . . . . . . . . . . . . . . . . . . . . . . . . . . . . . . . . . .
ALPHAVISION Wall Mounting Instructions . . . . . . . . . . . . . . . . . . . . . . . . . . . . . . . . . . .
ALPHAVISION Overhead Suspension Mounting Instructions . . . . . . . . . . . . . . . . . . . . . .
Installing the Piezo Tone Device . . . . . . . . . . . . . . . . . . . . . . . . . . . . . . . . . . . . . . . . . . . .
Replacing the EPROM Chip . . . . . . . . . . . . . . . . . . . . . . . . . . . . . . . . . . . . . . . . . . . . . . . .
Replacing the Micro-Controller Board . . . . . . . . . . . . . . . . . . . . . . . . . . . . . . . . . . . . . . . .
Replacing Display Cubes . . . . . . . . . . . . . . . . . . . . . . . . . . . . . . . . . . . . . . . . . . . . . . . . . .
Replacing Fans . . . . . . . . . . . . . . . . . . . . . . . . . . . . . . . . . . . . . . . . . . . . . . . . . . . . . . . . . .
Replacing the Serial Board . . . . . . . . . . . . . . . . . . . . . . . . . . . . . . . . . . . . . . . . . . . . . . . . .
Replacing the Thermostat . . . . . . . . . . . . . . . . . . . . . . . . . . . . . . . . . . . . . . . . . . . . . . . . . .
Replacing the EMI Filter . . . . . . . . . . . . . . . . . . . . . . . . . . . . . . . . . . . . . . . . . . . . . . . . . .
Replacing the Circuit Breaker . . . . . . . . . . . . . . . . . . . . . . . . . . . . . . . . . . . . . . . . . . . . . . .
Replacing the Transformer . . . . . . . . . . . . . . . . . . . . . . . . . . . . . . . . . . . . . . . . . . . . . . . . .
Replacing Loop Back Boards . . . . . . . . . . . . . . . . . . . . . . . . . . . . . . . . . . . . . . . . . . . . . . .
Replacing Power Supplies . . . . . . . . . . . . . . . . . . . . . . . . . . . . . . . . . . . . . . . . . . . . . . . . .
Replacing Display Driver Boards . . . . . . . . . . . . . . . . . . . . . . . . . . . . . . . . . . . . . . . . . . . .
Periodic Maintenance . . . . . . . . . . . . . . . . . . . . . . . . . . . . . . . . . . . . . . . . . . . . . . . . . . . . .
4.
3.2
3.7
3.13
3.17
3.23
3.27
3.31
3.35
3.39
3.41
3.45
3.47
3.51
3.53
3.55
3.57
3.59
DIP SWITCHES
Basic Theory . . . . . . . . . . . . . . . . . . . . . . . . . . . . . . . . . . . . . . . . . . . . . . . . . . . . . . . . . . . 4.1
Changing DIP Switch Settings . . . . . . . . . . . . . . . . . . . . . . . . . . . . . . . . . . . . . . . . . . . . . . 4.4
Appendix A, Troubleshooting
ILLUSTRATIONS
Page #
Network Configurations
Connecting a Single ALPHAVISION display to a PC . . . . . . . . . . . . . . . . . . . . . . . . . . .
Network Configurations, Converter Box on the End
of the RS485 Transmission Line . . . . . . . . . . . . . . . . . . . . . . . . . . . . . . . . . . . . . . . . . . .
Network Configuration, Converter Box in the Middle
of the RS485 Transmission Line . . . . . . . . . . . . . . . . . . . . . . . . . . . . . . . . . . . . . . . . . . .
Connecting Modular Network Adapters . . . . . . . . . . . . . . . . . . . . . . . . . . . . . . . . . . . . . .
Connecting ALPHAVISION displays to a PC via modem . . . . . . . . . . . . . . . . . . . . . . . .
2.8
2.10
2.11
2.11
2.14
Case Assembly and Disassembly
ALPHAVISION display, Rear View. . . . . . . . . . . . . . . . . . . . . . . . . . . . . . . . . . . . . . . . .
Right Vertical side of ALPHAVISION, Enlarged View . . . . . . . . . . . . . . . . . . . . . . . . . .
3.2
3.3
Wall Mounting Instructions
Rear View, Corner Brackets. . . . . . . . . . . . . . . . . . . . . . . . . . . . . . . . . . . . . . . . . . . . . . .
Top View, Before Bracket Assembly . . . . . . . . . . . . . . . . . . . . . . . . . . . . . . . . . . . . . . . .
Side View, After Bracket Assembly . . . . . . . . . . . . . . . . . . . . . . . . . . . . . . . . . . . . . . . . .
3.9
3.10
3.10
Overhead Mounting
Top View of ALPHAVISION Display . . . . . . . . . . . . . . . . . . . . . . . . . . . . . . . . . . . . . . .
Side View of ALPHAVISION Display. . . . . . . . . . . . . . . . . . . . . . . . . . . . . . . . . . . . . . .
3.14
3.15
Installing the Piezo Tone Device
Location P15 on the Controller Board . . . . . . . . . . . . . . . . . . . . . . . . . . . . . . . . . . . . . . .
Connecting the Data Cable to Port P15 . . . . . . . . . . . . . . . . . . . . . . . . . . . . . . . . . . . . . .
Installing Stand-offs . . . . . . . . . . . . . . . . . . . . . . . . . . . . . . . . . . . . . . . . . . . . . . . . . . . .
Mounting the Tone Device Board . . . . . . . . . . . . . . . . . . . . . . . . . . . . . . . . . . . . . . . . . .
Tone Device Board Jumper . . . . . . . . . . . . . . . . . . . . . . . . . . . . . . . . . . . . . . . . . . . . . . .
3.18
3.18
3.19
3.20
3.20
Replacing the EPROM Chip
Controller Board . . . . . . . . . . . . . . . . . . . . . . . . . . . . . . . . . . . . . . . . . . . . . . . . . . . . . . .
Removing the U51 Chip . . . . . . . . . . . . . . . . . . . . . . . . . . . . . . . . . . . . . . . . . . . . . . . . .
Aligning the notches of the EPROM Chip . . . . . . . . . . . . . . . . . . . . . . . . . . . . . . . . . . . .
3.24
3.24
3.25
Page #
Replacing the Micro Controller Board
Connections to Micro Controller Board . . . . . . . . . . . . . . . . . . . . . . . . . . . . . . . . . . . . . .
3.28
Replacing the Display Cubes
Inserting Character Matrix Display Cubes . . . . . . . . . . . . . . . . . . . . . . . . . . . . . . . . . . . .
Inserting Full Matrix Display Cubes . . . . . . . . . . . . . . . . . . . . . . . . . . . . . . . . . . . . . . . .
3.33
3.33
Replacing Fans
Power Wires on 3” Fans . . . . . . . . . . . . . . . . . . . . . . . . . . . . . . . . . . . . . . . . . . . . . . . . .
Removing 3” Fans from ALPHAVISION Displays . . . . . . . . . . . . . . . . . . . . . . . . . . . . .
Power Cord and Terminal for 3.6” Fans. . . . . . . . . . . . . . . . . . . . . . . . . . . . . . . . . . . . . .
3.36
3.36
3.37
Replacing the Serial Board
Power Entry Plate . . . . . . . . . . . . . . . . . . . . . . . . . . . . . . . . . . . . . . . . . . . . . . . . . . . . . .
3.39
Replacing the Thermostat
Power Entry Plate . . . . . . . . . . . . . . . . . . . . . . . . . . . . . . . . . . . . . . . . . . . . . . . . . . . . . .
Removing and Attaching Thermostat to Serial Board. . . . . . . . . . . . . . . . . . . . . . . . . . . .
3.41
3.42
Replacing the EMI Filter
EMI Filter . . . . . . . . . . . . . . . . . . . . . . . . . . . . . . . . . . . . . . . . . . . . . . . . . . . . . . . . . . . .
3.46
Replacing the Circuit Breaker
Power Entry Plate Removal . . . . . . . . . . . . . . . . . . . . . . . . . . . . . . . . . . . . . . . . . . . . . . .
Removing the Circuit Breaker . . . . . . . . . . . . . . . . . . . . . . . . . . . . . . . . . . . . . . . . . . . . .
Removing/Attaching the Circuit Breaker . . . . . . . . . . . . . . . . . . . . . . . . . . . . . . . . . . . . .
3.48
3.48
3.49
Replacing Loop Back Boards
Replacing Loop Back Board . . . . . . . . . . . . . . . . . . . . . . . . . . . . . . . . . . . . . . . . . . . . . .
3.54
Replacing Power Supplies
Power Supply Wiring Diagram . . . . . . . . . . . . . . . . . . . . . . . . . . . . . . . . . . . . . . . . . . . .
3.57
DIP Switch Settings
Locating the DIP Switches. . . . . . . . . . . . . . . . . . . . . . . . . . . . . . . . . . . . . . . . . . . . . . . .
4.4
1
Chapter One • Introduction
USING THIS MANUAL
Products Described
This manual describes all 0.3" pitch full matrix and all 0.3" pitch character
matrix ALPHAVISION modular displays.
Intended Audience
The ALPHAVISION service manual is intended for authorized dealers of
ALPHAVISION products only—it is not intended for end users. The instructions
describing periodic maintenance procedures (on page 3.59) can and should be
shared with end users, however.
(1.1)
Chapter 1, Introduction
Safety Information
SAFETY INFORMATION
Hazard Statement Definitions
There are three different types of hazard statements used throughout this manual
to identify hazards and unsafe practices.
DANGER
DANGER statements are
used to describe
situations where failure
to follow instructions
will result in death or
severe personal injury.
WARNING
WARNING statements are
used to describe
situations where failure
to follow instructions
can result in personal
CAUTION
CAUTION statements are
used to describe
situations where failure
to follow instructions
can result in product or
equipment damage.
(1.2)
Chapter 1, Introduction
Power Requirements
Power Requirements
The table below shows the power requirements for ALPHAVISION displays.
MODEL
NUMBER
(MATRIX SIZE)
250W
PWR
SUPPLY
CM024004P03TRI
1
CM024006P03TRI
1
CM024008P03TRI
AC
FANS
(36CFM)
CONTROLLER
(15MHz)
TRICOLOR
DRIVERS
MONOCHROME
DRIVERS
CORCOM
15EHT6
INPUT
VAC
INPUT
AMPS
1
120/230
2.2/1.1
1
6
0
1
1
120/230
3.3/1.7
1
9
0
1
2
1
120/230
4.4/2.2
1
12
0
1
CM024010P03TRI
2
1
120/230
5.4/2.9
1
15
0
1
CM024012P03TRI
2
1
120/230
6.5/3.4
1
18
0
1
CM032004P03TRI
1
1
120/230
2.9/1.5
1
8
0
1
CM032006P03TRI
2
1
120/230
4.4/2.2
1
12
0
1
CM032008P03TRI
2
1
120/230
5.8/3.1
1
16
0
1
CM032010P03TRI
3
2
120/230
7.3/3.7
1
20
0
1
CM032012P03TRI
3
2
120/230
8.7/4.5
1
24
0
1
CM040004P03TRI
2
2
120/230
3.9/1.9
1
10
0
1
CM040006P03TRI
2
2
120/230
5.4/2.9
1
15
0
1
CM040008P03TRI
3
2
120/230
7.3/3.7
1
20
0
1
CM040010P03TRI
3
2
120/230
9.0/4.7
1
25
0
1
CM040012P03TRI
4
2
120/230
10.9/5.6
1
30
0
1
CM048004P03TRI
2
2
120/230
4.4/2.2
1
12
0
1
CD048006P03TRI
2
2
120/230
6.5/3.4
1
18
0
1
CM048008P03TRI
3
2
120/230
8.7/4.5
1
24
0
1
CM048010P03TRI
4
2
120/230
10.9/5.6
1
30
0
1
CM048012P03TRI
4
2
120/230
13.0/6.8
1
36
0
1
CM024004P03RED
1
1
120/230
1.5/0.8
1
0
6
1
CM024006P03RED
1
1
120/230
2.2/1.2
1
0
9
1
CM024008P03RED
1
1
120/230
3.1/1.7
1
0
12
1
CM024010P03RED
2
1
120/230
3.9/2.0
1
0
15
1
CM024012P03RED
2
1
120/230
4.6/2.4
1
0
18
1
CM032004P03RED
1
1
120/230
2.1/1.1
1
0
8
1
CM032006P03RED
1
1
120/230
3.1/1.7
1
0
12
1
CM032008P03RED
2
1
120/230
4.2/2.2
1
0
16
1
CM032010P03RED
2
2
120/230
5.2/2.8
1
0
20
1
CM032012P03RED
2
2
120/230
6.3/3.2
1
0
24
1
CM040004P03RED
1
2
120/230
2.6/1.3
1
0
10
1
CM040006P03RED
2
2
120/230
3.9/2.0
1
0
15
1
CM040008P03RED
2
2
120/230
5.2/2.8
1
0
20
1
CM040010P03RED
2
2
120/230
6.5/3.4
1
0
25
1
CM040012P03RED
3
2
120/230
7.7/4.1
1
0
30
1
CM048004P03RED
1
2
120/230
3.1/1.7
1
0
12
1
Table 1-1
Power Requirements
(1.3)
Table continues
on next page.
‘
Chapter 1, Introduction
Power Requirements
MODEL
NUMBER
(MATRIX SIZE)
250W
PWR
SUPPLY
AC
FANS
(36CFM)
INPUT
VAC
INPUT
AMPS
CONTROLLER
(15MHz)
TRICOLOR
DRIVERS
MONOCHROME
DRIVERS
CORCOM
15EHT6
CASE
DIMENSIONS
(INCHES)
CM048006P03RED
2
2
120/230
4.6/2.4
1
0
18
1
7 X 93.85 X 24.95
CM048008P03RED
2
2
120/230
6.3/3.2
1
0
24
1
7 X 93.85 X 31.55
CM048010P03RED
3
2
120/230
7.7/4.1
1
0
30
1
7 X 93.85 X 38.15
CM048012P03RED
3
2
120/230
9.4/4.8
1
0
36
1
7 X 93.85 X 44.75
FM096064P03TRI
2
1
120/230
5.0/2.5
1
12
0
1
7 X 33.21 X 23.64
FM096080P03TRI
2
1
120/230
6.2/3.2
1
15
0
1
7 X 33.21 X 28.45
FM096096P03TRI
3
2
120/230
7.5/3.9
1
18
0
1
7 X 33.21 X 33.25
FM096112P03TRI
3
2
120/230
8.7/4.5
1
21
0
1
7 X 33.21 X 38.05
FM096128P03TRI
3
2
120/230
9.9/5.2
1
24
0
1
7 X 33.21 X 42.85
FM128032P03TRI
1
1
120/230
3.3/1.8
1
8
0
1
7 X 42.82 X 14.05
FM128048P03TRI
2
1
120/230
5.0/2.5
1
12
0
1
7 X 42.82 X 18.85
FM128064P03TRI
2
1
120/230
6.6/3.4
1
16
0
1
7 X 42.82 X 23.64
FM128080PO3TRI
3
2
120/230
8.3/4.3
1
20
0
1
7 X 42.82 X 28.45
FM128096P03TRI
3
2
120/230
9.9/5.2
1
24
0
1
7 X 42.82 X 33.25
FM128112P03TRI
4
2
120/230
11.6/6.1
1
28
0
1
7 X 42.82 X 38.05
FM128128P03TRI
4
2
120/230
13.2/6.9
1
32
0
1
7 X 42.82 X 42.85
FM160032P03TRI
2
1
120/230
4.2/2.2
1
10
0
1
7 X 52.43 X 14.05
FM160048PO3TRI
2
1
120/230
6.2/3.3
1
15
0
1
7 X 52.43 X 18.85
FM160064PO3TRI
3
2
120/230
8.3/4.4
1
20
0
1
7 X 52.43 X 23.64
FM160080P03TRI
3
2
120/230
10.3/5.4
1
25
0
1
7 X 52.43 X 28.45
FM160096P03TRI
4
2
120/230
12.4/6.5
1
30
0
1
7 X 52.43 X 33.25
FM160112P03TRI
5
3
120/230
14.4/7.6
1
35
0
1
7 X 52.43 X 38.05
FM160128P03TRI
5
3
230
8.6
1
40
0
1
7 X 52.43 X 42.85
FM192032P03TRI
2
1
120/230
5.0/2.5
1
12
0
1
7 X 62.04 X 14.05
FM192048P03TRI
3
2
120/230
7.5/3.9
1
18
0
1
7 X 62.04 X 18.85
FM192064PO3TRI
3
2
120/230
9.9/5.2
1
24
0
1
7 X 62.04 X 23.64
FM192080P03TRI
4
2
120/230
12.4/6.5
1
30
0
1
7 X 62.04 X 28.45
FM192096PO3TRI
5
3
120/230
14.9/7.8
1
36
0
1
7 X 62.04 X 33.25
FM192112P03TRI
5
3
230
9.0
1
42
0
1
7 X 62.04 X 38.05
FM192128P03TRI
5
3
230
10.3
1
48
0
1
7 X 62.04 X 42.85
FM224032P03TRI
2
2
120/230
5.8/3.0
1
14
0
1
7 X 71.65 X 14.05
FM224048P03TRI
3
2
120/230
8.7/4.5
1
21
0
1
7 X 71.65 X 18.85
FM224064P03TRI
4
2
120/230
11.6/6.1
1
28
0
1
7 X 71.65 X 23.64
FM224080PO3TRI
5
3
120/230
14.4/7.6
1
35
0
1
7 X 71.65 X 28.45
FM224096P03TRI
5
3
230
9.0
1
42
0
1
7 X 71.65 X 33.25
FM224112P03TRI
6
4
230
10.6
1
49
0
1
7 X 71.65 X 38.05
FM224128P03TRI
7
4
230
12.1
1
56
0
1
7 X 71.65 X 42.85
FM256032P03TRI
2
2
120/230
6.6/3.4
1
16
0
1
7 X 81.26 X 14.05
FM256048P03TRI
3
2
120/230
9.9/5.2
1
24
0
1
7 X 81.26 X 18.85
FM256064P03TRI
4
3
120/230
13.2/6.9
1
32
0
1
7 X 81.26 X 23.64
Table continues
on next page.
(1.4)
‘
Chapter 1, Introduction
Power Requirements
MODEL
NUMBER
(MATRIX SIZE)
250W
PWR
SUPPLY
AC
FANS
(36CFM)
FM256080P03TRI
5
3
230
8.9
1
40
0
1
FM256096P03TRI
6
4
230
10.3
1
48
0
1
FM256112P03TRI
7
4
230
12.1
1
56
0
1
FM256128P03TRI
8
4
230
13.8
1
64
0
1
FM128032P03RED
1
1
120/230
2.4/1.2
1
0
8
1
FM128048P03RED
1
1
120/230
3.5/1.9
1
0
12
1
FM128064P03RED
2
1
120/230
4.7/2.4
1
0
16
1
FM128080P03RED
2
2
120/230
5.9/3.1
1
0
20
1
FM128096P03RED
2
2
120/230
7.2/3.7
1
0
24
1
FM128112P03RED
3
2
120/230
8.3/4.3
1
0
28
1
FM128128P03RED
3
3
120/230
9.5/5.0
1
0
32
1
FM160032P03RED
1
1
120/230
3.0/1.5
1
0
10
1
FM160048P03RED
2
1
120/230
4.4/2.3
1
0
15
1
FM160064P03RED
2
2
120/230
5.9/3.1
1
0
20
1
FM160080P03RED
3
2
120/230
7.4/3.9
1
0
25
1
FM160096P03RED
3
2
120/230
8.9/4.6
1
0
30
1
FM160112P03RED
3
3
120/230
10.3/5.4
1
0
35
1
FM160128P03RED
4
3
120/230
11.9/6.2
1
0
40
1
FM192032P03RED
1
1
120/230
3.5/1.9
1
0
12
1
FM192048P03RED
2
2
120/230
5.3/2.8
1
0
18
1
FM192064P03RED
2
2
120/230
7.2/3.7
1
0
24
1
FM192080P03RED
3
2
120/230
8.9/4.6
1
0
30
1
FM192096P03RED
3
3
120/230
10.7/5.5
1
0
36
1
FM192112P03RED
4
3
120/230
12.4/6.5
1
0
42
1
FM192128P03RED
4
3
120/230
14.3/7.4
1
0
48
1
FM224032P03RED
2
2
120/230
4.2/2.2
1
0
14
1
FM224048P03RED
2
2
120/230
6.3/3.3
1
0
21
1
FM224064P03RED
3
2
120/230
8.3/4.4
1
0
28
1
FM224080P03RED
3
3
120/230
10.3/5.5
1
0
35
1
FM224096P03RED
4
3
120/230
12.4/6.5
1
0
42
1
FM224112P03RED
5
4
120/230
14.5/7.6
1
0
49
1
FM224128P03RED
5
4
230
8.7
1
0
56
1
FM256032P03RED
2
2
120/230
4.7/2.4
1
0
16
1
FM256048P03RED
2
2
120/230
7.2/3.7
1
0
24
1
FM256064P03RED
3
3
120/230
9.5/5.0
1
0
32
1
FM256080P03RED
4
3
120/230
11.9/6.2
1
0
40
1
FM256096P03RED
4
4
120/230
14.3/7.4
1
0
48
1
FM256112P03RED
5
4
230
8.7
1
0
56
1
FM256128P03RED
6
4
230
9.9
1
0
64
1
INPUT
VAC
INPUT
AMPS
CONTROLLER
(15MHz)
(1.5)
TRICOLOR
DRIVERS
MONOCHROME
DRIVERS
CORCOM
15EHT6
(1.6)
Chapter 1, Introduction
Agency Approval
Safety Compliance
All of the ALPHAVISION models listed on the next page beginning with “FM”
and “CM” comply with the requirements specified by the Standard for Safety of
Information Technology Equipment, Including Electrical Business Equipment, as
follows:
Models configured for use in North America:
ANSI/UL 1950– Second Edition, CAN/CSA–22.2 No. 950–M89.
Models configured for use in Europe:
EN 60950 : 1992.
EMI Compliance
All of the ALPHAVISION models listed on the next page beginning with “FM”
and “CM” comply with part 15 of the FCC rules when configured for use in
North America.
This equipment has been tested and found to comply with the limits for a
Class A digital device, pursuant to part 15 of the FCC Rules. These limits
are designed to provide reasonable protection against harmful interference
when the equipment is operated in a commercial environment. This
equipment generates, uses, and can radiate radio frequency energy and, if
not installed and used in accordance with the instruction manual, may cause
harmful interference to radio communications. Operation of this equipment
in a residential area is likely to cause harmful interference in which case the
user will be required to correct the interference at his own expense.
Changes or modifications made to ALPHAVISION modular displays that
have not been expressly approved by Adaptive Micro Systems, Inc. could
void your authority to operate ALPHAVISION modular displays.
All of the ALPHAVISION models listed on the next page beginning with “FM”
comply with the requirements specified in EN 55022 (C.I.S.P.R.22, 1985, First
Edition) for Class B Information Technology Equipment, when configured for
use in Europe.
(1.7)
Chapter 1, Introduction
Agency Approval
CM024004P03TRI
CM048012P03RED
FM256112P03TRI
CM024006P03TRI
FM096064P03TRI
FM256128P03TRI
CM024008P03TRI
FM096080P03TRI
FM128032P03RED
CM024010P03TRI
FM096096P03TRI
FM128048P03RED
CM024012P03TRI
FM096112P03TRI
FM128064P03RED
CM032004P03TRI
FM096128P03TRI
FM128080P03RED
CM032006P03TRI
FM128032P03TRI
FM128096P03RED
CM032008P03TRI
FM128048P03TRI
FM128112P03RED
CM032010P03TRI
FM128064P03TRI
FM128128P03RED
CM032012P03TRI
FM128080PO3TRI
FM160032P03RED
CM040004P03TRI
FM128096P03TRI
FM160048P03RED
CM040006P03TRI
FM128112P03TRI
FM160064P03RED
CM040008P03TRI
FM128128P03TRI
FM160080P03RED
CM040010P03TRI
FM160032P03TRI
FM160096P03RED
CM040012P03TRI
FM160048PO3TRI
FM160112P03RED
CM048004P03TRI
FM160064PO3TRI
FM160128P03RED
CM048006P03TRI
FM160080P03TRI
FM192032P03RED
CM048008P03TRI
FM160096P03TRI
FM192048P03RED
CM048010P03TRI
FM160112P03TRI
FM192064P03RED
CM048012P03TRI
FM160128P03TRI
FM192080P03RED
CM024004P03RED
FM192032P03TRI
FM192096P03RED
CM024006P03RED
FM192048P03TRI
FM192112P03RED
CM024008P03RED
FM192064PO3TRI
FM192128P03RED
CM024010P03RED
FM192080P03TRI
FM224032P03RED
CM024012P03RED
FM192096PO3TRI
FM224048P03RED
CM032004P03RED
FM192112P03TRI
FM224064P03RED
CM032006P03RED
FM192128P03TRI
FM224080P03RED
CM032008P03RED
FM224032P03TRI
FM224096P03RED
CM032010P03RED
FM224048P03TRI
FM224112P03RED
CM032012P03RED
FM224064P03TRI
FM224128P03RED
CM040004P03RED
FM224080PO3TRI
FM256032P03RED
CM040006P03RED
FM224096P03TRI
FM256048P03RED
CM040008P03RED
FM224112P03TRI
FM256064P03RED
CM040010P03RED
FM224128P03TRI
FM256080P03RED
CM040012P03RED
FM256032P03TRI
FM256096P03RED
CM048004P03RED
FM256048P03TRI
FM256112P03RED
CM048006P03RED
FM256064P03TRI
FM256128P03RED
CM048008P03RED
FM256080P03TRI
CM048010P03RED
FM256096P03TRI
(1.8)
Chapter 1, Introduction
Physical Sizes
and Weights
ALPHAVISION Enclosure
Dimensions
7.00" (177.8
mm.)
"A"
Model No.
inches
"B"
mm.
Weight
inches
mm.
lbs.
Kg.
FM128032P03XXX
42.82
1087.6
14.05
356.9
45
20.4
FM128048P03XXX
42.82
1087.6
18.85
478.8
60
27.2
FM128064P03XXX
42.82
1087.6
23.64
600.5
75
34.0
FM128080P03XXX
42.82
1087.6
28.45
722.6
90
40.8
FM128096P03XXX
42.82
1087.6
33.25
844.6
105
47.6
FM128112P03XXX
42.82
1087.6
38.05
966.5
120
54.4
FM128128P03XXX
42.82
1087.6
42.85
1088.4
135
61.2
FM160032P03XXX
52.43
1331.7
14.05
356.9
68
30.8
FM160048P03XXX
52.43
1331.7
18.85
478.8
83
37.6
FM160064P03XXX
52.43
1331.7
23.64
600.5
98
44.5
FM160080P03XXX
52.43
1331.7
28.45
722.6
113
51.3
FM160096P03XXX
52.43
1331.7
33.25
844.6
128
58.1
FM160112P03XXX
52.43
1331.7
38.05
966.5
143
64.9
FM160128P03XXX
52.43
1331.7
42.85
1088.4
158
71.7
Table 1-2
Physical Sizes and Weights
Table continues
on next page.
(1.9)
‘
Chapter 1, Introduction
Physical Sizes
and Weights
"A"
Model No.
inches
"B"
mm.
Weight
inches
mm.
lbs.
Kg.
FM192032P03XXX
62.41
1585.2
14.05
356.9
91
41.3
FM192048P03XXX
62.41
1585.2
18.85
478.8
106
48.1
FM192064P03XXX
62.41
1585.2
23.64
600.5
121
54.9
FM192080P03XXX
62.41
1585.2
28.45
722.6
136
61.7
FM192096P03XXX
62.41
1585.2
33.25
844.6
151
68.5
FM192112P03XXX
62.41
1585.2
38.05
966.5
166
75.3
FM192128P03XXX
62.41
1585.2
42.85
1088.4
181
82.1
FM224032P03XXX
71.65
1820.0
14.05
356.9
114
51.7
FM224048P03XXX
71.65
1820.0
18.85
478.8
129
58.5
FM224064P03XXX
71.65
1820.0
23.64
600.5
144
65.3
FM224080P03XXX
71.65
1820.0
28.45
722.6
159
72.1
FM224096P03XXX
71.65
1820.0
33.25
844.6
174
78.9
FM224112P03XXX
71.65
1820.0
38.05
966.5
189
85.7
FM224128P03XXX
71.65
1820.0
42.85
1088.4
204
92.5
FM256032P03XXX
81.26
2064.0
14.05
356.9
137
62.1
FM256048P03XXX
81.26
2064.0
18.85
478.8
152
68.9
FM256064P03XXX
81.26
2064.0
23.64
600.5
167
75.8
FM256080P03XXX
81.26
2064.0
28.45
722.6
182
82.6
FM256096P03XXX
81.26
2064.0
33.25
844.6
197
89.4
FM256112P03XXX
81.26
2064.0
38.05
966.50
212
96.2
FM256128P03XXX
81.26
2064.0
42.85
1088.40
227
103.0
Table continues
on next page.
(1.1 0)
‘
Chapter 1, Introduction
Physical Sizes
and Weights
"A"
Model No.
inches
"B"
mm.
Weight
inches
mm.
lbs.
Kg.
CM024004P03XXX
50.64
1286.3
18.35
466.1
60
27.2
CM024006P03XXX
50.64
1286.3
24.95
633.8
71
32.2
CM024008P03XXX
50.64
1286.3
31.55
801.4
83
37.6
CM024010P03XXX
50.64
1286.3
38.15
969.0
95
43.1
CM024012P03XXX
50.64
1286.3
44.75
1136.7
107
48.50
CM032004P03XXX
65.04
1652.0
18.35
466.10
77
34.9
CM032006P03XXX
65.04
1652.0
24.95
633.8
92
41.7
CM032008P03XXX
65.04
1652.0
31.55
801.4
107
48.5
CM032010P03XXX
65.04
1652.0
38.15
969.0
121
54.9
CM032012P03XXX
65.04
1652.0
44.75
1136.7
136
61.7
CM040004P03XXX
79.45
2018.0
18.35
466.1
94
42.6
CM040006P03XXX
79.45
2018.0
24.95
633.8
112
50.8
CM040008P03XXX
79.45
2018.0
31.55
801.40
131
59.4
CM040010P03XXX
79.45
2018.0
38.15
969.0
149
67.6
CM040012P03XXX
79.45
2018.0
44.75
1136.7
121
54.9
CM048004P03XXX
93.85
2383.8
18.35
466.1
102
46.3
CM048006P03XXX
93.85
2383.8
24.95
633.8
125
56.7
CM048008P03XXX
93.85
2383.8
31.55
801.64
148
67.1
CM048010P03XXX
93.85
2383.8
31.55
969.0
172
78.0
CM048012P03XXX
93.85
2383.8
44.75
1136.7
195
88.5
(1.1 1)
(1.1 2)
2
Chapter Two • General Operation
BASIC THEORY OF OPERATION
Schematic Diagrams
Schematic diagrams of the printed circuit boards used in ALPHAVISION displays can be obtained by contacting Adaptive Micro Systems.
Wiring
Adaptive Micro Systems recommends the following procedures be used to
decrease the amount of electrical noise surrounding ALPHAVISION displays.
•
All ALPHAVISION displays should be connected to their own branch
circuits.
•
The input power source should be protected by a circuit breaker rated at
no more than 20 Amps per display.
(2.1)
Chapter 2, General Operation
Basic Theory
of Operation
•
Route incoming power to the display by a separate path from the
communications cables—do not run signal wiring and power
wiring in the same circuit.
•
Where power and communications lines must cross, their intersection should be perpendicular. Communications lines can be
installed in the same conduit as low level (less than 10 Volts) DC
I/O lines.
•
All communications lines should be shielded. The shield should
only be connected to ground at the transmitting device.
Grounding
All ALPHAVISION displays should be properly grounded. Proper
grounding is an important safety precaution and also helps eliminate
Electromagnetic Interference (EMI.) An authoritative source on grounding requirements is the National Electrical Code published by the
National Fire Protection Association of Boston, Massachusetts.
Descriptions of various types of conductors and safe grounding methods
can be found in Article 250 of the Code.
Serial Interface
The serial interface is located on top of the ALPHAVISION display's
enclosure as part of the power/serial entry plate. The serial interface consists of two RJ-11 jacks, located next to the ON/OFF switch.
The functionality of the serial interface is identical to the Alpha 4000
series, where one RJ-11 jack can accept both RS-232 and RS-485 communications and the other is limited to RS-485 communications only.
Refer to the label near the RJ-11 jacks to identify the proper port needed
for your mode of communication.
Use Standard AMS network hardware (cables, converter box, etc.) to
communicate with your ALPHAVISION display. Contact the AMS sales
department for a complete list of network products.
(2.2)
Chapter 2, General Operation
Basic Theory
of Operation
The serial interface is connected to the display's micro-controller board
via a multi-conductor cable terminated in a DB-9 connector at the microcontroller board.
Incoming Power
All ALPHAVISION models have a fixed line cord that supplies primary
power to the display. The type of line cord will vary according to the line
voltage and the standards for the country where it will be installed.
The AC line enters the cabinet through the line cord and connects to the
circuit breaker/switch mounted in the top-left of the display's enclosure.
The breaker is a slow blow 15 amp, double pole device with a rocker
action switch that breaks both sides of the AC line. The breaker will trip
due to an overload or shorting conditions and is resettable. Some early
ALPHAVISION models used a single pole circuit breaker/switch.
The incoming AC connects to an AC line filter after the breaker/switch,
then to a terminal block where it is distributed to the fan circuit, transformer, and switching power supplies.
Turbo Data Circuit
Data from the micro-controller board is sent to the display driver boards
via a flat ribbon cable. In turn, the data signals are passed from one display driver board to the next display driver board via shorter flat ribbon
cables. Some ALPHAVISION display configurations have more than one
channel—this means there will be more than one connection between the
micro-controller board and the display driver matrix.
The turbo signals flow from the micro-controller board to the display driver board in the bottom left corner of the ALPHAVISION display (when
viewed from the back), then to the next display driver board to the right,
and so on. The last display driver board in a row (the display driver board
on the far right) is connected up to the first display driver board on the
left in the next row.
(2.3)
Chapter 2, General Operation
Basic Theory
of Operation
Exhaust Fans
Exhaust fans are provided for cooling. The fans are controlled by a thermostat, turning on when the internal cabinet temperature reaches approximately 120 degrees Fahrenheit and turning off when the temperature falls
below 90 degrees Fahrenheit.
The air intake for the fans is provided by vents in the bottom of the
enclosure. Hot air is blown out the top of the enclosure through the fan
guards. An ALPHAVISION display will have one or more cooling fans,
depending on the matrix size and the power supply configuration. The
fans are rated at 120 volts or 230 volts depending on the application.
Switching Power Supplies
One or more switching power supplies are used in every ALPHAVISION
display. The power supply converts the high voltage AC line to a 5 volt
DC line that powers the LED displays (VLED.) Both the 0.3” pitch FM
and 0.3” pitch CM models operate the logic circuits (VLOGIC) on 8.5
volts DC that is tapped off of the micro-controller board.
Transformers
The low-voltage AC transformer provides power for the micro-controller
board. There is a 120 volt AC input model and a 230 volt AC input
model installed depending on the application. Some early
ALPHAVISION models used only a 120 volt model, fed by a 230 to 120
volt step-down transformer if the incoming power was 230 volts.
Power Distribution Boards
One or more power distribution boards are used depending on the matrix
size and the power supply configuration. The power distribution board is
connected to the output of the switching power supplies and provides a
parallel feed to each of the display driver boards. Both the VLED and
(2.4)
Chapter 2, General Operation
Basic Theory
of Operation
VLOGIC levels are distributed to the display drivers through the power
distribution boards.
When multiple power distribution boards are used, the negative DC
(common) circuits are connected together to keep all common circuits at
the same voltage level. The common circuits are also connected to the
common circuits on the turbo loop back boards.
Turbo Loop Back Boards
Turbo loop back boards are used when the width of the display's matrix
exceeds the length of the turbo ribbon cables between two horizontal
lines of display driver boards. There are at least five display driver boards
or more in one horizontal row on 0.3” full matrix displays and at least
four display driver boards or more on 0.3” character matrix displays. The
turbo loop back boards clean up the data signals before they are sent out
to the next driver board. Two inputs and two outputs are provided as pin
headers for connection to the turbo ribbon cables.
Display Driver Boards
ALPHAVISION display driver boards come in many configurations
depending on the display type. All display driver boards provide the same
function, to accept turbo data signals and light the LED display cubes
attached to them. They also pass the turbo data signals to the next display
driver board.
LED Display Cubes
LED display cubes come in a variety of configurations, depending on the
type of display. They are inserted into display driver boards and may be
replaced if there is a failure of an LED. LED display cubes contain no
electrical components except the LED die.
(2.5)
Chapter 2, General Operation
Basic Theory
of Operation
On the back of all full matrix LED display cubes and tri-color
character matrix LED display cubes is an adhesive label which
contains important information (serial numbers, date codes, and
color matching codes.) If a replacement LED display cube is
required, please provide this information to Adaptive Micro
Systems when placing your order.
Micro-Controller Board
The micro-controller board is the brain or control center of the
ALPHAVISION display. It controls all display functions, all serial
I/O functions (both RS-485 and RS-232), contains the micro–
processor, contains the RAM memory and the EPROM memory,
contains the real time clock circuitry, operates the piezo tone
board, and provides the VLOGIC output. On board DIP switches
provide a means for setting addresses, baud rates, test modes, etc.
The micro–controller is mounted to the internal framework near
the lower left of the display (when viewing the display from the
back.) It is powered by low voltage AC from the 60 watt transformer which it rectifies and regulates to 5 volts DC to run its
circuitry.
Environmental Requirements
ALPHAVISION displays are designed for indoor use only. They
should only be used in an environment where the temperature is
between 0 and 49 degrees Celsius and the humidity (non-condensing) does not exceed 95%.
(2.6)
Chapter 2, General Operation
Network
Configurations
NETWORK CONFIGURATIONS
PC System Requirements
To network ALPHAVISION displays with a personal computer, a computer system that meets these requirements must be used
•
386 IBM or compatible computer (a 486 or Pentium processor is
recommended for optimal performance)
•
MS-DOS (version 3.0 or higher)
•
3.5" disk drive
•
hard drive (with at least 1.5 megabytes of available disk space)
•
640K RAM
•
EGA Monitor (a VGA monitor is recommended)
•
Microsoft compatible mouse
•
RS232 Serial Port (PC Card)
•
Alpha PC programming software (AlphaNET plus, AlphaNET
plus II, AlphaNET plus II for Windows, or PrintPak software)
Networking Notes
•
•
If the network connects more than 32 displays, or uses more than
4,000 feet of cable, a Repeater Box must be used. Contact
Adaptive Micro Systems for more information.
The RJ11 ports on the ALPHAVISION displays should not be
used as direct phone connections. Damage to the displays can
occur if they are connected directly to a telephone circuit.
(2.7)
Chapter 2, General Operation
Network
Configurations
Network Installation Guidelines
•
Keep network cables away from AC power lines.
•
Keep network cables away from all other forms of communication cables.
•
Keep network cables away from central clock networks (like
Simplex, for example.)
•
Keep network cables away from noisy environments like motors
and fluorescent lights.
•
If AC lines are noisy, use line filters to help stabilize line voltage.
•
Do not backtrack network cables upon themselves.
•
If any any information is going to be retrieved from the displays,
make sure that all of the displays on a network have unique
addresses.
•
Do not use Adaptive Micro Systems networking cables outdoors.
25 Pos. Sub-D to 6 Pos RJ11 Adapter
(P/N 4370-0001C)
ALPHAVISION
Display
Computer
25 ft. or 50 ft. 6-Conductor RS-232 Data Cable
(P/N 1088-8625) or (P/N 1088-8627)
Plug the end of the cable with the
ferrite core into the ALPHAVISION display.
Figure 2-1.
Connecting a Single ALPHAVISION display to a PC.
CAUTION
The RJ11 ports on
ALPHAVISION displays
should not be used as
direct phone
connections. Damage to
the displays can occur if
they are connected to a
live telephone circuit.
(2.8)
Chapter 2, General Operation
Network
Configurations
Connecting a Single ALPHAVISION Display to a PC
The directions below describe the easiest method to connect one
ALPHAVISION display to a PC (personal computer.) This method
requires that the PC and the ALPHAVISION display are within 50 feet of
each other. To connect a single ALPHAVISION display with a PC at a
distance greater than 50 feet, follow the directions for connecting multiple ALPHAVISION displays with a PC.
Required equipment
•
one 25 Pos. Sub-D to 6 Position RJ11 adapter
•
one 25 ft. or 50 ft. 6-conductor RS232 data cable
1.
Find the RJ11 port labeled “RS485 OR RS232 IN” located on the
top of the ALPHAVISION display, next to the power switch.
2.
Insert the end of the 6-conductor RS232 data cable with the ferrite core into the port labeled “RS485 OR RS232 IN.” Make sure
the end of the cable with the ferrite core is attached to the
ALPHAVISION display (see figure 2-1.)
3.
Connect the other end of the 6-conductor RS232 data cable (the
end without a ferrite core) to the 25 Pos. Sub.-D to 6 Pos. RJ11
Adapter.
4.
Connect the 25 Pos. Sub.-D to 6 Pos. RJ11 Adapter to the serial
port of the PC.
Note: Adaptive Micro Systems also sells a 9 Pos. Sub.-D to 6
Pos. RJ11 Adapter.
(2.9)
Chapter 2, General Operation
Network
Configurations
Connecting Multiple ALPHAVISION Displays to a PC
(This configuration can also be used to connect a single ALPHAVISION
display to a PC.)
Required Equipment
•
AMS Converter Box III
•
one Type “A9” RS232 Cable
•
RS485 cable (RS485 cable is needed for connection between the
converter box and all modular network adapters)
•
Modular Network Adapters with 4-conductor data cables (one
Modular Network Adapter and one 4-conductor data cable is
needed for each display connected to the network)
An EOL terminator is
plugged into the last
display on the network.
RS232
Electronic Message Displays
Personal
RS485
Converter
Modular Network
Adapters with 4-conductor data cables
A DB25 to DB9 adapter
may be required
Figure 2-2.
Network Configuration, Converter Box on the End of the RS485 Transmission
Line.
• Terminal Switch on the converter box is set to terminated.
• One EOL terminator is attached to the last display on the network.
CAUTION
The RJ11 ports on
ALPHAVISION displays
must not be used as
direct phone
connections. Damage to
the displays can occur if
they are connected to a
live telephone circuit.
(2.1 0)
Chapter 2, General Operation
Network
Configurations
EOL Terminator
Electronic Message Display
RS232
Modular Network
Adapters with 4-conductor data cables
RS485
Personal
Computer
Converter Box
A DB25 to DB9
adapter may be
Electronic Message Display
EOL Terminator
Figure 2.3.
Network Configuration, Converter Box in the MIddle of the RS485 Transmission Line.
• Terminal switch on the converter box is set to unterminated.
• EOL terminators are attached to the displays on each end of the RS485 transmission
line.
To the RJ11 Port (labeled RS485 IN) on ALPHAVISION display
4-Conductor Data Cable
Ferrite Core -- Must be on the end of the cable attached to the
ALPHAVISION display
Modular Network Adapter
BL
WH
OR
BR
BK
YL
RD
GN
= BLACK WIRE (POSITIVE)
= SHIELD WIRE
= RED WIRE (NEGATIVE)
RS485 CABLE (Connects with the converter box)
RS485 Cable (connects with the modular network adapter of the next ALPHAVISION display)
Figure 2-4.
Connecting Modular Network Adapters.
Chapter 2, General Operation
Network
Configurations
Connecting Multiple ALPHAVISION Displays to a PC
1.
Use RS232 cable to connect the converter box to the serial port of
the PC. On some computers, it may be necessary to use a DB25
to DB9 adapter to allow the RS232 cable to plug into the computer’s serial port.
2.
Use an RS485 cable to connect the converter box to a modular
network adapter. Connect one end of the RS485 cable to the terminal block on the converter box. Connect the other end of the
RS485 cable to a modular network adapter by connecting the
black wire to the black terminal, the red wire to the yellow terminal, and the shield wire to the red terminal (see figures 2-2, 2-3,
and 2-4.)
3.
Use a 4-conductor data cable to connect the modular network
adapter to the ALPHAVISION display. Insert the end of the cable
with the ferrite core into the RJ11 port (labeled RS485 IN) located
on the top panel of the ALPHAVISION display.
4.
Additional ALPHAVISION displays should be connected using a
“daisy-chain” configuration. A daisy-chain configuration means
that each additional display connected to the network will be connected to the previous ALPHAVISION display. Each ALPHAVISION display will need to be connected to its own modular network adapter (see step 3 above) and be connected (via RS485
cable) to another modular network adapter.
For example, to connect a second ALPHAVISION display, it must
first be connected to its own modular network adapter. This modular network adapter is then connected to the modular network
adapter of the first ALPHAVISION display. If a third ALPHAVISION display needs to be connected, its modular network adapter
should be connected to the modular network adapter of the second
ALPHAVISION display (see figures 2-2 and 2-3.)
Do not use a “star” configuration when connecting additional
ALPHAVISION displays. Each ALPHAVISION display should be
connected to its own modular network adapter and a maximum of
two RS485 cables (as shown in figure 2-3) should be connected
directly to the RS485 terminal block on the converter box and to
modular network adapters.
(2.1 2)
Chapter 2, General Operation
Network
Configurations
5.
EOL (end-of-line) terminators help maintain stable communication across a network. They are inserted directly into the RJ11
ports (labeled RS 232 IN) on ALPHAVISION displays.
If the converter box is on one end of the RS485 transmission line
(as it is in figure 3.2), then only one EOL terminator should be
used and the termination switch on the converter box should be
set to terminated.
If the converter box is in the middle of an RS485 transmission
line (as it is in figure 3.3), then one EOL terminator should be
used on each end of the RS485 transmission line and the termination switch on the converter box should be set to unterminated.
EOL terminators should only be used with the RS232 to RS485
Converter Box III. Do not use EOL terminators with older versions of the RS232 to RS485 Converter Box.
Connecting Single or Multiple ALPHAVISION Displays to a PC
via Modem
Required equipment
At the computer site
• one “A9” RS232 cable
•
one Hayes compatible modem
•
one 9 pin to 25 pin adapter
At each remote location
• one "B9" RS232 cable
•
one converter box III
•
one Hayes compatible modem
•
one modular network adapter and a 4-conductor data cable for
each ALPHAVISION display connected at the remote location
•
RS485 2-wire shielded cable
(2.1 3)
Chapter 2, General Operation
Network
Configurations
ALPHAVISION displays
EOL Terminator
Converter Box III
(P/N 1088-1111)
Modular Network
Adapter
RS485 Cable
Modem
Type "B9" Cable
(P/N 1088-8635)
Phone Cable
Computer
Type "A9" Cable
(P/N 1088-8634)
Phone Cable
Modem
9 pin to
25 pin adapter
Figure 2-5.
Make the connections listed below at the PC site.
1. Connect the modem to the serial port of the PC using a "Type
A9" cable and a 9 pin to 25 pin adapter.
2. Connect the modem to the phone outlet.
Make the connections listed below at each remote site.
1. Connect the modem to the desired phone outlet.
2. Connect the modem to RS232 port on the converter box using
a Type "B9" RS232 cable.
3. Follow the instructions in the previous section, Connecting
Multiple ALPHAVISION displays to a PC, to connect one or
more ALPHAVISION displays at each remote site.
(2.1 4)
3
Chapter Three• Service Procedures
Case Assembly and Disassembly . . . . . . . . . . . . . . . . . . . . . . . . . . . . . . . . . . . . . . . . . . . .
ALPHAVISION Wall Mounting Instructions . . . . . . . . . . . . . . . . . . . . . . . . . . . . . . . . . . .
ALPHAVISION Overhead Suspension Mounting Instructions . . . . . . . . . . . . . . . . . . . . . .
Installing the Piezo Tone Device . . . . . . . . . . . . . . . . . . . . . . . . . . . . . . . . . . . . . . . . . . . .
Replacing the EPROM Chip . . . . . . . . . . . . . . . . . . . . . . . . . . . . . . . . . . . . . . . . . . . . . . . .
Replacing the Micro-Controller Board . . . . . . . . . . . . . . . . . . . . . . . . . . . . . . . . . . . . . . . .
Replacing Display Cubes . . . . . . . . . . . . . . . . . . . . . . . . . . . . . . . . . . . . . . . . . . . . . . . . . .
Replacing Fans . . . . . . . . . . . . . . . . . . . . . . . . . . . . . . . . . . . . . . . . . . . . . . . . . . . . . . . . . .
Replacing the Serial Board . . . . . . . . . . . . . . . . . . . . . . . . . . . . . . . . . . . . . . . . . . . . . . . . .
Replacing the Thermostat . . . . . . . . . . . . . . . . . . . . . . . . . . . . . . . . . . . . . . . . . . . . . . . . . .
Replacing the EMI Filter . . . . . . . . . . . . . . . . . . . . . . . . . . . . . . . . . . . . . . . . . . . . . . . . . .
Replacing the Circuit Breaker . . . . . . . . . . . . . . . . . . . . . . . . . . . . . . . . . . . . . . . . . . . . . . .
Replacing the Transformer . . . . . . . . . . . . . . . . . . . . . . . . . . . . . . . . . . . . . . . . . . . . . . . . .
Replacing Loop Back Boards . . . . . . . . . . . . . . . . . . . . . . . . . . . . . . . . . . . . . . . . . . . . . . .
Replacing Power Supplies . . . . . . . . . . . . . . . . . . . . . . . . . . . . . . . . . . . . . . . . . . . . . . . . .
Periodic Maintenance . . . . . . . . . . . . . . . . . . . . . . . . . . . . . . . . . . . . . . . . . . . . . . . . . . . . .
(3.1)
3.2
3.7
3.13
3.17
3.23
3.27
3.31
3.35
3.39
3.41
3.45
3.47
3.51
3.53
3.55
3.57
Chapter 3, Service Procedures
Case Assembly
and Disassembly
CASE ASSEMBLY AND DISASSEMBLY—
REMOVING THE SIDE PANEL, THE BACK PANEL, AND THE FRONT LENS
Required Tools/Equipment
• Phillips head screwdriver
• Small flat head screwdriver
•
•
Needle nose pliers
Safety glasses/goggles
Remove the Side Panel
(Note: The side panel must be removed before removing either the back
panel or the front lens.)
1. Disconnect the ALPHAVISION display from its power source. Then
remove the display from the ceiling or wall mount system.
Power
Side panel located on
the right vertical
side of the ALPHAVISION display (see
enlargement in
Figure 3-2.)
Back of display
Figure 3-1.
ALPHAVISION Display, Rear View.
2. On a flat, level surface, place the ALPHAVISION display on its feet
with the back of the display facing you. The fan and power switch
should be facing up (see figure 3-1.)
(3.2)
Chapter 3, Service Procedures
Case Assembly
and Disassembly
3. On the right, vertical side of the display (see figures 3-1 and 3-2)
remove the 6 Phillips pan head screws (round) from the top and bottom of the casing. Then remove the 6 Phillips flat head screws located
at the top and the bottom of the middle section. Do not remove the 6
screws located along the the top and the bottom of the casing.
Remove
these
screws
(Phillips
pan head)
DO NOT REMOVE
Remove these
screws (Phillips
flat head)
Remove these
screws (Phillips
flat head)
DO NOT REMOVE
Remove these
screws
(Phillips
pan head)
Figure 3-2.
4. With the screws removed, lift the side panel up from the bottom
(away from the display), then slide it towards the top of the display
until it is completely removed.
(3.3)
Chapter 3, Service Procedures
Case Assembly
and Disassembly
Remove the Back Panel
(Note: The back panel does not need to be removed to remove the front lens.)
WARNING
Spring clips can enter
eye, causing personal
injury. Always wear eye
protection when
removing or installing
1. Remove either the small screws or the spring clips located along the
edges of the back panel (some ALPHAVISION displays have small
screws—other displays have spring clips.) The screws can be removed
with a screwdriver and the spring clips can be removed with needle
nose pliers. The number of spring clips or screws will vary from display to display.
2. Face the back of the ALPHAVISION display and carefully slide the
back panel to the right.
Remove the Front Lens
(Note: The front lens does not need to be removed to remove the back panel.)
1. Face the front of the ALPHAVISION display and carefully slide the
lens to the left.
Reassembling the Case
1. If the back panel has been removed, re-install it by facing the back of
the display, placing the back panel into the grooves on the casing, and
carefully sliding the back panel to the left.
(3.4)
Chapter 3, Service Procedures
Case Assembly
and Disassembly
2. If the front lens has been removed, re-install it by facing the front of
the display, inserting the lens into the grooves on the casing, and sliding the lens to the right.
3. Align the front lens and back panel grooves with the side panel. Then,
with the recessed side facing in, gently push the panel in until it is
evenly seated at both the top and bottom of the unit.
4. Re-install all 12 screws in their respective holes. Alternate screw
installation from top to bottom and hand–tighten with a Phillips head
screwdriver. DO NOT USE POWER TOOLS. Note: Install flat head
screws in the middle portion of the side panel. Install pan head screws
(round) at the top and bottom of the casing.
WARNING
Spring clips can enter
eye, causing personal
injury. Always wear eye
protection when
removing or installing
5. As applicable, re-install the small screws or the spring clips located
along the edges of the display. Wear safety glasses/goggles when reinstalling clips.
Note: All screws and/or spring clips must be re-installed into the
ALPHAVISION display in order for the display to remain
compliant with various regulatory standards.
6. Reconnect power to the unit and send a test message.
7. If the unit is fully operational, return it to its original mounting position. If you have any additional questions, contact your Adaptive
Micro Systems sales representative.
(3.5)
(3.6)
Chapter 3, Service Procedures
Wall Mounting
Instructions
ALPHAVISION WALL MOUNTING
Wall Mounting Notes
WARNING
Do not use ALPHAVISION
displays outdoors.
Outdoor use can result
in personal injury,
death, and product
1.
ALPHAVISION displays are for indoor use only. Using an
ALPHAVISION display outdoors will damage the display and can
pose a shock or fire hazard. Adaptive Micro Systems manufactures electronic displays intended for outdoor use—contact
Adaptive Micro Systems for more details.
WARNING
Only mount
ALPHAVISION displays
on walls capable of
supporting 1250 lbs.
(567 Kg.) Personal
injury and damage to the
display can occur if
2.
Mount the ALPHAVISION display on a sturdy wall. Adaptive
Micro Systems highly recommends using a masonry wall. The
wall bracket must be attached to a wall capable of supporting
1250 lbs. (567 Kg.)
(3.7)
Chapter 3, Service Procedures
Wall Mounting
Instructions
3.
Optional Wall mounting kits are not provided with ALPHAVISION displays but can be ordered from Adaptive Micro Systems
at an additional cost. There is a wall mounting kit available for
each type of ALPHAVISION display. Consult the table below to
determine the correct kit to use with a particular ALPHAVISION
display.
Mounting Kit
xx____Part Number____xxx
10209010A
10209010B
10209010C
10209010D
10209010E
10209010F
10209011A
10209011B
10209011C
10209011D
_______Description of Display_______
96 pixel wide full matrix
128 pixel wide full matrix
160 pixel wide full matrix
192 pixel wide full matrix
224 pixel wide full matrix
256 pixel wide full matrix
24 char. wide character matrix
32 char. wide character matrix
40 char. wide character matrix
48 char. wide character matrix
Table 3-1
ALPHAVISION Wall Mounting Kits
5.
The wall mounting kits sold by AMS do not include fasteners for
attaching the wall bracket to the wall. The exact type of fastener
which should be used will vary, depending upon the type of wall
the display is being attached to (concrete, brick, dry-wall, etc.)
6.
The fasteners used to attach the wall bracket to the wall must be
capable of supporting 800 lbs. (363 Kg.) each.
(3.8)
Chapter 3, Service Procedures
Wall Mounting
Instructions
Wall Mounting Instructions
Parts Required
wall mounting kit (available from Adaptive Micro Systems) containing
eight (8) 1⁄4 - 20 x 1.25" (31.8 mm.) long, hex head, stainless steel bolts
eight (8) 1⁄4" split washers
two (2) corner brackets
one (1) wall mounting bracket
one (1) instruction sheet
fasteners (available at hardware and building supply stores)
Tools Required
one (1) 7⁄16 socket - 3⁄8 drive wrench
one (1) #3 phillips head screw driver
drill
drill bit(s)
safety glasses/goggles
FIGURE 1-3
REAR VIEW
Figure 3-3
Rear View, Corner Brackets
1.
Check the wall mounting kit to ensure it contains all parts.
Instructions
continue on
next page
(3.9)
‘
Chapter 3, Service Procedures
Wall Mounting
Instructions
2.
Using a #3 phillips head screw driver, remove the flat head screws
at “B” and “C” on one of the top corners of the display. Remove
both the top and side screws (see figures 3-4 and 3-5.)
1/4-20 X 1.00 [25.4] LG.
FLAT HEAD SCREW (6) AT
EACH CORNER
“A”
Figure 3-4.
“B”
“C”
FIGURE 1
1/4-20 X 1.25 [31.8] LG
HEX HEAD BOLT
(4) REQUIRED FOR EACH
CORNER BRACKET
TOP VIEW BEFORE BRACKET ASSEMBLY
TYP. ON ALL TOP AND SIDE VIEWS
FRONT
OF
DISPLAY
1/4 SPLIT WASHER
(8) REQUIRED
“B”
“C”
CORNER BRACKET
(2) REQUIRED
“B”
“C”
WALL BRACKET
STARTER
GROOVES
FOR WALL
MOUNTING
FASTENERS
FIGURE 2
SIDE VIEW
Figure 3-5.
3.
Align the corner bracket clearance holes with the empty holes at
“B” and “C.”
4.
While holding the 1⁄4 washers on the 1⁄4 - 20 bolts, thread the bolts
through the corner bracket holes into the empty holes at “B” and
“C” on the display.
5.
Using a 7⁄16 socket and 3⁄8 drive wrench, tighten all four (4) bolts to
50-60 lbs. (5.7-6.8 Nm.)
6.
Repeat steps 2-5 on the other top corner of the display.
(3.1 0)
Chapter 3, Service Procedures
Wall Mounting
Instructions
7.
Following the fastener manufacturer’s recommendations, select
locations to drill a minimum of six (6) holes into the wall bracket.
Note that the wall bracket has starter grooves—the holes should
be drilled so they are staggered along these grooves (see figure
3-5.) The location of the holes will be dictated by the secure locations in the wall. A minimum of six (6) fasteners must be used to
attach the wall bracket to the wall.
CAUTION
Always wear eye
protection when
drilling. Personal
injury can result if eye
protection is not used.
8.
Put on eye protection, follow the drill manufacturer's instructions,
and drill holes into the locations selected in step 7.
WARNING
Display can be damaged
or cause personal
injury if dropped. Use a
safe lifting technique to
insure that the display
9.
Attach the wall bracket (pointed ends facing up) to the wall.
Tighten the fasteners to within the range specified by the fastener
manufacturer.
(3.1 1)
Chapter 3, Service Procedures
Overhead Suspension
Mounting
10.
Carefully lift the display high enough so that the corner brackets
are about 1” (25.4 mm.) above the wall bracket. Make sure that
the wall bracket does not extend beyond the ends of the display.
11.
Slowly lower the display down onto the wall bracket until the corner brackets rest on the wall bracket.
(3.1 2)
Chapter 3, Service Procedures
Overhead Suspension
Mounting
ALPHAVISION OVERHEAD MOUNTING
Overhead Suspension Mounting Notes
1.
ALPHAVISION displays are for indoor use only. Using
ALPHAVISION displays outdoors will damage the displays and
can pose a shock or fire hazard. Adaptive Micro Systems manufactures electronic displays intended for outdoor use—contact
Adaptive Micro Systems for more details.
2.
ALPHAVISION displays come with the following parts to allow
for overhead suspension mounting
four (4) 1⁄4 - 20 x 2.50" (63.5 mm.) long, stainless steel eyebolts
four (4) 1⁄4 - 20 hex stop nuts
four (4) 1.00" (25.4 mm.) O.D. fender washers
one (1) instruction sheet
3.
ALPHAVISION displays do not come with chains or quick links,
which can be purchased at hardware and building supply stores.
Four (4) chains and four (4) locking quick links are required.
WARNING
Make sure the chains
and quick links meet the
specifications listed on
the next page. Damage to
the display and personal
injury can occur if
incorrect equipment is
used.
(3.1 3)
Chapter 3, Service Procedures
Overhead Suspension
Mounting
WARNING
Only suspend an
ALPHAVISION display
from a structure
capable of supporting
1250 lbs. (567 Kg.)
Personal injury and
damage to the display
The flat head screws at locations "A" and
"B" have been removed and the eyebolts
are shown installed.
The center screw should not be removed.
Figure 3-6.
Top View of ALPHAVISION
4.
Each chain must be capable of supporting 800 lbs. (363 Kg.)
5.
The chains and the eyebolts must be linked together with 0.25"
(6.4 mm.) diameter locking quick links having a working load
limit of no less than 1,250 lbs. (567 Kg.)
6.
The quick links must have a working load limit which is equal to
or greater than the working load limit of the chain.
7.
The structure that the ALPHAVISION display is attached to must
be capable of supporting a minimum of 1,250 lbs. (567 Kg.)
(3.1 4)
Chapter 3, Service Procedures
Overhead Suspension
Mounting
1
⁄4 - 20 x 2.50" (63.5 mm.) long, stainless steel eyebolts
engaged into corner support (4 places)
1
⁄4 - 20 hex stop nuts (4 places)
1.00" (25.4 mm.) O.D. fender washer (4 places)
Corner support brackets must be properly
secured at all four (4) corners of the cabinet
before beginning overhead mounting
procedures.
Figure 3-5.
Side View, ALPHAVISION Display.
8.
There must be a minimum of 1" (25.4 mm.) clearance on the top
and the bottom of the ALPHAVISION display to allow for adequate ventilation. Without adequate ventilation, the ALPHAVISION can malfunction and become damaged.
(3.1 5)
Chapter 3, Service Procedures
Overhead Suspension
Mounting
Overhead Suspension Mounting Instructions
Parts Required
included with ALPHAVISION displays
four (4) 1⁄4 - 20 x 2.50" (63.5 mm.) long, stainless steel eyebolts
four (4) 1⁄4 - 20 hex stop nuts
four (4) 1.00 " (25.4 mm.) O.D. fender washers
one (1) instruction sheet
available at hardware and building supply stores
four (4) chains
four (4) locking quick links
Tools Required
one (1) #3 phillips head screw driver
an adjustable wrench
1.
Check the parts bag to ensure all parts are there.
2.
Remove the flat head screws from holes "A" and "B" on the top,
right side of the ALPHAVISION display (see figure 3-6.)
3.
Thread the stop nut onto the eyebolt, up to the end of the eyebolt
thread. Make sure no threads are showing above the stop nuts.
4.
While holding the fender washer under the stop nut, thread the
eyebolt into empty holes "A" and "B" until snug (see figure 3-4.)
5.
Wrench-tighten the stop nut down onto the fender washer.
6.
Check to insure that the no threads are showing above the stop
nuts (see figure 3-5.) If threads are visible, remove the stop nuts
and fender washer from holes "A" and "B" and repeat steps 3-6.
7.
Remove the flat head screws from holes "A" and "B" on the top,
left side of the ALPHAVISION display (see figure 3-4.)
8.
Repeat instructions 3-6.
(3.1 6)
Chapter 3, Service Procedures
Installing the Piezo
Tone Device
INSTALLING THE PIEZO TONE DEVICE
(Note: As of July 1995, all ALPHAVISION displays are shipped with the Piezo
Tone Device already installed.)
Required Tools/Equipment
The following items are needed to install the Tone Device
•
•
•
•
•
Tone Device Kit (includes Board, Data Cable)
An anti-static protection device (such as a grounding wrist or heel strap)
Phillips head screwdriver
• Needle nose pliers
Small flat head screwdriver • Safety glasses/goggles
Alcohol wipe
• Tie-wraps
DANGER
Hazardous voltage.
Contact with high
voltage will cause death
or severe personal
injury. Always
disconnect power to
display prior to
servicing and installing
Remove Back Panel
1. See Case Assembly and Disassembly
Installing the Tone Device Board
1. Make sure that you are properly grounded—use an anti–static protection
device such as a grounding wrist or heel strap.
2. Locate component P15 on the controller board (P15 is circled in figure 3-7 on
the next page.)
(3.1 7)
Chapter 3, Service Procedures
Installing the Piezo
Tone Device
Figure 3-7.
Location P15 on the Controller Board.
3. Connect the Data Cable (attached to the Tone Device Board) to the
controller port P15. Connect the brown wire to the bottom pin of the
three pin header. Connect the second wire to the middle pin. The top
pin remains exposed (see figure 3-8.)
4. Disconnect the power wire harness from the controller board by
pulling the connectors apart. Note: The connection may be hidden
under a rail.
Controll
er Board
••
•
Figure 3-8.
Connecting the Data Cable to Port P15.
Port
Chapter 3, Service Procedures
Installing the Piezo
Tone Device
5. Connect the power assembly wires from the Tone Device Board.
Insert one end into the driver board connection and the remaining
connection into the open connector (see Figure 3-9.)
Rail
Driver
Controller
Board
Connector
Tone
Device
Tone Device
Figure 3-9
Connecting Power Assembly Wires.
6. Install the the 3 stand-offs (feet) into the mounting holes on the Tone
Device Board. Insert the narrow end of each stand-off into a hole on
the component side of board. The stand-offs should snap into place.
(See figure 3-10.)
Tone Device Board
Buzzer
Figure 3-10.
Installing Stand-
Component side
Stand-off
(3.1 9)
Chapter 3, Service Procedures
Installing the Piezo
Tone Device
7. Locate a ventilation hole in the bottom of the enclosure near the driver board connection. Make sure that the Tone Device Board can
reach and is able to sit securely within the selected ventilation hole.
(The buzzer should face down.)
8. Clean the area around the ventilation hole with an alcohol wipe.
9. Remove the backing from the stand-offs (feet) and mount the Tone
Device board as stated in Step 7 (see figure 3-11.) Make sure to tie
wrap the power and data cable wires to the rail.
Controller Board
Connector
“Volum
e
Tone Device Board
Stand-offs
Figure 3-11.
Selecting the Tone Device Volume
The Tone Device buzzer is preset to
“High.” To change the tone, you will
need to change the position of the
“Volume jumper.”
1. Looking at the Tone Device Board,
locate the jumper (see figures 3-11
and 3-12 for jumper location.)
(3.2 0)
Figure 3-12.
Tone Device Board Jumper.
Chapter 3, Service Procedures
Installing the Piezo
Tone Device
2. Using your fingers or a needle nose pliers, grasp the jumper and pull
up until the jumper is removed from the receptacle.
3. With the jumper in the upright position (see figure 3-12), place it onto
both prongs of the desired tone, Medium or Low, pushing the jumper
downward until it is secure.
Reassembling the Case
See Case Assembly and Disassembly
(3.2 1)
(3.2 2)
Chapter 3, Service Procedures
Replacing the
EPROM Chip
REPLACING THE EPROM CHIP
Required Tools/Equipment
The following items are needed to install the EPROM chip upgrade
• EPROM chip upgrade
• Phillips head screwdriver
• Small flat head screwdriver
•
•
•
Safety glasses/goggles
Needle nose pliers
Anti-static protection device, such
as a wrist or heel strap
DANGER
Hazardous voltage.
Contact with high
voltage will cause death
or severe personal
injury. Always
disconnect power to
display prior to
servicing and installing
Remove Back Panel
1. See Case Assembly and Disassembly
Removing the Existing EPROM Chip
1. Make sure that you are properly grounded—use an anti–static protection device such as a grounding wrist or heel strap.
2. Locate component U51 on the controller board (slot U51 is marked
with an X in figure 3-13.)
(3.2 3)
Chapter 3, Service Procedures
Replacing the
EPROM Chip
X
Figure 3-13.
Controller Board.
3. Place a small screwdriver under the bottom of the chip and slowly
move towards the top of the chip until the entire chip is away from the
socket. Then lift the chip up and out of the socket (see figure 3-14.)
Existing chip
in place at
Open socket
at U51
(C) AMS 1020 6405 TRI
1994
(C) AMS 1020 6405 TRI
1994
U51
Remove chip
using screw-
Figure 3-14.
(3.2 4)
Chapter 3, Service Procedures
Replacing the
EPROM Chip
Replacing the EPROM Chip
1. With the chip label facing up, align the notches at the top of the socket with the EPROM chip (see figure 3-15.)
Align notch(C) AMS 1020 6405 TRI
1995
Figure 3-15.
Aligning the Notches of the EPROM
2. Carefully align the pins on the right side of the chip with the corresponding sockets at slot U51, right side.
3. With the notches and right side aligned, gently push the pins on the
left side in towards the chip. Make sure all the pins are aligned on
both sides.
4. Gently push the chip in towards the controller board until it is seated
in the socket. Make sure the pins do not bend under or away from the
chip when pushing in.
Reassembling the Case
1. See Case Assembly and Disassembly
(3.2 5)
(3.2 6)
Chapter 3, Service Procedures
Replacing the MicroController Board
REPLACING THE MICRO-CONTROLLER BOARD
Tools Required
Phillips head screwdriver
flat–head screwdriver
anti–static protection device, such as a grounding wrist or heel strap
Ordering Replacement Controller Boards From AMS
Replacement controller boards can be ordered from AMS with or without
EPROM chips. If the EPROM chip in the defective board is out-of-date
(not the most current chip), it may be convenient to order a new controller board which has the newest EPROM chip already installed.
If a controller board is ordered without a new EPROM chip, the existing
EPROM chip must first be removed from the defective controller board
and installed on the new controller board. Please remember, however,
that it is possible for the EPROM chip to be the defective part.
DANGER
Hazardous voltage.
Contact with high
voltage will cause death
or severe personal
injury. Always
disconnect power to
display prior to
servicing and installing
Remove Back Case
1.
See Case Assembly and Disassembly.
(3.2 7)
Chapter 3, Service Procedures
Replacing the MicroController Board
Red and Black Power Wires
(attach to power distribution
DSIP1
DSIP2
Yellow Wire
Harness
(attach to
Turbo
Ribbon
Cables
P12
P6
P10
P8
P12
Serial Cable
(attach to serial
P6
P8
P10
Figure 3-16.
Connections to the Micro-Controller
Removing the Controller Board
1.
Make sure that you are properly grounded—use an anti–static
protection device such as a grounding wrist or heel strap.
2.
Remove the turbo ribbon cable(s) from the controller board. The
turbo ribbon cable will be attached to the controller board at location P12. Large displays will have two turbo ribbon cables—one
at location P12 and one at location P10. When removing two
turbo ribbon cables, mark the cables so they can be easily identified and put back into their original locations. If the cables are not
installed into the proper location on the controller board, messages and graphics may be displayed erratically—messages
intended for the top may be displayed on the bottom, for instance.
3.
Disconnect the serial cable from the controller board. Use a small
flat head screwdriver to remove the two small screws that hold the
serial cable to the controller board.
4.
Unplug the red and black power wires that connect the controller
board to the power distribution board. The red and black power
wires may be connected with plastic connectors or held together
with wirenuts.
(3.2 8)
Chapter 3, Service Procedures
Replacing the MicroController Board
4.
Disconnect the yellow wire harness that connects the controller
board to the transformer. The yellow wires may be connected with
plastic connectors or held together with wirenuts.
5.
If the Piezo tone device is installed, disconnect it from location
P15 on the controller board (see Installing the Piezo Tone Device
for more information.)
6.
Remove the six screws that secure the controller board to the rails.
7.
Remove the Eprom chip from the controller board (see Installing
the Eprom Chip for more information.)
8.
Set the controller board aside.
Installing New Controller Board
1.
If needed, install the Eprom chip from the defective controller
board into the new controller board.
2.
If necessary, connect the Piezo tone device to location P15 on the
controller board.
3.
Attach the new controller board to the rails using the six phillips
head screws.
4.
Attach the yellow wire harness that connects the controller board
to the the transformer.
5.
Attach the red and black wires that connect the controller board to
the power distribution board.
6.
Attach the serial cable to the controller board.
7.
Attach the turbo ribbon cables to the controller board.
(3.2 9)
Chapter 3, Service Procedures
Replacing the MicroController Board
Test Unit
1.
Reconnect power to the display.
2.
Send a test message to insure that the unit is operating properly.
Reassemble Case
1.
See Case Assembly and Disassembly.
(3.3 0)
Chapter 3, Service Procedures
Replacing Display
Cubes
REPLACING DISPLAY CUBES
Sequential Order of Display Cubes
At AMS, the LED display cubes are installed into the driver boards in a
special sequence, insuring that all of the LED cubes in an area of the display will emit light at approximately the same intensity. Once display
cubes have been removed from the driver board, they need to be reinstalled into their original locations on the driver board so that this special sequence is maintained.
When removing LED display cubes, make sure to remove them in an
organized manner so they can be put back in their proper sequence. For
instance, start with the first cube on the left side of the top row of the driver board, remove it, then remove the next cube to the right. When all of
the cubes on the top row have been removed, go on to the next row of
cubes and remove them, working from left to right.
Removing Display Cubes
DANGER
Hazardous voltage.
Contact with high
voltage will cause death
or severe personal
injury. Always
disconnect power to
display prior to
servicing and installing
1.
Before removing any cubes, the front lens needs to be removed.
See Case Assembly and Disassembly.
2.
To remove a display cube, firmly grab the cube and pull it out
(away from the ALPHAVISION display), wiggling the cube back
and forth while pulling.
(3.3 1)
Chapter 3, Service Procedures
Replacing Display
Cubes
Note: To remove defective display cubes which are not
along the edge of the display, it may be necessary to
remove some functioning display cubes in order to obtain
a firm grip on the defective display cube.
3.
Remember the locations of all display cubes removed from the
ALPHAVISION display. All display cubes should be put back
into their original locations. Also remember the locations of
defective display cubes—when AMS sends out replacement display cubes, we will indicate which defective display cubes the
new display cubes are replacing.
Calling AMS to Order New Display Cubes
Before calling AMS to request replacement display cubes, remove the
defective display cubes from the ALPHAVISION display. Find the numbers located on the back of these display cubes and give these numbers to
your AMS representative when calling.
Inserting Display Cubes into Driver Board
Character Matrix Displays
There are two rows of header pins on LED display cubes for character matrix displays—one row of eight (8) pins and one row of nine
(9) pins. Make sure to insert the row with 8 pins into the row of 8
holes on the display socket and the row with 9 pins into the row of 9
holes on the display socket. (see figure 3-17.)
Full Matrix Displays
Insert the header pins on the display cube into the display socket.
Make sure that the display cube’s tabs are on the left and the display
cube's notches are on the right (see figure 3-18.)
Final Assembly and Testing
1.
Replace the front polycarbonate lens (see Case Assembly and
Disassembly.)
(3.3 2)
Chapter 3, Service Procedures
Replacing Display
Cubes
Row of
Nine pins
Row of
Nine holes
LED Display Cube
for
Character Matrix
Display Socket
Row of
Eight pins
Row of
Eight holes
Figure 3-17.
Inserting Character Matrix Display Cubes.
Tabs are
on the
left side
Notches are
on the
right side
Full Matrix Display Cube
Figure 3-18.
Inserting Full Matrix Display Cubes.
(3.3 3)
(3.3 4)
Chapter 3, Service Procedures
Replacing Fans
REPLACING FANS
Tools Required
1 Phillips head screwdriver
1 flat head screwdriver
Calling AMS to Order Replacement Fans
There are two different types of fans on ALPHAVISION displays—old
models use 3" fans while new models use 3.6" fans. To make sure you
receive the correct replacement fan, give the model number of the
ALPHAVISION display requiring a replacement fan to your Adaptive
Micro Systems representative when calling.
How Fans are Connected
All ALPHAVISION displays have at least one fan, while large displays
will have several fans. The fan closest to the power supply will always be
connected directly to the terminal block and to the thermostat. There are
power wires attached directly (soldered) to the 3" fans. The 3.6" fans
have no wires attached to them; instead, they are connected via a twoprong terminal and cords (see figure 3-21.)
DANGER
Hazardous voltage.
Contact with high
voltage will cause death
or severe personal
injury. Always
disconnect power to
display prior to
servicing and installing
(3.3 5)
Chapter 3, Service Procedures
Replacing Fans
Remove Back Case
1.
See Case Assembly and Disassembly.
Removing 3" Fans
1.
Remove the wire nuts from the power wires connected to the
defective fan and, if necessary, separate the wires (see figure 3-19.)
Case
Front Panel
Leads to thermostat
Back Panel
Leads to terminal block
Power wires
Wire Nuts
BOTTOM VIEW OF FAN
Figure 3-19.
2.
Remove the nuts which hold the fan to the top of the case (see
figure 3-20.) Do not remove the screws.
3.
Remove the defective fan from the case and set aside.
ALPHAVISION display's
outer case
Fan
Screw
Nut
Figure 3-20.
(3.3 6)
Chapter 3, Service Procedures
Replacing Fans
Installing Replacement 3" Fans
1.
Make sure that you are properly grounded—use an anti–static
protection device such as a grounding wrist or heel strap.
2.
Attach the replacement fan to the case. Insert the fan under the
screws, insert the nuts onto the screws, and tighten the nuts until
the fan is secure (see figure 3-20.)
3.
Connect the power wires to the replacement fan. Place wire nuts
on the wires that need to be connected and turn the wire nuts until
they are secure.
Removing 3.6" Fans
2 prong terminal
on 3.6" fan
power cord for
3.6" fans
Figure 3-21.
Power Cord and Terminal for 3.6" Fans.
1.
Make sure that you are properly grounded—use an anti–static protection device such as a grounding wrist
or heel strap.
2.
Remove the nuts that hold the fan to the top of the case (see figure 3-20.)
3.
Hold the fan with one hand and use the other hand to unplug the
(3.3 7)
Chapter 3, Service Procedures
Replacing Fans
power cord from the two-prong terminal on the fan.
4.
Remove the defective fan from the case and set aside.
Installing Replacement 3.6" Fans
1.
Make sure that you are properly grounded—use an anti–static
protection device such as a grounding wrist or heel strap.
2.
Plug the power cord into the two-prong terminal on the replacement fan.
3.
Attach the replacement fan to the case. Insert the fan under the
screws, insert nuts onto the screws, and tighten the nuts until the
fan is secure (see figure 3-20.)
(3.3 8)
Chapter 3, Service Procedures
Replacing the
Serial Board
REPLACING THE SERIAL BOARD
Tools Required
flat head screwdriver
Phillips head screwdriver
tie-wraps
Remove Back Panel
DANGER
Hazardous voltage.
Contact with high
voltage will cause death
or severe personal
injury. Always
disconnect power to
display prior to
servicing and installing
1.
See Case Assembly and Disassembly.
RJ11 ports
ON
OFF
Figure 3-21.
Power Entry Plate.
Power Cord
(3.3 9)
Chapter 3, Service Procedures
Replacing the
Serial Board
Removing Defective Serial Board
1.
Find the power entry plate located on top of the ALPHAVISION
display (see figure 3-21.)
2.
Use a phillips head screwdriver to remove the 3 screws that hold
the serial board to the power entry plate (see figure 3-21.) Save
the screws—they will be used again.
3.
Disconnect the serial cable from the controller board. Use a small
flat head screwdriver to remove the two small screws that hold the
serial cable to the controller board.
4.
Remove the defective serial board and set aside.
Installing Replacement Serial Board
1.
Connect the serial cable of the replacement serial board to the
controller board. Use a small flat head screwdriver to tighten the
two small screws that hold the serial cable to the controller board.
2.
Attach the serial board to the power entry plate. Use a phillips
head screwdriver to tighten the three screws that will hold the serial board to the power entry plate (see figure 3-21.)
3.
The serial cable should run along the bottom of the ALPHAVISION display's case—tie wraps should be used to hold the serial
cable in place.
Testing and Final Assembly
1.
Connect power to the display and send a test message.
2.
Reassemble the back panel (see Case Assembly and Disassembly)
(3.4 0)
Chapter 3, Service Procedures
Replacing the
Thermostat
REPLACING THE THERMOSTAT
Tools Required
Phillips head screwdriver
Remove Back Panel
DANGER
Hazardous voltage.
Contact with high
voltage will cause death
or severe personal
injury. Always
disconnect power to
display prior to
servicing and installing
1.
See Case Assembly and Disassembly.
Removing / Installing Thermostats
1.
Find the power entry plate located on top of the ALPHAVISION
display (see figure 3-22.)
RJ11 ports
(3.4 1)
ON
OFF
Figure 3-22.
Power Entry Plate.
Power Cord
Chapter 3, Service Procedures
Replacing the
Thermostat
2.
Remove the 3 screws that hold the serial board to the power entry
plate (see figure 3-22.) Save the screws—they will be used again.
3.
Remove the screw that holds the defective thermostat to the serial
board (see figure 3-23.) Save the screw—it will be used again.
Serial Board
One position connectors
Phillips head screw
Thermostat
Figure 3-23.
Removing and Attaching Thermostat to Serial Board.
4.
Disconnect the one-position connectors that are attached to the
defective thermostat.
5.
Remove the defective thermostat and set aside.
(3.4 2)
Chapter 3, Service Procedures
Replacing the
Thermostat
Installing Replacement Thermostat
1.
Attach the replacement thermostat to the serial board. Use the
same screw that held the defective thermostat to the serial board.
2.
Attach the one-position connectors to the replacement thermostat.
3.
Attach the serial board to the power entry plate—use the three
screws that originally held the serial board to the power entry
plate.
4.
Reassemble case (see Case Assembly and Disassembly.)
(3.4 3)
(3.4 4)
Chapter 3, Service Procedures
Replacing the
EMI Filter
REPLACING THE EMI FILTER
Tools Required
Phillips head screwdriver
wrench
Remove Back Panel
DANGER
Hazardous voltage.
Contact with high
voltage will cause death
or severe personal
injury. Always
disconnect power to
display prior to
servicing and installing
1.
See Case Assembly and Disassembly.
Replacing EMI Filter Instructions
1.
Face the back side of the ALPHAVISION display and find the
EMI Filter located beneath the power entry plate.
2.
Use a wrench to remove the four nuts off of the four screws that
hold the EMI filter to the Filter Plate (see figure 3-24.)
Note: Some older ALPHAVISION displays do not have filter
plates. On these displays, the EMI filter will be mounted directly
to a rail.
(3.4 5)
Chapter 3, Service Procedures
Replacing the
EMI Filter
3.
Disconnect the four power wires and the one ground wire
attached to the EMI Filter. Use a wrench to remove the five nuts
off of the wires (see figure 3-24.)
4.
Remove the defective EMI filter and set aside.
5.
Attach the replacement EMI filter to the Filter Plate (or to a rail if
no filter plate is present.) Place the replacement EMI filter on the
screws, attach the nuts to the screws, and tighten the nuts with a
wrench until the EMI filter is secure.
6.
Connect the four power wires and the one ground wire to the
replacement EMI filter. Place nuts on the screws and use a wrench
to tighten the nuts until the wires are secure.
Remove these nuts
Remove
these wires
Remove
these wires
EMI
Filter
Figure 3-24.
EMI Filter.
Chapter 3, Service Procedures
Replacing the
Circuit Breaker
REPLACING THE CIRCUIT BREAKER
Tools Required
phillips head screwdriver
Remove Back Case
DANGER
Hazardous voltage.
Contact with high
voltage will cause death
or severe personal
injury. Always
disconnect power to
display prior to
servicing and installing
1.
See Case Assembly and Disassembly.
Removing Defective Circuit Breaker
1.
Face the back of the display and find the circuit breaker, located in
the upper right corner of the display beneath the power entry plate.
2.
Disconnect the power wires attached to the circuit breaker.
Note: On some ALPHAVISION displays, two power wires will
need to be disconnected from the circuit breaker. On newer displays, four power wires will need to be disconnected.
(3.4 7)
Chapter 3, Service Procedures
Replacing the
Circuit Breaker
Power Entry Plate
Remove screws
on corners
Remove screws
on corners
ON
OFF
Top View
Figure 3-25.
Power Entry Plate Removal.
3.
Use a screwdriver to remove the four screws which hold the
power entry plate to the ALPHAVISION display.
4.
Lift the power entry plate up, away from the ALPHAVISION display. Although the serial cable is still attached to the serial board,
there should be enough slack on the cable to raise the power entry
plate a few inches above the top of the case. If needed, remove a
tie-wrap off of the serial cable (see figure 3-27.)
5.
Hold the power entry plate with one hand. Use the other hand to
push the circuit breaker's plastic arms in (towards the center of the
circuit breaker), then push the circuit breaker up and through its
hole in the power entry plate (see figure 3-26.)
Push the plastic arms
in, towards the center
of the circuit breaker.
Figure 3-26.
Removing the Circuit Breaker.
(3.4 8)
Chapter 3, Service Procedures
Replacing the
Circuit Breaker
Circuit
LINE
Black
EMI
LINE
LOAD
Figure 3-27.
Rear View
Inserting Replacement Circuit Breaker
1.
Insert the replacement circuit breaker into the power plate
assembly.
2.
Connect the power wires to the circuit breaker. Make sure to connect the
wires leading to the power cord to the labeled "LINE" on the circuit
breaker.
3.
Use a phillips screwdriver and screws to re-attach the power entry plate
to the outer case.
(3.4 9)
Chapter 3, Service Procedures
Replacing the
Circuit Breaker
Case Reassembly
1.
Reassemble back panel. See Case Assembly and Disassembly.
Test Unit
1.
Send a test message to the unit to verify it is working correctly.
(3.5 0)
Chapter 3, Service Procedures
Replacing the
Transformer
REPLACING THE TRANSFORMER
Tools Needed
Phillips head screwdriver
wrench
Calling AMS to Order a Replacement Transformer
A part number is printed on the top of all transformers. Give this number
to your AMS representative when ordering to insure that the correct
transformer is sent.
Remove Back Panel
1.
See Case Assembly and Disassembly.
Replacing Transformer Instructions
1.
Face the back of the display and find the defective transformer.
The transformer is connected to the controller board with yellow
power wires and can be found in the lower left corner near the
controller board or in the upper right corner, under the power plate.
2.
Disconnect the yellow power wire harness that connect the controller board to the transformer. Remove the wirenuts on the yellow power wires and, if necessary, separate the wires. Note that
on some ALPHAVISION displays, a plastic connector is used
instead of wirenuts.
(3.5 1)
Chapter 3, Service Procedures
Replacing the
Transformer
3.
Use a Phillips head screwdriver or a wrench to remove the defective transformer. In some ALPHAVISION displays, the transformer is attached with a phillips head screws. In other displays,
the transformer is attached using a screw and nut.
4.
Connect the yellow power wire harness on the replacement transformer to the yellow wires attached to the controller board. Place
a wirenut on the wires and turn the wirenut until secure. Note that
on some ALPHAVISION displays, the power wires are connected
using a plastic connector instead of wirenuts.
5.
Attach the replacement transformer to the ALPHAVISION display. The replacement transformer should be installed into the
same location the defective transformer was removed from.
Depending upon how the defective transformer was attached to
the display, a Phillips head screwdriver or a wrench will need to
be used to secure the replacement transformer in place.
Case Reassembly
1.
Reassemble back panel. See Case Assembly and Disassembly.
Test Unit
1.
Send a test message to the unit to verify it is working correctly.
(3.5 2)
Chapter 3, Service Procedures
Replacing Loop
Back Boards
REPLACING LOOP BACK BOARDS
(Note: The power wires connecting the power distribution
boards to the loop back boards must be de-soldered and
soldered to replace the loop back boards. The instructions
below are intended for someone who has experience soldering wires.)
DANGER
Hazardous voltage.
Contact with high
voltage will cause death
or severe personal
injury. Always
disconnect power to
display prior to
servicing and installing
Remove Back Case
1.
See Case Assembly and Disassembly.
Remove Defective Loopback Boards
1.
Make sure that you are properly grounded—use an anti–static
protection device such as a grounding wrist or heel strap.
2.
Disconnect the turbo ribbon cables attached to the defective loop
back board. Note the orientation and the location of each turbo
ribbon cable (they will need to be put back into their original
locations.)
3.
Remove the four screws that hold the loop back board in place.
4.
De-solder the orange and black power wires attached to the loopback board.
(3.5 3)
Chapter 3, Service Procedures
Replacing Loop
Back Boards
Loop Back Board
Power Distribution
Figure 3-28.
Install Replacement Loop Back Board
1.
Use four screws to secure the loop back board in place. Attach the
replacement board into the same location that was occupied by
the defective board.
2.
Solder the black and orange power wires to the replacement
board. Make sure the orange wire is soldered to the "+" position
on the loop back board and the black wire is soldered to the
"-" position.
3.
Attach the turbo ribbon cables to the replacement loop back board.
Be sure that each turbo ribbon cable has the same orientation and
is in the same position as it was on the defective board.
Case Reassembly
1.
Reassemble back panel. See Case Assembly and Disassembly.
Test Unit
1.
Send a test message to the unit to verify it is working correctly.
(3.5 4)
Chapter 3, Service Procedures
Replacing Power
Supplies
REPLACING POWER SUPPLIES
Tools Required
Phillips head screwdriver
Remove Back Panel
DANGER
Hazardous voltage.
Contact with high
voltage will cause death
or severe personal
injury. Always
disconnect power to
display prior to
servicing and installing
1.
See Case Assembly and Disassembly.
Removing Defective Power Supplies
1.
Use a screwdriver to remove all of the power wires attached to
the defective power supply.
2.
Remove all four screws from the mounting rail that the defective
power supply is attached to.
3.
Remove this mounting rail from the ALPHAVISION display. (On
some large ALPHAVISION displays, the micro-controller board
will also need to be removed if it is attached to the same mounting rail that the power supply is attached to.)
(3.5 5)
Chapter 3, Service Procedures
Replacing Power
Supplies
4.
Use a screwdriver to remove the four screws which hold the
power supply to the mounting rail.
Installing Replacement Power Supplies
1.
Attach the replacement power supply to the mounting rail.
2.
Attach the mounting rail to the ALPHAVISION display.
3.
Connect all power wires to their appropriate positions on the
replacement power supply (see figure 3-29.) Note that all connections on the power supply are labeled. Incoming (input) wires
should be wired as follows: green to ground, white to neutral, and
black to line. Outgoing (output) wires should be wired as follows:
red to positive (+) and black to negative (-).
RED (1)
RED (1)
BLACK (1)
BLACK (1)
GREEN (2)
BLACK (2)
BLACK (3)
WHITE (2)
BLACK (3)
1 = Power Distribution Board*
2 = Power Supply Cord
3 = Transformer
Figure 3-29.
Power Supply Wiring Diagram.
(3.5 6)
Metal Jumper
Chapter 3, Service Procedures
Replacing Power
Supplies
Case Reassembly
1.
Reassemble back panel. See Case Assembly and Disassembly.
Test Unit
1.
Send a test message to the unit to verify it is working correctly.
(3.5 7)
(3.5 8)
Chapter 3, Service Procedures
Replacing Driver
Boards
REPLACING DRIVER BOARDS
Tools Required
Phillips head screwdriver
Remove Front Lens
DANGER
Hazardous voltage.
Contact with high
voltage will cause death
or severe personal
injury. Always
disconnect power to
display prior to
servicing and installing
1.
See Case Assembly and Disassembly.
Remove LED Display Cubes from Driver Board
1.
Remove all of the LED display cubes from the defective driver
board. If the defective driver board is not located along the outer
edge of the display, additional LED display cubes will have to be
removed so you can access the display cubes on the defective driver board. Remember that all LED display cubes are in a special
sequence—when removing LED cubes, be sure to put them back
into their original locations. See Replacing Display Cubes.
2.
Using a Phillips head screwdriver, remove the four screws that
hold the driver board in place. Save theses screws—they will be
needed to install the replacement driver board.
3.
Remove the turbo ribbon cable from the defective driver board. If
necessary, pull the defective driver board out, away from the
ALPHAVISION, to access the turbo ribbon cable.
(3.5 9)
Chapter 3, Service Procedures
Replacing Driver
Boards
4.
Disconnect the power wires from the defective driver board.
5,
Set the defective driver board aside.
Install Replacement Driver Boards
1.
Connect the replacement driver board to the power wires.
2.
Connect the replacement driver board to the turbo ribbon cable.
3.
Using a Phillips head screwdriver and the four screws removed
from the defective driver board, secure the replacement driver
board in place.
4.
Replace all of the LED display cubes. Remember that the cubes
must be put back into their original locations on the driver boards
(see Replacing Display Cubes.)
Case Reassembly
1.
Reattach front lens. See Case Assembly and Disassembly.
Test Unit
1.
Send a test message to the unit to verify it is working correctly.
(3.6 0)
Chapter 3, Service Procedures
Periodic Maintenance
ALPHAVISION PERIODIC MAINTENANCE
ALPHAVISION displays require some periodic maintenance to insure
proper operation and to prolong their life.
Fan Intake Vents
DANGER
Hazardous voltage.
Contact with high
voltage will cause death
or severe personal
injury. Always
disconnect power to
display prior to
The fan intake vents (located in the bottom of the outer enclosure) must
be kept free of debris in order for proper cooling to take place. If these
vents become restricted, the display may overheat, leading to component
failure and costly repairs. It is the responsibility of the end user to perform periodic maintenance on the fan intake vents.
Under normal conditions, the fan intake vents should be inspected for
debris build up at six month intervals. In dusty environments, the fan
intake vents should be inspected more frequently, such as at three month
intervals. Debris can be removed from the vents by either using a vacuum
cleaner on the exterior of the display, or by blowing compressed air outward, through the vents, from inside the display. Adaptive Micro Systems
recommends that the fans located in the top of the display's enclosure be
cleared of debris whenever the intake vents are serviced.
Note: The fans are controlled by a thermostat and do not
operate continuously. They turn on only when the internal
temperature of the display exceeds 120 degrees Fahrenheit
and turn off when the internal temperature falls below 90
degrees Fahrenheit.
(3.6 1)
Chapter 3, Service Procedures
Periodic Maintenance
Polycarbonate Display Face (Front Lens)
CAUTION
Do not use abrasive
cleansers, harsh
chemicals, or brushes
on the display face.
Damage to the display
will result. Clean the
display face only as
The front lens (the polycarbonate display face) will require occasional
cleaning for best viewing. Adaptive Micro Systems recommends using a
soft cloth and Miller-Stephenson MS-260 Safezone Cleaner (or another
cleaner designed specifically for cleaning polycarbonate lenses.) A mild
soap and water mixture may also be used.
Do not use abrasive cleansers or harsh chemicals on the display face. Do
not scrub the display face with a brush.
(3.6 2)
4
Chapter Four• DIP Switches
DIP SWITCH SETTINGS
Basic Theory
There are two sets of eight DIP switches located on the ALPHAVISION controller board, set S1 (see table 4-2) and set S2 (see table 4-1.) The S1 DIP
switches can be used to set the ALPHAVISION display's serial address. The S2
DIP switches control other miscellaneous operational functions of the ALPHAVISION display. SW1 (Switch 1) of both S1 and S2 is located towards the top of
each of bank of eight DIP switches. Please note that, unless otherwise specified,
all DIP switches are set in the “OFF” position before shipping.
The S1 DIP switches represent the serial address as one hexadecimal byte.
Switches set in the “ON” position represent set bits. Switch one is the least significant bit, and switch eight is the most significant bit. On page 4.3 is a table of
examples of how the switches should be set to achieve the desired serial address.
Note: The DIP switch addressing overrides the serial address that can be set serially via protocol. The address can still be modified serially once it has been set
via the DIP switches, but if power is cycled on the unit, the DIP switch address
will override the serially set serial address.
(4.1)
Chapter 4, Protocol/Software
DIP Switch Settings
SSSSSSSS
SETTINGS – 1=ON
0=OFF
x=don’t care
W W W W W W W
W
FUNCTION
0xxxxxxx
Serial communications set for 7 databits, even parity, 2 stop bits
1xxxxxxx
Serial communications set for 8 databits,no parity, 1 stop bits
xxxxxx10
Display test -diagonal pattern
xxxxxx01
Memory clear on power-up
xxxxxx11
Display test -display matching pattern (green, red, amber, off)
Table 4-1.
S2 DIP Switch Functions.
S1 DIP switch settings are assigned on the following page. Each serial
address is shown as HEXADECIMAL (DECIMAL). A “1” represents a
switch in the “ON” position while a “0” represents a switch in the “OFF”
position. Please note that, unless otherwise specified, all DIP switches are
set in the “OFF” position before shipping.
(4.2)
Chapter 4, Protocol/Software
DIP Switch Settings
S1 dipswitches are assigned as follows:
SSSSSSSS
WWWWWWWW
Address 8 7 6 5 4 3 2 1
SSSSSSSS
WWWWWWWW
Address 8 7 6 5 4 3 2 1
SSSSSSSS
WWWWWWWW
Address 8 7 6 5 4 3 2 1
00H(00) 0 0 0 0 0 0 0 0
01H(01) 0 0 0 0 0 0 0 1
02H(02) 0 0 0 0 0 0 1 0
03H(03) 0 0 0 0 0 0 1 1
04H(04) 0 0 0 0 0 1 0 0
05H(05) 0 0 0 0 0 1 0 1
06H(06) 0 0 0 0 0 1 1 0
07H(07) 0 0 0 0 0 1 1 1
08H(08) 0 0 0 0 1 0 0 0
09H(09) 0 0 0 0 1 0 0 1
0AH(10) 0 0 0 0 1 0 1 0
0BH(11) 0 0 0 0 1 0 1 1
0CH(12) 0 0 0 0 1 1 0 0
0DH(13) 0 0 0 0 1 1 0 1
0EH(14) 0 0 0 0 1 1 1 0
0FH(15) 0 0 0 0 1 1 1 1
10H(16) 0 0 0 1 0 0 0 0
11H(17) 0 0 0 1 0 0 0 1
12H(18) 0 0 0 1 0 0 1 0
13H(19) 0 0 0 1 0 0 1 1
14H(20) 0 0 0 1 0 1 0 0
15H(21) 0 0 0 1 0 1 0 1
16H(22) 0 0 0 1 0 1 1 0
17H(23) 0 0 0 1 0 1 1 1
18H(24) 0 0 0 1 1 0 0 0
19H(25) 0 0 0 1 1 0 0 1
1AH(26) 0 0 0 1 1 0 1 0
1BH(27) 0 0 0 1 1 0 1 1
1CH(28) 0 0 0 1 1 1 0 0
1DH(29) 0 0 0 1 1 1 0 1
1EH(30) 0 0 0 1 1 1 1 0
1FH(31) 0 0 0 1 1 1 1 1
20H(32) 0 0 1 0 0 0 0 0
21H(33) 0 0 1 0 0 0 0 1
22H(34) 0 0 1 0 0 0 1 0
23H(35) 0 0 1 0 0 0 1 1
24H(36) 0 0 1 0 0 1 0 0
25H(37) 0 0 1 0 0 1 0 1
26H(38) 0 0 1 0 0 1 1 0
27H(39) 0 0 1 0 0 1 1 1
28H(40) 0 0 1 0 1 0 0 0
29H(41) 0 0 1 0 1 0 0 1
2AH(42) 0 0 1 0 1 0 1 0
2BH(43) 0 0 1 0 1 0 1 1
2CH(44) 0 0 1 0 1 1 0 0
2DH(45) 0 0 1 0 1 1 0 1
2EH(46) 0 0 1 0 1 1 1 0
2FH(47) 0 0 1 0 1 1 1 1
30H(48) 0 0 1 1 0 0 0 0
31H(49) 0 0 1 1 0 0 0 1
32H(50) 0 0 1 1 0 0 1 0
33H(51) 0 0 1 1 0 0 1 1
34H(52) 0 0 1 1 0 1 0 0
35H(53) 0 0 1 1 0 1 0 1
36H(54) 0 0 1 1 0 1 1 0
37H(55) 0 0 1 1 0 1 1 1
38H(56) 0 0 1 1 1 0 0 0
39H(57) 0 0 1 1 1 0 0 1
3AH(58) 0 0 1 1 1 0 1 0
3BH(59) 0 0 1 1 1 0 1 1
3CH(60) 0 0 1 1 1 1 0 0
3DH(61) 0 0 1 1 1 1 0 1
3EH(62) 0 0 1 1 1 1 1 0
3FH(63) 0 0 1 1 1 1 1 1
40H(64) 0 1 0 0 0 0 0 0
41H(65) 0 1 0 0 0 0 0 1
42H(66) 0 1 0 0 0 0 1 0
43H(67) 0 1 0 0 0 0 1 1
44H(68) 0 1 0 0 0 1 0 0
45H(69) 0 1 0 0 0 1 0 1
46H(70) 0 1 0 0 0 1 1 0
47H(71) 0 1 0 0 0 1 1 1
48H(72) 0 1 0 0 1 0 0 0
49H(73) 0 1 0 0 1 0 0 1
4AH(74) 0 1 0 0 1 0 1 0
4BH(75) 0 1 0 0 1 0 1 1
4CH(76) 0 1 0 0 1 1 0 0
4DH(77) 0 1 0 0 1 1 0 1
4EH(78) 0 1 0 0 1 1 1 0
4FH(79) 0 1 0 0 1 1 1 1
50H(80) 0 1 0 1 0 0 0 0
51H(81) 0 1 0 1 0 0 0 1
52H(82) 0 1 0 1 0 0 1 0
53H(83) 0 1 0 1 0 0 1 1
54H(84) 0 1 0 1 0 1 0 0
55H(85) 0 1 0 1 0 1 0 1
56H(86) 0 1 0 1 0 1 1 0
57H(87) 0 1 0 1 0 1 1 1
58H(88) 0 1 0 1 1 0 0 0
59H(89) 0 1 0 1 1 0 0 1
5AH(90) 0 1 0 1 1 0 1 0
5BH(91) 0 1 0 1 1 0 1 1
5CH(92) 0 1 0 1 1 1 0 0
5DH(93) 0 1 0 1 1 1 0 1
5EH(94) 0 1 0 1 1 1 1 0
5FH(95) 0 1 0 1 1 1 1 1
60H (96) 0 1 1 0 0 0 0 0
61H (97) 0 1 1 0 0 0 0 1
62H (98) 0 1 1 0 0 0 1 0
63H (99) 0 1 1 0 0 0 1 1
64H(100) 0 1 1 0 0 1 0 0
65H(101) 0 1 1 0 0 1 0 1
66H(102) 0 1 1 0 0 1 1 0
67H(103) 0 1 1 0 0 1 1 1
68H(104) 0 1 1 0 1 0 0 0
69H(105) 0 1 1 0 1 0 0 1
6AH(106) 0 1 1 0 1 0 1 0
6BH(107) 0 1 1 0 1 0 1 1
6CH(108) 0 1 1 0 1 1 0 0
6DH(109) 0 1 1 0 1 1 0 1
6EH(110) 0 1 1 0 1 1 1 0
6FH(111) 0 1 1 0 1 1 1 1
70H(112) 0 1 1 1 0 0 0 0
71H(113) 0 1 1 1 0 0 0 1
72H(114) 0 1 1 1 0 0 1 0
73H(115) 0 1 1 1 0 0 1 1
74H(116) 0 1 1 1 0 1 0 0
75H(117) 0 1 1 1 0 1 0 1
76H(118) 0 1 1 1 0 1 1 0
77H(119) 0 1 1 1 0 1 1 1
78H(120) 0 1 1 1 1 0 0 0
79H(121) 0 1 1 1 1 0 0 1
7AH(122) 0 1 1 1 1 0 1 0
7BH(123) 0 1 1 1 1 0 1 1
7CH(124) 0 1 1 1 1 1 0 0
7DH(125) 0 1 1 1 1 1 0 1
7EH(126) 0 1 1 1 1 1 1 0
7FH(127) 0 1 1 1 1 1 1 1
80H(128) 1 0 0 0 0 0 0 0
81H(129) 1 0 0 0 0 0 0 1
82H(130) 1 0 0 0 0 0 1 0
83H(131) 1 0 0 0 0 0 1 1
84H(132) 1 0 0 0 0 1 0 0
85H(133) 1 0 0 0 0 1 0 1
86H(134) 1 0 0 0 0 1 1 0
87H(135) 1 0 0 0 0 1 1 1
88H(136) 1 0 0 0 1 0 0 0
89H(137) 1 0 0 0 1 0 0 1
8AH(138) 1 0 0 0 1 0 1 0
8BH(139) 1 0 0 0 1 0 1 1
8CH(140) 1 0 0 0 1 1 0 0
8DH(141) 1 0 0 0 1 1 0 1
8EH(142) 1 0 0 0 1 1 1 0
8FH(143) 1 0 0 0 1 1 1 1
Table 4-2.
S1 DIP Switch Settings.
(4.3)
SSSSSSSS
WWWWWWWW
Address 8 7 6 5 4 3 2 1
90H(144) 1 0 0 1 0 0 0 0
91H(145) 1 0 0 1 0 0 0 1
92H(146) 1 0 0 1 0 0 1 0
93H(147) 1 0 0 1 0 0 1 1
94H(148) 1 0 0 1 0 1 0 0
95H(149) 1 0 0 1 0 1 0 1
96H(150) 1 0 0 1 0 1 1 0
97H(151) 1 0 0 1 0 1 1 1
98H(152) 1 0 0 1 1 0 0 0
99H(153) 1 0 0 1 1 0 0 1
9AH(154) 1 0 0 1 1 0 1 0
9BH(155) 1 0 0 1 1 0 1 1
9CH(156) 1 0 0 1 1 1 0 0
9DH(157) 1 0 0 1 1 1 0 1
9EH(158) 1 0 0 1 1 1 1 0
9FH(159) 1 0 0 1 1 1 1 1
0A0H(160) 1 0 1 0 0 0 0 0
0A1H(161) 1 0 1 0 0 0 0 1
0A2H(162) 1 0 1 0 0 0 1 0
0A3H(163) 1 0 1 0 0 0 1 1
0A4H(164) 1 0 1 0 0 1 0 0
0A5H(165) 1 0 1 0 0 1 0 1
0A6H(166) 1 0 1 0 0 1 1 0
0A7H(167) 1 0 1 0 0 1 1 1
0A8H(168) 1 0 1 0 1 0 0 0
0A9H(169) 1 0 1 0 1 0 0 1
0AAH(170) 1 0 1 0 1 0 1 0
0ABH(171) 1 0 1 0 1 0 1 1
0ACH(172) 1 0 1 0 1 1 0 0
0ADH(173) 1 0 1 0 1 1 0 1
0AEH(174) 1 0 1 0 1 1 1 0
0AFH(175) 1 0 1 0 1 1 1 1
0B0H(176) 1 0 1 1 0 0 0 0
0B1H(177) 1 0 1 1 0 0 0 1
0B2H(178) 1 0 1 1 0 0 1 0
0B3H(179) 1 0 1 1 0 0 1 1
0B4H(180) 1 0 1 1 0 1 0 0
0B5H(181) 1 0 1 1 0 1 0 1
0B6H(182) 1 0 1 1 0 1 1 0
0B7H(183) 1 0 1 1 0 1 1 1
0B8H(184) 1 0 1 1 1 0 0 0
0B9H(185) 1 0 1 1 1 0 0 1
0BAH(186) 1 0 1 1 1 0 1 0
0BBH(187) 1 0 1 1 1 0 1 1
0BCH(188) 1 0 1 1 1 1 0 0
0BDH(189) 1 0 1 1 1 1 0 1
0BEH(190) 1 0 1 1 1 1 1 0
0BFH(191) 1 0 1 1 1 1 1 1
Chapter 4, Protocol/Software
DIP Switch Settings
Changing DIP Switch Settings
1. Facing the back of the display, locate the controller board located in
the mid to lower left corner of the ALPHAVISION display.
2. Make sure that you are properly grounded—use an anti–static protection device such as a grounding wrist or heel strap.
3. Locate the DIP switches at the top of the controller board. The DIP
switches are outlined in figure 4-1 below.
Figure 4-1.
(4.4)
Appendix A
Troubleshooting Network Hardware
Software Troubleshooting