1
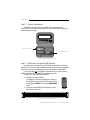
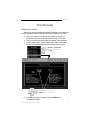
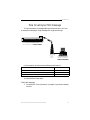
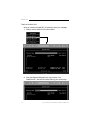
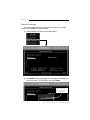
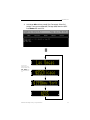
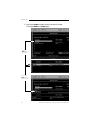
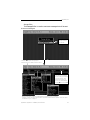
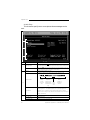
n
io
rs
Ve
2
1.
PagerNET plus
User Manual
for use with an
ALPHA 215, Big Dot®, 4000 Series, 7000 Series, or 300 Series
Electronic Message Center
equipped with a Wireless Data Receiver
in a
WAWN (Wide Area Wireless Network)
© 1996 Adaptive Micro Systems
Form No. 9708-8089
10/17/97
i
NOTE:
Due to continuing product innovation, specifications in
this document are subject to change without notice.
Copyright © 1996, 1997 Adaptive Micro Systems, Inc. All rights reserved.
Trademarked names appear throughout this document. Rather than list the names and entities
that own the trademarks or insert a trademark symbol with each mention of the trademarked
name, the publisher states that it is using the names for editorial purposes and to the benefit
of the trademark owner with no intention of improperly using the trademark.
BETA-BRITE, BIG DOT, and PowerView are trademarks of Adaptive Micro Systems, Inc.
registered in the United States Patent and Trademark Office.
Alec, ALPHA, AlphaLert, AlphaNET, AlphaNET plus, AlphaNET plus II, ALPHAVISION,
Ambassador, Automode, Director, EZ KEY II, EZ95, PagerNET, Performer, PPD, PrintPak,
Producer, Smart Alec, Smartalarm+, Smartstat+, Smartcomm+, Smartcore+, SmartSDK, Solar,
and TimeNet are trademarks of Adaptive Micro Systems, Inc.
Visit us at our Internet World Wide Web site:
http://www.ams-i.com or e-mail us at [email protected]
ii
Contents
Purchasing a Data Receiver............................................................. 1
Step 1 — Sign up with a paging service .........................................................1
Step 2 — Order a Data Receiver .....................................................................2
Step 3 — Make sure your sign has EZ95 firmware .........................................3
Installing PagerNET plus software .................................................... 3
System requirements ......................................................................................3
Using DOS to install PagerNET plus ................................................................3
Using Windows 3.1 to install PagerNET plus ..................................................4
Connecting your signs with a wireless network ...................................... 8
Overview .........................................................................................................8
Creating a WAWN (Wide Area Wireless Network)............................................8
First-time setup ........................................................................... 9
Setting up your modem...................................................................................9
Advanced setup options ................................................................................10
How to send your first message .......................................................11
Create the message .......................................................................................11
Create a Location Card ..................................................................................14
Transmit the message ...................................................................................18
Advanced message editing.............................................................21
Using Modes .................................................................................................21
Using Characters ...........................................................................................25
Creating Location Cards (Advanced) .............................................................29
Transmitting Messages (Advanced) ..............................................................35
Appendix A: Software quick reference................................................40
Appendix B: What Modes are available on signs ...................................48
Appendix C: What Characters, Speeds, Colors,
and Options are available on signs ...................................................49
Appendix D: How text is displayed on signs .........................................52
iii
Warranty and license agreement
Limited warranty
To the original licensee only, Adaptive Micro Systems, Inc. warrants
that the media on which the software is recorded is free from defects in
material and workmanship under normal conditions of use and service
for sixty (60) days from the date of purchase. If during the sixty (60) day
period a defect should appear, the licensee should return the media and
a copy of the original purchase receipt to Adaptive Micro Systems, Inc.
and the media will be replaced without charge.
Limitations of warranty and liability
Adaptive Micro Systems, Inc., its software suppliers, distributors,
dealers, and authors make no warranties or representations, either
expressed or implied, as to the software and documentation, including
without limitation, the condition of the software and the implied
warranties of its merchantability or fitness for a particular purpose. The
software is licensed on an as is basis
Adaptive Micro Systems, Inc. shall not be liable for any lost profits or
for any direct, indirect, incidental, consequential, or other damages
suffered by licensee or others resulting from use of the program or
arising out of any breach of warranty.
License agreement
Adaptive Micro Systems, Inc. grants the customer a single, nontransferable, nonexclusive license to use the accompanying software
and associated documentation, subject to the terms and conditions of
this License Agreement. This Adaptive Micro Systems, Inc. program,
including its documentation, is copyrighted in the United States with all
rights reserved. The customer may not copy the software or
documentation except to create a backup copy or to transfer the
program to one hard disk. The original copy, the backup copy and/or
the hard disk copy of the software are to be used by only one person at a
time and remain the property of Adaptive Micro Systems, Inc.
iv
PagerNET plus
Purchasing a Data Receiver
PagerNET plus software is intended for use with signs that are part
of a Wide Area Wireless Network (WAWN). (See “Connecting your signs
with a wireless network” on page 8.)
To do this, a Data Receiver must be connected to a sign. Messages
you create with the PagerNET plus are transmitted to your paging
service who then sends them to a Data Receiver:
See the ALPHA™ On-Site Wireless Data Receiver
Installation Manual (part number 9708-8080) for
complete information on how to connect a Data Receiver to
ALPHA 215, Big Dot®, 4000 Series, 7000 Series, and 300
Series signs.
Data Receiver plugs
into a sign’s RS232
jack.
On a 4000 Series
sign, these jacks
are on the back.
Figure 1: How to connect a Data Receiver to a sign.
Step 1 — Sign up with a paging service
Buy a pager and paging service from a provider like SkyTel,
PAGENET, etc.
Purchasing a Data Receiver: Step 1 — Sign up with a paging service
1
PagerNET plus
Step 2 — Order a Data Receiver
The pager from your service provider will have a frequency,
CAPCODE, and POCSAG baud rate which you’ll need when ordering a
Data Receiver for a sign:
Frequency of the pager
CAPCODE of the pager
Figure 2: A typical pager (front and back).
Step 3 — Make sure your sign has EZ95 firmware
Your sign has a computer chip or EPROM inside which controls its
operation. This chip contains software called firmware which is updated
from time to time. The latest version of this firmware is called EZ95.
If your sign does not have EZ95 firmware, then you must order an
EZ95 upgrade for the PagerNET plus software to work.
To see if your sign has EZ95 firmware . . .
1. Restart your sign by either
unplugging it and then plugging it in again, or
pointing a Remote Control at your sign and then
holding down SHIFT and pressing PROGRAM
twice.
2. Next, the phrase EZ95 should appear on your
sign when it starts up:
SOUND
ON - OFF
RUN
PROGRAM
APPEND CURSOR SPECIAL FONT
SCROLL FLASH
ROLL
WIPE
1
2
3
4
AUTO
SPEED
TIME
DOT
7
8
9
0
A
B
C
D
¢
#
I
N
:
T
S
*
K
+
L
-
R
Q
.
,
V
6
F
E
P
’
U
ROTATE
SELECT
&
/
O
”
COLOR
HOLD
5
J
=
>
M
;
%
$
H
G
<
?
WIDTH
W
X
!
Y
Z
SHIFT
INSERT
RETURN
SPACE
CAPS
BACK
SHIFT
ADV
DELETE
Figure 3: Startup message on a 4200C sign.
2
Purchasing a Data Receiver: Step 2 — Order a Data Receiver
PagerNET plus
Installing PagerNET plus software
System requirements
To use PagerNET plus software, you’ll need the following:
• Personal computer running MS DOS 2.1 or higher
• 3.5-inch diskette drive
• hard drive with at least 400k of free space
• 640K RAM (memory)
• Black and white or color monitor
• Microsoft-compatible mouse (optional)
• RS232 serial port (PC card)
Using DOS to install PagerNET plus
1.
2.
3.
Make a backup copy of your PagerNET plus diskette.
Insert the original PagerNET plus diskette into drive A.
Type the following DOS commands (shown in bold):
What you type (in bold)
4.
What it means
C:\>mkdir pagernet
Create a directory on your hard drive called pagernet.
C:\>cd pagernet
Change to the pagernet directory.
C:\PAGERNET>copy a:\
Copy all the files on the PagerNET plus diskette to the pagernet
directory.
C:\PAGERNET>dir
Displays a list of all the files in the pagernet directory which
should look something like this:
.
<DIR>
06-25-96 10:30a
..
<DIR>
06-25-96 10:30a
00000000 CRD
52 10-17-95 11:46a
SIGNS
DAT
572 07-17-93
8:11a
SYS$ERR DTA
3118 11-04-92
8:18a
SYS$HELP DTA
3722 11-04-92
8:18a
SYS$MSG DTA
12468 11-04-92
8:19a
ALPHANET EXE
82819 10-17-95
4:19p
NETPLUS EXE 161059 10-17-95
5:15p
ALPHAHLP HLP
21021 02-14-95
3:07p
NETHLP
HLP
19238 10-17-95
2:13p
LASTCARD OVL
12 10-17-95
3:10p
SYSTEM
OVL
153 10-17-95
3:10p
00000000 SND
5 10-17-95 11:48a
READ_ME TXT
1329 10-17-95
5:18p
C:\PAGERNET>netplus
Starts the PagerNET plus software.
This completes the DOS software installation.
Installing PagerNET plus software: System requirements
3
PagerNET plus
Using Windows 3.1 to install PagerNET plus
4
1.
2.
3.
4.
Make a backup copy of your PagerNET plus diskette.
Insert the original PagerNET plus diskette into drive A.
Start Microsoft Windows.
Open the File Manager:
5.
From the File Manager, select File and then Create Directory:
Installing PagerNET plus software: Using Windows 3.1 to install PagerNET plus
PagerNET plus
6.
Type a directory name (like pagernet):
7.
From the File Manager, select Window and then New Window.
Then click on the drive a icon. Next, copy the contents of drive A
to the pagernet directory on drive C. To do this, drag the folder in
the drive A window to on top of the pagernet folder.
Drag the drive A
directory icon to on
top of the pagernet
directory icon.
8.
Messages like this will appear as the files are copied:
Installing PagerNET plus software: Using Windows 3.1 to install PagerNET plus
5
PagerNET plus
9.
After the files have been copied, close the File Manager. Then
select New from the Program Manager:
10. Select Program Group:
11. When the following window appears, type PagerNET plus:
12. Select New again, but this time select Program Item:
6
Installing PagerNET plus software: Using Windows 3.1 to install PagerNET plus
PagerNET plus
13. When the following window appears, enter the information as
shown below:
Use whatever software version is
printed on the PagerNET plus diskette.
14. You have just created a program icon for the PagerNET plus
software. Whenever you want to start PagerNET plus, just
double click on this icon:
15. This completes the Windows software installation.
Installing PagerNET plus software: Using Windows 3.1 to install PagerNET plus
7
PagerNET plus
Connecting your signs with a wireless network
Overview
There are several ways to connect (or “network”) your PC to signs.
For example, messages can be sent to one or more signs which are wired
directly to your PC, or which are connected via a modem. However,
PagerNET plus software is specifically designed for use with a WAWN
(Wide Area Wireless Network).
Creating a WAWN (Wide Area Wireless Network)
This is the type of network intended for the PagerNET plus software:
A
ALPHA 215, Big Dot, 4000 Series, 7000 Series,
or 300 Series sign (with EZ95 EPROM installed)
A
ALPHA 215, Big Dot, 4000 Series, 7000 Series,
or 300 Series sign (with EZ95 EPROM installed)
E
B
D
C
B
Paging
Service
A
B
C
D
E
8
1088-1411
1088-1412
1088-1413
—
—
—
1088-7812
VHF Data Receiver (138 to 174 MHz)
Your paging service should supply you with a
UHF Data Receiver (435 to 480 MHz)
frequency and CAPCODE which will
900 MHz Data Receiver (929 to 931 MHz) determine what Data Receiver you need.
Phone line
Modem
standard 25 pin-to-25 pin RS232 cable
PagerNET plus software
Connecting your signs with a wireless network: Overview
PagerNET plus
First-time setup
Setting up your modem
Before you can start creating and sending messages, you need to set
up your software to operate with the particular modem you’re using:
1. With your computer off, attach your modem to one of the
computer’s serial ports (usually labelled COM1, COM2, etc.)
2. Turn your computer on and start the PagerNET plus software.
3.
From the Main Menu, select Configuration Setup. Then select
the appropriate serial port and baud rate for your modem:
Use the Up Arrow and Down Arrow
keys to highlight Configuration Setup.
Then press Enter.
Use the arrow keys to highlight an item.
Press Enter to select an item to change.
4.
Press F2 to save your changes. Then press Esc to exit
Configuration Setup.
First-time setup: Setting up your modem
9
PagerNET plus
Advanced setup options
In addition to setting up your modem, there are other options you
may want to set up, such as a printer port. To do this, see “Configuration
Setup” on page 46.
10
First-time setup: Advanced setup options
PagerNET plus
How to send your first message
To show the basics of message editing and transmission, we’ll use
an example of sending a single message to a single remote sign:
Status meeting 1 pm
ALPHA sign (with EZ95 EPROM)
with a Data Receiver in CHICAGO, ILLINOIS
Paging
Service
PC with a modem running
PagerNET plus software in
MADISON, WISCONSIN
In this example, we’ll assume the following information:
The location of the remote sign:
Telephone number of your pager (and your Data Receiver):
Telephone number of your paging service:
The message you want to send:
Chicago, Illinois
555-1234
1-800-222-5678
“Status meeting 1 pm”
You would follow these steps:
Create the message
1.
Complete the “First-time setup” on page 9 if you haven’t already
done so.
How to send your first message: Create the message
11
PagerNET plus
12
2.
Type in your message using the Message Editor in PagerNET
plus. Select Message Editor from the Main Menu:
3.
After the Message Editor window appears, select Create New
Message. Then type Status meeting 1 pm:
How to send your first message: Create the message
PagerNET plus
4.
Save your message by pressing Esc and selecting Yes when the
Save Changes prompt appears:
5.
When the following prompt appears, name your message file
STATUS:
6.
After the message is saved, press Esc to return to the Main
Menu:
How to send your first message: Create the message
13
PagerNET plus
Create a Location Card
Now you need to tell PagerNET plus where to send your message.
7. Select Location Setup from the Main Menu:
8.
14
After the Notecard Name prompt, type a name—like
WAREHOUSE—that will be used to identify your remote sign:
How to send your first message: Create a Location Card
PagerNET plus
9.
Next, press Insert to create a blank line under Location.
Then press Enter and Insert again:
Pressing
Enter opens
this window.
Then pressing
Insert opens the
Location prompt.
How to send your first message: Create a Location Card
15
PagerNET plus
10. Enter the remote sign’s location—Chicago:
11. After typing the remote sign’s location and pressing Enter, type
the phone number of the paging service in the special format
shown below:
PG:M,5551234:18002225678
Always
Phone number of
include this your pager (and your
at the start.
Data Receiver)
Phone number of your
paging service
Use a colon here.
16
How to send your first message: Create a Location Card
PagerNET plus
12. After typing the phone number of the paging service and
pressing Enter, this is what the Location Card should look like
now:
13. Next, with the Chicago location highlighted, press Enter to
complete the remote sign’s Location Card:
14. Finally, press Esc to return to the Main Menu.
How to send your first message: Create a Location Card
17
PagerNET plus
Transmit the message
Once the message has been created and the location of the sign
entered, the message can be transmitted:
15. Select Message Transmit from the Main Menu:
16. Press Enter to select a message. Then highlight the message you
want to transmit—STATUS.MSG—and press Enter:
This is the message you just
created in the Message
Editor. (MSG is added to the
end of all messages.)
18
How to send your first message: Transmit the message
PagerNET plus
17. Next, type the letter A after the Enter File Letter prompt and
press Enter:
A file letter is a letter from A to Z that is “attached” to a message sent to a sign.
The letter represents one of 26 possible locations where a message can be stored in a sign’s memory.
FIle Letter
Message
A
B
C
.
.
.
Z
Status meeting 1 pm
.
.
.
Status meeting 1 pm
After pressing Enter, the following should appear on the Message Transmit Card:
The message name (STATUS.MSG) and
its location (A) in a sign’s memory.
How to send your first message: Transmit the message
19
PagerNET plus
18. Other messages could be added to the Message List, but in this
example, we’ll only send one message. To send the messages,
press F3.
NOTE: If you selected Yes to Request time zone in Configuration
Setup (see “Advanced setup options” on page 10), then
the following prompt would appear. A time zone
adjustment number from 14 to -14 could be entered:
Also, if you selected Yes to Request delayed send in
Configuration Setup, then the following prompt would
appear. A time like 10:30p could be entered when
messages would be transmitted:
The following will appear as messages are transmitted:
The messages will be transmitted to the sign.
19. Finally, press Esc to return to the Main Menu.
20
How to send your first message: Transmit the message
PagerNET plus
Advanced message editing
Using Modes
“Modes” are special effects that change the way a message appears
on a sign. For example, the Rotate Mode moves a message from right to
left across a sign. In this example, we’ll create a message that displays
employee birthdays using the Hold and Rotate Modes:
In this example, multiple messages
will be sent to multiple signs.
2-line ALPHA sign (with EZ95 EPROM)
with a Data Receiver in PORTLAND, MAINE.
2-line ALPHA sign (with EZ95 EPROM)
with a Data Receiver in DALLAS, TEXAS.
2-line ALPHA sign (with EZ95 EPROM)
with a Data Receiver in CHICAGO, ILLINOIS
Paging
Service
PC with a modem running
PagerNET plus software
in MADISON, WISCONSIN
In this example, we’ll assume the following information:
Chicago, Illinois (a Warehouse)
The location of the remote signs:
Dallas, Texas (a Warehouse)
Portland, Maine (a Sales Office)
555-1234 (for Chicago sign)
Telephone numbers of your three pagers
(and your three Data Receivers)
333-3333 (for Dallas sign)
234-5555 (for Portland sign)
Telephone number of your paging service:
1-800-222-5678
“Las Vegas $85, Chicago $199, New York $235
(for Chicago and Dallas)
The messages you want to send:
Advanced message editing: Using Modes
“Birthdays
Tom White, Patty Smith, Bob Evans”
(a 2-line message just for Portland)
21
PagerNET plus
1.
2.
22
Complete the “First-time setup” on page 9 if you haven’t already
done so.
Select Message Editor from the Main Menu. When the Message
Editor window appears, select Create New Message:
Advanced message editing: Using Modes
PagerNET plus
3.
Next, hold down Alt and then press M (for Modes). Then
highlight Hold:
4.
After highlighting Hold, press Enter. Then, in order to put the
word Birthdays on the top line of the 2-line sign, select Top Line:
These are “line positions”. A line position
is where a message appears on a sign.
See “Appendix D: How text is displayed
on signs” on page 52 for more details.
This symbol for the
Hold Mode will appear.
Advanced message editing: Using Modes
23
PagerNET plus
24
5.
After the | Top Hold | symbol, type Birthdays:
6.
Next, hold down Alt and then press M (for Modes). In order to
make the people’s names (Tom White, etc.) move across the
bottom line of the sign, select Rotate and Bottom Line. Then type
the three names:
7.
Press Esc and save this message with the name BIRTHDAY:
Advanced message editing: Using Modes
PagerNET plus
Using Characters
“Characters” are options that change the appearance of text in a
message. For example, normal-sized text (called Seven Row) is seven
rows high, but some signs allow you to display much taller text (called
Full Height).
In this example, we’ll create a message that displays airline fares in
large text:
1.
2.
Complete the “First-time setup” on page 9 if you haven’t already
done so.
Select Message Editor from the Main Menu. When the Message
Editor window appears, select Create New Message:
Advanced message editing: Using Characters
25
PagerNET plus
3.
26
Next, hold down Alt and then press M (for Modes). Select Roll
and then In. Finally, select the Middle Line position:
Advanced message editing: Using Characters
PagerNET plus
4.
Hold down Alt and then press C (for Characters). Select Full
Height. Then type Las Vegas $85, Chicago $199, New York $235.
Press Enter after each line:
=
The text runs
together on a sign
because New Lines
(Alt + Enter) were
not used after each
line.
Advanced message editing: Using Characters
27
PagerNET plus
5.
To format the text so that Las Vegas $85 and Chicago $199 and
New York $235 all appear on separate lines, add a New Line after
each city/amount pair. To do this, position the cursor after Las
Vegas $85, hold down Alt and then press Enter. Repeat this after
each city.
NOTE: Just pressing Enter after each line will not work.
=
Adding a New Line
after each line breaks
the message into
readable pieces.
6.
28
Next, press Esc and save the message to a file called AIRFARES:
Advanced message editing: Using Characters
PagerNET plus
Creating Location Cards (Advanced)
We’ll use the situation and information from “Using Modes” on
page 21 to demonstrate how to transmit two messages to three remote
sites.
1. Select Location Setup from the Main Menu. The WAREHOUSE
card should appear because we created it earlier:
This WAREHOUSE Location Card and the
Chicago location were created in the previous
“Create a Location Card” on page 14.
2.
We’ll add the Dallas location first because it’s a warehouse (just
like Chicago) and belongs in this WAREHOUSE Location Card.
To add the Dallas warehouse, first press the Down Arrow to
highlight Chicago:
Advanced message editing: Creating Location Cards (Advanced)
29
PagerNET plus
3.
Next, press Insert to create a blank line above Chicago.
Then press Enter and Insert again:
Pressing
Enter opens
this window.
Then pressing
Insert opens the
Location prompt.
30
Advanced message editing: Creating Location Cards (Advanced)
PagerNET plus
4.
After Location, type Dallas, the remote sign’s location:
5.
After typing Dallas and pressing Enter, type the phone number
of the paging service in the special format shown below:
PG:M,3333333:18002225678
Always
Phone number of the
include this
pager (and Data
at the start. Receiver) in Dallas
Phone number of the
paging service
Use a colon here.
Advanced message editing: Creating Location Cards (Advanced)
31
PagerNET plus
32
6.
After typing the phone number of the paging service and
pressing Enter, this is what the WAREHOUSE Location Card
should look like now:
7.
With the Dallas location highlighted, press Enter to add Dallas
to the WAREHOUSE Location Card:
Advanced message editing: Creating Location Cards (Advanced)
PagerNET plus
8.
Next, we’ll need to add the Portland location. However, a new
Location Card should be created because the Portland sign is in
a sales office and not a warehouse. (Think of Location Cards as a
way of organizing or grouping your signs.)
To create a new Location Card, Press F3:
To go to the LAST or NEXT Location Card, hold down
Ctrl and then press PageUp or PageDown.
9.
Use the Up Arrow to highlight Notecard Name. Then type SALES:
Advanced message editing: Creating Location Cards (Advanced)
33
PagerNET plus
10. Enter the information for the Portland remote site the same way
as you did previously for the Dallas site. When you’re done, the
completed SALES Location Card should look like this:
34
Advanced message editing: Creating Location Cards (Advanced)
PagerNET plus
Transmitting Messages (Advanced)
After creating Location Cards for the Dallas and Portland remote
sites [see “Creating Location Cards (Advanced)” on page 29], the
BIRTHDAY and AIRFARE messages (see “Using Modes” on page 21 and
“Using Characters” on page 25) can be transmitted.
To do this, follow these steps:
1. Select Message Transmit from the Main Menu:
2.
Press Enter to select a message. Highlight a message you want to
transmit, like AIRFARE.MSG. Then press Enter again:
Advanced message editing: Transmitting Messages (Advanced)
35
PagerNET plus
3.
Next, type the letter A (or any letter from A to Z) after the Enter
File Letter prompt and press Enter:
A file letter is a letter from A to Z that is “attached” to a message sent to a sign.
The letter represents one of 26 possible locations where a message can be stored in
a sign’s memory.
FIle Letter
Message
A
Las Vegas $85, Chicago
$199, New York $235
B
C
.
.
.
Z
.
.
.
2-line ALPHA sign (with EZ95 EPROM)
with a Data Receiver
in CHICAGO, ILLINOIS and in DALLAS, TEXAS
After pressing Enter, the following should appear on the Message Transmit Card:
The message name (AIRFARE.MSG)
and its location (A) in a sign’s memory.
36
Advanced message editing: Transmitting Messages (Advanced)
PagerNET plus
4.
Imagine you also wanted to send a message called STATUS to
the WAREHOUSE remote sites (Chicago and Dallas).
To do this, move the highlighted line under AIRFARE.MSG,A and
press Enter. Then select the message STATUS from the message
list, but this time type B after Enter File Letter:
FIle Letter
Message
A
Las Vegas $85, Chicago
$199, New York $235
Status meeting 1 pm
B
C
.
.
.
Z
.
.
.
2-line ALPHA sign (with EZ95 EPROM)
with a Data Receiver
in CHICAGO, ILLINOIS and in DALLAS, TEXAS
After pressing Enter, the following should appear on the Message Transmit Card:
Advanced message editing: Transmitting Messages (Advanced)
37
PagerNET plus
5.
Before transmitting the messages, check to make sure they are
going to the right locations. To do this, press F8 to look at the
WAREHOUSE Location Card:
6.
Since the locations are correct, press F8 again to return to the
Message Transmit Card. Then press F3 to transmit the two
messages in the WAREHOUSE Message List.
To transmit the BIRTHDAY message to the SALES site in
Portland, hold down Ctrl and press either PageUp or PageDown
to go to the SALES Location Card:
7.
38
Advanced message editing: Transmitting Messages (Advanced)
PagerNET plus
8.
Add the BIRTHDAY message to the SALES Message List. Then
press F3 to transmit the message:
If you have a lot of messages to send, a fast method of
transmitting would be to “mark” the Location Cards
you’ll be using to transmit.
Advanced message editing: Transmitting Messages (Advanced)
39
PagerNET plus
Appendixes
Appendix A: Software quick reference
Main Menu
This is the screen that first appears when PagerNET plus is started:
see page 41
see page 42
see page 44
see page 45
see page 46
see page 47
•
•
•
40
Use Configuration Setup to do a first-time set up of your PC.
Use Location Setup to specify where messages should be sent.
Use Message Editor to create messages and to set when they will
be sent.
Appendixes: Appendix A: Software quick reference
PagerNET plus
Message Editor
The Message Editor is used to create text messages that will be sent
to one or more signs:
Displays a list of
messages stored on
your hard disk.
Hold down Alt and press the highlighted
character (like “M” for Modes) to access a menu.
Transmits the message you’re
currently editing. The message
will be sent to any signs attached
to the Local serial port. (See
“Advanced setup options” on
page 10.) If you have problems,
hold down Alt and then press D.
Modes are described in “Appendix B: What Modes are available on signs” on page 48.
Characters, Speeds, and Options are described in “Appendix C: What Characters, Speeds, Colors, and Options
are available on signs” on page 49
Appendixes: Appendix A: Software quick reference
41
PagerNET plus
Location Setup
This is used to specify one or more places where messages can be
sent:
A
B
C
Item
Name
Notecard Name
A
Mark Card?
Location
Phone Number
B
Sign Address
C
42
F2 - Copy Card
F3 - Add Card
F4 - Delete Card
Description
A name used to group where messages are sent into convenient categories.
This name appears on a Location Card (shown above) and a Transmit Card.
If you select Yes, then you have the ability to transmit messages to all of the
locations specified in all the “marked” Location Cards.
A place where messages are sent.
The phone number of your paging service in the following format:
Always
include
this at the
start.
Telephone
number of the
Data Receiver
connected to a
sign
Use a
colon
here
Phone
number of
the paging
service
A sign has a feature which allows a unique number or “address” (00 to 99)
to be assigned to it. This address permits you to send messages to an
individual sign on a network. All signs leave the factory with a default
address of 00. To change a sign’s address, see Network Configurations (part
number 9708-8046).
Allows you to duplicate any card.
Adds a blank card.
Deletes the currently displayed card.
Appendixes: Appendix A: Software quick reference
PagerNET plus
C
F5 - Find Card
F8 - Transmit Card
Keyboard File Size
TempNet File Size
LAST
NEXT
Displays a menu of all the cards and allows you to select one.
Moves to the Transmit Card for the currently displayed Location Card.
Should not be used.
Should not be used.
Allows you to move from one Location Card to the other by holding Ctrl and
then pressing either PageUp or PageDown.
Appendixes: Appendix A: Software quick reference
43
PagerNET plus
Message Transmit
This is used to select what messages will be send and where they will
be sent:
A
B
C
Item
A
B
Name
Notecard Name
Message List
TempNet Message
F2 - Transmit TempNet Message
F3 - Transmit Message List
F4 - Transmit Marked Cards
F5 - Transmit All Messages
F6 - Find Card
C
F7 - Delete All Fail Cards
F8 - Location Card
LAST
NEXT
44
Description
A name used to group where messages are sent into convenient
categories. This name appears on a Location Card and a Transmit
Card (shown above).
The message files selected for transmission. The maximum
number of files per card is 200.
Should not be used.
Should not be used.
Sends all the message files in the Message List.
Sends the message files in all the Location Cards that have been
“marked”. (See “Location Setup” on page 42.)
Should not be used.
Displays a menu of all the cards and allows you to select one.
Deletes any cards created by transmissions that failed. Fail Cards
are only available if Error Checking in selected in Configuration
Setup. (See “Configuration Setup” on page 46.)
Moves to the Location Card for the currently displayed Transmit
Card.
Allows you to move from one Transmit Card to the other by holding
Ctrl and then pressing either PageUp or PageDown.
Appendixes: Appendix A: Software quick reference
PagerNET plus
Printer Options
This allows you to print a message, a Location Card, a Transmit
Card, or the Phone Book (the telephone numbers and locations of all the
places where messages can be sent):
NOTE: Before printing, make sure that a printer port has been
selected in Configuration Setup.
Except for Phone Book, when you
select one of the Printer Options,
a list of all available files will
appear.
Then choose one of these files to
print.
To print the Transmit Log File
(XMITLOG), select Message.
************** AlphaNet Plus Transmission Log ***************
Date: 7/2/1996-12:06:10
Transmission from AlphaNet Plus Editor
File Name: Untitled
----------------------------------------------------------------------------Date: 7/2/1996-10:54:45
Card Name: SALES
Locations:
Description: Portland
Phone Number: PG:M,7777777:18002225678
Addresses:
Messages:
AIRFARE.MSG,A
Appendixes: Appendix A: Software quick reference
45
PagerNET plus
Configuration Setup
This is usually used to specify first-time setup options:
A
B
Item
A
Name
Local
Modem
Printer Port?
Directory:
24 hour clock?
B
Request time zone?
Compatible with AVII?
Error checking enabled?
46
Description
Set up this port for signs that are directly wired to your PC via a converter
box. (See Network Configurations, part number 9708-8046, for more
detailed information on sign networks.)
See “First-time setup” on page 9.
If you have a printer connected to your computer, select the port to which it’s
attached.
The DOS directory where your messages are kept. To change this to another
directory, type the complete DOS path. For example, c:\pagernet\newdir.
Selecting Yes displays time in 24-hour format (00:00 to 24:00).
Selecting No displays time in 12-hour format (00:00 to 12:00).
Selecting Yes displays the Enter time zone adjust prompt when messages
are sent using Message Transmit from the Main Menu. This option allows
you to adjust for a time zone difference between the location where
messages are sent and the location of the sign receiving the messages. For
example, if you are sending messages from a PC located in the Eastern Time
Zone to a sign located in the Central Time Zone, you would enter a -1 after
the Enter time zone adjust prompt. (The range is between 14 and -14.) This
is because the Central Time Zone is one hour behind the Eastern Time Zone.
Select No because all the signs you’re sending to should have EZ95
EPROMs installed.
Select Yes if you want the PagerNET plus software to check if each
transmission was received correctly.
Appendixes: Appendix A: Software quick reference
PagerNET plus
Configuration Password:
Color Monitor?
EZ95 Compatible?
Send tone triggers?
B
Request delayed send?
Safety Enabled?
Unlock All Files?
Editor Password:
If you enter a password here, you will be required to enter it before accessing
Configuration Setup. A password can have up to eight characters.
Select Yes if you’re using a color monitor.
Select No if you’re using a black and white monitor.
Select Yes because all the signs you’re sending to should have EZ95
EPROMs installed.
Select Yes if you want a sign to beep each time it receives a new message.
Selecting Yes displays the Enter time to send prompt when messages are
sent using Message Transmit from the Main Menu. This is useful for sending
messages when you’re not at your computer. For example, if you need to
send messages at 11:30 pm at night, then you would enter 11:30pm after
the Enter time to send prompt.
Select No.
Selecting Yes permits anyone using an Infrared Keyboard to change
messages that you send to a sign.
Selecting No only permits messages to be changed by using the PagerNET
plus software.
If you enter a password here, you will be required to enter it before accessing
the Message Editor. A password can have up to eight characters.
Dots Programmer
This option allows you to create bitmapped images that can be sent
and then displayed on a sign. However, since these images can not be
sent to signs using paging receivers, the Dots Programmer should not be
used.
Appendixes: Appendix A: Software quick reference
47
PagerNET plus
Appendix B: What Modes are available on signs
“Modes” are special effects used by the PagerNET plus software to
change the way text appears on a sign. Modes are added to a message
using the Message Editor:
Modes available on signs
Flash
Hold
Interlock
Roll
Rotate
Scroll
Slide
Snow
Sparkle
Spray
Starburst
Switch
Twinkle
Wipe
Cond. Rotate
200 Series
●
●
●
●
●
●
●
●
●
●
●
●
●
●
●
●
300 Series
●
●
●
●
●
●
●
●
●
●
●
●
●
●
●
●
4000 Series
●
●
●
●
●
●
●
●
●
●
●
●
●
●
●
7000 Series
●
●
●
●
●
●
●
●
●
●
●
●
●
●
●
Big Dot
●
●
●
●
●
●
●
●
●
●
●
●
●
●
●
AlphaVision
(Full Matrix)
●
●
●
●
●
●
●
●
●
AlphaVision
(Char. Matrix)
●
●
●
790i
●
●
●
Sign
48
Roving Dot
Automode
Modes
●
●
●
●
●
●
●
●
●
●
●
●
●
●
●
●
Appendixes: Appendix B: What Modes are available on signs
PagerNET plus
Appendix C: What Characters, Speeds, Colors, and Options are
available on signs
PagerNET plus software allows you to change the character shapes
and colors of text used in sign messages. The Characters and Color
options are available in the Message Editor. Also, the speed of a moving
message can be set using the Speeds option. Finally, several choices in
Options are available on signs:
Characters and Speeds
Characters and Speeds available on signs
Seven Row Serif
Five Row
Slim
Wide
Fixed Width
Proportional
●
●
●
●
●
●
●
●
300 Series
●
●
●
●
●
●
●
●
Full Height Serif
200 Series
Sign
Full Height
Seven Row
Characters
Speeds
4000 Series
●
●
●
●
●
●
●
●
●
●
7000 Series
●
●
●
●
●
●
●
●
●
●
●
●
●
●
●
●
●
●
●
●
●
●
●
●
●
●
Big Dot
AlphaVision
(Full Matrix)
●
●
AlphaVision
(Char. Matrix)
●
●
●
790i
●
●
●
●
●
●
●
●
Appendixes: Appendix C: What Characters, Speeds, Colors, and Options are available on signs
49
PagerNET plus
International characters
International characters can be used in messages by selecting
International from the Characters menu:
50
A
C
E
I
â
ä
å
Ä
Å
æ
Æ
á
a
A
a
Ç
ç
C
c
é
ê
ë
è
É
E
e
ï
î
ì
I
i
Base Characters:
N O U Y
ñ
Ñ
N
n
ô
ö
ò
Ö
ó
o
O
o
ü
û
Ü
ú
U
u
ÿ
Y
y
?
!
$
¿
?
¡
!
¢
£
¥
ƒ
$
Appendixes: Appendix C: What Characters, Speeds, Colors, and Options are available on signs
PagerNET plus
Color and Options
Text can be colored by selecting Options in the Message Editor:
Colors and Options available on signs
●
300 Series
●
8
●
●
4000 Series
●
3
●
●
7000 Series
●
3
●
●
Big Dot
●
8
●
●
AlphaVision
(Full Matrix)
●
3
●
●
AlphaVision
(Char. Matrix)
●
3
●
●
790i
●
3
●
●
●
Though these two options
are available, they should
not be used with
PagerNET plus software
because of the nature of
paged messages.
Compute File Size
●
Animation
Unlock Message
8
Dots Picture
Set Run Time
●
Temperature
200 Series
Sign
Time
Color (see NOTE)
Options
This merely
computes the size
of the current
message in bytes.
NOTE: Sign names ending in “C”, such as 4120C, have color
capabilities. Sign names ending in “R”, such as 4120R, can
display in red only.
Appendixes: Appendix C: What Characters, Speeds, Colors, and Options are available on signs
51
PagerNET plus
Appendix D: How text is displayed on signs
Columns and rows make up a sign
Each sign is made up of a display area of columns and rows of LED
“pixels” that can be turned on or off and that can display different colors
(for color-capable signs).
For example, a 4120C (or 4120R) sign has a total display area of 120 x
16:
Rows = 16
Columns = 120
The number of columns and rows in signs.
Sign
BETA-BRITE Series
215 Series
300 Series
4000 Series
7000 Series
Outdoor displays
ALPHAVISION
NOTE:
52
Display area
(col x rows)
Colors
BETA-BRITE
80 x 7
BETA-BRITE BIG DOT
80 x 7
ALPHA Big Dot
80 x 7
215
90 x 7
215C
90 x 7
320C
120 x 7
330C
180 x 7
4120R
120 x 16
4120C
120 x 16
4160R
160 x 16
4160C
160 x 16
4200R
200 x 16
4200C
200 x 16
4240R
240 x 16
4240C
240 x 16
7120C
120 x 24
7160C
160 x 24
7200C
200 x 24
790i
90 x 7
Display areas from 128 x 32 to 256 x 128.
8
3
Sign names ending in “C”, such as 4120C, have color capabilities. Sign names
ending in “R”, such as 4120R, can display in red only.
Appendixes: Appendix D: How text is displayed on signs
PagerNET plus
Text comes in three basic sizes
The Characters menu in the Message Editor displays a list of the
available text sizes, such as Full Height and Five Row, and options such
as Wide and Fixed Width:
Using the three basic text sizes, the message Las Vegas $85, Chicago
$199 would appear like this on a two-line 4120C (or 4120R):
• Full Height (which includes Full Height Serif)
•
Seven Row (which includes Seven Row Serif), and
•
Five Row
Appendixes: Appendix D: How text is displayed on signs
53
PagerNET plus
Understanding message line positions (Top, Middle, Bottom, Fill)
Line positions let you display a message in the Top, Middle, Bottom,
and Fill areas on all ALPHA two-line signs:
How the message appears in
the Message Editor:
How the message appears on a 2-line sign:
Top:
| Top_Automode | Las Vegas $85,
Chicago $199, New York $235
Middle:
| Middle_Automode | Las Vegas $85,
Chicago $199, New York $235
Bottom:
| Bottom_Automode | Las Vegas $85,
Chicago $199, New York $235
Fill:
| Fill_Automode | Las Vegas $85,
Chicago $199, New York $235
When you use the Fill position, the sign
will try to fill both lines with the message.
54
Appendixes: Appendix D: How text is displayed on signs