1
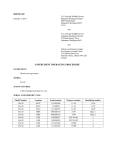
IOP:004.4
IOP:004.4A
IOP:004.3B
IOP:004.10C
IOP:004.0D
Fluorometers
IOP:004.4
Model 450 Fluorometer
IOP:004.4
U.S. Fish and Wildlife Service
Marquette Biological Station
3090 Wright Street
Marquette, Michigan 49855
U.S.A.
April 16, 2006
and
U.S. Fish and Wildlife Service
Ludington Biological Station
229 South Jebavy Drive
Ludington, Michigan 49431
U.S.A.
and
Fisheries and Oceans Canada
Sea Lamprey Control Centre
1219 Queen Street East
Sault Ste. Marie, Ontario P6A 2E5
Canada
INSTRUMENT OPERATING PROCEDURE
INSTRUMENT:
Fluorometer
MODEL:
Model 450
MANUFACTURER:
Barnstead/Thermolyne/Sequoia-Turner
SERIAL AND PROPERTY NOS:
Model number
Location
Serial number
Property number
Identifying number
450
MBS
904980824984
1212
--
PRECAUTIONS:
POTENTIAL INTERFERENCES
See instrument manual
SAFETY
No special safety precautions
PROCEDURES:
I.
Installation
A.
Place the instrument on a vibration free laboratory counter. Allow two inches behind
panel for air circulation and power cord.
B.
Assure that the proper fuse is installed in the voltage selector board (i.e. 2.0 Amp fuse for
100/120 VAC).
C.
Connect power cord to instrument and to outlet.
Top of cuvette holder
II.
Instrument Components
A.
B.
C.
D.
III.
Controls and indicators; Model 450
1.
Gain: Turning clockwise to higher readings increases the gain of the instrument
(increases sensitivity of the instrument to read lower fluorescence emission).
The opposite effect occurs when turning gain counterclockwise.
2.
Zero: This control is used to zero the instrument response. This eliminates the
sample background fluorescence before measuring samples.
3.
Span: This control is used in conjunction with the gain control to display the
concentration of a standard.
4.
Display: Provides the instrument reading of fluorescence.
Cuvette holder
1.
The standard cuvette holder supplied with the instrument accommodates a
12mm X 75mm tube.
2.
To insert tube, lift the cover from the front and insert the tube until it touches the
bottom of the cell.
Interchangeable Filter Holder:
1.
Inside of the cuvette holder, are two machine-slotted grooves designed to hold
the emission and excitation filters.
2.
The emission filter is installed in the bottom groove and the excitation filter is
installed in the groove on the left.
3.
Both filters are utilized to measure the relative fluorescence of Rhodamine WT
Dye.
Aperture slide
1.
The aperture slide is located inside the cuvette holder at the top.
2.
The aperture slide reduces the sensitivity of the instrument when sample
fluorescence is too high.
Operation
A.
Turn on power switch (back panel of instrument)
B.
Allow the instrument to operate for 15 minutes.
C.
Assure that the emission and excitation filters are installed. (See Components II.C.2.).
D.
Insert aperture slide if required.
E.
Place cuvette with blank solution (or distilled water) into the cuvette holder.
F.
The cuvette used for the blank is matched to the cuvette(s) used during the sampling.
1.
Zero the instrument with the blank cuvette
2.
Additional cuvettes used for sampling are matched to the blank sample cuvette
within ± 1 fluorescence unit
G.
Set Span fully clockwise and adjust Zero knob until display indicates 000.
H.
Replace blank solution with sample to be measured.
I.
If the display remains blank, reduce Gain until a number is displayed. If display remains
blank on lowest Gain setting, install aperture slide.
J.
Read and record the fluorescence on the Dye Study data form (Appendix M).
MAINTENANCE:
I.
General Maintenance and Repair
A.
Instrument is kept clean and out of dusty areas or areas with temperature and humidity
extremes. (The dust cover is placed on the instrument when not in use).
B.
Fuse Replacement
C.
1.
Turn off instrument and remove cable from power outlet.
2.
Remove power cable from back of instrument.
3.
Slide plastic cover to left exposing fuse holder.
4.
Locate black lever marked FUSE PULL. Swing lever out and to the left.
5.
Remove bad or blown fuse.
6.
For 100 and 120 VAC voltages, replace fuse with 2.0 amp fuse.
7.
Push lever back into place.
8.
Slide plastic cover to the right and reconnect power cord to instrument and
power outlet.
Lamp Replacement
1.
Turn instrument off and remove cable.
2.
Remove Cover
a.
Remove two screws in lid of the cuvette holder with an Allen wrench
and remove lid.
b.
Turn instrument over and remove the five recessed screws holding the
cover in place.
c.
Turn the instrument upright and remove the cover.
3.
Locate the lamp within the black lamp housing. Remove the two small screws
holding lamp with a Phillips screwdriver.
II.
4.
Remove the lamp and disconnect the two leads from the board.
5.
Clean the new lamp with lens tissue and acetone.
6.
Install the new lamp, replace the screws, and connect the two leads to the board.
The lamp is pre-aligned and requires no further alignment.
7.
Replace the cover.
Troubleshooting
A.
B.
C.
Little can be done by the operator to repair a malfunction in the Model 450 fluorometer.
1.
The Model 450 has no user replaceable or adjustable components other than the
lamp and fuse.
2.
If the following steps do not solve problem contact dealer service representative.
Front panel does not illuminate:
1.
Turn power off and remove electrical cord.
2.
Remove and inspect fuse. Replace if necessary (see fuse replacement section).
3.
Reinsert electrical cord and turn instrument on to verify proper operation.
Front panel illuminates, source lamp does not:
1.
D.
Replace lamp. (See lamp replacement section).
Front panel and source illuminate, display will not change:
1.
Perform installation procedure and operation procedure.
REFERENCE:
Operator’s Reference Manual Model 450 Digital Fluorometer
This procedure has been reviewed and approved by the undersigned representative of the U.S.
Fish and Wildlife Service.
REVIEWED/APPROVED______________________________
Field Supervisor (U.S.)
DATE____________
IOP:004.4A
Model 10-000 Fluorometer
IOP:004.4A
U.S. Fish and Wildlife Service
Marquette Biological Station
3090 Wright Street
Marquette, Michigan 49855
U.S.A.
January 12, 2012
and
U.S. Fish and Wildlife Service
Ludington Biological Station
229 South Jebavy Drive
Ludington, Michigan 49431
U.S.A.
and
Fisheries and Oceans Canada
Sea Lamprey Control Centre
1219 Queen Street East
Sault Ste. Marie, Ontario P6A 2E5
Canada
INSTRUMENT OPERATING PROCEDURE
INSTRUMENT:
Fluorometer
MODEL:
Model 10-000
MANUFACTURER:
Turner Designs
SERIAL, PROPERTY, AND DEPARTMENT NOS:
Model number
Location
Serial number
Property number
Identifying number
10-000
MBS
000503
364182
--
10-000
MBS
000390
360269
--
PRECAUTIONS:
POTENTIAL INTERFERENCES
No known interferences
SAFETY
No special safety precautions
PROCEDURES:
I.
II.
Installation
A.
Place the instrument on a vibration free laboratory counter.
B.
Connect power cord to instrument and to outlet. The unit will also run off a 12 volt
battery if required.
Instrument Components
A.
B.
III.
Controls and indicators
1.
Sensitivity: Sets the basic sensitivity of the unit. It requires adjustment if the
optical filters are changed.
2.
Blank: Is used to compensate for the residual or “blank” fluorescence
corresponding to zero concentration of the unknown.
3.
Span: Is used to calibrate the panel meter in the concentration of the unknown.
If the Blank control is properly set, the Span control may be adjusted without
affecting the setting of the blank control.
4.
Range Auto-Man Switch: When the control is in the Auto position, the
instrument selects the appropriate range for measuring the fluorescence of the
sample. When the control is in the Man (manual) position, ranges are changed
only with the Step switch.
5.
Range light indicators: These indicate the selected sensitivity.
Cuvette system
1.
The model 10-000 comes with a high volume, continuous-flow cuvette system
installed and ready for operation.
2.
A single-sample cell (cuvette) is used for measurement of individual samples.
Calibration
A.
Prior to use, a 100 µg/L Rhodamine WT standard solution is prepared with deionized
water. The instrument response is linear so a single standard is sufficient (TOP:002.x and
TOP:003.x).
B.
Turn unit on and wait 5 minutes for instrument to warm up.
C.
Unlock BLANK knob and set full counter-clockwise.
D.
Unlock SPAN knob. Set three turns counter-clockwise from the knob’s clockwise stop.
E.
Pour deionized water through the cuvette and adjust the BLANK control knob to read 0.0
on the maximum sensitivity scale. Lock the BLANK knob.
Note:
Samples should be at least 400 mL to effectively flush the previous sample from
the flow-through cuvette.
F.
IV.
Select the appropriate range for the standard and pour the standard through the cuvette.
While pouring, unlock the Span knob and adjust it until the panel meter indicates the
concentration of the standard. Lock the Span knob. For the single-cell cuvette model, fill
the cuvette and insert. Record the temperature of the standard.
Operation
A.
Turn on power switch.
B.
Allow the instrument to warm up for 5 minutes.
C.
Calibrate the instrument (see section III.)
D.
Pour a stream blank sample through the flow-through cell or into a cuvette. While
pouring into the flow-through cell, unlock the blank control knob and adjust to zero on
the maximum sensitivity scale (X31.6). The volume of all the samples must be at least
400 mL to flush the flow-through cuvette of the previous sample.
E.
Record the temperature of the samples for further temperature compensation if greater
precision is needed.
MAINTENANCE:
I.
General Maintenance and Repair
A.
Instrument is kept clean and out of dusty areas or areas with temperature and humidity
extremes.
B.
All connections in the flow-through cuvette must be kept air-tight and hoses within 0.5 m
of the flow cell must be opaque. The sample compartment must be kept air-tight to
prevent the formation of condensation on the cuvette. If the unit is moved from a cold to
a hot humid area, the unit may fail to operate correctly. Leave instrument on and the
condensate will evaporate in about 15 to 20 minutes.
C.
Little can be done by the operator to repair a malfunction in the Model 10-000
Fluorometer. It is recommended that the unit be returned to a service technician for
repair.
REFERENCE:
Operating and Service Manual for the Model 10 Series Fluorometers.
This procedure has been reviewed and approved by the undersigned representatives of the U.S.
Fish and Wildlife Service and Fisheries and Oceans Canada.
REVIEWED/APPROVED______________________________
Field Supervisor (U.S.)
DATE____________
IOP:004.3B
Model 10-AU-005-CE Fluorometer
IOP:004.3B
U.S. Fish and Wildlife Service
Marquette Biological Station
3090 Wright Street
Marquette, Michigan 49855
U.S.A.
January 12, 2012
and
U.S. Fish and Wildlife Service
Ludington Biological Station
229 South Jebavy Drive
Ludington, Michigan 49431
U.S.A.
and
Department of Fisheries and Oceans
Sea Lamprey Control Centre
1219 Queen Street East
Sault Ste. Marie, Ontario P6A 2E5
Canada
INSTRUMENT OPERATING PROCEDURE
INSTRUMENT:
Fluorometer
MODEL:
Model 10-AU-005-CE
MANUFACTURER:
Turner Designs
SERIAL AND PROPERTY NOS:
Model number
Location
Serial number
Property number
Identifying number
10-AU-005-CE
LBS
6406xxx
US 392266
–
PRECAUTIONS:
POTENTIAL INTERFERENCES
No known interferences
SAFETY
No special safety precautions
PROCEDURES:
I.
II.
Installation
A.
Place the instrument on a vibration free laboratory counter.
B.
Connect power cord to instrument and to outlet. The unit will also run with power from a
12 volt battery if required.
Instrument Components
A.
B.
Controls and indicators
1.
Sensitivity: Sets the basic sensitivity of the unit. This procedure is done the first
time before calibration and is locked in place (5/32 Allen screw).
2.
Blank: Is used to compensate for the residual or “blank” fluorescence
corresponding to zero concentration of the unknown.
3.
Span: During calibration, minor adjustments may be made to sensitivity with the
span function
4.
Auto-ranging function: Will select the appropriate instrument range for the
standard and blank. Instrument ranges (high, medium, and low) are in factors of
10. You also have the option of setting the instrument to manual and selecting
the range for the blank and standard.
5.
Range alarm indicators: These indicate the selected sensitivity.
Cuvette system
1.
III.
A single-sample cell (cuvette) is used for measurement of individual samples
(discrete sampling).
Calibration
A.
The calibration process is completed only once; the information is stored within the
instruments memory. Once calibrated, drift is less than 0.5%.
B.
Prior to use, prepare a standard that is ~ 80% of the highest concentration that you may
encounter, but still within the linear range.
C.
Turn unit on and wait 10 minutes for instrument to warm up.
D.
Access the calibration menu, screen 2.0. Set the concentration range to Auto. Enter the
concentration for your standard.
E.
If you want the instrument to subtract a blank, set screen 2.12 to yes.
F.
Measure the blank to determine blank range. The auto range mode will automatically
select the appropriate range, generally the lowest range. Access Run Blank from screen
2.11. While on screen 2.11, wait until the reading is stable. Then, if the blank is less
than 200%, press<0>. Remove the cuvette and set aside.
IV.
G.
Run standard to determine the standard range (access Run Standard screen 2.3). The
auto range function will select the best standard range for the instrument that will ensure
the optimum resolution. Note: the best accuracy and resolution is attained on low and
medium ranges. In all cases, regardless of range selection, the concentration of the
standard must be within the linear range of the instrument for the dye being analyzed.
H.
Return to the Home screen and analyze samples. The dye concentration of each sample
will be displayed digitally (ug/L).
Operation
A.
Turn on power switch.
B.
Allow the instrument to warm up for 10 minutes. Set the basic operating level.
C.
Calibrate the instrument (see section III.) The calibration should be checked periodically
to ensure accuracy/precision and to detect drift.
D.
Pour a stream blank sample into a cuvette. This reading can be subtracted from sample
readings to compensate for background.
E.
Record the temperature of the samples for temperature compensation if greater precision
is needed.
MAINTENANCE:
I.
II.
General Maintenance and Repair
A.
Instrument is kept clean and out of dusty areas or areas with temperature and humidity
extremes. Make sure cuvettes are clean/clear and dry before use.
B.
The sample compartment should be air tight to prevent condensation on the cuvette. If
the unit is moved from a cold to a hot humid area, the unit may fail to operate correctly.
Leave instrument on and the condensate will evaporate in about 15-20 minutes.
C.
Little can be done by the operator to repair a malfunction. It is recommended that the
unit be returned to a service technician for repair.
Documentation
A.
Note all instrument malfunctions.
B.
Note all repairs conducted on the fluorometer.
REFERENCE:
Operating and Service Manual for the Model 10-AU-005-CE Fluorometer user’s manual, April 1999
Part Number 10-AU-074
Service department:
Turner Designs 845 W. Maude Ave. Sunnyvale, CA. 94086
This procedure has been reviewed and approved by the undersigned representative of the U.S.
Fish and Wildlife Service.
REVIEWED/APPROVED______________________________
Field Supervisor (U.S.)
DATE____________
IOP:004.10C
Model 8000 Fluorometer
IOP:004.10C
U.S. Fish and Wildlife Service
Marquette Biological Station
3090 Wright Street
Marquette, Michigan 49855
U.S.A.
December 18, 2012
and
U.S. Fish and Wildlife Service
Ludington Biological Station
229 South Jebavy Drive
Ludington, Michigan 49431
U.S.A.
and
Department of Fisheries and Oceans
Sea Lamprey Control Centre
1219 Queen Street East
Sault Ste. Marie, Ontario P6A 2E5
Canada
INSTRUMENT OPERATING PROCEDURE
INSTRUMENT:
Fluorometer
MODEL:
8000
MANUFACTURER:
Turner Designs
SERIAL, PROPERTY, AND DEPARTMENT NOS:
Model number
Location
Serial number
Property number
Identifying number
8000-002
MBS
0526
1508
--
8000-002
MBS
0529
1515
--
8000-002
MBS
800451
2197
--
8000-010
MBS
800626
2193
--
8000-010
MBS
802910
3252
--
8000-002
LBS
1400
C-20,021
#1
8000-010
LBS
801254
LFY11-015
--
8000-010
LBS
802475
LFY13-012
--
8000-002
SLCC
0694
01-89
01-89
8000-010-R
SLCC
800241
05-65
05-65
PRECAUTIONS:
POTENTIAL INTERFERENCES
Do not use glass or quartz cuvettes.
Use only lens cleaning tissues or cloth on plastic cuvettes.
Use a clean cuvette for all readings. The Aquafluor TM is sensitive; sample residue may cause errors.
Fluorescence is temperature sensitive; read the blank, standard, and all samples at the same temperature.
High background or blank values may reduce sensitivity. Do not use this instrument for dye dilution
studies.
SAFETY
No special safety precautions
PROCEDURES:
I.
II.
Preparation of the AquafluorTM Fluorometer for use.
A.
Turn on the instrument by pressing ON/OFF button. The instrument will countdown
from five after which it is ready to use.
B.
If RHOD doesn’t appear in lower left of screen, press the A/B button. This toggles
between the Rhodamine and Turbidity channels.
Calibration of the fluorometer.
A.
With a known standard.
1.
Press the STD VAL button.
2.
Use the up and down arrow buttons to adjust the readout to the standard value.
Holding the button down activates scrolling. When done, press ENT or ESC to
return to home screen.
3.
Press the CAL button then the ENT button.
4.
Insert a blank, close cover, and press ENT. Be sure the cuvette is at least half
full (>2 mL of sample), is free of bubbles, and is clean and dry. Wait until
prompted before moving to the next step. Always orient the cuvette in the same
direction when inserting it into the instrument.
5.
Insert calibration standard and press ENT. When calibration is
complete, Calibration Completed will be displayed - press ENT. If
ENT is not pressed within 10 seconds the readout will ask if you wish
to abort the calibration - if not, press the down arrow then ENT to
accept the calibration.
Insert the Secondary Solid Standard, press either READ button, and record
(attachment) the result. Slight variations in placement of the standard may result
in variations in readings. It is recommended that 3-5 readings be taken while
removing and reinserting the standard between readings. The average of these
readings is used for future checks of instrument stability and for recalibration.
6.
B.
III.
With the Secondary Solid Standard.
1.
If the instrument was previously calibrated with a known standard and
the value of the Secondary Solid Standard was determined against that value,
you can recalibrate with the Secondary Solid Standard.
2.
Follow calibration directions (II.A.1. – 6.).
3.
Enter the value found for the Secondary Solid Standard in place of the known
standard.
Analyzing unknown samples.
A.
Samples are collected by either hand or more routinely through the use of automatic
water samplers. Natural fluorescence is present in stream water, so the fluorescence of
water from the site to be sampled (without Rhodamine) is measured first to provide a
background reading. Stream water with suspended solids must be filtered to remove the
solids before measurement. The background fluorescence is used for comparison to
determine if Rhodamine dye is present or absent.
1.
If suspended solids are present in the stream water, filter before measurement.
2.
Place a properly filled, dry cuvette into the sample compartment. Press either of
the two READ buttons.
3.
The instrument will auto-range, measure and average the fluorescence for 5
seconds, then display the reading at the top center of the display. WAIT is
displayed in the upper left corner of the display during the 5- second
measurement period. When WAIT disappears, the next sample can be read.
MAINTENANCE:
A.
Minimal maintenance is required or possible. Replacement of batteries is completed according to
instructions found in the instrument manual A section on service/troubleshooting is included in
the instrument manual.
B.
All maintenance conducted on the instrument is recorded in the instrument log book.
REFERENCE:
AquafluorTM Handheld Fluorometer and Turbidimeter User’s Manual P/N 998-0851 and AquafluorTM
Secondary Solid Standard Operational Instructions P/N 998-0025 REV A.
This procedure has been reviewed and approved by the undersigned representatives of the U.S.
Fish and Wildlife Service and Fisheries and Oceans Canada.
REVIEWED/APPROVED______________________________
Field Supervisor (U.S.)
DATE____________
REVIEWED/APPROVED______________________________
Division Manager (Canada)
DATE____________
ATTACHMENT
Calibration Log
Date
Stream
Initials
Cal. Std. conc.
(ug/L)
Solid
standard
reading
Remarks
IOP:004.0D
Trilogy Laboratory Fluorometer
IOP:004.0D
U.S. Fish and Wildlife Service
Marquette Biological Station
3090 Wright Street
Marquette, Michigan 49855
U.S.A.
April 16, 2008
and
U.S. Fish and Wildlife Service
Ludington Biological Station
229 South Jebavy Drive
Ludington, Michigan 49431
U.S.A.
and
Fisheries and Oceans Canada
Sea Lamprey Control Centre
1219 Queen Street East
Sault Ste. Marie, Ontario P6A 2E5
Canada
INSTRUMENT OPERATING PROCEDURE
INSTRUMENT:
Fluorometer
MODEL:
Trilogy Laboratory Fluorometer
MANUFACTURER:
Turner Designs
SERIAL AND DEPARTMENT NOS:
Model number
Location
Serial number
Property number
Identifying number
7200-000
SLCC
720000190
06-12
06-12
PRECAUTIONS:
POTENTIAL INTERFERENCES
Use a clean cuvette for all readings. The Trilogy is sensitive; sample residue may cause errors.
Use a lense cleaning cloth when using plastic Methacrylate cuvettes.
Fluorescence is temperature sensitive; read the blank, standard, and all samples at the same temperature.
SAFETY
No special safety precautions
PROCEDURES:
I.
Preparation of the Trilogy Fluorometer for use.
A. With the unit turned off insert the “green” optical module into the base for the sample adapter.
B. Turn on the On/Off switch located on the back of the Trilogy. Verify that the display becomes
active, and shows the module selection screen.
C. Opt for the selected (green) module and touch “OK” on the confirming screen.
D. When the display indicates the “Home” screen, you are ready to use Trilogy in the Raw mode
(measurements are relative), or calibrate Trilogy to make quantitative measurements.
II.
Calibration of the Fluorometer.
A.
B.
With a known standard.
1.
On the home screen touch “Calibrate” to begin a calibration sequence.
2.
Select “Run New Calibration”.
3.
Select the unit of measurement (PPB).
4.
Insert the calibration “blank” and touch “OK”.
5.
Enter the concentration for the first standard. If doing a multi-point calibration,
use standards in order of increasing concentration.
6.
Follow the screen prompt indicating that the standard should be inserted, then
touch “OK”.
7.
After the calibration is complete, either select “Proceed with Current
Calibration” or select “Enter More Standards”, in which case, return to “5”
above.
8.
Save calibration for future use (optional).
9.
Confirm successful completion of the calibration by measuring the previously
used standard. The displayed concentration should equal the same value used in
step “5” above. Optionally, the secondary standard now could be adjusted to
give the same reading for future calibrations or accuracy checks.
Using the Secondary Solid Standard.
1.
Measure a dye solution of known value (100 ppb standard) and note the Trilogy
reading.
2.
Place the secondary standard in the Optical Module, note the reading, and if
necessary turn the adjustment screw to produce the same displayed
concentration as in step 1. Turning the adjustment screw clockwise decreases the
displayed concentration.
3.
III.
The secondary standard can now be used for future calibrations or to check the
instrument for accuracy prior to measurement of unknown samples.
Analyzing unknown samples.
A.
Samples are collected either through hand-sampling hand or more routinely through the
use of automatic water samplers. Natural fluorescence is present in stream water, so the
fluorescence of water from the site to be sampled (without Rhodamine) is measured first
to provide a background reading. The background fluorescence (blank) is used for
comparison to determine if Rhodamine dye is present or absent.
1.
Place a properly filled, dry cuvette into the sample compartment. Close the lid
and press “Measure Fluorescence”. The Trilogy will measure the sample for six
seconds and report the average reading for the sample.
2.
The Trilogy reports data on the “Home” screen and displays the results for the
20 most recent measurements. If more than 20 readings are taken the oldest
reading is overwritten. Calibration is normally performed with standards made
with distilled water so the stream blank must be subtracted from the reported
value to ensure accuracy.
MAINTENANCE:
A. Minimal maintenance is required or possible.
B. Fluorescence troubleshooting is available in Appendix A of the User’s manual.
REFERENCE:
Trilogy Laboratory Fluorometer User’s Manual
Trilogy Fluorometer Quick Start Guide
This procedure has been reviewed and approved by the undersigned representatives of the U.S.
Fish and Wildlife Service and Fisheries and Oceans Canada.
REVIEWED/APPROVED______________________________
Division Manager (Canada)
DATE____________