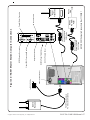
1
IL815
SECTION E
Rev. 13 - 09/2008
Tek-CARE®500
Wireless Emergency Call System
Operation, Installation and Service Manual
Alpha Communications®
42 Central Drive
Farmingdale, NY 11735-1202
Phone: (631) 777-5500
Fax: (631) 777-5599
Website:
www.AlphaCommunications.com
Email:
[email protected]
TOLL-FREE Technical #:
1-800-666-4800
TekTone® has designed Tek-CARE®500 to work as a system. Its NC501 Master Station
Computer has been carefully designed and matched to work with Tek-CARE®500 wireless
and wired peripherals. TekTone® will not warrant or support components of Tek-CARE®500
that are purchased separately unless the components are add-ons to previously sold systems.
TekTone® will also not warrant or support a system that is a mix of TekTone® and Non-TekTone®
parts, unless prior permission has been obtained.
A site survey must be performed and submitted before ordering a Tek-CARE®500 system.
In order to track our systems and to inform facilities of software upgrades, full site information
(site name, address and phone number) will be required when ordering. Site information
and NC501 warranty numbers will also be required when requesting technical support.
Operation, Installation and Service Manual
Copyright © 2003–2008 TekTone® Sound & Signal Mfg., Inc., All rights reserved.
No part of this publication may be copied without the express written permission of TekTone® Sound & Signal Mfg., Inc. The content
of this manual is furnished for informational use only, is subject to change without notice, and should not be construed as a commitment
by TekTone® Sound & Signal Mfg., Inc. TekTone® Sound & Signal Mfg., Inc. assumes no responsibility or liability for any errors or
inaccuracies that may appear in this documentation.
TekTone, the TekTone logo, Tek-Call, Tek-Care, Tek-Check-In, Tek-Com, Tek-Digicare, Tek-Door, Tek-Entry, Tek-Guard, TekMicro, Tek-MMARS, TekNIOS, Tek-Paging, Tek-Phone, Tek-Safe, Tek-Select, Tek-Sentry, Tek-Sound, Tek-Status, Tek-Trio and
Tek-View are either registered trademarks or trademarks of TekTone® Sound & Signal Mfg., Inc. in the United States and/or other
countries. All other trademarks are the property of their respective owners.
Tek-CARE®500 devices comply with Part 15 of the FCC Rules. Operation is subject to the following two conditions: (1) Devices
may not cause harmful interference, and (2) devices must accept any interference received, including interference that may cause
undesired operation.
TekTone Part #
FCC ID#
NC500SK ..................................................... HCQ3B6SSR16, HCQ3B6UMXF
NC505 .......................................................... HCQ3B6SSR64
NC510 .......................................................... HCQ3B6FA403
NC511, NC512 ............................................. HCQ3B6SSRL
SF501 ........................................................... HCQ3B6RTA
SF502 ........................................................... HCQ3B6RTX
SF505 ........................................................... HCQ3B6ESL
SF515 ........................................................... HCQ3B6SSF
SF520, SF525, SF526, SF527, SF528 .......... HCQ3B6UMXF
SF529/A, SF530, SF531/A ........................... HCQ3B6U1XFM
ii • IL815 Tek-Care®500 Manual
Copyright © TekTone Sound & Signal Mfg., Inc. All Rights Reserved.
Table of Contents ————————————————————
System Operating Instructions .............................................................. 1
NC501 Master Station Computer Setup and Usage ..................................................... 1
The Tek-CARE®500 Operating Screen ......................................................................... 1
Menu Bar .............................................................................................................. 1
Online Indicator .................................................................................................... 1
Error Indicator ....................................................................................................... 1
Night Mode Indicator ........................................................................................... 1
Demo Mode Indicator ........................................................................................... 1
Transmitter/Locator Indicator ............................................................................... 1
Signal Indicator .................................................................................................... 1
RF Signal Strength Indicator ................................................................................ 1
Battery Indicator ................................................................................................... 1
Events Monitor Button (F2) ................................................................................. 2
Residents Button (F3) ........................................................................................... 2
Transmitters Button (F4) ...................................................................................... 2
Page Button (F5) ................................................................................................... 2
History Button (F6) .............................................................................................. 2
System Log Button (F7) ........................................................................................ 2
F8—Turn Night Mode On/Off .............................................................................. 2
Silence Alarm Button (Ctrl+A) .............................................................................. 2
Alt+X—Quit ......................................................................................................... 2
Resident Menu ............................................................................................................ 2
Assign/Unassign Transmitter .............................................................................. 2
New Resident ....................................................................................................... 2
Delete Resident .................................................................................................... 2
Residents Register (F3) ........................................................................................ 2
Transmitters Menu ...................................................................................................... 7
Low Battery .......................................................................................................... 7
Missing Transmitters ........................................................................................... 7
Lost Transmitters ................................................................................................. 7
Transmitters Register (F4) .................................................................................... 7
Events Menu .............................................................................................................. 10
Events Monitor (F2) ............................................................................................ 10
Events History (F6) ............................................................................................. 11
Paging Menu .............................................................................................................. 12
Send Page (F5) ..................................................................................................... 13
Paging Groups Register ....................................................................................... 13
Pagers Register ....................................................................................................13
System Menu .............................................................................................................. 14
Night Mode (F8) .................................................................................................. 14
Locators & Repeaters .......................................................................................... 14
Zones Register ....................................................................................................16
Edit Proximity Map ..............................................................................................17
System Log (F7) ................................................................................................... 17
System Operation History Log ............................................................................19
Database (DB) Maintenance Log ........................................................................ 19
Configure Menu ......................................................................................................... 19
Tek-CARE®500 Options ....................................................................................... 19
Signal Interface Setup .......................................................................................... 19
Paging Interface Setup ........................................................................................21
Database Setup & Maintenance .......................................................................... 21
Customize Sounds ............................................................................................... 23
Help Menu .............................................................................................................. 23
Tek-CARE®500 Help ............................................................................................ 23
About Tek-CARE®500 ......................................................................................... 23
Exit Menu
.............................................................................................................. 24
Important Terms ..........................................................................................................24
Device Operation ........................................................................................................ 24
Copyright © TekTone Sound & Signal Mfg., Inc. All Rights Reserved.
IL815 Tek-Care®500 Manual • iii
Table of Contents
System Installation ................................................................................ 26
Equipment Installation ................................................................................................ 26
System Components ................................................................................................... 26
Initial Programming ..................................................................................................... 29
System Troubleshooting Guide .......................................................... 32
Appendix: Central Monitoring ............................................................. 33
Overview
.............................................................................................................. 33
Central Monitoring (CM) Server ................................................................................. 33
Central Monitoring (CM) Config Tool ........................................................................ 33
Starting Central Monitoring ........................................................................................34
Stopping Central Monitoring ...................................................................................... 36
Illustrations
Figure 1—Tek-CARE®500 Operating Screen & Residents Register ............................. 3
Figure 2—Residents Register–Medical Information Tab ............................................. 4
Figure 3—Residents Register–Contacts List Tab ........................................................ 4
Figure 4—Residents Register–Assigned Transmitters Tab–Transmitter Info sub-Tab . 4
Figure 5—Residents Register–Assigned Transmitters Tab–Programmable Timers sub-Tab 5
Figure 6—Residents Register–Assigned Transmitters Tab–Paging Groups sub-Tab . 5
Figure 7—Residents Register–Assigned Transmitters Tab–Zones sub-Tab .............. 5
Figure 7a—Residents Register–Notes Tab .................................................................. 6
Figure 8—Low Battery ................................................................................................. 6
Figure 9—Missing Transmitters .................................................................................. 6
Figure 10—Lost Transmitters ...................................................................................... 6
Figure 11—Transmitters Register (F4) ......................................................................... 8
Figure 12—Transmitters Register–Programmable Timers Tab ..................................... 8
Figure 13—Transmitters Register–Battery Status Tab ................................................ 8
Figure 14—Events History (F6) ..................................................................................11
Figure 15—Send Page (F5) ......................................................................................... 12
Figure 16—Paging Groups Register ........................................................................... 12
Figure 17—Pagers Register ........................................................................................12
Figure 18—Night Mode (F8) ....................................................................................... 14
Figure 19—Zones Register ......................................................................................... 16
Figure 20—Edit Proximity Map ................................................................................... 16
Figure 21—System Log (F7) ....................................................................................... 18
Figure 22—System Operation History Log ................................................................. 18
Figure 23—Database Maintenance Log ..................................................................... 18
Figure 24—Tek-CARE®500 Options–Tek-CARE®500 Tab .......................................... 20
Figure 25—Tek-CARE®500 Options–Passwords Tab .................................................20
Figure 25a—Administrator and User Password Access ............................................. 20
Figure 25b—Tek-CARE®500 Options–Advanced Tab ................................................ 20
Figure 26—Signal Interface Setup .............................................................................. 20
Figure 27—Paging Interface Setup ............................................................................. 22
Figure 28—Database Setup & Maintenance–Database Tab ...................................... 22
Figure 29—Database Setup & Maintenance–Maintenance Tab ................................ 22
Figure 30—Customize Sounds .................................................................................... 22
Figure 31—PK510 Serial Cable Connection ................................................................26
Figure 32—NC501 Master Station Computer Connections ........................................27
Figure 33—CM Server ................................................................................................ 35
Figure 34—List Devices ............................................................................................. 35
Figure 35—Device List ............................................................................................... 35
Figure 36—Event Details ............................................................................................ 35
Figure 37—Account Details ....................................................................................... 35
Figure 38—Configuration Details ...............................................................................35
iv • IL815 Tek-Care®500 Manual
Copyright © TekTone Sound & Signal Mfg., Inc. All Rights Reserved.
System Operating Instructions ——————————————
NC501 Master Station Computer Setup and Usage
Due to the critical nature of the Tek-CARE®500 reporting features, all power saving features
on the master station computer and monitor have been disabled. TekTone® recommends that
the computer be dedicated to Tek-CARE®500. Running additional applications on the
computer diminishes the effectiveness of the system and may halt (lock up) the system.
Note: Perform the Database Clean-up function regularly to ensure proper system operation.
See System Operating Instructions—Configure Menu–Database Setup & Maintenance—
Maintenance Tab—Database Clean-up for complete details.
The Tek-CARE®500 Operating Screen
This section provides a brief description of the various parts of the operating screen. The
separate menu sections go into greater detail regarding specific functions. Refer to Figure 1
for operating screen layout.
Menu Bar—To access the Tek-CARE®500 system’s various menu functions, move the mouse
(or other pointing device) over a menu bar item and then click. This displays the available
menu items.
Online Indicator—This indicator has two states:
• Green indicates the system software is running.
• Clear (off) indicates an error has occurred that interferes with the software. (See Error
Indicator.)
Error Indicator—This indicator has three states:
• Clear (off) indicates no errors.
• Red indicates a significant, system-wide error in system operation has occurred.
• Orange indicates an error has occurred that affects only part of the system.
When an error has occurred, use the System Log Button to access more information
regarding the nature of the error.
Night Mode Indicator—This indicator has two states:
• Clear (off) indicates that Day Mode is active.
• Blue indicates that Night Mode is active. (See System Operating Instructions—System
Menu—Night Mode (F8) for more information.)
Note: The transmitter/locator, signal, signal strength and battery indicators work together
to provide data for a single signal occurrence.
Demo Mode Indicator—This indicator is displayed only when Tek-CARE®500 is operating
in demo mode. In demo mode, the system has the same functionality as normal mode, but
runs for just 2 hours, after which the Tek-CARE®500 program quits and must be restarted. If
you have purchased a Tek-CARE®500 and it runs in demo mode, please contact TekTone®’s
sales department at (800) 327-8466.
Transmitter/Locator Indicator—Displays the transmitter number and locator number of
the last signal received. Locator numbers are shown only when applicable.
Signal Indicator—This indicator has four states:
• Blue indicates a supervisory signal.
• Red indicates an alarm signal.
• Green indicates a reset signal.
• Orange indicates a tamper signal.
RF Signal Strength Indicator—Shows the strength of the last signal received.
Battery Indicator—This indicator has two states:
• Green/High shows good battery condition.
• Red/Low shows a low battery condition. (See System Operating Instructions—
Transmitters Menu—Low Battery for more information.)
Copyright © TekTone Sound & Signal Mfg., Inc. All Rights Reserved.
IL815 Tek-CARE®500 Manual • 1
System Operating Instructions
Events Monitor Button (F2)—Click on button or press F2 to display a list of currently active
system events. The following information is provided: Time, Category, Type, Device #,
Device Type, Resident Name, Zones, Location, Paging Group, Device Description, Reset at
Site, Date Cleared, Cleared By and Event #. (See System Operating Instructions—Events
Menu—Events Monitor (F2) for more information.)
Residents Button (F3)—Click on button or press F3 to display the Residents Register. (See
System Operating Instructions—Resident Menu—Residents Register (F3) for more
information.)
Transmitters Button (F4)—Click on button or press F4 to display the Transmitters Register.
(See System Operating Instructions—Transmitters Menu—Transmitters Register (F4) for
more information.)
Page Button (F5)—Click on button or press F5 to send a page. (See System Operating
Instructions—Paging Menu—Send Page (F5) for more information.)
History Button (F6)—Click on button or press F6 to display the Events History. The following
information is provided: Time, Category, Type, Device #, Reset at Site, Date Cleared, Cleared
By, Resident Name, Zones, Location, Paging Group, Device Type, Device Description and
Event #. (See System Operating Instructions—Events Menu—Events History (F6) for more
information.)
System Log Button (F7)—Click on button or press F7 to display the system log information—
Date, Time and Event. (See System Operating Instructions—System Menu—System Log
(F7) for more information.)
F8—Turn Night Mode On/Off—Press the F8 key to toggle Night Mode On/Off. (See System
Operating Instructions—System Menu—Night Mode (F8) for more information.)
Silence Alarm Button (Ctrl+A)—Press (while a system event is active) to toggle between
these two states:
—Alarm sounds are on
—Alarm sounds are off
Alt+X—Quit—Press the Alt+X key combination to quit the Tek-CARE®500 program.
Resident Menu
Assign/Unassign Transmitter—Prompts for a resident name and then displays the Transmitter
Info tab in the Residents Register for that resident. (See System Operating Instructions—
Resident Menu—Residents Register (F3) for more information.)
New Resident—Used to add a new resident to the system. (See System Operating
Instructions—Resident Menu—Residents Register (F3) for more information.)
Delete Resident—Used to Delete a resident from the system.
Residents Register (F3)—This is the primary tool for handling resident information. To add
a new resident, click the Add button and fill in all relevant information fields. (The various
fields are discussed in detail below.) To edit an existing resident record, select the record and
change the relevant information fields.When finished with all changes or additions to a
specific resident record, click the Save button. Click the Add button to add another record, or
click the Close button if finished.
The following searching and sorting functions are available in the Residents Register to
facilitate the handling of resident information (refer to Figure 1 for screen layout):
Search—Select the type of information to search in the drop-down category box. Enter
the information to search for in the second field. Then click the Go button.
2 • IL815 Tek-CARE®500 Manual
Copyright © TekTone Sound & Signal Mfg., Inc. All Rights Reserved.
System Operating Instructions
Show—Select an option from this drop-down box to show only one category of information.
Order By—Sort the displayed data by Resident Name, Building or Wing.
—Sort in ascending order, based on the Order By field.
—Sort in descending order, based on the Order By field.
The following features can be also accessed from the Residents Register:
—Displays first record in list.
—Displays prior record in list.
—Displays last record in list.
—Displays next record in list.
Add Button (Alt+A)—Add new residents to the system.
Cancel Edit Button (Alt+C)—Cancel all edits made to the displayed data (if Save button
has not been clicked).
Delete Button (Alt+D)—Delete the selected residents from the system.
Save Button (Alt+V)—Save entered or edited information.
Refresh Button (Alt+H)—Refresh the displayed data to ensure information is current.
Close Button (Alt+L)—Close the Residents Register.
—Click on the print icon (or press Ctrl+P). To print only the selected record, click
Yes, and the record will print immediately. To print all displayed records (filtered by any
searches that have been invoked), click No, and a print preview screen will appear—click
Figure 1—Tek-CARE®500 Operating Screen & Residents Register
Menu Bar
Indicators
Buttons
Events Monitor
Residents
Register (F3)
Copyright © TekTone Sound & Signal Mfg., Inc. All Rights Reserved.
IL815 Tek-CARE®500 Manual • 3
System Operating Instructions
the printer setup button to select which pages to print; click the print button to print
those pages.
Resident Info Tab—Provides a place to enter: name, ID #, address, city, state, zip, building,
wing, floor, apartment number, phone number, and extension. (Only the first 17 characters
of a name will be sent to pagers, although the name can be longer. Location information
is required to assign zones.) Use the Load Photo button to select a resident photo from
the local hard drive, using a browse function. Resident photos must be in bitmap format
(.BMP), 100 pixels wide × 125 pixels high. Refer to Figure 1 for screen layout.
Medical Information Tab—Provides a place to enter: physician, phone number, extension,
hospital, allergies, medication, health history, instructions and insurance information.
Refer to Figure 2 for screen layout.
Contacts List Tab—Provides a place to enter: type (select from pull down menu), name,
phone number, extension, comments and address. Note: Tek-CARE®500 shares information
between records for “non-relative” contacts to allow system-wide update of common
information. For example, updating a specific doctor’s phone number in one resident
record changes it in all other resident records. “Relative” information is not shared between
records. Refer to Figure 3 for screen layout.
Assigned Transmitters Tab
Transmitter Info sub-Tab—Refer to Figure 4 for screen layout. Provides a place to
enter:
• Dev #—Assigns a transmitter to the selected resident. A Dev # must be entered
in the Transmitters Register before it can be assigned.
• Status—Indicates the transmitter’s status. Status can be changed by the user
if appropriate. (Lost, for example.)
• Date—This drop-down box next to the Status box allows a date to be associated
with a particular status setting (if desired).
Figure 2—Residents
Register—
Medical Information Tab
Figure 3—Residents
Register—
Contacts List Tab
Figure 4—Residents
Register—Assigned
Transmitters Tab—
Transmitter Info sub-Tab
4 • IL815 Tek-CARE®500 Manual
Copyright © TekTone Sound & Signal Mfg., Inc. All Rights Reserved.
System Operating Instructions
•
•
Used As—This drop-down box determines the type of call the device sends.
Options are: Call/Alarm Device, Check-In Device, Emergency Device, Repeater/
Locator or Security Device. (Not all options are available for all devices.)
In Use—This checkbox indicates the “use” status of a transmitter. To disable
a transmitter, uncheck this box—signals from the device will not be processed,
except battery signals which will be processed.
Programmable Timers sub-Tab—Refer to Figure 5 for screen layout.
• Disable Supervision—Schedule a time period during which the system does
not supervise signals from this transmitter. If the supervision enabled checkbox
is not checked, reprogram the transmitter to be supervised (see System
Operating Instructions—Transmitters Menu—Transmitters Register—Device
Info Tab).
• Disable Alarm—Schedule a time period during which the system does not
supervise alarms from this transmitter. (Available for security devices only,
such as door/window egress transmitters.) Enable or disable all alarm schedules
for a security device by checking or unchecking the alarm enabled checkbox
in the upper right.
• Activity Check-In—Available for check-in devices only. Schedule a time period
during which the system requires a button press (or motion if using a SF515
motion detector) from this transmitter. If the button is not pressed during the
scheduled time period, a Check Event will appear in the event list approximately
5 minutes prior to the scheduled End time. Enable or disable all check-in
schedules for a particular transmitter by checking or unchecking the activity
check-in enabled checkbox in the upper right.
First, check the Schd. Enabled checkbox. Enter the start time in the Begin field
and the end time in the End field. (Begin and End times must be at least 10
Figure 5—Residents
Register—Assigned
Transmitters Tab—
Programmable Timers
sub-Tab
Figure 6—Residents
Register—Assigned
Transmitters Tab—Paging
Groups
sub-Tab
Figure 7—Residents
Register—Assigned
Transmitters Tab—Zones
sub-Tab
Copyright © TekTone Sound & Signal Mfg., Inc. All Rights Reserved.
IL815 Tek-CARE®500 Manual • 5
System Operating Instructions
minutes apart.) Check the boxes to select which days of the week this event is
scheduled.
Note: A single time period cannot cross midnight into the next day; divide it
into two time period entries. For example, create these two entries to create a
scheduled time period of 6:00 PM Friday to 10:00 AM Saturday (as shown in
Figure 5):
Begin—6:00 PM
Begin—12:00 AM
End—11:59 PM
End—10:00 AM
Day—Friday
Day—Saturday
Paging Groups sub-Tab—Assign the transmitter to one or more paging groups so
that calls are paged in addition to normal call annunciation. (See System Operating
Instructions—Paging Menu and System Operating Instructions—System Menu—
Night Mode (F8) for more information.) Refer to Figure 6 for screen layout.
Zones sub-Tab—Assign the transmitter to one or more zones, which are used as
report filtering criteria for active and historical call data. All transmitters assigned to
the same resident are automatically assigned to the same zones. Refer to Figure 7 for
screen layout. See System Operating Instructions—System Menu—Zones Register
to create zones.
Notes Tab—Provides a place to enter additional notes, comments or requests. Refer to
Figure 7a for screen layout.
Figure 7a—Residents
Register—Notes Tab
Figure 8—Low Battery
Figure 9—Missing Transmitters
Figure 10—Lost Transmitters
6 • IL815 Tek-CARE®500 Manual
Copyright © TekTone Sound & Signal Mfg., Inc. All Rights Reserved.
System Operating Instructions
Transmitters Menu
Low Battery—Shows a list of transmitters that have low battery status, as well as information
relevant to those transmitters. Refer to Figure 8 for screen layout.
Missing Transmitters—Shows a list of transmitters from which the system is no longer
receiving supervisory signals, as well as information relevant to those transmitters. Refer to
Figure 9 for screen layout.
Lost Transmitters—Shows a list of transmitters that have been classified as lost, as well as
information relevant to those transmitters. Classify a transmitter as lost by changing the
status in the Transmitters Register (F4) (see below). This status is used when a transmitter is
still present in the building, but cannot be located. The system will not process call signals
from lost transmitters, although it will continue to process battery status and tamper signals.
Refer to Figure 10 for screen layout.
Transmitters Register (F4)—This is the primary tool for modifying and accessing transmitter
information. To add a new transmitter, click the Add button and fill in all relevant information
fields. Fields designated with an asterisk (*) are settings programmed into the transmitter
and cannot be changed without reprogramming the transmitter. (The various fields are
discussed in detail below.) To edit an existing transmitter record, select the record and
change the relevant information fields.
When finished with all changes or additions to a specific transmitter record, click the Save
button. Then click the Program Transmitter button, if necessary (see System Installation—
Initial Programming—Programming Transmitters, Locators and Repeaters for more
information). Click the Add button to add another record, or click the Close button if finished.
The following searching and sorting functions are available in the Transmitters Register to
facilitate the handling of transmitter information (refer to Figure 11 for screen layout):
Search—Select the type of information to search in the drop-down category box. Enter
the information to search for in the second field. Then click the Go button.
Show—Select an option from this drop-down box to show only one category of information.
Order By—Sort the displayed data by Device # or Model.
—Sort in ascending order, based on the Order By field.
—Sort in descending order, based on the Order By field.
The following features can also be accessed from the Transmitters Register:
—Displays first record in list.
—Displays prior record in list.
—Displays last record in list.
—Displays next record in list.
Add Button (Alt+A)—Add new transmitters to the system.
Cancel Edit Button (Alt+C)—Cancel all edits made to the displayed data (if Save button
has not been clicked).
Save Button (Alt+V)—Save entered or edited information.
Refresh Button (Alt+H)—Refresh the displayed data to ensure information is current.
Close Button (Alt+L)—Closes the Transmitters Register.
—Click on the print icon (or press Ctrl+P). To print only the selected record, click
Yes, and the record will print immediately. To print all displayed records (filtered by any
searches that have been invoked), click No, and a print preview screen will appear—click
the printer setup button to select which pages to print; click the print button to print
those pages.
Copyright © TekTone Sound & Signal Mfg., Inc. All Rights Reserved.
IL815 Tek-CARE®500 Manual • 7
Figure 11—Transmitters Register (F4)
Device Info Tab—Location
Figure 12—
Transmitters Register—
Programmable Timers Tab
Figure 13—
Transmitters Register—
Battery Status Tab
8 • IL815 Tek-CARE®500 Manual
Copyright © TekTone Sound & Signal Mfg., Inc. All Rights Reserved.
System Operating Instructions
Device Info Tab—Refer to Figure 11 for screen layout. Provides a place to enter Dev #
and Model #, plus:
Status—Indicates the transmitter’s current status, which can be changed to reflect a
different status if appropriate. Drop-down box choices are: normal operation, lost,
missing, tampered, damaged, or in program/test mode.
Date—Located next to Status, this box allows a date to be associated with a particular
status setting.
Used As—Select from the following choices in this drop-down box (not all options are
available for all devices): Call/Alarm Device, Check-In Device, Emergency Device,
Repeater/Locator or Security Device.
In Use—To disable a transmitter, uncheck this box. If unchecked, signals from this
device will not be processed, although battery signals will be processed.
Supervised—Use this checkbox to indicate whether a transmitter is supervised (active)
or unsupervised (inactive). Level of supervision is entirely dependent on system size
and settings.
Supervision Interval—Determines how often the transmitter sends a signal to satisfy
the Supervision Timeout function. The following minimum Supervision Interval
settings are suggested (exceeding these recommendations increases the potential for
missed alarm signals):
• Fewer than 200 transmitters:
SF501 Single-Button Call Transmitter—60 seconds (1 minute)
All other devices—5 minutes
• 200 to 1500 transmitters—5 minutes
Supervision Timeout (minutes)—Determines how long the system will wait without
receiving a supervision signal before generating a supervision alarm. This setting is
the maximum period of time that a transmitter can be out of communication with the
system and not generate an alarm. (Not all supervision intervals are available for
every transmitter type.) The following Supervision Interval and Supervision Timeout
settings are recommended; the potential for missed alarm signals is increased if these
recommendations are not followed. For systems that exceed 1000 devices, please call
TekTone® Technical Support at (800) 332-6608.
Total Number
Device
of Devices
Type
1–200
pendant
1–200
wall mounted*
1–200
201–1000
pendant
201–1000
wall mounted*
201–1000
All wall-mounted AC powered devices**
*
Supervision
Interval
1 minute
5 minutes
12.5 minutes
5 minutes
5 minutes
12.5 minutes
60 minutes
Supervision
Timeout
60 minutes
240 minutes
600 minutes
240 minutes
240 minutes
600 minutes
1440 minutes
The Supervision Interval and Supervision Timeout values provided are typical values for
systems of various sizes. These values are intended to provide the highest degree of supervision
available without introducing a high risk of spurious missing-transmitter indications.
Specific results will vary depending upon site conditions that affect the transmission and
reception of RF signals.
* * Options vary among wall-mounted devices.
Assigned to—Displays name of resident or staff member to whom this transmitter is
assigned (portable transmitters only). Double-click on the name to view that
individual’s Residents Register information.
Copyright © TekTone Sound & Signal Mfg., Inc. All Rights Reserved.
IL815 Tek-CARE®500 Manual • 9
System Operating Instructions
Location—Displays the location of permanently mounted transmitters. An entry is
required in this field if zones will be assigned.
Program Transmitter—After a transmitter’s information is entered, connect it to the
NC510 Receiver for programming. See System Installation—Initial Programming—
Programming Transmitters, Locators and Repeaters for more information. Fields
denoted with an asterisk (*) are programmed into the device and cannot be changed
without reprogramming the device. All other fields are editable.
Programmable Timers Tab—Refer to Figure 12 for screen layout.
Disable Supervision—Schedule a time period during which the system does not
supervise signals from this transmitter. If the supervision enabled checkbox is not
checked, reprogram the transmitter to be supervised (see System Operating
Instructions—Transmitters Menu—Transmitters Register—Device Info Tab).
Disable Alarm—Schedule a time period during which the system does not supervise
alarms from this transmitter. (Available for security devices only, such as door/window
egress transmitters.) Enable or disable all alarm schedules for a security device by
checking or unchecking the alarm enabled checkbox in the upper right.
Activity Check-In—Available for check-in devices only. Schedule a time period during
which the system requires a button press (or motion if using a SF515 motion detector)
from this transmitter. If the button is not pressed during the scheduled time period, a
Check Event will appear in the event list approximately 5 minutes prior to the scheduled
End time. Enable or disable all check-in schedules for a particular transmitter by
checking or unchecking the activity check-in enabled checkbox in the upper right.
First, check the Schd. Enabled checkbox. Enter the start time in the Begin field and the
end time in the End field. (Begin and End times must be at least 10 minutes apart.) Use
the checkboxes to select which days of the week this event is scheduled.
Note: A single time period cannot cross midnight into the next day; divide it into two
time period entries. For example, create these two entries to create a scheduled time
period of 6:00 PM Friday to 10:00 AM Saturday (as shown in Figure 12):
Begin—6:00 PM
Begin—12:00 AM
End—11:59 PM
End—10:00 AM
Day—Friday
Day—Saturday
Battery Status Tab—Shows the transmitter’s current battery status and includes these
fields to document battery status: Date when first low, Last Changed Date and Expected
Failure Date. Refer to Figure 13 for screen layout.
Zones Tab—Assign the transmitter to one or more zones, which are used as report
filtering criteria for active and historical call data. All transmitters assigned to the same
resident are automatically assigned to the same zones. See System Operating
Instructions—System Menu—Zones Register to create zones.
Paging Groups Tab—Assign the transmitter to one or more paging groups so that calls
are paged in addition to normal call annunciation. (See System Operating Instructions—
Paging Menu and System Operating Instructions—System Menu—Night Mode (F8) for
more information.)
Events Menu
Events Monitor (F2)—This is the core operational screen of the Tek-CARE®500 system,
and displays all currently active events. The following information is provided: Time, Category,
Type, Device #, Device Type, Resident Name, Zones, Location, Paging Group, Device
Description, Reset at Site, Date Cleared, Cleared By and Event #. Refer to Figure 1 for screen
layout.
10 • IL815 Tek-CARE®500 Manual
Copyright © TekTone Sound & Signal Mfg., Inc. All Rights Reserved.
System Operating Instructions
Right-click on an event to access these functions:
Clear/ACK (acknowledge) Event (Ctrl+C)—Resets call and removes it from the list. (Calls
placed from SF501 Single Button Call Transmitters, SF527/SF337C Emergency Switch
assemblies and SF528/SF340B Emergency Switch Assemblies cannot be reset at the TekCARE®500 master station computer; they must be reset in person.)
Silence Alarm (Ctrl+A)—Turn alarm sounds off. (Emergency calls cannot be silenced.)
Proximity Map (Ctrl+M)—Display the proximity map, highlighting the selected device or
the locator in the general vicinity of the calling pendant transmitter.
Resident Info (Ctrl+R)—Display resident information.
Transmitter Info (Ctrl+T)—Display transmitter information.
Mark as Lost (Ctrl+L)—Mark the selected transmitter as lost (see System Operating
Instructions—Transmitters Menu—Lost Transmitters and System Operating
Instructions—Transmitters Menu—Transmitters Register (F4) for more information).
Events History (F6)—This shows a list of the events that have been cleared from the Events
Monitor. The following information is provided: Time, Category, Type, Device #, Reset at
Site, Date Cleared, Cleared By, Resident Name, Zones, Location, Paging Group, Device Type,
Device Description and Event #. Refer to Figure 14 for screen layout.
Right-click on an event to access these functions:
Resident Info (Ctrl+R)—Display resident information.
Transmitter Info (Ctrl+T)—Display transmitter information.
These search tools are provided to facilitate viewing the Events History:
Last xx Hours—Use this drop-down box to show only events from the last 24, 12, 6, 3 or
1 hours.
Filter Menu—Use this drop-down box to show only events in one of these categories:
Show All, Emergency, Resident Alarm, Security Alarm, Inactivity Alarm, Supervision
Alarm, Tamper Alarm or Missing Alarm.
Between Date and Time—Use these four fields to show only events that occurred in a
specific period of date and time.
Search—Select the type of information to search in the drop-down category box. Enter
the information to search for in the second field. Then click the Find button.
Figure 14—Events History (F6)
Copyright © TekTone Sound & Signal Mfg., Inc. All Rights Reserved.
IL815 Tek-CARE®500 Manual • 11
System Operating Instructions
Order By—Sort the displayed data by Event Date, Device #–Time, Priority–Time, Reset
at Site or Date Cleared.
—Sort in ascending order, based on the Order By field.
—Sort in descending order, based on the Order By field.
—Click on the print icon (or press Ctrl+P). A print preview screen will appear—click
the printer setup button to select which pages to print; click the print button to print
those pages.
Paging Menu
Paging is an ancillary method of call annunciation, and is not intended to replace the primary
annunciation provided by the NC501 Master Station Computer. The Tek-CARE®500 system
does not monitor pager battery levels or RF signal strength to the pagers, and the pagers are
not supervised.
Figure 15—Send Page (F5)
Figure 16—Paging Groups Register
Figure 17—Pagers Register
12 • IL815 Tek-CARE®500 Manual
Copyright © TekTone Sound & Signal Mfg., Inc. All Rights Reserved.
System Operating Instructions
Tek-CARE®500 supports two modes of paging: Day Mode and Night Mode. In Day Mode,
pocket paging may be configured with multiple paging groups, so that only relevant pages
are sent to each staff member. In Night Mode, all pages are sent to the default paging
group—especially useful during hours when staff is reduced. (See System Operating
Instructions—System Menu—Night Mode (F8) for more information.)
An automatic page message includes the time, resident, and location information, along with
an initial single-letter code that indicates the event type. Event type codes are:
A = Alarm
R = Reset
E = Emergency
S = Security
I = Inactivity
T = Tamper
M = Missing
Send Page (F5)—Send a manual page using the Send Page window, which provides these
fields (refer to Figure 15 for screen layout):
Name—Name of staff member carrying pager.
Pager ID—Pager ID number (3-digit cap code).
Paging Group—Paging group name.
Message—Text message to send to the selected pager(s).
Priority—(Priority settings are restricted to the paging system’s acceptable inputs.)
A—Urgent
B—High
C—Medium
D—Low
Enter the page recipient in either the Name, the Pager ID or the Paging Group field.
Complete the Message and Priority fields, and then click the Send button to send the
manual page. The Send Page window will show the send status. After the page is sent,
click the Close button to close the window.
Paging Groups Register—Create paging groups so that several pagers can be paged
simultaneously manually or in Day Mode. The following features can be accessed from the
Paging Groups Register (refer to Figure 16 for screen layout):
—Displays first record in list.
—Displays prior record in list.
—Displays last record in list.
—Displays next record in list.
Add Button (Alt+A)—Add a new paging group to the system.
Cancel Edit Button (Alt+C)—Cancel all edits made to the displayed data (if Save button
has not been clicked).
Delete Button (Alt+D)—Delete the selected paging group from the system.
Save Button (Alt+V)—Save entered or edited information.
Refresh Button (Alt+H)—Refresh the displayed data to ensure information is current.
Close Button (Alt+L)—Close the Paging Groups Register.
—Click on the print icon (or press Ctrl+P) to print the Paging Groups list.
Pagers Register—Enter pagers into the system and assign them to paging groups. Provides
a place to enter Pager ID (3-digit cap code) and staff member Name. The following searching
and sorting functions are available in the Pagers Register to facilitate the handling of pager
information (refer to Figure 17 for screen layout):
Select the type of information to search in the drop-down category box. Enter the
information to search for in the second field. Then click the Go button.
Show—Select an option from this drop-down box to show only one category of information.
Order By—Sort the displayed data by Pager ID or Name.
—Sort in ascending order, based on the Order By field.
—Sort in descending order, based on the Order By field.
Copyright © TekTone Sound & Signal Mfg., Inc. All Rights Reserved.
IL815 Tek-CARE®500 Manual • 13
System Operating Instructions
The following features can also be accessed from the Pagers Register:
—Displays first record in list.
—Displays prior record in list.
—Displays last record in list.
—Displays next record in list.
Add Button (Alt+A)—Add a new pager to the system.
Cancel Edit Button (Alt+C)—Cancel all edits made to the displayed data (if Save button
has not been clicked).
Delete Button (Alt+D)—Delete the selected pager from the system.
Save Button (Alt+V)—Save entered or edited information.
Refresh Button (Alt+H)—Refresh the displayed data to ensure information is current.
Close Button (Alt+L)—Close the Paging Register.
—Click on the print icon (or press Ctrl+P) to print the Pager list.
System Menu
Night Mode (F8)—This menu option opens the Tek-CARE®500 Options window with the
Night Mode Setting tab selected. Refer to Figure 18 for screen layout.
Tek-CARE®500 supports two modes of paging: Day Mode and Night Mode. In Day Mode,
pocket paging may be configured with multiple paging groups, so that only relevant pages
are sent to each staff member. In Night Mode, all pages are sent to the default paging
group—especially useful during hours when staff is reduced. (See System Operating
Instructions—Configure Menu—Paging Interface Setup to assign the default paging group.)
To manually enable Night Mode, click the Turn Night Mode On button. To automatically
enable Night Mode, check the Enable Automatic Night Mode checkbox, enter the start time
in the Begin field, the end time in the End field, and then click the Set button. Click the Close
button to close the window.
Locators & Repeaters—This is an additional tool for handling locator and repeater information;
all options are also available in the Transmitters Register. The following functions are available
to facilitate the handling of locators and repeaters information:
—Displays first record in list.
—Displays prior record in list.
—Displays last record in list.
—Displays next record in list.
Add Button (Alt+A)—Add a new locator or repeater to the system.
Figure 18—Night Mode (F8)
14 • IL815 Tek-CARE®500 Manual
Copyright © TekTone Sound & Signal Mfg., Inc. All Rights Reserved.
System Operating Instructions
Cancel Edit Button (Alt+C)—Cancel all edits made to the displayed data (if Save button
has not been clicked).
Save Button (Alt+V)—Save entered or edited information.
Refresh Button (Alt+H)—Refresh the displayed data to ensure information is current.
Close Button (Alt+L)—Close the Locators & Repeaters Register.
—Click on the print icon (or press Ctrl+P). To print only the selected record, click
Yes, and the record will print immediately. To print all displayed records (filtered by any
searches that have been invoked), click No, and a print preview screen will appear—click
the printer setup button to select which pages to print; click the print button to print
those pages.
Device Info Tab—Provides a place to enter Dev # and Model #, plus:
Status—Indicates the transmitter’s current status, which can be changed to reflect a
different status if appropriate. Drop-down box choices are: normal operation, lost,
missing, tampered, damaged, or in program/test mode.
Date—Located next to Status, this box allows a date to be associated with a particular
status setting.
Used As—The only choice in this drop-down box is: Repeater/Locator.
In Use—To disable a transmitter, uncheck this box. If unchecked, signals from this
device will not be processed, although battery signals will be processed.
Supervised—Use this checkbox to indicate whether a transmitter is supervised (active)
or unsupervised (inactive). Level of supervision is entirely dependent on system size
and settings.
Supervision Interval—Determines how often the transmitter sends a signal to satisfy
the Supervision Timeout function. The following minimum interval settings are suggested
(exceeding these recommendations increases the potential for missed alarm signals):
• Fewer than 200 transmitters:
SF501 Single-Button Call Transmitter—60 seconds (1 minute)
All other devices—5 minutes
• 200 to 1500 transmitters—5 minutes
Supervision Timeout (minutes)—Determines how long the system will wait without
receiving a supervision signal before generating a supervision alarm. This setting is
the maximum period of time that a transmitter can be out of communication with the
system and not generate an alarm. (Not all supervision intervals are available for
every transmitter type.) The following Supervision Interval and Supervision Timeout
settings are recommended; the potential for missed alarm signals is increased if these
recommendations are not followed. For systems that exceed 1000 devices, please call
TekTone® Technical Support at (800) 332-6608.
Total Number
Device
of Devices
Type
1–200
pendant
1–200
wall mounted*
1–200
201–1000
pendant
201–1000
wall mounted*
201–1000
All wall-mounted AC powered devices**
Supervision
Interval
1 minute
5 minutes
12.5 minutes
5 minutes
5 minutes
12.5 minutes
60 minutes
Supervision
Timeout
60 minutes
240 minutes
600 minutes
240 minutes
240 minutes
600 minutes
1440 minutes
*
The Supervision Interval and Supervision Timeout values provided are typical values for
systems of various sizes. These values are intended to provide the highest degree of supervision
available without introducing a high risk of spurious missing-transmitter indications.
Specific results will vary depending upon site conditions that affect the transmission and
reception of RF signals.
* * Options vary among wall-mounted devices.
Copyright © TekTone Sound & Signal Mfg., Inc. All Rights Reserved.
IL815 Tek-CARE®500 Manual • 15
System Operating Instructions
Location—Displays the location of permanently mounted transmitters. An entry is
required in this field if zones will be assigned.
Program Transmitter—After a locator or repeater’s information is entered, connect it
to the NC510 Receiver for programming. See System Installation—Initial
Programming—Programming Transmitters, Locators and Repeaters for more
information. Fields denoted with an asterisk (*) are programmed into the device and
cannot be changed without reprogramming the device. All other fields are editable.
Battery Status Tab—Shows the locator or repeater’s current battery status and includes
these fields to document battery status: Date when first low, Last Changed Date and
Expected Failure Date.
Zones Tab—Assign the locator or repeater to one or more zones, which are used as
report filtering criteria for active and historical call data. All transmitters assigned to the
same resident are automatically assigned to the same zones. See System Operating
Instructions—System Menu—Zones Register to create zones.
Paging Groups Tab—Assign the locator or repeater to one or more paging groups so
that calls are paged in addition to normal call annunciation. (See System Operating
Instructions—Paging Menu and System Operating Instructions—System Menu—Night
Mode (F8) for more information.)
Zones Register—Zones are used as report filtering criteria for active and historical call data.
Define a zone as a geographical area of the facility, and then assign transmitters to the zone.
All transmitters assigned to the same resident are automatically assigned to the same zones.
Figure 19—Zones Register
Figure 20—Edit Proximity Map
16 • IL815 Tek-CARE®500 Manual
Copyright © TekTone Sound & Signal Mfg., Inc. All Rights Reserved.
System Operating Instructions
The following features can be accessed from the Zones Register (refer to Figure 19 for
screen layout):
—Displays first record in list.
—Displays prior record in list.
—Displays last record in list.
—Displays next record in list.
Add Button (Alt+A)—Add a new zone to the system.
Cancel Edit Button (Alt+C)—Cancel all edits made to the displayed data (if Save button
has not been clicked).
Delete Button (Alt+D)—Delete the selected zone from the system.
Save Button (Alt+V)—Save entered or edited information.
Refresh Button (Alt+H)—Refresh the displayed data to ensure information is current.
Close Button (Alt+L)—Close the Zones Register.
—Click on the print icon (or press Ctrl+P) to print the zones list.
Edit Proximity Map—The proximity map is a visual representation of the facility’s floor
plan or layout. If properly set up, it displays the installed locations of fixed devices. If the
system includes locators, the proximity map also displays the general locations of mobile
transmitters, based on locator information. The following features can be accessed from Edit
Proximity Map (refer to Figure 20 for screen layout):
Select Map—Choose from the list of available proximity maps.
New—Generate a new proximity map. Then enter a map name and description, and click
the Load Floorplan button to add a bitmap (.bmp) image of the facility’s layout. The
image must be 500 pixels wide × 300 pixels high (or a 5:3 ratio) to fit properly on the screen.
Delete Map—Deletes the presently selected proximity map.
Save Map—Save entered or edited information.
Print Map—Print the proximity map.
Close—Close the proximity map.
Devices—Place icons on the proximity map to represent fixed devices. Choose from
these icons:
Smoke Detector
Window Open Sensor
Door Open Sensor
Alarm Device
Emergency Device
Motion Detector
Security Device
Locator
Repeater
Detector/Sensor
Wall Mounted Device
Check-In Device
Load Floorplan—Add a bitmap (.bmp) image of the facility’s layout.
Clear Map—Removes all device icons from the map.
The map name and description fields display the selected map’s information, and are data
entry fields when creating a new map.
System Log (F7)—Displays the last 300 functional activities of the Tek-CARE®500 software.
This log is provided as a troubleshooting tool for installers and factory personnel, and is
Copyright © TekTone Sound & Signal Mfg., Inc. All Rights Reserved.
IL815 Tek-CARE®500 Manual • 17
Figure 21—System Log (F7)
Figure 22—System Operation History Log
Figure 23—Database Maintenance Log
18 • IL815 Tek-CARE®500 Manual
Copyright © TekTone Sound & Signal Mfg., Inc. All Rights Reserved.
System Operating Instructions
normally not used by facility staff. Data logging can be disabled in Configuration Menu—
Tek-CARE®500 Options. Refer to Figure 21 for screen layout.
System Operation History Log—Another troubleshooting log, this displays all functional
activities of the Tek-CARE®500 software since installation, or since the log file was last
deleted. This log is provided as a troubleshooting tool for installers and factory personnel,
and is normally not used by facility staff. Data logging can be disabled in Configuration
Menu—Tek-CARE®500 Options. Refer to Figure 22 for screen layout.
Database Maintenance Log—Cumulatively records the functional activity of TekCARE®500’s database maintenance. This log is provided as a troubleshooting tool for
installers and factory personnel, and is normally not used by facility staff. Refer to Figure 23
for screen layout.
Configure Menu
Tek-CARE®500 Options—This menu option displays the Tek-CARE®500 Options window
with the Tek-CARE®500 tab selected. The following features are available:
Tek-CARE®500 Tab—Refer to Figure 24 for screen layout.
Station ID—Factory setting is 1, and must not be changed. This setting is reserved
for future development of multiple station applications.
Facility—Enter the facility’s name here so that it is displayed in the Tek-CARE®500’s
top window bar and on all printed reports.
Password Protected Quit Program Checkbox—If this box is checked, a username
and password must be entered to quit the Tek-CARE®500 software.
Save System Log Checkbox—If this box is checked, the system will maintain a log of
system operation, as described in System Menu—System Log (F7) and System Menu—
System Operation History Log.
Apply Changes Button—Implements changes made on this tab.
Night Mode Settings Tab—This tab’s functions are described in System Menu—Night
Mode (F8).
Passwords Tab—Create the administrator-level password and/or the user-level password
(maximum one of each type), and then click the Set Button. Refer to Figure 25 for screen
layout. The administrator password is required for higher level functions; the user-level
password is used for day-to-day operations (refer to Figure 25a for password access
levels). The system will request the appropriate password when required.
Advanced Tab—Used to adjust both the length of time before checking for missing
transmitters and the time between checks for missing transmitters. Use the default settings
unless told otherwise by TekTone® staff (usually for sites having more than 1000
transmitters). Restart the Tek-CARE®500 system to make the changes effective. Refer to
Figure 25b for screen layout.
Signal Interface Setup—This menu option displays the I/O Interfaces window with the
Signal Interface tab selected. This screen is used to set up the receivers that will be connected
to the Tek-CARE®500 system. One receiver has been set up at the factory. The following
features are available (refer to Figure 26 for screen layout):
Add Button—Begin the process of adding a receiver.
Remove Button—Remove the selected receiver.
Apply/Install Button—Implement entered or edited information.
Cancel Button—Cancel all edits made to the displayed data (if Apply/Install button has
not been clicked).
Copyright © TekTone Sound & Signal Mfg., Inc. All Rights Reserved.
IL815 Tek-CARE®500 Manual • 19
Figure 24—Tek-CARE®500 Options—
Tek-CARE®500 Tab
Figure 25—Tek-CARE®500 Options—
Passwords Tab
Figure 25b—Tek-CARE®500 Options—
Advanced Tab
Figure 26—Signal Interface Setup
Figure 25a—Administrator and User Password Access—items in gray do not require a password
Action
Resident Menu
Assign/Unassign Transmitter
Add New Resident
Delete Resident
Residents/Patients Register
Transmitters Menu
Low Battery
Missing Transmitters
Lost Transmitters
Transmitters Register
Events Menu
Events Monitor
Events History
Paging Menu
Send Page
Paging Groups Register
Pagers Register
System Menu
Night Mode (F8)
Locators & Repeaters
Zones
Edit Proximity Map
System Log
System Operation History Log
DB Maintenance Log
20 • IL815 Tek-CARE®500 Manual
Admin User
yes
yes
yes
yes
yes
yes
yes
yes
yes
yes
yes
yes
yes
yes
yes
yes
yes
yes
yes
yes
yes
yes
yes
yes
yes
yes
yes
yes
yes
—
Action
Configure Menu
Tek-CARE Options
Signal Interface Setup
Paging Interface Setup
Database Setup & Maintenance
Customize Sounds
Help Menu
Exit Menu
Buttons
Events Monitor (F2)
Residents (F3)
Transmitters (F4)
Page (F5)
History (F6)
System Log (F7)
Silence Alarm (Ctrl+A)
Close
Right-Click Menu
Clear Event (Ctrl+C)
Silence Alarm (Ctrl+A)
Proximity Map (Ctrl+M)
Resident Info (Ctrl+R)
Transmitter Info (Ctrl+T)
Mark as Lost (Ctrl+L)
Admin User
yes
yes
yes
yes
yes
—
—
—
—
—
yes
—
yes
yes
yes
yes
yes
yes
yes
yes
yes
yes
yes
yes
yes
yes
yes
yes
yes
yes
yes
yes
Copyright © TekTone Sound & Signal Mfg., Inc. All Rights Reserved.
System Operating Instructions
Select Type Drop-Down Box—Select from these available types of receivers: NC510
Receiver.
COM Port Drop-Down Box—Choose which system COM port the receiver is connected
to.
Receiver Inactivity Timeout—Set how long the receiver is inactive before it generates an
alarm message.
Transmitter model—Set the default transmitter model that is displayed in the Registers
when creating new entries. Default setting is SF501.
Locator model—Set the default locator model that is displayed in the Registers when
creating new entries. Default setting is NC512.
Repeater model—Set the default repeater model that is displayed in the Registers when
creating new entries. Default setting is NC511.
Paging Interface Setup—This menu option displays the I/O Interfaces window with the
Paging Interface tab selected. This screen is used to set up the paging transmitters that will
be connected to the Tek-CARE®500 system. For more information, see System Installation—
Initial Programming—Paging Interface. The following features are available (refer to Figure
27 for screen layout):
Add Button—Begin the process of adding a paging transmitter.
Remove Button—Remove the selected paging transmitter.
Apply/Install Button—Implement entered or edited information.
Cancel Button—Cancel all edits made to the displayed data (if Apply/Install button
has not been clicked).
Select Type Drop-Down Box—Select from these available types of paging transmitters:
Tek-PAGING™.
COM Port Drop-Down Box—Choose which system COM port the paging transmitter
is connected to.
Default Paging Group—Set the default paging group for Night Mode.
Re-page Interval—Set the frequency of pager transmissions for a given event.
Do not send RESET event to pagers—When checked, event/device resets are not
sent to pagers
Disable paging in DAY MODE operation—When checked, automatic paging is not
available in Day Mode.
Enable Re-paging—When checked, a call that is not reset within the Re-page Interval
will be resent to pagers. (Only calls made after re-paging is enabled will be re-paged.
Calls made while the feature is disabled will not be re-paged after it is enabled.)
Send to Pager Drop-Down Box—Choose what information is sent to pagers: Resident
Name and Phone #, or Resident Name and Building & Apt #. If total characters
exceeds 36, the end of the resident’s name will be cut off.
Database Setup & Maintenance—This menu option displays the Database Setup &
Maintenance window with the Database tab selected. This screen is used to set up the
schedule and options for maintaining the database. For more information, see System
Installation—Initial Programming—Set Up Database Maintenance Schedule. The
following features are available:
Database Tab—These settings are either preset or are set up with the initial installation and
should only be changed by qualified personnel. Refer to Figure 28 for screen layout.
Copyright © TekTone Sound & Signal Mfg., Inc. All Rights Reserved.
IL815 Tek-CARE®500 Manual • 21
System Operating Instructions
File—The path to the database file. This cannot be changed.
Auto Display all records—When checked (default), the Residents Register and the
Transmitters Register display all records when opened. When unchecked, the Registers
display no records when opened—enter search criteria to show desired records.
Purge events older than __ months—Determines how long old events are retained
and viewable. Entries beyond this time cannot be accessed via the Events History
window.
Purge Schedule—Used to schedule maintenance options for purging the database of
extraneous data. In order to set up scheduled maintenance, set the password on the
task page. This password must be the same as the password used to log on as
administrator to the NC501 Master Station Computer. Factory default administrator
logon is:
User:
tekcare500
Password: tektone
Automatic backup—Use to create a backup of the current database at a scheduled
interval. Default setting is active.
Figure 27—Paging Interface Setup
Figure 29—Database Setup &
Maintenance—Maintenance Tab
22 • IL815 Tek-CARE®500 Manual
Figure 28—Database Setup &
Maintenance—Database Tab
Figure 30—Customize Sounds
Copyright © TekTone Sound & Signal Mfg., Inc. All Rights Reserved.
System Operating Instructions
Purge backup files older than __ days—Determines how long backed up data will be
retained and available for restoration.
Backup Directory—C:\TekCARE500\data\backup\ is the path to the backup files
directory.
Backup Schedule—Used to schedule automatic backup of the database to
C:\TekCARE500\data\backup\. TekTone® recommends copying the files from the
backup directory to removable media (floppies or CD-Rs) on a regular schedule. In
order to set up scheduled database backup, set the password on the task page. This
password must be the same as the password used to log on as administrator to the
NC501 Master Station Computer. Factory default administrator logon is:
User:
tekcare500
Password: tektone
Maintenance Tab—Displays the current database file location and the path to the current
backup directory. The following options are available (refer to Figure 29 for screen layout):
Backup Database—Creates a manual backup of the current database to
C:\TekCARE500\data\backup\. It is not necessary to create a manual backup if automatic
backup has been set up in Database Tab—Backup Schedule. TekTone® recommends
copying the files from the backup directory to removable media (floppies, USB flash
drives or CD-Rs) on a regular schedule.
Restore Database—Deletes the current database and replaces it with a previous
backup of the database. Choose from a list of valid backup files. This function causes
the Tek-CARE®500 software to automatically shut down and restart. TekTone®
recommends performing Backup Database immediately before Restore Database.
Purge Old Events—Manually deletes events older than the time specified in Database
Tab—Purge events older than__months. It is not necessary to manually purge old
events if an automatic purge schedule has been set up in Database Tab—Purge
Schedule.
Database Clean-up—Removes unnecessary, temporary information from the active
database. It is recommended that this function be performed monthly to ensure efficient
operation of the database. This function causes the Tek-CARE®500 software to
automatically shut down and restart.
Customize Sounds—Use this menu option to customize which sound file is associated with
each event type. Additional sounds have been included with the installation in the directory
C:\TekCARE500\Sounds\. Custom sounds may also be added; they must be the .wav file
type, under 200 kb file size, and placed in the directory C:\TekCARE500\Sounds\.
The following events have associated sound files: Emergency Alarm, Resident Alarm, Security
Alarm, Tamper Alert, Inactivity Alert and Transmitter Missing Alert. Refer to Figure 30 for
screen layout.
Browse for a .wav sound file to associate with this event.
Play the .wav sound file associated with this event.
Help Menu
Tek-CARE®500 Help—An online version of the printed manual.
About Tek-CARE®500—Provides information about software version.
Copyright © TekTone Sound & Signal Mfg., Inc. All Rights Reserved.
IL815 Tek-CARE®500 Manual • 23
System Operating Instructions
Exit Menu
Closes all interfaces and terminates the Tek-CARE®500 software application. No information
will be displayed or logged when the software is not running. (The Alt+X key combination
performs the same function.)
Important Terms
Damaged—The transmitter is not functioning, whether temporarily or permanently. This
state is assigned by the user, and allows the system to ignore transmissions from this device.
This transmitter’s information will continue to be stored in the database.
Lost—The transmitter is still present in the building, but cannot be located. This state is
assigned by the user; and allows the system to ignore transmissions from this device.
Missing—The system is not receiving transmitter supervisory signals. This state is assigned
by the system.
Tampered—The transmitter has been tampered with. Typically indicates that case of
transmitter has been opened. This state is assigned by the system.
Virgin Signal—A signal from a transmitter that hasn’t been reproduced by a locator/repeater.
Device Operation
NC397 Alphanumeric Pocket Pager—Refer to the included owner’s manual for operational
information.
SF501 Single Button Call Transmitter—A water resistant transmitter suitable for use in
showers and bathtubs. The SF501 includes a lightweight neck chain, which will separate to
prevent choking if it is pulled tight.
Place a call—Press and hold the large button on the front of the transmitter for at least 1
second. The SF501 transmitter will transmit the call and its call-assurance LED will blink
rapidly. Every 3 seconds until it is reset, the SF501 will resend the call signal and its callassurance LED will blink.
Reset a call—Use a ballpoint pen or similar device to press the recessed black button on
the back of the transmitter. The transmitter will send a reset signal to the system and its
call-assurance LED will blink rapidly. Call cannot be reset at the Tek-CARE®500 master
station computer; it must be reset in person.
SF502 Wall-Mounted Call Transmitter
Place a call—Press and hold the large button on the front of the transmitter for at least 1
second. The SF502 transmitter will transmit the call once only and its call-assurance LED
will blink rapidly. To transmit the call continually, press and hold the button.
Reset a call—Reset the call at the Tek-CARE®500 master station computer as described
in System Operating Instructions—Events Menu—Events Monitor (F2).
SF527 Wireless Support Module with SF337C Waterproof Emergency Switch
SF528 Wireless Support Module with SF340B Emergency Switch (not waterproof)
SF531/A Wireless Emergency Station
Place a call—Push the red emergency switch down or pull the attached cord. The
transmitter will transmit the call and its call-assurance LED will light.
Reset a call—Push the red emergency switch up. The transmitter will send a reset signal
to the system and its call-assurance LED will go out. Call cannot be reset at the TekCARE®500 master station computer; it must be reset in person.
24 • IL815 Tek-CARE®500 Manual
Copyright © TekTone Sound & Signal Mfg., Inc. All Rights Reserved.
System Operating Instructions
NC397 Pager
SF501
Transmitter
SF527/SF337C & SF528/SF340B
Emergency Switch Assembly;
SF531/A Wireless Emergency
Station
SF529/A Wireless Assistance Call
& Resident Check-In Station
SF502 Transmitter
SF530 Single Patient Station
CHECK-IN
SF529/A Wireless Assistance Call & Resident Check-In Station
Place a call—Push the red emergency switch down or pull the attached cord. The
transmitter will transmit the call and its call-assurance LED will light.
Reset a call—Push the red emergency switch up. The transmitter will send a reset signal
to the system and its call-assurance LED will go out. Call cannot be reset at the TekCARE®500 master station computer; it must be reset in person.
Resident Check-In—Push the check-in button during the scheduled check-in time period.
SF530 Single Patient Station
Place a call—Push the call button at the end of the associated call cord. The transmitter
will transmit the call and the call-assurance LED will light.
Reset a call—Push reset button on the patient station. The transmitter will send a reset
signal to the system and the call-assurance LED will go out. Call cannot be reset at the
Tek-CARE®500 master station computer; it must be reset in person.
Copyright © TekTone Sound & Signal Mfg., Inc. All Rights Reserved.
IL815 Tek-CARE®500 Manual • 25
System Installation ———————————————————
Equipment Installation
Ensure that a site survey has been done by a qualified TekTone® representative. This is a
necessary step to correctly determine what equipment is necessary and where it should be
located. A properly done site survey will also identify potential problem areas in a facility so
that those issues may be addressed. Note: The total number of transmitters must not
exceed 1500.
Connect system components according to Figures 31 and 32. System component descriptions
are below.
System Components
TekTone®’s Tek-CARE®500 Wireless Emergency Call System consists of and/or supports
the following equipment. Each unit is packaged with specific installation, programming and
operating instructions. For more detailed information visit our website: www.tektone.net.
NC501 Master Station Computer—The core component of the Tek-CARE®500 system.
NC510 Receiver—Connected directly to the NC501 Master Station Computer, the receiver
transfers information received from the transmitters in the field to the Tek-CARE®500 master
station computer.
NC511 Repeater—Extends the transmission range of transmitters and locators. An optional
IH511 weatherproof housing is available for indoor or outdoor use with a backup battery.
NC512 Locator—Use to determine the approximate location of roaming transmitters. Not
recommended for use in multi-story buildings. An optional IH511 weatherproof housing is
available for indoor or outdoor use with a backup battery.
Figure 31—PK510 Serial Cable Connection
To 120 VAC 60 Hz
NC510 Receiver
(FA403)
Serial Data Port
Vs
In
Gnd Out
To PC Comm. Port
Red
Green
IL815 PK510 Serial Cable Connection Rev0 082703 1
26 • IL815 Tek-CARE®500 Manual
Copyright © TekTone Sound & Signal Mfg., Inc. All Rights Reserved.
Copyright © TekTone Sound & Signal Mfg., Inc. All Rights Reserved.
IL815 Tek-CARE®500 Manual • 27
PK510 Power Supply &
PC Interconnect Assembly
NC510
Receiver
Power Cord Connector
to 120 VAC 60 Hz
CT430 USB to Serial
Adapter Cable and
CA365 Cable
NC502
PC Alarm
Panel
Phone
Line
NC365A
Pager
Transmitter
Mouse Connector
Parallel Printer Connector
IL815 NC501 Computer Connections Rev1 110806 1
CT430 USB to Serial
Adapter Cable and
CA365 Cable
NC502 PC Alarm Panal
NC365A Pager Transmitter
Keyboard Connector
Video (VGA) Connnector (Monitor)
NC510 Receiver Connector
Figure 32—NC501 Master Station Computer Connections
System Installation
NC365A Paging Transmitter/Control Unit—Connected directly to the NC501 Master Station
Computer, the paging transmitter enables automatic and manual staff paging, when used
with NC397 Pagers.
NC397 Alphanumeric Pocket Pager—Receives automatic and manual paging messages
from the Tek-CARE®500 system, via the NC365A Paging Transmitter/Control Unit.
SF501 Water-Resistant Single Button Call Transmitter—A latching pendant transmitter
with attachable necklace and belt clip, the SF501 places an alarm signal that can be reset only
by pressing the reset button on its reverse.
SF502 Wall-Mounted Call Transmitter—The SF502 places an alarm signal that can be
reset only at the Tek-CARE®500 NC501 Master Station Computer. Includes an attachable
necklace for use as a portable transmitter.
SF505 Wireless Smoke Detector—Transmits an alarm signal when the smoke detector is
activated. The signal will be reset automatically when the detector is clear of all smoke.
NOTE: The Tek-CARE®500 System is not tested as a fire alarm system and is not intended
as a primary means of evacuation.
SF515 Passive Infra-Red Detector—The SF515 is a motion detector that is sensitive to
moving heat (infrared radiation). Can be used as a check-in device or a security device by
monitoring activity.
SF520 Door/Window Egress Transmitter—Use to monitor door and window activity. May
be used as either NO or NC to allow for a variety of applications. Alarms are automatically
reset when returned to normal state.
SF525 Maintained NO Universal Contact Transmitter—Use with a maintained NO switch
for a variety of applications. Alarms are automatically reset when returned to normal state.
SF526 Momentary NO Universal Contact Transmitter—Use with a momentary NO switch
for a variety of applications. Alarms are automatically reset when returned to normal state.
SF527 Wireless Support Module with SF337C Waterproof Emergency Switch—Use in
showers and bathrooms or anywhere a high priority call is desired. Alarms must be reset at
point of origin.
SF528 Wireless Support Module with SF340B Emergency Switch (not waterproof)—Use
where a high priority call is desired. Alarms must be reset at point of origin.
SF529/A Wireless Assistance Call & Resident Check-In Station—Use where a high priority
call and resident check-in is desired. High priority calls must be reset at point of origin.
SF530 Single Patient Station—Use where call cord usage is desired. Alarms must be reset
at point of origin.
SF531/A Wireless Emergency Call Station (not waterproof)—Use where a high priority
call is desired. Alarms must be reset at point of origin.
CT430 USB to Serial Adaptor—Use to convert a USB port on the NC501 Master Station
Computer to a serial COM port.
IH511 Weatherproof Housing—Provides indoor or outdoor mounting of an NC511 Repeater
or an NC512 Locator, plus a BA510 Backup Battery.
IH527 Surface-Mount Single-Gang Plastic Back Box—for SF527/SF337C and SF528/SF340B
Emergency Switch assemblies. To flush mount, use a plastic box that does not interfere with
RF signals.
28 • IL815 Tek-CARE®500 Manual
Copyright © TekTone Sound & Signal Mfg., Inc. All Rights Reserved.
System Installation
PK510 Power Supply and PC Interconnect Assembly—Convenient cable assembly supplies
power to the NC510 Receiver and a serial connection from the NC510 Receiver to the NC501
Master Station Computer.
RP501 Replacement SF501 Accessory Kit—Replacement necklace and belt clip for the
SF501 call transmitter.
SS014 AC Transformer—Replacement transformer and power supply for NC511 Repeaters
and N512 Locators.
Battery Information
BA501—Replacement Battery for SF501
BA502—Replacement Battery for SF502
BA505—Replacement Battery for SF505, SF515, SF520, SF525, SF526, SF527, SF528, SF529/
A, SF530, SF531/A
BA510—Backup Battery for NC511, NC512
Cross Reference Chart of Innovonics and TekTone® Part Numbers
Innovonics
Part #
ACC610
ACC623A
ACC640
ACC643
BAT603
BAT604
TekTone
Part #
SS014
RP501
IH511
PK510
BA510
BA505
BAT608
BAT609
FA202
FA203S
FA206S
FA210
FA210M
FA210W
FA223S-LTH
FA403
FA536
FA570
BA502
BA501
SF505
SF502
SF515
SF525
SF526
SF520
SF501
NC510
NC512
NC511
Description
Replacement AC Transformer for NC511, NC512
Replacement necklace and belt clip for SF501
Weatherproof Housing for NC511, NC512 with BA510
Power Supply/PC Interconnect Assembly
Backup Battery for NC511, NC512
Replacement Battery for SF505, SF515, SF520, SF525,
SF526, SF527, SF528, SF529/A, SF530, SF531/A
Replacement Battery for SF502
Replacement Battery for SF501
Wireless Smoke Detector
Wall-Mounted Call Transmitter
Passive Infra-Red Detector
Maintained NO Universal Contact Wireless Transmitter
Momentary NO Universal Contact Wireless Transmitter
Door/Window Egress Transmitter
Water-Resistant Single Button Call Transmitter
Receiver
Locator
Repeater
Initial Programming
Paging Interface
If the system includes pagers, complete these steps first:
• Connect the NC365A Paging Transmitter to the NC501 Master Station Computer as
shown in Figure 32.
•
Copyright © TekTone Sound & Signal Mfg., Inc. All Rights Reserved.
One paging transmitter has been pre-programmed in the Tek-CARE®500 master station
computer (if ordered with the system). However, due to the dynamic method that MS
Windows® uses to assign USB ports, the pager transmitter may be reassigned a
different COM port (COM2, COM3, etc.) than was pre-programmed. Therefore, whenever the CT430 USB to Serial Adapter Cable is connected or reconnected to the PC,
determine which COM port it has been assigned to—and then remove the existing
paging interface settings and set up a new one (if the COM port has changed):
IL815 Tek-CARE®500 Manual • 29
System Installation
1.
On the MS Windows® desktop, right-click on My Computer and then click on
Properties.
2.
Click on the Hardware tab, click on the Device Manager button, and then click on
the plus sign (+) next to “Ports.”
3.
In the list that appears, note which COM port the “USB to Serial Adapter” (or similar
name) is assigned to.
4.
On the Tek-CARE®500 screen, click on Configure Menu and then click on Paging
Interface Setup. If the Tek-CARE®500 COM Port number is the same as the MS
Windows® Device Manager COM port number, skip step 5. If the two numbers are
different, perform step 5. For more information, refer to Figure 27 and System
Operating Instructions—Configure Menu—Paging Interface Setup.
5.
If the COM port numbers are different, click on the Remove button on the Paging
Interface Setup window. Next, click on the Add button to add a new Paging
Transmitter using the MS Windows® Device Manager COM port number and then
click on the Apply/Install button. Then exit the Tek- CARE®500 program and then
restart it to complete the change.
•
Create Paging Groups as described in System Operating Instructions—Paging Menu—
Paging Groups Register.
•
Set the Default Paging Group (used in Night Mode) as described in System Operating
Instructions—Configure Menu—Paging Interface Setup.
•
Add Pagers to the system and assign them to Paging Groups as described in System
Operating Instructions—Paging Menu—Pagers Register.
Programming Transmitters, Locators and Repeaters
Next, program all transmitters, locators and repeaters and assign valid ID numbers to
them, as follows:
• Valid ID numbers are hexadecimal numbers from 0001–FFFE (for a possible 65,534
addresses). Note: The total number of transmitters must not exceed 1500.
30 • IL815 Tek-CARE®500 Manual
•
For simplicity, assign each device type to a specific range of ID numbers. For example,
assign 0001–0FFF to locators and repeaters, and assign 1000–1FFF to pendant
transmitters.
•
Open the Transmitters Register (F4) and then click the Add button to add the first
device. (See System Operating Instructions—Transmitters Menu—Transmitters Register (F4) for more information.) When finished adding information for this device, click
the Save button. Then click the Program Transmitter button and follow the on-screen
instructions.
•
Open both the receiver and the device being programmed so that their 3-pin programming header and reset buttons are accessible. (SF529/A and SF531/A stations have a
connector on the programming header—note its orientation, and then remove it.)
Connect the receiver’s programming cable from the 3-pin programming header of the
device being programmed to the 3-pin programming header of the receiver. Either end
of the cable may be connected to either device. Push the cable connector onto the 3pin programming header in either direction. The connector must cover all three pins on
the programming header. For SF529/A and SF531/A stations, push the programming
cable’s connector onto the 3-pin programming header, orienting it so that the two
conductors align with the pins previously connected to the pushbutton (SF529/A) or
bridged by the jumper (SF531/A). For header locations, refer to the owner’s manual
included with the receiver and the device being programmed.
Copyright © TekTone Sound & Signal Mfg., Inc. All Rights Reserved.
System Installation
Programming Error: Unable to write new settings into receiver memory. Operation
terminated. If this error message is displayed, the receiver was busy handling
supervision signals from the field. Click the Program Transmitter button to begin
programming again. (This error becomes more common as the number of programmed
devices increases. To avoid this error, remove the batteries and/or power from all
transmitters, repeaters and locators, except the one being programmed—until all
devices have been programmed.)
•
Disconnect the programmed device from the receiver’s programming cable. (For SF529/
A and SF531/A stations, replace the connector on the programming header in its original
orientation.) Repeat this procedure to program the next device.
Adding Residents
Add each resident to the Residents Register (F3), completing all relevant fields including
assigned transmitters. (See System Operating Instructions—Resident Menu—Residents
Register (F3) for more information.)
Set Up Database Maintenance Schedule
Create the database backup schedule and the purge schedule. TekTone® recommends
backup to removable media (floppies or CD-Rs) on a regular schedule. See System
Operating Instructions—Configure Menu—Database Setup & Maintenance—Database
Tab for more information.
Customize the Software
Complete the following menu functions to customize the Tek-CARE®500 software for
your facility:
• System Menu—Night Mode (F8)
• System Menu—Zones Register
• System Menu—Edit Proximity Map
• Configure Menu—Tek-CARE®500 Options—Tek-CARE®500 Tab
• Configure Menu—Tek-CARE®500 Options—Passwords Tab
• Configure Menu—Customize Sounds
If the system includes Central Monitoring, configure it as shown in the Appendix: Central
Monitoring section.
Copyright © TekTone Sound & Signal Mfg., Inc. All Rights Reserved.
IL815 Tek-CARE®500 Manual • 31
System Troubleshooting Guide ——————————————
An accurate site survey is critical to the installation of a trouble-free system. After installation,
if transmissions are not reliably received, another site survey must be performed by a qualified
TekTone® representative. Before beginning this site survey, disable all transmitters, including
locators and repeaters, by removing batteries and other power sources. Perform the site
survey as described in the NC500SK Survey Kit User Manual.
If isolated problems arise with individual transmitters, verify the correct programming
instructions as outlined in System Installation—Initial Setup and Programming—
Programming Transmitters. The following chart lists other possible equipment problems,
their causes and recommended solutions.
Symptom
Transmissions are
not displayed on
screen.
Audio indications
are not heard.
Possible Cause
Solution
No power to the receiver.
Verify that receiver is plugged in.
Verify that receiver is powered by
removing its cover and checking that
the three red LEDs are flashing.
No connection or bad
connection from the
receiver to the PC.
Check the connections between the
receiver and the PC. Verify that comm
port setting in the configuration menu
(signal interface setup) matches the
actual connection.
The receiver is damaged.
Contact TekTone Technical Support.
No power to the speakers
and/or volume is turned
down.
Verify that the speakers are
connected to the PC and have power.
Increase volume. Check MS Windows
volume setting.
No valid audio file has been
selected.
Verify settings in configuration menu
(customize sounds).
No power to the printer.
Verify that printer is connected and
has power.
Printer’s settings are
incorrect.
Check printer driver and configuration
in MS Windows.
No power to the pager
transmitter.
Verify that pager transmitter is
plugged in and red LED is lit.
No connection or bad
connection from the pager
transmitter to the PC.
Check the connections between the
pager transmitter and the PC. Verify
that comm port setting in the
configuration menu (paging interface
setup) matches the actual connection.
Paging groups are not
defined and/or pagers are
not assigned to groups.
Set up groups and assign pagers as
described in manual.
Pager transmitter has been
damaged.
Contact TekTone Technical Support.
Corrupt or altered program
files.
Contact TekTone Technical Support.
Can’t print reports.
Messages are not
sent to pagers.
System
unexpectedly runs
in demo mode.
32 • IL815 Tek-CARE®500 Manual
®
®
®
Copyright © TekTone Sound & Signal Mfg., Inc. All Rights Reserved.
Appendix: Central Monitoring –——————————————
Overview
Central Monitoring (CM) consists of two components: the Central Monitoring Config Tool
and the Central Monitoring Server. The CM Server receives events (such as alarms, resets,
and missing transmitters) from Tek-CARE®500 and then sends them via a USB/serial
connection to the NC502 PC-Alarm Panel (see Figure 32 for connections). The NC502 PCAlarm panel dials the Central Monitoring facility’s telephone number and transmits the
events to the Central Monitoring facility. The CM Config Tool is used to configure the CM
Server; double-click its desktop icon to run it. When the CM Server is running, it is shown as
an icon in the system tray.
Central Monitoring (CM) Server
The CM Server runs as an icon in the system tray. Double-click this icon to show a log of
server events (Figure 33). If the CM Server encounters an error, a pop-up notification
window will appear. If the error is so severe that the CM Server stops functioning, its systemtray icon will display a red X.
After Central Monitoring has been enabled using the CM Config Tool, the CM Server starts
automatically when Tek-CARE®500 starts and shuts down when Tek-CARE®500 shuts down.
Central Monitoring (CM) Config Tool
Double-click the CM Config Tool’s desktop icon to run the program. The CM Config Tool
includes three menus (File, Control and Tools) and three tabs (Event Details, Account Details
and Configuration Details).
File Menu:
Commit Settings—Saves settings to the CM database. If the CM Server is running, it is
shut down and restarted with the new settings.
Reload Settings from Database—Loads saved settings from the CM database, overwriting
any changes just made.
Exit—Exits the program and prompts for changed settings to be saved to the CM database.
Control Menu:
Start/Reboot Server—Starts the CM Server. If the server is already running, it is shut
down and restarted.
Shut down Server—Shuts down the CM Server.
Tools Menu:
List Devices—In the window that appears (Figure 34), select which information to
display for each transmitter device: device number, type, associated resident and/or
location. Click OK to create a list of all devices in the Tek-CARE®500 database, showing
the selected properties for each device (Figure 35), plus each device’s CM ID. The list
opens in a text editor, and can be printed or saved as a text file. This list is used by the
Central Monitoring facility to match the CM ID transmitted with an event to the more
complete information found in the list.
Event Details Tab (Figure 36):
Enable Central Monitoring—When Enable Central Monitoring is checked, the CM
Server starts when Tek-CARE®500 starts, and shuts down when Tek-CARE®500 shuts
down.
Copyright © TekTone Sound & Signal Mfg., Inc. All Rights Reserved.
IL815 Tek-CARE®500 Manual • 33
Appendix: Central Monitoring
Room Numbers—The CM Server responds only to events from the specified list of room
numbers. Click the Import Rooms button to add all room numbers from the Tek-CARE®500
database.
Schedule—If Unscheduled (always active) is checked, the CM Server processes events
whenever it is running. If Unscheduled (always active) is not checked, the CM Server
processes events only during scheduled intervals, when the CM Server is running.
Account Details Tab (Figure 37):
Phone List—When sending an event, the CM Server tries each telephone number in
order, and uses the first one that connects. If that telephone number stops working, the
server continues through the list until it finds another working number. The CM Server
retries once per minute until it connects.
Account Number—This 4-digit number is sent with every event to the Central Monitoring
facility, and is used to identify the event’s originating Tek-CARE®500 facility.
Dialing Options—Use this section to enter a prefix to disable call waiting, to enter a
prefix to access an outside line, or to dial “1” before 10-digit telephone numbers.
Configuration Details Tab (Figure 38):
Alarm Panel COM Port—This is the port to which the NC502 PC-Alarm Panel is
connected. If the wrong port is selected, the CM Server displays an error startup. To
determine which port the NC502 PC-Alarm Panel is connected to:
Click on the Start menu and then click on Control Panel. Double-click on System and
then click on the Hardware tab. Click on Device Manager and then double-click on
Ports (COM & LPT).
The list displayed should include Communications Port (COM1), to which the NC510
Receiver is connected. The list should also include up to two ATEN USB to Serial
Bridge—one connected to the NC365A Pager Transmitter, and the other connected to
the NC502 PC-Alarm Panel.
Starting Central Monitoring
1. Verify that the Tek-CARE®500 system is running. Connect the NC502 PC-Alarm Panel
to the NC501 Master Station Computer as shown in Figure 32.
2. From the desktop, double-click on the Central Monitoring Config Tool.
3. Under the Event Details tab, check Enable Central Monitoring.
4. Click Import Rooms to import rooms to be monitored from the Tek-CARE®500’s
database. Delete from the list those rooms you do not want to monitor.
5. Check Unscheduled (always active) to make Central Monitoring always active.
Otherwise, set a monitoring schedule so that Central Monitoring will be active only
during specified intervals. To add a schedule interval, click the Add button in the
Schedule area, and then set a start day/time and a stop day/time. Each week, Central
Monitoring will be active only between the start day/times and stop day/times of the
intervals specified.
6. Select the Account Details tab. Enter the Central Monitoring facility’s telephone
number and click the Add button.
7. Enter the facility’s 4-digit Account Number, as assigned by the Central Monitoring
facility.
8. Configure Dialing Options as needed, to disable call waiting, to use a prefix to dial an
outside line, or to dial “1” for 10-digit numbers.
34 • IL815 Tek-CARE®500 Manual
Copyright © TekTone Sound & Signal Mfg., Inc. All Rights Reserved.
Figure 33—CM Server
Figure 34—List Devices
Figure 35—Device List
Figure 36—Event Details
Figure 37—Account Details
Figure 38—Configuration Details
Copyright © TekTone Sound & Signal Mfg., Inc. All Rights Reserved.
IL815 Tek-CARE®500 Manual • 35
Appendix: Central Monitoring
9. Select the Configuration Details tab. Select the COM port to which the NC502 PCAlarm Panel is attached:
•
On the MS Windows® desktop, right-click on My Computer and then click on
Properties.
•
Click on the Hardware tab, click on the Device Manager button, and then click on
the plus sign (+) next to “Ports.”
•
In the list that appears, note which COM port the “USB to Serial Adapter” (or similar
name) is assigned to and select that COM port in the Configuration Details tab
of the CM Config Tool. If the system also includes an NC365A Pager Transmitter,
there will be two ports with names similar to “USB to Serial Adapter.” In that case,
on the Tek-CARE®500 screen, click on Configure Menu and then click on Paging
Interface Setup to determine which port the pager transmitter is using. Then assign
the other COM port to the PC-alarm panel in the Configuration Details tab of the
CM Config Tool.
Whenever the CT430 USB to Serial Adapter Cable is connected or reconnected to the
PC, determine which COM port the PC-alarm panel has been assigned to—and modify
this setting if the COM port has changed
10. From the Control menu, select Start/Reboot Server.
11. Click Yes to confirm that the CM Server is to be started and to save changes.
12. When the CM Server starts, its icon will appear in the system tray at the bottom-right
of the screen.
13. The Central Monitoring (CM) Server is now running. It will start automatically whenever
Tek-CARE®500 starts and will shut down whenever Tek-CARE®500 shuts down.
Stopping Central Monitoring
To shut down Central Monitoring manually, either select Shut down server from the Control
menu of the CM Config Tool, or double-click the CM Server icon in the system tray and then
close the window that appears.
To disable Central Monitoring and prevent it from starting with the Tek-CARE®500, uncheck
Enable Central Monitoring in the Event Details tab of the CM Config Tool, select the File
Menu, choose Commit Settings, and click Yes to save the settings.
36 • IL815 Tek-CARE®500 Manual
Copyright © TekTone Sound & Signal Mfg., Inc. All Rights Reserved.