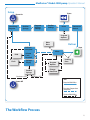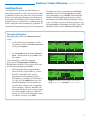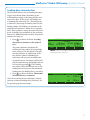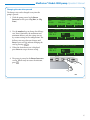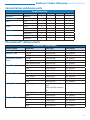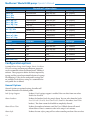
1
f Medfusion® Syringe Infusion Pump Model 4000 Operator’s Manual Software Version V1.1 This manual and its contents are valid for use with software version V1.1 Medfusion® Model 4000 pump Operator’s Manual Technical Assistance The issue date of this manual is included on the back cover. If your manual is a year or more old, contact Smiths Medical to see if a newer manual is available. If you have comments or questions concerning the operation of the Medfusion® Syringe Infusion Pump Model 4000 (Medfusion® Model 4000 pump), please call the appropriate number given below. When calling, please specify your pump’s software version. This information is located on the start-up screen. Our staff at Smiths Medical in the USA is available to help clinicians 24 hours a day with the programming and operation of the Medfusion® Model 4000 pump. Smiths Medical ASD, Inc. 1265 Grey Fox Road St. Paul, MN 55112 USA 1 800.258.5361 (USA), +1 214.618.0218 www.smiths-medical.com A printed copy of this manual is available upon request. ii Medfusion® Model 4000 pump Operator’s Manual Table of Contents Important Safety Information 1 Warnings.................................................................................... 1 Cautions..................................................................................... 4 Symbols...................................................................................... 5 Introduction6 Indications for use.................................................................... 6 Contraindications..................................................................... 7 About the pump 8 Features and Controls.............................................................. 8 Keypad closeup................................................................... 9 Network Connections 11 Ethernet State.................................................................... 11 Wireless State..................................................................... 11 Connected to Toolbox...................................................... 11 Network Configuration.................................................... 11 Attaching the Pump to the Network.................................... 11 Network status.................................................................. 11 Pump Customization and General Programming12 Custom Configuration........................................................... 12 General Programming........................................................... 14 Exceeding limits..................................................................... 14 How pump settings and limits are prioritized.................... 14 User defined pump Configurations..................................... 15 What are Configurations?................................................ 15 When are Drug Programs used?..................................... 15 Who can use these Drug Programs?.............................. 15 Types of programmable Library Categories.................. 15 Using a Custom Configuration............................................. 16 Using Quick Libraries............................................................ 17 PharmGuard™ Safety Software: Dose Protocol Protection..................................................................... 19 Soft limits........................................................................... 19 Hard limits......................................................................... 19 Adjusted limits in reverse............................................ 20 Overridden limits in reverse....................................... 20 Invalid infusion parameter combination.................. 20 PharmGuard™ Supported Syringes (PSS) Series 2............. 21 Navigating the pump menus................................................. 22 The Workflow Process...................................................... 22 Guidelines for enhanced pump performance 24 Always use the smallest syringe for volume of fluid being delivered............................................................ 24 Bolus Volume.......................................................................... 25 Use appropriate internal diameter tubing........................... 25 Programming an Infusion 26 Turn the pump on.................................................................. 26 Turning the pump off....................................................... 27 Selecting a Delivery Mode and Programming an infusion........................................................................ 28 General Infusion Programming Procedure.................. 29 Selecting an Infusion.............................................................. 30 Select a Profile (Custom Configuration)....................... 31 Select a Category.......................................................... 32 Select a Drug Program................................................ 32 Select a Delivery Mode (Medfusion™ Standard Configuration).............................................................. 33 Loading a syringe and syringe model setup........................ 34 Unloading the syringe................................................. 38 Programming Infusions........................................................ 39 Continuous mode: mL/hr............................................... 39 Dose / Min and Dose / Hr............................................... 40 Dose / Day......................................................................... 42 Dose / Time....................................................................... 44 Body weight/surface area infusion deliveries............... 46 Volume / weight infusions............................................... 48 Dose/kg/time (dose/m2/time)......................................... 50 Volume / weight / time..................................................... 52 Volume / time.................................................................... 54 Intermittent volume / time ............................................. 55 Recall last settings............................................................. 57 Priming the system................................................................. 59 Options61 Bolus dosing............................................................................ 62 Bolus programming......................................................... 62 Bolus delivery.................................................................... 64 Continuing an interrupted bolus dose...................... 65 Bolus dose rate reduction................................................ 66 Loading doses......................................................................... 67 Set up loading dose........................................................... 67 Delivering a loading dose................................................ 69 Continuing an interrupted loading dose.................. 70 Loading dose rate reduction............................................ 71 Volume limit .......................................................................... 72 Setting volume limit ........................................................ 72 Keep Vein Open (KVO) rate................................................. 74 Programming KVO rate.................................................. 74 Standby.................................................................................... 76 Programming standby..................................................... 76 Delayed start........................................................................... 78 Programming delayed start............................................. 78 Periodic callback alarm......................................................... 79 Programming periodic callback alarm.......................... 79 Override and toggle features................................................. 81 Change to Dose / Change to Volume ............................ 81 Override occlusion limit ................................................. 82 Override alarm loudness................................................. 83 Disable/enable FlowSentry™............................................ 84 Disable/enable near empty alarm tone.......................... 84 Disable/enable vol empty alarm tone............................. 85 Infusion Delivery 86 Starting & stopping infusion delivery.................................. 86 Start delivery from pause................................................. 86 Starting delivery from standby or delayed start............ 87 Stopping delivery......................................................... 87 Continuing interrupted delivery................................ 87 Flush feature............................................................................ 88 Volume only...................................................................... 88 Continuing an interrupted flush infusion................ 89 Volume and time............................................................... 90 iii Medfusion® Model 4000 pump Operator’s Manual Time to occlusion................................................................... 92 Occlusion trend graph during delivery............................... 92 FlowSentry™ (rapid occlusion detection)...................... 92 Post occlusion bolus reduction ...................................... 93 Making changes during delivery.......................................... 94 Changing delivery rate..................................................... 94 Changing rate during delivery................................... 94 Changing the rate when paused................................. 95 Total volume, program volume / dose delivered................ 96 Displaying “Program Volume Delivered” (PVD) / “Program Dose Delivered” (PDD) ............................ 96 Clearing total volume, program volume, or program dose delivered............................................... 97 Keypad lock ............................................................................ 98 Alarms & remedies 99 Alarms / alerts types.............................................................. 99 Re-displaying an alarm message................................... 100 “User Callback” alarm ......................................................... 101 Syringe Empty Alarm Process............................................ 101 “Syringe Near Empty” alarm......................................... 101 “Syringe Volume Near Empty” alarm.......................... 101 “Syringe Empty” alarm.................................................. 102 System Advisory - Maintenance is Recommended......... 102 System Failures..................................................................... 102 General system alarms & alerts.......................................... 103 System Failure and Advisory Alarms................................. 107 Battery Alarms................................................................ 107 System Failure Alarms................................................... 108 System Advisory Alarms................................................ 108 Update(s) Available Notification........................................ 110 Battery and AC power operation 111 Poleclamp assembly & use 113 On screen display of internal battery power level gauge......................................... 112 Battery guidelines .......................................................... 112 Rotating/detachable poleclamp (standard)....................... 113 Assembling the rotating/detachable poleclamp......... 114 Assembling the stationary poleclamp.......................... 115 EMC information for the Medfusion® Model 4000 pump........................................................................... 116 Use of cables.................................................................... 116 Stacked equipment......................................................... 116 Technical specifications & other information 117 Pump development standards............................................ 117 Medical Electrical Equipment Safety........................... 117 Electromagnetic Compatibility..................................... 117 Miscellaneous Standards................................................ 119 Compliance using:.......................................................... 120 IEEE 802.11 b,g Radio for Auxiliary Communication......................................................... 123 Technical specifications....................................................... 124 Specifications................................................................... 124 Safety Features 128 Safety Features and Fault Detection................................... 128 Hardware Safety Features.......................................... 128 iv Software Safety Features...................................................... 128 Hardware-related Software Safety Features............ 128 Program Memory - Check FLASH memory POST or BGND...................................................... 128 RAM Memory Check - RAM BGND ..................... 128 Motor Circuit Check - pump motor phase A or B POST and Motor rate error during operation... 128 Keyboard Encoder Check - Control key POST or BGND ................................................................ 128 Data Handling Software Safety Features........................... 128 Data Stored in EEPROM - Critical data POST or EEPROM timeout or Primary/Secondary critical data corrupted........................................... 128 Data Used in Calculations - Critical data failure... 128 Timer Data Registers - Time base BGND, time of day clock POST, time of day clock timeout ....... 129 Additional Technical Information 130 Limited Warranty Index 146 147 Medfusion™ Standard Syringes........................................... 130 PharmGuard™ Supported Syringes (PSS) Series 2...... 130 Flow rate & minimum volume by manufacturer & size - Standard syringes......................................... 131 Concentration and dosing units ........................................ 133 PharmGuard™ software limits............................................. 133 Configuration options......................................................... 134 General Options.............................................................. 134 Program Options............................................................ 136 Auto Prompt Options..................................................... 137 Device Setup Features.................................................... 138 Flow Delivery Graphs.......................................................... 138 Start-up curves over stabilization period................ 139 Trumpet curves over T2 period............................... 139 Communications ................................................................. 140 Magnetic Resonance Imaging (MRI) Information.......... 140 MRI Related Testing....................................................... 140 Image Distortion............................................................. 140 Cleaning and care................................................................. 141 Maintenance & service........................................................ 142 Periodic maintenance..................................................... 142 Using Smiths Medical USA service assistance............ 143 Returning a pump to the USA for repair..................... 144 Collect Separately................................................................. 145 Medfusion® Model 4000 pump Operator's Manual Important Safety Information WARNING: Read this entire manual before using the Medfusion® Syringe Infusion Pump, Model 4000 (Medfusion® Model 4000 pump). Failure to follow the instructions and important information contained in this manual, or improper/inadequate troubleshooting can lead to death or serious injury. Warnings, cautions and other important safety information can be found in this section, and throughout the manual (they are contained within lines above and below in the main part of the manual). See the Alarms and Remedies section for information on troubleshooting pump alarms. The term WARNING is used in this manual to indicate a hazard that has the potential to cause injury or death to a patient or user. The term CAUTION is used to indicate a hazard that has the potential to cause damage to the product or other property. • • Warnings • To avoid risk of explosion, never use pump in presence of flammable anesthetics, oxygen-enriched atmospheres, or explosive gases. • Due to risk of explosion, never use this pump inside a hyperbaric chamber. If the patient is placed in a hyperbaric chamber while connected to a pump located outside the chamber, delivery accuracy can be affected. Due to pressure changes on the IV tubing, under-delivery can occur during compression, and over-delivery can occur during decompression. • Medical Electrical Equipment needs special precautions regarding EMC and needs to be installed and put into service according to the EMC information provided. • Portable and mobile Radio Frequency (RF) communications equipment can affect medical electrical equipment. • This equipment has been tested and found to comply with the limits for a Class A digital device, pursuant to part 15 of the FCC rules. These limits are designed to provide reasonable protection against harmful interference when the equipment is operated in a commercial environment. This equipment generates, uses, and can radiate radio frequency energy and, if not installed and used in accordance with the operator's manual, may cause • • • • • • • harmful interference to radio communications. Operation of this equipment in a residential area is likely to cause harmful interference in which case the user will be required to correct the interference at his own expense. This equipment/system is intended for use by healthcare professionals only. The equipment/system may cause radio interference or may disrupt the operation of nearby equipment. It may be necessary to take mitigation measures, such as re-orienting or relocating the Medfusion® Model 4000 pump or shield the location. The unauthorized modification of this product may constitute a safety hazard, which could lead to patient injury or death, as well as the potential for property damage (including the risk of fire). Use only Smiths Medical supplied service/replacement parts, including the battery pack. Unauthorized modification and/or the use of unauthorized service/replacement parts will also void the Limited Warranty. This device contains an RF transmitter which may interfere with aircraft systems. Before using any Medfusion® Model 4000 pump, users must be thoroughly familiar with the contents of the operator's manual, including all warnings, cautions, and instructions for use. This syringe infusion pump is intended for use only under the direction of trained medical professionals. Do not use on the inlet side of Extracorporeal Membrane Oxygenation (ECMO) systems where the negative pressure is greater than negative 100mm Hg as the high negative pressures can result in uncontrolled fluid flow. The user should ensure that the performance offered by the pump is fit for the intended use and that the pump is not used in any way or for any purpose other than its intended purpose. This pump is not to be used in any intra-articular space infusion. The pump must be positioned in an MR environment such that it is secured to a non-moveable object and the magnetic fringe field does not exceed 1 Medfusion® Model 4000 pump Operator's Manual 150 gauss. Exposing the Medfusion® Model 4000 pump to magnetic fields that exceed 150 gauss presents a risk of becoming a projectile hazard and can lead to possible patient injury or death. Irreversible damage to the pump can also occur, rendering it inoperable. • Confirm All Settings. Before starting any delivery, always confirm the accuracy of all infusion values to the original order. Programming the pump at a delivery rate other than that prescribed will cause inappropriate delivery. • Always read manufacturer precautions and guidelines for medications, fluids, syringes and administration sets used with this pump. Medications or fluids may interact with the plastic components of the infusion syringe and sets. • Only use the Medfusion™ Standard Syringes (supplied with PharmGuard® Toolbox 2, and included in the Medfusion™ Standard Configuration), or the models and sizes available as part of the PharmGuard™ Supported Syringes (PSS) Series 2, and always confirm that the syringe model and size displayed on the pump matches the model and size loaded into the pump. Use of unapproved syringes may cause improper pump operation resulting in inaccurate fluid delivery or occlusion sensing or other potential hazards. • Verify that the plunger holders securely capture the syringe plunger. Make sure to capture the syringe barrel and flange. Failure to properly secure the syringe could result in uncontrolled fluid flow to the patient. • Always use the Prime function on the pump when loading a new syringe in order to remove any mechanical slack. Failure to prime correctly can delay infusion delivery and cause Total Volume Delivered to read higher than what is actually delivered to the patient. • Periodically check the fluid pathway and all connections (including the catheter/administration set connection) for leaks. Leaks in the system may cause fluid loss resulting in under-delivery, as well as allowing an opening for contamination. • Always turn off fluid flow to patient in tubing via clamp or stopcock before loading or unloading a syringe. Uncontrolled fluid flow can occur when infusion set is not clamped or turned off resulting 2 • • • • • • • in inappropriate delivery rate. NEVER prime any syringe while connected to a patient infusion site, as this may cause over-infusion. To avoid air embolism, always purge all air from syringe and infusion lines before connecting to the patient. Once the syringe and tubing system is connected to the patient, raising the system above the patient (even briefly) can cause significant bolusing due to changes in hydrostatic pressure. Lowering the system below the patient (even briefly) can cause significant interruptions in flow due to changes in hydrostatic pressure. This could cause improper pump operation resulting in inaccurate fluid delivery. Place the pump as close to the patient's infusion site as possible. Use the smallest syringe size necessary to deliver the fluid or medication. Using a large syringe at very low rates (below Minimum Recommended Rate for the syringe) may cause improper pump operation, delayed occlusion sensing, larger post occlusion bolus at higher occlusion limit settings, delivery inaccuracies, or other potential hazards. Bolus Volume: Delivering a bolus volume less then the recommended bolus volume for the syringe used may result in delivery inaccuracies. Use an infusion set with the smallest diameter tubing available that does not result in excessive back pressure at the desired flow rate. Consider priming, loading, bolus, and flush rates when selecting an infusion set. Larger size syringes at occlusion setting HIGH may produce a post occlusion bolus larger than 0.3 mL due to excessive syringe plunger tip compliance. When using Quick libraries, preset values are automatically inserted without pausing to verify each setting. The Begin Infusion screen displays immediately after selecting/confirming the drug program. Verify the infusion parameters before starting the delivery. Certain data fields may not be programmed (e.g. patient weight) and require data entry before the infusion will proceed. If a system failure alarm occurs and cannot be cleared by powering the pump down then back up, the pump cannot be used. Remove it from use Medfusion® Model 4000 pump Operator's Manual • • • • • • • • and send it to a trained biomedical technician for service. Electric Shock hazard. The only means of removing AC power is to disconnect the AC power cord. While the AC power cord is attached to the pump and plugged into an AC outlet, live mains voltage is present inside the pump. Ensure that the ± 2% accuracy specification (± syringe accuracy) is taken into account when programming the pump and/or filling a syringe. If accuracy is of prime concern, use only syringes that meet the ± 2% requirement of the ISO 7886-2 Standard. Failure to do so may result in medication in the syringe becoming depleted sooner or later than expected. Use of cables other than as listed and with equipment other than those specified may result in increased EMC emissions or decreased immunity of the pump. It is recommended that when connecting the pump to a network using an Ethernet cable, the network equipment should conform to EN/IEC 60950. The pump should not be used adjacent to or stacked with other equipment. If adjacent or stacked use is necessary, the user should verify normal operation of the pump in the configuration in which it is to be used. To avoid electric shock, before cleaning, always switch electrically operated equipment off and disconnect from AC power source. To avoid electric shock, only trained biomedical service personnel may service this pump. Service personnel should disconnect the AC power cord before servicing the pump. Always maintain this pump following manufacturer recommended instructions in the Technical Service Manual. Improperly maintained pumps may cause either under-infusion or over-infusion to patient. To avoid electric shock, users should never open the pump case or battery compartment for any reason. Service personnel should always disconnect the AC power cord before servicing the pump. • Never use a dropped or obviously damaged pump. Withdraw it from service until a trained biomedical technician can test it. • There are potential health hazards associated with improper disposal of batteries, electronics, and contaminated (used) infusion sets and syringes. Dispose of used batteries, infusion sets, syringes, and other used accessories, or a pump that has reached the end of its useful life, in an environmentally safe manner, and according to any regulations that may apply. 3 Medfusion® Model 4000 pump Operator's Manual Cautions • Federal (USA) law restricts this device to sale by or on the order of a physician. • ALWAYS verify that the software version of the pump (displayed on screen during power-up) and Operator's Manual are the same. Refer to this manual’s front page. • NEVER use sharp objects to depress keypad keys on the pump. This may damage the pump by rendering keypad keys inoperable. • This pump is designed to be used in a horizontal position. If the pump is operated in a vertical position, there is an increased potential for fluid leaking into the pump. If fluid leakage into a pump is suspected, remove it from use until a trained biomedical technician can test it. • Always verify the stability of the object to which the pump is mounted (for instance, an IV pole) using the poleclamp. Failure to verify the stability could cause the object to tip, with the possibility of causing damage to the pump and other equipment If the poleclamp is not adequately tightened, it could cause the pump to fall. • NEVER use organic solvents (e.g., acetone), quarternary ammonia compounds, strong acids, or bases to clean any portion of the pump as these compounds may damage the pump. • The pump is “spray resistant” from the top and sides but not “water proof ”. NEVER spray cleaning or other fluids directly into openings on the bottom of the pump as pump damage may occur. • The pump is not certified “waterproof ”. Never immerse the pump in water or other fluids as this can render the pump inoperable. • NEVER use light oil sprays (e.g., WD40®) to clean or lubricate pump. These oils contain chemicals that can damage the plastic of the pump. No useradded lubrication is necessary. • NEVER sterilize the pump in a steam autoclave or gas sterilizer. Using autoclave or gas sterilization can seriously damage the pump and will void the warranty. 4 Medfusion® Model 4000 pump Operator's Manual Symbols The following is a list of symbols which may appear on the pump (or on its labeling or accessories), as well as certain technical terms, along with an explanation of what they mean. > Serial number J Type CF equipment (protection from electric shock) Class II Equipment in which protection against electric shock relies on double or reinforced insulation instead of basic insulation. Accessible metal components of pump enclosure use this higher level of insulation instead of safety grounding. Date of manufacture CAUTION: Federal (USA) law restricts this device to sale by or on the order of a physician. Catalog number Latex free f K J 6 < nol 7 8 P _ i ED WD V~ IPX3 Caution î CCK Ü Z Non-ionizing radiation MR (Magnetic Resonance) Conditional Australian c-tick mark. Indicates that the product complies with the applicable standard and establishes a traceable link between the equipment and the manufacturer, importer or their agent responsible for compliance and for placing it on the Australian or New Zealand market. Pins of connectors and other areas identified with this ESD Warning symbol should not be touched. Connections should only be made when ESD precautionary measures are used. Collect Separately For an explanation of the symbols that appear on the pump keypad, see “Keypad Closeup” and the tables that follow (page 9). Do not reuse Use by UL Mark for Canada and the United States. Indicates the product was manufactured in accordance with the requirements of UL (Underwriter’s Laboratory). Temperature limitation Humidity limitation Atmospheric pressure limitation E=Wired Connection, D=Device Server Connection W=Wireless connection, D=Device Server Connection Operating voltage range for alternating current (i.e. AC or mains) power source Equipment that is ingress protected from fluid spraying at a vertical angle from above, and from angles to 60° on either side of vertical 5 Medfusion® Model 4000 pump Operator's Manual Introduction CAUTION: ALWAYS verify that the software version of the pump (displayed on screen during power-up) and Operator's Manual are the same. Refer to this manual’s front page. The Medfusion® Model 4000 pump is a small, lightweight and portable syringe infusion pump. The pump offers a variety of delivery modes programmable to meet specific patient care needs. The actual modes available in a given pump, and their location on a given screen, depend on the custom setup. Fluids can be delivered from a variety of syringe sizes (1-60 mL) and syringe manufacturers in various delivery modes. The Medfusion® Model 4000 pump is equipped with PharmGuard® Medication Safety Software, an intuitive system designed to enhance safety while maintaining simplicity, which can allow streamlined implementation and improved work flow. A pump Configuration is created on a PC using the PharmGuard® Toolbox 2 software, and then the Configuration is sent to the pump. The Configuration may contain global settings, Profile definitions, library definitions, Drug Programs and syringe definitions (see page 15 for discussion about libraries). The Medfusion® Model 4000 pump imports and exports data to assist in history data management. The pump communicates with the PharmGuard® Server using Wireless and Ethernet interfaces. With its wired or wireless Ethernet connection, bi-directional communication of Configuration and infusion data is possible to and from the Medfusion® Model 4000 pump via your institution’s network. Pump Configurations and firmware can be updated, and infusion settings and events history downloaded in combination with the PharmGuard® Toolbox 2 software application and the PharmGuard® Server. The pump also has the FlowSentry™ rapid occlusion detection feature, which is a comprehensive array of pressure-related safety features, including rapid alarm response and reduced false alarms. Pressure trending is shown in the pump display, allowing earlier opportunities for intervention, as well as a post-occlusion bolus reduction feature. 6 Indications for use The Medfusion® Model 4000 Syringe Infusion Pump is indicated for the following uses: • In the administration of fluids requiring precisely controlled infusion rates including blood or blood products, lipids, drugs, antibiotics, enteral solutions and other therapeutic fluids. • By the following delivery routes: arterial, epidural, intravenous, intrathecal, subcutaneous, and enteral. • By the following delivery modes: continuous, volume/time, mass, body weight, intermittent and bolus. • In critical care, anesthesia, neonatal and pediatric applications or other healthcare settings where the use of the syringe infusion pump can be monitored or supervised by a clinician. • Inside the MRI room mounted outside the 150 Gauss line and with shielded magnets of field strength of 1.5 Tesla. WARNINGS: • Before using any Medfusion® Model 4000 pump, users must be thoroughly familiar with the contents of this Operator’s Manual, including all warnings, cautions, and instructions for use. • The user should ensure that the performance offered by the pump is fit for the intended use and that the pump is not used in any way or for any purpose other than its intended purpose. • This pump is not to be used in any intra-articular space infusion. • This syringe infusion pump is intended for use only under the direction of trained medical professionals. • If the pump is used to deliver life-sustaining medications, an additional pump must be available for situations where an interruption in infusion could be dangerous. • The pump must be positioned in an MR environment such that it is secured to a non-moveable object and the magnetic fringe field does not exceed 150 gauss. Exposing the Medfusion® Model 4000 pump to magnetic fields that exceed 150 gauss presents a risk of becoming a projectile hazard and can lead to possible Medfusion® Model 4000 pump Operator's Manual patient injury or death. Irreversible damage to the pump can also occur, rendering it inoperable. CAUTION: NEVER use sharp objects to depress keypad keys on the pump. This may damage the pump by rendering keypad keys inoperable. • Only the Medfusion™ Standard Syringes (supplied with PharmGuard® Toolbox 2, and included in the Medfusion® Standard Configuration), or the additional syringe models and sizes available as part of the PharmGuard™ Supported Syringes (PSS) Series 2 (see page 21), may be used on the pump. • Ensure all medications or fluids are compatible with the syringe, catheters, tubing, and fittings used in the infusion setup. • Always ensure fluids are compatible with each other when infusing more than one fluid or medication through the same infusion site. If connecting more than one pump to the same infusion site, use one-way checkvalves to prevent pumps from interfering with each other. Verify that the pumps will operate together without alarming. Contraindications WARNING: ECMO use: Do not use on the inlet side of Extracorporeal Membrane Oxygenation (ECMO) systems where the negative pressure is greater than negative 100mm Hg as the high negative pressures can result in uncontrolled fluid flow. 7 Medfusion® Model 4000 pump Operator's Manual About the pump Features and Controls Following are several illustrations showing the various controls, connectors and features of the Medfusion® Model 4000 pump. * * PRIME / BOLUS 1 Display: all pump operating and status information appears on the display. The lower portion of the display corresponds with the 4 ‘softkeys’ (their function changes depending on the pump programming being accomplished) on the keypad. 2 Tubing Holders: Thread infusion set tubing between holders to prevent kinking at syringe tip. 3 Carrying Handle 4 Syringe Barrel Clamp: The clamp holds the syringe barrel securely in place. 5 Syringe Barrel Flange Clip: When loading a syringe, slide the syringe flange into the clip. 6 Syringe Plunger Holders: Holds the syringe plunger securely in place. 7 Syringe Plunger Driver: Once loaded and delivery is started, the driver pushes the plunger forward at a controlled, precise rate to deliver fluid. 8 8 Syringe Plunger Release Lever: Squeeze the release lever to allow placement of the syringe plunger onto the holder during loading, or to remove it during unloading. 9Keypad: See Keypad closeup (next page) for identification of the individual keypad keys and what they are used for. Medfusion® Model 4000 pump Operator's Manual 10 AC Power Connection Port: Plug the AC power cord into connection port to allow pump to operate on AC (mains) power. 11 Ethernet Port: Plug an Ethernet network cable into the port to receive and send Configurations and data. 12 Optional Poleclamp Mount: If desired, attach the optional poleclamp here. 13 Pump Base / Bottom Keypad closeup PRIME / BOLUS G6000912 Rev 0 9 Medfusion® Model 4000 pump Operator's Manual Key í) Alarm Silence ( ë) Power ( Menu keys (softkeys) Back (â) Numbers & Decimal á) Start (É) Stop ( è) Prime / Bolus ( Indicator ò - Alarm ô - AC Line õ - Battery ö - Lock ù - Infusing When pump is paused Silences audible alarm. Allows operator to switch the display backlight from bright to dim or dim to bright. Allows redisplay of the text for the last active alarm. Silence certain active alarms. Push and hold to turn pump off. Function is defined on the display. Reverts to a previous step or level. Set number values or selects menu items. N/A When pump is delivering Silences audible alarm. Allows operator to switch the display backlight from bright to dim or dim to bright. Silence certain active alarms (some alarms must be silenced with before will function). Push and release, then push and hold to turn pump off. Function is defined on the display. Reverts to a previous step or level if adjusting settings. Briefly displays the battery life indicator, network connection type, data server status and PDD/PVD. Set number values or selects menu items. í ë Stops delivery (pump remains on). Starts delivery. N/A Begins priming after confirmation. Displays the programmed bolus programming or confirmation/Begin Delivery screen. What it means The Alarm indicators (yellow or red) are on whenever the pump is in an alarm condition. The specific details of each alarm are covered in the Alarm section later in this manual. The AC Line indicator (green) is on whenever the pump is connected to “mains” line power. It is off when the pump is not connected to an active AC line. The Battery indicator (green) blinks on & off whenever the pump is operating on internal battery power, and remains on when battery is charging. The Lock indicator indicates the pump has been locked into its current operational mode. While this indicator is lit, the keypad is locked and no changes can be made to settings. Attempting to stop or change an infusion while locked will result in an alarm and an informational message. The Infusing indicators are 3 green lights, which illuminate in sequence right to left when the pump is infusing. During intermittent volume over time delivery mode, a single Infusing indicator lights during the time between infusions. 10 When the pump is off or stopped, the Infusing indicator is not lit. The Communicating indicator (blue) is on whenever the pump is communicating with - Communicating the PharmGuard® Server using wireless or wired interface. There is no audible tone associated with communications. During normal network operations the light may periodically turn on and off. The Communicating indicator has no affect on clinical operations of the pump. Medfusion® Model 4000 pump Operator's Manual Network Connections The pump can be connected to the PharmGuard® Server and/or to the PharmGuard® Toolbox 2 Software. When the pump is connected to the network, there are two connectivity states: Wireless and Ethernet. Ethernet (wired connection): When the pump is connected to Ethernet, it automatically defaults to communicating over Ethernet. Wireless: When an Ethernet connection is not present (and the Wireless Interface is enabled), the pump communicates via Wireless. The blue “Communicating” light is on whenever the pump is communicating with the PharmGuard® Server using wireless or wired interface. Note: To set up a network configuration, see the procedure provided in the Medfusion® Model 4000 Network Settings Manual (“Network Configuration”), the instructions provided with the PharmGuard® Server, and work with your IT personnel as needed. through a simple command line interface from a telnet client program. The pump accepts incoming connections from the network using telnet. The telnet configuration interface supports a user definable telnet password. The pump must have External Commands enabled in biomed mode to use telnet. Attaching the Pump to the Network See the Medfusion® Model 4000 Network Settings Manual for instructions in how to attach the pump to the network. Network status Briefly display the network status at any time while the pump is infusing by pressing â. Example of communications state icon Ethernet State The pump displays the ‘ED’ icon when the pump is connected to the PharmGuard® Server using the Ethernet connection. First an ‘E’ icon is displayed when the Ethernet connection is established, then an ‘ED’ icon when the connection to the PharmGuard® Server is also established. B-D 100% 60ml PVD RATE LOCK CHG RATE OPTIONS E 0.55 mL N 10 mL/hr CLEAR TVD Wireless State The pump displays the icon ‘WD’ when the pump is connected to PharmGuard® Server using a Wireless connection. First a ‘W’ icon is displayed when the Wireless connection is established, then a ‘WD’ icon when the connection to the PharmGuard® Server is also established. Connected to Toolbox When External Commands are enabled in Biomed mode, the pump can be connected to PharmGuard® Toolbox 2. Network Configuration The Medfusion® Model 4000 pump provides a telnet server to enable performance of configuration tasks 11 Medfusion® Model 4000 pump Operator's Manual Pump Customization and General Programming Custom Configuration Generally speaking, pump customization is performed before a pump is used on a patient (see the graph on page 13). Customization is accomplished using PharmGuard® Toolbox 2. Once the custom Configuration is created and validated, PharmGuard® Toolbox 2 or the PharmGuard® Server is used to send it to one or more pumps. When sending Configurations using the PharmGuard® Server, all Medfusion® Model 4000 pumps configured to communicate with the PharmGuard® Server will receive the Configuration. Depending on the settings and features chosen in customization, certain features may or may not be available when programming any specific pump. Each user is responsible to determine which features are present on the pump they are using and to program them accordingly. For this reason, the following warning is included throughout the steps for programming and delivering fluids throughout this manual: WARNING: Confirm All Settings. Before starting any delivery, always confirm the accuracy of all infusion values to the original order. Programming the pump at a delivery rate other than that prescribed will cause inappropriate delivery, which can result in serious injury or death. 12 Medfusion® Model 4000 pump Operator's Manual ® Medfusion 4000 Infusion Pump “Medfusion™ Standard Configuration” includes manual delivery modes and a variety of syringes. No Drug Programs or Options are available in the Standard Configuration PharmGuard® Toolbox V2 Create a custom Configuration (settings and Drug Programs), validate Configuration, then send to pump using PharmGuard® Toolbox or PharmGuard® Server (see the product literature supplied with these products for more information) ® Medfusion Model 4000 Pump With Custom Configuration Send Configuration Types of Delivery Modes Possible Dose / Day Dose / Hour Dose / Kg / Day Dose / Kg / Hr Dose / Kg/ Min Dose / m2 / Day Dose / m2 / Hr Dose / m2 / Min Dose / Min Dose / Time Intermit Volume / Time mL / Hr mL / Kg / Hr mL / Kg / Min mL / Kg / Time Volume Over Time Dose / Kg / Time Dose / M2 / Time Other mode: Recall Last Settings These are the types of infusion modes possible. Some are manual (in that they can be used in Drug Programs or can be menu items on their own), while others can only be used in the creation of Drug Programs (such as Dose / Kg / Time and Dose / M2 / Time) Flush feature may be used in some modes Possible Options The Customization Process Bolus Dose Delayed Start KVO Loading Dose Override Alarm Loudness Override Occlusion Limit Periodic Callback Alarm Standby Toggle Empty Tone Toggle FlowSentry Toggle Near Empty Tone Toggle PVD / PDD Volume Limit Not all options are available in all delivery modes or Drug Programs 13 Medfusion® Model 4000 pump Operator's Manual General Programming The Medfusion® Model 4000 pump has a variety of delivery modes that are customizable by the user. The actual modes available on a given pump, and their location on a given screen, depend on the custom setup performed. All customization is accomplished using the PharmGuard® Toolbox 2 software, including which syringes and features are available on the pump, as well as hard and soft limits on values (see below and page 19 for discussion about hard and soft limits). The modes and programming steps described in this chapter, and the steps given for programming them, are based on general setup parameters. Which of the features and functions are available on a specific pump, and how the screens associated with them appear, depends entirely on how the pump was customized. If the functions and screens on a pump look different than those shown here, it is due to this customization. It is possible that a pump is customized so that an infusion cannot be programmed without first entering a user ID, or so that certain profiles cannot be accessed without first entering a passcode. If that is the case, you will be prompted to enter an ID or a passcode when attempting to program an infusion. WARNING: Always read manufacturer precautions and guidelines for medications, fluids, syringes and administration sets used with this pump. Medications or fluids may interact with the plastic components of the infusion syringe and sets. This interaction may result in serious injury or death. Exceeding limits The pump has two types of programmed infusion limits, Hard limits and Soft limits. • Hard Limits – Values that cannot be exceeded under any conditions. Hard limits show up as Max and Min on the pump. If you try to exceed a hard limit, a screen similar to the following figure displays. 14 INPUT OUT OF RANGE - GREATER THAN MAX VALUE MAX:59 HIGH:50 LOW:10 mL MIN:1 62 DISABLE CLEAR BACKSPACE ENTER The pump then prompts you to enter a new value. • Soft Limits - The normal range. Soft Limits show up as High and Low on the pump. They are the normal upper and lower limits. You can enter a value above or below the High or Low limit (so long as it does not exceed the Min or Max). If the soft limits are exceeded, the pump prompts you to first silence an alarm, then confirm or cancel the override condition, as shown in the following screen. CONFIRM LIMIT OVERRIDE? MAX:59 HIGH:50 LOW:10 MIN:1 55 OVERRIDE mL NO It is possible that a pump is customized so that limits cannot be exceeded unless a user ID is entered. If that is the case you will be prompted to enter an ID. “Limit” style alerts are advisories that occur for various reasons (usually during programming). A non-repeating audio alarm sounds and a message is displayed for 3 seconds. To re-display the alert message, press í. The pump records exceeded limits and attempts to exceed limits. How pump settings and limits are prioritized There can be a number of limits imposed on pump settings, for instance the rate is limited by the syringe size being used, as well as any hard and/or soft limits imposed in the drug program. The most restrictive limit takes priority. Additionally, available Options for delivery can be set for profiles as well as individual drug programs. In these cases, the settings for the drug program take priority over profile settings. For example, the Bolus option may be enabled for a profile, but a drug program within that profile may have the bolus option disabled. Medfusion® Model 4000 pump Operator's Manual User defined pump Configurations This chapter describes the Medfusion® Model 4000 pump Configuration. What are Configurations? A Configuration is a database of pump settings organized into Profiles, Categories and Drug Programs. The Configuration has global settings that are applicable to the pump operations. The Configuration may have up to 16 Profiles. Each Profile has a set of Profile-level settings and also up to 8 Categories. Each Category may contain up to 36 Drug Programs. There is a special category called a Quick Library. A Quick Library contains Drug Programs that have all infusion parameters pre-specified to allow quick start of an infusion. A Configuration is defined here as a stored record of infusion settings that load from memory. These programs are stored in memory indefinitely (over 10 years) or until overwritten. The Configuration is set up using PharmGuard® Toolbox 2. When it is completed it should be validated by the person responsible for custom configuration before the pumps are delivered to a work area. When are Drug Programs used? Every unit, department, organization, or hospital has standard ways of delivering medications or fluids. The custom setup enables you to use programs of stored presets. Using the PharmGuard® Toolbox 2 Software, the PharmGuard® Toolbox 2 Administrator will establish the pump Configuration that implements the standard infusions for the unit, department, organization, or hospital. This process is described in the PharmGuard® Toolbox 2 User’s Manual. Who can use these Drug Programs? Anyone who is authorized to use the infusion pump can use programs from the available libraries. Types of programmable Library Categories There are two types of library categories in the Medfusion® Model 4000 pumps: Library Category Type Standard Quick What it does Standard library categories contain programs with parameters that are applied when programming an infusion. These libraries require you to step through and review each setting. This allows modifying standard settings while stepping through preset values. A quick category contains drug programs with the presets necessary for programming an infusion. However, they do not pause at each level for you to enter the settings. Instead, the entire set of values is programmed at one step including syringe model and size. The Begin Infusion screen, where all infusion values are shown, displays at once. At that point, you confirm all the settings are correct, then press to begin delivery. É WARNINGS: Confirm All Settings. Before starting any delivery, always confirm the accuracy of all infusion values to the original order. Programming the pump at a delivery rate other than that prescribed will cause inappropriate delivery, which can result in serious injury or death. When using Quick libraries, preset values are automatically inserted without pausing to verify each setting. The Begin Infusion screen displays immediately after selecting/confirming the drug program. Verify the infusion parameters before starting the delivery. Certain data fields may not be programmed (e.g. patient weight) and require data entry before the infusion will proceed. Displaying Quick library Options: The steps in this section are hypothetical. The Medfusion® Model 4000 pump is shipped with a Medfusion™ Standard Configuration, and without any Profiles, Categories and Drug Programs. So the actual Quick libraries available depend entirely on the custom Configuration sent to the pump. 15 Medfusion® Model 4000 pump Operator's Manual Using a Custom Configuration PharmGuard® Toolbox 2 allows a facility to create a custom Configuration and send it to the pump for use. If profiles are created in the Configuration, the pump displays the Profile Menu. If the desired profile isn't displayed on the first screen press More for additional selections. 1. If a profile listing isn't displayed on the Select the Profile menu, press More to find it on another screen; otherwise it is necessary to create that profile using PharmGuard® Toolbox 2. For example, if “4” at right is selected, the General Peds profile opens (profiles names are customized per facility preference, so will not be the same as those shown in the following screens). 2. Library categories in the profile are displayed. Select a category from the menu. For example: if “1” at right is selected, then the drug program category Gen Peds A - D opens. 3. Custom drug programs are displayed on the Drug Program screen. To use a drug program, use the number keys to select the desired drug program (see page 32 for a full explanation of this screen). For example: if entry “2” is selected, the preset infusion parameters for Abelcet 2 mg/mL is chosen. 4. You are next prompted to load a syringe, then confirm & accept each level of settings by pressing Enter. Some data fields may require data input prior to proceeding (e.g. Patient Weight). WARNING: Confirm All Settings. Before starting any delivery, always confirm the accuracy of all infusion values to the original order. Programming the pump at a delivery rate other than that prescribed will cause inappropriate delivery, which can result in serious injury or death. 5. When all settings are confirmed, the Begin Infusion screen is displayed. Use the Prime feature, then press É to begin the infusion. 16 PRESS THE NUMBER TO SELECT THE PROFILE 1 2 3 4 ANESTHESIA NICU PICU GENERAL PEDS 5 6 7 8 CARDIAC HEM/ONC TICU ED MORE PRESS THE NUMBER TO SELECT 1 2 3 4 GEN GEN GEN GEN PEDS PEDS PEDS PEDS A E J N - GENERAL PEDS 5 GEN PEDS Q - Z 6 Blood Products 7 Enteral FEEDS D I M P CHG PROFILE 1/8 1 2 3 4 MORE PRESS NUMBER TO SELECT 3% Saline mL/kg/time Abelcet 2 mg/mL Acyclovir (Zovirax)(kg dosing) Ambisome 2 mg/mL PAGE PREV NEXT Medfusion® Model 4000 pump Operator's Manual Using Quick Libraries Smiths Medical ships the infusion pump with Medfusion™ Standard Configuration that does not include a Quick Library. The profiles, categories and custom drug programs available on a pump depend on the configuration set up by the person responsible for custom configuration. Quick Libraries is an option that can be set-up in custom configuration. This option designates a category in a profile as a Quick Library. A profile with quick library enabled displays a list of custom drug programs. PRESS NUMBER TO SELECT 1/1 1 2 3 4 Propofol 10 mg/mL Vecuroniom 1 mg/mL (OR) DOBUTamine 200 mcg/mL (OR) DOPAmine 1600 mcg/mL (OR) MAIN MENU Rather than the CHG Profile key displayed on standard library category screens, the Quick Library will have Main Menu on the far left. When Main Menu is pressed, another selection screen is displayed, with the additional categories and delivery modes for the selected profile. PRESS THE NUMBER TO SELECT 1 Anesthesia A-D 2 Anesthesia E-I 3 Anesthesia J-M 4 Anesthesia N-P QUICK LIBRARY (If there is only one profile on the pump, and a Quick library is enabled, the drug programs in the designated Quick Library will display on screen after the pump is turned on and completes its self tests.) The drug programs in a Quick Library have been customized with default values for infusion parameters that may include: syringe model and size, dose, volume, weight, delivery time, etc. Setting default values in the custom program allows the user to proceed from the drug program selection screen to the final confirmation screen (provided the loaded syringe matches the default syringe in the drug program). The Quick Library program’s preset values are loaded automatically into the pump provided that you have loaded a syringe of the manufacturer and size programmed for this library entry. Press É to begin the preset infusion after verifying infusion settings and using the Prime feature. Some data fields may be blank and require data entry to proceed. ANESTHESIA 5 Anesthesia Q-Z CHG PROFILE MORE The soft key on the far left of this screen reflects the name of the Quick library (the above is an example only). Press this key to re-enter the Quick library. The Quick library is exited when Main Menu is pressed. The CHG Profile key responds the same here as with all others. 17 Medfusion® Model 4000 pump Operator's Manual 1. To use Quick Library programs from the Select screen, use the number keys to select a drug program. For example: if “1” at right is selected, the pump loads the stored settings for Propofol 10 mg/ml infusion and pauses at the Begin Infusion screen. 2. All the infusion settings display on the Begin Infusion screen. You have the option to change the default settings for weight and dose using the soft keys displayed. All settings should be confirmed to ensure they are correct. Always check the infusion settings’ accuracy. You are responsible for ensuring the safety of any infusion the pump is programmed to deliver. 3. Use the Prime feature, then press É to begin the infusion. 18 1/1 1 2 3 4 PRESS NUMBER TO SELECT Propofol 10 mg/mL Vecuroniom 1 mg/mL (OR) DOBUTamine 200 mcg/mL (OR) DOPAmine 1600 mcg/mL (OR) MAIN MENU Propofol 10 mg/mL CONC 10 mg/mL TVD WEIGHT 75 KGKVO LOAD 2000MCG/KG DOSE 75 MCG/KG/MIN CHG DOSE QUICK LIBRARY ANESTHESIA 0 mL RATE OPTIONS 33.8 mL/hr CHG WEIGHT Medfusion® Model 4000 pump Operator's Manual PharmGuard™ Safety Software: Dose Protocol Protection PharmGuard® Medication Safety Software provides programmable Hard and Soft upper and lower limits for infusion parameters. Refer to the PharmGuard™ software limits in the Technical Specifications section of this manual (page 133) for a list of all parameters that may be protected with PharmGuard™ software limits. Soft limits Soft limits are the normal limits, and show on screen as High and Low. Soft limits can be exceeded (so long as the Hard limits or the physical limits imposed by the syringe size in use are not exceeded). 1. When attempting to enter or change infusion parameters of a drug program, the soft limits are displayed on screen as “High” and “Low”. 2. If a value is entered that is outside the range, an audible alarm sounds and the message “Outside Range Limit – Silence Alarm to Continue” appears. 3. Once the alarm is silenced, the message “Confirm Limit Override?” appears. 4. If Override is pressed, the value will be accepted. If No is pressed, the value entry screen reappears. Hard limits Hard limits are the absolute maximum and minimum for a value. When attempting to enter or change a numeric infusion parameter of a drug program the Hard limits are displayed on screen as “MAX:” and “MIN:” values. It is not possible to exceed a Hard limit. 19 Medfusion® Model 4000 pump Operator's Manual Adjusted limits in reverse During set up, the pump determines absolute minimums and maximums based on the physical abilities of the pump, such as syringe size (among other things). (See the table on page 130 for minimum and maximum flow rates.) If the PharmGuard™ software limits are outside of the pump limits, the pump adjusts the limits as appropriate. When this occurs, the limit priority alarm “Limits Adjusted—Cannot Deliver All Doses” is sounded. When the pump adjusts limits, they are reverse highlighted. Overridden limits in reverse When a soft limit is overridden, as described in “Soft Limits,” above, the overridden values are displayed in reverse highlight. Invalid infusion parameter combination The pump has several types of limits: physical limits, those imposed by the syringe size in use, and drug program limits. When the PharmGuard™ software limits and the pump physical limits cannot be reconciled, the alarm “Invalid Infusion Parameter Combination” or “Calculated Rate Out of Range” is displayed. At this point, the only possible corrective action is to silence the alarm, look at the prompt to determine which values were to be entered, press â one or more times, and attempt to re-enter valid values. An example of an invalid infusion parameter combination is one where the pump physical maximum is lower than the software minimum, or vice-versa. Whenever a “Calculated Rate Out of Range” or, in certain cases of an “Invalid Infusion Parameter Combination” alarm, it is possible that the drug program created in PharmGuard® Toolbox 2 software is such that no valid entry is possible, in which case you will need to document the issue and request an update for custom Configuration. It may be useful to check calculations using a calculator and formula to help identify issues with invalid infusion parameters. If a pump has recurring issue with invalid infusion parameters, contact the person(s) responsible for configuring pumps. 20 Reverse highlight PRESS < « > TO BEGIN INFUSION CONC 40mg/mL PVD 0 mL WEIGHT 50KG DOSE 495 MG TIME 01:00:00 TIME REMAINING01:00:00RATE 12.4 mL/hr MAIN MENU CHG DOSE OPTIONS CLEAR TOTALS Medfusion® Model 4000 pump Operator's Manual PharmGuard™ Supported Syringes (PSS) Series 2 Each manufactured syringe has unique characteristics. These characteristics differ by model and syringe size. The Medfusion® Model 4000 pump uses the specific characteristics to accurately deliver fluid. Included with PharmGuard® Toolbox 2 are several commonly used Medfusion™ Standard Syringes for a facility to choose from. These syringes are chosen for use in a Configuration via PharmGuard® Toolbox 2. PharmGuard™ Supported Syringes (PSS) Series 2 allow the addition of a wide range of available syringe models and sizes to PharmGuard® Toolbox 2, for use in creating Drug Programs. PSS Series 2 files must be added via PharmGuard® Toolbox 2 when creating a custom Configuration. Contact Smiths Medical for a complete list of available PharmGuard™ Supported Syringes (PSS) Series 2. (The Medfusion™ Standard Syringe models and sizes are listed in the Technical Information section of this manual on page 130.) Specific technical information, including syringe flow rate and minimum volume, is also supplied in the literature accompanying PharmGuard® Toolbox 2 and the PharmGuard™ Supported Syringes (PSS) Series 2. Refer to www. smiths-medical.com or contact Customer Service for more information about available PharmGuard™ Supported Syringes (PSS) Series 2. WARNING: Only use the Medfusion™ Standard Syringes (supplied with PharmGuard® Toolbox 2, and included in the Medfusion™ Standard Configuration), or the models and sizes available as part of the PharmGuard™ Supported Syringes (PSS) Series 2, and always confirm that the syringe model and size displayed on the pump matches the model and size loaded into the pump. Use of unapproved syringes may cause improper pump operation resulting in inaccurate fluid delivery or occlusion sensing or other potential hazards. 21 Medfusion® Model 4000 pump Operator's Manual Navigating the pump menus There are some general rules for navigating pump menus. Most of the pump programming steps are accomplished by looking to the display screen, and pressing the softkey keys indicated. For example: PRIME / BOLUS G6000912 Rev 0 PRESS < « > KEY TO BEGIN INFUSION CONC 1000 mcg/mLPVD 0.000 mL WEIGHT 5KG DOSE MAIN MENU 1MCG/KG/MIN CHG DOSE RATE OPTIONS 0.3 mL/hr CLEAR TOTALS The screen shown above is an example of a “Begin Infusion” screen. Pressing softkey “1” opens the Main menu; pressing softkey “2” initiates the screens for changing the dose value; pressing softkey “3” opens the Options menu; pressing softkey “4” clears the infusion volume and dose totals stored in pump memory. Legend The softkeys change for different screens, and some screens will have only certain of the softkeys active, or even no active softkeys. Always look to the display to see what the softkeys are used for. The basic workflow for programming and delivering an infusion is shown in the diagram on the following page. When programming a value or to enter a menu, in most cases the number and decimal keys on the right side of the keypad are used. (In many cases once a value is entered, you will need to press a softkey to “Enter” or save the value or to open the menu.) Some menus are very large and there will be more items to choose from than can fit on a single display screen. In those cases one of the softkeys will be “More”, indicating there are more options available and More can be pressed to view them. On those sorts of menus, once the end of the choices is reached, the More key becomes Beginning, indicating Beginning can be pressed to go back to the first “page” of the menu. If a mistake is made in programming, or a menu opened accidentally, press â to return to a previous screen or menu. 22 In this manual, menu information that appears onscreen is shown in bold and small capitals (for instance, Select the Profile). Text associated with softkeys is shown as bold (for instance, Enter). The Workflow Process The infusion may consist of several distinct deliveries, possibly including a loading dose, main infusion, one or more boluses during the main infusion, as well as a flush or KVO infusion once the main infusion is complete. It is possible that all of these parts are programmed in the initial infusion setup sequence, or they may also be added at a later time (after the initial setup but before pressing É to start the infusion, or in some cases after the infusion is started). Because the pump has multiple customizable features, actual Drug Programs and manual infusion may have other delivery options and confirmation screens included that are not shown in the diagram. These additional options and screens are dependent on the custom Configuration created in PharmGuard® Toolbox 2. Medfusion® Model 4000 pump Operator's Manual Setup Prime Power On Select Drug Program Program Infusion Settings Confirm Syringe Confirm Settings Connect to Patient Pause Program Options Bolus Dose Infusion Complete KVO Volume Limit Reached Syringe Empty Flush Start OR Infuse OR Confirm Syringe Continue = NO Deliver Program Options Loading Dose Change Rate/Dose Continue = YES Power Off KEY: Required Workflow Function-Dependent (Required) Optional Workflow The Workflow Process 23 Medfusion® Model 4000 pump Operator's Manual Guidelines for enhanced pump performance The following are guidelines for enhanced syringe pump performance. Review occlusion time and flow delivery graphs (starting on page 92). Use appropriate syringe size, tubing, and inline devices for expediting delivery of medication or fluid. Certain factors enhance syringe pump performance, where performance is defined as: a) Time to Detect Occlusion b) Continuity of Flow c) Startup Time Always use the smallest syringe for volume of fluid being delivered WARNING: Use the smallest syringe size necessary to deliver the fluid or medication. Using a large syringe at very low rates (below Minimum Recommended Rate for the syringe) may cause improper pump operation, delayed occlusion sensing, larger post occlusion bolus at higher occlusion limit settings, delivery inaccuracies, or other potential hazards. Bolus Volume: Delivering a bolus volume less then the recommended bolus volume for the syringe used may result in delivery inaccuracies. Use an infusion set with the smallest diameter tubing available that does not result in excessive back pressure at the desired flow rate. Consider priming, loading, bolus, and flush rates when selecting an infusion set. If accuracy is of prime concern, use only syringes that meet the ± 2% requirement of the ISO 7886-2 Standard. Friction and compliance of the syringe plunger tip affect delivery startup and flow continuity. The bigger the syringe, the greater the friction and compliance, the slower the startup. Use a smaller syringe when running at a lower rate. The tables on page 131 show the recommend minimum delivery rates for the standard syringes (included with PharmGuard® Toolbox 2) by syringe size. Similar information is provided in the documentation supplied with PharmGuard™ Supported Syringes (PSS) Series 2. When programming flow rates, a limited priority alarm will be activated, with an advisory message on 24 the screen, if a rate that falls outside those recommended is entered. Note: • FlowSentry™ is not available for all syringe sizes or types. Check the documentation that came with the Medfusion™ Standard Syringes Series 2 (supplied with PharmGuard® Toolbox 2) and/or PSS Series 2 for information on the availability of FlowSentry™. • If a rate below that shown on the tables on page 131 or in the documentation supplied with the PharmGuard™ Supported Syringes (PSS) Series 2 is entered, the Rate Below Recommended Min for Syringe Size alarm will occur (see page 105 for a full explanation of the alarm). The absolute minimum rate allowed by the pump with a given syringe is listed in the tables found on page 131, and included in the literature supplied with the PharmGuard™ Supported Syringes (PSS) Series 2. • High viscosity fluids may cause false occlusion alarms at lower occlusion alarm settings, particularly with higher rates of delivery. When infusing higher viscosity fluids, adjust the occlusion alarm setting to minimize false occlusion alarms. Medfusion® Model 4000 pump Operator's Manual Bolus Volume The recommended minimum bolus volume is 1.0 mL or 10 percent of the syringe volume of the syringe used, which ever is less. In other words, for a 1.0 mL syringe (regardless of the actual volume of medication contained), the minimum recommended bolus volume is 0.1 mL. For a 60 mL syringe, the recommended minimum bolus volume (regardless of the actual volume of medication contained), the minimum recommended bolus volume is 1.0 mL. Bolus volumes delivered that are less then the recommended minimum bolus volumes for the syringe used may result in delivery inaccuracies. Syringe Size 1 mL 3 mL 5 mL 6 mL 10 mL 12 mL 20 mL 30/35 mL 50 mL 60 mL Minimum Recommended Bolus Volume 0.1 mL 0.3 mL 0.5 mL 0.6 mL 1 mL 1 mL 1 mL 1 mL 1 mL 1 mL Use appropriate internal diameter tubing For the most consistently precise control of all fluids and medications, it is recommended to use appropriate internal diameter tubing, as well as to minimize residual volumes between syringe and patient by reducing: a) Tubing internal diameter (generally, for rates under 5 mL/hr small internal diameter tubing is recommended; for rates 5 mL/hr or above, tubing with a larger internal diameter should be used to reduce occlusion alarms) b) Tubing length c) Size of in-line filters d) Number of stopcocks This makes the infusion setup less variable or compliant, which in turn reduces the start time for fluid to reach the patient – and reduces time required for detecting an occlusion and maintains delivery accuracy. Use only the standard syringes specified on the table on page 130 and supplied with PharmGuard® Toolbox 2, or supplied with the PharmGuard™ Supported Syringes (PSS) Series 2 (available from Smiths Medical). Smiths Medical also provides a variety of infusion sets that can be used with the pump. See www.smiths-medical.com for information regarding infusion sets available from Smiths Medical, or contact your sales representative. 25 Medfusion® Model 4000 pump Operator's Manual Programming an Infusion Turn the pump on Below right is an illustration of a startup screen, and a list of basic steps for turning the infusion pump on. 1. Press and hold ë until the display turns dark. Verify the display shows all pixels on, then all pixels off. 2. The pump “beeps” twice, one low beep and one high beep. This is a test of the standard audible alarm and the battery backup audible alarm (high tone). The Alarm, Infusing, Communication and Lock indicators flash as the self-test cycles and the startup screen appears. The Device ID, if it has one, appears in the middle left corner. (In this example, it is called “HOSPITAL”.) The pump serial number will appear at the middle right (in this example, it is “M01234”). 3. Verify the display indicates successful completion of system startup self-tests. If the pump does not turn on with successful completion of self-tests, remove it from service and have it checked by a trained biomedical technician. Note: The “Battery Not Working” alarm is not fully functional until the system startup self-tests and processes are completed, approximately two minutes after turning the pump on. IMPORTANT: Do not move the Syringe Plunger Driver or otherwise manipulate the pump until the startup tests are complete and the Profile selection screen appears. Sensors are tested as part of the startup process, and manipulating the pump during this process may cause it to detect false sensor failures, resulting in alarms. 26 PRIME / BOLUS VERIFYING CONFIGURATION PHARMGUARD® MEDICATION SAFETY HOSPITAL CONFIG VERSION: V1.1.0 01.05.00002 2000187 VERSION 5 100% CONFIG CRC: 4A4F SECONDS REMAINING © 99-2010 Medfusion® Model 4000 pump Operator's Manual Turning the pump off The pump can be turned off at any time, in any delivery mode, while the pump is running. Note: If there are any alarms sounding, you must first silence the alarm by pressing í before the pump can be turned off. With the pump infusing: 1. Press and hold ë. PRIME / BOLUS DOBUTAMINE 0.5 CONC WEIGHT mg/mL 1000 mcg/mLPVD 5KG DOSE LOCK The Press Power Again to Shutdown screen appears. Infusion has not stopped at this point. (If ë is not pressed again, power off is cancelled after 6 minutes.) 2. Press and hold ë again to turn the pump off. To cancel press Continue or â. Infusion stops when the pump is turned off. With the pump stopped: 0.05 1 MCG/KG/MIN RATE 0.3 PRESS < POWER > AGAIN TO SHUTDOWN CONC 1000 mcg/mLPDD 1.27 mL WEIGHT 5KG DOSE 1MCG/KG/MIN RATE N 0.3 mL/hr CONTINUE SHUTDOWN IN PROGRESS CONC 1000 mcg/mLPDD 1.27 mL WEIGHT 5KG DOSE 1MCG/KG/MIN RATE N 0.3 mL/hr CONTINUE 1. Press and hold ë. The pump turns off. Note: If there are any Configuration or software updates waiting to be installed in the pump, the “Update(s) Available” message is displayed when you attempt to turn the pump off. See page 110. 27 Medfusion® Model 4000 pump Operator's Manual Selecting a Delivery Mode and Programming an infusion Due to the customization capabilities of the Medfusion® Model 4000 pump, the screen shown once power-up is complete depends entirely on what, if any, customization was performed. Typically a Custom Configuration will have been created using PharmGuard® Toolbox 2, and have been sent to the pump. If a Configuration with Profiles was sent to the pump, the pump will stop at the “Select the Profile” Main menu. If no Custom Configuration was sent to the pump, the pump will stop at the “Medfusion™ Standard Configuration” Main menu. If the Custom Configuration sent to the pump consists of only one profile containing a Quick library, the pump stops at the Quick library menu. The graphic on the following page shows the general steps required to program and start an infusion. Specific instruction for programming the various settings, delivery modes and options follows. 28 Medfusion® Model 4000 pump Operator's Manual General Infusion Programming Procedure Load desired syringe (may also be done when it comes up in the programming process) Custom Configuration: Medfusion™ Standard Configuration: Select a Profile PRESS THE NUMBER TO SELECT THE PROFILE 1 2 3 4 ANESTHESIA NICU PICU GENERAL PEDS 5 6 7 8 CARDIAC HEM/ONC TICU ED MORE Select a Category or manual delivery mode PRESS THE NUMBER TO SELECT 1 2 3 4 GEN GEN GEN GEN PEDS PEDS PEDS PEDS A E J N - GENERAL PEDS 5 GEN PEDS Q - Z 6 Blood Products 7 Enteral FEEDS D I M P CHG PROFILE MORE Select a Drug Program 1/8 1 2 3 4 Select a manual delivery mode PRESS THE NUMBER TO SELECT PRESS NUMBER TO SELECT 3% Saline mL/kg/time Abelcet 2 mg/mL Acyclovir (Zovirax)(kg dosing) Ambisome 2 mg/mL PAGE 1 2 3 4 PREV mL/hr 5 RECALL LAST SETTINGS VOLUME/TIME DOSE/TIME DOSE / KG / TIME MORE NEXT Select a Syringe Model/Size [If not done previously, load desired syringe] Verify model and size Program required infusion parameters as they appear in programming process If desired (and if available), program desired Options Prime infusion set and pump Start infusion 29 Medfusion® Model 4000 pump Operator's Manual Selecting an Infusion Following are the steps for selecting an infusion type for programming an infusion. The Profiles, Categories or Delivery Modes, and drug programs available on a pump are dependent on how the pump was configured, and whether a custom Configuration was created using the PharmGuard® Toolbox 2 (performed by whomever is responsible for customizing the pump before it was delivered to a work area). The actual screens on the pump may look very different from those shown here. After successfully completing its system startup selftests, the pump displays one of the following menus (depending on the pump’s configuration). 30 Medfusion® Model 4000 pump Operator's Manual Select a Profile (Custom Configuration) After successfully completing its system startup self-tests, a pump with a Custom Configuration with multiple profiles defined will display Select The Profile. Pumps can be configured so that all or some of the profiles require a passcode to access them. If that is the case, the appropriate passcode must be entered to access the profile. Note: If only a single Profile was set up for use on the pump (using PharmGuard® Toolbox 2), none of these screens will appear. The pump will instead display the drug category selection screen following successful system startup self-tests. • The configuration profiles, categories and drug programs available on the following screens are dependent on which were set up in the custom Configuration. The actual screen on the pump may look very different from the ones shown here. 1. Press any number key to select the desired profile. If a mistake is made, press â to return to the Select the Profile screen. 2. If the desired profile is not displayed, press More to display the next page of profiles. Either: a) Select a profile by pressing its number and continue the programming process. OR b) Press Beginning to return to the first page of the Select the Profile screen. 3. If required, enter the profile passcode, then press Enter. PRESS THE NUMBER TO SELECT THE PROFILE 1 2 3 4 ANESTHESIA NICU PICU GENERAL PEDS 5 6 7 8 CARDIAC HEM/ONC TICU ED MORE PRESS THE NUMBER TO SELECT THE PROFILE 1 MRI/RADIOLOGY 2 CODE DRUGS MORE ENTER PROFILE PASSCODE - PRESS ENTER TO CONTINUE MAX:9999 MIN:1000 CLEAR BACKSPACE ENTER 31 Medfusion® Model 4000 pump Operator's Manual Select a Category 4. Once inside a profile, select a category by pressing its number. If a category cannot be found, press CHG Profile to return to the Select the Profile menu. Each Profile can have a maximum of 8 Categories with up to 36 Drug Programs each, resulting in a maximum of 288 entries per Profile. The actual number of drug programs is dependent on the content of each drug program and on the amount of available pump memory. “Quick” Library a. If the Profile selected includes a “Quick” Library, the Quick Library's drug program selection screen displays. b. Select a drug program by pressing its number. (If Quick Library drug programs are not desired, press Main Menu to exit the Quick library and display the category choices for further drug program selections.) Item 4, above, applies to Quick Library as well. c. The far left softkey can be pressed to access the Quick Library. The key will reflect the actual name assigned to the Quick Library in the Configuration (Quick Library is only an example). Select a Drug Program 5. Select a Drug Program by pressing its number. Note the number of pages in the category is displayed, along with the current page (in this example, 1/8). If the desired drug program is not displayed (and provided the category contains more drug programs), press Next (or, if you know the page number of the drug program you want, press Page then use the number key for the page). Once past page 1 of the category, press Prev to move back a page. 32 PRESS THE NUMBER TO SELECT 1 2 3 4 GEN GEN GEN GEN PEDS PEDS PEDS PEDS A E J N - GENERAL PEDS 5 GEN PEDS Q - Z 6 Blood Products 7 Enteral FEEDS D I M P CHG PROFILE PRESS NUMBER TO SELECT 1/1 1 2 3 4 Propofol 10 mg/mL Vecuroniom 1 mg/mL (OR) DOBUTamine 200 mcg/mL (OR) DOPAmine 1600 mcg/mL (OR) MAIN MENU PRESS THE NUMBER TO SELECT 1 Anesthesia A-D 2 Anesthesia E-I 3 Anesthesia J-M 4 Anesthesia N-P QUICK LIBRARY 1/8 1 2 3 4 MORE ANESTHESIA 5 Anesthesia Q-Z CHG PROFILE MORE PRESS NUMBER TO SELECT 3% Saline mL/kg/time Abelcet 2 mg/mL Acyclovir (Zovirax)(kg dosing) Ambisome 2 mg/mL PAGE PREV NEXT Medfusion® Model 4000 pump Operator's Manual The pump requires a confirmation for drug program selections; press Yes to confirm the selection, or press No to return to the Select screen. CONFIRM DRUG PROGRAM SELECTION? DEXAmethasone 4 HEM/ONC mg/mL YES If “manual” modes are available in the custom Configuration and selected for an infusion, the pump prompts for a confirmation as well. Press Yes to confirm the selection, or press No to return to the Select screen. NO CONFIRM MANUAL PROGRAMMING / DELIVERY MODE? mL / hr YES NO After a drug program selection is made the pump will prompt you to select the syringe model and size before programming the selected mode (see page 34). Specific information for programming the various delivery types follows the instructions for the syringe. Select a Delivery Mode (Medfusion™ Standard Configuration) 1 If the pump does not have a custom configuration, the Medfusion™ Standard Configuration menu displays. 2. Select a delivery mode by pressing its number. If the desired mode is not displayed, press More to display additional delivery modes (if present). 3. The pump requires confirmation of manual mode selection. Press Yes to confirm the selection, or press No to return to the Select screen. After a delivery mode selection is made the pump will prompt you to select the syringe model and size before programming the selected mode (see page 34). PRESS THE NUMBER TO SELECT 1 2 3 4 mL/hr 5 RECALL LAST SETTINGS VOLUME/TIME ROSE/TIME DOSE / KG / TIME MORE CONFIRM MANUAL PROGRAMMING / DELIVERY MODE? mL YES / hr NO Specific information for programming the various delivery types follows the instructions for the syringe. 33 Medfusion® Model 4000 pump Operator's Manual Loading a syringe and syringe model setup Once a Drug Program or manual delivery mode has been chosen, specify the syringe model and size, and load the syringe. Pumps can be customized to allow for use of a wide variety of syringe brands and sizes, or can limit to as few as a single syringe brand. If a pump has been customized to a single syringe brand, none of the following screens will appear. Syringe setup and loading is a multi-step process, based on your daily practice of infusing patients with medications or other fluids. Use your facility's standard protocol for preparing an infusion. WARNING: Only use the Medfusion™ Standard Syringes (supplied with PharmGuard® Toolbox 2, and included in the Medfusion™ Standard Configuration), or the models and sizes available as part of the PharmGuard™ Supported Syringes (PSS) Series 2, and always confirm that the syringe model and size displayed on the pump matches the model and size loaded into the pump. Use of unapproved syringes may cause improper pump operation resulting in inaccurate fluid delivery or occlusion sensing or other potential hazards. 1. Inspect the syringe to identify the model and size. 2. Press a number key to select the syringe model being used. Note: If, when the pump was powered up, the syringe barrel clamp was pulled up and resting on the pump handle, a Check Syringe Barrel Clamp alarm may occur immediately upon selecting a syringe model (manufacturer). Press í to silence the alarm, press Confirm, then continue with these instructions for loading a syringe. 3. It is now time to load the syringe. (The arrows shown on screen indicate that the syringe sensors detect that the syringe is not loaded.) 34 Note: Pharmacy labels placed on the syringe may interfere with the pump’s syringe sensors. To avoid interference, place pharmacy labels at least 1 inch from the flange (so that the Syringe Barrel Clamp does not rest on a label), and orient the syringe so the label faces upward and does not rest on the pump. IMPORTANT: Do not move the Syringe Plunger Driver or otherwise manipulate the pump until the startup tests are complete and the Profile selection screen appears. Sensors are tested as part of the startup process, and manipulating the pump during this process may cause it to detect false sensor failures, resulting in alarms. SELECT SYRINGE MODEL 1 B-D 2 MONOJECT 3 TERUMO CONFIRM SYRINGE MODEL / SIZE / LOADING ™ ≤ B-D ¤ CONFIRM Medfusion® Model 4000 pump Operator's Manual 4. Lift upward on the Syringe Barrel Clamp and turn it so it is out of the way. 5. Squeeze the Plunger Release Lever on the syringe plunger driver and pull gently to extend it all the way outward. WARNING: Verify that the plunger holders securely capture the syringe plunger. Make sure to capture the syringe barrel and flange. Failure to properly secure the syringe could result in uncontrolled fluid flow to the patient, which could result in serious injury or death. 6. Load the syringe onto the pump as illustrated, making sure the flange of the syringe barrel is pressed or rolled into the Flange Clip. 35 Medfusion® Model 4000 pump Operator's Manual 7. Squeeze the Plunger Release Lever on the syringe plunger driver and push it toward the syringe plunger; once it is flush with the syringe plunger release the lever. Be sure both holders close around the syringe plunger. 8. Turn and lower the Barrel Clamp onto the barrel of the syringe. WARNINGS: • Verify that the plunger holders securely capture the syringe plunger. Make sure to capture the syringe barrel and flange. Failure to properly secure the syringe could result in uncontrolled fluid flow to the patient, which could result in serious injury or death. • Always use the Prime function on the pump when loading a new syringe in order to remove any mechanical slack. Failure to prime correctly can delay infusion delivery and cause Total Volume Delivered to read higher than what is actually delivered to the patient. The size should now appear in the display. CONFIRM SYRINGE MODEL / SIZE/ LOADING ™ ≤ B-D ¤ CONFIRM CONFIRM SYRINGE MODEL / SIZE/ LOADING Note: If the syringe is incorrectly loaded, guide arrows appear on screen to identify the problem. B-D 60mL CONFIRM Arrow pointing down “™“ means check syringe barrel clamp. Arrow pointing left “≤“ means check syringe plunger holders. Arrow pointing up “¤” means check syringe flange clip. 36 Medfusion® Model 4000 pump Operator's Manual Note: Some syringes may have similar outer dimensions, despite being different sizes (for example, BD® 1mL Luer Lok™ and 3mL syringes), or even different models. In these cases, the pump will display options, requiring you to select the correct syringe size actually in use. Always verify that the syringe model shown is what you are actually using. 9. Make sure the pump correctly recognizes the syringe size, and the syringe model is correct. If not, verify that the model and size are available on the pump (contact the person within the facility responsible for customizing the pump for more information, if necessary). SELECT THE SYRINGE ™ B-D 1mL 3mL ll CONFIRM SYRINGE MODE / SIZE / LOADING B-D 1mL ll CONFIRM WARNING: Only use the Medfusion™ Standard Syringes (supplied with PharmGuard® Toolbox 2, and included in the Medfusion™ Standard Configuration), or the models and sizes available as part of the PharmGuard™ Supported Syringes (PSS) Series 2, and always confirm that the syringe model and size displayed on the pump matches the model and size loaded into the pump. Use of unapproved syringes may cause improper pump operation resulting in inaccurate fluid delivery or occlusion sensing or other potential hazards. 10.Thread the tubing through the three Tubing Holders on the top left side of the pump. WARNING: Periodically check the fluid pathway and all connections (including the catheter/administration set connection) for leaks. Leaks in the system may cause fluid loss resulting in under-delivery, as well as allowing an opening for contamination. 11.Press Confirm to confirm the syringe information. The pump will now automatically display the programming screens for the delivery mode chosen. Since there are many modes to choose from, in which a wide variety of functions within that mode may or may not have been enabled, what follows is an explanation of the programming steps required for each possible delivery mode with all functions enabled. 37 Medfusion® Model 4000 pump Operator's Manual Unloading the syringe WARNING: Turn off fluid flow. Always turn off fluid flow to patient in tubing via clamp or stopcock before loading or unloading a syringe. Uncontrolled fluid flow can occur when infusion set is not clamped or turned off resulting in inappropriate delivery rate, and may cause serious injury and/or death. Unload a syringe exactly the opposite way as it was loaded. Just use the following steps: 1. Press á to stop delivery. 2. Clamp or close infusion line from the syringe to patient. 3. Unthread the tubing from the Tubing Holders on the top left side of the pump. 4. Lift and swivel the syringe Barrel Clamp out of the way. 5. Squeeze the Plunger Release Lever on the syringe plunger and remove the syringe. 38 Medfusion® Model 4000 pump Operator's Manual Programming Infusions Continuous mode: mL/hr Continuous infusion is programmed by setting a flow rate in mL/hr. Actual range limits for flow rate are determined by syringe model and size (see the table in Technical section (page 130) of this manual and/ or the product literature supplied with PharmGuard® Toolbox 2 or the PharmGuard™ Supported Syringes [PSS] Series 2) or by a custom configured maximum rate. If needed, and if the options have been enabled using PharmGuard® Toolbox 2, a volume limit, loading dose, or bolus dose can also be programmed. 1. Use the number keys and (if needed) the decimal point to set the flow rate. Press Clear to clear an entry. Press Backspace to erase a character. Press the Enter key to accept the setting. 2. After all infusion values are set, the pump pauses at the Begin Infusion screen (the pump may be configured with additional confirmation screens, requiring you to confirm all settings twice before beginning the infusion). 3. If desired, program a Bolus Dose, Loading Dose or Volume Limit (see Options, page 61). 4. Prior to connecting to the patient, press è to initiate the priming sequence (page 59). 5. Confirm the settings and start the infusion, or use the four menu keys to modify the settings. To program a Continuous mode infusion, at the selection menu, choose ml/hr (or choose a drug program that uses the continuous mode infusion type). Choose the syringe model and size, and load the syringe as instructed on page 34. ENTER RATE - PRESS ENTER TO CONTINUE HIGH:944 LOW:0.1 50 CLEAR mL / hr ENTER BACKSPACE PRESS < « > TO BEGIN INFUSION 0 mL PVD RATE MAIN MENU CHG RATE OPTIONS 50 mL/hr CLEAR TOTALS Main Menu – returns to the Main Menu. Chg Rate – allows modifying the set rate. Options – selection from a list of variables (e.g., bolus, volume limit, etc.). Clear Totals – clears total volume delivered, and PVD or PDD. WARNING: Confirm All Settings. Before starting any delivery, always confirm the accuracy of all infusion values to the original order. Programming the pump at a delivery rate other than that prescribed will cause inappropriate delivery, which can result in serious injury or death. 6. When all delivery settings are confirmed as correct, press É to begin the infusion. 39 Medfusion® Model 4000 pump Operator's Manual Dose / Min and Dose / Hr The Dose / Min and/or Dose / Hr modes may be available on a pump. Program them by setting: • Drug concentration units (i.e., g/mL, mg/mL, mcg/mL, mMol/mL, mEq/mL, or Units/mL) • Drug concentration • Drug delivery units (e.g., g, mg, mcg, ng, mMol, mEq, or Units) • Dose rate 1. Use the number keys to select the medication concentration units. (The actual units available on a pump depends on the custom setup.) Press Enter to accept the medication concentration units. 2. Use the number keys to set medication concentration. Concentration is limited to 4 digits. Press Clear to clear an entry. Press Backspace to erase a character. Press the Enter key to accept the setting. 3. Use the number keys to set the delivery units. (The actual units available on a pump depends on the custom setup.) If only one delivery unit is available for the concentration units selected, this screen will not appear. Press Enter to accept the delivery units. 4. Use the number keys to set dose rate. Range limits for dose rate are determined by syringe size and/or the custom setup in the Configuration. The high and low rate limits display on screen. When the dose is correct, press Enter. 5. At the Begin Infusion screen all values are set and the pump pauses (the pump may be configured with additional confirmation screens, requiring you to confirm all settings twice before beginning the infusion). 40 • Volume limit, KVO, loading dose, or bolus dose may also be programmed (these options are only available if they have been enabled in the profile or specified in the Drug Program using PharmGuard® Toolbox 2) At the selection menu, choose either Dose/Min or Dose/hr (or choose a drug program that uses the infusion type). Choose the syringe model and size, and load the syringe as instructed on page 34. PRESS THE NUMBER TO SELECT THE CONCENTRATION UNITS 1 2 3 4 GRAMS MG MCG UNITS 5 MILLIEQUIVALENTS 6 MILLIMOLES ENTER CONCENTRATION - PRESS ENTER TO CONTINUE HIGH:9999 LOW:0.0001 0.6 CLEAR mg BACKSPACE / mL ENTER PRESS THE NUMBER TO SELECT THE DELIVERY UNITS 1 MG 2 MCG ENTER DOSE RATE - PRESS ENTER TO CONTINUE HIGH:8732 LOW:0.925 1.5 CLEAR MCG / MIN BACKSPACE ENTER Medfusion® Model 4000 pump Operator's Manual 6. Confirm the settings and start the infusion, or use the four menu keys shown at right to modify the settings. 7. Prior to connecting to the patient, press è to initiate the priming sequence (page 59). 8. If desired, program a Bolus Dose, Loading Dose or Volume Limit (see Options, page 61). WARNING: Confirm All Settings. Before starting any delivery, always confirm the accuracy of all infusion values to the original order. Programming the pump at a delivery rate other than that prescribed will cause inappropriate delivery, which can result in serious injury or death. PRESS < « > TO BEGIN INFUSION CONC 0.6 mg/mL DOSE 1.5MCG/MINRATE 0.15 mL/hr MAIN MENU CHG DOSE PVD OPTIONS 0 mL CLEAR TOTALS Main Menu – returns to the Main Menu. Chg Dose – allows modifying the set dosage without starting from scratch. Options – allows selection from a list of variables (e.g., bolus, volume limit, etc.). Clear Totals – clears total volume delivered, and PVD or PDD. 9. When all delivery settings are confirmed as correct, press É to begin infusion. 41 Medfusion® Model 4000 pump Operator's Manual Dose / Day The Dose / Day mode may be available on a pump. Program Dose / Day by setting: • Drug concentration units (i.e., g/mL, mg/mL, mcg/mL, mMol/mL, mEq/mL, or Units/mL) • Drug concentration • Drug delivery units (e.g., g, mg, mcg, ng, mMol, mEq, or Units) • Dose rate 1. Use the number keys to select the medication concentration units. (The actual units available on a pump depends on the custom setup.) Press Enter to accept the medication concentration units. 2. Use the number keys to set medication concentration. Concentration is limited to 4 digits. Press Clear to clear an entry. Press Backspace to erase a character. Press the Enter key to accept the setting. 3. Use the number keys to set the delivery units. (The actual units available on a pump depends on the custom setup.) If only one delivery unit is available for the concentration units selected, this screen will not appear. Press Enter to accept the delivery units. 4. Use the number keys to set dose rate. Range limits for dose rate are determined by syringe size and/or the custom setup in the Configuration. The high and low rate limits display on screen. When the dose is correct, press Enter. 5. At the Begin Infusion screen all values are set and the pump pauses (the pump may be configured with additional confirmation screens, requiring you to confirm all settings twice before beginning the infusion). 6. Confirm the settings and start the infusion, or use the four menu keys shown at right to modify the settings. 42 • Volume limit, KVO, loading dose, or bolus dose may also be programmed (these options are only available if they have been enabled in the profile or specified in the Drug Program using PharmGuard® Toolbox 2) At the selection menu, choose Dose/Day (or choose a drug program that uses the infusion type). Choose the syringe model and size, and load the syringe as instructed on page 34. PRESS THE NUMBER TO SELECT THE CONCENTRATION UNITS 1 2 3 4 GRAMS MG MCG UNITS 5 MILLIEQUIVALENTS 6 MILLIMOLES ENTER CONCENTRATION - PRESS ENTER TO CONTINUE HIGH:9999 LOW:0.0001 0.9 CLEAR mg / mL BACKSPACE ENTER PRESS THE NUMBER TO SELECT THE DELIVERY UNITS 1 MG 2 MCG ENTER DOSE RATE - PRESS ENTER TO CONTINUE HIGH:8732 LOW:2.16 5 CLEAR MG / DAY BACKSPACE ENTER PRESS < « > TO BEGIN INFUSION CONC 0.9 mcg/mL DOSE MAIN MENU PVD 0 mL 5MCG/DAYRATE 0.232 mL/hr CHG DOSE OPTIONS CLEAR TOTALS Main Menu – returns to the Main Menu. Chg Dose – allows modifying the set dosage without starting from scratch. Options – allows selection from a list of variables (e.g., bolus, volume limit, etc.). Clear Totals – clears total volume delivered, and PVD or PDD. Medfusion® Model 4000 pump Operator's Manual 7. Prior to connecting to the patient, press è to initiate the priming sequence (page 59). 8. If desired, program a Bolus Dose, Loading Dose or Volume Limit (see Options, page 61 ). WARNING: Confirm All Settings. Before starting any delivery, always confirm the accuracy of all infusion values to the original order. Programming the pump at a delivery rate other than that prescribed will cause inappropriate delivery, which can result in serious injury or death. 9. When all delivery settings are confirmed as correct, press É to begin infusion. 43 Medfusion® Model 4000 pump Operator's Manual Dose / Time The Dose / Time mode may be available on a pump. Program Dose / Time by setting: • Drug concentration units (i.e., g/mL, mg/mL, mcg/mL, mMol/mL, mEq/mL, or Units/mL) • Drug concentration • Drug delivery units (e.g., g, mg, mcg, ng, mMol, mEq, or Units) 1. Use the number keys to select the medication concentration units. (The actual units available on a pump depends on the custom setup.) Press Enter to accept the medication concentration units. 2. Use the number keys to set medication concentration. Concentration is limited to 4 digits. Press Clear to clear an entry. Press Backspace to erase a character. Press the Enter key to accept the setting. 3. Use the number keys to set the delivery units. (The actual units available on a pump depends on the custom setup.) If only one delivery unit is available for the concentration units selected, this screen will not appear. Press Enter to accept the delivery units. 4. Use the number keys to set dose. Range limits for dose are determined by syringe size and/or the custom setup in the Configuration. The high and low dose limits display on screen. When the dose is correct, press Enter. 5. The time setting screen appears. Press the number keys to set the time in hours and minutes, then press Enter. 6. At the Begin Infusion screen all values are set and the pump pauses (the pump may be configured with additional confirmation screens, requiring you to confirm all settings twice before beginning the infusion). 44 • Dose rate • Delivery Time At the selection menu, choose Dose/Time (or choose a drug program that uses the infusion type). Choose the syringe model and size, and load the syringe as instructed on page 34. PRESS THE NUMBER TO SELECT THE CONCENTRATION UNITS 1 2 3 4 GRAMS MG MCG UNITS 5 MILLIEQUIVALENTS 6 MILLIMOLES ENTER CONCENTRATION - PRESS ENTER TO CONTINUE HIGH:9999 LOW:0.0001 0.6 CLEAR mg BACKSPACE / mL ENTER PRESS THE NUMBER TO SELECT THE DELIVERY UNITS 1 MG 2 MCG ENTER DOSE - PRESS ENTER TO CONTINUE HIGH:300 LOW:0.003 5 CLEAR MG BACKSPACE ENTER ENTER DELIVERY TIME HIGH: 24:00:00 LOW: 00:06:00 02:15 :00 HR:MIN:SEC CLEAR BACKSPACE ENTER Medfusion® Model 4000 pump Operator's Manual 7. Confirm the settings and start the infusion, or use the three menu keys shown at right to modify the settings. 8. Prior to connecting to the patient, press è to initiate the priming sequence (page 59). 9. If desired, Loading Dose or Volume Limit (see Options, page 61). WARNING: Confirm All Settings. Before starting any delivery, always confirm the accuracy of all infusion values to the original order. Programming the pump at a delivery rate other than that prescribed will cause inappropriate delivery, which can result in serious injury or death. PRESS < « > TO BEGIN INFUSION CONC 0.6 mg/mL PVD 0 mL DOSE 5 MG TIME 02:15:00 TIME REMAINING 02:15:00RATE 3.7 mL/hr MAIN MENU OPTIONS CLEAR TOTALS Main Menu – returns to the Main Menu. Options – allows selection from a list of variables (e.g., bolus, volume limit, etc.). Clear Totals – clears total volume delivered, and PVD or PDD. 10.When all delivery settings are confirmed as correct, press É to begin infusion. 45 Medfusion® Model 4000 pump Operator's Manual Body weight/surface area infusion deliveries The following Body weight/surface area -based infusion delivery modes may be available on a pump: dose/kg/min (dose/m2/min) − dose/kg/hr (dose/m2/ hr) – dose/kg/day (dose/m2/day). The body weight/surface area rate calculation allows programming by: • Drug concentration units (i.e., g/mL, mg/mL, mcg/mL, mMol/mL, mEq/mL, or Units/mL) • Drug concentration • Drug delivery units (i.e., g, mg, mcg, ng, mMol, mEq, or Units) • Patient’s weight/Body surface area • Dose 1. Press the number keys to set the medication concentration units. (The actual units available on a pump depends on the custom setup.) Press Enter to accept the medication concentration units. 2. Press the number keys to set medication concentration. Concentration is limited to 4 digits. Press Clear to clear an entry. Press Backspace to erase a character. Press Enter to accept the setting. 3. Use the number keys to set the delivery units. (The actual units available on a pump depends on the custom setup.) If only one delivery unit is available for the concentration units selected, this screen will not appear. Press Enter to accept the delivery units. 4. Press the number keys to set the patient’s weight in kilograms or surface area in square meters. Weight/surface area are limited to the indicated range (which may have been customized). Press Enter to accept the patient weight/surface area setting. 46 • Volume limit, KVO, loading dose, or bolus dose may also be programmed (these options are only available if they have been enabled in the custom program using PharmGuard® Toolbox 2) The pump calculates the correct flow rate in mL/hr to achieve the required drug dose. To program a body weight/surface area infusion, at the selection menu, choose either Dose/Kg/Min (Dose/M2/Min), Dose/ Kg/hr (Dose/M2/Hr) or Dose/Kg/Day (Dose/M2/ Day) (or choose a drug program that uses the body weight/surface area mode infusion type). Choose the syringe model and size, and load the syringe as instructed on page 34. PRESS THE NUMBER TO SELECT THE CONCENTRATION UNITS 1 2 3 4 GRAMS MG MCG UNITS 5 MILLIEQUIVALENTS 6 MILLIMOLS ENTER CONCENTRATION - PRESS ENTER TO CONTINUE HIGH:20 LOW:0.001 0.25 CLEAR mg BACKSPACE / mL ENTER PRESS THE NUMBER TO SELECT THE DELIVERY UNITS 1 MG 2 MCG ENTER PATIENT WEIGHT - PRESS ENTER TO CONTINUE HIGH:250 LOW:0.25 10 CLEAR KG BACKSPACE ENTER Medfusion® Model 4000 pump Operator's Manual The pump may be customized with an additional patient weight/body surface area confirmation screen. If so, re-enter the patient weight/body surface area, then press Enter to accept the setting. 5. At the Dose Rate screen, press the number keys to set the dose. Range limits are determined by installed syringe size and/or the custom setup in the Configuration. When the setting is correct press Enter to accept the dose. 6. If desired (and if they are enabled), program a Bolus Dose, Loading Dose or Volume Limit (see Options, page 61). 7. At the Begin Infusion screen all values are set and the pump pauses (the pump may be configured with additional confirmation screens, requiring you to confirm all settings twice before beginning the infusion). 8. Prior to connecting to the patient, press è to initiate the priming sequence (page 59). 9. Confirm the settings and start the infusion, or use the four menu keys shown at right to modify the settings. WARNING: Confirm All Settings. Before starting any delivery, always confirm the accuracy of all infusion values to the original order. Programming the pump at a delivery rate other than that prescribed will cause inappropriate delivery, which can result in serious injury or death. RE-ENTER PATIENT WEIGHT - PRESS ENTER TO CONTINUE HIGH:250 LOW:0.25 KG CLEAR BACKSPACE ENTER ENTER DOSE RATE - PRESS ENTER TO CONTINUE HIGH:0.2012 LOW:0.0001 0.2 CLEAR MCG / KG / HR BACKSPACE ENTER PRESS < « > TO BEGIN INFUSION CONC WEIGHT 0.25 10 DOSE MAIN MENU 0.2 mg/mL kg PVD mg/kg/hrRATE CHG DOSE OPTIONS 0 mL 8 mL/hr CLEAR TOTALS Main Menu – returns to the Main Menu. Chg Dose – allows modifying the set dosage without starting from scratch. Options – allows selection from a list of variables (e.g., bolus, volume limit, etc.). Clear Totals – clears total volume delivered, and PVD or PDD. 10.When all delivery settings are confirmed as correct, press É to begin infusion. 47 Medfusion® Model 4000 pump Operator's Manual Volume / weight infusions The following volume/weight modes may be available on a pump: mL/kg/min and mL/kg/hr. Volume/weight infusions rate calculations allow programming by: • Patient’s weight • Volume of drug per kilogram of weight • Volume limit, KVO, loading dose, or bolus dose may also be programmed (these options are only available if they have been enabled in the custom program using PharmGuard® Toolbox 2) 1. Use the number keys to set the patient’s weight in kilograms. Weight is limited to the indicated range. Press Enter to accept the patient weight setting. 2. 3. 4. 5. 48 The pump may be customized with an additional patient weight/body surface area confirmation screen. Re-enter the patient weight, then press Enter to accept the setting. At the Volume/Kilogram screen, press the number keys to set the volume per weight setting. Range limits are determined by the installed syringe size, patient weight, and/or the custom setup in the Configuration. When the setting is correct press Enter to accept it. If desired (and if they are enabled), program a Bolus Dose, Loading Dose or Volume Limit (see Options, page 61). At the Begin Infusion screen all values are set and the pump pauses (the pump may be configured with additional confirmation screens, requiring you to confirm all settings twice before beginning the infusion). Prior to connecting to the patient, press è to initiate the priming sequence (page 59). The pump calculates the correct flow rate in mL/hr to achieve the required drug dose. To program a volume/weight infusion, at the selection menu, choose either mL/Kg/Min or mL/Kg/Hr (or choose a drug program that uses the volume/weight mode infusion type). Choose the syringe model and size, and load the syringe as instructed on page 34. ENTER PATIENT WEIGHT - PRESS ENTER TO CONTINUE HIGH:250 LOW:0.25 5 CLEAR KG BACKSPACE ENTER RE-ENTER PATIENT WEIGHT - PRESS ENTER TO CONTINUE HIGH:250 LOW:0.25 KG CLEAR BACKSPACE ENTER ENTER VOLUME / KILOGRAM - PRESS ENTER TO CONTINUE HIGH:0.3267 LOW:0.0002 0.3 CLEAR mL BACKSPACE / kg / hr ENTER Medfusion® Model 4000 pump Operator's Manual 6. Confirm the settings and start the infusion, or use the four menu keys shown at right to modify the settings. PRESS < « > TO BEGIN INFUSION PVD 0 mL WEIGHT 5KG DOSE WARNING: Confirm All Settings. Before starting any delivery, always confirm the accuracy of all infusion values to the original order. Programming the pump at a delivery rate other than that prescribed will cause inappropriate delivery, which can result in serious injury or death. 7. When all delivery settings are confirmed as correct, press É to begin infusion. MAIN MENU 0.3 mL/kg/hrRATE 1.5 mL/hr CHG DOSE OPTIONS CLEAR TOTALS Main Menu – returns to the Main Menu. Chg Dose – allows modifying the set dosage without starting from scratch. Options – allows selection from a list of variables (e.g., bolus, volume limit, etc.). Clear Totals – clears total volume delivered, and PVD or PDD. 49 Medfusion® Model 4000 pump Operator's Manual Dose/kg/time (dose/m2/time) The body weight/surface area infusion delivery mode will only be available on your pump through custom programming via PharmGuard® Toolbox 2. Once configured on the PharmGuard® Toolbox 2, taught to a Medfusion® Model 4000 pump, and once a drug has been selected from the library, entries on the pump may be required for the following: • Drug selection only • Drug concentration (NOTE: If preset limits were programmed in PharmGuard® Toolbox 2, this option will be available. If a preset value was programmed in PharmGuard® Toolbox 2, the concentration limits are not needed.) 1. Press the number keys to set medication concentration. Concentration is limited to 4 digits. Press Clear to clear an entry. Press Backspace to erase a character. Press Enter to accept the setting. 2. Press the number keys to set the patient’s weight in kilograms or surface area in square meters. Weight/surface area are limited to the indicated range. Press Enter to accept the patient weight/surface area setting. The pump may be customized with an additional patient weight/body surface area confirmation screen. If so, re-enter the patient weight/body surface area, then press Enter to accept the setting. 3. At the Dose screen, press the number keys to set the dose. Dose limits displayed are dependant on custom settings and installed syringe size. When the setting is correct press Enter to accept the dose. (The pump calculates the correct flow rate in mL/hr to achieve the required drug dose.) 4. The time setting screen appears. Press the number keys to set the time in hours and minutes, then press Enter. • Patient’s weight/Body surface area • Dose • Delivery time The pump calculates the correct flow rate in mL/hr to achieve the required drug dose. The patient weight/ body surface area is used to calculate dose limits. To program a body weight/surface area infusion, choose a Drug Program with Dose/Kg/Time (Dose/m2/ Time). Choose the syringe model and size, and load the syringe as instructed on page 34. The following procedure is an example of how an infusion might be programmed. The actual procedure depends on how the infusion was initially customized. ENTER CONCENTRATION - PRESS ENTER TO CONTINUE HIGH:10 LOW:2 mg CLEAR BACKSPACE ENTER ENTER PATIENT WEIGHT - PRESS ENTER TO CONTINUE HIGH:8 LOW:0.25 KG CLEAR BACKSPACE ENTER RE-ENTER PATIENT WEIGHT - PRESS ENTER TO CONTINUE HIGH:250 LOW:0.25 KG CLEAR BACKSPACE ENTER ENTER DOSE - PRESS ENTER TO CONTINUE HIGH:2500 LOW:0.083 GRAM CLEAR BACKSPACE ENTER ENTER DELIVERY TIME HIGH: 08:00:00 LOW: 00:01:00 00:01 :00 HR:MIN:SEC CLEAR BACKSPACE 50 / mL ENTER Medfusion® Model 4000 pump Operator's Manual 5. At the Begin Infusion screen all values are set and the pump pauses (the pump may be configured with additional confirmation screens, requiring you to confirm all settings twice before beginning the infusion). 6. Prior to connecting to the patient, press è to initiate the priming sequence (page 59). 7. Confirm the settings and start the infusion, or use the menu keys shown at right to modify the settings. WARNING: Confirm All Settings. Before starting any delivery, always confirm the accuracy of all infusion values to the original order. Programming the pump at a delivery rate other than that prescribed will cause inappropriate delivery, which can result in serious injury or death. Acyclovir (Zovirax)(kg CONC WEIGHT TIME TIME REMAINING MAIN MENU dosing) GENERAL PEDS 7 mg/mLTVD 0 mL 1KG DOSE 2 MG 00:01:00 00:01:00 RATE 0.286 mL/hr OPTIONS CLEAR TVD Main Menu – returns to the Main Menu. Options – allows selection from a list of variables (e.g., bolus, volume limit. etc.). Clear TVD – clears total volume delivered. 8. When all delivery settings are confirmed as correct, press É to begin infusion. 51 Medfusion® Model 4000 pump Operator's Manual Volume / weight / time The volume/weight/time delivery mode (mL/kg/ Time) may be available on a pump. Volume/weight/time infusion rate calculations allow programming by: • Patient’s weight • Volume of drug per kilogram of weight • Delivery time 1. Use the number keys to set the patient’s weight in kilograms. Weight is limited to the indicated range. Press Enter to accept the patient weight setting. The pump calculates the correct flow rate in mL/hr to achieve the required drug dose. To program a volume/ weight/time infusion, at the selection menu, choose mL/Kg/Time (or choose a drug program that uses the volume/weight/time mode infusion type). Choose the syringe model and size, and load the syringe as instructed on page 34. ENTER PATIENT WEIGHT - PRESS ENTER TO CONTINUE HIGH:8 LOW:0.25 5 CLEAR The pump may be customized with an additional patient weight confirmation screen. If so, re-enter the patient weight, then press Enter to accept the setting. 2. At the Volume/Kilogram screen, press the number keys to set the volume per weight setting. Range limits here are determined by the installed syringe size, patient weight and/or the custom setup in the Configuration. When the setting is correct press Enter to accept it. 3. The time setting screen appears. Press the number keys to set the time in hours and minutes, then press Enter. 4. At the Begin Infusion screen all values are set and the pump pauses (the pump may be configured with additional confirmation screens, requiring you to confirm all settings twice before beginning the infusion). 5. Prior to connecting to the patient, press è to initiate the priming sequence (page 59). 52 KG BACKSPACE ENTER RE-ENTER PATIENT WEIGHT - PRESS ENTER TO CONTINUE HIGH:12 LOW:0.25 KG CLEAR BACKSPACE ENTER ENTER VOLUME / KILOGRAM - PRESS ENTER TO CONTINUE HIGH:20 LOW:10 15 CLEAR mL BACKSPACE / kg ENTER ENTER DELIVERY TIME MAX: 01:00:00 MIN: 00:10:00 00:30 :00 HR:MIN:SEC CLEAR BACKSPACE ENTER Medfusion® Model 4000 pump Operator's Manual 6. Confirm the settings and start the infusion, or use the menu keys shown at right to modify the settings. WARNING: Confirm All Settings. Before starting any delivery, always confirm the accuracy of all infusion values to the original order. Programming the pump at a delivery rate other than that prescribed will cause inappropriate delivery, which can result in serious injury or death. PRESS < « > TO BEGIN INFUSION PVD 0 mL WEIGHT 5 KG VTBI 15 mL/kg TIME: 00:30:00 TIME REMAINING 00:30:00RATE 150 mL/hr MAIN MENU OPTIONS CLEAR TVD Main Menu – returns to the Main Menu. Options – allows selection from a list of variables (e.g., bolus, volume limit, etc.). Clear TVD – clears total volume delivered. 7. When all delivery settings are confirmed as correct, press É to begin infusion. 53 Medfusion® Model 4000 pump Operator's Manual Volume / time The volume over time rate calculation allows programming by: • Dose Volume • Delivery Time The pump calculates the correct flow rate by dividing the volume by the delivery time. Volume limit, load1. Press the number keys to program the volume to infuse. Volume is limited to 500 mL – and minimum volume is 1/600th of the selected syringe size. When the Volume setting is correct, press Enter. ing or bolus dose cannot be set in this mode. To program Volume / Time, choose it at the selection menu (or choose a drug program that uses the volume/time mode infusion type). Choose the syringe model and size, and load the syringe as instructed on page 34. ENTER VOLUME TO INFUSE - PRESS ENTER TO CONTINUE HIGH:500 LOW:0.005 50 CLEAR mL BACKSPACE ENTER Note: Volume is limited to 500 mL regardless of syringe size in use, as some infusions may require multiple syringes. 2. Press the number keys to set delivery time. Time is always limited by maximum and minimum rates for selected syringe size and/or the custom setup in the Configuration. When the delivery time is correct, press Enter. 3. At the Begin Infusion screen all values are set and the pump pauses (the pump may be configured with additional confirmation screens, requiring you to confirm all settings twice before beginning the infusion). 4. Prior to connecting to the patient, press è to initiate the priming sequence (page 59). 5. Confirm the settings and start the infusion, or use the three menu keys to modify the settings. ENTER DELIVERY TIME HIGH: 24:00:00 LOW: 00:31:00 6. When all delivery settings are confirmed as correct, press É to begin infusion. 54 :00 HR:MIN:SEC CLEAR BACKSPACE ENTER PRESS < « > TO BEGIN INFUSION VOLUME TIME 50 mL 00:40:00 TIME REMAINING 00:40:00 MAIN MENU WARNING: Confirm All Settings. Before starting any delivery, always confirm the accuracy of all infusion values to the original order. Programming the pump at a delivery rate other than that prescribed will cause inappropriate delivery, which can result in serious injury or death. 00:40 TVD 0 mL RATE 75 mL/hr OPTIONS CLEAR TVD Main Menu – returns to the Main Menu. Options – allows selection from a list of variables (e.g., standby, etc.). Clear TVD – clears total volume delivered. Medfusion® Model 4000 pump Operator's Manual Intermittent volume / time This Intermittent Volume / Time Mode allows specification of a delivery volume for a specific delivery time, after which the delivery stops for a programmed interval, then the pattern recycles. In other words, the pump delivers for a set period, pauses a set period, then infuses for a set period, and so on. Below are the steps for programming an Intermittent Volume / Time infusion. Select Intermittent Volume / Time from the selection menu (or choose a drug program that uses the intermittent volume/time mode infusion type). Choose the syringe model and size, and load the syringe as instructed on page 34. • The delivery stop interval equals “Time Between Starts” minus “Delivery Time.” • The pattern repeats at “Time Between Starts” interval. 1. Use the number keys to set the volume. Volume is limited to 500 mL, and minimum volume is 1/600th of syringe size. When the volume is correct, press Enter. ENTER VOLUME TO INFUSE - PRESS ENTER TO CONTINUE HIGH:500 LOW:0.1 CLEAR Note: Volume is limited to 500 mL regardless of syringe size in use, as some infusions may require multiple syringes. 2. Use the number keys to set the delivery time. Maximum and minimum times are calculated for the syringe in use and/or the custom setup in the Configuration. When ready, press Enter. 3. Use the number keys to set the time between starts value. Maximum and minimum times are calculated for the delivery time entered (minimum time must be at least one minute longer than the delivery time; the pump will not accept delivery times equal to or less than the delivery time). When ready, press Enter. 4. At the Begin Infusion screen all values are set and the pump pauses (the pump may be configured with additional confirmation screens, requiring you to confirm all settings twice before beginning the infusion). 5. Prior to connecting to the patient, press è to initiate the priming sequence (page 59). 60 mL BACKSPACE ENTER ENTER DELIVERY TIME HIGH: 24:00:00 LOW: 00:04:00 00:55 :00 HR:MIN:SEC CLEAR BACKSPACE ENTER ENTER TIME BETWEEN STARTS HIGH: 24:00:00 LOW: 00:06:00 05:00 :00 HR:MIN:SEC CLEAR BACKSPACE ENTER 55 Medfusion® Model 4000 pump Operator's Manual 6. Confirm the settings and start the infusion, or use the three menu keys shown at right to modify the settings. WARNING: Confirm All Settings. Before starting any delivery, always confirm the accuracy of all infusion values to the original order. Programming the pump at a delivery rate other than that prescribed will cause inappropriate delivery, which can result in serious injury or death. 7. When all delivery settings are confirmed as correct, press É to begin infusion. 56 PRESS < « > TO BEGIN INFUSION VOLUME 60 mL TVD 0.000 mL TIME 00:55:00 TIME BETWEEN STARTS 05:00:00 TIME REMAINING 00:55:00 RATE 65.5 mL/hr MAIN MENU OPTIONS CLEAR TVD Main Menu – returns to the Main Menu. Options – allows selection from a list of variables (e.g., standby, etc.). Clear TVD – clears total volume delivered. Medfusion® Model 4000 pump Operator's Manual Recall last settings The Medfusion® Model 4000 pump will recall the settings used to run the last infusion. Note: If a pump has a custom configuration (created using PharmGuard® Toolbox 2 and taught to the pump) the Recall last settings feature is available only in those profiles it has been included in. To use the feature, you must first enter the profile for the previous infusion. Any Options used in the infusion (disable bolus dose, adjust alarm volume, occlusion setting, etc.) return to the default settings and must be reprogrammed. 1. Select Recall Last Settings from the selection menu. (If it isn't shown, press the More key and search for it.) In this example, press the number 4. When selected, press Enter to confirm the syringe type and size if the syringe has been replaced. After the syringe has been confirmed the Continue Same Infusion screen appears. 2. Prior to connecting to the patient, press è to initiate the priming sequence (page 59). 3. If No is pressed, the pump returns to the Main menu to select a different Drug Program or Manual delivery mode. If Yes is pressed, the pump pauses at the Begin Infusion screen and PVD is not cleared. After reviewing these previously used settings, the pump pauses. To clear the TVD and PVD or PDD, press Clear Totals. (For volume limited infusions, only the remaining volume specified will be delivered.) Reuse the same delivery settings to repeat an identical dosage of medication or fluids to a patient (choose the syringe model and size, and load the syringe as instructed on page 34): PRESS THE NUMBER TO SELECT 1 2 3 4 mL / hr VOLUME / TIME DOSE / KG/ MIN RECALL LAST SETTINGS MAIN MENU VOLUME WEIGHT LOAD DOSE YES CONTINUE SAME INFUSION? 10 mL PVD 75 kgKVO MORE 0.487 mL 2000 mcg/kg 75 mcg/kg/minRATE 33.8 mL/hr NO 57 Medfusion® Model 4000 pump Operator's Manual WARNING: Confirm All Settings. Before starting any delivery, always confirm the accuracy of all infusion values to the original order. Programming the pump at a delivery rate other than that prescribed will cause inappropriate delivery, which can result in serious injury or death. 4. When all delivery settings are confirmed as correct, press É to begin infusion. Be sure all pump settings are correct before starting infusion. TVD and PVD/PDD Retention: The pump also retains TVD and PVD or PDD from the last infusion. If these values are not wanted, you must manually clear them before beginning a new infusion. 58 Medfusion® Model 4000 pump Operator's Manual Priming the system Priming is one of the functions of the Prime/Bolus key (è). Always prime a new syringe after loading it onto the pump and before connecting the tubing to the patient. This removes the mechanical slack in the pump and syringe, and significantly reduces startup time. The priming sequence is extremely important to assure the accuracy of the delivery and reduce the start-up time. The priming sequence is performed after the infusion is programmed, and before the delivery is started. The message at the top of the Begin Infusion screen will alternate between “Press < « > To Begin Infusion”, and “Press < «« > To Prime” to remind you of the prime sequence. WARNINGS: • NEVER prime any syringe while connected to a patient infusion site, as this may cause over-infusion which could result in serious injury or death. • To avoid air embolism, always purge all air from syringe and infusion lines before connecting to the patient. • Periodically check the fluid pathway and all connections (including the catheter/administration set connection) for leaks. Leaks in the system may cause fluid loss resulting in under-delivery, as well as allowing an opening for contamination. 1. Press è to initiate priming. PRIME / BOLUS G6000912 Rev 0 2. The priming screen opens. To prime a loaded syringe, press and hold è while observing for fluid movement at the patient end of the system. 3. For safety reasons, priming stops as soon as the finger is lifted from è or after 15 seconds. To continue priming beyond the 15-second cutoff, release è, then press & hold it again. PRESS AND HOLD < «« > KEY TO PRIME PRESS EXIT WHEN PRIME IS COMPLETE PRIMING VOLUME 0.00 mL EXIT Priming Volume Not Counted in TVD: The total priming volume accumulates on screen, but is NOT counted in the Total Volume Delivered display. This is because the tubing is not connected to the patient during priming and therefore not delivered to the patient. The Priming infusion rate is 300 mL/hr, or the default maximum bolus rate for the syringe size being used, whichever is lower. 59 Medfusion® Model 4000 pump Operator's Manual WARNING: Once the syringe and tubing system is connected to the patient, raising the system above the patient (even briefly) can cause significant bolusing due to changes in hydrostatic pressure. Lowering the system below the patient (even briefly) can cause significant interruptions in flow due to changes in hydrostatic pressure. This could cause improper pump operation resulting in inaccurate fluid delivery that could result in serious injury or death. Place the pump as close to the patient's infusion site as possible. Once the system is primed, connect the tubing to the patient and begin infusion. 60 Medfusion® Model 4000 pump Operator's Manual Options Options gives you access to program options that affect the current infusion only. The options available depend on the options that have been enabled for the profile and which have been customized for use using PharmGuard® Toolbox 2. Any options in use return to the default selection whenever the pump is turned off, or whenever the program is returned to the Main menu prior to beginning the next infusion. These options are available when the pump is at the Begin Infusion screen (prior to starting an infusion): Note: Customization settings in individual drug programs take priority over profile settings as to which options are available. For instance, while Bolus Dose and Loading Dose may be available as options in a given profile, individual drug programs within that profile may have these options disabled, and you will therefore not be able to set them when using those specific drug programs. • Override Occlusion Limit • Override Alarm Loudness • Disable/Enable Near Empty Alarm Tone • Disable/Enable Volume Empty Alarm Tone • Bolus Dose • Delayed Start • KVO • Periodic Callback Alarm • Change to Dose/Change to Volume • Loading Dose • Standby • Volume Limit • Disable/Enable FlowSentry™ These options are available when the pump is running an infusion: • • • • • • • Bolus Dose Override Alarm Loudness Periodic Callback Alarm Disable/Enable Volume Empty Tone Disable/Enable Near Empty Tone Change to Dose/Change to Volume Disable/Enable FlowSentry™ 61 Medfusion® Model 4000 pump Operator's Manual Bolus dosing A Bolus dose is a separate delivery that pauses the main infusion, delivers the bolus (often at a different, higher rate), then returns to the main infusion when complete. It is an optional parameter of continuous delivery modes which allows a bolus volume or dose to be delivered over a specified time. Bolus dose may also be configured to be automatically “prompted” or included in the programming steps of a drug program. A bolus may be programmed during the initial infusion setup, at the Begin Infusion screen, or during an infusion without stopping medication delivery. If Bolus Autoprompt is set to Enable in PharmGuard® Toolbox 2, when initially programming a continuous infusion the bolus programming screens (steps 3-5, below) are part of the drug program setup. Pressing Disable at the bolus entry screen will disable the bolus feature for the duration of the infusion. Bolus programming If programming a bolus at the Begin Infusion screen or during an infusion: 1. Press Options. PRESS < « > KEY TO BEGIN INFUSION CONC WEIGHT KVO MAX DOSE MAIN MENU 10 mg/mL PVD 0 mL 40 kg 9 mL/hr 4 mg/kg/hrRATE 16 mL/hr CHG DOSE Ketamine 10 10 40 CONC WEIGHT DOSE LOCK 2. Use the number keys to choose Bolus Dose. Steps 3 through 5 are the bolus programming screens. If Autoprompt is Enabled in PharmGuard® Toolbox 2, they are part of the normal infusion programming workflow: 3. If the initial infusion is programmed in one of the body weight modes (e.g. Dose/Kg/ Min), the bolus “dose” may be programmed in the parameters of that dose mode (e.g. Mg/Kg) or in Total Dose (e.g. Mg). Use the number keys to set the desired bolus dose for this infusion (or to set the dose volume in mL, if applicable for the infusion). Volume is limited by the maximum fill volume of the current syringe size, and minimum volume is 1/600th the syringe size. When the dose setting (or bolus volume) is correct, press Enter. 62 4 OPTIONS CLEAR TOTALS mg/mL mg/mLTVD 1.408 mL kgKVO mg/kg/hrRATE CHG DOSE ED N ≥ 16 mL/hr OPTIONS CLEAR TVD PRESS THE NUMBER TO SELECT THE PROGRAM OPTION 1 2 3 4 BOLUS DOSE 5 CHANGE TO DOSE OVERRIDE ALARM LOUDNESS OVERRIDE OCCL LIMIT DISABLE FlowSentry ENTER BOLUS DOSE - PRESS ENTER TO CONTINUE HIGH:4 LOW:0.2 DISABLE 2 CLEAR MG/KG BACKSPACE ENTER ENTER BOLUS DOSE - PRESS ENTER TO CONTINUE HIGH:28.57 LOW:0.0477 DISABLE 5 CLEAR MG BACKSPACE ENTER Disable – turns Bolus off for the duration of the infusion. Clear – deletes an entry. Backspace – erases a character. Medfusion® Model 4000 pump Operator's Manual 4. Confirm that the bolus dose settings and total bolus dose are correct. If incorrect, press No, and the pump returns to the Enter Bolus Dose screen. If correct, press Yes. Note that the bolus dose may be entered in dose/kg or Total Dose for weight-based modes (depending on pump customization). The confirmation screen highlights (in reverse) the value that the pump calculates. 5. Use the number keys to set bolus delivery time in minutes and seconds. The default value for bolus delivery rate is set in custom configuration. Maximum & minimum time is calculated from the maximum & minimum rate for the syringe size currently in use and/or the custom setup in the Configuration. (If using a manual delivery mode and the Bolus Time feature has been disabled the pump will default to the maximum bolus rate.) When the bolus time is correct, press Enter. Using PharmGuard® Toolbox 2, it is possible to restrict bolus time to minutes only. If that is the case the screen will look like this: It is also possible to specify an absolute time limit using PharmGuard® Toolbox 2, in which case you will not be able to change it. CONFIRM TOTAL BOLUS DOSE BOLUS DOSE PER KILOGRAM WEIGHT 2 MG/KG KG 40 TOTAL BOLUS DOSE 80 MG NO YES CONFIRM TOTAL BOLUS DOSE BOLUS DOSE PER KILOGRAM WEIGHT 2 MG/KG KG 40 TOTAL BOLUS DOSE 80 MG NO YES ENTER BOLUS TIME - PRESS ENTER TO CONTINUE HIGH:00:59:00 LOW:00:01:00 CLEAR 00:01:00 HR : MIN : SEC BACKSPACE ENTER ENTER BOLUS TIME - PRESS ENTER TO CONTINUE HIGH:00:59:00 LOW:00:01:00 CLEAR 00:01:00 HR : MIN : SEC BACKSPACE ENTER Note: If the bolus is being programmed while an infusion is delivering, pressing Enter following time entry will cause the Begin Bolus Delivery? screen to be displayed. See Bolus Delivery (starting at item 2 in the section that follows) for instructions on delivering the bolus. 63 Medfusion® Model 4000 pump Operator's Manual Bolus delivery 1. Press è (if necessary). PRIME / BOLUS G6000912 Rev 0 2. The Begin Bolus Delivery? screen appears. To begin bolus delivery, press Yes. If you do not want to start the bolus right now, press No. If you want to change the bolus amount, press CHG Bolus and reprogram the bolus (items 3 through 5 in the preceding section). WARNING: Confirm All Settings. Before starting any delivery, always confirm the accuracy of all infusion values to the original order. Programming the pump at a delivery rate other than that prescribed will cause inappropriate delivery, which can result in serious injury or death. 3. If Yes was pressed, the Bolus Delivery screen appears, with “Delivering” and the drug program name alternately appearing. BEGIN BOLUS DELIVERY? 2 01:00 BOLUS TIME MG/KG MM:SS total bolus dose YES 8 mL 480 mL/hr VOLUME RATE 80 MG CHG BOLUS NO BEGIN BOLUS DELIVERY? 2 01:00 BOLUS TIME MG/KG MM:SS total bolus dose YES VOLUME RATE 80 8 mL 480 mL/hr MG CHG BOLUS NO PRESS CANCEL TO STOP BOLUS DELIVERY DELIVERING BOLUS 2 mg/kgDELIVERED 3.0760 mL REMAINING 00:37MM:SS 30.7600 MG TOTAL BOLUS 80 MG RATE 480 mL/hr CANCEL CANCEL – stops the bolus and returns to the normal delivery rate and screen. 64 If No was pressed, the pump returns to the delivery screen. Note that the bolus information appears on the screen. Pressing è will cause the Begin Bolus Delivery? screen to reappear, where you can begin delivering the bolus (see above). Ketamine 10 mg/mL CONC 10 mg/mLTVD WEIGHT 40 kgKVO BOLUS DOSE mg/kg/hrRATE LOCK CHG DOSE OPTIONS 4 ED 31.338 mL N 2 16 mg/ml mL/hr ≥ CLEAR TVD Medfusion® Model 4000 pump Operator's Manual Continuing an interrupted bolus dose Should a High Priority alarm occur during bolus delivery, or if á or Cancel are pressed, the bolus will stop. You can then either continue the bolus from where it left off, or cancel the bolus. 1. If necessary, press í to silence the alarm. Troubleshoot the alarm condition. OCCLUSION - CHECK INFUSION LINE Ketamine 10 2. Press É. mg/mL BOLUS 2 mg/kgDELIVERED 1.0910 mL REMAINING 00:52MM:SS 10.9100 MG TOTAL BOLUS 80 MG RATE 480 mL/hr CANCEL Ketamine 10 mg/mL ED CONC 10 mg/mLTVD WEIGHT 40 kgKVO BOLUS DOSE mg/kg/hrRATE LOCK CHG DOSE OPTIONS 4 3. Either: • Press Options, then use the number keys to select Bolus Dose. OR • Press É. 4. To continue the bolus from where it left off (delivering only what was remaining), press Yes. Press No to exit the bolus screen, cancel bolus delivery and return to the main infusion. 31.338 mL N 2 16 mg/ml mL/hr # CLEAR TVD PRESS THE NUMBER TO SELECT THE PROGRAM OPTION 1 2 3 4 BOLUS DOSE OVERRIDE ALARM LOUDNESS OVERRIDE OCCL LIMIT DISABLE FlowSentry 5 CHANGE TO DOSE CONTINUE SAME BOLUS? BOLUS 2 mg/kgDELIVERED 1.0910 mL REMAINING 00:52MM:SS 10.9100 MG TOTAL BOLUS 80MG RATE 480 mL/hr YES NO 65 Medfusion® Model 4000 pump Operator's Manual Bolus dose rate reduction The increased delivery rate of a bolus dose may trigger an occlusion alarm (depending on the occlusion limit settings in the pump and the resistance in the line). If this occurs, the bolus rate is automatically reduced to 70%. The bolus rate is reduced by increasing the bolus time over the bolus volume. The bolus rate continues to be reduced until resistance is below the set occlusion limit. There could be a variety of reasons for this to occur, including (but not limited to) the occlusion limit in use, fluid/medication viscosity, tubing size, the patient’s infusion site setup, etc. 1. Press í to silence the alarm. (Bolus delivery continues at the reduced rate.) The pump continues to monitor the infusion and may reduce the rate multiple times. However, the first alarm is the only one that produces an audible tone. If the first alarm is silenced, additional rate reductions will not cause an audible tone to sound, however the amber (yellow) LED and the alarm message will display and can be cleared by pressing í. If the bolus rate reduces below the infusion rate, or the bolus time increases past the maximum bolus time, the bolus is cancelled. 2. Press í to silence the alarm. The normal infusion delivery is continued. Once the reason for the rate reduction is cleared, you may resume the bolus (if desired). See the previous page for instructions. 66 RESTRICTED FLOW - RATE REDUCED DELIVERING BOLUS 2 mcg/mLDELIVERED 0.0040 mL REMAINING 00:54 MM:SS 1.00 MCG RATE 2.4 mL/hr CANCEL CANCEL – stops the bolus and returns to the normal delivery rate and screen. RESTRICTED FLOW - BOLUS CANCELLED 0.447 mL N # RATE2.5 mL/hr TVD LOCK CHG RATE OPTIONS CLEAR TVD Medfusion® Model 4000 pump Operator's Manual Loading doses A loading dose is a separate, specified volume (or dose) of drug infused as a one-time-only bolus (often at a different, higher rate) prior to the start of normal delivery. It is an optional parameter of continuous delivery modes which allows a bolus volume or dose to be delivered over a specified time. A loading dose may also be configured to be automatically “prompted” or included in the programming steps of a drug program. A loading dose may be programmed at the Begin Infusion screen by pressing Options. If Loading Dose Autoprompt is set to Enable in PharmGuard® Toolbox 2, when initially programming a continuous infusion the loading dose programming screens (steps 3-5, below) are part of the drug program setup. Pressing Disable at the loading dose entry screen will disable the feature for the duration of the infusion. Set up loading dose If programming a bolus at the Begin Infusion screen: 1. Set the delivery mode parameters. When the pump is paused at the Begin Infusion screen, press Options. 2. Use the number keys to choose Loading Dose. (You may have to press More to see this option.) Steps 3 through 5 are the bolus programming screens. If Autoprompt is Enabled in PharmGuard® Toolbox 2, they are part of the normal infusion programming workflow: 3. If the initial infusion is programmed in one of the body weight modes (e.g. Dose/ Kg/Min), the loading “dose” may be programmed in the parameters of that dose mode (e.g. Mcg/Kg) or in Total Dose (e.g. Mg). Use the number keys to set the desired loading dose for this infusion (or to set the dose volume in mL, if applicable for the infusion). Volume is limited by the maximum fill volume of the current syringe size, and minimum volume is 1/600th the syringe size. When the loading dose setting (or volume) is correct, press Enter. PRESS < « > KEY TO BEGIN INFUSION CONC WEIGHT 20 mg/mL 40 kgKVO 0 mL PVD DOSE 33.3 mg/kg/hrRATE 66.6 mL/hr MAIN MENU CHG DOSE OPTIONS CLEAR TOTALS PRESS THE NUMBER TO SELECT THE PROGRAM OPTION 1 2 3 4 STANDBY KVO LOADING DOSE OVERRIDE ALARM LOUDNESS 5 6 7 8 DELAYED START VOLUME LIMIT DISABLE FLOWSENTRY CHANGE TO DOSE MORE ENTER LOADING DOSE - PRESS ENTER TO CONTINUE HIGH:30 LOW:0.05 DISABLE 15 15 CLEAR CURRENT SETTING MG/KG BACKSPACE ENTER Disable – turns Bolus off for the duration of the infusion. Clear – deletes an entry. Backspace – erases a character. 67 Medfusion® Model 4000 pump Operator's Manual 4. Confirm that the loading dose settings and total loading dose are correct. If incorrect, press No, and the pump returns to the Enter Loading Dose screen. If correct, press Yes. Note that the bolus dose may be entered in dose/kg or Total Dose for weight-based modes (depending on pump customization). The confirmation screen highlights (in reverse) the value that the pump calculates. 5. Use the number keys to set delivery time in minutes & seconds. The default value for loading (i.e., bolus) delivery rate is set in custom configuration. Maximum & minimum time is calculated from the maximum & minimum rate for the syringe size currently in use (or maximum and minimum can be set using PharmGuard® Toolbox 2). Using PharmGuard® Toolbox 2, it is possible to restrict loading time to minutes only. If that is the case the screen will look like this: Using PharmGuard® Toolbox 2, it is also possible to expand loading time to up to 12 hours. If that is the case the screen will look like this: 6. After the loading dose is set and accepted, the pump pauses. The Loading Dose setting now appears on the Begin Infusion screen. If this is a new infusion, prior to connecting to the patient press è to initiate the priming sequence (page 59). WARNING: Confirm All Settings. Before starting any delivery, always confirm the accuracy of all infusion values to the original order. Programming the pump at a delivery rate other than that prescribed will cause inappropriate delivery, which can result in serious injury or death. 68 CONFIRM TOTAL LOADING DOSE LOADING DOSE PER KILOGRAM WEIGHT 15 MG/KG KG 40 TOTAL LOADING DOSE 600 MG NO YES CONFIRM TOTAL LOADING DOSE LOADING DOSE PER KILOGRAM WEIGHT 15 MG/KG KG 40 TOTAL LOADING DOSE 600 MG NO YES ENTER LOADING TIME - PRESS ENTER TO CONTINUE HIGH:00:59:00 LOW:00:03:00 00:03:00 CURRENT SETTING 00:03:00 HR : MIN : SEC CLEAR BACKSPACE ENTER ENTER LOADING TIME - PRESS ENTER TO CONTINUE HIGH:00:59:00 LOW:00:03:00 00:03:00 CURRENT SETTING 00:03:00 HR : MIN : SEC CLEAR BACKSPACE ENTER ENTER LOADING TIME - PRESS ENTER TO CONTINUE HIGH:12:00:00 LOW:00:03:00 10:00:00 CURRENT SETTING 10:00:00 HR : MIN : SEC CLEAR BACKSPACE ENTER PRESS < « > KEY TO BEGIN INFUSION CONC 20 mcg/mL WEIGHT 40KG KVO LOAD 15MCG/KG DOSE 33.3MG/KG/HR MAIN MENU CHG RATE PVD RATE OPTIONS 0 mL 66.6 mL/hr CLEAR TOTALS Medfusion® Model 4000 pump Operator's Manual Delivering a loading dose 1. When ready, press É. PRIME / BOLUS G6000912 Rev 0 2. The Begin Loading Dose screen appears. Depending on which mode the pump is delivering in, the screen is slightly different. 3. To begin delivering the loading dose, press Yes. OR • Press No to skip the loading dose and return to the Normal Delivery screen. OR • Press Chg Dose to change the loading dose settings. • If enabled in PharmGuard® Toolbox 2 and if the loading dose settings have been programmed in body weight, the key labeled Chg In mL will allow the dose to be changed in mL directly (if enabled). BEGIN LOADING DOSE DELIVERY? LOAD TIME 15 03:00 MG/KG MM:SS total loading dose YES RATE 600 600 mL/hr MG CHG DOSE NO BEGIN LOADING DOSE DELIVERY? LOAD TIME 15 03:00 MG/KG MM:SS total loading dose YES RATE 600 CHG DOSE 600 mL/hr MG NO Note: If no keys are pressed for 30 seconds, the User Callback alarm will sound. 4. If Yes was pressed, the Loading Dose Delivery screen appears and the infusion begins, with “Delivering” and the library name alternately appearing. The pump delivers the loading dose then automatically switches to the normal delivery rate and screen. The loading dose volume delivered is automatically added to the Total Volume Delivered (TVD) as well as the Programmed Volume Delivered (PVD), or Programmed Dose Delivered (PDD) for that infusion. PRESS CANCEL TO STOP LOADING DOSE DELIVERY DELIVERING LOAD REMAINING TOTAL LOAD CANCEL 15 MG/KGDELIVERED 2.8280 mL 02:43 MIN:SS 56.5600 MCG 600 MG RATE 600 mL/hr CANCEL – stops the loading dose and returns to the normal delivery rate and screen. 69 Medfusion® Model 4000 pump Operator's Manual Continuing an interrupted loading dose Should a High Priority alarm occur during loading dose delivery, or if á or Cancel are pressed, the dose will stop. You can then either continue the dose from where it left off, or cancel the dose. 1. If necessary, press í to silence the alarm. Troubleshoot the alarm condition. OCCLUSION - CHECK INFUSION LINE Aminocaproic Acid Drip 20 mg/mL LOAD 15 mg/kgDELIVERED 14.8340 mL REMAINING 01:31MM:SS 296.6800 MG TOTAL LOAD 600 MG RATE 600 mL/hr 2. Press É. 3. To continue the loading dose from where it left off (delivering only what was remaining), press Yes. Press No to cancel the remainder of the loading dose and begin the main infusion. 70 CANCEL CONTINUE SAME LOAD? BOLUS 15 mg/kgDELIVERED 14.8340 mL REMAINING 01:31MM:SS 296.6800 MG TOTAL BOLUS 600MG RATE 600 mL/hr YES NO Medfusion® Model 4000 pump Operator's Manual Loading dose rate reduction The increased delivery rate of a loading dose may trigger an occlusion alarm (depending on the occlusion limit settings in the pump and the resistance in the line). If this occurs, the loading rate is automatically reduced to 70%. The loading rate is reduced by increasing the loading time over the loading volume. The loading rate continues to be reduced until resistance is below the set occlusion limit. There could be a variety of reasons for this to occur, including (but not limited to) the occlusion limit in use, fluid/medication viscosity, the patient’s infusion site setup, etc. 1. Press í to silence the alarm. (Loading dose delivery continues at the reduced rate.) The pump continues to monitor the infusion and may reduce the rate multiple times. However, the first alarm is the only one that produces an audible tone. If the first alarm is silenced, additional rate reductions will not cause an audible tone to sound, however the amber (yellow) LED and the alarm message will display and can be cleared by pressing í. If the loading rate reduces below the infusion rate, or the loading time increases past the maximum loading time, the loading dose is cancelled. 2. Press í to silence the alarm. The normal infusion delivery is continued. Once the reason for the rate reduction is cleared, you may resume the loading dose (if desired). See the previous page for instructions. RESTRICTED FLOW - RATE REDUCED DELIVERING LOAD 50 MCG/KGDELIVERED 0.0960 mL REMAINING 09:52 MIN:SS 24.00 MCG RATE 60 mL/hrR CANCEL CANCEL – stops the loading dose and returns to the normal delivery rate and screen. RESTRICTED FLOW - LOADING CANCELLED 1.702 mL N # RATE 60 mL/hr TVD LOCK CHG RATE OPTIONS CLEAR TVD 71 Medfusion® Model 4000 pump Operator's Manual Volume limit A Volume Limit is an Option available for continuous delivery modes. On reaching the preset volume limit, the pump stops – or changes to KVO if a keep vein open rate has been programmed. Volume limit is based on the amount of programmed volume that is delivered. Enable / Disable Volume Limit: If Volume Limit is not currently available as a dosing option, it can be enabled through custom pump configuration (using PharmGuard® Toolbox 2). Setting volume limit A volume limit can be set either before starting an infusion or by pausing the pump during an infusion. Volume limit is found in the Options menu, which you access from the Begin Infusion screen. 1. With the pump stopped, press Options. PRESS < « > KEY TO BEGIN INFUSION PVD 0.000 mL RATE MAIN MENU CHG RATE OPTIONS 2. Use the number key to select Volume Limit. 3.5 mL/hr CLEAR TOTALS PRESS THE NUMBER TO SELECT THE PROGRAM OPTION 1 2 3 4 STANDBY VOLUME LIMIT OVERRIDE OCCL LIMIT OVERRIDE ALARM LOUDNESS 5 6 7 8 DELAYED START LOADING DOSE BOLUS DOSE KVO MORE 3. Use the number keys to set the volume limit, then press Enter. Note: Volume is limited to 500 mL regardless of syringe size in use, as some infusions may require multiple syringes. 72 ENTER VOLUME LIMIT - PRESS ENTER TO CONTINUE HIGH:500 LOW:0 DISABLE 50 CLEAR mL RATE 3.5 mL/hr BACKSPACE ENTER Disable – turns Volume Limit off. CLEAR – deletes an entry. Backspace – erases a character. Medfusion® Model 4000 pump Operator's Manual 4. The volume limit setting now appears on the display. Program Volume Delivered (PVD) will appear on the screen directly above the V Limit. 5. If this is a new infusion, prior to connecting to the patient press è to initiate the priming sequence (page 59). PRESS < « > KEY TO BEGIN INFUSION PVD 0.000 mL V LIMIT 50 mL RATE 3.5 mL/hr MAIN MENU CHG RATE OPTIONS CLEAR TOTALS WARNING: Confirm All Settings. Before starting any delivery, always confirm the accuracy of all infusion values to the original order. Programming the pump at a delivery rate other than that prescribed will cause inappropriate delivery, which can result in serious injury or death. 6. Press É to begin infusion. The infusion will automatically stop when it reaches the preset volume limit. 73 Medfusion® Model 4000 pump Operator's Manual Keep Vein Open (KVO) rate The Keep Vein Open (KVO) rate is an Option available for continuous delivery modes. The keep vein open feature is intended for use when delivering a series of infusions to a patient, and the delivery site must remain patent between the end of one infusion and the beginning of the next. • A volume limit must be programmed for KVO to work. After a volume limit is reached, a low rate (KVO) is set to maintain patency of the infusion site. • The range of rates available appears on the Enter KVO Rate screen. KVO rates are calculated by syringe size and its minimum flow rate. • The programmed KVO rate must be less than the normal delivery rate and greater than or equal to minimum flow rate for the syringe. Once the volume limit has been reached, the pump will begin infusing at either the programmed KVO rate or the current infusion rate, which ever is less. A KVO rate can be set at the Begin Infusion screen before starting an infusion or by pausing the pump during an infusion. KVO can also be programmed as part of the drug program using PharmGuard® Toolbox 2. Note: The setting of KVO rates should be based on a physician's order or your facility’s policies and procedures for rate determination. Enable / Disable KVO Rate: KVO rate can be enabled or disabled through custom pump configuration (using PharmGuard® Toolbox 2). Programming KVO rate 1. With the pump stopped, press Options. 2. Use the number keys to choose KVO. PRESS < « > KEY TO BEGIN INFUSION PVD 0.000 mL BOLUS 2.5 mL V LIMIT 50 mL RATE 3.5 mL/hr MAIN MENU CHG RATE OPTIONS CLEAR TOTALS PRESS THE NUMBER TO SELECT THE PROGRAM OPTION 1 2 3 4 STANDBY VOLUME LIMIT OVERRIDE OCCL LIMIT OVERRIDE ALARM LOUDNESS 5 6 7 8 DELAYED START LOADING DOSE BOLUS DOSE KVO MORE 3. Use the number keys to set the KVO rate within the minimum and maximum rates on screen. When the KVO rate is set, press Enter. 4. The KVO setting now appears on the screen. 5. If this is a new infusion, prior to connecting to the patient press è to initiate the priming sequence (page 59). 74 ENTER KVO RATE - PRESS ENTER TO CONTINUE HIGH:3.5 LOW:0.1 DISABLE 0.6 CLEAR mL/hr BACKSPACE ENTER PRESS < « > KEY TO BEGIN INFUSION PVD 0.000 mL BOLUS 2.5 mL V LIMIT 50.003 mL KVO RATE 0.6 mL/hr RATE 3.5 mL/hr CLEAR TOTALS MAIN MENU CHG RATE OPTIONS Medfusion® Model 4000 pump Operator's Manual WARNING: Confirm All Settings. Before starting any delivery, always confirm the accuracy of all infusion values to the original order. Programming the pump at a delivery rate other than that prescribed will cause inappropriate delivery, which can result in serious injury or death. 6. Press É to begin infusion. 7. When the infusion reaches the programmed volume limit, rather than stopping delivery, the pump automatically begins delivery at the KVO rate (or continues at the current rate if less than the KVO rate) and triggers an alarm. 8. KVO delivery automatically stops when the pump calculates the syringe is empty, or if á was pressed. When the pump automatically stops keep vein open infusion, it sounds a “syringe empty” alarm. KVO IN PROGRESS PVD 50.0030 mL KVO V LIMIT 50 mL N RATE0.6 mL/hr LOCK Stop KVO Infusion: Stop a KVO infusion at any time by pressing á. Silence KVO Alarm: Silence the alarm by pressing í. 75 Medfusion® Model 4000 pump Operator's Manual Standby Standby is an Option that allows the pump to remain at the Begin Infusion screen without the User Callback alarm sounding for the Standby period. Enable / Disable Standby: The Standby option can be enabled / disabled through custom configuration (using PharmGuard® Toolbox 2). • The pump does not automatically start an infusion at the end of the standby. • Instead, the pump triggers an alarm at the end of the standby period. Programming standby 1. When the pump is paused at the Begin Infusion screen, press Options. PRESS < « > KEY TO BEGIN INFUSION PVD 0.000 mL BOLUS 2.5 mL V LIMIT 50 mL KVO RATE 0.6 mL/hr RATE 3.5 mL/hr CLEAR TOTALS MAIN MENU CHG RATE OPTIONS 2. Use the number keys to choose Standby. PRESS THE NUMBER TO SELECT THE PROGRAM OPTION 1 2 3 4 STANDBY VOLUME LIMIT OVERRIDE OCCL LIMIT OVERRIDE ALARM LOUDNESS 5 6 7 8 DELAYED START LOADING DOSE BOLUS DOSE KVO MORE 3. Set the Standby time in hours & minutes. The maximum Standby setting is 24 hours. The default standby time is 1:00 Hr. When the Standby time is correct, press Enter to accept the standby setting and go to the Begin Infusion screen. 4. The standby timer then appears in the upper right corner on screen “counting down” alternately with “Press < « > To Begin Infusion” and the Drug Program name. The User Callback alarm is disabled for this interval. Standby continues until the timer has counted to zero. Standby can be discontinued at any time by pressing É, when Main Menu is pressed to return to the main menu, or by setting standby to zero. 5. If this is a new infusion, prior to connecting to the patient press è to initiate the priming sequence (page 59). 76 ENTER STANDBY TIME - PRESS ENTER TO CONTINUE HIGH: 24:00:00 LOW: 00:00:00 CLEAR 01:00:00 HR : MIN : SEC BACKSPACE STANDBY TIME REMAINING ENTER 00:59:50 PVD 0.000 mL BOLUS 2.5 mL V LIMIT 50 mL KVO RATE 0.6 mL/hr RATE 3.5 mL/hr CLEAR TOTALS MAIN MENU CHG RATE OPTIONS Medfusion® Model 4000 pump Operator's Manual 6. When the counter reaches zero, the pump sounds an alarm reminding you to begin the infusion. WARNING: Confirm All Settings. Before starting any delivery, always confirm the accuracy of all infusion values to the original order. Programming the pump at a delivery rate other than that prescribed will cause inappropriate delivery, which can result in serious injury or death. 77 Medfusion® Model 4000 pump Operator's Manual Delayed start Delayed Start is an Option that allows the pump to remain at the Begin Infusion screen without the User Callback alarm sounding for the specified period, then automatically starts the infusion at the end of the Delayed Start period. Enable / Disable Delayed Start: The Delayed Start option can be enabled / disabled through custom configuration (using PharmGuard® Toolbox 2). Programming delayed start 1. When the pump is paused at the Begin Infusion screen, press Options. 2. Use the number keys to choose Delayed Start. PRESS < « > KEY TO BEGIN INFUSION PVD 0.000 mL BOLUS 2.5 mL V LIMIT 50 mL KVO RATE 0.6 mL/hr RATE 3.5 mL/hr MAIN MENU CHG RATE OPTIONS CLEAR TOTALS PRESS THE NUMBER TO SELECT THE PROGRAM OPTION 1 2 3 4 STANDBY VOLUME LIMIT OVERRIDE OCCL LIMIT OVERRIDE ALARM LOUDNESS 5 6 7 8 DELAYED START LOADING DOSE BOLUS DOSE KVO MORE 3. Set the Delayed Start time in hours & minutes. The maximum delayed start setting is 6 hours. The default delayed start time is 1:00 Hr. When Delayed Start is correct, press Enter to accept the setting and go to the Begin Infusion screen. 4. The Delayed Start timer then appears in the upper right corner on screen “counting down” alternately with “Press < « > Key To Start Infusion Immediately” and the Drug Program name. The User Callback alarm is disabled for this interval. Delayed Start continues until the timer has counted to zero. Delayed Start can be discontinued at any time by pressing É, or by setting Delayed Start to zero. 5. If this is a new infusion, prior to connecting to the patient press è to initiate the priming sequence (page 59). WARNING: Confirm All Settings. Before starting any delivery, always confirm the accuracy of all infusion values to the original order. Programming the pump at a delivery rate other than that prescribed will cause inappropriate delivery, which can result in serious injury or death. 6. When the counter reaches zero, the pump automatically begins the infusion. 78 ENTER DELAYED START TIME - PRESS ENTER TO CONTINUE HIGH: 06:00:00 LOW: 00:00:00 CLEAR 01:00:00 HR : MIN : SEC BACKSPACE TIME UNTIL START OF INFUSION ENTER 00:59:50 PVD 0.000 mL BOLUS 2.5 mL V LIMIT 50 mL KVO RATE 0.6 mL/hr RATE 3.5 mL/hr CLEAR TOTALS MAIN MENU CHG RATE OPTIONS Medfusion® Model 4000 pump Operator's Manual Periodic callback alarm The Periodic callback alarm is an Option that causes an alarm to be generated at a programmed period of time. Note: During delivery of a loading dose, bolus dose, or flush delivery, the periodic callback timer is suspended, then restarts once the optional delivery is complete. For example, if you have periodic callback set for 1 hour, then deliver a bolus dose which lasts 10 minutes, the periodic callback will actually occur at 1 hour and 10 minutes. Enable / Disable Periodic Callback Alarm: The Periodic Callback Alarm option can be enabled / disabled through custom configuration (using PharmGuard® Toolbox 2). Programming periodic callback alarm 1. With the pump delivering an infusion or paused, press Options. 2. Use the number keys to choose Periodic Callback Alarm. (You may need to press More to see it.) PRESS < « > KEY TO BEGIN INFUSION PVD 0.000 mL BOLUS 2.5 mL V LIMIT 50 mL KVO RATE 0.6 mL/hr RATE 3.5 mL/hr CLEAR TOTALS MAIN MENU CHG RATE OPTIONS PRESS THE NUMBER TO SELECT THE PROGRAM OPTION 1 2 3 4 DISABE FLOWSENTRY DISABLE NEAR EMPTY TONE DISABLE VOL EMPTY TONE PERIODIC CALLBACK ALARM 5 CHANGE TO DOSE 6 DISABLE FLOWSENTRY MORE 3. Set the callback alarm time in hours & minutes. The maximum periodic callback setting is 8 hours. The default callback time is 2:00 Hr. When the callback alarm time is correct, press Enter to accept the setting and go to the Begin Infusion screen. 4. If this is a new infusion, prior to connecting to the patient press è to initiate the priming sequence (page 59). ENTER PERIODIC CALLBACK ALARM TIME - PRESS ENTER HIGH: 08:00:00 LOW: 00:00:00 CLEAR 02:00:00 HR : MIN : SEC BACKSPACE ENTER WARNING: Confirm All Settings. Before starting any delivery, always confirm the accuracy of all infusion values to the original order. Programming the pump at a delivery rate other than that prescribed will cause inappropriate delivery, which can result in serious injury or death. 79 Medfusion® Model 4000 pump Operator's Manual 5. When ready, press É to begin infusion. Once the infusion starts, the Periodic Callback Alarm sounds a Medium priority alarm at the time interval programmed. The Periodic Callback Alarm can be discontinued at any time by changing the Periodic Callback Alarm time to zero. 80 PERIODIC CALLBACK - SILENCE ALARM TO CONTINUE PVD 14.251 mL N BOLUS 2.5 mL V LIMIT 50 mL KVO RATE 0.6 mL/hr RATE3.5 mL/hr CLEAR TOTALS MAIN MENU CHG RATE OPTIONS Medfusion® Model 4000 pump Operator's Manual Override and toggle features When the pump is paused at the Begin Infusion screen (or, in some cases while infusing), pressing Options gives you access to several override and toggle options that will affect the current infusion only. These Options will return to the default selection whenever the pump is turned off, or whenever the program is returned to the Main menu prior to beginning the next infusion. Change to Dose / Change to Volume When delivering a drug program or infusion containing a concentration (must be a “continuous” style infusion), you may want to view either the volume delivered (PVD) or the dose delivered (PDD). The toggle PVD / PDD option may be used at the Begin Infusion screen, or during an infusion without stopping medication delivery. 1. With the pump at the Begin Infusion screen (or during medication delivery), press Options. 2. Use the number keys to choose Change to Dose or Change to Volume (only one or the other will be shown, depending on the current setting). (You may have to press More to see this option.) PVD (Program Volume Delivered) indicates Volume is currently selected PRESS < « > KEY TO BEGIN INFUSION CONC 1.5 mg/mL PVD 0 mL WEIGHT 5 kgDOSE 20 mg TIME 02:00:00 TIME REMAINING 02:00:00RATE 6.67 mL/hr MAIN MENU CHG DOSE OPTIONS CLEAR TOTALS PRESS THE NUMBER TO SELECT THE PROGRAM OPTION 1 2 3 4 BOLUS DOSE PERIODIC CALLBACK ALARM OVERRIDE ALARM LOUDNESS DELAYED START 5 6 7 8 OVERRIDE OCCL LIMIT CHANGE TO DOSE VOLUME LIMIT DISABLE FLOWSENTRY MORE PDD (Program Dose Delivered) indicates Dose is currently selected 3. PVD will change to PDD (or vice-versa, depending on the current setting). See page 96 for more information on PVD/PDD. PRESS < « > KEY TO BEGIN INFUSION CONC 1.5 mg/mL PDD 0 mcg WEIGHT 5 kgDOSE 20 mg TIME 02:00:00 TIME REMAINING 02:00:00RATE 6.67 mL/hr MAIN MENU CHG DOSE OPTIONS CLEAR TOTALS 81 Medfusion® Model 4000 pump Operator's Manual Override occlusion limit The pump’s programmed default occlusion setting can be overridden. This allows setting a higher or lower occlusion limit for a specific infusion. Note: When a 1mL syringe is entered into the programming the occlusion pressure setting is fixed at very high - 50psi, meaning you do not have the option of changing it. 1. Set the delivery mode parameters. When the pump is paused at the Begin Infusion screen, press Options. 2. Use the number keys to choose Override Occl Limit. (You may have to press More to see this option.) PRESS < « > KEY TO BEGIN INFUSION PVD 0.000 mL BOLUS 2.5 mL V LIMIT 50 mL KVO RATE 0.6 mL/hr RATE 3.5 mL/hr MAIN MENU CHG RATE OPTIONS CLEAR TOTALS PRESS THE NUMBER TO SELECT THE PROGRAM OPTION 1 2 3 4 STANDBY VOLUME LIMIT OVERRIDE OCCL LIMIT OVERRIDE ALARM LOUDNESS 5 6 7 8 DELAYED START LOADING DOSE BOLUS DOSE KVO MORE 3. The highlight shows the pump’s current default setting. Use the number keys to choose the occlusion setting you want to use, then press Enter (see the table on page 92 for more information about occlusion settings). 82 SELECT OCCLUSION LIMIT - PRESS ENTER TO CONTINUE 1 2 3 4 VERY LOW - MOST SENSITIVE LOW NORMAL HIGH - LEAST SENSITIVE ENTER Medfusion® Model 4000 pump Operator's Manual Override alarm loudness Occasionally it may be necessary to change the loudness of the audible alarm. For instance, if the infusion is taking place in an area with a lot of ambient room noise the loudest alarm setting may be wanted. The alarm loudness can be set from Level 1 (quietest) to Level 5 (loudest), however it cannot be disabled or completely silenced. 1. With the pump running or stopped, press Options. 2. Use the number keys to choose Override Alarm Loudness. (You may have to press More to see this option.) PRESS < « > KEY TO BEGIN INFUSION PVD 0.000 mL BOLUS 2.5 mL V LIMIT 50 mL KVO RATE 0.6 mL/hr RATE 3.5 mL/hr MAIN MENU CHG RATE OPTIONS CLEAR TOTALS PRESS THE NUMBER TO SELECT THE PROGRAM OPTION 1 2 3 4 STANDBY VOLUME LIMIT OVERRIDE OCCL LIMIT OVERRIDE ALARM LOUDNESS 5 6 7 8 DELAYED START LOADING DOSE BOLUS DOSE KVO MORE 3. The highlight shows the pump’s current default setting. Use the number keys to choose the desired alarm loudness setting, then press Enter. To determine which setting meets your needs for the infusion, use the number key to choose a loudness level then press Test. ADJUST LOUDNESS - PRESS ENTER TO CONTINUE 1 2 3 4 LEVEL LEVEL LEVEL LEVEL 1 2 3 4 TEST 5 LEVEL 5 ENTER 83 Medfusion® Model 4000 pump Operator's Manual Disable/enable FlowSentry™ The pump has an internal program for rapid occlusion detection called FlowSentry™. The pump may have been configured to either turn this feature on or off. To change the default configuration for a specific infusion, use this option. Note: With certain PharmGuard™ Supported Syringes (PSS) Series 2, such as those for enteral delivery, FlowSentry™ is automatically disabled and cannot be enabled. 1. With the pump running or stopped, press Options. 2. Use the number keys to choose Disable FlowSentry or Enable FlowSentry (only one of the above will be displayed, depending on whether the rapid occlusion detection feature is currently active or not). (You may have to press More to see this option.) PRESS < « > KEY TO BEGIN INFUSION PVD 0.000 mL BOLUS 2.5 mL V LIMIT 50 mL KVO RATE 0.6 mL/hr RATE 3.5 mL/hr MAIN MENU CHG RATE OPTIONS CLEAR TOTALS PRESS THE NUMBER TO SELECT THE PROGRAM OPTION 1 DISABLE FLOWSENTRY 2 DISABLE NEAR EMPTY TONE 3 DISABLE VOL EMPTY TONE BEGINNING Disable/enable near empty alarm tone The pump may be configured to have an alarm sound to indicate when a syringe is nearly empty. (Alarm triggering is calculated based on the syringe size used and the volume initially calculated; see page 101 for an explanation of this alarm.) Use this option to enable or disable this feature for this infusion. 1. With the pump running or stopped, press Options. 2. Use the number keys to choose Disable Near Empty Tone or Enable Near Empty Tone (only one of the above will be displayed, depending on whether the Near Empty Alarm feature is currently active or not). (You may have to press More to see this option.) 84 PRESS < « > KEY TO BEGIN INFUSION PVD 0.000 mL BOLUS 2.5 mL V LIMIT 50 mL KVO RATE 0.6 mL/hr RATE 3.5 mL/hr MAIN MENU CHG RATE OPTIONS CLEAR TOTALS PRESS THE NUMBER TO SELECT THE PROGRAM OPTION 1 DISABLE FLOWSENTRY 2 DISABLE NEAR EMPTY TONE 3 DISABLE VOL EMPTY TONE BEGINNING Medfusion® Model 4000 pump Operator's Manual Disable/enable vol empty alarm tone The pump may be configured to have an alarm sound to indicate when the volume of medication in a syringe is near empty. (The calculation for when the alarm sounds is based on the syringe size used and the volume initially programmed.) Use this option to enable or disable this feature for this infusion. PRESS < « > KEY TO BEGIN INFUSION 1. With the pump running or stopped, press Options. PVD 0.000 mL BOLUS 2.5 mL V LIMIT 50 mL KVO RATE 0.6 mL/hr RATE 3.5 mL/hr MAIN MENU CHG RATE OPTIONS CLEAR TOTALS 2. Use the number keys to choose Disable Empty Tone or Enable Empty Tone (only one of the above will be displayed, depending on whether the Empty Alarm feature is currently active or not). (You may have to press More to see this option.) 1 DISABLE FLOWSENTRY 2 DISABLE NEAR EMPTY TONE 3 DISABLE VOL EMPTY TONE PRESS THE NUMBER TO SELECT THE PROGRAM OPTION BEGINNING 85 Medfusion® Model 4000 pump Operator's Manual Infusion Delivery Starting & stopping infusion delivery An infusion delivery can be started at any time after a delivery mode has been set up. An infusion can be started from a pause, standby, or delayed start screen. Prior to connecting the tubing to the patient and starting an infusion, press è to initiate the priming sequence (page 59). WARNING: Confirm All Settings. Before starting any delivery, always confirm the accuracy of all infusion values to the original order. Programming the pump at a delivery rate other than that prescribed will cause inappropriate delivery, which can result in serious injury or death. Start delivery from pause Whenever beginning an infusion setup and progressing all the way through the setup levels, the pump pauses at the Begin Infusion screen. 1. Program an infusion. 2. Verify all values are correct. PRESS < « > KEY TO BEGIN INFUSION 250 mcg/mLPVD 5KG CONC WEIGHT DOSE MAIN MENU 3. Press É. 4. The pump begins the infusion. 86 0.00 mL 1MCG/KG/MIN RATE 1.2 mL/hr CHG DOSE OPTIONS CLEAR TOTALS PRIME / BOLUS G6000912 Rev 0 Medfusion® Model 4000 pump Operator's Manual Starting delivery from standby or delayed start Start the infusion at any time when the pump is on standby or delayed start. It is unnecessary to either cancel standby or wait until the standby period ends. 1. To start infusion from standby or delayed start, press É. 2. Before starting the infusion, you may also: a) Return to the Main menu. b) Change the Rate (or Dose). c) Change delivery options, such as volume limit or bolus dose. d) Clear Totals. TIME UNTIL START OF INFUSION 00:59:50 PVD 0.000 mL BOLUS 2.5 mL V LIMIT 50 mL KVO RATE 0.6 mL/hr RATE 3.5 mL/hr CLEAR TOTALS MAIN MENU CHG RATE OPTIONS PRIME / BOLUS G6000912 Rev 0 Stopping delivery An infusion can be stopped at any time, in any delivery mode. 1. If there is an active alarm, first silence it. Press á. 2. The infusing indicators turn off and the pump pauses. You may restart the infusion, or change settings and restart. Or, turn the pump off. PRIME / BOLUS G6000912 Rev 0 Continuing interrupted delivery An infusion can be continued from where it left off should it be interrupted for any reason. 1. If there is an active alarm, first silence it. 2. To continue the infusion, press Yes. Press No to cancel the remainder of the infusion and return to the Main menu. CONTINUE SAME INFUSION? PVD 0.000 mL BOLUS 2.5 mL V LIMIT 50 mL KVO RATE 0.6 mL/hr RATE 3.5 mL/hr NO YES 87 Medfusion® Model 4000 pump Operator's Manual Flush feature Some medications and infusions may require flushing the line to remove any residual medication or infusate. Using PharmGuard® Toolbox 2, this feature can be enabled for certain profiles, facilitating the pump to automatically prompt flushing the tubing when an infusion is complete. The pump may prompt to set a delivery time for the flush, or only to specify a volume (depending on how the feature is enabled). This feature is only available if enabled for intermittent (timed) infusions (for example, Dose/kg/Time, Volume/Time, mL/Kg/Time, etc.), and is not available for continuous infusions. Depending on the pump’s custom configuration, a volume limit may have been set the drug program using PharmGuard® Toolbox 2. Volume only 1. When the programmed infusion is complete or the Syringe Empty alarm activates and the pump alarms, press í. INFUSION COMPLETE VOLUME TIME 50 mLPVD 00:25:00 TIME REMAINING 00:00:00RATE MAIN MENU 2. The Begin Flush Setup screen appears. If you do not want to start the flush at this point, press No (the pump will return to the Begin Infusion screen). If you do want to begin the flush setup, press Yes. 3. Remove the syringe at the end of the infusion when prompted and replace with the flush syringe. Press the number key to select the syringe model. 4. Load the syringe onto the pump, verify the correct size is shown, then press Enter. OPTIONS 50 mL 120 mL/hr CLEAR TVD BEGIN FLUSH SETUP? NO YES SELECT SYRINGE MODEL 1 B-D 2 MONOJECT 3 TERUMO LOAD SYRINGE - PRESS ENTER WHEN READY B-D 5mL ENTER 5. Use the number keys to enter the desired amount of flushing infusate, then press Enter. Volume is limited by the size of the syringe being used, and may also be limited by any custom configuration settings. 6. To begin flush delivery, press Confirm. OR • Press Chg Vol to return to the Flush Volume screen and change the volume. OR • Press Main Menu (or the Quick Library) to skip the flush delivery and return to the Main menu. 88 FLUSH VOLUME TO INFUSE - PRESS ENTER TO CONTINUE HIGH:3 LOW:0.033 CLEAR mL BACKSPACE ENTER CONFIRM FLUSH SETTINGS? VOLUME 1.5 mL TIME 00:01:30 RATE MAIN MENU CHG VOL 60 mL/hr CONFIRM Medfusion® Model 4000 pump Operator's Manual Note: If no keys are pressed for 30 seconds, the User Callback alarm will sound. 7. When Confirm is pressed, the flush infusion begins delivering, with “Flushing” and the library name alternately appearing. The flush is calculated to deliver at the same rate as the previous infusion. To cancel or stop the delivery, press á.) If flush delivery is cancelled/stopped, or should an alarm interrupt flush delivery, you will have the option of restarting it (see below). 8. When the flush infusion has been delivered, delivery stops and the pump alarms. Press í to silence the alarm, then press Main Menu. PRESS < > TO STOP FLUSH DELIVERY FLUSHING VOLUME1.5 mLFLUSHED TIME 00:01:30 REMAINING 00:01:22RATE 0.08 mL 60 mL/hr FLUSH STOPPED - PRESS < « > KEY TO CONTINUE VOLUME1.5 mLFLUSHED TIME 00:01:30 REMAINING 00:01:22RATE MAIN MENU 0.08 mL 60 mL/hr INFUSION COMPLETE VOLUME TIME REMAINING MAIN MENU 1.5 mLFLUSHED 1.50 mL 00:01:30 00:00:00RATE 60 mL/hr Continuing an interrupted flush infusion Should a High Priority alarm occur during flush infusion delivery, or if á is pressed to interrupt a flush infusion, delivery will stop. You can then either continue the dose from where it left off, restart a new dose, or cancel the dose. 1. If necessary, press í to silence the alarm. Troubleshoot the alarm condition. 2. Press É. OCCLUSION - CHECK INFUSION LINE VOLUME TIME REMAINING CANCEL 1.5 mLFLUSHED 0.08 mL 00:01:30 00:00:59RATE 60 mL/hr FLUSH STOPPED - PRESS < « > KEY TO CONTINUE 3. To continue the flush infusion from where it left off (delivering only what was remaining), press Yes. Press No to cancel the remainder of the flush infusion and return to the Main menu. VOLUME1.5 mLFLUSHED TIME 00:01:30 REMAINING 00:01:22RATE MAIN MENU 0.08 mL 60 mL/hr CONTINUE SAME FLUSH? VOLUME TIME REMAINING YES PVD 0.23 mL 1.5 mLFLUSHED 0.08 mL 00:01:30 00:00:59RATE 60 mL/hr NO 89 Medfusion® Model 4000 pump Operator's Manual Volume and time 1. When the programmed infusion is complete or the Syringe Empty alarm activates and the pump alarms, press í. 2. The Begin Flush Setup screen appears. If you do not want to start the flush at this point, press No (the pump will return to the Begin Infusion screen). If you do want to begin the flush setup, press Yes. 3. Remove the syringe at the end of the infusion when prompted and replace with the flush syringe. Press the number key to select the syringe model. 4. Load the syringe onto the pump, verify the correct size is shown, then press Enter. INFUSION COMPLETE PVD WEIGHT 1 KG TIME 00:03:00VTBI TIME REMAINING 00:00:00RATE CHG DOSE MAIN MENU OPTIONS 1 mL 1 mL 20 mL/hr CLEAR TVD BEGIN FLUSH SETUP? NO YES SELECT SYRINGE MODEL 1 B-D 2 MONOJECT 3 TERUMO LOAD SYRINGE - PRESS ENTER WHEN READY 5mL B-D ENTER 5. Use the number keys to enter the desired amount of flushing infusate, then press Enter. FLUSH VOLUME TO INFUSE - PRESS ENTER TO CONTINUE HIGH:3 LOW:0.005 mL CLEAR 6. The pump requires confirmation that the flush be delivered at the same rate as the previous infusion. To deliver at the same rate, press Yes (the pump will then automatically calculate the delivery time). To deliver at a different rate, press No. 7. If No was pressed, the Flush Time screen appears. Use the number keys to select the delivery time, then press Enter. ENTER CONFIRM SAME RATE? NO YES FLUSH TIME - PRESS ENTER TO CONTINUE HIGH:00:10:00 LOW:00:02:00 00:00:00 CLEAR 90 BACKSPACE HR:MIN:SEC BACKSPACE ENTER Medfusion® Model 4000 pump Operator's Manual 8. To begin flush delivery, press Confirm. OR • Press Chg Vol to return to the Flush Volume screen and change the volume. OR • Press Chg Time to return to the Flush Time screen and change the time. OR • Press Main Menu (or the Quick Library) to skip the flush delivery and return to the Main menu. Note: If no keys are pressed for 30 seconds, the User Callback alarm will sound. 9. When Confirm is pressed the flush infusion begins delivering, with “Flushing” and the library name alternately appearing. To cancel the flush, press Cancel. If flush delivery is cancelled, or should an alarm interrupt flush delivery, you will have the option of restarting it by pressing Flush (or if finished press Main Menu (or the Quick Library) to exit). 10.When the flush infusion has been delivered, delivery stops and the pump alarms. Press í to silence the alarm, then press Main Menu. CONFIRM FLUSH SETTINGS? VOLUME 1.5 mL TIME 00:04:30 RATE 20 mL/hr CHG TIME CONFIRM MAIN MENU CHG VOL PRESS CANCEL TO STOP FLUSH DELIVERY FLUSHING VOLUME1.5 mLFLUSHED TIME 00:04:30 REMAINING 00:04:21RATE CANCEL 0.02 mL 20 mL/hr FLUSH STOPPED VOLUME1.5 mLFLUSHED TIME 00:04:30 REMAINING 00:03:22RATE FLUSH MAIN MENU 0.02 mL 20 mL/hr INFUSION COMPLETE VOLUME1.5 mLFLUSHED TIME 00:04:30 REMAINING 00:00:00RATE MAIN MENU 1.50 mL 20 mL/hr 91 Medfusion® Model 4000 pump Operator's Manual Time to occlusion The time for the pump to detect an occlusion is affected by three factors: 1. Occlusion Pressure Setting – High (H), Normal (N), Low (L), or Very Low (VL). 2. Flow Rate Setting. 3. Syringe & Tubing Compliance, (i.e., softness of syringe plunger tip or tubing). Reference the Specifications section of this manual (page 124) for typical time-to-occlusions values. See guidelines for pump performance on time to occlusion. At lower rates smaller syringes have shorter occlusion times, which is why the smallest available syringe for the volume to be delivered should always be used. Occlusion trend graph during delivery The pump automatically monitors occlusion or syringe backpressure during any infusion. This trend appears in a bar graph on the right side of the display during delivery. The letter at the top of the graph indicates the configured occlusion alarm level: Code VH H N L VL Meaning Relative Pressure Very High (fixed for 50 psi (345 kPa) 1 mL syringes) High 16 psi (110 kPa) Normal 12 psi (83 kPa) Low 8 psi (55 kPa) Very Low 4 psi (28 kPa) The pressure graph is scaled between 0 psi at the bottom and the Occlusion setting pressure at the top. The occlusion limit can be set from Very Low to High for syringes with a volume greater than 1 mL. The occlusion limit is a fixed value for 1 mL syringes. The setting for 1 mL syringes is fixed at 50 psi, meaning you are not able to change the setting. The reason for this is that at lower pressure settings occlusion alarms would be frequent. Pressures in the above table are only approximations. This is because syringe friction affects the actual pressure level. Occlusion limit default is set up using PharmGuard® Toolbox 2, which was completed by the person responsible for custom Configuration before the pumps 92 were delivered to a work area. You can override the default Occlusion limit for a particular infusion from the Options menu if that option is enabled. The pump takes the pressure measurement approximately every second: • The right side of the bar is the most current reading. • The middle bar is the 1 minute average. • The far left bar is the 2 minute average. Therefore: B-D 100% 60mL PVD 0.55 mL RATE 10 mL/hr LOCK CHG RATE N CLEAR TVD OPTIONS • If the graph slopes upward from left to right, then the pump is headed toward occlusion. B-D 100% 60mL PVD 0.55 mL RATE 10 mL/hr LOCK CHG RATE OPTIONS N CLEAR TVD • If the graph is level, then backpressure is steady. FlowSentry™ (rapid occlusion detection) FlowSentry™ is an internal program unique to Medfusion® syringe pumps that monitors and analyzes delivery pressure. When activated, FlowSentry™ alerts you to the existence of an occlusion much more rapidly than conventional occlusion alarm systems. The sensitivity of the FlowSentry™ setting is determined by the selection in the custom Configuration, using PharmGuard® Toolbox 2. How do you know if FlowSentry™ has been activated? • During startup and during the stabilization period following a rate change a pound sign (#) will appear to the left of the pressure trend graph. The presence of the # indicates that FlowSentry™ is active, and that the delivery pressure is stabilizing. Medfusion® Model 4000 pump Operator's Manual Note: FlowSentry™ is disabled at rates greater than roughly ⅓ of the syringe size per hour. See the table at right for more information. TVD 60mL B-D PVD RATE LOCK CHG RATE OPTIONS 1.60 mL H 1.60 mL 10 mL/hr # CLEAR TVD • Once the delivery pressure has reached a stable level the # sign will be replaced by a horizontal arrow (≥). TVD 60mL B-D PVD RATE LOCK CHG RATE OPTIONS 4.98 mL H 4.98 mL ≥ 10 mL/hr CLEAR TVD • If there is an increase in the delivery pressure the horizontal arrow will be replaced by a vertical arrow (¤). TVD 60mL B-D PVD RATE LOCK CHG RATE OPTIONS 5.64 mL H 5.64 mL ¤ 10 mL/hr CLEAR TVD In this way you can easily see a) that FlowSentry™ is activated, and b) whether the delivery pressure is stabilizing, steady, or increasing. In the event that the FlowSentry™ has not been activated there will be no # or arrow signs to the left of the pressure trend graph. FlowSentry™ is automatically disabled when the delivery rate for a syringe size is exceeded as indicated in the following table: Syringe Size 60 mL 50 mL 35 mL 30 mL 20 mL 12 mL 10 mL 6 mL 5 mL 3 mL FlowSentry™ maximum infusion rate 20 mL/hr 20 mL/hr 12 mL/hr 10 mL/hr 6.6 mL/hr 3.3 mL/hr 3.3 mL/hr 1.65 mL/hr 1.65 mL/hr 1 mL/hr If FlowSentry™ is disabled, the bar graph is still shown, however none of the icons (#, ≥ or ¤) will appear on screen. Post occlusion bolus reduction With large syringes, fluid can accumulate or be “stored” in the line when an occlusion happens, which is then delivered as a bolus when the occlusion is released. This stored volume is the result of the volume of the syringe and infusion set increasing under pressure. This pump contains a feature for reducing this bolus upon occlusion release (or occlusion bolus). Using post occlusion bolus reduction, the pump withdraws the plunger a predetermined amount to reduce “stored” bolus in the syringe. However, this feature does not totally eliminate the occlusion bolus. Occlusion bolus will vary greatly with occlusion limit setting, syringe size, and the fluid infused. The postocclusion bolus reduction feature decreases bolus on occlusion release to less than 0.3 mL. WARNING: Larger size syringes at occlusion setting HIGH may produce a post occlusion bolus larger than 0.3 mL due to excessive syringe plunger tip compliance. 93 Medfusion® Model 4000 pump Operator's Manual Making changes during delivery At right is an illustration of a delivery screen. There are eight options available during any standard infusion. While running an infusion, you may: • • • • • • • • Lock/Unlock the keypad. Change the Dosage Rate. Select certain Program Options. Clear TVD Press è to set, change, or deliver a bolus. Press á to pause or end the infusion delivery. Press ë to begin pump shutdown. Press í to silence an alarm. DOBUTAMINE 0.5 CONC WEIGHT DOSE 0.5 mg/mL 5 KG 6 MCG/KG/MIN CHG DOSE LOCK PICU N mg/mL TVD 0.005 mL RATE 3.6 mL/hr OPTIONS CLEAR TVD Changing delivery rate The Medfusion® Model 4000 pumps offer ways of changing delivery rate either before beginning an infusion, during delivery or when delivery is paused. Changing rate during delivery The infusion rate can be changed during any delivery session, except when using Intermittent delivery modes. 1. From any delivery screen, press CHG Rate (or CHG Dose). 2. The Enter Rate screen appears. Infusion does not stop. The current setting continues to be delivered until the new rate is entered. Note the current setting is always shown in the top of the display. 3. Use the number keys to set the dose rate. Rate is limited by the maximum and minimum delivery rate for syringe size. If you decide you don’t want to change the rate, press â. The delivery rate does not change until Enter is pressed. 4. When the desired rate is displayed press Enter to accept the new setting. (The new rate is not effective until Enter is pressed.) 94 ENTER RATE - PRESS ENTER TO CONTINUE HIGH: 944 LOW: 0.1 60 40 CLEAR CURRENT SETTING mL/hr BACKSPACE ENTER Medfusion® Model 4000 pump Operator's Manual Changing the rate when paused The dosage rate can be changed at any time the pump is paused: 1. With the pump paused at the Begin Infusion screen, press Chg Rate (or Chg Dose). PRESS < « > TO BEGIN INFUSION PVD BOLUS 2.5 mL V LIMIT KVO RATE 0.6 mL/hr RATE MAIN MENU 2. Use the number keys to change the delivery rate. Rate is limited by the maximum and minimum delivery rate for syringe size, or by custom settings in the configuration. The delivery rate entry does not change until Enter is pressed. Exit without changing the rate by pressing â. 3. When the desired new rate is displayed press Enter to accept the new setting. CHG RATE 3.5 mL/hr CLEAR TOTALS ENTER RATE - PRESS ENTER TO CONTINUE HIGH: 944 LOW: 0.1 60 60 CLEAR CURRENT SETTING mL/hr BACKSPACE ENTER ENTER RATE - PRESS ENTER TO CONTINUE HIGH: 944 LOW: 0.1 60 40 CLEAR 4. The pump is paused at the Begin Infusion screen. When ready to restart the infusion, press É. OPTIONS 0.429 mL 60 mL CURRENT SETTING mL/hr BACKSPACE ENTER PRIME / BOLUS G6000912 Rev 0 95 Medfusion® Model 4000 pump Operator's Manual Total volume, program volume / dose delivered The Medfusion® Model 4000 pump monitors and maintains the total quantity of fluids being delivered during any given session of infusions. Total Volume Delivered (TVD) is displayed at the top of the screen. The TVD is the total volume delivered to the patient, accumulated over multiple drug programs and infusions, and it will continue to accumulate until Clear TVD (or Clear Totals) is pressed or the pump is turned off. DOBUTAMINE 1000 CONC WEIGHT DOSE mcg/mL 1000 mcg/mL TVD 0.414 mL 5 kg 15 mcg/kg/minRATE 4.5 mL/hr CHG DOSE LOCK OPTIONS NICU N ≥ CLEAR TVD TVD can be recalled using the Recall Last Settings feature (see page 57). Displaying “Program Volume Delivered” (PVD) / “Program Dose Delivered” (PDD) In most delivery modes, you have the option of viewing either “Program Volume Delivered” or “Program Dose Delivered”. On the display, PVD or PDD accumulates as the volume or dose is delivered to the patient, and accumulates for the current infusion only. PVD/PDD is automatically cleared when the infusion ends and the pump is returned to the Main menu, and can be cleared by pressing Clear Totals. This display totals the boluses, loading dose, and normal delivery volumes. • Priming volume – Which should never be delivered to the patient – does not accumulate on this display. • Program volume or dose delivered – Appears on screen while the pump is paused and during Delivery for the first three seconds and briefly by pressing â. • Program Dose Delivered − Only available when concentration has been programmed. • Toggle from PVD to PDD – Available through Options menu (provided this option has been enabled for use). See page 81 for instructions on using this option. 96 b-d CONC WEIGHT 20mL 1000 mcg/mL PVD 5 KG 15 mcg/kg/minRATE DOSE MAIN MENU b-d CONC WEIGHT CHG DOSE OPTIONS 20mL 1000 mcg/mL PDD 5 KG 15 mcg/kg/minRATE DOSE MAIN MENU CHG DOSE OPTIONS 0.067 mL 4.5 mL/hr CLEAR TOTALS 0.113 mcg 4.5 mL/hr CLEAR TOTALS Medfusion® Model 4000 pump Operator's Manual Clearing total volume, program volume, or program dose delivered Use the following steps to clear the total volume and program volume (or dose) and reset the counter to zero. With the pump paused (press á, if necessary): 1. Press Clear Totals. 2. Confirmation is required to clear totals delivered. Press Yes to clear total volume delivered and program volume (or dose) delivered. (Or press No to exit without clearing.) The program volume (or dose) delivered is cleared automatically whenever the pump’s delivery mode is changed. The Total Volume Delivered is only cleared when the softkey is pressed (i.e., Clear Totals key). PRESS < « > KEY TO BEGIN INFUSION CONC WEIGHT DOSE MAIN MENU 1.2 2.5 mg/mLPVD 50 KG MCG/KG/MIN CHG DOSE RATE OPTIONS 0.000 mL 3.5 mL/hr CLEAR TOTALS CLEAR TOTAL VOLUME DELIVERED? NO YES With the pump delivering: 1. From any run screen, press Clear TVD. B-D 60ml N PVD 5.048 mL KVO V LIMIT 60 mL 3.5 RATE mL/hr CHG RATE CLEAR TVD LOCK 2. Confirmation is required to clear the Total Volume delivered. Press Yes to clear total volume delivered only. (Or press No to exit without clearing.) The program volume (or dose) delivered is cleared automatically whenever the pump’s delivery mode is changed. The Total Volume Delivered is only cleared when the softkey is pressed (i.e., Clear Totals key). CLEAR TOTAL VOLUME DELIVERED? YES NO Recovering TVD / TDD Information: The Total volume delivered display can be restored after turning the pump off by using the Recall Settings selection from the Main menu. If TVD has been cleared, then only the quantity infused since clearing will be stored in memory. It may be good practice to make note of TVD before clearing it. 97 Medfusion® Model 4000 pump Operator's Manual Keypad lock The keypad can be locked during delivery. The lock feature is provided to make the delivery settings tamper resistant. Once the keypad is locked, a setting cannot be modified until the keypad is unlocked. The Medfusion® Model 4000 pump offers a programmable unlock code option set through custom configuration. Any high-priority alarm automatically unlocks the front panel. 1. Press Lock to lock the front panel controls. B-D 100% 60mL PVD 0.025 mL N RATE4.5 mL/hr LOCK The Lock indicator on the front panel lights. 2. If any front panel keys other than Unlock are pressed, a “Pump is Locked” message appears on screen. 98 OPTIONS CLEAR TVD PRIME / BOLUS G6000912 Rev 0 PUMP IS LOCKED N PVD 0.030 mL 4.5 RATE mL/hr UNLOCK 3. Press the Unlock menu key to unlock the front panel. If an Unlock Passcode has been set, you will be prompted to supply the passcode before the front panel will unlock. CHG RATE CHG RATE OPTIONS CLEAR TVD ENTER UNLOCK PASSCODE - PRESS ENTER TO CONTINUE HIGH: 9999 LOW: 0 CLEAR BACKSPACE ENTER Medfusion® Model 4000 pump Operator's Manual Alarms & remedies The Medfusion® Model 4000 pump has numerous alarms built into it. These are triggered by situations as a means of warning or advising you something is not functioning within normal parameters. Pump alarms are logged into the pump's Alarm History (viewable in the Biomed menu, and may be included in various reports via PharmGuard® Toolbox 2 and/or the PharmGuard® Server). Alarms / alerts types Below is a table of the alarms and alerts generated by the pump, including definitions and remedies: Type System Fault priority Definition and Remedy A System Fault alarm is initiated when one of the system fault conditions occur. Fluid delivery stops. System Fault alarms are signaled with a flashing red indicator, repeating audible signal and a viewing screen backlight that oscillates between bright and dim; the pump will return to the Main menu and show the Biomed menu as the only choice. Press í to silence the audible alarm, then press ë to turn the pump off. There is no other method for ending a System Fault alarm. If the alarm persists when the pump is turned back on, or if the Main menu shows only the Biomed menu, the pump must be removed from service for inspection and repair by a trained biomedical technician. If the front panel controls are locked when a System Fault alarm occurs, the pump controls do unlock. Note: System faults may result in subsequent faults being logged in the pump's Alarm History, however only the initial fault is displayed on the pump (due to the fact that the only method for ending the alarm is to turn the pump off). A high-priority alarm is initiated by any condition that halts an ongoing infusion. HighHigh priority priority alarms are signaled with a flashing red indicator, a viewing screen backlight that oscillates between bright and dim, and a repeating audible signal. Press í to return the viewing screen backlight to bright and silence the audible alarm for the programmed alarm silence period. During a high-priority alarm condition, all keys except í are locked. You must silence the alarm by pressing í before any other action can be taken. If the front panel controls are locked when a high-priority alarm occurs, the pump controls do unlock. A high-priority alarm that stops delivery during a loading dose or bolus will not return to the Begin Delivery screen until the alarm is silenced – this allows you to record the portion of the loading dose/bolus volume delivered prior to the alarm sounding. Medium priority A medium-priority alarm indicates any condition requiring intervention but does not halt infusion. Medium-priority alarms are signaled with a flashing yellow indicator, a viewing screen backlight that oscillates between bright and dim, and a repeating audible signal. Pressing í will return the viewing screen backlight to bright and silence the audible alarm for the programmed alarm silence period. During a medium-priority alarm condition, all keys except í are locked. You must silence the alarm by pressing í before any other action can be taken. If the front panel controls are locked when a medium-priority alarm occurs, the pump controls do not unlock. 99 Medfusion® Model 4000 pump Operator's Manual Type Low priority Definition and Remedy A low-priority alarm indicates any condition not requiring immediate operator intervention. Low-priority alarms are announced with a continuous yellow indicator, a viewing screen backlight that oscillates between bright and dim and a non-repeating audible signal. During a low-priority alarm condition, all keys except í are locked. You must silence the alarm by pressing í before any other action can be taken. Limit priority If the front panel controls are locked when a low-priority alarm occurs, the pump controls do not unlock. A limit priority alarm provides user feedback related to interaction with the pump. Note: The audio part of Limit priority alert is tied to “Key Click loudness”, which is set in PharmGuard® Toolbox 2. If key click loudness is set to Off, there will be no audible tone accompanying Limit priority alerts (visual alerts will still appear in the display). The volume will otherwise sound at the loudness level selected for key clicks - Level 2 (quietest), Level 3, Level 4, or Level 5 (loudest). A limit-priority alarm sounds a three tone, non-repeating audible signal and displays an advisory message on screen for 3 seconds. If the front panel controls are locked when a low-priority alarm occurs, the pump controls do not unlock. Re-displaying an alarm message Whenever an alarm is silenced, the alarm message remains on the screen for approximately 3 seconds. This message can be re-displayed for an additional 3 seconds by pressing í. 100 Medfusion® Model 4000 pump Operator's Manual “User Callback” alarm The “User Callback” alarm is a Medium priority alarm that serves as a reminder to finish what you started. Once you begin programming any infusion delivery, the pump expects you to continue until setup is complete. If the pump is paused too long (30 seconds) after a profile is selected or on a data entry screen, the pump initiates this alarm. There are several basic resolutions: • Press ANY key to silence the alarm for another 30 seconds. • Go to the Begin Infusion screen. There the alarm silence interval is one to two minutes, depending on the configuration. • Use the Standby option to prevent the User Callback alarm while paused at the Begin Infusion screen. • Press É to begin the infusion. • Cancel the infusion and return to the Select the Profile screen, where no alarms sound. • Press & hold ë and turn the pump off. Syringe Empty Alarm Process Sensing for an empty syringe can be a multi-step process on the Medfusion® Model 4000 pump. The “Syringe Near Empty” alarm and “Syringe Volume Near Empty” alarms are both calculated by the pump, based on infusion volume and time, and are designed to indicate the syringe is nearing empty so there is time to prepare for another syringe, if needed. The “Syringe Empty” and “Syringe Empty - Stop” alarms are the final alarms in the process, stopping fluid delivery when the syringe is empty. The “Syringe Near Empty” alarm time is calculated based on the flow rate and syringe volume to occur at the set amount of time before the “Syringe Volume Near Empty” alarm. The “Syringe Volume Near Empty” alarm occurs at a syringe position near the end of the syringe travel. Due to variation in syringe dimensions, the pump will continue to infuse for a variable amount of time until the syringe plunger reaches the end of the syringe and the “Syringe Empty” alarm sounds stopping the infusion. The “Syringe Near Empty” alarm time may be set and is useful in allowing preparation time for the next syringe on continuous infusions. This alarm indicates the time remaining to the “Syringe Volume Near Empty” alarm. The “Syringe Volume Near Empty” alarm provides indication that the syringe is nearly empty. The remaining time to the “Syringe Empty” alarm is variable depending on syringe dimensional variation. “Syringe Near Empty” alarm The Syringe Near Empty alarm is a Medium or Low priority alarm that occurs indicating that the syringe will reach empty in the “Near Empty Time” interval. The “Near Empty Time” interval ranges from 1 - 240 minutes. This time interval may be set via the “Near Empty Time” PharmGuard® Toolbox 2 setting as well as the alarm priority, Low or Medium. Note: If the “Near Empty Time” is greater than or equal to the infusion time, the Syringe Near Empty alarm will sound as soon as the infusion is started. The pump sounds the respective priority alarm tone, displays the near empty alarm message on screen, but does not stop delivery. Pressing í when this alarm is active silences the alarm. The “Syringe Near Empty” alarm occurs only once if the infusion is allowed to continue until it stops due to an “End of Infusion,” “Syringe Empty,” or some other alarm. SYRINGE NEAR EMPTY N CONC 1.2 mg/mL PVD 13.81 mL WEIGHT 50 KG BOLUS MCG/KG/MIN RATE mL/hr DOSE CHG DOSE OPTIONS CLEAR TVD LOCK 20 50 1. Press í to clear the alarm message. 2. Confirm how long before the infusion ends. 3. If necessary, prepare a new syringe to load onto the pump and then start a new infusion. “Syringe Volume Near Empty” alarm The Syringe Volume Near Empty alarm is a Medium priority alarm indicating that the syringe has reached the syringe position “Volume Empty”. Due to syringe 101 Medfusion® Model 4000 pump Operator's Manual variation there may still be a residual volume of medication in the syringe; therefore the infusion continues. 1. Press í. 2. If you do not wish to deliver any remaining fluid, or if the syringe is empty, press á and unload the syringe. Either prepare and load another syringe, return to the Select the Profile screen (where no alarms sound), or turn the pump off. 3. The pump continues delivery, and continues until no fluid remains in the syringe. 4. As soon as the syringe plunger reaches the end of the syringe, it halts delivery and displays the “Syringe Empty” message on screen. 5. Press í. (The pump has stopped delivery and is at the Begin Infusion screen.) 6. Either prepare and load another syringe, return to the Select the Profile screen (where no alarms sound), or turn the pump off. “Syringe Empty” alarm The Syringe Empty alarm is a high priority alarm advising the syringe is empty. The Empty alarm stops delivery immediately. 1. Press í to clear the alarm tone & message. 2. Unload the syringe. 3. If the infusion is complete either turn the pump off or prepare for another infusion. If the infusion is not complete, prepare and load another syringe and: • return to the Select the Profile screen (where no alarms sound) or turn off the pump. OR • if the mode in use was a continuous infusion, the screen displays Continue Same Infusion?, with choices of Continue or Restart. Continue or restart the infusion, or turn the pump off. 102 Monoject® 1, 3, 12 and 35 mL: Because of variations in syringe manufacturing, the Monoject® 1, 3, 12 and 35 mL syringes may in some cases not fully empty. Here, the empty alarm sounds with some fluid left in the syringe. System Advisory - Maintenance is Recommended If your organization has set up a preventive maintenance policy for the Medfusion® Model 4000 pump and programmed a preventive maintenance reminder in the Biomed menu, a special alert is added. When it is time for a preventive maintenance inspection, each time the pump is turned on System Advisory : Maintenance is Recommended appears at the top of the Main Menu. Press í to silence the audible alarm and send to pump for maintenance as soon as practical. This alert will recur each time the pump is powered up until a trained biomedical service technician has reset it. SYSTEM ADVISORY - MAINTENANCE IS RECOMMENDED 1 2 3 4 NICU PICU General Anesthesia MORE System Failures System Failure alarms may indicate a problem with pump hardware or software. Occasionally, turning the pump off, then back on will clear the fault (see the pages that follow for specific information). If the alarm persists when the pump is turned back on, the pump must be removed from use and checked by a trained biomedical service technician. If the pump experiences certain system faults, a screen requiring entry of a Biomed Passcode will appear. If this screen appears, immediately remove pump from service for inspection/repair by a trained biomedical service technician. Medfusion® Model 4000 pump Operator's Manual General system alarms & alerts This section contains a table of the general system alarms, listed alphabetically, which may be encountered while operating the Medfusion® Model 4000 pump. This table identifies the alarm by message and type, and provides a definition and possible remedies. WARNING: If a system failure alarm occurs and cannot be cleared by powering the pump down then back up, the pump cannot be used. Remove it from use and send it to a trained biomedical technician for service. Alarm Message Calculated Rate Out of Range Check Clutch / Plunger Lever Check Syringe Barrel Clamp Check Syringe Flange Sensor Priority High Remedy Based on the values entered, the pump has calculated a rate that is not valid and cannot be delivered based on physical limits (such as syringe parameters). Press í. Verify that all infusion parameters have been entered correctly. If the invalid combination is part of a Drug Program, contact your PharmGuard® Toolbox 2 Administrator, who will have to review and correct the problem. High The pump has sensed that the plunger driver is not moving correctly. This may be caused by a variety of issues such as the Prime function was not used before starting delivery (leaving slack in the drive system), the plunger levers are moved, the clutch is not properly engaged, or there is a problem with the pump hardware. Press í and check the plunger lever and ensure the lever moves freely and is capturing the syringe plunger. Always use the Prime feature when loading a new syringe. If the alarm persists, remove the pump from service for repair by a trained biomedical service technician. Medium Certain syringe models and sizes may cause the barrel clamp sensor to have difficulty in verifying the clamp is in position. When this alarm occurs press í, verify that the barrel clamp is indeed in place, then press Confirm. OR When the pump was powered up, the syringe barrel clamp was lifted up and resting on the pump handle. When the syringe model is selected, this alarm occurs. Press í, press Confirm and continue loading the syringe. Ensure that the syringe barrel clamp is properly positioned on the syringe barrel. High Sensor is active when a syringe is not loaded correctly. Check the syringe flange holder. Ensure the syringe barrel clamp, flange holder, and plunger holders are properly engaged and the flange holder pulls back to the side of the case. If holder does not operate correctly or the alarm persists, immediately remove the pump from service for repair by a trained biomedical service technician. 103 Medfusion® Model 4000 pump Operator's Manual Alarm Message Check Syringe Plunger Sensor Priority High Data Does Not Match Previous Entry Limit Force Sensor Bgnd Test High Infusion Complete High Input Out of Range Greater Than Max Minutes (Seconds) Input Out of Range Greater Than Max Value Limit Input Out of Range - Less Than Min Value Invalid Entry Invalid Infusion Parameter Combination Invalid Syringe Size KVO in Progress Limits Adjusted - Cannot Deliver All Doses 104 Remedy Sensor is active when syringe is not loaded correctly. Check the syringe plunger holders. Ensure the syringe barrel clamp, flange holder, and plunger holders are properly engaged and the holders move freely. If they do not operate correctly or if the alarm persists, immediately remove the pump from service for repair by a trained biomedical service technician. In cases where confirmation of entered data is required, the confirmation value did not match the originally programmed value. Re-enter the correct value. A self-test was performed on the force sensor, and the test failed due to a sensor malfunction OR the Syringe Plunger Driver was being moved during the pump startup process, or if the Syringe Plunger Driver receives a hard bump during the pump startup process. Press í. Press ë to turn the pump off. Immediately remove the pump from service for repair by a trained biomedical service technician. The programmed infusion (based upon the values entered in the pump) has been delivered. Press í. Either begin a new infusion, return to the Select The Profile screen (where no alarms sound), or turn off the pump. The time value entered is greater than the maximum allowed for the minutes or seconds. Please try a lower value. The value entered is greater than the maximum allowed for the item. Please try a lower value. Limit The value entered is less than the minimum allowed for this item. Please try a higher value. Limit There is a problem with the drug program selected, and the pump cannot deliver it. Contact your PharmGuard® Toolbox 2 Administrator, who will have to review and correct the problem. Low The combination of infusion parameters does not allow a valid flow rate to be calculated. Verify all infusion settings. If the invalid combination is part of a Drug Program, contact your PharmGuard® Toolbox 2 Administrator, who will have to review and correct the problem. High Syringe size not recognized for the model selected, or the syringe barrel clamp was lifted during delivery. Review syringe sizes in the technical specifications section, and do not lift the syringe barrel clamp during delivery. If the alarm persists, remove the pump from service for repair by a trained biomedical technician. Medium Informational message that volume limit has been reached and KVO infusion is in progress. Press í. Limit The PharmGuard® Toolbox 2 specified soft limit values and syringe specified during programming would allow values to be entered that result in a rate outside the allowable limits. The pump has adjusted the limits to keep the rate inside allowable limits. Verify the values entered and the syringe size. Limit Medfusion® Model 4000 pump Operator's Manual Alarm Message Motor Not Running Priority High Motor Rate Error High Occlusion - Check Infusion Line High Outside Range Limit Silence Alarm to Continue Medium The entered rate is outside of the Drug Program soft limits. Press í to continue. You may then choose to override the range limit or change the value entered. Periodic Callback - Silence Alarm to Continue Pressure Increasing Check Infusion Line Medium Press í. User programmed callback alarm - no remedy required. Profile Does Not Match Last Settings Profile Pump is Locked Rate Below Recommended Min for Syringe Size Restricted Flow - Bolus Cancelled Remedy The motor is not running, which may be due to an erroneous (possibly transient) sensor signal, or a mechanical and/or electrical failure. Press í. Press ë to turn the pump off, then back on. If the alarm persists when the pump is turned back on, immediately remove the pump from service for repair by a trained biomedical service technician. The motor is not running at the programmed rate, which may be due to an erroneous (possibly transient) sensor signal, or a mechanical and/ or electrical failure. Press í. Press ë to turn the pump off, then back on. If the alarm persists when the pump is turned back on, immediately remove the pump from service for repair by a trained biomedical service technician. Check infusion line for blockage. Clear or remedy any discovered occlusion; for example, check the infusion set for closed stopcocks, clamps, check the tubing for kinks, verify the patency of the tubing and the IV site, etc. Press É to restart infusion once occlusion is located and cleared. If this alarm occurs frequently and you have ruled out an actual occlusion, the infusion set tubing may be too small for the rate or fluid viscosity, you may want to consider enabling flow sentry, or you may want to consider choosing a different occlusion alarm setting in the Configuration. If you cannot clear the occlusion alarm, there may be a problem with the pump that requires repair by a trained biomedical technician. Medium Press í. FlowSentry™ detects increasing pressure in the infusion line. Check infusion line for blockage; for example, check the infusion set for closed stopcocks, clamps, check the tubing for kinks, verify the patency of the tubing and the IV site, etc. Clear or remedy any discovered occlusion. If occlusion is not cleared, the “Occlusion” alarm will result. Limit The user attempted to use the “Recall Last Settings” feature. Recall Last Settings only works if the pump is in the same profile under which the previous infusion was programmed. Limit The keypad has been locked to prevent changes during infusion. The alarm is initiated by pressing any key except Unlock. Press Unlock to make changes to delivery settings. Limit Reminds you that the programmed rate is below that recommended for the syringe size - no remedy required (see Guidelines for enhanced pump performance, page 24). Medium Bolus delivery was cancelled before completion. While the pump was delivering a bolus, the flow rate was restricted and initiated rate reduction, which eventually fell below the main infusion rate or extended past the maximum bolus time. Check the infusion line for occlusion. 105 Medfusion® Model 4000 pump Operator's Manual Alarm Message Restricted Flow - Loading Cancelled Restricted Flow - Rate Reduced Set Volume Limit Before KVO Syringe Does Not Match Entry Syringe Empty Priority Medium Remedy Loading dose delivery was cancelled before completion. While the pump was delivering a loading dose, the flow rate was restricted and initiated rate reduction, which eventually fell below the main infusion rate or extended past the maximum loading dose time. Check the infusion line for occlusion. Medium If the bolus or loading dose rate is high enough to trigger an occlusion alarm, the software reduces the rate until the bolus/loading dose is successfully delivered or, if the rate falls below a certain level or takes longer than the pump allows, is cancelled. With each rate reduction, this process repeats. Once silenced, the audible alarm tone will not reactivate, even if the process repeats. Limit Programming of a KVO rate was attempted, but there is no volume limit set. Program a volume limit, then set a KVO rate. Limit The drug program indicates a specific syringe, and the syringe in use is different. Verify the correct drug program and syringe are being used. High Press í. The syringe is now empty. Either: • Prepare and load another syringe. • Return to the Select the Profile screen, where no alarms sound. • Turn off the pump. Syringe Empty - Stop High Press í. The pump has either calculated (based on the syringe model in use) that the syringe should be at it's forward-most travel point, or the pump’s Syringe Plunger Driver has moved as far forward as is possible. Either: • Prepare and load another syringe. • Return to the Select the Profile screen, where no alarms sound. • Turn off the pump. Syringe Flange Not in Place High Syringe Near Empty Syringe Plunger Not in Place 106 Press í. The syringe is not loaded correctly, or the sensor has failed. Make sure the syringe flange is properly inserted into the flange clip. Proceed with the infusion, if possible. If the alarm recurs, remove the pump from service for repair by a trained biomedical service technician. Medium The pump is indicating the syringe will soon be empty. The “Near Empty or Low* Time” interval ranges from 1 - 240 minutes. This time interval may be set via the “Near Empty Time” in PharmGuard® Toolbox 2, as well as the alarm priority, Low or Medium. High Press í. The syringe is not loaded correctly, or the sensor has failed. Make sure the syringe plunger head is properly inserted. Proceed with the infusion, if possible. If the alarm recurs, remove the pump from service for repair by a trained biomedical service technician. Medfusion® Model 4000 pump Operator's Manual Alarm Message Syringe Volume Near Empty User Call Back Priority High Remedy Press í. The pump has calculated that the volume of medication in the syringe is nearly empty. The “Syringe Empty” Alarm will activate when the syringe is empty. Make preparations to install a new syringe, if necessary. The time until the syringe is empty can be estimated by estimating the volume remaining in the syringe and dividing by the delivery rate. Medium The pump was left idle on a user input screen. Either: • Finish the programming steps. • Return to the Select the Profile screen, where no alarms sound. • Turn off the pump. * “Syringe Near Empty” alarm priority is configurable separately for each profile using PharmGuard® Toolbox 2. System Failure and Advisory Alarms Battery Alarms Alarm Message System Advisory : Battery Communication Timeout System Advisory : Battery Not Working System Failure : Depleted Battery System Advisory : Low Battery Priority Medium Medium Remedy The internal battery is not working. The pump may be used on AC power on a conditional basis. As soon as possible, remove pump from service for repair by a trained biomedical technician. The internal battery is not working. The pump may be used on AC power on a conditional basis. As soon as possible, remove pump from service for repair by a trained biomedical technician. Press ë to turn the pump off. The battery is completely drained. Plug in the AC power cord, then press ë to turn the pump on. Until the battery is allowed to recharge, the pump can only be used if connected to AC power. Medium Initial: Indicates battery is low, and needs charging soon or the pump or Low will not be able to continue delivery. Press í. If possible, plug in power cord and run pump on AC mains while recharging the battery. As an additional reminder, for each 1% drop in capacity after the initial Low Battery alarm, the Low priority Low Battery alarm will sound. System Fault If the pump is not plugged in, the amber alert LED will blink at the same rate as the battery indicator LED until the System Failure - Battery Depleted alarm occurs (as a visual reminder that the battery is low). 107 Medfusion® Model 4000 pump Operator's Manual System Failure Alarms Alarm Message System Failure : Control Key Switch BGND Test Priority System Fault System Failure: Configuration Required System Fault System Failure : xx xx xx System Fault Remedy Either a key on the keypad has been pressed for longer than 7 seconds, or the keypad needs to be replaced; fluid delivery stops. Press ë to turn the pump off, then turn it back on. If the alarm persists when the pump is turned back on, immediately remove pump from service for repair by a trained biomedical technician. The pump has detected that a valid Configuration is not installed and the pump cannot operate. A possible cause of this alarm is that a firmware update and a Configuration were sent to the pump at the same time, and when the firmware update was installed first, the Configuration became incompatible and so was deleted. If this is the case, send a new Configuration to the pump. Then turn the pump off, and at the prompts install the new Configuration, then turn the pump back on. If this is not the cause, remove the pump from service for repair by a trained biomedical technician. Where “xx xx xx” indicates additional text for the specific type of failure. The pump display shows the Main menu, with only the Biomed menu available. Some system failures result in a hardware “watchdog” alarm which results in an alarm tone sounding (and may or may not be accompanied by a flashing red alarm indicator). Press ë to turn off pump, then back on. If the alarm persists when the pump is turned back on, immediately remove pump from service for repair by a trained biomedical technician. System Advisory Alarms Alarm Message System Advisory : Base Hardware Failure Priority Medium System Advisory : Base Not Responding Medium System Advisory : Base Unknown Failure Medium System Advisory : Configuration Invalid Medium System Advisory : Improper Shutdown Low System Advisory : KB Data Integrity Failure Medium 108 Remedy The base has detected a hardware failure (the specific code is in the failed value). As soon as possible, remove the pump from service for repair by a trained biomedical technician. The pump base has experienced a hardware or software failure. As soon as possible, remove pump from service for repair by a trained biomedical technician. The base has an unknown hardware failure. As soon as possible, remove the pump from service for repair by a trained biomedical technician. The Configuration data is invalid due to user action or corruption. The pump stores a copy of the Configuration in the base, which can be applied to restore it. Press ë to turn the pump off, and at the prompt apply the update. Press ë to restart the pump. The Configuration should now be restored for use. The pump improperly powered down. As soon as possible remove pump from service for repair by a trained biomedical technician. The network settings are corrupt. As soon as possible, remove pump from service for repair by a trained biomedical technician. Medfusion® Model 4000 pump Operator's Manual Alarm Message System Advisory : Maintenance is Recommended System Advisory : Network Configuration Reset System Advisory : Set Time and Date System Advisory : xx Data Corrupted Priority Low Remedy Low The pump's Time and Date settings have been lost. As soon as possible, remove pump from service for testing and checkout by a trained biomedical technician. Infusion will continue using backup copy of xx data (where xx represents variable text indicating the specific data that is corrupted). As soon as possible, remove pump from service for testing and checkout by a trained biomedical service technician. The scheduled Preventive Maintenance is due. As soon as possible, remove pump from service for testing and checkout by a trained biomedical technician. This alarm will reactivate each time the pump is powered on until service is performed. Medium The network configuration reset command has been executed in the Biomed menu. No action required. Low 109 Medfusion® Model 4000 pump Operator's Manual Update(s) Available Notification When new Configurations or pump software are available and have been “taught” or sent to a pump, the next time the pump is turned off a screen appears indicating there is an update available for installation. Important: There should be a well-defined review and test process performed before installing a Configuration onto pumps for use with patients. The Configuration should be developed, sent to several test pumps for validation and then approved via your facility’s appropriate review. Only after this process is completed should a Configuration be made available to pumps for patient use. A defined process for assuring that the new update is installed on all pumps in a timely manner should be developed. 1. Press ë to turn the pump off. 2. To install the update, press Enter. To exit the screen without installing the update, either press ë again or wait 60 seconds for the pump to turn off automatically without installing the update. 3. The Learning progress is then shown on the pump’s display. DO NOT press ë or any other key until the update finishes. 4. When the process is complete, the pump automatically turns off. In rare cases, the pump will complete the update and then, at 0 percent remaining, a “watchdog” system failure will occur. Turning the pump off, then back on should clear this condition and make the pump ready for use. 5. Validate the update is correctly installed when the pump is next turned on (on the pump’s startup screen, the version number matches that shown in PharmGuard® Toolbox 2, and the Configuration CRC matches the one displayed on the Teach Progress screen (in PharmGuard® Toolbox 2; if unsure what the version number and CRC should be, contact your PharmGuard® Toolbox 2 Administrator, or follow your validation protocol). Note: If a pump is operating on battery power, and the battery has 10% or less remaining charge, the Update Notification will not activate. This is because with less than 10% charge it is possible that the battery will be depleted before the update can be completed. CONFIRM SYSTEM UPDATE AVAILABLE UPDATE MAY TAKE UP TO 5 MINUTES TO FINISH EITHER PRESS <ENTER> TO BEGIN UPDATE OR PRESS <POWER> AGAIN TO SHUT DOWN NOW. OTHERWISE PUMP WILL SHUT DOWN IN 60 SECONDS. ENTER LEARNING CONFIGURATION 78% REMAINING 110 Pump Software Version VERIFYING CONFIGURATION PHARMGUARD® MEDICATION SAFETY HOSPITAL CONFIG VERSION: V1.1.0 01.05.00002 2000187 VERSION 5 100% CONFIG CRC: 4A4F SECONDS REMAINING Configuration Version and CRC numbers © 99-2010 Medfusion® Model 4000 pump Operator's Manual Battery and AC power operation The infusion pump is typically operated by AC (mains) power. The pump contains a rechargeable battery that is continually charged – as long as the pump is connected to AC power (see page 125 for battery life specification). If the AC is disconnected − while the pump is turned on − the pump automatically begins drawing power from the internal battery. Attaching the power cord: 1. Thread the power cord connector through the cord retainer and connect the AC power cord to the connector port on the pump. 2. Insert the screws into the cord retainer and tighten them to attach the cord retainer to the pump (to prevent accidentally unplugging the pump). WARNING: Shock Hazard. The only means of removing AC power is to disconnect the AC power cord. While the AC power cord is attached to the pump and plugged into an AC outlet, live mains voltage is present inside the pump. 111 Medfusion® Model 4000 pump Operator's Manual On screen display of internal battery power level gauge Battery guidelines Whenever the pump is turned on, the internal battery charge level briefly appears on the “battery shaped” gauge in the bottom left corner of the display. VERIFYING CONFIGURATION PHARMGUARD® MEDICATION SAFETY HOSPITAL CONFIG VERSION: V1.1.0 01.05.00002 2000187 VERSION 5 100% CONFIG CRC: 4A4F © 99-2010 SECONDS REMAINING When running an infusion on internal battery, this “battery shaped” gauge also appears briefly in the upper right corner of the display at the start of delivery. B-D 100% 60mL PVD 0.18 mL RATE 5 mL/hr LOCK CHG RATE N CLEAR TVD Briefly display this “battery shaped” gauge at any time while the pump is infusing on battery by pressing â. Power & Battery Limits When to charge When the “Battery Low” message displays, plug the pump into the battery a power outlet for recharging. The battery indicator remains on continuously when charging. If the pump IS plugged into an outlet and fails to charge the battery, or the pump has been stored for longer than two months without charging, contact Service & Repair for information on how to test and/or service the battery. The internal battery is intended When you can to allow infusions of medications run on battery and fluids when an external power outlet is not conveniently available or when the patient is being moved. When the battery becomes fully When you depleted, all infusion stops, and cannot run on a “Battery Depleted” alarm battery begins sounding. For a fully depleted battery, plug in the AC power cord, turn the pump off to clear the alarm, and then turn the pump back on. Leave the pump plugged in for at least 8 hours to completely recharge the battery. • See “General System Alarms and Alerts” table to identify battery message status. 112 Medfusion® Model 4000 pump Operator's Manual Poleclamp assembly & use This section contains the instructions for assembling and using the poleclamp options available for the pump. CAUTION: This pump is designed to be used in a horizontal position. If the pump is operated in a vertical position, there is an increased potential for fluid leaking into the pump. If you suspect fluid has leaked into a pump, remove it from service until a trained biomedical technician can test it. CAUTION: Always verify the stability of the object to which the pump is mounted (for instance, an IV pole) using the poleclamp. Failure to verify the stability could cause the object to tip, with the possibility of causing damage to the pump and other equipment If the poleclamp is not adequately tightened, it could cause the pump to fall. Rotating/detachable poleclamp (standard) With the Rotating Poleclamp (catalog number 3000RPC), you can align the poleclamp for mounting on any vertical or horizontal pole, bed rail, or similar solid structure small enough to fit within the clamp’s jaws. The light weight of the pump makes this convenient. 1. Open the clamp jaws wide enough to easily slip around the pole. 2. Tighten the clamp until it is securely fastened so the pump cannot be moved. The rotating/detachable poleclamp is packaged in two pieces that must be clipped together before it can be used: • The “L” Bracket and clamp anchor with release lever - is pre-attached to the pump base with 2 “flathead” screws. • The Rotating poleclamp - which must be slid onto the clamp anchor at the back of the pump. 113 Medfusion® Model 4000 pump Operator's Manual Assembling the rotating/detachable poleclamp 1. Unpack the pump and poleclamp assembly from the shipping container. 2. Slide the rotating poleclamp onto the poleclamp anchor at the rear of the pump until the retainer lock button audibly clicks into place. 3. Pull the round lock button at the top of the clamp assembly up and rotate the clamp to fit either a vertical or horizontal pole. 4. To remove the pump from the poleclamp, pull the release lever toward the pump and slide the pump off the poleclamp. 114 Medfusion® Model 4000 pump Operator's Manual Assembling the stationary poleclamp A Phillips head screwdriver is required to assemble the poleclamp. 1. Unpack the poleclamp assembly from the shipping container. 2. The “L” bracket attaches the poleclamp to the pump. When you receive the poleclamp assembly it is configured for use with a vertical pole. If you wish to change this assembly for use with a horizontal pole (e.g. bed rail), reconfigure the “L” bracket using the following steps: • Remove the 4 “pan head” screws and their lock washers from the rear of the poleclamp. • Align the “L” bracket for horizontal mounting (see previous page). Install the 4 washers and pan head screws to mount the “L” bracket to the clamp. Tighten them to at least 10 in-lb (1.1 Nm) torque. 3. Use the small “flathead” screws and “star” lock washers to attach the poleclamp to the bottom of the pump. Tighten them to at least 10 in-lb (1.1 Nm) torque. 115 Medfusion® Model 4000 pump Operator's Manual EMC information for the Medfusion® Model 4000 pump Electromagnetic Compliance (EMC) precautions are necessary when dealing with the Medfusion® Model 4000 pumps. Accessible pins of connectors identified with the ESD warning symbol near them should not be touched with the fingers or hand-held tool, unless proper precautionary measures are followed. These measures include: This pump has been tested for EMC with the following cables: 1) Discharging one’s body to earth or to a large metal object. 2) Bonding oneself by means of an ESD wrist strap to earth. It is recommended that all staff, including clinical and biomedical staff, receive training in the meaning of the ESD warning symbol, and on the above precautionary measures. WARNING: The pump should not be used adjacent to or stacked with other equipment. If adjacent or stacked use is necessary, the user should verify normal operation of the pump in the configuration in which it is to be used. This training should also include an introduction to the physics of electrostatic discharge, the voltage levels that can occur in normal practice, and the damage that can be done to electronic components if they are touched by an operator who is electrostatically charged. Further, an explanation should be given of the methods to prevent build-up of electrostatic charge, and how and why to discharge one’s body to earth, or to bond oneself by means of a wrist strap to earth prior to making a connection. Use of cables WARNINGS: • Use of cables other than as listed below may result in increased EMC emissions or decreased immunity of the pump. • Use of the listed cables with equipment other than those specified may result in increased EMC emissions or decreased immunity of the equipment or system. It is recommended that when connecting the pump to a network using an Ethernet cable, the network equipment should conform to EN/IEC 60950. • The pump should not be used adjacent to or stacked with other equipment. If adjacent or stacked use is necessary, the user should verify normal operation of the pump in the configuration in which it is to be used. 116 • Smiths Medical 21-2145-01 AC power cord • Ethernet unshielded less than 3 meter Stacked equipment Medical Electrical Equipment needs special precautions regarding EMC and needs to be installed and put into service according to the EMC information provided in this manual. Portable and mobile RF communication equipment can affect Medical Electrical Equipment. Medfusion® Model 4000 pump Operator's Manual Technical specifications & other information Pump development standards Medical Electrical Equipment Safety Reference (Year) IEC 60601-1 (1988) Title Medical Electrical Equipment, Part 1: General Requirements for Safety, Amendment 1 (1991), Amendment 2 (1995) IEC 60601-1-4 (2000) Medical electrical equipment -- Part 1-4: General requirements for safety - Collateral standard: Programmable electrical medical systems. IEC 60601-1-6 (2006) Medical electrical equipment – Part 1-6: General requirements for safety – collateral standard: usability IEC 60601-2-24 (1998) Medical Electrical Equipment, Part 2: Particular requirements for safety of infusion pumps and controllers IEC 62304 (2006) Medical device software - Software life cycle processes IEC 62366 (2007) Medical Devices, Application of usability engineering to medical devices EN 60601-1 (1990) Medical Electrical Equipment, Part 1: General Requirements for Safety EN 60601-1-4 (1996) Medical electrical equipment -- Part 1-4: General requirements for safety - Collateral standard: Programmable electrical medical systems. Amendment 1 (1999) EN 60601-1-6 (2007) Medical electrical equipment – Part 1-6: General requirements for safety – collateral standard: usability EN 60601-2-24 (1998) Medical Electrical Equipment, Part 2: Particular requirements for safety of infusion pumps and controllers EN 475 (1995) Medical Devices - Electrically -generated alarm signals UL 60601-1 (2006) Medical Electrical Equipment, Part 1: General Requirements for Safety (US Deviations to IEC 60601-1) CAN/CSA-C22.2 No. Medical Electrical Equipment, Part 1: General Requirements for Safety – November 601.1-M90 (2003) 1990 (Canadian Deviations to IEC 60601-1) Update No. 2 (November 2003) AS/NZS 3200.1.0 (1998) Australian/New Zealand Standard, Medical electrical equipment - Part 1.0: General requirements for safety - Parent Standard (Australian Deviations to IEC 60601-1) AS/NZS 3200.2.24 Medical Electrical Equipment: Part 2-24: Particular requirements for safety(1999) Infusion pumps and controllers Electromagnetic Compatibility Reference (Year) 47 CFR Part 15.247, Class B RSS-210, Issue 7, (June 2007) EN 60601-1-2 (2007) EN 61000-4-2 (2009) Title FCC Rules and regulations 47 CFR part 15.247, Class B Low-power Licence-exempt Radiocommunication Devices (All Frequency Bands): Category I Equipment - Canada Medical electrical equipment -- Part 1-2: General requirements for safety - Collateral standard: Electromagnetic compatibility - Requirements and tests Electromagnetic Compatibility (EMC), Part 4: Testing and measurement techniques. Section 2: Electrostatic Discharge immunity test. Basic EMC Publication 117 Medfusion® Model 4000 pump Operator's Manual Reference (Year) EN 61000-4-3 (2006) Title Electromagnetic Compatibility (EMC), Part 4: Testing and measurement techniques. Section 3: Radiated, radio frequency, electromagnetic fields immunity test. Basic EMC Publication EN 61000-4-4 (2004) Electromagnetic Compatibility (EMC), Part 4: Testing and measurement techniques. Section 4: Electrical fast transients/bursts immunity test. Basic EMC Publication EN 61000-4-5 (2006) Electromagnetic Compatibility (EMC), Part 4: Testing and measurement techniques. Section 5: Surge immunity test. Basic EMC Publication EN 61000-4-6 (2007) Electromagnetic Compatibility (EMC), Part 4: Testing and measurement techniques. Section 6: Immunity to conducted disturbances, induced by radio frequency fields. Basic EMC Publication EN 61000-4-8 (1993) Electromagnetic Compatibility (EMC), Part 4: Testing and measurement techniques, Section 8: Power frequency magnetic field immunity test. Amendement (2001). EN 61000-4-11 (2004) Electromagnetic compatibility (EMC) - Part 4: Testing and measuring techniques Section 11: Voltage dips, short interruptions and voltage variations immunity tests EN 45502-1 (1997) Active implantable medical devices. Part 1. General requirements for safety, marking and information to be provided by the manufacturer. Section 27.1 only. EN 45502-2-1 (2003) Active implantable medical devices -- Part 2-1: Particular requirements for active implantable medical devices intended to treat bradyarrhythmia (cardiac pacemakers). Section 27.8 only. EN 55011 (2007) Industrial, scientific and medical (ISM) radio frequency equipment - Radio disturbance characteristics - Limits and methods of measurement. AS/NZS 3200.1.2 (2005) Australian/New Zealand Standard, Medical electrical equipment - Part 1.2: General requirements for safety - Collateral standard: Electromagnetic compatibility Requirements and tests Parent Standard CISPR 11 (2003) Industrial, scientific and medical (ISM) radio frequency equipment electromagnetic disturbance characteristics - limits and methods of measurement. Amendment 1 (2004), Amendment 2 (2006). ASTM F2052-06 Standard Test Method for Measurement of Magnetically Induced Displacement Force on Medical Devices in the Magnetic Resonance Environment IEEE 802.11 (2007) IEEE Standard for Information technology - Telecommunications and information exchange between systems - Local and metropolitan area networks - Specific requirements - Part 11: Wireless LAN Medium Access Control (MAC) and Physical Layer (PHY) Specifications ETSI EN 300 328 (2006) V1.7.1 - Electromagnetic compatibility and Radio spectrum Matters (ERM); Wideband Transmission systems; Data transmission equipment operating in the 2,4 GHz ISM band and using spread spectrum modulation techniques; Part 2: Harmonized EN covering essential requirements under article 3.2 of the R&TTE Directive ETSI EN 301 489-1 V1.8.1 - Electromagnetic compatibility and Radio spectrum Matters (ERM); (2008) ElectroMagnetic Compatibility (EMC) standard for radio equipment and services; Part 1: Common technical requirements ETSI EN 301 489-17 V1.2.1 - ElectroMagnetic Compatibility and Radio Spectrum Matters (ERM); (2002) ElectroMagnetic Compatibility (EMC) Standard for Radio Equipment and Services; Part 17: Specific Conditions for 2,4 GHz Wideband Transmission Systems and 5 GHz High Performance RLAN Equipment 118 Medfusion® Model 4000 pump Operator's Manual Miscellaneous Standards Reference (Year) IEC 60320-1 (2007) Title Appliance couplers for household and similar general purposes - Part 1: General requirements (IEC 60320-1:2001 + Amendment 1:2007) IEC 60529 (2001) Degrees of Protection Provided by Enclosures (IP Code) IEC 60878 (2003) Graphical Symbols for electrical equipment in medical practice EN 980 (2008) Graphical Symbols for Use in the Labeling of Medical Devices EN 1041 (2008) Information Supplied by the Manufacturer with Medical Devices EN ISO 10993-1 (2003) Biological Evaluation of Medical Devices Part 1: Evaluation and Testing ASTM D999-08 Method for Vibration Testing of Shipping Containers ASTM D4169-08 Performance Testing of Shipping Containers and Systems ASTM D4332-01 (2006) Conditioning Containers, Packages, or Packaging Components for Testing ASTM D4728-06 Standard Test Method for Random Vibration Testing of Shipping Container ASTM F2097-08 Standard Guide for Design and Evaluation of Primary Packaging for Medical Products ASTM 5264-98 (2004) Standard Practice for Abrasion Resistance of Printed Materials by the Sutherland Rub Tester ASTM F2503-08 Standard Practice for Marking Medical devices and Other Items for Safety in the Magnetic Resonance Environment ISO 3744 (1994) Acoustics- Determination of Sound Power Levels ISO 14971 (2007) Medical Devices, Application of Risk Management to Medical Devices UL746C (2004) Polymeric Materials - Use in Electrical Equipment Evaluations 119 Medfusion® Model 4000 pump Operator's Manual Guidance and Manufacturer’s Declaration – Electromagnetic Emissions The Medfusion® Syringe Infusion Pump Model 4000 is intended for use in the electromagnetic environment specified below. The customer or the user of the Medfusion® Syringe Infusion Pump Model 4000 should assure that it is used in such an environment. Emissions test RF Emissions Compliance Group 1 CISPR 11 RF emissions Class A CISPR 11 Harmonic emissions Not Applicable IEC 61000-3-2 Voltage fluctuations/ Not Applicable Flicker emissions IEC 61000-3-3 Compliance using: 1. AC power cord length of 2.4 m (8 feet). 2. Rechargeable lithium ion battery pack. 3. Ethernet cable of less than 3 m (9.75 feet). Exceeding this length could result in increased susceptibility to external electromagnetic interference. WARNING: The pump should not be used adjacent to or stacked with other equipment. If adjacent or stacked use is necessary, the user should verify normal operation of the pump in the configuration in which it is to be used. 120 Electromagnetic environment - guidance The Medfusion® Syringe Infusion Pump Model 4000 may be configured to use RF energy as a wireless communication method to a network. Therefore, when using the wireless communication method, the user should evaluate the Medfusion® Model 4000 pump in the environment of its intended use to ensure that the RF energy output does not interfere with the operation of other devices. The Medfusion® Syringe Infusion Pump Model 4000 is suitable for use in all establishments other than domestic and those directly connected to the public low-voltage power supply network that supplies buildings used for domestic purposes. Medfusion® Model 4000 pump Operator's Manual Guidance and Manufacturer’s Declaration – Electromagnetic Immunity The Medfusion® Syringe Infusion Pump Model 4000 is intended for use in the electromagnetic environment specified below. The customer or the user of the Medfusion® Syringe Infusion Pump Model 4000 should assure that it is used in such an environment. Immunity test Electrostatic IEC 60601 Test level Compliance level ±6 kV contact ±8 kV contact ±8 kV air ±15 kV air IEC 61000-4-2 Electrical fast ±2 kV for power ±2 kV for power Transient/burst supply lines supply lines IEC 61000-4-4 ±1 kV for input/output ±1 kV for input/output lines Discharge (ESD) Surge IEC 61000-4-5 lines ±1 kV differential mode ±2 kV common mode Voltage dips, short inter- <5 % Uт ruptions and voltage (>95 % dip in Uт) variations on power supfor 0.5 cycle ply input lines IEC 61000-4-11 Power frequency (50/60 Hz) Electromagnetic environmentguidance Floors should be wood, concrete or ceramic tile. If floors are covered with synthetic material, the relative humidity should be at least 30%. Mains power quality should be that of a typical commercial or hospital environment. ±1 kV differential mode Mains power quality should be that of a typical commercial or hospital environment. ±2 kV common mode <5 % Uт (>95 % dip in Uт) for 0.5 cycle 40 % Uт 40 % Uт (60 % dip in Uт) (60 % dip in Uт) for 5 cycles for 5 cycles 70 % Uт 70 % Uт (30 % dip in Uт) (30 % dip in Uт) for 25 cycles for 25 cycles <5 % Uт <5 % Uт (>95 % dip in Uт) (>95 % dip in Uт) for 5 sec 3 A/m for 5 sec 400 A/m and 3 A/m Magnetic field Mains power quality should be that of a typical commercial or hospital environment. If the user of the Medfusion Syringe Infusion Pump Model 4000 requires continued operation during power mains interruptions, it is recommended that the Medfusion® Syringe Infusion Pump Model 4000 be powered from an uninterruptible power supply. ® Power frequency magnetic fields should be at levels characteristic of a typical location in a typical commercial or hospital environment. IEC 61000-4-8 Note: Ut is the AC mains voltage prior to application of the test level. 121 Medfusion® Model 4000 pump Operator's Manual Guidance and manufacturer’s declaration – electromagnetic immunity The Medfusion® Syringe Infusion Pump Model 4000 is intended for use in the electromagnetic environment specified below. The customer or the user of the Medfusion® Syringe Infusion Pump Model 4000 should assure that it is used in such an environment. Immunity test IEC 60601 test level Compliance level Electromagnetic environment - guidance Portable and mobile RF communications equipment should be used no closer to any part of the Medfusion® Syringe Infusion Pump Model 4000, including cables, than the recommended separation distance calculated from the equation applicable to the frequency of the transmitter. Recommended separation distance Conducted RF 3 Vrms IEC 61000-4-6 150 kHz to 80 MHz outside ISM bandsa 10 Vrms 10 V d = 0.35 10 V d = 1.2 10 V/m d = 1.2 80 MHz to 800 MHz d = 2.3 800 MHz to 2.5 GHz 150 kHz to 80 MHz in ISM bandsa Radiated RF 10 V/m IEC 61000-4-3 80 MHz to 2.5 GHz where P is the maximum output power rating of the transmitter in watts (W) according to the transmitter manufacturer and d is the recommended separation distance in metres (m). b Field strengths from fixed RF transmitters, as determined by an electromagnetic site survey, c should be less than the compliance level in each frequency range. d Interference may occur in the vicinity of equipment marked with the following symbol: î NOTE 1 At 80 MHz and 800 MHz, the higher frequency range applies. NOTE 2 These guidelines may not apply in all situations. Electromagnetic propagation is affected by absorption and reflection from structures, objects and people. The ISM (industrial, scientific and medical) bands between 150 kHz and 80 MHz are 6.765 MHz to 6.795 MHz; 13.553 MHz to 13.567 MHz; 26.957 MHz to 27.283 MHz; and 40.66 to 40.70 MHz. b The compliance levels in the ISM frequency bands between 150 kHz and 80 MHz and in the frequency range 80 MHz to 2.5 GHz are intended to decrease the likelihood that mobile/portable communications equipment could cause interference if it is inadvertently brought into patient areas. For this reason, an additional factor of 10/3 is used in calculating the recommended separation distance for transmitters in these frequency ranges. c Field strengths from fixed transmitters, such as base stations for radio (cellular/cordless) telephones and land mobile radios, amateur radio, AM and FM radio broadcast and TV broadcast cannot be predicted theoretically with accuracy. To assess the electromagnetic environment due to fixed RF transmitters, an electromagnetic site survey should be considered. If the measured field strength in the location in which the Medfusion® Syringe Infusion Pump Model 4000 is used exceeds the applicable RF compliance level above, the Medfusion® Syringe Infusion Pump Model 4000 should be observed to verify normal operation. If abnormal performance is observed, additional measures may be necessary, such as reorienting or relocating the Medfusion® Syringe Infusion Pump Model 4000. d Over the frequency range 150 kHz to 80 MHz, field strengths should be less than 3 V/m. a 122 Medfusion® Model 4000 pump Operator's Manual Recommended separation distances between portable and mobile RF communications equipment and the Medfusion® Syringe Infusion Pump Model 4000 The Medfusion® Syringe Infusion Pump Model 4000 is intended for use in an electromagnetic environment in which radiated RF disturbances are controlled. The customer or the user of the Syringe Infusion Pump Model 4000 can help prevent electromagnetic interference by maintaining a minimum distance between portable and mobile RF communications equipment (transmitters) and the Medfusion® Model 4000 pump as recommended below, according to the maximum output power of the communications equipment. Rated Maximum output power or transmitter W 0.01 0.1 1 10 100 Separation distance according to frequency of transmitter (m) 150 kHz to 80 MHz 150 kHz to 80 MHz 80 MHz to 800 MHz 800 MHz to 2.5 GHz outside ISM bands in ISM bands d = 0.35 d = 1.2 d = 1.2 d = 2.3 .04 .11 .35 1.1 3.5 .12 .38 1.2 3.8 12 .12 .38 1.2 3.8 12 .23 .73 2.3 7.3 23 For transmitters rated at a maximum output power not listed above, the recommended separation distance d in meters (m) can be determined using the equation applicable to the frequency of the transmitter, where P is the maximum output power rating of the transmitter in watts (W) according to the transmitter manufacturer. NOTE 1 At 80 MHz and 800 MHz, the separation distance for the higher frequency range applies. NOTE 2 The ISM (industrial, scientific and medical) bands between 150 kHz and 80 MHz are 6.765 MHz to 6.795 MHz; 13.553 MHz to 13.567 MHz; 26.957 MHz to 27.283 MHz; and 40.66 MHz to 40.70 MHz. NOTE 3 An additional factor of 10/3 is used in calculating the recommended separation distance for transmitters in the ISM frequency bands between 150 kHz and 80 MHz and in the frequency range 80 MHz to 2.5 GHz to decrease the likelihood that mobile/portable communications equipment could cause interference if it is inadvertently brought into patient areas. NOTE 4 These guidelines may not apply in all situations. Electromagnetic propagation is affected by absorption and reflection from structures, objects and people. IEEE 802.11 b,g Radio for Auxiliary Communication The Medfusion® Model 4000 pump intentionally receives RF electromagnetic energy for non-critical communication. The RF band of reception is 2412 MHz to 2462 MHz. The bandwidth of the signal is 20Mhz. Note: The pump may be interfered with by other equipment, even if that other equipment complies with CISPR EMISSION requirements. The Medfusion® Model 4000 pump includes a low power RF transmitter for non-critical communication. The RF band of transmission is 2412 MHz to 2462 MHz. The bandwidth of the signal is 20MHz. The modulation is OFDM and CCK. The maximum output power at the RF connector is 0.032 watts. 123 Medfusion® Model 4000 pump Operator's Manual Technical specifications Specifications Below are the technical specifications of the Medfusion® Model 4000 pump. Testing was performed using the syringes listed in the table on page 130 and the following Medfusion® Administration Sets: 1) Model 536040 for low flow rates and 2) Model MX448HL60 for high flow rates. Minimum increment of resolution Size (pump only) Weight Classification Moisture protection Pump Alarms 0.01 mL/hr 10.5” wide × 6.2” high × 5.7” deep (27cm × 16cm × 14.5cm) Approximately 4.54 lbs. (2.04 kg) Type CF (protection from electric shock) IPX3 (sprayproof) Syringe empty, syringe near empty, syringe not loaded properly, incorrect syringe size, infusion complete, KVO, battery low/damaged/not working, incorrect calculation, (value) out of range, occlusion/fluid restricted/rate reduced/ pressure increasing, pump stopped, system fault, system advisory (set time/date, maintenance recommended, data corrupted) For a complete list of alarms, see the General system alarms and alerts table starting on page 103. Time to occlusion alarm Very High (50 psi) testing performed using BD® 1 mL syringe; High and Very Low (typical values) testing performed using BD® 20 mL syringe Flow Rate Occlusion Setting Max time to Max time to occlusion (steady occlusion (start up) state) hr:min:sec hr:min:sec 1 mL/hr Very High 00:00:38 00:07:15 (minimum) High 00:26:58 00:22:25 Very Low 00:07:16 00:06:39 5 mL/hr Very High 00:00:13 00:00:36 (intermediate) High 00:05:35 00:04:33 Very Low 00:01:55 00:03:40 Bolus volume at Variable, dependent on infusion variables and syringe in use. Typical values occlusion release (typical obtained when testing a pump, using a BD® 20mL syringe at Intermediate (5 mL/ values) hr) rate: Bolus after occlusion at minimum selectable Occlusion alarm setting (Very Low) 0.0454 mL Bolus after occlusion at maximum selectable Occlusion alarm setting (High) 0.0815 mL WARNING: Larger size syringes at occlusion setting HIGH may produce a post occlusion bolus larger than 0.3 mL due to excessive syringe plunger tip compliance. Power source 124 Internal battery: AC power: Rechargeable (lithium-ion) 100-240 VAC, 50/60 Hz, 42VA; Safety Class II – Type CF with Functional Earth conductor Medfusion® Model 4000 pump Operator's Manual Battery Life Battery longevity Operating conditions Infusion Back Pressure Storage/transportation conditions Delivery Accuracy 400 charge cycle counts minimum 10 hours typical at 5.0 mL/hr with 60 mL syringe − (from fully charged battery) Temperature: 5° to 40° C (40° to 104° F) Relative Humidity: 20 to 95% non-condensing Ambient Pressure: 70 kPa to 106 kPa (10.2 psia to 15.4 psia) -100 mmHg to 300 mmHg Temperature: –20° to 50°C (–4° to 122°F) Relative Humidity: 20% to 95% non-condensing Ambient Pressure: 70 kPa to 106 kPa (10.2 psia to 15.4 psia) Nominal ± 2% (± syringe accuracy) (for infusion back pressures of -100 mmHg to +300 mmHg). At low infusion rates, the system accuracy may not be achieved for short periods. During the total infusion time, the accuracy averages out (see accuracy curves, page 138). Overall flow rate accuracy is equal to pump accuracy combined with syringe tolerances. For syringes specified to meet the ISO 7886-2 standard, syringe accuracy may be expected to meet the ± 2% requirement. WARNING: Ensure that the ± 2% accuracy specification is taken into account when programming the pump and/or filling a syringe. If accuracy is of prime concern, use only syringes that meet the ± 2% requirement of the ISO 7886-2 Standard. Failure to do so may result in medication in the syringe becoming depleted sooner than expected. If the pump is being used to deliver critical or life sustaining medication, the interruption in the delivery of medication could result in patient injury or death. Bolus Accuracy This data taken with BD® 20 mL syringe Minimum Bolus* Minimum Recommended Bolus 0.98767 -1.23 0.32 Maximum Bolus Average (mL) 0.0298 19.8302 % Average Error -11.09 -0.85 Maximum Pos. 14.12 -0.38 Error % Maximum Neg. -44.71 -3.52** -1.369 Error % Minimum -0.0040 0.0032 -0.07520 Deviation (mL) Maximum -0.0152 -0.0352 -0.27220 Deviation (mL) * IMPORTANT: “Minimum Bolus” refers to the minimum bolus that can be set on the pump, and which may be below the recommended minimum rate for the syringe. ** NOTE: 2% of the measured error may be due to syringe characteristics per ISO 7886-2 125 Medfusion® Model 4000 pump Operator's Manual Occlusion Alarm For 1 mL Syringes, the occlusion limit is fixed at Very High. Very High (1 mL syringe only, not selectable): 50 psi (2585 mmHg) (345 kPa) For Syringes with a volume greater than 1 mL, the user can set the occlusion limit from Very Low to High. Maximum volume infused under single fault conditions Maximum delivery rate during bolus Maximum delivery rate during Prime Infusion rate range: Bolus volume range: High: 16 psi (827 mmHg) (110 kPa) Normal: 12 psi (621 mmHg) (83 kPa) Low: 8 psi (413 mmHg) (55 kPa) Very Low: 4 psi (206 mmHg) (28 kPa) 1/100th of the syringe size by volume The configured maximum rate at which a bolus or loading dose can be delivered is: Syringe size ×5mL/hr, Syringe size ×10mL/hr or Syringe size Max mL/hr (see page 135 for further explanation) The priming delivery rate is 300 mL/hr or the default maximum bolus rate for the syringe size being used (Syringe size ×5mL/hr, Syringe size ×10mL/hr or Syringe size Max mL/hr), whichever is lower (see page 135, Maximum Bolus Rate, for further explanation) 0.01 mL/hr to 1130 mL/hr in increments of 0.01/0.1 mL/hr (depending on syringe size/rate). Refer to syringe tables on page 131 for Minimum Recommended Rate. Volume is limited to the maximum fill volume of the current syringe size, and minimum volume is 1/600th the syringe size Note: The Minimum Recommended Bolus Volume is 10% of syringe or 1 mL, whichever is smaller. Bolus volumes delivered that are less then the recommended minimum bolus volume for the syringe used may result in delivery inaccuracies. Delivery modes (user customized) Continuous Delivery Modes: Dose / min, hr, day Dose / kg / min, hour, day Dose / m2 / min, hr, day mL / hr mL / kg / min, hr Delivery Options (user customized) Dose / time Volume Limit Intermittent volume / time Toggle FlowSentry™ Bolus Dose Delayed Start Loading Dose Override Alarm Loudness KVO Toggle PVD/PDD Standby Disable/Enable Vol Empty Tone Override Occlusion Limit Disable/Enable Near Empty Tone Periodic Callback 126 Intermittent Delivery Modes: Dose / kg / time Dose / m2 / time mL / kg / time Volume / time Medfusion® Model 4000 pump Operator's Manual User-defined libraries Standard libraries are organized on a per Profile basis. Each Profile allows up to eight library Categories with up to 36 Drug Programs each, for a total of 288 entries per profile One “Quick Library” per Profile for rapid setup Accessories (may not Rotating Poleclamp (catalog number 3000RPC) be available in all areas; PharmGuard® Toolbox 2, Version 2.1 Software (catalog number 22-4075-0201-51) contact customer service Medfusion™ Standard Configuration (catalog number 67-2460-0001-51) for availability) Medfusion™ Standard Syringes (catalog number 67-2459-0100-51) PharmGuard™ Supported Syringes (PSS) Series 2 (various, contact Smiths Medical for details) For replacement parts, including power cords and replacement battery packs, see the Medfusion® Model 4000 Series Technical Service Manual (catalog number 672452-51) 127 Medfusion® Model 4000 pump Operator's Manual Safety Features Drive Phase A/B POST, the ability for the watchdog to stop the motor (Motor Drive off POST). Safety Features and Fault Detection Periodically during pump operations the software checks motor operation in background. Motor background checks include the stopping of the motor when an infusion stops and the motor supply voltage test. Hardware Safety Features A watchdog circuit, made up of a separate microcontroller with a dedicated timer, alarm speaker, and power supply, monitors the main microprocessor and associated electronics. The purpose of this circuit is to detect failures of the system including power, electronics and software, and generate an alarm if one is detected. If a failure is detected, a watchdog or "SYSTEM FAILURE" alarm will be generated through the dedicated speaker, the red alarm indicator will be turned on, and the pumping mechanism will be disabled. Some watchdog failures (for example, one that may occur rarely when powering down following a Configuration update) may be cleared by cycling power on the pump. Software Safety Features Hardware-related Software Safety Features Program Memory - Check FLASH memory POST or BGND At power up and at regular intervals thereafter, the program memory is tested by calculating a Cyclic Redundancy Code (CRC) on the program and then comparing it with the CRC stored with the program. If the stored and calculated CRCs do not match, the software will display a system fault screen, turn on a continuous audible alarm, and stop all drug delivery. RAM Memory Check - RAM BGND During operation, the random access memory is checked. A series of bit patterns is written to and read from the RAM. If the read data is different from the written data, the software will display a system fault screen, turn on a continuous alarm, and stop all drug delivery. Motor Circuit Check - pump motor phase A or B POST and Motor rate error during operation At power up the pump performs power on self test (POST) checks of the motor. Motor POST checks include the ability to drive current to the motor (Motor 128 If a motor POST or background check fails the pump will display a system fault screen, turn on a continuous two-tone audible alarm, flash the backlight and stop all drug delivery. If the Motor shaft fails to complete the first shaft rotation (Motor Not Running) or a subsequent shaft rotation (Motor Rate Error) with the expected timing the pump will display a high priority alarm, turn on a continuous two-tone audible alarm, flash the backlight and stop all drug delivery. When the pump is powered on with a depleted battery and no AC power, this alarm may sound due to the low battery state. Recharge the battery, turn the pump on, turn the pump off, then turn the pump on to clear the condition. Keyboard Encoder Check - Control key POST or BGND Every time the software receives data from the keyboard encoder, it is checked. If the data is not a valid key press, the software will disregard the key press. Data Handling Software Safety Features Data Stored in EEPROM - Critical data POST or EEPROM timeout or Primary/Secondary critical data corrupted Before use, data associated with delivery and stored in EEPROM is tested by calculating a CRC on the data and then comparing it with the CRC stored with the data. If the EEPROM timeout or EEPROM Primary and Secondary stored and calculated CRCs do not match, the software will display a system fault screen, turn on a continuous two-tone audible alarm, and stop all drug delivery. Data Used in Calculations - Critical data failure Calculations on data used in some way to control the delivery of drug are performed redundantly. Medfusion® Model 4000 pump Operator's Manual The two calculated values are then compared. If the two values do not match, the software will display a system fault screen, turn on a continuous two-tone audible alarm, and stop all drug delivery. Timer Data Registers - Time base BGND, time of day clock POST, time of day clock timeout The data in the Real Time Clock is checked at regular intervals. If the data is not reasonable, the software will turn on a continuous two-tone audible alarm and stop all drug delivery. 129 Medfusion® Model 4000 pump Operator's Manual Additional Technical Information Medfusion™ Standard Syringes Below is a table of the standard model syringes supplied with PharmGuard® Toolbox 2 (and included in the Medfusion™ Standard Configuration) which can be used with the Medfusion® Model 4000 pump. (Information regarding syringe flow rate and minimum volume for these syringes can be found on the next page and in the product literature supplied with the PharmGuard® Toolbox 2.) Model (Manufacturer) B-D® (BectonDickinson) Terumo® (Terumo® Medical) Syringe Model/Sizes 1, 3, 5, 10, 20, 30 and 60 mL (Luer Lok™) 1mL (Tuberculin) 3, 6, 12, 20, 35 and 60 mL (Luer lock) 1mL (Tuberculin) 3, 5, 10, 20, 30 and 60mL (Luer Lock) 1mL (Tuberculin) BB Omnifix™ (B. Braun) 5, 10, 20 and 50 mL (Luer Lock) BB Perfusor® (B. Braun) 20 and 50 mL (Luer Lock) Monoject® (Clovidien) The critical volume (maximum) which could be infused in the event of a single point failure is 1/100th of the syringe size by volume. PharmGuard™ Supported Syringes (PSS) Series 2 In order to offer customers a wide range of available syringe manufacturers and sizes, Smiths Medical has available PharmGuard™ Supported Syringes (PSS) Series 2 in addition to the Medfusion™ Standard Syringes. Refer to www.smiths-medical.com or call Customer Service for more information about available PharmGuard™ Supported Syringes (PSS) Series 2. The PharmGuard™ Supported Syringes (PSS) Series 2 can only be imported into the PharmGuard® Toolbox 2. These additional syringe models can be sent to a pump as available syringes for the downloadable Configurations. (Information regarding syringe flow rate and minimum volume for these syringes can be found in the product literature supplied with the PSS Series 2.) 130 Medfusion® Model 4000 pump Operator's Manual Flow rate & minimum volume by manufacturer & size - Standard syringes For flow rate and minimum volume information regarding syringes available in the PharmGuard™ Supported Syringes (PSS) Series 2, see the product literature provided with that product. Please see the tables on page 131 for information regarding the lowest recommended rates for each syringe size used on the pump. The table below is provided for convenience. Should changes to the listed syringes occur, the values shown here may be superceded (see the Instructions for Use provided with the Medfusion™ Standard Syringes.) Model (Manufacturer) Size Min. Rate Max. Rate mL mL/hr mL/hr B-D (Becton-Dickinson) Tuberculin 1 Luer Lok™ 1 3 5 10 20 30 60 Monoject® (Covidien) Tuberculin 1 Luer Lock 3 6 12 20 35 60 Terumo® (Terumo® Medical) Tuberculin 1 Luer Lock 3 5 10 20 30 60 Minimum volume to infuse mL Minimum recommended rate mL/hr FlowSentry™ disabled FlowSentry™ enabled 0.01 29 0.0016 0.033 N/A* 0.01 0.01 0.03 0.05 0.1 0.1 0.1 29 98 191 277 483 622 944 0.0016 0.005 0.0083 0.0166 0.0333 0.05 0.1 0.033 0.1 0.17 0.33 0.67 1 2 N/A* 0.03 0.05 0.1 0.2 0.3 0.6 0.01 0.01 0.03 0.05 0.1 0.1 0.1 29 105 213 325 536 735 944 0.0016 0.005 0.01 0.02 0.0333 0.0583 0.1 0.033 0.1 0.2 0.4 0.67 1.2 2 N/A* 0.03 0.06 0.12 0.2 0.35 0.6 0.01 0.01 0.03 29 106 225 0.0016 0.005 0.0083 0.033 0.1 0.17 N/A* N/A* N/A* 0.05 0.1 0.1 0.11 333 541 712 1130 0.0166 0.0333 0.05 0.1 0.33 0.67 1 2 N/A* N/A* N/A* N/A* 131 Medfusion® Model 4000 pump Operator's Manual Model (Manufacturer) Size Min. Rate Max. Rate mL mL/hr mL/hr Minimum volume to infuse mL 0.1 0.1 481 1042 0.0333 0.0833 0.67 1.7 0.2 0.5 0.03 0.05 0.1 0.1 207 338 537 1042 0.0083 0.0166 0.0333 0.0833 0.17 0.33 0.67 1.7 0.05 0.1 0.2 0.5 BB Perfusor® (B. Braun) Luer Lock 20 50 BB Omnifix™ (B. Braun) Luer Lock 5 10 20 50 Minimum recommended rate mL/hr *FlowSentry™ is not available with 1 mL and Terumo® syringes. Syringe Size Minimum Recommended Bolus Volume 1mL 0.1mL 3mL 0.3mL 5mL 0.5mL 6mL 0.6mL 10mL 1mL 12mL 1mL 20mL 1mL 30mL 1mL 35mL 1mL 50mL 1mL 60mL 1mL WARNING: Use the smallest syringe size necessary to deliver the fluid or medication. Using a large syringe at very low rates (below Minimum Recommended Rate for the syringe) may cause improper pump operation, delayed occlusion sensing, larger post occlusion bolus at higher occlusion limit settings, delivery inaccuracies, or other potential hazards. Bolus Volume: Delivering a bolus volume less then the recommended bolus volume for the syringe used may result in delivery inaccuracies. Use an infusion set with the smallest diameter tubing available that does not result in excessive back pressure at the desired flow rate. Consider priming, loading, bolus, and flush rates when selecting an infusion set. 132 Medfusion® Model 4000 pump Operator's Manual Concentration and dosing units Drug Delivery Units Concentration Units Delivery Units Millimoles Milliequivalents Units Millimoles Milliequivalents Units Milliunits Grams Milligrams Milligrams Micrograms Micrograms Nanograms Grams Milligrams Micrograms /Time • • • • • • • • • • /Min • • • • • • • • • • /Day /Hr • • • • • • • • • • • • • • • • • • • • PharmGuard™ software limits Delivery Mode mL/hr Volume / Time Intermittent Volume / Time Dose / Time Dose / Kg/ Time mL / Kg/ Time Dose / m2 / Time PharmGuard™ software limits Parameter Limit Type mL/hr rate Hard and Soft Volume Hard and Soft Time Hard and Soft Volume Hard and Soft Time Hard and Soft Time Between Starts Hard and Soft Concentration Hard and Soft Dose Hard and Soft Time Hard and Soft Concentration Hard and Soft Body Weight Configurable Dose Hard and Soft Time Hard and Soft Body Weight Hard MAX, Soft High Limit (Low and MIN cannot be set) Volume / kg Hard and Soft Time Hard and Soft Concentration Hard and Soft m2 Configurable Dose Hard and Soft Time Hard and Soft Limit Range User Defined User Defined User Defined User Defined User Defined User Defined User Defined User Defined User Defines User Defined User Defined User Defined User Defined User Defined User Defined User Defined User Defined User Defined User Defined User Defined 133 Medfusion® Model 4000 pump Operator's Manual Delivery Mode Dose / Hr Dose / Min Dose / Day Dose / Kg / Hr Dose / Kg / Min Dose / Kg / Day mL / Kg / Hr mL / Kg / Min Dose / m2 / Hr Dose / m2 / Min Dose / m2 / Day Options Loading dose Bolus dose KVO Max bolus rate PharmGuard™ software limits Parameter Limit Type Concentration Hard and Soft Dose Hard and Soft Limit Range User Defined User Defined Concentration Body weight Dose rate Body Weight Volume / kg Concentration m2 Dose rate Hard and Soft Configurable Hard and Soft Hard and Soft Hard and Soft Hard and Soft Configurable Hard and Soft User Defined User Defined User Defined User Defined User Defined User Defined User Defined User Defined Parameter Dose Time Dose Time Rate Volume Rate Limit Type Hard and Soft Hard and Soft Hard and Soft Hard and Soft Hard Hard MAX Hard Limit range User Defined User Defined User Defined User Defined User Defined User Defined Configuration options A pump’s Alarm Setup, Auto Prompts, Limits, Occlusion Detection settings and many miscellaneous properties can be customized within the PharmGuard® Toolbox 2 software. These properties define the limits imposed by a pump and the general operational behavior of a pump. The following is a list of user configurable settings that are available. Each of these settings is customizable for each profile that is defined. General Options General Options are optional settings that affect all infusions initiated in the defined profile. 1mL Syringe Support Defines if 1 mL syringe support is enabled. You can select from two values: Enabled or Disabled. Alarm Loudness Defines the loudness level of a pump’s alarm. You can select from five levels: Level 1, Level 2, Level 3, Level 4, or Level 5 (Level 1 is the softest, Level 5 the loudest). The alarm cannot be disabled or completely silenced. Alarm Silence Time Defines the number of minutes until the User Callback alarm will sound. Alarm Silence Time is a numeric value in the range 1 to 2 minutes. Alarm Style Defines the tone style a pump will use when sounding an alarm. You can select 134 Medfusion® Model 4000 pump Operator's Manual from three styles: Medfusion® Defined, International Standard and Medfusion® Multi-tone. Auto Lock Time Defines the number of seconds the pump will wait before automatically locking the pump’s interface. Auto Lock Time is a numeric value in the range 0 to 999 seconds. Setting this value to zero will disable the Auto Lock feature. Bolus Change in mL Defines if a pump user can change a Bolus Dose or Loading Dose in mL. You can select from two values: Enabled or Disabled. Bolus Time Feature Defines if a pump user will have to enter a time when setting a Bolus Dose using a manual delivery mode. Due to a conflict between library and profile options, bolus time is always enabled inside of library programs. You can select from two values: Enabled or Disabled. Bolus Total Dose Defines if a pump user will be allowed to enter a Bolus Dose or Loading Dose as a Total Dose rather than the standard dose/kg in weight based modes. Select from two values—Enabled and Disabled. Date Separator Defines whether dates are separated by a slash (yyyy/mm/dd) or a dash (yyyymm-dd). Decimal Separator Defines whether decimal points in numbers are represented by a comma or a period. Enter User ID on Override Defines if the pump will prompt a user for their User ID when overriding a Drug Program infusion property. You can select from two values: Enabled or Disabled. Flush Defines if the pump will prompt a user to program a flush infusion following completion of an infusion. You can select from two values: Enabled or disabled. Flush Time Defines whether a user will be allowed to set an infusion time for a flush infusion. You can select from two values: Enabled or disabled. Maximum Flush Volume Defines the maximum volume allowed by the pump during a flush infusion. Maximum flush volume is a numeric value from the minimum volume for the syringe to the fill volume of the syringe. FlowSentry™ Defines if the FlowSentry™ (Rapid Occlusion Detection) feature is enabled. You can select from two values: Enabled or Disabled. FlowSentry™ Sensitivity Defines the sensitivity of the FlowSentry™ algorithm during normal infusion. You can select from four values: Low - least sensitive, Normal, High, or Very High - most sensitive. FlowSentry™ Startup Sensitivity Defines the sensitivity of the FlowSentry™ algorithm during infusion startup. You can select from four values: Low - least sensitive, Normal, High, or Very High - most sensitive. Key Click (key click loudness) Defines the click loudness level when pressing pump keys. You can select from five levels: Off, Level 2, Level 3, Level 4, or Level 5 (Level 5 is the loudest). Maximum Body Surface Area Defines the maximum allowed value for the Body Surface Area infusion parameter. Maximum Body Surface Area is a numeric value in the range 0.0001 to 4 m2. Maximum Bolus Rate Defines the maximum bolus infusion rate allowed by the pump. You can select from three rates: Syringe Size x 5 mL/hr (example: 5 mL syringe × 5 mL/hr = 25 135 Medfusion® Model 4000 pump Operator's Manual mL/hr maximum bolus rate), Syringe Size x 10 mL/hr (example: 5 mL syringe × 10 mL/hr = 50 mL/hr maximum bolus rate), or Syringe Size Max mL/hr (see the table on page 131). Maximum Flow Rate Defines the maximum flow rate allowed by the pump. Maximum Flow Rate is a numeric value in the range 0.1 to 1130 mL/hr. Maximum Patient Weight Defines the maximum allowed value for the Patient Weight infusion parameter. Maximum Patient Weight is a numeric value in the range 0.25 to 250 kg. Near Vol Empty Time Defines the number of minutes remaining before a syringe is empty, at which time a Syringe Near Empty Alarm will occur. Near Empty Alarm Time is a numeric value in the range 0 to 240 minutes. Setting this value to zero will disable the Syringe Near Empty Alarm. Near Empty Alarm Priority Defines the priority level at which to generate the Syringe Near Empty Alarm. You can select from two levels: Low or Medium. Occlusion Limit Defines the pressure at which the pump will consider the line occluded. You can select from four limits: Very Low (Approx. 4 psi, 206.9 mmHg), Low (Approx. 8 psi, 413.7 mmHg), Normal (Approx. 12 psi, 620.6 mmHg), and High (Approx. 16 psi, 827.4 mmHg). For 1 mL syringes, the occlusion limit is fixed at Very High (Approx. 50 psi) and cannot be changed. Profile Passcode Defines the passcode that must be entered to access a profile when programming an infusion. Profile Passcodes can be any numeric code in the range of 1000 to 9999. To disable a Profile Passcode, simply delete the contents of this property. Program Dose Display Defines if the pump will display the delivered Program Dose or the delivered Program Volume. You can select from two values: Volume or Dose. Unlock Passcode Defines the passcode that must be entered at a pump to unlock its interface. Unlock Passcodes can be any numeric code in the range 0 to 9999. To disable the Unlock Passcode, simply delete the contents of this property. Program Options Program Options are optional settings that affect the current infusion initiated in the defined profile. While individual options can be enabled for a profile, they can also be disabled in individual drug programs within that profile. Settings in drug programs take priority over those of the profile. Bolus Dose Defines if a pump user will be able to enter a Bolus Dose during infusion setup. Delayed Start Defines if a pump user will be able to enter a Delayed Start time during infusion setup. The range is 0 to 6 hours. KVO Defines if a pump user will be able to enter a Keep-Vein-Open (KVO) rate. This value cannot be set or changed while an infusion is running. Loading Dose Defines if a pump user will be able to enter a Loading Dose during infusion setup. Override Alarm Loudness Defines if a pump user will be able to change the loudness level of a pump’s alarm during an infusion. 136 Medfusion® Model 4000 pump Operator's Manual Override Occlusion Limit Defines if a pump user will be able to override the profile default setting of the pressure at which the pump will consider the line occluded for the current infusion. Periodic Callback Alarm Defines if a pump user will be able to enter a Periodic Callback Alarm time during infusion setup. The range is 0 to 8 hours. Standby Defines if a pump user will be able to enter a Standby time during infusion setup. The range is 0 to 24 hours. Toggle Vol Empty Tone Defines if a pump user will be able to disable the Syringe Vol Empty Alarm Tone for the current infusion. (The user callback alarm will still be activated after the defined Alarm Silence Time). Toggle FlowSentry™ Defines if a pump user will be able to disable the FlowSentry™ (Rapid Occlusion Detection) feature for the current infusion. Toggle Near Empty Tone Defines if a pump user will be able to disable the Syringe Near Empty Alarm Tone for the current infusion. Toggle PVD/PDD Displayed on the pump options menu as “Change to Dose” or “Change to Volume.” Defines if a pump user will be able to change the profile default setting to display the delivered Program Dose or the delivered Program Volume. Volume Limit Defines if a pump user will be able to enter a Volume Limit during infusion setup. This value cannot be set or changed while an infusion is running. The range is 0 to 500 mL. Auto Prompt Options Auto Prompt Options are optional settings that the user will be prompted to enter for all infusions initiated in the defined profile. The default for all Auto Prompt Options is Disabled. Bolus Dose Defines if a pump user will be prompted to enter a Bolus Dose during infusion setup. You can select from two values: Enabled or Disabled. Confirm Settings Defines if a pump user will be prompted to Confirm Infusion Settings when setting up an infusion. Once the infusion settings are made, if Confirm Settings is enabled the user will be required to re-confirm the settings. You can select from two values: Enabled or Disabled. Enter User ID to Program Defines if a pump user will be prompted to enter their User ID when setting up an infusion. You can select from two values: Enabled or Disabled. Prompt to Prime Defines if a pump user will be prompted to Prime as a last step in setting up an infusion. You can select from two values: Enabled or Disabled. Re-enter Weight Defines if a pump user will be prompted to re-enter a patient’s weight twice to confirm the setting (a double check). You can select from two values: Enabled or Disabled. Standby Defines if a pump user will be prompted to enter a Standby time during infusion setup. You can select from two values: Enabled or Disabled. Volume Limit Defines if a pump user will be prompted to enter a Volume Limit during infusion setup. You can select from two values: Enabled or Disabled. 137 Medfusion® Model 4000 pump Operator's Manual Device Setup Features The following items are set on a per pump basis in the Device Setup menu. All of these features are optional, and while they do not directly affect infusion programming, they can affect alarms and reporting. Preventative maintenance date Defines the date when the pump's preventative maintenance required alarm activates. Time Zone Defines the time zone where the pump is located. Daylight Saving Defines if a pump will automatically switch to Daylight Saving Time on the appropriate date. If selected, you must specify when Daylight Saving begins and ends, what time the clocks change, and by how much. Flow Delivery Graphs In this device, as with all syringe infusion pumps, the motion of the pumping mechanism and variations in individual disposables (both the syringe and infusion set) cause short-term fluctuations in the rate accuracy. The curves on the following page show typical performance of the pump system in two ways: 1. A flow versus time graph during the stabilization period (start-up curves). 2. The accuracy of fluid delivery of particular time periods or ‘observation windows’ is measured (trumpet curves). The start-up curve displays flow rate continuously from the start of the infusion. The curve visually represents flow rate uniformity. Trumpet curves are derived from the second hour of this data. Tests were performed per the IEC 60601-2-24 standard. Over long observation windows, short term fluctuations have minimal effect on accuracy as represented by the flat part of the curve. As the observation window is reduced, short term fluctuations have an increasing effect as represented by the “mouth” of the trumpet. Being aware of system accuracy over various observation windows may be of interest when certain drugs are being administered. Short term fluctuations in rate accuracy may have clinical impact depending on the half-life of the drug being infused, therefore both the trumpet curve and drug half-life should be taken into account. 138 The data was created using a Medfusion® pump and Becton-Dickinson (B-D®) WWD 30 mL syringe. The 1 mL/hr data was created using the Medfusion® 536040 Extension set and 18G needle. The 5 mL/hr data was created using the Medfusion® MX448HL60 Extension set and 18G needle. Medfusion® Model 4000 pump Operator's Manual Start-up curves over stabilization period Minimum rate (1 mL/hr) Intermediate rate (5 mL/hr) Flow rate immediately following startup 2 10 1.5 7.5 flow [ml/h] flow [ml/h] Flow rate immediately following startup 1 5 2.5 0.5 0 0 0 10 20 30 40 50 60 70 80 90 100 time [Min] 110 120 0 10 20 30 40 50 60 70 80 90 100 110 120 time [Min] Trumpet curves over T2 period Minimum rate (1 mL/hr) 10.0 7.5 % Error of Flow 5.0 2.5 0.0 2 -2.5 5 Epmax 11 19 -1.47% Epmin -5.0 T (min) 31 Trumpet Curve -7.5 -10.0 Intermediate rate (5 mL/hr) 10.0 7.5 5.0 % Error of Flow 2.5 0.0 -2.5 -5.0 -7.5 0.54% T (min) Epmax 2 5 Epmin 11 19 31 Trumpet Curve -10.0 139 Medfusion® Model 4000 pump Operator's Manual Communications The connectivity states available for Medfusion® Model 4000 pumps are Ethernet and Wireless. The pump display shows an icon indicating which interface is active (see page 11). Whenever communication with the PharmGuard® Server is occurring, the blue “Communicating” light () will be on. (See the Network Settings Manual for information in how to set up these interfaces.) The pump can be used with a PC running PharmGuard® Toolbox 2 Software to configure the pump. This process is described in the PharmGuard® Toolbox 2 User’s Manual, and the Network Settings manual. Magnetic Resonance Imaging (MRI) Information The Medfusion® Model 4000 pump is MR Conditional according to the terminology specified in the American Society for Testing and Materials (ASTM) International, Designation: F2503-08, Standard Practice for Marking Medical Devices and Other Items for Safety in the Magnetic Resonance Environment. Non-clinical testing demonstrated that the Medfusion® Model 4000 pump is MR Conditional. The pump will not present a hazard or risk to the patient or MR user, or significantly affect the MR image quality if the pump is operated according to the specific guidelines as follows: WARNING: The pump must be positioned in an MR environment such that it is secured to a non-moveable object and the magnetic fringe field does not exceed 150 gauss. Exposing the Medfusion® Model 4000 pump to magnetic fields that exceed 150 gauss presents a risk of becoming a projectile hazard and can lead to possible patient injury or death. Irreversible damage to the pump can also occur, rendering it inoperable. MRI Related Testing In non-clinical testing, the Medfusion® Model 4000 pump evaluations have included Magnetic Attraction (projectile hazard), MR interference with the pump, and MR Image Distortion. • Magnetic Attraction (projectile hazard): The Medfusion® Model 4000 pump showed no attraction torque or force at 150 gauss static magnetic 140 field strength. • MR Interference with the Pump: The Medfusion® Model 4000 pump operated normally while in the 150 gauss static magnetic field. • MR Image Distortion: No MR imaging interference was observed when tested with the Medfusion® Model 4000 pump at 8 feet from the isocenter of a 1.5T (64 MHz) Siemens Symphony MR system, Siemens Software 2002 Revision C, under the following conditions: battery only (no AC cord), back of the pump facing the MRI isocenter, full body receiver coil (most sensitive), using standard spin echo, fast spin echo and gradient spin echo pulse sequences. Image Distortion Certain MRI receiver coils are sensitive to electronic emissions. Therefore, prior to patient examinations, MR image scans should be completed while operating the Medfusion® Model 4000 pump in the MR environment that is to be used for the examination to verify acceptable MR image quality. Note that results vary between MRI systems due to differences in scanning systems and receivers used. The following are tips to minimize the possibility of image artifacts appearing: • Ensure that the back of the pump faces the MRI isocenter during operation (pump screen facing away from the MRI. • Move the pump further from the isocenter of the MRI system if image artifacts appear. • Operate the Medfusion® Model 4000 pump on battery power in an MR environment. The presence of a powered AC cord typically induces image artifacts. Furthermore, the MRI technologist can improve the Signal to Noise Ratio (SNR) of the image, typically reducing or eliminating image artifacts, by adjusting any of the following variables: • Use signal rich pulse sequences like Spin Echo where applicable • Decrease the Phase Encoding matrix • Increase the acquisition Field of View • Increase the slice thickness • Increase the number of averages Medfusion® Model 4000 pump Operator's Manual Cleaning and care Below are common methods and cautions relating to cleaning and caring for the infusion pump. WARNING: Power Source: To avoid electric shock, before cleaning, always switch electrically operated equipment off and disconnect from AC power source. CAUTIONS: • Avoid Using Solvents: NEVER use organic solvents (e.g., acetone), quarternary ammonia compounds, strong acids, or bases to clean any portion of the pump. • Spray Resistant: The pump is “spray resistant” from the top and sides but not “water proof ”. NEVER spray cleaning or other fluids directly into openings on the bottom of the pump. • Not Waterproof: The pump is not certified “water proof ”. Never immerse the pump in water or other fluids. • Avoid Oil Sprays: NEVER use light oil sprays (e.g., WD40®) to clean or lubricate pump. These oils contain chemicals that can damage the plastic of the pump. No user-added lubrication is necessary. • Never Autoclave: NEVER sterilize the pump in a steam autoclave or gas. Using autoclave or gas sterilization can seriously damage the infusion pump and void the warranty. 1. Follow your institution’s guidelines for cleaning and disinfecting of devices. The pump can be safely cleaned with the following agents: • Common bleach 10% solution diluted with water. • Mild detergent mixed with water. • Isopropyl alcohol 70% solution. 2. For best results: clean by spraying cleanser directly onto a soft cloth and then wiping surfaces dry. 141 Medfusion® Model 4000 pump Operator's Manual Maintenance & service This chapter includes information relating to both standard maintenance and service. WARNINGS: • Pump Maintenance. To avoid electric shock, only trained biomedical service personnel may service this pump. Service personnel should disconnect the AC power cord before servicing the pump. • Shock Hazard: The only means of removing AC power is to disconnect the AC power cord. While the AC power cord is attached to the pump and plugged into an AC outlet, live main voltage is present within the pump. • Manufacturer Recommended Maintenance: Always maintain this pump following manufacturer recommended instructions in the Service Manual. Improperly maintained pumps may cause either under-infusion or over-infusion to patient. • Never Open the Pump Case: To avoid electric shock, users should never open the pump case or battery compartment for any reason. Service personnel should always disconnect the AC power cord before servicing the pump. • Dropped or Damaged Pumps: Never use a dropped or obviously damaged pump. Withdraw it from service until a trained biomedical technician can test it. 142 Periodic maintenance Trained biomedical service personnel should test the pump at least yearly to ensure continued safe operation. • This testing should be performed at least yearly, or whenever the pump has been damaged or dropped. • The occlusion and other sensors must be checked yearly. • Refer to the Technical Service Manual for specific details. The PharmGuard® Toolbox 2 User's Manual (provided with the PharmGuard® Toolbox 2 software) provides information on customizing the settings and features of the pump, which in turn affect the use and operation of the pump on a daily basis. The Medfusion® Model 4000 Series Technical Service Manual, (part number 67-2452-51) provides technical information on this pump, including: • Functional Descriptions • Calibration • Theory of Operation • Service Parts* • Diagnosis and Testing Contact Smiths Medical for availability. *Including replacement battery packs and power cords Medfusion® Model 4000 pump Operator's Manual Using Smiths Medical USA service assistance Use the following steps to make use of Smiths Medical USA service assistance: 1. Contact the Smiths Medical Service Department (USA) at one of the following telephone numbers: Toll-free in the U.S. 1 800.258.5361 Outside the U.S. 1 214.618.0218 2. When calling any of these numbers, please have the following ready: • Model name / number of pump • Pump serial number • Purchase date if pump is within warranty period • Description of problem in as much detail as possible 3. The service representative may “talk you through” to a solution if possible. Component parts such as the internal battery can be ordered from Smiths Medical Service and Repair. Note: If outside the USA, contact your local distributor for service assistance. 143 Medfusion® Model 4000 pump Operator's Manual Returning a pump to the USA for repair When the service representative cannot resolve an issue over the phone, then it becomes necessary to return the infusion pump for service. 1. If the problem cannot be resolved through the telephone assistance of the Service Department, obtain a Return Authorization (RA) number by calling Customer Service at 1 800.258.5361 (USA). Customer Service hours of operation are Monday through Friday, 7:00AM to 5:30PM CST. 2. Clean and decontaminate the pump and accessories prior to returning items to Smiths Medical. This is required before shipment according to United States Occupational Safety & Health Administration (OSHA) regulations. 3. Package the infusion pump carefully for shipment. 4. Smiths Medical will not accept returns for service without the assigned RA number clearly printed on the shipping package. Mark the RA number clearly on the outside of the shipping package used to return the pump. 5. Ship the carefully packaged infusion pump to: Smiths Medical ASD, Inc. 1265 Grey Fox Road St. Paul, MN 55112 1 800.258.5361 (USA) www.smiths-medical.com Note: Unless accessory items (such as the poleclamp, AC power cord, etc.) are specifically part of the problem encountered, remove all accessory items from the pump before returning it to Smiths Medical. 144 Medfusion® Model 4000 pump Operator's Manual Collect Separately WARNING: Collect Separately. There are potential health hazards associated with improper disposal of batteries, electronics, and contaminated (used) infusion sets and syringes. Dispose of used batteries, infusion sets, syringes, and other used accessories, or a pump that has reached the end of its useful life, in an environmentally safe manner, and according to any regulations that may apply. This product contains electrical and electronic components (including batteries) that may contain materials which, if disposed of with general waste, could be damaging to the environment. In accordance with Directive 2002/96/EC Waste Electrical and Electronic Equipment, residents of the European Union must follow specific disposal or recycling instructions for this product. Contact your local distributor, or visit the following web site for specific instructions: http://www.smiths-medical.com/recycle/index.html Non-European Union residents must dispose of or recycle this product (including batteries) in accordance with the local laws or regulations that apply. 145 Medfusion® Model 4000 pump Operator's Manual Limited Warranty Smiths Medical ASD, Inc. (the “Manufacturer”) warrants to the Original Purchaser that the Medfusion® Syringe Infusion Pump Model 4000 (the “Pump”), not including accessories, shall be free from defects in materials and workmanship under normal use, if used in accordance with this Operator's Manual, for a period of one (1) year from the actual date of sale to the Original Purchaser. THERE ARE NO OTHER WARRANTIES. This warranty does not cover normal wear and tear and maintenance items, and specifically excludes batteries, administration sets, extension sets or any other accessory items or equipment used with the Pump. Subject to the conditions of and upon compliance with this Limited Warranty, the Manufacturer will repair or replace at its option without charge (except for a minimal charge for postage and handling) any Pump (not including accessories) which is defective if a claim is made during such one-year period. The following conditions, procedures, and limitations apply to the Manufacturer’s obligation under this warranty: A. Parties Covered by this Warranty: This warranty extends only to the Original Purchaser of the Pump. This warranty does not extend to subsequent purchasers. The Original Purchaser may be a patient, medical personnel, a hospital, or institution which purchases the Pump for treatment of patients. The Original Purchaser should retain the invoice or sales receipt as proof as to the actual date of purchase. B. Warranty Performance Procedure: Notice of the claimed defect must be made in writing or by telephone to the Manufacturer as follows: Customer Service Department, Smiths Medical ASD, Inc., 1265 Grey Fox Road, St. Paul, MN 55112 USA, 1 800.258.5361 (USA) or Smiths Medical International Ltd. 1500, Eureka Park, Lower Pemberton, Ashford, Kent, TN25 4BF, UK, +44 (0)1233 722100. Notice to the Manufacturer must include date of purchase, model and serial number, and a description of the claimed defect in sufficient detail to allow the Manufacturer to determine and facilitate any repairs which may be necessary. AUTHORIZATION MUST BE OBTAINED PRIOR TO RETURNING THE PUMP. If authorized, the Pump must be properly and carefully packaged and returned to the Manufacturer, postage prepaid. Any loss or damage during shipment is at the risk of the sender. C. Conditions of Warranty: The warranty is void if the Pump has been 1) repaired by someone other than the Manufacturer or its authorized agent; 2) altered so that its stability or reliability is affected (which includes use of service/replacement parts not supplied by Smiths Medical or its authorized agents, including the battery pack); 3) misused; or, 4) damaged by negligence or accident. Misuse includes, but is not limited to, use not in compliance with the Operator's Manual or use with non-approved accessories. Removal or damage to the Pump’s serial number will invalidate this warranty. D. Limitations and Exclusions: Repair or replacement of the Pump or any component part thereof is the EXCLUSIVE remedy offered by the Manufacturer. The following exclusions and limitations shall apply: 146 1. No agent, representative, or employee of the Manufacturer has authority to bind the Manufacturer to any representation or warranty, expressed or implied. 2. THERE IS NO WARRANTY OF MERCHANTABILITY OR FITNESS OR USE OF THE PUMP FOR ANY PARTICULAR PURPOSE. 3. The Pump can only be used under the supervision of medical personnel whose skill and judgment determine the suitability of the Pump for any particular medical treatment. 4. All recommendations, information, and descriptive literature supplied by the Manufacturer or its agents are believed to be accurate and reliable, but do not constitute warranties. E. Computer Program License: 1. The Pump is intended to be used in conjunction with a particular Licensed Computer Program supplied by Manufacturer and use of any other program or unauthorized modification of a Licensed Computer Program shall void Manufacturer’s warranty as set forth above. 2. The Original Purchaser and any users authorized by the Original Purchaser are hereby granted a nonexclusive, nontransferable license to use the Licensed Computer Program only in conjunction with the single Pump supplied by Manufacturer. The Licensed Computer Program is supplied only in machine-readable object code form and is based upon Manufacturer’s proprietary confidential information. No rights are granted under this license or otherwise to decompile, produce humanly readable copies of, reverse engineer, modify or create any derivative works based upon the Licensed Computer Program. 3. All other terms and conditions of this Limited Warranty shall apply to the Licensed Computer Program. The Manufacturer disclaims responsibility for the suitability of the Pump for any particular medical treatment or for any medical complications resulting from the use of the Pump. The Manufacturer shall not be responsible for any incidental damages or consequential damages to property, loss of profits, or loss of use caused by any defect or malfunction of the Pump. This warranty gives the Original Purchaser specific legal rights, and the Original Purchaser may have other legal rights which may vary from state to state. Medfusion® Model 4000 pump Operator's Manual Index F A AC power connection port 9, 111 Alarms & alerts 99 Troubleshooting 103 Update(s) Available Notification 110 B Battery 111 Battery Alarms 107 guidelines 112 Onscreen power gauge 112 Body weight/surface area infusions 46 Bolus dosing 62 Bolus rate reduction 66, 106 Continuing/restarting a bolus dose 65 C Changing rate 94 during delivery 94 when paused 95 Cleaning the pump 141 Communication 123, 140 Concentration and dosing units 133 Configuration 6, 12, 134 Configuration profile 30 Continuing a bolus dose 65 Continuing a loading dose 70 Continuous mode: ml/hr 39 D Data Handling Software Safety Features 128 Delayed start 78, 87 Delivering a loading dose 69 Delivery mode 33 Display 8 Dose / Day 42 Dose / Hr 40 Dose / Min 40 Dose / Time 44 E ECMO (Extracorporeal Membrane Oxygenation) 7 Electromagnetic Compliance (EMC) 116 Ethernet State 11 Ethernet Port 9 Explosion risk warning 1 FlowSentry rapid occlusion detection 6, 92 Flush feature 88, 135 G General Use Diagram 23 H Hard limits 14, 19, 133 Hardware-related Software Safety Features 128 hyperbaric chamber use warning 1 I Intermittent volume / time 55 K Keep Vein Open (KVO) rate 74 Keypad 9 buttons (or keys) 10 Indicators 10 Keypad lock 98 Unlocking 98 L Libraries Quick 15 Standard 15 Loading a syringe 34 Unloading a syringe 38 Loading dose 67 Continuing/restarting a loading dose 70 Delivering a loading dose 69 Loading dose rate reduction 71 Locking the keypad 98 M Maintenance & service 142 Mode 14, 33 Body weight/surface area infusions 46 Continuous 39 Dose / Day 42 Dose / Hr 40 Dose / Min 40 Dose / Time 44 Intermittent Volume / Time 55 Recall last settings 57 Volume / Time 54 MRI (Magnetic Resonance Imaging) 140 147 Medfusion® Model 4000 pump Operator's Manual N Near empty alarm tone, disable/enable 84 Network status 11 O Occlusion settings 92 Post occlusion bolus reduction 93 Options 61, 136 Bolus dosing 62 Delayed start 78, 87 Disable/enable near empty alarm tone 84 Disable/enable rapid occlusion detection 84 Disable/enable vol empty alarm tone 85 KVO (Keep Vein Open) 74 Loading dose 67 Delivering a loading dose 69 Override alarm loudness 83 Override occlusion limit 82 Perioodic callback alarm 79 Standby 76 Override alarm loudness 83 Override occlusion limit 82 P Periodic callback alarm 79 PharmGuard Safety Software 6, 15, 19, 31, 133 PharmGuard Server 11 Poleclamp 113 rotating/detachable poleclamp Assembling 114 Stationary poleclamp Assembling 115 Post occlusion bolus reduction 93 Prime function 36, 57 Program Dose Delivered (PDD) 96 Clearing 97 Displaying 96 Program Volume Delivered (PVD) 96 Clearing 97 Displaying 96 Q S Self-tests 26 Service 142 Soft limits 14, 19, 133 Software Safety Features 128 Data Handling Software Safety Features 128 Hardware-related Software Safety Features 128 Standard libraries 15 Using 16 Standby 76, 87 Starting an infusion 86 from pause 86 from standby, delayed start 87 Stopping an infusion 87 Stopping delivery 87 Symbols 5 Syringe barrel clamp 8, 35, 36 Syringe barrel flange clip 8, 35 Syringe manufacturer/type 39 Syringe plunger driver 8, 36 Syringe plunger holders 8 Syringe plunger release lever 8, 35, 36 System Advisory 107 System Failures 102, 108 T Technical specifications 124 Concentration and dosing units 133 Flow delivery graphs (trumpet curves) 138 Options 136 PharmGuard limits 133 Total Volume Delivered 96 Clearing 97 Trumpet curves (flow delivery graphs) 138 Tubing holders 8, 37 Turning the pump off 27 U Unloading a syringe 38 Unlocking the keypad 98 Update(s) Available 110 User Callback alarm 101 Quick libraries 15 V R Rapid occlusion detection, disable/enable 84 Rate reduction 66, 71, 106 Recall last settings 57 Restarting a bolus dose 65 Restarting a loading dose 70 148 Vol Empty alarm tone, disable/enable 85 Volume / time - ml/hr infusions 54 W watchdog 128 Wireless State 11 Workflow Process 23 Smiths Medical ASD, Inc. St. Paul, MN 55112 USA 1 800.258.5361 (USA), 1 214.618.0218 www.smiths-medical.com 6 2 @ Smiths Medical International Ltd. TN25 4BF, UK Tel: +44 (0)1233 722100 Aus Smiths Medical Australasia Pty. Ltd. 61 Brandl Street Eight Mile Plains, QLD 4113, Australia +61 (0) 7 3340 1300 Medfusion, PharmGuard, FlowSentry, and the Medfusion and Smiths Medical design marks are trademarks of Smiths Medical. The symbol indicates the trademark is registered in the U.S. Patent and Trademark Office and certain other countries. All other names and marks are trademarks, tradenames, or service marks of their respective owners. ® This product includes software developed by the OpenSSL Project for use in the OpenSSL Toolkit. (http://www.openssl.org) This product includes cryptographic software written by Erc Young ([email protected]). © 2010-2011 Smiths Medical. All rights reserved. 2011-0940-5760-51A s