1
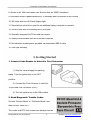
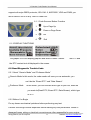
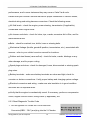
For
OBD2
Code Reader
User Manual
http://www.motodok.com
Table of Contents
1. Description ................................................................................................................ 2
2. Features...................................................................................................................... 2
3. Getting Started........................................................................................................... 3
1. Connect Code Reader to Vehicle's Test Connector .......................................... 3
2. Read Diagnostic Trouble Codes........................................................................ 3
3. Read Engine Data Stream ................................................................................. 4
4. Safety Warning.......................................................................................................... 4
5. About OBD-II............................................................................................................ 5
5.1 OBD-II Terminology....................................................................................... 5
5.2 Diagnostic Trouble Code (DTC)..................................................................... 9
6. How to Use the Code Scanner................................................................................. 10
6.1 ABOUT THE CODE READER.................................................................... 10
6.2 Read Diagnostic Trouble Code ..................................................................... 11
6.3 Erase Diagnostic Trouble Codes ................................................................... 13
6.4 Data Stream ................................................................................................... 15
7. One Year Warranty .................................................................................................. 16
V-Checker Code Reader User Manual
1. Description
All vehicles manufactured after 1996 are equipped with OBD II (second
generation On-Board Diagnostics). This change in vehicles has created a need for a
tool to retrieve the diagnostic information for these newer vehicles. The V-Checker
OBD II Code Reader is the tool you need to retrieve important repair information
from your vehicle's computer system This sophisticated new tool detects failures in
various vehicle systems, including fuel injection, ignition, catalyst, and EGR. If a
problem is found, the computer turns on the "Check Engine" light to warn the driver
and sets a Diagnostic Trouble Code to identify the system or circuit where the
problem is. The V-Checker OBD II Code Reader can read the data stream of the
engine, including engine speed, calculated load value, engine coolant temperature,
throttle open state, preignition angel etc from this you can know the work status of
you car engine well.
2 Features
1. Data stream read
2. DTC text content display backlit 4-line LCD display
3. Support 4 types of Standard OBD-II protocol
4. Professor mode included
5. Data base of DTCs is expanded
6. Highly reliable and accurate
7. Easy to use with one plug-in
Оборудование для автосервиса
2
Website: http://www.motodok.com
V-Checker Code Reader User Manual
8. Works on all 1996 and newer cars & trucks that are OBD II compliant
9. Automatic refresh updates data every 15 seconds when connected to the vehicle
10. Will clear and turn off Check Engine light
11. Stand-alone unit with no need for an additional laptop computer to operate
12. Small in size and conveniently fits in your palm
13. Specially designed for DIYers and car-owners
14. Safely communicates with the on-board computer
15. No batteries needed-power provided via detachable OBD II cable
16. One-year warranty
3. Getting Started
1. Connect Code Reader to Vehicle's Test Connector
1). Stop the car and apply the parking
brake. Turn the ignition key to the OFF
position.
2). Connect the Code Scanner to vehicle’s
16-pin Data Link Connector (DLC).
3). Turn the ignition key to the ON position.
2. Read Diagnostic Trouble Codes
Choose “Generic Mode” or “Professor Mode” and
then choose “Read DTC”.
The codes and DTC text content are displayed on the
Оборудование для автосервиса
3
Website: http://www.motodok.com
V-Checker Code Reader User Manual
Code Reader’s LCD display screen.
3. Read Engine Data Stream
By choose “Data Stream”, and start engine.
The car engine current data are displayed on the Code
Reader’s LCD display screen.
4 Safety Warning
1. Do all testing only in a well-ventilated area.
2. Do not smoke. Keep sparks, open flames away from fuel system and the battery.
3. Always wear safety eye protection.
4. Don’t contact with hot engine parts.
5. Keep people, tools and test equipment away form moving parts.
6. Turn the ignition OFF before connecting or disconnecting the scanner
7. Do not wear watches, rings and loose clothing when working on the engine.
8. Before performing any troubleshooting, place the transmission in Neutral (manual
transmission) or Park (automatic transmission). Apply the parking brake and block
the drive wheels.
9. Always follow vehicle manufacture’s warning and service procedures.
Оборудование для автосервиса
4
Website: http://www.motodok.com
V-Checker Code Reader User Manual
5. About OBD-II
OBD-II stands for second-generation onboard diagnostics. OBD-II is a system
developed by Society of Automotive Engineers (SAE) to reduce engine emission and
standardize automotive electronic diagnosis. Beginning with the 1996 model year, all
domestic and import cars and light trucks sold in USA and Canada must be fully
OBD-II compliant.
5.1 OBD-II Terminology
To better understand OBD-II logic, you should know a few basic terms and their
definitions.
Powertrain Control Module (PCM):
PCM is the on-board computer controlling the engine management and emissions
systems. Some vehicles also have electronic transmission functions as part of the
PCM responsibilities.
Malfunction Indicator Lamp (MIL):
Malfunction Indicator Lamp is also called Check Engine or Warning Light. The MIL
illuminates when OBD-II detects a failure of the emission-related components and
systems. The MIL may come on immediately with some faults, but may not come on
with others until a failure has occurred on two or three consecutive trips. The light
will generally remain on until there are three consecutive trips without the fault
reoccurring.
Monitor:
Monitors are a set of diagnostic evaluations. OBD-II runs these diagnostic tests to
monitor the performance of the vehicle’s emissions-related components and systems.
Оборудование для автосервиса
5
Website: http://www.motodok.com
V-Checker Code Reader User Manual
Most diagnostic monitors do not turn the MIL on when the vehicle fails a test for the
first time. Instead a Pending Code is set along with the related freeze frame data. If
the test fails on a second or even third consecutive trip, however, the MIL is
illuminated and a DTC is stored. As of this writing, there are only eleven Monitors in
OBD-II system, and not all of these monitors apply to every vehicle.
Continuous Monitors: The Continuous Monitors continuously monitor their
related components and systems when the engine is in operation. There are three
Continuous Monitors. Following is a brief explanation of each Continuous Monitor
1. Misfire Monitor: Misfire Monitor is designed to continuously monitor engine
misfire.
A misfire occurs while a lack of combustion or an instability of combustion. Misfire
Monitor detects engine misfire by checking crankshaft speed fluctuations. Misfire
Monitor is either a one-trip or a two-trip monitor.
2. Fuel System Monitor: Fuel System Monitor is designed to continuously
monitor fuel meter system. This monitor checks the fuel system to optimize engine
combustion condition by using the feedback from the oxygen and other sensors. Fuel
System Monitor is either a one-trip or a two-trip monitor.
3. Comprehensive Component Monitor (CCM):
CCM is designed to continuously monitor all electronic components and systems.
PCM checks all inputs and outputs to detect the malfunctions for lack of circuit
continuity (open circuit, internal shorts, short to ground) and rationality (out of range
value). CCM is either a one-trip or a two-trip monitor.
Non-Continuous Monitors: Non-Continuous Monitors monitor their related
Оборудование для автосервиса
6
Website: http://www.motodok.com
V-Checker Code Reader User Manual
components and systems only under specific conditions. Usually, they run their
diagnostic tests once per trip. There are eight Non-Continuous Monitors.
Following is a brief explanation of each Non-Continuous Monitor.
1. Catalyst Monitor: This monitor is designed to monitor the conversion efficiency
of the catalytic converter. The catalytic convert installed downstream of the exhaust
manifold is used to convert the exhaust pollutants (HC, CO and NOx) into carbon
dioxide (CO2), water (H2O) and nitrogen. PCM checks the catalytic converter by
comparing the signal between the upstream and downstream O2 sensors.
Catalyst Monitor is a two-trip monitor.
2. Heated Catalyst Monitor: This monitor is designed to monitor and optimize the
performance of the heated catalytic converter. The heated catalytic converter is
similar to the catalytic converter described above. The only difference is that a heater
element is added, so the heated catalytic converter can reach its operating temperature
more quickly. Heated Catalyst Monitor is also a two-trip monitor.
3. Evaporative System (EVAP) Monitor: This monitor is designed to monitor
the evaporative emission control system. The EVAP detects the level of hydrocarbon
(HC) loss to prevent the HC vapors from evaporating into the atmosphere. OBD-II
vehicle must be equipped with the EVAP system. EVAP Monitor is a two-trip
monitor.
4. Secondary Air System Monitor: This monitor is designed to monitor the
secondary air injection system.
The secondary air system injects air into the exhaust manifold to reduce cold start
emissions. The Secondary Air System Monitor is a two-trip monitor.
Оборудование для автосервиса
7
Website: http://www.motodok.com
V-Checker Code Reader User Manual
5. Air Conditioning (A/C) System Refrigerant Monitor: This monitor is
designed to monitor the leaks of refrigerant in air conditioning system.
6. Oxygen Sensor Monitor: This monitor is designed to monitor the oxygen
sensor. The PCM checks the amplitude of the oxygen sensor signal to adjust the
air/fuel mixture. Oxygen Sensor Monitor is a two-trip monitor.
7. Oxygen Sensor Heater Monitor: This monitor is designed to monitor the
oxygen sensor heater. The PCM checks the performance of the oxygen sensor heater
to ensure that it is heating the sensor during cold start conditions. Oxygen Sensor
Heater Monitor is a two-trip monitor.
8. Exhaust Gas Recirculation (EGR) Monitor: This monitor is designed to
monitor the Exhaust Gas Recirculation (EGR) system. The ERG system helps reduce
the combustion chamber temperature, thereby reducing Nox emissions. Exhaust Gas
Recirculation (EGR) Monitor is a two-trip monitor.
Enable Criteria:
Each Monitor has a certain number of conditions or driving procedures that need to
be met before it is executed. The requirements and conditions vary for each Monitor.
Some common Enable Criteria are: engine speed, engine temperature, vehicle speed,
barometric pressure, ECT, MAF/MAP, IAT, TPP, canister purge, fuel trim, TCC
enable and A/C on-signal.
Trip:
A Trip for a particular Monitor is a key-on, key-off drive cycle allowing the vehicle
to satisfy the Enable Criteria to run and complete its diagnostic testing.
Monitor Complete/Monitor Not Complete:
Оборудование для автосервиса
8
Website: http://www.motodok.com
V-Checker Code Reader User Manual
Monitor Complete indicates the OBD-II has utilized the particular Monitor to run and
complete the required diagnostic testing on the related system and section. That also
means the Trip for that particular Monitor has run and completed. Monitor Not
Complete means the OBD-II has not yet completed the required diagnostic testing for
that particular Monitor.
OBD-II Drive Cycle:
The OBD-II Drive Cycle is a key-on, key-off cycle that must satisfy all the Enable
Criteria for all the applicable Monitors on a particular vehicle to run and complete
their diagnostic testing. The purpose of OBD-II Drive Cycle is to run and complete
all of the on-board diagnostics.
Warm-up Cycle:
A Warm-up Cycle is defined as vehicle operation where coolant temperature must
reach at least 160° F (70° C) and rise at least 40° F (22° C).
5.2 Diagnostic Trouble Code (DTC)
An OBD-II equipped vehicle will turn on the MIL and log a Diagnostic Trouble Code
(DTC) if OBD-II detects the degradation or failure of the emissions-related
components and systems. The MIL may not come on when the vehicle fails a test for
the first time. Instead a Pending Code is set along with the related freeze frame data.
If the test fails on a second or even third consecutive trip, however, the MIL is
illuminated and a DTC is stored. A typical DTC is shown above. It consists of five
characters: four digits proceeded by one letter. The first letter indicates the main
system where the fault is located (Powertrain, Body, Chassis or Network). The
second character is a number and it identifies whether the code is an SAE standard
Оборудование для автосервиса
9
Website: http://www.motodok.com
V-Checker Code Reader User Manual
code (Generic) or manufacture specific code. The remaining three numbers provide
information regarding the sub-system and section that are malfunctioning.
A typical DTC is shown above. It consists of five characters: four digits proceeded by
one letter. The first letter indicates the main system where the fault is located
(Powertrain, Body, Chassis or Network). The second character is a number and it
identifies whether the code is an SAE standard code (Generic) or manufacture
specific code. The remaining three numbers provide information regarding the
sub-system and section that are malfunctioning.
6. How to Use the Code Scanner
6.1 ABOUT THE CODE READER
This OBD-II Code Scanner is designed to read and clear vehicle’s DTCs and
Pending DTCs, Read the engine current data, check vehicle’s Monitor status. Since it
Оборудование для автосервиса
10
Website: http://www.motodok.com
V-Checker Code Reader User Manual
supports all major OBD2 protocols, ISO-1941-2, KWP2000, VPW and PWM, you
will be able to use it on any 1996 or newer car.
6.1.1 Code Scanner Button Function
1.
Up or Page Up
2.
Down or Page Down
3.
OK
4.
Exit
6.1.2 DISPLAY FUNCTIONS
The graphic LCD can display graphics and letter in lattice 128x64.
The DTC and
the DTC content text all displayed in the screen.
6.2 Read Diagnostic Trouble Code
6.2.1 About “Generic Mode” and “Professor Mode”
Generic Mode In this mode, the code reader will scan you car automatic, you
can’t do the “Erase DTC” and “Data Stream”.
Professor Mode
In this mode, you can choose which type of your car, what are
you want do(Read DTC, Erase DTC, Data Stream) ,which type
of DTC.
6.2.2 Before You Begin
Fix any known mechanical problems before performing any test.
Perform a thorough vehicle inspection before starting any test procedures. Loose or
damaged hoses, wiring or electrical connectors are often responsible for poor engine
Оборудование для автосервиса
11
Website: http://www.motodok.com
V-Checker Code Reader User Manual
performance, and in some instances they may cause a “false” fault code.
Please read your vehicle’s service manual for proper connection of vacuum hoses,
electrical wiring and wiring harness connectors. Check the following areas:
All fluid levels - check the engine, power steering, transmission (if applicable),
coolant and other engine fluids.
Air cleaner and ducts - check for holes, rips, cracks, excessive dirt in filter, and for
disconnected ducts.
Belts - check for cracked, torn, brittle, loose or missing belts.
Mechanical linkage (throttle, gearshift position, transmission, etc.), associated with
sensors - refer to your vehicle’s service manual for locations.
Rubber and steel hoses (vacuum/fuel) - check for leaks, cracks, blockage or any
other damage, and for proper routing.
Spark plugs and wires - check for damaged, loose, disconnected or missing spark
plug wires.
Battery terminals - make sure battery terminals are clean and tight; check for
corrosion or broken connections. Verify proper battery and charging system voltage.
Electrical connectors and wiring - make sure wire insulation is in good condition
and there are no exposed wires.
Verify that the engine is mechanically sound. If necessary, perform a compression
check, engine vacuum check, timing check (if applicable), etc.
6.2.3 Read Diagnostic Trouble Code
1. Turn the ignition off. Locate the 16Pin Data Link
Connector(OBD-
DLC),and plug into the V-Checker
Оборудование для автосервиса
12
Website: http://www.motodok.com
V-Checker Code Reader User Manual
cable connector, wait for the screen display that is shown Press any key to start
diagnosis, turn the ignition on, then press any key to continue.
2. Now, V-Checker will scan 4 types of OBD
communication protocol, please waiting
3. After scanning is finished, the screen will display the
menu for test mode selection press
and
to
choose the test mode you want, then press .
4. If you choose "professor Mode" V-Checker will let you
choose which type of your car is.
5. The screen should display the menu for function
selection. Choose
"Read DTC"
6. Choose "All DTC" or "Pend DTC", after
communication, if there isn't any DTC exists; the
screen will display "No trouble code!"
7. Otherwise, the first DTC will be displayed on the
screen. Press
to read next DTC if there it is, Press
to read last DTC. Press
come back to step 5.
6.3 Erase Diagnostic Trouble Codes
CAUTION: When the Code Reader’s ERASE function is used to erase the DTCs
from the vehicle’s on-board computer, “Freeze Frame” data and manufacturer
Оборудование для автосервиса
13
Website: http://www.motodok.com
V-Checker Code Reader User Manual
specific enhanced data are also erased, and the I/M Readiness Monitor Status for
all vehicle Monitors is reset to not RUN or not COMPLETE status.
If you plan to take the vehicle to a Service Center for repair, DO NOT erase the
codes from the vehicle’s computer. If the codes are erased, valuable information that
might help the technician troubleshoot the problem will also be erased.
Use your judgment and always keep the above in mind when erasing DTCs.
Erase (clear) Diagnostic Trouble Codes from the computer’s memory as follows:
1. Turn the ignition off. Locate the 16Pin Data Link
Connector(OBD- DLC),and plug into the V-Checker
cable connector, wait for the screen display that is shown
“Press any key to start” diagnosis, turn the ignition on, then press any key to
continue.
NOTE: If the Code Reader is already connected and linked to the vehicle’s computer,
proceed directly to step 5. If not, continue to step 2.
1. Now, V-Checker will scan 4 types of OBD
communication protocol, please waiting
2. After scanning is finished, the screen will display the
menu for test mode selection, choose "professor
Mode", then press
.
3. V-Checker will let you choose which type of your car
is.
Оборудование для автосервиса
14
Website: http://www.motodok.com
V-Checker Code Reader User Manual
4. The screen should display the menu for function
selection. Choose
"Erase DTC"
5. You can erase DTCs of your car.
6.4 Data Stream
The V-Checker OBD II Code Reader can read the data stream of the engine,
including engine speed, calculated load value, engine coolant temperature, throttle
open state, preignition angel etc from this you can know the work status of you car
engine well.
Read the data stream from the engine as follows:
1. Turn the ignition off. Locate the 16Pin Data Link
Connector(OBD-
DLC),and plug into the V-Checker
cable connector, wait for the screen display that is shown
“Press any key to start” diagnosis, turn the ignition on, then press any key to
continue.
NOTE: If the Code Reader is already connected and linked to the vehicle’s computer,
proceed directly to step 5. If not, continue to step 2.
2. Now, V-Checker will scan 4 types of OBD
communication protocol, please waiting
3. After scanning is finished, the screen will display the
menu for test mode selection, choose "professor
Mode", then press
Оборудование для автосервиса
.
15
Website: http://www.motodok.com
V-Checker Code Reader User Manual
4. V-Checker will let you choose which type of your car
is.
5. The screen should display the menu for function
selection. Start engine then choose
"Data Stream"
6. The current data of our car will be dispayed on the
screen. Use
and
to scroll screen
7. One Year Warranty
This OBD-II Code Scanner has one-year repair or exchange warranty for any defects
in materials and workmanship. This warranty does not apply to improperly installed,
handled, abused, damaged in crash, nor to any unit that has been repaired by
unauthorized agencies. Under no circumstances will the buyer be entitled to
consequential or incidental damages. This limited warranty gives you specific legal
rights; you may have other rights that vary from state to state. This warranty applies
only to the original purchaser and is not transferable.
Оборудование для автосервиса
16
Website: http://www.motodok.com