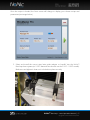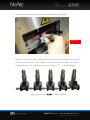
1
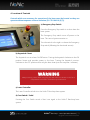
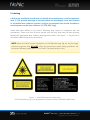
NoNic™ Benchtop – Laser Operation Manual | 1
Copyright © 2015 Control Laser Corporation
Table of Contents
Table of Contents.................................................................................................................... 2
Introduction ............................................................................................................................ 5
Chapter Summary ..................................................................................................................................... 6
Technical Support Directory ................................................................................................................. 6
Chapter 1. Safety................................................................................................................................... 6
Chapter 2. Installation........................................................................................................................... 6
Chapter 3. System Function .................................................................................................................. 6
Chapter 4. Laser Operation ................................................................................................................... 6
Revisions ............................................................................................................................................... 6
Technical Support Directory ..................................................................................................................... 7
Field Service Support ............................................................................................................................ 7
Support by Phone.................................................................................................................................. 7
Support by Fax ...................................................................................................................................... 7
Support by E-mail .................................................................................................................................. 7
Support by Website .............................................................................................................................. 7
Support by Forum ................................................................................................................................. 7
Service and Maintenance Programs ......................................................................................................... 8
Advanced Maintenance Training Seminars .............................................................................................. 8
Parts Repair ............................................................................................................................................... 8
Replacement and Spare Parts ................................................................................................................... 9
Safety 1 .................................................................................................................................. 10
Recommendation.................................................................................................................................... 10
Compliance Statement............................................................................................................................ 10
Laser Radiation Wavelength ................................................................................................................... 10
Responsibility of the Laser User.............................................................................................................. 11
Performance Requirements .................................................................................................................... 12
1. Protective Housing .......................................................................................................................... 12
2. Safety Interlocks .............................................................................................................................. 12
NoNic™ Benchtop – Laser Operation Manual | 2
Copyright © 2015 Control Laser Corporation
3. Beam Attenuator............................................................................................................................. 12
4. Location of Controls ........................................................................................................................ 13
5. Labeling ........................................................................................................................................... 14
6. Documentation ............................................................................................................................... 15
Classification of Laser Functions ............................................................................................................. 16
Electrical Safety ....................................................................................................................................... 18
Use of Combustible Material .................................................................................................................. 18
Laser Hazards .......................................................................................................................................... 19
Eye Injury............................................................................................................................................. 19
Thermal Injury ..................................................................................................................................... 19
Toxic Injury .......................................................................................................................................... 20
Installation 2 ......................................................................................................................... 21
Receipt and Inspection............................................................................................................................ 21
Unpacking ............................................................................................................................................... 22
Space and Environmental Requirements................................................................................................ 22
Electrical Requirements and Connections .............................................................................................. 23
Moving and Storage ................................................................................................................................ 23
System Function 3 ................................................................................................................ 24
Laser Basics ............................................................................................................................................. 24
System Startup Procedure ...................................................................................................................... 25
System Shutdown Procedure .................................................................................................................. 25
Emergency Shutdown Procedure ........................................................................................................... 26
Laser Operation 4 ................................................................................................................. 27
Introduction ............................................................................................................................................ 27
Front Panel Layout .................................................................................................................................. 27
System Calibration .................................................................................................................................. 28
Understanding Recipes ........................................................................................................................... 31
Creating a Recipe .................................................................................................................................... 31
Stripping - Benchtop 1 Model ............................................................................................................. 33
Slitting - Benchtop 2 Model ................................................................................................................ 34
Modify a Recipe ...................................................................................................................................... 37
NoNic™ Benchtop – Laser Operation Manual | 3
Copyright © 2015 Control Laser Corporation
Delete a Recipe ....................................................................................................................................... 39
Processing Wires ..................................................................................................................................... 41
Power Override ....................................................................................................................................... 45
Process Button ........................................................................................................................................ 47
NoNic™ Benchtop – Laser Operation Manual | 4
Copyright © 2015 Control Laser Corporation
Introduction
The NoNic™ Benchtop laser system is specifically designed for wire stripping applications that
require a delicate and accurate method of removing wire insulation without causing any
damage to the exposed wire underneath. The machine itself is strictly intended for this
purpose in mind. This will optimize the time and efficiency of wire stripping while maintaining a
consistent and high quality standard of literally every piece of material it encounters. Please
ALWAYS exercise caution and strict safety measures when using the NoNic™ Benchtop laser
system. It contains an active CO2 laser, which should be handled with care and all operators
should use proper judgment when using this system. The machine is fully enclosed with an
interlocking door and adheres to all current CDRH standards.
This
manual
covers
safety,
system
specifications,
installation,
maintenance,
basic
troubleshooting procedures, software, and operations. Diagrams and drawings may be
included to assist in the description of components and layout of the NoNic™ Benchtop laser
system.
Product Feedback & Suggestions:
Attention: Marketing
Control Laser Corporation
7101 TPC Drive, Suite 100
Orlando, Florida 32822
E-mail: [email protected]
Field Service Department:
Phone: 866-612-8619, Monday through Friday
8:00 a.m. to 5:00 p.m. EST
Fax: 407-926-3590, 24 hours a day, seven days
a week
E-mail: [email protected]
For information about CLC, visit our website at www.controllaser.com.
WARNING
It is extremely important to read and understand the Safety section of this manual
before attempting to operate the NoNic™ Benchtop laser system.
NoNic™ Benchtop – Laser Operation Manual | 5
Copyright © 2015 Control Laser Corporation
Chapter Summary
Technical Support Directory
This directory explains how to contact CLC for technical support by telephone, fax, and e-mail;
how to order parts; and how to return components for repair. Information about technical
support programs, training classes, and the CLC website are included.
Chapter 1. Safety
This chapter describes how the NoNic™ Benchtop fulfills the performance requirements
established by the United States Title 21, Code of Federal Regulations, Subchapter J (21 CFR).
This chapter documents the user’s responsibility and safety precautions.
All users should read and understand the safety chapter before attempting to operate the
NoNic™ Benchtop laser system.
Chapter 2. Installation
This chapter explains proper procedures for receiving, inspecting, and unpacking the NoNic™
Benchtop laser system. Space, environmental, and electrical requirements are described. Stepby-step instructions for installing safety interlocks and connecting electrical lines are included.
Guidelines for moving and storing the system are also outlined.
Chapter 3. System Function
This chapter provides diagrams and descriptions of the NoNic™ Benchtop controls and stepby-step instructions for system startup and shutdown.
Chapter 4. Laser Operation
This chapter describes the basic features of the NoNic™ Benchtop software. An overview of is
provided as well as directions for navigating. Other topics include user login, creating and
running jobs, and accessing other applications.
Revisions
If any changes occur after the printing of this manual, a Revision Page will be included in the
back of this manual.
NoNic™ Benchtop – Laser Operation Manual | 6
Copyright © 2015 Control Laser Corporation
Technical Support Directory
Field Service Support
A qualified maintenance technician should troubleshoot the laser
system before contacting the Field Service department. Attempting to
isolate the source of the problem will make it easier for the field service
technician to assist you. Have the model name and serial number of
the laser available when you contact Field Service. This information is
located on the supplied Data Sheet in the Customer Service Manual.
Support by Phone
The Field Service department can be contacted at (866) 612-8619, Monday through Friday,
8:00 a.m. to 5:00 p.m. Eastern Time. After 5:00 p.m., an answering service will take your
message and notify a field service technician of your requirements by the next business day.
Support by Fax
The Field Service department can be contacted by fax at (407) 926-3590, 24 hours a day,
including weekends. Faxes received after business hours and on weekends will be responded
to the next business day.
Support by E-mail
The Field Service department can be contacted by e-mail at [email protected].
Support by Website
Visit our website at www.controllaser.com to learn more about Control Laser Corporation
(CLC), our laser products, and various applications.
Support by Forum
Visit our website support forums at www.controllaser.com/forums to troubleshoot your
issues with our technicians and community contributors.
NoNic™ Benchtop – Laser Operation Manual | 7
Copyright © 2015 Control Laser Corporation
Service and Maintenance Programs
The Field Service department offers several service and maintenance programs that provide
expert on-site support from factory trained representatives. Programs may be purchased on a
quarterly or annual basis.
Contact Field Service for details at (866) 612-8619 or [email protected].
Advanced Maintenance Training Seminars
Advanced maintenance training seminars are held periodically on-site at CLC. Contact Field
Service for enrollment information at (866) 612-8619 or [email protected]
Parts Repair
If a laser component fails, contact Field Service immediately. Most repairs can be accomplished
within 24-48 hours upon receipt of the component. Some power supply units may take
additional time to replace/repair because they may require outside vendor participation.
Before returning any parts to CLC for repair/replacement contact Customer Service at (866)
612-8619. You will be supplied with a Return Material Authorization (RMA) number used to
track the part during repair and shipping.
Return all components to CLC by United Parcel Service (UPS), Federal Express, or any local
carrier that can track your package to:
Attention: (Use your RMA # here)
Control Laser Corporation
7101 TPC Drive, Suite 100
Orlando, Florida 32837
NoNic™ Benchtop – Laser Operation Manual | 8
Copyright © 2015 Control Laser Corporation
Replacement and Spare Parts
In North America, replacement and spare parts must be ordered directly through CLC. Parts
can be shipped overnight at the customer’s request. Spare part kits and test equipment kits
are also available.
To order parts or a current parts catalog
contact Customer Service at Control Laser:
Attention: Customer Service
Control Laser Corporation
7101 TPC Drive, Suite 100
Orlando, Florida 32822
Telephone: (866) 612-8619
Fax: (407) 926-3590
You may also view spare parts online via our website at www.controllaser.com/shop
NoNic™ Benchtop – Laser Operation Manual | 9
Copyright © 2015 Control Laser Corporation
Safety
1
Recommendation
Control Laser Corporation (CLC) recommends the Safety chapter be read thoroughly by all
personnel before operating or performing maintenance on the NoNic™ Benchtop laser
system.
Compliance Statement
The NoNic™ Benchtop is certified
by Control Laser Corporation as a
Class I laser product in accordance
with Title 21, Code of Federal
Regulations, Subchapter J, (21 CFR).
Compliance may be verified by contacting:
Office of Compliance (HFZ-312)
Center for Devices and Radiological Health
US Department of Health & Human Services
2098 Gaither Road
Rockville, MD 20850
Telephone: (301) 594-4654
Laser Radiation Wavelength
The NoNic™ Benchtop emits carbon dioxide (CO2) radiation at 10,600 nanometers (nm). The
CO2 laser poses the greatest risk of injury if the safety precautions in this manual are not
followed. The specifications in the following chart are provided to assist the Laser Safety Officer
(see Responsibility of the Laser User below) in evaluating the hazard potential of the laser.
These specifications represent the “worst-case” potential for short-term, peak laser emission.
Recommended Optical Density for Eyewear: NoNic™ Benchtop (CO2) - 3.9
NoNic™ Benchtop – Laser Operation Manual | 10
Copyright © 2015 Control Laser Corporation
Responsibility of the Laser User
The performance requirements are defined by the United States as the responsibility of the
laser manufacturer. The responsibility of the user is the safe use of the laser defined in ANSI
Z136.1; the American National Standard for the Safe Use of Lasers.
These standards require the user to appoint a Laser Safety Officer to oversee the use of this
equipment. This individual shall have the authority and responsibility to evaluate, monitor, and
enforce the control of laser hazards. See the appropriate standard: ANSI Z136.1 in the United
States of America for the specific responsibilities of the Laser Safety Officer.
ANSI Z136.1 is issued by the American National
Standards Institute (ANSI) as a recommended safety
guide for the use of laser products in the United States
of America. ANSI cannot enforce adherence to the
guide. However, OSHA, the Occupational Safety and
Health Administration, uses the guide as its inspection
standard when it inspects workplaces that use lasers.
Therefore, the guide carries the authority of the United
States government. It is recommended the procedures
outlined in the guide be followed when operating the
NoNic™ Benchtop and the user contact local and state
authorities to determine if any additional regulations
may apply.
ANSI Z136.1-2000
ordered from:
may
be
Laser Institute of America
(LIA)
13501 Ingenuity Drive
Suite 128, Orlando, FL 328263009
Telephone: 407-380-1553
Fax: 407-380-5588
www.ANSI.org
NoNic™ Benchtop – Laser Operation Manual | 11
Copyright © 2015 Control Laser Corporation
Performance Requirements
21 CFR specifies certain performance requirements (features) that must be incorporated into
or provided with each laser product for radiation safety purposes. These features with an
explanation of their function in the NoNic™ Benchtop are described in the following sections.
1. Protective Housing
The laser radiation emitted by a Class IV laser product must be contained within a
protective housing at all points where access to radiation is not required during
normal operation of the product in the performance of the function for which it was
designed. [21 CFR 1040(f)(1)].
The NoNic™ Benchtop is enclosed within a custom built Class I workstation designed to
eliminate all radiation leaks and to comply with all current CDRH standards.
2. Safety Interlocks
Any part of the protective housing that must be opened, removed or displaced
during normal operation of the laser must be interlocked to prevent access to laser
radiation. [21 CFR 1040.10(f)(2)].
Dual Door Interlocks have been utilized to immediately eliminate any laser process in the event
that the laser safe door is opened or ajar. Upon opening the part loading door, two springloaded interlocking switches release effectively eliminating all laser processes.
3. Beam Attenuator
A beam attenuator (safety shutter) must be provided to enable the user to terminate
lasing without turning off the master keyswitch or main power switch. [21 CFR
1040.10(f)(6)].
The shutter terminates lasing by blocking the laser beam before it reaches the output optics.
The NoNic™ Benchtop has an internal safety shutter that can only be opened by inserting a
part into the machine and having the side door closed simultaneously. If either of these two
conditions is not met, the safety shutter will continue to block the path of the laser beam.
NoNic™ Benchtop – Laser Operation Manual | 12
Copyright © 2015 Control Laser Corporation
4. Location of Controls
Controls which are necessary for operation of the laser must be located so they can
operate without exposure to laser radiation. [21 CFR 1040.10 (f)(7)].
a) Emergency Stop Switch
Press the Emergency Stop switch in to shut down the
laser system.
The Emergency Stop switch turns off power to the
laser. The control system remains on.
Turn the switch to the right to release the Emergency
Stop switch (following the directional arrows).
b) Keyswitch / Reset
The Keyswitch acts as a laser On/Off button. Turning the keyswitch clockwise to the ON
position Resets and provides power to the laser. Turning the keyswitch counterclockwise to the OFF position shuts only the laser down (not the computer / software).
WARNING
Always exercise caution when using the laser with either the shutter in the On or
Off positions at all times. The beam may still be active.
c) Laser Controller
The Laser Controller is built in to the NoNic™ Benchtop laser system.
d) Foot Switch / Pedal
Pressing the Foot Switch sends a Start Lase signal to the NoNic™ Benchtop laser
system.
NoNic™ Benchtop – Laser Operation Manual | 13
Copyright © 2015 Control Laser Corporation
5. Labeling
Labels must be affixed to each laser to identify the manufacturer, certify compliance
with 21 CFR, provide warnings to the user about the wavelength, level, and location
of accessible laser radiation present, and give precautions that should be taken to
avoid exposure to the laser radiation. [21 CFR 1040.10(g)].
Labels have been affixed to the NoNic™ Benchtop laser system in compliance with this
requirement. Please note that all doors, panels, and the laser head have all been properly
labeled with appropriate laser radiation warnings and cautions. See Figure 1-1, for pictures of
all machine labels being used in accordance.
NOTE: Dates and Serial Number information on the Manufacturing Tag are only for image
reference purposes, they DO NOT reflect the actual laser system being purchased. We
include the following safety labels on our NoNic™ Benchtop laser product:
Figure 1-1 – NoNic™ Benchtop Laser Safety Labels
(NOTE: Manufacturing Tag is not representative of customer’s machine, REFERENCE IMAGE ONLY)
NoNic™ Benchtop – Laser Operation Manual | 14
Copyright © 2015 Control Laser Corporation
6. Documentation
Instructions must be provided that will enable the user to safely operate and
maintain the laser. [21 CFR 1040.10(h)].
It is recommended that the supplied manuals be thoroughly studied by all personnel who have
any responsibility for the laser prior to operation. The Operations manual gives instructions for
proper operation and maintenance of the NoNic™ Benchtop. The manual also provides
warnings and cautions that must be observed by the user to prevent unnecessary exposure to
laser radiation.
NoNic™ Benchtop – Laser Operation Manual | 15
Copyright © 2015 Control Laser Corporation
Classification of Laser Functions
Laser products are classified according to the maximum level of laser radiation within human
access during operation only. Levels accessible only during maintenance or service do not
affect the classification. Therefore, it is possible for class I or class II products to contain class IV
lasers. It is the responsibility of the manufacturer to determine whether specific functions are
operation, maintenance, or service. The following definitions apply:
Operation - Consists of functions by which the product accomplishes its intended purpose.
These may include loading work pieces or documents and setting and manipulating external
controls.
Maintenance - Consists of functions performed by the user to assure performance. These
may include cleaning and replacement of expendables.
Service - Usually means repair. Service may be performed by specially trained service
personnel or by sophisticated users following instructions specifically indicated as service
instructions. Certain maintenance procedures will be considered service if they are infrequent,
complex, or highly specialized.
The following chart lists the functions of operation, maintenance, and service associated with
the NoNic™ Benchtop laser system described in this manual.
WARNING
All personnel in the vicinity of the laser while it is in operation must follow all
prescribed safety procedures and use appropriate safety equipment. This
includes wearing laser eyewear with an optical density (OD) as recommended on
page 6. Failure to follow these instructions may result in the exposure of
personnel to hazardous laser radiation.
NoNic™ Benchtop – Laser Operation Manual | 16
Copyright © 2015 Control Laser Corporation
FUNCTION
CLASSIFICATION
REQUIRES LASING
Operation of Laser Controls
Operation
Yes
Cleaning Optics
Maintenance
No
Replacements of Electrical Assemblies &
Components
Service
No
Replacement of Mechanical Components
Service
No
Troubleshooting & Repair
Service
See Note
Testing Following Repair
Service
See Note
Optical Alignment/Adjustment
Service
No
Programming
Service
No
Connections to Remote Interlock
Connector
Service
No
Setup/Fixture Alignment
Service
No
Testing Marking (following repair,
programming, setup)
Service
Yes
NOTE: Some troubleshooting and testing functions will not require the laser to be lasing.
NoNic™ Benchtop – Laser Operation Manual | 17
Copyright © 2015 Control Laser Corporation
Electrical Safety
1. Disconnect main power line(s) before working on any electrical equipment if it is not
necessary for the equipment to be operating.
2. After disconnecting power, wait at least five minutes for the capacitors to discharge
through the bleeder resistors before touching any electrical equipment.
3. Do not short or ground the power supply output. The power supply is not electrically
isolated from the power line. Protection against possible hazards requires proper
connection of the ground terminal on the power cable and an adequate external
ground. Check these connections at the time of installation and periodically thereafter.
4. Never work on electrical equipment unless there is another person nearby who is
knowledgeable of the operation and hazards of the equipment and who is competent
to administer first aid.
5. When possible, keep one hand away from the equipment to reduce the danger of
current flowing through the body.
6. Special measurement techniques are required for this system. Ground references must
be selected by a technician who has a complete understanding of the system operation
and associated electronics.
Use of Combustible Material
WARNING
A fire or explosion could occur if the laser beam is allowed to contact
flammable or combustible materials. Care must be taken to ensure that
such materials are kept away from any part of the laser beam path.
NoNic™ Benchtop – Laser Operation Manual | 18
Copyright © 2015 Control Laser Corporation
Laser Hazards
There are some highly dangerous laser hazards that should be considered when operating a
laser. The collimated beam direct from the laser head or a mirror (without any focusing optics)
contains sufficient heat energy to damage eyes, skin, or flammable materials for a considerable
distance (possibly hundreds of feet or more) from the source. The focused beam contains
much higher power density for marking, cutting or welding, but it is present only in a localized
area near the beam focus. Past the focus, the beam pattern expands significantly, and there is
a distance beyond which the power spreads over an area that is so large that the laser beam is
no longer hazardous.
Eye Injury
Because of the high degree of beam collimation, a laser serves as an almost ideal point source
of intense light. A laser beam of sufficient power can theoretically produce retinal intensities at
magnitudes that are greater than conventional light sources, and even larger than those
produced when directly viewing the sun. Permanent blindness can be the result.
Thermal Injury
The most common cause of laser-induced tissue damage is thermal in nature, where the tissue
proteins are denatured due to the temperature rise following absorption of laser energy.
The thermal damage process (burns) is generally associated with lasers operating at exposure
times greater than 10 microseconds and in the wavelength region from the near ultraviolet to
the far infrared (0.315 μm-103 μm). Tissue damage may also be caused by thermally induced
acoustic waves following exposures to sub-microsecond laser exposures.
With regard to repetitively pulsed or scanning lasers, the major mechanism involved in laserinduced biological damage is a thermal process wherein the effects of the pulses are additive.
The principal thermal effects of laser exposure depend upon the following factors:
1. The absorption and scattering coefficients of the tissues at the laser wavelength
2. Irradiance or radiant exposure of the laser beam.
3. Duration of the exposure and pulse repetition characteristics, where applicable.
4. Extent of the local vascular flow.
5. Size of the area irradiated.
NoNic™ Benchtop – Laser Operation Manual | 19
Copyright © 2015 Control Laser Corporation
Toxic Injury
Fumes generated from cutting some plastics and other materials can be highly toxic. Any
materials being processed should be evaluated to determine what fume collection and filtering
is needed to ensure that the Threshold Limit Values (TLVs) for the byproducts are not
exceeded.
NoNic™ Benchtop – Laser Operation Manual | 20
Copyright © 2015 Control Laser Corporation
Installation
2
Receipt and Inspection
The NoNic™ Benchtop laser system is thoroughly inspected and carefully packed before
leaving the Control Laser Corporation (CLC) factory. The carrier assumes responsibility for the
unit’s safe delivery. Any claims for loss or damage sustained in transit must be made against
the carrier. Carefully inspect the shipment upon receipt prior to signing for the delivery.
Ensure the container is in an upright position as marked by the container labels.
Check the shock and tilt indicators on the system. If one or more indicators are red inspect the
system for damage. Contact the carrier immediately.
Any damage, loss, or discrepancies discovered during unpacking should be reported to the
carrier immediately. Not immediately reporting damage or discrepancies of the shipment
could result in the carrier refusing to honor a claim. All claims should be confirmed in writing
as required by the carrier. For claim purposes, it is recommended all packing material be
retained.
WARNING
A fire or explosion could occur if the laser beam is allowed to contact
flammable or combustible materials. Care must be taken to ensure that
such materials are kept away from any part of the laser beam path.
NoNic™ Benchtop – Laser Operation Manual | 21
Copyright © 2015 Control Laser Corporation
Unpacking
1. Ensure the shipping containers are in the upright position as labeled.
2. Cut and remove any bands or straps from the container.
3. Carefully remove any packing material from the equipment.
4. Check the packing list against the equipment received. Report any discrepancies to
both the carrier and CLC Field Service department (407-926-3562).
5. Ensure all packing lists, manuals, drawings, and accessory packages are removed from
the packing material before it is stored. It is recommended to retain all packing
materials.
6. In the unlikely event the laser must be returned, pack the laser or parts in a suitable
container for shipping. CLC is not responsible for any damage on returned laser or
parts.
NOTE: The temperature where the laser is installed should not be less than 33°F (1°C) or
greater than 93°F (33°C), non-condensing humidity.
Space and Environmental Requirements
The NoNic™ Benchtop should be installed in an area as free as possible from the following:
1. Contaminants such as dust and oil mist.
2. Combustible and flammable materials such as explosive fumes and gases.
3. Corrosives such as acid vapors.
4. The system should not be subjected to high energy level radio frequency emissions
such as a two-way radio or broadcasting equipment.
WARNING
The infrared laser emissions might interfere with the infrared sensors of
nearby equipment.
NoNic™ Benchtop – Laser Operation Manual | 22
Copyright © 2015 Control Laser Corporation
5. The floor or foundation where the laser is installed must be level and firm. It must not
be subjected to vibration or shock.
NOTE: The temperature where the laser is installed should not be less than 33°F (1°C) or
greater than 93°F (33°C), non-condensing humidity.
IMPORTANT:
Do not turn on the laser if there is any condensation on the output casing of either the laser
head or the control unit. Remove the condensation with clean warm air.
Never place the unit in a location where excessive heat, moisture, or corrosive materials are
present.
If the system is moved into the working location from a cold environment, leave the system
for a few hours to warm up before installing it.
Electrical Requirements and Connections
All NoNic™ Benchtop laser systems use a standard 115 VAC (+6%, -10%), 50/60 Hz electrical
plug connection or an optional 230 VAC (+6%, -10%), (50/60 Hz). Also refer to the electrical
data tag on the system control unit cabinet to verify the input power requirements.
Moving and Storage
Confirm the system’s power requirements can be met if moving the NoNic™ Benchtop from
the original installation site. Check the environmental requirements outlined on page #21,
Space and Environmental Requirements.
During moving, do not subject the laser system to vibration, excessive cold or excessive heat.
The NoNic™ Benchtop can be stored for up to 5 years. The temperature of the storage area
must be between 14°F to 140°F (-10°C to 60°C).
NoNic™ Benchtop – Laser Operation Manual | 23
Copyright © 2015 Control Laser Corporation
System Function
3
Laser Basics
Laser is an acronym for Light Amplification by Stimulated Emission of Radiation. Simply stated,
the laser is a light amplifier.
Lasers amplify light by absorbing and emitting energy. Absorption can be either electronic on
the atomic level or rotational/vibrational on the molecular level. The emitted energy is a highintensity beam of laser light.
Lasers emit optical radiation which can be either invisible (infrared) or visible (laser pointer
diode) light. Optical radiation is referred to as non-ionizing to distinguish it from ionizing
radiation which is the type of radiation associated with X-rays and gamma rays. While
overexposure to ionizing radiation such as frequent medical X-rays may cause health
problems, the non-ionizing radiation emitted by lasers do not pose similar health risks even
with frequent and long-term non-direct exposure.
Direct exposure to optical radiation can, however, pose serious health hazards to the skin and
eyes. Lethal electrical hazards may also be present in all lasers. A laser-induced reaction on
certain types of marking materials can release hazardous particles and gaseous products.
Review Chapter 1, Safety, for instructions on how to avoid eye, skin injuries and electrical
hazards. Never operate or service the NoNic™ Benchtop laser system without following the
safety procedures specified in the safety chapter of this manual.
NoNic™ Benchtop – Laser Operation Manual | 24
Copyright © 2015 Control Laser Corporation
System Startup Procedure
Please observe the following guidelines for starting up the NoNic™ Benchtop:
1. Plug in the Laser System to a supplied Power Outlet.
2. Make sure the Red Emergency Stop Button is fully released (pulled-out).
3. On the back of the machine, turn the Main Breaker Switch to the ON position.
4. Insert the key into the keyswitch and turn clockwise to the ON position. This will
initialize the laser and automatically home the system and startup the NoNic ™
Benchtop laser software. Once the system has finished homing, the yellow light on the
front panel will turn ON and the laser is ready for processing.
System Shutdown Procedure
Please observe the following guidelines for shutting the laser system down:
1. Remove all processing materials [wires] from the machine.
2. Turn the Laser Keyswitch counter-clockwise to the OFF position and remove the Key (if
necessary).
3. Press the Exit Button on the touchscreen to shut down the software and computer.
4. On the back of the machine, turn the Main Breaker Switch to the OFF position.
5. Now the Laser is Powered Down properly.
NOTE: The software only powers down after manually exiting through the touchscreen
interface. The actual laser turns off (no beam delivery) once the keyswitch is in the OFF
position.
NoNic™ Benchtop – Laser Operation Manual | 25
Copyright © 2015 Control Laser Corporation
Emergency Shutdown Procedure
At any time, the laser and workstation can be manually shut down in the event of an
emergency:
1. Press the Red Emergency Stop button on the front of the laser system. This
immediately shuts down power to the laser (no beam delivery).
To release the Emergency Stop button, turn the switch to the
right (following the directional arrows) and pull the switch out
(towards you).
NoNic™ Benchtop – Laser Operation Manual | 26
Copyright © 2015 Control Laser Corporation
Laser Operation
4
Introduction
The NoNic™ Benchtop laser software is a unique windows based application designed around
an easy-to-use touchscreen Graphical User Interface (GUI). It allows the users to create wire
stripping and slitting recipes for processing wire stripping applications. The graphical
programming environment was built around simplicity and only requires a user to enter some
simple parameters in order to process wire jobs successfully. By utilizing this unique system
and interface, it ensures that our process can be handled with extreme precision and is
repeatable.
Front Panel Layout
The front panel of the machine houses the touchscreen display interface, red emergency stop
button, keyswitch, and status indicator lights. Please observe the status indicators and
touchscreen display closely for system faults and warnings that can affect wire processing.
STATUS INDICATORS
Yellow Light (Laser Ready) –
Laser Beam Enabled and Ready,
System Homed.
Red Light (Laser On) – Laser
Processing is Active. Wait for light
to shut off before removing part.
Green Light (Part Present) –
Part Present and Inserted.
NoNic™ Benchtop – Laser Operation Manual | 27
Copyright © 2015 Control Laser Corporation
System Calibration
The NoNic™ Benchtop laser system will need to be calibrated before starting to process any
wire applications. The calibration is necessary to ensure that accurate processing will apply to
all wire recipes. The lengths and process parameters may be thrown off if this calibration is not
performed before lasing begins.
NOTE: Calibration should be performed any time it is suspected that there is an error.
Routinely the machine should be calibrated once a week.
1. From the front screen press in order:
Main Menu
CAL
2. A password screen will be prompted, Enter CSI123 as the password to continue.
NoNic™ Benchtop – Laser Operation Manual | 28
Copyright © 2015 Control Laser Corporation
3. You’ll be prompted to insert the 1.25” calibration rod (provided) and set the internal
rotary slider adjustment until it stops against the rod at 1.25”. Once set, press Next on
the screen to proceed.
NoNic™ Benchtop – Laser Operation Manual | 29
Copyright © 2015 Control Laser Corporation
4. You’ll now be prompted to insert the 6” calibration rod (provided) and set the internal
rotary slider adjustment until it stops against the rod at 6”. Once set, press Save on the
screen.
5. At the Values Saved Dialog, press OK on the screen to finalize the settings. You are now
finished performing system calibration and can now begin accurate wire processing.
NoNic™ Benchtop – Laser Operation Manual | 30
Copyright © 2015 Control Laser Corporation
Understanding Recipes
Before an operator can process any jobs, recipes MUST be created first for each type of wire. A
recipe is a set of parameters designed to process an application to its desired specification.
Recipes consist of laser power levels, frequency, processing speeds, and part specific strip/slit
parameters. Each recipe can be saved and given a unique recipe name for reference. This
allows the user to call up a saved recipe at any time depending on which wire is being
processed. A new recipe should be created for each and every unique wire type to be
processed.
Creating a Recipe
1. In the NoNic™ Benchtop software front screen, press the Main Menu button.
NoNic™ Benchtop – Laser Operation Manual | 31
Copyright © 2015 Control Laser Corporation
2. Next, Press the Recipes Button to enter the recipe list.
3. Press the NEW button to start creating a new recipe.
NoNic™ Benchtop – Laser Operation Manual | 32
Copyright © 2015 Control Laser Corporation
Add New Recipe Benchtop 1 – Page 1
Add New Recipe Benchtop 1 – Page 2
Stripping - Benchtop 1 Model
The values at the recipe creation screen (pictured above) coincide with the Benchtop 1 Model of
the NoNic™. Values need to be entered for the following parameters in order to process an
application properly.
STRIP & SLIT: END ONLY – Strips a defined end section of the wire.
SLIT MODE: NONE
LASER POWER - Enter the amount of lasing power from (range 1% - 99%). Power
values can be entered for desired STRIPPING processing effect.
LASER FREQUENCY – Enter the laser frequency (range 5 – 20 kHz, typically 10)
SPIN START/STOP – The time adjustment between the motor spinning and when the
lasing begins/ends.
STRIP PASSES – The number of rotations the internal rotary turns to strip the wire.
SPEED (Stripping) – Stripping speed is set at 3.0 revolutions per second and cannot
change.
SLIT BEAM DELAY – Not Available in this model.
DISPLAY OFFSET – Not Available in this model.
NoNic™ Benchtop – Laser Operation Manual | 33
Copyright © 2015 Control Laser Corporation
Add New Recipe Benchtop 2 – Page 1
Add New Recipe Benchtop 2 – Page 2
Slitting - Benchtop 2 Model
The values at the recipe creation screen (pictured above) coincide with the Benchtop 2 Model of
the NoNic™. Values need to be entered for the following parameters in order to process an
application properly.
STRIP & SLIT: END ONLY – Strips a defined end section of the wire.
SLIT MODE:
NONE – Strips a defined end section of the wire without slitting.
STRAIGHT – A straight slit from the origin of the cut to the end of the wire
SPIRAL – A spiraling slit from the origin of the cut to the end of the wire
LASER POWER - Enter the amount of lasing power from (range 1% - 99%). Power
values can be entered for desired SLITTING processing effect.
LASER FREQUENCY – Enter the laser frequency (range 5 – 20 kHz, typically 10)
SPIN START/STOP – The time adjustment between the motor spinning and when the
lasing begins/ends.
SPEED (Slitting) – The speed at which the slide moves.
SLIT BEAM DELAY – The time adjustment when the stripping completes and slitting
begins.
END SLIT LENGTH – Length of slit
MID SLIT LENGTH – Not Available in this model.
GAP – Not Available in this model.
NoNic™ Benchtop – Laser Operation Manual | 34
Copyright © 2015 Control Laser Corporation
4. After all the necessary parameters have been entered, save the recipe by pressing the
Save button on the left of the touchscreen.
NoNic™ Benchtop – Laser Operation Manual | 35
Copyright © 2015 Control Laser Corporation
5. Enter a name (MAXIMUM 8 CHARACTERS) by typing on the touchscreen and pressing
Save after you are finished. Name your recipes carefully; you may be switching wire
types often. These names should be easy to call upon when changing over from one
wire to another (especially once you get a large list of recipes to keep organized).
6. Congratulations, you have now created your first recipe. Continue to create recipes for
each individual wire type you intent to process with the NoNic™ Benchtop laser system.
The recipe list will continue to populate as you add more recipes.
NoNic™ Benchtop – Laser Operation Manual | 36
Copyright © 2015 Control Laser Corporation
Modify a Recipe
It may take multiple attempts to get a recipe just right. Some trial and error is necessary to
establish accurate process parameters for each wire type. Therefore, we allow you to modify a
recipe and make adjustments until it processes your wire correctly. To modify a recipe, follow
the steps below.
1. First navigate to the recipe list screen to choose the recipe you wish to modify. Follow
the touchscreen prompts (in order) to modify a recipe.
From the front screen press in order:
Main Menu
Recipes
Choose your recipe from the list
Modify
NoNic™ Benchtop – Laser Operation Manual | 37
Copyright © 2015 Control Laser Corporation
2. Modify the process parameters, and press Save to update the changes.
3. You will be prompted to make changes to the recipe name if you wish. It is not
necessary to change the name of the recipe – it is your choice. Press Save once you are
finished.
NoNic™ Benchtop – Laser Operation Manual | 38
Copyright © 2015 Control Laser Corporation
4. Now you have completed the recipe modification and may continue testing to see if
your changes have improved your process.
Delete a Recipe
Sometimes you may wish to delete a recipe completely from the recipe list. In order to delete a
recipe, follow the steps below.
1. First navigate to the recipe list screen to choose the recipe you wish to delete. Follow
the touchscreen prompts (in order) to delete a recipe.
From the front screen press in order:
Main Menu
Recipes
Choose your recipe from the list
Delete
NoNic™ Benchtop – Laser Operation Manual | 39
Copyright © 2015 Control Laser Corporation
2. As a precaution, we prompt you one final time before allowing you to delete your
recipe. Press the Delete button if you wish to proceed with the recipe deletion. You will
not be able to recover this recipe, once you press Delete.
NoNic™ Benchtop – Laser Operation Manual | 40
Copyright © 2015 Control Laser Corporation
Processing Wires
The physical processing of wires is actually very simple once we have created the proper
recipes for each part. There may be some trial and error at first in order to get the recipe
perfected.
1. We will first load the recipe that will be used for the selected wire to process. Follow the
touchscreen prompts (in order) to load your recipe shown below.
From the front screen press in order:
Main Menu
Recipes
Choose your recipe from the list
Load
NoNic™ Benchtop – Laser Operation Manual | 41
Copyright © 2015 Control Laser Corporation
Once the recipe is loaded, the front screen will change to display your chosen recipe and
parameters (see image below).
2. Select and install the correct sized wire guide adapter or “needle” into the NoNic™
Benchtop laser system (ex. 0.185” diameter wire should use the 0.160” – 0.200” needle).
Make sure and tighten it down so it is locked into place securely.
NoNic™ Benchtop – Laser Operation Manual | 42
Copyright © 2015 Control Laser Corporation
3.
Adjust the wire stop to the desired depth indicated by the LED display.
LED Display
4. Select and insert the correct sized wire guide into the insertion hole on the left side
panel of the laser system. The wire guide is determined by the diameter of the wire to
be processed (ex. 0.141” diameter wire should use the 0.136” – 0.148” wire guide).
Larger wire guides up to 0.200” in diameter available
NoNic™ Benchtop – Laser Operation Manual | 43
Copyright © 2015 Control Laser Corporation
5. Once the selected wire guide is in place, we can now insert the wire through the smaller
hole in the wire guide.
6. Now, pull the wire into the machine through the wire guide and insert it through the
needle attached to the machine. Once the wire is through the attached needle, pull it all
the way down to the desired stripping length and tighten it to the end piece.
7. When everything is securely in place, press the
front button to begin the lasing process. Let
the wire finish processing completely before
removing. Remove the wire in exactly the
reverse order that you loaded it.
8. Finally, check the part to ensure that the
process
worked
successfully.
Continue
following the same steps to process more
wires. Make sure to create/load a new recipe and change over any wire guides/needles
to accommodate every new wire type you wish to process.
NoNic™ Benchtop – Laser Operation Manual | 44
Copyright © 2015 Control Laser Corporation
Power Override
There may be a need over time to manually override the laser output power percentage. This
can account for laser degradation over time or to equalize the power once you notice some
recipes are not processing as expected. We allow for a global override adjustment so the user
doesn’t have to modify each recipe individually. This could become very tedious depending on
the number of recipes created. One single change of the laser output power can quickly fix the
quality of the process without having to make excessive changes to many different recipes all
at once.
1. Follow the touchscreen prompts (in order) to adjust the power override.
From the front screen press in order:
Main Menu
Power Override
NoNic™ Benchtop – Laser Operation Manual | 45
Copyright © 2015 Control Laser Corporation
2. Change the Power Override percentage to the value you wish to use. It may take
multiple trials in order to get the power levels adjusted correctly. Save your changes to
update the system.
NOTE: Exercise caution when making changes to the Power Override feature. It should only
be adjusted if absolutely necessary.
WARNING
Be careful not to over adjust the Power Override as it could make the laser
unstable and could potentially be dangerous.
NoNic™ Benchtop – Laser Operation Manual | 46
Copyright © 2015 Control Laser Corporation
Process Button
The process button allows the user to see the details and process parameters of the current
loaded recipe. After pressing the button, the user will be taken to the recipe parameters
screen. You can modify and make changes to the current recipe and Save your changes, if
necessary.
NoNic™ Benchtop – Laser Operation Manual | 47
Copyright © 2015 Control Laser Corporation