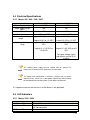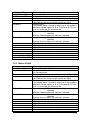
1
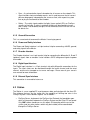
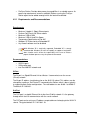
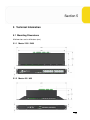
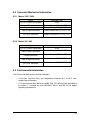
FireSync Network Devices, Generation 2 Version 4.11.0.0 Copyright, © 2009, LMI Technologies, Inc. All rights reserved. Proprietary This document, submitted in confidence, contains proprietary information which shall not be reproduced or transferred to other documents or disclosed to others or used for manufacturing or any other purpose without prior written permission of LMI Technologies Inc. No part of this publication may be copied, photocopied, reproduced, transmitted, transcribed, or reduced to any electronic medium or machine readable form without prior written consent of LMI Technologies, Inc. Trademarks and Restrictions DynaVision, chroma+scan®, Selcom®, FireSync®, and Sensors That See® are registered trademarks of LMI Technologies, Inc. Any other company or product names mentioned herein may be trademarks of their respective owners. Information in this manual is subject to change. This product is designated for use solely as a component and as such it does not comply with the standards relating to laser products specified in U.S. FDA CFR Title 21 Part 1040. LMI Technologies, Inc. 1673 Cliveden Ave. Delta, BC V3M 6V5 Telephone: +1 604 636 1011 Facsimile: +1 604 516 8368 www.lmi3D.com Table of Contents 1 2 3 4 5 Overview .................................................................................................................. 5 1.1 FireSync Master ................................................................................................ 5 1.2 Station............................................................................................................... 5 1.3 Network Switches.............................................................................................. 6 1.4 FireSync Cordsets............................................................................................. 6 1.4.1 Network Cordset ........................................................................................ 6 1.4.2 Ethernet Cable ........................................................................................... 7 Network Configurations ............................................................................................ 8 2.1 Typical .............................................................................................................. 8 2.2 Multiple Stations ................................................................................................ 9 2.3 Event Channel Connections .............................................................................. 9 System Setup ......................................................................................................... 11 3.1 Electrical Connections ..................................................................................... 11 3.1.1 Master 1200/2400 .................................................................................... 11 3.1.2 Master 400/800 ........................................................................................ 12 3.2 Connecting a Windows* PC to the FireSync Network ...................................... 14 Identification of Parts and Features ........................................................................ 16 4.1 FireSync Master .............................................................................................. 16 4.1.1 Ethernet Link Interface ............................................................................. 17 4.1.2 Up and Down Ports .................................................................................. 17 4.1.3 LED Indicators ......................................................................................... 17 4.1.4 Power-Sync-Safety Ports ......................................................................... 17 4.1.5 Ground Connection .................................................................................. 18 4.1.6 Power and Safety Interface ...................................................................... 18 4.1.7 Encoder Interface ..................................................................................... 18 4.1.8 Digital Input Interface ............................................................................... 18 4.1.9 External Sync Interface ............................................................................ 18 4.2 Station............................................................................................................. 18 4.2.1 Requirements and Recommendations ..................................................... 19 Technical Information ............................................................................................. 20 5.1 Mounting Dimensions...................................................................................... 20 5.1.1 Master 1200 / 2400 .................................................................................. 20 5.1.2 Master 400 / 800 ...................................................................................... 20 5.2 Connector Mechanical Information .................................................................. 21 5.2.1 Master 1200 / 2400 .................................................................................. 21 5.2.2 Master 400 / 800 ...................................................................................... 21 5.3 Environmental Information .............................................................................. 21 5.4 Electrical Specifications................................................................................... 22 5.4.1 Master 400 / 800 / 1200 / 2400................................................................. 22 5.5 LED Indicators ................................................................................................ 22 5.5.1 Master 1200 / 2400 .................................................................................. 22 5.5.2 Master 400/800 ........................................................................................ 23 5.6 Cordsets.......................................................................................................... 24 5.6.1 Network Cordset ...................................................................................... 24 5.6.2 Ethernet Cable ......................................................................................... 24 5.7 Typical Network Settings ................................................................................. 24 5.7.1 Station Sensor (‘IN’) Port.......................................................................... 24 5.7.2 Station Client (‘OUT’) Port ........................................................................ 24 Warranty ................................................................................................................ 25 6.1 Warranty policies............................................................................................. 25 6.2 Return policy ................................................................................................... 25 7 Getting Help ........................................................................................................... 26 6 Section 1 1 Overview FireSync Network devices are hardware components used to distribute power, data, safety interlock, and synchronization information to all devices in a FireSync sensor network. A FireSync Network consists of one or more Masters and one or more Stations to support an application requiring two or more sensors. 1.1 FireSync Master The FireSync Master provides sensor power, safety interlock and broadcasts systemwide synchronization information (ie. time, encoder count, and digital I/O states) to all devices on a sensor network. There are currently four models of the FireSync Master, the primary differences being the number of Power-Sync-Safety and Digital input ports, as listed below: • • • • Master 400 – 4 PSS, 4 digital input Master 800 – 8 PSS, 4 digital input Master 1200 – 12 PSS, 4 digital input Master 2400 – 24 PSS, 4 digital input 1.2 Station The station provides dedicated, real-time processing of sensor data. It is intended to operate the FireSync Station Software and optionally act as a FireSync Host Protocol Server, the primary interface between a client application and the sensor network, using the FireSync Host Protocol. The station is connected to the sensors via a gigabit Ethernet network switch. Multiple stations can be added to a sensor network to boost processing power as required by the application. The station can be any industrial computer which meets the requirements listed later in this manual. 5 1.3 Network Switches While any Gigabit switch can be used to connect the various components of a FireSync network, there are some preconditions that should be followed: • • There should never be more than one switch between a sensor and a station. Additional switching adds latency and could produce undesirable or unpredictable results. The switch (or switch group) used to connect the sensors to the stations should be independent of any switch (or switch group) used to connect the client to the stations. Do not bridge the sensor network with the client network. Use a separate switch (or VLAN) to keep the two networks isolated. 1.4 FireSync Cordsets All FireSync devices connect to each other through FireSync cord sets. The names of the cord sets used in this manual along with a description of each cord set are listed below: 1.4.1 Network Cordset The network cordset is a cable that contains two CAT5e cables within one shroud. One of these CAT5e cables is used to carry data between a sensor and a network switch, and the other cable is used to send power, safety*, and synchronization signals to a sensor. *See Section 4.1 for an explanation of the safety signal 6 1.4.2 Ethernet Cable Standard CAT5e Gigabit Ethernet cable is used to connect a station to a client PC. This cable will connect to the Station OUT port (See Section 4.3 for more information about the Station’s OUT port). Cable drawings for all FireSync Cordsets are available on the LMI Technologies Partners download site. 7 Section 2 2 Network Configurations FireSync Network components can be connected in many different configurations to suit the needs of a specific sensor application. Two common configurations are described in this section. The following examples are illustrated with a Master 2400, however the same principles apply to a system built with any other Master model 2.1 Typical Some sensor applications require few sensors and minimal data processing. This configuration is used in simple sensor applications requiring 24 or fewer sensors in a sensor network. The simplest FireSync Network is illustrated below: 8 2.2 Multiple Stations Certain sensor applications may require more data processing than can be provided by a single station. This configuration is used when more processing power is needed than a single stations can provide. While a network with two stations is illustrated below, adding even more stations would follow the same pattern, illustrated below: 2.3 Event Channel Connections In order to use the Event channel, a connection from an open port on the sensor switch to a network interface on the client machine must be made. Since the sensor network operates on a private subnet, this requires you to have an additional network adapter dedicated to connecting the client directly to the sensor network. This connection is illustrated below in green. 9 The dedicated NIC must be configured to the 90.X.X.X subnet in order to use the Event channel, and must not conflict with the station 90.X.X.X IP address 10 Section 3 3 System Setup This section outlines the steps required to power up and connect a Master or Station to a sensor network. 3.1 Electrical Connections Each FireSync Network device has electrical input(s) that must be connected in order for the system to power up and operate properly. It is recommended to use 22AWG cable when wiring these connectors. 3.1.1 Master 1200/2400 The Master uses four Phoenix Contact terminal plugs (see Section 5.2.1): Power and Safety interface Encoder interface Digital I/O interface External Sync interface • • • • Power and Safety (6-pin connector) 1 6 Pin 1 2 3 4 5 6 Signal +48VDC +48VDC GND(48V) GND(48V) Safety Control + Safety Control - The +48VDC power supply must be isolated from AC ground. This means that AC ground and DC ground are not connected. Refer to Section 5.4.1 for electrical specifications of the Safety Control circuit. 11 Encoder (8-pin connector) 1 Pin 1 2 3 4 5 6 7 8 8 Signal A+ AB+ BZ+ ZGND +5VDC Digital Input (12-pin connector) 1 12 Pin 1 2 3 4 5 6 7 8 9 10 11 12 Signal Input 1 Input 1 GND Input 2 Input 2 GND Input 3 Input 3 GND Input 4 Input 4 GND Do not use Do not use Do not use Do not use This connector does not need to be wired up for proper system operation External Sync (4-pin connector) The features of this connector are not currently implemented 3.1.2 Master 400/800 The Master uses four Phoenix Contact terminal plugs (see Section 5.2.1): • • • • Power and Safety interface Encoder interface Digital I/O interface External Sync interface 12 Power and Safety (6-pin connector) 1 Pin 1 2 3 4 5 6 6 Signal +48VDC +48VDC GND(48V) GND(48V) Safety Control + Safety Control - The +48VDC power supply must be isolated from AC ground. This means that AC ground and DC ground are not connected. The Safety control requires a voltage differential across the two pins. This is different from previous versions of FireSync Masters where a short across the two pins was required. In current (and future) revisions, a short across the two pins will cause the safety system to prevent system operation. Refer to Section 5.4.1 for electrical specifications of the Safety Control circuit. Encoder (8-pin connector) 1 8 Pin 1 2 3 4 5 6 7 8 Signal A+ AB+ BZ+ ZGND +5VDC 13 Digital Input (12-pin connector) 1 16 Pin 1 2 3 4 5 6 7 8 9 10 11 12 13 14 15 16 Signal Input 1 Input 1 GND Input 2 Input 2 GND Input 3 Input 3 GND Input 4 Input 4 GND Do not use Do not use Do not use Do not use Do not use Do not use Do not use Do not use This connector does not need to be wired up for proper system operation 3.2 Grounding All FireSync equipment should be grounded to the earth/chassis through their housing. The mounting brackets of all Masters have been designed to provide adequate grounding with the use of start-washers and must be checked with a multi-meter by ensuring electrical continuity between the mounting frame and RJ45 connectors on the front. It is imperative that the frame or electrical cabinet that the Master is mounted to is connected to earth ground. 3.3 Connecting a Windows* PC to the FireSync Network In order to connect to the FireSync Network, attach a Client PC with an open Gigabit Ethernet port to the ‘OUT’ port on the station. The out port is the port in which all data from the system will be sent to the client – it is established during the FireSync Station 14 Software installation process. If you have multiple stations in your system, you can use a gigabit Ethernet switch to establish a connection to all of them. Your PC IP address will have to be configured to the same subnet as the station’s OUT port: • Go to the Windows control panel, select “Network Connections” • Double-click on the name of the connection you are using • Click “Properties”, and double-click on “Internet Protocol (TCP/IP)”. This window will show up: • Select “Use the following IP address”, and input the Subnet mask shown above. The IP you enter must be on the same subnet as the station’s (the IP address shown above is appropriate for connecting to a station with the default IP address of 192.168.1.10). Click OK. • Click OK on the Connection properties window. Your computer has now been configured to connect to a FireSync Station. After this procedure is complete, you can connect to the Station using the appropriate version of FireSync Client specific to the sensor type that is used in your sensor network. Consult that sensor’s User’s Manual to learn how to use FireSync Client. • The first time you connect to a station with kClient, the error log will display two messages stating that it was unable to connect to the “Server” and “Management” ports, and the station’s serial number will be displayed as “SN 0”. This is expected behavior, and the proper serial number will show after the station’s software has been upgraded. *While This procedure specifically outlines the steps required to connect a Windows XP PC to the FireSync Network, any computer running on an OS that supports TCP/IP will be able to connect to the FireSync Network. 15 Section 4 4 Identification of Parts and Features This section describes the physical features of each generation 2 network device. 4.1 FireSync Master • • • • • • • • • Ethernet LINK interface UP and DOWN ports LED indicators 12/24 FireSync sensor ports Ground connection Power and Safety interface Encoder interface Digital Input interface (four inputs) External Sync interface Master 1200/2400 Sensor Ports 13 - 24 (2400 only) Sensor Ports 1 - 12 LED Indicators UP Port LINK Port DOWN Port Ground Connection Power and Safety Encoder Interface Input Interface External Sync Interface 16 Master 400/800 Sensor Ports 5 - 8 (800 only) Sensor Ports 1 - 4 LED Indicators LINK Port Power and Safety Encoder Interface Interface Input Interface 4.1.1 Ethernet Link Interface This is a gigabit Ethernet link to the Master. It is connected to the sensor network. 4.1.2 Up and Down Ports These ports are reserved for future use. 4.1.3 LED Indicators Please refer to Section 5.5.1 for details on the LED indicators of the Master 1200/2400. 4.1.4 Power-Sync-Safety Ports The PSS ports are used to interface to FireSync sensors. When connected to a sensor (via a Network Cordset, Section 1.4.1), they provide the following signals: • Power – +48VDC and ground are provided to power FireSync sensors. It is important to note that while the ports on the Master are RJ45 connectors, they are not compatible with standard ethernet devices. If you plug a non-FireSync device into a PSS port, it may be damaged by the 48v DC source 17 • Sync – A synchronization signal is broadcast to all sensors on the network. This signal includes clock and encoder counts, and is used to ensure that all sensors’ data can be properly interpreted by the server or client, with respect to system time or physical movement of the encoder. • Safety – The safety signal enables the lights (lasers and/or LEDs) on FireSync sensors to illuminate. If safety is enabled, the lights will be allowed to turn on, and if safety is not enabled, the lights will not illuminate, but the sensors will still be able to run. 4.1.5 Ground Connection This is a screw terminal to connect the Master’s housing to ground. 4.1.6 Power and Safety Interface The Power and Safety interface is a 6-pin terminal strip for connecting +48VDC, ground, and safety signals to the Master. 4.1.7 Encoder Interface The Encoder interface is an 8-pin terminal strip for connecting the differential A, B and Z (optional) signals from an encoder. It also includes +5VDC and ground signals to power an encoder. 4.1.8 Digital Input Interface The Digital Input interface is a 12-pin terminal strip with differential connections for the inputs. The input states can be monitored through the health channel and the event channel, and are also stamped on to sensor messages. Please consult your sensor’s user manual for more information. 4.1.9 External Sync Interface This connection is reserved for future use. 4.2 Station The Station is a user-supplied PC used to process data and interface with the client PC. The software that runs on the station has the capability of fulfilling two roles in the FireSync System. These software “agents” are as follows: • FireSync Server: Implements the FireSync Host Protocol, the foundation upon which all interactions between the FireSync System and the Client PC are based. Only ONE station should ever run this agent. All interaction with the rest of the system (and any other stations which may be installed) will be co-ordinated through the FireSync Server. 18 • FireSync Station: Provides data processing capabilities in a scalable manner. As processing requirements increase, additional Stations running the FireSync Station agent can be added amongst which the load will be divided. 4.2.1 Requirements and Recommendations Requirements • • • • • • • Minimum 2 gigabit (1 Gbps) Ethernet ports Pentium Core Duo at 2.0 GHz or above Minimum 2 GB of RAM Minimum 2 GB of Hard Disk Space Temperature Specification of 0 to 40C Windows XP Professional or Embedded XP Any firewall software must be disabled While Windows XP is technically supported, Embedded XP is strongly recommended. Windows XP lacks the capabily to support a hard powerdown situation and it will be the responsibility of the user to initiate a proper shutdown process every time power disconnected. Recommendations • • • USB 2.0 ports VGA monitor port Intel Pro/1000 GT network card IN Port The IN port is a Gigabit Ethernet link to a Master. It communicates on the sensor (Private) network. The IN port IP address should always be on the 90.X.X.X subnet. This address can be changed by sending a “Set Private IP” command to the Station, which is done, typically, to support multiple station configurations. The valid addresses are 90.0.0.1 to 90.0.0.5. The default IP is 90.0.0.1. Out Port The OUT port is a gigabit Ethernet link to the client (Public) network. It is the gateway through which the user communicates with the sensor network. The OUT port can be set to any IP address except addresses belonging to the 90.X.X.X subnet. The typical default IP is 192.168.1.10. 19 Section 5 5 Technical Information 5.1 Mounting Dimensions All dimensions are in millimeters (mm). 5.1.1 Master 1200 / 2400 5.1.2 Master 400 / 800 20 5.2 Connector Mechanical Information 5.2.1 Master 1200 / 2400 Name Connector Type Link, UP, DOWN, Sensor ports RJ45 Power & Safety connector Encoder connector Phoenix Contact MC 1,5/ 6-STF-3,5 Phoenix Contact MC 1,5/ 8-STF-3,5 Input & Output connector Phoenix Contact MC 1,5/ 12-STF-3,5 Ext. Sync. connector Phoenix Contact MC 1,5/ 4-STF-3,5 5.2.2 Master 400 / 800 Name Connector Type Link, UP, DOWN, Sensor ports RJ45 Power & Safety connector Encoder connector Input & Output connector Ext. Sync. connector Phoenix Contact MC 1,5/ 6-STF-3,5 Phoenix Contact MC 1,5/ 8-STF-3,5 Phoenix Contact MC 1,5/ 12-STF-3,5 Phoenix Contact MC 1,5/ 4-STF-3,5 5.3 Environmental Information The FireSync Network devices must be mounted in: • A dust-free (minimum IP61) and temperature-controlled (0°C to 40°C, noncondensing) environment • A 12-type electrical box (based on NEMA 250). This box must be grounded to the frame it is installed on (see NEC250.8, 250.12, and 250.122 for proper grounding requirements). 21 5.4 Electrical Specifications 5.4.1 Master 400 / 800 / 1200 / 2400 Power Supply voltage Power Supply current (Max.) Power Draw (Min.) Safety Voltage Encoder signal voltage range Digital Input voltage range Master 400/800 +48 VDC 10A Master 1200/2400 +48 VDC 10A 15W +6.72 to 48 VDC Logical LOW: -7 to -0.2 VDC 15W +8.1 to 48 VDC Logical LOW: -7 to -0.2 VDC Logical HI: 0.2 to +12 VDC Logical HI: 0.2 to +12 VDC Logical LOW: 0VDC to +0.1 VDC Logical LOW: 0VDC to +0.1 VDC Logical HI: +11.5 VDC to +22.5 VDC Logical HI: +3.5 VDC to +6.5 VDC For higher voltage signals add external resistor R=(V4.8)/0.01 The +48VDC power supply must be isolated from AC ground. This means that AC ground and DC ground are not connected. The Power Draw specification is based on a Master with no sensors attached. Every sensor has it’s own power requirements which need to be considered when calculating total system power requirements. It is important to ensure that the chassis of the Master is well grounded. 5.5 LED Indicators 5.5.1 Master 1200 / 2400 Indicator LED Link Green LED Link Yellow LED UP Green LED Description Blinking: Ethernet traffic detected On: Connected Off: Not connected Reserved for future use 22 UP Yellow LED DOWN Green LED DOWN Yellow LED Power Safety Encoder A Encoder F Encoder R In 1 In 2 In 3 In 4 Out 1 Out 2 Sensor Port Green LED Sensor Port Yellow LED Reserved for future use Reserved for future use Reserved for future use Device is powered on Indicates the status of the Safety Interlock circuitry. The “On” state indicates that all sensor light sources are active Encoder alarm: The encoder alarm is turned on when one of the encoder’s differential voltage signals (A, B or Z) fall below 0.475 volts. If no Z is connected, this will remain on. On continuously: Forward motion with no indexing is detected Blinking: Forward motion with indexing is detected On continuously: Reverse motion with no indexing is detected Blinking: Reverse motion with indexing is detected Digital input port 1 active Digital input port 2 active Digital input port 3 active Digital input port 4 active Unused Unused Unused Unused 5.5.2 Master 400/800 Indicator LED Link Green LED Link Yellow LED Power Safety Encoder A Encoder F Encoder R In 1 In 2 In 3 In 4 Out 1 Out 2 Description Blinking: Ethernet traffic detected On: Connected Off: Not connected Device is powered on Indicates the status of the Safety Interlock circuitry. The “On” state indicates that all sensor light sources are active Encoder alarm: The encoder alarm is turned on when one of the encoder’s differential voltage signals (A, B or Z) fall below 0.475 volts. If no Z is connected, this will remain on. On continuously: Forward motion with no indexing is detected Blinking: Forward motion with indexing is detected On continuously: Reverse motion with no indexing is detected Blinking: Reverse motion with indexing is detected Digital input port 1 active Digital input port 2 active Digital input port 3 active Digital input port 4 active Unused Unused 23 Out 3 Out 4 Sensor Port Green LED Sensor Port Yellow LED Unused Unused Unused Unused 5.6 Cordsets 5.6.1 Network Cordset • • • • Maximum length 50m (164’) RJ45 connectors (Master end) Binder 423-series 14-pin connector (sensor end, female) FireSync Dual CAT5e cable 5.6.2 Ethernet Cable • • • • Maximum length 100m (328’) Solid-Core UTP cable RJ45 connectors CAT5e cable 5.7 Typical Network Settings 5.7.1 Station Sensor (‘IN’) Port • • IP address : 90.0.0.1 Subnet Mask 255.0.0.0 5.7.2 Station Client (‘OUT’) Port • • IP address : 192.168.1.10 Subnet Mask 255.255.255.0 24 Section 6 6 Warranty 6.1 Warranty policies These products are warranted for one year from the date of purchase from LMI Technologies Inc. Products that are found to be non-conforming during their warranty period are to be returned to LMI Technologies Inc. The shipper is responsible for covering all duties and freight for returning the sensor to LMI. It is at LMI’s discretion to repair or replace sensors that are returned for warranty work. LMI Technologies Inc. warranty covers parts, labor and the return shipping charges. If the warranty stickers on the sensors are removed or appear to be tampered with, LMI will void the warranty of the sensor. 6.2 Return policy Before returning the product for repair (warranty or non-warranty) a Return Material Authorization (RMA) number must be obtained from LMI. Please call LMI to obtain this RMA number. Carefully package the sensor in its original shipping materials (or equivalent) and ship the sensor prepaid to your designated LMI location. Please insure that the RMA number is clearly written on the outside of the package. With the sensors, include the address you wish this shipment returned to, the name, email and telephone number of a technical contact should we need to discuss this repair, and details of the nature of the malfunction. For non-warranty repairs, a purchase order for the repair charges must accompany the returning sensor. LMI Technologies Inc. is not responsible for damages to a sensor that is the result of improper packaging or damage during transit by the courier. 25 Section 7 7 Getting Help If you wish further help on a component or product, contact your distributor or LMI directly. Visit our website at www.lmitechnologies.com for the agent nearest you. For more information on Safety and Laser classifications, contact: Center for Devices and Radiological Health, FDA Office of Compliance (HFZ-305) Attn: Electronic Product Reports 2098 Gaither Road Rockville, Maryland 20850 26