1
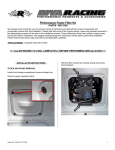
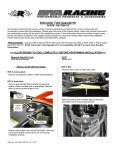
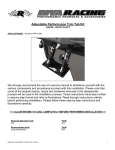
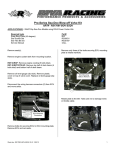
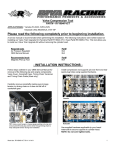
Pro-Series Aluminum Water Box PART# - RK16091-1 We strongly recommend the use of a service manual to familiarize yourself with the various components and procedures involved with this installation. Please note that some of the original clamps, hoses and hardware removed in the disassembly process will be used in the installation process. These instructions have been written in step-by-step format and refer to illustrations. We suggest reading through the instructions entirely before performing installation. Please follow these step-by-step instructions and illustrations carefully. APPLICATION(S): Kawasaki Ultra 300/260/250 ALLOW ENGINE TO COOL COMPLETELY BEFORE PERFORMING INSTALLATION NOTE: Installation of this kit in 2008~2010 models requires RIVA Free Flow Exhaust Kit (part# RK16090-08) as referenced in these instructions. - INSTALLATION INSTRUCTIONS Remove seats. Remove rear storage tray/grab handle. Remove hoses (3) attached to catch can. Remove bolts (2) securing oil catch can to intercooler. Remove catch can from engine compartment. Intercooler air inlet hose. Intercooler cooling line (top). Cap nuts securing storage tray/grab handle. Oil catch can. TIP: Replace cap nuts on studs for storage tray to prevent injury while performing work. 2008~2010 models only: Disconnect cooling line secured to top of intercooler. Disconnect intercooler air inlet hose (left side of intercooler). Word doc. Part # RK16091-1 © H1 5/9/11 1 Disconnect primary bypass valve hose and over-boost bypass valve hose from intercooler. Disconnect intercooler inlet temperature electrical sensor. Carefully slide intercooler forward towards exhaust until tab at bottom on rear of intercooler clears securing bracket. Over-boost bypass valve hose. Tab securing intercooler to hull. Primary bypass valve hose. Intercooler cooling line (under air outlet). Intercooler air outlet hose. Disconnect intercooler air outlet hose. Disconnect cooling line secured to bottom center section of intercooler. Remove bolts (2) securing intercooler to mounting bracket. Bolts securing intercooler to hull. Remove second cooling line secured to bottom right side of intercooler (under intercooler air outlet). Remove intercooler by rotating air outlet side upward while lifting. Remove exhaust hose between stock water box (muffler) and exhaust outlet tube. Inside craft at engine remove the four M10 bolts securing exhaust tail pipe to exhaust pipe. Exhaust Tail Pipe Bolts Intercooler cooling line (bottom/center). Exhaust Tail Pipe Loosen clamps securing coupler between exhaust tail pipe and water box. Remove exhaust tail pipe from muffler and set aside. Word doc. Part # RK16091-1 © H1 5/9/11 2 2008~2010 models only: Disconnect cooling line from fitting at front of stock water box. Loosely install stock clamps over water box inlet and two of the supplied clamps over water box outlet. Thoroughly clean exhaust tail pipe with a non-residual cleaner. Insert exhaust tail pipe into water box coupler. Align tail pipe with exhaust pipe and exhaust gasket(s). Secure with stock bolts. NOTE: Apply red Loctite to bolts. Torque bolts to 33 ft•lb / 45 N•m. Check alignment of water box at coupler between exhaust tail pipe and water box inlet. Tighten clamps securing coupler. NOTE: Do not over tighten clamp. 2008~2010 models only: Refer to RIVA Free Flow Exhaust Kit installation instructions to complete installation. 2007 & 2011 models only: Reconnect water box outlet hose. NOTE: Do not over tighten clamp. Remove water box. Retain silicone coupler. 2008~2010 models only: Remove fitting from front of stock water box and install into supplied water box. NOTE: Apply pipe thread sealant to fitting threads. Do not over tighten fitting. 2011 models only: Install supplied block-off fitting into supplied water box. NOTE: Apply pipe thread sealant to fitting threads. Do not over tighten fitting. Install stock silicone coupler onto water box inlet. Tip: Apply glass cleaner to inside of coupler before installing. Install water box into hull and secure. 2008~2010 models only: Install and secure cooling line to fitting at front of water box. NOTE: Do not over tighten clamp. Replace intercooler. NOTE: Make sure tab at lower rear of intercooler is under bracket. Apply blue Loctite to bolts. Torque bolts to 22 ft•lb / 30 N•m. Reconnect intercooler cooling lines, bypass hoses, inlet & outlet hoses and reconnect temperature sensor. NOTE: Do not over tighten clamps. Replace oil catch can. NOTE: Apply blue Loctite to threads. Torque bolts to 78 in•lb / 8.8 N•m. Reconnect catch can hoses (3). Replace storage tray/grab handle. NOTE: Apply blue Loctite to studs. Do not over tighten nuts. Check bilge for tools, rags, etc. Run craft on a flush kit to check for proper operation. Remember, the water belongs to everyone. Please ride responsibly and respect the environment! Technical Support For answers to questions regarding installation or trouble shooting RIVA Performance Products contact: RIVA Technical Support directly at (954) 247-0705 or by e-mail at [email protected]. Limited Warranty RIVA Pro-Series Aluminum Water Boxes carry a 1-year limited warranty to the original purchaser. They are warranted to be free of defects in materials and workmanship under normal use and service. Customer modified components will be void of warranty. This warranty is limited to defects in the primary components only. Finish and/or wear marks in or on primary components are not covered under this warranty. RIVA Racing’s liability is expressly limited to the repair or replacement of the components contained within or associated with this kit. RIVA Racing agrees to repair or at RIVA’s option, replace any defective unit without charge, if product is returned to RIVA Racing freight prepaid within the warranty period. Any equipment returned which, in RIVA’s opinion, has been subjected to misuse, abuse, overheating or accident shall not be covered by this warranty. RIVA Racing shall have no liability for special, incidental or consequential damages or injury to persons or property from any cause arising from the sale, installation or use of this product. No other warranty, express or implied, including, but not limited to the implied warranties of merchantability and fitness for a particular purpose, applies. Various states do not allow for the limitation of incidental or consequential damages and therefore the above exclusion or limitation may not apply to you. Warranty does not include the expenses related to freight or transportation of parts or compensation for any inconvenience or loss of use while being repaired. A copy of the original invoice and a Return Authorization Number (RA#) must accompany all warranty claims. Warranted replacement parts will be returned freight collect. Word doc. Part # RK16091-1 © H1 5/9/11 3