1
GIGAswitch System
Installation and Service Manual
Order Number: EK-GGSVA-IN-001
This document provides qualified DIGITAL service personnel with
instructions for installing, and servicing the GIGAswitch System
hardware.
Revision/Update Information:
Digital Equipment Corporation
Maynard, Massachusetts
This is a new document.
First Printing, August 1993
While Digital believes that information included in this publication is correct as of the
date of publication, it is subject to change without notice
Digital Equipment Corporation makes no representations that the interconnection of its
products in the manner described in this document will not infringe existing or future
patent rights, nor do the descriptions contained in this document imply the granting of
licenses to make, use, or sell equipment or software in accordance with the description.
NOTE: This equipment has been tested and found to comply with the limits for a
Class A digital device, pursuant to Part 15 of the FCC rules. These limits are designed
to provide reasonable protection against harmful interference when the equipment is
operated in a commercial environment. This equipment generates, uses, and can radiate
radio frequency energy and, if not installed and used in accordance with the instruction
document, may cause harmful interference to radio communications. Operation of this
equipment in a residential area is likely to cause harmful interference, in which case
the user will be required to correct the interference at the user’s own expense.
Copyright © Digital Equipment Corporation 1993. All Rights Reserved. Printed in the
United States of America.
The postpaid Reader’s Comments forms at the end of this document request your
critical evaluation to assist in preparing future documentation.
The following are trademarks of Digital Equipment Corporation: DECconnect,
GIGAswitch, ThinWire, and the DIGITAL Logo.
All other trademarks and registered trademarks are the property of their respective
holders.
This document was prepared using VAX DOCUMENT, Version 2.1.
Contents
Preface . . . . . . . . . . . . . . . . . . . . . . . . . . . . . . . . . . . . . . . . . . . . . . . . . . . . . . . . . . . .
vii
Part I Install
1 Overview of the GIGAswitch System
Purpose of the GIGAswitch System . . . . . . . . .
Parts of the GIGAswitch System . . . . . . . . . . .
Location of the Modules . . . . . . . . . . . . . . . . . .
Description of the Cooling and Power Modules
Description of the Logic Modules . . . . . . . . . . .
.
.
.
.
.
.
.
.
.
.
.
.
.
.
.
.
.
.
.
.
.
.
.
.
.
.
.
.
.
.
.
.
.
.
.
.
.
.
.
.
.
.
.
.
.
.
.
.
.
.
.
.
.
.
.
.
.
.
.
.
.
.
.
.
.
.
.
.
.
.
.
.
.
.
.
.
.
.
.
.
.
.
.
.
.
.
.
.
.
.
.
.
.
.
.
.
.
.
.
.
.
.
.
.
.
1–2
1–3
1–5
1–6
1–8
.
.
.
.
.
.
.
.
.
.
.
.
.
.
.
.
.
.
.
.
.
.
.
.
.
.
.
.
.
.
.
.
.
.
.
.
.
.
.
.
.
.
.
.
.
.
.
.
.
.
.
.
.
.
.
.
.
.
.
.
.
.
.
.
.
.
.
.
.
.
.
.
.
.
.
.
.
.
.
.
.
.
.
.
.
.
.
.
.
.
.
.
.
.
.
.
.
.
.
.
.
.
.
.
.
.
.
.
.
.
.
.
.
.
.
.
.
.
.
.
.
.
.
.
.
.
.
.
.
.
.
.
.
.
.
.
.
.
.
.
.
.
.
.
.
.
.
.
.
.
.
.
.
.
.
.
.
.
.
.
.
.
.
.
.
.
.
.
.
.
.
.
.
.
.
.
.
.
.
.
.
.
.
.
.
.
.
.
.
2–2
2–4
2–9
2–13
2–20
2–21
2–25
2–26
2–31
Installing the GIGAswitch System in the Rack . . . . . . . . . . . . . . . . . . . . .
Attaching the Upper Plenum to the GIGAswitch System . . . . . . . . . . . . .
Installing the System Modules . . . . . . . . . . . . . . . . . . . . . . . . . . . . . . . . .
3–3
3–7
3–9
2 Preparing to Install the System
Verifying the Site Preparation . . . . . .
Unpacking the System . . . . . . . . . . . .
Testing the System Modules . . . . . . .
Preparing the Rack . . . . . . . . . . . . . .
Setting Up ESD Protection . . . . . . . .
Removing the System Modules . . . . .
Installing the PMD Daughter Cards .
Installing the MMF ANSI MIC PMD
Installing the SMF PMD . . . . . . . . . .
.
.
.
.
.
.
.
.
.
.
.
.
.
.
.
.
.
.
.
.
.
.
.
.
.
.
.
.
.
.
.
.
.
.
.
.
.
.
.
.
.
.
.
.
.
.
.
.
.
.
.
.
.
.
.
.
.
.
.
.
.
.
.
3 Installing the GIGAswitch System
Part II Test
4 Preparing to Test the System
Connecting the OBM terminal . . . . . . . . . . . . . . . . . . . . . . . . . . . . . . . . . .
Setting the Security Switch . . . . . . . . . . . . . . . . . . . . . . . . . . . . . . . . . . . .
4–2
4–4
iii
5 Testing the System
Diagnostic Mode Screens
Help Screens . . . . . . . . .
Initiating the MST . . . . .
Testing Procedures . . . . .
Meaning of LEDs . . . . . .
.
.
.
.
.
.
.
.
.
.
.
.
.
.
.
.
.
.
.
.
.
.
.
.
.
.
.
.
.
.
.
.
.
.
.
.
.
.
.
.
.
.
.
.
.
.
.
.
.
.
.
.
.
.
.
.
.
.
.
.
.
.
.
.
.
.
.
.
.
.
.
.
.
.
.
.
.
.
.
.
.
.
.
.
.
.
.
.
.
.
.
.
.
.
.
.
.
.
.
.
.
.
.
.
.
.
.
.
.
.
.
.
.
.
.
.
.
.
.
.
.
.
.
.
.
.
.
.
.
.
.
.
.
.
.
.
.
.
.
.
.
.
.
.
.
.
.
.
.
.
.
.
.
.
.
.
.
.
.
.
.
.
.
.
.
.
.
.
.
.
.
.
.
.
.
.
.
.
.
.
.
.
.
.
.
.
.
.
.
.
5–2
5–4
5–5
5–12
5–15
Prerequisites for Replacing GIGAswitch System Modules . . . . . . . . . . . . .
Setting Up ESD Protection . . . . . . . . . . . . . . . . . . . . . . . . . . . . . . . . . . . .
Removing Power . . . . . . . . . . . . . . . . . . . . . . . . . . . . . . . . . . . . . . . . . . . .
6–2
6–3
6–4
Part III Service
6 Preparing to Replace Modules
7 Replacing Modules
Replacing a Logic Module . . . . . . . . . . . .
Replacing the PMD Daughter Cards . . . .
Removing the MMF ANSI MIC PMD . . .
Installing the MMF ANSI MIC PMD . . .
Removing the SMF PMD Daughter Card
Installing the SMF PMD . . . . . . . . . . . . .
Replacing a Blank Handle . . . . . . . . . . . .
Replacing a Fan Tray Assembly . . . . . . .
Replacing a FEU . . . . . . . . . . . . . . . . . . .
Replacing a Power Supply Filler Panel . .
Replacing a PSA . . . . . . . . . . . . . . . . . . .
Replacing a PSC Card . . . . . . . . . . . . . . .
.
.
.
.
.
.
.
.
.
.
.
.
.
.
.
.
.
.
.
.
.
.
.
.
.
.
.
.
.
.
.
.
.
.
.
.
.
.
.
.
.
.
.
.
.
.
.
.
.
.
.
.
.
.
.
.
.
.
.
.
.
.
.
.
.
.
.
.
.
.
.
.
.
.
.
.
.
.
.
.
.
.
.
.
.
.
.
.
.
.
.
.
.
.
.
.
.
.
.
.
.
.
.
.
.
.
.
.
.
.
.
.
.
.
.
.
.
.
.
.
.
.
.
.
.
.
.
.
.
.
.
.
.
.
.
.
.
.
.
.
.
.
.
.
.
.
.
.
.
.
.
.
.
.
.
.
.
.
.
.
.
.
.
.
.
.
.
.
.
.
.
.
.
.
.
.
.
.
.
.
.
.
.
.
.
.
.
.
.
.
.
.
.
.
.
.
.
.
.
.
.
.
.
.
.
.
.
.
.
.
.
.
.
.
.
.
.
.
.
.
.
.
.
.
.
.
.
.
.
.
.
.
.
.
.
.
.
.
.
.
.
.
.
.
.
.
.
.
.
.
.
.
.
.
.
.
.
.
.
.
.
.
.
.
.
.
.
.
.
.
.
.
.
.
.
.
.
.
.
.
.
.
.
.
.
.
.
.
.
.
.
.
.
.
.
.
.
.
.
.
7–2
7–5
7–6
7–9
7–12
7–15
7–20
7–22
7–24
7–26
7–28
7–30
Removing the Upper Plenum . . . . . . . . . . . . . . . . . . . . . . . . . . . . . . . . . . .
Detaching the Empty GIGAswitch System from the Rack . . . . . . . . . . . . .
Lowering the Empty GIGAswitch System . . . . . . . . . . . . . . . . . . . . . . . . .
8–2
8–3
8–4
8 Removing the System from the Rack
9 Replacing Backplanes
Accessing the Backplanes . . . . .
Replacing the Power Backplane .
Replacing the Logic Backplane .
Restoring the System . . . . . . . . .
Part IV Reference
iv
.
.
.
.
.
.
.
.
.
.
.
.
.
.
.
.
.
.
.
.
.
.
.
.
.
.
.
.
.
.
.
.
.
.
.
.
.
.
.
.
.
.
.
.
.
.
.
.
.
.
.
.
.
.
.
.
.
.
.
.
.
.
.
.
.
.
.
.
.
.
.
.
.
.
.
.
.
.
.
.
.
.
.
.
.
.
.
.
.
.
.
.
.
.
.
.
.
.
.
.
.
.
.
.
.
.
.
.
.
.
.
.
.
.
.
.
.
.
.
.
.
.
.
.
.
.
.
.
9–3
9–6
9–10
9–15
A GIGAswitch System Specifications
Physical Dimensions of the GIGAswitch System . . . . . . . . . . . . . . . . . . . .
Electrical Information . . . . . . . . . . . . . . . . . . . . . . . . . . . . . . . . . . . . . . . .
Environmental Information . . . . . . . . . . . . . . . . . . . . . . . . . . . . . . . . . . . .
A–3
A–4
A–6
B Cooling and Power Modules
Fan Tray Assembly
FEU . . . . . . . . . . . .
PSA . . . . . . . . . . . .
PSC Card . . . . . . . .
.
.
.
.
.
.
.
.
.
.
.
.
.
.
.
.
.
.
.
.
.
.
.
.
.
.
.
.
.
.
.
.
.
.
.
.
.
.
.
.
.
.
.
.
.
.
.
.
.
.
.
.
.
.
.
.
.
.
.
.
.
.
.
.
.
.
.
.
.
.
.
.
.
.
.
.
.
.
.
.
.
.
.
.
.
.
.
.
.
.
.
.
.
.
.
.
.
.
.
.
.
.
.
.
.
.
.
.
.
.
.
.
.
.
.
.
.
.
.
.
.
.
.
.
.
.
.
.
.
.
.
.
.
.
.
.
.
.
.
.
.
.
.
.
.
.
.
.
.
.
.
.
.
.
.
.
.
.
.
.
.
.
.
.
.
.
.
.
B–2
B–3
B–4
B–6
Line Card . . . . . . . . . .
PMD Daughter Cards
SCP Card . . . . . . . . . .
Clock Card . . . . . . . . .
CBS Card . . . . . . . . . .
.
.
.
.
.
.
.
.
.
.
.
.
.
.
.
.
.
.
.
.
.
.
.
.
.
.
.
.
.
.
.
.
.
.
.
.
.
.
.
.
.
.
.
.
.
.
.
.
.
.
.
.
.
.
.
.
.
.
.
.
.
.
.
.
.
.
.
.
.
.
.
.
.
.
.
.
.
.
.
.
.
.
.
.
.
.
.
.
.
.
.
.
.
.
.
.
.
.
.
.
.
.
.
.
.
.
.
.
.
.
.
.
.
.
.
.
.
.
.
.
.
.
.
.
.
.
.
.
.
.
.
.
.
.
.
.
.
.
.
.
.
.
.
.
.
.
.
.
.
.
.
.
.
.
.
.
.
.
.
.
.
.
.
.
.
.
.
.
.
.
.
.
.
.
.
.
.
.
.
.
.
.
.
.
.
.
.
.
.
.
.
.
.
.
.
.
.
.
.
.
C–2
C–5
C–6
C–9
C–12
Identifying the Contents of the GIGAswitch System . . . . . . . . . . . . . . . . .
Recommended Location for Logic Modules . . . . . . . . . . . . . . . . . . . . . . . . .
D–2
D–4
C Logic Modules
D Guidelines for Installing Additional Modules
Index
v
Preface
This document provides qualified DIGITAL service personnel with
instructions for installing, and servicing the GIGAswitch System
hardware.
Intended Audience
This document is intended for DIGITAL service personnel who are
experienced in installing and servicing network hardware.
vii
Document Structure
This document is structured as follows:
Part I contains overview information and instructions for
installing the GIGAswitch System:
•
Chapter 1 describes the GIGAswitch System and its
component modules.
•
Chapter 2 describes the procedures that you must complete
before installing the GIGAswitch System. These procedures
include verifying the site preparation, unpacking the system,
testing the system modules, installing the lower plenum in the
rack, setting up electrostatic discharge (ESD) protection, and
removing the modules.
•
Chapter 3 describes the procedures for installing the
GIGAswitch System. These procedures include lifting the
empty GIGAswitch System onto the lower plenum, attaching
the GIGAswitch System to the rack, installing the upper
plenum, and installing the modules.
Part II contains information for testing the GIGAswitch System:
•
Chapter 4 describes the procedures that you must complete
before testing the GIGAswitch System. These procedures
include connecting the out-of-band management (OBM)
terminal, and setting the security switch.
•
Chapter 5 describes the procedures for initiating the module
self-tests (MSTs) and provides instructions for evaluating the
results of the MSTs.
Part III contains information for replacing the field replaceable
units (FRUs)
viii
•
Chapter 6 describes the replacement requirements for each
GIGAswitch System module, and describes the procedures
used in replacing some of the GIGAswitch System modules.
These procedures include setting up electrostatic discharge
(ESD) protection, and removing or applying system power.
•
Chapter 7 describes the procedures for replacing the cooling
and power modules and the logic modules. Cooling and power
modules include modules of the fan tray assembly, front end
unit (FEU), power status assembly (PSA) , and power system
controller (PSC) families. Logic modules include modules of
the line card, physical medium dependent (PMD) daughter
card, switch control processor (SCP), clock card (CLK), and
crossbar switch (CBS) families.
•
Chapter 8 describes the procedure for removing the
GIGAswitch System.
•
Chapter 9 describes the procedures for replacing the power
and logic backplanes.
Part IV contains reference information.
•
Appendix A provides the physical, electrical, and
environmental specifications for the GIGAswitch System.
•
Appendix B describes the cooling and power modules in the
fan tray assembly, FEU, PSA, and the PSC card families.
•
Appendix C describes the logic modules in the line card,
physical medium dependent (PMD) daughter card, SCP card,
CBS card, and clock card families.
•
Appendix D provides guidelines for installing additional logic
modules.
Customer Documentation
The customer GIGAswitch System documentation set consists of
the following documents:
document
Part Number
GIGAswitch System
Manager’s Guide
EK-GGMGA-MG
Internal Documentation
The internal GIGAswitch System documentation set is for
DIGITAL internal use only. This documentation set includes this
manual and the following documents:
document
Part Number
GIGAswitch System
Maintenance Card
EK-GGGSV-CD
GIGAswitch System
Installation Card
EK-GGGIN-CD
Related Documentation
Additional information is available in the following documents:
document
Part Number
Fiber Distributed Data
Interface Media Connection
Information
EK-A0597-M1
DECconnect System
Requirements Evaluation
Workbook
EK-DECSY-EG
ix
Conventions
The following conventions are used in this document:
Bold
typeface
Indicates that a word or phrase is being emphasized
to the reader.
Italic
typeface
Indicates the complete titles of manuals.
Return
Ctrl/O
x
Indicates that you press the return key on the
keyboard.
Indicates that you must hold down the key labeled
Ctrl while you press another key or a pointing device
button.
Safety Symbols
1
2
3
4
mkv-0281-13
Number Symbol
Description
Caution - Rotating
fans
Allow the fans to run down before
removing the fan tray from the
unit.
Caution
Remove system power before
removing or installing the system
module.
Warning
The weight of this unit when
empty is 31.75 Kg (70 lb). Use
two people to lift the unit.
Caution Electrostatic
sensitive device
Take precautions to protect
against equipment damage due to
electrostatic discharge (ESD).
xi
Part I
Install
Part I contains overview information and instructions for
installing the GIGAswitch System:
•
Chapter 1 describes the GIGAswitch System and its
component modules.
•
Chapter 2 describes the procedures that you must complete
prior to installing the GIGAswitch System. These procedures
include verifying the site preparation, unpacking the system,
testing the system modules, installing the lower plenum in the
rack, setting up electrostatic discharge (ESD) protection, and
removing the modules.
•
Chapter 3 describes the procedures for installing the
GIGAswitch System. These procedures include lifting the
empty GIGAswitch System onto the lower plenum, attaching
the GIGAswitch System to the rack, installing the upper
plenum, and installing the modules.
1
Overview of the GIGAswitch System
Chapter
Contents
This chapter introduces you to the GIGAswitch System and its
component modules including:
•
Purpose of the GIGAswitch System
•
Parts of the GIGAswitch System
•
Location of the modules
•
Description of the logic modules
•
Description of the cooling and power modules
Overview of the GIGAswitch System 1–1
Purpose of the GIGAswitch System
Purpose of the GIGAswitch System
General
Description
The GIGAswitch System is a standalone, intelligent, switching
system that forwards packets among a set of connected data links.
The data links can be connected to end stations, bridges, routers,
and to other GIGAswitch Systems. The core of the GIGAswitch
System is a crossbar switch (CBS) card that forms point-to-point
communication paths by mapping inputs to outputs.
The GIGAswitch System acts as a multiport FDDI bridge with
all attached local area networks (LANs) being bridged together.
Subsequently, added line cards will have their data links
automatically added to the bridged LANS.
Versions
Two versions of the GIGAswitch System are available.
The DEFGA-BA version is compatible with the US power
requirements. The DEFGA-BB version in conjunction with a
selected country kit is compatible with the power requirements
for the selected country. See Appendix A for a listing of the power
cord types found in country kits.
Functions
Both versions (DEFGA-Bx) function as a modular, multiport,
FDDI bridge that uses the CBS card as the interconnection
mechanism for its line cards and processing engines. The
DEFGA-Bx utilizes both distributed and centralized packet
processing algorithms to perform the following ANSI and IEEE
802.1d bridging functions:
•
Forwarding
•
Filtering
•
Learning
•
Aging
•
Spanning tree
1–2 Overview of the GIGAswitch System
Parts of the GIGAswitch System
Parts of the GIGAswitch System
Part (Order Number)
2-port FDDI line card (DEFGL-AA)
(contains one or more of the following
types of PMD daughter cards 1 ):
•
MMF ANSI MIC PMD (DEFXM-AA)
•
SMF PMD (DEFXS-AA)
Quantity
DEFGA-BB
Option
1
1
Up to 11
1
1
1
1
1
1
1
1
1
0
0
0
1
0
1
0
1
1
1
1
0
1
0
0
0
0
1 country kit per
FEU
2
3
Switch control processor (SCP) card
(DEFGP-AA)
Crossbar switch (CBS) card (54-22116-01)
Clock card (54-22120-01)
Chassis (contains):
•
Fan tray assembly (70-30578-01)4
•
Logic backplane (54-21849-01)
•
Power backplane (54-22138-01)
Front end unit (FEU) (DEFGB-AA)
Front end unit (FEU) (DEFGB-AB)
Power status assembly (PSA) (70-30585-01)
(contains):
•
DEFGB-BA
Power system controller (PSC) card
(54-22132-01)
Power cord (U.S.) (17-00083-42)
Power cord (Non-U.S.)
1 PMD
daughter cards ordered separately as options (Maximum of 4 PMD daughter cards per line card)
2 MMF=multimode
fiber, ANSI=American National Standards Institute, MIC=medium interface connector, and
PMD=physical medium dependent.
3 SMF=single-mode fiber, and PMD=physical medium dependent.
4 Two per chassis
Overview of the GIGAswitch System 1–3
Parts of the GIGAswitch System
Configuration
Used in This
Document
The configuration used in this document is a DEFGA-Bx. The
upper port of the line card is configured as a single-attachment
station (SAS) port, and the lower port of the line card is
configured as a dual-attachment station (DAS) port.§ Multimode
fiber (MMF) ANSI MIC PMD daughter cards are installed in both
ports of the line card.
1
2
mk28176
Number Port Type
SAS Port
Number Port Type
DAS Port
§ Any port on the line card can be configured as either as SAS or a DAS port.
1–4 Overview of the GIGAswitch System
Location of the Modules
Location of the Modules
1
2
mk28107e
Number
Location of the . . .
Logic modules
Cooling and power modules
Overview of the GIGAswitch System 1–5
Description of the Cooling and Power Modules
Description of the Cooling and Power Modules
1
1
2
3
4
mk28107d
Name
Function
Fan tray assembly
Cools the GIGAswitch System. The GIGAswitch System houses
two fan tray assemblies. Each fan tray assembly contains two fans.
Front end unit (FEU)
Converts ac primary power to regulated 48 Vdc power and to 12
Vdc through 26 Vdc power. The regulated 48 Vdc power is used
to energize the discrete power modules located on each logic card.
The 12 Vdc through 26 Vdc power is used to energize the fans.§
Power status assembly
(PSA)
Provides monitoring and control of the cooling and power systems.
Also provides a security keyswitch for in-band or out-of-band
management.
Slot for backup Front
end unit (FEU)
Contains either power supply filler panel or backup FEU
§Another FEU can be installed for redundancy.
Hotswap
Capability
All cooling and power modules can be hotswapped.
1–6 Overview of the GIGAswitch System
Description of the Cooling and Power Modules
LEDs,
Controls, and
Connectors on
the Cooling
and Power
Modules
1
3
2
4
mk28124
Item
Modules
Function
Status LED (amber)
All
Indicates module self-test (MST) failed. §
Status LED (green)
FEU
Indicates MST passed. §
Status LED (red)
PSA
Indicates overtemperature. §
Security switch
(key operated)
Power status
assembly (PSA)
Controls the ability to configure or monitor
the GIGAswitch System with in-band or
out-of-band management commands using
password security. Positions: 1 - No access,
2 - Secure Access, 3 - Normal Access, and 4
- Easy Access.
Power switch
Front end unit
(FEU)
Enables or disables power to the
GIGAswitch System.
Power connector
Front end unit
(FEU)
Provides ac power for the GIGAswitch
System.
§For further information on LED functions refer to Chapter 5
Power Switch
The power switch is located on the FEU. There is no circuit
breaker for overcurrent protection although the modules have
fuses that are not field replaceable units (FRUs).
Overview of the GIGAswitch System 1–7
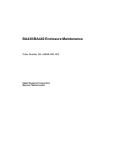
Description of the Logic Modules
Description of the Logic Modules
1
2
3
4
mk28123
Module
Description
Line card
Provides the packet input/output ports for the GIGAswitch System.
Filters selected packets. Directly forwards packets with known
destination addresses. Forwards other packets to the switch
control processor (SCP) for further consideration. §
SCP card
Acts as a switch control processor (SCP) when elected. Forwards
multicast packets and packets with an unknown destination
address. §
Clock card
Provides the clock signals for the GIGAswitch System. Responsible
for the central arbitration for the backplane (BP) bus. Identifies
presence, model number, and type of module in slots 1 through 6,
and 8 through 14. Permanently stores management parameters.
Contains the OBM port. †
CBS card
Houses the crossbar switch chips. Provides interconnection of the
ports on the GIGAswitch System. Allows multiple connections to
exist at the same time. ‡
§Can be installed in slots 1 through 6, and 9 through 14.
†Must be installed in slot 7.
‡Must be installed in slot 8.
Hotswap
Capability
The SCP card can be hotswapped. All other logic modules can
not be hotswapped.
1–8 Overview of the GIGAswitch System
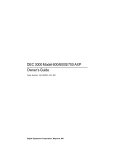
Description of the Logic Modules
LEDs,
Controls, and
Connectors
on the Logic
Modules
1
2
3
4
7
5
6
mk28123a
Item
Modules
Function
All
Indicates power available and MST status.
§
Line card
Indicates status of data port. §
Diagnostic readout
(hexadecimal LED)
SCP card
Indicates coded diagnostic results. §
Reset (push button)
SCP card
Resets the SCP.
PMD daughter card LEDs
Line card
Indicates status of PMD daughter card. §
OBM port
Clock card
Connects serial port of a console or modem
to the GIGAswitch System. Primarily
used for out-of-band management and
diagnostics.
MST LED (amber/green LED)
Status (amber/green LED)
§For further information on LED functions refer to Chapter 5
Overview of the GIGAswitch System 1–9
2
Preparing to Install the System
Chapter
Contents
This chapter describes the procedures that you must complete
prior to installing the GIGAswitch System:
1. Verifying the site preparation
2. Unpacking the system
3. Testing the system modules
4. Preparing the rack
5. Setting up ESD protection
6. Removing the system modules
Preparing to Install the System 2–1
Verifying the Site Preparation
Verifying the Site Preparation
Verify the following requirements are met prior to installing the
GIGAswitch System:
•
Area
•
Cable plant
•
Rack space
Area
Appendix A provides the physical, electrical, and environmental
specifications for the GIGAswitch System.
Cable Plant
The DECconnect System Requirements Evaluation Workbook
contains checklists and additional references used to verify proper
cable plant installation.
2–2 Preparing to Install the System
Verifying the Site Preparation
Rack
A grounded rack 47.5 cm (19 in) wide with 90.0 cm (35.4 in)
contiguous vertical space is required for the installation of the
GIGAswitch System, the lower plenum, and the upper plenum.
The template provided in the rackmount kit is 90.0 cm (35.4 in)
long and can be used to verify the contiguous space.
The spacing between the holes of the rack should comply with
EIA/RETMA standard EIA 310B or one of the metric 25mm
standards (EIA 310-D, IEEE 1301, or IEC-48D) (See the following
figure).
ACCEPTABLE RACK PATTERNS
25.000 mm
.5 in
.625 in
25.000 mm
EIA/RETMA STANDARD
(EIA 310 B)
.625 in
METRIC 25 mm STANDARD
EIA 310–D, IEEE 1301,IEC–48D
Preparing to Install the System 2–3
Unpacking the System
Unpacking the System
Time Required
15 minutes.
Tools Required
•
Procedures
1. Removing the packing material
Band cutter
2. Identifying the contents of the shipping container
3. Testing the modules
2–4 Preparing to Install the System
Unpacking the System
Note
Removing
the Packing
Material
DO NOT remove GIGAswitch System from the pallet.
The pallet will serve as a temporary operational
platform during system module testing.
Step
Action
1
Locate the banding
and the shipping container
.
2
1
mK28119
2
Cut the banding
from the shipping container and the
pallet using a band cutter.
3
Slide the shipping container
up and off the
GIGAswitch System using two people.
4
Remove the packing material, the rack mount kit, and
the accessory kit
5
Remove the shipping bag from the GIGAswitch System.
Preparing to Install the System 2–5
Unpacking the System
Identifying
the Contents
of Shipping
Container
4
1
2
3
mk28118
Number Part Number
Description
17-00083-42
Power cord, term 3-18 SJT or the power
cord from the appropriate country kit §
70-30580-01
Rack mount kit
70-30582-01
Accessory kit
DEFGA-Bx §
GIGAswitch System
§DEFGA-BA includes a power cord, term 3-18 SJT. DEFGA-BB does not include a power
cord, term 3-18 SJT. The customer ordering the DEFGB-BB version must order a country
kit to obtain the proper power cord.
Identifying the
Options
Appendix D provides a description of these options, as well as
where the options should be installed in the GIGAswitch System.
2–6 Preparing to Install the System
Unpacking the System
Identifying the
Contents of the
Rackmount Kit
1
2
3
4
mk28156
Number Part Number
Name
Function
74-45687-01
Upper
plenum
Directs air from the front
of the rack into the top of
the GIGAswitch System
and down through the
GIGAswitch System.
70-30586-01
Lower
plenum (with
brackets)
Supports the
GIGAswitch System
and directs the air
exhausting from the
fans in the GIGAswitch
System to the rear of the
rack.
N/A
Hardware
container
Contains the 18 clip nuts
and 23 screws used to
install the lower plenum,
the GIGAswitch System,
and the upper plenum.
36-40161-01
Template
Used to determine the
location on the rack for
the clip nuts.
Preparing to Install the System 2–7
Unpacking the System
Identifying the
Contents of the
Accessory Kit
1
2
mk28157
Number Part Number
Name
EK-GGGAA-AP
GIGAswitch System Planning
Guide§
EK-GGMGA-MG
GIGAswitch System Manager’s
Guide
§The GIGAswitch System Planning Guide shown in the figure is not currently available.
2–8 Preparing to Install the System
Testing the System Modules
Testing the System Modules
Time Required
5 minutes.
Tools Required
None
Procedures
1. Applying power to the GIGAswitch System
2. Evaluating the results of the MST
Preparing to Install the System 2–9
Testing the System Modules
Applying
Power to the
GIGAswitch
System
Complete the following steps to apply power to the GIGAswitch
System:
Step
Action
1
Locate the power switch,
power connector .
, the power cord §
and the
§Some power cords are shipped separately in country kits
1
3
2
mk28175
Evaluating the
Results of the
MST
2
Place the power switch
3
Plug the power cord
into the power connector
and
then into the connector for the primary power source.
4
Place the power switch
in the 0 (OFF) position.
in the 1 (ON) position.
Observe the operational status of the GIGAswitch System after
the power-on MST is complete. If one or more of the following
conditions exist see Chapter 5. If none of the following conditions
exist see the next section:
•
One or more of the LEDs on the GIGAswitch System remains
solid amber or solid red.
•
None of the LEDs light.
2–10 Preparing to Install the System
Testing the System Modules
Removing
Power from the
GIGAswitch
System
Complete the following steps to remove the power from the
GIGAswitch System:
Step
Action
1
Locate the power switch
and the power connector
1
2
mk28175a
2
3
Place the power switch
4
in the 0 (OFF) position.
Do not remove the power cord from the power connector
. The power cord provides the ground for ESD
protection.
Repeat steps 1 and 2 for any alternate power supply.
Preparing to Install the System 2–11
Preparing the Rack
Preparing the Rack
Time Required
30 minutes.
Tools Required
•
Number 2 cross-point screwdriver
•
Pencil
Procedures
1. Installing the clip nuts
2. Installing the lower plenum
Preparing to Install the System 2–13
Preparing the Rack
Installing the
Clip Nuts
Procedures
1. Marking the position for the clip nuts
2. Attaching the clip nuts
)
Marking
the
Position for the
Clip Nuts
Step
Action
1
Locate the template
and distinguish between the
metric markings , and the RETMA § markings .
2
Locate the front rails
, and the rear rails
§RETMA - Radio Electronics Television Manufacture’s Association
5
4
1
2
3
mk28115
2–14 Preparing to Install the System
.
Preparing the Rack
3
Identify the area in the rack designated for the
GIGAswitch System.
4
Position the template
behind one of the front rails .
Match the markings on the template
to the holes in
rail using one of the following:
•
Metric markings
•
RETMA markings
(open slot) for metric racks.
(closed slot) for RETMA racks.
If the whole template does not fit in the spaced reserved,
move equipment, as necessary, to reserve the additional
space.
5
Mark the position on the front rail
for the two clip
nuts associated with the lower plenum and the six clip
nuts associated with the GIGAswitch System.
6
Repeat steps 4 through 5 for the other front rail
7
Repeat step 4 for a rear rail
8
Mark the position on the inside of the rear rail for the
clip nut associated with the lower plenum bracket.
9
Repeat steps 7 and 8 for the other rear rail
.
.
.
Preparing to Install the System 2–15
Preparing the Rack
Attaching the
Clip Nuts
Complete the following steps to attach the clip nuts to the front
and rear rails of the rack:
Step
Action
1
Locate the clip nuts
rack.
, and the marked holes
on the
1
2
mk28148
2
Place eight clip nuts over the marked holes on the right
front rail of the rack. Orient each clip nut
so the
screw can be installed from the front of the rack, and
press each clip nut onto the marked hole .
3
Repeat step 2 for the left front rail.
4
Place one clip nut over the marked holes on the right
rear rail of the rack. Orient the clip nut
so the screw
can be installed from the front of the rack, and press
each clip nut onto the marked hole .
5
2–16 Preparing to Install the System
Repeat step 4 for the left rear rail.
Preparing the Rack
Installing the
Lower Plenum
Procedures
1. Attaching the lower plenum brackets
2. Attaching the lower plenum
Preparing to Install the System 2–17
Preparing the Rack
Attaching the
Lower Plenum
Bracket
Complete the following steps to attach the lower plenum bracket
to the rear rails of the rack:
Step
Action
1
Locate hole and the attached pin on the rear of the lower
used to
plenum brackets , rear rails , two screws
attach the lower plenum brackets to the rear rails of the
rack, and the clip nuts (not shown) on the rear rails of
the rack.
2
3
2
3
1
mk28167
2
Align the hole and the attached pin of the right lower
plenum bracket
with the corresponding clip nut and
hole on the inside of the rear rail , and insert the pin of
the right lower plenum bracket
into the corresponding
hole in the rack.
3
Attach the right lower plenum bracket to the right rear
rail . Install one screw using a number 2 cross-point
screwdriver.
4
2–18 Preparing to Install the System
Repeat steps 2 and 3 for the left lower plenum bracket
.
Preparing the Rack
Attaching the
Lower Plenum
Complete the following steps to attach the lower plenum to the
rack and to the lower plenum brackets:
Step
Action
1
Locate the lower plenum , the four clip nuts and
associated screws , the right and left lower plenum
bracket , the two screws
used to connect the right
and left lower plenum brackets to the lower plenum
4
1
2
3
2
mk28168
2
Align the holes in the brackets on the lower plenum
with the clip nuts on the front rails of the rack
designated for the lower plenum .
3
Attach the lower plenum
to the front rails of the rack.
Install the four screws
using a number 2 cross-point
screwdriver.
4
5
Attach the lower plenum
. Install the two screws
screwdriver.
to the right plenum bracket
using a number 2 cross-point
Repeat step 4 for the left plenum bracket.
Preparing to Install the System 2–19
Setting Up ESD Protection
Setting Up ESD Protection
Protect the logic module against damage from electrostatic
discharge (ESD) by using:
Using ESD
Equipment
•
Static-free containers for long-term storage.
•
Grounded ESD wrist strap while installing and removing
modules.
•
Grounded ESD mat for tempory storage.
The Portable Static-Dissipative Field Service Kit (Part No.
29-26246) is used to protect ESD sensitive modules against
damage. Complete the following steps to set up and maintain a
static-free area.
Step
Action
1
Ground the unit. The unit is grounded through the
power cord when it is connected between the unit and
the primary power source.
2
Lay out the static-dissipative work surface (ESD mat) on
a flat surface.
3
Connect the ground cord assembly to the ESD mat and
to an unpainted surface on the unit.
4
Wear the ESD wrist strap and attach it to the ground
cord assembly.
2–20 Preparing to Install the System
Removing the System Modules
Removing the System Modules
Warning
Remove all system modules from the unit to make it
light enough for two people to lift the unit.
Caution
Ensure the power cord is connected at both ends to
place the chassis at earth ground potential.
Procedures
1. Removing the logic modules
2. Installing the PMD Daughter Cards
3. Removing the fan tray assemblies
4. Removing the cooling and power moduless
Preparing to Install the System 2–21
Removing the System Modules
Warning
Removing the
Logic Modules
Remove all system modules from the unit to make it
light enough for two people to lift the unit.
Note
The SCP card shown in the figure represents any
logic module since all logic modules are removed in
the same manner
Note
Remove the line card last to make it accessable for
PMD daughter card installation.
Complete the following steps to remove the logic modules from
the GIGAswitch System:
Step
Action
1
Locate the two screws
that fasten the selected module
to the GIGAswitch System and the ejectors used to
seat the module.
3
1
2
1
3
mkv-0281-27
2–22 Preparing to Install the System
Removing the System Modules
1
Set up the ESD equipment.
2
Slip on ESD wrist band.
3
Loosen the upper and lower screws
4
Move the ejectors
from the unit.
5
GENTLY slide the module
6
Place module
7
Place bagged module
on a flat surface or on another
bagged module. The modules can be stacked four
modules high.
8
Repeat steps 3 through 6 to remove the rest of the logic
modules.
.
outward to unseat the module
out of the unit.
in a static proof bag.
Preparing to Install the System 2–23
Installing the PMD Daughter Cards
Installing the PMD Daughter Cards
The following table provides the part numbers for the possible
PMD daughter cards:
Physical Media
PMD Part Number
ANSI Multimode Fiber FDDI
DEFXM-AA
Single-mode Fiber FDDI
DEFXS-AA
Preparing to Install the System 2–25
Installing the MMF ANSI MIC PMD
Installing the MMF ANSI MIC PMD
Note
Unpacking the
PMD
(The extra posts and the PHY M key provided in the
package are not used in this installation. The PHY A
and PHY B keys are used in the DAS configuration
of the ANSI Multimode Fiber FDDI PMD only.
1
Set up the ESD equipment.
2
Slip on ESD wrist band.
3
Unpack the PMD and check the contents against the
packing slip.
2–26 Preparing to Install the System
Installing the MMF ANSI MIC PMD
Note
Installing a
PHY Port Key
This section applies to a dual-attachment station
(DAS) configuration only
The connector on the PMD daughter card is shipped with a
universal (PHY S) key installed. The PHY S key is replaced by a
PHY A key for the PMD daughter card designated for the top slot.
The PHY S key is replaced by a PHY B key for the PMD daughter
card designated for the bottom slot. Complete the following
procedure to replace the PHY keys:
1
2
3
LKG–6937–92I
Step
Action
Release the edge of the PHY key using a thin flat blade
(4.41 mm (3/16 in)) screwdriver
Slide the key forward and remove it.
Tip the replacement key in place and press down.
Preparing to Install the System 2–27
Installing the MMF ANSI MIC PMD
Mounting the
MMF ANSI MIC
PMD
Complete the following steps to install multimode fiber (MMF)
ANSI MIC PMD: daughter cards.
Step
Action
1
Identify the ESD mat , port slot , the two retaining
clips , the PMD daughter card , the brass standoffs
, the bezel , and the collar shroud .
1
4
2
6
7
3
5
Slip on ESD wrist strap and place the line card on
the ESD mat
with the components of the line card
facing up and the top of the line card facing left.
2
Note
Remove the top blank bezel for a SAS configuration.
Remove both the top and the bottom blank bezel for
a DAS configuration.
2–28 Preparing to Install the System
Installing the MMF ANSI MIC PMD
3
Remove the blank bezel. Release the locking tabs on
both sides of the bezel using a screwdriver.
4
Insert the collar shroud
into the port slot
in the
handle of the line card. Orient the open portion of the
in the up position and insert
U shaped collar shroud
the collar shroud into the port slot in the handle of the
line card. Slide the collar shroud into the port slot
in
the handle of the line card until the fingers of the collar
shroud rest against the handle of the line card.
5
Mount the PMD daughter card
containing the
PHY S key or the PHY A key in the upper slot of
the selected port. Orient the PMD daughter card with
the connector facing down and away from the handle of
the line card and position the PMD daughter card over
the line card. Place the collar shroud around the front
of the PMD daughter card. Snap the PMD daughter card
onto the two brass standoffs mounted on the line card,
and then mate the connector by pressing down on the
back of the PMD daughter card.
Note
Ensure the bezel completely surrounds the collar
shroud before snapping the bezel onto the front of
the handle of the line card.
6
Snap the bezel onto the front of the handle of the
line card. Orient the bezel
with the label area facing
the top of the line card.
7
This step is for DAS configuration only. Repeat
steps 4 through 6 to install the PMD daughter card
containing the PHY B key in the lower slot of the
selected port.
8
Place line card in a static proof bag.
9
Place bagged module on a flat surface or on
another bagged module. The modules can be stacked
four modules high.
Preparing to Install the System 2–29
Installing the SMF PMD
Installing the SMF PMD
Note
Unpacking the
PMD
(The extra posts are not used in this installation
1
Set up the ESD equipment.
2
Slip on ESD wrist band.
3
Unpack the PMD and check the contents against the
packing slip.
4
Remove the cable-ties from the coiled cable bundle.
Preparing to Install the System 2–31
Installing the SMF PMD
Prepairing the
SMF PMD
Complete the following steps to prepare single-mode fiber (SMF)
PMD (DEFXS-AA) daughter cards:
Step
Action
1
Identify the receiver cable , the transceiver cable ,
the bezel , the coiled cable bundle , the coiled cable
tie point , the lower port cable-tie anchor mounting
location , and the upper port cable-tie anchor mounting
location .
4
7
6
5
2
1
3
MKV-0281-99
Slip on ESD wrist strap and place the line card
on the ESD mat with the components of the line card
facing up and the top of the line card facing left.
2
Note
Remove the top blank bezel for a SAS configuration.
Remove both the top and the bottom blank bezel for
a DAS configuration.
3
2–32 Preparing to Install the System
Remove the blank bezel. Release the locking tabs on
both sides of the bezel using a screwdriver.
Installing the SMF PMD
Note
The receiver cable is the thin white cable. The
transceiver cable is the thick yellow cable
Mate the connectors of the receiver cable
and the
transceiver cable
to the respective connectors on the
bezel . Orient the bezel
with the label area facing
the top of the line card. Extend the loose ends of the
receiver cable
and the transceiver cable through the
hole in the line card. The receiver cable
will be to the
left and the transceiver cable will be to the right.
4
Caution
Do not exceed the 3" minimum bend diameter when
adjusting coils.
Roughly dress the coiled cable bundle . Equalize
the cables in the coiled cable bundle and dress the coiled
cable bundle to the rear of the PMD daughter card as
shown in the figure.
5
Note
Loosely install the cable-ties to allow for final
dressing of the loops.
6
Install the cable-ties. Wrap one cable-tie around all
the cables in the coiled cable bundle
and attach it
to the PMD daughter card using the after post hole on
the TX side of the PMD daughter card. Wrap the other
cable-tie around all the cables in the coiled cable bundle
and position it near the RX connector.
Preparing to Install the System 2–33
Installing the SMF PMD
Mounting the
SMF PMD
Complete the following steps to mount the single-mode fiber
(SMF) PMD (DEFXS-AA) daughter cards:
Step
Action
1
Identify the receiver cable , the transceiver cable ,
the bezel , the coiled cable bundle , the coiled cable
tie point , the lower port cable-tie anchor mounting
location , and the upper port cable-tie anchor mounting
location .
4
7
6
5
2
1
3
MKV-0281-99
Mount the PMD daughter card. Turn the PMD
daughter over. Orient the PMD daughter card with the
connector facing down and away from the handle of the
line card and position the PMD daughter card over the
line card. Snap the PMD daughter card onto the two
brass standoffs mounted on the line card.
2
Note
Ensure the coiled cable bundle
is clear of the
connector before mating the connector.
2–34 Preparing to Install the System
Installing the SMF PMD
3
Mate the connector by pressing down on the back of
the PMD daughter card.
4
Snap the bezel onto the front of the handle of the
with the label area facing
line card. Orient the bezel
the top of the line card.
5
Dress the cables in the coiled cable bundle and
tighten the cable-ties.
6
Install final cable_tie. If SMF PMD daughter card is
already installed in the port, attach the two coiled cable
bundles together at the tie point shown using a cabletie. If this is the first SMF PMD daughter card to be
installed, mount the cable-tie anchor in the appropriate
position (the position for the upper port or the position
for the lower port ), and attach the coiled cable bundle
to the appropriate cable-tie anchor.
7
This step is for DAS configuration only. Repeat
steps 4 through 6 to install the other PMD daughter
card.
8
Place line card in a static proof bag.
9
Place bagged module on a flat surface or on
another bagged module. The modules can be stacked
four modules high.
Preparing to Install the System 2–35
Installing the SMF PMD
Warning
Removing
the Fan Tray
Assemblies
Remove all system modules from the unit to make it
light enough for two people to lift the unit.
Complete the following steps to remove the fan tray assemblies
from the GIGAswitch System:
Step
Action
1
Locate the two fasteners
that attach the selected fan
to the GIGAswitch System, and the
tray assembly
handle .
2
3
1
mk28152
2
Release the two fasteners
that attach the selected fan
tray assembly to the GIGAswitch System.
3
Grasp the handle
and slide the fan tray assembly
out of the unit enough to see if the fan is rotating.
4
Wait for the fan to stop rotating.
5
Slide the fan tray assembly out of the unit. Grasp the
handle
with one hand and support the bottom of the
fan tray assembly with your other hand.
6
2–36 Preparing to Install the System
Repeat steps 1 through 5 to remove the other fan tray
assembly.
Installing the SMF PMD
Warning
Remove all system modules from the unit to make it
light enough for two people to lift the unit.
Removing the
PSA
Complete the following steps to remove the power status assembly
(PSA).
Step
Action
1
Locate the four screws
that fasten the module to the
GIGAswitch System, the handle
of the module, and
the slot designated for the module.
3
2
1
mk28169
2
Remove the four screws
on the module using a
number 2 cross-point screwdriver.
3
Slide the module out of the unit. Grasp the handle
with one hand and support the bottom of the module
with your other hand. When the module comes to a stop,
lift up to allow it to clear the upper edge of the chassis
and continue removal.
Preparing to Install the System 2–37
Installing the SMF PMD
Warning
Remove all system modules from the unit to make it
light enough for two people to lift the unit.
Caution
Remove FEU after removing all logic modules. The
power cord provides the ground required for ESD
protection.
Removing the
FEU
Complete these steps to remove a front end unit (FEU).
Step
Action
1
Locate the power switch , the power cord , the
four screws
that fasten the selected module to the
of the selected
GIGAswitch System, and the handle
module.
1
4
2
3
mk28175b
2–38 Preparing to Install the System
Installing the SMF PMD
2
Place the power switch
in the O (OFF) position and
remove the power cord from the primary power outlet
and the power connector.
What is Next?
3
Remove the four screws on the module using a number
2 cross-point screwdriver.
4
Slide the module out of the unit. Grasp the handle
with one hand and support the bottom of the module
with your other hand.
5
Repeat steps 1 through 4 to remove the other module if
installed.
Now that you have removed all of the system modules you are
now ready to lift the empty GIGAswitch System onto the lower
plenum. Continue to the next chapter.
Preparing to Install the System 2–39
3
Installing the GIGAswitch System
Note
Complete the procedures described in Chapter 2
before proceeding with this chapter.
Chapter
Contents
This chapter describes the procedures for installing the empty
GIGAswitch System including:
1. Installing the GIGAswitch System in the rack
2. Attaching the upper plenum to the GIGAswitch System
3. Installing the system modules
Installing the GIGAswitch System 3–1
Installing the GIGAswitch System in the Rack
Installing the GIGAswitch System in the Rack
Time Required
45 minutes.
Needed Tools
•
Adjustable wrench
•
Number 2 cross-point screwdriver
•
ESD equipment
Procedures
1. Removing the GIGAswitch System from the pallet
2. Placing the GIGAswitch System on the lower plenum
3. Attaching the GIGAswitch System to the rack
Installing the GIGAswitch System 3–3
Installing the GIGAswitch System in the Rack
Removing the
GIGAswitch
System from
the Pallet
Step
Action
1
Locate the four screws
attaching the brackets to the
attaching the brackets to
pallet, and the six screws
the GIGAswitch System.
1
2
mk28177
2
Loosen the four screws
attaching the brackets to the
pallet using the adjustable wrench.
3
attaching the brackets to the
Remove the six screws
GIGAswitch System using the adjustable wrench.
3–4 Installing the GIGAswitch System
Installing the GIGAswitch System in the Rack
Warning
Placing the
GIGAswitch
System on the
Lower Plenum
The empty GIGAswitch System weighs 31.75 kg (70
lbs). Use two people to lift the unit.
1
mkv-0281-50
Step
Action
1
Lift the empty GIGAswitch System to the height of the
lower plenum in the rack using two people.
2
Gently slide the empty GIGAswitch System
rack, placing it onto the lower plenum.
into the
Installing the GIGAswitch System 3–5
Installing the GIGAswitch System in the Rack
Attaching the
GIGAswitch
System to the
Rack
Step
Action
1
Locate the GIGAswitch System , the 12 clip nuts (not
shown) designated for the GIGAswitch System, and the
12 screws .
1
2
mk28162
2
Align the holes in the GIGAswitch System
corresponding clip nuts on the rack.
3
using a number 2 crossPartially start the 12 screws
point screwdriver beginning with the bottom screws.
4
Finish tightening the 12 screws
cross-point screwdriver.
3–6 Installing the GIGAswitch System
with the
using a number 2
Attaching the Upper Plenum to the GIGAswitch System
Attaching the Upper Plenum to the GIGAswitch System
Step
Action
1
Locate the upper plenum , the four shoulder screws
and the mounting screw .
,
2
mkv-0281-66
3
1
mkv-0281-65
2
Place the upper plenum
on the GIGAswitch System.
Slide the upper plenum in until it catches under the four
shoulder screws .
3
Install the mounting screw to attach the upper plenum
to the GIGAswitch System using a number 2 crosspoint screwdriver.
Installing the GIGAswitch System 3–7
Installing the System Modules
Installing the System Modules
Procedures
1. Installing the FEUs
2. Installing the PSA
3. Installing the fan tray assemblies
4. Installing the logic modules
Installing the GIGAswitch System 3–9
Installing the System Modules
Caution
Install the FEU before installing any logic modules.
The power cord provides the ground required for
ESD protection.
Installing the
FEU
Step
Action
1
Locate the power switch , the power cord , the
four screws
that fasten the selected module to the
GIGAswitch System, and the handle
of the selected
module.
1
4
2
3
mk28175b
2
Align the selected module with the module guides of the
slot designated for the module.
3
Grasp the handle
4
Tighten the four screws
screwdriver.
5
Place the power switch
6
Plug the power cord into the power connector and then
into the connector for the primary power source.
3–10 Installing the GIGAswitch System
and slide the module into the unit.
using a number 2 cross-point
in the 0 (OFF) position.
Installing the System Modules
Installing the
PSA
Step
Action
1
Locate the four screws
that fasten the module to the
of the module, and
GIGAswitch System, the handle
the slot designated for the module.
3
2
1
mk28169
2
Align the module with the module guides of the slot
designated for the module. Lower the rear of the module
slightly to allow the lip on the upper rear edge of the
module to clear the upper edge of the slot
designated
for the module.
3
Slide the module into the unit. Grasp the handle with
one hand and support the bottom of the module with
your other hand.
4
Tighten the four screws
screwdriver.
using a number 2 cross-point
Installing the GIGAswitch System 3–11
Installing the System Modules
Installing
the Fan Tray
Assemblies
Step
Action
1
Locate the two fasteners
that attach the selected fan
to the GIGAswitch System, and the
tray assembly
handle of the selected fan tray assembly.
2
3
1
mk28152
2
Align the fan tray assembly (LED to the upper right of
the handle) with module guides of the slot designated
for fan tray assembly.
3
Slide the fan tray assembly
System.
4
Tighten the two fasteners
5
Repeat steps 1 through 4 to install the other fan tray
assembly.
3–12 Installing the GIGAswitch System
into the GIGAswitch
.
Installing the System Modules
Installing the
Logic Module
Step
Action
1
Locate the screws
that fasten the selected module
to the GIGAswitch System and the ejectors
used to
seat the module.
3
1
2
1
3
mkv-0281-27
2
Remove power and set up the ESD equipment (See
Chapter 6).§
3
Wear the ESD wrist band.
4
Align the module (component side facing right) with the
upper and lower guides, and GENTLY slide the module
into the unit.
5
Move the ejectors
unit.
6
Tighten the upper and lower screws
cross-point screwdriver.
inward to seat the module
in the
using a number 2
§The SCP card can be hotswapped
What is Next
If
Then
Options were ordered
Proceed to Chapter 7
Options were not ordered
Proceed to Chapter 5
Installing the GIGAswitch System 3–13
Part II
Test
Part II contains information for testing the GIGAswitch System:
•
Chapter 4 describes the procedures that you must complete
before testing the GIGAswitch System. These procedures
include preparing the ports, connecting the Out-of-Band
Management (OBM) terminal, and setting the security switch.
•
Chapter 5 describes the procedures for initiating the MSTs
and provides instructions for evaluating the results of the
MSTs.
4
Preparing to Test the System
Chapter
Contents
This chapter describes the following procedures that should be
completed prior to conducting tests on the GIGAswitch System:
1. Connecting the OBM terminal
2. Setting the security switch
Preparing to Test the System 4–1
Connecting the OBM terminal
Connecting the OBM terminal
Complete the following steps to connect an out-of-band management (OBM) terminal to
the OBM port on the clock card: 1
Step
1
Action
Locate the OBM port , the OBM terminal , the modem , remote modem
, remote OBM terminal , and the associated cables , §
§Typical part numbers BC22D-xx, and BC05D-xx respecively where xx = length of cable in feet.
1
2
3
4
7
6
5
mk28151
1
The OBM terminal, and modems meeting CCITT V.32 standards and the
associated cables are supplied by the customer.
4–2 Preparing to Test the System
Connecting the OBM terminal
2
Connect an RS232 cable
to the terminal
3
Install a modem as described in the appropriate modem documentation and
connect the modem to the OBM terminal †.
and to the OBM port
.
4
Have the remote modem
remote site †.
5
Refer to the terminal documentation and set up the terminal as follows.
9600 baud rate
8 bits
no parity
1 stop bit
6
Press
7
Set the security switch position 4 to allow OBM access without password.
Return
or
Ctrl/O
, and the remote OBM terminal
installed at the
to prepare the terminal for out-of-band commands.
†Modem installation only
Preparing to Test the System 4–3
Setting the Security Switch
Setting the Security Switch
The security switch controls the ability to configure or monitor
the GIGAswitch System using in-band § or out-of-band (OBM) †
management commands. The following figure and table identify
the security switch and the positions of the security switch.
mk28109a
Position Function
Out-of-Band
Access Allowed §
In-Band
1
No Access
No
No
2
Secure Access
With password
SNMP get, and getnext protocol data
units (PDUs) only
3
Normal Access
With password
SNMP get, getnext, and set PDU
4
Easy Access
Without password
SNMP get, getnext, and set PDUs
§Security for OBM is set by password. Security for in-band management is set by community and privileged port
designation. Both can be changed using in-band or out-of-band management commands.
What is Next?
You are now ready to initiate and evaluate the MSTs for the units
of the GIGAswitch System. Continue to the next chapter.
§ Issued from any GIGAswitch System management station.
† Issued through the terminal/modem interface for the GIGAswitch System.
4–4 Preparing to Test the System
5
Testing the System
Chapter
Contents
This chapter describes the various screens associated with the
diagnostics mode and the following procedures:
1. Initiating the MST
2. Evaluating the results of the MST
Testing the System 5–1
Diagnostic Mode Screens
Diagnostic Mode Screens
The following figures show the various screens available in
diagnostic mode and their interconnection.
CLK SCREEN PROMPT
CLK>{Ctrl O]
MAIN SCREEN
***GIGAswitch Out−of Band Management***
Copyright (c)1993 Digital Equipment Corporation
Control−D will abort OBM session at any time
Main Menu−
1 Show/Set IP Addresses
2 Show/Modify GIGAswitch Configuration
3 Show/Set Privileged Ports
4 Show/Set Bootserver Ports
5 Set OBM password
6 Dump Mib−2 counters
7 Show forwarding−database entry
8 Do Get/GetNext of MIB variables
9 End this session
Choice
CONFIGURATION MENU
Configuration Menu−
1 Show Box Configuration (fans,power,etc.)
2 Show Slot Configuration
3 Show LAN Addresses
4 Power Up a card
5 Power Down a card
6 Reset Management Memory/Reboot the GIGAswitch
7 Return to Main menu
Choice:
RESET/REBOOT MENU
Reset/Reboot Menu−
1 Reset Management Memory
2 Reboot the GIGAswitch
3 Return to Main menu
Choice:
REBOOT MENU
Reboot Menu−
1 Reboot the GIGAswitch
2 Reboot into diagnostic mode
3 Return to previous menu
Choice:
5–2 Testing the System
Diagnostic Mode Screens
CLK SCREEN PROMPT
CLK>
9
^O
End Session
MAIN SCREEN
2 Show/Modify GIGAswitch Configuration
Choice
2
7
CONFIGURATION MENU
Configuration Menu−
6 Reset Management Memory/Reboot the GIGAswitch
Choice:
6
3
RESET/REBOOT MENU
Reset/Reboot Menu−
2 Reboot the GIGAswitch
Choice:
2
Yes
REBOOT MENU
Reboot Menu−
2 Reboot into diagnostic mode
Choice:
3
2
CLK DIAGNOSTIC DISPATCHER
Sonoma Clk Crd BIST V1.2 Defaults:/BEll/Halt/Pass=1/Skip
Valid Commands:CLrDEfaultDUmpExitHelpListPEekPOkeRunSeqXDs
Diag_v2.1>
E
DI
TERMINAL PROTOCOL MODE
CLK MMCLI accessed using ’Exit’ from Diagnostics
R
Calling MMCLI. Nonfatal Status = 00000000
Yes MMCLI>:
CH"n"
^D
FGL (or SCP) DIAGNOSTIC DISPATCHER
Sonoma Clk Crd BIST V1.2 Defaults:/BEll/Halt/Pass=1/Skip
Valid Commands:CLrDEfaultDUmpExitHelpListPEekPOkeRunSeqXDs
Diag_S.03>
Testing the System 5–3
Help Screens
Help Screens
The following figures describe the commands available in the
diagnostic dispatcher and the terminal protocol modes.
TERMINAL PROTOCOL MODE
MCCLI>Help
CH[annel]n
CL[ear]
DI[ag_Dispat]
DO[wnline_load]
Help
O[per_Firmware]
PS[C]
PO[werup_rslts]
R[eset_Clock
T[ime]
V[ersions]
Make connection to Module n, n=1 to 6, 9 to 14
Clears the terminal screen
Return to the Diagnostic Dispatcher
Update of non−bootblock firmware
This help message
Call the Operational Firmware (does not return)
Transparant access to PSC
Powerup execution results
Reset the Clock Module
Read/Update the Clock Module’s Real Time Clock
Bootblock and Hardware Versions
MCCLI>
FGL (OR SCP) DIAGNOSTIC DISPATCHER
Diag_v2.1>Help
Clear
Clear the Non−Volatile error log
DEfault
Set default switches and update header
DUmp
Dump the Non−Volatile error log
Exit
Exit to Terminal Protocol Mode
Help
Display this help screen
LIst [start_id][end_id][seq_mask] Run range of tests with sequence mask
Run [start_id][end_id][sesq_mask] Run range of tests bybe,sord or longwords
Sequence [seq_mask]
Run all tests with sequence mask
XDs
Jump to XDS application
SWITCHES:/Bell/NOBel/NB
Bell or no bell on error
SWITCHES:/Continue/Halt LOop Continue, halt, or loop error
SWITCHES:/INHIBIT_A/IA
Inhibit all output except summaries
SWITCHES:/NOInhibit/NI
Don’t inhibit any output
SWITCHES:/Pass=n
Repeat length for run, Seq
SWITCHES:/Ski/NOSkip/NS
Skip or don’t skip over tests on error
Diag_v2.1>
5–4 Testing the System
Initiating the MST
Initiating the MST
The following methods are used to initiate the module self-test
(MST).
•
Applying power to the GIGAswitch System
•
Rebooting the GIGAswitch System
•
Running MST in diagnostic mode
Testing the System 5–5
Initiating the MST
Applying
Power to the
GIGAswitch
System
Complete the following steps to apply power to the GIGAswitch
System:
Step
Action
1
Locate the power switch,
power connector .
, the power cord §
and the
§Some power cords are shipped separately in country kits
1
3
2
mk28175
5–6 Testing the System
2
Place the power switch
3
Plug the power cord
into the power connector
and
then into the connector for the primary power source.
4
Place the power switch
in the 0 (OFF) position.
in the 1 (ON) position.
Initiating the MST
Rebooting the
GIGAswitch
System
The following contains the displays and selections required to
reboot the GIGAswitch System from the OBM terminal. To
initiate an OBM session apply power to the OBM terminal or
press ctrl-O .§
CLK>[Control−O}
***GIGAswitch Out−of−Band Management***
Copyright (c) 1993 Digital Equipment Corporation
Contros−D will abort OBM session at any time
Main Menu −
2 Show/Modify GIGAswitch Configuration
Choice 2
Configuration Menu−
6 Reset Management Memory/Reboot the GIGAswitch
Choice: 6
Reset/Reboot Menu−
2 Reboot the GIGAswitch
Choice: 2
WARNING: This will terminate your OBM session and REBOOT the GIGAswitch.
Do you really want to do this? (yes/no)): yes
Reboot Menu−
1 Reboot the GIGAswitch
Choice: 1
CLK>
Action
Results
Look for operational
firmware prompt CLK
Type
Main Menu appears§
Ctrl/O
Type 2 to select Show
/Modify GIGAswitch
Configuration
Configuration Menu appears
Type 6 to select Reset
Management/Reboot the
GIGAswitch
Reset/Reboot Menu appears
Type 2 to select Reboot the
GIGAswitch
WARNING: . . . (yes/no) appears
Type yes
Reboot Menu appears
Type 1 to select Normal
Reboot
CLK appears
§If an error message appears, set the security switch to position 4 and try again.
§ If power has already been applied the Main Menu will be present.
Testing the System 5–7
Initiating the MST
Running
the MST in
Diagnostic
Mode
Rebooting into
Diagnostic
Mode
The following methods are used to enter diagnostic mode:
•
Rebooting into diagnostic mode - preferred
•
Installing the maintenance jumper - alternate
The following contains the displays and selections required to
reboot the GIGAswitch System from the OBM terminal into
diagnostic mode. To initiate an OBM session apply power to the
OBM terminal or press ctrl-O .§
CLK>[Control−O}
***GIGAswitch Out−of−Band Management***
Copyright (c) 1993 Digital Equipment Corporation
Contros−D will abort OBM session at any time
Main Menu −
2 Show/Modify GIGAswitch Configuration
Choice 2
Configuration Menu−
6 Reset Management Memory/Reboot the GIGAswitch
Choice: 6
Reset/Reboot Menu−
2 Reboot the GIGAswitch
Choice: 2
WARNING: This will terminate your OBM session and REBOOT the GIGAswitch.
Do you really want to do this? (yes/no)): yes
Reboot Menu−
2 Reboot into diagnostic mode
Choice: 2
Sonoma Clk Crd BIST V1.2 Defaults:/BEll/Halt/Pass=1/Skip
Valid Commands:CLrDEfaultDUmpExitHelpListPEekPOkeRunSeqXDs
Diag_v2.1>
Action
Results
Look for operational
firmware prompt CLK
CLK appears
Type Ctrl/O
Main Menu appears
Type 2 to select Show
/Modify GIGAswitch
Configuration
Configuration Menu appears
Type 6 to select Reset
Management/ Reboot the
GIGAswitch
Reset/Reboot Menu appears
Type 2 to select Reboot the
GIGAswitch
WARNING: . . . (yes/no) appears
Type yes
Reboot Menu appears
Type 2 to select Reboot
into diagnostic mode
CLK diagnostic dispatcher menu and prompt appears
§ If power has already been applied the Main Menu will be present.
Testing the System 5–9
Initiating the MST
Installing the
Maintenance
Jumper
An SCP card must be operational to enter an OBM mode of
operation. Using a maintenance jumper allows entry into the
OBM maintenance mode without an operational SCP.
The following figure and table describe how to enter the OBM
maintenance mode using a maintenance jumper.
1
Number Description
Slot 6
Maintenance jumper
Slot 7
5–10 Testing the System
2
3
Initiating the MST
Action
Results
Primary power switch
placed in O position
Power removed from unit
Access the maintenance
connector
Cards removed from slots 6 and 7
Install maintenance
jumper
Jumper installed as shown
Install cards in slots 6 and
7
Cards reinstalled
Primary power switch
placed in the (1)(ON)
position
CLK diagnostic dispatcher menu and prompt appears
Testing the System 5–11
Testing Procedures
Testing Procedures
Module self-tests (MSTs) are initiated when power is applied or
when the system is rebooted. See MST summary to interpret the
results of the MSTs.
The diagnostic mode can be used to run selected tests multiple
times to isolate intermittent faults. (See example on the next
page). When the fault is identified Repeat the MSTs to ensure
that all faults have been corrected.
Example
of Using
Diagnostic
Mode
The following figure is an example of using the diagnostic mode
to isolate an intermittent fault in the clock module. Complete
navigational information for the diagnostic mode is also provided.
For a list of available tests for a given module type "li" at the
Diagnostic Dispatcher prompt.
Description of
Example
After rebooting into diagnostic mode and entering the CLK
Diagnostic Dispatcher mode the following line was entered to
set the number of passes from 1 to 10 and to inhibit all outputs
except the summaries. Since the module will be replaced if any
test fails, it is not necessary to see the other displays.
After setting the default switches, test 101 was run 10 times. The
summary indicates the results of the test.
A line card or an SCP card can be tested using the same
commands once the Diagnostic Dispatcher mode for that card is
entered.
5–12 Testing the System
Testing Procedures
CLK SCREEN PROMPT
CLK>
9
^O
End Session
MAIN SCREEN
2 Show/Modify GIGAswitch Configuration
Choice
2
7
CONFIGURATION MENU
Configuration Menu−
6 Reset Management Memory/Reboot the GIGAswitch
Choice:
6
3
RESET/REBOOT MENU
Reset/Reboot Menu−
2 Reboot the GIGAswitch
Choice:
2
Yes
REBOOT MENU
Reboot Menu−
2 Reboot into diagnostic mode
Choice:
3
2
CLK DIAGNOSTIC DISPATCHER
Sonoma Clk Crd BIST V1.2 Defaults:/BEll/Halt/Pass=1/Skip
Valid Commands:CLrDEfaultDUmpExitHelpListPEekPOkeRunSeqXDs
Diag_v2.1>DE/pass=10/IA
Diag_v2.1>r101
Sequence Summary Report
Runs: 10
Passes: 10
Failures: 0
%Pass: 100
Testing the System 5–13
Meaning of LEDs
Meaning of LEDs
This section identifies each LED on the logic module and describes
its purpose:
•
Line card
•
SCP card
•
Clock card
•
CBS card
Line Card LEDs
3
4
1
2
mk28108
Event
Number Event
1
SCP card applies
power to line card
LED Condition
Meaning
Both port LEDS
amber, PMD FRU
LED
and PMD
PHY LEDS
out
Port LEDs
operational
Flashing amber
MST in progress
Line card LED
solid green
MST passed
are
2
Line card MST
Line card LED
solid amber or out
MST failed
Testing the System 5–15
Meaning of LEDs
SCP Card LEDs
and Control
1
2
3
mk28110
Number Item
Function
Module LED
(Amber/green LED)
Indicates power available and MST status.
Diagnostic Readout
(Hexadecimal LED)
Indicates coded diagnostic results.
Reset (push button)
Resets the SCP.
5–16 Testing the System
Meaning of LEDs
SCP HEX LED
Table
The following table further identifies the purpose of the SCP
LEDs.
Meaning
Number/Event
LED
1/SCP card startup
Amber
Out
MST has not passed.
2/Startup complete
Solid amber LED
F
Startup complete
3/SCP card MST
Flashing amber
Test number
updated
MST in progress
Solid green
B
MST passed, SCP card in
backup mode
Solid amber or out
Solid number
MST failed
Solid green
E
Elected switch control
processor
4/SCP election
5/Downline load
Condition
HEX LED
Condition
Solid green
Test passed
Solid amber
Test failed
Solid green
D
New firmware images are
being loaded into the flash
memory during a firmware
upgrade.
Solid green
Alternating D/E
Corrupt image detected
during system boot. SCP
continues to try to retrieve
a good image from the
bootserver.
Testing the System 5–17
Meaning of LEDs
Clock Card
LEDs
1
MK28132
5–18 Testing the System
Event
Number Event
LED
1
Clock card startup
Solid amber
After reset,
MST has
not passed
2
Clock card MST
Flashing amber
MST in
progress
Solid green
MST
passed
Solid amber
MST failed
Condition
Meaning
Meaning of LEDs
CBS LEDs
1
mk28133
Event
Number Event
LED
1
Flashing amber
Test in progress
Solid green
Test passed
Solid amber
Test failed
Clock card tests the
CBS card
Condition
Meaning
Testing the System 5–19
Meaning of LEDs
Logic Module
LED Summary
The following figures and tables identify each indicator and the
meaning of its various conditions.
5
3
6
7
4
1
5–20 Testing the System
2
mk28123b
Meaning of LEDs
Number/Name
/PMD FRU
Condition
Off = PMD OK and fully operational or no power
Steady amber = PMD loop test failure (defective PMD FRU)
/PMD PHY
Off = no power.
Steady amber = Link confidence test (LCT) failure
Flashing amber = Topology reject
Steady green = Connection accepted
Flashing green = Awaiting a connection
Flashing amber/green = Stand by (dual-homing)
/Line card
Off = No power or with port LEDs off and PMD daughter card LEDs on,
card is not fully seated or in process of being removed.
Steady amber = MST failure or fatal firmware error.
Flashing amber = MST in progress (Wait).
Steady green = MST passed.
Flashing green = Firmware down-line load (DLL) in progress - will flash
at 1/2 second intervals.
Flashing amber/green = Non-fatal firmware error.
/Port
Off = No power or with port LEDs off and PMD daughter card LEDs on,
card is not fully seated or in process of being removed.
Steady amber = MST failure in this port
Flashing amber = MST in progress (wait)
Steady green = MST passed, port active and in forwarding state.
Flashing green = MST passed, port in backup , preforwarding state, or
station management is off.
/SCP card
Off = No power or severe fault
Steady amber = MST failure
Flashing amber = MST in progress (Wait)
Steady green with B or E in HEX LED = MST passed
Steady green with D in HEX LED = Downline load in progress
Steady green with alternating D/E in HEX LED = Corrupt image detected
during downline load. Retrying
/Clock card
Steady amber = MST failure
Flashing amber = MST in progress
Steady green = MST passed
/CBS card
Steady amber = MST failure
Flashing amber = MST in progress
Steady green = MST passed
Testing the System 5–21
Meaning of LEDs
Cooling and
Power Modules
LED Summary
4
1
6
2
5
3
mk28124a
Number/Name
Condition
/Front end unit
(FEU)
Steady amber = MST failure
/Front end unit
(FEU) OK
Steady green = MST passed
/AC power
Off = power is not available for FEU circuit breaker
On = power is available for FEU circuit breaker
/Fan tray
assembly fault
Off = MST passed
Steady amber = MST failure
/System
temperature fault
Steady Red = system temperature fault
Off = system temperature normal
/PSC card Fault
Off = MST passed
Steady amber = MST failure
5–22 Testing the System
Part III
Service
Part III contains information for replacing the field replaceable
units (FRUs)
•
Chapter 6 describes the procedures you must complete
before replacing the GIGAswitch System modules. Failure to
perform these procedures can result in harm to personnel or
equipment. These procedures include setting up electrostatic
discharge (ESD) protection, evaluating the need for power
removal, and for applying power.
•
Chapter 7 describes the procedures for replacing the cooling
and power modules and the logic modules. Cooling and power
modules include modules of the fan tray assembly, front end
unit (FEU), power status assembly (PSA) , and power system
controller (PSC) families. Logic modules include modules of
the line card, physical medium dependent (PMD) daughter
card, switch control processor (SCP), clock card, and crossbar
switch (CBS) families.
•
Chapter 8 describes the procedures for removing the
GIGAswitch System.
•
Chapter 9 describes the procedures for replacing the logic and
power backplanes after all the modules have been removed
from the selected backplane.
6
Preparing to Replace Modules
Chapter
Contents
This chapter lists the prerequisites for replacing the GIGAswitch
System modules and describes the following procedures:
•
Setting up ESD protection
•
Removing power from the system
Preparing to Replace Modules
6–1
Prerequisites for Replacing GIGAswitch System Modules
Prerequisites for Replacing GIGAswitch System Modules
GIGAswitch System modules include the following:
Logic Modules
•
Logic modules
•
Cooling and power modules
The following figure and associated table summarize the
prerequisites for removing logic modules. They identify slot
limitations, which modules must be removed prior to performing
the replacement procedure for the desired module, and whether or
not power must be removed or ESD equipment used.
1
2
3
4
mk28123
Number
Not
Shown
Module
ESD
Required?
Power
Removed?
Slot
Limitations? Other Modules Removed?
Line card
Yes
Yes
1 through 6,
9 through
14
None
SCP card
Yes
No
1 through
6,9 through
14
None
Clock card
Yes
Yes
7
None
CBS card
Yes
Yes
8
None
Logic
backplane
Yes
Yes
N/A
All logic modules §.
§The GIGAswitch System will also have to be removed from the rack prior to logic backplane replacement if the rear of
the rack is not accessible.
6–2 Preparing to Replace Modules
Setting Up ESD Protection
Setting Up ESD Protection
Protect the logic module against damage from electrostatic
discharge (ESD) by using:
Using ESD
Equipment
•
Static-free containers for long-term storage.
•
Grounded ESD wrist strap while installing and removing
modules.
•
Grounded ESD mat for tempory storage.
The Portable Static-Dissipative Field Service Kit (Part No.
29-26246) is used to protect ESD sensitive modules against
damage. Complete the following steps to set up and maintain a
static-free area.
Step
Action
1
Ground the unit. The unit is grounded through the
power cord when it is connected between the unit and
the primary power source.
2
Lay out the static-dissipative work surface (ESD mat) on
a flat surface.
3
Connect the ground cord assembly to the ESD mat and
to an unpainted surface on the unit.
4
Wear the ESD wrist strap and attach it to the ground
cord assembly.
Preparing to Replace Modules
6–3
Removing Power
Removing Power
Complete the following steps to remove the power from the
GIGAswitch System:
Step
Action
1
Locate the power switch
and the power connector
1
2
mk28175a
2
3
Place the power switch
4
6–4 Preparing to Replace Modules
in the 0 (OFF) position.
Do not remove the power cord from the power connector
. The power cord provides the ground for ESD
protection.
Repeat steps 1 and 2 for any alternate power supply.
7
Replacing Modules
Caution
Read Chapter 6 before attempting to replace any
module in the GIGAswitch System.
Chapter
Contents
This chapter describes the following procedures for replacing the
GIGAswitch System:
•
Replacing a logic module
•
Replacing a PMD daughter card
•
Replacing a blank handle
•
Replacing a fan tray assembly
•
Replacing a FEU
•
Replacing a power supply filler panel
•
Replacing a PSA
•
Replacing a PSC card
Replacing Modules 7–1
Replacing a Logic Module
Replacing a Logic Module
Note
Appendix D contains the recommended location for
the modules.
Complete the following steps to replace a logic module:
1. Remove power and set up the ESD equipment. See Chapter 6
§.
2. Wear the grounded ESD wrist band.
3. Unpack the replacement module. Leave the module in the
ESD bag.
4. Place the ESD bagged replacement module on a flat surface.
5. Place the empty container on the ESD mat.
6. Remove the module to be replaced from the chassis. See the
procedure in Removing the Logic Module.
7. Place the module to be replaced in the empty container.
8. Remove the replacement module from the ESD bag.
9. Install the replacement module in the chassis. See the
procedure in Installing the Logic Module.
10. Remove the module to be replaced from the container and
place it in the ESD bag.
11. Place the ESD bagged module in the container.
12. Remove the ESD wrist band.
§ The SCP card can be hotswapped
7–2 Replacing Modules
Replacing a Logic Module
Removing the
Logic Module
The following procedure describes how to remove the logic
module. See Replacing a Logic Module for the complete
replacement procedure:
Step
Action
1
Locate the two screws
that fasten the selected module
to the GIGAswitch System and the ejectors
used to
seat the module.
3
1
2
1
3
mkv-0281-27
2
Remove power and set up the ESD equipment (See
Chapter 6).§
3
Slip on ESD wrist band
4
Loosen the upper and lower screws
5
Move ejectors outward to unseat logic module
unit.
6
GENTLY slide the module
.
from the
out of the unit.
§The SCP card can be hotswapped
Replacing Modules 7–3
Replacing a Logic Module
Installing the
Logic Module
The following procedure describes how to install the logic module.
See Replacing a Logic Module for the complete replacement
procedure:
Step
Action
1
Locate the screws
that fasten the selected module
to the GIGAswitch System and the ejectors
used to
seat the module.
3
1
2
1
3
mkv-0281-27
2
Remove power and set up the ESD equipment (See
Chapter 6).§
3
Wear the ESD wrist band.
4
Align the module (component side facing right) with the
upper and lower guides, and GENTLY slide the module
into the unit.
5
Move the ejectors
unit.
6
Tighten the upper and lower screws
cross-point screwdriver.
inward to seat the module
§The SCP card can be hotswapped
What is Next
7–4 Replacing Modules
Proceed to Chapter 5 to test the system.
in the
using a number 2
Replacing the PMD Daughter Cards
Replacing the PMD Daughter Cards
The following table provides the part numbers for the possible
PMD daughter cards:
Physical Media
PMD Part Number
ANSI Multimode Fiber FDDI
DEFXM-AA
Single-mode Fiber FDDI
DEFXS-AA
Replacing Modules 7–5
Removing the MMF ANSI MIC PMD
Removing the MMF ANSI MIC PMD
Complete the following steps to remove the multimode fiber
(MMF) ANSI MIC PMD:
Step
Action
1
Identify the ESD mat , port slot , the two retaining
clips , the PMD daughter card , the brass standoffs
, the bezel , and the collar shroud .
1
4
2
6
7
3
7–6 Replacing Modules
5
Removing the MMF ANSI MIC PMD
2
Remove the line card that will contain the new PMD
daughter card from the unit. See Removing the Logic
Module
3
Place the line card on the ESD mat
with the
components of the line card facing up and the top of the
line card facing left.
4
Unsnap the bezel from the front of the handle of
the line card. Access the retaining clips from the back of
the line card handle, release the retaining clips , and
separate the PMD blank cover from the line card.
5
Remove the collar shroud
the handle of the line card.
6
Remove the PMD daughter card
from the line
card. Mate the connector by lifting up on the back of the
PMD daughter card, and then unsnap the PMD daughter
card from the two brass standoffs mounted on the line
card.
from the port slot
in
7
Install new PMD daughter card or blank PMD
cover. To install a blank PMD cover snap the PMD
cover into the selected port slot. To install a new PMD
daughter card see the appropriate installation procedure
for the PMD daughter card concerned.
8
Install the line card in the unit. See Installing the
Logic Module.
Replacing Modules 7–7
Installing the MMF ANSI MIC PMD
Installing the MMF ANSI MIC PMD
Note
Unpacking the
PMD
(The extra posts and the PHY M key provided in the
package are not used in this installation. The PHY A
and PHY B keys are used in the DAS configuration
of the ANSI Multimode Fiber FDDI PMD only.
1
Set up the ESD equipment.
2
Slip on ESD wrist band.
3
Unpack the PMD and check the contents against the
packing slip.
Replacing Modules 7–9
Installing the MMF ANSI MIC PMD
Mounting the
MMF ANSI MIC
PMD
Complete the following steps to install multimode fiber (MMF)
ANSI MIC PMD: daughter cards.
Step
Action
1
Identify the ESD mat , port slot , the two retaining
clips , the PMD daughter card , the brass standoffs
, the bezel , and the collar shroud .
1
4
2
6
7
3
2
5
Slip on ESD wrist strap and place the line card on
the ESD mat
with the components of the line card
facing up and the top of the line card facing left.
Note
Remove the top blank bezel for a SAS configuration.
Remove both the top and the bottom blank bezel for
a DAS configuration.
7–10 Replacing Modules
Installing the MMF ANSI MIC PMD
3
Remove the blank bezel. Release the locking tabs on
both sides of the bezel using a screwdriver.
4
Insert the collar shroud
into the port slot
in the
handle of the line card. Orient the open portion of the
in the up position and insert
U shaped collar shroud
the collar shroud into the port slot in the handle of the
line card. Slide the collar shroud into the port slot
in
the handle of the line card until the fingers of the collar
shroud rest against the handle of the line card.
5
Mount the PMD daughter card
containing the
PHY S key or the PHY A key in the upper slot of
the selected port. Orient the PMD daughter card with
the connector facing down and away from the handle of
the line card and position the PMD daughter card over
the line card. Place the collar shroud around the front
of the PMD daughter card. Snap the PMD daughter card
onto the two brass standoffs mounted on the line card,
and then mate the connector by pressing down on the
back of the PMD daughter card.
Note
Ensure the bezel completely surrounds the collar
shroud before snapping the bezel onto the front of
the handle of the line card.
6
Snap the bezel onto the front of the handle of the
line card. Orient the bezel
with the label area facing
the top of the line card.
7
This step is for DAS configuration only. Repeat
steps 4 through 6 to install the PMD daughter card
containing the PHY B key in the lower slot of the
selected port.
8
Place line card in a static proof bag.
9
Place bagged module on a flat surface or on
another bagged module. The modules can be stacked
four modules high.
Replacing Modules 7–11
Removing the SMF PMD Daughter Card
Removing the SMF PMD Daughter Card
Complete the following steps to remove the single-mode fiber
(SMF) PMD (DEFXS-AA) daughter card:
Step
Action
1
Identify the ESD mat , port slot , the two retaining
clips , the PMD daughter card , the brass standoffs
, the bezel , the receiver cable
and the transceiver
cable .
1
4
7
2
8
6
3
5
7–12 Replacing Modules
Removing the SMF PMD Daughter Card
2
Remove the line card that will contain the new PMD
daughter card from the unit. See Removing the Logic
Module.
3
Place the line card on the ESD mat
with the
components of the line card facing up and the top of the
line card facing left.
4
Cut the cable-tie that connects the coiled cable bundles
the cable-tie anchor or to another PMD.
5
Unsnap the bezel from the front of the handle of
the line card. Access the retaining clips from the back of
the line card handle, release the retaining clips , and
separate the PMD blank cover from the line card.
6
Disconnect the connectors of the receiver cable and
the transceiver cable from the respective connectors on
the bezel.
7
Remove the PMD daughter card
from the line
card. Break the connection by lifting up on the back
of the PMD daughter card, and then unsnap the PMD
daughter card from the two brass standoffs
mounted
on the line card.
8
Install new PMD daughter card or blank PMD
cover. To install a blank PMD cover snap the PMD
cover into the selected port slot. To install a new PMD
daughter card see the appropriate installation procedure
for the PMD daughter card concerned.
9
Install the line card in the unit. See Installing the
Logic Module.
Replacing Modules 7–13
Installing the SMF PMD
Installing the SMF PMD
Note
Unpacking the
PMD
(The extra posts are not used in this installation
1
Set up the ESD equipment.
2
Slip on ESD wrist band.
3
Unpack the PMD and check the contents against the
packing slip.
4
Remove the cable-ties from the coiled cable bundle.
Replacing Modules 7–15
Installing the SMF PMD
Prepairing the
SMF PMD
Complete the following steps to prepare single-mode fiber (SMF)
PMD (DEFXS-AA) daughter cards:
Step
Action
1
Identify the receiver cable , the transceiver cable ,
the bezel , the coiled cable bundle , the coiled cable
tie point , the lower port cable-tie anchor mounting
location , and the upper port cable-tie anchor mounting
location .
4
7
6
5
2
1
3
MKV-0281-99
2
Slip on ESD wrist strap and place the line card
on the ESD mat with the components of the line card
facing up and the top of the line card facing left.
Note
Remove the top blank bezel for a SAS configuration.
Remove both the top and the bottom blank bezel for
a DAS configuration.
3
7–16 Replacing Modules
Remove the blank bezel. Release the locking tabs on
both sides of the bezel using a screwdriver.
Installing the SMF PMD
Note
The receiver cable is the thin white cable. The
transceiver cable is the thick yellow cable
Mate the connectors of the receiver cable
and the
transceiver cable
to the respective connectors on the
bezel . Orient the bezel
with the label area facing
the top of the line card. Extend the loose ends of the
receiver cable
and the transceiver cable through the
hole in the line card. The receiver cable
will be to the
left and the transceiver cable will be to the right.
4
Caution
Do not exceed the 3" minimum bend diameter when
adjusting coils.
Roughly dress the coiled cable bundle . Equalize
the cables in the coiled cable bundle and dress the coiled
cable bundle to the rear of the PMD daughter card as
shown in the figure.
5
Note
Loosely install the cable-ties to allow for final
dressing of the loops.
6
Install the cable-ties. Wrap one cable-tie around all
the cables in the coiled cable bundle
and attach it
to the PMD daughter card using the after post hole on
the TX side of the PMD daughter card. Wrap the other
cable-tie around all the cables in the coiled cable bundle
and position it near the RX connector.
Replacing Modules 7–17
Installing the SMF PMD
Mounting the
SMF PMD
Complete the following steps to mount the single-mode fiber
(SMF) PMD (DEFXS-AA) daughter cards:
Step
Action
1
Identify the receiver cable , the transceiver cable ,
the bezel , the coiled cable bundle , the coiled cable
tie point , the lower port cable-tie anchor mounting
location , and the upper port cable-tie anchor mounting
location .
4
7
6
5
2
1
3
MKV-0281-99
2
Mount the PMD daughter card. Turn the PMD
daughter over. Orient the PMD daughter card with the
connector facing down and away from the handle of the
line card and position the PMD daughter card over the
line card. Snap the PMD daughter card onto the two
brass standoffs mounted on the line card.
Note
Ensure the coiled cable bundle
is clear of the
connector before mating the connector.
7–18 Replacing Modules
Installing the SMF PMD
3
Mate the connector by pressing down on the back of
the PMD daughter card.
4
Snap the bezel onto the front of the handle of the
with the label area facing
line card. Orient the bezel
the top of the line card.
5
Dress the cables in the coiled cable bundle and
tighten the cable-ties.
6
Install final cable_tie. If SMF PMD daughter card is
already installed in the port, attach the two coiled cable
bundles together at the tie point shown using a cabletie. If this is the first SMF PMD daughter card to be
installed, mount the cable-tie anchor in the appropriate
position (the position for the upper port or the position
for the lower port ), and attach the coiled cable bundle
to the appropriate cable-tie anchor.
What is Next
7
This step is for DAS configuration only. Repeat
steps 4 through 6 to install the other PMD daughter
card.
8
Place line card in a static proof bag.
9
Place bagged module on a flat surface or on
another bagged module. The modules can be stacked
four modules high.
Proceed to Chapter 5 to test the system.
Replacing Modules 7–19
Replacing a Blank Handle
Replacing a Blank Handle
Removing a
Blank Handle
Complete the following steps to remove a blank handle from the
GIGAswitch System:
Step
Action
1
Locate the screws
that fasten the selected blank
to the GIGAswitch System, the
guide pins,
handle
and the EMI shield .
1
3
2
4
1
mk28106
Caution
Be careful not to damage the EMI shield.
7–20 Replacing Modules
2
Loosen the upper and lower screws that fasten the
selected blank handle to the system
using a number 2
cross-point screwdriver.
3
Lift the blank handle
System.
away from the GIGAswitch
Replacing a Blank Handle
Installing a
Blank Handle
Complete the following steps to install a blank handle:
Step
Action
1
Locate the screws
that fasten the selected blank
handle
to the GIGAswitch System, the guide pins
and the EMI shield .
,
1
3
2
4
1
mk28106
Caution
Be careful not to damage the EMI shield.
2
Align the upper and lower guide pins
on the blank
handle (EMI shield
facing left) with the associated
holes in the card cage.
3
Tighten the upper and lower screws
cross-point screwdriver.
using a number 2
Replacing Modules 7–21
Replacing a Fan Tray Assembly
Replacing a Fan Tray Assembly
Removing
the Fan Tray
Assemblies
Warning
Remove all system modules from the unit to make it
light enough for two people to lift the unit.
Complete the following steps to remove the fan tray assemblies
from the GIGAswitch System:
Step
Action
1
Locate the two fasteners
that attach the selected fan
tray assembly
to the GIGAswitch System, and the
handle .
2
3
1
mk28152
2
Release the two fasteners
that attach the selected fan
tray assembly to the GIGAswitch System.
3
Grasp the handle
and slide the fan tray assembly
out of the unit enough to see if the fan is rotating.
4
Wait for the fan to stop rotating.
5
Slide the fan tray assembly out of the unit. Grasp the
handle
with one hand and support the bottom of the
fan tray assembly with your other hand.
6
7–22 Replacing Modules
Repeat steps 1 through 5 to remove the other fan tray
assembly.
Replacing a Fan Tray Assembly
Installing
the Fan Tray
Assemblies
Complete the following steps to install the fan tray assemblies in
the GIGAswitch System:
Step
Action
1
Locate the two fasteners
that attach the selected fan
to the GIGAswitch System, and the
tray assembly
handle of the selected fan tray assembly.
2
3
1
mk28152
2
Align the fan tray assembly (LED to the upper right of
the handle) with module guides of the slot designated
for fan tray assembly.
What is Next
3
Slide the fan tray assembly
System.
4
Tighten the two fasteners
5
Repeat steps 1 through 4 to install the other fan tray
assembly.
into the GIGAswitch
.
Proceed to Chapter 5 to test the system.
Replacing Modules 7–23
Replacing a FEU
Replacing a FEU
Removing the
FEU
Complete these steps to remove a front end unit (FEU).
Step
Action
1
Locate the power switch , the power cord , the
four screws
that fasten the selected module to the
of the selected
GIGAswitch System, and the handle
module.
1
4
2
3
mk28175b
2
Place the power switch
in the O (OFF) position and
remove the power cord from the primary power outlet
and the power connector.
7–24 Replacing Modules
3
Remove the four screws on the module using a number
2 cross-point screwdriver.
4
Slide the module out of the unit. Grasp the handle
with one hand and support the bottom of the module
with your other hand.
Replacing a FEU
Installing the
FEU
Complete the following steps to install the front end units (FEUs):
Step
Action
1
Locate the power switch , the power cord , the
four screws
that fasten the selected module to the
of the selected
GIGAswitch System, and the handle
module.
1
4
2
3
mk28175b
2
Align the selected module with the module guides of the
slot designated for the module.
3
Grasp the handle
4
Tighten the four screws
screwdriver.
5
Place the power switch
6
Plug the power cord into the power connector and then
into the connector for the primary power source.
7
Repeat steps 1 through 6 for the remaining FEU.
and slide the module into the unit.
using a number 2 cross-point
in the 0 (OFF) position.
Replacing Modules 7–25
Replacing a Power Supply Filler Panel
Replacing a Power Supply Filler Panel
Removing a
Power Supply
Filler Panel
Complete the following steps to remove a power supply filler
panel:
Step
Action
1
Locate the screws
that fasten the power supply filler
panel to the GIGAswitch System.
2
1
mk28153
7–26 Replacing Modules
2
Remove the two upper and the two lower screws
a number 2 cross-point screwdriver.
3
Lift the power supply filler panel
GIGAswitch System.
away from the
using
Replacing a Power Supply Filler Panel
Installing a
Power Supply
Filler Panel
Complete the following steps to install a power supply filler panel:
Step
Action
1
Locate the screws
that fasten the power supply filler
panel to the GIGAswitch System.
2
1
mk28153
3
Align the power supply filler panel with the associated
holes in the system.
4
Tighten the 2 upper and 2 lower screws
number 2 cross-point screwdriver.
using a
Replacing Modules 7–27
Replacing a PSA
Replacing a PSA
Removing the
PSA
Complete the following steps to remove the power status assembly
(PSA).
Step
Action
1
Locate the four screws
that fasten the module to the
of the module, and
GIGAswitch System, the handle
the slot designated for the module.
3
2
1
mk28169
7–28 Replacing Modules
2
Remove the four screws
on the module using a
number 2 cross-point screwdriver.
3
Slide the module out of the unit. Grasp the handle
with one hand and support the bottom of the module
with your other hand. When the module comes to a stop,
lift up to allow it to clear the upper edge of the chassis
and continue removal.
Replacing a PSA
Installing the
PSA
Complete the following steps to install the power status assembly
(PSA).
Step
Action
1
Locate the four screws
that fasten the module to the
of the module, and
GIGAswitch System, the handle
the slot designated for the module.
3
2
1
mk28169
2
Align the module with the module guides of the slot
designated for the module. Lower the rear of the module
slightly to allow the lip on the upper rear edge of the
module to clear the upper edge of the slot
designated
for the module.
What is Next
3
Slide the module into the unit. Grasp the handle with
one hand and support the bottom of the module with
your other hand.
4
Tighten the four screws
screwdriver.
using a number 2 cross-point
Proceed to Chapter 5 to test the system.
Replacing Modules 7–29
Replacing a PSC Card
Replacing a PSC Card
Complete the following procedures to replace a power system
controller (PSC) card:
1. Remove the PSA
2. Remove the PSC card
3. Install the PSC card
4. Install the PSA
7–30 Replacing Modules
Replacing a PSC Card
Removing the
PSA
Complete the following steps to remove the power status assembly
(PSA).
Step
Action
1
Locate the four screws
that fasten the module to the
of the module, and
GIGAswitch System, the handle
the slot designated for the module.
3
2
1
mk28169
2
Remove the four screws
on the module using a
number 2 cross-point screwdriver.
3
Slide the module out of the unit. Grasp the handle
with one hand and support the bottom of the module
with your other hand. When the module comes to a stop,
lift up to allow it to clear the upper edge of the chassis
and continue removal.
Replacing Modules 7–31
Replacing a PSC Card
Removing the
PSC Card
Once the power status assembly (PSA) has been removed,
complete the following steps to remove the power system
controller (PSC):
Step
1
Action
Locate the PSC card , the PSA , and the two cables
connecting the PSC card
to the PSA , and the
standoffs .
3
4
2
1
mk28155
2
Unplug the two cables
3
Unsnap the PSC card
from the standoffs
on the
PSA , and pull the PSC card
away from the PSA.
from the PSC card
.
7–32 Replacing Modules
Replacing a PSC Card
Installing a
PSC Card
Complete the following steps to install a power system controller
(PSC):
Step
1
Action
Locate the PSC card , the PSA , and the two cables
connecting the PSC card
to the PSA , and the
standoffs .
3
4
2
1
mk28155
2
Align the holes in the PSC card
with the standoffs on
the PSA
and snap the PSC card
onto the standoffs
.
Note
The bottom connector has 5 wires, the top
connector has 4 wires and the top three pins remain
disconnected.
3
Starting from the bottom pin on the connector, plug the
two cables
from the PSA
onto the PSC card
as
shown in the figure.
Replacing Modules 7–33
Replacing a PSC Card
Installing the
PSA
Complete the following steps to install the power status assembly
(PSA).
Step
Action
1
Locate the four screws
that fasten the module to the
of the module, and
GIGAswitch System, the handle
the slot designated for the module.
3
2
1
mk28169
2
Align the module with the module guides of the slot
designated for the module. Lower the rear of the module
slightly to allow the lip on the upper rear edge of the
module to clear the upper edge of the slot
designated
for the module.
What is Next
7–34 Replacing Modules
3
Slide the module into the unit. Grasp the handle with
one hand and support the bottom of the module with
your other hand.
4
Tighten the four screws
screwdriver.
using a number 2 cross-point
Proceed to Chapter 5 to test the system.
8
Removing the System from the Rack
Warning
Chapter
Contents
Remove all system modules from the unit to make
it light enough for two people to lift the unit. See
Chapter 7 for removal procedures
This chapter describes the following procedures that should be
completed to remove the GIGAswitch System in the rack.
1. Removing the upper plenum
2. Detaching the empty GIGAswitch System from the rack
Time Required
45 minutes.
Needed Tools
You will need the following tools:
•
Number 2 cross-point screwdriver
•
ESD equipment
•
Static proof containers for modules
Removing the System from the Rack 8–1
Removing the Upper Plenum
Removing the Upper Plenum
Complete the following steps to remove the upper plenum:
Step
Action
1
Locate the upper plenum , the four shoulder screws
and the mounting screw .
,
2
mkv-0281-66
3
1
mkv-0281-65
2
Remove the mounting screw
that attaches the upper
plenum
to the GIGAswitch System using a number 2
cross-point screwdriver.
3
Pull the upper plenum away from the rack.
8–2 Removing the System from the Rack
Removing the Upper Plenum
Detaching the Empty GIGAswitch System from the Rack
Complete the following steps to detach the GIGAswitch System
from the rack:
Step
Action
1
Locate the GIGAswitch System
.
, and the twelve screws
1
2
mk28162
2
Remove 12 screws
screwdriver.
using a number 2 cross-point
Removing the System from the Rack 8–3
Lowering the Empty GIGAswitch System
Lowering the Empty GIGAswitch System
Warning
The Empty GIGAswitch System weighs 31.75 kg. Use
two people to lift the unit.
Complete the following procedure to lower the GIGAswitch
System:
1
mkv-0281-50
1
Pull the empty GIGAswitch System away from the rack.
2
Lower the empty GIGAswitch System and place it on a
flat surface.
8–4 Removing the System from the Rack
9
Replacing Backplanes
Caution
Chapter
Contents
Read Chapter 6 before attempting to replace a logic
or power backplane, as described in this chapter.
Note
The modules from the selected backplane should
have already been removed (see Chapter 7) for to
remove the modules
This chapter describes the procedures for replacing the logic and
power backplanes.
Time Required
60 minutes.
Tools Required
•
Number 2 cross-point screwdriver
•
Thin flat blade (4.41 mm (3/16 in)) screwdriver
•
Accessing the backplanes
•
Replacing the logic backplane
•
Replacing the power backplane
•
Restoring the system
Procedures
Replacing Backplanes 9–1
Accessing the Backplanes
Accessing the Backplanes
This section contains the following procedures:
•
Removing the back door
•
Installing the back door
Replacing Backplanes 9–3
Accessing the Backplanes
Removing the
Back Door
Complete the following steps to remove the back door from the
GIGAswitch System:
Step
Action
1
Locate the 10 screws
that fasten the back door to
used to
the GIGAswitch System and the lower lip
remove the back door.
1
3
2
9–4 Replacing Backplanes
mkv-0281-59
2
Loosen the 10 screws
several turns using a number 2
cross-point screwdriver.
3
Grasp the lower lip
and pull the back door up far
enough to clear the keyhole slots in the back door.
4
Pull the back door away from the GIGAswitch System
.
Accessing the Backplanes
Installing the
Back Door
Complete the following steps to install the back door on the
GIGAswitch System:
Step
Action
1
Locate the screws
that fasten the back door to the
GIGAswitch System , and the back door .
1
3
2
2
mkv-0281-59
Align the keyslots on the back door
with the ten
screws on the GIGAswitch System and press down.
3
Tighten the ten screws
screwdriver.
using a number 2 cross-point
Replacing Backplanes 9–5
Replacing the Power Backplane
Replacing the Power Backplane
Removing the
Back Door
Removing
the Power
Backplane
Remove the back door (see Accessing the Backplanes )
Complete the following steps to remove the power backplane from
the GIGAswitch System.
Step
Action
1
Locate the four screws
that fasten the power
to the GIGAswitch System, and the three
backplane
cables used to connect the power backplane with the
logic backplane and with the fan tray assemblies.
2
1
9–6 Replacing Backplanes
mkv-0281-60
Replacing the Power Backplane
4
3
mk28161
2
Unplug the three cables . Remove the two fan tray
assembly cables with the Molex type connectors (squeeze
tab) and remove the backplane end. Remove the D
connector on the power backplane to backplane bulkhead
by loosening the two screws and pulling away from the
backplane using a thin flat blade (4.41 mm (3/16 in))
screwdriver.
3
using a number 2 cross-point
Remove the four screws
screwdriver. Remove the three bottom screws first and
then remove the top screw.
4
Drop the top back and lift the power backplane away
from the GIGAswitch System.
Replacing Backplanes 9–7
Replacing the Power Backplane
Installing
the Power
Backplane
Complete the following steps to install the power backplane onto
the GIGAswitch System:
Step
Action
1
Locate the four screws
that fasten the power
to the GIGAswitch System, and the three
backplane
cables used to connect the power backplane with the
logic backplane and with the fan tray assemblies.
2
1
9–8 Replacing Backplanes
mkv-0281-60
Replacing the Power Backplane
4
3
mk28161
Installing the
Back Door
2
Insert the bottom of the power backplane (lift the cables
out of the way) and place the power backplane on the
upper and lower alignment pins.
3
Install the four screws
using a number 2 cross-tip
screwdriver. Install the top screw first, then install the
bottom three screws.
4
Install the three cables . Install the two fan tray
assembly cables. Install the power backplane to the
bulkhead cable and tighten the two screws.
Remove the back door (see Accessing the Backplanes )
Replacing Backplanes 9–9
Replacing the Logic Backplane
Replacing the Logic Backplane
Removing the
Back Door
Removing
the Logic
Backplane
Remove the back door (see Accessing the Backplanes )
Complete the following steps to remove the logic backplane from
the GIGAswitch System:
Step
1
Action
Locate the six screws
that fasten the logic backplane
to the GIGAswitch System, and the cable
used
to interconnect the logic backplane with the power
backplane.
1
2
3
mkv-0281-28
Caution
Hold the backplane in place while removing the
screws.
9–10 Replacing Backplanes
Replacing the Logic Backplane
2
Disconnect, unplug, and remove the cable assembly .
Loosen the two screws on each connector (backplane and
chassis sides) using a thin flat blade (4.41 mm (3/16 in))
screwdriver.
3
Remove the six screws
using a number 2 cross-point
screwdriver. Remove the three lower screws first, then
remove the three upper screws.
4
Lift the logic backplane away from the GIGAswitch
System. Rotate the backplane slightly (right side
turning inward and the left side turning outward during
removal).
Replacing Backplanes 9–11
Replacing the Logic Backplane
Installing
the Logic
Backplane
Step
1
Action
Locate the screws
that fasten the logic backplane
to the GIGAswitch System, and the cables
used
to connect the logic backplane
with the fan tray
assemblies.
1
2
3
mkv-0281-28
9–12 Replacing Backplanes
Replacing the Logic Backplane
Installing the
Back Door
2
Insert the lower edge of the backplane behind the power
connector and into the lower right corner of unit.
3
Install the six screws (three upper and three lower)
(1) using a number 2 cross-point screwdriver. Install
the three upper screws first, then install the three lower
screws.
4
Install the cable assembly . Plug in the connector and
tighten the two screws using a thin flat blade (4.41 mm
(3/16 in)) screwdriver.
Remove the back door (see Accessing the Backplanes )
Replacing Backplanes 9–13
Restoring the System
Restoring the System
Complete the following procedures to restore the system:
•
Install the modules in the selected backplane (See Chapter 7).
Replacing Backplanes 9–15
Part IV
Reference
Part IV contains reference information.
•
Appendix A provides the physical, electrical, and
environmental specifications for the GIGAswitch System.
•
Appendix B describes the cooling and power modules in the
fan tray assembly, FEU, PSA, and the PSC card families.
•
Appendix C describes the logic modules in the line card,
physical medium dependent (PMD) daughter card, SCP card,
CBS card, and clock card families.
•
Appendix D provides guidelines for installing additional logic
modules.
A
GIGAswitch System Specifications
This appendix provides the specifications for the GIGAswitch
System. These specifications include:
•
Physical specifications for the GIGAswitch System.
•
Electrical specifications for the GIGAswitch System.
•
Environmental specifications for the GIGAswitch System.
GIGAswitch System Specifications A–1
Physical Dimensions of the GIGAswitch System
Physical Dimensions of the GIGAswitch System
The following table shows the physical specifications for the
GIGAswitch System. Allow 90.0 cm (35.4 in) contiguous vertical
space for the installation of the GIGAswitch System, the lower
plenum, and the upper plenum. (Physical Specifications)
Parameter
Mounting type
Height
Width
Depth
Weight
Operation clearance (front)
Operation clearance (rear)
Operation clearance (side)
Service clearance (front)
Service clearance (rear)
Service clearance (side)
Service clearance (top)
Shipping height§
Shipping width§
Shipping depth§
Shipping weight§
Min
–
–
–
–
–
–
–
–
51
2.0
76
3.0
0
0
914
36.0
914
36.0
0
0
0
0
–
–
–
–
–
–
–
–
Typ
Max
Rack Mounted
896.2
–
35.25
–
507
–
19.95
–
495
–
19.50
–
87.1
–
192
–
–
–
–
–
–
–
–
–
–
–
–
–
–
–
–
–
–
–
–
–
–
–
–
–
–
–
–
–
1283
–
50.5
–
–
26.0
–
–
32.0
–
99.8
120
220
264
Units
Symbol
–
millimeters
inches
millimeters
inches
millimeters
inches
kilogams
pounds
millimeters
inches
millimeters
inches
millimeters
inches
millimeters
inches
millimeters
inches
millimeters
inches
millimeters
inches
millimeters
inches
millimeters
inches
millimeters
inches
kilograms
pounds
–
mm
in
mm
in
mm
in
kg
lb
mm
in
mm
in
mm
in
mm
in
mm
in
mm
in
mm
in
mm
in
mm
in
mm
in
kg
lbs
§Shipping for standard shipping container
GIGAswitch System Specifications A–3
Electrical Information
Electrical Information
AC Input Power
Requirements
The following table shows the ac input power requirements for
the GIGAswitch System.
Parameter
Min
Typ
Max
Units
Symbol
Nominal Voltage
Operational Voltage Range
Nominal Frequency
Frequency Range
Number of Phases
120V Single Phase Input
Current (Steady State)
120V Single Phase Input
Current (Neutral N)
120V Single Phase Input
Current (Ground G)
240V Single Phase Input
Current (Steady State)
240V Single Phase Input
Current (Neutral N)
240V Single Phase Input
Current (Ground G)
Ride-Through Time
Inrush Current
Start-Up Current
Start-Up Current Duration
Power Consumption
Apparent Power
Power Factor
Crest Factor
–
93
–
47
–
–
120
–
50/60
–
1
8.0
–
264
–
63
–
15
volts
volts
hertz
hertz
none
amperes
V
V
Hz
Hz
NA
A
–
4.0
7.5
amperes
A
–
1.0
–
milliamperes
mA
–
4.0
7.5
amperes
A
–
4.0
7.5
amperes
A
–
1.0
–
milliamperes
mA
100
–
–
–
–
–
–
–
–
–
–
–
800
1052
.95
1.37
–
n/a
n/a
n/a
1250
1316
–
–
milliseconds
amperes peak
rms amperes
seconds
watts
volt amperes
none
none
ms
A
A
s
W
VA
PF
CF
Power Cord
Types
The following table lists the power cords used in the various
country kits available with the GIGAswitch System.
Country
Part Number
Country
Part Number
Denmark
UK/Ireland
Italy
Switzerland
BN16A-2E
BN12A-2E
BN17A-2E
BN14A-2E
Israel
Central Europe
Austraila
New Zealand
BN18W-2E
BN13A-2E
BN22C-2E
BN22C-2E
Line cords are 2.5 meters in length. Use different outlets and
services breakers for redundant power supplies.)
A–4 GIGAswitch System Specifications
Electrical Information
DC Power
Requirements
The following table shows the DC power requirements for the
GIGAswitch System.
Parameter
Power Consumption
Current at
48 Vdc
Current at
12-26 Vdc
DC voltage
range (48
Vdc)
DC voltage
range (12Vdc
- 26 Vdc)
Output Watts Available
Current
available at
48 Vdc
Current
available at
11-27.1 Vdc
Min
Typ
Max
Units
Symbol
–
–
640
12
1000
20
watts
amperes
W
A
—
3.6
5.0
amperes
A
46.32
–
49.68
volts
Vdc
11.0
–
27.1
volts
Vdc
–
–
–
–
1000
22.
watts
amperes
W
A
—
–
1.5-5.0
amperes
A
GIGAswitch System Specifications A–5
Environmental Information
Environmental Information
Parameter
Min
Typ
Max
Units
Symbol
Temperature (Operating)
10
50
–
–
–
1.8
35
95
–
°C
°F
°C/km
–
1.0
–
-40
–
66
degrees Celsius
degrees Fahrenheit
degrees Celsius per
kilometer
degrees Fahrenheit per
1000 feet
degrees Celsius
-40
-40
-40
10
–
–
–
–
151
66
151
90
°F
°C
°F
%RH
<50
–
95
<50
–
95
–
–
25
degrees Fahrenheit
degrees Celsius
degrees Fahrenheit
percent relative humidity
(noncondensing)
percent relative humidity
(noncondensing)
percent relative humidity
(noncondensing)
degrees Celsius
–
–
–
–
77
146
degrees Fahrenheit
degrees Celsius
°F
°C
–
2
–
–
115
–
degrees Fahrenheit
degrees Celsius
°F
°C
–
1250
4265
2400
8000
4900
16000
10+3
degrees Fahrenheit
watts
Btu/hr
meters above sea level
feet above sea level
meters above sea level
feet above sea level
milliseconds
°F
W
Btu/hr
m
ft
m
ft
ms
10g
500
gravities
hertz
G
Hz
29.2
milliseconds
ms
Level
–
13.67
300
gravities
hertz
G
Hz
–
.029
gz/hz
–
Bels
B
Altitude derating
Temperature
(Nonoperating)
Temperature (Storage)
Relative Humidity
(Operating)
Relative Humidity
(Nonoperating)
Relative Humidity
(Storage)
Maximum Wet Bulb
Temperature (Operating)
Maximum Wet Bulb
Temperature (Storage)
Minimum Dew Point
Temperature (Operating)
Heat Dissipation
Altitude (Operating)
Altitude (Nonoperating)
Mechanical Shock
(Operating)
36
–
–
–
–
–
–
Vibration Freq Range
(Operating)
Vibration Level
(Operating)
Mechanical Shock
(Nonoperating)
5
Vibration Freq Range
(Nonoperating)
Vibration Level
(Nonoperating)
Acoustic Emission
(Operating)
10
–
800
2730
–
–
–
–
Duration
Level
–
.010.25g
in DB
Duration
1.40g
–
A–6 GIGAswitch System Specifications
°F/1000
ft
°C
%RH
%RH
°C
peak
Environmental Information
Parameter
Min
Acoustic Emission (LNPE)
–
Acoustic Emission (LPA)
–
Acoustic Emission (Idle
–
/Standby)
Acoustic Emission (LNPE)
–
Acoustic Emission (LPA)
–
Airflow Intake Location
Airflow Exhaust Location
Ventilation
EMI
Susceptibility
Typ
Max
Units
Symbol
5.9
46
–
–
–
decibels
decibels
Bels
dBA
dBA
B
decibels
decibels
dBA
dBA
5.9
46
–
–
Top-Front
Bottom Rear
The GIGAswitch System cooling system is designed to be tolerant
of various rack installation configurations. However, to provide
adequate ventilation:
•
Do not block off the inlet air vents (upper grilles).
•
Do not block off the outlet air vents (lower grilles).
•
Do not allow the cooling air entering the GIGAswitch System
to rise above 32°C (90°F).
The following table shows the electromagnetic interference (EMI)
susceptibility for the GIGAswitch System.
Parameter
Broadband Conducted EMI
Class A
Narrowband Conducted
Transients
Frequency
Range
V rms into
50 ohms
Frequency
Range
Level
Narrowband Radiated
Susceptibility
ESD Control
Maximum
Units
Symbol
Composite
(FCC/VDE)
-3db
10KHZ to
30MHZ
3VRMS
Volts dbuv
dbuv
kilohertz,
megahertz
Volts
kHz, MHz
kilohertz,
megahertz
Volts per
Meter
kilovolts
kHz, MHz
.01MHZ1GHZ
5 Volts/M
15KV
V
V/m
kV
GIGAswitch System Specifications A–7
B
Cooling and Power Modules
This appendix provides a description of the cooling and power
modules belonging to the following families:
•
Fan tray assembly
•
Front end unit (FEU)
•
Power status assembly (PSA)
•
PSC card
Cooling and Power Modules B–1
Fan Tray Assembly
Fan Tray Assembly
The fan tray assembly (70-30578-01) is a member of the fan
tray assembly family of cooling modules. The fan tray assembly
contains two 5.75 inch fans used to provide convective cooling to
the GIGAswitch System. These variable speed fans are controlled
by the PSC card based on ambient temperature.
Air Flow
The air above the GIGAswitch System is drawn from the front
of the GIGAswitch System, directed on the modules inside the
GIGAswitch System, and exhausted from the bottom rear of the
GIGAswitch System.
LED Meaning
The following figure identifies the LEDs on the fan tray assembly.
1
mk28111
Number/Name
Condition
/Fan tray
assembly fault
Off = MST passed
Steady Amber = MST failure
B–2 Cooling and Power Modules
FEU
FEU
The front end unit (FEU) (DEFGB-AB) is a member of the FEU
family of power modules.
Function
Front end unit (FEU) converts primary AC power to system 48
Vdc and to 12 Vdc through 26 Vdc fan power. The FEU also
houses the system circuit breaker.
LEDs
The following figure identifies the LEDs on the FEU.
1
2
3
mk28112
Number/Name
Condition
/Front end unit
(FEU)
Steady Amber = MST failure
/Front end unit
(FEU) OK
On Green = MST passed
/AC Power
Off = Power NOT available for FEU circuit breaker
On = Power is available for FEU circuit breaker
Cooling and Power Modules B–3
PSA
PSA
Description
The power status assembly (PSA) (70-30585-01) is a member of
the FEU family of power modules.
Function
The PSA houses the security switch and the PSC card.
Security Switch
The security switch controls the ability to configure or monitor
the GIGAswitch System using in-band § or out-of-band (OBM)
† management commands. The following table identifies the
various positions of the security switch.
Position Name
Function
Access Allowed? §
Out-of-Band
In-Band
1
1
No Access
No
No
2
2
Secure Access
With password
SNMP Get, and
getnext PDUs only
3
3
Normal Access
With password
SNMP Get,
getnext, and set
PDU
4
4
Easy Access
Without password
SNMP Get,
getnext, and set
PDUs
§Security for out-of-band management is set by password. Security for in-band management is set by community and
privileged port designation. Both can be changed using in-band or out-of-band management commands.
PSC
The PSC card is an FRU that is mounted on the PSA.
LED Testing
All LEDs are lit for one second during start-up to ensure that the
LEDs are operational. After start-up only those LEDs indicating
faults remain lit.
§ Issued from any GIGAswitch System management station.
† Issued through the terminal/modem interface for the GIGAswitch System.
B–4 Cooling and Power Modules
PSA
LED Meaning
The following figure and associated table identify the security
switch and the LEDs on the PSA.
1
2
3
mk28109
Number/Name
/PSC card Fault
Condition
Off = MST passed
Steady Amber = MST failure
/System
temperature fault
Steady Red = System temperature fault
Off = System temperature normal
Cooling and Power Modules B–5
PSC Card
PSC Card
The power system controller (PSC) card (54-22132-01) is a
member of the FEU family of power modules.
The PSC card is a module that snaps onto standoffs on the PSA.
The PSC card automatically plugs into the power backplane when
the PSA is installed in the GIGAswitch System.
Function
The PSC card is that portion of the GIGAswitch System that
controls and monitors the redundant 48 Vdc power supplies, and
the fan tray assemblies. The PSC card reports the operational
status of the monitored units to the clock card.
The PSC card performs the following functions:
Description
•
MST diagnostics, and fan tests at start-up.
•
Temperature and fan speed monitoring.
•
Fan speed control to minimize audible noise and to insure
sufficient cooling.
•
Power and cooling system status, configuration and fault
reporting by way of the serial bus to the clock card.
•
Power failure early warning signaling to the clock card.
•
Power and cooling system LED LEDs on/off control.
•
System security key switch monitoring.
The following figure shows the physical characteristics of the PSC
card.
mkv-0281-63
B–6 Cooling and Power Modules
C
Logic Modules
This appendix describes of the logic modules belonging to the
following families:
•
Line card
•
PMD daughter card
•
SCP card
•
Clock card
•
CBS card
Logic Modules C–1
Line Card
Line Card
The 2-port FDDI line card (DEFGL-AA) is a member of the line
card family of logic modules.
Hotswap
Capability
The line card can not be replaced without removing the power
from the system.
Function
The line card performs bridge forwarding functions, including
packet filtering, assisting in learning, and determining the correct
output data link to which a packet should be forwarded. Packets
with unknown destinations, multicast packets, or exceptions are
sent to the switch control processor (SCP).
The line card implements two fully independent FDDI forwarding
bridge ports and interfaces these ports to the CBS card. Either or
both ports may be configured in a single-attachment station (SAS)
or a dual-attachment station (DAS) mode.
Each of the two line card ports is capable of processing over
430,000 FDDI packets per second while the maximum connection
rate from the line card to the CBS card is over 500,000
connections per second.
1
2
mk28176
Number Port Type
SAS Port
C–2 Logic Modules
Number Port Type
DAS Port
Line Card
LEDs on Line
Card
The following figure identifies the LEDs and connectors on the
line card and the associated PMD daughter cards.
3
4
1
2
mk28108
Logic Modules C–3
Line Card
LED Meaning
Number/Name
/PMD FRU LED
The following table provides the meaning for the line card LEDs .
OFF
Amber
PMD OK
and fully
operational
or no power.
Steady - PMD
loop test failed
(defective PMD
FRU)
Steady Reserved
Indication
Green
Green/Amber
Flashing Reserved
Flashing Reserved
Flashing Reserved
/PMD PHY LED
/Line card LED
/Port LED
C–4 Logic Modules
No power or
severe fault
No power or
with port LEDs
off and PMD
daughter card
LEDs on, card
is not fully
seated or in
process of being
removed.
No power or
or with port
LEDs off and
PMD daughter
card LEDs on,
card is not fully
seated or in
process of being
removed.
Steady - Link
confidence test
(LCT) failure
Steady Connection
accepted
Flashing Topology reject
Flashing Awaiting a
connection
Steady - MST
failed or fatal
firmware error.
Steady - MST
passed
Flashing - MST
in progress
(wait)
Steady - MST
failure in this
port,
Flashing - MST
in progress
(Wait)
Flashing Firmware
down-line
load (DLL)
in progress
- will flash
at 1/2 second
intervals.
Steady - MST
passed, port
active and in
forwarding
state.
Flashing MST passed,
port in backup,
preforwarding
state or station
management is
off.
Flashing - Standby
(dual-homing)
Flashing - Nonfatal firmware
error.
Flashing Reserved
PMD Daughter Cards
PMD Daughter Cards
The line card can have up to four physical medium dependent
(PMD) daughter cards installed as independent field replaceable
units (FRUs). The PMD daughter card houses a PMD option §
Each PMD daughter card contains a PMD FRU LED and a PMD
PHY LED.
The following figure and table identify the various PMD options.
Name
Part Number
Loopback
PMD
Description
Single-Mode
Fiber
12-34685-01
12-34830-01
FC-to-FC
ANSI
Multimode Fiber
BN24B-xx §
12-32005-01
FDDI-to-FDDI
ANSI
Multimode Fiber
BN24D-xx §
12-32005-01
FDDI-to- 2.5 mm ST-type
Blank PMD
Bezel
§xx = cable length in meter (See Fiber Distributed Data Interface Media Connection Information).
1
2
3
MK28171
§ Typical PMD options include multimode fiber (MM), and single-mode fiber
(SM)
Logic Modules C–5
SCP Card
SCP Card
The switch control processor (SCP) card (DEFGP-AA) is a member
of the SCP card family of logic modules.
Application
The most common application for the SCP card is to serve as
the System Control Processor (SCP) for the GIGAswitch System.
During system initialization, an election takes place in software
to assign one SCP card the role of primary SCP. If other switch
engines are installed, they might be used by the system as backup
SCPs for redundancy.
SCP Function
The SCP function includes central functions such as initialization,
remote management, and control of services (such as bridging)
that are distributed across modules.
One of the major bridging services is to send and receive packets
that cannot be handled by the line cards. The SCP card sends
and receives packets for these purposes, among others:
C–6 Logic Modules
•
Exchanging intraswitch control packets between SCPs and
line cards, including background monitor (keep-alive packets,
address learning packets for transparent bridging, and packets
to read or set management parameters.
•
Forwarding multicast packets to an SCP by each line card.
The primary SCP uses special resources in the system to
broadcast each packet to the proper set of outbound line-card
ports and other switch engines.
•
Interpreting network control packets diverted from line cards.
•
Acting as a station on the network and emitting packets for
remote management the GIGAswitch System.
SCP Card
SCP Card LEDs
and Control
1
2
3
mk28110
Number Item
Function
Module LED
(Amber/green LED)
Indicates power available and MST status.
Diagnostic Readout
(Hexadecimal LED)
Indicates coded diagnostic results.
Reset (push button)
Resets the SCP.
Logic Modules C–7
SCP Card
SCP HEX LED
Table
The following table further identifies the purpose of the SCP
LEDs.
Meaning
Number/Event
LED
1/SCP card startup
Amber
Out
MST has not passed.
2/Startup complete
Solid amber LED
F
Startup complete
3/SCP card MST
Flashing amber
test number
updated
MST in progress
Solid green
B
MST passed, SCP card in
backup mode
Solid amber or out
solid number
MST failed
4/SCP election
Solid green
E
Elected switch control
processor
5/Downline load
Solid green
D
New firmware images are
being loaded into the flash
memory during a firmware
upgrade.
Solid green
Alternating D/E
Corrupt image detected
during system boot. SCP
continues to try to retrieve
a good image from the
bootserver.
C–8 Logic Modules
Condition
HEX LED
Condition
Solid green
Test passed
Solid amber
Test failed
Clock Card
Clock Card
The clock card (54-22120-01) is a member of the clock card
family of logic modules. The clock card must be included in any
GIGAswitch System configuration.
Application
The clock card performs the following functions:
•
Clock generation and distribution
•
Arbitration
•
Terminal or modem interface
•
PSC card interface
•
PSC card power source
Clock
Generation and
Distribution
The clock card generates master system clocks and distributes
them through the backplane to each of the line card and the SCP
card. This allows resources associated with the backplane (in
particular the CBS card and the Backplane bus) to be used in a
synchronous and efficient manner.
Arbitration
The clock card also arbitrates access to the backplane bus to grant
ownership of the potential users in a fair manner.
Terminal
or Modem
Interface
The clock card provides the GIGAswitch System user with a
standard terminal or modem interface conforming to RS232
specifications, and compatible with RS423. The interface can
be used to connect a terminal to GIGAswitch System for local
management and diagnostic purposes. Full modem support is also
provided for remote maintenance and diagnostic support.
User specific parameters, such as baud rates, stop bits, parity,
data length and so forth are stored locally on the clock card in
nonvolatile (FLASH) memory.
PSC Card
Interface
Line Card
Monitoring and
Power Control
The clock card receives environmental status from the PSC card
when requested. This status includes:
•
Power supply status
•
The state of the fans
•
Ambient temperature
The clock card monitors line card, SCP card, and CBS card to
determine the type of card present during power initialization,
and to determine when a card is removed or inserted. The major
functions of the clock card are:
•
Clock generation and distribution.
•
Backplane bus arbitration and power sourcing.
Logic Modules C–9
Clock Card
•
Arbitration and tie breaking on behalf of the SCP card.
•
Local console (terminal or modem interface.
•
Sensing and control of the environment and of other modules.
In addition, many centralized resources exist on the clock card.
Examples of such resources include the many Ethernet addresses
associated with each GIGAswitch System platform, network and
local management parameters, and parameters learned about any
local topology.
C–10 Logic Modules
Clock Card
Clock Card
LEDs
1
MK28132
Event
Number Event
LED
1
Clock card startup
Solid amber
After reset,
MST has
not passed
2
Clock card MST
Flashing amber
MST in
progress
Solid green
MST
passed
Solid amber
MST failed
Condition
Meaning
Logic Modules C–11
CBS Card
CBS Card
The crossbar switch (CBS) card (54-22116-01) is a member of the
CBS card family of logic modules. The crossbar is comprised of
three CBS-36 chips each operating in 36x36x2 mode to make a
6-bit wide, 36 port crossbar.
Function
The function of the CBS card is to connect numerous 100
Mbit links together in a dynamic fashion. Any input port may
be connected to any single-output or group of outputs. Each
connection must be specified individually.
Specifications
The CBS card has an aggregate maximum bandwidth of 3.6
Gigabits/second. Connections are made through the crossbar
between 100 Mbit/second links at a maximum rate of 6.25 million
connections per second. Half duplex connections are made
independently; a full duplex connection may be established as two
half duplex connections.
C–12 Logic Modules
CBS Card
CBS LEDs
1
mk28133
Event
Number Event
LED
1
Flashing amber
Test in progress
Solid green
Test passed
Solid amber
Test failed
Clock card tests the
CBS card
Condition
Meaning
Logic Modules C–13
D
Guidelines for Installing Additional Modules
This appendix provides guidance for installing additional logic
module.
Guidelines for Installing Additional Modules D–1
Identifying the Contents of the GIGAswitch System
Identifying the Contents of the GIGAswitch System
The contents of the GIGAswitch System depend on any options
the customer may have ordered. These options were installed in
the GIGAswitch System before shipment. Refer to the following
figure and table to identify the contents of the GIGAswitch
System configuration.
1
2
7
8
3
4
5
6
D–2 Guidelines for Installing Additional Modules
9
mk28107F
Identifying the Contents of the GIGAswitch System
Number Order Number
Description
DEFGL-AA
A line card with the requested PMD
daughter cards (ordered separately)
installed §. One line card is included
with the DEFGA-BA, and DEFGA-BB
versions of the product. Additional line
cards can be ordered separately by the
customer.
DEFGP-AA
A SCP card. One SCP card is included
in all versions of the product. Additional
SCP cards can be ordered separately by
the customer.
54-22120-01
A clock card is included in all versions of
the product.
54-22116-01
A CBS card is included in all versions of
the product.
70-30587-05
All empty logic slots are covered by blank
handles.
70-30578-01
Two fan tray assemblies are included in
all versions of the product.
DEFGB-AB
A FEU is included in all versions of the
product. One additional FEU can be
ordered as a redundant power supply.
70-30585-01
A PSA is included in all versions of the
product.
74-45749-01
A power supply filler panel is included in
all versions of the product. It covers the
empty slot that can be occupied by the
optional redundant FEU.
§See the Fiber Distributed Data Interface Media Connection Information document for
available versions, part numbers, and associated loopback connectors.
Guidelines for Installing Additional Modules D–3
Recommended Location for Logic Modules
Recommended Location for Logic Modules
Although line cards or SCP cards can fit in any slot (except 7 or
8) 1 Digit al recommends the positions identified in the following
figure for these reasons:
•
High availability: Zone 1 and zone 2 2 are cooled by different
fans so the first SCP card is placed in slot 4 (zone 1) and the
second SCP card is placed in slot 13 (zone 2).
•
Minimum future upgrade impact: 2-port backplane slots
are filled first. This leaves the 4-port backplane slots 4 open
for 4-port line cards when they become available.
3
The following figure identifies where each additional line card and SCP card should be
installed §.
1
Slot 7 is reserved for the CLK card only. Slot 8 is reserved for the CBS card
only.
2
Zone 1 = slots 1 through 7. Zone 2 = slots 8 through 14.
3
2-port slots = 1,2,3,4,13, and 14
4
4-port slots = 5,6,9,10,11, and 12
§ All empty logic slots are covered by blank handle (70-30587-05)s.
D–4 Guidelines for Installing Additional Modules
Recommended Location for Logic Modules
L L L
C C C
L L C C L L L L L L
C C L B C C C C C C
K S
4 2 1
5
7
6 8 9 10 11 3
O
R
S
C
P
S
C
P
1
2
1 2 3 4 5 6 7 8 9 10 11 12 13 14
Abbrev.
Order Number
Description
LC
DEFGL-AA
A line card with the requested PMD
daughter cards (ordered separately)
installed. One line card is included
with the DEFGA-BA, and DEFGA-BB
versions of the product. Additional line
card can be ordered separately by the
customer.
SE
DEFGP-AA
A SCP card. One SCP card is included
in all versions of the product. Additional
SCP cards can be ordered separately by
the customer.
CLK
54-22120-01
A clock card is included in all versions of
the product.
CBS
54-22116-01
A CBS card is included in all versions of
the product.
Guidelines for Installing Additional Modules D–5
Index
A
Access
See Security
Accessory kit (70-30582-01), 2–6
contents of, 2–8
B
Back door
installing, 9–5
removal or installation of (fig), 9–4, 9–5
removing, 9–4
Backplane replacement, 9–1
Backplanes
preparing to replace, 6–1
Backup Front end unit (FEU) (DEFGB-AB)
function of, 1–6
location of (fig), 1–6
Blank handle
installing, 7–21
replacement of (fig), 7–20, 7–21
Blank handle (70-30587-05)
logic slots and, D–3
removing, 7–20
C
CBS card
function of, C–12
removal prerequisites, 6–2
specifications for, C–12
Clip nuts
installation of (fig), 2–16
installing on rack, 2–16
positioning on rack, 2–14
Clock card
function of, C–9
removal prerequisites, 6–2
Clock card (54-22120-01)
configurations included in, D–3
description of, C–9
evaluating LEDs on (table), 5–18, 5–19,
5–21, C–11, C–13
function of, 1–8
location of (fig), 1–8
part number, C–9
Clock card (54-22120-01) (fig), 5–18, C–11
Commands
Dispatcher mode (fig), 5–4
Terminal protocol mode (fig), 5–4
Configuration guidelines (fig), D–5
Connector, terminal
See OBM port
Connectors
logic module (fig), 1–9
power module (fig), 1–7
Console port
See OBM port
Controls
logic module (fig), 1–9
power module (fig), 1–7
Cooling and power modules
installing, 3–11, 7–29, 7–34
Cooling and Power Modules, B–1
Cooling modules
controls, LEDs, connectors (fig), 1–7
functions of, 1–6
location of (fig), 1–5
types of, 1–6
Cooling modules (fig), 1–6
Crossbar switch (CBS) card (54-22116-01)
configurations included in, D–3
description of, C–12
evaluating LEDs on (table), 5–18, 5–19,
5–21, C–11, C–13
function of, 1–8
location of (fig), 1–8
part number, C–12
Crossbar switch (CBS) card (54-22116-01)
(fig), 5–19, C–13
D
DAS port
identification of (fig), 1–4, C–2
Diagnostic boot (fig), 5–9
Diagnostic mode
entering, 5–9
Diagnostic Mode
Example of using (fig), 5–13
Index–1
Diagnostic modes
Interconnection (fig), 5–3
Menus (fig), 5–2
E
EMI shield
damage to, 7–21
Example configuration
description of, 1–4
F
Fan tray assembly
replacement of (fig), 2–36, 3–12, 7–22,
7–23
Fan tray assembly (70-30578-01)
configurations included in, D–3
evaluating LEDs (table), 5–22, B–2
function of, 1–6
location of (fig), 1–6
status LED, B–2
Fan tray assembly (70-30578-01) (fig), B–2
Fan tray assembly (70-30578-01)s
removing, 2–36, 7–22
Fault isolation
PSA, B–4
Front end unit (FEU)
installing, 3–10, 7–25
replacement of (fig), 2–38, 3–10, 7–24,
7–25
Front end unit (FEU) (DEFGB-AB)
configurations included in, D–3
evaluating LEDs (table), 5–22, B–3
function of, 1–6
location of (fig), 1–6
removing, 2–38, 7–24
Front end unit (FEU) (DEFGB-AB) (fig), B–3
Function of
PSA, B–4
security switch positions, 4–4, B–4
G
GIGAswitch System
applying power to, 2–10, 5–6
attaching to rack, 3–6
attaching to the rack (fig), 3–6, 8–3
configuration guidelines for, D–1
contents of, 2–6
contents of (fig), D–2
description of, 1–2
detaching from rack, 8–3
disconnecting from the pallet (fig), 2–5
electrical, A–4
environment, A–6
lifting of (fig), 3–5, 8–4
lowering of, 8–4
Index–2
GIGAswitch System (cont’d)
physical dimensions, A–3
rebooting, 5–7, 5–10
rebooting into diagnostic mode, 5–9
removing, 8–1
sections of, 1–5
Sections of (fig), 1–5
specifications, A–1
temperature status LED, B–5
ventilation, A–7
GIGAswitch System contents of, D–2
GIGAswitch System options for, D–2
H
hotswap
modules eligible for, 1–8
Hotswap
modules eligible for, 1–6
I
Input power connector, 1–6
Input power switch, 1–6
Installation tasks
module removal, 2–21
K
Key operated switch
See Security switch
L
LED
PSA, interpretation of, B–4
LEDs
cooling module (fig), 1–7
logic module (fig), 1–9
power module (fig), 1–7
Line card
removal prerequisites, 6–2
logic backplane
replacement of (fig), 9–10
Logic backplane
installing, 9–12
removal prerequisites, 6–2
Logic backplane (54-21849-01)
removing, 9–10
logic module
replacement of, 2–22, 7–4
replacement of (fig), 3–13
Logic module
Clock card (54-22120-01), C–9
crossbar switch (CBS) card (54-22116-01),
C–12
Logic module, additional
location for, D–1
Logic modules, C–1
controls, LEDs, connectors (fig), 1–9
functions of, 1–8
LEDs (fig), 5–20
location of (fig), 1–5
removing, 2–22, 7–3
slot restrictions, 1–8
types of, 1–8
Logic modules (fig), 1–8, 6–2
Lower plenum
attaching to rack, 2–19
function of, 2–7
installation of (fig), 2–19
Lower plenum bracket
attaching to rack, 2–18
installation of (fig), 2–18
M
Maintenance jumper
Location of (fig), 5–10
Module removal
prerequisites for, 6–1
Module replacement, 7–1
Modules
installing, 3–9
removing, 2–21
Modules, cooling and power
controls, LEDs, connectors (fig), 1–7
Modules, cooling and power (fig), 1–6
Modules, logic
controls, LEDs, connectors (fig), 1–9
Modules, logic (fig), 1–8, 6–2
O
OBM port
access control, 4–4, B–4
location of, 1–9
password requirements, 4–4, B–4
OBM terminal
rebooting from, 5–7, 5–9, 5–10
OBM Terminal
connection of (fig), 4–2
Out-of-band management connector
See OBM port
Out-of-band port terminal
See OBM Terminal
P
Package contents
accessory kit, 2–8
accessory kit (fig), 2–8
GIGAswitch System, D–2
identifying, 2–6
Package contents (cont’d)
rack mount kit, 2–7
rack mount kit (fig), 2–7
unpacking, 2–4
Pallet
removal of (fig), 3–4
Part number
Clock card (54-22120-01), C–9
crossbar switch (CBS) card (54-22116-01),
C–12
power status assembly (PSA) (70-30585-01)
, B–4
PHY Key
Replacement of (fig), 2–27
Plenum
See Lower plenum and Upper plenum
function of, 2–7
PMD
installing the MMF ANSI MIC PMD
(DEFXM-AA), 2–26, 7–9
installing the SMF PMD (DEFXS-AA),
2–31, 7–15
PMD daughter card
evaluating LEDs on (table), 5–21
Installing a MMF ANSI MIC PMD
(DEFXM-AA) (fig), 2–28, 7–6, 7–10
removing, 7–12
removing MMF ANSI MIC PMD
(DEFXM-AA), 7–6
PMD daughter card (fig), C–5
PMD daughter card, SMF
installation of (fig), 2–32, 2–34, 7–16, 7–18
Removal (fig), 7–12
2-port FDDI line card (DEFGL-AA)
configurations included in, D–3
evaluating LEDs on (table), 5–15, 5–21
function of, 1–8
location of (fig), 1–8
2-port FDDI line card (DEFGL-AA) (fig),
5–15, C–3
2-port FDDI line card (DEFGL-AA)s
removing, 7–2
Port type
verifying (fig), 1–4
Power
applying to system, 2–10, 5–6
control of (fig), 2–11, 6–4
removing, 2–11, 6–4
Power and Cooling Modules
evaluating LEDs (table), 5–22
LEDs (fig), 5–22
Power backplane
installing, 9–8
replacement of (fig), 9–8, 9–9
Power backplane (54-22138-01)
removing, 9–6
Index–3
Power connector
function of, 1–7
Power cord
connection of (fig), 2–10, 5–6
Power cord (U.S.) (17-00083-42), 2–6
configurations included in, D–2
Power module
power status assembly (PSA) (70-30585-01)
, B–4
Power modules
controls, LEDs, connectors (fig), 1–7
functions of, 1–6
location of (fig), 1–5
types of, 1–6
Power modules (fig), 1–6
Power status assembly (PSA)
description of, B–4
evaluating LEDs (table), B–5
function of, B–4
LED interpretation (fig), B–5
purpose of, B–4
removal of (fig), 2–37, 3–11, 7–28, 7–29,
7–31, 7–34
Power status assembly (PSA) (70-30585-01)
configurations included in, D–3
evaluating LEDs (table), 5–22
location of (fig), 1–6
part number, B–4
removing, 2–37, 7–28, 7–31
Power status assembly (PSA) (70-30585-01)
(fig), 4–4, B–5
Power supply filler panel
installing, 7–27
replacement of (fig), 7–26, 7–27
Power supply filler panel (74-45749-01)
configurations included in, D–3
removing, 7–26
Power switch
function of, 1–7
Power system controller (PSC) card
(54-22132-01)
function of, 1–6, 1–8
removing, 7–32
Power system controller (PSC) card
(54-22132-01) (fig), B–6
Preinstallation tasks
rack preparation, 2–13
site preparation, 2–2
unpacking, 2–4
Pretest tasks
connecting the OBM terminal, 4–2
setting the security switch, 4–4
PSA
location of LEDs, B–5
meaning of LEDs, B–5
Index–4
PSC card
installing, 7–33
location of, B–4
replacement of (fig), 7–32, 7–33
Purpose of
PSA, B–4
R
Rack
attaching lower plenum bracket to, 2–18
attaching lower plenum to, 2–19
attaching system to, 3–6
attaching upper plenum to, 3–7
installing clip nuts on, 2–16
positioning clip nuts on, 2–14
Selection of of ((fig)), 2–3
Rack mount kit (70-30580-01), 2–6
contents of, 2–7
Rack preparation, 2–13
Requirements
electrical, A–4
environmental, A–6
physical dimensions, A–3
tools, 2–4, 2–9, 2–13, 3–3, 9–1
S
Safety symbols
definition of (fig), xi
SAS port
identification of (fig), 1–4, C–2
SCP card
removal prerequisites, 6–2
Sections (fig), 1–5
Security switch
function of, 1–7
location of, 1–6
use of, 4–4, B–4
Serial port
See OBM port
Shipping carton contents (fig), 2–6
Site preparation, 2–2
Specifications
electrical, A–4
environmental, A–6
physical dimensions, A–3
Status LED
function of, 1–7
Switch control processor (SCP) card
(DEFGP-AA)
configurations included in, D–3
evaluating LEDs on (table), 5–16, 5–21,
C–7
function of, 1–8
location of (fig), 1–8
removing, 7–2
Switch control processor (SCP) card
(DEFGP-AA) (fig), 5–16, C–7
System
removing, 8–1
T
Temperature, system
status LED, B–5
Template
function of, 2–7
use of (fig), 2–14
Template, positioning clip nuts with, 2–14
Terminal, OBM
connection of (fig), 4–2
Tests,
preparation for, 4–1
Tools
for module removal, 3–3
for rack preparation, 2–9, 2–13
for unpacking, 2–4, 9–1
U
Upper plenum
aligning of, 3–7
attaching to the GIGAswitch System, 3–7
function of, 2–7
installation of (fig), 3–7, 8–2
removing, 8–2
V
Ventilation, A–7
W
Warm boot (fig), 5–7
Index–5