1
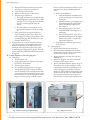
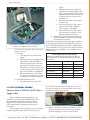
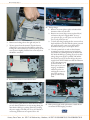
SERVICE EDGE The Laser Printer Tech Quarterly Winter 2009 IN THIS ISSUE! • 2009 ENDS STRONG, BUT WHAT ABOUT 2010? • HUNG DISPLAYS AND THE LJ 4345 MFP • PRINT DEFECTS SUMMARY • NEW TECH RULER IN STOCK! • FUSER SPECIALS 2010: the New Dawn for Printer Service ServiceEdgePage2 For Printer Service, a New Day For those of you who had a tough 2009, the New Year promises much. The recession is over, many experts agree. Federal Reserve Chairman Ben Bernanke says the economy is fragile but improving. November's job loss report was far lower than expected, so much so that the unemployment rate dropped slightly. Employers are adding hours again and we are on our way to a healthier unemployment rate. Industry has already made ground. FedEx (which is used by financial experts as an indicator of the state of commerce in the country) announced stronger than expected growth in ground delivery for its November quarter, boosting its expected earnings. (SunNews.com). We at Liberty have done even better. Here is the data, including estimates for December. • Demand for Parts Increases in Second Half of 2009. Liberty Parts Team sales grew in 2009, especially, in the • • second half of the year, when the growth was 25%. Number of customers sold monthly up 26%. In 2008, we at LPT saw a dramatic increase in total customers. In 2009, these sometime buyers became regular clients. We had an increase of 26% in customers sold each month. Other Second-Half Growth. Average invoice amount rose 22% and the number of packages rose 23%. (Second half of 2009 compared to second half of 2008). The number of orders for the second half of the year increased 23%. Onward 2010 The U.S. economy is wobbly, but it has its legs under it. Conditions are ripe for printer service companies to thrive. The "repair, don't replace" mindset will continue. People who said 'no' will say 'yes' to remanufactured toner and to the repair of printers. This is the largest amount of off-warranty printers ever to be considered for repair. It appears that the expected benefits of a recession are at last making their impact felt. We anticipate a really big 2010 for all of us. LPT PRINTER PARTS SPECIALS RM1-1082, Fuser for LJ 4240/50, 4350 New outright: $169.00 Refurb outright: $119.00 RG5-2661, Fuser for LJ 4000/50 New outright: $124.00 Refurb outright: $79.00 RM1-0013, Fuser for LJ 4200 New outright: $139.00 Refurb outright: $99.00 RG5-5063, Fuser for LJ 4100 New outright: $139.00 Refurb outright: $89.00 Prices valid through Jan. 29, 2010, while quantities last. Prices subject to change without notice. Call Liberty Parts Team at 888-444-8778. For HP, Lexmark, Xerox, Samsung and Okidata printer parts, call Liberty Parts Team: 888-444-8778. ServiceEdgePage3 PRODUCTS COMPANY NEWS The NEW Technician's Service Edge is in Stock LPT Tech Support is Direct and Toll Free LPT's repetitive defect ruler and reference book Technician's Service Edge is in stock. It has repetitive defect rulers for 64 HP printers, plus many other interesting features. • Error code summaries for Lexmark • Paper jam troubleshooting steps • Expanded HP Error code summaries • PIN codes, Maintenance instructions & JetDirect info. CORRECTIONS Inventory Size In the autumn edition of Service Edge there was a misprint regarding the size of the company inventory. In fact, it was our 2008 sales which were $25 million. LPT clients can now contact technical support direct and toll-free at 866-947-9295. To expedite your call, please be able to tell us… 1. WHAT is happening 2. WHEN it happens 3. FOR HOW LONG it has been happening. 4. WHICH TESTS you have run. 5. WHICH REPAIRS you have tried. After you have told us this information, our tech support providers should be able to help you very quickly. Their expertise comes from many years in the laser printer service industry (more than 17 years each, on average). Part numbers for laser printers can be found on our website, www.lbrty.com. PRINTER TECH ARTICLE "Hung" Displays and the HP LaserJet 4345 A hung display is one that is stuck with the screen displaying “initializing,” “warming up,” “calibrating,” or sometimes nothing but a row of asterisks or blocks. Essentially, the printer has failed to initialize. This article will offer an efficient way of tackling a particularly challenging case: the LJ 4345 MFP. First, we will describe the procedure for most other HP Laserjets. General Hung Display Troubleshooting For most Laserjets, failure to initialize can be traced to a bad formatter or something plugged into this board (firmware, memory, network card, hard disk drive, etc.). The normal troubleshooting sequence is to remove everything from the formatter that isn’t absolutely necessary for basic operation, leaving you with a formatCaution: always turn ter board with nothing plugged in it the power off before except perhaps the firmware DIMM. removing anything If it now comes to “Ready,” one of the from the formatter removed items is bad, and you can find board, or plugging out which one by re-installing them anything into it. one at a time. If the formatter/firmware combination still “hangs,” then one of those two items is defective, and the only solution is to replace them one at a time, since the printer cannot function at all with either of them missing. In a few specific cases, hung displays can be caused by other parts. Fuser warm-up issues can cause it in the LaserJet 9000 series, as we pointed out in the Fall 2009 Service Edge. LJ 4345 Hung Display After the memory count, the normal initialization display is a small HP logo that grows and shrinks in size for about three minutes before displaying “Ready." If it continues cycling for much more than three minutes, the printer probably has an initialization problem. There are two main types of problems that cause hung displays on the 4345. On the one hand, it could be the formatter or something plugged into the formatter. On the other hand, it could be caused by the engine power supply or the FN101 fan. The following troubleshooting sequence will help you discover which part is causing the problem. Ideally, you would have all parts available that are listed at the end of the article. If not, the procedures described in this article will probably require two service calls: 1. Troubleshooting, to determine which parts are needed. 2. Repair (installing the parts). If the printer is at a remote site, much of the troubleshooting can be done over the phone with the customer. Alternatively, you may want to treat this as a depot repair, where the printer is brought to your shop. I. Is it the Formatter/Formatter Plug-ins or the Power Supply/Fan? A. Observe the “heartbeat LED” (visible just below the parallel port, or on the M4345, below the USB port – see figure 1). In a working printer, this LED will flash briefly on power-up, turn off during the memory count, and then pulse on and off in a regular pattern while the HP logo is cycling. If this LED is not pulsing while the logo is cycling, the problem is formatter-related. If the LED is pulsing, it’s hard to be sure, so we need to run an engine test. Go to step B. B. Running an engine test on the 4345 mfp Liberty Parts Team, Inc. 3517 W Beltline Hwy., Madison, WI 53713 608-268-7600 FAX 608-268-7619 ServiceEdgePage4 1. Remove the formatter (with all its accessories and plug-ins), and power up without it. 2. Let it warm up a few minutes. 3. Make sure there is paper in all cassettes. 4. Press the engine test button. a. The engine test button is accessible through a small single hole on the back of the printer (see figure 2). Use a long, thin, non-metallic object to reach through and press the switch. b. This may require several attempts, as you may miss the switch if you don’t go straight in. 5. If the printer prints an engine test sheet (a page containing just lines), then the fan and power supply are working. The problem is with something that plugs into the formatter or the formatter itself. Go to II. C. If the printer does not print an engine test sheet, either the fan or the power supply is defective. If you have a voltmeter, you should be able to tell which part is bad by observing fan rotation and/ or measuring the voltage going to the fan. This will require some disassembly. You will find instructions on page six. II. Is it the formatter or one of the plug-ins? A. Hard Drive. 1. Turn the printer off 2. Unplug and remove the cable that connects the hard drive to the formatter. 3. Turn the printer back on. 4. In a normally working printer, you may get a message that tells you that copy & send functions are disabled, and/or that the internal disk was not found, but you will still be able to print from the menus or from the computer. If it still hangs or will not print, go to 2B. If it prints, there is a problem with the hard drive. You can sometimes cure this by initializing the hard drive. a. Hard drive initialization 1. With the hard drive installed and connected, turn the printer on and watch the display. 2. When the memory count begins, press and hold the right side of the “Start” button until all three LEDs are lit, then release it. 3. Press and release the “5” key. “INITIALIZE DISK” should appear on the display. 4. Press and release the “6” key. A row of asterisks should appear on the display. Wait for the printer to complete the initialization sequence. b. If initialization of the hard drive does not work, replace it. B. Other plug-ins. 1. Remove the formatter from the printer. 2. Reseat the compact flash firmware and base memory. These are the only two plug-ins that the formatter requires to function. 3. Remove all other accessories (fax card, extra DIMMs, etc.). 4. Reseat the “daughter card” that connects the formatter to the copy processor. 5. Then re-install the formatter and power up. If the machine now works normally, one of the removed items is bad. Re-install them one at a time (cycling power each time) to find out which one. If you still have a hung display with all those items removed, one of the remaining items (formatter, firmware, base memory) is bad, and all you can do is replace them one at a Fig. 1 Heartbeat LED (green flashing light) Fig. 2 Engine Test button For HP, Lexmark, Xerox, Samsung and Okidata printer parts, call Liberty Parts Team: 888-444-8778. ServiceEdgePage5 d c a b Fig. 3 Formatter and cage: a. Compact Flash (firmware), b. Memory, c. Daughter Board, d. Hard drive. time. But before doing that, there are two more resets you can try. a. Cold reset 1. Turn the printer on and watch the display. 2. When the memory count begins, press and hold the “6” key until all three LEDs are lit, then release it. The display should show “Select Language.” 3. Use either the “3” key (up arrow) or the “9” key (down arrow) to scroll the display until “Cold Reset” is highlighted. 4. Press and release the “6” key to select the cold reset, and wait for the printer to complete the initialization sequence. b. NVRAM Initialization reset 1. Turn the printer on and watch the LJ 4345 TECHNICAL SIDEBAR Shortcut: How to Tell if the LJ 4345 Power Supply is Bad When troubleshooting a hanging display on a LJ 4345, once you have ruled out the formatter, that leaves either Fan 1 (FN101) or the Engine Power Supply. We at Liberty have found a way to test the power supply without swapping parts, saving time and money. This will require removing the front cover. This involves manipulating hidden plastic tabs and removing screws. display. 2. When the memory count begins (on the M4345, before the memory count begins), press and hold the “9” key until all three LEDs flash once and then stay on (this may take up to 20 seconds), then release it. 3. Press and release the “3” key, and then the “Start” key. 4. Press and release the “3” key as many times as needed, until “NVRAM INIT” appears on the display. 5. Press and release the “6” key to select this, and wait for the printer to complete the initialization sequence. 6. If neither reset solves the problem, replace the firmware DIMM, then the base memory, then the formatter (if necessary). NOTE: Almost everything in this article applies equally to the LaserJet 4345 and the LaserJet M4345. However, note that the NVRAM initialization procedure is slightly different on the M4345. Also, it does not have a separate firmware DIMM or base memory DIMM – these are built into the formatter board. Parts Mentioned in this article Ideally, you would have all parts below. If not, the procedures described in this article will probably require two service calls. Part Required Part # (4345) Part # (M4345) Compact Flash (Firmware) Q7725-67996 N/A Memory Q2627A N/A Formatter Q3942-67901 CB425-67910 Fan 1 (FN101) RK2-0278 RK2-0278 Engine Power Supply RM1-1041 RM1-1041 Internal Hard Drive J7948A 5851-3231 Some of these tabs may break when you remove the cover. Do not worry, this does not cause problems, as the screws hold the cover in place perfectly well. A. Pull the control panel away from the printer to release the upper locking tabs. Then rotate it away from the printer and unplug one connector from the back. Liberty Parts Team, Inc. 3517 W Beltline Hwy., Madison, WI 53713 608-268-7600 FAX 608-268-7619 ServiceEdgePage6 B. Pop up one end of the top cover flatbed flange with a pick or small flat screwdriver, then remove it. F. Slide the output bin from the MFP. C. Remove two screws with a long Phillips screwdriver. G. Release the retaining tab on the left side of the front cover. This one seems prone to breaking. D. Open the top cover and remove one screw. E. Remove Tray 2 and remove two screws. H. Remove two locking tabs on the right side (1 of 2). For HP, Lexmark, Xerox, Samsung and Okidata printer parts, call Liberty Parts Team: 888-444-8778. ServiceEdgePage7 I. Remove two locking tabs on the right side (2 of 2). J. We now quote frome the manual: "Flex the bottom of the (front) cover away from the MFP to release the locking tab at the mid-bottom, and then push up on the cover to raise it slightly. Pull the front cover away from the MFP to remove it." M. Testing voltage. 1. Remove one screw (photo, right) and unhook the thermistor. Move it to the side. 2. Remove two screws (large arrows in photo below) and remove the power supply shield. (Later, if you replace the fan, you will squeeze two tabs (small arrows) and pull the fan out.) 3. To check the voltage, unplug the fan connector from the board below it (do this with the printer powered off ), and look at the connector on the board. It should have three pins, as in the photo above. 4. Turn the printer back on and use the voltmeter to measure across the outermost pins (see figure). You should see something between 15 and 25 volts DC while the HP logo is pulsing. If you do see this voltage, the power supply is probably OK and the fan is bad. If you do not see the voltage, the power supply is bad. NOTE: Make sure that the voltmeter is set to the proper range (at least 25 VDC, or better yet, set it to autoranging), and that the voltmeter probes are touching the connector pins. This requires a good eye and a steady hand. K. Remove two screws to remove the fan duct. L. Once you have gotten down to where the fan is visible, you can observe whether or not it is turning during the time that the HP logo is pulsing. If the fan is turning, the power supply is the bad part. Go to O. If the fan is not turning, further tests are required. Go to M. N. If the power supply needs replacement, consult the service manual for this lengthy procedure. Liberty Parts Team, Inc. 3517 W Beltline Hwy., Madison, WI 53713 608-268-7600 FAX 608-268-7619 Service Edge Page 8 PRINTER TECH ARTICLE Universal Print Quality Defect Charts After paper jams, print defects are the most common printer error. They are generally easier to correct than jams. They give you the possibility of a head start because the customer can fax or email you a sample before you visit. This sample can be compared with print defect samples in this article or in the appropriate manual and lead you in the right direction. For those times when you are without a manual, this article will be especially useful. Even if you have the manual, this article will prove useful, as we emphasize key parts while the omitting the unlikely. For monochrome laser printers Monochrome printers are simple. Just match the defect type with a picture. The troubleshooting steps on page six correspond to the numbers of the pictures. For color laser printers First, determine whether the problem is associated with a specific color. Run a print quality troubleshooting page. This creates separate prints from each toner cartridge. If the problem is isolated to one color, either that cartridge is bad or something associated with that cartridge: all color printers have separate high voltage contacts for each cartridge, and many also have separate high voltage circuits and separate laser scanners for each color. To distinguish between the cartridge itself and other things associated with it, set the printer to Disable Cartridge Check and swap cartridges. If the problem follows the cartridge, the cartridge is obviously bad. Otherwise, match the pictures to these procedures. 1. Light Print (partial). A. Gently shake and reinstall print cartridge(s), making sure the cover is closed securely. If this helps, the cartridge is close to being empty, and will need replacement soon. B. If light areas are strips in the direction of paper movement (as in the picture), laser/scanner optics may be partially dirty. C. If one side of the page is light, check mechanical alignment between cartridge(s), drum(s) (if separate from cartridge), and transfer elements. This can also indicate high voltage problems (see next step). D. If light areas are randomly positioned on page, check high voltage contacts to the cartridge(s), drum(s), and transfer elements. If contacts look good, the high voltage power supply may be bad. E. Inspect the surfaces of imaging elements (cartridge(s), transfer roller or belt, etc. – and even the fuser) for visible defects corresponding to the light area on the page. 2. Light Print (entire page, all colors). A. Check settings in Print Quality Menu. In particular, if Economode (or “Economy Mode”) is on, turn it off! Also experiment with print density settings. Color printers have individual print density settings for each color. B. Any of the items discussed in #1 (light print, partial) can also cause the entire page to be light. A halfway test (page 11) can help narrow it down. Laser/Scanner and high voltage power supply are the two most common causes. Note that in a color printer with separate scanners for each color, light print in all colors is unlikely to be scanner-related, since all four scanners would have to be bad. 3. Light Print, one color only (color printers). A. Check print quality adjustments for the affected color. Select “calibrate now” from the menu (this should also be done after replacing any imaging element, such as a toner cartridge, scanner, or transfer belt). B. Turn on Disable Cartridge Check and swap cartridges between the affected color and another color. If the same color is still light, that cartridge is bad. C. If the light color changes to whatever color is installed in the suspect location, something associated with that location is bad. Check the high voltage contacts. The high voltage power supply or transfer belt may be bad. If the printer has separate laser/scanners, the one associated with that slot may be bad. 4. Missing color. A. Make sure that the cartridge of the affected color is properly seated (also check the high voltage contacts), and that the cartridge shutter is opening when the printer door is being closed. Check cartridge rotation by making some sort of mark on the drum (outside the printable area) and observing whether the mark has changed position after a print attempt. If not, the cartridge or the cartridge drive mechanism may be defective. B. If the printer has separate scanners for each color, check the relevant scanner, consulting the service manual if necessary. Make sure that the safety shutter is opening and that the scanner optics have not gotten dislodged. The scanner may also be defective. C. Print an engine test (see the relevant service manual for details). If all colors are present on the engine test, either the formatter or firmware is defective. D. Other possibilities are the transfer belt or high voltage power supply. Replace these one at a time. 5. Specks on front or back of page. A. Make sure that paper and toner are within HP specifications. For HP, Lexmark, Xerox, Samsung and Okidata printer parts, call Liberty Parts Team: 888-444-8778. ServiceEdgePage9 1.Light Print, partial. 2.Light Print, entire page, all colors. 3.Light Print, one 4. Missing Color color, color printers. 5. Specks on back or on front. 6. White Lines. 7. Lines 8. Voids 9. Grey Background 10. Smearing toner 11. Repeating marks or ghosts 12. Distortion 13. Skewing 14. Smudged lines, either direction 15. Distortion or Blurring. 17. Dark Color 18. Black or Solid Color Page 19. White Page (no error code) 20. Drum Ground on 4100 cartridge. Square in lower right is a HV contact 16. Dark Print 21. HV contact inside a LJ 4100, second from right; Round HV contacts in an 8150, right. The metal clip is a ground. B. Clean the printer with a toner vacuum and/or run a cleaning page. C. If the specks occur at regular repeating intervals, use the repetitive defect ruler (in the service manual or in LPT’s Technician’s Service Edge) to pinpoint the cause. D. Use the halfway test (pg.11) to determine whether the defect originates in the toner area or the fuser. Replace the appropriate item. E. Check the high voltage and ground contacts. Replace the high voltage power supply. 6. White lines. A. If the lines are parallel to the direction of paper movement, check the toner cartridge(s) and fuser for obstructions or visible defects that line up with the position of the lines. Also check and clean the scanner optics. It is also possible, although unlikely, for the transfer roller or belt to cause white lines in this direction. B. If the lines are perpendicular to the direction of paper movement and regularly repetitive, use the repetitive defect ruler to pinpoint the cause. C. The formatter can cause white lines. It may be possible to determine this by running an engine test, which bypasses the formatter. 7. Dark lines. A. Ambient light getting into the toner cartridge can cause dark lines or bars. Make sure the printer has Liberty Parts Team, Inc. 3517 W Beltline Hwy., Madison, WI 53713 608-268-7600 FAX 608-268-7619 Service Edge Page 10 all covers and doors properly installed and closed. When running tests with some covers missing, do not position the printer under a bright light. B. Check the toner cartridge(s) and fuser for visible defects. Run a halfway test (pg. 11) if necessary to distinguish between these items. C. If the lines are perpendicular to the direction of paper movement and regularly repetitive, use the repetitive defect ruler to pinpoint the cause. D. The formatter can cause dark lines. It may be possible to determine this by running an engine test, which bypasses the formatter. 8. Voids. A. Gently shake and reinstall print cartridge(s), making sure the cover is closed securely. If this helps, the cartridge is close to being empty, and will need replacement soon. B. Run an engine test to make sure the formatter is not causing voids. If not the formatter, this is usually a high voltage problem. C. Check high voltage and ground contacts. Make sure paper and toner are within HP specifications. Make sure temperature and humidity are within normal limits. D. Replace the high voltage power supply. 9. Gray background (or light colored background). A. Try another toner cartridge if one is available. B. Check density settings in the menu and experiment with them. Sometimes a darker setting will actually reduce background. C. Make sure paper and toner are within HP specifications (in particular, envelopes, heavy paper, and labels are susceptible to this problem). Make sure temperature and humidity are within normal limits. D. Check high voltage and ground contacts. Replace the high voltage power supply if necessary. 10.Loose or smearing toner. A. If toner can still be smeared after printing, this is a fusing issue. Make sure paper and toner are within HP specifications. If paper is heavier or glossier than normal (such as envelopes or labels), a fuser temperature adjustment may be necessary. Consult the appropriate service manual for details. In the worst case, the fuser may be defective. B. If toner has a smeared appearance but cannot be smeared further, check for dirt or obstructions between the toner cartridge and fuser. Clean or remove as necessary. 11.Repeating ghost images or any repeating mark. A. Use the repetitive defect ruler to pinpoint the cause. Most often, this will either be the toner cartridge or the fuser. A halfway test (pg. 11) may also help to distinguish between these. B. Ghosting (also known as offset) that happens in the fuser does not necessarily mean the fuser is bad. Make sure paper and toner are within HP specifications. If paper is heavier or glossier than normal (such as envelopes or labels), a fuser temperature adjustment may be necessary. 12.Distortion. A. Check laser/scanner optics. Clean if necessary. B. Check the toner cartridge and the mechanism that drives it (usually the printer’s main drive assembly). If the cartridge is not turning smoothly in synchronization with paper movement, the printed image can be stretched or compressed vertically. C. The formatter can cause distortion. It may be possible to determine this by running an engine test, which bypasses the formatter 13. Skewing. A. Run test pages from all trays. If skewing occurs from some trays but not others, look for unevenly worn rollers or obstructions in the affected trays, or in portions of the paper path that are unique to those trays. B. If skewing occurs from all trays, look for worn rollers or obstructions in the areas common to all print paths (primarily the registration assembly and the surrounding area). Replace the registration assembly if necessary. C. If the paper does not appear to be skewing, check the alignment of laser/scanner (including its internal optics) and/or toner cartridge. 14.Smudged lines, either direction. A. If the lines are perpendicular to the direction of paper movement and regularly repetitive, use the repetitive defect ruler to pinpoint the cause. A halfway test (pg. 11) may help distinguish between fuser and toner cartridge as possible causes. B. Dirty rollers can cause smudging. Printing from different trays can help isolate which rollers are dirty. 15.Distortion or blurring. A. Check print quality adjustments in menu. Run “calibrate now” on color printers. B. A fuser film that is not turning freely can cause blurring. A halfway test (pg. 11) will determine whether or not the fuser is at fault. C. If the image on the drum (as viewed in the halfway test) is already blurred, the laser/scanner optics may be out of focus. Replace the scanner. D. If the blurring happens between the toner cartridge and fuser, look for obstructions in the paper path. Abnormal vibrations can also cause blurring in this area of the printer. E. In color printers, blurring can be caused by improper color registration. Replace the color misregistration sensor assembly and/or the transfer For HP, Lexmark, Xerox, Samsung and Okidata printer parts, call Liberty Parts Team: 888-444-8778. ServiceEdgePage11 …AND THIS DEFECT MEANS YOU NEED A NEW TRANSFER ROLLER! belt (in many printers, the sensor assembly is part of the transfer belt). 16. Dark Image. A. Check print quality adjustments (especially print density) in menu. Run “calibrate now” on color printers. B. Make sure paper and toner are within HP specifications. C. Check high voltage and ground contacts. Replace the high voltage power supply. D. Replace the laser/scanner (note: if all colors are too dark on a printer with multiple scanners, they are probably not all bad). 17. Dark color. A. Same as #16, except that the scanner is now a real possibility (and maybe even more likely than the high voltage), since it’s only one color. 18. Black page (or solid color page). A. If the page has a white border around the outside, this is a formatter/firmware issue. Replace the firmware, then the formatter. B. If there is no border, it is a high voltage issue: either the toner cartridge is bad, or the high voltage power supply is bad, or the connections between them are bad. 19. White page (no error code). A. If white pages appear between printed pages, this may be a software issue (try printing something from the printer menu) or a paper feed issue: multiple pickup (replace the separation pad or roller) or, in some printers, incorrect paper size sensing. B. Make sure that all cartridges and/or drums are properly seated (also check the high voltage contacts), and that the cartridge shutters are opening when the printer door is being closed. Check cartridge/drum rotation by making some sort of mark on the drum (outside the printable area) and observing whether the mark has changed position after a print attempt. If not, the cartridge or the cartridge drive mechanism may be defective. C. If the printer has only one scanner, make sure that the safety shutter is opening, and that the scanner optics have not gotten dislodged. The scanner may also be defective. The manual may be necessary to help you access the scanner(s). D. Print an engine test (see the relevant service manual for details). If this prints normally (i.e., you get a page of lines rather than a white page), either the formatter or firmware is defective. E. Other possibilities are the transfer belt or high voltage power supply. Replace these one at a time. F. Various color printers have unique mechanisms that can cause white pages. Consult the service manuals. We will only mention one, because it is so common: on the 4600/5500 family of color printers, the developer disengagement plate (also called the alienation rod or alienation bar) on the left side of the printer can fail, causing white pages. Usually, this involves broken gear teeth on the inner surface of the plate. Laser Printer Halfway Test The halfway test (also called the stop test) is a useful way to isolate print image defects. To perform the test, print something and then stop the paper halfway through the printer by opening the lid. This works best if you feed from the manual or MP tray, because you can watch the paper feeding. Open the lid just as the trailing edge of the page disappears into the printer. Now remove the toner cartridge. Ideally, the page will be stopped between the toner cartridge and fuser, with part of the image on the page (but unfused), and part of it still on the drum (in the toner cartridge). Observing these two partial images can help you decide where the defect is originating. There are three possibilities: I. There is no defect visible in either partial image. Assuming that the defect is not intermittent and happens on every printed page, this eliminates everything before the fuser. Therefore, the defect must be originating in the fuser. II. The defect is visible on the paper but not on the drum. This eliminates logic boards, laser/scanner, toner cartridge, and fuser. Either it is a transfer issue (bad transfer roller or high voltage) or a mechanical issue (rubbing or vibration in the area between transfer and fuser). III. The defect is visible in both partial images. This eliminates transfer and fuser. The defect originates in the toner cartridge, high voltage, laser/scanner, or logic boards. Further troubleshooting (such as the engine test) may be necessary to distinguish between these options. Liberty Parts Team, Inc. 3517 W Beltline Hwy., Madison, WI 53713 608-268-7600 FAX 608-268-7619 Prsrt Std U.S. Postage PAID Permit #168 Madison, WI LIBERTY PARTS TEAM, INC. 3517 W. BELTLINE HWY. MADISON, WI 53713 888-444-8778 WWW.LBRTY.COM I know the price of success: dedication, hard work, and an unremitting devotion to the things you want to see happen. —Frank Lloyd Wright Every Liberty fuser is remanufactured and thoroughly tested in the USA.