1
December 17, 2004
No. 21936
SNOWPLOWS
MECHANIC'S GUIDE
SNO
WPL
OWS
SNOWPL
WPLO
Featuring the
ISARMATIC® Hydraulic System
CAUTION
Read this manual before servicing the snowplow.
TABLE OF CONTENTS
PREFACE
Preface .............................................................................................................3
ISARMATIC® Hydraulic System ......................................................................6
Product Specifications .............................................................................6
Required Tools ..........................................................................................6
Hydraulic Hose Routing ...........................................................................7
Hydraulic Unit Parts Diagram ..................................................................8
Solenoid Cartridge Valve Identification and Location ...........................9
Vehicle Harness and Vehicle Cable Location ............................................. 10
Operating the Snowplow .............................................................................. 11
Theory of Operation ......................................................................................13
Hydraulic and Electrical Schematics ...........................................................14
Electrical Schematic ............................................................................... 15
Hydraulic Schematic ............................................................................... 17
Angle Right .............................................................................................. 18
Angle Left ................................................................................................ 20
Raise ........................................................................................................22
Lower ....................................................................................................... 24
Hold in Raise Position ............................................................................ 26
Striking An Object While Plowing – Right Cylinder Retracts ..............27
Striking an Object While Plowing – Left Cylinder Retracts .................28
Headlamps – Plow Not Connected – Vehicle Only ............................... 29
High Beam Headlamps With Plow Connected to Vehicle ....................31
Low Beam Headlamps With Plow Connected to Vehicle ....................33
Troubleshooting Guide ................................................................................. 35
This guide has been prepared to
assist the trained mechanic in the
service of WESTERN® snowplows.
It also provides safety information
and recommendations. We urge all
mechanics to read this manual
carefully before attempting to service
the WESTERN snowplow equipment
covered by this guide.
No. 21936
Service of your WESTERN
snowplow equipment is best
performed by your local Western
Products outlet. They know your
snowplow best and are interested in
your complete satisfaction.
3
December 17, 2004
SAFETY INFORMATION
WARNING
Indicates
a
potentially
hazardous situation that, if not
avoided, could result in death or
serious personal injury.
CAUTION
Indicates a situation that, if not
avoided, could result in minor
personal injury and/or damage
to product or property.
WARNING
Do not exceed GVWR or GAWR
including blade and ballast. The
rating label is found on the
driver-side vehicle door
cornerpost.
z
z
NOTE: Identifies tips, helpful hints
and maintenance information the
owner/operator should know.
Park the vehicle on a level
surface, place shift lever in PARK
or NEUTRAL and set parking
brake.
Leave the snowplow mounted on
the vehicle and lowered for most
service procedures, unless told
otherwise.
PERSONAL SAFETY
BEFORE YOU BEGIN
WARNING
Lower blade when vehicle is
parked. Temperature changes
could
change
hydraulic
pressure, causing the blade to
drop unexpectedly or damaging
hydraulic components. Failure
to do this can result in serious
personal injury.
z
z
Do not wear jewelry or a necktie,
and secure long hair.
z
Be especially careful near moving
parts such as fan blades, pulleys
and belts.
z
Wear safety goggles to protect
your eyes from battery acid,
gasoline, dirt and dust.
z
Avoid touching hot surfaces such
as the engine, radiator, hoses
and exhaust pipes.
z
Always have a fire extinguisher
handy, rated BC for flammable
liquids and electrical fires.
WARNING
Remove blade assembly before
placing vehicle on hoist.
No. 21936
Wear only snug-fitting clothing
while working on your vehicle or
snowplow.
VENTILATION
HYDRAULIC SAFETY
WARNING
Vehicle exhaust contains deadly
carbon monoxide (CO) gas.
Breathing this gas, even in low
concentrations, could cause
death. Never operate a vehicle
in an enclosed area without
venting exhaust to the outside.
If you work on the vehicle or
snowplow in a garage or other
enclosed area, be sure to vent
exhaust gas directly to the outside
through a leakproof exhaust hose.
FIRE AND EXPLOSION
WARNING
Hydraulic fluid under pressure
could cause skin injection
injury. If you are injured by
hydraulic fluid, get medical
treatment immediately.
z
Always inspect hydraulic
components and hoses before
using. Replace any damaged or
worn parts immediately.
z
If you suspect a hose leak, DO
NOT use your hand to locate it.
Use a piece of cardboard or
wood.
WARNING
Gasoline is highly flammable
and gasoline vapor is explosive.
Never smoke while working on
vehicle. Keep all open flames
away from gasoline tank and
lines. Wipe up any spilled
gasoline immediately.
Be careful when using gasoline. Do
not use gasoline to clean parts. Store
only in approved containers away
from sources of heat or flame.
December 17, 2004
4
SAFETY INFORMATION
BATTERY SAFETY
CAUTION
Batteries normally produce
explosive gases which can
cause
personal
injury.
Therefore, do not allow flames,
sparks or lit tobacco to come
near the battery. When charging
or working near a battery,
always cover your face and
protect your eyes, and also
provide ventilation.
Batteries contain sulfuric acid
which burns skin, eyes and
clothing.
Disconnect the battery before
removing or replacing any
electrical components.
No. 21936
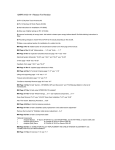
Warning Label
Please become familiar with and make
owners knowledgeable of the Warning and
Instruction labels on the back of the blade!
WARNING
LOWER BLADE WHEN VEHICLE IS PARKED.
REMOVE BLADE ASSEMBLY BEFORE PLACING VEHICLE
ON HOIST.
DO NOT EXCEED GVWR OR GAWR INCLUDING BLADE
AND BALLAST.
CAUTION
Warning Label
Instruction Label
READ OWNER'S MANUAL BEFORE OPERATING OR
SERVICING SNOWPLOW.
TRANSPORT SPEED SHOULD NOT EXCEED 45 MPH.
REDUCE SPEED UNDER ADVERSE TRAVEL
CONDITIONS.
PLOWING SPEED SHOULD NOT EXCEED 10 MPH.
SEE YOUR WESTERN OUTLET FOR APPLICATION
RECOMMENDATIONS.
59900
Instruction Label
December 17, 2004
5
PRODUCT SPECIFICATIONS
REQUIRED TOOLS
ISARMATIC® SYSTEM SPECIFICATIONS
Hydraulic Fluid Capacity
CAUTION
Do not mix different types of
hydraulic fluid. Some fluids are
not compatible and may cause
performance problems and
product damage.
z
Unit Reservoir = 1 3/4 Quarts
z
System Total:
w/ 6" Ram = 2 1/8 Quarts
Sport Utility
w/ 8" Ram = 2 1/4 Quarts
LSX
w/ 10" Ram = 2 3/8 Quarts
Standard & PRO-PLOW®
w/ 16" Ram = 2 3/4 Quarts
Heavyweight
Hydraulic System
Hydraulic Fluid
z
z
WESTERN High Performance
Fluid to -40°F (-40°C) or other
fluid conforming to military
specification MIL-H-5606A, such
as Mobil Aero HFA or Shell
AeroShell® Fluid 4.
®
Automatic Transmission Fluid
(ATF) Dexron® III to -10°F
(-23° C).
z
Solenoid Valve Spool Travel =
0.07" for three- and four-way valves
(S2, S3)
Electrical System – approximate
values:
z
Solenoid Valve Coil Resistance =
6.7 Ohms at room temperature
z
z
z
z
Solenoid Valve Coil Amp. Draw =
1.5 Amp.
Motor Relay Coil Resistance =
16 - 17 Ohms
Motor Relay Amp. Draw =
0.7 Amp.
Headlamp Relay Coil
Resistance = 106 Ohms
Headlamp Relay Amp Draw =
0.1 Amp.
z
z
z
z
z
z
z
z
Fuse Size
z Harness – 6 Amp. (SFE-6)
z
Tools Required for servicing the
electrical and hydraulic systems:
z
z
z
z
Long/Slender Needle Nose Pliers
Flat Screwdriver
Socket and Combination Wrenches:
3/8" thru 7/8", 1-1/16", 1-1/8"
z
Deep Socket: 7/8"
1/4" Socket or Nut Driver
12 V Test Light
Torque Wrench (in-lb)
Allen Wrench Set
3000 PSI Pressure Gauge
w/adapter fittings
Flashlight
Pick Set
Hammer
Digital Volt/Ohm Meter
Pencil Magnet
Available from your WESTERN®
outlet:
z UniMount® Electrical Tester
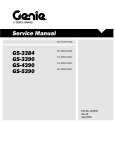
Mechanical
Hydraulic System
Crossover
Relief Valve
Pressure
(± 100 PSI)
Plow Type
No. of Turns
Pump Relief
Max. Motor
Crossover Relief Valve
Valve Pressure
Amp Draw At
Is Backed Off (CCW)
(± 100 PSI)
Relief Pressure**
From Fully Seated*
Fastener Torque (in-lb)
Pump Mounting Cap Screws.................... 175 – 185
Motor Terminal Nuts.................................
50 – 60
Standard, PRO-PLOW , LSX
3500
1-1/2 – 2
1750
200
Motor Base Cap Screws .......................... 180 – 240
Heavyweight
3500
1-1/2 – 2
1900
210
Motor End Cap Screws ............................
35 – 45
Sport Utility
2500
2-1/4 – 2-3/4
1550
180
Valve Manifold Cap Screws .....................
55 – 60
®
* Settings are approximate.
** Actual readings may vary due to vehicle battery voltage and oil temperature.
Solenoid Cartridge Valve ......................... 120 – 144
Coil Nut ....................................................
48 – 60
Cartridge/Coil Cover Screws ....................
15 – 20
Base Lug Cap Screws.............................. 180 – 240
O-Ring Boss Plug.....................................
No. 21936
50 – 70
December 17, 2004
6
ISARMATIC® HYDRAULIC HOSE ROUTING AND FITTING ORIENTATION
Front
45º Swivel
Fitting
Driver Side
Hose
Passenger Side
Hydraulic Hose
(To Rear 45º Swivel Fitting)
1/4" Street Elbow
No. 21936
Rear
45º Swivel
Fitting
Passenger Side
Hose
7
Lift Frame Hose Loop
Driver Side
Hydraulic Hose
(To Front 45º Swivel Fitting)
1/4" Street Elbow
(Typical Orientation
Each Side)
December 17, 2004
ISARMATIC® HYDRAULIC UNIT PARTS DIAGRAM
End Cap
Motor
Wiper Ring
Cable Boot
2-pc. Die-Cast Pump
(Production prior to
September 1995)
Packing Nut
Motor Base
Cap Screw
Packing Set
Thrust Washer
Motor Flange
Pump
Mounting
Cap Screw
Cylinder
Rod
Boot
Bracket
Motor Flange
Gasket
Oil Seal
Quill
Poppet
Check Valve
Poppet Ass'y
Fill Plug
Current
3-pc. Pump
Cartridge/Coil
Cover Screw
Crossover
Relief Valve
Ass'y
8
Retaining
Ring
Filter
Inlet
Check Valve
Housing
Coil Cartridge/Coil
Cover
Nut
Solenoid Valve
Coil
Solenoid
Cartridge Valves
Crossover
Relief Valve
Ass'y
Fluid Level
Plug
Drain Plug
O-Rings
Valve
Manifold Block
Base Lug
Cap Screw
No. 21936
Base Lug
Valve Manifold
Cap Screw (3)
Poppet Check Valve
Spool Ass'y
December 17, 2004
ISARMATIC® HYDRAULIC UNIT VALVE IDENTIFICATION AND LOCATION
Lift Cylinder Rod
Motor
Packing Nut
Valve Manifold
Block
Quill
Passenger-Side
Crossover Relief Valve
Housing
Quill
S1 (SV08-2004)
2-Way Cartridge Valve
S2 (SV08-30)
3-Way Cartridge Valve
S3 (SV08-40)
4-Way Cartridge Valve
Driver-Side
Crossover Relief Valve
Valve Manifold
Block
No. 21936
Passenger-Side
Crossover Relief Valve and
Solenoid Cartridge Valves
Under Cartridge/Coil Cover see view above
December 17, 2004
9
VEHICLE HARNESS AND VEHICLE CABLE LOCATION
Red Cable
Secondary (Large)
Terminals
To Cab Control
Primary (Small)
Terminals
Motor
Relay
To Negative
Battery Terminal *
Connector
Brown/Red
Wire
Orange/Black
Wire*
Black Wire
Black/Red
Wire
Red Wire
Firewall
Grommet
Vehicle Cable
Assembly
10
Fuse Holder
Vehicle Cable
Assembly Plug
Self-Stripping
Connector (Blue)
Vehicle Harness
Plug
To Front of Vehicle
* On later revision harnesses only.
Early revision harness has a single black/orange wire to
motor relay only, unless modified to use with hand-held control.
No. 21936
Wires to
Headlamp
Relays
Vehicle Harness
Brown Wire to
Vehicle
Parking Light
Circuit
Vehicle Wire Controlled
by Ignition Switch
Purple/Gray Wires to
Vehicle Turn Circuits
December 17, 2004
OPERATING THE SNOWPLOW
SOLENOID CONTROL
WARNING
The driver shall keep bystanders
clear of the blade when it is
being raised, lowered or angled.
Do not stand between the
vehicle and the blade, or within
8 feet of a moving blade. A
moving or falling blade could
cause personal injury.
CAUTION
To prevent accidental movement
of the blade, always turn the ON/
OFF switch to OFF whenever the
snowplow is not in use. The
control indicator light will turn
off.
Turn the vehicle ignition switch to the
ON or the ACCESSORY position.
Move control ON/OFF switch to the
ON position. The control indicator
light (red) should light whenever the
control ON/OFF switch and the
ignition (key) are both turned ON.
11
Turn the vehicle ignition switch on. Turn the control on. The control indicator light should be on.
RAISE
R
I
G
H
T
L
E
F
T
LOWER
FLOAT
ON
OFF
No. 21936
U.S. PATENT NO.
4,999,935
Action
Description of Operation
ON/OFF
Slide the control power switch ON to activate the hydraulic system. Turn the control OFF to lock
the blade in place. This will prevent accidental movement of the blade.
Right
Move the control lever right to angle the blade to the right.
Left
Move the control lever left to angle the blade to the left.
Raise
Move the control lever up (forward) to raise the blade to the desired height.
Lower/Float
Move the control lever down (back) to lower the blade and activate the FLOAT mode.
To Cancel FLOAT
The FLOAT mode can be canceled by either momentarily placing the control in the RAISE
position, turning the control off or turning the vehicle ignition off. Angling left or right will not cancel
float.
December 17, 2004
OPERATING THE SNOWPLOW
CABCOMMAND HAND-HELD CONTROL
WARNING
will glow red whenever the control
ON/OFF switch and the vehicle
ignition switch are both ON.
CAUTION
The driver shall keep bystanders
clear of the blade when it is
being raised, lowered or angled.
Do not stand between the
vehicle and the blade, or within
8 feet of a moving blade. A
moving or falling blade could
cause personal injury.
To prevent accidental movement
of the blade, always turn the ON/
OFF switch to OFF whenever the
snowplow is not in use. The
control indicator light will turn
off.
1. Turn the vehicle ignition switch to
the ON or the ACCESSORY
position. The controller logo area
will become illuminated.*
2. Press the ON/OFF button on the
control. The control indicator light
will glow red indicating the control
is on. The control indicator light
3. Pressing the LOWER button for
0.75 seconds will engage the
FLOAT mode. The control
indicator FLOAT light will glow
green.* Cancel the FLOAT mode
by momentarily pressing the
RAISE button.
Function Time Outs
The time-out period for the RAISE
function is 2.4 seconds, while the
angle function is 4.8 seconds.
The control will automatically turn off
after being idle for 20 minutes.
Smooth Stop
The control automatically allows the
blade to coast to a stop. This results
in smoother operation, reduces the
shock to the hydraulic system and
increases hose and valve life.
All control functions, except for
LOWER, automatically time out –
stop – after a period of time. This is
to prevent unnecessary battery drain.
ON/OFF
POWER
FLOAT
RAISE
R
I
G
H
T
L
E
F
T
LOWER
Button
Description of Operation
Right
Left
Raise
Press this button to angle blade to the right.
Press this button to angle blade to the left.
Press this button to raise the plow and to cancel the float mode.
NOTE: Plow will automatically stop raising after 2.4 seconds.
Press this button to lower the plow. NOTE: After reaching the desired height, release the button.
Holding the button down for more than 3/4 second will activate the float mode, indicated by green
FLOAT light.*
The float mode can be cancelled by pressing the RAISE button, turning control off or turning vehicle
ignition off. Angling left or right will momentarily cancel float.
Lower/
Float
Cancel
Float
*Early models do not have FLOAT light or illuminated logo.
No. 21936
December 17, 2004
12
THEORY OF OPERATION
SNOWPLOW HEADLAMPS
The type of headlamp circuit varies,
depending on the make/model/year
of vehicle and whether or not it is
equipped with Daytime Running
Lights (DRLs). The headlamp
switching circuit uses two or more
relays. When combined with the
plug-in headlamp harness, plow light
harness and vehicle harness, the
relays automatically switch between
vehicle and snowplow headlamps as
the harness plugs are connected and
disconnected.
Vehicles with Daytime Running
Lights (DRLs) require a DRL kit
which is an additional fused pink wire
used in place of the brown wire.
on trucks with clearance lights
require an optional Park/Turn Relay
Kit which allows the snowplow park
lamps to operate directly off the
battery, using the vehicle circuit to
power only the relay. In either case,
the vehicle and snowplow park and
turn lamps will operate
simultaneously.
NOTE:
The headlamp wiring
schematics
and
electrical
information included in this manual
are typical for most 1998 and older
vehicles. For 1999 and newer
vehicles, refer to the snowplow
installation instructions.
SNOWPLOW HYDRAULICS
SNOWPLOW PARK/TURN
LAMPS
In an ordinary installation, the
snowplow Park/Turn lamps are wired
in parallel with the corresponding
vehicle circuits. Some installations
The snowplow hydraulic system
performs four blade movement
functions. All functions require the
vehicle ignition (key) switch to be in
the run position and the cab control
to be turned on.
The cab control supplies power to
the motor relay and the three
solenoid cartridge valves in various
combinations to direct hydraulic fluid
to the snowplow lift and angle
cylinders or back to the reservoir.
Raise and angle functions require
both the motor and solenoid cartridge
valve(s) to activate, while the lower
function only requires activation of a
solenoid cartridge valve. The motor
and valves are deactivated when the
cab control button or lever is
released. The high amperage motor
power circuit is completed through
the battery cables when the motor
relay is activated. The motor relay
and solenoid cartridge valve circuits
are low amperage, high side drive,
and are completed when the cab
control is activated.
Proper operation of the snowplow
hydraulic system depends on the
vehicle's ability to provide adequate
electrical power. Electrical loads
from the snowplow, vehicle and
BLADE
MOVEMENT
No. 21936
accessories can substantially reduce
the vehicle system voltage if the
charging system cannot meet the
electrical demand. A low voltage
condition can cause intermittent
snowplow operation because the
magnetic field produced in the
solenoid cartridge valve coils may
not be strong enough to shift the
valves. Because of many variables,
it is impossible to determine the point
at which the system voltage is too
low to consistently operate the
snowplow. This condition can be
difficult to diagnose because the coil
magnetism can still be detected and
no problem exists in the hydraulic
system. Do not overlook the fact that
an apparent problem with the
snowplow can actually be caused by
low voltage in the vehicle electrical
system. Consult a vehicle repair
manual for electrical system
specifications.
ANGLE
RIGHT
ANGLE
LEFT
RAISE
LOWER
December 17, 2004
13
HYDRAULIC AND ELECTRICAL SCHEMATICS
The following section contains
hydraulic and electrical schematics to
help explain how the hydraulic unit
performs the different functions. A
schematic is an abstract drawing
showing the purpose of each of the
components in the system. Each
component is represented by a
graphical symbol. The hydraulic and
electrical legends list and describe
each of the symbols used in the
schematics for this guide.
The first two schematics show a
general overview of the complete
hydraulic and electrical systems.
The remainder of the schematics
have been altered to highlight flow of
hydraulic fluid and electrical current
for each function the hydraulic unit
performs or flow of electrical current
for the snowplow and vehicle lights.
z Bold lines represent the circuit
being activated only.
z Shaded components are either
activated or shifted from their
normal position.
HYDRAULIC LEGEND
LINE, WORKING (MAIN)
ELECTRICAL LEGEND
SPRING
CROSSING WIRE
LINE, PILOT (FOR CONTROL)
IN LINE CONNECTOR
LINES CROSSING
FUSE
No. 21936
Black
Black w/ Orange
Black w/ Red
Black w/ White
Blue
Blue w/ Orange
Brown
SOLENOID
VALVE, ADJUSTABLE
PRESSURE RELIEF
LINE, TO RESERVOIR
BELOW FLUID LEVEL
DIODE
CIRCUIT GROUND
VALVE, FLOW CONTROL,
ADJUSTABLENON-COMPENSATED
HYDRAULIC PUMP
FIXED DISPLACEMENT
VALVE, TWO POSITION
TWO CONNECTION
(TWO WAY) S1
CYLINDER
ELECTRIC MOTOR
VALVE, TWO POSITION
THREE CONNECTION
(THREE-WAY) S2
FILTER,STRAINER
DIFFUSER
VALVE, TWO POSITION
FOUR CONNECTION
(FOUR-WAY) S3
COMPONENT
ENCLOSURE
CHECK VALVE
MOTOR RELAY
BATTERY
- M +
MOTOR
PARK /TURN LAMP
HEADLAMP
COMPONENT ENCLOSURE
Wire Color Code
BLK
BLK/ORN
BLK/RED
BLK/WHT
BLU
BLU/ORN
BRN
RING TERMINAL
PILOT OPERATED (P/O)
CHECK VALVE
FLOW, DIRECTION OF
HYDRAULIC FLUID
NOTE:
Left side = Driver side
Right side = Passenger side
WIRE SPLICE
SOLENOID, SINGLE WINDING
LINES JOINING
Abbreviations
BRN/GRN
BRN/RED
DKBLU
DKBLU/ORN
DKBLU/WHT
GRN
GRY
Brown w/ Green
Brown w/ Red
Dark Blue
Dark Blue w/ Orange
Dark Blue w/ White
Green
Gray
LTBLU
LTGRN
LTBLU/ORN
LTBLU/WHT
ORN
ORN/BLK
PNK
Light Blue
Light Green
Light Blue w/ Orange
Light Blue w/ White
Orange
Orange w/ Black
Pink
PUR
RED
TAN
VIO
WHT
WHT/YEL
YEL
Purple
DRL
Red
MTR RLY
Tan
P/T SIG
Violet
White
White w/ Yellow
Yellow
Daytime Running Lights
Motor Relay
Park/Turn Signal
December 17, 2004
14
ELECTRICAL SCHEMATIC – 9-PIN HARNESS (’98 AND OLDER VEHICLES)
PLOW ASSEMBLY
RIGHT SIDE PLOW LAMPS
T
P
T
P
COMPONENTS LOCATED NEAR FRONT OF VEHICLE
RED
BRN
RED
PUR
BRN
BRN
WHT
BLK/ORN
BLK
H
L
TO VEHICLE
HEADLAMPS
BLU (GND)
BLU (GND)
RED (HIGH)
GRN (HIGH)
ORN (LOW)
YEL (LOW)
TO RIGHT TURN
LAMP BULLET
PUR
TO LEFT TURN
LAMP BULLET
GRY
TO PARK
LAMP BULLET
BLK/ORN
(GROUND)
HIGH
BEAM
RELAY
LOW
BEAM
RELAY
BRN
ORN 87A
BLK 87
30 YEL
BRN 86
85 BLK/ORN
RED 87A
WHT 87
30 GRN
BRN 86
85 BLK/ORN
87
86
PUMP MOTOR
- M + #6 BLK/RED
BLK
BLK/ORN
WHT
T
P
T
BRN
BRN
RED
GRY
BRN
RED
LEFT SIDE PLOW LAMPS
No. 21936
#6 BLK/RED
#6 BLK
WHT/YEL
BLK
LT GRN
LT BLU
BLK/ORN
WHT
GRY
PUR
BRN
RED
IGNITION
2
RED
1
4
2
5
3
6
LT GRN
ORN/BLK
BRN/RED
LT BLU
WHT/YEL
GRN
BLK
BLU
RED
*REPRESENTATION
OF PRINTED
CIRCUIT BOARD
5
LOCATED UNDER DASH
1
2
3
4
5
#6 BLK/RED
#6 BLK
15
BRN
3
4
6
*SOLENOID
CONTROL
6
BLU
RED
YEL
ORN
GRN
WHT
BLK
**HAND HELD
CONTROL
1
2
3
4
5
6
7
COIL CORD HARNESS
1
2
3
4
5
6
7
**REPRESENTATION
OF PRINTED
CIRCUIT BOARD
LOCATED NEAR BATTERY
NOTE: DRL kit not shown.
NOTE: All relays are shown in the
de-energized state.
#6 BLK/RED
ORN/BLK
#6 BLK
BRN/RED
MTR RLY
#6 RED
12V BATTERY
WHT/YEL
1
2
3
4
5
6
7
8
9
10
11
12
PUR
1
2
3
4
5
6
7
8
GRY
9
PUR
10
BRN
11
12
PUR
BLK/ORN
WHT/YEL
BLK
LT GRN
LT BLU
BLK/ORN
WHT
#6 BLK
P
SFE6
LOCATED AT FRONT OF VEHICLE
LT GRN
H
WHT
1
BLK/ORN
S3 SOLENOID
LT BLU
L
85
TERMINAL
LOCATIONS
WHT (HIGH BEAM)
S1 SOLENOID
87A
30
BLK (LOW BEAM)
S2 SOLENOID
FROM VEHICLE
HEADLAMP
CONNECTOR
December 17, 2004
ELECTRICAL SCHEMATIC – 12-PIN HARNESS (’98 AND OLDER VEHICLES)
COMPONENTS LOCATED NEAR FRONT OF VEHICLE
PLOW ASSEMBLY
ORN (LOW)
RIGHT SIDE PLOW LAMPS
BRN
TO TURN LAMP
BULLET
GRY
ORN (LOW)
YEL (LOW)
TO LEFT SIDE
VEHICLE
HEADLAMPS
RED (HIGH)
GRN (HIGH)
BRN
P
WHT
DK BLU/ORN
BLK
H
L
DK BLU/ORN-RIGHT
LT BLU/ORN-LEFT
(GROUND)
WHT(HIGH BEAM)
BLK/ORN
S1 SOLENOID
M
+
P
WHT/YEL
#6 BLK/RED
T
P
T
BRN
RED
BRN
RED
LEFT SIDE PLOW LAMPS
No. 21936
TO PARK LAMP
BULLET
BRN
RIGHT
SIDE
RELAY
DK BLU/
87A
WHT
30 DK BLU
DK BLU/ 87
ORN
85 BLK/ORN
PNK 86
LEFT
SIDE
RELAY
VEHICLE
HIGH BEAM
RELAY
RED 87A
87
PNK 86
LT BLU/
WHT 87A
LT BLU/ 87
ORN
PNK 86
30 GRN
85 BLK/ORN
FROM LEFT SIDE
VEHICLE HEADLAMP
CONNECTOR
30 LT BLU
87
85 BLK/ORN
86
BRN
BLK/ORN
GRY
#6 BLK/RED
#6 BLK
1
2
3
4
5
6
7
8
9
10
11
12
1
2
3
4
5
6
7
8
9
10
11
12
87A
85
30
PUR
LT GRN
BLK/WHT
LT BLU/ORN
WHT
H
PUR
WHT/YEL
BLK
LT GRN
LT BLU
BLK/ORN
WHT
BLK/WHT
DK BLU/ORN
GRY
PUR
BRN
LT BLU/ORN
#6 BLK
L
TO TURN LAMP
BULLET
LOCATED AT FRONT OF VEHICLE
PUMP MOTOR
-
LT BLU/WHT
(GND)
LT BLU
(GND)
BRN WIRES
DO NOT USE ON
DRL VEHICLES
BLK-RIGHT
BLK/WHT-LEFT
(LOW BEAM)
BLK/ORN
S3 SOLENOID
LT BLU
S2 SOLENOID
WHT
FROM RIGHT SIDE
VEHICLE HEADLAMP
CONNECTOR
WHT/YEL
BLK
LT GRN
LT BLU
BLK/ORN
WHT
BLK/WHT
DK BLU/ORN
GRY
PUR
BRN
LT BLU/ORN
DRL KIT WIRE
3AG5
PNK
SFE6
WHT
1
GRN
2
RED
LT GRN
ORN/BLK
BRN/RED
LT BLU
WHT/YEL
BLK
4
BLU
5
1
16
BRN
3
RED
IGNITION
RED
6
*REPRESENTATION
2
OF PRINTED
CIRCUIT BOARD
3
4
BLU
1
5
RED
2
6
LOCATED UNDER DASH
YEL
3
ORN
4
GRN
5
#6 BLK/RED
#6 BLK
TERMINAL
LOCATIONS
*SOLENOID
CONTROL
WHT
6
BLK
**HAND HELD
CONTROL
1
2
3
4
5
6
7
COIL CORD HARNESS
1
2
3
4
5
6
7
**REPRESENTATION
OF PRINTED
CIRCUIT BOARD
LOCATED NEAR BATTERY
NOTE: DRL kit shown.
NOTE: All relays are shown in the
de-energized state.
#6 BLK/RED
ORN/BLK
#6 BLK
MTR RLY
#6 RED
12V BATTERY
T
BLK YEL
PUR
BLK/ORN
BRN
RED
BLK/WHT
P
DK BLU (GND)
DK BLU/WHT (GND)
PUR
T
RED (HIGH)
RED
TO RIGHT SIDE
VEHICLE
HEADLAMPS
BRN/RED
December 17, 2004
HYDRAULIC SCHEMATIC
LIFT CYLINDER
VALVE MANIFOLD BLOCK
S1
RIGHT CYLINDER
CROSSOVER
RELIEF VALVE
RIGHT
ANGLE CYLINDERS
S2
LEFT
LEFT CYLINDER
CROSSOVER
RELIEF VALVE
POPPET
CHECK
VALVE
17
S3
PUMP
ASSEMBLY
BLADE
MOVEMENT
MOTOR
M
SV08-2004 (2W) S1
SV08-30 (3W)
S2
S3
SV08-40 (4W)
No. 21936
PUMP
RELIEF
VALVE
ANGLE
RIGHT
ANGLE
LEFT
ON
ON
ON
ON
ON
ON
ON
RAISE
LOWER
M
ON
December 17, 2004
ANGLE RIGHT – ELECTRICAL
Blade Movement: Angle Right
Controller:
Right
System Response:
1) By moving control lever or
pressing the controller button, the
circuit board within the cab
control supplies power for the
electrical circuit.
2) Electrical current flows through
the motor relay, activating the
pump motor, and solenoid
cartridge valve S2, shifting its
spool.
3) Hydraulic fluid from the pump
flows through the inlet check
valve, solenoid cartridge valve S3
and the poppet check valve, and
into the base end of the left
cylinder, causing it to extend.
4) The retracting right cylinder
pushes the hydraulic fluid out of
its base end, through solenoid
cartridge valves S2 & S3 back to
the reservoir.
PLOW ASSEMBLY
BLK/ORN
S2 SOLENOID
S1 SOLENOID
WHT/YEL
BLK
LT GRN
LT BLU
BLK/ORN
WHT
1
2
3
4
5
6
7
8
9
10
11
12
1
2
3
4
5
6
7
8
GRY
9
PUR
10
BRN
11
12
LT GRN
WHT/YEL
PUMP MOTOR
- M + #6 BLK/RED
#6 BLK
BLK/ORN
WHT
WHT/YEL
BLK
LT GRN
LT BLU
BLK/ORN
WHT
RED
IGNITION
2
RED
1
4
2
5
3
6
LT GRN
ORN/BLK
BRN/RED
LT BLU
WHT/YEL
GRY
PUR
BRN
TO LEFT SIDE
PLOW LAMP
GRN
BRN
3
BLK
BLU
RED
*REPRESENTATION
4
OF PRINTED
CIRCUIT BOARD
5
6
LOCATED UNDER DASH
BLU
1
RED
2
YEL
3
ORN
4
GRN
5
#6 BLK/RED
#6 BLK
WHT
6
GRY
#6 BLK/RED
#6 BLK
BLK
BLK/ORN
WHT
BRN
1
SFE6
LOCATED AT FRONT OF VEHICLE
LT BLU
*SOLENOID
CONTROL
WHT
BLK
**HAND HELD
CONTROL
1
2
3
4
5
6
7
COIL CORD HARNESS
ON/OFF
RAISE
L
E
F
T
LOWER
R
I
G
H
T
FLOAT
POWER
FLOAT
R
I
G
H
T
L
E
F
T
ON
OFF
U.S.PATENT NO.
4,999,935
2
3
4
5
6
7
**REPRESENTATION
OF PRINTED
CIRCUIT BOARD
LOCATED NEAR BATTERY
#6 BLK/RED
ORN/BLK
RAISE
1
#6 BLK
BRN/RED
MTR RLY
#6 RED
12V BATTERY
S3 SOLENOID
BLK
BLK/ORN
WHT
BRN
PUR
BLK/ORN
COMPONENTS LOCATED
NEAR FRONT OF VEHICLE
WHT/YEL
GRY
PUR
BRN
TO RIGHT SIDE
PLOW LAMP
LOWER
BLADE MOVEMENT
ANGLE RIGHT
No. 21936
December 17, 2004
18
ANGLE RIGHT – HYDRAULIC
LIFT CYLINDER
VALVE MANIFOLD BLOCK
S1
RIGHT CYLINDER
CROSSOVER
RELIEF VALVE
RIGHT
ANGLE CYLINDERS
S2
LEFT
LEFT CYLINDER
CROSSOVER
RELIEF VALVE
POPPET
CHECK
VALVE
19
S3
PUMP
ASSEMBLY
BLADE
MOVEMENT
MOTOR
M
SV08-2004 (2W) S1
SV08-30 (3W)
S2
SV08-40 (4W)
S3
No. 21936
PUMP
RELIEF
VALVE
ANGLE
RIGHT
ANGLE
LEFT
ON
ON
ON
ON
ON
ON
ON
RAISE
LOWER
M
ON
December 17, 2004
ANGLE LEFT – ELECTRICAL
control supplies power for the
electrical circuit.
2) Electrical current flows through
the motor relay, activating the
pump motor, and solenoid
cartridge valves S2 & S3, shifting
both spools.
4) Pressure within the hydraulic
circuit shifts the spool, opening
the poppet check valve.
5) The retracting left cylinder pushes
the hydraulic fluid out of its base
end, through the open poppet
check valve and solenoid
cartridge valve S3 and back to
the reservoir.
3) Hydraulic fluid from the pump
flows through the inlet check
valve and solenoid cartridge
valves S3 & S2, and into the base
end of the right cylinder, causing
it to extend.
PLOW ASSEMBLY
TO RIGHT SIDE
PLOW LAMP
S3 SOLENOID
BLK/ORN
S2 SOLENOID
S1 SOLENOID
BLK/ORN
WHT
WHT/YEL
GRY
PUR
BRN
BLK
BLK/ORN
WHT
BRN
PUR
BLK/ORN
COMPONENTS LOCATED
NEAR FRONT OF VEHICLE
LT BLU
WHT/YEL
BLK
LT GRN
LT BLU
BLK/ORN
WHT
1
2
3
4
5
6
7
8
9
10
11
12
1
2
3
4
5
6
7
8
GRY
9
PUR
10
BRN
11
12
LT GRN
WHT/YEL
PUMP MOTOR
- M + #6 BLK/RED
#6 BLK
WHT/YEL
BLK
LT GRN
LT BLU
BLK/ORN
WHT
RED
IGNITION
2
RED
1
4
2
5
3
6
LT GRN
ORN/BLK
BRN/RED
LT BLU
WHT/YEL
GRY
PUR
BRN
TO LEFT SIDE
PLOW LAMP
GRN
BRN
3
BLK
BLU
RED
*REPRESENTATION
4
OF PRINTED
CIRCUIT BOARD
5
6
LOCATED UNDER DASH
BLU
1
RED
2
YEL
3
ORN
4
GRN
5
#6 BLK/RED
#6 BLK
WHT
6
GRY
#6 BLK/RED
#6 BLK
BLK
BLK/ORN
WHT
BRN
1
SFE6
LOCATED AT FRONT OF VEHICLE
*SOLENOID
CONTROL
WHT
BLK
**HAND HELD
CONTROL
1
2
3
4
5
6
7
COIL CORD HARNESS
ON/OFF
RAISE
L
E
F
T
LOWER
R
I
G
H
T
FLOAT
POWER
FLOAT
R
I
G
H
T
L
E
F
T
ON
OFF
U.S.PATENT NO.
4,999,935
2
3
4
5
6
7
**REPRESENTATION
OF PRINTED
CIRCUIT BOARD
LOCATED NEAR BATTERY
#6 BLK/RED
ORN/BLK
RAISE
1
#6 BLK
BRN/RED
MTR RLY
#6 RED
12V BATTERY
Blade Movement: Angle Left
Controller:
Left
System Response:
1) By moving control lever or
pressing the controller button, the
circuit board within the cab
LOWER
BLADE MOVEMENT
ANGLE LEFT
No. 21936
December 17, 2004
20
ANGLE LEFT – HYDRAULIC
LIFT CYLINDER
VALVE MANIFOLD BLOCK
S1
RIGHT CYLINDER
CROSSOVER
RELIEF VALVE
RIGHT
ANGLE CYLINDERS
S2
LEFT
LEFT CYLINDER
CROSSOVER
RELIEF VALVE
POPPET
CHECK
VALVE
21
S3
PUMP
ASSEMBLY
BLADE
MOVEMENT
MOTOR
M
SV08-2004 (2W) S1
SV08-30 (3W)
S2
S3
SV08-40 (4W)
No. 21936
PUMP
RELIEF
VALVE
ANGLE
RIGHT
ANGLE
LEFT
ON
ON
ON
ON
ON
ON
ON
RAISE
LOWER
M
ON
December 17, 2004
RAISE – ELECTRICAL
Blade Movement: Raise
Controller:
Raise
System Response:
1) By moving control lever or
pressing the controller button, the
circuit board within the cab
control supplies power for the
electrical circuits.
2) Electrical current flows through
the motor relay, activating the
pump motor, and solenoid
cartridge valve S3, shifting the
spool.
3) Hydraulic fluid from the pump
flows through the inlet check
valve, solenoid cartridge valves
S3 & S2 and the internal check
valve in solenoid cartridge valve
S1, and into the lift cylinder
causing it to extend.
PLOW ASSEMBLY
BLK/ORN
S2 SOLENOID
S1 SOLENOID
LT BLU
WHT/YEL
BLK
LT GRN
LT BLU
BLK/ORN
WHT
1
2
3
4
5
6
7
8
GRY
9
PUR
10
BRN
11
12
LT GRN
WHT/YEL
PUMP MOTOR
- M + #6 BLK/RED
#6 BLK
1
2
3
4
5
6
7
8
9
10
11
12
BLK/ORN
WHT
WHT/YEL
BLK
LT GRN
LT BLU
BLK/ORN
WHT
RED
IGNITION
2
RED
1
4
2
5
3
6
LT GRN
ORN/BLK
BRN/RED
LT BLU
WHT/YEL
GRY
PUR
BRN
TO LEFT SIDE
PLOW LAMP
GRN
BRN
3
BLK
BLU
RED
*REPRESENTATION
4
OF PRINTED
CIRCUIT BOARD
5
6
LOCATED UNDER DASH
BLU
1
RED
2
YEL
3
ORN
4
GRN
5
#6 BLK/RED
#6 BLK
WHT
6
GRY
#6 BLK/RED
#6 BLK
BLK
BLK/ORN
WHT
BRN
1
SFE6
LOCATED AT FRONT OF VEHICLE
*SOLENOID
CONTROL
WHT
BLK
**HAND HELD
CONTROL
1
2
3
4
5
6
7
COIL CORD HARNESS
ON/OFF
RAISE
L
E
F
T
LOWER
R
I
G
H
T
FLOAT
POWER
FLOAT
R
I
G
H
T
L
E
F
T
ON
OFF
U.S.PATENT NO.
4,999,935
2
3
4
5
6
7
**REPRESENTATION
OF PRINTED
CIRCUIT BOARD
LOCATED NEAR BATTERY
#6 BLK/RED
ORN/BLK
RAISE
1
#6 BLK
BRN/RED
MTR RLY
#6 RED
12V BATTERY
S3 SOLENOID
BLK
BLK/ORN
WHT
BRN
PUR
BLK/ORN
COMPONENTS LOCATED
NEAR FRONT OF VEHICLE
WHT/YEL
GRY
PUR
BRN
TO RIGHT SIDE
PLOW LAMP
LOWER
BLADE MOVEMENT
RAISE
No. 21936
December 17, 2004
22
RAISE – HYDRAULIC
LIFT CYLINDER
VALVE MANIFOLD BLOCK
S1
RIGHT CYLINDER
CROSSOVER
RELIEF VALVE
RIGHT
ANGLE CYLINDERS
S2
LEFT
LEFT CYLINDER
CROSSOVER
RELIEF VALVE
POPPET
CHECK
VALVE
23
S3
PUMP
ASSEMBLY
BLADE
MOVEMENT
MOTOR
M
SV08-2004 (2W) S1
SV08-30 (3W)
S2
SV08-40 (4W)
S3
No. 21936
PUMP
RELIEF
VALVE
ANGLE
RIGHT
ANGLE
LEFT
ON
ON
ON
ON
ON
ON
ON
RAISE
LOWER
M
ON
December 17, 2004
LOWER – ELECTRICAL
Blade Movement: Lower / Float
Controller:
Lower
System Response:
1) By moving control lever or
pressing the controller button, the
circuit board within the cab
control supplies power for the
electrical circuit.
2) Electrical current flows through
solenoid cartridge valve S1,
shifting the spool.
3) The weight of the plow forces the
lift cylinder to retract. The
retracting lift cylinder pushes the
hydraulic fluid through solenoid
cartridge valves S1 & S2 & S3,
and back to the reservoir.
NOTE: CabCommand hand-held
control only – while in FLOAT,
angling right or left will temporarily
cancel float (turn off solenoid
cartridge valve S1) until the angle
button is released.
PLOW ASSEMBLY
BLK/ORN
S2 SOLENOID
S1 SOLENOID
LT BLU
WHT/YEL
BLK
LT GRN
LT BLU
BLK/ORN
WHT
1
2
3
4
5
6
7
8
GRY
9
PUR
10
BRN
11
12
LT GRN
WHT/YEL
PUMP MOTOR
- M + #6 BLK/RED
#6 BLK
1
2
3
4
5
6
7
8
9
10
11
12
BLK/ORN
WHT
WHT/YEL
BLK
LT GRN
LT BLU
BLK/ORN
WHT
2
RED
1
4
2
5
3
6
LT GRN
ORN/BLK
BRN/RED
LT BLU
GRY
PUR
BRN
GRN
BRN
3
BLK
BLU
*REPRESENTATION
OF PRINTED
CIRCUIT BOARD
5
6
BLU
1
RED
2
YEL
3
ORN
4
GRN
5
#6 BLK/RED
#6 BLK
WHT
6
BLK
**HAND HELD
CONTROL
1
2
3
4
5
6
7
COIL CORD HARNESS
1
2
3
4
5
6
7
**REPRESENTATION
OF PRINTED
CIRCUIT BOARD
ON/OFF
RAISE
L
E
F
T
LOWER
R
I
G
H
T
FLOAT
LOCATED NEAR BATTERY
POWER
FLOAT
RAISE
R
I
G
H
T
L
E
F
T
ON
OFF
24
RED
4
LOCATED UNDER DASH
GRY
BLK
BLK/ORN
WHT
BRN
RED
IGNITION
WHT/YEL
#6 BLK/RED
#6 BLK
TO LEFT SIDE
PLOW LAMP
1
SFE6
LOCATED AT FRONT OF VEHICLE
*SOLENOID
CONTROL
WHT
U.S.PATENT NO.
4,999,935
#6 BLK/RED
ORN/BLK
#6 BLK
BRN/RED
MTR RLY
#6 RED
12V BATTERY
S3 SOLENOID
BLK
BLK/ORN
WHT
BRN
PUR
BLK/ORN
COMPONENTS LOCATED
NEAR FRONT OF VEHICLE
WHT/YEL
GRY
PUR
BRN
TO RIGHT SIDE
PLOW LAMP
LOWER
BLADE MOVEMENT
LOWER
No. 21936
December 17, 2004
LOWER – HYDRAULIC
LIFT CYLINDER
VALVE MANIFOLD BLOCK
S1
RIGHT CYLINDER
CROSSOVER
RELIEF VALVE
RIGHT
ANGLE CYLINDERS
S2
LEFT
LEFT CYLINDER
CROSSOVER
RELIEF VALVE
POPPET
CHECK
VALVE
25
S3
PUMP
ASSEMBLY
BLADE
MOVEMENT
MOTOR
M
SV08-2004 (2W) S1
SV08-30 (3W)
S2
SV08-40 (4W)
S3
No. 21936
PUMP
RELIEF
VALVE
ANGLE
RIGHT
ANGLE
LEFT
ON
ON
ON
ON
ON
ON
ON
RAISE
LOWER
M
ON
December 17, 2004
HOLD IN RAISED POSITION – HYDRAULIC
Blade Movement: Hold in Raised Position
Controller:
None
System Response:
LIFT CYLINDER
1) Hydraulic fluid is trapped in the lift
cylinder by the internal check
valve in solenoid cartridge valve
S1.
VALVE MANIFOLD BLOCK
S1
RIGHT CYLINDER
CROSSOVER
RELIEF VALVE
RIGHT
ANGLE CYLINDERS
S2
LEFT
LEFT CYLINDER
CROSSOVER
RELIEF VALVE
POPPET
CHECK
VALVE
26
S3
PUMP
ASSEMBLY
BLADE
MOVEMENT
MOTOR
M
SV08-2004 (2W) S1
SV08-30 (3W)
S2
SV08-40 (4W)
S3
No. 21936
PUMP
RELIEF
VALVE
ANGLE
RIGHT
ANGLE
LEFT
ON
ON
ON
ON
ON
ON
ON
RAISE
LOWER
M
ON
December 17, 2004
STRIKING AN OBJECT WHILE PLOWING – RIGHT HYDRAULIC CYLINDER RETRACTS
Blade Movement: Striking an Object While Plowing
Controller:
None
System Response:
1) Hydraulic fluid is trapped in the
base end of the cylinders by the
relief valves, the poppet check
valve and solenoid cartridge
valve S2.
2) When the plow contacts an
object, the force of the impact
increases the hydraulic pressure
in the base end of the cylinder.
When the pressure exceeds the
relief valve pressure setting, the
relief valve opens allowing fluid to
flow to the base of the opposite
cylinder.
LIFT CYLINDER
VALVE MANIFOLD BLOCK
FORCE APPLIED
S1
RIGHT CYLINDER
CROSSOVER
RELIEF VALVE
RIGHT
ANGLE CYLINDERS
S2
LEFT
LEFT CYLINDER
CROSSOVER
RELIEF VALVE
POPPET
CHECK
VALVE
27
S3
PUMP
ASSEMBLY
BLADE
MOVEMENT
MOTOR
M
SV08-2004 (2W) S1
SV08-30 (3W)
S2
SV08-40 (4W)
S3
No. 21936
PUMP
RELIEF
VALVE
ANGLE
RIGHT
ANGLE
LEFT
ON
ON
ON
ON
ON
ON
ON
RAISE
LOWER
M
ON
December 17, 2004
STRIKING AN OBJECT WHILE PLOWING – LEFT HYDRAULIC CYLINDER RETRACTS
Blade Movement: Striking an Object While Plowing
Controller:
None
System Response:
1) Hydraulic fluid is trapped in the
base end of the cylinders by the
relief valves, the poppet check
valve and solenoid cartridge
valve S2.
2) When the plow contacts an
object, the force of the impact
increases the hydraulic pressure
in the base end of the cylinder.
When the pressure exceeds the
relief valve pressure setting, the
relief valve opens allowing fluid to
flow to the base of the opposite
cylinder.
LIFT CYLINDER
VALVE MANIFOLD BLOCK
S1
RIGHT CYLINDER
CROSSOVER
RELIEF VALVE
RIGHT
ANGLE CYLINDERS
S2
LEFT
LEFT CYLINDER
CROSSOVER
RELIEF VALVE
POPPET
CHECK
VALVE
28
S3
FORCE APPLED
PUMP
ASSEMBLY
BLADE
MOVEMENT
MOTOR
M
SV08-2004 (2W) S1
SV08-30 (3W)
S2
SV08-40 (4W)
S3
No. 21936
PUMP
RELIEF
VALVE
ANGLE
RIGHT
ANGLE
LEFT
ON
ON
ON
ON
ON
ON
ON
RAISE
LOWER
M
ON
December 17, 2004
HEADLAMPS – PLOW NOT CONNNECTED – 9-PIN (’98 AND OLDER VEHICLES)
PLOW ASSEMBLY
RIGHT SIDE PLOW LAMPS
T
P
T
P
COMPONENTS LOCATED NEAR FRONT OF VEHICLE
RED
BRN
RED
PUR
BRN
BRN
WHT
BLK/ORN
BLK
H
L
TO VEHICLE
HEADLAMPS
BLU (GND)
BLU (GND)
RED (HIGH)
GRN (HIGH)
ORN (LOW)
YEL (LOW)
TO RIGHT TURN
LAMP BULLET
PUR
TO LEFT TURN
LAMP BULLET
GRY
TO PARK
LAMP BULLET
BLK/ORN
(GROUND)
HIGH
BEAM
RELAY
LOW
BEAM
RELAY
ORN 87A
BLK 87
BRN 86
BRN
30 YEL
85 BLK/ORN
RED 87A
WHT 87
30 GRN
BRN 86
85 BLK/ORN
87
86
PUMP MOTOR
- M + #6 BLK/RED
BLK
BLK/ORN
WHT
T
P
T
BRN
BRN
RED
GRY
BRN
RED
LEFT SIDE PLOW LAMPS
No. 21936
#6 BLK/RED
#6 BLK
WHT/YEL
BLK
LT GRN
LT BLU
BLK/ORN
WHT
GRY
PUR
BRN
RED
IGNITION
2
RED
1
4
2
5
3
6
LT GRN
ORN/BLK
BRN/RED
LT BLU
WHT/YEL
GRN
BLK
BLU
RED
*REPRESENTATION
OF PRINTED
CIRCUIT BOARD
5
LOCATED UNDER DASH
1
2
3
4
5
#6 BLK/RED
#6 BLK
29
BRN
3
4
6
*SOLENOID
CONTROL
6
BLU
RED
YEL
ORN
GRN
WHT
BLK
**HAND HELD
CONTROL
1
2
3
4
5
6
7
COIL CORD HARNESS
1
2
3
4
5
6
7
**REPRESENTATION
OF PRINTED
CIRCUIT BOARD
LOCATED NEAR BATTERY
NOTE: DRL kit not shown.
NOTE: Both high beam and low
beam are shown.
#6 BLK/RED
ORN/BLK
#6 BLK
BRN/RED
MTR RLY
#6 RED
12V BATTERY
WHT/YEL
1
2
3
4
5
6
7
8
9
10
11
12
PUR
1
2
3
4
5
6
7
8
GRY
9
PUR
10
BRN
11
12
PUR
BLK/ORN
WHT/YEL
BLK
LT GRN
LT BLU
BLK/ORN
WHT
#6 BLK
P
SFE6
LOCATED AT FRONT OF VEHICLE
LT GRN
H
WHT
1
BLK/ORN
S3 SOLENOID
LT BLU
L
85
TERMINAL
LOCATIONS
WHT (HIGH BEAM)
S1 SOLENOID
87A
30
BLK (LOW BEAM)
S2 SOLENOID
FROM VEHICLE
HEADLAMP
CONNECTOR
December 17, 2004
HEADLAMPS – PLOW NOT CONNECTED – 12-PIN (’98 AND OLDER VEHICLES)
COMPONENTS LOCATED NEAR FRONT OF VEHICLE
PLOW ASSEMBLY
ORN (LOW)
TO RIGHT SIDE
VEHICLE
HEADLAMPS
RED
BRN
PUR
BLK/ORN
BRN
T
BRN
P
WHT
DK BLU/ORN
BLK
H
L
DK BLU/ORN-RIGHT
LT BLU/ORN-LEFT
(GROUND)
WHT(HIGH BEAM)
BLK/ORN
S1 SOLENOID
M
+
P
WHT/YEL
#6 BLK/RED
T
P
T
BRN
RED
BRN
RED
LEFT SIDE PLOW LAMPS
No. 21936
TO PARK LAMP
BULLET
BRN
GRN (HIGH)
WHT
RIGHT
SIDE
RELAY
DK BLU/
WHT 87A
DK BLU/ 87
ORN
PNK 86
30 DK BLU
85 BLK/ORN
LEFT
SIDE
RELAY
VEHICLE
HIGH BEAM
RELAY
RED 87A
30 GRN
LT BLU/
WHT 87A
87
PNK 86
LT BLU
(GND)
LT BLU/ 87
ORN
PNK 86
85 BLK/ORN
FROM LEFT SIDE
VEHICLE HEADLAMP
CONNECTOR
30 LT BLU
87
85 BLK/ORN
86
BRN
BLK/ORN
GRY
#6 BLK/RED
#6 BLK
1
2
3
4
5
6
7
8
9
10
11
12
1
2
3
4
5
6
7
8
9
10
11
12
87A
85
30
PUR
LT GRN
BLK/WHT
LT BLU/ORN
WHT
H
TO TURN LAMP
BULLET
PUR
WHT/YEL
BLK
LT GRN
LT BLU
BLK/ORN
WHT
BLK/WHT
DK BLU/ORN
GRY
PUR
BRN
LT BLU/ORN
#6 BLK
L
LT BLU/WHT
(GND)
LOCATED AT FRONT OF VEHICLE
PUMP MOTOR
-
YEL (LOW)
RED (HIGH)
BRN WIRES
DO NOT USE ON
DRL VEHICLES
BLK-RIGHT
BLK/WHT-LEFT
(LOW BEAM)
BLK/ORN
S3 SOLENOID
LT BLU
S2 SOLENOID
TO LEFT SIDE
VEHICLE
HEADLAMPS
FROM RIGHT SIDE
VEHICLE HEADLAMP
CONNECTOR
WHT/YEL
BLK
LT GRN
LT BLU
BLK/ORN
WHT
BLK/WHT
DK BLU/ORN
GRY
PUR
BRN
LT BLU/ORN
DRL KIT WIRE
3AG5
PNK
SFE6
WHT
1
GRN
2
RED
LT GRN
ORN/BLK
BRN/RED
LT BLU
WHT/YEL
BLK
4
BLU
5
1
30
BRN
3
RED
IGNITION
RED
6
*REPRESENTATION
2
OF PRINTED
CIRCUIT BOARD
3
4
BLU
1
5
RED
2
6
LOCATED UNDER DASH
YEL
3
ORN
4
GRN
5
#6 BLK/RED
#6 BLK
TERMINAL
LOCATIONS
*SOLENOID
CONTROL
WHT
6
BLK
**HAND HELD
CONTROL
1
2
3
4
5
6
7
COIL CORD HARNESS
NOTE: DRL kit shown.
NOTE: 3-relay system only.
NOTE: Both high beam and low
beam are shown.
1
2
3
4
5
6
7
**REPRESENTATION
OF PRINTED
CIRCUIT BOARD
LOCATED NEAR BATTERY
#6 BLK/RED
ORN/BLK
#6 BLK
MTR RLY
#6 RED
12V BATTERY
RED
TO TURN LAMP GRY
BULLET
ORN (LOW)
BLK/WHT
P
DK BLU (GND)
DK BLU/WHT (GND)
PUR
T
RED (HIGH)
BLK YEL
RIGHT SIDE PLOW LAMPS
BRN/RED
December 17, 2004
HIGH BEAM HEADLAMPS WITH PLOW CONNECTED TO VEHICLE – 9-PIN (’98 AND OLDER VEHICLES)
PLOW ASSEMBLY
RIGHT SIDE PLOW LAMPS
T
P
T
P
COMPONENTS LOCATED NEAR FRONT OF VEHICLE
RED
BRN
RED
PUR
BRN
BRN
H
WHT
BLK/ORN
L
BLK
TO VEHICLE
HEADLAMPS
BLU (GND)
RED (HIGH)
GRN (HIGH)
HIGH
BEAM
RELAY
LOW
BEAM
RELAY
TO RIGHT TURN PUR
LAMP BULLET
TO LEFT TURN GRY
LAMP BULLET
BRN
ORN 87A
BLK 87
30 YEL
BRN 86
85 BLK/ORN
RED 87A
WHT 87
30 GRN
BRN 86
85 BLK/ORN
87
86
WHT/YEL
PUMP MOTOR
- M + #6 BLK/RED
BLK
BLK/ORN
WHT
P
T
WHT/YEL
BLK
LT GRN
LT BLU
BLK/ORN
WHT
GRY
PUR
BRN
RED
IGNITION
2
RED
1
4
2
5
3
6
LT GRN
ORN/BLK
BRN/RED
LT BLU
WHT/YEL
GRN
BLK
BLU
RED
*REPRESENTATION
OF PRINTED
CIRCUIT BOARD
5
LOCATED UNDER DASH
1
2
3
4
5
#6 BLK/RED
#6 BLK
31
BRN
3
4
6
*SOLENOID
CONTROL
6
BLU
RED
YEL
ORN
GRN
WHT
BLK
**HAND HELD
CONTROL
1
2
3
4
5
6
7
COIL CORD HARNESS
BRN
BRN
RED
GRY
2
3
4
5
6
7
**REPRESENTATION
OF PRINTED
CIRCUIT BOARD
LOCATED NEAR BATTERY
#6 BLK/RED
ORN/BLK
BRN
RED
1
NOTE: DRL kit not shown.
#6 BLK
BRN/RED
MTR RLY
#6 RED
12V BATTERY
T
#6 BLK/RED
#6 BLK
1
2
3
4
5
6
7
8
9
10
11
12
PUR
1
2
3
4
5
6
7
8
GRY
9
PUR
10
BRN
11
12
PUR
BLK/ORN
WHT/YEL
BLK
LT GRN
LT BLU
BLK/ORN
WHT
#6 BLK
P
SFE6
LOCATED AT FRONT OF VEHICLE
LT GRN
H
WHT
1
BLK/ORN
S3 SOLENOID
LT BLU
L
85
TERMINAL
LOCATIONS
BLK (LOW BEAM)
S1 SOLENOID
87A
30
WHT (HIGH BEAM)
S2 SOLENOID
FROM VEHICLE
HEADLAMP
CONNECTOR
YEL (LOW)
ORN (LOW)
TO PARK
LAMP BULLET
BLK/ORN
(GROUND)
BLU (GND)
LEFT SIDE PLOW LAMPS
No. 21936
December 17, 2004
HIGH BEAM HEADLAMPS WITH PLOW CONNECTED TO VEHICLE – 12-PIN (’98 AND OLDER VEHICLES)
COMPONENTS LOCATED NEAR FRONT OF VEHICLE
PLOW ASSEMBLY
ORN (LOW)
RED
BRN
PUR
BLK/ORN
BRN
BRN
P
ORN (LOW)
YEL (LOW)
TO LEFT SIDE
VEHICLE
HEADLAMPS
RED (HIGH)
GRN (HIGH)
H
TO TURN LAMP
BULLET
PUR
L
BLK
TO PARK LAMP
BULLET
BRN
WHT(HIGH BEAM)
S1 SOLENOID
M
+
PUR
WHT/YEL
BLK
LT GRN
LT BLU
BLK/ORN
WHT
LT GRN
WHT/YEL
BLK/WHT
DK BLU/ORN
#6 BLK/RED
GRY
PUR
BRN
LT BLU/ORN
#6 BLK
#6 BLK/RED
#6 BLK
BLK/WHT
LT BLU/ORN
WHT
L
H
P
T
BRN
BRN
BLK/ORN
RED
GRY
BRN
P
T
No. 21936
1
2
3
4
5
6
7
8
9
10
11
12
1
2
3
4
5
6
7
8
9
10
11
12
WHT/YEL
BLK
LT GRN
LT BLU
BLK/ORN
WHT
BLK/WHT
DK BLU/ORN
GRY
PUR
BRN
LT BLU/ORN
RED 87A
87
PNK 86
LT BLU/
WHT 87A
LT BLU/ 87
ORN
PNK 86
30 GRN
85 BLK/ORN
DRL KIT WIRE
3AG5
PNK
SFE6
30 LT BLU
87
85 BLK/ORN
WHT
1
86
87A
85
LT GRN
ORN/BLK
BRN/RED
LT BLU
WHT/YEL
BLK
4
BLU
5
1
32
BRN
3
RED
TERMINAL
LOCATIONS
*SOLENOID
CONTROL
GRN
2
RED
IGNITION
RED
6
2
*REPRESENTATION
OF PRINTED
CIRCUIT BOARD
3
4
BLU
1
5
RED
2
6
LOCATED UNDER DASH
YEL
3
ORN
4
GRN
5
#6 BLK/RED
#6 BLK
WHT
6
BLK
**HAND HELD
CONTROL
1
2
3
4
5
6
7
COIL CORD HARNESS
1
2
3
4
5
6
7
**REPRESENTATION
OF PRINTED
CIRCUIT BOARD
LOCATED NEAR BATTERY
#6 BLK/RED
ORN/BLK
NOTE: DRL kit shown.
RED
LEFT SIDE PLOW LAMPS
LEFT
SIDE
RELAY
VEHICLE
HIGH BEAM
RELAY
FROM LEFT SIDE
VEHICLE HEADLAMP
CONNECTOR
30
LOCATED AT FRONT OF VEHICLE
PUMP MOTOR
-
RIGHT
SIDE
DK BLU/ RELAY
WHT 87A
30 DK BLU
DK BLU/ 87
ORN
85 BLK/ORN
PNK 86
LT BLU
(GND)
BRN WIRES
DO NOT USE ON
DRL VEHICLES
BLK-RIGHT
BLK/WHT-LEFT
(LOW BEAM)
BLK/ORN
S3 SOLENOID
LT BLU
S2 SOLENOID
WHT
LT BLU/WHT
(GND)
WHT
DK BLU/ORN
DK BLU/ORN-RIGHT
LT BLU/ORN-LEFT
(GROUND)
BLK/ORN
GRY
FROM RIGHT SIDE
VEHICLE HEADLAMP
CONNECTOR
NOTE: 3-relay system only.
#6 BLK
MTR RLY
#6 RED
12V BATTERY
RED
T
TO TURN LAMP
BULLET
DK BLU (GND)
DK BLU/WHT (GND)
BLK/WHT
P
RED (HIGH)
PUR
T
TO RIGHT SIDE
VEHICLE
HEADLAMPS
BLK YEL
RIGHT SIDE PLOW LAMPS
BRN/RED
December 17, 2004
LOW BEAM HEADLAMPS WITH PLOW CONNECTED TO VEHICLE – 9-PIN (’98 AND OLDER VEHICLES)
PLOW ASSEMBLY
RIGHT SIDE PLOW LAMPS
T
P
T
P
COMPONENTS LOCATED NEAR FRONT OF VEHICLE
RED
BRN
RED
PUR
BRN
BRN
WHT
BLK/ORN
BLK
H
L
BLK/ORN
(GROUND)
TO VEHICLE
HEADLAMPS
BLU (GND)
BLU (GND)
RED (HIGH)
GRN (HIGH)
ORN (LOW)
YEL (LOW)
HIGH
BEAM
RELAY
LOW
BEAM
RELAY
TO RIGHT TURN
LAMP BULLET
PUR
TO LEFT TURN
LAMP BULLET
GRY
ORN 87A
BLK 87
30 YEL
RED 87A
WHT 87
30 GRN
TO PARK
LAMP BULLET
BRN
BRN 86
85 BLK/ORN
BRN 86
85 BLK/ORN
87
86
PUMP MOTOR
- M + #6 BLK/RED
BLK
BLK/ORN
H
WHT
T
BRN
BRN
RED
GRY
#6 BLK/RED
#6 BLK
LT GRN
LT BLU
BLK/ORN
RED
1
4
2
5
3
6
ORN/BLK
BRN/RED
LT BLU
WHT/YEL
GRN
BLK
BLU
RED
*REPRESENTATION
4
OF PRINTED
CIRCUIT BOARD
5
6
LOCATED UNDER DASH
1
2
3
5
#6 BLK/RED
#6 BLK
33
BRN
3
4
6
BLU
RED
YEL
ORN
GRN
WHT
BLK
**HAND HELD
CONTROL
1
2
3
4
5
6
7
COIL CORD HARNESS
1
2
3
4
5
6
7
**REPRESENTATION
OF PRINTED
CIRCUIT BOARD
LOCATED NEAR BATTERY
#6 BLK/RED
ORN/BLK
BRN
RED
2
LT GRN
WHT
GRY
PUR
BRN
RED
IGNITION
*SOLENOID
CONTROL
NOTE: DRL kit not shown.
#6 BLK
BRN/RED
MTR RLY
#6 RED
12V BATTERY
WHT/YEL
WHT/YEL
BLK
PUR
LT GRN
1
2
3
4
5
6
7
8
9
10
11
12
PUR
BLK/ORN
WHT/YEL
1
BLK
2
LT GRN
3
LT BLU
4
BLK/ORN
5
WHT
6
7
8
GRY
9
PUR
10
BRN
11
12
L
P
SFE6
LOCATED AT FRONT OF VEHICLE
#6 BLK
T
WHT
1
BLK/ORN
S3 SOLENOID
LT BLU
P
85
TERMINAL
LOCATIONS
BLK (LOW BEAM)
S1 SOLENOID
87A
30
WHT (HIGH BEAM)
S2 SOLENOID
FROM VEHICLE
HEADLAMP
CONNECTOR
LEFT SIDE PLOW LAMPS
No. 21936
December 17, 2004
LOW BEAM HEADLAMPS WITH PLOW CONNECTED TO VEHICLE – 12-PIN (’98 AND OLDER VEHICLES)
COMPONENTS LOCATED NEAR FRONT OF VEHICLE
PLOW ASSEMBLY
ORN (LOW)
RED
BRN
PUR
BLK/ORN
BRN
T
BRN
P
WHT
DK BLU/ORN
BLK
H
L
DK BLU/ORN-RIGHT
LT BLU/ORN-LEFT
(GROUND)
WHT(HIGH BEAM)
BLK/ORN
S1 SOLENOID
M
+
WHT/YEL
#6 BLK/RED
L
H
WHT
BRN
BLK/ORN
RED
GRY
P
T
RED
LEFT SIDE PLOW LAMPS
No. 21936
TO TURN LAMP
BULLET
PUR
TO PARK LAMP
BULLET
BRN
RIGHT
SIDE
RELAY
DK BLU/
87A
WHT
30 DK BLU
DK BLU/ 87
ORN
85 BLK/ORN
PNK 86
LEFT
SIDE
RELAY
VEHICLE
HIGH BEAM
RELAY
RED 87A
87
PNK 86
LT BLU
(GND)
LT BLU/
WHT 87A
LT BLU/ 87
ORN
PNK 86
30 GRN
85 BLK/ORN
FROM LEFT SIDE
VEHICLE HEADLAMP
CONNECTOR
30 LT BLU
87
85 BLK/ORN
86
#6 BLK/RED
#6 BLK
1
2
3
4
5
6
7
8
9
10
11
12
87A
85
30
WHT/YEL
BLK
LT GRN
LT BLU
BLK/ORN
WHT
BLK/WHT
DK BLU/ORN
GRY
PUR
BRN
LT BLU/ORN
DRL KIT WIRE
3AG5
PNK
SFE6
WHT
1
GRN
2
RED
LT GRN
ORN/BLK
BRN/RED
LT BLU
WHT/YEL
BLK
4
BLU
5
1
34
BRN
3
RED
IGNITION
RED
6
*REPRESENTATION
2
OF PRINTED
CIRCUIT BOARD
3
4
BLU
1
5
RED
2
6
LOCATED UNDER DASH
YEL
3
ORN
4
GRN
5
#6 BLK/RED
#6 BLK
TERMINAL
LOCATIONS
*SOLENOID
CONTROL
WHT
6
BLK
**HAND HELD
CONTROL
1
2
3
4
5
6
7
COIL CORD HARNESS
BRN
BRN
WHT
LT BLU/WHT
(GND)
PUR
LT GRN
BLK/WHT
LT BLU/ORN
T
GRN (HIGH)
WHT/YEL
1
BLK
2
LT GRN
3
LT BLU
4
BLK/ORN
5
WHT
6
BLK/WHT
7
DK BLU/ORN
8
GRY
9
PUR
10
BRN
11
LT BLU/ORN
12
#6 BLK
P
YEL (LOW)
RED (HIGH)
LOCATED AT FRONT OF VEHICLE
PUMP MOTOR
-
ORN (LOW)
TO LEFT SIDE
VEHICLE
HEADLAMPS
BRN WIRES
DO NOT USE ON
DRL VEHICLES
BLK-RIGHT
BLK/WHT-LEFT
(LOW BEAM)
BLK/ORN
S3 SOLENOID
LT BLU
S2 SOLENOID
GRY
FROM RIGHT SIDE
VEHICLE HEADLAMP
CONNECTOR
1
2
3
4
5
6
7
**REPRESENTATION
OF PRINTED
CIRCUIT BOARD
LOCATED NEAR BATTERY
#6 BLK/RED
ORN/BLK
NOTE: DRL kit shown.
NOTE: 3-relay system only.
#6 BLK
MTR RLY
#6 RED
12V BATTERY
RED
TO TURN LAMP
BULLET
DK BLU (GND)
DK BLU/WHT (GND)
BLK/WHT
P
RED (HIGH)
PUR
T
TO RIGHT SIDE
VEHICLE
HEADLAMPS
BLK YEL
RIGHT SIDE PLOW LAMPS
BRN/RED
December 17, 2004
TROUBLESHOOTING GUIDE
Troubleshooting Guide Contents
Introduction
How to Use the Troubleshooting Guide
General Diagnostic Table ............... 36
Packing Nut Adjustment ................ 39
Motor Test ...................................... 40
Motor and Motor Relay Test
Diagram ............... 41
Motor Relay Test ............................ 42
Vehicle Harness Test –
Motor Relay ......... 43
Control Test ................................... 44
Pump Pressure Test ...................... 46
Cartridge Coil Activation Test ......... 48
Vehicle Harness Test –
Cartridge Coils ..... 49
Hydraulic System Test ................... 50
Crossover Relief Valve Inspection
and Adjustment .... 51
Poppet Valve Inspection ................ 52
Individual Solenoid Coil Test .......... 53
Solenoid Cartridge Valve
Inspection ............ 53
Headlamp Test Diagram – 9-Pin .... 54
Vehicle Headlamp Test – 9-Pin ...... 55
Plow Headlamp Test – 9-Pin .......... 56
Plow Park/Turn Lamp Test –
9- or 12-Pin ........... 57
Optional Park/Turn Relay Kit Test ... 58
Optional Park/Turn Relay Kit
Schematics .......... 59
Vehicle Headlamp Test – 12-Pin .... 60
Plow Headlamp Test – 12-Pin ........ 62
Headlamp Test Diagram – 12-Pin ... 64
This guide consists of a series of
tables, diagrams, flow charts and
other information. When used
properly it will assist the mechanic in
identifying and repairing
malfunctioning system components.
Western Products highly
recommends the use of the
UniMount® Electrical Tester as a
timesaving option for electrical
system diagnosis. When using this
tester, refer to the supplied instruction
manual for proper use of the tester.
When diagnosing the snowplow
electrical and hydraulic systems,
many variables need to be eliminated
in order to obtain workable test
procedures. These variables
translate into conditions listed before
the tables or flow charts and must be
satisfied before proceeding.
No. 21936
Any malfunction of the snowplow can
be categorized as either mechanical,
electrical or hydraulic. Mechanical
issues are generally related to the
blade, framework and mount
components and are usually identified
by visual inspection. Electrical and
hydraulic issues can sometimes be
difficult to trace to the component
level and that is the purpose of this
troubleshooting guide.
Read and understand the Theory
of Operation before attempting
troubleshooting.
If the listed conditions are not met,
the procedure can result in inaccurate
results and wasted time.
In many cases, satisfying the listed
conditions alone will solve the
problem.
1. Go to the General Diagnostic
Table and satisfy the nine listed
conditions. These conditions
must be met before proceeding
into the table or to any
subsequent test.
2. Locate the condition in the table
which best describes the problem
and check possible causes and
actions in the order listed.
3. Proceed to a service procedure,
another condition, or a specific
test as directed. All tests except
the Hydraulic System Test use a
flow chart format. To use these
flow charts, first satisfy any listed
conditions at the top of the page.
Then begin at the upper left
square and proceed as directed.
4. Follow along sequentially through
the table and tests, referring to
the hydraulic and electrical
schematics in the Theory of
Operation section and the
component Identification and
Location diagrams. Eventually
the problem will be pinpointed at
the component level.
Electrical Testing
Read and understand the Theory of
Operation section. A simple 12V test
light with a ground lead can be used
for circuit testing. When directed to
check for 12 volts (12V), ground the
test lamp lead and probe the
terminal. When asked to check for
ground, attach the test lamp lead to
+12V and probe the terminal. Note
that 12V is a nominal value. If using
a voltmeter, actual voltage will vary
with the vehicle and presence of
loads in tested circuits. Continuity
alone does not guarantee a good
circuit. Poor connections or
damaged wires may have continuity
but be unable to carry sufficient
current.
December 17, 2004
35
GENERAL DIAGNOSTIC TABLE
BEFORE USING THIS GENERAL DIAGNOSTIC TABLE OR PERFORMING ANY TESTS, YOU MUST VERIFY THE FOLLOWING
CONDITIONS:
1. Snowplow is attached to vehicle
and all harnesses are connected.
2. Harness connector pins and
terminals are free of corrosion,
insuring good connections, and
coated with dielectric grease.
3. Vehicle battery and charging
system are in good condition and
battery connections are clean and
tight.
CAUTION
Do not mix different types of
hydraulic fluid. Some fluids are
not compatible and may cause
performance problems and
product damage.
4. Hydraulic reservoir is filled to filler
plug level with recommended
fluid, when lift cylinder is fully
retracted. See Product
Specifications.
5. There are no fluid leaks from
hoses, fittings, cylinders or the
hydraulic unit.
6. All built up snow and ice is
removed from the snowplow.
7. 6 amp fuse* in vehicle harness is
good.
8. Ignition is turned on or engine is
running.
9. The control is connected in the
cab and turned on.
*Early revision harnesses may have a
10 amp fuse.
36
CONDITION
POSSIBLE CAUSE
ACTION
Motor does not run for any requested function.
Poor connections in vehicle or snowplow battery
cables.
Motor worn or damaged or pump seized.
Motor relay inoperative.
Open circuit in vehicle wiring harness.
Malfunctioning controller.
Clean and re-establish connections.
Motor relay sticking or always energized.
Short circuit in vehicle wiring harness.
Go to Motor Relay Test.
Go to Vehicle Harness Test - Motor Relay.
Malfunctioning controller.
Go to Control Test.
Lift cylinder packing nut too tight.
Clogged pump filter (all functions are affected).
Worn or damaged pump.
Poor connections on battery cables.
Adjust lift cylinder packing nut.
Clean or replace filter, flush reservoir.
Go to Pump Pressure Test.
Inspect battery cables, clean and re-attach all
connections.
Motor runs continuously.
Snowplow won’t raise – motor runs.
No. 21936
Go to Motor Test.
Go to Motor Relay Test.
Go to Vehicle Harness Test - Motor Relay.
Go to Control Test.
December 17, 2004
GENERAL DIAGNOSTIC TABLE
CONDITION
POSSIBLE CAUSE
ACTION
Snowplow won’t raise – motor runs. (cont.)
Solenoid valve coil not activating properly.
Hydraulic system malfunction.
Malfunctioning controller.
Go to Solenoid Coil Activation Test.
Go to Hydraulic System Test.
Go to Control Test.
Snowplow raises slowly or partially – motor runs.
Lift cylinder packing nut too tight.
Clogged pump filter (all functions are affected).
Worn or damaged pump.
Poor connections on battery cables.
Adjust lift cylinder packing nut.
Clean or replace filter, flush reservoir.
Go to Pump Pressure Test.
Inspect battery cables, clean and re-attach all
connections.
Adjust quill out.
Go to Control Test.
Quill adjusted in too far.
Malfunctioning controller.
Snowplow will not lower or lowers slowly, or won’t
float.
Quill adjusted in too far.
Lift cylinder packing nut too tight.
Lift cylinder packing dried out.
Solenoid valve coils not activating properly.
Hydraulic system malfunction.
Malfunctioning controller.
Adjust quill out.
Adjust lift cylinder packing nut.
Loosen packing nut, lubricate rod, operate cylinder
until it moves easily, adjust packing nut.
Go to Solenoid Coil Activation Test.
Go to Hydraulic System Test.
Go to Control Test.
Snowplow lowers by itself or won’t stay in raised
position.
Solenoid valve coils not activating properly.
Hydraulic system malfunction.
Malfunctioning controller.
Go to Solenoid Coil Activation Test.
Go to Hydraulic System Test.
Go to Control Test.
Blade will not hold angled position.
Air in angle cylinders.
Fluid bypassing cylinder relief valve.
Hydraulic system malfunction.
Cycle angle functions to purge cylinders.
Go to Relief Valve Inspection and Adjustment.
Go to Hydraulic System Test.
Plow does not perform the selected function or
performs a different function.
Hydraulic hose routing incorrect.
Verify correct hose installation. See Hose Routing
Diagram.
Go to Solenoid Coil Activation Test.
Go to Hydraulic System Test.
Go to Control Test.
Solenoid valve coils not activating properly.
Hydraulic system malfunction.
Malfunctioning Controller.
No. 21936
December 17, 2004
37
GENERAL DIAGNOSTIC TABLE
CONDITION
POSSIBLE CAUSE
ACTION
Vehicle harness 6 amp fuse blows.
Red wire in vehicle harness is shorted to ground.
Motor relay primary coil shorted internally.
Repair wire or replace vehicle harness.
Check primary coil with ohmmeter. Replace
defective motor relay.
Go to individual coil test. Replace shorted coils.
Repair wire or replace vehicle harness.
Solenoid valve coil shorted internally.
Motor relay or solenoid coil wires in vehicle harness
shorted to ground.
Solenoid coil wires in plow harness shorted to
ground.
Malfunctioning controller.
Repair wire or replace plow harness.
Go to Control Test.
Vehicle accessory fuse blows.
Circuit overloaded.
Consult vehicle owner’s manual for correct
application of aftermarket electrical loads.
Excessive load on vehicle electrical system while
using snowplow.
Poor connections in battery cables.
Angle or lift cylinder packing nut too tight.
Worn or damaged pump or motor.
Inspect battery cables, clean and re-establish all
connections.
Adjust cylinder packing nut.
Go to Pump Pressure Test/check motor.
Snowplow headlamps operate irregularly or not at
all – snowplow attached.
-orVehicle headlamps operate irregularly or not at all –
snowplow removed.
Burned out bulbs or corroded sockets.
Replace bulbs, clean contacts.
Wires improperly connected to relays.
Review and correct wire installation. See Headlamp
Test Diagram.
Headlamp relay inoperative.
Go to Plow Headlamp Test or Vehicle Headlamp
Test.
Vehicle daytime running lamps (DRLs) do not work
– snowplow removed. ('98 and older vehicles)
Parking brake on.
Fully release parking brake.
Power in DRL circuit has been interrupted.
No output from DRL module.
Turn lamp and/or ignition switch on and off to cycle
the DRL circuitry.
Repair vehicle electrical system.
Hydraulic system malfunction.
Go to Hydraulic System Test.
Blade will not hold position.
Snowplow Park or Turn lamps operate intermittently Burned out bulb, corroded socket(s) or poor
or not at all – snowplow attached.
electrical connection.
No. 21936
Replace bulbs/clean contacts. If necessary, go to
Park/Turn Lamp test.
December 17, 2004
38
PACKING NUT ADJUSTMENT
Periodically verify the lift cylinder and
angle cylinder packing nuts have not
loosened. If a packing nut is loose or
excessive leakage appears when
activating the cylinder, tighten the
packing nut 1/4 turn maximum after
you feel the packing nut contact the
packing.
CAUTION
Do not overtighten the packing
nut. Over-tightening affects
plow operation and the life of the
packing.
NOTE: A small amount of leakage
is necessary to properly lubricate
the cylinder rod.
The lift or angle cylinder packings
may dry out if the plow is not used for
a period of time. If the lift arm is
difficult to push completely down
when the control is in float, or the
plow angles slowly and causes
excessive load on the motor, loosen
the lift or angle cylinder packing nuts,
lubricate the cylinder rods with oil and
cycle the plow using the control.
When the packings are lubricated,
tighten the packing nuts and recheck
operation.
39
No. 21936
December 17, 2004
MOTOR TEST
WARNING
Refer to the Motor and Motor Relay
Test Diagram.
The driver shall keep bystanders
clear of the blade during this
test. Do not stand between the
vehicle and the blade. A moving
or falling blade could cause
personal injury.
Momentarily attach jumper cables
from the battery to respective (+)
and (-) motor terminals. Does
motor run?
YES
Retest with jumper cable from
battery (+) to (+) motor
terminal. Does motor run?
NO
NO
Check for binding in pump.
Replace pump, or repair or
replace motor.
No. 21936
YES
Momentarily attach (+)
jumper cable between battery
and motor side of motor relay
secondary. Does motor run?
YES
Go to Motor
Relay Test.
NO
Repair ground (black) wire in
vehicle or plow battery cable.
Repair positive (black/red) wire
in vehicle battery cable or plow
battery cable.
December 17, 2004
40
MOTOR AND MOTOR RELAY TEST DIAGRAM
Black/Red
Wire
Motor Terminal**
(-)
Orange/Black Wire*
Black Wire
Motor Terminal
(+)
Red Cable
+
-
Motor Relay
Secondary
Terminals
Black/Orange
Wire
To Vehicle
Harness
Black Wire
41
Black/Red
Wire
3W COIL
4W COIL
Motor Relay
Primary Terminals
WHITE
WIRE
GREEN
WIRE
2W COIL
Vehicle Battery Cable
Plow Battery Cable
BLUE
WIRE
Colored wires as shown.
Black wire tabs, one to each coil.
SOLENOID VALVE TORQUE:
No. 21936
Brown/Red Wire
* Later revision harness only.
Early revision harness has a single black/orange wire to
motor relay only, unless modified for use with hand-held
control.
ELECTRICAL CONNECTIONS:
Cartridges 10 ft. lbs.
Coils 5 ft. lbs.
Orange/Black Wire*
56294
DIAGRAM INSIDE COVER
** Early production motors use cap screw and star washer.
Current production motors have a stud.
December 17, 2004
MOTOR RELAY TEST
WARNING
The driver shall keep bystanders
clear of the blade during this
test. Do not stand between the
vehicle and the blade. A moving
or falling blade could cause
personal injury.
1. Jumper power and ground directly
from battery to motor to verify that
the motor runs. Make final
connection at the motor.
2. Refer to the Motor and Motor
Relay Test Diagram, and Vehicle
Harness and Vehicle Cable
Location Diagram.
Repair or replace
orange/black wire
between motor relay and
battery (-).
Motor does not run:
Momentarily attach a jumper
cable across the motor relay
secondary terminals.
Does motor run?
YES
NO
Attach a jumper wire
from battery (+) to motor
relay primary terminal
with brown/red wire.
Does motor run?
NO
NO
YES
Black/orange wire in plow
harness is open. Repair wire or
replace harness.
NO
Replace motor relay.
No. 21936
YES
Verify correct polarity of
cables from battery to
motor.
YES
NO
Reverse leads or replace cable
if manufactured incorrectly.
Is the primary terminal ground
wire black/orange
(early revision harness)?
42
YES
Replace motor relay.
Motor runs continuously:
Disconnect brown/red wire
from motor relay primary
terminal. Does the motor
stop?
YES
NO
Go to Vehicle Harness Test Motor Relay. If OK, go to
Control Test.
Repair or replace red (+) cable
from battery to motor relay.
Leave (+) jumper wire attached
and attach a ground jumper
wire from battery (-) to relay
primary terminal with black/
orange or orange/black wire.
Does motor run?
YES
Leave (+) jumper wire attached
and remove ground jumper
wire. Unplug vehicle harness
connector and apply ground to
socket #5 on vehicle side.
Does motor run?
NO
Black/orange wire in vehicle
harness is open. Repair wire or
replace harness.
Go to Control Test.
December 17, 2004
VEHICLE HARNESS TEST – MOTOR RELAY
WARNING
The driver shall keep bystanders
clear of the blade during this
test. Do not stand between the
vehicle and the blade. A moving
or falling blade could cause
personal injury.
1. Perform the Motor Test and Motor
Relay Test first.
2. Disconnect the control in the cab.
3. Refer to the 6-Pin Connector
diagram. Test the vehicle side of
the connector in the cab as
follows.
White 6-Pin Connector
on vehicle harness
located in cab
(end view)
3
6
2
5
1
4
Pin #
Wire Color
1
Red
2
Lt Green
3
Orange/Black
4
Brown/Red
5
Lt Blue
6
White/Yellow
(sockets)
YES
Is there 12V at socket #1?
NO
Verify vehicle power
source and 6 amp fuse* in
red wire. Repair red wire
or replace harness.
Install a jumper wire
between sockets #1 and
#4. Does motor run?
NO
43
Brown/red wire to motor
relay is open. Repair wire
or replace harness.
YES
Remove jumper wire. Go
to Control Test.
*Early revision harnesses may have a 10 amp fuse.
No. 21936
December 17, 2004
CONTROL TEST
Test Procedure for Hand-Held or Solenoid Control
1. Disconnect the control in the cab
and remove to work bench.
2. Refer to the 6-Pin Connector
diagram and the chart.
3. Using a 12V power source with a 6
amp fuse in the positive lead,
carefully apply +12V to pin #1 and
ground to pin #3 of the 6-pin
connector.
Pin
No.
Purpose
1
12V Input
2
S2 Output (3-Way)
3
Ground
4
Motor Relay Output
5
S3 Output (4-Way)
6
S1 Output (2-Way)
4. Turn the control on. Power
indicator lamp should be lit. Using
a grounded test light, check for
12V at each of pins #2, 4, 5, 6
when the control is activated for
each function. Footnotes in the
chart indicate special conditions of
control operation.
Angle
Right (c)
ON
ON (b)
(a)
Angle
Left (c)
Raise (d)
5. Compare the control outputs for all
functions with the chart and
proceed to the flow diagram.
Control Side
(end view)
Lower/
Float (e)
6
3
5
2
4
1
ON
ON (b)
ON (b)
ON
ON
(a)
ON
a. S1 output will be ON if control is in float. Activate raise function to cancel float. If
hand-held control is in float, S1 output will turn off while angle button is pressed
and on when the button is released.
Pin #
Solenoid Control
Wire Color Only
1
White
2
Green
3
Brown
4
Black
5
Blue
6
Red
(pins)
b. For hand-held control, motor relay output turns off before solenoid coil outputs
when button is released.
c. For hand-held control, outputs turn off after button is held for approximately 5
seconds.
d. For hand-held control, outputs turn off after button is held for approximately 2.5
seconds.
e. Solenoid control activates S1 output in float when lever is moved to lower position.
Hand-held control activates float when lower button is held for .75 second.
No. 21936
December 17, 2004
44
CONTROL TEST
Do control outputs
match chart for all
functions?
No
Yes
Control is OK. Verify
vehicle harness ground
and power source for
red wire.
Solenoid Control:
replace PCB or control
assembly
Hand-Held Control:
follow handling
instructions. Remove
handle half. Is the white
cord connector fully
seated on the PCB?
No
Yes
Carefully disconnect white cord
connector from PCB. Test the cord
for continuity according to
electrical schematics. Note internal
connection in the cord. Does
continuity match schematic?
Yes
Replace PCB
Seat the cord
connector fully
on the PCB.
Retest Control.
No
Replace coil cord
NOTE: For hand-held control, poor
ground connections or high or low
voltage will shut the control off.
No. 21936
To Safely Handle Hand-Held PCB:
CAUTION
Printed circuit board (PCB) is
subject to damage from static
electricity. Follow instructions
below to safely handle PCB.
1. Disconnect the control in the cab
and remove to a workbench.
2. Place control on its left side and
remove right side of handle,
leaving the keypad/circuit board
assembly in left half.
45
3. Touch hand to any grounded metal
object to discharge possible static
buildup.
4. Remove keypad/circuit board
assembly from housing by only
touching the edges of the keypad/
circuit board assembly.
5. The keypad/circuit board
assembly can be handled safely
as long as contact with it is
maintained.
December 17, 2004
PUMP PRESSURE TEST
WARNING
The tester shall keep bystanders
clear of the blade during this
test. Do not stand between the
vehicle and the blade. A moving
or falling blade could cause
personal injury.
1. Lower blade to the ground and fully
collapse the lift cylinder.
2. Carefully remove the 1/4" pipe plug
from the lift cylinder test port in the
housing above the manifold block.
Be aware of possible residual
pressure in the lift cylinder.
3. Using a suitable adapter fitting,
attach a 3000 psi hydraulic
pressure gauge to the lift cylinder
test port.
4. Activate the raise function with the
control and read the pump relief
pressure when the blade is fully
raised.
5. Refer to the illustration below for
pump relief valve screw and lift
cylinder test port location. The
chart lists relief pressure settings.
Maximum Motor Amp Draw
At 11.2 Volts w/Warm Oil
Pump Relief
Valve Pressure
(± 100 PSI)
200
1750
Heavyweight
210
1900
Sport Utility
180
1550
Plow Type
Standard, PRO-PLOW
®
NOTE: Adjusting pump relief valve screw
clockwise 1/4 turn increases relief pressure
approximately 225 PSI. Early 2-piece diecast pumps may require removal to adjust.
6. Proceed to the flow chart on the
following page.
46
Lift
Cylinder
Test Port
Pump Relief Valve Screw
Current 3-Piece Pump
Pump Relief Valve Screw
No. 21936
Early 2-Piece
Die-Cast Pump
December 17, 2004
PUMP PRESSURE TEST
Does pump relief pressure
match value on chart?
NO
YES
YES
Is motor amp draw greater than
chart value when pump at
specified relief pressure?
YES
Repair or
replace
motor.
Is the pump pressure
zero?
NO
Go to
Hydraulic
System Test.
Go to Cartridge Coil
Activation Test. Repair
as necessary and recheck pump pressure.
NO
Turn pump pressure relief
screw clockwise to increase
pressure. Can pressure be
adjusted to value in chart
above?
YES
NO
Inspect pump
O-ring beneath pump.
Replace if damaged. Can
the pressure now be
adjusted to chart value?
YES
On 3-piece pumps, verify the relief
valve screw cannot be turned by
hand. If it can, adjust to chart value
after applying medium strength
thread locking compound to screw
heads or stake pump body with
punch around threads to prevent
screw loosening.
47
NO
Replace
pump.
No. 21936
December 17, 2004
CARTRIDGE COIL ACTIVATION TEST
1. Disconnect the black/red (+)
battery cable from the motor and
isolate it.
2. Verify wires are properly attached
to solenoid coils. Refer to Wire
Connection Table, Electrical
Schematic, and Solenoid Cartridge
Valve Identification and Location.
3. Activate the control for each
function and check for magnetic
pull at all three solenoid valve
coils. Only the coils designated
as "ON" in the table should
activate for each function. After
noting which coils are energized,
proceed to the flow chart.
Cartridge Coil Wiring and Activation – Wire Connection Table
Solenoid
Coil
Plow
Harness
Pin
Wire Color
Angle
Right
Angle
Left
Raise
Lower
S1 (2-Way)
1
White/ Yellow
*
*
*
ON
S2 (3-Way)
3
Light Green
ON
ON
S3 (4-Way)
4
Light Blue
ON
ON
*S1 output will be “ON” for all functions if control is in “FLOAT”.
Activate “RAISE” function to cancel “FLOAT”.
Hand Held Control Only – While in “FLOAT”, pressing and holding the “RIGHT”
or “LEFT” button will turn off the solenoid cartridge valve S1 until the
button is released.
Do activated coils match the
chart for all functions?
YES
NO
Verify battery cables are connected. Is there
ground at all black/orange wires attached to coils?
Repair black/orange wires to coils, check
ground connections at motor, battery cable
connector and battery (-) terminal. Retest.
NO
YES
Go to
Hydraulic System Test.
Disconnect 9- or 12-pin harness at front of vehicle.
Apply 12V to the white/yellow, light blue and light green
wires at coils S1, S2 and S3. Does each coil activate?
NO
Go to Individual Coil Test.
Replace open coils.
YES
9- or 12-Pin Connector
Plow Side
7
8
9
10
11
12
Apply 12v to pins #1,3 and 4 of the plow harness
connector. Do the respective coils activate
according to the chart?
NO
Respective wire is open or has
bad connection. Repair wire or
replace plow harness.
YES
1
No. 21936
2
3
4
5
6
Go to Vehicle Harness Test for Cartridge Coils.
December 17, 2004
48
VEHICLE HARNESS TEST – CARTRIDGE COILS
1. Disconnect the black/red (+)
battery cable from the motor and
isolate it.
2. Perform Cartridge Coil Activation
Test.
White 6-Pin Connector
on vehicle harness
located in cab
(end view)
3. Connect all harness connectors
at the front of the vehicle.
4. Refer to the 6-Pin Connector
diagram for socket location.
3
6
2
5
1
4
Pin #
Wire Color
1
Red
2
Lt Green
3
Orange/Black
4
Brown/Red
5
Lt Blue
6
White/Yellow
(sockets)
Is there ground at socket #3?
NO
Orange/black wire is open
between connector and motor
relay or battery (-). Repair
wire or replace harness.
YES
Is there 12v at socket #1?
NO
YES
49
Attach a jumper wire between terminal #1 and
terminals #6. Does solenoid coil S1 activate?
Repeat process between terminal #1 and #2, and
between terminal #1 and terminal #5. Do solenoid
coils S2 and S3 activate respectively?
YES
Verify 6 amp fuse* and red wire
connection to vehicle circuit.
Repair wire or replace harness.
Replace fuse as needed.
Go to Control Test
NO
Corresponding wire is
open or has poor
connection. Repair wire or
replace vehicle harness.
*Early revision harnesses may have a 10 amp fuse.
No. 21936
December 17, 2004
HYDRAULIC SYSTEM TEST
This test consists of trying all the
plow functions and comparing the
plow reaction to the action requested
in the following table. The table will
pinpoint a solenoid valve or poppet
check valve problem accurately if
only one component is
malfunctioning. If the plow reaction
for a given function is not listed in
the table, there may be a crossover
relief or poppet check valve which is
stuck open or contaminated, missing
or damaged O-rings or backing rings
on cartridge, crossover relief or
poppet check valve spool, or there
may be two or more malfunctioning
components. In this case, use the
specific function hydraulic schematic
and carefully inspect each
component in the flow circuit. If
contamination is evident in more
than one component, the hydraulic
unit, hoses and cylinders must be
completely disassembled, inspected
and cleaned.
4. Inspect and clean or replace the
suspected component. Refer to
the Hydraulic Unit Parts Diagram.
1. Perform Cartridge Coil Activation
Test first.
5. Refer to the sections following
the table for inspection and
adjustment of solenoid cartridge
valves, poppet check valve and
crossover relief valves.
2. Verify hydraulic hose installation
is correct. Refer to the Hose
Routing diagram.
3. Test all of the plow functions.
IMPORTANT: When testing the plow
functions, be sure the control is not
in “float.”
ACTION REQUESTED
PLOW REACTION
POSSIBLE CAUSE
Angle Right
Angle Left
None
S3 stuck shifted
S2 not shifted
Poppet check valve not opening
S3 not shifted
S2 not shifted
S2 and S3 not shifted
Poppet check valve not opening
S3 not shifted
S2 stuck shifted
S1 stuck shifted or has leaking internal check valve
S1 not shifted
S2 stuck shifted
Angle Left
Angle Right
Raise
None
Raise
None
Angle Left
Lowers
None
None (blade raised)
Lower
S3 stuck shifted
None
No. 21936
Drifts Right
S2 stuck shifted
Contamination or damaged O-rings in crossover relief
valve
Drifts Left
Poppet check valve open
Contamination or damaged O-rings in crossover relief
valve
December 17, 2004
50
CROSSOVER RELIEF VALVE INSPECTION AND ADJUSTMENT
Crossover Relief Valve Inspection
Adjustment
1. Remove the valve stem, ball,
spacer and spring.
1. Adjust by tightening the relief
valve stem until it bottoms out
(until spring is fully compressed).
2. Look for broken or damaged
parts, contamination or missing or
damaged O-rings.
CAUTION
Be careful to strike the stem
squarely. You can bend the stem
if you do not strike it squarely.
Crossover Relief Valve Settings
2. Back off valve stem (rotate
counterclockwise) the number of
turns indicated in the Crossover
Relief Valve Settings chart.
No. of Turns Backed Off
(CCW) From Fully Seated*
Crossover Relief Valve
Pressure (± 100 PSI)
1-1/2 – 2
3500
Heavyweight
1-1/2 – 2
3500
Sport Utility
2-1/4 – 2-3/4
2500
Plow Type
Standard, PRO-PLOW
®
* Settings are approximate.
Valve Manifold Block
3. If parts are in good condition,
place ball on hard wood block,
hold stem seat on ball, and strike
stem lightly with a hammer. This
will re-conform the seat to the
ball.
4. Apply a light coat of anti-seize or
grease to stem threads. Lubricate
O-ring with hydraulic fluid.
Reassemble components into
valve block.
51
Crossover Relief Valve
Assembly
Spring
Spring Spacer
Ball
Valve Stem Seat
Valve Stem w/ O-rings
No. 21936
December 17, 2004
POPPET CHECK VALVE INSPECTION
1. Remove O-ring boss plug, spring
and poppet.
NOTE: Strike boss plugs squarely
with a hammer to facilitate removal.
2. Remove O-ring boss plug, spring
and spool with O-ring. Use long/
slender needle-nosed pliers to
remove spool.
3. Inspect springs, poppet, spool,
O-rings and poppet seat* for
wear, damage or contamination.
4. If the valve manifold block has a
steel poppet seat, use a strong
pencil magnet to push and pull on
the seat. If the seat moves at all,
replace the valve block.
O-Ring Boss
Plug
O-Ring
Spring
52
Poppet
O-Ring
5. Re-oil O-rings, install spool fully
into bore. Spool must insert
smoothly.
6. Install poppet, springs and O-ring
boss plugs. Torque O-ring boss
plug to 60 in-lb.
* Early valve manifolds have the
poppet seat machined into the
block. Current valve manifolds use
a pressed-in steel poppet seat.
No. 21936
Back-Up Ring
Spool
Spring
O-Ring Boss
Plug
O-Ring
December 17, 2004
INDIVIDUAL SOLENOID COIL TEST
SOLENOID CARTRIDGE VALVE INSPECTION
1. Remove both wires from coil
terminals.
1. Remove coils from the solenoid
cartridge valves and remove the
cartridge valves from the manifold.
Look for visible contamination or
damaged seals. Check for stuck
spools with a plastic, aluminum, or
soft brass probe by pushing on the
spring loaded internal spool from
the end of the valve. The spool
should move freely through its
entire travel. Spool travel is
approx. 0.070".
2. Attach an ohmmeter across the
coil terminals.
3. A reading of approximately 6.7
ohms indicates the coil is good.
NOTE: A good coil will draw
approximately 1.5 amps.
NOTE: Using probe to move spool
may shear contamination which was
affecting spool movement.
2. Bench test the cartridge valve by
installing a coil on the stem and
applying 12V and ground. Watch
through the side ports for internal
spool travel.
If the cartridge valve spool is
stuck or its travel is restricted,
replace the cartridge. If the
cartridge valve appears to be in
good condition, clean it with parts
cleaning solvent and dry with
compressed air, being careful not
to damage the seals. Check the
spool travel again in case any
internal contaminants were
dislodged during cleaning.
Re-oil the cartridge valve seals
No. 21936
and o-rings and reinstall the
cartridge valve, torquing to
10 ft-lb. Install the coils and torque
the retaining nuts to 4 ft-lb.
NOTE: If contamination is seen in
more than one component, it can
reasonably be assumed that the
entire system is contaminated. In
order to perform a proper repair, the
entire hydraulic unit, including
hoses and cylinders, must be
disassembled and cleaned. The
source of the contamination must
be located and repaired before
reassembly.
Apply 12V
and ground
to coil
Cartridge valve
identification
marked on hex
Watch here
Probe here
December 17, 2004
53
HEADLAMP TEST DIAGRAM – 9-PIN HARNESS (’98 AND OLDER VEHICLES)
NOTE:
THIS CONNECTOR
IS NOT USED
FOR SOME INSTALLATIONS
PARK/TURN
TURN SIGNAL
TAP
RIGHT SIDE
HEADLAMP
CONNECT TO
MOTOR RELAY
RED
ORN
BLU
PUR
PART OF FACTORY
VEHICLE HARNESS
CONNECT TO
BATTERY (NEG.)*
BRN/RED ORN/BLK
ORN/BLK
RED
CONNECT
TO A SWITCHED
ACCESSORY LINE
FE
6a S
RE
D
PLUG-IN HARNESS
NC
TO
CAB CONTROL
NO
BLK/ORN
PUR
BLK
VEHICLE HARNESS
COIL
O
RN
87A
RED
ORN
BLU
BRN
GRY
GRN = HI BEAM
YEL = LO BEAM
BLU = GROUND
85
30
HIGH BEAM RELAY
No. 21936
54
87 NO (NORMALLY OPEN) TO PLOW LIGHTS,
CLOSES WHEN PARKING LIGHTS ARE ON.
GRN
PARK/TURN
SIGNAL TAPS
PARK/TURN
COIL
87a NC (NORMALLY CLOSED) TO VEHICLE HEADLIGHTS,
OPENS WHEN PARKING LIGHTS ARE ON.
87
87A
85
30 COMMON +12V FROM THE HEADLIGHT SWITCH.
RED
86
86
86 COIL CONNECTION +12V FROM PARKING LIGHT TAP.
(SEE NOTE BELOW)
BLU
LEFT SIDE
HEADLAMP
87
85 COIL CONNECTION GROUND FROM VEHICLE HARNESS
PLUG.
30
LOW BEAM RELAY
WHT
PUR
C
RELAY PIN OUT
85
YEL
BRN
86
BLK/ORN
VEHICLE HARNESS
CONNECTOR
30
THE RELAY SHOWN
IS NOT ENERGIZED
87
BRN
87a
* LATER REVISION HARNESSES ONLY
NOTE: DRL applications
require a DRL kit. DRL kit
not shown.
PART OF FACTORY
VEHICLE HARNESS
December 17, 2004
VEHICLE HEADLAMP TEST – 9-PIN HARNESS
1. Verify correct harness and wire
installation to relays and vehicle
headlamps. See the Headlamp
Test Diagram – 9-Pin Harness.
The specific wiring diagram for
the vehicle can be found in the
At each relay, is there 12V at terminal
30 with green (high beam) or yellow
(low beam) wires?
NO
plow installation instructions, the
WESTERN® UniMount® Service
Manual Vol. 2., or (for ’98 and
older vehicles) the manual
Headlamp Electrical Schematics
for Straight Blades.
YES
2. Turn ignition and headlight switch
on.
3. Disconnect all harnesses at the
front of the vehicle.
4. All bulbs must be good.
Is there 12V at terminal 87a
with red (high beam) or orange
(low beam) wires?
NO
YES
Unplug plug-in harness
connectors at each vehicle
headlamp. Is there 12V at
the red wire (high beam) and
orange wire (low beam)?
YES
Blue ground wire in
plug-in harness is
open. Repair wire
or replace harness.
NO
Check vehicle output from
headlight connector to plug-in
harness. Repair vehicle
system or open wires in plugin harness.
Carefully disconnect the
black/orange wire from terminal
85 of both relays. Is there now
12V at terminal 87a?
NO
Replace relay.
55
Red or orange wires
open in plug-in
harness. Repair wire
or replace harness.
YES
Black/orange wire in vehicle
harness is shorted to ground.
Repair wire.
No. 21936
December 17, 2004
PLOW HEADLAMP TEST – 9-PIN HARNESS
1. Verify correct harness and wire
installation to the headlamp
relays.
4. Turn vehicle headlamp switch on.
For vehicles with Daytime
Running Lamps (DRLs), turn
ignition on. DRL equipped
vehicles have a pink wire instead of
a brown wire on relay terminal 86.
2. All bulbs must be good.
3. Connect all harnesses at the front
of the vehicle.
At each headlamp relay, is there
12V at terminal 30 with green (high
beam) or yellow (low beam) wires?
YES
Is there 12V at terminal 87?
With white (high beam) or
black (low beam) wires.
YES
Check vehicle output from
headlamp connector to plug-in
harness. Repair vehicle electrical
system or open wires in plug-in
harness.
Check brown wire connection to
vehicle park lamp circuit or (DRL)
pink wire fuse or connection to
vehicle accessory wire or fusebox.
Repair or replace open (DRL) pink
or brown wire.
NO Is there 12V at each relay terminal
86 with brown or (DRL) pink wire?
Vehicle Harness
9-Pin Connector
No. 21936
NO
YES
High Beam
Headlamp
Ground
1
2
3
4
5
7
8
9
10
11
Right Turn
Plow lights are good.
6
12
Park
Black/orange ground wire in
plow harness is open. Repair
wire or replace harness.
YES
NO
NO
Disconnect 9-pin connector. Attach
ground jumper to relay terminal 85.
Is there 12V at socket #6 (high
beam, white wire) or socket #2 (low
beam, black wire) on vehicle side?
YES
Replace headlamp relay.
Do plow lights work?
be found in the plow installation
instructions, the WESTERN®
UniMount® Service Manual Vol. 2.,
or (for ’98 and older vehicles) the
manual Headlamp Electrical
Schematics for Straight Blades.
NO
Attach a ground jumper wire to relay
terminal 85 with black/orange wire. Is
there now 12V at relay terminal 87?
Left Turn
Is there 12V at the black or white
wires in the plow headlamp
connectors at the bulb?
NO
NO
Low Beam
Headlamp
5. Refer to the 9-Pin Electrical
Schematic Headlamp Test
Diagram – 9-Pin Harness, and
Connector diagram. The specific
wiring diagram for the vehicle can
YES
YES
Remove jumper wire from relay.
Disconnect 9-pin connector. Attach
ground jumper wire to socket #5 on
vehicle side. Is there 12V at socket #6
(high beam) or socket #2 (low beam)?
NO
YES
Corresponding wire is
open in vehicle harness.
Repair wire or replace
harness.
Corresponding wire is
open in plow harness.
Repair wire or replace
harness.
Reconnect 9-Pin
connector. Attach
ground jumper to (-)
motor terminal. Do
plow lights come on?
NO
Black/orange ground wire in
vehicle harness is open.
Repair wire or replace
harness.
Black/orange
wire in plow
harness is
open. Repair
wire or replace
harness.
YES
Poor ground
between battery
and motor (-)
terminal. Repair
vehicle or plow (-)
battery cable.
December 17, 2004
56
PARK/TURN LAMP TEST – 9-PIN OR 12-PIN HARNESS
1. Verify plow park/turn (P/T) bulbs
and contacts are good.
3. Connect all harnesses at the front
of the vehicle.
2. Turn parking lamps and ignition
on.
4. Refer to the Vehicle Harness 9- or
12-Pin Connector diagram.
Vehicle Harness
9- or 12- Pin Connector
Ground
1
7
2
8
3
9
4
10
5
11
Left Turn
Right Turn
Do vehicle park lamps
work?
Disconnect 9 or 12-pin connector.
Is there 12V at socket #11 on the
vehicle side?
YES
NO
NO
Repair vehicle electrical
system.
NO
Poor connection to vehicle circuit or
open brown wire in vehicle harness.
Repair wire or replace vehicle
harness.
Do vehicle turn signals
work?
NO
YES
Poor connection to vehicle circuit or
open purple (right) or gray (left) wire
in vehicle harness. Repair wire or
replace harness.
Reconnect 9 or 12-pin
connector. Remove P/T bulbs
from plow lights. Is there 12V
at each brown wire terminal in
the sockets?
YES
Poor ground connection
between bulb and socket or
black/orange ground wire is
open in plow harness. Repair
wire or replace harness.
57
Brown wire is open in plow
harness. Repair wire or replace
harness.
YES
Go to Optional Park/Turn Relay Kit Test
YES
NO
NO
Park
NO
Is the optional Park/Turn Relay Kit
installed? (Vehicle harness brown
wire connects to relay kit gray wire.)
Disconnect 9 or 12-pin connector. Is
there 12V at sockets #10 for right
turn and #9 for left turn?
Repair vehicle electrical
system.
No. 21936
YES
6
12
Is the optional Park/Turn Relay Kit
installed? (Vehicle harness gray
wire and purple wires connect to
relay kit gray and purple wires.)
YES
Reconnect 9 or 12-pin connector.
Remove P/T bulbs from plow
lights. Is there 12V at each red
wire terminal in the sockets? (The
purple and gray wires are spliced to
red wires in the P/T sockets.)
YES
Poor ground connection
between bulb and socket or
black/orange ground wire is
open in plow harness. Repair
wire or replace harness.
NO
Purple or gray wire is open in plow
harness. Repair wire or replace
harness.
Go to Optional Park/Turn Relay Kit Test
December 17, 2004
OPTIONAL PARK/TURN RELAY KIT TEST
1. Turn signal applications use both
gray and purple relay circuits.
3. Refer to the Optional Park/Turn
Relay Kit schematic.
5. Verify in-line 10 amp fuse in red
wire is good.
2. Park lamp applications use gray
relay circuit only. If gray relay
circuit fails, purple relay circuit
can be used instead.
4. Verify relay kit red and black wires
are connected to battery (+) and
(–) respectively.
6. Disconnect long and short gray
and purple wires to isolate relay
circuits.
Apply 12V to long gray wire. Is
there 12V at short gray wire?
NO
Gray relay circuit failed.
Use good purple relay
circuit or replace relay kit.
No. 21936
YES
Apply 12V to long purple wire. Is
there 12V at short purple wire?
NO
YES
Note: If the snowplow park/turn
lamps are on when the vehicle park/
turn lamps are off, replace the relay
kit.
Relay kit is OK. Check bullet
connectors on vehicle
park/turn circuits.
58
Purple relay circuit failed.
Replace relay kit.
December 17, 2004
OPTIONAL PARK/TURN RELAY KIT SCHEMATICS
WIRED FOR PARK LAMPS
WIRED FOR TURN SIGNALS
SEALED RELAY KIT
SEALED RELAY KIT
GRY
BRN
VEHICLE HARNESS WIRE
PUR
87A
87
86
87A
30
87
85
86
85
87A
PURPLE RELAY CIRCUIT NOT USED
30
87
PUR
GRY
86
87A
30
87
85
86
PUR
PUR
85
PUR
GRY
VEHICLE HARNESS WIRES
TO RIGHT TURN LAMP BULLET
TO LEFT TURN LAMP BULLET
RED
10 AMP FUSE
BLK
RED
BLK
No. 21936
BRN
30
TO PARK/LAMP BULLET
10 AMP FUSE
VEHICLE BATTERY
GRY
59
VEHICLE BATTERY
December 17, 2004
VEHICLE HEADLAMP TEST – 12-PIN HARNESS – 3 RELAY SYSTEM ONLY
1. Verify correct harness and wire
installation to headlamp relays,
vehicle headlamps, and vehicle
headlamp connectors.
2. All bulbs must be good.
3. Disconnect all harnesses at the
front of the vehicle.
4. Turn vehicle headlamp switch on.
For vehicles with Daytime
Running Lamps (DRL’s), turn
ignition on. DRL equipped vehicles
have a pink wire instead of a
brown wire on relay terminal 86.
5. Verify power for both high and low
beam and ground are present at
the original vehicle headlamp
connectors.
6. Refer to the Electrical Schematic
– 12-Pin Harness, and the
Headlamp Test Diagram – 12-Pin
Harness. The specific wiring
diagram for the vehicle can be
found in the plow installation
instructions, the WESTERN®
UNIMOUNT® Service Manual Vol. 2.,
or (for ’98 and older vehicles) the
manual Headlamp Electrical
Schematics for Straight Blades.
Relays are activated.
Black/orange wire in
vehicle harness is
shorted to ground.
*
YES
Remove headlamp harness
connectors from vehicle
headlamps. Is there 12V at
each orange wire socket (low
beam) and red wire socket
(high beam)?
NO
Low beam: orange or yellow
wire in headlamp harness is
open.
High beam: Is there 12V at
terminal 30 with the green wire
at the vehicle high beam relay?
*
YES
NO
*
Red wire in headlamp
harness is open.
Remove black/orange wire
from vehicle high beam
relay. Do the high beam
lights work?
NO
YES
NO
Green wire in headlamp
harness is open.
Is there 12V at terminal
87a with the red wire at
the vehicle high beam
relay?
*
Replace vehicle high
beam relay.
YES
* Repair wire or replace harness for
all open or shorted wires.
No. 21936
December 17, 2004
60
VEHICLE HEADLAMP TEST – 12-PIN HARNESS – 3 RELAY SYSTEM ONLY
YES
Is there ground at the Lt
blue/white wire socket in
the right connector and
Dk blue/white wire socket
in the left connector?
YES
Check for poor or
corroded connections in
the headlamp harness
and at relays.
Relays are activated.
Black/orange wire in
vehicle harness is shorted
to ground.
NO
Right side headlamp: Attach
a ground jumper wire to
terminal 87a with the Dk
blue/white wire on the curb
side relay. Does the
headlamp work?
Left side headlamp: Attach a
ground jumper wire to
terminal 87a with the Lt
blue/white wire on the driver
side relay. Does the
headlamp work?
YES
YES
Right side headlamp: Attach
a ground jumper wire to
terminal 30 with the Dk
blue/white wire on the curb
side relay. Does the
headlamp work?
*
YES
NO
Left side headlamp: Attach a
ground jumper wire to
terminal 30 with the
Lt blue/white wire on the
driver side relay. Does the
headlamp work?
61
Disconnect the
black/orange wire from
the relay. Does the
headlamp work?
NO
YES
NO
Dk blue/white or Lt
blue/white wire in
headlamp harness is
open.
*
Dk blue/white or Lt
blue/white wire in
headlamp harness is
open.
*
Replace relay.
* Repair wire or replace harness for
all open or shorted wires.
No. 21936
December 17, 2004
PLOW HEADLAMP TEST – 12-PIN HARNESS – 3 RELAY SYSTEM ONLY (’98 AND OLDER VEHICLES)
1. Verify correct harness and wire
installation to headlamp relays,
vehicle headlamps, and vehicle
headlamp connectors.
2. All bulbs must be good.
3. Connect all harnesses at the front
of the vehicle.
Disconnect the 12-pin
harness connector. Do
the vehicle headlights turn
on?
4. Turn vehicle headlamp switch on.
For vehicles with Daytime
Running Lamps (DRL’s), turn
ignition on. DRL equipped
vehicles have a pink wire instead
of a brown wire on relay terminal 86.
YES
NO
On the vehicle 12-pin
harness connector, is
there 12V at socket 6 (high
beam) and sockets 2 and
7 (low beam)?
YES
NO
Yellow or orange wire
in headlamp harness
is open.
On the plow harness
connector, attach a ground
jumper wire to pin #8 and 12V
to pin #2 (low beam) or pin #6
(high beam). Does the right
side plow headlamp work for
both high and low beam?
NO
*
*
NO
High beam: Open the
connection between the white
wire of the vehicle harness
and the green wire of the
headlamp harness. Is there
12V at the green wire?
NO
Low beam: Open the
connection between the yellow
and orange or orange wire
terminal of the headlamp
harness and the black wire of
the vehicle harness. Is there
12V at the yellow and orange
or orange wire?
YES
YES
YES
White wire in vehicle
harness is open.
Either black wire (right
headlamp) or
black/white wire (left
headlamp) in vehicle
harness is open.
Harness. The specific wiring
diagram for the vehicle can be
found in the plow installation
instructions, the WESTERN®
UNIMOUNT® Service Manual Vol. 2.,
or (for ’98 and older vehicles) the
manual Headlamp Electrical
Schematics for Straight Blades.
*
If no low beam: black wire in
plow harness is open.
If no high beam: white wire is
open.
If no high or low beam: Dk
blue/orange wire is open.
62
YES
Go to Vehicle
Headlamp Test
12-pin.
Green wire in
headlamp harness is
open.
5. Verify power for both high and low
beam and ground are present at
the original vehicle headlamp
connectors.
6. Refer to the Electrical Schematic
– 12-Pin Harness, and the
Headlamp Test Diagram – 12-Pin
*
*
On the plow 12-pin harness
connector, attach a ground
jumper wire to pin #12 and 12V
to pin #7 (low beam) or pin #6
(high beam). Does the left
side plow headlamp work for
both high and low beam?
NO
If no low beam: black/white
wire in plow harness is open.
If no high beam: white wire is
open.
If no high or low beam : Lt
blue/orange wire is open
*
* Repair wire or replace harness for
all open or shorted wires.
No. 21936
December 17, 2004
PLOW HEADLAMP TEST – 12-PIN HARNESS – 3 RELAY SYSTEM ONLY (’98 AND OLDER VEHICLES)
Brown or pink wire is open.
Check brown wire connection
to vehicle park lamp circuit or
fuse in pink wire.
NO
*
*
Dk blue wire in headlamp
harness open.
YES
YES
NO
Remove ground jumpers. Is
there 12V at terminal 86 with
brown wire (pink wire for
DRLs) at all relays?
NO
Move ground jumper wire to
terminal 30 with Dk blue wire at
curb side relay. Does right
plow headlamp work?
YES
YES
Move ground jumper wire to
terminal 30 with Lt blue wire at
driver side relay. Does left
plow headlamp work?
Reconnect all harness
connectors. Attach a ground
jumper wire to terminal 87 with
the Dk blue/orange wire at the
curb side relay. Does the left
plow headlamp work?
Reconnect all harness
connectors. Attach a ground
jumper wire to terminal 87 with
the Lt blue/orange wire at the
driver side relay. Does the
right plow headlamp work?
NO
NO
Dk blue/orange
wire in vehicle
harness is open.
Lt blue/orange
wire in vehicle
harness is open.
*
*
63
YES
YES
Attach a ground jumper wire to
terminal 85 with black/orange
wire at the relays. Do plow
headlamps work?
Lt blue wire in
headlamp harness is
open.
*
Remove ground jumper wires.
Disconnect the 12 pin harness
connector. Touch socket 5 of the
vehicle harness connector with a
ground jumper wire. Do the
relays make a clicking sound
indicating they are activating?
YES
NO
Black/orange
ground wire in
vehicle harness is
open.
*
NO
Replace relay.
No. 21936
Black/orange
ground wire in
plow harness is
open.
*
YES
* Repair wire or replace harness for
all open or shorted wires.
December 17, 2004
HEADLAMP TEST DIAGRAM – 12-PIN HARNESS – 3 RELAY SYSTEM ONLY (’98 AND OLDER VEHICLES)
NOTE:
THESE CONNECTORS
ARE NOT USED
FOR SOME INSTALLATIONS
PARK/TURN
RIGHT SIDE
HEADLAMP
CONNECT TO
MOTOR RELAY
ORN
CONNECT TO
BATTERY (NEG.)*
BRN/RED ORN/BLK
RED
ORN/BLK
6a S
PUR
DKBLU/WHT
TURN SIGNAL
TAP
RED
PART OF FACTORY
VEHICLE HARNESS
FE
RE
D
DKBLU/WHT
CONNECT
TO A SWITCHED
ACCESSORY LINE
TO
CAB CONTROL
PLUG-IN HARNESS
BLK/ORN
NC
NO
LTBLU/ORN
COIL
BRN
86
DRIVER-SIDE
RELAY
85
H
/W
LU
LT
B
VEHICLE HARNESS
CONNECTOR
86
BLK/WHT
30
RED
WHT
DKBLU/ORN
ORN
GRY
LTBLU/WHT
LEFT SIDE
HEADLAMP
BLK
DKBLU/WHT
86
DKBLU/WHT
BRN
30
PARK/TURN
SIGNAL TAPS
BLK/WHT
No. 21936
87A
O
85
87
86
85
COIL
64
85 COIL CONNECTION GROUND FROM VEHICLE HARNESS
PLUG.
YEL = LO BEAM
GRN = HI BEAM
LTBLU/DKBLU = GROUND
LTBLU
GRN
DKBLU
YEL
87
ORN
PARK/TURN
85
C
RELAY PIN OUT
HIGH BEAM
RELAY
GRN
RED
87A
BRN
PUR
87
30
THE RELAY SHOWN
IS NOT ENERGIZED
BLK/ORN
30
T
BRN
VEHICLE HARNESS
87A
BLK/ORN
PUR
87
87a
PASSENGER-SIDE
RELAY
86 COIL CONNECTION +12V FROM PARKING LIGHT TAP.
(SEE NOTE BELOW)
30 COMMON +12V FROM THE HEADLIGHT SWITCH.
87a NC (NORMALLY CLOSED) TO VEHICLE HEADLIGHTS,
OPENS WHEN PARKING LIGHTS ARE ON.
87 NO (NORMALLY OPEN) TO PLOW LIGHTS,
CLOSES WHEN PARKING LIGHTS ARE ON.
* Later revision harnesses only
NOTE: DRL applications
require a DRL kit. DRL kit
not shown.
PART OF FACTORY
VEHICLE HARNESS
December 17, 2004
NOTES
65
No. 21936
December 17, 2004
NOTES
66
No. 21936
December 17, 2004
WESTERN PRODUCTS
7777 NORTH 73RD STREET
P.O. BOX 23045
MILWAUKEE, WISCONSIN 53223
68
A DIVISION OF DOUGLAS DYNAMICS, L.L.C.
Copyright © 2004 Douglas Dynamics, L.L.C. All rights reserved. This material may not be reproduced or copied, in whole or in part, in any printed, mechanical, electronic, film or other
distribution and storage media, without the written consent of Western Products. Authorization to photocopy items for internal or personal use by Western Products outlets or
snowplow owner is granted.
Western Products reserves the right under its product improvement policy to change construction or design details and furnish equipment when so altered without reference to
illustrations or specifications used. Western Products and the vehicle manufacturer may require and/or recommend optional equipment for snow removal. Do not exceed vehicle
ratings with a snowplow. This product is manufactured under the following US patents: 4,999,935; 5,420,480; 5,806,213; 5,806,214; 6,253,470; RE35,700; CAN PATENT 2,060,425
and other patents pending. Western Products offers a limited warranty for all snowplows and accessories. See separately printed page for this important information. The following
are registered (®) trademarks of Douglas Dynamics, L.L.C.: ISARMATIC®, PRO-PLOW®, UniMount®, WESTERN®
Printed in USA
No. 21936
December 17, 2004