1
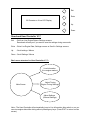
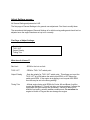
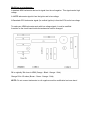
RAZORBACK
SV21
V2.7 Manual
Thankyou for purchasing Razorback, I hope you enjoy driving with Razorback as much as I do!
I have personally driven 1,000's of kilometres with Razorback, running a 16psi SC14 powered
4AGZE to a 7500RPM limit I chose, and NA 4AGs to 8000+.
RAZORBACK is a programmable modification board and hand-controller for Factory Toyota
ECUs.
No longer are you locked into the limits in a factory ECU.
With Razorback you can run virtually any Toyota 4 cylinder engine of virtually and Toyota
ECU!
Razorback will allow you to run Single coil or Multicoil (Wasted spark twin coil) ignition, Toyota
NA map sensors / Toyota boosted map sensors (16psi Limit) or Razorback internal 35psi map
sensors!
Razorback allows you to adjust mixtures and timing from 0RPM to 12,000RPM! (Factory
hardware limits at approx 9400RPM apply)
Razorback allows you to adjust Rev Limit, TVIS / VVT RPM point.
Razorback allows you to adjust the entire timing setting map +- 10 degrees with one
adjustment to suit different octane fuel etc!
Razorback allows you to move the distributor base teeth (just like if you install the distributor
on a different tooth) without touching the engine, to allow timing changes of ~30 degrees at a
time (engine re-starting required for changes to take effect).
With Razorback you get a backlit hand controller at no extra cost!
The dream behind Razorback is to allow affordable engine conversion / modifications because
I know how much fun that can be, but no one wants to buy an engine only to pay twice as
much for the ECU to run it!
*Note, Razorback is not approved for public road use. Information contained in this manual is based on the
opinion of the author and may not be accurate. Razorback and the suppliers / builders / designers and installers
are not responsible for damage or incident occurring due to the use of this device.
What you get:-
Razorback Hand Controller
Serial data cable
Toyota ECU with Razorback board installed
ECU plugs and short wires.
Setting up your Razorback:Wiring The Razorback you purchased uses the same plugs as AE82 / AE86 BUT the wiring is
different!
Don't be scared, Razorback can run your engine on a small number of wires, even without
Throttle Position Sensor (TPS) and Air Temperature sensor (if required)
*Note - All Earth connections should join together at a manifold or head connection!
Ensure good earth connections from head to firewall and from block to chassis!
Tacho Output is suitable for Low Level Tacho's eg 4AGZE. See 'Modifying your tacho'
Looking at the ECU from outside - (V2)
1
5
6
14
15
21
22
26
27
35
36
42
1
2
3
4
5
Earth
Injector 1 & 4
N/C
N/C
N/C
22
23
24
25
26
Earth
Injector 2 & 3
Spark Ignitor 1 (IGT)
Earth
N/C
6
7
8
9
10
11
12
13
14
N/C
Spark Ignitor 2 (IGT2) - Multicoil
N/C
N/C
N/C
Distributor G- (White)
Distributor G1 (Black or Green)
VVT / TVIS Output
Distributor NE (Red)
27
28
29
30
31
32
33
34
35
N/C
N/C
N/C
N/C
Earth
N/C
N/C
Throttle Position Sensor Signal
Water Temperature Sensor
15
16
17
18
19
20
21
Fuel Pump Relay (L3)
Idle Up VSV (L1)
5V out to MAP and TPS
Signal from MAP
Air Temperature Sensor
Switched 12V from Ignition Relay **
Switched 12V from Ignition Relay
36
37
38
39
40
41
42
N/C
Tacho Output (L2)
Earth
N/C
Speed Sensor (Not Connected)
N/C
Switched 12V from Ignition Relay
* N/C means Not Connected - Do not connect to this pin
** RAZORBACK ECU's do not require permanent power (unlike standard ECUs)
Notes on operational differences between Razorback and standard ECU
-
Razorback ECU will run without TPS, without external MAP sensor, without
Air Flow meter, and even without Air Temperature sensor (not
recommended for boosted engines).
-
Fuel Pump control is from the ECU via a standard relay, no need for
special Toyota circuit opening relay's (Starter wire is not required for ECU
or relay as Razorback will run the pump when it detects the engine is
rotating).
-
TVIS / VVT output can be used for a shift light or supercharger control (via
relay) if TVIS / VVT not required.
-
IGF ignition return signal from ignitor not required.
-
Razorback ECU is not speed limited.
-
Razorback ECU is not compatible with electronic automatic transmission
(ECT).
-
Razorback does not control idle speed.
-
Closed loop (EGO / HEGO sensor) operation is not supported.
First Time Engine Start:The default settings in your Razorback should be capable of starting and running your engine.
You will have to choose the correct MAP sensor and Coils number in the settings menu first.
1. Before your first start make sure your static timing is set as per Toyota service manual.
For most engines that means turn the engine over by hand until TDC (Top Dead Centre or
zero degrees on timing marks).
Make sure that the engine is on the correct stroke by looking down the oil filler cap hole at the
cam, there should be a small oval indent in the cam shaft that is facing straight up.
If the engine is on the wrong stroke you will spark-ignite the fuel out the exhaust! It should not
damage anything if you don't do it for long.
After setting the engine to TDC, insert the distributor with the shaft dot-dimple or longer /
shorter gear tooth lining up with the dot-dimple on the distributor leg (The part that goes in the
hole in the head) and make sure the distributor / head bolt hole is lined up with the middle of
the distributor slot as you do this.
2. Set the number of coils in Adjust Settings menu.
3. Choose MAP sensor type in Adjust Settings menu (or choose TPS for 20V).
4. Set TPS positions for TPS run engines using the 4th Adjust Settings screen (Put foot to the
floor and press the UP button, take foot off, press DOWN button then save settings with EXIT.
5. Start the engine and adjust distributor so that timing (with a timing light) is the same as the
Live Engine Data reading for timing with the Timing Trim (in Adjust Settings menus) set to 0
degrees.
Razorback recommends dyno tuning for all engines as no 2 engines are exactly the same.
Dyno tuning a Razorback should only take 1 - 2 hours maximum, gives you piece of mind and
horsepower / torque figures you can brag about.
Razorback may not give power improvements on stock engines over a standard factory ECU,
Razorback is designed mainly for the benefit of modified engines.
The first Adjust Tuning menu (000RPMS) allows you to change the start position of the
distributor in 30 degree jumps (1 tooth is 30 degrees). It also allows you to set when the
engine becomes stable after starting.
Exit
Enter
20 Character x 4 Line LCD Display
Up
Down
Razorback Hand Controller V1.7
Exit
- Exit from Live Engine Data or Settings screens.
Razorback will ask you if you want to save the settings during menu exits.
Enter - Enter Live Engine Data, Settings screens or Scroll in Settings screens.
Up
- Scroll settings / Menus
Down - Scroll Settings / Menus
Basic menu structure for Hand Controller V1.7:-
Live Information
(Live engine readout)
Main Screen
Adjust Tuning
(Engine Tuning Settings)
Adjust Settings
(General Settings)
Note:- The Hand Controller will automatically jump to Live Information after switch on, so you
can view engine data while driving without pressing any keys. (Press 'EXIT' to return to main
screen)
Live Information screen:Used to view engine conditions eg.
Engine RPM
MAP Reading
Air Temperature
Injector Duty Cycle
Injection Duration
Ignition Timing
Water Temperature
Battery Voltage
What does it all mean??
Engine RPM
- Live engine RPM
Injection Duration
- How long the fuel is injected for each engine revolution
MAP Reading
- Live manifold pressure, vacuum or boost in kPa ( 7kpa = 1Psi )
Ignition Timing
- Live engine ignition timing
Air Temperature
- Air temperature in manifold or at air filter. Expect 30 - 45 degrees
for NA engines in 25 degree ambiant, and 30 - 120 degrees for Boosted
engines (A good intercooler should keep this to below 55 degrees)
Water Temperature - Water Temperature at engine head. Expect ~80 - 95 degrees. If 60 - 75
degrees then engine is running too cold, check thermostat and fan. If
above 100 degrees then engine is too hot, and at 110 degrees + you risk
damage.
Injector Duty Cycle - This is ratio of fuel over time used. Use this to estimate your fuel
economy, the lower the number, the less fuel you are using!
Note:- If your duty cycle is above 80%, MAX will be displayed.
This shows that the injectors are too small for your requirements.
You risk leaning your engine out and damaging the internals!
Razorback will attempt to cut the engine in extreme cases.
Battery Voltage
- This is a good indicator for your battery / charging system. Expect
13.5V - 14.5V for normal readings. The lower the voltage, the flatter your
battery might be! Head lights and other big loads will also lower this
number.
Adjust Tuning screen:Generally only modified when dyno-tuning. Adjusting these settings can make things better or
worse. Razorback recommends only qualified engine tuners should adjust. Adjusting mixtures
without an Air Fuel Ratio meter is dangerous and could lead to engine damage.
The adjustments on these screens are LIVE.
Adjustments should be made at normal operating water temperature of 75 - 95 degrees.
You can adjust fuel and timing every 500 RPM from 0 RPM to 12,000 RPM (Bands)
When adjusting an RPM band, try to match the Live Engine RPM as close as possible to the
RPM band you are adjusting. This allows you to see / feel the results while you are adjusting.
These settings can be adjusted with engine stopped or running.
Live Engine RPM
RPM band to adjust
Fuel Mixture to adjust
Timing to adjust
Live MAP reading
Live Duty Cycle
Live Water Temperature
Fuel Mixture Adjustment
Timing Adjustment
Up / Down buttons will adjust RPM BAND / Fuel / Timing as selected with the Enter button and
highlighted with the Æ arrow on the left of the screen.
There is 3 screens in Engine Tuning SettingsThe first screen is for adjusting Cruise Vac and Timing.
These adjustments are done in neutral, free-revving the engine, mixture should be adjusted for
~14.7 Air Fuel Ratio (Normally between -40kpa to -80kpa). Timing should be adjusted for best
drivability, generally up to 10 degrees less then NA timing. Cruise Vac allows you to set the
average no-load vacuum reading (or TPS position). This improves engine smoothness.
For TPS run engines, Cruise Vac should be based around 100.
Note:- 000RPMS Settings are special. The engine always starts with the NA settings, so the
cruise settings have been replaced with Timing Tooth Trim and Start2Run.
Timing Tooth Trim - Sets the initial TDC position of the distributor, allowing you to move the
distributor one tooth or more in either direction just like pulling the
distributor out and moving it a tooth, but without getting out of the car!
(Engine re-starting required).
Start2Run
- Controls when the engine becomes stable after starting. (Big cam or
super charged engines may require a higher stable RPM setting)
The second screen is for adjusting NA Fuel and Timing.
These adjustments are done at 0 kPa load. Hold an NA engine full throttle or run Boosted
engines at part throttle close to 0kPa (dyno locked in hold mode).
Aim for an Air Fuel Ratio of ~13.0:1 - 13.5:1. Adjust timing until Knocking or Pinging
is just
detectable by ear, and then retard (reduce) the timing at least 2 degrees OR advance timing
until power reading gains become minimal (ensure no knocking or pinging!).
The third screen is for Boosted Fuel and Timing.
Adjust similar to NA Fuel and Timing but at full Boost. Gently increase the boost from 0 kPa
carefully monitoring Air Fuel Ratio to prevent damaging lean - out. Aim for Air Fuel Ratio of
~12.0:1 - 12.5:1. The extra fuel used does not provide more power, its purpose it to lower the
temperature during combustion to prevent knocking / pinging and reduce the risk of internal
damage. Timing will be less then NA timing.
The fourth screen is for TPS run engines only.
This allows you to curve the fuel and timing maps at different RPMs.
WHY?
Because TPS is not proportional to vacuum or airflow and this varies at different RPM. eg. At
low RPM, half throttle might be the same as full throttle (no difference in power) as the engine
is already getting all the air it can use. At high RPM, every last bit of throttle might make a
difference.
Bend Depth
- Imagine a straight line between no throttle and full throttle, this is how far
we bend the line into a curve to make part throttle like full throttle etc
(cannot exceed the bend point).
Bend Point
- This is the centre of where we are bending the line, varies from near no
throttle (100) to near full throttle (0) for different engines, manifolds and
RPM.
Using the Bend Depth and Bend Point you can make the ECU inject similar fuel for part throttle
as for full throttle, to remove part throttle lean points at lower RPM when running from TPS.
Pressing 'Exit' button will return to Main Screen and will save the Engine Tuning settings
NOTE:- As the RPM increases, the maximum time you have to inject gets smaller. High
revving engines will require larger injectors then low revving engines.
eg.
At 6000RPM you have 10ms per revolution to inject fuel, BUT
at 8000RPM you only have 7.50ms to inject fuel, you cannot exceed 7.50ms for your
fuel settings at this RPM. Refer to Meanings and Conversion Tables at the end of this
manual for RPM vs Maximum Injection Time tables.
Adjust Settings screen:All General Settings adjustment is LIVE.
The first page of General Settings is for general user adjustment. Feel free to modify these.
The second and third pages of General Settings is for initial running settings and should not be
adjusted once the engine has been set up to run correctly.
First Page of Adjust SettingsRev Limit
TVIS / VVT
Output Polarity
Timing Trim
What does it all mean??
Rev Limit
- RPM for fuel cut rev limit.
TVIS / VVT
- RPM for TVIS / VVT switch point
Output Polarity
- Sets the polarity for TVIS / VVT switch point. This allows you to set the
TVIS / VVT to be ON above the switch point RPM, or OFF above the
switch point RPM. If the engine is struggling to rev beyond 6000 RPM
then this may be set to the wrong setting!
Timing Trim
- Affects engine timing at all RPMs for Cruise, NA and Boost (Just like
turning the distributor). This will not alter your dyno settings, it affects the
timing after the dyno settings are processed. Use this to account for
different fuel quality, extreme weather conditions etc. Do not allow the
engine to Knock or Ping as this can damage the engine.
Second Page of Adjust SettingsChoke
Idle Vac
Map Sensor
Coils
What does it all mean??
Choke
- Cold engine choke fuel. It is a level of extra fuel added to the injection
during cold engine running, Adjust for good cold engine drivability.
Idle Fuel
- Used to set the minimum fuel required for no-load running eg. idle
This is different for different injectors and engine configurations (normally
between 1.00ms - 2.50ms)
Sensor
- Chooses whether to run from External 4AGE, 4AGZE / 3SGTE or Internal 35psi
map sensors, or from TPS (required for smooth running with ITB style intake (eg.
quad throttles).
Coils
- Choose the number of coils / ignitors you have (Daewoo combo coil pack
should be set to '2'). You are not restricted by engine type eg. A 4AGZE can run
1 or 2 coils (depending on the distributor you use) and 20V engines can run 1 or
2 coils depending on your application.
Third Page of Adjust SettingsLive TPS
Up for TPS Full
Down for TPS Off
What does it all mean??
Live TPS
- Live reading from the TPS sensor, if this number varies depending on
throttle position the TPS sensor is working.
Up for TPS Full
- Put the accelarator all the way down and press the UP button to lock in
the live reading.
Down for TPS Off
- Take your foot completely off the accelarator and press the DOWN
button to lock in the live reading.
NOTE:- Make sure you exit the menu (with the EXIT button) to save the settings.
More on Coils and Distributors:Most Toyota ignitors work in similar fashion. Different Toyota ignitors often have different
pinouts and plugs. Razorback is compatible with many Toyota ignitors, Daewoo combo coil
pack, and many Nissan / Mitsubishi / Bosch ignitors as Razorback actively controls the coil
charge dwell time.
Razorback is compatible with 2 TDC spike and 4 TDC spike distributors with 24 teeth position
reluctor sensors. Multicoil (2 coil) applications require the correct distributor.
What does that mean??
For single coil setups, Razorback with work with 4 TDC spike big port 4AGE and 1-2 TDC
spike small port 4AGE, 20V 4AGE, 4AGZE and 3SGE / 3SGTE distributors (in other words
unmodified original distributors)
For multicoil (2 coil) setups, Razorback will not work with big port 4AGE (4 TDC spike)
distributors without modification to the distributors.
For multicoil (2 coil) setup with big port 4AGE (4 TDC spike) distributors, 2 of the spikes must
be CAREFULLY removed with suitable cutting or grinding tool. Remove all metal fragments
after cutting / grinding.
Make sure you remove the correct 2 spikes!!!
Look at the distributor with the cap and rotor button removed:-
Before - Standard 4 spike
After - Only 2 spikes left
Modifying your tachometer:A standard AE86 tachometer derives its signal from the coil negative. This signal can be high
voltage.
A 4AGZE tachometer signal is from the ignitor and is low voltage.
A Razorback ECU tachometer signal (for multicoil ignition) is from the ECU and is low voltage.
To make your AE86 tachometer work with low voltage signals, it must be modified.
A resistor on the circuit board inside the tachometer must be changed.
R4 is originally 30k ohms in AE86 (Orange - Black - Orange - Gold).
Change R4 to 15k ohms (Brown - Green - Orange - Gold)
NOTE:- Do not connect tachometer to coil negative once this modification has been done!
Problem Solving:-
Meanings and Conversion Tables:1psi = approx 7kpa, so 70kpa is ~10psi, 105kpa is ~15psi and 140kpa is ~20psi
TPS reads 100 at no throttle and 0 at full throttle, this is so the readings look (and work) similar
to MAP sensor readings (0 at full throttle on NA engine)
6000RPM is 100RPS (revs per seconds) = 10.00ms per revolution
RPM vs Maximum Injection Time:- (Stay under these values in your settings)
5000RPM
5500RPM
6000RPM
6500RPM
7000RPM
7500RPM
8000RPM
8500RPM
9000RPM
9500RPM
10,000RPM
-
12.00ms Max
10.90ms Max
10.00ms Max
9.23ms Max
8.57ms Max
8.00ms Max
7.50ms Max
7.05ms Max
6.66ms Max
6.31ms Max
6.00ms Max
Silly notes from the Author about pretty much anything:- (These may have no bearing
on reality!)
Absolute vacuum (maximum vacuum physically possible) is ~ -101kpa, beyond this would be
totally void of all atoms and so cannot exist.
Valve springs must be installed right way up! They are heavier at the bottom then the top.
Same spec cams might be quite different - eg. a 272 degree cam with 8.35mm lift in one brand
may have a different ramp angle to another brand. This will affect the power achieved. A
steeper ramp angle with have the valve open further earlier, and so will make more power, but
require stiffer valve springs to keep the required spring pressure on the cam at all times. This
will also shorten the life of the cams and springs etc.
100kw small port engines use the same crank and rods (same Toyota part numbers) as ZE
engines, and so are as strong as ZE engines (with the exception of the pistons, 100kw small
port pistons have a large oil slot behind the oil ring and this is prone to cracking.
Single ignition coils are good for 9000RPM, Unless under high boost, there is generally no
power benefit from running multiple coils.
Japanese and Australian T50 gearboxes are internally the same. Older Celica / T18 T50 has
less bearings and is weaker.
SC12 replacement bearings are not available from any source, SC14 are common. SC14 can
be fitted to unmodified bottom SC mount by simply machining belt grooves into the front blank
area of the SC clutch pulley. SC14 will make 11psi on standard ZE with standard pully.
A 15psi ZE (SC14 + 175cm pulley and RWD intake manifold) does a 14.38 quarter mile with
gentle 3000RPM launch and 6000RPM rev limit in a full stock trim KE70 (Holds with 13 second
cars from 70km/h up).
Cold start injectors are only required in regions near or below freezing temperatures.