1
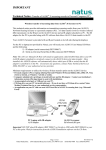
Quick Reference Guide for using the
®
ALGO 3i Newborn Hearing Screener
A.
B.
C.
D.
E.
Power-On slider switch
Display
Navigation buttons (keys)
Earphone (ATA) cable connection
Sensor (Preamp/PCA) cable
connection
F. Infrared (IR) port: printing/data
export
G. DC power port: battery charger
connection
H. SoftClip™: device stand/bassinet
clip
Initial Set Up Of The Screener
Note: Refer to the ALGO 3i user manual, Chapter VIII: Service Manual: Description and Initial
Set-up of Device Components.
1. Unpack the ALGO 3i screening system and its accessories.
2. Set up the screener properly, attaching the earphone and sensor cables (if unattached).
3. Power on the ALGO 3i screener and fully charge it for 6 hours.
4. After fully charging the battery, ensure that the correct time and date are set.
5. Change the User Preferences and/or Biomed Preferences settings to meet your program
requirements, i.e. time/date format, language, alpha-numeric entry, or notch filter
settings.
Note: Ensure that the notch filter setting of 50Hz or 60Hz is correctly adjusted for your
region. An incorrect setting may result in high myogenic interference while screening.
6. Set the ALGO 3i system in an appropriate location for screening.
Selecting A Baby
Indications for use:
•
•
•
Term, healthy newborns
NICU graduates, 34 weeks gestational
age and under 6 months of age
Newborns with normal outer ear
anatomy and no obvious deformities of
the head or neck
Exclusion criteria:
•
•
•
•
•
•
•
•
Infants not between 34 weeks
gestational and 6 months of age
Infants on ventilators or in incubators
Infants on CNS (central nervous
system) stimulants
Infants receiving ototoxic medications
Infants with compromised skin or
jaundice
Natus Medical • www.natus.com
•
•
•
Page 1 of 12
Ready for discharge, or scheduled to go
home within a few days
Sleeping or in a relaxed state (usually
after a recent feeding)
In an open crib
Infants exhibiting cranio-facial head
abnormalities, including structural
abnormalities of the outer, middle, or
inner ear
Infants with known or suspected
neurologic conditions
Infants in an agitated state
P/N 051179E
Navigating On the Screener
Up/Down arrow keys: These keys control the movement within the user interface, enabling
the user to move between and select from the available options presented in the display.
Toggle key: This large key enables up/down/left/right movements, and is primarily used to
scroll through the alphanumeric keypad to input data and passwords.
OK key: This green key controls the “YES”, “OK”, and “CONFIRM” functions, which
allow a command to be executed.
X key: This red key controls the “NO”, “STOP”, and “PAUSE” functions, which allow a
command to be stopped, screening to be paused, or allows the user to return directly to the
MainMenu.
? key: This key controls the Help system and will access the section of the ALGO 3i
screener’s help system corresponding to the area of the interface where the user is located.
The user can scroll through the Help system to access different information as desired.
Up/Down
Arrow Keys
Toggle Key
OK Key
? Key
X Key
The display will always indicate to the user which keys are used to select, scroll, advance to
the next window, or go back to the previous window.
Examples:
Go Back (to MainMenu) Advance (to DataManagement)
Scrolling/Selecting in the ALGO 3i Screener
The ALGO 3i screener will show you which keys are “active” or “inactive” at all times.
“Inactive” keys or functions will turn light blue to indicate they are not available to the user.
Whenever the ALGO 3i screener presents you with options, they will be framed by blue bars
showing an up and down arrow key. This indicates you may scroll through the options by
pressing either arrow key. Press the arrow key once to scroll to the next option. Press and
hold the arrow key to scroll rapidly through the available options.
Scroll until the black select bar highlights the desired option. The select bar will indicate what
to do to activate your option (in most cases, clicking on the OK key) and the Message Box,
located on the bottom of the window, will update to provide further information about your
choice.
Natus Medical • www.natus.com
Page 2 of 12
P/N 051179E
Example of a
Message Box
Single-choice options are indicated by a . See illustration below.
You will always use the up/down arrow keys to scroll through the options and press the OK
key to select one.
A few options within the ALGO 3i screener are multi-choice options, meaning the user may
select more than one at a time.
Multi-choice options are indicated by a toggle key symbol . See illustration below.
In this case, the black select bar indicates use of the toggle keys to select or deselect the
desired option set. Use the OK key to save your option set.
Data Entry in the ALGO 3i Device
Data is entered into the ALGO 3i screener by using the up/down toggle key to scroll through
a keypad containing the numbers 0–9, the Roman character alphabet A–Z, a blank space, ‘+’, ‘-’,
Natus Medical • www.natus.com
Page 3 of 12
P/N 051179E
‘/’, ‘,’(comma), ‘.’(period), and ‘?’. You may scroll forwards and backwards through the keypad by
clicking the up arrow key (A, B, C, D….) or the down arrow key (9, 8, 7, 6…).
Note: The Roman character alphabets A-Z consist of language specific characters. For example, the character ‘Ñ’
is only found if the device is set to Spanish.
Note: Only if the alpha-numeric function is enabled) will the capitalized Roman character
alphabet sequence appear with the number sequence in the Infant Identifier and User
Identifier fields. (See Chapter VIII. Service Manual: Device Set-Up: User Preferences)
Blank Spaces
There is a blank space in the keypad between A and 9 (or between 9 and 0 if alphanumeric
entry is disabled). This allows users to insert blank spaces if needed in the data fields or to
remove characters.
Note: The infant identifier data field may not begin with a blank space.
Example of Entering Data
The black select bar will indicate which data field is active, and a cursor symbol will
indicate the current position within the data field. To begin scrolling through the keypad,
click on the up or down toggle keys (press and hold key for rapid scrolling). When you have
located the correct number or letter, simply click on the right or left toggle keys to set it and
move one space right or left. To advance to a different data field, click one of the arrow keys.
Example: Enter infant identifier 6C, then move to the Last Name field
1. Enter the Infant Data window. The cursor will be set on the first space of the 12-digit
infant identifier data field.
2. Click the down toggle key to scroll through the numbers 9…8…7…6.
3. Click on the right toggle key to set the first space to the number 6 and advance to the
second space.
4. Click the up toggle key to scroll through the letters A…B…C.
Page 1 of
Infant Data
Window
5. Click the down arrow key to set the second space to the letter C and move to the Last
Name data field.
Natus Medical • www.natus.com
Page 4 of 12
P/N 051179E
Use the same process to enter data into the other fields of the Infant Data window. Page two
of the infant Data Window allows the user to enter the Date of Birth, User ID and
Comments.
Page 2 of
Infant Data
Window
Performing A Hearing Screen
Step 1. Power on: Turn on the ALGO 3i screener by sliding the On/Off switch upward, and
releasing it.
Start-up/Warnings: The ALGO 3i screener will briefly display a Start-Up window
while it performs a self-check. Warnings may appear which may require your
acknowledgement. The MainMenu will appear next.
Step 2. Observe MainMenu: The MainMenu shows each of the major functions of the
ALGO 3i screener, and is indicated by this icon:
a. SpeedScreen, if enabled (SpeedScreen mode)
b. Enter Data/ScreenBaby (ScreenBaby mode)
c. DataManagement
d. Device Set-Up
SpeedScreen disabled (default setting)
Natus Medical • www.natus.com
Page 5 of 12
SpeedScreen enabled
P/N 051179E
Step 3. Select screening mode: Use the up/down arrow keys to select the screening mode.
Below are the two choices (if SpeedScreen is enabled). Select the Enter Data and
Screen Baby (ScreenBaby) mode. Press the OK key.
a. SpeedScreen allows you to immediately begin screening, with the option of
entering infant data during the screening process. (This option is disabled at
default.)
b. Enter Data/ScreenBaby allows you to create an infant record and select screening
configurations prior to initiating the screening process.
Enter infant data in the Infant Data window using the toggle key. Use the up/down
arrow keys to move from data field to data field (press and hold key for rapid
scrolling).
a. There are three data fields in the first Infant Data Window. Infant Identifier, Last
Name, and Frist Name. There are another three data fields in the second window.
Date of Birth, User Identifier, and Comment.
Press the OK key when data entry is complete.
Step 4. Prepare baby and attach supplies: Prepare the infant for screening by ensuring that
no exclusion criteria are present, and that the infant is in a quiet state. Collect
screening supplies: Natus single-use earphones (pair) and single-use sensor (triplet)
for the infant.
a. Attach sensor cable clips to sensors (clip onto the purple section of sensor). See
Figure 1 below.
Figure 1
Note: Clips may be attached after placement of sensors on infant.
b. Evaluate infant’s skin type at Vertex, Nape, and Common sites. Clean or prep if
necessary. Use NuPrep gel or saline and gauze, if appropriate.
Natus Medical • www.natus.com
Page 6 of 12
P/N 051179E
•
Moist or oily skin: Gently wash sites with soap and water, or alcohol if
allowed by your hospital protocol. Alcohol use must be followed by saline as
alcohol dries the skin, inactivating the sensor adhesive.
• Dry skin: Apply a drop of saline at the sensor sites.
• Flaky skin: Apply a drop of NuPrep gel on gauze sponge and gently scrub
site. Remove gel using a damp cloth or gauze. Pat lightly with dry gauze.
Note: Refer to Chapter VI: Baby Preparation in the ALGO 3i user manual.
c. Place colored clips/sensors to the correct sites on the baby. See Figure 2 below.
Figure 2
•
•
•
Vertex site: centered on the forehead, as high as possible.
Nape site: center and back of neck, not on skull and not on infant’s back.
Common site: front or back of either shoulder, not on cheek.
Note: Ensure the tab portion of all sensors are pointed towards the same side of
baby.
Note: Hold sensors in place for a few seconds to warm and activate sensor
adhesive.
Note: For a secure vertex sensor attachment, the vertex sensor and clip may be
placed after the attachment of the other sensors and earphones.
d. Connect earphone cables to earphones by inserting the colored (red and blue)
acoustic transducers into earphones. See Figure 3.
or
Figure 3
Figure 4
e. Attach earphones to baby by rolling from behind the ear to the front. Hold
earphones in place for a few seconds to warm and activate earphone adhesive.
The earphone tab should be directed towards the back of the infant’s head. The
earphone cable may emerge either “up” or “down” from the earphone, see Figure
4 above.
Natus Medical • www.natus.com
Page 7 of 12
P/N 051179E
Figure 5
The RED transducer is placed on the infant’s RIGHT ear. The BLUE transducer
is placed on the LEFT ear. See Figure 5 above.
Step 5. Select screening parameters: Select either 35 dBnHL or 40 dBnHL screening (if 40
dB option is enabled). Select Simultaneous (not available for 40 dB), Sequential,
Right-only, or Left-only screening. Use the up/down arrow keys to scroll and select
the parameters then click on the OK key to proceed.
35 dBnHL screening only (default setting)
40 dBnHL screening option enabled
Step 6. Start Screening/Check Impedances: Test immediately begins after screening
parameters are selected. Monitor the impedances at each sensor location. Insure that
the impedances are less than 7 kOhms for optimal screening. If impedances are
between 8 and 11 kOhms, an “Impedances Marginal” message appears. Select the
OK key to initiate screening. If impedances are 12 kOhms or greater, screening will
pause and the message below appears. Re-prep infant as necessary to lower
impedances.
Natus Medical • www.natus.com
Page 8 of 12
P/N 051179E
Caution: When screening a baby, position the ALGO 3i display so that it is facing
away from the baby. Facing the display to the baby may cause non-physiologic noise
and prolong screening times.
Caution: Do not lay patient cables across the device during screening. This may
cause non-physiologic noise and prolong screening times.
Step 7. Monitor screening in progress: Monitor impedances and the Message window
during the screening. The ALGO 3i screener will alert you to any conditions which
require your attention during the screening process.The Screening in Progress
window displays the following information:
a.
b.
c.
d.
e.
f.
g.
h.
i.
j.
Natus Medical • www.natus.com
Infant data
Sweep Counts
Elapsed screening time
Current Date and Time of screening
Impedance monitor
Screening Progress bar
Screening Result
Ambient and Myogenic noise bars
Message Box
“X” to Pause Screening
Page 9 of 12
P/N 051179E
Note: The “X” key with the “pause” icon
allows you to pause screening
from the Screening in Progress or Infant Data Window (SpeedScreen only).
Pause and Cancel Screening
During the screening, you may pause screening at any time by clicking the X key.
The display will indicate “Screening Paused” and will wait indefinitely. To resume
screening, click OK.
To cancel screening, click X again. The ALGO 3i screener will ask for confirmation
that you want to exit the screening. If a result for at least one ear has been obtained,
the ALGO 3i screener will save and confirm a screening record. If neither ear has
obtained a result, no screening record will be saved.
There are a few conditions under which the ALGO 3i screener will automatically
terminate the screening process:
• Cable(s) disconnected
• Battery charger connected
• Screening time limit exceeded
• Battery too low to complete screening
Step 8. Observe screening complete: At the completion of the screen, the ALGO 3i screener
will save a screening record to memory, and will display the infant data, including a
summary of the screening results.
Step 9. Remove/discard supplies: Remove from the baby and discard the Natus screening
supplies.
Step 10. Return to MainMenu/Disposition screening record: Return to the MainMenu or
go to DataManagement for printing, exporting, or deleting the screening record.
a. From the Screening Complete window, you may click X to return to the
MainMenu, then either power off the device or screen another infant.
b. From the Screening Complete window, you may instead click OK, which will
bring you to the DataManagement Window. You may immediately print or
export the screening record just saved. See the Chapter V: ALGO 3i Screening
Natus Medical • www.natus.com
Page 10 of 12
P/N 051179E
Procedures, section “Printing (or Exporting) a Record Immediately after
Screening” in the user manual.
Step 11. Power off: Turn off the device by sliding and holding the ON/OFF switch for 3
seconds. The ALGO 3i screener will count down from 5 to 1 before powering off.
Step 12. Clean Preamp/PCA and ATA cables before and/or after use: Clean patient
cables after use. Residual sensor adhesive may corrode Preamplifier/PCA cable clips.
SpeedScreen mode (alternative to Steps 3 to 6 of ScreenBaby mode)
When enabled (see Biomed preferences), SpeedScreen mode allows advanced users to
immediately begin screening according to Biomed-selected default parameters. Infants
should be prepped, and screening supplies/cable attachments should be in place prior to
clicking on SpeedScreen. You may only enter infant data by clicking the OK key (to
access Infant Data window) prior to completion of the screen. SpeedScreen may decrease
total screening time by allowing users to enter infant data while the screening is in
progress.
a. Prepare infant for screening. Refer to Chapter VI: Baby Preparation.
b. Turn on the ALGO 3i screener, wait for the MainMenu to appear, and click on
SpeedScreen. (If required fields are set, SpeedScreen will not be available.) Click the
OK key.
c. If impedances are below 8 kOhms, screening will immediately begin, and ALGO 3i
screener will advance to the “Screening in Progress” window.
i.
If impedances are between 8 kOhms and 11 kOhms, the “Impedances Marginal”
message will appear, showing actual impedances, and asking you to confirm your
intention to begin screening. Natus recommends skin prepping to reduce
impedances to below 8 kOhms.
ii. If impedances are 12 kOhms or greater, the “Impedances Too High” message
will appear and screening will pause. Skin prepping is necessary.
iii. Once impedances are satisfactory, click the OK key to begin or continue
screening.
iv. The ALGO 3i screener will advance to the Screening in Progress window.
d. If you wish to enter infant data for the screening record, click OK from the Screening
in Progress window to access the Infant Data window.
i.
You must access the Infant Data window prior to completion of the screen
(minimum time is about 36 seconds), or else the screening record will be saved
without any infant data.
ii. The device will display the Infant Data window. Enter the desired information,
and click OK to return to the Screening in Progress window. As in ScreenBaby
mode, the ALGO 3i screener will display the information you have entered and
will ask you to confirm that all data is correct.
Note: There is no time constraint for entering infant data once you are in the
Infant Data window. The screen may be completed while you are entering infant
information but the ALGO 3i device will wait until you click OK before matching
this infant information to the screening results and save it as a screening record.
Natus Medical • www.natus.com
Page 11 of 12
P/N 051179E
Note: Once you exit the Infant Data window, you may not re-enter this area.
Ensure that all infant data is accurate before clicking the OK key.
e. If you do not wish to enter infant data for the screening record, proceed with
screening.
At the completion of the screening, the device will save the screening record and will
display the screening results. The infant data fields will be blank.
Natus Medical • www.natus.com
Page 12 of 12
P/N 051179E