1
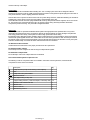
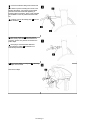
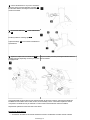
(H) Locate and remove any screws or bolts holding
the original brake disc to the hub.
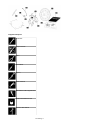
Remove the original disc (9) from the hub. If the disc
is difficult to remove, there may be a threaded hole
in the hub face of the brake disc to aid in its removal.
In these cases, thread a bolt with the correct size
and pitch into this hole until it pushed the disc off the
hub face. In the absence of a hole of this type, or a
suitable bolt, use a rubber mallet to tap the back
side of the disc at several points around its
circumference until it is freed from the hub face. The
disc may then be removed.
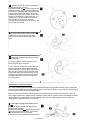
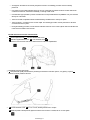
(J) Clean spece the caliper mounting surfaces (10)
using a cloth moistened with solvent to remove any
contaminants. If corrosion is present on these
surfaces, remove with an abrasive pad or wire
brush.
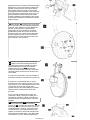
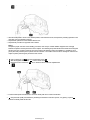
(K) Clean the disc mounting area of the hub face
(11) using a cloth moistened with solvent to remove
any contaminants.
If corrosion is present on these surfaces, remove
with an abrasive pad or wire brush.
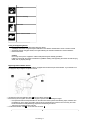
In many cases, the original dust / splash shield will
have to be removed in order to fit the larger Gran
Turismo brake disc. Test fit the Gran Turismo brake
disc. If the Gran Turismo Disc cannot sit flat on the
hub face and rotate freely with a minimum of 3 mm
of clearance, the shield must be removed. Refer to
the vehicle manufacturer's service manual for the
removal procedure.
Gran Turismo Component Installation
Gran Turismo Brake Systems are supplied in two separate packages which constitute left hand and right hand brake
elements, and are labeled as such. Ensure that the correct components set is used on each side of the vehicle, and do
not mix components from the two separate packages.
Brembo recommends that the disc run out measurement be performed upon installation of the new disc. This is to
ensure that the vehicle hub / upright / bearing is in perfect working order. If a vibration problem should be present, and
this procedure has not followed due to lack of availability of the proper tools and equipment, take the vehicle to a
facility capable of performing these measurements.
(L) If your system uses lug mount calipers, skip to
step (O).
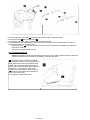
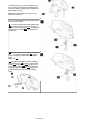
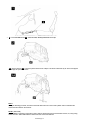
Refer to the diagram included with the system for
proper bracket orientation.
Install the bracket on the (12) knuckle using the bolts
(8) that mounted the original caliper. If the original
bolts are damaged in any way, purchase
replacements from your vehicle manufacturer's parts
Install Page 7