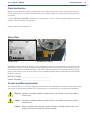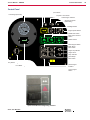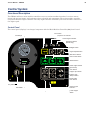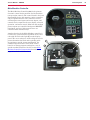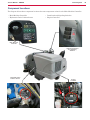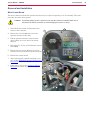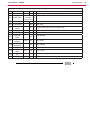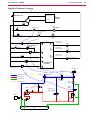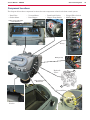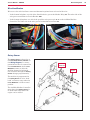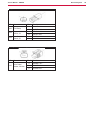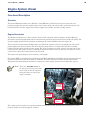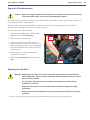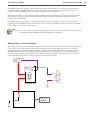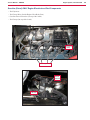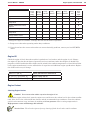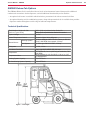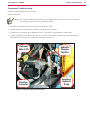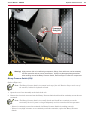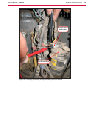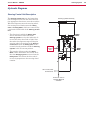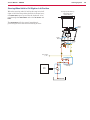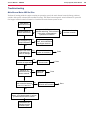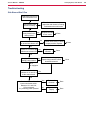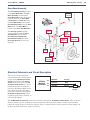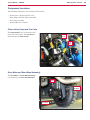
1
SW8000 Service Manual Advance Model Numbers: Nilfisk Model Numbers: 56107501 56107503 56107505 56107507 56107509 56107511 56107512 56107513 56107514 56107515 56107517 65” Gasoline 65” LPG 65” Diesel 65” Gasoline w/ cab 65” LPG w/ cab 65” Diesel w/ cab 165 cm LPG 165 cm Diesel 165 cm LPG w/ cab 165 cm Diesel w/ cab 165 cm Petrol English 1/13 Form No. 56043163 Service Manual – SW8000 Contents General Information . . . . . . . . . . . . . . . . . . . . . . . . . . . . . . . . . . . . . . . . . . . . . . 9 General Machine Description . . . . . . . . . . . . . . . . . . . . . . . . . . . . . . . . . . . . . . . . 9 Service Manual Purpose and Application . . . . . . . . . . . . . . . . . . . . . . . . . . . . . . . . . 9 Other Reference Manuals and Information Sources . . . . . . . . . . . . . . . . . . . . . . . . . . . 9 Nilfisk-Advance Publications . . . . . . . . . . . . . . . . . . . . . . . . . . . . . . . . . . . . . . . . . . . . 9 Engine Manufacturers’ Technical Manuals . . . . . . . . . . . . . . . . . . . . . . . . . . . . . . . . 9 Introduction . . . . . . . . . . . . . . . . . . . . . . . . . . . . . . . . . . . . . . . . . . . . . . . . . . . . . 9 Parts And Service . . . . . . . . . . . . . . . . . . . . . . . . . . . . . . . . . . . . . . . . . . . . . . Name Plate . . . . . . . . . . . . . . . . . . . . . . . . . . . . . . . . . . . . . . . . . . . . . . . . . General Safety Instructions . . . . . . . . . . . . . . . . . . . . . . . . . . . . . . . . . . . . . . . . Hopper Safety Support . . . . . . . . . . . . . . . . . . . . . . . . . . . . . . . . . . . . . . . . . . . Jacking The Machine . . . . . . . . . . . . . . . . . . . . . . . . . . . . . . . . . . . . . . . . . . . . Transporting The Machine . . . . . . . . . . . . . . . . . . . . . . . . . . . . . . . . . . . . . . . . . Towing Or Pushing A Disabled Machine . . . . . . . . . . . . . . . . . . . . . . . . . . . . . . . . . Technical Specifications . . . . . . . . . . . . . . . . . . . . . . . . . . . . . . . . . . . . . . . . . . Fastener Torque Specifications . . . . . . . . . . . . . . . . . . . . . . . . . . . . . . . . . . . . . . Maintenance . . . . . . . . . . . . . . . . . . . . . . . . . . . . . . . . . . . . . . . . . . . . . . . . Maintenance Schedule . . . . . . . . . . . . . . . . . . . . . . . . . . . . . . . . . . . . . . . . . . . . . . After Use . . . . . . . . . . . . . . . . . . . . . . . . . . . . . . . . . . . . . . . . . . . . . . . . . . . . . . To Shut Down The Diesel / Gasoline Engine . . . . . . . . . . . . . . . . . . . . . . . . . . . . . . . . . . To Shut Down The Propane Engine . . . . . . . . . . . . . . . . . . . . . . . . . . . . . . . . . . . . . . . Important Machine Lubrication . . . . . . . . . . . . . . . . . . . . . . . . . . . . . . . . . . . . . . . . . Engine Coolant . . . . . . . . . . . . . . . . . . . . . . . . . . . . . . . . . . . . . . . . . . . . . . . . . . Engine Oil – Gasoline / Petrol & Lpg . . . . . . . . . . . . . . . . . . . . . . . . . . . . . . . . . . . . . . . Engine Oil - Diesel . . . . . . . . . . . . . . . . . . . . . . . . . . . . . . . . . . . . . . . . . . . . . . . . . Engine Air Filter . . . . . . . . . . . . . . . . . . . . . . . . . . . . . . . . . . . . . . . . . . . . . . . . . . Engine Maintenance (150 Hours) . . . . . . . . . . . . . . . . . . . . . . . . . . . . . . . . . . . . . . . . Hydraulic Oil . . . . . . . . . . . . . . . . . . . . . . . . . . . . . . . . . . . . . . . . . . . . . . . . . . . Hopper Dust Control Filter (Panel Filter) . . . . . . . . . . . . . . . . . . . . . . . . . . . . . . . . . . . . To remove the hopper dust control filter... . . . . . . . . . . . . . . . . . . . . . . . . . . . . . . . . . . . Method “A” . . . . . . . . . . . . . . . . . . . . . . . . . . . . . . . . . . . . . . . . . . . . . . . . . . Method “B” . . . . . . . . . . . . . . . . . . . . . . . . . . . . . . . . . . . . . . . . . . . . . . . . . . Method “C” . . . . . . . . . . . . . . . . . . . . . . . . . . . . . . . . . . . . . . . . . . . . . . . . . . 10 10 11 12 13 14 15 16 18 19 19 19 20 20 20 20 21 21 22 22 22 23 23 23 23 23 SW8000 PM Checklist . . . . . . . . . . . . . . . . . . . . . . . . . . . . . . . . . . . . . . . . . . . 24 Know Your Machine . . . . . . . . . . . . . . . . . . . . . . . . . . . . . . . . . . . . . . . . . . . . 26 Operator’s Compartment . . . . . . . . . . . . . . . . . . . . . . . . . . . . . . . . . . . . . . . . . . . . 28 Control Panel . . . . . . . . . . . . . . . . . . . . . . . . . . . . . . . . . . . . . . . . . . . . . . . . . . . 29 Control System . . . . . . . . . . . . . . . . . . . . . . . . . . . . . . . . . . . . . . . . . . . . . . . . 30 Functional Description . . . . . . . . . . . . . . . . . . . . . . . . . . . . . . . . . . . . . . . . . . . 30 Control Panel . . . . . . . . . . . . . . . . . . . . . . . . . . . . . . . . . . . . . . . . . . . . . . . . . . . 30 Main Machine Controller . . . . . . . . . . . . . . . . . . . . . . . . . . . . . . . . . . . . . . . . . . . . . 33 Component Locations . . . . . . . . . . . . . . . . . . . . . . . . . . . . . . . . . . . . . . . . . . . 34 Main Machine Controller Programming . . . . . . . . . . . . . . . . . . . . . . . . . . . . . . . . . 35 Hydrostatic Neutral Position and Dead-band . . . . . . . . . . . . . . . . . . . . . . . . . . . . . . . . . . 35 Recall of Stored Fault Codes . . . . . . . . . . . . . . . . . . . . . . . . . . . . . . . . . . . . . . . . . . . 35 Automatic Shaker Operation . . . . . . . . . . . . . . . . . . . . . . . . . . . . . . . . . . . . . . . . . . . 36 Troubleshooting . . . . . . . . . . . . . . . . . . . . . . . . . . . . . . . . . . . . . . . . . . . . . . 36 ii Service Manual – SW8000 Main Controller Error Codes . . . . . . . . . . . . . . . . . . . . . . . . . . . . . . . . . . . . . . . . . . . 36 Removal and Installation . . . . . . . . . . . . . . . . . . . . . . . . . . . . . . . . . . . . . . . . . . 38 Main Control Board . . . . . . . . . . . . . . . . . . . . . . . . . . . . . . . . . . . . . . . . . . . . . . . . 38 Specifications . . . . . . . . . . . . . . . . . . . . . . . . . . . . . . . . . . . . . . . . . . . . . . . . 39 Sample Shop Voltage Measurements . . . . . . . . . . . . . . . . . . . . . . . . . . . . . . . . . . . . . . 39 Dust Control System . . . . . . . . . . . . . . . . . . . . . . . . . . . . . . . . . . . . . . . . . . . . . 41 Functional Description . . . . . . . . . . . . . . . . . . . . . . . . . . . . . . . . . . . . . . . . . . . 41 DustGuard™ Spray System (optional) . . . . . . . . . . . . . . . . . . . . . . . . . . . . . . . . . . . . . . Dust Control Vacuum System . . . . . . . . . . . . . . . . . . . . . . . . . . . . . . . . . . . . . . . . . . Circuit Description . . . . . . . . . . . . . . . . . . . . . . . . . . . . . . . . . . . . . . . . . . . . . . . . Simplified Schematic Diagram . . . . . . . . . . . . . . . . . . . . . . . . . . . . . . . . . . . . . . . . . . 41 41 41 42 Component Locations . . . . . . . . . . . . . . . . . . . . . . . . . . . . . . . . . . . . . . . . . . . 43 Maintenance and Adjustment . . . . . . . . . . . . . . . . . . . . . . . . . . . . . . . . . . . . . . . 44 Dustguard Spray Nozzle Cleaning . . . . . . . . . . . . . . . . . . . . . . . . . . . . . . . . . . . . . . . . 44 Dust Control Filter Cleaning . . . . . . . . . . . . . . . . . . . . . . . . . . . . . . . . . . . . . . . . . . . 44 Troubleshooting . . . . . . . . . . . . . . . . . . . . . . . . . . . . . . . . . . . . . . . . . . . . . . 45 Dust Control Vacuum Motor will not Run . . . . . . . . . . . . . . . . . . . . . . . . . . . . . . . . . . . . Dust Control Vacuum Motor will not Shut Off . . . . . . . . . . . . . . . . . . . . . . . . . . . . . . . . . Shaker Motor will not Run . . . . . . . . . . . . . . . . . . . . . . . . . . . . . . . . . . . . . . . . . . . . Misting Pump will not Run . . . . . . . . . . . . . . . . . . . . . . . . . . . . . . . . . . . . . . . . . . . . 45 46 47 48 Overview . . . . . . . . . . . . . . . . . . . . . . . . . . . . . . . . . . . . . . . . . . . . . . . . . . . . . Gauge Panel Assembly . . . . . . . . . . . . . . . . . . . . . . . . . . . . . . . . . . . . . . . . . . . . . . Circuit Breaker Panel Assembly . . . . . . . . . . . . . . . . . . . . . . . . . . . . . . . . . . . . . . . . . Wire Identification . . . . . . . . . . . . . . . . . . . . . . . . . . . . . . . . . . . . . . . . . . . . . . . . Rotary Sensor . . . . . . . . . . . . . . . . . . . . . . . . . . . . . . . . . . . . . . . . . . . . . . . . . . . Seat Switch Circuit Description . . . . . . . . . . . . . . . . . . . . . . . . . . . . . . . . . . . . . . . . . 50 50 51 52 52 53 Battery . . . . . . . . . . . . . . . . . . . . . . . . . . . . . . . . . . . . . . . . . . . . . . . . . . . . . . . Instrument Panel Assembly . . . . . . . . . . . . . . . . . . . . . . . . . . . . . . . . . . . . . . . . . . . Circuit Breakers . . . . . . . . . . . . . . . . . . . . . . . . . . . . . . . . . . . . . . . . . . . . . . . . . . SPDT Relays . . . . . . . . . . . . . . . . . . . . . . . . . . . . . . . . . . . . . . . . . . . . . . . . . . . . K11 Seat Relay Coil and K12 Timer Relay (seat switch option only) . . . . . . . . . . . . . . . . . . . . . . S22 Brake Switch (seat switch option only) . . . . . . . . . . . . . . . . . . . . . . . . . . . . . . . . . . . Rotary Sensor . . . . . . . . . . . . . . . . . . . . . . . . . . . . . . . . . . . . . . . . . . . . . . . . . . . 54 55 55 56 56 57 57 Specifications . . . . . . . . . . . . . . . . . . . . . . . . . . . . . . . . . . . . . . . . . . . . . . . . 49 Electrical System . . . . . . . . . . . . . . . . . . . . . . . . . . . . . . . . . . . . . . . . . . . . . . . 50 Functional Description . . . . . . . . . . . . . . . . . . . . . . . . . . . . . . . . . . . . . . . . . . 50 Component Locations . . . . . . . . . . . . . . . . . . . . . . . . . . . . . . . . . . . . . . . . . . . 54 Electrical Connectors . . . . . . . . . . . . . . . . . . . . . . . . . . . . . . . . . . . . . . . . . . . . 58 Component to Connector ID Look-up Table . . . . . . . . . . . . . . . . . . . . . . . . . . . . . . . . . . . 58 Component to Relay ID Look-up Table . . . . . . . . . . . . . . . . . . . . . . . . . . . . . . . . . . . . . 59 Connector Pin-out Assignments . . . . . . . . . . . . . . . . . . . . . . . . . . . . . . . . . . . . . . . . . 59 Troubleshooting . . . . . . . . . . . . . . . . . . . . . . . . . . . . . . . . . . . . . . . . . . . . . . Specifications . . . . . . . . . . . . . . . . . . . . . . . . . . . . . . . . . . . . . . . . . . . . . . . . Wiring Diagrams, p/n 56382530, Rev. D . . . . . . . . . . . . . . . . . . . . . . . . . . . . . . . . . Wiring Diagram, Kubota Gasoline Engine, p/n 56107658, Rev. A. . . . . . . . . . . . . . . . . . . . Wiring Diagram, Kubota LP Engine, p/n 56107659, Rev. A. . . . . . . . . . . . . . . . . . . . . . . . Wiring Harness Diagrams, p/n 56382531 Rev. D . . . . . . . . . . . . . . . . . . . . . . . . . . . . . Engine System, Diesel . . . . . . . . . . . . . . . . . . . . . . . . . . . . . . . . . . . . . . . . . . . . Functional Description . . . . . . . . . . . . . . . . . . . . . . . . . . . . . . . . . . . . . . . . . . 66 66 67 70 71 72 75 75 iii Service Manual – SW8000 Overview . . . . . . . . . . . . . . . . . . . . . . . . . . . . . . . . . . . . . . . . . . . . . . . . . . . . . Engine Description . . . . . . . . . . . . . . . . . . . . . . . . . . . . . . . . . . . . . . . . . . . . . . . . Manufacturers’ Technical Literature . . . . . . . . . . . . . . . . . . . . . . . . . . . . . . . . . . . . . . Engine Starter Circuit . . . . . . . . . . . . . . . . . . . . . . . . . . . . . . . . . . . . . . . . . . . . . . . Starter Circuit Description . . . . . . . . . . . . . . . . . . . . . . . . . . . . . . . . . . . . . . . . . . . . Engine Protection – Low Oil Pressure Shutdown . . . . . . . . . . . . . . . . . . . . . . . . . . . . . . . . Engine Speed Control . . . . . . . . . . . . . . . . . . . . . . . . . . . . . . . . . . . . . . . . . . . . . . . Glow Plug Control . . . . . . . . . . . . . . . . . . . . . . . . . . . . . . . . . . . . . . . . . . . . . . . . . 75 75 76 76 76 77 77 78 Maintenance Schedule . . . . . . . . . . . . . . . . . . . . . . . . . . . . . . . . . . . . . . . . . . . . . . Engine Oil . . . . . . . . . . . . . . . . . . . . . . . . . . . . . . . . . . . . . . . . . . . . . . . . . . . . . Engine Coolant . . . . . . . . . . . . . . . . . . . . . . . . . . . . . . . . . . . . . . . . . . . . . . . . . . Checking Engine Coolant . . . . . . . . . . . . . . . . . . . . . . . . . . . . . . . . . . . . . . . . . . Replacing Engine Coolant . . . . . . . . . . . . . . . . . . . . . . . . . . . . . . . . . . . . . . . . . . Engine Air Filter Maintenance . . . . . . . . . . . . . . . . . . . . . . . . . . . . . . . . . . . . . . . . . . Replacing the Fuel Filter . . . . . . . . . . . . . . . . . . . . . . . . . . . . . . . . . . . . . . . . . . . . . Bleeding the Fuel System . . . . . . . . . . . . . . . . . . . . . . . . . . . . . . . . . . . . . . . . . . . . . 81 82 82 82 83 84 84 85 General Troubleshooting . . . . . . . Engine Overheating Problems . . . . Loss of Oil Pressure . . . . . . . . . . APECS 3000 Controller Fault Codes . Compression Test . . . . . . . . . . . 88 89 89 89 90 Component Locations . . . . . . . . . . . . . . . . . . . . . . . . . . . . . . . . . . . . . . . . . . . 79 Maintenance and Adjustments . . . . . . . . . . . . . . . . . . . . . . . . . . . . . . . . . . . . . . 81 Troubleshooting . . . . . . . . . . . . . . . . . . . . . . . . . . . . . . . . . . . . . . . . . . . . . . 88 . . . . . . . . . . . . . . . . . . . . . . . . . . . . . . . . . . . . . . . . . . . . . . . . . . . . . . . . . . . . . . . . . . . . . . . . . . . . . . . . . . . . . . . . . . . . . . . . . . . . . . . . . . . . . . . . . . . . . . . . . . . . . . . . . . . . . . . . . . . . . . . . . . . . . . . . . . . . . . . . . . . . . . . . . . . . . . . . . . . . . . . . . . . . . . Specifications . . . . . . . . . . . . . . . . . . . . . . . . . . . . . . . . . . . . . . . . . . . . . . . . Special Tools . . . . . . . . . . . . . . . . . . . . . . . . . . . . . . . . . . . . . . . . . . . . . . . . Engine System, Gasoline/LPG . . . . . . . . . . . . . . . . . . . . . . . . . . . . . . . . . . . . . . . . Functional Description . . . . . . . . . . . . . . . . . . . . . . . . . . . . . . . . . . . . . . . . . . Overview . . . . . . . . . . . . . . . . . . . . . . . . . . . . . . . . . . . . . . . . . . . . . . . . . . . . . Engine Description . . . . . . . . . . . . . . . . . . . . . . . . . . . . . . . . . . . . . . . . . . . . . . . . Kubota 1.6L Gasoline Fuel System Description . . . . . . . . . . . . . . . . . . . . . . . . . . . . . . . . . Kubota 1.6L LPG Fuel System Description . . . . . . . . . . . . . . . . . . . . . . . . . . . . . . . . . . . . Engine Starter Circuit Description . . . . . . . . . . . . . . . . . . . . . . . . . . . . . . . . . . . . . . . . Engine Protection – Low Oil Pressure Shutdown . . . . . . . . . . . . . . . . . . . . . . . . . . . . . . . . Engine Protection – High Temperature . . . . . . . . . . . . . . . . . . . . . . . . . . . . . . . . . . . . . Engine Speed Control . . . . . . . . . . . . . . . . . . . . . . . . . . . . . . . . . . . . . . . . . . . . . . . 92 93 95 95 95 95 95 95 96 97 97 97 Component Locations . . . . . . . . . . . . . . . . . . . . . . . . . . . . . . . . . . . . . . . . . . . 98 LPG And Gasoline Engine Common Electrical Components . . . . . . . . . . . . . . . . . . . . . . . . . . 98 LPG ONLY Engine Electrical and Fuel Components . . . . . . . . . . . . . . . . . . . . . . . . . . . . . . 101 Gasoline (Petrol) ONLY Engine Electrical and Fuel Components . . . . . . . . . . . . . . . . . . . . . . . 102 Maintenance and Adjustments . . . . . . . . . . . . . . . . . . . . . . . . . . . . . . . . . . . . . 103 Maintenance Schedule . . . . . . . . . . . . . . . . . . . . . . . . . . . . . . . . . . . . . . . . . . . . . Engine Oil . . . . . . . . . . . . . . . . . . . . . . . . . . . . . . . . . . . . . . . . . . . . . . . . . . . . Engine Coolant . . . . . . . . . . . . . . . . . . . . . . . . . . . . . . . . . . . . . . . . . . . . . . . . . Checking Engine Coolant . . . . . . . . . . . . . . . . . . . . . . . . . . . . . . . . . . . . . . . . . Replacing Engine Coolant . . . . . . . . . . . . . . . . . . . . . . . . . . . . . . . . . . . . . . . . . Engine Air Filter Maintenance . . . . . . . . . . . . . . . . . . . . . . . . . . . . . . . . . . . . . . . . . 103 104 104 104 105 106 Troubleshooting . . . . . . . . . . . . . . . . . . . . . . . . . . . . . . . . . . . . . . . . . . . . . .106 General Troubleshooting . . . . . . . . . . . . . . . . . . . . . . . . . . . . . . . . . . . . . . . . . . . . 106 Engine Overheating Problems . . . . . . . . . . . . . . . . . . . . . . . . . . . . . . . . . . . . . . . . . 107 Shop Measurements . . . . . . . . . . . . . . . . . . . . . . . . . . . . . . . . . . . . . . . . . . . . . . 109 iv Service Manual – SW8000 Engine Vacuum . . . . . . . . . . . . . . . . . . . . . . . . . . . . . . . . . . . . . . . . . . . . . . 109 Special Tools . . . . . . . . . . . . . . . . . . . . . . . . . . . . . . . . . . . . . . . . . . . . . . . .110 Hopper System . . . . . . . . . . . . . . . . . . . . . . . . . . . . . . . . . . . . . . . . . . . . . . . 111 Functional Description . . . . . . . . . . . . . . . . . . . . . . . . . . . . . . . . . . . . . . . . . .111 Overview . . . . . . . . . . . . . . . . . . . . . . . . . . . . . . . . . . . . . . . . . . . . . . . . . . . . Hopper . . . . . . . . . . . . . . . . . . . . . . . . . . . . . . . . . . . . . . . . . . . . . . . . . . . . . . Hopper Door . . . . . . . . . . . . . . . . . . . . . . . . . . . . . . . . . . . . . . . . . . . . . . . . . . Hopper Hydraulic System . . . . . . . . . . . . . . . . . . . . . . . . . . . . . . . . . . . . . . . . . . . 111 111 112 113 Hopper Down, Hopper Door Closed . . . . . . . . . . . . . . . . . . . . . . . . . . . . . . . . . . . . . . Raise Hopper . . . . . . . . . . . . . . . . . . . . . . . . . . . . . . . . . . . . . . . . . . . . . . . . . . Lower Hopper . . . . . . . . . . . . . . . . . . . . . . . . . . . . . . . . . . . . . . . . . . . . . . . . . . Open Hopper Door . . . . . . . . . . . . . . . . . . . . . . . . . . . . . . . . . . . . . . . . . . . . . . . Close Hopper Door . . . . . . . . . . . . . . . . . . . . . . . . . . . . . . . . . . . . . . . . . . . . . . . 116 117 118 119 120 Hopper . . . . . . . . . . . . . . . . . . . . . . . . . . . . . . . . . . . . . . . . . . . . . . . . . . . . . . Hopper Interlock Switch . . . . . . . . . . . . . . . . . . . . . . . . . . . . . . . . . . . . . . . . . . . . Hopper Lift Cylinder . . . . . . . . . . . . . . . . . . . . . . . . . . . . . . . . . . . . . . . . . . . . . . . Hopper Prop Rod . . . . . . . . . . . . . . . . . . . . . . . . . . . . . . . . . . . . . . . . . . . . . . . . Hopper Door Cylinder . . . . . . . . . . . . . . . . . . . . . . . . . . . . . . . . . . . . . . . . . . . . . . Hydraulic Manifold Assembly and Solenoid Valves . . . . . . . . . . . . . . . . . . . . . . . . . . . . . 121 121 122 122 123 123 Overview . . . . . . . . . . . . . . . . . . . . . . . . . . . . . . . . . . . . . . . . . . . . . . . . . . . . Hydraulic Pumps . . . . . . . . . . . . . . . . . . . . . . . . . . . . . . . . . . . . . . . . . . . . . . . . Hydraulic Manifold Assembly . . . . . . . . . . . . . . . . . . . . . . . . . . . . . . . . . . . . . . . . . Electrical Schematic . . . . . . . . . . . . . . . . . . . . . . . . . . . . . . . . . . . . . . . . . . . . . . Electrical Circuit Description . . . . . . . . . . . . . . . . . . . . . . . . . . . . . . . . . . . . . . . . . . 127 128 128 129 129 Hydraulic Piston and Gear Pumps . . . . . . . . . . . . . . . . . . . . . . . . . . . . . . . . . . . . . . Hydraulic Manifold Assembly . . . . . . . . . . . . . . . . . . . . . . . . . . . . . . . . . . . . . . . . . Hydraulic Oil Reservoir . . . . . . . . . . . . . . . . . . . . . . . . . . . . . . . . . . . . . . . . . . . . . Oil Filter . . . . . . . . . . . . . . . . . . . . . . . . . . . . . . . . . . . . . . . . . . . . . . . . . . . . . Oil Cooler . . . . . . . . . . . . . . . . . . . . . . . . . . . . . . . . . . . . . . . . . . . . . . . . . . . . 130 130 131 131 132 Hopper System Wiring Diagram . . . . . . . . . . . . . . . . . . . . . . . . . . . . . . . . . . . . . 114 Hopper System Circuit Description . . . . . . . . . . . . . . . . . . . . . . . . . . . . . . . . . . . .115 Hopper System Hydraulic Diagrams . . . . . . . . . . . . . . . . . . . . . . . . . . . . . . . . . . . 116 Component Locations . . . . . . . . . . . . . . . . . . . . . . . . . . . . . . . . . . . . . . . . . . .121 Troubleshooting . . . . . . . . . . . . . . . . . . . . . . . . . . . . . . . . . . . . . . . . . . . . . .124 Specifications . . . . . . . . . . . . . . . . . . . . . . . . . . . . . . . . . . . . . . . . . . . . . . . 126 Hydraulic System . . . . . . . . . . . . . . . . . . . . . . . . . . . . . . . . . . . . . . . . . . . . . . 127 Functional Description . . . . . . . . . . . . . . . . . . . . . . . . . . . . . . . . . . . . . . . . . .127 Component Locations . . . . . . . . . . . . . . . . . . . . . . . . . . . . . . . . . . . . . . . . . . .130 Maintenance and Adjustments . . . . . . . . . . . . . . . . . . . . . . . . . . . . . . . . . . . . . 132 To Check the Hydraulic Oil Level . . . . . . . . . . . . . . . . . . . . . . . . . . . . . . . . . . . . . . . . 132 To Change the Hydraulic Oil Filter . . . . . . . . . . . . . . . . . . . . . . . . . . . . . . . . . . . . . . . 133 To Clean the Hydraulic Oil Cooler . . . . . . . . . . . . . . . . . . . . . . . . . . . . . . . . . . . . . . . 133 Troubleshooting . . . . . . . . . . . . . . . . . . . . . . . . . . . . . . . . . . . . . . . . . . . . . .134 General Troubleshooting . . . . . . . . . . . . . . . . . . . . . . General Information Regarding Checking Hydraulic Pressures . Checking the Gear Pump Pressure . . . . . . . . . . . . . . . . . Checking the Piston Pump Pressure . . . . . . . . . . . . . . . . Hydraulic Truth Table . . . . . . . . . . . . . . . . . . . . . . . . . . . . . . . . . . . . . . . . . . . . . . . . . . . . . . . . . . . . . . . . . . . . . . . . . . . . . . . . . . . . . . . . . . . . . . . . . . . . . . . . . . . . . . . . . . . . . . . . . . . . . . . . . . . . . . 134 134 135 136 136 Specifications . . . . . . . . . . . . . . . . . . . . . . . . . . . . . . . . . . . . . . . . . . . . . . . 137 General Specifications . . . . . . . . . . . . . . . . . . . . . . . . . . . . . . . . . . . . . . . . . . . . . 137 v Service Manual – SW8000 Hydraulic Manifold Assembly . . . . . . . . . . . . . . . . . . . . . . . . . . . . . . . . . . . . . . . . . 138 Special Tools . . . . . . . . . . . . . . . . . . . . . . . . . . . . . . . . . . . . . . . . . . . . . . . .139 Hydraulic Schematic, 56507055, Rev. L . . . . . . . . . . . . . . . . . . . . . . . . . . . . . . . . . 140 Options and Accessories . . . . . . . . . . . . . . . . . . . . . . . . . . . . . . . . . . . . . . . . . . 141 SW8000 Deluxe Cab Options . . . . . . . . . . . . . . . . . . . . . . . . . . . . . . . . . . . . . . .151 Technical Specifications . . . . . . . . . . . . . . . . . . . . . . . . . . . . . . . . . . . . . . . . . . . . Cab Controls . . . . . . . . . . . . . . . . . . . . . . . . . . . . . . . . . . . . . . . . . . . . . . . . . . . Heating System Components . . . . . . . . . . . . . . . . . . . . . . . . . . . . . . . . . . . . . . . . . Air Conditioning System Components . . . . . . . . . . . . . . . . . . . . . . . . . . . . . . . . . . . . . Maintenance . . . . . . . . . . . . . . . . . . . . . . . . . . . . . . . . . . . . . . . . . . . . . . . . . . Maintenance Schedule . . . . . . . . . . . . . . . . . . . . . . . . . . . . . . . . . . . . . . . . . . . To Clean and Replace the Cab Filter . . . . . . . . . . . . . . . . . . . . . . . . . . . . . . . . . . . 151 152 153 154 155 155 155 General System Overview . . . . . . . . . . . . . . . . . . . . . . . . . . . . . . . . . . . . . . . . . . . Electrical Circuit Overview . . . . . . . . . . . . . . . . . . . . . . . . . . . . . . . . . . . . . . . . . . . Heater Blower Motor . . . . . . . . . . . . . . . . . . . . . . . . . . . . . . . . . . . . . . . . . . . Heater Temperature Control . . . . . . . . . . . . . . . . . . . . . . . . . . . . . . . . . . . . . . . . . . Electrical Troubleshooting . . . . . . . . . . . . . . . . . . . . . . . . . . . . . . . . . . . . . . . . . . . To Troubleshoot the Heater Temperature Control . . . . . . . . . . . . . . . . . . . . . . . . . . . . . . To Eliminate Air Locks from the Cooling System . . . . . . . . . . . . . . . . . . . . . . . . . . . . . . . Cooling System Vacuum Filler . . . . . . . . . . . . . . . . . . . . . . . . . . . . . . . . . . . . . . . Purge the Heater Circuit . . . . . . . . . . . . . . . . . . . . . . . . . . . . . . . . . . . . . . . . . . 156 156 156 156 157 159 160 160 160 General System Overview . . . . . . . . . . . . . . . . . . . . . . . . . . . . . . . . . . . . . . . . . . . Electrical Circuit Overview . . . . . . . . . . . . . . . . . . . . . . . . . . . . . . . . . . . . . . . . . . . Condenser Fan, Thermostat, Pressure Switch and Compressor Motor . . . . . . . . . . . . . . . . . . . Electrical Troubleshooting . . . . . . . . . . . . . . . . . . . . . . . . . . . . . . . . . . . . . . . . . . . Component Troubleshooting . . . . . . . . . . . . . . . . . . . . . . . . . . . . . . . . . . . . . . . . . . Accessory (Gear) Hydraulic Pump . . . . . . . . . . . . . . . . . . . . . . . . . . . . . . . . . . . . . . . Compressor Relay (K10) . . . . . . . . . . . . . . . . . . . . . . . . . . . . . . . . . . . . . . . . . . . . Binary Pressure Switch (S34) . . . . . . . . . . . . . . . . . . . . . . . . . . . . . . . . . . . . . . . . . . Thermostat (S33) . . . . . . . . . . . . . . . . . . . . . . . . . . . . . . . . . . . . . . . . . . . . . . . . 161 161 162 163 165 166 166 167 169 Heating System . . . . . . . . . . . . . . . . . . . . . . . . . . . . . . . . . . . . . . . . . . . . . . 156 Air Conditioning System . . . . . . . . . . . . . . . . . . . . . . . . . . . . . . . . . . . . . . . . . .161 Heating and A/C System Plumbing and Hydraulic Flow Schematic . . . . . . . . . . . . . . . . . . 171 Steering System . . . . . . . . . . . . . . . . . . . . . . . . . . . . . . . . . . . . . . . . . . . . . . . 172 Functional Description . . . . . . . . . . . . . . . . . . . . . . . . . . . . . . . . . . . . . . . . . .172 Overview . . . . . . . . . . . . . . . . . . . . . . . . . . . . . . . . . . . . . . . . . . . . . . . . . . . . 172 Hydraulic Diagrams . . . . . . . . . . . . . . . . . . . . . . . . . . . . . . . . . . . . . . . . . . . . 174 Steering Control Unit Description . . . . . . . . . . . . . . . . . . . . . . . . . . . . . . . . . . . . . . . Steering Wheel Stationary . . . . . . . . . . . . . . . . . . . . . . . . . . . . . . . . . . . . . . . . . . . Steering Wheel Turned Toward the Right . . . . . . . . . . . . . . . . . . . . . . . . . . . . . . . . . . . Steering Wheel Turned Toward the Left . . . . . . . . . . . . . . . . . . . . . . . . . . . . . . . . . . . . Steering Wheel Held in Full Right or Left Position . . . . . . . . . . . . . . . . . . . . . . . . . . . . . . Turning the Steering Wheel with the Engine Off . . . . . . . . . . . . . . . . . . . . . . . . . . . . . . . 174 175 176 177 178 179 Component Locations . . . . . . . . . . . . . . . . . . . . . . . . . . . . . . . . . . . . . . . . . . .180 Steering Wheel and Steering Control Unit . . . . . . . . . . . . . . . . . . . . . . . . . . . . . . . . . . 180 Steering Cylinder . . . . . . . . . . . . . . . . . . . . . . . . . . . . . . . . . . . . . . . . . . . . . . . . 180 Maintenance . . . . . . . . . . . . . . . . . . . . . . . . . . . . . . . . . . . . . . . . . . . . . . . .181 Troubleshooting . . . . . . . . . . . . . . . . . . . . . . . . . . . . . . . . . . . . . . . . . . . . . .182 Specifications . . . . . . . . . . . . . . . . . . . . . . . . . . . . . . . . . . . . . . . . . . . . . . . 182 vi Service Manual – SW8000 Sweep System, Main Broom . . . . . . . . . . . . . . . . . . . . . . . . . . . . . . . . . . . . . . . . 183 Functional Description . . . . . . . . . . . . . . . . . . . . . . . . . . . . . . . . . . . . . . . . . . 183 Circuit Description . . . . . . . . . . . . . . . . . . . . . . . . . . . . . . . . . . . . . . . . . . . . . . . 183 Hydraulic Operation . . . . . . . . . . . . . . . . . . . . . . . . . . . . . . . . . . . . . . . . . . . . . . 184 Component Locations . . . . . . . . . . . . . . . . . . . . . . . . . . . . . . . . . . . . . . . . . . .185 Maintenance and Adjustment . . . . . . . . . . . . . . . . . . . . . . . . . . . . . . . . . . . . . . 186 Cleaning and Inspecting the Main Broom . . . . . . . . . . . . . . . . . . . . . . . . . . . . . . . . . . Rotate or Replace the Main Broom . . . . . . . . . . . . . . . . . . . . . . . . . . . . . . . . . . . . . . Inspect and Adjust the Broom Height . . . . . . . . . . . . . . . . . . . . . . . . . . . . . . . . . . . . . Inspect Housing Skirts . . . . . . . . . . . . . . . . . . . . . . . . . . . . . . . . . . . . . . . . . . . . . 186 186 187 187 Troubleshooting . . . . . . . . . . . . . . . . . . . . . . . . . . . . . . . . . . . . . . . . . . . . . .188 Main Broom Motor Will Not Run . . . . . . . . . . . . . . . . . . . . . . . . . . . . . . . . . . . . . . . 188 Specifications . . . . . . . . . . . . . . . . . . . . . . . . . . . . . . . . . . . . . . . . . . . . . . . 189 Sweep System, Side Broom . . . . . . . . . . . . . . . . . . . . . . . . . . . . . . . . . . . . . . . . 190 Functional Description . . . . . . . . . . . . . . . . . . . . . . . . . . . . . . . . . . . . . . . . . . 190 Circuit Overview . . . . . . . . . . . . . . . . . . . . . . . . . . . . . . . . . . . . . . . . . . . . . . . . Electrical Circuit . . . . . . . . . . . . . . . . . . . . . . . . . . . . . . . . . . . . . . . . . . . . . . . . . Hydraulic Circuit, Brooms Off . . . . . . . . . . . . . . . . . . . . . . . . . . . . . . . . . . . . . . . . . Hydraulic Circuit, Brooms On . . . . . . . . . . . . . . . . . . . . . . . . . . . . . . . . . . . . . . . . . 190 191 191 192 Component Locations . . . . . . . . . . . . . . . . . . . . . . . . . . . . . . . . . . . . . . . . . . .193 Troubleshooting . . . . . . . . . . . . . . . . . . . . . . . . . . . . . . . . . . . . . . . . . . . . . .194 Side Broom Won’t Run . . . . . . . . . . . . . . . . . . . . . . . . . . . . . . . . . . . . . . . . . . . . . 194 Side Broom Won’t Raise . . . . . . . . . . . . . . . . . . . . . . . . . . . . . . . . . . . . . . . . . . . . 195 Side Broom Won’t Lower . . . . . . . . . . . . . . . . . . . . . . . . . . . . . . . . . . . . . . . . . . . . 195 Specifications . . . . . . . . . . . . . . . . . . . . . . . . . . . . . . . . . . . . . . . . . . . . . . . 195 Wheel System, Non-Traction . . . . . . . . . . . . . . . . . . . . . . . . . . . . . . . . . . . . . . . 196 Functional Description . . . . . . . . . . . . . . . . . . . . . . . . . . . . . . . . . . . . . . . . . . 196 Maintenance and Adjustments . . . . . . . . . . . . . . . . . . . . . . . . . . . . . . . . . . . . . .196 Troubleshooting . . . . . . . . . . . . . . . . . . . . . . . . . . . . . . . . . . . . . . . . . . . . . .196 Removal and Installation . . . . . . . . . . . . . . . . . . . . . . . . . . . . . . . . . . . . . . . . . 196 To Remove and Reinstall a Wheel . . . . . . . . . . . . . . . . . . . . . . . . . . . . . . . . . . . . . . . 196 To Remove and Reinstall a Brake and Spindle Assembly . . . . . . . . . . . . . . . . . . . . . . . . . . . 197 Wheel System, Traction . . . . . . . . . . . . . . . . . . . . . . . . . . . . . . . . . . . . . . . . . . 198 Functional Description . . . . . . . . . . . . . . . . . . . . . . . . . . . . . . . . . . . . . . . . . . 198 Overview . . . . . . . . . . . . . . . . . . . . . . . . . . . . . . . . . . . . . . . . . . . . . . . . . . . . Piston (drive) Pump and Drive Motor . . . . . . . . . . . . . . . . . . . . . . . . . . . . . . . . . . . . . Foot Pedal Assembly . . . . . . . . . . . . . . . . . . . . . . . . . . . . . . . . . . . . . . . . . . . . . . Forward/Reverse Controls . . . . . . . . . . . . . . . . . . . . . . . . . . . . . . . . . . . . . . . . . . . Rear Wheel Assembly . . . . . . . . . . . . . . . . . . . . . . . . . . . . . . . . . . . . . . . . . . . . . 198 198 199 199 200 Drive Motor in Neutral . . . . . . . . Tow Valve in Bypass Position . . . . . Drive Motor in Forward or Reverse . Drive Motor Stalling Out . . . . . . . Electrical Schematic and Circuit Description . . . . . . . . . . . . . . . . . . . . . . . . . . . . . . .200 Hydraulic Diagrams . . . . . . . . . . . . . . . . . . . . . . . . . . . . . . . . . . . . . . . . . . . . 201 . . . . . . . . . . . . . . . . . . . . . . . . . . . . . . . . . . . . . . . . . . . . . . . . . . . . . . . . . . . . . . . . . . . . . . . . . . . . . . . . . . . . . . . . . . . . . . . . . . . . . . . . . . . . . . . . . . . . . . . . . . . . . . . . . . . . . . . . . . . . . . . . . . . . 201 201 202 203 Piston (drive) Pump and Tow Valve . . . Drive Motor and Rear Wheel Assembly . Foot Pedal Assembly . . . . . . . . . . . Forward/Reverse Controls . . . . . . . . . . . . . . . . . . . . . . . . . . . . . . . . . . . . . . . . . . . . . . . . . . . . . . . . . . . . . . . . . . . . . . . . . . . . . . . . . . . . . . . . . . . . . . . . . . . . . . . . . . . . . . . . . . . . . . . . . . . . . . . . . . . . . . . . . . . . . . . . . . . . 204 204 205 205 Component Locations . . . . . . . . . . . . . . . . . . . . . . . . . . . . . . . . . . . . . . . . . . .204 vii Service Manual – SW8000 Adjustments . . . . . . . . . . . . . . . . . . . . . . . . . . . . . . . . . . . . . . . . . . . . . . . .206 To Set the Drive Pump Neutral Position . . . . . . . . . . . . . . . . . . . . . . . . . . . . . . . . . . . . 206 Troubleshooting . . . . . . . . . . . . . . . . . . . . . . . . . . . . . . . . . . . . . . . . . . . . . .207 Specifications . . . . . . . . . . . . . . . . . . . . . . . . . . . . . . . . . . . . . . . . . . . . . . . 207 viii Service Manual – SW8000 9 General Information General Machine Description The SW8000 machine is an industrial power rider broom sweeper. Gasoline (Petrol), LPG and diesel engine models are available, with or without the DustGuard™ option. The machine is hydraulic powered and electrically controlled. The sweep system has a center main broom and a right-hand side brooms. A left hand side broom is available as an option. Service Manual Purpose and Application This Service Manual is a technical resource designed to aid service personnel in maintaining and repairing the SW8000 Sweeper to ensure optimum performance and long service life. Please read it thoroughly before servicing your machine. Other Reference Manuals and Information Sources Nilfisk-Advance Publications Model Name Model Number Instructions for Use Form Number Advance SW8000 4 Cylinder LPG 56107503 Advance SW8000 4 Cylinder Gasoline / Petrol 56107501 Advance SW8000 4 Cylinder Diesel 56107505 Advance SW8000 4 Cylinder LPG / Cab 56107509 Advance SW8000 4 Cylinder Gasoline / Petrol Cab 56107507 Advance SW8000 4 Cylinder Diesel / Cab 56107511 56091065: English, Spanish, French, Portuguese Parts List Form Number 56042600 56042602 56042601 56042603 These manuals can be found in the following locations: • EzParts within Nilfisk-Advance Dealer Customer Zone website or EzParts CD-ROM • Nilfisk-Advance website: www.Nilfisk-Advance-us.com Engine Manufacturers’ Technical Manuals Engine Type Publication Title Diesel: Kubota 05 Series Service Data Book 9Y110-00051.pdf Workshop Manual, Diesel Engine, 05 Series, WG1605 9Y111-00126.pdf Woodward Product Specification 03399, APECS™ 0175 Series Actuators Gas/LPG: Operator’s Manual WG1605 EG523-89162ENG.pdf Engine Specifications WG1605 9Y110-01770.pdf Workshop Manual WG1605 9Y111-06610.pdf Diagnosis Manual ECM System WG1605 9Y110-01760.pdf Introduction This manual will help you get the most from your Advance rider Scrubber-Sweeper. Read it thoroughly before servicing the machine. Refer to the “Know Your Machine” section for component locations discussed in this chapter. This product is intended for commercial use only. Service Manual – SW8000 General Information Parts And Service Repairs, when required, should be performed by your Authorized Advance Service Center, who employs factory trained service personnel, and maintains an inventory of Advance original replacement parts and accessories. Call the ADVANCE DEALER named below for repair parts or service. Please specify the Model and Serial Number when discussing your machine. (Dealer, affix service sticker here.) Name Plate Unit Nameplate Unit Nameplate Location The Model Number and Serial Number of your machine are shown on the Nameplate on the machine. The Model Name imprinted on the nameplate will be SW8000 and the Part Number will correspond to engine type and options on the machine (example: “56107503”). This information is needed when ordering repair parts for the machine. Use the space below to note the Model Number and Serial Number of your machine for future reference. MODEL NUMBER ________________________________________ SERIAL NUMBER ________________________________________ Caution and Warning Symbols It is important for you to read and understand this manual. The information it contains relates to protecting your safety and preventing problems. The symbols below are used to help you recognize this information. Warning: Indicates a potentially hazardous situation which, if not avoided, could result in death or serious injury. Caution: Indicates a potentially hazardous situation which, if not avoided, could result in minor or moderate injury. Caution: When used without the Safety Alert Symbol, indicates a potential situation which, if not avoided, could result in property or machine damage. 10 Service Manual – SW8000 General Information General Safety Instructions Specific Cautions and Warnings are included to warn you of potential danger of machine damage or bodily harm. Warning! −− This machine emits exhaust gases (carbon monoxide) that can cause serious injury or death, always provide adequate ventilation when using machine. −− This machine shall be used only by properly trained and authorized persons. −− This machine is not intended for use by persons (including children) with reduced physical, sensory or mental capabilities, or lack of experience and knowledge. −− While on ramps or inclines, avoid sudden stops. Avoid abrupt sharp turns. Use low speed down ramps. −− To avoid hydraulic oil injection or injury always wear appropriate clothing and eye protection when working with or near hydraulic system. −− Turn the key switch off (O) and disconnect the batteries before servicing electrical components. −− Never work under a machine without safety blocks or stands to support the machine. −− Do not dispense fl ammable cleaning agents, operate the machine on or near these agents, or operate in areas where fl ammable liquids exist. −− Only use the brushes provided with the appliance or those specifi ed in the instruction manual. The use of other brushes may impair safety. −− Do not use the machine without a falling object protective structure (FOPS) in areas where it is likely that the operator is hit by falling objects. −− Machines shall be parked safely. −− The machine shall be inspected by a qualifi ed person regularly, in particular regarding the LPG container and their connections, as required for safe operation by regional or national regulations. −− Observe the Gross Vehicle Weight, GVW, of the machine when loading, driving, lifting or supporting the machine. Caution! −− This machine is not approved for use on public paths or roads. −− This machine is only approved for hard surface use. −− This machine is not suitable for picking up hazardous dust. −− When operating this machine, ensure that third parties, particularly children, are not endangered. −− Before performing any service function, carefully read all instructions pertaining to that function. −− Do not leave the machine unattended without first turning the key switch off, removing the key and applying the parking brake. 11 Service Manual – SW8000 General Information −− Turn the key switch off and remove the key, before changing the brooms, and before opening any access panels. −− Take precautions to prevent hair, jewelry, or loose clothing from becoming caught in moving parts. −− Before use, all doors and hoods should be properly latched. −− The battery must be removed from the machine before the machine is scrapped. The disposal of the battery should be safely done in accordance with your local environmental regulations. −− Do not use on surfaces having a gradient exceeding that marked on the machine. −− All doors and covers are to be positioned as indicated in the instruction manual before using the machine. Hopper Safety Support Warning! Make sure the Hopper Safety Support is in place by using the Hopper Safety Support Handle whenever attempting to do any maintenance work under or near the raised hopper. The Hopper Safety Support mechanically holds the hopper in the raised position to allow work to be performed under the hopper. NEVER rely on the machine’s hydraulic components to safely support the hopper. See “To Engage The Safety Support” below. Hopper Safety Support Hopper Safety Support Handle Hopper Safety Support 12 Service Manual – SW8000 General Information The Hopper Safety Support must be engaged whenever personnel are working on or underneath the hopper. The safety support prevents the hopper from being lowered, or from dropping down accidentally if there’s a failure in the hydraulic system. The Hopper Safety Support Handle operates the Hopper Safety Support. To engage the Safety Support: 1. Raise the hopper to its full-up position. 2. Pull the Hopper Safety Support Handle toward the rear of the machine to engage the Safety Support as shown here. 3. Lower the hopper to rest on the Safety Support. To disengage the Safety Support. 1. Raise the hopper to its full-up position. 2. Push the Hopper Safety Support Handle toward the front of the machine to the to the disengaged position. age Eng ety Saf ort p Sup e eas Rel fety Sa ort p Sup Hopper Safety Support Handle Hopper Safety Support Operation 3. Lower the hopper. Jacking The Machine Caution! Never work under a machine without safety stands or blocks to support the machine. −− When jacking the machine, do so at designated locations (Do Not jack on the hopper) Jack Location On Metal Frame Jack Location On Metal Frame Jack Location On Weight 13 Service Manual – SW8000 General Information Transporting The Machine Caution! Before transporting the machine on an open truck or trailer, make sure that . . . −− All access doors are latched securely. −− The machine parking brake is set. −− The machine is tied down securely - see tie-down locations in following figures. Tie Down Tie Down Tie Down - Left Front Tie Down - Left Rear Tie Down Tie Down Tie Down - Right Front Tie Down - Right Rear 14 Service Manual – SW8000 General Information Towing Or Pushing A Disabled Machine Caution! The machine’s drive propelling pump is manufactured with an adjustable tow valve. This valve prevents damage to the hydraulic system when the machine is being towed/pushed short distances without use of the engine. To access the valve; unlatch and open the Oil Reservoir / Fuel Tank Cover, then open the Engine Compartment Cover and locate the hydrostatic pump at the rear of the engine. The illustration below shows the location. Turn the valve 90 degrees; this disengages the hydrostatic lock between the motor and pump. The hydraulic propelling pump can be damaged if the machine is towed with the valve in the normal working position. Reference the illustration below for the normal working setting (vertical) and the free wheeling towing setting (horizontal). Note: If the tow valve is left in free wheeling (horizontal) position the propelling pump can’t drive the machine FWD or REV. No damage will result, just re-set valve to the normal working setting (vertical). NOTE: Tow or push machine no faster than a normal walking pace (2-3 miles per hour) and for short distances only. If the machine is to be moved long distances the drive wheel needs to be raised off the floor and placed on a suitable transport dolly. Free Wheeling Towing Setting Hydraulic Propelling Pump Tow Valve Normal Working Setting 15 Service Manual – SW8000 General Information Technical Specifications General Specifications common to All Models English (Metric) Dimensions Height w/Overhead Guard Height Front View Side View Length Width Front View Side View Length 95 inches (2241 cm) Width (minimum)* 64 (163cm) Height 59 inches (150cm) Height w/overhead guard 81.25 inches (206cm) Height w/cab 79 inches (201cm) Ground clearance 3.5 inches (8.9cm) Minimum ceiling height dumping clearance 101.4 inches (257.5cm) Weights Gross weight, without cab** 4426 lbs. (2007kg) Gross weight, with cab** 4775 lbs. (2165kg) Sweep System Main broom length 50 inches (127cm) Main broom diameter 14 inches (35.5cm) Main broom bristle length 3.25 inches (8.26cm) Sweeping path w/single side broom 65 inches (165cm) Sweeping path w/dual side brooms 77 inches (196cm) Side broom diameter (STD) 26 inches (66cm) Side broom bristle length 6 inches (15.2cm) *Width (minimum): Width of machine body at the hopper, no side brooms. **Gross Weight: Standard machine without options, with 175 lbs. operator, with standard sweeping brooms and full tank of fuel. 16 Service Manual – SW8000 General Information Technical Specifications Hopper System Capacity 14 ft3 (396L) Lifting capacity 1000 lbs. (454kg) Dump height (variable) Max. 60 inches (152cm) Dump height with door open 52.75 inches (134cm) Dust Control System Filter type: Pleated paper panel STD (optional poly filter available) Filter media area 94 ft2 (8.7m2) Filter dimension 3.19” x 18” x 30” (8.1cm x 45.7cm x 76.2cm) Dust Guard Water Misting Tank Capacity 14 gal. (53L) Steering System Type: Full power steering unit and hydraulic cylinder Turn radius left 95” (242cm) Turn radius right 63” (160cm) Minimum aisle turn width (left) 109 in. (277cm) Hydraulic System Oil type: SAE 10W-30 (fill to bottom of screen) System fill capacity 11 gal. (41.6L) Engine System Diesel & Petrol (gasoline) fuel tank capacity 12.5 gal. (47.3L) Tires Tire pressure (all 3) 90-100 PSI (6.2 - 6.9 bar) Engine Sound Level At operators ear - LPG/Gasoline (Petrol) At operators ear - Diesel 79.3 dBA 85.5 dBA Speed and Gradeability Maximum grade angle (transport) 20% / 11.3° Maximum grade angle (sweeping) 20% / 11.3° Maximum trailer loading angle (all models) 19.4° Travel speed (Maximum forward) 9 mph (14.5km/h) Maximum reverse speed 5.5 mph (8.8km/h) *Width (minimum): Width of machine body at the hopper, no side brooms. **Gross Weight: Standard machine without options, with 175 lbs. operator, with standard sweeping brooms and full tank of fuel. 17 Service Manual – SW8000 General Information Fastener Torque Specifications Standard Torque Specifications (unless otherwise specified) Size Plated Steel Stainless Steel #10 42 in.-lb. 28 in.-lb. 1/4“ 100 in.-lb. 67 in.-lb. 5/16” 17 ft.-lb. 11 ft.-lb. 3/8” 31 ft.-lb. 20 ft.-lb. 1/2” 75 ft.-lb. 50 ft.-lb. 3/4” 270 ft.-lb. 180 ft.-lb. M5 61 in.-lb. 36 in.-lb. M6 9 ft.-lb. 62 in.-lb. M8 22 ft.-lb. 13 ft.-lb. M10 44 ft.-lb. 25 ft.-lb. M12 70 ft.-lb. 40 ft.-lb 18 Service Manual – SW8000 General Information Maintenance Maintenance Schedule Maintenance intervals given are for average operating conditions. Machines used in severe operational environments may require service more often. Maintenance Item Perform Daily Perform the “After Use” maintenance steps X Check parking brake X *Clean main and side broom(s) X Check filter indicator and lights (hyd & air) X Check engine coolant level X Check hydraulic oil level X Maintenance Item 15 hrs. *Rotate main broom X Clean the DustGuard™ Spray Nozzles & Strainer X 30 hrs. *Inspect/adjust brooms X * Check / Clean Hopper Dust Control Filter Using Method “A” X *Inspect broom housing skirts X *Inspect hopper seals X Clean radiator and oil cooler X 150 hrs. Perform engine maintenance X *Inspect and grease steering spindle X * Check / Clean Hopper Dust Control Filter Using Method “B” X * Check / Clean Hopper Dust Control Filter Using Method “C” 300 hrs. 1000 hrs. X Change the hydraulic oil filter X Change reservoir hydraulic oil X Flush the radiator X Engine fuel filter(s) X *See the Mechanical Repair Service Manual for detailed maintenance information of systems listed. (Sweeping, Hopper, Steering, Dust Control). NOTE: Cleaning the hopper dust control filter is not required on models using the maintenance free bag filter. After Use 1. Shake the Hopper Dust Control Filter (Figure 6, #12) and empty the hopper. 2. Check the maintenance schedule and perform all required maintenance before storage. 3. Move the machine to an indoor storage area. 4. Shut down the engine according to the shut down procedures. 5. Make sure the Ignition Switch is OFF and the Parking Brake is engaged. Note: It is safe to clean this machine with a pressure washer as long as you do not spray directly at or into electrical components or at the radiator or hydraulic oil cooler. The machine should always be allowed to dry completely before each use 19 Service Manual – SW8000 General Information To Shut Down The Diesel / Gasoline Engine 1. Turn all controls to the OFF position. 2. Raise the brooms. 3. Place the Engine Speed Switch in IDLE and let the engine idle for 25 - 30 seconds. 4. Turn the Ignition Key Switch OFF and remove the key. 5. Apply the Parking Brake. To Shut Down The Propane Engine 1. Turn all controls to the OFF position. 2. Raise the brooms. 3. Turn the service valve on PROPANE Tank OFF. 4. Run the engine until all the PROPANE is dispelled from the line (the engine will stall). 5. Turn the Ignition Key Switch OFF and remove the key. Note: The 4 cylinder LPG engine will continue to run for a few seconds after switching the key to off. This is part of the proper operation of the closed loop electronic control system. 6. Apply the Parking Brake. Important Machine Lubrication Rear Steering Yoke Bearing Assembly : Once every 150 hours attach a grease gun to the yoke bearing pivot zerk (location under operator’s seat) and pump a small amount of grease into bearing assembly. Also every 150 hours apply light machine oil to maintain free movement of all general pivot points. Example the seat adjustment track, and broom door hinges etc. Broom and hopper pivots use composite bearings; lubrication is not required. Caution! For the protection of the environment; when servicing any of the machine’s lubrication fluids they must be disposed of safely in accordance with your local environmental regulations (recycling). Examples of machine lubrication products: (Engine crankcase oil, Engine crankcase oil filter, Hydraulic system oil, Hydraulic system oil filters). Engine Coolant Caution! Do not remove the radiator cap when the engine is hot. To check the engine coolant level, first unlatch and open the Oil Reservoir / Fuel Tank Cover then tilt the Engine Compartment Cover and observe the coolant level on the Coolant Recovery Tank. For Cab equipped models, the cab panels and left side window must be opened in order to tilt the Engine Compartment Cover. If the level is low add a mixture of half water and automotive type anti-freeze. Clean the radiator and oil cooler exteriors by washing with LOW-RESSURE water every 30 hours. 20 Service Manual – SW8000 General Information Caution! Do not use a pressure washer on the raditor or hydraulic oil cooler. Doing so may bend the cooling fins reducing cooling capability. Service Note: The oil cooler tips out for easy cleaning. Engine Oil – Gasoline / Petrol & Lpg Check the engine oil level when the machine is parked on a level surface and the engine is cool. Change the engine oil after the first 35 hours of operation and every 150 hours after that. Engine oil should have properties of API classification SL or higher.and suited to seasonal temperatures. Refer to the Kubota Workshop Manual, Engine Specifications and Operator’s Manual for the WG1605 for further information Replace the oil filter with every oil change. Temperature Range Oil Weight Above 25 C (77 F) SAE30 or SAE10W-30 SAE15W-40 0 C to 25 C (32 F to 77 F) SAE20 or SAE10W-30 0 C to -20 C (32 F to -4 F) SAE10W or SAE10W-30 Engine Oil - Diesel Check the engine oil level when the machine is parked on a level surface and the engine is cool. Change the engine oil after the first 35 hours of operation and every 150 hours after that. Use CF, CF-4 or CG-4 oil meeting API specifications and suited temperatures (*important reference the oil/fuel type note below for further diesel oil recommendations). Refer to the Engine System section for oil capacities and additional engine specifications. Replace the oil filter with every oil change. Temperature Range Oil Weight Above 77 °F (25 °C) SAE 30 or SAE 10W-30, SAE 10W-40 32 °F to 77 °F (0 °C to 25 °C) SAE 20 or SAE 10W-30, SAE 10W-40 Below 32 °F (0 °C) SAE 10W or SAE 10W-30, SAE 10W40 * Diesel Lubricating Oil Note: Refer to the Kubota Diesel Engine 05-E3B Series Work Shop Manual for the suitable American Petroleum Institute (API) classification of engine oil according to the engine type (with internal EGR, external EGR or non-EGR) and the Fuel Type Used. 21 Service Manual – SW8000 General Information Engine Air Filter The engine Air Filter is located in the engine compartment. Check the air mechanical vacuum filter Service Indicator before each use of the machine. Do not service the air filter unless the indicator is shown (red). Caution! When servicing the engine air filter elements, use extreme care to prevent loose dust from entering the engine. Dust can severely damage the engine. The engine air filter contains a Primary (outer) and a Safety (inner) filter element. The Primary Element may be cleaned twice before being replaced. The Safety Element should be replaced every third time that the Primary Filter Element is replaced. Never attempt to clean the Inner Safety Element. To clean the Primary Filter Element, unsnap the 2 clips at the end of the air filter housing and remove the end housing. Pull the primary element out. Clean the element with compressed air (maximum pressure 100 psi) or wash it with water (maximum pressure 40 psi). DO NOT put the element back into the canister until it is completely dry. Air Mechanical Vacuum Filter Service Indicator Location Empty dust from the outer plastic housing by squeezing the rubber flap. Orientate flap down when reinstalling. Engine Maintenance (150 Hours) At 150 hour intervals it is recommended that the following service be performed: Change oil and filter, clean and inspect spark plugs, check all engine belts condition and adjustment, check battery charge and level, check cooling system hoses and clamps and check general condition and performance of engine. Note: See the “Other Manuals Available” section for a complete list of the engine manuals that are available. Hydraulic Oil Caution! To avoid hydraulic oil injection or injury, always wear appropriate clothing and eye protection when working with or near hydraulic system. Check the Hydraulic Oil Level. Unlatch and swing open the Oil Reservoir / Fuel tank Cover. Remove the reservoir cap to check the oil level. The hydraulic oil level should be just above the bottom of the screen filter inside the filler neck of the reservoir. Add SAE 10W30 motor oil if it is below this level. Change the oil if major contamination from a mechanical failure occurs. Change the Hydraulic “Charge” Oil Filter once a year or every 1000 hours. 22 Service Manual – SW8000 General Information Hopper Dust Control Filter (Panel Filter) The hopper dust control filter must be cleaned regularly to maintain the efficiency of the vacuum system. Follow the recommended filter service intervals for the longest filter life. Caution! −− Wear safety glasses when cleaning the filter. −− Do not puncture the paper filter. −− Clean the filter in a well-ventilated area. −− Wear appropriate dust mask to avoid breathing in dust. To remove the hopper dust control filter... 1. Unlatch and open the Hopper Cover. Make sure that the Hopper Cover Prop Rod is in place. 2. Inspect the top of the Hopper Dust Control Filter for damage. A large amount of dust on top of the filter is usually caused by a hole in the filter or a damaged filter gasket. Inspect the bottom of the Hopper Dust Control Filter. If the filter is covered with wet or dry mud, the dust control system will not function properly without replacing or thoroughly cleaning the filter using Method “C”. 3. Loosen the four Shaker Assembly Retainer Knobs. Lift off the Dust Filter Shaker Assembly to access the panel filter. Note: Be careful not to damage the shaker motor wiring. 4. Lift the Hopper Dust Control Filter out of the machine. 5. Clean the filter using one of the methods below: Method “A” Vacuum loose dust from the filter. Then gently tap the filter against a flat surface (with the dirty side down) to remove loose dust and dirt. Note: Take care not to damage the metal lip which extends past the gasket. Method “B” Vacuum loose dust from the filter. Then blow compressed air (maximum pressure 100 psi) into the clean side of the filter (in the opposite direction of the airflow). Method “C” Vacuum loose dust from the filter. Then soak the filter in warm water for 15 minutes, then rinse it under a gentle stream of water (maximum pressure 40 psi). Let the filter dry completely before putting it back into the machine. 6. Follow the instructions in reverse order to install the filter. If the gasket on the filter is torn or missing, it must be replaced. NOTE: Before replacing filter clear debris from dust plate located under filter. Verify that the debris flap at the rear of the dust plate swings freely. 23 Service Manual – SW8000 General Information SW8000 PM Checklist Defect Codes A Needs Adjustment B Binding C Dirty or Contaminated D Damaged, Bent or Torn L Leaks MMissing W Worn Out Customer _________________________________________________ Address __________________________________________________ City ________________________________ St __________ Zip ______ Model __________________ Serial_________________ Hours ______ Ref OPERATIONAL INSPECTION ITEMS OK Defect Codes (circle) 1 Check Neutral Safety/Sense Switch operation (To test depress drive pedal and start the engine; it should not start.) 2 Engine Starting with pedal in neutral (if it will not start, check sensor switch programming) 3 Engine Speeds 4 cyl G/P (1200 - 2400 RPM) 4 Engine Speeds Diesel (note electrical actuator linkage 1200 - 2400 RPM) 5 Drive Pedal Linkage (check for FWD/REV drive and any neutral creep) 6 Drive System Performance 7 Brakes (check both service & parking) A Excsssive Play A B C Starts Hard A Low Power A B Noisy Sluggish B W 8 Steering 9 Hopper Up/Down (also check operation of the safety hopper support) A B 10 Hopper Dump Door Open/Close A B 11 Main Broom Raise /Lower <-----------> 12 Side Broom Raise /Lower <-----------> 13 Main Broom On/Off <-----------> 14 Side Broom On/Off <-----------> 15 Headlights, Gauges and Optional Accessories (example rotating beacon, backup alarm) 16 Dust Control Filter Shaker & Vacuum Impeller 17 Tilt Steering Mechanism (OPT) and Seat Adjustment lever 18 DustGuard (OPT) Water Pump Operation On/Off Ref Does Not Work <-----------> VISUAL INSPECTION ITEMS Comments 3 O’clock to 11 A OK B Defect Codes (circle) 19 Side Broom Pattern & Height Adj. (min bristle length 3 inches) 20 Side Broom Motor B L 21 Hopper Cover Gasket D W D A 22 Hopper Dust Filter & Gasket 23 Dust Control Vacuum Impeller Motor 24 Hopper Dump Door Cylinder 25 Hopper Skirting & Seals (raise hopper to inspect) 26 Hopper Dump Door & Seal (raise hopper to inspect) A 27 Hopper Lift Cylinder & Hopper Interlock Switch D 28 Main Broom Pattern Adjustment (min bristle wear 2-1/2” 6.4cm length) A B D W W L Sheet 1 of 2 B D M B W W D W Does Not Work 24 Service Manual – SW8000 General Information 29 Main Broom Motor (open left side access door to inspect) 30 Broom Housing & Door Skirts B D L M W 31 Front tires (check lug nut torque 80FT LB, 108 Nm) L W 32 Battery C W 33 Engine Air Cleaner Element (inner & outer) C W 34 Circuit Breaker/Relay panel (inspect electrical connections) C D 35 Hydrostatic Dump Valve 36 Hopper Up Transport Speed control Cam/Cable Linkage 37 Propulsion drive & Accessory Pumps L 38 Hydraulic Reservoir, System Hoses & fittings L 39 Propulsion Pump Hydro Back Cable & Clevis Connections 40 Engine, Oil Level, Hoses & Belts 41 Engine Coolant Level 42 Radiator & Oil Cooler Core Blockage 43 Hydraulic Oil Reservoir Level (10W-30 engine oil only) L Add Oil 44 Hydraulic Oil Filter L Replace 45 Steer Spindle & Drive Wheel motor (open operator’s seat) 46 Rear Tire (check lug nut torque 100 FT LB, 135Nm) B A B B M W Add or Change L W L Add Coolant L Needs Cleaning 47 Gasoline/Diesel tank , Filter & Lines 48 LP Tank, Hoses & Fittings 49 LP Fuel Filter 50 LP Fuel Regulator, Lock Off Valve & Hoses 51 Diesel Glow Plug Indicator Light 52 Diesel Fuel Filter D L L M C W L L L Replace L Replace L Replace 53 Engine Air-Intake Hose Assembly (air inlet to engine) 54 DustGuard Water Tank, Misting Pump & Storage Tank C L NOTE: For additional service information see service manual form number 56043163 and operators manual form number 56091065 (English & Spanish). Defect Codes A Needs Adjustment B Binding C Dirty or Contaminated M Missing D Damages, bent or torn W Worn Out L Leaks Work Completed By: Acknowledged By: __________________________________ ____________ __________________________________ ______________ Service Technical SignatureDateCustomer SignatureDate Sheet 2 of 2 25 Service Manual – SW8000 General Information Know Your Machine Refer to these pages whenever necessary to pinpoint the location of an item mentioned in this manual. Shaker Assembly Retainer Knobs Side Broom Height Adjustment Knob Hopper Dust Control Filter (Dust Filter Shaker Assembly below filter) Engine Compartment Cover Center Cover Assembly Tie-Down Locations (5) Hopper Cover Hopper Cover Latch Know Your Machine Left Side Main Broom Access Panel Jacking Locations (Rear location is large weight below radiator) 26 Service Manual – SW8000 General Information Engine Compartment Cover Hopper Cover Prop Rod Tie-Down Locations (5) Right Side Main Broom Access Panel Fuel Tank Cover Release Latch Oil Reservoir / Fuel Tank Cover Oil Reservoir Fuel Tank Know Your Machine (LPG tank shown / Gasoline / Petrol tank is in same location) 27 Service Manual – SW8000 General Information Operator’s Compartment Main Broom Adjust Knob Steering Wheel Main Broom Lever Operator’s Seat (Operator Seat Adjustment Lever under seat) Know Your Machine Control Panel Hopper Safety Support Handle Brake Pedal / Parking Brake Circuit Breaker Panel FWD / REV Drive Pedal 28 Service Manual – SW8000 General Information Control Panel Horn Switch Fuel Gauge (Not LPG) Propane Low Indicator Check Engine Indicator Glowplug Indicator (Diesel Only) Headlight Switch Engine Speed Switch Side Broom Switch Dust Control Vacuum Switch Shaker Switch Raise Hopper Switch Open Dump Door Switch Hopper Up Indicator Hopper OverTemp Indicator Close Dump Door Switch Key Switch Check Engine Indicator Hour Meter Lower Hopper Switch Optional DustGuard and Signalling Switches Know Your Machine 29 Service Manual – SW8000 30 Control System Functional Description The SW8000 utilizes a main machine controller to turn on various machine functions. It receives sensor inputs and operator inputs, and activates various solenoids and components. The main machine controller is separate from the engine controller. The only engine function controlled by the main machine controller is the engine speed. Control Panel The control panel (display) is an integral component with the Main Machine Controller (A2) circuit board. Horn Switch Fuel Gauge Propane Low Indicator Check Engine Indicator Glowplug Indicator (Diesel Only) Headlight Switch Engine Speed Switch Side Broom Switch Dust Control Switch Shaker Switch Raise Hopper Switch Open Dump Door Switch Hopper Up Indicator Hopper OverTemp Indicator Close Dump Door Switch Key Switch Hour Meter Check Engine Indicator Lower Hopper Switch Service Manual – SW8000 Control System Ignition (key) Switch (A): The ignition switch serves as a main control switch for the machine and for starting the engine. The key is removable to prevent unwanted operation when not in use. For diesel engines, it also controls the function of the glow plugs. A Hour Meter (B): The hour meter shows the run-time on the engine, and it use for tracking maintenance tasks. B Fuel Gauge (C): For gasoline or diesel engines only. Shows the level of the fuel in the fuel tank. C Horn Switch (D): Activates the horn D Propane Low Indicator (E): The lamp illuminates when the propane tank is empty. E Headlight Switch (F): Turns the headlamps on and off. F Check Engine Light (G): The lamp illuminates when the engine controller signals a problem exists with the engine. G Glow Plug Indicator (H): (diesel engine only) The lamp is illuminated while the glow plugs are active. Diesel engine glow plugs preheat the cold cylinders before starting then engine. The glow plugs are activated when the ignition switch is turned to the counterclockwise position H Engine Speed Switch (I): Switches between idle and run speed (rpm) of the engine. (Do not drive or otherwise operate the machine while the engine is at idle.) I Side Broom Down/Up Switch (J): Raises and lowers the side brooms. J Dust Control Switch (K): Turns the dust control fan on and off. K Dust Control Indicator: Illuminates when the dust control fan is active. Shaker Switch (L): Turns the shaker on and off. The dust control fan automatically turns off while the shaker is active. The shaker is used to clean debris from the filter. Plugged Filter Indicator: Optional equipment. The LED on the shaker switch illuminates when the pressure sensor indicates the filter is clogged. L 31 Service Manual – SW8000 Control System Hopper Up Indicator (M): Illuminates when the hopper mechanism is not in the lowered position. M Hopper Over-temp Indicator (N): This lamp illuminates if the hopper temperature exceeds 140˚F (60˚C), due to ingestion of combustible materials or embers. N Open Dump Door Switch (O): Opens the dump door for emptying the hopper. O Close Dump Door Switch (P): Closes the dump door after emptying the hopper. P Lower Hopper Switch (Q): Lowers the hopper from the raised position after emptying the hopper. Q Raise Hopper Switch (R): Raises the hopper for emptying. R Main Controller Fault Code Light (S): Flashes out the fault code for the controller. Refer to Main Controller Error Codes described on page 36 for a listing of the specific error codes. S 32 Service Manual – SW8000 Control System Main Machine Controller The Main Machine Controller (A2) is the primary electronic control for the machine and its functions (except engine control). The control board is the basic input/output device and contains a micro-controller chip to regulate function. The controller receives and interprets user inputs and sensor inputs, and controls device output for the user display, solenoid operation, and motor control. Most low and medium power outputs are controlled with power MOSFET transistors, and very high power devices are controlled with external relays. Another function of the Main Machine controller is to detect any system failures and flash out an error code with the fault code light (U) on the display panel. The error code(s) are used to help the service person determine the fault and to quickly guide 1 in repairing a specific system malfunction. An additional special feature of the main control A2 board is to change program settings for a set of specific machine functions. See the section,Main Machine Controller Programming described on page 35 for further information. J1 B J2 J3 J4 A 33 Service Manual – SW8000 Control System Component Locations The diagram below shows component locations for some components related to the Main Machine Controller. • Main Machine Controller • DustGuard and Signaling Switches • Hydrostatic Drive Position Sensor • Engine Controller Main Machine Controller Optional DustGuard and Signalling Switches Hydrostatic Drive Position Sensor Engine Controller 34 Service Manual – SW8000 Control System Main Machine Controller Programming Hydrostatic Neutral Position and Dead-band The purpose of this adjustment procedure is to synchronize the electrical neutral position with the mechanical neutral position of the hydrostatic drive. The mechanical neutral position needs to be adjusted first, and this is where the self-centering drive cable matches the neutral position of the hydrostatic drive. A rotary sensor (potentiometer) reports the position of the drive pump lever to the main machine controller. This procedure records the voltage value of the potentiometer that signifies when the drive is in the neutral position. The dead-band adjustment is the sensitivity of the neutral position. If the dead-band is set too narrow (too sensitive), the controller may believe the drive is in motion, when it is still in neutral, which would prevent engine starting. If set too wide, the drive may be engaged when the controller believes it is in neutral, which would prevent the sweeping system to engage. Correctly setting these adjustments is important, because they control when the machine can be started, and also when sweeping functions activate and deactivate. These adjustments should be made anytime the Main Machine controller or potentiometer are replaced, the mechanical adjustment is performed, or any time the machine shows symptoms of misadjustment. 1. Make sure the keyswitch is in the off position. 2. To ensure the drive is in the mechanical neutral position, press the drive pedal into reverse and slowly release it. Avoid biasing the neutral position, and do not move the pedal for the remainder of the procedure. 3. While holding the Engine Speed switch (I), turn the keyswitch (A) to the on position. Continue to hold the speed switch until all display indicators turn off (approximately 2 seconds). 4. When the Engine Speed switch is released, the controller will record the resistance value from the drive position sensor. 5. The Fault Code Light (S) will indicate the dead-band setting as described below. To change the dead-band (sensitivity), press the Engine Speed switch (I) to cycle through the 3 options. I S • Narrow = Steady on • Medium = Slow flash (Default) • Wide = Rapid flash 6. To save the settings and exit the process, turn off the keyswitch. Recall of Stored Fault Codes Past fault codes are stored in memory and may be retrieved and cleared as part of maintenance history. 1. Make sure the keyswitch is in the off position. 2. While holding the Horn switch (D), turn the keyswitch (A) to the on position. Continue to hold the Horn switch until all display indicators turn off (approximately 2 seconds). 3. When the Horn switch is released, the Fault Code Light (S) will flash out the error codes. If no past error codes exist the light will remain steady-on. 4. To clear the fault code history, press and release the Horn switch. The Fault Code Light will change to steady-on. 5. To exit, turn the keyswitch off. D S 35 Service Manual – SW8000 Control System Automatic Shaker Operation This adjustment enables or disables the automatic shaker option, and how the shaker functions when it is active in either automatic or manual operation. In either of the 2 automatic modes, the shaker will activate for 15 seconds whenever the broom is raised. Automatic operation in Liberator mode is the default setting. The 3 options are described below: a. Liberator Mode: Automatic operation with manual operation by pressing the shaker switch. When active, the shaker will be on for ½ second and off for ½ second for the 15-second duration of the cycle. b. Continuous Mode: Automatic operation with manual operation by pressing the shaker switch. When active, the shaker will run continuously for the 15-second duration of the cycle. c. Manual Mode: Manual mode only. When the shaker switch is pressed, the shaker will operate continuously for the 15-second duration of the cycle. 1. Make sure the keyswitch is in the off position. 2. While holding the Shaker switch (L), turn the keyswitch (A) to the on position. Continue to L hold the Shaker switch until all display indicators turn off (approximately 2 seconds). 3. The Shaker light (L) and Fan Light (K) will indicate the current state of the automatic shaker function, as described below. K 4. Press the Shaker switch to toggle through the setting. • Liberator Mode: Both Shaker and Fan lights on. • Continuous Mode: Shaker light on. • Manual Mode: Neither light on. 5. To exit, turn the keyswitch off. Troubleshooting Main Controller Error Codes The following table lists the main controller error codes. When an error code is present, the Error Code lamp (S) will flash out the specific 2-digit code(s). Count the flashes for each digit. There will be a short pause between digits, and a long pause between error codes (or before repeating the sequence of code(s)). 3/4-sec pause 1/4-sec Digit = 2 Code Pin # 1,1 1,2 J1-1 J1-2 Example: Code = 2,3 S 2-sec pause Digit = 3 Description Comments Hopper close/open solenoid (L1) overload • Check coil resistance.† If below 6 Ohms replace (8 ohms nominal). • Check wiring for a short circuit (Blu/Wht)‡ Main broom solenoid (L2) overload • Check coil resistance.† If below 6 Ohms replace (8 ohms nominal). • Check wiring for a short circuit (Grn/Gra)‡ 36 Service Manual – SW8000 Code Pin # 1,3 1,4 2,1 2,2 2,3 2,4 Control System Description Comments Side broom solenoid (L3) overload • Check coil resistance.† If below 6 Ohms replace (8 ohms nominal). • Check wiring for a short circuit (Brn/Blk)‡ Dust control solenoid (L4) overload • Check coil resistance.† If below 6 Ohms replace (8 ohms nominal). • Check wiring for a short circuit (Brn/Yel)‡ J1-5 Hopper up/down solenoid (L5) overload • Check coil resistance.† If below 6 Ohms replace (8 ohms nominal). • Check wiring for a short circuit (Red/Gra)‡ J1-6 Hopper up/bypass solenoid (L6) overload • Check coil resistance.† If below 6 Ohms replace (8 ohms nominal). • Check wiring for a short circuit (Blu/Gra)‡ J1-7 Hopper door/open solenoid (L7) overload • Check coil resistance.† If below 6 Ohms replace (8 ohms nominal). • Check wiring for a short circuit (Blk/Wht)‡ J1-8 Dust control bypass solenoid (L8) overload • Check coil resistance.† If below 4 Ohms replace (6 ohms nominal). • Check wiring for a short circuit (Brn)‡ Hopper lower solenoid (L9) overload • Check coil resistance.† If below 6 Ohms replace (8 ohms nominal). • Check wiring for a short circuit (Yel/Grn)‡ J1-3 J1-4 3,1 J1-9 3,2 J1-14 Shaker relay (K3) overload • Check coil resistance.† If below 70 Ohms replace (85 ohms nominal). • Check wiring for a short circuit (Yel/Red)‡ 3,3 J1-15 Back-up alarm overload • Check wiring for a short circuit (Grn/Brn)‡ • If overload persists, replace the alarm. J1-16 Light relay (K2) overload • Check coil resistance.† If below 70 Ohms replace (85 ohms nominal). • Check wiring for a short circuit (Yel/Wht)‡ 4,1 J1-18 Neutral start relay (K4) overload • Check coil resistance.† If below 70 Ohms replace (85 ohms nominal). • Check wiring for a short circuit (Gry/Wht)‡ 4,2 Horn relay K1 overload J1-19 Coil spec is 85 Ohms • Check coil resistance.† If below 70 Ohms replace (85 ohms nominal). • Check wiring for a short circuit (Vio/Brn)‡ 4,3 Engine speed output overload J1-17 Note the Gra/Blu wire is 0 V’s when engine is @ idle. • Throttle input to engine ECM (A3) is 0V for idle and +12V for high speed. • Check Gra/Blu wire for a short to ground. 4,4 J1-12 3,4 Spare overload Not used at this time NA † When testing for short circuits, make sure the machine is off, and disconnect the connectors at the solenoid or relay in question and also at the main controller. Then use an ohmmeter between the two wires at the device, or between J1-11 and the listed J# from the table. The ohmmeter should show “open circuit”. ‡ When testing a coil resistance, disconnect the connector at the device and use an ohmmeter to measure the resistance of the coil. If the value is below the minimum value from the table, replace the device. 37 Service Manual – SW8000 Control System Removal and Installation Main Control Board The main control board and the operator interface may be replaced separately or as an assembly. The same procedure describes either option. Caution! Unswitched battery power is present on the operator interface assembly. Make sure to disconnect the battery connector to avoid damaging the system or wiring. 1. Turn off the key switch and disconnect the battery cable connector. 2 1 2. Remove the 3 screws (2) that secure the operator interface to the dash. 3. Lift the operator interface away from the dash, taking care not to stress the wiring harness. 4. Disconnect J1, J2, J3, and J4 from the control board (A2). 2 5. Remove the two screws (3) that secure the control board and remove the ground wire (4) . 6. Remove the control board. 2 7. After replacing the control board with a new one, set the Hydrostatic Neutral Position and Dead-band described on page 35. 8. If necessary, also set the Automatic Shaker Operation described on page 36. 3 J2 A2 J1 J3 J4 3 4 38 Service Manual – SW8000 Control System Specifications Probe Wire Sample Shop Voltage Measurements Examining signals sent and received at the control board can be very effective in determining if external components are functioning as expected or if the control board is processing them as expected. The tables below show sample voltage measurements taken from a typical machine. Actual voltages will vary from machine to machine, and with battery charge level. T-Pin To aid in taking voltage measurements from the cable connectors without removing the connector, a T-shaped push pin connected to the voltmeter probe wire works well (see image to the right). Main Machine Controller Sample Voltage Measurements at the J1 Connector Pin # Name J1-1 Hopper close valve 0.25 13.7 B- J1-2 Main broom valve 0.3 13.7 B- 0.3 13.7 B- J1-3 Side broom valve V-On V-Off Ref. Comments J1-4 Dust control valve 0.266 J1-5 Hopper up/down valve 0.27 J1-6 Hopper up/ bypass vlv J1-7 B- Using litter control vac 13.7 B- On = raising, Off = rest or down 0.3 13.7 B- Hopper open valve 0.25 13.7 B- On = closed, Off = open J1-8 Dust ctrl bypass vlv 0.3 13.7 B- On = bypass J1-9 Hopper lower valve 0.25 13.7 B- On = down, Off = up or rest J1-10 Bat- 0.011 B- Key On 13.9 B- Engine run J1-11 Switched Bat+ J1-12 NC B- J1-13 NC B- J1-14 Shaker relay 0.07 13.9 J1-15 Back up alarm B- 0.01 B- J1-16 Light relay 0.04 13.9 B- J1-17 Throttle out 13.0 2.6 B- On = high, Off = idle J1-18 Neutral pos. relay 0.05 13.9 B- On = not neutral, Off = neutral J1-19 Horn relay 0.04 12.0 B- J1-20 Bat- 0.01 B- Not equipped Key on 39 Service Manual – SW8000 Control System Main Machine Controller Sample Voltage Measurements at the J2 Connector Pin # Name J2-1 Pedal high J2-2 Pedal wiper J2-3 Pedal low V-On V-Off Ref. Comments NA B- 1.72 full fwd 1.31 neutral 1.214 full rev 4.12 B- 0.01 J2-4 LP low switch J2-5 Check eng. input NA B- Low voltage reference output of potentiometer 5.02 B- Not empty 4.81 B- Engine running but no check engine signal Not available J2-6 Glow plug input B- J2-7 NC B- J2-8 Dust filter switch J2-9 Hopper interlock J2-10 Hopper temperature 0.002 J2-11 Ignition input 13.89 J2-12 Main broom down 0.003 J2-13 NC J2-14 Bat- Not available 5.02 B- 5.02 B- On = down 5.02 B- Not available B5.02 BB- 0.013 High voltage reference output of potentiometer B- On = raised 40 Service Manual – SW8000 Dust Control System Functional Description The purpose of the dust control system is to reduce the amount of airborne dust emanating from the machine during sweeping operations. There are two primary stages in controlling dust from the machine. The optional DustGuard™ system sprays a fine mist of water in front of each side broom to minimize the dust created by the side brooms. The vacuum-based dust control system reduces airborne dust inside the hopper by pulling air through the hopper and through a filter to trap the dust inside the hopper. DustGuard™ Spray System (optional) The misting pump pumps water from a separate reservoir to nozzles on the front of the machine. The nozzles direct a fine stream of water onto the floor in front of the side brooms to help reduce the dust generated by the brooms. The DustGuard solenoid valve opens to allow water flow from the misting pump to the nozzles when the power to the misting pump switches on. A removable Strainer is installed in the water line upstream of the misting pump and solenoid valve. Removable strainers are also located inside of the nozzle assemblies. When installed and the manual switch is activated, the DustGuard spray system will turn on automatically when the side broom is turned on. Dust Control Vacuum System The hydraulically driven impeller is mounted in the side wall of the hopper, and pulls air from the hopper through the filter and discharges it out the rear of the machine. An optional clogged filter sensor/switch will shut off the vacuum motor if the vacuum on the clean side of the filter gets too high as a result of a clogged filter. When the switch is activated, the LCD will display an icon to the operator. The filter system contains a shaker motor that vibrates the filter to shake loose particulate from the bottom of the filter to assist in keeping the filter clean. When the shaker switch is pressed, the vacuum motor turns off and the shaker motor turns on. The shaker motor contains an eccentric weight that causes vibration when rotated. This reduces filter maintenance and helps maintain adequate airflow through the filter. The filter shaker will automatically switch on for a short period when the sweep system is turned off (broom raised). Circuit Description Most control circuits are fairly straight forward with the controller completing the electrical circuits to ground. However, there are some electrical and hydraulic circuits with interdependencies on other circuits. The electric misting pump is controlled by a relay from the Main Machine Controller. When the mechanical switch (S26) is closed by the operator, the misting pump relay coil is enabled, but waiting for the controller to activate the side broom circuit. When the controller sets the side broom output (J1-3) to low voltage (battery ground) it completes the circuit for both the misting pump relay and the side broom hydraulic valve. The dust control vacuum motor has two hydraulic interdependencies for it to function. If the hopper is raised, the entire dust control hydraulic circuit is bypassed through the S6 valve, and none of the dust control or broom circuits will receive hydraulic power. When the hopper is down, the dust control vacuum motor is in series with the main broom motor. It will not receive hydraulic power unless the main broom motor is also active via the S2 Main Broom Enable valve. In its relaxed state, the S8 hydraulic valve will send fluid through the dust control vacuum motor, but when energized, the valve will bypass the motor to allow the main broom motor to operate without the vacuum motor operating. 41 Service Manual – SW8000 Dust Control System Simplified Schematic Diagram + BT - BATTERY, 12 Vdc CB1 CIRCUIT BREAKER, 70 AMP STARTER COMMAND A3 START ENGINE SYSTEM IGN BAT IGN. SW INPUT SWITCH, IGN. CB4 ACC CIRCUIT BREAKER, 20 AMP K3 2 1 M2 MOTOR, SHAKER RELAY, SHAKER CB6 30 87a 87 1 M 2 CIRCUIT BREAKER, 20 AMP RELAY, MISTING PUMP (OPTIONAL) CB8 1 K6 2 30 M4 87a 87 + CIRCUIT BREAKER, 10 A. (OPTIONAL) M - MISTING PUMP (OPTIONAL) K3 J2-9 RELAY, SHAKER S26 (Closed when hopper is down) +5 J1-14 1 K6 2 SWITCH, HOPPER INTERLOCK +5 SWITCH, MISTING PUMP J2-8 L3 1 (Closed when filter is plugged) S5 1 2 J1-3 2 SWITCH, DUST CONTROL FILTER (OPTIONAL) VALVE S3, SIDE BROOM +5 L4 1 S4 RELAY, MISTING PUMP (OPTIONAL) J1-4 2 J2-12 VALVE S4, DUST CONTROL MISTING SOLENOID (Open when broom is down) 1 S2 2 SWITCH, MAIN BROOM L2 1 J1-6 2 A2 VALVE S2, MAIN BROOM CONTROL BOX ASSEMBLY L8 1 J1-8 2 VALVE S8, DUST CONTROL VACUUM MOTOR Side Broom High Pressure Steering Flow Spliter Low Pressure Flow Spliter Sump Return Main Broom Enable Flow Direction Filter Pressure Relief Cooler Hopper Up / Sweep Bypass Main Broom Dust Bypass Engine Vacuum Motor Sump 42 Service Manual – SW8000 Dust Control System Component Locations The diagram below shows component locations for some components related to the dust control system. • Dust Filter • Vacuum Motor • DustGuard Nozzles • Plugged Filter Switch • Shaker Motor • Dust Hopper • Hopper Temp Switch • Misting Pump Hopper Temp & Plugged Filer Switches K3 Shaker Motor Relays K6 Dust Filter Misting Pump Hydraulic Valves S2 Dust Hopper and Blower Inlet S8 Vacuum Motor DustGuard Spray Nozzles 43 Service Manual – SW8000 Dust Control System Maintenance and Adjustment Dustguard Spray Nozzle Cleaning 1. For easier access to the nozzles, raise the hopper slightly. 4 2. Place a container underneath the nozzles to catch any water that may leak from the hoses. 3. While holding the nozzle body (4) from turning (7/8" wrench) rotate the nozzle cap (1) 1/4-turn and remove the nozzle cap, nozzle tip (2), and check valve strainer (3). 1 2 4. Rinse the nozzle cap, spray nozzle and check valve strainer in clean water to remove any accumulated dirt or sediment. If necessary, rinse or soak the components in vinegar or other commercial cleaner to remove any mineral deposits. 5. Reassemble the nozzles by following the above steps in reverse order. 1 4 2 3 Dust Control Filter Cleaning Caution! Avoid breathing dust or getting debris in your eyes. Wear safety glasses and respiratory protection when cleaning the filter. Clean the filter in a well ventilated area. 1. Lift the hopper cover and prop it open with the cover prop rod. 2. Disconnect the Shaker Motor Electrical Connector. 3. Remove the 4 thumbnuts (5) that secure the shaker frame (6), and lift the shaker frame off the filter (7). 4. Lift the filter out of the machine. 5. Inspect the top of the dust control filter for damage. A large amount of dust on top of the filter is usually caused by a hole in the filter or a damaged filter gasket. 5 6. Vacuum the underside (dirty side) of the filter to remove loose debris. 7. Loosen additional stuck debris by gently tapping the filter against a flat surface, such as a workbench or floor. 8. If additional cleaning is necessary, you may use compressed air (less than 100 psi), but do so with caution. Direct the air through the filter from the clean side to the dirty side. 9. When replacing the filter, make sure the flow direction arrow is pointing up. 44 Service Manual – SW8000 Dust Control System Troubleshooting Dust Control Vacuum Motor will not Run The dust control hydraulic solenoid valve is normally-active (on when no power is present). So the most likely cause is a hydraulic problem, but may also be electrical. Isolate the cause using the following steps: Note: In the decision tree below, all function prerequisites are assumed to be true for the function to normally be active. For example, the engine is assumed to be at run-speed and the main broom is active. Dust control vacuum motor will not run Verify that the main broom is running Yes The main broom must be No active with the throttle position No Troubleshoot the main broom function sensor out of neutral before the vacuum motor will run. Yes Disconnect the electrical Remove the S8 solenoid No valve and examine it for No Replace the connector from the S8 solenoid. Does the a stuck plunger. Replace vacuum motor vacuum motor run? the valve if necessary. Yes Done Done Inspect the brown wire from the S8 solenoid to the J1-8 connector on the control board for a short to ground. Yes Repair/replace the wiring No Is the dust control Yes LED illuminated on the control panel display? Done Replace the main control board No Done Turn the machine off. Press and hold the dust control switch, and Yes check for continuity between the J3-1 and J3-10 pins on the ribbon cable connector. Replace the main control board No Done Replace the display panel Done 45 Service Manual – SW8000 Dust Control System Dust Control Vacuum Motor will not Shut Off The dust control vacuum motor should turn off while the shaker is running or when the dust control system is disabled. Failure to turn off is an indication that the bypass solenoid valve is not being activated. The most likely cause is electrical, but may also be from a stuck solenoid valve. Use the following steps to isolate the cause: Note: In the decision tree below, all function prerequisites are assumed to be true for the function to normally be active. Dust control vacuum motor will not stop Check the voltage at Yes the S8 solenoid valve connector for 12 volts. Check the coil resistance of the S8 solenoid. Is it close to 6.5 ohms? Yes No Check for 12 volts between Yes the J1-11 and J1-8 pins at the main control board. Repair/replace the wiring No Done Replace the main control board Done No Coil failure. Replace the coil or the whole solenoid Valve failure. Replace the valve or the whole solenoid 46 Service Manual – SW8000 Dust Control System Shaker Motor will not Run If the shaker motor does not operate when the switch is pressed, use the follow steps to isolate the cause: Note: In the decision tree below, all function prerequisites are assumed to be true for the function to normally be active. Shaker motor will not run when switch is pressed Verify that the CB6 circuit breaker is not tripped Does the shaker LED illuminate when the shaker switch is pressed? No Yes First, verify that the LED is functional by observing it during machine initialization. Then turn the machine off. Press and hold the shaker switch, and check for continuity between the J3-1 and J3-11 pins on the ribbon cable connector. No Check for 12 volts at the Yes shaker motor connector. Replace the shaker motor No Done Done Swap the shaker relay for an adjacent relay, such as the horn or lights, and check the shaker function Yes Replace the shaker relay No Check for 12 volts between Yes the J1-11 and J1-14 pins at the main control board. No Replace the main control board Done Replace the display panel Done Check the wiring for loose connections or broken wires Yes Replace the main control board Done 47 Service Manual – SW8000 Dust Control System Misting Pump will not Run Operation of the misting pump relay coil has two dependencies. The misting pump switch must be closed for positive voltage at the relay coil, and the controller output for the side broom provides the negative voltage at the coil. If the side broom is functional and in motion, then the controller is known to not be the cause of the problem. If the side broom is not functioning, then troubleshoot the side broom first. Use the following steps to isolate the cause. Misting pump will not run when the switch is on The misting pump will not operate if the side broom(s) are not running. Troubleshoot the side brooms first Verify that the side broom(s) No are enabled and turning Yes If the side brooms are working, then the control board is known to be working Verify that the CB8 circuit breaker is not tripped Check for 12 volts at the Yes misting pump connector. Replace the misting pump No Done Swap the misting pump relay Yes Replace the for an adjacent relay, such as misting pump relay the horn or lights, and check the misting pump function No Unplug the relay and check the voltage at the plug Done Bat+ to Brn/Blk ≠ 12V Repair/replace wire to controller Bat+ to Gra/Orn ≠ 12V Repair/replace wire to pump Bat- to Blu ≠ 12V Confirm 12 volts at CB8 breaker Repair/replace wire to breaker Bat- to Blu/Orn ≠ 12V Confirm 12 volts at S26 switch Repair/replace wire to switch 48 Service Manual – SW8000 Dust Control System Specifications Parameter Range Misting pump relay coil resistance • 85 Ω Shaker motor relay coil resistance • 90 Ω Dust control (misting) valve coil resistance • 85 Ω Dust control (vacuum) valve coil resistance • 6 Ω 49 Service Manual – SW8000 50 Electrical System Functional Description Overview The electrical system consists of the switches, gauges and relays on the instrument panel, the circuit breakers, the drive pedal rotary sensor and the battery. Note that the hydraulic solenoid valves and engine electrical components are described in the corresponding sections of this manual. Gauge Panel Assembly The gauge panel assembly panel includes the Fuel Level Gauge (gas and diesel machines only), Hour Meter, Panel Assembly, A2 Main Machine Controller and the Starter Switch. The Panel Assembly contains the touch-pad membrane switches and indicators that allow the Operator to enable and disable the sweeping functions, raise and lower the hopper, open and close the hopper door, control the engine speed, sound the horn, and switch the headlights on and off. The A2 Main Machine Controller is a computerized controller that receives inputs from the membrane switches and the system components, and provides output voltage to the various solenoid valves, relays, Panel Assembly indicators, etc. Fuel Level Gauge (Gas and Diesel only) Panel Assembly A2 Control Box Assembly Hour Meter Starter Switch Service Manual – SW8000 Electrical System Circuit Breaker Panel Assembly The Circuit Breaker Panel assembly is mounted below the instrument panel hopper switches and includes the Circuit Breakers and the SPDT Relays. Note that diesel models have an additional SPDT Relay. Models equipped with the DustGuard™ system have an additional 10-amp Circuit Breaker and SPDT Relay for the misting pump. Models equipped with the optional signal lights will have an additional 20-amp Circuit Breaker and SPDT Relay. Models equipped with the cab HVAC option will have an additional 20-amp Circuit Breaker and two additional SPDT Relays. Circuit Breaker Panel Circuit Breakers Reset Button Boot Cap Plug (2) SPDT Relays 51 Service Manual – SW8000 Electrical System Wire Identification Wires are color coded and have connector information printed near each end of the wire. • In the bottom left photo, one side of the blue/black wire goes to the Shaker Relay, K3. The other side of the wire goes to terminal 2 on Circuit Breaker CB6. • In the bottom right photo, one side of the gray/blue wire goes to pin J1-17 on the A2 Main Machine Controller. The other side of the wire goes to terminal K on connector X2. Rotary Sensor The Rotary Sensor (referred to as the Drive Pedal Sensor, 5K Ohm on the Wiring Diagram) is a rotary potentiometer that is connected to the Lever Weldment. As the Lever Weldment rotates to drive the machine forward or backward, the resistance through the Rotary Sensor changes proportionately. The machine is programmed so the Rotary Sensor is in its “deadband” resistance range when the Lever Weldment is in the neutral position. The A2 Main Machine Controller must detect the Rotary Sensor in its dead-band range before the engine can be started. Lever Weldment Rotary Sensor 52 HEATER TEMP. CONTROL VIO/GRA R BLK B M6/M9 YEL RED ORN YEL RED ORN RED/WHT - BLK Service ManualM– SW8000 S35 2 1 MOTOR, BLOWER MOTOR M10 YEL RED BLK M ORN WHT SW SPST MOTOR, BLOWER MOTOR K9 S33 BLU OR FAN 1 BLK/WHT to K10 S34 2 1 GRN 2 87a GRN/WHT 30 THERMOSTAT L10 87 BLU/BRN 1 2 BLK + M3 DIESEL AND GAS ONLY D D PINK/YEL + M PINK/YEL Machines also equipped with the Litter Vac Kit option FUEL PUMP OUTPUT FUEL PUMP X1 have a parking Brake C C S22 BLK/REDSwitch BLK/REDand Seat Relay K11 that GROUND STARTER COMMAND will bypass the Seat Switch S21 when the parking brake ENGINE LIGHT MIL OUTPUT A3 X1 is engaged.(SWITCHED This allows the engine to runCHECK to operate OUTPUT TO CONTROL the G G GRN/YEL GRN/YEL GRN/YEL BOX ASSEMBLY GROUND) ENGINE SYSTEM Litter Vac with the Operator off of the seat. REFERENCE: X1 56107658 - DIAGRAM-WIRING KUBOTA GAS 56107659 - DIAGRAM-WIRING KUBOTA LP DIESEL DIAGRAM ON PAGE 3 THROTTLE INPUT (12V FOR HIGH) GRA/BLU K X2 K GRA/BLU X3 A GRA/BLU SEAT SWITCH (OPTIONAL) WITH LIGHT OPTION B+ 12V 2 CONNECT TO CONTROL BOX ASSEMBLY IGN. SW INPUT RPLE ALT. EXCITE TAN F A B F I BLK B COIL, RELAY SEAT SWITCH, IGN. ST IGN BAT TAN ACC K11 87a 87 RED/YEL 30 RED/BLK RELAY, SEAT S21 SW SEAT RED/BLK • When K12 sees voltage at terminal T it energizes and 1sendsNOTE: the voltage available on terminal 15 through P3 AND R3 ARE NOT USED ON L.P. MODEL R3 terminal 53s to circuit breaker CB5, then to the engine S 1 2 GRA/BLK controller. Without this power SENDER,to FUELthe engine controller GAUGE, FUEL the engine will not run. Note that: BLK 3 HOUR METER YEL/BLK P2 GRA S1 4 • When the Operator sits on the seat and closes the Seat Switch S21, this provides positive voltage to terminal T P1 1 2 on K12.BLK 4 h 3 VIO OUTPUT GRA GRA TO SP6 A5 BLK/GRN 1 K11 X58 X57 A A 1 GRN/YEL TO K5 • The ignition switch voltage to B B positive GRN/WHT provides GRN/WHT 2 3 C C GRN/RED 3 GRN/RED 2 terminal 15 on the .5 sec. Delay Relay K12 . Terminal 53M D D WHT/GRN 4 WHT/GRN 1 SENSOR, GASOLINE on the K12 is connected to battery ground. X2 COOLANT TEMPERATURE D BLK/GRN B- S22 SWITCH, BRAKE The seat switch and brake switch circuits work as follows: NK 53 RELAY, COMPRESSOR STARTER B+ NK DEL: T A-08928 UPDATE: SHEET 1 & MAIN MACHINE CON ASSEMBLY, RELAY RELAY .5 SEC DELA ONLY A-09080 UPDATE: SENSOR, GASOLINE(GM ENG VALVE, COMPRESSOR PRESSURE The SeatBLKSwitch S21 and SWITCH, .5 sec. Delay Relay K12 are installed on Nilfisk machines only and will shut off the M MOTOR, CONDENSER FAN if the Operator leaves the seat for more than one-half second. engine M8 7a 7 C D RELAY, CONDENSOR FAN BLK Seat Switch Circuit Description WHT Electrical System 1 BLOWER MOTOR FOR PRESSURIZED AND HEATED CAB, 2 BLOWER MOTORS FOR A/C A-08898 2 RED/BLK 1 RED/YEL K12 15 53m T 31 53s .5 SEC BLK ORN/GRN TO CB5 RED/YEL RELAY, .5 SEC DELAY ON BREAK -- If the1 voltage from the Seat Switch S21 to terminal 2 BLK LIGHT, STROBE T on K12(OPTIONAL) is interrupted for one-half second or less, M2 MOTOR, SHAKER K3 87a K12 will continue to send voltage through terminal 30 87 1 M 2 BLU/GRN WHT BLK RELAY, SHAKER 53s to circuit breaker CB5 to allow the engine to H1 K1 continue to run. 87a LP12 87 RELAY, HORN WHT/YEL 1 2 1 2 2 L FLASHER (OPTIONAL) YEL 2 - BLK RED/BLK ACC M7 - TER FAN ON) BLK 87a 87 RED/YEL RELAY, SEAT WHT BLK REDwith GRA -S26 - On machines not equipped the light option, (OPTIONAL) LAMP, RIGHT REAR TAIL/BRAKE the Brake Switch S22 gets positive voltage from the LP6 1 VIO/YEL 3 BLK WHT GRN GRN BLK ignition switch. (OPTIONAL) S21 SW SEAT 2 RED/BLK 1 RED/YEL K12 BLK 15 53m T 31 53s .5 SEC BLK ORN/GRN TO CB5 RED/YEL RELAY, .5 SEC DELAY ON BREAK LAMP, LEFT FRONT SIGNAL LP7 BLK WHT BLK • The closed Brake SwitchGRNS22 provides positive voltage (OPTIONAL) LAMP, LEFT REAR SIGNAL to energize the Seat Relay Coil K11 , which closes the LP8 BLK YEL/BLK WHT RED GRA K11 contacts on the Seat Relay . The Seat Relay K11 BLK (OPTIONAL) LAMP, LEFT REAR TAIL/BRAKE contacts provide positive voltageLP9to terminal T on 1 2 YEL/BLK BLK (OPTIONAL) K12, bypassing the Seat Switch S21 . K12 sends voltage CURB LAMP through terminal 53s to circuit breaker CB5 and the LP11 21 2 YEL/BLK 1 BLK (OPTIONAL) engine controller to allow the engine to run with the LAMP, REAR WORK Operator off of the seat. BLK TING PUMP ) K11 30 RED/BLK LP5 SWITCH, TURN SIGNAL (OPTIONAL) WIPER ON) ED SWITCH) MP, DOME ON) BLK 7 IGN BAT BLK LP4 -- On machines equipped with the light option, the BLK WHT S25 VIO/YEL BLK (OPTIONAL) 3 VIO/YEL YEL 2 Switch S22 gets positive voltage from 6Brake YEL 5 GRN LAMP, RIGHT REAR SIGNALrelay K5. YEL/BLK BLK B S1 S22 SWITCH, HAZARD (OPTIONAL) GRA SWITCH, IGN. ST • If the machine is equipped withLP2the HEAD Litter LIGHT, RIGHTVac Kit, 1 2 YEL/BLK BLK the parking brake will close the Brake Switch 2 engaging GRA HEAD LIGHT, LEFT LP3 SWITCH, BRAKE S22. BLK WHT VIO/YEL BLK 1 K11 GRA COIL, RELAY SEAT RED/BLK X X58 X17 A A 1 B (OPTIONAL) LAMP, RIGHT FRONT E13 M SWITCH, BRAKE BLK HORN Seat Switch S21 to terminal T -- If the voltage from the K5 BLK on K12 isRELAY, interrupted for more than one-half second, SIGNAL LIGHTS K8 (OPTIONAL) BLK K12 will cut off the voltage to terminal 53s and RELAY, HVAC circuit breaker CB5 to shut off the engine. (OPTIONAL) LP1 YEL/BLK BS22 COMBINATION GAUGE OPTION GRA/BLK P3 VIO 4 7 4 2 2 7 6 3 5 1 R1 6 WHT/BLK 1 2 SENDER, OIL PRESSURE BLK 1 YEL/BLK 30 SEAT SWITCH (OPTIONAL) WITHOUT LIGHT OPTION B+ 12V 3 5 GAUGE, COMBINATION TAN BLK M4 GRA/ORN + M - MISTING PUMP (OPTIONAL) BLK BLK NOTES UNLESS OTHERWISE SPECIFIED 1. ALL DIMENSIONS IN INCHES. 2. DO NOT SCALE DRAWING. 3. ALL DIMENSIONS APPLY AFTER PLATING AND HEAT TREATING, BUT BEFORE PAINTING. 4. REMOVE ALL BURRS AND SHARP EDGES. DIM. IN [ ] ARE MM. UNITS IN [ ] ARE ISO METRIC AS NOTED. DRAWN 6-27-11 PMO NILFISK-ADV CHECKED PLYMOUTH, M PROJ ENG APPROVED 6-27-11 WGL TITLE DIAGRAM-LA APPROVED APPROVED FIRST USED ON SIZE ORCAD SW8000 CODE 5 E SCALE NONE ASSY. 56507E11 Service Manual – SW8000 Electrical System Component Locations The following components are included in this section: • Battery • Instrument Panel Assembly • Circuit Breakers • SPDT Relays • K11 Seat Relay Coil and K12 Timer Relay • S22 Brake Switch • Rotary Sensor Battery The Battery is mounted on the lefthand side of the machine frame, just behind the left front wheel. Battery 54 Service Manual – SW8000 Electrical System Instrument Panel Assembly The A2 Main Machine Controller, Hour Meter and Starter Switch are mounted on the Panel Assembly. Note that Gas and Diesel models also have a Fuel Level Gauge mounted on the Panel Assembly adjacent to the Hour Meter. Hour Meter A2 Main Machine Controller Starter Switch Panel Assembly Circuit Breakers The machine Circuit Breakers are mounted on the Circuit Breaker Panel, located below the instrument panel hopper switches. Circuit Breaker (typical) Note that additional Circuit Breakers are installed on machines equipped with the optional DustGuard™ system, optional signal lights and the cab HVAC option. Circuit Breaker Panel 55 Service Manual – SW8000 Electrical System SPDT Relays The SPDT (single pole, double throw) Relays are mounted on the back of the Circuit Breaker Panel, located below the instrument panel hopper switches. Note that diesel models have an additional SPDT Relay. Circuit Breaker (typical) Additional SPDT Relays are also installed on machines equipped with the optional DustGuard™ system, optional signal lights and the cab HVAC option. SPDT Relay (typical) Circuit Breaker Panel (rear) Signal Lights Relay K5 (location) Circuit Breaker Panel Horn Relay K1 Lights Relay K2 Shaker Relay K3 Neutral Relay K4 Misting Pump Relay K6 Cab HVAC Relay (location) Diesel Relay K7 (location) K11 Seat Relay Coil and K12 Timer Relay (seat switch option only) The K11 Seat Relay Coil and K12 Timer Relay are mounted on the front of the frame behind the Hopper and rubber cover. K11 Seat Relay Coil K12 Timer Relay 56 Service Manual – SW8000 Electrical System S22 Brake Switch (seat switch option only) The S22 Brake Switch is located adjacent to the Brake Pedal and is actuated when the parking brake is engaged. S22 Brake Switch Rotary Sensor The Rotary Sensor is fastened to the mount plate, which is mounted to the RTN Bracket. RTN Bracket Rotary Sensor 57 Service Manual – SW8000 Electrical System Electrical Connectors The following tables list the machine components and their assigned connector or relay, and the individual connector pin-out assignments. The Connector Pin-out Assignments tables include connector illustrations to help you identify the various connectors on the machine. If you are viewing this document on a computer, you can search for the component name or connector ID to find the pin-out assignments. However, if you are viewing a paper copy, it will be easier for you to find the correct pin-out assignment table for a particular component if you know the connector ID. To get the connector ID, find the component name from the Wiring Harness Diagram, then use the Component to Connector ID Look-up Table below to find the corresponding connector ID. Component to Connector ID Look-up Table Component Name Connector ID A2 Main Machine Controller J1 A2 Main Machine Controller J2 Engine System X1 Engine System X2 Seat Switch, S21 X12 Brake Switch, S22 X17 Shaker Motor X40 Back Up Alarm (optional) X46 Strobe (optional) X76 Fuel Pump X37 Hopper Interlock Switch, S4 X50 Main Broom Switch, S2 X52 Drive Pedal Sensor, 5K Ohm X47 L1 - Hopper Door Close/Open Valve, S1 X86 L2 - Main Broom Valve, S2 X96 L3 - Side Broom Valve, S3 X97 L4 - Dust Control Valve, S4 X98 L5 - Hopper Up/Down Valve, S5 X99 L6 - Hopper Up/Bypass Valve, S6 X100 L7 - Hopper Door Valve, S7 X101 L8 - Dust Control Bypass Valve, S8 X102 L9 - Hopper Lower Valve, S9 X103 58 Service Manual – SW8000 Electrical System Component to Relay ID Look-up Table Component Name Relay ID Horn Relay K1 Lights Relay K2 Shaker Relay K3 Neutral Relay K4 Signal Lights Relay K5 Seat Relay K11 0.5 Second Delay Relay K12 Connector Pin-out Assignments Connector J1, A2 Main Machine Controller – Molex Mini Fit Jr. 39012205 Pin# Component Assignment Wire Color J1-1 Hopper Open/Close Solenoid Valve, S1 BLU/WHT 18-1 J1-2 Main Broom Solenoid Valve, S2 GRN/GRA 18-1 J1-3 Side Broom Solenoid Valve, S3 BRN/BLK 18-1 J1-4 Dust Control Solenoid Valve, S4 BRN/YEL 18-1 J1-5 Hopper Up/Down Solenoid Valve, S5 Compressor Relay, K10 (optional) RED/GRA 18-1 J1-6 Hopper Up/Bypass Solenoid Valve, S6 BLU/GRA 18-1 J1-7 Hopper Open Solenoid Valve, S7 BLK/WHT 18-1 J1-8 Dust Control Bypass Solenoid Valve, S8 BRN 18-1 J1-9 Hopper Lower Solenoid Valve, S9 YEL/GRN 18-1 J1-10 Ground BLK 18-1 J1-11 Acc. Input VIO 18-3 J1-12 Not Used – J1-13 Not Used – J1-14 Shaker Relay, K3 YEL/RED 18-1 J1-15 Back Up Alarm (optional) GRN/BRN 18-1 J1-16 Lights Relay, K2 YEL/WHT 18-1 J1-17 Throttle Output to Engine System (+12 V for High Speed) GRA/BLU 18-1 J1-18 Neutral Relay, K4 GRA/WHT 18-1 J1-19 Horn Relay, K1 VIO/BRN 18-1 J1-20 Ground BLK 18-2 59 Service Manual – SW8000 Electrical System Connector J2, A2 Main Machine Controller – Molex Mini Fit Jr. 39012145-14 Pin# Component Assignment Wire Color J2-1 Drive Pedal Sensor, 5K Ohm (3), 5v Reference YEL/GRA 18-1 J2-2 Drive Pedal Sensor, 5K Ohm (2), Wiper ORN/GRA 18-1 J2-3 Drive Pedal Sensor, 5K Ohm (1), Ground BRN/WHT 18-1 J2-4 Low LP Pressure Switch, S3 GRA/YEL 18-1 J2-5 Check Engine Output from Engine System GRN/YEL 18-1 J2-6 Glow Plug Indicator Light (diesel only) GRN/RED 18-1– J2-8 Dust Control Filter Switch, S5 (optional) WHT/GRA 18-1 J2-9 Hopper Interlock Switch, S4 RED/BLK 18-1 J2-7 – J2-10 140° F. Hopper Temperature Switch, S6 (optional) YEL/VIO 18-1 J2-11 Ign. Input PINK 18-1 J2-12 Main Broom Switch, S2 ORN/BLK 18-1 J2-13 – J2-14 Ground Horn Relay, K1 – Bosch 3334485007 Pin# Wire Color BLK 18-3 Lights Relay, K2 – Bosch 3334485007 Pin# Wire Color 85 VIO/BRN 18-1 30 GRA/RED 14-1 87 WHT/YEL 18-1 85 YEL/WHT 18-1 87a – 87a – 30 VIO 16-2 86 VIO 16-3 30 VIO 16-3 86 VIO 16-4 86 VIO 16-2 87 YEL/BLK 16-1 86 VIO 16-1 87 YEL/BLK 16-2 60 Service Manual – SW8000 Shaker Relay, K3 – Tyco 1393310-4 Pin# Wire Color Electrical System Neutral Relay, K4 – Bosch 3334485007 Pin# Wire Color 30 BLU/BLK 12-1 30 RED/GRN 16-1 85 YEL/RED 18-1 86 GRA/WHT 18-1 87 BLU/GRN 12-1 87 – 86 VIO 18-1 87a BLU/PINK 16-1 86 VIO 16-4 85 PINK 16-2 85 PINK 16-3 Signal Lights Relay, K5 – Bosch 3334485007 Seat Relay, K11 – Bosch 3334485007 Pin# Wire Color Pin# Wire Color 30 ORN 16-1 30 RED/BLK 18-5 85 BLK 18-10 30 RED/BLK 18-4 85 BLK 18-25 30 RED/BLK 18-3 87a – 85 GRA 18-6 87 GRN/YEL 16-3 86 BLK 18-39 87 GRN/YEL 16-4 87 RED/YEL 18-2 86 VIO 18-1 86 VIO 18-2 61 Service Manual – SW8000 Electrical System 0.5 Second Delay Relay, K12 – Cobo 30-16-07811 Pin# Wire Color 15 RED/BLK 18-2 15 RED/BLK 18-3 53M BLK 18-38 53M BLK 18-39 53s ORN/GRN 16-1 T RED/YEL 18-1 T RED/YEL 18-2 Engine System Connector, X1 – Delphi 15326868 Pin# Component Assignment Wire Color A Ignition Switch Input to A3 PINK 16-4 B Alt. Excite on A3 PINK 16-7 C Fuel Pump Output BLK/RED 16-1 D Fuel Pump Output PINK/YEL 16-1 E – F Starter Command BLU/PINK 16-1 G MIL Output (switched ground) GRN/YEL 18-1 H – J – K – L – M – N – P – R – S – 62 Service Manual – SW8000 Electrical System Engine System Connector, X2 – Delphi 15326863 Pin# Component Assignment Wire Color A – B – C – D – E F – Coolant Temperature Output TAN 18-1 G – H – J – K Throttle Input (12V for high) GRA/BLU 18-1 L – M – N – P – R – S – Two-pin Connectors – Delphi 12015792 ID Name X12 Seat Switch, S21 X17 Brake Switch, S22 X40 Shaker Motor X46 Back Up Alarm (optional) X76 Strobe (optional) Pin# Wire Color A RED/YEL 18-1 B RED/BLK 18-4 A RED/BLK 18-5 B GRA 18-6 A BLU/GRN 14-1 B BLK 14-1 A VIO 18-17 B GRN/BRN 18-1 A VIO 18-16 B BLK 18-22 63 Service Manual – SW8000 Electrical System Two-pin Connectors – Delphi 12010973 ID Name X37 Fuel Pump X50 Hopper Interlock Switch, S4 X52 Main Broom Switch, S2 Pin# Wire Color A PINK/YEL 16-1 B BLK/RED 16-1 A RED/BLK 18-1 B BLK 18-6 18-6 A ORN/BLK 18-1 B BLK 18-7 Three-pin Connector – Delphi 12162182 ID X47 Name Drive Pedal Sensor, 5K Ohm Pin# Wire Color A BRN/WHT 18-1 B ORN/GRA 18-1 C YEL/GRA 18-1 64 Service Manual – SW8000 Electrical System Two-pin Connectors – Deutsch DT06-2S ID Name X86 L1 - Hopper Door Close/Open Valve, S1 X96 L2 - Main Broom Valve, S2 X97 L3 - Side Broom Valve, S3 X98 L4 - Dust Control Valve, S4 X99 L5 - Hopper Up/Down Valve, S5 X100 L6 - Hopper Up/Bypass Valve, S6 X101 L7 - Hopper Door Valve, S7 X102 L8 - Dust Control Bypass Valve, S8 X103 L9 - Hopper Lower Valve, S9 Pin# Wire Color 1 VIO 18-4 2 BLU/WHT 18-1 1 VIO 18-7 2 GRN/GRA 18-1 1 VIO 18-8 2 BRN/BLK 18-2 1 VIO 18-10 2 BRN/YEL 18-1 1 VIO 18-5 2 RED/GRA 18-1 1 VIO/18-11 2 BLU/GRA 18-1 1 VIO 18-12 2 BLK/WHT 18-1 1 VIO 18-13 2 BRN 18-1 1 VIO 18-23 2 YEL/GRN 18-1 65 Service Manual – SW8000 Electrical System Troubleshooting Problem Cause Correction No power to the machine Discharged battery. Check the battery voltage and charge as necessary. Poor battery connection(s). Check the battery cables, terminals and connections and tighten/repair/replace as necessary. Battery needs to be replaced. Perform a load test on the battery and replace if necessary. Note: Refer to the individual machine system sections for electrical troubleshooting procedures. Specifications Component Specifications Coil Operating Current – 160 mA Coil Resistance – 85 ± 5 ohms SPDT Relay (R1, R2, R3, R4, R5 and R6) Pull-in Voltage – 8 volts Release Voltage – 1.0 to 5.0 volts 66 Service Manual – SW8000 67 Electrical System Wiring Diagrams, p/n 56382530, Rev. D CONFIDENTIAL + RED BT - THIS DRAWING AND THE DESIGN REPRESENTED HEREON IS THE PROPERTY OF NILFISK-ADVANCE, INC., PLYMOUTH, MINNESOTA AND IT HAS BEEN ISSUED WITH THE UNDERSTANDING THAT IT WILL NOT BE REPRODUCED NOR COPIED NOR USED FOR ANY PURPOSE OTHER THAN FOR WHICH IT WAS ISSUED AND RECIPIENT AGREES TO RETURN IT UPON REQUEST. BLK DWG. NO. Note: Refer to the individual machine system sections for the system ladder diagrams and circuit descriptions. 1 K8 2 30 RED/VIO CIRCUIT BREAKER, 20 A. 87a 87 REV HEATER TEMP. CONTROL VIO/GRA RELAY, HVAC L M H C BLK YEL RED ORN YEL RED ORN RED/WHT S35 SWITCH, FAN 2 1 B - M S33 K9 + BLU 1 BLK/WHT M8 87a 87 K9 to K10 S34 2 M D RELAY, CONDENSOR FAN BLK 1 GRN 2 87a GRN/WHT 30 THERMOSTAT - C 1 BLOWER MOTOR FOR PRESSURIZED AND HEATED CAB, 2 BLOWER MOTORS FOR A/C MOTOR, BLOWER MOTOR WHT 30 BLK MOTOR, BLOWER MOTOR M10 YEL RED BLK M ORN WHT SW SPST HVAC OPTION RED A M6/M9 S30 B VIO/GRA REVISIONS DFTM DATE APPD 9-24-12 PMO HH RELEASE A-08898 12-13-12 PMO HH DEL: TAN/BRN WIRE A-08928 12-18-12 PMO HH UPDATE: SHEET 1 & 3 ORN/GRN WAS ORN/GRA, MAIN MACHINE CONTROLLER WAS CONTROL BOX ASSEMBLY, RELAY .5 SEC DELAY ON BREAK WAS RELAY .5 SEC DELAY. ADD; DIESEL AND GAS ONLY A-09080 2-8-13 PMO HH UPDATE: SENSOR, GASOLINE WAS SENSOR, GASOLINE(GM ENGINE) ECO A-08718 L10 87 BLU/BRN 1 2 RELAY, COMPRESSOR BLK VALVE, COMPRESSOR SWITCH, PRESSURE BLK RED RELAY, CONDENSOR FAN MOTOR, CONDENSER FAN STARTER B+ RED D PINK/YEL FUEL PUMP OUTPUT 2 CB1 CIRCUIT BREAKER, 70 AMP 1 GRN/BLK X1 F BLU/PINK ENGINE SYSTEM IGN BAT RED/BLK REFERENCE: 56107658 - DIAGRAM-WIRING KUBOTA GAS 56107659 - DIAGRAM-WIRING KUBOTA LP DIESEL DIAGRAM ON PAGE 3 THROTTLE INPUT (12V FOR HIGH) PINK/YEL C BLK/RED + M DIESEL AND GAS ONLY - FUEL PUMP G X1 G GRN/YEL GRN/YEL CHECK ENGINE LIGHT OUTPUT TO CONTROL BOX ASSEMBLY SEAT SWITCH (OPTIONAL) WITH LIGHT OPTION GRA/BLU CONNECT TO CONTROL BOX ASSEMBLY 2 GRA/BLU K X2 K GRA/BLU 2 PINK A PINK CIRCUIT BREAKER, 10 AMP H ACC B PINK X1 X1 X1 X3 A A BLK/GRN 1 4 GRN/WHT B B GRN/WHT 2 3 GRN/RED C C GRN/RED 3 2 WHT/GRN D D WHT/GRN 4 BLK/GRN A PINK IGN. SW INPUT H B PURPLE ALT. EXCITE COOLANT TEMPERATURE OUTPUT F TAN X2 B 1 2 VIO 1 4 VIO GRA SWITCH, IGN. ST 1 SENSOR, GASOLINE IGN BAT D F TAN ACC K11 2 3 h BLK VIO I S 15 1 GRA/BLK GAUGE, FUEL 2 1 RED/YEL 53m T 2 .5 SEC SENDER, FUEL 3 S21 SW SEAT RED/BLK K12 NOTE: P3 AND R3 ARE NOT USED ON L.P. MODEL 1 R3 VIO 87a 87 RED/YEL 30 RELAY, SEAT HOUR METER YEL/BLK P2 BLK S1 A5 P1 CIRCUIT BREAKER, 20 AMP GRA GRN/YEL TO K5 RED/BLK GRN/BLU GRA B COIL, RELAY SEAT RED/BLK CB4 K11 X58 X57 A A 1 PINK TO MAIN MACHINE CONTROLER B- S22 SWITCH, BRAKE TO SP6 ORN/GRN 1 SWITCH, IGN. GRN/YEL CB5 53S 15 X1 M3 D B+ 12V MIL OUTPUT (SWITCHED GROUND) A3 REMOVE JUMPER WHEN SEAT SWITCH OPTION IS INSTALLED X1 GROUND STARTER COMMAND JUMPER INSTALLED BETWEEN 15 TO 53S AT K12 SOCKET WITH NO SEAT SWITCH ST GRN/BLU F BLU/PINK RELAY, NEUTRAL (CLOSED IN NEUTRAL) CB3 CIRCUIT BREAKER, 15 AMP S1 87a 87 30 RED/GRN 1 C BLK/RED K4 2 RED 1 OF 3 E1 CB9 RED SHEET 56382530 BATTERY, 12 Vdc BLK 31 53s ORN/GRN TO CB5 RED/YEL RELAY, .5 SEC DELAY ON BREAK BLK LP12 1 VIO 1 RED 2 BLK LIGHT, STROBE (OPTIONAL) CB6 K3 2 30 BLU/BLK CIRCUIT BREAKER, 20 AMP 87a 87 BLU/GRN WHT M2 MOTOR, SHAKER 1 M SEAT SWITCH (OPTIONAL) WITHOUT LIGHT OPTION B+ 12V 2 B- BLK S22 RELAY, SHAKER K1 30 RED VIO SWITCH, BRAKE H1 87a 87 2 WHT/YEL RELAY, HORN 1 2 X58 X17 A A 1 BLK B K11 GRA GRA COIL, RELAY SEAT HORN K5 BLK B VIO BLK S1 RELAY, SIGNAL LIGHTS (OPTIONAL) VIO RELAY, HVAC (OPTIONAL) K2 2 87a 87 30 GRA/RED LP1 YEL/BLK YEL/BLK 1 YEL/BLK 1 RELAY, LIGHTS CIRCUIT BREAKER, 20 AMP 1 GRN/YEL S22 2 BLK WHT (OPTIONAL) LAMP, RIGHT FRONT LP4 BLK WHT (OPTIONAL) LAMP, RIGHT REAR SIGNAL LP5 BLK WHT RED (OPTIONAL) E13 1 RED 2 ORN CIRCUIT BREAKER, 20 A. (OPTIONAL) 30 87a 87 GRN/YEL X GRN/YEL L RELAY, SIGNAL LIGHTS (OPTIONAL) FLASHER (OPTIONAL) S25 YEL 2 YEL 5 VIO/YEL 3 6 K11 HEAD LIGHT, LEFT VIO/YEL K5 RED/BLK ACC BLK VIO/YEL GRN SWITCH, HAZARD (OPTIONAL) YEL/BLK GRA S26 RELAY, SEAT BLK BLK S21 SW SEAT M5 + YEL 2 - M BLK 1 3 15 BLK 53m T SWITCH, TURN SIGNAL (OPTIONAL) MOTOR ASM, WIPER (CAB OPTION) (INCLUDES 2 SPEED SWITCH) M7 2+ 1 GRN/YEL M GRN BLK GRN BLK YEL/BLK GRA BLK RED 1 YEL/BLK MOTOR, DEFROSTER FAN (CAB OPTION) GRN/YEL S24 RED 1 F1 2 1 RED FUSE, 1A. 2 1 SW SPST LP14 21 2 LAMP, DOME (CAB OPTION) 1 LP10 2 (OPTIONAL) TROUBLE LAMP CB8 RED RED 1 K6 2 CIRCUIT BREAKER, 10 A. (OPTIONAL) BLU 30 YEL/BLK BLK 1 WHT (OPTIONAL) LAMP, LEFT FRONT SIGNAL LP7 WHT (OPTIONAL) LAMP, LEFT REAR SIGNAL LP8 WHT (OPTIONAL) LAMP, LEFT REAR TAIL/BRAKE LP9 2 (OPTIONAL) CURB LAMP 21 LP11 2 (OPTIONAL) LAMP, REAR WORK BLK 87a 87 RELAY, MISTING PUMP (OPTIONAL) NOTES: 1. REFERENCE 56382531 DIAGRAM-WIRING BLK BLK 31 53s ORN/GRN TO CB5 RED/YEL LP6 VIO/YEL GRN 1 RED/YEL K12 LAMP, RIGHT REAR TAIL/BRAKE BLK 7 2 RED/BLK .5 SEC GRN/YEL 87a 87 RED/YEL 30 RED/BLK LP3 SWITCH, BRAKE CB7 BLK LP2 HEAD LIGHT, RIGHT 2 GRA IGN BAT 2 RED/BLK VIO CB2 1 RED SWITCH, IGN. ST BLK RELAY, .5 SEC DELAY ON BREAK BLK COMBINATION GAUGE OPTION BLK GRA/BLK P3 VIO 4 BLK 7 4 2 2 7 6 3 5 1 R1 6 WHT/BLK 1 BLK 1 3 5 GAUGE, COMBINATION TAN BLK M4 GRA/ORN + M - MISTING PUMP (OPTIONAL) BLK BLK NOTES UNLESS OTHERWISE SPECIFIED 1. ALL DIMENSIONS IN INCHES. 2. DO NOT SCALE DRAWING. 3. ALL DIMENSIONS APPLY AFTER PLATING AND HEAT TREATING, BUT BEFORE PAINTING. 4. REMOVE ALL BURRS AND SHARP EDGES. DIM. IN [ ] ARE MM. UNITS IN [ ] ARE ISO METRIC AS NOTED. DRAWN Notes: 1. Reference 56382531 Wiring Harness Diagram 6-27-11 PMO NILFISK-ADVANCE, INC. CHECKED PLYMOUTH, MINNESOTA 55447-3408 PROJ ENG APPROVED 6-27-11 WGL TITLE DIAGRAM-LADDER APPROVED APPROVED FIRST USED ON FORMS.DSN - E SIZE FORM 4/24/96 2 SENDER, OIL PRESSURE BLK YEL/BLK K8 SIZE ORCAD SW8000 CODE DWG. NO. 56382530 E SCALE NONE ASSY. 56507E11 SHEET REV. D 1 OF 3 DSN - E SIZE FORM 4/24/96 Service Manual – SW8000 Electrical System Wiring Diagrams, p/n 56382530, Rev. D, sheet 2 of 3 VIO BLK VIO J1-11 J2-6 (ACC INPUT) L1 1 VIO 2 BLU/WHT (IGN. INPUT) J1-1 J2-11 GRN/RED PINK VALVE S1, HOPPER CLOSE/OPEN 2 GRN/GRA J1-18 GRA/WHT J1-17 GRA/BLU J2-1 BRN/WHT J2-2 ORN/GRA J2-3 YEL/GRA J1-2 RELAY, NEUTRAL VALVE S2, MAIN BROOM L3 1 VIO 2 BRN/BLK 2 3 K6 BLK/ORN BLU/ORN SWITCH, MISTING PUMP GRA/BLU BRN/BLK 2 BRN/YEL (CLOSES WITH HIGH HOPPER TEMPERATURE) J1-4 VALVE S4, DUST CONTROL J2-10 K10 VIO YEL/VIO 2 1 RED/GRA RELAY, COMPRESSOR (OPTIONAL) L5 1 2 VIO J1-5 (CLOSED WHEN HOPPER IS DOWN) RED/GRA L6 1 VIO 1 VIO 1 J2-9 2 BLU/GRA J1-6 BLK/WHT J1-7 S6 t 3 BLK 140 DEG. F SWITCH, HOPPER TEMP. (OPTIONAL) VALVE S5, HOPPER UP/DOWN VIO 3 DRIVE PEDAL SENSOR, 5K OHM L4 1 2 R2 1 RELAY, MISTING PUMP (OPTIONAL) VIO TROTTLE OUTPUT TO ENGINE SYSTEM (+ 12 V FOR HIGH SPEED) J1-3 VALVE S3, SIDE BROOM S26 VIO FROM IGNITION CIRCUIT K4 L2 1 VIO GLOW PLUG SIGNAL (DIESEL ENGINE ONLY) GRN/RED PINK RED/BLK 1 S4 2 BLK SWITCH, HOPPER INTERLOCK VALVE S6, HOPPER UP/BYPASS GRN/YEL (MIL INPUT) J2-5 L7 2 VALVE S7, HOPPER OPEN L8 2 L9 2 VIO WHT/GRA CLOSES WHEN FILTER IS PLUGGED) S5 1 J1-9 1 2 GRN/BRN J1-15 BACK UP ALARM K1 2 BLK SWITCH, DUST CONTROL FILTER (OPTIONAL) A2 YEL/GRN VALVE S9, HOPPER LOWER H2 J2-8 J1-8 VALVE S8, DUST CONTROL BYPASS 1 VIO BRN CHECK ENGINE OUTPUT FROM ENGINE SYSTEM MAIN MACHINE CONTROLLER J2-4 GRA/YEL (CLOSES WHEN TANK IS EMPTY) S3 1 2 BLK SWITCH, LOW LP PRESSURE (OPTIONAL) VIO VIO/BRN J1-19 J2-12 (OPEN WHEN BROOM IS DOWN) ORN/BLK 1 K2 VIO YEL/WHT 2 BLK K3 YEL/RED J1-10 BLK J1-20 BLK J2-14 BLK J1-16 RELAY, LIGHTS VIO S2 SWITCH, MAIN BROOM RELAY, HORN J1-14 RELAY, SHAKER TPS1 1 2 TPS2 1 J3-4 ENGINE SPEED 2 TPS3 1 J3-2 J4-8 D1 2 J3-3 LIGHTS TPS4 1 2 J4-10 LED, SERVICE INDICATOR D2 J4-6 LED, DUST CONTROL FILTER D3 J3-11 SHAKER J4-5 TPS5 1 TOUCH PAD SWITCHES LED, GLOW PLUG 2 TPS6 1 TPS7 J3-10 DUST CONTROL 2 1 D4 J4-3 LED, SERVICE ENG. (MIL) D5 J3-9 J4-2 LED, LOW FUEL SIDE BROOMS D6 2 J3-5 J4-9 LED, HOPPER TEMP. HOPPER DOOR OPEN D7 TPS8 1 2 J4-4 J3-6 LED, DUST CONTROL HOPPER UP D8 TPS9 1 J4-7 2 LED, HOPPER NOT DOWN J3-8 HOPPER DOWN TPS10 1 COMMON ANODE HORN 2 J3-7 HOPPER DOOR CLOSE COMMON GROUND J3-1 TOUCH PAD DISPLAY 68 Service Manual – SW8000 Electrical System Wiring Diagrams, p/n 56382530, Rev. D, sheet 3 of 3 KUBOTA DIESEL ENGINE SYSTEM + RED BT - BLK RED BATTERY, 12 Vdc RED 2 K4 30 RED/GRN 87a 87 RELAY, NEUTRAL (CLOSED IN NEUTRAL) 2 CB3 CIRCUIT BREAKER, 15 AMP 2 GRN/RED E1 GRN/BLK 1 RED F BLU/PINK GLOW PLUGS 2 2 E2 E3 X1 F BLU/PINK 30 50 CB1 CIRCUIT BREAKER, 70 AMP 1 M2 2 + E4 STARTER G1 B RED 1 S7 SWITCH, IGN. 17 19 30 1 1 PINK 1 X1 B RED B PINK S S F I/F L P L GRN/RED P ALTERNATOR A4 AC APECS 3000 GOVERNOR CB5 50 ORN/GRN 1 2 PINK PINK A X1 A RED RED CONNECT TO MAIN MACHINE CONTROLLER CIRCUIT BREAKER, 10 AMP GRA/BLU GRA/BLU K X2 ACTUATOR (-) K VIO VIO RED WHT/GRN GRA S28 NO GRA/BRN C NC RED/YEL X140 TO MAIN MACHINE CONTROLLER GRN/RED GRN/RED GRN/YEL VIO/BLU VIO/BLU TO GAUGE GRN/YEL F X2 F D VIO GRA X113 X113 C POWER TO FUEL PUMP R7 1 VIO/BLU BLK 2 SENDER, TEMPERATURE G X1 G S8 o t 1 GRN/YEL 2 SWITCH, COOLANT TEMP. K7 WHT/GRN RED 1 BLK COIL, RELAY CB4 K7 2 WHT/VIO CIRCUIT BREAKER, 20 A. 30 87a 87 RELAY, ACC (DIESEL ONLY) VIO SPEED SELECT 2 DIODE GRA/BRN PINK MAGNETIC PICKUP (+) MAGNETIC PICKUP (-) DIODE D3 SWITCH, OIL PRESSURE SPEED SELECT 1 SERVICE TOOL (Tx) SERVICE TOOL (Rx) D2 C B (-) ACTUATOR (+) B (+) BLK WHT WHT/BLK BLU GRN YEL ORN BLK 69 Service Manual – SW8000 Wiring Diagram, Kubota Gasoline Engine, p/n 56107658, Rev. A. Electrical System 70 Service Manual – SW8000 Wiring Diagram, Kubota LP Engine, p/n 56107659, Rev. A. Electrical System 71 Service Manual – SW8000 Electrical System Wiring Harness Diagrams, p/n 56382531 Rev. D CONFIDENTIAL THIS DRAWING AND THE DESIGN REPRESENTED HEREON IS THE PROPERTY OF NILFISK-ADVANCE, INC., PLYMOUTH, MINNESOTA AND IT HAS BEEN ISSUED WITH THE UNDERSTANDING THAT IT WILL NOT BE REPRODUCED NOR COPIED NOR USED FOR ANY PURPOSE OTHER THAN FOR WHICH IT WAS ISSUED AND RECIPIENT AGREES TO RETURN IT UPON REQUEST. DWG. NO. WITH LIGHT OPTION AND SEAT SWITCH OPTION B A RED/BLK 18-5 B GRA 18-6 D CONNECT X17 HERE S24 SWITCH, TURN SIGNAL 1 1 1 SP13 LP6 2 1 BLK 1 WHT SP14 LAMP, LEFT FRONT SIGNAL (OPTIONAL) BLK 18-11 B YEL/BLK 18-10 A X43 LP2 B 2 A HEAD LIGHT, LEFT 1 VIO 18-4 B BLK 18-18 1 RED 8-1 C 1 VIO 18-13 1 1 VIO 18-23 1 2 A X50 A B B RED/BLK 18-1 BLK 18-6 2 H2 HORN VIO 18-17 S4 SWITCH, HOPPER INTERLOCK X46 X45 A A + GRN/BRN 18-1 B - B BACK UP ALARM (OPTIONAL) 2 1 X X185 3 X47 2 X165 1 SP3 X167 RED 18-2 B F1 E5 FLASHER (OPTIONAL) YEL/GRA 18-1 B ORN/GRA 18-1 A A BRN/WHT 18-1 FUSE, 1 A. BLK 1-1 - BT1 + RED 1-1 - -BATTERY, 12 Vdc 1 3 CONNECTOR 1 2 C A RED 18-1 X10 4 X188 B 2 ENGINE SYSTEM L CONNECTOR 2 X1 RED 8-1 X2 RED 1-1 B BLK 1-1 BLK 6-1 DRIVE PEDAL SENSOR, 5K OHM 5 X82 CHASSIS GROUND 4 1 BLK 6-1 3 6 H1 1 2 R2 B P GRN/YEL 16-4 X186 X187 GRN/YEL 16-1 GRN/YEL 16-2 RELAY, SIGNAL LIGHTS (OPTIONAL) ORN 16-1 LP10 2 LAMP, TROUBLE (OPTIONAL) L9 VALVE S9, HOPPER LOWER X103 1 22 2 YEL/GRN 18-1 1 A RELAY, MISTING PUMP (OPTIONAL) 1 VIO 18-11 L8 VALVE S8, DUST CONTORL BYPASS X102 1 22 2 BRN 18-1 1 1 1 X69 A RED 18-2 WHT/YEL 18-1 2 BLK 18-13 L6 VALVE S6, HOPPER UP/BYPASS X100 1 22 2 BLU/GRA 18-1 NOTE: FOR DIESEL WIRE CB4 AS SHOWN ON SHEET 2 VIO 18-10 L1 VALVE S1, HOPPER DOOR CLOSE/OPEN X86 1 22 2 BLU/WHT 18-1 87a 87 30 1 PINK 16-3 2 B PINK 16-4 1 PINK 16-7 X61 X62 A YEL/BLK 18-1 A 1 SP4 BLK 18-17 B B X78 YEL/BLK 18-13 X63 X64 A A BLK 18-36 B S23 1 2 1 BLK/GRN 18-1 A L4 VALVE S4, DUST CONTROL X98 1 22 2 BRN/YEL 18-1 NOTE: VIO 18-20 IS USED WITH MISTING PUMP OPTION GRN/WHT 18-1 B 1 VIO 18-7 2 CIR. BKR., 20 AMP SIGNAL LIGHTS K6 86 85 GRN/RED 18-1 C 1 CIR. BKR., 10 AMP MISTING PUMP S VIO 18-8 CB7 1 WHT/GRN 18-1 D 1 2 87a 30 87 BLU/GRN 14-1 RELAY, SHAKER BLU/BLK 14-1 GRA/WHT 18-1 K4 PINK 16-2 86 85 PINK 16-3 87a BLU/PINK 16-1 30 87 RELAY, NEUTRAL RED/GRN 16-1 VIO 18-1 VIO 18-2 K5 BLK 18-10 86 85 BLK 18-25 87a 30 GRN/YEL 16-3 87 P 1 L2 VALVE S2, MAIN BROOM X96 1 22 2 GRN/GRA 18-1 CB8 1 YEL/RED 18-1 R - M MOTOR ASM, WIPER INCLUDES 2 SPEED SWITCH VIO 18-5 B N M5 + RED/GRA 18-1 1 X127 A B BLK 18-37 M L3 VALVE S3, SIDE BROOM X97 1 22 2 BRN/BLK 18-2 2 X128 GRA/ORN 18-1 A J X99 1 SP5 2 2 F 22 BLK 18-22 BLK 16-1 H 1 1 VIO 18-12 1 E L5 VALVE S5, HOPPER UP/DOWN 85 - BLK 18-21 VIO 16-4 VIO 18-1 K3 86 LP5 LAMP, RIGHT REAR TAIL/BRAKE (OPTIONAL) G 1 CIR. BKR., 20 AMP ACCESSORY X204 X169 X166 VIO 14-3 VIO 18-20 WHT SP18 TAN 18-1 VIO 18-15 CIR. BKR., 10 AMP IGNITION CIR. BKR., 20 AMP SHAKER 30 RELAY, LIGHTS 2 BLK 2 RED 1 B VIO 18-13 A 1 M D GRA 18-4 A B L7 VALVE S7, HOPPER DOOR X101 1 22 2 BLK/WHT 18-1 CB4 2 + D GRA 18-3 M4 PUMP, MISTING C VIO 18-12 CB5 1 SWITCH, LOW LP PRESSURE A C 2 YEL/BLK 16-2 YEL/BLK 16-1 GRA/RED 14-1 SP17 C YEL/BLK 18-11 1 2 B LAMP, RIGHT FRONT SIGNAL (OPTIONAL) CB6 1 YEL/WHT 18-1 87a 87 BLK 18-21 SP15 2 1 1 B BLK 18-34 PINK 16-4 VIO 18-11 85 B YEL/BLK 18-4 C X76 VIO 16-2 VIO 16-3 VIO 16-3 VIO 16-4 86 2 X71 X73 A A VIO/YEL 18-6 BLK 18-14 PINK 16-7 VIO 18-10 D 1 VIO/YEL 18-1 E VIO 18-9 E WHT/YEL 18-1 STROBE (OPTIONAL) - BLK/RED 16-1 C WHT 87a 87 2 BLK X75 M PUMP, FUEL PINK/YEL 16-1 D 1 BLK 30 + BLU/PINK 16-1 F 2 VIO/BRN 18-1 K2 A S3 J LP3 SP12 1 RED 85 RELAY, HORN A GRA/YEL 18-1 86 2 PINK/YEL 16-1 LP4 LAMP, RIGHT REAR SIGNAL (OPTIONAL) SP16 1 2 BLK WHT M3 H VIO 18-9 CB1 1 CIR. BKR., 70 AMP MAIN X37 X38 B B LP12 VIO 16-1 VIO 16-2 K1 BLK/RED 16-1 GRN/YEL 18-1 G A X31 F 2 L BLK 18-12 1 K VIO 18-8 D P VIO 18-7 B 1 2 1 2 CIR. BKR., 20 AMP CIR. BKR., 15 AMP LIGHTS STARTER X211 1 2 GRN/YEL 18-4 RED 10-1 RED 14-1 RED 14-2 RED 18-3 RED 14-4 C A HEAD LIGHT, RIGHT SP11 2 1 CB2 VIO 16-1 VIO 16-6 VIO 14-2 VIO 18-5 1 1 SENSOR, GASOLINE GRA/BLK 18-1 S2 SWITCH, MAIN BROOM ORN 16-1 VIO 18-4 D 1 2 4 R3 NOTE: BRN/BLK 18-3 IS FROM MISTING PUMP HARNESS GRA/ORN 18-1 BRN/BLK 18-3 2 2 A BLU/ORN 18-1 B A YEL/BLK 18-9 VIO 16-6 E LP1 X42 CB3 1 A B BLK 18-23 X29 F A X126 BRN/BLK 18-3 RED 14-2 SP2 1 1 YEL/BLK 18-9 YEL/BLK 18-10 3 2 SENDER, FUEL GRN/BLU 14-1 BLK 18-18 X125 BRN/BLK 18-1 BRN/BLK 18-2 3 BLK/GRN 18-1 B PINK 18-1 PINK 16-2 BLK 18-1 BLK 18-2 BLK 18-3 BLK 18-10 TROUBLE LAMP X52 A ORN/BLK 18-1 2 2 B BLK 18-7 GRA/RED 14-1 BLK 18-9 BLK 18-7 BLU 18-1 YEL/BLK 16-2 1 6 YEL/GRA 18-1 ORN/GRA 18-1 BRN/WHT 18-1 GRA/YEL 18-1 GRN/YEL 18-1 A5 4 GRN/RED 18-1 GRN/WHT 18-1 N 5 4 3 BLU/ORN 18-1 BLU 18-1 A RED 14-1 BLU/GRN 14-2 ORN/GRN 16-1 BLK 14-3 RED 18-3 A 1 2 3 4 5 6 7 X79 WHT/GRN 18-1 D X209 2 GRN/YEL 18-4 RED/GRN 16-1 A X83 BLU/BLK 14-1 M X55 B MOTOR, SHAKER (POCKET FILTER) GRN 18-1 1 GRN/YEL 18-2 BLK 18-4 X54 X53 - B B 5 J2 WHT/GRA 18-1 8 9 RED/BLK 18-1 10 YEL/VIO 18-1 11 PINK 18-1 ORN/BLK 18-1 12 13 14 BLK 18-3 GRN/YEL 18-2 M8 VIO/YEL 18-3 h VIO 18-19 VIO 18-3 BLK 18-8 A YEL/BLK 16-5 GRN/YEL 18-3 HOUR METER 2 3 BLU/WHT 18-1 GRN/GRA 18-1 BRN/BLK 18-1 BRN/YEL 18-1 RED/GRA 18-1 BLU/GRA 18-1 BLK/WHT 18-1 BRN 18-1 YEL/GRN 18-1 BLK 18-1 B B MOTOR, SHAKER (PANEL FILTER) + LIGHT OPTIONS C YEL/BLK 18-2 BLK 14-1 A BLU/GRN 14-1 P1 1 4 1 2 3 4 5 6 7 8 9 10 A A GAUGE, FUEL 3 VIO 18-18 VIO 18-19 GRN/BLK 16-1 M 11 12 13 YEL/RED 18-1 14 GRN/BRN 18-1 15 YEL/WHT 18-1 16 GRA/BLU 18-1 17 GRA/WHT 18-1 18 VIO/BRN 18-1 19 20 BLK 18-2 VIO 18-3 CURB LIGHT RED 14-4 + 1 3 X109 X110 YEL/BLK 18-11 J1 S GRA/BLK 18-1. D X39 X40 - B B I BLK 18-9. BLK 18-8. X59 F YEL/BLK 18-8 E YEL/BLK 18-1 REAR WORK LIGHT M2 YEL/BLK 16-5 YEL/BLK 16-1 TAN 18-1 WHT/BLK 18-1 BLK 18-22 B LAMP, CURB (OPTIONAL) SWITCH, HOPPER TEMP. 140 DEG. F (OPTIONAL) VIO 18-2. VIO 18-18. A YEL/BLK 18-8 VIO 18-16 A B BLK 18-19 GRN/YEL 16-1 X33 A 5 X210 LP11 2 B LAMP, REAR WORK (OPTIONAL) GRA 18-3 GRA 18-2 2 B P3 GAUGE, COMINATION (OPTION) 6 REPLACES P1 AND P2 7 6 3 2 SP6 1 2 1 YEL/BLK 18-2 LP9 1 7 1 GRA 18-1 YEL/VIO 18-1 3 P2 (SEAT SWITCH OPTION) HH GRN/YEL 18-3 BLK 18-4 BLK 18-6 BLK 16-1 30 87a 87 RED/YEL 18-2 GRA 18-6 RELAY, SEAT 3 2 to 1 85 2 MISTING PUMPBLK 18-37 S6 86 3 6 A2 CONTROL BOX ASSEMBLY 1 SIGNAL LIGHT BLK 18-15 SIGNAL LIGHT BLK 18-14 BLK 14-2 BLK 14-1 S1 SWITCH, IGNITION ACC YEL/BLK 16-5. YEL/BLK 16-1. 2 5 YEL 16-2 YEL 16-1 GRN 18-2 GRN 18-3 VIO/YEL 18-2 VIO/YEL 18-3 IGN GRN/BLU 14-1 K11 2 1 BLK 18-9 BLK 18-8 S26 SWITCH, MISTING PUMP YEL 16-3 YEL 16-2 SW SEAT ST BAT APPD HH 1 VIO 18-23 VIO 18-15 VIO 18-16 VIO 18-17 BLK 18-27 SWITCH, DUST CONTROL FILTER (OPTIONAL) X19 4 4 S25 SWITCH, HAZARD RED/BLK 18-2 GRN/BLK 16-1 RED/BLK 18-3 RED/BLK 18-4 RED/BLK 18-5 BLK 18-39 2 GRA/BLK 18-1 2 REAR WORK LIGHT BLK 18-17 1 WHT/GRA 18-1 S21 X18 1 3 B RED/BLK 18-6 RED 10-1 S5 2 RED/BLK 18-4B 7 S 2 RELAY, .5 SEC DELAY ON BREAK (SEAT SWITCH OPTION) X12 X13 A RED/YEL 18-3 RED/YEL 18-1A 2 BLK 18-24 GRN 18-1 GRN 18-2 VIO/YEL 18-1 VIO/YEL 18-2 YEL 16-1 X85 BLK 18-12 BLK 18-13 BLK 18-24 YEL 16-3 BLK/ORN 18-1 1 BLK 18-19 VIO 14-2 .5 SEC 3 31 53S ORN/GRN 16-1 2 SWITCH, BRAKE (WITHOUT LIGHT OPTION) (WITH SEAT SWITCH OPTION) 4 BLK 18-38 53M BLK 18-39 S22 B BLK/ORN 18-1 T 1 B B K12 15 B GRA 18-6 PMO VIO 18-2 VIO 18-18 SP8 2 YEL/BLK 18-4 YEL/BLK 18-3 RED/BLK 18-2 X58 A VIO 18-20 RED/BLK 18-3 RED/BLK 18-5 BLK 18-11 BLK 18-23 BLK 14-2 BLK 18-38 RED/YEL 18-1 RED/YEL 18-2 X17 A DFTM PMO A-08928 PMO HH UPDATE: RELAY .5 SEC DELAY ON BREAK WAS RELAY .5 SEC DELAY A-09080 2-8-13 PMO HH UPDATE: SENSOR, GASOLINE WAS SENSOR, GASOLINE (GM ENGINE) L X17 M B X66 R A GRA 18-9 C A-08898 GRA/BLU 18-1 K B GRA 18-8 ECO A-08718 A B SWITCH, BRAKE S22 1 2 X57 X58 A A REVISIONS DATE 9-24-12 RELEASE 12-13-12 DEL: TAN/BRN 16-1 12-18-12 1 OF 3 REV 1 1 WHT/BLK 18-1 GRN/YEL 16-2 2 2 SP29 1 GRA 18-1 SHEET 56382531 LP8 LAMP, LEFT REAR SIGNAL (OPTIONAL) SP19 2 1 BLK WHT R1 1 2 GRN 18-3 X72 X74 A A GRN 18-4 BLK 18-15 B YEL/BLK 18-3 C SENDER, OIL PRESSURE (OPTIONAL) GRA 18-2 D SP7 2 1 1 B BLK 18-35 SP20 C YEL/BLK 18-12 2 1 D GRA 18-5 2 BLK 1 RED SP21 WHT LP13 LAMP, LEFT REAR TAIL/BRAKE (OPTIONAL) BLK/ORN 18-2 NOTES UNLESS OTHERWISE SPECIFIED 1. ALL DIMENSIONS IN INCHES. 2. DO NOT SCALE DRAWING. 3. ALL DIMENSIONS APPLY AFTER PLATING AND HEAT TREATING, BUT BEFORE PAINTING. 4. REMOVE ALL BURRS AND SHARP EDGES. Notes: 1. Reference 56382530 Wiring Diagrams NOTES 1. REFERENCE: 56382530 DIAGRAM-LADDER FORMS.DSN - E SIZE FORM 1/12/98 DIM. IN [ ] ARE MM. UNITS IN [ ] ARE ISO METRIC AS NOTED. <NOTE> DRAWN 6-27-11 PMO NILFISK-ADVANCE, INC. CHECKED PLYMOUTH, MINNESOTA 55447-3408 PROJ ENG APPROVED 6-27-11 WGL TITLE DIAGRAM-WIRING APPROVED APPROVED ORCAD FIRST USED ON SW8000 SIZE CODE DWG. NO. 56382531 E SCALE NONE ASSY. 56507E11 SHEET REV. D 1 OF 3 72 KUBOTA ENGINE SYSTEM REFERENCE: 56107658 - DIAGRAM-WIRING KUBOTA GAS 56107658 - DIAGRAM-WIRING KUBOTA LP Service Manual – SW8000 Electrical System 73 Wiring Harness Diagrams, p/n 56382531 Rev. D, sheet 2 of 3 GRN/BLK 16-1 19 INSERT GRN/RED WIRE INTO POSITION 6 ON CONNECTOR J2 AT THE CONTROL BOX ASSEMBLY D2 R7 C C VIO GRA 18-6 D D GRA ACTUATOR (-) B (-) MAGNETIC PICKUP (+) SPEED SELECT 1 MAGNETIC PICKUP (-) SPEED SELECT 2 SERVICE TOOL (Tx) WHT WHT/BLK BLU GRN YEL ORN RED 16-1 VIO 18-21 PINK 16-8 A TAN 18-3 BLK 16-12 B GRA/BRN 18-3 GRA/BRN 18-2 C RED/YEL 18-9 D VIO 18-21 S R N N P M P L R K M J J L H K G E F D F C E H B D J J A K K B L L C M M E N B A PINK 16-4 S C A D E PINK 16-7 3 GRA/BLU 18-1 1 P B 4 X10.. 2 BLK/RED 16-1 BLK 1-1 BLK 6-1 X140 X2_ X1_ PINK/YEL 16-1 1 R X113 N STARTER RED 1-1 1 GRA/BRN 18-1 RED 16-3 RED 16-2 RED 16-1 + E4 RED 8-1 1 VIO 18-22 ACTUATOR (+) B (+) M7 2 E3 S 2 E2 P 2 E1 S 2 BLK 2 2 BLU/PINK 16-4 RED/YEL 18-7 B SERVICE TOOL (Rx) GRN/YEL 18-3 RED 16-3 C RED B APECS 3000 GOVERNOR F B A BLK 16-13 2 2 RED 6-1 VIO 16-1 VIO 16-6 VIO 14-2 CONNECT VIO 14-1 TO VIO 16-1, VIO 16-6, AND VIO 14-2 1 RELAY, ACCESSORY (DIESEL ONLY) L X142 P RED 16-2 X154 A SP26 R 87a 87 C X158 SWITCH, OIL PRESSURE GRN/RED 10-1 30 I/F P L PINK 16-8 A GRA/BRN 18-1 X150 VIO 14-1 85 VIO 14-1 BLK 18-5 GRN/BLU 14-2 WHT/VIO 14-1 86 RED 12-2 F S28 2 CIR. BKR., 20 AMP ACCESSORY K7 S ALTERNATOR NO NC 2 2 RED 6-1 B S BLK 16-12 BLK 16-13 1 1 RED/YEL 18-7 RED/YEL 18-8 RED/YEL 18-9 G2 30 50 BLU/PINK 16-4 X151 CB4. SP24 1 F RED 10-1 RED 14-1 RED 14-2 RED 18-3 RED 14-5 RED 14-5 GRN/BLU 14-2 GRN/BLU 14-1 CIR. BKR., 70 AMP MAIN SP22 1 2 WHT/VIO 14-1 RED8-1 CB1. 1 TAN 18-3 D3 G 1 SENDER, TEMP. RED/YEL 18-8 2 GRN/YEL 18-3 GRA/BRN 18-3 2 SWITCH, COOLANT TEMP. BLK 18-5 GRA/BRN 18-2 S9 o t 1 1 G 3 2 2 SP23 BLU/PINK 16-1 YEL/GRA 18-1 ORN/GRA 18-1 BRN/WHT 18-1 GRA/YEL 18-1 GRN/YEL 18-1 GRN/RED 18-2 GRN/YEL 18-1 1 2 1 2 3 4 5 6 7 H 6 5 4 A4 J2. WHT/GRA 18-1 8 RED/BLK 18-1 9 YEL/VIO 18-1 10 PINK 18-1 11 ORN/BLK 18-1 12 13 BLK 18-3 14 G 50 H AC GRN/RED 10-1 GRN/RED 18-2 TAN 18-1 30 GRN/BLU 14-1 ORN/GRN 18-1 X83. TERMINAL, 6 WAY KUBOTA DIESEL ENGINE SYSTEM S7 SWITCH, IGNITION 17 RED 10-1 NOTES UNLESS OTHERWISE SPECIFIED 1. ALL DIMENSIONS IN INCHES. 2. DO NOT SCALE DRAWING. 3. ALL DIMENSIONS APPLY AFTER PLATING AND HEAT TREATING, BUT BEFORE PAINTING. 4. REMOVE ALL BURRS AND SHARP EDGES. DIM. IN [ ] ARE MM. UNITS IN [ ] ARE ISO METRIC AS NOTED. FORMS.DSN - E SIZE FORM 1/12/98 <NOTE> DRAWN 6-27-11 PMO NILFISK-A CHECKED PLYMOUTH PROJ ENG APPROVED 6-27-11 WGL TITLE DIAGRAM APPROVED APPROVED SIZE ORCAD FIRST USED ON SW8000 CODE E SCALE NONE ASSY. 5 Service Manual – SW8000 Electrical System Wiring Harness Diagrams, p/n 56382531 Rev. D, sheet 3 of 3 74 CONFIDENT THIS DRAWING AND THE DESIGN REPRESENTED HEREO PLYMOUTH, MINNESOTA AND IT HAS BEEN ISSUED WIT DUCED NOR COPIED NOR USED FOR ANY PURPOSE OT AGREES TO RETURN IT UPON REQUEST. DWG. NO. 56507375 SHEET 3 OF 3 REV D CAB WIRING LP12. 1 R9 2 + 1 M - CONNECT TO X76 FOR STROBE LIGHT OPTION ON TOP OF CAB 2 1 2 SP27 K8 1 X83. VIO 18-21 2 CONNECT TO X83 ON SHEET 1 1 BLK 18-31 HEATER TEMP. CONTROL RED... VIO/GRA 12-2 5 E1 X195 1 VIO/GRA 12-1 4 3 MOTOR, DEFROSTER FAN BLK... RED/VIO 12-1 86 85 30 87a 87 RELAY, HVAC (OPTIONAL) X179 GRN/YEL 16-5 GRN/YEL 16-3 CONNECT TO GRN/YEL WIRE (AT X188) FROM K5 X183 X194 VIO/GRA 12-1 BLK 18-20 1 2 2 3 3 BLK 14-4 1 M6 YEL RED ORN M - RED.. WITH A/C SYSTEM: 1. M6 IS NOT USED 2. X170 PLUGS INTO X174 3. X172 PLUSG INTO X175 MOTOR, BLOWER S35 X175 M9 to 2 - M YEL RED ORN YEL RED ORN M10 M 1 2 THERMOSTAT MOTOR, BLOWER MOTOR, BLOWER SWITCH, PRESSURE 86 85 30 87a 87 X105 2 1 1 BLU/BRN 18-1 VALVE, COMPRESSOR 2 1 X207 CONNECT TO L5 M8 BLU RELAY, CONDENSER FAN + M - BLK. MOTOR, CONDENSER FAN RED/GRA 18-3 2 VIO 18-25 BLK. RELAY, COMPRESSOR 2 2 87a 87 1 30 VIO 18-24 85 RED/GRA 18-2 BLK 14-7 A S34 - BLK 18-31 VIO/GRA 14-1 A 1 86 K9 1 BLU/BRN 18-1 BLK/WHT 18-2 B B RED/GRA 18-2 RED/GRA 18-3 GRN 18-5 C GRN/WHT 18-2 GRN/WHT 18-2 D RED. F C BLK 16-1 A A BLK.. C B ORN.. RED.. D YEL.. A GRN B C L10 K10 X199 X198 X197 D ORN 14-2 B BLK 14-7 1 BLK 18-31 2 SP28 F RED 14-7 C GRN 18-5 A YEL 14-2 WHT 18-1 B D BLK/WHT 18-2 C 1 BLK 14-5 2 BLK 16-1 E A/C SYSTEM BLK/WHT. ORN 14-2 WHT 2 GRN. RED 14-7 3 S33 BLK 18-20 CIR. BKR., 20 AMP HVAC GRN/WHT. E YEL 14-2 2 BLK 14-5 1 1 BLK/WHT CB9 1 X184 CONNECT TO BLK WIRE (AT X185) FROM K5 X174 1 SWITCH, A/C WHT 18-1 2 RED/VIO 12-1 X170 X172 RED 12-1 1 BLU.. 1 RED/WHT 18-1 ORN 14-1 RED 14-6 YEL 14-1 CONNECT TO X204 ON SHEET 1 YEL.. X203 VIO/GRA 14-1 M7 X178 VIO/GRA 12-3 X182 CONNECT TO TERMINAL 1 ON CB1 SWITCH, FAN VIO/GRA 12-5 RED 12-1 BLK 18-31 B BLK 18-30 BLK 18-28 BLK 14-4 VIO 18-22 A BLK 18-29 BLK 18-28 1 VIO 18-22 BLK 18-29 GRN/YEL 16-4 GRN/YEL 16-3 X189 LP14 21 2 (CAB OPTION) LAMP, DOME 1 - M VIO 18-24 VIO 18-25 VIO/GRA 12-4 L M H C M5 + MOTOR ASM, WIPER INCLUDES 2 SPEED SWITCH VIO 18-21 S30 B X190 GRN/YEL 16-4 YEL 14-1 RED 14-6 ORN 14-1 VIO/GRA 12-2 X191 BLK 18-30 BLK 1 RED GRN/YEL 16-5 STROBE (OPTIONAL) X208 CONNECT TO X99 AT L5 UNPLUG X99 FROM L5 (S5 HOPPER UP/DOWN VALVE) AND CONNECT IT TO X208. CONNECT X207 TO L5. ECO Service Manual – SW8000 75 Engine System, Diesel Functional Description Overview The diesel SW8000 machines use a Kubota V-1505-E3B four-cylinder diesel engine to power the two hydraulic pumps that run the machine drive wheel motor, main and side brooms, vacuum fan motor, side broom hydraulic cylinder, hopper lift cylinder, hopper door cylinder and the steering system. Engine Description The Kubota V1505 diesel is a four-cylinder, liquid cooled, naturally aspirated engine. A Bosch MD type mechanical injection pump fitted with an actuator that physically moves the fuel lever inside the pump. The injection pump controls the fuel quantity to maintain the selected RPM or shut the engine off. Fuel is stored in a tank under the Operator’s seat. The tank contains a fuel level sending unit. An electric pump supplies low pressure fuel to the diesel injector pump. There is a replaceable fuel filter cartridge between the fuel pump and the injector pump. The injector pump has s small “return” line that runs to the closest injector. The return circuit is carried from injector to injector where it exits the rear injector, and is connected to a hose that returns back to the fuel tank. The engine uses glow plugs to aid in starting a cold engine. The engine RPM is controlled with the Woodward APECS 3000 Electronic Engine Speed Governing System based on requests from the main machine controller. The main machine controller sends signals to the Woodward Governing System controller to request one of two engine speeds based on Operator request. Note: There is a “Dead Man” Lever on the side of the injector pump that can be used to shut the injection pump fuel down to shut off the engine manually. Normal Run Position (as shown) Engine Shutdown Position “Dead Man” Lever The cooling system consists of a standard radiator and belt driven fan. Note that the fan pushes air away from the engine and out through the radiator. Service Manual – SW8000 Engine System, Diesel Manufacturers’ Technical Literature Also refer to the following manufacturer’s technical literature when servicing or repairing the engine: • Kubota 05 Series Service Data Book 9Y110-00051.pdf • Workshop Manual, Diesel Engine, 05 Series, WG1605 9Y111-06610.pdf • Woodward Product Specification 03399, APECS™ 0175 Series Actuators Engine Starter Circuit Battery 12 VDC + - 2 CB1 Circuit Breaker, 70 Amp K4 1 30 87a 87 BLU/PINK F X1 F BLU/PINK 30 50 RED/GRN 2 M2 1 CB3 Circuit Breaker, 15 Amp 1 30 + Starter GRN/BLK RED St. Neutral Relay (closed in neutral) A2 Main Machine Controller J2-11 J1-18 17 S7 Ignition Switch J2-1 BRN/WHT J2-2 ORN/GRA J2-3 YEL/GRA B+ B- Drive Pedal Sensor, 5K Ohm Starter Circuit Description For the engine to start: • The Ignition Switch must provide positive voltage to the contact side of the Neutral Relay, K4, and to the positive terminal on the Starter. • The A2 Main Machine Controller must send power to the coil on the Neutral Relay, K4. In order to do this, the A2 Main Machine Controller must sense that the resistance through the 5K Ohm Drive Pedal Sensor is within the programmed deadband range. • The Neutral Relay, K4, must close to provide positive voltage to the Starter. 76 Service Manual – SW8000 Engine System, Diesel Engine Protection – Low Oil Pressure Shutdown Battery 12 VDC + - 2 CB1 Circuit Breaker, 70 Amp RED 1 30 S7 Ignition Switch B+ APECS 3000 Controller CB5 Acc. 1 ORN/GRN 2 PINK A X1 A RED RED B (+) Circuit Breaker, 10 Amp Connect to Pin J1-17 on A2 Main GRA/BLU Machine Controller X2 GRA/BLU K K VIO VIO Speed Select 1 RED GRA Speed Select 2 D2 C NO NC GRA/BRN C RED/YEL X140 VIO B (-) BLK Actuator (+) WHT Actuator (-) WHT/BLK Magnetic Pickup (+) BLU Magnetic Pickup (-) GRN DIODE D3 GRA DIODE Oil Pressure Switch, S28 GRA/BRN D X113 X113 C Power to Fuel Pump BLK B- • The fuel pump electrical power comes from the NO contact of the Oil Pressure Switch, S28. When oil pressure builds, the Oil Pressure Switch connects C to the NO terminal to provide power to the fuel pump. • If oil pressure is lost, the Oil Pressure Switch will connect C to the NC terminal. This takes power away from the fuel pump and gives 12V to both Speed Select 1 and Speed Select 2, which is the “lost oil pressure” signal to the APECS 3000 Controller. When the APECS 3000 Controller sees this signal, it shuts down the engine by turning “off” the fuel actuator on the engine. Engine Speed Control The APECS 3000 Controller manages the engine RPM through the use of an electronic actuator connected to the fuel control lever inside the injector pump. The Controller monitors the actual engine RPM via a speed sensor connected to the Magnetic Pickup (+) and (-) terminals. The speed sensor reads the flywheel ring gear teeth and the Controller compares the actual engine speed to the desired speed setting. The Controller sends out a pulse-width-modulated signal to the actuator, which then moves the fuel control lever to regulate the engine speed. The Controller increases the current it sends through the actuator to increase the engine speed The actuator is spring-loaded in the “no fuel” default position, and will shut off the fuel to the engine when there is no electrical current available from the Controller. When the A2 Main Machine Controller receives an engine speed request from the engine speed switch on the control panel, it sends either +12V or 0V from pin J1-17 to the Speed Select 1 terminal on the Controller. The Controller then sends the appropriate current from the Actuator terminals to the actuator to obtain the desired RPM corresponding to the engine speed requested. The following table shows the inputs to the Speed Select 1 and 2 terminals and the resulting action. APECS 300 Controller Inputs Speed Select 1 Speed Select 2 Engine Condition 0v 0v Idle 12v 0v High Speed 0v 12v (Not Used) 12v 12v Low Oil Pressure Shutdown 77 Service Manual – SW8000 Engine System, Diesel Glow Plug Control Battery 12 VDC - + 2 30 50 CB1 Circuit Breaker, 70 Amp 1 GRN/RED 2 2 RED E1 2 E3 E4 St. Starter 19 GRN/RED S7 Ignition Switch GRN/RED 30 B+ 2 E2 1 1 1 1 B- The engine is equipped with glow plugs to assist starting a cold engine. The Battery provides voltage to the Glow Plugs when the Ignition Switch, S7, is in the engine-run position. The glow plugs have an internal resistive element that increases in resistance as it heats up. This protects the glow plug from overheating by reducing the current flow as it gets hot. Note that you have to hold the key switch in the counterclockwise position to get power to the glow plugs. When the power to the glow plugs is switched on, the A2 Main Machine Controller will light the glow plug indicator on the control panel for six seconds. 78 Service Manual – SW8000 Engine System, Diesel Component Locations The following components are included in this section: •Coolant Temperature Switch •Alternator •Oil Pressure Switch •Starter •Air Cleaner •Engine RPM Sensor •Woodward APECS™ Controller •Woodward APECS™ Actuator •Fuel Filter Coolant Temperature Switch Oil Pressure Switch Alternator Starter 79 Service Manual – SW8000 Engine System, Diesel Air Cleaner Engine RPM Sensor Woodward APECS™ Controller Woodward APECS™ Actuator Fuel Filter 80 Service Manual – SW8000 Engine System, Diesel Maintenance and Adjustments Warning! Before performing any machine maintenance or adjustments, make sure the parking brake is engaged, key switch is off and the key is removed from the machine. Maintenance Schedule Item Service Interval Every 50 hrs. Check fuel pipes and clamps Every 75 hrs Every 100 hrs Every 150 hrs Every 200 hrs Every 300 hrs Every 400 hrs Every 500 hrs Every 800 hrs Every 1500 hrs Every Year Every Two Years X * Change engine oil X * Change oil filter cartridge X Clean air filter element X Clean fuel filter element X Check fan belt tension and for damage X Check water pipes and clamps Change fuel filter cartridge Clear radiator interior X X X Change radiator coolant X ** Check injection nozzle X Change air filter element Check valve clearance X X Change water pipes and clamps X Change fuel pipes and clamps X * Change the engine oil and filter cartridge after the first 50 hours of operation. ** Maintenance intervals per EPA instructions 81 Service Manual – SW8000 Engine System, Diesel Engine Oil Check the engine oil level when the machine is parked on a level surface and the engine is cool. Change the engine oil and oil filter after the first 50 hours of operation, then every 200 service hours after that. Use CF, CF-4 or CG-4 oil meeting API specifications and suited temperatures. * Important: Refer to the Diesel Lubricating Oil Note below for further diesel oil recommendations. Refer to the engine manufacturer’s service manuals for oil capacities and additional engine specifications. Replace the oil filter with every oil change. Temperature Range Oil Weight Above 77 °F (25 °C) SAE 30 or 10W-30 32 °F to 77 °F (0 °C to 25 °C) SAE 20 or 10W-30 Below 32 °F (0 °C) SAE 10W or 10W-30 * Diesel Lubricating Oil Note: With the emission control now in effect, the CF-4 and CG-4 lubricating oils have been developed for use with a low-sulfur fuel used in on-road vehicle engines. When an off-road vehicle engine runs on a highsulfur fuel, it is advisable to employ the CF, CD or CE lubricating oil with a high total base number. If the CF-4 or CG-4 lubricating oil is used with a high-sulfur fuel, change the lubricating oil at shorter intervals. Low sulfur (0.5 % ≥) High sulfur Remarks CF O O Refer to Kubota Diesel Engine Workshop Manual CF-4 O X CG-4 O X Lubricating Oil class Fuel O = Recommended X = Not Recommended Engine Coolant Checking Engine Coolant Caution! Do not remove the radiator cap when the engine is hot. To check the engine coolant level, open the engine cover and observe the coolant level in the coolant overflow tank. If the level is low, add a 50/50 mix of water and the recommended type antifreeze. Clean the radiator and oil cooler exteriors every 150 hours by washing with low-pressure water or using compressed air. High-pressure water will damage the radiator. . 82 Service Manual – SW8000 Engine System, Diesel Replacing Engine Coolant One possible cause of engine overheating is trapped air in the cooling system. It’s recommended that you use a Cooling System Tool when changing the engine coolant. The Cooling System Tool pulls a vacuum on the cooling system prior to filling to prevent air from being trapped in the cooling system. Note that there are several types of Cooling System Tools. The following instructions describe how to use a typical type of tool. Refer to the operating instructions included with your particular tool if different than the example shown here. 1. Connect a Compressed Air Supply Line to the fitting on the Cooling System Tool. 2. Connect the Coolant Supply Line to the Cooling System Tool. Make sure the Coolant Valve is closed. 3. Insert and hold the Cooling System Tool onto the radiator filler neck, then press the Air Switch. The compressed air travelling through the Venturi Tube Assembly will pull a vacuum on the cooling system to remove air from the system. 4. Once the vacuum reading on the Gauge reaches approximately 25 on the green scale, release the Air Switch. Note that this also a good opportunity to check for cooling system leaks, 5. Continue to hold the Cooling System Tool onto the radiator filler neck and open the Coolant Valve to allow coolant to flow into the radiator. Compressed Air Supply Line Gauge Air Switch Coolant Valve (closed) Venturi Tube Assembly Coolant Supply Line Removing the Air from the Cooling System with Cooling System Tool Gauge Coolant Valve (open) 6. Once the pressure on the Gauge reaches approximately 5 on the red scale and the radiator is almost full, shut off the Coolant Valve and remove the Cooling System Tool from the radiator filler neck. 7. Top off the radiator and overflow tank as necessary. Filling Cooling System with Coolant 83 Service Manual – SW8000 Engine System, Diesel Engine Air Filter Maintenance Caution! When servicing the engine air filter elements, use extreme care to prevent loose dust from entering the engine. Dust can severely damage the engine. The engine air filter contains a primary (outer) and a safety (inner) filter element. The primary element can be cleaned twice before being replaced. The inner safety element (blue) should be replaced every third time that the primary filter element is replaced. Never attempt to clean the inner safety element. To clean the primary filter element: 1. Unlatch the two Clips at the end of the Air Filter and remove the End Housing. 2. Pull the primary element out. End Housing Air Filter 3. Clean the element with compressed air (maximum pressure 100 psi) or wash it with water (maximum pressure 40 psi). Do not put the element back into the canister until it is completely dry. 4. Reinstall the inner safety element and primary filter element. 5. Reinstall the End Housing and latch the two Clips. Clip (2) Replacing the Fuel Filter Warning! Replacing the fuel filter can result in diesel fuel being spilled on the machine and surrounding areas. This can present a potential fire hazard that can result in serious personal injury or death. −− Do not replace the fuel filter on a hot engine as fuel spilled onto a hot exhaust manifold can catch fire. −− Replace the fuel filter in a well-ventilated area and observe all applicable safety precautions. −− Always wear the recommended personal protective equipment (PPE), including eye protection. 1. Place a pan or other suitable receptacle underneath the fuel filter to catch any spilled fuel. 84 Service Manual – SW8000 Engine System, Diesel 2. Unscrew the Fuel Filter from the Fuel Filter Housing. 3. Pre-fill the new Fuel Filter with clean diesel fuel to minimize the amount of air that will need to be bled out of the fuel system. 4. Screw the new Fuel Filter onto the Fuel Filter Housing. 5. Bleed the remaining air out of the Fuel Filter. (Refer to the Bleeding the Fuel System subsection below.) Fuel Filter Housing Fuel Filter Bleeding the Fuel System The electric fuel pump on the fuel tank pumps fuel to the fuel filter. The fuel flows through the filter to the injector pump on the engine. The injector pump pumps fuel under high pressure to the injectors. You’ll need to bleed the fuel system whenever the fuel filter element is removed/replaced, or if the machine runs out of fuel. Warning! Bleeding the fuel system can result in diesel fuel being spilled on the machine and surrounding areas. This can present a potential fire hazard that can result in serious personal injury or death. −− Do not bleed the fuel system on a hot engine as fuel spilled onto a hot exhaust manifold can catch fire. −− Bleed the fuel system in a well-ventilated area and observe all applicable safety precautions. −− Always wear the recommended personal protective equipment (PPE), including eye protection. 1. Make sure the fuel tank is not empty. 2. Connect switched jumper wires from the battery to the electric fuel pump so you can run the fuel pump with the ignition switch off. Service Note: If you’ve removed or replaced the fuel filter element, fill the filter canister with fuel before you bleed the system. This will minimize the amount of air remaining in the filter. 3. Turn on the fuel pump. 85 Service Manual – SW8000 Engine System, Diesel 4. Slightly loosen the Bleed Screw on top of the Fuel Filter to remove the air from the fuel line and Fuel Filter. 5. When no more bubbles can be seen at the Fuel Filter Bleed Screw and the fuel is running clear, tighten the Bleed Screw. Bleed Screw 6. Repeat steps 4 and 5 above as needed to remove all of the air from the fuel line and Fuel Filter. Note that you may need to do this four or five times. Fuel Filter 7. Use a wrench to hold the Injector Pump base stationary, then slightly loosen the Bleed Screw on top of the Injector Pump to remove the air from the Injector Pump fuel line. 8. When no more bubbles can be seen at the Bleed Screw and the fuel is running clear, tighten the Bleed Screw. Injector Pump Bleed Screw 86 Service Manual – SW8000 Engine System, Diesel Service Note: Normally steps 9 through 17 below are not required to bleed the fuel system. If you do need to perform these steps to bleed the fuel system at the injector pump fittings and injector fittings, make sure to follow the safety warning information below. Warning! If you need to bleed the fuel system at the injector pump fittings or injector fittings as outlined in steps 9 through 17 below, make sure to wear protective gloves to protect your hands from the high-pressure diesel fuel present at these fittings. This highpressure fuel is capable of piercing the skin and injecting diesel fuel into the skin, which can result in severe personal injury. 9. If necessary, slightly loosen one of the four Injector Pump Fittings on the top of the injector pump. 10. Crank the engine to bleed any air from the Injector Pump Fitting. Injector Pump Fitting (4) 11. When no more bubbles can be seen at the Injector Pump Fitting and the fuel is running clear, tighten the Injector Pump Fitting. 12. Repeat steps 9 through 11 above for the other three Injector Pump Fittings. Service Note: If you need to bleed the fuel system at the injector fittings as described below, it’s recommended that you start with the fitting on the shortest line and finish with the fitting on the longest line. 13. If necessary, slightly loosen one of the four Injector Fittings. 14. Crank the engine to bleed any air from the Injector Fitting. 15. When the injection pulses can be seen at the Injector Fitting and the fuel is running clear, tighten the Injector Fitting. 16. Repeat steps 13 through 15 above for the other three Injector Fittings. 17. Make sure the check valve is oriented so that fuel can only flow from the rear injector to the fuel tank, Injector Fitting (typical) 87 Service Manual – SW8000 Engine System, Diesel Troubleshooting Note: Also refer to the Workshop Manual, Diesel Engine, 05 Series, WG1605 9Y111-06610.pdf for additional troubleshooting information and procedures. General Troubleshooting Problem Cause The engine will not The drive pedal is not in crank; the starter does neutral. not engage. The battery charge level is low. No power to the starter. The engine cranks but No power to the glow plugs. will not start. No output from the APECS 3000 Controller to the actuator. Correction Make sure the drive pedal is in its neutral position. 1.Check the battery voltage and charge as necessary. 2.If the engine still won’t crank, load-test the battery. Replace the battery if necessary. • Check circuit breaker CB1 and reset if necessary. • Check circuit breaker CB3 and reset if necessary. • Make sure there is continuity through the Neutral Relay K4 terminals 30 and 87a with the drive pedal in neutral. 1.Reset the foot pedal deadband position if necessary. (Refer to the Control System/Main Machine Controller Programming/Hydrostatic Neutral Position and Dead-band section.) 2.Check the relay coil resistance. If not 85 ± 5 ohms, replace the relay. • Check the wiring to the starter and repair as necessary. • Check wiring from the ignition switch to the glow plugs and repair as necessary. • Check the ground connection to the glow plugs and repair as necessary. • Check wiring to the Controller and repair as necessary. • Check the wiring from the actuator terminals on the Controller to the actuator and repair as necessary. The APECS 3000 Controller is • Check the APECS 3000 Controller fault codes and not operating correctly. take the recommended corrective actions. (Refer to the APECS 3000 Controller Fault Codes subsection.) The engine stops running, service indicator light is on. The coolant temperature is too Refer to the Engine Overheating Problems section high. below. The oil pressure has dropped below the minimum acceptable pressure. Refer to the Loss of Oil Pressure Protection section below. Engine will not run at operating speed. There is no +12V signal from pin J1-17 on the A2 Main Machine Controller to the Speed Select 1 terminal on the APECS 3000 Controller. • Check the wiring from pin J1-17 to the Speed Select 1 terminal on the APECS 3000 Controller (GRA/BLU wire). • If this doesn’t correct the problem, there may be a problem with the A2 Main Machine Controller or APECS 3000 Controller. 88 Service Manual – SW8000 Engine System, Diesel Engine Overheating Problems When the Coolant Temperature Switch S8 senses that the coolant temperature is too high, it grounds out the wire to the MIL INPUT J2-5 input on the A2 Main Machine Controller. The A2 Main Machine Controller then lights the Engine Service Indicator light on the control panel. Use the checklist below as a guide to thoroughly check the engine cooling system. • Check the coolant level in the overflow tank and radiator. • Inspect and clean the radiator and hydraulic oil cooler. • Check for correct operation of the belt-driven engine cooling fan (slippage). • Check to see that the engine thermostat opens. • Check for correct water pump operation. • Check the engine crankcase oil level. • Check for air trapped in the cooling system. (Refer to the Engine Coolant/Replacing Engine Coolant section.) • Check the coolant temperature switch for correct function as replace if necessary. Loss of Oil Pressure Check for possible causes for low oil pressure such as: • Engine crankcase level is low. • Incorrect oil viscosity. • Fault in the oil pressure switch S28. • Excessive engine wear or defective internal oil pump (relief valve) APECS 3000 Controller Fault Codes The Woodward APECS 3000 Controller is capable of identifying some fault conditions and displaying a fault code. A flashing LED displays the fault conditions. When power is first applied to the Controller, the LED will flash just once for one second to indicate that the LED is operational. If there is more than one fault, the LED will flash them all. If there are no faults the LED will flash once every reset, and from then on indicate the detection of engine speed. The controller will attempt to shut the engine down for all faults and will not permit starting after reset with fault 1, 5 and 6. Flash Code Fault Correction 1 APECS unit not calibrated. Calibrate the unit. 2 Excessive engine speed. Check parameter settings, wiring, case ground, linkage and speed sensor. 3 Unusually low engine speed. Check parameter settings, linkage, load and engine capacity. 4 Protection input shuts down engine. Check parameter settings and probable cause for fault. 5 Factory settings lost. Download calibration file and recycle power or consult factory. 6 APECS unit failed. Check wiring, shielding, and recycle power. Consult factory. 89 Service Manual – SW8000 Engine System, Diesel Compression Test Note: The photos shown in this section are from a similar three-cylinder diesel. 1. Begin with a fully-charged battery. 2. Remove the air cleaner assembly. 3. Cover the air inlet opening to prevent foreign objects from falling into the engine. 4. Remove the glow plug Electrical Connector Nuts and Connector “Rail”. Electrical Connector Nuts Connector “Rail” 5. Insulate the Electric Terminal that feeds the rail to prevent it from shorting to ground. 6. Clean the area around the glow plugs to prevent any debris from falling into the engine cylinders when they are removed. 7. Remove the glow plugs. Electrical Terminal 90 Service Manual – SW8000 Engine System, Diesel 8. To test the compression of one of the cylinders, screw in an appropriate adapter into the glow plug threads in the cylinder head and attach a suitable compression gauge. Pictured are Snap-On® Diesel Compression gauge EEPD500 used with compression test adapter fitting TU-15-35 and coupler M3569. Snap-On® EEPD500 Snap-On® TU-15-35 Snap-On® M3569 9. Disconnect the Injector Pump Actuator Connector to prevent the engine from starting. 10. Remove any cover over the air inlet but be very careful not to allow anything to get “sucked in” during the test. 11. Crank the engine over until the compression gauge stops climbing. Record the reading. The cranking compression specifications are shown in the following table: Injector Pump Actuator Connector 3.14 to 3.53 MPa Factory Specification 32.0 to 36.0 kgf/cm2 456 to 512 psi 2.26 MPa Allowable Limit 23.0 kgf/cm2 327 psi The allowable difference among cylinders is 10% or less. 12. Repeat for the other cylinders. 13. Reassemble in reverse order. 91 Service Manual – SW8000 Engine System, Diesel Specifications Kubota V-1505 -E3B Diesel Engine Type Water cooled, four-cylinder, four-stroke diesel engine Displacement 91.41 cubic inches [1.498 L] Bore and Stroke 3.07” x 3.09” [78 mm x 78.4 mm] Compression Ratio 22:1 Engine Firing Order 1-3-4-2 Rotation Counterclockwise (as viewed from the flywheel end) 3.14 to 3.53 MPa Factory Specification Cranking Compression 32.0 to 36.0 kgf/cm2 456 to 512 psi 2.26 MPa Allowable Limit 23.0 kgf/cm2 327 psi Fuel Injector Pump Bosch MD Type Mini Pump Fuel Filter Cartridge Type Fuel Pump Pressure 3-5 psi Fuel Pump Volume Capacity 30 GPM [113.6 LPM] Fuel Injection Nozzle Mini Nozzle (DNOPD) Fuel System 140 kgf/cm2 Injection Pressure 1,991 psi 13.73 MPa Lubrication System Cooling System Type Type Forced Lubrication by Pump Engine Oil API Service Class CF Recommended Engine Oil Capacity 6.34 US qts.[6 L] Oil Filter Full Flow Paper Filter (cartridge type) Pressurized Radiator, Forced Circulation with Water Pump 92 Service Manual – SW8000 Engine System, Diesel Kubota V-1505 -E3B Diesel Resistance – 2.1K ohms near room temperature Engine RPM Sensor Output while cranking (unplugged) – 3.6 to 3.9 VAC Output at idle (connected) – 14.0 VAC Electrical System Resistance – 3.3 Ohms near room temperature Actuator Starter Voltage supply from APECS controller when cranking – approximately 8.0 VDC 160-190 Amps cranking Special Tools Cooling System Tool Diesel Compression Gauge There are many brands of compression gauges available. Shown is a Snap-On® EEPD500 Gauge kit Compression Gauge Fitting for Glow Plug threads Shown is the Snap-On® TU-15-35; Threads - M8 X 1.0 93 Service Manual – SW8000 Gauge Coupler If using the Snap-On® diesel compression EEPD500 Gauge kit and Snap-On® TU-15-35 glow plug thread fitting, a coupler must be used to join the fitting to the gauge hose. Shown are Snap-On® couplers M3569 and M3570. Engine System, Diesel 94 Service Manual – SW8000 Engine System, Gasoline/LPG Functional Description Overview The gasoline (petrol) and LPG SW8000 machines use a four-cylinder 1.6L Kubota engine to power the two hydraulic pumps that run the machine drive wheel, steering system, side and main broom hydraulic motors, dust control hydraulic motor, and the hopper lift and door cylinders. Note: Also refer to the following manufacturer’s technical literature: • Operator’s Manual WG1605 EG523-89162ENG.pdf • Engine Specifications WG1605 9Y110-01770.pdf • Workshop Manual WG1605 9Y111-06610.pdf • Diagnosis Manual ECM System WG1605 9Y110-01760.pdf Engine Description The Kubota WG1605-G-E3 (gasoline) and WG1605-L-E3 (LPG) are four-cylinder, liquid cooled, naturally aspirated engines. Kubota 1.6L Gasoline Fuel System Description This engine uses an electric fuel pump to pump gasoline through the gas filter to the Gasoline Fuel Pressure Manifold assembly. The Gasoline Fuel Pressure Manifold assembly controls the delivery of gasoline to the gasoline injector rail assembly. Each cylinder has a fuel rail, mounted with injectors. An Electronic Throttle Body (ETB) is used to control engine speed. The Gasoline Fuel Pressure Manifold is equipped with a sensor that sends fuel temperature and pressure data to the Engine Control Module (ECM). The ECM uses this information to calculate the precise amount of gasoline to be injected to the engine during operation. This eliminates the need for a separate return line from the fuel rail assembly. Kubota 1.6L LPG Fuel System Description The fuel system on LPG engines includes an LPG Fuel Lock-off device, Dual Stage Regulator (DSR), Direct Electronic Pressure Regulator (DEPR), Mixer Assembly and Electronic Throttle Body (ETB). An LPG Fuel Lock-off device, consisting of a 12 volt solenoid and a normally-closed valve, opens during cranking and engine run cycles. The ECM controls the voltage to the LPG Fuel Lock-off device. The DSR is a two-stage regulator that is a combination vaporizer, pressure regulating device. The DSR normally closed when the engine is not running. When the engine is cranking or running, a partial vacuum is created in the fuel line which connects the regulator to the DEPR and Mixer Assembly. This partial vacuum opens the second stage regulator, permitting fuel to flow to the DEPR and Mixer Assembly. 95 Service Manual – SW8000 Engine System, Gasoline/LPG The DEPR controls the fuel flow, and provides the correct air/fuel mixture to maintain performance and emissions control. The DEPR uses an internal computer, and fuel pressure and temperature sensors to provide input to the ECM for fuel calculation, fault detection and diagnostics. The Mixer Assembly is a self-contained air/fuel metering device that utilizes a relatively constant pressure drop to draw fuel into the mixer from cranking to full load. The Mixer Assembly is mounted in the air stream, ahead of the ETB. The ETB uses an electric motor, connected to the throttle shaft, to increase or decrease the angle of the throttle blade. The ECM sends electrical signals to the motor in the ETB to increase or decrease the airflow to the engine to control the engine speed. Note: For a more detailed and thorough description of the Gasoline and LPG fuel systems, refer to the Diagnosis Manual ECM System WG1605 9Y110-01760.pdf. Engine Starter Circuit Description The starter is prevented from engaging whenever the drive pedal is NOT in the neutral position. A “Neutral relay” (K4) is in series between the key switch and the starter solenoid. When the relay is at rest (not energized) current is allowed to flow through the normally-closed contacts (30 to 87a) on to the starter. The Main Machine Controller monitors the Drive Pedal Sensor to understand the current pedal position. If it senses that the drive pedal is NOT in the neutral position, it energizes the neutral relay to break the connection between 30 and 87a. This prevents the starter from engaging. Crank and Run Crank Starter Solenoid Neutral Relay K4 Drive Pedal Sensor Input = Neutral Main Machine Controller 96 Service Manual – SW8000 Engine System, Gasoline/LPG Crank and Run Crank Starter Solenoid Neutral Relay K4 Drive Pedal Sensor Input = NOT Neutral Main Machine Controller Engine Protection – Low Oil Pressure Shutdown The engine controller monitors the oil pressure switch. If it sees a loss of oil pressure, it will shut down the engine immediately. Engine Protection – High Temperature The engine controller monitors the engine coolant temperature. If the temperature reaches 230 deg. F. (110 deg. C.), it will derate the engine power by 30%. If the temperature reaches 240 deg. F. (115 deg. C.), it will shut down the engine. Engine Speed Control The operator can request two engine speeds, “idle” and “full throttle”. The Engine Controller operates an Electronic Throttle Body to adjust and maintain engine speed according to the requested input of the Main Machine Controller. To request full throttle, the main machine controller sends out a 12v supply from J1-17 on the GRA/BLU wire to the engine controller. To request idle, the main machine controller does not apply 12v; the output remains low. 97 Service Manual – SW8000 Engine System, Gasoline/LPG Component Locations LPG And Gasoline Engine Common Electrical Components The following components are included in this section: (Most photos are of LPG Engine) • Alternator • Ignition Coils • Electronic Throttle Body • Knock Sensor • Cam Position Sensor • Oil Pressure Switch • Connector 1 • Post Catalyst O2 Sensor • Connector 2 • Power Relay (Inside Engine Fuse/Relay Box) • Crank Position Sensor • Pre Catalyst O2 Sensor • Diagnostic Connector • Starter • Engine Control Module • Starter Relay (Inside Engine Fuse/Relay Box) • Engine Coolant Sensor • TMAP Sensor • Ground Figure 1. LPG Engine Shown, Left Side Engine Control Module Electronic Throttle Body Knock Sensor Crank Position Sensor Connector 1 and Connector 2 98 Service Manual – SW8000 Engine System, Gasoline/LPG Alternator Oil Pressure Switch Starter Oil Filter Figure 2. LPG Engine Shown - Left Side Diagnostic Connector TMAP Sensor Engine Fuse/ Relay Box Ignition Coils Figure 3. LPG Engine Shown, Top 99 Service Manual – SW8000 Engine System, Gasoline/LPG Ground Engine Coolant Sensor Figure 4. LPG Engine Shown - Top Figure 5. LPG Engine Shown - Rear, Under Air Cleaner Cam Position Sensor Alternator Pre-Catalyst O2 Sensor Post-Catalyst O2 Sensor Figure 6. Oxygen Sensors 100 Service Manual – SW8000 Engine System, Gasoline/LPG LPG ONLY Engine Electrical and Fuel Components • Fuel Lockoff Solenoid • DEPR - Direct Electronic Pressure Regulator • LP Dual Stage Pressure Regulator • Mixer Assembly Fuel Lockoff Solenoid Direct Electronic Pressure Regulator (DEPR) LP Dual Stage Pressure Regulator Mixer Assembly 101 Service Manual – SW8000 Engine System, Gasoline/LPG Gasoline (Petrol) ONLY Engine Electrical and Fuel Components • Fuel Injectors • Fuel Pump Relay (Inside Engine Fuse/Relay Box) • Gasoline Sensor Interface (On top of fuel tank) • Fuel Pump (On top of fuel tank) Fuel Pump Relay Fuel Injectors Gasoline Sensor Interface Fuel Tank 102 Service Manual – SW8000 Engine System, Gasoline/LPG Maintenance and Adjustments Warning! Before performing any machine maintenance or adjustments, make sure the key switch is off, the key is removed from the machine and the parking brake is engaged. Maintenance Schedule Item Service Interval Every 8 hrs (daily). Check engine oil level X Check and replenish coolant X Check and clean air filter element if necessary Check LPG tank setting condition if necessary Check LPG fuel connector Every 50 hrs (weekly) Every 100 hrs Every 1000 hrs X * Replace oil filter cartridge X Check gasoline fuel hose and clamp bands X Check LPG fuel hose and clamp bands X Clean spark plugs X Check fuel filter X Check fan belt tension and for damage X Check battery electrolyte level X Every Year if necessary Check LPG tank setting condition X Check radiator hoses and clamp bands X Check PCV valve X Check coolant hose of LPG vaporizer X Check LPG Lock off valve X Check valve clearance X Replace spark plugs Every 2000 hrs X * Change engine oil Replace fuel filter Every 200 hrs X ** Replace air cleaner element X Replace gasoline fuel hose, clamp bands and fuel filter X Clean inside of fuel tank (gasoline fuel) X Clean water jacket and radiator interior X Every Two Years 103 Service Manual – SW8000 Engine System, Gasoline/LPG Item Service Interval Every 8 hrs (daily). Every 50 hrs (weekly) Every 100 hrs Every 200 hrs Every 1000 hrs Every 2000 hrs Every Year Every Two Years Replace intake air line X Replace breather hose X Replace LPG fuel hose and clamp bands X Replace coolant hose of LPG vaporizer X *** Check LPG vaporizer X Replace radiator hoses and clamp bands X Change radiator coolant X Replace battery X * Change the engine oil and filter cartridge after the first 50 hours of operation. ** Change more often when operating under dusty conditions. ***If you do not have the correct tools and/or are not mechanically proficient, contact your local KUBOTA dealer. Engine Oil Check the engine oil level when the machine is parked on a level surface and the engine is cool. Change the engine oil after the first 50 hours of operation and every 200 hours after that. Engine oil should have properties of API classification SL or higher and be suited to the ambient temperature as listed below. Refer to the engine manufacturer’s service manuals for oil capacities and additional engine specifications. Replace the oil filter with every oil change. Temperature Range Oil Weight Above 77° F [25° C] SAE30, SAE10W-30 or SAE15W-40 32° F to 77° F [0° C to 25° C] SAE20 or SAE 10W-30 -4° F to 32° F [-20° C to 0° C] SAE10 or SAE 10W-30 Engine Coolant Checking Engine Coolant Caution! Do not remove the radiator cap when the engine is hot. To check the engine coolant level, open the engine cover and observe the coolant level in the coolant overflow tank. If the level is low, add a 50/50 mix of water and the recommended type antifreeze. Clean the radiator and oil cooler exteriors every 150 hours by washing with low-pressure water or using compressed air. High-pressure water will damage the radiator. Service Note: The oil cooler tips out for easy cleaning of both the oil cooler and the radiator. 104 Service Manual – SW8000 Engine System, Gasoline/LPG Replacing Engine Coolant One possible cause of engine overheating is trapped air in the cooling system. It’s recommended that you use a Cooling System Tool when changing the engine coolant. The Cooling System Tool pulls a vacuum on the cooling system prior to filling to prevent air from being trapped in the cooling system. Note that there are several types of Cooling System Tools. The following instructions describe how to use a typical type of tool. Refer to the operating instructions included with your particular tool if different than the example shown here. 1. Connect a Compressed Air Supply Line to the fitting on the Cooling System Tool. 2. Connect the Coolant Supply Line to the Cooling System Tool. Make sure the Coolant Valve is closed. 3. Insert and hold the Cooling System Tool onto the radiator filler neck, then press the Air Switch. The compressed air travelling through the Venturi Tube Assembly will pull a vacuum on the cooling system to remove air from the system. 4. Once the vacuum reading on the Gauge reaches approximately 25 on the green scale, release the Air Switch. Note that this also a good opportunity to check for cooling system leaks, 5. Continue to hold the Cooling System Tool onto the radiator filler neck and open the Coolant Valve to allow coolant to flow into the radiator. Compressed Air Supply Line Gauge Air Switch Coolant Valve (closed) Venturi Tube Assembly Coolant Supply Line Removing the Air from the Cooling System with Cooling System Tool Gauge Coolant Valve (open) 6. Once the pressure on the Gauge reaches approximately 5 on the red scale and the radiator is almost full, shut off the Coolant Valve and remove the Cooling System Tool from the radiator filler neck. 7. Top off the radiator and overflow tank as necessary. Filling Cooling System with Coolant 105 Service Manual – SW8000 Engine System, Gasoline/LPG Engine Air Filter Maintenance Caution! When servicing the engine air filter elements, use extreme care to prevent loose dust from entering the engine. Dust can severely damage the engine. Service the air cleaner more frequently under severe dusty or dirty conditions. 1. Remove the air cleaner elements from the air cleaner assembly and inspect them for foreign material restrictions or signs of excessive wear or damage. Replace the elements if necessary. 2. Remove all dust and foreign matter from the air cleaner housing. 3. Reinstall the air cleaner elements. 4. Reinstall the air cleaner cup, then securely fasten the retaining clips Troubleshooting The EControls engine management package supports robust self diagnostics and is capable of setting scores of Diagnostic Trouble Codes (DTCs). DTCs and sensor data can be viewed on a coputer using the “GCP Display” software along with an “ECom” communication cable. See the Diagnosis Manual ECM System WG1605 9Y110-01760.pdf for the diagnostic tool connection procedure. The ECom cable can be purchased through Nilfisk-Advance. (See Special Tools in this section for the part number). It is the same cable that has been used on other recent Nilfisk-Advance machines using the GM 1.6L and GM 3.0L engines. You will need a new version of the GCP software to work with the Kubota WG1605 engine along with the correlating password. The software, password and installation instructions can all be downloaded from “Customer Zone”at www.advance-us.com. Most or all engine troubleshooting is covered in Kubota manuals. There are some things specific to the SW8000 engine application which are covered here in this manual section such as, engine speed control and engine starter operation. Note: Refer to the Diagnosis Manual ECM System WG1605 9Y110-01760.pdf, for engine troubleshooting information and procedures including all fault code diagnosis. General Troubleshooting Problem Cause Correction The engine will not crank. Weak battery, poor battery cable connections. • Check the battery and connections and clean/repair as necessary. • Check the wiring from the battery to the Starter B+ terminal on the A3 Engine System and repair as necessary. No power to the Starter Solenoid (Starter Command circuit) • Make sure the foot pedal is in the neutral position. • Reset the foot pedal deadband position if necessary. (Refer to the Control System, / Main Machine Controller Programming section.) • Make sure there is continuity through the Neutral Relay K4 contacts 30 and 87a (relay off). • Check the starter relay operation • Check circuit breaker CB1 and reset if necessary. • Check circuit breaker CB3 and reset if necessary. 106 Service Manual – SW8000 Engine System, Gasoline/LPG Problem Cause Correction The engine will not start. No power to the Ign. Switch Input terminal on the A3 Engine System. • Check circuit breaker CB5 and reset if necessary. • Check the continuity from the Ignition Switch to the Ign. Switch Input terminal on the A3 Engine System and repair as necessary. Engine will not run at high speed. Loss of throttle input from Main Machine Controller to Engine Controller Engine System Problem • Check that a voltage signal is being sent to the engine controller when the Throttle Switch is set to operating speed. • Refer to Diagnosis Manual ECM System WG1605 9Y110-01760.pdf The engine stops running, check engine light is on. The coolant temperature is too Refer to the Engine Overheating Problems section high. below. The oil pressure has dropped too low. Refer to the Loss of Oil Pressure Protection section below. Engine Management System Problem Consult Diagnosis Manual ECM System WG1605 9Y110-01760.pdf Engine Overheating Problems Use the checklist below as a guide to thoroughly check the engine cooling system. • Check the coolant level in the overflow tank and radiator. • Inspect and clean the radiator and hydraulic oil cooler. • Check for correct operation of the belt-driven engine cooling fan (slippage). • Check to see that the engine thermostat opens. • Check for correct water pump operation. • Check the engine crankcase oil level. • Check for air trapped in the cooling system. (Refer to the Engine Coolant/Replacing Engine Coolant section.) • Check the engine coolant sensor for correct function as replace if necessary. • Check for combustion gasses in the coolaning system. 107 Service Manual – SW8000 Engine System, Gasoline/LPG Specifications Model WG1605-G-E3 WG1605-L-E3 Gasoline fuel LPG fuel Number of Cylinders Four Vertical, water cooled, four-cycle Gasoline engine Type Bore × Stroke 79.0 × 78.4 mm (3.11 × 3.09 in.) Total Displacement 1.537 L (93.79 cu.in.) Cylinder Head Ignition System Overhead-Valve Full Transistor Battery Ignition Type Governor Direction of Rotation Spark Plug Type/Spark Plug Gap Ignition Timing. Vertical, water cooled, four-cycle LPG engine Electronic Governor Counterclockwise (Viewed from Flywheel Side) NGK IFR6F8DN; 0.70 to 0.80 mm (0.028 to 0.031 in.) 0.45 rad (26 °) before T.D.C. 0.35 rad (20 °) before T.D.C. 3000 min-1 (rpm), 3600 min-1 (rpm) 3000 min-1 (rpm), 3600 min-1 (rpm) 0.17 rad (10 °) before T.D.C. 0.17 rad (10 °) before T.D.C. 750 min-1 (rpm), 800 min-1 (rpm) 750 min-1 (rpm), 800 min-1 (rpm) Firing Order 1-3-4-2 Compression Ratio 9.1: 1 Lubricating System Forced Lubrication by Trochoid Pump Oil Pressure Indication Engine Oil Pressure (Hot) Electrical Type Switch Factory Specification Allowable Limit 49 kPa At Idle Speed 0.50 kgf/cm2 – 7.1 psi At Rated Speed Lubricating Filter Cooling System Type Starting System 196 to 441 kPa 147 kPa 2.00 to 4.49 kgf/cm2 1.50 kgf/cm2 28.5 to 63.9 psi 21.3 psi Full Flow Paper Filter (Cartridge Type) Pressurized Radiator, Forced Circulation with Water Pump Electric Starting with Starter Starting Motor Battery 12 V, 1.0 kW 12 V, 52 AH or Equivalent Charging Alternator Fuel Lubricating Oil 12 V, 480 W, 720 W Unleaded Automobile Gasoline Commercial LPG Better than SL Class (API) SAE 10W-30 Lubricating Oil Capacity 6.0 L (1.6 U.S.gals) Catalytic Muffler / Converter Three-way Catalyst Weight (Dry) Kubota Recommended LPG Fuel Specifications 119 kg (262 lbs) 120 kg (265 lbs) Commercial Propane gas only, Equivalent to Propanes H-D-5 of GPA* standards 108 Service Manual – SW8000 Engine System, Gasoline/LPG Shop Measurements The following information was gathered by measuring one machine. While the values recorded cannot serve as “true specifications” they may help you recognize what normal looks like and give you some standard of comparison. Engine Vacuum 17.5-18 “HG (59-61kPa)-at warm idle. Measured at approximately 900 ft. elevation LP Fuel Pressure • Primary - Approximately 3 psi (20 kPa) • Secondary - Approximately 1 psi (7 kPa) Ignition Output while cranking WaveStar30:KV CKP and CMP Running Page: 1 Cam Sensor and Crank Sensor Oscilloscope Pattern 109 Service Manual – SW8000 Special Tools Diagnostic Communication Cable and software, p/n 56305647 Note: The “Ecom” cable is used but the software on the CD is for the GM engines. New software and a new password must be downloaded from Customer Zone to use on the Kubota engine. Cooling System Tool Engine System, Gasoline/LPG 110 Service Manual – SW8000 111 Hopper System Functional Description Overview The hopper holds the dust and debris swept up by the brooms. A hydraulic cylinder raises the hopper for emptying into a dumpster or other receptacle. A second hydraulic cylinder opens and closes the hopper door to allow the Operator to empty the hopper. The dust control system pulls air from the hopper through the hopper filter to reduce the dust generated from sweeping. Refer to the Dust Control System section for more information on the dust control components. Hopper The Hopper is supported by the Hopper Lift Arm Weldment. The Hopper Lift Arm Weldment pivots in the chassis to allow the Hopper to swing up and down. The Hopper Lift Cylinder is attached to the Hopper Lift Arm Weldment and chassis, and extends and retracts to raise and lower the Hopper. The mechanical Prop Rod can be engaged to prevent the Hopper from being lowered, or from dropping accidentally if there’s a problem with the hydraulic system. Hopper Hopper Lift Arm Weldment Prop Rod Hopper Lift Cylinder Service Manual – SW8000 Hopper System Hopper Door The Hopper Door is attached to the Hopper Door Pivot. The Hopper Door Pivot is mounted to the two Side Broom Arm Brackets to allow the Hopper Door to open and close. The Hopper Door Cylinder is attached to the Hopper Door and hopper lift arm weldment, and extends and retracts to open and close the Hopper Door. Side Broom Arm Bracket (2) Hopper Door Hopper Door Cylinder Hopper Door Pivot 112 Service Manual – SW8000 Hopper System Hopper Hydraulic System The hydraulic solenoid valves that control the Hopper Lift Cylinder and Hopper Door Cylinder are in the Hydraulic Manifold Assembly, The solenoid valves are electrically energized by pressing the corresponding switches on the control panel. S5 Hopper Up/Down S4 Only Installed on Models with Litter Vac Kit S7 Hopper Open S9 Hopper Lower The hopper lift cylinder is connected to ports M and N on the Hydraulic Manifold Assembly. Hydraulic Manifold Assembly The S5 Hopper Up/Down, S6 Hopper Up Bypass and the S9 Hopper Lower solenoid valves control the hopper lift cylinder. S1 Hopper Close/ Open The hopper door cylinder is connected to ports B and C on the Hydraulic Manifold Assembly. The S1 Hopper Close/Open and S7 Hopper Open solenoid valves control the hopper door cylinder. S6 Hopper “M” To Upper Up Bypass “B” To Lower Port on Port on Hopper Lift Hopper Door Cylinder Cylinder Note that: • The S4 solenoid valve is only installed on machines equipped with the Litter Vac Kit. “N” To Lower Port on Hopper Lift Cylinder “C” To Upper Port on Hopper Door Cylinder Hydraulic Manifold Assembly • On machines without the Litter Vac Kit, a captive plug is installed in the S4 location in the Hydraulic Manifold Assembly. C Hopper Door Cylinder B M N Hopper Lift Cylinder 113 Service Manual – SW8000 Hopper System Hopper System Wiring Diagram Battery 12 VDC + - 2 CB1 Circuit Breaker, 70 Amp St. Ignition Switch Ign. Acc. CB4 Circuit Breaker, 20 Amp GRN/BLU 1 2 VIO VIO Bat. S1 GRN/BLU RED 1 A2 Main Machine Controller L1 VIO 1 BLU/WHT 2 J1-1 Bat - RED/GRA J1-5 Bat - BLU/GRA J1-6 Bat - Valve S1 Hopper Close/Open L5 VIO 1 2 Valve S5 Hopper Up/Down (Closed when Hopper is Down) L6 VIO 1 2 5v Valve S6 Hopper Up/Bypass 1 2 BLK/WHT J1-7 Bat - YEL/GRN J1-9 Bat - Valve S7 Hopper Open L9 VIO 1 2 Valve S9 Hopper Lower Touch Pad Switches TPS7 1 2 J3-5 5v Hopper Door Open TPS8 1 2 J3-6 5v Hopper Up TPS9 1 2 J3-8 5v Hopper Down 1 RED/BLK 1 S4 2 Hopper Interlock Switch L7 VIO J2-9 TPS10 2 J3-7 5v Hopper Door Close Common Ground J3-1 BLK 114 Service Manual – SW8000 Hopper System Hopper System Circuit Description Positive voltage is provided to hopper solenoid valves S1, S5, S6, S7 and S9 when the Ignition Switch is on. The A2 Main Machine Controller will ground and energize the solenoid valve corresponding to the function selected by the Operator via the Touch Pad Switches. • The Hopper Interlock Switch, S4, must be closed (hopper down) before the sweeping functions can be enabled. • The Hopper Interlock Switch, S4, must be open (hopper up) before the hopper door can be opened or closed manually. Note:The A2 Main Machine Controller programming logic for the hopper functions works as follows: • The engine needs to be at the high-speed setting in order to raise or lower the hopper. • The A2 Main Machine Controller will automatically open the hopper door when the main broom is on (lowered). • The A2 Main Machine Controller will automatically close the hopper door when the main broom is off (raised) or when the hopper is not down. • The hopper door cannot be closed manually when the main broom is on and the hopper is down. • The hopper must not be down and the main broom must be off in order for the hopper door to be opened or closed manually. • The main broom is turned off automatically and the hopper door is closed automatically when the hopper is raised (not down). 115 Service Manual – SW8000 Hopper System Hopper System Hydraulic Diagrams Hopper Down, Hopper Door Closed Hopper Dump Cylinder B C S1 From Steering To Steering Hopper Close/Open S7 Hopper Open Main S2 2.0 GPM Hopper 8.6 GPM S6 Hopper Lower S5 2500 PSI To Oil Cooler and Filter T Captive Plug From Dust Control S9 Hopper Up/Down N M P Hopper Lift Cylinder Gear Pump 2400 RPM 1.02 CIR Reservoir When the hopper is down and the main broom is off, the hydraulic oil from the Gear Pump passes through the 8.6 GPM splitter, through the de-energized Hopper Up Bypass solenoid valve, S6, then through the return lines to the Oil Cooler and Filter. When the hopper door is closed, the hydraulic oil from the Gear Pump passes through the de-energized Hopper Open solenoid valve, S7, then to the retract (lower) port, B, on the extended Hopper Dump Cylinder. The check valve on the de-energized Hopper Close/Open solenoid valve, S1, blocks the oil flow through the Hopper Dump Cylinder to keep the Hopper Dump Cylinder extended and the hopper door closed. 116 Service Manual – SW8000 Hopper System Raise Hopper From Steering To Steering Main S2 Broom 2.0 GPM Hopper Up Bypass 8.6 GPM S6 Hopper Lower S5 2500 PSI To Oil Cooler and Filter T Captive Plug From Dust Control S9 Hopper Up/Down N M P Hopper Lift Cylinder Raises Hopper Gear Pump 2400 RPM 1.02 CIR Reservoir • When the Raise Hopper Switch on the control panel is pressed, the A2 Main Machine Controller energizes the Hopper Up/Down solenoid valve, S5, and the Hopper Up Bypass solenoid valve, S6. • The check valve in the energized Hopper Up Bypass solenoid valve blocks and directs the hydraulic oil to the energized Hopper Up/Down solenoid valve, S5. The hydraulic oil also “deadheads” at the check valve in the de-energized Main Broom solenoid valve, S2, at the de-energized Hopper Lower solenoid valve, S9, and at the Captive Plug in the pressure line. • The hydraulic oil goes through the energized Hopper Up/Down solenoid valve, S5, then to the extend (lower) port, N, on the Hopper Lift Cylinder to raise the hopper. • The oil from the retract (upper) port, M, on the Hopper Lift Cylinder goes to the return line to the Oil Cooler and Filter. 117 Service Manual – SW8000 Hopper System Lower Hopper To Steering From Steering Main S2 Broom 2.0 GPM Hopper Up Bypass 8.6 GPM Captive Plug S6 S5 2500 PSI To Oil Cooler and Filter T From Dust Control S9 Hopper Hopper N M P Hopper Lift Cylinder Lowers Hopper Gear Pump 2400 RPM 1.02 CIR Reservoir • When the Lower Hopper Switch on the control panel is pressed, the A2 Main Machine Controller energizes the Hopper Lower solenoid valve, S9. • The hydraulic oil is directed through the de-energized Hopper Up Bypass solenoid valve, S6, then to the retract (upper) port, M, on the Hopper Lift Cylinder to lower the hopper. The check valves in the deenergized Hopper Up/Down solenoid valve, S5, block the oil to and from the extend (lower) port, N, on the Hopper Lift Cylinder. The hydraulic oil also “deadheads” at the check valve in the de-energized Main Broom solenoid valve, S2, and at the Captive Plug in the pressure line. • The oil from the extend (lower) port, N, on the Hopper Lift Cylinder goes through the energized Hopper Lower solenoid valve, S9, then returns to the Reservoir. 118 Service Manual – SW8000 Hopper System Open Hopper Door Hopper Dump Cylinder Opens Hopper Door B To Steering From Steering C S1 Hopper Close/Open S7 Hopper Open To Oil Cooler and Filter T P Gear Pump 2400 RPM 1.02 CIR Reservoir Note: The hopper door can only be opened and closed manually when the hopper is not down. The hopper door opens automatically when the hopper is down and the main broom is on. • When the Open Dump Door Switch on the control panel is pressed, the A2 Main Machine Controller energizes the Hopper Close/Open solenoid valve, S1. • The hydraulic oil goes through the de-energized Hopper Open solenoid valve, S7, then to the retract (lower) port, B, on the Hopper Dump Cylinder to open the hopper door. • The oil from the extend (upper) port, C, on the Hopper Dump Cylinder goes through the energized Hopper Close/Open solenoid valve, S1, through the de-energized Hopper Open solenoid valve, S7, then returns to the Reservoir. 119 Service Manual – SW8000 Hopper System Close Hopper Door Hopper Dump Cylinder Closes Hopper Door B To Steering From Steering C S1 Hopper Close/Open S7 Open n To Oil Cooler and Filter T P Gear Pump 2400 RPM 1.02 CIR Reservoir Note: The hopper door can only be opened and closed manually when the hopper is not down. The hopper door closes automatically when the broom is off or the hopper is raised. • When the Close Dump Door Switch on the control panel is pressed, the A2 Main Machine Controller energizes the Hopper Open solenoid valve, S7. • The hydraulic oil is directed through the energized Hopper Open solenoid valve, S7, through the check valve in the de-energized Hopper Close/Open solenoid valve, S1, then to the extend (upper) port, C, on the Hopper Dump Cylinder to close the hopper door. • The oil from the retract (lower) port, B, on the Hopper Dump Cylinder goes through the energized Hopper Open solenoid valve, S7, then returns to the Reservoir. 120 Service Manual – SW8000 Hopper System Component Locations The following components are included in this section: • Hopper • Hopper Interlock Switch • Hopper Lift Cylinder • Hopper Prop Rod • Hopper Door Cylinder • Hydraulic Manifold Assembly and Solenoid Valves Hopper The Hopper is on the front of the machine and holds the dust and debris swept up by the brooms. The hopper also houses the dust control system components (panel filter, panel filter shaker assembly, vacuum fan assembly, etc.). Refer to the Dust Control System section for details on the Dust Control System. Hopper Cover The Hopper Cover lifts up to allow access to the dust control system components. Hopper Hopper Interlock Switch The Hopper Interlock Switch (S4) is a proximity switch that “closes” when the hopper is fully down. The switch is mounted on the left side of the machine above the left front wheel. This switch must be closed in order for the sweeping functions to be enabled. Hopper Interlock Switch 121 Service Manual – SW8000 Hopper System Hopper Lift Cylinder The Hopper Lift Cylinder is attached to the machine frame and hopper, and raises and lowers the hopper. Hopper Prop Rod The Prop Rod must be engaged whenever personnel are working on or underneath the hopper. The Prop Rod prevents the hopper from being lowered, or from dropping down accidentally if there’s a failure in the hydraulic system. Hopper Lift Cylinder Prop Rod Warning! Never work under the hopper without first engaging the Prop Rod. To engage the Prop Rod: 1. Raise the hopper to its full-up position. 2. Pull the Hopper Safety Support Handle toward the rear of the machine to retract the Prop Rod to the engage position (as shown in the adjacent photo). 3. Lower the hopper to engage the Prop Rod. t rac Ret Rod p Pro end Ext Rod p Pro To disengage the Prop Rod. 1. Raise the hopper to its full-up position. 2. Push the Hopper Safety Support Handle toward the front of the machine to extend the Prop Rod to the disengage position. 3. Lower the hopper. Hopper Safety Support Handle 122 Service Manual – SW8000 Hopper System Hopper Door Cylinder The Hopper Door Cylinder is attached to the Hopper Door and Hopper Lift Arm Weldment, and retracts and extends to open and close the Hopper Door. Hopper Door Hopper Door Cylinder Hopper Lift Arm Weldment Hydraulic Manifold Assembly and Solenoid Valves The Hydraulic Manifold Assembly is mounted on the frame underneath the center cover assembly/DustGuard™ tank. • The S5 Hopper Up/Down, S7 Hopper Open and S9 Hopper Lower solenoid valves are mounted on the top of the Hydraulic Manifold Assembly. S4 Only Installed on Models with Litter Vac Kit S5 Hopper Up/Down S7 Hopper Open S9 Hopper Lower • The S6 Hopper Up Bypass and S1 Hopper Close/Open solenoid valves are mounted on the bottom of the Hydraulic Manifold Assembly. Hydraulic Manifold Assembly S1 Hopper Close/Open S6 Hopper Up Bypass S7 Hopper Open S9 Hopper Lower S5 Hopper Up/Down S6 Hopper Up Bypass S1 Hopper Close/Open 123 Service Manual – SW8000 Hopper System Troubleshooting Problem Cause Correction The hopper doesn’t rise when the Raise Hopper Switch is pressed. The engine is at idle speed. Switch the engine to high speed. The Raise Hopper Switch is not making connection with the A2 Main Machine Controller. Check the connection between the touch pad switch panel and pin J3-6 on the A2 Main Machine Controller. If the connection is OK, there may be a problem with the touch pad switch panel or the A2 Main Machine Controller. There is no power to the S5 Hopper Up/Down solenoid valve. Check the wiring to the S5 Hopper Up/Down solenoid valve. The solenoid receives positive battery voltage and is grounded to the A2 Main Machine Controller when the Raise Hopper Switch is pressed. Repair/ replace the wiring as necessary. The S5 Hopper Up/Down solenoid valve is not operating. • Check the solenoid coil resistance. If the resistance doesn’t measure approximately 9 ohms ±10%, replace the coil. • Check the function of the solenoid valve cartridge. Replace as necessary. There is no power to the S6 Hopper Up Bypass solenoid valve. Check the wiring to the S6 Hopper Up Bypass solenoid valve. The solenoid receives positive battery voltage and is grounded to the A2 Main Machine Controller when the Raise Hopper Switch is pressed. Repair/ replace the wiring as necessary. The S6 Hopper Up Bypass solenoid valve is not operating. • Check the solenoid coil resistance. If the resistance doesn’t measure approximately 9 ohms ±10%, replace the coil. • Check the function of the solenoid valve cartridge. Replace as necessary. The S9 Hopper Lower solenoid valve is stuck open. The S2 Main Broom solenoid valve is stuck open. The hopper mount or hopper lift cylinder is binding. Check the function of the solenoid valve cartridge. Replace as necessary. Check for any mechanical binding or damage to the hopper pivot points, hopper lift cylinder and cylinder mounting points. Correct as necessary. 124 Service Manual – SW8000 Hopper System Problem Cause Correction The hopper doesn’t lower when the Lower Hopper Switch is pressed. The engine is at idle speed. Switch the engine to high speed. The Lower Hopper Switch is not making connection with the A2 Main Machine Controller. Check the connection between the touch pad switch panel and pin J3-8 on the A2 Main Machine Controller. If the connection is OK, there may be a problem with the touch pad switch panel or the A2 Main Machine Controller. There is no power to the S9 Hopper Lower solenoid valve. Check the wiring to the S9 Hopper Lower solenoid valve. The solenoid receives positive battery voltage and is grounded to the A2 Main Machine Controller when the Lower Hopper Switch is pressed. Repair/ replace the wiring as necessary. The S9 Hopper Lower solenoid valve is not operating. • Check the solenoid coil resistance. If the resistance doesn’t measure approximately 9 ohms ±10%, replace the coil. • Check the function of the solenoid valve cartridge. Replace as necessary. The S2 Main Broom solenoid valve is stuck open. The S6 Hopper Up Bypass solenoid valve is stuck closed. Check the function of the solenoid valve cartridge. Replace as necessary. The S5 Hopper Up/Down solenoid valve is stuck open. The hopper door doesn’t open when the Open Dump Door Switch is pressed. The Open Dump Door Switch is not making connection with the A2 Main Machine Controller. Check the connection between the touch pad switch panel and pin J3-5 on the A2 Main Machine Controller. If the connection is OK, there may be a problem with the touch pad switch panel or the A2 Main Machine Controller. There is no power to the S7 Hopper Open solenoid valve. Check the wiring to the S7 Hopper Open solenoid valve. The solenoid receives positive battery voltage and is grounded to the A2 Main Machine Controller when the Lower Hopper Switch is pressed. Repair/ replace the wiring as necessary. The S7 Hopper Open solenoid • Check the solenoid coil resistance. If the resistance valve is not operating. doesn’t measure approximately 9 ohms ±10%, replace the coil. • Check the function of the solenoid valve cartridge. Replace as necessary. There is binding in the hopper door mount or hopper door cylinder. Check for any mechanical binding or damage to the hopper door pivot points, hopper door cylinder and cylinder mounting points. Correct as necessary. 125 Service Manual – SW8000 Hopper System Problem Cause Correction The hopper door doesn’t close when the Close Dump Door Switch is pressed. The Close Dump Door Switch is not making connection with the A2 Main Machine Controller. Check the connection between the touch pad switch panel and pin J3-7 on the A2 Main Machine Controller. If the connection is OK, there may be a problem with the touch pad switch panel or the A2 Main Machine Controller. There is no power to the S1 Hopper Close/Open solenoid valve. Check the wiring to the S1 Hopper Close/Open solenoid valve. The solenoid receives positive battery voltage and is grounded to the A2 Main Machine Controller when the Lower Hopper Switch is pressed. Repair/replace the wiring as necessary. The S1 Hopper Close/ Open solenoid valve is not operating. • Check the solenoid coil resistance. If the resistance doesn’t measure approximately 9 ohms ±10%, replace the coil. • Check the function of the solenoid valve cartridge. Replace as necessary. The S7 Hopper Open solenoid Check the function of the solenoid valve cartridge. valve is stuck in the energized Replace as necessary. position. There is dirt or debris preventing the hopper door from closing. • Clean/remove any dirt or debris from the hopper door and door sealing surfaces. There is binding in the hopper door mount or hopper door cylinder. Check for any mechanical binding or damage to the hopper door pivot points, hopper door cylinder and cylinder mounting points. Correct as necessary. Specifications Component Specifications S1, S5, S6, S7 and S9 Solenoid Valves Nominal Coil Resistance – 8 Ohms Bore Diameter – 2.5 in. Hopper Lift Cylinder Rod Diameter – 1.25 in. Bore Diameter – 1.5 in. Hopper Door Cylinder Rod Diameter – .75 in. 126 Service Manual – SW8000 127 Hydraulic System Functional Description Overview The hydraulic Piston Pump powers the traction Drive Motor. The hydraulic Gear Pump powers the Main Broom Motor, Side Broom Motor(s) and the Dust Control Vacuum Fan Motor. The Gear Pump also powers the Hopper Lift, Hopper Door and Side Broom Cylinders, and the Steering Control Unit and Steering Cylinder. The Piston Pump and traction Drive Motor are a “closed” system. Electrically-controlled solenoid valves, located in the Hydraulic Manifold Assembly, direct the hydraulic oil from the Gear Pump to the various system components to perform the sweeping and dust control functions, raise and lower the hopper, and open and close the hopper door. The hydraulic oil from the machine system components returns through the Oil Cooler and Oil Filter to the Reservoir. Note: The individual hydraulic motors and cylinders are described in the corresponding machine system sections. Hopper Door Cylinder Dust Control Motor Steering Control Unit Hydraulic Manifold Assembly Oil Cooler Side Broom Cylinder Main Broom Motor Side Broom Motor Oil Filter Hopper Lift Cylinder Gear/Piston Pump Assembly Reservoir Steering Cylinder Drive Motor Service Manual – SW8000 Hydraulic System Hydraulic Pumps The engine drives the two hydraulic pumps that power the drive wheel and the various system components: Case Drain to Reservoir To “P” Port on Hydraulic Manifold Assembly Charge Circuit from Filter To “B” Port on Drive Motor The Piston Pump (2.48 CIR) is a variable-displacement axial piston pump that powers the drive motor. Test Port The Gear Pump (1.02 CIR) powers the main and side broom motors, dust control vacuum fan motor, hopper lift cylinder, hopper door cylinder, side broom cylinder, steering control unit and steering cylinder, Piston Pump To “A” Port on Drive Motor The Test Port is located on the pressure side of the Gear Pump to allow you to measure the pressure from the Gear Pump. Gear Pump Supply from Reservoir Hydraulic Manifold Assembly The Hydraulic Manifold Assembly contains the hydraulic solenoid valves that control the oil flow to the main broom motor, side broom motor(s), dust control motor, hopper lift cylinder, hopper door cylinder, side broom lift cylinder and steering control unit. To Side Broom Lift Cylinder To Dust Control Motor Hydraulic Manifold Assembly From Steering Control Unit To Hopper Lift Cylinder Return to Reservoir To Side Broom Motor and Lift Cylinder From Side Broom Motor From Gear Pump From Main Broom Motor Return to Filter, Cooler and Reservoir From Dust Control Motor To Hopper Door Cylinder To Steering Control Unit To Main Broom Motor To Hopper Lift Cylinder To Hopper Door Cylinder 128 Service Manual – SW8000 Hydraulic System Electrical Schematic Battery 12 VDC - + 2 CB1 Circuit Breaker, 70 Amp A2 Main Machine Controller Bat. S1 St. J2-1 Ignition Switch Ign. J2-2 VIO RED 1 L1 GRN/BLU VIO Acc. CB4 Circuit Breaker, 20 Amp GRN/BLU 1 VIO 2 1 2 BLU/WHT J1-1 J2-3 BRN/WHT ORN/GRA Bat - L2 1 2 GRN/GRA J1-2 R2 3 Drive Pedal Sensor, 5K Ohm Valve S1 Hopper Close/Open VIO 2 1 YEL/GRA J2-12 5v 1 S2 2 ORN/BLK BLK Bat Main Broom Switch (Open when Broom is Down) Valve S2 Main Broom L3 VIO 1 2 BRN/BLK J1-3 Bat - J2-9 5v Valve S3 Side Broom 1 2 RED/GRA J1-5 Bat - Valve S5 Hopper Up/Down Touch Pad Switches L6 VIO 1 BLK Hopper Interlock Switch (Closed when Hopper is Down) L5 VIO 1 S4 2 RED/BLK 2 BLU/GRA J1-6 TPS5 J3-10 Bat 5v Valve S6 Hopper Up/Bypass 1 2 Dust Control TPS6 J3-9 L7 VIO 1 2 BLK/WHT J1-7 Bat - 5v 1 Valve S7 Hopper Open TPS7 J3-5 5v L8 VIO 1 2 Side Brooms 1 2 Hopper Door Open BRN 2 J1-8 Bat TPS8 Valve S8 Dust Control Bypass J3-6 5v 1 2 Hopper Up L9 VIO 1 2 YEL/GRN J1-9 TPS9 Bat - Valve S9 Hopper Lower J3-8 5v 1 2 Hopper Down J3-7 5v 1 TPS10 2 Hopper Door Close J3-1 Common Ground Electrical Circuit Description The Touch Pad Switches on the control panel enable the solenoid Valves corresponding to the selected functions. The A2 Main Machine Controller will actuate the appropriate solenoid Valves to run the main broom, side broom and dust control motors, and extend the side broom cylinder when the following conditions are met: • The main broom is lowered and the Main Broom Switch S2 is open. • The hopper is down and the Hopper Interlock Switch S4 is closed. • The drive pedal is moved from neutral, changing the resistance through the 5K Ohm Drive Pedal Sensor from its “deadband” range. 129 Service Manual – SW8000 Hydraulic System Component Locations The following components are included in this section: • Hydraulic Piston and Gear Pumps • Hydraulic Manifold Assembly • Hydraulic Oil Reservoir • Oil Filter • Oil Cooler Hydraulic Piston and Gear Pumps The hydraulic Piston Pump and Gear Pump are mounted on the rear of the engine (toward the front of the machine) and are driven by the engine crankshaft. Piston Pump Gear Pump Hydraulic Manifold Assembly The Hydraulic Manifold Assembly is mounted on the frame underneath the center cover assembly/ DustGuard™ tank (removed in the adjacent photo). Hydraulic Manifold Assembly 130 Service Manual – SW8000 Hydraulic System Hydraulic Oil Reservoir The Hydraulic Oil Reservoir is located below the Operator seat. The hydraulic oil in the Hydraulic Oil Reservoir is at the correct level when it is halfway up the filter screen inside the reservoir filler neck as viewed when the Filler Cap is removed. Filler Cap Hydraulic Oil Reservoir Oil Filter The Oil Filter is mounted to the machine frame and filters the oil returning to the reservoir. Oil Filter 131 Service Manual – SW8000 Hydraulic System Oil Cooler The Oil Cooler is mounted to the rear of the engine Radiator. Radiator Oil Cooler Maintenance and Adjustments Warning! Before performing any machine maintenance or adjustments, make sure the key switch is off, the key is removed from the machine and the parking brake is engaged. To Check the Hydraulic Oil Level Remove the filler cap from the reservoir and check the hydraulic oil level in the reservoir. The hydraulic oil level should be halfway up the Filter Screen inside the reservoir filler neck. Add 10w-30 oil as needed. Note: Change and flush the oil if major contamination from a mechanical failure occurs. Filter Screen 132 Service Manual – SW8000 Hydraulic System To Change the Hydraulic Oil Filter Caution! Make sure the hydraulic system is not under pressure, and that the hydraulic filter and reservoir are cool to the touch before servicing the filter. Make sure you are wearing the appropriate clothing and eye protection when working with or near the hydraulic system. 1. It’s recommended that you lay down some rags or paper towels underneath the Oil Filter to catch any oil that may spill. 2. Spin the Oil Filter Cartridge off of the Oil Filter Head. 3. Install the new Oil Filter Cartridge onto the Oil Filter Head. Oil Filter Head Oil Filter Cartridge To Clean the Hydraulic Oil Cooler Clean the engine radiator and hydraulic oil cooler every 30 hours of operation as follows: Caution! Wear Safety glasses when cleaning the engine radiator and hydraulic oil cooler. 1. Tip the Engine Cover back, then disconnect the cable latch on the left side of Engine Cover to allow the Cover to tip all the way back and out of the way. Hydraulic Oil Cooler 2. Turn the locking mechanism at the top of the Hydraulic Oil Cooler to allow the Cooler to tip back away from the Radiator for easy access. Radiator 3. Blow out the Radiator and Hydraulic Oil Cooler with compressed air, or clean using low-pressure water to rinse any debris from the fins. Engine Cover 133 Service Manual – SW8000 Hydraulic System Caution! Do not use a pressure washer or a mechanical brush to clean fins since this can damage the fins. If the fins get bent, carefully straighten them to improve cooling performance. 4. Lift the Hydraulic Oil Cooler to its upright position and latch it into place. 5. Lift the Engine Cover up and reconnect the cable latch. Troubleshooting General Troubleshooting Problem Cause Correction General poor hydraulic performance. Low oil hydraulic level. Check the oil level in the reservoir and add oil as necessary. Hydraulic oil temperature too high. • Check for any restrictions to or from the oil cooler and correct as necessary. • Clean the cooling fins on the oil cooler to ensure adequate airflow through the cooler. Hydraulic oil filter plugged. Replace the oil filter cartridge. Gear pump failing. Check the output pressure from the gear pump. If below specs, repair or replace the pump. Contamination in the hydraulic system. Drain, flush and refill the system. General Information Regarding Checking Hydraulic Pressures Accurate measurements are the key to troubleshooting a hydraulic system. Once you obtain accurate measurements you can compare them to the specifications to analyze a problem. You can use digital tachometers, flow gauges/meters or pressure gauges to troubleshoot the hydraulic system. The pressure gauge should have a range of 0 to 3000 psi (see the Special Tools section). The flow meter must be rated to 3000 psi and 10 gal./min. The most convenient way to check for oil flow is to check the RPM of the motor that is performing poorly. Refer to the following tables to determine the motor RPM. If the motor speed is correct, the pump is producing the correct amount of oil flow. However, this does not mean that if a motor is running too slow the problem is in the pump. The following information should be used to check for correct system pressure. The readings are nominal measured figures, and there will be variations due to manufacturing tolerances and system oil temperature. If any reading varies greater than 20 percent, there will be a noticeable loss of performance and the problem should be corrected. 134 Service Manual – SW8000 Hydraulic System Checking the Gear Pump Pressure Note: There is Test Port on the Gear Pump that can be used to check the Gear Pump pressure. Test Port 1. Connect the pressure gauge to the Test Port on the Gear Pump. 2. Run the engine in the high throttle position and allow the hydraulic oil to warm up. Gear Pump 3. Refer to the following tables to determine if the gear pump and/or hydraulic motor is operating correctly. Note: All of the following readings were static, taken on a smooth painted concrete surface. Measured Pressure at the Gear Pump Test Port Machine Condition High RPM, nothing running 380 psi High RPM, main broom only running, standard broom, two-inch wide brush pattern on concrete, vacuum fan turned off 1,275 psi High RPM, main broom off, vacuum fan turned on, side brooms off 1,650 psi High RPM, main broom on, two-inch wide brush pattern on concrete, vacuum fan turned on, side brooms off 1,770 psi High RPM, main broom on, two-inch wide brush pattern on concrete, vacuum fan turned on, side brooms on 1,810 psi High RPM, raising empty hopper Time to raise hopper – 10/11 seconds 2,875 psi High RPM, lowering empty hopper Time to lower hopper – 7 seconds 380 psi High RPM, opening hopper door, nothing else running 20 psi High RPM, closing hopper door, nothing else running 50 psi Two side brooms running, nothing else running 360 psi One side broom running, nothing else running 425 psi Machine Condition Measured Motor Speed Two side brooms on the floor 103 RPM One side broom on the floor 130 RPM Main broom with a two-inch pattern 405 RPM Vacuum fan impeller 8,920 RPM 135 Service Manual – SW8000 Hydraulic System Checking the Piston Pump Pressure Note: Checking the piston pump hydraulic pressure will require you to assemble the appropriate fittings that will allow you to connect your pressure gauge to a suitable location. Measured Pressure from the Piston Pump Machine Condition Level surface, 70°F ambient temperature, empty hopper and tank. Pedal fully depressed – 700 psi Pedal 1/2 depressed – 600 psi Hydraulic Truth Table Electrical Solenoid’s Energized Status Solenoid Function S1 S2 S3 S4 Hopper Raise (UP) S5 S6 X X S7 S8 Hopper Lower (DN) Dump Door Open X X Dump Door Closed X Main Broom State ON X Main/Side Broom State ON X X X Dust Control ON Wand State (**) X X X Dust Control OFF Bypass (*) X Side Broom Lower X Side Broom Raise & Turn OFF Side Broom Motor 0V No Hydraulic Manifold Functions S9 System overload in relief S6 not energized (***) * Operator sweeping wet debris with the dust control fan (impeller) turned off. ** Operator using vacuum wand option. The dust control fan operates when the machine’s drive is stationary. To vacuum, attach the suction hose wand to the special hopper inlet fitting. *** The S6 solenoid valve assembly bypasses the sweep system components and sends its hydraulic oil flow to the tank when S6 is de-energized (0 volts). 136 Service Manual – SW8000 Hydraulic System Specifications General Specifications Component Specifications System Capacity 11 gal. (41.6 L) Fluid Type SAE 10w-30 motor oil Type – manually-variable displacement piston pump, tow valve included Displacement – 0 to 2.48 CIR Speed – 3600 RPM max. Piston Pump Continuous pressure – 3000 psi [206.8 bar] Maximum pressure – 5000 psi [344.7 bar] Main Loop Relief Valve Set Point – 3000 psi [206.8 bar] Type – external spur gear, positive displacement Gear Pump Displacement – 1.02 CIR Hydraulic Manifold Assembly Solenoid Valves S1, S2, S3, S4, S5, S6, S7 and S9 Nominal Coil Resistance – 9 ohms (measured on one machine) Solenoid Valve S8 Nominal Coil Resistance – 6.5 ohms (measured on one machine) 137 Service Manual – SW8000 Hydraulic System Hydraulic Manifold Assembly S3 S2 S4 Only Installed on Models with Litter Vac Kit S5 S7 S9 Hydraulic Manifold Assembly S8 S1 S6 Solenoid Valve Hydraulic Circuit Function S1 Hopper Close/Open S2 Main Broom S3 Side Broom Component Description Solenoid-actuated, 2/2 directional poppet, pilot operated cartridge valve Solenoid-actuated 4/2 directional spool, direct acting cartridge valve S7 Hopper Open S5 Hopper Up/Down S9 Lower Hopper S6 Hopper Up Bypass S8 Dust Control Bypass Solenoid-actuated 3/2 directional spool, direct acting cartridge valve Coil Used on S1-S7, S9 12 VDC; nominal coil resistance – 9 Ω. Coil Used on S8 Solenoid-actuated 2/2 directional poppet, direct acting cartridge valve Solenoid-actuated 2/2 directional poppet, pilot operated cartridge valve 12 VDC; nominal coil resistance – 6.5 Ω. Note: The following solenoid valves are interchangeable: • S1 and S2 • S3 and S7 • S5 and S9 Also note that S1, S2, S3, S5, S6, S7 and S9 all use the same solenoid coil. 138 Service Manual – SW8000 Special Tools Hydraulic test gauge w/connector, 3000 PSI range, p/n 56504516 Flow Meter – rated at 3000 psi and 10 gal./min. (typical shown) Various hydraulic fittings required to connect hydraulic test gauge into hydraulic circuits Hydraulic System 139 Service Manual – SW8000 Hydraulic System Hydraulic Schematic, 56507055, Rev. L Dual Side Broom Option Side Broom Lift Cyl. 1.00 x 1.18 x .50 Side Broom Lift Cyl. 1.00 x 1.18 x .50 25 PSI 25 PSI To Side Broom Side Broom Lift Cyl. 1.00 x 1.18 x .50 CF Side Broom Motor 6.1 CIR 6.1 CIR Side Broom Motor E EX 25 PSI IN E F F Side Broom Speed Control Option D 6.1 CIR J1 K Side Broom Motor Main Broom Motor Hopper Dump Cyl. 1.5 x 3.75 x .75 Steering Cyl. 1.75 x 8.5 x .75 2.45 CIR R A T T1 B C D .086 Piloted Check Valve Hopper Close/Open L P 2.9 GPM S6 Hopper Lower 2500 PSI Oil Cooler Hopper S5 Up/Down .037 J1 J 5.7 GPM S8 Main S2 Broom 8.6 GPM Filter 15 GPM K Captive Plug P S9 L .078 N M 1500 PSI Piston Pump B 2400 RPM 3000 PSI 2.48 CIR A 100 Tow Valve 3000 PSI Gear Pump Drive B Motor 22.8 CIR 1.02 CIR A PSI Drive Wheel System Reservoir 1.02 CIR AC Hydraulic Compressor Motor AC Option .161 CIR Hopper Up Bypass T 50 PSI H Dust Control Bypass Open 2.0 GPM G Side Broom S3 S7 Hopper Steering 4.88 CIR F Pilot Operated Hydraulic Valve S1 1100 PSI E 4:1 Hopper Lift Cyl. 2.5 x 15.125 x 1.25 Hydraulic Manifold Assembly Dust Control System 140 Service Manual – SW8000 141 Options and Accessories Description Left Hand Side Broom Rear Bumper Kit (For Non-Cab models) Tilt Steering Kit Illustration Service Manual – SW8000 Description Raised Air Intake Kit for use with Overhead Guard Hopper Temperature Sensor Kit Fire Extinguisher Kit (For Non-Cab models) Options and Accessories Illustration 142 Service Manual – SW8000 Description Hopper Bottom Plate Kit Suspension Seat Kit Options and Accessories Illustration 143 Service Manual – SW8000 Description DustGuard Premist Kit Seat Belt Kit Options and Accessories Illustration 144 Service Manual – SW8000 Description Right and Left Side Broom Guard Kits Plugged Filter Switch Kit Options and Accessories Illustration 145 Service Manual – SW8000 Description Litter Vac Kit Raised Air Intake Kit, without Overhead Guard Options and Accessories Illustration 146 Service Manual – SW8000 Options and Accessories Description Illustration Rear Work Light Curb Work Light Work Light Kit The Work Light Kit includes three lights: a Curb Work Light, a Rear Work Light, and a Trouble Light. Trouble Light Back Up Alarm Kit The Back-Up Alarm Kit includes the Back-Up Alarm, electrical connector and mounting hardware. The Back-Up Alarm connects to the existing machine wiring to sound a warning when the machine is moving in reverse. Brake/Signal Light Kit Front Turn Light Rear Turn and Tail Lights 147 Service Manual – SW8000 Description Overhead Guard Kit Amber Strobe Kit, without Overhead Guard Options and Accessories Illustration 148 Service Manual – SW8000 Description Amber Strobe Kit, with Overhead Guard Cab Side Mirror Option Raised Air Intake Kit for use with Cab Options and Accessories Illustration 149 Service Manual – SW8000 Description Amber Strobe Kit for use with Cab Options and Accessories Illustration 150 Service Manual – SW8000 Options and Accessories SW8000 Deluxe Cab Options The SW8000 Deluxe Cab is available with two levels of environmental control that provide additional comfort and convenience for the Operator, and add additional functionality to the machine. • An optional cab heater is available which includes a pressurized cab with an external air filter. • An optional heating and air conditioning system, along with pressurized cab is available that provides Operator comfort throughout a wide range of ambient temperatures. Technical Specifications Total Machine Height with Cab (Refer to Figure below.) 79.5 in (202 cm) without Amber Strobe Kit 84.5 in (215 cm) with Amber Strobe Kit installed System Voltage 12 VDC Heater Temperature Control Electronic Water Valve w/Bypass (1) Fasco OEM p/n 2807-510-154, Fasco p/n DC136, 1/8 HP, 4200 RPM, three-speed, 4.5 Amp (2) SPAL type 008-A37/C-42D, 4.5 Amp Heating System Blower Motors A/C System Refrigerant R-134a, 1.3 lbs. Condenser Fan Motor Heating System Capacity SPAL, type VA13-AP9/C-35S, 6.9 Amp ICE TM-08-HD, 5 cu. in. (82.0 cc) per revolution, 7006000 RPM Sauer-Danfoss p/n 121.20.045.00, 1.02 cu. in. (16.7 cc) displacement 20,000 BTUs/hr. Air Conditioning System Capacity 13,000 BTUs/hr. Compressor Compressor Motor Figure 1. Cab Height 151 Service Manual – SW8000 Cab Controls (Refer to Figure 2) 1. Cooling Fan Switch 2. Dome Light 3. Heater A/C Fan Switch 4. Heater Temperature Control 5. A/C On/Off Switch 6. Windshield Wiper Switch Figure 2. Cab Controls Options and Accessories 152 Service Manual – SW8000 Heating System Components (Refer to Figure 3) 7. Blower Motor 8. Blower Assembly 9. Heater Core 10. Heater Air Box Assembly 11. Filter 12. Coolant Tube (From Engine Radiator) 13. Cab Filter Cover 14. Heater Hoses 15. Heater Control Assembly 16. HVAC Relay Figure 3. Heating System Components Options and Accessories 153 Service Manual – SW8000 Options and Accessories Air Conditioning System Components (Refer to Figure 4) 17. Evaporator-Heater Unit 18. A/C Condenser 19. Binary Pressure Switch 20. A/C Receiver/Dryer 21. A/C Compressor 22. Hydraulic Compressor Motor 23. Air Filter 24. Cab Filter Cover 25. Coolant Tube (From Engine Radiator) 26. Heater Hoses 27. Heater Control Assembly 28. Accessory (Gear) Hydraulic Pump 29. Compressor Motor Hydraulic Valve 30. Compressor Relay 31. HVAC Relay Figure 4. Air Conditioning System Components 154 Service Manual – SW8000 Options and Accessories Maintenance Warning! Turn the key switch off and remove the key from the ignition switch before performing any machine maintenance. Maintenance Schedule Maintenance intervals given are for average operating conditions. Machines used in severe operational environments may require service more often. Maintenance Item Check for any coolant, hydraulic or refrigerant leaks. Note: Refrigerant leaks can appear as dirty, oily areas around A/C components and fittings. Check the cab filter and clean or replace as necessary. Note: The cab filter may need to be cleaned or replaced more often if the machine is operated in dusty environments. Daily Weekly Monthly X Hours 8-12 X 40 Clean the heater core fins and air box (heater only). X 160 Clean the evaporator and heater core fins inside the evaporator-heater unit (A/C only). X 160 Clean the condenser fins (A/C only). X To Clean and Replace the Cab Filter (Refer to Figure 5) 1. Remove the four screws holding the Cab Filter Cover, then remove the Cab Filter Cover and Filter from the machine. 2. Clean the Filter using any of the following methods: • Tap the Filter gently on a flat surface (dirty side down). • Clean the Filter with compressed air (100 psi max.) blown from the inside (cab side) of the Filter. • Soak the Filter in warm water for 15 minutes, rinse with clean water (40 psi max. water pressure), then air-dry (don’t use compressed air). Make sure the Filter is completely dry before reinstalling. 3. Reinstall the Filter and Cab Filter Cover, then reinstall and tighten the four screws. Figure 5. Cab Filter 40 155 Service Manual – SW8000 Options and Accessories Heating System General System Overview The SW8000 cab heating system uses an electronic Heater Control Assembly to direct the appropriate amount of engine coolant to the Heater Core in the Heater Air Box Assembly . The Blower Assembly in the Heater Air Box Assembly blows filtered air through the Heater Core to provide warm air to the cab. A four-port bypass butterfly valve in the Heater Control Assembly, run by a small electric motor, controls the coolant flow to the Heater Core. The Heater Temperature Control in the cab controls the voltage to the valve motor, and uses a feedback potentiometer to sense the position of the butterfly valve. Electrical Circuit Overview Heater Blower Motor The following conditions must be met for the blower motor to function: Positive (+) Voltage • The key switch (S1)must be in either the accessory or ignition position to provide +12 VDC (GRN/BLU wire) to the 20A circuit breaker CB4. • Circuit breaker CB4 must be closed to provide +12 VDC (VIO wire) to the control side (coil) of the HVAC Relay K8. • The 20A circuit breaker CB9 must be closed to provide voltage (RED/VIO wire) to the input load side of the HVAC Relay K8. • HVAC Relay K8 must be closed to provide +12 VDC (VIO/GRAY wire) to the positive terminal on the Fan Switch S30. • The Fan Switch S30 must be set to the Low (YEL wire), Medium (RED wire) or High (ORN wire) position to provide +12 VDC to the corresponding terminal on the Blower Motor M6. Negative (–) Voltage The Blower Motor M6 must be connected to battery negative (BLK wire). The control side (coil) of the HVAC Relay K8 must be connected to battery negative (BLK wire). Heater Temperature Control The following conditions must be met for the heater temperature control to function: Positive (+) Voltage • The key switch must be in either the accessory or ignition position to provide +12 VDC (GRN/BLU wire) to the 20A circuit breaker CB4. • Circuit breaker CB4 must be closed to provide +12 VDC (VIO wire) to the control side (coil) of the HVAC Relay K8. • The 20A circuit breaker CB9 must be closed to provide voltage (RED/VIO wire) to the input load side of the HVAC Relay K8. • HVAC Relay K8 must be closed to provide +12 VDC (VIO/GRAY to RED wire) to the Heater Temperature Control E1. Negative (–) Voltage The Heater Temperature Control E1 (BLK wire) must be connected to battery ground. The control side (coil) of the HVAC Relay K8 must be connected to battery negative (BLK wire). 156 Service Manual – SW8000 Options and Accessories Electrical Troubleshooting Note: Refer to the Electrical Wiring and Ladder Diagrams in the Appendix. Symptom: The heater Blower Motor will not run. The Blower Motor is not working. Is there 12V at the VIO/GRA wire on the Fan Switch S30? (ref. to bat. neg. w/key switch on) Yes Is there voltage at each of the three positive terminals on Fan Switch S30 when the Switch is set to the corresponding fan speed? (YEL, RED and ORN wires ref. to bat. neg.) No Replace the Fan Switch S30. No Reset or replace circuit breaker CB4. No Is there continuity through 20A circuit breaker CB4? Yes Reset or replace circuit breaker CB9. No Is there continuity through 20A circuit breaker CB9? Yes Replace the Relay. No Does the resistance of Relay coil K8 measure 85 ±20%? Yes Replace the relay. No Is there continuity through the load contacts on K8 (terminals 30 and 87) when the coil is energized? Yes Check the connectors and wiring and repair as necessary. Yes Is there continuity in the YEL, RED and ORN wires from Fan Switch S30 to the positive terminals on the Blower Motor M6? No Repair the wires. No Repair the wire. Yes Is there 12V in the BLK wire from the negative terminal on the Blower Motor M6 ref. to bat. pos.? Yes Replace the Blower Motor M6. 157 Service Manual – SW8000 Options and Accessories Symptom: There is no cab heat, or the cab heat cannot be controlled. Note: Before troubleshooting the heating system, make sure the engine is up to normal operating temperature, the engine coolant is at the recommended level and there are no air locks in the cooling system. (Refer to the To Eliminate Air Locks from the Cooling System subsection.) To Troubleshoot the Valve Assembly Valve Assembly 1. Disconnect the electrical connector from the Valve Assembly. 2. Carefully connect a 12 VDC source to the Motor (-) and Motor (+) pins (directly or via the BLK/WHT and ORN wires in the connector) to run the butterfly valve motor independently without input from the heater temperature control. 3. Check for the heated coolant being switched on and off to the heater core. Note that it will take approximately 15-20 seconds for the valve motor to run between its full-off and full-on positions. Motor (-) Pin Motor (+) Pin • If the valve motor isn’t running, replace the Valve Assembly. Feedback (-) Pin • If the valve motor appears to be running correctly, continue on to step 5 below. Feedback Pot Pin Feedback (+) Pin 4. Check the resistance through the Figure 6. Valve Assembly Connector Pins Feedback Pins to determine if the feedback potentiometer in the Valve Assembly is working correctly. The resistance values should be close to those shown in the table below. Valve Open to Heater Core, Heater Temperature Control set to Hot (full clockwise) Valve Closed to Heater Core, Heater Temperature Control set to Cold (full counterclockwise) Valve Halfway Open, Heater Temperature Control set to approximate midpoint Ohmmeter Connections Resistance (Approximate) Feedback (+) Pin and Feedback (-) Pin 5.71 kW Feedback (+) Pin and Feedback Pot Pin 5.55 kW Feedback Pot Pin and Feedback (-) Pin 0.88 kW Feedback (+) Pin and Feedback (-) Pin 5.71 kW Feedback (+) Pin and Feedback Pot Pin 0.48 kW Feedback Pot Pin and Feedback (-) Pin 5.63 kW Feedback (+) Pin and Feedback (-) Pin 5.71 kW Feedback (+) Pin and Feedback Pot Pin 3.14 kW Feedback Pot Pin and Feedback (-) Pin 3.25 kW 5. If the Feedback Pin resistance values are not close to those shown in the above table, it indicates that the feedback potentiometer in the Valve Assembly is not working correctly. Replace the Valve Assembly. 158 Service Manual – SW8000 Options and Accessories To Troubleshoot the Heater Temperature Control There is no Cab heat/the Cab heat cannot be controlled. Is there 12V to the Heater Temperature Control (BLK and RED wires)? No Check the wiring to the Heater Temperature Control and repair as necessary. No Is there continuity in all five wires from the Heater Temperature Control to the Valve Assembly Connector? Yes Is there approximately +/- 9.75V at the Valve Assembly Connector (BLK/WHT and ORN wires) when the Heater Temperature Control E1 is rotated between cold and hot? No Repair the wiring as necessary. Yes Replace the Heater Temperature Control. Yes Is there continuity in the three feedback pot wires (WHT, VIO and GRN) from the Heater Temperature Control to the Valve Assembly Connector? No Repair the wiring as necessary. Yes Replace the Heater Temperature Control. Service Note: If you have to replace the Heater Temperature Control in the cab, we recommend that you do so as follows: 1. Remove the Overhead Control Plate from the cab. 2. Disassemble the Heater Temperature Control from the Overhead Control Plate. 3. Cut the seven wires going to the Heater Temperature Control at the point where they enter the sealed back of the module. 4. Check the continuity of the five wires going to the Valve Assembly (VIO, WHT, GRN, GRA/BLK WHT, and ORN). • If there is continuity in all five wires from the cab to the Valve Assembly, continue to step 5. • If there is no continuity in any of the five wires from the cab to the Valve Assembly, you will need to either repair the wires or run new wires to the Valve Assembly. 5. Install the replacement Heater Temperature Control on the Overhead Control Plate. 6. Splice the original wires from the Valve Assembly to the replacement Heater Temperature Control using butt connectors and heat-shrink insulation. 7. Reinstall the Overhead Control Plate in the cab. 159 Service Manual – SW8000 Options and Accessories To Eliminate Air Locks from the Cooling System Air locks (air bubbles) in the cooling system can prevent normal coolant flow to the heater core. One factor that can contribute to the formation of air locks is the fact that the heater cores in the SW8000 cabs are the highest point in the machine’s cooling system. This can make it difficult to purge the air from the system using traditional methods more common to the automotive industry. Cooling System Vacuum Filler One recommended method for removing air locks is to drain the cooling system completely, then refill the system using a cooling system vacuum filler tool. This type of tool uses a Venturi vacuum generator to remove the air from the radiator as it fills the radiator with coolant. Purge the Heater Circuit Another method is to remove the hoses that run from the Valve Assembly to the heater core, fill the hoses with coolant to remove as much air as possible from the heater circuit, reinstall the hoses, then run the machine with the heater on to purge any remaining air from the system. Figure 7 shows the heater hose functions for reference. Warning! Before attempting to remove the heater hoses, make sure: −− The engine is switched off. −− The machine coolant has cooled to a low enough temperature so as not to cause burns or injury to persons contacting the hoses or coolant. −− The cooling system temperature and pressure have decreased enough to allow you to remove the radiator cap to relieve the system pressure before removing the hoses. Coolant Supply from Engine Coolant Return to Engine Coolant Supply to Heater Core Coolant Return from Heater Core Figure 7. Valve Assembly Hose Functions 160 Service Manual – SW8000 Options and Accessories Air Conditioning System Note: Refer to the schematics at the end of this chapter. General System Overview The SW8000 cab air conditioning system uses a Hydraulic Compressor Motor (22), powered by the Gear (Accessory) Hydraulic Pump (28), to run the A/C Compressor (21). The A/C Compressor compresses the refrigerant and transfers the hot, high-pressure refrigerant gas to the A/C Condenser (18) at the rear of the machine which condenses the refrigerant gas into a liquid. The condensed high-pressure liquid refrigerant travels from the A/C Condenser to the A/C Receiver/Dryer (20), then to the expansion valve and evaporator inside the Evaporator-Heater Unit (17) inside the cab. The cold, low-pressure refrigerant gas then returns to the A/C Compressor to complete the refrigeration cycle. The Operator moderates the cab cooling by “mixing in” heated air from the heater core in the EvaporatorHeater Unit by adjusting the Heater Temperature Control (4). The Thermostat (S33) (normally closed) has a temperature probe that is inserted into the evaporator coil in the Evaporator-Heater Unit. When the temperature of the evaporator coil reaches 39.5°F, the Thermostat closes to enable the A/C system. When the temperature of the evaporator coil drops to 31°F, the Thermostat opens to switch off the A/C system. The Binary Pressure Switch (S34) (19) (normally closed), located on top of the A/C Receiver/Dryer, will interrupt the +12 VDC to the Compressor Motor Hydraulic Valve (L10) (29) to switch off the Hydraulic Compressor Motor and A/C Compressor under the following two conditions: The refrigerant line pressure drops below 30 psig, indicating an insufficient amount of refrigerant in the system. The refrigerant line pressure rises above 270 psig, indicating an overheated or unsafe condition. The Compressor Relay (K10) (30) will interrupt the +12 VDC to the Compressor Motor Hydraulic Valve (L10) to switch off the Hydraulic Compressor Motor and A/C Compressor whenever the hopper is raised. Electrical Circuit Overview Blower Motors The following conditions must be met for the blower motors to function: Positive (+) Voltage • The key switch must be in either the accessory or ignition position to provide +12 VDC (GRN/BLU wire) to the 20A circuit breaker CB4. • Circuit breaker CB4 must be closed to provide +12 VDC (VIO wire) to the control side (coil) of the HVAC Relay K8. • The 20A circuit breaker CB9 must be closed to provide voltage (RED/VIO wire) to the load side of the HVAC Relay K8. • The HVAC Relay K8 must be closed to provide +12 VDC (VIO/GRAY wire) to the positive terminal on the Fan Switch S30. • The Fan Switch S30 must be set to the Low (YEL wire), Medium (RED wire) or High (ORN wire) position to provide +12 VDC to the corresponding terminals on the Blower Motors M9 and M10. Negative (–) Voltage The Blower Motors M9 and M10 must be connected to battery negative (BLK wires). The control side (coil) of the HVAC Relay K8 must be connected to battery negative (BLK wire). 161 Service Manual – SW8000 Options and Accessories Condenser Fan, Thermostat, Pressure Switch and Compressor Motor The following conditions must be met for the air conditioning system to function: Positive (+) Voltage • The key switch must be in either the accessory or ignition position to provide +12 VDC (GRN/BLU wire) to the 20A circuit breaker CB4. • Circuit breaker CB4 must be closed to provide +12 VDC (VIO wire) to the control side (coil) of the HVAC Relay K8. • The 20A circuit breaker CB9 must be closed to provide voltage (RED/VIO wire) to the load side of the HVAC Relay K8. • HVAC Relay K8 must be closed to provide +12 VDC (VIO/GRA wire) to the positive terminal on the Fan Switch S30. • The Fan Switch S30 must be set to the Low, Medium or High position to provide +12 VDC (RED/WHT wire) to the AC Switch S35. • The AC Switch S35 must be closed to provide +12 VDC to: • The control side (coil) of the Condenser Fan Relay K9 (WHT wire). • The input terminal on the Thermostat S33 (BLK/WHT wire). • The Thermostat S33 (normally closed) must be closed to provide +12 VDC (GRN wire) to the input terminal on the Pressure Switch S34. • The Binary Pressure Switch S34 (normally closed) must be closed to provide +12 VDC (GRN/WHT wire) to the load side of the Compressor Relay K10 (terminal 30). • The load side of the Compressor Relay K10 (normally closed) must be closed to provide +12 VDC (BLU/ BRN wire from terminal 87a) to the Compressor Hydraulic Valve L10. Note: The Compressor Relay K10 coil (control side) is wired in parallel with the Hopper Up/ Down Hydraulic Valve L5. When the Raise Hopper switch is pressed, it actuates the Hopper Up/Down Hydraulic Valve L5 to raise the hopper, and actuates the Compressor Relay K10 coil to open the circuit to the Compressor Hydraulic Valve L10 and switch off the A/C compressor motor. This feature allows the machine to use the maximum available hydraulic force to raise the hopper. Negative (–) Voltage • The control side (coil) of the Condenser Fan Relay K9 must be connected to battery negative (BLK wire). • The control side (coil) of the Compressor Hydraulic Valve L10 must be connected to battery negative (BLK wire). • The control side (coil) of the HVAC Relay K8 must be connected to battery negative (BLK wire). 162 Service Manual – SW8000 Options and Accessories Electrical Troubleshooting Note: Refer to the Cab Electrical Wiring and Ladder Diagrams at the end of this chapter. Symptom: One or both of the Blower Motors will not run. One or both of the Blower Motors will not run. Is there 12V at VIO/GRA wire on Fan Switch S30? (ref. to bat. neg. w/key switch on) Yes Is there voltage at each of the three positive terminals on Fan Switch S30 when the Switch is set to the corresponding fan speed? (YEL, RED and ORN wires ref. to bat. neg.) No Replace the Fan Switch. No Reset or replace circuit breaker CB4. No Is there continuity through 20A circuit breaker CB4? Yes Reset or replace circuit breaker CB9. No Is there continuity through 20A circuit breaker CB9? Yes Replace the Relay. No Does the resistance of Relay coil K8 measure 85 ±20%? Yes Replace the Relay. No Is there continuity through the load contacts on K8 (terminals 30 and 87) when the coil is energized? Yes Check the connectors and wiring and repair as necessary. Yes Is there continuity in the YEL, RED and ORN wires from Fan Switch S30 to positive terminals on Blower Motors M9 and M10? No Repair the wires. No Repair the wire(s). Yes Is there 12V in the BLK wire from negative terminal on Blower Motors M9 and M10 ref. to bat. pos.? Yes Replace Blower Motor M9 and/or M10. 163 Service Manual – SW8000 Options and Accessories Symptom: The Blower Motors run but there is no cold air coming out of the Evaporator-Heater Unit. Note: Before troubleshooting the air conditioning system, make sure the system is filled with the recommended amount of refrigerant. We recommend that you have this checked by a qualified technician or an EPA-certified air conditioning repair shop. Note: Refer to the Cab Electrical Wiring and Ladder Diagrams in Appendix, and the Component Troubleshooting subsections on the following pages. There is no cold air from the Evaporator-Heater Unit. Check the cartridge on Hydraulic Valve L10 and clean/replace as necessary. Yes Is there 12V across the coil on the Compressor Hydraulic Valve L10 (hopper down, A/C switched on)? No Check/replace A/C Switch S35. No Is there 12V at the WHT wire on A/C Switch S35 (ref. to bat. neg. w/A/C Switch S35 on)? Yes Check/replace Thermostat S33. No Is there 12V at the GRN wire on the Thermostat S33 (ref. to bat. neg.)? Yes The A/C system is overheated. Check the Condenser Fan Relay K9, Condenser Fan and associated wiring and replace/repair as necessary. No Is there 12V at the GRN/WHT wire on the Pressure Switch S34 (ref. to bat. neg.)? Yes Check the function of the Compressor Relay K10 and wiring and repair/replace as necessary. No Is there 12V at the BLU/BRN wire on the Compressor Relay K10 (ref. to bat. neg. with the Hopper down)? Yes Check the auxiliary pump, compressor motor and related hydraulics. No Is the hydraulic pressure at the auxiliary pump test port within specs? Yes Check the compressor and air conditioning system components. 164 Service Manual – SW8000 Options and Accessories Component Troubleshooting Compressor Motor Hydraulic Valve (L10) (Refer to Figure 8) Note: The Compressor Motor Hydraulic Valve and Hydraulic Pressure Test Port are attached to the tee-fitting off of the Accessory Hydraulic Pump. 1. Disconnect the Electrical Connector from the Hydraulic Valve. 2. Switch on the A/C and check for 12 VDC at the Electrical Connector. 3. Check the coil resistance of the Hydraulic Valve. It should be approximately 7 ohms ±20%. 4. If there is 12 VDC at the Electrical Connector and the coil resistance is within spec, disassemble the Hydraulic Valve and clean or replace the cartridge as necessary. Hydraulic Valve (L10) Electrical Connector Figure 8. Compressor Motor Hydraulic Valve Hydraulic Pressure Test Port Accessory Hydraulic Pump 165 Service Manual – SW8000 Options and Accessories Accessory (Gear) Hydraulic Pump (Refer to Figure 8) 1. Connect a hydraulic pressure gauge to the Hydraulic Pressure Test Port off of the Accessory Hydraulic Pump. 2. Start the engine, then switch the A/C on and off at the two engine speeds and note the hydraulic pressures at the Hydraulic Pressure Test Port. The following chart shows pressure values that are representative of what you should be reading at normal operating temperature if the Accessory Hydraulic Pump, Hydraulic Valve and compressor motor are working correctly. Note that pressures tend to be higher if the hydraulic system is below normal operating temperature. Hydraulic Pressure at Test Port (typical) Engine at idle, A/C off 500 psi Engine at idle, A/C on 880 psi Engine at high speed, A/C off 675 psi Engine at high speed, A/C on 1100 psi Difference in Hydraulic Pressure between A/C off and A/C on 380 psi 425 psi If you don’t observe differences in the hydraulic pressures similar to those in the above chart when switching the A/C on and off, it could indicate a problem with the Hydraulic Valve (L10), the Accessory Hydraulic Pump or the A/C compressor motor. Compressor Relay (K10) (Refer to Figure 9) Note: The Compressor Relay is located in the engine compartment below the main broom lever. 1. Make sure the hopper is down, then switch on the A/C. 2. Back-probe the BLU/BRN wire connected to the Compressor Relay. • If you see 12 VDC at the BLU/BRN wire referenced to battery negative, the Compressor Relay is working correctly. • If you don’t see 12 VDC at the BLU/BRN wire, proceed to step 3 below. 3. Remove the electrical connector from the Compressor Relay and check for continuity across the load terminals (30 and 87a). Note: The Compressor Relay is a normally-closed relay and should have continuity across the load terminals with the electrical connector removed. • If there is continuity across load terminals 30 and 87a, the Compressor Relay is working correctly. Check the connections and wiring upstream of the Compressor Relay and repair/replace as necessary. • If there is very high resistance or no continuity across terminals 30 and 87a, replace the Compressor Relay. 166 Service Manual – SW8000 Options and Accessories Compressor Relay (K10) Figure 9. Compressor Relay Warning! High-pressure side air conditioning components, fittings, lines and hoses can be extremely hot after operation and can cause severe burns. Always use the appropriate precautions when working around the Binary Pressure Switch, Receiver/Dryer or other A/C components. Binary Pressure Switch (S34) (Refer to Figure 10) Note: The Binary Pressure Switch is mounted to the top of the A/C Receiver/Dryer at the rear of the machine, behind the hydraulic oil tank. 1. Open the rear Cover Assembly at the back of the cab. 2. Remove the electrical connector from the Binary Pressure Switch and check for continuity across the two terminals. Note: The Binary Pressure Switch is normally closed and should have continuity across the terminals if the A/C system is charged adequately and is at normal ambient temperature. • If there is continuity across the terminals, the Binary Pressure Switch is working correctly. • If there is very high resistance or no continuity across the terminals, replace the Binary Pressure Switch. 167 Service Manual – SW8000 Options and Accessories Binary Pressure Switch (S34) A/C Receiver/Dryer Figure 10. Checking Continuity through the Binary Pressure Switch 168 Service Manual – SW8000 Options and Accessories Thermostat (S33) (Refer to Figure 11) Note: The Thermostat is located inside the Evaporator-Heater Unit in the cab. 1. Remove the top cover/nozzle assembly from the Evaporator-Heater Unit. 2. Remove the front panel from the Evaporator-Heater Unit. 3. Remove the two electrical connectors (BLK/WHT and GRN wires) from the Thermostat and check the continuity across the two terminals. Note: The Thermostat is normally closed and should have continuity across the terminals at ambient temperatures above 31° F. • If there is continuity across the terminals, the Thermostat is working correctly. • If there is very high resistance or no continuity across the terminals, replace the Thermostat. Service Note: To verify that the thermostat is operating correctly, spray electronic component cooler or canned air dusting spray onto the probe embedded in the evaporator coils to cool the probe to below 31° F. • The Thermostat should open and you should read an open circuit through the terminals with the probe below 31° F. • Once the probe warms up to 39.5° F, there should again be continuity through the Thermostat terminals. 169 Service Manual – SW8000 Thermostat (S33) Figure 11. Checking Continuity through the Thermostat Options and Accessories 170 Service Manual – SW8000 Options and Accessories Heating and A/C System Plumbing and Hydraulic Flow Schematic 1. Heater Core 2. AC Evaporator 3. Radiator Coolant Tube 4. Feed Hot Water 5. Return Flow 6. Heater Control Valve 7. Hydraulic Test Port 8. Low Pressure Refrigerant (Gas) 9. High Pressure Gas 10. High Pressure Liquid 171 Service Manual – SW8000 172 Steering System Functional Description Overview The steering system includes the Steering Wheel, Steering Control Unit, Steering Cylinder and Drive Yoke Weldment. The Steering Wheel rotates the shaft on the Steering Control Unit which controls the oil flow to the Steering Cylinder. The Steering Cylinder extends and retracts to rotate Drive Yoke Weldment to steer the Rear Wheel Assembly. Steering Control Unit Steering Wheel Steering Cylinder Drive Yoke Weldment Rear Wheel Assembly Service Manual – SW8000 Steering System The “A” port on the Hydraulic Manifold Assembly supplies hydraulic oil to the “P” (pressure) port on the Steering Control Unit. The oil from the “T” (tank) port on the Steering Control Unit goes to the “T1” port on the Hydraulic Manifold Assembly, then to the oil cooler, filter and reservoir. Hydraulic Manifold Assembly Steering Control Unit L A T1 P R The Steering Cylinder is connected to the “R” and “L” ports on the Steering Control Unit. When the Operator turns the steering wheel, the T Steering Control Unit directs the oil to the “R” or “L” port on the Steering Cylinder to steer the machine right or left. L R Steering Cylinder 173 Service Manual – SW8000 Steering System Hydraulic Diagrams Steering Control Unit Description The Steering Control Unit uses the input from the steering wheel to turn the drive wheel in the appropriate direction to steer the machine. When the Operator turns the steering wheel, the steering wheel shaft rotates the Rotary Valve and Rotary Meter, which are connected by a mechanical link inside of the Steering Control Unit. • The direction in which the Rotary Valve moves determines which side of the Steering Cylinder receives the hydraulic oil to turn the drive wheel left or right. Note that when the Operator stops turning the steering wheel, the springs in the Steering Control Unit return the Rotary Valve to the neutral (closed) position to hold the Steering Cylinder rod in its current position. • The number of degrees that the Rotary Meter rotates determines the volume of oil that the Steering Cylinder receives from the Rotary Valve. This allows the drive wheel to turn in proportion to the steering wheel rotation. Steering Cylinder Stationary L R Rotary Valve Steering Control Unit Rotary Meter 1100 PSI A Oil to Cooler, Filter and Reservoir Oil from "A" Port on Hydraulic Manifold Assembly T 174 Service Manual – SW8000 Steering System Steering Wheel Stationary When the engine is running, the Gear Pump sends oil through the 2.0 GPM flow divider in the Hydraulic Manifold Assembly to the “A” port on the Steering Control Unit. When the steering wheel is stationary, the Rotary Valve is in its neutral (closed) position. The hydraulic oil flows through the U-shaped ports in the Rotary Valve, through the “T” port on the Steering Control Unit, then to the Oil Cooler and Filter. Note that when the steering wheel is stationary, the Rotary Valve ports are blocked and the Steering Cylinder will maintain its current position. Steering Cylinder Stationary L R Rotary Valve Rotary Meter 1100 PSI A T To Oil Cooler and Filter 2.0 GPM A P Gear Pump 2400 RPM Hydraulic Manifold Assembly 1.02 CIR Reservoir 175 Service Manual – SW8000 Steering System Steering Wheel Turned Toward the Right When the Operator turns the steering wheel to the right, the Rotary Valve directs the hydraulic oil to the corresponding side of the Rotary Meter. The Rotary Meter sends the appropriate volume of oil to the Steering Cylinder corresponding to the amount of steering wheel rotation. Steering Cylinder Moves Drive Wheel to Steer Machine Toward the Right L R Rotary Valve Rotary Meter PSI A T To Oil Cooler and Filter 2.0 GPM A P Gear Pump 2400 RPM Hydraulic Manifold Assembly 1.02 CIR Reservoir 176 Service Manual – SW8000 Steering System Steering Wheel Turned Toward the Left When the Operator turns the steering wheel to the left, the Rotary Valve directs the hydraulic oil to the opposite side of the Rotary Meter. The Rotary Meter again sends the appropriate volume of oil to the Steering Cylinder corresponding to the amount of steering wheel rotation. Steering Cylinder Moves Drive Wheel to Steer Machine Toward the Left L R Rotary Valve Rotary Meter PSI A T To Oil Cooler and Filter 2.0 GPM A P Gear Pump 2400 RPM Hydraulic Manifold Assembly 1.02 CIR Reservoir 177 Service Manual – SW8000 Steering System Steering Wheel Held in Full Right or Left Position When the steering wheel is held to the stop in its fullright or full-left turn position (full-left is shown here), the Relief Valve opens up to allow the hydraulic oil to pass through the Relief Valve and to the Oil Cooler and Filter. Steering Cylinder Stationary with Steering Wheel Held at Full Stop L R The Relief Valve will also open if something is preventing the drive wheel from rotating to steer. Rotary Valve Rotary Meter Relief Valve 1100 T A To Oil Cooler and Filter 2.0 GPM A P Gear Pump 2400 RPM Hydraulic Manifold Assembly 1.02 CIR Reservoir 178 Service Manual – SW8000 Steering System Turning the Steering Wheel with the Engine Off When the engine is off and no hydraulic oil is being pumped to the Rotary Valve and Rotary Meter, the Rotary Meter acts like a pump when the steering wheel is turned. The Check Valve opens to allow the oil pumped from the Rotary Meter to flow to and from the Steering Cylinder to allow the machine to be steered manually with the engine off. Steering Cylinder Moves Drive Wheel to Steer Machine Toward the Left L R Rotary Valve Check Valve Rotary Meter 1100 PSI A T To Oil Cooler and Filter 2.0 GPM A P Gear Pump 2400 RPM Hydraulic Manifold Assembly 1.02 CIR Reservoir 179 Service Manual – SW8000 Steering System Component Locations The following components are included in this section: • Steering Wheel and Steering Control Unit • Steering Cylinder Steering Wheel and Steering Control Unit The Steering Wheel rotates the splined shaft on the Steering Control Unit which controls the hydraulic oil flow to the steering cylinder. Steering Wheel Steering Plate The Steering Control Unit is mounted to the frame and is located underneath the Steering Plate. Steering Control Unit (mounted underneath Steering Plate) Steering Cylinder The Steering Cylinder is located at the bottom rear of the machine and is connected to the machine frame and the Drive Yoke Weldment. Drive Yoke Weldment Steering Cylinder Drive Yoke Weldment and Steering Cylinder as viewed from underneath the machine 180 Service Manual – SW8000 Steering System Maintenance Warning! Make sure the steering system and surrounding components are cool to the touch before attempting to grease the steering system components. Failure to observe this safety precaution can result in severe burns. • Lubricate the steering Bearing Cones and Bearing Cups on the Drive Yoke Weldment. Steering Cylinder • Lubricate the Pivot Point where the Steering Cylinder is attached to the Drive Yoke Weldment. Bearing Cone Pivot Point Bearing Cup Drive Yoke Weldment Bearing Cup Bearing Cone Drive Yoke Pivot Pin 181 Service Manual – SW8000 Steering System Troubleshooting Problem Cause Correction The steering is hard or Not enough oil to the steering “jerky”. system Check the pump output and correct as necessary. Check the priority flow divider and correct/replace as necessary. There is binding at the steering cylinder mounting points. Check the steering cylinder mounting points and lubricate/repair as necessary. There is binding in the drive yoke weldment, bearing cups, bearing cones or drive yoke pivot pin. Check the drive yoke weldment, bearing cups, bearing cones and drive yoke pivot pin and lubricate/repair as necessary. Specifications Component Specifications Steering Rear wheel, hydraulic cylinder and rotary valve controlled P – 1,813 psi [125 bar] Maximum Pressure on Connections T – 290 psi [20 bar] R and L – 2,610 psi [180 bar] Steering Control Unit Recommended Oil Flow – 1.9-5.3 GPM [7-20 LPM] Displacement – 4.88 CIR [80 cm3/Rev.] Check Valve for Manual Steering – Yes Relief Valve – 1100 psi [75.8 bar] 182 Service Manual – SW8000 183 Sweep System, Main Broom Functional Description The hydraulically powered main broom is used to sweep dry debris into the hopper. It can be operated with or without the dust control function, and with or without the side brooms being used. Circuit Description Most control circuits are fairly straight forward with the controller completing the electrical circuits to ground. The main broom is activated (lowered and spinning) when the control panel energizes the S2 Main Broom Enable valve. The control panel will energize the S2 solenoid only when the following conditions are met: • The engine is running with the Engine Speed Switch set to full throttle. • The hopper is properly seated. (The S4 Hopper Interlock switch is closed to ground to indicate the hopper is properly seated.) • The Main Broom Lever is in the Sweep (Down) or Full Float position. • The Drive Pedal is activated. The electrical (and hydraulic) circuitry related to the main broom is shown in the following simplified diagram, and explained on the following page. + BT - BATTERY, 12 Vdc CB1 CIRCUIT BREAKER, 70 AMP STARTER COMMAND START IGN BAT A3 ENGINE SYSTEM IGN. SW INPUT SWITCH, IGN. CB4 ACC CIRCUIT BREAKER, 20 AMP +5 A2 CONTROL BOX ASSEMBLY 1 L3 J1-3 2 (Closed when hopper is down) 1 S4 2 J2-9 +5 VALVE S3, SIDE BROOM SWITCH, HOPPER INTERLOCK (Closed when filter is plugged) S5 1 2 J2-8 SWITCH, DUST CONTROL FILTER (OPTIONAL) +5 L2 1 J1-6 2 (Open when broom is down) 1 J2-12 VALVE S2, MAIN BROOM S2 2 SWITCH, MAIN BROOM Side Broom High Pressure Low Pressure Steering Sump Return Flow Spliter Flow Spliter Flow Direction Main Broom Enable Filter Pressure Relief Cooler Main Broom Hopper Up / Sweep Bypass Dust Control Engine Sump Service Manual – SW8000 Sweep System, Main Broom Hydraulic Operation The hydraulic system is controlled by two solenoid valves, which are themselves, controlled by the main machine controller. The solenoids are active when the main machine controller sets the output to a low voltage (connects the output to ground). • The Bypass solenoid valve (S6) is “normally open”, meaning that fluid flows through it when the solenoid is not active. This provides a low resistance path for hydraulic fluid back to the reservoir when no downstream hydraulics are being used. This solenoid valve is active (fluid flow blocked) any time the main hydraulics related to the sweeping system are required. This includes raising the hopper or any of the broom and dust control hydraulics. If this valve fails to energize (block flow), then the sweep system will either not function at all, or function very slowly. • There are two flow splitters in the system. The 2.0/8.6 gpm splitter requires 2.0 gpm, minimum, to flow to the steering system as a priority, and up to 8.6 gpm flow to the rest of the sweep system. The 2.9/5.7 gpm splitter is a 2:1 ratio splitter at any flow rate. • When the main broom is on, the Main Broom solenoid valve (S2) is active (fluid can flow through), and the Bypass solenoid (S6) is active (blocking fluid). Hydraulic fluid flows through the Main Broom motor and through the Dust Control system. (The dust control system contains a bypass valve so that fluid will always be available to flow regardless whether the vacuum motor is active or not.) • The Main Broom motor contains a case drain. The case drain is not normally part of the hydraulic circuit, but it permits excess and leakage hydraulic fluid to return to the sump, and prevents damage to the motor case in the event that the motor’s case were to become pressurized. 184 Service Manual – SW8000 Sweep System, Main Broom Component Locations The diagram below shows component locations for some components related to the main broom system. • Idler Arm • Broom Motor • Broom Controls • Main Broom Switch • Main Broom • Hydraulic Valves Broom Controls Idler Arm Main Broom Switch Broom Motor Main Broom Hydraulic Valves S2 185 Service Manual – SW8000 Sweep System, Main Broom Maintenance and Adjustment When the machine is not in use, the main broom should be in the raised position to prevent flattening and curling of the bristles. Cleaning and Inspecting the Main Broom Inspect and clean the main broom whenever it is removed for rotation, or if sweeping performance is reduced when the hopper is not full. Remove any twine or other materials that are wound around the broom cylinder or any other debris that prevents good contact between the broom bristles and the cleaning surface. Rotate or Replace the Main Broom Because the Main Broom Motor always turns in the same direction, the bristles on the broom will eventually become curved opposite of that rotation. Sweeping performance can be improved by removing the broom and turning it around (end-for-end). This procedure, known as “rotating” the main broom, and should be performed every 15 hours of operation. Note: This procedure does not apply to the optional chevron broom, because that broom has directional bristles. Caution! Broom bristles may be sharp. Wear gloves to protect your hands when handling the broom. 1. Turn the Ignition Switch to Off. 2. Put the Main Broom Lever in the Up position. 3. Open the broom access panel (2). 4. Pivot the idler arm (3) away from the main broom core. 5. Pull the Main Broom (1) off the motor shaft and out of the machine. 3 1 2 6. Remove any string or wire wrapped around the broom. Also inspect the skirts at the front, back, and sides of the broom housing. The skirts should be replaced or adjusted if they are torn or worn to a height of more than 1/4 inch (6.35 mm) off the ground. 7. Turn the broom around (end-for-end) and slide it back into the broom housing. Make sure that the lugs on the broom core engage the slots in the broom drive hub and that the broom is fully seated. 8. Swing the idler arm back into the broom core. Make sure the lugs on the idler arm engage the slots in the broom core 9. Close and latch the broom access panel. 186 Service Manual – SW8000 Sweep System, Main Broom Inspect and Adjust the Broom Height The main broom has 2 operating positions; Float (7) and Sweep (6). In the Float position, the height is left uncontrolled (floating) and the pressure on the broom is primarily determined by the weight of the mechanism. Due to the weight of the mechanism, operating the broom in Float mode for extended periods can result in excessive wear of the broom. In Sweep mode, the height of the broom is limited by the adjustment knob (4) to reduce wear on the broom. The main broom adjustment knob (4) must be re-adjusted as bristle material is worn down and when the broom is replaced. Determining whether the broom height needs to be adjusted involves examining the contact area under the broom. 1. Drive the machine to an area with a level floor and set the parking brake. (Preferably an area with a dirty floor that will show contact from the spinning broom.) 2. Leave the engine running. 4 3. Move the Main Broom Lever (5) forward to the Sweep position (6). 4. Without actually moving the machine, lightly press the drive pedal out of the neutral position just enough to engage the broom. This allows the broom to polish a “strip” on the floor. 5. Raise the broom, release the parking brake, and move the machine so that the polished strip is visible. 7 6 5 6. Inspect the polished strip on the floor. The target width is between 2 and 3 inches (50 to 80 mm). • If the strip is less than 2 inches (50 mm) wide, lower the broom by loosening the knob (4) and sliding it forward. • If the strip is more than 3 inches (80 mm) wide, raise the broom by loosening the knob (4) and sliding it back towards you. 7. Repeat the procedure to verify the settings. Inspect Housing Skirts Visually inspect the skirts when rotating or replacing the main broom. The skirts should be replaced or adjusted if they are torn or more than 1/4 inch (6.35 mm) above the floor. 187 Service Manual – SW8000 Sweep System, Main Broom Troubleshooting Main Broom Motor Will Not Run Perform all testing with the engine running at operating speed, the main broom lowered (Sweep position), and the drive pedal activated (the machine moving). The main broom magnetic switch S2 must be open and the hopper interlock switch S4 must be closed for the main broom system to run. Main broom motor will not run Can the hopper be raised and lowered No Yes Inspect the S6 Bypass valve solenoid and wiring. If this solenoid No Troubleshoot the main machine controller is not active, no downstream hydraulics will function Is the hopper up Yes lamp illuminated? Verify that the hopper is down, and troubleshoot the hopper interlock. No Inspect the motor hub and broom collar for damage. Yes Replace the brush or motor as necessary Done No Do the side brooms Yes function as expected? Replace the main broom motor Done No Check for 12 volts at the main broom solenoid Yes Replace the solenoid Done No Check for 12 volts at the Yes main controller between pins J1-11 and J1-6 No Check the operation of the Broom Down sensor. J2-12 should show 12 volts to ground when the broom is down. Troubleshoot the controller and the controller inputs Repair wiring between controller and solenoid Done 188 Service Manual – SW8000 Sweep System, Main Broom Specifications Solenoid Coil Resistance Values Solenoid Coil Normal Resistance Value S2 coil 8 ohms S6 Coil 8 ohms 189 Service Manual – SW8000 190 Sweep System, Side Broom Functional Description The side broom sweep system consists of one or two hydraulically driven rotating brooms at the front corners of the machine. The brooms direct debris to the center of the machine where it can be picked up by the main broom and deposited in the hopper. The brooms are raised and lowered by hydraulic actuators. Circuit Overview + BT - BATTERY, 12 Vdc A3 ENGINE START A2 CONTROL BOX SYSTEM IGN SWITCH, IGN. CB4 +5 ACC 1 L3 (Closed when hopper is down) J1-3 2 S4 2 SWITCH, HOPPER INTERLOCK +5 VALVE S3, SIDE BROOM (Closed when filter is plugged) L2 1 1 J2-9 J1-6 2 S5 1 2 +5 J2-8 (Open when broom is down) VALVE S2, MAIN BROOM J2-12 SWITCH, DUST CONTROL FILTER 1 S2 2 SWITCH, MAIN BROOM Side Broom Lift High Pressure Side Broom Low Pressure Pilot / Control Sump Return Flow Direction Side Broom Lift Pilot Controlled Check Valve Side Broom Dual Broom Option w/o Pressure CF EX Speed Control w/ Pressure V1 To Steering Flow Spliter Pressure Relief Engine Filter Cooler Sump Side Broom Bypass Slave to S3 S2 Flow Spliter Main Broom Enable Hopper Up / Sweep Bypass Main Broom IN Service Manual – SW8000 Sweep System, Side Broom Electrical Circuit Most electrical control circuits are fairly straight forward with the controller completing the electrical circuits to ground. The controller will not activate the side brooms unless the main broom is active (and all other prerequisites to that function are also true). Hydraulic Circuit, Brooms Off When the side brooms are not active, the lift cylinders are held in the lifted state and no fluid flows to the motors. The hydraulically controlled valve V1 is in the inactive state because S3 is also inactive, and no hydraulic pressure is present on the control circuit. This also sets the pilot controlled check valve C2 inactive, so it functions as a normal check valve. This check valve keeps the brooms in the lifted state even if the hydraulic system is shut down. Piloted check valve C1 is active, and this allows fluid to pass backward through the check valve to drain excess fluid from the second (optional) lift cylinder. Excess fluid from the first lift cylinder flows through the inactive S3 valve to return to the sump. In the event that the main broom is running without the side brooms, the S3 valve also contains a side broom bypass circuit to permit excess fluid not needed by the main broom to return to the low pressure return line. Side Broom Lift High Pressure Low Pressure Side Brooms Raised, Motors Inactive Pilot / Control Side Broom Sump Return Flow Direction Side Broom Lift Pilot Controlled Check Valve Dual Broom Option w/o Pressure C1 Reverse Flow Side Broom CF EX w/ Pressure Speed Control C2 V1 To Steering Slave to S3 Side Broom Bypass Main Broom Flow Spliter Flow Spliter Pressure Relief Engine Filter Cooler Sump Hopper Up / Sweep Bypass Main Broom IN 191 Service Manual – SW8000 Sweep System, Side Broom Hydraulic Circuit, Brooms On In order for the side brooms to operate, the main broom must be running. The S2 solenoid is energized to allow fluid to flow to the splitter between the main broom and the side broom circuits. The side broom solenoid (S3) is energized to allow fluid to flow into the side broom circuit. This also energizes the piloted control line for V1 and C2 to allow excess fluid to leave the side broom lift cylinders so they can be lowered. If equipped with the optional side broom speed control, fluid flows through the variable flow regulator, and any excess flow not needed for the set speed will return through the low pressure return line. The two side brooms are connected in series. At the first broom, fluid activates the cylinder to lower the broom and flows through the broom motor. The fluid exiting that motor then passes to the second (optional) side broom before returning through the low pressure return line. Side Broom Lift High Pressure Low Pressure Side Brooms Lowered, Motors Active Pilot / Control Side Broom Sump Return Flow Direction Side Broom Lift C1 No Flow Pilot Controlled Check Valve Dual Broom Option w/o Pressure CF Reverse Flow C2 w/ Pressure EX Speed Control V1 Slave to S3 To Steering Side Broom Side Broom Bypass No Flow Main Broom Flow Spliter Flow Spliter Pressure Relief Engine Filter Cooler Sump Hopper Up / Sweep Bypass Main Broom IN 192 Service Manual – SW8000 Sweep System, Side Broom Component Locations The diagram below shows the location of the side broom motor, lift cylinder, and hydraulic valves. S3 V1 Hydraulic Valves Side Broom Side Broom Motor Lift Cylinder 193 Service Manual – SW8000 Sweep System, Side Broom Troubleshooting Side Broom Won’t Run Side Broom will not run when the switch is on The side broom cannot operate unless the main broom is running. Troubleshoot the main broom Verify that the main No broom is turning Yes Is the side broom Yes firmly locked in the down position? No Replace the side broom motor Is one side broom working, Yes but second side broom not? Done Piloted check valve C1 stuck in open position. Replace. Done No Check for 12 volts at the Yes side broom solenoid S3. Replace the solenoid Done No If equipped, does the misting pump function Yes Control board working properly. Repair wiring between control board and solenoid. No or not equipped Check for 12 volts between J1-11 and J1-3 at the control board Yes No Confirm the function of the side broom membrane switch: Between J3-1 and J3-9; 12V not pressed, 0V (continuity) when pressed Yes Replace the controller Done No Replace the Display Done Done 194 Service Manual – SW8000 Sweep System, Side Broom Side Broom Won’t Raise If the side broom stops rotating but won’t raise, that is indicative of a hydraulic problem with the pilot controlled valve V1. If the side broom won’t raise and also continues to rotate (with main broom running), that may be either a stuck S3 solenoid or an electrical problem. Side Broom will not raise when off Stay lowered when Yes main broom is off? Piloted valve V1 is stuck. Replace the valve. Done No Check for 12 V at side No broom solenoid S3 Side broom solenoid S3 stuck. Replace solenoid Done Yes Confirm the function of the side broom membrane switch: Between J3-1 and J3-9; 12V not pressed, 0V (continuity) when pressed Is 12V still present even No when main broom is off Yes With machine off, disconnect Yes cable from controller and solenoid and check for short to ground. Repair/replace cable Yes Replace the controller Done No Replace the Display Done Done No Replace the controller Done Side Broom Won’t Lower If the side broom rotates but will not lower, that is an indication that high pressure hydraulic fluid is present at both ports of the lift cylinder at the same time. The pilot controlled valve V1 is stuck. If the side broom neither rotates nor lowers, then use the Side Broom Won’t Run troubleshooting procedure described on page 194. Specifications Parameter Nominal Resistance Side Broom Solenoid resistance • 8 Ω 195 Service Manual – SW8000 196 Wheel System, Non-Traction Functional Description The non-traction wheels support the front of the machine and house the machine brakes. The wheel system includes the Wheels, Brake and Spindle Assemblies and the various mounting hardware. The wheels are mounted in the wheel wells on the front sides of the machine, between the main broom cover panels and the side brooms. Maintenance and Adjustments Warning! Before performing any maintenance or adjustments, make sure the key switch is off and the key is removed from the machine. Chock the machine wheels to prevent the machine from moving. Troubleshooting Problem Cause Correction The wheels are making excess noise. The wheel bearings are worn. The wheel and/or brake and spindle assembly are damaged. Check the wheel, wheel bearings, brake and spindle assembly and replace as required. The brakes are not working correctly. The brakes are out of adjustment Adjust the brakes. The brake linings are worn out. Replace the brake linings. Removal and Installation Warning! Before performing any maintenance or adjustments, make sure the key switch is off and the key is removed from the machine. Chock the machine wheels to prevent the machine from moving. −− Never work under a machine without safety stands or blocks to support the machine. When jacking the machine, do so at the designated Tie Down/Jacking Locations. To Remove and Reinstall a Wheel The Wheels are held onto the Brake and Spindle Assemblies with 5 lug bolts. The Brake and Spindle Assemblies are fastened to the machine frame with 1/2”-20 Hex Screws. 1. Jack up the machine at a designated jacking point. 2. Install safety stands or blocks to support the machine while you work on it. 3. Remove the five lug bolts that secure the wheel. 4. Repair or replace the wheel assembly. Service Manual – SW8000 Wheel System, Non-Traction 5. Place the wheel on the spindle and install the five lug bolts to secure the wheel. Torque to 95-105 Ft. lbs. (130 - 140 N m) To Remove and Reinstall a Brake and Spindle Assembly 1. Jack up the machine at a designated jacking point. 2. Install safety stands or blocks to support the machine while you work on it. 3. Remove the Wheel from the Brake and Spindle Assembly. 4. Remove the clevis and yoke holding the Rod End to the Brake Lever. 5. Remove the four 1/2”-20 hex screws and remove the Brake and Spindle Assembly from the machine. 6. Reinstall the Brake and Spindle Assembly by following the above steps in reverse order. 197 Service Manual – SW8000 198 Wheel System, Traction Functional Description Overview The traction wheel system includes the piston (drive) pump, hydraulic traction drive motor, foot pedal, and the forward/reverse controls that control the direction and speed of the drive motor. The traction drive motor is driven by the variable-displacement piston pump which allows speed and directional control. The piston pump and drive motor hydraulic system is a closed system, but allows for oil leakage through the drive pump for lubrication and cooling purposes. This leaked oil returns to the reservoir through the case drain, and requires make-up oil that is supplied to the drive pump through the charge circuit from the oil cooler and filter. Piston (drive) Pump and Drive Motor The Piston Pump is driven by the engine and powers the hydraulic Drive Motor. Hydraulic lines A and B connect the Piston Pump to the Drive Motor. A Case Drain Port The Case Drain Port is connected to the reservoir. The Charge Pressure Inlet is connected to the filter. When the internal tow valve in the Piston Pump is actuated, it bypasses the hydraulic circuit from the Piston Pump to the Drive Motor to allow the rear drive wheel to rotate freely when towing or pushing the machine. (Refer to the General Information section for instructions on how to set the tow valve when towing or pushing the machine.) Charge Pressure Inlet B Piston Pump B Drive Motor A Service Manual – SW8000 Wheel System, Traction Foot Pedal Assembly The Foot Pedal pivots in the Foot Throttle Plate to move the Lever Weldment Push/Pull Control Cable forward and backward. The Lever Weldment Push/Pull Control Cable actuates the forward/reverse controls connected to the piston (drive) pump. Foot Pedal Forward/Reverse Controls The forward/reverse controls connect the Foot Pedal to the drive pump control shaft. Pressing the Foot Pedal changes the angle of the swash plate inside of the drive pump. • The direction in which the swash plate is moved determines which port on the drive motor receives the hydraulic oil from the piston pump. This determines the machine direction. Lever Weldment Push/Pull Control Cable • The distance to which the swash plate is moved determines the volume of hydraulic oil the piston pump sends to the drive motor. This determines the machine speed. The Foot Pedal actuates the Lever Weldment Push/Pull Control Cable which actuates the Hydroback. The Rod End on the Hydroback pivots the Lever and attached Lever Weldment Foot Throttle Plate connected to the piston pump control shaft to control the oil direction and flow volume from the pump to the drive motor. The Hydroback returns the Lever Weldment, piston pump control shaft and Foot Pedal to the neutral position when the Foot Pedal is released. The Cam Push/Pull Control Cable is connected to the hopper and the Nylon Cam. When the hopper is raised, the Cam Push/Pull Control Cable rotates the Nylon Cam to limit the rotation of the Lever Weldment. This restricts the machine travel speed when the hopper is raised. Lever Weldment The Rotary Sensor (referred to as the Drive Pedal Sensor, 5K Ohm in the electrical ladder diagram) is coupled to the Lever Weldment. The Rotary Sensor must be in its “deadband” range before the engine can be started. (Refer to the Hydrostatic Neutral Position and Dead-band section for instructions on how to set the Rotary Sensor.) Rotary Sensor Connected to Hopper Lever Nylon Cam Connected to Foot Pedal Cam Push/Pull Control Cable Lever Weldment Push/Pull Control Cable Rod End Hydroback 199 Service Manual – SW8000 Wheel System, Traction Rear Wheel Assembly The Rear Wheel Assembly is bolted to the Drive Wheel Hub. The Rear Wheel Assembly and attached Drive Wheel Hub fit onto the keyed, tapered shaft on the Drive Motor. A Slotted Nut and Cotter Pin hold the Drive Wheel Hub and attached Rear Wheel Assembly onto the Drive Motor shaft. The Drive Motor is bolted to the Drive Yoke Weldment. Steering Cylinder The Steering Cylinder extends and retracts to rotate the Drive Yoke Weldment and attached Drive Motor/Drive Wheel Hub/ Rear Wheel Assembly about the Drive Yoke Pivot Pin to steer the machine. Slotted Nut Drive Yoke Weldment Rear Wheel Assembly Drive Wheel Hub Drive Motor Cotter Pin Drive Yoke Pivot Pin Electrical Schematic and Circuit Description The only electrical component associated with the traction wheel system is the 5K Ohm Drive Pedal Sensor (referred to as the Rotary Sensor in the Parts List). The 5K Ohm Drive Pedal Sensor is a rotary potentiometer that is coupled to the Lever Weldment. (Refer to the lower drawing on the preceding page.) The resistance through the 5K Ohm Drive Pedal Sensor varies according to the rotary position of the Lever Weldment. A2 Main Machine Controller J2-1 J2-2 J2-3 BRN/WHT Pot High ORN/GRA Wiper YEL/GRA Pot Low 2 1 R2 3 Drive Pedal Sensor, 5K Ohm The A2 Main Machine Controller senses the resistance through the 5K Ohm Drive Pedal Sensor. This resistance must be within a preset “deadband” range that indicates that the piston pump is in the neutral position before the engine starter is allowed to operate. This is a safety feature to ensure that the piston pump is in its neutral position when the engine is started. 200 Service Manual – SW8000 Wheel System, Traction Hydraulic Diagrams Drive Motor in Neutral When the foot pedal is in the neutral position with the engine running, the Piston Pump will not send any oil to the Drive Motor. From Oil Cooler and Filter Piston Pump B 2400 RPM 3000 PSI 2.48 CIR Tow Valve 22.8 CIR 3000 PSI A 100 B Drive Motor A PSI Reservoir Tow Valve in Bypass Position If the Drive Motor is mechanically rotated by towing or pushing the machine, it acts as a pump. Since there is no place for the hydraulic oil to flow, the wheel may not turn at all, and may skid across the floor if the machine is towed or pushed with great enough force. The machine is equipped with a Tow Valve to eliminate this problem when towing or pushing the machine. When the Tow Valve is rotated to the bypass (open) position, the oil is free to flow to and from the Drive Motor through the Tow Valve when the rear wheel is rotated, bypassing the Piston Pump. (Refer to the General Information/Towing or Pushing the Machine subsection in this manual.) Note that while only one drive wheel direction is shown in the adjacent drawing, the Tow Valve functions the same when the drive wheel is moved in either forward or reverse. From Oil Cooler and Filter 3000 PSI Piston Pump B 2400 RPM 2.48 CIR A 100 PSI Reservoir 3000 PSI Tow Valve B 22.8 CIR A Drive Motor 201 Service Manual – SW8000 Wheel System, Traction Drive Motor in Forward or Reverse When the engine is running and the foot pedal is moved to either the forward or reverse position, the Piston Pump sends oil to the Drive Motor to drive the machine in the corresponding direction. The swash plate in the Piston Pump regulates the direction and volume of oil the Piston Pump sends to the Drive Motor to control the machine direction and speed. From Oil Cooler and Filter Tow Valve Piston Pump B 2400 RPM PSI CIR The direction in which the foot pedal moves the swash plate in the Piston Pump controls the machine direction. The distance to which the foot pedal moves the swash plate in the Piston Pump controls the machine speed. B 22.8 CIR 3000 PSI A Drive Motor 100 PSI Check Valve (open) The return oil from the from the Oil Cooler and Filter passes through the appropriate Check Valve to provide make-up oil to the return (slack) side of the Piston Pump. Reservoir When the return oil pressure from the Oil Cooler and Filter exceeds 100 psi, the 100 PSI piloted relief valve opens to allow the return oil to flow to the Reservoir. From Oil Cooler and Filter (open) The case drain from the Piston Pump goes to the Reservoir. Tow Valve Piston Pump B 2400 RPM PSI CIR 3000 PSI 100 PSI Reservoir B 22.8 CIR A Drive Motor 202 Service Manual – SW8000 Wheel System, Traction Drive Motor Stalling Out If the Drive Motor is unable to run in forward or reverse for any reason (rear wheel stalled, etc.), the corresponding internal 3000 PSI relief valve in the Piston Pump will open to bypass the Drive Motor to prevent damage to the hydraulic components. From Oil Cooler and Filter Piston Pump B 2400 RPM 3000 PSI 2.48 CIR A 3000 3 Tow Valve B 22.8 CIR A 100 PSI Reservoir Drive Motor 203 Service Manual – SW8000 Wheel System, Traction Component Locations The following components are included in this section: • Piston (drive ) Pump and Tow Valve • Drive Motor and Rear Wheel Assembly • Foot Pedal Assembly • Forward/Reverse Controls Piston (drive) Pump and Tow Valve The Piston Pump (blue) is attached to the front end of the engine. The Tow Valve is mounted onto the Piston Pump. Piston Pump Tow Valve Drive Motor and Rear Wheel Assembly The Drive Motor and Rear Wheel Assembly are mounted to the Drive Yoke Weldment. Drive Motor Drive Yoke Weldment Rear Wheel Assembly 204 Service Manual – SW8000 Wheel System, Traction Foot Pedal Assembly The Foot Pedal Assembly actuates the forward/reverse controls to control machine direction and speed. Foot Pedal Assembly Forward/Reverse Controls The lever weldment push/pull control cable, Lever Weldment, Lever, Nylon Cam and Hydroback are mounted on the left side of the machine underneath the center cover assembly/DustGuard™ tank. The Rotary Sensor is coupled to the Lever Weldment and is mounted to the RTN Bracket. Lever Weldment RTN Bracket Rotary Sensor Nylon Cam Lever Hydroback 205 Service Manual – SW8000 Wheel System, Traction Adjustments To Set the Drive Pump Neutral Position 1. Jack up the rear of the machine to get the drive wheel up off the ground. 2. Install safety blocks or stands to support the rear of the machine. 3. Remove the center cover assembly/DustGuard™ tank to access the forward/reverse controls. Note: If your machine is equipped with a DustGuard™ system, you’ll need to disconnect the hose coupling on the DustGuard™ tank before you remove the DustGuard™ tank from the machine. 4. Start the engine and observe the wheel rotation with the engine idling. If the wheel is rotating either forward or reverse with the foot pedal in the neutral position, adjust the position of the Lever Weldment as follows: 5. Loosen the two 1/4”-20 x .62” Screws holding the Lever to the Lever Weldment. 6. Rotate the Lever Weldment as necessary until the wheel stops turning. Lever Lever Weldment 7. Tighten the two 1/4”-20 x .62” Screws. 8. Shut the engine off. 9. Reset the foot pedal deadband setting. (Refer to the Control System/Main Machine Controller Programming/Hydrostatic Neutral Position and Dead-band section.) 10. Reinstall the center cover assembly/ DustGuard™ tank. 11. Reconnect the DustGuard tank hose coupling (if applicable). ™ 1/4”-20 x .62” Screw (2) Lever Weldment 1/4”-20 x .62” Screw Lever 1/4”-20 x .62” Screw 206 Service Manual – SW8000 Wheel System, Traction Troubleshooting Problem Cause Correction The machine won’t start. The foot pedal deadband position is not set correctly. Reset the foot pedal deadband position. The machine “creeps” forward or backward when the foot pedal is in the neutral position. The forward/reverse controls are out of adjustment. Adjust the forward/reverse controls and/or linkage so the machine is stationary when the foot pedal is in the neutral position. The cable or forward/reverse controls are damaged or dirty. Clean or replace the cable or forward/reverse controls as necessary. Specifications Component Specifications Size – 5 in. x 8 in. Tire (rear) Drive/Steer Rear Wheel Lug Nut Torque – 100 ft.-lb. [135 Nm] Tire Pressure – 90 psi Displacement – 22.8 CIR Rear Drive Wheel Motor Shaft Rotation – Bidirectional Shaft – 1½ in., tapered w/key Type – manually-variable displacement, axial piston pump, tow valve included Displacement – 2.48 CIR max. Speed – 3600 RPM max. Piston Pump Shaft Rotation – Clockwise (as viewed from shaft end) Continuous pressure – 3000 psi [206.8 bar] max. Maximum pressure – 5000 psi [344.7 bar] max. Main Loop Relief Valve – set at 3000 psi [206.8 bar] 207