1
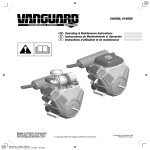
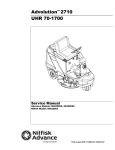
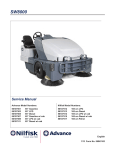
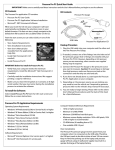
spark plug wire (see figure 2). spark plug wire (see figure 2). 2. With the engine running, firmly place the signal receiver tip over the 2. With the engine running, firmly place the signal receiver tip over the To indicate the tester is on, the headlamp, along with the red and green LEDs, flash alternately, and the tester emits a beeping sound for a short period. To switch to the Measurement Mode, firmly press the power/ toggle button. Note: When powered on, the tester is always in the Quick Check Mode. To indicate the tester is on, the headlamp, along with the red and green LEDs, flash alternately, and the tester emits a beeping sound for a short period. To switch to the Measurement Mode, firmly press the power/ toggle button. figure 2 Spark plug wire Signal Note: When powered on, the tester is always in the Quick Check Mode. Signal receiver tip 1. Turn the tester on by firmly pressing the power/toggle button. Signal receiver tip Using the Tester figure 1 figure 1 Extension Probe 2. Press fit the probe tip onto the extension probe. Assembling the Tester Signal 1. Turn the tester on by firmly pressing the power/toggle button. Using the Tester 1. Attach the extension probe onto the tester. figure 2 Spark plug wire Red & green LEDs 2. Press fit the probe tip onto the extension probe. Signal receiver tip Red LED Headlamp Extension Probe 1. Attach the extension probe onto the tester. Power/toggle button Assembling the Tester The tester works by receiving a signal transmitted from the spark plug’s wire. In the Quick Check Mode, the red LED headlamp flashes when a spark is detected. If the polarity is negative (-), the green LED lights; and if positive (+), the red LED lights. In the Measurement Mode, the probe measures and displays the peak spark voltage for approximately 15 seconds. Red & green LEDs Signal receiver tip Red LED Headlamp Power/toggle button The tester works by receiving a signal transmitted from the spark plug’s wire. In the Quick Check Mode, the red LED headlamp flashes when a spark is detected. If the polarity is negative (-), the green LED lights; and if positive (+), the red LED lights. In the Measurement Mode, the probe measures and displays the peak spark voltage for approximately 15 seconds. The kV/Arc Quick Probe is a battery-operated, hand-held tester designed to easily and quickly check the presence of a spark in the vehicle’s cylinders, determine the polarity (+/-), and measure the peak voltage as the spark plug is firing on Distributor and Distributorless Ignition Systems The kV/Arc Quick Probe is a battery-operated, hand-held tester designed to easily and quickly check the presence of a spark in the vehicle’s cylinders, determine the polarity (+/-), and measure the peak voltage as the spark plug is firing on Distributor and Distributorless Ignition Systems Warranty Warranty Subject to the conditions that follow and are noted below, this product is warranted to be free from defects in material and workmanship, under proper use and in accordance with the manufacturer’s written recommendation and specifications, for a period designated below on all products: Subject to the conditions that follow and are noted below, this product is warranted to be free from defects in material and workmanship, under proper use and in accordance with the manufacturer’s written recommendation and specifications, for a period designated below on all products: • • In the event it is determined that the product has been tampered with, or altered in any way, this warranty is void and all claims against the product will not be honored. All warranty claims must be submitted as outlined by the manufacturer and shall be processed in accordance with the manufacturer’s established warranty claim procedures. These procedures include provisions that proof of purchase must be established (by either warranty card from the seller or by point of purchase receipt) and that the manufacturer will make every attempt to return ship the product within one business day from receipt of the returned product, freight prepaid. In addition, all maintenance procedures, as outlined by the product manuals, should be followed for the warranty to be kept in force. Should the product not be used in accordance with procedures as specified, or if the product otherwise fails outside of the warranty, the manufacturer reserves the right to make such judgment and the party returning the product will be notified that written notification will be necessary to repair the product at a cost which the manufacturer deems as reasonable. The product will then be shipped back to the customer, COD; or as the manufacturer deems appropriate. The manufacturer’s obligation under this warranty is limited to unaltered products returned to the manufacturer by the initial end user of the new products. Therefore, this warranty does not cover any products resold by the end user to third parties, nor any reconditioned products sold as such, by the manufacturer. The sole remedy for any such defect shall be the repair, or replacement, of the product at the sole discretion of the manufacturer. This warranty does not cover expendable parts, such as batteries, nor does it cover shipping or handling. In addition, manufacturer is not liable for any loss or damage to product during shipping. A 20 ll 1 ri 1 gh H ts ick re ok se I rv nc ed . The manufacturer’s obligation under this warranty is limited to unaltered products returned to the manufacturer by the initial end user of the new products. Therefore, this warranty does not cover any products resold by the end user to third parties, nor any reconditioned products sold as such, by the manufacturer. The sole remedy for any such defect shall be the repair, or replacement, of the product at the sole discretion of the manufacturer. This warranty does not cover expendable parts, such as batteries, nor does it cover shipping or handling. In addition, manufacturer is not liable for any loss or damage to product during shipping. This product carries a limited lifetime warranty. In the event it is determined that the product has been tampered with, or altered in any way, this warranty is void and all claims against the product will not be honored. All warranty claims must be submitted as outlined by the manufacturer and shall be processed in accordance with the manufacturer’s established warranty claim procedures. These procedures include provisions that proof of purchase must be established (by either warranty card from the seller or by point of purchase receipt) and that the manufacturer will make every attempt to return ship the product within one business day from receipt of the returned product, freight prepaid. In addition, all maintenance procedures, as outlined by the product manuals, should be followed for the warranty to be kept in force. Should the product not be used in accordance with procedures as specified, or if the product otherwise fails outside of the warranty, the manufacturer reserves the right to make such judgment and the party returning the product will be notified that written notification will be necessary to repair the product at a cost which the manufacturer deems as reasonable. The product will then be shipped back to the customer, COD; or as the manufacturer deems appropriate. © This product carries a limited lifetime warranty. This is the only authorized manufacturer’s warranty and is in lieu of all other expressed, or implied, warranties or representations, including but not limited to any implied warranties of merchantability or fitness or any other obligations on the part of the manufacturer. In no vent will the manufacturer be liable for business interruptions, loss of profit, personal injury, costs of delays, or any special, indirect, incidental or consequential damages, costs or losses. This is the only authorized manufacturer’s warranty and is in lieu of all other expressed, or implied, warranties or representations, including but not limited to any implied warranties of merchantability or fitness or any other obligations on the part of the manufacturer. In no vent will the manufacturer be liable for business interruptions, loss of profit, personal injury, costs of delays, or any special, indirect, incidental or consequential damages, costs or losses. 19120-845 Rev B © 2004 Hickok Inc. All rights reserved. 19120-845 Rev B © 2004 Hickok Inc. All rights reserved. spark plug wire (see figure 2). 2. With the engine running, firmly place the signal receiver tip over the To indicate the tester is on, the headlamp, along with the red and green LEDs, flash alternately, and the tester emits a beeping sound for a short period. figure 2 Signal Signal receiver tip spark plug wire (see figure 2). 2. With the engine running, firmly place the signal receiver tip over the To indicate the tester is on, the headlamp, along with the red and green LEDs, flash alternately, and the tester emits a beeping sound for a short period. To switch to the Measurement Mode, firmly press the power/ toggle button. Spark plug wire figure 2 A 20 ll 1 ri 1 gh H ts ick re ok se I rv nc ed . Spark plug wire © To switch to the Measurement Mode, firmly press the power/ toggle button. Note: When powered on, the tester is always in the Quick Check Mode. 1. Turn the tester on by firmly pressing the power/toggle button. Using the Tester Note: When powered on, the tester is always in the Quick Check Mode. Signal Signal receiver tip 1. Turn the tester on by firmly pressing the power/toggle button. Using the Tester figure 1 Extension Probe 2. Press fit the probe tip onto the extension probe. 1. Attach the extension probe onto the tester. figure 1 Red & green LEDs Extension Probe 2. Press fit the probe tip onto the extension probe. Signal receiver tip Red LED Headlamp Assembling the Tester Power/toggle button 1. Attach the extension probe onto the tester. Red & green LEDs Signal receiver tip Red LED Headlamp Assembling the Tester Power/toggle button Warranty Warranty The kV/Arc Quick Probe is a battery-operated, hand-held tester designed to easily and quickly check the presence of a spark in the vehicle’s cylinders, determine the polarity (+/-), and measure the peak voltage as the spark plug is firing on Distributor and Distributorless Ignition Systems The kV/Arc Quick Probe is a battery-operated, hand-held tester designed to easily and quickly check the presence of a spark in the vehicle’s cylinders, determine the polarity (+/-), and measure the peak voltage as the spark plug is firing on Distributor and Distributorless Ignition Systems The tester works by receiving a signal transmitted from the spark plug’s wire. In the Quick Check Mode, the red LED headlamp flashes when a spark is detected. If the polarity is negative (-), the green LED lights; and if positive (+), the red LED lights. In the Measurement Mode, the probe measures and displays the peak spark voltage for approximately 15 seconds. The tester works by receiving a signal transmitted from the spark plug’s wire. In the Quick Check Mode, the red LED headlamp flashes when a spark is detected. If the polarity is negative (-), the green LED lights; and if positive (+), the red LED lights. In the Measurement Mode, the probe measures and displays the peak spark voltage for approximately 15 seconds. Subject to the conditions that follow and are noted below, this product is warranted to be free from defects in material and workmanship, under proper use and in accordance with the manufacturer’s written recommendation and specifications, for a period designated below on all products: • Subject to the conditions that follow and are noted below, this product is warranted to be free from defects in material and workmanship, under proper use and in accordance with the manufacturer’s written recommendation and specifications, for a period designated below on all products: This product carries a limited lifetime warranty. • The manufacturer’s obligation under this warranty is limited to unaltered products returned to the manufacturer by the initial end user of the new products. Therefore, this warranty does not cover any products resold by the end user to third parties, nor any reconditioned products sold as such, by the manufacturer. The sole remedy for any such defect shall be the repair, or replacement, of the product at the sole discretion of the manufacturer. This warranty does not cover expendable parts, such as batteries, nor does it cover shipping or handling. In addition, manufacturer is not liable for any loss or damage to product during shipping. This product carries a limited lifetime warranty. The manufacturer’s obligation under this warranty is limited to unaltered products returned to the manufacturer by the initial end user of the new products. Therefore, this warranty does not cover any products resold by the end user to third parties, nor any reconditioned products sold as such, by the manufacturer. The sole remedy for any such defect shall be the repair, or replacement, of the product at the sole discretion of the manufacturer. This warranty does not cover expendable parts, such as batteries, nor does it cover shipping or handling. In addition, manufacturer is not liable for any loss or damage to product during shipping. In the event it is determined that the product has been tampered with, or altered in any way, this warranty is void and all claims against the product will not be honored. All warranty claims must be submitted as outlined by the manufacturer and shall be processed in accordance with the manufacturer’s established warranty claim procedures. These procedures include provisions that proof of purchase must be established (by either warranty card from the seller or by point of purchase receipt) and that the manufacturer will make every attempt to return ship the product within one business day from receipt of the returned product, freight prepaid. In the event it is determined that the product has been tampered with, or altered in any way, this warranty is void and all claims against the product will not be honored. All warranty claims must be submitted as outlined by the manufacturer and shall be processed in accordance with the manufacturer’s established warranty claim procedures. These procedures include provisions that proof of purchase must be established (by either warranty card from the seller or by point of purchase receipt) and that the manufacturer will make every attempt to return ship the product within one business day from receipt of the returned product, freight prepaid. In addition, all maintenance procedures, as outlined by the product manuals, should be followed for the warranty to be kept in force. Should the product not be used in accordance with procedures as specified, or if the product otherwise fails outside of the warranty, the manufacturer reserves the right to make such judgment and the party returning the product will be notified that written notification will be necessary to repair the product at a cost which the manufacturer deems as reasonable. The product will then be shipped back to the customer, COD; or as the manufacturer deems appropriate. In addition, all maintenance procedures, as outlined by the product manuals, should be followed for the warranty to be kept in force. Should the product not be used in accordance with procedures as specified, or if the product otherwise fails outside of the warranty, the manufacturer reserves the right to make such judgment and the party returning the product will be notified that written notification will be necessary to repair the product at a cost which the manufacturer deems as reasonable. The product will then be shipped back to the customer, COD; or as the manufacturer deems appropriate. This is the only authorized manufacturer’s warranty and is in lieu of all other expressed, or implied, warranties or representations, including but not limited to any implied warranties of merchantability or fitness or any other obligations on the part of the manufacturer. In no vent will the manufacturer be liable for business interruptions, loss of profit, personal injury, costs of delays, or any special, indirect, incidental or consequential damages, costs or losses. This is the only authorized manufacturer’s warranty and is in lieu of all other expressed, or implied, warranties or representations, including but not limited to any implied warranties of merchantability or fitness or any other obligations on the part of the manufacturer. In no vent will the manufacturer be liable for business interruptions, loss of profit, personal injury, costs of delays, or any special, indirect, incidental or consequential damages, costs or losses. 19120-845 Rev B © 2004 Hickok Inc. All rights reserved. 19120-845 Rev B © 2004 Hickok Inc. All rights reserved. For the best test results do the following: • Make sure all other secondary ignition wires and any metal objects are at least 1-inch from the receiver tip. If adjacent wires/metal are too close during testing, the probe may provide inconsistent results. • Make sure all other secondary ignition wires and any metal objects are at least 1-inch from the receiver tip. If adjacent wires/metal are too close during testing, the probe may provide inconsistent results. • Do not touch the receiver tip or the extension probe while testing. Doing so will cause inaccurate readings. • Do not touch the receiver tip or the extension probe while testing. Doing so will cause inaccurate readings. • On DIS vehicles, the wasted spark may cause a doubling of the spark detection. To avoid this and only detect the true spark, slightly move the probe tip away from the ignition cable. • On DIS vehicles, the wasted spark may cause a doubling of the spark detection. To avoid this and only detect the true spark, slightly move the probe tip away from the ignition cable. • If the tester resets or changes mode during testing, the spark plug may not be firing and the high voltage is approaching the coil’s maximum output voltage. • If the tester resets or changes mode during testing, the spark plug may not be firing and the high voltage is approaching the coil’s maximum output voltage. Quick Check Mode A 20 ll 1 ri 1 gh H ts ick re ok se I rv nc ed . For the best test results do the following: Quick Check Mode To enter the Quick Check Mode, simply turn the tester on. The tester To enter the Quick Check Mode, simply turn the tester on. The tester automatically enters this mode when it is powered on. automatically enters this mode when it is powered on. During this mode, the red and green LEDs alternately flash once every second until a spark is detected. During this mode, the red and green LEDs alternately flash once every second until a spark is detected. Once a spark is detected, the headlamp flashes and the red or the green LED lights to show the polarity. Once a spark is detected, the headlamp flashes and the red or the green LED lights to show the polarity. Notes: Notes: • If the tester does not detect a spark after 30 seconds, it automatically turns off. • If the tester does not detect a spark after 30 seconds, it automatically turns off. • The Quick Check Mode may not detect spark voltage less than 5 kV. Use the Measurement Mode to verify. • The Quick Check Mode may not detect spark voltage less than 5 kV. Use the Measurement Mode to verify. Measurement Mode Measurement Mode To enter the Measurement Mode: To enter the Measurement Mode: 2. Press the power/toggle button when the headlight begins to flash. During this mode, the red and green LEDs stay lit while the tester measures the peak spark voltage (for approximately 10 to 15 seconds). 1. Firmly place the tester’s receiver tip over the secondary ignition wire. © 1. Firmly place the tester’s receiver tip over the secondary ignition wire. When the tester finishes a measurement, it will do all of the following: 2. Press the power/toggle button when the headlight begins to flash. During this mode, the red and green LEDs stay lit while the tester measures the peak spark voltage (for approximately 10 to 15 seconds). When the tester finishes a measurement, it will do all of the following: • The tester emits a beeping sound • The tester emits a beeping sound • The headlight flashes 3 times • The headlight flashes 3 times • The corresponding polarity LED lights • The corresponding polarity LED lights • LCD displays the current reading for 15 seconds. • LCD displays the current reading for 15 seconds. After completing this sequence, the tester returns to the Quick Test Mode. You can also return to the Quick Test Mode by pressing the power/toggle button while the kV is displayed. After completing this sequence, the tester returns to the Quick Test Mode. You can also return to the Quick Test Mode by pressing the power/toggle button while the kV is displayed. Note: It is normal for the LCD to flash random segments while the peak kV is measured. Note: It is normal for the LCD to flash random segments while the peak kV is measured. Interpreting the Results Interpreting the Results 1. Compare voltages for all cylinders. 1. Compare voltages for all cylinders. • Make sure to measure at the same location on each wire. • Make sure to measure at the same location on each wire. • On DIS vehicles, the positive firing voltage is typically 3–5 kV less than the negative reading. • On DIS vehicles, the positive firing voltage is typically 3–5 kV less than the negative reading. 2. Voltages above 20 kV indicate a non-firing plug. • May cause the tester to reset or change modes. 2. Voltages above 20 kV indicate a non-firing plug. • May cause the tester to reset or change modes. Turning the Tester Off Turning the Tester Off The tester automatically turns off after approximately 30 seconds of non-use. Before shutting off, all LEDs flash and the tester emits a beeping sound for a short period. The tester automatically turns off after approximately 30 seconds of non-use. Before shutting off, all LEDs flash and the tester emits a beeping sound for a short period. Replacing the Batteries Replacing the Batteries Replace the batteries when the polarity LEDs or the LCD segments become dim. Replace the batteries when the polarity LEDs or the LCD segments become dim. The kV/Arc Quick Probe uses two 3-volt CR2016 lithium batteries. The kV/Arc Quick Probe uses two 3-volt CR2016 lithium batteries. 1. Remove the two screws from the handle. 1. Remove the two screws from the handle. 2. Carefully separate the handle and remove the old batteries. 2. Carefully separate the handle and remove the old batteries. 3. Place the new batteries in the handle, positive (+) side facing up. 3. Place the new batteries in the handle, positive (+) side facing up. 4. Reassemble and tighten the screws. 4. Reassemble and tighten the screws. Replacement Part Kits Replacement Part Kits To place an order, contact our Customer Care department at 800/342-5080 or visit our website at www.quick-n-ezparts.com. To place an order, contact our Customer Care department at 800/342-5080 or visit our website at www.quick-n-ezparts.com. Description Part Number Description Part Number CR2016 batteries (2) T2000-9P2 CR2016 batteries (2) T2000-9P2 7⁄” Adapter (extension probe) 16970-195 7⁄” Adapter (extension probe) 16970-195 Signal Receiver Tip 16970-196 Signal Receiver Tip 16970-196 For the best test results do the following: For the best test results do the following: • Make sure all other secondary ignition wires and any metal objects are at least 1-inch from the receiver tip. If adjacent wires/metal are too close during testing, the probe may provide inconsistent results. • Make sure all other secondary ignition wires and any metal objects are at least 1-inch from the receiver tip. If adjacent wires/metal are too close during testing, the probe may provide inconsistent results. • Do not touch the receiver tip or the extension probe while testing. Doing so will cause inaccurate readings. • Do not touch the receiver tip or the extension probe while testing. Doing so will cause inaccurate readings. • On DIS vehicles, the wasted spark may cause a doubling of the spark detection. To avoid this and only detect the true spark, slightly move the probe tip away from the ignition cable. • On DIS vehicles, the wasted spark may cause a doubling of the spark detection. To avoid this and only detect the true spark, slightly move the probe tip away from the ignition cable. • If the tester resets or changes mode during testing, the spark plug may not be firing and the high voltage is approaching the coil’s maximum output voltage. • If the tester resets or changes mode during testing, the spark plug may not be firing and the high voltage is approaching the coil’s maximum output voltage. Quick Check Mode Quick Check Mode To enter the Quick Check Mode, simply turn the tester on. The tester To enter the Quick Check Mode, simply turn the tester on. The tester automatically enters this mode when it is powered on. automatically enters this mode when it is powered on. During this mode, the red and green LEDs alternately flash once every second until a spark is detected. During this mode, the red and green LEDs alternately flash once every second until a spark is detected. Once a spark is detected, the headlamp flashes and the red or the green LED lights to show the polarity. Once a spark is detected, the headlamp flashes and the red or the green LED lights to show the polarity. Notes: Notes: • If the tester does not detect a spark after 30 seconds, it automatically turns off. • If the tester does not detect a spark after 30 seconds, it automatically turns off. • The Quick Check Mode may not detect spark voltage less than 5 kV. Use the Measurement Mode to verify. • The Quick Check Mode may not detect spark voltage less than 5 kV. Use the Measurement Mode to verify. Measurement Mode Measurement Mode To enter the Measurement Mode: To enter the Measurement Mode: 1. Firmly place the tester’s receiver tip over the secondary ignition wire. 1. Firmly place the tester’s receiver tip over the secondary ignition wire. 2. Press the power/toggle button when the headlight begins to flash. 2. Press the power/toggle button when the headlight begins to flash. During this mode, the red and green LEDs stay lit while the tester measures the peak spark voltage (for approximately 10 to 15 seconds). During this mode, the red and green LEDs stay lit while the tester measures the peak spark voltage (for approximately 10 to 15 seconds). When the tester finishes a measurement, it will do all of the following: When the tester finishes a measurement, it will do all of the following: • The tester emits a beeping sound • The tester emits a beeping sound • The headlight flashes 3 times • The headlight flashes 3 times • The corresponding polarity LED lights • The corresponding polarity LED lights • LCD displays the current reading for 15 seconds. • LCD displays the current reading for 15 seconds. After completing this sequence, the tester returns to the Quick Test Mode. You can also return to the Quick Test Mode by pressing the power/toggle button while the kV is displayed. After completing this sequence, the tester returns to the Quick Test Mode. You can also return to the Quick Test Mode by pressing the power/toggle button while the kV is displayed. Note: It is normal for the LCD to flash random segments while the peak kV is measured. Note: It is normal for the LCD to flash random segments while the peak kV is measured. Interpreting the Results Interpreting the Results 1. Compare voltages for all cylinders. 1. Compare voltages for all cylinders. • Make sure to measure at the same location on each wire. • Make sure to measure at the same location on each wire. • On DIS vehicles, the positive firing voltage is typically 3–5 kV less than the negative reading. • On DIS vehicles, the positive firing voltage is typically 3–5 kV less than the negative reading. 2. Voltages above 20 kV indicate a non-firing plug. • May cause the tester to reset or change modes. A 20 ll 1 ri 1 gh H ts ick re ok se I rv nc ed . 2. Voltages above 20 kV indicate a non-firing plug. • May cause the tester to reset or change modes. Turning the Tester Off Turning the Tester Off The tester automatically turns off after approximately 30 seconds of non-use. Before shutting off, all LEDs flash and the tester emits a beeping sound for a short period. Replacing the Batteries The tester automatically turns off after approximately 30 seconds of non-use. Before shutting off, all LEDs flash and the tester emits a beeping sound for a short period. Replacing the Batteries Replace the batteries when the polarity LEDs or the LCD segments become dim. The kV/Arc Quick Probe uses two 3-volt CR2016 lithium batteries. 1. Remove the two screws from the handle. 2. Carefully separate the handle and remove the old batteries. 3. Place the new batteries in the handle, positive (+) side facing up. 4. Reassemble and tighten the screws. Replace the batteries when the polarity LEDs or the LCD segments become dim. The kV/Arc Quick Probe uses two 3-volt CR2016 lithium batteries. 1. Remove the two screws from the handle. 2. Carefully separate the handle and remove the old batteries. 3. Place the new batteries in the handle, positive (+) side facing up. 4. Reassemble and tighten the screws. Replacement Part Kits To place an order, contact our Customer Care department at 800/342-5080 or visit our website at www.quick-n-ezparts.com. Description Part Number CR2016 batteries (2) T2000-9P2 7⁄” Adapter (extension probe) 16970-195 Signal Receiver Tip 16970-196 To place an order, contact our Customer Care department at 800/342-5080 or visit our website at www.quick-n-ezparts.com. © Replacement Part Kits Description Part Number CR2016 batteries (2) T2000-9P2 7⁄” Adapter (extension probe) 16970-195 Signal Receiver Tip 16970-196