1
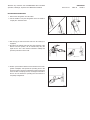
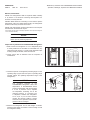
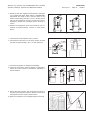
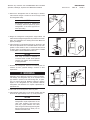
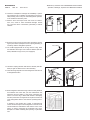
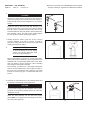
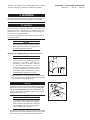
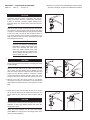
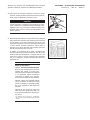
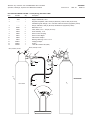
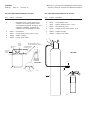
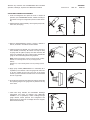
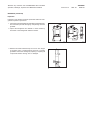
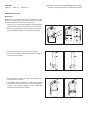
sentry dry chemical and cleanguard hand portable fire extinguishers OPERATION, Recharge, Inspection, and Maintenance Manual 000769 One Stanton Street / Marinette, WI 54143-2542, USA / +1-715-735-7411 / www.ansul.com Copyright © 2014 Tyco Fire Products LP. / All rights reserved. / Part No. 430141-05 FOREWORD 2014-JUL-15 REV. 05 SENTRY Dry Chemical and CLEANGUARD Hand Portables Operation, Recharge, Inspection and Maintenance Manual This manual is intended for use with SENTRY Dry Chemical and CleanGuarD Hand Portable Fire Extinguishers; Models: A02 A02S C02 AA05 AA05-1 A05 PK05 C05 A10H A10T AA10S PK10 C10 C10S PK10S AA20 AA20-1 PK20 C20 AA10S1 A10I PK10I PK10SI C10I AA20I-1 A20I PK20I FE02 FE05 FE09 FE13 HF-PK10S HF-PK20 HF-AA10S HF-AA20-1 CR-HF-PK20I CR-HF-PK10SI CR-HF-AA20I-1 CR-HF-AA10SI Those who may operate, recharge, inspect, or maintain these fire extinguishers should read this entire manual. Specific sections will be of particular interest depending upon one’s responsibilities. Fire extinguishers are mechanical devices. They require periodic care. If the extinguishers are not installed properly, are abused in service or are not properly maintained, they may not perform reliably. These extinguishers are pressure vessels that must be treated with respect and handled with care. It is recommended that only genuine ANSUL replacement components be installed on ANSUL products. Only authorized ANSUL distributors, who are trained in and authorized for a particular product line, shall be allowed to service and maintain ANSUL products. This manual is limited to uses herein described. For other applications, contact your local authorized distributor, Domestic District Manager, International Area Manager or Tyco Fire Protection Products – Technical Services Department, Marinette, Wisconsin 54143-2542, USA. Note: The converted metric values in this manual are provided for dimensional reference only and do not reflect an actual measurement. Part Number: 430141-05 Date: 2014-JUL-15 ANSUL, SENTRY, and the product names listed in this manual are marks and/or registered marks. Unauthorized use is strictly prohibited. EXPLANATION OF SAFETY ALERTS REV. 05 2014-JUL-15 SENTRY Dry Chemical and CLEANGUARD Hand Portables Operation, Recharge, Inspection and Maintenance Manual ! DANGER Indicates a hazardous situation in which a person will experience serious personal injury or death if the situation is not avoided. ! WARNING Indicates a hazardous situation in which a person could experience serious personal injury or death if the situation is not avoided. ! CAUTION Indicates a hazardous situation in which a person could experience minor or moderate personal injury if the situation is not avoided. CAUTION Addresses practices not related to personal injury, such as a system part malfunctioning, property damage, or system failure. NOTICE Addresses general practices or observations related to system function that are not related to personal injury. SENTRY Dry Chemical and CLEANGUARD Hand Portables Operation, Recharge, Inspection and Maintenance Manual SECTION PAGE Introduction 1–2 Operation3 Inspection 4–5 Maintenance 6 – 8 Recharge – Dry Chemical Extinguisher 9 – 12 Recharge – CleanGuard (HFC-236fa) Extinguisher 13 – 17 Appendix 18 – 29 Dry Chemical Recharge System 18 CleanGuard (HFC-236fa) Recharge System 19 – 20 CleanGuard (HFC-236fa) Reclaim Procedures 21 CleanGuard (HFC-236fa) Reclaim System 22 Gauge Replacement Procedures 23 Brackets 24 – 26 Servicing Materials 27 Service and Repair 28 TABLE OF CONTENTS 2014-JUL-15 REV. 05 PAGE TOC-1 TABLE OF CONTENTS PAGE TOC-2 REV. 05 2014-JUL-15 NOTES: SENTRY Dry Chemical and CLEANGUARD Hand Portables Operation, Recharge, Inspection and Maintenance Manual INTRODUCTION 2014-JUL-15 REV. 05 PAGE 1 SENTRY Dry Chemical and CLEANGUARD Hand Portables Operation, Recharge, Inspection and Maintenance Manual INTRODUCTION SIX YEAR TEARDOWN The Occupational Safety and Health Administration (OSHA) – Rules and Regulations state that ‘‘the National Fire Protection Association (NFPA) provides excellent guidelines in its standard for portable fire extinguishers.’’ NFPA 10 – ‘‘Standard for Portable Fire Extinguishers’’ is available from the National Fire Protection Association. Visit www.nfpa.org. Refer to NFPA 10, “Standard for Portable Fire Extinguishers” for detailed instructions concerning six-year teardown. RESPONSIBILITY The owner or occupant of a property in which fire extinguishers are located has an obligation for the care and use of these extinguishers at all times. By doing so, he/she is contributing to the protection of life and property. The nameplates and instruction manual should be read and thoroughly understood by all persons who may be expected to use these extinguishers. RECHARGE All extinguishers shall be recharged immediately after use. They shall also be recharged when dictated by an inspection or when performing maintenance. Recharge is the replacement or replenishment of the extinguishing agent. It also includes the replenishment of the expellant for certain types of extinguishers. When performing the recharge, use only those materials specified on the nameplate. The use of other recharging materials may impair the efficiency, cause malfunction, or damage the extinguisher resulting in possible injury to the operator. INSPECTION ‘‘Inspection’’ is a ‘‘quick check’’ that an extinguisher is available and will operate. It is intended to give reasonable assurance that the extinguisher is fully charged and operable. This is done by seeing that it is in its designated place, that it has not been actuated or tampered with, and that there is no obvious physical damage or condition to prevent operation. The value of an inspection lies in the frequency, regularity, and thoroughness with which it is conducted. Extinguishers shall be inspected at regular monthly intervals, or at more frequent intervals when circumstances require. MAINTENANCE NOTICE At the six year teardown, CLEANGUARD (HFC‑236fa) extinguishers require replacement of the valve stem assembly and valve body quad ring. Lightly lubricate new valve stem O-ring and valve body quad ring with Silicone Grease (Part No. 9030). Do not lubricate valve stem seat. CAUTION Examine interior of agent tank for pitting or corrosion. If found, it indicates that excessive moisture has been introduced into the tank. Mark tank ‘‘REJECTED’’ and return to owner without recharging. Tank is to be properly destroyed to prevent reuse. HYDROTEST Extinguishers shall be hydrostatically tested at regular intervals as required in the NFPA 10 – ‘‘Standard for Portable Fire Extinguishers,’’ or more frequently when inspection or maintenance indicates a specific need. Such tests are required on extinguisher shells. IF, AT ANY TIME, AN EXTINGUISHER SHOWS EVIDENCE OF CORROSION OR MECHANICAL DAMAGE, IT SHALL BE SUBJECTED TO A HYDROSTATIC PRESSURE TEST, OR REPLACED. ! WARNING Air or gas should not be used for pressure testing as failure of the shell could be violent and dangerous, and could result in severe personal injury or death. Follow proper hydrotest procedures. Extinguishers shall be maintained at regular intervals, not more than one year apart, or when specifically indicated by an inspection. Maintenance is a ‘‘thorough check’’ of the extinguisher. It is intended to give maximum assurance that an extinguisher will operate effectively and safely. It includes a thorough examination and any necessary repair, recharging, or replacement. It will normally reveal if there is a need for hydrostatic testing of an extinguisher. THE EXTINGUISHER SHALL BE DISCHARGED AND HYDROTESTED AT TWELVE YEAR INTERVALS IN ACCORDANCE WITH THE APPROPRIATE PROCEDURES. The periodic hydrostatic retest may be conducted within twelve months of the specified interval. Refer to ANSUL Portables, Wheeled Units, and Pre-engineered Systems Hydrostatic Test Instructions, Form No. F‑7602. Extinguishers removed for maintenance or recharge shall be replaced by spare extinguishers of the same type and at least equal rating. RECORD KEEPING Each extinguisher shall have a tag or label securely attached that indicates the month and year the maintenance was performed and shall identify the person performing the service. The same record tag or label shall indicate if recharging was also performed. The tag shall not be placed on the front of the extinguisher where it could obscure operating instructions. At least monthly, the date the inspection was performed and the initials of the person performing the inspection shall be recorded. INTRODUCTION PAGE 2 REV. 05 2014-JUL-15 RECORD KEEPING (Continued) A separate label shall also be affixed to the extinguisher following a successful hydrostatic test. This label shall include the month and year the test was performed, the test pressure used, and the name or initials of the person performing the test. This label shall be self-destructive when removal from the extinguisher is attempted, and shall not be placed on the front of the extinguisher where it could obscure operating instructions. In addition to the required tags or labels, a permanent file record should be kept for each extinguisher. This file record should include the date and the name of the person and/or agency performing maintenance, recharge or hydrostatic test. A description of dents remaining after passing a hydrostatic test should also be noted in this record. Parts of above were taken from NFPA 10. SENTRY Dry Chemical and CLEANGUARD Hand Portables Operation, Recharge, Inspection and Maintenance Manual HEALTH WARNINGS ! WARNING HFC-236fa may decompose when applied to a fire or to a heated surface above 900 °F (482 °C). The product of this decomposition is gaseous hydrogen fluoride. Hydrogen fluoride has an irritating odor. This decomposition product, even in low concentration, is dangerous and in sufficient concentration may cause injury or death. The quantity of by-product that may be generated is dependent upon fire size, agent concentration, and the length of time HFC-236fa is in contact with the fire or heated surface. If this irritating odor is detected, evacuate the area immediately. Avoid unnecessary inhalation of toxic by-products or concentra-tions of HFC-236fa by evacuating and ventilating the area. Where HFC-236fa has been released in a confined space, prohibit smoking and use of electric and gas heaters and furnaces in the immediate area until the space has been completely ventilated. Toxicity tests on HFC-236fa have demonstrated no remarkable clinical signs in 90-day inhalation studies. All genotoxicity tests were negative and cardiac sensitization studies have shown favorable results. The NOAEL is 10% and the LOAEL is 15%. General safety practices should be followed when using HFC-236fa. Avoid unnecessary contact. If inhaled, immediately remove to fresh air. Remain calm. For skin contact, flush area with lukewarm water. Do not use hot water. If frostbite has occurred call a physician. In case of eye contact, immediately flush eyes with plenty of water for at least 15 minutes. Call a physician. CLEANGUARD extinguishers should not be used in confined spaces less than the applicable volume per extinguisher listed below. If part of the confined space is occupied by equipment or other objects, this should be taken into account when calculating volume. The following calculations are based upon the HFC-236fa LOAEL of 15%. CLEANGUARD (HFC-236fa) Extinguisher Capacity Minimum Net Room Volume Required for 15% LOAEL HFC-236fa Concentration ft3 (m3) 2.50(1.1) 38 (1.08) 4.75(2.2) 73 (2.10) 6.00(2.7) 92 (2.61) 8.80(4.0) 135 (3.82) 9.50(4.3) 146 (4.13) 10.00(4.5) 154 (4.36) 13.20(6.0) 203 (5.75) 13.25(6.0) 204 (5.78) 14.00(6.4) 215 (6.09) lb (kg) OPERATION 2014-JUL-15 REV. 05 PAGE 3 SENTRY Dry Chemical and CLEANGUARD Hand Portables Operation, Recharge, Inspection and Maintenance Manual EXTINGUISHER OPERATION 1.Remove the extinguisher from its station. 2.Use the handle to carry the extinguisher to the fire. Walk at a rapid pace. DO NOT RUN. 000516 1 000611 3 000518 5 000520 2 000517 3.Pull the ring pin and remove the hose from its holder (if so equipped). 4.Proceed to the upwind side of the fire. Stay well clear of the flames. From this position, the air currents help carry the agent into the fire. It also assures maximum visibility and provides protection from the heat. 5.Position yourself at the distance recommended on the extinguisher nameplate, and squeeze the operating lever to the full open position. Direct the extinguishing agent at the base of the fire with a sweeping motion, covering the full width of the fire. Do not release the operating lever until the fire is completely extinguished. 4 000519 INSPECTION PAGE 4 REV. 05 2014-JUL-15 SENTRY Dry Chemical and CLEANGUARD Hand Portables Operation, Recharge, Inspection and Maintenance Manual NFPA 10, 2013 Edition: 7.2.1.2* Fire extinguishers shall be inspected either manually or by means of an electronic monitoring device/system at a minimum of 30-day intervals. 7.2.1.2.1 Where electronic monitoring is used and the specific extinguisher cannot be verified electronically, the extinguisher shall be continuously monitored for location. 7.2.1.3* Fire extinguishers shall be inspected at more frequent intervals when circumstances require. *Dry chemical and dry powder in cartridge-operated or stored pressure extinguishers are examined annually. NOTICE Become familiar with the Service and Repair section prior to performing Inspection. Inspect the Dry Chemical and CLEANGUARD Extinguisher: 1. Make certain the extinguisher is in its designated place, is clearly visible and is accessible for immediate use. Any obstructions that obscure it, or that would otherwise impair its being readily accessible, should be removed. 2. Check service date to determine need for inspection or maintenance 1 000521 2 000522 3.Check that pointer on extinguisher pressure gauge is in the operating range. (Upper and lower point of operating range normally reflects the operating temperature range of the extinguisher.) NOTICE The operating pressure of the CLEANGUARD extinguisher varies with temperature. A CLEANGUARD stored pressure extinguisher shall be recharged if a loss in pressure occurs, adjusted for temperature, exceeding 10% of the charging pressure. If a pressure loss is suspected, condition the extinguisher at 70 °F (21 °C) for 12 hours and then recheck the pressure reading. If gauge still shows a 10% pressure loss, the extinguisher must be recharged. 4.Remove the extinguisher from its wall hanger or bracket. Check that the hanger or bracket is secure enough to hold the extinguisher safely. 000524 3 000523 4 000533 INSPECTION 2014-JUL-15 REV. 05 PAGE 5 SENTRY Dry Chemical and CLEANGUARD Hand Portables Operation, Recharge, Inspection and Maintenance Manual 5.Heft (lift up and down slightly) the extinguisher to determine if it is charged with agent. When hefting a CLEANGUARD extinguisher, also shake it side to side and listen for any rattles. Internal rattling indicates a loose or broken pick-up tube and the extinguisher must be removed from service, discharged, repaired and recharged before returning to service. 6. Examine the extinguisher shell and all external parts for evidence of physical damage, corrosion or other impairments. 5 000525 6 000526 7.Check that the visual inspection seal is in place. 8.Check that the valve stem is in the full up position and that the stem has approximately 1/16 in. (1.6 mm) clearance. 7 000529 8 9 000642 10 000528 9.Check the nameplates for damage and readability. 10.Inspect the hose and/or nozzle for damage or obstructions. Insects are common causes of obstructions, particularly in warmer climates. 000531 11.Record date the inspection was performed and initials of the person performing the inspection. Keep records of those extinguishers found to require corrective action. 12.Return the extinguisher to its designated place and secure. 000532 11 000522 12 000594 MAINTENANCE PAGE 6 REV. 05 2014-JUL-15 SENTRY Dry Chemical and CLEANGUARD Hand Portables Operation, Recharge, Inspection and Maintenance Manual NFPA 10, 2013 Edition: 7.1.2.2 Persons performing maintenance and recharging of extinguishers shall be trained and shall have available the appropriate manufacturer’s servicing manual(s), the correct tools, recharge materials, lubricants, and manufacturer’s replacement parts or parts specifically listed for use in the fire extinguisher. 7.1.2.3* Persons performing 30-day inspections shall not be required to be certified. * Dry chemical and dry powder in cartridge-operated or stored pressure extinguishers are examined annually. NOTICE Always be alert for any indications of damage or inoperability in the unit. No manual can anticipate everything that could happen to a unit. In the event that something not covered in the manual is found, ascertain whether any potential for damage exists and repair or replace, as necessary. See Service and Repair Section, Page 28. Dry Chemical and CLEANGUARD E xtinguishers Maintenance: 1. Make certain the extinguisher is in its designated place, is clearly visible and is accessible for immediate use. Any obstructions that obscure it, or that would otherwise impair its being readily accessible, should be removed. 2. Check service date to determine need for inspection or maintenance. 1 000521 3 000523 3.Check that pointer on extinguisher pressure gauge is in the operating range. (Upper and lower point of operating range normally reflects the operating temperature range of the extinguisher.) Ensure the gauge is the proper model for the extinguisher being maintained. Also check the gauge for mechanical damage. (For gauge replacement, see Gauge Replacement Procedures, Page 23.) NOTICE The operating pressure of the CLEANGUARD extinguisher varies with temperature. A CLEANGUARD stored pressure extinguisher shall be recharged if a loss in pressure occurs, adjusted for temperature, exceeding 10% of the charging pressure. If a pressure loss is suspected, condition the extinguisher at 70 °F (21 °C) for 12 hours and then recheck the pressure reading. If gauge still shows a 10% pressure loss, the extinguisher must be recharged. 2 000522 MAINTENANCE 2014-JUL-15 REV. 05 PAGE 7 SENTRY Dry Chemical and CLEANGUARD Hand Portables Operation, Recharge, Inspection and Maintenance Manual 4.Remove the extinguisher from its wall hanger or bracket. Check that the hanger or bracket is secure enough to hold the extinguisher safely. NOTICE Extinguishers removed for maintenance or recharge shall be replaced by spare extinguishers of the same type and at least equal rating. 000524 4 000533 5 000534 7 000526 5. Weigh the extinguisher. Extinguisher weight MUST fall within the total charged weight limits as printed on the nameplate. Any extinguisher not meeting those limits MUST be properly recharged. 6.Check the date of manufacture stamped on the shell or the date of last hydrostatic test on the label affixed to the extinguisher to make certain it does not exceed the test interval of twelve years as specified in the current edition of NFPA 10 and ANSUL Technical Bulletin Number 50. NOTICE Date stamp is located on nameplate or on bottom dome of shell. These painted surfaces may require close examination to distinguish date. 6 000535 7. Examine the extinguisher shell and all external parts for evidence of burns, physical damage, corrosion or other impairments. ! WARNING Depending on the degree of corrosion or extent of mechanical damage, the extinguisher may be an explosive event type hazard to persons in the surrounding area, to operators or to service personnel. Welding, soldering or brazing repairs to the extinguisher are not permitted. Remove extinguisher and determine if it requires replacement or hydrostatic test. 8.Check that the visual inspection seal is in place. 9.Check that the valve stem is in the full up position and that the stem has approximately 1/16 in. (1.6 mm) clearance. NOTICE At the six year teardown, CLEANGUARD extinguishers require replacement of the valve stem assembly and valve body quad ring. Lightly lubricate new valve stem O-ring and valve body quad ring with Silicone Grease (Part No. 9030). Do not lubricate valve stem seat. 9 000538 8 000529 MAINTENANCE PAGE 8 REV. 05 2014-JUL-15 SENTRY Dry Chemical and CLEANGUARD Hand Portables Operation, Recharge, Inspection and Maintenance Manual 10.Check the nameplate for damage and readability. If operating instructions are not legible, an instructed (but not necessarily trained) person may not recall extinguisher operation in the excitement caused by a fire. 11. Remove hose and inspect hose and nozzle for obstructions, cuts, cracks or other mechanical damage. Insects are a common cause of obstruction, particularly in warmer climates. 10 12.Ensure hose and nozzle are the proper assembly by matching the part number (stamped on hose coupling hex fitting or nozzle tip) with the extinguisher parts list. 000642 11 000539 PART NUMBER 13.On models equipped with an O-ring, remove O-ring, clean and lubricate with a light coat of Silicone Grease (Part No. 9030). Reinstall O-ring to hose (if so equipped). 12 000540 13 000541 14.Lubricate coupling threads with Silicone Grease (Part No. 9030) or light oil. Attach hose to valve assembly. 15.Clean all foreign deposits from the extinguisher and return to its designated location. 14 000542 16.Each extinguisher shall have a tag or label securely attached that indicates the month and year the maintenance was performed and the identity of the person performing the service. The same tag or label shall indicate if recharging was also performed. The tag shall not be placed on the front of the extinguisher where it could obscure operating instructions. In addition to the required tag or label, a permanent file record should be kept for each extinguisher. This file record should include the maintenance date and the name of the person or agency performing the hydrostatic test; and a description of dents remaining after passing a hydrostatic test. 16 000522 15 000543 RECHARGE — DRY CHEMICAL 2014-JUL-15 REV. 05 PAGE 9 SENTRY Dry Chemical and CLEANGUARD Hand Portables Operation, Recharge, Inspection and Maintenance Manual NOTICE Before proceeding to recharge any extinguisher, visually examine the unit for any physical damage or impairment which may further dictate the need for maintenance. Recharge Dry Chemical Extinguisher: 1.Invert the extinguisher and, while holding nozzle assembly, press the lever to release all pressure. 2.Remove the hose and/or nozzle from the valve assembly and then remove the valve assembly from the shell by unscrewing it in a counterclockwise direction. NOTICE If recharging multiple extinguishers, keep the components for each extinguisher separate. Valve assemblies and shells are not indexed and labels will not line up properly if valve assemblies are transposed. 1 000544 2 000545 3.Remove the pick-up tube and spring from the valve assembly. 4. CAUTION Do not scratch internal valve surfaces. Scratching can result in valve leakage. Remove the valve stem by pushing down on the operating lever and withdrawing stem. Clean the stem and the internal valve body with a soft cloth. Examine the stem seating surface and O‑ring for cuts, scratches or other damage. Old style plastic valve stems are obsolete. Replace with the appropriate new style metal stems. 3 000546 5. Remove O-ring. Clean dry chemical from the valve and O-ring groove. Inspect the O-ring for damage, replace if necessary. Lubricate the O-ring with a light coat of silicone grease (Part No. 9030) and return to valve assembly. Make certain O-ring is not twisted. 5 000538 4 000547 RECHARGE — DRY CHEMICAL PAGE 10 REV. 05 2014-JUL-15 6. SENTRY Dry Chemical and CLEANGUARD Hand Portables Operation, Recharge, Inspection and Maintenance Manual CAUTION Small end of spring must be inserted into valve body first. Large end of spring must be toward pick-up tube. Failure to install correctly will cause the extinguisher to not function properly. Inspect the pick-up tube and verify that the tube is not blocked and is secure. Use a light coat of Silicone Grease (Part No. 9030) to lubricate the metal valve stem O-ring, and reassemble the valve body with the cleaned metal valve stem assembly, spring, and pick-up tube. Wrench-tighten the pick-up tube to prevent expellent gas leakage. 6 000767 7 000768 8 000612 10 7. Visually inspect the interior of the tank for any corrosion or foreign materials. If the tank is corroded, it should be replaced. If foreign materials are present, thoroughly clean and dry the tank before refilling. 8. NOTICE To avoid scratching the O-ring seating surface, use a plastic rather than metal funnel when filling extinguisher. Place all extinguisher components on a scale and fill extinguisher using only the ANSUL dry chemical specified on the nameplate. Fill to total charged weight listed on the nameplate. The weight of the dry chemical is critical. Overfilling may render the extinguisher ineffective. 000605 The remaining dry chemical in a discharged extinguisher may be reused provided that it is thoroughly checked for the proper type, contamination and condition. Dry chemical found to be of the wrong type, or contaminated shall not be reused. 9.Clean the dry chemical from the O-ring seating surface and the threads of the shell with a stiff bristle brush. 10. CAUTION Use care when inserting the valve assembly into the shell. Scratches on the quad ring seating surface can cause the extinguisher to leak. Screw the valve assembly into the shell until properly seated. Note: Do not apply force to the hanger portion of the valve body when tightening. 9 000551 RECHARGE — DRY CHEMICAL 2014-JUL-15 REV. 05 PAGE 11 SENTRY Dry Chemical and CLEANGUARD Hand Portables Operation, Recharge, Inspection and Maintenance Manual 11. ! WARNING – N ever leave a regulated high pressure source connected to an extinguisher for an extended period of time. A defective regulator could cause a violent failure of the extinguisher due to excess pressure buildup, resulting in severe personal injury or death. – N ever set the regulator higher than 25 psi (1.7 bar) over the extinguisher operating pressure. – N ever stand directly in front of extinguisher gauge when pressurizing. 11 000552 CAUTION The pressure gauge on the extinguisher should not be used to determine whether the intended charging pressure has been reached. Use the calibrated gauge on the Recharge System to determine if the correct pressure is being applied. Install recharge system using recharge adaptor (Part No. 440623) 12. Make certain nitrogen cylinder regulator is preset at correct pressure (see a, b or c) or lower before opening nitrogen cylinder valve. Open nitrogen cylinder valve. Open recharge system ball valve, press lever and pressurize to proper extinguisher operating pressure with dry nitrogen. Release lever, close ball valve. Extinguisher gauge pointer should be in the GREEN operating range. If not, check gauge. Replace if necessary by referring to Gauge Replacement Procedure, page 23, in Appendix. a.SENTRY 2 1/2 lb (A02S) extinguisher: 125 psi (8.6 bar). b.SENTRY 2 1/2 lb, 5 lb, 10 lb or 20 lb extinguisher: 195 psi (13.5 bar). 12 000553 c.High-Flow SENTRY 10 lb or 20 lb extinguisher: 240 psi (16.6 bar) 13.Reinsert the ring pin and install a new visual inspection seal. Then, relieve pressure from recharge system at the regulator and remove the recharge adaptor. 14.Check that there is approximately 1/16 in. (1.6 mm) clearance between the top of the valve stem and the push lever. 13 000529 14 000538 RECHARGE — DRY CHEMICAL PAGE 12 REV. 05 2014-JUL-15 SENTRY Dry Chemical and CLEANGUARD Hand Portables Operation, Recharge, Inspection and Maintenance Manual 15.Test for leakage using LEAK-TEC FORMULA 177 or equivalent. Observe gauge 24 to 48 hours after recharge. There should be no loss of pressure. If gauge shows a pressure loss, raise the pressure and retest for leakage. If gauge again shows a pressure loss, depressurize and recharge. NOTICE Ensure all valve areas are thoroughly dried before placing unit back in service. 16.Inspect hose and nozzle for obstructions, cuts, cracks or other mechanical damage. Insects are common causes of obstructions, particularly in warmer climates. 15 000554 16 000539 17 000542 18 000522 17.Check the hose couplings for tightness, corrosion or cracks. Lubricate coupling threads with Silicone Grease (Part No. 9030) or light oil. Reinstall hose and/or nozzle. NOTICE A loose connection of coupling to valve assembly or nozzle could contribute to a significant change in discharge characteristics upon use. A corroded or cracked coupling could separate under pressure. 18.Each extinguisher shall have a tag or label securely attached that indicates the month and year recharging was performed and the identity of the person performing the service. Record date of recharge on this tag or label and notify operating personnel that the extinguisher is back in service. In addition to the required tag or label, a permanent file record should be kept for each extinguisher. This file record should include the maintenance or recharge date and the name of the person or agency performing the hydrostatic test; and a description of dents remaining after passing a hydrostatic test. NOTICE NFPA 10, 2013 Edition: 7.3.1.2.1 Six-Year Internal Examination. Every 6 years, stored-pressure fire extinguishers that require a 12-year hydrostatic test shall be emptied and subjected to the applicable internal examination procedures as detailed in the manufacturer’s service manual and this standard. 7.3.1.2.1.1 When the applicable maintenance procedures are performed during periodic recharging or hydrostatic testing, the 6-year requirement shall begin from that date. RECHARGE — CLEANGUARD EXTINGUISHER 2014-JUL-15 REV. 05 PAGE 13 SENTRY Dry Chemical and CLEANGUARD Hand Portables Operation, Recharge, Inspection and Maintenance Manual ! WARNING HFC-236fa could cause freezing if sprayed on bare skin or in the eyes. Always wear gloves and goggles or a face shield. ! CAUTION During recharge, escaping HFC-236fa could raise the HFC-236fa volume concentration to a hazardous level (the NOAEL level is 10%). Ensure the area in which recharge is to be performed is properly v entilated. Do not allow smoking in the area of agent transfer, reclaim or recharge operations. NOTICE Properly identify cylinders containing contaminated agent and keep them separate from pure rechargable agent supplies. Recharge the CLEANGUARD (HFC-236fa) Extinguisher: 1. NOTICE HFC-236fa has been developed in response to the provisions of the Montreal Protocol. Unwanted or accidental discharges of HFC-236fa should be avoided. Servicing of HFC-236fa extinguishers should be conducted to prevent the release of agent into the atmosphere. Proper environmental stewardship should be practiced in returning CLEANGUARD extinguishers to service. With extinguisher in an upright position, release all pressure from extinguisher, reclaiming HFC-236fa according to procedures in the Appendix Section. 2. 1 000555 CAUTION Any pitting or corrosion of the shell indicates that excessive moisture has been introduced into the shell and The entire unit is not rechargeable. Mark shell ‘‘REJECTED’’ and return to owner without recharging. Shell is to be properly destroyed to prevent reuse. NOTICE If recharging multiple extinguishers, keep the components for each extinguisher separate. Valve assemblies and shells are not indexed and nameplates may not line up properly if valve assemblies are transposed. Remove the hose and/or nozzle from the valve assembly and then remove the valve assembly from the shell. Check the shell for corrosion and/or HFC-236fa contamination. 2 000556 RECHARGE — CLEANGUARD EXTINGUISHER PAGE 14 REV. 05 2014-JUL-15 3. SENTRY Dry Chemical and CLEANGUARD Hand Portables Operation, Recharge, Inspection and Maintenance Manual CAUTION Thoroughly examine internal components and shell for pitting or corrosion caused by contaminated HFC-236fa. If pitting or corrosion is present, replace damaged parts (including gauge) or in severe cases, remove the unit from service. Remove the pick-up tube and spring from the valve assembly. Inspect the valve spring and pick-up tube for any pitting or corrosion. Check the length of the pick-up tube by holding it next to the shell. The pick-up tube should be about 1/4 in. (6.4 mm) shorter than the shoulder to base length of the shell. If the pick-up tube is too short, replace with proper part (see extinguisher parts list). 3 000546 4 000507 5 6 000593 7 NOTICE At the six year teardown, CLEANGUARD extinguishers require replacement of the valve stem assembly and valve body quad ring. Lightly lubricate new valve stem O-ring and valve body quad ring with Silicone Grease (Part No. 9030). Do not lubricate valve stem seat. 4. CAUTION Do not scratch internal valve surfaces. Scratching can result in valve leakage. Remove the valve stem from the valve body, taking care not to scratch the valve seating area or damage the valve stem and O-rings. Remove O-rings from the valve stem and inspect for any damage; replace if necessary. Lubricate O-rings with Silicone Grease (Part No. 9030) and return O-rings to valve stem. Then return valve stem to valve body. 5.Remove O-ring from valve body. Inspect for any damage and replace if necessary. Lubricate the O-ring with Silicone Grease (Part No. 9030) and return to O-ring groove on valve body. 000548 6.Inspect pick-up tube and verify that the tube is not blocked and is securely attached to the adaptor.Reinstall spring and pick-up tube into the valve body. Wrench tighten pick-up tube. 7. CAUTION Use care when inserting the valve assembly into the shell. Scratches on the O-ring seating surface can cause the extinguisher to leak. Screw the valve assembly into the shell until properly seated. Note: Do not apply force to the hanger portion of the valve body when tightening. 000551 RECHARGE — CLEANGUARD EXTINGUISHER 2014-JUL-15 REV. 05 PAGE 15 SENTRY Dry Chemical and CLEANGUARD Hand Portables Operation, Recharge, Inspection and Maintenance Manual 8.Make certain all equipment is connected and all valves are closed on HFC-236fa Recharge System (see the Appendix Section). NOTICE To avoid overpressurization of extinguisher, the HFC-236fa supply tank, the nitrogen supply and the extinguisher shell should be at 70 °F (21 °C) before recharging. 9.Make certain the regulator (in the nitrogen supply to the HFC-236fa supply tank) is preset at 75 psi (5.2 bar) or lower before opening the nitrogen cylinder valve. Open nitrogen cylinder valve and adjust regulator so that calibrated gauge reads 75 psi (5.2 bar). DO NOT EXCEED 100 psi (6.9 bar). Open Blue vapor valve on HFC-236fa supply tank to pressurize. 10.Install recharge adaptor (Part No. 429951). Also, place an O‑ring over the push lever handle. Use O-ring (Part No. 428327). 11. CAUTION Only dry nitrogen may be used. Introduction of moisture into the extinguisher will result in corrosion and ultimate extinguisher malfunction. Place cylinder on weigh scale and connect hose from supply tank to fill adaptor on extinguisher. Set scale for the charged weight as shown on the extinguisher nameplate. 10 000560 11 000561 12 000562 13 000563 12.Open Red liquid HFC-236fa valve on supply tank until extinguisher is filled with only HFC-236fa to the rated capacity. Then close both valves (Red and Blue) and remove O-ring from push lever. CAUTION Only dry nitrogen may be used. Introduction of moisture into the extinguisher will result in corrosion and ultimate extinguisher malfunction. The nitrogen charging regulator should be set to no more than 25 psi (1.7 bar) above the extinguisher’s normal charged pressure. The pressure gauge on the extinguisher should not be used to determine whether the intended charging pressure has been reached. Use the calibrated gauge on the Recharge System to determine if the correct pressure is being applied. 13.Disconnect the HFC-236fa supply hose from the extinguisher fill adaptor. Make certain the regulator (in the nitrogen pressurization line) is preset at or below the nominal operating pressure required for the extinguisher. Connect the nitrogen pressurization hose to the extinguisher fill adaptor. RECHARGE — CLEANGUARD EXTINGUISHER PAGE 16 REV. 05 2014-JUL-15 SENTRY Dry Chemical and CLEANGUARD Hand Portables Operation, Recharge, Inspection and Maintenance Manual 14. The calibrated gauge on the regulator should read the nominal operating pressure for that extinguisher (indicated in the GREEN operating range of the extinguisher pressure gauge). DO NOT OVERPRESSURIZE. Depress the push lever to charge extinguisher to indicated pressure at 70 °F (21 °C). During pressurization, agitate or shake the extinguisher for 60 seconds to assure that proper superpressurization of extinguisher occurs. Then, release push lever. 15.Disconnect the nitrogen supply hose from the extinguisher fill adaptor. Check that the extinguisher pressure gauge reads in the GREEN operating range. If not, replace the gauge by referring to Gauge Replacement Procedures, page 23, in the Appendix. 14 000564 15 000565 16 000529 17 000538 18 000554 19 000539 16.Reinsert the ring pin and install a new visual inspection seal. Then, remove the recharge adaptor. 17.Check that there is approximately 1/16 in. (1.6 mm) clearance between the top of the valve stem and the push lever. 18.Test for leakage using LEAK-TEC FORMULA 177 or equivalent. Observe gauge 24 to 48 hours after recharge. There should be no loss of pressure. If gauge shows a pressure loss, raise the pressure and retest for leakage. If unit still leaks, depressurize and repeat recharge procedure. NOTICE Ensure all valve areas are thoroughly dried before placing the unit back in service. 19.Inspect the hose and/or nozzle for damage or obstructions. Insects are common causes of obstructions, particularly in warmer climates. RECHARGE — CLEANGUARD EXTINGUISHER 2014-JUL-15 REV. 05 PAGE 17 SENTRY Dry Chemical and CLEANGUARD Hand Portables Operation, Recharge, Inspection and Maintenance Manual 20.Check the hose couplings for tightness, corrosion or cracks. Lubricate coupling threads with Silicone Grease (Part No. 9030) or light oil. Reinstall hose and/or nozzle. CAUTION A loose connection of coupling to valve assembly or nozzle could contribute to a significant change in discharge characteristics upon use. A corroded or cracked coupling could separate under pressure, causing the extinguisher to not function properly. 20 000542 21.Each extinguisher shall have a tag or label securely attached that indicates the month and year recharging was performed and the identity of the person performing the service. The tag shall not be placed on the front of the extinguisher where it could obscure operating instructions. Record date of recharge on this tag or label and notify operating personnel that the extinguisher is back in s ervice. In addition to the required tag or label, a permanent file record should be kept for each extinguisher. This file record should include the maintenance or recharge date and the name of the person or agency performing the hydrostatic test; and a description of dents remaining after passing a hydrostatic test. NOTICE NFPA 10, 2013 Edition: 7.3.1.2.1 Six-Year Internal Examination. Every 6 years, stored-pressure fire extinguishers that require a 12-year hydrostatic test shall be emptied and subjected to the applicable internal examination procedures as detailed in the manufacturer’s service manual and this standard. 7.3.1.2.1.1 When the applicable maintenance procedures are performed during periodic recharging or hydrostatic testing, the 6-year requirement shall begin from that date. 7.3.1.2.1.2* The removal of agent from halon agent fire extinguishers shall only be done using a listed halon closed recovery system. * Dry chemical and dry powder in cartridge-operated or stored pressure extinguishers are examined annually. 21 000522 APPENDIX PAGE 18 REV. 05 2014-JUL-15 SENTRY Dry Chemical and CLEANGUARD Hand Portables Operation, Recharge, Inspection and Maintenance Manual DRY CHEMICAL RECHARGE SYSTEM Item 1 2 3 4 Part No. 32633 32636 27350 70452 Qty. Description 1 1 2 1 Hose Assembly, 1/4 in. Coupler, Quick-Connect, Valved, 1/4 in. Tee, 1/4 in. Valve, Relief, 1/4 in. – 300 psi (20.7 bar) 5 – – – 1 6 68780 1 7 – – – 1 Gauge, Calibrated, 1000 psi (68.9 bar) with Restrictor Ball Valve, 1/4 in. Regulator, Adjustable, Inlet 0-3000 psi (206.8 bar), Outlet 0-1000 psi (68.9 bar), Self-Relieving with Gauges, 1/4 in. Inlet and Outlet Connections (supplied by others) 8 31059 1 Cylinder, Nitrogen, Assembly, 400 cu ft 9 10 11 12 1778 12791 3384 3799 1 1 1 1 Nipple, Schedule 80, 1/4 in. Tee, Schedule 80, 1/4 in. Nipple Nut 13 14 429951 440623 1Adaptor, Charging 1Adaptor, Universal 2 1/2 lb, 5 lb, 10 lb, and 20 lb models 7 9 10, 11, 12 6 5 4 1 RECHARGE 3 8 2 13 or 14 N2 000566 APPENDIX 2014-JUL-15 REV. 05 PAGE 19 SENTRY Dry Chemical and CLEANGUARD Hand Portables Operation, Recharge, Inspection and Maintenance Manual HFC-236fa RECHARGE SYSTEM – 145 lb (65.8 kg) HFC-236fa TANK Item Part No. Qty. Description 1 2 3 3799 3384 – – – 4 5 6 7 8 9 10 11 12 13 14 – – – 68780 70452 32633 32636 32637 32632 32641 429951 428327 422725 1 Nut 1 Nipple, Schedule 80, 1/4 in. 1Regulator, Adjustable, Inlet 0-3000 psi (206.8 bar), Outlet 0-1000 psi (68.9 bar), Self-Relieving with Gauges, 1/4 in. Inlet and Outlet Connections (supplied by others) 1 Gauge, Calibrated, 1000 psi (68.9 bar) with Restrictor (supplied by others) 3 Ball Valve, 1/4 in. 1 Valve, Relief, 1/4 in. – 300 psi (20.7 bar) 2 Hose Assembly, 1/4 in. 2 Quick-Connect Coupling 1 Quick-Connect Nipple 1 Swivel Union Adaptor 1 Bushing, Reducing, 3/4 in. x 1/4 in. 1 Charging Adaptor 1 O-Ring 1 145 lb HFC-236fa Tank (filled) RED (Liquid) Valve BLUE (Vapor) Valve 10 3 1 5 11 4 2 5 5 9 6 14 7 RECHARGE 7 HFC-236fa 8 N2 8 12 13 000558 APPENDIX PAGE 20 REV. 05 2014-JUL-15 SENTRY Dry Chemical and CLEANGUARD Hand Portables Operation, Recharge, Inspection and Maintenance Manual RECHARGE INSTRUCTIONS – 50 LB (22.7 kg) HFC-236fa TANK The 50 lb (22.7 kg) HFC-236fa recharge tank (Part No. 422817) is equipped with two cylinder valves, (Blue Vapor valve and Red Liquid valve). Refer to below figure for proper components and assembly of the recharge station. RED LIQUID VALVE HFC-236fa AGENT HOSE NITROGEN SUPPLY FROM VALVED, REGULATED SOURCE BLUE VAPOR VALVE TO EXTINGUISHER 6 2 Instructions for Recharging the CLEANGUARD Extinguisher: 1.Remove extinguisher hose and install valve adaptor (Item No. 5) into extinguisher valve outlet. Also, hold extinguisher valve open by squeezing handle and holding open by using O-Ring (Item No. 6). 2.Connect the nitrogen pressure hose to the Blue Vapor valve on the HFC-236fa supply tank. 3.Connect the HFC-236fa agent hose to the Red Agent valve on the HFC-236fa supply tank. Also, connect the hose adaptor (Item No. 3) and the female quick-connect (Item No. 4) to the hose. Finally, connect female quick-connect (Item No. 4) to valve adapter (Item No. 5) on the extinguisher. 4.Make certain the HFC-236fa nitrogen supply is regulated to a maximum of 75 psi (5.2 bar). 2 5.Open nitrogen cylinder valve. RECHARGE 1 6.Open Blue Vapor valve on HFC-236fa supply tank. 7.Open Red Liquid valve on HFC-236fa supply tank. 8.At this point, HFC-236fa agent will flow into the empty extinguisher. 9.Fill to rated capacity as noted on the extinguisher nameplate. 5 3 4 001509 Item No. Description 150 lb HFC-236fa Tank (Part No. 422817). Tank valve threads are 7/16-20 flare. Supplied by Tyco Fire Protection Products. 2Refrigeration Hose – Hose coupling must contain the “Sure Seal” type fitting. Hoses are available through W.W. Grainger or other suppliers of refrigeration equipment. Not supplied by Tyco Fire Protection Products. 3Hose Adaptor (Part No. 32338) – Supplied by Tyco Fire Protection Products. 4Female Quick-Connect (Part No. 32636) – Supplied by Tyco Fire Protection Products. 10.When proper fill has been reached, remove O-Ring (Item No. 6) on handle and close extinguisher valve. 11.Close Red Liquid Valve and Blue Vapor Valve on HFC-236fa supply tank and remove nitrogen supply hose. NOTICE If recharging multiple extinguishers, keep the components for each extinguisher separate. Valve assemblies and shells are not indexed and nameplates may not line up properly if valve assemblies are transposed. 12.If necessary, follow same procedure to recharge any other CLEANGUARD extinguishers. 13.After extinguisher has been filled, disconnect HFC-236fa agent hose from extinguisher valve. 5 Valve Adaptor Assembly (Part No. 429951 for FE02, FE05, FE09, and FE13) – Supplied by Tyco Fire Protection Products. 14.Attach nitrogen supply hose to extinguisher valve adaptor. 6O-Ring (Part No. 428327 for FE models) – Supplied by Tyco Fire Protection Products. 16.Note extinguisher gauge needle. If needle is not indicating the correct pressure on the gauge, slowly open the extinguisher valve handle. Carefully monitor the extinguisher gauge needle. When the needle indicates the correct pressure, close the extinguisher valve handle. 15.Make certain nitrogen supply is regulated to approximately 75 or 125 psi (5.2-8.6 bar) per model requirement. 17.Seal the extinguisher handle with proper visual inspection seal. 18.Remove the nitrogen supply hose and the valve adaptor. 19.Install the extinguisher hose. 20.Complete with same procedure on all remaining extinguishers. 21. When all extinguishers have been filled and pressurized properly, return all agent tank and nitrogen valves to their correct standby position. SENTRY Dry Chemical and CLEANGUARD Hand Portables Operation, Recharge, Inspection and Maintenance Manual APPENDIX 2014-JUL-15 REV. 05 PAGE 21 HFC-236fa RECLAIM PROCEDURES ! WARNING HFC-236fa could cause freezing if sprayed on bare skin or in the eyes. Always wear gloves and goggles or a face shield. ! CAUTION During recharge, escaping HFC-236fa could raise the HFC-236fa volume concentration to a hazardous level (the NOAEL level is 10%). Ensure the area in which reclaim is to be performed is properly ventilated. Do not allow smoking in the area of agent transfer, reclaim or recharge operations. NOTICE Properly identify cylinders containing contaminated agent and keep them separate from pure rechargable agent supplies. 1.Check weight, gauge, or shake extinguisher to determine if there is any liquid agent remaining in the extinguisher. 2.Assemble Recharge System as indicated in the Figure and Table below. Make certain Red and Blue Valves are closed. 3.Remove hose and/or nozzle from extinguisher and install recharge adaptor (Part No. 429951). 4. CAUTION Any residual nitrogen pressure existing in the reclaim tank should be released through the Blue Valve to a vented hood or outside atmosphere. Connect hose from outlet adaptor on EMPTY unpressurized HFC-236fa reclaim tank to recharge adaptor on extinguisher using quick-connect coupler. 5.Open Red Valve on HFC-236fa reclaim tank. Install proper O‑ring (see Figure and Table below) over extinguisher push lever and handle to allow HFC-236fa to flow from extinguisher to reclaim tank. 6.When extinguisher is empty, remove O-ring from push lever and close Red Valve on reclaim tank. Then, disconnect hose from charging adaptor and remove charging adaptor from extinguisher valve. NOTICE HFC-236fa has been developed in response to the provisions of the Montreal Protocol. Unwanted or accidental discharge of HFC‑236fa should be avoided. Servicing of CLEANGUARD extinguishers should be conducted to prevent the release of agent into the atmosphere. Proper environmental stewardship should be practical in returning CLEANGUARD extinguishers to service. APPENDIX PAGE 22 REV. 05 2014-JUL-15 SENTRY Dry Chemical and CLEANGUARD Hand Portables Operation, Recharge, Inspection and Maintenance Manual HFC-236fa RECLAIM SYSTEM (50 lb Cylinder) HFC-236fa RECLAIM SYSTEM (145 lb Cylinder) Item Part No. Description Item Part No. Description 1 422818Cylinder, HFC-236fa, 50 lb (22.6 kg) (empty) 1 432588Cylinder, HFC-236fa, 145 lb (65.8 kg) (empty) 2 —Refrigeration Hose – Hose coupling must contain the “Sure Seal” type fitting. Hoses are available through W.W. Grainger or other suppliers of refrigeration equipment. Not supplied by Tyco Fire Protection Products. 2 32632Swivel Adaptor Union. 3 32641 4 32633Hose Assembly, 1/4 in. 3 32338 5 32636 4 32636Coupler, Quick-Connect, Valved, 1/4 in. 6 429951Adaptor, Charging 5 429951Adaptor, Charging 7 428327 6 428327 RED LIQUID VALVE HFC-236fa AGENT HOSE Hose Adaptor O-Ring, for FE models 3 Bushing, Reducing, 3/4 in. x 1/4 in. Coupler, Quick-Connect, Valved, 1/4 in. O-Ring, for FE models 2 NITROGEN SUPPLY FROM VALVED, REGULATED SOURCE BLUE VAPOR VALVE TO EXTINGUISHER (Connect to 3) 6 2 RECLAIM 2 5 RECLAIM 1 5 3 4 4 001509 1 7 6 000567 APPENDIX 2014-JUL-15 REV. 05 PAGE 23 SENTRY Dry Chemical and CLEANGUARD Hand Portables Operation, Recharge, Inspection and Maintenance Manual GAUGE REPLACEMENT PROCEDURES 1.Invert the extinguisher and press the lever to release all pressure. (For CLEANGUARD models, reclaim according to procedures on Page 21 of Appendix.) Remove valve assembly. 2.Disassemble the valve assembly, removing the pick-up tube, valve stem, and spring. 1 000569 2 000571 3.Remove damaged/defective gauge. If gauge is difficult to remove, immerse in hot water to loosen sealant. 4.Clean the gauge port threads. Use 1/8–27 NPT pipe tap to chase threads, if necessary. Be careful not to tap too deep as gauge will not tighten properly and valve assembly will have to be replaced. Be sure to select proper replacement gauge for the model extinguisher being repaired. Note: High-flow extinguishers use 240 psi Gauge (Part No. 441264); SENTRY 2 1/2 lb extinguishers use 125 psi Gauge (Part No. 436610); SENTRY 5 lb, 10 lb, 20 lb extinguishers use 195 psi Gauge (Part No. 56776). 3 000572 5 000574 7 000576 4 000573 5.Apply epoxy sealant (ARMSTRONG C-7 w/Activator W or equivalent) to the threads of the new gauge. Be careful not to get any sealant into the hole in the face of the gauge socket. Tyco Fire Protection Products does not recommend the use of pipe tape. 6.Screw the new gauge into the valve body making certain that the operating range on the gauge face is pointed to the top of the valve. 7. Clean valve body, lubricate, and reassemble. Recharge extinguisher and check for leakage (use LEAK-TEC FORMULA 177 or equivalent). If there is leakage through gauge threads, relieve pressure from extinguisher and tighten gauge one more turn. If leakage cannot be stopped, discard valve assembly. 6 000575 APPENDIX PAGE 24 REV. 05 2014-JUL-15 BRACKETS Introduction Brackets are available for each SENTRY hand portable extinguisher. Certain applications require extinguishers to be mounted in brackets for safety and restraint. Installation and Mounting Make certain mounting location and position meet NFPA 10 requirements. Brackets may be mounted in a vertical, horizontal or sloping position on sufficiently strong, stationary supporting surfaces or within suitable vehicle compartments. The brackets are provided with mounting holes in the back plate (frame) and /or mounting holes in the base. The mounting surface will usually dictate that either the back or the base of the bracket be used but in some cases, both may be used to improve the weight distribution. Use good quality fasteners, one in each mounting hole. Fasteners should be tightened as recommended for the specific type and grade of fastener used. Even though welding is an effective method of securing the bracket in place, it is NOT recommended because Tyco Fire Protection Products has no control over the placement and quality of the welds. Mounting Location Two considerations will affect the choice of bracket mounting location. The first is fire protection needs. 1.The extinguisher must be visible, not hidden in an out-of-theway spot. 2.The extinguisher must be easy to reach. 3.The extinguisher should not be placed where a fire is likely to make it inaccessible. The second set of considerations deal with keeping the extinguisher safe and secure. 1.Avoid locations where grease or oil could build up on the extinguisher and bracket. 2. Select a relatively flat mounting surface which is strong enough to support the weight of the extinguisher and bracket. 3.Avoid surfaces which may flex enough to cause metal fatigue in the bracket support. 4.Be sure there is enough space to allow proper mounting of the bracket and easy access to the extinguisher. 5.Avoid locations that may expose the extinguisher to temperatures detrimental to its operation (such as too near a motor or exhaust manifold). SENTRY Dry Chemical and CLEANGUARD Hand Portables Operation, Recharge, Inspection and Maintenance Manual APPENDIX 2014-JUL-15 REV. 05 PAGE 25 SENTRY Dry Chemical and CLEANGUARD Hand Portables Operation, Recharge, Inspection and Maintenance Manual BRACKETS (Continued) Inspection Inspection of the bracket should be performed whenever extinguisher inspection is performed. 1.Check for looseness between the extinguisher and the bracket. The band clamp should shut tightly, compressing the band grommet. 2.Inspect the extinguisher and bracket for wear caused by movement of the extinguisher within the bracket. 1 000578 3 000580 3.Examine the entire bracket closely for loose or worn hinges or hingepins, bent or cracked bands and worn or missing grommets. Avoid future damage by replacing or repairing all components that are missing, worn or damaged. 2 000579 APPENDIX PAGE 26 REV. 05 2014-JUL-15 SENTRY Dry Chemical and CLEANGUARD Hand Portables Operation, Recharge, Inspection and Maintenance Manual BRACKETS (Continued) Maintenance Maintenance is a very important factor in the lifespan and reliability of a bracket. Bracket maintenance should be performed whenever extinguisher maintenance is performed. 1.Clean any dirt or other foreign material from the extinguisher and bracket using a brush, cleaning cloth or soap and water. 2.Remove the extinguisher from the bracket and clean extinguisher surfaces which were in contact with the bracket. 1 2 000582 000583 4 000584 000585 6 000586 000543 3.Inspect the bracket. If it is bent or cracked, replace it. 4.Check to see that the bracket is firmly mounted. Tighten or replace mounting fasteners. 3 5.Avoid possible rust damage by cleaning and painting whenever bare metal is exposed. 6.Following extinguisher maintenance, secure the extinguisher in the bracket. If the bracket does not hold the extinguisher securely or the bracket is difficult to close, replace the affected part and/or the entire bracket. 5 SENTRY Dry Chemical and CLEANGUARD Hand Portables Operation, Recharge, Inspection and Maintenance Manual SERVICING MATERIALS The following are some additional materials and equipment available to properly service stored pressure extinguishers in the field. Lubricants • Silicone Grease for O-rings and Quad Rings (5.3 oz (150 g) tube) Part No. 9030 O-Rings • Valve O-ring (primary) Part No. 428327 • Valve Stem O-ring Part No. 11873 • Pick-up Tube O-ring Part No. 76016 Touch-Up Paint - Red (Requires no primer) • Spray Can Pre May 2009 Part No. 79730 • Bottle with Brush Post May 2009 Part No. 436049 Labels and Tags • Metal Inspection Tags Part No. 4111 • Paper Inspection Tags Part No. 2364 • Fire Extinguisher Maintenance Form No. F-7288 and Recharge Record Form (Order from Marketing Communications) Recharge Adaptors •Universal 2 1/2 lb, 5 lb, 10 lb, and 20 lb Adaptor •Models FE02, FE05, FE09, FE13, and FE13NM Charging Adaptor Part No. 440623 Part No. 429951 APPENDIX 2014-JUL-15 REV. 05 PAGE 27 APPENDIX PAGE 28 REV. 05 2014-JUL-15 SENTRY Dry Chemical and CLEANGUARD Hand Portables Operation, Recharge, Inspection and Maintenance Manual SERVICE AND REPAIR COMPONENT DISORDER CORRECTIVE ACTION Tank Dents or abrasions Hydrotest (see Form No. F-7602, Hydrostatic Test Instructions) or discard tank. Rust spots, pits or corrosion Replace tank if there is any corrosion penetration. Threads nicked, cross-threaded, corroded or worn If damaged or worn extensively the tank must be discarded. Leak in weld seam Discard tank. Burn marks Discard tank. Extinguishing Improper fill level Agent Fill shell to rated capacity with ANSUL extinguishing agent specified on nameplate. Caked* dry chemical Discard agent and refill clean tank to rated capacity with ANSUL extinguishing agent specified on nameplate. Pickup Tube Bent, cracked, broken or obstructed Replace, using factory-built assembly only. Valve Leak through valveInstall new valve stem assembly or valve stem seal. Check valve seat for scratches or foreign matter. Leak around gauge threadsDepressurize extinguisher, remove gauge and reinstall with plastic lead pipe sealant (Armstrong C-4 w/Activator W or equivalent) on gauge threads. Defective or damaged gaugeDepressurize extinguisher, remove gauge and replace with proper gauge for extinguisher model being repaired. Use plastic lead pipe sealant (Armstrong C-4 w/Activator W or equivalent) on gauge threads. Low pressure on gauge Nameplate UnreadableUse a mild detergent to clean plate. If readability cannot be improved, replace operating nameplate.** Check for leaks. Weigh extinguisher. Repressurize. Retest. Loose Inspect area under plate. If corroded, see ‘‘Tank – Rust spots, pits, or corrosion’’ and reaffix nameplate using a good grade of heatless adhesive. Missing Replace with correct nameplate.** Hose Cut, cracked or abraded Replace hose assembly. Replace hose assembly. Corroded or cracked coupling Internal blockageReplace or clear by flexing or blowing air or nitrogen through the hose at 50 psi (3.5 bar) or less. O-ring cut, brittle or missing Nozzle Wrong nozzleReplace with proper model nozzle recommended by Tyco Fire Protection Products. Refer to Parts List. Nozzle body corroded, cracked or dented Replace nozzle. Threads nicked, worn or cross-threaded Replace nozzle. Replace, lubricating new O-ring lightly with silicone grease. *The term caked, as applied to dry chemical describes a specific condition that is best identified as dry chemical containing hard lumps. These lumps will render a dry chemical extinguisher inoperative. The condition usually follows the absorption and later the evaporation of an unusual amount of moisture. It is often confused with ‘‘packing’’ (a condition produced by normal settling, by vibration or impact). A simple procedure to determine which condition exists is the UL test in which lumps are dropped from 4 in. (10 cm) onto a clean, hard surface. If the lumps do not break up into individual particles, caking is present. For additional details, refer to ANSUL Technical Bulletin No. 45 ‘‘Caking Versus Packing of Dry Chemical Agents’’ (Form No. F-8083). ** Replacement maintenance nameplates will not have a UL manifest. SENTRY Dry Chemical and CLEANGUARD Hand Portables Operation, Recharge, Inspection and Maintenance Manual NOTES: APPENDIX 2014-JUL-15 REV. 05 PAGE 29


![Model PH450G [Style: S2] pH and ORP Converter](http://vs1.manualzilla.com/store/data/006013412_1-cd77700eed276036ffccc744cbf6fbb4-150x150.png)