1
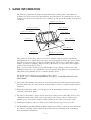
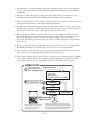
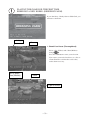
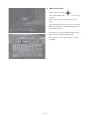
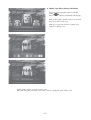
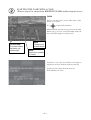
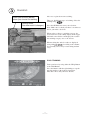
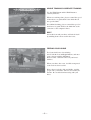
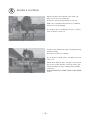
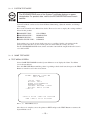
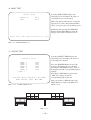
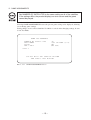
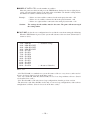
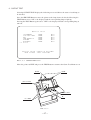
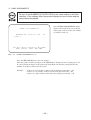
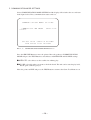
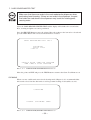
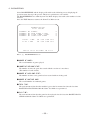
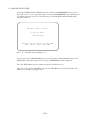
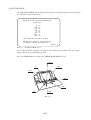
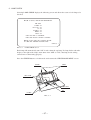
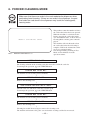
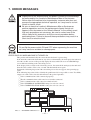
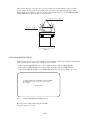
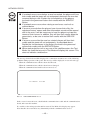
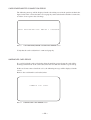
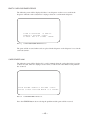
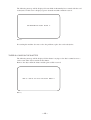
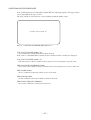
BEFORE USING THE PRODUCT, BE SURE TO READ THE FOLLOWING:
To maintain safety:
To ensure the safe operation of this product, be sure to read the following before usage.
The following instructions are intended for the users, operators and the personnel in charge of the
operation of the product. After carefully reading and sufficiently understanding the warning
displays and cautions, handle the product appropriately. Be sure to keep this manual close to the
product or in a convenient place for future reference.
Herein, explanations which require special attention are enclosed with dual lines. Depending on
the potentially hazardous degrees, the terms of DANGER, WARNING, CAUTION, etc. are used.
Be sure to understand the contents of the displays before reading the text.
Indicates that mishandling the
product by disregarding this
pictograph will cause severe
injury or death.
Indicates that mishandling the
product by disregarding this
caution will cause a slight
hazardous situation which can
result in personal injury and/or
material damage.
Indicates that mishandling the
product by disregarding this
warning will cause a potentially
hazardous situation which can
result in death or serious injury.
For the safe usage of the product, the following pictographs are used:
Indicates "HANDLE WITH CARE." In order to protect the human body and
equipment, this display is attached to places where the Owner's Manual, Serviceman
Manual and/or Service Manual should be referred to.
Indicates a "Protective Earth Terminal." Before operating the equipment, be sure to
connect it to the Ground.
(The step may be omitted for products in which a power cord with earth is used.)
❍ Perform work in accordance with the instructions herein stated.
Instructions for work are explained by paying attention to the aspect of accident prevention.
Failing to perform work as per the instructions can cause accidents. In the case where only
those who have technical expertise should perform the work to avoid hazardous situation, the
instructions herein state that the site maintenance personnel should perform such work.
❍ Be sure to turn off the power before working on the machine.
To prevent an electric shock, be sure to turn off the power before carrying out any work that
requires direct contact with the interior of the product. If the work is to be performed in the
power-on status, the Instruction Manual herein always states to that effect.
❍ Be sure to ground the Earth Terminal.
(This is not required in the case where a power cord with earth is used.)
This product is equipped with the Earth Terminal. When installing the product, connect the
Earth Terminal to the "accurately grounded indoor earth terminal" by using an earth wire.
Unless the product is grounded appropriately, the user can be subject to an electric shock.
After performing repair, etc. for the control equipment, ensure that the Earth Wire is firmly
connected to the control equipment.
❍ Ensure that the Power Supply used is equipped with an Earth Leakage Breaker.
This product does not incorporate the Earth Leakage Breaker. Using a power supply which is
not equipped with the Earth Leakage Breaker can cause a fire when earth leakage occurs.
❍ Be sure to use fuses which meet the specified rating.
(Only for the machines which use fuses.)
Using fuses exceeding the specified rating can cause a fire and an electric shock.
❍ Specification changes (removal of equipment, conversion and addition) not
designated by SEGA are not allowed.
The parts of the product include warning labels for safety, covers for personal protection, etc.
It is very hazardous to operate the product by removing parts and/or modifying the circuits.
Should doors, lids and protective parts be damaged or lost, refrain from operating the product,
and contact where the product was purchased from or the office herein stated.
SEGA shall not be held responsible for any accidents, compensation for damage to a third
party, resulting from the specifications not designated by SEGA.
❍ Ensure that the product meets the requirements of appropriate Electrical
Specifications.
Before installing the product, check for Electrical Specifications. SEGA products have a
nameplate on which Electrical Specifications are described. Ensure that the product is
compatible with the power supply voltage and frequency requirements of the location. Using
any Electrical Specifications different from the designated Specifications can cause a fire and
an electric shock.
❍ Install and operate the product in places where appropriate lighting is
available, allowing warning labels to be clearly read.
To ensure safety for the customers, labels and printed instructions describing potentially
hazardous situations are applied to places where accidents can be caused. Ensure that where
the product is operated has sufficient lighting allowing the warnings to be read. If any label is
peeled off, apply it again immediately. Please place an order with where the product was
purchased from or the office herein stated.
❍ When handling the monitor, be very careful.
(Applies only to the product with a monitor.)
Some of the monitor (TV) parts are subject to high tension voltage. Even after turning off the
power, some portions are still subject to high tension voltage sometimes. Monitor repair and
replacement should be performed only by those technical personnel who have knowledge of
electricity and technical expertise.
❍ Be sure to adjust the monitor/projector properly.
(Applies only to the product with a monitor/projector.)
Do not operate the product leaving on-screen flickering or blurring as it is. Using the product
with the monitor/projector not properly adjusted may cause dizziness or a headache to an
operator, a player, or the customers.
❍ When transporting or reselling this product, be sure to attach this manual to
the product.
In the case where commercially available monitors and printers are used in this product, only
the contents relating to this product are explained herein. Some commercially available
equipment has functions and reactions not stated in this manual. Read this manual together
with the specific Instruction Manual of such equipment.
* Descriptions herein contained may be subject to improvement changes without notice.
* The contents described herein are fully prepared with due care. However, should any
question arise or errors be found, please contact SEGA.
INSPECTIONS IMMEDIATELY AFTER TRANSPORTING THE PRODUCT TO THE LOCATION
Normally, at the time of shipment, SEGA products are in a status allowing for usage immediately
after transporting to the location. Nevertheless, an irregular situation may occur during
transportation. Before turning on the power, check the following points to ensure that the product
has been transported in a satisfactory status.
❐ Are there any dented portions or defects (cuts, etc.) on the external surfaces of the cabinet?
❐ Are Casters and Adjusters damaged?
❐ Do the power supply voltage and frequency requirements meet with those of the location?
❐ Are all wiring connectors correctly and securely connected? Unless connected in the correct
way, connector connections can not be made accurately. Do not insert connectors forcibly.
❐ Do power cords have cuts and dents?
❐ Do the fuses used meet specified ratings? Is the Circuit Protector in an energized status?
❐ Are all accessories available?
❐ Can all Doors and Lids be opened with the Accessory Keys? Can Doors and Lids be firmly
closed?
TABLE OF CONTENTS
BEFORE USING THE PRODUCT, BE SURE TO READ THE FOLLOWING:
TABLE OF CONTENTS
INTRODUCTION OF THE SERVICE MANUAL
1.GAME INFORMATION .................................................. 1
2.TEST MODE PRECAUTIONS ............................................. 11
3.MAIN PROJECTION UNIT TEST MODE ....................................
3−1 SWITCH UNIT ...............................................
3−2 SYSTEM TEST MODE ..........................................
3−3 GAME TEST MODE ............................................
12
12
13
13
4.SATELLITE TEST MODE ...............................................
4−1 SWITCH UNIT AND COIN METER ................................
4−2 SYSTEM TEST MODE ..........................................
4−3 GAME TEST MODE ............................................
22
22
24
25
5.CHECK MODE ........................................................ 35
6.FORCED CLEANING MODE .............................................. 40
7.ERROR MESSAGES .................................................... 41
E2-0512
420-6680
−i−
INTRODUCTION OF THE SERVICE MANUAL
This manual provides information concerning the software operation of the product
DERBY OWNERS CLUB WORLD EDITION (hereafter referred to as "DOC WE".)
The manual is intended for the use of owners, administrators, and operators of this
product. Please read this manual and the Naomi Service Manual (No. 420-6455-01)
thoroughly to fully understand their contents before operating the product.
This product employs a Naomi Game Board. The Naomi Game Board system is
designed to allow other games to be operated by exchanging the installed ROM Board
Case. For this reason, the system's test mode is comprised of an automatic self-test for
devices that employ the same Naomi Game Board standard, a system test mode for item
such as coin settings, and a game test mode to test input and output for each product's
particular operation device and to set the level of difficulty.
This manual explains settings particular to the system test mode of this product. For
more information about the system test mode, please consult the Naomi Service
Manual. For details concerning mechanical and hardware maintenance, please read the
DOC WE Owner's Manual (No. 420-6679).
In the unlikely event that the product does not function correctly, DO NOT allow
anyone other than a technician to touch the internal system. Turn off power to the
machine, making sure to unplug the electrical cord from the outlet, and contact the
office listed below or the point-of-purchase for this product.
Use of this product is unlikely to cause physical injuries or damages to property. However,
where special attention is required this is indicated by a thick line, the word "IMPORTANT"
and its sign in this manual.
Indicates that mishandling the product by disregarding this display can cause the
product's intrinsic performance not to be obtained, resulting in malfunctioning.
SEGA AMUSEMENTS U.S.A. INC.
901 Cambridge Drive, Elk Grove Village, IL 60007, U.S.A.
TEL:
(847) 364-9787
TOLL FREE: (888) 877-2669
FAX:
(847) 439-7968
−ii−
DEFINITION OF LOCATION'S MAINTENANCE MAN AND SERVICEMAN
Non-technical personnel who do not have technical knowledge and
expertise should refrain from performing such work that this manual
requires the location's maintenance man or a serviceman to carry out, or
work which is not explained in this manual. Failing to comply with this
instruction can cause a severe accident such as electric shock.
Ensure that parts replacement, servicing & inspections, and troubleshooting are performed by the
location's maintenance man or the serviceman. It is instructed herein that particularly hazardous
work should be performed by the serviceman who has technical expertise and knowledge.
The location's maintenance man and serviceman are herein defined as follows:
"Location's Maintenance Man" :
Those who have experience in the maintenance of amusement equipment and vending machines,
etc., and also participate in the servicing and control of the equipment through such routine work
as equipment assembly and installation, servicing and inspections, replacement of units and
consumables, etc. within the Amusement Facilities and or locations under the management of the
Owner and Owner's Operators of the product.
Activities of Location's Maintenance Man :
Assembly & installation, servicing & inspections, and replacement of units & consumables as
regards amusement equipment, vending machines, etc.
Serviceman :
Those who participate in the designing, manufacturing, inspections and maintenance service of
the equipment at an amusement equipment manufacturer.
Those who have technical expertise equivalent to that of technical high school graduates as regards electricity, electronics and or mechanical engineering, and daily take part in the servicing &
control and repair of amusement equipment.
Serviceman's Activities :
Assembly & installation and repair & adjustments of electrical, electronic and mechanical parts of
amusement equipment and vending machines.
−iii−
1. GAME INFORMATION
The following explanation describes the normal functions of this product. Any number of
problems may arise from actions other than those described below. If a problem arises, be sure
to make every effort to investigate the cause, eliminate it, and operate the product under normal
conditions.
Right Select Button Start Button Up Select Button Left Select Button Coin Inlet Whip Button Card Slot Hold Button OK Button Down Select Button FIG. 1
This product is a game where players raise horses and then compete against each other by
participating in races with the horses they have raised. Each player becomes the owner, trainer,
and jockey of his or her horse in hopes of winning the G1 (Grade 1) race. Each horse's name,
abilities, personality, reliability, and prize money obtained are saved on a horse data magnetic
card (hereafter referred to as "card".)
Horses saved on cards can run in a prescribed number of races. Horses can also retire after
running in twenty races, after which they can be used for breeding. However, the proficiencies
inherited by foals gradually decrease each time the horse mates.
The number of races held varies according to game settings.
For details, refer to "GAME ASSIGNMENTS" in Chapter 3 "MAIN PROJECTION UNIT
TEST MODE ".
① Insert coins. This product can count up to 24 credits and does not count coins inserted beyond
24 credits. Moreover, the coins cannot be returned. However, they are counted on the satellite's
coin meter.
② Follow the instructions on the screen display, press the Start Button or insert a card, make
selections, and start the game.
③ For "Breed a New Horse", players decide their horses' names, choose their silks, and race. For
"Starting the Game with a Card", players insert their cards and race. Players cannot choose
whether to race or not. Players must carefully consider the best time to insert their cards.
④ Training is held before each race. Each session is tailored to the type of race to be run.
⑤ The Hold Button and Whip Button should be employed carefully to control the horse during the
race. Players can bring out the natural talents of the horses by controlling them according to
their personalities and abilities.
−1−
⑥ Total Earnings are awarded according to the order in which the horses arrive at the finish line.
A horse can run in the G1 Race if the amount of earnings it has obtained reaches one million
(1,000,000).
⑦ When the race has ended, players return to the racing stables and care for their horses. The
reliability of the horses increases by handling them according to their personalities.
⑧ The game ends when players have finished caring for their horses after the race. Players can run
in the next race by inserting a coin and pressing the Start Button.
⑨ If a player does not continue the game before the timer counts down to zero, the card is ejected
from the card reader/writer and the game ends. Data for the horse raised is recorded on the card.
Players can use their cards to play again with the horses they have raised.
⑩ Before the G1 race commences, players whose horses are not eligible to run in the race will
have display betting screens, displayed on their monitors. Players receive winnings if the horse
they bet on wins. These winnings are then added to the winnings of the horse in their
possession. The betting screen is not displayed, however, if none of the players can participate
in the G1 race.
⑪ Players can retire their horses and use them for breeding after the horses have run twenty times.
By skillfully matching sires and dams, players can raise horses of even high abilities.
⑫ Horses that have run in sixty-three races are forced into retirement. Such horses can be used as
sires or dams after retirement, but they may not run in any more races.
⑬ Total earnings rankings (the top 50 of all time) are displayed for even-numbered races. Monthly
total earnings rankings (the top 15) are displayed for odd-numbered races. Note that monthly
total earnings rankings are erased when thirty days have elapsed since their last update.
GAME FLOW
Play the game for the
Press the Start Button.
first time. Breed a new
horse. (BREEDING FARM)
1. Breed Your Horse (Thoroughbred)
-Select a sire
-Select a dam
2. Name Your Horse
3. Select Your Silks (Jockey's Uniform)
Start the game with a card.
TRAINING
Insert the card.
RACE
SAVE ONTO CARD
Horses that players have bred are
saved onto these cards. Players
can elect to use the cards to
continue in future games.
CONTINUE
RETIRE
REVIEW
Players can retire their horses and use them as
breeding cards when they have run over twenty
races. In DOC WE, the proficiencies inherited by
foals change (decrease) according to the number
of times the breeding cards have been used.
−2−
PLAYING THE GAME FOR THE FIRST TIME.
BREEDING A NEW HORSE. (BREEDING FARM)
If you don't have a Derby Owners Club Card, you
will start at the Farm.
Ability
Name
1. Breed Your Horse (Thoroughbred)
Select a Sire (Father) and a Dam (Mother)
using .
Press the OK Button to enter your selection.
You can use your retired racehorse as a Sire or
a Dam. Enter the card into the card reader/
writer when necessary.
Sire (Father)
Dam (Mother)
Color
Type of Horse
−3−
2. Name Your Horse
Name your horse using .
You cannot change the name once it has been
entered.
You can use up to 18 letters to name your
horse.
After entering the horse's name, press the Start
Button and the cursor will automatically move
to the End position.
If a name is not entered within the time limit, a
name will be assigned automatically.
It is your horse, so be sure to choose a name
carefully.
−4−
3. Select Your Silks (Jockey's Uniform)
Select the pattern and the color of your silk
using .
Press the OK Button to confirm the silk design.
Silks are the clothes that the jockeys wear when
the players' horses run a race.
Silks are a visual cue used to recognize one's
own horse during a race.
At this point, players are ready to enter a race.
After this, the game procedure is the same as when "starting the game with a card".
−5−
STARTING THE GAME WITH A CARD.
(When a player has started from BREEDING FARM and developed a horse.)
FARM
Players can enjoy these screens when there is time
before a race starts.
Use to play with your horse.
Different kinds of masks are spread across the field.
When you get a jewel, your relationship with your
horse will either improve or deteriorate.
Relationship
The more hearts,
the better the
relationship.
Mask
Choose your
favorite mask.
Jewel
Affects the number
of Hearts.
Just before a race, the screen shown at left appears
and players wait for all of the jockeys to line up.
You have been registered for the next race.
Wait until the race starts.
−6−
TRAINING
After race registration comes training.
Check your horse's abilities
before you choose the training.
There are 10 different types of training. Select the
training using .
Training effect.
(See how much it changes.)
Press the OK Button to enter your selection.
Note: Make sure to check your horse's weaknesses
before you make a decision.
When a player chooses a training category, the
word "UP" next to the ability display in the upper
left-hand corner flashes and displays the result if
that training category were to be chosen.
When training has ended, results are displayed
according to the amount.
along with
Occasionally, horses may resist training and run
away.
POOL TRAINING
Train your horse by using either the Whip Button
or the Hold Button.
Press the buttons with the right timing to stop the
moving markers at the indicated positions.
Miss three times and your horse drowns.
−7−
SINGLE TRAINING/COOPERATE TRAINING
Use the Whip Button and the Hold Button to
control your horse.
When race training alone, players control the speed
of their horses to guide them to the finish line in
the specified time.
In combined training, players control the speed of
their horses to guide them to the finish line at the
same time as the computer's horse.
REST
Select this item and your horse will refresh itself
by ambling down a horse trail in the forest.
FEEDING YOUR HORSE
Feed your tired horse after training.
Select with the Left and Right Buttons, and enter
your selection with the OK Button.
Each feed has a different effect on your horse's
abilities.
When your horse has eaten, it will be transported
to the track in a horse trailer.
Horses have foods they like and dislike, just like
people. They sometimes will not eat food they do
not like. Be careful when interacting with your
horse.
−8−
RACE
Use the whip/hold buttons to win the race!
Whip Button: Your horse will run fast, but uses a lot of energy.
Hold Button: Your horse will slow down, but picks up energy.
Radar Display: Displays where a player's horse is located in the pack.
Identify your jockey by hat and silk colors.
This mark ( ) is displayed above a player's horse. Use it to identify your jockey by color and
number.
Horse's Name
Horse's Abilities
Horse's condition
Keep an eye on the whip's effect.
If the effect is "Low", your horse
will perform poorly.
−9−
Racetrack
REVIEW & CONTINUE
When your horse has returned to the farm, you
must review its race performance.
Your horse may be strong-willed or very lazy.
Make sure you understand your horse's condition
and treat it correspondingly.
If your horse has raced 20 times or more, you may
retire it and use it to breed.
You have just finished one game (Training, Racing
and Reviewing).
Insert more credit(s) to continue.
If you decide to end the game, wait until your card
comes out.
Information about the horse you have raised (used)
has been recorded onto this card. You can use this
card in the future to enjoy continued play with the
same horse.
DON'T FORGET TO TAKE YOUR CARD WITH
YOU!!
− 10 −
2. TEST MODE PRECAUTIONS
Never touch any areas of the machine other than those specified when
using the Test/Check Mode of the satellite. Touching such areas can
cause electric shock and short circuit accidents.
Since the service door of the satellite
closes due to its own weight, be careful
not to pinch/injure hands or fingers.
● When any one of the communicating satellites enters Test Mode,
game play is locked out at all of the other satellites. When the main
projection unit enters Test Mode, game play is locked out at all of the
satellites. Game play in progress is discontinued, and fractional coin
and bonus adder data is erased. For this reason, do not enter Test
Mode when other seats are being used for play. This product is
equipped with a Check Mode for cases where input/output tests and
card reader/writer checks must be performed while other seats are
being used for play. (Chapter 5)
● After using Test Mode, turn the power off and on again for the main
projection unit and all satellites.
● After the network check is complete and before the advertising screen
displays, do not operate any buttons or switches or insert coins. These
actions may lead to malfunctions.
● When settings have been changed in Test Mode, select EXIT from the
menu screen to exit Test Mode. Setting changes will not take effect
unless Test Mode has been exited properly.
● The left and right speakers on the main projection unit will always
output sound during the advertising sequence. Sound output during
the advertising sequence when sound has been turned OFF in Test
Mode does not indicate a malfunction. Note that satellites do not
output sound during the advertising sequence.
● This product cannot be used if coin settings and the number of
connected satellite seats has not been properly set.
● To enter Check Mode, press the CHECK Button during the advertising
sequence any time the ability level explanation screen is not being
displayed. The machine will not enter Check Mode if the CHECK
Button is pressed while the ability level explanation screen is being
displayed.
− 11 −
3. MAIN PROJECTION UNIT TEST MODE
3 − 1 SWITCH UNIT
Adjust the sound to the optimum volume, taking into consideration the
environmental requirements of the installation location.
Unlock and open the main projection unit service door to access the switch unit. The functions
of each button are listed below.
LEFT SPEAKER RIGHT SPEAKER SERVICE DOOR TEST BUTTON TEST
SW SERVICE
SW
SOUND
SOUND
VOL. L
VOL. R
SERVICE BUTTON LEFT SPEAKER VOLUME RIGHT SPEAKER VOLUME FIG. 3. 1
● TEST BUTTON (TEST SW):
used when entering Test Mode and for selections within Test Mode.
● SERVICE BUTTON (SERVICE SW):
used to move the pointer in Test Mode.
● LEFT SPEAKER VOLUME (SOUND VOL.L):
used to adjust the volume of the two left side frame speakers.
● RIGHT SPEAKER VOLUME (SOUND VOL.R):
used to adjust the volume of the two right side frame speakers.
− 12 −
3 − 2 SYSTEM TEST MODE
The BOOKKEEPING area of the System Test Mode displays no gamerelated data. For product data, refer to the BOOKKEEPING area of each
satellite.
System Test Mode can be used to check IC Board functioning, adjust the monitor, and change
coin settings.
Refer to the Naomi Service Manual for details. However, be sure to employ the settings outlined
below for this product.
● CABINET TYPE:
● MONITOR TYPE:
● SERVICE TYPE:
● COIN CHUTE TYPE:
1 PLAYER(S)
HORIZONTAL
COMMON
COMMON
Coin settings are set at the factory in the same way as satellites, but the coin settings for the
main projection unit have no effect on the game no matter what the setting. (See 4-2)
For the ADVERTISE SOUND item, fanfare and other sound will be output whether the item is
set to ON or OFF.
3 − 3 GAME TEST MODE
A . TEST MENU SCREEN
Select GAME TEST MODE from the System Menu screen to display the Game Test Menu
screen (shown below).
Press the SERVICE Button until the pointer is pointing to the desired item, then press the TEST
Button to enter the test for the selected item.
DERBY OWNERS CLUB WE TEST MENU
INPUT TEST OUTPUT TEST GAME ASSIGNMENTS
BOOKKEEPING
COURSE RECORD CLEAR
BACKUP DATA CLEAR −>EXIT
SELECT WITH SERVICE BUTTON
AND PRESS TEST BUTTON
FIG. 3. 3 a TEST MENU Screen
After the test is complete, move the pointer to EXIT and press the TEST Button to return to the
System Menu screen.
− 13 −
B . INPUT TEST
INPUT TEST
Selecting INPUT TEST displays the
following screen and allows the status of
each input device to be checked.
SERVICE OFF
TEST OFF
Make sure that the indicator for each of the
input devices can be changed from OFF to
ON as you operate the corresponding device.
Simultaneously pressing the SERVICE
Button and the TEST Button returns the
display to the Game Test Menu screen.
PRESS TEST AND SERVICE BUTTON TO EXIT
FIG. 3. 3 b INPUT TEST Screen
C . OUTPUT TEST
Selecting OUTPUT TEST displays the
following screen and allows the status of
each lamp to be checked.
OUTPUT TEST
LAMP 1 OFF
LAMP 2 OFF
LAMP 3 OFF
LAMP 4 OFF
LAMP 5 OFF
LAMP 6 OFF
−>EXIT
SELECT WITH SERVICE BUTTON
AND PRESS TEST BUTTON
Press the SERVICE Button to move the
pointer to the lamp item to be checked.
Pressing the TEST Button causes "ON" to
be displayed and the corresponding lamp to
light up.
Pressing the TEST Button again causes
"OFF" to be displayed and the
corresponding lamp to turn off.
Move the pointer to EXIT and press the
TEST Button to return to the Game Test
Menu screen.
FIG. 3. 3 c 1 OUTPUT TEST Screen
FIG. 3. 3 c 2
− 14 −
D . GAME ASSIGNMENTS
Set NUMBER OF SATELLITES to the same setting on all of the satellites.
If the settings differ, the product displays an error screen and the game
cannot be played.
Selecting GAME ASSIGNMENTS causes the present game settings to be displayed, allowing
you to change game settings.
Setting changes are not effected until the Test Mode is exited. After changing settings, be sure
to exit Test Mode.
GAME ASSIGNMENTS
NUMBER OF SATELLITES 8P
RACE MODE USA 3R−LOOP(2/13)
PAUSE ON
AGE LIMIT (NO USE)
−>EXIT
SELECT WITH THE SERVICE BUTTON
AND PRESS TEST BUTTON
FIG. 3. 3 d 1 GAME ASSIGNMENTS Screen
− 15 −
● NUMBER OF SATELLITES: sets the number of satellites.
Move the pointer to this item and press the TEST Button. Settings for four to eight players
can be selected from the display to the right of the item. Make sure that this setting matches
the number of satellites connected to the system.
Example:
− If there are four satellites connected to the main projection unit → 4P
− If there are six satellites connected to the main projection unit → 6P
− If there are eight satellites connected to the main projection unit → 8P
Caution:
The settings for all satellites must be the same. The game will not start up if
the settings differ.
● RACE MODE: Select the race configuration to be used in the event from among the following.
When the TEST button is pressed, the system will advance to the next item. (From 13/13 it
returns to 1/13.)
1/13:
2/13:
3/13:
4/13:
5/13:
6/13:
7/13:
8/13:
9/13:
10/13:
11/13:
12/13:
13/13:
USA-6R
USA-3R LOOP
USA-4R LOOP
USA-5R LOOP
G1-16R
G1-3R 1
G1-3R 2
G1-3R 3
G1-3R D
G1-4R 1
G1-4R 2
G1-6R 1
G1-6R 2
(→ Standard setting)
(→ Return to USA-6R )
FIG. 3. 3 d 2
- 1/13:The USA-6R is a standard race system. It features a G1 race every 6 races, and a total of
96 races in a loop. (Data is saved on the horse cards.)
- 2/13 - 4/13 (USA-3R, USA-4R, and USA-5R) are 3 to 5 race loops without a G1 race. (Data is
saved on the horse cards.)
- 5/13: The G1-16R is a G1-only 16 race loop configuration, from the previous version.
- The 6/13-13/13 (G1-3R to G1-6R) are G1-only, 3 to 6 race loop configurations, with each race
configuration as follows. (Data is not saved on the horse cards.)
− 16 −
< Event (Race Configuration) Table >
2 USA-3R LOOP 1
3 USA-4R LOOP 2
4 USA-5R LOOP 3
4
5
Distance
Course
Remarks
Central
Northern
Central
Northern
Central
Dirt
Special
1200
2500
2200
1800
3000
Handicap
5 G1-16R
6 G1-3R 1
1
2
3
DOC 2000 GUINEAS
AMERICAN DERBY
DERBY OWNERS CLUB GRAND PRIX
2000
2400
2400
Northern
Eastern
SEGA
7 G1-3R 2
1
2
3
SPRINTERS STAKES
WINTER STAKES
STAYERS STAKES
1200
1600
3000
Northern
Eastern
Central
Dirt
8 G1-3R 3
1
2
3
WINTER STAKES
SUPER DIRT GRAND PRIX
JAPAN CUP DIRT
1600
2000
2100
Eastern
SEGA
Eastern
Dirt
Dirt
Dirt
9 G1-3R D
1
2
3
DOC 1000 GUINEAS
AMERICAN OAKS
QUEEN ELIZABETH II CUP
1600
2400
2200
Western
Eastern
Central
Mares
Mares
Mares
10 G1-4R 1
1
2
3
4
WINTER STAKES
AMERICAN DERBY
JAPAN CUP DIRT
JAPAN CUP
1600
2400
2100
2400
Eastern
Eastern
Eastern
Eastern
Dirt
11 G1-4R 2
1
2
3
4
SPRING CLASSIC
AMERICAN DERBY
STAYERS STAKES
DERBY OWNERS CLUB GRAND PRIX
3200
2400
3000
2400
Central
Eastern
Central
SEGA
12 G1-6R 1
1
2
3
4
5
6
SPRINTERS TROPHY
DOC 2000 GUINEAS
SPRING CLASSIC
SPRINTERS STAKES
STAYERS STAKES
JAPAN CUP
1200
2000
3200
1200
3000
2400
Southern
Northern
Central
Northern
Central
Eastern
13 G1-6R 2
1
2
3
4
5
6
DOC 1000 GUINEAS
DOC 2000 GUINEAS
AMERICAN OAKS
AMERICAN DERBY
QUEEN ELIZABETH II CUP
DERBY OWNERS CLUB GRAND PRIX
1600
2000
2400
2400
2200
2400
Western
Northern
Eastern
Eastern
Central
SEGA
Dirt
− 17 −
Mares
Mares
Mares
● PAUSE:
Set whether game pauses or not before the race starts.
- If it is ON, the game stops before each race starts and restarts when the attendant pushes the
service button.
- If it is OFF, the race continues as is without stopping, in the same manner as conventional
games.
NOTE: In USA-6R, the pause function cannot be used. For systems other than the USA-6R,
the standard setting is ON.
● AGE LIMIT: Set the conditions of the horses that can take part in the races.
- For NO LIMIT (standard setting), all horses can participate without conditions. (There is no
G1 prize limit, either.)
- For UNDER 10 RACES, only horses that have competed in 10 or fewer races can participate.
- For UNDER 20 RACES, only horses that have competed in 20 or fewer races can participate.
GAME ASSIGNMENTS
NUMBER OF SATELLITES 8P
RACE MODE USA G1−16R(5/13)
PAUSE OFF
−>AGE LIMIT UNDER 10 RACES
EXIT
SELECT WITH SERVICE BUTTON
AND PRESS TEST BUTTON
FIG. 3. 3 d 3 GAME ASSIGNMENTS Screen
After changing the settings, select EXIT and press the TEST Button to return to the Game Test
Menu screen.
− 18 −
E .BOOKKEEPING
When BOOKKEEPING is selected the following 8 screens are displayed, and current course
records can be checked.
Pressing the TEST Button will bring up the following screen.
BOOKKEEPING 1/8
RECORD TIME OF G1 1/2
WINTER STAKES 1M 39S 0
DOC 1000 GUINEAS 1M 35S 23
DOC 2000 GUINEAS 2M 0S 14
SPRING CLASSIC 3M 17S 33
AMERICAN DERBY 1M 36S 86
HONG KONG OAKS 2M 26S 67
HONG KONG DERBY 2M 26S 67
AMERICAN OAKS 1M 36S 86
SUMMER GRAND PRIX 2M 12S 4
SUMMER DIRT GRAND PRIX 2M 3S 23
PERSS TEST BUTTON TO CONTINUE
FIG. 3. 3 e BOOKKEEPING Screen
1/8:
2/8:
3/8:
4/8:
5/8:
6/8:
7/8:
8/8:
G1-1
G1-2
EASTERN CITY
WESTERN HILL
NOTHERN PARK
CENTRAL CITY
SEGA
SOUTHERN PARK
Press the TEST Button to cycle through each screen from 1/8 to 8/8.
Pressing the TEST Button while the 8/8 screen is displayed cycles back to the Game Test Menu
screen.
− 19 −
F .COURSE RECORD CLEAR
When COURSE RECORD CLEAR is selected the following screen is displayed, and only the
current course record can be cleared.
COURSE RECORD CLEAR
YES(CLEAR)
−> NO(CANCEL)
SELECT WITH SERVICE BUTTON
AND PRESS TEST BUTTON
FIG. 3. 3 f COURSE RECORD CLEAR Screen
To clear data, use the SERVICE Button to move the cursor to YES (CLEAR) and then press the
TEST Button.
When the data has been cleared, the message "COMPLETED" will be displayed.
Press the TEST Button again to return to the Game Test Menu screen.
Move the cursor to NO (CANCEL) and press the TEST Button to return to the Game Test Menu
screen without clearing the data.
− 20 −
G . BACKUP DATA CLEAR
Select BACKUP DATA CLEAR and the display will switch to the screen shown below. Here,
rankings and record data can be reset to the factory settings.
In addition, this returns the races to be held for the game to the beginning.
BACKUP DATA CLEAR
−>YES(CLEAR)
NO(CANCEL)
SELECT WITH SERVICE BUTTON
AND PRESS TEST BUTTON
FIG. 3. 3 g BACKUP DATA CLEAR Screen
To clear data, use the SERVICE Button to move the pointer to YES (CLEAR) and press the
TEST Button. When the data has been cleared, "COMPLETED" will be displayed.
Press the TEST Button again to return to the Game Test Menu screen.
Move the pointer to NO (CANCEL) and press the TEST Button to return to the Game Test
Menu screen without clearing the data.
− 21 −
4. SATELLITE TEST MODE
4 − 1 SWITCH UNIT AND COIN METER
Never touch any areas of the machine other than those specified.
Touching such areas can cause electric shock and short circuit accidents.
● Adjust the sound to the optimum volume, taking into consideration the
environmental requirements of the installation location.
● Removing the coin meter circuitry renders the game inoperable.
Release and open the satellite service doors to access the service switch unit located therein.
Demagnetization(DEMAG)Button Service door B1K
H.HOLD H.POSI
B50K
V.POSI
B1K
B1K
B5K
B10K
B1K
B1K
SELECT Button G.GAIN B.GAIN BRIGHT V.HOLD V.HEIGHT V.LIN
B1K
B-
CHECK Button SERVICE Button TEST Button R.GAIN
5K
Sound Volume Release. FIG. 4. 1 a
Monitor Adjustment Board (Refer to the Owner's Manual chapter 11.)
● TEST Button: used when entering Test Mode and for selections within Test Mode.
● SERVICE Button: used when entering service credits. Credits are added, but the coin meter does not
count them. Also used to move the pointer in Test Mode.
● SELECT Button: used to select items in Check Mode.
● CHECK Button: used when entering Check Mode. Used within Check Mode to enter selections.
● SOUND VOLUME:used to adjust the sound volume of the two satellite speakers.
● Demagnetization(DEMAG)Button: removes color distortions by demagnetizing the cathode ray tube.
Use this switch before performing monitor color adjustments.
− 22 −
A switch cover is provided for the Test Button to
prevent improper operation. Loosen the fixed screw
(plastic screw) in the switch cover and rotate the
switch cover when operating the Test Button.
Plastic Screw Switch Cover FIG. 4. 1 b
− 23 −
4 − 2 SYSTEM TEST MODE
● BOOKKEEPING data within the Game Test Mode will not be erased
even if BACKUP DATA CLEAR in the System Test Mode is employed.
● When Test Mode is entered, fractional coin and bonus adder data is
erased
System Test Mode can be used to check IC Board functioning, adjust the monitor, and change
coin settings.
Refer to the Naomi Service Manual for details. However, be sure to employ the settings outlined
below for this product. Each of the settings is the same for the main projector unit.
● CABINET TYPE:
● MONITOR TYPE:
● SERVICE TYPE:
1 PLAYER (S)
HORIZONTAL
COMMON
For the ADVERTISE SOUND item, there will be no change whether it is set to ON or OFF.
There is no sound output for the satellites during the advertising sequence.
SEQUENCE SETTINGS
SEQUENCE 1:
SEQUENCE 2:
SEQUENCE 3:
SEQUENCE 4 − 8:
3 CREDITS (For New Game start)
1 CREDIT (For Card Game start)
1 CREDIT (To continue)
1 CREDIT (Not used)
Adjust the settings so that "SEQUENCE 1 ≧ SEQUENCE 2 ≧ SEQUENCE 3".
− 24 −
4 − 3 GAME TEST MODE
A . TEST MENU SCREEN
Select GAME TEST MODE from the System Menu screen to display the Game Test Menu
screen (shown below).
Press the SERVICE Button until the pointer is pointing to the desired item, then press the TEST
Button to enter the test for the selected item.
DERBY OWNERS CLUB WE
TEST MENU
INPUT TEST
OUTPUT TEST
GAME ASSIGNMENTS
COMMUNICATION MODE SETTING CARD READER−WRITER TEST
BOOKKEEPING
BACKUP DATA CLEAR
−>EXIT
SELECT WITH SERVICE BUTTON
AND PRESS TEST BUTTON
FIG. 4. 3 a TEST MENU Screen
After the test is complete, move the pointer to EXIT and press the TEST Button to return to the
System Menu screen.
− 25 −
B . INPUT TEST
Selecting INPUT TEST displays the following screen and allows the status of each input device
to be checked.
Make sure that the indicator for each of the input devices can be changed from OFF to ON as
you operate the corresponding device.
INPUT TEST
UP OFF
DOWN OFF
LEFT OFF
RIGHT OFF
OK OFF
HOLD OFF
WHIP OFF
START OFF
COIN CHUTE1# OFF
COIN CHUTE2# OFF
CHECK OFF
SELECT OFF
SERVICE OFF
TEST OFF
PRESS TEST AND SERVICE BUTTONS TO EXIT
FIG. 4. 3 b 1 INPUT TEST Screen
Simultaneously pressing the SERVICE Button and the TEST Button returns the display to the
Game Test Menu screen.
RIGHT START UP LEFT CHECK SELECT WHIP SERVICE TEST HOLD OK DOWN FIG. 4. 3 b 2
− 26 −
C . OUTPUT TEST
Selecting OUTPUT TEST displays the following screen and allows the status of each lamp to
be checked.
Press the SERVICE Button to move the pointer to the lamp item to be checked. Pressing the
TEST Button causes "ON" to be displayed and the corresponding lamp to light up.
Pressing the TEST Button again causes "OFF" to be displayed and the corresponding lamp to
turn off.
OUTPUT TEST
UP&DOWN LAMP OFF
LEFT&RIGHT LAMP OFF
OK LAMP OFF
HOLD&WHIP LAMP OFF
ERROR LAMP OFF
WINNER LAMP OFF
−> EXIT
SELECT WITH SERVICE BUTTON
AND PRESS TEST BUTTON
FIG. 4. 3 c 1 OUTPUT TEST Screen
Move the pointer to EXIT and press the TEST Button to return to the Game Test Menu screen.
WINNER ERROR LEFT & RIGHT HOLD & WHIP OK UP & DOWN FIG. 4. 3 c 2
− 27 −
D . GAME ASSIGNMENTS
Be sure to set NUMBER OF SATELLITES to the same setting on all of the
satellites. If the settings differ, the product displays an error screen and the
game cannot be played.
Select GAME ASSIGNMENTS and the
monitor will switch to the screen shown
in the figure to the left. Here, the number
of satellites can be set.
GAME ASSIGNMENTS
NUMBER OF SATELLITES 8P
−>EXIT
SELECT WITH SERVICE BUTTON
AND PRESS TEST BUTTON
FIG. 4. 3 d GAME ASSIGNMENTS Screen
Press the SERVICE Button to move the pointer.
Move the pointer to this item and press the TEST Button. Settings for four to eight players can
be selected from the display to the right of the item. Make sure that this setting matches the
number of satellites connected to the system.
Example:
− If there are four satellites connected to the main projection unit → 4P
− If there are six satellites connected to the main projection unit → 6P
− If there are eight satellites connected to the main projection unit → 8P
− 28 −
E . COMMUNICATION MODE SETTINGS
Select COMMUNICATION MODE SETTING and the display will switch to the screen shown
in the figure below. Here, communication status can be set.
COMMUNICATION MODE SETTING
COMMUNICATION MODE SATELLITE
−>EXIT
SELECT WITH SERVICE BUTTON
AND PRESS TEST BUTTON
FIG. 4. 3 e COMMUNICATION MODE SETTING Screen
Press the SERVICE Button to move the pointer. Move the pointer to COMMUNICATION
MODE and press the TEST Button to switch between SATELLITE and NO LINK settings.
● SATELLITE: select this to use the satellite for ordinary play.
● NO LINK: select this when you want to check the board. The unit can be started up by itself,
but the game cannot be played.
Move the pointer to EXIT and press the TEST Button to return to the Game Test Menu screen.
− 29 −
F . CARD READER/WRITER TEST
Make sure that there are cards in the card reader/writer dispenser when
performing head cleaning. If there are no cards in the dispenser, the part
that holds the card down in the dispenser may touch the rotating parts,
causing noise.
Select the CARD READER-WRITER TEST and the display will switch to the screen below.
Here, cleaning and print tests can be performed.
Press the SERVICE Button to move the pointer. Move the pointer to the item to be selected and
press the TEST Button. The selected item will then be executed.
CARD READER−WRITER TEST
CLEANING PRINT TEST
−>EXIT
SELECT WITH SERVICE BUTTON
AND PRESS TEST BUTTON
FIG. 4. 3 f 1 CARD READER-WRITER TEST Menu Screen
Move the pointer to EXIT and press the TEST Button to return to the Game Test Menu screen.
CLEANING
When even one satellite unit enters forced cleaning mode (Chapter 6), it is recommended that
this item be selected on the other units as well to perform cleaning on all satellites at once.
CLEANING
INSERT CLEANING CARD
FIG. 4. 3 f 2 CARD READER/WRITER CLEANING Screen
− 30 −
Select this item to clean the head of the card reader/writer. Follow the instructions on the screen
to perform cleaning.
INSERT CLEANING CARD.
Put cleaning solution on the cleaning card, then insert the card in the card slot.
To interrupt the operation, press the CHECK Button.
↓
CLEANING NOW. PLEASE WAIT.
The machine is now cleaning. Wait a moment.
↓
REMOVE CLEANING CARD.
Remove the cleaning card.
↓
TURN CLEANING CARD
OVER AND RE-INSERT.
Turn the card over and insert it into the card slot again.
To interrupt the operation, press the CHECK Button.
↓
CLEANING NOW. PLEASE WAIT.
The machine is now cleaning. Wait a moment.
↓
REMOVE CLEANING CARD.
Remove the cleaning card.
↓
Cleaning has now ended. Do not forget to remove the cleaning card.
The machine will return to the menu when the cleaning card has been removed.
PRINT TEST
PRINT TEST
NOW PRINTING.PLEASE WAIT.
FIG. 4. 3 f 3 PRINT TEST Screen
Select this item to check the state of the print head.
When this item is executed, a new card will be drawn in from the dispenser to and the message
shown below will be printed. Perform a head cleaning if the type is misaligned or broken.
− 31 −
−DERBY OWNERS CLUB WE−
※※※※※※※※※※※※※※※※※※※※※※
This is test print.
No horse data is saved.
※※※※※※※※※※※※※※※※※※※※※※
PRINT SAMPLE
NOW PRINTING. PLEASE WAIT.
The machine is now printing. Wait a moment.
↓
REMOVE THE CARD.
Remove the card.
↓
The print test has now ended. Do not forget to remove the card.
The machine will return to the menu when the card has been removed.
EMPTY DISPENSER ERROR DISPLAY DURING THE PRINT TEST
If there are no cards in the card dispenser or there is no card dispenser when CARD PRINTING
TEST is selected, the following message will be displayed.
CARD DISPENSER IS EMPTY.
CONTACT ARCADE STAFF.
PLEASE REFILL CARDS THERE.
Place cards in the card dispenser. The print test will commence when the card dispenser has
been reset in the card reader/writer.
Additionally, if this error occurs after the test ends, place fresh cards in the card dispenser. The
machine will return to the menu when the card dispenser has been reset in the card reader/
writer.
− 32 −
G . BOOKKEEPING
Select BOOKKEEPING and the display will switch to the following screen, displaying all
operation status data up to the present. This data is particular to each satellite.
The BOOKKEEPING area within System Test Mode displays data such as the number of coins
inserted.
Press the TEST Button to return to the Game Test Menu screen.
BOOKKEEPING
PLAY COUNT
NUMBER OF GAMES 0
NUMBER OF NEW GAME START 0
NUMBER OF CARD GAME START 0
NUMBER OF CONTINUE GAME 0
TOTAL TIME 0D 00H 00M 00S
PLAY TIME 0D 00H 00M 00S
PRESS TEST BUTTON TO EXIT
FIG. 4. 3 g BOOKKEEPING Screen
● NUMBER OF GAMES:
The overall number of games played.
● NUMBER OF NEW GAME START:
The number of times the game has started with the creation of a new horse.
(The number of cards issued.)
● NUMBER OF CARD GAME START:
The number of times a new game has been started with an existing card.
● NUMBER OF CONTINUE GAME:
The overall number of continued games.
● TOTAL TIME:
The total amount of time that the machine's power has been turned on since the last time
BACKUP DATA CLEAR within the Game Test Mode was performed.
● PLAY TIME:
The total amount of time that the game has been played since the last time BACKUP DATA
CLEAR within the Game Test Mode was performed.
− 33 −
H . BACKUP DATA CLEAR
Selecting BACKUP DATA CLEAR allows the contents of BOOKKEEPING to be cleared.
Note that even if a clear is performed at this screen, the BOOKKEEPING data within System
Test Mode will not be cleared. To clear this data, select BACKUP DATA CLEAR within
System Test Mode.
BACKUP DATA CLEAR
−>YES(CLEAR)
NO(CANCEL)
SELECT WITH SERVICE BUTTON
AND PRESS TEST BUTTON
FIG. 4. 3 h BACKUP DATA CLEAR Screen
To clear data, use the SERVICE Button to move the pointer to YES (CLEAR) and press the
TEST Button. When the data has been cleared, "COMPLETED" will be displayed.
Press the TEST Button again to return to the Game Test Menu screen.
Move the pointer to NO (CANCEL) and press the TEST Button to return to the Game Test
Menu screen without clearing the data.
− 34 −
5. CHECK MODE
Never touch any areas of the machine other than those specified.
Touching such areas can cause electric shock and short circuit accidents.
● To enter Check Mode, press the CHECK Button during the advertising
sequence when the ability level explanation screen is not being
displayed.
● Do not press the TEST Button or SERVICE Button while using Check
Mode. Entering Test Mode will interrupt all games.
When any one of the communicating satellites enters Test Mode, game play is locked out at all
of the other satellite seats. Check Mode exists so that such a situation can be avoided.
Unlike Test Mode, this mode allows the cartridge reader/writer test, the input test, and the
output test to be performed without interrupting any games. Use this mode to check the
operation of the card reader, buttons, and lamps during game play.
However, there are some operations that cannot be performed outside of Test Mode. To perform
operations that cannot be performed in Check Mode, enter Test Mode outside of operating hours
or remove the problem satellite from the communications link. (Owner's Manual chapter 14)
A . CHECK MODE MENU
WELCOME TO BUTTON, LAMP AND CARD READER-WRITER.
BUTTON CHECK
LAMP CHECK
CLEANING CARD READER-WRITER
CARD PRINT TEST
BACK TO THE GAME
Press the CHECK Button during the
advertising sequence when the ability
explanation screen is not being displayed
and the display will switch to the screen
shown in the figure to the left.
SELECT WITH SELECT BUTTON.
DECIDE WITH CHECK BUTTON.
WARNING! DO NOT PRESS TEST OR SERVICE BUTTONS.
ALL GAMES WILL END WHEN TEST MODE STARTS.
CREDIT(S) 0
FIG. 5 a CHECK MODE MENU Screen
Press the SELECT Button to move the item color. Move it to the desired item and press the
CHECK Button to execute the item.
Select BACK TO THE GAME and press the CHECK Button to exit the mode and return to the
game screen.
− 35 −
B . BUTTON CHECK
Select BUTTON CHECK and the display will switch the screen in the figure below. The status
of each switch can be checked here.
WELCOME TO BUTTON, LAMP AND CARD READER-WRITER.
BUTTON CHECK
UP
DOWN
LEFT
RIGHT
OK
HOLD
WHIP
START
OFF
OFF
OFF
OFF
OFF
OFF
OFF
OFF
PRESS CHECK BUTTON TO RETURN TO THE MENU.
WARNING! DO NOT PRESS TEST OR SERVICE BUTTONS.
ALL GAMES WILL END WHEN TEST MODE STARTS.
CREDIT(S) 0
FIG. 5 b 1 BUTTON CHECK Screen
Press each switch. If the display to the right of a switch changes from OFF to ON, the switch's
wiring connections are functioning properly.
Press the CHECK Button to return to the CHECK MODE MENU screen.
RIGHT START UP LEFT WHIP HOLD OK DOWN FIG. 5 b 2
− 36 −
C . LAMP CHECK
Selecting LAMP CHECK displays the following screen and allows the status of each lamp to be
checked.
WELCOME TO BUTTON, LAMP AND CARD READER-WRITER.
LAMP CHECK
UP DOWN OFF
LEFT RIGHT OFF
OK OFF
HOLD WHIP OFF
WINNER OFF
ERROR OFF
CHECK THAT LAMP IS ILLUMINATED.
PRESS CHECK BUTTON TO RETURN TO THE MENU.
WARNING! DO NOT PRESS TEST OR SERVICE BUTTONS.
ALL GAMES WILL END WHEN TEST MODE STARTS.
CREDIT(S) 0
FIG. 5 c 1 LAMP CHECK Screen
Each lamp will automatically turn "ON" in order from the top lamp. If a lamp flashes when the
display to the right of the lamp's name turns from "OFF" to "ON", that lamp and its wiring
connections are functioning properly.
Press the CHECK Button to exit this mode and return to the CHECK MODE MENU screen.
WINNER ERROR LEFT RIGHT HOLD WHIP OK UP DOWN FIG. 5 c 2
− 37 −
D . CLEANING CARD READER-WRITER
Make sure that there are cards in the card reader/writer dispenser when
performing head cleaning. If there are no cards in the dispenser, the part
that holds the card down in the dispenser may touch the rotating parts,
causing noise.
WELCOME TO BUTTON, LAMP AND CARD READER-WRITER.
CLEANING CARD READER-WRITER
INSERT CLEANING CARD.
Select CLEANING CARD READERWRITER and the display will switch to
the following screen, allowing you to
clean the head of the card reader/writer.
Follow the instructions on the screen to
perform cleaning.
WARNING! DO NOT PRESS TEST OR SERVICE BUTTONS.
ALL GAMES WILL END WHEN TEST MODE STARTS.
CREDIT(S) 0
FIG. 5 d CLEANING CARD READER-WRITER Screen
INSERT CLEANING CARD.
Put cleaning solution on the cleaning card, then insert the card in the card slot.
To interrupt the operation, press the CHECK Button.
↓
CLEANING NOW. PLEASE WAIT.
The machine is now cleaning. Wait a moment.
↓
REMOVE CLEANING CARD.
Remove the cleaning card.
↓
TURN CLEANING CARD OVER AND RE-INSERT.
Turn the card over and insert it into the card slot again.
To interrupt the operation, press the CHECK Button.
↓
CLEANING NOW. PLEASE WAIT.
The machine is now cleaning. Wait a moment.
↓
REMOVE CLEANING CARD.
Remove the cleaning card.
↓
Cleaning has now ended. Do not forget to remove the cleaning card.
The machine will return to the menu when the cleaning card has been removed.
− 38 −
E . CARD PRINT TEST
WELCOME TO BUTTON, LAMP AND CARD READER-WRITER.
CARD PRINTING TEST
NOW PRINTING. PLEASE WAIT.
WARNING! DO NOT PRESS TEST OR SERVICE BUTTONS.
ALL GAMES WILL END WHEN TEST MODE STARTS.
CREDIT(S) 0
Select CARD PRINTING TEST and the
card reader/writer will begin to operate.
The monitor will switch to the following
screen when the card is drawn in from
the dispenser.
When this item is executed, a new card
will be drawn in from the dispenser to
and the message shown below will be
printed. Perform a head cleaning if the
type is misaligned or broken.
FIG. 5 e CARD PRINTING TEST Screen
−DERBY OWNERS CLUB WEー
※※※※※※※※※※※※※※※※※※※※※※
This is test print.
No horse data is saved.
※※※※※※※※※※※※※※※※※※※※※※
PRINT SAMPLE
When the print test has ended, the following message will be displayed. Remove the card.
REMOVE THE CARD.
EMPTY DISPENSER ERROR DISPLAY DURING THE PRINT TEST
CARD DISPENSER IS EMPTY.
CONTACT ARCADE STAFF.
PLEASE REFILL CARDS THERE.
If there are no cards in the card dispenser or there is no card dispenser when CARD PRINTING
TEST is selected, the following message will be displayed.
Place cards in the card dispenser. The print test will commence when the card dispenser has
been reset in the card reader/writer.
− 39 −
6. FORCED CLEANING MODE
Make sure that there are cards in the card reader/writer dispenser when
performing head cleaning. If there are no cards in the dispenser, the part
that holds the card down in the dispenser may touch the rotating parts,
causing noise.
INSERT CLEANING CARD.
FIG. 6 FORCED CLEANING Screen
This product counts the number of times
the card reader/writer has been operated.
When the machine is switched on after
having operated the card reader/writer
over one hundred times, it enters Forced
Cleaning Mode and the game cannot be
played.
The machine will exit this mode when
the card reader/writer head cleaning is
complete. Follow the instructions on the
screen to perform cleaning.
Note that performing cleaning in Test
Mode or Check Mode clears the
operation counter.
INSERT CLEANING CARD.
Put cleaning solution on the cleaning card, then insert the card in the card slot.
To interrupt the operation, press the CHECK Button.
↓
CLEANING NOW. PLEASE WAIT.
The machine is now cleaning. Wait a moment.
↓
REMOVE CLEANING CARD.
Remove the cleaning card.
↓
TURN CLEANING CARD OVER AND RE-INSERT.
Turn the card over and insert it into the card slot again.
To interrupt the operation, press the CHECK Button.
↓
CLEANING NOW. PLEASE WAIT.
The machine is now cleaning. Wait a moment.
↓
REMOVE CLEANING CARD.
Remove the cleaning card.
↓
Cleaning has ended. Do not forget to remove the cleaning card.
The machine will return to the game screen when the cleaning card has been removed.
− 40 −
7. ERROR MESSAGES
● Inspections of the machine while the power is turned on should always
be performed by the Location's Maintenance Man or Serviceman.
Never allow the machine to be inspected by someone who does not
possess the appropriate technical expertise, as it may lead to a short
circuit or electric shock.
● Be sure to have the Location's Maintenance Man or Serviceman
perform operations such as the replacement of parts that do not
appear in this document or the Owner's Manual. In the unlikely event
that such procedures are necessary, be sure to contact one of the
offices listed in this manual or verify the correct procedure before
performing them. Failure to observe these precautions may result in a
short circuit or electric shock.
Do not flip the power switch ON and OFF when repowering the machine
as it may cause an accident or damage parts.
ERROR DISPLAY WHEN MACHINE IS TURNED ON
This product will automatically run a network check when it is powered up.
If the network connections demonstrate any defect or abnormality, the main projection unit and
all of the satellite screens will repeatedly display the network check screen and NAOMI logo
screen without switching to the advertising screen.
If the display fails to switch to the advertising screen, first turn off the main projection unit and
then all of the satellites. Wait a few seconds and then turn them on again.
Perform the following inspection if the advertising screen does not appear after powering up
again.
If the following inspection fails to identify the problem and it is not possible to enter Test Mode,
contact one of the offices listed in this manual or the point of purchase.
□ Is the communications cable connected properly?
□ Has the communications cable come loose from the connector?
□ Is the communications cable curved too much or bent?
□ Is the NUMBER OF SATELLITES setting for each seat correct?
□ Is the COMMUNICATION MODE setting for each seat correct?
MODE : MASTER
SIZE : ××××
GAP : 0000
STATUS : 0000
CHECKING NETWORK
waiting MASTER
MODE : SLAVE
SIZE : ××××
GAP : 0000
STATUS : 0000
CHECKING NETWORK
FIG. 7 a NETWORK CHECK Screen
− 41 −
This product displays error messages on screen whenever an abnormality is detected. The
winner lamps on both sides of the satellite that caused the error will simultaneously flash,
indicating an error. However, the error lights will not flash in the case of an UNREMOVED
CARD ERROR. Respond to and resolve each error.
Flashing error lights Message display ×××××××××××
FIG. 7 b
COIN ASSIGNMENTS ERROR
In this version, the message below will be displayed on the satellite advertising screens and the
game will not operate if the coin settings are set as follows.
・If the value for SEQUENCE 2 is set to be higher than the value for SEQUENCE 1.
・If the value for SEQUENCE 3 is set to be higher than the value for SEQUENCE 2.
・If the COIN CHUTE TYPE is set to INDIVIDUAL in the System Test Mode. (See 3-2)
IT DOESN'T WORK WITH THE PRESENT COIN ASSIGNMENTS.
IN TEST MODE, SET FOR COIN PLAY OR FREE PLAY
AS FOLLOWS:
SETTING ERROR
FIG. 7 c COIN ASSIGNMENTS ERROR Screen
Reset the coin settings and restart the machine.
Free play operates as usual.
− 42 −
NETWORK ERROR
● If a network error occurs before a race has ended, the players will lose
their credits and the game will not end properly because the error has
occurred during a race. Explain the circumstances to the players
involved in the game and restore their credits with the SERVICE
Button.
● If a network error occurs when raising a new horse, resolve it as
outlined below.
● If an error occurs before the players have chosen their silks, the
registered horses' names and other information records will be erased
due to the error. It will be necessary to have the players re-input the
names of their horses. In addition, they will lose their credits when the
game starts, so be sure to restore their credits with the SERVICE
Button.
● If an error occurs after the race has started, players will lose their
credits and the game will not end properly, as described above.
Explain the circumstances to the players involved in the game and
restore their credits with the SERVICE Button.
● When main projection unit or any one of the satellites enters the Test
Mode, the seats that are not in Test Mode will display this screen. This
does not indicate a malfunction.
The message shown below will be displayed if a connection encounters one of the following
problems during operation of the game. The message will be displayed on screen in red type.
・When the communications cable has been disconnected.
・When the communications cable has been bent or damaged.
・When the communications board has been removed, etc.
NETWORK ERROR
FIG. 7 d NETWORK ERROR Screen
In the event of a network error, check both the communications cable and the communications
board, and restart the machine.
If a satellite or the main projection unit has entered Test Mode, this display may appear.
Note that this does not indicate any abnormality with the communications devices.
− 43 −
CARD READER/WRITER CONNECTION ERROR
The following message will be displayed on the advertising screen in the position of that in the
figure below if the card reader/writer is not properly connected when the machine is turned on,
or if there is no response due to damage.
CARD READER−WRITER DOESN’T RESPOND.
FIG. 7 e CARD READER/WRITER CONNECTION ERROR Screen
Verify that the card reader/writer is connected properly.
UNREMOVED CARD ERROR
If a card is left in the card reader/writer when the machine powers down, the card will be
discharged from inside of the card reader/writer the next time the machine is powered up.
If this card is not removed and left as it is, the following message will be displayed on the
screen.
Remove the card from the card reader/writer.
REMOVE THE CARD.
FIG. 7 f UNREMOVED CARD ERROR Screen
− 44 −
EMPTY CARD DISPENSER ERROR
The following error will be displayed if there is no dispenser or there are no cards in the
dispenser when the card reader/writer is trying to draw in a card from the dispenser.
CARD DISPENSER IS EMPTY.
CONTACT ARCADE STAFF.
PLEASE REFILL CARDS THERE.
FIG. 7 g CARD DISPENSER EMPTY Screen
The game will be restored when cards are placed in the dispenser or the dispenser is reset in the
card reader/writer.
CARD READER JAM
The following error will be displayed if a card is jammed when the card reader/writer is trying
to draw in a card, when it is trying to read or write, or when some other kind of card problem
has occurred.
CARD ERROR.CONTACT ARCADE STAFF.
PRESS CHECK BUTTON WHEN IT'S READY.
FIG. 7 h CARD READER JAM Screen.
Press the CHECK Button after resolving the problem and the game will be restored.
− 45 −
The following message will be displayed if some kind of abnormality has occurred with the card
reader/writer. If this error is displayed, power down the machine and then restart it.
CARD READER-WRITER TROUBLE. RESTART IT.
FIG. 7 i
If restarting the machine does not resolve the problem, replace the card reader/writer.
THERE IS A CARD ON THE SHUTTER
The following message will be displayed if the shutter is trying to close but it cannot because a
card or some other object remains on the shutter.
Remove the object from the shutter and the game will be restored.
THERE IS A CARD OR THE LIKE ON THE SHUTTER. REMOVE IT.
FIG. 7 j
− 46 −
CARD DRAW-IN ERROR MESSAGE
If the card being drawn in is unusable for DOC WE, the following displays will appear on the
screen depending on the type of card.
The game will be restored after the card is discharged without further action.
YOU CAN'T USE THIS CARD. (D)
FIG. 7 k CARD DRAW-IN ERROR MESSAGE Screen
YOU CAN'T USE THIS CARD. (D)
→ A card other than a DOC WE card has been inserted.
If the card is a valid DOC WE card, then the data contained on the card may be corrupted.
YOU CAN'T USE THIS CARD. (C)
→ The data may have been rewritten or there may have been an attempt to copy the card.
THIS IS ACTIVE RACEHORSE CARD.
→ A card for a horse that has not been retired has been inserted instead of a sire or dam card.
THIS IS SIRE CARD.
→ A sire card has been inserted outside of sire select mode.
THIS IS DAM CARD.
→ A dam card has been inserted outside of dam select mode.
THIS CARD IS WRONG VERSION.
→ A card for a different version has been inserted.
− 47 −