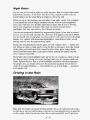
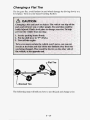
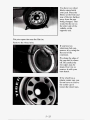
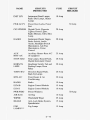
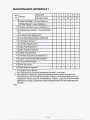
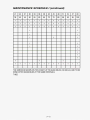
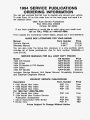
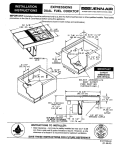
1
0W ner
S
Manual
.
.
.
INTRODUCTION
1994 GMC Safari Owner's Manual
Welcome
This manual was prepared to acquaint you with theoperation and
maintenance of your 1994 GMC Safari and to provide important safety
information. There is also a GMC Truck Warranty andOwner Assistance
Information booklet. In some vehicles, there can be information manuals
from other manufacturers like body builders or special equipment
companies. We urge you to review all these publications carefully. This will
help you enjoy safe and trouble-free operation of your vehicle.
When it comes to service, keep in mindthat your GMC Truckdealer knows
your vehicle best and is interested in your complete satisfaction. Your dealer
invites you to return for all of your service needs both during and after the
warranty period.
Remember, if you havea concern and need helphandling it to your
satisfaction, see theprocedure in the GMC Truck Warranty andOwner
Assistance Information booklet.
Thanks for choosing a GMC Truckproduct. We value you as a member of
the GMC Truck family.We want to assure you of our continuing interest in
your pleasure and satisfaction with your vehicle.
GMC TruckDivision
General Motors Corporation
Pontiac, Michigan
'Copyright 1993 General Motors Corporation, GMC Truck Division
All Rights Reserved
Second Edition
Printed in U.S.A.
i
Important Notes to Owners and Drivers
....About This Manual:
Please keep this manual in your vehicle so it will be there if you ever need it
when you’re on the road. If you sell the vehicle, please leave this manual in
it so the new owner can use it.
This manual includes the latest information at the time it was printed. We
reserve the right to make changes in the product after that time without
further notice. For vehicles first sold in Canada, substitute the name
“General Motors of Canada Limited” for GMC TruckDivision whenever it
appears in this manual.
For Canadian Owners Who Prefer a
French Language Manual:
Aux proprietaires canadiens: Vous pouvez vous procurer un exemplaire de
ce guide enfrancais chez votre concessionaire ou au DGN Marketing
Services Ltd., 1500 Bonhill Rd., Mississauga, Ontario L5T 1C7.
GMTRUCK
General Motors, GM and the GM Emblem, GMC and the GMCEmblem,
SAFARI and the SAFARI Emblem are registered trademarks of General
Motors Corporation.
..
11
Model Reference
This manual covers these models:
Passenger Model
Cargo Model
...
111
Table of Contents
Introduction - How to Use this Manual
This section tells you how to use your manual and includes safety
and vehicle damage warnings and symbols.
Section 1 - Seats and Safety Restraints
This section tells youhow to use your seats and safety restraints
properly.
Section 2 - Features & Controls
This section explains how to start and operate your vehicle.
Section 3 - Comfort Controls& Audio Systems
This section tells you how toadjust the ventilation andcomfort
controls and how tooperate your audio system.
Section 4 - Your Driving and the Road
Here you’ll find helpful information and tips aboutthe road and
how to drive under different conditions.
Section 5 - Problems on the Road
This section tells you what todo if you have a problem while
driving, such as aflat tire or engine overheating.
,ection 6
- Service & Appearance Care
Here the manual tells you how to keep your vehicle running
properly and looking good.
Section 7-
Scheduled Maintenance Services
This section tells you when to perform vehicle maintenance and
what fluids and lubricants to use.
Section 8 - Customer Assistance Information
This section tells you how to contact your GM division for
assistance and how to get service publications. It also gives you
information on “Reporting Safety Defects”on page 8 4 .
Index
Here’s analphabetical listing of almost every subject in this
manual. You can use it to quicklyfind something you want to read.
How to Use This Manual
Many people read their owner’s manual from beginningto end when rney
first receive their new vehicle. This will help you learn about the features
and controls for your vehicle. In this manual, you’ll find that pictures and
words work together to explain things quickly.
INDEX: A good place to look for what you need is theIndex in back of the
manual. It’s an alphabetical list of all that’s in the manual, and the page
number where you’ll find it.
SECTIONS 1-6: Each section of this manual begins with a brief list of its
contents, so you can often find at a glance if a section contains the
information you want.
SECTION 7:This section of the manual covers the maintenance required
for your vehicle.
SECTION 8 CUSTOMER ASSISTANCE: This section includes
important information about reporting safety defects and gives you details
about the “Roadside Assistance” program. You will also find customer
satisfaction phone numbers (including customer satisfaction numbers for the
hearing and speech impaired) as well as the mediatiodarbitration procedure.
We’ve also included ordering information for service publications in this
section.
V
Safety Warnings and Symbols
You will find a number of safety cautions in this book. We use a box with
gray background and the word CAUTION to tell you about things that could
hurt you if you were to ignore the warning.
In the gray caution area, we tell you what the hazard is. Then we tell you
what to do to help avoid or reduce the hazard. Please read these cautions. If
you don’t, you or others could be hurt.
You will also finda circle with a slash through it in this book. This safety
symbol means “Don’t,” “Don’t do this,” or “Don’t let this happen.”
vi
Vehicle Damage Warnings
Also, in this book you willfind these notices:
NOTICE:
These mean there is something that could damage
your vehicle.
In the notice area, we tell you aboutsomething that can damage your
vehicle. Many times, thisdamage would not becovered by your warranty,
and it could be costly. But the notice will tell you what
to do to help avoid
the damage.
When you readother manuals, you might see CAUTION andNOTICE
warnings in different colors or in different words.
You’ll also see warning labels on your vehicle. They use yellow
for
cautions, blue for notices and the words CAUTION or NOTICE.
Vehicle Symbols
These are some of the symbols you willfind on your vehicle.For example,
these symbols are used on an original battery:
A
Cautron
Possible Injury
I
Avoid Sparks
or Flames
Protect Eyes
by Shielding
Caustic Battery Acid Spark or Flame Could
Explode Battery
Could Cause Burns
These symbols are important for you and your passengers whenever your
vehicle is driven:
I
Fasten Safety
Door LocWUnlock
Belts
These symbols have to do with your lights:
I
I
I
Master Lighting
Switch
A
'00
Turn Signal
I
Parking Lights
Hazard Warning
Flasher
Direction
-
Headlight
High Beam
I
f o g Lights
Daytime
Running Lights
Viii
These symbols are on some of your controls:
Hood Release
Windshield
Wiper
I
Ventilating Fan
Windshield
Washer
Windshield
Defroster
I
I
Rear Window
Wiper & Washer
Rear Window
Defogger
Hatch
Release
These symbols are used on warning andindicator lights:
93
l-
Engine Coolant
Temperature
Battery Charging
System
nANTILOCK
I
BRAKE
Brake
(Standard Cluster)
4- Wheel
Anti-Lock
Fuel
Engine Oil
Pressure
Here are some other symbols you may see:
X
Seats and Safety Belts
Section
Here you’ll find information about the seats in your vehicle and how to use
your safety belts properly. You can also learn about some things you should
not do with safety belts .
Seats and Seat Controls ......................................
1-2
1-2
Frontseats . . . . . . . . . . . . . . . . . . . . . . . . . . . . . . . . . . . . . . . . . . . . .
Rearseats . . . . . . . . . . . . . . . . . . . . . . . . . . . . . . . . . . . . . . . . . . . . . .
1-5
Head Restraints . . . . . . . . . . . . . . . . . . . . . . . . . . . . . . . . . . . . . . . . . 1-10
Safety Belts: They’re forEveryone . . . . . . . . . . . . . . . . . . . . . . . . . . . . 1-11
Why Safety Belts Work . . . . . . . . . . . . . . . . . . . . . . . . . . . . . . . . . . 1-12
Questions Many People Ask About Safety Belts . . . . . . . . . . . . . . . 1-15
1-16
Safety Belt Reminder Light ...............................
1-16
How to Wear Safety Belts Properly ............................
1-16
Adults ...................................................
1-17
Driver Position .........................................
1-17
Lap-Shoulder Belt . . . . . . . . . . . . . . . . . . . . . . . . . . . . . . . . . . . .
Driver’s Facial Air Bag System . . . . . . . . . . . . . . . . . . . . . . . . . . . . 1-25
1-29
Safety Belt Use During Pregnancy ..........................
Right Front Passenger Position . . . . . . . . . . . . . . . . . . . . . . . . . . . . . 1-30
1-31
Rear Seat Outside Passenger Positions .......................
1-34
Center Passenger Positions ................................
LapBelt . . . . . . . . . . . . . . . . . . . . . . . . . . . . . . . . . . . . . . . . . . . . 1-34
Children . . . . . . . . . . . . . . . . . . . . . . . . . . . . . . . . . . . . . . . . . . . . . . . . . 1-35
1-36
Smaller Children and Babies ..............................
1-37
Child Restraints ........................................
Larger Children . . . . . . . . . . . . . . . . . . . . . . . . . . . . . . . . . . . . . . . . . 1-44
Safety Belt Extender . . . . . . . . . . . . . . . . . . . . . . . . . . . . . . . . . . . . . . . 1-46
Checking Your Restraint Systems . . . . . . . . . . . . . . . . . . . . . . . . . . . . . 1-47
Replacing Safety Belts After a Crash . . . . . . . . . . . . . . . . . . . . . . . . . . 1-47
1-1
Seats and Seat Controls
This section tells you about the seats-how to adjust them, take them out
and put them back in. It also tells you about bucket and benchseats, power
seats, and headrestraints.
Froni Seais
Manual Front Seat
Slide the lever at the front of the seat to the left to unlockit. Slide the seat to
where you want it. Then release the lever and try to move the
seat with your
body, to make sure the seat is locked into place.
1-2
1.
Power Driver’s Seat
You can adjust the seatbefore entering the vehicle.
The front control
makes the frontof the
seat go up and down.
The rear control
makes the rear of the
seat go up and down.
The center control
makes the whole seat
go up and down or
forward and rearward.
Reclining Bucket Seats
If you have this feature, you will have either a knob or a lever on the inside
of the seat to adjust the seatback.
If you have the knob,
you can adjust the
seatback by rotating
the knob to the left or
right.
1-3
If you have the lever,
you can adjust the
seatback by liftingthe
lever. Release the
lever to lock the seat
back where you want
it. Pull up on the lever
and the seat will go to
an upright position.
Don’t adjust the driver’s seatback while your vehicleis moving.
Don’t have a seatback reclined if your vehicle is moving.
1-4
Rear Seats
Bucket Seats
If you have rear bucket seats in your vehicle, they will recline and adjust the
same way as the front manual bucket seats. See “Front Seats” earlier in this
section or in the Index.
Bench Seats
If you have bench seats in your vehicle, each seat can carry up to three
passengers. They can also be removed to increase storage space.
The center and rear benchseats can be adjusted forwardor rearward by the
lever at the front of the seat.
Slide the lever at the
front of the seat to the
right to unlock it.
Slide the seat to where
you want it. Then
release the lever and
try to move the seat
with your body, to
make sure the seat is
locked into place.
The non-touring center bench seat has a pivoting right armrest. The left
armrest can also be used as astorage compartment.
The storage compartment and beverage cooler can also be used as rear seat
armrests. See “Storage Compartment/Beverage Cooler” in the Index.
The optional touring bench seats come with moveable armrests, individual
reclining seatbacks, adjustable headrests and a folddown center console.
1-5
To adjust your
seatback, pull up on
the lever on the lower
outside of the seat.
The center bench
seatbacks willrecline
further back thanthe
rear benchseatbacks.
To raise or lower the
center console, press
the button betweenthe
beverage holders.
Only sit in the center
seating position when
the console is in an
upright position. For
details about
headrests, see “Head
Restraints” in this
section.
1-6
1
Seatback Latches (Non-Touring Bench Seats)
To fold your
non-touring seatback
forward, pull up on
the latch release lever
while pulling the
seatback toward you.
The leveris on the
right rear of your seat.
After the latch has been released, push the seatback down until it locks in
place. To raise the seatback, unlock the seat by pushing forward on the
lever. Make sure the seatback is locked when it isput back in the upright
position.
Removable Seats (Touring and Non-Touring Bench Seats)
To Remove The Seat
1. Disconnect the quick release latch plates for the lap-shoulder belt from
the buckles in theroof.
1-7
I
I
'
I
I
BELTFOR \
SEAT REMOVAL1
2. If you are
removing the
center seat,
remove the right
lapshoulder belt.
To do this, press
the tip of a key
into the release
hole of the safety
belt attachment
while pulling up
on the safety belt.
3. If you have a
safety beltguide
on your seat, pull
the safety belt all
the way out
through the
guide.
4. Pull up on the
seatback latch on
the right rear of
the front seat.
Push the seatback
down until it
locks in place
(non-touring
bench seats only).
5. Lift up on the seat release latch. The latches are near the floor on the
rear legs of the seat. To relieve pressure on the latch, pull back on the
seat.
6. Lift up on the
rear of the seat to
remove the seat
assembly from
the rear latch
pins. Then, pull
back and lift the
seat out of the
vehicle.
To Install The Seat
1. Lower the seat
into position.
Make sure the
front retainers are
hooked onto the
anchor pins. Pull
the seat down to
latch the rear
retainers.
Make sure the seat is locked in by pulling up and down on the seat.
_I
1-9
2. Raise the
seatback by
pushing forward
on the latch at the
right rear of the
seat. Pull up on
the seatback until
it is locked
securely in the up
position.
3. Attach the quick release latch plate to the buckles in the roof. If you are
installing the center seat, connect the rightlapshoulder belt to the
attachment on the seat cushion. If you havea safety belt guide on your
seat, pull the belt through theguide before reattaching the lap-shoulder
belt to the side of the seat. The release hole should befacing outward.
If you installed the safety belt with the release hole facing inward
(toward the seat), slide the plastic cover upso you can see the buckle.
Disconnect the seatbelt. Slide the cover back down andreinstall the
belt correctly.
NOTICE:
Be sureto put the correct seats back in the proper positions
so
the safety beltswill work properly.
Head Restraints
If your vehicle has the optional touring package, you haveadjustable head
restraints.
Slide the head
restraint upor down
so that the top ofthe
restraint is closest to
the topof your ears.
This position reduces
the chances of a neck
injury in a crash.
1-10
Safety Belts: They’re For Everyone
This part of the manual tells you how to use safety belts properly. It also
teils you some things you should not do with safety belts.
And it explains the Supplemental Inflatable Restraint, or “air bag” system.
This figure lights up as a reminder to buckle up. (See “Safety Belt Reminder
Light” in the Index.)
In many states and Canadian provinces, the law says to wear safety belts.
Here’s why: They work.
You never know ifyou’ll be in a crash. If you do have a crash, you don’t
know ifit will be a bad one.
A few crashes are mild, and some crashes can be so serious that even
buckled up a person wouldn’t survive. But most crashes are in between. In
many of them, people who buckle up can survive and sometimes walk away.
Without belts they could have been badlyhurt or killed.
1-11
After more than 25 years of safety belts in vehicles, the facts are clear. In
most crashes buckling up does matter ... a lot!
Why Safety Belts Work
When you ride in or on anything, you go as fast as it goes.
For example, if the
bike is going 10 mph
(16 km/h), so is the
child.
1-12
When the bike hits the
block, it stops. But the
child keeps going!
....................
".
...
Take the simplest
vehicle. Suppose it's
just a seat on wheels.
H Put someone on it.
1-13
Get it up to speed.
Then stop the vehicle.
The rider doesn’tstop.
The person keeps
going until stoppedby
something.
In a real vehicle, it
could be the
windshield ...
or the instrument
panel ...
1-14
1
or the safety belts!
With safety belts, you slow down asthe vehicle does. You get more time to
stop. You stop over more distance, and your strongest bones take the forces.
That’s why safety belts make such good sense.
Here Are Questions Many People
Ask About
Safety Belts- and the Answers
Q: Won ’tI be trapped in the vehicle after an accident
if I’m wearing a
safety belt?
A:
You could be - whether you’re wearing a safety belt or not. But you
can easily unbuckle a safety belt, evenif you’re upside down. And
your chance of being conscious during and after an accident, so you
can unbuckle and getout, is much greater if youare belted.
0:Why don ’t theyjust put in air bags so people won’t haveto wear
safety belts?
A:
Air bags, or Supplemental Inflatable Restraint systems, are in some
vehicles today and willbe in more of them in the future. But they are
supplemental systems only - so they work with safety belts, not
instead of them. Every air bag system ever offered for sale has required
the use of safety belts. Even if you’re in a vehicle that has air bags, you
still have to buckle up to get the most protection. That’s true not only
in frontal collisions, but especially in side and other collisions.
Q : If I ’rn a
good driver, and
I never drivefar fromhome, why shouldI
wear safety belts?
A:
You may be an excellent driver, but if you’re in anaccident - even
one that isn’t your fault - you and your passengers can behurt. Being
a good driver doesn’t protect you from things beyondyour control,
such as baddrivers.
Most accidents occur within 25 miles (40 km)of home. And the
greatest number of serious injuries and deaths occur at speeds of less
than 40 mph (65 kmh).
Safety belts are for everyone.
Safety Belt Reminder
Light
When the key is turned to RUN or START a light will come on for about
eight seconds to remind people to fasten their safety
belts. Unless the
driver’s safety belt is already buckled,a chime will also sound.
How To Wear Safety Belts Properly
Adults
This section is only for people of adult size.
Be aware that there are special thingsto know about safety belts and
children. And there aredifferent rules for smaller children andbabies. If a
child will be ridingin your vehicle, see the section afterthis one, called
“Children.” Follow those rulesfor everyone’s protection.
First, you’ll want to know which restraint systems your vehicle has.
We’ll start with the driver position.
1-16
Driver Position
This section describes the driver's restraint system.
Lap-Shoulder Belt
The driverhas a lap-shoulder belt. Here's how to wear it properly.
1. Close and lock the door.
2. Adjust the seat (to see how, see "Seats" in the Index) so you can sit up
straight.
1-17
3. Pick up the latch
plate and pull the
belt across you.
Don’t letit get
twisted.
4. Push the latch plate into the buckle until it clicks.
Pull up on the latch plate to make sure it is secure.
If the belt isn’t long enough, see “Safety BeltExtender” at the end of
this section.
Make sure the release button on the buckleis positioned so you would
be able to unbuckle the safety belt quicklyif you ever had to.
5. To make the lap
part tight, pull
down on the
buckle end of the
belt as you pull
up on the
shoulder belt.
The lappart of the belt should be worn low and snug on the hips, just
touching the thighs. In a crash, this applies force to the strong pelvic bones.
And you’d beless likely to slide under the lap belt.If you slid under it, the
belt would applyforce at your abdomen. This could cause serious or even
fatal injuries. The shoulder belt should go over the shoulder and across the
chest. These parts of the body are best able to take belt restraining forces.
The safety belt locks if there’s a sudden stop or a crash.
Shoulder Belt Height Adjuster
You can move the
shoulder belt adjuster
to the height that is
right for you.
1
1-19
To move it down,
push in the adjuster at
the arrows and pull
down on the adjuster.
After you move the
adjuster to where you
want it, try to move it
up and down to make
sure it islocked into
place.
You can move the adjuster up
from a lower positionjust by pushing upon it.
Adjust the height so
that the shoulder
portion of the belt is
centered on your
shoulder. The belt
should be away from
your face and neck but
not falling off your
shoulder.
Q: What’s wrong with this?
n
A:
n
The shoulder belt is too loose. It won’t give nearly as much protection
this way.
1-21
Q: What’s wrong with this?
A:
The belt is over an armrest.
1-22
Q: What's wrong with this?
A:
The shoulder belt is worn under the arm. It should be worn over the
shoulder at all times.
1-23
Q: What’s wrong with this?
A:
The belt is twisted across the body.
To unlatch the belt,
just push the buttonon
the buckle. The belt
should go back out of
the way.
Before you close the door, be sure the belt is out of the way. If you slam the
door on it, you can damage both the belt and your vehicle.
Driver’s FacialAir Bag System
This section explains the Driver’s Facial Air Bagsystem. Here are the most
important things to know:
1-25
Air Bag System Light
There is an air bag readiness light on the instrument panel, whichshows
AIR BAG . The system checks for electrical malfunctions, and the light tells
you if there is a problem.
You will see this light
flash for afew
seconds when you
turn your ignition to
RUN or START.
Then the light should
go out, which means
the system is ready.
Remember, if the air bag readiness lightdoesn’t come on when you start
your vehicle, or stays on, or comes on when you are driving, your air bag
system may not work properly. Have your vehicle serviced right away.
1-26
How The Air Bag System Works
Where is the air bag?
The Driver’s Facial Air Bag is in the middle of the steering wheel.
When is an air bag expected
to inflate?
The air bag is designed to inflate in moderate to severe frontal or
near-frontal crashes. The air bag will onlyinflate if the velocity of the
impact is above the designed threshold level. When impacting straight into a
wall that does not move or deform, the threshold level is between 11 and 16
mph (17 and 23 k d h ) . However, this velocity threshold depends on the
option content of the vehicle and may beseveral miles-per-hour faster or
slower. In addition, this threshold velocity will beconsiderably higher if the
vehicle strikes an object such as a parked car which will move anddeform
on impact. The airbag is also not designed to inflate in rollovers, side
impacts, or rear impacts where the inflation would provide no occupant
protection benefit.
In any particular crash, the determination of whether the air bag should have
inflated cannot be based solely on the level of damage on the vehicle(s).
Inflation is determined by the angle of the impact and the vehicle’s
deceleration, of which vehicle damage is only one indication. Repair cost is
not a good indicator of whether an air bag should have deployed.
What makes an air bag inflate?
In a frontal impact of sufficient severity, the air bag sensing system detects
that the vehicle is suddenly stopping as a result of a crash. The sensing
system triggers a chemical reaction of the sodium azide sealed in the
inflator. The reaction produces nitrogen gas, which inflates the cloth bag.
The inflator, cloth bag, and related hardware are all part of the air bag
inflator module packed inside the steering wheel.
How does an air bag restrain?
In moderate to severe frontal or near-frontal collisions, even belted
occupants can contact thesteering wheel. The air bag supplements the
protection provided by safety belts. Air bags distribute the force of the
impact more evenly overthe occupant’s upper body, stopping the
occupant
more gradually. But air bags would not provide protection in many types of
collisions, including rollovers and rear andside impacts, primarily because
an occupant’s motionis not toward the air bag. Air bags should never
be
regarded as anything more thana supplement to safety belt protection in
moderate to severe frontal and near-frontal collisions.
What will yousee afteran air bag inflation?
After the air bag has inflated, it will then quickly deflate.This occurs so
quickly that some people may not even realize thatthe air bag inflated. The
air bag will nut impede the driver’s vision or ability to steer the vehicle, nor
will it hinder the occupants from exiting the vehicle. There will be small
amounts of smoke coming from vents in the deflated air bag.Some
components of the air bagmodule in the steering wheel hub
may be hot for
a short time, but the portion of the bag thatcomes into contact with you will
not be hot to the touch.
0
The air bag is designed to inflate only once. After it inflates, you’ll
need some new parts for your air bagsystem. If you don’t get them, the
air bag system won’t be there to help protect
you in another crash. A
new system willinclude the air bag module and possibly other parts.
The service manual has information about the need to replace
other
parts.
0
Your vehicle is equipped witha diagnostic module, which records
a crash.
information about the air bag systemif the air bag deploys in
The module records information about the readiness of the system,
which sensors activatedthe deployment, and whether thedriver’s
safety belt was in use.
0
Let only qualified technicians work on your air bagsystem. Improper
service can mean that your air bag system won’t work properly.
See
your dealerfor service.
NOTICE:
If you damage the cover of the driver’s
facial air bag,it may not
work properly. You may haveto replace the air bag on the
steering wheel.Do not open or break the air bag cover.
1-28
Is the smoke from an air bag inflationharmful?
The particles emitted during air bag inflation are not harmful to most
people. Some people with respiratory ailments may experience difficulty
breathing if they stay in the vehicle with thewindows closed after air bag
inflation. So, if your air bag inflates, you and any passengers should exit the
vehicle if and when it is safe to do so. If you or your passengers can’t get
out of the vehicle, try to get fresh air by opening a window, turning onthe
fan, or opening a door.
Servicing Your Facial Air Bag-Equipped Vehicle
The facial air bag affects how your vehicle should be serviced. There are
parts of the air bag system in several places around your vehicle.You don’t
want the system to inflate while someone is working on your vehicle. Your
GM dealer and the 1994 GM Service Manual have information about
servicing your vehicle and the air bag system. The air bag system does not
need regular maintenance.
Safety Belt Use During Pregnancy
Safety belts work for everyone, including pregnant women. Like all
occupants, they are more likely to be seriously injured if they don’t wear
safety belts.
A pregnant woman should weara lap-shoulder belt, and the lap portion
should be worn as low as possible throughout the pregnancy.
1-29
The best way to protect the fetus is to protect the mother. Whena safety belt
is worn properly, it’smore likely that the fetus won’t be hurt in a crash. For
pregnant women, as for anyone, the key to making safety belts effective is
wearing them properly.
Right Front Passenger Position
The right front passenger’s safety belt works thesame way as the driver’s
safety belt. See “Driver Position,” earlier in this part.
Rear Seat Passengers
It’s veryimportant for rear seat passengers to buckle up! Accident statistics
show that unbelted people in the rear seat are hurt more often in crashes
than those who are wearing safety belts.
Rear passengers who aren’t safety beltedcan be thrown outof the vehicle in
a crash. And they can strike others in the vehicle who are wearing safety
belts.
1-30
Rear Seat Outside Passenger Positions
Lap-Shoulder Belt
These positions have lap-shoulder belts. Here’s howto wear one properly.
1. Pick up the latch
plate and pull it
across you. Don’t
let it gettwisted.
2. Push the latch plate into the buckle until it clicks. If the belt stops
before it reaches the buckle, tilt the latch plate and keep pulling until
you can buckle it. Pull up on the latch plate to make sure it issecure.
If the belt is not long enough, see “Safety Belt Extender’’ at the end of
this section.
Make sure the release button on the buckle is positioned so you would
be able to unbuckle the safety belt quickly if you ever had to.
1-31
3. To make the lap
part tight, pull
down on the
buckle end of the
belt as you pull
up on the
shoulder part.
The lap part of the belt should be worn low and snug on the hips, just
touching the thighs. In a crash, this applies force to thestrong pelvic bones.
And you’d be less likely to slide under the lap belt. If youslid under it, the
belt would apply force at your abdomen. This could cause serious or even
fatal injuries. The shoulder belt should go over the shoulder and across the
chest. These parts of the body are best able to take belt restraining forces.
The safety belt locks if there’s asudden stop or a crash.
To unlatch the belt,
just push the button on
the buckle.
1-33
Center Passenger Pusitiun(Bench Seat)
Lap Belt
If your vehicle hasrear bench seats, someone can sit in thecenter positions.
When yousit in a
center seating
position, you have a
lap safety belt, which
has no retractor. To
make the belt longer,
tilt the latch plate and
pull it along thebelt.
To make the belt
shorter, pull its free
end as shown until the
belt is snug.
Buckle, position and release it the same way as thelap part of a
lapshoulder belt. If the belt isn’t long enough, see “Safety Belt Extender”
at the end of this section.
Make sure the release button on the buckle is positioned so you wouldbe
able to unbuckle the safety belt quickly if you ever had to.
Children
Everyone in a vehicle needs protection! That includes infants and all
children smaller than adult size. In fact, the law in everystate inthe United
States and in every Canadian province says children up to some age must be
restrained while in a vehicle.
1-35
Smaller Children and Babies
1-36
Child Restraints
Be sure to follow the instructions for the restraint. You may find these
instructions on therestraint itself or ina booklet, or both. These restraints
use the belt system in your vehicle, but the child also has to be secured
within the restraint to help reduce the chance of personal injury. The
instructions that come with the infant or child restraint will show you how
to do that.
Where to Put the Restraint
Accident statistics show that children are safer if they are restrained in the
rear rather than the front seat. We at General Motors therefore recommend
that you put your child restraint in the rear seat unless the child is an infant
and you’re the only adult in the vehicle. In that case, you might want to
secure the restraint in the front seatwhere you can keepan eye on the baby.
Wherever you install it, be sure to secure the child restraint properly.
Keep in mind that an unsecuredchild restraint can move around in a
collision or sudden stop and injure people in the vehicle. Be sure to properly
secure any child restraint in your vehicle - even when no child is init.
1-37
Top Strap
If your child restraint
has a top strap, it
should be anchored.
If you needto have an anchorinstalled, you can ask yourGM dealer to put
it in foryou. If you want to install an anchor yourself, yourdealer can tell
you how to do it.
Securing a Child Restraint ina Rear Outside Position
You’ll be using the lap-shoulder belt. See the earlier section about thetop
strap if the child restraint has one.
1. Put the restraint on the seat. Followthe instructions for the child
restraint.
2. Secure the child in the child restraint as the instructions say.
3. Pull out thevehicle’s safety belt. Make the belt as long as possible by
tilting the latch plate and pullingit along the belt.
4. Run the lap and
shoulder portions
through or around
the restraint. The
child restraint
instructions will
show you how. If
the shoulder belt
goes infront of
the child’s face or
neck, put it
behind the child
restraint.
5. Buckle the belt.
Make sure the
release button is
positioned so you
would be able to
unbuckle the
safety belt
quickly if you
ever had to.
i
6 . To tighten the
belt, pull up on
the shoulder belt
while you push
down on the child
restraint.
1-39
7. Push and pull the
child restraint in
different
directions to be
sure it is secure.
To remove the child restraint, just unbuckle the vehicle's safety belt and let
it go back all the way. The safety belt will move freely again and be ready to
work for an adult or larger child passenger.
Securing a Child Restraint in the
Center Rear Seat Position
When you secure a child restraint in a center seating position, you'll be
using the lap belt.
See the earlier section about the top strap if the child restraint has one.
1-40
1. Make the belt as
long as possible
by tilting the
latch plate and
pulling it along
the belt.
2. Put the restraint on the seat. Follow the instructions for the child
restraint.
3. Secure the child in the child restraint as the instructions say.
4. Run the vehicle's safety belt throughor around the restraint. The child
restraint instructions will show you how.
5. Buckle the belt.
Make sure the
release button is
positioned so you
would be able to
unbuckle the
safety belt
quickly if you
ever had to.
6. To tighten the belt, pull its free endwhile you push down on the child
restraint.
7. Push and pull the child restraint in different directions to be sure it is
secure. If the child restraint isn't secure, turn the latch plate over and
buckle it again. Then see if it issecure. If it isn't, secure the restraint in
a different place in thevehicle and contact the child restraint maker for
their advice about how to attach the child restraint properly.
To remove the child restraint, just unbuckle the vehicle's safety belt. It will
be ready to work for an adult or larger child passenger.
1-41
Securhg a Child Restraint in the Right Front Seat
You’ll be using thelapshoulder belt. See the earlier section about the top
strap if the child restraint has one.
1. Put the restraint on the seat. Follow theinstructions for the child
restraint.
2. Secure the child in thechild restraint as the instructiofis say.
3. Pick up the latchplate, and run the lap and shoulder portions of the
vehicle’s safety belt throughor around the restraint. The child restraint
instructions will show you how.
If the.shoulderbelt goes infront of the child’sface or neck, put it
behind the child restraint.
4. Buckle the belt.
Make sure the
release button is
positioned so you
would be able to
unbuckle the
safety belt
quickly if you
ever had to.
1-42
5. Press the button
on the retractor
cover to set the
lock.
6. To tighten the
belt, feed the
shoulder belt
back into the
retractor while
you push down
on the child
restraint.
7. Push and pull the
child restraint in
different
directions to be
sure it issecure.
To remove the child restraint, just unbuckle the vehicle’s safety belt and let
it go back all the way.
The safety belt will move freely again and be ready to work for an adult or
larger child passenger.
1-43
Larger Children
Children who haveoutgrown child restraints should wear the vehicle’s
safety belts.
If you have the choice, a child shouldsit next to a window so the child can
wear a lap-shoulderbelt and get the additional restraint a shoulder belt can
provide.
Accident statistics show that childrenare safer if they are restrained in the
rear seat. But they need to use the safety belts properly.
0
Children who aren’t buckled up can be thrownout in a crash.
8
A
c
Children who aren’t buckled upcan strike other people who are.
1-44
I
Q: What if a child is wearing a lap-shoulder belt, but the child isso
small that the shoulder belt
is very close to the child’s face or neck?
A:
Move the child toward the center of the vehicle, but be sure that the
shoulder belt still ison the child’s shoulder,so that in a crash the
child’s upper body would have the restraint that belts provide.If the
child is so small that the shoulder belt is still very close to the child’s
face orneck, you might want to place the child in aseat that has alap
belt, if your vehicle has one.
1-45
Wherever the child sits, the lap portionof the belt should be worn lowand
snug on the hips, just touching the child’s thighs.This applies belt force to
the child’s pelvic bonesin a crash.
Safety Belt Extender
If the vehicle’s safety belt will fasten around you, you should use
it.
But if a safety belt isn’t long enough to fasten, your dealer will order you an
extender. It’s free. When you go in to order it, take the heaviest coat you
will wear, so the extender will be longenough for you. The extender will be
just for you, and just for the seat in your vehicle thatyou choose. Don’t let
someone else use it, and use it only for the seat it is made to fit. To wear it,
just attach it to theregular safety belt.
Checking Your Restraint Systems
Now and then, make sure all your belts, buckles, latch plates, retractors,
anchorages and reminder systems are working properly. Look for any loose
parts or damage. If you see anything that might keepa restraint system from
doing its job,have it repaired.
Replacing Safety Belts After
a Crash
If you’ve had a crash,do you need new belts?
After a very minor collision, nothing may be necessary. But if the belts were
stretched, as they would be if worn during a more severe crash, then you
need new belts.
If belts are cut or damaged, replace them. Collision damage also may mean
you will need to have safety belt
or seat parts repaired or replaced. New
parts and repairs may be necessary even if the belt wasn’t being usedat the
time of the collision.
Q: What’s wrong with this?
A:
The belt is torn.
Torn or frayed belts may not protect you in a crash. They can rip apart under
impact forces. If a belt is torn or frayed, get a new one right away.
Before replacing any safety belt, see your dealer for the correct part number.
You’ll need the model year and model number for your vehicle. The model
year is on your title and registration. And you can find the model number on
the Certificatioflire label of your vehicle. See “Certificatioflire Label” in
the Index.
P
.. ..........
"
The model number on the replacementbelt must be listed on the safety belt
to see this label.
you want to replace. Pull the shoulder belt all the way out
1-48
Features & Controls
*
Section
I
......
...
Here you can learn aboutthe many standard andoptional features on your
vehicle. and information on starting. shifting. and braking. Also explained
are the instrument panel and the warning systems that tell you if everything
is working properly- and what to do if you havea problem .
For explanation of vehicle symbols. refer to “Vehicle Symbols’’ in the
Introduction
.
. . . . . . . . . . . . . . . . . . . . . . . . . . . . . . . . . . . . . . . . . . . . . . . . . . . . . 2-3
2-5
Your Doors and How They Work ..............................
DoorLocks . . . . . . . . . . . . . . . . . . . . . . . . . . . . . . . . . . . . . . . . . . . . . . . .
2-8
Theft . . . . . . . . . . . . . . . . . . . . . . . . . . . . . . . . . . . . . . . . . . . . . . . . . . . .2-11
New Vehicle “Break-In” . . . . . . . . . . . . . . . . . . . . . . . . . . . . . . . . . . . . 2-12
Keys
Ignitionswitch . . . . . . . . . . . . . . . . . . . . . . . . . . . . . . . . . . . . . . . . . . . .
2-13
Starting Your Engine .......................................
FuelRegulator .........................................
Driving Through Deep Standing Water ......................
Engine Block Heater . . . . . . . . . . . . . . . . . . . . . . . . . . . . . . . . . . . . .
2-14
2-15
2-15
2-16
Automatic Transmission . . . . . . . . . . . . . . . . . . . . . . . . . . . . . . . . . . . . 2-17
. . . . . . . . . . . . . . . . . . . . . . . . . . . . . . . . . . . . . . . . . 2-20
ParkingBrake . . . . . . . . . . . . . . . . . . . . . . . . . . . . . . . . . . . . . . . . . . . .2-20
Locking Rear Axle
Shifting Into “P” (Park) . . . . . . . . . . . . . . . . . . . . . . . . . . . . . . . . . . . . .
2-21
...................................
Parking Over Things That Burn ...............................
EngineExhaust ...........................................
2-22
Shifting Out of “P”(Park)
2-23
2-24
Running Your Engine While You’re Parked . . . . . . . . . . . . . . . . . . . 2-24
2-1
All-Wheel Drive (Option) ...................................
2-26
................................................
Horn ....................................................
Tilt Wheel (Option) ........................................
Turn Signalkiultifunction Lever ..............................
Turn Signal and Lane Change Indicator ......................
2-26
Windows
2-29
2-29
2-30
2-30
...............................
2-32
......................................
Windshield Washer ......................................
2-32
Headlight High-Low Beam
WindshieldWipers
..............................
Cruise Control ..........................................
RearWindow Wipermasher
2-33
2-34
2-35
Lights . . . . . . . . . . . . . . . . . . . . . . . . . . . . . . . . . . . . . . . . . . . . . . . . . . . 2-41
.................................................. 2-45
SunVisors . . . . . . . . . . . . . . . . . . . . . . . . . . . . . . . . . . . . . . . . . . . . . . .2-47
Cigarette LightedAshtrays ...................................
2-48
Mirrors
............................................
Storage Compartments ......................................
InstrumentCluster .........................................
Warning Lights, Gages and Indicators .......................
Indicator Lights .........................................
Gages ................................................
Luggagecarrier ...........................................
2-49
......................................
2-66
Assist Handles
Trailer Wiring Harness
2-2
2-50
2-51
2-55
2-57
2-61
2-65
Keys
2-3
The oval-shaped key
is for the doors and all
other locks.
When a new vehicle is delivered, the dealer removes the plugs from the
keys, and gives them to the first owner.
Each plug has a code on it that tells yourdealer or a qualified locksmith
how to make extra keys. Keep the plugs ina safe place. If you lose your
keys, you’ll be able to have newones made easily usingthese plugs.
I NOTICE:
Your vehicle hasa number of new features that can help prevent
theft. But you can have
a lot of trouble getting into your vehicle
if you ever lock your keys inside.
You may even have to damage
your vehicle to get in.
So be sure you have extra keys.
2-4
Your Doors and How They Work
Side Doors
To open the front side
door from the outside.
grasp the handle and
pull the door open.
J
2-5
To open the front side
door from the inside,
pull the lever toward
you and push the door
open.
"
Sliding Side Door
e
To open the sliding side door, pull the handle toward the back and slide the
door to the rear until it latches in the open position.
I
To close the sliding side door, pull the handle toward the front to release the
rear latch, and slide the door forward.
2-6
Rear Doors
To open the left rear
door, pull on thelatch
release handle in the
inside of the door.
To close the rear doors, close the left door first. Check to make sure both
doors are completely closed.
The rear doors have a check assembly to keep the doorsfrom opening
beyond 90".
2-7
To fully open the
doors, push in on the
clip and lift the check
assembly up off the
mounting bracket. Do
this on each door.
Replace the
assemblies the same
way.
See the caution under “Swing-Out Windows” in this section.
Door Locks
There are several ways to lock and unlock your vehicle:
From the outside: Use
your door key.
From the inside: To
lock front doors and
sliding side door, slide
the lock levers down.
To unlock the front
doors and the sliding
side door from the
inside: Slide the lock
levers up.
Rear doors cannot be manually locked from the inside
To unlock the rear
hatch and split-panel
doors from theinside:
Push the top of the
HATCH REL switch.
2-9
Power Door Locks
I
If your vehicle has
power door locks,
push thepower door
lock switch to lock or
unlock all the doors at
once.
The Power Door Lock switch will notlock or unlock the rear hatch and split
panel doors. You must use theHATCH REL switch. See “Hatch Release
Switch” in the Index.
Every vehicle with power door locks has a pulse lock system. A pulse lock
system works like this:
If the sliding door isopen and you pushthe power door lock switch, the
sliding door will not lock immediately. After you
close the door, thesystem
comes on and, in about five seconds, locks the sliding door.
All models have overriding door locks. When a door is locked, the door
handle will not work the latch.This will help stop a door from being
accidentally opened. However, powerdoor locks do not affect the operation
of the hatch.
Leaving Your Vehicle
If you are leaving the vehicle, take your keys, open your
door and set the
locks frominside. Then get out and close the door.
Rear Hatch and Split-Panel Doors
If you have this option, your vehicle must be ineither “ P ’ (Park) or
“ N ’ (Neutral) to release the hatch and unlock the split-panel doors. If your
battery is dead, the hatch anddoors will not open, even from the outside
with a key.
To release the hatch and unlock thedoors from the inside of the vehicle,
press the HATCH REL switch on the instrument panel just left of the
steering column.
2-10
Then, pull up on the
hatch handle and open
the doors.
To release the hatch
and unlock the doors
from the outside of the
vehicle, put the key in
the lock and turnto
the right. Then, pull
up on the hatch and
open the right rear
door first. Grasp the
handle and pull the
door open.
The hatch and doors will automatically lock when the hatchis shut.
If the hatch is partially closed, the rear doors will lock and you will need to
use the key or HATCH REL switch, located to theleft of the steering
column, to unlock them. (See also Hatch Release Switch, Rear
WiperNasher, and Rear Defogger in the Index.)
Vehicle theft is big business, especially in some cities. Although your
vehicle has a number of theft deterrent features, we know that nothing we
put on it can make it impossible to steal. However, there are ways you can
help.
2-11
Key in the /gnition
If you walk awayfrom your vehicle with the keys
inside, it’s an easy target
for joy riders or professional thieves - so don’t do it.
When you park your vehicle and open the
driver’s door, you’ll heara chime
reminding you to remove your key from theignition and takeit with you.
Always do this. Your steering wheel will be locked, and so will your
ignition and transmission. Andremember to lock the doors.
Parking at Night
Park in a lighted spot, close all windows and lock your vehicle. Remember
to keep your valuables outof sight. Put them in a storage area, or take them
with you.
Parking Lots
If you park ina lot where someone will be watching your vehicle,it’s best
to lock it upand take your keys. But what
if you haveto leave your ignition
key? What if you have toleave something valuable in yourvehicle?
0
Put your valuables ina storage area out of sight.
Lock all the doors except the driver’s.
0
Then take the door key with you.
New Vehicle “Break-in ’’
NOTICE:
Your modern vehicle doesn’t needan elaborate“break-in.” But
it will perform better in the long if
run
you follow these
guidelines:
0
0
0
Keep your speedat 55 mph (88 k m h ) o rless for thefirst
500 miles (804 km).
-
Don’t drive at any one speed-fast orslow for the first
500 miles (804 km).Don’t make full-throttle starts.
Avoid making hard stops for the
first 200 miles (322km) or
so. During this time your
new brake linings aren’tyet broken
in. Hard stops with new linings can mean premature wear and
earlier replacement.Follow this “breaking-in” guideline
every timeyou get new brake linings.
2- 12
Ignition Switch
Use your ignition key to start your vehicle. The ignition key lets you rurn
the ignition switch to five different positions.
1. OFF
2
2. RUN
3
3. START
4. ACC
5. LOCK
ACC (Accessory): ACC lets you use things like the radio andthe
windshield wipers when theengine is off. To get into ACC, push in the key
and turn it toward you. Your steering wheel will remain locked, just as it
was before you inse d the key.
NOTICE:
Prolonged operationof accessories in theACC position could
drain your battery and prevent you from starting your vehicle.
LOCK: This position locks your ignition, steering wheel and transmission.
It’s a theft deterrent feature. You will only be able to remove your key when
the ignition is turned to LOCK.
OFF: This position lets you turn off the engine but still turn the steering
wheel. Use OFF if you must have your vehiclein motion while the engine
is off (for example, if your vehicle is being pushed).
RUN: This is the position for driving.
START This starts your engine.
2-13
NOTICE:
If your key seemsstuck in LOCK and you can’t turn it, be sure
it is all the way in. If it is, then turn the steering wheel left and
right while you turn the key hard. But turn the key onlywith
your hand. Using a tool to force it could break the key or the
ignition switch.If none of this works, then your vehicle needs
service.
Starting Your Engine
Engines start differently. The 8th digit of your Vehicle Identification
Number (VIN) shows the code letter or number for your engine. You will
find the VIN at the top left of your instrument panel. (See “Vehicle
Identification Number’’ in the Index.) Follow the proper steps to
start the
engine.
Move your shift lever to “P” (Park) or “N” (Neutral). Your engine won’t
start in any other position - that’s a safety feature. To restart when you’re
already moving, use“ N ’ (Neutral) only.
~~
NOTICE:
Don’t try to shift to “P” (Park) if your vehicle is moving.If you
do, you could damagethe transmission. Shift to “P”(Park) only
when your vehicle is stopped.
1 . Without pushing theaccelerator pedal, turn your ignition key to
START. When the engine starts, let go of the key. The idle speed will
go down as yourengine gets warm.
NOTICE:
Holding your key in START for longer than 15 seconds at a time
will cause your battery tobe drained much sooner. Andthe
excessive heat can damage your starter motor.
2. If it doesn’t start right away, hold your keyin START. If it doesn’t start
in three seconds, push the accelerator pedal about one-quarter of the
way down for 12 more seconds, or until it starts.
2- 14
3. If your engine still won’t start (or starts but then stops), it could be
flooded with too much gasoline. Try this:
Wait 15 seconds to let the starter motor cool down. Then push your
accelerator pedal all the way to the floor. Hold it there. Then, hold the
key in START for nomore than ten seconds.This clears the extra
gasoline from the engine.
If the engine still doesn’t start, wait another 15 seconds and do it all
again.
When the engine starts, let goof the key and the accelerator pedal.
NOTICE:
Your engine is designedto work with the electronics inyour
vehicle. If you add electrical parts oraccessories, you could
change the way the fuel injection system operates. Before adding
electrical equipment, check withyour dealer. If you don’t, your
engine might notperform properly.
If you ever have to have your vehicle towed, seethe part of this
manual that tells howto do it without damaging your vehicle.
See “Towing Your Vehicle”in the Index.
Fuel Regulator
If you have the 4.3L engine (VIN Code W), you will have afuel regulator
that shuts thefuel off when theengine reaches 5,600 rpm.
Driving Through Deep Standing Water
I NOTICE:
If you drive too quicklythrough deep puddles or standing water,
water can come in through your engine’s air intake andbadly
or standing
damage your engine. If you can’t avoid deep puddles
water, drive through them very slowly.
2-15
Engine Coolant Heater (Engine
Block Heater)
(Option)
1. Engine Coolant
Heater Strap
2. Engine Coolant
Heater Cap
In very cold weather,0°F (-1 8°C) or colder, the engine coolant heater can
help. You’ll geteasier starting and better fueleconomy during engine
warm-up. Usually, the coolant heater should be plugged in a minimum of
four hours prior tostarting your vehicle.
To use the coolant heater:
1. Turn off the engine.
2. Open the hood and unwrapthe electrical cord.
3. Plug it into a normal, grounded 110-volt outlet.
NOTICE:
After you’ve used the coolant heater, be sure to store theascord
it was before to keepit away from moving engine parts.
If you
don’t, it could be damaged.
2- 16
How long should you keepthe coolant heater plugged in? Theanswer
depends on the weather, the kind of oil you have, and some other things.
Instead of trying to list everything here, we ask that youcontact a GM
dealer in the area where you’ll be parking your vehicle.The dealer can give
you the best advice for that particular area.
Automatic Transmission
There are several
different positions for
your shift lever.
P (Park) - This locks your rear wheels. It’sthe best position to use
when you start your engine because your vehiclecan’t move easily.
Ensure the shift lever is fully in “P” (Park) range before starting the engine.
Your vehicle has a brake-transmission shift interlock. You have to fully
apply your regular brakes before you can shift from“P” (Park) when the
ignition key is in the RUN position. If you cannot shift out of “P’ (Park),
ease pressure on the shift lever -push the shift lever all the way into
“P’
(Park) as you maintain brakeapplication. Then move the shift lever into
the gear you wish. See “Shifting Out of ‘P’ (Park)”in this part.
R (Reverse)- Use this gear to back up.
NOTICE:
Shifting to“R” (Reverse) while your vehicle is movingforward
could damage your transmission. Shift
to “R” (Reverse) only
after yourvehicle is stopped.
To rock your vehicle back and forth to get
out of snow, ice or sand
without damaging your transmission, see “If You’reStuck: In Sand,
Mud, Ice or Snow” in the Index.
N (Neutral) - In this position, your engine doesn’t connect withthe
wheels. To restart when you’re already moving, use “ N ’ (Neutral) only.
Also, use “ N ’ (Neutral) when your vehicleis being towed.
I NOTICE:
Damage to your transmission caused
by shifting outof “P”
(Park) or“N” (Neutral) with the engine racingisn’t covered by
your warranty.
248
0
@
(Overdrive)
This position is fornormal driving. If you need more power for
passing, and you’re:
-
Going less than about 35 mph (56 ludh), push your accelerator
pedal about halfway down.
-
Going about 35 mph (56 km/h) or more, push the accelerator pedal
all the way down. You’ll shift down to the next gear and have
more power.
@ should not be used when towing a trailer, carrying a heavy load, or
driving on steep hills, Select“D” (Third Gear) when operating the
vehicle under any of these conditions.
0
D (Third Gear)- This is like @, but you never go into Overdrive.
You should use “D” (Third Gear) when towing a trailer, carrying a
heavy load or driving on steep hills.
0
2 (Second Gear) -This position gives you more power but lower fuel
economy. You can use “2” (Second Gear) on hills. It can help control
your speed as you go down steep mountain roads, but then you would
also want to use your brakes off and on.
If you manually select “2” (Second Gear), the transmission will drive
in second gear. You may use this feature forreducing torque to the rear
wheels when you are trying to start your vehicle from a stop on
slippery road surfaces.
0
1 (First Gear)- This position gives you even more power (but lower
fuel economy) than “2” (Second Gear). You can use it on very steep
hills, or indeep snow or mud. If the selector lever is put in “1” (First
Gear), the transmission won’t shift into “I” (First Gear) until the
vehicle is going slowly enough.
NOTICE:
If your rearwheels can’t rotate, don’ttry to drive. This might
happen if you were stuck invery deep sand or mud or were up
against a solid object. You could damage your transmission
or
transfer case or both.
Also, if you stop whengoing uphill, don’t hold your vehicle there
with only the acceleratorpedal. This could overheat and damage
the transmission. Use your brakes or shift into
“P” Park to hold
your vehicle in position on a hill.
Lacking Rear Axle
If you have this feature, your rear axle can give you additional traction on
snow, mud, ice, sand or gravel. It works like a standard axle most of the
time, but when one of the rear wheels hasno traction and the other does, the
loclung feature will allow the wheel with traction to move
the vehicle.
Parking Brake
--
To Set the Parking Brake:
r
I
Hold the regular brake
t
pedal down with your
right foot. Push down
the parkingbrake
pedal with yourleft
foot. If the ignition is
on, the brake system
warning light will
come on.
To Release the Parking Brake:
Hold theregular brake
pedal down. Pull the
brake release lever.
NOTICE:
Driving with the parking brake on can cause your rear brakes to
overheat. You may have to replace them, and
you could also
damage other partsof your vehicle.
If you are on a hill: See “Parking on Hills” in the Index. That section
shows how to turn your front wheels.
If you are towing a trailer and are parking
on any hill: See “Towing a
Trailer” in the Index. That section shows what to do first tokeep the trailer
from moving.
Shifting Into “P” (Park)
1. Hold the brake pedal down with your right foot and set the parking
brake.
2. Move the shift
lever into “ P ’
(Park) position
like this:
Pull the lever
toward you.
Move the
lever up as far
as itwill go.
3. Move the ignition key to LOCK
4. Remove the key and take it with you. If you can walk away from your
vehicle with the ignition key in your hand, your vehicle is in
“P’
(Park).
2-21
Leaving Your Vehicle With the Engine Running
If you have to leave your vehicle with the engine running, be sure your
vehicle is in “P7,(Park) and your parking brake is firmly set before you
leave it. After you’ve moved theshift lever into the “P’ (Park) position,
hold the regular brake pedal down. Then, see if you can movethe shift lever
away from “ P ’ (Park) without first pulling it toward you. If you can, it
(Park).
means that the shift lever wasn’t fully lockedinto
“ P 7
Shifting Outof “P” (Park)
Your vehicle has a brake-transmission shift interlock. You have to fully
apply your regular brake before you can shift from “ P ’ (Park) when the
ignition is in the RUN position. See “Automatic Transmission” in the Index.
If you cannot shift out of “P’ (Park), ease pressure on the shift lever - push
the shift lever all the wayinto “P” (Park) as you maintain brake application.
Then move the shift lever into the gear you want.
If you ever hold the brake pedal down but stillcan’t shift out of “P’
(Park),
try this:
I. Turn the key to OFF.
2. Apply and hold thebrake until the end of Step 4.
3. Shift to
“
N
7
(Neutral).
4. Start the vehicle and then shift to the drive gear you want.
5. Have the vehicle fixed as soon as you can.
2-22
Torque Lock
If you are parking on a hill and you don’t shift your transmission into
“P” (Park) properly, the weight of the vehicle may put too muchforce on
the parking pawl in the transmission. You may find it difficult to pull the
shift lever out of “ P ’ (Park). This is called “torque lock.” To prevent torque
lock, setthe parking brake and then shift into “P” (Park) properly before
you leave the driver’s seat. To find out how, see “Shifting Into ‘P’ (Park)” in
the Index.
When you are ready to drive, move the shift lever out of “P’ (Park)
BEFORE you release the parking brake.
If “torque lock” does occur, you may needto have another vehicle push
yours a littleuphill to take some of the pressure from the transmission, so
you can pull the shift lever out of “ P ’ (Park).
Parking Over Things ThatBurn
2-23
Engine Exhaust
Running Your Engine While You’re Parked
It’s better not to park with the engine running. But if you ever have to, here
are some things to know.
2-24
Follow the proper stepsto be sure your vehicle won’t move. See “Shifting
Into ‘P’ (Park)’’in the Index.
If you’re pulling a trailer,see “Towing a Trailer” in the Index.
2-25
All- Wheel Drive (Option)
If your vehicle has all-wheeldrive, your engine’s driving poweris sent to
all four wheels for extra traction.
This is like
four-wheel drive, but
there is no separate
lever or switch to
engage or disengage
the front axle. It is
fully automatic, and
adjusts itself as
needed for road
conditions.
Windows
To open yourmanual
windows, turn the
hand crank on each
door to raise or lower
your side door
windows.
I
I
2-26
If you have optional
power windows, the
controls are on each of
the front side doors.
The driver’s door has
a switch for the front
passenger window as
well. Your power
windows will not
move unless the
ignition has been
turned to RUN.
Swing-Out Windows
2-27
Hatch Release Switch
This switch is to the
left of the steering
column. It will release
the rearhatch.
The vehicle must be in “P’ (Park) or “ N ’ (Neutral) to release the hatchand
unlock the split-panel doors. The hatch will release withor without the key
in the ignition.
Horn
To sound the horn,
press the pads on the
steering wheel with
the horn symbols.
Tilt Wheel (Option)
A tilt steering wheel
allows you to adjust
the steering wheel
before you drive.
You can alsoraise it to the highest level to give your legs more room when
you exit and enter the vehicle.
To tilt the wheel, hold the steering wheel and pull the lever. Move the
steering wheel to a comfortable level, then release the lever to lock the
wheel in place.
2-29
The Turn Signal/Multifunction Lever
The lever on the left sideof the steering column includes your:
0
Turn Signal and Lane Change Indicator
0
Headlight High-Low Beam
Windshield Wipers
0
Windshield Washer
Cruise Control (Option)
Turn Signal and Lane Change Indicator
The turn signal has
two upward (for
Right) and two
downward (for Left)
positions. These
positions allow you to
signal a turn or a lane
change.
To signal a turn, move thelever all the way up or down. When the turn is
finished, the lever will return automatically.
2-30
A green arrow on the
instrument panel will
flash in the direction
of the turn or lane
change.
L
To signal a lane change, just raise or lower the lever until the green arrow
starts to flash. Hold it thereuntil you complete your lane change. The lever
will return by itself when you
release it.
As you signal a turn or a lane change, if the arrows don’t flash but just stay
on, a signal bulb may be burned out and other drivers won’t see your turn
signal.
If a bulb is burned out, replace it to help avoid an accident. If the green
arrows don’t go on at all when you signal turn,
a check the fuse (see “Fuses”
in the Index) and for burned-out bulbs.
If you have a trailer towing optionwith added wiring for the trailer lights, a
different turn signalflasher is used. With this flasher installed, the signal
indicator will flash even if a turn signal bulb is burned out. Check the front
and rear turn signal lights regularly to make sure they are working.
Operation of Lights
Although your vehicle’s lighting system(headlights, parking lights, fog
lamps, side marker lights and taillights) meets all applicable federal lighting
requirements, certain states and provinces may applytheir own lighting
regulations that may require special attention before youoperate these
lights.
For example, some jurisdictions may require that you operate your fog
lamps only when your lower beam headlights are also on, or that headlights
be turned on whenever you must use your windshield wipers. In addition,
most jurisdictions prohibit driving solely with parkinglights, especially at
dawn or dusk. It is recommended that you check with your ownstate or
provincial highway authority for applicable lighting regulations.
2-31
Headlight High-Low Beam
To change the
headlights from low
beam to high or high
to low, pull the turn
signal lever all the
way toward you. Then
release it.
When the high beams
are on, this blue
indicator light on the
instrument panel also
will be on.
Windshield Wipers
You control the
windshield wipers by
turning the band with
the wiper symbolon
it.
2 -32
For a single wiping cycle, turn the band to MIST. Hold it there until the
wipers start, then let go. The wipers will stop after one cycle. If you want
more cycles, hold the band on MIST longer.
You can set the wiper speed for a long or short delay between wipes. This
can be very useful in light rain or snow. Turn the band to choose the delay
time. The closer toLO, the shorter the delay.
For steady wiping at low speed, turn the band away from you to the LO
position. For high speed wiping, turn the band further, to HI. To stop the
wipers, move the band to the off symbol.
Remember that damaged wiper blades may prevent you from seeing well
enough to drivesafely. To avoid damage, be sure to clear ice and snow from
the wiper blades before using them. If they’re frozen to the windshield,
carefully loosen or thaw them. If your blades do become damaged, get new
blades or blade inserts.
Heavy snow or icecan overload your wipers. A circuit breaker will stop
them until the motor cools. Clear away snow or ice to prevent an overload.
Windshield Washer
At the top of the multifunction lever there’s a paddle marked with the
windshield washer symbol and PUSH. To spray washer fluid on the
windshield, push the paddle.
The wipers will clear the window and then either stop or return to your
preset speed.
Driving without washer fluid can be dangerous. A bad mud splash can block
your vision. You could hit another vehicle or go off the road. Check your
washer fluid level often.
2-33
NOTICE:
When using concentrated washer fluid,
follow the
manufacturer’s instructions for adding
water.
Don’t mix water with ready-to-use washer fluid. Water can
cause thesolution to freeze and damage your washer fluid
tank and other parts
of the washersystem. Also, water
doesn’t clean aswell as washerfluid.
Fill your washer fluid tankonly 3/4 full whenit’s very cold.
This allows for expansion,which could damage the tank
if it is
completely full.
Don’t use radiator antifreeze in your windshield
washer. It
can damage your washer system and paint.
Rear Window Wiper/Washer-Dutch Door
You control your rear
window wipedwasher
from a switch on your
instrument panel, just
left of your steering
column.
2-34
Press the top of the switch to thefirst position to turn on the wiper.
Press the top of the switch in all the way and hold to release the desired
amount of washer fluid. Thewipers will continue to work after you
release the switch.
Press the bottom of the switch (OFF) to turn the wiper off.
The rear windBw washer system uses thesame fluid tank as the windshield
washer system.
The rear window washer system will run
out of fluid before the windshield
washer system, indicating you need to check your fluid level and fill the
fluid tank.
Cruise Control (Option)
With Cruise Control, you can maintain a speed of about 25 mph (40 km/h)
or more without keeping yourfoot on the accelerator. This can really help
on long trips. Cruise Control does not work at speeds below about 25 mph
(40 km/h).
When you apply yourbrakes, the Cruise Control shuts off.
To Set Cruise Control
Move the Cruise
Control switch to
ON.
Get up to the speed you want.
Push in the set button at the end of the lever and release it.
Take your foot off the accelerator pedal.
2-36
To Resume a Set Speed
Suppose you set your Cruise Control at a desired speed and thenyou apply
the brake. This, of course, shuts off the Cruise Control. But you don’t need
to reset it. Once you’re going about 25 mph (40 km/h) or more, you can
move the Cruise Control switch from ON to R/A (Resume/Accelerate) and
hold it for abouthalf a second.
You’ll go right back up to your chosen speed and stay there.
Remember, if you hold the switch at R/A (Resume/Accelerate) longer than
half a second, the vehicle will keep going faster until you release the switch
or apply the brake. You could be startled and even lose control. So unless
you want to go faster, don’t hold theswitch at R/A (Resume/Accelerate).
2-37
To lncrease Speed WhileUsing Cruise Control
While your cruise control switch is in the ON position, here are two ways to
go to a higher speed. Here’s the first:
Use the accelerator pedal to get to the higher speed. Push the button at
the end of the lever, then release the button and the accelerator
pedal.
You’ll now cruise at the higherspeed.
Here’s the second:
Move the Cruise switch from ON to RIA (Resume/Accelerate). Hold it
there until you get upto the speed you want, and then release the
switch.
To increase your speed in very small amounts, quickly(less than half a
second) move the switch to RIA (Resume/Accelerate). Each time you
do this, your vehicle willgo about 1 mph ( I .6 km/h) faster.
2-38
To Reduce Speed While Using Cruise Control
Push in the
button at the end
of the lever until
you reach the
lower speed you
want, then release
it.
To slow down in very small amounts, push the button for less than half
a second. Each time you do this, you’ll go 1 mph (1.6 k d h ) slower.
Passing Another Vehicle While Using Cruise Control
Use the accelerator pedal to increase your speed. When you take your foot
off the pedal, your vehicle will slow down to the Cruise Control speed you
set earlier.
Using Cruise Control on Hills
How well your Cruise Control will work on hills depends u9;oil YOU? speed,
load, and the steepness of the hills. When going upsteep hills, you may
want to step on the accelerator pedal to maintain your speed. When going
downhill, you may have to brake or shift to a lower gear to keep your speed
down. Of course, applying the brake takes youout of Cruise Control. Many
drivers find this to be too much trouble and don’t use Cruise Control on
steep hills.
2-39
To Get Out of Cruise Control
There are two ways to turn off the Cruise Control:
Move the Cruise
switch to OFF.
To Erase Speed Memory
When you turn off the Cruise Control or the ignition, your Cruise Control
set speed memory is erased.
2-40
1
Lights
1
Your light switches
are onthe left side of
the instrument panel
above the vent.
Press the top light switch to the left to turn on:
Parking Lights
0
Taillights
License Plate Lights
Instrument Panel Lights
Press the bottom light switch to the left to turn on the headlights, together
with:
Parking Lights
0
Taillights
License Plate Lights
Instrument Panel Lights
Press OFF to turn off all your lights.
Turn the dialabove thelight switches to the left to dim your instrument
panel lights.
Turn the dialto the right to brighten your instrument panel lights. If you
turn the dial all the way to the right until it clicks, your interior lights will
come on.
You can switch your headlights from high to low beam by pullingon the
multifunction lever on the left of the steering column.
A circuit breaker protects your headlights. If you have an electrical
overload, your headlights will flicker on and off. Have your headlight
wiring checked right away if this happens.
2-41
Fog Lamps
Use your optional fog
lamps for better vision
in foggy or misty
conditions. Your
parking lights or
headlights on low
beam must beon or
your fog lamps won’t
work.
I
Your fog lamp switch
is in the center of the
instrument panel
Slide the right side of the switchto turn the fog lamps on, and the left side
of the switch to turn themoff. A warning light in the switch will remind you
that your fog lights are on.
Remember, fog lamps alone will not give off as much light as your
headlights.
Never use your fog lamps in the dark without turning
on your headlights.
Fog lamps will go off whenever your high beamlights come on. When the
high beams go off, the fog lamps will come on again.
2-42
Daytime Running Lights(DRL) Indicator Light
(Canada Only)
If your vehicle was first sold, when new, inCanada, you will have this lighIt
on the instrument panel. It goeson whenever the Daytime Running Lights
are on, the ignition is on, the headlamp switch is off, and the parking brake
is released.
Daytime Running Lights (CanadaOnly)
The Canadian Federal Government has decided that “Daytime Running
Lights” (DRL) is a useful feature, in that DRL can make your vehicle more
visible to pedestrians and other drivers during daylight hours. DRL is
required on new vehicles sold in Canada.
The high beam headlights will come on at reduced brightness in daylight
when:
The ignition is on,
0
The headlight switch is off, and
The parking brake is released.
When you turn on your headlights, the DRL will switch off and the exterior
lights will come on. When you turn off the headlights, the exterior lights
will go outand the high beams will change to the reduced brightness of
DRL again.
The DRL indicator light on the instrument panel will go on whenever the
DRL is on. Thislight means that only the DRL is on.When you turn on
your exterior lights, this light will go out.
If the DRL indicator light is on at dawn or dusk, it is a reminder to turn on
your headlights.
Of course, you may still turnon the headlights any time you needto.
To idle your vehicle with the DRL off, set the parking brake. The DRL will
stay off until you release the parking brake.
2-43
Headlights-On Reminder
If you have this option, a reminder tone will sound when yourheadlights are
turned on and your ignition is in OFF, LOCK or ACC. To turn the tone off,
press the OFF switch.
Dome Lights
The dome lights may
come on when you
open any of the doors.
You can also turn on
the dome lights by
turning the dimmer
dial to the right until it
clicks.
Reading Lights
I
You may have the
optional reading lights
next to the dome
lights. Turn the lights
on and off by pressing
the switch next to the
light.
You can adjust the lights to any desired position by rotating the lamp and
they will work whenthe ignition is on or off. Be sure to turn the lights off
before you leave the vehicle.
2-44
Interior Lights Override Switch
.
position, your interior
lights will work as
usual.
'.
,.
, '
If the switch is OFF, the interior lights willnot come on when anyof the
vehicle doors are open. It is on the instrument panel above the radio.
If you have the optional reading lamps, they will stilloperate if the switch is
in the OFF position.
Mirrors
Inside Mirror
2-45
You can also adjust
the mirror for day or
night driving. Press
the tab forward (away
from you) for day
driving. Pull the tab
back (towards you)
for night driving.
I
Outside Mirrors
'
4djust your outside
mirrors by hand so
you canjust see the
side of your vehicle.
t
I
Your outside mirrors can also be folded in or out. Push the mirror towards
the vehicle to move it in. After pushing the mirror out, adjustment will be
maintained.
Some vehicles come
with the optional
remote control switch
for adjusting the
outside mirror. The
switch is on the
instrument panel
above the radio.
2-46
1
To move a mirror, slide the switch to L for the driver’s side mirror or to R
for thepassenger’s side mirror. Then, press the four-way pad to move the
mirror in the desired direction. To make sure you do not accidentally move a
mirror, slide the switch to the middle (off) position.
Convex Outside Mirror
Your right side mirror is convex.
A convex mirror’s surface is curved so you can see more from the driver’s
seat.
Sun VisorsNanity Mirrors
To block out glare, you can swing down the visors. You can also swing them
from side to side.
2-47
Cigarette Lighter/Ashtrays
The optional cigarette
lighter is on the left of
the engine cover
console. To use the
lighter, press itin all
the way andlet go.
When it's ready, it will
pop back by itself.
Don't hold a cigarette lighter in with yourhand while it isheating. If you
do, it won't be able to back awayfrom the heating element whenit's ready.
That can make it overheat, damaging the lighter and the heating element.
To remove the front
ashtray, pull on the
front of it while
pressing on the iafier
tab.
2-48
1
k
To remove the smaller
ashtrays on each
sidewall, press down
on the tabsinside and
pull out.
Don’t put papers and other things that burn into your ashtrays. If you do,
cigarettes or other smoking materials could set them on fire, causing
damage.
Assist Handles
Assist handles are located on the inside front and center vehicle pillars.
Grasp them as
necessary to help enter
and exit your vehicle.
If you have the
optional rear hatch
and split-panel doors,
you will also have an
assist handle on the
inside hatch.
2-49
Storage Compartments
Your front storage
compartment is at the
center of the engine
cover. To open the
compartment, press
the two tabs together
and pull.
If you have an
optional sliding tray
storage compartment,
it is under thefront
passenger seat. To
open the
compartment, slide the
latch in thetop handle
and pullthe tray
forward.
To open youroptional
beverage cooler,lift
up on the armrest. The
cooler has a drain
system that drains off
as much fluid as
necessary. It also has
an ashtray anda
cupholder for your
convenience.
2-50
To open youroptional
rear storage
compartment, pull up
on the handle to
remove the cover. To
replace the cover, fit
the notches on the
cover into the storage
compartment slots and
push down.
Center Overhead Console
The optional roof
console has two
storage compartments.
To open the
compartments, push
up and slide the door
forward. To close the
compartments, slide
the door back. Use the
straps to secure items.
lnstrument Cluster
Your instrument cluster is designed to let you know at a glance how your
vehicle is running. You’ll know howfast you’re going, about how much
fuel remains, and many other things you’ll need to knowto drive safely and
economically.
The optional digital cluster on your vehicle’sinstrument panel is displayed
electronically and will tell you everything the standard cluster does.
The digital cluster will give readings in either English or Metric. To switch
from English to Metric, just press the E M button.
2-51
Instrument Panel
3
4
13
1.
2.
3.
4.
5 27 7 8 9 6 1 0 2 7
27
14
Light Switches
Dimmer Switch
Instrument Cluster
Gearshift Lever
5 . Air ConditionerLHeater
6. Fog Light Switch
7. Remote Outside Mirror Switch
8. Rear Heater Switch
9. Rear N C Switch
10. Interior Light Override Switch
11. Audio System
12. Convenience Tray
13. Glove Box
14.Ashtray
15. Cigarette Lighter
16. Hood Release Handle
17. Hazard Warning Flasher
18. Ignition Switch
19. Horn
20. Brake Release Handle
2 1. Multifunction Lever
22. Cruise Control
23. Tilt Wheel Lever
24. Rear Wiperwasher Switch
25. Hatch Release Switch
26. Rear Window Defogger Switch
27. Vent
2-52
Speedometer and Odometer
Standard Cluster
Digital Cluster
H
Your speedometer lets you see your speed in both miles per hour(mph) and
kilometers per hour (kmdh). Yourodometer shows how far your vehicle has
been driven, in either miles (used in the U.S.) or kilometers (used in
Canada).
Tamper Resistant Odometer
Cluster
Digital
Cluster
Standard
Your odometer is tamper resistant. The odometer will show silver lines
between the numbersif someone tries to turn it back.
The digital odometer will read ERROR if someone tries to turn it back.
You may wonder what happensif your vehicle needs a newodometer
installed. If the new one canbe setto the mileage totalof the old odometer,
then it must be. But if it can’t, then it’s set at zero, and a label mustputbe
on the dhver’s door to show theold mileage reading when the new
odometer was installed.
Trip Odometer
Standard Cluster
Digital Cluster
The trip odometer can tell you how far your vehicle has been drivensince
you last set thetrip odometer to zero.
To reset the trip odometer on the standard cluster, press the button near the
readout.
The trip odometer on the digital willappear in place of your regular
odometer when you press the TRIP button.
To reset thetrip odometer on the digital cluster, press theRESET button. To
change back to the regular odometer, press the
TRIP button again.
2-54
Warning Lights, Gages and Indicators
This section describes the warning lights and gages that may be on your
vehicle. The pictures will help you locate them.
Warning lights and gages can signal that something is wrong before it
becomes serious enough to cause an expensive repair or replacement.
Paying attention to your warning lights and gages could also saveyou or
others from injury.
Warning lights go on when there may be or is a problem with one of your
vehicle’s functions. As you will see in the details on the next few pages,
some warning lights come on briefly when you turnthe ignition key just to
let you know they’re working. If you are familiar with this section, you
should not be alarmed when this happens.
Gages can indicate when there may be or isa problem with one of your
vehicle’s functions. Often gages and warning lights work together tolet you
know when there’sa problem with your vehicle.
When one of the warning lights comes on and stays on when you are
driving, or when one of the gages shows there may be a problem, check the
section that tells you whatto doabout it. Please follow the manual’s advice.
Waiting to do repairs can be costly - and even dangerous. So please get to
know your warning lights and gages. They’re a big help.
Brake System Warning Light
Digital Cluster
Standard Cluster
Your vehicle’s hydraulic brake system is divided into two parts. If one part
isn’t working, the other part can still work and stop you. For good braking,
though, you need both parts working well.
2-55
If the warning lightcomes on, there could bea brake problem. Have your
brake system inspectedright away.
This light should come on as you start the vehicle.Tf it doesn’t come on
then, have it fixed so it will be ready to warn you if there’s a problem.
If the light comes on while you are driving, pulloff the road andstop
carefully. You may notice that the pedal is harder
to push. Or, the pedal may
go closer to the floor. It may take longer to stop.
If the light is stillon, have
the vehicle towedfor service. (See “TowingYour Vehicle” in the Index.)
The brake system warninglight will also come on when you set your
parking brake, and it will stay on if your parking brake doesn’t release fully.
fully released, it means you havea
If it stays on after your parking brake is
brake problem.
Anti-Lock Brake System Warning Light
Standard Cluster
Digital Cluster
With anti-lock, this light will go on when you start your engine andmay
stay on for several seconds. That’s normal. If the light doesn’t comeon,
have it fixedso it will be ready to warn you if there is a problem.
2-56
If the light stays on, orcomes on when you’re driving, your vehicle needs
service. If the regular brake system warninglight isn’t on, you still have
brakes, but you don’t have anti-lock brakes. If the regular brake system
warning light is also on, you don’t have anti-lock brakes and there’s a
problem with your regular brakes. See “Brake System Warning Light”
earlier in this part.
Air Bag System Light
There is an air bag
readiness light on the
instrument panel,
which shows AIR
BAG. The system
checks for electrical
malfunctions, and the
light tells you if there
is a problem.
You will see this light flash for afew seconds when you turn your ignition
to RUN or START. Then the light should go out, which means the system is
ready.
Remember, if the air bag readiness light doesn’t come on when you start
your vehicle, or stays on, or comes on when you are driving, your air bag
system may not work properly.Have your vehicle serviced right away.
Indicator Lights
Indicator lights go on when you use your turn signals, change from low
beam headlights to high beams, or when you use your hazard flashers. The
next few pages will also tell you about the indicator lights on your vehicle
and help youlocate them.
2-57
Malfunction lndicator Lamp
(SERVlCE ENGINE SOON)
This light is on the
right-hand side of
your standard cluster.
If you have the digital
cluster, it is on the
left-hand side.
A computer monitors operation of your fuel, ignition and emissioncontrol
systems. This light should come on when the ignitionis on, but the engine is
not running, as a check to show you it is working. If it does not comeon at
all, have it fixed right away.If it stays on, or it comes on while you are
driving, the computer is indicating that you havea problem. You should
take your vehicle infor service soon.
I NOTICE:
If you keep driving your vehicle with this light on, after a while
the emission controls won’t work
as well, your fuel economy
won’t be as good and your engine may notasrun
smoothly. This
could lead to costly repairs not covered by your warranty.
2-58
Charging System Light
Standard Cluster
Digital Cluster
I
The charging system light will come on briefly when youturn the ignition
on, but the engine isnot running, as a check to show you the light is
working. Then it should go out once theengine is running. If it stays on, or
comes on while you are driving, you may have a problem with the electrical
charging system. It could indicate that you have a loose accessory drive belt,
or another electrical problem. Have it checked right away. Driving while
this light is on could drain your battery.
The charging system light is on the left bottom corner of your standard
cluster. It is part of the digital cluster voltmeter.
If you must drive a short distance with the light on, be certain to turn off all
your accessories, such as the radio and heatedair conditioner.
Daytime Running Lights(DRL) Indicator Light
(Canadian Vehicles Only)
The DIU indicator is
on whenever the
ignition and the
headlight switch and
parking brake are off.
For more details about
DlU,see “Lights” in
this part.
L
The DRL indicator light is on the lower left of the standard cluster. If you
have the digital cluster, it is on the top left.
Headlight High Beam Indicator Light
I
The high beam
indicator is on
whenever youuse
your high beam
headlights. For more
details, see “Headlight
High-Low Beam
Changer” in this part.
The light is on the left hand side of the standard cluster. If youhave the
digital cluster, it is on the top of the cluster.
2-60
Turn Signal and Lane Change Indicator
I The turn signal
indicator is a light
with two green
arrows. It comes on
whenever you signal a
turn or lane change.
i
L ‘
Turn signal arrows are at the top of the standard and digital clusters. For
more details, see “Turn and Lane Change Signal” in this part.
Gages
Fuel Gage
Standard Cluster
Digital Cluster
The fuel gage tells you how much fuel you haveremaining when the
ignition is on. When the gage first indicates empty you still have a little fuel
left, but you should get more fuel assoon as possible.
A box around the fuelgage symbol on the digital cluster will begin to flash
when your tank is 1/8 full or less.
Here are things some owners ask about. Noneof these indicate a problem
with your fuel gage:
At the gas station, the gas pump shuts off before the gage reads full.
The fuel tank will take either a little moreor a little less fuelto fill up
than the gage shows.
The gage moves a little when you turn corner
a
or speed up.
The gage doesn’t go back to empty when you turn offthe ignition.
For your fuel tank capacity,see the Index under “Fluid Capacities.”
Oil Pressure Gage
Digital
Cluster
Standard
Cluster
a
I
I
I
The oil pressure gage shows the engine oil pressure in psi (pounds per
square inch) when theengine is running. Canadian vehiclesindicate
pressure in kPa (kilopascals). Oil pressure may vary with
engine speed,
outside temperature and oil viscosity, but readings
above the low pressure
zone indicate the normal operating range.
A reading in the low pressure zone may be causedby a dangerously lowoil
level or other problems causing low oil pressure.
On the digital cluster, a box aroundthe oil pressure symbol will beginto
flash when the oil pressure is low.
2-62
NOTICE:
Damage to your engine from neglected oil problems can be
costly and is not covered
by your warranty.
Engine Coolant Temperature Gage
Cluster
Standard
Digital Cluster
If you have the Standard Cluster, you have a gage that shows the engine
coolant temperature. If the gage pointer moves to the “H” (red) side, your
engine is too hot!
It means that your engine coolant has overheated. If you have been
operating your vehicle under normal driving conditions, you should pulloff
the road, stop your vehicle and turn off the engine as soon aspossible.
If you have a digital cluster, a box around the temperature symbol will also
flash when yourengine is too hot.
2-63
HOT COOLANT CANBURN YOU BADLY!
In “Problems on the Road,’’this manual shows what to do. See “Engine
Overheating” in the Index.
Voltmeter
Standard Cluster
Cluster
Digital
When your engine is not running, but the ignitionis on (in the RUN
position), the gage shows your battery’s state of charge in DC volts. When
the ignition is running, the gage shows the condition of the charging system.
Readings between the low and high warning zones indicate the normal
operating range.
Readings in either warning zone indicate a possible problem inthe electrical
system.
On the digital cluster, a box around the voltmeter symbolwill begin the
flash when the charging system needs service.
You can only drive for a short time with the readings in either warning zone.
If you must drive, turnoff all unnecessary accessories.
2-64
Luggage Carrier
If you have the
luggage carrier, you
can load things ontop
of your vehicle. The
luggage carrier has
slats attached to the
roof, side rails, and
tiedowns.
NOTICE:
Loading cargo that weighs more than 200 pounds (91 kg) onthe
luggage carrier may damage your vehicle. When youcarry large
things, never let them hang over the rear orthe sides of your
vehicle. Load your cargo so that it rests on the slats and does not
scratch or damage the vehicle. Put the cargo against the side
rails andfasten it securely to theluggage carrier. Put themain
you can.
weight as far forward as
Don’t exceed the maximum vehicle capacity when loading your vehicle. For
more information on vehicle capacity and loading, see “Loading Your
Vehicle’’ in the Index.
To prevent damage or loss of cargo as you’re driving, check now and then to
make sure the luggage carrier and cargo are still securely fastened.
2- 65
Trailer Wiring Harness
If you have the optional trailering package, your vehicle will have a 7-wire
harness.
The 7-wire harness is stored on the right side of the van near the rear wheel
well. This harness has a 30 amp battery feed wire andno connector, and
should be wired by a qualified service person. Attach the harness tothe
trailer, then tape or strap it to your vehicle’sframe rail. Be sure you leave it
loose enough so the wiring doesn’t bend or break, but not so loose that it
drags on the ground.
The harness must be routed out of your vehicle between the rear door and
the floor, with enoughof the harness left on both sides so that the trailer or
the body won’t pullit.
Store theharness in its original place. Wrap the harness together and tie it
neatly so it won’t be damaged.
2-66
Notes
Notes
Comfort Controls& Audio Systems
Section
.
In this section you’ll find out how to operate the comfort control and audio
systems offered with your vehicle. Be sure to read about the particular
system supplied with your vehicle.
For explanation of vehicle symbolsin this section. refer to “Vehicle
Symbols” in the Introduction
.
Comfort Control
Flow-Through Ventilation System . . . . . . . . . . . . . . . . . . . . . . . . . 3-2
Heating System . . . . . . . . . . . . . . . . . . . . . . . . . . . . . . . . . . . . . . . . . . 3-4
Heating/Air Conditioning System . . . . . . . . . . . . . . . . . . . . . . . . . . .
3-5
RearHeater . . . . . . . . . . . . . . . . . . . . . . . . . . . . . . . . . . . . . . . . . . . . . 3-6
Rear Air Conditioning . . . . . . . . . . . . . . . . . . . . . . . . . . . . . . . . . . . .3-6
Rear Window Defogger . . . . . . . . . . . . . . . . . . . . . . . . . . . . . . . . . . . 3-7
Engine Coolant Heater . . . . . . . . . . . . . . . . . . . . . . . . . . . . . . . . . . . . . . . 3-8
3-8
Audio Systems . . . . . . . . . . . . . . . . . . . . . . . . . . . . . . . . . . . . . . . . . . . . .
FMStereo . . . . . . . . . . . . . . . . . . . . . . . . . . . . . . . . . . . . . . . . . . . . . .
3-8
AM . . . . . . . . . . . . . . . . . . . . . . . . . . . . . . . . . . . . . . . . . . . . . . . . . . . 3-8
AMStereo . . . . . . . . . . . . . . . . . . . . . . . . . . . . . . . . . . . . . . . . . . . . . . 3-8
How to Operate Your ETR’ AM Radio . . . . . . . . . . . . . . . . . . . . . . . 3-9
How to Operate Your ETR’ AM-FM
Stereo Audio System . . . . . 3-11
How to Operate Your ETR@AM-FM Stereo Audio
Cassette System . . . . . . . . . . . . . . . . . . . . . . . . . . . . . . . . . . . . . .
3-13
How to Operate Your ETR@AM-FM Stereo Audio Cassette System
With Equalizer . . . . . . . . . . . . . . . . . . . . . . . . . . . . . . . . . . . . . . . 3-16
Care of Your Cassette Tape Player ..........................
3-19
How to Operate Your ETR@AM-EM Stereo Audio 20
Compact Disc (CD) System ............................
3-20
Care of Your Compact Discs . . . . . . . . . . . . . . . . . . . . . . . . . . . . . .
3-25
Fixed Mast Antenna . . . . . . . . . . . . . . . . . . . . . . . . . . . . . . . . . . . . . 3-25
3-1
Comfort Controls
Flow-Through Ventilation System
Your vehicle’s flow-through ventilation systemsupplies outside air to the
inside of your vehicle when it is moving. With the side
windows closed, air
will flow into the front air inlet grilles at the base of the windshield, through
the vehicle and out the rear air exhaust valves. Outside air willalso enter the
vehicle when the heater or theair conditioning fan is running.
Ventilation Tips
Keep the hood and front air inlet free of ice, snow, or any other
obstruction (such as leaves).The heater and defroster will work far
better, reducing the chance of fogging the inside of your windows.
When you enter a vehicle in cold weather, turn the blower
fan to HIGH
for afew moments before driving off. This helps clear the intake ducts
of snow and moisture, and reduces
the change of fogging the inside of
your windows.
0
Keep the air path underthe front seats clear of objects. This helps air to
circulate throughout your vehicle.
3-2
Air Vents
I You will find air vents
in the center and on
the sides of your
instrument panel.
You can move the
vents to direct the
flow of air, or close
the vents altogether.
When you close a
vent, it will increase
the flow of air coming
out of any vents that
are open.
If your vehicle doesn’t have air conditioning, there is an air vent in the
right-hand kick panel below the instrument panel. The vent has a handle to
open and close it.
3-3
Heating System
I
If your vehicledoes
not haveair
conditioning, this is
what your heating
system willlook like.
Fan Lever
The top lever has four positions.To increase the air flow, move thelever
toward HIGH. To decrease the air flow, moveit toward OFF.
Temperature Lever
The left lever lets you select the temperature of the air flowing
into your
vehicle. Move the lever upfor warmer air. Move the lever down
for cooler
air.
Function Lever
The right lever can be moved to five different functions.
DEFROST: The setting with thedefrost symbol operates the defroster.
Most of the air comes out near the windshield, withsome going to the floor
vents and front side windows. Use this when youget fog or iceon the
windshield.
HTR (Heater): Most of theair comes out near the floor.The rest comes out
from the defroster vents under the windshield and at the front
side windows.
This is best for cold weather.
VENT: The air comes out at the vents onyour instrument panel.
BLEND (Position1): With this setting, the heated outside
air comes out
between the heater vents and defroster vents.
The lever can be positioned
anywhere betweento adjust proprotion of air coming through. Adjustthe
temperature lever for warmer or cooler air.
BLEND (Position2): With this setting, the heated outside aircomes out
between the vents and heater vents.
The lever can be positioned anywhere
between to adjust proprotion of air coming through. Adjust the temperature
lever for warmer or cooler air.
3-4
Heating/Air Conditioning System
If your vehicle has air conditioning, your heating/air conditioning system
will look like this.
Before using your vehicle’s air conditioning, open the windowsto clear the
vehicle of hot air. Close the windows when using thesystem.
Fan Lever
The top lever has five positions. To increase the air flow, move the lever
toward HIGH. To decrease the air flow, movethe lever toward OFF.
Temperature Lever
The left lever lets you select the temperature of the air flowing into your
vehicle. Move the lever up for warmer air. Move the lever down for cooler
air.
Function Lever
The right lever can be moved to four different functions.
DEFROST The setting with the defrost symbol operates the defroster.
Most of the air comes out near the windshield, with some going to the floor
vents and side window defrost vents. Use this when youget fog or ice on
the windshield.
BLEND: With this setting, the heated outside air comes out between the
heater vents and defroster vents, with some air coming through the side
vents. Adjust the temperature lever for warmer or cooler air.
HTR (Heater): Most of the air comes out near the floor. The rest comes out
from the defroster vents under thewindshield and at the front side windows.
This is best for coldweather.
VENT The air comes out at the vents on your instrument panel. The air
conditioner will not run. Adjust the temperature lever for warmer or cooler
air.
3-5
BI-LEV A/C: With this, outside air comes out through the heater floor vent
and the instrument panel vents.If you move your temperature controllever
between cold and hot,cooler air will come out of the upper vents while
warmer air comes out of the floor vent. This setting is useful in cool weather
with bright sunlight.
NORM A/C: This setting cools the outside air. If you first used MAX A/C,
use NORM A/C as soon asthe vehicle has cooled down,so outside air will
be going through yourvehicle.
MAX A/C: This cools the air the fastest. Move the other lever allthe way to
Cold. MAX A/C lets in only a little air from the outside. You can use MAX
A/C at first when it's really hot outside and you need to cool off quickly.
When the airconditioning, defrost or Blend is on, you may notice a slight
increase or decrease inengine speed, due to compressoroperation.
You may have rear air
conditioning. The rear
air conditioning
switch is located
above theradio at the
top of the instrument
panel. Slide the lever
toward HI for cooler
air in the reararea.
Slide the lever to OFF
to turn the system off.
3-6
If your vehicle has rear air conditioning, setting it on LOW may enhance
front N C performance by allowing trapped refrigerant in rear lines to
circulate.
The system will only send cooled airif the frontsystem is on. It can still be
used to recirculate air, even if thefront system is off.
Before using therear air conditioning, open the windows to clear the vehicle
of hot air. Close the windows when using the system.
Rear Window Defogger
If your vehicle has this option the rear window will havelines running
across the glass. These lines heat your window.
For best results, clear the window of as much snow or ice as possible before
using the rear window defogger.
To turn on the rear
window defogger, find
the switch marked
REAR DEFOG on
your instrument panel
to the left of the
steering column. Press
the top of this switch
until the light in the
switch comes on, then
release it .
The rear window defogger will only work when the ignition switchis in the
RUN position.
You can turn the defogger off at anytime by pressing the bottom of the
switch. The defogger will shut itself offafter several minutes so that the
glass does not get too hot. If the window still isn’t clear, turn thedefogger
on again.
NOTICE:
Scraping the inside of your rear window could cut and damage
the defogger. Your warranty wouldnot cover this damage. And
don’t put decals there, you might have to scrape them off.
3-7
Engine Coolant Heater
If you use theoptional engine coolant heater before starting your engine,
your heating system will produce warmer
air faster to heat the passenger
compartment in cold weather. See “Engine Coolant Heater”in the Index.
Audio Systems
Your Delco@audio system has been designed to
operate easily and give
of it, if
years of listening pleasure. But you will get the most enjoyment out
you acquaint yourself with it first. Find out what yourDelco@system can
do and how to operate all its controls, to be sure you’re getting the mostout
of the advanced engineering that wentinto it.
Be aware that hearing damage from loud noise is almost undetectable until
it is too late. Your hearing can adapt to higher volumes
of sound. Sound that
seems normal can be loud and harmful
to your hearing. Takeprecautions by
adjusting the volume control on your radio toa safe sound level before your
hearing adapts to it.
To help avoid hearing lossor damage:
Adjust the volume control to the lowest setting.
0
Increase volume slowly until you hear comfortably and clearly.
FM Stereo
FM stereo will give you the best sound. But
FM signals will reach only
about 10 to 40 miles (16 to 65 km). Tall buildings or hills can interfere with
FM signals, causing the sound tocome and go.
The range for most AM stations is greater than for FM, especiallyat night.
The longer range, however, can cause stations to interfere with each other.
AM can pick upnoise from things like storms and powerlines. Try reducing
the treble to reduce this noiseif you ever get it.
AM Stereo
This means the Delco@system can receive C-QUAM@stereo broadcasts.
Many AM stations around the country useC-QUAM’ to produce stereo,
though some do not. (C-QUAM@ is a registered trademark of Motorola,
Inc.) If your Delco@system can get C-QUAM@, your
“STEREO” light will
come on when you’re receivingit.
3-8
NOTICE:
Before you add any sound equipment to your
vehicle - like a
tape player, CB radio, mobile telephoneor two-way radio - be
sure you can add whatyou want. If you can, it’s very important
to do it properly. Added sound equipment may interfere with the
operation of your vehicle’s engine, Delco@ radio or other
systems, and even damage them. And, your
vehicle’s systems
may interfere with the operation
of sound equipment that has
been added improperly.
So, before adding sound equipment, check
with your dealer and
be sure to check Federal rules covering
mobile radio and
telephone units.
How to Operate Your ET@ AM Radio
R
.. .
... .
.
This part tells you how your ETR@AM radio works.
The Upper Knob
The upper knob does these three things:
0
It controls the volume. The VOL knob increases volume when rotated
to the right.
It lets you see what station you have. (When the radio is on, push the
knob to display the station.)
0
It tells you the time. (When the ignition is off, push the RECALL knob
to display the time.)
BAL (Balance)
The BAL control behind the upper knob moves the soundbetween the left
and right speakers.
The Lower Knob
Turn thelower knob to choose radio stations.
Tone Levers
Two levers control the tone
of your radio.
BASS -Slide this lever up to increase the bass response.
TREBLE -Slide this lever up to increase the treble response.
Adjust this lever to give a pleasing sound. If a station is weak and noisy,
move TREBLE down to reduce the noise.
PWR (Power)
The PWR button turns your system on and off.
Pushbuttons
The fourpushbuttons let you returnto favorite stations. To set the
pushbuttons, just:
Tune in the station.
0
Push SET. (SET appears in the VF display for a few seconds.)
Within 5 seconds, push one of the four pushbuttons. Whenever you
push that button, the preset station willreturn.
NOTE:
Up to three additionalstations may be preset by pressing two adjoining
buttons at the same time.
0 Tune in the station.
0 Push SET. (SET appears in the VF display for a few seconds.)
0 Within 5 seconds, push any two adjoining buttons at the same time.
(The station will return when thesame two buttons are pressed again.)
Clock
To set the clock, just:
Push SET.
0
Within 5 seconds, push and hold HRS (time will be displayed) until the
correct hour appears.
0
Push and hold MINS until the correct minute appears.
To display the clock with the ignition off, push the upper knob.The time
will be displayed for a few seconds.
3-10
How to Operate Your ETW
AM-FM Stereo Audio System
This part tells you how yourETR@AM-FM stereo audio system works:
The Upper Knob
The upper knob does these three things:
It controls the volume. The VOL knob increases volume when rotated
to the right.
It lets you see what station you have. (When the radio is on, push the
knob to display the station.)
It tells you the time. (When the ignition is off, push the RECALL knob
to display the time.)
The control behind the upper knob moves thesound between your left and
right speakers.
The Lower Knob
Turn the lower knob tochoose radio stations. Push it to get AM or FM
The control behind the lower knob moves the sound betweenyour front and
rear speakers.
Tone Levers
These two levers control the toneof your radio.
BASS -Slide this lever up to increase the bass response.
TREBLE -Slide this lever up to increase the treble response.
Adjust this lever to give a pleasing sound. If a station is weak and noisy,
move TREBLE down to reducethe noise.
PWR (Power)
The PWR button turns your systemon and off.
3-11
Pushbuttons
The four pushbuttons let p -return
~ to favorite stations.
You can set the pushbuttons for up to eight favorite stations (4 AM and
4 FM). Just:
Tune in the station.
0
Push SET. (SETappears in the VF display for afew seconds.)
0
Within 5 seconds, push one of the four pushbuttons to store the station.
Whenever you push thatbutton, the preset station will return.
Repeat these steps for each pushbutton.
NOTE:
You can preset 3 more stations on each band by pushinga pair of buttons
next to each other at the same time. Just:
0
Tune in the station.
0
Push SET. (SETappears in the VF display for a few seconds.)
0
Within 5 seconds, push two buttons next to each otherat the same time.
Whenever you push thatpair of buttons, the preset station will
return.
Repeat these stepsfor each pair of buttons.
SCAN Button
When you pushthis, the radio willgo to the next station and stay therea
few seconds. Then it will go to the next station and pause, and keep doing
that. Press SCAN again to stopscanning.
SEEK Button
This chooses station also, but it doesn’t keepmoving as SCAN does. When
you push SEEK the radio goes to the nextstation and stays there.
Clock
To set the clock, just:
0
Push SET.
0
Within 5 seconds, push and holdSCAN until the correct hour appears.
0
Press and hold SEEK until the correct minute appears.
To display the clock withthe ignition off, push the upper knob. The time
will be displayed for afew seconds.
3-12
How to Operate Your E T P
AM-FM Stereo Audio Cassette System
I.. .
This part tells you how your ETR@AM-FM stereo audio cassette sound
system works.
The Upper Knob
The upper knob does these four things:
0
It controls the volume. The VOL knob increases volume with to the
right.
0
It lets you know what station you're listening to. (When the radio is on,
push the knob to displaythe station.)
0
It tells you the time. (When the ignition is off, push the knob to display
the time.)
0
It allows you to hear the other side of the tape. (Press knob while the
cassette is playing.)
The control behind the upper knob moves the sound between your left and
right speakers.
The Lower Knob
Turn the lower knob tochoose radio stations. Push it to get AM or FM. The
control behind the lower knob moves the sound between your front and rear
speakers.
Tone Levers
These two levers control the toneof your radio.
BASS -Slide this lever up to increase the bass response.
TREBLE -Slide this lever up to increase the treble response.
Adjust this lever to give a pleasing sound. If a station is weak and noisy,
move TREBLE down to reduce the noise.
PWR (Power)
The PWR button turns your system on and
off.
DNR
This is the Dynamic Noise Reduction button. It helpsremove background
hiss noise from the radio or tape player. You may want to leave it pushed in
all the time.
@
DNR@is a registered trademark of National Semiconductor Corporation.
Pushbuttons
The fourpushbuttons let you return to
favorite stations.
You can set the pushbuttons for up to eightfavorite stations (4 AM and
4 FM). Just:
Tune in the station.
0
Push SET. (SET appears in the VF display for afew seconds.)
0
Within 5 seconds, push one of the four pushbuttons. Whenever you
push that button, the preset station will return.
Repeat these steps for each pushbutton.
NOTE:
You can preset 3 more stations on each band by pushing a pair of buttons
next to each other at the same time. Just:
0
Tune in the station.
Push SET. (SET appears in theVF display for afew seconds.)
0
Within 5 seconds, push two buttons next to each other at the same time.
Whenever you push that pair of buttons, the preset station willreturn.
Repeat these steps for each pair of buttons.
SCAN Button
When you push this,the radio will go to the nextstation and stay there a
few seconds. Then it will go to the next station and pause, and keep doing
that. Press SCAN again to stop scanning.
SEEK Button
This chooses station also, but it doesn’t keepmoving as SCAN does. When
you push SEEK the radio goes to the next station and stays there.
3-14
Clock
To set theclock, just:
Push SET.
Within 5 seconas, push and hold SCAN until the correct hour appears.
Press and hold SEEK until the correct minute appears.
To display the clock with the ignition off, push the upper knob.The time
will be displayed for afew seconds.
Cassette Tape Player
Your tape player is built to work best with tapes that are
30 to 45 minutes
long on each side. Tapes longer than that are so thin they may not work well
in this player.
To play a cassette tape:
0
Have the radio on.
Insert the tape squarely through the tape door.
The longer side with the tape visible goes in first. If you hear nothingor
hear just garbled sound, it may not be in squarely. PushSTOP-EJECT to
remove the tape and start over.
Once the tape is playing, I- - - the upper and lower knobs for volume and
balance, just as you do forradio. The arrows show which side of the tape is
playing.
To go forward to another part of the tape, push the button with an
arrow pointing toward the lighted arrow. To stop the tape, push the
STOP-E JECT button lightly.
To go backward, push the button with an arrow pointing away from
the lighted arrow. To stop the tape, push the STOP-EJECT button
lightly.
To go from one side of the tape to the other, push in the upper knob on
your radio.
0
To remove or stop the tape, push STOP-EJECT.
3-15
How to Operate Your ETW AM-FM Stereo Audio
Cassette System with Equalizer
This part tells you how your ETR@AM-FM stereo audio cassette system
with equalizer works.
The Upper Knob
The upper knob does these four things:
It controls the volume. The VOL knob increases volume with to the
right.
0
It lets you know what station you’re listening to. (When the radio is on,
push the knobto display the station.)
0
It tells you the time. (When the ignition is off, push the knobto display
the time.)
It allows you to hear the other side of the tape. (Press the knobwhile
the cassette is playing.)
your left and
The control behind the upper knob moves the sound between
right speakers.
The Lower Knob
Turn the lower knob to choose radio stations. Push it toget AM or FM. The
control behind the lower knob moves the sound between your front and
rear
speakers.
Tone Levers (Equalizer)
The 5 levers near the upper knob controlthe tone of your radio.
you get the sound
Use the levers to set the bass, midrange, and treble until
you prefer. The 60 and 250 levers adjust the bass; 1K is midrange; 3.5K and
1OK adjust the treble.
3-16
PW-R (Power)
The PWR button turns your system on and off.
AM-ST Button
Push this button if you wantAM stereo. (“STEREO” will be displayed
when you are receiving an AM stereo station.)
Cr02 Button
The Cr02 button lets you set the system for the type of cassette being used.
If you are using chrome or metal tapes, pushthe Cr02 button in. If you are
using standard iron tapes, makesure the button is out.
DNR@
Your audio system has automatic Dynamic Noise Reduction. It helps
remove background hiss noise from theradio or tape player.
DNR@is a registered trademark of the National Semiconductor
Corporation.
Pushbuttons
The four pushbuttons letyou return to favorite stations.
You can set the pushbuttons for up to eight favorite stations (4 AM and
4 FM). Just:
Tune in the station.
Push SET. (SET appears in the VF display for a few seconds.)
0
Within 5 seconds, push one of the four pushbuttons. Whenever you
push that button, the preset station will return.
Repeat these steps for each pushbutton.
NOTE:
You can preset 3 more stations on each band by pushing a pair of buttons
next to each other at the same time. Just:
Tune in the station.
Push SET. (SET appears in the VF display for a few seconds.)
Within 5 seconds, push two buttons next to each other atthe same time.
Whenever you push that pair of buttons, the preset station will return.
Repeat these steps for each pair of buttons.
SCAN Button
When you push this, the radio willgo to the next station and stay therea
few seconds. Then it will go tothe next station andpause, and keep doing
that. Press SCAN again to stopscanning.
SEEK Button
This chooses stations also, but it doesn’t keep moving as SCAN does. When
you push SEEK, the radio goes to the next station and stays there.
3-17
Clock
To set the clock, just:
0 Press SET. (SETappears in the VF display for a few seconds.)
Within 5 seconds, push and holdSCAN until the correct hour appears.
0
Press and hold SEEK until the correct minute appears.
To display the clock with the ignition off, push the upper knob.The time
will be displayedfor afew seconds.
To Play A Cassette
Your tape player is built to work best with tapes that are
30 to 45 minutes
long on each side. Tapes longer than thatare so thin they may not work well
in this player.
To play a cassette tape:
Have the radio on.
Insert the tape squarely through the tape door.
The longer side with the tape visible goes infirst. If you hear nothingor
hear just garbled sound, it may not be
in squarely.
Push STOP-EJECT to remove the tape and start over.
Once the tape is playing, use the upper and lower knobs
for volume and
balance, just as you do forradio. The arrows show whichside of the tape is
playing.
To go forward to another partof the tape, push b.
0
To go backward, push 4. To stop the tape, push the STOP-EJECT
button lightly.
0
To go from one side of the tape to the other, push inthe upper knob on
your radio. To remove or stop the tape, pushSTOP-E JECT.
APS (Automatic Program Search)
Press this button to activate the automatic program search. When the b
button is pressed, the tape will rapidly advance to the beginningof the next
selection. When the 4 button is pressed, the tape will rapidly reverse
to the
beginning of the current selection.
Press STOP-EJECT to remove the cassette and start the radio.
3-18
Care of Your Cassette Tape Player
A tape player thatis not cleaned regularly can cause reduced sound quality,
ruined cassettes, or a damaged mechanism. Cassette tapes should be stored
in their cases away from contaminants, direct sunlight, and extreme heat. If
they aren’t, they may not operate properly or cause failure of the tape
player.
Your tape player should be cleaned regularly each month or after every
15 hours of use. If you notice a reduction in sound quality, trya known good
cassette to see if the tape or the player is at fault. If this other cassette has no
improvement in sound quality, clean the tape player.
Clean your tape player with a wiping-action, non-abrasive cleaning
cassette, and follow the directions provided with it.
Cassettes are subject to wear and the sound quality may degrade over time.
Always make sure that the cassette tape is in good condition before you
have your tape player serviced.
3- 19
How to Operate Your ETW AM-FM Stereo
Audio Compact Disc (CD) System
This part tells you how yourETR@AM-FM stereo system works:
Upper Knob(PWR-VOL)
The upper knob has three functions:
It switches the radioon and off when the ignition is on.
It controls the volume. Volume will increase when the RCL knob is
turned to the right anddecrease when turned to the left. Volume will be
displayed briefly unless Left/Right speaker control, Rearmront speaker
control, BASS or TREBare adjusted.
It controls the mute feature.By pressing the MUTE knob, all sound
or by
from the radio or CD player stops. By pressing the knob again,
turning the VOL knob to the right, sound will begin again.
Lefmight Speaker Control
The control ring behind the upper knob allows
you to balance the sound
between the left and right speakers. Balance will be displayed briefly when
using this control.
Lower Knob
The lower knob has two functions:
It enables you to tune in different radio stationsby turning the knob to
the right or to the left.
It enables you to alternate between AM and FM stations by pressing the
BAND knob. Your selection willbe briefly displayed.
Rearmront Speaker Control
The control ring behind the lower knobfades the sound betweenyour rear
and front speakers. Fade levels will be briefly displayed.
3-20
SEEK
Pressing the SEEK b button will cause the receiver to seek the next higher
station and stop.
Pressing the 4 SEEK button will cause the receiver to seek the next lower
station and stop.
SCAN
When you press SCAN, the radio will go to the next station andpause, and
will keep scanning until you press SCAN again. SC will be displayed when
using this control.
Pushbuttons
The fivepushbuttons let you return to favorite stations. They are also used
when you play a disc.(See “To Play A Compact Disc”.)
To set the pushbuttons for up to ten favorite stations (5 AM and 5 FM):
Tune in the desired station.
Push the SET button. (SET is displayed briefly.)
0
Within 5 seconds, push one of the five pushbuttons to store the station.
Whenever you press that button, the preset station will return.
Clock
To set the clock, just:
Press the SET button. The radio may be on or off.
0
Within 5 seconds, press and hold either SEEK b to increase the
minutes or 4 SEEK to decrease the minutes until the correct minute
appears on the display.
Press and hold SCAN until the correct hour appears on the display.
RCL
Press the RCL button to alternate between time andradio station on the
display. RCL may be pressed when the ignitionis off to see the time.
BASS
Press the BASS A to increase the bass tones and
BASS to decrease bass
tones. Press the center of the control for a preset BASS position. The bass
level will bedisplayed briefly when usingthis control.
TREBLE
Press the TREB A to increase the treble tones and
TREB to decrease
the treble tones. Press the center of the control for a preset TREB position.
The treble level will be displayed briefly when usingthis control.
3-21
To Play A Compact Disc (CD)
NOTICE:
Before you begin, please note: DO NOT use mini-discs
that are
USE FULL-SIZE COMPACT
called singles. They won’t eject.
DISCS.
If the disc player is very hot,
or if you’re driving on a very rough
road, a disc may comeout or justnot play. If you seethe word
HOT on the display, the disc player is toohot to play the disc.
Press RCL to make the word HOT go off the display, When
things get back to
normal, the disc should play again.
Press
PWR to turn the system on,
Insert a disc partway into the slot, label side up. The player will pull it in.
Wait a few seconds and the disc should play.
If the disc comes back out, check whether:
The disc is upside down.
It is dirty, scratched, or wet.
Too much moisture is in the air.(If there is, wait about one hour and try
again.)
RCL
Press RCL to see what track is playing. Press it again within 5 seconds to
see how long it has been playing. The track number also appears when you
change the volume or when a new track starts to play.
COMP
Press the COMP button to make soft and loud passages more nearly equal
in volume. COMP appears in the display while using this command.
RDM
The RDM button means random and when it is pressed, it causes the CD
mechanism to play the tracks in a random order rather than in the sequential
1 , 2 , 3 order.
REV
Press and hold the REV button to quickly return to a favorite passage. The
counter reading will be displayed when using this control.
FWD
Press and hold the FWD button to advance quickly within a track. Release it
to resume playing. Watch the display to stop at a specific passage.
3-22
SCAN
Press SCAN to sample each track for approximately 10 seconds. Scanning
will continue until the RDM, SCANor any other motion button is pressed
again.
PREV
If you hold the PREV (4 SEEK ) button, or press it more thanonce, the
disc will return to previous tracks.
NEXT
Press NEXT (SEEKb ) to hear the next track now insteadof waiting until
the present track is finished. If you holdthis button or press it more than
once, the disc will advance further.
ST-PL
Press ST-PL (Stop-Play) to make the disc stop and the radio play. Press
ST-PL again to restart the disc at the point where it stopped.
Press PWR or turn the ignition key off tostop the disc player. The disc
stays in the player and will resume playingat the point where it stopped.
Press EJCT to eject the disc and make the radio play. The disc will start at
track 1 when you reinsert it.
Anti-Theft Feature
Delco LOC II@ is an Anti-Theft feature for the compact disc player. It can
be used or ignored. If ignored, the system plays normally. If it is used, your
player won’t beusable if it is ever stolen, because it won’t turn on.
The instructions below tell you how toenter a secret code into the system. If
your car loses battery power for any reason, you must unlockthe system
with the secret code before the radio will turn on.
To Lock The System:
1. Write down any 6 digit number and keep it in a safe place.
2. Turn the ignition to the ACC (Accessory) or RUN position.
3. Press the PWR button to turn the radio off.
4. Press the 1 and 4 buttons together. Hold them down until “- - -” shows
on the display.
You are now ready to enter your secret code. Don’t wait more than
15 seconds between steps.
5 . Press SET and 000 will appear on the display.
6. Press the SEEK b or 4 button to make the firstnumber appear.
7. Press SCAN to make the last two numbers agree with your code.
3-23
8. Press BAND and 000 will appear again. Nowyou are ready to enter the
last three digits of your code.
9. Repeat steps 6 and 7 for the last three digits of yourcode.
10. Press BAND and rEP will appear for 5 seconds and then000 will
appear.
11. Repeat steps 6 through 10. This time SEC will appear-indicating that
the radio is secure.
To Unlock The System AfterA Power Loss
When battery power is reapplied
to a secured radio, theradio won’t turn on
and LOC will appear on the display.
Enter your secret code as follows: pause no more than 15 seconds between
steps.
1. Turn the ignition on. (Radio off.)
2. Depress the SET button. The display will show 000.
3. Enter the six digits of the code following steps 6-9 above. The display
will show the numbersas entered.
4. Depress the BAND knob and thetime appears - indicating that the
disabling sequence was successful.If the display indicatesSEC, the
numbers did not match and the unit
is still secured.
Disabling The Theft System
1. Depress presets 1 and 4 for 5 seconds with ignitionon and radio power
off. The display will showSEC, indicating the unitis in the secure
mode.
2. Depress the SET button. The display will show 000.
3. Enter the first three digits of the code following steps 6 and 7 of the
preceding paragraphs. The display will show the numbers as
entered.
4. Depress the BAND knob. The radio will display 000.
5. Enter the second three digitsof the code. The display will show the
numbers as entered.
6. Depress the BAND knob. If the display shows “- - - ”, the disabling
sequence was successful.The numbers matched the user-selectedcode
or thefactory back-up code, and the unitis in the UNSECURED mode.
If the display showsSEC, the disabling sequence was unsuccessful and
the numbers did not match either of the codes and the unit will remain
in the SECURED mode.
3-24
Care of Your Compact Discs
Handle discs carefully. Store them in their original cases or other protective
cases and away fromdirect sunlight and dust. If the surface of a disc is
soiled, dampen a clean, soft cloth in a mild, neutral detergent solution and
clean it, wiping from the center to the edge.
Be sure never to touch the signal surface when handling discs. Pick up discs
by grasping the outer edges or the edge of the hole and the outer edge.
Fixed Mast Antenna
The fixed mast antenna can withstand mostcar washes without being
damaged. If the mast should ever become slightly bent, you can straightenit
out by hand. If the mast is badlybent, as it might be by vandals, you should
replace it.
Check every once in a while to be sure the mast is still tightened to the
fender.
3 -25
Notes
3-26
Your Driving and the Road
Section
Here you’ll find information about driving on different kinds of roads and in
varying weather conditions.We’ve also included many other useful tips
on
driving.
Defensive Driving . . . . . . . . . . . . . . . . . . . . . . . . . . . . . . . . . . . . . . . . . .
4-2
DrunkenDriving . . . . . . . . . . . . . . . . . . . . . . . . . . . . . . . . . . . . . . . . . . . 4-2
Control of a Vehicle
Braking . . . . . . . . . . . . . . . . . . . . . . . . . . . . . . . . . . . . . . . . . . . . . . . . 4-5
Steering
. . . . . . . . . . . . . . . . . . . . . . . . . . . . . . . . . . . . . . . . . . . . . . . .4-7
Steering Tips . . . . . . . . . . . . . . . . . . . . . . . . . . . . . . . . . . . . . . . . . . . . 4-8
Passing . . . . . . . . . . . . . . . . . . . . . . . . . . . . . . . . . . . . . . . . . . . . . . . 4-10
Loss of Control . . . . . . . . . . . . . . . . . . . . . . . . . . . . . . . . . . . . . . . . . 4-11
DrivingatNight . . . . . . . . . . . . . . . . . . . . . . . . . . . . . . . . . . . . . . . . . . . 4-12
4-13
Driving in the Rain . . . . . . . . . . . . . . . . . . . . . . . . . . . . . . . . . . . . . . . .
CityDriving . . . . . . . . . . . . . . . . . . . . . . . . . . . . . . . . . . . . . . . . . . . . . .
Freeway Driving
4-15
. . . . . . . . . . . . . . . . . . . . . . . . . . . . . . . . . . . . . . . . . .4-16
Hill and Mountain Roads . . . . . . . . . . . . . . . . . . . . . . . . . . . . . . . . . . . . 4-18
Winter Driving . . . . . . . . . . . . . . . . . . . . . . . . . . . . . . . . . . . . . . . . . . . . 4-20
Towing a Trailer . . . . . . . . . . . . . . . . . . . . . . . . . . . . . . . . . . . .
4- 1
%
. . . 4-23
Defensive Driving
The best advice anyone can give about driving is: Drive defensively.
Please start with a very important safetydevice in your vehicle: Buckle up.
(See “Safety Belts” in the Index.)
Defensive driving really means “be ready for anything.” On citystreets,
rural roads, or freeways, it means “always expect the unexpected.”
Assume that pedestrians or other drivers are going to be careless and make
mistakes. Anticipate what they might do.Be ready for their mistakes.
Rear-end collisions are about the most preventable of accidents.
Yet they
are common. Allow enough following distance. It’s the best defensive
driving maneuver, in both city and rural
driving. You never know when the
vehicle in front of you is going to brake or turn suddenly.
Drunken Driving
Death and injury associated with drinking and
driving is a national tragedy.
It’s the number one contributor to the highway death toll,claiming
thousands of victims every year. Alcohol takes away three things that
anyone needs to drive a vehicle:
Judgment
0
Muscular Coordination
Vision
Police records show that almost half of all motor vehicle-related
deaths
involve alcohol - a driver, apassenger or someone else, such as a
pedestrian, had beendrinking. In most cases, these deaths are the result of
someone who was drinking and driving. About20,000 motor
vehicle-related deaths occur each year because of alcohol, and thousands of
people are injured.
Just how much alcohol istoo much if a person plansto drive? Ideally, no
one should drink alcohol and thendrive. But if one does, then what’s “too
much”? It can be a lot less than many might think. Although
it depends on
each person and situation, here is some general information on the problem.
The Blood Alcohol Content (BAC) ofsomeone who is drinkingdepends
upon four things:
How much alcohol is in the drink.
0
The drinker’s body weight.
0
The amount of food that is consumed before and duringdrinking.
0
The length of time it has taken thedrinker to consume the alcohol.
4-2
According to the American Medical Association, a 180-pound (82 kg) person
who drinks three12-ounce (355 ml) bottles of beer in an hour will end up
with a BAC of about0.06 percent. The person would reach the same BAC
by
if each
drinking threek u n c e (120 ml) glassesof wine or three mixed drinks
had 1-1/2 ounces (45 ml) of a liquor like whiskey, ginor vodka.
if the same person drank
It’s the amountof alcohol that counts. For example,
three double martinis(3 ounces or 90 ml of liquor each) withinan hour, the
person’s BAC would be closeto 0.12 percent. A person who consumes food
just before or during drinking will have a slightly lower BAC level.
3 HOURS
2 HOURS
NUMBER
OF DRINKS
(as in picture)
1 HOUR
100
120
140
150
BODY WEIGHT
180
200
220
240
IN POUNDS
The law in most U.S. states sets the legal limit at a BAC of 0.10 percent. In
Canada the limit is 0.08 percent, and in some other countries it’s lower than
that. The BAC will be over 0.10 percent after three to six drinks (in one
hour). Of course, as we’ve seen, it depends on how much alcoholis in the
drinks, and how quickly the person drinks them.
4-3
But it’s very importantto keep in mind that the abilityto drive is affected
well below a BAC of 0.10 percent. Research shows that the driving skills of
many people are impaired at a BAC approaching 0.05 percent, and that the
effects are worse at night. Alldrivers are impaired at BAC levels above 0.05
percent. Statistics show that the chance of being in an accidentincreases
sharply for drivers who have a BAC of 0.05 percent or above. A driver with
a BAC level of 0.06 percent (three beers in one hour for a 180-pound or 82
kg person) has doubled his or her chance of having an accident. At BAC
a
level of 0.10 percent, thechance of that driver having an accident is six
times greater; at a level of 0.15 percent, the chances are twenty-five times
greater! And, the body takes about an hour to rid itself of the alcohol in one
drink. No amount of coffee or number of cold showers will speed that up.
“I’ll be careful” isn’t the right answer. Whatif there’s an emergency, a need
to take sudden action, as when a childdarts into the street? A person with a
higher BAC might not beable to react quickly enough to avoid the collision.
There’s something else about drinking and driving that many people don’t
know. Medical researchshows that alcohol in a person’s system
can make
crash injuries worse. That’s especiallytrue for brain, spinal cord andheart
injuries. That means that if anyone who has beendrinking - driver or
passenger -is in a crash, thechance of being killedor permanently
disabled is higher than if that person had not been drinking. And we’ve
already seen thatthe chance of a crash itself ishigher for drinking drivers.
4-4
Control of a Vehicle
You have three systems that make your vehicle go where you want it to go.
They are the brakes, the steering and the accelerator. All threesystems have
to do their work at the places where the tires meet the road.
Sometimes, as when you’re driving on snow or ice, it’s easy to ask more of
those control systems than the tires and road can provide.That means you
can lose control of your vehicle.
Braking
Braking action involves perception time and reaction time.
First, you have to decide to push on the brake pedal. That’s perception time.
Then you have to bring up yourfoot and do it. That’s reaction time.
Average reaction time is about 314 of a second. But that’s only an average. It
might be less with one driver and as long as two or three seconds or more
with another. Age, physical condition, alertness, coordination, and eyesight
all play a part. So do alcohol, drugs and frustration. But even in314 of a
second, a vehicle moving at 60 mph (100 kmh) travels 66 feet (20 m). That
could be a lotof distance in an emergency,so keeping enough space
between your vehicle and others is important.
And, of course, actual stopping distances vary greatly with the surface of the
road (whether it’s pavement or gravel); the condition of the road (wet, dry,
icy); tire tread; and the condition of your brakes.
4-5
Avoid needless heavy braking. Some peopledrive in spurts- heavy
acceleration followedby heavy braking rather than keeping pace with
traffic. This is a mistake. Your brakes may not have timeto cool between
hard stops. Your brakes will wear out much faster
if you do a lot of heavy
braking. If you keep pace with the traffic and allow realistic following
distances, you will eliminate a lot of unnecessary braking.That means better
braking and longer brake life.
-
If your engine ever stops whileyou’re driving, brake normally but don’t
pump your brakes.If you do, the pedal may get harder to push down.If
your engine stops, you will still havesome power brake assist. Butyou will
use it when you brake. Once the power assist is used up,
it may take longer
to push.
to stop and the brake pedal will be harder
Anti-Lock Brakes (ABS)
Your vehicle has an advanced electronic braking system that can help you
keep it under control. When you start your vehicle and begindrive
to away,
you may hear a momentary motor or clicking noise. This is the ABS system
testing itself.
Here’s how anti-lock works. Let’s say the roadis wet. You’redriving safely.
Suddenly an animaljumps out in front of you.
You slam on the brakes. Here’s what happens with
ABS.
A computer senses that wheels are slowing down.
If one of the wheels is
about to stop rolling, the computer will separately work the brakes ateach
front wheel and at the rear wheels. The anti-lock system can
change the
brake pressure faster than any driver
could. The computer is programmed to
make the mostof available tire and road conditions.
You can steer around
the obstacle while braking hard.
4-6
As you brake, your computer keeps receiving updates on wheel speed and
controls braking pressure accordingly.
Remember: Anti-lock doesn’t change the time you need toget your foot up
to the brakepedal. If you get too close to the vehicle in front of you, you
won’t have time to apply your brakesif that vehicle suddenly slows or
stops. Always leave enough room up ahead tostop, even though you have
anti-lock brakes.
To Use Four- Wheel Anti-Lock
Don’t pump the brakes. Just hold the brake pedal down and let anti-lock
work for you. You may feel the brakes vibrate, or you may notice some
noise, but this is normal.
Braking in Emergencies
Use your anti-lock braking system when you need to. With anti-lock, you
can steer and brake at thesame time. In many emergencies, steering can
help you more than even the very best braking.
Steering
Power Steering
If you lose power steering assist because the engine stops or the system is
not functioning, you can steer but it will take much more effort.
4-7
Steering Tips
Driving on Curves
It’s important to take curves at a reasonable speed.
A lot of the “driver lost control” accidents mentioned on the news happen
on curves. Here’s why:
Experienced driver or beginner, each of us is subject to thesame laws of
physics when driving on curves. The traction of the tires againstthe road
surface makes it possible for the vehicle to change its path when you turn
the front wheels. If there’sno traction, inertia will keep the vehicle goingin
the same direction. If you’ve ever tried to steer a vehicle on wet ice, you’ll
understand this.
The traction you can getin a curve depends on the condition of your tires
and the road surface, the angle at which the curveis banked, and your
speed. While you’re in a curve, speed is the one factor you can control.
Suppose you’re steering througha sharp curve. Then you suddenly
accelerate. Both control systems- steering and acceleration-have to do
their work where thetires meet the road. Adding the sudden acceleration
can demand too much of those places. You can lose control.
What should you doif this ever happens? Ease up on theaccelerator pedal,
steer the vehicle the way you want it to go, and slow down.
Speed limit signs near curves warn that you should adjust your speed.Of
course, the posted speeds are based on good weather and road
conditions.
Under less favorable conditions you’ll want togo slower.
If you need to reduce your speed as you approach
a curve, do it before you
enter the curve, while your front wheels are straight ahead.
Try to adjust your speed so you can “drive” through thecurve. Maintain a
reasonable, steady speed. Wait to accelerate until you are out of the curve,
and then accelerate gently into the straightaway.
Steering in Emergencies
There are times when steering can be moreeffective than braking. For
example, you come over a hill and find a truck stopped in your lane, or a car
suddenly pulls out from nowhere,or achild darts out from between parked
cars and stops right in front of you. You can avoid these problemsby
braking - if you can stop in time. But sometimes youcan’t; there isn’t
room. That’sthe time for evasive action - steering around the problem.
Your vehicle can perform very well in emergencieslike these. First apply
your brakes. It is better to remove as much speed as you canfrom a possible
collision. Then steer around the problem, to the left
or right depending on
the space available.
4-8
An emergency like this requires close attention and a quick decision. If you
are holding the steering wheel at the recommended 9 and 3 o’clock
positions, you can turn it a full 180 degrees very quickly without removing
either hand. But you have toact fast, steer quickly, and just asquickly
straighten the wheel once you have avoidedthe object.
The factthat such emergency situations are alwayspossible is a good reason
to practice defensive driving at all times and wear safety belts properly.
Off-Road Recovery
You may find sometime that your right wheels have dropped
off the edge of
a road onto the shoulder while you’redriving.
If the levelof the shoulder is only slightly below the pavement, recovery
off the accelerator and then,if there is nothing in
should be fairly easy. Ease
the way, steer so that your vehicle straddles the edge
of the pavement.You
can turn the steering wheel up to114 turn until the right front tire contacts the
pavement edge.Then turn your steering wheel togo straight down the
roadway.
1. Edge of Road
Surface
2. SlowDown
3. Left Approx.
Quarter Turn
4. Recover
4-9
Passing
The driver of a vehicle about to pass another on a two-lane highway waits
for just the right moment, accelerates, moves around the vehicle ahead, then
goes back into the right lane again. A simple maneuver?
Not necessarily! Passing another vehicleon a two-lane highway is a
potentially dangerous move,since the passing vehicle occupies thesame
lane as oncoming traffic for several seconds. A miscalculation, an error in
judgment, ora briefsurrender to frustrationor anger can suddenly put the
passing driver face to face with the worstof all traffic accidents- the
head-on collision.
So here are some tips for passing:
0
“Drive ahead.” Look down the road,
to the sides, and tocrossroads for
situations that might affect your passing patterns.
If you have any doubt
whatsoever about making a successful pass, wait
for a better time.
0
Watch for traffic signs, pavement markings, and lines.
If you can see a
sign up ahead that might indicate a turnanorintersection, delay your
pass. A broken center line usually indicates it’s all right to pass
(providing the road ahead is clear). Never cross a solid line on your side
of the laneor a double solid line, even
if the road seems emptyof
approaching traffic.
a Do not get too close to the vehicle you want to pass while you’re
awaiting an opportunity. Forone thing, following too closelyreduces
your areaof vision, especially if you’re following a larger vehicle.
Also, you won’t have adequate space if the vehicle ahead suddenly
slows or stops. Keep back a reasonable distance.
0 When it looks like a chance to pass iscoming up, start to accelerate but
stay in the right lane and don’t gettoo close. Time your moveso you
will be increasing speed as the time comes to move into theother lane.
more
If the way isclear to pass, you will have a “running start” that
than makes upfor the distance you wouldlose by dropping back. And
if something happens tocause you to cancel your pass,you need only
slow down and drop back again and wait
for another opportunity.
0 If other cars are lined up to pass a slow vehicle, wait your turn.
But
take care that someone isn’t trying to pass you as you pull outto pass
the slow vehicle. Rememberto glance over your shoulder andcheck
the blind spot.
0 Check your mirrors, glance over your shoulder, and start your left lane
change signal before moving outof the right laneto pass. When you are
far enough aheadof the passed vehicle tosee its frontin your inside
mirror, activate your right lane change signal and move back into the
4 -10
right lane. (Remember that your right outside mirror is convex.
The
vehicle you just passed may seem to be farther away from you thanit
really is.)
Try not to pass more than one vehicle at a time on two-lane roads.
Reconsider before passing the next vehicle.
0
Don’t overtake a slowly moving vehicle too rapidly. Even though the
brake lights are not flashing, itmay be slowing down or starting to turn.
0
If you’re being passed, make it easy for the following driver to get
ahead of you. Perhaps you can ease alittle to the right.
Loss of Control
Let’s review what driving experts say about whathappens when the three
control systems (brakes, steering and acceleration) don’t have enough
friction where the tires meet the road to do what the driver has asked.
In any emergency,don’t give up. Keep trying to steer and constantly seek an
escape route or area of less danger.
Skidding
In a skid, a driver can lose control of the vehicle. Defensivedrivers avoid
most skids by taking reasonable care suited to existing conditions, and by
not “overdriving” those conditions. But skids are always possible.
The three types of skids correspond to your Vehicle’s three control systems.
In the braking skid your wheels aren’t rolling. In
the steering or cornering
skid, too much speedor steering in a curve causes tires to slip and lose
cornering force. And in the acceleration skid too much throttle causes the
driving wheels to spin.
A cornering skid and an acceleration skid are best handledby easing your
foot off the accelerator pedal.
If your vehicle starts to slide, ease your foot off theaccelerator pedal and
quickly steer the way you want the vehicle to go. If you start steering
quickly enough, your vehicle maystraighten out. Always be ready for a
second skid if it occurs.
Of course, traction is reduced when water, snow,ice, gravel, or other
material is on the road. For safety, you’ll want to slow down and adjust your
driving to these conditions. It is important to slow downon slippery
surfaces because stopping distance will be longer and vehicle control more
limited.
4-11
While driving on a surface with reduced traction, try your best to avoid
sudden steering, acceleration, or braking (including engine braking by
shifting to a lower gear). Any sudden changes could causethe tires to slide.
You may not realize the surface is slippery until your vehicleis skidding.
Learn to recognize warningclues - such as enough water, ice or packed
snow on the road to makea “mirrored surface” - and slow down whenyou
have any doubt.
Remember: Any anti-lock braking system (ABS) helps avoid only the
braking skid.
Driving at Night
Night driving is more dangerous than daydriving. One reason is thatsome
drivers are likely to be impaired- by alcohol or drugs, with night vision
problems, or by fatigue.
Here are some tips on night driving.
Drive defensively.
0
Don’t drink and drive.
0
Adjust your inside rearview mirror to reduce theglare from headlights
behind you.
Since you can’t see as well, you may need to slow down and keep more
space between you and other vehicles.
Slow down, especially on higher speed roads. Your headlights can light
up only so much road ahead.
In remote areas, watch for animals.
If you’re tired, pull offthe road in a safe place and rest.
4-12
Night Vision
No one can see as well at night as in the daytime. But as we get older these
differences increase. A 50-year-old driver may require at least twice as
much light to see the same thing at night as a 20-year-ld.
What you do in the daytime can also affect your night vision. For example,
if you spend the day in bright sunshine you are wise to wear sunglasses.
Your eyes will have less trouble adjusting to night. But if you’re driving,
don’t wear sunglasses at night. They may cut down on glare from
headlights, but they also make a lot of things invisible.
You can be temporarily blinded by approaching lights. It can take a second
or two, or even several seconds, for your eyes to readjust to the dark. When
you are facedwith severe glare (as from a driver who doesn’t lower the high
beams, or a vehicle with misaimed headlights), slow down a little. Avoid
staring directly into theapproaching lights.
Keep your windshield and all the glass on your vehicle clean - inside and
out. Glare atnight is made much worse by dirt on the glass. Even the inside
of the glass can build up a film caused by dust. Dirty glass makes lights
dazzle and flash more than clean glass would, making the pupils of your
eyes contract repeatedly.
Remember that your headlights light up far less of a roadway when you are
in a turn or curve. Keep your eyes moving; that way, it’s easier to pick out
dimly lighted objects. Just as your headlights should be checked regularly
for proper aim, so should your eyes be examined regularly. Some drivers
suffer from night blindness - the inability to see in dim light - and aren’t
even aware of it.
Driving in the Rain
Rain and wet roads can mean driving trouble. On a wet road you can’t stop,
accelerate or turn as well because your tire-to-road traction isn’t as good as
on dry roads. And, if your tires don’t have much tread left, you’ll get even
4-13
less traction. It’s always wise to go slower and be cautious if rain starts to
fall while you are driving. The surface may get wet suddenly when your
reflexes are tuned for driving on dry pavement.
The heavier the rain, the harder it is to see. Even if your windshield wiper
blades are in good shape, a heavy rain can make
it harder to see road signs
and traffic signals, pavement markings, the edge of the road, and even
people walking.
It’s wise to keep your wiping equipment in good shape and keep your
windshield washer tank filled. Replace your windshield wiper inserts when
they show signs of streaking or missing areas on the windshield, or when
strips of rubber start to separate from the inserts.
I
Driving too fast through large water puddles or even going through some
car washes can cause problems, too. The water may affect yourbrakes. Try
to avoid puddles. But if you can’t, try to slow down before you hit them.
4- 14
Hydroplaning
Hydroplaning is dangerous. So much water can build up under your tires
that they can actually ride on the water.This can happen if the roadis wet
enough and you’re going fast enough. When your vehicleis hydroplaning, it
has little or no contact with the road.
Hydroplaning doesn’t happen often. But it can if your tireshaven’t much
tread or if the pressure in one ormore is low.It can happen if a lot of water
is standing on the road. If you can see reflections from trees, telephone
poles, or other vehicles, and raindrops “dimple” the water’ssurface, there
could be hydroplaning.
Hydroplaning usually happens at higher speeds. There just isn’t a hard and
fast rule about hydroplaning. The best advice is to slow down when it is
raining.
Some Other Rainy Weatherlips
Turn on your low-beam headlights - not just your parking lights - to
help make you more visible to others.
Besides slowing down, allow some extra following distance. And be
especially careful when you passanother vehicle. Allow yourself more
clear room ahead, and be prepared to have your view restricted by road
spray.
Have good tires with proper tread depth. (See “Tires” in theIndex.)
City Driving
One of the biggest problems with city streets is the amount of traffic on
them. You’ll wantto watch out forwhat the other drivers are doing and pay
attention to traffic signals.
Here are ways to increase your safety in city driving:
Know the best way to get to whereyou are going. Get a city map and
plan your tripinto an unknown partof the cityjust as you wouldfor a
cross-country trip.
Try to use the freeways that rim andcrisscross most large cities. You’ll
save time and energy.(See the next section, “Freeway Driving.”)
Treat a green light as a warning signal. A traffic light is there because
the corner is busy enough to need it. When a light turns green, andjust
before you start to move, check both waysfor vehicles that have not
cleared the intersection or may be running the red light.
Freeway Driving
Mile for mile, freeways (also called thruways, parkways,expressways,
turnpikes, or superhighways) are the safestof all roads. But they have their
own special rules.
The most important advice on freeway drivingis: Keep up with traffic and
keep to the right. Drive at thesame speed most of the other drivers are
driving. Too-fast or too-slow driving breaks a smooth traffic flow. Treat the
left lane on a freeway as a passing lane.
At the entrance there is usually a ramp that leads to the freeway.If you have
a clearview of the freeway as you drive along theentrance ramp, you
should begin to check traffic. Try to determine where
you expect to blend
with the flow.Try to merge into the gap at close to the prevailing speed.
Switch on your turn signal, check your mirrors andglance over your
shoulder as often as necessary. Try to blend smoothly with the traffic flow.
Once you are on the freeway, adjust your speed
to the posted limit or to the
prevailing rate if it’s slower. Stayin the right lane unless you wantto pass.
Before changing lanes, check your mirrors.Then use your turn signal.
4-16
Just before you leave the lane,glance quickly over your shoulder to make
sure there isn’t another vehicle in your “blind” spot.
Once you are moving on the freeway, make certain you allowa reasonable
following distance. Expect to move slightly slower at night.
When you want to leave the freeway, move tothe proper lane well in
advance. If you miss your exit do not, under any circumstances, stop and
back up. Drive on to the next exit.
The exit ramp can be curved, sometimes quite sharply.
The exit speed is usually posted.
Reduce your speed according to your speedometer,not to your sense of
motion. After driving for any distance at higher speeds, you may tend to
think you are going slower than you actually are.
Before Leaving on a Long Trip
Make sure you’re ready. Try to bewell rested. If you must start when you’re
not fresh - such as after a day’s work- don’t plan to make too many
miles that first part of the journey. Wear comfortable clothing and shoes you
can easily drive in.
Is your vehicle ready fora long trip?If you keep it serviced and maintained,
Of course,
it’s ready to go. If it needs service, have it done before starting out.
GM dealerships all across
you’ll find experienced and able service experts in
North America. They’ll be ready and willing to help
if you need it.
Here are some things you can check before a trip:
0
Windshield Washer Fluid: Is the reservoir full? Are all windows clean
inside and outside?
0
Wiper Blades: Are they in good shape?
0
Fuel, Engine Oil, Other Fluids: Have you checked all levels?
0
Lights: Are they all working? Are the lenses clean?
0
Tires: They are vitally important to a safe, trouble-free trip. Is the tread
good enough for long-distance driving? Are the tires all inflated to the
recommended pressure?
0
Weather Forecasts: What’s the weather outlook along your route?
Should you delay yourtrip a short time to avoid a major storm system?
0
Maps: Do you have up-to-date maps?
4-17
Highway Hypnosis
Is there actually such a condition as “highway hypnosis”?Or is it just plain
falling asleep at the wheel? Call it highway hypnosis, lackof awareness, or
whatever.
There is something about an easystretch of road with the same scenery,
along with the hum of the tires on the road, the drone of the engine, and the
rush of the wind against the vehicle thatcan make you sleepy. Don’t letit
happen to you! If it does, your vehicle can leave the road
in less than a
second, and you could crash and beinjured.
What can you do about highway hypnosis?First, be aware that it can
happen.
Then here are some tips:
Make sure your vehicle is well ventilated, with a comfortably cool
interior.
Keep your eyes moving. Scan the road ahead and to the sides. Check
your mirrors and your instruments frequently.
If you get sleepy, pull off the roadinto a rest, service, or parking area
and take a nap, get some exercise, or both. For safetv. treatdrowsiness
on the highway as an emergency.
Hill and Mountain Roads
--
. i
-
Driving on steep hills or mountains is different from driving in flat or
rolling terrain.
l
r
’
you drive regularly in steep country, or if you’re planning to visit there,
here are some tips that can make your trips safer and more
enjoyable.
Keep your vehicle in good shape. Check all fluid levels and also the
brakes, tires, cooling system and transmission.These parts can work
hard on mountain roads.
4-18
0
Know how to go down hills. The most important thing to know isthis:
let your engine do some of the slowing down. Shift to a lower gear
when you go down a steep or long hill.
0
Know how to go uphill. You may want to shift down to a lower gear.
The lower gears help cool your engine and transmission, and you can
climb the hill better.
0
Stay in your own lane when driving on two-lane roads in hills or
mountains. Don’t swing wide or cut across the center of the road. Drive
at speeds that let you stay in your own
lane.
0
As you go over the top of a hill, be alert. There could be something in
your lane, like astalled car or an accident.
0
You may see highway signs on mountains that warn of special
problems. Examples are long grades, passing or no-passing zones, a
falling rocks area, or winding roads. Be alert to these and take
appropriate action.
4- 19
Winter Driving
Here are some tips for winter driving:
Have your vehicle in good shape for winter. Be sure your engine
coolant mix is correct.
You may want to put winter emergency supplies in your vehicle.
Include an ice scraper, a small brush or broom, a supply of windshield
washer fluid, a rag, some winter outer clothing, a small shovel, a flashlight,
a red cloth, and a couple of reflective warning triangles. And,if you will be
driving under severe conditions, include a small bag of sand,a piece of old
carpet or a couple of burlap bags to help provide traction.
Be sure you
properly secure these items in your vehicle.
Driving on Snow or Ice
Most of the time, those places where your tires meet the road probably have
good traction.
However, if there is snow or ice between your tires and the
road, you can
have a very slippery situation. You’ll have a lot less traction or “grip” and
will need to be verycareful.
4-20
What’s the worst time for this? “Wet ice.” Very cold snow or ice can be
slick and hard to drive on. But wet ice can be evenmore trouble because it
may offer the least traction of all. You can get “wet ice” when it’s about
freezing (32°F; 0”C) and freezing rain begins to fall. Try to avoid driving
on wet ice until salt and sand crews can get there.
Whatever the condition - smooth ice, packed, blowing or loose snow drive with caution.
Accelerate gently. Try notto break the fragile traction. If you accelerate too
fast, the drive wheels will spin and polish thesurface under the tires even
more.
Your anti-lock brakes improve your ability to make a hard stop on a
slippery road. Even though you havean anti-lock braking system, you’ll
want to begin stopping sooner than you would on dry pavement. See
“Anti-lock” in the Index.
0
Allow greater following distance on any slippery road.
0
Watch for slippery spots. The road might be fine until you hit a spot
that’s covered with ice. On anotherwise clear road, ice patches may
appear in shaded areas where the sun can’t reach: around clumps of
trees, behind buildings, or under bridges. Sometimes the surface of a
curve or an overpass may remain icy when thesurrounding roads are
clear. If you see a patch of ice ahead of you, brake before youare on it.
Try not to brake while you’reactually on the ice, and avoid sudden
steering maneuvers.
/f You’re Caughtin a Blizzara
P
If you are stopped by heavy snow, you
could be in aserious situation. You
should probably stay with yourvehicle unless you knowfor sure that you
are near helpand you can hike through the snow.Here are some things to do
to summon help and keep yourself and your passengers safe: Turn
on your
hazard flashers. Tie a redcloth to your vehicle to alert police that you’ve
been stopped by the snow. Put on extra clothing or wrap a blanket around
you. If you have no blankets or extra clothing, make body insulatorsfrom
newspapers, burlap bags, rags,floor mats - anything you can wraparound
yourself or tuck under yourclothing to keep warm.
You can run the engine to keep warm, but be careful.
4-22
Run your engine only as long as you must. This saves fuel. When you run
the engine, make it go a little fasterthan just idle. That is, push the
accelerator slightly. This uses less fuel for the heat that you get and it keeps
the battery charged. You will need a well-charged battery to restart the
vehicle, and possibly for signaling later on with yourheadlights. Let the
heater run for awhile.
Then, shut the engine off and close the window almost all the way to
preserve the heat. Start the engine again and repeatthis only when youfeel
really uncomfortable from thecold. But do it as little as possible. Preserve
the fuel as long as you can. To help keep warm, you can get out of the
vehicle and do some fairly vigorous exercises every half hour or so until
help comes.
Towing a Trailer
4-23
I NOTICE:
Pulling a trailer improperly can damage your vehicle and result
in costly repairs not covered by your warranty.
To pull a trailer
correctly, follow the advice in this section, and see GM
your
dealer for important information about towing a trailer with
your vehicle.
Every vehicle is ready for some trailer towing. If it was built withtrailering
options, as many are, it’s readyfor heavier trailers. But trailering is different
than just driving your vehicleby itself. Trailering means changes in
handling, durability, and fuel economy. Successful, safe trailering takes
correct equipment, and it has to be used properly.
That’s the reasonfor this section. In it are many time-tested, important
trailering tips and safety rules. Many
of these are important for your safety
and that of your passengers. So please read this section carefully before you
pull a trailer.
If You Do Decide To Pull A Trailer
If you do, here are some important points.
0
There are many different laws having to do with trailering. Make sure
your rig willbe legal, not only where you live but also where you’ll be
driving. A good source for this information can be state or provincial
police.
0
Consider using a sway control if your trailer will weigh2,000 pounds
(900 kg) or less. You should always use a sway control if your trailer
will weigh more than2,000 pounds (900 kg).
You can ask a hitch dealer about sway controls.
0
Don’t tow a trailer at all during the first 500 miles (800 km) your new
vehicle is driven. Your engine, axle or other parts could be damaged.
0
Then, during the first 500 miles (800 km) that you tow a trailer, don’t
drive over 50 mph (80 k d h ) and don’t makestarts at full throttle. This
helps your engine and otherparts of your vehicle wearin at the heavier
loads.
0
You should use “D” (Drive) when towing a trailer. Operating your
vehicle in “D” (Drive) when towing a trailer will minimize heat
buildup and extend thelife of your transmission.
Three important considerations have to do with weight:
4-24
Weight of the Trailer
How heavy cana trailer safely be?
It depends on how you planto use your rig. For example, speed, altitude,
road grades, outside temperature and how much your vehicleis used to pull
a trailer are all important. And, it can also depend on any special equipment
that you have on your vehicle.
You can ask your dealer for ourtrailering information or advice, or you can
write us at the address listed in your Warranty andOwner Assistance
Information Booklet.
In Canada, write to General Motors of Canada Limited, Customer
Assistance Center, 1908 Colonel Sam Drive, Oshawa, Ontario LlH 8P7.
Weight of the Trailer Tongue
The tongue load (A) of any trailer is an important weight to measure
because it affects the total or gross weight of your vehicle. The gross vehicle
weight (GVW) includes the curb weight of the vehicle, any cargo you may
carry in it, and the people who willbe riding in the vehicle. And if you will
tow a trailer, you must add the tongue load to the GVW because your
vehicle will becarrying that weight, too. See “Loading Your Vehicle” in the
Index for more information about your vehicle’s maximumload capacity.
A
B
If you’re using a “dead-weight” hitch, the trailer tongue (A) should weigh
10% of the total loaded trailer weight (B). If you have a
“weight-distributing” hitch, the trailer tongue (A) should weigh 12% of the
total loaded trailer weight (B).
After you’ve loaded your trailer, weigh the trailer and then thetongue,
separately, to see if the weights are proper. If they aren’t, you may be able to
get them right simply by moving some items around in the trailer.
4-25
Total Weight on Your Vehicle’s Tires
Be sure your vehicle’s tiresare inflated to the limit for cold tires. You’ll find
of the driver’s door
these numbers on the Certification label at the rear edge
or see “Tire Loading” in theIndex, Then be sure you don’t go over the
GVW limit for your vehicle.
It’s important to have thecorrect hitch equipment. Crosswinds, large trucks
going by, and rough roadsare a few reasons why you’ll need the right hitch.
Here are some rulesto follow:
a If you’ll be pulling a trailer that, when
loaded, will weigh more than
2,000 pounds (900 kg), be sure to use a properly mounted,
weight-distributing hitch and sway controlof the proper size.This
equipment is very important for proper vehicle loading and good
handling when you’re driving.
0
Will youhave to make any holes in the body
of your vehicle when you
install a trailerhitch? If you do, then besure to seal theholes later
when you remove the hitch.If you don’t seal them, deadly
carbon
monoxide (CO) from your exhaust can get into your vehicle (see
“Carbon Monoxide” in theIndex). Dirt and water can, too.
Safety Chains
You should alwaysattach chains betweenyour vehicle and your trailer.
Cross the safety chains under the tongueof the trailer so that the tongue will
not drop to the road ifit becomes separatedfrom the hitch. Instructions
about safety chains may be provided
by the hitch manufactureror by the
trailer manufacturer. Follow the manufacturer’s recommendation
for
attaching safety chains. Always leave just enough slack so you can turn with
your rig. And, never allow safety chainsto drag on the ground.
Trailer Brakes
If your trailer weighs more than1,000 pounds (450 kg) loaded, then it needs
its own brakes - and they must be adequate.
Be sure to read and follow the
instructions for the trailer brakesso you’ll be able to install, adjust and
maintain them properly.
Your trailer brake system can tap into your vehicles’s hydraulic brake
system, except:
Don’t tap into your vehicle’s brake system ifthe trailer’s brake system
will use more than0.02 cubic inch ( 0 . 3 ~of
~ )fluid from your vehicle’s
master cylinder. If it does, both braking systems won’t work well.
You
could even lose your brakes.
4-26
Will the trailer parts take 3,000 psi (20 650 P a ) of pressure? If not, the
trailer brake system must not be used with your
vehicle.
If everything checks out this far, then make the brake fluid tap at the
port on the master cylinder that sends fluid to the rear brakes. But don’t
use copper tubing for this. If you do, itwill bend and finally break off.
Use steel brake tubing.
Driving witha Trailer
Towing a trailer requires a certain amount of experience. Before setting out
for the open road, you’ll want to get to know your rig. Acquaint yourself
with the feel of handling and braking withthe added weightof the trailer.
And always keep inmind that the vehicle you aredriving is now a good
deal longer and not nearlyso responsive as yourvehicle is by itself.
Before you start, check the trailer hitch and platform, safety chains,
electrical connector, lights, tires and mirror adjustment. If the trailer has
electric brakes, start your vehicle andtrailer moving and then applythe
trailer brake controller by hand to be sure the brakes are working.This lets
you check your electrical connection at the same time.
During your trip, check occasionally to be sure that the load is secure, and
that the lights and any trailer brakes are still working.
4-27
Following Distance
Stay at least twice as far behind the vehicle aheadas you would when
driving your vehicle without a trailer.
This can help you avoid situations that
require heavy braking and sudden turns.
Passing
You’ll need more passing distance up ahead when you’re towing a trailer.
And, because you’re a good deal longer, you’ll need
to go much farther
beyond the passed vehicle before you can return to your lane.
Backing Up
Hold the bottom of the steering wheel with
one hand. Then, to move the
trailer to the left,just move that handto the left. To move the trailerto the
and, if possible,
right, move your handto the right. Always back up slowly
have someone guide you.
Making Turns
When you’re turning with a trailer, make wider turns than normal.
Do this
so your trailer won’t strike soft shoulders,curbs, road signs, trees,or other
objects. Avoid jerky or sudden maneuvers. Signal well in advance.
Turn Signals When Towing a Trailer
When you tow a trailer, your vehicle has
to have a different turn signal
flasher and extra wiring. The green arrows on your instrument panel will
flash whenever you signal a turnor lane change. Properly hooked up,the
trailer lights will also flash, telling other drivers you’re about
to turn,
change lanes or stop.
on your instrument panel will flash
When towing a trailer, the green arrows
for turns even if the bulbs on the trailer are burned
out. Thus, you may think
drivers behind you are seeing your signal when they are not.
It’s important
to check occasionally to besure the trailer bulbsare still working.
Driving On Grades
Reduce speed and shift to a lower gear before you start down along or
steep downgrade. If you don’t shift down, you might have touse your
brakes so much that they wouldget hot and no longer work well.
On a long uphillgrade, shift down andreduce your speed to around 45 mph
(70 k d h ) to reduce the possibility of engine and transmission overheating.
Parking on Hills
You really should not park your vehicle, with atrailer attached, on a hill. If
something goes wrong, your rig could start to move. People can be injured,
and both your vehicle and thetrailer can be damaged.
But if you ever have to park your rig on ahill, here’s howto do it:
1. Apply your regular brakes, but don’t shift into “P”(Park) yet.
2. Have someone place chocks under the trailer wheels.
3. When the wheel chocks are in place, release the regular brakes until the
chocks absorb the load.
4. Reapply the regular brakes. Then apply your parking brake, andshift to
“ P ’ (Park).
5. Release the regular brakes.
When You Are Ready to Leave After Parking ona Hill
1. Apply your regular brakes and hold the pedal down while you:
Start your engine;
0
Shift into a gear; and
Release the parking brake.
2. Let up on the brake pedal.
3. Drive slowly until the traileris clear of the chocks.
4. Stop and have someone pick up and store the chocks.
Maintenance When Trailer Towing
Your vehicle will need service more often when you’repulling a trailer. See
the Maintenance Schedule for more on this. Things that are especially
important in trailer operation are automatic transmission fluid (don’t
overfill), engine oil, axle lubricant, belt, cooling system, and brake
adjustment. Each of these is covered in this manual, and the Index will help
you find them quickly. If you’re trailering, it’s agood idea to review these
sections before you start your trip.
Check periodically to see that all hitchnuts and bolts are tight.
Trailer Light Wiring
See “Trailer Wiring Harness’’ in
the Index.
4-29
Motes
Problems on the Road
Section
5
=
Here you’ll find what to do about some problems that can occur on the road .
Hazard Warning Flasher .....................................
5-2
......................................
Jumpstarting ..............................................
Towing Your Vehicle ........................................
Engine Overheating ........................................
EngineFanNoise ..........................................
If a Tire Goes Flat .........................................
Changing a Flat Tire .....................................
Compact Spare Tire .....................................
If You’re Stuck: In Sand. Mud. Ice or Snow .....................
Other Warning Devices
5-1
5-3
5-3
5-7
5-11
5-18
5-18
5-19
5-32
5-33
Your hazard warning
flashers let you warn
others. They also let
police know you have
a problem. Your front
and rear turn signal
lights will flash on
and off.
But they won’tflash if
you’re braking.
Press the button into
make yourfront and
rear turn signal lights
flash on andoff. Your
flashers workno
matter what position
your key is in, and
even if the key isn’tin.
To turn off the
flashers, pull out on
the collar.
When the hazard warning flashers are on, your turn signals won’t work.
5-2
Other Warning Devices
If you carry reflective triangles, you can set one up at the side of the road
about 300 feet (100 m) behind yourvehicle.
Jump Starting
If your battery has run down, you may wantto use another vehicle and some
jumper cables to start your vehicle. But please follow the steps below to do
it safely.
NOTICE:
Ignoring these steps couia result in costlydamage to your
vehicle that wouldn’t be covered byyour warranty.
Trying to startyour vehicle by pushing or pulling it won’t work,
and it could damage your vehicle.
To Jump Start Your Vehicle:
1. Check the other vehicle. It must have a 12-volt battery with a negative
ground system.
NOTICE:
If the othersystem isn’ta 12-volt system with a negaave
ground, both vehicles can be damaged.
5-3
2. Get the vehiclesclose enough so the jumper cables can reach, but be
sure the vehicles aren’t touching each other.
If they are, it could cause a
ground connection you don’t want. You wouldn’t be able to start your
vehicle, and the bad grounding coulddamage the electrical systems.
You could be injuredif the vehicles roll.Set the parking brakefirmly
on each vehicle. Put an automatic transmission in“P” (Park) or a
manual transmission in “N” (Neutral). If you have a four-wheel-drive
vehicle with a manual transfer case shift lever, be sure the transfercase
is not in “ N ’ (Neutral).
3. Turn off the ignition on both vehicles. Turn off alllights that aren’t
needed, and radios.This will avoid sparks and help save both batteries.
And it couldsave your radio!
NOTICE:
If you leave your radio on, it could be badly damaged. The
repairs wouldn’t be covered by your warranty.
4. Open the hoods and locate the batteries. Find thepositive (+) and
negative (-) terminals on each battery.
5-4
5. Check that the jumper cables don’t have loose or missing insulation. If
they do, you could get a shock. The vehicles could be damaged, too.
Before you connect the cables, here are some basic things you should
know. Positive (+) will go topositive (+) and negative (-) will go to
negative (-) or a metal engine part. Don’t connect (+) to (-) or you’ll
get a short that woulddamage the battery and maybeother parts, too.
6. Connect the red positive (+) cable to the positive (+) terminal of the
vehicle with the dead battery. Usea remote positive (+) terminal if the
vehicle has one.
Dead Battery (+)
Good Battery (+)
‘I
7. Don’t let the other end touch metal. Connect it to the positive (+)
terminal of the good battery. Use a remote positive (+) terminal if the
vehicle has one.
8. Now connect the black negative (-)
negative (-) terminal.
cable to the good battery’s
Don’t let the other end touch anything until the next step. The other end
of the negative cable doesn’t go tothe dead battery. Itgoes to a heavy
unpainted metal partof the vehicle with the dead battery.
5-5
Heavy Metal Engine Part
Good Battery (-)
9. Attach the cable at least 18 inches (45 cm) away from thedead battery,
but not nearengine parts that move.The electrical connection is just as
good there, but the chance of marks getting back to the battery is much
less.
10. Now start the vehicle with thegood battery and runthe engine for a
while.
11. Try to start the vehicle with the dead battery.
If it won't start after a few
tries, it probably needs service.
12. Remove the cables in reverse order to prevent electrical shorting. Take
care that they don't touch each other or any other metal.
Remove Cables In This Order:
1. Heavy Metal
Engine Part
2
2. Good Battery (-)
3. Good Battery (+)
4. Dead Battery (+)
5-6
Towing Your Vehicle
Try to have a GM dealer or a professional towing service tow your vehicle.
They can provide the right equipment and know how totow it without
damage.
If your vehicle has been changed
or modified since it was factory-new by
adding aftermarket items like fog lamps, aero skirting, or special tires and
wheels, these things can be damaged during towing.
Before you do anything, turn on the hazard warning flashers.
When you call, tell the towing service:
That, if your vehicle has all-wheel drive or rear-wheel drive with fog
lamps, it cannot be towed from the front with sling-type equipment.
That your vehicle has rear-wheel drive, or that it has the
all-wheel-drive option.
The make, model, and yearof your vehicle.
Whether you can still move the shift lever.
If there was an accident, what was damaged.
When your vehicle is being towed, have the ignition key off. The steering
wheel shouldbe clamped in a straight-ahead position, with a clamping
device designed for towing service. Do not use the vehicle’s steering
column lock for this. The transmission should be in
(Neutral) and the
parking brake released.
“
N
7
If your vehicle has the all-wheel drive option, it can only betowed with all
four wheels off the ground. A dolly must be used under the un-raised
wheels when towing or the vehicle must be transported on a flat bed carrier.
5-7
Don’t have your vehicle towed with the wheels in contact with ground
the
if
it has all-wheel drive. If a vehicle with all-wheel drive must be towed with
sling-type or wheel lift equipment, then either the front orrear wheels must
be supported on a dolly.
If your vehicle has rear-wheel drive, don’t have it towed on the rear wheels,
unless you must.If a vehicle with rear-wheel drive must be towedon the
rear wheels, don’tgo more than 35 mph (56 km/h) or farther than 50 miles
(80 km) or your transmission will bedamaged. If these limits must be
exceeded, then the rear wheels haveto be supported on a dolly.
Towing All-Wheel Drive Vehicles
NOTICE:
Do not tow with sling-type equipment or the front bumper
system will be damaged.
Use wheel lift or car-carrier equipment.
(Continued)
5-8
NOTICE: (Continued)
Additional ramping may be required for car-carrierequipment,
Use safety chains and wheel straps.
If your vehicle has the all-wheel drive option, a dollyMUST be
used under the rear wheels when towingfrom the front.
Towing From the Front (Except AII-Wheel Drive)
NOTICE:
Do not tow with sling-typeequipment or the front bumper
system will be damaged.
Use wheel liftor car-carrier equipment.
Additional ramping may berequired for car-carrier equipment.
Use safety chains and wheel straps.
If your vehicle has the all-wheel drive option, a dolly MUST be
used under the rear wheels when towingfrom the front.
5-9
Towing From the Rear (Except AII- Wheel Drive)
NOTICE:
Do not tow with sling-typeequipment or the rearbumper
system will be damaged.
Use wheellift or car-carrier equipment.
Additional ramping may be required for car-carrier equipment.
Use safety chains and wheel straps.
If your vehicle has the all-wheel drive option, a dolly MUST be
used under the front wheels when towingfrom the rear.
5-10
Engine Overheating
If Steam Is Coming From Your Engine
NOTICE:
If your engine catches fire because you keep driving with no
coolant, your vehicle can be badly damaged. The costly repairs
would not be covered by your warranty.
5-11
If No Steam Is Coming From Your Engine
If you get the overheat warning but see or hear no steam, the problem may
not be too serious. Sometimes the engine can get a little too hot when you:
Climb a long hill on a hot day.
Stop after high speed driving.
Idle for long periods in traffic.
Tow a trailer.
If you get the overheat warningwith no sign of steam, try this for aminute
or so:
1. If you have an air conditioner, turn it off.
2. Turn on your heater to full hot at the highest fan speed and open the
window as necessary.
3. If you’re in a traffic jam, shift to “N” (Neutral).
If you no longer have the overheat warning, you can drive. Just to besafe,
drive slower for about ten minutes. If the warning doesn’t come back on,
you can drive normally.
If the warning continues, pull over, stop, and park your vehicle right away.
If there’s still no sign of steam, push the accelerator until the engine speed is
about twice as fast as normalidle speed. Bring the engine speed back to
normal idle speed after twoor three minutes. Now see if the warning stops.
But then, if you still have the warning, TURNOFF THE ENGINE AND
GET EVERYONE OUT OF THE VEHICLE until it cools down.
You may decide not to lift the hood but to getservice help right away.
5-12
When you decide it's safe to lift the hood, here's what you'll see:
A. Coolant recovery tank
B. Radiator pressure cap
C. Engine fan
If the coolant inside the coolant recovery tank is boiling, don't do anything
else until it cools down.
The coolant level should be at or above FULL. If it isn't, you may have a
leak in the radiator hoses, heater hoses, radiator, water pumpor somewhere
else in the cooling system.
NOTICE:
Engine damage from running your engine without coolant isn't
covered by your warranty.
If there seems to be noleak, start the engine again. See if the fan speed
increases when idle speed is doubled by pushing the accelerator pedal down.
If it doesn't, your vehicle needs service. Turn off the engine.
5-13
How to Add Coolant to the CoolantRecovery Tank
If you haven’t founda problem yet, but the coolant level isn’t or
at above
the FULL mark, add a 50/50 mixture of clean water (preferably distilled)
and a proper antifreeze at the coolant recovery tank.
(See “Engine Coolant”
in the Indexfor more information about the proper coolant mix.)
NOTICE:
In cold weather, water can freeze and crack the engine, radiator,
heater core and other parts. Use the recommended coolant.
When the coolant in the coolant recovery tank is or
at above the FULL,
mark, start your vehicle.
If the overheat warning continues, there’s one more thing you can try. You
can add the propercoolant mix directly to the radiator, but besure the
cooling system is cool before youdo it.
5-14
How to Add Coolant to the Radiator
5-15
1. You can remove the radiator pressure cap when the cooling system,
including the radiator pressurecap and upper radiator hose, isno longer
hot. Turn the pressurecap slowly to the left until it first stops. (Don't
press down while turning the pressure cap.)
If you hear a hiss, wait for that to stop. A hiss means thereis still some
pressure left.
2. Then keep
turning the
pressure cap, but
now push down
as you turn it.
Remove the
pressure cap.
3. Fill the Radiator
with the proper
mix, up to the
base of thefiller
neck.
5-16
4. Then fill the
coolant recovery
tank to FULL.
5. Put the cap back
on the coolant
recovery tank,
but leave the
radiator pressure
cap off.
1
6. Start the engine
and let it run until
you can feel the
upper radiator
hose getting hot.
Watch out for the
engine fan.
7. By this time the coolant level inside the radiator filler neck may be
lower. If the level is lower, add moreof the proper mix through the
filler neck until the level reaches the base
of the filler neck.
8. Then replace the
pressure cap.At
any time during
this procedure if
coolant begins to
flow outof the
filler neck,
reinstall the
pressure cap.Be
sure the arrows on
the pressurecap
line up likethis.
Engine Fan Noise
This vehicle has a clutchedengine cooling fan. When theclutch is engaged,
the fan spins faster to provide more air to cool the engine. In most every day
driving conditions the clutch is not engaged. This improves fuel economy
and reduces fan noise. Under heavy vehicle loading, trailer towing and/or
high outside temperatures, the fan speed increases whenthe clutch engages.
So you may hear an increasein fan noise. This is norrnal and shouldnot be
mistaken as the transmission slippingor making extra shifts. It is merely the
cooling system functioning properly. The fan will slow down when
additional cooling is not required and theclutch disengages.
You may also hear this fan noise when you start the engine.
It will go away
as the fan clutch disengages.
If a Tire Goes Flat
It’s unusualfor a tire to “blow out” whileyou’re driving, especially if you
maintain your tires properly.If air goes out of a tire, it’s muchmore likely to
leak out slowly. But if you should ever have a “blowout,”here are a few tips
about what toexpect and whatto do:
If a front tire fails, the flat tire will create a drag that pulls thevehicle
toward that side. Take your foot off the accelerator pedal andgrip the
steering wheel firmly.Steer to maintain lane position, then gentlybrake to a
stop well out of the traffic lane.
A rear blowout, particularlyon a curve, acts much like a skid and may
require the same correction you’d use in a skid.
In any rear blowout, remove
your foot from the accelerator pedal, Get the vehicle under control by
steering the wayyou want the vehicle to go. It may be very bumpy and
noisy, but you can still steer. Gently braketo a stop, well off the road
if
possible.
If a tire goes flat, the next section shows how to use your jacking equipment
to change a flat tire safely.
5-18
Changing a Flat Tire
If a tire goes flat, avoid further tire and wheel damage by driving slowly to a
level place. Turn on your hazard warning flashers.
Tat
Tire
The following steps will tell you howto use the jack and change a tire.
5-19
Jack Storage
Your jack, extension, ratchet and wheel blocks
&i.estored by your vehicle’s
rear doors, along the passenger side wall.
To remove your jack
cover, takeoff the
plastic wing nutby
turning it to the left.
Lift up on the latch
and pull thejack cover
off.
Remove thewheel
blocks andjack by
turning the wing nut
to the left. Remove the
wing nut and washer
then pull the wheel
blocks and jack off the
bolt.
5-20
I
To remove the ratchet
and extension by
turning the wing nut
to the left. Remove the
wing nut andretainer
and take out the
ratchet and extension.
.
.
Jacking Tool Storage
1. Nut
2. Washer
3. Wheel Blocks
4. Jack Lifthead
5. Jack
6. Jacking Instructions Tag
7. Nut
8. Retainer
9. Ratchet
10. Extension
11. Bolt
5-21
Spare Tire
Your spare tire is
stored underneath
your vehicle. You will
use the ratchet and
extension to lower the
spare tire.
I
The ratchet has an UP
side.
And a DOWN side.
5-22
Attach the ratchet,
with the DOWN side
facing you, to the
extension. The
extension has a socket
end and a flat
(screwdriver shaped)
end.
Put the flat end of the extension on an angle through the hole in the rear
door frame, above the bumper. Be sure the flat end connects into the hoist
shaft.
Turn the ratchet to the
left to lower the spare
tire to the ground.
Keep turning the
ratchet until the spare
tire can be pulledout
from under the
vehicle.
4
I
When the tire has
been lowered, tilt the
retainer at the end of
the cable and pull it
through the wheel
opening.
Changing the Tire
The jack has a bolt on
the end.
Attach the socket end
of the extension to the
jack bolt like this.
Attach the ratchetto
the extension withthe
UP side facing you.
Rotate the ratchet to
the right. That will
raise the jack lift head
a little. Before raising
the vehicle, do the
following steps.
9.11
5-24
You have two wheel
blocks stored with
your jack. Place the
blocks at the front and
rear of the tire farthest
away from the one
being changed. That
would be the tire on
the other side of the
vehicle, at the
opposite end.
Put your spare tire near theflat tire.
Remove the wheel trim.
If you have an
aluminum hub cap,
remove it by using the
flat end of the
extension.
Pry along the.edge of
the cap until it comes
off. Be careful; the
rim edges may be
sharp. Don't try to
remove it with your
bare hands.
.
5-25
If the wheel has a
plastic center cap, you
do not have to remove
the center cap to
loosen the wheel nuts.
Place the ratchet and
socket on the wheel
nut with the center cap
on.
To remove the hubcap from the brushed aluminum wheel,fit the flat end of
the extension into the notch andpop the hubcap off.
With DOWN facing
you, use the ratchet
and socket to loosen
all the wheel nuts.
Don’t remove them
yet.
A. 6.5 in. (16.5 cm)
B. 12.0 in. (30.0 cm)
Position jack under the vehicle.
5-26
NOTICE:
Raising your vehicle with the jack improperly positioned
will
damage the vehicleor may allow the vehicle to fall off the
jack.
Be sureto fit the jack lift head into the proper location before
raising your vehicle.
Raise the vehicle by
rotating the ratchet to
the right. Make sure
the UP marking faces
you. Raise the vehicle
far enough off the
ground so there is
enough room for the
spare tire to fit.
Remove all the wheel
nuts.
5-27
'lake O H the tlat tire.
Remove any rustor
dirt from the wheel
bolts, mounting
surfaces and spare
wheel. Place thespare
on the wheel
mounting surface.
5-28
Replace the wheel
nuts with the rounded
end of the nuts toward
the wheel. Tighten
each nut by hand until
the wheel is held
against the hub.
1 Lower the vehicle by
I
5-29
rotating the ratchet to
the left. Lower the
jack completely.
Tightening Wheel Nut
Tightening Sequence
-
Tighten the wheel nuts firmly ina criss-cross sequence as shown. Rotate the
ratchet to the right with theUP marking facing you.
NOTICE:
Wheel coverswon't fit on your compact Spare.If you try to put
a wheel coveron your compact spare,you could damage the
cover or the spare.
Remove the wheel blocks.
5 -3.0
Storing The Jack and Spare Tire
Put the tire on the ground at the rear of the vehicle, with the valve stem
pointed down.
Pull the retaining bar through thecenter of the wheel, making sure it is
properly attached. Attach the ratchet, with the UP side facing you, to the
extension.
Put the flat end of the extension on an angle through the hole in the rear
door frame, above the bumper. Turn theratchet to the right until the tire is
against the underside of the vehicle.
You will hear two"c1icks" when the tire is all the way. Try to move the tire
with your hands tomake sure it is securely in place.
Return thejack, ratchet, extension and wheel blocks tothe proper location
in the rear storage area. Replace all bolts, retainers and wing nutsin the
proper location. Secure the jacking equipment in its proper location and
replace thejack storage cover.
Compact Spare Tire
Although the compact spare was fully inflated when your vehicle was new,
it can lose air after a time. Check the inflation pressure regularly.It should
be 60 psi (420 Wa). After installing the compact spare on your vehicle, you
should stop as soon as possible andmake sure your spare tireis correctly
inflated. The compact spare is made to perform well at posted speedlimits
for distances up to 3,000 miles ( 5 000 km). The compact spare is made to go
up to 3,000 miles (5 000 km), so you can finish your trip and have your
full-size tire repaired or replaced where you want. Of course, it’s best to
replace your spare with a full-size tire as soon as you can. Your spare will
last longer and be in good shapein case you need it again.
I NOTICE:
Don’t take your compact spare through an automatic car wash
with guide rails. The compact spare can get caught on the rails.
That can damage the tire andwheel, and maybe other parts of
your vehicle.
Don’t use yourcompact spare on some other vehicle.
And don’t mix your compact spare or wheel with other wheels ortires. They
won’t fit. Keep your spare and its wheel together.
NOTICE:
Tire chains won’tfit your compactspare. Using them will
damage your vehicle and destroy the chains too. Don’t use tire
chains on your compactspare.
I
5-32
If You’re Stuck: In Sand, Mud, Ice or Snow
What you don’t want to do when your vehicle is stuck is to spin your
wheels. The method known as “rocking” can help you get out when you re
stuck, but you must use caution.
I NOTICE:
Spinning your wheels can destroy parts of your vehicle
as well as
the tires.If you spin the wheels too fast while shifting your
transmission back and forth, you can destroy your transmission.
Rocking your vehicle to get it out:
First, turn your steering wheel left and right. That will clear the area around
your front wheels. Then shift back and forth between “R” (Reverse) and a
forward gear, spinning the wheels aslittle as possible. Release the
accelerator pedal while you shift, and press lightly on theaccelerator pedal
when the transmission isin gear. If that doesn’t get you out after a few tries,
you may need to be towed out. If you do need to be towed out, see “Towing
Your Vehicle” in the Index.
5-33
Notes
Service & Appearance Care
Section
Here you will find information about the care of your vehicle. This part
begins with service and fuel information. and then it shows how to check
important fluid and lubricant levels . There is also technical information
about your vehicle. and a section devoted to its appearance care.
Service . . . . . . . . . . . . . . . . . . . . . . . . . . . . . . . . . . . . . . . . . . . . . . . . . . .
6-2
Fuel . . . . . . . . . . . . . . . . . . . . . . . . . . . . . . . . . . . . . . . . . . . . . . . . . . . . . 6-3
Checking Things Under the Hood . . . . . . . . . . . . . . . . . . . . . . . . . . . . . .
6-7
HoodRelease . . . . . . . . . . . . . . . . . . . . . . . . . . . . . . . . . . . . . . . . . . . 6-7
6-9
Engineoil . . . . . . . . . . . . . . . . . . . . . . . . . . . . . . . . . . . . . . . . . . . . . .
Enginecover . . . . . . . . . . . . . . . . . . . . . . . . . . . . . . . . . . . . . . . . . .
6-15
Aircleaner . . . . . . . . . . . . . . . . . . . . . . . . . . . . . . . . . . . . . . . . . . . . 6-19
Automatic Transmission Fluid . . . . . . . . . . . . . . . . . . . . . . . . . . . . . 6-20
RearAxle . . . . . . . . . . . . . . . . . . . . . . . . . . . . . . . . . . . . . . . . . . . . . 6-24
All-WheelDrive . . . . . . . . . . . . . . . . . . . . . . . . . . . . . . . . . . . . . . . .
6-24
Transfer Case . . . . . . . . . . . . . . . . . . . . . . . . . . . . . . . . . . . . . . . . . .
6-24
FrontAxle . . . . . . . . . . . . . . . . . . . . . . . . . . . . . . . . . . . . . . . . . . . . . 6-25
Enginecoolant . . . . . . . . . . . . . . . . . . . . . . . . . . . . . . . . . . . . . . . . . 6-26
Power Steering Fluid . . . . . . . . . . . . . . . . . . . . . . . . . . . . . . . . . . . . 6-30
Windshield Washer Fluid . . . . . . . . . . . . . . . . . . . . . . . . . . . . . . . . .
6-31
Brake Master Cylinder . . . . . . . . . . . . . . . . . . . . . . . . . . . . . . . . . . . 6-32
Replacing Brake System Parts . . . . . . . . . . . . . . . . . . . . . . . . . . . . . . . . 6-35
Battery . . . . . . . . . . . . . . . . . . . . . . . . . . . . . . . . . . . . . . . . . . . . . . . . . . 6-35
Vehicle Storage . . . . . . . . . . . . . . . . . . . . . . . . . . . . . . . . . . . . . . . . . 6-35
FluidLeakCheck . . . . . . . . . . . . . . . . . . . . . . . . . . . . . . . . . . . . . . . . . .6-36
Bulb Replacement . . . . . . . . . . . . . . . . . . . . . . . . . . . . . . . . . . . . . . . . . 6-36
Other Maintenance Items . . . . . . . . . . . . . . . . . . . . . . . . . . . . . . . . . . . . 6 4 1
Loading YourVehicle . . . . . . . . . . . . . . . . . . . . . . . . . . . . . . . . . . . . . . 6-44
Tires . . . . . . . . . . . . . . . . . . . . . . . . . . . . . . . . . . . . . . . . . . . . . . . . . . . . 6-47
Appearancecare . . . . . . . . . . . . . . . . . . . . . . . . . . . . . . . . . . . . . . . . . . 6-54
Vehicle Identification Number . . . . . . . . . . . . . . . . . . . . . . . . . . . . . . . . 6-63
Service Parts Identification Label . . . . . . . . . . . . . . . . . . . . . . . . . . . . .
6-45
Capacities and Specification Charts . . . . . . . . . . . . . . . . . . . . . . . . . . . .
6-68
Fuses and Circuit Breakers . . . . . . . . . . . . . . . . . . . . . . . . . . . . . . . . . .
6-72
6-1
Service
Your G.M dealer knows your vehicle best and wantsyou to be happy with it.
We hope you’ll go to your dealer for all your service needs. You’ll get
genuine GM parts and GM-trained and supported service people.
We hope you’ll want to keep yourGM vehicle all GM. Genuine GM parts
have one of these marks:
Doing Your Own Service Work
If you want to do some of your own service work, you’ll want to getthe
proper GM Service Manual. It tells you much more about how toservice
your vehicle than this manualcan. To order the proper service manual,see
“Service Publications” in the Index.
do your own
Your vehicle has a facial air bag system. Before attempting to
service work, see “ServicingYour Facial Air Bag-Equipped Vehicle’’in the
Index.
You should keep a record with all parts receipts and list the mileage and the
date of any service work you perform. See “Maintenance Record’ in the
Index.
6-2
NOTICE:
If you tryto do your own service work without knowing enough
about it, your vehicle could
be damaged.
The 8th digit of your Vehicle Identification Number(VIN) shows the code
letter for your engine. You will find the VIN atthe top left of your
instrument panel. (See “Vehicle Identification Number”in the Index.)
Use regular unleaded gasoline rated at 87 octane or higher. With the
4.3L (Code W) engine, use premium unleadedgasoline rated at 91 octane or
higher for high power performance, when towing a trailer or with a high
payload requirement. But when operating with a light load as a normal
condition, you may use middle grade or regular unleaded gasolines.
The gasoline you use should meet specifications ASTM D4814 in the U.S.
and CGSB 35-92 in Canada. These fuels should have the proper additives,
so you should not have to add anything to the fuel.
In the U.S. and Canada, it’s easy to be sure you get the right kind of
gasoline (unleaded). You’ll see “UNLEADED” right on the pump. And only
unleaded nozzles will fit intoyour vehicle’s filler neck.
Be sure the posted octane is at least 91 for premium, 89 for middle grade
and 87 for regular. If the octane is less than 87, you may get a heavy
knocking noise when you drive. If it’s bad enough, it can damage your
engine.
If you’re using fuel rated at 91 octane or higher and you still hear heavy
knocking, your engine needs service. But don’t worry if you hear a little
pinging noise when you’re accelerating or driving up a hill. That’s normal,
and you don’t have to buy a higher octane fuel to get rid of it. It’s the heavy,
constant knock that means you have a problem.
What about gasoline with blending materials that contain oxygen
(oxygenates), such as MTBE or alcohol?
MTBE is “methyl tertiary-butyl ether.’’ Fuel that is nomore than
15% MTBE is fine foryour vehicle.
Ethanol is ethyl or grain alcohol. Properly-blended fuel thatis no more than
10%ethanol is fine for your vehicle.
Methanol is methyl or wood alcohol.
NOTICE:
Fuel that is more than 5% methanol is bad for your vehicle.
Don’t use it. It can corrode metal parts in your fuel system and
also damage plastic and rubber parts. That damage wouldn’t be
covered under your warranty. And even5%
at or less, there
must be “cosolvents” and corrosion preventers
in this fuel to
help avoid these problems.
Gasolines for Cleaner Air
Your use of gasoline with deposit controladditives will help prevent
deposits from forming in your engine and fuel system. That helps keep your
engine in tune and your emissioncontrol system working properly. It’s good
for your vehicle, andyou’ll be doing your partfor cleaner air.
Many gasolines are now blended with oxygenates. General Motors
recommends that you use gasolines with these blending materials, such as
MTBE and ethanol. By doing so, you can help clean the air, especiallyin
those parts of the country that have high carbon
monoxide levels.
In addition, some gasoline suppliers are now producing reformulated
gasolines. These gasolines are specially designed to reduce vehicle
emissions. General Motors recommends that you use reformulated gasoline.
By doing so, you can help clean the air, especially in those parts
of the
country that have high ozonelevels.
You should ask yourservice station operators if their gaso1ine.scontain
deposit control additives and oxygenates, and if they have been
reformulated to reduce vehicle emissions.
6-4
Fuels in Foreign Countries
If you plan on driving in another country outside the U.S. or Canada,
unleaded fuel may be hard to find.Do not use leaded gasoline. If you use
even one tankful, your emission controls won't work well or atall. With
continuous use, spark plugs can get fouled,the exhaust system can corrode,
and your engine oil can deteriorate quickly. Your vehicle's oxygen sensor
will be damaged. All of that means costly repairs that wouldn't be covered
by your warranty.
To check on fuel availability, ask an auto club, or contact a major oil
company that does business in the country where you'll be driving.
You can also write us at the following address for advice. Just tell us where
you're going and give your Vehicle Identification Number (VIN).
General Motors Overseas Distribution Corporation
North American Export Sales(NAES)
1908 Colonel Sam Drive
Oshawa, Ontario
L l H 8P7
Filling Your Tank
The cap is behind a
hinged door on the left
side of your vehicle.
While refueling, hang
the cap inside the fuel
door.
To take off the cap,
turn it slowly to the
left (counterclockwise).
Be careful not to spill gasoline. Clean gasoline from painted surfaces as
soon aspossible. See “Cleaning the Outside of Your Vehicle” in the Index.
When you putthe cap back on, turn it to theright until you hear a clicking
noise.
I NOTICE:
If you need a new cap, be sure to get the right type. Your dealer
can get one for you.
If you get the wrong type,
it may notfit or
have proper venting, and your fuel tank and emissions system
might be damaged.
Checking Things Under theHood
Hood Release
To open the hood, first
pull the handle inside
the vehicle on the
right sideof the
steering column.
Then go to the front of
the vehlcle and release
the secondary hood
release.
6-7
Lift the hood, release
the hood prop from its
retainer and putthe
hood prop into the slot
in the hood.
L
Before closing the
hood, be sureall the
filler caps are on
properly. Then lift the
hood to relieve
pressure onthe hood
Prop.
.I
,
Remove the hood prop
from the slotin the
hood and return the
prop to its retainer.
6-8
I
I
Then just pull the
hood down andclose
it firmly.
I
"
1
Engine Oil
It's a good idea to check your engine oil every time you get fuel. In order to
get an accurate reading, the oil must be warm and the vehicle must be on
level ground.
Turn off the engine
and give the oil a few
minutes to drain back
into the oil pan. If you
1 don't, the oil dipstick
might not show the
actual level.
6-9
To Check Engine Oil
Pull out the dipstick and clean it with a paper towel or cloth, then push it
back in all the way. Remove it again, keeping the tip lower.
When to Add Oil
If the oil is at or below the ADD line, then you’ll needto add some oil. But
you must use the right kind.This section explains what kind of oil to use.
For crankcase capacity, see “Capacities and Specifications” in theIndex.
NOTICE:
Don’t add too much oil.
If your engine hasso much oil that the
oil level gets above the cross-hatched area that shows the proper
operating range, your engine could
be damaged.
6-10
Just fill it enough to
put the level
somewhere in the
proper operating
range. Push the
dipstick all the way
back in when you’re
through.
What Kind of Oil to Use
Beginning midyear 1993, oils of the proper quality for your vehicle will be
identified with this new “starburst” symbol. The “starburst” symbol
indicates that the oil has been certified by the AmericanPetroleum Institute
(API), and is preferred for use in your gasoline engine.
You should look for this on the front of the oil container, and use only oils
that display this new symbol.
6-11
You should also use the proper viscosity oilfor your vehicle, as shown in
the following chart:
RECOMMENDED SAE VISCOSITY GRADE ENGINE OILS
FOR BEST FUEL ECONOMY AND COLD STARTING, SELECT THE LOWEST
SAE VISCOSITY GRADE 011 FOR THE EXPECTED TEMPERATURE RANGE.
LOOK FOR
ONE OF THESE
LABELS
HOT
WEATHER
C
F
100
+ 38
+ 80
+ 27
+ 60
+ 16
+ 40
+4
+ 20
-7
f
0
- 18
SAE 1OW-30
SAE SW-30
PREFERRED
/
COLD
WEATHER
IF NEITHER SAE 5W-30 NOR SAE 1OW-30
GRADE OILS ARE AVAILABLE, SAE 30
GRADE MAY BE USED AT TEMPERATURES
ABOVE 40 DEGREES F (4 DEGREES C).
DO NOT USE SAE 1OW-40, SAE 2OW-50 OR
ANY OTHER GRADE OIL NOT RECOMMENDED
As shown in the chart, SAE 5W-30 is best for your vehicle. However, you
can use SAE 1OW-30 if it's going to be 0°F (-I 8°C) or above. These
numbers on an oil container showits viscosity, or thickness. Do not use
other viscosity oils, such as SAE 1 O W 4 0 or SAE 2QW-SO.
6-12
If you cannot find oils with the new “starburst” symbol on the front of the
container, you should look for and use oils containing the following three
things:
0
SHor SG
“SH” or “SG” must be on the oil container, either by itself or combined
with other quality designations, such as “SHKD,” “SH, SG, CD,”
“SGKD,” etc.These letters show American Petroleum Institute (API)
levels of quality.
SAE 5W-30
Energy Conserving II
Oils with these words on the container will help you save fuel.
These three things are usually included in a doughnut shaped logo (symbol)
on most containers. If you cannot find oils with the “starburst” symbol, you
should look for oils with the doughnut shaped symbol, containing the three
things noted above.
NOTICE:
If you use oils that do not have either the “starburst” symbol
or
an API SH or SG designation, you can cause engine damage not
covered by your warranty.
GM Goodwrench@oil (in Canada, GM Engine Oil) meets all the
requirements for your vehicle.
6 - 13
Engine Oil Additives
Don’t add anything to youroil. Your GM dealer is ready to advise if you
think something should beadded.
When to Change Engine Oil
See if any one of these is truefor you:
Most trips are less than4 miles (6 km).
It’s below freezing outside and most trips are less than10 miles
(16 km).
0
The engine is at low speed most ofthe time (as in door-to-door
delivery, or in stop-and-go traffic).
You tow a trailer often.
0
Most trips are through dusty places.
If any one of these is true for your vehicle, then
you need to change your oil
andfilter every 3,000 miles (5 000 km) or 3 months - whichever comes
first.
If none of them is true, change theoil every 7,500 miles (1 2 500 km) or
12 months - whichever comes first. Change the filter at the first oil change
and at every other oilchange after that.
Engine Coolant Heater (Engine Block Heater)
An engine coolant heater can be a big help if you have to parkoutside in
very cold weather,0°F (-1 8 “C) or colder. If your vehicle has thisoption,
see “Engine Coolant Heater” in the Index.
What to Do with Used Oil
Did you know that used engine oil contains certain elements that may be
unhealthy for your skin and could evencause cancer? Don’t let used oil stay
on your skin for very long. Clean your skin and nails
with soap and water,
or a good hand cleaner.Wash or properly throw awayclothing or rags
containing used engine oil. (See the manufacturer’s warnings about the use
and disposal of oil products.)
Used oil can bea real threat to theenvironment, If you change your ownoil,
be sure to drain all free-flowing oil fromthe filter before disposal. Don’t
ever dispose of oil by putting it in the trash, pouring it on the ground, into
sewers, or into streams or bodies of water. Instead, recycle it by taking it to
a place that collects used oil. If you have a problem properly disposing of
your used oil, ask your dealer,a service station or a local recycling center
for help.
6-14
Engine Cover
In order to replace your air cleaner filter, you will haveto remove your
engine cover. It is inside your vehicle behind the instrument panel
extension.
To Remove the Engine Cover:
1. Move both front seats as far back as they willgo.
2. Remove the
instrument panel
extension by
removing the two
screws and two
nuts.
3. The screws are
on each side at
the top of the
extension. The
nuts are on the
bottom of the
extension.
6 - 15
4. Grasp the bottom
of the extension.
Lift up and then
pull out.
.x :
5. Disconnect the
electrical
connector for the
cigarette lighter.
Set the extension
aside.
6. Grasp the top of
the heater duct
and pull down
gently to remove.
6-16
'I
I
7. Remove the bolt
from the engine
cover bracket.
8. Loosen the nut
and move the
bracket out of the
way.
9. Lift up on each of
the two latches at
the bottom of the
cover.
6-17
10. Remove the two
screws atthe
engine cover
using a long
handled
screwdriver. The
screws are not
supposed to come
out of the cover,
only from the
front of dash.
When removing the cover, be
careful not to damage the instrument panel or
the trim.
11. Grasp the bottom
of the cover and
slide it
backwards. Then,
lift it up and out
of the vehicle.
To Install the EngineCover:
1. Lift the engine cover into the vehicle andslide it all theway forward.
Make sure the rubber sealis over the latches.
2. Install the two screws at the engine cover. Do not tighten the screws all
the way.
3. Press down on each of the two latches at the bottom of the cover. Make
sure they are secure.
4. Tighten thetwo screws at the engine cover.
at the
5. Turn the bracket into position and install the bolt. Tighten the nut
other endof the bracket.
6. Put the heaterduct over the engine coverstuds. Push up on the duct
gently until it snaps into place.
7. Reconnect the electrical connector for the cigarette lighter.
6-18
I
8. Grasp the bottom of the instrument panel extension and install the top
into the groove first. Then, push the bottom of the extension into place.
9. Install the two nuts and two screws on the extension.
Air Cleaner
To Remove the Air Cleaner Filter:
If you have the 4.3L engine (VIN Code Z) with the round air cleaner, you
must first remove the engine cover before changing the filter. (See “Engine
Cover” earlier in this section.) After removing theengine cover, unscrew the
wing nuts to take the cover off the air cleaner. After changing the filter, put
the cover back on and besure the wing nuts are properly tightened. Be sure
air cleaner lid is correctly positionedto seal out dust and contaminants that
are harmful to your engine.
If you have the 4.3L engine (VIN Code W) with the square air cleaner, you
can change the air cleaner filter without removing theengine cover. Just lift
the hood, unsnap bothclips and remove the top. After changing thefilter,
snap both clips to secure the air cleaner. Be sure air cleaner lidis correctly
positioned to seal outdust and contaminants thatare harmful to yourengine.
Refer to the Maintenance Scheduleto determine when to replacethe air
filter.
See “Scheduled MaintenanceServices” in the Index.
I IfNOTICE:
the air cleaner isoff, a backfire can causea damaging engine
fire. And, dirt can easily get into your engine, which will damage
it. Always have the air cleaner in place when you’re driving.
Automatic Transmission Fluid
When to Check and Change
A good time to check your automatic transmissionfluid level is when the
engine oil is changed. Refer to the Maintenance
Schedule to determine
when to change yourfluid. See “Scheduled MaintenanceServices” in the
Index.
How to Check
Because this operation canbe a little difficult, you may choose to have this
done at a GM dealership Service Department.
If you do it yourself, be sure to follow all theinstructions here, or you could
get a false reading on the dipstick.
NOTICE:
Too much or too little fluid can damage your transmission.
Too
much can mean that some of the fluid could come out and fall on
hot engine parts or exhaust system, starting
a fire. Be sure to get
an accurate readingif you check your transmission fluid.
Wait atleast 30 minutes before checking the transmission fluid level if you
have been driving:
When outside temperatures are above 90”F (32°C).
At high speed for quite a while.
In heavy traffic - especially in hot weather.
While pulling a trailer.
To get the right reading, the fluid should be at normal operating
temperature, which is 180°F to 200°F (82°Cto 93°C).
To check transmissionfluid hot: Get the vehicle warmed up bydriving
about 15 miles (24 km) when outside temperatures are above 50°F (10°C).
If it’s colder than 50°F (1 O”C), drive the vehicle in “D” (3rd Gear) until the
engine temperature gage moves and then remains steady for ten minutes.
Then follow the hot check procedures.
To check transmissionfluid cold: A cold check is made after the vehicle has
been sitting for eight hours or more with the engine off and is used only as a
reference. Let the engine run at idle for fiveminutes if outside temperatures
are 50°F (10°C) ormore. If it’s colder than 50°F ( 10°C), you may have to
idle the engine longer. Should the fluid level be low during a cold check,
you must perform a hot check before adding fluid. This will give you a
more accurate reading of the fluid level.
To check the fluid hot
or cold
Park your vehicle on a level place.
With the parking brake applied, place the shift lever in “P” (Park).
With your foot on the brake pedal, move the shift lever through each
gear range, pausing for about three seconds in each range. Then,
position the shift lever in “P” (Park).
Let the engine run at idle for three minutes or more.
6-21
Ther vithout shutting off the engine,follow these steps:
F
1. Pull out the
dipstick and wipe
-I
it with a clean rag
or paper towel.
2. Push it back in all
the way, wait
three seconds and
then pull it back
out again.
L
3. Check both sides of the dipstick, and read the lower level. The fluid
level must be in the COLD area for a cold check or in the HOT area or
cross-hatched area for a hot check.
6-22
I
4. If the fluid level
is in the
acceptable range,
push the dipstick
back in all the
way.
How to Add Fluid
Refer to the Maintenance Schedule to determine what kind of transmission
fluid to use. See “Recommended Fluids and Lubricants” in the Index.
If the fluid level is low, add onlyenough of the proper fluid to bring the
level up to the COLD area for acold check or theHOT area for ahot
check. It doesn’t take much fluid, generally less than a pint. Don’t overfill.
We recommend you use onlyfluid labeled DEXRON@-111 or
DEXRON@-IIE, because fluids with that label are made especially for our
automatic transmission. Damage caused by fluid other than DEXRON -1II
or DEXRON@-IIE is not covered by your new vehicle warranty.
d
After adding fluid, recheck the fluid level as described under “How to
Check.”
When the correct fluid level is obtained, push the dipstick back in all
the way.
6-23
Rear Axle
When to Check and Change Lubricant
Refer to the Maintenance Schedule to determine how often to check the
lubricant and when to change it. See “Scheduled Maintenance Services” in
the Index.
How to Check Lubricant
1
If the level is below
the bottom ofthe filler
plug hole, you’ll need
to add some lubricant.
Add enough lubricant
to raise the level to the
What to Use
Refer to the Maintenance Schedule to determine what kindof lubricant to
use. See “Recommended Fluids and Lubricants” in the Index.
All- Wheel ,Drive
If you have an all-wheel drive vehicle, be sure to perform the lubricant
checks described in this section. However, they havetwo additional systems
that need lubrication.
Transfer Case
When to Check Lubricant
Refer to the Maintenance Schedule to determine how often to check the
lubricant. See “Periodic Maintenance Inspections” in the Index.
6-24
How to Check Lubricant
If the level is below
the bottom of the filler
plug hole, you’ll need
to add some lubricant.
Add enough lubricant
to raise the level to the
bottom of the filler
plug hole (top arrow
shows filler plug hole,
lower arrow shows
drain plug hole.)
What to Use
Refer to the Maintenance Schedule to determine what kind of lubricant to
use. See “Recommended Fluids and Lubricants” in the Index.
Front Axle
When to Check and Change Lubricant
Refer to the Maintenance Schedule to determine how often to check the
lubricant and when to change it. See “Scheduled Maintenance Services” in
the Index.
How to Check Lubricant
If the level is below
the bottom of the filler
plug hole, you’ll need
to add some lubricant.
Add enough lubricant
to raise the level to the
bottom of the filler
plug hole.
6-25
What to Use
Refer to the Maintenance Schedule to determine what kindof lubricant to
use. See “Recommended Fluids and Lubricants” in the Index.
Engine Coolant
The following explains your cooling system and howto add coolant when it
is low. If you have a problem with engine overheating, see “Engine
Overheating” in the Index.
The proper coolant for your vehicle will:
Give freezing protection down to -20°F (-29”C), or -34°F (-37°C) in
Canada and for vehicles with the cold climate option.
Give boiling protection up to 258 “F ( 125“C).
Protect against rust and corrosion.
Help keep the proper engine temperature.
Let the warning gages work as they should.
What to Use
Use a mixture of one-half clean water (preferably distilled) and one-half
antifreeze that meets “GM Specification 6038-M,” which won’t
damage
aluminum parts. You can also use a recycled coolant conformingto “GM
Specification 6038-M” with a complete coolant flush and refill.If you use
this mixture, you don’t need to add anything else.
6-26
I NOTICE:
If you usean improper coolant mix,your engine couldoverheat
and be badlydamaged. The repair cost wouldn’t be coveredby
your warranty. Too much water in the mix can freezeand crack
the engine, radiator, heater core and other parts.
Some conditions, such as air trapped in the cooling system, can affect the
coolant level in the radiator.Check the coolant level when the engine is cold
and follow the steps under “Adding Coolant” for the proper way to add
coolant.
If you have to add coolant more than four times a year, have your dealer
check your cooling system.
I NOTICE:
If you use the proper coolant, you don’t haveto add extra
inhibitors or additives which claimto improve the system. These
can be harmful.
Adding Coolant
To Check Coolant
When your engine is cold, the coolant level should be at COLD LEVEL,or
a little higher. When your engine is warm, the level should be up toCOLD
LEVEL, or a little higher.
To Add Coolant
If you need more
coolant, add the
proper mix at the
coolant recovery tank.
Add coolant mix at the eecovery tank, but be careful not to spill
it.
6-28
Radiator Pressure Cap
~
NOTICE:
Your radiator cap is a15 psi (105 kPa) pressure-type cap and
must be tightly installed to prevent coolant loss and possible
engine damage from overheating. Be sure the arrows
on the cap
line up with the overflow tube on the radiator filler neck.
When youreplace
your radiator pressure
cap, an AC@cap is
recommended. See
“Service Replacement
Part and Filler
Recommendations” in
the Index.
Thermostat
Engine coolant temperature is controlled by a thermostat in the engine
coolant system. The thermostat stops the flow of coolant through the
radiator until the coolant reaches a preset temperature.
When youreplace your thermostat, an AC@thermostat is recommended.
6-29
Power Steering Fluid
How To Check Power Steering Fluid
Unscrew the cap and
wipe the dipstick with
a clean rag. Replace
the cap and
completely tighten it.
Then remove thecap
again and look atthe
fluid level on the
dipstick.
When the engine compartment is hot, the level should be at theHOT
mark.
When the engine compartment is cool, the level should be at theFULL
COLD mark.
What to Add
Refer to the Maintenance Schedule to determine what kind of fluid to use.
See "Recommended Fluids and Lubricants" in the Index.
6-30
I NOTICE:
When adding power steering fluid or making a complete fluid
change, always usethe properfluid. Failure to use the proper
fluid can cause leaksand damage hoses and seals.
Windshield Washer Fluid
To Add,
Open the cap labeled
WASHER FLUID
ONLY. Add washer
fluid until the tank is
full.
NOTICE:
When usingconcentrated washer fluid, followthe
manufacturer’s instructions for adding water.
Don’t mix water with ready-to-use washer fluid. Water can
cause the solution to freeze and damage your washer fluid
tank and other parts
of the washer system. Also,water
doesn’t clean as well as washer fluid.
Fill your washer fluid tank only 3/4 full whenit’s very cold.
This allows for expansion, which coulddamage the tank if it is
completely full.
~
~
I
Don’t use radiator antifreeze in your windshield washer.It
can damage your washer system and paint.
6-31
Brakes
Brake Master Cylinder
Your brake master cylinder is here. It is filled withDOT-3 brake fluid.
There are only two reasons why the brake fluid level inyour master cylinder
might go down. The first is that the brake fluid goes down to an acceptable
level during normal brake lining wear. When newlinings are put in, the
fluid level goes back up. The other reason is that fluid is leakingout of the
brake system. If it is, you should have your brake system fixed, since a leak
means that sooner or later your brakes won’t workwell, or won’t work at
all. So, it isn’t a good idea to “top off’ your brake fluid. Adding brake fluid
won’t correct a leak. If you add fluid whenyour linings are worn, then
you’ll have too much fluid when you get new brake linings. You should add
(or remove) brake fluid, asnecessary, only when workis done on the brake
hydraulic system.
Refer to the Maintenance Schedule to determine when to check your brake
fluid. See “Periodic Maintenance Inspections’’ in the Index.
6-32
To.Check BrakeFhid
You can check the
brake fluid without
taking off the cap. Just
look at the windows
on the brake fluid
reservoir.
The fluidlevels should be above MIN. If they aren’t, have yourbrake
system checked to see if there is a leak.
After work is done on the brake hydraulic system, make sure the levels are
above MIN and below the top of each window.
What to Add
When you do need brake fluid, use only DOT-3 brake fluid - such as
Delco Supreme II@(GM Part No. 1052535). Use new brakefluid froma
sealed container only, and always clean the brake fluid reservoir cap before
removing it.
NOTICE:
Don’t let someoneput in the wrong kind of fluid. For
example, just a few drops of mineral-based oil, such as engine
oil, in your brake system can damage brake system parts so
badly that they’ll haveto be replaced.
Brake fluid can damage paint, so be careful not to spill brake
fluid on your vehicle. If you do, washit off immediately. See
“Appearance Care” in the Index.
6-33
Brake Wear
Your vehicle has front disc brakes and rear drum brakes.
Disc brake pads have built-in wear indicators that make a high-pitched
warning sound when the brakepads are worn and new padsare needed. The
sound may come andgo orbe heard all the time your vehicleis moving
(except when you are pushing on the brake pedal firmly).
1I NOTICE:
Continuing to drive with worn-out brakepads could result in
costly brake repair.
Some driving conditions or climates may cause a brake squeal when the
brakes are first applied or lightly applied. This does not mean something is
wrong with your brakes.
Your rear drum brakes don’t have wear indicators, butif you ever hear a
rear brake rubbing noise,have the rear brake linings inspected. Also, the
rear brake drums should be removed and inspected each time the tires
are
removed for rotation or changing. When you have the front brakes replaced,
have the rear brakes inspected, too.
Brake linings should always be replacedas complete axle sets.
Brake Pedal Trave/
See your dealer if the brake pedaldoes not return to normal height, or if
there is a rapid increase in pedal travel. This could be a sign of brake
trouble.
Brake Adjustment
Every time you make a brake stop, your disc brakes adjust for wear.
If your brake pedal goes down farther than normal, your rear drum brakes
may need adjustment. Adjust them by backing up and firmlyapplying the
brakes a few times.
6-34
II
Replacing Brake System Parts
The braking system on a modem vehicle is complex. Its many parts have to
be of top quality and work well together if the vehicle is to have really good
braking. Vehicles we design and test have top-quality GM brake parts in
them, as your vehicle does when it is new. Whenyou replace parts of your
braking system -for example, when your brake linings wear down and
you have tohave new ones put in -be sure you get newgenuine GM
replacement parts. If you don’t, your brakes may nolonger work properly.
For example, if someone puts in brake linings that are wrong for your
vehicle, the balance between your front and rear brakes canchange, for the
worse. The braking performance you’ve come to expect can change in many
other ways if someone puts in the wrong replacement brake parts.
Hydro-Boost Brake System
The power steering pump also powers the Hydro-Boost. Refer to“Power
Steering Fluid’’ in the section when checking the fluid level or adding fluid.
Battery
Every new vehicle has a Delco Freedom@battery. You never have to add
water to one of these. When it’s timefor a new battery, we recommend a
Delco Freedom@battery. Get one that has the catalog number shown on the
original battery’s label.
Vehicle Storage
If you’re not going to drive your vehicle for 25 days or more, take off the
black, negative (-) cable from the battery. This will help keep your battery
from running down.
Contact your dealer to learn how to prepare your vehicle for longer storage
periods.
6-35
For more information on vehicle storage, contact your dealer’s service
department, or write to:
Adistra Corporation
I 7 1 Hamilton Street
Plymouth, MI 48 170
In Canada, write to:
General Motors of Canada, Limited
Customer Services Department
Oshawa, Ontario Ll J 526
Fluid Leak Check
After the vehicle has been parkedfor awhile, inspect the surface beneath the
vehicle for water, oil, fuel or other fluids. Water dripping from the air
conditioning system is normal. If you notice fuel leaks or fumes, the causes
should be found andcorrected at once.
Bulb Replacement
Before replacing any bulbs, make sure all lights are off and the vehicle is
not running.
Halogen Bulbs
6-36
Headlights
1 . Open the hood.
2. Remove the four
screws from the
headlight bezel.
Pull the bezel out
so you can see
the parkinghrn
signal sockets.
3. Press the tab and
turn the socket to
the left to remove
the socket from
the bezel. If the
socket does not
have a tab, turn
the socket to the
left. Set the bezel
aside,
4. Remove the four
retainer screws
and the retainer.
. .. ..
5. Pullthe
connector out and
unplug the light.
6. Install the new
bulb into the
connector.
7. Reverse steps 1-5 to reinstall the headlight.
Front Parkingmum Signal Lights
1. Open the hood.
2, Remove the four screws from the headlight bezel. Pull the bezelout so
you can see the parkinghurn signal sockets.
3. Press the tab and
turn the socket to
the left toremove
the socket from
the bezel. If the
socket does not
have a tab, turn
the socket to the
left to remove the
pl"
socket from the
bezel.
4. Pull out the bulb
and replace it
with the new
bulb.
5. Reverse steps 1-3 to reinstall the headlight.
Rear Lights
1. Open the rear door.
3. Pull out the
taillight assembly
so you can see
the socket.
6-39
4. Press the tab and
turn the socket to
the left to remove
the socketfrom
the bezel.If the
socket does not
have a tab, turn
the socket to the
left to remove the
socket from the
bezel.
5. Pull out the bulb
....
and replaceit
with the new
bulb.
.
6. Reverse steps 1-4 to reinstall the taillight.
Center High Mounted Stop Lamp (CHMSL)
Your CHMSL bulbs
are not replaced
separately. You must
replace the entire unit.
See your GM dealer
for areplacement
CHMSL assembly.
$\s1
6-40
Other Maintenance /terns
Front Suspension and Steering Linkage
Refer to the Maintenance Schedule to determine how often to lubricate the
fittings and what type of lubricant to use.
Front Wheel Bearing (Two-Wheel Drive)
If your vehicle is two-wheel drive, it has wheel bearings that must be
cleaned andrepacked.
Refer to the Maintenance Schedule to determine how often this must be
done.
Single Belt Accessory Drive
Your new vehicle uses a serpentine belt that is lighter, and moredurable
than systems withseveral belts.
The belt runs over or around the pulleys on the engine. A tensioner is used
to keep the belt tight at all times. The tensioner also makes replacing the
belt easier.If you need to replace the belt, be sure to get the correct
replacement belt. Your dealership or parts supplier can help you withthis.
The Accessory Drive Belt Routing label on your vehicle will showYOU how
to route the belt your vehicle uses.
Windshield Wiper Blade Inserts
To replace your
windshield wiper
blade inserts, lift the
wiper arm away from
the windshield. Pinch
the two tabs on the
wiper arm and slide
the insert out of the
blade. Slide the new
one in place. Make
sure the tabs are
locked into position.
6-41
Air Conditioning
Every now and then haveyour dealership check your air conditioning
system to be sure it has not lost any cooling ability. If you think thesystem
is not working properly, have yourdealership check it out as soon as
possible.
The air conditioning will not work when
the temperature is below 40°F
(4 C).
O
Lubrication
Accelerator Control System
Refer to the Maintenance Schedule to determine how often theaccelerator
linkage pivot points must be lubricated and what
type of lubricant to use.
Accelerator cables and cruise control cables should not be lubricated. Any
cables that are worn or arehard to pull should be replaced.
When cleaning theengine compartment with water or steam, avoid directing
the flow ontothe throttle linkage in a manner that would cause moisture to
enter the cables.
Hood Latches and Hood Hinge
Refer to the Maintenance Schedule to determine how to lubricate the hood
latch and hood hinge assembly.
Sliding Door Tracks
Your vehicle’s slidingdoor has three tracks which need lubrication.
For the upper andlower tracks, open the door, wipe
the track clean and then
lubricate with Lubriplate White Grease.
For the outside middle track, close the door after you finish the upper and
lower tracks. Then, wipe the track clean and lubricate with
Lubriplate White Grease.
TM
Body
Normal use of your vehicle willcause metal to metal wear atsome points on
the cab and body if they are not lubricated.
For exposed surfaces, such as doorchecks, door lock bolts, lockstriker
plates, dovetail bumper wedges, etc., a thinfilm of engine oil should be
applied.
Where oil holes are provided in the body or cab, a dripless oil can be used.
The seat adjusters and seat track shouldbe lubricated with chassis grease.
6-42
Door weatherstrips and rubber hood bumpers should be wipedclean with a
wet cloth and lightly coated with a rubber lubricant.
Never use too much of any lubricant and be sure to wipe up anyextra
lubricant when you are finished.
Some parts that need lubricating are hard to get at. Windowregulators and
controls are inside the doors.You can get to these by removing the trim
panels.
Refer to the Maintenance Schedule to determine how often to lubricate
these items and what typeof lubricant to use.
Lock Cy/inders
To be sure your locks operate properly, they must belubricated.
Refer to the Maintenance Schedule to determine how often tolubricate them
and what typeof lubricant to use.
You should not use penetrating oils because they could washout the factory
installed lubricant and cause the lock to bind. De-icers whichcontain
alcohol could also wash away the lubricant, so be sure to lubricate the lock
after using a de-icer of this type.
Exhaust System
To help prevent damage to your exhaust system, do not continue to drive
your vehicle if you notice:
0
Engine misfiring
Loss of performance
Other unusual operating conditions
Have your engine and exhaust system serviced regularly.
Three-way Catalytic Converter
Your vehicle’s three-way catalytic converter is designed to reduce the
pollutants in your vehicle’sexhaust. Use only unleaded fuel in your vehicle.
If you use leaded fuel, you could damage your three-way catalytic converter
and other engine components.
Engine Control Module System
This system has an oxygen (02) sensor that helps keep yourengine’s
air-fuel mixture at a proper level. Use only unleaded fuelin your vehicle. If
you use leaded fuel, you could damage your oxygen (02) sensor and affect
your vehicle’s emissions.
6-43
Malfunction Indicator Lamp
(SERVICE ENGINE SOON )
This light on your instrument cluster lets you know when your emission
system needs service. The light will come on briefly when you start your
engine to let you know that the systemis working. If it does not come on
when you start your engine, or if it comes on and stayson while you’re
driving, your system may needservice. Your vehicle should stillbe
driveable, but you should have your system serviced right away.
Loading Your Vehicle
This iscalled the GVWR (Gross Vehicle Weight Rating).
The GVWR
includes the weight of the vehicle, all occupants, fuel and cargo.
The CertificationRirelabel also tells you the maximum weightsfor the
front and rear axles, called Gross Axle Weight Rating (GAWR). To find
out
the actual loads on your front and rear axles, you need to goto a weigh
station and weighyour vehicle. Your dealer can help you with this. Be sure
to spread out your load equally on both sides of the centerline.
Never exceed the GVWRfor your vehicle, or the Gross Axle Weight Rating
(GAWR) for either the front or rear axle.
6-44
And, if you do have a heavy load, you should spread it out.
Using heavier suspension components to get added durability might not
change your weight ratings. Ask your dealer to help you load your vehicle
the right way.
NOTICE:
Your warranty does not cover parts or components that fail
because of overloading.
If you put things inside your vehicle - like suitcases, tools, packages, or
anything else - they will go as fast asthe vehicle goes. If you have to stop
or turn quickly, or if there is a crash,they’ll keep going.
6 -45
Payload
The Payload Capacity is shown on the CertificationITire label. This is the
maximum load capacity that your vehicle can carry. Besure to include the
weight of the peopleinside as partof your load. If you added any
accessories or equipment after your vehicle leftthe factory, remember to
subtract the weight of these things from the payload. Your dealer can help
you with this.
Trailering Package
If your vehicle comes with the Trailering Package, there isalso a load rating
which includes the weight of the vehicle and the trailer it tows. This rating
is called the Gross Combination WeightRating (GCWR).
When you weigh your trailer, besure to include the weight of everything
you put init. And, remember to figure the weight of the people inside as
part of your load.
Your dealer can help you determine yourGCWR.
6-46
Add-on Equipment
When you carryremovable items, you may need to put a limit on how many
people you carryinside your vehicle. Be sure to weigh your vehicle before
you buy and install the new equipment.
NOTICE:
Your warranty doesn’t cover parts or components that fail
because of overloading.
Tires
We don’t make tires. Your new vehicle comes with high quality tires made
by a leading tire manufacturer. These tires are warranted by thetire
manufacturers and their warranties are delivered with every new vehicle. If
your spare tire is adifferent brand than your roadtires, you will have a tire
warranty folder from each of these manufacturers.
6-47
Inflation
- Tire Pressure
The Certificationnirelabel which is on the rearedge of the driver’s door,
shows the correct inflation pressures for your tires, whenthey’re cold.
“Cold” means your vehicle has been
sitting for at least three hours or driven
no more than a mile.
NOTICE:
Don’t let anyone tellyou that underinflation or overinflation is
all right. It’s not. If your tires don’t have enoughair
(underinflation) you can get:
Too much flexing
0
Too much heat
Tire overloading
0
Bad wear
0
Bad handling
Bad fuel economy.
If your tires have too muchair (overinflation), you can get:
0
Unusual wear
0
Bad handling
0
Rough ride
0
Needless damage from road hazards.
When to Check
Check your tires once a month or more.
Don’t forget your compact sparetire. It should be at60 psi (420 P a ) .
How to Check
Use a good quality pcket-type gage to checktire pressure. Simply looking
at the tires will not tell youthe pressure, especially if you have radial tires
- which may look properlyinflated even if they’re underinflated.
If your tires have valve caps, be sure to put them backon. They help prevent
leaks by keeping out dirt and moisture.
6-48
Tire Inspection and Rotation
To make your tires last longer, have them inspected and rotated at the
mileages recommended in the Maintenance Schedule. See “Scheduled
Maintenance Services” in the Index.
Use this rotation
pattern. Do not
include compact spare
tire in rotation.
If your vehicle has front tires with different load ratings or tread designs
(such as all seasonvs. ordoff road) than the rear tires, don’t rotate your tires
front to rear.
After the tires have been rotated, adjust the frontand rear inflation pressure
as shown on the CertificatiodTire label. Make certain that all wheel nuts are
properly tightened. See “Wheel Nut Torque” in the Index.
When It’s Time for New Tires
One way to tell when
it’s time for new tires
is to check the
treadwear indicators,
which will appear
when your tires have
only 2/32 inch
( I .6 mm) or less of
tread remaining.
You need a new tire i f
You can see the indicators at three or more places around the tire.
a You can see cord or fabric showing through the tire’s rubber.
a The tread or sidewall is cracked, cut or snagged deep enough to show
cord or fabric.
a The tire has a bump, bulge or split.
The tire has a puncture, cut, or other damage that can’t be repaired well
because of the size or location of the damage.
Buying New Tires
To find out what kind andsize of tires you need, look at the
CertificatiodTire label.
The tires installed on your vehicle when it was new had a Tire Performance
Criteria Specification (TPC Spec) number on each tire’s sidewall. When you
get new tires, get ones with thatsame TPC Spec number. That way, your
vehicle will continue to have tires thatare designed to give proper
endurance, handling, speed rating, traction, ride and other thingsduring
normal service on your vehicle.If your tires have an all-season tread
design, the TPC number will be followed by a “MS” (for mud and snow).
6-50
-
If you ever replace your tires with those not having a TPC Spec number,
make sure they are thesame size, load range, speed rating and construction
type (bias, bias-belted or radial) as your original tires.
Uniform Tire Quality Grading
The following information relates to the system developed by the United
States National Highway Traffic Safety Administration which gradestires
by treadwear, traction and temperature performance. (This applies only to
vehicles sold in the United States.)
Treadwear
The treadwear grade is a comparative rating based on the wear rate of the
tire when tested undercontrolled conditions on a specified government test
course. For example, a tire graded 150 would wear one and a half (1 1/2)
times as wellon the government course as a tire graded 100. The relative
performance of tires depends upon the actual conditions of their use,
however, and may depart significantly from the norm due to variations in
driving habits, service practices and differences in road characteristics and
climate.
Traction - A, B, C
The traction grades, from highest to lowest are: A, B, and C . They represent
the tire’s ability to stop on wet pavement as measured undercontrolled
conditions on specified government test surfaces of asphalt and concrete. A
tire marked C may have poor traction performance.
Warning: The traction grade assigned to this tire is based on braking
(straight-ahead) traction tests and does not include cornering (turning)
traction.
6-51
Temperature - A, 9, C
The temperature grades are A (the highest), B, and C, representing the tire’s
resistance to the generation of heat and its abilityto dissipate heat when
tested under controlledconditions on a specified indoor laboratory test
wheel. Sustained high temperature can cause the material of the tire to
degenerate and reduce tirelife, and excessive temperature can leadto
sudden tire failure. The grade C corresponds to a level of performance
which all passenger car tires must meet underthe Federal Motor Vehicle
Safety Standard No. 109. Grades B and A represent higher levels of
performance on the laboratory test wheel thanthe minimum required by
law.
Warning: The temperature grade for this tire is established for a tire that is
properly inflated and not overloaded.Excessive speed, underinflation, or
excessive loading, either separately or in combination, can cause heat
buildup and possible tirefailure.
These grades are molded on the sidewalls of passenger car tires.
While the tires available as standard or optional equipment on General
Motors vehicles may vary with respect to
these grades, all such tiresmeet
General Motors performance standards and have been approved
for use on
General Motors vehicles. All passenger type(P Metric) tires mustconform
to Federal safety requirements in addition to thesegrades.
Wheel Alignment and Tire Balance
The wheels on your vehicle were aligned and balanced carefully
at the
factory to give you the longest tire life and best overall performance.
In most cases, you will not needto have your wheels aligned again.
However, if you notice unusual tire wearor your vehicle pullingone way or
the other, the alignment may needto be reset. If you notice your vehicle
vibrating when driving on a smooth road,
your wheels may needto be
rebalanced.
Wheel Replacement
Replace any wheel that is bent,cracked or badly rusted. If wheel nuts keep
coming loose, the wheel, wheel bolts, and wheel nuts should be replaced.
If
the wheel leaks air, replace it (exceptsome aluminum wheels, whichcan
sometimes be repaired). See your GM dealer if any ofthese conditions exist.
Your dealer will know the kindof wheel you need.
6-52
Each new wheel should havethe same load carrying capacity, diameter,
width, offset, and be mounted the same way as the one it replaces.
If you need to replace any of your wheels, wheelbolts, or wheel nut,s,
replace them only with new GM original equipment parts. This way, you
will be sure to have the right wheel, wheel bolts, and wheelnuts for your
GM model.
I NOTICE:
The wrong wheel canalso cause problems with bearing life,
brake cooling, speedometer/odometer calibration, headlight aim,
bumper height, vehicle ground clearance, and tire or tire chain
clearance to the body and chassis.
Used Replacement Wheels
6-53
Tire Chains
NOTICE:
If your vehicle has P245/60R15size tires, don’t use
tire chains;
they can damage your vehicle.
If you have other size tires, use
tire chains only where legaland
SAE Class “S” type chains that
only when you must. Use only
are the proper size for your tires. Install them onthe rear axle
tires and tighten them as tightly as possible withthe ends
securely fastened. Drive slowly
and follow the chain
manufacturer’s instructions. Ifyou can hear the chains
contacting your vehicle,stop and retighten them. If the contact
fast with chains
continues, slow downuntil it stops. Driving too
on will damageyour vehicle.
Appearance Care
Remember, cleaning products can be hazardous. Some are toxic. Otherscan
burst into flame if you strike a match or get them on a hot partof the
vehicle. Some are dangerousif you breathe their fumes in a closed space.
When you use anything from a container to clean yourvehicle, be sure to
follow the manufacturer’s warnings andinstructions. And always open your
doors or windows when you’re cleaning theinside.
6-54
a
Never use these to clean your vehicle:
Gasoline
Paint Thinner
Benzene
Turpentine
Naphtha
Carbon Tetrachloride
0
Lacquer Thinner
Nail Polish Remover
Acetone
They can all behazardous - some more than others - and they can all
damage your vehicle, too.
Don’t use anyof these unless this manual says you can. In many uses, these
will damage your vehicle:
Alcohol
Laundry Soap
Bleach
Reducing Agents
Cleaning the Inside of Your Vehicle
Use a vacuum cleaner often to get rid of dust and loose dirt. Wipe vinyl or
leather with a clean, damp cloth.
Your GM dealer has two GM cleaners, a solvent-type spot lifter and a
foam-type powdered cleaner. They will clean normal spots and stains very
well. Do not use them on vinyl or leather.
Here are some cleaning tips:
0
Always read the instructions on the cleaner label.
Clean up stains as soon as you can -before they set.
Use a clean cloth or sponge, and change to a clean area often. A soft
brush may be usedif stains are stubborn.
Use solvent-type cleaners in a well-ventilated area only. If you use
them, don’t saturate the stained area.
If a ring forms after spot cleaning, clean the entire area immediately or
it will set.
Using Foam-Type Cleaner on Fabric
Vacuum and brush the areato remove any loose dirt.
9
Always clean a whole trim panelor section. Mask surrounding trim
along stitch or welt lines.
0
Mix Multi-Purpose Powdered Cleaner following the directions on the
container label.
Use suds only and apply with aclean sponge.
0
Don’t saturate the material.
0
Don’t rub it roughly.
0
As soon as you’ve cleaned the section, use a sponge to remove the
suds.
9
Rinse the section with aclean, wet sponge.
0
Wipe off what’s left with a slightly
damp paper towel or cloth.
Then dry it immediately with ablow dryer or a heat lamp.
NOTICE:
Be careful with a hair dryer or heat lamp.
You could scorch the
fabric.
0
Wipe with a clean cloth.
Using Solvent-Type Cleaner on Fabric
First, see if you have to use solvent-type cleaner at all. Some spots and
stains will clean off better with just water and mild soap.
If you need to use a solvent:
9
Gently scrape excess soil from the trim material witha clean, dull knife
or scraper. Use very little cleaner, light pressure
and clean cloths
(preferably cheesecloth). Cleaning should start at the outside of the
stain, “feathering” towardthe center. Keepchanging to a clean section
of thecloth.
0
When you clean a stain from fabric, immediately dry the area with an
air hose, hair dryer, or heat lamp to help prevent a cleaning ring.(See
the previous NOTICE.)
6-56
Fabric Protection
Your vehicle has upholstery that has been treated withScotchgard" Fabric
Protector, a 3M product. Scotchgard protects fabrics by repelling oil and
water, which are the carriers of most stains. Even with this protection, you
still need to clean your upholstery oftento keep it looking new.
lM
Further information on cleaning is available by calling 1-800-433-3296
(in Minnesota, 1-800-642-6 167).
Special Cleaning Problems
Greasy or Oily Stains
Such as grease, oil, butter, margarine, shoe polish, coffee with cream,
chewing gum, cosmetic creams, vegetable oils, wax crayon, tar and asphalt.
Carefully scrape off excess stain.
Follow the solvent-type instructions described earlier.
Shoe polish, wax crayon, tar and asphalt will stain if left ona vehicle
seat fabric. They should be removed as soon as possible. Be careful,
because the cleaner will dissolve them and maycause them to spread.
Non-Greasy Stains
Such as catsup, coffee (black), egg, fruit, fruit juice, milk, soft drinks, wine,
vomit, urine and blood.
Carefully scrape off excess stain, then sponge the soiled area with cool
water.
If a stain remains, follow the foam-type instructions described earlier.
If an odor lingers after cleaning vomit or urine, treat the area with a
waterhaking soda solution: 1 teaspoon (5 ml) of baking soda to 1 cup
(250 ml) of lukewarm water.
If needed, clean lightly with solvent-type cleaner.
Combination Stains
Such as candy, ice cream, mayonnaise, chili sauce and unknown stains.
0
Carefully scrape off excess stain, then clean with cool water and allow
to dry.
0
If a stain remains, clean it with solvent-type cleaner.
Cleaning Vinyl
Use warm water anda clean cloth.
0
Rub with a clean, damp cloth to remove dirt. You may have to do it
more than once.
Things like tar, asphalt and shoe polish will stain if you don’t get them
off quickly. Usea clean cloth and a solvent-type vinyl cleaner.
Cleaning theTop of the Instrument Panel
Use only mild soap and water clean
to
the top surfaces of the instrument
panel. Sprays containing silicones or waxes may cause annoying reflections
in the windshield and even make itdifticult to see through the windshield
under certain conditions.
Care of Safety Belts
Keep belts clean and dry.
Glass
Glass should be cleaned often. GM Glass Cleaner (GM Part No. 1050427)
or a liquid household glasscleaner will remove normal tobacco smoke and
dust films.
Don’t use abrasive cleaners on glass, because they may cause scratches.
Avoid placing decals on the inside rear window, since they may have to be
scraped off later. If abrasive cleaners are used on the inside of the rear
window, an electric defogger element may be damaged. Any temporary
license should not be attached across thedefogger grid.
C/eaning the Outsideof the Windshield,
Backglass and Wiper Blades
If the windshield is not clear after using the windshield washer,or if the
wiper blade chatters when running, wax or other material may be on the
blade or windshield.
6-58
Clean the outside of the windshield with GM Windshield Cleaner, Bon-Ami
Powder@(GM Part No. 1050011). The windshield is clean if beads do not
form when you rinse it with water.
Clean the blade by wiping vigorously witha cloth soaked in full strength
windshield washer solvent. Then rinse the blade with water.
Wiper blades should be checked on a regular basis and replaced when worn.
Cleaning the Outsideof Your Vehicle
The paint finish on your vehicle provides beauty, depth of color, gloss
retention and durability.
Washing Your Vehicle
The best way to preserve your vehicle’s finish is to keep it clean by washing
it often with lukewarm or cold water.
Don’t wash your vehicle in the direct rays of the sun. Don’t use strong soaps
or chemical detergents. Use liquid hand, dish or car washing (mild
detergent) soaps. Don’t use cleaning agents that contain acid or abrasives.
All cleaning agents should be flushed promptly and not allowedto dry on
the surface, or they could stain. Dry the finish with a soft, clean chamois or
a 100% cotton towel to avoid surface scratches and water spotting.
High pressure vehicle washes maycause water to enter vour vehicle.
Finish Care
Occasional waxing or mild polishing of your vehicle may be necessary to
remove residue from the paint finish. You can get GM approved cleaning
products from your dealer.(See “Appearance Care and Materials” in the
Index.)
paint finish. The clearcoat gives
Your vehicle has a “ba~ec~at/clearc~at”
more depth and gloss to the colored basecoat. Always use waxes and
polishes that are non-abrasive and made for a basecoatklearcoatpaint
finish.
NOTICE:
Machine compounding or aggressive polishing on
a
basecoatklearcoat paint finishmay dull thefinish or leave swirl
marks.
6-59
Protecting Exterior Bright Metal Parts
Bright metal parts shouldbe cleaned regularly to keep their luster. Washing
with water is all that is usually needed. However, you may use
GM Chrome
Polish on chrome or stainless steel trim, if necessary.
Use special care with aluminum trim. To avoid damaging protective trim,
never use autoor chrome polish, steam or caustic soap to clean aluminum.
A coating of wax, rubbed to high polish, is
recommended for all bright
metal parts.
Aluminum Wheels (If So Equipped)
Your aluminum wheels have a protective coating similar to the painted
surface of your vehicle. Don’t use strongsoaps, chemicals, chrome polish,
abrasive cleaners or abrasive cleaning brushes on them becauseyou could
damage this coating. After rinsing thoroughly,a wax may be applied.
NOTICE:
If you have aluminum wheels, don’t use an automatic vehicle
wash that has hard silicon carbide cleaning brushes. These
brushes can takeoff the protective coating.
Weatherstrips
Silicone grease on weatherstrips will make them last longer, sealbetter, and
not stick or squeak. Apply silicone grease with a clean cloth at least every
six months. During verycold, damp weather more frequent application may
be required. (See “Recommended Fluids & Lubricants” in the Index.)
Sheet Metal Damage
If your vehicle is damaged and requires sheet metal repair or replacement,
make sure the body repair shopapplies anti-corrosion material to the parts
repaired or replaced to restore corrosionprotection.
Foreign Material
Calcium chloride and other salts, ice melting agents, road oil and tar, tree
sap, bird droppings, chemicals from industrial chimneys, and other foreign
matter can damage your vehicle’s finish if they remain on paintedsurfaces.
Use cleaners that are marked safefor painted surfaces to remove foreign
matter.
6-60
Finish Damage
Any stone chips, fractures or deep scratches in the finish should be repaired
right away. Bare metal will corrode quickly and maydevelop into a major
repair expense.
Minor chips and scratches can be repaired with touch-up materials available
from your dealer or otherservice outlets. Larger areas of finish damage can
be corrected in your dealer’s body and paintshop.
Underbody Maintenance
Chemicals used for iceand snow removal and dust controlcan collect on
the underbody. If these are not removed, accelerated corrosion (rust) can
occur on the underbody parts such as fuel lines, frame, floor pan, and
exhaust system even though they have corrosion protection.
At least every spring, flush these materials from the underbody with plain
water. Clean anyareas where mud and other debris can collect. Dirt packed
in closed areas of the frame should be loosened before being flushed. Your
dealer oran underbody vehicle washing system cando this for you.
Fiberglass Springs
I NOTICE:
I
Don’t use corrosiveor acidic cleaning agents, engine degreasers,
aluminum cleaning agents or other harsh solvents to clean
fiberglass springs; they’ll damage the springs.
I
I
Chemical Paint Spotting
Some weather and atmospheric conditions can create a chemical fallout.
Airborne pollutants can fall upon and attack painted surfaces on your
vehicle. This damage can take two forms: blotchy, ringlet-shaped
discolorations, and small irregular dark spots etched into the paint surface.
Although no defect in the paintjob causes this, GM will repair, at nocharge
to the owner, the surfaces of new vehiclesdamaged by this fallout condition
within 12 months or 12,000 miles (20 000 km) of purchase, whichever
comes first.
6-61
Appearance Care Materials Chart
PART
NUMBER
1050172
SIZE
DESCRIPTION
USAGE
16 oz. (0.473L) Tar and Road Oil
Remover
Removes old
waxes, polishes,
tar and roadoil
1050173
16 oz. (0.473L) Chrome Cleaner
and Polish
1050174
16 oz. (0.473L) White Sidewall
Tire Cleaner
1050214
32 oz. (0.946L) VinylLeather
Cleaner
Removes rust and
corrosion on
chrome and
stainless steel
Cleans white and
black tires
Spot and stain
removal on leather
or vinyl
1050244
16 oz. (0.473L)
Fabric
1050427
23 oz. (0.680L)Glass
1050429
6 lbs. (2.72 kg)Multi-Purpose
Powder Cleaner
1050729
1051055
1051398
1052870
1050201
Cleaner
Cleaner
Spot and stain
removal on cloth
and fabric
Glass cleaning and
spot cleaning on
vinyls
Cleans vinyl and
cloth on door trim,
seats, and carpet
- also tires and
mats
8 oz. (0.237L)VinylTop
Cleaner Cleaning of vinyl
tops
Vinyl top dressing
16 02. (0.473L) Preservatone
Spot and stain
8 oz. (0.237L) Spot Lifter
removal on cloth
and fabric
16 oz. (0.473L) Wash-Wax (conc.) Exterior wash
Exterior cleaner
16 02. (0.473L) Magic Mirror
and polish
Cleaner-Polish
6-62
Vehicle Identification Number
(VIA/)
This is the legal identifier for your vehicle. It appears on a plate in the front
corner of the instrument panel, on the driver’s side. You can see it if you
look through the windshieldfrom outside your vehicle. The VTN also
appears on the Vehicle Certification and Service Parts labels and the
certificates of title and registration.
6-63
Engine ldentification
The eighth character in your VIN is the engine code. This code will help
you identify your engine, specifications, and replacement parts.
cv
n
z
c')
s
U
r
rJ-
II
1
I
t
Wf
I
6-64
Service Parts Identification Label
You’ll find this label on theinside of the glove box door.
WHEELBASE
MODEL DESGNATION
OPTIONCONTENT
LC3 M X l M31 NA5
K19K64
NB1 QMXVK3VC2VY1VY4V73Y19
ZJ7
6BJ 62L 62U 67D 671 679 7BJ 8HJ 9HJ
I
I
PAINTTECHNOLOGY
ORDER NUMBER
EXTERIOR COLORS
It’s very helpful if you ever need to order parts. On this label is:
0
your VIN,
the model designation,
paint information, and
a list of all production options and special equipment.
Be sure that this label is not removed from the vehicle.
Add-on Electrical Equipment
NOTICE:
Don’t add anything electrical to your vehicle unless you check
with your dealer first. Some electrical equipment can damage
your vehicle and the damage wouldn’t be covered by your
warranty. Some add-on electrical equipment can keep other
components from workingas they should.
Your vehicle has a facial air bag system. Before attempting to add anything
electrical to your vehicle, see “Servicing Your Facial Air Bag-Equipped
Vehicle” inthe Index.
6-65
Fuses and Circuit Breakers
The wiring circuits in your vehicle are protected from shortcircuits by a
combination of fuses, circuit breakers, and fusible thermal links in the
wiring itself. This greatly reduces the chance of fires caused by electrical
problems. See “Fuses and Circuit Breakers’’ in the Indexfor more
information.
Headlights
The headlight wiring is protected by a circuit breaker in the light switch. An
electrical overload will cause the lights to go on and off, or in some cases to
remain off. If this happens, have yourheadlight wiring checked right away.
Windshield Wipers
The windshield wiper motor is protectedby a circuit breaker and a fuse. If
the motor overheats due to heavy snow, etc., the wiper willstop until the
motor cools, If the overload is caused by some electrical problem and not
snow, etc., besure to get it fixed.
Power Windows and Other Power Options
Circuit breakers in the fuse panel protect the power windows andother
power accessories. When the current load is too heavy, the circuit breaker
opens and closes, protecting the circuit until the problemis fixed or goes
away.
Trailer Wiring Harness
The optional seven-wire trailer wiring harness is protected by an in-line
fuse in the battery feed wire. This fuse is near the junction block. See
“Trailer Wiring Harness”in the Index.
6-66
Fuse Block
The fuseblock is
under the instrument
panel on the driver’s
side. Remove the
cover with a
screwdriver.
To remove fuses if you don’t havea fuseextractor, hold the end of the fuse
between your thumb and index finger and pull straight out.
Be sure to use the correct fuse. If you ever have a problem on the road and
don’t have a spare fuse, you can “borrow” one of the correct value. Just pick
some feature of your vehicle that you can get along without-like the radio
or cigarette lighter-and use its fuse, if it is of the value you need.Replace
it as soon as youcan. See “Fuses and Circuit Breakers” in this section.
6-67
Capacities and SpecificationCharts
Replacement Parts
Replacement part numbers listed in this section are based on the latest
If a
information available at the timeof printing, and are subject to change.
part listed in this manual is not the same as the part usedin your vehicle
when it was built, or if you have any questions, please contact yourGM
truck dealer.
Engine Identification
4.3L
V6
4.3L
V6
z
w
Fuel System
TBI*
CPI" *
Produced By
U.S.
L.D.
U.S.
L.D.
Engine Description
Type
VTN Code
Emissions
*Throttle Body Fuel Injection
**Central Port Fuel Injection
Wheel NutTorque
DESCRIPTION
Base or Optional Wheel
TORQUE
100 ft. lbs. (140 Nom)
Cooling System Capacity
ENGINE
VIN CODE
4.3L
z
w
4.3L
QUANTITY*
Without Rear
Heater
QUANTITY*
With Rear Heater
1 3.5 Quarts
16.5 Quarts
( 12.8 Liters)
( 15.5 Liters)
13.5 Quarts
16.5 Quarts
(1 5.5 Liters)
( 12.8 Liters)
*All quantities are approximate. After refill, the level MUST bechecked.
Crankcase Capacity
ENGINE
VIN CODE
QUANTITY*
Without Filter
QUANTITY*
With Filter
4.3L
Z
4 Quarts
(3.8 Liters)
4.5 Quarts
(4.3 Liters)
4.3L
w
4 Quarts
(3.8 Liters)
4.5 Quarts
(4.3 Liters)
*All quantities are approximate. After refill, the level MUST be checked.
Do not overfill.
Fuel Tank Capacity
TYPE
Standard Tank
QUANTITY*
27 Gallons (102 Liters)
*All quantities are approximate.
6-69
Lamp and Bulb Data
TRADE NO.
Backup Lamp
QUANTITY
2
2
2
4
2
License Lamp
1
194
1 Unit
See GM Dealer
Dome Lamp (w/o Roof Console)
2
211-2
Dome Lamp (with Roof Console)
3
211-2
Glove Box Lamp
1
194
Heater & AC Control
2
37
Visor Vanity MirrorLamps
4
194
Stepwell Lamp
3
2111.2
Reading Lamp (with Roof Console)
4
Reading Lamp (w/o Roof Console)
2
Ashtray Lamp
1
Heater or A/C Control
2
906
906
161
194
EXTERIOR LAMPS
Headlamps (Halogen)
Park, Signal Lamp
Tail, Stop Lamps
Marker Lamps
CHMSL Assembly
INTERIOR LAMPS
H6054
2057
2057
194
1156
Instrument Cluster Lamps
NOTE: A PC part number indicates that the bulb and base are one
assembly and must be replaced
as such.
6-70
LAMPS
General Indicator Lamp?
Instrument Cluster I l l u m . ~
Headlamp Beam Indicator Lamp?
Headlamp Beam Indicator Lamp$
Malfunction Indicator Lamp
(Service Engine Soon)?
Malfunction Indicator Lamp
(Service Engine Soon)$
Directional Indicator?
Directional Indicator$
Brake WarningIndicator Lamp?
Brake Warning Indicator Lamp$
Transmission Indicator Dial$
QUANTITY
1
1
1
1
1
TRADE NO.
1
PC I94
2
PC74
2
1
1
1
PC 194
Fog Lamps
Safety Belt Warning?
Safety Belt Warning$
Daytime Running Lights Indicator?
Daytime Running Lights Indicator$
Anti-lock Warning Indicator?
Anti-lock Warning Indicator$
Air Bag?
Air Bag$
?With Standard Cluster
$With Digital Cluster
2
2
PC74
PC94
PC74
PC161
PC74
PC74
PC 194
PC 194
GE885
PC73
PC 194
PC74
PC161
PC74
PC 194
PC74
PC194
Fuses and Circuit Breakers
6941
€3
I
SHUNT
SHUNT
CIGLTWDM
GAGES
E3
AUX
HTR
A/C
STOPlHAZ
20
20
HRNlTL LPS
Fuse Legend
0
0
5 Amp -Tan
7.5 Amp - Brown
10 Amp - Red
15 Amp -Blue
0
0
0
15 Amp -Blue
20 Amp - Yellow
25 Amp - Clear
30 Amp - Green
NAME
INST LPS
CIRCUITS
PROTECTED
FUSE
Instrument Panel Lamps,
Radio Dial Lamps, Heater
Lamps
10 Amp
Power Door Locks, Power
Seat
CIG LTR/DM Digital Clock, Cigarette
Lighter, Dome Lights,
Radio Memory, Glove Box
Lamp
Instrument Cluster Gages,
GAGES
Brake Switch, Audio
Alarm, Headlight Switch
Illumination, Ash Tray
Illumination, Cruise
Control
Auxiliary Heater-Rear A/C
AUX
HTR-A/C
(if equipped)
STOP-HAZ
Stop Lamps, Hazard Flash,
Digital Instrument Cluster
Headlamp Switch, Tail and
HORNEL
Parking Lamps, Horn
LMPS
Relay
30 Amp
PWR ACCY
RADIO
Direction Signal Flash,
Back Up Lamps
Front Heater & Air
Conditioning
Radio
ECM B
Engine Control Module
ECM I
Engine Control Module
PWRWDO
AIR BAG
WIPER
Power Windows
Air Bag
Windshield Wiper
BRAKE
Anti-Lock Brake System,
Speedometer
Fog Lamps
TURN-B/U
HTR A/C
FOG
LAMPS * * *
CIRCUIT
BREAKER
20 Amp
20 Amp
25 Amp
20 Amp
20 Amp
20 Amp
20 Amp
10 Amp
15 Amp
10 Amp
30 Amp
10 Amp
25 Amp
6-73
15 Amp
15 Amp
NAME
DRL**
Power
PWR
MIRRORS*
TRAILER*
CIRCUITS
PROTECTED
FUSE
Canadian Daytime Running
Lights
Mirror
10 Amp
Trailer
Wiring
30 Amp
Harness
CIRCUIT
BREAKER
3 Amp
*In-line fuse
**Canada only
***In-line fuse (certain models)
Service ReplacementPart and Filter
Recommendations
4.3L (Z)
4.3L (W)
PF52
PF52
A773C
A1163C
CV789C
cv774c
SPARK PLUGS*
FUEL FILTER
.CR43TSM
.CR43TSM
GF48 1
RADIATOR CAP
RC36
GF48 1
RC36
ENGINE (VIN)
OIL FILTER
AIR CLEANER
FILTER
PCV VALVE
*Use copper-cored resistor type spark plugs.
6-74
Air Conditioning Refrigerants
Not all air conditioning refrigerants are the same. If the air conditioning
system in your vehicleneeds refrigerant, be sure the proper refrigerant is
used. If you’re not sure, ask your GM dealer. For additional information, see
your “Warranty andOwner Assistance Information” booklet.
Air Conditioning Refrigerant Capacity
TYPE
R- 134a
R- 1 34a
QUANTITY*
2.00 lbs. (.91 kg)
3.00 lbs. ( I .36 kg)
*All Quantities Are Approximate
**Front A/C Only
***Front & Rear A/C
NOTICE:
R-134a refrigerant is not compatible with
R-12 refrigerant in
an air conditioning system.R-12 in an R-134a systemwill cause
compressor failure, refrigerant oil sludge, or poor
air
conditioning system performance.
6-75
Notes
Scheduled Maintenance Services
Section
This section covers the maintenance requiredfor your vehicle. Your vehicle
needs these services to retain its safety, dependability, and emission control
performance.
A Word About Maintenance . . . . . . , . . . . . . . . . . . . . . . . . . . . . . . . . . . 7-2
Your Vehicle and the Environment . . . . . . . . . . . . . . . . . . . . . . . . . . . . . 7-2
Scheduled Maintenance Services . . . . . . . . . . . . . . . . . . . . . . . . . . . . . . . 7-3
Selecting The Proper Maintenance Schedule . . . . . . . . . . . . . . . . . . . 7-3
Maintenance Schedule I . . . . . . . . . . . . . . . . . . . . . . . . . . . . . . . . 7 4
MaintenanceScheduleII . . . . . . . . . . . . . . . . . . . . . . . . . . . . . . . . 7-6
Explanation of Scheduled Maintenance Services . . . . . . . . . . . . . . . . 7-7
Owner Checks and Services . . . . . . . . . . . . . . . . . . . . . . . . . . . . . . . . . 7-10
At Least Once a Month . . . . . . . . . . . . . . . . . . . . . . . . . . . . . . . . . . . 7-10
At Least Once a Year . . . . . . . . . . . . . . . . . . . . . . . . . . . . . . . . . . . 7-10
Periodic Maintenance Inspections . . . . . . , . . . . . . . . . . . . . . . . . . . . 7-1 2
Recommended Fluids & Lubricants . . . . . . . . .
. . . . . . . . . . . . . . 3-13
Maintenance Record . . . . . . . . . . . . . . . . . . . . . . . . . . . . . . . . . . . . 7-15
Service Station Checks . . . . . . . . . . . . . . . . . . . . . . . . . . . . . . . . . . . . 7-16
1
.
I
protection
PJan
Have you purchased theGM Protection Plan?The Plan supplements
your new vehicle warranties. See your Vehicle dealer for details.
7-1
A Word About Maintenance
We at General Motors want to help you keep your vehicle
in good working
condition. But we don’t know exactly how you’lldrive it. You may drive
very short distances onlya few times a week. Or you may drive long distances
all the time in very hot, dusty weather. You may use your vehicle in making
deliveries. Oryou may drive it to work, to do errands, or in many other ways.
Because of all the different ways people usetheir GM vehicles, maintenance
needs vary. You may even need more frequent checks and replacements than
you will find in the schedules in this section. So please read this section and
note how you drive. If you have any questions on how to keep your vehicle
in good condition, see your GM dealer, the place manyGM owners choose
to have their maintenance workdone. Your dealer can be relied upon to use
proper parts and practices.
Your Vehicle And The Environment
Proper vehicle maintenance not only helps keep your vehicle
in good
working condition, but it also helps the environment. All recommended
maintenance procedures are important. Improper vehicle maintenanceor the
removal of important components can significantly affect the quality
of the
air we breathe. Improper fluidlevels or even the wrong tire inflation can
increase the level of emissions from your vehicle.To help protect our
environment, and to help keep your vehicle good
in condition, please
maintain your vehicle properly.
If you are skilled enough to do some work on your vehicle, you will
probably want to get theservice information GM publishes. You will find a
list of publications and how to get them
in Section 8, Customer Assistance
Information. See “Service Publications’’in the Index.
The Maintenance Record provides a place for you to record the maintenance
performed on your vehicle. Whenever any maintenance is performed, be
sure to write it down in this section. This will help you determine when your
next maintenance should bedone. In addition, it is a good idea to keep your
maintenance receipts. They may be needed to qualify your vehiclefor
warranty repairs.
7-2
Scheduled Maintenance Services
This part tells you the maintenance services you should have done and when
you should schedule them. Your GM dealer knows your vehicle best and
wants you tobe happy with it. If you go toyour dealer for all your service
needs, you’ll know that GM-trained and supportedservice people will
perform the work using genuine GM parts.
These schedules are for vehicles that:
carry passengers and cargo within the recommended limits. You will
find these limits on your vehicle’s Certification Label. See “Loading
Your Vehicle” inthe Index.
-
are driven on regular road surfaces, and within legal driving limits, as
described in Section 4, Your Driving and the Road.
use the proper fuel. See “Fuel” in the Index.
Selecting TheProper Maintenance Schedule
Your driving conditions and how you use your vehicle will help you
determine which schedule to use. The schedules are found later in this
section.
MAINTENANCE SCHEDULE I
Is any one of these true for your vehicle?
Most trips are less than 4 miles (6 kilometers).
Most trips are less than 10 miles (16 kilometers) and the outside
temperatures are below freezing.
The engine is at low speed most of the time (as in stop-and-go traffic,
door-to-door delivery, or other commercial uses).
You operate in dusty areas.
You tow a trailer.
If any one (ormore) of these is true for your driving, follow Schedule I. The
chart for ScheduleI has plus signs (+).
MAINTENANCE SCHEDULE I1
Follow Schedule 11 ONLY if none of the above conditions are true. The
chart for Schedule I1 has dots (e).
ervice
MAlNTENANCE SCHEDULE I
Item
No.
1
2
3
or
4
5
6
7
8
9
10
11
12
13
Axle
14 Drive
t
t
t
t
t
t
15 Brake Systems Inspection**
* AI Emission Control Service
**
SI e “Explanation of Scheduled Maintenance Services” in the Index
$ Tt e California Air Resources Board has determined that thefailure to perform this
m lintenance item will notnullify the emission warranty orlimit recall liability prior to the
cc mpletion of vehicle useful life. General Motors, however, urges thatall recommended
m lintenance servicesbe performed at the indicated intervals and the maintenance be
re :orded.
T I 001
7-4
MAINTENANCE SCHEDULE I (continued)
~
~~
~~
~
~~
THE SERVICES SHOWN ONTHIS CHART UP TO 60,000 MILES (100 000 km) ARE TO BE
DONE AFTER 60,000 MILES AT THE SAME INTERVALS.
T1002
MAINTENANCE SCHEDULEI1
Item
Service
No.
Miles (000)
1 Engine Oil Change*-Every
12 Months, or
Oil Filter Change*-Every
12 Months, or
2 Chassis Lubrication-Every
12 Months, or
-
3 Cooling System Service*
-Every 24 Months or
4 Air Cleaner Filter Replacement*
-
5 Front Wheel Bearing Repack
(2WD Only)
6 Transmission Service **
7 Fuel Filter Replacement*$
8 Spark Plug Replacement*
9 ’ Spark Plug Wire Inspection*
10 Engine Timing Check*$
11 1 Fuel lank, Cap and Lines
I Inspection*$
12 Engine Accessory Drive Belt
1
-i Inspection*
13 1 Tire and Wheel Rotation
Drive Axle Service
~
~
Brake Systems Inspection**
n Emission Control Service
ee “Explanation of Scheduled Mai ltenance Services” in the Index
l e California Air Resources Boardlas determined that the failureto perform this
aintenance item will not nullify the3mission warranty or limit recall liability priorto the
completion of vehicle useful life. General Motors, however, urgesthat all recommended
maintenance servicesbe performed at the indicated intervals and the maintenance be
recorded.
THE SERVICES SHOWN ON THIS CHART UP TO 60,000 MILES (100 000 km) ARE TO BE
DONE AFTER 60,000 MILES AT THE SAME INTERVALS.
T I 003
Explanation Of Scheduled Maintenance Services
Below are explanations of the services listed in the maintenance charts.
The proper fluids and lubricants to use are listed in this section. Make sure
whoever services your vehicle uses these. All parts should be replaced and
all necessary repairs done before you or anyone else drives the vehicle.
1. ENGINE OIL AND OIL FILTER CHANGE*
-ALWAYS USE
API SERVICE SH OR SG ENERGY CONSERVING I1 OILS OF THE
PROPER VISCOSITY. The “SH” or “SG’ designation may be shown
alone or in combination with others, such as “SH/CD”, or “SH, SG,
CD,” or “SG/CD”, etc. To determine the preferred viscosity oil for your
vehicle’s engine see“Engine Oil” in the Index.
2. CHASSIS LUBRICATION-Lubricate the front suspension,
steering linkage, transfer case shift linkage, parking brake cable guides,
and brake pedal springs at the intervals specified on the proper
maintenance schedule, or at every engine oil change, whichever comes
first.
Ball joints and king pin bushings should not be
lubricated unless their
temperature is 10°F (-12°C) or higher. When the weather iscold, let
them warm up before lubricating them or they could be damaged.
Also, be sure to check all the vehiclefluid levels at this time.
3. COOLING SYSTEM SERVICE*- Drain, flush and refill the
system with new or approved recycled coolant conforming to “GM
Specification 6038-M”. See “Engine Coolant” in the Index for the
proper coolant and mixture to use in your vehicle.
Also inspect the hoses and replace them if they are cracked, swollen, or
deteriorated. Clean the outside of the radiator and air conditioning
condenser. Wash the radiator neck. To ensure proper operation,
pressure test the radiator and cap.
4. AIR CLEANER FILTER REPLACEMENT*- Replace at
specified intervals. Ask your dealer for the proper replacement
intervals for your driving conditions.
5. FRONT WHEEL BEARING REPACK
(2-WHEEL DRIVE ONLY)- Clean and repack thefront wheel
bearings at each brake relining, or at the specified interval, whichever
comes first.
* An Emission Control Service
7-7
6. TRANSMISSION SERVICE: - Change the transmission fluid and
filter every 15,000 miles (25 000 km) if the vehicle is mainly driven
under one or more of these conditions:
0
In heavy city traffic.
0
Where the outside temperature regularly reaches90°F (32 O C ) or
higher.
0
In hilly or mountainous terrain.
Frequent trailer pulling.
0
Uses such as taxi, police, delivery or other commercial service.
If the vehicle is not used mainly under any
of these conditions, change
the fluid and filter every 30,000 miles (50 000 km). See “Automatic
Transmission Fluid” in theIndex for more information.
7. FUEL FILTER REPLACEMENT*$- Replace the fuel filter at the
specified interval or sooner if clogged.
8. SPARK PLUG REPLACEMENT*- Replace spark plugs withthe
type listed inSection 6 . See “Specification Charts’’ inthe Index.
9. SPARK PLUG WIRE INSPECTION*- Clean wires andinspect
for burns, cracks or other damage. Check the wireboot fit at the
distributor and at the spark plugs. Replace wires as needed.
10. ENGINE TIMING CHECK AND DISTRIBUTOR CHECK*$Adjust timing to underhood label specifications. Inspect theinside and
outside of the distributor cap and rotorfor cracks, carbon tracking and
corrosion. Clean or replace as needed.
11. FUEL TANK, CAP AND LINES INSPECTION*$-Inspect the
fuel tank, cap and lines for damage or leaks. Removefuel cap,inspect
gasket for an even filler neck imprint, and anydamage. Replace parts
as needed.
12. ENGINE ACCESSORY DRIVE BELT INSPECTION*- Inspect
belt. Look for cracks, fraying, wear, and proper tension.Adjust or
replace as needed.
* An Emission Control Service
$ The California Air Resources Board has determined that the failure
to perform this
maintenance item will not nullify the emission warranty or limit recall liability prior
to the
completion of vehicle useful life. General Motors, however, urges that
all recommended
maintenance servicesbe performed at the indicated intervalsand the maintenance be
recorded.
7-8
13. TIRE AND WHEEL ROTATION AND INSPECTION- For
proper wear and maximum tire life, rotate tires at the first 6,000 miles
(10 000 kilometers) for Schedule I or 7,500 miles (12 500 kilometers)
for Schedule I1 and then every 15,000 miles (25 000 kilometers)
thereafter. Follow theinstructions and patterns shown inSection 6.
Check tires for uneven wear or damage. If irregular or premature wear
is apparent, check wheel alignment. Also, check for damaged wheels.
See “Tires” in the Index for more information.
14. DRIVE AXLE SERVICE- Check readfront axlefluid level and add
as needed. Check constant velocity joints and axle seals for leaking.
Locking Differential- Drain fluid at first oil change and refill.
Check fluid level and add as needed at subsequent oilchanges. In
dusty areas or trailer towing applications, drain fluid at every
15,000 miles (24 135 kilometers) and refill.?
Standard Differential- Check fluid level and addas needed at
every oil change. In dusty areas or trailer towing applications,
drain fluid every 15,000 miles (24 135 kilometers) and refill.?
15. BRAKE SYSTEM INSPECTION -When the engine oil is changed,
inspect the lines and hoses for proper hookup, binding, leaks,cracks,
chafing, etc. Check the parking brake adjustment, and the fluidlevel in
the master cylinder. A lowfluid level can indicate worn disc brake pads
which may needto be serviced.?
When the wheels are removed for rotation, inspect disc brake pads for
wear and rotors for surface condition. Also inspect drum brake linings
for wear and cracks. Inspect other brake parts, includingdrums, wheel
cylinders, parking brake, etc. at the same time.
Inspect brakes more often if driving habits or conditions result
in
frequent braking.
-t- A fluid loss in these systems may indicatea problem. Have them inspected and
repaired at once.
7-9
Owner Checksand Services
Listed below are owner checks and services which would be madeat the
time period specified tohelp ensure proper safety, emission performance,
and dependabilityof your vehicle.
Be sure any necessary repairs are completed at
once. Whenever any fluids
or lubricants are added to your vehicle, make sure they are the proper
ones,
as shown in this section.
At Least Oncea Month
Tire Inflation Pressure Check
- Check the tires for proper inflation. If
they are low, inflate them to the level specified on the Certification label.
See “Inflation-Tire Pressure” in the Index.
At Least Oncea Year
Key Lock Cylinder Lubrication- Lubricate key lockcylinders with one
of the lubricants recommended in this section.
Transmission Neutral or Clutch Start Switch Operation
-
1. Before you start, be sure you have enough room around the vehicle.
2. Firmly apply both themanual parking brake, and the regularbrake. See
“Brakes” and “Parking Brake” in the Index. Do not use the accelerator
pedal.
3. Be ready to turn off the engine immediately if it starts.
4. Try to start the engine in each gear.The starter should work onlyin “P,’
(Park) or “N” (Neutral).
Steering ColumnLock Operation -While parked, try to turn the keyto
LOCK in each gearshift position.
The key should turn to LOCK only when the gearshift is in “ P ’
(Park).
On all vehicles,the key should come out only in LOCK.
Parking Brake and Transmission
“ P ’ (Park) Mechanism Operation
-
Park on a fairly steep hill, with the vehicle facing downhill. Keeping your
foot on the regular brake, set the manual parking brake.
To check the parking brake: With the engine running and the
transmission in
(Neutral), slowly remove foot pressure from the
regular brake pedal. Do this until the vehicle is held by the parking
brake only.
“ N 7
To check the “P,’ (Park) mechanism’s holding ability: Apply the regular
brake and shift to “ P 7 (Park). Release the manual parking brake, then
slowly release the regular brake.
Lap and Shoulder Belts Condition and Operation
- Inspect belt system,
including: webbing, buckles, latch plates, retractors, guide loops and
anchors. Have a belt assembly replaced if the webbing has beencut or
otherwise damaged.
Body Lubrication Service- Lubricate all body door hinges. Lubricate the
body hood, fuel doorand rear compartment hinges, latches and locks
including interior glove box and console doors, and any moving seat
hardware. Lubricate the hood safety lever pivot and prop rod pivot. More
frequent lubrication may be required when exposed to a corrosive
environment.
7-11
Periodic Maintenance Inspections
Listed below are inspections and services which should be performedat
least twice a year (for instance, each spring and fall). You should let your
GM dealer’s service department or other qualified service center do these
jobs. Make sure any necessary repairs are completedat once.
Steering and Suspension Inspection?- Inspect front and rear suspension
and steering system for damaged, loose or missing parts, signs of wear or
lack of lubrication. Inspect power steering lines and hosesfor proper
hook-up, binding, leaks, cracks, chafing, etc. Lubricate the steering linkage.
Accelerator Control System- Lubricate all pivot points with
engine oil,
except the TBI throttle shaft. Do not lubricate the cam pulley.Remove all
external deposits from pulley. Do not oil any accelerator or cruise control
cables. Replace any cables that have high effort or excessive wear.
Exhaust System Inspection-Inspect the complete system. Inspect the
body near the exhaust system. Lookfor broken, damaged, missingor
out-of-position parts, as well as open seams, holes, loose connections or
other conditions which could causea heat buildup in thefloor pan or could
let exhaust fumes seep into the passenger compartments. See “Engine
Exhaust’’ in the Index.
Drive Axle Service- Check readfront axle fluid level and addas needed.
Check constant velocity joints and axle seals for leaking.
Transfer Case (all-wheel drive) Inspection?-Every 12 months or at oi.1
change intervals, check front axle and transfer case and addlubricant when
necessary. Oilthe control lever pivot point (exceptL Van) and all exposed
control linkage. Check vent hose at transfercase for kinks and proper
installation.
-f- A fluid loss in these systems may indicate a problem. Have them inspected and
repaired at once.
7-12
Recommended Fluids& Lubricants
NOTE: Fluids and lubricants identified below by name, part number or
specification may be obtained from your GM Dealer.
USAGE
Engine Oil
Engine Coolant
Hydraulic Brake Systems
Parking Brake Cable
Power Steering System
Manual Steering Gear
Automatic Transmission
Differential:
a. Standard -Front and
Rear Axle
b. Locking
Transfer Case
Column Shift
FLUIDLUBRICANT
API service SH or SG Energy
Conserving I1 oils of the proper
viscosity. The “SH” or “SG’
designation may be shown alone or in
combination with others, such as
“SH/CD”, or “SH, SG, CD,” or
“SG/CD”, etc. To determine the
preferred viscosity oil for your
vehicle’s engine ( e g SAE 5W-30).
See “Engine Oil” in the Index.
Mixture of water and a good quality
ethylene glycol base antifreeze or an
approved recycled coolant conforming
to GM Specification GM-6038-M
(GM Part No. 1052103).
Delco Supreme I1 brake fluid (GM
Part No. 1052535 or DOT-3).
Chassis lubricant meeting
requirements of NLGI Grade 2,
Category LB or GC-LB or (GM Part
No. 1052497).
GM Hydraulic Power Steering Fluid
(GM Part No. 1052884) or equivalent.
GM Lubricant (GM Part
No. 1052182) or equivalent.
DEXRON @-I11 is preferred, if
unavailable use DEXRON @-HE .
a. SAE-80W-90 GL-5 gear lubricant
(GM Part No. 1052271).
b. SAE-80W-90 gear lubricant (GM
Part No. 1052271).
DEXRON@-IIE Automatic
Transmission Fluid.
Chassis lubricant meeting
requirements of NLGI Grade 2,
Catagory LB or GC-LB (GM Part
No. 1052497).
7- 13
USAGE
Hood Latch Assembly:
a. Pivots and spring anchor
b. Release Pawl
Front Wheel Bearings
Automatic Transmission Shift
Linkage, Floor Shift Linkage,
Hood and Door Hinges, Body
Door Hinge Pins, Folding Seat,
Fuel Door Hinge
Key Lock Cylinders
Chassis Lubrication
Windshield WasherSolvent
Weatherstrips
Gas Line
FLUIDLLUBRICANT
a. Engine oil (GM Part
No. 1050109).
b. Chassis lubricant meeting
requirements of NLGI Grade 2,
Catagory LB or (GM Part
No. 1052497 or equivalent) or
GC-LB .
Wheel bearing lubricant meeting
requirements of NLGI Grade2,
Catagory GC or GC-LB (GM Part
No. 1051344).
Engine Oil (GMPart No. 1050109).
GM Multi-Purpose lubricant
(GM PartNo. 12345120) or a
synthetic light weight engine oil
(SAE 5W-30).
Chassis lubricant meeting
requirements of NLGI Grade2,
Category LB or GC-LB (GM Part
No. 1052497).
GM Optikleen@washer solvent (GM
Part No. 105 15 15) or
equivalent.
Dielectric Silicone grease (GM Part
No. 12345579) or equivalent.
Gas Line De-Icer (GM Part
No. 1051516).
7-14
Maintenance Record
After each of the preceding Scheduled Maintenance Services is performed,
record the date, odometer reading, services performed (list item numbers)
and who performed the services in the appropriate column. In addition,
retain copies of your receipts. It is suggested that receiptsbe kept with your
Owner’s Manual.
TOO01
7- 15
Service Sfafion Checks
It is important for you or a service station attendant to perform these
under-hood checks at each fuel fill.
0
Check the engine oil level and addif necessary.
0
Check the engine coolant level and addif necessary.
0
Check the windshield washer fluid level and addif necessary.
See the Index under theseitems for information on how to check them.
7 - 1.6
Hood Release
Lever
Engine uil
See Page 6-9.
see Page 6-7.
Checkandadd
coolant only at
the coolant
recovery tank.
See Page 6-26.
Battery
TheDelco
Freedom battery
needsnowater.
See Page 6-35.
Cooling
System
I
' Windshield
Brake Fluid
Reservoir
Washer
Fluid
See Page 6-32.
See Page 6-31.
Automatic A
Transmission
Fluid
bower
Steering
Reservoir
See Page 6-20.
See Page 6-30.
Spare fire
Pressure
Fuel
Capacity
27 US. Gal.
(102 L.). Use
unleaded
gas
only. 87 octane
orhigher.
See Page 6-3.
CompactSpare
See Page 6-48.
i
Cold Tire
Pressure
See Tire Loadinglabelonthe
driver's door.
See Page 6-44.
7- 17
Notes
7- 18
.
.
r_
-
Customer Assistance Information
-
Section
Here you will find out how to contact GMC Truck if you need assistance.
This section also tells you how to obtain service publications and how to
report any safety defects.
Customer Satisfaction Procedure . . . . . . . . . . . . . . . . . . . . . . . . . . . . . . .
8-2
Customer Assistance for the Hearing or Speech Impaired (TDD) . . . . . 8-3
GM Participation in BBB AUTO LINE - Alternative Dispute Resolution
Program . . . . . . . . . . . . . . . . . . . . . . . . . . . . . . . . . . . . . . . . . . . . . . . .8-3
Reporting Safety Defects To the United States Government . . . . . . . . . . 8-4
Reporting Safety Defects To the Canadian Government . . . . . ,,.
8-5
r
I...
*.
’1
. ..
,.
r. .
Reporting Safety Defects To General Motors . . . . . . . . . . . . . . . . . . . . . 8-5
Roadside Assistance . . . . . . . . . . . . . . . . . . . . . . . . . . . . . . . . . . . . . . . . . 8-6
Courtesy Transportation . . . . . . . . . . . . . . . . . . . . . . . . . . . . . . . . . . . . . .
8-6
Service Publications . . . . . . . . . . . . . . . . . . . . . . . . . . . . . . . . . . . . . . . . . 8-7
8-1
Customer Satisfaction Procedure
Your satisfaction and goodwill are important to yourdealer and GMC
Truck. Normally, any concern with thesales transaction or the operation of
your vehicle will be resolved by your dealer’s
Sales or Service Departments.
Sometimes, however, despite the best intentionsof all concerned,
misunderstandings can occur. If your concern has not been resolved
to your
satisfaction, the following steps shouldbe taken:
STEP ONE - Discuss your concernwith a member of dealership
management. Normally, concerns can be quickly resolved at that level.If
the matter has already been reviewed with the
Sales, Service, or Parts
Manager, contact the owner of the dealership or the General Manager.
STEP TWO - If after contacting a member of dealership management, it
appears your concern cannot be resolvedby the dealership withoutfurther
help, contact your GMC TruckConsumer Relations Manager by calling
1-800-GMC-TRUCK (1-800-462-8782, Customer Assistance prompt.) In
Canada, contact GM of Canada Customer Assistance Center in Oshawa by
calling 1-800-263-3777 (English) or 1-800-263-7854 (French).
In Mexico, call (525) 254-3777. In Puerto Rico or U.S. Virgin Islands, call
1-809-763-1 3 15. In all other overseas locations, contact GM North
American Export Sales in Canada by calling 1-416-644-4 112. Asof
October 4, 1993, call 1-905-644-4 1 12.
For prompt assistance, please have the following informationavailable to
give the Customer Assistance Manager:
e Your name, address, home and business telephone number
e Vehicle Identification Number (This is available from the vehicle
registration or title, or the plate at the left topof the instrument panel
and visible throughthe windshield.)
e Dealership name and location
Vehicle delivery date and present mileage
Nature of concern
We encourage you to call the toll free number listed previouslyin order to
give your inquiry promptattention. However, if you wish to write GMC
Truck, write to:
GMC Truck Customer Assistance
3 1 E. Judson Street 1607-04
Pontiac, MI 48342-2230
Refer to your Warranty and Owner Information bookletfor addresses of
Canadian and GM overseas offices.
When contacting GMC Truck, please remember that your concern will
likely be resolved in the dealership, using the dealership’s facilities,
8-2
equipment and personnel. That is why we suggest you follow Step One first
if you have a concern.
Customer Assistancefor the Hearingor
Speech Impaired(TDD)
To assist customers who have hearing difficulties, GMC Truck has installed
special TDD (Telecommunication Devices for the Deaf) equipment at its
Customer Assistance Center. Any hearing or speech impaired customer who
has access to a TDDor a conventional teletypewriter (TTY) can
communicate with GMC Truckby dialing: In the UnitedStates,
1-800-GMC-TKTD (1-800-462-8583). (TDD users in Canada can dial
1-800-263-3830.)
GM Participation inBBB AUTO LINEAlternative Dispute Resolution Program
*
*This program may not be available in all states, depending on state law.
Canadian owners refer to your Warranty andOwner Assistance Information
booklet. General Motors reserves the right to change eligibility limitations
and/or to discontinue its participation in this program.
Both GMC Truck and your GMC Truck
dealer are committed to making
sure you are completely satisfied with your new vehicle. Our experience has
shown if a situation arises where you feel your concern has not been
adequately addressed, the Customer Satisfaction Procedure described earlier
in this section is very successful.
There may be instances where an impartial third-party can assist in arriving
at a solution to a disagreement regarding vehicle repairs or interpretation of
the New Vehicle Limited Warranty.To assist in resolving these
disagreements GMC Truck voluntarilyparticipates in BBB AUTO LINE.
BBB AUTO LINE is an out-of-court program administered by the Better
Business Bureau system tosettle disputes between customers and
automobile manufacturers. This program is available free of charge to
customers who currently own or lease a GM vehicle.
If you are not satisfied after following the Customer Satisfaction Procedure,
you may contact the BBB using the toll-freetelephone number, or write
them at the following address:
BBB AUTO LINE
Council of Better Business Bureaus
4200 Wilson Boulevard
Suite 800
Arlington, VA 22203
Telephone: 1-800-955-5100
To file aclaim, you will be asked to provide your name andaddress, your
vehicle identification number (VIN), anda statement of the nature of your
complaint. Eligibility is limited by vehicleage and mileage, and other
factors.
We prefer you utilizethe Customer Satisfaction Procedure before you resort
to AUTO LINE, but you may contact the BBB at any time. The BBB will
attempt to resolve the complaint by serving as an intermediary between you
and GMC Truck.If this mediation isunsuccessful, an informal hearing will
be scheduled where eligible customers may present their case to an
impartial third-party arbitrator.
The arbitrator will make a decision which you may acceptor reject. If you
accept the decision, GM will be boundby that decision. The entiredispute
resolution procedure should ordinarily take about forty days from
the time
you file aclaim until a decision is made.
Some state laws may require you to use this program before filing a claim
with a state-run arbitration program or in the courts. For further
information, contact the BBB at 1-800-955-5100 or the GMC Truck
Customer Assistance Center at 1-800-GMC-TRUCK ( 1-800-462-8782).
REPORTING SAFETY DEFECTS TO THE
UNITED STATES GOVERNMENT
If you believe that your vehicle hasa defect which couldcause a crash or
could cause injury or death, you should immediately informthe National
Highway Traffic Safety Administration(NHTSA), in addition to notifying
General Motors.
If NHTSA receives similar complaints, it may open an investigation, and if
it finds that a safety defect exists in a group of vehicles, it may order a recall
and remedy campaign. However, NHTSA cannot become involved in
individual problems between you, your dealer, or General Motors.
To contact NHTSA, you may either call the Auto Safety Hotline toll-free at
1-800424-9393 (or 366-0123 in the Washington, D.C. area)or write to:
NHTSA, U.S. Department of Transportation
Washington, D.C. 20590
You can also obtainother information about motor vehicle safetyfrom the
Hotline.
8 --4
REPORTING SAFETY DEFECTS TO THE
CANADIAN GOVERNMENT
If you live in Canada, and you believe that your vehicle has a safety defect,
you should immediately notify Transport Canada, in addition to notifying
General Motors of Canada Limited. You may write to:
Transport Canada, Box 8880
Ottawa, Ontario K l G 352
REPORTING SAFETY DEFECTS TO
GENERAL MOTORS
In addition to notifying NHTSA (or Transport Canada) in a situation like
this, we certainlyhope you’ll notify us. Please call us at
1-800-GMC-TRUCK (1-800-462-8782)
, or write:
GMC Truck Consumer Relations
3 1 E. Judson Street 1607-04
Pontiac, MI 48342-2230
In Canada, please call us at 1-800-263-3777
(French). Or, write:
General Motors of Canada Limited
Customer Assistance Center
1908 Colonel Sam Drive
Oshawa, Ontario LlH 8P7
(English) or 1-800-263-7854
Roadside Assistance
GMC Truck’s Roadside Assistance provides stranded owners with
over-the-phone roadside repairs or towing service for disabled vehicles.
This service combines the efforts of technically trained telephone
representatives with a network of GMC Truck’sdealer services.
Just dial GMC Truck Roadside Assistance at 1-800-GMC TRUCK
(1-800-462-8782, Roadside Assistance prompt) to reach a qualified
representative who can assist you in repair or arrange a tow. Other
recommended services can also be arranged for situations such as retrieving
locked-in keys, changing a tire, or delivering gasoline, at a charge to the
owner. We also provide dealer information at no charge such as location of
the nearest GMC Truck dealer and their hours of operation.
Roadside Assistance is available 24 hours a day, seven days a week, 365
days a year, including weekends and holidays. Should you have any
questions about roadside assistance, call the GMC Truck Roadside
Assistance Center or contact your dealer.
Courtesy Transportation
0
The GMC Truck Commitment Plus Program offers courtesy
transportation for customers when obtaining warranty service. The
Courtesy Transportation Program is available to retail purchasers of
Commitment Plus eligible 1994 GMC light duty trucks. This program
is offered in conjunction with the 36 month/36,000 mile BUMPER TO
BUMPER New VehicleLimited Warranty.
0
In Canada, please consult your GM Dealer for information on
courtesy transportation.
COURTESY TRANSPORTATIONINCLmES:
0
One way SHUTTLE RIDE from the dealership (up to 10 miles) for
same-day warranty repairs.
A loaner vehicle will be made available for overnight warranty repairs
up to a 5 day maximum, or a $30 allowance for a rental vehicle, cab,
bus or other transportation in lieu of a loaner. (Bringing vehicles in late
in the day, for service on the next day, does notconstitute overnight
repairs.)
0
GAS allowance of $10 a day for rides provided by another person (i.e.,
friend, neighbor, etc.) in lieu of rental for overnight warranty repair up
to 5 day maximum.
Note: All Courtesy Transportation arrangementswill be administered
by your GMC Truck dealership service management. All requests
should reflect actual costsup to and not to exceed the maximum
allowable dollar limits.
8-6
The Commitment Plus Courtesy Transportation Program is not part of
the BUMPER TO BUMPER Limited Warranty. GMC Truck reserves
the right to make any changes or discontinue the Courtesy
Transportation Program at any time without notification.
For additional program details contact your GMC Truck dealer.
Note: Because of insurance liability considerations, age restrictions
exist in some states when loaning dealer owned vehicles or obtaining
vehicles from rental establishments.
See your dealerfor details.
Service Publications
Information on how to obtain Product Service Publications (PSP’s),
Subscriptions, Indexes and Summaries as described below is applicable only
in the fifty U.S. States (and the District of Columbia) and only for light
trucks with GVWR less than 10,000 pounds (4536 kg).
In Canada, information pertaining to Product Service Bulletins and Indexes
can be obtained by writing to:
General Motors of Canada Limited
Service Publications Department
1908 Colonel Sam Dr.
Oshawa, Ontario L l H 8P7
GMC Truck regularly sends its dealers useful service bulletins about GMC
Truck products. GMC Truck monitors product performance in the field. We
then prepare bulletins for servicing our products better. Now, you canget
these bulletins too.
Bulletins cover various subjects. Some pertain to the proper use and care of
your vehicle. Some describe costly repairs. Others describe inexpensive
repairs which, if done on time with the latest parts, may avoid future costly
repairs. Some bulletins tell a technician how to repair a new or unexpected
condition. Others describe a quicker way to fix your vehicle. They can help
a technician service your vehicle better.
Most bulletins apply to conditions affecting a small number of cars or
trucks. Your GMC Truck dealer or a qualified technician may have to
determine if a specific bulletin applies to your vehicle.
Individual PSP’s
If you don’t want to buy all the PSP’s issued by GMC Truck for all models
in the model year, you can buyindividual PSP’s, such as those which may
pertain to a particular model. To do this, you will first need to see our index
of PSP’s. It provides a variety of information. Here’s what you’ll find in the
index and how you can get one:
8-7
What You’ll Find in the Index:
0
A list of all PSP’s publishedby GMC Truck in a model year. PSP’s
covering all models of GMClight trucks are listed in the same index.
Ordering information so you can buy the specific PSP’s you may want.
Price information for the PSP’s youmay want to buy.
How You Can Get an Index:
Indexes are published periodically. Mostof the PSP’swhich could
potentially apply to the most recent GMC Truck models willlisted
be in the
most recent publicationfor that model year.This means you may wantto
wait until the end of the model year before orderingan index, if you are
interested in buying PSP’s pertaining to a current model yearcar or truck.
Some PSP’s pertaining toa particular model year vehicle may be publishedin
later years, and these would be listed
in the later year’s index. When you order
an index for a model year that is not over yet, we’ll send you the most recently
published issue. Check the ordering form for indexes
for earlier model years.
Cut out the ordering form, fill it out, and mail it in. We will then see to it
that an index is mailed to you.There is no charge for indexes for the
1989- 1994 model years.
Toll-Free Telephone Number
If you want an additionalordering form for an index or asubscription,just
call toll-free and we’ll be happy to send youone. Automated recording
equipment will take your name and mailingaddress. The number to call is
1-800-551-4123.
Copies at Participating Dealers
Copies of Indexes and individual PSP’sare at your participating GMC
Truck dealer. You can ask to see them.
A Very Important Reminder
These PSP’s are meant for technicians. They are not meant for the
“do-it-yourselfer”. Technicians have the equipment, tools, safety
instructions, and know-how to do a job quickly and safely.
GMC Truck reserves the right to
change these procedures withoutnotice
after November, 1992.
GMC Truck Service Publications
You can get these Product Service Publications by using the orderform. You
can also get Service Manuals and Owner Publications.
Notes
I
8-9
1994 SERVICE PUBLICATIONS
ORDERING INFORMATION
You can get manuals that tell how to operate and service your vehicle.
To order them, fill out the order form on the next page and send it to
the address below.
GMCTruck Service Publications
Post Office Box 436006
Pontiac,MI48343
If you have questions or would like to order using your credit card,
call us TOLL FREE at 1-800-627-5699.
From outside the Continental United States, please call 1-31 3-455-801
6
GLOVEBOXLITERATUREFORYOURSAFARI
Manual
Manual
Owner’s
X-94 10
$10.00
X-94 Manual
Warranty
17
$ 3.00
You can alsoorder the GloveBoxLiterature
in a vinylportfoliowhich
includesall of thesepublications. Askforformnumber15959036-it
costs $15.00.
SERVICEMANUALSFORALL
LIGm
bum TRUCKS
Model
Models
C/K 1994
NATP-9431K
$120.00
$1NATP-9457K
1994 G Van
20.00
1994 P3 Models & Models
P/G
NATP-9432K
20.00
$1
Safari
1994
NATP-9430K
$120.00
1994NATP-9429K
STT Models
20.00
$1
Includes:ServiceManual,UnitRepairManual,Driveability,Emissions,
andElectricalDiagnosisManual.
PRODUCTSERVICEPUBLICATIONS
Description
1991 Model Year Index
PSP I 91
1992 Model Year Index
PSP I 92
1993 Model Year Index
PSP I 93
For 1994 Call 1-800-782-4356
1994 Model Year Index
PSP I 94
1994 Model Year Product Service
Subscription
Publication
94
PSP
0 Above Subscription With Binder
PSP 948
Binder Only
PSP B
Prices Subject To Change Without Notice.
Price
Free
Free
Free
Free
TBD
TBD
TBD
W
..
0
+
Index
A
AirBag ........................................................
1-25
Servicing Your Air Bag-Equipped Vehicle ......................... 1-29
Aircleaner ..................................................... 6-19
Airconditioning .................................................
3-5
FanLever ....................................................
3-5
FunctionLever . . . . . . . . . . . . . . . . . . . . . . . . . . . . . . . . . . . . . . . . . . . . . . . .3-5
Maintenance . . . . . . . . . . . . . . . . . . . . . . . . . . . . . . . . . . . . . . . . . . . . . . . . . 6-42
Rear . . . . . . . . . . . . . . . . . . . . . . . . . . . . . . . . . . . . . . . . . . . . . . . . . . . . . . . . . 3-6
Refrigerant Capacity ...........................................
6-75
TemperatureLever .............................................
3-5
All-WheelDrive . . . . . . . . . . . . . . . . . . . . . . . . . . . . . . . . . . . . . . . . . . . 2-26,6-24
Alternative Dispute Resolution Program . . . . . . . . . . . . . . . . . . . . . . . . . . . . . . . 8-3
Antenna, Fixed Mast .............................................
3-25
Anti-lock Brakes (See “Brakes”)
Appearancecare ................................................
6-54
MaterialsChart ...............................................
6-62
Ashtrays ....................................................... 2-48
AssistHandles ..................................................
2-49
Audiosystems . . . . . . . . . . . . . . . . . . . . . . . . . . . . . . . . . . . . . . . . . . . . . . . . . . . 3-8
AMRadio . . . . . . . . . . . . . . . . . . . . . . . . . . . . . . . . . . . . . . . . . . . . . . . . . . . .3-9
AM-FM Stereo Audio Cassette System with Equalizer................ 3-16
AM-FM Stereo Audio Cassette System ............................
3-13
AM-FM Stereo Audio Compact Disc (CD) System
................... 3-20
AM-FM Stereo Audio System ...................................
3-11
Anti-TheftFeature ............................................ 3-23
Cassette Tape Player . . . . . . . . . . . . . . . . . . . . . . . . . . . . . . . . . . . . . . . . . . . 3-15
CompactDiscCare ............................................
3-25
AutomaticTransmission ..........................................
2-17
Fluid .......................................................
6-20
Axle
Front .......................................................
6-25
Rear . . . . . . . . . . . . . . . . . . . . . . . . . . . . . . . . . . . . . . . . . . . . . . . . . . . . . . . . 6-24
I
Battery . . . . . . . . . . . . . . . . . . . . . . . . . . . . . . . . . . . . . . . . . . . . . . . . . . . . . . . . 6-35
Belts (See “Safety Belts”)
Better Business Bureau
Mediation . . . . . . . . . . . . . . . . . . . . . . . . . . . . . . . . . . . . . . . . . . . . . . . . . . . . 8-3
Brakes
Adjustment ..................................................
6-34
Anti-lock . . . . . . . . . . . . . . . . . . . . . . . . . . . . . . . . . . . . . . . . . . . . . . . . . . . . 4-6
Fluid .......................................................
6-33
Hydro-Boost System (Hydraulic Pump) ...........................
6-35
MasterCylinder ..............................................
6-32
Parking ..................................................... 2-20
PedalTravel .................................................
6-34
RearDrum . . . . . . . . . . . . . . . . . . . . . . . . . . . . . . . . . . . . . . . . . . . . . . . . . . . 6-34
Replacingparts ...............................................
6-35
System Warning Light .........................................
2-55
1
Trailer ...................................................... 4-26
Wear Indicators . . . . . . . . . . . . . . . . . . . . . . . . . . . . . . . . . . . . . . . . . . . . . . .6-34
4-5
Braking .........................................................
In Emergencies ................................................
4-7
. . . . . . . . . . . . . . . . . . . . . . . . . . . . . . . . . . . . . . . . . . .2-12
Break-In.NewVehicle
BulbReplacement ...............................................
6-36
6-36
Halogen .....................................................
ReplacementChart ............................................
6-70
C
CarbonMonoxide ..........................................
2.24.7.27
6-68
Capacities and Specifications .......................................
CassetteTapePlayer .............................................
3-15
CatalyticConverter .............................................. 6-43
Certificatioflire Label ...........................................
6-44
5-19. 5-24
Changing A Flat Tire ........................................
Charging System Light . . . . . . . . . . . . . . . . . . . . . . . . . . . . . . . . . . . . . . . . . . . 2-59
Chemical Paint Spotting ...........................................
6-61
ChildRestraints .................................................
1-37
CHMSL (Centered High Mounted Stop Lamp)
.........................
6-40
Cigarette LightedAshtrays .........................................
248
Cleaning . . . . . . . . . . . . . . . . . . . . . . . . . . . . . . . . . . . . . . . . . . . . . . . . . . . . . . 6-55
.
Glass .......................................................
6-58
InsideofVehicle .............................................. 6-55
Instrumentpanel ..............................................
6-58
Outside of Vehicle .............................................
6-59
6-57
Special Problems ..............................................
Vinyl or Leather . . . . . . . . . . . . . . . . . . . . . . . . . . . . . . . . . . . . . . . . . . . . . .6-58
Windshield . . . . . . . . . . . . . . . . . . . . . . . . . . . . . . . . . . . . . . . . . . . . . . . . . . 6-58
Clock
AMRadio . . . . . . . . . . . . . . . . . . . . . . . . . . . . . . . . . . . . . . . . . . . . . . . . . . . 3-10
AM-FM Stereo Audio Compact Disc (CD) System
. . . . . . . . . . . . . . . . . . . 3-21
AM-FM Stereo Audio System . . . . . . . . . . . . . . . . . . . . . . . . . . . . . . . . . . . 3-12
AM-FM Stereo Audio System with Cassette Deck................... 3-15
. . . . . . . . 3-18
AM-FM Stereo Audio System with Cassette Deck and Equalizer
ComfortControls .................................................
3-2
CoolingSystem . . . . . . . . . . . . . . . . . . . . . . . . . . . . . . . . . . . . . . . . . . . . . . . . . 6-69
Crankcase ......................................................
6-69
CruiseControl . . . . . . . . . . . . . . . . . . . . . . . . . . . . . . . . . . . . . . . . . . . . . . . . . . 2-35
Increasespeed . . . . . . . . . . . . . . . . . . . . . . . . . . . . . . . . . . . . . . . . . . . . . . .2-38
2-39
OnHills .....................................................
2-39
Passing .....................................................
2-39
Reducespeed ................................................
ResumeaSetSpeed ...........................................
2-37
ToGetOutOf . . . . . . . . . . . . . . . . . . . . . . . . . . . . . . . . . . . . . . . . . . . . . . . . 2 4 0
ToSet ......................................................
2-36
Customer Assistance for the Hearingor Speech Impaired . . . . . . . . . . . . . . . . . 8-3
Customer Satisfaction Procedure .....................................
8-2
D
Damage
Finish . . . . . . . . . . . . . . . . . . . . . . . . . . . . . . . . . . . . . . . . . . . . . . . . . . . . . .
6-61
SheetMetal . . . . . . . . . . . . . . . . . . . . . . . . . . . . . . . . . . . . . . . . . . . . . . . . . .
6-60
Daytime Running Lights . . . . . . . . . . . . . . . . . . . . . . . . . . . . . . . . . . . . .
2-43. 2.60
2-43. 2.60
IndicatorLight . . . . . . . . . . . . . . . . . . . . . . . . . . . . . . . . . . . . . . . . . .
Defogger.RearWindow . . . . . . . . . . . . . . . . . . . . . . . . . . . . . . . . . . . . . . . . . . .
3-7
2-44
DomeLights . . . . . . . . . . . . . . . . . . . . . . . . . . . . . . . . . . . . . . . . . . . . . . . . . . . .
2-5
Doors . . . . . . . . . . . . . . . . . . . . . . . . . . . . . . . . . . . . . . . . . . . . . . . . . . . . . . . . . .
Locks . . . . . . . . . . . . . . . . . . . . . . . . . . . . . . . . . . . . . . . . . . . . . . . . . . . . . . . .
2-8
PowerLocks . . . . . . . . . . . . . . . . . . . . . . . . . . . . . . . . . . . . . . . . . . . . . . . . .
2-10
2-10
Rear ........................................................
Side . . . . . . . . . . . . . . . . . . . . . . . . . . . . . . . . . . . . . . . . . . . . . . . . . . . . . . . . .
2-5
2-6
Side,Sliding . . . . . . . . . . . . . . . . . . . . . . . . . . . . . . . . . . . . . . . . . . . . . . . . . .
Sliding Tracks ................................................
6-42
Driving
4-12
AtNight . . . . . . . . . . . . . . . . . . . . . . . . . . . . . . . . . . . . . . . . . . . . . . . . . . . .
4-15
City . . . . . . . . . . . . . . . . . . . . . . . . . . . . . . . . . . . . . . . . . . . . . . . . . . . . . . . .
4-5
Control Of A Vehicle . . . . . . . . . . . . . . . . . . . . . . . . . . . . . . . . . . . . . . . . . . .
Defensive ....................................................
4-2
HighwayHypnosis . . . . . . . . . . . . . . . . . . . . . . . . . . . . . . . . . . . . . . . . . . . .
4-18
Hydroplaning ................................................
4-15
4-22
InBlizzard . . . . . . . . . . . . . . . . . . . . . . . . . . . . . . . . . . . . . . . . . . . . . . . . . . .
In Mud, Sand, Snow, Or Ice ................................
4-20, 5-33
InRain . . . . . . . . . . . . . . . . . . . . . . . . . . . . . . . . . . . . . . . . . . . . . . . . . . . . . . 4-13
4-14
InWater . . . . . . . . . . . . . . . . . . . . . . . . . . . . . . . . . . . . . . . . . . . . . . . . . . . . .
4-11
LossofControl . . . . . . . . . . . . . . . . . . . . . . . . . . . . . . . . . . . . . . . . . . . . . . .
Nightvision . . . . . . . . . . . . . . . . . . . . . . . . . . . . . . . . . . . . . . . . . . . . . . . . .
4-13
On Hill and Mountain Roads ....................................
4-18
OnSnoworIce . . . . . . . . . . . . . . . . . . . . . . . . . . . . . . . . . . . . . . . . . . . . . . . 4-20
Passing .....................................................
4-10
Skidding . . . . . . . . . . . . . . . . . . . . . . . . . . . . . . . . . . . . . . . . . . . . . . . . . . . .
4-11
Stuck in Deep Snow . . . . . . . . . . . . . . . . . . . . . . . . . . . . . . . . . . . . . .
4-22. 5-33
Throughwater . . . . . . . . . . . . . . . . . . . . . . . . . . . . . . . . . . . . . . . . . .2-15,4-14
Uphill . . . . . . . . . . . . . . . . . . . . . . . . . . . . . . . . . . . . . . . . . . . . . . . . . . . . . .
4-19
Winter . . . . . . . . . . . . . . . . . . . . . . . . . . . . . . . . . . . . . . . . . . . . . . . . . . . . . . 4-20
4-23
WithaTrailer . . . . . . . . . . . . . . . . . . . . . . . . . . . . . . . . . . . . . . . . . . . . . . . .
4-2
DrunkenDriving .................................................
Engine
. . . . . . . . . . . . . . . . . . . . . . . . . . . . . . . . . . . . . - .16,
3 - 8
Coolant
(Block)
Heater
Coolant ................................................
5-14,6-26
2-63
Coolant Temperature Gage . . . . . . . . . . . . . . . . . . . . . . . . . . . . . . . . . . . . . .
6-15
Cover . . . . . . . . . . . . . . . . . . . . . . . . . . . . . . . . . . . . . . . . . . . . . . . . . . . . . . .
Exhaust . . . . . . . . . . . . . . . . . . . . . . . . . . . . . . . . . . . . . . . . . . . . . . . .
2-24, 6-43
FanNoise ...................................................
5-18
6-64,6-68
Identification ............................................
Oil (See “Oil”)
5-11
Overheating . . . . . . . . . . . . . . . . . . . . . . . . . . . . . . . . . . . . . . . . . . . . . . . . . .
RunningWhileParked . . . . . . . . . . . . . . . . . . . . . . . . . . . . . . . . . . . . . . . . . 2-24
Starting . . . . . . . . . . . . . . . . . . . . . . . . . . . . . . . . . . . . . . . . . . . . . . . . . . . . .
2-14
Equipment,Add-on . . . . . . . . . . . . . . . . . . . . . . . . . . . . . . . . . . . . . . . . . . . . . 6-47
3
Exhaustsystem
................................................. 6-43
F
Fan Noise ......................................................
5-18
Filter Replacement Chart .......................................... 6-74
Finish
Care ........................................................
6-59
Damage ..................................................... 6-61
Fluid
Automatic Transmission ........................................ 6-20
Brake .......................................................
6-32
Capacities ................................................... 6-69
CoolantRecovery .............................................
5-14
FrontAxle . . . . . . . . . . . . . . . . . . . . . . . . . . . . . . . . . . . . . . . . . . . . . . . . . . . 6-25
Leakcheck ..................................................
6-36
Powersteering . . . . . . . . . . . . . . . . . . . . . . . . . . . . . . . . . . . . . . . . . . . . . . . 6-30
Radiator ..................................................... 5-15
RearAxle ...................................................
6-24
RecommendedFluids ..........................................
7-13
Transfercase ................................................ 6-24
Windshield Washer . . . . . . . . . . . . . . . . . . . . . . . . . . . . . . . . . . . . . . . . . . . . 6-31
FogLamps .....................................................2-42
Four-wheel Anti-lock .............................................
4-7
Frontseats ...................................................... 1-2
Fuel ...........................................................
6-3
FillingYourTank ..............................................
6-5
Foreign Countries ..............................................
6-5
Gage .......................................................
2-61
Gasolines for Cleaner Air ........................................
6-4
Tankcapacity ................................................ 6-69
Fuses and Circuit Breakers ........................................ 6-72
FuseBlock .................................................. 6-67
Headlights ................................................... 6-66
Power Windows and Other Power Options .........................
6-66
6-66
Trailer Wiring Harness .........................................
WindshieldWipers ............................................
6-66
G
Gages .........................................................
2-61
Coolant Temperature Gage ......................................
2-63
FuelGage ...................................................2-61
Odometer . . . . . . . . . . . . . . . . . . . . . . . . . . . . . . . . . . . . . . . . . . . . . . . . . . . 2-53
Oil Pressure Gage ............................................. 2-62
Speedometer . . . . . . . . . . . . . . . . . . . . . . . . . . . . . . . . . . . . . . . . . . . . . . . . .2-53
Trip Odometer ................................................
2-53
Voltmeter ....................................................
2-64
Gasolines for Cleaner Air . . . . . . . . . . . . . . . . . . . . . . . . . . . . . . . . . . . . . . . . . . 6 4
H
Hatch Release Switch............................................. 2-28
HalogenBulbs ..................................................
6-36
4
Hazard Warning Flashers ...........................................
5-2
HeadRestraints .................................................
1-10
Headlights .....................................................
6-37
High Beam Indicator Light ......................................
2-60
High-LowBeam . . . . . . . . . . . . . . . . . . . . . . . . . . . . . . . . . . . . . . . . . . . . . . 2-32
Reminder .................................................... 2-44
HeatingSystem .................................................. 3 4
Block Heater ................................................. 2-16
FanLever ....................................................
3-5
FunctionLever . . . . . . . . . . . . . . . . . . . . . . . . . . . . . . . . . . . . . . . . . . . . . . . . 3-5
Rear .........................................................
3-6
TemperatureLever . . . . . . . . . . . . . . . . . . . . . . . . . . . . . . . . . . . . . . . . . . . . . 3-4
HighwayHypnosis . . . . . . . . . . . . . . . . . . . . . . . . . . . . . . . . . . . . . . . . . . . . . . . 4-18
Hitches . . . . . . . . . . . . . . . . . . . . . . . . . . . . . . . . . . . . . . . . . . . . . . . . . . . . . . . . 4-26
Hood
CheckingUnder ............................................... 6-7
LatchesandHinge ............................................
6-42
Release . . . . . . . . . . . . . . . . . . . . . . . . . . . . . . . . . . . . . . . . . . . . . . . . . . . . . .6-7
Horn . . . . . . . . . . . . . . . . . . . . . . . . . . . . . . . . . . . . . . . . . . . . . . . . . . . . . . . . . . 2-29
Hydroplaning ...................................................4-15
I
If You’re Stuck in Sand. Mud. Ice. or Snow ...........................
5-33
Ignitionswitch . . . . . . . . . . . . . . . . . . . . . . . . . . . . . . . . . . . . . . . . . . . . . . . . . . 2-13
Inflation-Tire Pressure ............................................ 6-48
Instrumentcluster . . . . . . . . . . . . . . . . . . . . . . . . . . . . . . . . . . . . . . . . . . . . . . . 2-52
Digital ...................................................... 2-53
Standard .................................................... 2-53
J
Jackstorage ....................................................
5-20
Jumpstarting . . . . . . . . . . . . . . . . . . . . . . . . . . . . . . . . . . . . . . . . . . . . . . . . . . . . 5-3
K
Keys
...........................................................
2-3
L
i
Labels
Certification/Tire . . . . . . . . . . . . . . . . . . . . . . . . . . . . . . . . . . . . . . . . . . . . . . 6-44
Service Parts Identification ......................................
6-65
Lights ......................................................... 2-41
Dome .......................................................
2-44
FogLamps ..................................................
242
Frontparking ................................................
6-38
Indicator ....................................................
2-57
Taillights ....................................................
6-39
Interior Override Switch . . . . . . . . . . . . . . . . . . . . . . . . . . . . . . . . . . . . . . . . 2-45
Operation . . . . . . . . . . . . . . . . . . . . . . . . . . . . . . . . . . . . . . . . . . . . . . . . . . . 2-41
Reading .....................................................
244
Turnsignal ..................................................
6-38
Loading YourVehicle ............................................
6-44
Lubrication .....................................................
6-42
Accelerator Control System ..................................... 6-42
Body .......................................................6-42
Sliding Door Tracks ........................................... 6 4 2
Front Suspension and Steering Linkage ............................ 6-41
Front Wheel Bearings(Two Wheel Drive) . . . . . . . . . . . . . . . . . . . . . . . . . .6 - 4 1
LatchesandHinge . . . . . . . . . . . . . . . . . . . . . . . . . . . . . . . . . . . . . . . . . . . .6 4 2
Lockcylinders ............................................... 6 4 3
RearAxle ................................................... 6-24
TransferCase ................................................ 6-24
Luggagecarrier . . . . . . . . . . . . . . . . . . . . . . . . . . . . . . . . . . . . . . . . . . . . . . . . . 2-65
Maintenance .....................................................
7-2
OtherItems ..................................................
641
PeriodicInspections ...........................................
7-12
Record ......................................................
7-15
ScheduledMaintenance ..................................... 7-3.7-7
Underbody ..................................................
6-61
WhenTowingaTrailer .........................................
4-23
Mirrors ........................................................
245
Inside .......................................................
2-45
Outside ..................................................... 2 4 6
Vanity ......................................................
2-47
...
ModelReference ..................................................
m
0
Odometer . . . . . . . . . . . . . . . . . . . . . . . . . . . . . . . . . . . . . . . . . . . . . . . . . . . . . . 2-54
Trip . . . . . . . . . . . . . . . . . . . . . . . . . . . . . . . . . . . . . . . . . . . . . . . . . . . . . . . . 2-54
Off-RoadRecovery . . . . . . . . . . . . . . . . . . . . . . . . . . . . . . . . . . . . . . . . . . . . . . . 4-9
Oil ............................................................6-9
Additives .................................................... 6-14
DisposalofUsed ..............................................
6-14
PressureGage ................................................
2-62
ToCheck ....................................................
6-10
WhatKindtoUse .............................................
6-11
Whentochange ..............................................
6-14
Owner Checks and Services ........................................ 7-10
P
Parking
Brake . . . . . . . . . . . . . . . . . . . . . . . . . . . . . . . . . . . . . . . . . . . . . . . . . . . . . . . 2-20
OnHills .....................................................
4-29
OverThingsThatBurn .........................................
2-23
Passing ........................................................
4-10
PayloadCapacity ................................................
6-46
Periodic Maintenance Inspections ...................................
7-12
Power
246
Mirrors .....................................................
Seat .........................................................
1-3
6
Visorvanity .................................................
Windows ....................................................
Powersteering ...................................................
Fluid .......................................................
Product Service Publications ........................................
2-47
2-26
4-7
6-30
8-7‘
Radiator Pressure Cap ............................................
Radio (See “Audio Systems”)
ReadingLights ..................................................
RearDefogger ...................................................
Rear HatcWSplit Panel Doors .......................................
Rear Wipermasher ..............................................
RecommendedFluids/Lubricants ...................................
Reporting Safety Defects ...........................................
Roadside Assistance ...............................................
Rocking YourVehicle ............................................
RoofConsole . . . . . . . . . . . . . . . . . . . . . . . . . . . . . . . . . . . . . . . . . . . . . . . . . . .
6-29
2-44
3-7
2-7
2-34
7-13
8-4
8-6
5-33
2-51
S
SafetyBelts . . . . . . . . . . . . . . . . . . . . . . . . . . . . . . . . . . . . . . . . . . . . . . . . . . . . 1-11
1-16
Adults ......................................................
CareOf .....................................................
6-58
Checking Restraint Systems .....................................
1-47
DriverPosition ...............................................
1-17
1-46
Extender ....................................................
Lap-ShoulderBelt ............................................
1-17
1-44
LargerChildren ...............................................
Passenger Positions .......................................
1.30,1.34
Properwear .................................................
1-16
Questions and Answers . . . . . . . . . . . . . . . . . . . . . . . . . . . . . . . . . . . . . . . . . 1-15
1-11
ReminderLight ...............................................
Replacing After a Crash ........................................
1-47
Shoulder Belt Height Adjuster ...................................
1-19
Smaller Children and Babies ....................................
1-36
UseDuringPregnancy .........................................
1-29
1-12
WhyTheyWork ..............................................
4-26
SafetyChains ...................................................
SafetyWarnings ...................................................
vi
Scheduled Maintenance Services . . . . . . . . . . . . . . . . . . . . . . . . . . . . . . . . . 773.7.,
Seats ...........................................................
1-2
Bench .......................................................
1-5
1-2
Controls ......................................................
HeadRestraints ...............................................
1-10
1-5
Rear .........................................................
PowerDriver’s ................................................
1-3
1-3
RecliningBucket ...............................................
Removable . . . . . . . . . . . . . . . . . . . . . . . . . . . . . . . . . . . . . . . . . . . . . . . . . . . 1-7
SeatbackLatches ...............................................
1-7
6-2
Service .........................................................
6-2
Do-It-Yourself . . . . . . . . . . . .’:...................................
6-65
Parts Identification Label .......................................
Publications ...................................................
8-7
Replacement Part/Filter Recommendations .........................
6-74
StationsChecks ............................................... 7-16
Servicing Your Facial Air Bag-Equipped Vehicle .......................
1-29
Shifting Into P (Park) .............................................
2-21
Shifting Out Of P (Park) ..........................................
2-22
Single Belt Accessory Drive .......................................
6-41
SpareTire ...................................................... 5-32
SpecificationCharts .............................................. 6-68
Speedometer ....................................................
2-53
Springs. Fiberglass ............................................... 6-61
Starting Your Engine ............................................. 2-14
Steering
4-7
InEmergencies ................................................
Tips .........................................................4-8
Storage Compartments ............................................ 2-50
Storing the JacWSpare Tire ........................................ 5-31
SunVisors ..................................................... 2-47
T
Theft ..........................................................2-11
Thermostat . . . . . . . . . . . . . . . . . . . . . . . . . . . . . . . . . . . . . . . . . . . . . . . . . . . . . 6-29
Tilt Wheel ...................................................... 2-29
Tires .......................................................... 6-47
Chains ...................................................... 6-54
Changing A Flat ......................................... 5-18, 5-24
Compactspare ...............................................
5-32
InspectionandRotation . . . . . . . . . . . . . . . . . . . . . . . . . . . . . . . . . . . . . . . . 6-49
Loading .....................................................
6-44
New ........................................................
6-50
Pressure .....................................................
6-48
Uniform Tire Quality Grading ................................... 6-51
TopStrap ...................................................... 1-38
TowingYourVehicle .............................................. 5-7
TowingATrailer ................................................ 4-23
BackingUp ..................................................
4-28
FollowingDistance . . . . . . . . . . . . . . . . . . . . . . . . . . . . . . . . . . . . . . . . . . . . 4-28
MakingTurns ................................................ 4-28
Turnsignals . . . . . . . . . . . . . . . . . . . . . . . . . . . . . . . . . . . . . . . . . . . . . . . . .4-28
Trailer
Brakes ...................................................... 4-26
WiringHarness ..........................................
2-66, 6-66
TraileringPackage . . . . . . . . . . . . . . . . . . . . . . . . . . . . . . . . . . . . . . . . . . . . . . . 6-46
Transfercase . . . . . . . . . . . . . . . . . . . . . . . . . . . . . . . . . . . . . . . . . . . . . . . . . . . 6-24
Transmission, Automatic ..........................................
2-17
AddFluid ................................................... 6-23
CheckFluid ..................................................
6-20
TorqueLock . . . . . . . . . . . . . . . . . . . . . . . . . . . . . . . . . . . . . . . . . . . . . . . . . 2-23
Tripodometer .................................................. 2-54
Turn Signal/Multifunction Lever .................................... 2-30
Lane Change Indicator ....................................
2-30, 2-61
V
Vehicle
Damagewarnings ...............................................
vii
Identification Number ..........................................
6-63
Storage .....................................................
. . . . .6-35
.
Symbols .............................................. vu. ~111.IX. x
Ventilation System . . . . . . . . . . . . . . . . . . . . . . . . . . . . . . . . . . . . . . . . . . . . . . . . 3-2
3-3
AirVents .....................................................
Tips . . . . . . . . . . . . . . . . . . . . . . . . . . . . . . . . . . . . . . . . . . . . . . . . . . . . . . . . . 3-2
Voltmeter . . . . . . . . . . . . . . . . . . . . . . . . . . . . . . . . . . . . . . . . . . . . . . . . . . . . . . 2-64
Warning Lights and Gages .........................................
2-55
Anti-Lock Brake . . . . . . . . . . . . . . . . . . . . . . . . . . . . . . . . . . . . . . . . . . . . . .2-56
Devices.Other . . . . . . . . . . . . . . . . . . . . . . . . . . . . . . . . . . . . . . . . . . . . . . . . 5-3
2-58. 6-44
Service Engine Soon ......................................
Washing Your Vehicle ............................................
6-59
6-60
Weatherstrips ...................................................
Wheels
Alignment and Tire Balance .....................................
6-52
Aluminum . . . . . . . . . . . . . . . . . . . . . . . . . . . . . . . . . . . . . . . . . . . . . . . . . . . 6-60
Front Bearings (Two-Wheel Drive) . . . . . . . . . . . . . . . . . . . . . . . . . . . . . . . 6-41
NutTorque ..................................................
6-68
Replacement .................................................
6-52
Windows ...................................................... 2-26
RearDefogger . . . . . . . . . . . . . . . . . . . . . . . . . . . . . . . . . . . . . . . . . . . . . . . . . 3-7
Swing-Out . . . . . . . . . . . . . . . . . . . . . . . . . . . . . . . . . . . . . . . . . . . . . . . . . . 2-27
WindshieldWasher . . . . . . . . . . . . . . . . . . . . . . . . . . . . . . . . . . . . . . . . . . . . . .2-33
Fluid . . . . . . . . . . . . . . . . . . . . . . . . . . . . . . . . . . . . . . . . . . . . . . . . . . . . . . . 6-31
Rearwasher . . . . . . . . . . . . . . . . . . . . . . . . . . . . . . . . . . . . . . . . . . . . . . . . .2-34
Windshield Wipers ..........................................
2.32. 6-41
Bladechatter . . . . . . . . . . . . . . . . . . . . . . . . . . . . . . . . . . . . . . . . . . . . . . . .6-58
Bladecleaning . . . . . . . . . . . . . . . . . . . . . . . . . . . . . . . . . . . . . . . . . . . . . . . 6-58
Bladehserts . . . . . . . . . . . . . . . . . . . . . . . . . . . . . . . . . . . . . . . . . . . . . . . . .6-41
Rearwindow ................................................
2-34
WinterDriving . . . . . . . . . . . . . . . . . . . . . . . . . . . . . . . . . . . . . . . . . . . . . . . . . . 4-20
1
Notes
Notes
4
Notes
Notes
i
I!
i
1
Notes
X-941 0
WE SUPPORT
VOLUNTARY TECHNICIAN
CERTIFICATION THROUGH
National Institute for
AUTOMOTIVE
SERVICE
EXCELLENCE
Keep withvehicle at all times.
Contains Important Operating, Safety,
and Maintenance Instructions.
GMC
TRUCK
THE STRENGTH OF EXPERIENCE.