1
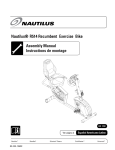
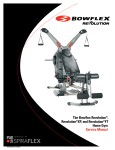
Nautilus ONE™
Service Manual
Nautilus® Bowflex® Schwinn® Fitness Pearl Izumi® StairMaster® Universal® Nautilus Institute®
001-7147-120507A
Table of Contents
Safety Warnings............................................................................................................................ 1
Exploded Views............................................................................................................................ 2
Service Procedures....................................................................................................................... 5
Tower Shroud Removal............................................................................................... 5
Tower Shroud Installation........................................................................................... 7
Weight Drive Installation/Removal............................................................................. 9
Screw Belt Adjustment.............................................................................................. 11
Bottom Loading Gas Spring Replacement............................................................... 12
Knob Removal............................................................................................................ 18
Contact Information................................................................................................................... 19
Required Tools
1) 9/16" Socket Wrench
2) 3/4" Socket Wrench
3) Torque Wrench
4) 9/16" Wrench
5) Adjustable Wrench
6) 5/32" Hex Wrench
7) 5/16" Hex Wrench
8) 7/32" Hex Wrench
9) 1/4" Hex Wrench
Safety Warnings
This icon means a potentially hazardous situation which, if not avoided, could result in death or
serious injury.
Obey the following warnings:
Read and understand all Warnings on this machine. Specific Caution, Warning and/or Danger decals may be
applied to call attention to specific hazards.
• Carefully read and understand the Service Manual before you work on the machine. Failure to follow
instructions and safety warnings could result in injury to service technician or bystanders.
•
Damaged machines or machines under repair must be marked as “Out of Service”, set aside and
prohibited from being used by customers or others.
•
Keep bystanders and children away from the product being serviced at all times.
•
Make sure that repair is done in an appropriate work space away from foot traffic and exposure to
unauthorized personnel.
•
Adjustments and repairs to Nautilus equipment must only be performed by a professional service
technician trained to service Nautilus equipment.
•
Some components of the equipment may be heavy or awkward. Use a second person or other
resources when performing maintenance steps involving these parts. Do not perform steps that require
heavy lifting or awkward movement on your own.
•
Use only genuine Nautilus replacement parts and hardware. Failure to use genuine replacement parts
may cause a risk to users, keep the machine from operating properly, or void the warranty.
•
Make sure that all warning stickers and instructional placards on the machine stay attached and are in
good condition. Request replacement warning stickers or placards if necessary from Nautilus customer
service.
•
Do not attempt to modify the design or functionality if the machine. This could compromise user safety
and may void the warranty.
•
Do not place the machine back in service until the machine, shrouds, instructions, warning labels and
have been verified and tested for proper performance.
•
If you any questions regarding the Service Manual or the servicing of our equipment, please contact
qualified Nautilus personnel immediately.
1
Service Manual
Assembly
Manual
Service Manual
NLS ONE™ 3” Dome Decal (000-6491)
2
Weight Select Knob Assembly
Center Cap
Placard Lens
Inside Shroud
Rear Shroud
Engine WT-250-5
WT-SYS-250-5
Weight Tower View #1
Outside Shroud
Graphic Bezel
Nautilus ONE™ Back Dome
Frame and Engine Mounts
Belt and Cam Assembly
Top Cap
Exploded Views
Service Manual
3
Center Cap
Placard Lens
Inside Shroud
Rear Shroud
Button Head Socket Cap
Screw 1/4" - 20 x 3/4"
Button Head Socket Cap
Screw 1/4" - 20 x 3/8"
Rear Tower Foot Pad
WT-SYS-250-5
Weight Tower View #2
Outside Shroud
Graphic Bezel
Front Tower Foot Pad
Top Cap
Exploded Views
Weight Selection
Knob Assembly
BH Bolt 1/4"-20
UNC X
Weight Selection
Front Bezel
Service Manual
4
Wheel Adjustment
Screw #8 x 1/2"
#8 Steel Washer
Number Wheel
Base
Number Wheel
IGUS Bushing 1"
ID x 1/2"
Steel Washer
1.0" ID
WT-SYS-250-5
Weight Selection Assembly
Plastic Washer 1.0 ID
x 1.5 OD x 0.0625 L
Add-on Weight
Lever
IGUS Bushing 1"
ID x 1/2"
Weight Selection
Backing Plate
Exploded Views
Service Procedures
Nautilus ONE™ Tower Shroud Removal
Tools Required: 9/16” Socket Wrench
9/16" Wrench
5/32" Hex Wrench
Remove the Top Cover
1-1Remove the two mounting screws on the rear of the
top cover with a 5/32" Hex wrench (Figure 1).
1-2Remove the cover by lifting the rear edge up and
forward to clear the front slot (Figure 2).
Figure 1
Remove the Handlebar
2-1Remove the (4) 3/8" hex head bolts, (4) lock washers
and (4) lock nuts with a 9/16" socket wrench.
2-2Carefully lift the handlebar and place aside
(Figure 3).
Remove the Rear Shroud
Figure 2
3-1Remove one screw at the top of the shroud with a
5/32" Hex wrench. Lift up and out of the bottom slot
(Figure 4).
(Shroud Removal continued on next page)
Figure 3
Figure 4
5
Service Manual
Service Procedures
Nautilus ONE™ Tower Shroud Removal (cont.)
Remove the Outside Shroud
Note: The large round bezel does not need to be removed from
the outside shroud.
4-1 L ift the shroud up until the tabs stop at the top of the
P-slot (Figure 5).
NOTICE: D
o not attempt to remove shroud by prying with any
kind of tool.
4-2Pull shroud outward to remove from the P-slots (Figure 6).
P-Slot
Figure 5
Remove the Inside Shroud
5-1Remove the center cap behind the dial. Adjust the dial to
the lowest setting and lift the dial up and out of the way.
Unsnap the center cap out of the shroud opening tabs
(Figure 7).
5-2Lift the shroud up until the tabs stop at the top of the
P-slot.
5-3Pull the shroud outward to remove it from the P-slots
(Figure 8).
Figure 6
Figure 7
Figure 8
6
Service Manual
Service Procedures
Nautilus ONE™ Tower Shroud Installation
Attach the Rear Shroud
1-1 P
ut Rear Shroud into the Bottom slot and secure with one
screw at the top.
P-Slot
Attach the Inside Shroud
2-1Put Inside Shroud into P-slots in the Steel Frame and fit
the adjustment knob assembly through the center hole of
the shroud.
2-2 I nsert front and back tabs into the P-slot openings (See
Fig. 1).
2-3 P
ush down on both front and back to seat tabs at the
bottom of the P-slots.
NOTICE: D
o not attempt to force the shroud downward or
tabs may be broken off. When the tabs are aligned
to the P-slots, the cover should drop down into the
slots with minimal resistance.
Figure 1
Figure 2
2-4Install the center cap behind the dial. Adjust the dial to
the lowest setting and lift the dial up and out of the way
(Figure 2). Snap the center cap into the shroud opening
tabs. Make sure to align the cap to the open ring.
Attach the Outside Shroud
3-1Put Outside Shroud into the P-slots in the Steel Frame.
3-2 P
ush down on both front and back to seat tabs at the
bottom of the P-slots. When the tabs are aligned to the
P-slots, the cover should drop down into the slots with
minimal resistance.
3-3 A
lign and attach the tab/slot where the front of both side
shrouds meet at the top of the front post.
NOTICE: D
o not attempt to force the shroud downward or
tabs may be broken off.
Figure 3
Attach the Handlebar Assembly
4-1Position the handle bars over the plastic shrounds (Figure 3).
4-2Attach the handlebar with (4) hex head bolts, (4) lock
washers and (4) lock nuts.
Attach the Rear Shroud
5-1Position the handle bars over the plastic shrounds (Figure 4).
7
Service Manual
Figure 4
Nautilus ONE™ Tower Shroud Installation
(cont.)
Attach the Top Cover
6-1 L ower the top cover onto side shrouds making sure that
the tops edges of both side shrouds fit securely into
the slots on each side of the top cover (Figure 5and 6).
Note: Push inward on the top edge of the length of both side
shrouds to assure the top cover is securely attached.
If you can push the shroud inward, it is not in the slot
and needs to be installed again.
6-2 I nstall the two mounting screws on the rear of the top
(Figure 7).
Note: Overtightening the shield screws may cause the top
shield to crack.
Figure 5
Figure 6
Figure 7
8
Service Manual
Service Procedures
Weight Drive Installation/Removal
Tools Required: 3 /4” Socket Wrench,
AdjustableWrench
Installation Tip: Inspect the seat frame movement
arm(s) before assembly to the weight tower. If the
movement arm(s) are not resting firmly against the rubber
stop(s), reduce belt tension as necessary. The movement
arm must rest against the rubber stops to ensure proper
initial weight drive to seat frame assembly and jackshaft
timing. Belt tensioning procedures are located on Page 11
of this service manual.
NO.
PART NO.
DESCRIPTION
QTY.
1
56-0161
WEIGHT DRIVE SUPPORT
1
2
01-1331
BOLT HH 1/2-13 X 3”
3
3
01-1271
BOLT HH 1/2-13 X 1 1/4”
4
4
03-1055
LOCK NUT 1/2-13
4
Tower
Weight Drive
Seat Frame
Weight Drive
3
1-1Remove (3) 1/2-13 x 3” bolts from the Tower with
3/4” socket wrench (Figure 1).
1-2Remove the Weight Drive Support from the Seat
Frame by removing (4) 1/2-13 x 1 1/4” bolts and
(4) 1/2-13 Lock Nuts with 3/4” socket wrench and
adjustable wrench. Discard (1) bolt and (1) nut
(Figure 2).
2
4
1
Weight Drive
Support
3
Figure 1
Seat Frame
Weight Drive
3
Seat Frame
Plate
2
Figure 2
9
Service Manual
1
Return plates to:
Nautilus Inc.
709 Powerhouse Rd.
Independence, VA
24348
Service Procedures
Weight Drive Installation/Removal
(cont.)
1-3Align the Seat Frame Weight Drive holes to Tower
Weight Drive holes and pins. Insert (3) 1/2 x 1 1/4”
bolts into weight drive and (3) 1/2 x 3” bolts into
seat frame plate. Carefully align Seat Frame to the
Tower and tighten all bolts (Figure 3).
Note: Confirm that the movement arm is at rest
against the rubber stop(s). If the movement
arms are not resting on the rubber stops, then
reduce seat frame belt tension (see page
11). Ensure that the Weight Drive belt cam
is resting against the cam stop. If it is not at
rest, then refer to "Troubleshooting Steps" on
this page to reduce Weight Engine Drive belt
tension. Make sure that the dial selects and
engages the weight plates.
Weight Drive belt cam stop
1-4Reverse steps 1-1 through 1-3 for Weight
Drive removal.
Figure 3
Troubleshooting Steps
2-1.6Turn the weight selection dial to several different
resistance settings to confim the dial now engages
the weight plates.
Tools Required: 3/8" wrench
2-1If the dial does not select and engage the
weight plates, the Weight engine Drive Belt
may be too tight.
2-1.7Tighten the two Belt Clamp Retaining bolts with a 3/8"
wrench. Confirm that the weight selection dial will
select and engage the weight plates.
2-1.1Ensure clearance is 1/8" between the weight
hooks and the weight plate hooks (Figure 2,
page 11).
2-1.8Replace the top cover.
2-2If the movement arms do not rest fully against the
rubber stop(s) in the starting position, the Weight
Engine Drive (steps 2-1-1 through 2-2-8) will be the
steps to correct.
2-1.2 Refer to the "Remove the Top Cover"
instructions (steps 1-1 through 1-2) on page
5 of this Service Manual.
2-1.3 With the top cover removed, loosen (do not
remove) the two Belt Clamp Retaining Bolts
with a 3/8" wrench (Figure 2, page 11).
2-1.4Turn the weight selection dial to the minimum
resistance setting and lift the weight drive engine
assembly up several inches by the dial assembly.
2-1.5Release the knob to allow the work box to
drop. This should allow the belt to "slip" in
the clamp, reducing tension on the Weight
Engine Drive Belt.
10
Service Manual
Service Procedures
Seat Frame Belt Cam Adjustment
Articulating
Clamp Mount
Tools Required: 5/16" Hex Wrench
1-1Use a 5/16" Hex Wrench to tighten or
loosen the Button Head Belt Adjustment
Bolt.
Sliding Belt
Adjustment Clamp
Button Head Belt
Adjustment Bolt
Note:Turning the screw clockwise increases
tension. Turning the screw counter
clockwise reduces tension (Figure 1).
Note: Increasing tension on the belt tensioning
screw tightens not only the seat frame belt
and proportionately increases tension on
the weight engine drive belt. Excessive belt
tension will cause weight hook to weight
plate hook malfunctions. (Figure 2).
5/16" Hex Wrench
Seat Frame
Belt Cam
Figure 1
3/8" Belt Clamp
Retaining Bolts
Maintain proper
clearance of 1/8"
between the
Weight Hooks and
weight Plate Hooks
Weight Hooks
Weight Plate
Hooks
Weight Engine
Drive Belt
Figure 2
11
Service Manual
Service Procedures
Bottom Loading Gas Spring Replacement
These procedures apply to the following units:
• Nautilus ONE™ Mid Row (S6MR)
• Nautilus ONE™ Lat Pull (S6LATP)
• Nautilus ONE™ Chest Press (S6CP)
• Nautilus ONE™ Shoulder Press (S6SP)
• Nautilus ONE™ Bicep Curl (S6BC)
• Nautilus ONE™ Tricep Extension (S6TE)
Tools Required:
Figure 1
• 9/16" Socket and Ratchet
• 7/32" Hex Wrench
• 1/4" Hex Wrench
1-1Remove (2) 3/8" upholstery bolts with a 9/16" Socket and
Ratchet.
1-2Remove the seat pad by pulling it upwards (Figure 1).
1-3Remove the release handle shoulder bolt with a 1/4" Hex
wrench and a 9/16" Socket and ratchet (Figure 2).
1-4Remove the handle.
Figure 2
12
Service Manual
Remove using a 1/4"
Hex head wrench and
9/16" socket and ratchet
Service Procedures
1-5Remove the top 7/32" Hex head screw with a 7/32" Hex
Wrench (Figure 3).
1-6Remove the bottom 7/32" Hex head screw while supporting
the seat bracket with your free hand (Figure 4).
Figure 3
Figure 4
13
Service Manual
Service Procedures
Note: It is neccessary to disassemble the seat frame from the
weight stack. This will allow the service personnel to
access the gas spring assembly. Please refer to pages
9 and 10 of this service manual for the seat frame/tower
disassembly and belt timing.
1-7Once the seat frame has been disconnected from the weight
tower and with the seat bracket removed (Figure 5), tip the
seat frame on its back ( Figures 6 & 7).
The seat frame is heavy. Use two people for this step to
prevent injury.
Figure 5
Figure 6
Figure 7
14
Service Manual
Service Procedures
Note: Figure 8 shows a seat disconnected from the weight tower
to gain access to the gas spring seat adjustment assembly.
1-8Remove the (2) plate retaining screws with a 7/32" Hex
wrench (Figure 9).
1-9Pull the gas spring seat adjustment assembly out of the seat
frame tube (Figure 10).
Figure 8
Plate Retaining
Screws
Figure 9
Figure 10
15
Service Manual
Service Procedures
1-10Finish removing the gas spring seat adjustment assembly
(Figure 11).
1-11 Replace the gas spring if neccessary (not pictured).
1-12Insert the gas spring seat frame assembly into the seat
frame tube (Figure 12).
1-13Confirm the horse shoe shaped bracket is aligned
(Figure 13).
Note: I f the plate is installed backwards, the gas spring seat frame
assembly will not operate properly.
1-14Tighten (2) 7/32" Hex screws with a 7/32" Hex wrench
(Figure 14).
1-15Refer back to pages 9-10 for seat frame/tower installation
instructions.
Figure 11
Figure 12
Horseshoe
Shaped Bracket
Figure 13
Plate Retaining
Screws
16
Service Manual
Figure 14
Service Procedures
Weight Selection Knob Removal
Tools Required: Torque Wrench
Remove the Center Cap
1-1Adjust the dial to the lowest setting.
1-2Lift the dial assembly up and move it aside (Figure 1).
1-3Remove the center cap by carefully prying between the inside
shroud and center cap.
Figure 1
Remove the Nautilus ONE™ 3" Decal
2-1Carefully pry the 3" decal from the knob.
2-2Remove the plastic decal by slowly working the prying tool
between the back of the decal and the front surface of the knob
(Figure 2).
Remove the Weight Selection
Knob Assembly Retaining Bolt
Figure 2
3-1Hold the knob assembly and use the 5/32" Hex wrench to turn the
button head screw counter clockwise (Figure 3).
Note: The 1/4" x 20 x 1" long screw was installed with removable strength
thread-lock. Apply more removable strength thread-lock when
replacing the Assembly Retaining Bolt and tighten to 10 lb. ft. with a
torque wrench.
3-2Pull the weight selection knob assembly away from the weight
tower (Figure 3).
Figure 3
Remove the Bezel
4-1Unsnap the bezel from the add on weight lever housing and set it
aside (Figure 5).
Figure 4
17
Service Manual
Figure 5
Service Procedures
Knob Removal (cont.)
Remove Number Wheel
5-1Pull the number wheel assembly away from the weight
tower (Figure 6).
Remove the Add On Weight Lever
6-1The handle adjustment knob has two index pins
that insert into the add on weight cam. Use a small
flat head screwdriver to help separate the add on
weight lever from the black plastic cam. Pull the
add on weight lever assembly away from he tower
approximately 1.5".
Figure 6
Note: T he lever assembly should rotate freely but the weight
selection backing plate will stay affixed.
6-2Use a 1/2" socket with 6" socket wrench extension to
remove the top weight selection backing plate bolt
(Figure 7).
6-3Rotate the add on weight lever clockwise and remove
the bottom bolt with a 1/2" socket (Figure 8).
6-4Remove the add on weight lever and weight selection
backing plate by pulling away from the weight tower
(Figure 9).
6-5Reverse these steps to assemble the knob.
Figure 7
Figure 8
Figure 9
18
Service Manual
Contact Information
OFFICES IN THE UNITED STATES:
INTERNATIONAL OFFICES:
E-mail: [email protected]
For technical assistance and a list of distributors in your
area, please call or fax one of the following numbers.
TECHNICAL/CUSTOMER SERVICE
Phone: 800-NAUTILUS (800-628-8458)
Fax: (877) 686-6466
E-mail: [email protected]
INTERNATIONAL CUSTOMER SERVICE
Nautilus International S.A.
Rue Jean Prouvé
1762 Givisiez / Switzerland
Tel: (41) (26) 460 77 77
Fax: (41) (26) 460 77 70
E-mail: [email protected]
CORPORATE HEADQUARTERS
Nautilus, Inc.
World Headquarters
16400 SE Nautilus Drive
Vancouver, Washington, USA 98683
Phone: (800) NAUTILUS (800) 628-8458
GERMANY and AUSTRIA
Nautilus Deutschland GmbH
Albin-Köbis-Str. 4
51147 Köln
Tel.: (49) 02203 2020 0
Fax: (49) 02203 2020 45 45
ITALY
Nautilus Italy S.r.l., Via della Mercanzia, 103
40050 Funo di Argelato - Bologna
Tel: (39) 051 664 6201
Fax: (39) 051 664 7461
SwITZERLAND
Nautilus Switzerland SA
Rue Jean-Prouvé 6,
CH-1762 Givisiez
Tel: (41) 026 460 77 66
Fax: (41) 026 460 77 60
United Kingdom
Nautilus UK Ltd
Nautilus UK, 4 Vincent Avenue,
Crownhill, Milton Wrenchnes, Bucks, MK8 0AB
Tel: (44) 1908 267 345
Fax: (44) 1908 567 346
Please supply the serial number of your machine and the date of
purchase when you call Nautilus. Use the space in the boxes below
to write down this information. To find the serial number on your
machine, refer to the Safety Warning Label information page. Dial
the number of the office close to you.
Serial Number
chinA
Nautilus Representative Office
Nautilus, Shanghai, 7A No.728, Yan’an Rd(West),
200050 Shanghai, China
Tel: (86) 21 523 707 00
Fax: (86) 21 523 707 09
Date of Purchase
19
Service Manual
™
©2007. Nautilus, Inc. All rights reserved. Nautilus, the Nautilus Logo, Universal, the Universal Logo, Bowflex, StairMaster, Pearl Izumi and Nautilus Institute are either registered trademarks
or trademarks of Nautilus, Inc. Schwinn is a registered trademark. All other trademarks are owned by their respective companies. Nautilus, Inc., World Headquarters, 16400 SE Nautilus Drive,
Vancouver, WA 98683 1-800-NAUTILUS www.nautilus.com
Nautilus®
Bowflex®
Schwinn® Fitness
Pearl Izumi®
StairMaster®
Universal®
Nautilus Institute®