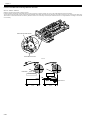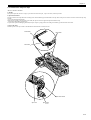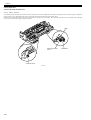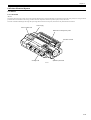
1
Service Manual
iPF6000 series
Aug 13 2008
Application
This manual has been issued by Canon Inc. for qualified persons to learn technical theory, installation, maintenance, and repair
of products. This manual covers all localities where the products are sold. For this reason, there may be information in this
manual that does not apply to your locality.
Corrections
This manual may contain technical inaccuracies or typographical errors due to improvements or changes in products. When
changes occur in applicable products or in the contents of this manual, Canon will release technical information as the need
arises. In the event of major changes in the contents of this manual over a long or short period, Canon will issue a new edition
of this manual.
The following paragraph does not apply to any countries where such provisions are inconsistent with local law.
Trademarks
The product names and company names used in this manual are the registered trademarks of the individual companies.
Copyright
This manual is copyrighted with all rights reserved. Under the copyright laws, this manual may not be copied, reproduced or
translated into another language, in whole or in part, without the written consent of Canon Inc.
COPYRIGHT © 2001 CANON INC.
Printed in Japan
Caution
Use of this manual should be strictly supervised to avoid disclosure of confidential information.
Introduction
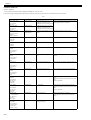
Symbols Used
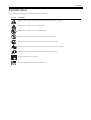
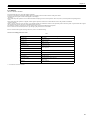
This documentation uses the following symbols to indicate special information:
Symbol
Description
Indicates an item of a non-specific nature, possibly classified as Note, Caution, or Warning.
Indicates an item requiring care to avoid electric shocks.
Indicates an item requiring care to avoid combustion (fire).
Indicates an item prohibiting disassembly to avoid electric shocks or problems.
Indicates an item requiring disconnection of the power plug from the electric outlet.
Indicates an item intended to provide notes assisting the understanding of the topic in question.
Memo
Indicates an item of reference assisting the understanding of the topic in question.
REF.
Provides a description of a service mode.
Provides a description of the nature of an error indication.
Introduction
The following rules apply throughout this Service Manual:
1. Each chapter contains sections explaining the purpose of specific functions and the relationship between electrical and mechanical systems with reference to the timing of operation.
In the diagrams,
represents the path of mechanical drive; where a signal name accompanies the symbol , the arrow
indicates the
direction of the electric signal.
The expression "turn on the power" means flipping on the power switch, closing the front door, and closing the delivery unit door, which results in
supplying the machine with power.
2. In the digital circuits, '1'is used to indicate that the voltage level of a given signal is "High", while '0' is used to indicate "Low".(The voltage value, however, differs from circuit to circuit.) In addition, the asterisk (*) as in "DRMD*" indicates that the DRMD signal goes on when '0'.
In practically all cases, the internal mechanisms of a microprocessor cannot be checked in the field. Therefore, the operations of the microprocessors
used in the machines are not discussed: they are explained in terms of from sensors to the input of the DC controller PCB and from the output of the
DC controller PCB to the loads.
The descriptions in this Service Manual are subject to change without notice for product improvement or other purposes, and major changes will be communicated in the form of Service Information bulletins.
All service persons are expected to have a good understanding of the contents of this Service Manual and all relevant Service Information bulletins and be
able to identify and isolate faults in the machine."
Contents
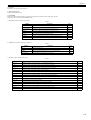
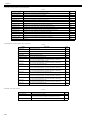
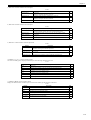
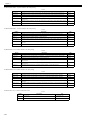
Contents
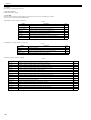
Chapter 1 PRODUCT DESCRIPTION
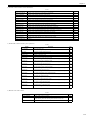
1.1 Product Overview .......................................................................................................................................1- 1
1.1.1 Product Overview .................................................................................................................................................... 1- 1
1.1.2 Product Overview .................................................................................................................................................... 1- 2
1.1.3 Product Overview .................................................................................................................................................... 1- 3
1.2 Features .....................................................................................................................................................1- 4
1.2.1 Features .................................................................................................................................................................. 1- 4
1.2.2 Features .................................................................................................................................................................. 1- 4
1.2.3 Features .................................................................................................................................................................. 1- 4
1.2.4 Printhead ................................................................................................................................................................. 1- 5
1.2.5 Ink Tank................................................................................................................................................................... 1- 5
1.2.6 Ink Tank................................................................................................................................................................... 1- 6
1.2.7 Cutter....................................................................................................................................................................... 1- 7
1.2.8 Roll Feed Unit.......................................................................................................................................................... 1- 7
1.2.9 Stand ....................................................................................................................................................................... 1- 8
1.2.10 Hard disk drive....................................................................................................................................................... 1- 8
1.2.11 IEEE1394 (FireWire) Board ................................................................................................................................... 1- 8
1.2.12 Consumables....................................................................................................................................................... 1- 10
1.2.13 Consumables....................................................................................................................................................... 1- 11
1.3 Product Specifications ..............................................................................................................................1- 12
1.3.1 Product Specifications ........................................................................................................................................... 1- 12
1.3.2 Product Specifications ........................................................................................................................................... 1- 13
1.3.3 Product Specifications ........................................................................................................................................... 1- 15
1.4 Detailed Specifications .............................................................................................................................1- 17
1.4.1 Print Speed and Direction...................................................................................................................................... 1- 17
1.4.2 Interface Specifications ......................................................................................................................................... 1- 23
1.4.3 Interface Specifications ......................................................................................................................................... 1- 24
1.5 Names and Functions of Components .....................................................................................................1- 25
1.5.1 Front ...................................................................................................................................................................... 1- 25
1.5.2 Rear....................................................................................................................................................................... 1- 26
1.5.3 Rear....................................................................................................................................................................... 1- 26
1.5.4 Top Cover (Inside)................................................................................................................................................. 1- 27
1.5.5 Manual Loading Area ............................................................................................................................................ 1- 27
1.5.6 Roll Feed Unit Cover (Inside) ................................................................................................................................ 1- 29
1.5.7 Carriage................................................................................................................................................................. 1- 29
1.5.8 Inside ..................................................................................................................................................................... 1- 30
1.6 Basic Operation ........................................................................................................................................1- 31
1.6.1 Operation Panel..................................................................................................................................................... 1- 31
1.6.2 Main Menu............................................................................................................................................................. 1- 33
1.6.3 Main Menu............................................................................................................................................................. 1- 53
1.6.4 Main Menu............................................................................................................................................................. 1- 73
1.7 Safety and Precautions ............................................................................................................................1- 93
1.7.1 Safety Precautions ................................................................................................................................................ 1- 93
1.7.1.1 Moving Parts .......................................................................................................................................................................... 1- 93
1.7.1.2 Adhesion of Ink ...................................................................................................................................................................... 1- 93
1.7.1.3 Electric Parts.......................................................................................................................................................................... 1- 95
1.7.2 Other Precautions.................................................................................................................................................. 1- 95
1.7.2.1 Printhead................................................................................................................................................................................ 1- 95
1.7.2.2 Printhead................................................................................................................................................................................ 1- 96
1.7.2.3 Ink Tank ................................................................................................................................................................................. 1- 97
1.7.2.4 Handling the Printer ............................................................................................................................................................... 1- 98
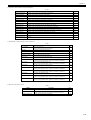
Contents
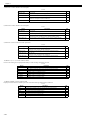
1.7.3 Precautions When Servicing Printer ....................................................................................................................1- 101
1.7.3.1 Notes on the Data Stored in the Printer ............................................................................................................................... 1- 101
1.7.3.2 Confirming the Firmware Version ........................................................................................................................................ 1- 101
1.7.3.3 Precautions against Static Electricity ................................................................................................................................... 1- 101
1.7.3.4 Precautions for Disassembly/Reassembly........................................................................................................................... 1- 101
1.7.3.5 Self-diagnostic Feature ........................................................................................................................................................ 1- 101
1.7.3.6 Disposing of the Lithium Battery .......................................................................................................................................... 1- 101
Chapter 2 TECHNICAL REFERENCE
2.1 Basic Operation Outline ............................................................................................................................. 2- 1
2.1.1 Printer Diagram........................................................................................................................................................2- 1
2.1.2 Printer Diagram........................................................................................................................................................2- 2
2.1.3 Printer Diagram........................................................................................................................................................2- 3
2.1.4 Print Signal Sequence .............................................................................................................................................2- 4
2.1.5 Print Signal Sequence .............................................................................................................................................2- 5
2.1.6 Print Driving .............................................................................................................................................................2- 6
2.1.7 Print Driving .............................................................................................................................................................2- 8
2.2 Firmware .................................................................................................................................................. 2- 10
2.2.1 Operation Sequence at Power-on..........................................................................................................................2- 10
2.2.2 Operation Sequence at Power-off..........................................................................................................................2- 11
2.2.3 Print Control ...........................................................................................................................................................2- 12
2.2.4 Print Position Adjustment Function ........................................................................................................................2- 18
2.2.5 Head Management ................................................................................................................................................2- 18
2.2.6 Printhead Overheating Protection Control .............................................................................................................2- 18
2.2.7 Pause between Pages ...........................................................................................................................................2- 18
2.2.8 White Raster Skip ..................................................................................................................................................2- 18
2.2.9 Sleep Mode............................................................................................................................................................2- 18
2.2.10 Hard Disk Drive ....................................................................................................................................................2- 18
2.3 Printer Mechanical System....................................................................................................................... 2- 20
2.3.1 Outline....................................................................................................................................................................2- 20
2.3.1.1 Outline.................................................................................................................................................................................... 2- 20
2.3.2 Ink Passage ...........................................................................................................................................................2- 21
2.3.2.1 Ink Passage ........................................................................................................................................................................... 2- 21
2.3.2.2 Ink Tank Unit.......................................................................................................................................................................... 2- 23
2.3.2.3 Carriage Unit.......................................................................................................................................................................... 2- 27
2.3.2.4 Printhead................................................................................................................................................................................ 2- 30
2.3.2.5 Purge Unit .............................................................................................................................................................................. 2- 31
2.3.2.6 Maintenance Cartridge........................................................................................................................................................... 2- 35
2.3.2.7 Air Flow .................................................................................................................................................................................. 2- 36
2.3.3 Paper Path .............................................................................................................................................................2- 37
2.3.3.1 Outline.................................................................................................................................................................................... 2- 37
2.3.3.2 Paper Path ............................................................................................................................................................................. 2- 38
2.3.3.3 Cutter Unit.............................................................................................................................................................................. 2- 48
2.4 Printer Electrical System .......................................................................................................................... 2- 49
2.4.1 Outline....................................................................................................................................................................2- 49
2.4.1.1 Overview ................................................................................................................................................................................ 2- 49
2.4.1.2 Overview ................................................................................................................................................................................ 2- 51
2.4.1.3 Overview ................................................................................................................................................................................ 2- 53
2.4.2 Main Controller.......................................................................................................................................................2- 55
2.4.2.1 Main controller components................................................................................................................................................... 2- 55
2.4.2.2 Main controller components................................................................................................................................................... 2- 56
2.4.2.3 Main controller components................................................................................................................................................... 2- 58
2.4.2.4 HDD expansion PCB components......................................................................................................................................... 2- 59
2.4.3 Carriage Relay PCB...............................................................................................................................................2- 59
2.4.3.1 Carriage PCB components .................................................................................................................................................... 2- 59
2.4.4 Motor Driver ...........................................................................................................................................................2- 60
2.4.4.1 Roll feed unit PCB components ............................................................................................................................................. 2- 60
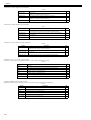
Contents
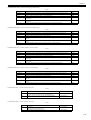
2.4.5 Maintenance Cartridge Relay PCB........................................................................................................................ 2- 60
2.4.5.1 Maintenance cartridge relay PCB components...................................................................................................................... 2- 60
2.4.6 Power Supply ........................................................................................................................................................ 2- 61
2.4.6.1 Power supply block diagram .................................................................................................................................................. 2- 61
2.5 Detection Functions with Sensors ............................................................................................................2- 62
2.5.1 Sensors for covers................................................................................................................................................. 2- 62
2.5.2 Ink passage system............................................................................................................................................... 2- 63
2.5.3 Ink passage system............................................................................................................................................... 2- 65
2.5.4 Carriage system .................................................................................................................................................... 2- 67
2.5.5 Paper path system................................................................................................................................................. 2- 68
2.5.6 Others.................................................................................................................................................................... 2- 70
Chapter 3 INSTALLATION
3.1 Installation ..................................................................................................................................................3- 1
3.1.1 Making Pre-Checks ................................................................................................................................................. 3- 1
3.1.1.1 Making Pre-Checks.................................................................................................................................................................. 3- 1
3.1.2 Unpacking and Installation ...................................................................................................................................... 3- 1
3.1.2.1 Unpacking and Installation....................................................................................................................................................... 3- 1
3.1.2.2 Installing the Stand ................................................................................................................................................................ 3- 10
3.1.3 Checking the Images/Operations .......................................................................................................................... 3- 19
3.1.3.1 Checking the Image and Operation ....................................................................................................................................... 3- 19
3.2 Transporting the Printer ............................................................................................................................3- 20
3.2.1 Transporting the Printer......................................................................................................................................... 3- 20
3.2.1.1 Transporting the Printer ......................................................................................................................................................... 3- 20
3.2.2 Reinstalling the Printer .......................................................................................................................................... 3- 21
3.2.2.1 Reinstalling the Printer........................................................................................................................................................... 3- 21
Chapter 4 DISASSEMBLY/REASSEMBLY
4.1 Service Parts ..............................................................................................................................................4- 1
4.1.1 Service Parts ........................................................................................................................................................... 4- 1
4.2 Disassembly/Reassembly...........................................................................................................................4- 2
4.2.1 Disassembly/Reassembly ....................................................................................................................................... 4- 2
4.3 Points to Note on Disassembly and Reassembly .......................................................................................4- 2
4.3.1 Note on locations prohibited from disassembly ....................................................................................................... 4- 2
4.3.2 Moving the carriage manually.................................................................................................................................. 4- 2
4.3.3 Units requiring draining of ink .................................................................................................................................. 4- 2
4.3.4 External Covers ....................................................................................................................................................... 4- 4
4.3.5 Driving Unit ............................................................................................................................................................ 4- 16
4.3.6 Cutter..................................................................................................................................................................... 4- 17
4.3.7 Carriage Unit ......................................................................................................................................................... 4- 20
4.3.8 Feeder Unit............................................................................................................................................................ 4- 28
4.3.9 Roll Feed Unit........................................................................................................................................................ 4- 31
4.3.10 Purge Unit............................................................................................................................................................ 4- 34
4.3.11 Waste Ink Collection Unit..................................................................................................................................... 4- 37
4.3.12 Ink Tank Unit........................................................................................................................................................ 4- 40
4.3.13 Head Management Sensor.................................................................................................................................. 4- 43
4.3.14 Multi Sensor......................................................................................................................................................... 4- 43
4.3.15 PCBs.................................................................................................................................................................... 4- 44
4.3.16 PCBs.................................................................................................................................................................... 4- 47
4.3.17 Opening the Cap/Moving the Wiper Unit ............................................................................................................. 4- 51
4.3.18 Opening/Closing the Ink Supply Valve ................................................................................................................ 4- 53
4.3.19 Draining the Ink.................................................................................................................................................... 4- 54
4.4 Applying the Grease .................................................................................................................................4- 55
4.4.1 Applying the Grease .............................................................................................................................................. 4- 55
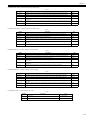
Contents
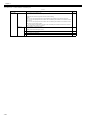
4.5 Adjustment and Setup Items .................................................................................................................... 4- 59
4.5.1 Adjustment Item List ..............................................................................................................................................4- 59
4.5.2 Procedure after Replacing the Carriage Unit or Multi Sensor................................................................................4- 59
4.5.3 Procedure after Replacing the Head Management Sensor ...................................................................................4- 62
Chapter 5 MAINTENANCE
5.1 Periodic Replacement Parts ....................................................................................................................... 5- 1
5.1.1 Periodic Replacement Parts ....................................................................................................................................5- 1
5.2 Consumable Parts ...................................................................................................................................... 5- 1
5.2.1 Consumable Parts ...................................................................................................................................................5- 1
5.2.2 Consumable Parts ...................................................................................................................................................5- 2
5.3 Periodic Maintenance ................................................................................................................................. 5- 3
5.3.1 Periodic Maintenance ..............................................................................................................................................5- 3
5.3.2 Periodic Maintenance ..............................................................................................................................................5- 6
Chapter 6 TROUBLESHOOTING
6.1 Troubleshooting.......................................................................................................................................... 6- 1
6.1.1 Outline......................................................................................................................................................................6- 1
6.1.1.1 Outline of Troubleshooting....................................................................................................................................................... 6- 1
6.1.2 Troubleshooting When Warnings Occur ..................................................................................................................6- 1
6.1.2.1 Ink Lvl: Chk XX (1000,1001,1002,1003,1004,1005,1006,1008,1009,100A,100B,100C)......................................................... 6- 1
6.1.2.2 MTCart Full Soon (1100) ......................................................................................................................................................... 6- 1
6.1.2.3 Mist Full Soon (1101)............................................................................................................................................................... 6- 1
6.1.2.4 GARO W12xx: xx stands for digits (1221,1222,1223,1225,1231,1232,1233,1234,1235) ....................................................... 6- 1
6.1.2.5 Feed Limit... (100F).................................................................................................................................................................. 6- 2
6.1.2.6 Check printed document.(1010)............................................................................................................................................... 6- 2
6.1.3 Troubleshooting When Errors Occur .......................................................................................................................6- 2
6.1.3.1 01800500-1012/01800500-1013 Defective printhead nozzle .................................................................................................. 6- 2
6.1.3.2 03010000-200C/03010000-2017/03010000-2018/03016000-2010 Multi sensor error............................................................ 6- 2
6.1.3.3 03010000-200D Cut sheet end cannot be detected ................................................................................................................ 6- 2
6.1.3.4 03010000-2820/03010000-2821/03010000-2822/03010000-2823/03130031-2F32/03010000-2F33 Adjustment error......... 6- 3
6.1.3.5 03010000-2E1F/03060000-2E14/03061000-2E15/03060000-2E16/03060200-2E03/03060200-2E0B/03060A00-2E00/
03060A00-2E01/03860002-2E0A Path mismatch error ................................................................................................................. 6- 3
6.1.3.6 03010000-2E25/03010000-2E27 Paper feed/delivery jam error ............................................................................................. 6- 3
6.1.3.7 03030000-2E21 IEEE1394 error.............................................................................................................................................. 6- 4
6.1.3.8 03060A00-2E0E Roll media unit uninstallation........................................................................................................................ 6- 4
6.1.3.9 03060A00-2E1B Roll media end error ..................................................................................................................................... 6- 4
6.1.3.10 03130031-291B Lift home position error................................................................................................................................ 6- 4
6.1.3.11 03130031-291D Supr cam sensor error................................................................................................................................. 6- 5
6.1.3.12 03130031-2E23 Cutter unit breakdown ................................................................................................................................. 6- 5
6.1.3.13 03130031-2F13 A/D Converter external trigger output stopped ............................................................................................ 6- 5
6.1.3.14 03130031-2F14 ASIC Register cannot be written................................................................................................................. 6- 5
6.1.3.15 03130031-2F16 Mist fan error................................................................................................................................................ 6- 5
6.1.3.16 03130031-2F17 Suction fan error .......................................................................................................................................... 6- 6
6.1.3.17 03130031-2F20/03130031-2F28/03130031-2F22/03130031-2F23 Defective sensor in purge unit ...................................... 6- 6
6.1.3.18 03130031-2F24 Cutter drive time-out error............................................................................................................................ 6- 6
6.1.3.19 03130031-2F25 Carriage home position error ....................................................................................................................... 6- 6
6.1.3.20 03130031-2F26/03130031-2F27 Carriage motor error.......................................................................................................... 6- 7
6.1.3.21 03130031-2F2A Feed roller home position error ................................................................................................................... 6- 7
6.1.3.22 03130031-2F2D The cassette cannot work. .......................................................................................................................... 6- 7
6.1.3.23 03130031-2F2E Roll drive time-out error............................................................................................................................... 6- 7
6.1.3.24 03130031-2F3A Valve open/close error ................................................................................................................................ 6- 8
6.1.3.25 03180003-2E22 MIT error...................................................................................................................................................... 6- 8
6.1.3.26 03180101-2E17 Cassette uninstallation ................................................................................................................................ 6- 8
6.1.3.27 03800200-2802/03800400-2803/03800300-2801/03800201-280A/03800401-280B/03800301-2809/03800200-2804/
03800202-2807 Printhead error ..................................................................................................................................................... 6- 8
6.1.3.28 03810101-2501/03810102-2502/03810103-2503/03810104-2500/03810105-2508/03810106-2506/03810107-250A/
03810108-250C/03810109-250B/03810112-2504/03810113-2505/03810115-2509 No ink error................................................. 6- 9
Contents
6.1.3.29 03830101-2521/03830104-2520/03830102-2522/03830103-2523/03830112-2524/03830113-2525/03830106-2526/
03830105-2528/03830115-2529/03830107-252A/03830109-252B/03830108-252C Ink tank is not installed.(This error occurs when
the ink tank is replaced.) ................................................................................................................................................................ 6- 9
6.1.3.30 03830201-2541/03800204-2540/03830202-2542/03830203-2543/03830212-2544/03830213-2545/03830206-2546/
03830205-2548/03830215-2549/03830207-254A/03830209-254B/03830208-254C Invalid ink tank ID....................................... 6- 9
6.1.3.31 03830301-2561/03830304-2560/03830302-2562/03830303-2563/03830312-2564/03830313-2565/03830306-2566/
03830305-2568/03830305-2568/03830315-2569/03830307-256A/03830309-256B/03830308-256C Ink tank EEPROM error ... 6- 9
6.1.3.32 03841001-2819/03841201-2816/03841201-2817/03841101-2818/01841001-281B Maintenance cartridge error................ 6- 9
6.1.3.33 03861001-2405/03861001-2406 Borderless printing error .................................................................................................. 6- 10
6.1.3.34 03862000-2E09 Insufficient roll media error ........................................................................................................................ 6- 10
6.1.3.35 03870001-2015 Cut error..................................................................................................................................................... 6- 10
6.1.4 Troubleshooting When Service Call Errors Occur................................................................................................. 6- 10
6.1.4.1 Outline.................................................................................................................................................................................... 6- 10
6.1.4.2 E141-4046 Recovery system rotation count reached 50,000. ............................................................................................... 6- 11
6.1.4.3 E144-4047 Supply system's count error ................................................................................................................................ 6- 11
6.1.4.4 E146-4001 Borderless/idle ejection/mist collection count full ................................................................................................ 6- 11
6.1.4.5 E194-404A Non-discharge detection count error................................................................................................................... 6- 11
6.1.4.6 E196-4040/E196-4041/E196-4042/E196-4045/E196-4049 main controller PCB error ......................................................... 6- 11
6.1.4.7 E198-401C/E198-401D/E198-401E RTC error...................................................................................................................... 6- 11
6.2 Location of Connectors and Pin Arrangement..........................................................................................6- 12
6.2.1 Main controller PCB............................................................................................................................................... 6- 12
6.2.2 Main controller PCB............................................................................................................................................... 6- 24
6.2.3 Main controller PCB............................................................................................................................................... 6- 35
6.2.4 Carriage PCB ........................................................................................................................................................ 6- 46
6.2.5 Power supply ......................................................................................................................................................... 6- 55
6.2.6 Roll feed unit PCB ................................................................................................................................................. 6- 56
6.3 Version Up ................................................................................................................................................6- 57
6.3.1 Firmware Update Tool ........................................................................................................................................... 6- 57
6.3.2 Firmware Update Tool ........................................................................................................................................... 6- 58
6.4 Service Tools ............................................................................................................................................6- 59
6.4.1 Tool List ................................................................................................................................................................. 6- 59
Chapter 7 SERVICE MODE
7.1 Service Mode..............................................................................................................................................7- 1
7.1.1 Service Mode Operation.......................................................................................................................................... 7- 1
7.1.2 Map of the Service Mode......................................................................................................................................... 7- 2
7.1.3 Map of the Service Mode......................................................................................................................................... 7- 7
7.1.4 Map of the Service Mode....................................................................................................................................... 7- 12
7.1.5 Details of Service Mode......................................................................................................................................... 7- 17
7.1.6 Details of Service Mode......................................................................................................................................... 7- 25
7.1.7 Details of Service Mode......................................................................................................................................... 7- 33
7.1.8 Sample Printout ..................................................................................................................................................... 7- 41
7.2 Special Mode ............................................................................................................................................7- 45
7.2.1 Special Modes for Servicing .................................................................................................................................. 7- 45
Chapter 8 ERROR CODE
8.1 Outline ........................................................................................................................................................8- 1
8.1.1 Outline ..................................................................................................................................................................... 8- 1
8.2 Warning Table ............................................................................................................................................8- 2
8.2.1 Warnings ................................................................................................................................................................. 8- 2
8.2.2 Warnings ................................................................................................................................................................. 8- 3
8.3 Error Table..................................................................................................................................................8- 4
8.3.1 Error Code List ........................................................................................................................................................ 8- 4
8.3.2 Error Code List ...................................................................................................................................................... 8- 14
8.4 Sevice Call Table......................................................................................................................................8- 25
8.4.1 Service Call Errors................................................................................................................................................. 8- 25
Contents
8.4.2 Service Call Errors .................................................................................................................................................8- 25
Chapter 1 PRODUCT DESCRIPTION
Contents
Contents
1.1 Product Overview ..........................................................................................................................................................1-1
1.1.1 Product Overview ........................................................................................................................................................................ 1-1
1.1.2 Product Overview ........................................................................................................................................................................ 1-2
1.1.3 Product Overview ........................................................................................................................................................................ 1-3
1.2 Features ..........................................................................................................................................................................1-4
1.2.1 Features ........................................................................................................................................................................................ 1-4
1.2.2 Features ........................................................................................................................................................................................ 1-4
1.2.3 Features ........................................................................................................................................................................................ 1-4
1.2.4 Printhead ...................................................................................................................................................................................... 1-5
1.2.5 Ink Tank ....................................................................................................................................................................................... 1-5
1.2.6 Ink Tank ....................................................................................................................................................................................... 1-6
1.2.7 Cutter............................................................................................................................................................................................ 1-7
1.2.8 Roll Feed Unit.............................................................................................................................................................................. 1-7
1.2.9 Stand ............................................................................................................................................................................................ 1-8
1.2.10 Hard disk drive........................................................................................................................................................................... 1-8
1.2.11 IEEE1394 (FireWire) Board ...................................................................................................................................................... 1-8
1.2.12 Consumables ............................................................................................................................................................................ 1-10
1.2.13 Consumables ............................................................................................................................................................................ 1-11
1.3 Product Specifications..................................................................................................................................................1-12
1.3.1 Product Specifications ............................................................................................................................................................... 1-12
1.3.2 Product Specifications ............................................................................................................................................................... 1-13
1.3.3 Product Specifications ............................................................................................................................................................... 1-15
1.4 Detailed Specifications ................................................................................................................................................1-17
1.4.1 Print Speed and Direction .......................................................................................................................................................... 1-17
1.4.2 Interface Specifications.............................................................................................................................................................. 1-23
1.4.3 Interface Specifications.............................................................................................................................................................. 1-24
1.5 Names and Functions of Components .........................................................................................................................1-25
1.5.1 Front ........................................................................................................................................................................................... 1-25
1.5.2 Rear ............................................................................................................................................................................................ 1-26
1.5.3 Rear ............................................................................................................................................................................................ 1-26
1.5.4 Top Cover (Inside) ..................................................................................................................................................................... 1-27
1.5.5 Manual Loading Area ................................................................................................................................................................ 1-27
1.5.6 Roll Feed Unit Cover (Inside).................................................................................................................................................... 1-29
1.5.7 Carriage...................................................................................................................................................................................... 1-29
1.5.8 Inside.......................................................................................................................................................................................... 1-30
1.6 Basic Operation............................................................................................................................................................1-31
1.6.1 Operation Panel.......................................................................................................................................................................... 1-31
1.6.2 Main Menu................................................................................................................................................................................. 1-33
1.6.3 Main Menu................................................................................................................................................................................. 1-53
1.6.4 Main Menu................................................................................................................................................................................. 1-73
1.7 Safety and Precautions .................................................................................................................................................1-93
1.7.1 Safety Precautions...................................................................................................................................................................... 1-93
1.7.1.1 Moving Parts .................................................................................................................................................................................................1-93
1.7.1.2 Adhesion of Ink.............................................................................................................................................................................................1-93
1.7.1.3 Electric Parts .................................................................................................................................................................................................1-95
1.7.2 Other Precautions....................................................................................................................................................................... 1-95
1.7.2.1 Printhead .......................................................................................................................................................................................................1-95
1.7.2.2 Printhead .......................................................................................................................................................................................................1-96
1.7.2.3 Ink Tank ........................................................................................................................................................................................................1-97
1.7.2.4 Handling the Printer ......................................................................................................................................................................................1-98
Contents
1.7.3 Precautions When Servicing Printer ........................................................................................................................................ 1-101
1.7.3.1 Notes on the Data Stored in the Printer ...................................................................................................................................................... 1-101
1.7.3.2 Confirming the Firmware Version.............................................................................................................................................................. 1-101
1.7.3.3 Precautions against Static Electricity.......................................................................................................................................................... 1-101
1.7.3.4 Precautions for Disassembly/Reassembly .................................................................................................................................................. 1-101
1.7.3.5 Self-diagnostic Feature ............................................................................................................................................................................... 1-101
1.7.3.6 Disposing of the Lithium Battery ............................................................................................................................................................... 1-101
Chapter 1
1.1 Product Overview
1.1.1 Product Overview
0016-8093
iPF6100
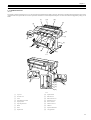
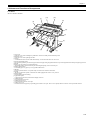
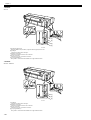
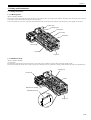
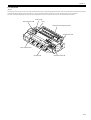
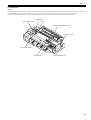
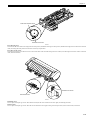
This printer is capable of printing on A4- to A1-size cut sheets and its maximum print width is 24 inches. This printer is a desktop large-format printer twelve-colors
(pigment-based colors) printer that can be used to print office documents as well as handy POP and posters. An auto roll feed unit is equipped for printing on roll
media.
[1]
[13]
[12]
[11]
[2]
[10]
[9]
[3]
[8]
[4]
[5]
[7]
[6]
F-1-1
[18]
[17]
[16]
[18]
[15]
[14]
F-1-2
T-1-1
[1]
Top Cover
[10]
Operation Panel
[2]
Ink Tank Cover
[11]
Roll Feed Unit
[3]
Cutter
[12]
Roll Feed Unit Cover
[4]
Front Manual Feed Guide
[13]
Manual Feed Cover
[5]
Peper Eject Slot
[14]
Power Connector
[6]
Paper Alignment Line
[15]
Ethernet Connector
[7]
Basket
[16]
USB Port
[8]
Stand
[17]
Expansion Board Slot
[9]
Output Guide
[18]
Carrying Handle
1-1
Chapter 1
1.1.2 Product Overview
0020-1808
iPF6200
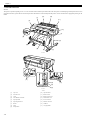
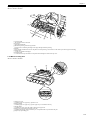
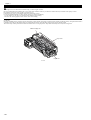
This printer is capable of printing on A4- to A1-size cut sheets and its maximum print width is 24 inches. This printer is a desktop large-format printer twelve-colors
(pigment-based colors) printer that can be used to print office documents as well as handy POP and posters. An auto roll feed unit is equipped for printing on roll
media.
[1]
[13]
[12]
[11]
[2]
[10]
[9]
[3]
[8]
[4]
[5]
[7]
[6]
F-1-3
[17]
[16]
[15]
[14]
F-1-4
T-1-2
1-2
[1]
Top Cover
[10]
Operation Panel
[2]
Ink Tank Cover
[11]
Roll Feed Unit
[3]
Cutter
[12]
Roll Feed Unit Cover
[4]
Front Manual Feed Guide
[13]
Manual Feed Cover
[5]
Peper Eject Slot
[14]
Power Connector
[6]
Paper Alignment Line
[15]
Ethernet Connector
[7]
Basket
[16]
USB Port
[8]
Stand
[17]
Carrying Handle
[9]
Output Guide
[17]
Chapter 1
1.1.3 Product Overview
0020-7368
iPF6000S
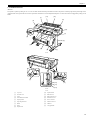
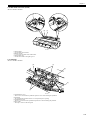
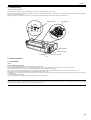
This printer is capable of printing on A4- to A1-size cut sheets and its maximum print width is 24 inches. This printer is a desktop large-format printer eight-colors
(pigment-based colors) printer that can be used to print office documents as well as handy POP and posters. An auto roll feed unit is equipped for printing on roll
media.
[1]
[13]
[12]
[11]
[2]
[10]
[9]
[3]
[8]
[4]
[5]
[7]
[6]
F-1-5
[17]
[16]
[17]
[15]
[14]
F-1-6
T-1-3
[1]
Top Cover
[10]
Operation Panel
[2]
Ink Tank Cover
[11]
Roll Feed Unit
[3]
Cutter
[12]
Roll Feed Unit Cover
[4]
Front Manual Feed Guide
[13]
Manual Feed Cover
[5]
Peper Eject Slot
[14]
Power Connector
[6]
Paper Alignment Line
[15]
Ethernet Connector
[7]
Basket
[16]
USB Port
[8]
Stand
[17]
Carrying Handle
[9]
Output Guide
1-3
Chapter 1
1.2 Features
1.2.1 Features
0016-8104
iPF6100
- A new 12-color pigmented ink formulation featuring additional three types of special-color inks (red, green, blue) and two types of gray ink varying in grayscale,
"Lucia" prints on a variety of grades of paper, from glossy paper to art, mat and sign, with a high degree of coloring.
- Two types of black ink, vividly glossy "black ink" and "mat black ink" full of a sense of high quality, are loaded concurrently and are selected automatically to
suit paper types. There is no need to manually change inks.
- BK (black)/GY (gray)/PGY (photo gray) ink are mainly used to offer a drastically enhanced power of halftoning, achieving an equivalent of the high picture quality
of monochrome silver-salt films.
- One-inch wide printhead having 2,560 nozzles per color, which are twice as many as the those of the existing models. High-density printhead technology "FINE"
that can satisfy both of beautiful and fast printing requirements of a high order is employed for accurate ejection of ultrasmall 4-pl drops of ink to the target positions.
Prints with 2400 x 1200 dpi resolution can be made at a high speed.
- Imaging processor "L-COA" incorporated for high-speed image data processing. High-speed processing of 12-color, 2-bit large-size images and printer control
for high-accuracy operation of high-density double head can be performed with a single chip.
- Support for roll media, manual feed from front, and manual feed from top (3-way paper supply). A maximum of 1.5 mm thick of paper (POP Board) can be manually fed from the front.
- Borderless printing on and auto cutting of roll media.
- Standard support for 10Base-T/100Base-TX. Standard support for USB 2.0 Hi-Speed. Optional support for IEEE1394.
- Data scanned using CanoScan can be easily printed on large-size paper just like a dedicated copier. Just pressing the Start button allows you to blow up an original
of up to A3 size in collaboration with Canon Image RUNNER.
- Support for remote notification utility which is used to send an E-mail when an alarm or error occurs.
Functional enhancements new to this model include:
- Higher image quality
Use of abrasion-resistant inks (MBK, BK, PGY, GY) offers enhanced image durability.
The color calibration feature adds to the faithfulness of color reproduction.
- Enhanced ease of operation
A 160-by-128-dot-large LCD, coupled with the new [Paper Load/Eject] button, offers drastically enhanced ease of operation.
The cassette feature has been removed in the interest of users who do not require a cassette capability, resulting in a downsized printer geometry and better roll
media accessibility.
1.2.2 Features
0020-1810
iPF6200
- A new 12-color pigmented ink formulation featuring additional three types of special-color inks (red, green, blue) and two types of gray ink varying in grayscale,
"Lucia" prints on a variety of grades of paper, from glossy paper to art, mat and sign, with a high degree of coloring.
- Two types of black ink, vividly glossy "black ink" and "mat black ink" full of a sense of high quality, are loaded concurrently and are selected automatically to
suit paper types. There is no need to manually change inks.
- BK (black)/GY (gray)/PGY (photo gray) ink are mainly used to offer a drastically enhanced power of halftoning, achieving an equivalent of the high picture quality
of monochrome silver-salt films.
- Use of abrasion-resistant inks (MBK, BK, PGY, GY) offers enhanced image durability.
- The color calibration feature adds to the faithfulness of color reproduction.
- A 160-by-128-dot-large LCD is equipped.
- One-inch wide printhead having 2,560 nozzles per color, which are twice as many as the those of the existing models. High-density printhead technology "FINE"
that can satisfy both of beautiful and fast printing requirements of a high order is employed for accurate ejection of ultrasmall 4-pl drops of ink to the target positions.
Prints with 2400 x 1200 dpi resolution can be made at a high speed.
- Imaging processor "L-COA" incorporated for high-speed image data processing. High-speed processing of 12-color, 2-bit large-size images and printer control
for high-accuracy operation of high-density double head can be performed with a single chip.
- Support for roll media, manual feed from front, and manual feed from top (3-way paper supply). A maximum of 1.5 mm thick of paper (POP Board) can be manually fed from the front.
- Borderless printing on and auto cutting of roll media.
- Standard support for 10Base-T/100Base-TX. Standard support for USB 2.0 Hi-Speed.
- Data scanned using CanoScan can be easily printed on large-size paper just like a dedicated copier. Just pressing the Start button allows you to blow up an original
of up to A3 size in collaboration with Canon Image RUNNER.
- Support for remote notification utility which is used to send an E-mail when an alarm or error occurs.
Functional enhancements new to this model include:
- Hard disk drive mounted for greater ease of job management.
1.2.3 Features
0020-7252
iPF6000S
- Two types of black ink, vividly glossy "black ink" and "mat black ink" full of a sense of high quality, are loaded concurrently and are selected automatically to
suit paper types. There is no need to manually change inks.
- The color calibration feature adds to the faithfulness of color reproduction.
- A 160-by-128-dot-large LCD is equipped.
- One-inch wide printhead having 2,560 nozzles per color, which are twice as many as the those of the existing models. High-density printhead technology "FINE"
that can satisfy both of beautiful and fast printing requirements of a high order is employed for accurate ejection of ultrasmall 4-pl drops of ink to the target positions.
Prints with 2400 x 1200 dpi resolution can be made at a high speed.
- Imaging processor "L-COA" incorporated for high-speed image data processing. High-speed processing of 8-color, 2-bit large-size images and printer control for
high-accuracy operation of high-density double head can be performed with a single chip.
- Support for roll media, manual feed from front, and manual feed from top (3-way paper supply). A maximum of 1.5 mm thick of paper (POP Board) can be manually fed from the front.
- Borderless printing on and auto cutting of roll media.
- Standard support for 10Base-T/100Base-TX. Standard support for USB 2.0 Hi-Speed.
- Data scanned using CanoScan can be easily printed on large-size paper just like a dedicated copier. Just pressing the Start button allows you to blow up an original
of up to A3 size in collaboration with Canon Image RUNNER.
- Support for remote notification utility which is used to send an E-mail when an alarm or error occurs.
- Hard disk drive mounted for greater ease of job management and for driving on night time.
Functional enhancements new to this model include:
- High printing productivity
The eight-color pigment ink system offers enhanced printing prudutivity.
1-4
Chapter 1
1.2.4 Printhead
0012-6187
iPF6100 / iPF6200 / iPF6000S
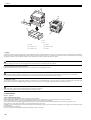
Printhead set on the carriage is a 6-color integral disposable type.
On the printhead, two rows of 1,280 nozzles (total 2,560 nozzles) are arranged in a staggered pattern. .
If print quality does not improve despite carrying out the specified cleaning, the printhead must be replaced with a new one. Generally, it is recommended that the
printhead be replaced about 12 months after you have opened the package.
F-1-7
1.2.5 Ink Tank
0013-0608
iPF6100 / iPF6200
The ink tank is disposable.
There are twelve pigment-based ink colors (matte black,black,photo cyan,cyan,photo magenta,magenta,yellow,red,blue,green,gray,and photo gray).
This printer features a mechanism by which only the correct color ink tank will fit in the given slot.
When the message No Ink is displayed, replace the ink tank with a new one. Also, each ink tank should generally be replaced six months after you have opened the
package.
F-1-8
1-5
Chapter 1
1.2.6 Ink Tank
0020-7255
iPF6000S
The ink tank is disposable.
There are eight pigment-based ink colors (matte black,black,photo cyan,cyan,photo magenta,magenta,yellow and gray).
This printer features a mechanism by which only the correct color ink tank will fit in the given slot.
When the message No Ink is displayed, replace the ink tank with a new one. Also, each ink tank should generally be replaced six months after you have opened the
package.
F-1-9
1-6
Chapter 1
1.2.7 Cutter
0013-3524
iPF6100 / iPF6200 / iPF6000S
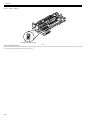
A round-blade cuter comes with the cutter unit.
F-1-10
1.2.8 Roll Feed Unit
0013-2512
iPF6100 / iPF6200 / iPF6000S
Roll Feed Unit
The roll feed unit is optionally available to use roll media with this printer.
F-1-11
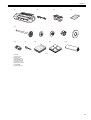
Roll holder set
This set consists of roll holder, holder stopper, 3-inch paper tube attachment, and borderless printing spacer (commonly used for 2-inch paper tube and 3-inch paper
tube).
[Roll holder]
F-1-12
[Holder stopper](for 2-inch paper tube and 3-inch paper tube)
F-1-13
[3-inch paper tube attachment]
F-1-14
[Borderless printing spacer]
F-1-15
MEMO:
A borderless printing spacer is used to perform borderless printing on A1-size (594 mm) and A2-size (420 mm) roll media. This printer is furnished with a number
of borderless printing ink receiving channels on the platen to address multi-sized borderless printing needs. Borderless printing on A1 or A2-size roll media is made
possible by using a spacer, without needing to produce a new borderless printing ink receiving channel.
1-7
Chapter 1
1.2.9 Stand
0016-8107
iPF6100 / iPF6200 / iPF6000S
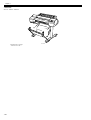
Stand (Option)
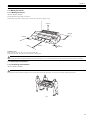
It is a stand that puts the printer. Equipped with casters so that the printer can be easily moved. The output stacker included with stand can use by the two ways of
the regular position or extended position.
F-1-16
MEMO:
- Use the output stacker in the regular position [A]. However, for the specified media, it can also be used in the extended position [B]. The media can be removed
more easily when the output stacker is in the extended position.
- The output stacker can accommodate one sheet. Remove each sheet before printing if you are printing a series of documents.
[A]
[B]
F-1-17
1.2.10 Hard disk drive
0017-8472
iPF6200 / iPF6000S
Each print job received from the host computer is saved to the 80GB hard disk drive(serial ATA connection) attached to the printer, so the printer can print the job
repeatedly as needed, without having to wait for its retransmission from the host computer.
Saving print jobs will offer the following benefits:
- Eased computer workload
A print job may be automatically preserved to the hard disk when printing or may be preserved to the hard disk without printing. A print job preserved can be
printed in as many copies as needed without having to use the host computer.
- Reprinting after error occurrence
If the printer encounters errors, such as paper out, while printing a print job, it can resume the print operation as soon as the errors are cleared, without needing its
retransmission from the host computer.
- Higher print work efficiency
Print jobs can be printed selectively or in a specified number of copies without using a host computer. Multiple print jobs can be printed batched. Unattended print
operations in the nighttime are also possible.
1.2.11 IEEE1394 (FireWire) Board
0016-8123
iPF6100
1-8
Chapter 1
IEEE1394 (FireWire) expansion board (option)
An interface board that provides an additional IEEE1394 (FireWire) port.
F-1-18
1-9
Chapter 1
1.2.12 Consumables
0016-8111
iPF6100 / iPF6200
Printhead
The consumable print head is the same as that supplied with the printer.
F-1-19
Ink Tanks
The consumable ink tanks are available in twelve colors (matte black, black, photo cyan, cyan, photo magenta, magenta, yellow, red, blue, green, photo gray, and
gray). They are the same as those supplied with the printer. Each ink tank must be replaced with a new one six month after you have opened the package.
The ink tank that can be used with this printer is labeled "H".
F-1-20
Maintenance cartridge
The consumable maintenance cartridge is the same as that supplied with the printer.
F-1-21
1-10
Chapter 1
1.2.13 Consumables
0020-7258
iPF6000S
Printhead
The consumable print head is the same as that supplied with the printer.
F-1-22
Ink Tanks
The consumable ink tanks are available in eight colors (matte black, black, photo cyan, cyan, photo magenta, magenta, yellow and gray). They are the same as those
supplied with the printer. Each ink tank must be replaced with a new one six month after you have opened the package.
The ink tank that can be used with this printer is labeled "H".
F-1-23
Maintenance cartridge
The consumable maintenance cartridge is the same as that supplied with the printer.
F-1-24
1-11
Chapter 1
1.3 Product Specifications
1.3.1 Product Specifications
0016-8112
iPF6100
Type
Bubble jet large-sized paper printer
Feeding system
Automatic feeding of one roll media/One cut sheet (manual feed from
front)/One cut sheet (manual feed from top)
Feeding capacity
- Roll media
One roll at the back/Outer diameter of roll: 150 mm or less/Inner
diameter of paper tube: 2 or 3 inches
- Cut sheet
1 sheet
Delivery method
Delivers the media with its printed side up in the forward direction.
Sheet delivery capability
Using the stand (option) basket:
- Roll media
1 sheet
- Cut sheet
1 sheet
Cutter
Automatically cuts paper laterally. Cartridge-type (with round blade)
Type of media
- Roll media
Plain Paper, Economy Bond Paper, Universal Bond Paper, Plain Paper
(High Quality), Plain Paper (High Grade), Recycled Coated Paper, Matte
Coated Paper 90gsm, Coated Paper, Premium Coated Paper,
Heavyweight Coated Paper, Extra Heavyweight Coated Paper, Premium
Matte Paper, Glossy Photographic Paper 190gsm, Satin Photographic
Paper 190gsm, Glossy Photographic Paper 240gsm, Satin Photographic
Paper 240gsm, HW Glossy Photo Paper, HW Satin Photo Paper,
Premium RC Photo Luster, Glossy Photo Paper, Semi-Glossy Photo
Paper, Heavyweight Glossy Photo Paper 2, Heavywght SemiGlos Photo
Paper 2, Poster Semi-Glossy Photo Paper, Fine Art Photo, Fine Art
Heavyweight Photo, Fine Art Textured, Fine Art Watercolor, Fine Art
Block Print, Graphic Canvas, Canvas Matte 2, Japanese Paper Washi,
Commercial Proofing Paper, Commercial RC Proofing 210gsm,
Commercial RC Proofing 270gsm, Proofing Paper, Newsprint for
Proofing1, Newsprint for Proofing2, Newsprint for Proofing3, Durable
Banner, Synthetic Paper, Adhesive Synthetic Paper, Flame-Resistant
Cloth, Thin Fabric Banner 2, Backlit Film, Durable Backlit Film,
Backprint Film, Colored Coated Paper, CAD Tracing Paper, CAD
Translucent Matte Film
- Cut sheet (manual feed from top)
Plain Paper, Economy Bond Paper, Universal Bond Paper, Plain Paper
(High Quality), Plain Paper (High Grade), Recycled Coated Paper, Matte
Coated Paper 90gsm, High Resolution Paper, Coated Paper, Premium
Coated Paper, Heavyweight Coated Paper, Extra Heavyweight Coated
Paper, Premium Matte Paper, Matte Photo Paper , Glossy Photographic
Paper 190gsm, Satin Photographic Paper 190gsm, Glossy Photographic
Paper 240gsm, Satin Photographic Paper 240gsm, HW Glossy Photo
Paper, HW Satin Photo Paper, Premium RC Photo Luster, Glossy Photo
Paper, Semi-Glossy Photo Paper, Heavyweight Glossy Photo Paper 2,
Heavywght SemiGlos Photo Paper 2, Poster Semi-Glossy Photo Paper,
Photo Paper Plus, Photo Paper Plus Semi-Gloss, Fine Art Photo, Fine
Art Heavyweight Photo, Fine Art Textured, Fine Art Watercolor, Fine
Art Block Print, Graphic Canvas, Canvas Matte 2, Japanese Paper
Washi, Commercial Proofing Paper, Commercial RC Proofing 210gsm,
Commercial RC Proofing 270gsm, Proofing Paper, Newsprint for
Proofing1, Newsprint for Proofing2, Newsprint for Proofing3, Durable
Banner, Synthetic Paper, Adhesive Synthetic Paper, Flame-Resistant
Cloth, Thin Fabric Banner 2, Backlit Film, Durable Backlit Film,
Backprint Film, Colored Coated Paper, CAD Tracing Paper, CAD
Translucent Matte Film
- Cut sheet (manual feed from front)
POP Board
1-12
Supported thickness
Roll media: 0.08 to 0.8 mm
Manual feed from top: 0.08 to 0.8 mm
Manual feed from front: 0.8 to 1.5 mm
Media size (Roll media)
Width:203mm X 610mm(24inch)
Lengh:203mm X 18m
Maximum outside diameter:150 mm
Media size (Cut sheet)
- Manual feed from top
Width:203mm(8inch) X 610mm(24inch)
Lengh:279mm X 1600mm
- Manual feed from front
Width:250mm(8inch) X 610mm(24inch)
Lengh:350mm X 914mm
Chapter 1
Printable area (Roll media)
Area excluding 3mm from the leading edge, 3 mm from the trailing edge,
and 3 mm from the left and right edges.
Borderless printing: 0 mm from the leading edge, trailing edge, and left
and right edges.
Width of media allowing borderless printing:
10"(254mm), B4(257mm), A3+(329mm), 14"(356mm), 16"(407mm),
A2(420mm),
A2+/17"(432mm),
B2(515mm),
A1(594mm),
24"(610mm)
Media type allowing borderless printing:
Premium Coated Paper, Heavyweight Coated Paper, Extra Heavyweight
Coated Paper, Premium Matte Paper, Glossy Photographic Paper
190gsm, Satin Photographic Paper 190gsm, Glossy Photographic Paper
240gsm, Satin Photographic Paper 240gsm, HW Glossy Photo Paper,
HW Satin Photo Paper, Premium RC Photo Luster, Glossy Photo Paper,
Semi-Glossy Photo Paper, Heavyweight Glossy Photo Paper 2,
Heavywght SemiGlos Photo Paper 2, Poster Semi-Glossy Photo Paper,
Fine Art Photo, Fine Art Heavyweight Photo, Fine Art Textured, Fine
Art Watercolor, Fine Art Block Print
Printable area (Cut sheet)
Area excluding 3 mm from the leading edge, 3 mm from the trailing edge
(23 mm when supplied from manual feed from top or selected the fine
art), and 3 mm from the left and right edges.
Printing recommendation area
(Roll media)
Area excluding 20 mm from leading edge, 5 mm from the trailing edge
and 5 mm from the left and right edges (standard size).
Printing recommendation area
(Cut sheet)
Area excluding 20 mm from the leading edge, 27 mm from the trailing
edge, and 5 mm from the left and right edges (standard size).
Memory
384MB
Increase of memory: none
Firmware
Flash ROM (update from USB or Ethernet, IEEE1394)
- Printer description language
GARO (Graphic Arts language with Raster Operation)
Interface
USB2.0, Ethernet, IEEE1394 (option)
Operation panel
LCD (160 X 128 dots), 12 keys, 5 LEDs
- Panel language
English
- Message language
English, German, French, Italian, Spanish, Chinese, Korean, Russianand
and Japanese
Printhead/Ink Tank type
Printhead and separate ink tanks
Printhead
[PF-03] Number nozzles: 2560 nozzles per color
Ink tank
[PFI-103]MBK,BK,GY,PGY
[PFI-101]R,G,B,C,M,Y,PC,PM
Capacity: 130 ml per color (Ink tanks supplied with the printer contain
90 ml of each color.)
Detection functions (Cover
system)
Detects opening/closing of the top cover and ink tank cover.
Detection functions (Ink passage Detects presence/absence of ink tank, ink level (dot count and electrode),
system)
presence/absence of the maintenance cartridge, waste ink full level,
presence/absence of the printhead, and opening/closing of the supply
valve.
Detection functions (Carriage
system)
Detects the ambient temperature, head temperature, presence/absence of
the head, and no ink ejection.
Detection functions (Paper path
system)
Detects presence/absence of paper, cutter position, leading/trailing edge
of paper, paper width, and skew.
Operating noise
During printing: Approx. 49 dB (A) or less
During standby: Approx. 35 dB (A) or less
Operating environment
Temperature: 15 to 30 degrees centigrade
Humidity: 10% to 80% without dew condensation
Print quality guaranteed
environment
Temperature: 15 to 30 degrees centigrade
Humidity: 10% to 80%RH
Power supply
100-120 VAC (50/60 Hz), 220-240 VAC (50/60 Hz)
Power consumption (Maximum) During printing: Max. 100 W
Power consumption
In power save (sleep) mode: 5W or less(220-240 VAC: 6W or less)
(When IEEE1394 board installed, 8W or less[220-240 VAC: 9W or
less])
During standby: 1 W or less
Printer unit dimensions
(WxDxH)
1177 x 670 x 344 mm
With stand (option): 1177 x 870 x 991 mm
Weight
Approx. 51 kg
1.3.2 Product Specifications
0020-1815
iPF6200
Type
Bubble jet large-sized paper printer
Feeding system
Automatic feeding of one roll media/One cut sheet (manual feed from
front)/One cut sheet (manual feed from top)
1-13
Chapter 1
Feeding capacity
- Roll media
One roll at the back/Outer diameter of roll: 150 mm or less/Inner
diameter of paper tube: 2 or 3 inches
- Cut sheet
1 sheet
Delivery method
Delivers the media with its printed side up in the forward direction.
Sheet delivery capability
Using the stand (option) basket:
- Roll media
1 sheet
- Cut sheet
1 sheet
Cutter
Automatically cuts paper laterally. Cartridge-type (with round blade)
Type of media
- Roll media
Plain Paper, Economy Bond Paper, Universal Bond Paper, Plain Paper
(High Quality), Plain Paper (High Grade), Recycled Coated Paper, Matte
Coated Paper 90gsm, Coated Paper, Premium Coated Paper,
Heavyweight Coated Paper, Extra Heavyweight Coated Paper, Premium
Matte Paper, Glossy Photographic Paper 190gsm, Satin Photographic
Paper 190gsm, Glossy Photographic Paper 240gsm, Satin Photographic
Paper 240gsm, HW Glossy Photo Paper, HW Satin Photo Paper,
Premium RC Photo Luster, Glossy Photo Paper, Semi-Glossy Photo
Paper, Heavyweight Glossy Photo Paper 2, Heavywght SemiGlos Photo
Paper 2, Poster Semi-Glossy Photo Paper, Fine Art Photo, Fine Art
Heavyweight Photo, Fine Art Textured, Fine Art Watercolor, Fine Art
Block Print, Graphic Canvas, Canvas Matte 2, Japanese Paper Washi,
Commercial Proofing Paper, Commercial RC Proofing 210gsm,
Commercial RC Proofing 270gsm, Proofing Paper, Newsprint for
Proofing1, Newsprint for Proofing2, Newsprint for Proofing3, Durable
Banner, Synthetic Paper, Adhesive Synthetic Paper, Flame-Resistant
Cloth, Thin Fabric Banner 2, Backlit Film, Durable Backlit Film,
Backprint Film, Colored Coated Paper, CAD Tracing Paper, CAD
Translucent Matte Film
- Cut sheet (manual feed from top)
Plain Paper, Economy Bond Paper, Universal Bond Paper, Plain Paper
(High Quality), Plain Paper (High Grade), Recycled Coated Paper, Matte
Coated Paper 90gsm, High Resolution Paper, Coated Paper, Premium
Coated Paper, Heavyweight Coated Paper, Extra Heavyweight Coated
Paper, Premium Matte Paper, Matte Photo Paper , Glossy Photographic
Paper 190gsm, Satin Photographic Paper 190gsm, Glossy Photographic
Paper 240gsm, Satin Photographic Paper 240gsm, HW Glossy Photo
Paper, HW Satin Photo Paper, Premium RC Photo Luster, Glossy Photo
Paper, Semi-Glossy Photo Paper, Heavyweight Glossy Photo Paper 2,
Heavywght SemiGlos Photo Paper 2, Poster Semi-Glossy Photo Paper,
Photo Paper Plus, Photo Paper Plus Semi-Gloss, Fine Art Photo, Fine
Art Heavyweight Photo, Fine Art Textured, Fine Art Watercolor, Fine
Art Block Print, Graphic Canvas, Canvas Matte 2, Japanese Paper
Washi, Commercial Proofing Paper, Commercial RC Proofing 210gsm,
Commercial RC Proofing 270gsm, Proofing Paper, Newsprint for
Proofing1, Newsprint for Proofing2, Newsprint for Proofing3, Durable
Banner, Synthetic Paper, Adhesive Synthetic Paper, Flame-Resistant
Cloth, Thin Fabric Banner 2, Backlit Film, Durable Backlit Film,
Backprint Film, Colored Coated Paper, CAD Tracing Paper, CAD
Translucent Matte Film
- Cut sheet (manual feed from front)
POP Board
Supported thickness
Roll media: 0.08 to 0.8 mm
Manual feed from top: 0.08 to 0.8 mm
Manual feed from front: 0.8 to 1.5 mm
Media size (Roll media)
Width:203mm X 610mm(24inch)
Lengh:203mm X 18m
Maximum outside diameter:150 mm
Media size (Cut sheet)
- Manual feed from top
Width:203mm(8inch) X 610mm(24inch)
Lengh:279mm X 1600mm
- Manual feed from front
Width:250mm(8inch) X 610mm(24inch)
Lengh:350mm X 914mm
Printable area (Roll media)
Area excluding 3mm from the leading edge, 3 mm from the trailing edge,
and 3 mm from the left and right edges.
Borderless printing: 0 mm from the leading edge, trailing edge, and left
and right edges.
Width of media allowing borderless printing:
10"(254mm), B4(257mm), A3+(329mm), 14"(356mm), 16"(407mm),
A2(420mm),
A2+/17"(432mm),
B2(515mm),
A1(594mm),
24"(610mm)
Media type allowing borderless printing:
Premium Coated Paper, Heavyweight Coated Paper, Extra Heavyweight
Coated Paper, Premium Matte Paper, Glossy Photographic Paper
190gsm, Satin Photographic Paper 190gsm, Glossy Photographic Paper
240gsm, Satin Photographic Paper 240gsm, HW Glossy Photo Paper,
HW Satin Photo Paper, Premium RC Photo Luster, Glossy Photo Paper,
Semi-Glossy Photo Paper, Heavyweight Glossy Photo Paper 2,
Heavywght SemiGlos Photo Paper 2, Poster Semi-Glossy Photo Paper,
Fine Art Photo, Fine Art Heavyweight Photo, Fine Art Textured, Fine
Art Watercolor, Fine Art Block Print
1-14
Chapter 1
Printable area (Cut sheet)
Area excluding 3 mm from the leading edge, 3 mm from the trailing edge
(23 mm when supplied from manual feed from top or selected the fine
art), and 3 mm from the left and right edges.
Printing recommendation area
(Roll media)
Area excluding 20 mm from leading edge, 5 mm from the trailing edge
and 5 mm from the left and right edges (standard size).
Printing recommendation area
(Cut sheet)
Area excluding 20 mm from the leading edge, 27 mm from the trailing
edge, and 5 mm from the left and right edges (standard size).
Memory
384MB
Increase of memory: none
Hard disk drive
80GB
Firmware
Flash ROM (update from USB or Ethernet)
- Printer description language
GARO (Graphic Arts language with Raster Operation)
Interface
USB2.0, Ethernet
Operation panel
LCD (160 X 128 dots), 12 keys, 5 LEDs
- Panel language
English
- Message language
English, German, French, Italian, Spanish, Chinese, Korean, Russianand
and Japanese
Printhead/Ink Tank type
Printhead and separate ink tanks
Printhead
[PF-03] Number nozzles: 2560 nozzles per color
Ink tank
[PFI-103]MBK,BK,GY,PGY
[PFI-101]R,G,B,C,M,Y,PC,PM
Capacity: 130 ml per color (Ink tanks supplied with the printer contain
90 ml of each color.)
Detection functions (Cover
system)
Detects opening/closing of the top cover and ink tank cover.
Detection functions (Ink passage Detects presence/absence of ink tank, ink level (dot count and electrode),
system)
presence/absence of the maintenance cartridge, waste ink full level,
presence/absence of the printhead, and opening/closing of the supply
valve.
Detection functions (Carriage
system)
Detects the ambient temperature, head temperature, presence/absence of
the head, and no ink ejection.
Detection functions (Paper path
system)
Detects presence/absence of paper, cutter position, leading/trailing edge
of paper, paper width, and skew.
Operating noise
During printing: Approx. 49 dB (A) or less
During standby: Approx. 35 dB (A) or less
Operating environment
Temperature: 15 to 30 degrees centigrade
Humidity: 10% to 80% without dew condensation
Print quality guaranteed
environment
Temperature: 15 to 30 degrees centigrade
Humidity: 10% to 80%RH
Power supply
100-120 VAC (50/60 Hz), 220-240 VAC (50/60 Hz)
Power consumption (Maximum) During printing: Max. 100 W
Power consumption
In power save (sleep) mode: 5W or less(220-240 VAC: 6W or less)
During standby: 1 W or less
Printer unit dimensions
(WxDxH)
1177 x 670 x 344 mm
With stand (option): 1177 x 870 x 991 mm
Weight
Approx. 51 kg
1.3.3 Product Specifications
0020-7260
iPF6000S
Type
Bubble jet large-sized paper printer
Feeding system
Automatic feeding of one roll media/One cut sheet (manual feed from
front)/One cut sheet (manual feed from top)
Feeding capacity
- Roll media
One roll at the back/Outer diameter of roll: 150 mm or less/Inner
diameter of paper tube: 2 or 3 inches
- Cut sheet
1 sheet
Delivery method
Delivers the media with its printed side up in the forward direction.
Sheet delivery capability
Using the stand (option) basket:
- Roll media
1 sheet
- Cut sheet
1 sheet
Cutter
Automatically cuts paper laterally. Cartridge-type (with round blade)
1-15
Chapter 1
Type of media
- Roll media
Plain Paper, Economy Bond Paper, Universal Bond Paper, Plain Paper
(High Quality), Plain Paper (High Grade), Recycled Coated Paper, Matte
Coated Paper 90gsm, Coated Paper, Premium Coated Paper,
Heavyweight Coated Paper, Extra Heavyweight Coated Paper, Premium
Matte Paper, Glossy Photographic Paper 190gsm, Satin Photographic
Paper 190gsm, Glossy Photographic Paper 240gsm, Satin Photographic
Paper 240gsm, HW Glossy Photo Paper, HW Satin Photo Paper,
Premium RC Photo Luster, Glossy Photo Paper, Semi-Glossy Photo
Paper, Heavyweight Glossy Photo Paper 2, Heavywght SemiGlos Photo
Paper 2, Poster Semi-Glossy Photo Paper, Fine Art Photo, Fine Art
Heavyweight Photo, Fine Art Textured, Fine Art Watercolor, Fine Art
Block Print, Graphic Canvas, Canvas Matte 2, Japanese Paper Washi,
Commercial Proofing Paper, Commercial RC Proofing 210gsm,
Commercial RC Proofing 270gsm, Proofing Paper, Newsprint for
Proofing1, Newsprint for Proofing2, Newsprint for Proofing3, Durable
Banner, Synthetic Paper, Adhesive Synthetic Paper, Flame-Resistant
Cloth, Thin Fabric Banner 2, Backlit Film, Durable Backlit Film,
Backprint Film, Colored Coated Paper, CAD Tracing Paper, CAD
Translucent Matte Film
- Cut sheet (manual feed from top)
Plain Paper, Economy Bond Paper, Universal Bond Paper, Plain Paper
(High Quality), Plain Paper (High Grade), Recycled Coated Paper, Matte
Coated Paper 90gsm, High Resolution Paper, Coated Paper, Premium
Coated Paper, Heavyweight Coated Paper, Extra Heavyweight Coated
Paper, Premium Matte Paper, Matte Photo Paper , Glossy Photographic
Paper 190gsm, Satin Photographic Paper 190gsm, Glossy Photographic
Paper 240gsm, Satin Photographic Paper 240gsm, HW Glossy Photo
Paper, HW Satin Photo Paper, Premium RC Photo Luster, Glossy Photo
Paper, Semi-Glossy Photo Paper, Heavyweight Glossy Photo Paper 2,
Heavywght SemiGlos Photo Paper 2, Poster Semi-Glossy Photo Paper,
Photo Paper Plus, Photo Paper Plus Semi-Gloss, Fine Art Photo, Fine
Art Heavyweight Photo, Fine Art Textured, Fine Art Watercolor, Fine
Art Block Print, Graphic Canvas, Canvas Matte 2, Japanese Paper
Washi, Commercial Proofing Paper, Commercial RC Proofing 210gsm,
Commercial RC Proofing 270gsm, Proofing Paper, Newsprint for
Proofing1, Newsprint for Proofing2, Newsprint for Proofing3, Durable
Banner, Synthetic Paper, Adhesive Synthetic Paper, Flame-Resistant
Cloth, Thin Fabric Banner 2, Backlit Film, Durable Backlit Film,
Backprint Film, Colored Coated Paper, CAD Tracing Paper, CAD
Translucent Matte Film
- Cut sheet (manual feed from front)
POP Board
Supported thickness
Roll media: 0.07 to 0.8 mm
Manual feed from top: 0.07 to 0.8 mm
Manual feed from front: 0.5 to 1.5 mm
Media size (Roll media)
Width:203mm X 610mm(24inch)
Lengh:203mm X 18m
Maximum outside diameter:150 mm
Media size (Cut sheet)
- Manual feed from top
Width:203mm(8inch) X 610mm(24inch)
Lengh:279mm X 1600mm
- Manual feed from front
Width:250mm(8inch) X 610mm(24inch)
Lengh:350mm X 914mm
Printable area (Roll media)
Area excluding 3mm from the leading edge, 3 mm from the trailing edge,
and 3 mm from the left and right edges.
Borderless printing: 0 mm from the leading edge, trailing edge, and left
and right edges.
Width of media allowing borderless printing:
10"(254mm), B4(257mm), A3+(329mm), 14"(356mm), 16"(407mm),
A2(420mm),
A2+/17"(432mm),
B2(515mm),
A1(594mm),
24"(610mm)
Media type allowing borderless printing:
Premium Coated Paper, Heavyweight Coated Paper, Extra Heavyweight
Coated Paper, Premium Matte Paper, Glossy Photographic Paper
190gsm, Satin Photographic Paper 190gsm, Glossy Photographic Paper
240gsm, Satin Photographic Paper 240gsm, HW Glossy Photo Paper,
HW Satin Photo Paper, Premium RC Photo Luster, Glossy Photo Paper,
Semi-Glossy Photo Paper, Heavyweight Glossy Photo Paper 2,
Heavywght SemiGlos Photo Paper 2, Poster Semi-Glossy Photo Paper,
Fine Art Photo, Fine Art Heavyweight Photo, Fine Art Textured, Fine
Art Watercolor, Fine Art Block Print
1-16
Printable area (Cut sheet)
Area excluding 3 mm from the leading edge, 3 mm from the trailing edge
(23 mm when supplied from manual feed from top or selected the fine
art), and 3 mm from the left and right edges.
Printing recommendation area
(Roll media)
Area excluding 20 mm from leading edge, 5 mm from the trailing edge
and 5 mm from the left and right edges (standard size).
Printing recommendation area
(Cut sheet)
Area excluding 20 mm from the leading edge, 27 mm from the trailing
edge, and 5 mm from the left and right edges (standard size).
Memory
256MB
Increase of memory: none
Hard disk drive
80GB
Chapter 1
Firmware
Flash ROM (update from USB or Ethernet)
- Printer description language
GARO (Graphic Arts language with Raster Operation)
Interface
USB2.0, Ethernet
Operation panel
LCD (160 X 128 dots), 12 keys, 5 LEDs
- Panel language
English
- Message language
English, German, French, Italian, Spanish, Chinese, Korean, Russianand
and Japanese
Printhead/Ink Tank type
Printhead and separate ink tanks
Printhead
[PF-03] Number nozzles: 2560 nozzles per color
Ink tank
[PFI-101]MBK,BK,PC,C,PM,M,Y,GY
Capacity: 130 ml per color (Ink tanks supplied with the printer contain
90 ml of each color.)
Detection functions (Cover
system)
Detects opening/closing of the top cover and ink tank cover.
Detection functions (Ink passage Detects presence/absence of ink tank, ink level (dot count and electrode),
system)
presence/absence of the maintenance cartridge, waste ink full level,
presence/absence of the printhead, and opening/closing of the supply
valve.
Detection functions (Carriage
system)
Detects the ambient temperature, head temperature, presence/absence of
the head, and no ink ejection.
Detection functions (Paper path
system)
Detects presence/absence of paper, cutter position, leading/trailing edge
of paper, paper width, and skew.
Operating noise
During printing: Approx. 49 dB (A) or less
During standby: Approx. 35 dB (A) or less
Operating environment
Temperature: 15 to 30 degrees centigrade
Humidity: 10% to 80% without dew condensation
Print quality guaranteed
environment
Temperature: 15 to 30 degrees centigrade
Humidity: 10% to 80%RH
Power supply
100-120 VAC (50/60 Hz), 220-240 VAC (50/60 Hz)
Power consumption (Maximum) During printing: Max. 100 W
Power consumption
In power save (sleep) mode: 5W or less(220-240 VAC: 6W or less)
During standby: 1 W or less
Printer unit dimensions
(WxDxH)
1177 x 670 x 344 mm
With stand (option): 1177 x 870 x 991 mm
Weight
Approx. 51 kg
1.4 Detailed Specifications
1.4.1 Print Speed and Direction
0016-9138
iPF6100 / iPF6200 / iPF6000S
1-17
Chapter 1
T-1-4
Media Type
Plain Paper/
Plain Paper
Recycled Paper
Print Priority
Bi-directional
Print
Resolution
(dpi)
1200x1200
Used BK
ink
Line Document/
Text
Draft
2
Bi-directional
1200x1200
MBK
Standard
4
Bi-directional
1200x1200
MBK
MBK
Draft
2
Bi-directional
1200x1200
MBK
Standard
4
Bi-directional
1200x1200
MBK
High
8
Bi-directional
2400x1200
MBK
Office Document
Standard
4
Bi-directional
1200x1200
MBK
Line Document/
Text
Draft
2
Bi-directional
1200x1200
MBK
Standard
4
Bi-directional
1200x1200
MBK
Draft
2
Bi-directional
1200x1200
MBK
Standard
4
Bi-directional
1200x1200
MBK
High
8
Bi-directional
2400x1200
MBK
Office Document
Standard
4
Bi-directional
1200x1200
MBK
Line Document/
Text
Draft
2
Bi-directional
1200x1200
MBK
Standard
4
Bi-directional
1200x1200
MBK
Image
Draft
2
Bi-directional
1200x1200
MBK
Standard
4
Bi-directional
1200x1200
MBK
MBK
High
8
Bi-directional
2400x1200
Office Document
Standard
4
Bi-directional
1200x1200
MBK
Line Document/
Text
Draft
2
Bi-directional
1200x1200
MBK
Standard
4
Bi-directional
1200x1200
MBK
Draft
2
Bi-directional
1200x1200
MBK
Image
Standard
4
Bi-directional
1200x1200
MBK
High
8
Bi-directional
2400x1200
MBK
Office Document
Standard
4
Bi-directional
1200x1200
MBK
Line Document/
Text
Draft
2
Bi-directional
1200x1200
MBK
Standard
4
Bi-directional
1200x1200
MBK
Draft
2
Bi-directional
1200x1200
MBK
Image
Standard
4
Bi-directional
1200x1200
MBK
High
8
Bi-directional
2400x1200
MBK
Office Document
Standard
4
Bi-directional
1200x1200
MBK
Line Document/
Text
Draft
2
Bi-directional
1200x1200
MBK
Standard
4
Bi-directional
1200x1200
MBK
Draft
2
Bi-directional
1200x1200
MBK
Image
Standard
4
Bi-directional
1200x1200
MBK
High
8
Bi-directional
2400x1200
MBK
Office Document
Standard
4
Bi-directional
1200x1200
MBK
Line Document/
Text
Draft
2
Bi-directional
1200x1200
MBK
Standard
4
Bi-directional
1200x1200
MBK
Draft
2
Bi-directional
1200x1200
MBK
Standard
4
Bi-directional
1200x1200
MBK
High
8
Bi-directional
2400x1200
MBK
Economy Bond Paper
Universal Bond Paper
Standard Paper 1569B 80g
Standard Paper 1570B 90g
Image
1-18
4
Printing direction
Standard
Image
Plain Paper (High Grade)
PrintPass
Office Document
Image
Plain Paper (High Quality)
Print
Quality
Chapter 1
Media Type
Coated Paper
Print Priority
Coated Paper
Image
Heavyweight Coated Paper
Image
High Resolution Paper
Image
Premium Matte Paper
Image
Matte Photo Paper
Image
Extra Heavyweight Coated Paper
Image
Recycled Coated Paper
Image
Premium Coated Paper
LightWeight Coated paper
High Resolution Barrier Paper
Matt Coated Paper
Extra Matt Coated Paper
Opaque paper
Matt Coated Paper
Photo Realistic Paper
Image
Image
Image
Image
Image
Image
Image
Image
Print
Quality
PrintPass
Printing direction
Print
Resolution
(dpi)
Used BK
ink
Standard
4
Bi-directional
1200x1200
MBK
High
8
Bi-directional
2400x1200
MBK
MBK
Highest
12
Bi-directional
2400x1200
Standard
4
Bi-directional
1200x1200
MBK
High
8
Bi-directional
2400x1200
MBK
MBK
Highest
12
Bi-directional
2400x1200
Standard
4
Bi-directional
1200x1200
MBK
High
8
Bi-directional
2400x1200
MBK
MBK
Highest
12
Bi-directional
2400x1200
Standard
8
Bi-directional
1200x1200
MBK
High
12
Bi-directional
2400x1200
MBK
MBK
Highest
16
Bi-directional
2400x1200
Standard
8
Bi-directional
1200x1200
MBK
High
12
Bi-directional
2400x1200
MBK
MBK
Highest
16
Bi-directional
2400x1200
Standard
4
Bi-directional
1200x1200
MBK
High
8
Bi-directional
2400x1200
MBK
MBK
Highest
12
Bi-directional
2400x1200
Standard
4
Bi-directional
1200x1200
MBK
High
8
Bi-directional
2400x1200
MBK
MBK
Highest
12
Bi-directional
2400x1200
Standard
4
Bi-directional
1200x1200
MBK
High
8
Bi-directional
2400x1200
MBK
MBK
Highest
12
Bi-directional
2400x1200
Standard
4
Bi-directional
1200x1200
MBK
High
8
Bi-directional
2400x1200
MBK
MBK
Highest
12
Bi-directional
2400x1200
Standard
4
Bi-directional
1200x1200
MBK
High
8
Bi-directional
2400x1200
MBK
MBK
Highest
12
Bi-directional
2400x1200
Standard
4
Bi-directional
1200x1200
MBK
High
8
Bi-directional
2400x1200
MBK
MBK
Highest
12
Bi-directional
2400x1200
Standard
4
Bi-directional
1200x1200
MBK
High
8
Bi-directional
2400x1200
MBK
MBK
Highest
12
Bi-directional
2400x1200
Standard
4
Bi-directional
1200x1200
MBK
High
8
Bi-directional
2400x1200
MBK
MBK
Highest
12
Bi-directional
2400x1200
Standard
4
Bi-directional
1200x1200
MBK
High
8
Bi-directional
2400x1200
MBK
MBK
Highest
12
Bi-directional
2400x1200
Standard
4
Bi-directional
1200x1200
MBK
High
8
Bi-directional
2400x1200
MBK
Highest
12
Bi-directional
2400x1200
MBK
1-19
Chapter 1
Media Type
Photo Paper
Print Priority
Glossy Photo Paper
Image
Semi-Glossy Photo Paper
Image
Photo Paper Plus
Image
Photo Paper Plus Semi-Gloss
Image
Heavyweight Glossy Photo Paper 2
Image
Heavywght SemiGlos Photo Paper 2
Image
Poster Semi-Glossy Photo Paper
Image
Premium RC Photo Luster
Instant Dry Papers Glossy 200g
Instant Dry Papers Satin 200g
Photo paper High Glossy 250g
Photo paper Semi Matt 250g
Photo paper Satin 240g
Photo paper Pearl 260g
1-20
Image
Image
Image
Image
Image
Image
Image
Print
Quality
PrintPass
Printing direction
Print
Resolution
(dpi)
Used BK
ink
Standard
8
Bi-directional
1200x1200
PBK
High
12
Bi-directional
2400x1200
PBK
PBK
Highest
16
Bi-directional
2400x1200
Standard
8
Bi-directional
1200x1200
PBK
High
12
Bi-directional
2400x1200
PBK
PBK
Highest
16
Bi-directional
2400x1200
Standard
8
Bi-directional
1200x1200
PBK
High
12
Bi-directional
2400x1200
PBK
PBK
Highest
16
Bi-directional
2400x1200
Standard
8
Bi-directional
1200x1200
PBK
High
12
Bi-directional
2400x1200
PBK
PBK
Highest
16
Bi-directional
2400x1200
Standard
8
Bi-directional
1200x1200
PBK
High
12
Bi-directional
2400x1200
PBK
PBK
Highest
16
Bi-directional
2400x1200
Standard
8
Bi-directional
1200x1200
PBK
High
12
Bi-directional
2400x1200
PBK
PBK
Highest
16
Bi-directional
2400x1200
Standard
8
Bi-directional
1200x1200
PBK
High
12
Bi-directional
2400x1200
PBK
PBK
Highest
16
Bi-directional
2400x1200
Standard
8
Bi-directional
1200x1200
PBK
High
12
Bi-directional
2400x1200
PBK
PBK
Highest
16
Bi-directional
2400x1200
Standard
8
Bi-directional
1200x1200
PBK
High
12
Bi-directional
2400x1200
PBK
PBK
Highest
16
Bi-directional
2400x1200
Standard
8
Bi-directional
1200x1200
PBK
High
12
Bi-directional
2400x1200
PBK
PBK
Highest
16
Bi-directional
2400x1200
Standard
8
Bi-directional
1200x1200
PBK
High
12
Bi-directional
2400x1200
PBK
PBK
Highest
16
Bi-directional
2400x1200
Standard
8
Bi-directional
1200x1200
PBK
High
12
Bi-directional
2400x1200
PBK
PBK
Highest
16
Bi-directional
2400x1200
Standard
8
Bi-directional
1200x1200
PBK
High
12
Bi-directional
2400x1200
PBK
PBK
Highest
16
Bi-directional
2400x1200
Standard
8
Bi-directional
1200x1200
PBK
High
12
Bi-directional
2400x1200
PBK
Highest
16
Bi-directional
2400x1200
PBK
Chapter 1
Media Type
Art Paper
Print Priority
Fine Art Photo
Image
Fine Art Heavyweight Photo
Image
Fine Art Textured
Image
Fine Art Block Print
Image
Fine Art Watercolor
Image
Canvas Matte 2
Image
Japanese Paper Washi
Image
Graphic Matte Canvas
Art paper smooth 225g
Art paper embossed 225g
Art Paper Extra Smooth 250g
Water resistant paper Art Canvas
Proofing Paper Proofing Paper
Image
Image
Image
Image
Print
Resolution
(dpi)
Used BK
ink
Standard
8
Bi-directional
1200x1200
MBK
High
12
Bi-directional
2400x1200
MBK
MBK
Highest
16
Bi-directional
2400x1200
Standard
8
Bi-directional
1200x1200
MBK
High
12
Bi-directional
2400x1200
MBK
MBK
Highest
16
Bi-directional
2400x1200
Standard
8
Bi-directional
1200x1200
MBK
High
12
Bi-directional
2400x1200
MBK
MBK
Highest
16
Bi-directional
2400x1200
Standard
8
Bi-directional
1200x1200
MBK
High
12
Bi-directional
2400x1200
MBK
MBK
Highest
16
Bi-directional
2400x1200
Standard
8
Bi-directional
1200x1200
MBK
High
12
Bi-directional
2400x1200
MBK
MBK
Highest
16
Bi-directional
2400x1200
Standard
8
Bi-directional
1200x1200
MBK
High
12
Bi-directional
2400x1200
MBK
MBK
Highest
16
Bi-directional
2400x1200
Standard
8
Bi-directional
1200x1200
MBK
High
12
Bi-directional
2400x1200
MBK
MBK
Highest
16
Bi-directional
2400x1200
Standard
8
Bi-directional
1200x1200
MBK
High
12
Bi-directional
2400x1200
MBK
MBK
Highest
16
Bi-directional
2400x1200
Standard
8
Bi-directional
1200x1200
MBK
High
12
Bi-directional
2400x1200
MBK
MBK
Highest
16
Bi-directional
2400x1200
Standard
8
Bi-directional
1200x1200
MBK
High
12
Bi-directional
2400x1200
MBK
MBK
Highest
16
Bi-directional
2400x1200
Standard
8
Bi-directional
1200x1200
MBK
High
12
Bi-directional
2400x1200
MBK
MBK
16
Bi-directional
2400x1200
8
Bi-directional
1200x1200
MBK
Image
High
12
Bi-directional
2400x1200
MBK
Highest
16
Bi-directional
2400x1200
MBK
Image
Standard
8
Bi-directional
1200x1200
PBK
High
12
Bi-directional
2400x1200
PBK
PBK
Image
Professional Proof and Photo Semiglossy
195g
Image
Professional Proof and Photo Semigloss
255g
Backlit Film
Printing direction
Standard
Professional Proof and Photo Glossy 195g
Backprint Film
PrintPass
Highest
Image
Film Paper
Print
Quality
Image
Image
Pop-up Gloss Film
Image
Universal Opaque White Film
Image
Outdoor Backlit
Image
Highest
16
Bi-directional
2400x1200
Standard
8
Bi-directional
1200x1200
PBK
High
12
Bi-directional
2400x1200
PBK
PBK
Highest
16
Bi-directional
2400x1200
Standard
8
Bi-directional
1200x1200
PBK
High
12
Bi-directional
2400x1200
PBK
PBK
Highest
16
Bi-directional
2400x1200
Standard
8
Bi-directional
1200x1200
PBK
High
12
Bi-directional
2400x1200
PBK
PBK
Highest
16
Bi-directional
2400x1200
Standard
8
Bi-directional
1200x1200
PBK
High
12
Bi-directional
2400x1200
PBK
Highest
16
Bi-directional
2400x1200
PBK
Standard
8
Bi-directional
1200x1200
MBK
High
12
Bi-directional
2400x1200
MBK
Highest
16
Bi-directional
2400x1200
MBK
Standard
8
Bi-directional
2400x1200
PBK
High
16
Bi-directional
2400x1200
PBK
Standard
8
Bi-directional
2400x1200
PBK
High
16
Bi-directional
2400x1200
PBK
Standard
8
Bi-directional
1200x1200
MBK
High
12
Bi-directional
2400x1200
MBK
Highest
16
Bi-directional
2400x1200
MBK
1-21
Chapter 1
Media Type
Scrim Banner 370g
Print Priority
Image
Mat Film Paper
Adhesive Matt Stretch Vinyl
Thin Fabric
Banner
Image
Thin Fabric Banner 2
Image
Flame-Resistant Cloth
Image
Synthetic
Paper
Synthetic Paper
Image
Adhesive Synthetic Paper
Image
Outdoor Polypropylene (Durable Banner) Image
Adhesive Matt
High Resolution Graphic paper Self ADH Image
Paper
Board
POP Board
Image
CAD
CAD Tracing Paper
CAD Translucent Matte Film
Special
Special 1
Special 2
Special 3
Special 4
Special 5
Special 6
Special 7
Special 8
Special 9
Special 10
1-22
Line Document/
Text
Print
Quality
PrintPass
Printing direction
Print
Resolution
(dpi)
Used BK
ink
Standard
6
Bi-directional
1200x1200
MBK
High
8
Bi-directional
2400x1200
MBK
MBK
Highest
16
Bi-directional
2400x1200
Standard
6
Bi-directional
1200x1200
MBK
High
8
Bi-directional
2400x1200
MBK
MBK
Highest
16
Bi-directional
2400x1200
Standard
6
Bi-directional
1200x1200
MBK
High
8
Bi-directional
2400x1200
MBK
MBK
Highest
16
Bi-directional
2400x1200
Standard
6
Bi-directional
1200x1200
MBK
High
8
Bi-directional
2400x1200
MBK
MBK
Highest
16
Bi-directional
2400x1200
Standard
6
Bi-directional
1200x1200
MBK
High
8
Bi-directional
2400x1200
MBK
MBK
Highest
16
Bi-directional
2400x1200
Standard
6
Bi-directional
1200x1200
MBK
High
8
Bi-directional
2400x1200
MBK
MBK
Highest
16
Bi-directional
2400x1200
Standard
6
Bi-directional
1200x1200
MBK
High
8
Bi-directional
2400x1200
MBK
MBK
Highest
16
Bi-directional
2400x1200
Standard
6
Bi-directional
1200x1200
MBK
High
8
Bi-directional
2400x1200
MBK
MBK
Highest
16
Bi-directional
2400x1200
Standard
6
Bi-directional
1200x1200
MBK
High
8
Bi-directional
2400x1200
MBK
MBK
Highest
16
Bi-directional
2400x1200
Draft
2
Bi-directional
1200x1200
MBK
Standard
4
Bi-directional
1200x1200
MBK
MBK
High
8
Bi-directional
2400x1200
Line Document/
Text
Draft
2
Bi-directional
1200x1200
MBK
Standard
4
Bi-directional
1200x1200
MBK
High
8
Bi-directional
2400x1200
MBK
Image
Standard
8
Bi-directional
1200x1200
PBK
High
12
Bi-directional
2400x1200
PBK
Highest
16
Bi-directional
2400x1200
PBK
Standard
8
Bi-directional
1200x1200
PBK
High
12
Bi-directional
2400x1200
PBK
Highest
16
Bi-directional
2400x1200
PBK
Standard
8
Bi-directional
1200x1200
PBK
High
12
Bi-directional
2400x1200
PBK
Highest
16
Bi-directional
2400x1200
PBK
Standard
8
Bi-directional
1200x1200
PBK
High
12
Bi-directional
2400x1200
PBK
Highest
16
Bi-directional
2400x1200
PBK
Standard
8
Bi-directional
1200x1200
PBK
High
12
Bi-directional
2400x1200
PBK
Highest
16
Bi-directional
2400x1200
PBK
Standard
8
Bi-directional
1200x1200
MBK
High
12
Bi-directional
2400x1200
MBK
Highest
16
Bi-directional
2400x1200
MBK
Standard
8
Bi-directional
1200x1200
MBK
High
12
Bi-directional
2400x1200
MBK
Highest
16
Bi-directional
2400x1200
MBK
Standard
8
Bi-directional
1200x1200
MBK
High
12
Bi-directional
2400x1200
MBK
Highest
16
Bi-directional
2400x1200
MBK
Standard
8
Bi-directional
1200x1200
MBK
High
12
Bi-directional
2400x1200
MBK
Highest
16
Bi-directional
2400x1200
MBK
Standard
8
Bi-directional
1200x1200
MBK
High
12
Bi-directional
2400x1200
MBK
Highest
16
Bi-directional
2400x1200
MBK
Image
Image
Image
Image
Image
Image
Image
Image
Image
Chapter 1
1.4.2 Interface Specifications
0020-1816
iPF6200 / iPF6000S
a. USB (standard)
(1) Interface type
USB 2.0 Hi-Speed (Full speed (12 Mbits/sec), High speed (480 Mbits/sec))
(2) Data transfer system
Control transfer
Bulk transfer
(3) Signal level
Compliant with the USB standard.
(4) Interface cable
Twisted-pair shielded cable, 5.0 m max.
Compliant with the USB standard.
Wire materials: AWG No.28, data wire pair (AWF: American Wire Gauge)
AWG No.20 to No.28, power distribution wire pair
(5) Interface connector
Printer side: Series B receptacle compliant with USB standard
Cable side: Series B plug compliant with USB standard
b. Network (standard)
(1) Interface type
Interface compliant with IEEE802.3
(2) Data transfer system
10Base-T/100Base-TX
(3) Signal level
Input: Threshold
10Base-T: Max. +585 mV, Min. +300 mV
100Base-TX: Turn-on +1000 mV diff pk-pk, Turn-off +200 mV diff pk-pk
Output:
10Base-T: +2.2 V to +2.8 V
100Base-TX: +0.95 to +1.05 V
(4) Interface cable
Category 5 (UTP or FTP) cable, 100 m or shorter
Compliant with ANSI/EIA/TIA-568A or ANSI/EIA/TIA-568B
(5) Interface connector
Printer side: Compliant with IEEE802.3, ANSI X3.263, ISO/IEC60603-7
1-23
Chapter 1
1.4.3 Interface Specifications
0012-6200
iPF6100
a. USB (standard)
(1) Interface type
USB 2.0 Hi-Speed (Full speed (12 Mbits/sec), High speed (480 Mbits/sec))
(2) Data transfer system
Control transfer
Bulk transfer
(3) Signal level
Compliant with the USB standard.
(4) Interface cable
Twisted-pair shielded cable, 5.0 m max.
Compliant with the USB standard.
Wire materials: AWG No.28, data wire pair (AWF: American Wire Gauge)
AWG No.20 to No.28, power distribution wire pair
(5) Interface connector
Printer side: Series B receptacle compliant with USB standard
Cable side: Series B plug compliant with USB standard
b. Network (standard)
(1) Interface type
Interface compliant with IEEE802.3
(2) Data transfer system
10Base-T/100Base-TX
(3) Signal level
Input: Threshold
10Base-T: Max. +585 mV, Min. +300 mV
100Base-TX: Turn-on +1000 mV diff pk-pk, Turn-off +200 mV diff pk-pk
Output:
10Base-T: +2.2 V to +2.8 V
100Base-TX: +0.95 to +1.05 V
(4) Interface cable
Category 5 (UTP or FTP) cable, 100 m or shorter
Compliant with ANSI/EIA/TIA-568A or ANSI/EIA/TIA-568B
(5) Interface connector
Printer side: Compliant with IEEE802.3, ANSI X3.263, ISO/IEC60603-7
c. IEEE1394 (option)
(1) Interface type
Interface compliant with IEEE1394-1995, P1394a (Version 2.0)
(2) Data transfer system
Asynchronous transfer
(3) Signal level
Input:
Differential input voltage:
During S100 settlement: +173 mV to +260 mV
During data reception: +142 mV to +260 mV
During S200 settlement: +171 mV to +262 mV
During data reception: +132 mV to +260 mV
During S400 settlement: +168 mV to +265 mV
During data reception: +118 mV to +260 mV
Output:
Differential output voltage: +172 mV to +265 mV
(4) Interface cable
Twisted-pair shielded cable, 4.5 m max.
Compliant with IEEE1394-1995 standard or P1394a (Version 2.0) standard
(5) Interface connector
Printer side: 6-pin connector (socket) compliant with IEEE1394 standard
Cable side: 6-pin connector (plug) compliant with IEEE1394 standard
Cable side: RJ-45 type compliant with ANSI/EIA/TIA-568A or ANSI/EIA/TIA-568B
1-24
Chapter 1
1.5 Names and Functions of Components
1.5.1 Front
0016-8143
iPF6100 / iPF6200 / iPF6000S
[1]
[13]
[12]
[11]
[2]
[10]
[9]
[3]
[8]
[4]
[5]
[6]
[7]
F-1-25
[1] Top cover
Open this cover when installing the printhead or remove the media jammed inside the printer.
[2] Ink tank cover
Open this cover when replacing ink tanks.
[3] Cutter
A round-blade cutter cuts roll media automatically. It is stowed inside when it is out of use.
[4] Front manual feed guides
Erect all these guides to print on thick paper. Place thick paper along the guides and insert it up to the alignment lines while pressing the paper to the
right side.
[5] Paper eject slot (paper tray front loading port)
All printed matter is ejected from this port. In loading thick paper, insert it into this port.
[6] Paper alignment line
Load thick paper in a paper tray to stay parallel with this line.
[7] Basket
Receives printed matter as it is ejected. Only one sheet can be housed in the basket.
[8] Stand
The base on which the printer is mounted. The stand equipped with casters is easy to move.
[9] Output guide
Holds ejected paper from lifting.
[10] Operation panel
Contains the power button, online button display and so on.
[11] Roll feed unit
Load roll media on this unit.
[12] Roll feed unit cover
Load roll media with this cover open.
[13] Paper tray cover
Load cut sheet at the paper tray top loading port with this cover open. This cover is opened, and the cut sheet is set at top manual feed slot.
1-25
Chapter 1
1.5.2 Rear
0016-8147
iPF6100
[5]
[1]
[2]
[5]
[3]
[4]
F-1-26
[1] Expansion board slot
Insert the IEEE1394 (FireWire) expansion board (option) in this slot.
[2] USB port
Connect the USB cable to this port.
[3] Ethernet connector
Connect the Ethernet cable to this connector.
[4] Power connector
Connect the power cord to this connector.
[5] Carrying handle (5)
The printer is carried with this handles of a right and left bottom.
1.5.3 Rear
0020-1817
iPF6200 / iPF6000S
[4]
[1]
[2]
[3]
F-1-27
[1] USB port
Connect the USB cable to this port.
[2] Ethernet connector
Connect the Ethernet cable to this connector.
[3] Power connector
Connect the power cord to this connector.
[4] Carrying handle (5)
The printer is carried with this handles of a right and left bottom.
1-26
[4]
Chapter 1
1.5.4 Top Cover (Inside)
0016-8151
iPF6100 / iPF6200 / iPF6000S
[6]
[1]
[2]
[3]
[4]
[5]
F-1-28
[1] Carriage shaft
The carriage travels in this area.
[2] Carriage
Moves the printheads.
[3] Borderless printing ink receiving channel
Receives inks overflowing the edges of the paper during borderless printing.
[4] Platen
Paper and the printheads travel over the platen to execute printing. Suction holes on the surface prevent the paper from lifting.
[5] Pinch roller
A vital part needed to feed paper.
[6] Cleaner brush
Use this brush to wipe off chad over the plant when cleaning the inside of the top cover.
1.5.5 Manual Loading Area
0016-8152
iPF6100 / iPF6200 / iPF6000S
[3]
[2]
[1]
[5]
[4]
F-1-29
[1] Paper tray cover
In loading paper in a paper tray, open this cover.
[2] Paper support
In loading paper in a paper tray, open the paper tray cover and then this tray.
[3] Width guides
In loading cut sheet, move the guide to adjust to the paper size.
[4] Paper tray front loading port (Paper eject slot)
In loading thick paper, insert it into this port. All printed matter is ejected from this port.
[5] Paper tray top loading port
1-27
Chapter 1
In loading cut sheet, insert them into this port.
1-28
Chapter 1
1.5.6 Roll Feed Unit Cover (Inside)
0016-8154
iPF6100 / iPF6200 / iPF6000S
[3]
[3]
[2]
[1]
F-1-30
[1] Roller holder
Set roll media on this holder.
[2] Holder stopper
Use to secure roll media to the roller holder.
[3] Roller holder slot
Set the roller holder in this guide groove.
1.5.7 Carriage
0016-8157
iPF6100 / iPF6200 / iPF6000S
[2]
[1]
[2]
[4]
[3]
F-1-31
[1] Printhead lock cover
This cover is used to lock the printhead. Open this cover when installing the printhead.
[2] Printhead
The printhead incorporated nozzles. It is an important part for printing.
[3] Printhead lock lever
This lever is used to lock the printhead. Open this lever when installing the printhead.
[4] Wire guide
This stay is used as an ink tube guide.
1-29
Chapter 1
1.5.8 Inside
0016-8159
iPF6100 / iPF6200 / iPF6000S
[1]
F-1-32
[1] Maintenance cartridge
Absorbs excess ink
1-30
Chapter 1
1.6 Basic Operation
1.6.1 Operation Panel
0016-8164
iPF6100 / iPF6200 / iPF6000S
This section explains the functions of the buttons and the meanings of the LEDs on the operation panel.
[1]
[18]
[17]
[16]
[2]
[4] [3]
[15]
[5]
[14]
[6]
[7]
[8]
[13]
[9]
[10]
[11]
[12]
F-1-33
[1] Data lamp
Blinking: Indicates that a print job is being received or processed if the printer is printing, or that a print job has paused or firmware data is being if the printer is
not printing.
Off: No print job is available.
[2] Message lamp
On: Indicates that a warning message is on display.
Blinking: Indicates that an error message is on display.
Off: The printer is normal or is turned off.
[3] Cut sheet lamp (green)
On: Either the paper tray or paper tray front loading port is selected as a paper source.
Off: Roll media are selected as a paper source.
[4] Roll media lamp (green)
On: Roll media are selected as a paper source.
Off: Either the paper tray or paper tray front loading port is selected as a paper source.
[5] Online button
Toggles the printer mode between online and offline.
On: Online mode.
Blinking: Emerging from sleep mode.
Off: Offline mode.
[6] Paper source button
Selects a paper source. Each time this button is pressed, the paper source toggles between roll media (roll media source) and cut sheet (paper tray or paper tray
front loading port), with the paper source selector lamp illuminating.
[7] Menu button
Displays the printer main menu.
[8] Information button
Displays the printer submenu. Each time this button is pressed, information about the inks and paper is displayed.
Hold this button depressed for 3 seconds to execute printhead cleaning ([Head Cleaning A]).
[9]
button
Press this button when the printer is in menu mode to view the menu at the upper level.
The button is also used from one position to the next when entering a numeric value.
If [<-- STOP] is on display, the guidance screen can be paused.
If [<-- BACK] on display, the guidance screen can be moved backward.
[10]
button
Press this button when the printer is in offline mode to manually feed roll media.
Press this button when the printer is in menu mode to view the next item or setting.
[11] OK button
Press to set or set or execute a menu choice when the printer is in menu mode.
Press this button in any other situation to transition to the next screen as directed by a message appearing in the display.
[12]
button
Press this button when the printer is in menu mode to view the menu at the lower level.
If [NEXT -->] on display, the guidance screen can be moved forward.
[13] Stop button
Press for longer than 1 second to cancel the job or ink drying process in progress.
If cut sheet loading guidance or the like is on display, hold this button for longer than 1 second to stop the guidance.
[14] Load/Eject button
Guidance offers a visual clue to loading (replacing)/removing paper. Press this button when no paper is loaded to view instructions on how to load (replace) paper
in the display; press the button when paper is loaded to view instructions on how to remove the paper.
[15] Power button
Turns the printer on and off.
[16]
button
Press this button when the printer is in offline mode to manually feed roll media in the direction opposite to that of ejection.
Press this button when the printer is in menu mode to view the last item or setting.
1-31
Chapter 1
[17] Color labels
Represent ink tank colors in association with the remaining ink levels shown in the display.
[18] Display
Displays the printer menu, status or messages.
1-32
Chapter 1
1.6.2 Main Menu
0020-7362
iPF6000S
The printer has a Main menu which includes a menu related to maintenance such as adjustment of ink ejection position of each nozzle and head cleaning, a menu
related to printing settings such as auto cutting and ink drying time, and a menu related to parameters such as a message language.
1. Main menu operations
a) How to enter the Main menu
To enter the Main menu, press the [Menu] button on the operation panel.
b) How to exit the Main menu
To exit the Main menu, press the [Online] button.
c) Buttons used with the Main menu
- Selecting menus and parameters: [ ] or [ ] button
- Going to the next lower-level menu: [ ] button
- Going to the next higher-level menu: [ ] button
- Determining a selected menu or parameter: [OK] button
1-33
Chapter 1
2. Main Menu
The structure of the main menu is as follows.
T-1-5
First Level
[Paper Cut] (*1)
Second Level
Third Level
[No]
[Yes]
[Rep.Ink Tank]
[No]
[Yes]
[Head Cleaning]
[Head Cleaning A]
[Head Cleaning B]
[Media Menu]
[Manual Paper Type]
[Plain Paper] (*5)
[Plain Paper HQ] (*5)
[Plain Paper HG] (*5)
[Recycled Coated] (*5)
[High Resolution] (*5)
[Coated Paper] (*5)
[HW Coated] (*5)
[Ex HW Coated] (*5)
[Premium MatteP] (*5)
[Matte Photo] (*5)
[Glossy Photo] (*5)
[Semi-Gl Photo] (*5)
[HW Glossy Photo2] (*5)
[HW SemiGl Photo2] (*5)
[Poster Semi-Gl] (*5)
[SatinPhoto 190] (*5)
[Photo PaperPlus] (*5)
[PhotoPlusSemiGl] (*5)
[Syn. Paper] (*5)
[Adh. Syn. Paper] (*5)
[Backlit Film] (*5)
[Backprint Film] (*5)
[Flame-Res.Cloth] (*5)
[ThinFab.Banner2] (*5)
[Proofing Paper] (*5)
[News Proof 1] (*5)
[News Proof 2] (*5)
[FineArt Photo] (*5)
[FneArt HW Photo] (*5)
1-34
Fourth Level
Fifth Level
Chapter 1
T-1-6
First Level
[Media Menu]
Second Level
[Manual Paper Type]
Third Level
Fourth Level
Fifth Level
[FineArt Txtr] (*5)
[FineArt Wtrclr] (*5)
[FineArtBlockP] (*5)
[Canvas Matte2] (*5)
[JPN Paper Washi] (*5)
[Colored Coated] (*5)
[CAD Trace Paper] (*5)
[CAD Matte Film] (*5)
[POP Board] (*5)
Special # Here, the number is 1
to 10(*5)
[Manual Paper Size]
[ISO A1]
[ISO A2+]
[ISO A2]
[ISO A3+]
[ISO A3]
[ISO A4]
[ISO B2]
[ISO B3]
[ISO B4]
[JIS B2]
[JIS B3]
[JIS B4]
[22"X34" (ANSI D) ]
[17"X22" (ANSI C) ]
[11"X17" (Ledger) ]
[13"X19" (Super B) ]
[Letter (8.5"X11") ]
[Legal (8.5"X14") ]
[24"X36"(ARCH D)]
[18"X24"(ARCH C)]
[12"X18"(ARCH B)]
[9"X12"(ARCH A)]
[DIN C2]
[DIN C3]
[DIN C4]
1-35
Chapter 1
T-1-7
First Level
[Media Menu]
Second Level
[Manual Paper Size]
Third Level
[20"x24"]
[18"x22"]
[14"x17"]
[12"x16"]
[10"x12"]
[10"x15"]
[8"x10"]
[16"x20"]
[20"X30"]
[13"X22"]
[300x900 mm]
[Free size setting]
[Roll Media Type]
[Plain Paper] (*5)
[Plain Paper HQ] (*5)
[Plain Paper HG] (*5)
[Recycled Coated] (*5)
[High Resolution] (*5)
[Coated Paper] (*5)
[HW Coated] (*5)
[Ex HW Coated] (*5)
[Premium MatteP] (*5)
[Matte Photo] (*5)
[Glossy Photo] (*5)
[Semi-Gl Photo] (*5)
[HW Glossy Photo2] (*5)
[HW SemiGl Photo2] (*5)
[Poster Semi-Gl] (*5)
[SatinPhoto 190] (*5)
[Photo PaperPlus] (*5)
[PhotoPlusSemiGl)] (*5)
[Syn. Paper] (*5)
[Adh. Syn. Paper] (*5)
[Backlit Film] (*5)
[Backprint Film] (*5)
[Flame-Res.Cloth] (*5)
[ThinFab.Banner2] (*5)
[Proofing Paper] (*5)
[News Proof 1] (*5)
[News Proof 2] (*5)
[FineArt Photo] (*5)
[FineArt HW Photo] (*5)
1-36
Fourth Level
Fifth Level
Chapter 1
T-1-8
First Level
[Media Menu]
Second Level
[Roll Media Type]
Third Level
Fourth Level
Fifth Level
[FineArt Txtr] (*5)
[FineArt Wtrclr] (*5)
[FineArtBlockP] (*5)
[Canvas Matte2] (*5)
[JPN Paper Washi] (*5)
[Colored Coated] (*5)
[CAD Trace Paper] (*5)
[CAD Matte Film] (*5)
[POP Board] (*5)
[Special #]# Here, the number
is 1 to 10 (*5)
[Chk Remain.Roll]
[Off]*
[On]
[Roll Length Set] (*1, *2)
[### m] (*16)
[### feet] (*16)
[Paper Details]
(The paper type is displayed
here.)
[Roll DryingTime]
[Off]
[30 sec.]
[1 min.]
[3 min.]
[5 min.]
[10 min.]
[30 min.]
[60 min.]
[Scan Wait Time]
[Off]
[1 sec.]
[3 sec.]
[5 sec.]
[7 sec.]
[9 sec.]
1-37
Chapter 1
T-1-9
First Level
[Paper Details]
Second Level
(The paper type is displayed
here.)
Third Level
[Feed Priority]
Fourth Level
Fifth Level
[Automatic]
[Band Joint]
[Print Length]
[Adjust Length A]
-0.70 to 0.70
[Adjust Length B]
-0.70 to 0.70
[Head Height]
[Automatic]
[Highest]
[High]
[Standard]
[Low]
[Lowest]
[Skew Check Lv.]
[High Accuracy]
[Standard]
[Loose]
[Off]
[VacuumStrngth]
[Automatic]
[Strongest]
[Strong]
[Standard]
[Weak]
[Weakest]
[NearEnd RollMrgn]
[3mm]
[20mm]
[Cut Speed]
[Fast]
[Standard]
[Slow]
[Trim Edge First]
[Automatic]
[Off]
[On]
[Cutting Mode]
[Automatic]
[Eject]
[Manual]
[Bordless Margin]
[Automatic]
[Fixed]
[CutDustReduct.]
[Off]
[On]
[NearEnd Sht Mrgn]
[3 mm]
[Manual Feed]
[Front]
[20 mm]
[Top]
[Return Defaults]
[No]
[Yes]
[Job Management]
[Job Queue Ope.]
[Job List]
(Choose a print job)
[Delete]
[Priority]
[Com. BOX Ope.]
[Job List]
(Choose a print job)
[Print]
[Delete]
[Print Job List]
[No]
[Yes]
[Psnl. BOX Ope.]
[Folder List]
(Enter a password if one has
been set.)
[Job List]
(Choose a print job)
[Print Job List]
[Print]
[Delete]
[No]
[Yes]
1-38
Chapter 1
T-1-10
First Level
[Adjust Printer]
Second Level
[Auto Head Adj.]
Third Level
Fourth Level
[Standard Adj.]
[No]
[Advanced Adj.]
[No]
Fifth Level
[Yes]
[Yes]
[Auto Print]
[Off]
[On]*
[Manual Head Adj] (*12)
[No]
[Auto Band Adj.]
[Standard Adj.]
[No]
[Advanced Adj.]
[No]
[Yes]
[Yes]
[Yes]
[Manual Band Adj]
[No]
[Adj Far Ed Feed]
[No]
[Yes]
[Yes]
[Adjust Length] (*3)
[Standard]
[No]
[Other]
[No]
[Auto Adjust]
[No]
[Yes]
[Yes]
[Calibration]
[Yes]
[Execution Log]
[Date]
[Media]
[Use Adj. Value]
[No]
[Restore Defaults]
[No]
[Yes]*
[Yes]
[Interface Setup]
[EOP Timer]
[10 sec.]
[30 sec.]
[1 min.]
[2 min.]
[5 min.]
[10 min.]*
[30 min.]
[60 min.]
[TCP/IP]
[IP Mode]
[Automatic]
[Protocol] (*4)
[DHCP]
[Manual]*
[On]
[Off]*
1-39
Chapter 1
T-1-11
First Level
[Interface Setup]
Second Level
[TCP/IP]
Third Level
[Protocol] (*4)
Fourth Level
Fifth Level
[BOOTP]
[On]
[RARP]
[On]
[IP Address]
0.0.0.0* to 255.255.255.255
[Off]*
[Off]*
[IP Setting] (*14)
[NetWare]
[Subnet Mask]
0.0.0.0* to 255.255.255.255
[Default G/W]
0.0.0.0* to 255.255.255.255
[NetWare]
[On]
[Frame Type] (*6)
[Auto Detect]
[Off]*
[Ethernet 2]
[Ethernet 802.2]*
[Ethernet 802.3]
[Ethernet SNAP]
[Print Service] (*6)
[BinderyPServer]
[RPrinter]
[NDSPServer]*
[NPrinter]
[AppleTalk]
[On]
[Off]*
[Ethernet Driver]
[Auto Detect]
[On]
[Off]*
[Comm.Mode] (*7)
[Half Duplex]*
[Full Duplex]
[Ethernet] (*7)
[10 Base-T]*
[Spanning Tree]
[Not Use]*
[100 Base-TX]
[Use]
[MAC Address]
[Ext.Interface]
[No]*
[IEEE1394]
[Init. Settings]
[No]*
[Yes]
[Maintenance]
[Repl. maint. cart.]
[No]
[Yes]
1-40
Chapter 1
T-1-12
First Level
[Maintenance]
Second Level
[Replace P.head]
Third Level
Fourth Level
[Printhead L]
[No]
[Printhead R]
[No]
Fifth Level
[Yes]
[Yes]
[Move Printer]
[No]
[Yes]
[Clean Platen]
[No]
[Yes]
[System Setup]
[Warning]
[Buzzer]
[Off]
[On]*
[Detect Mismatch]
[Pause]
[Warning]*
[None]
[Keep Media Size]
[Off]*
[On]
[Paper Size Basis]
[Sht Selection]
[ISO A3+]*
[Roll Selection 1]
[ISO A3 (297 mm)]
[Roll Selection 2]
[10 in. (254 mm)]
[13"x19" (Super B)]
[300 mm Roll]
[JIS B4 (257 mm)]
[TrimEdge Reload]
[Off]
[On]
[Automatic]
[Noz. Check Freq.]
[Off]
[1 page]
[10 pages]
[Automatic]*
[Sleep Timer]
[5 min.]*
[10 min.]
[15 min.]
[20 min.]
[30 min.]
[40 min.]
[50 min.]
[60 min.]
[240 min.]
1-41
Chapter 1
T-1-13
First Level
[System Setup]
Second Level
[Length Unit]
Third Level
Fourth Level
[meter]*
[feet/inch]
[Time Zone]
[0: London (GMT)]
[+1: Paris, Rome]
[+2: Athens, Cairo]
[+3: Moscow]
[+4: Eerenan, Baku]
[+5: Islamabad]
[+6: Dacca]
[+7: Bangkok]
[+8: Hong Kong]
[+9: Tokyo, Seoul]
[+10: Canberra]
[+11: NewCaledonia]
[+12: Wellington]
[-12: Eniwetok]
[-11: Midway is]
[-10: Hawaii (AHST)]
[-9: Alaska (AKST)]
[-8: Oregon (PST)]
[-7: Arizona (MST)]
[-6: Texas (CST)]
[-5: NewYork (EST)]
[-4: Santiago]
[-3: Buenos Aires]
[-2: ]
[-1: Cape Verde]
[Date Format]
[yyyy/mm/dd]*
[dd/mm/yyyy]
[mm/dd/yyyy]
[Date & Time]
1-42
[Date]
[yyyy/mm/dd] (*8)
[Time]
[hh: mm]
Fifth Level
Chapter 1
T-1-14
First Level
[System Setup]
Second Level
[Language]
Third Level
Fourth Level
Fifth Level
[Japanese]
[Engulish]
[Francais]
[Italiano]
[Deutsch]
[Espanol]
[Pyccknn]
[Chinese]
[Korea]
[Contrast Adj.]
-4, -3, -2, -1 ,0*, +1, +2, +3, +4
[Reset PaprSetngs]
[No]
[High Speed]
[No]
[Secure High Spd.]
[No]
[Secure]
[No]
[Yes]
[Erase HDD Data]
[Yes]
[Yes]
[Yes]
[Output Method]
[Print]*
[Print(auto delete)]
[Save in mail box]
[Save beforePrint]
[Off]*
[On]
[Save in Comm.Box]
[Off]
[On]*
[Test Print]
[Status Print]
[No]
[Yes]
[Media Details]
[No]
[Yes]
[Print Job Log]
[No]
[Yes]
[Menu Map]
[No]
[Yes]
[Nozzle Check]
[No]
[Yes]
[Information]
[System Info]
[Error Log]
[########-####]
[Job Log]
(Choose from information
about the latest three print
jobs.)
[Document Name]
[User Name]
[Page Count]
[Job Status]
[Print Start Time]
[Print End Time]
[Print Time]
[Print Size]
[Media Type]
[Interface]
[Ink Consumed]
[HDD Information]
[HDD Space]
[xx.xGB]
*1: Displayed if a roll is loaded.
*2: Displayed if Chk Remain.Roll is On.
*3: Displayed if IP Mode is Automatic.
*4: Only these menus are displayed during printing.
*5: For information on the types of paper the printer supports, refer to the Media Guide. The media type setting in the printer driver and related software (as well
as on the Control Panel is updated when you install Media Configuration Tool from the User Software CD-ROM or if you change paper information by using Media
Configuration Tool.
*6: Available only if Auto Detect is Off.
*7: Available only if NetWare is On.
*8: Follows the setting in Date Format.
*12: Displayed if paper is loaded in the tray.
*14: This menu is only displayed during printing.
*16: Not displayed if a roll or a sheet has been fed.
1-43
Chapter 1
3. Main menu during printing
The structure of the main menu during printing is as follows.
T-1-15
First Level
[Menu Durng Prtng]
Second Level
Third Level
[Head Cleaning]
[Head Cleaning A]
[Fine Band Adj.]
-5 to 5
Fourth Level
Fifth Level
[Head Cleaning B]
[Information]
[System Info]
[Error Log]
[########-####]
[Job Log]
(Choose from information
about the latest three print
jobs.)
[Document Name]
[User Name]
[Page Count]
[Job Status]
[Print Start Time]
[Print End Time]
[Print Time]
[Print Size]
[Media Type]
[Interface]
[Ink Consumed]
[HDD Information]
1-44
[HDD Space]
[xx.xGB]
Chapter 1
4. Main Menu Settings
Main menu items are described in the following tables.
T-1-16
Setting Item
Description, Instructions
[Paper Cut]
Displayed if a roll is loaded.
Choose Yes to cut the roll at the current position. The paper will be fed, if necessary, so that the
sheet is at least 10 cm (39.4 in.)long after the cut. The paper will not be cut if there is not enough
paper left to feed the paper this much.
[Rep. Ink Tank]
When exchanging the ink tank, choose Yes and follow the instructions on the screen.
[Head Cleaning]
Specify Printhead cleaning options.
Choose Head Cleaning A if printing is faint, oddly colored, or contains foreign substances.
Choose Head Cleaning B if no ink is printed at all, or if printing is not improved by Head
Cleaning A .
[Media Menu]
Specify the type and size of paper.
[Paper Details]
Specify detailed paper-related settings, including the ink drying time and borderless printing
options.
[Job Management]
Manage print jobs on the printer's hard disk.
[Adjust Printer]
Adjust the Printhead alignment or amount of feed by printing a test pattern.
[Interface Setup]
Configure the network settings.
[Maintenance]
Replace the Printhead , prepare to transfer the printer, and clean the Pick Up Roller .
[System Setup]
Specify the printer system settings, including the date format and display language.
[Test Print]
Choose Status Print to print information about the printer.
Choose Media Details to print the paper settings as specified in Med.Detail Set. .
Choose Print Job Log to print a record of print jobs, including the paper type and size, amount
of ink used, and so on.
Choose Menu Map to print a list of the main menu options.
Choose Nozzle Check to print a test pattern for checking the nozzles.
If you have selected a leading edge margin of 20 mm in Nr End Sht Mrgn in the printer menu,
the test print sheet may not be printed completely.
[Information]
Displays the information about the printer and history of print jobs.
[Paper Settings]
T-1-17
Setting Item
Description, Instructions
[Roll Media Type]
Choose the type of roll.
[Chk Remain.Roll]
Choose On to print a barcode at the end of a roll before you remove it. The printed barcode can
be used in managing the amount of roll paper left. Choose Off if you prefer not to print the
barcode.
[Roll Length Set]
Displayed if Chk Remain.Roll is On .
If a barcode is not printed on rolls, specify the roll length. The roll length is displayed in meters
(1.0 - 91.0 m) or feet (1 - 300 ft.), depending on the setting in Length Unit .
[Manual Paper Type]
Choose the type of manual feed paper.
[Manual Paper Size]
Choose the size of manual feed paper.
1-45
Chapter 1
[Paper Details]
T-1-18
Setting Item
(The paper type is displayed
here.)
1-46
Description, Instructions
[Roll DryingTime]
Specify the time to wait for the ink to dry for each sheet.
[Scan Wait Time]
Specify the time to wait for the ink to dry between each scan in bidirectional printing, in
consideration of how quickly the paper absorbs ink. Note that printing will take longer if you
specify a wait time.
[Feed Priority]
Specify exact paper feeding, if desired. Normally, select Automatic . Choose Print Length if you
prefer to feed the paper an exact amount. However, note that choosing Print Length may result
in slight banding in the direction of Carriage scanning.
[Adjust Length A]/[Adjust
Length B]
Displayed if Feed Priority is Print Length .
Adjustment relative to the amount of stretching or shrinkage of the current paper. For paper that
tends to stretch, increase the feed amount by setting the adjustment value toward +. For paper
that tends to shrink, decrease the feed amount by setting the adjustment value toward -.
The setting for the amount of paper stretching or shrinkage is relative. If you access it again
later, it will be displayed as 0.00 %.
[Head Height]
Adjust the Printhead height.
[Skew Check Lv.]
If you print on Japanese Paper Washi or other handmade paper that has an irregular width,
choose Loose for a higher skew detection threshold, or choose Off to disable skew detection.
However, if paper is loaded askew when detection is Off , note that paper jams or Platen soiling
may occur.
If strict skew detection is required, choose High Accuracy.
[VacuumStrngth]
Specify the level of suction that holds paper against the Platen .
[NearEnd RollMrgn]
Specify a margin at the leading edge of roll paper to ensure better printing quality at the leading
edge.
Note that if you choose 3 mm , it may lower the printing quality at the leading edge and affect
feeding accuracy. The printed surface may be scratched, and ink may adhere to the the leading
edge.
[Cut Speed]
Choose the cutting speed. For media such as film that are more likely to generate debris when
cut, choose Fast to reduce the amount of debris.
[Trim Edge First]
If a roll is loaded, the end of the paper will be cut.
Choose Forced to have 40 mm (1.6 in) cut off the leading edge of the roll, ensuring a straight
edge, after you load the roll. Scraps are then removed.
When Automatic is selected, if the left and right side of the leading edge of the roll are uneven
(by 3 mm [0.12 in] or more), the edge is cut an amount relative to the slant to ensure a straight
edge after you load the roll. Scraps are then removed.
If the unevenness is less than 3 mm or if No Cutting is selected, the edge is not cut and scraps
are not removed.
[Cutting Mode]
Specify if the Cutter Unit is used for cutting.
Choose Automatic to have roll paper cut automatically after printing. If you choose Eject , the
paper will not be cut after printing. Instead, a line will be printed at the cut position.
[Bordless Margin]
Adjust the margin during borderless printing.
[CutDustReduct.]
Choose On to reduce the amount of debris generated when cutting film and similar media by
printing a line at the cut position. This option reduces the amount of debris given off after
cutting.
[Manual Feed]
Choose how the paper is supplied, Top for printing from the Tray or Front for printing from the
Front Paper Feed Slot .
[NearEnd Sht Mrgn]
Specify a margin at the leading edge of sheets to ensure better printing quality at the leading
edge.
Note that if you choose 3 mm , it may lower the printing quality at the leading edge and affect
feeding accuracy. The printed surface may be scratched, and ink may adhere to the the leading
edge.
If you have selected 20 mm , the test print sheet may not be printed completely.
[Return Defaults]
Choose Yes to restore Med.Detail Set. to the factory default values.
Chapter 1
[Job Management]
T-1-19
Setting Item
[Job Queue Ope.]
[Job List]
[Com. BOX Ope.] [Job List]
Description, Instructions
(Choose a print
job)
[Delete]
Delete the current job or queued jobs.
[Priority]
Print the job first after the current print job is finished
printing.
(Choose a print
job)
[Print]
Print jobs in the Common Box.
[Delete]
Delete jobs in the Common Box.
(Enter a password
if one has been
set.)
[Job List]-[Print]
Print jobs in Personal Boxes.
[Job List]-[Delete]
Delete jobs in Personal Boxes.
[Print Job List]
Print a list of jobs in Personal Boxes.
[Print Job List]
[Psnl. BOX Ope.]
[Folder List]
Print a list of jobs in the Common Box.
[Adjust Printer]
T-1-20
Setting Item
[Auto Head Adj.]
Choose Yes to have the printer print and read a test pattern for the automatic adjustment of
Printhead alignment relative to the printing direction.
[Advanced Adj.]
Choose Yes to have the printer print and read a test pattern for the automatic adjustment of
Printhead alignment relative to the nozzle, ink tank, and printing direction.
Three sheets are required when printing on sheets.
[Auto Print]
Choose On to have the printer automatically execute the Advanced Adj. operations after you
replace the Printhead .
[Manual Head Adj]
[Auto Band Adj.]
Description, Instructions
[Standard Adj.]
Choose Yes to print a test pattern for adjustment of Printhead alignment relative to the printing
direction. Enter the adjustment value manually based on the resulting pattern.
[Standard Adj.]
Choose Yes to have the printer print and read a test pattern for band adjustment, based on which
the printer automatically adjusts the feed amount.
[Advanced Adj.]
Choose this option when using paper other than genuine Canon paper, or paper for purposes
other than checking output.
Choose Yes to have the printer print and read a test pattern for band adjustment, based on which
the printer automatically adjusts the feed amount. Note that this function takes more time and
requires more ink than Standard Adj.
Two sheets are required when printing on sheets.
[Manual Band Adj]
Choose Yes to print a test pattern for adjusting the feed amount based on the paper type.
Two sheets are required when printing on sheets.
[Adj Far Ed Feed]
Choose Yes to print a test pattern for adjusting the feed amount of the trailing edge of paper
based on the paper type.
[Adjust Length]
[Standard]
[Other]
[Calibration]
Choose Yes to print a test pattern for adjustment relative to paper stretching or shrinkage, after
which you can enter the amount of adjustment.
[Auto Adjust]
Select [Yes] to print a color calibration adjustment pattern and adjust the correction value
automatically. This color calibration adjustment value is extended to all print tasks.
[Execution Log]
The date of color calibration and the paper type are displayed for visual verification.
[Use Effect Value]
Select [Disable] and press the [OK] button not to apply the color calibration correction value to
printing. The printer driver setting governs.
Select [Enable] and press the [OK] button to apply the color calibration correction value to
printing. It is overridden by the printer driver setting, though.
[Return Defaults]
The color calibration correction value and the execution history are cleared.
1-47
Chapter 1
[Interface Setup]
T-1-21
Setting Item
Description, Instructions
[EOP Timer]
[TCP/IP]
Specify the timeout period for print jobs.
[IP Mode]
[Protocol]
Choose whether the printer IP address is configured automatically or a static IP address is
entered manually.
[DHCP]
Specify the protocol used to configure the IP address automatically.
[BOOTP]
[RARP]
[IP Setting]
[IP Address]
[Subnet Mask]
[Default G/W]
[NetWare]
[NetWare]
Specify the NetWare protocol. To apply your changes, choose Store Setting .
[Frame Type]
Specify the frame type to use.
[Print Service]
[AppleTalk]
[Ethernet Driver]
Specify the printer network information when using a static IP address.
Enter the IP address assigned to the printer, as well as the network subnet mask and default
gateway.
Choose the print service.
Specify whether to use the AppleTalk protocol. To apply your changes, choose Store Setting .
[Auto Detect]
Specify the communication method. To apply your changes, choose Store Setting .
Choose On for automatic configuration of the LAN communication protocol. Choose Off to use
settings values of Comm.Mode and Ethernet Type .
[Comm.Mode]
Choose the LAN communication method.
[Ethernet Type]
Choose the LAN transfer rate.
[Spanning Tree]
Choose whether spanning-tree packets are supported over the LAN.
[MAC Address]
Displays the MAC address.
[Ext.Interface]
When installing the expansion interface board, choose whether the expansion interface board is
used.
[Init. Settings]
A confirmation message is displayed if you press the
network settings to the default values.
button. Choose [OK] to restore the
[Maintenance]
T-1-22
Setting Item
1-48
Description, Instructions
[Maint. cart.]
When exchanging the maintenance cartridge, choose Yes and follow the instructions on the
screen.
[Replace P.head]
Not displayed during a warning message that the remaining Maintenance Cartridge capacity is
low.
When replacing the Printhead , choose Yes and follow the instructions on the screen.
[Move Printer]
Not displayed during a warning message that the remaining Maintenance Cartridge capacity is
low.
When transferring the printer to another location, choose Yes and follow the instructions on the
screen.
[Clean Platen]
Use this function to clean inside the Top Cover . After you select Yes , the Carriage is moved
in preparation for Platen cleaning.
Chapter 1
[System Setup]
T-1-23
Setting Item
[Warning]
Set the buzzer. Choose On for the buzzer to sound in case of errors.
[Detect Mismatch]
Choose Warning for notification (display of a warning message) during printing if the paper
type specified in the printer menu does not match the paper type in the printer driver. Choose
None to continue print without notification. Choose Pause to have printing paused under these
circumstances. In this case, you can continue printing by pressing the Online button.
[Keep Media Size]
[Paper Size Basis]
Description, Instructions
[Buzzer]
Choose On to use the paper size setting as the basis for printing instead of other settings. The
margin setting of the printer menu will be used instead of the margin setting of the printer driver
if the latter is smaller, which may prevent text or images in the margin from being printed.
Choose Off to use the printer driver settings instead. Even if the margin setting of the printer
driver is smaller than that of the printer driver, text or images will not be cut off. However, this
requires longer paper because the actual margin will be equal to the margin setting of the printer
driver plus the margin setting of the printer menu.
[Sht Selection]
If sheet size detection is activated, choose whether ISO A3+ or ANSI B Super is applied when
an inbetween size is detected.
[Sht Selection 1]
If roll size detection is activated, choose whether ISO A3 (297 mm) and 300 mm Roll is applied
when an inbetween size is detected.
[Sht Selection 2]
If roll size detection is activated, choose whether 10in. (254 mm) or JIS B4 (257 mm) is applied
when an inbetween size is detected.
[TrimEdge Reload]
Keeping a roll in the printer for a long time without printing on it may leave a depression on the
leading edge.
When printing quality is most important, we recommend setting this option to On so that the
paper edge is automatically cut before printing.
[Noz. Check Freq.]
Specify the timing for automatic checks of nozzle clogging. Choose Off to disable checking.
Choose 1 page to check after each page is printed. Choose 10 pages to check once after every
ten pages are printed.
[Sleep Timer]
Specify the period before the printer enters sleep mode.
[Length Unit]
Choose the unit of measurement when roll length is displayed. You can switch the unit
displayed for Roll Length Set and the remaining paper amount displayed in the submenu.
[Time Zone]
Specify the time zone. Time zone options indicate a main city in this time zone and the
difference from Greenwich Mean Time.
[Date Format]
[Date & Time]
Specify the date format.
[Date]
Set the current date.
[Time]
Set the current time.
[Language]
Specify the language used on the Display Screen.
[Contrast Adj.]
Adjust the contrast of the Display Screen.
[Reset PaprSetngs]
Restores settings that you have changed with Media Configuration Tool to the factory default
values.
[Erase HDD Data]
[Output Method]
[High Speed]
The file management information of the data recorded in the hard disk drive is deleted. The time
required is several seconds.
[Secure High Spd.]
The random data in the entire hard disk drive is overwrited. The time required is about 40
minutes.
[Secure]
The 00 or FF or the random data in the entire hard disk drive is overwrited each once. The verify
check whether the data recorded in the hard disk drive is correct is executed. The time required
is 20 hours.
[Print]
Choose how to print.
[Print(auto delete)]
Select [Print] to perform normal printing. Select [Print (Auto delete)], print data and remove it
from the hard disk. Select [Save in mail box] to only save data to the box, without printing it.
[Save in mail box]
[Save beforePrint]
Select [On] to start printing data when its save is complete.
[Save in Comm.Box]
Select [Off] to print data without saving it to the common box.
1-49
Chapter 1
[Information]
T-1-24
Setting Item
[System Info]
Description, Instructions
[Firmware]
Displays the version of the printer and firmware.
[Boot: ##.##]
Displays the Boot ROM version of the printer.
[MIT]
Displays the DB format version of the MIT.
[IP:]
Displays the printer IP address.
[Ext.Interface: ]
Displays the interface used the expansion slot.
[s/n: ]
Displays the printer serial number.
[Error Log]
[########-####]
Displays the most recent error messages (up to two).
[Job Log]
(Choose from
[Document Name]
information about the [User Name]
latest three print
[Page Count]
jobs.)
[Job Status]
1-50
[HDD Space]
Displays the number of pages in the print job.
Displays the results of the print job processed.
[Print Start Time]
Displays the time when the print job was started.
[Print End Time]
Displays the time when the print job was finished.
[Print Time]
Displays the time required to print the job.
[Print Size]
Displays the paper size in the print job.
[Media Type]
Displays the paper type in the print job.
[Interface]
Displays the interface used for the print job.
[Ink Consumed]
[HDD Information]
Displays the document name in the last print job.
Displays the name of the user who sent the print job.
Displays the ink density of each color in the print job.
Displays the space available on the printer's hard disk.
Chapter 1
5. Main Menu Settings (During Printing)
Main menu items during printing are described in the following tables.
T-1-25
Setting Item
Description, Instructions
[Head Cleaning]
Specify Printhead cleaning options.
Choose Head Cleaning A if printing is faint, oddly colored, or contains foreign substances.
Choose Head Cleaning B if no ink is printed at all, or if printing is not improved by Head
Cleaning A .
[Fine Band Adj.]
Displayed during print jobs. Fine-tune the feed amount manually.
[Information]
Displays the information about the printer and history of print jobs.
[Information]
T-1-26
Setting Item
[System Info]
Description, Instructions
[Firmware]
Displays the version of the printer and firmware.
[Boot: ##.##]
Displays the Boot ROM version of the printer.
[MIT]
Displays the DB format version of the MIT.
[IP:]
Displays the printer IP address.
[Ext.Interface: ]
Displays the interface used the expansion slot.
[s/n: ]
Displays the printer serial number.
[Error Log]
[########-####]
Displays the most recent error messages (up to two).
[Job Log]
[Document Name]
(Choose from
information about the [User Name]
latest three print
[Page Count]
jobs.)
[Job Status]
Displays the document name in the last print job.
[HDD Space]
Displays the number of pages in the print job.
Displays the results of the print job processed.
[Print Start Time]
Displays the time when the print job was started.
[Print End Time]
Displays the time when the print job was finished.
[Print Time]
Displays the time required to print the job.
[Print Size]
Displays the paper size in the print job.
[Media Type]
Displays the paper type in the print job.
[Interface]
Displays the interface used for the print job.
[Ink Consumed]
[HDD Information]
Displays the name of the user who sent the print job.
Displays the ink density of each color in the print job.
Display the space available on the printer's hard disk.
1-51
Chapter 1
6. Color calibration print chart
The following chart (sample) is printed when executing "Calibration".
F-1-34
1-52
Chapter 1
1.6.3 Main Menu
0016-8909
iPF6100
The printer has a Main menu which includes a menu related to maintenance such as adjustment of ink ejection position of each nozzle and head cleaning, a menu
related to printing settings such as auto cutting and ink drying time, and a menu related to parameters such as a message language.
1. Main menu operations
a) How to enter the Main menu
To enter the Main menu, press the [Menu] button on the operation panel.
b) How to exit the Main menu
To exit the Main menu, press the [Online] button.
c) Buttons used with the Main menu
- Selecting menus and parameters: [ ] or [ ] button
- Going to the next lower-level menu: [ ] button
- Going to the next higher-level menu: [ ] button
- Determining a selected menu or parameter: [OK] button
1-53
Chapter 1
2. Main Menu
The structure of the main menu is as follows.
T-1-27
First Level
[Paper Cut] (*1)
Second Level
Third Level
[No]
[Yes]
[Rep.Ink Tank]
[No]
[Yes]
[Head Cleaning]
[Head Cleaning A]
[Head Cleaning B]
[Media Menu]
[Manual Paper Type]
[Plain Paper] (*5)
[Plain Paper HQ] (*5)
[Plain Paper HG] (*5)
[Recycled Coated] (*5)
[High Resolution] (*5)
[Coated Paper] (*5)
[HW Coated] (*5)
[Ex HW Coated] (*5)
[Premium MatteP] (*5)
[Matte Photo] (*5)
[Glossy Photo] (*5)
[Semi-Gl Photo] (*5)
[HW Glossy Photo2] (*5)
[HW SemiGl Photo2] (*5)
[Poster Semi-Gl] (*5)
[SatinPhoto 190] (*5)
[Photo PaperPlus] (*5)
[PhotoPlusSemiGl] (*5)
[Syn. Paper] (*5)
[Adh. Syn. Paper] (*5)
[Backlit Film] (*5)
[Backprint Film] (*5)
[Flame-Res.Cloth] (*5)
[ThinFab.Banner2] (*5)
[Proofing Paper] (*5)
[News Proof 1] (*5)
[News Proof 2] (*5)
[FineArt Photo] (*5)
[FneArt HW Photo] (*5)
1-54
Fourth Level
Fifth Level
Chapter 1
T-1-28
First Level
[Media Menu]
Second Level
[Manual Paper Type]
Third Level
Fourth Level
Fifth Level
[FineArt Txtr] (*5)
[FineArt Wtrclr] (*5)
[FineArtBlockP] (*5)
[Canvas Matte2] (*5)
[JPN Paper Washi] (*5)
[Colored Coated] (*5)
[CAD Trace Paper] (*5)
[CAD Matte Film] (*5)
[POP Board] (*5)
Special # Here, the number is 1
to 10(*5)
[Manual Paper Size]
[ISO A1]
[ISO A2+]
[ISO A2]
[ISO A3+]
[ISO A3]
[ISO A4]
[ISO B2]
[ISO B3]
[ISO B4]
[JIS B2]
[JIS B3]
[JIS B4]
[22"X34" (ANSI D) ]
[17"X22" (ANSI C) ]
[11"X17" (Ledger) ]
[13"X19" (Super B) ]
[Letter (8.5"X11") ]
[Legal (8.5"X14") ]
[24"X36"(ARCH D)]
[18"X24"(ARCH C)]
[12"X18"(ARCH B)]
[9"X12"(ARCH A)]
[DIN C2]
[DIN C3]
[DIN C4]
1-55
Chapter 1
T-1-29
First Level
[Media Menu]
Second Level
[Manual Paper Size]
Third Level
[20"x24"]
[18"x22"]
[14"x17"]
[12"x16"]
[10"x12"]
[10"x15"]
[8"x10"]
[16"x20"]
[20"X30"]
[13"X22"]
[300x900 mm]
[Free size setting]
[Roll Media Type]
[Plain Paper] (*5)
[Plain Paper HQ] (*5)
[Plain Paper HG] (*5)
[Recycled Coated] (*5)
[High Resolution] (*5)
[Coated Paper] (*5)
[HW Coated] (*5)
[Ex HW Coated] (*5)
[Premium MatteP] (*5)
[Matte Photo] (*5)
[Glossy Photo] (*5)
[Semi-Gl Photo] (*5)
[HW Glossy Photo2] (*5)
[HW SemiGl Photo2] (*5)
[Poster Semi-Gl] (*5)
[SatinPhoto 190] (*5)
[Photo PaperPlus] (*5)
[PhotoPlusSemiGl)] (*5)
[Syn. Paper] (*5)
[Adh. Syn. Paper] (*5)
[Backlit Film] (*5)
[Backprint Film] (*5)
[Flame-Res.Cloth] (*5)
[ThinFab.Banner2] (*5)
[Proofing Paper] (*5)
[News Proof 1] (*5)
[News Proof 2] (*5)
[FineArt Photo] (*5)
[FineArt HW Photo] (*5)
1-56
Fourth Level
Fifth Level
Chapter 1
T-1-30
First Level
[Media Menu]
Second Level
[Roll Media Type]
Third Level
Fourth Level
Fifth Level
[FineArt Txtr] (*5)
[FineArt Wtrclr] (*5)
[FineArtBlockP] (*5)
[Canvas Matte2] (*5)
[JPN Paper Washi] (*5)
[Colored Coated] (*5)
[CAD Trace Paper] (*5)
[CAD Matte Film] (*5)
[POP Board] (*5)
[Special #]# Here, the number
is 1 to 10 (*5)
[Chk Remain.Roll]
[Off]*
[On]
[Roll Length Set] (*1, *2)
[### m] (*16)
[### feet] (*16)
[Paper Details]
(The paper type is displayed
here.)
[Roll DryingTime]
[Off]
[30 sec.]
[1 min.]
[3 min.]
[5 min.]
[10 min.]
[30 min.]
[60 min.]
[Scan Wait Time]
[Off]
[1 sec.]
[3 sec.]
[5 sec.]
[7 sec.]
[9 sec.]
1-57
Chapter 1
T-1-31
First Level
[Paper Details]
Second Level
(The paper type is displayed
here.)
Third Level
[Feed Priority]
Fourth Level
[Automatic]
[Band Joint]
[Print Length]
[Adjust Length]
-0.70 to 0.70
[Head Height]
[Automatic]
[Highest]
[High]
[Standard]
[Low]
[Lowest]
[Skew Check Lv.]
[High Accuracy]
[Standard]
[Loose]
[Off]
[VacuumStrngth]
[Automatic]
[Strongest]
[Strong]
[Standard]
[Weak]
[Weakest]
[NearEnd RollMrgn]
[3mm]
[20mm]
[Cut Speed]
[Fast]
[Standard]
[Slow]
[Trim Edge First]
[Automatic]
[Off]
[On]
[Cutting Mode]
[Automatic]
[Eject]
[Manual]
[Bordless Margin]
[Automatic]
[Fixed]
[CutDustReduct.]
[Off]
[On]
[NearEnd Sht Mrgn]
[3 mm]
[Manual Feed]
[Front]
[20 mm]
[Top]
[Return Defaults]
[No]
[Yes]
1-58
Fifth Level
Chapter 1
T-1-32
First Level
[Adjust Printer]
Second Level
[Auto Head Adj.]
Third Level
Fourth Level
[Standard Adj.]
[No]
[Advanced Adj.]
[No]
Fifth Level
[Yes]
[Yes]
[Auto Print]
[Off]
[On]*
[Manual Head Adj] (*12)
[No]
[Auto Band Adj.]
[Standard Adj.]
[No]
[Advanced Adj.]
[No]
[Yes]
[Yes]
[Yes]
[Manual Band Adj]
[No]
[Adj Far Ed Feed]
[No]
[Adjust Length] (*3)
[No]
[Calibration]
[Auto Adjust]
[Yes]
[Yes]
[Yes]
[No]
[Yes]
[Execution Log]
[Date]
[Media]
[Use Adj. Value]
[No]
[Restore Defaults]
[No]
[Yes]*
[Yes]
[Interface Setup]
[EOP Timer]
[10 sec.]
[30 sec.]
[1 min.]
[2 min.]
[5 min.]
[10 min.]*
[30 min.]
[60 min.]
[TCP/IP]
[IP Mode]
[Automatic]
[Protocol] (*4)
[DHCP]
[Manual]*
[On]
[Off]*
1-59
Chapter 1
T-1-33
First Level
[Interface Setup]
Second Level
[TCP/IP]
Third Level
[Protocol] (*4)
Fourth Level
Fifth Level
[BOOTP]
[On]
[RARP]
[On]
[IP Address]
0.0.0.0* to 255.255.255.255
[Off]*
[Off]*
[IP Setting] (*14)
[NetWare]
[Subnet Mask]
0.0.0.0* to 255.255.255.255
[Default G/W]
0.0.0.0* to 255.255.255.255
[NetWare]
[On]
[Frame Type] (*6)
[Auto Detect]
[Off]*
[Ethernet 2]
[Ethernet 802.2]*
[Ethernet 802.3]
[Ethernet SNAP]
[Print Service] (*6)
[BinderyPServer]
[RPrinter]
[NDSPServer]*
[NPrinter]
[AppleTalk]
[On]
[Off]*
[Ethernet Driver]
[Auto Detect]
[On]
[Off]*
[Comm.Mode] (*7)
[Half Duplex]*
[Full Duplex]
[Ethernet] (*7)
[10 Base-T]*
[Spanning Tree]
[Not Use]*
[100 Base-TX]
[Use]
[MAC Address]
[Ext.Interface]
[No]*
[IEEE1394]
[Init. Settings]
[No]*
[Yes]
[Maintenance]
[Repl. maint. cart.]
[No]
[Yes]
1-60
Chapter 1
T-1-34
First Level
[Maintenance]
Second Level
[Replace P.head]
Third Level
Fourth Level
[Printhead L]
[No]
[Printhead R]
[No]
Fifth Level
[Yes]
[Yes]
[Move Printer]
[No]
[Yes]
[Clean Platen]
[No]
[Yes]
[Spur Cleaning]
[No]
[Yes]
[System Setup]
[Warning]
[Buzzer]
[Off]
[On]*
[Detect Mismatch]
[Pause]
[Warning]*
[None]
[Keep Media Size]
[Off]*
[On]
[Paper Size Basis]
[Sht Selection]
[ISO A3+]*
[Roll Selection 1]
[ISO A3 (297 mm)]
[Roll Selection 2]
[10 in. (254 mm)]
[13"x19" (Super B)]
[300 mm Roll]
[JIS B4 (257 mm)]
[TrimEdge Reload]
[Off]
[On]
[Automatic]
[Noz. Check Freq.]
[Off]
[1 page]
[10 pages]
[Automatic]*
[Sleep Timer]
[5 min.]*
[10 min.]
[15 min.]
[20 min.]
[30 min.]
[40 min.]
[50 min.]
[60 min.]
[240 min.]
1-61
Chapter 1
T-1-35
First Level
[System Setup]
Second Level
[Length Unit]
Third Level
Fourth Level
[meter]*
[feet/inch]
[Time Zone]
[0: London (GMT)]
[+1: Paris, Rome]
[+2: Athens, Cairo]
[+3: Moscow]
[+4: Eerenan, Baku]
[+5: Islamabad]
[+6: Dacca]
[+7: Bangkok]
[+8: Hong Kong]
[+9: Tokyo, Seoul]
[+10: Canberra]
[+11: NewCaledonia]
[+12: Wellington]
[-12: Eniwetok]
[-11: Midway is]
[-10: Hawaii (AHST)]
[-9: Alaska (AKST)]
[-8: Oregon (PST)]
[-7: Arizona (MST)]
[-6: Texas (CST)]
[-5: NewYork (EST)]
[-4: Santiago]
[-3: Buenos Aires]
[-2: ]
[-1: Cape Verde]
[Date Format]
[yyyy/mm/dd]*
[dd/mm/yyyy]
[mm/dd/yyyy]
[Date & Time]
1-62
[Date]
[yyyy/mm/dd] (*8)
[Time]
[hh: mm]
Fifth Level
Chapter 1
T-1-36
First Level
[System Setup]
Second Level
[Language]
Third Level
Fourth Level
Fifth Level
[Japanese]
[Engulish]
[Francais]
[Italiano]
[Deutsch]
[Espanol]
[Pyccknn]
[Chinese]
[Korea]
[Contrast Adj.]
-4, -3, -2, -1 ,0*, +1, +2, +3, +4
[Reset PaprSetngs]
[No]
[Yes]
[Test Print]
[Status Print]
[No]
[Yes]
[Media Details]
[No]
[Yes]
[Print Job Log]
[No]
[Yes]
[Menu Map]
[No]
[Yes]
[Nozzle Check]
[No]
[Yes]
[Information]
[System Info]
[Error Log]
[########-####]
[Job Log]
(Choose from information
about the latest three print
jobs.)
[Document Name]
[User Name]
[Page Count]
[Job Status]
[Print Start Time]
[Print End Time]
[Print Time]
[Print Size]
[Media Type]
[Interface]
[Ink Consumed]
*1: Displayed if a roll is loaded.
*2: Displayed if Chk Remain.Roll is On.
*3: Displayed if IP Mode is Automatic.
*4: Only these menus are displayed during printing.
*5: For information on the types of paper the printer supports, refer to the Media Guide. The media type setting in the printer driver and related software (as well
as on the Control Panel is updated when you install Media Configuration Tool from the User Software CD-ROM or if you change paper information by using Media
Configuration Tool.
*6: Available only if Auto Detect is Off.
*7: Available only if NetWare is On.
*8: Follows the setting in Date Format.
*12: Displayed if paper is loaded in the tray.
*14: This menu is only displayed during printing.
*16: Not displayed if a roll or a sheet has been fed.
1-63
Chapter 1
3. Main menu during printing
The structure of the main menu during printing is as follows.
T-1-37
First Level
[Menu Durng Prtng]
Second Level
Third Level
[Head Cleaning]
[Head Cleaning A]
[Fine Band Adj.]
-5 to 5
Fourth Level
Fifth Level
[Head Cleaning B]
[Information]
[System Info]
[Error Log]
[########-####]
[Job Log]
(Choose from information
about the latest three print
jobs.)
[Document Name]
[User Name]
[Page Count]
[Job Status]
[Print Start Time]
[Print End Time]
[Print Time]
[Print Size]
[Media Type]
[Interface]
[Ink Consumed]
1-64
Chapter 1
4. Main Menu Settings
Main menu items are described in the following tables.
T-1-38
Setting Item
Description, Instructions
[Paper Cut]
Displayed if a roll is loaded.
Choose Yes to cut the roll at the current position. The paper will be fed, if necessary, so that the
sheet is at least 10 cm (39.4 in.)long after the cut. The paper will not be cut if there is not enough
paper left to feed the paper this much.
[Rep. Ink Tank]
When exchanging the ink tank, choose Yes and follow the instructions on the screen.
[Head Cleaning]
Specify Printhead cleaning options.
Choose Head Cleaning A if printing is faint, oddly colored, or contains foreign substances.
Choose Head Cleaning B if no ink is printed at all, or if printing is not improved by Head
Cleaning A .
[Media Menu]
Specify the type and size of paper.
[Paper Details]
Specify detailed paper-related settings, including the ink drying time and borderless printing
options.
[Adjust Printer]
Adjust the Printhead alignment or amount of feed by printing a test pattern.
[Interface Setup]
Configure the network settings.
[Maintenance]
Replace the Printhead , prepare to transfer the printer, and clean the Pick Up Roller .
[System Setup]
Specify the printer system settings, including the date format and display language.
[Test Print]
Choose Status Print to print information about the printer.
Choose Media Details to print the paper settings as specified in Med.Detail Set. .
Choose Print Job Log to print a record of print jobs, including the paper type and size, amount
of ink used, and so on.
Choose Menu Map to print a list of the main menu options.
Choose Nozzle Check to print a test pattern for checking the nozzles.
If you have selected a leading edge margin of 20 mm in Nr End Sht Mrgn in the printer menu,
the test print sheet may not be printed completely.
[Information]
Displays the information about the printer and history of print jobs.
[Paper Settings]
T-1-39
Setting Item
Description, Instructions
[Roll Media Type]
Choose the type of roll.
[Chk Remain.Roll]
Choose On to print a barcode at the end of a roll before you remove it. The printed barcode can
be used in managing the amount of roll paper left. Choose Off if you prefer not to print the
barcode.
[Roll Length Set]
Displayed if Chk Remain.Roll is On .
If a barcode is not printed on rolls, specify the roll length. The roll length is displayed in meters
(1.0 - 91.0 m) or feet (1 - 300 ft.), depending on the setting in Length Unit .
[Manual Paper Type]
Choose the type of manual feed paper.
[Manual Paper Size]
Choose the size of manual feed paper.
1-65
Chapter 1
[Paper Details]
T-1-40
Setting Item
(The paper type is displayed
here.)
1-66
Description, Instructions
[Roll DryingTime]
Specify the time to wait for the ink to dry for each sheet.
[Scan Wait Time]
Specify the time to wait for the ink to dry between each scan in bidirectional printing, in
consideration of how quickly the paper absorbs ink. Note that printing will take longer if you
specify a wait time.
[Feed Priority]
Specify exact paper feeding, if desired. Normally, select Automatic . Choose Print Length if you
prefer to feed the paper an exact amount. However, note that choosing Print Length may result
in slight banding in the direction of Carriage scanning.
[Adjust Length]
Displayed if Feed Priority is Print Length .
Adjustment relative to the amount of stretching or shrinkage of the current paper. For paper that
tends to stretch, increase the feed amount by setting the adjustment value toward +. For paper
that tends to shrink, decrease the feed amount by setting the adjustment value toward -.
The setting for the amount of paper stretching or shrinkage is relative. If you access it again
later, it will be displayed as 0.00 %.
[Head Height]
Adjust the Printhead height.
[Skew Check Lv.]
If you print on Japanese Paper Washi or other handmade paper that has an irregular width,
choose Loose for a higher skew detection threshold, or choose Off to disable skew detection.
However, if paper is loaded askew when detection is Off , note that paper jams or Platen soiling
may occur.
If strict skew detection is required, choose High Accuracy.
[VacuumStrngth]
Specify the level of suction that holds paper against the Platen .
[NearEnd RollMrgn]
Specify a margin at the leading edge of roll paper to ensure better printing quality at the leading
edge.
Note that if you choose 3 mm , it may lower the printing quality at the leading edge and affect
feeding accuracy. The printed surface may be scratched, and ink may adhere to the the leading
edge.
[Cut Speed]
Choose the cutting speed. For media such as film that are more likely to generate debris when
cut, choose Fast to reduce the amount of debris.
[Trim Edge First]
If a roll is loaded, the end of the paper will be cut.
Choose Forced to have 40 mm (1.6 in) cut off the leading edge of the roll, ensuring a straight
edge, after you load the roll. Scraps are then removed.
When Automatic is selected, if the left and right side of the leading edge of the roll are uneven
(by 3 mm [0.12 in] or more), the edge is cut an amount relative to the slant to ensure a straight
edge after you load the roll. Scraps are then removed.
If the unevenness is less than 3 mm or if No Cutting is selected, the edge is not cut and scraps
are not removed.
[Cutting Mode]
Specify if the Cutter Unit is used for cutting.
Choose Automatic to have roll paper cut automatically after printing. If you choose Eject , the
paper will not be cut after printing. Instead, a line will be printed at the cut position.
[Bordless Margin]
Adjust the margin during borderless printing.
[CutDustReduct.]
Choose On to reduce the amount of debris generated when cutting film and similar media by
printing a line at the cut position. This option reduces the amount of debris given off after
cutting.
[Manual Feed]
Choose how the paper is supplied, Top for printing from the Tray or Front for printing from the
Front Paper Feed Slot .
[NearEnd Sht Mrgn]
Specify a margin at the leading edge of sheets to ensure better printing quality at the leading
edge.
Note that if you choose 3 mm , it may lower the printing quality at the leading edge and affect
feeding accuracy. The printed surface may be scratched, and ink may adhere to the the leading
edge.
If you have selected 20 mm , the test print sheet may not be printed completely.
[Return Defaults]
Choose Yes to restore Med.Detail Set. to the factory default values.
Chapter 1
[Adjust Printer]
T-1-41
Setting Item
[Auto Head Adj.]
Choose Yes to have the printer print and read a test pattern for the automatic adjustment of
Printhead alignment relative to the printing direction.
[Advanced Adj.]
Choose Yes to have the printer print and read a test pattern for the automatic adjustment of
Printhead alignment relative to the nozzle, ink tank, and printing direction.
Three sheets are required when printing on sheets.
[Auto Print]
Choose On to have the printer automatically execute the Advanced Adj. operations after you
replace the Printhead .
[Manual Head Adj]
[Auto Band Adj.]
Description, Instructions
[Standard Adj.]
Choose Yes to print a test pattern for adjustment of Printhead alignment relative to the printing
direction. Enter the adjustment value manually based on the resulting pattern.
[Standard Adj.]
Choose Yes to have the printer print and read a test pattern for band adjustment, based on which
the printer automatically adjusts the feed amount.
[Advanced Adj.]
Choose this option when using paper other than genuine Canon paper, or paper for purposes
other than checking output.
Choose Yes to have the printer print and read a test pattern for band adjustment, based on which
the printer automatically adjusts the feed amount. Note that this function takes more time and
requires more ink than Standard Adj.
Two sheets are required when printing on sheets.
[Manual Band Adj]
Choose Yes to print a test pattern for adjusting the feed amount based on the paper type.
Two sheets are required when printing on sheets.
[Adj Far Ed Feed]
[Choose Yes to print a test pattern for adjusting the feed amount of the trailing edge of paper
based on the paper type.
[Adjust Length]
Choose Yes to print a test pattern for adjustment relative to paper stretching or shrinkage, after
which you can enter the amount of adjustment.
[Calibration]
[Auto Adjust]
Select [Yes] to print a color calibration adjustment pattern and adjust the correction value
automatically. This color calibration adjustment value is extended to all print tasks.
[Execution Log]
The date of color calibration and the paper type are displayed for visual verification.
[Use Effect Value]
Select [Disable] and press the [OK] button not to apply the color calibration correction value to
printing. The printer driver setting governs.
Select [Enable] and press the [OK] button to apply the color calibration correction value to
printing. It is overridden by the printer driver setting, though.
[Return Defaults]
The color calibration correction value and the execution history are cleared.
1-67
Chapter 1
[Interface Setup]
T-1-42
Setting Item
Description, Instructions
[EOP Timer]
[TCP/IP]
Specify the timeout period for print jobs.
[IP Mode]
[Protocol]
Choose whether the printer IP address is configured automatically or a static IP address is
entered manually.
[DHCP]
Specify the protocol used to configure the IP address automatically.
[BOOTP]
[RARP]
[IP Setting]
[IP Address]
[Subnet Mask]
[Default G/W]
[NetWare]
[NetWare]
Specify the NetWare protocol. To apply your changes, choose Store Setting .
[Frame Type]
Specify the frame type to use.
[Print Service]
[AppleTalk]
[Ethernet Driver]
Specify the printer network information when using a static IP address.
Enter the IP address assigned to the printer, as well as the network subnet mask and default
gateway.
Choose the print service.
Specify whether to use the AppleTalk protocol. To apply your changes, choose Store Setting .
[Auto Detect]
Specify the communication method. To apply your changes, choose Store Setting .
Choose On for automatic configuration of the LAN communication protocol. Choose Off to use
settings values of Comm.Mode and Ethernet Type .
[Comm.Mode]
Choose the LAN communication method.
[Ethernet Type]
Choose the LAN transfer rate.
[Spanning Tree]
Choose whether spanning-tree packets are supported over the LAN.
[MAC Address]
Displays the MAC address.
[Ext.Interface]
When installing the expansion interface board, choose whether the expansion interface board is
used.
[Init. Settings]
A confirmation message is displayed if you press the
network settings to the default values.
button. Choose [OK] to restore the
[Maintenance]
T-1-43
Setting Item
1-68
Description, Instructions
[Maint. cart.]
When exchanging the maintenance cartridge, choose Yes and follow the instructions on the
screen.
[Replace P.head]
Not displayed during a warning message that the remaining Maintenance Cartridge capacity is
low.
When replacing the Printhead , choose Yes and follow the instructions on the screen.
[Move Printer]
Not displayed during a warning message that the remaining Maintenance Cartridge capacity is
low.
When transferring the printer to another location, choose Yes and follow the instructions on the
screen.
[Clean Platen]
Use this function to clean inside the Top Cover . After you select Yes , the Carriage is moved
in preparation for Platen cleaning.
[Spur Cleaning]
Choose Yes to clean the spur. Use the cleaning sheet come with the printer.
Chapter 1
[System Setup]
T-1-44
Setting Item
[Warning]
Set the buzzer. Choose On for the buzzer to sound in case of errors.
[Detect Mismatch]
Choose Warning for notification (display of a warning message) during printing if the paper
type specified in the printer menu does not match the paper type in the printer driver. Choose
None to continue print without notification. Choose Pause to have printing paused under these
circumstances. In this case, you can continue printing by pressing the Online button.
[Keep Media Size]
[Paper Size Basis]
Description, Instructions
[Buzzer]
Choose On to use the paper size setting as the basis for printing instead of other settings. The
margin setting of the printer menu will be used instead of the margin setting of the printer driver
if the latter is smaller, which may prevent text or images in the margin from being printed.
Choose Off to use the printer driver settings instead. Even if the margin setting of the printer
driver is smaller than that of the printer driver, text or images will not be cut off. However, this
requires longer paper because the actual margin will be equal to the margin setting of the printer
driver plus the margin setting of the printer menu.
[Sht Selection]
If sheet size detection is activated, choose whether ISO A3+ or ANSI B Super is applied when
an inbetween size is detected.
[Sht Selection 1]
If roll size detection is activated, choose whether ISO A3 (297 mm) and 300 mm Roll is applied
when an inbetween size is detected.
[Sht Selection 2]
If roll size detection is activated, choose whether 10in. (254 mm) or JIS B4 (257 mm) is applied
when an inbetween size is detected.
[TrimEdge Reload]
Keeping a roll in the printer for a long time without printing on it may leave a depression on the
leading edge.
When printing quality is most important, we recommend setting this option to On so that the
paper edge is automatically cut before printing.
[Noz. Check Freq.]
Specify the timing for automatic checks of nozzle clogging. Choose Off to disable checking.
Choose 1 page to check after each page is printed. Choose 10 pages to check once after every
ten pages are printed.
[Sleep Timer]
Specify the period before the printer enters sleep mode.
[Length Unit]
Choose the unit of measurement when roll length is displayed. You can switch the unit
displayed for Roll Length Set and the remaining paper amount displayed in the submenu.
[Time Zone]
Specify the time zone. Time zone options indicate a main city in this time zone and the
difference from Greenwich Mean Time.
[Date Format]
[Date & Time]
Specify the date format.
[Date]
Set the current date.
[Time]
Set the current time.
[Language]
Specify the language used on the Display Screen.
[Contrast Adj.]
Adjust the contrast of the Display Screen.
[Reset PaprSetngs]
Restores settings that you have changed with Media Configuration Tool to the factory default
values.
1-69
Chapter 1
[Information]
T-1-45
Setting Item
[System Info]
1-70
Description, Instructions
[Firmware]
Displays the version of the printer and firmware.
[Boot: ##.##]
Displays the Boot ROM version of the printer.
[MIT]
Displays the DB format version of the MIT.
[IP:]
Displays the printer IP address.
[Ext.Interface: ]
Displays the interface used the expansion slot.
[s/n: ]
Displays the printer serial number.
[Error Log]
[########-####]
Displays the most recent error messages (up to two).
[Job Log]
(Choose from
[Document Name]
information about the [User Name]
latest three print
[Page Count]
jobs.)
[Job Status]
Displays the document name in the last print job.
Displays the name of the user who sent the print job.
Displays the number of pages in the print job.
Displays the results of the print job processed.
[Print Start Time]
Displays the time when the print job was started.
[Print End Time]
Displays the time when the print job was finished.
[Print Time]
Displays the time required to print the job.
[Print Size]
Displays the paper size in the print job.
[Media Type]
Displays the paper type in the print job.
[Interface]
Displays the interface used for the print job.
[Ink Consumed]
Displays the ink density of each color in the print job.
Chapter 1
5. Main Menu Settings (During Printing)
Main menu items during printing are described in the following tables.
T-1-46
Setting Item
Description, Instructions
[Head Cleaning]
Specify Printhead cleaning options.
Choose Head Cleaning A if printing is faint, oddly colored, or contains foreign substances.
Choose Head Cleaning B if no ink is printed at all, or if printing is not improved by Head
Cleaning A .
[Fine Band Adj.]
Displayed during print jobs. Fine-tune the feed amount manually.
[Information]
Displays the information about the printer and history of print jobs.
[Information]
T-1-47
Setting Item
[System Info]
Description, Instructions
[Firmware]
Displays the version of the printer and firmware.
[Boot: ##.##]
Displays the Boot ROM version of the printer.
[MIT]
Displays the DB format version of the MIT.
[IP:]
Displays the printer IP address.
[Ext.Interface: ]
Displays the interface used the expansion slot.
[s/n: ]
Displays the printer serial number.
[Error Log]
[########-####]
Displays the most recent error messages (up to two).
[Job Log]
[Document Name]
(Choose from
information about the [User Name]
latest three print
[Page Count]
jobs.)
[Job Status]
Displays the document name in the last print job.
Displays the name of the user who sent the print job.
Displays the number of pages in the print job.
Displays the results of the print job processed.
[Print Start Time]
Displays the time when the print job was started.
[Print End Time]
Displays the time when the print job was finished.
[Print Time]
Displays the time required to print the job.
[Print Size]
Displays the paper size in the print job.
[Media Type]
Displays the paper type in the print job.
[Interface]
Displays the interface used for the print job.
[Ink Consumed]
Displays the ink density of each color in the print job.
1-71
Chapter 1
6. Color calibration print chart
The following chart (sample) is printed when executing "Calibration".
F-1-35
1-72
Chapter 1
1.6.4 Main Menu
0020-1818
iPF6200
The printer has a Main menu which includes a menu related to maintenance such as adjustment of ink ejection position of each nozzle and head cleaning, a menu
related to printing settings such as auto cutting and ink drying time, and a menu related to parameters such as a message language.
1. Main menu operations
a) How to enter the Main menu
To enter the Main menu, press the [Menu] button on the operation panel.
b) How to exit the Main menu
To exit the Main menu, press the [Online] button.
c) Buttons used with the Main menu
- Selecting menus and parameters: [ ] or [ ] button
- Going to the next lower-level menu: [ ] button
- Going to the next higher-level menu: [ ] button
- Determining a selected menu or parameter: [OK] button
1-73
Chapter 1
2. Main Menu
The structure of the main menu is as follows.
T-1-48
First Level
[Paper Cut] (*1)
Second Level
Third Level
[No]
[Yes]
[Rep.Ink Tank]
[No]
[Yes]
[Head Cleaning]
[Head Cleaning A]
[Head Cleaning B]
[Media Menu]
[Manual Paper Type]
[Plain Paper] (*5)
[Plain Paper HQ] (*5)
[Plain Paper HG] (*5)
[Recycled Coated] (*5)
[High Resolution] (*5)
[Coated Paper] (*5)
[HW Coated] (*5)
[Ex HW Coated] (*5)
[Premium MatteP] (*5)
[Matte Photo] (*5)
[Glossy Photo] (*5)
[Semi-Gl Photo] (*5)
[HW Glossy Photo2] (*5)
[HW SemiGl Photo2] (*5)
[Poster Semi-Gl] (*5)
[SatinPhoto 190] (*5)
[Photo PaperPlus] (*5)
[PhotoPlusSemiGl] (*5)
[Syn. Paper] (*5)
[Adh. Syn. Paper] (*5)
[Backlit Film] (*5)
[Backprint Film] (*5)
[Flame-Res.Cloth] (*5)
[ThinFab.Banner2] (*5)
[Proofing Paper] (*5)
[News Proof 1] (*5)
[News Proof 2] (*5)
[FineArt Photo] (*5)
[FneArt HW Photo] (*5)
1-74
Fourth Level
Fifth Level
Chapter 1
T-1-49
First Level
[Media Menu]
Second Level
[Manual Paper Type]
Third Level
Fourth Level
Fifth Level
[FineArt Txtr] (*5)
[FineArt Wtrclr] (*5)
[FineArtBlockP] (*5)
[Canvas Matte2] (*5)
[JPN Paper Washi] (*5)
[Colored Coated] (*5)
[CAD Trace Paper] (*5)
[CAD Matte Film] (*5)
[POP Board] (*5)
Special # Here, the number is 1
to 10(*5)
[Manual Paper Size]
[ISO A1]
[ISO A2+]
[ISO A2]
[ISO A3+]
[ISO A3]
[ISO A4]
[ISO B2]
[ISO B3]
[ISO B4]
[JIS B2]
[JIS B3]
[JIS B4]
[22"X34" (ANSI D) ]
[17"X22" (ANSI C) ]
[11"X17" (Ledger) ]
[13"X19" (Super B) ]
[Letter (8.5"X11") ]
[Legal (8.5"X14") ]
[24"X36"(ARCH D)]
[18"X24"(ARCH C)]
[12"X18"(ARCH B)]
[9"X12"(ARCH A)]
[DIN C2]
[DIN C3]
[DIN C4]
1-75
Chapter 1
T-1-50
First Level
[Media Menu]
Second Level
[Manual Paper Size]
Third Level
[20"x24"]
[18"x22"]
[14"x17"]
[12"x16"]
[10"x12"]
[10"x15"]
[8"x10"]
[16"x20"]
[20"X30"]
[13"X22"]
[300x900 mm]
[Free size setting]
[Roll Media Type]
[Plain Paper] (*5)
[Plain Paper HQ] (*5)
[Plain Paper HG] (*5)
[Recycled Coated] (*5)
[High Resolution] (*5)
[Coated Paper] (*5)
[HW Coated] (*5)
[Ex HW Coated] (*5)
[Premium MatteP] (*5)
[Matte Photo] (*5)
[Glossy Photo] (*5)
[Semi-Gl Photo] (*5)
[HW Glossy Photo2] (*5)
[HW SemiGl Photo2] (*5)
[Poster Semi-Gl] (*5)
[SatinPhoto 190] (*5)
[Photo PaperPlus] (*5)
[PhotoPlusSemiGl)] (*5)
[Syn. Paper] (*5)
[Adh. Syn. Paper] (*5)
[Backlit Film] (*5)
[Backprint Film] (*5)
[Flame-Res.Cloth] (*5)
[ThinFab.Banner2] (*5)
[Proofing Paper] (*5)
[News Proof 1] (*5)
[News Proof 2] (*5)
[FineArt Photo] (*5)
[FineArt HW Photo] (*5)
1-76
Fourth Level
Fifth Level
Chapter 1
T-1-51
First Level
[Media Menu]
Second Level
[Roll Media Type]
Third Level
Fourth Level
Fifth Level
[FineArt Txtr] (*5)
[FineArt Wtrclr] (*5)
[FineArtBlockP] (*5)
[Canvas Matte2] (*5)
[JPN Paper Washi] (*5)
[Colored Coated] (*5)
[CAD Trace Paper] (*5)
[CAD Matte Film] (*5)
[POP Board] (*5)
[Special #]# Here, the number
is 1 to 10 (*5)
[Chk Remain.Roll]
[Off]*
[On]
[Roll Length Set] (*1, *2)
[### m] (*16)
[### feet] (*16)
[Paper Details]
(The paper type is displayed
here.)
[Roll DryingTime]
[Off]
[30 sec.]
[1 min.]
[3 min.]
[5 min.]
[10 min.]
[30 min.]
[60 min.]
[Scan Wait Time]
[Off]
[1 sec.]
[3 sec.]
[5 sec.]
[7 sec.]
[9 sec.]
1-77
Chapter 1
T-1-52
First Level
[Paper Details]
Second Level
(The paper type is displayed
here.)
Third Level
[Feed Priority]
Fourth Level
Fifth Level
[Automatic]
[Band Joint]
[Print Length]
[Adjust Length]
-0.70 to 0.70
[Head Height]
[Automatic]
[Highest]
[High]
[Standard]
[Low]
[Lowest]
[Skew Check Lv.]
[High Accuracy]
[Standard]
[Loose]
[Off]
[VacuumStrngth]
[Automatic]
[Strongest]
[Strong]
[Standard]
[Weak]
[Weakest]
[NearEnd RollMrgn]
[3mm]
[20mm]
[Cut Speed]
[Fast]
[Standard]
[Slow]
[Trim Edge First]
[Automatic]
[Off]
[On]
[Cutting Mode]
[Automatic]
[Eject]
[Manual]
[Bordless Margin]
[Automatic]
[Fixed]
[CutDustReduct.]
[Off]
[On]
[NearEnd Sht Mrgn]
[3 mm]
[Manual Feed]
[Front]
[20 mm]
[Top]
[Return Defaults]
[No]
[Yes]
[Job Management]
[Job Queue Ope.]
[Job List]
(Choose a print job)
[Delete]
[Priority]
[Com. BOX Ope.]
[Job List]
(Choose a print job)
[Print]
[Delete]
[Print Job List]
[No]
[Yes]
[Psnl. BOX Ope.]
[Folder List]
(Enter a password if one has
been set.)
[Job List]
(Choose a print job)
[Print Job List]
[Print]
[Delete]
[No]
[Yes]
1-78
Chapter 1
T-1-53
First Level
[Adjust Printer]
Second Level
[Auto Head Adj.]
Third Level
Fourth Level
[Standard Adj.]
[No]
[Advanced Adj.]
[No]
Fifth Level
[Yes]
[Yes]
[Auto Print]
[Off]
[On]*
[Manual Head Adj] (*12)
[No]
[Auto Band Adj.]
[Standard Adj.]
[No]
[Advanced Adj.]
[No]
[Yes]
[Yes]
[Yes]
[Manual Band Adj]
[No]
[Adj Far Ed Feed]
[No]
[Adjust Length] (*3)
[No]
[Calibration]
[Auto Adjust]
[Yes]
[Yes]
[Yes]
[No]
[Yes]
[Execution Log]
[Date]
[Media]
[Use Adj. Value]
[No]
[Restore Defaults]
[No]
[Yes]*
[Yes]
[Interface Setup]
[EOP Timer]
[10 sec.]
[30 sec.]
[1 min.]
[2 min.]
[5 min.]
[10 min.]*
[30 min.]
[60 min.]
[TCP/IP]
[IP Mode]
[Automatic]
[Protocol] (*4)
[DHCP]
[Manual]*
[On]
[Off]*
1-79
Chapter 1
T-1-54
First Level
[Interface Setup]
Second Level
[TCP/IP]
Third Level
[Protocol] (*4)
Fourth Level
Fifth Level
[BOOTP]
[On]
[RARP]
[On]
[IP Address]
0.0.0.0* to 255.255.255.255
[Off]*
[Off]*
[IP Setting] (*14)
[NetWare]
[Subnet Mask]
0.0.0.0* to 255.255.255.255
[Default G/W]
0.0.0.0* to 255.255.255.255
[NetWare]
[On]
[Frame Type] (*6)
[Auto Detect]
[Off]*
[Ethernet 2]
[Ethernet 802.2]*
[Ethernet 802.3]
[Ethernet SNAP]
[Print Service] (*6)
[BinderyPServer]
[RPrinter]
[NDSPServer]*
[NPrinter]
[AppleTalk]
[On]
[Off]*
[Ethernet Driver]
[Auto Detect]
[On]
[Off]*
[Comm.Mode] (*7)
[Half Duplex]*
[Full Duplex]
[Ethernet] (*7)
[10 Base-T]*
[Spanning Tree]
[Not Use]*
[100 Base-TX]
[Use]
[MAC Address]
[Ext.Interface]
[No]*
[IEEE1394]
[Init. Settings]
[No]*
[Yes]
[Maintenance]
[Repl. maint. cart.]
[No]
[Yes]
1-80
Chapter 1
T-1-55
First Level
[Maintenance]
Second Level
[Replace P.head]
Third Level
Fourth Level
[Printhead L]
[No]
[Printhead R]
[No]
Fifth Level
[Yes]
[Yes]
[Move Printer]
[No]
[Yes]
[Clean Platen]
[No]
[Yes]
[Spur Cleaning]
[No]
[Yes]
[System Setup]
[Warning]
[Buzzer]
[Off]
[On]*
[Detect Mismatch]
[Pause]
[Warning]*
[None]
[Keep Media Size]
[Off]*
[On]
[Paper Size Basis]
[Sht Selection]
[ISO A3+]*
[Roll Selection 1]
[ISO A3 (297 mm)]
[Roll Selection 2]
[10 in. (254 mm)]
[13"x19" (Super B)]
[300 mm Roll]
[JIS B4 (257 mm)]
[TrimEdge Reload]
[Off]
[On]
[Automatic]
[Noz. Check Freq.]
[Off]
[1 page]
[10 pages]
[Automatic]*
[Sleep Timer]
[5 min.]*
[10 min.]
[15 min.]
[20 min.]
[30 min.]
[40 min.]
[50 min.]
[60 min.]
[240 min.]
1-81
Chapter 1
T-1-56
First Level
[System Setup]
Second Level
[Length Unit]
Third Level
Fourth Level
[meter]*
[feet/inch]
[Time Zone]
[0: London (GMT)]
[+1: Paris, Rome]
[+2: Athens, Cairo]
[+3: Moscow]
[+4: Eerenan, Baku]
[+5: Islamabad]
[+6: Dacca]
[+7: Bangkok]
[+8: Hong Kong]
[+9: Tokyo, Seoul]
[+10: Canberra]
[+11: NewCaledonia]
[+12: Wellington]
[-12: Eniwetok]
[-11: Midway is]
[-10: Hawaii (AHST)]
[-9: Alaska (AKST)]
[-8: Oregon (PST)]
[-7: Arizona (MST)]
[-6: Texas (CST)]
[-5: NewYork (EST)]
[-4: Santiago]
[-3: Buenos Aires]
[-2: ]
[-1: Cape Verde]
[Date Format]
[yyyy/mm/dd]*
[dd/mm/yyyy]
[mm/dd/yyyy]
[Date & Time]
1-82
[Date]
[yyyy/mm/dd] (*8)
[Time]
[hh: mm]
Fifth Level
Chapter 1
T-1-57
First Level
[System Setup]
Second Level
[Language]
Third Level
Fourth Level
Fifth Level
[Japanese]
[Engulish]
[Francais]
[Italiano]
[Deutsch]
[Espanol]
[Pyccknn]
[Chinese]
[Korea]
[Contrast Adj.]
-4, -3, -2, -1 ,0*, +1, +2, +3, +4
[Reset PaprSetngs]
[No]
[High Speed]
[No]
[Secure High Spd.]
[No]
[Secure]
[No]
[Yes]
[Erase HDD Data]
[Yes]
[Yes]
[Yes]
[Output Method]
[Print]*
[Print(auto delete)]
[Save in mail box]
[Save beforePrint]
[Off]*
[On]
[Save in Comm.Box]
[Off]
[On]
[Test Print]
[Status Print]
[No]
[Yes]
[Media Details]
[No]
[Yes]
[Print Job Log]
[No]
[Yes]
[Menu Map]
[No]
[Yes]
[Nozzle Check]
[No]
[Yes]
[Information]
[System Info]
[Error Log]
[########-####]
[Job Log]
(Choose from information
about the latest three print
jobs.)
[Document Name]
[User Name]
[Page Count]
[Job Status]
[Print Start Time]
[Print End Time]
[Print Time]
[Print Size]
[Media Type]
[Interface]
[Ink Consumed]
[HDD Information]
[HDD Space]
[xx.xGB]
*1: Displayed if a roll is loaded.
*2: Displayed if Chk Remain.Roll is On.
*3: Displayed if IP Mode is Automatic.
*4: Only these menus are displayed during printing.
*5: For information on the types of paper the printer supports, refer to the Media Guide. The media type setting in the printer driver and related software (as well
as on the Control Panel is updated when you install Media Configuration Tool from the User Software CD-ROM or if you change paper information by using Media
Configuration Tool.
*6: Available only if Auto Detect is Off.
*7: Available only if NetWare is On.
*8: Follows the setting in Date Format.
*12: Displayed if paper is loaded in the tray.
*14: This menu is only displayed during printing.
*16: Not displayed if a roll or a sheet has been fed.
1-83
Chapter 1
3. Main menu during printing
The structure of the main menu during printing is as follows.
T-1-58
First Level
[Menu Durng Prtng]
Second Level
Third Level
[Head Cleaning]
[Head Cleaning A]
[Fine Band Adj.]
-5 to 5
Fourth Level
Fifth Level
[Head Cleaning B]
[Information]
[System Info]
[Error Log]
[########-####]
[Job Log]
(Choose from information
about the latest three print
jobs.)
[Document Name]
[User Name]
[Page Count]
[Job Status]
[Print Start Time]
[Print End Time]
[Print Time]
[Print Size]
[Media Type]
[Interface]
[Ink Consumed]
[HDD Information]
1-84
[HDD Space]
[xx.xGB]
Chapter 1
4. Main Menu Settings
Main menu items are described in the following tables.
T-1-59
Setting Item
Description, Instructions
[Paper Cut]
Displayed if a roll is loaded.
Choose Yes to cut the roll at the current position. The paper will be fed, if necessary, so that the
sheet is at least 10 cm (39.4 in.)long after the cut. The paper will not be cut if there is not enough
paper left to feed the paper this much.
[Rep. Ink Tank]
When exchanging the ink tank, choose Yes and follow the instructions on the screen.
[Head Cleaning]
Specify Printhead cleaning options.
Choose Head Cleaning A if printing is faint, oddly colored, or contains foreign substances.
Choose Head Cleaning B if no ink is printed at all, or if printing is not improved by Head
Cleaning A .
[Media Menu]
Specify the type and size of paper.
[Paper Details]
Specify detailed paper-related settings, including the ink drying time and borderless printing
options.
[Job Management]
Manage print jobs on the printer's hard disk.
[Adjust Printer]
Adjust the Printhead alignment or amount of feed by printing a test pattern.
[Interface Setup]
Configure the network settings.
[Maintenance]
Replace the Printhead , prepare to transfer the printer, and clean the Pick Up Roller .
[System Setup]
Specify the printer system settings, including the date format and display language.
[Test Print]
Choose Status Print to print information about the printer.
Choose Media Details to print the paper settings as specified in Med.Detail Set. .
Choose Print Job Log to print a record of print jobs, including the paper type and size, amount
of ink used, and so on.
Choose Menu Map to print a list of the main menu options.
Choose Nozzle Check to print a test pattern for checking the nozzles.
If you have selected a leading edge margin of 20 mm in Nr End Sht Mrgn in the printer menu,
the test print sheet may not be printed completely.
[Information]
Displays the information about the printer and history of print jobs.
[Paper Settings]
T-1-60
Setting Item
Description, Instructions
[Roll Media Type]
Choose the type of roll.
[Chk Remain.Roll]
Choose On to print a barcode at the end of a roll before you remove it. The printed barcode can
be used in managing the amount of roll paper left. Choose Off if you prefer not to print the
barcode.
[Roll Length Set]
Displayed if Chk Remain.Roll is On .
If a barcode is not printed on rolls, specify the roll length. The roll length is displayed in meters
(1.0 - 91.0 m) or feet (1 - 300 ft.), depending on the setting in Length Unit .
[Manual Paper Type]
Choose the type of manual feed paper.
[Manual Paper Size]
Choose the size of manual feed paper.
1-85
Chapter 1
[Paper Details]
T-1-61
Setting Item
(The paper type is displayed
here.)
1-86
Description, Instructions
[Roll DryingTime]
Specify the time to wait for the ink to dry for each sheet.
[Scan Wait Time]
Specify the time to wait for the ink to dry between each scan in bidirectional printing, in
consideration of how quickly the paper absorbs ink. Note that printing will take longer if you
specify a wait time.
[Feed Priority]
Specify exact paper feeding, if desired. Normally, select Automatic . Choose Print Length if you
prefer to feed the paper an exact amount. However, note that choosing Print Length may result
in slight banding in the direction of Carriage scanning.
[Adjust Length]
Displayed if Feed Priority is Print Length .
Adjustment relative to the amount of stretching or shrinkage of the current paper. For paper that
tends to stretch, increase the feed amount by setting the adjustment value toward +. For paper
that tends to shrink, decrease the feed amount by setting the adjustment value toward -.
The setting for the amount of paper stretching or shrinkage is relative. If you access it again
later, it will be displayed as 0.00 %.
[Head Height]
Adjust the Printhead height.
[Skew Check Lv.]
If you print on Japanese Paper Washi or other handmade paper that has an irregular width,
choose Loose for a higher skew detection threshold, or choose Off to disable skew detection.
However, if paper is loaded askew when detection is Off , note that paper jams or Platen soiling
may occur.
If strict skew detection is required, choose High Accuracy.
[VacuumStrngth]
Specify the level of suction that holds paper against the Platen .
[NearEnd RollMrgn]
Specify a margin at the leading edge of roll paper to ensure better printing quality at the leading
edge.
Note that if you choose 3 mm , it may lower the printing quality at the leading edge and affect
feeding accuracy. The printed surface may be scratched, and ink may adhere to the the leading
edge.
[Cut Speed]
Choose the cutting speed. For media such as film that are more likely to generate debris when
cut, choose Fast to reduce the amount of debris.
[Trim Edge First]
If a roll is loaded, the end of the paper will be cut.
Choose Forced to have 40 mm (1.6 in) cut off the leading edge of the roll, ensuring a straight
edge, after you load the roll. Scraps are then removed.
When Automatic is selected, if the left and right side of the leading edge of the roll are uneven
(by 3 mm [0.12 in] or more), the edge is cut an amount relative to the slant to ensure a straight
edge after you load the roll. Scraps are then removed.
If the unevenness is less than 3 mm or if No Cutting is selected, the edge is not cut and scraps
are not removed.
[Cutting Mode]
Specify if the Cutter Unit is used for cutting.
Choose Automatic to have roll paper cut automatically after printing. If you choose Eject , the
paper will not be cut after printing. Instead, a line will be printed at the cut position.
[Bordless Margin]
Adjust the margin during borderless printing.
[CutDustReduct.]
Choose On to reduce the amount of debris generated when cutting film and similar media by
printing a line at the cut position. This option reduces the amount of debris given off after
cutting.
[Manual Feed]
Choose how the paper is supplied, Top for printing from the Tray or Front for printing from the
Front Paper Feed Slot .
[NearEnd Sht Mrgn]
Specify a margin at the leading edge of sheets to ensure better printing quality at the leading
edge.
Note that if you choose 3 mm , it may lower the printing quality at the leading edge and affect
feeding accuracy. The printed surface may be scratched, and ink may adhere to the the leading
edge.
If you have selected 20 mm , the test print sheet may not be printed completely.
[Return Defaults]
Choose Yes to restore Med.Detail Set. to the factory default values.
Chapter 1
[Job Management]
T-1-62
Setting Item
[Job Queue Ope.]
[Job List]
[Com. BOX Ope.] [Job List]
Description, Instructions
(Choose a print
job)
[Delete]
Delete the current job or queued jobs.
[Priority]
Print the job first after the current print job is finished
printing.
(Choose a print
job)
[Print]
Print jobs in the Common Box.
[Delete]
Delete jobs in the Common Box.
(Enter a password
if one has been
set.)
[Job List]-[Print]
Print jobs in Personal Boxes.
[Job List]-[Delete]
Delete jobs in Personal Boxes.
[Print Job List]
Print a list of jobs in Personal Boxes.
[Print Job List]
[Psnl. BOX Ope.]
[Folder List]
Print a list of jobs in the Common Box.
[Adjust Printer]
T-1-63
Setting Item
[Auto Head Adj.]
Choose Yes to have the printer print and read a test pattern for the automatic adjustment of
Printhead alignment relative to the printing direction.
[Advanced Adj.]
Choose Yes to have the printer print and read a test pattern for the automatic adjustment of
Printhead alignment relative to the nozzle, ink tank, and printing direction.
Three sheets are required when printing on sheets.
[Auto Print]
Choose On to have the printer automatically execute the Advanced Adj. operations after you
replace the Printhead .
[Manual Head Adj]
[Auto Band Adj.]
Description, Instructions
[Standard Adj.]
Choose Yes to print a test pattern for adjustment of Printhead alignment relative to the printing
direction. Enter the adjustment value manually based on the resulting pattern.
[Standard Adj.]
Choose Yes to have the printer print and read a test pattern for band adjustment, based on which
the printer automatically adjusts the feed amount.
[Advanced Adj.]
Choose this option when using paper other than genuine Canon paper, or paper for purposes
other than checking output.
Choose Yes to have the printer print and read a test pattern for band adjustment, based on which
the printer automatically adjusts the feed amount. Note that this function takes more time and
requires more ink than Standard Adj.
Two sheets are required when printing on sheets.
[Manual Band Adj]
Choose Yes to print a test pattern for adjusting the feed amount based on the paper type.
Two sheets are required when printing on sheets.
[Adj Far Ed Feed]
[Choose Yes to print a test pattern for adjusting the feed amount of the trailing edge of paper
based on the paper type.
[Adjust Length]
Choose Yes to print a test pattern for adjustment relative to paper stretching or shrinkage, after
which you can enter the amount of adjustment.
[Calibration]
[Auto Adjust]
Select [Yes] to print a color calibration adjustment pattern and adjust the correction value
automatically. This color calibration adjustment value is extended to all print tasks.
[Execution Log]
The date of color calibration and the paper type are displayed for visual verification.
[Use Effect Value]
Select [Disable] and press the [OK] button not to apply the color calibration correction value to
printing. The printer driver setting governs.
Select [Enable] and press the [OK] button to apply the color calibration correction value to
printing. It is overridden by the printer driver setting, though.
[Return Defaults]
The color calibration correction value and the execution history are cleared.
1-87
Chapter 1
[Interface Setup]
T-1-64
Setting Item
Description, Instructions
[EOP Timer]
[TCP/IP]
Specify the timeout period for print jobs.
[IP Mode]
[Protocol]
Choose whether the printer IP address is configured automatically or a static IP address is
entered manually.
[DHCP]
Specify the protocol used to configure the IP address automatically.
[BOOTP]
[RARP]
[IP Setting]
[IP Address]
[Subnet Mask]
[Default G/W]
[NetWare]
[NetWare]
Specify the NetWare protocol. To apply your changes, choose Store Setting .
[Frame Type]
Specify the frame type to use.
[Print Service]
[AppleTalk]
[Ethernet Driver]
Specify the printer network information when using a static IP address.
Enter the IP address assigned to the printer, as well as the network subnet mask and default
gateway.
Choose the print service.
Specify whether to use the AppleTalk protocol. To apply your changes, choose Store Setting .
[Auto Detect]
Specify the communication method. To apply your changes, choose Store Setting .
Choose On for automatic configuration of the LAN communication protocol. Choose Off to use
settings values of Comm.Mode and Ethernet Type .
[Comm.Mode]
Choose the LAN communication method.
[Ethernet Type]
Choose the LAN transfer rate.
[Spanning Tree]
Choose whether spanning-tree packets are supported over the LAN.
[MAC Address]
Displays the MAC address.
[Ext.Interface]
When installing the expansion interface board, choose whether the expansion interface board is
used.
[Init. Settings]
A confirmation message is displayed if you press the
network settings to the default values.
button. Choose [OK] to restore the
[Maintenance]
T-1-65
Setting Item
1-88
Description, Instructions
[Maint. cart.]
When exchanging the maintenance cartridge, choose Yes and follow the instructions on the
screen.
[Replace P.head]
Not displayed during a warning message that the remaining Maintenance Cartridge capacity is
low.
When replacing the Printhead , choose Yes and follow the instructions on the screen.
[Move Printer]
Not displayed during a warning message that the remaining Maintenance Cartridge capacity is
low.
When transferring the printer to another location, choose Yes and follow the instructions on the
screen.
[Clean Platen]
Use this function to clean inside the Top Cover . After you select Yes , the Carriage is moved
in preparation for Platen cleaning.
[Spur Cleaning]
Choose Yes to clean the spur. Use the cleaning sheet come with the printer.
Chapter 1
[System Setup]
T-1-66
Setting Item
[Warning]
Set the buzzer. Choose On for the buzzer to sound in case of errors.
[Detect Mismatch]
Choose Warning for notification (display of a warning message) during printing if the paper
type specified in the printer menu does not match the paper type in the printer driver. Choose
None to continue print without notification. Choose Pause to have printing paused under these
circumstances. In this case, you can continue printing by pressing the Online button.
[Keep Media Size]
[Paper Size Basis]
Description, Instructions
[Buzzer]
Choose On to use the paper size setting as the basis for printing instead of other settings. The
margin setting of the printer menu will be used instead of the margin setting of the printer driver
if the latter is smaller, which may prevent text or images in the margin from being printed.
Choose Off to use the printer driver settings instead. Even if the margin setting of the printer
driver is smaller than that of the printer driver, text or images will not be cut off. However, this
requires longer paper because the actual margin will be equal to the margin setting of the printer
driver plus the margin setting of the printer menu.
[Sht Selection]
If sheet size detection is activated, choose whether ISO A3+ or ANSI B Super is applied when
an inbetween size is detected.
[Sht Selection 1]
If roll size detection is activated, choose whether ISO A3 (297 mm) and 300 mm Roll is applied
when an inbetween size is detected.
[Sht Selection 2]
If roll size detection is activated, choose whether 10in. (254 mm) or JIS B4 (257 mm) is applied
when an inbetween size is detected.
[TrimEdge Reload]
Keeping a roll in the printer for a long time without printing on it may leave a depression on the
leading edge.
When printing quality is most important, we recommend setting this option to On so that the
paper edge is automatically cut before printing.
[Noz. Check Freq.]
Specify the timing for automatic checks of nozzle clogging. Choose Off to disable checking.
Choose 1 page to check after each page is printed. Choose 10 pages to check once after every
ten pages are printed.
[Sleep Timer]
Specify the period before the printer enters sleep mode.
[Length Unit]
Choose the unit of measurement when roll length is displayed. You can switch the unit
displayed for Roll Length Set and the remaining paper amount displayed in the submenu.
[Time Zone]
Specify the time zone. Time zone options indicate a main city in this time zone and the
difference from Greenwich Mean Time.
[Date Format]
[Date & Time]
Specify the date format.
[Date]
Set the current date.
[Time]
Set the current time.
[Language]
Specify the language used on the Display Screen.
[Contrast Adj.]
Adjust the contrast of the Display Screen.
[Reset PaprSetngs]
Restores settings that you have changed with Media Configuration Tool to the factory default
values.
[Erase HDD Data]
[Output Method]
[High Speed]
The file management information of the data recorded in the hard disk drive is deleted. The time
required is several seconds.
[Secure High Spd.]
The random data in the entire hard disk drive is overwrited. The time required is about 40
minutes.
[Secure]
The 00 or FF or the random data in the entire hard disk drive is overwrited each once. The verify
check whether the data recorded in the hard disk drive is correct is executed. The time required
is 20 hours.
[Print]
Choose how to print.
[Print(auto delete)]
Select [Print] to perform normal printing. Select [Print (Auto delete)], print data and remove it
from the hard disk. Select [Save in mail box] to only save data to the box, without printing it.
[Save in mail box]
[Save beforePrint]
Select [On] to start printing data when its save is complete.
[Save in Comm.Box]
Select [Off] to print data without saving it to the common box.
1-89
Chapter 1
[Information]
T-1-67
Setting Item
[System Info]
Description, Instructions
[Firmware]
Displays the version of the printer and firmware.
[Boot: ##.##]
Displays the Boot ROM version of the printer.
[MIT]
Displays the DB format version of the MIT.
[IP:]
Displays the printer IP address.
[Ext.Interface: ]
Displays the interface used the expansion slot.
[s/n: ]
Displays the printer serial number.
[Error Log]
[########-####]
Displays the most recent error messages (up to two).
[Job Log]
(Choose from
[Document Name]
information about the [User Name]
latest three print
[Page Count]
jobs.)
[Job Status]
1-90
[HDD Space]
Displays the number of pages in the print job.
Displays the results of the print job processed.
[Print Start Time]
Displays the time when the print job was started.
[Print End Time]
Displays the time when the print job was finished.
[Print Time]
Displays the time required to print the job.
[Print Size]
Displays the paper size in the print job.
[Media Type]
Displays the paper type in the print job.
[Interface]
Displays the interface used for the print job.
[Ink Consumed]
[HDD Information]
Displays the document name in the last print job.
Displays the name of the user who sent the print job.
Displays the ink density of each color in the print job.
Displays the space available on the printer's hard disk.
Chapter 1
5. Main Menu Settings (During Printing)
Main menu items during printing are described in the following tables.
T-1-68
Setting Item
Description, Instructions
[Head Cleaning]
Specify Printhead cleaning options.
Choose Head Cleaning A if printing is faint, oddly colored, or contains foreign substances.
Choose Head Cleaning B if no ink is printed at all, or if printing is not improved by Head
Cleaning A .
[Fine Band Adj.]
Displayed during print jobs. Fine-tune the feed amount manually.
[Information]
Displays the information about the printer and history of print jobs.
[Information]
T-1-69
Setting Item
[System Info]
Description, Instructions
[Firmware]
Displays the version of the printer and firmware.
[Boot: ##.##]
Displays the Boot ROM version of the printer.
[MIT]
Displays the DB format version of the MIT.
[IP:]
Displays the printer IP address.
[Ext.Interface: ]
Displays the interface used the expansion slot.
[s/n: ]
Displays the printer serial number.
[Error Log]
[########-####]
Displays the most recent error messages (up to two).
[Job Log]
[Document Name]
(Choose from
information about the [User Name]
latest three print
[Page Count]
jobs.)
[Job Status]
Displays the document name in the last print job.
[HDD Space]
Displays the number of pages in the print job.
Displays the results of the print job processed.
[Print Start Time]
Displays the time when the print job was started.
[Print End Time]
Displays the time when the print job was finished.
[Print Time]
Displays the time required to print the job.
[Print Size]
Displays the paper size in the print job.
[Media Type]
Displays the paper type in the print job.
[Interface]
Displays the interface used for the print job.
[Ink Consumed]
[HDD Information]
Displays the name of the user who sent the print job.
Displays the ink density of each color in the print job.
Display the space available on the printer's hard disk.
1-91
Chapter 1
6. Color calibration print chart
The following chart (sample) is printed when executing "Calibration".
F-1-36
1-92
Chapter 1
1.7 Safety and Precautions
1.7.1 Safety Precautions
1.7.1.1 Moving Parts
0013-3746
iPF6100 / iPF6200 / iPF6000S
Moving parts of the printer include the carriage unit driven by the carriage motor, the carriage belt, the ink tube, the flexible cable, the feed roller drives the feed
motor, the pinch roller, and the purge unit driven by the purge motor.
To prevent accidents, if the top cover is opened in the online/offline mode, the carriage motor, feed motor, and other driving power supplies are turned off.
Flexible cable
Carriage motor
Carriage unit
Pinch roller
Feed roller
Feed motor
Ink tube
Purge unit
F-1-37
1.7.1.2 Adhesion of Ink
0013-3747
iPF6100 / iPF6200 / iPF6000S
(1) Ink passages
Be careful not to touch the ink passages of the printer to prevent the printer, workbench, ands, and clothes from being stained with ink.
The ink flows through the ink tank unit, carriage unit, purge unit, maintenance jet tray, maintenance cartridge, and the ink tubes that relay ink to individual units.
Carriage unit
Ink tank unit
Platen
Maintenance cartridge
Maintenance-jet tray
Purge unit
F-1-38
1-93
Chapter 1
- Although the ink is not harmful to the human body, it contains organic solvents.
Ink may contaminate the surrounding parts. Carry out the work with due caution. If your hands are stained with ink, wash them with a plenty of water.
Be careful not to allow the ink to get into your mouth or eyes.
If the ink gets into your eyes, flush them with water well and see a doctor.
In case of accidental ingestion of a large quantity of ink, see a doctor immediately.
- It is also effective to use gloves to prevent ink from adhering when working.
- Since this ink contains pigment, stains will not come out of clothing.
(2) Ink Mist
Since the printhead prints by squirting ink onto the media, a minute amount of ink mist is generated in the printing unit during printing. The generated ink mist is
collected in the printer by the airflow. However, uncollected ink mist may stain the platen, carriage unit, exterior, and purge unit.
These stains may soil the print media or hands and clothes when servicing the printer. Wipe them off carefully with a soft, well-wrung cloth.
Platen/carriage unit
Top cover
Purge unit
F-1-39
1-94
Chapter 1
1.7.1.3 Electric Parts
0016-8168
iPF6100 / iPF6200 / iPF6000S
The electric parts of the printer are activated when the printer is connected to the AC power supply.
At the left rear of the printer are the main controller, power supply, and interface connector. The carriage PCB is incorporated in the carriage unit, and the operation
panel is on the upper right top cover.
When serving the printer with the cover removed, be extremely careful to avoid electric shock and shorting electrical devices.
Operation panel
Carriage PCB
Main controller
Interface connector
Power supply
Power connector
F-1-40
1.7.2 Other Precautions
1.7.2.1 Printhead
0013-1929
iPF6100
1. How to Handle the Printhead
Do not open the printhead package until you are ready to install the head.
When installing the printhead in the printer, hold the knob[1] and then remove the protective cap 1[2] and protective cap 2[3] in that order.
Do not reattach the protective cap 2[3] to the printhead because the cap may damage the nozzles[4].
To prevent the nozzles from getting clogged with foreign matter or dried ink, install the printhead immediately after you remove the protective caps.
Also make sure to press down the locking lever of the printhead until you feel a click.
In addition, to prevent clogging of the nozzles with foreign matter and improper supply of ink, never touch the nozzles[4] or ink port[6], or wipe it with tissue paper
or anything else.
Do not touch Electriacl contact[5].
Also, never attempt to disassemble/reassemble the printhead or wash it with water.
MEMO:
If the nozzles are clogged or an ink suction problem occurs, white lines can appear on the printout a constant frequency or color dulling can occur. If this problem
is not resolved by cleaning operations, replace the printhead with a new one.
1-95
Chapter 1
[1]
[4]
[2]
[6]
[3]
[5]
F-1-41
T-1-70
[1] knob
[4] nozzles
[2] protective cap 1
[5] Electrical contact
[3] protective cap 2
[6] ink port
2. Capping
The printer will perform the capping operation when printing has ended or during standby due to an error, in order to protect the printhead and avoid ink leakage.
If the power cord is accidentally unplugged, turn off the Power button, reconnect the power cord, and then turn on the Power button. Confirm that the printer starts
up properly and enters to the "Online" or "Offline" status, and then power off the printer using the Power button.
Improper "capping operation" may cause clogged nozzles due to dried ink or ink leakage from the printhead.
3. When the printer is not used for a long time
Keep the printhead installed in the printer even when it is not used for an extended period of time.
If the printhead is left uninstalled, a printing failure may arise from closed nozzles due to depositing of foreign matter or dried ink when it is reinstalled.
Even if the head remains installed, the nozzle may dry out and cause a printing failure if the ink is drained for transport.
4. Conductivity of Ink
The ink used in this printer is electrically conductive. If ink leaks to into the mechanical unit, wipe clean with a soft, well-wrung damp cloth. If ink leaks onto
electrical units, wipe them completely using tissue paper. If you cannot remove ink completely, replace the electrical units with new ones.
If electrical units are powered with ink leaked onto them, the units may damage.
Never connect the power cord when ink has leaded onto the electrical units.
1.7.2.2 Printhead
0020-1924
iPF6200 / iPF6000S
1. How to Handle the Printhead
Do not open the printhead package until you are ready to install the head.
When installing the printhead in the printer, hold the knob[1] and then remove the protective cap 1[2] and protective cap 2[3] in that order.
Do not reattach the protective cap 2[3] to the printhead because the cap may damage the nozzles[4].
To prevent the nozzles from getting clogged with foreign matter or dried ink, install the printhead immediately after you remove the protective caps.
Also make sure to press down the locking lever of the printhead until you feel a click.
In addition, to prevent clogging of the nozzles with foreign matter and improper supply of ink, never touch the nozzles[4] or ink port[6], or wipe it with tissue paper
or anything else.
Do not touch Electriacl contact[5].
Also, never attempt to disassemble/reassemble the printhead or wash it with water.
1-96
Chapter 1
MEMO:
If the nozzles are clogged or an ink suction problem occurs, white lines can appear on the printout a constant frequency or color dulling can occur. If this problem
is not resolved by cleaning operations, replace the printhead with a new one.
[1]
[4]
[2]
[6]
[3]
[5]
F-1-42
T-1-71
[1] knob
[4] nozzles
[2] protective cap 1
[5] Electrical contact
[3] protective cap 2
[6] ink port
2. Capping
The printer will perform the capping operation when printing has ended or during standby due to an error, in order to protect the printhead and avoid ink leakage.
If the power cord is accidentally unplugged, turn off the Power button, reconnect the power cord, and then turn on the Power button. Confirm that the printer starts
up properly and enters to the "Online" or "Offline" status, and then power off the printer using the Power button.
Improper "capping operation" may cause clogged nozzles due to dried ink or ink leakage from the printhead.
3. When the printer is not used for a long time
Keep the printhead installed in the printer even when it is not used for an extended period of time.
If the printhead is left uninstalled, a printing failure may arise from closed nozzles due to depositing of foreign matter or dried ink when it is reinstalled.
Even if the head remains installed, the nozzle may dry out and cause a printing failure if the ink is drained for transport.
4. Conductivity of Ink
The ink used in this printer is electrically conductive. If ink leaks to into the mechanical unit, wipe clean with a soft, well-wrung damp cloth. If ink leaks onto
electrical units, wipe them completely using tissue paper. If you cannot remove ink completely, replace the electrical units with new ones.
If electrical units are powered with ink leaked onto them, the units may damage.
Never connect the power cord when ink has leaded onto the electrical units.
1.7.2.3 Ink Tank
0013-1924
iPF6100 / iPF6200 / iPF6000S
1-97
Chapter 1
1. Unpacking the Ink Tank
Do not unpack the ink tank until you are ready to install it.
When installing the ink tank, be sure to shake it slowly 7 to 8 times before unpacking it. Otherwise, the ink ingredients may precipitate and degrade the print quality.
To prevent foreign matter from entering the ink port, installed the unpacked ink tank in the printer immediately.
2. Handling the Ink Tank
To prevent foreign matter from entering the ink flow path and causing ink suction and printing problems, never touch the ink port and contacts of the ink tank.
When you press down the ink tank lock lever, the needle enters the ink port, allowing ink to flow between the printer and ink tank.
Do not raise or lower the ink tank lock lever except when replacing the ink tank.
[1]
[2]
[4]
[3]
F-1-43
[1] Ink tank
[2] Ink tank lock lever
[3] Contacts
[4] Ink port
1.7.2.4 Handling the Printer
0016-8169
iPF6100 / iPF6200 / iPF6000S
1. Precautions against Static Electricity
Certain clothing may generate static electricity, causing an electrical charge to build up on your body. Such a charge can damage electrical devices or change their
electrical characteristics.
In particular, never touch the printhead contacts.
[2]
[1]
F-1-44
[1] Carriage unit
[2] Printhead contacts
1-98
Chapter 1
2. Fixing the Carriage
After completion of printing, the carriage is mechanically locked by the lock arm in the purge unit at the same moment the printhead is capped.
Before transporting the printer, secure the carriage at its home position using belt stoppers[1] so that the carriage does not become separated from the lock arm and
damage or ink does not leak.
[1]
F-1-45
3. Vent holes
This printer has four vent holes, [1] to [4]. Do not block the vent holes when the printer is in service
[1]
[2]
[4]
[3]
F-1-46
1-99
Chapter 1
4. Contact of Linear Scale/Carriage Shaft
Please do not touch a linear scale and the carriage shaft when the inside of the top cover is opened, and execute maintenance.
When touching a linear scale and the carriage shaft, it might cause defective movement of the carriage and a defective print.
[2]
[1]
F-1-47
[1] Linear Scale
[2] Carriage Shaft
5. Handling the Maintenance Cartridge
When removing the maintenance cartridge form the printer, use caution so that waste ink does not spatter.
6. Refilling the Printer with Ink
After removing the ink from inside the printer using the automatic or manual ink draining procedure to disassemble/reassemble or transport the printer, refill the
printer with ink as soon as possible upon completion of the work.
If the ink remaining in the printer dries up, mechanical parts may be seized and malfunction may result.
1-100
Chapter 1
1.7.3 Precautions When Servicing Printer
1.7.3.1 Notes on the Data Stored in the Printer
0013-3742
iPF6100 / iPF6200 / iPF6000S
This printer counts the print length, number of ink tank replacements, number of cleaning operations, number of cutter operations, and so on and stores them in the
main controller's EEPROM as a service mode counter.
This counter provides important information about the printer usage status.
You can check this information by printing it in the service mode or displaying it on the display.
Following the precautions below when servicing the printer.
(1) Repairing/replacing the PCB
When replacing the main controller, follow the specified replacement procedure.
For the main controller replacement procedure, see "Disassembly/Reassembly" > "Points to Note on Disassembly and Reassembly" > "Boards".
(2) After replacing the purge unit
The information about the number of cleanings arises in the purge unit. After replacing the purge unit, select [INITIALIZE] > [PURGE] in the service mode to
initialize (clear) the information about the number of cleanings.
(3) On replacement of supplies
After supplies have been replaced, execute [INITIALIZE] > [PARTS COUNTER] > [PARTS xx] in service mode to initialize (clear) the parts counter information.
For the consumable parts, see "Maintenance" > "Consumable Parts".
You cannot check the counter information once it is initialized (cleared). Be careful not to initialize the counter information before checking it.
You cannot modify the counter information from the operation panel.
1.7.3.2 Confirming the Firmware Version
0012-6235
iPF6100 / iPF6200 / iPF6000S
Firmware has been downloaded to the main controller.
When you have replaced the main controller, check that the firmware is the latest version. If not, update it to the latest version.
Reference:
For how to up update the main controller, refer to "TROUBLESHOOTING" > "Update".
1.7.3.3 Precautions against Static Electricity
0012-6236
iPF6100 / iPF6200 / iPF6000S
Certain clothing may generate static electricity, causing an electrical charge to build up on your body. Such a charge can damage electrical devices or change their
electrical characteristics.
Before disassembling the printer for servicing, discharge any static buildup by touching a grounded metal fitting or the like.
1.7.3.4 Precautions for Disassembly/Reassembly
0012-6238
iPF6100 / iPF6200 / iPF6000S
The precautions for disassembly/reassembly are described in "Disassembly/Reassembly".
1.7.3.5 Self-diagnostic Feature
0012-6239
iPF6100 / iPF6200 / iPF6000S
The printer has a self-diagnostic feature to analyze hardware problems.
The self-diagnosis result is shown on the display and indicated by lamps.
For detailed information, see "Error Codes".
1.7.3.6 Disposing of the Lithium Battery
0012-6240
iPF6100 / iPF6200 / iPF6000S
The main controller PCB of this printer is equipped with a lithium battery to back up various data.
Risk of explosion if battery is replaced by an incorrect type.
Dispose of used batteries according to the instructions.
"For CA, USA Only
Included battery contains Perchlorate Material-special handling may apply. See
http://www.dtsc.ca.gov/hazardouswaste/perchlorate/ for detail."
1-101
Chapter 1
1-102
Chapter 1
1-103
Chapter 2 TECHNICAL REFERENCE
Contents
Contents
2.1 Basic Operation Outline.................................................................................................................................................2-1
2.1.1 Printer Diagram............................................................................................................................................................................ 2-1
2.1.2 Printer Diagram............................................................................................................................................................................ 2-2
2.1.3 Printer Diagram............................................................................................................................................................................ 2-3
2.1.4 Print Signal Sequence .................................................................................................................................................................. 2-4
2.1.5 Print Signal Sequence .................................................................................................................................................................. 2-5
2.1.6 Print Driving ................................................................................................................................................................................ 2-6
2.1.7 Print Driving ................................................................................................................................................................................ 2-8
2.2 Firmware ......................................................................................................................................................................2-10
2.2.1 Operation Sequence at Power-on............................................................................................................................................... 2-10
2.2.2 Operation Sequence at Power-off .............................................................................................................................................. 2-11
2.2.3 Print Control............................................................................................................................................................................... 2-12
2.2.4 Print Position Adjustment Function........................................................................................................................................... 2-18
2.2.5 Head Management ..................................................................................................................................................................... 2-18
2.2.6 Printhead Overheating Protection Control................................................................................................................................. 2-18
2.2.7 Pause between Pages.................................................................................................................................................................. 2-18
2.2.8 White Raster Skip ...................................................................................................................................................................... 2-18
2.2.9 Sleep Mode ................................................................................................................................................................................ 2-18
2.2.10 Hard Disk Drive ....................................................................................................................................................................... 2-18
2.3 Printer Mechanical System ..........................................................................................................................................2-20
2.3.1 Outline........................................................................................................................................................................................ 2-20
2.3.1.1 Outline...........................................................................................................................................................................................................2-20
2.3.2 Ink Passage................................................................................................................................................................................. 2-21
2.3.2.1 Ink Passage....................................................................................................................................................................................................2-21
2.3.2.1.1 Overview of Ink Passage.......................................................................................................................................................................2-21
2.3.2.2 Ink Tank Unit ................................................................................................................................................................................................2-23
2.3.2.2.1 Structure of Ink Tank Unit ....................................................................................................................................................................2-23
2.3.2.2.2 Structure of Ink Tank Unit ....................................................................................................................................................................2-25
2.3.2.3 Carriage Unit .................................................................................................................................................................................................2-27
2.3.2.3.1 Functions of Carriage Unit....................................................................................................................................................................2-27
2.3.2.3.2 Structure of Carriage Unit .....................................................................................................................................................................2-28
2.3.2.4 Printhead .......................................................................................................................................................................................................2-30
2.3.2.4.1 Structure of Printhead............................................................................................................................................................................2-30
2.3.2.5 Purge Unit .....................................................................................................................................................................................................2-31
2.3.2.5.1 Functions of Purge Unit ........................................................................................................................................................................2-31
2.3.2.5.2 Structure of Purge Unit .........................................................................................................................................................................2-33
2.3.2.6 Maintenance Cartridge ..................................................................................................................................................................................2-35
2.3.2.6.1 Maintenance Cartridge ..........................................................................................................................................................................2-35
2.3.2.7 Air Flow ........................................................................................................................................................................................................2-36
2.3.2.7.1 Air flow .................................................................................................................................................................................................2-36
2.3.3 Paper Path .................................................................................................................................................................................. 2-37
2.3.3.1 Outline...........................................................................................................................................................................................................2-37
2.3.3.1.1 Overview of Paper Path.........................................................................................................................................................................2-37
2.3.3.2 Paper Path......................................................................................................................................................................................................2-38
2.3.3.2.1 Structure of Roll Media Pick-up Unit ...................................................................................................................................................2-38
2.3.3.2.2 Roll Media Pick-up Sequence ...............................................................................................................................................................2-40
2.3.3.2.3 Structure of Manual Feed Unit..............................................................................................................................................................2-41
2.3.3.2.4 Manual Feed (from Front) Sequence ....................................................................................................................................................2-43
2.3.3.2.5 Manual Feed (from Rear) Sequence......................................................................................................................................................2-43
2.3.3.2.6 Structure of Feed Roller Unit ................................................................................................................................................................2-45
2.3.3.2.7 Feed Roller Eccentricity Detection Function ........................................................................................................................................2-46
2.3.3.2.8 Structure of Ejection Spur .....................................................................................................................................................................2-47
2.3.3.3 Cutter Unit.....................................................................................................................................................................................................2-48
Contents
2.3.3.3.1 Structure of Cutter unit ......................................................................................................................................................................... 2-48
2.4 Printer Electrical System ............................................................................................................................................. 2-49
2.4.1 Outline........................................................................................................................................................................................ 2-49
2.4.1.1 Overview....................................................................................................................................................................................................... 2-49
2.4.1.2 Overview....................................................................................................................................................................................................... 2-51
2.4.1.3 Overview....................................................................................................................................................................................................... 2-53
2.4.2 Main Controller.......................................................................................................................................................................... 2-55
2.4.2.1 Main controller components ......................................................................................................................................................................... 2-55
2.4.2.2 Main controller components ......................................................................................................................................................................... 2-56
2.4.2.3 Main controller components ......................................................................................................................................................................... 2-58
2.4.2.4 HDD expansion PCB components................................................................................................................................................................ 2-59
2.4.3 Carriage Relay PCB................................................................................................................................................................... 2-59
2.4.3.1 Carriage PCB components............................................................................................................................................................................ 2-59
2.4.4 Motor Driver .............................................................................................................................................................................. 2-60
2.4.4.1 Roll feed unit PCB components.................................................................................................................................................................... 2-60
2.4.5 Maintenance Cartridge Relay PCB............................................................................................................................................ 2-60
2.4.5.1 Maintenance cartridge relay PCB components............................................................................................................................................. 2-60
2.4.6 Power Supply ............................................................................................................................................................................. 2-61
2.4.6.1 Power supply block diagram......................................................................................................................................................................... 2-61
2.5 Detection Functions with Sensors ............................................................................................................................... 2-62
2.5.1 Sensors for covers ...................................................................................................................................................................... 2-62
2.5.2 Ink passage system..................................................................................................................................................................... 2-63
2.5.3 Ink passage system..................................................................................................................................................................... 2-65
2.5.4 Carriage system.......................................................................................................................................................................... 2-67
2.5.5 Paper path system ...................................................................................................................................................................... 2-68
2.5.6 Others......................................................................................................................................................................................... 2-70
Chapter 2
2.1 Basic Operation Outline
2.1.1 Printer Diagram
0016-8189
iPF6100
Shown below is a printer diagram.
Main controller PCB
IC601-IC604
SDRAM
Power supply PCB
CN2
J1801
IC802
EEPROM
IC701
FLASH ROM
IC803
RTC
IC1
ASIC
J101
Operation panel PCB
Maintenance cartridge
relay PCB
BAT 801
Lithium battery
USB
Maintenance cartridge
ROM PCB
IEEE1394 Board
LAN
Carriage PCB
Linear
encoder
J3
Ink tank
IC1/IC3
Head
J11/J12
J13/J21
J22/J23
Multi
sensor
IC1201
LAN Controller
J5
IC6/IC7
J2601
Ink tank
ROM PCB
J2512
Sensor
IC2
ASIC
J3401/J3402
J3501/J3601
J3701/J3801
Roll cam sensor
Roll media sensor
J3202/
J3301
Motor
Sensor /Switch
J2/J3
J2511/J2512
J3011/J3202
J3211/J3301
J3411/J3911
Roll motor
J3
J2/J3
J2703
Valve open /closed detection sensor
Feed roller HP sensor
Feed roller encoder sensor
Lift cam sensor
Paper detection sensor
Cutter right position sensor
Spur cam sensor
Pump cam sensor
Pump encoder sensor
Ink detection sensor
Temperature/humidity sensor
Head management sensor
Top cover sensor
Cutter HP sensor
Ink tank cover switch
J1
IC1
Motor driver
Roll feed unit PCB
J2511/
J2512
Fan
Suction fan
Mist fan
IC2801/IC2901
IC3001/IC3101
Motor driver
J2511/J2801
J3011/J3101
Motor
Carriage motor
Feed motor
Lift motor
Purge motor
Valve motor
Spur motor
Cutter motor
F-2-1
2-1
Chapter 2
2.1.2 Printer Diagram
0020-1928
iPF6200
Shown below is a printer diagram.
Main controller PCB
IC601-IC604
SDRAM
Power supply PCB
CN2
J1801
HDD expansion PCB
HDD
J104/
J105
IC201
HDD Controller
IC802
EEPROM
IC701
FLASH ROM
IC803
RTC
IC1
ASIC
J101
Operation panel PCB
J101
Maintenance cartridge
relay PCB
BAT 801
Lithium battery
J1101
Maintenance cartridge
ROM PCB
USB
LAN
Carriage PCB
Linear
encoder
J3
Ink tank
IC1/IC3
Head
J11/J12
J13/J21
J22/J23
Multi
sensor
IC1201
LAN Controller
J5
IC6/IC7
J2601
Ink tank
ROM PCB
J2512
Sensor
IC2
ASIC
J3401/J3402
J3501/J3601
J3701/J3801
Roll cam sensor
Roll media sensor
J3202/
J3301
Motor
Sensor /Switch
J2/J3
J2511/J2512
J3011/J3202
J3211/J3301
J3411/J3911
J3
J2/J3
J2703
Valve open /closed detection sensor
Feed roller HP sensor
Feed roller encoder sensor
Lift cam sensor
Paper detection sensor
Cutter right position sensor
Spur cam sensor
Pump cam sensor
Pump encoder sensor
Ink detection sensor
Temperature/humidity sensor
Head management sensor
Top cover sensor
Cutter HP sensor
Ink tank cover switch
J1
IC1
Motor driver
Roll feed unit PCB
J2511/
J2512
Fan
Suction fan
Mist fan
IC2801/IC2901
IC3001/IC3101
Motor driver
J2511/J2801
J3011/J3101
Motor
Carriage motor
Feed motor
Lift motor
Purge motor
Valve motor
Spur motor
Cutter motor
F-2-2
2-2
Roll motor
Chapter 2
2.1.3 Printer Diagram
0020-7287
iPF6000S
Shown below is a printer diagram.
Main controller PCB
IC301/IC302
IC601-IC604
SDRAM
Power supply PCB
CN2
J1801
HDD expansion PCB
HDD
J104/
J105
IC201
HDD Controller
IC802
EEPROM
IC701
FLASH ROM
IC803
RTC
IC1
ASIC
J101
Operation panel PCB
J101
Maintenance cartridge
relay PCB
BAT 801
Lithium battery
J1101
Maintenance cartridge
ROM PCB
USB
LAN
Carriage PCB
Linear
encoder
J3
Ink tank
IC1/IC3
Head
J11/J12
J13/J21
J22/J23
Multi
sensor
IC1201
LAN Controller
J5
IC6/IC7
J2601
Ink tank
ROM PCB
J2512
Sensor
IC2
ASIC
J3401/J3402
J3501/J3601
J3701/J3801
Roll cam sensor
Roll media sensor
J3202/
J3301
Motor
Sensor /Switch
J2/J3
J2511/J2512
J3011/J3202
J3211/J3301
J3411/J3911
Roll motor
J3
J2/J3
J2703
Valve open /closed detection sensor
Feed roller HP sensor
Feed roller encoder sensor
Lift cam sensor
Paper detection sensor
Cutter right position sensor
Spur cam sensor
Pump cam sensor
Pump encoder sensor
Ink detection sensor
Temperature/humidity sensor
Head management sensor
Top cover sensor
Cutter HP sensor
Ink tank cover switch
Valve open /closed detection sensor 2
J1
IC1
Motor driver
Roll feed unit PCB
J2511/
J2512
Fan
Suction fan
Mist fan
IC2801/IC2901
IC3001/IC3101
Motor driver
J2511/J2801
J3011/J3101
Motor
Carriage motor
Feed motor
Lift motor
Purge motor
Valve motor
Spur motor
Cutter motor
F-2-3
2-3
Chapter 2
2.1.4 Print Signal Sequence
0016-8841
iPF6100 / iPF6200
The signal sequence from when the printer receives the print signals until printing starts is shown in Figure.
: Image data
: Mask pattern data
: Heat pulse
: Command data
: PCI bus
: Data bus
: Universal sirial bus
Host computer
Printer driver
a
a
Interface unit
Expansion
USB
LAN
b
b
b
i
EEPROM
c
DDR-SDRAM
ASIC (IC1/L-COA)
Image processing
unit
Printhead
g
EEPROM
d
SDR-SDRAM
FLASH ROM
f
e
Carriage PCB
f
Latch IC
e,h
e
e
i
Ink tank
h
EEPROM
ASIC (IC2)
i
Operation panel
i
Sensor and drive unit
Main controller
F-2-4
a) The printer driver on the host computer transmits print data, including command data, to the printer after compressing the image data, without resolution, color
and 12-color binarization conversion.
To achieve high-quality image output, the image processing table data used for image data color conversion and binarization conversion are generated as command
data to meet the Media Type and other specifications of the printer driver.
b) This printer receives print data from the individual interfaces on the main controller, transmitting the received print data to ASIC (IC1).
c) The main controller decompresses the print data transmitted to the ASIC and gets it through resolution, color and 12-color binarization conversion while loading
the data into DDR-SDRAM from time to time.
It also converts the print data to 12-color binary equivalents of image and command data.
d) The ASIC (IC1) generates image data synthesized with mask data within the ASIC in sync with the discharge time while loading the data into DDR-SDRAM
from time to time.
e) The ASIC (IC2) collects printhead information from EEPROM mounted on the printheads and the printer temperature from the latch IC on the carriage board
and transmit them to the ASIC (IC1).
The ASIC (IC1) also receives mask pattern data from the firmware installed in flash ROM.
f) The ASIC (IC1) converts the image data synthesized with the mask pattern to data associated with the printhead information and the printer temperature, transmitting the data to the printheads as a print signal. It transmits heat pulses to the printheads at the same time to optimize head driving.
g) The printheads convert the received print signal from a serial signal to a parallel signal for each row of nozzles and ANDs it with the heat pulses for perform
printing.
h) The ASIC (IC1) controls the general aspects of image processing and print drive control by detecting the status of the individual printer components with reference to the adjustment values stored in EEPROM. SDR-SDRAM is used as work memory.
i) The ASIC (IC2) controls the general aspects of drive control by controlling button actuations and message displays on the basis of the firmware installed in flash
ROM.
2-4
Chapter 2
2.1.5 Print Signal Sequence
0017-8155
iPF6000S
The signal sequence from when the printer receives the print signals until printing starts is shown in Figure.
: Image data
: Mask pattern data
: Heat pulse
: Command data
: PCI bus
: Data bus
: Universal sirial bus
Host computer
Printer driver
a
a
Interface unit
Expansion
USB
LAN
b
b
b
i
EEPROM
c
DDR-SDRAM
ASIC (IC1/L-COA)
Image processing
unit
Printhead
g
EEPROM
d
SDR-SDRAM
FLASH ROM
f
e
Carriage PCB
f
Latch IC
e,h
e
e
i
Ink tank
h
EEPROM
ASIC (IC2)
i
Operation panel
i
Sensor and drive unit
Main controller
F-2-5
a) The printer driver on the host computer transmits print data, including command data, to the printer after compressing the image data, without resolution, color
and 8-color binarization conversion.
To achieve high-quality image output, the image processing table data used for image data color conversion and binarization conversion are generated as command
data to meet the Media Type and other specifications of the printer driver.
b) This printer receives print data from the individual interfaces on the main controller, transmitting the received print data to ASIC (IC1).
c) The main controller decompresses the print data transmitted to the ASIC and gets it through resolution, color and 8-color binarization conversion while loading
the data into DDR-SDRAM from time to time.
It also converts the print data to 8-color binary equivalents of image and command data.
d) The ASIC (IC1) generates image data synthesized with mask data within the ASIC in sync with the discharge time while loading the data into DDR-SDRAM
from time to time.
e) The ASIC (IC2) collects printhead information from EEPROM mounted on the printheads and the printer temperature from the latch IC on the carriage board
and transmit them to the ASIC (IC1).
The ASIC (IC1) also receives mask pattern data from the firmware installed in flash ROM.
f) The ASIC (IC1) converts the image data synthesized with the mask pattern to data associated with the printhead information and the printer temperature, transmitting the data to the printheads as a print signal. It transmits heat pulses to the printheads at the same time to optimize head driving.
g) The printheads convert the received print signal from a serial signal to a parallel signal for each row of nozzles and ANDs it with the heat pulses for perform
printing.
h) The ASIC (IC1) controls the general aspects of image processing and print drive control by detecting the status of the individual printer components with reference to the adjustment values stored in EEPROM. SDR-SDRAM is used as work memory.
i) The ASIC (IC2) controls the general aspects of drive control by controlling button actuations and message displays on the basis of the firmware installed in flash
ROM.
2-5
Chapter 2
2.1.6 Print Driving
0016-8856
iPF6100 / iPF6200
Print and control signals are transferred via the carriage board to the printheads to discharge inks from the nozzle assembly at printing.
Each printhead has 12 trains of nozzles arranged in a zigzag pattern.
This printer uses two printheads arranged side by side.
(In installed state, from left to right, Y, PC, C, PGY, GY, BK, PM, M, MBK, R, G, B)
Print signals directed at each nozzle train are even-numbered nozzle data (Hx-x-DATA-x-EV) and odd-numbered nozzle data (Hx-x-DATA-x-OD). These are
transferred in timing with a data transfer clock (Hx-CLK) and data latch pulses (Hx-LT).
The Heat Enable (Hx-x-HE-x) drive control signal enables inks to be discharged from the nozzles.
1. Pint drive control
Each train of nozzles in a printhead has 2,560 nozzles.
Ink discharge nozzles are selected split in 40-, 20- or 10-nozzle blocks according to the Block Enable information in the even-numbered nozzle data and odd-numbered nozzle data.
Each selected block of nozzles is impressed with a Heat Enable signal generated with variable pulse widths according to the head rank, head temperature and printer
temperature for optimized ink discharges. The nozzles are driven by heater boards in the nozzles to discharge inks. Optimal nozzle blocks are selected according
to the print path.
The diagram below illustrates the relationship between a 40-block nozzle and nozzles driven.
Printhead nozzle No.
0 1 2 3 4 5 6 7 8 9 10 11 1213 1415 1617 1819 2021 2223 24 25 26 27 28 29 30 31 32 33 34 35 36 37 38 39 Block No.
0
1
2
3
4
5
6
7
8
9
10
11
12
13
14
15
16
17
18
19
20
21
22
23
24
25
26
27
28
29
30
31
32
33
34
35
36
37
38
39
40
41
42
43
44
45
46
47
48
49
50
51
52
53
54
55
56
57
58
59
60
61
62
63
64
65
66
67
68
69
70
71
72
73
2559
The pattern is repeated until 2560 nozzles is reached.
F-2-6
2-6
Chapter 2
2. Print drive timing
Each printhead houses 12 trains of nozzles, which share the same data transfer clock (Hx-CLK) and data latch pulses (Hx-LT).
Even-numbered nozzle data (Hx-x-DATA-x-EV), odd-numbered nozzle data (Hx-x-DATA-x-OD) and the Heat Enable (Hx-x-HE-x) signal are generated for each
nozzle train and controlled individually.
Printing is carried out in two ways through reciprocating motion of the carriage.
An encoder sensor mounted on the carriage generates a 150-dpi-pitched linear scale detection signal (ENCODER_A) and a signal (ENCODER_B) shifted 120 degrees in phase. The direction of carriage motion is detected from the status of the ENCODER_B signal relative to the leading edge of the ENCODER_A signal.
The printhead is driven using a 2400-dpi timing signal (internal signal), which is generated by dividing the ENCODER_A signal detected at the 150 dpi timing into
16 equal sections.
Printing in the forward direction is triggered at the leading edge of the detection signal (ENCODER_A).
Printing in the backward direction is carried out the same way as printing in the forward direction but at the trailing edge of the detection signal (ENCODER_A),
when the order of heated nozzles is reversed depending on the sequence of transfer of even-numbered nozzle data and odd-numbered nozzle data.
150dpi
Linear scale
ENCODER_A
ENCODER_B
2400dpi
Internal signal
2400dpi
H0_CLK
H0_A_DATA_0_EV
Data of block 0
Data of block 2
Data of block 4
Data of block 22
H0_A_DATA_1_EV
Data of block 0
Data of block 2
Data of block 4
Data of block 22
H0_A_DATA_0_OD
Data of block 0
Data of block 2
Data of block 4
Data of block 22
H0_A_DATA_1_OD
Data of block 0
Data of block 2
Data of block 4
Data of block 22
H0_LT
H0_A_HE_1
Low active
F-2-7
2-7
Chapter 2
2.1.7 Print Driving
0017-8157
iPF6000S
Print and control signals are transferred via the carriage board to the printheads to discharge inks from the nozzle assembly at printing.
Each printhead has 12 trains of nozzles arranged in a zigzag pattern.
This printer uses two printheads arranged side by side.
(In installed state, from left to right, PC, C, PM, GY, Y, MBK, M, PM, C, PC)
Print signals directed at each nozzle train are even-numbered nozzle data (Hx-x-DATA-x-EV) and odd-numbered nozzle data (Hx-x-DATA-x-OD). These are
transferred in timing with a data transfer clock (Hx-CLK) and data latch pulses (Hx-LT).
The Heat Enable (Hx-x-HE-x) drive control signal enables inks to be discharged from the nozzles.
1. Pint drive control
Each train of nozzles in a printhead has 2,560 nozzles.
Ink discharge nozzles are selected split in 40-, 20- or 10-nozzle blocks according to the Block Enable information in the even-numbered nozzle data and odd-numbered nozzle data.
Each selected block of nozzles is impressed with a Heat Enable signal generated with variable pulse widths according to the head rank, head temperature and printer
temperature for optimized ink discharges. The nozzles are driven by heater boards in the nozzles to discharge inks. Optimal nozzle blocks are selected according
to the print path.
The diagram below illustrates the relationship between a 40-block nozzle and nozzles driven.
Printhead nozzle No.
0 1 2 3 4 5 6 7 8 9 10 11 1213 1415 1617 1819 2021 2223 24 25 26 27 28 29 30 31 32 33 34 35 36 37 38 39 Block No.
0
1
2
3
4
5
6
7
8
9
10
11
12
13
14
15
16
17
18
19
20
21
22
23
24
25
26
27
28
29
30
31
32
33
34
35
36
37
38
39
40
41
42
43
44
45
46
47
48
49
50
51
52
53
54
55
56
57
58
59
60
61
62
63
64
65
66
67
68
69
70
71
72
73
2559
The pattern is repeated until 2560 nozzles is reached.
F-2-8
2-8
Chapter 2
2. Print drive timing
Each printhead houses 12 trains of nozzles, which share the same data transfer clock (Hx-CLK) and data latch pulses (Hx-LT).
Even-numbered nozzle data (Hx-x-DATA-x-EV), odd-numbered nozzle data (Hx-x-DATA-x-OD) and the Heat Enable (Hx-x-HE-x) signal are generated for each
nozzle train and controlled individually.
Printing is carried out in two ways through reciprocating motion of the carriage.
An encoder sensor mounted on the carriage generates a 150-dpi-pitched linear scale detection signal (ENCODER_A) and a signal (ENCODER_B) shifted 120 degrees in phase. The direction of carriage motion is detected from the status of the ENCODER_B signal relative to the leading edge of the ENCODER_A signal.
The printhead is driven using a 2400-dpi timing signal (internal signal), which is generated by dividing the ENCODER_A signal detected at the 150 dpi timing into
16 equal sections.
Printing in the forward direction is triggered at the leading edge of the detection signal (ENCODER_A).
Printing in the backward direction is carried out the same way as printing in the forward direction but at the trailing edge of the detection signal (ENCODER_A),
when the order of heated nozzles is reversed depending on the sequence of transfer of even-numbered nozzle data and odd-numbered nozzle data.
150dpi
Linear scale
ENCODER_A
ENCODER_B
2400dpi
Internal signal
2400dpi
H0_CLK
H0_A_DATA_0_EV
Data of block 0
Data of block 2
Data of block 4
Data of block 22
H0_A_DATA_1_EV
Data of block 0
Data of block 2
Data of block 4
Data of block 22
H0_A_DATA_0_OD
Data of block 0
Data of block 2
Data of block 4
Data of block 22
H0_A_DATA_1_OD
Data of block 0
Data of block 2
Data of block 4
Data of block 22
H0_LT
H0_A_HE_1
Low active
F-2-9
2-9
Chapter 2
2.2 Firmware
2.2.1 Operation Sequence at Power-on
0012-6493
iPF6100 / iPF6200 / iPF6000S
Shown below is the flowchart of the initialization sequence from the moment the power is turned on to the moment the printer enters the online state. The time
required for initialization is less than 1 minute*.
* This time does not include the time required for supplying ink and cleaning which takes place after the printer has been left unused for an extended period of time.
Power Button ON
Device/resource
Initialization of software
Initialization of various devices
initializarion
Engine status check
Printhead/
ink tank check
Media feed system
initialization
Recovery system
Engine startup status check
Previous power-off status check,etc.
Printhead installation status check
Ink tank installation status check
EEPROM check
Cassette pick-up unit initialization
Roll feed unit initialization
Roll feed unit initialization
Sensor check
Recovery system return to origin
Sensor check
initialization
Carriage motor return to origin
Carriage position
initialization
Remaining ink level detection/
Waste ink level detection
Power-on
automatic recovery operation
Capping
Waiting for print operation
F-2-10
2-10
Chapter 2
2.2.2 Operation Sequence at Power-off
0012-6494
iPF6100 / iPF6200 / iPF6000S
Turning off the power cuts off the voltage to all drive systems. At this time, the firmware starts the power-off sequence as shown below.
This printer immediately suspends all operations in progress and stops whenever the power cord is unplugged or a cover such as the top cover is opened. In this
case, the printer may stop without capping the print head. If the power was turned on by unplugging the power cord, plug the power cord into the outlet, turn on the
power again so that the printer enters the online or offline state, and then press the Power button to turn off the power.
Power button OFF
Media ejection
Hold down for at least once second
If media remains,it is ejected even
when printing is in progress.
Power-off automatic recovery
Capping
Sensor system power OFF
Backup of various data
Writing to EEPROM
Power-off
F-2-11
2-11
Chapter 2
2.2.3 Print Control
0016-8192
iPF6100 / iPF6200 / iPF6000S
1. Print mode
This printer is capable of fast, high-quality printing without blur and non-uniform density by changing the carriage operation, media feeding, other printing methods
according to the selected media type, print quality, print data and so on.
Printing is performed for each color using a maximum of 16 paths in each print mode according to the selected print quality.
This reduces density irregularities caused by the variation in the amounts of ink discharged from individual nozzles. In addition, it shifts the printing timing so that
the current ink layer is nearly fixed before the next ink layer is applied, thus minimizing bleeding.
Even in the same mode, the printer operates in a different way depending on the media setting made using the printer driver.
a) Draft mode
In the draft mode, image data is thinned out and a single band (equivalent to the width of a nozzle array) is printed using one or two paths.
To use this mode, select "Draft" under "Print Quality" in the printer driver.
b) Standard mode
In the standard mode, a single band (equivalent to the width of a nozzle array) is printed using 4-8 (4, 6, or 8) paths.
To use this mode, select "Standard" under "Print Quality" in the printer driver.
c) High quality mode
In the high quality mode, a single band is printed using 8 or 12 paths.
To use this mode, select "High" under "Print Quality" in the printer driver.
d) Highest quality mode
In the high quality mode, a single band is printed using 12 or 16 paths.
To use this mode, select "Highest" under "Print Quality" in the printer driver.
T-2-1
Printing Modes
2-12
Chapter 2
T-2-2
Media Type
Plain Paper/
Plain Paper
Recycled Paper
Plain Paper (High Quality)
Plain Paper (High Grade)
Print Priority
Print
Quality
PrintPass
Line Document/
Text
Draft
2
Bi-directional
1200x1200
MBK
Standard
4
Bi-directional
1200x1200
MBK
Image
Draft
2
Bi-directional
1200x1200
MBK
Standard
4
Bi-directional
1200x1200
MBK
High
8
Bi-directional
2400x1200
MBK
Office Document
Standard
4
Bi-directional
1200x1200
MBK
Line Document/
Text
Draft
2
Bi-directional
1200x1200
MBK
Standard
4
Bi-directional
1200x1200
MBK
Image
Draft
2
Bi-directional
1200x1200
MBK
Standard
4
Bi-directional
1200x1200
MBK
High
8
Bi-directional
2400x1200
MBK
Office Document
Standard
4
Bi-directional
1200x1200
MBK
Line Document/
Text
Draft
2
Bi-directional
1200x1200
MBK
Standard
4
Bi-directional
1200x1200
MBK
Image
Draft
2
Bi-directional
1200x1200
MBK
Standard
4
Bi-directional
1200x1200
MBK
High
8
Bi-directional
2400x1200
MBK
Office Document
Standard
4
Bi-directional
1200x1200
MBK
Line Document/
Text
Draft
2
Bi-directional
1200x1200
MBK
Standard
4
Bi-directional
1200x1200
MBK
Draft
2
Bi-directional
1200x1200
MBK
Image
Standard
4
Bi-directional
1200x1200
MBK
High
8
Bi-directional
2400x1200
MBK
Office Document
Standard
4
Bi-directional
1200x1200
MBK
Line Document/
Text
Draft
2
Bi-directional
1200x1200
MBK
Standard
4
Bi-directional
1200x1200
MBK
Draft
2
Bi-directional
1200x1200
MBK
Image
Standard
4
Bi-directional
1200x1200
MBK
High
8
Bi-directional
2400x1200
MBK
Office Document
Standard
4
Bi-directional
1200x1200
MBK
Line Document/
Text
Draft
2
Bi-directional
1200x1200
MBK
Standard
4
Bi-directional
1200x1200
MBK
Draft
2
Bi-directional
1200x1200
MBK
Image
Standard
4
Bi-directional
1200x1200
MBK
High
8
Bi-directional
2400x1200
MBK
Office Document
Standard
4
Bi-directional
1200x1200
MBK
Line Document/
Text
Draft
2
Bi-directional
1200x1200
MBK
Standard
4
Bi-directional
1200x1200
MBK
Draft
2
Bi-directional
1200x1200
MBK
Standard
4
Bi-directional
1200x1200
MBK
High
8
Bi-directional
2400x1200
MBK
Standard Paper 1569B 80g
Standard Paper 1570B 90g
Image
1200x1200
Used BK
ink
Standard
Universal Bond Paper
Bi-directional
Print
Resolution
(dpi)
Office Document
Economy Bond Paper
4
Printing direction
MBK
2-13
Chapter 2
Media Type
Coated Paper
Print Priority
Coated Paper
Image
Heavyweight Coated Paper
Image
High Resolution Paper
Image
Premium Matte Paper
Image
Matte Photo Paper
Image
Extra Heavyweight Coated Paper
Image
Recycled Coated Paper
Image
Premium Coated Paper
LightWeight Coated paper
High Resolution Barrier Paper
Matt Coated Paper
Extra Matt Coated Paper
Opaque paper
Matt Coated Paper
Photo Realistic Paper
2-14
Image
Image
Image
Image
Image
Image
Image
Image
Print
Quality
PrintPass
Printing direction
Print
Resolution
(dpi)
Used BK
ink
Standard
4
Bi-directional
1200x1200
MBK
High
8
Bi-directional
2400x1200
MBK
MBK
Highest
12
Bi-directional
2400x1200
Standard
4
Bi-directional
1200x1200
MBK
High
8
Bi-directional
2400x1200
MBK
MBK
Highest
12
Bi-directional
2400x1200
Standard
4
Bi-directional
1200x1200
MBK
High
8
Bi-directional
2400x1200
MBK
MBK
Highest
12
Bi-directional
2400x1200
Standard
8
Bi-directional
1200x1200
MBK
High
12
Bi-directional
2400x1200
MBK
MBK
Highest
16
Bi-directional
2400x1200
Standard
8
Bi-directional
1200x1200
MBK
High
12
Bi-directional
2400x1200
MBK
MBK
Highest
16
Bi-directional
2400x1200
Standard
4
Bi-directional
1200x1200
MBK
High
8
Bi-directional
2400x1200
MBK
MBK
Highest
12
Bi-directional
2400x1200
Standard
4
Bi-directional
1200x1200
MBK
High
8
Bi-directional
2400x1200
MBK
MBK
Highest
12
Bi-directional
2400x1200
Standard
4
Bi-directional
1200x1200
MBK
High
8
Bi-directional
2400x1200
MBK
MBK
Highest
12
Bi-directional
2400x1200
Standard
4
Bi-directional
1200x1200
MBK
High
8
Bi-directional
2400x1200
MBK
MBK
Highest
12
Bi-directional
2400x1200
Standard
4
Bi-directional
1200x1200
MBK
High
8
Bi-directional
2400x1200
MBK
MBK
Highest
12
Bi-directional
2400x1200
Standard
4
Bi-directional
1200x1200
MBK
High
8
Bi-directional
2400x1200
MBK
MBK
Highest
12
Bi-directional
2400x1200
Standard
4
Bi-directional
1200x1200
MBK
High
8
Bi-directional
2400x1200
MBK
MBK
Highest
12
Bi-directional
2400x1200
Standard
4
Bi-directional
1200x1200
MBK
High
8
Bi-directional
2400x1200
MBK
MBK
Highest
12
Bi-directional
2400x1200
Standard
4
Bi-directional
1200x1200
MBK
High
8
Bi-directional
2400x1200
MBK
MBK
Highest
12
Bi-directional
2400x1200
Standard
4
Bi-directional
1200x1200
MBK
High
8
Bi-directional
2400x1200
MBK
Highest
12
Bi-directional
2400x1200
MBK
Chapter 2
Media Type
Photo Paper
Print Priority
Glossy Photo Paper
Image
Semi-Glossy Photo Paper
Image
Photo Paper Plus
Image
Photo Paper Plus Semi-Gloss
Image
Heavyweight Glossy Photo Paper 2
Image
Heavywght SemiGlos Photo Paper 2
Image
Poster Semi-Glossy Photo Paper
Image
Premium RC Photo Luster
Instant Dry Papers Glossy 200g
Instant Dry Papers Satin 200g
Photo paper High Glossy 250g
Photo paper Semi Matt 250g
Photo paper Satin 240g
Photo paper Pearl 260g
Image
Image
Image
Image
Image
Image
Image
Print
Quality
PrintPass
Printing direction
Print
Resolution
(dpi)
Used BK
ink
Standard
8
Bi-directional
1200x1200
PBK
High
12
Bi-directional
2400x1200
PBK
Highest
16
Bi-directional
2400x1200
PBK
Standard
8
Bi-directional
1200x1200
PBK
PBK
High
12
Bi-directional
2400x1200
Highest
16
Bi-directional
2400x1200
PBK
Standard
8
Bi-directional
1200x1200
PBK
PBK
High
12
Bi-directional
2400x1200
Highest
16
Bi-directional
2400x1200
PBK
Standard
8
Bi-directional
1200x1200
PBK
PBK
High
12
Bi-directional
2400x1200
Highest
16
Bi-directional
2400x1200
PBK
Standard
8
Bi-directional
1200x1200
PBK
PBK
High
12
Bi-directional
2400x1200
Highest
16
Bi-directional
2400x1200
PBK
Standard
8
Bi-directional
1200x1200
PBK
PBK
High
12
Bi-directional
2400x1200
Highest
16
Bi-directional
2400x1200
PBK
Standard
8
Bi-directional
1200x1200
PBK
PBK
High
12
Bi-directional
2400x1200
Highest
16
Bi-directional
2400x1200
PBK
Standard
8
Bi-directional
1200x1200
PBK
PBK
High
12
Bi-directional
2400x1200
Highest
16
Bi-directional
2400x1200
PBK
Standard
8
Bi-directional
1200x1200
PBK
PBK
High
12
Bi-directional
2400x1200
Highest
16
Bi-directional
2400x1200
PBK
Standard
8
Bi-directional
1200x1200
PBK
PBK
High
12
Bi-directional
2400x1200
Highest
16
Bi-directional
2400x1200
PBK
Standard
8
Bi-directional
1200x1200
PBK
PBK
High
12
Bi-directional
2400x1200
Highest
16
Bi-directional
2400x1200
PBK
Standard
8
Bi-directional
1200x1200
PBK
PBK
High
12
Bi-directional
2400x1200
Highest
16
Bi-directional
2400x1200
PBK
Standard
8
Bi-directional
1200x1200
PBK
PBK
High
12
Bi-directional
2400x1200
Highest
16
Bi-directional
2400x1200
PBK
Standard
8
Bi-directional
1200x1200
PBK
High
12
Bi-directional
2400x1200
PBK
Highest
16
Bi-directional
2400x1200
PBK
2-15
Chapter 2
Media Type
Art Paper
Print Priority
Fine Art Photo
Image
Fine Art Heavyweight Photo
Image
Fine Art Textured
Image
Fine Art Block Print
Image
Fine Art Watercolor
Image
Canvas Matte 2
Image
Japanese Paper Washi
Image
Graphic Matte Canvas
Art paper smooth 225g
Art paper embossed 225g
Art Paper Extra Smooth 250g
Water resistant paper Art Canvas
Proofing Paper Proofing Paper
Image
Image
Image
Image
Image
Image
Image
Professional Proof and Photo Glossy 195g
Image
Professional Proof and Photo Semiglossy
195g
Image
Professional Proof and Photo Semigloss
255g
Film Paper
Backprint Film
Backlit Film
2-16
Image
Image
Pop-up Gloss Film
Image
Universal Opaque White Film
Image
Outdoor Backlit
Image
Print
Quality
PrintPass
Printing direction
Print
Resolution
(dpi)
Used BK
ink
Standard
8
Bi-directional
1200x1200
MBK
High
12
Bi-directional
2400x1200
MBK
MBK
Highest
16
Bi-directional
2400x1200
Standard
8
Bi-directional
1200x1200
MBK
High
12
Bi-directional
2400x1200
MBK
MBK
Highest
16
Bi-directional
2400x1200
Standard
8
Bi-directional
1200x1200
MBK
High
12
Bi-directional
2400x1200
MBK
MBK
Highest
16
Bi-directional
2400x1200
Standard
8
Bi-directional
1200x1200
MBK
High
12
Bi-directional
2400x1200
MBK
MBK
Highest
16
Bi-directional
2400x1200
Standard
8
Bi-directional
1200x1200
MBK
High
12
Bi-directional
2400x1200
MBK
MBK
Highest
16
Bi-directional
2400x1200
Standard
8
Bi-directional
1200x1200
MBK
High
12
Bi-directional
2400x1200
MBK
MBK
Highest
16
Bi-directional
2400x1200
Standard
8
Bi-directional
1200x1200
MBK
High
12
Bi-directional
2400x1200
MBK
MBK
Highest
16
Bi-directional
2400x1200
Standard
8
Bi-directional
1200x1200
MBK
High
12
Bi-directional
2400x1200
MBK
MBK
Highest
16
Bi-directional
2400x1200
Standard
8
Bi-directional
1200x1200
MBK
High
12
Bi-directional
2400x1200
MBK
MBK
Highest
16
Bi-directional
2400x1200
Standard
8
Bi-directional
1200x1200
MBK
High
12
Bi-directional
2400x1200
MBK
MBK
Highest
16
Bi-directional
2400x1200
Standard
8
Bi-directional
1200x1200
MBK
High
12
Bi-directional
2400x1200
MBK
MBK
Highest
16
Bi-directional
2400x1200
Standard
8
Bi-directional
1200x1200
MBK
High
12
Bi-directional
2400x1200
MBK
MBK
Highest
16
Bi-directional
2400x1200
Standard
8
Bi-directional
1200x1200
PBK
High
12
Bi-directional
2400x1200
PBK
PBK
Highest
16
Bi-directional
2400x1200
Standard
8
Bi-directional
1200x1200
PBK
High
12
Bi-directional
2400x1200
PBK
PBK
Highest
16
Bi-directional
2400x1200
Standard
8
Bi-directional
1200x1200
PBK
High
12
Bi-directional
2400x1200
PBK
PBK
Highest
16
Bi-directional
2400x1200
Standard
8
Bi-directional
1200x1200
PBK
High
12
Bi-directional
2400x1200
PBK
PBK
Highest
16
Bi-directional
2400x1200
Standard
8
Bi-directional
1200x1200
PBK
High
12
Bi-directional
2400x1200
PBK
Highest
16
Bi-directional
2400x1200
PBK
Standard
8
Bi-directional
1200x1200
MBK
High
12
Bi-directional
2400x1200
MBK
MBK
Highest
16
Bi-directional
2400x1200
Standard
8
Bi-directional
2400x1200
PBK
High
16
Bi-directional
2400x1200
PBK
Standard
8
Bi-directional
2400x1200
PBK
High
16
Bi-directional
2400x1200
PBK
Standard
8
Bi-directional
1200x1200
MBK
High
12
Bi-directional
2400x1200
MBK
Highest
16
Bi-directional
2400x1200
MBK
Chapter 2
Media Type
Scrim Banner 370g
Print Priority
Image
Mat Film Paper
Adhesive Matt Stretch Vinyl
Thin Fabric
Banner
Image
Thin Fabric Banner 2
Image
Flame-Resistant Cloth
Image
Synthetic
Paper
Synthetic Paper
Image
Adhesive Synthetic Paper
Image
Outdoor Polypropylene (Durable Banner) Image
Print
Quality
PrintPass
Printing direction
Print
Resolution
(dpi)
Used BK
ink
Standard
6
Bi-directional
1200x1200
MBK
High
8
Bi-directional
2400x1200
MBK
MBK
Highest
16
Bi-directional
2400x1200
Standard
6
Bi-directional
1200x1200
MBK
High
8
Bi-directional
2400x1200
MBK
MBK
Highest
16
Bi-directional
2400x1200
Standard
6
Bi-directional
1200x1200
MBK
High
8
Bi-directional
2400x1200
MBK
MBK
Highest
16
Bi-directional
2400x1200
Standard
6
Bi-directional
1200x1200
MBK
High
8
Bi-directional
2400x1200
MBK
MBK
Highest
16
Bi-directional
2400x1200
Standard
6
Bi-directional
1200x1200
MBK
High
8
Bi-directional
2400x1200
MBK
MBK
Highest
16
Bi-directional
2400x1200
Standard
6
Bi-directional
1200x1200
MBK
High
8
Bi-directional
2400x1200
MBK
MBK
Highest
16
Bi-directional
2400x1200
Standard
6
Bi-directional
1200x1200
MBK
High
8
Bi-directional
2400x1200
MBK
MBK
Highest
16
Bi-directional
2400x1200
Standard
6
Bi-directional
1200x1200
MBK
Adhesive Matt
High Resolution Graphic paper Self ADH Image
Paper
High
8
Bi-directional
2400x1200
MBK
Highest
16
Bi-directional
2400x1200
MBK
Board
Standard
6
Bi-directional
1200x1200
MBK
Image
High
8
Bi-directional
2400x1200
MBK
Highest
16
Bi-directional
2400x1200
MBK
Line Document/
Text
Draft
2
Bi-directional
1200x1200
MBK
Standard
4
Bi-directional
1200x1200
MBK
MBK
CAD
POP Board
CAD Tracing Paper
CAD Translucent Matte Film
Special
Special 1
Special 2
Special 3
Special 4
Special 5
Special 6
Special 7
Special 8
Special 9
Special 10
High
8
Bi-directional
2400x1200
Line Document/
Text
Draft
2
Bi-directional
1200x1200
MBK
Standard
4
Bi-directional
1200x1200
MBK
High
8
Bi-directional
2400x1200
MBK
Image
Standard
8
Bi-directional
1200x1200
PBK
High
12
Bi-directional
2400x1200
PBK
PBK
Image
Image
Image
Image
Image
Image
Image
Image
Image
Highest
16
Bi-directional
2400x1200
Standard
8
Bi-directional
1200x1200
PBK
High
12
Bi-directional
2400x1200
PBK
PBK
Highest
16
Bi-directional
2400x1200
Standard
8
Bi-directional
1200x1200
PBK
High
12
Bi-directional
2400x1200
PBK
PBK
Highest
16
Bi-directional
2400x1200
Standard
8
Bi-directional
1200x1200
PBK
High
12
Bi-directional
2400x1200
PBK
PBK
Highest
16
Bi-directional
2400x1200
Standard
8
Bi-directional
1200x1200
PBK
High
12
Bi-directional
2400x1200
PBK
Highest
16
Bi-directional
2400x1200
PBK
Standard
8
Bi-directional
1200x1200
MBK
High
12
Bi-directional
2400x1200
MBK
Highest
16
Bi-directional
2400x1200
MBK
Standard
8
Bi-directional
1200x1200
MBK
High
12
Bi-directional
2400x1200
MBK
MBK
Highest
16
Bi-directional
2400x1200
Standard
8
Bi-directional
1200x1200
MBK
High
12
Bi-directional
2400x1200
MBK
MBK
Highest
16
Bi-directional
2400x1200
Standard
8
Bi-directional
1200x1200
MBK
High
12
Bi-directional
2400x1200
MBK
MBK
Highest
16
Bi-directional
2400x1200
Standard
8
Bi-directional
1200x1200
MBK
High
12
Bi-directional
2400x1200
MBK
Highest
16
Bi-directional
2400x1200
MBK
2-17
Chapter 2
2.2.4 Print Position Adjustment Function
0012-6498
iPF6100 / iPF6200 / iPF6000S
This printer has a printing position adjusting function to adjust the lateral and longitudinal printing positions and bidirectional printing position of the printhead
mounted on the carriage as well as the media feed amount.
The printing position can be adjusted in two ways: "automatic adjustment" by which the multi sensor installed at the lower left of the carriage reads the printing
position adjusting pattern and "manual adjustment" by which a print position adjusting pattern is printed with the printing conditions changed little by little to allow
the user to enter the visually checked adjustment value from the operation panel.
Printing position adjustment requires A4-size or larger roll media or cut sheet.
2.2.5 Head Management
0012-6499
iPF6100 / iPF6200 / iPF6000S
This printer has a nozzle check function to detect any non-discharging nozzle. When a non-discharging nozzle is detected, the printer performs the print head cleaning operation. If the problem persists after completion of the print head cleaning operation, the non-discharged nozzles are automatically backed up by other nozzles.
2.2.6 Printhead Overheating Protection Control
0012-6501
iPF6100 / iPF6200 / iPF6000S
This printer performs printhead overheating protection control when an abnormally high temperature is detected in the printhead.
The printhead can overheat, for instance, when the print operation continues for some time with no ink supplied to the nozzles.
The overheating protection control function prevents a print head nozzle from becoming clogged or damaged due to excessive heat.
Overheating protection control is performed based on the temperatures detected by the head temperature sensors in the nozzle arrays. If overheating is detected in
a single nozzle array, overheating protection control is performed at either of the following levels according to the temperature.
Protection level 1:
If the printhead temperature sensor detects a temperature above the limit, the carriage stops at the scan end position printer in the direction of travel according to
the carriage's scan status.
Then, wait control is performed to allow the printhead to cool naturally. When the printhead temperature drops below the prescribed value or 30 seconds have lapsed
since detection of the abnormal temperature, printing resumes.
Protection level 2:
When the head temperature sensor detects an abnormally high temperature, printing stops immediately, the carriage is moved to the home position, and the printhead
is capped. In this case, an error code is shown on the display.
2.2.7 Pause between Pages
0012-6502
iPF6100 / iPF6200 / iPF6000S
To prevent ink blots form forming, this printer has a "pause between pages" function to hang down the printed paper from the platen to dry it and delivers it after
lapse of the specified wait time.
The user can set the wait time using the printer drive. This function is particularly useful for printing on film-type sheets that requires extra long time to dry.
For borderless printing, 30 seconds of drying time is automatically set.
2.2.8 White Raster Skip
0012-6504
iPF6100 / iPF6200 / iPF6000S
To improve the printing throughput, this printer has a white raster skip function to skip the carriage scan operation for continuous blank segments in print data.
2.2.9 Sleep Mode
0012-6505
iPF6100 / iPF6200 / iPF6000S
This printer has a Sleep mode to reduce the standby power.
The printer automatically enters the Sleep mode (Power Save mode) when neither user operation nor data reception occurs for a preset period of time in the online
or offline mode.
The printer wakes from the Sleep mode when the user presses any button on the operation panel or data is received from the host computer.
The time until the printer enters the Sleep mode can be changed from the operation panel. (Default: 5 minutes)
2.2.10 Hard Disk Drive
0013-9239
iPF6200 / iPF6000S
This printer features a hard disk drive, which provides the following functions.
- Early release of the host computer
- Error recovery
- Job preservation
- Preserved job print
- Job queue handling
1) Early release of the host computer
Each print job received from the host computer is preserved to the hard disk drive attached to the printer, so the printer can proceed with independent printing,
releasing the host computer before the print job completes.
2) Error recovery
If a print job aborts as a result of any print problem, such as a paper jam or insufficient paper, the printer reloads the print job stored on the hard disk so it can resume
the print job without having to retransmit the job from the host computer to it.
3) Job preservation
Print jobs are in the common box, a place of temporary data storage, and in the personal box, a place of permanent data storage.
Normal print jobs are stored in the common box as they are received. Due to the limited hard disk space available, jobs stored in the common box are deleted from
the oldest one in sequence.
Print jobs can be simply stored in the personal box without printing. Print jobs stored in the common box can be moved to the personal box.
4) Preserved job handling
Print jobs stored in the personal box or common box can be printed from the operation panel.
5) Job queue handling
2-18
Chapter 2
Multiple jobs queued for print can be handled. including the raising priority order of selected jobs in the queue or canceling selected print jobs.
2-19
Chapter 2
2.3 Printer Mechanical System
2.3.1 Outline
2.3.1.1 Outline
0016-8860
iPF6100 / iPF6200 / iPF6000S
The printer mechanism can be broadly divided into two major components: the ink passage and paper path.
The ink passage consists of an ink tank, a carriage unit having a printhead, a purge unit. and a maintenance cartridge unit which are used to supply, circulate, and
suck ink.
The paper path consists of a roll feed unit, paper feed unit to support three types of media feeding, transport, and ejection.
This section provides an overview of these mechanical components.
Printhead
Carriage unit
Ink tank unit
Pinch roller
Feed roller
Maintenance cartridge
Ink tube
Purge unit
F-2-12
2-20
Chapter 2
2.3.2 Ink Passage
2.3.2.1 Ink Passage
2.3.2.1.1 Overview of Ink Passage
0013-4299
iPF6100 / iPF6200 / iPF6000S
The ink passage consists of ink tanks, printhead, cap, waste ink collection unit, ink tubes for connecting the mechanical components, and an ink suction pump which
is operated to suck ink. These components are used to supply, circulate, and suck ink.
A schematic diagram of the ink passage (for one color) and the ink flow are shown below.
Mechanical Drive Unit
Ink flow
Carriage unit
Joint
Ink tank
Printhead
Agitation plate
Suction pump
Cap
Sub buffer
Ink supply valve
Waste ink from sub cap for capping
Waste glycerin
Absorbent material under the ink tank unit
Absorbent material under the purge unit
Waste ink from cap for suction and capping
Maintenance cartridge
F-2-13
a) Ink supply from ink tank to ink supply valve
The ink tank contains ink to be supplied to the printhead.
Ink flow from the ink tank to the ink tank supply valve due to the fluid level difference.
b) Ink flow from ink tank to sub-buffer
Ink flows from the ink tank to the sub-buffer due to the fluid level difference, and air enters the ink tank through the air passage of the sub-buffer, maintaining the
pressure inside the ink tank constant.
If the ink in the sub-buffer exceeds the predetermined level, the excessive ink flows to the absorbent material under the ink tank.
c) Ink supply from ink supply valve to printhead
Ink is supplied from the ink tank to the printhead by opening the ink supply valve, capping the head, and operating the suction pump.
The ink sucked from the caps flows to the maintenance cartridge.
d) Ink supply during printing
During printing, the ink supply vale is held open to allow ink to flow from the ink tank to the printhead constantly due to the negative pressure generated by discharging of ink.
The waste ink used for printhead cleaning and borderless printing flows to the waste ink absorbent materials under the maintenance cartridge in addition to the waste
ink box.
If all of ink passages are opened (no ink tank is installed, the ink supply valve is opened, and the printhead fixer lever is opened) when the ink tube is filled with
ink, the ink in the ink tube may reverse-flow due to the fluid level difference and ink may leak from the hollow needle of the ink tank.
Do not open all of the ink passages at the same time when the ink tube is filled with ink.
e) Agitation of ink in the ink tank
Ink in the ink tank is agitated to prevent precipitation of pigment-based ink in the ink tank.
This function is implemented by reverse-flowing ink to the ink tank by opening and closing the supply valve in succession. Inside the ink tank is provided with an
agitation plate to assist agitation of ink. (The agitation plate is also provided in the
- Operation timing: When a new ink tank is installed or when 168 hours have lapsed since the previous agitation (the agitation is performed irrespective of the
whether the printer is printing or cleaning its head)
2-21
Chapter 2
- Ink supply valve opening/closing count: 30 times (every 30 seconds)
If 336 or more hours have lapsed, the ink valve opening/closing count and the time until the next agitation are changed according to the length of the tame lapsed.
2-22
Chapter 2
2.3.2.2 Ink Tank Unit
2.3.2.2.1 Structure of Ink Tank Unit
0013-4300
iPF6100 / iPF6200
a) Ink tank
Each ink tank contains 130 ml of ink (the starter ink tank supplied with the printer contains 90 ml of ink) for each color. The amount of ink is memorized in the
EEPROM mounted to the ink tank.
The amount of the ink remaining in the ink tank is detected as a dot count according to the data memorized in the EEPROM.
When the electrodes mounted to the hollow needle detect a con-conductive state, a message appears on the display to indicate that the ink is nearly empty. If the
dot count reaches the prescribed value, the ink tank is considered to be empty.
b) Ink port
When the ink tank lock lever is pressed down, the hollow needle enters the ink port (covered with a rubber plug), establishing an ink passage between the printer
and ink tank.
c) Air passage
When the ink tank lever of the printer is pressed down, the hollow needle enters the air passage (covered with a rubber plug) and thus the internal pressure of the
ink tank is released, maintaining the internal pressure constant.
d) Notches for preventing incorrect insertion
The ink tanks have notches for preventing insertion. Wrong ink tanks cannot be installed in place due to these notches.
The ink tank lock lever can lowered to start ink supply only when the ink tank has been installed in place.
e) Agitation plate
The agitation plate assists the ink agitation which is performed to prevent precipitation of ink.
Notches for preventing
incorrect installation
Ink port
EEPROM
Notches for preventing
incorrect installation
Air passage
Agitation plate
Notches for preventing
incorrect installation
Ink tank
F-2-14
2-23
Chapter 2
f) Ink supply valve
The ink supply valve is located between the ink tank and ink tube to prevent ink leakage from occurring when the ink tube on the ink tank side is opened during
replacement of the ink tank.
The ink supply valve is opened and closed by the valve open/close mechanism which is driven by the valve motor.
The ink tank unit consists of two tank bases each of which contains ink tanks for three colors and the ink tubes for six colors.
The ink supply valve for each color is driven by the valve cam though a link. Ink supply valves for all colors are opened and closed at the same time.
Valve cam
Valve motor
Linkage
Valve open/closed detection sensor
Linkage
Ink supply valve
F-2-15
2-24
Chapter 2
2.3.2.2.2 Structure of Ink Tank Unit
0020-7294
iPF6000S
a) Ink tank
Each ink tank contains 130 ml of ink (the starter ink tank supplied with the printer contains 90 ml of ink) for each color. The amount of ink is memorized in the
EEPROM mounted to the ink tank.
The amount of the ink remaining in the ink tank is detected as a dot count according to the data memorized in the EEPROM.
When the electrodes mounted to the hollow needle detect a con-conductive state, a message appears on the display to indicate that the ink is nearly empty. If the
dot count reaches the prescribed value, the ink tank is considered to be empty.
b) Ink port
When the ink tank lock lever is pressed down, the hollow needle enters the ink port (covered with a rubber plug), establishing an ink passage between the printer
and ink tank.
c) Air passage
When the ink tank lever of the printer is pressed down, the hollow needle enters the air passage (covered with a rubber plug) and thus the internal pressure of the
ink tank is released, maintaining the internal pressure constant.
d) Notches for preventing incorrect insertion
The ink tanks have notches for preventing insertion. Wrong ink tanks cannot be installed in place due to these notches.
The ink tank lock lever can lowered to start ink supply only when the ink tank has been installed in place.
e) Agitation plate
The agitation plate assists the ink agitation which is performed to prevent precipitation of ink.
Notches for preventing
incorrect installation
Ink port
EEPROM
Notches for preventing
incorrect installation
Air passage
Agitation plate
Notches for preventing
incorrect installation
Ink tank
F-2-16
2-25
Chapter 2
f) Ink supply valve
The ink supply valve is located between the ink tank and ink tube to prevent ink leakage from occurring when the ink tube on the ink tank side is opened during
replacement of the ink tank.
The ink supply valve is opened and closed by the valve open/close mechanism which is driven by the valve motor.
The ink tank unit consists of two tank bases each of which contains ink tanks for three colors and the ink tubes for six colors.
The ink tubes coming from the PC, PM and C ink tanks feed both printheads L and R. Two valve open/closed detection sensors and valve motor control the opening
and closing of the ink supply valves to prevent the ink tubes to whichever printhead that is not engaged in any operation, such as ink filling and suction, from being
released.
T-2-3
Valve open/closed detection sensor Valve open/closed detection sensor Printhead L
2
Printhead R
OFF
ON
Open/Close
Open/Close
OFF
OFF
Close
Close
ON
ON
Open
Open
Valve open/closed detection sensor
Valve open/closed detection sensor 2
Valve motor
Linkage
Valve cam
Linkage
Ink supply valve (driven simultaneously)
Ink supply valve
F-2-17
2-26
Chapter 2
2.3.2.3 Carriage Unit
2.3.2.3.1 Functions of Carriage Unit
0016-8194
iPF6100 / iPF6200 / iPF6000S
a) Printhead mounting function
The carriage mechanically locks the printhead and is connected to the printhead via the terminals on the carriage PCB.
b) Control function
The carriage incorporates a carriage PCB that relays the signal from the main controller, a linear encoder that generates a print timing signal based on the detected
carriage position, and a multi sensor that detects the media width and skewing to adjust the registration and height.
The carriage PCB and main controller PCB are connected with a flexible cable.
c) Carriage drive function
The carriage motor moves the carriage back and forth on the platen via the carriage belt.
d) Printhead maintenance function
The printer performs the printhead cleaning operation such as printhead wiping and suction at the home position of the carriage.
The cleaning operation accompanied by ink suction is performed only at the left cap.
e) Nozzle check function
The printer detects a non-discharging nozzle using the head management sensor attached to the maintenance jet tray by discharging ink with the carriage stopped
at the maintenance jet tray.
f) Media thickness adjustment function
If the gap between the printhead face and the media increases due to the difference in media thickness, cockling, curling, and so on, more ink mist is generated. In
reverse, if the gap decreases, the head can touch the media surface more frequently.
To maintain the proper gap, the remote lifter is driven to adjust the head height automatically according to the selected media type, media supply method, printing
conditions (borderless/priority print type), environmental conditions (temperature/humidity), and the result of measurement by the multi sensor.
The relationship between media types and head heights (from the platen) is summarized in the table below. Note that the head height is adjusted with priority given
to the media gap measured by the multi sensor.
T-2-4
Head height (mm)
Media type (Value in parentheses:mm)
1.4
Glossy paper(0.2),plain paper(line drawing)(0.1)
1.8
Plain paper(0.1)
2
Coated paper(0.5)
2.2
Semi-glossy canvas(0.5)
3.2
Board paper(1.5)
g) Paper leading edge detection function/paper width detection function/skewing detection function
The leading edge, width, and skewing of the paper fed to the platen is detected by the multi sensor mounted at the lower left of the carriage.
h) Auto printing position adjustment function
The adjustment pattern printed on paper is read by the multi sensor mounted at the lower left of the carriage, thus adjusting the printing timings of each printhead
automatically.
i) Color calibration function
A multi sensor installed in the lower left part of the carriage reads the adjustment pattern printed on paper and corrects the coloring of the printed matter automatically.
The main menu choice "Calibration" can be executed to correct the coloring of printed matter in the wake of initial installation of the printer, the replacement of its
printheads or otherwise changes in the coloring of printed matter.
j) Remaining roll media detection function
The amount of the remaining roll paper can be detected using the multi sensor mounted at the lower left of the carriage by printing a barcode at delivery of the roll
media.
k) Internal temperature detection function
The internal temperature around the printhead is detected using the thermistor mounted on the carriage PCB.
2-27
Chapter 2
2.3.2.3.2 Structure of Carriage Unit
0016-8195
iPF6100 / iPF6200 / iPF6000S
a) Printhead mounting unit
The printhead is secured to the carriage by the printhead fixer lever.
When the printhead is secured to the carriage, the signal contact of the carriage PCB touches the signal contact point of the printhead, allowing print signals to be
transmitted.
The ink passage from the ink tank is connected to the printhead through the ink tube and joint.
Printhead fixer lever
Printhead fixer cover
Joint for ink supply
Terminal
Carriage motor
Carriage
Ink tube
F-2-18
b) Ink port
Ink is supplied to the printhead through the ink tubes.
Ink tube run through the ink tube guide mounted on the carriage and move in conjunction with the carriage.
c) Control unit
The carriage PCB is connected to the main controller PCB with a flexible cable. The flexible cable moves in conjunction with the carriage.
A photo-coupler-type encoder is mounted at the top of the rear of the carriage to detect the slit on the linear scale during carriage movement, thus controlling the
print timing.
d) Carriage drive unit
Mechanical misalignment of the printhead in the vertical and horizontal direction and in bidirectional printing can be corrected by changing the print timing using
the "Adjust Printer" option in the Main menu.
The carriage motor (DC motor) moves the carriage back and forth on the platen via the carriage belt.
The carriage home position is the capping position to which the carriage is slowly moved when the power is turned on.
When the position read on the linear scale is set as the home position for position control, the carriage motor moves based on control signal output from the main
controller.
2-28
Chapter 2
Linear encoder sensor
Carriage PCB
Shaft cleaner
Multi sensor
Shaft cleaner
Multi sensor reference plate
Linear scale
Carriage height changing cam
Head management sensor unit
Lift cam sensor
Lift motor
F-2-19
e) Printhead maintenance unit
The printer performs the printhead cleaning operation at the home position of the carriage.
The purge motor is used for wiping. When the carriage is stationary at the home position, the printhead installed in the carriage is wiped with the wiper blade. The
wiper blade is pressed against the absorbent material soaked with glycerin so that the wiper blade is moistened with glycerin, thus improving the wiping performance.
Idle ejection of ink is performed on the cap, the borderless ink tray of the platen, and paper.
The suction operation is performed by rotating the pump motor after completion of capping. (Note that the cleaning operation accompanied by suction is performed
only at the left cap.)
f) Carriage height adjustment
When the lift motor is driven to rotate the carriage height changing cams installed at both ends of the shaft, the height of the carriage shaft is varied to change the
spacing between the face of the printheads and the paper.
The printhead height is detected by the multisensor installed in the lower left part of the carriage.
g) Multi sensor unit
The multi sensor mounted at the lower left of the carriage is composed of four LEDs (red, blue, green, infrared) and two light-sensitive elements which are used to
detect the leading edge, width, and skewing of paper and adjust the color calibration and head height.
The multi sensor reference plate is provided with a white plate. By measuring the quantity of the reflected light from the white plate, the reference value for gap
measurement is computed.
(Service mode: SERVICE MODE> ADJUST> GAP CALIB.)
h) Shaft cleaner units
The shaft cleaners mounted at the left and right of the carriage are used to clean the carriage and apply oil to the shaft.
i) Internal temperature detection
A themistor for measuring the internal temperature is mounted on the carriage PCB on the rear of the head holder.
2-29
Chapter 2
2.3.2.4 Printhead
2.3.2.4.1 Structure of Printhead
0013-4821
iPF6100 / iPF6200 / iPF6000S
A printhead incorporates six nozzle arrays. Each nozzle can be controlled individually so that a six-color discharge action can be performed by a single printhead.
a) Nozzle arrays
A total of 2560 nozzles are arranged in a two-column staggered pattern.
In each column, 1280 nozzles are arranged in a staggered pattern at intervals of 600 dpi, forming a 2560-nozzle arranged at intervals of 1200 dpi.
5/600inch
0
2
2556
2558
0
2
1
3
2557
2559
2556
2558
0
2
1
3
2557
2559
2556
2558
1
3
2557
2559
0
2
2556
2558
1
3
2557
2559
0
2
2556
2558
1
3
2557
2559
0
2
2556
2558
1
3
1/1200inch
2557
2559
82/600inch
F-2-20
b) Nozzle structure
Ink supplied from the ink tank is filtered by a mesh ink filter, and the supplied to the nozzles.
Ink is supplied from the shared ink chamber to the nozzles. When the head driving current is applied to the nozzle heater, ink boils and form bubbles so that ink
droplets are discharged from the nozzles.
Resin
Sillicon plate
Heater
Heater
Shared ink chamber
F-2-21
2-30
Chapter 2
2.3.2.5 Purge Unit
2.3.2.5.1 Functions of Purge Unit
0013-4347
iPF6100 / iPF6200 / iPF6000S
To maintain high print quality, the purge unit performs maintenance of the nozzles o the printhead.
The purge unit supports a capping function, cleaning function, and ink supply function.
a) Capping function
The capping function presses the cap of the purge unit against the face plate on the nozzle section of the printhead to prevent nozzle drying and dust adhesion.
Capping is performed when printing is complete, at the start of the suction operation, and when switching to the standby state due to an error.
The capping function also establishes the ink passage between the printhead and purge unit.
b) Cleaning function
The cleaning function restores the printhead to the state where ink can be easily discharged from nozzles. This function includes the following three types of operations.
- Wiping operation
This operation is performed to remove paper fibers and dried ink from to the face plate.
- Pumping operation
This operation is performed to remove ink from the nozzles and fill the nozzles with fresh ink.
- Maintenance jet operation
This operation is performed to spray ink from the nozzles to the cap, borderless ink jet tray, an paper to remove bubbles in the nozzles and dust and other foreign
particles.
c) Ink supply function
The suction pump of the purge unit operates together with the ink supply valve to supply ink to the printhead during the initial filling and ink level adjustment.
Details of the cleaning function are shown in the table below.
Cleaning mode
Name of Service mode
or PRINT INF
(Name of Main Menu)
Operation
Description of cleaning
Cleaning 1
CLN-A-1/CLN-M-1
(Head Cleaning A)
Normal cleaning
Removes dried ink from nozzles, thick ink accumulated on the
face, and paper particles.
Cleaning 2
CLN-A-2
Ink level adjustment and cleaning
Adjust the ink level in the head by suction, and then performs
normal cleaning.
Cleaning 3
CLN-A-3
Initial filling ink
Fills the empty tube (during initial installation) with ink, and
then performs normal cleaning.
Cleaning 4
CLN-M-4
(Replace P.head)
Ink drainage for head replacement
Drains ink to replace the head (drains only the ink in the head).
Cleaning 5
CLN-M-5
(Move Printer)
Ink drainage for secondary transport
Drains ink from the head and tube for secondary transport.
Cleaning 6
CLN-A-6/CLN-M-6
(Head Cleaning B)
Normal (strong) cleaning
Performs suction stronger than when adjusting the ink filling
amount in the head or normal cleaning to unclog nozzles.
Cleaning 7
CLN-A-7
Aging
Performs idle ejection after replacement of the head.
Cleaning 10
CLN-A-10
(Move Printer)
Ink filling after secondary transport
Fills the empty tube (during installation after secondary
transport) with ink, and performs normal cleaning.
Cleaning 11
CLN-A-11
Ink filling after head replacement
Performs normal cleaning after head replacement and ink
filling.
Cleaning 15
CLN-A-15
Dot count suction
Performs suction to remove ink adhered to dried nozzles and
thick ink accumulated on the face when the dot count reaches
the prescribed value.
Cleaning 16
CLN-A-16
Precipitated ink agitation
Performs the agitation (ink supply valve open/close) operation
to prevent the ink ingredient from precipitating.
Cleaning 17
CLN-A-17
Cleaning (weak)
Performs cleaning weaker than normal cleaning to unclog
nozzles.
2-31
Chapter 2
Cleaning operation timings are as follows.
Printer status
Standby
Power-on
168 hours elapsed capped
Cleaning 1 (Normal
Cleaning)
1g
At least 720 hours elapsed since the last session of Cleaning 2, 3, 6 or 10 (360 hours after initial
installation)
Cleaning 6 (Normal
(strong) Cleaning)
5g
At initial installation and 96 hours elapsed since the last session of Cleaning 16
Cleaning 16
(Precipitated ink
agitation)
-
1 hour elapsed capped with a specified number of dots discharged per chip completed after last
wiping
Wiping + Idle ejection
0.013g
At initial installation
Cleaning 3 (initial filling 15g
ink)
Both heads and inks
available
The print operation has completed. 168 to 720 hours elapsed capped
Cleaning 1 (Normal
Cleaning)
1g
At least 720 hours elapsed since the Cleaning 6 (Normal
last session of Cleaning 2, 3, 6 or 10 (strong) Cleaning)
(360 hours after initial installation)
5g
At least 96 hours elapsed since the Cleaning 16
last session of Cleaning 16
(Precipitated ink
agitation)
-
At least 1 hour elapsed capped with Wiping + Idle ejection
a specified number of dots
discharged per chip completed after
last wiping
0.013g
Print operation aborted (uncapped) Up to 72 hours elapsed after an
and CR error occurring
abort
Cleaning 1 (Normal
Cleaning)
1g
Over 72 hours elapsed after an abort Cleaning 6 (Normal
(strong) Cleaning)
5g
Print operation aborted (uncapped) and no CR error occurring
Cleaning 11 (ink filling 10g
after head replacement)
No heads are available
Cleaning 10 (ink filling 15g
on secondary transport)
Power off
Specified number of dots discharged per chip completed since the last session of wiping
Wiping + Idle ejection
0.013g
Before the
start of
printing
Less than 168 hours elapsed capped
Idle ejection
0.013g
At least 168 hours elapsed capped
Cleaning 1 (Normal
Cleaning)
1g
Before printing in the wake of an error occurrence
Cleaning 1 (Normal
Cleaning)
1g
Printing
Before scanning while printing
Idle ejection (+Wiping) - (0.013g)
After the end
of printing
A specified number of dots (color) discharged per chip since the last session of Cleaning 2, 3, 6 or 1 Cleaning 6 (Normal
(strong) Cleaning)
5g
A specified number of dots discharged per chip after the last session of wiping
Wiping + Idle ejection
0.013g
3 minutes elapsed since the last session of capping
Wiping + Idle ejection
0.013g
Total 2 hours elapsed uncapped since the last session of Cleaning 1, 2, 3, 6 or 10
Cleaning 1 (Normal
Cleaning)
1g
When the
Head
Cleaning
menu choice
is executed
Manual Cleaning (Head Cleaning A)
Cleaning 1 (Normal
Cleaning)
1g
Manual cleaning (Head cleaning B)
Cleaning 6 (Normal
(strong) Cleaning)
5g
When the
Replace Print
Head menu
choice is
executed
After head replacement
Cleaning 2 (ink level
adjustment and
cleaning) + Cleaning 4
(ink drainage for head
replacement)
10g
When the
Move Printer
menu choice
is executed
After the Move Printer menu choice is executed
Cleaning 5 (ink drainage 10g
for secondary transport)
After power-on at secondary installation
After power-on at
secondary installation
*1: Quantities of ink consumption by nozzle train
2-32
Consumption
(typ.)*1
Cleaning operation
15g
Chapter 2
2.3.2.5.2 Structure of Purge Unit
0013-4382
iPF6100 / iPF6200 / iPF6000S
Purge unit
F-2-22
a) Cap unit
The cap unit is used to cap the print head nozzles during capping and cleaning. The portion that touches the face plate is made from rubber. Two left caps are arranged for the printhead (six arrays of nozzles) installed in the carriage.
During cleaning, the caps used for both suction and capping are used to suck ink from the printhead using the suction pump.
Each of the right caps is used to cap the six arrays of nozzles.
This cap is used only for capping.
During capping, the caps are raised by the cap cams operated by the purge motor to cover the arrays when the carriage has moved to the home position, thus protecting the nozzles.
Carriage lockpin
Cap
Pump cam sensor
Glycerin tank
Sub cap
Purge motor
Pump encoder encoder
F-2-23
2-33
Chapter 2
b) Wiper unit
The wiper unit operated by the purge motor wipes the print head face.
The printer is provided with a pair of wiper blades for better wiping performance.
The wiping operation is performed by a "slide wipe" method by which the purge motor rotates (in the normal direction) to slide the wiper blade via the wiper cam.
It is performed by a constant-speed movement toward the front of the printer as viewed from the printer front.
The wiper blade, which is positioned at right angles to the print head, wipes the entire printhead face, and then the narrow blade is used to wipe the nozzle arrays.
After wiping, the wipe blades are cleaned before they are set at the wiping position so that the maximum wiping performance is obtained.
During the wiper blade cleaning, the ink removed form the head is rubbed off by the in scraper.
Absorbent material soaked with glycerin is pressed against the wiper blades to enhance the wiping performance. The amount of glycerin used (tank capacity: 50
ml) is managed by counting the number of times the wiper blade is pressed against the absorbent material. When the count reaches the following value, an advance
notice of replacement (printing can be continued) or a request for replacement (service call error) is displayed.
T-2-5
Advance notice of replacement
47,500times
Service call
50,000times
Ink scraper
Printhead
Glycerin absorbent material
Glycerin tank
Wiper blade
Blade holder
Cap
Wiper cam
F-2-24
c) Pump unit
This printer uses tube pumps (suction pumps) that press on the ink tubes using rollers to produce negative pressure, thus sucking ink.
Two rollers are used to press on a single tube one after another to control the amount of ink sucked.
The roller rotation timing is detected by the pump cam sensor, and the amount of rotation is controlled by the driving of the purge motor.
Cap
Pump unit
Pump cam sensor
Suction pump
Cap
Push rollers
Ink tubes
Purge motor
Pump encoder sensor
To maintenance cartridge.
The ink from the sub cap flows to the absorbent
material under the purge unit.
F-2-25
2-34
Sub cap
Chapter 2
2.3.2.6 Maintenance Cartridge
2.3.2.6.1 Maintenance Cartridge
0013-4161
iPF6100 / iPF6200 / iPF6000S
a) Maintenance cartridge
The maintenance cartridge can contain up to approximately 957 ml (approx. 1021 g ) of waste ink (including the moisture evaporation in the waste ink).
b) Detection of waste ink in maintenance cartridge
The quantity of waste ink in the maintenance cartridge is measured by counting dots.
When the quantity of waste ink collected in the maintenance cartridge reaches 80% of the cartridge capacity, a warning message "MTCart Full Soon" appears to
indicate that the maintenance cartridge is nearly full.
If printing is continued, an error message "Maint Cartridge Replace Cart" appears to indicate that the maintenance cartridge is full.
When this error occurs, the printer judges the maintenance cartridge as being full of waste ink and stops printing immediately. The printer stops even if printing is
in progress, and it will not operate until the maintenance cartridge is replaced with a new one.
The maintenance cartridge incorporates an EEPROM. The main controller reads and writes the contents of the EEPROM to control the maintenance cartridge status.
Maintenance Cartridge
F-2-26
2-35
Chapter 2
2.3.2.7 Air Flow
2.3.2.7.1 Air flow
0016-8199
iPF6100 / iPF6200 / iPF6000S
This printer has two fans, a mist fan used to collect mist and a suction fan used to suck media onto the platen.
Ink mist that floats inside the printer and ink splashes from the media are collected in the filter through the front duct and the air flow path inside the printer by the
driving of the mist fan, thus preventing mist from discharged outside the printer.
Fan filter
Mist fan
F-2-27
During operation of the suction fan, suspended substances are collected in the filter through the airflow path inside the printer, preventing them from being emitted
to outside of the printer.
Fan filter
Suction fan
F-2-28
2-36
Chapter 2
2.3.3 Paper Path
2.3.3.1 Outline
2.3.3.1.1 Overview of Paper Path
0016-8200
iPF6100 / iPF6200 / iPF6000S
The paper path consist of roll feed unit, feed roller unit, pinch roller drive unit that applies/releases pressure to/from the pinch roller, spur drive unit that moves the
spur up/down, and various sensors that detect the media feed status, allowing media to be fed in three ways, fed, and ejected.
Manually fed cut sheet (top)
Paper detection sensor
Roll media
Multi sensor
Feed roller
Roll media
sensor
Manually fed cut
sheet (front)
F-2-29
2-37
Chapter 2
2.3.3.2 Paper Path
2.3.3.2.1 Structure of Roll Media Pick-up Unit
0016-8203
iPF6100 / iPF6200 / iPF6000S
When the roll media sensor detects media loaded with the printer powered, the roll media pick-up roller touches the media to rotate the roll media feed roller, thus
feeding the roll media onto the platen. Roll media feeding is controlled by the roll motor and roll feed unit PCB.
The roll media pick-up roller is moved up and down by the cam, and the cam movement is detected by the roll media cam sensor.
When the printer is turned on with roll media loaded, the roll media pick-up operation starts automatically.
Roll cam sensor
Roll motor
F-2-30
If the roll media sensor detects that there is no roll during roll media pick-up operation, the roll media is ejected.
2-38
Roll feed unit PCB
Chapter 2
Roll Feed Unit
Roll media sensor
F-2-31
2-39
Chapter 2
2.3.3.2.2 Roll Media Pick-up Sequence
0013-4173
iPF6100 / iPF6200 / iPF6000S
When the roll media detects the loaded roll media, roll media pick-up operation starts.
When media is fed from the auto roll feed unit by the specified length, the nulti sensor performs the adjustments and detection shown below, thus completing the
roll media pick-up operation.
Roll media is fed by controlling the roll motor and feed motor of the auto roll feed unit.
Roll media loading
(manual)
Roll media detection
(roll media sensor)
Light intensity/
Head hight adjustment
Detection of leading edge of media *2
Detection of bar code pattern *1
Detection of skewed media
Media width detection
Detection of leading edge of media *2
End of roll media pick-up
Printing
*1
- This operation is performed only when "ON" is selected for "Detect Remaining Roll Media".
- If the roll media does not have a bar code pattern on it, enter the length of the roll media using the menu on the operation panel.
*2
- The purpose of the first leading edge detection is to detect presence of media.
- The purpose of the second leading edge detection is to detect the printing start position.
F-2-32
2-40
Chapter 2
2.3.3.2.3 Structure of Manual Feed Unit
0016-8204
iPF6100 / iPF6200 / iPF6000S
a) Manual feed (from front)
The cut sheet fed from the front (ejection unit) of the printer is fed to the rear of the printer [1], and then fed onto to platen [2] for printing.
[2]
[1]
F-2-33
This method of feeding paper can be used only when an accept media type is selected from the Manual Feed menu in the use mode. If you select the Manual Feed
menu, the pinch roller unit moves up to allow you to feed paper from the front of the printer according to the message shown on the operation panel.
The pinch roller unit is moved up and down by the lift motor. The cam which is also operated by the lift motor via gears moves up and down the pinch roller.
Lift cam sensor
Lift motor
Cam
Pinch roller unit
F-2-34
2-41
Chapter 2
The pick-up timing of the paper fed to the rear of the printer is controlled by the paper detection sensor.
Paper detection sensor
F-2-35
b) Manual feed (from rear)
The paper loaded in the paper tray provided at the rear of the printer is fed onto the platen for printing.
This method of feeding paper can be used only when an acceptable media type is selected from the Manual Feed menu in the user mode. The pick-up timing of the
paper loaded in the rear paper tray according to the message shown on the operation panel is controlled by the paper detection sensor.
Paper detection sensor
F-2-36
2-42
Chapter 2
2.3.3.2.4 Manual Feed (from Front) Sequence
0013-4174
iPF6100 / iPF6200 / iPF6000S
This sequence can be performed according to the messages shown on the operation panel only when a specific type of media is selected after selecting the manual
feed mode from the menu shown on the operation panel. When a cut sheet is loaded according to the message shown on the operation panel, the printer performs
various adjustments and detection using the multi sensor and then feeds the cut sheet to the rear of the printer. At this time, the multi sensor detects skewed feeding
and leading edge of the cut sheet, thus completing the paper pick-up operation.
During printing, the cut sheet is fed by controlling the rotation of the feed roller according to the selected print mode.
Cut sheet loading
(manual)
Light intensity/
Head hight adjustment
Detection of paper width
Back feed
Detection of skewed movement of paper
End of cut sheet pick-up operation
Printing
F-2-37
2.3.3.2.5 Manual Feed (from Rear) Sequence
0013-4176
iPF6100 / iPF6200 / iPF6000S
This sequence can be performed according to the messages shown on the operation panel only when a specific type of media is selected after selecting the manual
feed mode from the menu shown on the operation panel. When the cut sheet loaded at the back of the printer is detected by the sensor, the printer starts feeding the
cut sheet. After this, the printer performs various adjustments and detection using the multi sensor, thus completing the paper pick-up operation.
During printing, the cut sheet is fed by controlling the rotation of the feed roller according to the selected print mode.
2-43
Chapter 2
Cut sheet loading
(manual)
Detection of cut sheet *1
Light intensity/
Head hight adjustment
Detection of paper width
Detection of skewed movement of paper
End of cut sheet pick-up operation
Printing
*1
The auto roll feed unit starts feeding the cut sheet when the roll media detection sensor detects the media.
When the auto roll feed unit is not mounted, the printer starts feeding the media when the paper detection
sensor detects the media.
F-2-38
2-44
Chapter 2
2.3.3.2.6 Structure of Feed Roller Unit
0016-8218
iPF6100 / iPF6200 / iPF6000S
The feed roller unit consists of media feeding mechanisms such as feed rollers driven by the feed motor and the pinch roller unit operating in conjunction with the
feed rollers.
While being held flat on the platen, media is fed horizontally under the printhead.
The feed roller unit has a sensor that detects the media feed status and a sensor that detects the status of the mechanisms that constitute the paper path.
Feed roller
Feed roller encoder sensor
Pinch roller
Feed motor
Feed roller HP sensor
F-2-39
2-45
Chapter 2
2.3.3.2.7 Feed Roller Eccentricity Detection Function
0016-8219
iPF6100 / iPF6200 / iPF6000S
Media are fed by the feed roller at regular intervals.
Irregular feeding of media due to the feed roller eccentricity problem, irregular printing can occur in the media feeding direction periodically.
To prevent this, the feed roller encoder sensor and feed roller HP sensor detect the presence and amount of feed roller eccentricity every rotation of the feed roller.
This function is called the feed roller eccentricity detection function. If eccentricity is detected, the media feed mount is compensated for according to the amount
of eccentricity.
Feed roller encoder sensor
Feed roller HP sensor
F-2-40
Media
Feed roller
Not decentered
Decentered
Feed amount
Feed roller
once
Feed roller
once
F-2-41
2-46
Chapter 2
2.3.3.2.8 Structure of Ejection Spur
0016-8220
iPF6100 / iPF6200 / iPF6000S
a) Outline
The ejection spur unit consists of a spur, a spur motor that moves the spur, a spur cam sensor, and an eject roller.
b) Spur lift mechanism
The spur must be moved up and down according to the selected media type and feed mode. The spur motor and spur cam sensor are used to control the spur stop
position.
- In case of manual feed from front
When the above mode is selected in the user mode, the spur moves to the upper limit position and then stops.
- Stop position depending on media type
To prevent the spur from damaging the media, the spur stops at a proper position according to the media type selected in the user mode.
c) Eject roller drive
The drive power of the eject roller is transmitted from the feed roller via the drive belt.
Feed roller
Eject roller
Drive belt
Spur cam sensor
Spur unit
Spur motor
F-2-42
2-47
Chapter 2
2.3.3.3 Cutter Unit
2.3.3.3.1 Structure of Cutter unit
0016-8205
iPF6100 / iPF6200 / iPF6000S
If roll media are used, the cutter unit attached on the front of the spur unit cuts the leading end of the media on loading and cuts the media on ejection. Whether to
perform cutting or not is determined by the choice of the main menu and the specifications of the printer driver.
The cutter in the cutter unit stands by at the cutter home position, except when it cuts roll media. Power from the cutter drive motor is imparted to the circular belt
to move the cutter from left to right for cutting roll media.
Cutter
Cutter right position
sensor
Cutter HP sensor
F-2-43
2-48
Cutter motor
Chapter 2
2.4 Printer Electrical System
2.4.1 Outline
2.4.1.1 Overview
0016-8221
iPF6100
The printer electrical system consists of the main controller PCB and power supply PCB which are mounted on the left side of the printer, the carriage PCB and
print head which are mounted in the carriage, and other electrical components such as the operation panel, sensors, and motors.
The main controller PCB manages the image data processing and the entire electrical system, and controls relay PCBs and driver functions.
Power supply
Main controller PCB
Maintenance cartridge relay PCB
Roll feed unit PCB
Carriage PCB
Operation panel PCB
F-2-44
2-49
Chapter 2
Power supply
AC inlet
Main controller PCB
+26V generation function
IC1501/IC1701
IC1601-IC1603
Power supply control function
+21.5V generation function
BAT801
Lithium battery
IC601-IC604
SDRAM
IC803
RTC
IC802
EEPROM
IC1
Host computer
Carriage PCB
Interface
control function
IC1201
LAN Controller
Linear encoder
Linear encoder detection function
Head
Heat pulse control function
IC1/IC3
EEPROM
Temperature reading
control function
Thermistor
Multi sensor
EEPROM
Image data control function
DI sensor reading
control function
IC6/IC7
Multi sensor
control function
IC701 FLASH ROM
IC2
Operation panel control function
Operation panel
PWM control function
Fans
Remaining ink level
detection function
Ink tank ROM PCB
LED control function
Maintenance cartridge
relay PCB
EEPROM control function
IC1 EEPROM
Sensor detection function
Sensors
Motor control function
Roll feed unit PCB
IC1
Motor driver
IC2801/IC2901
IC3001/IC3101
Motor driver
F-2-45
2-50
Motors
Chapter 2
2.4.1.2 Overview
0020-1934
iPF6200
The printer electrical system consists of the main controller PCB and power supply PCB and hard disk drive which are mounted on the left side of the printer, the
carriage PCB and print head which are mounted in the carriage, and other electrical components such as the operation panel, sensors, and motors.
The main controller PCB manages the image data processing and the entire electrical system, and controls relay PCBs and driver functions.
Power supply
HDD expansion PCB
HDD
Maintenance cartridge relay PCB
Roll feed unit PCB
Main controller PCB
Carriage PCB
Operation panel PCB
F-2-46
2-51
Chapter 2
Main controller PCB
Power supply
AC inlet
+26V generation function
IC1501/IC1701
IC1601-IC1603
Power supply control function
+21.5V generation function
BAT801
Lithium battery
IC601-IC604
SDRAM
IC803
RTC
IC802
EEPROM
IC1
Host computer
Interface
control function
IC1201
LAN Controller
HDD
HDD expansion PCB
Image data control function
IC201
HDD Controller
Hard disk drive control function
Linear encoder detection function
Heat pulse control function
IC701 FLASH ROM
Carriage PCB
Linear encoder
IC2
Head
Operation panel control function
Operation panel
PWM control function
Fans
Remaining ink level
detection function
Ink tank ROM PCB
IC1/IC3
EEPROM
DI sensor reading
control function
Temperature reading
control function
LED control function
Maintenance cartridge
relay PCB
Thermistor
Multi sensor
EEPROM
IC6/IC7
Multi sensor
control function
EEPROM control function
IC1 EEPROM
Sensor detection function
Sensors
Motor control function
Roll feed unit PCB
IC1
Motor driver
IC2801/IC2901
IC3001/IC3101
Motor driver
F-2-47
2-52
Motors
Chapter 2
2.4.1.3 Overview
0020-7371
iPF6000S
The printer electrical system consists of the main controller PCB and power supply PCB and hard disk drive which are mounted on the left side of the printer, the
carriage PCB and print head which are mounted in the carriage, and other electrical components such as the operation panel, sensors, and motors.
The main controller PCB manages the image data processing and the entire electrical system, and controls relay PCBs and driver functions.
Power supply
HDD expansion PCB
HDD
Maintenance cartridge relay PCB
Roll feed unit PCB
Main controller PCB
Carriage PCB
Operation panel PCB
F-2-48
2-53
Chapter 2
Main controller PCB
Power supply
AC inlet
+26V generation function
IC1501/IC1701
IC1601-IC1603
Power supply control function
+21.5V generation function
IC301/IC302
IC601-IC604
SDRAM
BAT801
Lithium battery
IC803
RTC
IC802
EEPROM
IC1
Host computer
Interface
control function
IC1201
LAN Controller
HDD
HDD expansion PCB
Image data control function
IC201
HDD Controller
Hard disk drive control function
Linear encoder detection function
Heat pulse control function
IC701 FLASH ROM
Carriage PCB
Linear encoder
IC2
Head
Operation panel control function
Operation panel
PWM control function
Fans
Remaining ink level
detection function
Ink tank ROM PCB
IC1/IC3
EEPROM
DI sensor reading
control function
Temperature reading
control function
LED control function
Maintenance cartridge
relay PCB
Thermistor
Multi sensor
EEPROM
IC6/IC7
Multi sensor
control function
EEPROM control function
IC1 EEPROM
Sensor detection function
Sensors
Motor control function
Roll feed unit PCB
IC1
Motor driver
IC2801/IC2901
IC3001/IC3101
Motor driver
F-2-49
2-54
Motors
Chapter 2
2.4.2 Main Controller
2.4.2.1 Main controller components
0016-8391
iPF6100
IC802
IC803
BAT801
IC701
IC601
IC3101
IC602
IC2
IC603
IC1
IC604
IC2801
IC1201
IC2901
IC3001
F-2-50
a) ASIC (IC1/IC2)
The ASIC with a 16-bit internal bus is driven in sync with the 66 MHz external clock. It supports the following functions:
Image processing unit
This unit converts the RGB multi-value image data or CMYK multi-value data received from the host computer through the interface connector to the binary image
data for the ink colors used.
DMA controller
This controller control DMA transfer of the data transferred through the input interfaces such as the USB and expansion card slot as well as DMA transfer of the
data stored in the DIMM.
Image data generation/output function
This function generates image data for color printing from the received image data and the mask pattern (corresponding to print mode) stored in the FLASH ROM,
and stored the generated image data in DIMM. It also outputs the generated image data to the carriage PCB.
Interrupt controller
This controller receives and processes internal interrupts and external interrupts from the USB, image processing unit, and expansion card slot.
Timer function
Even when the printer is turned off, the timer function is held on using the RTC(IC803) and lithium battery(BAT801) to assist the cleaning function.
When the power cord is plugged to the outlet, power is supplied to the RTC and therefore the lithium battery power is not consumed.
Heat Enable signal control function
This function uses the pulse width to perform variable control of the time of application of the Heat Enable signal to the nozzle heater board for each printhead
nozzle array.
Linear scale count function
This function reads the linear scale when the carriage moves, thus generating the ink discharge timing. It also counts the linear scale timing cycle using the reference
clock to measure the carriage moving speed.
Dot count function
This function controls the discharge dots used as the information for Heat Enable signal control, maintenance jet control, cleaning control, and remaining ink level
for each nozzle array.
Operation panel control function
This function controls serial communication with the operation panel.
PWM control function
This function controls driving of the suction fan and mist fan as well as the temperature of the printhead.
Remaining ink level detection function
This function detects the remaining level of each color of ink based on the signal received from the hollow needle mounted in the ink tank unit.
LED control function
This function controls the LEDs on the ink tank unit.
I/O port function
This function controls input signals from sensors.
Power ON/OFF control function
This function controls turning on/off of the drive power (26 V and 21.5 V) supplied from the power supply PCB.
2-55
Chapter 2
Head DI sensor read control function
This function controls read operation by the head DI sensor.
Multi sensor control function
This function controls the LED, adjusts the gain, and controls obtainment of the reading for the multi sensor.
EEPROM control function
This function controls the EEPROMs of individual ink tanks, the maintenance cartridge EEPROM, the EEPROM on the maintenance cartridge relay PCB, and the
head EEPROM in addition to the on-board EEPROM.
Motor control function
This function controls the carriage motor, feed motor, valve motor, spur motor, purge motor, lift motor, and cutter motor based on the input signals from sensors.
b) Driver IC (IC3101)
This IC generates a carriage motor control signal based on the control signal from the ASIC.
c) Driver IC (IC2801)
This IC generates feed motor and valve motor control signals based on the control signal from the ASIC.
d) Driver IC (IC2901)
This IC generates purge motor, cutter motor and spur motor control signals based on the control signal from the ASIC.
e) Driver IC (IC3001)
This IC generates a lift motor control signal based on the control signal from the ASIC.
f) DIMMs (IC601,IC602,IC603,IC604)
The DIMM comprising a 128-MB SDR-SDRAM is connected to the 32-bit data bus to be used as a work area.
During print data reception, it is also used as an image buffer.
It cannot be expanded.
g) FLASH ROM (IC701)
A 64-MB flash ROM is connected to the 8-bit data bus to store the printer control program.
h) EEPROM (IC802)
The 128-KB EEPROM stores various setting values, adjustment values, log data, counter values related to the user/servicing.
i) SO-DIMM
The 256-MB SO-DIMM (J401) is connected to the 32-bit data bus to be used as a work area.
During print data reception, it is also used as an image buffer.
It cannot be expanded.
MEMO:
After replacement of the main controller PCB, the printer must be started up in the service mode to take over the setting and adjustment values to the new PCB
properly (the service mode will be switched to the PCB replacement mode automatically).
2.4.2.2 Main controller components
0020-1935
iPF6200
IC802
IC803
BAT801
IC701
IC601
IC3101
IC602
IC2
IC603
IC1
IC604
IC2801
IC1201
IC2901
IC3001
F-2-51
a) ASIC (IC1/IC2)
The ASIC with a 16-bit internal bus is driven in sync with the 66 MHz external clock. It supports the following functions:
Image processing unit
This unit converts the RGB multi-value image data or CMYK multi-value data received from the host computer through the interface connector to the binary image
data for the ink colors used.
2-56
Chapter 2
DMA controller
This controller control DMA transfer of the data transferred through the input interfaces such as the USB and expansion card slot as well as DMA transfer of the
data stored in the DIMM.
Image data generation/output function
This function generates image data for color printing from the received image data and the mask pattern (corresponding to print mode) stored in the FLASH ROM,
and stored the generated image data in DIMM. It also outputs the generated image data to the carriage PCB.
Interrupt controller
This controller receives and processes internal interrupts and external interrupts from the USB, image processing unit, and expansion card slot.
Timer function
Even when the printer is turned off, the timer function is held on using the RTC(IC803) and lithium battery(BAT801) to assist the cleaning function.
When the power cord is plugged to the outlet, power is supplied to the RTC and therefore the lithium battery power is not consumed.
Heat Enable signal control function
This function uses the pulse width to perform variable control of the time of application of the Heat Enable signal to the nozzle heater board for each printhead
nozzle array.
Linear scale count function
This function reads the linear scale when the carriage moves, thus generating the ink discharge timing. It also counts the linear scale timing cycle using the reference
clock to measure the carriage moving speed.
Dot count function
This function controls the discharge dots used as the information for Heat Enable signal control, maintenance jet control, cleaning control, and remaining ink level
for each nozzle array.
Operation panel control function
This function controls serial communication with the operation panel.
PWM control function
This function controls driving of the suction fan and mist fan as well as the temperature of the printhead.
Remaining ink level detection function
This function detects the remaining level of each color of ink based on the signal received from the hollow needle mounted in the ink tank unit.
LED control function
This function controls the LEDs on the ink tank unit.
I/O port function
This function controls input signals from sensors.
Power ON/OFF control function
This function controls turning on/off of the drive power (26 V and 21.5 V) supplied from the power supply PCB.
Head DI sensor read control function
This function controls read operation by the head DI sensor.
Multi sensor control function
This function controls the LED, adjusts the gain, and controls obtainment of the reading for the multi sensor.
EEPROM control function
This function controls the EEPROMs of individual ink tanks, the maintenance cartridge EEPROM, the EEPROM on the maintenance cartridge relay PCB, and the
head EEPROM in addition to the on-board EEPROM.
Motor control function
This function controls the carriage motor, feed motor, valve motor, spur motor, purge motor, lift motor, and cutter motor based on the input signals from sensors.
HDD control function
This function controls the hard disk drive.
b) Driver IC (IC3101)
This IC generates a carriage motor control signal based on the control signal from the ASIC.
c) Driver IC (IC2801)
This IC generates feed motor and valve motor control signals based on the control signal from the ASIC.
d) Driver IC (IC2901)
This IC generates purge motor, cutter motor and spur motor control signals based on the control signal from the ASIC.
e) Driver IC (IC3001)
This IC generates a lift motor control signal based on the control signal from the ASIC.
f) DIMMs (IC601,IC602,IC603,IC604)
The DIMM comprising a 128-MB SDR-SDRAM is connected to the 32-bit data bus to be used as a work area.
During print data reception, it is also used as an image buffer.
It cannot be expanded.
g) FLASH ROM (IC701)
A 16-MB flash ROM is connected to the 8-bit data bus to store the printer control program.
h) EEPROM (IC802)
The 128-KB EEPROM stores various setting values, adjustment values, log data, counter values related to the user/servicing.
i) SO-DIMM
The 256-MB SO-DIMM (J401) is connected to the 32-bit data bus to be used as a work area.
During print data reception, it is also used as an image buffer.
It cannot be expanded.
2-57
Chapter 2
MEMO:
After replacement of the main controller PCB, the printer must be started up in the service mode to take over the setting and adjustment values to the new PCB
properly (the service mode will be switched to the PCB replacement mode automatically).
2.4.2.3 Main controller components
0020-7340
iPF6000S
IC302
IC802
IC301
IC803
BAT801
IC701
IC601
IC3101
IC602
IC2
IC603
IC1
IC604
IC2801
IC1201
IC2901
IC3001
F-2-52
a) ASIC (IC1/IC2)
The ASIC with a 16-bit internal bus is driven in sync with the 66 MHz external clock. It supports the following functions:
Image processing unit
This unit converts the RGB multi-value image data or CMYK multi-value data received from the host computer through the interface connector to the binary image
data for the ink colors used.
DMA controller
This controller control DMA transfer of the data transferred through the input interfaces such as the USB and expansion card slot as well as DMA transfer of the
data stored in the DIMM.
Image data generation/output function
This function generates image data for color printing from the received image data and the mask pattern (corresponding to print mode) stored in the FLASH ROM,
and stored the generated image data in DIMM. It also outputs the generated image data to the carriage PCB.
Interrupt controller
This controller receives and processes internal interrupts and external interrupts from the USB, image processing unit, and expansion card slot.
Timer function
Even when the printer is turned off, the timer function is held on using the RTC(IC803) and lithium battery(BAT801) to assist the cleaning function.
When the power cord is plugged to the outlet, power is supplied to the RTC and therefore the lithium battery power is not consumed.
Heat Enable signal control function
This function uses the pulse width to perform variable control of the time of application of the Heat Enable signal to the nozzle heater board for each printhead
nozzle array.
Linear scale count function
This function reads the linear scale when the carriage moves, thus generating the ink discharge timing. It also counts the linear scale timing cycle using the reference
clock to measure the carriage moving speed.
Dot count function
This function controls the discharge dots used as the information for Heat Enable signal control, maintenance jet control, cleaning control, and remaining ink level
for each nozzle array.
Operation panel control function
This function controls serial communication with the operation panel.
PWM control function
This function controls driving of the suction fan and mist fan as well as the temperature of the printhead.
Remaining ink level detection function
This function detects the remaining level of each color of ink based on the signal received from the hollow needle mounted in the ink tank unit.
LED control function
This function controls the LEDs on the ink tank unit.
I/O port function
This function controls input signals from sensors.
2-58
Chapter 2
Power ON/OFF control function
This function controls turning on/off of the drive power (26 V and 21.5 V) supplied from the power supply PCB.
Head DI sensor read control function
This function controls read operation by the head DI sensor.
Multi sensor control function
This function controls the LED, adjusts the gain, and controls obtainment of the reading for the multi sensor.
EEPROM control function
This function controls the EEPROMs of individual ink tanks, the maintenance cartridge EEPROM, the EEPROM on the maintenance cartridge relay PCB, and the
head EEPROM in addition to the on-board EEPROM.
Motor control function
This function controls the carriage motor, feed motor, valve motor, spur motor, purge motor, lift motor, and cutter motor based on the input signals from sensors.
HDD control function
This function controls the hard disk drive.
b) Driver IC (IC3101)
This IC generates a carriage motor control signal based on the control signal from the ASIC.
c) Driver IC (IC2801)
This IC generates feed motor and valve motor control signals based on the control signal from the ASIC.
d) Driver IC (IC2901)
This IC generates purge motor, cutter motor and spur motor control signals based on the control signal from the ASIC.
e) Driver IC (IC3001)
This IC generates a lift motor control signal based on the control signal from the ASIC.
f) DIMMs (IC301,IC302,IC601,IC602,IC603,IC604)
The DIMM comprising a 256-MB SDRAM is connected to the 32-bit data bus to be used as a work area.
During print data reception, it is also used as an image buffer.
It cannot be expanded.
g) FLASH ROM (IC701)
A 32-MB flash ROM is connected to the 8-bit data bus to store the printer control program.
h) EEPROM (IC802)
The 128-KB EEPROM stores various setting values, adjustment values, log data, counter values related to the user/servicing.
MEMO:
After replacement of the main controller PCB, the printer must be started up in the service mode to take over the setting and adjustment values to the new PCB
properly (the service mode will be switched to the PCB replacement mode automatically).
2.4.2.4 HDD expansion PCB components
0020-1941
iPF6200 / iPF6000S
IC 201
F-2-53
a) HDD controller IC (IC201)
This controller control the hard disk drive.
2.4.3 Carriage Relay PCB
2.4.3.1 Carriage PCB components
0013-4310
iPF6100 / iPF6200 / iPF6000S
2-59
Chapter 2
IC 7
IC 3
IC 6
IC 1
F-2-54
a) Latch ICs (IC1 and IC3)
DI sensor reading control function
This function obtains the DI sensor value in the printhead and head rank for each color and sends it to the main controller PCB based on the control signals from
the main controller.
Environmental temperature reading control
This function sends the environmental temperature detected by the thermistor on the board based t the main controller PCB based on the control signals from the
main controller PCB.
Image data relay function
This function relays the image data from the main controller PCB to the printhead.
The function for processing image data is not supported.
b) Multi sensor control ICs (IC6 and IC7)
These ICs are used to generate the multi sensor LED control signal and adjust the gain.
2.4.4 Motor Driver
2.4.4.1 Roll feed unit PCB components
0013-4323
iPF6100 / iPF6200 / iPF6000S
IC 1
F-2-55
a) Driver IC (IC1)
Roll motor drive function
This function controls the roll motor based on the control signals from the main controller.
Sensor relay function
This function relays the input signals from the roll cam sensor and roll media sensor to the main controller PCB.
2.4.5 Maintenance Cartridge Relay PCB
2.4.5.1 Maintenance cartridge relay PCB components
0013-5143
iPF6100 / iPF6200 / iPF6000S
IC 1
F-2-56
a) EEPROM (IC1)
The 128-KB EEPROM stores all information written to the EEPROM on the main controller PCB.
2-60
Chapter 2
2.4.6 Power Supply
2.4.6.1 Power supply block diagram
0013-4333
iPF6100 / iPF6200 / iPF6000S
AC inlet
100V to 240V
Operation panel
POWER ON
Main controller PCB
Power supply
DC power supply
+26V
control circuit
generation circuit
Noize filter circuit
Transformer
+5V/+3.3V
generation circuit
+21.5V
generation circuit
Rectifying circuit
F-2-57
The power supply converts AC voltages ranging from 100 V to 240 V from the AC inlet to DC voltages for driving the ICs, motor, and others.
The voltage generator circuits include the +26 V generation circuit for driving motors, fans, and sensors and a +21.5 V generator circuit for driving sensors, heads,
logic circuits, and others.
When the power is turned off, +26 V and +21.5 V are reduced to about 12 V and 9 V respectively (power save mode).
Power ON/OFF operation is controlled by the main controller PCB.
2-61
Chapter 2
2.5 Detection Functions with Sensors
2.5.1 Sensors for covers
0013-4305
iPF6100 / iPF6200 / iPF6000S
Top cover sensor
Ink tank cover switch
F-2-58
Top cover sensor
The photo-interrupter-type top cover sensors detect opening and closing of the top cover.
When the top cover is closed, the sensor light is shielded by the sensor arm, thus notifying the sensor of closing the cover.
Ink tank cover switch
The micro-switch-type ink tank cover switch detects opening and closing of the ink tank cover.
When the ink tank cover is closed, the protrusion on the ink tank cover presses the switch, thus detecting closing of the ink tank cover.
2-62
Chapter 2
2.5.2 Ink passage system
0013-4334
iPF6100 / iPF6200
Purge unit
Pump cam sensor
Valve open/closed detection sensor
Pump encoder sensor
Head management sensor
F-2-59
Pump cam sensor
The photo-interrupter-type pump cam sensor detects that the sensor light is shielded or unshielded by the rotary cam. The sensor detects the purge unit capping and
wiping states with the combination of the state detected by the pump cam and the state of pump motor rotation control performed by the pump encoder.
Rotary flag
Sensor
- Carriage lock
- Capping
- Suction
- Air passage valve open
- Idle suction
- Printing
- Suction during printing
- Wiping
- Carriage lock
- Air passage
- Carriage move
- Idle ejection
- Idle suction
F-2-60
2-63
Chapter 2
Pump encoder sensor
The pump encoder is a photo-interruptive type sensor. It reads the slits on the pump motor's encoder film to control the amount of pump motor rotation.
Slits
Sensor
F-2-61
Valve open/closed detection sensor
The photo-interrupter-type valve open/closed detection sensor detects the valve cam state.
When the link that operates in conjunction with the valve cam shields light, this sensor detects that the ink supply valve has been opened.
Ink detection sensor
Presence of absence of ink in the ink tank is detected according to whether the two hollow needles are electrically connected.
When the ink level in the ink tank lowers below the wall around the hollow needle at the air passage, this hollow needle is electrically disconnected form the hollow
needle located on the ink supply side, thus detecting that the printer has run out of ink.
Ink tank
Wall
Rubber plug
Needle (ink supply)
Needle(air passage)
F-2-62
Head management sensor
The photo-transmission-type sensor detects that the printhead is discharging ink.
The carriage moves to and stops at the detection positions for individual nozzle arrays. When the carriage is at a stop, nozzles discharge ink on after another.
The sensor detects each nozzle due to the voltage change caused when ink discharged from the nozzle blocks the sensor light.
Non-discharging nozzle detection is carried out at the following timings:
- After the execution of Cleaning 1, Cleaning 2, Cleaning 3, Cleaning 6 or Cleaning 10
- After the number of copies that has been set by the user menu choice Nozzle Check Frequency have been printed
If more than a specified number of non-discharging nozzles have been located in one session of non-discharging nozzle detection, the normal cleaning sequence is
launched before a second session of non-discharging nozzle detection is conducted. If more than a specified number of non-discharging nozzles are located in the
second session of non-discharging nozzle detection, the normal (High) cleaning session is launched before a third session of non-discharging nozzle detection is
conducted.
If 30 or more non-discharging nozzles and less than 100 non-discharging nozzles per train are located as a result of the third session of non-discharging nozzle
detection, the print operation can resume after the message display as needed. If 100 or more non-discharging nozzles are located, a head replacement prompt
message is displayed.
Printhead
Nozzle unit
Head management
sensor unit
F-2-63
2-64
Chapter 2
2.5.3 Ink passage system
0020-7341
iPF6000S
Valve open/closed detection sensor
Purge unit
Pump cam sensor
Valve open/closed detection sensor 2
Pump encoder sensor
Head management sensor
F-2-64
Pump cam sensor
The photo-interrupter-type pump cam sensor detects that the sensor light is shielded or unshielded by the rotary cam. The sensor detects the purge unit capping and
wiping states with the combination of the state detected by the pump cam and the state of pump motor rotation control performed by the pump encoder.
Rotary flag
Sensor
- Carriage lock
- Capping
- Suction
- Air passage valve open
- Idle suction
- Printing
- Suction during printing
- Wiping
- Carriage lock
- Air passage
- Carriage move
- Idle ejection
- Idle suction
F-2-65
2-65
Chapter 2
Pump encoder sensor
The pump encoder is a photo-interruptive type sensor. It reads the slits on the pump motor's encoder film to control the amount of pump motor rotation.
Slits
Sensor
F-2-66
Valve open/closed detection sensor/Valve open/closed detection sensor 2
The photo-interrupter-type valve open/closed detection sensor/valve open closed detection sensor 2 detect the valve cam state.
When the link that operates in conjunction with the valve cam shields light, this sensors detect that the ink supply valve has been opened.
Ink detection sensor
Presence of absence of ink in the ink tank is detected according to whether the two hollow needles are electrically connected.
When the ink level in the ink tank lowers below the wall around the hollow needle at the air passage, this hollow needle is electrically disconnected form the hollow
needle located on the ink supply side, thus detecting that the printer has run out of ink.
Ink tank
Wall
Rubber plug
Needle (ink supply)
Needle(air passage)
F-2-67
Head management sensor
The photo-transmission-type sensor detects that the printhead is discharging ink.
The carriage moves to and stops at the detection positions for individual nozzle arrays. When the carriage is at a stop, nozzles discharge ink on after another.
The sensor detects each nozzle due to the voltage change caused when ink discharged from the nozzle blocks the sensor light.
Non-discharging nozzle detection is carried out at the following timings:
- After the execution of Cleaning 1, Cleaning 2, Cleaning 3, Cleaning 6 or Cleaning 10
- After the number of copies that has been set by the user menu choice Nozzle Check Frequency have been printed
If more than a specified number of non-discharging nozzles have been located in one session of non-discharging nozzle detection, the normal cleaning sequence is
launched before a second session of non-discharging nozzle detection is conducted. If more than a specified number of non-discharging nozzles are located in the
second session of non-discharging nozzle detection, the normal (High) cleaning session is launched before a third session of non-discharging nozzle detection is
conducted.
If 30 or more non-discharging nozzles and less than 100 non-discharging nozzles per train are located as a result of the third session of non-discharging nozzle
detection, the print operation can resume after the message display as needed. If 100 or more non-discharging nozzles are located, a head replacement prompt
message is displayed.
Printhead
Nozzle unit
Head management
sensor unit
F-2-68
2-66
Chapter 2
2.5.4 Carriage system
0016-8206
iPF6100 / iPF6200 / iPF6000S
Linear encoder sensor
Multi sensor
Lift cam sensor
F-2-69
Multi sensor
The photo-reflection-type multi sensor is composed of four LEDs (red, blue, green and infrared) and two light-sensitive sensors. It detects the leading edge, skewing,
and width of media and is used for adjustment of the registration, head height, and color calibration.
During head adjustment, the light reflected by the infrared LED and green LED is detected by two light-sensitive sensors to calculate the head height from the
difference between the measurements.
When color calibration is executed, a color chart printed is read with three-color LED (red, blue, green), so color correction is implemented on the basis of the
readings.
Ink mist adhering to the sensor could deliver incorrect measurement readings when color calibration is executed. If the ink dot count exceeds a tolerance, the service
error (E194-4034) would occur. If it does, execute service mode: SERVICE MODE > ADJUST > GAP CALIB. after the multisensor has been replaced to clear the
dot count.
LED(blue)
LED(green)
Infrared sensor
LED(red)
Infrared LED
Media
Platen
F-2-70
- Service mode: After SERVICE MODE > ADJUST > GAP CALIB. has been carried out, pass paper to make sure that it is detected properly.
- In executing Calibration concurrently with the main menu choice Auto Head Adj. or Manual Head Adj., Auto Head Adj. or Manual Head Adj. first for the sake
of higher color calibration accuracy.
Linear encoder sensor
When the carriage moves, the linear encoder sensor located at the rear of the carriage reads the slits on the linear encoder to detect the carriage position.
2-67
Chapter 2
Lift cam sensor
This is a photo-interrupter-type sensor. The lift motor is driven by a predetermined number of pulses received after blocking of the sensor light by the flag, thus
controlling the heights of the head and platen.
Environmental temperature sensor
The environmental temperature sensor installed on the carriage PCB detects the temperature around the carriage.
The resistance of the thermistor that changes with the temperature inside the printer is reported to the main controller via the carriage PCB.
The environmental temperature is used to calibrate the head sensor and to detect abnormal head temperatures.
Head temperature sensor
The diode-type head temperature sensors installed at the top and bottom of the printhead nozzle unit are used to detect the head temperature.
The diode voltage that changes with the nozzle unit temperature is reported to the main controller via the carriage PCB.
The detected head temperature is used to control the head operation and to detect abnormal head temperatures.
Printhead contact detection
The printhead contact status is detected by testing the electrical conductivity.
It is detected according to the voltage changes at the two terminals of the contact faces, power supply terminals, and GND terminal.
2.5.5 Paper path system
0016-8216
iPF6100 / iPF6200 / iPF6000S
Paper detection sensor
Cutter HP sensor
Cutter right position
sensor
F-2-71
Paper detection sensor
This is a photo-interrupter-type sensor. When paper is supplied from the paper tray, or roll feed unit, the sensor light is blocked by the sensor arm, thus detecting
paper.
Spur cam sensor
This is a photo-interrupter-type sensor.
When the sensor light is shielded by the rotation of the spur motor, the printer detects that the spur unit is at the upper-limit position.
When the sensor light is unshielded by the rotation of the spur motor, the printer detects that the spur unit is at the bottom position.
The spur height is controlled by driving the spur motor with a predetermined number of pulses.
Cutter HP sensor
This is a photo-interrupter-type sensor. This sensor detects that the cutter is at the home position (left end).
Cutter right position sensor
This is a photo-interrupter-type sensor. This sensor detects that the cutter is at the right end.
2-68
Chapter 2
Feed roller encoder sensor
Feed roller HP sensor
F-2-72
Feed roller HP sensor
The feed roller HP sensor detects the change from the white portion (unshielded sensor light) to black portion (shielded sensor light) of the encoder film on the feed
roller, thus setting the home position for feed roller eccentricity compensation.
Feed roller encoder sensor
The feed roller encoder sensor detects the slits on the encoder film of the feed roller during feed motor rotation, thus detecting the amount of rotation of the feed
roller (media feed amount).
Roll cam sensor
Roll media sensor
F-2-73
Roll media sensor
This is a photo-interrupter-type sensor. When media is loaded, the the sensor arm blocks the sensor light, thus detecting the media.
Roll cam sensor
This is a photo-interrupter-type sensor. When the roll cam blocks the sensor light, lowering of the transport roller (contact with the roller) is detected.
2-69
Chapter 2
2.5.6 Others
0013-4393
iPF6100 / iPF6200 / iPF6000S
Temperature/humidity sensor
F-2-74
Temperature/humidity sensor
This sensor detects the temperature and humidity around the printer so that the measured values are used for head height adjustment, idle discharge control, waste
ink evaporation amount calculation, and suction fan control.
2-70
Chapter 3 INSTALLATION
Contents
Contents
3.1 Installation......................................................................................................................................................................3-1
3.1.1 Making Pre-Checks...................................................................................................................................................................... 3-1
3.1.1.1 Making Pre-Checks.........................................................................................................................................................................................3-1
3.1.2 Unpacking and Installation .......................................................................................................................................................... 3-1
3.1.2.1 Unpacking and Installation .............................................................................................................................................................................3-1
3.1.2.2 Installing the Stand........................................................................................................................................................................................3-10
3.1.3 Checking the Images/Operations ............................................................................................................................................... 3-19
3.1.3.1 Checking the Image and Operation...............................................................................................................................................................3-19
3.2 Transporting the Printer ...............................................................................................................................................3-20
3.2.1 Transporting the Printer ............................................................................................................................................................. 3-20
3.2.1.1 Transporting the Printer ................................................................................................................................................................................3-20
3.2.2 Reinstalling the Printer .............................................................................................................................................................. 3-21
3.2.2.1 Reinstalling the Printer..................................................................................................................................................................................3-21
Chapter 3
3.1 Installation
3.1.1 Making Pre-Checks
3.1.1.1 Making Pre-Checks
0016-8483
iPF6100 / iPF6200 / iPF6000S
Package dimensions and weight are as follows.
Main body (with a palette): 1320 (W) mm x 914 (D) mm x 645 (H) mm, Approx. 79 kg
+300mm
+300mm
+150mm
+800mm
+150mm
F-3-1
Installation space
Main body only: 1477 (W) mm x 1770 (D) mm x 648 (H) mm
Main body with stand: 1477 (W) mm x 1961 (D) mm x 1293 (H) mm
When printing from the Front Paper Feed Slot, leave at least 1,300 mm (51.2 in) of unobstructed space in front of the printer and 700 mm (27.6 in) behind it.
3.1.2 Unpacking and Installation
3.1.2.1 Unpacking and Installation
0016-8530
iPF6100 / iPF6200 / iPF6000S
The printer must be moved with it held by three or more persons on both sides. Be careful not to get your lower back and other regions hurt.
F-3-2
3-1
Chapter 3
When moving the printer, grasp the carrying handles [1] on the left and right side of the bottom.
Holding other portions can drop the printer and you may be injured.
[1]
[1]
F-3-3
3-2
Chapter 3
(1) Check to see that none of the accessories is missing.
[1]
[2]
[3]
[4]
[5]
[6]
[7]
[8]
[9]
[10]
F-3-4
[1] Printer
[2] Power Cord
[3] Printhead
[4] Cleaning sheet
[5] Roll Holder Set
[6] Starter ink tanks
[7] Cleaning brush
[8] Reference Guides
[9] CD-ROM
[10] Sample paper
3-3
Chapter 3
(2) Unpack the printer and remove the packaging material.
F-3-5
(3) Grasaping the carrying handles [1] on the left and right side of the bottom, place the printer on a level place such as a table.
[1]
[1]
F-3-6
(4) The Roll Feed Unit [1] is preinstalled on the printer. Peel away the tape and remove the Roll Holder [2] and protective material from the Roll Feed Unit. Also
remove the tape on the two Holder Stoppers attached to the Roll Holder, and then remove the Holder Stoppers [3] from the Roll Holder.
[3]
[2]
[1]
F-3-7
(5) Remove the tape and other packaging material used to secure the printer and accessories. Remove the tape and protective material on the Top Cover [1] and
Ejection Guide [2]. After removing the tape and protective material on the Ejection Guide, reinstall it.
[1]
[2]
F-3-8
3-4
Chapter 3
(6) Lift the Belt Stopper [2] of the Carriage Shaft [1] and pull it forward to remove it.
[2] [1]
[3]
F-3-9
MEMO:
- You will need the Belt Stopper if you move the printer to another location. Do not discard the Belt Stopper you have removed.
- When you open the Top Cover, you will find a Cleaning Brush [3] on the right side. Use this brush to clean inside the Top Cover.
(7) Plug the power cord into the Power Socket on the back of the printer.
F-3-10
(8) Plug the power cord into the outlet.
F-3-11
(9) Press the Power botton to power on the printer.
OK
F-3-12
(10) When Open Top Cover is displayed on the Display Screen, open the Top Cover.
F-3-13
(11) Pull the Printhead Fixer Lever forward to open it completely.
F-3-14
3-5
Chapter 3
(12) Pull up the Printhead Fixer Cover to open it completely.
F-3-15
(13) Holding the Printhead by the grips [1], remove it from the case.
[1]
[1]
F-3-16
- When handling the Printhead, always hold it by the grips [1].
- Never touch the printhead nozzles [2] or the metal contacts [3]. The printhead can damage or a printing failure can occur. Do not reattach the removed protective
caps.
- Dispose of these parts following the local regulation.
[2]
[1]
[3]
F-3-17
(14) Remove the orange Safety Cap 1 [1]. While squeezing the grips of Safety Cap 2 [2], pull the cap down to remove it.
[3]
[4]
[1]
[2]
F-3-18
- Never touch the ink supply section [4].
This may cause printing problems.
- The Printhead is filled with ink. When removing Safety Cap 1 [1] and Satety Cap 2 [2], be careful not to spill it.
- Do not reattach the protective material after removing it. Dispose of these materials according to local regulations.
3-6
Chapter 3
(15) With the nozzles facing down and the metal contacts toward the back, insert the Printhead into the Carriage. Carefully push the Printhead firmly into the Carriage, ensuring that the nozzles and metal contacts do not touch the Carriage.
F-3-19
(16) Pull the Printhead Fixer Cover down toward the front to lock the Printhead in place.
F-3-20
(17) Push the Printhead Fixer Lever toward the back of the printer until it clicks.
F-3-21
(18) Repeat steps 11-17 to install the second Printhead.
(19) Close the Top Cover.
F-3-22
(20) Open the ink tank cover according to the message shown on the display.
F-3-23
3-7
Chapter 3
(21) Press the tip of the Ink Tank Lock Lever of the color for installation and open the Ink Tank Lock Lever.
F-3-24
(22) Before removing the Ink Tank from the pouch, shake it gently seven or eight times. Agitate the ink in the Ink Tank by rotating your wrist to turn the Ink Tank
upside-down and right side up repeatedly.
F-3-25
(23) Open the pouch and remove the Ink Tank.
F-3-26
- Never touch the ink port [1] and contacts [2]. The peripheral parts may be stained, the ink tank may be broken, or a printing failure may occur.
[1]
[2]
F-3-27
- Becareful not to drop the ink tank once it is unpacked. The leaked ink may stain the peripheral area.
- Do not remove and shake the ink once it is installed. Ink may spatter.
3-8
Chapter 3
(24) Insert the Ink Tank into the holder facing as shown, with the ink holes down.
F-3-28
MEMO:
If you do not shake the ink tank, the ink may sediment, which may affect printing quality.
(25) Close the Ink Tank Lock Lever until it clicks.
F-3-29
(26) Make sure the Ink Lamp is lit in red.
F-3-30
(27) Repeat steps 21-26 to install all Ink Tanks.
(28) Close the Ink Tank Cover.
F-3-31
(29) After all Printheads and Ink Tanks are installed, Keep Cover Closed is shown on the Display Screen. The system now automatically fills with ink. This process
takes about 14 minutes.
MEMO:
Initial ink filling performed at printer installation consumes ink beween the ink tanks and printhead. The ink level indicators may drop to 80% immediately, but this
does not indicate a problem with the printer.
3-9
Chapter 3
3.1.2.2 Installing the Stand
0016-8538
iPF6100 / iPF6200 / iPF6000S
Stand assembly requires two or more people.
a. Package Contents
[1]
[2]
[3]
R
L
[4]
[5]
[6]
[8]
[7]
[12]
[11]
[10]
[15]
[9]
[16]
[17]
[18]
F-3-32
[1] Stand L
[2] Stand R
[3] Stand Stay
[4] Output Stacker
[5] Stand Board
[6] Basket Bolts (2pcs.)
[7] Basket Decorative Nuts (2pcs.)
[8] Basket Rod #1 (2pcs.)
[9] Basket Rod #2
[10] Basket Rod #3
[11] Support Rod
[12] Basket Arm (2pcs.)
[13] Basket Rod Caps (2pcs.)
[14] Main Unit Securing Bolts (long, 4pcs.)
[15] Table Bolts (short, 4pcs.)
[16] Allen Wrench
[17] Wrench
[18] Accessory Box
[19] Velcro Tape
3-10
[13]
[14]
[19]
Chapter 3
b. Assembling the Stand
(1) Position the Stand L [1] and Stand R [2] so that the Basket Fasteners are on the front, facing out.
L
R
[1]
[2]
F-3-33
(2) Hold the Stand Stay [1] with the surface marked "R" facing back. Insert it fully into the grooves of the Stand L [2] and Stand R [3] until it stops.
[2]
[1]
[3]
F-3-34
Be careful not to put your fingers between the Stand Stay fixtures and the groove of Stand.
F-3-35
3-11
Chapter 3
(3) To secure the Stand Stay [2], use the M10 side of the Wrench [1] to tighten hex nuts in four positions on the top and bottom of both sides.
[2]
[1]
F-3-36
(4) Put the Stand Board [1] on the Stand, aligning the right side of the Stand Board [2] with the right side of the Stand [3].
[1]
[2]
[3]
F-3-37
Be careful not to pinch your fingers between the Stand Board and Stand.
(5) To secure the Stand Board [3] to the Stand, use the Allen Wrench [1] to tighten the four short Table Bolts [2] in the order shown.
[1]
[2]
3
[3]
2
4
1
[2]
F-3-38
3-12
Chapter 3
c. Assembling the Output Stacker
(1) Insert Basket Rod #1 [1] in the Basket Fastener so that the hole [2] of Basket Rod #1 and the hole [3] of the Basket Fastener on the right are aligned and the
Support Rod Holder [4] faces up.
[4]
[1]
[2]
[3]
F-3-39
(2) Insert Basket Bolts [2] into the hole of Basket Fastener, fitting the head of Basket Bolts [3] in the hole of Basket Fastener [1].
[3]
[1]
[2]
F-3-40
(3) Use Basket Decorative Nuts [2] to secure the Basket Bolts [1].
[1]
[2]
F-3-41
3-13
Chapter 3
(4) As in steps 1 to 3, insert Basket Rod #1 [1] in the Basket Fastener on the left so that the Support Rod Holder faces up. Secure it with Basket Bolts [2] and Basket
Decorative Nuts [3].
[1]
[2]
[3]
F-3-42
(5) Hang the hooks of the top of the Basket Arms [1] over the grooves [3] on the top of the Stand Stay [2], and hang the hooks of the bottom of the Basket Arms
on the bottom of the Stand Stay.
[3]
[2]
[1]
F-3-43
(6) Spread out the Output Stacker [2] so that the white tag [1] is face-down in the front right corner. Insert Basket Rod #2 [4] in the front hole [3] of the Output
Stacker and Basket Rod #3 [6] in the hole [5] in the middle of the Output Stacker on the bottom surface.
[6]
[5]
[4]
[3]
[2]
[1]
F-3-44
3-14
Chapter 3
(7) Insert Basket Rod Caps [1] on both ends of Basket Rod #2 [2] until they cover the lines [3].
[3]
[1]
[2]
[2]
[1]
[3]
F-3-45
(8) Insert Basket Rod Caps [2] on both ends of Basket Rod #1 [1] until they cover the lines [3].
[2]
[1]
[3]
F-3-46
(9) Insert Basket Rod #3 [1] in the holder groove [3] on the bottom of the Basket Arm [2].
[2]
[1]
[2]
[3]
[1]
[3]
F-3-47
3-15
Chapter 3
(10) Hang the holes [2] in the back of the Output Stacker [1] on both sides over the hooks [4] on the top of the Basket Arms [3], and then hang the loops [5] in the
middle of the Output Stacker on both sides over the hooks [6] in the middle of the Basket Arms.
[4]
[2]
[1]
[3]
[3]
[5]
[6]
[1]
F-3-48
(11) Insert the Support Rod [1] in the insertion slot [2] of the Support Rod Holder. Passing it through the bottom of the Output Stacker, insert it in the Support Rod
Holder on the opposite side. Normally, use the stacker in this position.
[2]
[1]
F-3-49
3-16
Chapter 3
d. Installing the Printer
- Moving the printer requires at least three people. Be careful to avoid back strain and other injuries.
F-3-50
- When moving the printer, grasp the carrying handles [1] on the left and right side of the bottom.
Holding other portions can drop the printer and you may be injured.
[1]
[1]
F-3-51
(1) Move the Stand into position and make sure the front casters are locked.
F-3-52
(2) With three people holding the printer carrying handles, align the
as you set the printer down on the Stand.
symbol on the back of the printer with the
symbol on the back of the Stand Board [1]
[1]
F-3-53
3-17
Chapter 3
(3) To secure the printer to the stand, use the provided Allen Wrench [2] to tighten the two long Main Unit Securing Bolts [1] firmly on either side from under the
printer.
[1]
[1]
[2]
F-3-54
(4) Assemble the Accessory Box [1] and use the Velcro Tape [2] to attach it to the Stand.
[2]
[1]
F-3-55
3-18
Chapter 3
3.1.3 Checking the Images/Operations
3.1.3.1 Checking the Image and Operation
0013-4090
iPF6100 / iPF6200 / iPF6000S
Do the paper set and the driver installation, and do the test print.
3-19
Chapter 3
3.2 Transporting the Printer
3.2.1 Transporting the Printer
3.2.1.1 Transporting the Printer
0016-8588
iPF6100 / iPF6200 / iPF6000S
When transporting the printer, the printhead must be capped and stay in the carriage.
In spite of this precaution, shocks incurred during transportation can damage the printhead.
Print the nozzle check pattern before making preparations for transporting the printer, pint the nozzle check pattern again after installing the printer at the new location, and then compare the two printouts.
If any problem such as nozzle clogging cannot be resolved by printhead cleaning, replace the printhead with a new one.
1. Moving the printer on the same floor having no step
(1) Turn off the Power button on the printer and check that the head is capped.
(2) Open the top cover and mount the belt stopper.
When mounting the belt stopper, be careful not to move the carriage by applying too much pressure to the carriage. If the carriage moves with the head capped, the
rubber part of the cap may touch the nozzles on the head and damage the printhead.
(3) Close the upper cover.
(4) Remove the roll holder from the roll holder slot.
(5) Remove the interface cable, power cord from the printer.
(6) Hold the carrying handles at the bottom, and then slowly move the printer.
If the printer is subjected to strong vibrations when it is moved, it can cause ink leakage and damage to the printhead. Be sure to move the printer slowly and carefully.
2. Moving the printer on the same floor having a step(s)
When the printer is operating properly, follow the instructions described in "When the printer is not operating".
1. When the printer is operating properly
To prevent the waste ink from leaking, drain the ink, wait about 15 minute, and then remove the maintenance cartridge. Package the removed maintenance cartridge
so that the waste ink does not leak.
(1) Turn on the Power button on the printer.
(2) Remove the roll holder from the roll holder slot
(3) Enter the Main menu, and then select "Maintenance" > "Move Printer". Remove all ink tanks following the displayed messages.
Put the removed ink tanks in the plastic bag with the ink port up and close the opening. It takes about 4 minutes to complete the "Move Printer" operation.
* "Move Printer" cannot be selected when "MT Cartridge Full Soon" is displayed.
In this case, replace the maintenance cartridge first.
* Never disconnect the power cord or open any cover while the "Move Printer" operation is in progress since this can cancel the operation.
If the "Move Printer" operation is canceled while in progress, the printer will remain in the offline mode and will not return to the online mode.
The "Ink Filling" operation is performed when the power is turned back on after canceling, so repeat the "Move Printer" operation from the beginning.
* The "Move Printer" operation will drain about 38 g of ink per color from the printer to the maintenance cartridge.
(4) When the "Move Printer" operation is completed, turn off the Power button.
(5) Open the top cover to check that the head is capped, and then secure the carriage with the belt stopper.
(6) Close the top cover.
(7) Disconnect the interface cable, power cord, and ground cable from the printer.
(8) Wait about 15 minutes after completion of the "Move Printer" operation, remove the maintenance cartridge, and then package it so that waste ink does not leak.
Check that waste ink is no longer leaking after removing the maintenance cartridge. If it is leaking, install the maintenance cartridge and wait until waste ink no
longer leaks.
(9) Attach the cushioning materials and tape.
(10) Pack the printer in the packing box, and then put the roll media, ink tank, and optional devices in another packing box for moving.
Use the original packing materials for the printer and other optional devices. If they are not available, pack them with a sufficient amount of cushioning materials.
2. When the printer is not operating properly
(1) Make sure that the printer is turned off.
(2) Disconnect the interface cable, power cord, and ground cable from the printer.
(3) Remove the roll holder from the roll holder slot.
(4) Drain ink from the printer.
(5) Manually cap the printhead.
* Manual capping is an emergency measure used when the printer does not operate properly, so it can damage the printhead.
(6) Remove the maintenance cartridge, and then package it so that waste ink does not leak.
(7) Attach all external covers.
(8) Open the top cover, and then secure the carriage with the belt stopper.
(9) Close the top cover.
(10) Attach the cushioning materials and tape.
(11) Pack the printer in the packing box, and then put the roll media, ink tank, and optional devices in another packing box for moving.
Use the original packing materials for the printer and other optional devices. If they are not available, pack them with a sufficient amount of cushioning materials.
Before transporting the printer, be sure to go through the following steps to protect the internal mechanism. For the printer packaging work and the installation work
after transportation, refer to the "Quick Start Guide".
* When "Check Free Space in Maintenance C" or "Replace Maintenance Cartridge" is shown on the display, you cannot make preparations for transportation. First
replace the maintenance cartridge, and then make preparations for transportation.
* Do not incline the printer during transportation. The internal ink may leak and the surrounding area may be stained. If it is necessary to place the printer with
either side up or down or to incline the printer, contact your sales agent.
3-20
Chapter 3
3.2.2 Reinstalling the Printer
3.2.2.1 Reinstalling the Printer
0013-4210
iPF6100 / iPF6200 / iPF6000S
1. When installing the printer after moving it on the same floor having no step
If you have moved the printer to the installation site on the same floor having no step without draining ink, check the operation test pattern.
2. When installing the printer after moving it on the same floor having a step(s)
If you have moved the printer to the installation site on the same floor having a step(s) with ink drained, install it again in the same manner as that for initial installation after reception of the delivered printer.
1) Unpack the printer.
2) Remove the cushioning materials and tape from the printer.
3) Install the maintenance cartridge.
4) Remove the belt stopper.
5) Connect the power cord.
6) Turn on the Power button and install ink tanks according to the displayed messages.
Ink filling will starts.
Load paper and check for normal operation.
3-21
Chapter 4 DISASSEMBLY/REASSEMBLY
Contents
Contents
4.1 Service Parts...................................................................................................................................................................4-1
4.1.1 Service Parts................................................................................................................................................................................. 4-1
4.2 Disassembly/Reassembly...............................................................................................................................................4-2
4.2.1 Disassembly/Reassembly............................................................................................................................................................. 4-2
4.3 Points to Note on Disassembly and Reassembly ...........................................................................................................4-2
4.3.1 Note on locations prohibited from disassembly........................................................................................................................... 4-2
4.3.2 Moving the carriage manually ..................................................................................................................................................... 4-2
4.3.3 Units requiring draining of ink .................................................................................................................................................... 4-2
4.3.4 External Covers............................................................................................................................................................................ 4-4
4.3.5 Driving Unit ............................................................................................................................................................................... 4-16
4.3.6 Cutter.......................................................................................................................................................................................... 4-17
4.3.7 Carriage Unit.............................................................................................................................................................................. 4-20
4.3.8 Feeder Unit................................................................................................................................................................................. 4-28
4.3.9 Roll Feed Unit............................................................................................................................................................................ 4-31
4.3.10 Purge Unit ................................................................................................................................................................................ 4-34
4.3.11 Waste Ink Collection Unit ....................................................................................................................................................... 4-37
4.3.12 Ink Tank Unit ........................................................................................................................................................................... 4-40
4.3.13 Head Management Sensor ....................................................................................................................................................... 4-43
4.3.14 Multi Sensor............................................................................................................................................................................. 4-43
4.3.15 PCBs ........................................................................................................................................................................................ 4-44
4.3.16 PCBs ........................................................................................................................................................................................ 4-47
4.3.17 Opening the Cap/Moving the Wiper Unit................................................................................................................................ 4-51
4.3.18 Opening/Closing the Ink Supply Valve ................................................................................................................................... 4-53
4.3.19 Draining the Ink ....................................................................................................................................................................... 4-54
4.4 Applying the Grease.....................................................................................................................................................4-55
4.4.1 Applying the Grease .................................................................................................................................................................. 4-55
4.5 Adjustment and Setup Items ........................................................................................................................................4-59
4.5.1 Adjustment Item List ................................................................................................................................................................. 4-59
4.5.2 Procedure after Replacing the Carriage Unit or Multi Sensor ................................................................................................... 4-59
4.5.3 Procedure after Replacing the Head Management Sensor......................................................................................................... 4-62
Chapter 4
4.1 Service Parts
4.1.1 Service Parts
0012-6347
iPF6100 / iPF6200 / iPF6000S
The service parts indicated below require careful handling.
1. Keep all packages with the warning not to turn over.
Pay careful attention to all individually packaged service part (carriage unit, purge unit, ink tank unit, and other parts) boxes marked "This side up" and handle
appropriately.
F-4-1
4-1
Chapter 4
4.2 Disassembly/Reassembly
4.2.1 Disassembly/Reassembly
0016-9450
iPF6100 / iPF6200 / iPF6000S
For the procedure for disassembly/reassembly of the components excluding the major components, refer to the parts catalog.
Illustrations in the parts catalog are assigned illustration numbers according to the order in which parts are disassembled.
4.3 Points to Note on Disassembly and Reassembly
4.3.1 Note on locations prohibited from disassembly
0012-6349
iPF6100 / iPF6200 / iPF6000S
Assemblies that are prohibited from disassembly and their adjustment outside the factory cannot be conducted are indicated by red screws.
Don't never loosen or remove the red screw, because normal operation and print can't be done if it is loosened or removed.
F-4-2
4.3.2 Moving the carriage manually
0012-6350
iPF6100 / iPF6200 / iPF6000S
Move the carriage as required during disassembly/reassembly to prevent the carriage form contacting the parts to be removed.
The carriage does not move when capped. When uncapping moving the carriage, refer to the procedures in DISASSEMBLY/REASSEMBLY>Points to Note on
Disassembly and Reassembly>Opening the Cap/Moving the Wiper Unit.
4.3.3 Units requiring draining of ink
0012-6351
iPF6100 / iPF6200 / iPF6000S
When disassembling the following units of the ink passage, drain ink completely to prevent it from leaking. For how to drain ink, refer to DISASSEMBLY/REASSEMBLY > Points to Note on Disassembly and Reassembly > Draining the Ink.
[1] Carriage unit
Refer to DISASSEMBLY/REASSEMBLY > Points to Note on Disassembly and Reassembly > Carriage Unit.
[2] Ink tank unit
Refer to DISASSEMBLY/REASSEMBLY > Points to Note on Disassembly and Reassembly > Ink Tank Unit.
4-2
Chapter 4
[1]
[2]
F-4-3
4-3
Chapter 4
4.3.4 External Covers
0016-8459
iPF6100 / iPF6200 / iPF6000S
a) Left/right circle cover
Removing the left/right circle cover
1) When removing the left circle cover [1], turn it in the direction of the arrow.
[1]
F-4-4
2) When removing the right circle cover[1], turn it in the direction of the arrow.
[1]
F-4-5
4-4
Chapter 4
Attaching the left/right circle cover
1) When attaching the left circle cover, fit it in place with the three hooks[1] up and turn it toward the rear side of the printer. When attaching the right circle cover,
fit it in place with the two hooks[2] up and turn it toward the rear side of the printer.
[1]
[2]
F-4-6
b) Roll Feed Unit
Removing the roll feed unit
1) Remove two coin screws[1] to remove roll feed unit[2].
[2]
[1]
F-4-7
4-5
Chapter 4
c) Tank cover
Removing the tank cover
1) When removing the tank cover[4], open the top cover, and then remove the roll feed unit and left circle cover.
2) Open the tank cover[4], remove the three screws[1], and then release the three hooks[2] while opening the hook[3] outward.
[1]
[4]
[2]
[3]
F-4-8
d) Left cover
Removing the left cover
1) When removing the left cover[3], open the top cover, and then remove the left circle cover and tank cover.
2) Remove the screw[1] and the hook[2], and slide the left cover in the direction of arrow 2, and then slide it in the direction of arrow 3.
[3]
3
2
1
[1]
[2]
F-4-9
4-6
Chapter 4
e) Output guide
Removing the output guide
1) To remove the output guide[2], pull it by holding the handles[1].
[2]
[1]
F-4-10
f) Lower rear left cover
Removing the lower rear left cover
1) Remove the screw[1] to remove the lower rear left cover [2].
[2]
[1]
F-4-11
4-7
Chapter 4
g) Lower rear cover
Removing the lower rear cover
1) When removing the lower rear cover[2], remove the two screws[1] and then remove it.
[2]
[1]
F-4-12
h) Left rear cover
Removing the left rear cover
1) When removing the left rear cover[2], open the top cover, and then remove the roll feed unit, left circle cover, tank cover, left cover, lower rear cover, and lower
rear left cover.
2) Remove the three screws[1], and then remove the left rear cover[2].
[2]
[1]
F-4-13
4-8
Chapter 4
i) Left front cover
Removing the left front cover
1) When removing the left front cover[2], open the top cover, and then remove the roll feed unit, left circle cover, tank cover, and output guide.
2) Rmove the three screws[1], and then remove the left front cover[2].
[2]
[1]
F-4-14
j) Right upper cover
Removing the right upper cover
1) When removing the right upper cover[2], open the top cover, and then remove the right circle cover.
2) Release the two hooks[1], and then remove the right upper cover[2].
[1]
[2]
F-4-15
k) Operation panel
Removing the operation panel
1) When removing the operation panel[4], open the top cover, and then remove the right circle cover and right upper cover.
2) Remove the two hooks[1] and flexible cable[2] and earth cable[3], and then remove the operation panel[4].
[4]
[1]
[3]
[2]
[1]
F-4-16
4-9
Chapter 4
l) Exhaust Filter
Removing the exhaust filter
1) When removing the filter cover[1], push it in the direction of the arrow while pressing on the handhold.
[1]
F-4-17
2) Remove the exhaust filter[2] while pushing the hook[1].
[1]
[2]
F-4-18
m) Mist filter
Removing the mist filter
1) When removing the mist filter[2], open the top cover, and then remove the right circle cover.
2) Removing the screw[1], and then remove the mist filter[2].
[2]
[1]
F-4-19
4-10
Chapter 4
n) Right cover
Removing the right cover
1) When removing the right cover[3], open the top cover, and then remove the roll feed unit, right circle cover, right upper cover, operation panel, mist filter, exhaust
filter, and lower rear cover.
2) Remove the six screws[1] and hook[2], and then remove the right cover[3].
[1]
[3]
[1]
[2]
F-4-20
Note on attaching the right cover
Be careful in attaching the right cover not to press the ink tubes with the edges of the cover.
F-4-21
o) Right front cover
Removing the right front cover
1) When removing the right front cover[2], open the top cover, and then remove the roll feed unit, output guide, right circle cover, operation panel, exhaust filter,
right cover, and lower rear cover.
2) Remove the two screws[1], and then remove the right front cover[2].
[1]
[2]
[1]
F-4-22
4-11
Chapter 4
p) Rear cover
Removing the rear cover
1) When removing the rear cover[2], open the top cover, and then remove the roll feed unit, left circle cover, tank cover, left circle cover, right upper cover, operation
panel, exhaust filter, right cover, lower rear cover, left cover, and left rear cover.
2) Remove the three screws[1], and then remove the rear cover[2].
[2]
[1]
F-4-23
q) Upper rear cover
Removing the upper rear cover
1) When removing the upper rear cover[2], open the top cover, and then remove the roll feed unit, left circle cover, tank cover, left cover, right circle cover, right
upper cover, operation panel, exhaust filter, right cover, and lower rear cover.
2) Remove the three screws[1], and then remove the upper rear cover[2].
[1]
[1]
[2]
F-4-24
Note on attaching upper rear cover
In attaching the upper rear cover, allow flexible cable[1] in the control area to pass over the cover.
[1]
F-4-25
4-12
Chapter 4
r) Upper front cover
Removing the upper front cover
1) When removing the upper front cover[3], open the top cover, and then remove left circle cover, tank cover, left cover, right circle cover, right upper cover, operation panel, right cover, and exhaust filter.
2) Remove the two screws[1], and then remove the upper front cover[3] while releasing the three hooks[2].
[1]
[2]
[3]
F-4-26
s) Lower front cover
Removing the lower front cover
1) When removing the lower front cover[3], open the top cover, and then remove the roll feed unit, left circle cover, tank cover, right circle cover, right upper cover,
operation panel, upper front cover, right cover, and exhaust filter.
2) Remove the three screws[1] and release the harness to remove the lower front cover[2].
[1]
[1]
[2]
F-4-27
4-13
Chapter 4
t) Left back cover
Removing the left back cover
1) When removing the left back cover[1], open the top cover, and then remove the roll feed unit, left circle cover, tank cover, left cover, lower rear cover, lower
rear left cover, and left rear cover.
2) Remove the two screws[2], and then remove the left back cover[1].
[2]
[1]
F-4-28
u) Back cover
Removing the back cover
1) When removing the back cover[1], open the top cover, and then remove the roll feed unit, left circle cover, tank cover, left cover, lower rear cover, lower rear
left cover, left rear cover, and left back cover.
2) Remove the two screws[2] and two hooks[3], and then remove the back cover[1].
[3]
[2]
[1]
F-4-29
4-14
Chapter 4
v) Lower back cover
Removing the lower back cover
1) When removing the lower back cover[2], open the top cover, and then remove the roll feed unit, left circle cover, tank cover, left cover, lower rear cover, lower
rear left cover, left rear cover, right circle cover, right upper cover, operation panel, exhaust filter, and right cover.
2) Remove the two screws[1], and then remove the lower back cover[2].
[1]
[2]
F-4-30
w) Cover guide
Removing the cover guide
1) When removing the cover guide[2], open the top cover, and then remove the roll feed unit, left circle cover, tank cover, left cover, right circle cover, right upper
cover, operation panel, exhaust filter, lower rear cover, lower rear left cover, left lower cover, rear cover, upper rear cover, upper front cover.
2) Remove the two screws[1], and then remove the cover guide[2].
[1]
[2]
F-4-31
x) Cover support plate (right)
Removing cover support plate (right)
1) When removing the cover support plate (right)[2], open the top cover, and then remove the roll feed unit, left circle cover, tank cover, left cover, right circle
cover, right upper cover, operation panel, exhaust filter, right cover, lower rear cover, left rear cover, rear cover, upper rear cover, upper front cover, and cover guide.
2) Remove the three screws[1], and then remove the cover support plate (right)[2].
[2]
[1]
[1]
F-4-32
4-15
Chapter 4
y) Cover support plate (left)
Rmoving the cover support plate (left)
1) When removing the cover support plate (left)[2], open the top cover, and then remove the roll feed unit, left circle cover, tank cover, left front cover, left cover,
right circle cover, right upper cover, operation panel, exhaust filter, right cover, lower rear cover, rear cover, upper rear cover, upper front cover, and lower front
cover.
2) Remove the three screws[1] and two connectors[3], and then remove the cover support plate (left)[2].
[3] [1]
[3]
[2]
F-4-33
4-16
[1]
Chapter 4
4.3.5 Driving Unit
0012-6368
iPF6100 / iPF6200 / iPF6000S
a) Feed motor
Removing the feed motor
1) When removing the feed motor[1], remove the main controller support plate.
Refer to DISASSEMBLY/REASSEMBLY > Points to Note on Disassembly and Reassembly > PCBs
2) Loosen the two screws[2], and then remove the timing belt[3] from the pulley.
3) Remove the two screws[4] and connector[5], and then remove the feed motor[1].
[2]
[5]
[4]
[1]
[2]
[3]
F-4-34
Note on mounting the feed motor
When mounting the feed motor, attach the timing belt[3] on the pulley, and then tighten the two screws[2].
4-17
Chapter 4
4.3.6 Cutter
0016-8468
iPF6100 / iPF6200 / iPF6000S
a) Removing the cutter unit
1) When removing the cutter unit, open the top cover, and then remove the roll feed unit, output guide, left and right circle covers, tank cover, left front cover, right
upper cover, operation panel, exhaust filter, lower rear cover, right cover, right front cover, upper front cover, lower front cover. Refer to DISASSEMBLY/REASSEMBLY > Points to note on Disassembly and Reassembly > External Covers.
2) Turning the motor pulley[1] in the arrow direction, move the cutter[2] about 2 cm to the right of the left most end.
[1]
[2]
F-4-35
4-18
Chapter 4
3) Remove the screw[1] and clamp[2] and slide cutter unit[3] to left obliquely upward out of position.
[2]
[1]
[3]
F-4-36
b) Points to note on Disassembly an Reassembly of Cutter unit
1) When disassembling or reassembling the cutter unit, align the cutter unit roller with the grooves[1] in the cutter lifter unit and cutter drive unit.
[1]
[1]
F-4-37
c) Removing the cutter mounting plate
1) Remove the cutter unit.
2) Remove the two screws[1] and connector[2] and free the harness from harness guide[3] to remove the cutter mounting plate[4].
[2]
[4]
[3]
[1]
F-4-38
4-19
Chapter 4
d) Removing the cutter drive unit
1) Remove the cutter unit.
2) Remove the two screws[1] and two connectors[2] and free the harness from harness guide [3] to remove the cutter drive unit[4].
[4]
[3]
[1]
[2]
F-4-39
4-20
Chapter 4
4.3.7 Carriage Unit
0016-8499
iPF6100 / iPF6200 / iPF6000S
a) Removing the carriage unit
1) Drain the ink.
Refer to DISASSEMBLY/REASSEMBLY > Points to Note on Disassembly and Reassembly > Draining the Ink.
2) Turn off the power, and then move the carriage over the platen.
Refer to DISASSEMBLY/REASSEMBLY > Points to Note on Disassembly and Reassembly > Opening the Cap/Moving the Wiper Unit.
3) Remove the printhead.
4) Remove the joint of the ink tube unit. Wrap the removed joint with a plastic bag or other covering so that ink does not splashes, then close the plastic bag.
F-4-40
5) Remove the linear scale[1] from the right clamp plate's spring, and then remove it rightward.
[1]
F-4-41
When removing the linear scale, take care not to damage or stain it. The stained or damaged liner plate can cause malfunction.
6) While sliding the pulley[2] to the left, remove the carriage belt[1]. Tie the removed belt lightly on the unit.
[2]
[1]
F-4-42
7) Disconnect the two connectors[1] and four connectors[2] of the flexible cables on the main controller PCB.
[1]
[2]
[1]
[2]
F-4-43
4-21
Chapter 4
The flexible cable connectors[2] are provided with a locking mechanism. When disconnecting or reconnecting the flexible cable, be sure to release the lock. Otherwise, the flexible cable can damage, resulting in malfunction.
8) Insert the flat-head screwdriver[3] into the part shown to release the hook[2] and then remove the flexible cable retainer[1]. (If the flexible cable retainer[1] is
marked with index[A], insert the flat-head screw driver to meet the index.)
[2]
[1]
[A]
[3]
F-4-44
9) Turn the gear[1] so that the sensor flag of the lift gear[2] leaves the interrupt position of the lift cam sensor[3], then remove the ring[4], the lift gear[2] and the
lift cam[5]. Disconnect the connector[6], remove the two screws[7], and then remove the lift cam sensor[3]. Remove the two torsion springs[8], pull out the carriage
rail[9] from the right side of the printer, and then remove the carriage.
[3]
[8]
[5]
[8]
[2]
[4]
[9]
[6]
[1]
[7]
F-4-45
4-22
Chapter 4
b) Points to Note on disassembly and Reassembly of Carriage Unit
1) Align the mark on the gear[3] with the mark on the bushing[4]. Align the mark on the lift gear[1] with the mark on the gear[2] to remove the ring[5].
[5]
[2]
[1]
[3]
[4]
F-4-46
2) Install the linear scale with its R-mark [1] located on the right side of the unit.
[1]
F-4-47
3) Install the left right lift cam [1] so its circular dent comes in the direction as shown (right side of the unit).
[1]
[1]
F-4-48
4-23
Chapter 4
c) Note on attaching the flexible cable
1) Insert the flexible cable[2] through the three claws[1] in the flexible cable retainer.
[1]
[2]
F-4-49
2) Lightly fold the flexible cable in its marked area[1] and pass it through claws[2].
[1]
[2]
F-4-50
3) Insert folded flexible cable [1] through the three claws [2].
4) Pull the flexible cable [1] lightly from both sides to remove slacks in it.
[1]
[2]
F-4-51
4-24
Chapter 4
5) Having installed the flexible cable retainer, align and flatten the flexible cables.
6) Attach the flexible guide sheet[1] over the flexible cable while matching its left end with the edge of the lower plate and bumping its rear side against the side
plate in addition.
[1]
F-4-52
d) Multi Sensor Recalibration
Since the multi sensor has individual electrical specificity, the following are recalibrated at the factory, namely, the optical axis of the sensor, the sensor gain for
measuring the printhead height and sensor calibration. Accordingly, carry out the following adjustments in the service mode whenever replacing the carriage unit
or multi sensor.
* The multi sensor reference plate(QL2-1561-000:PLATE, REFLECTION, MULTI-SENSOR) must be replaced at the same time whenever the carriage or the multi
sensor is being replaced.
- Service mode : SERVICE MODE > ADJUST > GAP CALIB.
- Service mode : SERVICE MODE > ADJUST > PRINT PATTERN > OPTICAL AXIS
Media type : Photo glossy paper
Media size : Media having a width equal too larger than that of A2-size paper
4-25
Chapter 4
e) Adjusting the wire roller
To prevent the wire roller mounted on the carriage from contacting the duct and others during carriage operation, perform the following adjusutment whenever tou
have removed or replaced the carriage unit. This adjustment is not required when you have replaced only the multi sensor.
- Make adjustments with the carriage lock released.
- Make adjustments with the tube disconnected from the tube guide.
1) Remove the ink tube from the wire guide.
2) Loosen the two screws[1].
3) Turn the gear[2] until the lift cam flag[3] reaches the position shown below.
- Bottom position where the sensor[4] light is blocked by the flag (lowest position to which the carriage unit descends)
[1]
[4]
[3]
[2]
F-4-53
4) Remove the clip [1] and roller retainer [2] from the carriage wire tool.
[2]
[1]
F-4-54
4-26
Chapter 4
5) Install the carriage wire tool [1] in position with its leaf spring being attached to the top of mist fan [2].
[2]
[1]
F-4-55
6) Moving the carriage, adjust the height of the wire guide to bring its roller [1] into contact with the top of carriage wire tool [2].
[2]
[1]
F-4-56
7) Secure the roller retainer [1] with the clip [3] in contact with the top of roller [2].
[1]
[3]
[2]
F-4-57
4-27
Chapter 4
8) Retighten the two screws [1] loosened in Step 2) to secure the wire guide.
[1]
F-4-58
9) Pass the ink tubes through the wire guides.
4-28
Chapter 4
4.3.8 Feeder Unit
0016-8509
iPF6100 / iPF6200 / iPF6000S
a) Removing the pinch roller
1) Remove the rear cover.
2) When removing the pinch roller, press down the pinch roller unit[1] in the direction of the arrow.
[1]
F-4-59
3) Remove the pinch roller[1].
[1]
F-4-60
b) Removing the spur unit
1) When removing the spur unit, first open the top cover, and then remove the roll feed unit, left and right circle covers, tank cover, right upper cover, operation
panel, lower rear cover, right cover, right front cover, upper front cover, lower front cover, cover guide, upper rear cover, and left and right cover mounting plates.
Refer to DISASSEMBLY/REASSEMBLY > Points to Note on Disassembly and Reassembly > External Covers.
2) Remove the three screws[1], and then remove the mist fan[2].
[1]
[2]
[1]
F-4-61
4-29
Chapter 4
3) Remove the three screws[1], and then remove the tube guide[2] and the wire guide[3].
[1]
[2]
[3]
F-4-62
4) Remove the front duct[3] by removing the four screws[2] and freeing ink tube from the guide[1].
[2]
[3]
[2]
[1]
F-4-63
5) Turn the pulley[1] in the direction of the arrow so that the spur unit[2] is at the top position.
[1]
[2]
F-4-64
4-30
Chapter 4
6) While pressing down the protrusion[A], slide the spur unit[1] in the direction of the arrow to remove it.
[A]
[1]
F-4-65
c) Handling the Feed Roller
The feed roller is an important mechanical component of the printer. Follow the precaution below when handring it.
* Do not touch the feed roller surface(coated surface).
* Do not scratch or dent the feed roller.
4-31
Chapter 4
4.3.9 Roll Feed Unit
0013-4377
iPF6100 / iPF6200 / iPF6000S
a) Removing the roll motor
1) When removing the roll motor, remove the roll feed unit[2] from the main body, and then remove the right cover[3] by removing the two screws[1].
[1]
[2]
[3]
F-4-66
2) Remove the four screws[1], and then remove the left cover[2] and paper tray[3].
[3]
[1]
[2]
F-4-67
3) Remove the three screws[1], and then remove the right inner cover[2].
[1]
[2]
F-4-68
4-32
Chapter 4
4) Remove the two screws[1], and then remove the roll motor[2].
[2]
[1]
F-4-69
b) Removing the roll feed unit
1) When removing the roll motor, remove the roll feed unit[2] from the main body, and then remove the right cover[3] by removing the two screws[1].
[1]
[2]
[3]
F-4-70
2) Remove the four screws[1], and then remove the left cover[2] and paper tray[3].
[3]
[1]
[2]
F-4-71
4-33
Chapter 4
3) Remove the three screws[1], and then remove the right inner cover[2].
[1]
[2]
F-4-72
4) Remove the two screws[1], and then remove the roll feed unit PCB[2].
[2]
[1]
F-4-73
4-34
Chapter 4
4.3.10 Purge Unit
0016-8514
iPF6100 / iPF6200 / iPF6000S
a) Removing the purge unit
1) Turn the gear[1] of the purge unit[3] in the direction of the arrow to unlock and uncap the carriage. Next, move the carriage[2] onto the platen.
[2]
[3]
[1]
F-4-74
2) Remove the connector[1] from the rear of the unit to free the harness from the harness guide.
[1]
F-4-75
4-35
Chapter 4
3) Remove the three screws[3] and press two claws[1] in the joint of the waste ink tube in the arrow direction to remove the purge unit[2].
[1]
[3]
[3]
[2]
F-4-76
b) Precaution for mounting the purge unit
1) When attaching the waste ink tube, make sure that the waste ink tube has been firmly attached with the two projections[1] of the joint engaging to the each
hook[2].
If the waste ink tube has not been attached firmly, it causes the ink leakage.
[1]
[2]
F-4-77
4-36
Chapter 4
2) When mounting the purge unit, pull out the waste ink tube[1] from the back of the printer to the position where the marking is visible. It the waste ink tube is not
pulled out to the marking position, it may bend and cause ink leakage.
[1]
F-4-78
3) Check the waste ink tube[1] from the front of the unit to make sure that it is not broken or twisted.
[1]
F-4-79
4) Check that waste ink tube[1] is inserted in the hole[2] in the absorber.
[1]
[2]
F-4-80
4-37
Chapter 4
4.3.11 Waste Ink Collection Unit
0016-8537
iPF6100 / iPF6200 / iPF6000S
a) Removing the waste ink box
1) When removing the waste ink box[3], first remove the output guide.
2) Remove the two screws[1] and connector cover[2].
[3]
[2]
[1]
F-4-81
3) Disconnect the connector[2], and then remove the waste ink box[1].
[1]
[2]
F-4-82
b) Removing the mist fan
1) When removing the mist fan, first open the top cover, and then remove the output guide, right circle cover, right upper cover, operation panel, mist filter, filter
cover, filter, right cover, and right front cover.
Refer to DISASSEMBLY/REASSEMBLY > Points to Note on Disassembly and Reassembly > External Cover.
2) Remove the three screws[1] and disconnect the connector, and then remove the mist fan[2].
[1]
[2]
[1]
F-4-83
4-38
Chapter 4
c) Removing the platen duct
1) When removing the platen duct, first open the top cover, and then remove the output guide, maintenance cartridge, waste ink box, left and right circle cover, tank
cover, right upper cover, operation panel, mist filter, filter cover, filter, right cover, right front cover, and mist fan.
Refer to DISASSEMBLY/REASSEMBLY > Points to Note on Disassembly andReassembly > External Cover.
2) Remove the three screws[1], and then remove the tube guide[2] and wire guide[3].
[1]
[2]
[3]
F-4-84
3) Remove the front duct[3] by removing the four screws[2] and freeing ink tube from guide[1].
[2]
[3]
[2]
[1]
F-4-85
4) Remove the six screws[1] and, while lifting the spur unit, remove three platens (front)[2].
[1]
[2]
F-4-86
4-39
Chapter 4
5) Remove the four screws[1] and four bushings[2].
[1]
[2]
[1]
[2]
F-4-87
6) Disconnect the two waste ink tubes[3] and remove the nine screws[2] and five bushings[3] and two bushing covers[4] and two springs[5], and then remove the
platen duct[6].
[2]
[3]
[2]
[2]
[2]
[5]
[4]
[1]
[2]
[2]
[3]
[3]
[6]
[2]
[3]
[4]
[5]
F-4-88
d) Note on attaching ink tubes to the front duct
In attaching ink tubes to the front guides, insert joint [1] into guide [2] first and then attach them to the guides, making sure that the tubes are not broken or twisted.
The marks appearing on the tubes were used for factory assembly purposes and are not used for servicing.
[2]
[1]
F-4-89
4-40
Chapter 4
4.3.12 Ink Tank Unit
0016-8541
iPF6100 / iPF6200 / iPF6000S
a) Removing the ink tank unit
1) Drain the ink. Refer to DISASSEMBLY/REASSEMBLY > Points to Note on Disassembly and Reassembly > Draining the ink.
2) Remove the output guide, left and right circle covers, tank cover, left and right covers, left and right front covers, right upper cover, operation panel, mist filter,
filter cover, filter, lower rear cover, upper front cover, and lower front cover.
Refer to DISASSEMBLY/REASSEMBLY > Points to Note on Disassembly and Reassembly > External Cover.
3) Move the carriage unit to the center. Refer to "Removing the Purge Unit".
4) Remove the three screws[1], and then remove the tube guide[2] and wire guide[3].
[1]
[2]
[3]
F-4-90
5) Remove the four link levers[2] from the carriage unit[1], and then remove the joint base[3].
[2]
[3]
[1]
F-4-91
4-41
Chapter 4
Put the removed joint base in a plastic bag so that ink does not splash.
F-4-92
6) Remove the cutter unit and cutter mounting plate.
Refer to DISASSEMBLY/REASSEMBLY > Point to Note on Disassembly and Reassembly > Cutter
7) Remove the two screws[1], and then remove the support plate[2].
[1]
[2]
[1]
F-4-93
8) Remove the four screws[1] and joint[3], and then remove the two ink tank unit R[2].
[1]
[3]
[2]
F-4-94
4-42
Chapter 4
9) Remove the four screws[1] and joint[3], and then remove the two ink tank unit F[2].
[1]
[1]
[3]
[2]
F-4-95
b) Removing the valve motor unit
1) When removing the valve motor unit, remove the ink tank cover.
2) Remove the two screws[1], disconnect the the two connectors[2], and then remove the valve motor unit[3].
[3]
[1]
[2]
F-4-96
4-43
Chapter 4
4.3.13 Head Management Sensor
0013-3845
iPF6100 / iPF6200 / iPF6000S
a) Removing the head management sensor
1) Remove the screw[1], disconnect the connector[2], and then remove the head management sensor[3].
[3]
[2]
[1]
F-4-97
b) Procedure after replacing the head management sensor
Since the distance between the head management sensor and the carriage unit varies among printers, the optical axis is factory-adjusted to adjust the non-discharging
detection position. When you have replaced the head management sensor or performed assembly/reassembly of surrounding parts that can change the distance between the head management sensor and the carriage unit, reasjustment is required.
Peform the readjustment in the service mode.
Service mode : SERVICE MODE > ADJUST > NOZZLE CHK POS.
4.3.14 Multi Sensor
0012-6402
iPF6100 / iPF6200 / iPF6000S
a) Removing the multi sensor
1) Remove the screw[1], disconnect the flexible cable[2], and then remove the multi sensor[3].
[2]
[3]
[1]
F-4-98
Since the multi sensor has individual electrical specificity, the following are recalibrated at the factory, namely, the optical axis of the sensor, the sensor gain for
measuring the printhead height and sensor calibration. Accordingly, carry out the following adjustments in the service mode whenever replacing the carriage unit
or multi sensor.
* The multi sensor reference plate(QL2-1561-000:PLATE, REFLECTION, MULTI-SENSOR) must be replaced at the same time whenever the carriage or the multi
sensor is being replaced.
* When replacing the carriage unit, refer to Adjustment and Setup > Procedure after Removing or Replacing the Carriage Unit.
- Service mode : SERVICE MODE > ADJUST > GAP CALIB.
- Service mode : SERVICE MODE > ADJUST > PRINT PATTERN > OPTICAL AXIS
Media type : Photo glossy paper
Media size : Media having a width equal too larger than that of A2-size paper
4-44
Chapter 4
4.3.15 PCBs
0012-6407
iPF6100
Do not replace the main controller PCB and maintenance cartridge relay PCB(ROM board) at the same time.
These PCBs store important data such as settings and carriage drive time. Before replacement of either PCB, the data stored in it is moved to the other PCB through
internal communication so that it can be taken over to the new PCB automatically. This is the reason why the two PCBs should not be replaced at the same time.
If you want to replace both PCBs at the same time, first carry out the procedure "Procedure for replacing the maintenance cartridge relay PCB(ROM board)" and
then carry out the procedure "Procedure for replacing the main controller PCB".
After replacing with the main controller PCB or maintenance cartridge relay PCB which are supplied as service parts, check that the firmware to the latest version.
a) Removing the main controller PCB
1) To remove the main controller PCB, open the top cover and remove the roll feed unit, left circle cover, tank cover, left cover, lower rear cover, lower rear left
cover and left rear cover.
Refer to DISASSEMBLY/REASSEMBLY > Points to note on Disassembly and Reassembly > External Covers.
2) Remove all connectors from the main controller PCB.
3) Remove two coin screws[1], interface cover[2] and screw[3] in this order.
[1]
[2]
[3]
F-4-99
4) Remove the ten screws[4] and free the harness from harness guide[5] to remove the main controller PCB[1].
[3]
[1]
[2]
[1]
[1]
F-4-100
4-45
Chapter 4
b) Removing the main controller mounting plate
1) Remove the main controller PCB.
2) Free the harness from the harness guide.
3) Remove the screw [1] and remove the flexible guide [2].
[1]
[2]
F-4-101
4) Remove the four screws [1] and two hooks [2] from the harness guide and remove the main controller mounting plate [3].
[5]
[4]
[3]
[3]
F-4-102
c) Note on installing the cable holder
In installing the cable holder, secure ferrite core [1] to the flexible cable on the carriage with the cable holder before hooking the flexible cable from the operation
panel at the three claws [2].
[1]
[2]
F-4-103
4-46
Chapter 4
d) Removing the power supply PCB
1) To remove the power supply PCB, open the top cover and remove the roll feed unit, left circle cover, tank cover, left cover, lower rear cover, lower rear left cover
and left rear cover.
Refer to DISASSEMBLY/REASSEMBLY > Points to note on Disassembly and Reassembly > External Covers.
2) Disconnect the two connectors[2] from the power supply PCB[1].
3) Remove the five screws[3] and remove the power supply PCB[1] together with the mounting plate.
[1]
[3]
[2]
[2]
[3]
F-4-104
e) Procedure for replacing the maintenance cartridge relay PCB(ROM board)
1) Turn off the printer and unplug the power cord.
2) Replace the maintenance cartridge relay PCB.
3) Plug the power cord to the outlet, and then turn on the printer whth the PAPER SOURCE button and INFORMATION button pressed down. (The printer will
start up in the PCB Replacement mode.)
4) Check that "Initializing" appears on the display, and then release the buttons. (When the printer enters the PCB Replacement mode, the message lamp goes on.)
5) What until "REPLACE MODE" appears on the display.
6) Select "MC BOARD", and then press the ok button.
7) Check that "TURN POWER OFF" appears on the display, and then turn off the printer.
8) Turn on the printer.
9) Check the firmware version. If the firmware is not the latest version, update.
f) Procedure for replacing the main controller PCB
1) Turn off the printer and unplug the power cord.
2) Replace the main controller PCB.
3) Plug the power cord to the outlet, and then turn on the printer whth the PAPER SOURCE button and INFORMATION button pressed down. (The printer will
start up in the PCB Replacement mode.)
4) Check that "Initializing" appears on the display, and then release the buttons. (When the printer enters the PCB Replacement mode, the message lamp goes on.)
5) What until "REPLACE MODE" appears on the display.
6) Select "MC BOARD", and then press the ok button.
7) Check that "TURN POWER OFF" appears on the display, and then turn off the printer.
8) Turn on the printer.
9) Check the firmware version. If the firmware is not the latest version, update.
4-47
Chapter 4
4.3.16 PCBs
0020-2187
iPF6200 / iPF6000S
Do not replace the main controller PCB and maintenance cartridge relay PCB(ROM board) at the same time.
These PCBs store important data such as settings and carriage drive time. Before replacement of either PCB, the data stored in it is moved to the other PCB through
internal communication so that it can be taken over to the new PCB automatically. This is the reason why the two PCBs should not be replaced at the same time.
If you want to replace both PCBs at the same time, first carry out the procedure "Procedure for replacing the maintenance cartridge relay PCB(ROM board)" and
then carry out the procedure "Procedure for replacing the main controller PCB".
After replacing with the main controller PCB or maintenance cartridge relay PCB which are supplied as service parts, check that the firmware to the latest version.
a) Removing the main controller PCB
1) To remove the main controller PCB, open the top cover and remove the roll feed unit, left circle cover, tank cover, left cover, lower rear cover, lower rear left
cover and left rear cover.
Refer to DISASSEMBLY/REASSEMBLY > Points to note on Disassembly and Reassembly > External Covers.
2) Remove the four screws[1] and remove the shield plate[2].
[1]
[2]
F-4-105
3) Remove the three screws[1], and then remove the shield cover[2] and the guide[3].
[3]
[1]
[2]
F-4-106
4-48
Chapter 4
4) Remove all connectors from the main controller PCB.
5) Remove the two screws[1] to remove the HDD expansion PCB[2], and then remove the screw[3].
[1]
[2]
[3]
F-4-107
6) Remove the ten screws[1] and free the harness from harness guide[2] to remove the main controller PCB[3].
[3]
[1]
[2]
[1]
[1]
F-4-108
b) Removing the main controller mounting plate
1) Remove the main controller PCB.
2) Free the harness from the harness guide.
3) Remove the screw [1] and remove the flexible guide [2].
[1]
[2]
F-4-109
4-49
Chapter 4
4) Remove the four screws [1] and two hooks [2] from the harness guide and remove the main controller mounting plate [3].
[3]
[2]
[1]
[1]
F-4-110
c) Note on installing the cable holder
In installing the cable holder, secure ferrite core [1] to the flexible cable on the carriage with the cable holder before hooking the flexible cable from the operation
panel at the three claws [2].
[1]
[2]
F-4-111
d) Removing the power supply PCB
1) To remove the power supply PCB, open the top cover and remove the roll feed unit, left circle cover, tank cover, left cover, lower rear cover, lower rear left cover
and left rear cover.
Refer to DISASSEMBLY/REASSEMBLY > Points to note on Disassembly and Reassembly > External Covers.
2) Remove the four screws[1] and remove the shield plate[2].
[1]
[2]
F-4-112
4-50
Chapter 4
3) Remove the three screws[1], and then remove the shield cover[2] and the guide[3].
[1]
[3]
[2]
F-4-113
4) Disconnect the four connectors[2] from the power supply PCB[1] and Hard disk drive.
5) Remove the five screws[3], and then remove the power supply PCB[1] together with the mounting plate.
[2]
[1]
[3]
[2]
[3]
F-4-114
e) Procedure for replacing the maintenance cartridge relay PCB(ROM board)
1) Turn off the printer and unplug the power cord.
2) Replace the maintenance cartridge relay PCB.
3) Plug the power cord to the outlet, and then turn on the printer whth the PAPER SOURCE button and INFORMATION button pressed down. (The printer will
start up in the PCB Replacement mode.)
4) Check that "Initializing" appears on the display, and then release the buttons. (When the printer enters the PCB Replacement mode, the message lamp goes on.)
5) What until "REPLACE MODE" appears on the display.
6) Select "MC BOARD", and then press the ok button.
7) Check that "TURN POWER OFF" appears on the display, and then turn off the printer.
8) Turn on the printer.
9) Check the firmware version. If the firmware is not the latest version, update.
f) Procedure for replacing the main controller PCB
1) Turn off the printer and unplug the power cord.
2) Replace the main controller PCB.
3) Plug the power cord to the outlet, and then turn on the printer whth the PAPER SOURCE button and INFORMATION button pressed down. (The printer will
start up in the PCB Replacement mode.)
4) Check that "Initializing" appears on the display, and then release the buttons. (When the printer enters the PCB Replacement mode, the message lamp goes on.)
5) What until "REPLACE MODE" appears on the display.
6) Select "MC BOARD", and then press the ok button.
7) Check that "TURN POWER OFF" appears on the display, and then turn off the printer.
8) Turn on the printer.
9) Check the firmware version. If the firmware is not the latest version, update.
4-51
Chapter 4
4.3.17 Opening the Cap/Moving the Wiper Unit
0016-8556
iPF6100 / iPF6200 / iPF6000S
This section explains how to open the cap and ink supply valve manualy.
To move the carriage with the power off, you need to release the carriage lock pin and cap manually.
1. Opening the Cap/Releasing the Carriage Lock Pin
1) Remove the right circle cover and mist filter.
Refer to DISASSEMBLY/REASSEMBLY > points to Note on Disassembly and Reassembly > External Cover.
2) Turn the gear[1] of the purge unit[3] in the direction of the arrow from the hole[6] of the right cover. The cap[5] and lock pin[4] move down, allowing you to
move the carriage[2].
[1]
[6]
F-4-115
[2]
[3]
[4]
[1]
[5]
F-4-116
4-52
[3]
Chapter 4
2. Moving the Wiper Unit
1) Open the top cover, and then remove the roll feed unit, output guide, right circle cover, right upper cover, operation panel, mist filter, exhaust filter, right cover,
right front cover, cover guide, cover plate(right).
Refer to DISASSEMBLY/REASSEMBLY > points to Note on Disassembly and Reassembly > External Cover.
2) To move the wiper unit[3], turn the gear[1] of the purge unit[2] in the direction of the arrow.
[3]
[2]
[1]
[2]
F-4-117
4-53
Chapter 4
4.3.18 Opening/Closing the Ink Supply Valve
0012-6413
iPF6100 / iPF6200 / iPF6000S
1) Open the top cover, and then remove the left circle cover and tank cover.
2) To open the ink supply valve, turn the cam [2] in the direction of the arrow and press the link [1].
[2]
[1]
F-4-118
- If the tube is full of ink, releasing the printhead lock lever with the ink supply valve open can cause the ink to flow back to the ink supply unit, resulting in leakage
of ink from the ink supply needle.
- If the ink supply valve is held open due to a problem such as a valve motor error(03130031-2F3A), remove the valve motor unit(refer to DISASSEMBLY/REASSEMBLY > Points to Note on Disassembly and Reassembly > Ink Tank Unit) and close the ink supply valve.
4-54
Chapter 4
4.3.19 Draining the Ink
0012-6416
iPF6100 / iPF6200
There are two methods of removing the ink, a manual methtod and an automatic method.
There the ink is drained, the ink inside the ink passage totaling about 72g(about 6g x 12) is drained as waste ink.
To prevent ink leakage, be sure to drain the ink inside the ink passage before transporting the printer again.
1. Automatic ink drainage
To perform "automatic ink drainage", select "Main Menu" > "Maintenance" > "Move Printer".
Perform automatic ink drainage again if a power outage or other cause shuts off the power during the operation for automatic ink drainage.
2. Manual Ink Drainage
Perform manual ink drainage when the printer cannot be powered due to a printer's electrcal part failure, firmware error, or power supply problem.
Manual Ink Drainage Procedure
1) Open the top cover, and then remove the left and right circle covers, tank cover, right upper cover, operation panel, mist filter, filter cover, filter, and right cover.
Refer to DISASSEMBLY/REASSEMBLY > Pointe toNote on Disassembly andReassembly > External Cover.
2) Move the carriage onto the platen.
Refer to DISASSEMBLY/REASSEMBLY > Points to Note on Disassembly and Reassembly > Opening the Cap/Move the Wiper Unit.
3) Turn the cam[2] in the direction of the arrow, and then press the link[1] to open the ink supply valve.
[2]
[1]
F-4-119
4) Release both printhead fixer levers[1] to flow the ink from inside the ink tube to the sub-buffer of the ink tank unit.
[1]
F-4-120
The sub-buffer can contain 22g of ink. About 6g of ink flows into the sub-buffer each time manual ink drainage is performed.
5) Make sure that the ink has been drained completely, turn the cam to close the ink supply valve.
4-55
Chapter 4
4.4 Applying the Grease
4.4.1 Applying the Grease
0016-8580
iPF6100 / iPF6200 / iPF6000S
Some parts require application of grease when replaced. Apply the grease(special tool) listed below.
Smear the grease lightly and evenly with a flat brush or the like.
For the printer disassembly/reassembly method, refer to "DISASSEMBLY/REASSEMBLY" and "parts catalog".
Do not apply the grease to locations in which not designated grease may cause poor print quality. Take particular care that grease do not get onto the wiper, cap,
and linear scale.
No.
1
4-56
Location
Joint base
Grease type
Molykote PG-641
Quantity
Approx.6/12mg
2
Shaft cleaner/oil pad
EU-1
soaks enough.
3
Eject roller bearing
Molykote PG-641
Approx.12mg
4
Eject roller center bearing
Molykote PG-641
Approx.12mg
5
Spur cam
Molykote PG-641
Approx.20mg
6
Pinch roller unit release shaft
Molykote PG-641
Approx.12mg
Chapter 4
a) Carriage unit
1) Joint base
Molykote PG-641
Approx. 12mg
Molykote PG-641
Approx. 6mg
F-4-121
2) Shaft cleaner/oil pad
EU-1
F-4-122
4-57
Chapter 4
b) Eject roller unit
3) Eject roller bearing
4) Eject roller center bearing
Molykote PG-641
Approx. 12mg
Molykote PG-641
Approx. 12mg
(One location on A2 (17") model
and two location on A1 (24") model)
Molykote PG-641
Approx. 12mg
F-4-123
4-58
Chapter 4
c) Spur unit
5) Spur cam
Molykote PG-641
Approx. 20mg
F-4-124
d) Pinch roller unit
6) Pinch roller unit release shaft
(Five location A2 (17") model
and seven location A1 (24") model)
Molykote PG-641
Approx. 12mg
F-4-125
4-59
Chapter 4
4.5 Adjustment and Setup Items
4.5.1 Adjustment Item List
0016-9220
iPF6100 / iPF6200 / iPF6000S
The following adjustment procedures need to be performed when the parts have been replaced or remove and then reinstalled:
T-4-1
Adjustment item
Multi sensor recalibration
Adjustment timing
Multi sensor replacement/removal
Carriage unit replacement/removal
Adjusting wire roller
Wire guide replacement/removal
Carriage unit replacement/removal
Head management sensor recalibration
Head management sensor replacement/removal
Carriage unit replacement/removal
4.5.2 Procedure after Replacing the Carriage Unit or Multi Sensor
0012-6486
iPF6100 / iPF6200 / iPF6000S
a) Multi Sensor Recalibration
Since the multi sensor has individual electrical specificity, the following are recalibrated at the factory, namely, the optical axis of the sensor, the sensor gain for
measuring the printhead height and sensor calibration. Accordingly, carry out the following adjustments in the service mode whenever replacing the carriage unit
or multi sensor.
- Service mode : SERVICE MODE > ADJUST > GAP CALIB.
- Service mode : SERVICE MODE > ADJUST > PRINT PATTERN > OPTICAL AXIS
Media type : Photo glossy paper
Media size : Media having a width equal too larger than that of A2-size paper
The multi sensor reference plate(QL2-1561-000:PLATE, REFLECTION, MULTI-SENSOR) must be replaced at the same time whenever the carriage or the multi
sensor is being replaced.
4-60
Chapter 4
b) Adjusting the wire roller
To prevent the wire roller mounted on the carriage from contacting the duct and others during carriage operation, perform the following adjusutment whenever tou
have removed or replaced the carriage unit. This adjustment is not required when you have replaced only the multi sensor.
- Make adjustments with the carriage lock released.
- Make adjustments with the tube disconnected from the tube guide.
1) Remove the ink tube from the wire guide.
2) Loosen the two screws[1].
3) Turn the gear[2] until the lift cam flag[3] reaches the position shown below.
- Bottom position where the sensor[4] light is blocked by the flag (lowest position to which the carriage unit descends).
[1]
[4]
[3]
[2]
F-4-126
4) Remove the clip [1] and roller retainer [2] from the carriage wire tool.
[2]
[1]
F-4-127
4-61
Chapter 4
5) Install the carriage wire tool [1] in position with its leaf spring being attached to the top of mist fan [2].
[2]
[1]
F-4-128
6) Moving the carriage, adjust the height of the wire guide to bring its roller [1] into contact with the top of carriage wire tool [2].
[2]
[1]
F-4-129
7) Secure the roller retainer [1] with the clip [3] in contact with the top of roller [2].
[1]
[3]
F-4-130
4-62
[2]
8) Retighten the two screws [1] loosened in Step 2) to secure the wire guide.
[1]
F-4-131
9) Pass the ink tubes through the wire guides.
4.5.3 Procedure after Replacing the Head Management Sensor
0012-6487
iPF6100 / iPF6200 / iPF6000S
Since the distance between the head management sensor and the carriage unit varies among printers, the optical axis is factory-adjusted to adjust the nondischarging detection position. When you have replaced the head management sensor or performed assembly/reassembly of surrounding parts that can
change the distance between the head management sensor and the carriage unit, reasjustment is required
Peform the readjustment in the service mode.
Service mode : SERVICE MODE > ADJUST > NOZZLE CHK POS.
Chapter 5 MAINTENANCE
Contents
Contents
5.1 Periodic Replacement Parts ...........................................................................................................................................5-1
5.1.1 Periodic Replacement Parts ......................................................................................................................................................... 5-1
5.2 Consumable Parts...........................................................................................................................................................5-1
5.2.1 Consumable Parts......................................................................................................................................................................... 5-1
5.2.2 Consumable Parts......................................................................................................................................................................... 5-2
5.3 Periodic Maintenance.....................................................................................................................................................5-3
5.3.1 Periodic Maintenance................................................................................................................................................................... 5-3
5.3.2 Periodic Maintenance................................................................................................................................................................... 5-6
Chapter 5
5.1 Periodic Replacement Parts
5.1.1 Periodic Replacement Parts
0013-4084
iPF6100 / iPF6200 / iPF6000S
T-5-1
Level
Periodic Replacement part
User
None
Service
Personnel
None
5.2 Consumable Parts
5.2.1 Consumable Parts
0016-9454
iPF6100 / iPF6200
T-5-2
Consumables
Name
Service
User
Service Mode
Part number
Q'ty
Life sheets/
A1
PARTS xx
COUNTER x
States (Error Code)
SUCTION FAN UNIT
QM3-0701-000
1
15000
A1
A
OK/W1/E146-4001
DUCT UNIT, PLATEN
QM3-0800-000
1
15000
B1
B
OK/W1/E146-4001
CARRIAGE UNIT
QM3-0784-000
1
15000
D1
D
OK/W1/W2
LEVER, R, INK TUBE
QC2-0659-050
1
15000
LEVER, L, INK TUBE
QC2-0660-050
1
15000
LINK, LEVER, TUBE
QC2-0661-000
4
15000
SPRING, TENSION
QC2-1396-000
2
15000
PAD, OIL
QC2-0664-000
2
15000
HOLDER, WIRE(MECH)
QC2-0663-000
1
15000
TUBE GUIDE UNIT
QM3-0704-000
1
15000
CLEANING UNIT, R, RAIL,
CARRIAGE
QM3-0543-000
1
15000
CLEANING UNIT, L, RAIL,
CARRIAGE
QM3-0542-000
1
15000
D1/D3
FLEXIBLE CABLE ASS'Y
QM3-0786-000
1
15000
D2
ENCODER SENSOR UNIT
QM2-3421-000
1
15000
D3
SCALE, LINEAR
QC2-0696-000
1
15000
CAM, LIFTER
QC2-0675-000
2
15000
D4
MULTI SENSOR UNIT
QM3-0365-000
1
15000
D5
X1
X
OK/W1/W2
INK SUPPLY UNIT
QM3-0775-000
1
15000
F1
F
OK/W1/E144-4047
INK SUPPLY UNIT (R)
QM3-0574-000
1
15000
PURGE KIT
QM3-0654-040
1
15000
H1
H
OK/W1/E141-4046
SENSOR UNIT
QM3-0529-000
1
15000
L1
L
OK/W1/E194-404A
MOTOR, 26.4V, DC
QK1-0447-000
1
15000
P1
P
OK/W1/W2
CAM, ROWEL
QC2-1027-000
1
15000
R1
R
OK/W1/W2
MIST FAN UNIT
QM3-0211-000
1
15000
V1
V
OK/W1/E146-4001
MIST FILTER UNIT
QM3-0212-030
1
15000
See "Product Overview> Features> Consumables"
After supplies have been replaced, execute [INITIALIZE] > [PARTS COUNTER] > [PARTS xx] in service mode to initialize (clear) the parts counter information.
5-1
Chapter 5
5.2.2 Consumable Parts
0020-7346
iPF6000S
T-5-3
Consumables
Name
Service
User
Part number
Service Mode
Q'ty
Life sheets/
A1
PARTS xx
COUNTER x
States (Error Code)
SUCTION FAN UNIT
QM3-0701-000
1
15000
A1
A
OK/W1/E146-4001
DUCT UNIT, PLATEN
QM3-0800-000
1
15000
B1
B
OK/W1/E146-4001
CARRIAGE UNIT
QM3-0784-000
1
15000
D1
D
OK/W1/W2
LEVER, R, INK TUBE
QC2-0659-050
1
15000
LEVER, L, INK TUBE
QC2-0660-050
1
15000
LINK, LEVER, TUBE
QC2-0661-000
4
15000
SPRING, TENSION
QC2-1396-000
2
15000
PAD, OIL
QC2-0664-000
2
15000
HOLDER, WIRE(MECH)
QC2-0663-000
1
15000
TUBE GUIDE UNIT
QM3-0704-000
1
15000
CLEANING UNIT, R, RAIL,
CARRIAGE
QM3-0543-000
1
15000
CLEANING UNIT, L, RAIL,
CARRIAGE
QM3-0542-000
1
15000
D1/D3
FLEXIBLE CABLE ASS'Y
QM3-0786-000
1
15000
D2
ENCODER SENSOR UNIT
QM2-3421-000
1
15000
D3
SCALE, LINEAR
QC2-0696-000
1
15000
CAM, LIFTER
QC2-0675-000
2
15000
D4
MULTI SENSOR UNIT
QM3-0365-000
1
15000
D5
X1
X
OK/W1/W2
INK SUPPLY UNIT
QM3-5295-000
1
15000
F1
F
OK/W1/E144-4047
INK SUPPLY UNIT (R)
QM3-5294-000
1
15000
INK TUBE UNIT (L)
QM3-5295-000
1
15000
INK TUBE UNIT (R)
QM3-5296-000
1
15000
PURGE KIT
QM3-0654-040
1
15000
H1
H
OK/W1/E141-4046
HEAD MANAGEMENT
SENSOR
QM3-0529-000
1
15000
L1
L
OK/W1/E194-404A
MOTOR, 26.4V, DC
QK1-0447-000
1
15000
P1
P
OK/W1/W2
MIST FAN UNIT
QM3-0807-000
1
15000
V1
V
OK/W1/E146-4001
MIST FILTER UNIT
QM3-0212-030
1
15000
See "Product Overview> Features> Consumables"
After supplies have been replaced, execute [INITIALIZE] > [PARTS COUNTER] > [PARTS xx] in service mode to initialize (clear) the parts counter information.
5-2
Chapter 5
5.3 Periodic Maintenance
5.3.1 Periodic Maintenance
0016-8170
iPF6100 / iPF6200
T-5-4
Level
User
Periodic maintenance
Cleaning of ink mist and other substances(about once each month
Spur cleaning
Service personnel
None
a) Printer cleaning
To keep up with print quality and prevent troubles, clean the printer about once each month.
1) Wipe the external surfaces of the printer with a cloth moistened with water and then wrung tight and then dry them finally with a dry cloth.
F-5-1
2) Press the [MENU] button to display the main menu.
3) Press the
and
buttons to select [Maintenance] and then press the
button.
4) Press the
and
buttons to select [Platen Cleaning] and press the
button.
5) Press the
and
buttons to select [Yes] and press [OK] button.
6) Open the top cover.
7) If the paper dust has accumulated in the suction holes[1] on the platen or in the borderless printing ink grooves[2], use the cleaning brush, provided with the
printer, to wipe it away.
[2]
[1]
F-5-2
MEMO:
Rinse the cleaner brush with water when it gets dirty.
5-3
Chapter 5
8) Wipe off dirt inside the top cover with a cloth moistened with water and then wrung tight. Wipe off ink smears from the entire surface of the platen, the pinch
roller unit, borderless printing ink grooves and else.
F-5-3
- Do not dry the interiors of the top cover with a dry cloth. Electrostatic charges could make the internal components susceptible to dirt, resulting in degraded print
quality.
- Do not use flammable solvents, such as thinner and benzine, on the printer. Solvents coming into contact with any electrical parts inside the printer could result
in fires or electrical shock hazards.
- Do not touch linear scale [1] and carriage shaft [2].
[2]
[1]
F-5-4
5-4
Chapter 5
9) Remove the roll feed unit and fold plain paper [1] two to three times and then insert through the printer rear into the underside [2] of the pinch roller unit to wipe
off dirt on the pinch roller unit.
[1]
[2]
F-5-5
5-5
Chapter 5
b) Spur cleaning
If white dots appear about 1mm apart in the paper feed direction, clean the spur[1].
To clean the spur[1], use the cleaning sheet bundled with the unit.
[1]
F-5-6
- Do not fold the cleaning sheet.
- Do not use a cleaning sheet with rugged edges or a significantly folded cleaning sheet.
- If the cleaning sheet is warped, flatten it before use.
- To cancel cleaning, press the [STOP] button.
1) Press the [MENU] button to display the main menu.
2) Press the
and
buttons to select [Maintenance] and press the
button.
3) Press the
and
buttons to select [Spur Cleaning] and press the
button.
4) Press the
and
buttons to select [Yes] and press the [OK] button.
If roll media are fed, they are ejected automatically.
5) Open the paper tray cover.
6) Pinching width guide [1], move it to the leftmost end.
A3
A4
[1]
F-5-7
7) Take the cleaning sheet out of the bag.
5-6
Chapter 5
Keep the bag in a safe place, because it is used for cleaning sheet.
8) Set a cleaning sheet at the cleaning point at paper tray top loading port, in landscape direction, blank side up.
Insert the cleaning sheet into position until it lightly hits the end.
F-5-8
MEMO:
If the cleaning position exceeds the sheet size, perform cleaning in several sessions, each with a varied cleaning sheet setting position.
F-5-9
9) Press the [OK] button to start cleaning.
Cleaning takes about 1 minute 30 seconds to complete.
10) When the cleaning session completes, store the cleaning sheet in the bag.
11) Close the paper tray cover.
5.3.2 Periodic Maintenance
0020-7363
iPF6000S
T-5-5
Level
Periodic maintenance
User
Cleaning of ink mist and other substances(about once each month
Service personnel
None
5-7
Chapter 5
a) Printer cleaning
To keep up with print quality and prevent troubles, clean the printer about once each month.
1) Wipe the external surfaces of the printer with a cloth moistened with water and then wrung tight and then dry them finally with a dry cloth.
F-5-10
2) Press the [MENU] button to display the main menu.
3) Press the
and
buttons to select [Maintenance] and then press the
button.
4) Press the
and
buttons to select [Platen Cleaning] and press the
button.
5) Press the
and
buttons to select [Yes] and press [OK] button.
6) Open the top cover.
7) If the paper dust has accumulated in the suction holes[1] on the platen or in the borderless printing ink grooves[2], use the cleaning brush, provided with the
printer, to wipe it away.
[2]
[1]
F-5-11
MEMO:
Rinse the cleaner brush with water when it gets dirty.
5-8
Chapter 5
8) Wipe off dirt inside the top cover with a cloth moistened with water and then wrung tight. Wipe off ink smears from the entire surface of the platen, the pinch
roller unit, borderless printing ink grooves and else.
F-5-12
- Do not dry the interiors of the top cover with a dry cloth. Electrostatic charges could make the internal components susceptible to dirt, resulting in degraded print
quality.
- Do not use flammable solvents, such as thinner and benzine, on the printer. Solvents coming into contact with any electrical parts inside the printer could result
in fires or electrical shock hazards.
- Do not touch linear scale [1] and carriage shaft [2].
[2]
[1]
F-5-13
5-9
9) Remove the roll feed unit and fold plain paper [1] two to three times and then insert through the printer rear into the underside [2] of the pinch roller
unit to wipe off dirt on the pinch roller unit.
[1]
[2]
F-5-14
Chapter 6 TROUBLESHOOTING
Contents
Contents
6.1 Troubleshooting .............................................................................................................................................................6-1
6.1.1 Outline.......................................................................................................................................................................................... 6-1
6.1.1.1 Outline of Troubleshooting .............................................................................................................................................................................6-1
6.1.2 Troubleshooting When Warnings Occur ..................................................................................................................................... 6-1
6.1.2.1 Ink Lvl: Chk XX (1000,1001,1002,1003,1004,1005,1006,1008,1009,100A,100B,100C) ............................................................................6-1
6.1.2.2 MTCart Full Soon (1100)................................................................................................................................................................................6-1
6.1.2.3 Mist Full Soon (1101) .....................................................................................................................................................................................6-1
6.1.2.4 GARO W12xx: xx stands for digits (1221,1222,1223,1225,1231,1232,1233,1234,1235) ............................................................................6-1
6.1.2.5 Feed Limit... (100F) ........................................................................................................................................................................................6-2
6.1.2.6 Check printed document.(1010)......................................................................................................................................................................6-2
6.1.3 Troubleshooting When Errors Occur........................................................................................................................................... 6-2
6.1.3.1 01800500-1012/01800500-1013 Defective printhead nozzle .........................................................................................................................6-2
6.1.3.2 03010000-200C/03010000-2017/03010000-2018/03016000-2010 Multi sensor error..................................................................................6-2
6.1.3.3 03010000-200D Cut sheet end cannot be detected .........................................................................................................................................6-2
6.1.3.4 03010000-2820/03010000-2821/03010000-2822/03010000-2823/03130031-2F32/03010000-2F33 Adjustment error ..............................6-3
6.1.3.5 03010000-2E1F/03060000-2E14/03061000-2E15/03060000-2E16/03060200-2E03/03060200-2E0B/03060A00-2E00/03060A00-2E01/
03860002-2E0A Path mismatch error....................................................................................................................................................................6-3
6.1.3.6 03010000-2E25/03010000-2E27 Paper feed/delivery jam error ....................................................................................................................6-3
6.1.3.7 03030000-2E21 IEEE1394 error.....................................................................................................................................................................6-4
6.1.3.8 03060A00-2E0E Roll media unit uninstallation .............................................................................................................................................6-4
6.1.3.9 03060A00-2E1B Roll media end error ...........................................................................................................................................................6-4
6.1.3.10 03130031-291B Lift home position error .....................................................................................................................................................6-4
6.1.3.11 03130031-291D Supr cam sensor error ........................................................................................................................................................6-5
6.1.3.12 03130031-2E23 Cutter unit breakdown ........................................................................................................................................................6-5
6.1.3.13 03130031-2F13 A/D Converter external trigger output stopped ..................................................................................................................6-5
6.1.3.14 03130031-2F14 ASIC Register cannot be written. ......................................................................................................................................6-5
6.1.3.15 03130031-2F16 Mist fan error ......................................................................................................................................................................6-5
6.1.3.16 03130031-2F17 Suction fan error .................................................................................................................................................................6-6
6.1.3.17 03130031-2F20/03130031-2F28/03130031-2F22/03130031-2F23 Defective sensor in purge unit ............................................................6-6
6.1.3.18 03130031-2F24 Cutter drive time-out error..................................................................................................................................................6-6
6.1.3.19 03130031-2F25 Carriage home position error ..............................................................................................................................................6-6
6.1.3.20 03130031-2F26/03130031-2F27 Carriage motor error ................................................................................................................................6-7
6.1.3.21 03130031-2F2A Feed roller home position error .........................................................................................................................................6-7
6.1.3.22 03130031-2F2D The cassette cannot work...................................................................................................................................................6-7
6.1.3.23 03130031-2F2E Roll drive time-out error ....................................................................................................................................................6-7
6.1.3.24 03130031-2F3A Valve open/close error .......................................................................................................................................................6-8
6.1.3.25 03180003-2E22 MIT error ............................................................................................................................................................................6-8
6.1.3.26 03180101-2E17 Cassette uninstallation ........................................................................................................................................................6-8
6.1.3.27 03800200-2802/03800400-2803/03800300-2801/03800201-280A/03800401-280B/03800301-2809/03800200-2804/03800202-2807
Printhead error........................................................................................................................................................................................................6-8
6.1.3.28 03810101-2501/03810102-2502/03810103-2503/03810104-2500/03810105-2508/03810106-2506/03810107-250A/03810108-250C/
03810109-250B/03810112-2504/03810113-2505/03810115-2509 No ink error..................................................................................................6-9
6.1.3.29 03830101-2521/03830104-2520/03830102-2522/03830103-2523/03830112-2524/03830113-2525/03830106-2526/03830105-2528/
03830115-2529/03830107-252A/03830109-252B/03830108-252C Ink tank is not installed.(This error occurs when the ink tank is replaced.).69
6.1.3.30 03830201-2541/03800204-2540/03830202-2542/03830203-2543/03830212-2544/03830213-2545/03830206-2546/03830205-2548/
03830215-2549/03830207-254A/03830209-254B/03830208-254C Invalid ink tank ID .....................................................................................6-9
6.1.3.31 03830301-2561/03830304-2560/03830302-2562/03830303-2563/03830312-2564/03830313-2565/03830306-2566/03830305-2568/
03830305-2568/03830315-2569/03830307-256A/03830309-256B/03830308-256C Ink tank EEPROM error ..................................................6-9
6.1.3.32 03841001-2819/03841201-2816/03841201-2817/03841101-2818/01841001-281B Maintenance cartridge error .....................................6-9
6.1.3.33 03861001-2405/03861001-2406 Borderless printing error ........................................................................................................................6-10
6.1.3.34 03862000-2E09 Insufficient roll media error .............................................................................................................................................6-10
6.1.3.35 03870001-2015 Cut error ............................................................................................................................................................................6-10
6.1.4 Troubleshooting When Service Call Errors Occur .................................................................................................................... 6-10
6.1.4.1 Outline...........................................................................................................................................................................................................6-10
6.1.4.2 E141-4046 Recovery system rotation count reached 50,000........................................................................................................................6-11
Contents
6.1.4.3 E144-4047 Supply system's count error ....................................................................................................................................................... 6-11
6.1.4.4 E146-4001 Borderless/idle ejection/mist collection count full..................................................................................................................... 6-11
6.1.4.5 E194-404A Non-discharge detection count error ......................................................................................................................................... 6-11
6.1.4.6 E196-4040/E196-4041/E196-4042/E196-4045/E196-4049 main controller PCB error .............................................................................. 6-11
6.1.4.7 E198-401C/E198-401D/E198-401E RTC error ........................................................................................................................................... 6-11
6.2 Location of Connectors and Pin Arrangement ............................................................................................................ 6-12
6.2.1 Main controller PCB .................................................................................................................................................................. 6-12
6.2.2 Main controller PCB .................................................................................................................................................................. 6-24
6.2.3 Main controller PCB .................................................................................................................................................................. 6-35
6.2.4 Carriage PCB ............................................................................................................................................................................. 6-46
6.2.5 Power supply.............................................................................................................................................................................. 6-55
6.2.6 Roll feed unit PCB ..................................................................................................................................................................... 6-56
6.3 Version Up .................................................................................................................................................................. 6-57
6.3.1 Firmware Update Tool............................................................................................................................................................... 6-57
6.3.2 Firmware Update Tool............................................................................................................................................................... 6-58
6.4 Service Tools............................................................................................................................................................... 6-59
6.4.1 Tool List..................................................................................................................................................................................... 6-59
Chapter 6
6.1 Troubleshooting
6.1.1 Outline
6.1.1.1 Outline of Troubleshooting
0012-6598
iPF6100 / iPF6200 / iPF6000S
1. Outline
Troubles subject to troubleshooting are classified into those shown on the display (warning, error, and service call) and those not shown on the display.
2. Precautions for Troubleshooting
1) Check the environmental conditions and the media used for printing.
2) Before performing troubleshooting, make sure that all connectors and cables are connected properly.
3) When servicing the printer with the external cover removed and the AC power supplied, be extremely careful to avoid electric shock and shorting electrical
devices.
4) In the following sections, the troubleshooting steps are described such that the component related to the most probable cause of the problem will be repaired or
replaced first, being followed by components with less problem probability. If multiple components have the same problem probability, the steps are described
begging with the easiest one.
After performing each step, check to see if the problem has been resolved by making test prints. If the problem persists, proceed to the next step.
5) After completion of the troubleshooting, check that all connectors and cables have been reconnected and screws have been tightened firmly.
6) Whenever you have performed replacement or repair services, make test prints to check whether the problem has been resolved.
6.1.2 Troubleshooting When Warnings Occur
6.1.2.1 Ink Lvl: Chk XX (1000,1001,1002,1003,1004,1005,1006,1008,1009,100A,100B,100C)
0012-8580
iPF6000
XX stands for an ink name.
When a warning occurs, no code number is displayed. To view the warning history, select SERVICE MODE > DISPLAY > WARNING.
<Cause>
The electrodes attached to the hollow needle in the ink tank unit has detected that the ink level lowered below the specified one.
<Probable problem locations>
Ink tank, ink tank unit, main controller
<Remedy>
1. Check the ink level.
2. Replace the ink tank.
3. Check the connector of the ink tank unit.
4. Replace the ink tank unit.
5. Replace the main controller.
6.1.2.2 MTCart Full Soon (1100)
0012-8575
iPF6000
<Cause>
The maintenance cartridge is nearly full of waste ink (about 80% of the total capacity of the maintenance cartridge).
<Probable problem locations>
Maintenance cartridge, main controller
<Remedy>
1. Maintenance cartridge
Select SERVICE MODE > COUNTER > PRINTER > 1-INK to check the free space in the maintenance cartridge. If there is almost no free space, replace the
maintenance cartridge.
2.Replace the main controller
6.1.2.3 Mist Full Soon (1101)
0012-9335
iPF6000
<Cause>
The waste ink in the waste ink box is nearly full (about 97% of the total capacity).
<Probable problem locations>
waste ink box, main controller
<Remedy>
1. Replace the waste ink box.
After replacing the waste ink box, select SERVICE MODE > INITIALIZE > PARTS COUNTER > PARTS Vl to reset the waste ink counter.
2. Replace the main controller
6.1.2.4 GARO W12xx: xx stands for digits (1221,1222,1223,1225,1231,1232,1233,1234,1235)
0012-6617
iPF6000
<Cause>
The GARO command was erroneous during data reception.
<Probable problem locations>
Operation error, main controller
<Remedy>
1. Check the operation method and print again.
2. Replace the main controller.
6-1
Chapter 6
6.1.2.5 Feed Limit... (100F)
0012-9338
iPF6000
<Cause>
The main controller has detected that the roll media was fed by the maximum amount in the manual feed mode.
Maximum feed amount in reverse feed mode: Printing standby position (on feed roller)
<Probable problem locations>
Main controller
<Remedy>
1. Replace the main controller.
6.1.2.6 Check printed document.(1010)
0013-5595
iPF6000
<Cause>
Many nozzle on printhead did not eject ink.
<Probable fault location>
Printhead
<Countermeasure>
1. The printhead is cleaned.
2. Replace the printhead.
6.1.3 Troubleshooting When Errors Occur
6.1.3.1 01800500-1012/01800500-1013 Defective printhead nozzle
0012-9400
iPF6000
<Cause>
Many non-discharging nozzles of the printhead(L) were detected.
Many non-discharging nozzles of the printhead(R) were detected.
<Probable fault location>
Printhead or head management sensor
<Countermeasure>
1. Clean the printhead.
2. Replace the printhead.
3. Replace the head management sensor.
6.1.3.2 03010000-200C/03010000-2017/03010000-2018/03016000-2010 Multi sensor error
0013-2107
iPF6000
<Cause>
When media was fed, the multi sensor could not detect the media width.
When the right edge of media was detected, the multi sensor detected that the media had been loaded at a wrong position.
When the leading edge of media was to be detected, the multi sensor could not detect the leading edge of media.
When media was fed, the multi sensor detected media smaller than the specified size.
When media was fed, the multi sensor detected media larger than the specified size.
When media was fed, the multi sensor detected skew greater than the specified one.
When media was fed, the multi sensor could not detect the right edge of media.
When media was fed, the multi sensor could not detect the left edge of media.
<Probable fault location>
Media, media loading method, paper path, multi sensor, carriage PCB, or main controller PCB
<Countermeasure>
1. Media check
If there is any print or stain in the detection area on the media or the media seze is not the specified one, replace the media.
2. Media loading position check
If the media loading position is wrong, load the media again.
3. Visual check
Remove foreign substances from multi sensor if any.
4. Multi sensor
Select [SERVICE MODE]>[DISPLAY]>[SYSTEM]>[SIZE CR] to check the value read by the multi sensor. If the value is wrong, replace the multi sensor.
5. Cable continuity check
If continuity of the cable between the head relay PCB and the carriage relay PCB is abnormal, replace the cable.
6. Replace the Carriage PCB
7. Cable continuity check
If continuity of the cable beween the carriage PCB and the main controller PCB is abnormal, replace the cable.
8. Replace the main controller PCB.
6.1.3.3 03010000-200D Cut sheet end cannot be detected
0013-4794
iPF6000
<Cause>
When cut media was fed by the specified length, the media sensor could not detect the trailing edge of the cut media.
During printing, the media sensor detected the trailing edge of the cut media at the position different from that detected during cut media feed.
6-2
Chapter 6
<Probable fault location>
Paper path, media sensor, or main controller PCB
<Countermeasure>
1. Visual check
Remove foreign substances from the paper path and media sensor if any.
If the paper feed surface or moving part of the paper path is damaged or deformed, replace the paper path.
2. Media sensor
Check the media sensor for normal operation. If the operation is abnormal, replace the media sensor.
3. Cable continuity check
If continuity of the cable between the madia sensor and the main controller PCB is abnormal, replace the cable.
4. Replace the main controller PCB.
6.1.3.4 03010000-2820/03010000-2821/03010000-2822/03010000-2823/03130031-2F32/03010000-2F33 Adjustment error
0012-6641
iPF6000
<Cause>
Auto head alignment selected from the user menu could not be carried out because the alignment patter read result was NG.
Auto LF adjustment selected from the user menu or in the service mode could not be carried out because the adjustment patter read result was NG.
Decentering correction selected in the service mode cannot be carried out because the correction pattern read result was NG.
Auto LF adjustment selected from the user menu or in the service mode could not be carried out because the head check patter read result was NG.
When adjustment has been carried after selecting [SERVECE MODE]>[ADJUST]>[PRINT PATTERN]>[OPTICAL AXIS] or [SERVICE MODE]>[ADJUST]>[PRINT PATTERN]>[LF TUNING] in the service mode, check that photo glossy paper is used.
<Probable fault location>
Operation method, printhead, multi sensor, carriage PCB, or main controller PCB
<Countermeasure>
1. Check whether the media type selected on the operation panel is the same as the type of the media used to print the adjustment pattern.
If they are different, retry adjustment using the media of the type selected on the operation panel.
2. If ink bleeds greatly, change the media.
3. Carry out head cleaning, and retry adjustment. If the adjustment result is poor, replace the printhead.
4. Replace the multi sensor, and then retry adjustment.
5. Cable continuity check
If continuity of the cable between the multi sensor and the main controller PCB is abnormal, replace the cable.
6. Replace the carriage PCB.
7. Cable continuity check
If continuity of the cable between the carriage PCB and the main controller PCB is abnormal, replace the cable.
8. Replace the main controller PCB.
6.1.3.5 03010000-2E1F/03060000-2E14/03061000-2E15/03060000-2E16/03060200-2E03/03060200-2E0B/03060A00-2E00/
03060A00-2E01/03860002-2E0A Path mismatch error
0012-9353
iPF6000
<Cause>
The size of the media used to print the adjustment pattern was smaller than the specified one.
No roll media was loaded when data was received with roll media specified as a media type.
No roll media was loaded when test printing.
No cut sheet was loaded in the cassette when data was received with cut sheet specified as a media type.
Data requiring roll media was received when cut sheet was loaded.
Data requiring cut sheet was received when roll media was loaded.
No roll media was loaded when data was different from the size of the actually loaded media.
The type of the loaded media was different from the media type specified using the driver.
The size of the loaded media in the cassette was different from the media size specified using the driver.
<Probable fault location>
Media type or main controller PCB
<Countermeasure>
1. Media check
Check the loaded media. If the media type is different from that required by the send data, no media is loaded, or the size of the loaded media is not the specified
one, load correct media.
2. Replace the main controller PCB.
6.1.3.6 03010000-2E25/03010000-2E27 Paper feed/delivery jam error
0013-2110
iPF6000
<Cause>
During paper feed or delivery, paper jammed or paper was fed improperly.
During printing, paper was fed out of the way.
<Probable fault location>
paper path, media sensor, or main controller
<Countermeasure>
1. Visual check
Remove foreign substances from the paper path and media sensor if any.
If the paper feed surface or moving part of the paper path is damaged or deformed, replace the peper path.
2. Media sensor
6-3
Chapter 6
Select [SERVICE MODE]>[I/O DISPLAY] to check the media sensor for normal operation. If the operation is abnormal, replace the media sensor.
3. Cable continuity check
If continuity of the cable between the media sensor and the main controller PCB is abnormal, replace the cable.
4. Replace the main controller PCB.
6.1.3.7 03030000-2E21 IEEE1394 error
0012-6654
iPF6000
<Cause>
The IEEE1394 interface is faulty.
<Probable fault location>
IEEE1394 interface board or main controller PCB.
<Countermeasure>
1. Turn off the printer, and then turn it on again.
2. IEEE1394 interface board
Remove the IEEE1394 interface board, nstall it again, and then turn on the printer, If the trouble persists, replace the IEEE1394 interface board.
3. Replace the main controller PCB.
6.1.3.8 03060A00-2E0E Roll media unit uninstallation
0013-2112
iPF6000
<Cause>
The auto roll feed unit cannot be detected.
<Probable fault location>
Roll feed unit PCB, connector, or main controller PCB
<Countermeasure>
1. Cable continuity check
If continuity of the cable between the roll feed unit PCB and the connector is abnormal, replace the cable.
2. Cable continuity check
If continuity of the cable between the connector and the main controller PCB is abnormal, replace the cable.
3. Replace the roll feed unit PCB.
4. Replace the connector.
5. Replace the main controller PCB.
6.1.3.9 03060A00-2E1B Roll media end error
0013-2105
iPF6000
<Cause>
During printing or roll media feed, the media sensor detected the end of the roll media.
<Probable fault location>
Roll media, roll media sensor, roll feed unit PCB, or main controller PCB.
<Countermeasure>
1. Roll media
If roll media is used up, load new roll media.
2. Roll media sensor
Select [SERVICE MODE]>[I/O DISPLAY] to check for normal operation. If the operation is abnormal, replace the media sensor.
3. Cable continuity check
If continuity of the cable between the roll media sensor and the roll feed unit PCB is abnormal, replace the cable.
4. Replace the roll feed unit PCB.
5. Cable continuit check
If continuity of the cable between the roll feed unit PCB and the main controller PCB is abnormal, replace the cable.
6. Replace the main controller PCB.
6.1.3.10 03130031-291B Lift home position error
0013-3859
iPF6000
<Cause>
The Lift home position could not be detected within the specified time.
<Probable fault location>
Lift drive unit, lift cam sensor, lift motor, or main controller PCB
<Countermeasure>
1. Visual check
Remove foreign substances from the lift drive unit if any.
2. Lift cam sensor
Select [SERVICE MODE]>[I/O DISPLAY] to check for normal operation. If the operation is abnormal, replace the lift cam sensor
3. Cable continuity check
If continuity of the cable between the lift cam sensor, lift motor and main controller PCB is abnormal, replace the cable.
4. Replace the lift motor.
5. Replace the main controller PCB.
6-4
Chapter 6
6.1.3.11 03130031-291D Supr cam sensor error
0013-3860
iPF6000
<Cause>
It failed in the detection of the spur cam sensor.
<Probable fault location>
Spur unit, spur cam sensor, or main controller PCB
<Countermeasure>
1. Visual check
Remove foreign substances from the spur unit if any.
2. Spur cam sensor
Select [SEVECE MODE]>[I/O DISPLAY] to check for normal operation. If the operation is abnormal, replace the feed roller HP sensor.
3. Cable continuity check
If continuity of the cable between the spur cam sensor and the main controller PCB is abnormal, replace the cable.
4. Replace the spur motor.
5. Replace the spur unit.
6. Replace the main controller PCB.
6.1.3.12 03130031-2E23 Cutter unit breakdown
0013-3861
iPF6000
<Cause>
Abnormality occurred in the cutter unit.
<Probable fault location>
Cutter unit, Cutter HP sensor, cutter right position sensor, cutter lift sensor, cutter motor, cutter driver PCB, or main controller PCB
<Countermeasure>
1. Visual check
Remove foreign substances from the cutter unit if any.
2. Cutter home position sensor
Select [SERVICE MODE]>[I/O DISPLAY] to check for normal operation. If the operation is abnormal, replace the cutter home position sensor.
3. Cutter right position sensor
Select [SERVICE MODE]>[I/O DISPLAY] to check for normal operation. If the operation is abnormal, replace the cutter right position sensor.
4. Cutter lift sensor
Select [SERVICE MODE]>[I/O DISPLAY] to check for normal operation. If the operation is abnormal, replace the cutter lift sensor.
5. Cable continuity check
If continuity of the cable between the cutter HP sensor, cutter right position sensor, cutter lift sensor, cutter motor and cutter driver PCB is abnormal, replace the
cable.
6. Replace the cutter motor.
7. Replace the cutter driver PCB.
8. Replace the cutter unit.
9. Cable continuity check
If continuity of the cable between the cutter driver PCB and the main controller PCB is abnormal, replace the cable.
10. Replace the main controller PCB.
6.1.3.13 03130031-2F13 A/D Converter external trigger output stopped
0013-3865
iPF6000
<Cause>
Defective main controller PCB
<Probable fault location>
Main controller PCB
<Countermeasure>
1. main controller PCB
6.1.3.14 03130031-2F14 ASIC Register cannot be written.
0013-3867
iPF6000
<Cause>
A main controller PCB firm ware error occurred.
<Probable fault location>
main controller PCB
<Countermeasure>
1. Turn off the printer, and then turn it off again.
2. Replace the main controller PCB.
6.1.3.15 03130031-2F16 Mist fan error
0012-6649
iPF6000
<Cause>
Mist fan rotation could not be detected during mist fan rotation.
<Probable fault location>
Mist fan or main controller PCB
6-5
Chapter 6
<Countermeasure>
1. Replace the mist fan.
2. Cable continuity check
If continuity of the cable between the mist fan and the main controller PCB is abnormal, replace the cable.
3. Replace the main controller PCB.
6.1.3.16 03130031-2F17 Suction fan error
0012-6652
iPF6000
<Cause>
When the suction fan was driven, the lock signal was detected for more the specified time.
<Probable fault location>
Suction fan or main controller PCB
<Countermeasure>
1. suction fan
Select [SERVICE MODE]>[FUNCTION]>[PLATEN FAN] to check the suction fan for normal operation. If the operation is abnormal, replace the suction fan.
2. Cable continuity check
If continuity of the cable between the suction fan and the main controller PCB is abnormal, replace the cable.
3. Replace the main controller PCB.
6.1.3.17 03130031-2F20/03130031-2F28/03130031-2F22/03130031-2F23 Defective sensor in purge unit
0013-3811
iPF6000
<Cause>
The pump cam sensor in the purge unit could not detect the home position of the purge motor within the specified time.
<Probable fault location>
Purge unit or main controller PCB
<Countermeasure>
1. Cable continuity check
If continuity of the cable between the pump cam sensor, pump motor and main controller PCB is abnormal, replace the cable.
2. Replace the purge unit.
3. Replace the main controller PCB.
6.1.3.18 03130031-2F24 Cutter drive time-out error
0012-6624
iPF6000
<Cause>
After the cutter motor was driven of the cutter unit, cutter right detection sensor or cutter HP sensor ON was not able to be detected in the regulation time.
<Probable fault location>
Cutter right position sensor, cutter HP sensor, cutter motor, cutter unit, cutter driver PCB, or main controller PCB
<Countermeasure>
1. Visual check
Remove foreign substances from the cutter unit if any.
2. Cutter right position sensor and cutter HP sensor
Select [SERVICE MODE]>[I/O DISPLAY] to check for normal operation. If the operation is abnormal, replace the feed roller HP sensor.
3. Cable continuity check
If continuity of the cable between the cutter right position sensor, the cutter HP sensor, the cutter motor and the cutter driver PCB is abnormal, replace the cable.
4. Replace the cutter motor.
5. Replace the cutter unit.
6. Replace the cutter driver PCB.
7. Cable continuity check
If continuity of the cable between the cutter driver PCB and the main controller PCB is abnormal, replace the cable.
8. Replace the main controller PCB.
6.1.3.19 03130031-2F25 Carriage home position error
0012-6647
iPF6000
<Cause>
The carriage home position could not be detected within the specified time.
<Probable fault location>
Carriage stopper, linear scale, linear encoder, carriage PCB, or main controller PCB.
<Countermeasure>
1. Visual check
Remove foreign substances from the carriage stopper, the linear scale and linear encoder if any.
2. Replace the linear scale.
3. Replace the linear encoder.
4. Cable continuity check
If continuity of the cable between the linear encoder and the carriage PCB is abnormal, replace the cable.
5. Replace the carriage PCB.
6. Cable continuity check
If continuity of the cable between the carriage PCB and the main controller PCB is abnormal, replace the cable.
7. Replace the main controller PCB.
6-6
Chapter 6
6.1.3.20 03130031-2F26/03130031-2F27 Carriage motor error
0012-9500
iPF6000
<Cause>
The carriage did not operate because the carriage motor was overloaded due to a physical cause such as a jam.
The carriage motor did not reach the specified time.
<Probable fault location>
Carriage path way, carriage rail, carriage belt, linear scale, linear encoder, carriage motor, carriage PCB, or main controller PCB.
<Countermeasure>
1. Carriage pathway check
Remove foreign substances(jammed paper) from the carriage pathway if any.
2. Carriage rail
Visually check whether the carriage rail is dirty. If the carriage rail is dirty, clean it using rail cleaner.
3. Carriage belt
Visually check whether the carriage belt is loose.If the carriage belt is loose, remove it and then reinstall it.
4. Replace linear scale
5. Replace liner encoder
6. Cable continuity check
If continuity of the cable between the linear encoder and the main controller PCB is abnormal, replace the cable.
7. Replace carriage motor
8. Cable continuity check
If continuity of the cable between the carriage motor and the main controller PCB is abnormal, replace the cable.
9. Replace the carriage PCB
10. Cable continuity check
If continuity of the cable between the carriage PCB and the main controller PCB is abnormal, replace the cable.
11. Replace the main controller PCB.
6.1.3.21 03130031-2F2A Feed roller home position error
0012-6651
iPF6000
<Cause>
During power-on, the feed roller HP sensor could not detect that the reference of Scale that exists on encoder film area color change from transparent to black.
<Probable fault location>
Feed roller encoder film, feed roller HP sensor, feed motor, or main controller PCB
<Countermeasure>
1. Visual check
If the feed roller encoder film is damaged, replace it. Remove foreign substances from the feed roller encoder film if any.
2. Feed roller HP sensor
Select [SERVICE MODE]>[I/O DISPLAY] to check for normal operation. If the operation is abnormal, replace the feed roller HP sensor.
3. Cable continuity check
If continuity of the cable between the feed roller HP sensor, feed motor and the main controller PCB is abnormal, replace the cable.
4. Replace the feed motor.
5. Replace the main controller PCB.
6.1.3.22 03130031-2F2D The cassette cannot work.
0013-3855
iPF6000
<Cause>
The cassette cannot work.
<Probable fault location>
pressure plate arm, cassette cam sensor, cassette motor, or main controller PCB
<Countermeasure>
1. Visual check
If the pressure plate arm is abnormal, replace the pressure plata arm.
2. Cassette cam sensor
Select [SERVICE MODE]>[I/O DISPLAY] to check for normal operation, If the operation is abnormal, replace the valve motor.
3. Cable continuity check
If continuity of the cable between the cassette cam sensor, cassette motor and the main controller PCB is abnormal, replace the cable.
4. Replace the cassette motor.
5. Replace the main controller PCB.
6.1.3.23 03130031-2F2E Roll drive time-out error
0013-3857
iPF6000
<Cause>
The roll cam sensor home position in roll feed unit could not be detected within the specified time.
<Probable fault location>
roll cam drive unit, roll cam sensor, roll motor, Connector, roll feed unit PCB, or main controller PCB
<Ountermeasure>
1. Visual check
If the gear in roll cam drive unit is abnormal, replace the gear.
2. Roll cam sensor
6-7
Chapter 6
Select [SERVICE MODE]>[I/O DISPLAY] to check for normal operation. If the operation is abnormal, replace the roll cam sensor.
3. Cable continuity check
If continuity of the cable between the roll cam sensor, roll motor and roll feed unit PCB is abnormal, replace the cable.
4. Replace the roll motor.
5. Replace the roll feed unit PCB.
6. Cable continuity check
If continuity of the cable between the roll feed unit PCB and main controller PCB is abnormal, replace the cable.
7. Replace the connector.
8. Replace the main controller PCB.
6.1.3.24 03130031-2F3A Valve open/close error
0012-6650
iPF6000
<Cause>
When the ink supply valve opened or closed, valve open/closed detection sensor could not detect the valve cam rotation.
<Probable fault location>
Valve open/closed detection sensor, valve motor, or main controller PCB
<Countermeasure>
1. Visual check
Remove foreign substances from the motor,gear, and sensor of the valve open/close mechanism if any.
2. Valve open/close detection sensor
Select [SERVICE MODE]>[I/O DISPLAY] to check for normal operation. If the operation is abnormal, replace the valve open/close detection sensor.
3. Valve motor
Select [SERVICE MODE]>[FUNCTION]>[INK VALVE] to check for normal operation. If the operation is abnormal, replace the valve motor.
4. Cable continuity check
If continuity of the cable between the valve open/close detection sensor, valve motor and main controller PCB is abnormal, replace the cable.
5. Replace main controller PCB.
6.1.3.25 03180003-2E22 MIT error
0012-9352
iPF6000
<Cause>
When set to cassette paper feed "No" with MIT, the job of the cassette specification was received.
<Probable fault location>
Main controller PCB
<Countermeasure>
1. Replace the main controller PCB.
6.1.3.26 03180101-2E17 Cassette uninstallation
0012-9350
iPF6000
<Cause>
The cassette has come off.
<Probable fault location>
Cassette detection sensor or main controller PCB
<Countermeasure>
1. Cassette detection sensor
Select [SEVICE MODE]>[I/O DISPLAY] to check for normal operation. If the operation is abnormal, replace the cassette detection sensor.
2. Cable continuity check
If continuity of the cable between the cassette detection sensor and the main controller PCB is abnormal, replace the cable.
3. Replace the main controller
6.1.3.27 03800200-2802/03800400-2803/03800300-2801/03800201-280A/03800401-280B/03800301-2809/03800200-2804/
03800202-2807 Printhead error
0012-6636
iPF6000
<Cause>
Improper installation of the printhead(L) was detected.
A checksum error was detected in the EEPROM of the printhead(L).
Unable to correct printhead(L) DI.
Printhead(L) was installed right and left and oppositely.
Improper installation of the printhead(R) was detected.
A checksum error was detected in the EEPROM of the printhead(R).
Unable to correct printhead(R) DI.
Printhead(R) was installed right and left and oppositely.
<Probable fault location>
Printhead, carriage PCB, carriage unit, or main controller PCB.
<Countermeasure>
1. Replace the printhead.
2. Cable continuity check
If continuity of the cable between the carriage PCB and the main controller PCB is abnormal, replace the cable.
3. Replace the carriage PCB.
4. Replace the carriage unit.
6-8
Chapter 6
5. Replace the main controller PCB.
6.1.3.28 03810101-2501/03810102-2502/03810103-2503/03810104-2500/03810105-2508/03810106-2506/03810107-250A/
03810108-250C/03810109-250B/03810112-2504/03810113-2505/03810115-2509 No ink error
0012-6630
iPF6000
<Cause>
No ink status was detected in the ink tank.
<Probable fault location>
Ink tank, ink tank unit, or main controller PCB
<Countermeasure>
1. Replace the ink tank.
2. Replace the ink tank unit.
3. Replace the main controller PCB.
6.1.3.29 03830101-2521/03830104-2520/03830102-2522/03830103-2523/03830112-2524/03830113-2525/03830106-2526/
03830105-2528/03830115-2529/03830107-252A/03830109-252B/03830108-252C Ink tank is not installed.(This error
occurs when the ink tank is replaced.)
0012-9360
iPF6000
<Cause>
When the ink tank was replaced, the closed state of the ink cover was detected with the ink tank removed.
<Probable fault location>
Operation method, ink tank, ink tank cover sensor, ink tank unit, or main controller PCB
<Countermeasure>
1. Operation check
Install the ink tank.
2. Visual check
Remove foreign substances from the ink tank contacts and ink cover sensor if any.
3. Replace the ink tank.
4. Ink tank cover sensor
Check for normal operation. If the operation is abnormal, replace the ink tank cover sensor.
5. Cable continuity check
If continuity of the cable between the ink tank cover sensor and the main controller PCB is abnormal, replace the cable.
6. Replace the ink tank unit.
7. Cable continuity check
If continuity of the cable between the ink tank unit and the main controller PCB is abnormal, replace the cable.
8. Replace the main controller PCB.
6.1.3.30 03830201-2541/03800204-2540/03830202-2542/03830203-2543/03830212-2544/03830213-2545/03830206-2546/
03830205-2548/03830215-2549/03830207-254A/03830209-254B/03830208-254C Invalid ink tank ID
0013-2115
iPF6000
<Cause>
The installed ink tank is wrong
<Probable fault location>
Ink tank, ink tank unit, or main controller PCB
<Countermeasure>
1. Replace the ink tank.
2. Replace the ink tank unit.
3. Replace the main controller PCB.
6.1.3.31 03830301-2561/03830304-2560/03830302-2562/03830303-2563/03830312-2564/03830313-2565/03830306-2566/
03830305-2568/03830305-2568/03830315-2569/03830307-256A/03830309-256B/03830308-256C Ink tank EEPROM error
0013-2116
iPF6000
<Cause>
An ink tank EEPROM checksum error was detected.
<Probable fault location>
Ink tank, ink tank unit, or main controller PCB
<Countermeasure>
1. Replace the ink tank.
2. Replace the ink tank unit.
3. Cable continuity check
If continuity of the cable between the ink tank unit and the main controller PCB is abnormal, replace the cable.
4. Replace the main controller PCB.
6.1.3.32 03841001-2819/03841201-2816/03841201-2817/03841101-2818/01841001-281B Maintenance cartridge error
0012-6640
iPF6000
6-9
Chapter 6
<Cause>
The maintenance cartridge is full.
The maintenance cartridge does not have the free space for various types of cleaning.
No maintenance cartridge is installed.
The EEPROM of the maintenance cartridge is abnormal.
A maintenance cartridge ID error occurred.
<Probable fault location>
Maintenance cartridge, maintenance cartridge relay PCB, or main controller PCB
<Countermeasure>
1. Replace the maintenance cartridge.
2. Replace the maintenance cartridge relay PCB.
3. Cable continuity check
If continuity of the cable between the maintenance cartridge relay PCB and the main controller PCB is abnormal, replace the cable.
4. Replace the main controller PCB.
6.1.3.33 03861001-2405/03861001-2406 Borderless printing error
0012-6629
iPF6000
<Cause>
The position where the media is loaded is not suitable for borderless printing.
The received data is not suitable for borderless printing.
<Probable fault location>
Operation method
<Countermeasure>
1. Check the operation method and retry printing.
6.1.3.34 03862000-2E09 Insufficient roll media error
0013-2111
iPF6000
<Cause>
The machine detected that the remaining roll media was insufficient.
<Probable fault location>
Roll media, feed roller HP sensor, feed roller encoder film, feed roller encoder, or main controller PCB
<Countermeasure>
1. Replace the roll media.
2. Feed roller HP sensor
Check for normal operation. If the operation is abnormal, replace the feed roller HP sensor.
3. Replace the feed roller encoder film.
4. Replace the feed roller encoder.
5. Replace the main controller PCB.
6.1.3.35 03870001-2015 Cut error
0013-2109
iPF6000
<Cause>
After roll media cutting, the multi sensor could not detect the media end.
<Probable fault location>
Media, multi sensor, cutter unit, cutter lifter unit, cutter drive unit, cutter driver PCB, carriage PCB, or main controller PCB
<Countermeasure>
1. Media check
If there is any print or stain in the detection area on the media or the media size is not the specified one, replace the media.
2. Multi sensor
Select [SERVICE MODE]>[DISPLAY]>[SYSTEM]>[SIZE CR] to check the value read by the multi sensor. If the value is wrong, replace the multi sensor.
3. Visual check
Remove foreign substances from the multi sensor, the cutter unit, the cutter lifter unit, and the cutter drive unit if any.
If the cutter unit, the cutter lifter unit, and the cutter drive unit is damaged or deformed, replace it.
4. Cable continuity check
If continuity of the cable between the multi sensor and the carriage PCB is abnormal, replace the cable.
5. Cable continuity check
If continuity of the cable between the cutter lifter unit, the cutter drive unit, and the cutter driver PCB is abnormal, replace the cable.
6. Replace the cutter driver PCB.
7. Replace the carriage PCB.
8. Replace the main controller PCB.
6.1.4 Troubleshooting When Service Call Errors Occur
6.1.4.1 Outline
0012-6656
iPF6000
When a service call error occurs, turning off the Power button will not recover the error. (Occurrence of a service call is displayed again when the power is turned
back on.)
This measure is taken to prevent user's recovery of the service call error and damages to the printer.
6-10
Chapter 6
To view the service call history, select SERVICE MODE > DISPLAY > ERROR.
6.1.4.2 E141-4046 Recovery system rotation count reached 50,000.
0012-9542
iPF6000
<Cause>
The machine detected that the rotation count of the purge unit reached the specified value.
<Probable fault location>
Purge unit or main controller PCB
<Countermeasure>
1. Replace Purge unit.
After replacing the purge unit, select [SEVICE MODE]>[INITIALIZE]>[PARTS COUNTER] to reset the counter.
2. Replace main controller PCB.
6.1.4.3 E144-4047 Supply system's count error
0012-9545
iPF6000
<Cause>
The machine detected that the carriage scan count reached the specified value.
<Probable fault location>
Ink tank or main controller PCB
<Countermeasure>
1. Replace the ink tank unit.
After replacing the ink tank unit select [SEVIVE MODE]>[INITIALIZE]>[PARTS COUNTER] to reset the counter.
2. Replace the main controller PCB.
6.1.4.4 E146-4001 Borderless/idle ejection/mist collection count full
0012-9557
iPF6000
<Cause>
The machine detected that the waste ink box, the mist fan unit or platen duct became full of ink.
<Probable fault location>
Waste ink box, mist fan unit, platen duct or main controller PCB
<Countermeasure>
1. Replace the waste ink box, mist fan unit or platen duct.
After replacing the waste ink box, mist fan unit or platen duct, select[SEVICE MODE]>[INITIALIZE]>[PARTS COUNTER] to reset the counter.
2. Replace main controller PCB.
6.1.4.5 E194-404A Non-discharge detection count error
0012-9560
iPF6000
<Cause>
The machine detected that the Non-discharge count error
<Probable fault location>
Head management sensor or main controller PCB
<Countermeasure>
1. Replace the head management sensor.
After replacing the head management sensor, select [SERVICE MODE]>[INITIALIZE]>[PARTS COUNTER] to reset the counter.
2. Replace the main controller PCB.
6.1.4.6 E196-4040/E196-4041/E196-4042/E196-4045/E196-4049 main controller PCB error
0012-9564
iPF6000
<Cause>
The main controller PCB is defective.
<Probable fault location>
Firmware or main controller PCB
<Countermeasure>
1. Upgrade the firmware.
2. Replace the main controller PCB.
6.1.4.7 E198-401C/E198-401D/E198-401E RTC error
0012-9599
iPF6000
<Cause>
The RTC of the main controller is not found.
6-11
Chapter 6
The battery capacity is low.
<Probable fault location>
Lithium battery or main controller PCB.
<Countermeasure>
1. Start up the printer in the service mode, and then turn off the power.
2. Replace the lithium battery.
3. Replace the main controller.
6.2 Location of Connectors and Pin Arrangement
6.2.1 Main controller PCB
0016-8457
iPF6100
J2601
J401
J401
1
1
1
1
J3411
J3402
J3101
1
J3701
1
J3801
1
1
J1101
J1801
J3401
1
J2801
J3501
1
J3601
1
J3211
1
1
1
J3911
J3203
J3202
1
1
J2511
1
J2703
J1001
J3301
1
1
J2512
J1201
1
1
J3011
1
1
F-6-1
T-6-1
J1001 (USB)
Pin Number
Signal name
IN/OUT
Function
1
VBUS
IN
USB VBUS (+5V)
2
D-
IN/OUT
USB data (-)
3
D+
IN/OUT
USB data (+)
4
GND
-
USB GND
5
GND
-
GND (Connector shell)
6
GND
-
GND (Connector shell)
T-6-2
J1101 (Connect to IEEE1394 board)
6-12
Pin Number
Signal name
IN/OUT
Function
1
GND
-
GND
2
GND
-
GND
3
GND
-
GND
4
+3.3V
OUT
Power supply (+3.3V)
5
+3.3V
OUT
Power supply (+3.3V)
6
+3.3V
OUT
Power supply (+3.3V)
7
+3.3V
OUT
Power supply (+3.3V)
8
+3.3V
OUT
Power supply (+3.3V)
9
+3.3V
OUT
Power supply (+3.3V)
10
N.C.
-
N.C.
11
GND
-
GND
12
PME#
IN
Power management enable signal
Chapter 6
J1101 (Connect to IEEE1394 board)
Pin Number
Signal name
IN/OUT
Function
13
INTA#
IN
Interrupt signal
14
GND
-
GND
15
RST#
OUT
PCI reset signal
16
CLK
OUT
PCI clock signal
17
GNT#
OUT
Grant signal
18
GND
-
GND
19
REQ#
IN
Request signal
20
AD31
IN/OUT
Address and data signal 31
21
AD30
IN/OUT
Address and data signal 30
22
AD29
IN/OUT
Address and data signal 29
23
AD28
IN/OUT
Address and data signal 28
24
GND
-
GND
25
AD27
IN/OUT
Address and data signal 27
26
AD26
IN/OUT
Address and data signal 26
27
AD25
IN/OUT
Address and data signal 25
28
AD24
IN/OUT
Address and data signal 24
29
CBE3#
IN/OUT
Bus command and byte enable signal 3
30
IDSEL
OUT
Initialization device select signal
31
GND
-
GND
32
GND
-
GND
33
AD23
IN/OUT
Address and data signal 23
34
AD22
IN/OUT
Address and data signal 22
35
AD21
IN/OUT
Address and data signal 21
36
AD20
IN/OUT
Address and data signal 20
37
GND
-
GND
38
AD19
IN/OUT
Address and data signal 19
39
AD18
IN/OUT
Address and data signal 18
40
AD17
IN/OUT
Address and data signal 17
41
AD16
IN/OUT
Address and data signal 16
42
CBE2#
OUT
Bus command and byte enable signal 2
43
GND
-
GND
44
FRAME#
IN/OUT
Cycle frame signal
45
IRDY#
IN/OUT
Initiator redy signal
46
TRDY#
IN/OUT
Target redy signal
47
DEVSEL#
IN/OUT
Device select signal
48
GND
-
GND
49
STOP#
IN/OUT
Stop signal
50
LOCK#
IN/OUT
Lock signal
51
PERR#
IN/OUT
Parity error signal
52
SERR#
IN/OUT
System error signal
53
PAR
IN/OUT
Parity signal
54
CBE1#
IN/OUT
Bus command and byte enable signal 1
55
GND
-
GND
56
GND
-
GND
57
AD15
IN/OUT
Address and data signal 15
58
AD14
IN/OUT
Address and data signal 14
59
AD13
IN/OUT
Address and data signal 13
60
AD12
IN/OUT
Address and data signal 12
61
GND
-
GND
62
AD11
IN/OUT
Address and data signal 11
63
AD10
IN/OUT
Address and data signal 10
64
AD9
IN/OUT
Address and data signal 09
65
AD8
IN/OUT
Address and data signal 08
66
CBE0#
IN/OUT
Bus command and byte enable signal 0
67
GND
-
GND
68
AD7
IN/OUT
Address and data signal 07
69
AD6
IN/OUT
Address and data signal 06
70
AD5
IN/OUT
Address and data signal 05
71
AD4
IN/OUT
Address and data signal 04
6-13
Chapter 6
J1101 (Connect to IEEE1394 board)
Pin Number
Signal name
IN/OUT
72
GND
-
Function
GND
73
AD3
IN/OUT
Address and data signal 03
74
AD2
IN/OUT
Address and data signal 02
75
AD1
IN/OUT
Address and data signal 01
76
AD0
IN/OUT
Address and data signal 00
77
GND
-
GND
78
HDD_LED
-
N.C.
79
+5V
OUT
Power supply (+5V)
80
+5V
OUT
Power supply (+5V)
81
+5V
OUT
Power supply (+5V)
82
+3.3V
OUT
Power supply (+3.3V)
83
+3.3V
OUT
Power supply (+3.3V)
84
+3.3V
OUT
Power supply (+3.3V)
85
GND
-
GND
86
GND
-
GND
87
GND
-
GND
88
GND
-
GND
T-6-3
J1201 (Network)
Pin Number
Signal name
IN/OUT
Function
1
TX+
OUT
Ethernet data TX line (+)
2
TX-
OUT
Ethernet data TX line (-)
3
RX+
IN
Ethernet data RX line (+)
4
-
-
Not used
5
-
-
Not used
6
RX-
IN
Ethernet data RX line (-)
7
-
-
Not used
8
-
-
Not used
9
GREEN_LED_C
OUT
Link LED (green:100Mb/s) cathode terminal
10
GREEN_LED_A
OUT
Link LED (green:100Mb/s) anode terminal
11
YELLOW_LED_C
OUT
Link LED (yellow:10Mb/s) cathode terminal
12
YELLOW_LED_A
OUT
Link LED (yellow:10Mb/s) anode terminal
T-6-4
J1801 (Connect to Power supply)
Pin Number
Signal name
IN/OUT
Function
1
HD1_VHFBH
OUT
VH feedback voltage +
2
HD1_VHFBG
OUT
VH feedback voltage -
3
VH
IN
Power supply (+21.5V)
4
GND
-
GND
5
VH
IN
Power supply (+21.5V)
6
GND
-
GND
7
RGV20(VCC)
IN
Power supply (+21.5V)
8
GND
-
GND
9
VM
IN
Power supply (+26V)
10
GND
-
GND
11
VM
IN
Power supply (+26V)
12
GND
-
GND
13
VH_ENB
OUT
VH power supply ON/OFF signal
14
PW_CONT
OUT
Normal/power saving switch signal
T-6-5
J2511 (Spur motor, Spur cam sensor, Mist fan, Cutter motor, Cutter right detection sensor)
6-14
Pin Number
Signal name
IN/OUT
Function
1
SNS_3V_1
OUT
Power supply (+3.3V)
2
GND
-
GND
3
CUTTER_R_SNS_R
IN
Cutter right detection sensor signal
4
CUTTER_OUTA
OUT
Cutter motor driver signal A
Chapter 6
J2511 (Spur motor, Spur cam sensor, Mist fan, Cutter motor, Cutter right detection sensor)
Pin Number
Signal name
IN/OUT
Function
5
CUTTER_OUTB
OUT
Cutter motor driver signal B
6
SNS_3V_1
OUT
Power supply (+3.3V)
7
GND
-
GND
8
HAKUSHA_CAM_SNS_R
IN
Spur cam sensor output signal
9
HAKUSHA_MOTOR_AM
OUT
Spur motor drive signal AM
10
HAKUSHA_MOTOR_AP
OUT
Spur motor drive signal AP
11
FAN_VM
OUT
Power supply (+26V)
12
MIST_FAN_LOCK
IN
Mist fan lock signal
13
MIST_FAN_PWM
OUT
Mist fan duty control signal
14
GND
-
GND
T-6-6
J2512 (Suction fan, Maintenance cartridge relay PCB, Paper detection sensor, Lift cam sensor)
Pin Number
Signal name
IN/OUT
1
FAN_VM
OUT
Function
Power supply (+26V)
2
PLATEN_FAN_LOCK
IN
Suction fan lock signal
3
PLATEN_FAN_PWM
OUT
Suction fan duty control signal
4
GND
-
GND
5
MENT_SDA
IN/OUT
Maintenance cartridge rom control signal (data)
6
MENT_SCL
IN/OUT
Maintenance cartridge rom control signal (clock)
7
GND
-
GND
8
MENT_3V
9
SNS_3V_1
OUT
Power supply (+3.3V)
10
N.C.
-
N.C.
11
N.C.
-
N.C.
12
N.C.
-
N.C.
13
GND
-
GND
14
PE_SNS
IN
Paper ditection sensor output signal
15
SNS_3V_1
OUT
Power supply (+3.3V)
16
GND
-
GND
17
LIFT_CAM_SNS
IN
Lift cam sensor output signal
Power supply (+3.3V)
T-6-7
J2601 (Operation panel)
Pin Number
Signal name
IN/OUT
Function
1
POWER_ON
IN
Power switch signal
2
PM_START
OUT
Power supply (+5V)
3
BUZZER
OUT
Buzzer control signal
4
PDODATA
OUT
Panel IC control signal
5
+3.3V
OUT
Power supply (+3.3V)
6
PDI_DATA
IN
Panel IC data signal
7
GND
-
GND
8
/PANEL RESET
OUT
Panel reset signal
9
GND
-
GND
10
PDOPCLK
OUT
Panel IC clock signal
11
SNS_5V
OUT
Power supply (+5V)
12
/PDOCS_L
OUT
Panel supply chip select signal
T-6-8
J2703 (Auto feed roll unit)
Pin Number
Signal name
IN/OUT
Function
1
OPT_5V
OUT
Power supply (+5V)
2
GND
-
GND
3
ROLL_CAM_SNS
IN
Roll cam sensor signal
4
ROLL_PAPER_SNS
IN
Roll media sensor signal
5
ROLL_UNIT
IN
Roll unit detection signal
6
VM
OUT
Power supply (+26V)
7
VM
OUT
Power supply (+26V)
8
/ROLL_SLEEP
OUT
Roll motor driver sleep signal
6-15
Chapter 6
J2703 (Auto feed roll unit)
Pin Number
Signal name
IN/OUT
9
ROLL_STB
OUT
Function
Roll motor driver strobe signal
10
ROLL_DAT
OUT
Roll motor driver data signal
11
ROLL_CLK
OUT
Roll motor driver clock signal
12
GND
-
GND
13
GND
-
GND
T-6-9
J2801 (Feed motor)
Pin Number
Signal name
IN/OUT
1
LF_OUTB
OUT
Function
Feed motor drive signal B
2
LF_OUTA
OUT
Feed motor drive signal A
T-6-10
J3011 (Purge motor, Pump encoder sensor, Pump cam sensor, Lift motor, Head management sensor)
Pin Number
Signal name
IN/OUT
Function
1
LIFTOUTCOM
OUT
Lift motor power supply
2
LIFT_OUTAP
OUT
Lift motor drive signal AP
3
LIFT_OUTAM
OUT
Lift motor drive signal AM
4
LIFT_OUTBP
OUT
Lift motor drive signal BP
5
LIFT_OUTBM
OUT
Lift motor drive signal BM
6
GND
-
GND
7
FUTO_CLMP
OUT
Head management sensor unit clamp signal
8
FUTO_XLEDON
OUT
Head management sensor unit LED ON/OFF signal
9
SNS_5V
10
FUTO_XCMP0
IN
Head management sensor unit skew detection signal
11
PUMP_OUTB
OUT
Purge motor drive signal B
12
PUMP_OUTA
OUT
Purge motor drive signal A
Power supply (+5V)
13
GND
-
GND
14
PUMP_ENCA
IN
Pump encoder sensor output signal A
15
SNS_5V
16
PUMP_ENCB
IN
Pump encoder sensor output signal B
Power supply (+5V)
17
PUMP_CAM_3V
OUT
Power supply (+3.3V)
18
GND
-
GND
19
PUMP_CAM_SNS
IN
Pump cam sensor output signal
T-6-11
J3101 (Carriage motor)
Pin Number
Signal name
IN/OUT
1
CR_HWP
IN
Function
Carriage motor hole device W-phase + signal
2
CR_HWM
IN
Carriage motor hole device W-phase - signal
3
CR_W
OUT
Carriage motor W-phase drive signal
4
CR_HVM
IN
Carriage motor hole device V-phase - signal
5
CR_U
OUT
Carriage motor U-phase drive signal
6
GND
-
GND
7
CR_V
OUT
8
SNS_5V
Carriage motor V-phase drive signal
Power supply (+5V)
9
N.C.
-
N.C
10
CR_HVP
IN
Carriage motor hole device V-phase + signal
11
CR_HUM
IN
Carriage motor hole device U-phase - signal
12
CR_HUP
IN
Carriage motor hole device U-phase + signal
T-6-12
J3202 (Ink tank ROM PCB, Ink detection sensor)
6-16
Pin Number
Signal name
IN/OUT
Function
1
TANK_DAT0
IN/OUT
Ink tank data signal 0
2
TANK_DAT1
IN/OUT
Ink tank data signal 1
3
TANK_3V
OUT
Power supply (+3.3V)
4
TANK_DAT2
IN/OUT
Ink tank data signal 2
Chapter 6
J3202 (Ink tank ROM PCB, Ink detection sensor)
Pin Number
Signal name
IN/OUT
5
GND
-
Function
GND
6
TANK_CLK
OUT
Ink tank clock signal
7
TANK_DAT3
IN/OUT
Ink tank data signal 3
8
TANK_DAT4
IN/OUT
Ink tank data signal 4
9
TANK_3V
OUT
Power supply (+3.3V)
10
TANK_DAT5
IN/OUT
Ink tank data signal 5
11
GND
-
GND
12
TANK_CLK
OUT
Ink tank clock signal
13
GND
-
GND
14
INK_SNS0
IN
Ink detection sensor output signal 0
15
INK_SNS1
IN
Ink detection sensor output signal 1
16
INK_SNS2
IN
Ink detection sensor output signal 2
17
GND
-
GND
18
INK_SNS3
IN
Ink detection sensor output signal 3
19
INK_SNS4
IN
Ink detection sensor output signal 4
20
INK_SNS5
IN
Ink detection sensor output signal 5
T-6-13
J3211 (Valve motor, Valve open/closed detection sensor, Feed roller HP sensor, Feed roller encoder sensor)
Pin Number
Signal name
IN/OUT
Function
1
VALVE_DETECT_3V
OUT
Power supply (+3.3V)
2
GND
-
GND
3
VALVE_DETECT_SNS
IN
Valve open/closed detection sensor output signal
4
VALVE_MOTOR_AM
OUT
Valve motor drive signal AM
5
VALVE_MOTOR_AP
OUT
Valve motor drive signal AP
6
LF_HP_SNS_3V
OUT
Power supply (+3.3V)
7
GND
-
GND
8
LF_HP_SNS
IN
Feed roller HP sensor output signal
9
GND
-
GND
10
LF_ENCA
IN
Feed roller encoder sensor output signal A
11
RGV5
OUT
Power supply (+5V)
12
LF_ENCB
IN
Feed roller encoder sensor output signal B
T-6-14
J3301 (Ink tank ROM PCB, Ink detection sensor)
Pin Number
Signal name
IN/OUT
Function
1
TANK_DAT6_L
IN/OUT
Ink tank data signal 6
2
TANK_DAT7_L
IN/OUT
Ink tank data signal 7
3
TANK_3V
OUT
Power supply (+3.3V)
4
TANK_DAT8
IN/OUT
Ink tank data signal 8
5
GND
-
GND
6
TANK_CLK
OUT
Ink tank clock signal
7
TANK_DAT9
IN/OUT
Ink tank data signal 9
8
TANK_DAT10
IN/OUT
Ink tank data signal 10
9
TANK_3V
OUT
Power supply (+3.3V)
10
TANK_DAT11
IN/OUT
Ink tank data signal 11
11
GND
-
GND
12
TANK_CLK
OUT
Ink tank clock signal
13
GND
-
GND
14
INK_SNS6_L
IN
Ink detection sensor output signal 6
15
INK_SNS7_L
IN
Ink detection sensor output signal 7
16
INK_SNS8
IN
Ink detection sensor output signal 8
17
GND
-
GND
18
INK_SNS9
IN
Ink detection sensor output signal 9
19
INK_SNS10
IN
Ink detection sensor output signal 10
20
INK_SNS11
IN
Ink detection sensor output signal 11
6-17
Chapter 6
T-6-15
J3401 (Carriage PCB J11)
Pin Number
Signal name
IN/OUT
Function
1
GND
-
GND
2
GND
-
GND
3
GND
-
GND
4
GND
-
GND
5
GND
-
GND
6
GND
-
GND
7
GND
-
GND
8
VH
OUT
Power supply (+21.5V)
9
VH
OUT
Power supply (+21.5V)
10
VH
OUT
Power supply (+21.5V)
11
VH
OUT
Power supply (+21.5V)
12
VH
OUT
Power supply (+21.5V)
13
VH
OUT
Power supply (+21.5V)
14
VH
OUT
Power supply (+21.5V)
15
VH
OUT
Power supply (+21.5V)
16
VH
OUT
Power supply (+21.5V)
17
VH
OUT
Power supply (+21.5V)
18
VH
OUT
Power supply (+21.5V)
19
VH
OUT
Power supply (+21.5V)
20
VH
OUT
Power supply (+21.5V)
21
VH
OUT
Power supply (+21.5V)
22
VH
OUT
Power supply (+21.5V)
23
VH
OUT
Power supply (+21.5V)
24
GND
-
GND
25
GND
-
GND
26
GND
-
GND
27
GND
-
GND
28
GND
-
GND
29
GND
-
GND
30
GND
-
GND
T-6-16
J3402 (Carriage PCB J21)
6-18
Pin Number
Signal name
IN/OUT
Function
1
GND
-
GND
2
GND
-
GND
3
GND
-
GND
4
GND
-
GND
5
GND
-
GND
6
GND
-
GND
7
VH
OUT
Power supply (+21.5V)
8
VH
OUT
Power supply (+21.5V)
9
VH
OUT
Power supply (+21.5V)
10
VH
OUT
Power supply (+21.5V)
11
VH
OUT
Power supply (+21.5V)
12
VH
OUT
Power supply (+21.5V)
13
VH
OUT
Power supply (+21.5V)
14
VH
OUT
Power supply (+21.5V)
15
VH
OUT
Power supply (+21.5V)
16
VH
OUT
Power supply (+21.5V)
17
VH
OUT
Power supply (+21.5V)
18
VH
OUT
Power supply (+21.5V)
19
VH
OUT
Power supply (+21.5V)
20
VH
OUT
Power supply (+21.5V)
21
VH
OUT
Power supply (+21.5V)
22
HD1_VHFBH
IN
VH feed back voltage +
23
HD1_VHFBG
IN
VH feed back voltage -
24
GND
-
GND
Chapter 6
J3402 (Carriage PCB J21)
Pin Number
Signal name
IN/OUT
Function
25
GND
-
GND
26
GND
-
GND
27
GND
-
GND
28
GND
-
GND
29
GND
-
GND
30
GND
-
GND
T-6-17
J3411 (Temperature/humidity detection sensor)
Pin Number
Signal name
IN/OUT
Function
1
TH2_OUT
IN
Thermistor output signal
2
GND
-
GND
3
RHV_OUT
IN
Temperature/humidity detection sensor output signal
4
SNS_5V
Power supply (+5V)
T-6-18
J3501 (Carriage PCB J12)
Pin Number
Signal name
IN/OUT
Function
1
GND
-
GND
2
GND
-
GND
3
H-DASH LICC2 B
OUT
Analogue switch A/D trigger signal
4
GND
-
GND
5
H0-D-DATA-7-OD
OUT
Odd head R data signal 7(D)
6
GND
-
GND
7
H0-E-HE-8
OUT
Head R heat enable signal 8(E)
8
GND
-
GND
9
H0-E-DATA-8-OD
OUT
Odd head R data signal 8(E)
10
GND
-
GND
11
H0-F-DATA-10-OD
OUT
Odd head R data signal 10(F)
12
GND
-
GND
13
H0-E-DATA-9-OD
OUT
Odd head R data signal 9(E)
14
GND
-
GND
15
H0-F-HE-10
OUT
Head R heat enable signal 10(F)
16
GND
-
GND
17
H0-F-DATA-11-OD
OUT
Odd head R data signal 11(F)
18
GND
-
GND
19
H0-F-HE-11
OUT
Head R heat enable signal 11(F)
20
GND
-
GND
21
H0-F-DATA-11-EV
OUT
Even head R data signal 11(F)
22
GND
-
GND
23
H0-F-DATA-10-EV
OUT
Even head R data signal 10(F)
24
GND
-
GND
25
H0-E-HE-9
OUT
Head R heat enable signal 9(E)
26
GND
-
GND
27
H0-E-DATA-9-EV
OUT
Even head R data signal 9(E)
28
GND
-
GND
29
GND
-
GND
30
GND
-
GND
31
GND
-
GND
32
GND
-
GND
33
GND
-
GND
34
GND
-
GND
35
H0-A-DATA-0-OD
OUT
Odd head R data signal 0(A)
36
GND
-
GND
37
H0-A-DATA-1-OD
OUT
Odd head R data signal 1(A)
38
GND
-
GND
39
H0-B-HE-2
OUT
Head R heat enable signal 2(B)
40
GND
-
GND
41
H0-B-DATA-2-OD
OUT
Odd head R data signal 2(B)
6-19
Chapter 6
J3501 (Carriage PCB J12)
Pin Number
Signal name
IN/OUT
Function
42
GND
-
GND
43
H0-B-DATA-3-OD
OUT
Odd head R data signal 3(B)
44
GND
-
GND
45
H0-C-HE-4
OUT
Head R heat enable signal 4(C)
46
GND
-
GND
47
H0-C-DATA-4-OD
OUT
Odd head R data signal 4(C)
48
SNS_5V
OUT
Power supply (+5V)
49
GND
-
GND
50
GND
-
GND
T-6-19
J3601 (Carriage PCB J13)
6-20
Pin Number
Signal name
IN/OUT
Function
1
H0-E-DATA-8
OUT
Even head R data signal 8(E)
2
GND
-
GND
3
H0-D-HE-7
OUT
Head R heat enable signal 7(D)
4
GND
-
GND
5
H0-D-DATA-7-EV
OUT
Even head R data signal 7(D)
6
GND
-
GND
7
H0-D-DATA-6-EB
OUT
Even head R data signal 6(D)
8
GND
-
GND
9
H0-D-DATA-6-OD
OUT
Odd head R data signal 6(D)
10
GND
-
GND
11
H0-D-HE-6
OUT
Head R heat enable signal 6(D)
12
GND
-
GND
13
H0-C-HE-5
OUT
Head R heat enable signal 5(C)
14
GND
-
GND
15
H0-C-DATA-5-OD
OUT
Odd head R data signal 5(C)
16
GND
-
GND
17
H0-DSOUT2
IN
Head R temperature output 2
18
GND
-
GND
19
H0-DSOUT1
IN
Head R temperature output 1
20
GND
-
GND
21
GND
-
GND
22
LICSEL0
OUT
Head R analogue switch clock signal
23
LICSEL2
OUT
Head R analogue switch latch signal
24
LICSEL1
OUT
Head R analogue switch data signal
25
GND
-
GND
26
GND
-
GND
27
H0_CLK
OUT
Head R data clock signal
28
GND
-
GND
29
H0-LT
OUT
Head R data latch signal
30
HEAD_3V
OUT
Power supply (+3V)
31
HEAD_3V
OUT
Power supply (+3V)
32
GND
-
GND
33
H0-C-DATA-5-EV
OUT
Even head R data signal 5(C)
34
GND
-
GND
35
H0-B-HE-3
OUT
Head R heat enable signal 8(E)
36
GND
-
GND
37
H0-C-DATA-4-EV
OUT
Even head R data signal 4(C)
38
GND
-
GND
39
H0-B-DATA-3-EV
OUT
Even head R data signal 3(B)
40
GND
-
GND
41
H0-B-DATA-2-EV
OUT
Even head R data signal 2(B)
42
GND
-
GND
43
H0-A-DATA-1-EV
OUT
Even head R data signal 1(A)
44
GND
-
GND
45
H0-A-HE-1
OUT
Head R heat enable signal 8(E)
46
GND
-
GND
47
H0-A-DATA-0-EV
OUT
Even head R data signal 0(A)
Chapter 6
J3601 (Carriage PCB J13)
Pin Number
Signal name
IN/OUT
48
GND
-
Function
GND
49
H0-A-HE-0_B
OUT
Head R heat enable signal 8(E)
50
GND
-
GND
T-6-20
J3701 (Carriage PCB J22)
Pin Number
Signal name
IN/OUT
Function
1
H1-D-DATA-7-OD
OUT
Odd head L data signal 7(D)
2
GND
-
GND
3
H1-E-HE-8
OUT
Head L heat enable signal8(E)
4
GND
-
GND
5
H1-E-DATA-8-OD
OUT
Odd head L data signal 8(E)
6
GND
-
GND
7
H1-F-DATA-10-OD
OUT
Odd head L data signal 10(F)
8
GND
-
GND
9
H1-E-DATA-9-OD
OUT
Odd head L data signal 9(E)
10
GND
-
GND
11
H1-F-HE-10
OUT
Head L heat enable signal10(F)
12
GND
-
GND
13
H1-F-DATA-11-OD
OUT
Odd head L data signal 11(F)
14
GND
-
GND
15
H1-F-HE-11
OUT
Head L heat enable signal11(F)
16
GND
-
GND
17
H1-F-DATA-11-EV
OUT
Even head L data signal11(F)
18
GND
-
GND
19
H1-F-DATA-10-EV
OUT
Even head L data signal10(F)
20
GND
-
GND
21
H1-E-HE-9
OUT
Head L heat enable signal9(E)
22
GND
-
GND
23
H1-E-DATA-9-EV
OUT
Even head L data signal9(E)
24
H1-DLD LICC2
OUT
Head L analogue switch latch signal
25
H1-DATA LICC2
OUT
Head L analogue switch data signal
26
H1-DASLK LICC2
OUT
Head L analogue switch clock signal
27
GND
-
GND
28
H1-DSOUT2
IN
Head L temperature output 2
29
H1-DSOUT1
IN
Head L temperature output 1
30
GND
-
GND
31
PWLED4_ON
OUT
Multi sensor LED 4 drive signal
32
PWLED3_ON
OUT
Multi sensor LED 3 drive signal
33
PWLED2_ON
OUT
Multi sensor LED 2 drive signal
34
PWLED1_ON
OUT
Multi sensor LED 1 drive signal
35
GND
-
GND
36
MLT_SNS_1IN
IN
Multi sensor signal 1
37
MLT_SNS_2IN
IN
Multi sensor signal 2
38
GND
-
GND
39
H1-B-DATA-2-OD
OUT
Odd head L data signal 2(B)
40
GND
-
GND
41
H1-B-DATA-3-OD
OUT
Odd head L data signal 3(B)
42
GND
-
GND
43
H1-C-HE-4
OUT
Head L heat enable signal8(E)
44
GND
-
GND
45
H1-C-DATA-4-OD
OUT
Odd head L data signal 4(C)
46
SNS_5V
OUT
Power supply (+5V)
47
ENCODER_B
IN
Carriage encoder output signalB
48
SNS_5V
OUT
Power supply (+5V)
49
ENCODER_A
IN
Carriage encoder output signalA
50
GND
-
GND
6-21
Chapter 6
T-6-21
J3801 (Carriage PCB J23)
Pin Number
Signal name
IN/OUT
Function
1
H1-E-DATA-8-EV
OUT
Even head L data signal 8(E)
2
GND
-
GND
3
H1-D-HE-7
OUT
Head L heat enable signal 7(D)
4
GND
-
GND
5
IO-ASIC_SDA
IN/OUT
Head ROM control signal (data)
6
GND
-
GND
7
H1-D-DATA-7-EV
OUT
Even head L data signal 7(D)
8
GND
-
GND
9
H1-D-DATA-6-EV
OUT
Even head L data signal 6(D)
10
GND
-
GND
11
H1-D-DATA-6-OD
OUT
Odd head L data signal6(D)
12
GND
-
GND
13
IO-ASIC_SCL
IN/OUT
Head ROM control signal (clock)
14
GND
-
GND
15
H1-D-HE-6
OUT
Head L heat enable signal 6(D)
16
GND
-
GND
17
H1-C-HE-5
OUT
Head L heat enable signal 5(C)
18
GND
-
GND
19
H1-C-DATA-5-OD
OUT
Odd head L data signal5(C)
20
GND
-
GND
21
H1_CLK
OUT
Head L clock signal
22
GND
-
GND
23
HEAD_3V
OUT
Power supply (+3V)
24
GND
-
GND
25
H1_LT
OUT
Head L latch signal
26
H-DASH_LICC2_B
OUT
Analogue switch/AD triggar
27
H1-C-DATA-5-EV
OUT
Even head L data signal 5(C)
28
GND
-
GND
29
H1-B-HE-3
OUT
Head L heat enable signal 3(B)
30
GND
-
GND
31
H1-C-DATA-4-EV
OUT
Even head L data signal 4(C)
32
GND
-
GND
33
H1-B-DATA-3-EV
OUT
Even head L data signal 3(B)
34
GND
-
GND
35
H1-B-DATA-2-EV
OUT
Even head L data signal 2(B)
36
GND
-
GND
37
H1-A-DATA-1-EV
OUT
Even head L data signal 1(A)
38
GND
-
GND
39
H1-A-HE-1
OUT
Head L heat enable signal 1(A)
40
GND
-
GND
41
H1-A-DATA-0-EV
OUT
Even head L data signal 0(A)
42
GND
-
GND
43
H1-A-HE-0
OUT
Head L heat enable signal 0(A)
44
GND
-
GND
45
H1-A-DATA-0-OD
OUT
Odd head L data signal0(A)
46
GND
-
GND
47
H1-A-DATA-1-OD
OUT
Odd head L data signal1(A)
48
GND
-
GND
49
H1-B-HE-2
OUT
Head L heat enable signal 2(B)
50
GND
-
GND
T-6-22
J3911 (Top cover sensor, Ink tank cover switch, Cutter HP sensor)
6-22
Pin Number
Signal name
IN/OUT
Function
1
TANK_COVER_SW
IN
Ink tank cover switch output signal
2
GND
-
GND
3
SNS_3V_1
OUT
Power supply (+3.3V)
4
GND
-
GND
Chapter 6
J3911 (Top cover sensor, Ink tank cover switch, Cutter HP sensor)
Pin Number
Signal name
IN/OUT
Function
5
TOP_COVER_SNS
IN
Top cover sensor output signal
6
SNS_3V_1
OUT
Power supply (+3.3V)
7
GND
-
GND
8
CUTTER_L_SNS
IN
Cutter HP sensor signal
6-23
Chapter 6
6.2.2 Main controller PCB
0020-1950
iPF6200
J2601
J401
J401
1
1
1
1
J3411
J3402
J3101
1
J3701
1
J3801
1
1
J1101
J1801
J3401
1
J2801
J3501
1
J3601
1
J3211
1
1
1
J3911
J3203
J3202
1
1
J2511
1
J2703
J1001
J3301
1
1
J2512
J1201
1
1
J3011
1
1
F-6-2
T-6-23
J1001 (USB)
Pin Number
Signal name
IN/OUT
Function
1
VBUS
IN
USB VBUS (+5V)
2
D-
IN/OUT
USB data (-)
3
D+
IN/OUT
USB data (+)
4
GND
-
USB GND
5
GND
-
GND (Connector shell)
6
GND
-
GND (Connector shell)
T-6-24
J1101 (Connect to HDD expansion PCB)
6-24
Pin Number
Signal name
IN/OUT
Function
1
GND
-
GND
2
GND
-
GND
3
GND
-
GND
4
+3.3V
OUT
Power supply (+3.3V)
5
+3.3V
OUT
Power supply (+3.3V)
6
+3.3V
OUT
Power supply (+3.3V)
7
+3.3V
OUT
Power supply (+3.3V)
8
+3.3V
OUT
Power supply (+3.3V)
9
+3.3V
OUT
Power supply (+3.3V)
10
N.C.
-
N.C.
11
GND
-
GND
12
PME#
IN
Power management enable signal
13
INTA#
IN
Interrupt signal
14
GND
-
GND
15
RST#
OUT
PCI reset signal
16
CLK
OUT
PCI clock signal
17
GNT#
OUT
Grant signal
18
GND
-
GND
19
REQ#
IN
Request signal
20
AD31
IN/OUT
Address and data signal 31
21
AD30
IN/OUT
Address and data signal 30
22
AD29
IN/OUT
Address and data signal 29
Chapter 6
J1101 (Connect to HDD expansion PCB)
Pin Number
Signal name
IN/OUT
Function
23
AD28
IN/OUT
Address and data signal 28
24
GND
-
GND
25
AD27
IN/OUT
Address and data signal 27
26
AD26
IN/OUT
Address and data signal 26
27
AD25
IN/OUT
Address and data signal 25
28
AD24
IN/OUT
Address and data signal 24
29
CBE3#
IN/OUT
Bus command and byte enable signal 3
30
IDSEL
OUT
Initialization device select signal
31
GND
-
GND
32
GND
-
GND
33
AD23
IN/OUT
Address and data signal 23
34
AD22
IN/OUT
Address and data signal 22
35
AD21
IN/OUT
Address and data signal 21
36
AD20
IN/OUT
Address and data signal 20
37
GND
-
GND
38
AD19
IN/OUT
Address and data signal 19
39
AD18
IN/OUT
Address and data signal 18
40
AD17
IN/OUT
Address and data signal 17
41
AD16
IN/OUT
Address and data signal 16
42
CBE2#
OUT
Bus command and byte enable signal 2
43
GND
-
GND
44
FRAME#
IN/OUT
Cycle frame signal
45
IRDY#
IN/OUT
Initiator redy signal
46
TRDY#
IN/OUT
Target redy signal
47
DEVSEL#
IN/OUT
Device select signal
48
GND
-
GND
49
STOP#
IN/OUT
Stop signal
50
LOCK#
IN/OUT
Lock signal
51
PERR#
IN/OUT
Parity error signal
52
SERR#
IN/OUT
System error signal
53
PAR
IN/OUT
Parity signal
54
CBE1#
IN/OUT
Bus command and byte enable signal 1
55
GND
-
GND
56
GND
-
GND
57
AD15
IN/OUT
Address and data signal 15
58
AD14
IN/OUT
Address and data signal 14
59
AD13
IN/OUT
Address and data signal 13
60
AD12
IN/OUT
Address and data signal 12
61
GND
-
GND
62
AD11
IN/OUT
Address and data signal 11
63
AD10
IN/OUT
Address and data signal 10
64
AD9
IN/OUT
Address and data signal 09
65
AD8
IN/OUT
Address and data signal 08
66
CBE0#
IN/OUT
Bus command and byte enable signal 0
67
GND
-
GND
68
AD7
IN/OUT
Address and data signal 07
69
AD6
IN/OUT
Address and data signal 06
70
AD5
IN/OUT
Address and data signal 05
71
AD4
IN/OUT
Address and data signal 04
72
GND
-
GND
73
AD3
IN/OUT
Address and data signal 03
74
AD2
IN/OUT
Address and data signal 02
75
AD1
IN/OUT
Address and data signal 01
76
AD0
IN/OUT
Address and data signal 00
77
GND
-
GND
78
HDD_LED
OUT
HDD LED signal
79
+5V
OUT
Power supply (+5V)
80
+5V
OUT
Power supply (+5V)
81
+5V
OUT
Power supply (+5V)
6-25
Chapter 6
J1101 (Connect to HDD expansion PCB)
Pin Number
Signal name
IN/OUT
Function
82
+3.3V
OUT
Power supply (+3.3V)
83
+3.3V
OUT
Power supply (+3.3V)
84
+3.3V
OUT
Power supply (+3.3V)
85
GND
-
GND
86
GND
-
GND
87
GND
-
GND
88
GND
-
GND
T-6-25
J1201 (Network)
Pin Number
Signal name
IN/OUT
Function
1
TX+
OUT
Ethernet data TX line (+)
2
TX-
OUT
Ethernet data TX line (-)
3
RX+
IN
Ethernet data RX line (+)
4
-
-
Not used
5
-
-
Not used
6
RX-
IN
Ethernet data RX line (-)
7
-
-
Not used
8
-
-
Not used
9
GREEN_LED_C
OUT
Link LED (green:100Mb/s) cathode terminal
10
GREEN_LED_A
OUT
Link LED (green:100Mb/s) anode terminal
11
YELLOW_LED_C
OUT
Link LED (yellow:10Mb/s) cathode terminal
12
YELLOW_LED_A
OUT
Link LED (yellow:10Mb/s) anode terminal
T-6-26
J1801 (Connect to Power supply)
Pin Number
Signal name
IN/OUT
Function
1
HD1_VHFBH
OUT
VH feedback voltage +
2
HD1_VHFBG
OUT
VH feedback voltage -
3
VH
IN
Power supply (+21.5V)
4
GND
-
GND
5
VH
IN
Power supply (+21.5V)
6
GND
-
GND
7
RGV20(VCC)
IN
Power supply (+21.5V)
8
GND
-
GND
9
VM
IN
Power supply (+26V)
10
GND
-
GND
11
VM
IN
Power supply (+26V)
12
GND
-
GND
13
VH_ENB
OUT
VH power supply ON/OFF signal
14
PW_CONT
OUT
Normal/power saving switch signal
T-6-27
J2511 (Spur motor, Spur cam sensor, Mist fan, Cutter motor, Cutter right detection sensor)
6-26
Pin Number
Signal name
IN/OUT
Function
1
SNS_3V_1
OUT
Power supply (+3.3V)
2
GND
-
GND
3
CUTTER_R_SNS_R
IN
Cutter right detection sensor signal
4
CUTTER_OUTA
OUT
Cutter motor driver signal A
5
CUTTER_OUTB
OUT
Cutter motor driver signal B
6
SNS_3V_1
OUT
Power supply (+3.3V)
7
GND
-
GND
8
HAKUSHA_CAM_SNS_R
IN
Spur cam sensor output signal
9
HAKUSHA_MOTOR_AM
OUT
Spur motor drive signal AM
10
HAKUSHA_MOTOR_AP
OUT
Spur motor drive signal AP
11
FAN_VM
OUT
Power supply (+26V)
12
MIST_FAN_LOCK
IN
Mist fan lock signal
13
MIST_FAN_PWM
OUT
Mist fan duty control signal
14
GND
-
GND
Chapter 6
T-6-28
J2512 (Suction fan, Maintenance cartridge relay PCB, Paper detection sensor, Lift cam sensor)
Pin Number
Signal name
IN/OUT
1
FAN_VM
OUT
Function
Power supply (+26V)
2
PLATEN_FAN_LOCK
IN
Suction fan lock signal
3
PLATEN_FAN_PWM
OUT
Suction fan duty control signal
4
GND
-
GND
5
MENT_SDA
IN/OUT
Maintenance cartridge rom control signal (data)
6
MENT_SCL
IN/OUT
Maintenance cartridge rom control signal (clock)
7
GND
-
GND
8
MENT_3V
9
SNS_3V_1
OUT
Power supply (+3.3V)
10
N.C.
-
N.C.
11
N.C.
-
N.C.
12
N.C.
-
N.C.
13
GND
-
GND
14
PE_SNS
IN
Paper ditection sensor output signal
15
SNS_3V_1
OUT
Power supply (+3.3V)
16
GND
-
GND
17
LIFT_CAM_SNS
IN
Lift cam sensor output signal
Power supply (+3.3V)
T-6-29
J2601 (Connect to Operation panel)
Pin Number
Signal name
IN/OUT
Function
1
POWER_ON
IN
Power switch signal
2
PM_START
OUT
Power supply (+5V)
3
BUZZER
OUT
Buzzer control signal
4
PDODATA
OUT
Panel IC control signal
5
+3.3V
OUT
Power supply (+3.3V)
6
PDI_DATA
IN
Panel IC data signal
7
GND
-
GND
8
/PANEL RESET
OUT
Panel reset signal
9
GND
-
GND
10
PDOPCLK
OUT
Panel IC clock signal
11
SNS_5V
OUT
Power supply (+5V)
12
/PDOCS_L
OUT
Panel supply chip select signal
T-6-30
J2703 (Auto feed roll unit)
Pin Number
Signal name
IN/OUT
Function
1
OPT_5V
OUT
Power supply (+5V)
2
GND
-
GND
3
ROLL_CAM_SNS
IN
Roll cam sensor signal
4
ROLL_PAPER_SNS
IN
Roll media sensor signal
5
ROLL_UNIT
IN
Roll unit detection signal
6
VM
OUT
Power supply (+26V)
7
VM
OUT
Power supply (+26V)
8
/ROLL_SLEEP
OUT
Roll motor driver sleep signal
9
ROLL_STB
OUT
Roll motor driver strobe signal
10
ROLL_DAT
OUT
Roll motor driver data signal
11
ROLL_CLK
OUT
Roll motor driver clock signal
12
GND
-
GND
13
GND
-
GND
T-6-31
J2801 (Feed motor)
Pin Number
Signal name
IN/OUT
1
LF_OUTB
OUT
Function
Feed motor drive signal B
2
LF_OUTA
OUT
Feed motor drive signal A
6-27
Chapter 6
T-6-32
J3011 (Purge motor, Pump encoder sensor, Pump cam sensor, Lift motor, Head management sensor)
Pin Number
Signal name
IN/OUT
Function
1
LIFTOUTCOM
OUT
Lift motor power supply
2
LIFT_OUTAP
OUT
Lift motor drive signal AP
3
LIFT_OUTAM
OUT
Lift motor drive signal AM
4
LIFT_OUTBP
OUT
Lift motor drive signal BP
5
LIFT_OUTBM
OUT
Lift motor drive signal BM
6
GND
-
GND
7
FUTO_CLMP
OUT
Head management sensor unit clamp signal
8
FUTO_XLEDON
OUT
Head management sensor unit LED ON/OFF signal
9
SNS_5V
10
FUTO_XCMP0
IN
Head management sensor unit skew detection signal
11
PUMP_OUTB
OUT
Purge motor drive signal B
12
PUMP_OUTA
OUT
Purge motor drive signal A
Power supply (+5V)
13
GND
-
GND
14
PUMP_ENCA
IN
Pump encoder sensor output signal A
15
SNS_5V
16
PUMP_ENCB
IN
Pump encoder sensor output signal B
Power supply (+5V)
17
PUMP_CAM_3V
OUT
Power supply (+3.3V)
18
GND
-
GND
19
PUMP_CAM_SNS
IN
Pump cam sensor output signal
T-6-33
J3101 (Carriage motor)
Pin Number
Signal name
IN/OUT
1
CR_HWP
IN
Function
Carriage motor hole device W-phase + signal
2
CR_HWM
IN
Carriage motor hole device W-phase - signal
3
CR_W
OUT
Carriage motor W-phase drive signal
4
CR_HVM
IN
Carriage motor hole device V-phase - signal
5
CR_U
OUT
Carriage motor U-phase drive signal
6
GND
-
GND
7
CR_V
OUT
8
SNS_5V
Carriage motor V-phase drive signal
Power supply (+5V)
9
N.C.
-
N.C
10
CR_HVP
IN
Carriage motor hole device V-phase + signal
11
CR_HUM
IN
Carriage motor hole device U-phase - signal
12
CR_HUP
IN
Carriage motor hole device U-phase + signal
T-6-34
J3202 (Ink tank ROM PCB, Ink detection sensor)
6-28
Pin Number
Signal name
IN/OUT
Function
1
TANK_DAT0
IN/OUT
Ink tank data signal 0
2
TANK_DAT1
IN/OUT
Ink tank data signal 1
3
TANK_3V
OUT
Power supply (+3.3V)
4
TANK_DAT2
IN/OUT
Ink tank data signal 2
5
GND
-
GND
6
TANK_CLK
OUT
Ink tank clock signal
7
TANK_DAT3
IN/OUT
Ink tank data signal 3
8
TANK_DAT4
IN/OUT
Ink tank data signal 4
9
TANK_3V
OUT
Power supply (+3.3V)
10
TANK_DAT5
IN/OUT
Ink tank data signal 5
11
GND
-
GND
12
TANK_CLK
OUT
Ink tank clock signal
13
GND
-
GND
14
INK_SNS0
IN
Ink detection sensor output signal 0
15
INK_SNS1
IN
Ink detection sensor output signal 1
16
INK_SNS2
IN
Ink detection sensor output signal 2
17
GND
-
GND
18
INK_SNS3
IN
Ink detection sensor output signal 3
Chapter 6
J3202 (Ink tank ROM PCB, Ink detection sensor)
Pin Number
Signal name
IN/OUT
Function
19
INK_SNS4
IN
Ink detection sensor output signal 4
20
INK_SNS5
IN
Ink detection sensor output signal 5
T-6-35
J3211 (Valve motor, Valve open/closed detection sensor, Feed roller HP sensor, Feed roller encoder sensor)
Pin Number
Signal name
IN/OUT
Function
1
SNS_3V
OUT
Power supply (+3.3V)
2
GND
-
GND
3
VALVE_DETECT_SENSOR
IN
Valve open/closed detection sensor output signal
4
VALVE_MOTOR_AM
OUT
Valve motor drive signal AM
5
VALVE_MOTOR_AP
OUT
Valve motor drive signal AP
6
SNS_3V
OUT
Power supply (+3.3V)
7
GND
-
GND
8
LF_HP_SNS
IN
Feed roller HP sensor output signal
9
GND
-
GND
10
LF_ENCA
IN
Feed roller encoder sensor output signal A
11
RGV5
OUT
Power supply (+5V)
12
LF_ENCB
IN
Feed roller encoder sensor output signal B
T-6-36
J3301 (Ink tank ROM PCB, Ink detection sensor)
Pin Number
Signal name
IN/OUT
Function
1
TANK_DAT6_L
IN/OUT
Ink tank data signal 6
2
TANK_DAT7_L
IN/OUT
Ink tank data signal 7
3
TANK_3V
OUT
Power supply (+3.3V)
4
TANK_DAT8
IN/OUT
Ink tank data signal 8
5
GND
-
GND
6
TANK_CLK
OUT
Ink tank clock signal
7
TANK_DAT9
IN/OUT
Ink tank data signal 9
8
TANK_DAT10
IN/OUT
Ink tank data signal 10
9
TANK_3V
OUT
Power supply (+3.3V)
10
TANK_DAT11
IN/OUT
Ink tank data signal 11
11
GND
-
GND
12
TANK_CLK
OUT
Ink tank clock signal
13
GND
-
GND
14
INK_SNS6_L
IN
Ink detection sensor output signal 6
15
INK_SNS7_L
IN
Ink detection sensor output signal 7
16
INK_SNS8
IN
Ink detection sensor output signal 8
17
GND
-
GND
18
INK_SNS9
IN
Ink detection sensor output signal 9
19
INK_SNS10
IN
Ink detection sensor output signal 10
20
INK_SNS11
IN
Ink detection sensor output signal 11
T-6-37
J3401 (Connect to Carriage PCB J11)
Pin Number
Signal name
IN/OUT
Function
1
GND
-
GND
2
GND
-
GND
3
GND
-
GND
4
GND
-
GND
5
GND
-
GND
6
GND
-
GND
7
GND
-
GND
8
VH
OUT
Power supply (+21.5V)
9
VH
OUT
Power supply (+21.5V)
10
VH
OUT
Power supply (+21.5V)
11
VH
OUT
Power supply (+21.5V)
12
VH
OUT
Power supply (+21.5V)
13
VH
OUT
Power supply (+21.5V)
6-29
Chapter 6
J3401 (Connect to Carriage PCB J11)
Pin Number
Signal name
IN/OUT
Function
14
VH
OUT
Power supply (+21.5V)
15
VH
OUT
Power supply (+21.5V)
16
VH
OUT
Power supply (+21.5V)
17
VH
OUT
Power supply (+21.5V)
18
VH
OUT
Power supply (+21.5V)
19
VH
OUT
Power supply (+21.5V)
20
VH
OUT
Power supply (+21.5V)
21
VH
OUT
Power supply (+21.5V)
22
VH
OUT
Power supply (+21.5V)
23
VH
OUT
Power supply (+21.5V)
24
GND
-
GND
25
GND
-
GND
26
GND
-
GND
27
GND
-
GND
28
GND
-
GND
29
GND
-
GND
30
GND
-
GND
T-6-38
J3402 (Connect to Carriage PCB J21)
Pin Number
Signal name
IN/OUT
Function
1
GND
-
GND
2
GND
-
GND
3
GND
-
GND
4
GND
-
GND
5
GND
-
GND
6
GND
-
GND
7
VH
OUT
Power supply (+21.5V)
8
VH
OUT
Power supply (+21.5V)
9
VH
OUT
Power supply (+21.5V)
10
VH
OUT
Power supply (+21.5V)
11
VH
OUT
Power supply (+21.5V)
12
VH
OUT
Power supply (+21.5V)
13
VH
OUT
Power supply (+21.5V)
14
VH
OUT
Power supply (+21.5V)
15
VH
OUT
Power supply (+21.5V)
16
VH
OUT
Power supply (+21.5V)
17
VH
OUT
Power supply (+21.5V)
18
VH
OUT
Power supply (+21.5V)
19
VH
OUT
Power supply (+21.5V)
20
VH
OUT
Power supply (+21.5V)
21
VH
OUT
Power supply (+21.5V)
22
HD1_VHFBH
IN
VH feed back voltage +
23
HD1_VHFBG
IN
VH feed back voltage -
24
GND
-
GND
25
GND
-
GND
26
GND
-
GND
27
GND
-
GND
28
GND
-
GND
29
GND
-
GND
30
GND
-
GND
T-6-39
J3411 (Temperature/humidity detection sensor)
6-30
Pin Number
Signal name
IN/OUT
Function
1
TH2_OUT
IN
Thermistor output signal
2
GND
-
GND
3
RHV_OUT
IN
Temperature/humidity detection sensor output signal
4
SNS_5V
Power supply (+5V)
Chapter 6
T-6-40
J3501 (Connect to Carriage PCB J12)
Pin Number
Signal name
IN/OUT
Function
1
GND
-
GND
2
GND
-
GND
3
H-DASH LICC2 B
OUT
Analogue switch A/D trigger signal
4
GND
-
GND
5
H0-D-DATA-7-OD
OUT
Odd head R data signal 7(D)
6
GND
-
GND
7
H0-E-HE-8
OUT
Head R heat enable signal 8(E)
8
GND
-
GND
9
H0-E-DATA-8-OD
OUT
Odd head R data signal 8(E)
10
GND
-
GND
11
H0-F-DATA-10-OD
OUT
Odd head R data signal 10(F)
12
GND
-
GND
13
H0-E-DATA-9-OD
OUT
Odd head R data signal 9(E)
14
GND
-
GND
15
H0-F-HE-10
OUT
Head R heat enable signal 10(F)
16
GND
-
GND
17
H0-F-DATA-11-OD
OUT
Odd head R data signal 11(F)
18
GND
-
GND
19
H0-F-HE-11
OUT
Head R heat enable signal 11(F)
20
GND
-
GND
21
H0-F-DATA-11-EV
OUT
Even head R data signal 11(F)
22
GND
-
GND
23
H0-F-DATA-10-EV
OUT
Even head R data signal 10(F)
24
GND
-
GND
25
H0-E-HE-9
OUT
Head R heat enable signal 9(E)
26
GND
-
GND
27
H0-E-DATA-9-EV
OUT
Even head R data signal 9(E)
28
GND
-
GND
29
GND
-
GND
30
GND
-
GND
31
GND
-
GND
32
GND
-
GND
33
GND
-
GND
34
GND
-
GND
35
H0-A-DATA-0-OD
OUT
Odd head R data signal 0(A)
36
GND
-
GND
37
H0-A-DATA-1-OD
OUT
Odd head R data signal 1(A)
38
GND
-
GND
39
H0-B-HE-2
OUT
Head R heat enable signal 2(B)
40
GND
-
GND
41
H0-B-DATA-2-OD
OUT
Odd head R data signal 2(B)
42
GND
-
GND
43
H0-B-DATA-3-OD
OUT
Odd head R data signal 3(B)
44
GND
-
GND
45
H0-C-HE-4
OUT
Head R heat enable signal 4(C)
46
GND
-
GND
47
H0-C-DATA-4-OD
OUT
Odd head R data signal 4(C)
48
SNS_5V
OUT
Power supply (+5V)
49
GND
-
GND
50
GND
-
GND
T-6-41
J3601 (Connect to Carriage PCB J13)
Pin Number
Signal name
IN/OUT
Function
1
H0-E-DATA-8
OUT
Even head R data signal 8(E)
2
GND
-
GND
3
H0-D-HE-7
OUT
Head R heat enable signal 7(D)
4
GND
-
GND
6-31
Chapter 6
J3601 (Connect to Carriage PCB J13)
Pin Number
Signal name
IN/OUT
Function
5
H0-D-DATA-7-EV
OUT
Even head R data signal 7(D)
6
GND
-
GND
7
H0-D-DATA-6-EB
OUT
Even head R data signal 6(D)
8
GND
-
GND
9
H0-D-DATA-6-OD
OUT
Odd head R data signal 6(D)
10
GND
-
GND
11
H0-D-HE-6
OUT
Head R heat enable signal 6(D)
12
GND
-
GND
13
H0-C-HE-5
OUT
Head R heat enable signal 5(C)
14
GND
-
GND
15
H0-C-DATA-5-OD
OUT
Odd head R data signal 5(C)
16
GND
-
GND
17
H0-DSOUT2
IN
Head R temperature output 2
18
GND
-
GND
19
H0-DSOUT1
IN
Head R temperature output 1
20
GND
-
GND
21
GND
-
GND
22
LICSEL0
OUT
Head R analogue switch clock signal
23
LICSEL2
OUT
Head R analogue switch latch signal
24
LICSEL1
OUT
Head R analogue switch data signal
25
GND
-
GND
26
GND
-
GND
27
H0_CLK
OUT
Head R data clock signal
28
GND
-
GND
29
H0-LT
OUT
Head R data latch signal
30
HEAD_3V
OUT
Power supply (+3V)
31
HEAD_3V
OUT
Power supply (+3V)
32
GND
-
GND
33
H0-C-DATA-5-EV
OUT
Even head R data signal 5(C)
34
GND
-
GND
35
H0-B-HE-3
OUT
Head R heat enable signal 8(E)
36
GND
-
GND
37
H0-C-DATA-4-EV
OUT
Even head R data signal 4(C)
38
GND
-
GND
39
H0-B-DATA-3-EV
OUT
Even head R data signal 3(B)
40
GND
-
GND
41
H0-B-DATA-2-EV
OUT
Even head R data signal 2(B)
42
GND
-
GND
43
H0-A-DATA-1-EV
OUT
Even head R data signal 1(A)
44
GND
-
GND
45
H0-A-HE-1
OUT
Head R heat enable signal 8(E)
46
GND
-
GND
47
H0-A-DATA-0-EV
OUT
Even head R data signal 0(A)
48
GND
-
GND
49
H0-A-HE-0_B
OUT
Head R heat enable signal 8(E)
50
GND
-
GND
T-6-42
J3701 (Connect to Carriage PCB J22)
6-32
Pin Number
Signal name
IN/OUT
Function
1
H1-D-DATA-7-OD
OUT
Odd head L data signal 7(D)
2
GND
-
GND
3
H1-E-HE-8
OUT
Head L heat enable signal8(E)
4
GND
-
GND
5
H1-E-DATA-8-OD
OUT
Odd head L data signal 8(E)
6
GND
-
GND
7
H1-F-DATA-10-OD
OUT
Odd head L data signal 10(F)
8
GND
-
GND
9
H1-E-DATA-9-OD
OUT
Odd head L data signal 9(E)
10
GND
-
GND
Chapter 6
J3701 (Connect to Carriage PCB J22)
Pin Number
Signal name
IN/OUT
Function
11
H1-F-HE-10
OUT
Head L heat enable signal10(F)
12
GND
-
GND
13
H1-F-DATA-11-OD
OUT
Odd head L data signal 11(F)
14
GND
-
GND
15
H1-F-HE-11
OUT
Head L heat enable signal11(F)
16
GND
-
GND
17
H1-F-DATA-11-EV
OUT
Even head L data signal11(F)
18
GND
-
GND
19
H1-F-DATA-10-EV
OUT
Even head L data signal10(F)
20
GND
-
GND
21
H1-E-HE-9
OUT
Head L heat enable signal9(E)
22
GND
-
GND
23
H1-E-DATA-9-EV
OUT
Even head L data signal9(E)
24
H1-DLD LICC2
OUT
Head L analogue switch latch signal
25
H1-DATA LICC2
OUT
Head L analogue switch data signal
26
H1-DASLK LICC2
OUT
Head L analogue switch clock signal
27
GND
-
GND
28
H1-DSOUT2
IN
Head L temperature output 2
29
H1-DSOUT1
IN
Head L temperature output 1
30
GND
-
GND
31
PWLED4_ON
OUT
Multi sensor LED 4 drive signal
32
PWLED3_ON
OUT
Multi sensor LED 3 drive signal
33
PWLED2_ON
OUT
Multi sensor LED 2 drive signal
34
PWLED1_ON
OUT
Multi sensor LED 1 drive signal
35
GND
-
GND
36
MLT_SNS_1IN
IN
Multi sensor signal 1
37
MLT_SNS_2IN
IN
Multi sensor signal 2
38
GND
-
GND
39
H1-B-DATA-2-OD
OUT
Odd head L data signal 2(B)
40
GND
-
GND
41
H1-B-DATA-3-OD
OUT
Odd head L data signal 3(B)
42
GND
-
GND
43
H1-C-HE-4
OUT
Head L heat enable signal8(E)
44
GND
-
GND
45
H1-C-DATA-4-OD
OUT
Odd head L data signal 4(C)
46
SNS_5V
OUT
Power supply (+5V)
47
ENCODER_B
IN
Carriage encoder output signalB
48
SNS_5V
OUT
Power supply (+5V)
49
ENCODER_A
IN
Carriage encoder output signalA
50
GND
-
GND
T-6-43
J3801 (Connect to Carriage PCB J23)
Pin Number
Signal name
IN/OUT
Function
1
H1-E-DATA-8-EV
OUT
Even head L data signal 8(E)
2
GND
-
GND
3
H1-D-HE-7
OUT
Head L heat enable signal 7(D)
4
GND
-
GND
5
IO-ASIC_SDA
IN/OUT
Head ROM control signal (data)
6
GND
-
GND
7
H1-D-DATA-7-EV
OUT
Even head L data signal 7(D)
8
GND
-
GND
9
H1-D-DATA-6-EV
OUT
Even head L data signal 6(D)
10
GND
-
GND
11
H1-D-DATA-6-OD
OUT
Odd head L data signal6(D)
12
GND
-
GND
13
IO-ASIC_SCL
IN/OUT
Head ROM control signal (clock)
14
GND
-
GND
15
H1-D-HE-6
OUT
Head L heat enable signal 6(D)
16
GND
-
GND
6-33
Chapter 6
J3801 (Connect to Carriage PCB J23)
Pin Number
Signal name
IN/OUT
Function
17
H1-C-HE-5
OUT
Head L heat enable signal 5(C)
18
GND
-
GND
19
H1-C-DATA-5-OD
OUT
Odd head L data signal5(C)
20
GND
-
GND
21
H1_CLK
OUT
Head L clock signal
22
GND
-
GND
23
HEAD_3V
OUT
Power supply (+3V)
24
GND
-
GND
25
H1_LT
OUT
Head L latch signal
26
H-DASH_LICC2_B
OUT
Analogue switch/AD triggar
27
H1-C-DATA-5-EV
OUT
Even head L data signal 5(C)
28
GND
-
GND
29
H1-B-HE-3
OUT
Head L heat enable signal 3(B)
30
GND
-
GND
31
H1-C-DATA-4-EV
OUT
Even head L data signal 4(C)
32
GND
-
GND
33
H1-B-DATA-3-EV
OUT
Even head L data signal 3(B)
34
GND
-
GND
35
H1-B-DATA-2-EV
OUT
Even head L data signal 2(B)
36
GND
-
GND
37
H1-A-DATA-1-EV
OUT
Even head L data signal 1(A)
38
GND
-
GND
39
H1-A-HE-1
OUT
Head L heat enable signal 1(A)
40
GND
-
GND
41
H1-A-DATA-0-EV
OUT
Even head L data signal 0(A)
42
GND
-
GND
43
H1-A-HE-0
OUT
Head L heat enable signal 0(A)
44
GND
-
GND
45
H1-A-DATA-0-OD
OUT
Odd head L data signal0(A)
46
GND
-
GND
47
H1-A-DATA-1-OD
OUT
Odd head L data signal1(A)
48
GND
-
GND
49
H1-B-HE-2
OUT
Head L heat enable signal 2(B)
50
GND
-
GND
T-6-44
J3911 (Top cover sensor, Ink tank cover switch, Cutter HP sensor)
6-34
Pin Number
Signal name
IN/OUT
Function
1
TANK_COVER_SW
IN
Ink tank cover switch output signal
2
GND
-
GND
3
SNS_3V_1
OUT
Power supply (+3.3V)
4
GND
-
GND
5
TOP_COVER_SNS
IN
Top cover sensor output signal
6
SNS_3V_1
OUT
Power supply (+3.3V)
7
GND
-
GND
8
CUTTER_L_SNS
IN
Cutter HP sensor signal
Chapter 6
6.2.3 Main controller PCB
0020-7347
iPF6000S
J2601
1
1
1
J3411
J3402
J3101
1
J3701
1
J3801
1
1
J1101
J1801
J3401
1
J2801
J3501
1
J3601
1
J3211
1
1
1
J3911
J3203
J3202
1
1
J2511
1
J2703
J1001
J3301
1
1
J2512
J1201
1
1
J3011
1
1
F-6-3
T-6-45
J1001 (USB)
Pin Number
Signal name
IN/OUT
Function
1
VBUS
IN
USB VBUS (+5V)
2
D-
IN/OUT
USB data (-)
3
D+
IN/OUT
USB data (+)
4
GND
-
USB GND
5
GND
-
GND (Connector shell)
6
GND
-
GND (Connector shell)
T-6-46
J1101 (Connect to HDD expansion PCB)
Pin Number
Signal name
IN/OUT
Function
1
GND
-
GND
2
GND
-
GND
3
GND
-
GND
4
+3.3V
OUT
Power supply (+3.3V)
5
+3.3V
OUT
Power supply (+3.3V)
6
+3.3V
OUT
Power supply (+3.3V)
7
+3.3V
OUT
Power supply (+3.3V)
8
+3.3V
OUT
Power supply (+3.3V)
9
+3.3V
OUT
Power supply (+3.3V)
10
N.C.
-
N.C.
11
GND
-
GND
12
PME#
IN
Power management enable signal
13
INTA#
IN
Interrupt signal
14
GND
-
GND
15
RST#
OUT
PCI reset signal
16
CLK
OUT
PCI clock signal
17
GNT#
OUT
Grant signal
18
GND
-
GND
19
REQ#
IN
Request signal
20
AD31
IN/OUT
Address and data signal 31
21
AD30
IN/OUT
Address and data signal 30
22
AD29
IN/OUT
Address and data signal 29
6-35
Chapter 6
J1101 (Connect to HDD expansion PCB)
6-36
Pin Number
Signal name
IN/OUT
Function
23
AD28
IN/OUT
Address and data signal 28
24
GND
-
GND
25
AD27
IN/OUT
Address and data signal 27
26
AD26
IN/OUT
Address and data signal 26
27
AD25
IN/OUT
Address and data signal 25
28
AD24
IN/OUT
Address and data signal 24
29
CBE3#
IN/OUT
Bus command and byte enable signal 3
30
IDSEL
OUT
Initialization device select signal
31
GND
-
GND
32
GND
-
GND
33
AD23
IN/OUT
Address and data signal 23
34
AD22
IN/OUT
Address and data signal 22
35
AD21
IN/OUT
Address and data signal 21
36
AD20
IN/OUT
Address and data signal 20
37
GND
-
GND
38
AD19
IN/OUT
Address and data signal 19
39
AD18
IN/OUT
Address and data signal 18
40
AD17
IN/OUT
Address and data signal 17
41
AD16
IN/OUT
Address and data signal 16
42
CBE2#
OUT
Bus command and byte enable signal 2
43
GND
-
GND
44
FRAME#
IN/OUT
Cycle frame signal
45
IRDY#
IN/OUT
Initiator redy signal
46
TRDY#
IN/OUT
Target redy signal
47
DEVSEL#
IN/OUT
Device select signal
48
GND
-
GND
49
STOP#
IN/OUT
Stop signal
50
LOCK#
IN/OUT
Lock signal
51
PERR#
IN/OUT
Parity error signal
52
SERR#
IN/OUT
System error signal
53
PAR
IN/OUT
Parity signal
54
CBE1#
IN/OUT
Bus command and byte enable signal 1
55
GND
-
GND
56
GND
-
GND
57
AD15
IN/OUT
Address and data signal 15
58
AD14
IN/OUT
Address and data signal 14
59
AD13
IN/OUT
Address and data signal 13
60
AD12
IN/OUT
Address and data signal 12
61
GND
-
GND
62
AD11
IN/OUT
Address and data signal 11
63
AD10
IN/OUT
Address and data signal 10
64
AD9
IN/OUT
Address and data signal 09
65
AD8
IN/OUT
Address and data signal 08
66
CBE0#
IN/OUT
Bus command and byte enable signal 0
67
GND
-
GND
68
AD7
IN/OUT
Address and data signal 07
69
AD6
IN/OUT
Address and data signal 06
70
AD5
IN/OUT
Address and data signal 05
71
AD4
IN/OUT
Address and data signal 04
72
GND
-
GND
73
AD3
IN/OUT
Address and data signal 03
74
AD2
IN/OUT
Address and data signal 02
75
AD1
IN/OUT
Address and data signal 01
76
AD0
IN/OUT
Address and data signal 00
77
GND
-
GND
78
HDD_LED
OUT
HDD LED signal
79
+5V
OUT
Power supply (+5V)
80
+5V
OUT
Power supply (+5V)
81
+5V
OUT
Power supply (+5V)
Chapter 6
J1101 (Connect to HDD expansion PCB)
Pin Number
Signal name
IN/OUT
Function
82
+3.3V
OUT
Power supply (+3.3V)
83
+3.3V
OUT
Power supply (+3.3V)
84
+3.3V
OUT
Power supply (+3.3V)
85
GND
-
GND
86
GND
-
GND
87
GND
-
GND
88
GND
-
GND
T-6-47
J1201 (Network)
Pin Number
Signal name
IN/OUT
Function
1
TX+
OUT
Ethernet data TX line (+)
2
TX-
OUT
Ethernet data TX line (-)
3
RX+
IN
Ethernet data RX line (+)
4
-
-
Not used
5
-
-
Not used
6
RX-
IN
Ethernet data RX line (-)
7
-
-
Not used
8
-
-
Not used
9
GREEN_LED_C
OUT
Link LED (green:100Mb/s) cathode terminal
10
GREEN_LED_A
OUT
Link LED (green:100Mb/s) anode terminal
11
YELLOW_LED_C
OUT
Link LED (yellow:10Mb/s) cathode terminal
12
YELLOW_LED_A
OUT
Link LED (yellow:10Mb/s) anode terminal
T-6-48
J1801 (Connect to Power supply)
Pin Number
Signal name
IN/OUT
Function
1
HD1_VHFBH
OUT
VH feedback voltage +
2
HD1_VHFBG
OUT
VH feedback voltage -
3
VH
IN
Power supply (+21.5V)
4
GND
-
GND
5
VH
IN
Power supply (+21.5V)
6
GND
-
GND
7
RGV20(VCC)
IN
Power supply (+21.5V)
8
GND
-
GND
9
VM
IN
Power supply (+26V)
10
GND
-
GND
11
VM
IN
Power supply (+26V)
12
GND
-
GND
13
VH_ENB
OUT
VH power supply ON/OFF signal
14
PW_CONT
OUT
Normal/power saving switch signal
T-6-49
J2511 (Spur motor, Spur cam sensor, Mist fan, Cutter motor, Cutter right detection sensor)
Pin Number
Signal name
IN/OUT
Function
1
SNS_3V_1
OUT
Power supply (+3.3V)
2
GND
-
GND
3
CUTTER_R_SNS_R
IN
Cutter right detection sensor signal
4
CUTTER_OUTA
OUT
Cutter motor driver signal A
5
CUTTER_OUTB
OUT
Cutter motor driver signal B
6
SNS_3V_1
OUT
Power supply (+3.3V)
7
GND
-
GND
8
HAKUSHA_CAM_SNS_R
IN
Spur cam sensor output signal
9
HAKUSHA_MOTOR_AM
OUT
Spur motor drive signal AM
10
HAKUSHA_MOTOR_AP
OUT
Spur motor drive signal AP
11
FAN_VM
OUT
Power supply (+26V)
12
MIST_FAN_LOCK
IN
Mist fan lock signal
13
MIST_FAN_PWM
OUT
Mist fan duty control signal
14
GND
-
GND
6-37
Chapter 6
T-6-50
J2512 (Suction fan, Maintenance cartridge relay PCB, Paper detection sensor, Lift cam sensor)
Pin Number
Signal name
IN/OUT
1
FAN_VM
OUT
Function
Power supply (+26V)
2
PLATEN_FAN_LOCK
IN
Suction fan lock signal
3
PLATEN_FAN_PWM
OUT
Suction fan duty control signal
4
GND
-
GND
5
MENT_SDA
IN/OUT
Maintenance cartridge rom control signal (data)
6
MENT_SCL
IN/OUT
Maintenance cartridge rom control signal (clock)
7
GND
-
8
MENT_3V
9
SNS_3V_1
OUT
Power supply (+3.3V)
10
N.C.
-
N.C.
11
N.C.
-
N.C.
12
N.C.
-
N.C.
13
GND
-
GND
14
PE_SNS
IN
Paper ditection sensor output signal
15
SNS_3V_1
OUT
Power supply (+3.3V)
16
GND
-
GND
17
LIFT_CAM_SNS
IN
Lift cam sensor output signal
GND
Power supply (+3.3V)
T-6-51
J2601 (Connect to Operation panel)
Pin Number
Signal name
IN/OUT
Function
1
POWER_ON
IN
Power switch signal
2
PM_START
OUT
Power supply (+5V)
3
BUZZER
OUT
Buzzer control signal
4
PDODATA
OUT
Panel IC control signal
5
+3.3V
OUT
Power supply (+3.3V)
6
PDI_DATA
IN
Panel IC data signal
7
GND
-
GND
8
/PANEL RESET
OUT
Panel reset signal
9
GND
-
GND
10
PDOPCLK
OUT
Panel IC clock signal
11
SNS_5V
OUT
Power supply (+5V)
12
/PDOCS_L
OUT
Panel supply chip select signal
T-6-52
J2703 (Auto feed roll unit)
Pin Number
Signal name
IN/OUT
Function
1
OPT_5V
OUT
Power supply (+5V)
2
GND
-
GND
3
ROLL_CAM_SNS
IN
Roll cam sensor signal
4
ROLL_PAPER_SNS
IN
Roll media sensor signal
5
ROLL_UNIT
IN
Roll unit detection signal
6
VM
OUT
Power supply (+26V)
7
VM
OUT
Power supply (+26V)
8
/ROLL_SLEEP
OUT
Roll motor driver sleep signal
9
ROLL_STB
OUT
Roll motor driver strobe signal
10
ROLL_DAT
OUT
Roll motor driver data signal
11
ROLL_CLK
OUT
Roll motor driver clock signal
12
GND
-
GND
13
GND
-
GND
T-6-53
J2801 (Feed motor)
6-38
Pin Number
Signal name
IN/OUT
1
LF_OUTB
OUT
Function
Feed motor drive signal B
2
LF_OUTA
OUT
Feed motor drive signal A
Chapter 6
T-6-54
J3011 (Purge motor, Pump encoder sensor, Pump cam sensor, Lift motor, Head management sensor)
Pin Number
Signal name
IN/OUT
1
LIFTOUTCOM
OUT
Function
Lift motor power supply
2
LIFT_OUTAP
OUT
Lift motor drive signal AP
3
LIFT_OUTAM
OUT
Lift motor drive signal AM
4
LIFT_OUTBP
OUT
Lift motor drive signal BP
5
LIFT_OUTBM
OUT
Lift motor drive signal BM
6
GND
-
GND
7
FUTO_CLMP
OUT
Head management sensor unit clamp signal
8
FUTO_XLEDON
OUT
9
SNS_5V
10
FUTO_XCMP0
IN
11
PUMP_OUTB
OUT
Purge motor drive signal B
12
PUMP_OUTA
OUT
Purge motor drive signal A
Head management sensor unit LED ON/OFF signal
Power supply (+5V)
Head management sensor unit skew detection signal
13
GND
-
GND
14
PUMP_ENCA
IN
Pump encoder sensor output signal A
15
SNS_5V
16
PUMP_ENCB
IN
Pump encoder sensor output signal B
17
PUMP_CAM_3V
OUT
Power supply (+3.3V)
18
GND
-
GND
19
PUMP_CAM_SNS
IN
Pump cam sensor output signal
Power supply (+5V)
T-6-55
J3101 (Carriage motor)
Pin Number
Signal name
IN/OUT
1
CR_HWP
IN
Function
Carriage motor hole device W-phase + signal
2
CR_HWM
IN
Carriage motor hole device W-phase - signal
3
CR_W
OUT
Carriage motor W-phase drive signal
4
CR_HVM
IN
Carriage motor hole device V-phase - signal
5
CR_U
OUT
Carriage motor U-phase drive signal
6
GND
-
GND
7
CR_V
OUT
Carriage motor V-phase drive signal
8
SNS_5V
9
N.C.
-
N.C
10
CR_HVP
IN
Carriage motor hole device V-phase + signal
Power supply (+5V)
11
CR_HUM
IN
Carriage motor hole device U-phase - signal
12
CR_HUP
IN
Carriage motor hole device U-phase + signal
T-6-56
J3202 (Ink tank ROM PCB, Ink detection sensor)
Pin Number
Signal name
IN/OUT
Function
1
TANK_DAT0
IN/OUT
Ink tank data signal 0
2
TANK_DAT1
IN/OUT
Ink tank data signal 1
3
TANK_3V
OUT
Power supply (+3.3V)
4
TANK_DAT2
IN/OUT
Ink tank data signal 2
5
GND
-
GND
6
TANK_CLK
OUT
Ink tank clock signal
7
TANK_DAT3
IN/OUT
Ink tank data signal 3
8
TANK_DAT4
IN/OUT
Ink tank data signal 4
9
TANK_3V
OUT
Power supply (+3.3V)
10
TANK_DAT5
IN/OUT
Ink tank data signal 5
11
GND
-
GND
12
TANK_CLK
OUT
Ink tank clock signal
13
GND
-
GND
14
INK_SNS0
IN
Ink detection sensor output signal 0
15
INK_SNS1
IN
Ink detection sensor output signal 1
16
INK_SNS2
IN
Ink detection sensor output signal 2
17
GND
-
GND
18
INK_SNS3
IN
Ink detection sensor output signal 3
6-39
Chapter 6
J3202 (Ink tank ROM PCB, Ink detection sensor)
Pin Number
Signal name
IN/OUT
Function
19
INK_SNS4
IN
Ink detection sensor output signal 4
20
INK_SNS5
IN
Ink detection sensor output signal 5
T-6-57
J3211 (Valve motor, Valve open/closed detection sensor, Valve open/closed detection sensor 2, Feed roller HP sensor, Feed roller encoder sensor)
Pin Number
Signal name
IN/OUT
Function
1
SNS_3V
OUT
Power supply (+3.3V)
2
GND
-
GND
3
VALVE_DETECT_SENSOR
IN
Valve open/closed detection sensor output signal
4
SNS_3V
OUT
Power supply (+3.3V)
5
GND
-
GND
6
VALVE_DETECT_SENSOR 2
IN
Valve open/closed detection sensor 2 output signal
7
VALVE_MOTOR_AM
OUT
Valve motor drive signal AM
8
VALVE_MOTOR_AP
OUT
Valve motor drive signal AP
9
SNS_3V
OUT
Power supply (+3.3V)
10
GND
-
GND
11
LF_HP_SNS
IN
Feed roller HP sensor output signal
12
GND
-
GND
13
LF_ENCA
IN
Feed roller encoder sensor output signal A
14
RGV5
OUT
Power supply (+5V)
15
LF_ENCB
IN
Feed roller encoder sensor output signal B
T-6-58
J3301 (Ink tank ROM PCB, Ink detection sensor)
Pin Number
Signal name
IN/OUT
Function
1
TANK_DAT6_L
IN/OUT
Ink tank data signal 6
2
TANK_DAT7_L
IN/OUT
Ink tank data signal 7
3
TANK_3V
OUT
Power supply (+3.3V)
4
TANK_DAT8
IN/OUT
Ink tank data signal 8
5
GND
-
GND
6
TANK_CLK
OUT
Ink tank clock signal
7
TANK_DAT9
IN/OUT
Ink tank data signal 9
8
TANK_DAT10
IN/OUT
Ink tank data signal 10
9
TANK_3V
OUT
Power supply (+3.3V)
10
TANK_DAT11
IN/OUT
Ink tank data signal 11
11
GND
-
GND
12
TANK_CLK
OUT
Ink tank clock signal
13
GND
-
GND
14
INK_SNS6_L
IN
Ink detection sensor output signal 6
15
INK_SNS7_L
IN
Ink detection sensor output signal 7
16
INK_SNS8
IN
Ink detection sensor output signal 8
17
GND
-
GND
18
INK_SNS9
IN
Ink detection sensor output signal 9
19
INK_SNS10
IN
Ink detection sensor output signal 10
20
INK_SNS11
IN
Ink detection sensor output signal 11
T-6-59
J3401 (Connect to Carriage PCB J11)
6-40
Pin Number
Signal name
IN/OUT
Function
1
GND
-
GND
2
GND
-
GND
3
GND
-
GND
4
GND
-
GND
5
GND
-
GND
6
GND
-
GND
7
GND
-
GND
8
VH
OUT
Power supply (+21.5V)
Chapter 6
J3401 (Connect to Carriage PCB J11)
Pin Number
Signal name
IN/OUT
Function
9
VH
OUT
Power supply (+21.5V)
10
VH
OUT
Power supply (+21.5V)
11
VH
OUT
Power supply (+21.5V)
12
VH
OUT
Power supply (+21.5V)
13
VH
OUT
Power supply (+21.5V)
14
VH
OUT
Power supply (+21.5V)
15
VH
OUT
Power supply (+21.5V)
16
VH
OUT
Power supply (+21.5V)
17
VH
OUT
Power supply (+21.5V)
18
VH
OUT
Power supply (+21.5V)
19
VH
OUT
Power supply (+21.5V)
20
VH
OUT
Power supply (+21.5V)
21
VH
OUT
Power supply (+21.5V)
22
VH
OUT
Power supply (+21.5V)
23
VH
OUT
Power supply (+21.5V)
24
GND
-
GND
25
GND
-
GND
26
GND
-
GND
27
GND
-
GND
28
GND
-
GND
29
GND
-
GND
30
GND
-
GND
T-6-60
J3402 (Connect to Carriage PCB J21)
Pin Number
Signal name
IN/OUT
Function
1
GND
-
GND
2
GND
-
GND
3
GND
-
GND
4
GND
-
GND
5
GND
-
GND
6
GND
-
GND
7
VH
OUT
Power supply (+21.5V)
8
VH
OUT
Power supply (+21.5V)
9
VH
OUT
Power supply (+21.5V)
10
VH
OUT
Power supply (+21.5V)
11
VH
OUT
Power supply (+21.5V)
12
VH
OUT
Power supply (+21.5V)
13
VH
OUT
Power supply (+21.5V)
14
VH
OUT
Power supply (+21.5V)
15
VH
OUT
Power supply (+21.5V)
16
VH
OUT
Power supply (+21.5V)
17
VH
OUT
Power supply (+21.5V)
18
VH
OUT
Power supply (+21.5V)
19
VH
OUT
Power supply (+21.5V)
20
VH
OUT
Power supply (+21.5V)
21
VH
OUT
Power supply (+21.5V)
22
HD1_VHFBH
IN
VH feed back voltage +
23
HD1_VHFBG
IN
VH feed back voltage -
24
GND
-
GND
25
GND
-
GND
26
GND
-
GND
27
GND
-
GND
28
GND
-
GND
29
GND
-
GND
30
GND
-
GND
6-41
Chapter 6
T-6-61
J3411 (Temperature/humidity detection sensor)
Pin Number
Signal name
IN/OUT
Function
1
TH2_OUT
IN
Thermistor output signal
2
GND
-
GND
3
RHV_OUT
IN
Temperature/humidity detection sensor output signal
4
SNS_5V
Power supply (+5V)
T-6-62
J3501 (Connect to Carriage PCB J12)
6-42
Pin Number
Signal name
IN/OUT
Function
1
GND
-
GND
2
GND
-
GND
3
H-DASH LICC2 B
OUT
Analogue switch A/D trigger signal
4
GND
-
GND
5
H0-D-DATA-7-OD
OUT
Odd head R data signal 7(D)
6
GND
-
GND
7
H0-E-HE-8
OUT
Head R heat enable signal 8(E)
8
GND
-
GND
9
H0-E-DATA-8-OD
OUT
Odd head R data signal 8(E)
10
GND
-
GND
11
H0-F-DATA-10-OD
OUT
Odd head R data signal 10(F)
12
GND
-
GND
13
H0-E-DATA-9-OD
OUT
Odd head R data signal 9(E)
14
GND
-
GND
15
H0-F-HE-10
OUT
Head R heat enable signal 10(F)
16
GND
-
GND
17
H0-F-DATA-11-OD
OUT
Odd head R data signal 11(F)
18
GND
-
GND
19
H0-F-HE-11
OUT
Head R heat enable signal 11(F)
20
GND
-
GND
21
H0-F-DATA-11-EV
OUT
Even head R data signal 11(F)
22
GND
-
GND
23
H0-F-DATA-10-EV
OUT
Even head R data signal 10(F)
24
GND
-
GND
25
H0-E-HE-9
OUT
Head R heat enable signal 9(E)
26
GND
-
GND
27
H0-E-DATA-9-EV
OUT
Even head R data signal 9(E)
28
GND
-
GND
29
GND
-
GND
30
GND
-
GND
31
GND
-
GND
32
GND
-
GND
33
GND
-
GND
34
GND
-
GND
35
H0-A-DATA-0-OD
OUT
Odd head R data signal 0(A)
36
GND
-
GND
37
H0-A-DATA-1-OD
OUT
Odd head R data signal 1(A)
38
GND
-
GND
39
H0-B-HE-2
OUT
Head R heat enable signal 2(B)
40
GND
-
GND
41
H0-B-DATA-2-OD
OUT
Odd head R data signal 2(B)
42
GND
-
GND
43
H0-B-DATA-3-OD
OUT
Odd head R data signal 3(B)
44
GND
-
GND
45
H0-C-HE-4
OUT
Head R heat enable signal 4(C)
46
GND
-
GND
47
H0-C-DATA-4-OD
OUT
Odd head R data signal 4(C)
48
SNS_5V
OUT
Power supply (+5V)
49
GND
-
GND
50
GND
-
GND
Chapter 6
T-6-63
J3601 (Connect to Carriage PCB J13)
Pin Number
Signal name
IN/OUT
Function
1
H0-E-DATA-8
OUT
Even head R data signal 8(E)
2
GND
-
GND
3
H0-D-HE-7
OUT
Head R heat enable signal 7(D)
4
GND
-
GND
5
H0-D-DATA-7-EV
OUT
Even head R data signal 7(D)
6
GND
-
GND
7
H0-D-DATA-6-EB
OUT
Even head R data signal 6(D)
8
GND
-
GND
9
H0-D-DATA-6-OD
OUT
Odd head R data signal 6(D)
10
GND
-
GND
11
H0-D-HE-6
OUT
Head R heat enable signal 6(D)
12
GND
-
GND
13
H0-C-HE-5
OUT
Head R heat enable signal 5(C)
14
GND
-
GND
15
H0-C-DATA-5-OD
OUT
Odd head R data signal 5(C)
16
GND
-
GND
17
H0-DSOUT2
IN
Head R temperature output 2
18
GND
-
GND
19
H0-DSOUT1
IN
Head R temperature output 1
20
GND
-
GND
21
GND
-
GND
22
LICSEL0
OUT
Head R analogue switch clock signal
23
LICSEL2
OUT
Head R analogue switch latch signal
24
LICSEL1
OUT
Head R analogue switch data signal
25
GND
-
GND
26
GND
-
GND
27
H0_CLK
OUT
Head R data clock signal
28
GND
-
GND
29
H0-LT
OUT
Head R data latch signal
30
HEAD_3V
OUT
Power supply (+3V)
31
HEAD_3V
OUT
Power supply (+3V)
32
GND
-
GND
33
H0-C-DATA-5-EV
OUT
Even head R data signal 5(C)
34
GND
-
GND
35
H0-B-HE-3
OUT
Head R heat enable signal 8(E)
36
GND
-
GND
37
H0-C-DATA-4-EV
OUT
Even head R data signal 4(C)
38
GND
-
GND
39
H0-B-DATA-3-EV
OUT
Even head R data signal 3(B)
40
GND
-
GND
41
H0-B-DATA-2-EV
OUT
Even head R data signal 2(B)
42
GND
-
GND
43
H0-A-DATA-1-EV
OUT
Even head R data signal 1(A)
44
GND
-
GND
45
H0-A-HE-1
OUT
Head R heat enable signal 8(E)
46
GND
-
GND
47
H0-A-DATA-0-EV
OUT
Even head R data signal 0(A)
48
GND
-
GND
49
H0-A-HE-0_B
OUT
Head R heat enable signal 8(E)
50
GND
-
GND
T-6-64
J3701 (Connect to Carriage PCB J22)
Pin Number
Signal name
IN/OUT
Function
1
H1-D-DATA-7-OD
OUT
Odd head L data signal 7(D)
2
GND
-
GND
3
H1-E-HE-8
OUT
Head L heat enable signal8(E)
4
GND
-
GND
6-43
Chapter 6
J3701 (Connect to Carriage PCB J22)
Pin Number
Signal name
IN/OUT
Function
5
H1-E-DATA-8-OD
OUT
Odd head L data signal 8(E)
6
GND
-
GND
7
H1-F-DATA-10-OD
OUT
Odd head L data signal 10(F)
8
GND
-
GND
9
H1-E-DATA-9-OD
OUT
Odd head L data signal 9(E)
10
GND
-
GND
11
H1-F-HE-10
OUT
Head L heat enable signal10(F)
12
GND
-
GND
13
H1-F-DATA-11-OD
OUT
Odd head L data signal 11(F)
14
GND
-
GND
15
H1-F-HE-11
OUT
Head L heat enable signal11(F)
16
GND
-
GND
17
H1-F-DATA-11-EV
OUT
Even head L data signal11(F)
18
GND
-
GND
19
H1-F-DATA-10-EV
OUT
Even head L data signal10(F)
20
GND
-
GND
21
H1-E-HE-9
OUT
Head L heat enable signal9(E)
22
GND
-
GND
23
H1-E-DATA-9-EV
OUT
Even head L data signal9(E)
24
H1-DLD LICC2
OUT
Head L analogue switch latch signal
25
H1-DATA LICC2
OUT
Head L analogue switch data signal
26
H1-DASLK LICC2
OUT
Head L analogue switch clock signal
27
GND
-
GND
28
H1-DSOUT2
IN
Head L temperature output 2
29
H1-DSOUT1
IN
Head L temperature output 1
30
GND
-
GND
31
PWLED4_ON
OUT
Multi sensor LED 4 drive signal
32
PWLED3_ON
OUT
Multi sensor LED 3 drive signal
33
PWLED2_ON
OUT
Multi sensor LED 2 drive signal
34
PWLED1_ON
OUT
Multi sensor LED 1 drive signal
35
GND
-
GND
36
MLT_SNS_1IN
IN
Multi sensor signal 1
37
MLT_SNS_2IN
IN
Multi sensor signal 2
38
GND
-
GND
39
H1-B-DATA-2-OD
OUT
Odd head L data signal 2(B)
40
GND
-
GND
41
H1-B-DATA-3-OD
OUT
Odd head L data signal 3(B)
42
GND
-
GND
43
H1-C-HE-4
OUT
Head L heat enable signal8(E)
44
GND
-
GND
45
H1-C-DATA-4-OD
OUT
Odd head L data signal 4(C)
46
SNS_5V
OUT
Power supply (+5V)
47
ENCODER_B
IN
Carriage encoder output signalB
48
SNS_5V
OUT
Power supply (+5V)
49
ENCODER_A
IN
Carriage encoder output signalA
50
GND
-
GND
T-6-65
J3801 (Connect to Carriage PCB J23)
6-44
Pin Number
Signal name
IN/OUT
Function
1
H1-E-DATA-8-EV
OUT
Even head L data signal 8(E)
2
GND
-
GND
3
H1-D-HE-7
OUT
Head L heat enable signal 7(D)
4
GND
-
GND
5
IO-ASIC_SDA
IN/OUT
Head ROM control signal (data)
6
GND
-
GND
7
H1-D-DATA-7-EV
OUT
Even head L data signal 7(D)
8
GND
-
GND
9
H1-D-DATA-6-EV
OUT
Even head L data signal 6(D)
10
GND
-
GND
Chapter 6
J3801 (Connect to Carriage PCB J23)
Pin Number
Signal name
IN/OUT
Function
11
H1-D-DATA-6-OD
OUT
Odd head L data signal6(D)
12
GND
-
GND
13
IO-ASIC_SCL
IN/OUT
Head ROM control signal (clock)
14
GND
-
GND
15
H1-D-HE-6
OUT
Head L heat enable signal 6(D)
16
GND
-
GND
17
H1-C-HE-5
OUT
Head L heat enable signal 5(C)
18
GND
-
GND
19
H1-C-DATA-5-OD
OUT
Odd head L data signal5(C)
20
GND
-
GND
21
H1_CLK
OUT
Head L clock signal
22
GND
-
GND
23
HEAD_3V
OUT
Power supply (+3V)
24
GND
-
GND
25
H1_LT
OUT
Head L latch signal
26
H-DASH_LICC2_B
OUT
Analogue switch/AD triggar
27
H1-C-DATA-5-EV
OUT
Even head L data signal 5(C)
28
GND
-
GND
29
H1-B-HE-3
OUT
Head L heat enable signal 3(B)
30
GND
-
GND
31
H1-C-DATA-4-EV
OUT
Even head L data signal 4(C)
32
GND
-
GND
33
H1-B-DATA-3-EV
OUT
Even head L data signal 3(B)
34
GND
-
GND
35
H1-B-DATA-2-EV
OUT
Even head L data signal 2(B)
36
GND
-
GND
37
H1-A-DATA-1-EV
OUT
Even head L data signal 1(A)
38
GND
-
GND
39
H1-A-HE-1
OUT
Head L heat enable signal 1(A)
40
GND
-
GND
41
H1-A-DATA-0-EV
OUT
Even head L data signal 0(A)
42
GND
-
GND
43
H1-A-HE-0
OUT
Head L heat enable signal 0(A)
44
GND
-
GND
45
H1-A-DATA-0-OD
OUT
Odd head L data signal0(A)
46
GND
-
GND
47
H1-A-DATA-1-OD
OUT
Odd head L data signal1(A)
48
GND
-
GND
49
H1-B-HE-2
OUT
Head L heat enable signal 2(B)
50
GND
-
GND
T-6-66
J3911 (Top cover sensor, Ink tank cover switch, Cutter HP sensor)
Pin Number
Signal name
IN/OUT
Function
1
TANK_COVER_SW
IN
Ink tank cover switch output signal
2
GND
-
GND
3
SNS_3V_1
OUT
Power supply (+3.3V)
4
GND
-
GND
5
TOP_COVER_SNS
IN
Top cover sensor output signal
6
SNS_3V_1
OUT
Power supply (+3.3V)
7
GND
-
GND
8
CUTTER_L_SNS
IN
Cutter HP sensor signal
6-45
Chapter 6
6.2.4 Carriage PCB
0016-8453
iPF6100 / iPF6200 / iPF6000S
11
11
J21
J12
J22
J22
J5
J13
J13
J23
J3
J14
J24
J24
F-6-4
T-6-67
J3
Pin Number
Signal name
IN/OUT
Function
1
ENCODER_B
IN
Linear encoder detection signal B
2
GND
-
GND
3
ENCODER_A
IN
Linear encoder detection signal A
4
H1_5V
OUT
Power supply (+5V)
T-6-68
J5
Pin Number
Signal name
IN/OUT
Function
1
HEAD_3V
OUT
Power supply (+3V)
2
EEPROM_SCL
OUT
EEPROM control signal (clock)
3
EEPROM_SDA
IN/OUT
EEPROM control signal (data)
4
GND
-
GND
5
PWLED1
OUT
Multi sensor LED1 drive signal
6
PWLED2
OUT
Multi sensor LED2 drive signal
7
PWLED3
OUT
Multi sensor LED3 drive signal
8
PWLED4
OUT
Multi sensor LED4 drive signal
9
VH
OUT
Power supply (+21.5V)
10
OUT1
IN
Multi sensor input signal 1
11
OUT2
IN
Multi sensor input signal 2
12
H1-5V
OUT
Power supply (+5V)
T-6-69
J11 (Connect to Main controller PCB J3401)
6-46
Pin Number
Signal name
IN/OUT
Function
1
GND
-
GND
2
GND
-
GND
3
GND
-
GND
4
GND
-
GND
5
GND
-
GND
6
GND
-
GND
7
GND
-
GND
8
VH
IN
Power supply (+21.5V)
9
VH
IN
Power supply (+21.5V)
10
VH
IN
Power supply (+21.5V)
11
VH
IN
Power supply (+21.5V)
12
VH
IN
Power supply (+21.5V)
13
VH
IN
Power supply (+21.5V)
14
VH
IN
Power supply (+21.5V)
15
VH
IN
Power supply (+21.5V)
16
VH
IN
Power supply (+21.5V)
17
VH
IN
Power supply (+21.5V)
18
VH
IN
Power supply (+21.5V)
Chapter 6
J11 (Connect to Main controller PCB J3401)
Pin Number
Signal name
IN/OUT
Function
19
VH
IN
Power supply (+21.5V)
20
VH
IN
Power supply (+21.5V)
21
VH
IN
Power supply (+21.5V)
22
VH
IN
Power supply (+21.5V)
23
VH
IN
Power supply (+21.5V)
24
GND
-
GND
25
GND
-
GND
26
GND
-
GND
27
GND
-
GND
28
GND
-
GND
29
GND
-
GND
30
GND
-
GND
T-6-70
J12 (Connect to Main controller PCB J3501)
Pin Number
Signal name
IN/OUT
Function
1
GND
-
GND
2
GND
-
GND
3
SNS_5V
IN
Power supply (+5V)
4
H0-C-DATA-4-OD
IN
Odd head R data signal 4(C)
5
GND
-
GND
6
H0-C-HE-4
IN
Head R heat enable signal 4(C)
7
GND
-
GND
8
H0-B-DATA-3-OD
IN
Odd head R data signal 3(B)
9
GND
-
GND
10
H0-B-DATA-2-OD
IN
Odd head R data signal 2(B)
11
GND
-
GND
12
H0-B-HE-2
IN
Head R heat enable signal 2(B)
13
GND
-
GND
14
H0-A-DATA-1-OD
IN
Odd head R data signal 1(A)
15
GND
-
GND
16
H0-A-DATA-0-OD
IN
Odd head R data signal 0(A)
17
GND
-
GND
18
GND
-
GND
19
GND
-
GND
20
GND
-
GND
21
GND
-
GND
22
GND
-
GND
23
GND
-
GND
24
H0-E-DATA-9-EV
IN
Even head R data signal 9(E)
25
GND
-
GND
26
H0-E-HE-9
IN
Head R heat enable signal 9(E)
27
GND
-
GND
28
H0-F-DATA-10-EV
IN
Even head R data signal 10(F)
29
GND
-
GND
30
H0-F-DATA-11-EV
IN
Even head R data signal 11(F)
31
GND
-
GND
32
H0-F-HE-11
IN
Head R heat enable signal 11(F)
33
GND
-
GND
34
H0-F-DATA-11-OD
IN
Odd head R data signal 11(F)
35
GND
-
GND
36
H0-F-HE-10
IN
Head R heat enable signal 10(F)
37
GND
-
GND
38
H0-E-DATA-9-OD
IN
Odd head R data signal 9(E)
39
GND
-
GND
40
H0-F-DATA-10-OD
IN
Odd head R data signal 10(F)
41
GND
-
GND
42
H0-E-DATA-8-OD
IN
Odd head R data signal 8(E)
43
GND
-
GND
44
H0-E-HE-8
IN
Head R heat enable signal 8(E)
6-47
Chapter 6
J12 (Connect to Main controller PCB J3501)
Pin Number
Signal name
IN/OUT
Function
45
GND
-
GND
46
H0-D-DATA-7-OD
IN
Odd head R data signal 7(D)
47
GND
-
GND
48
H-DASH LICC2 B
IN
Analogue switch A/D trigger signal
49
GND
-
GND
50
GND
-
GND
T-6-71
J13 (Connect to Main controller PCB J3601)
6-48
Pin Number
Signal name
IN/OUT
Function
1
GND
-
GND
2
H0-A-HE-0
IN
Head R heat enable signal 8(E)
3
GND
-
GND
4
H0-A-DATA-0-EV
IN
Even head R data signal 0(A)
5
GND
-
GND
6
H0-A-HE-1
IN
Head R heat enable signal 8(E)
7
GND
-
GND
8
H0-A-DATA-1-EV
IN
Even head R data signal 1(A)
9
GND
-
GND
10
H0-B-DATA-2-EV
IN
Even head R data signal 2(B)
11
GND
-
GND
12
H0-B-DATA-3-EV
IN
Even head R data signal 3(B)
13
GND
-
GND
14
H0-C-DATA-4-EV
IN
Even head R data signal 4(C)
15
GND
-
GND
16
H0-B-HE-3
IN
Head R heat enable signal 8(E)
17
GND
-
GND
18
H0-C-DATA-5-EV
IN
Even head R data signal 5(C)
19
HEAD_3V
IN
Power supply (+3V)
20
HEAD_3V
IN
Power supply (+3V)
21
GND
-
GND
22
H0-LT
IN
Head R data latch signal
23
GND
-
GND
24
H0_CLK
IN
Head R data clock signal
25
GND
-
GND
26
GND
-
GND
27
LICSEL1
IN
Head R analogue switch latch signal
28
LICSEL2
IN
Head R analogue switch clock signal
29
LICSEL0
IN
Head R analogue switch data signal
30
GND
-
GND
31
GND
-
GND
32
H0-DSOUT1
OUT
Head R temperature output 1
33
GND
-
GND
34
H0-DSOUT2
OUT
Head R temperature output 2
35
GND
-
GND
36
H0-C-DATA-5-OD
IN
Odd head R data signal 5(C)
37
GND
-
GND
38
H0-C-HE-5
IN
Head R heat enable signal 5(C)
39
GND
-
GND
40
H0-D-HE-6
IN
Head R heat enable signal 6(D)
41
GND
-
GND
42
H0-D-DATA-6-OD
IN
Odd head R data signal 6(D)
43
GND
-
GND
44
H0-D-DATA-6-EB
IN
Even head R data signal 6(D)
45
GND
-
GND
46
H0-D-DATA-7-EV
IN
Even head R data signal 7(D)
47
GND
-
GND
48
H0-D-HE-7
IN
Head R heat enable signal 7(D)
49
GND
-
GND
50
H0-E-DATA-8
IN
Even head R data signal 8(E)
Chapter 6
T-6-72
J14 (Head R)
Pin Number
Signal name
IN/OUT
Function
1
VH
OUT
Power supply (+21.5V)
2
VH
OUT
Power supply (+21.5V)
3
VH
OUT
Power supply (+21.5V)
4
VHT
OUT
Head R Transistor drive Power supply
5
H0-F-DATA-10-EV
OUT
Even head R data signal 10(F)
6
EEPROM_SDA
IN/OUT
EEPROMcontrol signal (data)
7
EEPROM_SCL
OUT
EEPROMcontrol signal (clock)
8
HEAD_3V
OUT
Power supply (+3V)
9
H0-C-DIA1
IN
Head R DI sensor signal 1(C)
10
H0-A-HE-1
OUT
Head R heat enable signal 8(E)
11
VH
OUT
Power supply (+21.5V)
12
VH
OUT
Power supply (+21.5V)
13
VH
OUT
Power supply (+21.5V)
14
VH
OUT
Power supply (+21.5V)
15
VH
OUT
Power supply (+21.5V)
16
H0-E-DATA-9-OD
OUT
Odd head R data signal 9(E)
17
H0-F-HE-11
OUT
Head R heat enable signal 11(F)
18
H0-E-DIA1
IN
Head R DI sensor signal 1(E)
19
H0-D-DIA1
IN
Head R DI sensor signal 1(D)
20
GND
-
GND
21
HEAD_3V
OUT
Power supply (+3V)
22
H0-B-DATA-3-EV
OUT
Even head R data signal 3(B)
23
H0-A-DATA-0-EV
OUT
Even head R data signal 0(A)
24
H0-B-HE-2
OUT
Head R heat enable signal 2(B)
25
VH
OUT
Power supply (+21.5V)
26
VH
OUT
Power supply (+21.5V)
27
H0-D-DIA2
IN
Head R DI sensor signal 2(D)
28
H0-E-HE-8
OUT
Head R heat enable signal 8(E)
29
H0-E-DIA2
IN
Head R DI sensor signal 2(E)
30
H0-F-DIA2
IN
Head R DI sensor signal 2(F)
31
H0-E-HE-9
OUT
Head R heat enable signal 9(E)
32
H0-D-DATA-7-EV
OUT
Even head R data signal 7(D)
33
H0-D-HE-6
OUT
Head R heat enable signal 6(D)
34
H0-C-DATA-5-0D
OUT
Odd head R data signal 5(C)
35
H0-C-DATA-4-EV
OUT
Even head R data signal 4(C)
36
H0-A-DATA-1-EV
OUT
Even head R data signal 1(A)
37
H0-A-DIA2
IN
Head R DI sensor signal 2(A)
38
H0-B-DIA2
IN
Head R DI sensor signal 2(B)
39
H0-C-HE-4
OUT
Head R heat enable signal 4(C)
40
H0-D-DATA-7-OD
OUT
Odd head R data signal 7(D)
41
H0-E-DATA-8-OD
OUT
Odd head R data signal 8(E)
42
H0-F-HE-10
OUT
Head R heat enable signal 10(F)
43
H0-F-DATA-11-EV
OUT
Even head R data signal 11(F)
44
H0-F-DATA-8-EV
OUT
Even head R data signal 8(F)
45
H0-D-DATA-6-EV
OUT
Even head R data signal 6(D)
46
H0-C-DIA2
IN
Head R DI sensor signal 2(C)
47
H0-C-DATA-5-EV
OUT
Even head R data signal 5(C)
48
H0-B-DIA1
IN
Head R DI sensor signal 1(B)
49
H0-A-HE-0
OUT
Head R heat enable signal 8(E)
50
H0-B-DATA-2-OD
OUT
Odd head R data signal 2(B)
51
H0-B-DATA-3-OD
OUT
Odd head R data signal 3(B)
52
H0-C-DATA-4-OD
OUT
Odd head R data signal 4(C)
53
GND
-
GND
54
GND
-
GND
55
GND
-
GND
56
H0-F-DATA-11-OD
OUT
Odd head R data signal 11(F)
57
H0-E-DATA-9-EV
OUT
Even head R data signal 9(E)
58
GND
-
GND
6-49
Chapter 6
J14 (Head R)
Pin Number
Signal name
IN/OUT
Function
59
H0-D-DATA-6-OD
OUT
Odd head R data signal 6(D)
60
H0-C-HE-5
OUT
Head R heat enable signal 5(C)
61
H0-B-HE-3
OUT
Head R heat enable signal 8(E)
62
H0-A-DIA1
IN
Head R DI sensor signal 1(A)
63
H0-A-DATA-1-OD
OUT
Odd head R data signal 1(A)
64
GND
-
GND
65
GND
-
GND
66
GND
-
GND
67
GND
-
GND
68
H0-F-DATA-10-OD
OUT
Odd head R data signal 10(F)
69
H0-F-DIA1
IN
Head R DI sensor signal 1(F)
70
H0-D-HE-7
OUT
Head R heat enable signal 7(D)
71
GND
-
GND
72
H0-CLK
OUT
Head R data clock signal
73
H0-LT
OUT
Head R data latch signal
74
H0-B-DATA-2-EV
OUT
Even head R data signal 2(B)
75
H0-A-DATA-0-OD
OUT
Odd head R data signal 0(A)
76
GND
-
GND
77
GND
-
GND
78
GND
-
GND
T-6-73
J21 (Connect to Main controller PCB J3402)
Pin Number
Signal name
IN/OUT
Function
1
GND
-
GND
2
GND
-
GND
3
GND
-
GND
4
GND
-
GND
5
GND
-
GND
6
GND
-
GND
7
GND
-
GND
8
HD1_VHFBG
OUT
VH feed back voltage -
9
HD1_VHFBH
OUT
VH feed back voltage +
10
VH
IN
Power supply (+21.5V)
11
VH
IN
Power supply (+21.5V)
12
VH
IN
Power supply (+21.5V)
13
VH
IN
Power supply (+21.5V)
14
VH
IN
Power supply (+21.5V)
15
VH
IN
Power supply (+21.5V)
16
VH
IN
Power supply (+21.5V)
17
VH
IN
Power supply (+21.5V)
18
VH
IN
Power supply (+21.5V)
19
VH
IN
Power supply (+21.5V)
20
VH
IN
Power supply (+21.5V)
21
VH
IN
Power supply (+21.5V)
22
VH
IN
Power supply (+21.5V)
23
VH
IN
Power supply (+21.5V)
24
VH
IN
Power supply (+21.5V)
25
GND
-
GND
26
GND
-
GND
27
GND
-
GND
28
GND
-
GND
29
GND
-
GND
30
GND
-
GND
T-6-74
J22 (Connect to Main controller PCB J3701)
6-50
Pin Number
Signal name
IN/OUT
Function
1
GND
-
GND
Chapter 6
J22 (Connect to Main controller PCB J3701)
Pin Number
Signal name
IN/OUT
Function
2
ENCODER_A
OUT
Linear encoder output signalA
3
SNS_5V
IN
Power supply (+5V)
4
ENCODER_B
OUT
Linear encoder output signalB
5
SNS_5V
IN
Power supply (+5V)
6
H1-C-DATA-4-OD
IN
Odd head L data signal 4(C)
7
GND
-
GND
8
H1-C-HE-4
IN
Head L heat enable signal8(E)
9
GND
-
GND
10
H1-B-DATA-3-OD
IN
Odd head L data signal 3(B)
11
GND
-
GND
12
H1-B-DATA-2-OD
IN
Odd head L data signal 2(B)
13
GND
-
GND
14
MLT_SNS_2IN
OUT
Multi sensor signal2
15
MLT_SNS_1IN
OUT
Multi sensor signal1
16
GND
-
GND
17
PWLED1_ON
IN
Multi sensor LED 1 drive signal
18
PWLED2_ON
IN
Multi sensor LED 2 drive signal
19
PWLED3_ON
IN
Multi sensor LED 3 drive signal
20
PWLED4_ON
IN
Multi sensor LED 4 drive signal
21
GND
-
GND
22
H1-DSOUT1
OUT
Head L temperature output 1
23
H1-DSOUT2
OUT
Head L temperature output 2
24
GND
-
GND
25
H1-DASLK LICC2
IN
Head L analogue switch clock signal
26
H1-DATA LICC2
IN
Head L analogue switch data signal
27
H1-DLD LICC2
IN
Head L analogue switch latch signal
28
H1-E-DATA-9-EV
IN
Even head L data signal9(E)
29
GND
-
GND
30
H1-E-HE-9
IN
Head L heat enable signal9(E)
31
GND
-
GND
32
H1-F-DATA-10-EV
IN
Even head L data signal10(F)
33
GND
-
GND
34
H1-F-DATA-11-EV
IN
Even head L data signal11(F)
35
GND
-
GND
36
H1-F-HE-11
IN
Head L heat enable signal11(F)
37
GND
-
GND
38
H1-F-DATA-11-OD
IN
Odd head L data signal 11(F)
39
GND
-
GND
40
H1-F-HE-10
IN
Head L heat enable signal10(F)
41
GND
-
GND
42
H1-E-DATA-9-OD
IN
Odd head L data signal 9(E)
43
GND
-
GND
44
H1-F-DATA-10-OD
IN
Odd head L data signal 10(F)
45
GND
-
GND
46
H1-E-DATA-8-OD
IN
Odd head L data signal 8(E)
47
GND
-
GND
48
H1-E-HE-8
IN
Head L heat enable signal8(E)
49
GND
-
GND
50
H1-D-DATA-7-OD
IN
Odd head L data signal 7(D)
T-6-75
J23 (Connect to Main controller PCB J3801)
Pin Number
Signal name
IN/OUT
Function
1
GND
-
GND
2
H1-B-HE-2
IN
Head L heat enable signal 2(B)
3
GND
-
GND
4
H1-A-DATA-1-OD
IN
Odd head L data signal 1(A)
5
GND
-
GND
6
H1-A-DATA-0-OD
IN
Odd head L data signal 0(A)
7
GND
-
GND
6-51
Chapter 6
J23 (Connect to Main controller PCB J3801)
Pin Number
Signal name
IN/OUT
Function
8
H1-A-HE-0
IN
Head L heat enable signal 0(A)
9
GND
-
GND
10
H1-A-DATA-0-EV
IN
Even head L data signal 0(A)
11
GND
-
GND
12
H1-A-HE-1
IN
Head L heat enable signal 1(A)
13
GND
-
GND
14
H1-A-DATA-1-EV
IN
Even head L data signal 1(A)
15
GND
-
GND
16
H1-B-DATA-2-EV
IN
Even head L data signal 2(B)
17
GND
-
GND
18
H1-B-DATA-3-EV
IN
Even head L data signal 3(B)
19
GND
-
GND
20
H1-C-DATA-4-EV
IN
Even head L data signal 4(C)
21
GND
-
GND
22
H1-B-HE-3
IN
Head L heat enable signal 3(B)
23
GND
-
GND
24
H1-C-DATA-5-EV
IN
Even head L data signal 5(C)
25
H-DASH_LICC2_B
IN
Analogue switch/AD triggar
26
H1_LT
IN
Head L latch signal
27
GND
-
GND
28
HEAD_3V
IN
Power supply (+3V)
29
GND
-
GND
30
H1_CLK
IN
Head L clock signal
31
GND
-
GND
32
H1-C-DATA-5-OD
IN
Odd head L data signal 5(C)
33
GND
-
GND
34
H1-C-HE-5
IN
Head L heat enable signal 5(C)
35
GND
-
GND
36
H1-D-HE-6
IN
Head L heat enable signal 6(D)
37
GND
-
GND
38
IO-ASIC_SCL
IN/OUT
Head ROM control signal (clock)
39
GND
-
GND
40
H1-D-DATA-6-OD
IN
Odd head L data signal 6(D)
41
GND
-
GND
42
H1-D-DATA-6-EV
IN
Even head L data signal 6(D)
43
GND
-
GND
44
H1-D-DATA-7-EV
IN
Even head L data signal 7(D)
45
GND
-
GND
46
IO-ASIC_SDA
IN/OUT
Head ROM control signal (data)
47
GND
-
GND
48
H1-D-HE-7
IN
Head L heat enable signal 7(D)
49
GND
-
GND
50
H1-E-DATA-8-EV
IN
Even head L data signal 8(E)
T-6-76
J24 (Head L)
6-52
Pin Number
Signal name
IN/OUT
Function
1
VH
OUT
Power supply (+21.5V)
2
VH
OUT
Power supply (+21.5V)
3
VH
OUT
Power supply (+21.5V)
4
VHT2
OUT
Head L transistor drive power supply
5
H1-F-DATA-10-EV
OUT
Even head L data signal10(F)
6
EEPROM_SDA
IN/OUT
EEPROM control signal (data)
7
EEPROM_SCL
OUT
EEPROM control signal (clock)
8
HEAD_3V
OUT
Power supply (+3V)
9
H1-C-DIA1
IN
Heal L DI sensor signal 1(C)
10
H1-A-HE-1
OUT
Head L heat enable signal 1(A)
11
VH
OUT
Power supply (+21.5V)
12
VH
OUT
Power supply (+21.5V)
13
VH
OUT
Power supply (+21.5V)
Chapter 6
J24 (Head L)
Pin Number
Signal name
IN/OUT
Function
14
VH
OUT
Power supply (+21.5V)
15
VH
OUT
Power supply (+21.5V)
16
H1-E-DATA-9-OD
OUT
Odd head L data signal 9(E)
17
H1-F-HE-11
OUT
Head L heat enable signal11(F)
18
H1-E-DIA1
IN
Heal L DI sensor signal 1(E)
19
H1-D-DIA1
IN
Heal L DI sensor signal 1(D)
20
HEAD_3V
OUT
Power supply (+3V)
21
HEAD_3V
OUT
Power supply (+3V)
22
H1-B-DATA-3-EV
OUT
Even head L data signal 3(B)
23
H1-A-DATA-0-EV
OUT
Even head L data signal 0(A)
24
H1-B-HE-2
OUT
Head L heat enable signal 2(B)
25
VH
OUT
Power supply (+21.5V)
26
VH
OUT
Power supply (+21.5V)
27
H1-D-DIA2
IN
Heal L DI sensor signal 2(D)
28
H1-E-HE-8
OUT
Head L heat enable signal8(E)
29
H1-E-DIA2
IN
Heal L DI sensor signal 2(E)
30
H1-F-DIA2
IN
Heal L DI sensor signal 2(F)
31
H1-E-HE-9
OUT
Head L heat enable signal9(E)
32
H1-D-DATA-7-EV
OUT
Even head L data signal 7(D)
33
H1-D-HE-6
OUT
Head L heat enable signal 6(D)
34
H1-C-DATA-5-0D
OUT
Odd head L data signal 5(C)
35
H1-C-DATA-4-EV
OUT
Even head L data signal 4(C)
36
H1-A-DATA-1-EV
OUT
Even head L data signal 1(A)
37
H1-A-DIA2
IN
Heal L DI sensor signal 2(A)
38
H1-B-DIA2
IN
Heal L DI sensor signal 2(B)
39
H1-C-HE-4
OUT
Head L heat enable signal8(E)
40
H1-D-DATA-7-OD
OUT
Odd head L data signal 7(D)
41
H1-E-DATA-8-OD
OUT
Odd head L data signal 8(E)
42
H1-F-HE-10
OUT
Head L heat enable signal10(F)
43
H1-F-DATA-11-EV
OUT
Even head L data signal11(F)
44
H1-F-DATA-8-EV
OUT
Even head L data signal 8(F)
45
H1-D-DATA-6-EV
OUT
Even head L data signal 6(D)
46
H1-C-DIA2
IN
Heal L DI sensor signal 2(C)
47
H1-C-DATA-5-EV
OUT
Even head L data signal 5(C)
48
H1-B-DIA1
IN
Heal L DI sensor signal 1(B)
49
H1-A-HE-0
OUT
Head L heat enable signal 0(A)
50
H1-B-DATA-2-OD
OUT
Odd head L data signal 2(B)
51
H1-B-DATA-3-OD
OUT
Odd head L data signal 3(B)
52
H1-C-DATA-4-OD
OUT
Odd head L data signal 4(C)
53
GND
-
GND
54
GND
-
GND
55
GND
-
GND
56
H1-F-DATA-11-OD
OUT
Odd head L data signal 11(F)
57
H1-E-DATA-9-EV
OUT
Even head L data signal9(E)
58
GND
-
GND
59
H1-D-DATA-6-OD
OUT
Odd head L data signal6(D)
60
H1-C-HE-5
OUT
Head L heat enable signal 5(C)
61
H1-B-HE-3
OUT
Head L heat enable signal 3(B)
62
H1-A-DIA1
IN
Heal L DI sensor signal 1(A)
63
H1-A-DATA-1-OD
OUT
Odd head L data signal1(A)
64
GND
-
GND
65
GND
-
GND
66
GND
-
GND
67
GND
-
GND
68
H1-F-DATA-10-OD
OUT
Odd head L data signal 10(F)
69
H1-F-DIA1
IN
Heal L DI sensor signal 1(F)
70
H1-D-HE-7
OUT
Head L heat enable signal 7(D)
71
GND
-
GND
72
H1-CLK
OUT
Head L clock signal
6-53
Chapter 6
J24 (Head L)
6-54
Pin Number
Signal name
IN/OUT
Function
73
H1-LT
OUT
Head L latch signal
74
H1-B-DATA-2-EV
OUT
Even head L data signal 2(B)
75
H1-A-DATA-0-OD
OUT
Odd head L data signal0(A)
76
GND
-
GND
77
GND
-
GND
78
GND
-
GND
Chapter 6
6.2.5 Power supply
0016-8455
iPF6100 / iPF6200 / iPF6000S
CN1
CN2
F-6-5
T-6-77
CN1
Pin Number
Signal name
IN/OUT
Function
1
AC(H)
-
Power supply (AC 120V or AC 230V)
2
AC(H)
-
Power supply (AC 120V or AC 230V)
T-6-78
CN2 (Connect to Main controller PCB)
Pin Number
Signal name
IN/OUT
Function
1
HD1_VHFBH
IN
VH feedback voltage +
2
HD1_VHFBG
IN
VH feedback voltage -
3
VH
OUT
Power supply (+21.5V)
4
GND
-
GND
5
VH
OUT
Power supply (+21.5V)
6
GND
-
GND
7
RGV20(VCC)
OUT
Power supply (+21.5V)
8
GND
-
GND
9
VM
OUT
Power supply (+26V)
10
GND
-
GND
11
VM
OUT
Power supply (+26V)
12
GND
-
GND
13
VH_ENB
IN
VH power supply ON/OFF signal
14
PW_CONT
IN
Normal/power saving switch signal
6-55
Chapter 6
6.2.6 Roll feed unit PCB
0013-3771
iPF6100 / iPF6200 / iPF6000S
J1
J3
J2
F-6-6
T-6-79
J1 (Connect to Main controller PCB)
Pin Number
Signal name
IN/OUT
Function
1
GND
-
GND
2
GND
-
GND
3
ROLL_CLK
IN
Roll motor driver clock signal
4
ROLL_DAT
IN
Roll motor driver data signal
5
ROLL_STB
IN
Roll motor driver strobe signal
6
/ROLL_SLEEP
IN
Roll motor driver sleep signal
7
VM
IN
Power supply (+26V)
8
VM
IN
Power supply (+26V)
9
ROLL_UNIT
OUT
Roll unit detection signal
10
ROLL_PAPER_SNS
OUT
Roll media sensor signal
11
ROLL_CAM_SNS
OUT
Roll cam sensor signal
12
GND
-
GND
13
OPT_5V
IN
Power supply (+5V)
T-6-80
J2 (Roll media sensor )
Pin Number
Signal name
IN/OUT
Function
1
+5V
OUT
Power supply (+5V)
2
GND
-
GND
3
ROLL_PAPER_SNS
IN
Roll media sensor signal
T-6-81
J3 (Roll cam sensor, roll motor)
6-56
Pin Number
Signal name
IN/OUT
Function
1
+5V
OUT
Power supply (+5V)
2
GND
-
GND
3
ROLL_CAM_SNS
IN
Roll cam sensor signal
4
GND
-
GND
5
ROLL_OUTAP
OUT
Roll motor drive signal AP
6
ROLL_OUTAM
OUT
Roll motor power supply AM
7
ROLL_OUTBP
OUT
Roll motor drive signal BP
8
ROLL_OUTBM
OUT
Roll motor power supply BM
Chapter 6
6.3 Version Up
6.3.1 Firmware Update Tool
0013-3917
iPF6100
Use of the following tools allows you to update the firmware of the main controller incorporated in the printer.
- imagePROGRAF Firmware Update Tool
- L Printer Service Tool
1. imagePROGRAF Firmware Update Tool
imagePROGRAF Firmware Update Tool is the same as that for user.
Procedure:
1) Start imagePROGRAF Firmware Update Tool.
2) Place the printer in the online mode.
3) Transfer the firmware data to the printer according to the instructions shown on the display.
4) The data shown on the LCD on the operation panel changes and the firmware is updated automatically.
5) When firmware update is completed, the printer will start again.
File transfer route:
USB, IEEE1394, network
2. L Printer Service Tool
Procedure:
1) Start L Printer Service Tool.
2) Place the printer in the online mode.
3) Specify the firmware file(.jdl) and then transfer it.
4) The data shown on the LCD on the operation panel changes and the firmware is updated automatically.
5) When firmware update is completed, the printer will start again.
File transfer route:
USB, IEEE1394, network
6-57
Chapter 6
6.3.2 Firmware Update Tool
0020-1951
iPF6200 / iPF6000S
Use of the following tools allows you to update the firmware of the main controller incorporated in the printer.
- imagePROGRAF Firmware Update Tool
- L Printer Service Tool
1. imagePROGRAF Firmware Update Tool
imagePROGRAF Firmware Update Tool is the same as that for user.
Procedure:
1) Start imagePROGRAF Firmware Update Tool.
2) Place the printer in the online mode.
3) Transfer the firmware data to the printer according to the instructions shown on the display.
4) The data shown on the LCD on the operation panel changes and the firmware is updated automatically.
5) When firmware update is completed, the printer will start again.
File transfer route:
USB, network
2. L Printer Service Tool
Procedure:
1) Start L Printer Service Tool.
2) Place the printer in the online mode.
3) Specify the firmware file(.jdl) and then transfer it.
4) The data shown on the LCD on the operation panel changes and the firmware is updated automatically.
5) When firmware update is completed, the printer will start again.
File transfer route:
USB, network
6-58
Chapter 6
6.4 Service Tools
6.4.1 Tool List
0013-4006
iPF6100 / iPF6200 / iPF6000S
T-6-82
General-purpose tools
Long Phillips screwdriver
Remarks
Inserting and removing screws
Phillips screwdriver
Inserting and removing screws
Flat-head screwdriver
Removing the E-ring
Needle-nose pliers
Inserting and removing the spring parts
Hex key wrench
Inserting and removing hexagonal screws
Flat brush
Applying grease
Lint free paper
Wiping off ink
Rubber gloves
Preventing ink stains
T-6-83
Special-purpose tools
Remarks
Carriage Wire Tool
(AY3-4493-000)
Adjusting carriage wire height
Grease MOLYKOTE PG-641
(CK-0562-000)
Applying to specified locations
EU-1
(QY9-0037-000)
Soaks to specified locations
6-59
Chapter 7 SERVICE MODE
Contents
Contents
7.1 Service Mode .................................................................................................................................................................7-1
7.1.1 Service Mode Operation .............................................................................................................................................................. 7-1
7.1.2 Map of the Service Mode............................................................................................................................................................. 7-2
7.1.3 Map of the Service Mode............................................................................................................................................................. 7-7
7.1.4 Map of the Service Mode........................................................................................................................................................... 7-12
7.1.5 Details of Service Mode............................................................................................................................................................. 7-17
7.1.6 Details of Service Mode............................................................................................................................................................. 7-25
7.1.7 Details of Service Mode............................................................................................................................................................. 7-33
7.1.8 Sample Printout.......................................................................................................................................................................... 7-41
7.2 Special Mode................................................................................................................................................................7-45
7.2.1 Special Modes for Servicing ...................................................................................................................................................... 7-45
Chapter 7
7.1 Service Mode
7.1.1 Service Mode Operation
0013-2121
iPF6100 / iPF6200 / iPF6000S
a) How to enter the Service mode
Enter the Service mode following the procedure below.
1) Turn off the printer.
2) Turn on the printer while holding down the [Paper Source] button and [Information] button.
* Keep pressing the above buttons until "Initializing" appears on the display.
3) "S" is displayed in the upper right corner of the display showing the version.
4) After display of "Online", pressing the [Menu] button displays the SERVICE MODE top menu and the MESSAGE LED flashes.
* The Service mode is added to the options in the Main menu. The Service mode can be entered even in the error status (when an error message is shown on the
display) by turning the power off and then using the above key operation.
b) How to exit the Service mode
Turn off the printer.
c) Key operation in the service mode
- Selecting menus and parameters: [ ] or [ ] button
- Going to the next lower-level menu: [ ] button
- Going to the next higher-level menu: [ ] key
- Determining a selected menu or parameter: [OK] button
7-1
Chapter 7
7.1.2 Map of the Service Mode
0016-9221
iPF6100
The hierarchy of menus and parameters in the Service Mode is as shown below.
T-7-1
First Level
DISPLAY
Second Level
Third Level
PRINTINF
YES/NO
SYSTEM
S/N
Fourth Level
Fifth Level
: Select YES to
execute print
TYPE
LF TYPE
TMP
SIZE LF
SIZE LF
SIZE CR
SIZE CR
HEAD
S/N R
S/N L
LOT R
LOT L
INK
Y
--B
WARNING
1
--20
ERROR
1
--20
INK CHECK
I/O DISPLAY
I/O DISPLAY 1
ADJUST
PRINT PATTERN
000000 000000
I/O DISPLAY 2
NOZZLE 1
: Press the [OK]
button to execute
OPTICAL AXIS
: Press the [OK]
button to execute
LF & HAKUSYA
SENSOR CHECK
HEAD ADJ.
AUTO HEAD ADJ
ROUGH
: Press the [OK]
button to execute
MANUAL HEAD ADJ
DETAIL
: Press the [OK]
button to execute
BASIC
: Press the [OK]
button to execute
A
A-1
ADJ. SETTING
: Adjustment
value entry
--A-48
: Adjustment
value entry
F-1
: Adjustment
value entry
F-2
: Adjustment
value entry
--F
SAVE SETTINGS
RESET SETTINGS
7-2
NOZZLE CHK POS.
YES/NO
GAP CALIB.
YES/NO
YES/NO
YES/NO
Chapter 7
T-7-2
First Level
Second Level
Third Level
REPLACE
CUTTER
L & R PRINTHEADS
YES/NO
COUNTER
PRINTER
LIFE TTL
Fourth Level
Fifth Level
YES/NO
LIFE ROLL
LIFE CUTSHEET
LIFE A
--LIFE F
POWER ON
W-INK
CUTTER
WIPE
CARRIAGE
PRINT
CR COUNT
CR DIST.
PRINT COUNT
PURGE
CLN-A-1
CLN-A-2
CLN-A-3
CLN-A-6
CLN-A-7
CLN-A-10
CLN-A-11
CLN-A-15
CLN-A-16
CLN-A-17
CLN-A-TTL
CLN-M-1
CLN-M-4
CLN-M-5
CLN-M-6
CLN-M-TTL
CLEAR
CLR-INK CONSUME
CLR-CUTTER EXC.
CLR-MTC EXC.
CLR-HEAD R EXC.
CLR-HEAD L EXC.
CLR-UNIT A EXC.
CLR-UNIT B EXC.
CLR-UNIT D EXC.
CLR-UNIT F EXC.
CLR-UNIT H EXC.
CLR-UNIT L EXC.
CLR-UNIT P EXC.
CLR-UNIT R EXC.
CLR-UNIT V EXC.
CLR-UNIT X EXC.
CLR-FACTORY CNT.
7-3
Chapter 7
T-7-3
First Level
COUNTER
Second Level
EXCHANGE
Third Level
CUTTER EXC.
MTC EXC.
HEAD R EXC.
HEAD L EXC.
BOARD EXC.(M/B)
UNIT A EXC.
UNIT B EXC.
UNIT D EXC.
UNIT F EXC.
UNIT H EXC.
UNIT L EXC.
UNIT P EXC.
UNIT R EXC.
UNIT V EXC.
UNIT X EXC.
DETAIL-CNT
MOVE PRINTER
N-INK CHK(Y)
--N-INK CHK(B)
MEDIACONFIG-CNT
INK-USE1
INK-USE1(Y)
--INK-USE1(B)
INK-USE1(TTL)
N-INK-USE1(Y)
--N-INK-USE1(B)
N-INK-USE1(TTL)
INK-USE2
INK-USE2(Y)
--INK-USE2(B)
INK-USE2(TTL)
N-INK-USE2(Y)
--N-INK-USE2(B)
N-INK-USE2(TTL)
INK-EXC
INK-EXC(Y)
--INK-EXC(B)
INK-EXC(TTL)
N-INK-EXC(Y)
--N-INK-EXC(B)
N-INK-EXC(TTL)
7-4
Fourth Level
Fifth Level
Chapter 7
T-7-4
First Level
COUNTER
Second Level
MEDIA 1
Third Level
Fourth Level
Fifth Level
NAME
TTL
TTL
ROLL
ROLL
CUTSHEET
CUTSHEET
--MEDIA 7
NAME
TTL
TTL
ROLL
ROLL
CUTSHEET
CUTSHEET
MEDIA OTHER
NAME
TTL
TTL
ROLL
ROLL
CUTSHEET
CUTSHEET
MEDIASIZE1 ROLL
P-SQ 24-36
P-SQ 24-36
P-SQ 17-24
P-SQ 17-24
P-SQ -17
P-SQ -17
P-CNT 24-36
P-CNT 17-24
P-CNT -17
MEDIASIZE2 ROLL
D-SQ 24-36
D-SQ 24-36
D-SQ 17-24
D-SQ 17-24
D-SQ -17
D-SQ -17
D-CNT 24-36
D-CNT 17-24
D-CNT -17
MEDIASIZE1 CUT
P-SQ 24-36
P-SQ 24-36
P-SQ 17-24
P-SQ 17-24
P-SQ -17
P-SQ -17
P-CNT 24-36
P-CNT 17-24
P-CNT -17
7-5
Chapter 7
T-7-5
First Level
COUNTER
Second Level
MEDIASIZE1 CUT
Third Level
Fourth Level
Fifth Level
D-SQ 24-36
D-SQ 24-36
D-SQ 17-24
D-SQ 17-24
D-SQ -17
D-SQ -17
D-CNT 24-36
D-CNT 17-24
D-CNT -17
HEAD DOT CNT. 1
Y
--B
TTL
HEAD DOT CNT. 2
Y
--B
TTL
PARTS CNT.
COUNTER A
OK/W1/W2/E
PARTS A1
1:
2:
3:
4:
--COUNTER X
OK/W1/W2/E
PARTS X1
1:
2:
3:
4:
SETTING
Pth
RTC
PV AUTO JUDGE
INITIALIZE
ON/OFF
DATE
XXXX/XX/XX
: Date entry
TIME
XX:XX
: Time entry
ON/PFF
WARNIG
: Press the [OK] button to clear
ERROR
: Press the [OK] button to clear
ADJUST
: Press the [OK] button to clear
W-INK
: Press the [OK] button to clear
PURGE
: Press the [OK] button to clear
INK-USE CNT
: Press the [OK] button to clear
CUTTER-CHG CNT
: Press the [OK] button to clear
W-INK-CHG CNT
: Press the [OK] button to clear
HEAD-CHG R CNT
: Press the [OK] button to clear
HEAD-CHG L CNT
: Press the [OK] button to clear
PARTS-CHG CNT
PARTS A1
: Press the [OK]
button to clear
---
PARTS COUNTER
PARTS X1
: Press the [OK]
button to clear
PARTS A1
: Press the [OK]
button to clear
--PARTS X1
7-6
: Press the [OK]
button to clear
Chapter 7
7.1.3 Map of the Service Mode
0020-2100
iPF6200
The hierarchy of menus and parameters in the Service Mode is as shown below.
T-7-6
First Level
DISPLAY
Second Level
Third Level
PRINTINF
YES/NO
SYSTEM
S/N
Fourth Level
Fifth Level
: Select YES to
execute print
TYPE
LF TYPE
TMP
SIZE LF
SIZE LF
SIZE CR
SIZE CR
HEAD
S/N R
S/N L
LOT R
LOT L
INK
Y
--B
WARNING
1
--20
ERROR
1
--20
INK CHECK
I/O DISPLAY
000000 000000
I/O DISPLAY 1
I/O DISPLAY 2
ADJUST
PRINT PATTERN
NOZZLE 1
: Press the [OK]
button to execute
OPTICAL AXIS
: Press the [OK]
button to execute
LF & HAKUSYA
SENSOR CHECK
HEAD ADJ.
AUTO HEAD ADJ
ROUGH
: Press the [OK]
button to execute
MANUAL HEAD ADJ
DETAIL
: Press the [OK]
button to execute
BASIC
: Press the [OK]
button to execute
A
A-1
ADJ. SETTING
: Adjustment
value entry
--A-48
: Adjustment
value entry
F-1
: Adjustment
value entry
F-2
: Adjustment
value entry
--F
SAVE SETTINGS
RESET SETTINGS
NOZZLE CHK POS.
YES/NO
GAP CALIB.
YES/NO
YES/NO
YES/NO
7-7
Chapter 7
T-7-7
First Level
Second Level
Third Level
REPLACE
CUTTER
L & R PRINTHEADS
YES/NO
COUNTER
PRINTER
LIFE TTL
Fourth Level
YES/NO
LIFE ROLL
LIFE CUTSHEET
LIFE A
--LIFE F
POWER ON
W-INK
CUTTER
WIPE
CARRIAGE
PRINT
CR COUNT
CR DIST.
PRINT COUNT
PURGE
CLN-A-1
CLN-A-2
CLN-A-3
CLN-A-6
CLN-A-7
CLN-A-10
CLN-A-11
CLN-A-15
CLN-A-16
CLN-A-17
CLN-A-TTL
CLN-M-1
CLN-M-4
CLN-M-5
CLN-M-6
CLN-M-TTL
CLEAR
CLR-INK CONSUME
CLR-CUTTER EXC.
CLR-MTC EXC.
CLR-HEAD R EXC.
CLR-HEAD L EXC.
CLR-UNIT A EXC.
CLR-UNIT B EXC.
CLR-UNIT D EXC.
CLR D-1 EXC.
--CLR D-5 EXC.
CLR-UNIT F EXC.
CLR-UNIT H EXC.
CLR-UNIT L EXC.
CLR-UNIT P EXC.
CLR-UNIT R EXC.
CLR-UNIT V EXC.
CLR-UNIT X EXC.
CLR-FACTORY CNT.
7-8
Fifth Level
Chapter 7
T-7-8
First Level
COUNTER
Second Level
EXCHANGE
Third Level
Fourth Level
Fifth Level
CUTTER EXC.
MTC EXC.
HEAD R EXC.
HEAD L EXC.
BOARD EXC.(M/B)
UNIT A EXC.
UNIT B EXC.
UNIT D EXC.
D-1 EXC.
--D-5 EXC.
UNIT F EXC.
UNIT H EXC.
UNIT L EXC.
UNIT P EXC.
UNIT R EXC.
UNIT V EXC.
UNIT X EXC.
DETAIL-CNT
MOVE PRINTER
N-INK CHK(Y)
--N-INK CHK(B)
MEDIACONFIG-CNT
INK-USE1
INK-USE1(Y)
--INK-USE1(B)
INK-USE1(TTL)
N-INK-USE1(Y)
--N-INK-USE1(B)
N-INK-USE1(TTL)
INK-USE2
INK-USE2(Y)
--INK-USE2(B)
INK-USE2(TTL)
N-INK-USE2(Y)
--N-INK-USE2(B)
N-INK-USE2(TTL)
INK-EXC
INK-EXC(Y)
--INK-EXC(B)
INK-EXC(TTL)
N-INK-EXC(Y)
--N-INK-EXC(B)
N-INK-EXC(TTL)
7-9
Chapter 7
T-7-9
First Level
COUNTER
Second Level
MEDIA 1
Third Level
NAME
TTL
TTL
ROLL
ROLL
CUTSHEET
CUTSHEET
--MEDIA 7
NAME
TTL
TTL
ROLL
ROLL
CUTSHEET
CUTSHEET
MEDIA OTHER
NAME
TTL
TTL
ROLL
ROLL
CUTSHEET
CUTSHEET
MEDIASIZE1 ROLL
P-SQ 24-36
P-SQ 24-36
P-SQ 17-24
P-SQ 17-24
P-SQ -17
P-SQ -17
P-CNT 24-36
P-CNT 17-24
P-CNT -17
MEDIASIZE2 ROLL
D-SQ 24-36
D-SQ 24-36
D-SQ 17-24
D-SQ 17-24
D-SQ -17
D-SQ -17
D-CNT 24-36
D-CNT 17-24
D-CNT -17
MEDIASIZE1 CUT
P-SQ 24-36
P-SQ 24-36
P-SQ 17-24
P-SQ 17-24
P-SQ -17
P-SQ -17
P-CNT 24-36
P-CNT 17-24
P-CNT -17
7-10
Fourth Level
Fifth Level
Chapter 7
T-7-10
First Level
COUNTER
Second Level
MEDIASIZE1 CUT
Third Level
Fourth Level
Fifth Level
D-SQ 24-36
D-SQ 24-36
D-SQ 17-24
D-SQ 17-24
D-SQ -17
D-SQ -17
D-CNT 24-36
D-CNT 17-24
D-CNT -17
HEAD DOT CNT. 1
Y
--B
TTL
HEAD DOT CNT. 2
Y
--B
TTL
PARTS CNT.
COUNTER A
OK/W1/W2/E
PARTS A1
1:00
2:00
3:00
4:00
--COUNTER X
OK/W1/W2/E
PARTS X1
1:00
2:00
3:00
4:00
SETTING
Pth
RTC
PV AUTO JUDGE
INITIALIZE
ON/OFF
DATE
XXXX/XX/XX
: Date entry
TIME
XX:XX
: Time entry
ON/PFF
WARNIG
: Press the [OK] button to clear
ERROR
: Press the [OK] button to clear
ADJUST
: Press the [OK] button to clear
W-INK
: Press the [OK] button to clear
PURGE
: Press the [OK] button to clear
INK-USE CNT
: Press the [OK] button to clear
CUTTER-CHG CNT
: Press the [OK] button to clear
W-INK-CHG CNT
: Press the [OK] button to clear
HEAD-CHG R CNT
: Press the [OK] button to clear
HEAD-CHG L CNT
: Press the [OK] button to clear
HDD BOX PASS
ALL FOLDERS
: Press the [OK]
button to clear
FOLDER 1
: Press the [OK]
button to clear
---
PARTS-CHG CNT
FOLDER 29
: Press the [OK]
button to clear
PARTS A1
: Press the [OK]
button to clear
---
PARTS COUNTER
PARTS X1
: Press the [OK]
button to clear
PARTS A1
: Press the [OK]
button to clear
--PARTS X1
: Press the [OK]
button to clear
7-11
Chapter 7
7.1.4 Map of the Service Mode
0020-7351
iPF6000S
The hierarchy of menus and parameters in the Service Mode is as shown below.
T-7-11
First Level
DISPLAY
Second Level
Third Level
PRINTINF
YES/NO
SYSTEM
S/N
Fourth Level
Fifth Level
: Select YES to
execute print
TYPE
LF TYPE
TMP
SIZE LF
SIZE LF
SIZE CR
SIZE CR
HEAD
S/N R
S/N L
LOT R
LOT L
INK
PC
--M
WARNING
1
--20
ERROR
1
--20
INK CHECK
I/O DISPLAY
I/O DISPLAY 1
ADJUST
PRINT PATTERN
000 00000
I/O DISPLAY 2
NOZZLE 1
: Press the [OK]
button to execute
OPTICAL AXIS
: Press the [OK]
button to execute
LF & HAKUSYA
SENSOR CHECK
HEAD ADJ.
AUTO HEAD ADJ
ROUGH
: Press the [OK]
button to execute
MANUAL HEAD ADJ
DETAIL
: Press the [OK]
button to execute
BASIC
: Press the [OK]
button to execute
A
A-1
ADJ. SETTING
: Adjustment
value entry
--A-48
: Adjustment
value entry
F-1
: Adjustment
value entry
F-2
: Adjustment
value entry
--F
SAVE SETTINGS
RESET SETTINGS
7-12
NOZZLE CHK POS.
YES/NO
GAP CALIB.
YES/NO
YES/NO
YES/NO
Chapter 7
T-7-12
First Level
Second Level
Third Level
REPLACE
CUTTER
L & R PRINTHEADS
YES/NO
COUNTER
PRINTER
LIFE TTL
Fourth Level
Fifth Level
YES/NO
LIFE ROLL
LIFE CUTSHEET
LIFE A
--LIFE F
POWER ON
W-INK
CUTTER
WIPE
CARRIAGE
PRINT
CR COUNT
CR DIST.
PRINT COUNT
PURGE
CLN-A-1
CLN-A-2
CLN-A-3
CLN-A-6
CLN-A-7
CLN-A-10
CLN-A-11
CLN-A-15
CLN-A-16
CLN-A-17
CLN-A-TTL
CLN-M-1
CLN-M-4
CLN-M-5
CLN-M-6
CLN-M-TTL
CLEAR
CLR-INK CONSUME
CLR-CUTTER EXC.
CLR-MTC EXC.
CLR-HEAD R EXC.
CLR-HEAD L EXC.
CLR-UNIT A EXC.
CLR-UNIT B EXC.
CLR-UNIT D EXC.
CLR D-1 EXC.
--CLR D-5 EXC.
CLR-UNIT F EXC.
CLR-UNIT H EXC.
CLR-UNIT L EXC.
CLR-UNIT P EXC.
CLR-UNIT V EXC.
CLR-UNIT X EXC.
CLR-FACTORY CNT.
7-13
Chapter 7
T-7-13
First Level
COUNTER
Second Level
EXCHANGE
Third Level
Fourth Level
CUTTER EXC.
MTC EXC.
HEAD R EXC.
HEAD L EXC.
BOARD EXC.(M/B)
UNIT A EXC.
UNIT B EXC.
UNIT D EXC.
D-1 EXC.
--D-5 EXC.
UNIT F EXC.
UNIT H EXC.
UNIT L EXC.
UNIT P EXC.
UNIT V EXC.
UNIT X EXC.
DETAIL-CNT
MOVE PRINTER
N-INK CHK(PC)
--N-INK CHK(M)
MEDIACONFIG-CNT
INK-USE1
INK-USE1(PC)
--INK-USE1(M)
INK-USE1(TTL)
N-INK-USE1(PC)
--N-INK-USE1(M)
N-INK-USE1(TTL)
INK-USE2
INK-USE2(PC)
--INK-USE2(M)
INK-USE2(TTL)
N-INK-USE2(PC)
--N-INK-USE2(M)
N-INK-USE2(TTL)
INK-EXC
INK-EXC(PC)
--INK-EXC(M)
INK-EXC(TTL)
N-INK-EXC(PC)
--N-INK-EXC(M)
N-INK-EXC(TTL)
7-14
Fifth Level
Chapter 7
T-7-14
First Level
COUNTER
Second Level
MEDIA 1
Third Level
Fourth Level
Fifth Level
NAME
TTL
TTL
ROLL
ROLL
CUTSHEET
CUTSHEET
--MEDIA 7
NAME
TTL
TTL
ROLL
ROLL
CUTSHEET
CUTSHEET
MEDIA OTHER
NAME
TTL
TTL
ROLL
ROLL
CUTSHEET
CUTSHEET
MEDIASIZE1 ROLL
P-SQ 24-36
P-SQ 24-36
P-SQ 17-24
P-SQ 17-24
P-SQ -17
P-SQ -17
P-CNT 24-36
P-CNT 17-24
P-CNT -17
MEDIASIZE2 ROLL
D-SQ 24-36
D-SQ 24-36
D-SQ 17-24
D-SQ 17-24
D-SQ -17
D-SQ -17
D-CNT 24-36
D-CNT 17-24
D-CNT -17
MEDIASIZE1 CUT
P-SQ 24-36
P-SQ 24-36
P-SQ 17-24
P-SQ 17-24
P-SQ -17
P-SQ -17
P-CNT 24-36
P-CNT 17-24
P-CNT -17
7-15
Chapter 7
T-7-15
First Level
COUNTER
Second Level
MEDIASIZE1 CUT
Third Level
Fourth Level
Fifth Level
D-SQ 24-36
D-SQ 24-36
D-SQ 17-24
D-SQ 17-24
D-SQ -17
D-SQ -17
D-CNT 24-36
D-CNT 17-24
D-CNT -17
HEAD DOT CNT. 1
PC
--M
TTL
HEAD DOT CNT. 2
PC
--M
TTL
PARTS CNT.
COUNTER A
OK/W1/W2/E
PARTS A1
1:00
2:00
3:00
4:00
--COUNTER X
OK/W1/W2/E
PARTS X1
1:00
2:00
3:00
4:00
SETTING
Pth
RTC
PV AUTO JUDGE
INITIALIZE
ON/OFF
DATE
XXXX/XX/XX
: Date entry
TIME
XX:XX
: Time entry
ON/PFF
WARNIG
: Press the [OK] button to clear
ERROR
: Press the [OK] button to clear
ADJUST
: Press the [OK] button to clear
W-INK
: Press the [OK] button to clear
PURGE
: Press the [OK] button to clear
INK-USE CNT
: Press the [OK] button to clear
CUTTER-CHG CNT
: Press the [OK] button to clear
W-INK-CHG CNT
: Press the [OK] button to clear
HEAD-CHG R CNT
: Press the [OK] button to clear
HEAD-CHG L CNT
: Press the [OK] button to clear
HDD BOX PASS
ALL FOLDERS
: Press the [OK]
button to clear
FOLDER 1
: Press the [OK]
button to clear
---
PARTS-CHG CNT
FOLDER 29
: Press the [OK]
button to clear
PARTS A1
: Press the [OK]
button to clear
---
PARTS COUNTER
PARTS X1
: Press the [OK]
button to clear
PARTS A1
: Press the [OK]
button to clear
--PARTS X1
7-16
: Press the [OK]
button to clear
Chapter 7
7.1.5 Details of Service Mode
0016-8435
iPF6100
This section provides details of the Service mode menu.
a) DISPLAY
Displays and prints the printer information.
1) PRINF INF
Prints adjustment values in the User menu, [DISPLAY] and [COUNTER] parameters on A4-size or lager paper.
When a roll media is used, the layout is optimized according to the media width.
2) SYSTEM
Displays the printer information shown below.
T-7-16
Display
Description
Unit
S/N
Serial number of printer
-
TYPE
Type setting on main controller PCB
* iPF6100 is represented by 24.
-
LF TYPE
Feed roller type: 0 or 1
-
TMP
Ambient temperature
degrees C
SIZE LF
Detected size of loaded media (feed direction)
0 is always detected for the roll media.
mm
SIZE LF
Detected size of loaded media (feed direction)
0 is always detected for the roll media.
inch
SIZE CR
Detected size of loaded media (carriage scan direction)
mm
SIZE CR
Detected size of loaded media (carriage scan direction)
inch
3) HEAD
Displays the following EEPROM information of the printhead.
T-7-17
Display
S/N R
Description
Serial number of printhead R
S/N L
Serial number of printhead L
LOT R
Lot number of printhead R
LOT L
Lot number of printhead L
4) INK
Displays the numbers of days passed since installation of the following ink tanks.
T-7-18
Display
Description
Unit
BK
Number of days passed since the BK ink tank was installed
Day(s)
MBK
Number of days passed since the MBK ink tank was installed
Day(s)
C
Number of days passed since the C ink tank was installed
Day(s)
M
Number of days passed since the M ink tank was installed
Day(s)
Y
Number of days passed since the Y ink tank was installed
Day(s)
PC
Number of days passed since the PC ink tank was installed
Day(s)
PM
Number of days passed since the PM ink tank was installed
Day(s)
GY
Number of days passed since the GY ink tank was installed
Day(s)
PGY
Number of days passed since the PGY ink tank was installed
Day(s)
R
Number of days passed since the R ink tank was installed
Day(s)
G
Number of days passed since the G ink tank was installed
Day(s)
B
Number of days passed since the B ink tank was installed
Day(s)
5) WARNING
Displays the warning history (up to 20 events). The newest event has the smallest history number.
6) ERROR
Displays the error history (up to 20 events). The newest event has the smallest history number.
7) INK CHECK
Displays the history of execution of turning off the remaining ink level detection (by using the refilled ink tank) in the order of Y, PC, C, PGY, GY, BK, PM, M,
MBK, R, G, and B.
0: No execution
1: Executed at least once
7-17
Chapter 7
b) I/O DISPLAY
The information of each sensor and switch is shown in the display.
Sensor and switch status is shown in the display.
ON=1 OFF or not used=0
ON = 1
OFF or not used = 0
Screen 1
T-7-19
I
/
O
D
I
S
P
L
A
Y
0
0
0
0
0
0
0
0
0
0
0
1
1
2
3
4
5
6
7
8
9
10 11 12 13 14 15 16 (Display position)
0
0
Upper row
0
0
0
Lower row
Screen 2
T-7-20
I
/
O
0
0
0
0
D
I
S
P
L
A
Y
0
0
0
0
0
0
0
2
0
0
Upper row
0
0
0
Lower row
17 18 19 20 21 22 23 24 25 26 27 28 29 30 31 32 (Display position)
Screens 1 and 2 are selectable with the [ ] and [ ] buttons.
These screens display the associated sensor status as listed in the table below.
T-7-21
Display
position
7-18
Sensor name
LCD display contents
1
Pump Cam Sensor
0: Sensor ON , 1: Sensor OFF
2
Valve Open/Closed Detection Sensor
0: Sensor ON , 1: Sensor OFF
3
(Not Used)
0
4
(Not Used)
0
5
Spur Cam Sensor
0: Sensor ON , 1: Sensor OFF
6
Lift Cam Sensor
0: Sensor ON , 1: Sensor OFF
7
Feed Roller HP Sensor
0: Sensor ON , 1: Sensor OFF
8
Top Cover Sensor
0: Cover open , 1: Cover close
9
(Not Used)
0
10
Ink Tank Cover Switch
0: Cover open , 1: Cover close
11
(Not Used)
0
12
Paper Detection Sensor
0: Sensor ON , 1: Sensor OFF
13
(Not Used)
0
14
(Not Used)
0
15
(Not Used)
0
16
(Not Used)
0
17
Roll Media Sensor
0: Sensor ON , 1: Sensor OFF
18
Roll Cam Sensor
0: Sensor ON , 1: Sensor OFF
19
(Not Used)
0
20
Cutter Right Position Sensor
0: Sensor ON , 1: Sensor OFF
21
Cutter HP Sensor
0: Sensor ON , 1: Sensor OFF
22
(Not Used)
0
23
(Not Used)
0
24
(Not Used)
0
25
(Not Used)
0
26
Roll unit detection
0: Roll unit not detected , 1: Roll unit detected
27
Cutter unit detection
0: Cutter unit not detected , 1: Cutter unit detected
28
(Not Used)
0
29
(Not Used)
0
30
(Not Used)
0
31
(Not Used)
0
32
(Not Used)
0
Chapter 7
c) ADJUST
Performs adjustments and prints the adjustment and check patterns necessary for adjusting the printer parts.
1) PRINT PATTERN
T-7-22
Display
Description
NOZZLE 1
Prints the nozzle check pattern by single direction/ single pass without using the nondischarging back up.
It is used to check for the non-discharging nozzles.
- Media size: A4
- Media type: any
OPTICAL AXIS
Prints the pattern and adjusts the optical axis of the multi sensor.
For details, refer to "Disassembly/Reassembly" > "Adjustment and Setup Items" > "Procedure
after replacing the carriage unit or multi sensor".
- Media type: photo glossy paper
LF & HAKUSHA
* For Factory
SENSOR CHECK
* For Factory
LF & HAKUSYA and SENSOR CHECK are intended for factory adjustment purposes.
No adjustment by service personnel is required.
2) HEAD ADJ.
Set or initialize the registration adjustment values of each printheads.
T-7-23
Display
Description
AUTO HEAD ADJ
ROUGH
Prints the pattern for auto head adjustment (rough adjustment).
MANUAL HEAD ADJ
DETAIL
Prints the detail patterns for the manual head adjustment.
After printing, the mode will change to [ADJ. SETTING]. Check the printed patterns and input the set values.
BASIC
Prints the basic patterns for the manual head adjustment.
After printing, the mode will change to [ADJ. SETTING]. Check the printed patterns and input the set values.
ADJ. SETTING
A to F
A-1 to F-1
SAVE SETTINGS
RESET SETTINGS
This mode is to input the registration adjustment values.
It is possible to return the values to the former one by printing the status print before changing the value.
Save the registration adjustment values that has been input.
Initialize the registration adjustment values (to 0).
3) NOZZLE CHK POS.
This mode for adjusting the optical axis of the head management sensor. For details, refer to "Disassembly/Reassembly" > "Adjustment and Setup Items" > "Procedure after replacing the head management sensor".
4) GAP CLIB.
This mode measures the gap between the printhead and media by multi sensor and corrects the calibration value.
7-19
Chapter 7
d) REPLACE
1) CUTTER
This mode is for replacing the cutter unit.
2) L&R PRINTHEADS
Replaces printheads L and R.
e) COUNTER
Displays the life (operation frequency and time) of each unit, print counts for each media type, and else.
The count values can be printed from [PRINT INF].
1) PRINTER: Counters related to product life
T-7-24
Display
LIFE TTL
Description
Unit
Cumulative number of printed media (equivalent of A4)
sheets
LIFE ROLL
Cumulative number of printed roll media (equivalent of A4)
sheets
LIFE CUTSHEET
Cumulative number of printed cut sheets (equivalent to A4)
sheets
LIFE A-F
Cumulative number of printed media for environments A to F
sheets
POWER ON
Cumulative power-on time (excluding the sleep time)
Hours
W-INK
Remaining capacity of the maintenance cartridge
%
CUTTER
Number of cutting operations (count as 1 by moving back and forth)
Times
WIPE
Number of wiping operations
Times
2) CARRIAGE: Counters related to carriage unit
T-7-25
Display
Description
Unit
PRINT
Cumulative printing time
Hours
CR COUNT
Cumulative carriage scan count (count as 1 by moving back and forth)
Times
CR DIST.
Cumulative carriage scan distance (count as 1 by moving 210mm)
Times
PRINT COUNT
Cumulative print end count (count as 1 by capping)
Times
3) PURGE: Counters related to purge unit
T-7-26
Display
7-20
Description
Unit
CLN-A-1
Cumulative number of automatic cleaning 1 (normal suction) operations
Times
CLN-A-2
Cumulative number of automatic cleaning 2 (ink level adjusting) operations
Times
CLN-A-3
Cumulative number of automatic cleaning 3 (initial filling) operations
Times
CLN-A-6
Cumulative number of automatic cleaning 6 (strong normal suction) operations
Times
CLN-A-7
Cumulative number of automatic cleaning 7 (aging) operations
CLN-A-10
Cumulative number of automatic cleaning 10 (ink filling after secondary transportation) operations
Times
CLN-A-11
Cumulative number of automatic cleaning 11 (ink filling after head replacement) operations
Times
CLN-A-15
Cumulative number of automatic cleaning 15 (dot count small suction) operations
Times
CLN-A-16
Cumulative number of automatic cleaning 16 (sedimented ink agitation) operations
Times
CLN-A-17
Cumulative number of automatic cleaning 17 (small suction) operations
Times
CLN-A-TTL
Total number of automatic cleaning operations
Times
CLN-M-1
Cumulative number of manual cleaning 1 (normal suction) operations
Times
CLN-M-4
Cumulative number of manual cleaning 4 (ink draining from head after head replacement) operations
Times
CLN-M-5
Cumulative number of manual cleaning 5 (ink draining from head and tube before transportation ) operations
Times
CLN-M-6
Cumulative number of manual cleaning 6 (normal strong suction) operations
Times
CLN-M-TTL
Total number of manual cleaning operations
Times
Chapter 7
4) CLEAR: Counters related to counter initialization
T-7-27
Display
Description
Unit
CLR-INK CONSUME
Cumulative count of ink section consumption amount clearing
Times
CLR-CUTTER EXC.
Cumulative count of cutter replacement count clearing
Times
CLR-MTC EXC.
Cumulative count of maintenance cartridge replacement count clearing
Times
CLR-HEAD L EXC.
Cumulative count of printhead L replacement count clearing
Times
CLR-HEAD R EXC.
Cumulative count of printhead R replacement count clearing
Times
CLR-UNIT A EXC.
Cumulative count of unit A(waste ink system) replacement count clearing
Times
CLR-UNIT B EXC.
Cumulative count of unit B(platen duct) replacement count clearing
Times
CLR-UNIT D EXC.
Cumulative count of unit D(carriage unit) replacement count clearing
Times
CLR-UNIT F EXC.
Cumulative count of unit F(ink supply system) replacement count clearing
Times
CLR-UNIT H EXC.
Cumulative count of unit H(purge) replacement count clearing
Times
CLR-UNIT L EXC.
Cumulative count of unit L(head management sensor) replacement count clearing
Times
CLR-UNIT P EXC.
Cumulative count of unit P(feed motor) replacement count clearing
Times
CLR-UNIT R EXC.
Cumulative count of unit R(spur cam) replacement count clearing
Times
CLR-UNIT V EXC.
Cumulative count of unit V(mist fan unit) replacement count clearing
Times
CLR-UNIT X EXC.
Cumulative count of unit X(multi sensor) replacement count clearing
Times
CLR-FACTORY CNT.
For factory
Times
5) EXCHANGE: Counters related to parts replacement
T-7-28
Display
Description
Unit
CUTTER EXC.
Cutter replacement count
(Count of executing cutter replacement mode)
Times
MTC EXC.
Maintenance cartridge replacement count
Times
HEAD R EXC.
Printhead R replacement count
Times
HEAD L EXC.
Printhead L replacement count
Times
BOARD EXC.(M/B)
Main controller PCB replacement count
Times
UNIT A EXC.
Unit A (waste ink system) replacement count
(Count of executing [INITIALIZE] > [PARTS COUNTER] > [PARTS A])
Times
UNIT B EXC.
Unit B (waste ink system) replacement count
(Count of executing [INITIALIZE] > [PARTS COUNTER] > [PARTS B])
Times
UNIT D EXC.
Unit D (carriage unit) replacement count
(Count of executing [INITIALIZE] > [PARTS COUNTER] > [PARTS D])
Times
UNIT F EXC.
Unit F (ink supply system) replacement count
(Count of executing [INITIALIZE] > [PARTS COUNTER] > [PARTS F])
Times
UNIT H EXC.
Unit H (purge unit) replacement count
(Count of executing [INITIALIZE] > [PARTS COUNTER] > [PARTS H])
Times
UNIT L EXC.
Unit L (head management sensor) replacement count
(Count of executing [INITIALIZE] > [PARTS COUNTER] > [PARTS L])
Times
UNIT P EXC.
Unit P (feed unit) replacement count
(Count of executing [INITIALIZE] > [PARTS COUNTER] > [PARTS P])
Times
UNIT R EXC.
Unit R (pick-up system) replacement count
(Count of executing [INITIALIZE] > [PARTS COUNTER] > [PARTS R])
Times
UNIT V EXC.
Unit V(mist fan unit) replacement count
(Count of executing [INITIALIZE] > [PARTS COUNTER] > [PARTS V])
Times
UNIT X EXC.
Unit X(multi sensor) replacement count
(Count of executing [INITIALIZE] > [PARTS COUNTER] > [PARTS X])
Times
6) DETAIL-CNT: Other counters
T-7-29
Display
Description
Unit
MOVE PRINTER
Count of [Move Printer] operations
Times
N-INKCHK(XX)
XX: Ink color
Count of turning off the ink remaining level detection for each color
Times
MEDIACONFIG-CNT
Count of media registered by media editor
Times
7-21
Chapter 7
7) INK-USE1: Counters related to ink consumption
T-7-30
Display
Description
Unit
INK-USE1(XX)
XX: Ink color
Cumulative consumption amount of generic ink
ml
INK-USE1(TTL)
Total amount of the cumulative consumption of generic ink
ml
N-INK-USE1(XX)
XX: Ink color
Cumulative consumption amount of refilled ink
ml
N-INK-USE1(TTL)
Total amount of the cumulative consumption of refilled ink
ml
8) INK-USE2: Counters related to ink consumption
T-7-31
Display
Description
Unit
INK-USE2(XX)
XX: Ink color
Consumption amount of generic ink of the currently installed ink tank.
ml
INK-USE2(TTL)
Total consumption amount of generic ink of the currently installed ink tanks
ml
N-INK-USE2(XX)
XX: Ink color
Consumption amount of refilled ink of the currently installed ink tank
ml
N-INK-USE2(TTL)
Total consumption amount of refilled ink of the currently installed ink tanks
ml
9) INK-EXC: Counters related to ink tank replacement
T-7-32
Display
Description
Unit
INK-EXC(XX)
XX: Ink color
Cumulative count of generic ink tank replacement
ml
INK-EXC(TTL)
Total amount of tho cumulative count of generic ink tank replacement
ml
N-INK-EXC(XX)
XX: Ink color
Cumulative count of refilled ink tank replacement
ml
N-INK-EXC(TTL)
Total amount of tho cumulative count of refilled ink tank replacement
ml
10) MEDIA x (x: 1 to 7): Counters related to media
One to seven media types are displayed individually in order with large cumulative print area.
T-7-33
Display
Description
Unit
NAME
Media type
-
TTL
Total amount of cumulative print area of roll media and cut sheet (metric)
m2
TTL
Total amount of cumulative print area of roll media and cut sheet (inch)
Sq.f
ROLL
Cumulative print area of roll media (metric)
m2
ROLL
Cumulative print area of roll media (inch)
Sq.f
CUT SHEET
Cumulative print area of cut sheet (metric)
m2
CUT SHEET
Cumulative print area of cut sheet (inch)
Sq.f
11) MEDIA OTHER: Counters related to media
Displays the total amount of cumulative print area of the other media type than the above-mentioned
T-7-34
Display
TTL
7-22
Description
Total amount of cumulative print area of roll media and cut sheet (metric)
Unit
m2
TTL
Total amount of cumulative print area of roll media and cut sheet (inch)
Sq.f
ROLL
Cumulative print area of roll media (metric)
m2
ROLL
Cumulative print area of roll media (inch)
Sq.f
CUT SHEET
Cumulative print area of cut sheet (metric)
m2
CUT SHEET
Cumulative print area of cut sheet (inch)
Sq.f
Chapter 7
12) MEDIASIZE1 ROLL: Counters related to roll media printing
T-7-35
Display
Description
P-SQ 24-36
Unit
Cumulative print area of paper equal to or larger than 24 inches but less than 36 inches (physical size)
m2/Sq.f
P-SQ 17-24
Cumulative print area of paper equal to or larger than 17 inches but less than 24 inches (physical size)
m2/Sq.f
P-SQ -17
Cumulative print area of paper less than 17 inches (physical size)
m2/Sq.f
P-CNT 24-36
Cumulative number of sheets of A4-equivalent paper equal to or larger than 24 inches but less than 36 inches sheets
(physical size)
P-CNT 17-24
Cumulative number of sheets of A4-equivalent paper equal to or larger than 17 inches but less than 24 inches sheets
(physical size)
P-CNT -17
Cumulative number of sheets of A4-equivalent paper less than 17 inches (physical size)
sheets
13) MEDIASIZE2 ROLL: Counters related to roll media printing
T-7-36
Display
Description
D-SQ 24-36
Unit
Cumulative print area of paper equal to or larger than 24 inches but less than 36 inches (data size)
m2/Sq.f
D-SQ 17-24
Cumulative print area of paper equal to or larger than 17 inches but less than 24 inches (data size)
m2/Sq.f
D-SQ -17
Cumulative print area of paper less than 17 inches (data size)
m2/Sq.f
D-CNT 24-36
Cumulative number of sheets of A4-equivalent paper equal to or larger than 24 inches but less than 36 inches sheets
(data size)
D-CNT 17-24
Cumulative number of sheets of A4-equivalent paper equal to or larger than 17 inches but less than 24 inches sheets
(data size)
D-CNT -17
Cumulative number of sheets of A4-equivalent paper less than 17 inches (data size)
sheets
14) MEDIASIZE1 CUT: Counters related to cut sheet printing
T-7-37
Display
Description
P-SQ 24-36
Unit
Cumulative print area of paper equal to or larger than 24 inches but less than 36 inches (physical size)
m2/Sq.f
P-SQ 17-24
Cumulative print area of paper equal to or larger than 17 inches but less than 24 inches (physical size)
m2/Sq.f
P-SQ -17
Cumulative print area of paper less than 17 inches (physical size)
m2/Sq.f
P-CNT 24-36
Cumulative number of sheets of A4-equivalent paper equal to or larger than 24 inches but less than 36 inches sheets
(physical size)
P-CNT 17-24
Cumulative number of sheets of A4-equivalent paper equal to or larger than 17 inches but less than 24 inches sheets
(physical size)
P-CNT -17
Cumulative number of sheets of A4-equivalent paper less than 17 inches (physical size)
sheets
15) MEDIASIZE2 CUT: Counters related to cut sheet printing
T-7-38
Display
Description
D-SQ 24-36
Unit
Cumulative print area of paper equal to or larger than 24 inches but less than 36 inches (data size)
m2/Sq.f
D-SQ 17-24
Cumulative print area of paper equal to or larger than 17 inches but less than 24 inches (data size)
m2/Sq.f
D-SQ -17
Cumulative print area of paper less than 17 inches (data size)
m2/Sq.f
D-CNT 24-36
Cumulative number of sheets of A4-equivalent paper equal to or larger than 24 inches but less than 36 inches sheets
(data size)
D-CNT 17-24
Cumulative number of sheets of A4-equivalent paper equal to or larger than 17 inches but less than 24 inches sheets
(data size)
D-CNT -17
Cumulative number of sheets of A4-equivalent paper less than 17 inches (data size)
sheets
16) HEAD DOT CNT.1: Counter related to dot count
T-7-39
Display
Description
Unit
XX
XX: Ink color
Dot counts of each colors of the currently installed printhead
(x 1,000,000) dots
TTL
Total dot counts of each colors of the currently installed printhead
(x 1,000,000) dots
17) HEAD DOT CNT.2: Counter related to dot count
T-7-40
Display
Description
Unit
XX
XX: Ink color
Cumulative dot counts of each colors
(x 1,000,000) dots
TTL
Total cumulative dot counts of each colors
(x 1,000,000) dots
7-23
Chapter 7
18) PARTS CNT. : Counter related to consumable parts
T-7-41
Display
Description
COUNTER x
x: Unit number of consumable parts
(For detail, refer to "Maintenance and Inspection" > "Consumable Parts")
Unit
Day(s)
Display the status and the days passed since the counter resetting.
- Status
OK: Use rate (until part replacement) of all consumable parts included in each unit are below 90%.
W1: Use rate (until part replacement) of either of the consumable parts included in each unit has reached
90% or more.
W2: Use rate (until part replacement) of either of the consumable parts included in each unit has reached
100%, but no need to stop the printer.
E : Use rate (until part replacement) of either of the consumable parts included in each unit has reached
100%, and the printer needs to be stopped.
PARTS yy
7-24
1:
yy: Unit number of consumable parts
(For detail, refer to "Maintenance and Inspection" > "Consumable Parts")
Counter of the consumable part (current)
2:
Life of the consumable part
3:
Use rate until part replacement
4:
Counter of the consumable part (accumulate)
%
Chapter 7
f) SETTING
Make various settings.
1) Pth
Turn on or off the head pulse rank control function.
Default: OFF
2) RTC
Set RTC (real time clock) after replacing the lithium battery on the main controller PCB.
T-7-42
Display
Description
DATE
yyyy/mm/dd
Set date
TIME
hh:mm
Set time
3) PV AUTO JUDGE
Sets ink saver mode.
Default: OFF
g) INITIALIZE
Clear the [DISPLAY] histories, [ADJUST] settings, [COUNTER] values, and other parameters.
T-7-43
Display
Description
WARNING
Initialize the history of WARNING.
(All displayed contents of [DISPLAY] > [WARNING] will be initialized.)
ERROR
Initialize the history of ERROR.
(All displayed contents of [DISPLAY] > [ERROR] will be initialized.)
ADJUST
Initialize the value of band adjustment (by user) and head adjustment.
The automatically adjusted value will not be initialized.
W-INK
Initialize the remaining capacity (%) of the maitenance cartridge.
(Clear [COUNTER] > [PRINTER] > [W-INK])
PURGE
Initialize the counter related to purge unit.
(Clear [COUNTER] > [PURGE])
INK-USE CNT
Initialize the consumption amount of ink.
(Clear [COUNTER] > [INK-USE2], and count up [COUNTER] > [CLEAR] > [CLR-INK CONSUME])
CUTTER-CHG CNT
Initialize the cutter unit replacement frequency.
(Clear [COUNTER] > [EXCHANGE] > [CUTTER EXC.], and count up [COUNTER] > [CLEAR] > [CLR-CUTTER
EXC.])
W-INK-CHG CNT
Initialize the maintenance cartridge replacement frequency.
(Clear [COUNTER] > [EXCHANGE] > [MTC EXC.], and count up [COUNTER] > [CLEAR] > [CLR-MTC EXC.])
HEAD-CHG R CNT
Initialize the printhead R replacement frequency.
(Clear [COUNTER] > [EXCHANGE] > [HEAD R EXC.], and count up [COUNTER] > [CLEAR] > [CLR-HEAD R
EXC.])
HEAD-CHG L CNT
Initialize the printhead L replacement frequency.
(Clear [COUNTER] > [EXCHANGE] > [HEAD L EXC.], and count up [COUNTER] > [CLEAR] > [CLR-HEAD L
EXC.])
PARTS-CHG CNT
PARTS xx
xx: Unit number of consumable parts
(For details, refer to "Maintenance and Inspection" > "Consumable Parts")
Initialize the consumable part replacement frequency.
(Clear [COUNTER] > [EXCHANGE] > [UNIT x EXC], and count up [COUNTER] > [CLEAR] > [CLR-UNIT x
EXC.])
PARTS COUNTER
PARTS xx
xx: Unit number of consumable parts
(For details, refer to "Maintenance and Inspection" > "Consumable Parts")
Initialize the counter amount of the consumable parts.
(Clear [COUNTER] > [PARTS CNT.] > [PARTS x])
* After replacing the consumable part, be sure to execute this menu.
7-25
Chapter 7
7.1.6 Details of Service Mode
0020-2101
iPF6200
This section provides details of the Service mode menu.
a) DISPLAY
Displays and prints the printer information.
1) PRINF INF
Prints adjustment values in the User menu, [DISPLAY] and [COUNTER] parameters on A4-size or lager paper.
When a roll media is used, the layout is optimized according to the media width.
2) SYSTEM
Displays the printer information shown below.
T-7-44
Display
Description
Unit
S/N
Serial number of printer
-
TYPE
Type setting on main controller PCB
* iPF6200 is represented by 24.
-
LF TYPE
Feed roller type: 0 or 1
-
TMP
Ambient temperature
degrees C
SIZE LF
Detected size of loaded media (feed direction)
0 is always detected for the roll media.
mm
SIZE LF
Detected size of loaded media (feed direction)
0 is always detected for the roll media.
inch
SIZE CR
Detected size of loaded media (carriage scan direction)
mm
SIZE CR
Detected size of loaded media (carriage scan direction)
inch
3) HEAD
Displays the following EEPROM information of the printhead.
T-7-45
Display
Description
S/N R
Serial number of printhead R
S/N L
Serial number of printhead L
LOT R
Lot number of printhead R
LOT L
Lot number of printhead L
4) INK
Displays the numbers of days passed since installation of the following ink tanks.
T-7-46
Display
Description
BK
Number of days passed since the BK ink tank was installed
Unit
Day(s)
MBK
Number of days passed since the MBK ink tank was installed
Day(s)
C
Number of days passed since the C ink tank was installed
Day(s)
M
Number of days passed since the M ink tank was installed
Day(s)
Y
Number of days passed since the Y ink tank was installed
Day(s)
PC
Number of days passed since the PC ink tank was installed
Day(s)
PM
Number of days passed since the PM ink tank was installed
Day(s)
GY
Number of days passed since the GY ink tank was installed
Day(s)
PGY
Number of days passed since the PGY ink tank was installed
Day(s)
R
Number of days passed since the R ink tank was installed
Day(s)
G
Number of days passed since the G ink tank was installed
Day(s)
B
Number of days passed since the B ink tank was installed
Day(s)
5) WARNING
Displays the warning history (up to 20 events). The newest event has the smallest history number.
6) ERROR
Displays the error history (up to 20 events). The newest event has the smallest history number.
7) INK CHECK
Displays the history of execution of turning off the remaining ink level detection (by using the refilled ink tank) in the order of Y, PC, C, PGY, GY, BK, PM, M,
MBK, R, G, and B.
0: No execution
1: Executed at least once
7-26
Chapter 7
b) I/O DISPLAY
The information of each sensor and switch is shown in the display.
Sensor and switch status is shown in the display.
ON=1 OFF or not used=0
ON = 1
OFF or not used = 0
Screen 1
T-7-47
I
/
O
D
I
S
P
L
A
Y
0
0
0
0
0
0
0
0
0
0
0
1
1
2
3
4
5
6
7
8
9
10 11 12 13 14 15 16 (Display position)
0
0
Upper row
0
0
0
Lower row
Screen 2
T-7-48
I
/
O
0
0
0
0
D
I
S
P
L
A
Y
0
0
0
0
0
0
0
2
0
0
Upper row
0
0
0
Lower row
17 18 19 20 21 22 23 24 25 26 27 28 29 30 31 32 (Display position)
Screens 1 and 2 are selectable with the [ ] and [ ] buttons.
These screens display the associated sensor status as listed in the table below.
T-7-49
Display
position
Sensor name
LCD display contents
1
Pump Cam Sensor
0: Sensor ON , 1: Sensor OFF
2
Valve Open/Closed Detection Sensor
0: Sensor ON , 1: Sensor OFF
3
(Not Used)
0
4
(Not Used)
0
5
Spur Cam Sensor
0: Sensor ON , 1: Sensor OFF
6
Lift Cam Sensor
0: Sensor ON , 1: Sensor OFF
7
Feed Roller HP Sensor
0: Sensor ON , 1: Sensor OFF
8
Top Cover Sensor
0: Cover open , 1: Cover close
9
(Not Used)
0
10
Ink Tank Cover Switch
0: Cover open , 1: Cover close
11
(Not Used)
0
12
Paper Detection Sensor
0: Sensor ON , 1: Sensor OFF
13
(Not Used)
0
14
(Not Used)
0
15
(Not Used)
0
16
(Not Used)
0
17
Roll Media Sensor
0: Sensor ON , 1: Sensor OFF
18
Roll Cam Sensor
0: Sensor ON , 1: Sensor OFF
19
(Not Used)
0
20
Cutter Right Position Sensor
0: Sensor ON , 1: Sensor OFF
21
Cutter HP Sensor
0: Sensor ON , 1: Sensor OFF
22
(Not Used)
0
23
(Not Used)
0
24
(Not Used)
0
25
(Not Used)
0
26
Roll unit detection
0: Roll unit not detected , 1: Roll unit detected
27
Cutter unit detection
0: Cutter unit not detected , 1: Cutter unit detected
28
(Not Used)
0
29
(Not Used)
0
30
(Not Used)
0
31
(Not Used)
0
32
(Not Used)
0
7-27
Chapter 7
c) ADJUST
Performs adjustments and prints the adjustment and check patterns necessary for adjusting the printer parts.
1) PRINT PATTERN
T-7-50
Display
Description
NOZZLE 1
Prints the nozzle check pattern by single direction/ single pass without using the nondischarging back up.
It is used to check for the non-discharging nozzles.
- Media size: A4
- Media type: any
OPTICAL AXIS
Prints the pattern and adjusts the optical axis of the multi sensor.
For details, refer to "Disassembly/Reassembly" > "Adjustment and Setup Items" > "Procedure
after replacing the carriage unit or multi sensor".
- Media type: photo glossy paper
LF & HAKUSHA
* For Factory
SENSOR CHECK
* For Factory
LF & HAKUSYA and SENSOR CHECK are intended for factory adjustment purposes.
No adjustment by service personnel is required.
2) HEAD ADJ.
Set or initialize the registration adjustment values of each printheads.
T-7-51
Display
Description
AUTO HEAD ADJ
ROUGH
Prints the pattern for auto head adjustment (rough adjustment).
MANUAL HEAD ADJ
DETAIL
Prints the detail patterns for the manual head adjustment.
After printing, the mode will change to [ADJ. SETTING]. Check the printed patterns and input the set values.
BASIC
Prints the basic patterns for the manual head adjustment.
After printing, the mode will change to [ADJ. SETTING]. Check the printed patterns and input the set values.
ADJ. SETTING
A to F
A-1 to F-2
SAVE SETTINGS
RESET SETTINGS
This mode is to input the registration adjustment values.
It is possible to return the values to the former one by printing the status print before changing the value.
Save the registration adjustment values that has been input.
Initialize the registration adjustment values (to 0).
3) NOZZLE CHK POS.
This mode for adjusting the optical axis of the head management sensor. For details, refer to "Disassembly/Reassembly" > "Adjustment and Setup Items" > "Procedure after replacing the head management sensor".
4) GAP CLIB.
This mode measures the gap between the printhead and media by multi sensor and corrects the calibration value.
7-28
Chapter 7
d) REPLACE
1) CUTTER
This mode is for replacing the cutter unit.
2) L&R PRINTHEADS
Replaces printheads L and R.
e) COUNTER
Displays the life (operation frequency and time) of each unit, print counts for each media type, and else.
The count values can be printed from [PRINT INF].
1) PRINTER: Counters related to product life
T-7-52
Display
LIFE TTL
Description
Unit
Cumulative number of printed media (equivalent of A4)
sheets
LIFE ROLL
Cumulative number of printed roll media (equivalent of A4)
sheets
LIFE CUTSHEET
Cumulative number of printed cut sheets (equivalent to A4)
sheets
LIFE A-F
Cumulative number of printed media for environments A to F
sheets
POWER ON
Cumulative power-on time (excluding the sleep time)
Hours
W-INK
Remaining capacity of the maintenance cartridge
%
CUTTER
Number of cutting operations (count as 1 by moving back and forth)
Times
WIPE
Number of wiping operations
Times
2) CARRIAGE: Counters related to carriage unit
T-7-53
Display
Description
Unit
PRINT
Cumulative printing time
Hours
CR COUNT
Cumulative carriage scan count (count as 1 by moving back and forth)
Times
CR DIST.
Cumulative carriage scan distance (count as 1 by moving 210mm)
Times
PRINT COUNT
Cumulative print end count (count as 1 by capping)
Times
3) PURGE: Counters related to purge unit
T-7-54
Display
Description
Unit
CLN-A-1
Cumulative number of automatic cleaning 1 (normal suction) operations
Times
CLN-A-2
Cumulative number of automatic cleaning 2 (ink level adjusting) operations
Times
CLN-A-3
Cumulative number of automatic cleaning 3 (initial filling) operations
Times
CLN-A-6
Cumulative number of automatic cleaning 6 (strong normal suction) operations
Times
CLN-A-7
Cumulative number of automatic cleaning 7 (aging) operations
CLN-A-10
Cumulative number of automatic cleaning 10 (ink filling after secondary transportation) operations
Times
CLN-A-11
Cumulative number of automatic cleaning 11 (ink filling after head replacement) operations
Times
CLN-A-15
Cumulative number of automatic cleaning 15 (dot count small suction) operations
Times
CLN-A-16
Cumulative number of automatic cleaning 16 (sedimented ink agitation) operations
Times
CLN-A-17
Cumulative number of automatic cleaning 17 (small suction) operations
Times
CLN-A-TTL
Total number of automatic cleaning operations
Times
CLN-M-1
Cumulative number of manual cleaning 1 (normal suction) operations
Times
CLN-M-4
Cumulative number of manual cleaning 4 (ink draining from head after head replacement) operations
Times
CLN-M-5
Cumulative number of manual cleaning 5 (ink draining from head and tube before transportation ) operations
Times
CLN-M-6
Cumulative number of manual cleaning 6 (normal strong suction) operations
Times
CLN-M-TTL
Total number of manual cleaning operations
Times
7-29
Chapter 7
4) CLEAR: Counters related to counter initialization
T-7-55
Display
Description
Unit
CLR-INK CONSUME
Cumulative count of ink section consumption amount clearing
Times
CLR-CUTTER EXC.
Cumulative count of cutter replacement count clearing
Times
CLR-MTC EXC.
Cumulative count of maintenance cartridge replacement count clearing
Times
CLR-HEAD R EXC.
Cumulative count of printhead R replacement count clearing
Times
CLR-HEAD L EXC.
Cumulative count of printhead L replacement count clearing
Times
CLR-UNIT A EXC.
Cumulative count of unit A(waste ink system) replacement count clearing
Times
CLR-UNIT B EXC.
Cumulative count of unit B(platen duct) replacement count clearing
Times
CLR-UNIT D EXC.
Cumulative count of unit D(carriage unit) replacement count clearing
Times
CLR-UNIT F EXC.
Cumulative count of unit F(ink supply system) replacement count clearing
Times
CLR-UNIT H EXC.
Cumulative count of unit H(purge) replacement count clearing
Times
CLR-UNIT L EXC.
Cumulative count of unit L(head management sensor) replacement count clearing
Times
CLR-UNIT P EXC.
Cumulative count of unit P(feed motor) replacement count clearing
Times
CLR-UNIT R EXC.
Cumulative count of unit R(spur cam) replacement count clearing
Times
CLR-UNIT V EXC.
Cumulative count of unit V(mist fan unit) replacement count clearing
Times
CLR-UNIT X EXC.
Cumulative count of unit X(multi sensor) replacement count clearing
Times
CLR-FACTORY CNT.
For factory
Times
5) EXCHANGE: Counters related to parts replacement
T-7-56
Display
Description
Unit
CUTTER EXC.
Cutter replacement count
(Count of executing cutter replacement mode)
Times
MTC EXC.
Maintenance cartridge replacement count
Times
HEAD R EXC.
Printhead R replacement count
Times
HEAD L EXC.
Printhead L replacement count
Times
BOARD EXC.(M/B)
Main controller PCB replacement count
Times
UNIT A EXC.
Unit A (waste ink system) replacement count
(Count of executing [INITIALIZE] > [PARTS COUNTER] > [PARTS A])
Times
UNIT B EXC.
Unit B (waste ink system) replacement count
(Count of executing [INITIALIZE] > [PARTS COUNTER] > [PARTS B])
Times
UNIT D EXC.
Unit D (carriage unit) replacement count
(Count of executing [INITIALIZE] > [PARTS COUNTER] > [PARTS D])
Times
UNIT F EXC.
Unit F (ink supply system) replacement count
(Count of executing [INITIALIZE] > [PARTS COUNTER] > [PARTS F])
Times
UNIT H EXC.
Unit H (purge unit) replacement count
(Count of executing [INITIALIZE] > [PARTS COUNTER] > [PARTS H])
Times
UNIT L EXC.
Unit L (head management sensor) replacement count
(Count of executing [INITIALIZE] > [PARTS COUNTER] > [PARTS L])
Times
UNIT P EXC.
Unit P (feed unit) replacement count
(Count of executing [INITIALIZE] > [PARTS COUNTER] > [PARTS P])
Times
UNIT R EXC.
Unit R (pick-up system) replacement count
(Count of executing [INITIALIZE] > [PARTS COUNTER] > [PARTS R])
Times
UNIT V EXC.
Unit V(mist fan unit) replacement count
(Count of executing [INITIALIZE] > [PARTS COUNTER] > [PARTS V])
Times
UNIT X EXC.
Unit X(multi sensor) replacement count
(Count of executing [INITIALIZE] > [PARTS COUNTER] > [PARTS X])
Times
6) DETAIL-CNT: Other counters
T-7-57
Display
7-30
Description
Unit
MOVE PRINTER
Count of [Move Printer] operations
Times
N-INKCHK(XX)
XX: Ink color
Count of turning off the ink remaining level detection for each color
Times
MEDIACONFIG-CNT
Count of media registered by media editor
Times
Chapter 7
7) INK-USE1: Counters related to ink consumption
T-7-58
Display
Description
Unit
INK-USE1(XX)
XX: Ink color
Cumulative consumption amount of generic ink
ml
INK-USE1(TTL)
Total amount of the cumulative consumption of generic ink
ml
N-INK-USE1(XX)
XX: Ink color
Cumulative consumption amount of refilled ink
ml
N-INK-USE1(TTL)
Total amount of the cumulative consumption of refilled ink
ml
8) INK-USE2: Counters related to ink consumption
T-7-59
Display
Description
Unit
INK-USE2(XX)
XX: Ink color
Consumption amount of generic ink of the currently installed ink tank.
ml
INK-USE2(TTL)
Total consumption amount of generic ink of the currently installed ink tanks
ml
N-INK-USE2(XX)
XX: Ink color
Consumption amount of refilled ink of the currently installed ink tank
ml
N-INK-USE2(TTL)
Total consumption amount of refilled ink of the currently installed ink tanks
ml
9) INK-EXC: Counters related to ink tank replacement
T-7-60
Display
Description
Unit
INK-EXC(XX)
XX: Ink color
Cumulative count of generic ink tank replacement
ml
INK-EXC(TTL)
Total amount of tho cumulative count of generic ink tank replacement
ml
N-INK-EXC(XX)
XX: Ink color
Cumulative count of refilled ink tank replacement
ml
N-INK-EXC(TTL)
Total amount of tho cumulative count of refilled ink tank replacement
ml
10) MEDIA x (x: 1 to 7): Counters related to media
One to seven media types are displayed individually in order with large cumulative print area.
T-7-61
Display
Description
Unit
NAME
Media type
-
TTL
Total amount of cumulative print area of roll media and cut sheet (metric)
m2
TTL
Total amount of cumulative print area of roll media and cut sheet (inch)
Sq.f
ROLL
Cumulative print area of roll media (metric)
m2
ROLL
Cumulative print area of roll media (inch)
Sq.f
CUT SHEET
Cumulative print area of cut sheet (metric)
m2
CUT SHEET
Cumulative print area of cut sheet (inch)
Sq.f
11) MEDIA OTHER: Counters related to media
Displays the total amount of cumulative print area of the other media type than the above-mentioned
T-7-62
Display
Description
Unit
TTL
Total amount of cumulative print area of roll media and cut sheet (metric)
m2
TTL
Total amount of cumulative print area of roll media and cut sheet (inch)
Sq.f
ROLL
Cumulative print area of roll media (metric)
m2
ROLL
Cumulative print area of roll media (inch)
Sq.f
CUT SHEET
Cumulative print area of cut sheet (metric)
m2
CUT SHEET
Cumulative print area of cut sheet (inch)
Sq.f
7-31
Chapter 7
12) MEDIASIZE1 ROLL: Counters related to roll media printing
T-7-63
Display
Description
P-SQ 24-36
Unit
Cumulative print area of paper equal to or larger than 24 inches but less than 36 inches (physical size)
m2/Sq.f
P-SQ 17-24
Cumulative print area of paper equal to or larger than 17 inches but less than 24 inches (physical size)
m2/Sq.f
P-SQ -17
Cumulative print area of paper less than 17 inches (physical size)
m2/Sq.f
P-CNT 24-36
Cumulative number of sheets of A4-equivalent paper equal to or larger than 24 inches but less than 36 inches sheets
(physical size)
P-CNT 17-24
Cumulative number of sheets of A4-equivalent paper equal to or larger than 17 inches but less than 24 inches sheets
(physical size)
P-CNT -17
Cumulative number of sheets of A4-equivalent paper less than 17 inches (physical size)
sheets
13) MEDIASIZE2 ROLL: Counters related to roll media printing
T-7-64
Display
Description
D-SQ 24-36
Unit
Cumulative print area of paper equal to or larger than 24 inches but less than 36 inches (data size)
m2/Sq.f
D-SQ 17-24
Cumulative print area of paper equal to or larger than 17 inches but less than 24 inches (data size)
m2/Sq.f
D-SQ -17
Cumulative print area of paper less than 17 inches (data size)
m2/Sq.f
D-CNT 24-36
Cumulative number of sheets of A4-equivalent paper equal to or larger than 24 inches but less than 36 inches sheets
(data size)
D-CNT 17-24
Cumulative number of sheets of A4-equivalent paper equal to or larger than 17 inches but less than 24 inches sheets
(data size)
D-CNT -17
Cumulative number of sheets of A4-equivalent paper less than 17 inches (data size)
sheets
14) MEDIASIZE1 CUT: Counters related to cut sheet printing
T-7-65
Display
Description
P-SQ 24-36
Unit
Cumulative print area of paper equal to or larger than 24 inches but less than 36 inches (physical size)
m2/Sq.f
P-SQ 17-24
Cumulative print area of paper equal to or larger than 17 inches but less than 24 inches (physical size)
m2/Sq.f
P-SQ -17
Cumulative print area of paper less than 17 inches (physical size)
m2/Sq.f
P-CNT 24-36
Cumulative number of sheets of A4-equivalent paper equal to or larger than 24 inches but less than 36 inches sheets
(physical size)
P-CNT 17-24
Cumulative number of sheets of A4-equivalent paper equal to or larger than 17 inches but less than 24 inches sheets
(physical size)
P-CNT -17
Cumulative number of sheets of A4-equivalent paper less than 17 inches (physical size)
sheets
15) MEDIASIZE2 CUT: Counters related to cut sheet printing
T-7-66
Display
Description
D-SQ 24-36
Unit
Cumulative print area of paper equal to or larger than 24 inches but less than 36 inches (data size)
m2/Sq.f
D-SQ 17-24
Cumulative print area of paper equal to or larger than 17 inches but less than 24 inches (data size)
m2/Sq.f
D-SQ -17
Cumulative print area of paper less than 17 inches (data size)
m2/Sq.f
D-CNT 24-36
Cumulative number of sheets of A4-equivalent paper equal to or larger than 24 inches but less than 36 inches sheets
(data size)
D-CNT 17-24
Cumulative number of sheets of A4-equivalent paper equal to or larger than 17 inches but less than 24 inches sheets
(data size)
D-CNT -17
Cumulative number of sheets of A4-equivalent paper less than 17 inches (data size)
sheets
16) HEAD DOT CNT.1: Counter related to dot count
T-7-67
Display
7-32
Description
Unit
XX
XX: Ink color
Dot counts of each colors of the currently installed printhead
(x 1,000,000) dots
TTL
Total dot counts of each colors of the currently installed printhead
(x 1,000,000) dots
Chapter 7
17) HEAD DOT CNT.2: Counter related to dot count
T-7-68
Display
Description
Unit
XX
XX: Ink color
Cumulative dot counts of each colors
(x 1,000,000) dots
TTL
Total cumulative dot counts of each colors
(x 1,000,000) dots
18) PARTS CNT. : Counter related to consumable parts
T-7-69
Display
Description
COUNTER x
x: Unit number of consumable parts
(For detail, refer to "Maintenance and Inspection" > "Consumable Parts")
Unit
Day(s)
Display the status and the days passed since the counter resetting.
- Status
OK: Use rate (until part replacement) of all consumable parts included in each unit are below 90%.
W1: Use rate (until part replacement) of either of the consumable parts included in each unit has reached
90% or more.
W2: Use rate (until part replacement) of either of the consumable parts included in each unit has reached
100%, but no need to stop the printer.
E : Use rate (until part replacement) of either of the consumable parts included in each unit has reached
100%, and the printer needs to be stopped.
PARTS yy
1:
yy: Unit number of consumable parts
(For detail, refer to "Maintenance and Inspection" > "Consumable Parts")
Counter of the consumable part (current)
2:
Life of the consumable part
3:
Use rate until part replacement
4:
Counter of the consumable part (accumulate)
%
7-33
Chapter 7
f) SETTING
Make various settings.
1) Pth
Turn on or off the head pulse rank control function.
Default: OFF
2) RTC
Set RTC (real time clock) after replacing the lithium battery on the main controller PCB.
T-7-70
Display
Description
DATE
yyyy/mm/dd
Set date
TIME
hh:mm
Set time
3) PV AUTO JUDGE
Sets ink saver mode.
Default: OFF
g) INITIALIZE
Clear the [DISPLAY] histories, [ADJUST] settings, [COUNTER] values, and other parameters.
T-7-71
Display
Description
WARNING
Initialize the history of WARNING.
(All displayed contents of [DISPLAY] > [WARNING] will be initialized.)
ERROR
Initialize the history of ERROR.
(All displayed contents of [DISPLAY] > [ERROR] will be initialized.)
ADJUST
Initialize the value of band adjustment (by user) and head adjustment.
The automatically adjusted value will not be initialized.
W-INK
Initialize the remaining capacity (%) of the maitenance cartridge.
(Clear [COUNTER] > [PRINTER] > [W-INK])
PURGE
Initialize the counter related to purge unit.
(Clear [COUNTER] > [PURGE])
INK-USE CNT
Initialize the consumption amount of ink.
(Clear [COUNTER] > [INK-USE2], and count up [COUNTER] > [CLEAR] > [CLR-INK CONSUME])
CUTTER-CHG CNT
Initialize the cutter unit replacement frequency.
(Clear [COUNTER] > [EXCHANGE] > [CUTTER EXC.], and count up [COUNTER] > [CLEAR] > [CLR-CUTTER
EXC.])
W-INK-CHG CNT
Initialize the maintenance cartridge replacement frequency.
(Clear [COUNTER] > [EXCHANGE] > [MTC EXC.], and count up [COUNTER] > [CLEAR] > [CLR-MTC EXC.])
HEAD-CHG R CNT
Initialize the printhead R replacement frequency.
(Clear [COUNTER] > [EXCHANGE] > [HEAD R EXC.], and count up [COUNTER] > [CLEAR] > [CLR-HEAD R
EXC.])
HEAD-CHG L CNT
Initialize the printhead L replacement frequency.
(Clear [COUNTER] > [EXCHANGE] > [HEAD L EXC.], and count up [COUNTER] > [CLEAR] > [CLR-HEAD L
EXC.])
HDD BOX PASS.
7-34
Initialize the BOX password of the hard disk drive to factory default.
PARTS-CHG CNT
PARTS xx
xx: Unit number of consumable parts
(For details, refer to "Maintenance and Inspection" > "Consumable Parts")
Initialize the consumable part replacement frequency.
(Clear [COUNTER] > [EXCHANGE] > [UNIT x EXC], and count up [COUNTER] > [CLEAR] > [CLR-UNIT x
EXC.])
PARTS COUNTER
PARTS xx
xx: Unit number of consumable parts
(For details, refer to "Maintenance and Inspection" > "Consumable Parts")
Initialize the counter amount of the consumable parts.
(Clear [COUNTER] > [PARTS CNT.] > [PARTS x])
* After replacing the consumable part, be sure to execute this menu.
Chapter 7
7.1.7 Details of Service Mode
0020-7352
iPF6000S
This section provides details of the Service mode menu.
a) DISPLAY
Displays and prints the printer information.
1) PRINF INF
Prints adjustment values in the User menu, [DISPLAY] and [COUNTER] parameters on A4-size or lager paper.
When a roll media is used, the layout is optimized according to the media width.
2) SYSTEM
Displays the printer information shown below.
T-7-72
Display
Description
Unit
S/N
Serial number of printer
-
TYPE
Type setting on main controller PCB
* iPF6000S is represented by 24.
-
LF TYPE
Feed roller type: 0 or 1
-
TMP
Ambient temperature
degrees C
SIZE LF
Detected size of loaded media (feed direction)
0 is always detected for the roll media.
mm
SIZE LF
Detected size of loaded media (feed direction)
0 is always detected for the roll media.
inch
SIZE CR
Detected size of loaded media (carriage scan direction)
mm
SIZE CR
Detected size of loaded media (carriage scan direction)
inch
3) HEAD
Displays the following EEPROM information of the printhead.
T-7-73
Display
S/N R
Description
Serial number of printhead R
S/N L
Serial number of printhead L
LOT R
Lot number of printhead R
LOT L
Lot number of printhead L
4) INK
Displays the numbers of days passed since installation of the following ink tanks.
T-7-74
Display
Description
Unit
BK
Number of days passed since the BK ink tank was installed
Day(s)
MBK
Number of days passed since the MBK ink tank was installed
Day(s)
C
Number of days passed since the C ink tank was installed
Day(s)
M
Number of days passed since the M ink tank was installed
Day(s)
Y
Number of days passed since the Y ink tank was installed
Day(s)
PC
Number of days passed since the PC ink tank was installed
Day(s)
PM
Number of days passed since the PM ink tank was installed
Day(s)
GY
Number of days passed since the GY ink tank was installed
Day(s)
5) WARNING
Displays the warning history (up to 20 events). The newest event has the smallest history number.
6) ERROR
Displays the error history (up to 20 events). The newest event has the smallest history number.
7) INK CHECK
Displays the history of execution of turning off the remaining ink level detection (by using the refilled ink tank) in the order of PC, C, PM, Y, GY, BK, MBK, and M.
0: No execution
1: Executed at least once
7-35
Chapter 7
b) I/O DISPLAY
The information of each sensor and switch is shown in the display.
Sensor and switch status is shown in the display.
ON=1 OFF or not used=0
ON = 1
OFF or not used = 0
Screen 1
T-7-75
I
/
O
D
I
S
P
L
A
Y
0
0
0
0
0
0
0
0
0
0
0
1
1
2
3
4
5
6
7
8
9
10 11 12 13 14 15 16 (Display position)
0
0
Upper row
0
0
0
Lower row
Screen 2
T-7-76
I
/
O
0
0
0
0
D
I
S
P
L
A
Y
0
0
0
0
0
0
0
2
0
0
Upper row
0
0
0
Lower row
17 18 19 20 21 22 23 24 25 26 27 28 29 30 31 32 (Display position)
Screens 1 and 2 are selectable with the [ ] and [ ] buttons.
These screens display the associated sensor status as listed in the table below.
T-7-77
Display
position
7-36
Sensor name
LCD display contents
1
Pump Cam Sensor
0: Sensor ON , 1: Sensor OFF
2
Valve Open/Closed Detection Sensor
0: Sensor ON , 1: Sensor OFF
3
(Not Used)
0
4
(Not Used)
0
5
Spur Cam Sensor
0: Sensor ON , 1: Sensor OFF
6
Lift Cam Sensor
0: Sensor ON , 1: Sensor OFF
7
Feed Roller HP Sensor
0: Sensor ON , 1: Sensor OFF
8
Top Cover Sensor
0: Cover open , 1: Cover close
9
(Not Used)
0
10
Ink Tank Cover Switch
0: Cover open , 1: Cover close
11
(Not Used)
0
12
Paper Detection Sensor
0: Sensor ON , 1: Sensor OFF
13
(Not Used)
0
14
(Not Used)
0
15
(Not Used)
0
16
(Not Used)
0
17
Roll Media Sensor
0: Sensor ON , 1: Sensor OFF
18
Roll Cam Sensor
0: Sensor ON , 1: Sensor OFF
19
(Not Used)
0
20
Cutter Right Position Sensor
0: Sensor ON , 1: Sensor OFF
21
Cutter HP Sensor
0: Sensor ON , 1: Sensor OFF
22
(Not Used)
0
23
(Not Used)
0
24
(Not Used)
0
25
(Not Used)
0
26
Roll unit detection
0: Roll unit not detected , 1: Roll unit detected
27
Cutter unit detection
0: Cutter unit not detected , 1: Cutter unit detected
28
(Not Used)
0
29
(Not Used)
0
30
(Not Used)
0
31
(Not Used)
0
32
(Not Used)
0
Chapter 7
c) ADJUST
Performs adjustments and prints the adjustment and check patterns necessary for adjusting the printer parts.
1) PRINT PATTERN
T-7-78
Display
Description
NOZZLE 1
Prints the nozzle check pattern by single direction/ single pass without using the nondischarging back up.
It is used to check for the non-discharging nozzles.
- Media size: A4
- Media type: any
OPTICAL AXIS
Prints the pattern and adjusts the optical axis of the multi sensor.
For details, refer to "Disassembly/Reassembly" > "Adjustment and Setup Items" > "Procedure
after replacing the carriage unit or multi sensor".
- Media type: photo glossy paper
LF & HAKUSHA
* For Factory
SENSOR CHECK
* For Factory
LF & HAKUSYA and SENSOR CHECK are intended for factory adjustment purposes.
No adjustment by service personnel is required.
2) HEAD ADJ.
Set or initialize the registration adjustment values of each printheads.
T-7-79
Display
Description
AUTO HEAD ADJ
ROUGH
Prints the pattern for auto head adjustment (rough adjustment).
MANUAL HEAD ADJ
DETAIL
Prints the detail patterns for the manual head adjustment.
After printing, the mode will change to [ADJ. SETTING]. Check the printed patterns and input the set values.
BASIC
Prints the basic patterns for the manual head adjustment.
After printing, the mode will change to [ADJ. SETTING]. Check the printed patterns and input the set values.
ADJ. SETTING
A to F
A-1 to F-2
SAVE SETTINGS
RESET SETTINGS
This mode is to input the registration adjustment values.
It is possible to return the values to the former one by printing the status print before changing the value.
Save the registration adjustment values that has been input.
Initialize the registration adjustment values (to 0).
3) NOZZLE CHK POS.
This mode for adjusting the optical axis of the head management sensor. For details, refer to "Disassembly/Reassembly" > "Adjustment and Setup Items" > "Procedure after replacing the head management sensor".
4) GAP CLIB.
This mode measures the gap between the printhead and media by multi sensor and corrects the calibration value.
7-37
Chapter 7
d) REPLACE
1) CUTTER
This mode is for replacing the cutter unit.
2) L&R PRINTHEADS
Replaces printheads L and R.
e) COUNTER
Displays the life (operation frequency and time) of each unit, print counts for each media type, and else.
The count values can be printed from [PRINT INF].
1) PRINTER: Counters related to product life
T-7-80
Display
LIFE TTL
Description
Unit
Cumulative number of printed media (equivalent of A4)
sheets
LIFE ROLL
Cumulative number of printed roll media (equivalent of A4)
sheets
LIFE CUTSHEET
Cumulative number of printed cut sheets (equivalent to A4)
sheets
LIFE A-F
Cumulative number of printed media for environments A to F
sheets
POWER ON
Cumulative power-on time (excluding the sleep time)
Hours
W-INK
Remaining capacity of the maintenance cartridge
%
CUTTER
Number of cutting operations (count as 1 by moving back and forth)
Times
WIPE
Number of wiping operations
Times
2) CARRIAGE: Counters related to carriage unit
T-7-81
Display
Description
Unit
PRINT
Cumulative printing time
Hours
CR COUNT
Cumulative carriage scan count (count as 1 by moving back and forth)
Times
CR DIST.
Cumulative carriage scan distance (count as 1 by moving 210mm)
Times
PRINT COUNT
Cumulative print end count (count as 1 by capping)
Times
3) PURGE: Counters related to purge unit
T-7-82
Display
7-38
Description
Unit
CLN-A-1
Cumulative number of automatic cleaning 1 (normal suction) operations
Times
CLN-A-2
Cumulative number of automatic cleaning 2 (ink level adjusting) operations
Times
CLN-A-3
Cumulative number of automatic cleaning 3 (initial filling) operations
Times
CLN-A-6
Cumulative number of automatic cleaning 6 (strong normal suction) operations
Times
CLN-A-7
Cumulative number of automatic cleaning 7 (aging) operations
CLN-A-10
Cumulative number of automatic cleaning 10 (ink filling after secondary transportation) operations
CLN-A-11
Cumulative number of automatic cleaning 11 (ink filling after head replacement) operations
Times
CLN-A-15
Cumulative number of automatic cleaning 15 (dot count small suction) operations
Times
CLN-A-16
Cumulative number of automatic cleaning 16 (sedimented ink agitation) operations
Times
CLN-A-17
Cumulative number of automatic cleaning 17 (small suction) operations
Times
CLN-A-TTL
Total number of automatic cleaning operations
Times
Times
CLN-M-1
Cumulative number of manual cleaning 1 (normal suction) operations
Times
CLN-M-4
Cumulative number of manual cleaning 4 (ink draining from head after head replacement) operations
Times
CLN-M-5
Cumulative number of manual cleaning 5 (ink draining from head and tube before transportation ) operations
Times
CLN-M-6
Cumulative number of manual cleaning 6 (normal strong suction) operations
Times
CLN-M-TTL
Total number of manual cleaning operations
Times
Chapter 7
4) CLEAR: Counters related to counter initialization
T-7-83
Display
Description
Unit
CLR-INK CONSUME
Cumulative count of ink section consumption amount clearing
Times
CLR-CUTTER EXC.
Cumulative count of cutter replacement count clearing
Times
CLR-MTC EXC.
Cumulative count of maintenance cartridge replacement count clearing
Times
CLR-HEAD R EXC.
Cumulative count of printhead R replacement count clearing
Times
CLR-HEAD L EXC.
Cumulative count of printhead L replacement count clearing
Times
CLR-UNIT A EXC.
Cumulative count of unit A(waste ink system) replacement count clearing
Times
CLR-UNIT B EXC.
Cumulative count of unit B(platen duct) replacement count clearing
Times
CLR-UNIT D EXC.
Cumulative count of unit D(carriage unit) replacement count clearing
Times
CLR-UNIT F EXC.
Cumulative count of unit F(ink supply system) replacement count clearing
Times
CLR-UNIT H EXC.
Cumulative count of unit H(purge) replacement count clearing
Times
CLR-UNIT L EXC.
Cumulative count of unit L(head management sensor) replacement count clearing
Times
CLR-UNIT P EXC.
Cumulative count of unit P(feed motor) replacement count clearing
Times
CLR-UNIT V EXC.
Cumulative count of unit V(mist fan unit) replacement count clearing
Times
CLR-UNIT X EXC.
Cumulative count of unit X(multi sensor) replacement count clearing
Times
CLR-FACTORY CNT.
For factory
Times
5) EXCHANGE: Counters related to parts replacement
T-7-84
Display
Description
Unit
CUTTER EXC.
Cutter replacement count
(Count of executing cutter replacement mode)
Times
MTC EXC.
Maintenance cartridge replacement count
Times
HEAD R EXC.
Printhead R replacement count
Times
HEAD L EXC.
Printhead L replacement count
Times
BOARD EXC.(M/B)
Main controller PCB replacement count
Times
UNIT A EXC.
Unit A (waste ink system) replacement count
(Count of executing [INITIALIZE] > [PARTS COUNTER] > [PARTS A])
Times
UNIT B EXC.
Unit B (waste ink system) replacement count
(Count of executing [INITIALIZE] > [PARTS COUNTER] > [PARTS B])
Times
UNIT D EXC.
Unit D (carriage unit) replacement count
(Count of executing [INITIALIZE] > [PARTS COUNTER] > [PARTS D])
Times
UNIT F EXC.
Unit F (ink supply system) replacement count
(Count of executing [INITIALIZE] > [PARTS COUNTER] > [PARTS F])
Times
UNIT H EXC.
Unit H (purge unit) replacement count
(Count of executing [INITIALIZE] > [PARTS COUNTER] > [PARTS H])
Times
UNIT L EXC.
Unit L (head management sensor) replacement count
(Count of executing [INITIALIZE] > [PARTS COUNTER] > [PARTS L])
Times
UNIT P EXC.
Unit P (feed unit) replacement count
(Count of executing [INITIALIZE] > [PARTS COUNTER] > [PARTS P])
Times
UNIT V EXC.
Unit V(mist fan unit) replacement count
(Count of executing [INITIALIZE] > [PARTS COUNTER] > [PARTS V])
Times
UNIT X EXC.
Unit X(multi sensor) replacement count
(Count of executing [INITIALIZE] > [PARTS COUNTER] > [PARTS X])
Times
6) DETAIL-CNT: Other counters
T-7-85
Display
Description
Unit
MOVE PRINTER
Count of [Move Printer] operations
Times
N-INKCHK(XX)
XX: Ink color
Count of turning off the ink remaining level detection for each color
Times
MEDIACONFIG-CNT
Count of media registered by media editor
Times
7-39
Chapter 7
7) INK-USE1: Counters related to ink consumption
T-7-86
Display
Description
Unit
INK-USE1(XX)
XX: Ink color
Cumulative consumption amount of generic ink
ml
INK-USE1(TTL)
Total amount of the cumulative consumption of generic ink
ml
N-INK-USE1(XX)
XX: Ink color
Cumulative consumption amount of refilled ink
ml
N-INK-USE1(TTL)
Total amount of the cumulative consumption of refilled ink
ml
8) INK-USE2: Counters related to ink consumption
T-7-87
Display
Description
Unit
INK-USE2(XX)
XX: Ink color
Consumption amount of generic ink of the currently installed ink tank.
ml
INK-USE2(TTL)
Total consumption amount of generic ink of the currently installed ink tanks
ml
N-INK-USE2(XX)
XX: Ink color
Consumption amount of refilled ink of the currently installed ink tank
ml
N-INK-USE2(TTL)
Total consumption amount of refilled ink of the currently installed ink tanks
ml
9) INK-EXC: Counters related to ink tank replacement
T-7-88
Display
Description
Unit
INK-EXC(XX)
XX: Ink color
Cumulative count of generic ink tank replacement
ml
INK-EXC(TTL)
Total amount of tho cumulative count of generic ink tank replacement
ml
N-INK-EXC(XX)
XX: Ink color
Cumulative count of refilled ink tank replacement
ml
N-INK-EXC(TTL)
Total amount of tho cumulative count of refilled ink tank replacement
ml
10) MEDIA x (x: 1 to 7): Counters related to media
One to seven media types are displayed individually in order with large cumulative print area.
T-7-89
Display
Description
Unit
NAME
Media type
-
TTL
Total amount of cumulative print area of roll media and cut sheet (metric)
m2
TTL
Total amount of cumulative print area of roll media and cut sheet (inch)
Sq.f
ROLL
Cumulative print area of roll media (metric)
m2
ROLL
Cumulative print area of roll media (inch)
Sq.f
CUT SHEET
Cumulative print area of cut sheet (metric)
m2
CUT SHEET
Cumulative print area of cut sheet (inch)
Sq.f
11) MEDIA OTHER: Counters related to media
Displays the total amount of cumulative print area of the other media type than the above-mentioned
T-7-90
Display
TTL
7-40
Description
Total amount of cumulative print area of roll media and cut sheet (metric)
Unit
m2
TTL
Total amount of cumulative print area of roll media and cut sheet (inch)
Sq.f
ROLL
Cumulative print area of roll media (metric)
m2
ROLL
Cumulative print area of roll media (inch)
Sq.f
CUT SHEET
Cumulative print area of cut sheet (metric)
m2
CUT SHEET
Cumulative print area of cut sheet (inch)
Sq.f
Chapter 7
12) MEDIASIZE1 ROLL: Counters related to roll media printing
T-7-91
Display
Description
P-SQ 24-36
Unit
Cumulative print area of paper equal to or larger than 24 inches but less than 36 inches (physical size)
m2/Sq.f
P-SQ 17-24
Cumulative print area of paper equal to or larger than 17 inches but less than 24 inches (physical size)
m2/Sq.f
P-SQ -17
Cumulative print area of paper less than 17 inches (physical size)
m2/Sq.f
P-CNT 24-36
Cumulative number of sheets of A4-equivalent paper equal to or larger than 24 inches but less than 36 inches sheets
(physical size)
P-CNT 17-24
Cumulative number of sheets of A4-equivalent paper equal to or larger than 17 inches but less than 24 inches sheets
(physical size)
P-CNT -17
Cumulative number of sheets of A4-equivalent paper less than 17 inches (physical size)
sheets
13) MEDIASIZE2 ROLL: Counters related to roll media printing
T-7-92
Display
Description
D-SQ 24-36
Unit
Cumulative print area of paper equal to or larger than 24 inches but less than 36 inches (data size)
m2/Sq.f
D-SQ 17-24
Cumulative print area of paper equal to or larger than 17 inches but less than 24 inches (data size)
m2/Sq.f
D-SQ -17
Cumulative print area of paper less than 17 inches (data size)
m2/Sq.f
D-CNT 24-36
Cumulative number of sheets of A4-equivalent paper equal to or larger than 24 inches but less than 36 inches sheets
(data size)
D-CNT 17-24
Cumulative number of sheets of A4-equivalent paper equal to or larger than 17 inches but less than 24 inches sheets
(data size)
D-CNT -17
Cumulative number of sheets of A4-equivalent paper less than 17 inches (data size)
sheets
14) MEDIASIZE1 CUT: Counters related to cut sheet printing
T-7-93
Display
Description
P-SQ 24-36
Unit
Cumulative print area of paper equal to or larger than 24 inches but less than 36 inches (physical size)
m2/Sq.f
P-SQ 17-24
Cumulative print area of paper equal to or larger than 17 inches but less than 24 inches (physical size)
m2/Sq.f
P-SQ -17
Cumulative print area of paper less than 17 inches (physical size)
m2/Sq.f
P-CNT 24-36
Cumulative number of sheets of A4-equivalent paper equal to or larger than 24 inches but less than 36 inches sheets
(physical size)
P-CNT 17-24
Cumulative number of sheets of A4-equivalent paper equal to or larger than 17 inches but less than 24 inches sheets
(physical size)
P-CNT -17
Cumulative number of sheets of A4-equivalent paper less than 17 inches (physical size)
sheets
15) MEDIASIZE2 CUT: Counters related to cut sheet printing
T-7-94
Display
Description
D-SQ 24-36
Unit
Cumulative print area of paper equal to or larger than 24 inches but less than 36 inches (data size)
m2/Sq.f
D-SQ 17-24
Cumulative print area of paper equal to or larger than 17 inches but less than 24 inches (data size)
m2/Sq.f
D-SQ -17
Cumulative print area of paper less than 17 inches (data size)
m2/Sq.f
D-CNT 24-36
Cumulative number of sheets of A4-equivalent paper equal to or larger than 24 inches but less than 36 inches sheets
(data size)
D-CNT 17-24
Cumulative number of sheets of A4-equivalent paper equal to or larger than 17 inches but less than 24 inches sheets
(data size)
D-CNT -17
Cumulative number of sheets of A4-equivalent paper less than 17 inches (data size)
sheets
16) HEAD DOT CNT.1: Counter related to dot count
T-7-95
Display
Description
Unit
XX
XX: Ink color
Dot counts of each colors of the currently installed printhead
(x 1,000,000) dots
TTL
Total dot counts of each colors of the currently installed printhead
(x 1,000,000) dots
7-41
Chapter 7
17) HEAD DOT CNT.2: Counter related to dot count
T-7-96
Display
Description
Unit
XX
XX: Ink color
Cumulative dot counts of each colors
(x 1,000,000) dots
TTL
Total cumulative dot counts of each colors
(x 1,000,000) dots
18) PARTS CNT. : Counter related to consumable parts
T-7-97
Display
Description
COUNTER x
x: Unit number of consumable parts
(For detail, refer to "Maintenance and Inspection" > "Consumable Parts")
Unit
Day(s)
Display the status and the days passed since the counter resetting.
- Status
OK: Use rate (until part replacement) of all consumable parts included in each unit are below 90%.
W1: Use rate (until part replacement) of either of the consumable parts included in each unit has reached
90% or more.
W2: Use rate (until part replacement) of either of the consumable parts included in each unit has reached
100%, but no need to stop the printer.
E : Use rate (until part replacement) of either of the consumable parts included in each unit has reached
100%, and the printer needs to be stopped.
PARTS yy
7-42
1:
yy: Unit number of consumable parts
(For detail, refer to "Maintenance and Inspection" > "Consumable Parts")
Counter of the consumable part (current)
2:
Life of the consumable part
3:
Use rate until part replacement
4:
Counter of the consumable part (accumulate)
%
Chapter 7
f) SETTING
Make various settings.
1) Pth
Turn on or off the head pulse rank control function.
Default: OFF
2) RTC
Set RTC (real time clock) after replacing the lithium battery on the main controller PCB.
T-7-98
Display
Description
DATE
yyyy/mm/dd
Set date
TIME
hh:mm
Set time
3) PV AUTO JUDGE
Sets ink saver mode.
Default: OFF
g) INITIALIZE
Clear the [DISPLAY] histories, [ADJUST] settings, [COUNTER] values, and other parameters.
T-7-99
Display
Description
WARNING
Initialize the history of WARNING.
(All displayed contents of [DISPLAY] > [WARNING] will be initialized.)
ERROR
Initialize the history of ERROR.
(All displayed contents of [DISPLAY] > [ERROR] will be initialized.)
ADJUST
Initialize the value of band adjustment (by user) and head adjustment.
The automatically adjusted value will not be initialized.
W-INK
Initialize the remaining capacity (%) of the maitenance cartridge.
(Clear [COUNTER] > [PRINTER] > [W-INK])
PURGE
Initialize the counter related to purge unit.
(Clear [COUNTER] > [PURGE])
INK-USE CNT
Initialize the consumption amount of ink.
(Clear [COUNTER] > [INK-USE2], and count up [COUNTER] > [CLEAR] > [CLR-INK CONSUME])
CUTTER-CHG CNT
Initialize the cutter unit replacement frequency.
(Clear [COUNTER] > [EXCHANGE] > [CUTTER EXC.], and count up [COUNTER] > [CLEAR] > [CLR-CUTTER
EXC.])
W-INK-CHG CNT
Initialize the maintenance cartridge replacement frequency.
(Clear [COUNTER] > [EXCHANGE] > [MTC EXC.], and count up [COUNTER] > [CLEAR] > [CLR-MTC EXC.])
HEAD-CHG R CNT
Initialize the printhead R replacement frequency.
(Clear [COUNTER] > [EXCHANGE] > [HEAD R EXC.], and count up [COUNTER] > [CLEAR] > [CLR-HEAD R
EXC.])
HEAD-CHG L CNT
Initialize the printhead L replacement frequency.
(Clear [COUNTER] > [EXCHANGE] > [HEAD L EXC.], and count up [COUNTER] > [CLEAR] > [CLR-HEAD L
EXC.])
HDD BOX PASS.
Initialize the BOX password of the hard disk drive to factory default.
PARTS-CHG CNT
PARTS xx
xx: Unit number of consumable parts
(For details, refer to "Maintenance and Inspection" > "Consumable Parts")
Initialize the consumable part replacement frequency.
(Clear [COUNTER] > [EXCHANGE] > [UNIT x EXC], and count up [COUNTER] > [CLEAR] > [CLR-UNIT x
EXC.])
PARTS COUNTER
PARTS xx
xx: Unit number of consumable parts
(For details, refer to "Maintenance and Inspection" > "Consumable Parts")
Initialize the counter amount of the consumable parts.
(Clear [COUNTER] > [PARTS CNT.] > [PARTS x])
* After replacing the consumable part, be sure to execute this menu.
7-43
Chapter 7
7.1.8 Sample Printout
0016-9412
iPF6100 / iPF6200 / iPF6000S
a) PRINTINF
A sample printout that is produced by executing [SERVICE MODE] > [DISPLAY] > [PRINTINF] is shown below, along with instructions about how to interpret it.
(1)
(2)
xxxx PRINT INF
Firm:00.49 Boot:00.31 MIT(DBF):9303 MIT(DB):1.02 S/N:DF029090
SYSTEM
TYPE:DF029090 24 0 TMP:26 SIZE_LF: 0.0 SIZE_CR: 514.3
HEAD S/N R:39410000 L:04400000 HEAD LOT R:166L09A0 L:166L09A0
INK
Y :0 PC :0
C :0 PGY :0 GY :0 BK :0
PM :0
M :0 MBK :0
R :0
G :0
B :0
WARNING
01:0000
02:0000
03:0000
04:0000
05:0000
06:0000
07:0000
08:0000
09:0000
10:0000
11:0000
12:0000
13:0000
14:0000
15:0000
16:0000
17:0000
18:0000
19:0000
20:0000
ERROR
01:03060A00-2E01
02:0000
03:0000
04:0000
05:0000
06:0000
07:0000
08:0000
09:0000
10:0000
11:0000
12:0000
13:0000
14:0000
15:0000
16:0000
17:0000
18:0000
19:0000
20:0000
INK CHK: Y:0 PC:0 C:0 PGY:0 GY:0 BK:0 PM:0 M:0 MBK:0 R:0 G:0 B:0
(3)
COUNTER
PRINTER
LIFE TTL:0 LIFE ROLL:0 LIFE CUTSHEET:0
LIFE A:0 B:0 C:0 D:0 E:0 F:0
POWER ON:0 CUTTER:1 WIPE:6 W-INK:79%
MEDIA 7
NAME
TTL
ROLL
CUTSHEET
MEDIA OTHER
:
NAME
: 0.0 m2 0.0 sq.f
TTL
: 0.0 m2 0.0 sq.f
ROLL
: 0.0 m2 0.0 sq.f
CUTSHEET
PARTS COUNTER (a)
COUNTER A : OK
PARTS A1 :
COUNTER B : OK
PARTS B1 :
COUNTER D : OK
PARTS D1
PARTS D2 :
PARTS D3 :
PARTS D4 :
PARTS D5 :
COUNTER F : OK
PARTS F1 :
COUNTER H : OK
PARTS H1 :
COUNTER L : OK
PARTS L1 :
COUNTER P : OK
PARTS P1 :
COUNTER R : OK
PARTS R1 :
COUNTER V : OK
PARTS V1 :
COUNTER X : OK
PARTS X1 :
(5)
(b)
(c)
OTHER
0.0 m2
0.0 m2
0.0 m2
(d)
(e)
(f)
0.0
36.1
0%
0.0
0.0
64.0
0%
0.0
1362
377
2238
2238
13028571
6700000
16500000
60000
16500000
0%
0%
0%
0%
0%
1362
377
2238
33
2238
377
4000000
0%
377
50000
0%
15
4
12500
0%
4
0
750
0%
0
0
27500
0%
0
0.0
15.2
0%
0.0
--------
0%
36
36
33
36
36
15
36
36
36
36
36
-----
-----
PV AUTO JUDGE : ON(NORMAL) , 1
(b)
Calibration History (Last 20times)
Date
Action
Media
1: 2007/02/24 0
2: 2007/02/24 0
3: 2007/02/24 0
4: 2007/02/24 0
5: 2007/02/24 0
6: 2007/02/22 3
7: 2007/02/21 2
Matte Photo
8: 2007/02/20 0
9: 2007/02/15 3
10: 2007/02/15 2
Special 1
11: 2007/02/15 2
Special 1
12: 2007/02/15 2
Special 1
13: 2007/02/15 2
Special 1
14: 2007/02/15 2
Special 1
15: 2007/02/15 2
Special 1
16: 2007/02/15 2
Special 1
17: 2007/02/15 2
Special 1
18: 2007/02/15 2
Special 1
19: 2007/02/15 2
Special 1
20: 2007/02/02 2
Glossy Photo
(a)
(b)
(c)
(d)
Temp[C]/Humid[%]
27/ 40
20/ 59
20/ 58
20/ 57
20/ 56
20/ 55
20/ 54
20/ 53
20/ 52
20/ 51
20/ 50
27/ 38
(e)
F-7-1
(1) Version numbers of the firmware installed in the printer, boot ROM, and MIT DB format
(2) Printer information
For more item details, see "Detail of Service Mode" > "a) Display".
(3) Counter information
For more item details, see "Detail of Service Mode" > "e) Counter".
(a) Consumables status
(b) Number of days elapsed since the counter was last reset
(c) Counter value
(d) Value with which consumables reach their replacement timing
(e) Ratio of the current count to the replacement timing
(f) Cumulative counter value
(4) History of execution of color calibration
(a) Order of the date of execution
When the value becomes larger, the date becomes older.
(b) Date of execution
(c) Operation executed
0: Automatic Restore Default with Head Replacement
1: Replace Multisensor
2: General Adj.
3: Restore Default
7-44
0.0 sq.f
0.0 sq.f
0.0 sq.f
36
(a)
(4)
:
:
:
:
Chapter 7
4: Media-Based Adj. (not used)
5: Media-Based Dfls. initialization (not used)
(d) If General Adj. is executed, the paper type is indicated; if Replace Multisensor (GAP CALIB) is executed, the unit version is indicated.
(e) If General Adj. is executed, the run-time temperature and relative humidity are indicated.
(5) Ink saver mode setting
(a) Ink saver mode status
(b) Number of times ink save mode has been executed (unit: times).
7-45
b) NOZZLE 1
A sample printout that is produced by executing [SERVICE MODE]> [ADJUST]> [PRINT PATTERN]> [NOZZLE 1] is shown below.
Nozzle Check Pattern SERVICE
(L)
(R)
F-7-2
c) OPTICAL AXIS
A sample printout that is produced by executing [SERVICE MODE]> [ADJUST]> [PRINT PATTERN]> [OPTICAL AXIS] is shown below.
F-7-3
d) ROUGH
A sample printout that is produced by executing [SERVICE MODE]> [ADJUST]> [HEAD ADJ.] > [AUTO HEAD ADJ]> [ROUGH] is shown below.
F-7-4
e) DETAIL
A sample printout that is produced by executing [SERVICE MODE]> [ADJUST]> [HEAD ADJ.] > [AUTO HEAD ADJ]> [DETAIL] is shown below.
Printhead Adjustment Pattern
A-1
A-3
A-5
A-7
A-9
A-11
A-13
A-15
A-17
A-19
A-21
A-23
0
0
0
0
0
0
0
0
0
0
0
0
2
2
2
2
2
2
2
2
2
2
2
2
4
4
4
4
4
4
4
4
4
4
4
4
6
6
6
6
6
6
6
6
6
6
6
6
8
8
8
8
8
8
8
8
8
8
8
8
10
10
10
10
10
10
10
10
10
10
10
10
12
12
12
12
12
12
12
12
12
12
12
12
14
14
14
14
14
14
14
14
14
14
14
14
16
16
16
16
16
16
16
16
16
16
16
16
18
18
18
18
18
18
18
18
18
18
18
18
20
20
20
20
20
20
20
20
20
20
20
A-2
A-4
A-6
A-8
A-10
A-12
A-14
A-16
A-18
A-20
20
A-22
A-24
0
0
0
0
0
0
0
0
0
0
0
0
2
2
2
2
2
2
2
2
2
2
2
2
4
4
4
4
4
4
4
4
4
4
4
4
6
6
6
6
6
6
6
6
6
6
6
6
8
8
8
8
8
8
8
8
8
8
8
8
10
10
10
10
10
10
10
10
10
10
10
10
12
12
12
12
12
12
12
12
12
12
12
12
14
14
14
14
14
14
14
14
6
6
16
16
16
16
16
18
18
18
18
16
8
8
8
8
8
10
10
10
10
10
10
12
12
12
12
12
12
12
14
14
14
14
14
14
14
14
14
16
16
16
16
16
16
16
16
18
18
18
18
18
18
18
20
20
20
20
20
20
20
E-1
E-2
E-3
E-4
10
E-5
12
12
14
14
14
16
16
16
16
18
18
18
18
18
20
20
20
20
E-6
E-7
E-8
E-9
20
E-10
E-11
0
0
0
0
0
0
0
0
0
0
0
1
1
1
1
1
1
1
1
1
1
1
2
2
2
2
2
2
2
2
2
2
2
3
3
3
3
3
3
3
3
3
3
3
4
4
4
4
4
4
4
4
4
4
4
6
8
F-1
F-2
0
2
10
12
4
6
8
0
2
10
12
4
F-7-5
f) BASIC
A sample printout that is produced by executing [SERVICE MODE]> [ADJUST]> [HEAD ADJ.] > [AUTO HEAD ADJ]> [BASIC] is shown below.
Printhead Adjustment Pattern
D-1
D-2
D-3
D-4
D-5
D-6
D-13
D-14
D-15
D-16
D-17
D-18
0
0
0
0
0
0
0
0
0
0
0
0
2
2
2
2
2
2
2
2
2
2
2
2
4
4
4
4
4
4
4
4
4
4
4
4
6
6
6
6
6
6
6
6
6
6
6
6
8
8
8
8
8
8
8
8
8
8
8
8
10
10
10
10
10
10
10
10
10
10
10
10
12
12
12
12
12
12
12
12
12
12
12
12
14
14
14
14
14
14
14
14
14
14
14
14
16
16
16
16
16
16
16
16
16
16
16
16
18
18
18
18
18
18
18
18
18
18
18
18
20
20
20
20
20
20
20
20
20
20
20
20
F-7-6
7.2 Special Mode
7.2.1 Special Modes for Servicing
0013-2122
iPF6100 / iPF6200 / iPF6000S
This printer supports the following special modes in addition to the service mode:
- PCB replacement mode
- Download mode
- Counter display mode
1. PCB replacement mode
This mode is used when replacing the main PCB or MC relay PCB.
By executing this mode,
- Backup data of the settings and counter values stored in the MC relay PCB are moved to the new main PCB.
- The data such as the settings and counter values are copied to the MC relay PCB.
a) Entering the PCB replacement mode
Follow the same procedure as that for entering the service mode.
(With the "Paper Source" button and "Information" button pressed down, turn on the "Power" button.)
When the printer starts up, compare the serial number memorized in the main PCB's EEPROM with that memorized in the MC relay PCB's EEPROM. If
they do not match, or no serial number is memorized in either EEPROM, enter the PCB replacement mode.
While you are in the PCB replacement mode, the MESSAGE LED, roll media LED, and ONLINE LED are lit.
b) Procedure
Select "CPU BOARD" or "MC BOARD" using the [
] and [
] buttons, and then press the [OK] button to determine it.
- CPU BOARD
Select this after replacing the main PCB.
The data in the MC relay PCB is copied to the main PCB.
- MC BOARD
Select this before replacing the main PCB.
The data in the main PCB is copied to the MC relay PCB.
Use this when the MC relay PCB is a new one.
c) Exiting the PCB replacement mode
Turning off the Power button of the printer allows you to exit the PCB replacement mode.
For details on how to replace the PCB, see Parts Replacement Procedure > Disassembly/Reassembly > Points to Note on Disassembly and Reassembly >
Boards.
2. Download mode
Use this mode only when updating the firmware without performing initialization.
a) Entering the download mode
1) Turning off the Power button of the printer.
2) With the "Stop" and "Information" buttons pressed down, turn on the Power button of the printer.
* Keep pressing the above buttons until "Initializing" appears on the display.
b) Procedure
When "Download Mode/Send Firmware" is shown on the display, transfer the firmware.
When downloading of the firmware is completed, the printer is turned off automatically.
3. Counter display mode
Use this mode to view only printer counter information.
a) Invoking counter display mode
1) Press the [MENU] button to keep [Information] > [System Info] selected.
2) Press the [ ] button whole holding down the [MENU] button + [OK] button to invoke counter display mode.
b) How to view counter display mode
- S/N: Unit serial number
- CNT: Number of copies printed in A4 terms (unit: copies)
Chapter 8 ERROR CODE
Contents
Contents
8.1 Outline............................................................................................................................................................................8-1
8.1.1 Outline.......................................................................................................................................................................................... 8-1
8.2 Warning Table................................................................................................................................................................8-2
8.2.1 Warnings ...................................................................................................................................................................................... 8-2
8.2.2 Warnings ...................................................................................................................................................................................... 8-3
8.3 Error Table .....................................................................................................................................................................8-4
8.3.1 Error Code List ............................................................................................................................................................................ 8-4
8.3.2 Error Code List .......................................................................................................................................................................... 8-14
8.4 Sevice Call Table .........................................................................................................................................................8-25
8.4.1 Service Call Errors ..................................................................................................................................................................... 8-25
8.4.2 Service Call Errors ..................................................................................................................................................................... 8-25
Chapter 8
8.1 Outline
8.1.1 Outline
0012-6681
iPF6100 / iPF6200 / iPF6000S
The printer indicates errors using the display and LEDs.
If an error occurs during printing, the printer status is also displayed on the status monitor of the printer driver.
The following three types of errors are displayed on the display:
- Warning
Status where the print operation can be continued without remedying the cause of the problem. This can, however, adversely affect the printing results.
- Error
Status where the print operation is stopped, and the regular operation cannot be recovered until the cause of the problem is remedied.
- Service call error
When a service call error occurs, the error is not cleared and the error indication remains on the operation panel even if the printer is powered off and on again.
(Occurrence of the service call error is indicated again at power-on.)
This measure is taken to prevent user's recovery of the service call error and damages to the printer.
Service call errors can be cleared, however, by starting up the printer in the service mode.
For how to take actions against warnings and errors, refer to "Troubleshooting".
Overview of warnings and error codes
T-8-1
Code*
0181010x-100x
Diagnosis
Ink warning
01841001-1100
Waste ink warning
013412xx-103x
GARO warning
01800500-1010
Printhead warning
03xxxxxx-20xx,24xx
03xxxxxx-2Exx
Media feeding error
Data mismatch error
Cover open error
03xxxxxx-25xx
Ink error
03xxxxxx-280x
Printhead error
03xxxxxx-281x
Maintenance cartridge error
03xxxxxx-282x
Adjustment error
03xxxxxx-2Fxx,26xx
Head management sensor unit error
Other errors
Exxx-40xx
Service call error
* "x" stands for a numeric or letter.
8-1
Chapter 8
8.2 Warning Table
8.2.1 Warnings
0012-7907
iPF6100
* Codes represent the numbers that are displayed in DISPLAY in service mode and that are recorded in PRINTINF. Messages that are not accompanied by a code
indication are not logged.
T-8-2
Display massage
Condition detected
0180104-1000
BK ink tank near-empty
Ink Level: Check
0180101-1001
Y ink tank near-empty
Ink Level: Check
0180102-1002
M ink tank near-empty
Ink Level: Check
0180103-1003
C ink tank near-empty
Ink Level: Check
0180112-1004
PM ink tank near-empty
Ink Level: Check
0180113-1005
PC ink tank near-empty
Ink Level: Check
0180106-1006
MBK ink tank near-empty
Action
Renew the ink tanks.
Ink Level: Check
0180106-1007
MBK2 ink tank near-empty
Ink Level: Check
01810105-1008
GY ink tank near-empty
Ink Level: Check
01810115-1009
PGY ink tank near-empty
Ink Level: Check
01810107-100A
R ink tank near-empty
Ink Level: Check
01810109-100B
B ink tank near-empty
Ink Level: Check
01810108-100C
G ink tank near-empty
Problem with
Printhead L
Chk printing results
01800500-1010
Number of non-discharging nozzles in
printhead L: Warning level
Problem with
Printhead R
Chk printing results
01800500-1010
Number of non-discharging nozzles in
printhead R: Warning level
Problem with
Printhead L/R
Chk printing results
01800500-1010
Number of non-discharging nozzles in both
printheads: Warning level
Prepare for
maint cart
replacement.
01841001-1100
Maintenance cartridge near-full
Replace the maintenance cartridge.
Prepare for parts
replacement.
Call for service.
Parts counter W1 level
Check the parts counter in service mode.
Parts replacement
time has passed.
Call for service.
Parts counter W2 level
After checking the parts counter in service mode, replace
any part whose counter is nearing the error value.
Clean the printheads. Renew the printheads. Identify the
head management sensor unit.
GARO W1221
01341221-1030
GARO (image mode): Unknown command Verify the transmitted data before reprinting.
GARO W1222
01341222-1031
GARO (image mode): Invalid parameter
count (no parameters)
GARO W1223
01341223-1032
GARO (image mode): Required parameter
missing
GARO W1225
01341225-1034
GARO (image mode): Other warning
GARO W1226
01341226-103A
GARO (image mode): Image processing
table error
GARO W1231
01341231-1035
GARO (setup): Unknown command
GARO W1232
01341232-1036
GARO (setup): Invalid parameter count
GARO W1233
01341233-1037
GARO (setup): Required parameter
missing
GARO W1234
01341234-1038
GARO (setup): Data out of bounds
GARO W1235
01341235-1039
GARO (setup): Other warning
End of paper feed.
Cannot feed
paper more.
8-2
Code*
Ink Level: Check
Forced feed limit
Check the remaining quantity of roll media.
Chapter 8
8.2.2 Warnings
0020-2105
iPF6200 / iPF6000S
* Codes represent the numbers that are displayed in DISPLAY in service mode and that are recorded in PRINTINF. Messages that are not accompanied by a code
indication are not logged.
T-8-3
Display massage
Code*
Condition detected
Ink Level: Check
0180104-1000
BK ink tank near-empty
Ink Level: Check
0180101-1001
Y ink tank near-empty
Action
Renew the ink tanks.
Ink Level: Check
0180102-1002
M ink tank near-empty
Ink Level: Check
0180103-1003
C ink tank near-empty
Ink Level: Check
0180112-1004
PM ink tank near-empty
Ink Level: Check
0180113-1005
PC ink tank near-empty
Ink Level: Check
0180106-1006
MBK ink tank near-empty
Ink Level: Check
0180106-1007
MBK2 ink tank near-empty
Ink Level: Check
01810105-1008
GY ink tank near-empty
Ink Level: Check
01810115-1009
PGY ink tank near-empty
Ink Level: Check
01810107-100A
R ink tank near-empty
Ink Level: Check
01810109-100B
B ink tank near-empty
Ink Level: Check
01810108-100C
G ink tank near-empty
Problem with
Printhead L
Chk printing results
01800500-1010
Number of non-discharging nozzles in
printhead L: Warning level
Problem with
Printhead R
Chk printing results
01800500-1010
Number of non-discharging nozzles in
printhead R: Warning level
Problem with
Printhead L/R
Chk printing results
01800500-1010
Number of non-discharging nozzles in both
printheads: Warning level
Prepare for
maint cart
replacement.
01841001-1100
Maintenance cartridge near-full
Replace the maintenance cartridge.
Prepare for parts
replacement.
Call for service.
Parts counter W1 level
Check the parts counter in service mode.
Parts replacement
time has passed.
Call for service.
Parts counter W2 level
After checking the parts counter in service mode, replace
any part whose counter is nearing the error value.
Clean the printheads. Renew the printheads. Identify the
head management sensor unit.
GARO W1221
01341221-1030
GARO (image mode): Unknown command Verify the transmitted data before reprinting.
GARO W1222
01341222-1031
GARO (image mode): Invalid parameter
count (no parameters)
GARO W1223
01341223-1032
GARO (image mode): Required parameter
missing
GARO W1225
01341225-1034
GARO (image mode): Other warning
GARO W1226
01341226-103A
GARO (image mode): Image processing
table error
GARO W1231
01341231-1035
GARO (setup): Unknown command
GARO W1232
01341232-1036
GARO (setup): Invalid parameter count
GARO W1233
01341233-1037
GARO (setup): Required parameter
missing
GARO W1234
01341234-1038
GARO (setup): Data out of bounds
GARO W1235
01341235-1039
GARO (setup): Other warning
End of paper feed.
Cannot feed
paper more.
Forced feed limit
Check the remaining quantity of roll media.
The free hard disk space left for Personal
Boxes in the printer's hard disk does not
have more than 1 GB, combined.
Delete unneeded jobs stored in Personal Boxes.
Mail box full.
01861003-2902
Now printing without saving data.
100 jobs are stored in the Personal Box.
Delete unneeded jobs stored in Personal Boxs.
Mail box full.
Delete unwanted data
Saved jobs exceed the Personal Box
capacity.
Press the stop button to cancel the print job.
Delete print jobs from the queue.
Delete unneeded jobs stored on the hard disk.
Mail box nearly full.
Delete unwanted data
011A1001-2901
011A1006-2906
8-3
Chapter 8
8.3 Error Table
8.3.1 Error Code List
0016-8356
iPF6100
* Codes represent the numbers that are displayed in DISPLAY in service mode.
If the same message is displayed when the printer is turned off, then back on, take action as recommended in the Action column.
T-8-4
Display massage
Clean right P Head
Code*
03800502-280E
Printhead L found to have many nondischarging nozzles during a nondischarging inspection (printing paused)
03800201-2804
03800202-2807
Printheads L and R installed in reverse
position
Reinstall the printheads in correct position.
03800101-2800
Printhead R not found
Install a printhead on the R side.
03800102-2808
Printhead L not found
Install a printhead on the L side.
03010000-200C
Unable to detect the leading end of
paper
Check the leading end of paper. Reload the paper.
03010000-200D
Unable to detect the trailing end of cut
sheet
Check the sheet length. Check to see if paper has not
jammed.
03010000-2017
Paper (right) edge detection error
Check the right edge of paper. Check the paper type.
03010000-2018
Paper (left) edge detection error
Check the left edge of paper. Check the paper type.
03010000-2820
Printhead registration unadjustable
Check the paper on which a pattern is printed for
smears.
Check the environment for interferences from outside
light.
Clean the printheads.
03010000-2821
LF unadjustable
Check the paper on which a pattern is printed for
smears.
Check the environment for interferences from outside
light.
Clean the printheads.
03010000-2823
Printhead check error
Check to see if paper has not jammed.
Check the paper on which a pattern is printed for
smears.
Press Online to
clear error.
PHeads: wrong pos.
Action
Printhead R found to have many non- Clean the printheads. Identify the nozzles in a nozzle
check pattern. Replace the printheads.
discharging nozzles during a nondischarging inspection (printing paused)
Press Online to
clear error.
Clean left P Head
Condition detected
03800501-280D
Open top cover and
check the
printhead positions.
No right printhead
Install right
printhead.
No left printhead
Install left
printhead.
Paper size not
detected.
Press Load/Eject
and reload the
paper.
Paper size not
detected.
Press Load/Eject
and reload the
paper.
Paper size not
detected.
Press Load/Eject
and reload the
paper.
Paper size not
detected.
Press Load/Eject
and reload the
paper.
Cannot adjust
printhead.
Press Online to
clear the error
and readjust
printhead.
Cannot adjust
printhead.
Press Online to
clear the error
and readjust
printhead.
Hardware error.
03010000-2823
Turn off printer,
wait, then
turn on again.
8-4
Chapter 8
Display massage
Cannot print
as specified.
Code*
Condition detected
Action
03010000-2E1F
Undersized paper loaded for internal
printing (A4 or larger)
Replace with A4/Letter or any larger-sized paper.
03010000-2E1F
Undersized paper loaded for internal
printing (A3 or larger)
Replace with A3/11"x17" or any larger-sized paper.
03010000-2E1F
Undersized paper loaded for internal
printing (roll media)
Replace with roll media at least 10 inches in width.
03010000-2E1F
The first sheet used for adjustment
printing or the like was A2 or largersized but the second sheet used was
smaller than A2.
Prepare about 10 sheets of A2 or larger-sized paper.
Replace with A2 or any larger-sized paper.
03010000-2E25
Feeding error
Remove the paper jam and reload the paper.
03010000-2E25
Paper jam while feeding/ejecting/
printing
Remove the paper jam and reload the paper.
03010000-2E27
Paper jam during feeding/printing/
ejection
Reload the paper.
03010000-200E
Undersized paper (cut sheets/roll
media)
Replace with larger-sized paper.
03010000-200F
Oversized paper (cut sheets/roll media) Replace with smaller-sized paper.
03010000-2016
Paper worked out of position while
printing
Reload the paper
03010000-2F33
Unadjustable because of transparent
media
Replace with adjustable media.
03016000-2010
Skew
Correct the skew in the paper and reload it.
03130000-2E21
IEEE1394 interface error
Check that the optionalIEEE1394 board is mounted.
Check the cable connection.
03061000-2E15
The first and second sheets used for
adjustment printing or the like differed
in paper type.
Prepare paper of the same type as used for the first
sheet for adjustment printing or the like.
Press Load/Eject
and replace paper
with A4/LTR
(vertical) or larger
Cannot print
as specified.
Press Load/Eject
and replace paper
with A3/11"x17"
(vertical) or larger
Cannot print
as specified.
Press Load/Eject
and replace roll
with 10 in. wide or
larger roll.
Cannot print
as specified.
Press Load/Eject
and replace paper
with A2/16.6"x23.4"
(vertical) or larger
Cannot feed paper.
Remove paper and
press Load/Eject.
Cannot detect papr
Remove paper and
press Load/Eject.
Cannot load.
Press Load/Eject
and reload the
paper.
This paper
cannot be used.
Check supported
paper sizes.
Load/Eject:
Change Paper
This paper
cannot be used.
Check supported
paper sizes.
Load/Eject:
Change Paper
No sheets.
Press Load/Eject
and reload the
paper.
Use another paper.
Press Online to
clear the error.
Paper loaded
askew.
Press Load/Eject
and reload the
paper.
Hardware error.
03130000-2E21
Turn off printer,
wait, then
turn on again.
Wrong paper type.
Stop: Stop Printing
Load/Eject:
Change Paper
8-5
Chapter 8
Display massage
Paper size not
detected.
Code*
Condition detected
Action
03010000-200A
Unable to detect the paper width (Paper Reload the paper
loaded at an improper position)
03010000-2016
Paper jam during feeding/printing/
ejection
Reload the paper
03010000-2016
Paper jam
Reload the paper
03010000-200C
Roll media loading size detection failure Reload the roll media.
03016000-2010
Skewed roll media
Rewind the roll media and reload them.
03010000-2822
Eccentricity correction disabled
Check to see if paper has not jammed.
03860200-2E02
Data with a cut sheet specification has
been received but no cut sheets are
loaded.
Load cut sheets at the paper tray port.
03860200-2E0A
Data with a roll media specification has Replace with roll media.
been received when a cut sheet tray is
loaded.
03060A00-2E00
Data with a roll media specification has Load roll media.
been received but no roll media are
loaded.
03060A00-2E0E
Roll media unit not installed
Install the roll media unit.
03060A00-2E1B
Roll media end
Renew the supply of roll media.
03061000-2E15
Paper type mismatch
Check the type of paper that can be fed and reload the
paper.
03862000-2E0C
Data with a cut sheet specification has
been received when roll media are
loaded.
Load cut sheets at the paper tray port.
03130031-291D
Spur cam sensor detection failure
Check the spur cam sensor.
03130031-2E23
Cutter unit failure
Check the cutter unit.
Press Load/Eject
and reload the
paper.
Paper jam.
Press Load/Eject
and reload the
paper.
Cannot feed paper.
Press Load/Eject
and reload the
paper.
Paper size not
detected.
Press Load/Eject
and reload the
paper.
Paper loaded
askew.
Press Load/Eject
and reload the
paper.
Cannot adjust
eccentric.
Press Online to
clear the error.
Cassette printing
is selected.
Press Load/Eject
and load sheets.
Roll printing is
selected, but sheets
are loaded.
Press Load/Eject and
remove the sheets.
Roll printing
is selected.
Press Load/Eject
and load a roll.
No Roll Feed Unit.
Turn printer off
and install roll
feed unit.
The roll is empty.
Load/Eject:
Change Paper
Wrong paper feed
slot for this paper
type.
Press Load/Eject
and reload the
paper.
Manual printing
is selected, but a
roll is loaded.
Press Load/Eject and
remove the roll.
Hardware error.
03130031-291D
Turn off printer,
wait, then
turn on again.
Hardware error.
03130031-2E23
Turn off printer,
wait, then
turn on again.
8-6
Chapter 8
Display massage
Hardware error.
03130031-2E14
Code*
Condition detected
Action
03130031-2F14
Writing to the ASIC register disabled
Replace the main controller PCB
03130031-2F16
Mist fan error
Check the mist fan.
03130031-2F17
Suction fan lock detection error
Check the suction fan.
03130031-2F20
Pump motor cam position error
Check the purge unit.
03130031-2F22
Pump travel timeout
Check the purge unit.
03130031-2F23
Pump motor error
Pump inoperable
Check the purge unit.
03130031-2F24
Cutter travel timeout
Check the cutter unit.
03130031-2F25
Unable to detect the carriage motor
home position
Check the carriage unit. Check the linear encoder for
smears.
03130031-2F26
Carriage inoperable
Check the carriage unit and surrounding parts.
03130031-2F27
Carriage travel timeout
Check the carriage unit and surrounding parts.
03130031-2F17
Pump encoder sensor error
Check the purge unit.
03130031-2F2A
Unable to detect the feed roller home
position
Check the feed roller encoder and surrounding part.
Check to see if paper has not jammed.
03030000-2F29
Feed motor timeout (Roll media)
Check the roll feed unit. Check roll media. Check to
see if paper has not jammed in the printer.
03130031-2F2E
Roll travel timeout
Check the roll feed unit.
Turn off printer,
wait, then
turn on again.
Hardware error.
03130031-2E16
Turn off printer,
wait, then
turn on again.
Hardware error.
03130031-2E17
Turn off printer,
wait, then
turn on again.
Hardware error.
03130031-2E20
Turn off printer,
wait, then
turn on again.
Hardware error.
03130031-2E22
Turn off printer,
wait, then
turn on again.
Hardware error.
03130031-2E23
Turn off printer,
wait, then
turn on again.
Hardware error.
03130031-2E24
Turn off printer,
wait, then
turn on again.
Hardware error.
03130031-2E25
Turn off printer,
wait, then
turn on again.
Hardware error.
03130031-2E26
Turn off printer,
wait, then
turn on again.
Hardware error.
03130031-2E27
Turn off printer,
wait, then
turn on again.
Hardware error.
03130031-2E17
Turn off printer,
wait, then
turn on again.
Hardware error.
03130031-2E2A
Turn off printer,
wait, then
turn on again.
Hardware error.
03130031-2E29
Turn off printer,
wait, then
turn on again.
Hardware error.
03130031-2E2E
Turn off printer,
wait, then
turn on again.
8-7
Chapter 8
Display massage
Hardware error.
03130031-4027
Code*
Condition detected
Action
03130031-4027
Lift travel timeout error
Check the carriage unit and surrounding parts.
03130031-2F13
A/D converter external trigger output
stop detection hardware error 1
If both printheads are signaled faulty, take the
following corrective action:
1) Replace the left printhead with a normal one.
2) Because the error indication lasts, turn the printer
off, then back on.
3) Replace the right printhead with a normal one, as
the automatic replacement of the right printhead is
suggested.
If a printhead is not at fault, replace the main controller
board.
03130031-2F32
Multi sensor error
Check the environment for interferences from outside
light.
Replace the multi sensor unit.
03130031-2F34
Color calibration adjustment failure
error
Check the environment for interferences from outside
light.
Replace the multi sensor unit.
03130031-2F35
Color calibration disabled
Check the parts counter in service mode.
Replace the multi sensor unit.
03130031-2F3A
Valve motor error
Check the ink supply unit.
03130031-2F3B
CS communication error
Remove the ink tanks and then reload them.
Check the main controller PCB.
0130031-260E
Gap detection error
Check the carriage unit and surrounding parts.
Replace the main controller PCB.
03130031-2618
VH voltage error
Check the power supply unit.
03130031-260F
Gap reference surface error
Replace the reference surface sheet.
03060A00-2E24
Roll feed unit failure
Replace the roll feed unit.
03900001-4049
ROM data for another model has been
transferred.
Transmit valid ROM data.
03900001-4042
MIT data transfer failure
Verify the validity of MID data before transferring it.
03130031-291A
Roll sensor detection failure
Check the roll feed unit.
Turn off printer,
wait, then
turn on again.
Hardware error.
03130031-2E13
Turn off printer,
wait, then
turn on again.
Hardware error.
03130031-2E32
Turn off printer,
wait, then
turn on again.
Cannot calibrate.
Press OK and try
calibration again.
Calibration
There is a problem
with the
multi-sensor.
Press OK to cancel
calibration.
Hardware error.
03130031-2F3A
Turn off printer,
wait, then
turn on again.
Hardware error.
03130031-2F3B
Turn off printer,
wait, then
turn on again.
Hardware error.
03130031-260E
Turn off printer,
wait, then
turn on again.
Hardware error.
03130031-2618
Turn off printer,
wait, then
turn on again.
Hardware error.
03130031-260F
Turn off printer,
wait, then
turn on again.
Roll feed unit err
Turn off printer and
check roll feed unit
Unknown file.
Check file format.
Turn off printer,
wait a while, then
turn it on again.
Unknown file.
Check file format.
Turn off printer,
wait a while, then
turn it on again.
Roll sensor
cannot detect.
Turn on printer
again.
8-8
Chapter 8
Display massage
Hardware error.
03130031-2F2B
Code*
Condition detected
Action
03130031-2F2B
LF operation failure
Check to see if paper has not jammed.
Check the feed motor and feed roller.
Right printhead
error
Open top cover and
replace the right
printhead.
03800201-2802
Invalid printhead R installed
Replace printhead R
Left printhead
error
Open top cover and
replace the left
printhead.
03800202-280A
Invalid printhead L installed
Replace printhead L
Right printhead
error
Open top cover and
replace the right
printhead.
03800301-2801
Printhead R DI compensation failure
Replace printhead R
Left printhead
error
Open top cover and
replace the left
printhead.
03800302-2809
Printhead L DI compensation failure
Replace printhead L
Right printhead
error
Open top cover and
replace the right
printhead.
03800401
-2803
Printhead R EEPROM error
Replace printhead R
Left printhead
error
Open top cover and
replace the left
printhead.
03800402-280B
Printhead L EEPROM error
Replace printhead L
Right printhead
error
Open top cover and
replace the right
printhead.
03800201-2812
Wrong printhead model installed on
printhead R
Install printhead PF-03 on printhead R.
Left printhead
error
Open top cover and
replace the left
printhead.
03800202-2813
Wrong printhead model installed on
printhead L
Install printhead PF-03 on printhead L.
Hardware error.
03800500-2F2F
03800500-2F2F
Non-discharging error
Identify the non-discharging unit
Replace the non-discharging unit
Replace the printheads
03800500-2F30
Non-discharging position adjustment
error
Identify the non-discharging unit
Replace the non-discharging unit
Replace the printheads
Ink tank is empty.
Press OK and
replace ink tank.
03810104
-2500
Bk ink tank empty
Renew the Bk ink tank
Ink tank is empty.
Press OK and
replace ink tank.
03810101-2501
Y ink tank empty
Renew the Y ink tank
Ink tank is empty.
Press OK and
replace ink tank.
03810102
-2502
M ink tank empty
Renew the M ink tank
Ink tank is empty.
Press OK and
replace ink tank.
03810103
-2503
C ink tank empty
Renew the C ink tank
Ink tank is empty.
Press OK and
replace ink tank.
03810112
-2504
PM ink tank empty
Renew the PM ink tank
Ink tank is empty.
Press OK and
replace ink tank.
03810113-2505
PC ink tank empty
Renew the PC ink tank
Ink tank is empty.
Press OK and
replace ink tank.
03810106-2506
MBk ink tank empty
Renew the MBk ink tank
Ink tank is empty.
Press OK and
replace ink tank.
03810106-2507
MBk2 ink tank empty
Renew the MBk ink tank
Turn off printer,
wait, then
turn on again.
Turn off printer,
wait, then
turn on again.
Hardware error.
03800500-2F30
Turn off printer,
wait, then
turn on again.
8-9
Chapter 8
Display massage
8-10
Code*
Condition detected
Action
Ink tank is empty.
Press OK and
replace ink tank.
03810105
-2508
GY ink tank empty
Renew the GY ink tank
Ink tank is empty.
Press OK and
replace ink tank.
03810115-2509
PGY ink tank empty
Renew the PGY ink tank
Ink tank is empty.
Press OK and
replace ink tank.
03810107
-250A
R ink tank empty
Renew the R ink tank
Ink tank is empty.
Press OK and
replace ink tank.
03810109
-250B
B ink tank empty
Renew the B ink tank
Ink tank is empty.
Press OK and
replace ink tank.
03810108
-250C
G ink tank empty
Renew the G ink tank
Ink insufficient.
Press OK and
replace ink tank.
03810204-2580
Low on the Bk ink tank (as during
cleaning)
Replace with a fully replenished Bk ink tank
Ink insufficient.
Press OK and
replace ink tank.
03810201-2581
Low on the Y ink tank (as during
cleaning)
Replace with a fully replenished Y ink tank
Ink insufficient.
Press OK and
replace ink tank.
03810202-2582
Low on the M ink tank (as during
cleaning)
Replace with a fully replenished M ink tank
Ink insufficient.
Press OK and
replace ink tank.
03810203-2583
Low on the C ink tank (as during
cleaning)
Replace with a fully replenished C ink tank
Ink insufficient.
Press OK and
replace ink tank.
03810212-2584
Low on the PM ink tank (as during
cleaning)
Replace with a fully replenished PM ink tank
Ink insufficient.
Press OK and
replace ink tank.
03810213-2585
Low on the PC ink tank (as during
cleaning)
Replace with a fully replenished PC ink tank
Ink insufficient.
Press OK and
replace ink tank.
03810206-2586
Low on the MBk ink tank (as during
cleaning)
Replace with a fully replenished MBk ink tank
Ink insufficient.
Press OK and
replace ink tank.
03810205-2588
Low on the GY ink tank (as during
cleaning)
Replace with a fully replenished GY ink tank
Ink insufficient.
Press OK and
replace ink tank.
03810215-2589
Low on the PGY ink tank (as during
cleaning)
Replace with a fully replenished PGY ink tank
Ink insufficient.
Press OK and
replace ink tank.
03810207-258A
Low on the R ink tank (as during
cleaning)
Replace with a fully replenished R ink tank
Ink insufficient.
Press OK and
replace ink tank.
03810209-258B
Low on the B ink tank (as during
cleaning)
Replace with a fully replenished B ink tank
Ink insufficient.
Press OK and
replace ink tank.
03810208-258C
Low on the G ink tank (as during
cleaning)
Replace with a fully replenished G ink tank
Ink insufficient.
Press OK and
replace ink tank.
03810204-2590
Low on the Bk ink tank (during preprinting checks)
Replace with a fully replenished Bk ink tank
Ink insufficient.
Press OK and
replace ink tank.
03810201-2591
Low on the Y ink tank (during preprinting checks)
Replace with a fully replenished Y ink tank
Ink insufficient.
Press OK and
replace ink tank.
03810202-2592
Low on the M ink tank (during preprinting checks)
Replace with a fully replenished M ink tank
Ink insufficient.
Press OK and
replace ink tank.
03810203-2593
Low on the C ink tank (during preprinting checks)
Replace with a fully replenished C ink tank
Ink insufficient.
Press OK and
replace ink tank.
03810212-2594
Low on the PM ink tank (during preprinting checks)
Replace with a fully replenished PM ink tank
Ink insufficient.
Press OK and
replace ink tank.
03810213-2595
Low on the PC ink tank (during preprinting checks)
Replace with a fully replenished PC ink tank
Ink insufficient.
Press OK and
replace ink tank.
03810206-2596
Low on the MBk ink tank (during preprinting checks)
Replace with a fully replenished MBk ink tank
Ink insufficient.
Press OK and
replace ink tank.
03810205-2598
Low on the GY ink tank (during preprinting checks)
Replace with a fully replenished GY ink tank
Ink insufficient.
Press OK and
replace ink tank.
03810215-2599
Low on the PGY ink tank (during preprinting checks)
Replace with a fully replenished PGY ink tank
Chapter 8
Display massage
Code*
Condition detected
Action
Ink insufficient.
Press OK and
replace ink tank.
03810207-259A
Low on the R ink tank (during preprinting checks)
Replace with a fully replenished R ink tank
Ink insufficient.
Press OK and
replace ink tank.
03810209-259B
Low on the B ink tank (during preprinting checks)
Replace with a fully replenished B ink tank
Ink insufficient.
Press OK and
replace ink tank.
03810208-259C
Low on the G ink tank (during preprinting checks)
Replace with a fully replenished G ink tank
Ink tank error.
03830204-2540
Bk ink tank ID error
Replace with a valid Bk ink tank
03830201-2541
Y ink tank ID error
Replace with a valid Y ink tank
03830202-2542
M ink tank ID error
Replace with a valid M ink tank
03830203-2543
C ink tank ID error
Replace with a valid C ink tank
03830212-2544
PM ink tank ID error
Replace with a valid PM ink tank
03830213-2545
PC ink tank ID error
Replace with a valid PC ink tank
03830206-2546
MBk ink tank ID error
Replace with a valid MBk ink tank
03830206-2547
MBk2 ink tank ID error
Replace with a valid MBk ink tank
03830205-2548
GY ink tank ID error
Replace with a valid GY ink tank
03830215-2549
PGY ink tank ID error
Replace with a valid PGY ink tank
03830207-254A
R ink tank ID error
Replace with a valid R ink tank
03830209-254B
B ink tank ID error
Replace with a valid B ink tank
03830208-254C
G ink tank ID error
Replace with a valid G ink tank
No ink tank
loaded.
Press OK and
check ink tank.
03830104-2520
BK ink tank not installed
Install a Bk ink tank
No ink tank
loaded.
Press OK and
check ink tank.
03830101-2521
Y ink tank not installed
Install a Y ink tank
No ink tank
loaded.
Press OK and
check ink tank.
03830102-2522
M ink tank not installed
Install a M ink tank
No ink tank
loaded.
Press OK and
check ink tank.
03830103-2523
C ink tank not installed
Install a C ink tank
No ink tank
loaded.
Press OK and
check ink tank.
03830112-2524
PM ink tank not installed
Install a PM ink tank
Press OK and
replace ink tank.
Ink tank error.
Press OK and
replace ink tank.
Ink tank error.
Press OK and
replace ink tank.
Ink tank error.
Press OK and
replace ink tank.
Ink tank error.
Press OK and
replace ink tank.
Ink tank error.
Press OK and
replace ink tank.
Ink tank error.
Press OK and
replace ink tank.
Ink tank error.
Press OK and
replace ink tank.
Ink tank error.
Press OK and
replace ink tank.
Ink tank error.
Press OK and
replace ink tank.
Ink tank error.
Press OK and
replace ink tank.
Ink tank error.
Press OK and
replace ink tank.
Ink tank error.
Press OK and
replace ink tank.
8-11
Chapter 8
Display massage
Code*
Condition detected
Action
No ink tank
loaded.
Press OK and
check ink tank.
03830113-2525
PC ink tank not installed
Install a PC ink tank
No ink tank
loaded.
Press OK and
check ink tank.
03830106-2526
MBK ink tank not installed
Install a MBk ink tank
No ink tank
loaded.
Press OK and
check ink tank.
03830106-2527
MBK2 ink tank not installed
Install a MBk ink tank
No ink tank
loaded.
Press OK and
check ink tank.
03830105-2528
GY ink tank not installed
Install a GY ink tank
No ink tank
loaded.
Press OK and
check ink tank.
03830115-2529
PGY ink tank not installed
Install a PGY ink tank
No ink tank
loaded.
Press OK and
check ink tank.
03830107-252A
R ink tank not installed
Install a R ink tank
No ink tank
loaded.
Press OK and
check ink tank.
03830109-252B
B ink tank not installed
Install a B ink tank
No ink tank
loaded.
Press OK and
check ink tank.
03830108-252C
G ink tank not installed
Install a G ink tank
Ink tank:BK error
03830304-2560
Bk ink tank EEPROM error
Renew the Bk ink tank
03830304-2561
Y ink tank EEPROM error
Renew the Y ink tank
03830304-2562
M ink tank EEPROM error
Renew the M ink tank
03830304-2563
C ink tank EEPROM error
Renew the C ink tank
03830304-2564
PM ink tank EEPROM error
Renew the PM ink tank
03830304-2565
PC ink tank EEPROM error
Renew the PC ink tank
03830304-2566
MBk ink tank EEPROM error
Renew the MBk ink tank
03830304-2567
MBk2 ink tank EEPROM error
Renew the MBk ink tank
03830304-2568
GY ink tank EEPROM error
Renew the GY ink tank
03830304-2569
PGY ink tank EEPROM error
Renew the PGY ink tank
03830304-256A
R ink tank EEPROM error
Renew the R ink tank
03830304-256B
B ink tank EEPROM error
Renew the B ink tank
Press OK and
replace ink tank.
Ink tank:BK error
Press OK and
replace ink tank.
Ink tank:BK error
Press OK and
replace ink tank.
Ink tank:BK error
Press OK and
replace ink tank.
Ink tank:BK error
Press OK and
replace ink tank.
Ink tank:BK error
Press OK and
replace ink tank.
Ink tank:BK error
Press OK and
replace ink tank.
Ink tank:BK error
Press OK and
replace ink tank.
Ink tank:BK error
Press OK and
replace ink tank.
Ink tank:BK error
Press OK and
replace ink tank.
Ink tank:BK error
Press OK and
replace ink tank.
Ink tank:BK error
Press OK and
replace ink tank.
8-12
Chapter 8
Display massage
Code*
Condition detected
Action
03830304-256C
G ink tank EEPROM error
Renew the G ink tank
03031000-2E0F
Top cover abnormally open
Close the top cover and turn on the printer again.
03031000-2E10
Ink tank cover abnormally open
Close the ink tank cover and turn on the printer again.
03841001-2819
Maintenance cartridge full
Renew the maintenance cartridge.
03841001-281B
Not enough space in the maintenance
cartridge prior to cleaning
Replace the maintenance cartridge.
03841101-2818
Maintenance cartridge not available
Set a maintenance cartridge.
Insert the maintenance cartridge fully into position.
03841201-2816
Maintenance cartridge EEPROM error
Renew the maintenance cartridge.
03841201-2817
Maintenance cartridge ID error
Renew the maintenance cartridge.
03860002-2E0A
Data with a roll media specification has Reload the cut sheets.
been received when a sheet tray is
loaded.
Borderless printng
not possible. Check
roll width and
spacers.
Online: Print
Load/Eject:
Change Paper
03861001-2405
Paper loaded at a position inaccessible
for borderless printing
Check to see if a borderless printing spacer is installed.
Reload the paper.
Borderless printng
not possible. Check
paper size setting.
03861001-2406
Data unfit for borderless printing
Check the paper size.
Change the paper size.
03862000-2E09
Not enough roll media on remaining roll Renew the supply of roll media.
media quantity detection
03063000-2E08
Mismatch between data width and paper Verify the paper size setting.
width
03870001-2015
Cutting failure
Ink tank:BK error
Press OK and
replace ink tank.
Top cover is open.
Turn off printer,
wait a while, and
turn it on again.
Ink tank cover
is open.
Turn off printer,
wait a while, and
turn it on again.
Maintenance
cartridge full.
Replace
the maintenance
cartridge.
No Maintenance
Cartridge capacity.
Replace
the maintenance
cartridge.
No maintenance
cartridge.
Check
the maintenance
cartridge.
Maintenance
cartridge problem.
Replace
the maintenance
cartridge.
Maintenance
cartridge problem.
Replace
the maintenance
cartridge.
Roll printing is
selected, but sheets
are loaded.
Press OK,
remove the sheets,
and load a roll.
Online: Print
Load/Eject:
Change Paper
Insufficient paper
for job
Online: Print
Stop: Stop Printing
Load/Eject:
Change Paper
Wrong paper size.
Check paper size
setting on computer.
Online: Print
Stop: Stop Printing
Cannot cut paper.
Cut paper manually.
Check the cutter.
Press Load/Eject
and reload the
paper.
8-13
Chapter 8
8.3.2 Error Code List
0020-2109
iPF6200 / iPF6000S
* Codes represent the numbers that are displayed in DISPLAY in service mode.
If the same message is displayed when the printer is turned off, then back on, take action as recommended in the Action column.
T-8-5
Display massage
Clean right P Head
Code*
03800502-280E
Printhead L found to have many nondischarging nozzles during a nondischarging inspection (printing paused)
03800201-2804
03800202-2807
Printheads L and R installed in reverse
position
Reinstall the printheads in correct position.
03800101-2800
Printhead R not found
Install a printhead on the R side.
03800102-2808
Printhead L not found
Install a printhead on the L side.
03010000-200C
Unable to detect the leading end of
paper
Check the leading end of paper. Reload the paper.
03010000-200D
Unable to detect the trailing end of cut
sheet
Check the sheet length. Check to see if paper has not
jammed.
03010000-2017
Paper (right) edge detection error
Check the right edge of paper. Check the paper type.
03010000-2018
Paper (left) edge detection error
Check the left edge of paper. Check the paper type.
03010000-2820
Printhead registration unadjustable
Check the paper on which a pattern is printed for
smears.
Check the environment for interferences from outside
light.
Clean the printheads.
03010000-2821
LF unadjustable
Check the paper on which a pattern is printed for
smears.
Check the environment for interferences from outside
light.
Clean the printheads.
03010000-2823
Printhead check error
Check to see if paper has not jammed.
Check the paper on which a pattern is printed for
smears.
03010000-2E1F
Undersized paper loaded for internal
printing (A4 or larger)
Replace with A4/Letter or any larger-sized paper.
Press Online to
clear error.
PHeads: wrong pos.
Action
Printhead R found to have many non- Clean the printheads. Identify the nozzles in a nozzle
discharging nozzles during a noncheck pattern. Replace the printheads.
discharging inspection (printing paused)
Press Online to
clear error.
Clean left P Head
Condition detected
03800501-280D
Open top cover and
check the
printhead positions.
No right printhead
Install right
printhead.
No left printhead
Install left
printhead.
Paper size not
detected.
Press Load/Eject
and reload the
paper.
Paper size not
detected.
Press Load/Eject
and reload the
paper.
Paper size not
detected.
Press Load/Eject
and reload the
paper.
Paper size not
detected.
Press Load/Eject
and reload the
paper.
Cannot adjust
printhead.
Press Online to
clear the error
and readjust
printhead.
Cannot adjust
printhead.
Press Online to
clear the error
and readjust
printhead.
Hardware error.
03010000-2823
Turn off printer,
wait, then
turn on again.
Cannot print
as specified.
Press Load/Eject
and replace paper
with A4/LTR
(vertical) or larger
8-14
Chapter 8
Display massage
Cannot print
as specified.
Code*
Condition detected
Action
03010000-2E1F
Undersized paper loaded for internal
printing (A3 or larger)
Replace with A3/11"x17" or any larger-sized paper.
03010000-2E1F
Undersized paper loaded for internal
printing (roll media)
Replace with roll media at least 10 inches in width.
03010000-2E1F
The first sheet used for adjustment
printing or the like was A2 or largersized but the second sheet used was
smaller than A2.
Prepare about 10 sheets of A2 or larger-sized paper.
Replace with A2 or any larger-sized paper.
03010000-2E25
Feeding error
Remove the paper jam and reload the paper.
03010000-2E25
Paper jam while feeding/ejecting/
printing
Remove the paper jam and reload the paper.
03010000-2E27
Paper jam during feeding/printing/
ejection
Reload the paper.
03010000-200E
Undersized paper (cut sheets/roll
media)
Replace with larger-sized paper.
03010000-200F
Oversized paper (cut sheets/roll media) Replace with smaller-sized paper.
03010000-2016
Paper worked out of position while
printing
Reload the paper
03010000-2F33
Unadjustable because of transparent
media
Replace with adjustable media.
03016000-2010
Skew
Correct the skew in the paper and reload it.
03130000-2E21
IEEE1394 interface error
Check that the optionalIEEE1394 board is mounted.
Check the cable connection.
03061000-2E15
The first and second sheets used for
adjustment printing or the like differed
in paper type.
Prepare paper of the same type as used for the first
sheet for adjustment printing or the like.
03010000-200A
Unable to detect the paper width (Paper Reload the paper
loaded at an improper position)
03010000-2016
Paper jam during feeding/printing/
ejection
Press Load/Eject
and replace paper
with A3/11"x17"
(vertical) or larger
Cannot print
as specified.
Press Load/Eject
and replace roll
with 10 in. wide or
larger roll.
Cannot print
as specified.
Press Load/Eject
and replace paper
with A2/16.6"x23.4"
(vertical) or larger
Cannot feed paper.
Remove paper and
press Load/Eject.
Cannot detect papr
Remove paper and
press Load/Eject.
Cannot load.
Press Load/Eject
and reload the
paper.
This paper
cannot be used.
Check supported
paper sizes.
Load/Eject:
Change Paper
This paper
cannot be used.
Check supported
paper sizes.
Load/Eject:
Change Paper
No sheets.
Press Load/Eject
and reload the
paper.
Use another paper.
Press Online to
clear the error.
Paper loaded
askew.
Press Load/Eject
and reload the
paper.
Hardware error.
03130000-2E21
Turn off printer,
wait, then
turn on again.
Wrong paper type.
Stop: Stop Printing
Load/Eject:
Change Paper
Paper size not
detected.
Press Load/Eject
and reload the
paper.
Paper jam.
Reload the paper
Press Load/Eject
and reload the
paper.
8-15
Chapter 8
Display massage
Cannot feed paper.
Code*
Condition detected
Action
03010000-2016
Paper jam
Reload the paper
03010000-200C
Roll media loading size detection failure Reload the roll media.
03016000-2010
Skewed roll media
Rewind the roll media and reload them.
03010000-2822
Eccentricity correction disabled
Check to see if paper has not jammed.
03860200-2E02
Data with a cut sheet specification has
been received but no cut sheets are
loaded.
Load cut sheets at the paper tray port.
03860200-2E0A
Data with a roll media specification has Replace with roll media.
been received when a cut sheet tray is
loaded.
03060A00-2E00
Data with a roll media specification has Load roll media.
been received but no roll media are
loaded.
03060A00-2E0E
Roll media unit not installed
Install the roll media unit.
03060A00-2E1B
Roll media end
Renew the supply of roll media.
03061000-2E15
Paper type mismatch
Check the type of paper that can be fed and reload the
paper.
03862000-2E0C
Data with a cut sheet specification has
been received when roll media are
loaded.
Load cut sheets at the paper tray port.
03130031-291D
Spur cam sensor detection failure
Check the spur cam sensor.
03130031-2E23
Cutter unit failure
Check the cutter unit.
03130031-2F14
Writing to the ASIC register disabled
Replace the main controller PCB
03130031-2F16
Mist fan error
Check the mist fan.
Press Load/Eject
and reload the
paper.
Paper size not
detected.
Press Load/Eject
and reload the
paper.
Paper loaded
askew.
Press Load/Eject
and reload the
paper.
Cannot adjust
eccentric.
Press Online to
clear the error.
Cassette printing
is selected.
Press Load/Eject
and load sheets.
Roll printing is
selected, but sheets
are loaded.
Press Load/Eject and
remove the sheets.
Roll printing
is selected.
Press Load/Eject
and load a roll.
No Roll Feed Unit.
Turn printer off
and install roll
feed unit.
The roll is empty.
Load/Eject:
Change Paper
Wrong paper feed
slot for this paper
type.
Press Load/Eject
and reload the
paper.
Manual printing
is selected, but a
roll is loaded.
Press Load/Eject and
remove the roll.
Hardware error.
03130031-291D
Turn off printer,
wait, then
turn on again.
Hardware error.
03130031-2E23
Turn off printer,
wait, then
turn on again.
Hardware error.
03130031-2E14
Turn off printer,
wait, then
turn on again.
Hardware error.
03130031-2E16
Turn off printer,
wait, then
turn on again.
8-16
Chapter 8
Display massage
Hardware error.
03130031-2E17
Code*
Condition detected
Action
03130031-2F17
Suction fan lock detection error
Check the suction fan.
03130031-2F20
Pump motor cam position error
Check the purge unit.
03130031-2F22
Pump travel timeout
Check the purge unit.
03130031-2F23
Pump motor error
Pump inoperable
Check the purge unit.
03130031-2F24
Cutter travel timeout
Check the cutter unit.
03130031-2F25
Unable to detect the carriage motor
home position
Check the carriage unit. Check the linear encoder for
smears.
03130031-2F26
Carriage inoperable
Check the carriage unit and surrounding parts.
03130031-2F27
Carriage travel timeout
Check the carriage unit and surrounding parts.
03130031-2F17
Pump encoder sensor error
Check the purge unit.
03130031-2F2A
Unable to detect the feed roller home
position
Check the feed roller encoder and surrounding part.
Check to see if paper has not jammed.
03030000-2F29
Feed motor timeout (Roll media)
Check the roll feed unit. Check roll media. Check to
see if paper has not jammed in the printer.
03130031-2F2E
Roll travel timeout
Check the roll feed unit.
03130031-4027
Lift travel timeout error
Check the carriage unit and surrounding parts.
Turn off printer,
wait, then
turn on again.
Hardware error.
03130031-2E20
Turn off printer,
wait, then
turn on again.
Hardware error.
03130031-2E22
Turn off printer,
wait, then
turn on again.
Hardware error.
03130031-2E23
Turn off printer,
wait, then
turn on again.
Hardware error.
03130031-2E24
Turn off printer,
wait, then
turn on again.
Hardware error.
03130031-2E25
Turn off printer,
wait, then
turn on again.
Hardware error.
03130031-2E26
Turn off printer,
wait, then
turn on again.
Hardware error.
03130031-2E27
Turn off printer,
wait, then
turn on again.
Hardware error.
03130031-2E17
Turn off printer,
wait, then
turn on again.
Hardware error.
03130031-2E2A
Turn off printer,
wait, then
turn on again.
Hardware error.
03130031-2E29
Turn off printer,
wait, then
turn on again.
Hardware error.
03130031-2E2E
Turn off printer,
wait, then
turn on again.
Hardware error.
03130031-4027
Turn off printer,
wait, then
turn on again.
8-17
Chapter 8
Display massage
Hardware error.
03130031-2E13
Code*
Condition detected
A/D converter external trigger output
stop detection hardware error 1
If both printheads are signaled faulty, take the
following corrective action:
1) Replace the left printhead with a normal one.
2) Because the error indication lasts, turn the printer
off, then back on.
3) Replace the right printhead with a normal one, as
the automatic replacement of the right printhead is
suggested.
If a printhead is not at fault, replace the main controller
board.
03130031-2F32
Multi sensor error
Check the environment for interferences from outside
light.
Replace the multi sensor unit.
03130031-2F34
Color calibration adjustment failure
error
Check the environment for interferences from outside
light.
Replace the multi sensor unit.
03130031-2F35
Color calibration disabled
Check the parts counter in service mode.
Replace the multi sensor unit.
03130031-2F3A
Valve motor error
Check the ink supply unit.
03130031-2F3B
CS communication error
Remove the ink tanks and then reload them.
Check the main controller PCB.
0130031-260E
Gap detection error
Check the carriage unit and surrounding parts.
Replace the main controller PCB.
03130031-2618
VH voltage error
Check the power supply unit.
03130031-260F
Gap reference surface error
Replace the reference surface sheet.
03060A00-2E24
Roll feed unit failure
Replace the roll feed unit.
03900001-4049
ROM data for another model has been
transferred.
Transmit valid ROM data.
03900001-4042
MIT data transfer failure
Verify the validity of MID data before transferring it.
03130031-291A
Roll sensor detection failure
Check the roll feed unit.
03130031-2F2B
LF operation failure
Check to see if paper has not jammed.
Check the feed motor and feed roller.
Turn off printer,
wait, then
turn on again.
Hardware error.
03130031-2E32
Action
03130031-2F13
Turn off printer,
wait, then
turn on again.
Cannot calibrate.
Press OK and try
calibration again.
Calibration
There is a problem
with the
multi-sensor.
Press OK to cancel
calibration.
Hardware error.
03130031-2F3A
Turn off printer,
wait, then
turn on again.
Hardware error.
03130031-2F3B
Turn off printer,
wait, then
turn on again.
Hardware error.
03130031-260E
Turn off printer,
wait, then
turn on again.
Hardware error.
03130031-2618
Turn off printer,
wait, then
turn on again.
Hardware error.
03130031-260F
Turn off printer,
wait, then
turn on again.
Roll feed unit err
Turn off printer and
check roll feed unit
Unknown file.
Check file format.
Turn off printer,
wait a while, then
turn it on again.
Unknown file.
Check file format.
Turn off printer,
wait a while, then
turn it on again.
Roll sensor
cannot detect.
Turn on printer
again.
Hardware error.
03130031-2F2B
Turn off printer,
wait, then
turn on again.
8-18
Chapter 8
Display massage
Code*
Condition detected
Action
Right printhead
error
Open top cover and
replace the right
printhead.
03800201-2802
Invalid printhead R installed
Replace printhead R
Left printhead
error
Open top cover and
replace the left
printhead.
03800202-280A
Invalid printhead L installed
Replace printhead L
Right printhead
error
Open top cover and
replace the right
printhead.
03800301-2801
Printhead R DI compensation failure
Replace printhead R
Left printhead
error
Open top cover and
replace the left
printhead.
03800302-2809
Printhead L DI compensation failure
Replace printhead L
Right printhead
error
Open top cover and
replace the right
printhead.
03800401
-2803
Printhead R EEPROM error
Replace printhead R
Left printhead
error
Open top cover and
replace the left
printhead.
03800402-280B
Printhead L EEPROM error
Replace printhead L
Right printhead
error
Open top cover and
replace the right
printhead.
03800201-2812
Wrong printhead model installed on
printhead R
Install printhead PF-03 on printhead R.
Left printhead
error
Open top cover and
replace the left
printhead.
03800202-2813
Wrong printhead model installed on
printhead L
Install printhead PF-03 on printhead L.
Hardware error.
03800500-2F2F
03800500-2F2F
Non-discharging error
Identify the non-discharging unit
Replace the non-discharging unit
Replace the printheads
03800500-2F30
Non-discharging position adjustment
error
Identify the non-discharging unit
Replace the non-discharging unit
Replace the printheads
Ink tank is empty.
Press OK and
replace ink tank.
03810104
-2500
Bk ink tank empty
Renew the Bk ink tank
Ink tank is empty.
Press OK and
replace ink tank.
03810101-2501
Y ink tank empty
Renew the Y ink tank
Ink tank is empty.
Press OK and
replace ink tank.
03810102
-2502
M ink tank empty
Renew the M ink tank
Ink tank is empty.
Press OK and
replace ink tank.
03810103
-2503
C ink tank empty
Renew the C ink tank
Ink tank is empty.
Press OK and
replace ink tank.
03810112
-2504
PM ink tank empty
Renew the PM ink tank
Ink tank is empty.
Press OK and
replace ink tank.
03810113-2505
PC ink tank empty
Renew the PC ink tank
Ink tank is empty.
Press OK and
replace ink tank.
03810106-2506
MBk ink tank empty
Renew the MBk ink tank
Ink tank is empty.
Press OK and
replace ink tank.
03810106-2507
MBk2 ink tank empty
Renew the MBk ink tank
Ink tank is empty.
Press OK and
replace ink tank.
03810105
-2508
GY ink tank empty
Renew the GY ink tank
Ink tank is empty.
Press OK and
replace ink tank.
03810115-2509
PGY ink tank empty
Renew the PGY ink tank
Turn off printer,
wait, then
turn on again.
Hardware error.
03800500-2F30
Turn off printer,
wait, then
turn on again.
8-19
Chapter 8
Display massage
8-20
Code*
Condition detected
Action
Ink tank is empty.
Press OK and
replace ink tank.
03810107
-250A
R ink tank empty
Renew the R ink tank
Ink tank is empty.
Press OK and
replace ink tank.
03810109
-250B
B ink tank empty
Renew the B ink tank
Ink tank is empty.
Press OK and
replace ink tank.
03810108
-250C
G ink tank empty
Renew the G ink tank
Ink insufficient.
Press OK and
replace ink tank.
03810204-2580
Low on the Bk ink tank (as during
cleaning)
Replace with a fully replenished Bk ink tank
Ink insufficient.
Press OK and
replace ink tank.
03810201-2581
Low on the Y ink tank (as during
cleaning)
Replace with a fully replenished Y ink tank
Ink insufficient.
Press OK and
replace ink tank.
03810202-2582
Low on the M ink tank (as during
cleaning)
Replace with a fully replenished M ink tank
Ink insufficient.
Press OK and
replace ink tank.
03810203-2583
Low on the C ink tank (as during
cleaning)
Replace with a fully replenished C ink tank
Ink insufficient.
Press OK and
replace ink tank.
03810212-2584
Low on the PM ink tank (as during
cleaning)
Replace with a fully replenished PM ink tank
Ink insufficient.
Press OK and
replace ink tank.
03810213-2585
Low on the PC ink tank (as during
cleaning)
Replace with a fully replenished PC ink tank
Ink insufficient.
Press OK and
replace ink tank.
03810206-2586
Low on the MBk ink tank (as during
cleaning)
Replace with a fully replenished MBk ink tank
Ink insufficient.
Press OK and
replace ink tank.
03810205-2588
Low on the GY ink tank (as during
cleaning)
Replace with a fully replenished GY ink tank
Ink insufficient.
Press OK and
replace ink tank.
03810215-2589
Low on the PGY ink tank (as during
cleaning)
Replace with a fully replenished PGY ink tank
Ink insufficient.
Press OK and
replace ink tank.
03810207-258A
Low on the R ink tank (as during
cleaning)
Replace with a fully replenished R ink tank
Ink insufficient.
Press OK and
replace ink tank.
03810209-258B
Low on the B ink tank (as during
cleaning)
Replace with a fully replenished B ink tank
Ink insufficient.
Press OK and
replace ink tank.
03810208-258C
Low on the G ink tank (as during
cleaning)
Replace with a fully replenished G ink tank
Ink insufficient.
Press OK and
replace ink tank.
03810204-2590
Low on the Bk ink tank (during preprinting checks)
Replace with a fully replenished Bk ink tank
Ink insufficient.
Press OK and
replace ink tank.
03810201-2591
Low on the Y ink tank (during preprinting checks)
Replace with a fully replenished Y ink tank
Ink insufficient.
Press OK and
replace ink tank.
03810202-2592
Low on the M ink tank (during preprinting checks)
Replace with a fully replenished M ink tank
Ink insufficient.
Press OK and
replace ink tank.
03810203-2593
Low on the C ink tank (during preprinting checks)
Replace with a fully replenished C ink tank
Ink insufficient.
Press OK and
replace ink tank.
03810212-2594
Low on the PM ink tank (during preprinting checks)
Replace with a fully replenished PM ink tank
Ink insufficient.
Press OK and
replace ink tank.
03810213-2595
Low on the PC ink tank (during preprinting checks)
Replace with a fully replenished PC ink tank
Ink insufficient.
Press OK and
replace ink tank.
03810206-2596
Low on the MBk ink tank (during preprinting checks)
Replace with a fully replenished MBk ink tank
Ink insufficient.
Press OK and
replace ink tank.
03810205-2598
Low on the GY ink tank (during preprinting checks)
Replace with a fully replenished GY ink tank
Ink insufficient.
Press OK and
replace ink tank.
03810215-2599
Low on the PGY ink tank (during preprinting checks)
Replace with a fully replenished PGY ink tank
Ink insufficient.
Press OK and
replace ink tank.
03810207-259A
Low on the R ink tank (during preprinting checks)
Replace with a fully replenished R ink tank
Ink insufficient.
Press OK and
replace ink tank.
03810209-259B
Low on the B ink tank (during preprinting checks)
Replace with a fully replenished B ink tank
Chapter 8
Display massage
Code*
Condition detected
Action
Ink insufficient.
Press OK and
replace ink tank.
03810208-259C
Low on the G ink tank (during preprinting checks)
Replace with a fully replenished G ink tank
Ink tank error.
03830204-2540
Bk ink tank ID error
Replace with a valid Bk ink tank
03830201-2541
Y ink tank ID error
Replace with a valid Y ink tank
03830202-2542
M ink tank ID error
Replace with a valid M ink tank
03830203-2543
C ink tank ID error
Replace with a valid C ink tank
03830212-2544
PM ink tank ID error
Replace with a valid PM ink tank
03830213-2545
PC ink tank ID error
Replace with a valid PC ink tank
03830206-2546
MBk ink tank ID error
Replace with a valid MBk ink tank
03830206-2547
MBk2 ink tank ID error
Replace with a valid MBk ink tank
03830205-2548
GY ink tank ID error
Replace with a valid GY ink tank
03830215-2549
PGY ink tank ID error
Replace with a valid PGY ink tank
03830207-254A
R ink tank ID error
Replace with a valid R ink tank
03830209-254B
B ink tank ID error
Replace with a valid B ink tank
03830208-254C
G ink tank ID error
Replace with a valid G ink tank
No ink tank
loaded.
Press OK and
check ink tank.
03830104-2520
BK ink tank not installed
Install a Bk ink tank
No ink tank
loaded.
Press OK and
check ink tank.
03830101-2521
Y ink tank not installed
Install a Y ink tank
No ink tank
loaded.
Press OK and
check ink tank.
03830102-2522
M ink tank not installed
Install a M ink tank
No ink tank
loaded.
Press OK and
check ink tank.
03830103-2523
C ink tank not installed
Install a C ink tank
No ink tank
loaded.
Press OK and
check ink tank.
03830112-2524
PM ink tank not installed
Install a PM ink tank
No ink tank
loaded.
Press OK and
check ink tank.
03830113-2525
PC ink tank not installed
Install a PC ink tank
No ink tank
loaded.
Press OK and
check ink tank.
03830106-2526
MBK ink tank not installed
Install a MBk ink tank
Press OK and
replace ink tank.
Ink tank error.
Press OK and
replace ink tank.
Ink tank error.
Press OK and
replace ink tank.
Ink tank error.
Press OK and
replace ink tank.
Ink tank error.
Press OK and
replace ink tank.
Ink tank error.
Press OK and
replace ink tank.
Ink tank error.
Press OK and
replace ink tank.
Ink tank error.
Press OK and
replace ink tank.
Ink tank error.
Press OK and
replace ink tank.
Ink tank error.
Press OK and
replace ink tank.
Ink tank error.
Press OK and
replace ink tank.
Ink tank error.
Press OK and
replace ink tank.
Ink tank error.
Press OK and
replace ink tank.
8-21
Chapter 8
Display massage
Code*
Condition detected
Action
No ink tank
loaded.
Press OK and
check ink tank.
03830106-2527
MBK2 ink tank not installed
Install a MBk ink tank
No ink tank
loaded.
Press OK and
check ink tank.
03830105-2528
GY ink tank not installed
Install a GY ink tank
No ink tank
loaded.
Press OK and
check ink tank.
03830115-2529
PGY ink tank not installed
Install a PGY ink tank
No ink tank
loaded.
Press OK and
check ink tank.
03830107-252A
R ink tank not installed
Install a R ink tank
No ink tank
loaded.
Press OK and
check ink tank.
03830109-252B
B ink tank not installed
Install a B ink tank
No ink tank
loaded.
Press OK and
check ink tank.
03830108-252C
G ink tank not installed
Install a G ink tank
Ink tank:BK error
03830304-2560
Bk ink tank EEPROM error
Renew the Bk ink tank
03830304-2561
Y ink tank EEPROM error
Renew the Y ink tank
03830304-2562
M ink tank EEPROM error
Renew the M ink tank
03830304-2563
C ink tank EEPROM error
Renew the C ink tank
03830304-2564
PM ink tank EEPROM error
Renew the PM ink tank
03830304-2565
PC ink tank EEPROM error
Renew the PC ink tank
03830304-2566
MBk ink tank EEPROM error
Renew the MBk ink tank
03830304-2567
MBk2 ink tank EEPROM error
Renew the MBk ink tank
03830304-2568
GY ink tank EEPROM error
Renew the GY ink tank
03830304-2569
PGY ink tank EEPROM error
Renew the PGY ink tank
03830304-256A
R ink tank EEPROM error
Renew the R ink tank
03830304-256B
B ink tank EEPROM error
Renew the B ink tank
03830304-256C
G ink tank EEPROM error
Renew the G ink tank
03031000-2E0F
Top cover abnormally open
Close the top cover and turn on the printer again.
Press OK and
replace ink tank.
Ink tank:BK error
Press OK and
replace ink tank.
Ink tank:BK error
Press OK and
replace ink tank.
Ink tank:BK error
Press OK and
replace ink tank.
Ink tank:BK error
Press OK and
replace ink tank.
Ink tank:BK error
Press OK and
replace ink tank.
Ink tank:BK error
Press OK and
replace ink tank.
Ink tank:BK error
Press OK and
replace ink tank.
Ink tank:BK error
Press OK and
replace ink tank.
Ink tank:BK error
Press OK and
replace ink tank.
Ink tank:BK error
Press OK and
replace ink tank.
Ink tank:BK error
Press OK and
replace ink tank.
Ink tank:BK error
Press OK and
replace ink tank.
Top cover is open.
Turn off printer,
wait a while, and
turn it on again.
8-22
Chapter 8
Display massage
Ink tank cover
is open.
Code*
Condition detected
Action
03031000-2E10
Ink tank cover abnormally open
Close the ink tank cover and turn on the printer again.
03841001-2819
Maintenance cartridge full
Renew the maintenance cartridge.
03841001-281B
Not enough space in the maintenance
cartridge prior to cleaning
Replace the maintenance cartridge.
03841101-2818
Maintenance cartridge not available
Set a maintenance cartridge.
Insert the maintenance cartridge fully into position.
03841201-2816
Maintenance cartridge EEPROM error
Renew the maintenance cartridge.
03841201-2817
Maintenance cartridge ID error
Renew the maintenance cartridge.
03860002-2E0A
Data with a roll media specification has Reload the cut sheets.
been received when a sheet tray is
loaded.
Borderless printng
not possible. Check
roll width and
spacers.
Online: Print
Load/Eject:
Change Paper
03861001-2405
Paper loaded at a position inaccessible
for borderless printing
Check to see if a borderless printing spacer is installed.
Reload the paper.
Borderless printng
not possible. Check
paper size setting.
03861001-2406
Data unfit for borderless printing
Check the paper size.
Change the paper size.
03862000-2E09
Not enough roll media on remaining roll Renew the supply of roll media.
media quantity detection
03063000-2E08
Mismatch between data width and paper Verify the paper size setting.
width
03870001-2015
Cutting failure
Mail box full.
Delete unwanted data on your
computer to resume printing.
Press Stop to cancel printing.
031A1002-2905
The job store executed when the free
Delete unneeded jobs stored in Personal Boxes.
hard disk space left for Personal Boxes
in the printer's hard disk is full.
Mail box full.
Cannot save. Delete unwanted
data on your computer to resume
printing.
Press Stop to cancel printing.
031A1002-2906
The store executed when 32 jobs are
stored in the Personal Box.
Turn off printer,
wait a while, and
turn it on again.
Maintenance
cartridge full.
Replace
the maintenance
cartridge.
No Maintenance
Cartridge capacity.
Replace
the maintenance
cartridge.
No maintenance
cartridge.
Check
the maintenance
cartridge.
Maintenance
cartridge problem.
Replace
the maintenance
cartridge.
Maintenance
cartridge problem.
Replace
the maintenance
cartridge.
Roll printing is
selected, but sheets
are loaded.
Press OK,
remove the sheets,
and load a roll.
Online: Print
Load/Eject:
Change Paper
Insufficient paper
for job
Online: Print
Stop: Stop Printing
Load/Eject:
Change Paper
Wrong paper size.
Check paper size
setting on computer.
Online: Print
Stop: Stop Printing
Cannot cut paper.
Cut paper manually.
Check the cutter.
Press Load/Eject
and reload the
paper.
Delete unneeded jobs stored in Personal Boxes.
8-23
Chapter 8
Display massage
Condition detected
Action
031A1001-2908
Hard disk format error
Press the [OK] button to start reformatting the hard
disk. When formatting is finished, the printer
automatically restarts.
File read error.
031A1006-2909
Hard disk file error
Restart the printer. Only the corrupted files will be
deleted, and the printer will restart.
Turn off printer, wait a while, and
turn it on again.
Invalid files will be deleted.
8-24
Code*
Hard disk error.
Press OK to reformat
Chapter 8
8.4 Sevice Call Table
8.4.1 Service Call Errors
0016-8357
iPF6100
*Codes correspond to the numbers shown on the DISPLAY in the service mode.
T-8-6
Code*
Description
Action
E141-4046
Number of recovery rotations reaching
50,000 or more
Replace the purge kit, and then clear the parts counter in
the service mode.
E144-4047
Ink supply count error
Replace the ink supply unit, and then clear the parts
counter in the service mode.
E146-4001
Borderless/flow idle ejection/mist recovery Replace the platen duct or mist fan or mist filter or
count error
suction fan, and then clear the parts counter in the service
mode.
E161-403E
Abnormal temperature rise in printhead R Replace the printhead R.
E161-403F
Abnormal temperature rise in printhead L
Replace the printhead L.
E194-404A
Non-discharging nozzle count error
Replace the head management sensor unit, and then clear
the parts counter in the service mode.
E196-4034
Multi sensor unit version error
Replace the multi sensor unit.
E196-4040
Checksum error
Replace the main controller PCB.
E196-4041
Flash memory erase error
Replace the main controller PCB.
E196-4042
Flash memory write error
Replace the main controller PCB.
E196-4045
EEPROM write error
Replace the main controller PCB.
E196-404C
Serial number mismatch between boards
Execute PCB replacement mode or replace the main
controller PCB.
E196-404D
Machine ID mismatch between boards
Replace the main controller PCB.
E196-404E
EEPROM read error
Replace the main controller PCB.
E198-401C
RTC error
Replace the lithium battery or replace the main controller
PCB.
E198-401D
RTC low battery error
Replace the lithium battery or replace the main controller
PCB.
E198-401E
RTC clock stop
Replace the lithium battery or replace the main controller
PCB.
E199-404B
Temperature/humidity sensor board
connector out of position
Check the temperature/humidity sensor board connector
or replace the board.
8.4.2 Service Call Errors
0020-2192
iPF6200 / iPF6000S
*Codes correspond to the numbers shown on the DISPLAY in the service mode.
T-8-7
Code*
Description
Action
E141-4046
Number of recovery rotations reaching
50,000 or more
Replace the purge kit, and then clear the parts counter in
the service mode.
E144-4047
Ink supply count error
Replace the ink supply unit, and then clear the parts
counter in the service mode.
E146-4001
Borderless/flow idle ejection/mist recovery Replace the platen duct or mist fan or mist filter or
count error
suction fan, and then clear the parts counter in the service
mode.
E161-403E
Abnormal temperature rise in printhead R Replace the printhead R.
E161-403F
Abnormal temperature rise in printhead L
Replace the printhead L.
E194-404A
Non-discharging nozzle count error
Replace the head management sensor unit, and then clear
the parts counter in the service mode.
E196-4034
Multi sensor unit version error
Replace the multi sensor unit.
8-25
Chapter 8
Code*
E196-4040
8-26
Description
Checksum error
Action
Replace the main controller PCB.
E196-4041
Flash memory erase error
Replace the main controller PCB.
E196-4042
Flash memory write error
Replace the main controller PCB.
E196-4045
EEPROM write error
Replace the main controller PCB.
E196-404C
Serial number mismatch between boards
Execute PCB replacement mode or replace the main
controller PCB.
E196-404D
Machine ID mismatch between boards
Replace the main controller PCB.
E196-404E
EEPROM read error
Replace the main controller PCB.
E198-401C
RTC error
Replace the lithium battery or replace the main controller
PCB.
E198-401D
RTC low battery error
Replace the lithium battery or replace the main controller
PCB.
E198-401E
RTC clock stop
Replace the lithium battery or replace the main controller
PCB.
E199-404B
Temperature/humidity sensor board
connector out of position
Check the temperature/humidity sensor board connector
or replace the board.
E602-401A
HDD failure
Replace the HDD unit.
E602-401B
HDD connection error
Check the HDD connector/Replace the HDD unit.
Aug 13 2008