1
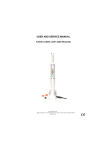
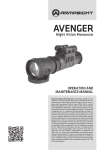
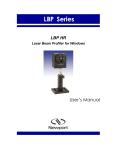
PRODUCTION AMALGAMATION
“NOVOSIBIRSK INSTRUMENT MAKING PLANT”
NIGHT VISION MONOCULAR
“HELIOS - 01”
SERVICE MANUAL
3.803.106 РЭ
CONTENTS
page
1 Application
4
2 Specifications
7
3 Standard Equipment
8
4 Design and Principle of Operation
8
5 Preparation for Operation and Order of Operation
12
6 Maintenance18
7 Rules of Storage
18
8 Possible Troubles and Trouble-Shooting
19
9 Acceptance Certificate
20
10 Warranty21
12.03
10.05.06
The monocular is subject to continuous development and
improvement, consequently it may incorporate minor changes in
detail from the information contained herein.
1 APPLICATION
Night vision monocular “Helios - 01” (here and after as monocular)
is intended for observation and terrain orientation at night by natural
light of the Moon and stars as well as in conditions of low illumination
intensity and in full darkness.
Monocular is completed with adapters M49x0.75 and M37x0.75,
which are allow to mount a monocular on camera and video camera
and to operate at night.
An eyepiece of monocular has a diopter laying which allows adjusting
it by user’s eye.
Electrical diagram of monocular allow to protect am image converter
from the intensive light at night.If bright lighting gets into the monocular
objective the screen of the image converter goes out for some period
of time.
Design of monocular provides a mechanical safety and protection
from the rain, snow and dust.
The monocular can operate at the ambient temperature from minus
40°C to 40°C and relative humidity of maximum 80% at the temperature
of 25°C.
The monocular is not injurious to health. It is not necessary to take
special measures to protect a user.
A present of small spots on the screen have not influence on operation
of product.
ATTENTION !
It is not recommended to make the following:
DO NOT DISASSEMBLE A PRODUCT AND SWITCH IT!
DO NOT CONNECT THE PRODUCT TO SUPPLY UNIT WITH
TENSION MORE THAN 1.5V !
DO NOT SWITCH THE MONOCULAR ON IN DAYLIGHT WITH THE
PROTECTIVE LENS COVER REMOVED !
DO NOT DIRECT THE MONOCULAR AT BRIGHT SOURCES OF
LIGHT !
2 SPECIFICATIONS
Range of visibility,m,not less
without illuminator:
by natural light of the Moon
upto 250
at moonless night
upto 100
in the full darkness with the use of illuminator upto 100
Angular field of view, ..., not less
20
Magnification in the center of field of view, fold, not less
1.8
Range of diopter laying of eyepiece, diopter, not less
±4
Range of objective focusing, m
0.5... ∞
Time of switching, sec, not less
2
Supply unit
two A-316 (AA) dry batteries
Voltage supply at the temperature of 20°5°C,mA, not more:
without illuminator
30
with illuminator
125
Mass, kg, not less
without bag
0.915
with bag
1.115
Overall dimensions, mm, not less
190x90x75
3 STANDARD EQUIPMENT
page
pcs.
Night Vision Monocular “Helios-01”
1
Light filter
1 in bag
Adapter M49x0.75
1 in bag
Supply unit2
Carrying bag
1
Packing box
1
Service manual
1
4 DESIGN AND PRINCIPLE OF OPERATION
The monocular is a complex optoelectronics system for individual
use. Its principle of operation is based on conversion (intensification)
of the image of an objects of low brightness into the visible image at
night by natural light of Moon the stars and so on as well as conversion
(intensification) of IR illumination of various objects to be invisible by
eye into the visible one. The user sees a magnified image of object.
The monocular consists of an objective lens 3 (Fig.1), eyepiece 10
and body 6. The body 6 contains an image converter and two battery
housings 5.
1
2
3
14
4 5
6
7
8 9
10 11 12 13
15
Fig. 1 General view
The objective lens has a protected cover 1.
Eyeshield 12 provides a convenient operation and to protect an eye
from damage.
IR illuminator 4 is located on the body 6. The button to be intended
for switching of image converter 8 and switch 9 of the illuminator are
located on the cover of body. When the switch is disposed in red spot,
the product is switched on. Electrical diagram of monocular allows to
protect am image converter from the intensive light at night.If bright
lighting gets into the monocular objective the screen of the image
converter goes out for some period of time.
For convenience the monocular is supplied with a belt 7 and a
carrying bag. The monocular, light filter and two cells are packed into
the carrying bag.
The light filter 2 is intended for checking of operation of product and
observation for various objects at high level of illumination.
Adapter 13 is intended for mounting of camera and video camera on
10
monocular. Monocular is completed with strap 7 and bag.
The design of the product allows using other photoobjectives, which
have an operating length of 45.5 mm and connecting size of M 42x1.
11
5 Preparation for Operation and ORDER OF OPERATION
Before operation:
- install the batteries into the battery housing with the polarity order
shown on the covers;
- screw up the covers 5 (Fig.1) into the body 6 to stop.
- remove the protective cover 1 from the objective lens, put a light
filter 2, switch the monocular pressing a button 8;
- make sure of the green luminance of the phosphor screen which is
due to appear not later that in 2 seconds after the monocular has been
switched on.
The monocular can operate without light filter at night.
To use a monocular at night it is necessary to shut a diaphragm
rotating a ring 15 and to switch the monocular pressing a button 8.
The brightness of screen illumination can be adjusted with diaphragm
to be located in objective lens.
- switch the monocular pressing the button 8 keeping up the level of
brightness of screen illumination.
- rotating a ring 11 of eyepiece 10 and ring 14 of objective lens one
12
should achieve a sharp image of object.
At night or in full darkness one should switch IR illuminator 4 with the
use of switch 9.
When the work is over, the batteries are to be removed from the
battery housings, the objective lens is to be covered and the monocular
is to be put into the case.
When using the monocular together with a camera it is necessary
to:
- screw up an eyeshield 12 from eyepiece 10;
- screw an adapter 13 in theeyepiece of monocular (Fig.2);
- open a diaphragm of objective lens;
- connect the camera to monocular as it is shown on figure 3;
- switch a monocular.
Rotating a ring 11 of eyepiece 10 and ring of objective lens of
monocular and camera one should achieve a sharp image of object.
13
Fig. 2 Mounting of adapter on monocular
14
The brightness of screen illumination can be adjusted with ring 15.
To make an adjustment of camera one should read a service manual
for camera.
To remove a camera from monocular one should make all above
points in the other way.
Fig. 3 Mounting of camera on monocular
15
When the work is over, the batteries are to be removed from the
battery housings, the objective lens is to be covered and the monocular
is to be put into the case.
When using the monocular together with a video camera it is
necessary to:
- screw up an eyeshield 12 from eyepiece 10;
- screw a video camera on eyepiece 10 by thread as it is shown on
figure 4.
- switch a video camera;
- switch a monocular;
To make an adjustment of video camera one should read a service
manual for video camera.
The brightness of screen illumination can be adjusted with ring 15.
To remove a video camera from monocular one should make all
above points in the other way.
When the work is over, the batteries are to be removed from the
battery housings, the objective lens is to be covered and the monocular
is to be put into the case.
16
Fig. 4 Mounting of videocamera on monocular
17
6 MAINTENANCE
The monocular must be kept clean and protected from dust, shocks
and friction of the optical surfaces. A cotton cloth to be wet with purified
alcohol is to be used to clean optical surfaces. It is not recommended
to use other alcoholic substances. In non-working time the monocular
is to be kept in the case.
7 RULES OF STORAGE
The monocular is to be stored in the heated rooms. For long storage
it is recommended to remove batteries from the battery housings and
keep them in the battery pockets of the carrying case.
18
8 POSSIBLE TROUBLES AND TROUBLES-SHOOTING
Troubles
Probable reason
No luminance of the The batteries are instalscreen after switching led in the wrong order.
the device on
The
batteries
are
discharged.
The objective lens is
covered.
Week
screen The
batteries
are
luminance
discharged.
The objective lens is
covered.
Not sharp image
The objective lens or
eyepiece
are
not
focused.
Troubles-Shooting
Install the batteries right
order.
Change the batteries.
Remove the cover.
Have the device repaired
Change the batteries.
Remove the cover.
Focus the objective lens
and adjust the eyepiece.
No luminance of the The protective scheme Get the bright light source
screen in the presence operates.
out of the field of view.
of the bright source
of light in the field of
view
19
9 ACCEPTANCE CERTIFICATE
Night Vision Monocular “Helios - 01” , serial № _____________ , is in
compliance with specifications and found fit for service.
Date of manufacture ______________
Signature _______________________
20
10 WARRANTY
The producer guarantees the conformity of night vision monocular
to technical specifications in the case the user observes all the
requirements to operation, transportation and storage.
The claims are not admitted in the event of a failure, which is due
to careless use violation of the rules of operation, transportation and
storage.
The Producer offers a 12 months’ guarantee since the monocular
has been bought (if sold by retail) or received by the user (if not sold
by retail).
The guarantee does not apply to batteries.
21