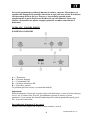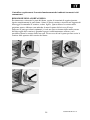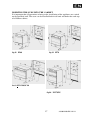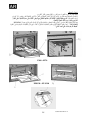
1
FORNI A GAS DA INCASSO ISTRUZIONI D’INSTALLAZIONE USO E MANUTENZIONE MOD. FI60 – FI70 - FINC90 – FISC90 – FI TWIN (GE) GRILL ELETTRICO (GG) GRILL GAS (GEV) GRILL ELETTRICO VENTILATO (GGV) GRILL GAS VENTILATO INDICE GUIDA ALL’UTILIZZO AVVERTENZA GENERALI GUIDA ALL’USO DEL FORNO PANNELLO COMANDI FUNZIONI DEL FORNO POSIZIONE GRIGLIE INTERNE UTILIZZO DEL GRILL GRILL ELETTRICO BRUCIATORE GRILL BRUCIATORE FORNO OROLOGIO ELETTRONICO OE CONTAMINUTI MECCANICO CM MANUTENZIONE E PULIZIA ANOMALIE DI FUNZIONAMENTO RIMOZIONE DELLA PORTA FORNO SOSTITUZIONE DELLA LAMPADA FORNO pagina 3 6 6 7 9 9 10 10 10 11 12 13 13 14 15 ISTRUZIONI PER L’INSTALLAZIONE VENTILAZIONE LOCALI D’USO CARATTERISTICHE DEL MOBILE INSERIMENTO DEL FORNO NEL MOBILE ALLACCIAMENTO ELETTRICO DEL FORNO MONTAGGIO/SOSTITUZIONE DEL CAVO DI ALIMENTAZIONE COLLEGAMENTO A TERRA ALLACCIAMENTO ALLA RETE GAS ADATTAMENTO AI DIVERSI TIPI DI GAS REGOLAZIONE DEL MINIMO DEL TERMOSTATO ASSISTENZA TECNICA E RICAMBI TABELLE DATI TECNICI 2 15 16 16 17 18 19 19 19 20 22 23 24 9880022200-IT-241111 AVVERTENZE GENERALI Questo prodotto è conforme alla Direttiva EU 2002/96/EEC. Il simbolo del cestino barrato riportato sull’apparecchio indica che il prodotto alla fine della propria vita utile, dovendo essere trattato separatamente dai rifiuti domestici, deve essere conferito in un centro di raccolta differenziata per apparecchiature elettriche ed elettroniche oppure riconsegnato al rivenditore al momento dell’acquisto di una nuova apparecchiatura equivalente. L’utente è responsabile del conferimento dell’apparecchio a fine vita nelle appropriate strutture di raccolta, pena le sanzioni previste dalla vigente legislazione sullo smaltimento rifiuti L’adeguata raccolta differenziata per l’avvio successivo dell’apparecchio dismesso al riciclaggio, al trattamento e allo smaltimento compatibile con l’ambiente contribuisce ad evitare possibili effetti negativi sull’ambiente e sulla salute e favorisce il riciclo dei materiali di cui è composto il prodotto. Per informazioni più dettagliate inerenti i sistemi di raccolta disponibili, rivolgersi al servizio locale di smaltimento rifiuti, o al negozio in cui è stato effettuato l’acquisto. Il produttore declina ogni responsabilità civile e penale in caso di cattiva o impropria installazione dell’apparecchio. Il produttore si riserva altresì il diritto di apportare ai propri prodotti modifiche che si ritenessero necessarie ed utili, senza alcun obbligo di preavviso. Non disperdere le diverse componenti dell’imballaggio, ma smaltirle in conformità alle norme locali per lo smaltimento rifiuti. Prima dell’installazione o dell’utilizzo di questa apparecchiatura è necessario leggere attentamente questo manuale di istruzioni al fine di disporre di tutte le informazioni necessarie per una corretta installazione, manutenzione ed uso della stessa. E’ molto importante che questo libretto d’istruzioni sia conservato assieme all’apparecchio per tutta la sua durata di vita, anche in caso di trasferimento ad altre persone. Questo apparecchio è stato concepito per il solo uso domestico di cottura e riscaldamento cibi. Ogni altro uso, diverso da quanto indicato nel presente libretto è da considerarsi improprio e conseguentemente pericoloso. Il prodotto è conforme alla Direttiva Europea 89/109/CEE in quanto destinato a venire in contatto con prodotti alimentari Questo elettrodomestico è conforme alle prescrizioni delle direttive comunitarie europee - DIRETTIVA BASSA TENSIONE – 2006/95/CE - DIRETTIVA GAS 2009/142/CE - DIRETTIVA COMPATIBILITA’ ELETTROMAGNETICA 2004/108/CE I dati identificativi del prodotto sono riportati nell’apposita targhetta applicata nella facciata interna del forno. La targhetta non deve essere mai rimossa 3 9880022200-IT-241111 L’installazione deve essere eseguita solamente da personale qualificato nel rispetto delle norme locali vigenti e seguendo quanto indicato in questo manuale. Importante: non sollevare o tirare il forno per la maniglia. Nel caso di malfunzionamento, provvedere a scollegare l’apparecchio dalla rete elettrica (non tirare il cavo di alimentazione per staccare la spina) ed interpellare il Centro di Assistenza Tecnica, autorizzato ad esigere ricambi originali. Prima di qualsiasi manutenzione chiudere il rubinetto dell’impianto del gas. Non provare in nessun caso a riparare da voi stessi l’apparecchio. Uso corretto del forno - L’uso dell’apparecchio è destinato solo a persone adulte, tenere lontani i bambini - L’apparecchio produce calore sia in fase di funzionamento che, per inerzia, anche appena spento. Non toccare le parti interne del forno durante queste fasi e limitare il contatto con le parti esterne. Tenere lontani i bambini dall’apparecchio in funzione, le parti accessibili possono diventare molto calde - Per inserire o estrarre i recipienti o gli accessori del forno, usare sempre dei guanti protettivi idonei - Usare solo recipienti in grado di resistere alle alte temperature - Non lasciare incustodito l’apparecchio durante le cotture che possono liberare grassi od oli che potrebbero incendiarsi - Non rivestire ne appoggiare mai alle pareti o alla parte inferiore del forno, fogli di alluminio o altri oggetti come teglie o vassoi che potrebbero danneggiare il prodotto - Non utilizzare il forno come portaoggetti quando non è in uso, nel caso vengano dimenticati all’interno dopo la sua accensione possono essere causa di danni al forno e agli stessi oggetti - Non sedersi e non appoggiare pesi sulla porta aperta e nemmeno appenderli alla maniglia, potrebbero danneggiare il prodotto creando malfunzionamenti - Prima della manutenzione o della pulizia, scollegare elettricamente il forno e, se appena utilizzato, attendere che si raffreddi. - Fare attenzione al flusso d’aria che fuoriesce dal forno al momento dell’apertura della porta quando questo è caldo - Non utilizzare per la pulizia, getti di vapore che potrebbero raggiungere e danneggiare le parti elettriche - Nel caso in cui il cavo di allacciamento fosse danneggiato, contattare immediatamente il centro di Assistenza Tecnica che provvederà a sostituirlo Attenzione questo apparecchio deve essere collegato a terra in conformità con le norme locali vigenti. Inoltre Può essere installato e funzionare solo in locali permanentemente ventilati sempre secondo relative norme locali Per l’installazione del forno vedi il capitolo “ istruzioni per l’installazione”. 4 9880022200-IT-241111 Uso consapevole del forno - Preriscaldare il forno per il tempo strettamente necessario - Aprire la porta solo quando è necessario per evitare inutili fuoriuscite di calore - Mantenere pulite ed efficienti le guarnizioni per evitare dannose dispersioni di calore - Al termine dell’utilizzo, spegnere sempre il forno - Per ridurre la formazione di condensa dovuta all’umidità contenuta nei cibi è sempre necessario preriscaldare il forno prima di inserire gli alimenti. In ogni caso un’eventuale formazione di condensa sul vetro della porta o sulle pareti del forno non compromette il suo funzionamento e con il proseguimento della cottura essa tenderà a scomparire. Prima di utilizzare il forno per la prima volta: Scollegare l’apparecchio dalla rete elettrica Togliere tutti gli imballaggi interni e gli accessori del forno. Pulire la superficie interna con acqua calda o detergente neutro (vedi al paragrafo “manutenzione e pulizia”) Risciacquare accuratamente con un panno umido. Lavare allo stesso modo gli accessori del forno e asciugare tutto con cura. Avvertenze: - Non immagazzinare e usare benzina od altre sostanze infiammabili nelle vicinanze di questo articolo - Non usare mai questo apparecchio per riscaldare l’ambiente - Non ostruire il passaggio di flusso dei gas combusti e dell’aria di raffreddamento bloccando i fori di ventilazione del locale e i condotti sull’apparecchiatura. Questo crea un funzionamento anomalo con possibile aumento dell’anidride carbonica a livelli di non sicurezza - L’utilizzo di un apparecchio di cottura può portare ad un aumento di calore e di umidità nel locale in cui è installato. Fare in modo di garantire una buona aerazione della cucina. mantenere libere le aperture di aerazione naturale e installare un dispositivo di aerazione forzata (cappa aspirante) - Il continuo uso dell’apparecchiatura potrà necessitare di extra ventilazione, questo può essere risolto aprendo una finestra o aumentando la potenza della cappa aspirante - Prima dell’installazione, verificare che le condizioni locali di distribuzione (natura e pressione del gas) e lo stato di regolazione dell’apparecchio siano compatibili - Le condizioni di regolazione di questo apparecchio sono riportate sull’etichetta (o sulla targa dati) - In presenza di odore di gas nella stanza, aprire una finestra ed attendere il completo ricambio d’aria prima di riaccendere il bruciatore - Questo apparecchio non è collegato ad un dispositivo di evacuazione dei prodotti della combustione. Esso deve essere installato conformemente alle regole di installazione in vigore. Deve essere dedicata un’attenzione particolare alle disposizioni applicabili in materia di ventilazione - Durante l’uso, prestare attenzione a non toccare gli elementi riscaldanti all’interno del forno - Le parti accessibili possono diventare molto calde durante l’uso, è opportuno tenere i bambini lontani. 5 9880022200-IT-241111 In caso di spegnimento accidentale durante la cottura, spegnere il bruciatore gas agendo sulla manopola di controllo (interviene in ogni caso una valvola di sicurezza che interrompe il flusso del gas). Provare a riaccenderlo aprendo prima completamente la porta In presenza di odore di gas nell’ambiente, aprire una finestra ed attendere che questo scompaia prima di accendere nuovamente il bruciatore. GUIDA ALL’ USO DEL FORNO PANNELLO COMANDI A = Termostato B = Selettore funzioni C = Contaminuti CM D = Orologio elettronico OE E = Spia rossa potenza Le posizioni possono variare a seconda dei modelli Importante: Prima di utilizzare il forno per la prima volta, farlo funzionare a vuoto ed al massimo per circa 1 ora. Ventilare bene il locale, possibilmente aprendo le finestre. Questo permetterà l’evacuazione dei fumi di combustione di residui di produzione quali grassi, oli e resina da lavorazione. Spia indicatore di potenza (Luce rossa) Qualora sia accesa, indica che il forno è sotto tensione e acceso 6 9880022200-IT-241111 Termostato temperatura forno: Il termostato forno controlla la temperatura desiderata per la cottura, su tutte le selezioni di funzionamento del forno. Commutatore o selettore funzioni Il commutatore attiva il tipo di funzione desiderata per la cottura. Contaminuti meccanico CM (nei modelli predisposti) E’ possibile usare il contaminuti meccanico come avviso con segnale acustico alla fine del periodo di tempo ritenuto necessario per una cottura. Attenzione, la cottura non viene interrotta. Orologio elettronico OE (nei modelli predisposti) Vi permette la visualizzazione elettronica dell’orario giornaliero e la verifica del tempo di cottura rimanente con successivo avviso tramite segnale acustico. Attenzione, la cottura non viene interrotta. FUNZIONI DEL FORNO (i simboli nel vostro forno indicano per quali funzioni è predisposto) Lampada forno (mod-GE;GEV;GG;GGV) In ogni momento è possibile accendere la lampada forno in maniera indipendente. La lampada rimane accesa anche con le altre funzioni. 7 9880022200-IT-241111 Grill elettrico (mod-GE;GEV) In questa selezione è in funzione la sola resistenza elettrica posta sulla parte superiore del forno (non è possibile l’uso contemporaneo del bruciatore a gas, una sicurezza ne impedisce il funzionamento). La caratteristica del Grill di emanare un calore intenso permette di utilizzare il forno per grigliare ed arrostire. Per questo tipo di cottura è necessario tenere la porta aperta. Nei modelli dove è predisposto, con questa funzione è possibile utilizzare il girarrosto. Consultare il paragrafo “Uso del Grill” Grill elettrico ventilato con girarrosto (mod-GEV) Questa funzione permette di grigliare in maniera più soffice grazie all’utilizzo di aria forzata. A seconda dei modelli è possibile cuocere con l’ausilio del girarrosto (se predisposto). Per questo tipo di cottura è necessario tenere la porta aperta .Consultare il paragrafo “Uso del Grill”. Ventola forno (mod-GEV; GGV) E’ in funzione solamente la ventola senza alcun elemento riscaldante. Questa funzione può essere usata per scongelare e/o asciugare il cibo da cuocere con il solo movimento dell’aria che circola a temperatura ambiente, oppure per una cottura più omogenea e soffice utilizzando il bruciatore forno. La ventola forno non è attivabile durante il funzionamento del Grill Gas. Nei modelli dove è predisposto, anche con questa funzione è possibile utilizzare il girarrosto Girarrosto (mod-GE;GG;GEV;GGV) Nei modelli dove è predisposto è possibile utilizzare il girarrosto. Nei modelli FISC90 il girarrosto è posizionato in senso trasversale con l’innesto sulla schiena del forno (nei modelli FINC90 l’innesto è sulla parete destra del forno) ed il suo funzionamento si ha in automatico in tutte le funzioni.anche se non è presente il simbolo. Per utilizzarlo agire nel modo seguente. Inserire la pietanza ben fissata con gli appositi ganci a forchetta nell’asta spiedo e inserire il tutto nel telaio portaspiedo preventivamente predisposto nel suo alloggiamento sulla teglia raccoglisugo. L’impugnatura del girarrosto, in materiale isolante deve essere utilizzata solamente per togliere l’asta dello spiedo dal forno e deve essere tolta durante la cottura FI70 – FISC90 FINC90 8 9880022200-IT-241111 Nei modelli FI60 dove predisposto (non è previsto nelle versioni GEV;GGV), il girarrosto è posizionato in senso longitudinale ed il suo innesto si trova centralmente nella schiena del forno. Inserire anche in questo caso la pietanza ben fissata con gli appositi ganci a forchetta dell’asta spiedo. Agganciare l’asta reggispiedo (R), alle guide laterali o nelle apposite fessure (a seconda dei modelli). Non lasciare l’impugnatura del girarrosto nel forno durante la cottura. FI60 Si consiglia di inserire i cibi nel forno dopo averlo preriscaldato POSIZIONE GRIGLIE INTERNE PER SPECIFICHE COTTURE Torte surgelate, Arrosti lunghi, Tacchino, Torte, Bistecca Carne ben cotta; posizione n° 1 e 2 dal basso. Torte, Pan Carrè, Toast, Casseruola, Pane integrale, Carne; posizione n° 2 dal basso. Biscotti, Carne a taglio fino; posizione n° 2 e 3 dal basso. Per Dorare col Grill, adoperare la posizione n° 3 dal basso. Questi dati sulle posizioni di cottura sono indicativi e possono essere interpretati in base alla vostra esperienza. UTILIZZO DEL GRILL Con il grill è possibile cuocere pesce, verdure, piccoli spiedini e vari tipi di carne, ad eccezione di alcune carni magre di selvaggina. La carne tagliata a fette sottili ed il pesce vanno sempre grigliati molto rapidamente ungendoli leggermente con olio tramite un pennello apposito e collocati sempre sulla griglia. La griglia va sistemata a sua volta nella posizione più vicina all’elemento riscaldante superiore proporzionatamente allo spessore della pietanza, onde evitare di bruciarla esternamente e cucinarla poco all’interno. Salate la carne solamente dopo la cottura altrimenti sarà meno sugosa. Non pungete mai gli alimenti durante la cottura nemmeno per girarli. Il loro sugo colerebbe e la grigliata risulterebbe secca. Per apprezzare la cottura Grill è necessario preriscaldare il forno per almeno 10 minuti. 9 9880022200-IT-241111 GRILL ELETTRICO Per ottimizzare la cottura Grill è necessario preriscaldare il forno a Grill acceso, (portare la manopola del selettore nella posizione ) per almeno 10 minuti. Introdurre la pietanza nel forno nella posizione più vicina al Grill a seconda del tipo di cibo da cuocere Utilizzare il Grill sempre a porta forno aperta e per un tempo massimo di 15 minuti. Durante l’utilizzo di questa funzione non è possibile usare il bruciatore forno (un dispositivo di sicurezza impedisce l’inserimento della resistenza elettrica se la manopola del termostato non si trova nella posizione . BRUCIATORE GRILL Aprire completamente la porta del forno, un dispositivo di sicurezza impedisce l’accensione dei bruciatori a porta chiusa, ruotare la manopola del termostato in senso orario fino a fine corsa (posizione GRILL) e premerla a fondo per innescare l’accensione Dopo l’avvenuta accensione del bruciatore Grill, mantenere premuta la manopola per 3/5 secondi; si dà modo così alla termocoppia di scaldarsi e quindi di tenere aperta la valvola di sicurezza. Rilasciare la manopola. Per dei risultati migliori si consiglia di lasciare preriscaldare il forno per alcuni minuti. Durante l’utilizzo di questa funzione non è possibile usare il bruciatore forno. Al primo utilizzo è normale dover ritentare più volte l’accensione a causa della presenza di aria nelle condotte del gas. Le carni possono essere sistemate negli appositi recipienti oppure cotte direttamente sulla griglia. In quest’ultimo caso versare sempre un po’ d’acqua nella leccarda inserendola poi nelle guide sotto la griglia. In questo modo si eviterà che i grassi colando nella leccarda brucino creando cattivi odori. Attenzione: durante l’utilizzo del Grill, le parti accessibili possono surriscaldarsi. Pertanto è opportuno tenere i bambini a debita distanza. BRUCIATORE FORNO Avvertenza: grazie alla presenza di un interruttore di sicurezza, l’accensione del bruciatore può essere eseguita solo a porta completamente aperta. Accensione del bruciatore forno Aprire completamente la porta del forno, premere leggermente la manopola del termostato e ruotarla in senso antiorario portandola nella posizione 260°. Premere a fondo la manopola per innescare l’accensione automatica del bruciatore forno. Accertarsi della presenza della fiamma sul bruciatore verificando attraverso il foro “F”. Al primo utilizzo è normale dover ritentare più volte l’accensione a causa della presenza di aria nelle condotte del gas Dopo l’avvenuta accensione del bruciatore, mantenere premuta la manopola per 3/5 secondi; si dà modo così alla termocoppia di scaldarsi e quindi di tenere aperta la valvola di sicurezza e quindi acceso il bruciatore. Posizionare la manopola del termostato sulla temperatura desiderata. 10 9880022200-IT-241111 Per facilitare l’individuazione della posizione di minimo, il termostato è dotato di un fermo in tale posizione. Per spegnere il bruciatore dalla posizione di minimo è sufficiente premere leggermente la manopola e ruotarla fino alla posizione . Durante l’utilizzo del bruciatore forno non è attivabile il bruciatore Grill. Il bruciatore è dotato di una valvola di sicurezza che blocca l’erogazione del gas in caso di spegnimento accidentale della fiamma. In nessun caso usare il forno per riscaldare l’abitazione o l’ambiente dove si trova. Un utilizzo prolungato ed intensivo dell’apparecchio può necessitare di un supplemento di aerazione tramite ad esempio l’apertura di una finestra o l’aumento della potenza di aspirazione forzata (elettroventilatore). OROLOGIO ELETTRONICO OE (nei modelli predisposti) L’orologio elettronico può essere utile oltre che per la visualizzazione dell’ora corrente, anche come un puntuale contaminuti che vi avvisa quando il tempo di cottura è terminato. Attenzione, la cottura non viene interrotta dall’orologio elettronico ma bisogna agire sui comandi manuali del forno Dopo aver collegato l’elettrodomestico alla rete elettrica e in caso di momentanea interruzione di fornitura di corrente elettrica, il display dell’orologio elettronico comincerà a lampeggiare. 11 9880022200-IT-241111 Impostazione dell’ora Premere il pulsante , impostare l’ora giornaliera agendo sui pulsanti + e --. Questa funzione rimane attiva per 7 secondi dopo l’ultima azione sui pulsanti + o --. Per modificare l’orario impostato, premere il pulsante per 4 secondi fino a che le cifre dell’ora non cominciano a lampeggiare. Modificare l’ora premendo sui pulsanti + o --. Premere nuovamente una volta sul pulsante e regolare i minuti tornando ad agire su + o --. Contaminuti Usare il contaminuti elettronico come avviso con segnale acustico alla fine del periodo di tempo necessario per una cottura. Attenzione, la cottura non viene interrotta. Impostazione del contaminuti Premere per una volta il pulsante +, premere nuovamente lo stesso pulsante per incrementare il tempo di durata. L’unità d’impostazione è di 10 secondi ad impulso. Per uno scorrimento veloce mantenere premuto il tasto + Il conto alla rovescia ha la priorità sul display. Il massimo tempo impostabile è di 10 ore. Dopo aver raggiunto i 99 minuti e 50 secondi, l’impostazione dell’ora cambia in 1h e 40’. Il simbolo della campanella indicherà che il contaminuti è attivato. Per rivedere l’ora giornaliera, durante il conto alla rovescia, premere il pulsante . L’ora giornaliera comparirà per 6 secondi, dopo di che ritorna il conto alla rovescia. Azzeramento del contaminuti Premere e mantenere premuto il pulsante -- fino all’avvenuto azzeramento del tempo precedentemente impostato Segnale acustico Una volta raggiunta l’ora d’allarme impostata, il segnale acustico suonerà per 7 minuti. Per interrompere il segnale acustico, premere indifferentemente uno dei tre pulsanti E’ possibile impostare la frequenza del segnale acustico scegliendo su tre diversi livelli premendo il pulsante -- . L’azzeramento del contaminuti non interrompe la cottura. CONTAMINUTI MECCANICO CM (nei modelli predisposti) Potete usare il contaminuti meccanico come avviso con segnale acustico alla fine del periodo di tempo necessario per una cottura. Per selezionare il tempo desiderato ruotare la manopola fino al valore in minuti corrispondente. Trascorso il tempo impostato il contaminuti emetterà un segnale acustico. L’azzeramento del contaminuti non interrompe la cottura. Ventilatore tangenziale (modelli predisposti) Nei modelli predisposti è in dotazione un ventilatore tangenziale per il raffreddamento del pannello comandi e della miniglia porta del forno. Questo ventilatore entra in funzione alcuni minuti dopo l’inizio della cottura, quando il forno raggiunge una certa temperatura (il tempo varia a seconda del modello) ed evita anche il surriscaldamento del mobile di alloggiamento. L’aria calda espulsa da sotto il pannello comandi continua a fuoriuscire anche dopo lo spegnimento del forno, finché la temperatura non scende a livelli normali. 12 9880022200-IT-241111 MANUTENZIONE E PULIZIA Scollegare l’alimentazione elettrica prima di prestare qualsiasi tipo di manutenzione al prodotto Non utilizzare pulitori a vapore per la pulizia dell’apparecchio. Non usare materiali ruvidi, abrasivi o raschietti metallici affilati per pulire la porta del forno, perché possono graffiare o danneggiare le superfici, non utilizzare prodotti acidi (ad esempio prodotti anticalcare) perchè possono danneggiare le parti smaltate. Spegnere i bruciatori e gli elementi riscaldanti, aspettare poi il raffreddamento delle parti interne del forno prima di toccarle o pulirle. Prestare maggiore attenzione alle griglie di cottura. Pulire il forno con cautela. Attenzione ad evitare bruciature da vapore nel caso in cui una spugna o pezza umida, usata per la pulizia di residui, venga a contatto con una superficie calda. Inoltre, alcuni detersivi creano fumi nocivi a contatto con il calore. Manutenzione periodica Controllare periodicamente lo stato della guarnizione in gomma collocata attorno all’apertura del forno. Essa garantisce il corretto funzionamento del forno. Mantenere pulita questa guarnizione evitando di usare oggetti o sostanze abrasive. Se notate dei danneggiamenti della guarnizione occorre rivolgersi al centro di assistenza tecnica più vicino. Il termostato a gas necessita di una lubrificazione periodica che deve essere eseguita solamente da personale qualificato. Pulizia delle superfici Le parti smaltate o in acciaio inox vanno trattate con cautela. Usare acqua o prodotti specifici asciugando poi accuratamente con un panno morbido. Non usare prodotti abrasivi. In caso di forti incrostazioni nelle parti smaltate, utilizzare una spugna di plastica o similare bagnata con acqua calda e aceto. I residui di cibo o macchie derivate da oli, zuccheri, grassi ecc, se non tolti subito dopo avere terminato di usare il forno, possono diventare in seguito più difficili da togliere. Per le parti interne del forno vi consigliamo di provvedere alla loro pulizia a forno ancora tiepido, sarà più facile toglierle. A causa di una crescente presenza di nuovi prodotti nel mercato non è possibile stabilire un elenco di articoli adatti alla pulizia di questo apparecchio. Leggere accuratamente le istruzioni del costruttore per verificare il possibile utilizzo del detergente. ANOMALIE DI FUNZIONAMENTO In caso di funzionamento anomalo bisogna immediatamente mettersi in contatto con il più vicino centro di assistenza tecnica qualificato ed autorizzato. Il verificarsi di una qualsiasi delle sottoelencate situazioni sono da considerarsi anomalie di funzionamento e di conseguenza hanno bisogno dell’intervento di un tecnico: - Fiamme con punte gialle. - Difficoltà nell’accensione del bruciatore. - Bruciatore che non rimane acceso. - Spegnimento del bruciatore senza motivo - Difficoltà nel ruotare il rubinetto-termostato. 13 9880022200-IT-241111 Controllare regolarmente il corretto funzionamento dei rubinetti-termostati e dei commutatori. RIMOZIONE DELLA PORTA FORNO Per rimuovere e reinserire la porta del forno, seguire le istruzioni di seguito riportate. Aprire completamente la porta forno. Alzare il gancio cerniera e inserirlo nel supporto di bloccaggio su entrambe le cerniere, vedere figura. Questo blocca la cerniera nella posizione aperta. Afferrare con ambedue le mani la porta dai lati verso il basso. Sollevare la porta per alcuni centimetri (ci sarà una certa resistenza della molla causata dal bloccaggio della cerniera). Quando la porta è sufficientemente sollevata, sarà possibile estrarre le cerniere dalle loro sedi. Tirare verso di voi la porta per fare uscire le cerniere dalle aperture della cornice del forno. 14 9880022200-IT-241111 Reinserimento della porta forno Agire nel modo inverso afferrando con entrambe le mani la porta lateralmente verso il basso ed inserendo le cerniere nelle aperture della cornice frontale del forno, (porre attenzione al posizionamento dell’incastro del piedino). Con la porta forno completamente aperta, rimuovere il blocco della cerniera riportando i ganci di bloccaggio nella posizione originale . Chiudere piano la porta forno ed assicurarsi che sia stata correttamente inserita ed allineata con i bordi laterali. Attenzione. Non togliere i ganci blocca cerniera dalla loro sede quando la porta non è montata nel forno. Non chiudere le cerniere senza il peso della porta perché provoca una chiusura violenta delle molle. Non appoggiare pesi sulla porta e nemmeno appenderli alla maniglia, potrebbero danneggiare il prodotto creando malfunzionamenti Inoltre non usare il forno fino a che la porta non sia stata rimontata correttamente. SOSTITUZIONE DELLA LAMPADA FORNO Per prevenire scosse elettriche e/o danni alla persona, leggere ed attenersi alla seguente procedura: Prima di sostituire la lampada forno, assicurarsi che la corrente elettrica sia stata tolta aprendo l’interruttore generale. Assicurarsi che il forno e la lampada siano freddi, poi rimuovere la calotta di protezione A. Non toccare la lampadina calda con un panno umido, può causarne la rottura. Sostituire la lampadina con altra appropriata di 25 W per 220 - 230 V con attacco tipo E14 adatta alle alte temperature. Nel caso in cui la calotta di protezione sia danneggiata o rotta, non usare il forno finché questa non sia stata sostituita o reinserita in modo corretto e sicuro. Attenzione: per una corretta installazione ed utilizzo di questo apparecchio, occorre riferirsi ai dati tecnici riportati nell’etichetta matricola del prodotto. L’etichetta prodotto si trova sul bordo della facciata interna del forno. Una seconda etichetta è posizionata sulla copertina del libretto d’istruzione. ISTRUZIONE PER L’INSTALLAZIONE L’installazione e l’assistenza tecnica devono essere effettuate solo da personale qualificato. Leggere con attenzione le istruzioni per la sicurezza riportate in questo manuale prima di un qualsiasi utilizzo del forno. Un’errata installazione, regolazione, taratura, manutenzione, assistenza e uso del forno possono causare gravi danni a persone o cose. Questo prodotto deve essere installato come previsto dal presente manuale in conformità alle norme nazionali e ai regolamenti locali vigenti. 15 9880022200-IT-241111 VENTILAZIONE LOCALI D’USO Questo apparecchio elettrodomestico deve essere installato e funzionare solamente in locali permanentemente ventilati e presentare una ventilazione maggiorata secondo quanto richiesto dalle norme locali vigenti. Tale ventilazione deve garantire il corretto scambio dei gas di combustione, del circolo d’aria e deve mantenere la temperatura di lavoro nei limiti di sicurezza. L’afflusso dell’aria nel locale deve avvenire direttamente attraverso aperture praticate sulle pareti esterne. Queste aperture devono avere una sezione libera di passaggio di almeno 100 cm² tale che non possa essere accidentalmente ostruita. Lo scarico dei prodotti di combustione deve avvenire attraverso cappe di aspirazione collegate a canne fumarie o direttamente all’esterno. Nel caso non sia possibile installare la cappa aspirante è necessario applicare alla parete esterna o alla finestra del locale d’uso un elettroventilatore, purché esistano nello stesso locale le aperture per l’entrata dell’aria previste dalle norme vigenti e proporzionate alla portata dell’elettroventilatore. I sistemi di scarico dei fumi devono essere funzionanti durante tutto l’uso dell’apparecchio. Non sollevare o tirare il forno dalla maniglia della porta e non esercitare pressione o caricare pesi quando questa è aperta. L’installazione è a carico dell’acquirente e gli eventuali interventi richiesti alla ditta costruttrice che dipendano da una errata installazione non saranno compresi nella garanzia. CARATTERISTICHE DEL MOBILE I requisiti tecnici del mobile sono i seguenti; - Il mobile e i suoi componenti devono essere in grado di resistere ad una temperatura di 90°C senza presentare deformazioni e/o difetti alla superficie. - Il mobile deve consentire il libero passaggio dei collegamenti del forno. - Tutti i mobili di cucina a livello domestico devono essere protetti con materiale ignifugo secondo quanto richiesto dalle normative vigenti. 16 9880022200-IT-241111 INSERIMENTO DEL FORNO NEL MOBILE E’ importante che tutte le operazioni relative all’installazione dell’apparecchio vengano eseguite da personale qualificato Il forno può essere installato sia a colonna sia sotto il piano di lavoro di un mobile da cucina. fig.01 FI60 fig.02 FI70 fis.03 FINC90/SC90 fig.04 FI TWIN 17 9880022200-IT-241111 Misure d’incasso Le dimensioni dell’apertura da effettuare sul mobile per l’incasso del forno sono indicate nelle figure. Assicurarsi che il mobile nel quale sarà installato il forno sia in grado di sopportare il peso di 30 kg per FI 60; 45 kg. per FI 90 e FI 70; 70 kg per FI TWIN.. Per l’apertura nel mobile seguire le rispettive dimensioni del tipo di forno acquistato, indicate in Fig. 01 per FI 60, Fig. 02 per FI 70, Fig. 03 per FI 90 e Fig. 04 per FI TWIN Nel fondo del mobile o nel ripiano di supporto del forno bisogna creare nella zona posteriore un’apertura (vedi figure) per permettere una sufficiente entrata d’aria e quindi il riciclo della stessa per il raffreddamento del forno durante il funzionamento. Per il buon funzionamento dei bruciatori a gas, oltre all’apertura posteriore va eseguita un’ulteriore apertura sullo zoccolo della cucina. La mancanza di questa apertura può causare il malfunzionamento o lo spegnimento del bruciatore a gas Assicurarsi che il forno sia installato in maniera sicura nel mobile. Utilizzare le viti A per il fissaggio del forno. ALLACCIAMENTO ELETTRICO DEL FORNO Assicurarsi che la corrente elettrica sia stata tolta prima di proseguire con l’allacciamento del forno alla rete elettrica. Il funzionamento avviene in corrente alternata monofase 220-230-240 V~ 50-60 Hz, utilizzando cavo flessibile. Accertarsi che l’impianto domestico possa sopportare il carico elettrico dell’apparecchiatura. (vedere targhetta matricola). La sicurezza elettrica di questo apparecchio è assicurata solamente se lo stesso è collegato correttamente a un impianto che disponga di un efficace collegamento a terra secondo le norme di legge in vigore. In caso di collegamento permanente alla rete elettrica, occorre applicare un interruttore bipolare dimensionato al carico corrispondente con apertura per ogni contatto di almeno 3 mm. Nei modelli dove presente, il cavo flessibile viene fornito senza spina. La spina da utilizzare deve essere idonea al carico elettrico del prodotto e deve rispettare le normative vigenti. L’installatore deve accertarsi che la sezione dei cavi della presa sia idonea alla potenza assorbita del forno come indicato nella targhetta matricola. La presa di allacciamento deve essere facilmente accessibile. 18 9880022200-IT-241111 MONTAGGIO/SOSTITUZIONE DEL CAVO DI ALIMENTAZIONE Il cavo elettrico deve essere tenuto bloccato alla morsettiera dal fissacavo, in modo tale che non si possa sfilare. Collegare al morsetto L il cavo di linea, al morsetto N il cavo del neutro e al morsetto di terra il cavo giallo/verde. Il cavo giallo/verde deve essere più lungo degli altri due di almeno 20 mm. Fare attenzione che il cavo elettrico non passi vicino o venga a contatto con superfici che raggiungano una temperatura superiore ai 75°C. COLLEGAMENTO A TERRA L’installazione il collegamento e la messa a terra del sistema elettrico devono rispettare i requisiti degli standard europei e comunque entro i parametri delle norme locali vigenti. Questo elettrodomestico richiede un collegamento di messa a terra per la vostra protezione da eventuali cortocircuiti o dispersioni elettriche. Deve essere pertanto collegato ad un’appropriata presa elettrica. Il cavo di terra non deve essere interrotto dall’interruttore. ATTENZIONE: SCOLLEGARE L’ALIMENTAZIONE ELETTRICA PRIMA DI PRESTARE ASSISTENZA TECNICA O MANUTENZIONE AL PRODOTTO. In caso di sostituzione del cavo elettrico, assicurarsi l’uso di un cavo elettrico certificato secondo normative vigenti e idoneo alle caratteristiche tecniche del prodotto. Usare solo cavi flessibili: per forno GGV o GGVT cavo tipo H05RR-FH 3 x 0.75 per forno GET o GEVT cavo tipo H05RR-FH 3 x 1.5 ALLACCIAMENTO ALLA RETE GAS Questo apparecchio elettrodomestico deve essere installato e funzionare solamente in locali permanentemente ventilati secondo norme locali vigenti Compatibilità del gas Prima dell’installazione, verificare che le condizioni locali di distribuzione (tipologia e pressione del gas) e lo stato di regolazione dell’apparecchio, siano compatibili (vedi targa dati tecnici dell’apparecchio). In caso contrario prima di proseguire leggere le indicazioni del paragrafo “adattamento ai diversi tipi di gas”. 19 9880022200-IT-241111 Allacciamento alla rete gas L’allacciamento alla rete gas deve essere eseguito in conformità con le norme locali vigenti e solamente da un tecnico addestrato o da un installatore di apparecchiature a gas qualificato che deve eseguire anche la prova di tenuta seguendo attentamente la scaletta sotto riportata Per l’allacciamento seguire lista controllo seguente: a) spegnere tutte le fiamme pilota e chiudere le rispettive valvole di altre apparecchiature a gas presenti b) chiudere la valvola principale della rete gas dell’abitazione c) interporre una valvola a sfera tra la rete gas ed il forno, in una posizione facilmente accessibile d) allacciare l’apparecchio alla rete gas utilizzando un tubo di acciaio inossidabile flessibile, limitatamente a quelli la cui massima estensione è di 2 mt. o un tubo rigido di rame di dimensioni appropriate (l’uso del tubo flessibile in gomma è vietato perché non ispezionabile) assicurarsi che il tubo metallico flessibile non venga a contatto con parti mobili o venga schiacciato. Prestare attenzione che il tubo rampa di collegamento del forno ed i vari raccordi non siano ostruiti da sporco, oggetti estranei etc. Questi particolari se lasciati all’interno del tubo rampa possono danneggiare la rubinetteria del forno e) procedere ora all’allacciamento del forno alla rete gas prestando attenzione al montaggio delle varie raccorderie e delle relative guarnizioni G f) riaprire la valvola principale della rete gas. Applicare una soluzione di acqua saponata sulle giunture dei nuovi collegamenti gas per verificarne la buona tenuta. g) aprire la valvola a sfera a monte dell’apparecchiatura a gas e, in caso di presenza di bolle d’aria stringere leggermente ancora il componente di collegamento fino a fermare la perdita oppure, verificare che sia stato correttamente avvitato. Ripetere poi la prova di tenuta Importante: non usare mai fiamma viva per la verifica delle perdite di gas. Al termine della prova di tenuta pulire la superficie da eventuali sostanze residue. E’ possibile ora riaccendere le fiamme pilota delle altre apparecchiature a gas. Nel caso si debba procedere all’installazione di un piano cottura abbinato ad un forno a gas, il collegamento alla rete gas non può assolutamente avvenire tramite una sola valvola a sfera di intercettazione. I due prodotti vanno collegati separatamente utilizzando due valvole a sfera indipendenti ADATTAMENTO AI DIVERSI TIPI DI GAS Tutti i modelli di forno sono accessoriati con i kit degli iniettori di ricambio per il gas GPL e/o Naturale. Controllare l’etichetta prodotto per verificare il tipo di gas di taratura di produzione. Per sostituire gli iniettori e per la regolazione della portata minima, leggere il paragrafo “sostituzione degli iniettori” Il bruciatore del forno non necessita di regolazione dell’aria primaria 20 9880022200-IT-241111 Sostituzione degli iniettori Scollegare innanzitutto elettricamente il forno e chiudere la valvola a sfera che alimenta il gas. Per sostituire gli iniettori occorre togliere la vite che fissa nella parte anteriore il bruciatore (per il bruciatore forno occorre prima estrarre il piano estraibile P) Estrarre leggermente e con cautela il bruciatore B dalla sede posteriore prestando attenzione a non strattonare la termocoppia e il cavo della candelina di accensione. Successivamente con una chiave esagonale da 7 mm svitare l’iniettore I e sostituirlo seguendo le indicazioni della tabella “dati tecnici bruciatori gas”. Rimontare il bruciatore seguendo a ritroso le operazioni appena descritte. Seguire ora le istruzioni del paragrafo “regolazione del minimo del termostato” FI60 – FI70 FINC90 – FI SC90 21 9880022200-IT-241111 REGOLAZIONE DEL MINIMO DEL TERMOSTATO Eseguire questa operazione con il forno già inserito nel mobile e con i collegamenti elettrici e gas già effettuati come da istruzioni precedenti E’ necessario eseguire la regolazione del minimo ogni qualvolta si passi da un tipo di gas ad un altro in modo da garantire il buon funzionamento dei bruciatori In posizione di minimo la fiamma deve essere stabile e non si deve spegnere quando si passa dal massimo al minimo e viceversa. L’altezza della fiamma in posizione di minimo deve essere di circa 5 mm. Taratura del minimo Accendere il bruciatore da tarare e farlo funzionare per alcuni minuti. Portare l’indice manopola in posizione di minimo, rimuovere la manopola. Introdurre ora un mini cacciavite a taglio nell’apertura posta sul lato sinistro dell’alberino del termostato, ottimizzare l’altezza della fiamma chiudendo o aprendo la vite V di regolazione con l’alberino bloccato. Fare alcune prove di chiusura e apertura normale della porta e in caso di spegnimento alzare leggermente il minimo. NOTA: Tutte le regolazioni devono essere realizzate solo da personale qualificato ed autorizzato. Per garantire una corretta e sicura operazione, il forno deve essere appropriatamente installato e collegato a terra/massa da personale qualificato ed autorizzato. Chiedere all’installatore di indicarvi la posizione della valvola a sfera di allacciamento alla rete gas e di mostrarvi come chiuderla in caso di necessità. Scollegare l’apparecchio dalla rete elettrica prima di qualsiasi intervento. 22 9880022200-IT-241111 ASSISTENZA TECNICA E RICAMBI Ricambi Per l’assistenza dell’elettrodomestico possono essere utilizzati solo componenti autorizzati. Non riparare o sostituire alcun componente del forno che non sia stato raccomandato da questo manuale. Tutti gli interventi e riparazioni devono essere effettuati da personale tecnico autorizzato. Per richiedere un componente di ricambio, bisogna indicare i seguenti dati: 1) Sigla del modello forno (MOD.) e numero di produzione (N.L.), che si trovano sull’etichetta prodotto posizionata sulla parte inferiore frontale della facciata del forno e nella prima pagina del libretto. 2) Descrizione e numero del componente di ricambio, informazione tecnica a disposizione solo del servizio di assistenza autorizzato. 3) Per ultimo, indicare i dati del distributore che ha venduto il forno, e i dati del centro di assistenza più vicino a Voi. Assistenza tecnica Nel caso che il vostro forno abbia bisogno di assistenza tecnica e/o pezzi di ricambio, contattare il rivenditore o il centro di assistenza tecnica autorizzato più vicino. Anche in questo caso è necessario trasmettere i dati completi dell’apparecchio che si trovano sull’etichetta prodotto in alluminio quali: modello (MOD.) numero di lotto (N.L.),etc, etichetta collocata sulla parte bassa della facciata del forno o sulla prima pagina del libretto istruzioni 23 9880022200-IT-241111 TABELLE DATI TECNICI DATI TECNICI BRUCIATORI GAS Mod Bruc. Potenza kW FI60 forno grill forno grill forno grill forno grill forno / 2,20 2,10 2,20 2,70 3,30 3,20 3,30 3,20 2,20 FI70 FINC90 FISC90 FI TWIN Pressione Gas (mbar) Nat. But-Prop G20 G30/31 20 30/37 20 30/37 20 30/37 20 30/37 20 30/37 20 30/37 20 30/37 20 30/37 20 30/37 Iniettori (mm) Nat. But-Prop G20 G30/31 1,10 0,70 1,10 0,72 1,10 0,70 1,20 0,80 1,30 0,85 1,30 0,85 1,30 0,85 1,30 0,85 1,10 0,70 Nat. G20 reg. reg reg. reg. reg. By-pass (mm) But-Prop G30-31 0,40 0,40 0,52 0,52 0,40 DIMENSIONI ESTERNE modello FI60 FI70 FINC90 FI SC90 FI TWIN larghezza (cm) 59,5 69,5 89,5 89,5 59,5 altezza (cm) 59,5 59,5 59,5 59,5 88,8 profondità (cm) 55 55 55 55 55 DATI TECNICI DI FUNZIONAMENTO modello FI60 FI70 voltaggio pot. elettrica totale resistenza Grill elett. resistenza circolare lampada forno ventilatore forno vent. tangenziale motorino girarrosto 2,2 kW 1,8 kW / 25 W 25 W 25 W 1-5 W 2,2 kW 1,8 kW / 25 W 25 W 25 W 1-5 W FINC90 FISC90 FI TWIN F60 F30 220/230/240V – 50/60Hz 1,8 kW 2,6 kW 1,8 kW 2,5 kW / / 25 W 25 W 25 W 25 W 25 W 25 W 1-5 W 1-5 W 2,6 kW 2,6 kW / 25 W 25 W 25 W / 1,8 kW 1,8 kW 1,5 kW 25 W 25 W 25 W / DIMENSIONI INTERNE CAMERA DI COTTURA modello FI60 FI70 FINC90 FISC90 Volume Area cottura Grill 56 lt. 726 cm² 77 lt. 726 cm² 71 lt. 1000 cm² 110 lt. 1200 cm² modello FI60 FI70 FINC90 FISC90 gas naturale G20 GPL G30 210 l/h 160 g/h 210 l/h 160 g/h 315 l/h 240 g/h 315 l/h 240 g/h FI TWIN F60 F30 56 lt 31 lt 726 cm² 726 cm² CONSUMO ENERGETICO FI TWIN F60 F30 210 l/h / 160 g/h / ACCESSORI modello FI60 FI70 FINC90 FISC90 leccarda forno griglie interne si si si si si si si si 24 FITWIN F60 F30 si si si si 9880022200-IT-241111 BUILT-IN GAS OVENS INSTALLATION, USE AND MAINTENANCE INSTRUCTIONS MOD. FI60 – FI70 - FINC90 – FISC90 – FI TWIN (GE) ELECTRIC GRILL (GG) GAS GRILL (GEV) VENTILATED ELECTRIC GRILL (GGV) VENTILATED GAS GRILL INDEX USER GUIDE GENERAL RECOMMENDATIONS USER GUIDE FOR OVEN CONTROL PANEL OVEN FUNCTIONS INTERNAL GRILLS POSITION USING THE GRILL ELECTRIC GRILL GRILL BURNER OVEN BURNER ELECTRONIC CLOCK OE MECHANICAL TIMER CM MAINTENANCE AND CLEANING FUNCTIONING ANOMALIES REMOVING THE OVEN DOOR REPLACING THE OVEN LIGHT BULB page 3 6 6 7 9 9 10 10 10 11 12 13 13 14 15 INSTALLATION INSTRUCTIONS VENTILATION OF ROOMS USED FEATURES OF THE CABINET INSERTING THE OVEN INTO THE CABINET OVEN ELECTRICAL CONNECTION ASSEMBLY/REPLACEMENT OF THE POWER SUPPLY CABLE EARTH CONNECTION CONNECTION TO THE GAS MAINS ADAPTATION TO THE DIFFERENT TYPES OF GAS REGULATION OF THE THERMOSTAT MINIMUM TECHNICAL AFTER-SALES ASSISTANCE AND SPARE PARTS TECHNICAL DATA TABLES 2 16 16 16 17 18 19 19 19 20 22 23 24 9880022200-EN-241111 GENERAL RECOMMENDATIONS This product is in compliance with the EU 2002/96/EEC Directive. The crossed out "wheeled bin" symbol on the appliance indicates that at the end of its life-span, the product, as it has to be separately treated from domestic waste, it must be conferred to a differential collection centre for electric and electronic appliances or redelivered to the dealer at the time of purchase of a new equivalent appliance. The user is responsible for conferring the appliance at life-span end, in the appropriate collection structures, penalty sanctions envisioned by the legislation in force with regard to waste disposal. The suitable differential collection for the subsequent start of the appliance dismissed to recycling, to treatment and to disposal compatible with the environment contributes to avoiding possible negative effects on the environment and on the health and safety and favours the recycling of the materials of which the product is made. For more detailed information inherent the collection systems available, contact the local waste disposal service or the shop where the purchase was made. The manufacturer declines all civil and liability liability in the case of bad or improper installation of the appliance. The manufacturer also reserves the right to make modifications to his products that are deemed necessary and useful, without forewarning. Do not dispose of the different packaging components but dispose of them in compliance with local Standards on this subject. Before installation and use of this appliance this instruction manual must be read thoroughly in order to obtain all information necessary for correct installation, maintenance and use of the same. It is very important that this instruction manual is kept with the appliance for its entire lifetime, even if transferred to other persons This appliance has been designed for domestic use only for cooking and heating food.. Any other use, different to that indicated in this manual must be considered improper and consequently dangerous. The product is in compliance with the 89/109/EEC European Directive as it is destined to come into contact with food products This household appliance complies with the prescriptions of European Community LOW VOLTAGE DIRECTIVE – 2006/95/CE ELECTROMAGNETIC COMPATIBILITY DIRECTIVE 2004/108/CE REGARDING THE GAS 2009/142/CE The product identification data is stated on the relevant plate applied to the internal face of the oven. The plate must never be removed Installation must only be performed by qualified staff with respect for local Standards in force and following that indicated in this manual. 3 9880022200-EN-241111 Important: do not lift or pull the oven by the hand. In case of malfunctioning, disconnect the appliance from the electric mains (do not pull the power supply cable to disconnect the plug) and contact the authorised original spare parts technical after-sales centre. Close the gas system cock before any maintenance. Never attempt to repair the appliance yourself. Correct use of the oven - The appliance must only be used by adults, keep children away - The appliance produces heat both in the functioning phase and due to inertia, also when just switched-off. Do not touch parts inside the oven during these phases and limit the contact with external parts. Keep children away from the appliance when operating, the accessible parts may become very hot - To insert or extract containers or accessories from the oven, always use suitable protective gloves - Only use containers that resist high temperatures - Do not leave the appliance unattended during cooking operations that may release greases or oils that may catch fire - Never cover or lean on the walls or lower part of the oven, with sheets of aluminium or other objects such as pans or trays that could damage the product. - Do not use the oven to store objects when it is not in use, in case they are forgotten inside and can cause damage, when the oven is switched-on, to oven itself or the objects - Do not sit on or place weight on the open door and do not hang them on the handle, it could damage the product, creating malfunctioning - Before maintenance or cleaning, disconnect the oven electrically and, if just used, wait for it to cool. - Pay attention to the air flow that leaves the oven when the door is opened when the same is hot - Do not use jets of steam for cleaning, which could reach and damage the electric parts - If the connection cable should be damaged, contact the technical after-sales centre immediately, who will replace it Attention, this appliance must be connected to earth in compliance with the standards in force. It can only be installed and function in places that are permanently ventilated according to relative local Standards in force. For installation of the oven see the “ installation instructions” chapter 4 9880022200-EN-241111 Conscious use of the oven - Pre-heat the oven for the time strictly necessary - Open the door only when necessary to prevent escape of heat - Keep the gaskets clean and efficient to prevent damaging dispersions of heat - Always switch the oven off when not in use - To reduce the formation of condensate owing to the humidity contained in the foods, it is always necessary to pre-heat the oven before introducing the foodstuffs. In all cases any formation of condensate on the door glass or on the walls of the oven do not compromise its functioning and will tend to disappear with the cooking process. Before using the oven for the first time: Disconnect the appliance from the electric mains Remove all internal packaging and accessories from the oven. Clean the internal surfaces with hot water or neutral detergent (see “maintenance and cleaning” paragraph) Rinse thoroughly with a damp cloth. Wash all oven accessories in the same way and dry everything thoroughly. Recommendations: - Do not store or use petrol or other inflammable substances in the vicinity of this article - Never use this appliance to heat the environment - Do not obstruct the passage of the burned gases and the cooling air blocking the ventilation holes of the room and ducts on the appliance. This creates anomalous functioning with possible increase of carbon dioxide to unsafe levels - The use of a cooking appliance can lead to an increase in heat and humidity in the place where it is installed. Guarantee good airing of the kitchen and keep natural airing openings free and install a forced airing device (suction hood) - The continuous use of the appliance can require extra ventilation, this can be solved by opening a window or increasing the suction hood power - Before installation, check that the local supply conditions (nature and pressure of the gas) and the regulation state of the appliance are compatible - The regulation conditions of this appliance are given on the label (or on the data plate) - If there is an odour of gas in the room, open the window and wait for a complete change of air before re-igniting the burner - This appliance is not connected to a combustion product evacuation device. This must be installed in compliance with the installation rules in force. Particular attention must be made to the applicable dispositions with regard to ventilation - During use, do not touch the heating elements inside the oven - The accessible parts can become very hot during use, it is opportune to keep children away. 5 9880022200-EN-241111 In case of accidental switch-off during cooking, switch-off the gas burner by acting on the control knob (a safety valve intervenes anyhow, interrupting the gas flow). Try switching it on firstly opening the door completely. If gas is smelled in the room, open a window and wait for this to disappear before switching on the burner again. USER GUIDE FOR OVEN CONTROL PANEL A = Thermostat B = Functions selector switch C = Timer CM D = Electronic Clock OE E = Red power LED The positions may vary depending on the model Important: Before using the oven for the first time, allow it to run empty and at maximum for about 1 hour. Air the room well, possibly opening a window. This will allow the evacuation of combustion fumes from production residues, which greases, oils and resin. Power indicator LED (Red light) When on, it indicates that the oven is live and on 6 9880022200-EN-241111 Oven temperature thermostat: The oven thermostat controls the temperature desired for cooking on all of the oven functioning selections. Functions switch or selector The switch activates the type of functioning desired for cooking. Mechanical timer CM (in the models set-up) The mechanical timer can be used as a warning with acoustic signal at the end of the time period deemed necessary for cooking. Attention, cooking is not interrupted. Electronic clock OE (in models set-up) It allows the electronic display of the daily time and verification of the cooking time remaining with successive warning via acoustic signal. Attention, cooking is not interrupted. OVEN FUNCTIONS (the symbols in the oven indicated for which functions it is set-up) Oven light bulb (mod-GE;GEV;GG;GGV) The oven light bulb can be switched-on independently at any time. The bulb stays on also with other functions. 7 9880022200-EN-241111 Electric grill (mod-GE;GEV) In this selection only the electric resistance on the upper part of the oven is functioning (the simultaneous use of the gas burner is not possible, a safety device prevents its functioning). The feature of the grill to emanate intense heat allows the use of the oven to grill and roast. For this type of cooking, the door must remain open. It is possible to use the spit in models where this function is set-up. Consult the “Use of the Grill” paragraph Ventilated electric grill with spit (mod-GEV) This function allows to grill in a softer manner thanks to the use of forced air. Depending on the models, it is possible to cook with the aid of the spit (if set-up). For this type of cooking it is necessary to keep the door open .Consult the “Use of the Grill” paragraph. Oven fan (mod-GEV; GGV) Only the fan is functioning without any heating element. This function can be used to defrost and/or dry the food to be cooked, only with the movement of air circulating at ambient temperature, or for a more homogenous and soft firing, using the oven burner. The oven fan cannot be activated during Gas Grill functioning. It is possible to use the spit in models where this function is also set-up. Spit (mod-GE;GG;GEV;GGV) It is possible to use the spit in models where it is set-up. In models FISC90, the spit is positioned transversally with the connection on the back of the oven (in models FINC90, the connection is on the right wall of the oven) and its functioning is automatic in all functions, even if the symbol is not present. For use, act as follows. Place the dish well fixed with the appropriate fork hooks in the split rod and place everything inside the split stand frame, previously set-up in its slot on the drip pan. The spit grip made of insulating material must be used only to remove the spit rod from the oven and it must be removed during firing FI70 – FISC90 FINC90 8 9880022200-EN-241111 In models FI60 where set-up (not envisioned in versions GEV;GGV), the spit is positioned longitudinally and its connection is central in the oven's back. In this case also, insert the dish fixed with appropriate fork hooks of the split rod. Hook the split stand (R) to the side guides or in the appropriate slots (depending on the models). Do not leave the spit grip inside the oven during firing. FI60 It is recommended to insert foods into the oven when it has been pre-heated INTERNAL GRILLS POSITION FOR SPECIFIC COOKING Frozen cakes, Long roasts, Turkey, Cakes, Steak, Meat well done; position n. 1 and 2 from bottom. Cakes, Sliced Bread, Toast, Casserole, Wholemeal bread, Meat; position n. 2 from bottom. Biscuits, Thin cut meat; position n. 2 and 3 from bottom. To Golden with Grill, use position n. 3 from bottom. This data regarding the cooking positions are indicative and can be interpreted on the basis of your own experience. USING THE GRILL With the grill it is possible to cook fish, vegetables, small spits and various types of meat, with the exception of lean game meat. The meat cut in thin slices and fish must always be grilled quickly, slightly greasing them with oil using a suitable brush and placed always on the grill. The grill must be arranged in the position nearest to the upper heating element, in proportion to the thickness of the dish, in order to avoid externally burning it and not cooking it enough inside. Only salt the meat after cooking otherwise it will be less juicy. Never prick food during cooking, not even to turn it. Their juice would run making the grilled food dry. To appreciate Grill cooking, it is necessary to pre-heat the oven for at least 10 minutes. 9 9880022200-EN-241111 ELECTRIC GRILL To optimise Grill cooking, pre-heat the switched on Grill oven (bring the selector knob in position (---) for at least 10 minutes. Introduce the dish inside the oven in the position closest to the Grill, depending on the type of food to cook Always use the Grill with the oven door open and for a maximum time of 15 minutes. When using this function, it is not possible to use the oven burner (a safety device prevents the insertion of the electric resistance if the thermostat knob is not in position GRILL BURNER Fully open the oven door, a safety device prevents the switching on of the burners with the door closed, turn the thermostat knob clockwise to end run (GRILL position) and fully push it to trigger its ignition After having switched on the Grill burner, keep the knob pressed for 3/5 seconds; this enables the thermocouple to heat up and therefore keep the safety valve open. Release the knob. For better results, we recommend pre-heating the oven for a few minutes. During use of this function it is not possible to use the oven burner. At first use it is normal to have to repeatedly attempt switch-on due to the presence of air inside the gas ducts. Meat can be arranged in suitable containers or cooked directly on the grill. In the latter case, always pour some water in the dripping pan then inserting it in the guides under the grill. In this way avoiding the grease dripping in the dripping pan burning creating bad odours. Attention: during use of Grill, the accessible parts can overheat. It is therefore opportune to keep children at a due distance. OVEN BURNER Recommendation: thanks to the presence of a safety switch, the burner switch-on can be performed only with the door fully open. Igniting the oven burner Completely open the oven door, slightly press on the thermostat knob and turn it anticlockwise, taking it to position 260°. Fully press the knob to trigger the automatic switch-on of the oven burner. Ensure the flame is present on the burners verifying it through hole “F”. At first use it is normal to have to repeatedly attempt switch-on due to the presence of air inside the gas ducts After having switched on the Grill burner, keep the knob pressed for 3/5 seconds; this enables the thermocouple to heat up and therefore keep the safety valve open and, therefore the burner switched on. Position the thermostat knob on the wanted temperature. 10 9880022200-EN-241111 To facilitate identifying the position of minimum, the thermostat has a stop in that position. To switch-off the burner from the position of minimum just press the knob slightly and turn it to positionWhile using the oven burner the Grill burner cannot be activated. The burner is equipped with a safety valve that locks the gas supply in case the flame accidentally goes off. The oven should never be used to heat the home or room in which it is installed. A prolonged and intensive use of the appliance may require additional ventilation by means of opening a window or increase the forced suction power (electric blower). ELECTRONIC CLOCK OE (in models set-up) The electronic clock, as well as displaying the current time, can also be useful as timer to warn when the cooking time has terminated. Attention, cooking is not interrupted by the electronic clock but it is necessary to act on the manual oven controls After having connected the household appliance to the electric mains and, in case of temporary interruption of the electric current supply, the display of the electronic clock will start to flash. 11 9880022200-EN-241111 Setting the time Press the button, set the time by acting on the + and --. buttons. This function remains active for 7 seconds after the last action on the + or -- buttons. To modify the time set, press the button for 4 seconds until the characters of the hour start to flash. Amend the time by pressing the buttons + or -- Press the button once again and adjust the minutes by acting on the + or -- buttons again. Timer Use the electronic timer as a warning with acoustic signal at the end of the time period necessary for cooking. Attention, cooking is not interrupted. Setting the timer Press button + once, press the same button again to increase the duration time. The setting unit is of 10 seconds per impulse. For quick scrolling, keep the key + pressed. Countdown has priority on the display. The maximum time is 10 hours. After having reached 99 minutes and 50 seconds, the time setting changes in 1h and 40 min. The bell symbol indicates that the timer is activated. To see the time during countdown, press button . The time will appear for 6 seconds, after which countdown is displayed again. Resetting the timer Press and hold the -- button down until the previously set time has been reset Acoustic signal Once the set alarm time has been reached, the acoustic signal will ring for 7 minutes. To interrupt the acoustic signal, press one of the three buttons indifferently............ It is possible to set the frequency of the acoustic signal by choosing from three different levels by pressing the button -- . Resetting the timer does not interrupt cooking. MECHANICAL TIMER CM (in the models set-up) The mechanical timer can be used as a warning with acoustic signal at the end of the time period necessary for cooking. To select the desired time, turn the knob to the corresponding time in minutes. When this time has passed, the timer will emit an acoustic signal. Resetting the timer does not interrupt cooking. Tangential fan (models set-up) In the set-up models, a tangential fan is provided for the cooling of the controls panel and of the oven door's handle. This fan starts to function a few minutes after the start of cooking, when the oven reaches a certain temperature (the time varies according to the model) and also prevents overheating of the housing cabinet. The hot air expelled from below the control panel will continue to escape also after the oven has been switchedoff, until the temperature does not fall to normal levels. 12 9880022200-EN-241111 MAINTENANCE AND CLEANING Disconnect the electric power supply before performing any type of maintenance on the product Do not use system cleaners on the appliance. Do not use coarse, abrasive or sharp metal scrapers to clean the oven door, as they can scratch or damage the surfaces, do not use acid products (like anti-scaling agents) as they can damage the enamelled parts. Switch-off the burners and heating elements, wait for the internal parts of the oven to cool down before touching or cleaning them. Pay great attention to the cooking grills. Clean the oven with care. Be careful to avoid scalding from steam in case a wet sponge or cloth, used for cleaning residues, comes into contact with a hot surface. Moreover, some detersives create noxious fumes on contact with the heat. Periodic maintenance Periodical check the state of the rubber gasket located around the oven opening. This guarantees the correct functioning of the oven. Clean this gasket avoiding the use of abrasive objects or substances. If gasket damage is noted, contact the nearest technical after-sales centre. The gas thermostat requires periodical lubrication, which must only be performed by qualified staff. Cleaning the surfaces The enamelled or stainless steel parts must be treated with caution. Use water or specific products, accurately drying with a soft cloth. Do not use abrasive products. In case of difficult encrustation on the enamelled parts, use a plastic sponge or similar, soaked with hot water and vinegar. If food residues or oil, sugar, grease stains, etc., are not immediately removed after having terminated using the oven, they can become more difficult to remove. It is recommended to clean internal parts of the oven when it is still warm, the task will be easier. Due to an increasing presence of new products on the market, it is impossible to establish a list of items useful for cleaning this appliance. Read the manufacturer's instructions thoroughly to check the possible use of detergent. FUNCTIONING ANOMALIES In the event of anomalous functioning, contact the nearest qualified and authorised technical after-sales centre immediately. The verifying of any of the situations listed below, is to be considered functioning anomaly and, consequently, require the intervention of a technician: - Flames with yellow tips. - Difficulty igniting the burner. - Burner that does not remain on. - Burner switch-off without reason - Difficulty in turning the cock-thermostat. Regularly check the correct functioning of the cocks-thermostats and of the switches. 13 9880022200-EN-241111 REMOVING THE OVEN DOOR To remove and reinsert the oven door, follow the instructions given below. Open the oven door completely. Lift the hinge hook and insert it inside the locking support on both hinges. see figure. This blocks the hinge in the open position. Grip the bottom sides of the door with both hands Lift the door by a few centimetres (there will be a resistance of the spring caused by the locking of the hinge). When the door is sufficiently lifted, the hinges can be extracted from their seats. Pull the door towards yourself to release the hinges from the openings of the oven frame. Re-insertion of the oven door Act in reverse order, holding the door sideways with both hands towards the bottom and inserting the hinges in the openings of the front oven frame, (pay attention to the positioning of the foot joint). With the oven door fully opened, remove the hinge lock bringing the locking hooks in their original position. Close the oven door slowly and make sure that it has been correctly inserted and aligned with the lateral edges. 14 9880022200-EN-241111 Attention- Do not remove the hinge locking hooks from their seat when the door is not mounted in the oven. Do not close the hinges without the weight of the door as it causes a violent closing of the springs. Do not rest weights on the door or hang them on the handle, they could damage the products, creating malfunctions Moreover, do not use the oven until the oven door has been re-mounted correctly. REPLACING THE OVEN LIGHT BULB To prevent electric shocks and/or damage to persons, read and follow the procedure given below: Before replacing the oven light bulb, make sure that the electric current has been removed by opening the master switch. Ensure that the oven and the light bulb are cold, then remove the protection cover A . Do not touch the hot bulb with damp cloth, breakage may be caused. Replace the light bulb with another suitable one of 25 W for 220 - 230 V with attachment type E14 suitable for high temperatures. In case the protection cover is damaged or broken, do not use the oven until the cover has been replaced or re-inserted correctly and safely. Attention: for correct installation and use of this appliance, refer to the technical data given on the serial label of the product. The product label is on the edge of the internal side of the oven. A second label is found on the cover of the instruction book. INSTALLATION INSTRUCTIONS The installation and technical assistance must only be performed by qualified staff. Read the safety instructions given in this manual thoroughly before using the oven. Incorrect installation, regulation, calibration, maintenance, assistance and use can cause serious damage/injury to persons or objects This product must be installed a envisioned by this manual in compliance with National Standards and local regulations in force. 15 9880022200-EN-241111 VENTILATION OF ROOMS USED This household appliance must be installed and only function in permanently ventilated rooms and have greater ventilation when requested by relative local Standards in force. Such ventilation must guarantee a correct exchange of combustion gases, of air circulation and must maintain the work temperature within the safety limits. The flow of air in the room must take place directly through the openings made in the external walls. These openings must have a free passage section of at least 100 cm² such that it cannot be accidentally obstructed. The combustion products discharge must happen through suction hoods connected to flues or directly to the outside. In case it is not possible to install the suction hood, an electric blower must be applied to the external wall or to the window of the room of use, as long as there are air inlets in the room envisioned by the Standards in force and proportioned for the capacity of the electric blower. The fumes discharge systems must be functioning during use of the appliance Do not lift or pull the oven from the door handle and do not put pressure or load weights when this is open Installation is the responsibility of the purchaser and any interventions requested of the manufacturing company due to an incorrect installation will not be included in the warranty FEATURES OF THE CABINET The cabinet has the following requisites; - The cabinet and its components must be able to resist a temperature of 90°C without deformations and/or defects of the surface. - The cabinet must allow the free passage of the oven connections. - All kitchen cabinets at household level must be protected with fireproof material according to the Standards in force. 16 9880022200-EN-241111 INSERTING THE OVEN INTO THE CABINET It is important that all operations relating to the installation of the appliance are carried out by qualified staff. The oven can be installed both in tall unit and under the work top of a kitchen cabinet. fig.01 FI60 fig.02 FI70 fis.03 FINC90/SC90 fig.04 FI TWIN 17 9880022200-EN-241111 Built-in measurements The dimensions of the opening to be made on the cabinet for fitting the oven are indicated in figures. Ensure that the cabinet where the oven is to be installed, is able to support the weight of 30 kg for FI 60; 45 kg. for FI 90 and FI 70; 70 kg for FI TWIN. For the opening in the cabinet follow the respective dimensions of the type of oven purchased, indicated in Fig. 01 for FI 60, Fig. 02 for FI 70, Fig. 03 for FI 90 and Fig. 04 for FI TWIN. It is necessary to create an opening in the rear part of the bottom of the cabinet or in the oven support shelf, (see figures), to allow sufficient air to circulate for the cooling of the oven during functioning. For a good functioning of the gas burners, as well as the rear opening, a further opening must be made on the kitchen skirting board. The lacking of this opening can cause the malfunctioning or switch-off of the gas burner Ensure the oven is safely installed inside the cabinet. Use screws A for fixing the oven. OVEN ELECTRICAL CONNECTION Make sure that the electric current has been removed before connecting the oven to the electric mains. Functioning happens in single-phase alternate current 220-230-240 V~ 50-60 Hz, using flexible cable. Ensure that the household system can support the charge of the appliance. (see serial plate). The electric safety of this appliance is only assured if the same is correctly connected to a system having efficient earth connection, according to the legal Standards in force. In case of permanent connection to the electric mains, apply a bipolar switch dimensioned to the corresponding charge, with an opening for every contact of at least 3 mm. In models where present, the flexible cable is supplied without plug. The plug to be used must be suitable to the electric charge of the product and must comply with the Standards in force. The installer must ascertain that the section of the socket cables is suitable to the power absorbed by the oven, as indicated in the serial plate. The connection socket must be easily accessible. 18 9880022200-EN-241111 ASSEMBLY/REPLACEMENT OF THE POWER SUPPLY CABLE The electric cable must be kept locked to the terminal box by the cable fix, so that it cannot come out. Connect the line cable to clamp L , the neutral cable to clamp N and the yellow/green cable to the earth clamp . The yellow/green cable must be longer than the other by at least 20 mm. Be careful that the electric cable does not pass near or comes into contact with the surfaces that reach temperatures above 75°C. EARTH CONNECTION Installation, connection and earthing of the electric system must comply with the European standard requisites and, however, fall within the parameters of the local Standards in force. This household appliance requires an earthing connection for your protection from any short-circuits or electric dispersions. It must therefore be connected to a suitable electric socket. The earth cable must not be interrupted by the switch. ATTENTION: DISCONNECT THE ELECTRIC POWER SUPPLY BEFORE PERFORMING TECHNICAL ASSISTANCE OR MAINTENANCE ON THE PRODUCT. In case of replacement of the electric cable, ensure the use of an electric cable certified according to the Standards in force and suitable to the technical features of the product. Use only flexible cables: for oven GGV or GGVT cable type H05RR-FH 3 x 0.75 for oven GET or GEVT cable type H05RR-FH 3 x 1.5 CONNECTION TO THE GAS MAINS This household appliance must be installed and functioning only in permanently ventilated rooms according to relative local Standards in force. Gas compatibility Before installing, verify that the local distribution conditions (gas type and pressure) and the adjustment state of the appliance, are compatible (see the appliance technical data plate). If not, before continuing, read the indications of the paragraph “adaptation to the different types of gas”. 19 9880022200-EN-241111 Connection to the gas mains Connection to the gas mains must be carried out in compliance with the relative local Standards in force and only by a trained technician or qualified installer of gas appliances that must also carry out the seal test, carefully following the outline below. For the connection, follow the control list below: a) switch-off all pilot flames off and close the respective valves of other gas appliances present b) close the main valve of the home's gas network c) interpose a ball valve between the gas mains and the oven, in an easily accessible position d) connect the appliance to the gas network using a flexible stainless steel pipe, limited to those with maximum extension of 2 mt., or a rigid copper pipe with suitable dimensions (the use of the rubber flexible pipe is forbidden as it cannot be inspected) ensure the flexible metal pipe does not come into contact with mobile parts or is crushed. Ensure that the ramp connection pipe of the oven and the various fittings are not obstructed by dirt, foreign objects, etc. If these parts are left inside the ramp pipe they can damage the oven faucets e) now proceed with the connection of the oven to the gas mains paying attention to the assembly of the various fittings and relative gaskets G f) open the main valve of the gas mains again. Apply a soapy water solution on the joints of the new gas connections to check the seal. g) open the ball valve upstream of the gas appliance and, in case of air bubbles, slightly tighten the connection component until the leak has stopped or, check it has been correctly fastened. Repeat the seal test Important: never use naked flame to check for gas leaks. After the seal test, clean the surface from any residue substances. It is now possible to switch-on the pilot flames of the other gas appliances. In case of having to install a cooking top combined with a gas oven, the connection to the gas mains cannot happen through only one shut-off ball valve. The two products must be connected separately using two independent ball valves ADAPTATION TO THE DIFFERENT TYPES OF GAS All oven models are accessorised with exchange injectors kit for the LPG and/or Neutral gas. Check the product label to verify the type of production calibration gas. To replace the injectors and to adjust the minimum capacity, read the paragraph “replacement of the injectors” The oven burner does not require adjustment of the primary air 20 9880022200-EN-241111 Replacement of the injectors Firstly, electrically disconnect the oven and close the ball valve supplying the gas. To replace the injectors, remove the screw fixing the burner to the front part (for the oven burner it is firstly necessary to extract the removable top P) Slightly and cautiously extract the burner B from the rear seat, being careful not to shake the thermocouple and the ignition spark plug cable. Subsequently, using a 7 mm hexagonal spanner, loosen the injector I and replace it following the indications in the table “gas burners technical data”. Re-mount the burner following the above described operations, but in reverse order. Now follow the instructions in the paragraph “regulation of the thermostat minimum” FI60 – FI70 FINC90 – FI 21 9880022200-EN-241111 REGULATION OF THE THERMOSTAT MINIMUM Perform this operation with the oven already inserted in the cabinet and with the electric and gas connections already carried out, as from previous instructions It is necessary to perform the adjustment of the minimum every time the type of gas is changed, in order to guarantee the good functioning of the burners In minimum position, the flame must be stable and must not go off when passing from maximum to minimum, and viceversa. The height of the flame in minimum position must be of about 5 mm. Calibration of the minimum Ignite the burner to be calibrated and make it function for a few minutes. Bring the knob index to minimum position, remove the knob. Introduce a small Phillips screwdriver in the opening on the left side of the thermostat shaft, optimise the height of the flame by closing or opening the adjustment screw V with the shaft locked. Carry out a few normal closing and opening tests of the door and, in case of switch-off, slightly lift the minimum. NOTE: All adjustments must be realised only by qualified and authorised staff. To guarantee a correct and safe operation, the oven must be suitably installed and connected to earth/mass by qualified and authorised staff. Ask the installer to show you the position of the connection ball valve to the gas mains and how to close it in case of need. Disconnect the appliance from the electric mains before any intervention. 22 9880022200-EN-241111 TECHNICAL AFTER-SALES ASSISTANCE AND SPARE PARTS Spare parts Only authorised components can be used for the household appliance assistance. Do not repair or replace any oven component that has not been recommended in this manual. All interventions and repairs must be carried out by authorised technical staff. To request a spare part, indicate the following data: 1) Oven model initial (MOD.) and production number (N.L.), found on the product label positioned on the lower front part of the oven facade and in the first page of the booklet. 2) Description and number of the spare part, technical information available only to the authorised assistance service. 3) Lastly, indicate the data of the distributor that sold you the oven and the data of the nearest assistance centre to you. Technical assistance In case your oven requires technical assistance and/or spare parts, contact the dealer or the authorised technical assistance centre nearest to you. In this case also it is necessary to transmit the full appliance data found on the aluminium product label, which: model (MOD.) lot number (N.L.),etc, label placed on the lower part of the oven facade or on the first page of the instructions booklet 23 9880022200-EN-241111 TECHNICAL DATA TABLES GAS BURNERS TECHNICAL DATA Mod Bruc. Power kW FI60 oven grill oven grill oven grill oven grill oven / 2,20 2,10 2,20 2,70 3,30 3,20 3,30 3,20 2,20 FI70 FINC90 FISC90 FI TWIN Gas Pressure (mbar) Nat. But-Prop G20 G30/31 20 30/37 20 30/37 20 30/37 20 30/37 20 30/37 20 30/37 20 30/37 20 30/37 20 30/37 Injectors (mm) Nat. But-Prop G20 G30/31 1,10 0,70 1,10 0,72 1,10 0,70 1,20 0,80 1,30 0,85 1,30 0,85 1,30 0,85 1,30 0,85 1,10 0,70 Nat. G20 reg. reg reg. reg. reg. By-pass (mm) But-Prop G30-31 0,40 0,40 0,52 0,52 0,40 EXTERNAL DIMENSIONS model FI60 FI70 FINC90 FI SC90 FI TWIN width (cm) 59,5 69,5 89,5 89,5 59,5 height (cm) 59,5 59,5 59,5 59,5 88,8 depth (cm) 55 55 55 55 55 FUNCTIONING TECHNICAL DATA model FI60 FI70 FINC90 FISC90 FI TWIN F60 F30 voltage total electric power electric grill resistance circular heat oven light bulb oven fan tangential fan spit motor 2,2 kW 1,8 kW / 25 W 25 W 25 W 1-5 W 2,2 kW 1,8 kW / 25 W 25 W 25 W 1-5 W model FI60 FI70 FINC90 FISC90 useful volume grill cooking area 56 lt. 726 cm² 77 lt. 726 cm² 71 lt. 1000 cm² 110 lt. 1200 cm² model FI60 FI70 FINC90 FISC90 G20 natural gas LPG G30 210 l/h 160 g/h 210 l/h 160 g/h 315 l/h 240 g/h 315 l/h 240 g/h 220/230/240V – 50/60Hz 1,8 kW 2,6 kW 1,8 kW 2,5 kW / / 25 W 25 W 25 W 25 W 25 W 25 W 1-5 W 1-5 W 2,6 kW 2,6 kW / 25 W 25 W 25 W / 1,8 kW 1,8 kW 1,5 kW 25 W 25 W 25 W / INTERNAL DIMENSIONS FI TWIN F60 F30 56 lt 31 lt 726 cm² 726 cm² ENERGY CONSUMPTION FI TWIN F60 F30 210 l/h / 160 g/h / OVEN ACCESSORIES model FI60 FI70 FINC90 FISC90 oven dripping pan internal grills yes yes yes yes yes yes yes yes 24 FITWIN F60 F30 yes yes yes yes 9880022200-EN-241111 جداول البيانات الفنية مجرى جانبي )ملم( بوتان -بروبان G30-31 طبيعي G20 0,40 0,40 0,52 0,52 0,40 نظامي نظامي نظامي نظامي نظامي بيانات فنية لشعالت الغاز ضغط غاز محاقن )م بار( )ملم( بوتان- بوتان- طبيعي طبيعي بروبان بروبان G20 G20 G30/31 G30/31 20 30/37 1,10 0,70 20 30/37 1,10 0,72 20 30/37 1,10 0,70 20 30/37 1,20 0,80 20 30/37 1,30 0,85 20 30/37 1,30 0,85 20 30/37 1,30 0,85 20 30/37 1,30 0,85 20 30/37 1,10 0,70 قدرة )طاقة( كيلوواط شعلة موديل 2,20 2,10 2,20 2,70 3,30 3,20 3,30 3,20 2,20 فرن شواية فرن شواية فرن شواية فرن شواية فرن / FI60 FI70 FINC90 FISC90 FI TWIN أبعاد خارجية ارتفاع )سم( 59,5 59,5 59,5 59,5 88,8 عمق )سم( 55 55 55 55 55 FI TWIN F60 F30 FISC90 عرض )سم( 59,5 69,5 89,5 89,5 59,5 بيانات فنية للتشغيل FI70 FINC90 موديل FI60 FI70 FINC90 FI SC90 FI TWIN FI60 240/230/220فولت – 60/50ھرتز 1,8كيلو واط 1,8كيلو واط موديل فولطية 2,6كيلو واط 2,6كيلو واط 1,8كيلو واط 2,2كيلو واط 2,2كيلو واط قدرة الكھرباء اإلجمالية 2,6كيلو واط 2,5كيلو واط 1,8كيلو واط 1,8كيلو واط 1,8كيلو واط مقاومة الشواية الكھربية 1,5كيلو واط / / / / / عنصر تسخين دائري 25واط 25واط 25واط / 25واط 25واط 25واط / 25واط 25واط 25واط 5-1واط 25واط 25واط 25واط 5-1واط مصباح الفرن مروحة فرن مروحة خارجية محرك لفافة التحمير FI60 موديل FI TWIN F60 F30 56لترا 31لترا 726سم مربع 726سم مربع FISC90 25واط 25واط 25واط 25واط 25واط 25واط 5-1واط 5-1واط أبعاد داخلية لغرفة الطھي FI70 FINC90 110لترا 71لترا 77لترا 56لترا الحجم 1200سم مربع 1000سم مربع 726سم مربع 726سم مربع مساحة منطقة الشواية FINC90 FI70 FI60 موديل 315لتر/ساعة 315لتر/ساعة 210لتر/ساعة 210لتر/ساعة غاز طبيعي 20G 240جالون/ساعة 240 جالون/ساعة 160 جالون/ساعة 160 جالون/ساعة غاز مسال FI70 FI60 موديل نعم نعم نعم نعم صينية قطرات الفرن شبكات داخلية استھالك الطاقة FI TWIN F60 F30 210لتر/ساعة / 160 جالون/ساعة FITWIN F60 F30 نعم نعم نعم نعم FISC90 FISC90 نعم نعم 9880022200-AR-241111 كماليات الفرن FINC90 نعم نعم 20 ضبط الترموستات على الحد األدنى. نفذ ھذه العملية بعد إدخال الفرن في األثاث وبتوصيالت الغاز والكھرباء بعد تمامھا بالطريقة السابق ذكرھا. من الضروري ضبط الحد األدنى كل فترة يتم فيھا االنتقال من نوع غاز إلى آخر بحيث يتم ضمان التشغيل الجيد للشعالت. وضع الشعلة األدنى يجب أن يكون مستقرا وال يجب أن يطفئ عند االنتقال من الحد األقصى إلى الحد األدنى والعكس صحيح .ارتفاع الشعلة في وضع الحد األدنى يجب أن يكون حوالي 5مم. معايرة الحد األدنى أشعل الشعلة المطلوب معايرتھا واجعلھا تعمل لعدة دقائق .اجعل مقبض المؤشر يذھب إلى عالمة الحد األدنى، وأزل المقبض .أدخل مفكا صغيرا في الفتحة الموضوعة إلى الجانب األيسر من محور الترموستات ،وحسن ارتفاع الشعلة مع غلق وفتح برغي الضبط مع إيقاف المحور .قم ببعض تجارب الغلق والفتح للباب وفي حالة االنطفاء ارفع الشعلة قليال. مالحظة :جميع عمليات الضبط يجب أن يقوم بھا عامل مؤھل ومرخص له. لضمان عملية صحيحة وآمنة يجب أن يكون الفرن مركبا على نحو صحيح ومتصال باألرضي بواسطة شخص مؤھل ومرخص .اطلب من عامل التركيب أن يبين لك وضع المحبس الكروي المتصل بشبكة الغاز وأن يبين لك كيف تغلقه في حالة الضرورة .افصل الجھاز عن الشبكة الكھربية قبل أي عملية تدخل. خدمة الدعم الفني وقطع الغيار قطع الغيار للدعم الفني للجھاز الكھربي المنزلي يمكن استخدام قطع مرخص بھا .ال تصلح وال تستبدل أيا من مكونات الفرن ليس موصى به في ھذا الكتيب .جميع عمليات التدخل األخرى واإلصالح يجب تنفيذھا بواسطة عاملين فنيين مرخص لھم. لطلب قطعة غيار ،يجب أن توضح البيانات التالية: (1اسم موديل الفرن ) (MOD.ورقم اإلنتاج ) ، (N.L.والتي توجد على لوحة المنتج الموضوعة على الجزء السفلي األمامي لواجھة الفرن وعلى الصفحة األولى من كتيب التعليمات. (2وصف ورقم قطعة الغيار ،معلومات فنية تتوفر فقط في مركز خدمة الدعم الفني المرخص لھا. (3وأخيرا اشر إلى بيانات الموزع الذي باع لك الفرن ،وبيانات مركز الدعم الفني األقرب إليك. خدمة الدعم الفني في حالة ما يحتاج الفرن إلى دعم فني و/أو قطع غيار ،اتصل ببائع أو مركز دعم فني مرخص له قريب إليك. أيضاً في ھذه الحالة ،من الالزم نقل البيانات الكاملة للجھاز التي توجد على لوحة المنتج من األلمنيوم مثل الموديل ) (MOD.ورقم الدفعة ) (N.L.الخ ،الموجودة في الجزء السفلي من واجھة الفرن أو على صفحة كتيب التعليمات. 9880022200-AR-241111 19 استبدال المحاقن افصل قبل كل شيء الكھرباء عن الفرن وأغلق محبس الغاز الكروي. الستبدال المحاقن يجب فك ونزع البراغي التي تثبت الشعلة في الجزء األمامي )لشعلة الفرن ينبغي أوال إخراج الرف المتحرك( .أخرج بخفة وبحذر الشعلة من مكانھا الخلفي مع توخي االنتباه إلى عدم التشديد على العزم المزدوج الحراري وسلك شمعة اإلشعال. بعد ذلك استخدم مفك سداسي 7مللي وفك المحقن واستبدله بإتباع اإلرشادات المدونة في جدول "بيانات فنية لشعالت الغاز" .أعد تركيب الشعلة بإتباع عكس العمليات المذكورة أعاله .اتبع اآلن التعليمات الموجودة في الفقرة "ضبط الترموستات على الحد األدنى". FI60 – FI70 FINC90 – FI SC90 9880022200-AR-241111 18 التوصيل بشبكة الغاز ھذا المنتج المنزلي الكھربي يجب تركيبه وتشغيله فقط في أماكن تتم تھويتھا باستمرار حسب القواعد القانونية توافق نوع الغاز قبل التركيب تحقق من أن الشروط المحلية للتوزيع )أنواع وضغط الغاز( وحالة ضبط الجھاز ،متوافقة )أنظر لوحة البيانات الفنية للجھاز( .في حالة العكس ،وقبل أن تقوم بالتنفيذ ،اقرأ اإلرشادات في الفقرة "التوافق مع أنواع الغاز المختلفة". التوصيل بشبكة الغاز التوصيل بشبكة الغاز يجب أن يتم بالتوافق مع القواعد األوروبية وفقط بواسطة عامل تقني مدرب أو عامل تركيب تجھيزات غاز مؤھل ،يجب أن ينفذ أيضا تجربة كشف التسرب بإتباع اإلجراءات التالي بيانھا. للتوصيل اتبع قائمة التحكم التالية: أ( قم بإطفاء جميع الشعالت المرشدة وأغلق محابس )صمامات( أجھزة الغاز األخرى الموجودة. ب( أغلق المحبس الرئيسي لشبكة غاز المسكن ج( ضع بين شبكة الغاز والفرن محبس ببلية )كروي( ،في وضع يسھل الوصول إليه د( قم بتوصيل الجھاز بشبكة الغاز باستخدام أنبوب مرن من الصلب الذي ال يصدأ ،من تلك األنابيب التي ال يمكن مدھا ألكثر من 2متر ،أو أنبوب صلب من النحاس بأبعاد مناسبة )استخدام األنبوب المرن الكاوتشوك ممنوع ألنه ال يمكن الكشف عليه( .تأكد من أن األنبوب المعدني ال يالمس األجزاء المتحركة أو ال يتم دھسه .توخى االنتباه لئال يكون أنبوب التوصيل للفرن والوصالت المختلفة ليست مسدودة بواسطة القاذورات ،واألجسام الغريبة الخ .مثل ھذه األشياء الدقيقة إذا تركت في داخل األنبوب يمكن أن تؤدي إلى تلف صنابير الفرن ھـ( اآلن يمكنك إجراء توصيل الفرن بشبكة الغاز مع توخي االنتباه لتركيب الوصالت المختلفة وما يتعلق بھا من حشوات مانعة للتسرب G ب( أعد فتح المحبس الرئيسي لشبكة غاز المسكن وضع محلول ماء وصابون على حشوات التوصيالت الجديدة للغاز للتحقق من العزل الجيد. و( افتح المحبس الكروي فوق التجھيز الغازي وفي حالة وجود فقاقيع ھواء ّ شد بخفة عنصر التوصيل حتى يتوقف التسرب أو تحقق من أنه تم ربطه على نحو صحيح .كرر بعد ذلك تجربة العزل ھام :ال تستخدم بتاتا الشعلة الحية للتحقق من تسرب الغاز .في نھاية التجربة نظف السطح من أية بقايا. من الممكن اآلن إعادة إشعال الشعلة المرشدة ألجھزة الغاز األخرى. في حالة وجوب المضي في تركيب موقد طھي مع فرن الغاز ،فإن التوصيل بالشبكة الغازية ال يمكن مطلقا عمله من خالل محبس كروي واحد لالعتراض )الحجز( .المنتجان ينبغي توصيلھما كال على حدا بمحبسين بلية )كروي( مستقلة. التھيئة مع أنواع الغاز المختلفة جميع موديالت الفرن لھا ملحقات عبارة عن أطقم محاقن غيار للغاز المسال و/أو الطبيعي .راجع بطاقة المنتج للتحقق من نوع الغاز المضبوط عليه الجھاز .الستبدال المحاقن أو ضبط الناتج األدنى ،اقرأ فقرة "استبدال المحاقن" شعلة الفرن ال تحتاج إلى ضبط الھواء الرئيسي 9880022200-AR-241111 17 توصيل الفرن بالكھرباء تأكد من أن التيار الكھربي قد تم قطعه قبل تنفيذ توصيل الفرن إلى الشبكة الكھربية. يحدث التشغيل بتيار متردد أحادي المرحلة 240-230-220فولت ~ تردد 60-50ھرتز ،باستخدام السلك المرن. تأكد من أن التجھيز المنزلي يمكن أن يتحمل شحنة الجھاز)أنظر اللوحة الفنية( يرتكز ضمان السالمة الكھربية لھذا الجھاز فقط إذا تم توصيله بتجھيز أرضي فعال حسب قواعد القانون السارية. في حالة التوصيل الدائم بالشبكة الكھربية يجب استخدام قاطع تيار ثنائي األقطاب بأبعاد مناسبة للشحنة المماثلة بفتحة لكل توصيل قدرھا 3مم على األقل. في الموديالت التي يوجد فيھا ،يتم التزويد بالسلك المرن بال قابس .يجب أن يكون القابس مناسبا لشحنة الكھرباء الخاصة بالمنتج ويجب أن يحترم القواعد القانونية السارية. يجب أن يتأكد المسئول عن التركيب من أن مقطع األسالك تناسب القوة الممتصة من الفرن وكما ھو مدون على لوحة الجھاز. يجب أن يتمكن المستخدم من الوصول إلى المقبس بسھولة. تركيب واستبدال سلك التغذية الكھربية الكابل الكھربي يجب إيقاف حركته في لوحة نقاط التوصيل بواسطة مثبت السلك بحيث ال يمكن خروجه منھا. وصل بنقطة التوصيل " "Lسلك الخط ،وبنقطة التوصيل " "Nالسلك المحايد وبنقطة توصيل األرض ) ( الكابل األصفر/األخضر .يجب أن يكون السلك األصفر /األخضر أطول من السلك Lو السلك Nبما يعادل 20ملم تقريبا. انتبه إلى أن السلك الكھربي ال يمر بالقرب أو يالمس أسطح تصل إلى درجة حرارة أعلى من 75درجة مئوية. التوصيل باألرض تثبيت التوصيل الكھربي والتوصيل باألرض للنظام الكھربي يجب أن يحترم شروط المعايير األوروبية وعلى كل حال ،حسب معايير القوانين المحلية السارية. ھذا الجھاز المنزلي يتطلب توصيال باألرض لحمايتكم من أي ماس محتمل أو التسرب الكھربي .ولھذا يجب توصيله بمقبس تيار صحيح .ال يجب قطع كابل األرضي من القاطع الكھربي. تنبيه: افصل التغذية الكھربية قبل أن تقوم بخدمة دعم فني أو صيانة للمنتج. في حالة استبدال الكابل الكھربي تأكد من أن استخدام الكابل الكھربي معتمد حسب القواعد األوروبية المناسبة وطبقا للمواصفات التقنية للمنتج. استخدم أسالكا مرنة فقط. للفرن GGVو GGVTاستخدم سلكا من نوع H05RR-FH 3 x 0.75 للفرن GETو GEVTاستخدم سلكا من نوع H05RR-FH 3 x 1.5 9880022200-AR-241111 16 fig.01 FI60 fig.02 FI70 fis.03 FINC90/SC90 fig.04 FI TWIN قياسات اإلدخال أبعاد الفتحة التي يجب تنفيذھا على قطعة األثاث إلدخال الفرن واردة في الصورة .تأكد من أن قطعة األثاث التي سوف يتم إدخال الفرن فيھا قادرة على تحمل وزن 30كجم لـ ،FI 60و 45كجم لـ FI 90و FI 70و 70كجم لـ .FI TWINللفتح في قطعة األثاث اتبع األبعاد المتعلقة بنوع الفرن الذي اشتريته والوارد في الصورة 01لموديل ،FI 60صورة 02للموديل FI ،70و صورة 03للموديل FI 90والصورة 04 للموديل .FI TWIN في قاعة قطعة األثاث أو في سطح دعم الفرن يجب عمل فتحة في الجزء الخلفي ،أنظر الصورة ،للسماح بدخول الھواء الكافي ومن ثم إعادة تدوير الھواء نفسه لتبريد الفرن أثناء تشغيله .لتشغيل الموديالت التي تعمل بشعالت الغاز على أفضل وجه ،عالوة على الفتحة الخلفية ،يجب تنفيذ فتحة إضافية على قاعدة المطبخ. عدم وجود ھذه الفتحة يمكن أن يسبب سوء تشغيل وانطفاء شعلة الغاز. تأكد من أن الفرن مركب بطريقة آمنة في األثاث. استخدم البراغي ، Aلتثبيت الفرن. 9880022200-AR-241111 15 تھويـــة أمـــاكن االســـتخدام ھــــذا المنتــــج المــــنزلي الكھــــربي يجــــب تركيبــــه وتشــــغيله فقــــط فــــي أمــــاكن تتــــم تھويتھــــا باســــتمرار حســــب القواعــــد القانونيــــة ويوجــــد بــــه تھويــــة إضــــافية وفقــــا مــــع القواعــــد الســــارية مثل ھذه التھوية يجب أن تضمن التبادل الصحيح لغاز االحتراق ودائرة الھواء ويجب أن تحافظ على درجة الحرارة عند حدود األمان. تدفق الھواء في المكان يجب أن يحدث مباشرة عبر فتحات يتم تنفيذھا في الحوائط الخارجية .ھذه الفتحات يجب أن يكون بھا قسم حر المرور قدره على األقل 100سم مربع حتى ال يمكن سده ولو عرضا. تفريغ نواتج االحتراق يجب أن يحدث من خالل أغطية الشفط الموصلة بالمداخن أو مباشرة إلى الخارج. في حالة عدم إمكان تركيب غطاء شفاط من الالزم استخدام مروحة كھربية في الحائط الخارجي أو نوافذ المكان أو فتحات إدخال الھواء كما ھو منصوص عليه في القوانين السارية وبما يتناسب مع قدرة المروحة الكھربية .يجب أن تكون نظم تفريغ األدخنة شغالة أثناء مدة استخدام الجھاز كلھا. ال ترفع وال تجر الفرن من مقبض بابه وال تمارس ضغطا أو تحمل أثقاال عندما يكون الباب مفتوحا. التركيب يقع على عاتق المشتري والتدخالت المطلوبة من الشركة الصانعة لمعالجة التركيب الخاطئ ال تدخل ضمن الضمان. مواصفات األثاث الشروط الفنية المطلوبة ھي ما يلي: يجب أن يكون األثاث ومكوناته قادرة على مقاومة درجة حرارة 90مئوية دون حدوث تشويھات و/أو عيوب بسطحھا. يجب أن تسمح قطعة األثاث بالمرور الحر لتوصيالت الفرن. جميع قطع أثاث الفرن على المستوى المنزلي يجب أن تكون محمية بواسطة موادضد االشتعال طبقا لما ھو مطلوب من التعليمات األوروبية. إدخال الفرن في قطعة األثاث من المھم أن تكون جميع العمليات المتعلقة بالجھاز منفذة بواسطة عامل مؤھل .يمكن أن يكون الفرن مركبا سواء على عمود أو تحت سطح عمل لقطعة أثاث المطبخ. 9880022200-AR-241111 14 إدخال باب الفرن تعامل بطريقة عكسية باليدين كلتيھما على الجانبين نحو األسفل مع إدخال المفصالت في فتحات إطار الفرن األمامي )انتبه لوضعية تعشيق القدم( .وباب الفرن مفتوح تماما ،أزل عنصر إيقاف المفصلة بإعادة وضع روابط )خطافات( اإليقاف إلى الوضع األصلي .أغلق الباب بلطف للتأكد من أنه تم إدخاله على نحو سليم ومتوازي مع الحواف الجانبية. انتبه .ال تنزع روابط إيقاف المفصلة من مكانھا عندما يكون الباب غير مركب على الفرن .ال تغلق المفصالت بدون ثقل الباب ألن ذلك يؤدي إلى اإلغالق العنيف لليايات )الزنبركات(. ال تضع أشياء ثقيلة على الباب وال تعلقھا على مقبضه ،فقد يؤدي ھذا إلى اإلضرار بالمنتج ويؤدي إلى عدم تشغيله على نحو صحيح. كذلك ال تستخدم الفرن ما دام الباب لم يتم تركيبه على نحو صحيح. استبدال مصباح الفرن لتحاشي الصدمات الكھربية و/أو األضرار الشخصية ،اقرأ بعناية والتزم باإلجراء التالي: قبل استبدال مصباح الفرن ،تأكد من أن التيار الكھربي قد تم فصله بفتح المفتاح القاطع العام. تأكد من أن الفرن والمصباح باردين ثم أزل غالف الحماية Aبفك برغيھا. ال تلمس المصباح بواسطة قطعة قماش مبللة ،فقد تؤدي إلى كسره. استبدل المصباح بواحد آخر مناسب لدرجات الحرارة العالية 25واط 230-200فولت مع قاعدة من نوع .14E في حالة ما إذا كان غالف المصباح مقطوعا أو تالفا ،ال تستخدم الفرن حتى يتم استبداله وإدخاله على نحو صحيح وآمن. تنبيه :من أجل التركيب الصحيح واستخدام ھذا الجھاز ،يجب الرجوع إلى البيانات الفنية الواردة في اللوحة الفنية للمنتج. بطاقة المنتج موجودة على حافة الواجھة الداخلية للفرن .وھناك بطاقة ثانية موضوعة على غالف كتيب التعليمات. تعليمات التركيب: التركيب والدعم الفني يجب أن يتم تنفيذھما فقط بواسطة عامل فني مختص .اقرأ بعناية تعليمات السالمة الواردة في ھذا الدليل قبل أي استخدام للفرن .التركيب والضبط والصيانة والدعم واالستخدام الخاطئ يمكن أن يؤدي إلى أضرار خطيرة لألشخاص واألشياء. يجب تركيب ھذا المنتج كما ھو منصوص عليه في الكتيب الحالي بما يتوافق مع القواعد القومية والتعليمات المحلية السارية. 9880022200-AR-241111 13 أعطال التشغيل في حالة التشغيل غير الطبيعي ينبغي االتصال على الفور بأقرب مركز دعم فني مؤھل ومرخص. عند حصول أي من الحاالت الواردة أدناه يعتبر تشغيل غير طبيعي ومن ثم يستلزم تدخل الفني المختص: لھب له طرف أصفر صعوبة في إشعال الشعلة شعلة ال تظل مشتعلة. انطفاء الشعلة بال سبب. صعوبة في إدارة المحبس أو الصنبور -الترموستات.راجع بانتظام التشغيل الصحيح للصنبور والترموستات ومفاتيح التبديل والقطع. إزالة باب الفرن إلزالة أو إدخال باب الفرن اتبع التعليمات الواردة فيما يلي. افتح باب الفرن تماما .ارفع خطاف المفصلة وأدخلھا في دعامة اإليقاف على المفصلتين ،أنظر الصورة .يوقف ھذا المفصلة في الوضع المفتوح .تناول بيديك كلتيھما الباب من الجانبين نحو األسفل .ارفع الباب لبضعة سنتيمترات )سوف تكون ھناك مقاومة ملحوظة من الزنبرك بسبب إيقاف المفصلة( .عندما يتم رفع الباب بدرجة كافية سوف يكون من ا لممكن إخراج المفصالت من مكانھا .اسحب الباب إلى ناحيتك لكي تخرج المفصلة من فتحات إطار الفرن. 9880022200-AR-241111 12 عداد دقائق ميكانيكي ) CMفي الموديالت المجھزة به( يمكنك استخدم عداد الدقائق الميكانيكي كتنبيه بإشارة صوتية عند نھاية الفترة الزمنية الالزمة للطھي .الختيار الزمن المرغوب أدر المقبض حتى قيمة الدقائق المطلوبة .بعد أن ينقضي الوقت المضبوط فإن العداد سوف يصدر إشارة صوتية .تصفير عداد الدقائق ال يقطع الطھي. مروحة خارجية )في الموديالت المجھزة به( في الموديالت المجھزة بھا ،تقوم المروحة الخارجية بتبريد لوحة األوامر ومقبض باب الفرن .تدخل ھذه المروحة قيد العمل بعد عدة دقائق من بداية الطھي ،عندما يصل الفرن إلى درجة حرارة معينة )يختلف الزمن حسب الموديل( ويتحاشي أيضا زيادة سخونة قطعة األثاث المركب بداخلھا .الھواء الساخن المطرود من تحت لوحة األدوات يواصل الخروج حتى بعد إطفاء الفرن ،حتى تھبط درجة الحرارة العادية. الصيانة والنظافة افصل التغذية الكھربية قبل أن تقوم بأية صيانة للمنتج ال تستخدم منظفات البخار لتنظيف الجھاز. ال تستخدم موادا خشنة أو كاشطة أو فرشاة معدنية مسنونة لتنظيف باب الفرن ،ألنھا قد تخدش أو تضر األسطح ،وال تستخدم منتجات حمضية )مثل المواد المضادة للجير( ألنھا قد تضر باألجزاء المطلية. أطفئ الشعالت وعناصر التسخين ،وانتظر بعد ذلك أن تبرد األجزاء الداخلية للفرن قبل أن تلمسھا أو تنظفھا .توخى حرصا أكبر لشبكات الطھي. نظف الفرن باحتراس .انتبه لكي تتحاشي الحروق من البخار في حالة مالمسة االسفنجة أو قطعة النسيج المبللة المتسخدمة لتنظيف الفضالت ،لألسطح الساخنة .عالوة على ذلك ،فإن بعض المنظفات تخلف أدخنة ضارة عندما تالمس األسطح الساخنة. الصيانة الدورية راجع دوريا حالة حشيات المطاط الموضوعة حول فتحة الفرن .فھي تضمن التشغيل الصحيح للفرن .حافظ على نظافة ھذه الحشوات بتحاشي استخدام أشياء أو مواد كاشطة .إذا الحظت أضرارا في الحشوات يلزم التوجه إلى مركز الدعم الفني األقرب إليك. يستلزم ترموستات الغاز التشحيم الدوري والذي يجب تنفيذه فقط بواسطة عامل مؤھل. تنظيف األسطح األجزاء المطلية أو أجزاء الصلب المقاوم للصدأ أينوكس يجب معاملتھا بحرص .استخدم الماء أو المنتجات المخصصة مع التجفيف الحريص بقطعة قماش ناعمة .ال تستخدم مواد كاشطة .في حالة وجود قشور قاسية على األجزاء المطلية ،استخدم اسفنجة بالستيكية أو ما شابه مبلال بالماء الساخن والخل .بقايا الطعام أو البقع الناشئة عن الزيوت ،والسكريات والشحوم وما إلى ذلك ،إن لم تنزع فور نھاية استخدام الفرن فإنھا قد تصبح بعد ذلك صعبة النزع .بالنسبة لألجزاء الداخلية من الفرن ،ننصحكم بالعمل على تنظيفھا والفرن ال يزال فاتر الحرارة ،فسوف يكون من السھل نزعھا. بسبب الوجود المتكاثر للمنتجات الجديدة في السوق ليس من الممكن تحديد قائمة المنتجات المناسبة لتنظيف ھذا الجھاز .اقرأ بعناية تعليمات الشركة الصانعة للتحقق من إمكانية استخدام المنظف. 9880022200-AR-241111 11 لتسھيل تحديد وضع الحد األدنى ،فإن الترموستات مزود بإيقاف على ھذا الوضع. إلطفاء الشعلة من وضع الحد األدنى من الكافي الضغط بخفة على المقبض ولفه حتى الوضع أثناء استخدام شعلة الفرن ليس من الممكن استخدام شعلة الشواية. الشعلة مزودة بصمام أمان يوقف اإلمداد بالغاز في حالة االنطفاء العرضي للشعلة. ال تستخدم بتاتا الفرن لتدفئة المنزل أو المكان الذي توجد فيه. االستخدام طويل المدى والمكثف للجھاز قد يتطلب تھوية إضافية من خالل فتح نافذة على سبيل المثال أو زيادة قوة شفط الھواء )مروحة كھربية(. ساعة إلكترونية ) OEفي موديالت مضبوطة مسبقا( يمكن أن تكون الساعة اإللكترونية مفيدة لعرض الساعة الحالية أيضا ،وكذلك كعداد دقائق دقيق ينبھكم عند انتھاء زمن الطھي .انتبه ،لن ينقطع الطھي بواسطة الساعة اإللكترونية ،ولكن يجب التدخل على أوامر التحكم اليدوية على الفرن. بعد توصيل الجھاز الكھربي المنزلي بالشبكة الكھربية وفي حالة االنقطاع المؤقت لإلمداد الكھربي ،فإن شاشة عرض الساعة الكھربية سوف تبدأ في الوميض. ضبط الساعة اضغط على النابض )الزر( ،واضبط الساعة بالتعامل مع النابضين +و .-- ھذه الوظيفة تظل نشطة لمدة 7ثوان بعد التعامل مع النابضين +و.-- لمدة 4ثوان حتى تبدأ أرقام الساعة في الوميض .قم بتعديل لتعديل التوقيت المضبوط اضغط على النابض الساعة بالضغط على النابضين +و --واضغط مرة أخرى النابض وقم بضبط الدقائق بالضغط على النابضين +و.-- عداد الدقائق استخدم عداد الدقائق اإللكتروني كتنبيه بإشارة صوتية عند نھاية الفترة الزمنية الالزمة للطھي .انتبه ،ال يتم قطع الطھي. ضبط عداد الدقائق اضغط لمرة واحدة النابض ، +واضغط من جديد النابض نفسه لزيادة زمن الطھي .وحدة الضبط ھي 10ثوان في كل نبضة .لتسيير جريان الزمن بسرعة واصل الضغط على الزر ، +العد العكسي سوف تكون له أولوية العرض على الشاشة. الزمن األقصى الذي يمكن ضبطه ھو 10ساعات .بعد أن تصل إلى 99دقيقة و 50ثانية فإن ضبط الساعة يتغير إلى 1ساعة و 40دقيقة .يشير رمز الجرس إلى أن عداد الدقائق نشط. .سوف تظھر ساعة اليوم لمدة ثوان وبعدھا يعود ظھور للعودة إلى مشاھدة الساعة اآلن ،اضغط على النابض العد العكسي. تصفير عداد الدقائق اضغط وواصل الضغط على النابض --حتى يحدث تصفير التوقيت الذي كان مضبوطا من قبل. اإلشارة الصوتية ما أن تصل ساعة اإلنذار المضبوط ،فإن اإلشارة الصوتية سوف تطن لمدة 7دقيقة .لقطع اإلشارة الصوتية اضغط على أي زر من األزرار الثالثة. من الممكن ضبط تردد اإلشارة الصوتية مع االختيار من بين مستويات مختلفة بالضغط على النابض .--تصفير عداد الدقائق ال يقطع الطھي. 9880022200-AR-241111 10 شعلة الشواية افتح الباب فتحا تاما ،تمنع أداة سالمة إشعال الشعالت والباب مغلق ،أدر مقبض الترموستات في اتجاه عقارب الساعة حتى نھاية مساره )وضع الشواية( واضغطه إلى آخره إلدخال األشعال. بعد حدوث اإلشعال لشعلة الشواية استمر في الضغط على المقبض ما بين 3و5 ثوان؛ وھكذا تسمح للرأس الحراري بأن يسخن ومن ثم الحفاظ على فتح صمام األمان .قم بتحرير المقبض .للحصول على أفضل نتائج ننصح بتسخين الفرن مسبقا لعدة دقائق .أثناء استخدام ھذه الوظيفة ليس من الممكن استخدام شعلة الفرن. عند االستخدام األول من العادي محاولة عملية اإلشعال مرات متعددة بسبب وجود ھواء في أنابيب الغاز. يمكن ترتيب وضع اللحوم في األوعية الخاصة بھا أو يتم طھيھا مباشرة على شبكة الشواء .في الحالة األخيرة أسكب قليالً من الماء في صينية جمع التقطير ثم أدخلھا في القنوات اإلرشادية الخاصة تحت شبكة الشواء .بھذه الطريقة يتم تحاشي أن تحترق الشحوم المتساقطة والتي تؤدي إلى روائح كريھة. انتبه :أثناء استخدام الشواية فإن األجزاء التي يمكن الوصول إليھا قد تصبح ساخنة جدا .ولھذا فمن المناسب الحفاظ على األطفال على بعد مناسب. شعلة الفرن تحذير :بفضل وجود قاطع للسالمة فإن إشعال الشعلة يمكن أن يتم فقط والباب مفتوح. إشعال شعلة الفرن افتح الباب فتحا تاما ،اضغط بخفة مقبض الترموستات وأدره بعكس اتجاه عقارب الساعة لكي تضعه على الوضع 260درجة .اضغط إلى آخر المقبض إلدخال اإلشعال األوتوماتيكي لشعلة الفرن .تأكد من وجود لھب الشعلة مع التأكد عبر الثقب .Fعند االستخدام األول من العادي محاولة عملية اإلشعال مرات متعددة بسبب وجود ھواء في أنابيب الغاز. بعد حدوث اإلشعال للشعلة استمر في الضغط على المقبض ما بين 3و 5ثوان؛ وھكذا تسمح للرأس الحراري بأن يسخن ومن ثم الحفاظ على فتح صمام األمان ،ومن ثم تشتعل الشعلة .ضع مقبض الترموستات على درجة الحرارة المرغوبة. 9880022200-AR-241111 9 في موديالت ) FI60غير متوقعة في موديالت ،(GEV;GGVتوجد لفافة الشواء في اتجاه أفقي وتوجد نقطة اإلدخال في منتصف خلف الفرن .أدخل الطعام المثبت بواسطة كالبات التثبيت في شوكة أسياخ الشواء .وأدخل كل شيء في الشاصيه الحامل ألسياخ الشواء وعلى األدلة الجانبية أو في الثقوب المخصصة لھا )حسب الموديالت( .ال تترك مقبض لفافة التحمير في الفرن أثناء الطھي. FI60 ننصح بإدخال الطعام في الفرن بعد تسخينه مسبقا وضع شبكات الشواء الداخلية ألنواع معينة من الطھي الفطائر المجمدة ،التحمير الطويل ،الديك الرومي ،الفطائر ،شرائح اللحم جيدة الطھي؛ الوضع رقم 1ورقم 2من األسفل. فطائر ،بانكاريه ،توست ،طناجر ،خبز مكتمل ،لحم؛ الوضع رقم 2من األسفل. بسكويت ،لحم مقطع تقطيعا ناعما؛ الوضع رقم 2ورقم 3من األسفل. للحصول على اللون الذھبي بالشواء ،استخدم الوضع رقم 3من األسفل. ھذه البيانات حول أوضاع الطھي إرشادية ويمكن تفسيرھا حسب خبرتك. استخدام الشواية مع الشواية من الممكن طھي السمك والخضروات واألسياخ الصغيرة وبعض أنواع اللحم ،باستثناء بعض اللحوم الخالية من الشحم للطيور البرية .اللحوم المقطعة في شرائح رقيقة واألسماك يتم شواؤھا بسرعة بدھنھا قليال بالزيت بواسطة فرشاة مخصصة وبوضعھا دائما على الشواية .يجب تثبيت الشواية في الموضع القريب من عنصر التسخين األعلى على نحو متناسب من سمك الطعام ،لتحاشي أن تحترق من الخارج وأن تنضج قليال من الداخل .ضع الملح على اللحم فقط بعد الطھي وإال سوف تخرج عصائرھا .ال تنقر الطعام بتاتا أثناء الطھي وحتى لتقليبه .سوف يتلون عصيرھا ويخرج الطعام المشوية جافة. لكي تحسن الطھي بالشواء من الالزم تسخين الفرن مسبقا لمدة 10دقائق على األقل. شواية كھربية ضع مقبض االختيار على لكي تحسن الطھي بالشواء من الالزم تسخين الفرن مسبقا والشوائة مشتعلة ) وضعية ---لمدة 10دقائق على األقل( .أدخل الطعام في الفرن في الوضع األقرب من الشواية حسب نوع الطعام المطلوب طھيه .استخدم Grillدائما والباب مفتوح ولمدة ال تزيد على 15دقيقة .أثناء استخدام ھذه الوظيفة ليس من الممكن استخدام شعلة الفرن )أداة سالمة سوف تمنع إشعال المقاومة الكھربية إذا كان مقبض الترموستات ليس في ( مكانه 9880022200-AR-241111 8 وظائف الفرن )تشير الرموز في فرنكم عن الوظائف المضبوطة مسبقا( مصباح الفرن ) موديالت (GGV;GG;GEV;GE في كل لحظة من الممكن إشعال مصباح الفرن بطريقة مستقلة .يبقى المصباح منيرا حتى مع الوظائف األخرى. الشواية الكھربية )موديل (GEV;GE في ھذا االختيار يعمل فقط عنصر التسخين الموجود على الجزء العلوي من الفرن )ليس من الممكن استخدام شعلة أو موقد الغاز في الوقت نفسه ،فصمام األمان يمنع التشغيل( .سمة الشواية ھي إصدار حرارة مكثفة تسمح باستخدام الفرن للشواء والتحمير .لھذا النوع من الطھي يجب إبقاء الباب مفتوحا .في الموديالت حيث يتم الضبط المسبق لھذه الوظيفة من الممكن استعمال لفافة التحمير .قم بمراجعة فقرة "استخدام الشواية" شواية كھربية بتھوية مع لفافة تحمير ) موديل (GEV تسمح ھذه الوظيفة بالشواء بطريقة طرية أكثر بفضل استخدام توزيع الھواء القسري .حسب الموديالت من الممكن الطھي بمساعدة لفافة التحمير )إذا كانت مھيأة لذلك( .لھذا النوع من الطھي يجب إبقاء الباب مفتوحا .قم بمراجعة فقرة "استخدام الشواية". مروحة الفرن )موديل (GGV ;GEV تستخدم فقط المروحة بدون أية عناصر تسخين .ھذه الوظيفة يمكن استخدامھا إلذابة تجميد أو تجفيف الطعام المطلوب طھيه ،أو للطھي األكثر تجانسا ،ونعومة ،باستخدام شعلة الفرن .مروحة الفرن ال تعمل أثناء تشغيل شواية الغاز .في الموديالت حيث يتم الضبط المسبق لھذه الوظيفة من الممكن استعمال لفافة التحمير. لفافة التحمير ) موديالت (GGV;GG;GEV;GE في الموديالت حيث يتم الضبط المسبق من الممكن استعمال لفافة التحمير .في موديالت FISC90توجد لفافة الشواء باتجاه طولي بإدخال في خلف الفرن )في موديالت FINC90توجد نقطة اإلدخال على جدار الفرن الجانبي( وتشغيلھا أوتوماتيكي في جميع الوظائف حتى وإن لم يكن موجود الرمز .الستخدامھا اعمل على النحو التالي .أدخل الطعام المثبت بواسطة كالبات التثبيت في شوكة أسياخ الشواء وأدخل كل شيء في الشاصيه )الھيكل( الحامل ألسياخ الشواء المجھز وقائيا في مكانه بوعاء لجمع العصير المتساقط .مقبض لفافة الشواء ،المصنعة بمادة عازلة ،يجب أن تستخدم فقط لنزع عمود السيخ من الفرن ويجب خلعھا أثناء الطھي. FINC90 9880022200-AR-241111 FI70 – FISC90 7 ترموستات درجة حرارة الفرن: يتحكم ترموستات الفرن في درجة الحرارة المرغوبة للطھي في جميع اختيارات تشغيل الفرن. رمز التبديل أو مفتاح اختيار الوظيفة مبدل الوظائف ينشط نوع الوظيفة المطلوبة للطھي. عداد دقائق ميكانيكي ) CMفي موديالت مضبوطة مسبقا( يمكنكم استخدام عداد دقائق ميكانيكي كتنبيه بإشارة صوتية في نھاية الزمن الذي تعتبرونه ضروريا للطھي .انتبه ،حتى ال يتوقف الطھي. ساعة إلكترونية ) OEفي موديالت مضبوطة مسبقا( تسمح لك برؤية إلكترونية للساعة على مدى اليوم والتحقق من زمن الطھي المتبقي بما يتبع ذلك من تنبيه بإشارة صوتية .انتبه ،حتى ال يتوقف الطھي. 9880022200-AR-241111 6 في حالة اإلطفاء العرضي أثناء الطھي ،أطفئ شعلة الغاز بالعمل على مقبض التحكم )على كل حال ،يقوم صمام األمان بقطع تدفق الغاز( .حاول إعادة اإلشعال بفتح الباب تماما .في حالة وجود رائحة غاز في المكان ،افتح نافذة وانتظر حتى تختفي ھذا الرائحة قبل أن تعود لفتح الشعلة )إشعال الموقد(. دليل استخدام الفرن لوحة األوامر =Aترموستات =Bمفتاح اختيار الوظيفة =Cعداد دقائق CM =Dساعة إلكترونية OE =Eضوء بيان القدرة ھام: قبل أن تستخدم الفرن للمرة األولى ،اجعله يعمل على الفارغ وعلى أقصى قدرة لمدة ساعة تقريبا .قم بتھوية المكان جيدا ،مع فتح نوافذ المطبخ إن أمكن .سوف يسمح ھذا بتصريف دخان االحتراق وبقايا اإلنتاج مثل الشحوم والزيوت وصمغ التصنيع. ضوء بيان مؤشر القوة )ضوء أحمر( متى كان مشتعال يشير إلى أن الفرن يعمل كھربيا أي بالتيار الكھربي. 9880022200-AR-241111 5 ـ ال تترك الجھاز بدون مراقبة أثناء الطھي ،يمكن أن تتطاير الشحوم أو الزيوت التي يمكن أن تسبب اندالع الحريق. ال تكسو أو تسند أبدا على جوانبه أو على الجزء السفلي للفرن أوراق ألومونيوم أو أية أشياء مثل علب الخبز أوالصواني التي يمكن أن تلحق الضرر بالمنتج. ـ ال تستخدم الفرن كمقصورة لتخزين المعدات في فترة عدم استخدامه ،إذا نسيت ھذه المعدات في داخل الفرن بعد إشعاله ،يمكن أن تسبب أضرارا جسيمة سواء على الفرن أو على المعدات نفسھا. ـ ال تجلس وال تضع أثقاال على الباب وال حتى تعلقھا من المقبض ،فقد تؤذي المنتج وتؤدي إلى حدوث أعطال به. ـ قبل الصيانة أو التنظيف ،افصل الفرن عن الكھرباء وانتظر حتى يبرد إذا كان قد تم استخدامه توا. توخى الحرص من تدفق الھواء الذي يخرج من الفرن لحظة فتح الباب عندما يكون ساخنا.ـ لتنظيف الفرن ،ال تستخدم ال تستخدم أجھزة ضخ البخار ،يمكن أن تتوصل إلى داخل األجزاء الكھربية وإتالفھا. ـ في حالة تلف الكابل الكھربي ،اتصل فورا بمركز الدعم التقني لكي يستبدله. يمكـــن .ي بمــــا يتوافــــق مــــع القواعــــد الســــاريةانتبــــه ھــــذا الجھــــاز ينبغــــي توصــــيله بــــاألرض تركيبــــه وتشــــغيله فقــــط فــــي أمــــاكن جيــــدة التھويــــة بمــــا يتوافــــق مــــع القواعــــد الســــاريةلتركيب الفرن انظر الفصل "تعليمات التركيب" االستخدام الصحيح للفرن قم بتسخين الفرن للوقت الالزم فقط افتح الباب فقط عندما يكون ھذا ضروريا لتحاشي تسرب الحرارة بال طائل حافظ على نظافة وكفاءة حشوات العزل لتفادي التسرب الحراري المضر. في نھاية االستخدام أطفئ الفرن دائما لتخفيض تكون التكثف الناشئ عن الرطوبة التي تحتويھا األطعمة من الالزم دائما تسخين الفرن قبل إدخالاألطعمة .في جميع األحوال أي تكون محتمل للتكثف على زجاج الباب أو على جدران الفرن ليس مانعا لعمله أو إلكمال الطھي ،فسوف يختفي تدريجيا. قبل استخدام الفرن للمرة األولى: افصل الجھاز عن الشبكة الكھربية انزع جميع التغليفات عن األجزاء الداخلية وعن ملحقات الفرن .نظف األسطح الداخلية بماء ساخن ومنظف محايد )أنظر الفقرة "صيانة وتنظيف"( واشطف بعناية بنسيج مبلل .اغسل بالطريقة نفسھا ملحقات الفرن وجففھا كلھا بعناية. تحذيرات: ال تخزن أو تستعمل البنزين أو أية مواد أخرى قابلة لالشتعال إلى جوار وعلى مقربة من ھذا الجھاز أو أي جزءمنه. ال تستخدم ھذا الجھاز بتاتا في لتدفئة المكان. ال تسد فتحة مرور الغاز أو ھواء التبريد بإعاقة فتحات تھوية المكان وأنابيب الجھاز .يؤدي ھذا إلى سوء عمله معاحتمال زيادة معدل أول أكسيد الكربون إلى مستويات غير آمنة. قد يؤدي استخدام جھاز طھي بالغاز إلى زيادة الحرارة والرطوبة في المكان الذي تم تركيبه فيه .اعمل على ضمانتھوية مناسبة للمطبخ وحافظ على بقاء الفتحات مفتوحة للتھوية الطبيعية وقم بتركيب أداة تھوية قسرية )جھاز شفط( االستخدام المستمر للجھاز يمكن أن يستلزم تھوية إضافية ،يمكن حلھا بفتح نافذة أو زيادة قوة جھاز الشفط قبل التركيب ،تحقق من أن شروط التوزيع المحلي )طبيعة الغاز وضغطه( وحالة منظم الجھاز متوافقين. حاالت ضبط ھذا الجھاز واردة في البطاقة )أو على لوحة البيانات( في حالة وجود رائحة غاز في الغرفة افتح النافذة وانتظر حتى تغير الھواء التام قبل أن تعود إلى فتح الشعلة)الموقد(. ھذا الجھاز ليس موصال بأداة تفريع منتجات الوقود .فيجب تركيبه بما يتوافق مع قواعد التركيب السارية .يجبتوخي االنتباه والحرص الخاص على الترتيبات المطبقة في موضوع التھوية. أثناء االستخدام ،توخى الحرص على عدم مالمسة عناصر التسخين داخل الفرن. األجزاء التي يمكن الوصول إليھا قد تصبح ساخنة جدا .يجب إبقاء األطفال بعيدا عنھا.9880022200-AR-241111 4 تحذيرات عامة ھذا المنتج متوافق مع التوجيھات األوروبية .EEC/96/2002 رمز السلة المحدد بعالمة يشير إلى أن المنتج في نھاية عمره التشغيلي يجب معاملته على نحو منفصل عن النفايات المنزلية ،ويجب أن يتم تسليمه إلى مركز جمع بالفرز خاص باألجھزة الكھربية واإللكترونية أو إعادة تسليمه للبائع عند شراء جھاز جديد مماثل له. المستھلك مسئول عن تسليم الجھاز في نھاية عمر الجھاز التشغيلي إلى جھات الجمع المسئولة وإال يتعرض لعقوبات منصوص عليھا في التشريعات السارية حول التخلص من النفايات. يساھم الجمع المناسب بالفرز وما يليه من تھيئة الجھاز إلعادة التدوير والمعالجة والتصريف المتوافق مع البيئة على تجبن التأثيرات السلبية المحتملة على البيئة وعلى الصحة ويشجع على إعادة تدوير الخامات التي يتكون منھا المنتج. لمزيد من التفاصيل المتعلقة بنظم الجمع المتاحة ،توجه إلى إدارة تصريف النفايات المحلية أو إلى المحل الذي اشتريت منه الجھاز. يخلي المنتج أية مسئولية مدنية أو جنائية في حالة االستخدام السيئ أو التركيب غير الصحيح للجھاز. كما يحتفظ المنتج بحق إدخال تعديالت على منتجاته الخاصة إذا اعتبر ذلك ضروريا ومفيدا ،دون أي التزام باإلخطار المسبق. ال تنثر مكونات التغليف المختلفة ولكن قم بالتخلص منھا بما يتوافق مع القواعد المحلية السارية المتعلقة بتصريف النفايات. قبل تركيب ھذا الجھاز أو استخدامه من الضروري أن تقرأ بعناية دليل االستخدام ھذا بھدف الحصول على جميع المعلومات الالزمة لتركيب الجھاز وصيانته واستخدامه على نحو صحيح. من المھم للغاية أن يتم االحتفاظ بھذا الكتيب مع الجھاز طيلة عمره التشغيلي وحتى في حالة نقل الجھاز إلى أشخاص .آخــرين أي اســتخدام آخــر مختلــف عمــا ورد .ھــذا الجھــاز مصــمم للطھــي أو تســخين األطعمـــة فـــي المـــنزل فقـــط المنتــــج متوافــــق مــــع القواعــــد الســــارية .يعتـــبر غـــير صـــحيح ومـــن ثـــم خطـــيرا فـــي ھـــذا الكتيـــب مـــن حيـــث أنـــه مصـــمم لمالمســـة المنتجـــات الغذائيـــة بيانات تعريف المنتج موجودة على اللوحة الخاصة بذلك والمثبتة على الواجھة داخل الفرن .يجب عدم إزالة ھذه اللوحة مطلقا. يجب أن يقوم بالتركيب العاملون المؤھلون وحدھم مع احترام القواعد السارية ومع إتباع ما ھو موجود في الكتيب ھذا. ھام :ال ترفع وال تسحب الفرن من المقبض. في حالة عطل الجھاز ،قم بفصله عن الشبكة الكھربية )ال تسحب الكابل الكھربي لفصل القابس( واستدعى مركز الدعم الفني المرخص له واستخدم قطع غيار أصلية .قبل أية صيانة أغلق محبس )صنبور( الغاز. ال تحاول إصالح الجھاز مطلقا بنفسك. االستخدام الصحيح للفرن استخدام الجھاز مقصور فقط على األشخاص البالغين ،حافظ على بقاء األطفال بعيدا عنه.ـ ينتج الجھاز حرارة سواء في مرحلة التشغيل أو بسبب النقل الحراري ،أيضا عقب إطفائه مباشرة .ال تلمس األجزاء الداخلية للفرن أثناء ھذه المراحل واقتصر في اللمس على األجزاء الخارجية .حافظ على األطفال بعيدا عن الجھاز في حالة عمله ،فاألجزاء التي يمكن الدخول إليھا يمكن أن تصبح شديدة السخونة. إلدخال أو إخراج األوعية والملحقات من الفرن ،استخدم دائما قفازات مناسبة للحماية. استخدم فقط أوعية قادرة على مقاومة درجات الحرارة العالية.9880022200-AR-241111 3 طراز FI60 – FI70 - FINC90 – FISC90 – FI TWIN ) (GEشواية كھربية ) (GGشواية بالغاز ) (GEVشواية كھربية بتوزيع الھواء ) (GGVشواية غاز بتوزيع الھواء فھرس دليل االستخدام تحذيرات عامة دليل استخدام الفرن لوحة األوامر وظائف الفرن وضع الشبكات الداخلية استخدام الشواية شواية كھربية شعلة الشواية شعلة الفرن ساعة إلكترونية OE عداد دقائق ميكانيكي CM الصيانة والتنظيف أعطال التشغيل إزالة باب الفرن استبدال مصباح الفرن صفحة 3 5 5 7 8 8 8 9 9 10 11 11 12 12 13 13 14 14 14 16 16 16 17 17 19 19 20 تعليمات التركيب تھوية أماكن االستخدام مواصفات قطعة األثاث إدخال الفرن في األثاث التوصيالت الكھربية للفرن تركيب /استبدال كابل التغذية التوصيل باألرض التوصيل بشبكة الغاز التھيئة ألنواع مختلفة من الغاز ضبط الحد األدنى للترموستات الدعم الفني وقطع الغيار جداول البيانات الفنية 9880022200-AR-241111 2 أفران غاز مدمجة باألثاث تعليمات التركيب واالستخدام والصيانة