1
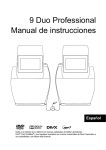
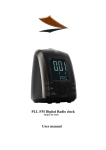
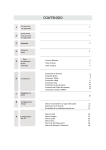
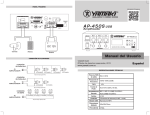
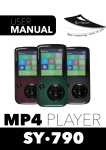
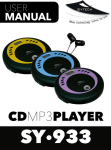
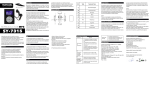
Rechargeable USB/SD PLL Radio Player
Model: SY-1649
Thank you for having purchased our Portable rechargeable
Radio SY-1649. Please read the instruction manual carefully
and store it in a safe place for future reference.
IMPORTANT SAFETY INSTRUCTIONS
It is important to use the product as per the described
instructions. However, improper use can result in potential
electrical shock or fire hazards. Please read all safety and
operating instructions carefully before installation and use.
Keep these instructions handy for future reference. Take
special note of all warnings listed in these instructions and on
the unit.
Water and Moisture
The unit should not be used near water. For example: near a
bathtub, washbowl, kitchen sink, laundry tub, swimming pool or
in a set basement.
Ventilation
The unit should be situated in such location so that it does not
interfere with its proper ventilation. For example, it should not
be placed on a bed, sofa, rug or similar surface that may block
the ventilation openings. It should not be placed in a built-in
installation, such as a bookcase or cabinet, which may impede
the flow of air through the ventilation openings.
Heat
The unit should be situated away from heat sources such as
radiators, heat registers, stoves or other appliances (including
amplifiers) that produce heat.
1
Power Source
The unit should be connected to a power supply only of the type
described in the operating instructions or as marked on the
rating label located at the back side of the unit.
Cleaning
The unit should be cleaned only as recommended. See the
section ”Care and Maintenance” of this manual for cleaning
instructions.
Do not spill any liquid on the unit, on the openings or on the
ventilations. This will cause the unit to malfunction.
Lightning and Power Surge Protection
Unplug the unit from the wall outlet. This will prevent damage to
the product due to lightning and power-line surges.
Overloading
Do not overload wall outlets, extension cords, or integral
convenience receptacles as this can result in a risk of fire of
electric shock.
Damage Requiring Service
This unit should be serviced by qualified service personnel
when:
Objects have fallen into or liquid has been spilled into the
enclosure.
The unit has been exposed to rain.
The unit has been dropped or the enclosure damaged.
The unit exhibits a marked change in performance or does not
2
operate normally.
Contact Sytech technical department for a proper repair or
exchange of the product.
Periods of Non use
If the unit is to be left unused for an intended period of time,
such as a week or longer, remove the rechargeable battery to
prevent damage or injury from possible battery leakage.
Servicing
The user should not attempt to dismount the unit by himself.
This will void the warranty. Please contact Sytech technical
department for any problem.
Controls Location
FRONT VIEW
3
4
1. Mode Button:
Press the mode button to select the different playing modes:
RADIO/ AUX-IN /USB/CARD
2.
Button
In USB/SD card mode, press the
button to skip to the
previous track
In radio mode, press the
button to manually tune the
radio frequency downwards.
In radio preset mode, press the
button to skip to the
previous stored channel
3.
Button
In USB/SD card mode, press the
button to skip to the
next track
In radio mode, press the
button to manually tune the
radio frequency upwards.
In radio preset mode, press the
button to skip to the
next stored channel
4. Preset Button
Press the “Preset” button to access to the stored preset
memories.
5. RPT (Repeat) / MEM Button
In USB/CARD mode, press the “RPT” button to access to
the Repeat-1, Repeat Folder, and Repeat All mode.
In Radio mode, press the “RPT” button to save a radio
preset station
5
6. Vol- Button
Press the VOL- button to decrease the volume level
7. Vol+ Button
Press the VOL+ button to increase the volume level
8.
Button
In USB/CARD mode, press the
button to playback the
first track. While playing, press the same button once more
to pause the music.
9. SD/MMC card slot
10. USB port
11. 3.5mm AUX-IN Jack
12. Power ON/OFF Switch
13. USB Charge port
14. DC 5V Jack (for charging only)
15. Battery compartment
16. FM Telescopic Antenna
Diagrams of PC connection
6
Diagrams of AC connection
Power source
The SY-1649 is operated by 1 rechargeable 3.7V lithium ion
battery (included in the packaging. BL-5C Nokia battery).
Battery installation
To install the battery:
1. Remove the battery compartment door.
2. Follow the polarity to install the accompanied 3.7V lithium ion
battery.
3.) Replace the battery compartment door.
T
WARNING:
Make sure the battery is installed correctly.
Only batteries of the same or equivalent type are
recommended to be used.
If the unit is not to be used for an extended period of time,
remove the battery to prevent damage or injury from possible
battery leakage.
Do not dispose of the battery in fire, the battery may explode
or leak.
7
Charging the battery
The installed battery can be charged by using the accompanied
charger. Insert he battery into the battery compartment and
plug the adaptor into the wall socket and the other end into the
DC 5V charging port. The charging indicator on the charger will
light up with red color and once it is fully charged, the indicator
will turn to blue.
The SY-1649 can also charge through the USB connector cable
when connected to a PC.
Getting started
Before using the SY-1649 for the first time, we recommend to
charge the unit for at least 4 hours. This will help the battery to
recharge to its full capacity.
Listening to FM Radio
Setting up the Antenna
Extend the telescopic antenna fully for best reception.
Tuning and Playing the Radio
1. Slide the Power ON/OFF switch to ON position to turn on
the unit.
2. Press the “MODE” button on the main unit until the FM
icon appears on the display.
3.
Press
/
button to fine tune the radio frequency.
4.
Press and hold
/
button for an automatic scan.
Notes:
Manual tune to select weaker stations that might be by skipped
during automatic tuning
8
If the automatic tuning does not stop on the exact frequency of
the station, for example, it stops on 93.8MHz instead of
93.9MHz, use the manual tuning method to fine tune to the
exact frequency of the desired station.
When inserting a USB /SD/MMC card during the radio playing
mode, the unit will automatically change to the USB / SD mode
and the radio will stop to play.
Preset Stations
The unit can store up to 30 FM stations for easy recall at any
time.
1.
Tune to the radio station you want to store in memory by
using
or
buttons
2. Press the RPT/MEM button. The memory channel
number”P 01” will show on the display, meanwhile, the
radio icon “FM” will flash simultaneously.
3. Press
/
buttons to select the channel number you
wish to set.
4.
Press RPT/MEM button once more to confirm the preset
location.
5.
Repeat steps 2-4 to store more stations if necessary.
Recalling Stored Stations
1.
2.
Press the PRESET button on the unit during Radio mode
to enter the radio memory selecting mode.
Press
/
button to select the desired stored
preset channel
9
USB/SD Operation
1. Slide the Power ON/OFF switch to ON position to turn on
the unit.
2. Connect your USB device or SD/MMC card to the unit to
access to the “USB” or “CARD” function. The relevant
“USB” or “CARD” icon will appear on the display. The USB
or SD/MMC card will start playing automatically once the
contents scanning has finalized.
Press
“PLAY/PAUSE” button to pause or resume
playback.
Press “VOL+” or “VOL-” button to increase/ decrease the
volume level.
Press “
” button to skip to next track. Press “
”
button to skip to the previous track.
Press and hold “
” or “
” button to forward or rewind
during playback.
Press “RPT/MEM” button to change the Repeat mode in
the following cyclical manner:
Repeat All (default repeat mode)→Repeat-1→Repeat folder
To remove your USB device or SD/MMC card, simply stop
the playback and gently unplug it from the connector.
AUX-IN (Line in) Operation
If you are using an iPod, MP3/digital audio player or a mobile
which cannot plug in this unit directly, you can still play it on the
unit via an audio connecting cable.
10
1.
2.
3.
4.
5.
Plug one end of the 3.5mm audio cable (excluded) into the
headphone or line out jack on your player. Plug the other
end of the cable into the unit AUX-IN jack.
Turn on the external audio source and play your device.
Slide the Power ON/OFF switch to ON position to turn on
the unit.
Press MODE button until “AUX” icon appears on the
display.
The volume level can now be controlled through the
SY-1649. Operate all other functions on the external
device as normal.
Notes:
1. If you're connected to the Line out Jack of your external
device, then you only need to adjust the volume control of
the SY-1649. If you're connected to the Headphone Jack
of your external device, then you may need to adjust both
the volume levels of your external device and of the
SY-1649 to find the most desirable volume setting.
2. Slide the Power ON/OFF switch to OFF position to turn off
the unit when you finish listening.
Do not forget to switch off the power of your external
device as well.
3. During AUX mode, if you plug USB or SD/MMC card into
the unit, the play mode will automatically change to USB
or SD playback mode.
11
Care and Maintenance
-Do not subject the unit to excessive force, shock, dust or
extreme temperature.
-Do not tamper the internal components of the unit.
-Clean the unit with a damp (never wet) cloth except metal
contact or speaker grille, Solvent or detergent should never be
used.
-Avoid leaving your unit in hot, humid or dusty places.
-Keep your unit away from heating appliances and sources of
electrical noise such as fluorescent lamps or motors.
-Always keep your fingers dry and clear before touching all the
buttons.
-Do not dispose of batteries in fire, batteries may explode or
leak.
Declaration of conformity
Manufacturer Name: Satyatrade S. L.
Address: Pol. Ind. La Raya. C/ Guadalquivir, 2.
Camarma de Esteruelas, 28816 Madrid
Tel: 902 430 967
Fax: 91 8864285
NIF: B83254763
Manufacturing country: China
Sytech®
SY-1649 complies with the following directives:
12
EMC Directive 2004/108/EC
EN 55013:2001+A1:2003+A2:2006
EN 55020 : 2007
EN61000-3-2:2006+A1 :2009 + A2 :2009
EN61000-3-3:2008
Low Power Directive : 1275/2008
EN62087:2008 (second edition)
EN62301:2005(first edition)
Low voltage Directive: 2006/95/EEC
EN60065:2002 +A1:2006´+A11:2008 +A2:2010
ROHS standard:2002/95/EC
Substance
Restriction
Signed: Ajeet Nebhwani Utamchandani
Sole Administrator
13
of
Hazardous
SPECIFICATIONS
Battery capacity (included):
1000 mAH
Charging Voltage:
DC 5V
Charging Time:
4 Hours
Max Play Time:
2.5 Hours
Music Format supports:
MP3, WMA
USB Format supports:
2.0 (up to 16GB)
Memory card type supports:
MMC & SD (up to 16GB)
FM Frequency:
87.5-108 MHz
Pre-set memories:
30 pre-set memories
Working Temperature:
-5℃ ~+ 40℃
Working Humidity:
20%~80%
14
Radio Digital Recargable con USB/SD
Modelo: SY-1649
Gracias por haber comprado nuestro radio portátil recargable
SY-1649. Por favor, lea el manual de instrucciones con cuidado
y guárdelo en un lugar seguro para referencia futura.
INSTRUCCIONES IMPORTANTES DE SEGURIDAD
Es importante utilizar el producto según las instrucciones
descritas. Sin embargo, el uso inadecuado puede causar
descargas eléctricas o incendios. Por favor, lea todas las
instrucciones de seguridad con cuidado antes de la instalación
y uso. Tenga a mano estas instrucciones para referencia futura.
Preste especial atención a todas las advertencias que figuran
en estas instrucciones y en la unidad.
Agua y humedad
La unidad no debe utilizarse cerca del agua. Por ejemplo: cerca
de una piscina bañera, lavabo, fregadero, lavadero, baño o en
un sótano conjunto.
Ventilación
La unidad debe estar situada en dicho lugar para que no
interfiera con una ventilación adecuada. Por ejemplo, no se
debe colocar en una cama, sofá, alfombra o superficie similar
que pueda bloquear las aperturas de ventilación. No se debe
colocar en una instalación integrada, como una estantería o un
armario, que pueda impedir el flujo de aire a través de las
aberturas de ventilación.
Calor
La unidad se debe colocar lejos de fuentes de calor tales como
radiadores, calefactores, estufas u otros aparatos (incluyendo
1
amplificadores) que produzcan calor
Fuente de alimentación
La unidad debe estar conectada a un generador de energía del
tipo descrito en las instrucciones de operación o como está
marcado en la etiqueta situada en la parte trasera de la unidad.
Limpieza
La unidad debe ser limpiada como se lo recomiende. Vea la
sección "Cuidado y Mantenimiento" de este manual para ver
las instrucciones de limpieza
No vierta ningún líquido sobre la unidad, en las aperturas o en
las ventilaciones. Esto hará que la unidad no funcione
correctamente.
Protección contra rayos y sobretensiones de
energía
Desenchufe la unidad de la toma de corriente. Esto evitará
daños al producto debido a rayos y picos de tensión de línea.
Sobrecarga
No sobrecargue las tomas de corriente, cables de extensión o
receptáculos integrales, ya que esto puede resultar en un
riesgo de incendio de una descarga eléctrica.
Daños que requieren reparación
Esta unidad debe ser reparada por personal calificado cuando:
Han caído objetos dentro o se ha derramado líquido sobre el
producto
La unidad ha sido expuesto a la lluvia.
2
La unidad se ha caído o se ha dañado de alguna forma
La unidad muestra un cambio en el rendimiento o si no
funciona correctamente.
Póngase en contacto con el departamento técnico de Sytech
para una reparación o cambio del producto
Períodos cuando no se utilice
Si la unidad no se va a utilizar durante un periodo de tiempo
previsto, ejemplo una semana o más, retire la batería para
evitar daños o lesiones por fugas de la batería.
Servicio
El usuario no debe tratar de desmontar la unidad por sí mismo.
Esto anulará la garantía. Por favor, póngase en contacto con el
departamento técnico de Sytech para cualquier problema.
Ubicación de los Controles
La vista frontal
3
4
1. Botón “Mode”:
Pulse el botón de “Mode” para seleccionar los diferentes
modos. Ej. Radio/Aux-in/USB/tarjeta
2.
Botón
.
Cuando este en el modo USB/ tarjeta SD pulse el botón
para volver a la pista anterior.
Cuando este en el modo Radio, pulse el botón
para
sintonizar hacia abajo los canales de radio.
Cuando este en el modo de Radio Presintonizado, pulse el
botón
para volver al canal de radio anterior.
3.
Botón
Cuando este en el modo USB/ tarjeta SD pulse el botón
para saltar a la pista siguiente.
Cuando este en el modo Radio, pulse el botón
para
sintonizar hacia arriba los canales de radio.
Cuando este en el modo de Radio Presintonizado, pulse el
botón
para ir al canal de radio siguiente.
4. Botón “Preset”
Pulse el botón “Preset” para acceder los canales
presintonizados guardados en la memoria.
5. RPT (Repeat) / MEM Button
En el modo USB/tarjeta SD, presione el botón “RPT” para
Repetir 1 archivo, Repetir la carpeta o Repetir todo del
USB/Tarjeta SD.
En el modo de Radio, pulse el botón “RPT” para guardar un
canal encontrado.
5
6.
Botón VolPresione el botón VOL- para disminuir el volumen
7. Botón Vol+
Press the VOL+ button to increase the volume level
8. Botón
En el modo de USB/tarjeta SD, presione el botón
para reproducir la primera pista. Durante la reproducción,
vuelve a presionarlo para pausar la música.
9. Ranura para SD/MMC
10. Puerto USB
11. Entrada Aux-IN – Jack 3.5mm
12. Interruptor Encendido/Apagado
13. Puerto USB para cargar.
14. Entrada DC 5V (para cargar solo)
15. Compartimiento de batería
16. Antena FM telescópica.
Conectar al PC
6
Conexión del alimentador AC
Alimentación
La SY-1649 funciona con una batería de litio recargable 3,7V
(incluido en la caja. BL-5C batería de Nokia)
Instalación de la batería
Para instalar la batería:
1. Retire la tapa del compartimento de la batería.
2. Inserte la batería de acuerdo con las polaridades.
3. Vuelva a colocar la tapa del compartimento de la batería.
ADVERTENCIA:
Asegúrese de que la batería está instalada correctamente.
Solo se recomienda usar pilas del mismo tipo o equivalente.
Si la unidad no se va a utilizar durante un período prolongado
de tiempo, retire la batería para evitar daños o posibles fugas
de la batería.
No deseche la batería en fuego, la batería puede explotar.
7
Carga de la batería
La batería instalada se puede cargar mediante el cargador
acompañado. Inserte la batería en el compartimiento de la
batería y conecte el adaptador a la toma de corriente y el otro
extremo en el puerto de carga DC 5V. El indicador de carga en
el cargador se iluminará de color rojo y una vez que esté
completamente cargada, el indicador se cambia a color azul.
La SY-1649 también se puede cargar por el cable USB cuando
se conecta a un PC.
Primeros pasos
Antes de utilizar la SY-1649 por primera vez, se recomienda
cargar la unidad durante al menos 4 horas. Esto ayudará a que
la batería se recarga a toda su capacidad
Escuchar la radio
Configuración de la Antena
Extienda la antena telescópica totalmente para una mejor
recepción.
Sintonización y reproducción de la Radio
1. Deslice el interruptor ON / OFF a la posición ON para
encender la unidad.
2. Pulse el botón "MODE" en la unidad principal hasta que el
icono FM aparece en la pantalla.
3. Pulse el botón
/
para ajustar la frecuencia de radio.
4. Presione y mantenga presionado el botón
/
para una
búsqueda automática.
8
Notas:
Haga una sintonización manual para seleccionar las estaciones
más débiles que podrían ser por saltadas durante la
sintonización automática.
Si el ajuste automático no se detiene en la frecuencia exacta de
la estación, por ejemplo, se detiene en 93.8MHz en lugar de
93.9MHz, utilice el método de ajuste manual para ajustar la
frecuencia exacta de la estación deseada.
Al insertar una tarjeta de USB / SD / MMC en el modo de radio
encendido, la unidad cambiará automáticamente al modo USB
/ SD y la radio deja de reproducir.
Emisoras memorizadas
La unidad puede almacenar hasta 30 emisoras de FM y
recuperarlas fácilmente en cualquier momento.
1. Sintonice la emisora de radio que desea almacenar en la
memoria mediante el uso de los botones
/
2. Pulse el botón RPT / MEM. El número de canal de memoria
"P 01" se verá en la pantalla, mientras tanto, el icono de radio
"FM" parpadeará al mismo tiempo.
3. Pulse los botones
/
para seleccionar el número del
canal que desea configurar.
4. Pulse RPT / botón MEM una vez más para confirmar la
ubicación de la memoria
5. Repita los pasos 2-4 para almacenar más estaciones, si es
necesario
9
Recuperar emisores guardados
1. Pulse el botón PRESET en la unidad durante el modo de
radio para entrar en el modo de seleccionado de emisoras
guardados
2. Pulse / para seleccionar la emisora deseada de la memoria.
Operación USB / SD
1. Deslice el interruptor ON / OFF a la posición ON para
encender la unidad.
2. Conecte el dispositivo USB o tarjeta SD / MMC a la unidad
para acceder a la función "USB" o "TARJETA". El icono
correspondiente de "USB" o "TARJETA" aparecerá en la
pantalla. El USB o tarjeta SD / MMC reproducirá de forma
automática una vez que el escaneo de contenidos haya
finalizado.
Pulse el botón "PLAY / PAUSE" para pausar o reanudar la
reproducción.
Presione "VOL +" o "VOL-" para aumentar / disminuir el nivel de
volumen.
Presione el botón "
" para saltar a la pista siguiente.
Presione el botón "
" para saltar a la pista anterior.
Presione y mantenga presionado "" o "" para avanzar o
rebobinar durante la reproducción.
Pulse el botón "RPT / MEM" para cambiar el modo de
repetición de la forma cíclica lo siguiente:
Repetir Todo →
Repetir-1→
(Modo Rep. por defecto)
10
Repetir Carpeta
Para retirar el dispositivo USB o tarjeta SD / MMC, primero
debe detener la reproducción y el quitar el USB o SD / MMC
con cuidado.
Operación AUX-IN
Si usted está usando un iPod, reproductor de audio
Reproductor MP3 o un móvil que no puede conectar a la unidad
directamente, aún se puede reproducir en la unidad mediante
un cable de conexión de audio.
1. Conecte un extremo del cable de audio de 3,5 mm (excluido)
en la toma de auriculares o línea out en su reproductor.
Conecte el otro extremo del cable en la entrada AUX-IN de la
unidad.
2. Encienda el dispositivo externo y ya esta listo para reproducir
música.
3. Deslice el interruptor ON / OFF a la posición ON para
encender la unidad.
4. Pulse el botón MODE hasta que aparezca "AUX" en la
pantalla
11
El nivel de volumen puede ser controlado ahora a través de la
SY-1649. Opera todas las otras funciones del dispositivo
externo como normal.
notas:
1. Si está conectado a la salida LINE OUT del dispositivo
externo, entonces sólo tendrá que ajustar el volumen de la
SY-1649. Si está conectado a la toma de auriculares del
dispositivo externo, puede que tenga que ajustar los niveles de
volumen del dispositivo externo y del SY-1649 para encontrar el
ajuste de volumen más deseable.
2. Deslice el interruptor ON / OFF a la posición OFF para
apagar la unidad cuando haya terminado de escuchar.
No se olvide apagar su dispositivo externo.
3. Durante el modo AUX, si se conecta la tarjeta USB o SD /
MMC en la unidad, el modo de reproducción cambiará
automáticamente al modo USB o SD.
Cuidado y Mantenimiento
-No exponga el producto a fuerza excesiva, polvo, golpes o
temperaturas extremas.
-No altere los componentes internos de la unidad.
-Limpie la unidad con un paño húmedo (no mojado), excepto
los partes de metal o la rejilla del altavoz. No debe utilizar
solventes o detergentes
-Evite dejar la unidad en lugares calientes, húmedos o
polvorientos.
-Mantenga su unidad alejada de fuentes de calor y fuentes de
ruido eléctrico, como lámparas fluorescentes o motores.
12
-Siempre mantenga sus dedos secos y limpios antes de tocar
todos los botones.
-No tire las pilas al fuego, pueden explotar o tener fugas.
Declaración de conformidad
Nombre del importador: Satyatrade S. L.
Dirección: Pol. Ind. La Raya. C/ Guadalquivir, 2.
Camarma de Esteruelas, 28816 Madrid
Tel: 902 430 967
Fax: 91 8864285
NIF: B83254763
País de fabricación: China
Sytech® SY-1649cumple con las siguientes directivas:
Directiva EMC 2004/108/EC
EN 55013:2001+A1:2003+A2:2006
EN 55020 : 2007
EN61000-3-2:2006+A1 :2009 + A2 :2009
EN61000-3-3:2008
DirectivaEléctrica :1275/2008
EN62087:2008 (second edition)
EN62301:2005(first edition)
Directivabajo consume: 2006/95/EEC
EN60065:2002 +A1:2006´+A11:2008 +A2:2010
ROHS standard:2002/95/EC
Substance
13
Restriction
of
Hazardous
Signed: Ajeet Nebhwani Utamchandani
Sole Administrator
Especificaciones
Capacidad de la batería (incluido): 1000 mAH
Voltaje de carga: DC 5V
Tiempo de carga: 4 horas
Tiempo máximo de reproducción: 2,5 horas
Formato de música compatible con MP3, WMA
Formato de USB: 2.0 (hasta 16GB)
Tipo de tarjeta de memoria compatible: MMC y SD (hasta 16GB)
FM Frecuencia: 87.5 a 108 MHz
Memorias:
30
Condiciones de uso: -5℃ ~+ 40℃
Humedad para uso: 20% ~ 80%
14