1
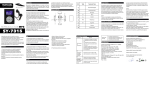
PLL FM Digital Radio clock Model: SY-1032 User manual WELCOME Thank you for purchasing the new Radio Clock SY-1032. Read the instructions manual carefully in order to get the best performance from this unit. Store the user manual in a safe place for future reference. WARNING TO PREVENT FIRE OR SHOCK HAZARD, DO NOT USE THIS PLUG WITH AN EXTENSION CORD, RECEPTACLE OR OTHER OUTLET UNLESS THE BLADES CAN BE FULLY INSERTED TO PREVENT BLADE EXPOSURE. TO PREVENT FIRE OR SHOCK HAZARD, DO NOT EXPOSE THIS APPLIANCE TO RAIN OR MOISTURE. The Caution Marking is located at the bottom enclosure of the apparatus. IMPORTANT SAFETY INSTRUCTIONS 1. 2. 3. 4. 5. 6. 7. 8. Read these instructions. All the safety and operating instructions should be read before the appliance is operated. Retain instructions. The safety and operating instructions should be retained for future reference. Heed all warnings. All warnings on the appliance and in the operating instructions should be adhered to. Follow all instructions. All operating instructions should be followed. Water and moisture. The appliance should not be used near water, for example, near a bathtub, washbowl, kitchen sink, laundry tub, swimming pool or in a wet basement. Ventilation. The appliance should be situated so that its location or position does not interfere with its proper ventilation. Do not place it on the bed, sofa, rug or similar surfaces that may block the ventilation openings, in a built-in installation, such as a bookcase or cabinet that may impede the flow of air through the ventilation openings. Heat. The appliance should be situated away from heat sources such as radiators, stoves, or other appliances (including amplifiers) that produce heat. Power source. This product should be operated only from the type of power source indicated on the marking label. If you are not sure of the type of power supply to your home, E-1 9. 10. 11. 12. 13. 14. 15. 16. 17. 18. 19. 20. 21. consult your product dealer or local power company. For products intended to operate from battery power, or other sources, refer to the operating instruction. Cleaning. Unplug this product from the wall outlet before cleaning. Do not use liquid cleaners or aerosol cleaners. Clean only with dry cloth. Location. Do not place this product on an unstable cart, stand, tripod, bracket, or table. The product may fall, causing serious injury to a child or adult and serious damage to the product. Use only with a cart, stand, tripod, bracket, or table recommended by the manufacturer, or sold with the product. Any mounting of the product should follow the manufacturer’s instructions, and should use a mounting accessory recommended by the manufacturer. A product and cart combination should be moved with care-quick stops, excessive force and uneven surfaces may cause the product and cart combination to overturn. Protection. Protect the power cord from being walked on or pinched particularly at plugs, convenience receptacles, and the point where they exit from the appliance. Accessories. Only use attachments/accessories specified by the manufacturer. Disconnect. Unplug the appliance during lightning storms or when unused for a long periods of time. Service department. Refer all servicing to Sytech technical department. Servicing is required when the appliance has been damaged in any way, such as power-supply cord or plug is damaged, liquid has been spilled or objects have fallen into the apparatus, the apparatus has been exposed to rain or moisture, does not operate normally, or has been dropped. Water. This appliance shall not be exposed to dripping or splashing water and that no object filled with liquids such as vases shall be placed on the apparatus. Wall outlet. Do not overload wall outlet. Use only power source as indicated. Parts. Use replacement part as specified by the manufacturer. Mounting. The product may be mounted to a wall only if recommended by the manufacturer. Upon completion of any service or repairs to this product, ask the service technician to perform safety checks. Object and Liquid Entry. Never push objects of any kind into this product through openings as they may touch dangerous voltage points or short-out parts that could result in a fire or electric shock. Never spill liquid of any kind on the product. Damage Requiring Service. Unplug this product from the wall outlet and refer servicing to qualified service personnel under the following conditions: a) When the power-supply cord or plug is damaged, b) If liquid has been spilled, or objects have fallen into the product, c) If the product has been exposed to rain or water, d) If the product does not operate normally by following the operating instructions. Adjust only those controls that are covered by the operating instructions as an improper adjustment of other controls may result in damage and will often require extensive work by a qualified technician to restore the product to its normal operation. e) If the product has been dropped or damaged in any way f) The appliance does not appear to operate normally. E-2 LOCATION OF CONTROLS 1. 2. 3. 4. 5. 6. BUILT IN SPEAKER SLEEP. 12/24 HOUR BUTTON CH+. MEMORY BUTTON FUNCTION SWITCH VOLUME+.ALARM 1 SNOOZE. LIGHT BUTTON 7. 8. 9. 10. 11. 12. E-3 LCD DISPLAY VOLUME-. ALARM 2 SET BUTTON. PLAY/PAUSE SCAN+, SCAN -, BATTERY COMPARTMENT DISPLAY POWER SOURCE Plug in the AC line cord into an AC 230V 50Hz power outlet. The unit display will switch on and the display will show “00:00, 1 1”. Refer to “Date Set” to adjust the time, month and year. OPERATING INSTRUCTIONS 1. DATE SET Press the SET button for 3 seconds to set the year. Use SCAN+ and SCAN – button to increase or decrease the years. Press one more time to set the month. Press a third time to set the date, hour and minutes consecutively. 2. TIME MODE SET Press the 12/24, HOUR button to select twelve hour clock or twenty four hour clock. 3. ALARM SET Press the ALARM1 button for 3 seconds to display and activate the Alarm symbol. Adjust the hours by pressing one more time on the ALARM1 button. Press once more the ALARM1 button to adjust the minutes. To adjust the hours and minutes, simply press the SCAN+ or SCANbutton. To deactivate the ALARM1 function, press and hold the ALARM1 until the ALARM symbol disappears from the display. The operating process forALARM 2 is exactly the same as the ALARM 1. 4. SNOOZE BUTTON If you want to prolong the alarm when it has gone off at the time set, simple to simply press the "snooze" button and the alarm will shut off for approximately 9 minutes before it sounds again. If you wish to turn off the alarm, simply press the “FUNC” button. 5. SLEEP CONTROL If you wish to hear the radio for a certain time before going to sleep, press the “FUNC” button to switch to the radio mode. Search the desired channel by pressing the SCAN+ or SCAN- button. At this moment, press the SLEEP button and the display will show 90 min. Press the SLEEP button until you have set the desired time for the unit to off. The options for the SLEEP function are as follow: 90, 80, 70, 60, 50, 40, 30, 20, 10 Off. Once the selected time has elapsed, the radio will automatically shut down. E-4 6. FM SET Press the FUNC button to turn on the unit and to switch to FM mode. Adjust the volume by pressing the VOL+ and VOL- button. To store a desired FM station, press the MEMO button for approximately 3 seconds. The “MEM” symbol will flash on the display. Select the desired position by pressing the SCAN+ or SCANbutton. Press once more the MEMO button to confirm the selection. Now your favorite station is stored in the selected preset number. You can store a maximum of 10 stations. 7. BRIGHT OR DIM SET The negative display of the SY-1032 is perfect for the night as it does not reflect the numbers. To increase the luminosity of the display, press the LIGHT button for the display to brighten up. After approximately 1 minute, the display will return to the original dim light. 8. TIME MEMORY SET The SY-1032 includes a battery backup feature in case of power failure. Plug in the radio clock to the mains output. Adjust al the parameters such as the year, month,date and time. Open the battery compartment located at the bottom of the unit and insert 2 x AAA batteries in the correct position (Not included).In the case of any cut off power, the SY-1032 will retain the actual time and date until the main power comes back. 9. BATTERY PRECAUTIONS Follow these precautions when using batteries in this device: 1. Use only the size and type of batteries specified. 2. Be sure to follow the correct polarity when installing the batteries as indicated in the battery compartment. A reversed battery may cause damage to the device. 3. If the device is not to be used for a long period of time, remove the batteries to prevent damage or injury from possible battery leakage. Do not try to recharge a battery not intended to be recharged; it can overheat and damage 4. the unit. IMPORTANT NOTES Avoid installing the unit in locations described below: • Places exposed to direct sunlight or close to heat radiating appliances such as electric heaters. • Dusty places. • Places subject to constant vibration. • Humid or moist places. SPECIFICATIONS Power supply: Backup battery : FM Frequency Range: Power consumption: AC 230V ~ 50 Hz 2 x AAA, 1.5V batteries 88 - 108 MHz 5W E-5 DECLARATION OF CONFORMITY Manufacturer Name: Satyatrade S.L. Address: Pol. Ind. La Raya. C/ Guadalquivir, 2 Camarma de Esteruelas, 28816 Madrid Tel: 902 430 967 Fax: 91 8864285 NIF: B83254763 Manufacturing country: China Sytech® SY-1032 complies with the following directives: CE standard:EMC Directive 2004/108/EC EN 55013:2001+A1+ A2 EN 6100- 3- 2 :2006+A1+A2 EN 61000- 3- 3:2008 EN 55020 :2007 ERP Standards: Directive 2009/125/EC EN 62301:2005+1275/2008/EC Low voltage : Directive 2006/95/EC EN 60065:2002+A1:2006+A11:2008 +A2:2010 ROHS standard:2002/95/EC Restriction of Hazardous Substance Signed: Ajeet Nebhwani Utamchandani Sole Administrator PLL FM Radio Reloj Digital Modelo: SY-1032 Manual de Usuario BIENVENIDOS Enhorabuena por la compra de su Radio Reloj Digital SY-1032. Lea las instrucciones atentamente para sacar el mejor rendimiento de la unidad. Guarde el manual de usuario en un lugar seguro para futuras referencias. ADVERTENCIA PARA EVITAR EL RIESGO DE INCENDIO O DESCARGA ELÉCTRICA, NO UTILICE ESTE ENCHUFE CON UN CABLE DE EXTENSIÓN, RECEPTÁCULO U OTRA SALIDA A MENOS LOS CONDUCTORES SE PUEDAN INSERTAR EN SU TOTALIDAD PARA EVITAR SU EXPOSICIÓN. PARA EVITAR EL RIESGO DE INCENDIO O DESCARGA ELÉCTRICA, NO EXPONER ESTE APARATO A LA LLUVIA O HUMEDAD El símbolo del rayo con punta de flecha dentro de un triángulo equilátero avisa al usuario de la presencia de “voltaje peligroso” sin aislar en el interior de la carcasa de producto que puede constituir un riesgo de descarga eléctrica para la persona. WARNING : PARA EVITAR QUE SE PRODUZCAN FUEGOS O DESCARGAS ELECTRICAS, NO EXPONGA ESTA UNIDAD O A LA HUMEDAD. El signo de admiración dentro del triángulo equilátero avisa al usuario de la existencia de instrucciones importantes acerca del funcionamiento y el mantenimiento (reparaciones) en la documentación que se incluye con el aparato. La ficha de precauciones técnicas se encuentra en el compartimiento inferior del aparato INSTRUCCIONES DE SEGURIDAD 1. 2. 3. 4. 5. 6. 7. Lea las instrucciones.Todas las instrucciones de seguridad y operación deben ser leídas antes de operar el aparato. Conserve las instrucciones. Las instrucciones de seguridad y operación deben ser conservadas para futuras referencias. Respete todas las advertencias. Todas las advertencias en el aparato y las instrucciones de operación deben ser atendidas. Siga todas las instrucciones. Todas las instrucciones deben ser seguidas. Agua y humedad. El aparato no se debe utilizar cerca del agua, por ejemplo, cerca de una bañera, lavabo, fregadero, lavadero, piscina o en un sótano húmedo. Ventilación.El aparato se debe colocar de tal manera que su ubicación o posición no interfiera con sus ranuras de ventilación. No lo coloque en la cama, sofá, alfombra o superficie similar que pueda bloquear las aperturas de ventilación, en una instalación empotrada,como una estantería o armario que pueda impedir el flujo de aire a través de las aperturas de ventilación. Calor. El aparato debe estar situado lejos de fuentes de calor tales como radiadores, estufas u otros aparatos (incluyendo amplificadores) que produzcan calor. 8. 9. 10. 11. 12. 13. 14. 15. 16. 17. 18. 19. 20. 21. Fuente de alimentación. Este producto debe ser operado solamente con el tipo de fuente de alimentación indicada en la etiqueta. Si no está seguro del tipo de fuente de alimentación de su casa, consulte con su distribuidor o compañía eléctrica local. Para los productos diseñados para funcionar con baterías u otras fuentes, consulte las instrucciones de funcionamiento. Limpieza. Desconecte este producto de la toma antes de limpiarlo. No utilice limpiadores líquidos o en aerosol. Limpie con un paño seco. Ubicación. No coloque este producto sobre un carrito, soporte, trípode, soporte de televisión o mesa. El producto podría caerse y causar lesiones graves a un niño o un adulto y daños serios al producto. Utilice sólo un carro, soporte, trípode, soporte o mesa recomendado por el fabricante o vendidos con el producto. Cualquier montaje del producto debe seguir las instrucciones del fabricante, y debe usar un accesorio de montaje recomendado por el fabricante. Una combinación de producto y carrito deberá moverse con cuidado- cualquier parada brusca, fuerza excesiva y superficies irregulares pueden hacer que el producto junto con su carrito vuelque. Protección.Proteja el cable de alimentación para evitar pisarlo o aplastarlo, en particular en los enchufes, los receptáculos y el punto donde salen del aparato. Accesorios. Use únicamente los dispositivos / accesorios especificados por el fabricante. Desconectar. Desconecte el aparato durante las tormentas eléctricas o cuando no se va utilizar por un largo tiempo. Departamento de servicio. Solicite cualquier reparación al departamento técnico de Sytech. Se requiere servicio cuando el aparato ha sido dañado de alguna manera,si el cable de alimentación o el enchufe está dañado, se ha derramado líquido o han caído objetos dentro del aparato, el aparato ha sido expuesto a la lluvia o la humedad, no funciona con normalidad, o se ha caído. El agua. Este aparato no debe ser expuesto a goteos o salpicaduras de agua y que no haya ningún objeto con líquido, como floreros, colocados al lado del aparato. Toma de pared. No sobrecargue la toma de corriente. Use única fuente de alimentación como se indica. Partes. Use piezas de repuesto especificadas por el fabricante. Montaje. El producto puede ser montado a una pared sólo si lo recomienda el fabricante. Una vez efectuado cualquier servicio o reparación a este producto, pida al técnico que realice comprobaciones de seguridad. Objetos y líquidos.Nunca introduzca objetos de ningún tipo en este producto a través de las aberturas porque podrán tocar puntos de tensión peligrosos o cortocircuitar piezas que podrían resultar en un incendio o descargas eléctricas. Nunca derrame líquidos de ningún tipo sobre el producto. Daños que requieren reparación. Desconecte este producto de la toma y póngase en contacto con personal de servicio calificado bajo las siguientes condiciones: a) Cuando el cable de alimentación o el enchufe está dañado, b) Si se ha derramado líquido o han caído objetos en el producto, c) Si el producto ha sido expuesto a la lluvia o el agua, d) Si el producto no funciona normalmente siguiendo las instrucciones de funcionamiento. Ajuste sólo los controles que están cubiertos por las instrucciones de operación. Un ajuste incorrecto de otros controles puede resultar en daño y casi siempre demandará trabajo extenso de un técnico cualificado para devolver el producto a su funcionamiento normal. e) Si el producto se ha caído o se ha dañado de alguna manera, f) El aparato no parece funcionar normalmente. SITUACION DE LOS CONTROLES 1. 2. 3. 4. 5. 6. Altavoz incorporada Botón Sleep ; formato 12h/24h Botón Prog+ ; Memoria Botón de funciones Botón de Vol+ ; Alarma 1 Botón Snooze ; Luz 7. 8. 9. 10. 11. 12. Pantalla LCD Botón de Vol- ; Alarma 2 Botón de Set ; Reproducir/Pausa Búsqueda + ; Búsqueda - ; Compartimiento de batería PANTALLA FUENTE DE ALIMENTACIÓN Conecte el cable CA en una toma de corriente de 230V 50Hz. La pantalla de la unidad se enciende y la pantalla mostrará "00:00, 1 1". Consulte la sección "Ajustar fecha" para ajustar la hora, mes y año. INSTRUCCIONES DE USO 1. AJUSTAR FECHA Pulse el botón SET durante 3 segundos para ajustar el año. Use SCAN + y SCAN - para aumentar o disminuir el año. Pulse una vez más para ajustar el mes. Pulse una tercera vez para fijar la fecha, hora y minutos en forma consecutiva. 2. MODO DE TIEMPO Pulse el botón de “12/24;HORA” para seleccionar que el reloj este en modo de doce horas o veinticuatro horas. 3. ALARMA Pulse el botón “ALARMA1” durante 3 segundos para activar la pantalla y el símbolo de alarma. Ajuste la hora presionando una vez más el botón de “ALARMA1”. Pulse una vez más el botón “ALARMA1” para ajustar los minutos. Para ajustar las horas y minutos, simplemente presione el botón “Scan+” o “Scan-“. Para desactivar la función “ALARMA1”, pulse y mantenga pulsada el botón de “ALARMA1” hasta que el símbolo de alarma desaparece de la pantalla. El proceso de funcionamiento de la alarma “ALARMA 2” es exactamente la misma que la alarma 1. 4. SNOOZE Para prolongar la alarma una vez que suene, simplemente presione el botón "snooze" y la alarma se apagará durante unos nueve minutos antes de que suene otra vez. Si desea desactivar la alarma, simplemente presione el botón "FUNC". 5. FUNCIÓN SLEEP Si desea escuchar la radio durante un tiempo antes de ir a dormir, presione el botón "FUNC" para cambiar al modo de radio. Busque el canal deseado pulsando el botón SCAN + o SCAN -. En este momento, pulse el botón SLEEP y la pantalla mostrará 90 min. Pulse el botón SLEEP hasta que haya establecido el tiempo deseado para que la unidad se apague automáticamente. Las opciones para la función del sueño son los siguientes: 90, 80, 70, 60, 50, 40, 30, 20, 10 Off. Una vez que el tiempo seleccionado haya transcurrido, la radio se apagará automáticamente. 6. RADIO FM Pulse el botón FUNC para encender la unidad y para cambiar al modo FM. Ajuste el volumen pulsando el botón VOL + y VOL -. Para almacenar una emisora FM que desea, pulse el botón MEMO durante aproximadamente 3 segundos. El símbolo “MEM” parpadeara en la pantalla. Seleccione la posición deseada pulsando el botón SCAN + o SCAN -. Pulse una vez más el botón MEMO para confirmar la selección. Ahora, su estación favorita esta almacenada en el número de memorización seleccionado. Puede almacenar un máximo de 10 emisoras. 7. AJUSTE DE BRILLO La pantalla negativa del SY-1032 es perfecta para la noche, ya que no reflejan los números. Para aumentar la luminosidad de la pantalla, pulse el botón “luz”. Después de aproximadamente 1 minuto, la pantalla volverá a la luz original. 8. PILA DE APOYO El SY-1032 incluye una pila de apoyo en caso de fallo de alimentación. Conecte el radio despertador a la salida de la red. Ajuste todos los parámetros tales como, el mes y año, fecha y hora. Abra el compartimento de las pilas en la parte inferior de la unidad e inserte 2 pilas AAA en la posición correcta (no incluido). En el caso de cualquier corte de energía, el SY-1032 mantendrá la hora y fecha hasta la alimentación principal vuelve a aparecer. 9. PRECAUCIONES DE LA BATERIA Siga estas precauciones cuando se utilizan pilas en este dispositivo: 1. Use sólo el tamaño y tipo de pila especificado. 2. Asegúrese de seguir la polaridad correcta al instalar las pilas como se indica en el compartimiento de la batería. Una batería invertida puede causar daños en el dispositivo. 3. Si el dispositivo no se va a utilizar durante un largo periodo de tiempo, extraiga las pilas para evitar daños o lesiones por fugas. 4. No trate de recargar una batería que no pretende ser recargada, ya que puede sobrecalentarse y dañar la unidad. NOTAS IMPORTANTES Evite instalar la unidad en lugares descritos a continuación: • Lugares expuestos a la luz directa del sol o cerca de aparatos de calor radiante, como calentadores eléctricos. • En lugares polvorientos. • En lugares sujetos a vibraciones constantes. • En lugares húmedos o mojados. ESPECIFICACIONES Fuente de alimentación: Pila de Apoyo: FM Rango de frecuencia: Consumo de energía: AC 230V ~ 50 Hz 2 x AAA, 1.5V batteries 88 - 108 MHz 5W DECLARACIÓN DE CONFORMIDAD Nombre del fabricante: Satyatrade S. L. Dirección: Pol. Ind. La Raya. C/ Guadalquivir, 2 Camarma de Esteruelas, 28816 Madrid Tel: 902 430 967 Fax: 91 8864285 NIF: B83254763 País de fabricación: China Sytech® SY-1032 Declaramos bajo nuestra propia responsabilidad que el producto cumple las siguientes directivas: Directivas: CE estándar: EMC Directiva 2004/108/EC EN 55013:2001+A1+ A2 EN 61000-3-2:2006+A1+A2 EN 61000-3-3:2008 EN 55020 :2007 Estándar ERP: Directiva 2009/125/EC EN 62301 :2005+1275/2008/EC Bajo consumo: Directiva 2006/95/EC EN 60065:2002+A1:2006+A11:2008 +A2:2010 ROHS estándar: 2002/95/EC Restricción de Sustancias Peligrosas Firmado: Ajeet Nebhwani Utamchandani Administrador único