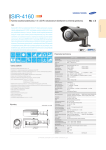
1
HOCHAUFLÖSENDE FARBKAMERA
HIGH-RESOLUTION COLOUR CAMERA
TVCCD-1602COL
Best.-Nr. 19.8830
BEDIENUNGSANLEITUNG
INSTRUCTION MANUAL
MODE D’EMPLOI
ISTRUZIONI PER L’USO
MANUAL DE INSTRUCCIONES
INSTRUKCJA OBSLUGI
®
D
A
CH
Bevor Sie einschalten ...
F
B
CH
Avant toute utilisation ...
E
Antes de la conexión ...
Nous vous remercions d'avoir choisi un appareil
MONACOR et vous prions de lire cette notice
avant l’utilisation.
La version française commence à la page 21.
Le agradecemos el haber adquirido un aparato
MONACOR. Por favor lee este manual antes del
uso.
La versión española se encuentra en la página 38.
2
GB Before you switch on ...
Wir wünschen Ihnen viel Spaß mit Ihrem neuen
Gerät von MONACOR. Bitte lesen Sie vor dem
Gebrauch diese Anleitung.
Der deutsche Text beginnt auf Seite 4.
We wish you much pleasure with your new
MONACOR unit. Please read these instructions
before use.
The English text starts on page 13.
I
Prima di accendere ...
Vi auguriamo buon divertimento con il Vostro nuovo apparecchio MONACOR. Vi preghiamo di leggere le presenti istruzioni prima dell'uso.
Il testo italiano comincia a pagina 30.
PL Przed Uruchomieniem ...
Życzymy Państwu zadowolenia z nowego urządzenia firmy MONACOR. Prosimy o zapoznanie się z
niniejsza instrukcją przed przystąpieniem do jego
użytkowania.
Tekst polski zaczyna się na stronie 47.
➀
TVCCD-1602COL
1 2 3
4
N
5 6
5a
POWER
A/F
M/F
AF / MF
W
T
OFF ON
1
MENU
5b
N
W
M
T
3
VIDEO
TERMINATION
F
REMOTE
7
3
8 9
2
Z F C
+12V
GND
10
F.G
11
F
S-VIDEO
➁
RMA-1602
12
D
GB
F
I
E
PL
Fernbedienung (optional)
Remote control (optional)
Télécommande (en option)
Telecomando (opzionale)
Mando (en opción)
Zdalne sterowanie (opcjonalne)
D
Bitte klappen Sie die Seite 3 heraus. Sie sehen dann immer die beschriebenen Bedienelemente und Anschlüsse.
A
CH
1 Übersicht der Bedienelemente und
Anschlüsse
1 Zoom-Tasten zum Verändern der Brennweite
„W“: Verkürzen der Brennweite
Der Blickwinkel vergrößert sich; das zu überwachende Objekt wird weiter weg gerückt.
„T“: Verlängern der Brennweite
Der Blickwinkel verkleinert sich; das zu überwachende Objekt wird näher herangeholt.
Bei aufgerufenem Bildschirm-Menü dienen die Tasten
zur Anwahl der Menüpunkte.
2 Taste zum Aufrufen und Verlassen der BildschirmMenüseiten
3 Fokus-Tasten zum manuellen Fokussieren des Bildes
„N“: um nähere Objekte zu fokussieren
„F“: um weiter entfernte Objekte zu fokussieren
Ist die Kamera auf automatische Fokussierung geschaltet, lässt sich das Bild nicht über die FokusTasten manuell fokussieren.
Bei aufgerufenem Bildschirm-Menü dienen die Tasten
zur Änderung der Menüeinstellungen.
4
4 Betriebsanzeige
5 Taste „AF/MF“ (an der Kamera) bzw. Tasten „A/F“ und
„M/F“ (auf der Fernbedienung RMA-1602) für den
schnellen Wechsel zwischen den Einstellungen
„manueller Fokus“ und „automatischer Fokus“,
auf dem Bildschirm erscheint nach dem Tastendruck
kurz eine Einblendung für die Fokus-Einstellung, auf
die gewechselt wurde: „AF“ oder „MF“
6 3-polige Steckbuchse für die externe Steuerung der
Zoom- und Fokus-Funktionen über ein Steuergerät;
zur Anschlussbelegung der Buchse siehe Kap. 5.3
7 Schalter „TERMINATION“ zum Zuschalten des Abschlusswiderstands bei der Fernsteuerung per RS485-Datenübertragung
Bei Steuerung einer Kamera, den Schalter auf „ON“
stellen, bei Steuerung mehrerer Kameras an der letzten Kamera den Schalter auf „ON“ stellen, an den restlichen Kameras auf „OFF“
8 Anschluss „REMOTE“ zur Fernsteuerung der Kamera
– über die optionale Fernbedienung RMA-1602 oder
– per RS-485-Datenübertragung über einen Computer oder ein Bedienpult
9 Schraubklemmen „+12V“ und „GND“ zum Anschluss
der Stromversorgung (12 V / 500 mA); die Schraub-
klemme „F.G“ der Klemmleiste bleibt frei
10 Adapter mit Gewindebuchse [Fotogewinde 6,3 mm
(1/4")] für die Kameramontage
11 BNC-Videoausgang zum Herausführen des Videosignals als FBAS-Signal
12 Hosiden-Videoausgang zum Herausführen des Videosignals als S-Video-Signal (S-VHS-Signal)
●
riert, kann keine Haftung für daraus resultierende Sachoder Personenschäden und keine Garantie für die
Kamera übernommen werden.
Soll die Kamera endgültig aus dem Betrieb genommen
werden, übergeben Sie sie zur umweltfreundlichen Entsorgung einem örtlichen Recyclingbetrieb.
D
A
CH
3 Anwendungsmöglichkeiten
2 Hinweise für den sicheren Gebrauch
Die Kamera entspricht der EMV-Richtlinie 89 / 336 / EWG
für elektromagnetische Verträglichkeit.
● Die Kamera ist nur zur Verwendung im Innenbereich
geeignet. Bei Außenmontage muss sie in ein wetterfestes Schutzgehäuse eingesetzt werden. Schützen Sie die
Kamera vor starken Erschütterungen, Feuchtigkeit und
Hitze (zulässiger Einsatztemperaturbereich 0 – 40 °C).
● Reinigen Sie das Gehäuse nur mit einem trockenen,
weichen Tuch, niemals mit Chemikalien oder Wasser.
● Berühren Sie die Objektivlinsen nicht mit den Fingern
und verwenden Sie für ihre Reinigung nur Mittel speziell
für optische Linsen.
● Wird die Kamera zweckentfremdet, nicht richtig angeschlossen, falsch bedient oder nicht fachgerecht repa-
Die Farbkamera TVCCD-1602COL ist speziell für den Einsatz in CCTV-Überwachungsanlagen konzipiert. Sie ist
mit einem motorisch gesteuerten Zoom-Objektiv ausgestattet, mit dem sich ein Bildausschnitt bis auf 22fache
Vergrößerung heranzoomen lässt. Dieser Vergrößerungsfaktor lässt sich über eine (abschaltbare) digitale ZoomFunktion noch verzehnfachen. Über ein Bildschirm-Menü
bietet die Kamera umfangreiche Einstellmöglichkeiten wie
z. B. automatische oder manuelle Einstellung von Fokus,
Shutter und Weißabgleich, SDR („Super Dynamic
Range“) ein/aus, negative oder spiegelverkehrte Abbildung usw.
Zur bequemen Steuerung der Kamera bietet sich die
optional erhältliche Fernbedienung RMA-1602 (Abb. 2)
an. Sämtliche Zoom-, Fokus- und Menüeinstellungen sind
über die Fernbedienung möglich.
5
D
4 Montage
A
Die Kamera kann auf ein Kamerastativ, auf einen
Schwenk-/Neigekopf (z. B. VPT-50 von MONACOR) oder
auf eine Kamerahalterung (z. B. Halterung der TVH-Serie
von MONACOR) montiert werden. Für die Befestigung
besitzt die Kamera auf ihrer Unterseite einen Adapter (10)
mit Gewindebuchse [Fotogewinde 6,3 mm (1/4")]. Er kann
für eine hängende Montage auch wahlweise an der
Kameraoberseite festgeschraubt werden.
Bei einer Außenmontage muss die Kamera in ein wetterfestes Schutzgehäuse eingesetzt werden.
CH
5 Kamera anschließen
ausgang, sondern der Videoausgang „S-VIDEO“ (12) verwendet werden. Hier steht das Signal im S-Video-Format
(S-VHS-Format) zur Verfügung. Weil, im Gegensatz zum
FBAS-Signal am BNC-Ausgang, im S-Video-Signal die
Helligkeits- und Farbinformationen getrennt übertragen
werden, verbessert sich bei diesem Anschluss die Bildqualität.
5.2 Fernsteuerung über die Buchse „REMOTE“
Über die 6-polige Buchse „REMOTE“ (8) lässt sich die
Kamera fernsteuern: wahlweise über die optional erhältliche Fernbedienung RMA-1602 (Abb. 2) oder über einen
Computer bzw. ein Bedienpult per serieller Datenübertragung nach dem Standard RS-485.
6 5
5.1 Videoanschluss
Die BNC-Buchse „VIDEO” (11) über ein 75-Ω-Kabel (z. B.
VEC-62/10 von MONACOR) mit dem Videoeingang des
nachfolgenden Geräts (z. B. Monitor, Videorecorder) verbinden. Bei einer Kabellänge von über 100 m sollte ein
Videoverstärker zwischen Kamera und Kabel geschaltet
werden, um die Kabelverluste auszugleichen.
Besitzt das nachfolgende Gerät einen S-Video-Eingang, sollte für die Videoverbindung nicht der BNC-Video-
6
1
2
3
➂
4
Pin RS-485
1 TxD (A)
2 RxD (B)
3
—
4
—
5
—
6
—
Fernbedienung RMA-1602
—
—
Masse
Stromversorgung +12 V
Steuerleitung 1
Steuerleitung 2
Pin-Belegung der 6-poligen Buchse „REMOTE“
Bei Verwendung der Fernbedienung RMA-1602 diese
über ihr Anschlusskabel an die Buchse „REMOTE“ anschließen. Die Fernbedienung benötigt keine Batterien,
sie wird über die Kamera gespeist.
Bei Steuerung der Kamera über RS-485-Datenübertragung den Pin 1 [TxD (A)] und den Pin 2 [RxD (B)] über
ein verdrilltes Leitungspaar mit dem Computer/Bedienpult
verbinden. Für den Anschluss liegt der Kamera ein passender 6-poliger Stecker bei. Den Schalter „TERMINATION“ (7) bei Steuerung einer Kamera auf „ON“ stellen;
sollen mehrere Kameras ferngesteuert werden, nur an der
letzten Kamera den Schalter auf „ON“ stellen, bei den
übrigen Kameras auf „OFF“. Für weitere Informationen
zur RS-485-Schnittstelle wenden Sie sich bitte an den
MONACOR-Kundendienst.
der Zoom-Taste „T“ („tele“), eine negative Steuerspannung entspricht der Funktion der Zoom-Taste „W“
(„wide angle“).
Pin „F“ (gelbe Ader): Eingang für die Fokus-Steuerung
Eine positive Steuerspannung entspricht der Funktion
der Fokus-Taste „N“ („near“), eine negative Steuerspannung entspricht der Funktion der Fokus-Taste „F“
(„far“).
Pin „C“: Masse (schwarze Ader)
5.3 Externe Steuerung von Zoom/Fokus
5.4 Stromversorgung
Die Zoom- und Fokus-Einstellungen lassen sich auch über
ein externes Steuergerät durchführen, das eine Steuerspannung zwischen 6 V
und 12 V
für Motor-ZoomObjektive liefert. Das Steuergerät über das beiliegende
3-adrige Anschlusskabel an die 3-polige Steckbuchse (6)
anschließen:
Pin „Z“ (weiße Ader): Eingang für die Zoom-Steuerung
Eine positive Steuerspannung entspricht der Funktion
Zur Stromversorgung ein stabilisiertes Netzgerät (z. B.
PS-1615ST von MONACOR) mit einer Ausgangsspannung von 12 V und einer Belastbarkeit von 500 mA an
die beiden Schraubklemmen „+12V“ und „GND“ (9) anschließen. Dabei auf die richtige Polung achten.
D
A
CH
Hinweis: Um zur Kontrolle der Menü-Einstellungen die
erste Seite des Bildschirm-Menüs aufzurufen, auf Pin „Z“
und „F“ gleichzeitig eine negative Steuerspannung geben.
Die Menüseite ist eingeblendet, solange die Steuerspannung an den beiden Pins anliegt.
7
D
A
CH
6 Bedienung
Die Objektivschutzkappe abnehmen und die Kamera an
die Stromversorgung anschließen. Die rote LED „POWER“
(4) leuchtet und auf dem Monitor erscheint erst die Einblendung „LENS INITIAL“, dann das Kamerabild.
Über das Bildschirm-Menü lassen sich die Funktionen
der Kamera an den jeweiligen Anwendungsfall anpassen,
siehe dazu Kap. 7.
6.1 Zoomen
Die Kamera verfügt über einen 22fachen Motor-Zoom.
Wird über die 22fache Vergrößerung hinaus weiter gezoomt, gelangt man in den digitalen Zoom-Bereich, in
dem sich der max. Motor-Zoomfaktor noch einmal verzehnfachen lässt. Der Digital-Zoom lässt sich über das
Bildschirm-Menü ausschalten (siehe Kap. 7.2, Einstellung
„DZOOM“).
Zum Zoomen die jeweilige Zoom-Taste (1) betätigen:
Taste „W“ („wide angle“): Verkürzen der Brennweite
Der Blickwinkel vergrößert sich; das zu überwachende
Objekt wird weiter weg gerückt.
Taste „T“ („tele“): Verlängern der Brennweite
Der Blickwinkel verkleinert sich; das zu überwachende
Objekt wird näher herangeholt.
8
Für die Dauer des Tastendrucks wird der jeweilige ZoomFaktor auf dem Bildschirm eingeblendet, z. B. bei 4fachZoom die Einblendung „ZOOM X004“ (vorausgesetzt, die
Einstellung „OSD“ ist im Bildschirm-Menü aktiviert, siehe
Kap. 7.2).
6.2 Manuelle Fokus-Einstellung
Die Fokus-Einstellung kann automatisch oder manuell
erfolgen. Als Grundeinstellung ist der automatische Fokus
eingeschaltet.
1) Zum Wechsel zwischen automatischem und manuellem Fokus kann:
entweder die jeweilige Fokus-Einstellung im Bildschirm-Menü aktiviert werden (siehe Kap. 7.1, Menüpunkt „FOCUS“)
oder – für den schnellen Wechsel – mit der Taste
„AF/MF“ (5) zwischen den beiden Einstellungen hinund hergeschaltet bzw. auf der Fernbedienung RMA1602 die Taste „A/F“ für automatischen Fokus (5a)
oder „M/F“ (5b) für manuellen Fokus gedrückt werden.
Auf dem Bildschirm erscheint nach dem Tastendruck
7 s lang eine Einblendung für die Fokus-Einstellung,
auf die gewechselt wurde: „AF“ oder „MF“.
2) Ist die Einstellung „manueller Fokus“ eingeschaltet, mit
den Fokus-Tasten (3) das Bild scharf stellen:
Taste „N“ („near“):
um nähere Objekte zu fokussieren
Taste „F“ („far“):
um weiter entfernte Objekte zu fokussieren
7 Einstellungen über das Bildschirm-Menü
Zum Aufrufen des Bildschirm-Menüs die Menü-Taste (2)
drücken. Das Menü besteht aus zwei Seiten: der Hauptseite „MENU“ und der Untermenüseite „SPECIAL“. Mit
den Tasten „W“ und „T“ (1) werden die einzelnen Menüpunkte angewählt und mit den Tasten „N“ und „F“ (3) werden die Menüeinstellungen geändert.
Das Bildschirm-Menü blendet sich automatisch aus,
wenn innerhalb 7 s nach dem letzten Tastendruck keine
Taste mehr betätigt wird.
7.1 Hauptmenü
D
A
MENU
" SPECIAL
FOCUS
SHUTTER
AGC
SDR
W/B
EXIT
::ENTER
::AUTO
::AUTO
::ON
::OFF
::AUTO
::ENTER
CH
Hauptmenü
„SPECIAL“: Aufrufen des Untermenüs „SPECIAL“
Zum Aufrufen des Untermenüs „SPECIAL“ die MenüTaste (2) drücken.
„FOCUS“: automatischer/manueller Fokus
Mit der Taste „N“ oder „F“ automatischen („AUTO“) oder
manuellen („M.FOCUS“) Fokus einstellen.
„SHUTTER“: automatischer/manueller Shutter
Der Shutter (elektronischer Verschluss) kann auf automatische Regelung in Abhängigkeit der Lichtverhältnisse (Regelbereich 1/50 – 1/100 000 s) oder auf einen festen Wert eingestellt werden, z. B. bei konstanten Lichtverhältnissen. Die folgenden Einstellungen sind möglich: „AUTO“ (automatisch), 1/50 s, 1/120 s, 1/250 s, 1/500 s,
9
D
A
CH
1/1000 s, 1/10 000 s. Mit der Taste „N“ oder „F“ die Einstellung auswählen.
„AGC“: AGC ein/aus
Mit der Taste „N“ oder „F“ kann die AGC (automatische
Verstärkungsregelung) ein- („ON“) oder ausgeschaltet
(„OFF“) werden. Die AGC sorgt für eine Anhebung des
Videosignalpegels bei schlechter Ausleuchtung. Allerdings verschlechtert sich bei eingeschalteter AGC der
Signal-Rausch-Abstand der Kamera.
„SDR“: SDR („super dynamic range“) ein/aus
Mit der Taste „N“ oder „F“ kann die SDR-Funktion aus(„OFF“) oder eingeschaltet („ON“) werden. Mit der
SDR-Funktion lässt sich ein größerer Dynamikbereich
erzielen, damit auch große Kontrastunterschiede, wie
sie z. B. auftreten, wenn sich die zu überwachende
Person vor einem sehr hellen Hintergrund bewegt,
naturgetreu abgebildet werden. Die SDR-Funktion bietet bessere Ergebnisse als herkömmliche Gegenlichtkompensationsverfahren (BLC).
„W/B“: Einstellung des Weißabgleichs
Um eine natürliche Farbdarstellung zu erhalten, muss
die Kamera durch den Weißabgleich an die Farbtemperatur der verwendeten Lichtquelle (z. B. Glühlampen,
Leuchtstofflampen, Sonnenlicht) angeglichen werden.
10
Mit der Taste „N“ oder „F“ kann zwischen verschiedenen Einstellungen gewählt werden: Bei automatischem
Weißabgleich (Einstellung „AUTO“) passt sich die Kamera automatisch der Farbtemperatur des Umgebungslichtes an, diese Einstellung sollte bei wechselnden
Lichtquellen (z. B. tagsüber Sonnenlicht, nachts Kunstlicht) gewählt werden. Bei stets gleichen Lichtquellen
kann der Weißabgleich entweder für eine feste Farbtemperatur eingestellt werden (Einstellung „3100K“ für Einsatz bei Kunstlicht, Einstellung „5100K“ für den Einsatz
bei Tageslicht) oder manuell durchgeführt werden (Einstellung „MANUAL“). Ist „MANUAL“ gewählt, lassen sich
der Rot-Anteil (Zeile „R-ADJUST“) und der Blau-Anteil
(Zeile „B-ADJUST“) mit der Taste „N“ oder „F“ jeweils in
den Stufen 0 – 20 einstellen: Je größer der Wert, desto
intensiver der jeweilige Farbton.
„EXIT“: Verlassen des Bildschirm-Menüs
Zum Verlassen des Bildschirm-Menüs die Menü-Taste
(2) drücken.
„MIRROR“: vertikale Spiegelung des Bildes
Mit der Taste „N“ oder „F“ kann zwischen „OFF“ (keine
Bildspiegelung), „HALF“ (eine Hälfte des Bildes wird
gespiegelt, so dass sich ein symmetrisches Bild ergibt)
und „FULL“ (Spiegelung des kompletten Bildes) gewählt
werden.
7.2 Untermenü „SPECIAL“
SPECIAL
::ON
NEGA
::OFF
COLOR
::ON
MIRROR
::OFF
BRIGHTNESS
::10
SHARPNESS
::10
OSD
::ON
PREVIOUS
::ENTER
" DZOOM
Untermenü
D
A
CH
„BRIGHTNESS“: Einstellung der Helligkeit
„SHARPNESS“: Einstellung der Schärfe
Helligkeit und Schärfe lassen sich mit der Taste „N“ oder
„F“ jeweils in den Stufen 0 – 20 einstellen: Je größer der
Wert, desto heller bzw. schärfer ist das Bild.
„DZOOM“: Digitaler Zoom ein/aus
Mit der Taste „N“ oder „F“ kann die digitale Zoom-Funktion (siehe dazu Kap. 6.1 „Zoomen“) ein- („ON“) oder
ausgeschaltet („OFF“) werden.
„OSD“: Einblendung des Zoom-Faktors ein/aus
Die Kamera kann so eingestellt werden, dass beim
Zoomen der Zoomfaktor auf dem Bildschirm eingeblendet wird („ON) oder nicht („OFF“).
„NEGA“: Negatives Bild ein/aus
Mit der Taste „N“ oder „F“ kann zwischen der normalen,
positiven („OFF“) und einer negativen („ON“) Bilddarstellung gewählt werden, bei der die Verhältnisse von
Hell und Dunkel und die Farben in ihre Komplementärfarben umgekehrt werden.
„PREVIOUS“: Zurückwechseln in das Hauptmenü
Zum Zurückwechseln in das Hauptmenü die MenüTaste (2) drücken.
„COLOR“: Schwarzweiß-/Farbbild
Mit der Taste „N“ oder „F“ kann zwischen S/W-Bild
(„OFF“) und Farbbild („ON“) umgeschaltet werden.
11
D
A
CH
8 Technische Daten
Bildaufnehmer: . . . . . . . CCD-Chip, 6,35 mm (1/4")
Video-System: . . . . . . . PAL, horizontal 15 625 Hz,
vertikal 50 Hz
Anzahl der Bildpunkte: . horizontal 752 x vertikal 582
Auflösung: . . . . . . . . . . 470 Linien
Objektiv
Brennweite: . . . . . . . 3,6 – 79,2 mm
Lichtstärke: . . . . . . . 1 : 1,6
Mindestbeleuchtung: . . 0,09 Lux
Signal-Rausch-Abstand: > 46 dB
Videoausgang: . . . . . . . 1 Vss
Einsatztemperatur: . . . . 0 – 40 °C
Stromversorgung: . . . . . 12 V / 500 mA
Abmessungen, Gewicht: 55 x 60 x 110 mm, 260 g
Laut Angaben des Herstellers.
Änderungen vorbehalten.
Diese Bedienungsanleitung ist urheberrechtlich für MONACOR ® INTERNATIONAL GmbH & Co. KG geschützt.
Eine Reproduktion für eigene kommerzielle Zwecke – auch auszugsweise – ist untersagt.
12
Please unfold page 3. Then you can always see the
operating elements and connections described.
1 Operating Elements and Connections
1 Zoom buttons for modifying the focal length
“W”: reduction of the focal length
The angle of view is wider; the object to be monitored is zoomed out.
“T”: extension of the focal length
The angle of view is reduced; the object to be monitored is zoomed in.
With the OSD menu recalled, these buttons are used
to select the menu items.
2 Button for recalling and exiting the OSD menu pages
3 Focus buttons for manual focussing of the picture
“N”: focussing of objects nearby
“F”: focussing of objects far away
If the camera is set to autofocus, it is impossible to
focus the picture manually via the focus buttons.
With the OSD menu recalled, these buttons are used
to modify the menu settings.
4 Power LED
5 Button “AF / MF” (on the camera) or buttons “A / F” and
“M / F” (on the remote control RMA-1602) for a quick
change-over between the settings “manual focus” and
“autofocus”,
after the button has been pressed, the screen will
shortly display the focus setting selected: “AF” or “MF”
6 3-pole tip jack for external control of zoom and focus
functions via a control unit; for configuration of the jack
see chapter 5.3
7 Switch “TERMINATION” for connecting the terminating resistor during remote control via RS-485 data
transmission
When controlling a single camera, set the switch to
“ON”; when controlling several cameras set the switch
on the last camera to “ON”, the switch on the other
cameras to “OFF”
8 Connection “REMOTE” for remote control of the
camera
– via the optional remote control RMA-1602 or
– by RS-485 data transmission via a computer or
control console
9 Screw terminals “+12V” and “GND” for connecting the
power supply (12 V / 500 mA), the screw terminal
“F.G” of the terminal strip remains unconnected
GB
13
GB
10 Adapter with thread jack [6.3 mm (1/4") thread] for
mounting the camera
11 BNC video output for routing the video signal as composite colour signal
12 Hosiden video output for routing the video signal as
S-video signal (S-VHS signal)
2 Safety Notes
The camera corresponds to the directive for electromagnetic compatibility 89 / 336 / EEC.
14
●
The camera is suitable for indoor use only. For outside
installation, the camera must be mounted into a weatherproof outdoor housing. Protect the camera against
intensive vibration, humidity, and heat (admissible
ambient temperature range 0 – 40 °C).
●
For cleaning the housing only use a dry, soft cloth;
never use chemicals or water.
●
Never touch the lenses of the lens assembly with your
fingers. For cleaning only use specific cleansing agents
for optical lenses.
●
No guarantee claims for the camera or liability for any
resulting personal damage or material damage will be
●
accepted if the camera is used for other purposes than
originally intended, if it is not correctly connected, operated, or not repaired in an expert way.
If the camera is to be put out of operation definitively,
take it to a local recycling plant for a disposal which is
not harmful to the environment.
3 Applications
The colour camera TVCCD-1602COL is specially designed
for use in CCTV surveillance systems. It is equipped with a
motor zoom lens which allows to zoom in a picture detail
up to 22-fold magnification. This magnification factor can
once again be increased ten times via a digital zoom function (to be deactivated). Via an OSD menu, the camera
offers extensive adjusting possibilities, e. g. autofocus or
manual focus, shutter and white balance, SDR (super
dynamic range) on/off, negative or mirror-inverted picture
display, etc.
For convenient control of the camera, the optional
remote control RMA-1602 (fig. 2) is available. All settings
concerning zoom, focus, and menu can be made via the
remote control.
4 Mounting
The camera can be installed on a camera stand, on a
pan / tilt head (e. g. MONACOR VPT-50), or on a camera
support (e. g. support of the MONACOR TVH series). For
mounting, the lower side of the camera is provided with an
adapter (10) with thread jack [6.3 mm (1/4") thread ]. For
suspension of the camera, this adapter can alternatively
be screwed to the upper side of the camera.
For outside installation, the camera must be mounted
into a weatherproof outdoor housing.
at the BNC output, the brightness and colour information
is separately transmitted in the S-video signal, the picture
quality will improve with this connection.
5.2 Remote control via the jack “REMOTE”
Via the 6-pole jack “REMOTE” (8), the camera can be
remote-controlled: via the optional remote control RMA1602 (fig. 2) or alternatively via a computer or control console by serial data transmission according to RS-485
standard.
2
Pin RS-485
1 TxD (A)
2 RxD (B)
3
—
4
—
5
—
6
—
➂
Pin configuration of the 6-pole jack “REMOTE”
6 5
5 Connecting the Camera
1
5.1 Video connection
Connect the BNC jack “VIDEO” (11) via a 75 Ω cable (e. g.
MONACOR VEC-62/10) to the video input of the following
unit (e. g. monitor, video recorder). With a cable length
exceeding 100 m, a video amplifier should be inserted between the camera and the cable to compensate cable loss.
If the following unit is equipped with an S-video input,
instead of the BNC video output, the video output
“S-VIDEO” (12) should be used for video connection. The
signal is available in the S-video format (S-VHS format) at
this output. Since, contrary to the composite colour signal
GB
3
4
Remote control RMA-1602
—
—
Ground
Power supply +12 V
Control line 1
Control line 2
When using the remote control RMA-1602, connect it
to the jack “REMOTE” via its cable. The remote control
does not require any batteries, power is supplied via the
camera.
15
GB
When controlling the camera via RS-485 data transmission, connect pin 1 [TxD (A)] and pin 2 [RxD (B)] via a
twisted pair to the computer / control console. For connection, the camera is supplied with a matching 6-pole plug.
When controlling a single camera, set the switch “TERMINATION” (7) to “ON”; when controlling several cameras,
only set the switch on the last camera to “ON”, the switch
on the other cameras to “OFF”. For further information
concerning the RS-485 interface please contact the
MONACOR after-sales service.
5.3 External zoom/focus control
Zoom and focus settings can also be made via an external control unit supplying a control voltage between 6 V
and 12 V for motor zoom lenses. Connect the control
unit via the supplied 3-core cable to the 3-pole tip jack (6):
pin “Z” (white core): input for zoom control
A positive control voltage corresponds to the function of
zoom button “T” (tele), a negative control voltage corresponds to the function of zoom button “W” (wide
angle).
pin “F” (yellow core): input for focus control
A positive control voltage corresponds to the function of
16
focus button “N” (near), a negative control voltage corresponds to the function of focus button “F” (far).
pin “C”: ground (black core)
Note: For recalling the first page of the OSD menu to
check the menu settings, simultaneously feed a negative
control voltage to pins “Z” and “F”. The menu page will be
displayed as long as the control voltage is applied to both
pins.
5.4 Power supply
For power supply, connect a regulated power supply unit
(e. g. MONACOR PS-1615ST) with an output voltage of
12 V and a current rating of 500 mA to the two screw terminals “+12V” and “GND” (9). Observe the correct polarity.
6 Operation
Remove the lens cover and connect the camera to the
power supply. The red LED “POWER” (4) will light up and
the monitor will display “LENS INITIAL” first, then the
camera picture.
Via the OSD menu, the functions of the camera can be
matched to the corresponding application, see chapter 7.
6.1 Zooming
The camera is equipped with a 22-fold motor zoom. If
zooming is continued beyond the 22-fold magnification,
the digital zoom range is reached where the maximum
motor zoom factor can once again be increased ten times.
The digital zoom can be deactivated via the OSD menu
(see chapter 7.2, setting “DZOOM”).
For zooming, actuate the corresponding zoom button (1):
button “W” (wide angle): reduction of the focal length
The angle of view is wider; the object to be monitored
is zoomed out.
button “T” (tele): extension of the focal length
The angle of view is reduced; the object to be monitored is zoomed in.
As long as the button is pressed, the corresponding zoom
factor will be displayed on the screen, e. g. “ZOOM X004”
for a 4-fold zoom (provided that the setting “OSD” has
been activated in the OSD menu, see chapter 7.2).
6.2 Manual focus setting
The focus setting can be made automatically or manually.
As a basic setting, autofocus is activated.
1) To change between autofocus and manual focus it is
possible to
either activate the corresponding focus setting in
the OSD menu (see chapter 7.1, menu item “FOCUS”)
or – for a quick change-over – switch between the
two settings with the button “AF / MF” (5) or press the
button “A / F” for autofocus (5a) or “M/F” (5b) for manual focus on the remote control RMA-1602. After actuation of the button, the screen will display the focus setting selected (“AF” or “MF”) for 7 s.
2) If “manual focus” is activated, set a sharp picture with
the focus buttons (3):
button “N” (near): focussing of objects nearby
button “F” (far):
focussing of objects far away
GB
7 Settings via the OSD Menu
For recalling the OSD menu, press the menu button (2).
The menu consists of two pages: the main page “MENU”
and the submenu page “SPECIAL”. The buttons “W” and
“T” (1) are used to select the individual menu items, the
buttons “N” and “F” (3) to modify the menu settings.
The OSD menu will automatically disappear if no button is actuated for 7 s after the last actuation of a button.
17
GB
7.1 Main menu
“AGC”: AGC on / off
Use the button “N” or “F” to activate (“ON”) or deactivate (“OFF”) the automatic gain control (AGC). In case
of poor illumination, the AGC will increase the video signal level. With the AGC activated, however, the S / N
ratio of the camera will deteriorate.
MENU
" SPECIAL
FOCUS
SHUTTER
AGC
SDR
W/B
EXIT
::ENTER
::AUTO
::AUTO
::ON
::OFF
::AUTO
::ENTER
Main menu
“SPECIAL”: recalling the submenu “SPECIAL”
For recalling the submenu “SPECIAL”, press the menu
button (2).
“FOCUS”: autofocus / manual focus
Use the button “N” or “F” to set autofocus (“AUTO”) or
manual focus (“M.FOCUS”).
18
“SHUTTER”: automatic / manual shutter
The electronic shutter can be set to automatic control depending on the lighting conditions (control range
1/50 – 1/100 000 s) or to a fixed value, e. g. for constant
lighting conditions. The following settings are possible:
“AUTO” (automatic), 1/50 s, 1/120 s, 1/250 s, 1/500 s, 1/1000 s,
1/10 000 s. Use the button “N” or “F” to select the setting.
“SDR”: SDR (super dynamic range) on / off
Use the button “N” or “F” to activate (“ON”) or deactivate (“OFF”) the SDR function. With the SDR function,
a wider dynamic range can be obtained, thus providing
a natural picture even in case of great differences in
contrast, e. g. a person moving against a very bright
background. The SDR function provides better results
than the standard backlight compensation (BLC).
“W / B”: white balance setting
For a natural colour representation, the camera must
be matched to the colour temperature of the light
source used (e. g. incandescent lamps, fluorescent
lamps, sunlight) by means of the white balance.
Use the button “N” or “F” for various settings: With
the automatic white balance (setting “AUTO”), the
camera will automatically adapt to the colour temperature of the ambient light; this setting should be used for
varying light sources (e. g. sunlight during the day, artificial light at night). With constant light sources, the
white balance can either be set for a fixed colour temperature (setting “3100K” for artificial light, setting
“5100K” for daylight) or made manually (setting
“MANUAL”). With “MANUAL” selected, the red contribution (line “R-ADJUST”) and the blue contribution
(line “B-ADJUST”) can each be set with the button “N”
or “F” in steps from 0 to 20: The higher the value, the
more intense the corresponding colour tone.
“EXIT”: exiting the OSD menu
To exit the OSD menu, press the menu button (2).
7.2 Submenu “SPECIAL”
" DZOOM
SPECIAL
::ON
::OFF
::ON
::OFF
::10
::10
::ON
::ENTER
“NEGA”: Negative picture on / off
Use the button “N” or “F” to select the normal positive
picture (“OFF”) or the negative picture (“ON”). With the
negative effect, bright and dark are reversed and
colours are reversed to their complementary colours.
GB
“COLOR”: Black-and-white / colour picture
Use the button “N” or “F” to select B / W picture (“OFF”)
or colour picture (“ON”).
“MIRROR”: vertical mirroring of the picture
Use the button “N” or “F” to select “OFF” (normal picture), “HALF” (one half of the picture is mirrored so that
a symmetric picture results), and “FULL” (mirror-inverted display of the complete picture).
“BRIGHTNESS”: Brightness setting
“SHARPNESS”: Sharpness setting
Brightness and sharpness can each be set in steps
from 0 to 20 with the button “N” or “F”: The higher the
value, the brighter or sharper the picture.
NEGA
COLOR
MIRROR
BRIGHTNESS
SHARPNESS
OSD
PREVIOUS
Submenu
“DZOOM”: Digital zoom on / off
Use the button “N” or “F” to activate (“ON”) or deactivate
(“OFF”) the digital zoom (see chapter 6.1 “Zooming”).
“OSD”: Display of the zoom factor on / off
When zooming, the camera can be set in such a way
that the zoom factor is displayed on the screen (“ON”)
or not (“OFF”).
“PREVIOUS”: Return to the main menu
To return to the main menu, press the menu button (2).
19
GB
8 Specifications
Image sensor: . . . . . . .
Video system: . . . . . . .
Number of pixels: . . . . .
Resolution: . . . . . . . . . .
Lens
Focal length: . . . . . .
Lens aperture: . . . . .
Minimum illumination: . .
S / N ratio: . . . . . . . . . . .
Video output: . . . . . . . .
Ambient temperature: . .
Power supply: . . . . . . .
Dimensions, weight: . . .
CCD chip, 6.35 mm (1/4")
PAL, hor. 15 625 Hz, vert. 50 Hz
hor. 752 x vert. 582
470 lines
3.6 – 79.2 mm
1 : 1.6
0.09 lux
> 46 dB
1 Vpp
0 – 40 °C
12 V / 500 mA
55 x 60 x 110 mm, 260 g
According to the manufacturer.
Subject to technical modification.
All rights reserved by MONACOR ® INTERNATIONAL GmbH & Co. KG. No part of this instruction manual may
be reproduced in any form or by any means for any commercial use.
20
Ouvrez le présent livret page 3 de manière à visualiser
les éléments et branchements.
1 Eléments et branchements
1 Touches zoom pour modifier la distance focale
“W” : réduction de la distance focale :
l’angle s’agrandit, l’objet à surveiller s’éloigne
“T” : allongement de la distance focale :
l’angle se réduit, l’objet à surveiller se rapproche
Lorsque le menu écran est appelé, les touches permettent de choisir les points du menu.
2 Touche pour appeler et quitter les pages du menu
écran
3 Touches Focus pour un focus manuel de l’image
“N” : pour faire un focus sur des objets plus près
“F” : pour faire un focus sur des objets plus loin
Si la caméra est réglée sur un réglage de focus automatique, on ne peut pas effectuer manuellement de
focus de l’image via les touches de focus.
Lorsque le menu écran est appelé, les touches servent à modifier les réglages du menu.
4 Témoin de fonctionnement
5 Touche “AF/MF” (sur la caméra)/touches “A/F” et
“M/F” (sur la télécommande RMA-1602) pour le changement rapide entre les réglages “focus manuel”
et “focus automatique”. Une fois la touche enfoncée,
l’écran affiche brièvement le focus choisi “AF” ou “MF”.
6 Prise 3 pôles pour la commande externe des fonctions
zoom et focus via un pupitre de commande ; voir chapitre 5.3 pour la configuration de branchement de la prise.
7 Interrupteur “TERMINATION” pour connecter la résistance terminale pendant une transmission de données
à distance via RS-485.
Si une seule caméra est contrôlée, mettez l’interrupteur sur “ON”, si plusieurs caméras sont contrôlées,
mettez l’interrupteur sur la dernière caméra sur “ON”,
sur les autres caméras, mettez-le sur “OFF”.
8 Branchement “REMOTE” pour la commande à distance de la caméra
– via la télécommande RMA-1602 disponible en
option ou
– par une transmission de données RS-485 via un
ordinateur ou un pupitre de commande
9 Bornes à vis “+12V” et “GND” pour brancher l’alimentation (12 V / 500 mA) ; la borne à vis “F.G” de la barrette reste libre
F
B
CH
21
F
B
CH
10 Adaptateur avec prise filetée femelle [filetage photo
6,35 (1/4")] pour le montage de la caméra
11 Sortie vidéo BNC pour diriger le signal vidéo comme
signal de synchronisation de chrominance
12 Sortie vidéo Hosiden pour diriger le signal vidéo
comme signal S-Vidéo (signal S-VHS)
2 Conseils d’utilisation et de sécurité
La caméra répond à la norme européenne 89/336/CEE
relative à la compatibilité électromagnétique.
● La caméra n’est conçue que pour une utilisation en intérieur. Pour un montage en extérieur, elle doit être placée dans un boîtier de protection étanche. Protégez-la
de vibrations intenses, de l’humidité et de la chaleur
(plage de température de fonctionnement autorisée :
0 °C à +40 °C).
● Pour la nettoyer, utilisez un chiffon sec et doux, en
aucun cas de produits chimiques ou d’eau.
● Ne touchez pas les lentilles de l’objectif avec les doigts
et pour les nettoyer, utilisez exclusivement des produits
spécifiquement adaptés aux lentilles optiques.
● Nous déclinons toute responsabilité en cas de dommages corporels ou matériels résultants si la caméra est
22
●
utilisée dans un but autre que celui pour lequel elle a
été conçue, si elle n’est pas correctement branchée, utilisée ou n’est pas réparée par une personne habilitée,
de même, la garantie deviendrait caduque.
Lorsque la caméra est définitivement retirée du marché,
vous devez la déposer dans une usine de recyclage de
proximité pour contribuer à son élimination non polluante.
3 Possibilités d’utilisation
La caméra couleur TVCCD-1602COL est spécialement
conçue pour une installation dans des centrales de surveillance vidéo. Elle est dotée d’un objectif zoom motorisé
permettant de faire un zoom d’un section d’image jusqu’à
22 fois. Ce facteur d’agrandissement peut être multiplié
par 10 via une fonction zoom digitale (déconnectable). Via
un menu écran, la caméra propose diverses possibilités
de réglage comme focus automatique ou focus manuel,
shutter (obturation) et compensation du blanc, SDR
(Super Dynamic Range) marche/arrêt, visualisation en
négatif ou affichage inversé (effet miroir)…
Pour une commande plus confortable de la caméra, la
télécommande RMA-1602 (schéma 2) est disponible en
option. L’ensemble des réglages de menu, zoom, focus
est possible via la télécommande.
4 Montage
La caméra peut être montée sur un pied de caméra, sur
un rotor inclinable (p. ex. VPT-50 de MONACOR) ou sur
un support de caméra (p. ex. support de la série TVH de
MONACOR). Pour la fixation, la caméra possède sur la
face inférieure un adaptateur (10) avec prise filetée [filetage photo 6,35 (1/4")]. Il peut également être vissé au choix
sur la face supérieure de la caméra pour un montage suspendu.
Pour un montage en extérieur, la caméra doit être placée dans un boîtier de protection étanche.
au format S-VHS. Car, à l’inverse du signal de synchronisation de chrominance à la sortie BNC, les données de
couleur et luminosité sont transmises séparément dans le
signal S-VHS, la qualité de l’image est donc meilleure
avec ce type de branchement.
Reliez la prise BNC “VIDEO” (11) via un câble 75 Ω (p. ex.
VEC-62/10 de MONACOR) à l’entrée vidéo de l’appareil
suivant, p. ex. moniteur, magnétoscope. Pour une longueur de câble supérieure à 100 m, il convient d’insérer
un amplificateur vidéo entre la caméra et le long câble de
manière à compenser les pertes en ligne.
Si l’appareil suivant possède une entrée S-VHS, il faut
utiliser pour la connexion vidéo la sortie vidéo “S-VIDEO”
(12) et non la sortie vidéo BNC. Le signal est disponible ici
B
CH
5.2 Commande à distance via la prise “REMOTE”
Via la prise 6 pôles “REMOTE” (8), la caméra peut être
commandé à distance : au choix, via la télécommande
RMA-1602 disponible en option (schéma 2) ou via un
ordinateur ou pupitre de commande par transmission
sérielle de données selon le standard RS-485.
5 Branchements
5.1 Branchement vidéo
F
6 5
1
2
3
➂
4
Pin RS-485
1 TxD (A)
2 RxD (B)
3
—
4
—
5
—
6
—
télécommande RMA-1602
—
—
Masse
Alimentation +12 V
Câble commande 1
Câble commande 2
configuration de la prise 6 pôles “REMOTE”
23
F
B
CH
Si vous utilisez la télécommande RMA-1602, reliez-la via
son cordon de branchement à la prise “REMOTE”. La
télécommande ne nécessite aucune batterie, elle est alimentée par la caméra.
Dans le cadre d’une commande par transmission de
données RS-485, reliez le pin 1 [TxD (A)] et le pin [RxD
(B)] via une paire torsadée à l’ordinateur/pupitre de commande. Pour le branchement, une fiche 6 pôles mâle correspondante est livrée avec la caméra. Mettez l’interrupteur “TERMINATION” (7) pour la commande d’une seule
caméra sur “ON”, dans le cas de plusieurs caméras, mettez l’interrupteur sur “ON” uniquement sur la dernière
caméra, pour les caméras restantes, sur “OFF”. Pour de
plus amples informations sur l’interface RS-485 adressezvous s’il vous plaît au service après-vente MONACOR.
commande négative à la fonction de la touche zoom
“W” (“wide angle” : grand angle).
pin “F” (conducteur jaune) : entrée pour la commande focus
une tension de commande positive correspond à la
fonction de la touche focus “N” (“near” : près), une tension de commande négative à la fonction de la touche
focus “F” (“far” : loin).
pin “C” : masse (conducteur noir)
Conseil : pour appeler la première page du menu écran de
manière à vérifier les réglages du menu, appliquez au pin
“Z” et au pin “F” simultanément une tension de commande négative. La page du menu s’affiche tant que la tension
est présente aux deux pins.
5.4 Alimentation
5.3 Commande externe du zoom/focus
Les réglages de zoom et focus peuvent également être
effectués via une unité de commande externe qui délivre
une tension entre 6 V
et 12 V
pour les objectifs à
zoom motorisé. Reliez l’unité de commande via le câble
de liaison 3 conducteurs livré à la prise 3 pôles (6) :
pin “Z” (conducteur blanc) : entrée pour la commande zoom
une tension de commande positive correspond à la
fonction de la touche zoom “T” (“télé”), une tension de
24
Pour l’alimentation, une alimentation secteur stabilisée
(p. ex. PS-1615ST de MONACOR) avec une tension de
sortie de 12 V et une puissance de 500 mA doit être reliée aux deux bornes “+12V” et “GND” (9). Veillez à respecter la polarité.
6 Fonctionnement
Retirez le cache de protection de l’objectif et reliez la
caméra à l’alimentation. La LED rouge “POWER” (4) brille et sur le moniteur, s’affiche tout d’abord le message
“LENS INITIAL” puis l’image de la caméra. Via le menu
écran, les fonctions de la caméra peuvent être adaptées
à tout type d’utilisation, voir chapitre 7.
6.1 Zoom
La caméra dispose d’un zoom motorisé x22. Si on continue à zoomer au-delà d’un agrandissement x22, on atteint
la zone du zoom digital dans laquelle le facteur d’agrandissement maximal du zoom motorisé peut être encore
multiplié par 10. Le zoom digital peut être déconnecté via
le menu écran (voir chapitre 7.2, réglage “DZOOM”).
Pour zoomer, activez la touche zoom (1) correspondante :
“W” (wide angle = grand angle) :
réduction de la distance focale : l’angle s’agrandit, l’objet à surveiller s’éloigne
“T” (télé) :
allongement de la distance focale : l’angle se réduit,
l’objet à surveiller se rapproche
Pendant la durée de la pression de la touche, le facteur
de zoom correspondant s’affiche sur l’écran, p. ex. pour
un zoom x4, le message “ZOOM X004” (à supposer que
le réglage “OSD” est activé dans le menu écran, voir chapitre 7.2).
6.2 Réglage manuel du focus
F
B
CH
Le réglage du focus peut s’effectuer manuellement ou
automatiquement. En réglage de base, le focus automatique est allumé.
1) Pour changer entre focus automatique et manuel, on
peut :
soit activer le réglage focus respectif sur le menu
écran (voir chapitre 7.1, point “FOCUS”)
soit, pour un changement rapide, commuter avec la
touche “AF/MF” (5) entre les deux réglages ou enfoncer
la touche “A/F” pour l’autofocus (5a) ou “M/F” (5b) pour
le focus manuel sur la télécommande RMA-1602. Après
une pression sur la touche, l’écran affiche pendant 7
secondes, le réglage de focus choisi “AF” ou “MF”.
2) Si le réglage “focus manuel” est activé, utilisez les touches focus (3) pour faire un focus de l’image :
touche “N” (“near” = près) :
pour faire un focus d’objets plus proches
touche “F” (“far”) :
pour faire un focus d’objets éloignés
25
F
B
CH
7 Réglages via le menu écran
Pour appeler le menu écran, enfoncez la touche menu (2).
Le menu se compose de deux pages : la page principale
“MENU” et la page du sous-menu “SPECIAL”. Avec les
touches “W” et “T” (1), sélectionnez les différents points
du menu et avec les touches “N” et “F” (3), les réglages du
menu sont modifiés.
Le menu écran s’efface automatiquement si aucune
touche n’est plus activée dans les 7 secondes suivant la
dernière activation d’une touche.
7.1 Menu principal
FOCUS
SHUTTER
AGC
SDR
W/B
EXIT
::ENTER
::AUTO
::AUTO
::ON
::OFF
::AUTO
::ENTER
Menu principal
“SPECIAL” : appel du sous-menu “SPECIAL”
pour appeler le sous-menu “SPECIAL”, enfoncez la
touche menu (2).
26
“SHUTTER” : shutter automatique/manuel
Le shutter (obturation électronique) peut être réglé sur
adaptation automatique selon les conditions lumineuses (plage de réglage 1/50 – 1/100 000 s) ou sur une valeur
fixe, p. ex. pour des conditions lumineuses constantes.
Les réglages suivants sont possibles : “AUTO” (automatique), 1/50 s, 1/120 s, 1/250 s, 1/500 s, 1/1000 s, 1/10 000 s.
Avec la touche “N” ou “F”, sélectionnez le réglage.
“AGC” : activation/désactivation
Avec la touche “N” ou “F”, le réglage automatique d’amplification AGC peut être activé (“ON”) ou désactivé
(“OFF”). L’AGC augmente le niveau du signal vidéo en
cas de mauvais éclairage. Cependant, le rapport signal/bruit de la caméra se dégrade si l’AGC est activé.
MENU
" SPECIAL
“FOCUS” : focus automatique/manuel
Avec la touche “N” ou “F”, réglez le focus automatique
(“AUTO”) ou manuel (“M.FOCUS”).
“SDR” (“Super Dynamic Range”) : activation/désactivation
Avec la touche “N” ou “F”, la fonction SDR peut être
activée (“ON”) ou désactivée (“OFF”). On peut avec la
fonction SDR avoir une plage de dynamique plus grande, ainsi, même en cas de différences de contraste
importantes on a une image naturelle, p. ex. lorsque la
personne à surveiller se déplace devant un fonds très
clair. La fonction SDR offre de meilleurs résultats que la
compensation habituelle du contre-jour (BLC).
“W/B” : réglage de la compensation du blanc
Pour obtenir une visualisation naturelle des couleurs, la
caméra doit s’adapter à la température de couleur de la
source lumineuse utilisée (p. ex. lampes à incandescence, lampes fluorescentes, lumière du soleil) grâce à
la compensation du blanc.
Avec la touche “N” ou “F”, vous pouvez choisir entre
différents réglages : en mode de compensation automatique (réglage “AUTO”), la caméra s’adapte automatiquement à la température de couleur de la lumière ambiante, ce réglage doit être privilégié pour des
sources lumineuses changeantes (p. ex. lumière du
soleil du jour, lumière artificielle de nuit). Pour des
sources de lumière constantes, la compensation peut
être réglée soit pour une température de couleur fixe
(réglage “3100K” pour utilisation sous lumière artificielle, réglage “5100K” pour utilisation en lumière du
jour) soit être effectuée manuellement (réglage “MANUAL”). Si “MANUAL” est sélectionné, on peut régler
la partie rouge (ligne “R-ADJUST”) et la partie bleue
(ligne “B-ADJUST”) avec la touche “N” ou “F” respecti-
vement dans les paliers 0 – 20 : plus la valeur est grande, plus le ton respectif de la couleur est intense.
“EXIT” : quitter le menu écran
Pour quitter le menu écran, enfoncez la touche menu
(2).
F
B
CH
27
F
B
CH
“COLOR” : image noir – blanc/couleur
Avec la touche “N” ou “F”, vous pouvez commuter entre
une image en noir et blanc (“OFF”) et une image en
couleur (“ON”).
7.2 Sous-menu “SPECIAL”
" DZOOM
SPECIAL
::ON
::OFF
::ON
::OFF
::10
::10
::ON
::ENTER
NEGA
COLOR
MIRROR
BRIGHTNESS
SHARPNESS
OSD
PREVIOUS
“MIRROR” : affichage miroir vertical de l’image
Avec la touche “N” ou “F”, vous pouvez choisir entre
“OFF” (aucun affichage miroir de l’image), “HALF” (une
moitié de l’image est en miroir pour obtenir une image
symétrique) et “FULL” (affichage miroir de l’image entière).
Sous-menu
“DZOOM” : activation/désactivation du zoom digital
Avec la touche “N” ou “F”, la fonction zoom digital peut
être activée (“ON”) ou éteinte (“OFF”), voir chapitre 6.1
“Zoom”.
“NEGA” : activation/désactivation de la visualisation
d’image en négatif
Avec la touche “N” ou “F”, on peut commuter entre une
visualisation d’image normale, positive (“OFF”) et une
visualisation négative (“ON”) pour laquelle les rapports
de sombre et clair sont inversés ainsi que les couleurs
dans leurs couleurs complémentaires.
28
“BRIGHTNESS” : réglage de la luminosité
“SHARPNESS” : réglage de la précision
On peut régler la luminosité et la précision avec la touche “N” ou “F” par palier de 0 à 20 : plus la valeur est
grande, plus l’image est claire ou précise.
“OSD” : activation/désactivation de l’affichage du
facteur du zoom
La caméra peut être réglée de telle sorte que lorsqu’on
zoome, le facteur du zoom s’affiche (“ON”) sur l’écran
ou non (“OFF”).
“PREVIOUS” : retour au menu principal
Pour revenir au menu principal, enfoncez la touche
menu (2).
8 Caractéristiques techniques
Puce : . . . . . . . . . . . . . CCD, 6,35 mm (1/4")
Système vidéo : . . . . . . PAL, hor. 15 625 Hz,
vert. 50 Hz
Nombre de points : . . . . hor. 752 x vert. 582
Résolution : . . . . . . . . . 470 lignes
Objectif
Focale : . . . . . . . . . . 3,6 – 79,2 mm
Luminosité : . . . . . . . 1 : 1,6
Luminosité minimale : . . 0,09 lux
Rapport signal/bruit : . . > 46 dB
Sortie vidéo : . . . . . . . . 1 Vcc
Température fonc. : . . . 0 – 40 °C
Alimentation : . . . . . . . . 12 V / 500 mA
Dimensions, poids : . . . 55 x 60 x 110 mm, 260 g
F
B
CH
D’après les données du constructeur.
Tout droit de modification réservé.
Notice d'utilisation protégée par le copyright de MONACOR ® INTERNATIONAL GmbH & Co. KG. Toute reproduction
même partielle à des fins commerciales est interdite.
29
I
Vi preghiamo di aprire completamente la pagina 3. Così
vedrete sempre gli elementi di comando e i collegamenti descritti.
1 Elementi di comando e collegamenti
1 Tasti zoom per variare la distanza focale
“W”: ridurre la distanza
L’angolo di visione aumenta; l’oggetto da sorvegliare si allontana.
“T”: allungare la distanza
L’angolo di visione si riduce; l’oggetto da sorvegliare viene ravvicinato.
Se è attivo il menù sullo schermo, i tasti servono per
chiamare i punti del menù.
2 Tasto per chiamare ed abbandonare le pagine del menù
3 Tasti fuoco per la messa a fuoco manuale
“N”: per mettere a fuoco oggetti vicini
“F”: per mettere a fuoco oggetti più lontani
Se nella telecamera è attiva la messa a fuoco automatica, l’immagine non può essere messa a fuoco con
questi tasti.
Se è attivo il menù sullo schermo, i tasti servono per
modificare le impostazioni del menù.
30
4 Spia di funzionamento
5 Tasto “AF/MF” (sulla telecamera) e tasti “A/F” e “M/F”
(sul telecomando RMA-1602) per il cambio veloce
fra “messa a fuoco manuale” e “messa a fuoco automatico”,
subito dopo la pressione del tasto, sullo schermo appare brevemente l’indicazione ora attivata: “AF” o “MF”
6 Presa a 3 poli per il comando esterno delle funzioni
zoom e messa a fuoco per mezzo di un’unità di comando. Per i contatti della presa vedi cap. 5.3
7 Interruttore “TERMINATION” per aggiungere una
resistenza terminale durante il telecomando mediante
la trasmissione dati via RS-485.
Se viene comandata una telecamera mettere l’interruttore su “ON”, nel caso di più telecamere metterlo su
“ON” nell’ultima telecamera e su “OFF” nelle restanti
telecamere.
8 Contatto “REMOTE” per telecomandare la telecamera
– mediante il telecomando opzionale RMA-1602 oppure
– mediante trasmissione date via RS-485 tramite un
computer o un’unità di comando
9 Morsetti a vite “+12V” e “GND” per collegare l’alimentazione (12 V /500 mA)
(il morsetto “F.G” della morsettiera rimane libero)
10 Adattatore con filettatura [tipo macchina fotografica
6,3 mm (1/4")] per il montaggio della telecamera
11 Uscita video BNC per fare uscire il segnale video
come segnale composito
12 Uscita video Hosiden per fare uscire il segnale video
come segnale S-VHS
2 Avvertenze di sicurezza
La telecamera è conforme alla direttiva CE 89/366/CEE
sulla compatibilità elettromagnetica.
● Usare la telecamera solo all’interno di locali. In caso di
montaggio all’esterno, la telecamera deve essere sistemata in una custodia protettiva resistente alle intemperie. Proteggerla da scosse forti, dall’umidità e da temperature alte (temperatura d’impiego ammessa 0 – 40 °C).
● Per la pulizia del contenitore usare solo un panno
asciutto; non impiegare in nessun caso prodotti chimici
o acqua.
● Non toccare le lenti con le dita e per la loro pulizia usare
solo mezzi speciali per lenti ottiche.
●
Nel caso d’uso improprio, di collegamenti sbagliati, di
impiego scorretto o di riparazione non a regola d’arte
non si assume nessuna responsabilità per eventuali
danni conseguenti a persone o a cose.
●
Se si desidera eliminare la telecamera definitivamente,
consegnarla per lo smaltimento ad un’istituzione locale
per il riciclaggio.
I
3 Possibilità d’impiego
La telecamera TVCCD-1602COL è stata realizzata specialmente per l’impiego in impianti di sorveglianza CCTV.
È equipaggiata con un obiettivo zoom motorizzato che
permette un ingrandimento di 22 volte. Con lo zoom digitale (disattivabile), questo fattore può ancora essere decuplicato. Con il suo menù sullo schermo, la telecamera
offre numerose possibilità di impostazione, come p. es. la
messa a fuoco automatica o manuale, lo shutter e la compensazione del bianco, SDR (“Super Dynamic Range”)
on/off, immagine negativa o rispecchiata ecc.
Per comandare la telecamera con maggiore comodità,
è disponibile, come opzione, il telecomando RMA-1602
(fig. 2). Tutte le impostazioni zoom, fuoco e menù sono
possibili anche tramite il telecomando.
31
I
4 Montaggio
La telecamera può essere montata su uno stativo per telecamera, su una testa orientabile basculante (p. es. VPT-50
della MONACOR) o su un supporto per telecamere (p. es.
della serie TVH della MONACOR). Per il fissaggio, la telecamera presenta sul lato inferiore un adattatore (10) con
filettatura [tipo macchina fotografica 6,3 mm (1/4")]. Per il
montaggio sospeso, l’adattatore può essere avvitato
anche sul lato superiore della telecamera.
In caso di montaggio all’esterno, la telecamera deve
essere sistemata in una custodia protettiva resistente alle
intemperie.
ta video BNC bensì l’uscita “S-VIDEO” (12) dove il segnale
è presente nel formato S-VHS. Dato che il segnale S-VHS
trasmette, contrariamente al segnale composito sull’uscita
BNC, le informazioni di luminosità e di colore in modo separato, con questo collegamento la qualità dell’immagine è
migliorata.
5.2 Telecomando mediante la presa “REMOTE”
Tramite la presa a 6 poli, “REMOTE” (8), la telecamera
può essere telecomandata: a scelta per mezzo del telecomando opzionale RMA-1602 (fig. 2) oppure per mezzo
di un computer o un’unità di comando con trasmissione
seriale dei dati secondo lo standard RS-485.
5 Collegamento della telecamera
6 5
5.1 Collegamento video
Collegare la presa BNC “VIDEO” (11) con l’ingresso video
dell’apparecchio a valle (p. es. monitor, videoregistratore),
servendosi di un cavo 75 Ω (p. es. VEC-62/10 della
MONACOR). Se il cavo supera i 100 m di lunghezza, conviene inserire fra telecamera e cavo un amplificatore video
per compensare le perdite dovute al cavo.
Se l’apparecchio a valle possiede un ingresso S-Video,
per il collegamento video è opportuno non utilizzare l’usci-
32
1
2
3
➂
4
Pin RS-485
1 TxD (A)
2 RxD (B)
3
—
4
—
5
—
6
—
telecomando RMA-1602
—
—
massa
alimentazione +12 V
linea di comando 1
linea di comando 2
Contatti della presa a 6 poli “REMOTE”
Se si utilizza il telecomando RMA-1602, collegarlo per
mezzo del suo cavo di collegamento con la presa “REMOTE”. Il telecomando non necessità di batteria in quanto viene alimentato dalla telecamera.
Nel caso della trasmissione dati tramite l’interfaccia
RS-485, collegare i pin 1 [TxD (A)] e 2 [RxD (B)] con il
computer o con l’unità di comando per mezzo di un cavo
twistato. Per tale collegamento, la telecamera ha in dotazione un connettore a 6 poli. Portare l’interruttore “TERMINATION” (7) su “ON” se è collegata una sola telecamera; nel caso di più telecamere, mettere l’interruttore su
“ON” solo sull’ultima telecamera e su “OFF nella altre
telecamere. Per altre informazioni sull’interfaccia RS-485
rivolgetevi all’assistenza tecnica della MONACOR.
invece alla funzione del tasto zoom “W” (“wide
angle/grandangolo”).
Pin “F” (conduttore giallo): ingresso per la messa a fuoco
Una tensione positiva di comando corrisponde alla funzione del tasto messa a fuoco “N” (“near/vicino”), una
tensione negativa invece alla funzione del tasto messa
a fuoco “F” (“far/lontano”)
Pin “C”: massa (conduttore nero)
Nota: Per controllare le impostazioni del menù chiamando
la prima pagina del menù sullo schermo, occorre applicare
contemporaneamente sui pin “Z” e “F” una tensione negativa di comando. La pagina del menù è visibile sullo schermo finché sui due pin è presente la tensione di comando.
5.3 Comando esterno di zoom/fuoco
5.4 Alimentazione
Le impostazioni di zoom e messa a fuoco possono essere eseguite anche attraverso un’unità di comando esterna
che fornisca una tensione di comando fra 6 V e 12 V
per obiettivi con zoom motorizzato. Collegare l’unità di comando con la presa a 3 poli (6) per mezzo del cavo di collegamento a 3 conduttori in dotazione:
Pin “Z” (conduttore bianco): ingresso per il comando zoom
Una tensione positiva di comando corrisponde alla funzione del tasto zoom “T” (“tele”), una tensione negativa
Per l’alimentazione collegare un alimentatore stabilizzato
(p. es. PS-1615ST della MONACOR), con tensione d’uscita di 12 V e con potenza di 500 mA, con i due morsetti a
vite “+12V” e “GND” (9), rispettando la corretta polarità.
I
33
I
6 Funzionamento
Togliere il cappuccio dell’obiettivo e collegare la telecamera con l’alimentazione. Il LED rosso “POWER” (4) si
accende e sul monitor si legge prima l’indicazione “LENS
INITIAL”, quindi si vede l’immagine della telecamera.
Con il menù sullo schermo si possono adattare le funzioni della telecamera ai rispettivi casi applicativi; vedere
cap. 7 in merito.
6.1 Zoomare
34
La telecamera è equipaggiata con uno zoom 22x motorizzato. Se si supera l’ingrandimento di 22 volte, si entra nel
campo dello zoom digitale che permette di decuplicare
ancora il fattore zoom più alto. Lo zoom digitale può essere disattivato con il menù sullo schermo (vedi cap. 7.2,
Impostazione “DZOOM”).
Per zoomare premere il relativo tasto (1):
Tasto “W” (“wide angle”): riduce la distanza focale
L’angolo di visione aumenta ; l’oggetto da sorvegliare si
allontana.
Tasto “T” (“tele”): aumenta la distanza focale
L’angolo di visione si riduce; l’oggetto da sorvegliare si
avvicina.
Durante la pressione sul tasto, il relativo fattore zoom
viene visualizzato sullo schermo; p. es. con uno zoom 4x
si legge “ZOOM X004” (ma solo se l’impostazione “OSD”
è stata attivata nel menù sullo schermo, vedi cap. 7.2).
6.2 Messa a fuoco manuale
La messa a fuoco può essere fatta automaticamente o
manualmente. Come impostazione base è valida la
messa a fuoco automatica.
1) Per cambiare fra messa a fuoco automatica e manuale
esistono due possibilità:
attivare l’impostazione desiderata nel menù sullo
schermo (vedi cap. 7.1, punto del menù “FOCUS”)
oppure si passa – per un cambio rapido – con il
tasto “AF/MF” (5) fra le due impostazioni o si aziona
sul telecomando RMA-1602 il tasto “A/F” per la messa
a fuoco automatica (5a), o “M/F” (5b) per la messa a
fuoco manuale. Dopo la pressione del tasto, sullo
schermo si vede per 7 s la nuova impostazione della
messa a fuoco, ovvero “AF” o “MF”.
2) Se è stata attivata l’impostazione “Messa a fuoco manuale”, con i tasti fuoco (3) si mette a fuoco l’immagine:
Tasto “N” (“near”):
Per mettere a fuoco oggetti vicini
Tasto “F” (“far”):
Per mettere a fuoco oggetti lontani
7 Impostazioni sul menu dello schermo
Per chiamare il menù sullo schermo, premere il tasto
menù (2). Il menù si compone di due pagine: la pagina
principale “MENU” e la pagina del sottomenù “SPECIAL”.
Con i tasti “W” e “T” (1) si scelgono i singoli punti del
menù, mentre con i tasti “N” e “F” (3) si modificano le
impostazioni del menù.
Il menù sullo schermo sparisce automaticamente se
entro 7 s dopo l’ultima pressione di un tasto non si aziona
nessun altro tasto.
7.1 Menù principale
FOCUS
SHUTTER
AGC
SDR
W/B
EXIT
I
“SHUTTER”: shutter automatico/manuale
Lo shutter (otturatore elettronico) può essere impostato
su regolazione automatica a seconda della luminosità
(esposizione 1/50 – 1/100 000 s) oppure su un valore fisso,
p. es. se le condizioni di luce sono costanti. Sono possibili le seguenti impostazioni: “AUTO” (automatico),
1/50 s, 1/120 s, 1/250 s, 1/500 s, 1/1000 s, 1/10 000 s. Selezionare l’impostazione desiderata con i tasti “N” o “F”.
“AGC”: AGC on/off
Con i tasti “N” o “F” si può attivare (“ON”) o disattivare
(“OFF”) l’AGC (regolazione automatica del guadagno).
AGC provvede all’aumento del livello del segnale video
in caso di scarsa illuminazione. Tuttavia, con AGC attivato peggiora il rapporto segnale/rumore della telecamera.
MENU
" SPECIAL
“FOCUS”: messa a fuoco automatica/manuale
Con i tasti “N” o “F” si imposta la messa a fuoco automatica (“AUTO”) o manuale (“M.FOCUS”).
::ENTER
::AUTO
::AUTO
::ON
::OFF
::AUTO
::ENTER
Menù principale
“SPECIAL”: chiamare il sottomenù “SPECIAL”
Per chiamare il sottomenù “SPECIAL” premere il tasto
menù (2).
“SDR”: SDR (“super dynamic range”) on/off
Con i tasti “N” o “F” si può disattivare (“OFF”) o attivare (“ON”) la funzione SDR. Con tale funzione si può
ottenere un campo dinamico maggiore per rappresentare fedelmente anche le grandi differenze nel contrasto, come p. es. quando la persona da riprendere si
muove davanti a uno sfondo molto chiaro. La funzione
35
I
SDR offre dei risultato migliori rispetto alla compensazione tradizionale del controluce (BLC).
“W/B”: Impostazione della compensazione del bianco
Per ottenere una riproduzione naturale dei colori è
necessario che la telecamera venga adattata alla temperatura della sorgente di luce (p. es. lampade ad
incandescenza, al neon, luce del sole).
Con i tasti “N” o “F” si può scegliere fra diverse
impostazioni: con la compensazione automatica del
bianco (impostazione “AUTO”), la telecamera si adatta
automaticamente alla temperatura del colore della
luce. Questa impostazione è consigliabile quando le
sorgenti di luce cambiano (p. es. luce del sole di giorno, luce artificiale di notte). Se la sorgente rimane invariata, la compensazione del bianco può essere impostata con una temperatura fissa del colore ( “3100K”
per luce artificiale, “5100K” per luce diurna) oppure
può essere fatta manualmente (“MANUAL”). Con
“MANUAL”, le parti del rosso (riga “R-ADJUST”) e del
blu (riga “B-ADJUST”) possono essere regolate fra 0 e
20 con i tasti “N” e “F”: con il valore maggiore aumenta anche l’intensità del colore in questione.
36
“EXIT”: Uscire dal menù
Per abbandonare il menù sullo schermo premere il
tasto menù (2).
7.2 Sottomenù “SPECIAL”
SPECIAL
::ON
NEGA
::OFF
COLOR
::ON
MIRROR
::OFF
BRIGHTNESS
::10
SHARPNESS
::10
OSD
::ON
PREVIOUS
::ENTER
" DZOOM
Sottomenù
“DZOOM”: zoom digitale on/off
Con i tasti “N” o “F” si può attivare (“ON”) o disattivare
(“OFF”) la funzione dello zoom digitale (vedi anche
cap. 6.1 “Zoomare”).
“NEGA”: immagine negativa on/off
Con i tasti “N” o “F” si può scegliere fra una rappresentazione normale, positiva (“OFF”) e una rappresentazione negativa (“ON”) dell’immagine, dove chiaro e
scuro vengono invertiti e i colori rappresentati nei loro
colori complementari.
“COLOR”: immagine b-n/a colori
Con i tasti “N” o “F” si può cambiare fra immagine b-n
(“OFF”) e a colori (“ON”).
“MIRROR”: immagine rispecchiata verticalmente
Con i tasti “N” o “F” si può scegliere fra “OFF” (immagine non rispecchiata), “HALF” (una metà viene rispecchiata in modo da avere una immagine simmetrica) e
“FULL” (l’immagine completa viene rispecchiata).
“BRIGHTNESS”: impostazione della luminosità
“SHARPNESS”: impostazione della nitidezza
La luminosità e la nitidezza possono essere regolati fra
0 e 20 con i tasti “N” o “F”: aumentando il valore,
aumentano anche risp. la luminosità e la nitidezza dell’immagine.
“OSD”: indicazione del fattore zoom on/off
La telecamera può essere impostata in modo tale che
mentre si zooma, sullo schermo si vede il fattore di
ingrandimento (“ON”) o non (“OFF”).
“PREVIOUS”: ritorno nel menù principale
Per ritornare nel menù principale premere il tasto del
menù (2).
8 Dati tecnici
I
Sensore ottico: . . . . . . . chip CCD, 6,35 mm (1/4")
Sistema video: . . . . . . . PAL, orizz. 15 625 Hz,
vert. 50 Hz
Numero pixel: . . . . . . . . orizz. 752 x vert. 582
Risoluzione: . . . . . . . . . 470 linee
Obiettivo
Distanza focale: . . . . 3,6 – 79,2 mm
Luminosità: . . . . . . . 1 : 1,6
Illuminazione: . . . . . . . . 0,09 Lux
Rapporto S/R: . . . . . . . > 46 dB
Uscita video: . . . . . . . . 1 Vss
Temperatura d’esercizio: 0 – 40 °C
Alimentazione: . . . . . . . 12 V /500 mA
Dimensioni, peso: . . . . . 55 x 60 x 110 mm, 260 g
Dati forniti dal costruttore.
Con riserva di modifiche tecniche.
La MONACOR ® INTERNATIONAL GmbH & Co. KG si riserva ogni diritto di elaborazione in qualsiasi forma delle
presenti istruzioni per l’uso. La riproduzione – anche parziale – per propri scopi commerciali è vietata.
37
E
Por favor despliegue página 3. Entonces usted
siempre puede ver los elementos y las conexiones
descritos.
4 Testigo de funcionamiento
“W”: reducción de la distancia focal
El ángulo de visibilidad se agranda; el objeto a vigilar se aleja.
5 Tecla “AF/MF” (en la cámara)/teclas “A/F” y “M/F” (en
el mando a distancia RMA-1602) para el cambio rápido entre los reglajes “enfoque manual” y “enfoque
automático”.
Una vez la tecla pulsada, en la pantalla aparece brevemente una visualización para el enfoque elegido:
“AF” o “MF”.
“T”: alargamiento de la distancia focal
El ángulo de visibilidad se reduce, el objeto a vigilar se acerca.
6 Toma 3 polos para el control externo de las funciones
zoom y enfoque vía una unidad de control; vea capítulo 5.3 para la configuración de la toma.
Cuando el menú pantalla está seleccionado, las teclas
permiten elegir los puntos del menú.
7 Interruptor “TERMINATION” para conectar la resistencia terminal durante una transmisión de datos a distancia vía RS-485.
1 Elementos y conexiones
1 Teclas zoom para modificar la distancia focal
2 Tecla para seleccionar y salir de las páginas del menú
pantalla
3 Teclas enfoque para un enfoque manual de la imagen
“N”: para un enfoque en objetos más cercanos
“F”: para un enfoque en objetos más lejanos
Si la cámara está reglada en enfoque automático, la
imagen no puede regularse manualmente vía las
teclas de enfoque.
38
Cuando el menú pantalla está seleccionado, las teclas
sirven para modificar los reglajes del menú.
Si una sola cámara se controla, ponga el interruptor
en “ON”, si varias cámaras se controlan, ponga el
interruptor en la última cámara en “ON”, en las otras
cámaras, póngalo en “OFF”.
8 Conexión “REMOTE” para el control a distancia de la
cámara
– vía el mando RMA-1602 disponible en opción o
9
10
11
12
– por una transmisión de datos RS-485 vía un ordenador o un panel de control
Bornes con tuerca “+12V” y “GND” para conectar la
alimentación (12 V / 500 mA). El borne con tuerca
“F.G” de la regleta queda libre.
Adaptador con toma fileteada hembra [6,35 mm (1/4")]
para el montaje de la cámara
Salida video BNC para dirigir la señal video como
señal compuesta de color
Salida video Hosiden para dirigir la señal video como
señal S-Video (señal S-VHS)
●
●
●
No manipule las lentes del objetivo con los dedos y
para limpiarlas, utilice exclusivamente productos específicamente adaptados a las lentes.
Rechazamos toda responsabilidad en caso de daño
corporal o material si la cámara se utiliza en otro fin
para el cual ha sido fabricada, si no está correctamente conectada, utilizada o reparada por una persona
habilitada, por estos motivos, el aparato carecería de
todo tipo garantía.
Cuando la cámara está definitivamente sacada del servicio, debe depositarla en una fábrica de reciclaje de
proximidad para contribuir a una eliminación no contaminante.
E
2 Consejos de utilización y seguridad
La cámara cumple la normativa europea 89 / 336 / CEE
relativa a la compatibilidad electromagnética.
● La cámara está fabricada solo para una utilización en
interior. Para un montaje en exterior, debe colocarla en
una caja de protección estanca, resistente a la intemperie. Protéjela de las vibraciones intensas, de la humedad
y del calor (temperatura de funcionamiento autorizada:
0 °C a +40 °C).
● Para limpiar la caja, solo utilice un trapo seco y suave,
en ningún caso productos químicos o agua.
3 Posibilidades de utilización
La cámara color TVCCD-1602COL está especialmente
fabricada para instalaciones en centrales de vigilancia
video. Dispone de un objetivo zoom motorizado que permite efectuar un zoom de una sección de imagen hasta
22 veces. Este factor de agrandamiento puede multiplicarse por 10 vía una función zoom digital (desconectable). Vía un menú pantalla, la cámara propone diversas
posibilidades de reglaje como p. ej. enfoque automático o
enfoque manual, shutter (obturación) y compensación del
39
E
blanco, SDR (“Super Dynamic Range”) on/off, visualización en negativo o invertida (efecto espejo), etc.
Para un control agradable de la cámara, el mando
RMA-1602 (esquema 2) está disponible en opción. Todos
los reglajes del zoom, enfoque y menú son posibles vía el
mando.
4 Montaje
La cámara puede instalarse sobre un pie de cámara,
sobre un rotor inclinable (p. ej. VPT-50 de MONACOR) o
en un soporte de cámara (p. ej. soporte de la serie TVH
de MONACOR). Para la fijación, la cámara dispone en la
parte inferior un adaptador (10) con toma fileteada
[6,35 mm (1/4")]. Puede atornillarse también según elección en la parte superior de la cámara para un montaje suspendido.
Para un montaje en exterior, la cámara debe instalarse en una caja de protección estanca, resistente a la
intemperie.
5 Conexiones
5.1 Conexión video
Conecte la toma BNC “VIDEO” (11) vía un cable 75 Ω
(p. ej. VEC-62/10 de MONACOR) con la entrada video
del aparato siguiente (p. ej. monitor, video). Para una longitud de cable superior a 100 m, conviene insertar un amplificador video entre la cámara y el cable de manera a
compensar las perdidas en línea.
Si el aparato siguiente dispone de una entrada S-VHS,
debería utilizar para la conexión video la salida video
“S-VIDEO” (12) y no la salida video BNC. La señal está
disponible aquí en formato S-VHS. Porque, al contrario de
la señal video compuesta de color en la salida BNC, los
datos de color y luminosidad se transmiten separadamente en la señal S-VHS, la calidad de la imagen es
entonces mejor con este tipo de conexión.
5.2 Control a distancia vía la toma “REMOTE”
Vía la toma 6 polos “REMOTE” (8), la cámara puede controlarse a distancia: según elección vía el mando RMA1602 (esquema 2) disponible en opción o vía un ordenador o panel de control por transmisión serial de datos
según el standard RS-485.
40
6 5
1
2
3
➂
4
Pin RS-485
1 TxD (A)
2 RxD (B)
3
—
4
—
5
—
6
—
Mando RMA-1602
—
—
masa
alimentación +12 V
cable control 1
cable control 2
Configuración de la toma 6 polos “REMOTE”
Si utiliza el mando RMA-1602, conéctelo vía su cable de
conexión a la toma “REMOTE”. El mando no necesita
ninguna batería, está alimentada por la cámara.
En el caso de un control de la cámara por transmisión
de datos RS-485, conecte el pin 1 [TxD (A)] y el pin 2
[RxD (B)] vía un par de cables trenzado al ordenador/
panel de control. Para la conexión, una toma 6 polos
macho correspondiente está entregada con la cámara.
Ponga el interruptor “TERMINATION” (7) para el control
de una sola cámara en “ON”, en el caso de varias cámaras, ponga el interruptor en “ON” únicamente en la última
cámara, para las cámaras restantes, en “OFF”. Para más
informaciones en la interfaz RS-485 contacte el servicio
post venta de MONACOR.
5.3 Control externo del zoom/enfoque
E
Los reglajes del zoom y del enfoque pueden también
efectuarse vía un panel de control externo que entrega
una tensión de control entre 6 V y 12 V para los objetivos con zoom motorizado. Conecte el panel de control
vía el cable de conexión 3 conductores entregado con la
toma 3 polos (6):
Pin “Z” (conductor blanco): entrada para el control del zoom
Una tensión de control positiva corresponde a la función de la tecla zoom “T” (“tele”), una tensión de control negativa con la función de la tecla zoom “W” (“wide
angle”: gran ángulo).
Pin “F” (conductor amarillo): entrada para el control del
enfoque
Una tensión de control positiva corresponde a la función de la tecla enfoque “N” (“near”: cerca), una tensión de control negativa con la función de la tecla enfoque “F” (“far”: lejano).
Pin “C”: masa (conductor negro)
Consejo: para seleccionar la primera página del menú
pantalla de manera a verificar los reglajes del menú, aplique al pin “Z” y al pin “F” simultáneamente una tensión de
control negativa. La página del menú aparece mientras
que la tensión está presente en los dos pins.
41
E
5.4 Alimentación
Para la alimentación, una alimentación estabilizada (p. ej.
PS-1615ST de MONACOR) con una tensión de salida de
12 V y una potencia de 500 mA debe estar conectada a
los bornes “+12V” y “GND” (9). Tenga cuidado con la polaridad.
6 Funcionamiento
Saque la tapa de protección del objetivo y conecte la cámara con la alimentación. El LED rojo “POWER” (4) brilla
y en el monitor, aparece antes de todo el mensaje “LENS
INITIAL”, después la imagen de la cámara.
Vía el menú pantalla, las funciones de la cámara pueden adaptarse a todo tipo de utilización, vea capítulo 7.
6.1 Efectuar un zoom
La cámara dispone de un zoom motorizado x22. Si sigue
haciendo un zoom más allá de un agrandamiento x22,
alcanza la zona del zoom digital en la cual el factor máximo de agrandamiento del zoom motorizado puede todavía multiplicarse por 10. El zoom digital puede desconectarse vía el menú pantalla (vea capítulo 7.2, reglaje
“DZOOM”).
42
Para efectuar un zoom, active la tecla zoom (1) correspondiente:
Tecla “W” (“wide angle” = gran ángulo): reducción de la
distancia focal.
El ángulo se agranda, el objeto a vigilar se aleja.
Tecla “T” (“tele”): alargamiento de la distancia focal.
El ángulo se reduce, el objeto a vigilar se acerca.
Durante la duración de la presión de la tecla, el factor del
zoom correspondiente aparece en pantalla, por ejemplo
para un zoom x4, el mensaje “ZOOM X004” (a suponer
que el reglaje “OSD” está activado en el menú pantalla,
vea capítulo 7.2).
6.2 Reglaje manual del enfoque
El reglaje del enfoque puede efectuarse manualmente o
automáticamente. En reglaje de base, el enfoque automático está conectado.
1) Para cambiar entre enfoque automático y enfoque
manual, puede:
o activar el reglaje del enfoque correspondiente en
el menú pantalla (vea capítulo 7.1, punto “FOCUS”)
o, para un cambio rápido, conmutar con la tecla
“AF/MF” (5) entre los dos reglajes o pulsar la tecla
“A/F” para el enfoque automático (5a) o “M/F” (5b)
para el enfoque manual en el mando RMA-1602. Después de una presión en la tecla, en la pantalla aparece durante 7 segundos, una visualización del enfoque
elegido “AF” o “MF”.
2) Si el reglaje “enfoque manual” está activado, utilice las
teclas enfoque (3) para regular la precisión de la imagen:
tecla “N” (“near”: cerca ):
para efectuar un enfoque de objetos más cercanos
tecla “F” (“far”: lejano):
para efectuar un enfoque de objetos más lejanos
7 Reglajes vía el menú pantalla
Para seleccionar el menú pantalla, pulse la tecla menú
(2). El menú se compone de dos páginas: la página principal “MENU” y la página del submenú “SPECIAL”. Con
las teclas “W” y “T” (1), seleccione los diferentes puntos
del menú y con las teclas “N” y “F” (3), los reglajes del
menú se modifican.
El menú pantalla se borra automáticamente si ninguna
tecla está activada en los 7 segundos siguientes después
de la última activación de una tecla.
7.1 Menú principal
E
MENU
" SPECIAL
FOCUS
SHUTTER
AGC
SDR
W/B
EXIT
::ENTER
::AUTO
::AUTO
::ON
::OFF
::AUTO
::ENTER
Menú principal
“SPECIAL”: selección del submenú “SPECIAL”
Para seleccionar el submenú “SPECIAL”, pulse la tecla
menú (2).
“FOCUS”: enfoque automático/manual
Con la tecla “N” o “F”, regule el enfoque automático
(“AUTO”) o manual (“M.FOCUS”).
“SHUTTER”: shutter automático/manual
El shutter (obturación electrónica) puede regularse en
adaptación automática según las condiciones luminosas (rango de reglajes: 1/50 – 1/100 000 s) o en un valor
fijo, p. ej. para condiciones luminosas constantes. Los
reglajes siguientes son posibles: “AUTO” (automática),
1/50 s, 1/120 s, 1/250 s, 1/500 s, 1/1000 s, 1/10 000 s. Con la
tecla “N” o “F”, seleccione el reglaje.
43
E
“AGC”: AGC on/off
Con la tecla “N” o “F”, el reglaje automático de amplificación AGC puede activarse (“ON”) o desactivarse
(“OFF”). El AGC aumenta el nivel de la señal video en
caso de una mala luminosidad. Pero la relación señal/
ruido de la cámara se agrava si el AGC está activado.
“SDR”: SDR (“super dynamic range”) on/off
Con la tecla “N” o “F”, la función SDR puede activarse
(“ON”) o desactivarse (“OFF”). Puede con la función
SDR obtener un rango de dinámica más grande, así,
mismo en caso de diferentes contrastes importantes,
dispone de una imagen natural, por ejemplo cuando la
persona a vigilar se desplaza delante un fondo muy
claro. La función SDR ofrece mejores resultados que la
compensación habitual del contraluz (BLC).
“W/B”: reglaje de la compensación del blanco
Para obtener una visualización natural de los colores,
la cámara debe adaptarse a la temperatura de color de
la fuente luminosa utilizada (p. ej. lámparas incandescentes, lámparas fluorescentes, luz del sol) mediante la compensación del blanco.
Con la tecla “N” o “F”, puede elegir entre diferentes
reglajes: en modo de compensación del blanco automático (reglaje “AUTO”), la cámara se adapta automá-
44
ticamente a la temperatura de color de la luz de ambiente, este reglaje debería ser seleccionado para
fuentes luminosas que cambian (p. ej. la luz del sol, luz
artificial de noche). Para fuentes luminosas siempre
constantes, la compensación del blanco puede regularse o por una temperatura de color fija (reglaje
“3100K” para utilización bajo luz artificial, reglaje
“5100K” para utilización a la luz del día) o efectuarse
manualmente (reglaje “MANUAL”). Si “MANUAL” está
seleccionado, puede regular la parte roja (línea “RADJUST”) y la parte azul (línea “B-ADJUST”) con la
tecla “N” o “F” respectivamente entre 0 a 20: más el
valor es grande, más el tono respectivo del color es
intenso.
“EXIT”: salir del menú pantalla
Para salir del menú pantalla, pulse la tecla menú (2).
“MIRROR”: modo espejo vertical de la imagen
Con la tecla “N” o “F”, puede elegir entre “OFF” (ningún
modo espejo de la imagen), “HALF” (una mitad de la
imagen está en modo espejo para obtener una imagen
simétrica) y “FULL” (modo espejo de la imagen completa).
7.2 Submenú “SPECIAL”
SPECIAL
::ON
NEGA
::OFF
COLOR
::ON
MIRROR
::OFF
BRIGHTNESS
::10
SHARPNESS
::10
OSD
::ON
PREVIOUS
::ENTER
" DZOOM
Submenú
E
“BRIGHTNESS”: reglaje de la luminosidad
“SHARPNESS”: reglaje de la precisión
Puede regular la luminosidad y la precisión respectivamente con la tecla “N” o “F” de 0 a 20: más el valor es
grande, más la imagen es clara o precisa.
“DZOOM”: zoom digital on/off
Con la tecla “N” o “F”, la función zoom digital puede activarse (“ON”) o desactivarse (“OFF”), vea capítulo 6.1
“Efectuar un zoom”.
“OSD”: visualización de la función del zoom on/off
La cámara puede estar regulada de manera que cuando efectuar un zoom, el factor del zoom aparece (“ON”)
en la pantalla o no (“OFF”).
“NEGA”: imagen negativa on/off
Con la tecla “N” o “F”, puede conmutar entre una visualización de imagen normal, positiva (“OFF”) y una
visualización negativa (“ON”) para la cual las relaciones de sombra y sol están invertidas y los colores
están invertidos en sus colores complementarios.
“PREVIOUS”: retorno al menú principal
Para volver al menú principal, pulse la tecla menú (2).
“COLOR”: imagen negra – blanca/color
Con la tecla “N” o “F”, puede conmutar entre una imagen en B & N (“OFF”) y una imagen en color (“ON”).
45
E
8 Características técnicas
Sistema: . . . . . . . . . . . . chip CCD, 6,35 mm (1/4")
Sistema video: . . . . . . . PAL, hor. 15 625 Hz,
vert. 50 Hz
Cantidad de puntos: . . . hor. 752 x vert. 582
Resolución: . . . . . . . . . 470 líneas
Objetivo
Distancia focal: . . . . 3,6 – 79,2 mm
Luminosidad: . . . . . . 1 : 1,6
Luminosidad mínima: . . 0,09 lux
Relación señal/ruido: . . > 46 dB
Salida video: . . . . . . . . 1 Vcc
Temperatura func.: . . . . 0 – 40 °C
Alimentación: . . . . . . . . 12 V / 500 mA
Dimensiones, peso: . . . 55 x 60 x 110 mm, 260 g
Según datos del fabricante.
Nos reservamos el derecho de modificación.
Manual de instrucciones protegido por el copyright de MONACOR ® INTERNATIONAL GmbH & Co. KG. Toda reproducción mismo parcial con fines comerciales está prohibida.
46
Proszę otworzyć instrukcję na stronie 3, dzięki
czemu możliwe będzie obserwowanie opisywanych
elementów i połączeń.
1 Elementy Sterujące i Połączenia
1 Przycisk zoom do modyfikowania długości ogniskowej
“W”: zmniejszenie długości ogniskowej
Kąt widzenia jest szeroki, oglądany obiekt został
oddalony
“T”: rozszerzenie długości ogniskowej
Kąt widzenia jest zmniejszony; oglądany obiekt
został przybliżony
Po przywołaniu menu OSD, powyższe przyciski służą
do wybierania pozycji menu
2 Przycisk do przywołania i wychodzenia ze stron menu
OSD
3 Przyciski ogniskowej do ręcznego ogniskowania
obrazu
“N”: ogniskowanie bliskich obiektów
“F”: ogniskowanie dalekich obiektów
Jeżeli kamera nastawiona jest na autofocus, nie jest
możliwa ręczna regulacja obrazu poprzez przyciski
sterowania ogniskową
Po przywołaniu menu OSD, te przyciski są używane
do modyfikowania opcji menu
PL
4 Wskaźnik zasilania
5 Przycisk “AF/MF” (w obudowie kamery) lub przyciski
“A/F” i “M/F” (na zdalnym sterowniku RMA-1602) do
szybkiego przełączania pomiędzy ustawieniami
“manual focus” i “autofocus”
po przyciśnięciu przycisku, przez moment na ekranie
wyświetli się aktualnie wybrany tryb sterowania
ogniskową: “AF” lub “MF”
6 3 biegunowe gniazdo do podłączenia zewnętrznego
sterowania zoomem i ogniskową poprzez jednostkę
sterującą; informacje o konfiguracji gniazda znajdują
się w rozdziale 5.3
7 Przełącznik “TERMINATION” służy do podłączania
rezystora krańcowego podczas sterownia sygnałem
RS-485 poprzez jednostkę sterującą
Przy sterowaniu pojedynczą kamerą należy ustawić
przycisk na “ON”, przy sterowaniu kilkoma kamerami
przycisk w ostatniej kamerze należy przełączyć w
pozycję “ON”, a w pozostałych kamerach w pozycję
“OFF”
47
PL
48
8 Gniazdo “REMOTE” do podłączania zdalnego sterowania kamery
– przez opcjonalne zdalne sterowanie RMA-1602 lub
– przez sterowanie sygnałem RS-485 poprzez komputer lub panel kontrolny
9 Terminal “+12V” i “GND” do podłączenia zasilania
(12 V / 500 mA)
(Końcówka terminala oznaczona jako “F.G” jest
odłączona)
10 Moduł z gwintowanym gniazdem [średnica 6,3 mm
(1/4")] do mocowania kamery
11 Gniazdo video BNC z wyjściem sygnału kompozytowego
12 Gniazdo z wyjściem sygnału S-video (S-VHS)
●
2 Noty bezpieczeństwa
3 Zastosowanie
Kamera spełnia wytyczne kompatybilności elektromagnetycznej zgodnie z normą 89/336/EEC.
● Urządzenie przeznaczone jest do użytku tylko wewnątrz pomieszczeń. Należy chronić je przed wilgocią i
temperaturą (dopuszczalna temperatura otoczenia
0 – 40 °C).
Kamera TVCCD-1602COL jest przeznaczona głównie
użytku w systemach monitorowania CCTV. Została
wyposażona w mechaniczny system zoomu, co pozwala
na 22 krotne przybliżenie monitorowanego obrazu.
Współczynnik przybliżenia może być jeszcze 10 krotnie
zwiększony dzięki cyfrowej funkcji zoomu (możliwość
●
●
●
Do czyszczenia obudowy używać tylko suchej, miękkiej
ściereczki, nie stosować środków czyszczących i wody.
Nigdy nie dotykać soczewki palcami, do czyszczenia
soczewki używać specjalnych detergentów do szkieł
optycznych.
Dostawca oraz producent nie ponoszą odpowiedzialności za wynikłe ewentualne szkody materialne lub
uszczerbki na zdrowiu, jeśli urządzenie było używane
niezgodnie z przeznaczeniem, zostało niepoprawnie
zainstalowane lub obsługiwane oraz było poddawane
naprawom przez nieautoryzowany personel.
Jeśli urządzenie nie będzie już nigdy więcej używane,
wskazane jest przekazanie go do miejsca utylizacji
odpadów, aby zostało utylizowane bez szkody dla
środowiska.
wyłączenia). Dzięki menu OSD, kamera oferuje wiele dodatkowych możliwości, np. autofocus lub manual focus,
migawkę i balans bieli, SDR (super dynamic range)
on/off, funkcję negatwu i lustrzanego odbicia.
W celu udogodnienia obsługi kamery można
posłużyć się, dostępnym w opcji panelem sterowania
RMA-1602 (rys. 2). Wszystkie ustawienia dotyczące
zoomu, ogniskowej i sterowania menu są dostępne.
4 Instalacja urządzenia
Kamera może być zainstalowana na statywie, na ruchomej głowicy (np. MONACOR VPT-50) albo na specjalnym uchwycie do kamer (np. uchwyty serii MONACOR
TVH). Dolna część kamery wyposażona jest w moduł z
gwintowanym otworem (10) [6,3 mm (1/4") gwint], który
może posłużyć do zamontowania kamery. Jeżeli kamera
ma być powieszona, moduł ten może być przykręcony
do górnej części jej obudowy.
W celu użytkowania zewnętrznego kamera musi być
zamontowana w wodoodpornej obudowie chroniącej
przeciw czynnikami atmosferycznymi.
5 Podłączanie kamery
PL
5.1 Podłączanie wyjścia video
Gniazdo BNC (11) należy za pomocą kabla 75 Ω (np.
kabel MONACOR VEC-62 / 10) podłączyć do wejścia
video takich urządzeń, jak monitor, magnetowid etc.
Jeżeli długość kabla przekracza 100 m należy pomiędzy
kamerą, a odbiornikiem zainstalować wzmacniacz, aby
wyeliminować straty sygnału.
Jeżeli urządzenie odbiorcze jest wyposażone w
wejście S-video, zamiast wyjścia BNC kamery należy do
podłączenia zastosować wyjście S-VIDEO (12). Na
wyjściu tym podawany jest sygnał w formacie S-video
(S-VHS). Ponieważ przeciwnie do sygnału kompozytowego na wyjściu BNC, sygnał S-video transmituje oddzielnie informacje dotyczące koloru i jaskrawości, jakość
obrazu ulegnie znacznej poprawie.
5.2 Zdalne sterowanie poprzez gniazdo “REMOTE”
6cio biegunowe gniazdo “REMOTE” (8), powala na zdalne sterowanie kamera: za pomocą sterownika RMA1602 (rys. 2) lub alternatywnie za pomocą komputera lub
panelu sterowniczego zgodnie ze standardem transmisji
danych RS-485.
49
PL
6 5
1
2
3
➂
4
Pin RS-485
1 TxD (A)
2 RxD (B)
3
—
4
—
5
—
6
—
Zdalny sterownik RMA-1602
—
—
Uziemienie
5.3 Zdalne sterowanie zoomem i ogniskową
Zasilanie +12 V
Sterowanie zoomem i ogniskową może odbywać się za
pomocą zdalnego sterowania przesyłającego sygnał
pomiędzy 6 V , a 12 V do mechanizmu sterowania
zoomem. Sterowanie podłącza się do 3 biegunowego
gniazda kamery (6):
biegun “Z” (biały przewód): wejście sterowania zoomem
Sygnał dodatni odpowiada funkcji zoom przycisku “T”
(wąski kąt), a sygnał ujemny funkcji przycisku “W”
(szeroki kąt).
biegun “F” (żółty przewód):wejście kontroli ogniskowej
Sygnał dodatni odpowiada funkcji przycisku “N” (blisko), sygnał ujemny natomiast odpowiada funkcji przycisku “F” (daleko).
biegun “C”: uziemienie (czarny przewód)
Uwaga: W celu przywołania pierwszego ekranu menu
OSD, aby sprawdzić ustawienia menu, równocześnie
należy podłączyć ujemny sygnał do biegunów “Z” i “F”.
Strona pierwsza menu będzie wyświetlać się dopóki
ujemny sygnał jest przyłożony do obu biegunów.
Żyła sygnałowa 1
Żyła sygnałowa 2
Konfiguracja biegunów gniazda “REMOTE”
Aby korzystać ze zdalnego sterownika RMA-1602
należy podłączyć go gniazda “REMOTE” za pomocą
przewodu. Sterownik nie potrzebuje baterii, zasilanie
odbywa się poprzez gniazdo kamery.
Aby korzystać ze sterowania za pomocą sygnału
RS-485, należy podłączyć biegun pierwszy [TxD (A)] i
biegun drugi [RxD (B)] za pomocą przewodów jednej
skrętki do komputera lub panelu sterowniczego. W celu
podłączenia tą metodą kamera została wyposażona
w odpowiadającą 6cio biegunową wtyczkę. Jeżeli
obsługiwana jest tylko jedna kamera należy przełącznik
“TERMINATION” (7) ustawić w pozycję “ON”. Jeżeli
liczba obsługiwanych kamer jest większa należy przełącznik “TERMINATION” (7) ostatniej kamery przełączyć
w pozycję “ON”, a przełączniki pozostałych kamer
50
w pozycję “OFF”. Więcej informacji odnośnie standardu
transmisji danych RS-485 można uzyskać kontaktując
się z doradcami technicznymi firmy MONACOR.
5.4 Zasilanie
Do zasilania urządzenia należy użyć zasilacza (np. zasilacz MONACOR PS-1615ST) o napięciu wyjściowym
12 V i mocy 500 mA. Zasilacz należy podłączyć do końcówek terminala (9) oznaczonych symbolami “+12V” i
“GND”. Należy zwrócić szczególną uwagę na prawidłową
polaryzację.
6 Działanie
Usunąć osłonę obiektywu i podłączyć zasilanie. Wskaźnik zasilania (4) zapali się. Na ekranie początkowo pojawi się napis “LENS INITIAL”, a następnie obraz z kamery.
Za pomocą menu OSD ustawić opcje kamery zgodnie
z rozdziałem 7.
6.1 Zoom
Kamera jest wypusaźona w mechanizm pozwalający na
uzyskanie 22-krotnego zbliżenia optycznego. Jeżeli
zbliżenie jest kontynuowane uruchamiany jest zoom
cyfrowy do momentu 10-krotnego zbliżenia uzyskanego
do tej pory obrazu. Funkcja zoom cyfrowy może być
wyłączana za pomocą menu OSD (rozdział 7.2, ustawianie “DZOOM”).
W celu użycia funkcji zoom należy użyć odpowiednich
przycisków (1):
przycisk “W” (szeroki kąt): redukcja długości ogniskowej
Kąt widzenia jest szerszy; monitorowany obiekt jest
oddalany.
przycisk “T” (wąski kąt): zwiększenie długości ogniskowej
Kąt widzenia jest redukowany; monitorowany obiekt
jest przybliżany.
Podczas przyciśnięcia przycisku odpowiadająca wielokrotność zoomu jest wyświetlana na ekranie, np.: “ZOOM
X004” oznacza czterokrotne zbliżenie (w przypadku,
kiedy funkcja “OSD” została aktywowana w ustawieniach, patrz rozdział 7.2).
PL
6.2 Ręczne ustawianie ogniskowej
Ustawienia ogniskowej mogą być wykonywane automatycznie bądź ręcznie. Funkcja autofocus jest włączona
domyślnie.
1) Przełączanie pomiędzy funkcjami autofocus i manual
focus następuje poprzez
włączenie odpowiedniego ustawienia w menu
OSD (patrz rozdział 7.1, funkcja menu “FOCUS”)
lub – w celu szybkiego przełączenia – naciśnięcie
przycisku “AF/MF” (5), lub przyciśnięcia przycisku
51
PL
“A / F” aby włączyć funkcję autofocus (5 a), albo
“M/F” (5b) aby włączyć funkcję manual focus na
zdalnym sterowniku RMA-1602. Po przyciśnięciu
przycisku, na ekranie pojawi się przez 7 sekund
wybrana aktualnie funkcja (“AF” lub “MF”).
2) Jeżeli włączona jest funkcja manual focus, ostrość obrazu ustawia się za pomocą przycisków ogniskowej (3):
przycisk “N” (blisko):
ustawianie ostrości obiektów położonych blisko
przycisk “F” (daleko):
ustawienie ostrości obiektów położonych daleko
7 Ustawianie funkcji poprzez menu OSD
W celu przywołania menu OSD, należy przycisnąć przycisk menu (2). Menu składa się z dwóch stron: strony
głównej “MENU” i podstrony “SPECIAL”. Przyciski “W” i
“T” (1) służą do wyboru poszczególnych funkcji menu, a
przyciski “N” i “F” (3) do ich modyfikowania.
Okno menu OSD wyłącza się automatycznie, jeżeli
żaden przycisk nie zostanie przyciśnięty w ciągu 7 sekund.
52
7.1 Menu główne
MENU
" SPECIAL
FOCUS
SHUTTER
AGC
SDR
W/B
EXIT
::ENTER
::AUTO
::AUTO
::ON
::OFF
::AUTO
::ENTER
Menu główne
“SPECIAL”: wywoływanie podstrony menu “SPECIAL”
W celu wywołania podstrony “SPECIAL”, należy przycisnąć przycisk menu (2).
“FOCUS”: autofocus / manual focus
Należy przycisnąć przycisk “N” lub “F”, aby włączyć
autofocus (“AUTO”) lub manual focus (“M.FOCUS”).
“SHUTTER”: automatyczna / ręczna migawka
Elektroniczna migawka może być ustawiona w trybie
automatycznej regulacji czasu w zależności od warunków oświetleniowych (zakres automatycznej regulacji
wynosi 1/50 – 1/100 000 s) lub ustawiona na stałe, np.:
w przypadku stałego oświetlenia. Następujące usta-
wienia mogą być włączane: “AUTO” (automatyczna
migawka), 1/50 s, 1/120 s, 1/250 s, 1/500 s 1/1000 s, 1/10 000 s.
Należy użyć przycisków “N” lub “F” w celu wyboru
odpowiedniego ustawienia.
“AGC”: AGC on / off
Należy użyć przycisków “N” lub “F” w celu włączenia
(“ON”) lub wyłączenia (“OFF”) funkcji automatycznej
regulacji wzmocnienia sygnału (AGC). W przypadku
słabego oświetlenia, AGC zwiększa poziom sygnału
video. Kiedy funkcja AGC jest włączona, współczynnik
sygnał/szum kamery zwiększa się.
“SDR”: SDR (super dynamiczny zakres) on/off
Należy użyć przycisków “N” lub “F” w celu włączenia
(“ON”) lub wyłączenia (“OFF”) funkcji SDR. Pozwala
ona na uzyskanie większej dynamiki zakresu, w ten
sposób, że nawet w przypadku występowania dużych
kontrastów obraz wyświetlany jest prawidłowo np.:
osoba poruszająca się na bardzo jasnym tle. Funkcja
SDR jest bardziej efektywna niż standardowa funkcja
kompensaty jasności tła (BLC).
“W/B”: ustawienia balansu bieli
W celu odpowiedniego odwzorowania kolorów, kamera musi być dopasowana do temperatury źródła
światła, w jakim pracuje (np.: lamp halogenowych,
świetlówek, oświetlenia słonecznego) w kwestii ustawienia balansu bieli.
Należy użyć przycisków “N” i “F”, aby wybrać
odpowiednie ustawienie: Jeżeli włączona jest funkcja
automatyczna (“AUTO”), kamera samoczynnie dopasuje się do temperatury aktualnego źródła oświetlenia; to ustawienie powinno być włączone w przypadku zmieniającego się rodzaju oświetlenia (np.: słońce
w czasie dnia, sztuczne światło w nocy). Jeżeli źródło
światła nie zmienia się wartość balansu bieli może
być ustawiona na stałe (“3100K” dla oświetlenia
sztucznego, “5100K” dla oświetlenia dziennego).
W przypadku włączenia trybu ręcznego “MANUAL”,
natężenie czerwieni (“R-ADJUST”) i natężenie błękitu
(“B-ADJUST”) mogą być regulowane za pomocą
przycisków “N” lub “F” w zakresie od 0 do 20: Im
wyższa wartość tym większy poziom nasycenia odpowiedniego koloru.
PL
“EXIT”: wychodzenie z menu OSD
Aby wyjść z menu OSD, należy wcisnąć przycisk (2).
53
PL
“MIRROR”: lustrzane odbicie w pionie
Należy użyć przycisków “N” lub “F” w celu włączenia
trybu normalnego obrazu “OFF”, obrazu odbitego w
połowie “HALF” (połowa obrazu jest odbita w pionie w
związku z czym uzyskany obraz jest symetryczny), lub
trybu “FULL” (cały obraz jest pionowym lustrzanym
odbiciem).
7.2 Podmenu “SPECIAL”
" DZOOM
SPECIAL
::ON
::OFF
::ON
::OFF
::10
::10
::ON
::ENTER
NEGA
COLOR
MIRROR
BRIGHTNESS
SHARPNESS
OSD
PREVIOUS
Podmenu
“DZOOM”: Cyfrowy zoom on / off
Należy użyć przycisków “N” lub “F” w celu aktywacji
(“ON”) lub dezaktywacji (“OFF”) funkcji cyfrowego
zoomu (patrz rozdział 6.1 “Zoom”).
“NEGA”: Negatyw on / off
Należy użyć przycisków “N” lub “F” w celu włączenia
funkcji normalnego obrazu (“OFF”) lub obrazu w
negatywie (“ON”). Podczas działania funkcji negatywu, jasność i ciemność są zamienione, a kolory są
zastąpione ich kolorami dopełniającymi.
“COLOR”: Obraz kolorowy / czarno biały
Należy użyć przycisków “N” lub “F” w celu włączenia
funkcji czarno białego obrazu (“OFF”) lub obrazu
kolorowego (“ON”).
54
“BRIGHTNESS”: Ustawienie jaskrawości
“SHARPNESS”: Ustawienie ostrości
Jasność i ostrość mogą być ustawione w zakresach
od 0 do 20 za pomocą przycisków “N” lub “F”: Im
wyższa jest wybrana wartość, tym jaśniejszy i ostrzejszy jest obraz.
“OSD”: Wyświetlanie wielokrotności zbliżenia on/off
Podczas zbliżania i oddalania, można tak ustawić
funkcję kamery, aby na ekranie wyświetlana była
obecna wartość wielokrotności zbliżenia (“ON”) lub
nie (“OFF”).
“PREVIOUS”: Powrót do menu głównego
Aby powrócić do menu głównego, należy wcisnąć
przycisk menu (2).
8 Dane techniczne
PL
Przetwornik obrazu: . . . CCD chip, 6,35 mm (1/4")
System video: . . . . . . . PAL, poziom 15 625 Hz,
pion 50 Hz
Ilość pikseli: . . . . . . . . . poziom 752 x pion 582
Rozdzielczość: . . . . . . . 470 lines
Obiektyw
Długość ogniskowej: 3,6 – 79,2 mm
Przysłona: . . . . . . . . 1 : 1,6
Minimalne oświetlenie: 0,09 lux
Współczynnik S/N: . . . > 46 dB
Wyjście video: . . . . . . . 1 Vpp
Temperatura
otoczenia pracy: . . . . . . 0 – 40 °C
Zasilanie: . . . . . . . . . . . 12 V /500 mA
Wymiary, waga: . . . . . . 55 x 60 x 110 mm, 260 g
Zgodnie ze specyfikacją producenta.
Może ulec zmianie.
Instrukcje obsługi są chronione prawem Copyright for MONACOR ® INTERNATIONAL GmbH & Co. KG.
Przetwarzanie całości lub części dla osobistych finansowych korzyści jest zabronione.
55
®
Copyright © by MONACOR INTERNATIONAL GmbH & Co. KG, Bremen, Germany. All rights reserved.
A-0108.99.01.07.2003