1
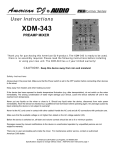
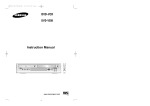
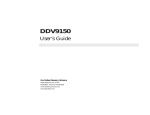
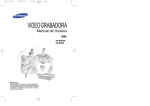
00090A DVD-V85K/XTC-Eng1
9/17/02 11:31 AM
Page 1
DVD-V85K
Instruction Manual
00090A DVD-V85K/XTC-Eng1
9/17/02 11:31 AM
Page 2
Important Safety Instructions
WARNING:
Copy Notification
TO PREVENT DAMAGE WHICH MAY RESULT IN
FIRE OR ELECTRIC SHOCK HAZARD, DO NOT
EXPOSE THIS APPLIANCE TO RAIN OR
MOISTURE.
Federal law provides severe civil and criminal
penalties for the unauthorized reproduction,
distribution, or exhibition of copyrighted motion
pictures and videotapes. (Title 17, United States
Code, Sections 501 and 506).
WARNING:
TO AVOID HAZARDOUS EXPOSURE TO
INVISIBLE LASER RADIATION, DO NOT OPEN
OR REMOVE/DEFEAT LASER TRANSPORT
PROTECTIVE HOUSING.
Macrovision Notification
Your authority to operate this FCC certified
equipment could be voided if you make changes or
modifications not expressly approved by the
manufacturer, who is responsible for compliance
with Part 15 FCC rules.
This product incorporates copyright protection
technology that is protected by method claims of
certain U.S. patents and other intellectual property
rights owned by Macrovision Corporation and other
rights owners. Use of this copyright protection
technology must be authorized by Macrovision
Corporation, and is intended for home and other
limited viewing uses only unless otherwise
authorized by Macrovision Corporation. Reverse
engineering or disassembly is prohibited.
NOTE TO CATV SYSTEM INSTALLER:
CAUTION:
This reminder is provided to call the CATV system
installer’s attention to Article 820-40 of the
National Electronic Code that provides guidelines
for proper grounding and, in particular, specifies
that the cable ground shall be connected to the
grounding system of the building, as close to the
point of cable entry as practical.
To prevent fire, shock hazard, or annoying
interference, use only the recommended
accessories. To prevent electric shock, do not use
this (polarized) plug with an extension cord,
receptacle, or other outlet unless the blades can be
fully inserted to prevent blade exposure. To reduce
the risk of electric shock, do not remove the unit
cover or back. There are no serviceable parts
inside. Refer servicing to qualified personnel only.
USER/INSTALLER CAUTION:
1.
Read these instructions.
2.
Keep these instructions.
3.
Heed all warnings.
4.
Follow all instructions.
5.
Do not use this apparatus near water.
6.
Clean only with dry cloth.
7.
Do not block any ventilation openings. Install in accordance with the manufacturer’s instructions.
8.
Do not install near any heat sources such as radiators, heat registers, or other apparatus (including amplifiers) that
produce heat.
9.
Do not defeat the safety purpose of the polarized or grounding-type plug. A polarized plug has two blades with
one wider than the other. A grounding type plug has two blades and a third grounding prong. The wide blade or
the third prong are provided for your safety. If the provided plug does not fit into your outlet, consult an
electrician for replacement of the obsolete outlet.
10.
Protect the power cord from being from being walked on or pinched particularly at plugs, convenience
receptacles, and the point where they exit from the apparatus.
11.
Only use attachments/accessories specified by the manufacturer.
12.
Use only with cart, stand, tripod, bracket, or table specified by the manufacturer, or sold with the apparatus.
When a used, caution when moving the cart/apparatus combination to avoid injury from tip-over.
13.
Unplug this apparatus. When a cart is used, use caution when moving the cart/apparatus combination to avoid
injury from tip-over.
14.
Refer all servicing to qualified service personnel. Servicing is required when the apparatus has been damaged in
any way, such as power-supply cord or plug is damaged, liquid has been spilled or objects have fallen into the
apparatus, the apparatus has been exposed to rain or moisture, does not operate normally, or been dropped.
CUIDADO:
CAUTION
This symbol is intended to alert
the user to the presence of
uninsulated dangerous voltage
within the product’s enclosure
that may be of sufficient
magnitude to constitute risk of
fire or electric shock.
This symbol is intended to alert
the user to the presence of
important operating and
maintenance instructions in the
literature accompanying this
product.
2
Para prevenir incendio, riesgo de choque, o
interferencia enfadosa, use solamente los
accesorios recomendados. Para prevenir
electrochoque, no use este enchufe (polarizado)
con un cordón de extensión, toma de corriente, o
cualquier otra toma a menos que los dientes
puedan ser completamente insertados para prevenir
exposición de los dientes. Para reducir el riesgo de
descarga eléctrica, no remueva la cubierta o la
parte posterior del equipo. Dentro del equipo no
hay partes que requieren servicio. Diríjase
solamente a personal calificado cuando requiera
servicio.
ATTENTION:
Pour éviter les incendis, risque de chocs, ou
interférences fâcheuses, employer seulement les
accessoires recommandés. Pour éviter les chocs
électriques, ne pas employer cette prise (polarisée)
avec une rallonge, une prise de courant ou une
autre sortie de courant à moins que les lames
peuvent être insérées à fond pour l’exposition des
lames. Pour réduire les risques de chocs
électriques, ne pas retirer le couvercle ou l'arrière
du module. Il n'y a pas de pièce utilisable à
l'intérieur. Ne faire effectuer l'entretien que par un
personnel qualifié.
3
00090A DVD-V85K/XTC-Eng1
9/17/02 11:31 AM
Page 4
Table of Contents
Table of Contents
◆ 7 - DVD Operations
◆ Safety
■
■
Important Safety Instructions. . . . . . . . . . . . . . . . . . . . . . . . . . . . . . . . . . . . . . .
3
■
■
◆ Welcome
■
■
■
Feature Summary . . . . . . . . . . . . . . . . . . . . . . . . . . . . . . . . . . . . . . . . . . . . . . .
Unpacking . . . . . . . . . . . . . . . . . . . . . . . . . . . . . . . . . . . . . . . . . . . . . . . . . . . . .
Disc Type and Characteristics. . . . . . . . . . . . . . . . . . . . . . . . . . . . . . . . . . . . . .
■
6
6
7
■
■
■
■
Front Panel Overview. . . . . . . . . . . . . . . . . . . . . . . . . . . . . . . . . . . . . . . . . . . . .
Rear Panel. . . . . . . . . . . . . . . . . . . . . . . . . . . . . . . . . . . . . . . . . . . . . . . . . . . . .
Front Panel Display . . . . . . . . . . . . . . . . . . . . . . . . . . . . . . . . . . . . . . . . . . . . . .
Remote Control Overview . . . . . . . . . . . . . . . . . . . . . . . . . . . . . . . . . . . . . . . . .
Insert Remote Control Batteries. . . . . . . . . . . . . . . . . . . . . . . . . . . . . . . . . . . . .
■
■
■
◆ 1 - System Overview
■
■
■
■
8
8
9
10
10
■
■
■
■
■
■
◆ 2 - Getting Started
■
Basic Connections. . . . . . . . . . . . . . . . . . . . . . . . . . . . . . . . . . . . . . . . . . . . . . .
◆ 3 - Basic Operation
■
■
■
Deck Control Buttons. . . . . . . . . . . . . . . . . . . . . . . . . . . . . . . . . . . . . . . . . . . . .
Basic DVD Playback . . . . . . . . . . . . . . . . . . . . . . . . . . . . . . . . . . . . . . . . . . . . .
Basic VHS Playback . . . . . . . . . . . . . . . . . . . . . . . . . . . . . . . . . . . . . . . . . . . . .
Basic TV Tuner Operations . . . . . . . . . . . . . . . . . . . . . . . . . . . . . . . . . . . . . . . .
■
■
12
12
13
14
■
■
■
■
■
■
■
■
On-Screen Menu Navigation . . . . . . . . . . . . . . . . . . . . . . . . . . . . . . . . . . . . . . .
Menu Language. . . . . . . . . . . . . . . . . . . . . . . . . . . . . . . . . . . . . . . . . . . . . . . . .
Manual Clock Set. . . . . . . . . . . . . . . . . . . . . . . . . . . . . . . . . . . . . . . . . . . . . . . .
Tuner Band Setting . . . . . . . . . . . . . . . . . . . . . . . . . . . . . . . . . . . . . . . . . . . . . .
Auto Channel Memory. . . . . . . . . . . . . . . . . . . . . . . . . . . . . . . . . . . . . . . . . . . .
Channel Add/Delete. . . . . . . . . . . . . . . . . . . . . . . . . . . . . . . . . . . . . . . . . . . . . .
RF Output Channel . . . . . . . . . . . . . . . . . . . . . . . . . . . . . . . . . . . . . . . . . . . . . .
Front Panel Dimmer. . . . . . . . . . . . . . . . . . . . . . . . . . . . . . . . . . . . . . . . . . . . . .
Auto Power Off. . . . . . . . . . . . . . . . . . . . . . . . . . . . . . . . . . . . . . . . . . . . . . . . . .
■
■
■
■
■
■
■
■
■
Disc Menu Language. . . . . . . . . . . . . . . . . . . . . . . . . . . . . . . . . . . . . . . . . . . . .
Audio Language. . . . . . . . . . . . . . . . . . . . . . . . . . . . . . . . . . . . . . . . . . . . . . . . .
Subtitle Language . . . . . . . . . . . . . . . . . . . . . . . . . . . . . . . . . . . . . . . . . . . . . . .
Parental . . . . . . . . . . . . . . . . . . . . . . . . . . . . . . . . . . . . . . . . . . . . . . . . . . . . . . .
Digital Output. . . . . . . . . . . . . . . . . . . . . . . . . . . . . . . . . . . . . . . . . . . . . . . . . . .
DTS . . . . . . . . . . . . . . . . . . . . . . . . . . . . . . . . . . . . . . . . . . . . . . . . . . . . . . . . . .
Dynamic Compression. . . . . . . . . . . . . . . . . . . . . . . . . . . . . . . . . . . . . . . . . . . .
TV Aspect Ratio. . . . . . . . . . . . . . . . . . . . . . . . . . . . . . . . . . . . . . . . . . . . . . . . .
Black Level. . . . . . . . . . . . . . . . . . . . . . . . . . . . . . . . . . . . . . . . . . . . . . . . . . . . .
Alt Video Out . . . . . . . . . . . . . . . . . . . . . . . . . . . . . . . . . . . . . . . . . . . . . . . . . . .
■
14
15
16
17
18
19
20
20
21
■
■
■
■
■
■
A/V Receiver Connections. . . . . . . . . . . . . . . . . . . . . . . . . . . . . . . . . . . . . . . . .
30
■
■
■
■
■
■
■
How to Set a Timer Recording. . . . . . . . . . . . . . . . . . . . . . . . . . . . . . . . . . . . . .
48
Using the KARAOKE Function. . . . . . . . . . . . . . . . . . . . . . . . . . . . . . . . . . . . . .
SCORE Function . . . . . . . . . . . . . . . . . . . . . . . . . . . . . . . . . . . . . . . . . . . . . . . .
KARAOKE SEARCH Function. . . . . . . . . . . . . . . . . . . . . . . . . . . . . . . . . . . . . .
49
49
49
Beginning Karaoke Functions . . . . . . . . . . . . . . . . . . . . . . . . . . . . . . . . . . . . . .
Key Control . . . . . . . . . . . . . . . . . . . . . . . . . . . . . . . . . . . . . . . . . . . . . . . . . . . .
Reserving a Song. . . . . . . . . . . . . . . . . . . . . . . . . . . . . . . . . . . . . . . . . . . . . . . .
Cancellation of reservation. . . . . . . . . . . . . . . . . . . . . . . . . . . . . . . . . . . . . . . . .
Vocal Fader . . . . . . . . . . . . . . . . . . . . . . . . . . . . . . . . . . . . . . . . . . . . . . . . . . . .
Guide Melody. . . . . . . . . . . . . . . . . . . . . . . . . . . . . . . . . . . . . . . . . . . . . . . . . . .
Score Function. . . . . . . . . . . . . . . . . . . . . . . . . . . . . . . . . . . . . . . . . . . . . . . . . .
Types of Karaoke disc . . . . . . . . . . . . . . . . . . . . . . . . . . . . . . . . . . . . . . . . . . . .
50
50
51
51
52
52
52
52
◆ Appendix A - Advanced Connections
■
■
S-Video/Component Video Connections (for DVD). . . . . . . . . . . . . . . . . . . . . .
Stereo Connections . . . . . . . . . . . . . . . . . . . . . . . . . . . . . . . . . . . . . . . . . . . . . .
Monitor TV Connections. . . . . . . . . . . . . . . . . . . . . . . . . . . . . . . . . . . . . . . . . . .
Connecting Other Video Equipment. . . . . . . . . . . . . . . . . . . . . . . . . . . . . . . . . .
53
54
55
56
◆ Appendix B - Help
■
4
45
46
47
47
◆ 12 - KARAOKE Functons (DVD)
■
■
Basic Recording. . . . . . . . . . . . . . . . . . . . . . . . . . . . . . . . . . . . . . . . . . . . . . . . .
Special Recording Features. . . . . . . . . . . . . . . . . . . . . . . . . . . . . . . . . . . . . . . .
One-Touch Recording (OTR). . . . . . . . . . . . . . . . . . . . . . . . . . . . . . . . . . . . . . .
Record Speed . . . . . . . . . . . . . . . . . . . . . . . . . . . . . . . . . . . . . . . . . . . . . . . . . .
◆ 11 - KARAOKE Functons (VCR)
■
◆ 6 - DVD Sound Setup
42
42
43
43
44
◆ 10 - Timer Recording
■
22
22
23
24
25
26
27
28
29
29
Special VCR Playback Features . . . . . . . . . . . . . . . . . . . . . . . . . . . . . . . . . . . .
Tracking. . . . . . . . . . . . . . . . . . . . . . . . . . . . . . . . . . . . . . . . . . . . . . . . . . . . . . .
Auto Play . . . . . . . . . . . . . . . . . . . . . . . . . . . . . . . . . . . . . . . . . . . . . . . . . . . . . .
S-VHS Playback . . . . . . . . . . . . . . . . . . . . . . . . . . . . . . . . . . . . . . . . . . . . . . . .
Variable Search System. . . . . . . . . . . . . . . . . . . . . . . . . . . . . . . . . . . . . . . . . . .
◆ 9 - VCR Recording
■
◆ 5 - DVD Setup
■
■
■
◆ 4 - System Setup
■
31
32
32
33
34
34
35
35
36
37
37
38
39
40
40
41
◆ 8 - VCR Playback
11
■
■
Special Playback Features. . . . . . . . . . . . . . . . . . . . . . . . . . . . . . . . . . . . . . . . .
Disc Menu Navigation . . . . . . . . . . . . . . . . . . . . . . . . . . . . . . . . . . . . . . . . . . . .
Screen Fit Playback. . . . . . . . . . . . . . . . . . . . . . . . . . . . . . . . . . . . . . . . . . . . . .
Title/Chapter/Time Selection . . . . . . . . . . . . . . . . . . . . . . . . . . . . . . . . . . . . . . .
Zoom . . . . . . . . . . . . . . . . . . . . . . . . . . . . . . . . . . . . . . . . . . . . . . . . . . . . . . . . .
Angle . . . . . . . . . . . . . . . . . . . . . . . . . . . . . . . . . . . . . . . . . . . . . . . . . . . . . . . . .
Subtitle. . . . . . . . . . . . . . . . . . . . . . . . . . . . . . . . . . . . . . . . . . . . . . . . . . . . . . . .
Digest Playback. . . . . . . . . . . . . . . . . . . . . . . . . . . . . . . . . . . . . . . . . . . . . . . . .
A-B Repeat. . . . . . . . . . . . . . . . . . . . . . . . . . . . . . . . . . . . . . . . . . . . . . . . . . . . .
Repeat Chapter/Title . . . . . . . . . . . . . . . . . . . . . . . . . . . . . . . . . . . . . . . . . . . . .
Audio . . . . . . . . . . . . . . . . . . . . . . . . . . . . . . . . . . . . . . . . . . . . . . . . . . . . . . . . .
Bookmarks. . . . . . . . . . . . . . . . . . . . . . . . . . . . . . . . . . . . . . . . . . . . . . . . . . . . .
Programmed Playback. . . . . . . . . . . . . . . . . . . . . . . . . . . . . . . . . . . . . . . . . . . .
Random Playback . . . . . . . . . . . . . . . . . . . . . . . . . . . . . . . . . . . . . . . . . . . . . . .
MP3 Playback . . . . . . . . . . . . . . . . . . . . . . . . . . . . . . . . . . . . . . . . . . . . . . . . . .
3D Sound. . . . . . . . . . . . . . . . . . . . . . . . . . . . . . . . . . . . . . . . . . . . . . . . . . . . . .
Technical Specifications. . . . . . . . . . . . . . . . . . . . . . . . . . . . . . . . . . . . . . . . . . .
57
5
00090A DVD-V85K/XTC-Eng1
9/17/02 11:31 AM
Page 6
Feature Summary
Disc Type and Characteristics
System Features
• Complete versatility to play DVD, VCDs, audio CDs, MP3 discs or VHS Tapes.
• Watch a DVD while recording a TV show to the VCR.
• Remote controls both DVD and VCR decks.
• Composite, S-Video and Component video outputs for high connectivity and optimum performance.
• RF inputs and outputs for connection to all TVs–new or old.
• English/French/Spanish on-screen programming.
This DVD player is capable of playing the following types of discs with the corresponding logos:
Disc Types
(Logos)
Recording
Types
Disc Size
Max.
Playing Time
5"
Single-sided
240 min.
Double-sided
480 min.
DVD Features
•
•
•
•
•
10-bit video digital to analog converter and 27MHz advanced digital filter.
Playback of 96KHz/24-bit sources.
DTS digital output for DTS-enhanced DVDs.
Playback MP3 files from CD-ROM.
Continued audio during 2x speed playback.
DVD
Audio
+
Video
31/2"
VCR Features
•
•
•
•
•
•
Hi-Fi Stereo VCR.
4 heads for superior slow motion and stop action.
Playback of S-VHS tapes at better than standard resolution.
VISS Index Search/Scan, Zero Return, Blank Search.
8-event/1 month timer recording.
Time remaining counter, real time counter.
VIDEO-CD
5"
*Ability to play back may depend on recording
conditions.
• DVD-R
• CD-RW
• DVD+RW, -RW
Unpacking
AUDIO-CD
•
•
•
•
•
•
DVD-VCR
User’s Guide
RCA cable for Audio/Video connection
RF (Radio Frequency) Antenna Cable
Remote Control
1.5V “AA” Batteries - 2EA
6
Single-sided
80 min.
Double-sided
160 min.
74 min.
3 1/2"
20 min.
5"
74 min.
31/2"
20 min.
Audio
• CD is recorded as a Digital
Signal with better audio
quality, less distortion and
less deterioration of audio
quality over time.
Disc Markings
~
As you unpack, please check that the following items are included in your DVD-VCR packing case:
• DVD contains excellent sound
and video due to Dolby Digital
and MPEG-2 system.
• Various screen and audio
functions can be easily selected
through the on-screen menu.
• Video with CD sound, VHS
quality & MPEG-1 compression
technology.
Audio
+
Video
Note
*Discs which cannot be played with this player.
• DVD-ROM
• DVD-RAM
• CD-ROM
• CDV
• CDI
• HD layer of super Audio CD
• CDGs play audio only, not graphics.
Characteristics
• Play
Region
Number
NTSC
• NTSC broadcast
system in U.S.A,
Canada, Korea,
Japan, etc.
• Dolby
Digital disc
STEREO
DIGITAL
SOUND
• Stereo disc
• Digital
Audio disc
• DTS disc
• MP3 disc
Play Region Number
Both the DVD player and the discs are coded by region. These regional codes must
match in order for the disc to play. If the codes do not match, the disc will not play.
The Region Number for this player is described on the rear panel of the player.
7
00090A DVD-V85K/XTC-Eng1
9/17/02 11:31 AM
Page 8
Front Panel Overview
1
Front Panel Display
2
3
4
5
1
6
1
2
3
4
5
6
7
8
9
10
7 8
9 10 11
12
11
12
13
14
15
DVD DECK
DVD OPEN/CLOSE
VCR DECK
DVD-VCR SELECT
EJECT
POWER
REWIND/REV
PLAY/PAUSE
FAST-FORWARD/FWD
STOP
13
14
15
RECORD
VOLUME /
ECHO /
CHANNEL /
MIC
2
1
2
3
4
5
4
5
6
7 8 9
15 16 17
1 The DVD Deck is selected
10
11
18
11
12
13
14
15
The VCR Deck is selected
The status of the DVD deck is graphically displayed
3D Sound is active
The DVD has multiple angles to choose from
MP3
16 The number to the right of the “T” symbol is the
current title number
17 The number to the right of the “C” symbol is the
current chapter number
18 VHS tape is inserted and the VCR Deck is active
8 The Hi-Fi track of a VHS tape is playing
9 A Timer Recording is programmed or in progress.
If blinking there is an error.
10 Tape Speed
3
4
RF ANTENNA INPUT
RF OUT TO TV
LINE OUT TO TV (COMPOSITE)
LINE IN 1
AUDIO LINE OUT TO TV
(S-VIDEO OR COMPONENT)
8
12 13 14
3
2 A DVD, CD, VCD or SVCD is loaded
3 A disc with LPCM (Linear Pulse Code
Modulation) audio is loaded
4 A DVD with a Dolby Digital is loaded
5 A DVD with a DTS soundtrack is loaded
6 The time, counter position, time remaining or
current deck status is displayed
7 The current TV show or video is broadcast in
Stereo
Rear Panel
1
2
5
6
7
8
9
6
7
8
9
COMPONENT VIDEO OUT
DIGITAL AUDIO OUT(COAXIAL)
DIGITAL AUDIO OUT(OPTICAL)
S-VIDEO OUT
9
00090A DVD-V85K/XTC-Eng1
9/17/02 11:31 AM
Page 10
Remote Control Overview
1
20
2
3
4
5
6
7
8
21
22
23
24
25
26
9
27
10
28
11
12
13
14
15
29
30
31
16
32
33
17
34
18
35
19
36
Basic Connections
1
2
3
4
5
6
7
8
9
10
11
12
13
14
15
16
17
18
19
20
21
22
23
24
25
26
27
28
29
30
31
32
33
34
35
36
POWER
AUTO TRACKING/TRACKING +/AUDIO
SHUTTLE <</>>
MODE, REPEAT
KARAOKE SEARCH
ZOOM
3D SOUND/100+
DVD, VCR
KARAOKE
VOLUME /
REWIND, SKIP BACK
STOP
RECORD
UP
LEFT
SETUP/ENTER
RETURN
TITLE, SPEED
OPEN/CLOSE
0-9
TV/VCR
DISPLAY
ANGLE
CLEAR
SCREEN FIT
INPUT SEL.
DIGEST, F.ADV/STEP
CH /
FAST-FORWARD
SKIP NEXT
DISC MENU
PLAY/PAUSE
RIGHT
DOWN
MARK, SEARCH
SUBTITLE, TIMER
In this section, you will connect the DVD-VCR to your television.
NOTES:
• Advanced Connections are covered in Appendix A.
• Even if you plan to use the S-Video or Component Video Outputs,
you MUST connect the DVD-VCR to your television with
either the standard RF or the Line Out connection. This
enables you to operate the DVD-VCR setup menus.
1
Connect Antenna/Cable to DVD-VCR
1
From Antenna or Cable
Connect the RF antenna cable from your indoor/outdoor antenna or
cable wall outlet to the IN (FROM ANT.) jack on the back panel of
the DVD-VCR.
2
Connect DVD-VCR to TV
Choose one of the following methods to connect the DVD-VCR to
your TV:
RF Connection
Connect the supplied RF antenna cable from the OUT (TO TV) jack
on the back panel of the DVD-VCR to your television’s Antenna
Input.
NOTE : Check the channel to connect DVD-VCR to your
television’s Antenna Input; See page 20.
Line Connection
Connect an RCA-type audio/video cable (red, white, yellow) from
the LINE OUTjacks on the back panel of the DVD–VCR to your
television’s Line In jacks. Use red for right audio, white for left
audio, and yellow for video.
NOTE: It is recommended that you use the Line Connection if your
TV is equipped with RCA jacks.
3
2
To TV’s Antenna Input
Plug In DVD-VCR
Connect the DVD-VCR power cord to wall outlet. Don’t press any
buttons on the DVD-VCR or remote during auto setup. “AUTO”
blinks while the DVD-VCR runs an auto setup procedure, where it
will automatically search for all active channels.
4
Turn On DVD-VCR
Press the POWER button on the remote control or on the
DVD–VCR’s front panel.
5
4
4
Turn On TV
Press the POWER button on your TV.
6
Set TV to Channel 3, 4 or Line
Be sure to use the same channel you selected in Step 2. If you
used the Line Connection, set your TV to its Line Input.
Insert Remote Control Batteries
• Remove the battery cover by pushing down on the thumb tab and
sliding the cover.
• Insert two 1.5V “AA” batteries as shown, paying attention to the correct
polarities (+/–).
• When finished, slide the cover until it clicks back into place.
10
2
11
00090A DVD-V85K/XTC-Eng2
9/17/02 11:31 AM
Page 12
Deck Control Buttons
The DVD-VCR uses one set of controls to operate both decks. The
following buttons are helpful in successfully controlling each deck.
1
POWER Button
Basic VHS Playback
To play a videotape, simply insert it in the VHS deck and press the
Play button. Tapes without Record Safety Tabs can be set to play
automatically when inserted; see page 43.
Press the POWERbutton on the remote control or front panel to
turn on the DVD-VCR.
1
2
1
DVD Button
Press the DVD button on the remote control or front panel when
you want to control the DVD deck.
• The DVD indicator will light on the Front Panel Display to show
that the DVD deck is selected.
3
2
4
3
4
2
3
Stop Playback
Press the ■ (Stop) button on the remote control or front panel.
4
Eject Tape
1
Press the OPEN/CLOSE button on the remote control or the
EJECT button on the front panel.
INPUT SEL. Button
Press the INPUT SEL.button repeatedly to cycle through all of
your input sources, including the Tuner (Ch##), Line 1 (rear AV
input).
• It is only available when VCR deck is selected.
Play Tape
Press the ll (Play/Pause) button on the remote control or front
panel. If the tape is missing the Record Safety Tab and Auto Play
is turned on, the tape will begin to play automatically, see page 43.
VCR Button
Press the VCR button on the remote control or front panel when
you want to control the VCR deck.
• The VCR indicator will light on the Front Panel Display to show
that the VHS deck is selected.
Insert VHS Tape
Insert a standard VHS videotape into the VHS Deck.
• Power will turn on automatically when you insert a videotape.
5
Additional VCR Options
• For special VCR Playback features, see pages 42~43.
• For VCR Recording features, see pages 45~47.
• For Timer Recording features, see page 48.
Basic DVD Playback
3
2
Follow these instructions to playback a DVD.
1
Open Disc Drawer
Press the OPEN/CLOSE button on the remote control or front
panel to automatically power on the DVD-VCR and open the disc
drawer.
1
2
1
Insert Disc
4
Place the disc in the drawer with the label side of the disc facing
up. If the disc has two sides, orient the disc with the desired label
facing up.
3
Close Disc Drawer
Press the OPEN/CLOSE button on the remote control or front
panel to close the disc drawer.
4
Play the DVD
Press the ll (Play/Pause) button on the remote control or front
panel.
• Many discs will begin playback automatically when the disc
drawer closes.
• If the DVD has a disc menu, or more than one title, the disc
menu may appear.
4
5
Additional DVD Options
• For advanced DVD Setup options, see pages 22~29.
• For special DVD Playback features, see pages 31~41.
12
13
00090A DVD-V85K/XTC-Eng2
9/17/02 11:31 AM
Page 14
Basic TV Tuner Operations
The following buttons are used when watching television via the
DVD-VCR’s built-in TV tuner.
1
3
2
Channel Up/Down
Press to change to the next or previous channel.
3
Follow these steps to change the on-screen menu language to
English, French or Spanish.
TV/VCR
Press to switch between your TV’s tuner and the VCR’s internal
tuner.
1
Menu Language
1
With the DVD in stop mode, press the SETUP button.
1
2
100+ Button
Press to select channels 100 and higher. First, press the 100+
button, then press the remaining digits using the 0-9 buttons.
5
5
Set “Language”
Using the Up/Down and Left/Right buttons, move the selection
arrow to “Language/Idioma/Langue,” then press ENTERbutton.
0-9 Buttons
Press to select channels directly.
4
Open “SETUP MENU”
3
Set menu Language
Move the selection bar to your desired Language, then press
ENTER button.
MAIN MENU
Display
Press to display the channel you are watching.
• Also works in DVD and VCR mode.
4
2
Language/Idioma/Langue
RETURN
ENTER
2
LANGUAGE/IDIOMA/LANGUE
English
Español
Français
On-Screen Menu Navigation
RETURN
MAIN MENU
The on-screen menu system allows you to set all functions for your
DVD-VCR. The following buttons are used to open and navigate
through the on-screen menu system.
1
English Setup Menu
SETUP Button
MENU PRINCIPAL
With the DVD in stop mode, press to access the DVD-VCR onscreen menu system.
DVD Setup
RETURN
ENTER
The Setup Menu is the opening
screen of the on-screen menu
system
2
Up/Down and Left/Right
Moves menu selection cursor up, down, left and right to cycle
through menu options
3
ENTERButton
Press to confirm settings in certain menus.
4
2
2
ENTER
Language/Idioma/Langue
RETURN
ENTER
French/Spanish Setup Menu
RETURNButton
Returns to the last menu viewed or exits the menu system.
2
1,3
4
2
14
15
00090A DVD-V85K/XTC-Eng2
9/17/02 11:31 AM
Page 16
Manual Clock Set
Tuner Band Setting
It is important to set the clock for accurate Timer
Recording.
1
Open “SETUP MENU”
With the DVDin stop mode, press the SETUP button.
2
3
•
•
•
•
•
Set Hour – Set the hour using the up and down buttons.
Set Minute – Set the minute using the up and down buttons.
Set Month – Set the month using the up and down buttons.
Set Day – Set the day using the up and down buttons.
Set Year – Set the year using the up and down buttons.
Open “SETUP MENU”
With the DVD in stop mode, press the SETUP button.
2
1
Select “Channel”
Using the up/down and left/right buttons, move the selection cursor
to “Channel Setup”, then press ENTER to select.
Set the Clock
Press LEFT/RIGHTto select each of the following options, then
press UP/DOWNto set each option:
MAIN MENU
1
Select “Clock”
Using the up/down and left/right buttons, move the selection cursor
to “Clock Set/Adjust,” then press ENTERto select.
1
This feature allows you to manually set the DVD-VCR’s tuner band
to Antenna or Cable, whichever you connected to the Antenna In
jack during initial setup.
3
Select “Ant/Cable”
Move the selection arrow to “Ant/Cable” then press right to select
from the following options:
MAIN MENU
• Antenna - Indicates that the DVD-VCR is connected to an indoor
or outdoor VHF/UHF antenna.
• Cable TV - Indicates that the DVD-VCR is connected to Cable TV.
Channel Setup
Clock Set/Adjust
4
RETURN
ENTER
Confirm Settings
RETURN
ENTER
Press the RETURN button to save your clock settings and return to
the Setup menu.
• Press Return again to exit.
CHANNEL SETUP
CLOCK SET/ADJUST
TIME
12:00AM
DATE
1/01
YEAR
2002 TUE
Ant/Cable:
[Cable TV]
Auto channel memory
Channel add/delete
RETURN
RETURN
CHANNEL SETUP
Ant/Cable:
[Antenna]
Auto channel memory
Channel add/delete
RETURN
16
17
00090A DVD-V85K/XTC-Eng2
9/17/02 11:31 AM
Page 18
Auto Channel Memory
Auto Channel Memory will automatically seek and store all active
channels in your area.
1
Open “SETUP MENU”
With the DVD in stop mode, press the SETUP button.
2
1,3
Select “Channel”
Using the up/down and left/right buttons, move the selection cursor
to “Channel Setup”, then press ENTERto select.
3
Use this feature if Auto Channel Search missed a channel that you
would like to add, or added a channel you wish to remove.
1
• The DVD-VCR will automatically search for all available
channels in the selected Tuner Band. This procedure may take
a few minutes to complete.
• When finished, the lowest channel found will be displayed.
2
ENTER
3
Select “Channel add/delete”
Move the selection bar to “Channel add/delete,” then press ENTER
to select.
4
Select Channel to add/delete
Use the CH / buttons to tune in the channel number you wish
to add or remove.
5
MAIN MENU
Select “CHANNEL ADD/DELETE”
Channel Setup
RETURN
Press right to add or press left to remove the channel from
your channel list.
• Repeat steps 4 and 5 to add or remove additional channels.
CHANNEL SETUP
Ant/Cable:
[CABLE TV]
Auto channel memory
Channel add/delete
RETURN
1,3
Select “Channel”
Using the up/down and left/right buttons, move the selection cursor
to “Channel Setup”, then press ENTERto select.
Channel Setup
RETURN
Open “SETUP MENU”
With the DVD in stop mode, press the SETUP button.
Run “Auto channel memory”
Move the selection arrow to “Auto channel memory,” then press
ENTER to select.
MAIN MENU
Channel Add/Delete
ENTER
ENTER
CHANNEL SETUP
Ant/Cable:
[CABLE TV]
Auto channel memory
Channel add/delete
RETURN
ENTER
CHANNEL ADD/DELETE
Memorizing
CH 07
Select channel :
[ 01]
. . . . . please wait . . . . .
and press [ ] to
p r e s s [ ] to
RETURN
18
ADD
DELETE
CH
19
00090A DVD-V85K/XTC-Eng2
9/17/02 11:31 AM
Page 20
RF Output Channel
1
MAIN MENU
Auto Power Off
Open “SETUP MENU”
1
2
Select “Option”
MAIN MENU
2
RETURN
ENTER
3
Select “RF Output Channel”
Move the selection bar to “RF Output Channel”, then press right
to change.
OPTION SETUP
RF Output Channel
Panel Display
Auto Power Off
4
Change “RF Output Channel”
Press Return to change. A message will appear on your TV.
Then press ENTER to change.
3CH
Auto
Off
5
3
Select “Auto Power Off”
Move the selection bar to “Option Setup”, then press right to
select from following options:
• Off – Auto power off is disabled.
• 1Hr – DVD-VCR will auto shut off 1 hour after the last button is
pressed.
• 2Hr – DVD-VCR will auto shut off 2 hours after the last button is
pressed.
Option Setup
RETURN
ENTER
OPTION SETUP
RF Output Channel
Panel Display
Auto Power Off
Change “TV Channel”
A message will appear on your TV. When the message disappears,
change your TV to channel 3 or 4 to match the RF output channel
of the player.
RETURN
Select “Option”
Using the up/down and left/right buttons, move the selection cursor
to “Option Setup,” then press ENTERto select.
Using the up/down and left/right buttons, move the selection cursor
to “Option Setup,” then press ENTER to select.
Option Setup
Open “SETUP MENU”
With the DVD in stop mode, press the SETUP button.
With the DVD in stop mode, press the SETUP button.
RETURN
Front Panel Dimmer
You can set the Front Panel Display to be bright all the time, dim
all the time, dim during power off.
MAIN MENU
1
Open “SETUP MENU”
2
Select “Option”
With the DVD in stop mode, press the SETUP button.
Option Setup
RETURN
Using the up/down and left/right buttons, move the selection cursor
to “Option Setup,” then press ENTER to select.
ENTER
3
Move the selection bar to “Panel Display,” then press right to select
from the following options:
OPTION SETUP
RF Output Channel
Panel Display
Auto Power Off
3CH
Auto
Off
Set “Panel Display”
Auto
Bright
Dim
• Auto – Front Panel Display will dim automatically during
power off.
• Bright – Front Panel Display will be bright all the time.
• Dim – Front Panel Display will be dim all the time.
RETURN
20
21
3CH
Auto
Off
Off
1Hr
2Hr
00090A DVD-V85K/XTC-Eng2
9/17/02 11:31 AM
Page 22
Disc Menu Language
MAIN MENU
Follow these steps to choose your preferred language for DVD disc
menus. The DVD-VCR will automatically default to the language
you choose if it is available on a given DVD.
Subtitle Language
Follow these steps to choose your preferred language for DVD
subtitles. The DVD-VCR will automatically default to the language
you choose if it is available on a given DVD.
MAIN MENU
DVD Setup
RETURN
1
ENTER
1
2
Select “DVD”
2
3
Select “Disc Menu”
Select “DVD”
Using the up/down and left/right buttons, move the selection cursor
to “DVD Setup,” then press ENTERto select.
Using the up/down and left/right buttons, move the selection cursor
to “DVD Setup,” then press ENTERto select.
English
English
Automatic
Unlocked
Open “SETUP MENU”
With the DVD in stop mode, press the SETUP button.
With the DVD in stop mode, press the SETUP button.
DVD SETUP
Disc Menu
Audio
Subtitle
Parental
Audio Options
Display Options
Open “SETUP MENU”
3
Move the selection bar to “Disc Menu,” then press ENTER to select.
DVD Setup
RETURN
ENTER
Select “Subtitle”
Move the selection bar to “Subtitle,” then press ENTER to select.
DVD SETUP
RETURN
4
ENTER
Set “Disc Menu Language” Preference
Move the selection bar to your preferred language for DVD disc
menus, then press ENTERto select.
4
Set “Subtitle Language” Preference
Move the selection bar to your preferred language for DVD
subtitles, then press ENTERto select.
Disc Menu
Audio
Subtitle
Parental
Audio Options
Display Options
English
English
Automatic
Unlocked
DISC MENU LANGUAGE
English
Français
Deutsch
Español
Italiano
Nederlands
Others
RETURN
ENTER
SUBTITLE LANGUAGE
RETURN
ENTER
Automatic
English
Français
Deutsch
Español
Italiano
Nederlands
Others
Audio Language
RETURN
DVD SETUP
Disc Menu
Audio
Subtitle
Parental
Audio Options
Display Options
RETURN
English
English
Automatic
Unlocked
ENTER
Follow these steps to choose your preferred language for DVD
audio soundtracks. The DVD-VCR will automatically default to the
language you choose if it is available on a given DVD.
1
Open “SETUP MENU”
With the DVD in stop mode, press the SETUP button.
ENTER
2
Select “DVD”
Using the up/down and left/right buttons, move the selection cursor
to “DVD Setup,” then press ENTERto select.
AUDIO LANGUAGE
English
Francais
Deutsch
Español
Italiano
Nederlands
Original
Others
RETURN
3
Select “Audio”
Move the selection bar to “Audio,” then press ENTERto select.
4
Set “Audio Language” Preference
Move the selection bar to your preferred language for DVD audio
soundtracks, then press ENTER to select.
ENTER
22
23
00090A DVD-V85K/XTC-Eng2
9/17/02 11:31 AM
Page 24
Parental
MAIN MENU
DVD Setup
RETURN
ENTER
Digital Output
Rating Control is a password protected system that allows you to
block playback of DVDs based on their content. The system uses an
eight level rating system.
• If you try to play a DVD that exceeds the selected rating, an error
message will appear.
• Not all discs are rated.
1
If your A/V receiver is equipped with a Dolby Digital decoder, your
DVD-VCR can output Dolby Digital 5.1 sound, but you MUST
enable this feature in the menu system to prevent damage to your
speakers.
NOTE:
Open “SETUP MENU”
With the DVD in stop mode, press the SETUP button.
DVD SETUP
Disc Menu
Audio
Subtitle
Parental
Audio Options
Display Options
English
English
Automatic
Unlocked
2
Select “DVD”
Using the up/down and left/right buttons, move the selection cursor
to “DVD Setup,” then press ENTERto select.
3
Select “Parental”
Move the selection bar to “Parental,” then press ENTERto select.
RETURN
ENTER
4
• No - Indicates that no password is required to view any DVD
disc or to change Rating Control options. No additional Rating
Control settings are necessary.
• Yes – Indicates that a password is required to view some DVD
discs and to view Rating Control options. The menu will change
as shown.
NOTES:
• The first time “Require Password” is set to “Yes,” you will be
prompted to enter a new password.
• If the “Enter Password” screen appears, then “Require
Password” has already been set to “Yes.” Please skip to Step 5.
PARENTAL CONTROL
Use Password
No
RETURN
ENTER
PASSWORD CHECK
5
1
ENTER
Open “SETUP MENU”
With the DVD in stop mode, press the SETUP button.
2
Select “DVD”
Using the up/down and left/right buttons, move the selection cursor
to “DVD Setup,” then press ENTER to select.
3
Select “Audio Options”
Move the selection bar to “Audio Options,” then press ENTERto
select.
4
DVD SETUP
Disc Menu
Audio
Subtitle
Parental
Audio Options
Display Options
Set “Digital Output”
Move the selection bar to “Digital Output” then press the right
button to select from the following options:
ENTER
AUDIO OPTIONS
Digital Output
DTS
Dynamic Compression
• PCM - To use your DVD/TV with an A/V receiver NOT equipped
with a Dolby Digital decoder.
• Bitstream – To use your DVD/TV with an A/V receiver equipped
with a Dolby Digital decoder.
RETURN
Enter Password
PRESS 0-9
6
Select “Rating Level”
Move the selection bar to “Rating Level,” then press ENTER to
select.
PARENTAL CONTROL
7
Use Password
Rating Level
Change Password
RETURN
Yes
1
ENTER
RATING LEVEL
Level 8 Adult
Level 7
Level 6
Level 5
Level 4
Level 3
Level 2
Level 1 Kids Safe
RETURN
Change Rating Level
Use the up/down to select one of the following ratings:
• Level 8 Adult
• Level 4
• Level 7
• Level 3
• Level 6
• Level 2
• Level 5
• Level 1 Kids Safe
All ratings above the level you select will also be blocked, e.g., if
you block Level 6, then Levels 7 and 8 will also be blocked.
Press ENTERto confirm your selection.
• If you forgot your password, press power on from a cold start
with no disc in the unit. Press the REW and F.F buttons
simultaneously on the front panel for 5 seconds. The “reset ok”
message will appear. Press the power button.
ENTER
24
English
English
Automatic
Unlocked
RETURN
Enter a 4-digit password using the 0–9 buttons on the remote
control.
• Write your password down, and keep it in a safe place in case
you need it to change your settings later.
Enter Password
____
RETURN
DVD Setup
RETURN
Select “Use Password”
Move the selection arrow to “Use Password,” then press the right
button to select from the following options:
Select “Bitstream” ONLY if you have connected a Dolby
Digital-equipped A/V receiver to the Digital Output
(optical or coaxial) on the DVD-VCR back panel.
MAIN MENU
25
PCM
off
on
PCM
Bitstream
00090A DVD-V85K/XTC-Eng2
9/17/02 11:31 AM
Page 26
Dynamic Compression
DTS
If your A/V receiver is equipped with a DTS decoder, your DVDVCR can output DTS digital sound, but you MUST enable this
feature in the menu system.
MAIN MENU
NOTE: Select “On” ONLY if you have connected a DTS-equipped
A/V receiver to the DIGITAL AUDIO OUT (optical or coaxial) on
the DVD-VCR back panel.
DVD Setup
RETURN
1
ENTER
Open “SETUP MENU”
Dynamic Compression constrains the dynamic range, i.e. the
difference between the quietest and loudest passages of a DVD
soundtrack. This enables you to limit loud noises, such as
explosions, or raise the volume of quiet passages, such as
whispering, while watching a movie. This is convenient for viewing
movies late at night.
1
2
DVD SETUP
Disc Menu
Audio
Subtitle
Parental
Audio Options
Display Options
RETURN
English
English
Automatic
Unlocked
3
3
Set “DTS”
Move the selection bar to “DTS,” then press right to select from the
following options:
Off
On
• off - To use your DVD/TV with an A/V receiver NOT equipped
with a DTS decoder.
• on – To use your DVD/TV with an A/V receiver equipped with a
DTS decoder.
Select “Audio Options”
Move the selection bar to “Audio Options,” then press ENTERto
select.
4
AUDIO OPTIONS
RETURN
Select “Audio Options”
DVD Setup
RETURN
ENTER
Select “DVD”
Using the up/down and left/right buttons, move the selection cursor
to “DVD Setup,” then press ENTERto select.
Move the selection bar to “Audio Options,” then press ENTERto
select.
4
PCM
off
on
2
Using the up/down and left/right buttons, move the selection cursor
to “DVD Setup,” then press ENTERto select.
ENTER
Digital Output
DTS
Dynamic Compression
Select “DVD”
Open “SETUP MENU”
With the DVD in stop mode, press the SETUP button.
With the DVD in stop mode, press the SETUP button.
MAIN MENU
Set “Dynamic Compression”
DVD SETUP
Disc Menu
Audio
Subtitle
Parental
Audio Options
Display Options
RETURN
ENTER
Move the selection bar to “Dynamic Compression,” then press
right to select from the following options:
• On - The total dynamic range of the DVD soundtrack will be
compressed, so quiet passages will be louder and loud
passages will be softer.
• Off – The original dynamic range will be preserved.
AUDIO OPTIONS
Digital Output
DTS
Dynamic Compression
RETURN
26
English
English
Automatic
Unlocked
27
PCM
off
on
On
Off
00090A DVD-V85K/XTC-Eng2
9/17/02 11:31 AM
Page 28
TV Aspect Ratio
Black Level
Set the aspect ratio (length x width) of your TV screen so the DVD
player will display movies at the appropriate size for your
television. Choose from standard, letterbox, or widescreen format.
MAIN MENU
1
Open “SETUP MENU”
With the DVD in stop mode, press the SETUP button.
2
DVD Setup
RETURN
ENTER
3
DVD SETUP
Disc Menu
Audio
Subtitle
Parental
Audio Options
Display Options
RETURN
English
English
Automatic
Unlocked
ENTER
DISPLAY OPTIONS
TV Aspect
Black Level
Alt Video Out
Wide
Low
Component
RETURN
ENTER
Select “DVD”
The Black Level feature adjusts the reference level of black in the
video signal to one of two choices:
• Low - Standard NTSC black level. Yields consistent contrast
through all sources.
• High - Enhanced black level, for increased contrast during DVD
playback.
1
Using the up/down and left/right buttons, move the selection cursor
to “DVD Setup,” then press ENTERto select.
2
Set “Display Options”
3
Set “TV Aspect”
ENTER
Select “DVD”
Using the up/down and left/right buttons, move the selection cursor
to “DVD Setup,” then press ENTERto select.
Set “Display Options”
Move the selection bar to “Display Options”, then press ENTERto
select.
DVD SETUP
Disc Menu
Audio
Subtitle
Parental
Audio Options
Display Options
English
English
Automatic
Unlocked
RETURN
4
ENTER
Set “Black Level”
Move the selection bar to “Black Level,” then press right to select
from the following options:
Move the selection arrow to “TV Aspect”, then press ENTERto
select from the following options:
• 4:3 Letterbox – This method displays the full width of the
widescreen movie on a standard 4:3 television. As a result,
black bars will appear at the top and bottom of the screen.
• 4:3 Pan-Scan – The familiar way of watching DVD and VHS
movies, this method selectively crops (by panning and scanning
to keep the most important part of the picture visible) wide
screen movies to fit a standard 4:3 television screen.
• 16:9 Widescreen – This method allows you to view the full 16:9
picture on a widescreen television.
DVD Setup
RETURN
With the DVD in stop mode, press the SETUP button.
Move the selection bar to “Display Options”, then press ENTERto
select.
4
Open “SETUP MENU”
MAIN MENU
• Low - Standard NTSC reference Black Level for consistent
brightness/contrast across all sources.
• High – Enhanced Black Level for increased brightness/contrast
when viewing DVDs.
DISPLAY OPTIONS
TV Aspect
Black Level
Alt Video Out
Wide
Low
Component
Low
High
RETURN
Alt Video Out
If you connected your DVD-VCR to your television using the
S-VIDEO OUT or COMPONENT VIDEO OUT jacks, you MUST set
the “Alt (alternative) Video Out” selection in the on-screen menu
system.
MAIN MENU
TV ASPECT
4:3 Letter Box
• The S-Video or Component Video connection is only for the
DVD player. The tuner and VCR will still be viewed through the
RF or line outputs.
4:3 Pan-Scan
16:9 Wide
RETURN
ENTER
1
DVD Setup
RETURN
ENTER
Open “SETUP MENU”
With the DVD in stop mode, press the SETUP button.
2
3
Using the up/down and left/right buttons, move the selection cursor
to “DVD Setup,” then press ENTERto select.
Set “Display Options”
RETURN
Select “DVD”
Move the selection bar to “Display Options”, then press ENTERto
select.
4
Select “Alt Video Out”
Move the selection bar to “Alt Video Out,” then press right to
select from the following options:
• S-Video – Indicates that you are using the S-VIDEO OUTjack on
the rear panel to connect to your TV.
• Component – Indicates that you are using the COMPONENT
VIDEO OUTjacks on the rear panel to connect to your TV.
28
DVD SETUP
Disc Menu
Audio
Subtitle
Parental
Audio Options
Display Options
English
English
Automatic
Unlocked
ENTER
DISPLAY OPTIONS
TV Aspect
Black Level
Alt Video Out
Wide
Low
Component
RETURN
29
S-Video
Component
00090A DVD-V85K/XTC-Eng2
9/17/02 11:31 AM
Page 30
A/V Receiver Connections
To take full advantage of the movie theater experience that DVD
offers, you may want to connect your DVD-VCR to a complete
Surround Sound system, including an A/V Receiver and six
Surround Sound speakers.
Before You Begin...
OR
To Digital Audio Input of an A/V
Receiver with a Dolby Digital
Decoder
Special Playback Features
During DVD/CD playback you can select from the following
special playback options. To resume normal playback, press the
(Play/Pause) button.
1
2
1
Frame Advance (Step)
While in Still mode, press the F.ADV/STEP button on the remote
control to advance one frame at a time.
Digital Audio Out
Connect EITHER an optical cable OR a digital coaxial cable from
the DIGITAL AUDIO OUTjacks on the back panel of the DVD-VCR
to their corresponding Digital Audio Input jacks on your A/V
Receiver:
• Optical
• Coaxial
• Use whichever connection is available on your A/V Receiver.
ll (Play/Pause) button on the remote control during
• The picture will pause and the audio will mute.
• To resume playback, press the ll (Play/Pause) button.
• If the player is left in Pause mode for 5 minutes, it will stop
automatically.
2
1
Still
Press the
playback.
• If your A/V receiver is equipped with a Dolby Digital Decoder,
you have the option to bypass the DVD-VCR’s built-in Dolby
Digital Decoder. Use the DIGITAL AUDIO OUT connection
below.
ll
• Audio is muted during Frame Advance mode.
• Press ll (Play/Pause) to resume normal playback.
NOTE: Frame Advance operates only in the forward direction.
3
3
3
Skip Forward/Back
While a CD or DVD disc is in Play mode, press the Skip
Forward/Back ( l / l ) buttons on the remote control or front
panel to jump forward and backward through disc chapters/tracks.
• Skip Forward will jump to the next chapter/track.
• Skip Back will jump to the beginning of the current chapter/track.
• Press Skip Back again to jump to the beginning of the previous
chapter/track.
Search Forward/Back
While a disc is in Play mode, press and hold the Forward/Back
( / ) buttons on the remote control or front panel to visually
search forward/backward at 2X - 4X - 8X - 16X - 32X - 128X speed.
Press ll (Play/Pause) button to resume normal speed.
4
5
Slow Motion
During playback, press the ll (Play/Pause) button to Still the
image. Then use the Search Forward ( ) to play in slow motion at
variable speeds.
• Each press increases the slow motion speed playback to 1/8, 1/4
or 1/2 normal speed.
• Audio is muted during slow motion playback.
• Front Panel Slow Motion Buttons - Press and hold the Forward
buttons on the front panel to activate slow motion playback.
Press the ll (Play/Pause) button to resume normal playback.
5
Stop/Resume
• Press the Stop button once to stop playback. To resume the
DVD/CD from the point where the disc stopped, press the ll
(Play/Pause) button.
• Press the ■ (Stop) button twice to completely stop playback.
The next time you press ll (Play/Pause), the disc will start over
from the beginning.
30
31
00090A DVD-V85K/XTC-Eng3
9/17/02 11:35 AM
Page 32
Disc Menu Navigation
Title/Chapter/Time Selection
Many DVDs feature their own menu systems, where you can select
Titles, Chapters, Audio Tracks, Subtitles, and special disc features,
such as movie trailers, and information on the cast. Use these
buttons to make selections in the Disc menus.
2
If you press the DISPLAY button during DVD playback, you can
view the current Title, Chapter/Track, and counter position. You
can also use this screen as shortcut to select any Title,
Chapter/Track, or counter position on the disc.
1
2
1
1
2
DISC MENUButton
1
Press to access the DVD’s Disc menu, if applicable.
Press the DISPLAY button on the remote control during DVD/CD
playback.
2
2
3
3
Press , or , to navigate through DVD’s Disc menu
options.
• Press up, down, left and right to highlight menu choices.
2
4
• The “TITLE” icon will light on the Front Panel Display, followed by
the current title number, hours, minutes, and seconds.
ENTERButton
TITLEButton
Select Title
Press the up/down and left/right buttons to select Title, then press
ENTERto change among all available titles on the disc.
Press to make your selections in the Disc menu.
4
View DVD/CD Display
3
Select Chapter or Track
Press the up/down and left/right buttons to select Chapter or Track,
then press ENTERto change among all available Chapters/Tracks
on the disc.
Press to access the DVD’s Title menu, if applicable.
• The “CHAP” icon will light on the Front Panel Display, followed
by the current title number, hours, minutes, and seconds.
4
Screen Fit Playback
1
Select Counter Position
Press the up/down and left/right buttons to select the counter
position indicator, then use the number buttons (0-9) to enter the
desired counter position in the format HH:MM:SS (H = Hours, M =
Minutes, S = Seconds).
Then press ENTERto enter the desired counter position.
SCREEN FITButton
During play, press SCREEN FIT button on the remote control.
• Allows you to eliminate the black bars in the top and bottom of
the screen when a movie is playing in the Widescreen
format (16:9).
• Screen Fit will not work when the Zoom mode is active.
(you can not remove the black bars on the screen) However,
Zoom mode will work when Screen Fit is active.
➢
32
◆ Various aspect ratios are available only in multiple
screen format discs.
◆ This function does not work when a DVD has been
recorded in a multi-camera angle format.
◆ On some DVDs, the black bars cannot be eliminated
due to their aspect ratio.
33
00090A DVD-V85K/XTC-Eng3
9/17/02 11:36 AM
Page 34
Zoom
Subtitle
You can zoom in at 2 or 4 times the normal magnification while
watching a DVD.
1
1
2
Many DVDs provide subtitles in one or more languages. The
SUBTITLE button provides a shortcut to view and select these
options.
Open Zoom Magnifying Glass
During Playback or STILL mode, press the ZOOM button to display
the “Magnifying Glass icon” on the screen.
1
Position Magnifying Glass
Use the , , , buttons to move the magnifying glass to any
2
Open Subtitle Menu
During playback, press the SUBTITLE button.
1
Set Subtitle Language
Press the up/down buttons to select among all available subtitle
languages.
position on the screen you want to zoom.
• Subtitle languages are often represented by abbreviations.
3
Zoom In
Press the ENTER button repeatedly to zoom in at 2X - 4X - 2X and normal magnification.
3
Activate Subtitles
Press the left/right buttons to turn subtitles On or Off.
• The default subtitle setting is Off.
• Press the ENTER button to confirm your selection.
Angle
Some DVDs allow you to view the same scene from
different perspectives, or angles, while watching a
movie. Press the ANGLE button to activate this feature.
Digest Playback
1
1
1
Check for Angle Marker
2
DIGEST Button
During playback, press the DIGEST button.
• You’ll see the 9 individual windows representing each of the
chapters on the TV screen.
• When each window is displayed, the first 3 seconds of the
chapter will be played.
If multiple Angles are available on the DVD, the Angle mark will
appear on the screen during playback.
1
View Angle Options
If the Angle mark is present, press the ANGLE button to view the
Angle Selection menu.
2
Set DIGEST
Press the up/down buttons and left/right buttons or NUMBER
button to select the window you’d like to see, and press ENTER.
3
Select Screen Angle
• Up to 9 windows(chapters) can be displayed on the screen at a
time. Press
for the next 9 chapters if the movie has more than
9.
Press the up/down buttons to select one of the available screen
angles.
➢
◆ You can start playback of the DVD player from the
desired chapter.
Skip button
◆ ‘DIGEST’ may not operate depending on the disc in
use.
34
35
00090A DVD-V85K/XTC-Eng3
9/17/02 11:36 AM
Page 36
A-B Repeat
Repeat Chapter/Title
The A-B Repeat function allows you to repeat any segment of a
DVD or CD. Simply mark the beginning point (A) and the ending
point (B) of the segment you want to review.
You can repeat a single chapter, or repeat a complete title.
1
Open Repeat Menu
In Play mode, press the REPEAT button to open the Repeat menu.
1
1
Select A-B Repeat Function
• The current Repeat Mode will highlighted.
In Play mode, press the REPEAT button, then press left/right to
select A-B Repeat.
• “A-” will highlight when A-B Repeat is selected.
1
2
Press the left/right buttons to select “Chapter”.
NOTE: If you are playing a CD, the menu will display “Track” in
place of “Chapter”
2
Mark the Starting Point
• “Chapter” will highlight when Chapter Repeat is selected.
3
Repeat Chapter
Press the ENTER button to repeat the current chapter/track.
Press the ENTER button at the beginning of the segment you want
to repeat (Point A).
• “B” will highlight after Point A is selected.
NOTE: The minimum AB Repeat time is 5 seconds.
Select “Chapter”
4
Select “Title”
Press the left/right buttons to select “Title”.
• “Title” will highlight when Title Repeat is selected.
3
Mark the Ending Point
Press the ENTER button again at the end of the segment you want
to repeat (Point B).
5
4
Repeat Title
Press the ENTER button to repeat the title.
• The segment will begin repeating in a continuous loop.
Cancel A-B Repeat
Press the REPEAT button to open the Repeat Menu, press
left/right to highlight “Off,” then press the ENTER button.
Audio
Many DVDs provide multiple language and audio setup options,
such as Dolby Digital 5.1, Dolby Pro Logic, or LPCM 2 Channel
audio. The AUDIO button provides a shortcut to view and select
among all available options for a given disc.
1
Open the Audio Menu
During playback, press the AUDIO button on the remote control.
2
Select DVD Audio Track
Press the up/down buttons to select the desired language/audio
setup on the DVD.
• Languages are represented by abbreviations; i.e. “ESP” for
“español.”
36
37
00090A DVD-V85K/XTC-Eng3
9/17/02 11:36 AM
Page 38
Bookmarks
Programmed Playback
You can insert up to three Bookmarks on your DVDs, so you can
jump quickly to your favorite scene or song.
1
Open Bookmark Menu
Programmed Playback lets you set a custom order for playback of
chapters/tracks on a DVD or CD.
1
During playback, press the MARK button on the remote control.
The “Mark” header will appear on the screen.
1
2
Select Bookmark Placeholder
2
3
3
4
Play Bookmark
•
•
•
•
•
During playback, press the MARK button on the remote control.
Press the left/right buttons to move to a previously set bookmark.
Press the Play/Pause button to play the bookmark.
Press the CLEAR button to cancel the bookmark.
Press the MARK button again to exit the Bookmark menu.
Select Chapter/Track
Program Playback Order
Use the up/down and left/right buttons to select the remaining
chapters/tracks, pressing Enter after each.
• You can continue setting up to three bookmarks.
• When finished, press the MARK button to exit.
• Depending on the disc, the bookmark function may not work.
4
Select “PROGRAM”
Press the up/down and left/right buttons to select the first
chapter/track in your revised playback list, then press the ENTER
button.
Set the Bookmark
Play the DVD to the scene you want to bookmark, then press the
ENTER button. The placeholder will change to a number (1, 2 or
3).
1
Using the left/right buttons, move the selection bar to “PROGRAM”
then press ENTERto select.
Press the left/right buttons to move to one of the three bookmark
placeholders (- - -).
• The selected placeholder will highlight.
Open Playback Mode Menu
While in Stop mode, press the MODE button.
PROGRAM 01
Chap. (T:01)
01
05
09
13
02
06
10
14
03
07
11
15
RETURN
01
-----
04
08
12
16
CLEAR
------
ENTER
------
-----PLAY
• Press the CLEAR button to change selections.
5
Play Revised Order
Press the ll (Play/Pause) button. The disc will play back in the
custom programmed order.
• While in playback mode, press the CLEAR button on the remote
control to cancel Programmed Play.
PROGRAM 02
Chap. (T:01)
01
05
09
13
02
06
10
14
03
07
11
15
RETURN
38
Program Order
Program Order
01
-- --- -- -- --- -- -- --- -- -- --- -- -- --
04
08
12
16
CLEAR
39
ENTER
PLAY
00090A DVD-V85K/XTC-Eng3
9/17/02 11:36 AM
Page 40
Random Playback
3D Sound
DVD Random Playback lets the DVD-VCR set a random order for
playback of chapters/tracks on a DVD or CD.
1
Open Playback Mode Menu
In Stop mode, press the MODE button.
PROGRAM
3D Audio is an enhanced audio mode that creates the illusion of
Surround Sound with only two speakers.
1
2
Select “RANDOM”
Using the left/right buttons, move the selection arrow to “Random
Play,” then press ENTER to select.
RETURN
• The disc will playback automatically in random order.
ENTER
3
Open 3D Sound Menu
During playback of a DVD, press the 3D SOUND button on the
remote control.
RANDOM
2
1
Set 3D Sound
Press the up/down buttons to set “3D Sound” On or Off, then press
the 3D SOUND button to confirm your selection.
Cancel Random Play
Press the CLEAR button on the remote control to cancel Random
Play.
MP3 Playback
MP3 is a popular music format which allows you to compress
music files up to 1/12 of their original size while retaining near CD
quality sound. Your DVD-VCR can playback MP3 files burned onto
a CD-R disc.
1
MP3
song1
2
RETURN
Insert Disc
Insert a CD-R with MP3 files into the DVD deck.
• The MP3 main menu will appear after a few seconds and the
first song on the disc will begin playing.
1 music c1
2 music c2
3 music c3
music c1
Select Folder
Press the up/down buttons to select the folder on the CD-R which
contains the MP3 files you want to hear, then press Enter to select.
ENTER
• If there are more than 8 folders on the disc, press RETURN to
view additional folders.
• If there are no folders on the CD-R, skip to Step 3.
MP3
1 song 1
2 song 2
3 song 3
4 song 4
5 song 5
6 song 6
7 song 7
8 song 8
music c1
song1
RETURN
3
Select MP3 File
Press the up/down buttons to select the desired MP3 file.
• If there are more than 8 MP3 files in the selected folder, press
the left/right buttons to view additional MP3 files.
• File names are truncated to eight characters: the first six
characters of the song, plus an asterisk (*), then a number.
• Press the Return button to back up and select another folder.
ENTER
4
Play MP3 File
Press the ENTER button on the remote control to play the selected
song.
• While the song is playing, you can use the up/down buttons to
browse through other folders.
5
Stop MP3 Selection
Press the ■ (Stop) button on the remote control to stop playback.
* To ensure proper playback of discs burned from MP3 files, make sure
the files have been recorded at a bit rate of at least 128 kbps.
* If there are any gaps (blank data) on multi-session discs, you may
experience playback problems.
* On discs that are recorded with a Variable Bit Rate(VBR), e.g. from 32 to
320 kbps, the sound may cut in and out.
40
41
00090A DVD-V85K/XTC-Eng3
9/17/02 11:36 AM
Page 42
Special VCR Playback Features
While a videotape is playing, you can enjoy a variety of special
playback features, including Still, Frame Advance, Skip, Repeat, and
more. Press the Play button again to resume normal playback.
PLAY
1
Auto Play
If you want your videotapes to play automatically when you insert
them, turn on Auto Play.
NOTE:
Only tapes that are missing the Record Safety Tab will
play automatically when inserted.
Still
From Play mode, press Play/Pause to still a single frame.
1
Open the “SETUP MENU”
With the DVD in stop mode, press the SETUP button.
0:00:00 SP
2
Frame Advance
From still mode, press F.ADV/STEP to advance to the next frame.
Press the DISPLAY button to see the
current status of the VCR deck, as well
as the tape counter position and
record speed.
3
2
Using the up/down and left/right buttons, move the selection arrow
to “VCR Function Setup,” then press ENTER to select.
Cue/Review
From Play mode, press F.Forward ( ) or Rewind ( ) to
cue/review at two speeds:
• Picture Search — Press and release to advance the tape
forward or backward at 5 times normal speed.
• Jet Search — Press and hold to advance the tape forward or
backward at 7 times normal speed.
3
4
Skip
From Play mode, press F.ADV/STEPto cue ahead exactly 30
seconds. Press Skip repeatedly up to 4 times to cue ahead 2
minutes.
5
Tape Length
Press the left button to select the video cassette length.
This information is usually printed on the tape box. The menu
cycles through: T120, T160 or T180. Once the type of cassette is
set, the VCR can display the amount of time remaining on the tape
when you press the DISPLAY button.
Repeat
Shuttle
VCR Function Setup
RETURN
ENTER
VCR FUNCTION SETUP
4
From Play mode, press Repeat to review the last 5 seconds of tape
(SP mode).
6
MAIN MENU
Select “Auto Play”
Move the selection arrow to “Auto Play,” then press right to select
from the following options:
• On - The VCR will automatically begin playing a video tape
when it is inserted, as long as the safety tab of the cassette has
been removed.
• Off - Auto play is disabled.
3
3
Select “VCR”
5
Tape Length
Auto Play
Auto Repeat
T120
On
Off
RETURN
Auto Repeat
In the VCR FUNCTION SET UP “ Auto Repeat” sets the VCR to
play a tape repeatedly [unless a tape control is activated (stop, fast
forward or rewind)].
From Play mode, Shuttle >> gradually increases the cue speed
from Double-Speed playback to Picture Search to Jet Search.
Shuttle << gradually slows down the tape, then goes into Slow
mode, Still mode, Reverse Picture Search and Reverse Jet Search.
Tracking
The Tracking adjustment removes the white lines that sometimes
appear during playback because of slight differences in recording
decks. The TRK button will automatically align the recorded tracks
with the playback heads to solve this problem. You may also set
tracking manually.
1
1
1
The DVD-VCR allows you to playback high quality S-VHS tapes.
1
Insert a S-VHS Tape
2
Start Playback
Adjust Tracking Manually
During playback, press the TRK ( + or - )buttons to move the white
lines out of the picture.
42
S-VHS Playback
Insert an S-VHS tape into the VCR deck.
Press Play/Pause on the remote control to begin playback of the
S-VHS tape.
43
On
Off
00090A DVD-V85K/XTC-Eng4
9/17/02 11:37 AM
Page 44
Variable Search System
Scan and play:
press [ ] or [ ]
Go to [0:00:00]:
Press [ ]
End search:
Press [ ]
0:00:00 SP
Press the SEARCH button to display the search screen in the stop
mode. When a program is recorded, the starting point is given an
Index mark for easy location. However, the VHS Index Search
System (VISS) cannot recognize index marks made by old VCRs. If
the VCR has trouble finding a mark, it is probably because the
cassette was recorded on a VCR without VISS. If you want to index
two programs in a row, set your VCR to stop, then start recording
each program. Pause has no effect on index marks.
1
• Power on the DVD-VCR
• Power on the TV
• Set the TV to channel 3 or 4 .
Go to 0:00:00 stop
2
End search
Be sure you videotape has a Record Safety Tab. If the tab
is missing, you can cover the opening with a small piece of
tape. Warning: Do not cover this opening unless you are
sure you want to record over the tape.
Before You Begin...
1
Use this feature when you want to search for a blank position to
record a program on a cassette. While a cassette is stopped, press
down arrow button. The VCR will fast forward, searching for a
blank position, and then automatically stop at that position.
If the VCR reaches the end of the tape during end search, the tape
will be ejected.
44
NOTE:
• Press right arrow for forward scan or left arrow for reverse scan.
• The display will show “Scan and Play”.
• When an index mark is found, the VCR plays for about five
seconds.
• Press the PLAY button to view that program.
If you don’t press PLAY, the VCR automatically searches for the
next index, or until the end of the tape is reached.
Use this feature when you want to search for the 0:00:00 counter
position on a cassette. Press the CLEAR button at the point on the
tape where you want to set the counter to 0:00:00. Later, while a
cassette is stopped, press up arrow button. The VCR will rewind or
fast forward, searching for the 0:00:00 counter position, and then
automatically stop at that position.
3
You can record a TV show in progress by inserting a blank tape and
pressing the REC button. You can even add time in 30-minute
increments up to 4 hours by pressing the REC button repeatedly;
see page 47.
Scan and play
Use scan and play when you don’t know exactly where a program
is located on a cassette tape.
2
Basic Recording
2
Insert Tape
Insert a blank VHS tape into the VCR deck.
• Make sure the tape is long enough to record the entire program.
To change the Recording Speed, see page 47.
3
Select a Channel to Record
Use the 0–9 buttons or the Channel Up/Down arrow buttons to
select the desired channel, or press the INPUT SEL. button to
select Line 1.
3
Start Recording
Press the REC button on the remote control or front panel.
For options while recording is in progress, see “Special Recording
Features” on the next page.
➢
1
3
Recording from the DVD player to the VCR is not
possible.
45
00090A DVD-V85K/XTC-Eng4
9/17/02 11:37 AM
Page 46
Special Recording Features
While a recording is in progress, you can watch a different channel,
watch a DVD, or add recording time in 30-minute increments.
1
1
2
2
Pause/Resume Recording
Press the
ll (Play/Pause) button. Press REC again to resume.
Stop Recording
One-Touch Recording (OTR)
One-Touch Recording (OTR) allows you to add recording time in
30-minute increments up to 4 hours at the touch of a button.
RECORD
1
Start Recording
2
Activate OTR
Follow the instructions on page 45 to begin recording.
Press the STOP button.
3
While in Record mode, press the REC button again to activate
One-Touch Recording (OTR).
Watch a Different Channel
• Record length 0:30 appears on the On-Screen Display and the
DVD-VCR will record for exactly 30 minutes.
Press the TV/VCR button on the remote to switch to your TV tuner,
then select a different channel on your television.
4
3
5
To Watch a DVD
3
Add Recording Time
Record
Insert a DVD in the DVD deck and press Play. The output will
automatically change to the DVD.
Continue pressing REC to add recording time in 30 minute
increments up to 4 hours.
Add Recording Time
• The DVD-VCR stops recording automatically when the time has
elapsed.
length 0:30
SP
See One-Touch Recording (OTR) on the next page.
4
Record Speed
You can slow down the recording speed from SP to SLP in order to
fit six hours of programming on a T-120 tape.
1
Start Recording
2
Set Record Speed
Follow the Basic Recording instructions on page 45.
2
Press the SPEED button on the remote control to set the Record
Speed to one of the following options:
• SP – Standard Play, for best quality.
• SLP – Super Long Play, for maximum recording time (3 times
SP).
NOTE: The selected Record Speed will appear on the front panel
display and on-screen display.
Maximum Recording Time - SP vs. SLP
46
Tape Length
SP (Standard Play)
SLP (Super Long Play)
T-120
2 hrs
6 hrs
T-160
2hrs 40 mins
8 hrs
T-180
3 hrs
9 hrs
47
07
0:30
1:00
1:30
2:00
3:00
4:00
00090A DVD-V85K/XTC-Eng4
9/17/02 11:37 AM
Page 48
How to Set a Timer Recording
MAIN MENU
Insert a blank tape with a Record Safety Tab into the VCR deck.
The Timer Recording Feature allows you to program up to 8 events
at a time to record up to a month in advance.
Set the TV to channel 3 or 4.
Using the KARAOKE Function (VCR)
1
Press the POWERbutton and insert KARAOKE tape.
2
Connect Mic into MIC1 or MIC2 jack.
Then the KARAOKE mode is transferred “ON” mode.
◆ Disconnect the Mic makes the KARAOKE mode transfer to
“OFF” mode automatically.
◆ Press the KARAOKE button on the remote control.
Press the or button to select KARAOKE mode “ON”.
Before You Begin...
• Power on the DVD-VCR
• Power on the TV
Set Timer Recording
RETURN
ENTER
1
CH
START
__
__
__
__
__
__
__
__
_:
_:
_:
_:
_:
_:
_:
_:
__
__
__
__
__
__
__
__
END
DATE
SPD
_:__
_:__
_:__
_:__
_:__
_:__
_:__
_:__
___
___
___
___
___
___
___
___
__
__
__
__
__
__
__
__
2
Open “SETUP MENU”
3
With the DVD in stop mode, press the SETUP button or press the
TIMER button.
To adjust the Mic volume and ECHO level, press the VOLUME
and ECHO or keys front pannel.
4
To sing with accompaniment.
3
Select “Program”
Using the up/down and left/right buttons, move the selection cursor
to “Set Timer Recording,” then press ENTERto select.
3
Select Channel Number
Press rightand up/down buttonsto set the channel. Press the right
button to move to the next setting.
RETURN
4
5
6
Set “Time/Date/Speed”
1
Press the KARAOKE button on the remote control.
Save “Timer Recording”
2
Press the corresponding
mode.
or
buttons to select the SCORE
3
Press the
4
Score will pop up whenever a song is completed.
or
KARAOKE :ON
SCORE
:ON
buttons to select the SCORE mode “ON”.
Auto Speed Select
If you are not sure the tape is long enough for timer program
recording in the SP tape speed, set the recording tape speed to
“AUTO”. Recording starts in the SP tape speed. If the tape length is
not long enough, the tape speed automatically changes from SP to
SLP.
7
SCORE Function
Repeat step 3 to set start time, end time, date and record speed.
Date can be set for one time, daily or weekly recording. See below.
Press the RETURN button to complete programming of the timer
recording. Stop the VCR or turn the power off. The timer indicator
comes on the VCR. The VCR will automatically turn on and begin
recording at the time you set. To stop a timer recording, press the
POWERbutton or STOP button on the VCR.
KARAOKE SEARCH Function
Daily/Weekly Date Programming
Weekly [SUN’S~SAT’S]: You can record TV programs on the same
channel at the same time every week.
Daily [MO FR] : You can record TV programs on the same
channel at the same time every day Monday through Friday.
48
2
1
Press the POWER button and insert KARAOKE tape.
2
Press the KARAOKE button to turn the KARAOKE mode ON.
3
Press
4
When you want the next song during playing a song, press the
KARAOKE SEARCH
or KARAOKE SEARCH
buttons on the
remote control.
ll to start playing the cassette.
4
4
49
00090A DVD-V85K/XTC-Eng4
9/17/02 11:37 AM
Page 50
Beginning Karaoke Functions (DVD)
KARAOKE : on
KEYCON REQUEST
Reserving a Song
1
Connect the Mixed Audio Out terminals with the TV or AMP.
2
Press the power button.
3
Connect Mic into Mic 1 or Mic 2 jack. Then the karaoke mode is
transferred to ON mode.
- To disconnect the Mic makes the karaoke mode transfer to OFF
mode automatically.
Key Control
KARAOKE : on
KEYCON
❙❙❙❙❙❙ ❙❙❙❙❙❙❙
REQUEST
1
Playback the Karaoke Disc containing the wanted songs.
2
After pressing the KARAOKE button of the remote transfer to the
KARAOKEON mode using the
or
buttons.
3
Select the “REQUEST” using the
ENTER button.
4
Input the number (Track No.) of the desired song into the flickering
part(--).
- You can reserve up to 10 songs.
5
When you want the next reserved song during playing a song,
press the I button.
KARAOKE : on
KEYCON REQUEST
REQUEST
or
buttons, then press
03
02
--
--
--
Cancellation of reservation
1
Pressing the KARAOKE button makes the karaoke ON mode.
2
Select the “KEYCON” using the
3
By use of the or buttons, change to the desired tone.
- : To let 7 scales down by half scale.
- : Original scale.
- # : To let 7 scales up by half scale.
➢
or
buttons.
◆ Key control function is not applied to the Mic output.
◆ Key control function can not work at the VCR
50
It is the function to reserve the desired song in advance by use of
Karaoke function.
1
Cancel by pressing the CLEAR button of the remote.
- The last reserved song will be erased first.
2
Continuous pressing of the CLEAR button can cancel the next
reserved song.
3
If the reservation is required again, input the song number in the
flickering part.
➢
◆ Request function is available only when the Karaoke
mode is “ON”.
◆ When using “ I ” button, it can not work at the last
song.
◆ When using Request function, the “REPEAT” function
does not work.
◆ If the CLEAR button is pressed when the Request
message is not shown on the screen, all the songs on
your playlist will be cleared.
51
--
--
--
--
--
00090A DVD-V85K/XTC-Eng4
9/17/02 11:37 AM
Page 52
S-Video/Component Video Connections (for DVD)
Vocal Fader
Pressing the KARAOKE button twice displays the following in
Karaoke ON mode:
VOCAL FADER
- The function to make the music only sound by cancelling vocal
when playing a Karaoke disc.
: off
GUIDE MELODY : off
SCORE MODE
VOCAL FADER
V1
: off
Remark
CH1. Vocal Cancel
V2
V1 +V2
OFF
CH2. Vocal Cancel
CH1, CH2. Vocal Cancel
Vocal Fader Off
- In VCD, CVD or CD, you can select only the L, R, OFF.
The S-Video or Component Video connection is only for the DVD
player. The tuner and VCR will still be viewed through the RF or
line inputs.
You must follow the “Alt Video Out” instructions on page 31 to
activate your alternative (S-Video, Component) video selection.
You can choose EITHER S-Video OR Component, but NOT both.
If your television is equipped with S-Video or Component Video
inputs, you can enjoy superior video quality when watching DVDs
with your DVD-VCR.
1
1
To S-Video Input on Your TV
Connect S-VIDEO OUTto TV
Connect an S-Video cable from the S-VIDEO OUTon the back
panel of the DVD-VCR to the S-Video Input on your television.
Guide Melody
◆
◆
To guide melody through xylophone and piano help you sing
easily.
This function works only on the DVD Karaoke disc on which the
guide melody is recorded.
Score Function
2
Connect Component Video Out to TV
Connect a component video cable from the COMPONENT VIDEO
OUT(Y, Pb, Pr) on the back panel of the DVD-VCR to the
Component Video Input on your television.
3
2
To Component Video Input
on Your TV
Connect Audio Out (DVD only)
3
Press KARAOKE button twice to turn the Score Mode On.
◆ Score will pop up whenever a song is completed.
• You must use these Line Out jacks when connecting the DVDVCR to your TV with the S-Video or Component Video Output.
• Please refer to “Alt Video Out” on page 29 to activate your
connection.
Types of Karaoke disc
◆ DVD
Connect RCA audio cables from the Left/Right Line Out jacks on
the back panel of the DVD/VCR to the Left/Right Audio Line In
jacks on your television.
To Left/Right Audio Inputs
on Your TV
Karaoke Disc
Channel
1 CH
2 CH
3 CH
4 CH
5 CH
◆ CVD,
Karaoke
-Channel
L
R
M
V1
V2
5CH. DVD
2CH. DVD
Left stereo music
Left stereo music + Vocal
Right stereo music Right stereo music + Vocal
Guide melody
Vocal track
Vocal track
-
VCD Karaoke Disc
Karaoke
Channel -Channel
CVD
VCD, CD
1 CH
CH1 LEFT Left stereo music+Vocal
Left stereo music
1 CH CH1 RIGHT Right stereo music+Vocal Right stereo music
+ Vocal
2 CH
CH2 LEFT
Left stereo music
2 CH
CH2 RIGHT Right stereo music
-
CAUTIONS: Make sure to turn the KARAOKE MODE to OFF to play
a movie disc or play in a general mode. If you play a
movie disc with the KARAOKE ON , a score will
show up every time when a chapter is over.
52
53
00090A DVD-V85K/XTC-Eng4
9/17/02 11:37 AM
Page 54
Stereo Connections
You can enjoy stereo sound when watching movies and TV shows by
connecting your DVD-VCR to your home stereo system or stereo
TV.
1
Connect DVD-VCR to Stereo
Connect RCA cables from the Line Out Left & Right Audio jacks on
the back panel of the DVD-VCR to the Auxiliary Inputs on your
stereo receiver. If you are using a stereo television, connect the
Video Output as well.
2
Monitor-style televisions offer improved sound and picture over
regular televisions because they receive the audio and video signals
directly from the DVD-VCR through the line inputs.
NOTE:
1
2
• If you still do not hear stereo sound after inserting Hi-Fi stereo
video tape, press the Audio button until “Hi-Fi” appears on the
on-screen display.
Connect VCR to Monitor TV
To Monitor TV Audio/Video Inputs
Set TV to Auxiliary Mode
Set your monitor TV to “Aux,” “Video,” or “Line.” Refer to your
monitor television owner’s manual for the correct setting.
Play a Tape
Insert a DVD or Hi-Fi stereo videotape in your system and adjust the
volume on your stereo receiver or television. You should hear the
audio through your stereo speakers.
A monitor television is not the same as a computer
monitor.
Connect RCA cables from the Audio/Video Line Out jacks on the
back panel of the DVD-VCR to the Audio/Video Line Inputs of your
monitor TV.
Set Stereo to Auxiliary Mode
Set your stereo receiver or television to “Aux” or “Tape,” whichever
selects the line input for your particular device.
3
Monitor TV Connections
3
Connection is Complete
NOTE: With this connection, the TV/VCR button has no effect. It is
as if the TV/VCR button were always set to VCR.
3
54
55
00090A DVD-V85K/XTC-Eng4
9/17/02 11:37 AM
Page 56
Connecting Other Video Equipment
You can connect a wide variety of audio/video equipment to your
DVD-VCR, including:
• An additional VCR
• Laser Disc Player
• DVD Player
• Camcorder
• Satellite Receiver
• Video Game
Since all of these devices use essentially the same connections, they
will be described together.
TV Audio/Video Outputs of
External Device
1
Technical Specifications
Inputs
Connect Device to DVD-VCR
Connect RCA cables from the Audio and Video Line Outputs of
your external device to the Audio and Video Line Inputs on the
back panel of the DVD-VCR.
Outputs
AUDIO
Stereo audio input, RCA Connector, -8dbm, 47KΩ,
front and rear
VIDEO
Composite video input, RCA Connector, 75Ω, 1Vp-p
RF
Antenna or CATV Input, F-Connector, 75Ω
AUDIO
1 Stereo audio outputs, RCA Connector, -8dbm, 1.5KΩ
AUDIO (DVD only)
2 Digital audio outputs (1 optical, 1 coaxial)
1 Stereo audio outputs
VIDEO
1 Composite video output, RCA Connector, 75Ω, 1Vp-p
VIDEO (DVD only)
1 S-Video output, S-Connector, 75Ω, Y=1.0Vp-p,
C=0.286Vp-p
1 Component video output, 75Ω, Y=1.0Vp-p, Pb=0.7Vp-p,
Pr=0.7Vp-p
2,3
2
Watch Device
Play your external device, then press the Input Sel. button until the
playback from LINE1 (rear panel inputs) appears on your TV
screen.
3
3
Record Device
First, play your external device. Next, press the Input Sel. button
until the playback from LINE1 (rear panel inputs) appears on your
TV screen. Then press Record on the VCR deck.
4
VCR
Timer Record From Device
RF
Channel 3 or 4
VIDEO SYSTEM
1/2-inch VHS system, 4 rotary head helical scanning;
FM azimuth luminance;chrominance: converted sub system
phase shift
AUDIO TRACK
Normal: 1 track; Hi-Fi: 2 track
PLAY/RECORD TIME
T-180 tape: SP 3 hours, SLP 9 hours
FF/REW TIME
T-120 tape: <2 minutes
HEADS
Video: DA 4 rotary
Audio: 2 rotary heads (Hi-Fi); 1 stationary head (Linear)
Select LINE1 (L1) as your record source in the Timer Record
menu. All other Timer Record settings should be set in the usual
manner.
Control:1 stationary head
Erase: 1 full track, 1 audio track
WOW & FLUTTER
DVD
SYSTEM
56
Less than 0.005% (Hi-Fi)
FREQ. RESPONSE
20-20,000 Hz (Hi-Fi)
DISC COMPATIBILITY
CD, CD-R, CD-R/W
DVD-Video, CD-Digital Audio (5” and 3.5”), CD-Video, MP3
files on CD-ROM
FREQ. RESPONSE
96/48 kHz Sampling: 4 Hz-22kHz
S/N RATIO
110 dB
DYNAMIC RANGE
96 dB
THD
0.003 %
POWER REQUIREMENT
100-240V AC, 50/60 Hz, 29 watts
ENVIRONMENT
41-104 F (5-40 C); 10%-75% humidity
WEIGHT
13.8 lbs.
57
00090A DVD-V85K/XTC-Eng4
9/17/02 11:37 AM
Page 58
AK68-00090A