1
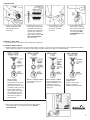
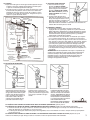
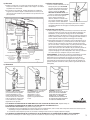
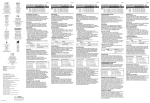
7) INSTALL TANK
a. Slide new sponge rubber
gasket (small side down)
onto threaded end of
flush valve.
b. Install 2 bolts as follows:
Slide rubber washer under
bolt head and insert bolt
through tank. Install brass
washer, then thread hex
nut onto bolt. Carefully
tighten bolt until snug. DO
NOT OVERTIGHTEN or
tank may crack.
c. Place tank back on bowl
so that sponge gasket
fits evenly. Level tank
and bowl.
d. Install rubber washer,
brass washer, and wing
nut onto bolt. Repeat for
the other side. Tighten
nuts evenly. DO NOT
OVERTIGHTEN or tank
may crack.
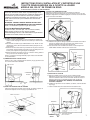
8) INSTALL TOILET SEAT
a. Install toilet seat in accordance with manufacturer’s directions.
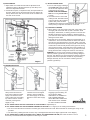
9) CONNECT WATER SUPPLY
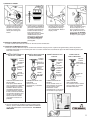
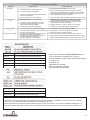
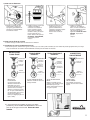
a. Before continuing, determine the type of water supply connection you have from the chart below and use the appropriate assembly
parts required to properly re-connect the water supply. DO NOT use plumber’s putty to seal these fittings.
METAL/COPPER
FLARED TUBING
These parts must be used
as illustrated to insure a
water-tight connection. Use
of existing coupling nut may
result in water leakage.
Water supply tube or pipe
must extend at least 1/2"
inside threaded shank of
valve (does not apply to
flanged tubing).
METAL FLANGED TUBING
Use existing coupling nut
and washer.
METAL SPIRAL TUBING
Use existing spiral cone
washer. Fluidmaster cone
washer may not seal
completely on spiral type
supply line.
VINYL/BRAIDED
CONNECTOR
Captive cone washers
already included. No
additional washers needed.
b. With correct washers in place (See previous step), tighten
COUPLING NUT 1/4 turn beyond hand tight. DO NOT
OVERTIGHTEN.
2