1
10) ADJUSTMENTS
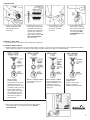
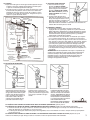
a. Adjust water level. Water level should be adjusted to level
indicated on tank by adjusting the float cup. See Step 11 for
water level adjustment method.
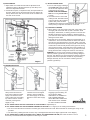
b. If bowl fails to siphon, an adjustment may be required with the
lift chain. Simply remove the bead chain from the retainer clip,
take up slack on the chain and re-insert on lift rod. Make sure
the chain is not too taut.
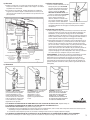
11) ADJUST WATER LEVEL
a. Turn on water supply. Submerge
the FLOAT CUP under the water
for 30 seconds. Adjust the water
to desired level by turning
WATER LEVEL ADJUSTMENT
ROD and moving FLOAT CUP up
or down.
b. Once water level is correct with
marking in tank, flush toilet 3 times
to prime toilet and “No Overflow”
system. After prime has been
established toilet traps are self-priming from this point on. No
further priming is required. Use toilet for normal use.
12) CARE AND CLEANING
a. When cleaning your toilet, wash it with mild, soapy water, rinse
thoroughly with clear water and dry with a soft cloth. Avoid
detergents, disinfectants, or cleaning products in aerosol cans.
NEVER use abrasive scouring powders or abrasive pads on
your toilet seat. Some bathroom chemicals and cosmetics may
damage the seat’s finish.
b. This toilet has a “No Overflow” feature that requires little or no
maintenance. There are 3 holes inside the back of the bowl. If
the toilet ever gets plugged in the main trap, water in the bowl
will exit through these holes. During every flush a small amount
of water fills a reservoir that prevents sewer gas from coming
up through these holes. If the toilet hasn’t been flushed for an
extended period (vacation) this water may get stale and smell.
Simply flush the toilet to bring fresh water into the reservoir.
WARNING: Do not use in-tank cleaners. Products containing
chlorine (calcium hypochlorite) can seriously damage fittings in
the tank. This damage can cause leakage and property damage.
Penguin shall not be responsible or liable for any tank fitting
damage caused by the use of cleaners containing chlorine
(calcium hypochlorite).
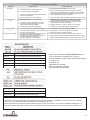
13) TROUBLESHOOTING
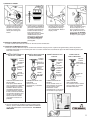
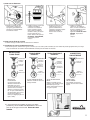
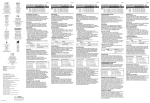
DIAGRAM 1: IMPORTANT:
Always clear sand and rust
from system. Make sure water
supply is off. Remove valve
TOP by lifting arm and rotating
top and arm 1/8 turn counterclockwise, pressing down
slightly on cap.
DIAGRAM 2: While holding a
container over the uncapped
VALVE to prevent splashing,
turn water supply on and off a
few times. Leave water supply
off.
DIAGRAM 3: Replace TOP by
engaging lugs and rotating 1/8
turn clockwise. MAKE
CERTAIN TIP IS TURNED TO
THE LOCKED POSITION.
VALVE MAY NOT TURN ON IF
TOP IS NOT FULLY TURNED
TO THE LOCKED POSITION.
IF FILL VALVE SHUTS OFF BUT CONTINUES TO LEAK SLOWLY:: Repeat Step 13.
IF FILL VALVE TURNS OFF AND ON DURING PERIODS OF NON-USE: It is a signal you are wasting water because:
a. The end of the refill tube is inserted into overflow pipe, below water level in tank. Attach refill tube to overflow pipe using “S” clip
provided.
b. The flush valve is leaking because it’s worn, dirty or misaligned with tank ball or flapper (replace with a new flapper).
IF FILL VALVE WON’T TURN ON OR SHUT OFF or REFILL OF TANK WATER IS SLOW (After valve has been in use for
some time). Fluidmaster Model 242 Replacement Seal may be needed.
3