1
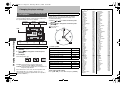
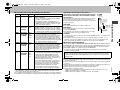
12:07 PM
You can enjoy comfortable, analog-like sound.
[DVD-VR] [DVD-V] (Discs recorded with 48 kHz only)
[DVD-A] (Discs recorded with 44.1 kHz and 48 kHz only)
[VCD] [CD]
[WMA] [MP3] (Disc recording is other than 8 kHz, 16 kHz or 32 kHz)
Sound
Enhancement On ,------. Off
≥ This does not work when Night Sound Mode, H.Bass(➜ page 11),
Advanced Surround or Multi Re-master (➜ page 12) is on.
≥ This may not work depending on the disc’s recording.
≥ This does not work with [MP3] on DVD-RAM or DVD-R/RW.
With AUDIO OUT connections (➜ page 6)
Switch on if sound is distorted.
Attenuator
On ,------. Off
∫ Display Menu
∫ Other Menu
To preset the settings
You can preset your favorite video/audio effects onto “User1”,
“User2” and “User3”.
AV Enhancer
On ,------. Off
0 to s60 (in 2 units)
Information
Subtitle Position
Subtitle Brightness
1. Select “Save Settings” and press [ENTER].
2. Press [34] to select the setting location (User1, User2 or
User3) and press [ENTER].
3. Follow the instructions on the menu screen and press
[ENTER] last.
To recall the settings (➜ page 11)
Auto, 0 to s7
To select how to show images made for 4:3 aspect screens on a
16:9 aspect television
Normal: Laterally stretches images.
4:3
Auto:
The standard setting is “Shrink”. However, this automatically
Aspect
changes to “Zoom” with a letterbox picture.
Shrink: Images appear in the center of the screen.
Zoom: Expands to 4:3 aspect ratio.
(➜ page 13, Zoom)
Just Fit Zoom
Manual Zoom
Bit Rate Display
(➜ page 13, Zoom)
Motion pictures
GUI See-through
Off, On, Auto (Switches on automatically when the
images appear on the display.)
s3 to r3
GUI Brightness
HDMI Status
Quick OSD
On ,------. Off
Indicates various information when connected with HDMI
AV OUT terminal. (➜ below, Confirming HDMI information)
(➜ page 11)
Preparation
Adjust the settings indicated below to your preference.
(When “Auto” is selected, this is not available.)
Audio settings:
Night Sound Mode/H.Bass (➜ page 11)
Advanced Surround/Multi Re-master (➜ page 12)
Dialogue Enhancer (➜ page 18, Audio Menu)
Sound Enhancement (➜ left)
Video settings:
Picture Mode (➜ page 18, Picture Menu)
Setup
Play as DVD-Video
or
Play as DVD-Audio
Play as DVD-VR
Play as HighMAT
or
Play as Data Disc
To confirm the settings
1. Press [34] to select “User1”, “User2” or “User3” and
press [ENTER].
2. Select “Save Settings” and press [ENTER] twice.
To exit the screen, select “No” and press [ENTER].
(➜ page 20, Changing the player settings)
Select “Play as DVD-Video” to play [DVD-V] on DVD-Audio.
Select “Play as Data Disc” to play [MP3] [JPEG] [MPEG4] or
[DivX] on DVD-RAM that contain both [DVD-VR] and another
format (e.g. [JPEG]) or to play HighMAT discs without using the
HighMAT function.
∫ Confirming HDMI information
Connection status
(➜ page 13, Changing soundtracks)
HDMI Status-----HDMI is connected.
HDMI Information
Audio Stream
Max Channel
PCM/Dolby Digital/DTS
6ch
Video Format
480p/720p/1080i
Color Space
YCbCr(4:4:4)/YCbCr(4:2:2)/RGB
Shows the maximum channel number
of the connected equipment.
(➜ page 18, Video Output Mode)
(➜ page 18, HDMI Color Space)
≥All possible outputs are displayed.
≥The current output for “Audio Stream”, “Video Format” and
“Color Space” will be underlined.
≥When “Off” is selected in “Audio Output” (➜ page 21,
“HDMI” tab) “– – –” will be displayed in “Audio Stream” and
“Max Channel”.
Using On-Screen Menus
Thursday, March 9, 2006
RQT8706
RQT8706-Y.fm Page 19
19