1
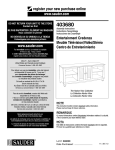
register your new purchase online
www.sauder.com
Entertainment Center
Model # 403933
Assembly Instructions
NOTE
THIS INSTRUCTION BOOKLET CONTAINS IMPORTANT SAFETY INFORMATION.
PLEASE READ AND KEEP FOR FUTURE REFERENCE.
DO NOT RETURN YOUR UNIT
TO THE STORE
Contact us first
www.sauder.com
For immediate service,
our website is available
24 hours a day, 7 days a week
to order replacement parts,
access assembly tips,
register your product,
and view Sauder products.
Mon-Fri -- 9am-5:30pm ET
United States and Canada (except holidays)
Consumer Services 1--800--523--3987
Most replacement parts ship from our
facility in one or two business days.
The center pages of this book are French instructions.
Se incluyen las instrucciones en español en el centro
de este folleto. Para facilitar su uso, se puede
desprenderlas fácilmente.
Record the date you purchased this unit and save the booklet for
future reference.
If you ever need to contact Sauder about this unit, refer to the lot #
and the model # when calling our toll-free number. For more
information about our furniture, company, or to order replacement
parts, please visit our web site.
Lot #: 349807
Date Purchased:
03 / 01 / 13
WARNING
This Sauder unit is designed for use with televisions weighing not more than 95 pounds. Use of a TV that is
too large or too heavy is hazardous. Severe injury or death can occur because the TV and furniture
combination will be unstable, and may tip over.
S Check the size and weight of your TV. Compare it to the size diagram below -- before you begin assembly.
S Make sure that the base of the TV can set completely on the TV shelf. The TV base should never extend
past the edge of the TV shelf. (The picture tube cone may extend past the shelf.)
S Never use a TV that is too heavy or too large.
S Be sure to apply the warning label as instructed in the last step. The label provides important safety related
TV weight information.
28--1/2”
39”
95 lbs.
403933
PARTS IDENTIFICATION
Each part for this unit may not have a label or inked letter on it.
Use this PARTS IDENTIFICATION to help identify similar parts.
RIGHT
LEFT
A END -- 1
HUTCH
E RIGHT END -- 1
LEFT
H UPRIGHT -- 1
F
I
B END -- 1
D END -- 2
HUTCH
LEFT END -- 1
G UPRIGHT -- 1
UPRIGHT -- 1
RIGHT
J
SHELF -- 1
403933
PARTS IDENTIFICATION (CONTINUED)
HUTCH
K TOP -- 1
L TOP -- 1
M BOTTOM -- 1
N BACK -- 1
P
DOOR -- 2
ADJUSTABLE
T SHELF -- 1
403933
O VALANCE -- 1
R BASE -- 1
RIGHT
U MOLDING -- 1
S
FRONT
MOLDING -- 1
LEFT
V MOLDING -- 1
HARDWARE IDENTIFICATION
TWIST-LOCKR
W FASTENER -- 6
X2
Z FOOT -- 2
AA HINGE -- 4
CC PULL -- 2
MOLDING
FF CONNECTOR -- 2
II
HIDDEN
CAM -- 16
TACK
GLIDE -- 4
JJ
CAM
Y2 DOWEL -- 16
HINGE
BB BRACKET -- 4
ANGLE
DD BRACKET -- 5
METAL
EE BRACKET -- 3
CAM
GG COVER -- 4
FELT
HH DISC -- 1
METAL
PIN -- 4
WARNING
LL LABEL -- 1
RUBBER
KK SLEEVE -- 4
SAFETY
SS BRACKET -- 1
(Refer to the last step for proper
location and application)
403933
1
SCREWS SHOWN ACTUAL SIZE
Using a SCREW that is too long will cause damage. Before beginning assembly, separate
each type of SCREW. Carefully study the SCREW diagrams below (SHOWN ACTUAL SIZE).
Pay close attention to the color of each SCREW. You may receive extra hardware with your unit.
MM BLACK 1--7/8” FLAT HEAD SCREW -- 15
NN
BLACK 1--1/8” PAN HEAD SCREW -- 8
OO SILVER 5/8” MACHINE SCREW -- 4
PP
BLACK 9/16” LARGE HEAD SCREW -- 17
QQ BLACK 1/2” FLAT HEAD SCREW -- 8
RR NAIL -- 61
ASSEMBLY TOOLS REQUIRED
TIP SHOWN ACTUAL SIZE
NO. 2 PHILLIPS SCREWDRIVER
HAMMER
403933
2
(6 used)
W
D
D
I
For assembly tips, visit our website at:
www.sauder.com/services/tips
Assemble your unit on a carpeted floor or on the empty carton to avoid scratching your unit or the floor.
- Push a SAUDER TWIST-LOCKR FASTENER (W) into the large holes in the ENDS (D) and UPRIGHT (I).
NOTE: Do not tighten the TWIST-LOCKR FASTENERS at this time.
www.sauder.com/services
403933
3
Do not tighten the HIDDEN CAMS in this step.
Y2
(16 used)
X2
E
F
M
G
H
A
Arrow
B
Insert the CAM DOWEL into the HIDDEN CAM.
X2
Y2
- Push sixteen HIDDEN CAMS (X2) into the ENDS (A, B, E, and F), UPRIGHTS (G and H) and BOTTOM (M).
Then, insert the metal end of a CAM DOWEL (Y2) into each HIDDEN CAM.
403933
www.sauder.com/services
4
Use your hammer to tap the
MOLDING CONNECTORS (FF)
into the notches in the MOLDINGS.
Flat end
Flat end
FF
FF
V
S
U
- Tap two MOLDING CONNECTORS (FF) into the notches in the MOLDINGS (S, U, and V).
www.sauder.com/services
403933
5
EE
(3 used)
NN
NN
S
U
NN
L
NN
V
BLACK 1--1/8” PAN HEAD SCREW
(8 used in this step)
BLACK 9/16” LARGE HEAD SCREW
(3 used in this step)
NN
PP
- Fasten the MOLDINGS (S, U, and V) to the HUTCH TOP (L). Use eight BLACK 1--1/8” PAN HEAD SCREWS (NN).
- Fasten the METAL BRACKETS (EE) to the HUTCH TOP (L). Use three BLACK 9/16” LARGE HEAD SCREWS (PP).
403933
www.sauder.com/services
6
V
O
L
F
Surface with
HIDDEN CAMS
E
U
BLACK 9/16” LARGE HEAD SCREW
(3 used in this step)
PP
- Fasten the VALANCE (O) to the HUTCH TOP (L). Use three BLACK 9/16” PAN HEAD SCREWS (PP).
- Fasten the HUTCH ENDS (E and F) to the MOLDINGS (U and V). Tighten four HIDDEN CAMS.
Caution
Risk of damage or
injury. Hidden Cams
must be completely
tightened. Hidden Cams
that are not completely
tightened may loosen,
and parts may separate.
To completely tighten:
Start
Arrow
Maximum Tighten
210 degrees
Minimum
190 degrees
www.sauder.com/services
Arrow
403933
7
F
K
E
Surface with
more holes
MM
These edges
should be even
MM
BLACK 1--7/8” FLAT HEAD SCREW
(4 used in this step)
MM
- Fasten the TOP (K) to the HUTCH ENDS (E and F). Use four BLACK 1--7/8” FLAT HEAD SCREWS (MM).
403933
www.sauder.com/services
403933
Meuble Télévision/Vidéo/Stéréo
NE PAS RAPPORTER L’ÉLÉMENT AU MAGASIN
Utilisez les instructions d’assemblage en français avec les
schémas étape par étape du manuel d’instruction en anglais.
Chaque étape en français correspond à la même étape en
anglais. La pièce devant être attachée à l’élément est
représentée en gris sur les schémas de chaque étape pour plus
de précision. Comparer la “Liste de pièces” ci--dessous avec la
“PARTS IDENTIFICATION” du manuel en anglais pour vous
familiariser avec les pièces avant l’assemblage.
Nous contacter en premier
www.sauder.com
Pour obtenir une service immédiate, notre site Internet
est disponible 24 heures sur 24, 7 jours sur 7,
pour commander des pièces de rechange,
des conseils d’assemblage, enregistrer tout produit
ou visualiser des produits Sauder.
Du lundi au vendredi de 9 h 00 à 17 h 30
(heure normale de l’est)
Aux États--Unis et au Canada (sauf jours fériés)
REMARQUE : Ce manuel d’instructions contient d’importantes
informations relatives à la sécurité. À lire et conserver pour
toute référence future.
Services aux consommateurs 1--800--523--3987
Les pièces de rechange sont, pour la plupart, expédiées
de notre établissement dans les un à deux jours ouvrables.
LISTE DE PIECES
REFERENCE
A
B
D
E
F
A l’usage exclusif du
Canada
Noter la date d’achat
de cet élément et
conserver le livret
pour future référence.
Pour contacter
Sauder en ce qui
concerne cet élément,
faire référence au
numéro de lot et
numéro de modèle en
appelant notre
numéro sans frais.
Ou écrire à :
Sauder Woodworking
P.O. Box 156
Archbold, Ohio 43502
É.--U.
Lot nº :
Date de
l’achat:
G
H
I
J
K
L
M
N
O
P
R
S
T
U
V
DESCRIPTION
QUANTITE
EXTRÉMITÉ DROITE
EXTRÉMITÉ GAUCHE . . . . . . . . . .
EXTRÉMITÉ
EXTRÉMITÉ DROITE DE
SURMEUBLE . . . . . . . . . . . . . . . . . .
EXTRÉMITÉ GAUCHE DE
SURMEUBLE
MONTANT DROIT . . . . . . . . . . . . . .
MONTANT GAUCHE
MONTANT . . . . . . . . . . . . . . . . . . . . .
TABLETTE
DESSUS . . . . . . . . . . . . . . . . . . . . . .
DESSUS DE SURMEUBLE
DESSOUS . . . . . . . . . . . . . . . . . . . . .
ARRIÈRE
LAMBREQUIN . . . . . . . . . . . . . . . . .
PORTE
SOCLE . . . . . . . . . . . . . . . . . . . . . . .
MOULURE AVANT
TABLETTE RÉGLABLE . . . . . . . . . .
MOULURE DROITE
MOULURE GAUCHE . . . . . . . . . . . .
1
1
2
1
1
1
1
1
1
1
1
1
1
1
2
1
1
1
1
1
LISTE DE PIECES
REFERENCE
W
X2
Y2
Z
AA
BB
CC
DD
EE
FF
GG
HH
II
JJ
KK
SS
LL
DESCRIPTION
QUANTITE
FIXATION TWIST--LOCKR
EXCENTRIQUE ESCAMOTABLE . .
CHEVILLE D’EXCENTRIQUE
PIED . . . . . . . . . . . . . . . . . . . . . . . . .
CHARNIÈRE
CONSOLE DE CHARNIÈRE . . . . . .
POIGNÉE
CONSOLE À ÉQUERRE . . . . . . . . .
CONSOLE EN MÉTAL
CONNECTEUR DE MOULURE . . .
COUVERCLE D’EXCENTRIQUE
TAMPON EN FEUTRE . . . . . . . . . .
PATIN
GOUPILLE EN MÉTAL . . . . . . . . . .
MANCHON EN CAOUTCHOUC
CONSOLE DE SÉCURITÉ . . . . . . .
ÉTIQUETTE DE MISE EN
GARDE
6
16
16
2
4
4
2
5
3
2
4
1
4
4
4
1
MM VIS NOIRE TÊTE PLATE 48 mm . .
NN VIS ARGENTÉE TÊTE GOUTTE
DE SUIF 28 mm
OO VIS ARGENTÉE À MÉTAUX
16 mm . . . . . . . . . . . . . . . . . . . . . . . .
PP VIS NOIRE TÊTE LARGE
14 mm
QQ VIS NOIRE TÊTE PLATE
13 mm . . . . . . . . . . . . . . . . . . . . . . . .
RR CLOU
15
1
8
4
17
8
61
OUTILS D’ASSEMBLAGE REQUIS
TOURNEVIS À TÊTE CRUCIFORME PHILLIPS
Nº 2 (POINTE GRANDEUR NATURE)
TOURNEVIS À POINTE DROITE
MARTEAU
ETAPE 1
ETAPE 3
L’usage d’une VIS trop longue peut endommager
l’élément. Avant de commencer l’assemblage,
séparer chaque type de VIS. Attentivement réviser
les schémas des VIS (VIS ILLUSTRÉES
GRANDEUR NATURE). Faire attention à la couleur
de chaque VIS. Il est possible que unes pièces
supplémentaires sont incluses avec l’élément.
Enfoncer seize EXCENTRIQUES ESCAMOTABLES (X2)
dans les EXTRÉMITÉS (A, B, E et F), les
MONTANTS (G et H) et le DESSOUS (M). Ensuite,
insérer une CHEVILLE D’EXCENTRIQUE (Y2) dans
chaque EXCENTRIQUE ESCAMOTABLE.
ETAPE 4
ETAPE 2
Assembler l’élément sur un sol à moquette ou sur le
carton vide pour éviter d’endommager l’élément ou
le sol.
Enfoncer une FIXATION TWIST--LOCKR
SAUDER (W) dans les gros trous des
EXTRÉMITÉS (D) et du MONTANT (I).
REMARQUE : Ne pas serrer les FIXATIONS
TWIST--LOCKR à ce stade de l’assemblage.
403933 Fr
Enfoncer deux CONNECTEURS DE MOULURE (FF)
dans les crans des MOULURES (S, U et V).
ETAPE 5
ETAPE 6
Fixer les MOULURES (S, U et V) au DESSUS DE
SURMEUBLE (L). Utiliser huit VIS NOIRES TÊTE
GOUTTE DE SUIF 28 mm (NN).
Fixer le LAMBREQUIN (O) au DESSUS DE
SURMEUBLE (L). Utiliser trois VIS NOIRES TÊTE
GOUTTE DE SUIF 14 mm (PP).
Fixer les CONSOLES EN MÉTAL (EE) au DESSUS
DE SURMEUBLE (L). Utiliser trois VIS NOIRES TÊTE
LARGE 14 mm (PP).
Fixer les EXTRÉMITÉS DE SURMEUBLE (E et F) aux
MOULURES (U et V). Serrer quatre EXCENTRIQUES
ESCAMOTABLES.
Attention: Utiliser cette page comme guide pour serrer
les Excentriques Escamotables à l’étape suivante.
Risque des dégâts ou blessures. Les Excentriques
Escamotables doivent être serrés à bloc. Si ne pas
serrer les Excentriques Escamotables à bloc, les
pièces peuvent séparer. Pour serrer à bloc :
Flèche
210 degrés -- serré correctement
190 degrés -- Non serré !
ETAPE 7
Fixer le DESSUS (K) aux EXTRÉMITÉS DE
SURMEUBLE (E et F). Utiliser quatre VIS NOIRES
TÊTE PLATE 48 mm (MM)
403933 Fr
ETAPE 8
ETAPE 10
Utilisation de la FIXATION TWIST--LOCKR SAUDER
(Consulter le schéma agrandi.)
Fixer les MONTANTS (G et H) à la TABLETTE (J).
Serrer quatre EXCENTRIQUES ESCAMOTABLES.
1. Insérer l’extrémité filetée de la FIXATION dans le
trou de la pièce attenante.
Fixer le DESSOUS (M) aux MONTANTS (G et H).
Utiliser quatre VIS NOIRES TÊTE PLATE
48 mm (MM)
REMARQUE : L’extrémité filetée de la FIXATION doit
rester complètement insérée dans le trou de la pièce
attenante lorsque l’on bloque la FIXATION.
2. Bien serrer la FIXATION à l’aide d’un tournevis
Phillips.
Fixer les EXTRÉMITÉS (D) et le MONTANT (I) au
DESSUS (K). Serrer six FIXATIONS TWIST--LOCKR.
ETAPE 9
Enfoncer un COUVERCLE D’EXCENTRIQUE (GG)
sur les EXCENTRIQUES ESCAMOTABLES dans les
EXTRÉMITÉS DE SURMEUBLE (E et F).
Fixer la TABLETTE (J) aux EXTRÉMITÉS (D) et au
MONTANT (I). Utiliser six VIS NOIRES TÊTE PLATE
48 mm (MM).
403933 Fr
ETAPE 11
Pour séparer les CHARNIÈRES des CONSOLES DE
CHARNIÈRE, faire tourner la vis de montage dans le
sens contraire des aiguilles d’une montre et la vis de
réglage dans le sens des aiguilles d’une montre.
Fixer quatre CONSOLES DE CHARNIÈRE (BB) aux
EXTRÉMITÉS (A et B). Utiliser les vis dans les
CONSOLES DE CHARNIÈRE.
ETAPE 12
Fixer les EXTRÉMITÉS (A et B) à la TABLETTE (J) et
au DESSOUS (M). Serrer huit EXCENTRIQUES
ESCAMOTABLES.
ETAPE 13
ETAPE 15
Fixer cinq CONSOLES À ÉQUERRE (DD) aux
EXTRÉMITÉS (A et B) et au DESSOUS (M). Utiliser
cinq VIS NOIRES TÊTE LARGE 14 mm (PP).
Relever, avec précaution, l’élément dans sa position
verticale.
REMARQUE : S’assurer que les chants des
CONSOLES À ÉQUERRE sont à fleur des chants des
EXTRÉMITÉS et du DESSOUS.
Fixer le SOCLE (R) aux EXTRÉMITÉS (A et B) et au
DESSOUS (M). Utiliser cinq VIS NOIRES TÊTE
LARGE 14 mm (PP).
Insérer les PIEDS (Z) dans les gros trous sur le
DESSOUS (M).
ETAPE 14
Avec précaution, retourner l’élément sur ses chants
avant. Placer l’ARRIÈRE (N) sur l’élément de façon à
ce que la surface non finie soit dirigée vers le haut.
Fixer deux CHARNIÈRES (AA) à une PORTE (P).
Utiliser quatre VIS NOIRE TÊTE PLATE
13 mm (QQ).
Fixer la PORTE (P) à l’EXTRÉMITÉ GAUCHE (B).
Enfiler les CHARNIÈRES (AA) sur les CONSOLES
DE CHARNIÈRE situées sur l’EXTRÉMITÉ GAUCHE.
Fixer la PORTE à l’aide de la vis de montage sur la
CONSOLE DE CHARNIÈRE. Consulter l’étape
suivante pour ajuster.
Décoller le TAMPON EN FEUTRE de la FICHE DE
TAMPONS EN FEUTRE (HH). Coller un TAMPON EN
FEUTRE sur la PORTE aux endroits où celle--ci entre
en contact avec le MONTANT GAUCHE (H).
Fixer une POIGNÉE (CC) à la PORTE (P). Utiliser
deux VIS ARGENTÉES À MÉTAUX 16 mm (OO).
Répéter cette étape pour l’autre PORTE (P).
Veiller à avoir des marges égales le long des quatre
chants de l’ARRIÈRE (N). Si besoin est, enfoncer sur
les coins opposés de l’élément pour s’assurer d’être «
d’équerre ».
Fixer l’ARRIÈRE (N) à l’élément à l’aide des
CLOUS (RR).
REMARQUE : Des lignes perforées ont été prévues
pour accéder facilement à l’ARRIÈRE. Découper avec
précaution les trous nécessaires.
À l’aide d’un marteau, enfoncer quatre PATINS (II)
dans les EXTRÉMITÉS (A et B).
403933 Fr
ETAPE 16
ETAPE 17
Consulter le schéma agrandi pour identifier les pièces
des CHARNIÈRES et CONSOLES DE CHARNIÈRE.
Apposer l’ÉTIQUETTE DE MISE EN GARDE (LL) au
DESSUS (K). Cette étiquette doit pouvoir être lisible
lorsque le téléviseur est enlevé de l’élément. Lorsque
le téléviseur est en place, il doit la dissimuler. Décoller
le film protecteur et apposer l’étiquette comme
l’indique le schéma.
Il faut peut--être ajuster les PORTES. Suivre les
indications ci--dessous pour ajuster.
RÉGLAGES DES PORTES :
Pour ajuster la PORTE latéralement
(horizontalement), desserrer la vis de montage
quelques tours et tourner la vis de réglage vers
l’intérieur ou vers l’extérieur. Serrer la vis de montage
après avoir ajusté.
Pour ajuster les PORTES de haut en bas
(verticalement), desserrer les deux vis qui
maintiennent les CONSOLES DE CHARNIÈRE à
l’EXTRÉMITÉ. Déplacer les PORTES verticalement à
l’emplacement désiré. Serrer les vis après
avoir ajusté.
Pour ajuster les PORTES vers l’intérieur où vers
l’extérieur (profondeur), desserrer la vis de montage
un tour et déplacer les PORTES vers l’intérieur ou
vers l’extérieur. Serrer la vis de montage après
avoir ajusté.
REMARQUE : Cette étiquette permanente est
prévue pour durer pendant toute la vie du produit. Une
fois apposée ne pas essayer de la retirer.
Enfoncer quatre MANCHONS EN
CAOUTCHOUC (KK) sur les GOUPILLES EN
MÉTAL (JJ). Insérer les GOUPILLES EN MÉTAL dans
les trous choisis dans les MONTANTS (G et H). Poser
la TABLETTE RÉGLABLE (T) sur les GOUPILLES
EN MÉTAL.
Il est recommandé d’utiliser la CONSOLE DE
SÉCURITÉ (SS) pour renforcer la stabilité. Utiliser
une VIS NOIRE TÊTE LARGE 14 mm (PP) dans le
haut de l’élément et une VIS NOIRE TÊTE GOUTTE
DE SUIF 48 mm (MM) dans un poteau mural.
REMARQUE : Prière de lire attentivement les
importantes informations concernant la sécurité qui
figurent sur la couverture arrière du manuel
d’instructions.
Ceci complète l’assemblage. Pour nettoyer, utiliser
l’encaustique pour meubles préférée ou un chiffon
humide. Essuyer.
403933 Fr
GARANTIE LIMITEE SUR 5 ANS
1. Les meubles SauderR sont garantis par Sauder
Woodworking Co. (Sauder) au profit de l’acheteur original
pendant une période de cinq ans à partir de la date d’achat
contre tout défaut dans les matériaux ou vice de fabrication
concernant les pièces des meubles. Le mot « défauts » tel
qu’il est utilisé sous les termes de cette garantie comprend
les imperfections des pièces qui empêchent
substantiellement l’utilisation du produit.
2. En vertu de la présente garantie, Sauder réparera ou
remplacera, à sa seule discrétion, toute pièce de meuble
défectueuse. Comme condition du remplacement de la pièce
jugée défectueuse, Sauder peut exiger une confirmation
indépendante du défaut allégué. Les pièces de rechange
seront garanties uniquement pendant la période restante de
la garantie originale. La présente garantie ne couvre pas le
coût du montage ou démontage, le transport, la main
d’œuvre ou les autres frais imprévus impliqués dans la
dépose d’une pièce défectueuse ou l’installation de la pièce
de rechange.
3. Cette garantie s’applique dans les cas d’utilisation
normale uniquement. La présente garantie ne saurait
couvrir les défauts qui surviendraient à la suite d’un
accident, d’une mauvaise utilisation ou d’un abus, d’un
dommage intentionnel, d’un incendie, d’une inondation,
d’une altération ou modification du produit, de négligence,
d’exposition ou d’utilisation du produit allant à l’encontre
de son usage prévu. Sauder ne sera en aucun cas
responsable des frais de réparation ou de remplacement de
tout article ayant été placé dans, sur ou à proximité de tout
mobilier Sauder.
4. La présente garantie ne s’applique que tant que le
produit continue d’être la propriété de l’acheteur original.
La garantie ne peut pas être transférée à des propriétaires
ou utilisateurs subséquents du produit, et sera
immédiatement invalidée dans le cas où le produit est
revendu, transféré, loué sous bail ou loué à une tierce
partie ou personne autre que l’acheteur original.
GARANTIE LIMITEE SUR 5
ANS (SUITE)
5. IL N’EXISTE PAS DE GARANTIES EXPRESSES
AUTRES QUE CELLES INDIQUÉES CI--DESSUS. EN
OUTRE, AUCUNE GARANTIE IMPLICITE Y COMPRIS,
MAIS NON DE FAÇON LIMITATIVE, TOUTE GARANTIE
IMPLICITE DE COMMERCIABILITÉ OU
D’ADAPTATION À UN USAGE PARTICULIER, NE
S’ÉTENDRA AU--DELÀ DU TERME DE LA PRÉSENTE
GARANTIE EXPRESSE. Certains états ne permettant pas
que des limites soient imposées quant à la durée d’une
garantie implicite, la limite ci--dessus peut donc ne pas être
applicable. SAUDER NE SERA EN AUCUN CAS
RESPONSABLE ENVERS QUICONQUE POUR PERTE
DE PROFIT OU POUR TOUT AUTRE DOMMAGE
SPÉCIAL, CONSÉCUTIF, INDIRECT, EXEMPLAIRE OU
ACCESSOIRE DE TOUTE SORTE QUELLE QU’EN
SOIT SA PROVENANCE, CONTRAT, DÉLIT,
RESPONSABILITÉ DU PRODUIT OU AUTRE. Certains
états ou provinces ne permettant pas l’exclusion ou la
limite aux responsabilités pour dommages accidentels ou
consécutifs, la limite ou l’exclusion ci--dessus peut ne pas
être applicable. La présente garantie vous donne des droits
légaux spécifiques et il est possible que vous ayez des droits
supplémentaires variant d’état en état ou de province en
province. En dehors des États--Unis, les droits légaux
spécifiques peuvent varier en fonction du pays de résidence
de l’acheteur original.
6. Pour toute question concernant la garantie ou toute
demande de réclamation, contactez Sauder en composant le
1--800--523--3987, en adressant un courrier électronique à
www.sauder.com ou bien encore en envoyant une télécopie
au 419--446--3444. Sauder peut exiger de soumettre les
demandes de réclamation sous garantie par écrit à Sauder
Woodworking Co., 502 Middle Street, Archbold, OH 43502
USA. Veuillez joindre votre ticket de caisse ou toute autre
preuve d’achat ainsi qu’une description spécifique du
défaut de produit.
403933 Fr
Avertissement
Avertissement (Suite)
Prière d’utiliser le mobilier à bon escient et avec
prudence. Une mauvaise utilisation peut être à l’origine
de risques d’accident ou peut endommager le mobilier
et les articles ménagers. Lire attentivement le tableau
suivant.
À surveiller :
S Les enfants qui grimpent sur le mobilier.
S Un enfant peut grimper sur le mobilier pour essayer
d’attraper un jouet ou tout autre objet.
S Les enfants jouèrent et sont actifs à proximité du
téléviseur.
S Mauvaise utilisation du mobilier qui supporte des
téléviseurs.
S Il est dangereux de placer un téléviseur qu’est trop
lourd qui recommandé sur des meubles.
S Tablettes surchargées.
S Déplacement inadéquat d’un mobilier qui n’est pas
conçu pour avoir des roulettes et n’en est pas
équipé.
Danger éventuel :
S Risque de blessures graves, voire mortelles.
S Un enfant qui grimpe sur un meuble risque de
déséquilibrer ce dernier et de le faire tomber.
S Un enfant qui joue avec un téléviseur risque de
provoquer le renversement de ce dernier.
S Risque de blessures graves, voire mortelles.
S Les téléviseurs peuvent être très lourds. De plus, le
poids et l’emplacement du tube image ont tendance
à rendre les téléviseurs instables et enclins à tomber
vers l’avant.
S Risque de blessure.
S Du mobilier mal équilibré risque de se renverser.
S Des tablettes surchargées risquent de casser.
S Le mobilier risque de se renverser ou de casser en
cas de déplacement inadéquat.
S Blessure physique. Le mobilier peut être très lourd.
Solution :
S Ne jamais laisser les enfants grimper sur le mobilier
ou jouer avec. Ne pas placer de jouets, d’aliments,
etc. sur les tablettes supérieures.
S Ne jamais utiliser un téléviseur plus large ou plus
lourd que la recommandation des instructions.
S Ce meuble est conçu pour être utilisé avec des
téléviseurs ne pesant pas plus du 43 kg et avec
dimensionnes que le permette reposer uniformément
sur la tablette.
S Veiller à apposer l’étiquette de mise en garde tel
qu’il l’est indiqué.
S Ne jamais excéder les limites de poids indiquées
dans les instructions.
S Pour charger les tablettes, commencer par remplir
celui du bas pour finir par celui du haut. Placer les
articles plus lourds sur les tablettes inférieures.
S Décharger les tablettes en commençant par celui
du haut avant de déplacer le mobilier.
S Ne pas pousser le mobilier, surtout sur la moquette.
Se faire aider par une autre personne pour soulever
l’élément et le mettre en place.
403933 Fr
8
D
K
I
Surface with
TWIST-LOCKR
FASTENERS
D
How to use the SAUDER TWIST-LOCKR FASTENER (Refer to the enlarged diagram.)
1. Insert the dowel end of the FASTENER into the hole of the adjoining part.
NOTE: The dowel end of the FASTENER must remain fully inserted in the hole of the adjoining part while locking the
FASTENER.
2. Tighten the FASTENER with a Phillips screwdriver as tight as possible.
- Fasten the ENDS (D) and UPRIGHT (I) to the TOP (K). Tighten six TWIST-LOCKR FASTENERS.
www.sauder.com/services
403933
9
GG
GG
F
D
I
J
E
Surface with
more holes
D
MM
MM
These edges
should be even
MM
BLACK 1--7/8” FLAT HEAD SCREW
(6 used in this step)
MM
- Push a CAM COVER (GG) onto the HIDDEN CAMS in the HUTCH ENDS (E and F).
- Fasten the SHELF (J) to the ENDS (D) and UPRIGHT (I). Use six BLACK 1--7/8” FLAT HEAD SCREWS (MM).
403933
www.sauder.com/services
10
Surface with HIDDEN
CONNECTORS
H
G
M
J
MM
MM
Maximum
210 degrees
Miniimum
190 degrees
This hole
must be here
Arrow
BLACK 1--7/8” FLAT HEAD SCREW
(4 used in this step)
MM
- Fasten the UPRIGHTS (G and H) to the SHELF (J). Tighten four HIDDEN CAMS.
- Fasten the BOTTOM (M) to the UPRIGHTS (G and H). Use four BLACK 1--7/8” FLAT HEAD SCREWS (MM).
www.sauder.com/services
403933
11
Mounting
screw
Adjusting
screw
BB
BB
AA
B
A
BB
- To separate the HINGES from the HINGE BRACKETS, turn the mounting screw counter--clockwise and the adjusting
screw clockwise.
- Fasten four HINGE BRACKETS (BB) to the ENDS (A and B). Use the screws in the HINGE BRACKETS.
403933
www.sauder.com/services
12
B
J
M
A
Maximum
210 degrees
Arrow
Miniimum
190 degrees
- Fasten the ENDS (A and B) to the SHELF (J) and BOTTOM (M). Tighten eight HIDDEN CAMS.
www.sauder.com/services
403933
13
R
B
M
A
Z
DD
DD
(5 used)
DD
BLACK 9/16” LARGE HEAD SCREW
(10 used in this step)
PP
- Fasten five ANGLE BRACKETS (DD) to the ENDS (A and B) and BOTTOM (M). Use five BLACK 9/16” LARGE
HEAD SCREWS (PP).
NOTE: Be sure the edges of the ANGLE BRACKETS are even with the edges of the ENDS and BOTTOM.
- Fasten the BASE (R) to the ENDS (A and B) and BOTTOM (M). Use five BLACK 9/16” LARGE HEAD SCREWS (PP).
- Insert the FEET (Z) into the large holes on the BOTTOM (M).
403933
www.sauder.com/services
14
Caution
Do not stand the unit upright without the
BACK fastened. The unit may collapse.
Notch
Unfinished
surface
N
A
M
B
II
NAIL
(61 used in this step)
RR
- Carefully turn your unit over onto its front edges. Lay the BACK (N) over your unit with the unfinished surface facing up.
- Make equal margins along all four edges of the BACK (N). Push on opposite corners of your unit if needed to make it
“square”.
- Fasten the BACK (N) to your unit using the NAILS (RR).
NOTE: Perforations have been provided for access through the BACK. Carefully cut out the holes needed.
- Use your hammer to tap four TACK GLIDES (II) into the ENDS (A and B).
www.sauder.com/services
403933
15
AA
P
HH
CC
P
B
H
HH
BLACK 1/2” FLAT HEAD SCREW
(8 used for the HINGES)
SILVER 5/8” MACHINE SCREW
(4 used for the PULLS)
OO
QQ
- Carefully stand your unit upright.
- Fasten two HINGES (AA) to a DOOR (P). Use four BLACK 1/2” FLAT HEAD SCREWS (QQ).
- Fasten the DOOR (P) to the LEFT END (B). Slide the HINGES (AA) onto the HINGE BRACKETS on the LEFT END.
Secure the DOOR with the mounting screw on the HINGE BRACKET. See the next step for adjustments.
- Peel the FELT DISC from the FELT DISC CARD (HH). Stick a FELT DISC on the DOOR where it comes in contact with
the LEFT UPRIGHT (H).
- Fasten a PULL (CC) to the DOOR (P). Use two SILVER 5/8” MACHINE SCREWS (OO).
- Repeat this step for the other DOOR (P).
403933
www.sauder.com/services
16
Adjusting screw
(horizontal)
Mounting screw
(depth)
(vertical adjustment)
Refer to the enlarged diagram to identify the parts on the HINGES and HINGE BRACKETS.
- The DOORS may need some adjustments. Follow the text below to make needed adjustments.
DOOR ADJUSTMENTS:
To adjust the DOORS from side to side (horizontal), loosen the mounting screw several turns, then turn the adjusting screw in
or out. Tighten the mounting screw after making adjustments.
To adjust the DOORS up and down (vertical), loosen both screws that fasten the HINGE BRACKETS to the END. Move the
DOORS up or down to the desired location. Tighten the screws after making adjustments.
To adjust the DOORS in or out (depth), loosen the mounting screw one turn and move the DOORS in or out, as needed.
Tighten the mounting screw after making adjustments.
www.sauder.com/services
403933
17
BLACK 1--7/8” FLAT HEAD SCREW
(1 used in this step)
MM
WARNING
Never use this furniture with a TV that is
too large or too heavy. Severe injury or
death can occur. The TV and furniture
will be unstable and may tip.
BLACK 9/16” LARGE HEAD SCREW
(1 used in this step)
--The TV must weigh less than 95 lbs.
--The base of the TV must be able to sit
completely on this shelf.
PP
SS
No load
LL
95 lbs.
K
40 lbs.
H
25 lbs.
T
JJ
(4 used)
50 lbs.
G
KK
- Apply the WARNING LABEL (LL) to the TOP (K). You should be able to read the label when the TV is removed from the
unit. When the TV is in place, it should hide the label. Peel off the backing and apply the label as shown in the diagram.
NOTE: This is a permanent label intended to last for the life of the product. Once applied, do not try to remove it.
- Push four RUBBER SLEEVES (KK) over the METAL PINS (JJ). Insert the METAL PINS into the hole locations of your
choice in the UPRIGHTS (G and H). Set the ADJUSTABLE SHELF (T) onto the METAL PINS.
- We recommend using the SAFETY BRACKET (SS) for added stability. Use a BLACK 9/16” LARGE HEAD SCREW (PP) into
the top of the unit and a BLACK 1--7/8” PAN HEAD SCREW (MM) into a stud in your wall.
NOTE: Please read the back page of the instruction booklet for important safety information.
This completes assembly. Clean with your favorite furniture polish or a damp cloth. Wipe dry.
403933
www.sauder.com/services
LIMITED 5-YEAR WARRANTY
1. SauderR furniture is warranted by Sauder
Woodworking Co. (Sauder) to the original purchaser for a
period of five years from the date of purchase against
defects in the material or workmanship of furniture
components. As used in this Warranty, “defects” mean
imperfections in components, which substantially impair
the utility of the product.
2. Under this Warranty, Sauder will (at its sole option)
repair or replace a defective furniture component. As a
condition of furnishing a replacement component claimed
to be defective, Sauder may require independent
confirmation of the claimed defect. Replacement parts will
be warranted for only the remaining period of the original
Warranty. This Warranty does not cover the cost of
assembly or disassembly, transportation, labor, or any
other incidental costs involved in the removal of a
defective part or the installation of the replacement part.
3. This Warranty applies under conditions of normal use
only. This Warranty does not apply to defects that result
from accident, misuse or abuse, intentional damage, fire,
flood, alteration or modification of the product,
negligence, exposure, or use of the product in a manner
inconsistent with its intended use. Sauder shall not be
liable for any expense to repair or replace any item placed
on, in, or around any Sauder furniture product.
4. This Warranty applies only as long as the product
continues to be held for use by the original purchaser. The
Warranty cannot be transferred to subsequent owners or
users of the product, and it shall be immediately
invalidated in the event that the product is resold,
transferred, leased or rented to any third party or person
other than the original purchaser.
5. THERE ARE NO OTHER EXPRESS WARRANTIES
OTHER THAN AS SET FORTH ABOVE.
FURTHERMORE, NO IMPLIED WARRANTY,
INCLUDING, BUT NOT LIMITED TO, ANY IMPLIED
WARRANTY OF MERCHANTABILITY OR FITNESS
FOR A PARTICULAR PURPOSE, SHALL EXTEND
BEYOND THE TERM OF THIS EXPRESS WARRANTY.
Some states do not allow limitations on how long an
implied warranty lasts, so the above limitation may not
apply to you. SAUDER SHALL HAVE NO LIABILITY
TO ANY PERSON FOR LOST PROFITS OR FOR ANY
SPECIAL, CONSEQUENTIAL, INDIRECT,
EXEMPLARY OR INCIDENTAL DAMAGES OF ANY
KIND WHETHER ARISING IN CONTRACT, TORT,
PRODUCT LIABILITY OR OTHERWISE. Some states
do not allow the exclusion or limitation of incidental or
consequential damages, so the above limitation or exclusion
may not apply to you. This warranty gives you specific
legal rights, and you may also have other rights which vary
from state to state. Outside the USA, specific legal rights
may vary depending on the country of residence of the
original purchaser.
6. For warranty inquiries or claims, you may contact
Sauder at 1--800--523--3987 or visit us at www.sauder.com.
Sauder may require warranty claims to be submitted in
writing to Sauder Woodworking Co.,
502 Middle Street, Archbold, OH 43502 USA. Please
include your sales receipt or other proof of purchase and a
specific description of the product defect.
403933
WARNING
Please use your furniture correctly and safely. Improper use can cause safety hazards,
or damage to your furniture or household items. Carefully read the following chart.
Look out for:
What can happen:
How to avoid the problem:
S Children climbing on furniture.
S A child may try to reach a toy or other
object by climbing on furniture.
S Children will play and be active near
the TV.
S Risk of injury or death.
S A child climbing on a piece of
furniture can make it top--heavy and
cause it to tip over.
S A child playing with a TV can cause it
to tip over.
S Never allow children to climb on or
play with furniture. Do not place toys,
food, etc. on the top shelves.
S Improper use of furniture to support
TVs.
S Setting a TV that is heavier than the
load rating on the furniture item is
hazardous.
S Risk of injury or death.
S TVs can be very heavy. Plus the
weight and location of the picture tube
tends to make TVs unbalanced and
prone to tipping forward.
S Never exceed the rating for the
maximum size and weight of TV
allowed.
S This product is designed and intended
for use with a TV weighing not more
than 95 pounds, and having
dimensions that will allow it to set
evenly on the shelf.
S Be sure you have applied the warning
label as instructed.
S Overloaded shelves.
S Risk of injury.
S Top--heavy furniture can tip over.
S Overloaded shelves can break.
S Never exceed the weight limits shown
in the instructions.
S Work from bottom to top when
loading shelves. Place the heavier items
on the lower shelves.
S Improperly moving furniture that is
not designed and equipped with casters.
S Furniture can tip over or break if
improperly moved.
S Physical injury. Furniture can be very
heavy.
S Unload shelves from top to bottom
before moving the furniture.
S Do not push furniture, especially on a
carpeted floor. Have a friend help you
lift the item and set it in place.
Certificate of Conformity
1. This certificate applies to the Sauder Woodworking Product identified by this Instruction Book.
2. This certificate applies to compliance of this product with the CPSC Ban on Lead--Containing
Paint (16 CFR 1303).
3. This product is manufactured by: Sauder Woodworking Company
502 Middle Street
Archbold, Ohio 43502
(419) 446--2711
August 2013
4. Date of Manufacture: ________________
403933


![Descargar - [ [ [ ANSEL ] ] ]](http://vs1.manualzilla.com/store/data/006268413_1-12223cddaa3301670b0a8998e4e61ac5-150x150.png)