1
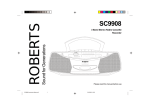
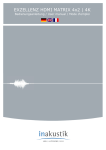
HDMI over Ethernet Extender
User Manual
Benutzerhandbuch
Manuel d’utilisateur
Manuale d’uso
No.38127
No.38128
English
Deutsch
Français
Italiano
Transmitter (TX)
Receiver (RX)
www.lindy.com
Tested to Comply with
FCC Standards
For Home and Office Use!
© LINDY Group - LINDY ELECTRONICS LIMITED & LINDY-ELEKTRONIK GMBH - FIRST EDITION (July 2013)
User Manual
English
User Manual
English
Introduction
Network Setup of TX and RX Extender units
Thank you for purchasing the LINDY HDMI over Ethernet Extender. This HDMI Extender allows
you to distribute an HDMI signal up to 1080p via Ethernet network to multiple displays for
applications such as digital signage, public display and large scale presentations. With support
for crystal-clear digital video, these extenders can take your distribution system to the next level.
This setup has to be used if you are using 1-to-many or many-to-many configurations.
These extenders convert the HDMI signal to IP broadcast signals. Network devices can be used
to distribute the signals. These extenders support 1-to-1, 1-to-many and also many-to-many
configurations, with the requirement of using managed network switches supporting broadcast
protocols. Because of bandwidth requirements this video broadcasts should use their own
dedicated network connections or should be used in a separate port based VLAN.
Step 1: Assign the computer’s IP address, i.e. 192.168.168.11, through Control Panel, Network
Connections, Local Area Connections, Status, Properties, Internet Protocol (TCP/IP). Press OK
to save the configuration.
Step 2: Turn on the Extender device to be configured. The red Power LED will light up, and
after 10 seconds the green Status LED will also light up. At this time press the Reset button
(about 5-10 seconds) until the green Status LED turns off.
Features
•
•
•
•
HDMI Extender TX and RX are setup via web browser. The default IP address of TX is
192.168.168.55 and of RX is 192.168.168.56. (This default IP address is always restored when
resetting!) An individual IP address must be assigned to each unit, i.e. IP:192.168.168.XX
(XX:1-255), Subnet mask 255.255.255.0, and MAC:00:0b:78:XX:XX-XX (XX:01-FF).
HDMI signal extension through Ethernet
Ability to cascade up to 3 layers of network switches
HDMI with HDCP support, 480i up to 1080p60@8bit supported, not 3D capable
Support for IR remote control back channel (IR: 940nm, 38kHz IR signals)
Step 3: Use an Ethernet Cable to connect the computer and the device. The Status LED will
flash in green.
Step 4: Use a web browser to access the unit
(TX:192.168.168.55, RX:192.168.168.56). Click
the System menu and setup the required IP
address, subnet mask, and MAC address as
mentioned above. It is recommended to label the
units with this setting.
Package Contents
•
•
•
Transmitter (TX) No.38127 or Receiver (RX) No.38128
Multi Country Power Supply with 4 adapters for EURO, US, UK, AUS/CN
This manual
Step 5: Click Apply button, the green Status LED should turn off.
Step 6: Turn off and disconnect the device.
Installation
1. Before connecting any extender equipment please switch off all devices
If you have any problems try to ping the connected device with the new IP address. You will
receive the reply if the connection is established. Remember that every Reset restores the
factory default values for IP address etc.!
2. Connect the HDMI display(s) to the Receiver(s) using HDMI cable
3. Connect the HDMI source(s) to the Transmitter(s) using HDMI cable
Trouble Shooting
4. If required connect the IR transmitter cable(s) and IR receiver cable(s) to the Extender
units and place them in appropriate position to the HDMI devices
•
Please only use HDTV/SDTV resolutions like 1080, 720, 576 and 480. Other resolutions
may require to copy the monitor EDID data into the TX.
5. Connect the power supplies
•
Please check if all power LEDs are lit. Eventually exchange / replace the power supply
•
Please check if all cable connections are seated well
•
Please check if you can ping the extender units
•
IR support is limited to 38kHz signals, IR signals in other frequency ranges, i.e. several
Sky receivers, are not supported
•
If you are not using a separated network, i.e. via VLAN configuration, your network may
suffer from extremely high traffic causing certain network components to fail. If this is the
case please contact an experienced network technician to set up your network
•
If you cannot locate the problem – and if it is NOT just a network problem – please contact
LINDY support team. The worldwide contact information is available from the LINDY
website.
1-to-many configuration with multiple Receivers (RX) / displays
6. Only use network switches that at least support port based VLAN management
functions and the broadcast protocol as well. Configure your network switch so that a
separate VLAN is used for the extender units. If your switch also allows you to define
ports as OUTPUT or INPUT you may also use this function. (The web configuration
page of the Extender units is not password protected and therefore open to any
user!)
7. The IP and MAC address of the TX and RX units must be different. The units can be
configured via web browser. Please refer to section Network Setup of TX and RX
Many-to-many configuration with multiple TX and multiple RX
8. Configure your network switch so that functionally linked TX and RX each use a
separate VLAN.
9. Connect your TX and RX Extenders to the network ports and power on all devices
This procedure refers to firmware v.1.07. It is subject to change without notice.
This procedure refers to firmware v.1.07. It is subject to change without notice.
Handbuch
Deutsch
Einführung
Mit dieser HDMI over Ethernet Extender-Serie können Sie HDMI-Signale bis 1080p über ein
Ethernet-Netzwerk an eine Vielzahl von HDMI-Displays verteilen. Es ist ideal geeignet für
Digital Signage, öffentliche Bildschirmanzeigen, Vorführ- und Videopräsentationen und immer,
wenn kristallklare Bilder verteilt werden sollen. Dieses System stellt Ihr Präsentationssystem auf
die nächsthöhere Ebene.
Die Extender konvertieren das HDMI- in ein IP-Broadcast-Signal. Dieses kann mit
Netzwerkgeräten (Switches, …) verteilt werden. Die Extender unterstützen Übertragungen in
den Modi „1-an-1“, „1-an-Viele“ und „Viele-an-Viele“ , was die Verwendung von
Netzwerkswitches mit Managementfunktionen und mit Unterstützung der Broadcast-Protokolle
zwingend erfordert. Wegen der Bandbreitenanforderungen sollten diese Video-Broadcasts
immer in einem eigenen oder per Port-based-VLAN abgeschlossenen Netz erfolgen.
Eigenschaften
•
•
•
•
HDMI Verteilsystem über Ethernet
Möglichkeit zur Kaskadierung über 3 Ebenen mit Netzwerkswitches
HDMI mit HDCP kompatibel, unterstützt 480i bis 1080p60@8 Bit, 3D nicht unterstützt
Unterstützt Rückkanal für IR Fernbedienungssignale (IR: 940nm, 38kHz)
Lieferumfang
•
•
•
Transmitter (TX) Art.-Nr. 38127 oder Receiver (RX) Art.-Nr.38128
Steckernetzteil mit 4 Adaptern für EURO, US, UK, AUS/CN Steckdosen
Dieses Handbuch
Installation
1.
2.
3.
4.
Schalten Sie alle Geräte aus bevor Sie mit der Installation beginnen
Verbinden Sie das/die HDMI Display(s) mit dem/n Receiver/n (RX)
Verbinden Sie die HDMI Quelle(n) mit dem/n Transmitter/n (TX)
Falls erforderlich, schließen Sie die IR Transmitter und IR-Receiverkabel an und
positionieren Sie die Sender/Empfänger in der richtigen Position zu den Geräten
5. Schließen Sie die Netzteile an
1-an-Viele-Konfiguration mit mehreren Receivern (RX) und Displays
6. Verwenden Sie ausschließlich Netzwerk-Switches mit Unterstützung von Portbasiertem VLAN sowie für das Broadcast Protokoll! Konfigurieren Sie ihren Switch so,
dass die Extender in einem separaten VLAN arbeiten. Falls Ihr Switch auch die
Definition von INPUT- und OUTPUT-Ports erlaubt, können Sie dies optional
verwenden. (HINWEIS: Die Web-Konfigurationsseiten der Extender sind nicht
Passwort-geschützt und frei zugänglich für jeden User!)
7. IP- und MAC-Adressen der TX und RX müssen alle unterschiedlich sein; Sie werden
per Web-Browser konfiguriert, siehe Abschnitt Netzwerkkonfiguration TX & RX
Viele-an-Viele-Konfiguration mit mehreren RX und mehreren TX
8. Konfigurieren Sie Ihren Switch so, dass funktional verbundene TX und RX jeweils in
einem eigenen abgeschlossenen VLAN arbeiten
9. Verbinden Sie die RX und TX mit dem Netzwerk und schalten Sie alles ein.
Die Installationsanleitung bezieht sich auf den Stand v.1.07 – Es kann jederzeit ohne Ankündigung geändert werden
Handbuch
Deutsch
Netzwerkkonfiguration TX & RX
Diese Konfiguration ist für 1-an-Viele- und Viele-an-Viele-Verbindungen zwingend erforderlich.
HDMI Extender TX und RX werden via Web Browser konfiguriert. Die Default IP-Adresse des
TX ist 192.168.168.55 und die des RX ist 192.168.168.56. (Auf diese Default IP-Adresse wird
bei jedem Reset wieder zurückgesetzt!) Jeder TX und RX benötigt eine individuelle IP-Adresse,
z.B. IP:192.168.168.XX (XX:1-255), Subnetz-Maske 255.255.255.0, und MAC:00:0b:78:XX:XXXX (XX:01-FF).
Schritt 1: Ändern Sie die IP Adresse des Computers z.B. auf 192.168.168.11, via:
Systemsteuerung > Netzwerkverbindungen > LAN Verbindung >Eigenschaften > TCP/IP
Protokoll > Eigenschaften > Folgende … verwenden. Drücken Sie OK zum Speichern.
Schritt 2: Schalten Sie den zu konfigurierenden Extender-Unit ein, die Power LED leuchtet rot
und nach ca. 10 Sekunden leuchtet die grüne Status LED. Drücken Sie nun den Reset-Taster,
z.B. mit einer Büroklammer, etwa 5-10 Sekunden bis die grüne Status LED erlischt.
Schritt 3: Verwenden Sie ein Patchkabel um den Extender an den Rechner anzuschließen –
die Status LED sollte nun grün blinken.
Schritt 4: Rufen Sie im Web Browser die IP Adresse
des
Extenders
auf:
TX:192.168.168.55,
RX:192.168.168.56. Klicken Sie auf System und
geben Sie die neue IP-Adresse, Subnetz Maske,
und MAC Adresse ein wie oben vorgegeben.
Schritt 5: Klicken Sie auf den Apply Button, die grüne Status LED sollte nun erlöschen.
Schritt 6: Schalten Sie den Extender aus und ziehen Sie das Patchkabel ab.
Um sicher zu gehen, dass die Extender-Unit korrekt erreichbar ist, können Sie vom WindowsEingabeprompt einen Ping Request absetzen. Beachten Sie aber die neue IP Adresse und die
Tatsache, dass ein Reset wieder die Default IP Adresse setzt.
Fehlersuche und -beseitigung
•
Verwenden Sie bitte nur HDTV/SDTV Auflösungen 1080, 720, 576 und 480. Andere Auflösungen erfordern möglicherweise das Kopieren der Monitor-EDID-Datei in den TX.
•
Prüfen Sie ob alle Power LEDs leuchten und tauschen/ersetzen Sie ggf. das Netzteil
•
Prüfen Sie alle Kabelverbindungen auf festen Sitz
•
Prüfen Sie ob der Extender auf einen Ping Request antwortet (s.o.)
•
IR Fernbedienungsunterstützung ist auf Fernbedienungen im am weitesten verbreiteten
38kHz Bereich beschränkt – Achtung: Manche Sky-Receiver verwenden andere
Frequenzen
•
Falls Sie kein via VLAN abgetrenntes Netzwerk verwenden kann es zu Überlastungen im
und Ausfällen Netz kommen. Falls dies der Fall ist lassen Sie ihr Netzwerk von einem
erfahrenen Netzwerktechniker konfigurieren.
•
Falls Sie das Problem nicht lokalisieren können – und falls kein Netzwerkproblem vorliegt
– kontaktieren Sie bitte den LINDY Support weltweit unter den auf LINDY.com
angegebenen Kontaktadressen
Die Installationsanleitung bezieht sich auf den Stand v.1.07 – Es kann jederzeit ohne Ankündigung geändert werden
Manuel d‘utilisateur
Français
Introduction
Avec cette série d’Extender HDMI over Ethernet LINDY, vous pouvez distribuer des signaux
HDMI jusqu’au 1080p via un réseau Ethernet à une grande variété d’écrans HDMI. C’est une
solution idéale en Digital Signage, les affichages publiques, vos présentations vidéo et à
chaque fois que des images de qualités cristallines devront être distribuées. Ce système
permettra d’élever votre installation au niveau supérieur
Les extenders convertissent les signaux HDMI en signaux Broadcast IP, ce qui permettra de
les distribuer au travers de périphériques réseau (switchs,…). Les extenders prennent en
charge les transferts dans les modes « 1 :1 », « 1 vers plusieurs » et « plusieurs vers
plusieurs », rendant nécessaire l’utilisation de commutateurs réseau avec des fonctions de
management et la prise en charge des protocoles de Broadcast. Ces Broacasts vidéo devraient
être, en raison des besoins de bande passante élevés, utilisés sur un réseau dédié ou dans une
configuration réseau avec VLAN.
Caractéristiques
•
•
•
•
Système de distribution HDMI sur Ethernet
Cascadable sur 3 niveaux avec switch Ethernet
Compatible HDMI avec HDCP, prise en charge du 480i au 1080p60@8 bit, la 3D n’est
pas prise en charge
Prise en charge du canal de retour pour les signaux IR (IR : 940nm, 38kHz)
Livraison
•
•
•
Emetteur (TX) N° Art. 38127 ou récepteur (RX) N° Art. 38128
Alimentation avec 4 adaptateurs EURO, US, UK, AUS/CN
Ce manuel
Installation
1.
2.
3.
4.
5.
6.
7.
8.
9.
Eteignez tous les appareils avant de commencer l‘installation
Connectez le(les) écran(s) HDMI avec le(les) récepteur(s) (RX)
Connectez la(les) source(s) avec le(les) émetteur(s) (TX)
Si requis, connectez les câbles transmetteur et récepteurs IR et positionnez les de façon
adéquate par rapport aux appareils.
Branchez les alimentations
Configuration « 1 vers plusieurs » avec plusieurs récepteurs (RX) et écrans
Utilisez exclusivement des switchs Ethernet avec des ports prenant en charge la fonction
VLAN ainsi que le protocole Broadcast ! Configurez votre switch de tel manière que les
extenders fonctionnent dans un VLAN dédié. Vous pourrez optionnellement utiliser la
définition des ports INPUT et OUTPUT si votre switch le permet. Note : l’interface de
configuration Web des extenders n’est pas protégée par mot de passe et est accessible
à tous les utilisateurs !
Les adresses IP et MAC des TX et RX doivent toutes être différentes, elles sont
configurables par navigateur Web, voir paragraphe Configuration réseau TX & RX.
Configuration « plusieurs vers plusieurs » avec plusieurs TX et RX
Configurez votre switch de tel manière que chaque TX et RX, reliés fonctionnellement,
travaillent dans leur propre VLAN.
Connectez les RX et TX avec le réseau et mettez le tout sous tension.
Ces instructions se réfèrent au firmware v.1.07 et peuvent être modifiés à tout moment et sans préavis.
Manuel utilisateur
Français
Configuration réseau TX & RX
Cette configuration est obligatoire pour les liaisons « 1 vers plusieurs» et «plusieurs vers
plusieurs».
Les extenders HDMI TX et RX sont configurés via navigateur Web. L’adresse IP par défaut des
TX est 192.168.168.55 et celle des RX est 192.168.168.56. (tout Reset remettra ces adresses
IP par défaut !) Chaques TX et RX nécessitent une adresse IP individuelle, par exe.
IP:192.168.168.XX
(XX:1-255),
masque
de
sous
réseau
255.255.255.0,
et
MAC:00:0b:78:XX:XX-XX (XX:01-FF).
Etape 1: changez l’adresse IP de l’ordinateur sur 192.168.168.11 par exemple, via: Panneau
de configuration > afficher l’état et la gestion du réseau > connexion au réseau local >propriétés
> TCP/IP version 4 > propriétés > rentrez l‘adresse. Cliquez sur OK pour enregistrer.
Etape 2: Mettez l’unité extender à configurer sous tension, la LED Power s’allume en rouge et
après 10 secondes la LED Status sera verte. Appuyez à présent sur le bouton Reset, avec un
trombone par exemple, environ 5-10 secondes jusqu’à ce que la LED verte Status s’éteigne.
Etape 3: Utilisez un câble réseau patch pour relier l’extender à l’ordinateur – la LED Status
clignotera en vert.
Etape 4: Entrez l’adresse IP de l’extender dans
votre
navigateur
Web:
TX:192.168.168.55,
RX:192.168.168.56. Cliquez sur System et entrez la
nouvelle adresse IP, masque de sous réseau,et
adresse MAC comme spécifié ci-dessus.
Etape 5: Cliquez sur Apply, la LED Status verte devrait s’éteindre.
Etape 6: Mettez l’extender hors tension et déconnectez le câble patch.
Pour vous assurez du bon paramétrage et de l’accessibilité de l’unité extender, vous pouvez
faire une requête PING à l’aide de l’invite de commandes Windows. Notez tout de même qu’un
reset remettra l’adresse IP par défaut.
Recherche de panne et dépannage
•
•
•
•
•
•
•
Veuillez, s’il vous plait, n’utiliser que des résolutions HDTV/SDTV 1080, 720, 576 et 480.
D’autres résolutions peuvent exiger la copie des données EDID de l’écran au TX.
Vérifiez que toutes les LED Power s’allument et inverser/remplacer l’alimentation si
nécessaire
Vérifiez que tous les câbles soient bien connectés
Testez la réponse à la requête PING de l’extender (voir ci-dessus)
La prise en charge des télécommandes IR limité à celles les plus couramment utilisées
dans la gamme de fréquence de 38kHz – Attention: certains récepteurs satelliteutilisent
d’autres fréquences
Si vous ne pouvez utiliser un réseau séparé via VLAN, une congestion ou des pannes
réseau peuvent s’en suivre. Dans ce cas faites appel à un technicien réseau pour
configurer votre équipement.
Si vous ne pouvez localiser le problème, et s’il n’y a pas de problème au niveau de votre
réseau, veuillez s’il vous plait prendre contact avec le support technique LINDY sous les
adresses indiquées sur LINDY.com.
Ces instructions se réfèrent au firmware v.1.07 et peuvent être modifiés à tout moment et sans préavis.
Manuale d’uso
Italiano
Introduzione
Manuale d’uso
Italiano
Configurazione di rete delle unità TX e RX
Grazie per aver acquistato un Extender della serie HDMI over Ethernet LINDY. Questa linea di prodotti
consente di distribuire segnali HDMI fino a 1080p su una rete Ethernet verso display multipli per
applicazioni come Digital Signage, Monitor Pubblici e presentazioni su larga scala. Con il il supporto del
video digitale di qualità Crystal-Clear la vostra distribuzione video raggiungerà livelli qualitativi superiori.
Questi extender convertono il segnale HDMI in un segnale broadcast su IP. E’ possibile distribuire il
segnale con normali apparati di rete e questa famiglia di prodotti consente di realizzare distribuzioni 1:1
(punto-punto), 1 a molti (punto-multipunto) e, se collegato a reti con switch “managed” con il supporto
per trasmissioni broadcast, anche molti a molti. A causa dell’elevato consumo di banda conviene
comunque utilizzare questi dispositivi su reti dedicate o su VLAN port based separate.
Questa procedura è utilizzata se state utilizzando le configurazioni 1 a molti o molti a molti.
Le unità TX e RX dell’Extender HDMI sono configurate con un browser web. L’indirizzo di
default IP del TX è 192.168.168.55 mentre per l’RX è 192.168.168.56. (Questi indirizzi
vengono sempre ripristinati dopo un Reset). Un indirizzo IP individuale va sempre assegnato
ad ogni unità. Es. IP:192.168.168.XX (XX:1-255), Subnet mask 255.255.255.0, e
MAC:00:0b:78:XX:XX-XX (XX:01-FF).
Caratteristiche
Step 2: Accendete l’extender da configurare. Il LED “Power” rosso di accenderà e dopo 10
secondi anche il il LED “Status” verde si accenderà. A questo punto premente il pulsante
Reset (per circa 5-10 secondi) fino a quando il LED Status verde si spegne.
•
•
•
•
Distribuzione del segnale HDMI su reti Ethernet
Possibilità di cascata fino a 3 livelli di switch di rete
Supporta segnali HDMI con HDCP, risoluzioni da 480i fino a 1080p60@8bit (NON
supporta il 3D)
Supporta back channel per ripetizione di telecomandi IR (IR: 940nm, frequenza 38kHz)
Contenuto della confezione
•
•
•
Trasmettitore (TX) art.38127 oppure Ricevitore (RX) Art.38128
Alimentatore Multi Country con 4 adattatori per prese EURO, US, UK, AUS/CN
Questo manuale
Step 1: Assegnate un indirizzo IP al vostro computer incluso nella stessa sottorete degli
extender (Es. 192.168.168.11) in Pannello di Controllo -> Connessioni di Rete ->
Connessione alla rete locale -> Stato -> Proprietà -> Protocollo Internet (TCP/IP). Premete
OK per salvare la configurazione.
Step 3: Utilizzate un cavo Ethernet per collegare il PC al dispositivo. Il LED Status
lampeggerà in verde.
Step 4: Utilizzate un browser web per accedere
all’apparato (indirizzo TX: 192.168.168.55,
indirizzo RX: 192.168.168.56). Fate click sul
menù System e modificate l’indirizzo IP, subnet
mask, and MAC come richiesto dalla vostra
installazione. Vi consigliamo di contrassegnare
l’unità con queste impostazioni per facilitarne il controllo.
Step 5: Fate Click sul pulsante Apply, dopo di che il LED verde Status dovrebbe spegnersi.
Installazione
1.
2.
3.
4.
Prima di tutto spegnete tutti I dispositive coinvolti nell’installazione
Collegate i display HDMI ai moduli ricevitori (RX) utilizzando cavi HDMI standard
Collegate le sorgenti HDMI ai moduli trasmettitori (TX) utilizzando cavi HDMI standard
Se richiesto collegate i cavi dei trasmettitori IR e dei ricevitori IR collocandoli in modo da
poter controllare correttamente gli apparati con i relativi telecomandi IR
5. Collegate gli alimentatori
-> Configurazione 1 a molti con ricevitori (RX) e display multipli
6. Utilizzate solo switch che possano almeno gestire delle VLAN port based e la gestione
dei protocolli di di trasmissione broadcast. Configurate il vostro switch in modo che le
unità dell’extender si trovino su una VLAN dedicata. Se il vostro switch consente anche
di configurare quali porte devono funzionare in Input e quali in Output fatelo pure.(la
pagina web di configurazione degli extender non è protetta e quindi accessibile a
qualsiasi utente!)
7. L’indirizzo IP e quello MAC di ciascuna unità degli extender devono essere differenti.
Questi parametri sono configurabili nella pagina di configurazione delle singole unità. Per
maggiori dettagli consultate la sezione Configurazione di rete delle unità TX e RX
-> Configurazione molti a molti con trasmettitori (TX) e ricevitori (RX) multipli
6. Configurate il vostro switch di rete in modo che i gruppi di trasmissione (TX con tutti gli
RX ad esso connesso) utilizzino delle VLAN separate.
7. Collegate le vostre unità TX e RX alle porte ethernet e accendete tutti i dispositivi
Ces instructions se réfèrent au firmware v.1.07 et peuvent être modifiés à tout moment et sans préavis.
Step 6:Spegnete e disconnettete il dispositivo.
Se avete qualsiasi problema provate a fare un ping sul nuovo indirizzo IP. Se la
connessione è correttamente stabilita riceverete risposta. Ricordate che dopo ogni Reset
vengono ripristinati gli indirizzi assegnati in Fabbrica!
Risoluzione dei problemi
•
•
•
•
•
•
•
Per favore utilizzate solo risoluzioni HDTV / SDTV come 1080, 720, 576 e 480. Altre
risoluzione possono richiedere la copia del segnale EDID del monitor nell’unità TX.
Per favore verificate se tutti i LED si accendono correttamente. Nel caso risultino spenti o
attenuati provate (se possibile) a sostituire l’alimentatore.
Controllate sempre che tutti connettori siano inseriti correttamente e a fondo.
Controllate sempre che le unità dell’extender rispondano al ping.
Il supporto per i telecomandi IR è limitato a 38kHz. I segnali inviati su frequenze differenti
(per esempio quelli dei ricevitori SKY) non sono supportati
Se non state utilizzando una rete dedicata (es. una VLAN) la vostra infrastruttura può
risultare rallentata dall’elevato traffico generato dalle trasmissioni broadcast rendendo
inaccessibili alcuni dispositivi. In questo caso contattate un tecnico specializzato per
ottimizzare e configurare correttamente la vostra rete.
Nel caso non riusciate ad identificare il problema e questo non è chiaramente un
problema di rete potete contattare il Team di Supporto LINDY ai recapiti riportati sui siti
nazionali LINDY.
Ces instructions se réfèrent au firmware v.1.07 et peuvent être modifiés à tout moment et sans préavis.
CE/FCC Statement
Technical Specifications
Operating Temperature Range
Operating Humidity Range
Supported HDMI Formats
Video Output HDMI
Transmission Distance
Power consumption
IR wave length & frequency
Dimension (L×W×H)
Net Weight
TX (Transmitter Module)
RX (Receiver Module)
Recycling Information
-5 to +35°C (+23 to +95°F) - use only in well-ventilated areas
5 to 90% RH (Non Condensing) – for inhouse use only
SDTV/HDTV:480i/576i/480P/576P/720P/1080i/1080P
Video Output HDMI, max 1080p, 8 bit, HDCP supported
1080P 8 bit 120m (Maximum) over direct Cat.5e/6 /24AWG/Solid
Or 3 layers of network switches
Power consumption TX: 3 watts; RX: 3 watts (Maximum)
940 nm, 38kHz
104 x 94 x 25 mm
Receiver: ~220g,Transmitter: ~220g
Default IP address: 192.168.168.55
MAC address: 00:0b:78:00:60:01
Default IP address: 192.168.168.56
MAC address: 00:0b:78:00:60:02
FCC Certification
This equipment has been tested and found to comply with the limits for a Class B digital device, pursuant
to part 15 of the FCC Rules. These limits are designed to provide reasonable protection against harmful
interference in a residential installation.
You are cautioned that changes or modification not expressly approved by the party responsible for
compliance could void your authority to operate the equipment.
Operation is subject to the following two conditions:
1. This device may not cause harmful interference, and
2. This device must accept any interference received, including interference that may cause undesired
operation.
CE Certification
This equipment complies with the requirements relating to Electromagnetic Compatibility Standards
EN55022/EN55024 and the further standards cited therein. It must be used with shielded cables only.
It has been manufactured under the scope of RoHS compliance.
WEEE (Waste of Electrical and Electronic Equipment),
Recycling of Electronic Products
Europe, United Kingdom
In 2006 the European Union introduced regulations (WEEE) for the collection and recycling of all waste
electrical and electronic equipment. It is no longer allowable to simply throw away electrical and
electronic equipment. Instead, these products must enter the recycling process.
Each individual EU member state has implemented the WEEE regulations into national law in slightly
different ways. Please follow your national law when you want to dispose of any electrical or electronic
products. More details can be obtained from your national WEEE recycling agency.
Germany / Deutschland
Die Europäische Union hat mit der WEEE Direktive Regelungen für die Verschrottung und das Recycling
von Elektro- und Elektronikprodukten geschaffen. Diese wurden im Elektro- und Elektronikgerätegesetz
– ElektroG in deutsches Recht umgesetzt. Dieses Gesetz verbietet das Entsorgen von entsprechenden,
auch alten, Elektro- und Elektronikgeräten über die Hausmülltonne! Diese Geräte müssen den lokalen
Sammelsystemen bzw. örtlichen Sammelstellen zugeführt werden! Dort werden sie kostenlos entgegen
genommen. Die Kosten für den weiteren Recyclingprozess übernimmt die Gesamtheit der
Gerätehersteller.
France
En 2006, l'union Européenne a introduit la nouvelle réglementation (DEEE) pour le recyclage de tout
équipement électrique et électronique.
Chaque Etat membre de l’ Union Européenne a mis en application la nouvelle réglementation DEEE de
manières légèrement différentes. Veuillez suivre le décret d’application correspondant à l’élimination des
déchets électriques ou électroniques de votre pays.
Italy
Nel 2006 l’unione europea ha introdotto regolamentazioni (WEEE) per la raccolta e il riciclo di
apparecchi elettrici ed elettronici. Non è più consentito semplicemente gettare queste apparecchiature,
devono essere riciclate. Ogni stato membro dell’ EU ha tramutato le direttive WEEE in leggi statali in
varie misure. Fare riferimento alle leggi del proprio Stato quando si dispone di un apparecchio elettrico o
elettronico.
Per ulteriori dettagli fare riferimento alla direttiva WEEE sul riciclaggio del proprio Stato.
CE Konformitätserklärung - Deutsch
Dieses Produkt entspricht den einschlägigen EMV Richtlinien der EU für IT-Equipment und darf nur
zusammen mit abgeschirmten Kabeln verwendet werden.
Diese Geräte wurden unter Berücksichtigung der RoHS Vorgaben hergestellt.
Die formelle Konformitätserklärung können wir Ihnen auf Anforderung zur Verfügung stellen
LINDY Herstellergarantie – Hinweis für Kunden in Deutschland
LINDY gewährt für dieses Produkt über die gesetzliche Regelung in Deutschland hinaus eine
zweijährige Herstellergarantie ab Kaufdatum. Die detaillierten Bedingungen dieser Garantie finden Sie
auf der LINDY Website aufgelistet bei den AGBs.
LINDY No. 38127, 38128
1st Edition, July 2013
www.lindy.com
Tested to Comply with
FCC Standards
For Home and Office Use!