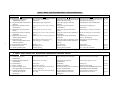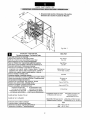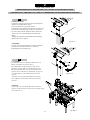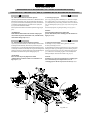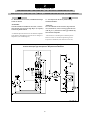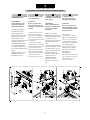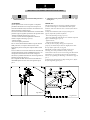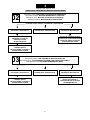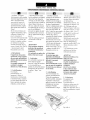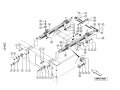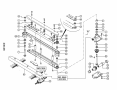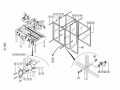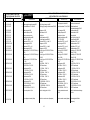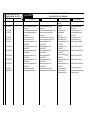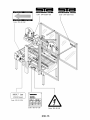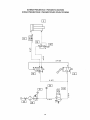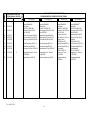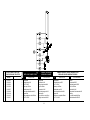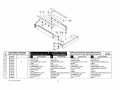
1
STA F47
I
Manuale di uso,
manutenzione e
parti di ricambio
E
Use, maintenance
and spare parts
handbook
F
Manuel d’utilisation,
entretien et de
pièces détachées
D
Anleitung für Betrieb,
Service und
Ersatzteile
Codice / Code
Code / Kode
851-03-714
Catalogo / Catalogue
Catalogue / Katalog
Nr. 232-02-01
SULLA MACCHINA DOVRÁ
OPERARE SOLAMENTE
PERSONALE
PRECEDENTEMENTE
ADDESTRATO.
SEUL UN PERSONNEL
PRÉCÉDEMMENT ENTRAÎNÉ
DEVRA INTERVENIR SUR LA
MACHINE.
DIE MASCHINE DARF NUR
VON GESCHULTEM
PERSONAL BEDIENT
WERDEN.
THE MACHINE SHOULD BE
OPERATED EXCLUSIVELY
BY PREVIOUSLY TRAINED
PERSONNEL.
I
E
F
Prima
- leggere le istruzioni di
preparazione della macchina
(vedere parte 2);
- controllare tutte le protezioni
(carter) sulla macchina e
sostituire immediatamente le
parti usurate o rotte con
ricambi originali;
- assicurarsi che sulla macchina
non vi siano oggetti o utensili e
che la stessa sia ben pulita;
- leggere attentamente il
manuale per Uso,
Manutenzione e Parti di
ricambio;
- leggere tutte le targhette
applicate alla macchina.
Durante
- non indossare indumenti che
possano venire impigliati da
parti in movimento;
- non mettere le mani od
oggetti impropri nel campo di
lavoro della macchina;
- non caricare la macchina con
peso superiore a quello
consigliato dal costruttore.
Dopo
- arrestare sempre il motore
elettrico premendo il tasto
rosso dell’ interruttore;
- interrompere sempre
l’alimentazione di corrente
elettrica e dell’aria compressa.
D
ALLGEMEINE
NORMES GÉNÉRALES DE
SICHERHEITSREGELN
SÉCURITÉ
Für Betrieb und Service der
Pour utiliser la machine ou en
Maschine sind folgende Regeln
effectuer l’entretien, lire
zu beachten:
attentivement les régles
suivantes:
GENERAL SAFETY
NORME GENERALI DI
REGULATIONS
SICUREZZA
Before using the machine or
Per usare la macchina o fare
carrying out maintenance
manutenzione, leggere
attentamente le seguenti norme: operations read the following
instructions very carefully:
Before
- read the instructions about
how to set up the machine (see
part 2);
- check all the safety guards on
the machine and immediately
replace any worn or broken
parts with original spares;
- make sure that no tools or
other objects have been left
lying on the machine and that
the machine itself is perfectly
clean;
- read the Use, Maintenance
and Spare Parts Handbook
very carefully;
- read all the labels and plates
applied to the machine.
Avant
- lire les instructions
concernant la préparation de la
machine (voir partie 2);
- contrôler tous les dispositifs
de protection (carter) sur la
machine et remplacer
immédiatement les pièces usées
ou cassées par des pièces
d’origine;
- s’assurer qu’aucun objet ou
outil n’a été laissé sur la
machine et qu’elle est bien
propre;
- lire attentivement le manuel
d’Utilisation, d’Entretien et de
Pièces détachées;
- lire toutes les plaquettes
appliquées sur la machine.
During
- do not wear clothing that
could get tangled up in the
moving parts of the machine;
- do not put the hands or any
kind of object inside the field of
operation of the machine;
- do not load the machine with
boxes heavier than those
recommended by the
manufacturer.
Pendant
- ne porter aucun vêtement
susceptible d’être pris dans les
parties en mouvement;
- ne mettre ni les mains ni des
objets impropres dans la zone
de travail de la machine;
- éviter de charger la machine
de boîtes dont le poids dépasse
celui qu’indique le
constructeur.
After
- always stop the electric motor
by pressing the red button on
the switch;
- switch off the electric power
and compressed air supply.
Aprés
- arrêter toujours le moteur en
pressant la touche rouge de
l’interrupteur;
- débrancher l’alimentation
d’air comprimé.
3
Vorher
- lesen Sie die Anleitung zur
Vorbereitung der Maschine
(siehe Teil 2);
- kontrollieren Sie alle
Abdeckungen an der Maschine
und ersetzen Sie verschleißte
oder gebrochene Teile sofort
mit Originalersatzteilen;
- vergewissern Sie sich, daß
sich auf der Maschine keine
Gegenstände oder Werkzeuge
befinden und daß sie sauber
ist;
- lesen Sie aufmerksam die
Anleitung für Betrieb, Service
und Ersatzteile der Klebeköpfe;
- lesen Sie sich auf der
Maschine befindlichen
Typenschilder.
Während
- tragen Sie keine Kleidung, die
sich in Teile in Bewegung
verwickeln kann;
- legen Sie weder die Hände
noch andere Gegenstände in
den Arbeitsbereich der
Maschine;
- belasten Sie die Maschine
nicht mit Kartons, die das vom
Hersteller empfohlene Gewicht
überschreiten.
Danach
- schalten Sie den elektrischen
Motor immer durch Drücken
des roten Knopfes des
Betriebsschalters aus;
- schalten Sie die Versorgung
der Druckluft aus.
SULLA MACCHINA DOVRÀ
OPERARE SOLAMENTE
PERSONALE
PRECEDENTEMENTE
ADDESTRATO.
SEUL UN PERSONNEL
PRÉCÉDEMMENT ENTRAÎNÉ
DEVRA INTERVENIR SUR LA
MACHINE.
DIE MASCHINE DARF NUR
VON GESCHULTEM
PERSONAL BEDIENT
WERDEN.
THE MACHINE SHOULD BE
OPERATED EXCLUSIVELY
BY PREVIOUSLY TRAINED
PERSONNEL.
I
E
F
D
NORME DI SICUREZZA
PER LA MANUTENZIONE
- Seguire le norme di
manutenzione ricordate in
questo catalogo (vedere
parte 4);
- non riparare, oliare e regolare
la macchina quando questa è in
movimento;
- prima di aprire i carter di
protezione, togliere sempre la
corrente elettrica e
l’alimentazione d’aria
compressa;
- non applicare pezzi non
propri della macchina senza
approvazione scritta della
SEKISUI;
- usare pezzi di ricambio
originali.
SAFETY REGULATIONS
FOR MAINTENANCE
- Follow the maintenance
regulations given in this
handbook (see part 4);
- never repair, lubricate or
adjust the machine while it is in
movement;
- always turn off the power
supply and the compressed air
supply before opening the
safety guards;
- do not use any parts other
than the originals on the
machine without the written
permission of SEKISUI;
- always use original spare
parts.
RÈGLES DE SÉCURITÉ
POUR L’ENTRETIEN
- Suivre les normes d’entretien
reproduites dans le présent
catalogue (cf. partie 4);
- éviter de réparer, d’huiler et
de régler la machine quand
cette dernière est en marche;
- avant d’ôter les carters de
protection, couper toujours le
courant électrique et
l’alimentation d’air comprimé;
- éviter toute application de
pièces non appropriées à la
machine sans l’approbation
écrite de SEKISUI;
- utiliser des pièces de rechange
d’origine.
SERVICE
SICHERHEITSNORMEN
- Halten Sie sich an die
Service-Normen dieses
Katalogs (siehe Teil 4);
- nehmen Sie keine
Reparaturen Schmierungen
oder Einstellungen vor, wenn
die Maschine in Bewegung ist;
- bevor Sie die Abdeckungen
entfernen, unterbrechen Sie
immer Stromund
Druckluftversorgung;
- montieren Sie keine nicht zur
Maschine gehörende Teile
ohne schriftliche Genehmigung
der SEKISUI;
- verwenden Sie
Originalersatzteile.
CONSIGLI UTILI
- Usare appropriati sistemi di
collegamento elettrici,
- non togliere o coprire le
targhette applicate alla
macchina,
- sostituire le targhette
danneggiate o non più leggibili,
- consultare all’occorrenza il
manuale di Uso e
Manutenzione,
- conservare in archivio il
numero di codice di questo
catalogo per la richiesta, in
caso di smarrimento, di
un’ulteriore copia.
USEFUL HINTS
- Always use appropriate
electrical connection systems,
- do not remove or cover up the
labels and plates on the
machine,
- replace any plates that
become damaged or illegible,
- consult the Use and
Maintenance handbook
whenever necessary,
- keep a record of the code
number of this handbook so
that another copy can be
requested if the original is lost.
CONSEILS UTILES
- Utiliser des systèmes
appropriés de branchement
électrique,
- éviter d’ôter ou de couvrir les
plaquettes appliquées à la
machine,
- remplacer les plaquettes
endommagées ou devenues
illisibles,
- consulter si nécessaire, le
Manuel d’Utilisation et
d’Entretien,
- conserver dans les fichiers le
numéro de code du présent
catalogue afin de pouvoir en
commander un autre en cas de
perte de celui-ci.
NÜTZLICHE HINWEISE
- Verwenden Sie geeignete
elektrische Verbindungs
systeme;
- entfernen oder verdecken Sie
die Typenschilder an der
Maschine nicht;
- ersetzen Sie beschädigte oder
unleserliche Typenschilder;
- bedienen Sie sich, wenn nötig,
der Anleitung für Betrieb und
Service;
- notieren Sie sich im Archiv
die Kodenummer dieses
Katalogs, damit Sie im Fall
von Verlust eine Kopie
anfordern können.
4
SULLA MACCHINA DOVRÁ
OPERARE SOLAMENTE
PERSONALE
PRECEDENTEMENTE
ADDESTRATO.
SEUL UN PERSONNEL
PRÉCÉDEMMENT ENTRAÎNÉ
DEVRA INTERVENIR SUR LA
MACHINE.
DIE MASCHINE DARF NUR
VON GESCHULTEM
PERSONAL BEDIENT
WERDEN.
THE MACHINE SHOULD BE
OPERATED EXCLUSIVELY
BY PREVIOUSLY TRAINED
PERSONNEL.
I
ANALISI RISCHI RESIDUI
E
F
D
5
INDICE / INDEX / TABLES DES MATIÈRES / INHALTSVERZEICHNIS
1 - PARTE / PART / PARTIE / TEIL SPECIFICHE / SPECIFICATIONS / SPÉCIFICATIONS / KENNZEICHEN
I
1.1 = Cosa fa la macchina
1.2 = Nastro
1.3 = Dimensioni delle scatole
1.4 = Altezza massima delle scatole
1.5 = Peso delle scatole
1.6 = Produzione
1.7 = Dimensioni della macchina
1.8 = Dati tecnici
E
What the machine does
Tape
Box dimensions
Maximum height of boxes
Weight of boxes
Output rate
Dimensions of the machine
Technical data
2 - PARTE / PART / PARTIE / TEIL
F
Rôle de la machine
Ruban
Dimensions des boites
Hauteur maximum des boîtes
Poids des boîtes
Production
Dimensions de la machine
Données techniques
D
Leinstungen der Maschine
Klebeband
Ausmaße der Kartons
Maximale Höhe der Kartons
Gewicht der Kartons
Produktion
Ausmaße der Maschine
Technische Daten
Pag. 9
Pag. 9
Pag. 9
Pag. 11
Pag. 11
Pag. 11
Pag. 12
Pag. 12
PREPARAZIONE DELLA MACCHINA PER L’USO / SETTING UP THE MACHINE FOR USE
/PRÉPARATION DE LA MACHINE POUR L’EMPLOI/ VORBEREITUNG DER MASCHINE FÜR DEN GEBRAUCH
E
Preliminary operations
Machine identification
Moving and positioning
D
Vorarbeiten
Maschinenkennzeichnung
Verschiebung und Positionierung
Positioning of the upper taping head
F
Opérations préliminaires
Identification de la machine
Déplacement et mise en place de la
machine
Position opérateur
Organes de commandes et de réglage
Hauteur de travail
Montage de la protection mécanisme
Augmentation de la hauteur maximale
des boîtes
Raccordement avec les éléments de
ligne
Pose de la tête rubaneuse supérieure
2.4 = Posizione operatore
2.5 = Organi di controllo e regolazioni
2.6 = Altezza di lavoro
2.7 = Montaggio carter
2.8 = Ampliamento altezza massima
scatole
2.9 = Collegamenti con elementi di linea
Position of operator
Controls and adjustments
Working height
Mounting of the protection cover
Increasing the maximum box height
2.10 = Collocamento della testa
nastrante superiore
2.11 = Collocamento della testa
nastrante inferiore
2.12 = Montaggio protezioni
antinfortunistiche
2.13 = Allacciamento alla rete elettrica,
impianto elettrico e avviamento
2.14 = Collegamento pneumatico
2.15 = Regolazione pressione impianto
pneumatico
Positioning of the lower taping head
Safety and protective device mounting
assembly
Connection to mains, electrical system
and start-up
Pneumatic connection
Pneumatic system pressure setting
6
I
2.1 = Operazioni preliminari
2.2 = Identificazione macchina
2.3 = Spostamento e posizionamento
Connections with the line elements
Pag. 14
Pag. 14
Pag. 15
Bedienerstelle
Kontrollorgane und Einstellungen
Arbeitshöhe
Montage der Abdeckung
Vergrößerung der maximalen
Kartonhöhe
Anschluss an Lienenelemente
Pag. 15
Pag. 16
Pag. 17
Pag. 19
Pag. 20
Montage des Klebekopfes oberen
Pag. 22
Pose de la tête rubaneuse inférieure
Montage des Klebekopfes unteren
Pag. 23
Montage de protecteurs contre les
accidents de travail
Branchement au réseau électrique,
installation électrique et mise en marche
Branchement pneumatique
Réglage de la pression du circuit
pneumatique
Montage der Unfallschutzvorrichtungen Pag. 24
Pag. 21
Anschluß an die elektrische Versorgung, Pag. 25
elektrische Anlage un Inbetriebnahme
Pneumatischer Anschluß
Pag. 29
Druckeinstellung der pneumatischen
Pag. 29
Anlage
INDICE / INDEX / TABLES DES MATIÈRES / INHALTSVERZEICHNIS
3 - PARTE / PART / PARTIE / TEIL
7
I
3.1 = Regolazione del comando
chiudifalda posteriore
3.2 = Regolazione della testa nastrante
superiore
3.3 = Regolazione apertura bracci di
trascinamento
3.4 = Regolazione dei rulli pressatori
laterali
3.5 = Regolazione pressione impianto
pneumatico
3.6 = Regolazione della leva per
chiusura falda posteriore
3.7 = Regolazione asta
antirovesciamento della scatola
nastrata (optionals)
3.8 = Inizio ciclo di lavorazione
3.9 = Messa fuori servizio
3.10 = Elenco possibili guasti
E
Rear box flap closing control
adjustment
Adjusting the upper taping head
F
Réglage de la commande du système de
fermeture des replis arrière
Réglage de la poupée rubaneuse
supérieure
Adjusting the aperture of the conveyor
Réglage de l’ouverture des bras
arms
d’entraînement
Adjusting the side pressure rollers
Réglage de la pression des roleaux
latéraux
Adjusting the pressure of the pneumatic Réglage de la pression de l’installation
system
pneumatique
Adjustment of the rear flap-closing lever Réglage des leviers de fermeture du
repli arrière
Regulation of rod designed to stop
Réglage de la barre de protection contre
boxes falling over (optionals)
le renversement de la boîte enrubannée
(options)
Working cycle
Cycle de travail
Disabling caution
Mise hors service
Trouble shooting
Liste des pannes possibles
4 - PARTE / PART / PARTIE / TEIL
I
4.1 = Norme generali per la
manutenzione
4.2 = Sostituzione delle cinghie di
trascinamento
4.3 = Lubrificazione
4.4 = Scarico condensa
4.5 = Verifica serraggio vite di
bloccaggio albero di trasmissione
4.6 = Verifica tensionamento e
sostituzione cinghia di
trasmissione
REGOLAZIONI / ADJUSTMENTS / RÉGLAGES / EINSTELLUNGEN
D
Regulierung der Steuerung der hinteren
Überlappungsschließung
Einstellung des oberen Klebekopfes
Pag. 31
Pag. 33
Einstellung der Öffnung der
Förderarme
Einstellung der seitlichen Pressrollen
Pag. 34
Druckeinstellung der pneumatischen
Anlage
Einstellung des Schliesshebels der
hinteren Überlappung
Einstellung der Kippschutzstange
(ZUBEHÖR)
Pag. 35
Arbeitszyklus
Außerbetriebsetzung
Liste ebentueller Probleme
Pag. 39
Pag. 41
Pag. 43
Pag. 34
Pag. 36
Pag. 38
MANUTENZIONI / MAINTENANCE / ENTRETIEN / SERVICE
E
General maintenance rules
F
Règles générales pour l’entretien
D
Allgemeine Wartungsvorschriften
Pag. 48
Replacing the drive belts
Replacement des courroies
d’entraînement
Lubrification
Vidange du condensat
Controle du serrage de la vis de blocage
de l'arbre de transmission
Controle du degre de tension et
remplacement de la courroie de
transmission
Austausch der Förder-riemen
Pag. 48
Schmierung
Kondenswasserauslaß
SPANNUNG DER SPERRSCHRAUBEN DER
ANTRIEBSWELLE KONTROLLIEREN
Uberprufung der Dehnung und
Austausch des treibriemens
Pag. 49
Pag. 50
Lubrication
Condensate drainage
Check the locking screws on the drive
shaft are tightened
Checking the tension and replacing the
drive belt
Pag. 51
Pag. 53
INDICE / INDEX / TABLES DES MATIÈRES / INHALTSVERZEICHNIS
5 - PARTE / PART / PARTIE / TEIL
ELENCO RICAMBI CONSIGLIATI / RECOMMENDED SPARE PARTS LIST / LISTE PIÈCES DE RECHANGE CONSEILLÈES /
/ VERZEICHNIS DER EMPFOHLENEN ERSATZTEILE ........................................................................................... Pag. 55
PARTI DI RICAMBIO / SPARE PARTS LIST / LISTE PIÈCES DE RECHANGE /
/ VERZEICHNIS DER ERSATZTEILE ........................................................................................................................................ Pag. 56
7 - PARTE / PART / PARTIE / TEIL
ACCESSORI / ACCESSORIES / ACCESSOIRES / ZUBEHÖR ............................................................................................ Pag. 89
8
6 - PARTE / PART / PARTIE / TEIL
I
Nota
Il presente catalogo è predisposto per la
lettura in quattro lingue di cui:
I = Italiano
E
NOTE
This catalogue is printed in four
different languages, and namely:
I = Italian
F
REMARQUE
Ce catalogue est préparé pour la lecture en
quatre languages:
I = Italien
D
HINWEIS
Vorliegender Katalog ist in vier
Sprachen ausgeführt, nämlich:
I = Italienisch
E = Inglese
E = English
E = Anglais
E = Englisch
F = Francese
F = French
F = Français
F = Französisch
D = Tedesco
D = German
D = Allemand
D = Deutsch
1
PARTE PART PARTIE TEIL
SPECIFICHE / SPECIFICATIONS / SPECIFICATIONS / KENNZEICHEN
I
1 – Cosa fa la macchina
La macchina chiude le quattro falde
superiori e sigilla con nastro
autoadesivo, la parte superiore ed
inferiore delle scatole.
E
F
D
1 – Function of the machine
The machine closes the four top flaps
and seals the top and bottoms of the
boxes with adhesive tape.
1 – Ce que fait la machine
La machine replie les quatres rabats
supérieures et pose le ruban adhésif
pour la fermeture de la partie supérieure
et de la partie inférieure des boîtes.
1 – Leistungen der Machine
Die Maschine schließt die vier oberen
Uberlappungen und verklebt mit einem
Selbstklebeband den oberen und
unteren Teil der Kartons.
ATTENTION:
The boxes must be correctly centred,
ATTENTION:
ACHTUNG:
with suitable distances between them,
Les
boîtes
devront
arriver
d’éjà
centrées
Die Kartons müssen auf der Maschine
when they are loaded onto the machine.
et espacées à la machine.
bereits zentriert und geeigneten
distanziert erscheinen.
2 - Tape
2 - Nastro
The machine can use taping heads for 2 - Ruban
La machine peut utiliser des têtes de
La macchina può usare teste nastranti tape with width of 2 inches (approx.
3 - Klebeband
per nastro di larghezza 2 pollici (ca.
50.8) or 3 inches (approx. 76.2) in rolls rubanage pour du ruban de 2 pouces
Die Maschine kann mit Klebeköpfen
50,8) o per nastro di larghezza 3 pollici with maximum diameter of 14 inches (env. 50,8) de large ou pour du ruban de für Klebeband mit 2 (ca. 50,8) oder 3
(ca. 76,2) in rotoli di diametro massimo (approx. 355).
3 pouces (env. 76,2) de large et présenté (ca. 76,2) Inch Breite arbeiten, mit
fino a 14 pollici (ca. 355).
en rouleaux atteignant un diamètre
Rollen bis zu einem maximalen
maximal de 14 pouces (env. 355).
Durchmesser von 14 Inch (ca. 355).
3 - Dimensioni scatole
3 - Dimensions of the boxes
(vedi Fig.1).
(see Fig.1).
4 - Dimensions des boîtes
4 - Ausmaße der Kartons
(Voir Fig.1).
(Siehe
Abb.1).
ATTENZIONE:
ATTENTION:
- Per avere un buon funzionamento
- To ensure that the machine operates
ATTENTION:
della macchina va rispettata la
correctly, the proportions between
ACHTUNG:
- Pour avoir un bon fonctionnement de
proporzione tra lunghezza, altezza e
length, weight and height of the box
- Damit die Maschine gut funktioniert,
peso della scatola che si ricava
must be right; the proportions must be la machine, respecter la proportion entre muß das Verhältnis zwischen Länge,
longueur, hauteur et poids de la boîte
sperimentalmente caso per caso.
by trial and error for each different
Höhe und Gewicht des Kartons
que l’on obtient expérimentalement cas
- Per scatole di misura molto ridotte e case.
berücksichtigt werden, das sich
par cas.
- For very small and lightweight
particolarmente leggere, è previsto
experimentell von Fall zu Fall ableiten
- Pour des boîtes de mesures très
boxes, the machine has a special rod
l’impiego di un’asta
läßt.
rèduites et particulièrement légères,
antirovesciamento che, normalmente, è to prevent the boxes falling over;
- Für sehr kleine und besonders leichte
l’utilisation d’une barre de protection
normally this rod is tucked away
custodita in posizione di riposo
Kartons ist der Einsatz von einer
inside the bracket of the upper taping contre les renversements est prévue.
all’interno della mensola del carrello
Kippschutzstange vorgesehen, die sich
head carriage. For its use, see Part 3, Normalement, cette barre est enfermée, in Ruhestellung in der Wagenkonsole
porta testa nastrante superiore. Per
en position de repos, à l’intérieur de la
Paragraph 7.
l’uso vedere Parte 3,
des oberen Klebekopfträgers befindet.
console du chariot porte-tête rubaneuse
Paragrafo 7.
Für ihren Gebrauch siehe Teil 3,
supérieur. Pour son utilisation, voir
Abschnitt 7.
Partie 3, Paragraphe 7.
ATTENZIONE:
Le scatole dovranno arrivare alla
macchina già opportunamente centrate
e distanziate.
STA F47
(mm)
L
W
H
Fig./Abb. 1
9
Min.
150
100
100
(inch)
Max.
700
510
510
Min.
6”
4”
4”
Max.
27” 1/2
20”
20”
1
PARTE PART PARTIE TEIL
SPECIFICHE / SPECIFICATIONS / SPECIFICATIONS / KENNZEICHEN
I
E
Caratteristiche della scatola
Le scatole dovranno arrivare alla macchina già
opportunamente centrate, distanziate e con le falde
superiori aperte.
Le falde laterali possono essere aperte verso l’esterno
da 0° a max.10° NON devono essere piegate ve rso l’interno.
Le falde anteriori e posteriori possono essere aperte verso
l’esterno fino a 10° mentre non ha importanza verso
l’interno.
Position of the boxes
When they arrive at the machine, the boxes must be
correctly spaced apart and whit the upper fl aps open.
The side flaps can be oponed outwards at an angle
between 0° and 10°; they must not be folded inwards.
The frond and back flaps can be opened outwards up to
10° or inwards at any angle.
F
D
Caractéristiques de la boîte
Les boîtes doivent arriver à machine déjà bien centrées,
espacées, et avec les rabats supérieurs ouverts.
Les rabats latéraux peuvent être ouverts vers l’extérieur,
allant de 0° à 10°.
Ils NE DOIVENT PAS être repliés vers l’intérieur.
Les rabats avant et arrière peuvent être ouverts vers
l’extérieur jusqu’à 10°, alors que vers l’intérieur cela n’a pas
d’importance.
Eigenschaften des Kartons
Die Kartons müssen auf der Maschine bereits geeignet
zentriert, distanziert und mit offenen oberen
überlappungen erscheinen.
Die seitlichen überlappungen dürfen nach außen von 0°
bis 10° geöffnet sein. Sie dürfen NICHT nach innen
gefaltet sein.
Die vorderen und hinteren überlappungen dürfen nach
außen bis zu 10° geöffnet sein, nach innen können sie
beliebig gefaltet sein.
10
2
PARTE PART PARTIE TEIL
PREPARAZIONE DELLA MACCHINA PER L’USO / SETTING UP THE MACHINE FOR USE
PREPARATION DE LA MACHINE POUR L’EMPLOI / VORBEREITUNG DER MASCHINE FÜR DEN GEBRAUCH
Fig./Abb. 1
I
1. Manuale uso e manutenzione.
2. Cassetta utensili.
3. Protezioni antinfortunistiche.
E
1. Use and maintenance handbook .
2. Tools tray.
3. Protective and safety devices.
F
1. Manuel d’utilisation et d’entretien.
2. Boîte à outils.
3. Protections contre les accidents de travail.
D
1. Handbuch für Betrieb und Wartung.
2. Werkzeugk asten.
3. Schutzvorrichtungen.
13
2
PARTE PART PARTIE TEIL
PREPARAZIONE DELLA MACCHINA PER L’USO / SETTING UP THE MACHINE FOR USE
PREPARATION DE LA MACHINE POUR L’EMPLOI / VORBEREITUNG DER MASCHINE FÜR DEN GEBRAUCH
I
E
F
D
1 - Operazioni preliminari
Dopo aver tolto la macchina
dall’apposito imballo (Fig.1), inserire
le quattro gambe fino a battuta della
fiancata e serrare le 4 viti di serraggio
del morsetto (Fig.10 pag.18).
Controllare che:
- nell’imballaggio non siano rimasti
pezzi sciolti;
- togliere eventuali legacci di
trattenimento delle parti interne della
macchina;
- la macchina corrisponda a quella
ordinata;
- nell’imballaggio vi sia una cassetta di
utensili, data in dotazione alla
macchina;
- manuale uso e manutenzione.
Segnalare eventuali danni causati dal
trasporto.
1 - Preliminary operations
After having removed the machine from
its packing (Fig.1), insert the four legs
up to the end into the slots provided
and tighten the four mounting screws
(Fig.10 pag.18).
Make sure that:
- there are no loose parts left in the
packing:
- any strings holding the internal parts
of the machine in place have been
removed;
- the machine corresponds to the one
ordered;
- there is a toolbox in the packing,
supplied together with the machine;
- use and maintenance handbook.
Report any damages caused during
transport.
1 - Opérations préliminaires
Après avoir ôté la machine de son
emballage (Fig.1), introduisez les
quatres pieds dans les logements
prévus jusque ou bout et bloquer les
quatres vis (Fig.10 pag.18) Vérifier:
- s’il ne reste aucune pièce détachée
dans l’emballage;
- ôter tout lien qui pourrait
éventuellment entraver les parties
intérieures de la machine;
si la machine correspond bien à celle
qui a été commandée;
- si l’emballage contient bien une
caissette à outils livrée avec la machine;
- manuel d’utilisation et d’entretien.
Signaler éventuellement tout domage
qui aurait pu être causé par le transport.
1 - Vorarbeiten
Nachdem die Maschine aus ihrer
Verpackung (Abb.1), entfernt worden
ist, setzen Sie die vier Füßen in die
entsprechenden Fassugen bis zum
Anschlag ein und ziehen Sie die vier
Schrauben fest (Abb.10 Seite 18).
Vergewissern Sie sich, daß:
- in der Maschine keine losen Teile
geblieben sind;
- entfernen Sie eventuelle Haltebinder
der inneren Maschinenteile;
- die Maschine dem bestellten Modell
entspricht;
- sich in der Maschine ein
Werkzeugkasten befindet, der mit der
Maschine geliefert wird;
- Handbuch für Betrieb und Wartung.
Melden Sie eventuelle
Transportschäden.
2 - Identification de la
machine
2 - Machine Identification Number
2 - Identificazione macchina When consulting the manufacturer
Pour toute communication avec le
Per qualsiasi comunicazione con il
always quote THE SERIAL NUMBER constructeur, citer toujours le n°
costruttore citare sempre IL NUMERO and the MODEL (see Fig.2).
matricule (SERIAL NUMBER) et le
DI MATRICOLA (SERIAL
modèle (MODEL) - (Fig.2).
NUMBER) e il MODELLO (MODEL)
- (Fig.2).
SEKISUI TA INDUSTRIES, INC.
7089 BELGRAVE AVENUE
GARDEN GROVE, CA. 92641-2807
(714)898-0344, FAX (714)894-4831
MODEL
STA F47
SERIAL NUMBER
ZZ011800
KG
186
YEAR
2000
V
110
Hz
60
W
360
A
6
Fig./Abb. 2
14
2 - Maschinen-kennzeichnung
Bei allen Mitteilungen an den
Hersteller muß immer die
SERIENNUMMER (SERIAL
NUMBER) und das MODELL
(MODEL) angegeben werden (Abb.2).
2
PARTE PART PARTIE TEIL
PREPARAZIONE DELLA MACCHINA PER L’USO / SETTING UP THE MACHINE FOR USE
PREPARATION DE LA MACHINE POUR L’EMPLOI / VORBEREITUNG DER MASCHINE FÜR DEN GEBRAUCH
I
E
3 - Spostamento e posizionamento
Infilare le forche sotto la
macchina (Fig.3), e spostarla
dal pallets inferiore di base.
Posizionare la macchina in
modo che lungo i due fianchi
vi sia un passaggio
sufficiente per l’operatore
(almeno 80 cm) (Fig.4).
3 - Moving and positioning
Insert the forks under the
machine (Fig.3), and lift it
off the lower pallets.
Position the machine so
that there is a sufficiently
wide passageway on either
side for the operator (at
least 80 cm) (Fig.4).
4 - Posizione operatore
(vedi Fig.5)
F
4 - Position of operator
(see Fig.5)
Fig./Abb. 3
D
3 – Déplacemen et mise en
place de la machine
Placer les fourches du
plateaupalette sous la
machine (Fig.3), et déplacer
cette dernière de la palette
inférieure de base.
Mettre la machine en place
de manière à ce que le long
des deux parois latérales il y
ait un passage suffisant
pour l’opérateur (au moins
80 cm) (Fig.4).
3 – Verschiebung und
Positionierung
Die Gabeln unter die
Maschine führen (Abb.3),
und von den unteren
Grundpaletten entfernen.
Die Maschinen muß so
stehen, daß ihre
Längsseiten genügend
Raum für den
Maschinenwärter (mind.
80 cm) freilassen (Abb. 4).
4 - Position opérateur
(voir Fig.5)
4 - Bedienerstelle
(siehe Abb.5)
3” 1/8
Fig./Abb. 4
3” 1/8
Fig./Abb. 5
15
2
PARTE PART PARTIE TEIL
PREPARAZIONE DELLA MACCHINA PER L’USO / SETTING UP THE MACHINE FOR USE
PREPARATION DE LA MACHINE POUR L’EMPLOI / VORBEREITUNG DER MASCHINE FÜR DEN GEBRAUCH
Fig./Abb. 6
I
E
5 – Organi di controllo e regolazioni (Fig. 6)
1)
Regolazione salita / discesa carrello
2)
Rulli pressatori laterali
3)
Regolazione pressione aria (cilindro chiudifalda posteriore)
4)
Manometro ingresso aria (cilindro chiudifalda posteriore)
5)
Rubinetto ingresso aria
6)
Regolazione larghezza scatola
7)
Interruttore elettrico
8)
Cavo elettrico alimentazione macchina
9)
Spia aria circuito inserito
10)
Regolazione inclinazione leva chiudifalda
11)
Valvola comando chiudifalda
12)
Viti per bloccaggio gambe
13)
Connettore elettrico protezione antinfortunistiche
5 – Control and adjustments (Fig. 6)
1)
Carriage raising/lowering adjustment
2) Side pressure rollers
3)
Air pressure control
4)
Air inlet pressure gauge
5)
Air inlet tap
6)
Box width adjustment
7)
Electrical switch
8)
Mains power electric connecting cable
9)
Air circuit “ON” warning light
10)
Flap closing leve tilt control
11)
Flap closing control valve
12)
Leg securing screws
13)
Connector for safety guards
F
D
5 – Organes de commandes et de réglage (Fig. 6)
1)
Réglage montée / descente du chariot
2)
Rouleaux presseurs latéraux
3)
Réglage pression d’air
4)
Manomètre de l’arrivée d’air
5)
Robinet de l’arrivée d’air
6)
Réglage largeur boîtes
7)
Interrupter électrique
8)
Câble électrique d'alimentation de la machine
9)
Voyant d’air (circuit branché)
10)
Réglage de l’inclinaison du levier de
fermeture des pans
11)
Vannes de commande de fermeture des pans
12)
Vis de blocage des pieds
13)
Connecteur pour protections de sécurité
5 – Kontrollorgane und Einstellungen (Abb. 6)
1)
Einstellung Wagenhinauf und hinunterfahrt
2) Seitliche Pressrollen
3)
Einstellung Luftdruck
4)
Zuluftmanometer
5)
Zulufthahn
6)
Einstellung Kartonbreite
7)
Elektrischer Schalter
8)
Elektrisches Kabel
9)
Luftkontrolleuchte bei eingeschaltenem Stromkreis
10)
Einstellung Neigung des
Uberlappungsschließhebeis
11)
Steuerventil Uberlappungsschließung
12)
Blockierungsschrauben für Beine
13)
Verbinder für Unfallschutzvorrichtungen
16
2
PARTE PART PARTIE TEIL
PREPARAZIONE DELLA MACCHINA PER L’USO / SETTING UP THE MACHINE FOR USE
PREPARATION DE LA MACHINE POUR L’EMPLOI / VORBEREITUNG DER MASCHINE FÜR DEN GEBRAUCH
I
25” 5/8
6 - Altezza del piano di lavoro
La macchina viene predisposta con la quota del piano rulli
di 650mm da terra. (Fig.7)
Tale quota può essere incrementata fino a 750mm.
Per eseguire questa operazione, inserire le forche sotto la
struttura della macchina (Fig.3), sollevare la macchina e
operare sulle due gambe di ciascuna estremità come segue:
- allentare le 4 viti a testa esagonale di ciascuna gamba
(Fig.8);
- sfilare le gambe della misura desiderata (max.100mm)
(Fig.9) e serrare le viti (Fig.10).
ATTENZIONE:
Assicurarsi che alla fine di queste operazioni la macchina
sia in bolla nei due sensi, longitudinale e trasversale
(Fig.11).
Fig./Abb. 7
E
6 - Working height
The roller table of the machine is 650mm from the
ground. (Fig.7).
The height can be increased up to a maximum of 750mm.
To do this, insert the forks beneath the frame of the
machine (Fig.3), raise the machine and adjust the two
legs at each end as follows:
- slacken the four hexagon head screw on each of the legs
(Fig.8);
pull out the legs to the required lenght (max.100mm)
(Fig.9) and then tighten the screws (Fig.10).
ATTENTION:
Make sure at the end of these operations that the machine
is placed at level in both directions lengthwise and
crosswise (Fig.11).
Fig./Abb. 8
17
2
PARTE PART PARTIE TEIL
PREPARAZIONE DELLA MACCHINA PER L’USO / SETTING UP THE MACHINE FOR USE
PREPARATION DE LA MACHINE POUR L’EMPLOI / VORBEREITUNG DER MASCHINE FÜR DEN GEBRAUCH
F
6 - Hauteur de travail
La machine est prévue pour que le plan du transporteur à
rouleaux soit à 650mm du sol. (Fig.7)
Cette cote peut être accrue jusqu’a 750mm.
Pour effectuer cette opération introduire les fourches sous
la structure de la machine (Fig.3),soulever la machine et
agir sur les deux pieds de chaque extrémité, comme suit:
- dévisser les 4 vis à tête hexagonale de chaque pied
(Fig.8);
- dégager les pieds dans la mesure désirée (max.100mm)
(Fig.9) et serrer les vis (Fig.10).
Fig./Abb. 9
ATTENTION:
S’assurer qu’à la fin des opérations ci-dessus la machine
soit bien de niveau dans le deux sens, aussi bien
longitudinal que trasversal (Fig.11).
D
6 - Arbeitshöhe
Die Maschine ist für eine Höhe der Rollenebene von
650mm vom Boden vorgesehen (Abb.7).
Diese Höhe kann bis auf 750 mm gebracht werden.
Für diesen Vorgang führen sie die Gabeln unter die
Maschinenstruktur (Abb.3), heben die Maschine und
gehen an den zwei Beinen von jedem Ende wie folgt vor:
- an jedem Bein die 4 Sechskantschrauben lockern
(Abb.8);
- die Beine bis zur gewünschten Höhe herausziehen
(max.100mm) (Abb.9) und die Schrauben festziehen
(Abb.10).
Fig./Abb. 10
ACHTUNG:
Vergewissern Sie sich, daß die Maschine nach diesen
Arbeiten sowohl in Längs als auch in Querrichtung völlig
eben steht (Abb.11)
18
Fig./Abb. 11
2
PARTE PART PARTIE TEIL
PREPARAZIONE DELLA MACCHINA PER L’USO / SETTING UP THE MACHINE FOR USE
PREPARATION DE LA MACHINE POUR L’EMPLOI / VORBEREITUNG DER MASCHINE FÜR DEN GEBRAUCH
I
E
7 - Montaggio carter
7 - Mounting of the protection cover
Inserire il carter di protezione come indicato in fig.12 pos.1 e Place the machine protection cover ou the machine frame
fissarlo utilizzando le viti fig.12 pos.2.
as described on fig.12 pos.1 and fix it with the selfthreading screws fig.12 pos.2.
F
7 - Montage de la protection mécanisme.
Monter la protection comme descrit sur la fig.12 pos.1 et la
fixer coutre le chassis avec les vis autotarandeuses fig.12
pos.2.
D
7 - Montage der Abdeckung
Die Abdeckung wie in der Abb.12 pos.1 geschrieben,
montieren und sie mit den selbstschneidenden Schrauben
Abb.12 pos.2 befestigen.
Fig./Abb.12
19
2
PARTE PART PARTIE TEIL
PREPARAZIONE DELLA MACCHINA PER L’USO / SETTING UP THE MACHINE FOR USE
PREPARATION DE LA MACHINE POUR L’EMPLOI / VORBEREITUNG DER MASCHINE FÜR DEN GEBRAUCH
I
8 – Ampliamento altezza massima scatole
L’altezza massima può essere incrementata di 50 o 100 mm. spostando le colonne
verso l’alto, agendo sulle viti (Fig.13 pos.1) ed i fori predisposti sulle colonne
(Fig.13 pos.2); in questo modo l’altezza minima d ella scatola da nastrare aumenta
del rispettivo spostamento effettuato.
ATTENZIONE:
È opportuno che questa operazione venga eseguita da
personale specializzato addetto alla manutenzione meccanica.
E
8 – Increasing the maximum box heigth
The maximum height can be increased by 50 or 100 mm. by moving the columns
upwards by means of the screws (Fig.13 pos.1) and the holes on the columns
(Fig.13 pos.2); in this way the minimum box height is increased by the distance
of the movement made.
ATTENTION:
This operation should be performed by specialized mechanical maintenance
technicians.
F
8 – Augmentation de la hauteur maximale des boîtes
La hauteur maximum peut être augmentée de 50 ou de 100 mm. en déplacant les
colonnes vers le haut, ce que l’on fera en intervenant sur les vis (Fig.13 pos.1) et
les orifices aménagés sur les colonnes (Fig.13 pos.2). De cette maniére, la hauter
minimum de la boîte à enrubanner augmente en fonction du déplacement effectué.
ATTENTION:
Il convient que cette opération soit effectuée par un personnel
spécialisé affecté à l’entretien mécanique.
D
8 – Vergrößerung der maximalen Kartonhöle
Die maximale Höhe kann um 50 oder 100 mm. erhöht
werden, indem die Säulen mittels der Schrauben (Abb.13
pos.1) und der Öffnungen (Abb.13 pos. 2) nach oben
verschoben werden; auf diese Weise vergrößert sich die
minimale Höhe des zu verklebenden Kartons um die
entsprechende durchgeführte Verschiebung.
ACHTUNG:
Diese einstellung sollte von spezialisiertem
wartungspersonal vorgenommen werden.
20
Fig./Abb. 13
2
PARTE PART PARTIE TEIL
PREPARAZIONE DELLA MACCHINA PER L’USO / SETTING UP THE MACHINE FOR USE
PREPARATION DE LA MACHINE POUR L’EMPLOI / VORBEREITUNG DER MASCHINE FÜR DEN GEBRAUCH
I
E
9 – Collegamenti con elementi di linea
La macchina può essere collegata meccanicamente con altri
elementi di linea (esempio: gruppi distanziatori scatole,
tavoli a rulli, ecc.).
Per il collegamento meccanico utilizzare l’apposito kit di
fissaggio cod. 801-09-868 (Fig. 14).
Per bancaletto L=375x500mm. (completo)
cod. 801-10-021 (Fig.15)
9 – Connection with the line elements
The machine can be connected mechanically with other
elements of the line (example: box spacing units, roller
tables, etc.).
For the mechanical connection use the proper connection
kit part n° 801 -09-868 (Fig. 14).
For the 375x500mm. roller table extension with
connecting Brackets, use part number 801-10-021
(Fig.15).
F
D
9 - Raccordement avec les éléments de ligne
La machine peut être raccordée mécaniquement à l’autres
éléments de ligne (exemple: groupes distanceurs des boîtes,
table à rouleaux, etc.).
Pour la connection mechanique, utiliser le kit de connection
réf. 801-09-868 (Fig. 14).
Pour le plan à rouleaux 375x500mm. avec kit de connection
utiliser code 801-10-021 (Fig.15).
9 - Anschluss an Lienienelemente
Die Maschine kann mechanisch mit anderen
Linienelementen verbunden werden (zum Beispiel
Kartonsdistanzierungsgruppen, Rollentische usw.).
Für die montage von Zube hören, das gelieferte
Montagekit nerrwenden Art.- nr. 801-09-868 (Abb. 14).
Für die Rollenbahn 375x500mm. komplett mit
Verbindungsblechen, Art. Nr. 801-10-021 (Abb.15)
verwemden.
Fig./Abb. 14
Fig./Abb. 15
21
2
PARTE PART PARTIE TEIL
PREPARAZIONE DELLA MACCHINA PER L’USO / SETTING UP THE MACHINE FOR USE
PREPARATION DE LA MACHINE POUR L’EMPLOI / VORBEREITUNG DER MASCHINE FÜR DEN GEBRAUCH
I
E
10 – Collocamento della testa nastrante superiore
Dopo aver preparato la testa nastrante (vedi fascicolo Uso, Manutenzione e Parti
di Ricambio Teste Nastranti), svitare i due perni di bloccaggio sulla macchina
(Fig.16 pos.3) ed inserire la testa nastrante nell’apposito vano, assicurandosi che
l’orientamento sia quello indicato in Fig. 16 facendo scorrere i quattro perni
(Fig.16 pos.1) nelle scanalature fino a battuta.
Bloccare quindi la testa nastrante riavvitando i due perni di bloccaggio (Fig.16
pos.3).
10 – Fittin the upper taping head
After setting up the taping head (see handbook for Use, Maintenance and Spare
Parts of Taping Heads), unscrew the two locking pins on the machine (Fig.16
pos.3) and fit the head in position, making sure that the direction is as indicated
in Fig.16, and sliding the four pins (Fig.16 pos.1) as far as they will go into the
grooves.
Then lock the taping head by retightening the locking screw (Fig.16 pos.3).
WARNING:
Fix on the taping head the anti-rotation plate
(part no. 801-10-243) before mounting it on the machine. See
Fig.16 pos. 4, 5, 6.
ATTENZIONE:
Prima dell’inserimento della testa nastrante nella propria
sede, montare la piastra antirotazione testa (cod. 801-10-243)
come indicato in Fig.16 pos. 4, 5, 6.
F
D
10 – Positionnement de la tête rubaneuse supérieure
Après avoir préparé la tête rubaneuse (voir Manuel d’Emploi, Entretien et Pièces
de rechange des Têtes rubaneuses), dévisser les deux pivots de blocage sur la
machine (Fig.16 pos.3) et introduire la tête rubaneuse dans le logement prévu en
s’assurant que l’orientation est celle indiquée sur la Fig.16 et en faisant glisser les
quatre pivots (Fig.16 pos.1) dans les rainures jusqu’à ce qu’ils butent. Bloquer la
tête rubaneuse en revissant les deux pivots de blocage (Fig.16 pos.3).
ATTENTION:
Fixer sur la tête de pose la plaque anti-rotation
(code 801-10-243) avant de la monter sur la machine. Voir
Fig.16 pos. 4, 5, 6.
10 – Montage des oberen Klebekopfes
Der Klebekopf wird entsprechend der Anelitung für Betrieb, Service und
Ersatzteile für Klebeköpfe vorbereitet.
Die beiden Blockierungschrauben auf der Machine (Fig.16 pos.3) lösen und den
Klebekopf in die dafür vorgesehene Öffnung einsetzen. die Richtung muß der in
Abb.16 angegebenen entsprechen, wobei die vier Befestungungsnippel (Abb.16
pos.1) in die Leisten bis zum Anschlag eingeführt werden; anschließend den
Klebekopf mit Hilfe der beiden Schrauben blockieren (Fig.16 pos.3).
ACHTUNG:
Das Plättchen (Art-Nr. 801-10-243), das die Montage des Verschlußaggregates
in der verkehrten Richtung nicht ermöglicht montieren, bevor das
Verschlußaggregat in die Maschine eingesetzt wird. Siehe Abb.16 pos. 4, 5, 6.
Fig./Abb. 16
22
2
PARTE PART PARTIE TEIL
PREPARAZIONE DELLA MACCHINA PER L’USO / SETTING UP THE MACHINE FOR USE
PREPARATION DE LA MACHINE POUR L’EMPLOI / VORBEREITUNG DER MASCHINE FÜR DEN GEBRAUCH
I
E
11 – Collocamento della testa nastrante inferiore
Dopo aver preparato la testa nastrante (vedi fascicolo Uso,
Manutenzione e Parti di Ricambio Teste Nastranti),
introdurla nell’apposito vano del piano rulli,
assicurandosiche i perni di sostegno (Fig.16 pos.1) siano
ben inseriti nelle apposite nicchie del telaio (Fig.16 pos.2) e
che l’orientamento sia quello indicato in Fig.16.
11 – Fittin the lower taping head
After setting up the taping head (see handbook for Use,
Maintenance and Spare Parts of Taping Heads), place it
into its position on the roller table, making sure that the
supporting pins (Fig.16 pos.1) are correctly inserted into
the slots on the frame (Fig.16 pos.2) and that the
direction is as indicated in Fig.16.
ATTENZIONE:
Prima dell’inserimento della testa nastrante nella propria
sede, montare la piastra antirotazione testa (cod. 801-10243) come indicato in Fig.16 pos. 4, 5, 6.
WARNING:
Fix on the taping head the anti -rotation plate
(part no. 801-10-243) before mounting it on the m achine.
See Fig.16 pos. 4, 5, 6.
F
D
11 – Positionnement de la tête rubaneuse inférieure
Après avoir préparé la tête rubaneuse (voir Manuel
d’Emploi, Entretien et Pièces de rechange des Têtes
rubaneuses), l’introduire dans le logement prévu du plan de
rouleaux, s’assurer que les pivots de soutien (Fig.16 pos.1)
sont correctement introduits dans les niches du châssis
(Fig.16 pos.2) et que l’orientation est celle indiquée sur la
Fig.16.
11 – Montage des unteren Klebekopfes
Der Klebekopf wird entsprechend der Anelitung für
Betrieb, Service und Ersatzteile für Klebeköpfe vorbereitet
und in die dafür vorgesehene Öffnung in den Rollentisch
eingesetzt, sodaß die Befestigungsnippel (Abb.16 pos.1)
in die entsprechenden Öffnungen im Rahmen (Abb.16
pos.2) passen und die Richtung des Klebekopfes die in
Abb.16 angegebene ist.
ATTENTION:
Fixer sur la tête de pose la plaque anti-rotation
ACHTUNG:
(code 801-10-243) avant de la monter sur la machine. Voir Das Plättchen (Art-Nr. 801-10-243), d as die Montage des
Fig.16 pos. 4, 5, 6.
Verschlußaggregates in der verkehrten Richtung nicht
ermöglicht montieren, bevor das Verschlußaggregat in
die Maschine eingesetzt wird. Siehe Abb.16 pos. 4, 5, 6.
23
2
PARTE PART PARTIE TEIL
PREPARAZIONE DELLA MACCHINA PER L’USO / SETTING UP THE MACHINE FOR USE
PREPARATION DE LA MACHINE POUR L’EMPLOI / VORBEREITUNG DER MASCHINE FÜR DEN GEBRAUCH
I
E
12 – Montaggio protezioni antinfortunistiche
Montare le protezioni antinfortunistiche sulla macchina,
inserendo nelle apposite sedi fig.17 pos.1 i pali di sostegno
fig.17 pos.2 completi di protezioni e traversi di irrigidimento
fig.17 pos.3.
Bloccare le protezioni serrando le apposite viti fig.17 pos.4
completi di dado e rondella fig.17 pos.5 e 6.
Dopo aver fissato meccanicamente la protezione eseguire i
collegamenti elettrici del micro di sicurezza inserendo il
connettore fig.17 pos.7 nell’apposita sede fig.17 pos.8.
12 – Assembly of interlocking guards
To install on the machine the interlocking guards
mount on them the support cross pieces Fig. 17 pos. 3
and insert the support tubes fig 17, pos. 2
in the proper lodgements fig. 17 pos. 1.
Clamp the support tubes with the screws, washers and
bolts fig. 17 pos. 4,5 and 6.
When the guards are in the proper position, connect the
safety switch by inserting in the connector fig 17, pos 7
into the socket fig 17, pos. 8.
F
D
12 – Montage des protections
Monter les protections comme il est indiqué ci-dessous.
Monter les traverses de support fig. 17 pos 3.
Insérer les tubes de soutien fig 17. pos. 2 à l’intérieur des
supports fig. 17 pos.1.
Bloquer les tubes de soutien au moyen des vis,
rondelles et écrous fig. 17 pos. 4, 5 et 6.
Après avoir montè les protections, exécuter le
reccordement électrique.insérant le connecteur
fig. 17, pos.7 dans la connexio fig. 17, pos. 8.
12 – Montage der Unfallschutzvorrichtungen
komplett mit den Querträgern Abb. 17, Pos. 3
vornehmen, wie im folgenden beschrieben:
Die Stützen Abb. 17, Pos. 2 ins Innere der
Halterungen Abb. 17, Pos. 1 einführen. Die Stützen, mit
Hilfe der Schrauben, Zwischenscheiben und Muttern Abb.
17 Pos. 4, 6 und 5 befestigen.
Nachdem die Unfallschutzvorrichtungen montiert sind,
die Elektroverbindungen wie folgt vornehmen:
Den Verbinder Abb. 17 Pos 7 in die dazugehörige
Verbindung, Abb. 17, Pos. 8 stecken.
8
Fig./Abb. 17
24
2
PARTE PART PARTIE TEIL
PREPARAZIONE DELLA MACCHINA PER L’USO / SETTING UP THE MACHINE FOR USE
PREPARATION DE LA MACHINE POUR L’EMPLOI / VORBEREITUNG DER MASCHINE FÜR DEN GEBRAUCH
I
E
13 - Allacciamento alla rete elettrica, impianto elettrico e
avviamento
13 - Electrical connections, circuitry and start-up
WARNING:
before connecting the machine to the mains ensure that
the red button is depressed (Fig. 20 pos. 1), and that
there are no objects on the work plane.
ATTENZIONE:
prima di allacciare la macchina alla rete elettrica
assicurarsi che il bottone rosso sia premuto (Fig. 20
pos.1) e che non vi siano oggetti sul piano di lavoro.
- The machine can be equipped with three phase or
single phase motors having various voltage and
frequency characteristics
(See diagram Fig.18).
- La macchina può essere fornita con motori a tre fasi e
motori monofasi, nelle varie tensioni e frequenze. (vedere
schemi in Fig.18);
Schema elettrico tipo trifase / Three phase wiring diagram
Schema électrique type triphasé / Dreinphasen-schaltschema
Fig./Abb. 18
25
2
PARTE PART PARTIE TEIL
PREPARAZIONE DELLA MACCHINA PER L’USO / SETTING UP THE MACHINE FOR USE
PREPARATION DE LA MACHINE POUR L’EMPLOI / VORBEREITUNG DER MASCHINE FÜR DEN GEBRAUCH
F
D
13 - Branchement sur le secteur, installation électrique
et mise en marche.
13 - Anschluß an das Stromnetz, Elektroanlage
und Inbetriebnahme
ATTENTION:
avant de brancher le machine sur le secteur, s'assurer
que le bouton rouge est presse (Fig. 20 pos. 1) et qu'il n'y
a rien sur le plan de travail.
ACHTUNG:
bevor der Maschine an das stromnetz angeschlossen
wird, kontrollieren, ob der rote knopf gedrückt wurd
(Abb.20, pos. 1), und dass sich keine gegenstände auf
dem arbeitstisch befinden
- Le machine peut être fourni avec des moteurs triphasés
et des moteurs monophasés, dans les divers voltages et
fréquences (voir schémas Fig.18).
- Die Maschine ist mit Dreiphasen und Einphasen Motoren in den verschiedenen Spannungen und
Frequenzen erhältlich (siehe Schema in Abb.18).
Schema elettrico tipo monofase / Single phase wiring diagram
Schema électrique type monophasé / Einphasen-schaltschema
110/24V
Fig./Abb. 18
26
2
PARTE PART PARTIE TEIL
PREPARAZIONE DELLA MACCHINA PER L’USO / SETTING UP THE MACHINE FOR USE
PREPARATION DE LA MACHINE POUR L’EMPLOI / VORBEREITUNG DER MASCHINE FÜR DEN GEBRAUCH
I
E
F
D
- accertarsi che il motore sia
predisposto per la tensione richiesta (la
tensione è indicata sulla targhetta
matricola Fig.19);
- l’interruttore di avviamento macchina
(Fig.20 pos.1) deve essere in posizione
di riposo (pulsante rosso premuto);
- ogni interruttore è provvisto di un
regolatore di scatto termico, regolato
per le caratteristiche del motore usato,
(vedere tabella Fig. 21). Nel caso in cui
la freccia non indichi il valore richiesto
regolare ruotando a destra o a sinistra
con un cacciavite come indicato in
Fig.22;
- Ensure that the installed motor
complies with the required voltage
specification (the motor’s voltage
specification is stamped on the
identifica-tion label Fig.19);
- the machine start switch (Fig.20
pos.1) must be in the off position (with
the red button pressed);
- Each switch has an adjustable
thermal cut-out device which has been
pre-set for the specific motor’s
characteristics (Table Fig. 21). Should
the arrow not reflect the desired
setting, correct the adjustment using a
screwdriver to turn the indicator left
or right (as shown in Fig.22).
- S'assurer que le moteur est
prédisposé pour le voltage voulu
(celui du moteur est indiqué sur la
plaquette Fig.19);
- l’interrupteur de démarrage de la
machine (Fig.20 pos.1) doit être en
position de repos (boutonrouge pressé);
- chaque interrupteur est équipé d'un
régulateur de déclenchement thermique,
réglé pour les caractéristiques du
moteur utilisé (voir tableau Fig.21). Si
la flèche n'indique pas la valeur voulue,
régler en tournant à droite ou à gauche à
l'aide d'un tournevis comme indiqué
par la Fig.22.
- kontrollieren, ob der Motor für die
erforderliche Spannung geeignet ist
(die Spannung ist auf der Plakette
Abb.19).
- Der elektrische Betriebsschalter muß
sich in Ruhestellung befinden (Abb.20
pos.1) (roter Knopfgedrückt);
- jeder Schalter ist mit einem Regler
mit Thermoauslösung aus gestattet,
(den Eigenschaften des verwendeten entsprechend
reguliert (s.Tabelle Abb.21). Wenn der
Pfeil nicht den erforderlichen Wert
anzeigt, mit Hilfe eines Schrau
benziehers nach rechts oder links
drehend regulieren, wie in Abb.22
angegeben;
AVVERTENZA:
questa operazione va eseguita WARNING:
ogni volta che si sostituisce
This operation must be carried out
l’interruttore.
each time a switch is replaced.
ATTENTION:
Il faut procéder à cette
opération chaque fois qu'on
change l'interrupteur.
ACHTUNG:
diese Operation muß jedesmal dann
durchgeführt werden, wenn ein
Schalter ausgetauscht wird.
SEKISUI TA INDUSTRIES,
7089 BELGRAVE
INC.
AVENUE
GARDEN GROVE, CA. 92641(714)898-0344, FAX (714)8942807
4831
MODEL
SERIAL NUMBER
STA F47
ZZ011800
KG
186
YEAR
2000
V
110
Hz
60
W
360
A
6
Fig./Abb. 19
Motori monofase / Single-phase motors /
Moteurs monophasés / Einphasen-motoren
Volt
Hz
A
220
50
2.5
220
60
2.5
240
50
2.5
110
60
6.0
100
50/60
5.0
Motori trifase / Three-phase motors /
Moteurs triphasés / Dreiphasen-motoren
Volt
Hz
A
220
50
1.8
400
50
1.1
Rev. III del 01/08/01
240
50
1.7
260
50
1.5
Fig./Abb.21
415
50
1.0
440
50
1.0
200
50/60
2.0
27
Fig./Abb. 20
III
2
PARTE PART PARTIE TEIL
PREPARAZIONE DELLA MACCHINA PER L’USO / SETTING UP THE MACHINE FOR USE
PREPARATION DE LA MACHINE POUR L’EMPLOI / VORBEREITUNG DER MASCHINE FÜR DEN GEBRAUCH
I
ATTENZIONE:
Collegare la macchina solo
tramite l’apposita spina. Non
rimuovere la spina dal proprio
cavo.
- inserire il connettore a spina della
macchina (Fig.20 pos. 2) nella presa di
corrente della rete;
- avviare la macchina premendo il
pulsante (Fig. 23 pos.1- 2)
dell’interruttore;
- controllare il corretto senso di rotazione
delle cinghie (avanzamento scatola)
indicato dalla freccia in Fig.20. Nel caso
in cui in un motore trifase, il senso di
rotazione sia errato, invertire il
collegamento di due fili di fase nella
spina.
Per motori monofase di fornitura
SEKISUI, il collegamento corretto per
l’avanzamento della scatola è quello
indicato nello schema elettrico Fig.18.
ATTENZIONE:
- Per arrestare il movimento delle
cinghie di trascinamento premere il
pulsante (fig.23 pos.3).
- Per arrestare tutte le funzioni della
macchina premere il pulsante di
emergenza (fig.23 pos.4).
E
F
WARNING:
only connect the machine by means of
the plug provided. Do not remove the
plug from its cable.
ATTENTION:
Ne brancher la machine
qu'avec sa fiche d'origine qu'il
ne faut jamais enlever du fil.
- Insert the machine electrical plug
(Fig.20 pos.2) into the mains outlet.
- Start the machine by pressing the
switch button (Fig. 23
pos.1 - 2);
- Check for correct rotational direction
of the belts (box advancement) as
indicated by the arrow in Fig.20. If a
three phase motor is installed, should
the rotational direction be reversed,
invert the two phase wire connectors on
the plug.
For single-phase motors supplied by
SEKISUI, the correct connection for
box feed is the one indicated in the
wiring diagram in Fig. 18.
- introduire la fiche du fil électrique du
machine
(Fig.20 pos.2) dans la prise de courant;
- mettre la machine en marche en pressant
le bouton de l'interrupteur (Fig. 23
pos.1 - 2);
- contrôler que le sens de rotation des
courroies indiqué par la flèche de la
Fig.20 est correct (avancement des
boîtes). Si, dans un moteur triphasé, le
sens de rotation est incorrect, invertir la
connexion de deux fils de phase dans la
fiche.
Pour les moteurs monophasés fournis
par SEKISUI, le raccordement correct
pour l'avance de la boîte est celui qui
est indiqué dans le schéma électrique
Fig. 18.
ATTENTION:
- To stop the drive belts, push the button
(Fig. 23 pos. 3).
- To stop all the functions of the
machine, push the emergency button
(Fig. 23 pos. 4).
ATTENTION:
- Pour arrêter les courroies
d’entraînement appuyer sur le poussoir
(Fig. 23 Pos. 3).
- Pour arrêter toutes les fonctions de la
machine appuyer sur le poussoir d’arrêt
(Fig. 23 Pos. 4).
D
ACHTUNG:
Die Maschine nur mit dem dafür
vorgesehenen Stecker verwenden. Der
Stecker darf nicht von seinem Kabel
abmontiert werden.
- den Stecker die Maschine (Abb.20
pos.2) in die Netz-steckdose stecken;
- die Maschine anstellen
( Knopf drücken Abb. 23
pos.1 - 2);
- kontrollieren, ob der Riemen in die
richtige Richtung drehen (Transport der
Kartons), die in Abb.20 mit dem Pfeil
angegeben ist.Sollte bei einem
Dreiphasen Motor die Drehrichtung
falsch sein, die beiden Phasendrähte des
Steckers austauschen.
Für von der SEKISUI gelieferte
Einphasenmotoren ist die richtige
Verbindung für den Kartontransport im
Elektroschaltplan Abb.18 angegeben.
ACHTUNG:
- Um die Transportriemen zu halten,
Taste (Abb.23 Pos. 3) drücken
- Um die Maschine komplett
auszuschalten, Die Not-Aus Taste (Abb.
23 Pos. 4) drücken.
Fig./Abb.22
Fig./Abb.23
28
2
PARTE PART PARTIE TEIL
PREPARAZIONE DELLA MACCHINA PER L’USO / SETTING UP THE MACHINE FOR USE
PREPARATION DE LA MACHINE POUR L’EMPLOI / VORBEREITUNG DER MASCHINE FÜR DEN GEBRAUCH
I
E
14 - Collegamento pneumatico
14 - Pneumatic connection
ATTENZIONE:
Onde evitare l’improvviso azionamento del sistema
pneumatico, assicurarsi che al momento del collegamento
con la rete di aria compressa, il rubinetto sia chiuso
(manicotto in basso) (fig. 24).
Collegare la macchina alla rete di aria compressa per mezzo
di un tubo ø 8/6 alla valvola di alimentazione
(fig. 25).
ATTENTION:
In order to prevent the pneumatic system from suddenly
starting up when connecting the machine to the
compressed air supply network, make sure that the tap is
closed (sleeve down) (fig.24).
Connect the machine to the compressed air supply
networkby fitting a dia. 8/6 hose onto the intake valve
(fig.25).
AVVERTENZE:
Sono sconsigliati collegamenti di tubi con sezione utile di
2
passaggio inferiore a 0,3cm (ø 6mm).
Inoltre una eccessiva lubrificazione dell’aria compressa o
improvvisa caduta di pressione dell’impianto pneumatico
di alimentazione possono provocare un funzionamento
anomalo della macchina.
IMPORTANT:
Do not use hose pipes with a sectional area of flow
smaller than 0, 3cm2 (dia. 6mm).
Excessive lubrification of the compressed air or a sudden
drop in pressure in the pneumatic supply system may
impair the efficiency of the machine.
15 - Regolazione pressione impianto pneumatico
- Alimentare il sistema pneumatico (fig.26);
- La massima pressione di rete ammissibile è di 7 bar, si
consiglia comunque di regolare, tramite l’apposito
5
regolatore, la pressione su 4 bar o 4x10 Pa (fig.27).
15 - Pneumatic system pressure setting
- Supply power to the pneumatic system (fig.26);
- The maximum permissible input pressure is 7 bars,
however it is advisable to set the pressure, by means of the
pressure regulator, at 4 bar o 4x10 5 Pa (fig.27).
Fig./Abb. 24
Fig./Abb. 25
Fig./Abb. 26
29
2
PARTE PART PARTIE TEIL
PREPARAZIONE DELLA MACCHINA PER L’USO / SETTING UP THE MACHINE FOR USE
PREPARATION DE LA MACHINE POUR L’EMPLOI / VORBEREITUNG DER MASCHINE FÜR DEN GEBRAUCH
F
D
14 - Branchement pneumatique
14 - Pneumatischer Anschluß
ATTENTION:
afin d’éviter tout démarrage intempestif du systéme
pneumatique, s’assurer qu’au moment du branchement au
circuit d’air comprimé, le robinet soit bien fermé (manchon
en bas) (fig.24).
Relier la machine au circuit d’air comprimé au moyen d’un
tuyau ø 8/6 de diamètre aboutissant à la soupape
d’alimentation (fig.25).
ACHTUNG:
Um plötzliches Funktionieren des pneumatischen System
zu vermeiden, vergewissern Sie sich, daß beim Anschluß
an das Druckluftnetz der Hahn geschlossen ist (Muffen
nach unten) (Abb.24).
Schließen Sie die Maschine an das pneumatische Netz mit
Hilfe eines ø8/6 Rohres an das Versorgungsventil an
(Abb.25).
ATTENTION:
Tout raccordement effectué avec des tuyaux à section utile
2
de passage inférieure à 0,3cm (ø 6mm) est vivement
déconseillé.
En outre, une lubrification excessive de l’air comprimé et ou
une chute de pression subite du circuit pneumatique
d’alimentation risquent de provoquer des anomalies dans
le fonctionnement de la machine.
HINWEISE:
Ungeeignet sind Rohrverbindungen mit innerem
Durschnitt von weniger als 0,3 cm2 (ø 6mm).
Eine erhöhte Schmierung der Druckluft oder ein
plötzlicher Druckfall der pneumatischen
Versorgungsanlage können ein schlechtes Funktionieren
der Maschine zur Folge haben.
15 - Druckeinstellung der pneumatischen Anlage
- Das pneumatische System versorgen (Abb.26);
- Der höchstzulässige Betriebsdruck beträgt 7 bar, es
empfiehlt sich jedoch mit Hilfe des Reglers den Druck auf
4 bar oder 4x10⁵ Pa einzustellen (Abb.27).
15 - Réglage de la pression du circuit pneumatique
- Alimenter le circuit pneumatique (fig.26);
- la pression maximale admise est de 7 bars; on conseille en
tous cas de la régler, au moyen du régulateur, sur 4 bars ou
5
4x10 Pa (fig.27).
Fig./Abb. 27
30
3
PARTE PART PARTIE TEIL
REGOLAZIONI / ADJUSTMENTS / RÉGLAGES / EINSTELLUNGEN
I
E
F
1 - Regolazione del comando 1 - Rear box flap closing
chiudifalda posteriore
control adjustment
ATTENZIONE:
Questa operazione è da
eseguirsi con impianto
pneumatico disattivato.
- Allargare le cinghie di
trascinamento scatola,
agendo sull’apposita
manovella fig.1 pos.1, fino a
permettere l’inserimento
manuale della scatola;
- alzare il carrello porta testa
nastrante superiore, per
mezzo della manovella fig.1
pos.2, fino a permettere
l’inserimento della scatola
con le quattro falde superiori
aperte;
- allargare i rulli pressatori
laterali allentando la
manopola fig.1 pos.3;
D
1 - Réglage de la commande 1 - Regulierung der
du système de fermeture des Steuerung der hinteren
replis arrière
Überlappungsschließung
WARNING:
Before performing this
operation ensure that the
pneumatic system has been
shut off.
ATTENTION:
Cette opération doit être
effectuée en maintenant le
système pneumatique
neutralisé.
- Widen the box conveyor
belts, by operating the
appropriate crank handle
fig. 1 pos. 1, until the box
can be manually inserted in
the machine.
- raise the upper taping
head carriage, by operating
the crank handle fig. 1 pos.
2, until the box can be
inserted with its four upper
flaps in the open position;
- widen the lateral pressure
rollers loosening the
control knob fig. 1 pos. 3;
- Elargir les courroies
d'entraîn ement de la boîte à
l'aide de la manivelle prévue
à cet effet fig. 1 pos. 1,
jusqu'à ce qu'il soit possible
d'introduire la boîte à la
main.
- Lever le chariot porte-tête
rubaneuse supérieure à l'aide
de la manivelle fig. 1 pos. 2,
jusqu'à ce qu'il soit possible
d'introduire la boîte en
laissant les quatre replis
supérieurs ouverts.
- Elargir les rouleaux
presseurs latéraux en
desserrant le bouton fig. 1
pos. 3.
ACHTUNG:
Dieser Vorgang darf nur
dann durchgeführt werden,
wenn die Druckluft -Anlage
ausgeschaltet ist.
- Die KartonTransportbänder mit der
dafür vorgesehenen Kurbel
(Abb. 1 pos.1) verbreitern,
bis der Karton per Hand
eingeschoben werden kann;
- mit Hilfe der Kurbel
(Abb.1 pos.2) den oberen
Klebekopfträger-Wagen
anheben, bis der Karton
mit geöffneten
Überlappungen
eingeschoben werden kann;
- die seitlichen Pressrollen
mit der Kurbel (Abb. 1
pos.3) verbreitern;
Fig./Abb. 1
31
3
PARTE PART PARTIE TEIL
REGOLAZIONI / ADJUSTMENTS / RÉGLAGES / EINSTELLUNGEN
I
E
F
D
- posizionare la scatola sul piano a rulli;
- ruotare manualmente il gruppo
chiudifalda posteriore fino a disporre la
leva chiudifalda in posizione verticale;
- far coincidere la superficie posteriore
della scatola con la parte piana della
leva chiudifalda, come indicato in fig.2;
- posizionare il micro comando
chiudifalda posteriore, con la leva in
posizione di azionamento, sullo stesso
piano del lato anteriore della scatola
come indicato in fig.3 e bloccarlo in
posizione tramite l’apposito volantino
fig.3 pos.1;
- position the box on the roller table;
- rotate the rear box flap closing
assembly manually until the flap
closing lever is in its vertical position;
- perform the necessary adjustments in
order to make the flat section of the
flap closing lever coincide with the
rear surface of the box, as shown in fig.
2;
- position the rear flap closing microswitch, while the flap closing lever is
in its operational position, and align it
to the same plane as that of the rear
surface of the box as shown in fig. 3;
now lock it into position tightening the
appropriate handwheel fig. 3 pos. 1;
- Placer la boîte sur le plan à rouleaux.
- Tourner lentement le groupe de
fermeture arrière jusqu'à ce que le levier
de fermeture des replis soit en position
verticale.
- Faire coïncider la surface supérieure de
la boîte avec la partie plate du levier de
fermeture des replis, comme il est
indiqué sur la figure 2.
- En laissant le levier en position de
mise en marche, placer le capteur de
commande de fermeture arrière sur le
même plan que celui du côté arrière de
la boîte, comme il est indiqué sur la
figure 3 et le bloquer à l'aide de le petit
volant prévue à cet effet fig. 3 pos. 1;
- den Karton auf den Rollentisch
aufsetzen;
- die Überlappungs schließ-Gruppe
manuell drehen, bis der Schließhebel
vertikal steht;
- die hintere Fläche des Kartons mit
dem flachen Teil des Hebels
zusammentreffen lassen,
wie in Abb.2 angegeben;
- den Steuermikro der hinteren
Schließvor- richtung, mit dem Hebel in
Funktionsstellung, auf
die vordere Kartonfläche aufsetzen,
wie in Abb. 3 angegeben und ihn in
dieser Position mit dem Handrad (Abb.
3 pos.1) blockieren;
WARNING:
This is only a basic adjustment. When
the first box is introduced, during
normal machine operation, observe
the flap closing lever performance and
refine the adjustment by anticipating
or retarding the lever’s descent moving
the micro-switch forwards or
backwards as the case may be.
ATTENTION:
Il s'agit d'une règle de base.
Pendant le passage de la
première boîte, observer le
fonctionnement du levier de
fermeture des replis et, si
besoin est, anticiper ou
retarder sa descente en
déplaçant de nouveau le
capteur de commande vers
l'entrée ou la sortie de la boîte.
ACHTUNG:
Es handelt sich hierbei um eine
Ersteinstellung. Während des
Durchgang des ersten Kartons darauf
achten, ob der Schließhebel korrekt
funktioniert und dessen Absinken
eventuell durch die Verschiebung des
Steuermikros zum Ein- bzw. Ausgang
des Kartons hin, beschleunigen oder
verzögern.
ATTENZIONE:
Questa è una regolazione di
base. Durante il passaggio
della prima scatola osservare
il funzionamento della leva
chiudifalda ed eventualmente
anticipare o ritardare la
discesa della stessa,
spostando nuovamente il
micro di comando verso
l’ingresso o l’uscita scatola.
Fig./Abb.3
Fig./Abb.2
32
3
PARTE PART PARTIE TEIL
REGOLAZIONI / ADJUSTMENTS / RÉGLAGES / EINSTELLUNGEN
I
E
F
D
2 - Regolazione della testa
nastrante superiore
Posizionare la scatola con le
quattro falde chiuse come in
fig.4 quindi per mezzo della
manovella (fig.4 pos.1),
abbassare il carrello porta
testa nastrante superiore fin
qundo il bordo inferiore
dello scivolo centrale del
chiudifalde (fig.4 pos.2), si
sarà portato a leggero
contatto con la parte
superiore della scatola da
nastrare.
2 - Adjusting the upper
taping head
Position the box to be taped
with the four flaps closed as
shown in fig.4 then lowe r
the upper taping head
carriage by means of the
crank lever (fig.4 pos.1)
until the lower edge of the
central chute of the flap closer (fig.4 pos.2)makes
contact with the top part of
the box.
2 - Réglage de la poupée
rubaneuse supérieure
Placer la bôite à rubaner, les
quatre pans fermés comme
dans la figure 4 ensuite, au
moyen de la manivelle (fig.4
pos.1) abaisser le chariot
porte-poupée rubaneuse
supérieure jusqu’au moment
où le bord inférieur du
coursier central du
dispositifde pliage (fig.4
pos.2) sera légèrement au
contact de la partie
supérieure de la bôite à
rubaner.
2 - Einstellung des oberen
Klebekopfes
Den zu verklebenden
Karton mit den vier
geschlossenen
Überlappungen wie in
Abb.4 positionieren,
anschließend mittels der
Kurbel (Abb.4 pos.1) den
oberen Klebekopfwagen
senken bis die untere Kante
der mittleren Gleitbahn des
Überlappungschließers
(Abb.4 pos.2) den oberen
Teil des Kartons leicht
berührt.
Fig./Abb.4
33
3
PARTE PART PARTIE TEIL
REGOLAZIONI / ADJUSTMENTS / RÉGLAGES / EINSTELLUNGEN
I
E
3 - Regolazione apertura bracci di trascinamento
Dopo aver posizionato la scatola da nastrare come in fig.5,
accostare i bracci trasportatori agendo sulla manovella fig.5
pos.1 fino a quando le cinghie di trascinamento vengano a
contatto (con una leggera pressione) con le pareti laterali
della scatola da nastrare.
3 - Adjusting the aperture of the conveyor arms
Having positioned the box to be taped as shown in fig.5
bring the two advance drive arms together by operating on
the crank handle (fig.5 pos.1) until the drive belts come
into contact (exerting a slight pressure) with the sides of
the box to taped.
ATTENZIONE:
ATTENTION:
Una eccessiva forza di chiusura dei bracci di
Excess closing pressure of the arms will block the machine
trascinamento comporta il bloccaggio della macchina ed il and damage it, especially when using thick boxes.
danneggiamento della stessa sopratutto quando la scatola è
di grosso spessore.
4 - Side pressure rollers adjustment
- Move the side pressure rollers against the surfaces of the box to
be taped and lock them by tightening the knobs (fig.6);
4 - Regolazione dei rulli pressatori laterali
- accostare i rulli pressatori laterali alle superfici della
scatola da nastrare e bloccarli serrando le manopole (fig.6);
F
D
3 - Réglage de l’ouverture des bras d’entraînement
La boîte étant la position indiquée par la fig.5, approcher les
bras transporteurs au moyen de la manivelle (fig.5 pos.1)
jusqu’à ce que les courroies d’entraînement soient en
contact (en exerçant une légère pression) avec les faces
latérales de la boîte à enrubanner.
3 - Einstellung der Öffnung der Förderarme
Befindet sich der zu klebende karton in der in Abb.5
angegebenen Positi on, legen Sie die Förderarme mit Hilfe
der Kurbel an (Abb.5 pos.1), bis die Förderriemen (mit
leichtem Druck) die Seitenwände des zu klebenden
Kartons berühren.
ATTENTION:
Une force excessive de fermeture des bras d’entraînement
provoque le blocage de la machine et son endommagement,
surtout quand la boîte est très épaisse.
ACHTUNG:
EINE ÜBERTRIEBENE SCHLIESSKRAFT DER
FÖRDERARME BEWIRKT DIE BLOCKIERUNG DER
MASCHINE SOWIE SCHÄDEN AN DERSELBEN, VOR
ALLEM BEI KARTONS GROSSER DICKE.
4 - Réglage des rouleaux de pression latéraux
- approcher les rouleaux de pression latéraux de la boîte à
enrubanner et les bloquer au moyen des boutons
(fig.6);
4 - Einstellung der seitlichen Pressrollen
- legen Sie die seitlichen Druckwalzen an der Oberfläche des zu
klebenden Kartons an und blockieren Sie sie, in dem Sie die
Drehknöpfe festdrehen (Abb.6);
Fig./Abb.5
34
Fig./Abb.6
3
PARTE PART PARTIE TEIL
REGOLAZIONI / ADJUSTMENTS / RÉGLAGES / EINSTELLUNGEN
E
I
5 - Regolazione pressione impianto pneumatico
- Alimentare il sistema pneumatico della macchina facendo
scorrere verso l’alto l’apposito manicotto (fig.7 pos.1); nella
spia pneumatica (fig.7 pos.2) apparirà il colore verde.
- Ruotando la manopola (fig.8) del regolatore, in senso
orario per aumentare ed in senso antiorario per diminuire,
regolare la pressione ad un valore compreso tra 1,5 e 4 bar a
seconda della rigidità delle scatole da nastrare.
5 - Adjusting the pressure of the pneumatic system
- Feed the system with air by sliding up the sleeve (fig.7
pos.1); the pilot signal will turn green (fig.7 pos.2).
- Turn the knob (fig.8) of the regulator clockwise to
increase the pressure or anti-clockwise to decrease it,
adjust the pressure to between 1,5 and 4 bars according
to the rigidity of the boxes being taped.
D
F
5 -Réglage de la pression de l’installation pneumatique
- Alimenter le système pneumatique de la machine en
faisant déplacer vers le haut le manchon approprié (fig.7
pos.1); une couleur vert apparaîtra dans le voyant
pneumatique (fig.7 pos.2).
- Tourner la manette (fig.8) du régulateur dans le sens
horaire pour augmenter et dans le sens anti-horaire pour
diminuer, afin de régler la pression à une valeur comprise
entre 1,5 et 4 bars selon la rigidité des boîtes à rubaner.
5 - Druckeinstellung der pneumatischen Anlage
- Die Versorgung des pneumatischen Systems der
Maschine mit Druckluft erfolgt durch Schieben nach oben
der dafür vorgesehenen Hahnmuffe (Abb.7 pos.1); die
pneumatische Kontrolleuchte (Abb.7 pos.2) leuchtet
grüne Farbe.
- Den Druck auf einen Wert zwischen 1,5 und 4 bar, je
nach Steifheit des zu verklebenden Kartons, einstellen
mittels des Drehknaufs (Abb.8) des Reglers: im
Uhrzeigersinn zur Erhöhung, gegen den Uhrzeigersinn zür
Verringerung.
Fig./Abb. 7
Fig./Abb. 8
35
3
PARTE PART PARTIE TEIL
REGOLAZIONI / ADJUSTMENTS / RÉGLAGES / EINSTELLUNGEN
E
I
6 - Regolazione della leva per chiusura falda posteriore e
velocità della stessa
6 - Adjustment of the position and speed of the rear flapclosing lever
ATTENZIONE:
questa operazione deve essere eseguita con impianto
pneumatico disattivato. Per non provocare improvvisi
movimenti della macchina, assicurarsi che il rubinetto sia
chiuso (manicotto in basso) (fig.9).
Nel caso di variazione dell’inclinazione leva chiusura falda
posteriore (fig.10) regolare la posizione nel seguente modo:
- allentare il dado di fissaggio (fig.11 pos.1);
- avvitare o svitare la vite di regolazione in modo da
ottenere l’angolo voluto (fig.11 pos.2);
- bloccare il dado;
- attivare l’impianto pneumatico.
Per un corretto funzionamento della leva per la chiusura
falda posteriore, il suo piano inferiore deve essere
leggermente più basso del piano superiore della scatola
(fig.10).
Se si riscontrasse un’eccessiva lentezza nel movimento di
riposizionamento del gruppo chiudifalda posteriore, con
conseguente interferenza con le scatole in ingresso
macchina, é possibile aumentarne la velocità regolando il
dosatore di scarico fig.10 pos.1.
Per la regolazione della velocità d’intervento della leva
chiudifalda posteriore intervenire sul regolatore fig.10
pos.2.
IMPORTANT:
This operation must be carried out with the pneumatic
system switched off. To avoid sudden movement of the
machine, make sure that the valve is closed (sleeve down see fig.9).
To vary the inclination of the rear flap-closing lever
(fig.10), adjust the position as follows:
- loosen the fastening nut (fig.11 pos.1);
- loosen or tighten the adjustment screw until the required
angle is achieved (fig.11 pos.2);
- tighten the nut;
- switch on the pneumatic system.
In order for the rear flap closing lever to function
properly, its bottom surface must be slightly lower than
the top surface of the box (see fig.10).
Should the rear flap closing assembly appear to be
returning to its rest position too slowly, causing
obstructions to the successive boxes being introduced into
the machine, it is possible to increase the repositioning
velocity by regulating the discharge control device fig. 10
pos. 1.
To change the speed of the rear flap-closing lever, adjust
the flow regulator fig.10 pos.2.
Fig./Abb. 9
Fig./Abb. 10
36
3
PARTE PART PARTIE TEIL
REGOLAZIONI / ADJUSTMENTS / RÉGLAGES / EINSTELLUNGEN
D
F
6 - Réglage des leviers et de la vitesse de fermeture du
repli arrière
6 - Einstellung der Position und der Geschwindigkeit des
Schliesshebels der hinteren Überlappung
ATTENTION:
cette opération doit être effectuée aprés avoir désactivé
l’installation pneumatique; afin de ne pas provoquer
quelque mouvement subit de la machine, s’assurer que le
robinet est fermé (manchon en bas, figure 9).
En cas de variation de l’inclinaison du levier de fermeture
du repli arrière (fig.10), régler la position de la façon
suivante:
- desserer l’écrou de fixation (fig.11 pos.1);
- visser ou dévisser la vis de réglage de façon à obtenir
l’angle voulu (fig.11 pos.2);
- bloquer l’écrou;
- activer l’installation pneumatique.
Aux fins d’un fonctionnement correct du levier de
fermeture du repli arrière, son plan inférieur doit se trouver
légèrement plus bas que le plan supérieur de la boîte
(fig.10).
Si l'on remarque que le mouvement de remise en place du
groupe de fermeture arrière est trop lent et qu'il provoque
une interférence avec les boîtes entrant dans la machine, il
est possible d'augmenter la vitesse en réglant le doseur de
déchargement fig. 10 pos. 1.
Pour changer la vitesse des leviers de fermeture du repli
arrière agisser sur le régulateur de débit fig.10 pos.2.
ACHTUNG:
Dieser Vorgang muß bei ausgeschaltener pneumatischer
Anlage ausgeführt werden. Um plötzliche
Maschinenbewegungen zu vermeiden, vergewissern Sie
sich, daß der Hahn geschlossen ist (Muffe nach unten)
(Abb. 9).
Ändert sich die Neigung des Schließhebels für die hintere
Überlappung (Abb.10), stellt man die Position wie folgt
ein:
- die Befestigungsmutter lösen (Abb.11 pos.1);
- die Einstellungsschrauben anziehen oder lockern je
nach dem gewünschten Winkel (Abb.11 pos.2);
- die Mutter blockieren;
- die pneumatische Anlage in Betrieb setzen.
- Für ein korrektes Funkionieren des Schließhebels der
hinteren Überlappung muß sich seine untere Ebene ein
wenig unterhalb der oberen Ebene des Kartons befinden
(Abb.10).
Sollte sich die hintere Schließ -Gruppe zu langsam
einrichten, wodurch es zu einer Störung beim Eintritt der
Kartons in die Maschine kommt, kann die
Geschwindigkeit durch den Entladeregler (Abb. 10
pos.1).
Um die Geschwindigkeit des Schliesshebels der hinteren
Überlappung zu modifizieren, der Mengenregler fig.10
pos.2 einstellen.
Fig./Abb. 11
37
3
PARTE PART PARTIE TEIL
REGOLAZIONI / ADJUSTMENTS / RÉGLAGES / EINSTELLUNGEN
I
E
F
D
7 - Regolazione asta
antirovesciamento della
scatola nastrata
(OPTIONALS)
Per attivare l’asta
antirovesciamento allentare
la vite (Fig.12 pos.1), sfilare
l’asta della corsa consentita
dall’asola (Fig.12 pos.2),
avvitare completamente la
vite (Fig.12 Part. A) e sfilare
l’asta fino a quando la vite
raggiunge l’asola (Fig.13
Pos.1) posta sull’estremità
posteriore della mensola;
svitare la vite (Fig.13
Part. B), innestarla nell’asola
e bloccare.
7 - Regulation of rod
designed to stop boxes
falling over (OPTIONALS)
To bring the rod into
action, loosen the screw
(Fig.12 pos.1), pull out the
rod as far as allowed by the
slot (Fig.12 Pos.2), fully
tighten the screw (Fig.12
Detail A) and pull out the
rod until the screw reaches
the slot (Fig.13 Pos.1)
situated on the back end of
the bracket; loosen the
screw (Fig.13 Detail B), fit
it into the slot and then
lock.
7 - Réglage de la barre de
protection contre le
renversement de la boîte
enrubannée (OPTIONS)
Pour mettre en place la barre
de protection contro le
renversement des boîtes à
enrubanner. desserrer la vis
(Fig.12 pos.1), dégager la
barre de la course permise
par la boutonnière (Fig.12
pos.2), serrer à fond la vis
(Fig.12 Détail A) et dégager
la barre jusqu’à ce que la vis
n’atteigne la boutonnière
(Fig.13 pos.1) placée sur
l’extrémité arrière de la
console.
Dévisser la vis (Fig.13
Détail B), l’introduire dans la
boutonnière et bloquer.
7 - Einstellung der
Kippschutzstange
(ZUBEHÖR)
Zur Verwendung der
Kippschutzstange
entspannen Sie die
Schraube (Abb.12 pos.1),
entnehmen die Stange
soweit es die Öse erlaubt
(Abb.12 pos.2), ziehen die
Schraube fest (Abb.12
Detail A) und ziehen die
Stange bis die Schraube die
Öse erreicht (Abb.13 pos.1);
entfernen Sie die Schraube
(Abb.13 Detail B), führen
Sie sie in die Öse ein und
blockieren Sie sie.
Part. A
Part. B
Fig./Abb. 12
Fig./Abb. 13
38
3
PARTE PART PARTIE TEIL
REGOLAZIONI / ADJUSTMENTS / RÉGLAGES / EINSTELLUNGEN
I
8 - Inizio ciclo di lavorazione
- Avviare la macchina seguendo la procedura indicata a
pag.25-29 ai paragrafi 13-14;
- riempita la scatola, predisporla nel senso di sigillatura
(senso di avanzamento);
- inserire a mano o automaticamente la scatola nella
macchina.
E
8 – Start-up operations
- To start the machine follow the instruction on page 2529 sections 13-14;
- when the filling operation is completed, position the box
in the taping direction;
- push the box manually into the machine.
WARNING:
ATTENZIONE:
Le scatole dovranno arrivare alla macchina già
opportunamente centrate e distanziate.
Il punto di intervento del micro di comando chiudifalda
posteriore è variabile in funzione della lunghezza della
scatola.
WARNING:
The boxes must be introduced into the machine correctly
aligned (centred) and spaced apart.
The position of the rear flap closing control switch is
varying according to the box length.
La scatola avanzando trascinata dalle cinghie della
macchina, inizierà la fase di autochiusura delle falde e
sigillatura come descritto nelle fasi sottostanti:
- nel movimento di avanzamento la falda anteriore della
scatola urta l’apposito chiudifalda, il quale la ripiega verso
l’interno scatola;
- continuando nel suo movimento aziona il micro comando
chiudifalda posteriore, il quale comanda il relativo cilindro
pneumatico che ripiega la falda posteriore verso l’interno
della scatola.
- Falde laterali: la scatola continuando nel suo movimento,
trascinata dalle cinghie, urta con le due falde laterali contro
gli appositi scivoli i quali ripiegandole verso l’interno
completano la chiusura della scatola.
- Nastratura: dopo aver chiuso le falde superiori la scatola
viene a contatto con i gruppi nastranti, superiore e
inferiore, i quali eseguono la sigillatura della scatola.
Completata l’operazione la scatola, per mezzo delle cinghie
di trascinamento, viene espulsa dalla macchina
completando il ciclo di lavorazione.
The machine while the box is conveyed through it by the
turning drive belts, will perform the top flaps
closing and taping operation as described below:
- the central chute is closing the front flap;
- the box is activating the valve that control s the cylinder
of the rear flap closer.
- Moving forwards, the box hits the side flaps closing
chutes completing the flaps closing operation.
- The box continues to be conveyed forward and contact
both top and bottom taping heads.
Top and bottom seals are applied simultaneously.
- When the box exits the machine, the taping operation
is completed.
ATTENZIONE:
Durante il passaggio della prima scatola verificare le
condizioni ottimali di regolazione della macchina:
- posizione micro comando leva chiudifalda posteriore;
- regolazione larghezza cinghie di trascinamento;
- regolazione testa superiore.
WARNING:
As the box continues to be conveyed through the
machine it may become apparent that certain
adjustments should be optimised:
- position of the rear flap closed control switch;
- adjustment of the conveyor arms;
- adjustment of the top taping head.
39
3
PARTE PART PARTIE TEIL
REGOLAZIONI / ADJUSTMENTS / RÉGLAGES / EINSTELLUNGEN
F
D
8 - Début du cycle d’usinage
- Mettre la machine en marche en suivant la procédure
indiquée pag.25-29 dans le paragraphes 13-14;
- La boîte étant remplie, la mettre dans le sens du collage
(sens d’avancée).
- Introduire la boîte sur la machine manuellement ou
automatiquement.
8 - Beginn des Arbeitszyklus
- Die Maschine wie auf Seite 25-29, Paragraph 13-14;
beschrieben ingangsetzen;
- nachdem der Karto n gefüllt wurde, ihn in Richtung der
Verklebung (Bewegungsrichtung) aufsetzen;
- den Karton manuell oder automatisch in die Maschine
einführen.
ATTENTION:
Lorsqu’ elle arrivent sur la machine, les boîtes doivent
centrées de façon appropriée et avec l’écartement voulu.
Le point d’intervention du capteur de commande du
dispositif de fermeture des replis arrière peut varier en
fonction de la longueur de la boîte.
ACHTUNG:
Die Kartons müssen bereits zentriert und mit korrektem
Abstand an der Maschine ankommen.
Der Einsatzpunkt des hinteren Steuermikros für die
Klappenschließung ist je nach Kartonlänge variierbar.
Lorsque la boîte avance sous l’effet d’entraînement des
courroies de la machine, la phase de fermeture automatique
des repris et de collage commence comme cela a été décrit
ci-dessous:
- Au cours du mouvement d’avancée, le pan avant de la
boîte bute contre le dispositif de fermeture qui le replie vers
l’intérieur de la boîte.
- En poursuivant son mouvement, elle déclenche le capteur
de commande de fermeture; cette dernière commande le
cylindre pneumatique qui replie le pan arrière vers
l’intérieur de la boîte.
- Repliges lateraux: la boîte poursuivant son mouvement
sous l’effect d’entrainement des courrois , bute avec les
rabats contre le dispositif ferme -feuille qui les replies vers
l’interiéur achevant ainsi la fermeture de la boîte.
Rubanage: après avoir fermé les replis supérieurs, la boîte
se trouve en contact avec les groupes de rubanage,
supérieur et inférieur, effectuant la fermeture de la boîte.
Achevée l’operation, la b oîte, par les courrois
d’entrainement, vient expulsede la machine completant le
cycle du travail.
ATTENTION:
Au cours du passage de la première boîte, s’assurer que
les conditions de réglage de la machine sont optimales:
- position du capteur de commande du levier du dispositif
de fermeture arrière;
- réglage de la largeur des courroies d’entraînemant;
- réglage tête superieure.
Der von den Transportbändern der Maschine fortbewegte
Karton beginnt die Phase der Selbstschließung seiner
Klappen und deren Verklebung wie unten beschrieben:
- durch die Vorwärtsbewegung triff die vordere Klappe
des Kartons auf den dafür vorgesehenen Schließer, der sie
in das Innere des Kartons klappt;
- durch seine Weiterbewegung betätigt der Karton den
hinteren Steuermikro für die Klappenschließung, der den
diesbezüglichen Druckluftzylinder betätigt, der seinerseits
die hintere Klappe in das Innere des Kartons umschlägt.
- Seitenklappen: in seiner Weiterbewegung schlägt der
durch die Transportbänder fortbewegte Karton mit seinen
beiden Seitenklappen gegen die dafür vorgesehenen
Rutschen, die die Klappen ins Innere des Kartons drücken
und damit die Schließung des Kartons komplettieren.
- Verklebung: nach der Schließung der oberen Klappen
kommt der Karton mit den oberen und unteren
Verklebegruppen in Kontakt, die den Karton verkleben.
- Nach dieser Opeartion wird der Karton durch die
Transportbänder aus der Maschine heraustransportiert
und der Arbeitsvorgang ist vollständing durchgeführt.
ACHTUNG:
Während des Durchgangs des ersten Kartons sollte
kontrolliert werden, ob die Maschine bestmöglich
eingestellt wurde:
- Position des Steuermikors für den hinteren
Klappenschließerhebel;
- Breiteneinstellung der Transportbänder;
- Einstellung des oberen Kopfes.
40
3
PARTE PART PARTIE TEIL
REGOLAZIONI / ADJUSTMENTS / RÉGLAGES / EINSTELLUNGEN
I
9 – Messa fuori servizio
ATTENZIONE:
La messa fuori servizio e la demolizione deve essere effettuata da personale specializzato in campo elettrico/pneumatico
e meccanico. Prima di iniziare le operazioni creare attorno alla macchina uno spazio sufficientemente ampio e sgombro in
modo da permettere agli operatori di lavorare senza ulteriori rischi creati dall’ambiente circostante.
Per la messa fuori servizio della macchina procedere come segue:
- fermare la macchina;
- togliere le teste nastranti;
- posizionare la macchina con il carrello porta testa nastrante abbassato;
- scollegarla dalla rete pneumatica;
- scollegarla dalla rete elettrica;
- scollegare meccanicamente la macchina dagli altri elementi di linea;
- rimuovere la macchina dalla linea;
- predisporre la macchina per l’eventuale trasporto bloccando le parti mobili della stessa.
Per l’eventuale demolizione della macchina occorre ripetere le stesse operazioni descritte per la messa fuori servizio.
- Rimuovere le protezioni antinfortunistiche (se montate);
- Separare le varie parti in base alla loro natura (metalli, plastica, gomma ecc.) ed avviarle alla raccolta differenziata.
N.B. In caso di demolizione della macchina devono essere osservate le disposizioni vigenti nel paese dell’utilizzatore.
E
9 – Disabling caution
Disabling and demolition must be performed by staff specialised in the electrical/pneumatic and mechanical fields.
Before starting operations, create a sufficiently large and clear space around the machine in ord er to allow staff to
work without additional risks created by the surroundings.
To disable the machine proceed as follows:
- stop the machine;
- remove the taping heads;
- position the machine with the taping head support carriage lowered;
- disconnect it from the pneumatic system;
- disconnect it from the electrical system;
- disconnect the machine mechanically from the other line elements;
- remove the machine from the line;
- prepare the machine for possible transport, clamping its mobile parts.
For possible demolition of the machine the same operations described for disabling have to be performed.
- Remove the accident prevention guards (if mounted);
- separate the various parts according to their type (metal, plastic, rubber etc.) and send them for differentiated waste
collection.
N.B. In the case of demolition of the machine, the regulations in force in the user's country must be observed.
41
3
PARTE PART PARTIE TEIL
REGOLAZIONI / ADJUSTMENTS / RÉGLAGES / EINSTELLUNGEN
F
9 - Mise hors service
ATTENTION:
La mise hors service et la démolition doivent être exécutées par du personnel spécialisé dans les secteurs électrique,
pneumatique et mécanique. Avant d’entreprendre ces opérations, laisser suffisamment d’espace bien dégagé autour de
la machine, de façon à permettre aux opérateurs de travailler sans risques complémentaires dus au milieu ambiant.
Pour mettre la machine hors service, suivre la démarche indiquée ci-dessous:
- Arrêter la machine.
- Enlever les têtes de rubanage.
- Mettre le chariot porte-tête de rubanage de la machine en position abaissée.
- Déconnecter la machine du circuit pneumatique.
- La déconnecter du circuit électrique.
- Procéder à la déconnexion mécanique de la machine des autres éléments de la ligne.
- Oter la machine de la ligne.
- Si besoin est, préparer la machine au transport en bloquant ses pièces mobiles.
En cas de démolition de la machine, il est nécessaire de faire les mêmes opérations que celles qui sont décrites pour la
mise hors service.
- Oter les dispositifs de protection contre les accidents de travail (s'ils sont montés);
- Séparer les différentes pièces en fonction de leur nature (métaux, plastique, caoutchouc, etc.) et les mettre au rebut en
respectant les critères du recyclage différencié.
N.B. En cas de démolition de la machine, il est nécessaire de respecter les normatives en vigueur dans le pays
d’utilisation.
D
9 - Außerbetriebsetzung
ACHTUNG:
Außerbetriebsetzung und Verschrottung müssen von Personal durchgeführt werden, das in den Bereichen
Elektrik/Druckluft und der Mechanik spezialisiert ist. Bevor diese Operationen durchgeführt werden, muß um die
Maschine herum ein ausreichend großer, freier Raum geschaffen werden, damit das Personal ohne zusätzliche, durch
das Umfeld geschaffene Risiken arbeiten kann.
Für die Außerbetriebsetzung wird wie folgt vorgegangen:
- Maschine anhalten,
- Klebeköpfe abnehmen,
- Maschine so stellen, daß der Wagen mit dem Klebekopfträger abgesenkt ist,
- von der Druckluftanlage lösen,
- vom Stromnetz lösen,
- die Maschine mechanisch von den anderen Elementen der Anlage lösen,
- die Maschine aus der Anlage herausnehmen,
- die Maschine für den eventuellen Transport vorbereiten, indem ihre beweglichen Teile befestigt
werden
Für die eventuelle Verschrottung der Maschine werden dieselben Arbeitsgänge durchgeführt, wie für die
Außerbetriebnahme angegeben.
- Arbeitsschutzvorrichtungen abnehmen (wenn montiert)
- Die verschiedenen Teile nach Material trennen (Metalle, Plastik, Gummi usw.) und s ie getrennt der
Müllversorgung zuführen.
N.B. Bei der Verschrottung der Maschine müssen die für das jeweilige Einsatzland gültigen Vorschriften beachtet
werden.
42
3
PARTE PART PARTIE TEIL
REGOLAZIONI / ADJUSTMENTS / RÉGLAGES / EINSTELLUNGEN
I
10 - Elenco possibili guasti
01) La macchina non parte.
02) Macchina in condizione di emergenza.
03) Le cinghie non si mettono in movimento.
04) Non chiude la falda posteriore .
05) Interrompe il ciclo automatico.
E
10 - Trouble shooting
01) The machine does not start.
02) Machine in emergency condition.
03) The belts are not in motion.
04) Rear box flap is not being closed
05) Interrupts the automatic cycle.
F
10 - Liste des pannes possibles
01) La machine ne démarre pas.
02) La machine est en condition d'urgence.
03) Les courroies ne se mettent pas en mouvement.
04) Le repli arrière ne se ferme pas .
05) Le cycle automatique s'interrompt.
D
10 - Liste ebentueller Probleme
01) Die Maschine startet nicht.
02) Maschine in Alarmzustand.
03) Die Riemen bewegen sich nicht.
04) Die hintere Überlappung schließt nicht.
05) Der automatische Kreis wird unterbrochen.
43
3
PARTE PART PARTIE TEIL
REGOLAZIONI / ADJUSTMENTS / RÉGLAGES / EINSTELLUNGEN
01
Descrizione guasto: LA MACCHINA NON PARTE
Description of failure: THE MACHINE DOES NOT START UP
Description panne: LA MACHINE NE DÉMARRE PAS
Defektbeschreibung: DIE MASCHINE STARTET NICHT
CONTROLLARE / CHECK / CONTRÔLER / KONTROLLEN
ELETTRICO / ELECTRICAL
ELECTRIQUE / ELEKTRISCHE
PNEUMATICO / PNEUMATIC
PNEUMATIQUE / PNEUMATISCHE
MECCANICO / MECHANICAL
MÉCANIQUE / MECHANISCHE
- PORTINE DI SICUREZZA APERTE
- PROTECTIVE PANEL DOORS OPEN
- PORTES DE SÛRETÉ OUVERTES
- SCHUTZPFORTEN OFFEN
- CORRENTE IN LINEA
- CURRENT IN LINE
- COURANT EN LIGNE
- LEITUNGSSTROM
- INSERIMENTO SPINA
- PLUG INSERTED
- INTRODUCTION FICHE
- STECKERANSCHLUß
- EMERGENZA DISINSERITA
- EMERGENCY DISCONNECTED
- SECOURS DÉBRANCHÉ
- NOTSCHALTER AUSGESCHALTEN
- RESET PREMUTO
- RESET BUTTON PRESSED
- RESET ENFONCÉ
- RESET GEDRÜCKT
- START PREMUTO
- START BUTTON PRESSED
- START ENFONCÉ
- START GEDRÜCKT
44
3
PARTE PART PARTIE TEIL
REGOLAZIONI / ADJUSTMENTS / RÉGLAGES / EINSTELLUNGEN
02
Descrizione guasto: MACCHINA IN CONDIZIONE DI EMERGENZA
Description of failure: MACHINE IN EMERGENCY CONDITION
Description panne: MACHINE EN CONDITION D’URGENCE
Defektbeschreibung: MASCHINE IM ALARMZUSTAND
CONTROLLARE / CHECK / CONTRÔLER / KONTROLLEN
ELETTRICO / ELECTRICAL
ELECTRIQUE / ELEKTRISCHE
PNEUMATICO / PNEUMATIC
PNEUMATIQUE / PNEUMATISCHE
- EMERGENZA INSERITA
- EMERGENCY ACTIVATED
- URGENCE ACTIVEE
- ALARM AUSGELÖST
MECCANICO / MECHANICAL
MÉCANIQUE / MECHANISCHE
- PORTINE DI SICUREZZA APERTE
- PROTECTIVE PANEL DOORS OPEN
- PORTES DE SÛRETÉ OUVERTES
- SCHUTZPFORTEN OFFEN
- SCATTO TERMICO
- THERMAL SWITCH
- DECLENCHEMENT THERMIQUE
- THERMISCHER AUSLÖSER
03
Descrizione guasto: LE CINGHIE NON SI METTONO IN MOVIMENTO
Description of failure: THE DRIVE BELTS ARE NOT IN MOTION
Description panne: LES COURROIES NE SE METTENT PAS EN MOUVEMENT
Defektbeschreibung: DIE RIEMEN BEWEGEN SICH NICHT
CONTROLLARE / CHECK / CONTRÔLER / KONTROLLEN
ELETTRICO / ELECTRICAL
ELECTRIQUE / ELEKTRISCHE
PNEUMATICO / PNEUMATIC
PNEUMATIQUE / PNEUMATISCHE
MECCANICO / MECHANICAL
MÉCANIQUE / MECHANISCHE
- CINGHIA DENTATA MOTORE
- MOTOR TOOTHED BELT
- COURROIE DENTEE DU MOTEUR
- ZAHHRIEMEN MOTOR
- SCATTO TERMICO
- THERMAL SWITCH
- DECLENCHEMENT THERMIQUE
- THERMISCHER AUSLÖSER
45
3
PARTE PART PARTIE TEIL
REGOLAZIONI / ADJUSTMENTS / RÉGLAGES / EINSTELLUNGEN
04
Descrizione guasto: NON CHIUDE LA FALDA POSTERIORE
Description of failure: REAR BOX FLAP IS NOT BEING CLOSED
Description panne: LE REPLI ARRIÈRE NE SE FERME PAS
Defektbeschreibung: DIE HINTERE ÜBERLAPPUNG SCHLIEβT NICHT
CONTROLLARE / CHECK / CONTRÔLER / KONTROLLEN
ELETTRICO / ELECTRICAL
ELECTRIQUE / ELEKTRISCHE
PNEUMATICO / PNEUMATIC
PNEUMATIQUE / PNEUMATISCHE
MECCANICO / MECHANICAL
MÉCANIQUE / MECHANISCHE
- CILINDRO DI COMANDO
- CONTROL CYLINDER
- CYLINDRE DE COMMANDE
- STEUERZYLINDER
- REGOLAZIONE POSIZIONE MICRO
DI COMANDO
- CONTROL MICRO-SWITCH
POSITIONING ADJUSTMENT
- RÉGLAGE DE LA POSITION DU
CAPTEUR DE COMMANDE
- POSITIONSREGULIERUNG DES
STEUERMIKROS
- FUNZIONAMENTO VALVOLA
- VALVE OPERATION
- FONCTIONNEMENT DE VALVE
- FUNKTION DES VENTILS
40
- MICRO DI COMANDO
- CONTROL MICRO-SWITCH
- CAPTEUR DE COMMANDE
- STEUERMIKRO
31
46
- LEVA CHIUDIFALDA
- FLAP CLOSING LEVER
- LEVIER DU DISPOSITIF DE
FERMETURE
- ÜBERLAPPUNGSSCHLIEß-ARM
- ECCESSIVA DIVARICAZIONE FALDE
VERSO ESTERNO SCATOLA
- EXCESSIVE OUTWARD OPENING
OF BOX FLAPS
- ECARTEMENT EXCESSIF DES REPLIS
VERS L’EXTÉRIEUR DE LA BOÎTE
- ZU STARKE NEIGUNG DER
ÜBERLAPPUNGEN NACH AUßEN
3
PARTE PART PARTIE TEIL
REGOLAZIONI / ADJUSTMENTS / RÉGLAGES / EINSTELLUNGEN
05
Descrizione guasto:INTERROMPE IL CICLO AUTOMATICO
Description of failure:THE AUTOMATIC CYCLE IS INTERRUPTED
Description panne:LE CYCLE AUTOMATIQUE EST INTERROMPU
Defektbeschreibung:UNTERBRECHUNG DES AUTOMATISCHEN ZYKLUS
CONTROLLARE / CHECK / CONTRÔLER / KONTROLLEN
- UNO DEI CASI PRECEDENTEMENTE ILLUSTRATI
- ONE OF THE PREVIOUSLY MENTIONED CASES
- UN DES CAS ILLUSTRES PRECEDEMMENT
- EINER DER ZUVOR BESCHRIEBENEN FÄLLE
- IN CASO DI ALTRE AVARIE CHIAMARE IL SERVIZIO ASSISTENZA TECNICA
- IN THE EVENT OF OTHER FAILURES CONTACT THE TECHNICAL SERVICING DEPARTMENT
- EN CAS D’AUTRES TYPES DE PANNE, APPELER LE SERVICE D’ASSISTANCE
- BEI ANDEREN DEFEKTEN DEN TECHNISCHEN BETREUUNGSDIENST RUFEN
47
4
PARTE PART PARTIE TEIL
MANUTENZIONI / MAINTENANCE / ENTRETIEN / SERVICE
I
4 - Scarico condensa
Scaricare l’eventuale
condensa depositata nel
filtro di accumulo situato
sotto il regolatore di
pressione generale (fig.5).
E
4 - Condensate drainage
Drain off any condensate
which may accumulate in
the filter located beneath
the general pressure
regulator (fig.5).
F
4 - Vidange du condensat
Eventuellement évacuer la
condensation qui a pu se
déposer dans le filtre
d’accumulation situé sous le
régulateur de pression
générale (fig.5).
Fig./Abb. 5
D
4 - Kondenswasserauslaß
Eventuelles Kondenswasser
aus dem Filter unterhalb
des Druckreglers entfernen
(Abb.5).
50
4
PARTE PART PARTIE TEIL
MANUTENZIONI / MAINTENANCE / ENTRETIEN / SERVICE
I
E
5 - VERIFICA SERRAGGIO VITE DI BLOCCAGGIO
ALBERO DI TRASMISSIONE
È buona norma,periodicamente in rapporto
alle ore di lavoro,verificare il corretto
serraggio della vite di fissaggio albero di
trasmissione.(fig.6 pos.1)
Per eseguire correttamente questa operazione
si deve:
- Svitare le viti (fig.7 pos.1) ed asportare
i carter di protezione delle cinghie.
- Allentare il dado di bloccaggio della
puleggia anteriore (fig.7 pos.2) in modo da
consentire lo spostamento della stessa verso
l'interno della macchina.
- Togliere la cinghia.
- Inserire chiave fissa da 38mm in dotazione alla macchina (fig.6
pos.3) in modo da mantenere bloccata la puleggia durante il
serraggio della vite.
5 - CHECK THE LOCKING SCREWS ON THE DRIVE
SHAFT ARE TIGHTENED
It is advisable to regularly check
(according to how long they have been in use)
the locking screws on the drive shaft are
tightened properly.(fig.6 pos.1)
To carry out this procedure properly,you must:
- Loosen the screws (fig.7 pos.1) and remove
the protective carters on the belts.
- Loosen the stop nut on the front pulley (fig.7
pos.2) so that it may moved towards the inside
of the machine.
- Remove the belt.
- Insert the 38mm spanner(fig.6 pos.3) into the niche provided on
the pulley in order to hold it position while the screw is
tightened.
F
D
5 - CONTROLE DU SERRAGE DE LA VIS DE BLOCAGE
DE L'ARBRE DE TRANSMISSION
Il est vivement conseillé de vérifier périodiquement, en fonction
du nombre d'heures de travail,que la vis de fixage de l'arbre de
transmission soit bien serrée.(fig.6 pos.1).
Pour exécuter correctement cette opération
il faut:
- Devisser les vis (fig.7 pos.1) et retirer les carters de protection
des courroies.
- Desserer l'écrou de blocage de la poulie avant
(fig.7 pos.2) afin de permettre à cette derniere e se déplacer vers
l'intérieur de la machine.
- Ritirer la courroie.
- Introduire la clé de 38mm (fig.6 pos.3) dans le logement prévu
à cet effet sur la poulie de façon à ce que la poulie reste bloquée
pendant le serrage de la vis.
1
5 - SPANNUNG DER SPERRSCHRAUBEN DER
ANTRIEBSWELLE KONTROLLIEREN
Es ist angebracht,die Spannung der Sperrschrauben der
Antriebswelle in Abständen,im Verhältnis zu den
Arbeitsstunden, zu kontrollieren (Abb.6 pos.1).
Dieser Arbeitsgang wird korrekt wie folgt vorgenommen:
- Die Schrauben lösen (Abb.7 pos.1) und die Abdeckung der
Riemen abnehmen.
- Klemm-Mutter der hinteren Riemenscheibe lockern (Abb.7
pos.2), so daß die Riemenscheibe in das Innere der Maschine
verschoben werden kann.
- Den Riemen.
- Den Schlüssel (Abb.6 pos.3) in die dafür vorgesehene
Vertiefung auf der Riemenscheibe ansetzen so dass diese
während des Anziehns der Schraube blockiert bleibt.
2
38 mm
3
Fig./Abb. 6
Fig./Abb. 7
51
4
PARTE PART PARTIE TEIL
MANUTENZIONI / MAINTENANCE / ENTRETIEN / SERVICE
I
E
- Serrare a fondo la vite di bloccaggio con chiave per viti
ad esagono incassato da 5mm (fig.6 pos.2).
- Rimontare la cinghia (fig.1 e 2 paragrafo 2).
- Con un cacciavite introdurre nell'apposita sede facendo
leva in modo da tendere la cinghia (fig.2).
- Serrare il dado (fig.1 pos.2).
- Verificare il corretto tensionamento della cinghia
tirandola leggermente con le dita in prossimità della
mezzeria del braccio di trascinamento (fig.3); lo
spostamento della cinghia dalla guida deve essere ca.20mm.
Se cio non avvenisse,per regolare la tensione si deve
riallentare il dado (fig.1 pos.2), introdurre il cacciavite
nell'apposita sede con manovra in avanti per tendere
la cinghia,secondo necessità (fig.2);serrare il dado
(fig.1 pos.2).
- Riposizionare il carter bloccandolo con le viti.
- Fasten the locking screws as tightly as possible using
the 5mm hexagonal screw spanner (fig.6 pos.2).
- Fit the belt (fig.1 and 2 section 2).
- Lever if into its housing using a screwdriver,making sure
that it is taut (fi g.2).
- Tighten the nut (fig.1 pos.2).
- Check the tension of the belt by pulling it out slightly
about half way along the arm (fig.3); the belt should come
away from its guide by about 20mm.If this is not the case,
adjust the tension by slackening the nut (fig.1 pos.2)
and shifting it fowards to tighten the belt and backwards
to loosen it (fig.2);tighten the nut (fig.1 pos.2).
- Put the safety guard back on and lock it with the screws.
F
- Avec une clé pour vis avec héxagone encastré de 5mm,
(fig.6 pos.2),serrer à fond la vis de blocage.
- Remonter la courroie (fig.1 et 2 paragraphe 2).
- Introduire un tournevis dans le logement spécial en
faisant levier de maniére à tendre la courroie (fig.2).
- Serrer l'écrou (fig.1 pos.2).
- Controler la tension correcte de la courroie en tirant
légàrement cette derniàre avec les doigts à proximità de
l'axe médian du bras d'entrainement (fig.3);
le déplacement de la courroise de guidage doit etre
d'environ 20mm.Si cela n'a pas lieu, pour régler la tension,
il faut desserer l'écrou (fig.1 pos.2), introduire le
tournevis dans le logement spécial en manoeuvrant vers
l'avant pour tendre la courroie;vers l'arriére pour la
détendre, selon les besoins (fig.2);
serrer l'écrou (fig.1 pos.2).
-Replacer le carter en le bloquant avec les vis.
D
- Mit einem 5mm Sechskanteinsteckschlüssel (Abb. 6
pos.2) die Sperrschrauben fest anziehen.
- Wiedermontieren transportriemen
(Abb.1 und 2 Abschnitt 2).
- Ihn mit einem Schraubenzieher in den entsprechende Sitz
einführen, dabei Druck ausüb en,um den Riemen zu
spannen (Abb.2).
- Mutter wieder anziehen (Abb.1 pos.2).
- Die korrekte Spannung des Riemens kontrollieren durch
leichtes Ziehen desselbens im Mitteltell des Förderarms
(Abb.3).
Die Dehnung des Riemens von der Führung muß etwa
20mm betragen.
Sollte dies nicht der Fall sein,so muß die Mutter (Abb.1
pos.2) wieder gelöst werden und mit Hilfe eines 4mm.
Imbusschlüssels die Stellschraube nach rechts zur
Spannung und nach links zur Entspannung gedreht
werden (Abb.2);
die Mutter festziehen (Abb.1 pos.2).
- Die Abdeckung wieder aufsetzen und mit den Schrauben
festziehen.
52
4
PARTE PART PARTIE TEIL
MANUTENZIONI / MAINTENANCE / ENTRETIEN / SERVICE
I
E
6 - Verifica tensionamento e sostituzione cinghia
di trasmissione
a - Verifica tensionamento cinghia di trasmissione
Per questo controllo e necessario:
- svitare le viti e togliere il carter di protezione
cinghia (fig.8 pos.4);
- verificare il corretto tensionamento della cinghia
spingendola leggermente con le dita (fig.8 pos.1);
- regolare eventualmente la tensione della cinghia
allentando i tre dadi di bloccaggio del motore, in modo da
consentirne lo spostamento necessario, e ribloccarli poi
nella giusta posizione a tensionamento eseguito (fig.8
pos.2);
- rimontare il carter di protezione.
b - Sostituzione cinghia di trasmissione
Sostituire la cinghia nel modo seguente:
- svitare le viti e togliere il carter di protezione cinghia (fig.8
pos.4);
- allentare i tre dadi di bloccaggio del motore (fig.8 pos.2), e
sostituire la cinghia (pos.3);
- ripristinare il tensionamento della cinghia stringendo
i tre dadi di bloccaggio del motore (fig.8 pos.2);
- rimontare il carter di protezione.
6-Checking the tension and replacing the drive belt
a-Checking the tension of the drive belt.
Check the tension as follows:
- unscrew the screws and remove the belt guard (fig.8
pos.4);
- check the tension of the belt by pushing it gently with the
fingers (fig.8 pos.1);
- if necessary,adjust the tension of the belt,after having
loosened the three nuts securing the motor to enable it to
be shifted as required,then retightening them after having
adjusted the tension (fig.8 pos.2);
- fit the belt guard back in place.
b - Replacing the drive belt
Replace the drive belt by proceeding as follows:
- unscrew the screws and remove the belt guard (fig.8
pos.4);
- loosen the three nuts securing the motor (fig.8 pos.2)
and replace the belt (pos.3);
- re-adjust the tension of the belt and tighten the three
nuts securing the motor (fig.8 pos.2);
- fit the belt guard back in place.
Fig./Abb. 8
53
4
PARTE PART PARTIE TEIL
MANUTENZIONI / MAINTENANCE / ENTRETIEN / SERVICE
D
F
6 - Contrôle du degré de tension et remplacement de la
courroie de transmission
6 - Überprüfung der Dehnung und Austausch
des Treibriemens
a - Contrôle du degré de tension de la courroie
de transmission
Pour ce contrôle,il faut:
- dévisser les vis et ôter le carter de protection (fig.8 pos.4);
- s'assurer que le degré de tension de la courroie est
correct en la poussant légèrement avec les doigts
(fig.8 pos.1);
- régler éventuellement la tension de la courroie en
desserrant les trois écrous de blocage du moteur, de
manière à en permettre le déplacement nécessarie, et les
bloquer de tension désiré (fig.8 pos.2);
- remonter le carter de protection.
a - Überprüfung der Dehnung des Treibriemens
Für diese Kontrolle wie folgt vorgehen:
- die Schrauben lösen und die Schutzabdeckung des
Riemens entfernen (Abb.8 pos.4);
- durch leichtes Stoßen mit den Fingern die korrekte
Riemendehnung überprüfen (Abb.8 pos.1);
- eventuell die korrekte Riemendehnung einstellen durch
Lockern der drei Blok kierungsmuttern des Motors, um
die nötige Verschiebung zu ermöglichen; anschließend in
der richtigen Position blockieren (Abb.8 pos.2);
- die Schutzabdeckung wieder aufsetzen.
b - Remplacement de la courroie de transmission
Remplacer la courroie de mouvement dévidoir de la
manière suivante:
- dévisser les vis et ôter le carter de protection
courroie (fig.8 pos.4);
- desserrer les trois écrous de blocage du moteur
(fig.8 pos.2), et remplacer la courroie (pos.3);
- rétablir la tension correcte de la courroie en serrant les
trois écrous de blocage du moteur (fig.8 pos.2);
- remonter le carter de protection.
b - Austausch des Treibriemens
Den Wicklerriemen wie folgt austauschen:
- die Schrauben lösen und die Riemenschutzabdeckung
entfernen (Abb.8 pos.4);
- die drei Blockierun gsmuttern des Motors (Abb.8 pos.2)
lockern und den Riemen austauschen (pos.3);
- die Riemendehnung einstellen durch Festziehen der drei
Blockierungsmuttern des Motors (Abb.8 pos.2);
- die Schutzabdeckung wieder aufsetzen.
54
CODICE RICAMBI / SPARES CODE
CODE DE RECHANGE / ERSATZTEIL KODEX
Fig.
Abb.
PARTE / PART / PARTIE / TEIL
STA F47
I
230-01
230-01
230-01
230-02
230-02
230-02
230-02
230-02
230-08
230-08
15
18
08
35
28
29
17
20
24
04
801-10-140
801-10-139
851-03-474
801-06-437
801-00-033
851-00-037
851-00-913
851-01-063
851-03-120
851-00-730
1
1
4
2
1
1
12
4
2
4
230-08
230-09
230-09
230-05
230-04
230-05
14
34
07
29
25
31
851-00-584
851-03-475
851-01-161
801-00-788
801-09-456
801-00-535
2
1
3
1
1
1
230-09
230-09
05
05
851-02-387
CNE-13007-106
230-09
230-09
230-09
230-09
230-09
230-09
230-09
05
05
05
05
05
05
06
CNE-13007-109
851-02-389
851-02-390
CNE-13007-105
851-02-939
851-03-683
851-03-598
230-11
230-11
20
20
230-11
230-11
230-11
230-11
230-10
230-06
20
20
20
21
19
09
DESCRIZIONE
Rullo ø32x516
Rullo ø32x183,5
Piedino
Chiocciola
Manopola
Anello seeger øe 8
Cuscinetto ø25x6x7,5
Cuscinetto ø26x6x7,5
Cinghia di trasc. h=50x2570
Cuscinetto ø15x32x9
(SKF tipo 6002 -2RS1)
Linguetta 5x5x20
Cinghia dentata Z=80 P=3/8”
Linguetta 5x5x15
Molla per leva chiudifalda posteriore
Molla per convogliatore chiudifalda
Tirante
ELENCO RICAMBI CONSIGLIATI / RECOMMENDED SPARE PARTS LIST
LISTE PIECES DE RECHANGE CONSEILLES / VERZEICHNIS DER EMPFOHLENEN
5
E
DESCRIPTION
DESCRIPTION
D
BESCHREIBUNG
Roller ø32x516
Roller ø32x183,5
Foot
Bearung block
Knob
Retaining ring for ext. dia. 8
Bearing dia.25x6x7,5
Bearing dia.26x6x7,5
Drive belt h=50x2570
Bearing dia.15x32x9
(SKF tipo 6002-2RS1)
Tongue 5x5x20
Toothed belt Z=80 P=3/8”
Tongue 5x5x15
Spring
Spring
Tie rod
Rouleau ø32x516
Rouleau ø3 2x183,5
Petite pied
Bloc avec filet
Bouton
Bague seeger øext.8
Roulement ø25x6x7,5
Roulement ø26x6x7,5
Courroie h=50x2570
Roulement ø15x32x9
(SKF tipo 6002-2RS1)
Clavette 5x5x20
Courroie dentee Z=80 P=3/8”
Clavette 5x5x15
Ressort
Ressort
Tirant (raidisseur)
Rolle ø32x516
Rolle ø32x183,5
Fuß
Gewindestueck
Knauf
Seegerring für a ø8
Lager ø25x6x7,5
Lager ø26x6x7,5
Transportriemen h=50x2570
Lager ø15x32x9
(SKF tipo 6002-2RS1)
Federkeil 5x5x20
Zahnriemen Z=80 P=3/8”
Federkeil 5x5x15
Feder
Feder
Zugstab
Single-phase motor 220/240V 50Hz
Three- phase motor 208/360V 50Hz. - 254/440V 60Hz
Moteur monophasé 220/240V 50Hz
Moteur triphasé 208/360V 50Hz. –
254/440V 60Hz
Moteur triphasé 290/500V 50Hz
Moteur monophasé 220V 60Hz
Moteur monophasé 100V 50/60Hz
Moteur tri phasé 220/380V 60Hz
Moteur triphasé 200/346V 50/60Hz
Moteur monophasé 110V 60Hz
Réducteur S.F. NMRV040
PAM 140/11
Interrupteur avec reglage 1 -1,6A ( type GV2-M06)
Interrupteur avec reglage 1,6-2,5A
( type GV2-M07)
Interrupteur avec reglage 2,5-4A ( type GV2-M08)
Interrupteur avec reglage 4 -6A ( type GV2-M10)
Interrupteur avec reglage 6-10A (type GV2-M14)
Fusible 4A retardé (ø5x20)
Bobine 24Vac (code MB 56)
Valve a levier oscillant Festo RW -3-M 5
Einphasen-Motoren 220/240V 50Hz
Dreiphasen-motoren 208/360V 50Hz. - 254/440V 60Hz
Three-phase motor 290/500V 50Hz
Single-phase motor 220V 60Hz
Single-phase motor 100V 50/60Hz
Three-phase motor 220/380V 60Hz
Three-phase motor 200/346V 50/60Hz
Single-phase motor 110V 60Hz
Gearbox S.F. NMRV040 PAM 140/11
851-02-927
CNE-10005-020
1 Motore monofase 220/240V 50Hz
1 Motore trifase 208/360V 50Hz. - 254/440V 60Hz
(0,37kW)
1 Motore trifase 290/500V 50Hz
1 Motore monofase 220V 60Hz
1 Motore monofase 100V 50/60Hz
1 Motore trifase 220/380V 60Hz
1 Motore trifase 200/346V 50/60Hz
1 Motore monofase 1 10V 60Hz
1 Riduttore vite S.F. NMRV040 PAM 140/11
1:10 (Mot. Gr. 63 Flan. B5)
1 Interruttore aut. da 1-1,6A (tipo GV2-M06)
1 Interruttore aut. da 1,6-2,5A (tipo GV2-M07)
CNE-10005-021
CNE-10005-022
CNE-10005-023
851-03-233
851-03-463
851-00-939
1
1
1
1
1
1
Switch, with reg. 2,5-4A ( type GV2-M08)
Switch, with reg. 4 -6A ( type GV2-M10)
Switch, with reg. 6 -10A (tipo GV2-M14)
4A delayed-action fuse (dia.5x20)
Coil 24Vac (code MB 56)
Valve Festo RW-3-M5 with lever
Interruttore aut. da 2,5-4A (tipo GV2-M08)
Interruttore aut. da 4-6A (tipo GV2-M10)
Interruttore aut.da 6 -10A (tipo GV2-M14)
Fusibile 4A ritardato (ø5x20)
Bobina 24Vac (cod. MB 56)
Valvola Festo RW-3 -M5 con leva
F
Switch, with reg. 1 -1,6A ( type GV2-M06)
Switch, with reg. 1,6-2,5A ( type GV2-M07)
55
Dreiphasen-Motoren 290/500V 50Hz
Einphasen-Motoren 220V 60Hz
Einphasen-Motoren 100V 50/60Hz
Dreiphasen-Motoren 220/380V 60Hz
Dreiphasen-Motoren 200/346V 50/60Hz
Einphasen-Motoren 110V 60Hz
Schneckengetriebe S.F. NMRV040
PAM 140/11
Schalter 1-1,6A ( type GV2-M06)
Schalter 1,6-2,5A ( type GV2-M07)
Schalter 2,5-4A ( type GV2-M08)
Schalter 4-6A ( type GV2-M10)
Schalter 6-10A (tipo GV2-M14)
4A Sicherung verzögert (ø5x20)
Spule 24Vac (Kode MB 56)
Schwinghebelventil Festo RW -3-M5
CODICE RICAMBI / SPARES CODE
CODE DE RECHANGE / ERSATZTEIL KODEX
Fig.
Abb.
230-10
STA F47
8
851-00-135
PARTE / PART / PARTIE / TEIL
I
DESCRIZIONE
1 Manometro 0-10bar-1/8"G-ø40
(cod. 160101005)
ELENCO RICAMBI CONSIGLIATI / RECOMMENDED SPARE PARTS LIST
LISTE PIECES DE RECHANGE CONSEILLES / VERZEICHNIS DER EMPFOHLENEN
5
E
DESCRIPTION
Pressure gauge 0-10bar-1/8"G-dia.40 (code 160101005)
55
F
DESCRIPTION
Manomètre 0-10bar-1/8"G-ø40
(code 160101005)
D
BESCHREIBUNG
Manometer 0-10bar-1/8"G-ø40
(Kode 160101005)
CODICE RICAMBI / SPARES CODE
CODE DE RECHANGE / ERSATZTEIL
ASSIEME BANCALE / BED ASSEMBLY
ENSEMBLE BANC / BETTEINHEIT
Fig./Abb. 230-01
DESCRIPTION
MSNA-10296-01
MSNA-20383-01
MSNA-20383-02
851-00-214
851-01-072
DESCRIZIONE
2 Colonna H=1100 mm.
2 Supporto sinistro
2 Supporto destro
12 Vite T.C.E.I. M6x16
16 Vite autofilettante T.E. ø5,5x9,5
Mast H=1100 mm.
Left support
Right support
Socket head screw M6x16
Self-tapping hexagon head screw ø5,5x9,5
06
06
MSNA-81742-81
MSNA-81742-82
1
1
Bancale chiodato
Bancale chiodato (Opposta)
Riveted bed
Riveted bed (Opposite)
07
08
09
10
11
12
13
801-10-010
851-03-474
801-10-078
851-00-506
851-00-294
801-00-905
851-01-072
4
4
4
16
16
4
18
Gamba
Piedino
Morsetto gambe
Rondella piana per M8
Vite T.E. M8x16
Staffa fissaggio rulli
Vite autofilettante T.E. ø5,5x9,5
Leg
Foot
Legs clamp
Flat washer for M8
Hexagon head screw M8x16
Bracket
Self-tapping hexagon head screw ø5,5x9,5
Table travail clouée
Table travail clouée
(Gauche/Droite)
Jambe
Petite pied
Support
Rondelle plate pour M8
Vis T.H. M8x16
Entrier
Vis autotaraudeuse T.H. ø5,5x9,5
14
15
16
17
18
19
MSNA-30427-01
801-10-140
801-00-904
801-09-858
801-10-139
801-01-103
2
13
13
2
10
10
Staffa fissaggio rulli
Rullo L=516mm
Perno ø 8 L=539mm
Staffa fissaggio rulli
Rullo L=183,5mm
Perno ø 8 L=200mm
Bracket
Roller L=516mm
Pin ø 8 L=539mm
Bracket
Roller L=183,5mm
Pin ø 8 L=200mm
Entrier
Rouleau L=516mm
Pivot ø 8 L=539mm
Entrier
Rouleau L=183,5mm
Pivot ø 8 L=200mm
STA F47
01
02
03
04
05
I
E
57
DESCRIPTION
Montant h=1100 mm.
Support gauche
Support de droite
Vis T.C.E.I. M6x16
Vis autotaraudeuse T.H. ø5,5x9,5
F
BESCHREIBUNG
Kolonne h=1100 mm.
Linker Träger
Rechter Träger
Inbusschraube M6x16
Selbstschneidende
Sechskantschraube ø5,5x9,5
Vernietetes Bett
Vernietetes Bett (Kontra)
D
Bein
Fuß
Beinhalter
Flachscheibe für M8
Sechskantschraube M8x16
Bügel
Selbstschneidende
Sechskantschraube ø5,5x9,5
Bügel
Rolle L=516mm
Bolzen ø 8 L=539mm
Bügel
Rolle L=183,5mm
Bolzen ø 8 L=200mm
CODICE RICAMBI / SPARES CODE
CODE DE RECHANGE / ERSATZTEIL
01
02
03
04
05
06
07
08
09
10
11
12
13
14
15
16
17
18
19
20
21
22
23
24
851-00-237
801-00-037
801-00-032
801-00-226
851-00-473
851-00-191
801-00-230
801-00-023
801-00-110
851-00-403
801-00-231
801-00-232
801-00-096
851-00-193
801-00-234
851-01-076
851-00-913
851-02-829
MSNA-81713-81
851-01-063
801-00-233
801-00-771
801-00-775
851-00-062
DESCRIZIONE
1 Vite T.S.P.E.I. M6x16
1 Coperchietto
1 Leva
1 Bussola a morsetto
1 Dado esagonale M6
2 Vite T.C.E.I. M4x10
2 Rondella speciale
2 Perno
1 Asta antirovesciamento scatola
1 Vite T.C.E.I. M5x10
6 Tendicatena
2 Piastrina
2 Pignone Z= 9
3 Vite T.C.E.I. M4x14
4 Bussola
20 Dado esagonale basso M6
24 Cuscinetto ø25x6x7,5
8 Vite T.E. M6x18
1 Carrello porta unità
8 Cuscinetto ø26x6x7,5
1 Perno
1 Pignone Z= 9
1 Distanziale
8 Vite autofilettante T.B.I.C. ø3,9x38
25
26
27
28
29
30
31
32
33
34
35
36
37
851-00-852
801-00-229
851-00-408
801-00-033
851-00-037
851-00-505
851-00-287
801-00-030
801-00-029
851-00-154
801-06-437
801-06-254
MSNA-20384-01
1
1
1
1
1
12
12
2
2
2
2
2
2
STA F47
CARRELLO PORTA UNITÀ / TOP HEAD FRAME
CHARIOT PORTE TÊTE RUBANEUSE / OBERES SCHLITTGESTELL
Fig./Abb. 230-02
I
Catena 3/8"x174 passi chiusa
Protezione catena
Vite T.C.E.I. M6x20
Manopola
Anello seeger per øe 8
Rondella piana per M6
Vite T.E. M6x30
Fermo
Fermo
Grano E.I.E.C M6x6
Chiocciola
Molla
Vite di sollevamento
E
DESCRIPTION
F
DESCRIPTION
Socket flat head screw M6x16
Bushing
Lever
Bush
Hexagon nut M6
Socket head screw M4x10
Special washer
Pin
Anti-tipping rod
Socket head screw M5x10
Chain tightener
Plate
Pinion Z= 9
Socket head screw M4x14
Bush
Low hexagon nut M6
Bearing dia.25x6x7,5
Hexagon head screw M6x18
Top head frame
Bearing dia.26x6x7,5
Pin
Pinion Z= 9
Distance piece
Self-tapping screw ø3,9x38
Vis T.S.P.E.I. M6x16
3/8"x174 closed-pitch chain
Chain guard
Socket head screw M6x20
Knob
Retaining ring for ext.dia. 8
Flat washer for M6
Hexagon head screw M6x30
Catch
Catch
Dowel M6x6
Bearung block
Spring
Lifting screw
59
Chaîne 3/8"x174 fermée
Douille
Levier
Douille
Ecrou hexagonal M6
Vis T.C.E.I. M4x10
Rondelle spéciale
Pivot
Barre contre le renversement dela boîte
Vis T.C.E.I. M5x10
Tendeur de chaîne
Plaquette
Pignon Z= 9
Vis T.C.E.I. M4x14
Douille
Ecrou hexagonal bas M6
Roulement ø25x6x7,5
Vis T.H. M6x18
Chariot porte tête rubaneuse
Roulement ø26x6x7,5
Pivot
Pignon Z= 9
Entretoise
Vis autotaraudeuse T.B.I.C. ø 3,9x38
Protection chaîne
Vis T.C.E.I. M6x20
Bouton
Bague seeger pour øext. 8
Rondelle plate pour M6
Vis T.H. M6x30
Cale
Cale
Goujon E.I.E.C. M6x6
Bloc avec filet
Ressort
Vis de levage
BESCHREIBUNG
Inbussenkschraube M6x16
Buechse
Hebel
Hülse
Sechskantmutter M6
Inbusschraube M4x10
Scheibe spezial
Bolzen
Karton Kip pschutzstange
Inbusschraube M5x10
Kettenspanner
Plättchen
Ritzel Z=9
Inbusschraube M4x14
Hülse
Flache Sechskantmutter M6
Lager ø25x6x7,5
Sechskantschraube M6x18
Oberes schlittgestell
Lager ø26x6x7,5
Bolzen
Ritzel Z=9
Distanzstück
Selbstschneidende Schraube
ø3,9x38
Kette 3/8"x174 Teilungen
Kettenschutz
Inbusschraube M6x20
Knauf
Seegerring für ä.ø 8
Flachscheibe für M6
Sechskantschraube M6x30
Feststellvorrichtung
Feststellvorrichtung
Innensechskantstift M6x6
Gewindestueck
Feder
Hebeschraube
D
CODICE RICAMBI / SPARES CODE
CODE DE RECHANGE / ERSATZTEIL
CARRELLO PORTA UNITÀ / TOP HEAD FRAME
CHARIOT PORTE TÊTE RUBANEUSE / OBERES SCHLITTGESTELL
Fig./Abb. 230-02
I
STA F47
DESCRIZIONE
DESCRIPTION
E
F
DESCRIPTION
38
39
801-00-831
851-00-494
2
4
Guida vite
Dado esagonale autobloccante M6
Guide
Self-locking hexagon nut M6
Glissière
Ecrou hexagonal de sûreté M6
40
41
801-01-833
801-06-213
2
2
Piastrina
Vite T.S.P.E.I. M10x20 (speciale)
Plate
Socket flat head screw M10x20 (special)
Plaquette
Vis T.S.P.E.I. M10x20 (spéciale)
42
43
851-00-283
851-01-984
4
1
Vite T.E. M6x12
Vite autofilettante T.C.E.I. ø 5,5x13
Hexagon head screw M6x12
Self-tapping socket head screw dia. 5,5x13
44
45
46
47
801-00-910
801-00-105
801-00-106
851-00-252
2
4
2
6
Manopola
Rondella speciale
Supporto
Vite autofilettante T.E. ø 6,3x13
48
49
50
801-00-107
801-00-108
801-00-109
2
2
2
Rondella speciale
Rullo singolo
Rullo doppio (optional)
Knob
Special washer
Support
Self-tapping hexagon head screw
ø 6,3x13
Special washer
Single roller
Double roller (optional)
Vis T.H. M6x12
Vis autotaraudeuse T.C.E.I.ø
5,5X13
Bouton
Rondelle
Support
Vis autotaraudeuse T.H.ø 6,3x13
60
Rondelle
Rouleau simple
Rouleau double (optional)
D
BESCHREIBUNG
Führung
Selbstsichernde
Sechskantmutter M6
Plättchen
Inbussenkschraube M10x20
(spezial)
Sechskantschraube M6x12
Selbstschneidende Antriebs
Imbusschraube ø 5,5x13
Knauf
Scheibe
Träger
Selbstschneidende
Sechskantschraube ø 6,3x13
Scheibe
Rolle
Doppelte rolle (optional)
CODICE RICAMBI / SPARES CODE
CODE DE RECHANGE / ERSATZTEIL
SOSTEGNO CHIUDIFALDE / FLAP-CLOSING SUPPORT
SUPPORT DISPOSITIF DE FERMETURE / ÜBERLAPPUNGSCHLIESSER-STÜTZE
Fig./Abb. 230-03
DESCRIPTION
01
851-01-699
2
DESCRIZIONE
Vite T.B.Q.S.T. M10x30
02
03
851-00-320
801-05-457
4
1
Vite T.E. M6x55
Prolunga per chiudifalda destro
Hexagon head screw M6x55
Extension for right flap-closing device
Vis T.H. M6x55
Prolonge pour fermeture droit
04
05
06
07
08
09
10
11
851-00-238
801-09-575
851-00-294
801-00-403
851-00-910
801-00-034
851-00-505
851-00-494
2
1
2
2
2
2
6
8
Vite T.S.P.E.I. M6x20
Chiudifalda sinistra
Vite T.E. M8x16
Distanziale
Manopola
Coperchietto
Rondella piana per M6
Dado esagonale autobloccante M6
Socket flat head screw M6x20
Left flap-closer
Hexagon head screw M8x16
Distance piece
Knob
Bushing
Flat washer for M6
Self-locking hexagon nut M6
Vis T.S.P.E.I. M6x20
Dispositif de fermeture gauche
Vis T.H. M8x16
Entretoise
Bouton
Douille
Rondelle plate pour M6
Ecrou hexagonal de sûreté M6
12
13
851-00-506
851-00-494
2
2
Rondella piana per M8
Dado esagonale autobloccante M8
Flat washer for M8
Self-locking hexagon nut M8
Rondelle plate pour M8
Ecrou hexagonal de sûreté M8
14
15
16
17
18
801-04-416
851-00-286
801-03-975
801-02-922
801-05-458
1
2
2
1
1
Piastrina sinistra
Vite T.E. M6x25
Distanziale
Piastrina destra
Prolunga per chiudifalda sinistro
Left plate
Hexagon head screw M6x25
Distance piece
Right plate
Extension for left flap-closing device
Plaquette gauche
Vis T.H. M6x25
Entretoise
Plaquette droite
Prolonge pour fermeture gauche
19
801-09-574
1
Chiudifalda destra
Right flap-closer
Dispositif de fermeture droite
I
STA F47
Square button head screw M10x30
DESCRIPTION
Vis T.B.Q.S.T. M10x30
E
62
F
BESCHREIBUNG
Hanbrundvierkantschraube
M10x30
Sechskantschraube M6x55
Verlängerungsstück für rechten
Überlappungschließer
Inbussenkschraube M6x20
Klappenschliesser links
Sechskantschraube M8x16
Distanzstück
Knauf
Buechse
Flachscheibe für M6
Selbstsichernde Sechskantmutter
M6
Flachscheibe für M8
Selbstsichernde Sechskantmutter
M8
Linker Plättchen
Sechskantschraube M6x25
Distanzstück
Rechter Plättchen
Verlängerungsstück für linken
Überlappungschließer
Klappenschliesser rechts
D
CODICE RICAMBI / SPARES CODE
CODE DE RECHANGE / ERSATZTEIL
01
02
03
04
851-00-214
851-00-505
MSNA-30444-02
851-00-494
DESCRIZIONE
4 Vite T.C.E.I. M6x16
22 Rondella piana per M6
1 Traversa sinistra
16 Dado esagonale autobloccante M6
05
06
07
08
09
10
11
12
13
14
851-00-284
MSNA-83339-81
851-00-329
MSNA-30444-01
MSNA-83338-81
851-00-290
851-02-973
MSNA-40462-01
MSNA-50764-01
851-03-309
4
1
3
1
1
1
1
1
1
1
15
16
CNP-11054-023
851-03-666
1
1
17
18
851-02-711
851-01-813
19
STA F47
SOSTEGNO CHIUDIFALDE / FLAP-CLOSING SUPPORT
SUPPORT DISPOSITIF DE FERMETURE / ÜBERLAPPUNGSCHLIESSER-STÜTZE
Fig./Abb. 230-04
I
E
DESCRIPTION
Socket head screw M6x16
Flat washer for M6
Left crosspiece
Self-locking hexagon nut M6
DESCRIPTION
Vis T.C.E.I. M6x16
Rondelle plate pour M6
Traverse gauche
Ecrou hexagonal de sûreté M6
F
Hexagon head screw M6x16
Support
Hexagon head screw M8x70
Right crosspiece
Support
Hexagon head screw M6x45
Hexagon head screw M10x70
Support
Pin
Flow regulator dia.1/4” - pipe dia.6/4
art. AB 454060
Hinged fastener
Pneumatic cylinder ø40x160
Camozzi art. 40N2A40A160
Reduction nipple M dia.1/4”- M dia.1/8”
Straight connector dia.1/8"G. pipe dia.6/4
Vis T.H. M6x16
Support
Vis T.H. M8x70
Traverse droite
Support
Vis T.H. M6x45
Vis T.H. M10x70
Support
Pivot
1
1
Vite T.E. M6x16
Supporto
Vite T.E. M8x70
Traversa destra
Supporto
Vite T.E. M6x45
Vite T.E. M10x70
Supporto
Perno
Regolatore di portata ø1/4” - tubo ø6/4
art. AB 454060
Fissaggio a cerniera
Cilindro pneumatico ø40x160
Camozzi art. 40N2A40A160
Nipplo di riduzione M ø 1/4” – M ø 1/8”
Raccordo diritto ø1/8"G. tubo ø6/4
851-01-785
1
Scarico rapido ø1/8” art. AD6050-1/8”
Quick discharge dia.1/8” ref. AD6050-1/8”
20
21
22
23
24
25
26
27
28
29
851-01-634
851-03-546
MSNA-50763-01
NAST -50513-01
801-08-525
801-09-456
NAST -50448-01
801-00-529
801-00-536
851-00-496
1
1
1
2
1
2
4
1
1
3
Regolatore di portata RSW-1/8”
Vite T.C.E.I. M8x65
Distanziale
Distanziale
Attacco stelo cilindro
Molla
Attacco molla
Perno
Distanziale
Dado esagonale autobloccante M10
Flow regulator RSW-1/8”
Socket head screw M8x65
Distance piece
Distance piece
Cylinder stem coupling
Spring
Spring connection
Pin
Distance piece
Self-locking hexagon nut M10
Décharge rapide ø1/8”
réf. AD6050-1/8”
Régulateur de débit RSW-1/8”
Vis T.C.E.I. M8x65
Entretoise
Entretoise
Fixation tige cylindre
Ressort
Bague prise
Pivot
Entretoise
Ecrou hexagonal de sûreté M10
30
31
32
MSNA-83340-81
851-00-282
NAST -50439-01
1
1
1
Traversa
Vite T.E. M6x10
Perno
Crosspiece
Hexagon head screw M6x10
Pin
64
Régulateur de débit ø1/4” - tuyau ø 6/4
art. AB 454060
Fixage à charnière
Cylindre pneumatique ø40x160
Camozzi art. 40N2A40A160
Nipple de réduction M ø1/4” – M ø1/8”
Raccord droit ø1/8"G. tuyau ø6/4
Traverse
Vis T.H. M6x10
Pivot
BESCHREIBUNG
Inbusschraube M6x16
Flachscheibe für M6
Linker Querbalken
Selbstsichernde
Sechskantmutter M6
Sechskantschraube M6x16
Träger
Sechskantschraube M8x70
Rechter Querbalken
Träger
Sechskantschraube M6x45
Sechskantschraube M10x70
Träger
Bolzen
Mengenregler ø1/4” - Schlauch ø6/4
art. AB 454060
Scharnieranschluß
Pneumatisher Zylinder ø40x160
Camozzi art. 40N2A40A160
D
Reduktion Nippel M ø1/4” – Mø1/8”
Gerades Anschlußstück
ø1/8"G. Schlauch ø6/4
Schnellauslassventil ø1/8”
Art. AD6050-1/8”
Mengenregler RSW-1/8”
Inbusschraube M8x65
Distanzstück
Distanzstück
Zylinderschaftanschluß
Feder
Federbefestigung
Bolzen
Distanzstück
Selbstsichernde
Sechskantmutter M10
Querbalken
Sechskantschraube M6x10
Bolzen
CODICE RICAMBI / SPARES CODE
CODE DE RECHANGE / ERSATZTEIL
SOSTEGNO CHIUDIFALDE / FLAP-CLOSING SUPPORT
SUPPORT DISPOSITIF DE FERMETURE / ÜBERLAPPUNGSCHLIESSER-STÜTZE
Fig./Abb. 230-04
DESCRIPTION
2
2
1
1
2
2
5
DESCRIZIONE
Cuscinetto ø26x10x8
Distanziale
Bussola
Bussola
Montante
Rondella piana per M8
Dado esagonale autobloccante M8
Bearing dia.26x10x8
Distance piece
Bush
Bush
Upright
Flat washer for M8
Self-locking hexagon nut M8
DESCRIPTION
Roulement ø26x10x8
Entretoise
Douille
Douille
Montant
Rondelle plate pour M8
Ecrou hexagonal de sûreté M8
851-00-507
801-04-315
851-00-234
NAST -50393-01
851-00-236
851-00-330
851-00-323
MSNA-30423-02
NAST -50445-01
NAST -50514-01
NAST -50437-01
851-00-285
UNN-10039-046
MSNA-40516-01
MSNA-20395-01
851-00-278
851-00-493
2
1
1
2
2
1
1
1
1
1
1
1
2
2
1
1
1
Rondella piana per M10
Rondella speciale
Vite T.S.P.E.I. M5x10
Bussola
Vite T.S.P.E.I. M6x12
Vite T.E. M8x90
Vite T.E. M6x80
Leva sinistra
Distanziale
Protezione
Supporto
Vite T.E. M6x20
Vite T.C.E.I. M10x25
Montante
Chiudifalda centrale
Vite T.E. M5x12
Dado esagonale autobloccante M5
Flat washer for M10
Special washer
Socket flat head screw M5x10
Bush
Socket flat head screw M6x12
Hexagon head screw M8x90
Hexagon head screw M6x80
Left lever
Distance piece
Guard
Support
Hexagon head screw M6x20
Socket head screw M10x25
Upright
Central flap-closer
Hexagon head screw M5x12
Self-locking hexagon nut M5
Rondelle plate pour M10
Rondelle spéciale
Vis T.S.P.E.I. M5x10
Douille
Vis T.S.P.E.I. M6x12
Vis T.H. M8x90
Vis T.H. M6x80
Levier gauche
Entretoise
Protection
Support
Vis T.H. M6x20
Vis T.C.E.I. M10x25
Montant
Dispositif central de fermeture
Vis T.H. M5x12
Ecrou hexagonal de sûreté M5
801-00-576
MSNA-50836-01
851-00-320
UNN-10039-042
MSNA-30423-01
851-00-283
1
1
4
2
1
2
Bussola
Piastra
Vite T.E. M6x55
Vite T.C.E.I. M10x16
Leva destra
Vite T.E. M6x12
Bush
Plate
Hexagon head screw M6x55
Socket head screw M10x16
Right lever
Hexagon head screw M6x12
Douille
Plaquette
Vis T.H. M6x55
Vis T.C.E.I. M10x16
Levier droite
Vis T.H. M6x12
I
STA F47
33
34
35
36
37
38
39
851-01-846
NAST -50438-01
801-02-537
801-02-538
MSNA-40511-01
851-00-506
851-00-495
40
41
42
43
44
45
46
47
48
49
50
51
52
53
54
55
56
57
58
59
60
61
62
E
65
F
BESCHREIBUNG
Lager ø26x10x8
Distanzstück
Hülse
Hülse
Ständer
Flachscheibe für M8
Selbstsichernde
Sechskantmutter M8
Flachscheibe für M10
Scheibe spezial
Inbussenkschraube M5x10
Hülse
Inbussenkschraube M6x12
Sechskantschraube M8x90
Sechskantschraube M6x80
Linker Hebel
Distanzstück
Schutz
Träger
Sechskantschraube M6x20
Inbusschraube M10x25
Ständer
Zentraler Überlappungschließer
Sechskantschraube M5x12
Selbstsichernde
Sechskantmutter M5
Hülse
Plättchen
Sechskantschraube M6x55
Inbusschraube M10x16
Rechts Hebel
Sechskantschraube M6x12
D
CODICE RICAMBI / SPARES CODE
CODE DE RECHANGE / ERSATZTEIL
STRUTTURA CHIUDIFALDA / FLAP-CLOSING STRUCTURE
STRUCTURE DISPOSITIF DE FERMETURE / ÜBERLAPPUNGSCHLIESSER-STRUKTUR
Fig./Abb. 230-05
DESCRIPTION
01
02
03
04
05
06
07
851-00-483
851-00-506
NAST-50124-01
MSNA-50835-01
851-00-560
851-00-330
851-00-002
3
1
1
1
1
1
1
DESCRIZIONE
Dado esagonale M8 (basso)
Rondella piana per M8
Molla
Piastrina
Spina elastica ø3,3x18
Vite T.E. M8x90
Catena 3/8"x25 passi aperta
08
09
10
MSNA-20394-02
MSNA-20394-01
851-00-155
1
1
8
Leva sinistra
Leva destra
Vite autofilettante T.E. ø5,5x9,5
Left lever
Right lever
Self-tapping hexagon head screw ø5,5x9,5
Levier gauche
Levier droite
Vis autotaraudeuse T.H. ø5,5x9,5
11
12
13
MSNA-30424-01
1
Carter
Guard
Carter
851-00-494
2
Dado esagonale autobloccante M6
Self-locking hexagon nut M6
Ecrou hexagonal de sûreté M6
14
15
16
17
851-00-505
851-00-278
851-00-504
851-00-493
2
2
2
2
Rondella piana per M6
Vite T.E. M5x12
Rondella piana per M5
Dado esagonale autobloccante M5
Flat washer for M6
Hexagon head screw M5x12
Flat washer for M5
Self-locking hexagon nut M5
Rondelle plate pour M6
Vis T.H. M5x12
Rondelle plate pour M5
Ecrou hexagonal de sûreté M5
18
19
20
21
22
23
24
25
26
27
28
29
30
31
32
851-00-018
801-00-417
851-00-174
801-00-416
NAST-84082-81
801-00-530
NAST-50508-01
801-09-457
801-00-528
851-00-321
NAST-50510-01
801-00-788
801-00-534
801-00-535
851-00-329
1
1
1
1
1
3
1
1
1
1
2
1
1
1
1
Maglia falsa passo 3/8”
Forcella (filetto sinistro)
Spina elastica ø3,3x14
Tendicatena
Tirante
Gommino
Distanziale
Assieme leva
Distanziale
Vite T.E. M6x60
Guida
Molla
Perno
Tirante
Vite T.E. M8x70
false link pitch 3/8”
Chain tightener screw left
Spring pin dia.3,3x14
Chain tightener
Tie rod
Rubber
Distance piece
Lever assembly
Distance piece
Hexagon head screw M6x60
Guide
Spring
Pin
Tie rod
Hexagon head screw M8x70
Fausse maille pas 3/8”
Vis de tension gauche
Cheville élastique ø3,3x14
Tendeur de chaîne
Tirant (raidisseur)
Caoutchouc
Entretoise
Ensemble levier
Entretoise
Vis T.H. M6x60
Glissière
Ressort
Pivot
Tirant (raidisseur)
Vis T.H. M8x70
I
STA F47
III
I
Hexagon nut M8
Flat washer for M8
Spring
Plate
Spring pin dia.3,3x18
Hexagon head screw M8x90
3/8"x25 open-pitch chain
DESCRIPTION
Ecrou hexagonal M8
Rondelle plate pour M8
Ressort
Plaquette
Cheville élastique ø3,3x18
Vis T.H. M8x90
Chaîne 3/8x25 ouverte
E
67
F
BESCHREIBUNG
Sechskantmutter M8
Flachscheibe für M8
Feder
Plättchen
Elastischer Stift ø3,3x18
Sechskantschraube M8x90
Geschlassene Kette 3/8"x25
Teilungen
Linker Hebel
Rechter Hebel
Selbstschneidende
Sechskantschraube ø5,5x9,5
Carter
D
Selbstsichernde Sechskantmutter
M6
Flachscheibe für M6
Sechskantschraube M5x12
Flachscheibe für M5
Selbstsichernde
Sechskantmutter M5
Blindkettenglied Teilungen 3/8”
Linker Kettenspanner
Elastischer Stift ø3,3x14
Kettenspanner
Zugstab
Gummidichtung
Distanzstück
Hebelwerk
Distanzstück
Sechskantschraube M6x60
Führung
Feder
Bolzen
Zugstab
Sechskantschraube M8x70
CODICE RICAMBI / SPARES CODE
CODE DE RECHANGE / ERSATZTEIL
VALVOLA COMANDO CHIUDIFALDE / FLAP-CLOSING CONTROL VALVE
VANNE DE COMMANDE DISPOSITIF DE FERMETURE / INNERER HEBELMECHANISMUS DES UBERLAPPUNGSUBERLAPPUNGSCHLIESSERS
DESCRIPTION
I
E
F
D
DESCRIZIONE
DESCRIPTION
BESCHREIBUNG
Vite T.C.E.I. M6x16
Socket head screw M6x16
Vis T.C.E.I. M6x16
Inbusschraube M6x16
Rondella piana per M6
Flat washer for M6
Rondelle plate pour M6
Flachscheibe für M6
Raccordo a gomito Øi.12 - 3/8”
M/F Elbow Øi.12 - 3/8”
Raccord coudé Øi.12 - 3/8”
Winkelverbindung Øi.12 - 3/8”
Guaina flessibile di protezione ø16,4x12 Flexible sheathing dia. 16,4x12 L=1Mt.
Guaine souple protective ø16,4x12 Kabelmantel ø16,4x12 L=1Mt.
L=1Mt.
L=1Mt.
Guida micro
Guide
Glissière
Führung
Supporto micro
Support
Support
Träger
Supporto micro (Opposta)
Support (Opposite)
Support (Gauche/Droite)
Träger (Kontra)
Vite T.C.E.I. M4x25
Socket head screw M4x25
Vis T.C.E.I. M4x25
Inbusschraube M4x25
Piastrina
Plate
Plaquette
Plättchen
Valvola con leva RW-3-M5 Festo 4031
Valve with lever RW-3-M5 Festo 4031
Valve a levier oscillant RW-3-M5
Schwinghebelventil RW-3-M5
Festo 4031
Festo 4031
Raccordo diritto M5 tubo ø4
Straight connector M5 tubo ø4
Raccord droit M5 tubo ø4
Gerades Anschlußstück M5
tubo ø4
Dado esagonale autobloccante M4
Self-locking hexagon nut M4
Ecrou hexagonal de sûreté M4
Selbstsichernde Sechskantmutter
M4
Rondella piana per M4
Flat washer for M4
Rondelle plate pour M4
Flachscheibe für M4
Rotella in nylon
Nylon roller
Rouleau
Rolle
Volantino (ELESA art.VC192/40 p-M8x16)
Handwheel (ELESA art.VC192/40 pPetit volant (ELESA art.VC192/40 p- Handrad (ELESA art.VC192/40
M8x16)
M8x16)
p-M8x16)
Rondella speciale
Special washer
Rondelle spéciale
Scheibe spezial
Fig./Abb. 230-06
STA F47
01
02
03
04
851-00-214
851-00-505
CNE-32022-041
CNE-32025-004
2
2
1
1
05
06
06
07
08
09
MSNA-30428-01
MSNA-40515-01
MSNA-40515-02
851-00-198
801-10-181
851-00-939
1
1
1
2
1
1
10
851-02-431
2
11
851-00-492
2
12
13
14
851-00-512
801-00-668
851-03-214
2
1
1
15
801-00-090
1
69
CODICE RICAMBI / SPARES CODE
CODE DE RECHANGE / ERSATZTEIL
Fig./Abb. 230-07
REGOLAZIONE GUIDE DI TRASCINAMENTO / CONVEYOR REGULATION ASSEMBLY
REGULATION SUPPORT COURROIES / RIEMENARM EINSTELLUNG
DESCRIPTION
E
F
D
DESCRIPTION
BESCHREIBUNG
8
8
4
4
1
1
1
4
1
2
4
4
4
4
4
2
2
4
4
DESCRIZIONE
Vite T.E. M6x16
Rondella speciale
Vite T.E. M6x12
Rondella speciale
Anello seeger per øe 8
Manopola
Leva
Bussola
Distanziale
Chiocciola sinistrorsa
Molla
Bussola
Scatola per chiocciola
Distanziale
Asta
Vite sinistrorsa
Giunto
Vite T.C.E.I. M4x20
Dado esagonale autobloccante M4
Hexagon head screw M6x16
Special washer
Hexagon head screw M6x12
Special washer
Retaining ring for ext.dia. 8
Knob
Lever
Bush
Distance piece
Left-hand lead screw
Spring
Bush
Screw casing
Distance piece
Rod
Left-hand screw
Sleeve joint
Socket head screw M4x20
Self-locking hexagon nut M4
Vis T.H. M6x16
Rondelle spéciale
Vis T.H. M6x12
Rondelle spéciale
Bague seeger pour øext. 8
Bouton
Levier
Douille
Entretoise
Vis d’Archimede sinistrosum
Ressort
Douille
Boîte pour limaçon
Entretoise
Tige
Vis sinistrorsum
Joint à manchou
Vis T.C.E.I. M4x20
Ecrou hexagonal de sûreté M4
MSNA-30426-02
851-00-193
801-00-096
851-02-386
801-00-246
801-00-090
851-00-495
2
2
2
1
1
1
1
Vite destrorsa
Vite T.C.E.I. M4x14
Pignone Z=9
Catena 3/8"x111 passi chiusa
Bussola
Rondella speciale
Dado esagonale autobloccante M8
Right-hand screw
Socket head screw M4x14
Pinion Z=9
3/8"x111 closed-pitch chain
Bush
Special washer
Self-locking hexagon nut M8
Vis à droite
Vis T.C.E.I. M4x14
Pignon Z=9
Chaîne 3/8x111 fermée
Douille
Rondelle spéciale
Ecrou hexagonal de sûreté M8
27
28
29
30
31
32
33
851-00-506
851-01-630
851-02-780
801-06-191
2
1
1
4
Rondella piana per M8
Vite T.E. M8x45
Tappo
Pattino completo h=50
Flat washer for M8
Hexagon head screw M8x45
Cap
Complete shoe h=50
Rondelle plate pour M8
Vis T.H. M8x45
Couvercle
Patin complète h=50
851-00-493
8
Dado esagonale autobloccante M5
Self-locking hexagon nut M5
Ecrou hexagonal de sûreté M5
34
35
851-01-121
851-00-237
8
4
Vite T.E. M5x25
Vite T.S.P.E.I. M6x16
Hexagon head screw M5x25
Socket flat head screw M6x16
71
Vis T.H. M5x25
Vis T.S.P.E.I. M6x16
I
STA F47
01
02
03
04
05
06
07
08
09
10
11
12
13
14
15
16
17
18
19
851-00-284
801-00-088
851-00-283
801-00-104
851-00-037
801-00-033
801-00-032
801-00-031
801-00-043
801-00-053
801-00-057
801-00-056
801-05-767
801-00-911
MSNA-40514-01
MSNA-30426-01
801-00-040
851-00-196
851-00-492
20
21
22
23
24
25
26
Sechskantschraube M6x16
Scheibe spezial
Sechskantschraube M6x12
Scheibe spezial
Seegerring für ä.ø 8
Knauf
Hebel
Hülse
Distanzstück
Linksgängige Mutter
Feder
Hülse
Muttergehäuse
Distanzstück
Stab
Linksgängige Schraube
Muffen-Kupplung
Inbusschraube M4x20
Selbstsichernde
Sechskantmutter M4
Schraube rechts
Inbusschraube M4x14
Ritzel Z=9
Kette 3/8"x111 Teilungen
Hülse
Scheibe spezial
Selbstsichernde
Sechskantmutter M8
Flachscheibe für M8
Sechskantschraube M8x45
Stoepsel
Vollstandinger Gleitschuh h=50
Selbstsichernde
Sechskantmutter M5
Sechskantschraube M5x25
Inbussenkschraube M6x16
CODICE RICAMBI / SPARES CODE
CODE DE RECHANGE / ERSATZTEIL
Fig./Abb. 230-07
801-00-158
801-04-201
801-00-058
DESCRIZIONE
Rondella speciale
Distanziale
Chiocciola destrorsa
I
STA F47
36
37
38
4
4
2
REGOLAZIONE GUIDE DI TRASCINAMENTO / CONVEYOR REGULATION ASSEMBLY
REGULATION SUPPORT COURROIES / RIEMENARM EINSTELLUNG
DESCRIPTION
E
F
D
DESCRIPTION
BESCHREIBUNG
Special washer
Distance piece
Bearing block right
72
Rondelle spéciale
Entretoise
Bloc avec filet droit
Scheibe spezial
Distanzstück
Gewindestueck rechts
CODICE RICAMBI / SPARES CODE
CODE DE RECHANGE / ERSATZTEIL
Fig./Abb. 230-08
01
02
03
04
851-00-507
851-00-044
801-00-063
851-00-730
05
06
07
08
09
801-04-506
801-04-503
801-05-569
801-06-327
801-05-647
DESCRIZIONE
2 Rondella piana per M10
8 Anello seeger per øi 32
2 Puleggia folle
10 Cuscinetto ø32x15x9 (SKF TYPE 60022RS1)
4 Distanziale ø20x26,8mm
2 Tenditore cinghia h=50
2 Perno per cinghia h=50
2 Semibraccio inferiore h=50
6 Distanziale ø20x58 per cinghia
10
11
12
13
14
15
16
17
18
851-00-287
851-00-238
801-04-509
801-00-913
851-00-584
851-01-073
801-00-920
801-00-915
851-00-493
6
12
2
2
2
4
2
2
8
19
20
21
851-00-504
851-02-038
851-01-984
8 Rondella piana per M5
2 Dado esagonale basso M10
14 Vite autofilettante T.C.E.I. ø5,5x13
22
23
24
25
26
801-00-842
801-00-841
851-03-120
801-00-065
801-05-557
1
1
2
12
2
Protezione per cinghia sinistra h=50
Protezione per cinghia destra h=50
Cinghia di trascinamento h=50x2570
Distanziale
Rinforzo superiore motorizzazione
27
28
29
30
31
32
33
801-06-321
801-00-068
801-00-047
801-04-508
801-04-507
851-00-205
801-00-914
2
2
2
2
2
8
2
Braccio superiore completo h=50
Distanziale L=6mm
Puleggia comando
Distanzia le L=15mm
Distanziale L=17mm
Vite T.C.E.I. M5x20
Semiscatola superiore
STA F47
I
Vite T.E. M6x30
Vite T.S.P.E.I. M6x20
Bussola distanziale
Distanziale L=9mm
Linguetta 5x5x20
Boccola
Pignone induttore
Semiscatola inferiore
Dado esagonale autobloccante M5
TRASCINAMENTO SCATOLA H=50 / BOX DRIVE SYSTEM H=50
ENTRAÎNEMENT BOÎTE H=50 / SCHUBBETTRIEB DER SCHACHTEL H=50
DESCRIPTION
E
F
D
DESCRIPTION
BESCHREIBUNG
Flat washer for M10
Rondelle plate pour M10
Flachscheibe für M10
Retaining ring for ins.dia. 32
Bague seeger pour øint. 32
Seegerring für inn. ø 32
Idley pulley
Poulie point mort
Leerlaufscheibe
Bearing dia. ø32x15x9 (SKF TYPE 6002Roulement ø32x15x9 (SKF TYPE
Lager ø32x15x9 (SKF TYPE
2RS1)
6002-2RS1)
6002-2RS1)
Distance piece
Entretoise
Distanzstück
Belt strecher h=50
Tendeur courroie h=50
Riemenspanner h=50
Pin for belt h=50
Pivot pourcourroie h=50
Bolzen für Riemen h=50
Lower half arm h=50
Semi-bras inférieure h=50
Untere Armhallte h=50
Distance piece dia. 20x58 for belt
Entretoise ø20x58 pour courroie
Distanzstück ø20x58 für
Riemen
Hexagon head screw M6x30
Vis T.H. M6x30
Sechskantschraube M6x30
Socket flat head screw M6x20
Vis T.S.P.E.I. M6x20
Inbussenkschraube M6x20
Distance piece bush
Douille distanceur
Distanzstück Hülse
Distance piece
Entretoise
Distanzstück
Tongue 5x5x20
Clavette 5x5x20
Federkeil 5x5x20
Bush
Fourreau
Büchse
Inductor pinion
Pignon inducteur
Induktionsritzel
Lower half box
Semi-bôite inférieure
Untere Gehäusehälfte
Self-locking hexagon nut M5
Ecrou hexagonal de sûreté M5
Selbstsichernde Sechskantmutter
M5
Flat washer for M5
Rondelle plate pour M5
Flachscheibe für M5
Low hexagon nut M10
Ecrou hexagonal bas M10
Flache Sechskantmutter M10
Self-tapping socket head screw ø5,5x13
Vis autotaraudeuse T.C.E.I.
Selbstschneidende Antriebs
ø5,5x13
Imbusschraube ø5,5x13
Guard for left belt h=50
Protection pour courroie gauche h=50
Schutz für links Riemen h=50
Guard for right belt h=50
Protection pour courroie droite h=50
Schutz für rechts Riemen h=50
Drive belt h=50x2570
Courroie h=50x2570
Transportriemen h=50x2570
Distance piece
Entretoise
Distanzstück
Upper motor guard bracket
Equerre de renfort supérieur
Obere Antriebs Verstärkung
motorisation
Complete upper arm h=50
Bras supérieur complet h=50
Kompletter obere Arm h=50
Distance piece
Entretoise
Distanzstück
Control pulley
Poulie de commande
Antriebsförderwalze
Distance piece
Entretoise
Distanzstück
Distance piece
Entretoise
Distanzstück
Socket head screw M5x20
Vis T.C.E.I. M5x20
Inbusschraube M5x20
Upper half box
Semi-boîte supérieure
Obere Gehäusehälfte
74
CODICE RICAMBI / SPARES CODE
CODE DE RECHANGE / ERSATZTEIL
Fig./Abb. 230-08
34
35
36
37
38
39
40
801-04-012
801-04-013
801-00-919
801-05-542
851-01-366
851-02-149
801-04-804
2
2
2
2
2
2
2
DESCRIZIONE
Pignone indotto
Alberino per puleggia h=50
Bussola distanziale
Coperchietto
Vite T.S.P.E.I. M8x20
Rondella dentellata conica per M8
Gruppo rinvio completo h=50
41
42
851-00-505
801-04-806
6
2
Rondella piana per M6
Puleggia folle h=50 con cuscinetto
I
STA F47
TRASCINAMENTO SCATOLA H=50 / BOX DRIVE SYSTEM H=50
ENTRAÎNEMENT BOÎTE H=50 / SCHUBBETTRIEB DER SCHACHTEL H=50
DESCRIPTION
E
F
D
DESCRIPTION
BESCHREIBUNG
Induced pinion
Pignon induit
Induktionsritzel
Shaft for pulley h=50
Arbre pour poulie h=50
Welle für Riemenscheibe h=50
Distance piece bush
Douille distanceur
Distanzstück Hülse
Bushing
Douille
Buechse
Socket flat head screw M8x20
Vis T.S.P.E.I. M8x 20
Inbussenkschraube M8x20
Toothed conical washer for M8
Rondelle conique dentetée pour M8
Gezackte Scheibe für M8
Complete drive unit h=50
Groupe renvoi complet h=50
Komplette Vorgelegegruppe
h=50
Flat washer for M6
Rondelle plate pour M6
Flachscheibe für M6
Idley pulley h=50 with bearing
Poulie point mort h=50 avec
Leerlaufscheibe h=50 mit Lager
roulement
75
CODICE RICAMBI / SPARES CODE
CODE DE RECHANGE / ERSATZTEIL
Fig./Abb. 230-09
GRUPPO MOTORE / MOTOR ASSEMBLY
GROUPE MOTEUR / MOTORGRUPPE
DESCRIPTION
F
DESCRIPTION
3
3
DESCRIZIONE
Vite T.E. M8x16
Molla a tazza øe.18 øi.8,2 sp.1
Hexagon head screw M8x16
Belleville washer ext.dia.18 int.dia.8,2 th.1
801-00-090
3
Rondella speciale
Special washer
Vis T.H. M8x16
Ressort à godet øext.18 øint.8,2
épais.1
Rondelle spéciale
851-02-939
CNE-13007-104
1
1
CNE-13007-111
1
Three- phase motor 200/346V 50/60Hz.
Three- phase motor 230/400V 50Hz. 277/480V 60Hz
Three- phase motor 440V 50Hz.
Moteur triphasé 200/346V - 50/60Hz.
Moteur triphasé 230/400V 50Hz. 277/480V 60Hz
Moteur triphasé 440V 50Hz.
Dreiphasen-motoren 200/346 - 50/60Hz.
05
Motore trifase 200/346V 50/60Hz. (0,37kW)
Motore trifase 230/400V 50Hz. - 277/480V
60Hz (0,37kW)
Motore trifase 440V 50Hz. (0,37kW)
05
05
CNE-13007-105
CNE-13007-106
1
1
CNE-13007-109
1
Three- phase motor 220/380V 60Hz.
Three- phase motor 208/360V 50Hz. - 254/440V
60Hz
Three- phase motor 500V 50Hz.
Moteur triphasé 220/380V - 60Hz.
Moteur triphasé 208/360V 50Hz. 254/440V 60Hz
Moteur triphasé 500V 50Hz.
Dreiphasen-motoren 220/380 - 60Hz.
05
Motore trifase 220/380V 60Hz. (0,37kW)
Motore trifase 208/360V 50Hz. - 254/440V
60Hz (0,37kW)
Motore trifase 500V 50Hz. (0,37kW)
05
CNE-13007-110
1
Motore trifase 575V 60Hz. (0,37kW)
Three- phase motor 575V 60Hz.
Moteur triphasé 575V 60Hz.
Dreiphasen-motoren 575V 60Hz.
05
851-02-387
1
Motore monofase 220/240V 50Hz
Single-phase motor 220/240V 50Hz.
Moteur monophasé 220/240V 50Hz.
05
05
05
06
851-02-389
851-02-390
851-03-683
851-03-598
1
1
1
1
Single-phase motor 220V 60Hz.
Single-phase motor 10 0V 50/60Hz.
Single-phase motor 11 0V 60Hz.
Gearbox S.F. NMRV040 PAM 140/11
Moteur monophasé 220V 60Hz.
Moteur monophasé 100V 50/60Hz.
Moteur monophasé 110V 60Hz.
07
08
09
10
11
12
13
14
15
851-01-161
801-00-917
851-01-366
851-02-149
801-05-542
851-00-044
801-00-916
851-00-730
851-00-494
Motore monofase 220V 60Hz
Motore monofase 100V 50/60Hz.
Motore monofase 110V 60Hz.
Riduttore vite S.F. NMRV040 PAM 140/11 R
1:10 (Mot. Gr. 63 Flan. B5)
2 Linguetta 5x5x15
1 Coperchietto
1 Vite T.S.P.E.I. M8x20
1 Rondella dentellata conica per M8
1 Coperchietto per vite T.S.P.E.I. M8
3 Anello seeger per øi 32
3 Supporto
3 Cuscinetto ø32x15x9
16 Dado esagonale autobloccante M6
Einphasen-Motoren
50Hz.
Einphasen-Motoren
Einphasen-Motoren
Einphasen-Motoren
16
17
18
19
851-00-505
851-03-597
801-10-019
801-10-281
13
1
1
1
I
STA F47
01
02
851-00-294
851-03-284
03
04
05
05
Rondella piana per M6
Linguetta 6x6x15
Distanziale
Sostegno riduttore
E
Réducteur S.F. NMRV040
PAM 140/11
Tongue 5x5x15
Bushing
Socket flat head screw M8x20
Toothed conical washer for M8
Bushing
Retaining ring for ins. dia. 32
Support
Bearing dia.32x15x9
Self-locking hexagon nut M6
Clavette 5x5x15
Douille
Vis T.S.P.E.I. M8x20
Rondelle conique dentetée pour M8
Douille
Bague seeger pour øint. 32
Support
Roulement ø32x15x9
Ecrou hexagonal de sûreté M6
Flat washer for M6
Tongue 6x6x15
Distance piece
Support gearbox
77
Rondelle plate pour M6
Clavette 6x6x15
Entretoise
Support réducteur
BESCHREIBUNG
Sechskantschraube M8x16
Tellerfeder ä. ø18 i.ø8,2 Dicke 1
D
Scheibe spezial
Dreiphasen-motoren 230/400V
50Hz. - 277/480V 60Hz
Dreiphasen-motoren 440V 50Hz.
Dreiphasen-motoren 208/360V
50Hz. - 254/440V 60Hz
Dreiphasen-motoren 500V 50Hz.
220/240V
220V 60Hz.
100V 50/60Hz.
110V 60Hz.
Schneckengetriebe S.F. NMRV040
PAM 140/11
Federkeil 5x5x15
Buechse
Inbussenkschraube M8x20
Gezackte Scheibe für M8
Buechse
Seegerring für inn. ø 32
Träger
Lager ø32x15x9
Selbstsichernde
Sechskantmutter M6
Flachscheibe für M6
Federkeil 6x6x15
Distanzstück
Schneckengetrlebe-Halter
CODICE RICAMBI / SPARES CODE
CODE DE RECHANGE / ERSATZTEIL
GRUPPO MOTORE / MOTOR ASSEMBLY
GROUPE MOTEUR / MOTORGRUPPE
DESCRIPTION
F
DESCRIPTION
Fig./Abb. 230-09
851-01-913
DESCRIZIONE
14 Vite autofilettante T.B.I.C. ø3,9x9,5
Self-tapping screw ø3,9x9,5
21
22
23
24
801-01-130
801-10-014
851-00-512
851-00-446
1
2
8
6
Protezione centrale
Protezione
Rondella piana per M4
Vite T.B.Q.S.T. M6x16
Central protection
Guard
Flat washer for M4
Square button head screw M6x16
Vis autotaraudeuse T.B.I.C.
ø3,9x9,5
Protection central
Protection
Rondelle plate pour M4
Vis T.B.Q.S.T. M6x16
25
26
27
801-10-016
851-00-408
851-03-477
1
4
4
Albero scanalato
Vite T.C.E.I. M6x20
Rondella dentellata per M6
Spline shaft
Socket head screw M6x20
Toothed washer for M6
Arbre cannelé
Vis T.C.E.I. M6x20
Rondelle dentetée pour M6
28
29
851-00-212
851-02-367
4
6
Vite T.C.E.I. M6x12
Vite T.B.Q.S.T. M6x20
Socket head screw M6x12
Square button head screw M6x20
Vis T.C.E.I. M6x12
Vis T.B.Q.S.T. M6x20
30
30
31
32
33
34
35
36
801-10-018
MSNA-40548-01
801-10-020
801-00-104
801-04-044
851-03-475
801-10-280
801-00-048
1
1
1
3
2
1
1
1
Piastra
Piastra (Opposta)
Carter
Rondella speciale
Puleggia Z=44 P=3/8”
Cinghia dentata Z=80 P=3/8”
Perno motorizzazione
Distanziale ø20/15,3x4
Plate
Plate (Opposite)
Guard
Special washer
Pulley Z=44 P=3/8”
Toothed belt Z=80 P=3/8”
Drive pin
Distance piece
Plaque
Plaque (Gauche/Droite)
Carter
Rondelle spéciale
Poulie Z=44 P=3/8”
Courroie dentée Z=80 P=3/8”
Tourillon motorisation
Entr etoise
I
STA F47
20
II
E
Rev. II del 23/05/01
78
BESCHREIBUNG
Selbstschneidende Schraube
ø3,9x9,5
Zentraler Schutz
Schutz
Flachscheibe für M4
Hanbrundvierkantschraube
M6x16
Nutenwelle
Inbusschraube M6x20
Gezckte Kegelförmige Scheibe
für M6
Inbusschraube M6x12
Hanbrundvierkantschraube
M6x20
Platte
Platte (Kontra)
Carter
Scheibe spezial
Förderwalze Z=44 P=3/8”
Zahnriemen Z=80 P=3/8”
Antriebsbolzen
Distanzstück
D
CODICE RICAMBI / SPARES CODE
CODE DE RECHANGE / ERSATZTEIL
SCATOLA INTERRUTTORE / CIRCUIT BREAKER BOX
BOÎTE INTERRUPTEUR / SCHALTERGEHÄUSE
Fig./Abb. 230-11
I
STA F47
DESCRIZIONE
DESCRIPTION
E
F
DESCRIPTION
D
BESCHREIBUNG
01
02
03
801-10-023
851-00-493
851-01-072
1
4
4
Piastra
Dado esagonale autobloccante M5
Vite autofilettante T.E. ø5,5x9,5
Plate
Plaque
Platte
Ecrou hexagonal de sûreté M5
Selbstsichernde Sechskantmutter M5
Self-locking hexagon nut M5
Self-tapping hexagon head screw ø5,5x9,5 Vis autotaraudeuse T.H. ø5,5x9,5 Selbstschneidende
Sechskantschraube ø5,5x9,5
Dado esagonale M5
Hexagon nut M5
Ecrou hexagonal M5
Sechskantmutter M5
Rondella piana per M5
Flat washer for M5
Rondelle plate pour M5
Flachscheibe für M5
Cavo per messa a terra
Earth wire
Câble mise a la terre
Erdungskabel
Gezckte Kegelförmige Scheibe für M5
Rondella dentellata per M5
Toothed washer for M5
Rondelle dentetée pour M5
Vite T.C.E.I. M5x16
Socket head screw M5x16
Vis T.C.E.I. M5x16
Inbusschraube M5x16
Passacavo PG16 – øi 10
Grommet PG16 – int. dia. 10
Presse câble PG16 – ø int.10
Kabelhalter PG16 – øi 10
Dado esagonale PG16
Hexagon nut PG16
Ecrou hexagonal PG16
Sechskantmutter PG16
Passacavo PG13 – øi 8
Grommet PG13 – int. dia. 8
Presse câble PG13 – ø int.8
Kabelhalter PG13 – øi 8
Dado esagonale PG13
Hexagon nut PG13
Ecrou hexagonal PG13
Sechskantmutter PG13
Contattore tipo LC1-KO610 B7 24Vac (1- Contact type LC1-KO610 B7 24Vac
Contact type LC1-KO610 B7
Kontakt typ LC1-KO 610 B7
6,3A)
(1-6,3A)
24Vac (1-6,3A)
24Vac (1-6,3A)
Contattore tipo LC1-KO910 B7 24Vac (6- Contact type LC1-KO910 B7 24Vac
Contact type LC1-KO910 B7
Kontakt typ LC1-KO910 B7
10A)
(6-10A)
24Vac (6-10A)
24Vac (6-10A)
Contattore tipo LC1-D210 B7 24Vac
Contact type LC1-D210 B7 24Vac
Contact type LC1-D210 B7 24Vac Kontakt typ LC1-D210 B7 24Vac
(9-14A)
(9-14A)
(9-14A)
(9-14A)
Trasformatore 25VA
P.400 50Hz - S.24V 1A
Transformateur VA25
P.400V 50Hz - S.24V 1A
P. 400V 50Hz - S. 24V 1A
VA25 transformer
P.400V 50Hz - S.24V 1A
VA25 Transformator
Trasformatore 25VA
P.110 60Hz - S.24V 1A
Transformateur VA25
P.110V 60Hz - S.24V 1A
P. 110V 60Hz - S. 24V 1A
VA25 transformer
P.110V 60Hz - S.24V 1A
VA25 Transformator
Trasformatore 25VA
P.230 50Hz - S.24V 1A
Transformateur VA25
P.230V 50Hz - S.24V 1A
P. 230V 50Hz - S. 24V 1A
VA25 transformer
P.230V 50Hz - S.24V 1A
VA25 Transformator
Trasformatore 25VA
P.415 50Hz - S.24V 1A
Transformateur VA25
P.415V 50Hz - S.24V 1A
P. 415V 50Hz - S. 24V 1A
VA25 transformer
P.415V 50Hz - S.24V 1A
VA25 Transformator
Trasformatore 25VA
P.200 50/60Hz - S.24V 1A
Transformateur VA25
P.200V 50/60Hz - S.24V 1A
P. 200V 50/60Hz - S. 24V 1A
VA25 transformer
P.200V 50/60Hz - S.24V 1A
VA25 Transformator
Trasformatore 25VA
P.100 50/60Hz - S.24V 1A
Transformateur VA25
P.100V 50/60Hz - S.24V 1A
P. 100V 50/60Hz - S. 24V 1A
VA25 transformer
P.100V 50/60Hz - S.24V 1A
VA25 Transformator
04
05
06
07
08
09
10
11
12
13
851-02-983
851-00-504
851-01-101
851-00-248
851-01-014
851-01-106
CNE-32021-063
851-02-025
851-03-622
CNE-10035-001
2
1
1
1
5
1
1
3
3
1
13
CNE-10035-002
1
13
CNE-10020-043
1
14
CNE-34018-006
1
14
CNE-34018-001
1
14
CNE-34018-002
1
14
CNE-34018-003
1
14
CNE-34018-004
1
14
CNE-34018-005
1
15
CNE-11000-003
1
Cavo micro portina L=0,5mt.
Cable for safety guards L=0,5mt.
Câble pour protection de securite
L=0,5mt.
Kabel für Unfallschutzvorrichtungen
L=0,5mt.
851-00-794
1
Cavo collegamento motore (trifase)
Cable for connection motor (three-phase)
Câble de connection moteur (triphase)
Verbindungskabel für Motor
(dreiphasen)
16
17
82
CODICE RICAMBI / SPARES CODE
CODE DE RECHANGE / ERSATZTEIL
SCATOLA INTERRUTTORE / CIRCUIT BREAKER BOX
BOÎTE INTERRUPTEUR / SCHALTERGEHÄUSE
Fig./Abb. 230-11
I
STA F47
DESCRIZIONE
DESCRIPTION
E
F
DESCRIPTION
D
BESCHREIBUNG
18
851-00-793
1
Cavo collegamento motore (monofase)
19
851-00-797
1
851-01-099
851-00-796
1
1
Cable for connection three-phase
(without plug)
Cable for connection three-phase (C.E.E.)
Cable for connection mono-phase
(without plug)
Câble triphase
(sans fiche)
Câble triphase (C.E.E.)
Câble monophase
(sans fiche)
Netzverbindungskabel-Dreiphasen
(ohne Stecker)
19
19
Cavo per collegamento rete trifase
(senza spina)
Cavo per collegamento rete trifase (C.E.E.)
Cavo per collegamento monofase
(senza spina)
19
19
20
851-00-799
851-01-100
851-02-927
1
1
1
Cavo per collegamento monofase (U.S.A.)
Cavo per collegamento monofase (C.E.E.)
Cable for connection mono-phase (U.S.A.)
Cable for connection mono-phase (C.E.E.)
CNE-10005-020
1
Switch-with regulating 1-1,6A
(type GV2-M06)
Switch-with regulating 1,6-2,5A
(tipo GV2-M07)
Switch-with regulating 2,5-4A
(tipo GV2-M08)
Switch-with regulating 4-6A
(tipo GV2-M10)
Switch-with regulating 6-10A
(tipo GV2-M14)
Switch-with regulating 10-14A
(tipo GV2-M16)
4A delayed-action fuse (dia.5x20)
Connecting cable of the safety electrovalve
Netzverbindungskabel-Einphasen (U.S.A.)
Netzverbindungskabel-Einphasen (C.E.E.)
Schalter 1-1,6A (typ GV2-M06)
20
Interruttore con regolazione 1-1,6A
(tipo GV2-M06)
Interruttore con regolazione 1,6-2,5A
(tipo GV2-M07)
Interruttore con regolazione 2,5-4A
(tipo GV2-M08)
Interruttore con regolazione 4-6A
(tipo GV2-M10)
Interruttore con regolazione 6-10A
(tipo GV2-M14)
Interruttore con regolazione 10-14A
(tipo GV2-M16)
Fusibile 4A ritardato (ø5x20)
Cavo collegamento EV sicurezza
Câble monophase (U.S.A.)
Câble monophase (C.E.E.)
Interrupteur avec réglage 1-1,6Amp.
20
20
20
20
21
22
CNE-10005-021
CNE-10005-022
CNE-10005-023
CNE-10005-024
851-03-233
MSNA-85086-81
1
1
1
1
1
1
Cable for connection motor (mono -phase)
C âble de connection moteur
(monophase)
Verbindungskabel für Motor (einphasen)
83
Netzverbindungskabel-Dreiphasen (C.E.E.)
Netzverbindungskabel-Einphasen
(ohne Stecker)
(type GV2-M06)
Interrupteur avec réglage 1,6-2,5Amp.
Schalter 1,6-2,5A (tipo GV2-M07)
(tipo GV2-M07)
Interrupteur avec réglage 2,5-4Amp.
Schalter 2,5-4A (tipo GV2-M08)
(tipo GV2-M08)
Interrupteur avec réglage 4-6Amp.
Schalter 4-6A (tipo GV2-M10)
(tipo GV2-M10)
Interrupteur avec réglage 6-10A mp.
Schalter 6-10A (tipo GV2-M14)
(tipo GV2-M14)
Interrupteur avec réglage 10-14Amp.
Schalter 10-14A (tipo GV2-M16)
(tipo GV2-M16)
Fusible 4A retardé (ø5x20)
4A Sicherung verzögert (ø5x20)
Câble de connexion de
l’electrovanne de sécurité
Verbindungskabel des Elektroventils der
Unfallschutzvorrichtung
CODICE RICAMBI / SPARES CODE
CODE DE RECHANGE / ERSATZTEIL
STA F47
SCATOLA INTERRUTTORE / CIRCUIT BREAKER BOX
BOÎTE INTERRUPTEUR / SCHALTERGEHÄUSE
Fig./Abb. 230-11
I
DESCRIZIONE
DESCRIPTION
E
84
F
DESCRIPTION
D
BESCHREIBUNG
CODICE RICAMBI / SPARES CODE
CODE DE RECHANGE / ERSATZTEIL
PROTEZIONI ANTINFORTUNISTICHE / PROTECTIVE DEVICES
PROTECTION DE SECURITE / UNFALLSCHUTZVORRICHTUNGEN
Fig./Abb. 230-12
I
STA F47
DESCRIZIONE
DESCRIPTION
E
01
02
03
MSNA-30429-01
851-03-338
851-03-336
4
1
1
Supporto
Custodia fissa ad angolo art. CK 03 IA
Frutto presa 4 poli + T (art. CKF 04 ILME)
Support
Casing (art. CK 03 IA)
Socket 4 poles + earth (type CKF O4 ILME)
04
05
06
07
851-02-744
851-00-928
851-02-110
MSNA-30430-01
2
2
2
4
Vite T.C.E.I. M3x20
Rondella piana per M3
Dado esagonale autobloccante M3
Tubolare fissaggio protezioni
08
09
10
851-00-295
851-00-506
851-00-495
11
12
F
DESCRIPTION
D
BESCHREIBUNG
Träger
Schutzkapsel (art. CK 03 IA)
Socket head screw M3x20
Flat washer for M3
Self-locking hexagon nut M3
Tubolar support for fixing protections
Support
Gaine (art. CK 03 IA)
Prise 4 poles + terre (type CKF O4
ILME)
Vis T.C.E.I. M3x20
Rondelle plate pour M3
Ecrou hexagonal de sûreté M3
Tubolaire de fixage protections
16 Vite T.E. M8x20
16 Rondella piana per M8
16 Dado esagonale autobloccante M8
Hexagon head screw M8x20
Flat washer for M8
Self-locking hexagon nut M8
Vis T.H. M8x20
Rondelle plate pour M8
Ecrou hexagonal de sûreté M8
801-00-104
851-00-501
24 Rondella speciale
16 Dado esagonale autobloccante M6
Special washer
Self-locking hexagon nut M6
Rondelle spéciale
Ecrou hexagonal de sûreté M6
13
14
851-03-339
851-03-337
1
1
Custodia mobile diritta (art. CK 03V)
15
16
17
18
19
20
851-03-710
801-00-982
801-00-011
851-00-223
MSNA-40517-01
CNN-10501-078
4
4
4
4
2
4
Vite T.E. M6x110
Distanziale
Piedino
Vite T.E. M6x80
Traversa di fissaggio
Vite autofilettante T.E. ø6,3x19
Casing (art. CK 03V)
Plug 4 poles + earth
(type CKM O4 ILME)
Hexagon head screw M6x110
Distance piece
Foot
Hexagon head screw M6x80
Cross piece
Self-tapping hexagon head screw ø6,3x19
Gaine (art. CK 03V)
Fiche 4 poles + terre
(type CKM O4 ILME)
Vis T.H. M6x110
Entretoise
Petite pied
Vis T.H. M6x80
Traverse dé fixage protections
Vis autotaraudeuse T.H. ø6,3x19
21
22
22
801-10-004
801-10-003
MSNA-93121-03
1
1
1
Protezione (fissa)
Protezione sinistra (apribile)
Protezione destra (apribile) (Opposta)
23
24
851-02-454
851-03-168
2
1
25
26
851-02-025
851-00-493
1
4
Vite T.C.E.I. M5x65
Interruttore di sicurezza a chiave
art. FR 692
Pressacavo PG13
Dado esagonale autobloccante M5
Safety guards
Protection
Safety guards left (interloched)
Protection gauche (ouvrable)
Safety guards right (interloched) (Opposite) Protection droite (ouvrable)
(Gauche/Droite)
Socket head screw M5x65
Vis T.C.E.I. M5x65
Safety switch FR 692
Interrupteur de sécurités en
service FR 692
Grommet PG13
Presse câble PG13
Self-locking hexagon nut M5
Ecrou hexagonal de sûreté M5
Sechskantschraube M8x20
Flachscheibe für M8
Selbstsichernde Sechskantmutter
M8
Scheibe spezial
Selbstsichernde Sechskantmutter
M6
Schutzkapsel (art. CK 03V)
Stecker 4-polig + Erde
(Typ CKM O4 ILME)
Sechskantschraube M6x110
Distanzstück
Fuß
Sechskantschraube M6x80
Traverse
Selbstschneidende
Sechskantschraube ø6,3x19
Unfallschutzvorrichtung
Unfallschutzvorrichtung links
Unfallschutzvorrichtung recht
(Kontra)
Inbusschraube M5x65
Microschalter FR 692
27
851-00-320
8
Vite T.E. M6x55
Hexagon head screw M6x55
Frutto spina 4 poli + T
(art. CKM 04 ILME)
85
Vis T.H. M6x55
Steckdose 4-polig + Erde Typ CKF O4 ILME
Inbusschraube M3x20
Flachscheibe für M3
Selbstsichernde Sechskantmutter M3
Röhrfoermiges Befestigungselements der
Unfallschutzvorrichtungen
Kabelhalter PG13
Selbstsichernde Sechskantmutter
M5
Sechskantschraube M6x55
SCHEMA PNEUMATICO / PNEUMATIC DIAGRAM
SCHÉMA PNEUMATIQUE / PNEUMATISCHES SCHALTSCHEMA
CODICE RICAMBI / SPARES CODE
CODE DE RECHANGE / ERSATZTEIL
A
851-03-666
1
20
851-00-123
1
21
851-00-135
1
26
30
31
851-02-771
851-02-877
851-00-939
1
1
1
DESCRIZIONE
Cilindro pneumatico ø40x160
Camozzi 40N2A40A160
Filtro riduttore
(cod. B07-101-M3KG 1/8G)
Manometro 0-10bar-1/8"G-ø40
(cod. 160101005)
Indicatore ottico verde (tipo LA84150202)
Valvola a manicotto ø1/4” (art. VMS-114)
Valvola a rullo (RW-3-M5 Festo 4031)
40
YV1
60
851-02-774
851-02-810
851-01-785
1
1
1
Valvola (Pneumax tipo 228.52.11.1)
Elettrovalvola (cod. 828.52.3.6)
Scarico rapido ø1/8” art. AD 6050-1/8”
Valve (Pneumax type 228.52.11.1)
Solenoid valve (code 828.52.3.6)
Quick discharge ø1/8” art. AD 6050-1/8”
61
851-03-309
1
62
851-01-634
Regolatore di portata ø1/4” - tubo ø 6
art. AB 454060
Regolatore di scarico RSW-1/8”
Flow regulator dia.1/4” - pipe dia.6
art. AB 454060
Exhaust air regolator type RSW-1/8”
I
STA F47
II
1
DESCRIPT ION
Pneumatic cylinder ø40x160
Camozzi 40N2A40A160
Reduction filter
(code B07-101-M3KG 1/8G)
Pressure gauge 0-10bar-1/8"G-dia.40
(code 160101005)
Optical indicator (type LA84150202)
Sleeve valve dia. 1/4” (art. VMS-114)
Roller valve (RW-3-M5 Festo 4031)
E
Rev. II del 23/05/01
88
F
DESCRIPTION
Cylindre pneumatique ø40x160
Camozzi 40N2A40A160
Filtre réducteur
(code B07-101-M3KG 1/8G)
Manomètre 0-10bar-1/8"G-ø40
(code 160101005)
D
Indicateur optique (type LA84150202)
Clapet à manchon ø1/4” (art. VMS-114)
Optischer-Anzeiger (Typ LA84150202)
Soupape à rouleau
(RW-3-M5 Festo 4031)
Soupape (Pneumax type 228.52.11.1)
Electrovalve (code 828.52.3.6)
Décharge rapide
ø1/8” art. AD 6050-1/8”
Régulateur de débit ø1/4” - tuyau ø 6
art. AB 454060
Régulateur de décharge
type RSW-1/8”
BESCHREIBUNG
Pneumatisher Zylinder ø40x160
Camozzi 40N2A40A16 0
Reduzierfilter
(Kode B07-101-M3KG 1/8G)
Manometer 0-10bar-1/8"G-ø40
(Kode 160101005)
Muffenventil ø1/4” (art. VMS-114)
Rollenventil
(RW-3-M5 Festo 4031)
Ventil (Pneumax Typ 228.52.11.1)
Elektroventil (Kode 828.52.3.6)
Schnellauslassventil
ø1/8” art. AD 6050-1/8”
Mengenregler ø1/4” - Schlauch ø 6
art. AB 454060
Schnellauslassventilregler
Typ RSW-1/8”
Position
01
02
03
04
05
06
07
08
09
CODICE RICAMBI / SPARES CODE
CODE DE RECHANGE / ERSATZTEIL
PARTE / PART / PARTIE / TEIL
STA F47
851-03-473
851-00-505
851-00-283
801-10-009
851-00-507
851-00-496
801-01-149
801-10-015
851-00-307
I
1
2
2
1
1
1
1
1
1
DESCRIZIONE
Ruota frenante
Rondella piana per M6
Vite T.E. M6x12
Gamba per h=650mm
Rondella piana per M10
Dado esagonale autobloccante M10
Supporto ruota
Gamba completa con ruota h=650mm
Vite T.E. M10x35
7
E
ACCESSORI / ACCESSORIES
/ACCESSOIRES / ZUBEHÖR
DESCRIPTION
Braking wheel
Flat washer for M6
Hexagon head screw M6x12
Leg for h=650mm
Flat washer for M10
Self-locking hexagon nut M10
Wheel support
Leg complete with castor wheel h=650mm
Hexagon head screw M10x35
89
GAMBE CON RUOTE / WHEEL-MOUNTED LEGS
PIEDS AVEC ROUES / BEINE MIT RÄDERN
F
DESCRIPTION
D
BESCHREIBUNG
Roue freinante
Bremsrad
Rondelle plate pour M6
Flachscheibe für M6
Sechskantschraube M6x12
Bein für h=650mm
Vis T.H. M6x12
Jambe pour h=650mm
Rondelle plate pour M10
Ecrou hexagonal de sûreté M10
Support roue
Pied avec roue complète h=650mm
Vis T.H. M10x35
Flachscheibe für M10
Selbstsichernde Sechskantmutter M10
Radstütze
Béin mit Rad komplett h=650mm
Sechskantschraube M10x35
Position
CODICE RICAMBI / SPARES CODE
CODE DE RECHANGE / ERSATZTEIL
PARTE / PART / PARTIE / TEIL
7
-
ACCESSORI / ACCESSORIES
/ACCESSOIRES / ZUBEHÖR
TRASCINAMENTO SCATOLA H=30 / BOX DRIVE SYSTEM H=30
ENTRAÎNEMENT BOÎTE H=30 / SCHUBBETTRIEB DER SCHACHTEL H=30
DESCRIPTION
801-05-572
801-05-575
801-05-574
801-06-329
801-05-646
DESCRIZIONE
2 Rondella piana per M10
4 Anello seeger per øi 32
2 Puleggia folle h=30
10 Cuscinetto ø32x15x9 (SKF TYPE 60022RS1)
4 Distanziale ø20x16,8
2 Tenditore cinghia h=30
2 Perno per cinghia h=30
2 Semibraccio inferiore h=30
6 Distanziale ø20x38 per cinghia
Flat washer for M10
Retaining ring for ins.dia. 32
Idley pulley h=30
Bearing dia. ø32x15x9 (SKF TYPE 60022RS1)
Distance piece ø20x16,8
Belt strecher h=30
Pin for belt h=30
Lower half arm h=30
Distance piece dia. 20x38 for belt
DESCRIPTION
Rondelle plate pour M10
Bague seeger pour øint. 32
Poulie point mort h=30
Roulement ø32x15x9 (SKF TYPE
6002-2RS1)
Entretoise ø20x16,8
Tendeur courroie h=30
Pivot pourcourroie h=30
Semi-bras inférieure h=30
Entretoise ø20x38 pour courroie
10
11
12
13
14
15
16
17
18
801-05-568
851-00-238
801-04-509
801-00-913
851-00-584
851-01-073
801-00-920
801-00-915
851-00-493
2
6
2
2
2
4
2
2
16
Idley pulley h=30 with bearing
Socket flat head screw M6x20
Distance piece bush
Distance piece
Tongue 5x5x20
Bush
Inductor pinion
Lower half box
Self-locking hexagon nut M5
Poulie point mort h=30 avec roulement
Vis T.S.P.E.I. M6x20
Douille distanceur
Entretoise
Clavette 5x5x20
Fourreau
Pignon inducteur
Semi-bôite inférieure
Ecrou hexagonal de sûreté M5
19
20
21
851-00-504
851-02-038
851-01-984
8 Rondella piana per M5
2 Dado esagonale basso M10
14 Vite autofilettante T.C.E.I. ø5,5x13
Flat washer for M5
Low hexagon nut M10
Self-tapping socket head screw ø5,5x13
22
23
24
25
26
801-06-373
801-06-372
851-03-122
801-00-065
801-05-557
1
1
2
6
2
Protezione per cinghia sinistra h=30
Protezione per cinghia destra h=30
Cinghia di trascinamento h=30x2550
Distanziale
Rinforzo superiore motorizzazione
Guard for left belt h=30
Guard for right belt h=30
Drive belt h=30x2550
Distance piece
Upper motor guard bracket
27
28
29
30
31
32
33
801-06-323
851-00-237
801-05-390
851-02-186
801-04-507
851-00-205
801-00-914
2
16
2
4
2
8
2
Braccio superiore completo h=30
Vite T.S.P.E.I. M6x16
Puleggia comando h=30
Anello seeger per øi 34
Distanziale L=17mm
Vite T.C.E.I. M5x20
Semiscatola superiore
Complete upper arm h=30
Socket flat head screw M6x16
Control pulley h=30
Retaining ring for ins.dia. 34
Distance piece
Socket head screw M5x20
Upper half box
92
Rondelle plate pour M5
Ecrou hexagonal bas M10
Vis autotaraudeuse T.C.E.I.
ø5,5x13
Protection pour courroie gauche h=30
Protection pour courroie droite h=30
Courroie h=30x2550
Entretoise
Equerre de renfort supérieur
motorisation
Bras supérieur complet h=30
Vis T.S.P.E.I. M6x16
Poulie de commande h=30
Bague seeger pour øint. 34
Entretoise
Vis T.C.E.I. M5x20
Semi-boîte supérieure
STA F47
01
02
03
04
851-00-507
851-00-044
801-00-942
851-00-730
05
06
07
08
09
I
Puleggia folle h=30 con cuscinetto
Vite T.S.P.E.I. M6x20
Bussola distanziale
Distanziale L=9mm
Linguetta 5x5x20
Boccola
Pignone induttore
Semiscatola inferiore
Dado esagonale autobloccante M5
E
F
BESCHREIBUNG
Flachscheibe für M10
Seegerring für inn. ø 32
Leerlaufscheibe h=30
Lager ø32x15x9 (SKF TYPE
6002-2RS1)
Distanzstück ø20x16,8
Riemenspanner h=30
Bolzen für Riemen h=30
Untere Armhallte h=30
Distanzstück ø20x38 für
Riemen
Leerlaufscheibe h=30 mit Lager
Inbussenkschraube M6x20
Distanzstück Hülse
Distanzstück
Federkeil 5x5x20
Büchse
Induktionsritzel
Untere Gehäusehälfte
Selbstsichernde Sechskantmutter
M5
Flachscheibe für M5
Flache Sechskantmutter M10
Selbstschneidende Antriebs
Imbusschraube ø5,5x13
Schutz für links Riemen h=30
Schutz für rechts Riemen h=30
Transportriemen h=30x2550
Distanzstück
Obere Antriebs Verstärkung
D
Kompletter obere Arm h=30
Inbussenkschraube M6x16
Antriebsförderwalze h=30
Seegerring für inn. ø 34
Distanzstück
Inbusschraube M5x20
Obere Gehäusehälfte
Position
CODICE RICAMBI / SPARES CODE
CODE DE RECHANGE / ERSATZTEIL
PARTE / PART / PARTIE / TEIL
7
-
ACCESSORI / ACCESSORIES
/ACCESSOIRES / ZUBEHÖR
DESCRIPTION
TRASCINAMENTO SCATOLA H=30 / BOX DRIVE SYSTEM H=30
ENTRAÎNEMENT BOÎTE H=30 / SCHUBBETTRIEB DER SCHACHTEL H=30
2
2
2
2
2
2
2
DESCRIZIONE
Pignone indotto
Alberino per puleggia h=30
Bussola distanziale
Coperchietto
Vite T.S.P.E.I. M8x20
Rondella dentellata conica per M8
Gruppo rinvio completo h=30
Induced pinion
Shaft for pulley h=30
Distance piece bush
Bushing
Socket flat head screw M8x20
Toothed conical washer for M8
Complete drive unit h=30
DESCRIPTION
Pignon induit
Arbre pour poulie h=30
Douille distanceur
Douille
Vis T.S.P.E.I. M8x20
Rondelle conique dentetée pour M8
Groupe renvoi complet h=30
801-10-427
1
Distanziale L=5mm
Distance piece
Entretoise
BESCHREIBUNG
Induktionsritzel
Welle für Riemenscheibe h=30
Distanzstück Hülse
Buechse
Inbussenkschraube M8x20
Gezackte Scheibe für M8
Komplette Vorgelegegruppe
h=30
Distanzstück
801-00-158
801-04-201
801-05-766
851-01-121
4
4
4
8
Rondella speciale
Distanziale
Pattino completo h=30
Vite T.E. M5x25
Special washer
Distance piece
Complete shoe h=30
Hexagon head screw M5x25
Rondelle spéciale
Entretoise
Patin complète h=30
Vis T.H. M5x25
Scheibe spezial
Distanzstück
Vollstandinger Gleitschuh h=30
Sechskantschraube M5x25
I
STA F47
34
35
36
37
38
39
40
801-04-012
801-05-528
801-00-919
801-05-542
851-01-366
851-02-149
801-05-512
41
42
43
44
45
46
E
93
F
D
Position
CODICE RICAMBI / SPARES CODE
CODE DE RECHANGE / ERSATZTEIL
PARTE / PART / PARTIE / TEIL
7
-
ACCESSORI / ACCESSORIES
/ACCESSOIRES / ZUBEHÖR
TRASCINAMENTO SCATOLA H=70 / BOX DRIVE SYSTEM H=70
ENTRAÎNEMENT BOÎTE H=70 / SCHUBBETTRIEB DER SCHACHTEL H=70
DESCRIPTION
801-05-573
801-05-576
801-05-570
801-06-328
801-05-580
DESCRIZIONE
2 Rondella piana per M10
8 Anello seeger per øi 32
2 Puleggia folle
12 Cuscinetto ø32x15x9 (SKF TYPE 60022RS1)
4 Distanziale ø20x39,3mm
2 Tenditore cinghia h=70
2 Perno per cinghia h=70
2 Semibraccio inferiore h=70
6 Distanziale ø20x83 per cinghia
Flat washer for M10
Retaining ring for ins.dia. 32
Idley pulley
Bearing dia. ø32x15x9 (SKF TYPE 60022RS1)
Distance piece
Belt strecher h=70
Pin for belt h=70
Lower half arm h=70
Distance piece dia. 20x83 for belt
DESCRIPTION
Rondelle plate pour M10
Bague seeger pour øint. 32
Poulie point mort
Roulement ø32x15x9 (SKF TYPE
6002-2RS1)
Entretoise
Tendeur courroie h=70
Pivot pourcourroie h=70
Semi-bras inférieure h=70
Entretoise ø20x83 pour courroie
10
11
12
13
14
15
16
17
18
801-04-807
851-00-238
801-04-509
801-00-913
851-00-584
851-01-073
801-00-920
801-00-915
851-00-493
2
18
2
2
2
4
2
2
16
Idley pulley h=70 with bearing
Socket flat head screw M6x20
Distance piece bush
Distance piece
Tongue 5x5x20
Bush
Inductor pinion
Lower half box
Self-locking hexagon nut M5
Poulie point mort h=70 avec roulement
Vis T.S.P.E.I. M6x20
Douille distanceur
Entretoise
Clavette 5x5x20
Fourreau
Pignon inducteur
Semi-bôite inférieure
Ecrou hexagonal de sûreté M5
19
20
21
851-00-504
851-02-038
851-01-984
8 Rondella piana per M5
2 Dado esagonale basso M10
14 Vite autofilettante T.C.E.I. ø5,5x13
Flat washer for M5
Low hexagon nut M10
Self-tapping socket head screw ø5,5x13
22
23
24
25
26
801-01-532
801-01-531
851-03-118
801-00-065
801-05-557
1
1
2
6
2
Protezione per cinghia sinistra h=70
Protezione per cinghia destra h=70
Cinghia di trascinamento h=70x2570
Distanziale
Rinforzo superiore motorizzazione
Guard for left belt h=70
Guard for right belt h=70
Drive belt h=70x2570
Distance piece
Upper motor guard bracket
27
28
29
30
31
32
33
801-06-322
801-00-068
801-00-264
801-04-508
801-04-507
851-00-205
801-00-914
2
2
2
2
2
8
2
Braccio superiore completo h=70
Distanziale L=31mm
Puleggia comando
Distanziale L=15mm
Distanziale L=17mm
Vite T.C.E.I. M5x20
Semiscatola superiore
Complete upper arm h=70
Distance piece
Control pulley
Distance piece
Distance piece
Socket head screw M5x20
Upper half box
95
Rondelle plate pour M5
Ecrou hexagonal bas M10
Vis autotaraudeuse T.C.E.I.
ø5,5x13
Protection pour courroie gauche h=70
Protection pour courroie droite h=70
Courroie h=70x2570
Entretoise
Equerre de renfort supérieur
motorisation
Bras supérieur complet h=70
Entretoise
Poulie de commande
Entretoise
Entretoise
Vis T.C.E.I. M5x20
Semi-boîte supérieure
STA F47
01
02
03
04
851-00-507
851-00-044
801-00-269
851-00-730
05
06
07
08
09
I
Puleggia folle h=70 con cuscinetto
Vite T.S.P.E.I. M6x20
Bussola distanziale
Distanziale L=9mm
Linguetta 5x5x20
Boccola
Pignone induttore
Semiscatola inferiore
Dado esagonale autobloccante M5
E
F
BESCHREIBUNG
Flachscheibe für M10
Seegerring für inn. ø 32
Leerlaufscheibe
Lager ø32x15x9 (SKF TYPE
6002-2RS1)
Distanzstück
Riemenspanner h=70
Bolzen für Riemen h=70
Untere Armhallte h=70
Distanzstück ø20x83 für
Riemen
Leerlaufscheibe h=70 mit Lager
Inbussenkschraube M6x20
Distanzstück Hülse
Distanzstück
Federkeil 5x5x20
Büchse
Induktionsritzel
Untere Gehäusehälfte
Selbstsichernde Sechskantmutter
M5
Flachscheibe für M5
Flache Sechskantmutter M10
Selbstschneidende Antriebs
Imbusschraube ø5,5x13
Schutz für links Riemen h=70
Schutz für rechts Riemen h=70
Transportriemen h=70x2570
Distanzstück
Obere Antriebs Verstärkung
D
Kompletter obere Arm h=70
Distanzstück
Antriebsförderwalze
Distanzstück
Distanzstück
Inbusschraube M5x20
Obere Gehäusehälfte
Position
CODICE RICAMBI / SPARES CODE
CODE DE RECHANGE / ERSATZTEIL
PARTE / PART / PARTIE / TEIL
2
2
2
2
2
2
2
DESCRIZIONE
Pignone indotto
Alberino per puleggia h=70
Bussola distanziale
Coperchietto
Vite T.S.P.E.I. M8x20
Rondella dentellata conica per M8
Gruppo rinvio completo h=70
4
4
4
4
8
Vite T.S.P.E.I. M6x16
Rondella speciale
Distanziale
Pattino completo h=70
Vite T.E. M5x25
I
STA F47
34
35
36
37
38
39
40
801-04-012
801-04-014
801-00-919
801-05-542
851-01-366
851-02-149
801-04-805
41
42
43
44
45
46
851-00-237
801-00-158
801-04-201
801-05-775
851-01-121
7
-
ACCESSORI / ACCESSORIES
/ACCESSOIRES / ZUBEHÖR
DESCRIPTION
TRASCINAMENTO SCATOLA H=70 / BOX DRIVE SYSTEM H=70
ENTRAÎNEMENT BOÎTE H=70 / SCHUBBETTRIEB DER SCHACHTEL H=70
F
D
Induced pinion
Shaft for pulley h=70
Distance piece bush
Bushing
Socket flat head screw M8x20
Toothed conical washer for M8
Complete drive unit h=70
DESCRIPTION
Pignon induit
Arbre pour poulie h=70
Douille distanceur
Douille
Vis T.S.P.E.I. M8x20
Rondelle conique dentetée pour M8
Groupe renvoi complet h=70
Socket flat head screw M6x16
Special washer
Distance piece
Complete shoe h=70
Hexagon head screw M5x25
Vis T.S.P.E.I. M6x16
Rondelle spéciale
Entretoise
Patin complète h=70
Vis T.H. M5x25
Inbussenkschraube M6x16
Scheibe spezial
Distanzstück
Vollstandinger Gleitschuh h=70
Sechskantschraube M5x25
E
96
BESCHREIBUNG
Induktionsritzel
Welle für Riemenscheibe h=70
Distanzstück Hülse
Buechse
Inbussenkschraube M8x20
Gezackte Scheibe für M8
Komplette Vorgelegegruppe
h=70
I dati contenuti nella presente
pubblicazione hanno carattere informativo e
possono essere modificati in qualunque
momento senza preavviso. Ogni riproduzione,
anche parziale, deve essere autorizzata per
iscritto dalla SEKISUI TA Brea.
The information contained in this
handbook is for information only and is liable
to be modified at any moment without prior
notice. Any form of reproduction, partial or
total, must have the written authorization of
SEKISUI TA Brea.
Les données continues dans la présente
publication sont d’information pure et simple.
Elles peuvent donc être modifiées à tout
moment sans préavis. Toute reproduction,
même partielle, devra être effectuée
uniquement sur indication écrite de
SEKISUI TA Brea.
Die Angaben dieser Veröffentlichung
haben informativen Charakter und können
jederzeit ohne vorherige Verständigung
geändert werden. Jede Art von Nachdruck
muß von der SEKISUI TA Brea schriftlich
genehmigt werden.
SEKISUI
SEKISUI TA INDUSTRIES, INC.
100 SOUTH PUENTE STREET
BREA, CA 92821
(714) 255-7888 FAX (800) 235-8273