1
P,""nAAr
;.-;.;;;;.;.--------------- ..
rn
~
ce_.
-
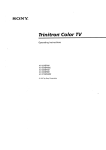
CD RECEIVER
AUTORADIO CD
RADIO CD
DEH-12E
rn
f/)
"C
s»
~l
o
~UPE~UMER1IIiJ
Owner's Manual
Mode d'emploi
Manual de instrucciones
Section
D (Before You Start
Thank you for purchasing this PIONEER
product.
or other reproductive harm, Wash hands after
handling,
To ensure proper use. please read through this
manual before using t is produc . It is especially important that you read and observe
WARNINGs and CAUTIONs in this manual.
Please keep the manual in a safe and accessible
place for future reference.
CAUTION:
USE OF CONTROL OR ADJUSTMENT OR
PERFORMANCE OF PROCEDURES
OTHER THAN THOSE SPECIFIED HEREIN
MAY RESULT IN HAZARDOUS RADIATION
EXPOSURE.
0
This device compiles with part 15 of the FCC
Rules. Operation IS subject to the following
two conditions:
(1) Th is device may not cause harmfu I interference. and (2) thiS deVice must accept any interference received. including interference that
may cause undesired operation.
CAUTION:
THE USE OF OPTICAL INSTRUMENTS
WITH THIS PRODUCT WILL INCREASE
EYE HAZARD.
4
•
Information to User
Alteration or modifications can-jed out without
appropriate authorization may invalidate the
user's right to oper-ate the equipment.
For Canadian model
This Class B digital apparatus compiles with
Canadian ICES-003.
About this unit
The tuner frequencies on thiS unit are allocated for use in I olih Anlerica. Use In 0 er
areas Illay result in poor reception,
4
WARNING
Handling the cord on this product or cords assoCiated with accessories sold with the product will
expose you to chemicals listed on proposition 65
known to the State of California and other govemITlenta! elitities to cause cancer and birth defect
m
En
•
•
•
CAUTION
Do not allow this unit to come into contact
with liquids. Electrical shock could result.
Also, damage to this unit. smoke, and overheating could result from contact with liquids,
Always keep the volume low enough to hear
outside sounds.
Avoid exposure to moisture,
If the battery is disconnected or discharged.
any preset memory will be erased.
Q Important (Serial number)
The sel-ial number is located on the bottom of
this unit. For your own security and convenience,
be sure to record thiS number- on the enclosed
warranty card,0
Section
'\1:11
) 'ill
~---------------------------------
m
After-sales service for
Pioneer products
::::J
-
tC
tJ)
':j'
Piei::l~e
contact the deaier or distributor from
where you purchased this unit for after-sales
service (including vv'arranty conditions) or any
other information. In case the necessary information is not available, please contact the
companies listed below:
Please do not ship your unit to the companies
at the addresses listed below for repair without
advance contact.
U.S.A.
Pioneer Electronics (USA) Inc.
CUSTOMER SUPPORT DIVISION
PO. Box 1760
Long Beach, CA 90801-1760
800-421-1404
CANADA
Pioneer Electronics of Canada, Inc.
CUSTOMER SATISFACTION DEPARTMENT
300 Allstate Parkway
Markham, Ontario L3R OP2
1-877-283-5901
905-479·4411
For warranty information please see the limited Warranty sheet included with this unit. 0
Visit our website
http://www.pioneerelectronics.com
• Learn about product updates (such as firmware updates) for your product.
• Register your product to receive notices
about product updates and to safeguard
purchase details in our files in the event of
loss or theft.
• Access owner's manuals, spare parts information. service information, and much
more.C!J
En
IT)
Section
DB ( Operating this unit
)
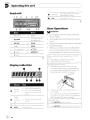
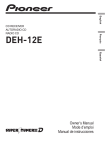
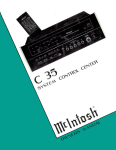
Head unit
•
CD (stereo)
The selected frequency is being
broadcasted in stereo,
LOC
Local seek tunin[1ls on
Basic Operations
Button
Q
Sutton
•
F (function)
8
Detach
2
EQ/LOUD
9
AUX Input Jack (35
mm stereo jack)
•
3
SRC/OFF
10
ClOCK
•
4
1 06
11
PAUSE
5
Disc loading slot
12
.;'Y/..../.
6
~
13
BAND/ESC
7
A (audio)
(eject)
Display indication
Handle gently when removing or attaching
the front panel
Avoid subjecting the front panel to excessive
shock,
Keep the front panel out of direct sunlight and
high temperatures,
Remove any cables and deVices attached to
this unit before detaching the front panel to
avoid damage to the device or vehicle interior.
•
0
Important
RemOVing the front panel to pr-otect your unit from
theft
., Press detach to release the fmnt panel.
Y Grab the fran panel and remove,
Re-attach:ng the fran panel
T Slide the front panel to the left until it clicks,
Front panel and the heao unit are connected on
the left side Make sure that the front panel has
been properly connected to the head unit
Indicator
'v1ain dispiav sectlon
0
•
•
0
En
State
•
Tuner: band and frequency
Builtin CD player: elapsed
playback time and text InfOi-matlon
Preset
numberl
track number
•
RPT
Repeat play is tur-ned on
LOUD
Loudness is on,
The track number or preset
number
2
Pless the right Side of the fl-ont panel until it IS
fl
seated
If you cant attach the front panel to'the head unit
successfully, tl-y agam, However-, forcing the fmnt
panel into place may result in damage,
Turning the unii on
1~ Press SRC/OFF to tu rn the unit on
Tuming the unii off
~t Press SRClOFF and hold until the unit turns off,
Section
)(B
(\ Opft.~+._th.s
·._...
'11;;1 U ILII
I
ILI . . IIL
I~
---=----~=-----------------------------
Selecting a source
T' Press SRC/OFF to cycle between
TUNER (tuner)-CD (buil_-in CD player)-AUX
(AUX)
Adjusting the volume
Turn SRClOFF to adjust volume
U__
gNote
When this unit's blue/white lead is connected to
the vehicle's auto-antenna relay control terminal,
the vehicle's antenna extends when thiS unit's
source is turned on. To retract the antenna. turn
the source off,0
Storing and recalling stations
You can easi Iy store up to six stations as prespts.
• When you find a station that you want
to store in memory, press one of the preset
tuning buttons (1 to 6) and hold until the
preset number stops flashing.
Stored radio station frequency can be recalled
by pressing the preset tuning button.
• Press A or" to recall radio station frequencies.
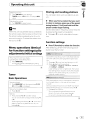
Function settings
•
Menu operations identical
for function settings/audio
adjustments/initial settings
Returning 0 the ordinary display
Canceling the initial setting menu
IT: Press BAND/ESC.
You can also cancel initial settings by holding
down SRC/OFF until the unit turns off.
Tuner
Press F (function) to select the function.
After selecting. perform the following procedures to set the function.
Local seek ulling lets you tune in only those radio s atlons with sufficiently strong signals tor good reception
LL Press.6 or • to turn local seek tuning on or off.
L.L Press ..... or ~ to set the sensitivity.
FM: LOCAL 1-LOCAL 2-LOCAL 3-LOCAL 4
AM: LOCAL 1-LOCAL 2
Larger setting number is higher level. The highest
level setting allows reception of only the strongest
stations. while lowel' settings let you receive progresslvely weaker stations.
Basic Operations
Selecting a band
r-' ~L Press BAND/ESC until the desired band (F1 Fl.
F3 for FM or AM) is displayed.
tuning (step by step)
,..,Manual
Press .....
or~.
Seeking
T
Press and hold ..... or ~. and then release.
-_
BSM (best stations memory) automatically stores the
six strongest stations in the order of their signal
strength.
Stonng bmadcast frequencies With BSM may replace
broadcast frequencies you have saved using 1to 6.
J... Press.6 to turn BSM on
The six strongest bmadcast frequencies are
stoled in the order of t eir signal strength.
To cancel the storage process. pr'ess •.
..
You can cancel seek tuning by briefly pressing .....
or ~.
While pressing and holding ..... or ~. you can skip
stations. Seek tuning starts as soon as you release ..... or~.
En
CD
m(
Section
)
Operating this unit
CD
_Note
Basic Operations
You can also turn pause on or off
Playing a CD
I Inseli the diSC, label side up into the disc loading
slot.
T
-- If a disc has already been inseried, press SRCI
OFF to select the built'ln CD player,
Ejecting a CD
1 Press ~,
by pressing
PAUSE.~
Audio Adjustments
Audio Adjustments
• Press A (audio) to select the audio function.
After selecting. perform the following procedures to set the audio function.
Selecting a track
~ or"
_1 Press
Fast forwarding or reversing
Press and hold ~ or ...
'1
You can change the fader/balance setting.
Function settings
• Press F (function) to select the function.
After selecting, perform the following procedures to set the function.
T PI'ess .... or " to adjus front/rear speaker balance
Adjustment range (front/rear): FAD F15 to FAD
R15
~z.
FAD 0 is the proper setting when only two speak,
ers are used,
Press ~ or" to adjust left/I-ight speaker balance,
Adjustment range (left/right) BAL L15 to BAL
R15
L!.. Press
~ or" to select the repeat range.
DSC - Repeat all tracks
TRK - Repeat the current track
=..,....,....,..
-.itfij"",:,
Scan play searches for' a song wi hin the selected repeat range.
'j" Press .... to tum scan play on.
SCAN appears in the display, The first 10 seconds
of each track is played,
,1. When you fl nd the desl red track pl'ess " to tu rn
scan playoff.
If the display has automatically returned to the
playback display. select SCAN again by pressing f
(function)
Aftel' scanning of a CD:s finished, normal play,
back of the tracks will begin agam.
~77'?7T'~"7""7:~7S
Press .... or " to pause or resume,
CD
En
CUSTOM,
J,
Press .... or " to tum random play on or off,
When random play IS on, ROM appears In the diS'
play.
--~.6.USE(>i
You can adj ust the bassimid/Ireble level.
• Adjusted equalizer curve settings are stored In
Press .... or " to adjust the level,
Adjustment range: +6 to-6
Loudness compensates for deficiencies in the low,
and high-frequency ranges at low volume
,,_ Press ... or" 0 urn loudness on or off,
~L Press ~ or" to select the desired setting,
LOW (I owl-HI (high)
SLA (Soul-ce level adjustment) lets you adjust the vo'
lume level of each source to prevent radical changes
In volume when switching between sources,
• Settings are based on the FM volume level. which
remains unchanged.
Before adjusting SOUITe levels, compare the FM
volume level with the level of the soul'ce you wish
to adjust.
• The AM volume level can also be adjusted with
source level adjustments.
1 PI'ess .... or " to adjust the source volume
Adjustment range SLA +4 to SLA-4
)Section
('" nn~r;:a+inn
+hic IIni+
- . - . - - ....... -':JI ......... -_ •• -
/
"
F
---------==------------------------------~
Turning the clock display on or off
CC
ONate
You can also turn loudness on
m
::::J
01'
off by pressing
and holding EQ/LOUD,
• Press CLOCK to turn the clock display
on or off.
Each press of CLOCK turns the clock display
rJ)
::r
on or off,
Using the equalizer
• Press EQ/LOUD to select the equalizer.
DYNAMIC-VOCAL-NATURAL-CUSTOM
-FLAT-POWERFUL
• CUSTOM allows you to create a customized
setting,
•
When FLAT is selected no adjustments are
made to the sound,[!J
• The clock display disappears temporarily
when you perform other operations, but the clock
display appears again after 25 seconds,
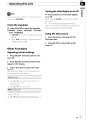
Using the AUX source
1 Insert the stereo mini plug into the
AUX input jack.
2 Press SRC/OFF to select AUX as the
source.[!J
Other Functions
Adjusting initial settings
1 Press SRC/OFF and hold until the unit
turns off.
2 Press SRC/OFF and hold until the clock
appears in the display.
3 Press F (function) to select the initial
setting.
After selecting, perform the following procedures to set the initial setting,
T
2
PI'ess .... or ~ to select the segment of the clock
display you wish to set.
Hour-Minute
Press. or .... to put a ciock right.
Activate thiS setting when uSing auxiliary deVice con,
nected to thiS unit.
Press. or .... to turn auxiliary setting on or off
En
CIJ
Section
•
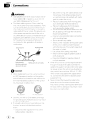
~onnections
-
Secure the wIring With cable clamps or ad-
AWARNING
heSive tape, \Nr-ap adhesive tape around
•
Will ng that comes Into contact With metal
Use speakers over 50 W (output value) and between 4 f2 to 8 f2 (Impedance,al
. Do not
paris to pl-otect the wll-ing,
use 1 f2 to 3 f2 speakers fOI- this unit
•
-
The black cable IS gl-ound. When Installing
such as the gear shift and seat ralls,
this unit or power amp (sold separately). make
-
sUI-e to corlnect the glound wire first Ensure
Place all cables away from hot places.
such as near the heater outlet
that the ground wil-e is pmpel-Iy connected to
-
Do not connect the yellow cable to the bat-
nletal parts of the cal's body The gr-oulld Wll-e
tery by passing It through the hole to the
of the power amp and the one of thiS unit or
engine compartment
any other device must be connected to the car
-
separately with different sCI-ews. If the screw
Cover any disconnected cable connectors
with insulatlllg tape,
for the ground wire loosens or falls out it
-
Do not shorten any cables.
could result In fire. generation of smoke or
-
Never cut the Insulation of the power cable
malfunction,
of thiS unit In or-der to share the power
Ground wire
6
Other devices
(Another electronic
device in the car)
o
with other deVices, The current capacity of
POWER AMP
~~~?!
II
L1-6
•
Place all cables away from moving parts.
the cable Is !Imited.
-
Use a fuse of the r-ating pl'escribed
-
Never Wll-e the negative speaker cable di-
-
Nevel- band together negative cables of
I-ectly to ground.
\_
multiple speakers,
Metal parts of car's body
•
When thiS unit is on, control Signals are sent
through tile blue/white cable, Connect thiS
cable to the system I-emote control of an external power amp 01- the vehlcle's auto-antenna
Important
ay contm l ter-mlnal (max
12 \j DC).
na, connect It to the antenna booster power
supply terminal.
SWitch. failure to connect the I-ed cable to the
key may r-esult In batter-y drall',
Iilt\
It the vehicle IS equipped With a glass anten-
When installing this unit In a vehicle without
all ACC (accessor-y) position on the Ignition
terminal that detects operation of the Ignition
300
•
Never- connect the blue/white cable to the
pOV\lel' temllnal of an extemal power amp,
Also, never connect It to the power terminal of
the auto antenna. Doing so may result
tel'y drain
No LCC
IJOSltron
•
Use thiS unit with a 12-volt battel-y and Ilegatlve grounding only, Fallur-e to do so may I-esult
•
To prevent a shod-CII-CUIt. over-lleatlng
In a fll-e
01-
malfunction,
01
mal-
functlori, be SlHe to follow the dll-ections
IJe!ow
Disconnect the negative ternwlal of the
batter-y befor-e Installation,
01-
a malfunction.
In
bat-
'\ ,"t_
Section
)~
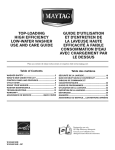
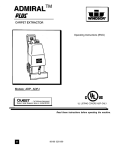
Connection diagram
Th IS prod\ct
r
~~
Connect with RCA cables
(sold sepalately)
Antenna Jack
Fuse (10 A)
~
- - . . -_ _ 1
'\
Yellow
Connect to the constant 12 V
supply terminal.
------
~
System remote control
Blue/white
Connect to system contl'Ol terminal of the
power amp 01' auto,antenna relay control
terminal (max 300 mA 12 V DC)
Red
Connect to tel'mlnai controlled
by ignition sWitch (12 V DC).
With a 2 speaker system. do not connect
anything to the speaker leads that are not
connected to speakel's.
Black (chassIs grOIJ
Connect to a clean. palrHree
metal location.
i_
r----
I
I
Front speakel'
I
I Left
I
I
~
V8L
Gray/black
Green
Violet
Rear speakel'
_
Green/black
JloleUblack
~
18
--- - ----------
1-----Real speaker
~
8
FI'ont speaker
Right
I
l
I
I
White/black
- - - - - - 1
-
Gray
White
8
-
I
I
I
I
I
I
I
I
I
II
Rear speakel'
- - - - - - -
1
II
II
JI
~---------
-"'--------PerfOl'm these connections when
the optional ampllflel'
8
Rear speaker
I
I
I
I
I
___ J
USing
En
CD
Section
D
(Installation
o
•
•
•
•
•
•
Important
Check ali connections and systems before
final installation.
Do not use unauthorized palis as this may
cause malfunctions.
Consult your dealer if Installation requires drilling of holes or other modifications to the vehicle.
Do not Install this unit where:
- It may Interfere with operation of the vehicle.
- it may cause Injury to a passenger as a I-esuit of a sudden stop.
The semiconductor laser will be damaged if it
overheats. Install this unit away from hot
places such as near the heater outlet.
Optimum performance is obtained when the
unit is installed at an angle of less than 60°.
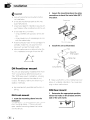
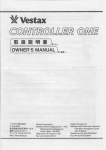
2 Secure the mounting sleeve by using a
screwdriver to bend the metal tabs (90°)
into place.
Dashboard
Mounting sleeve
3
Install the unit as illustrated.
x---- Firewall or
metal support
DIN front/rear mount
ThiS unit can be properly installed either from
"Front" (conventional DIN front-mount) or
"Rear-" (DIN rear-mount installation. utilizing
threaded screw holes on the sides of unit
chassis). For details. refer to the following installation methods.
•
Use commercially available palis when installing.
DIN Front-mount
1 Insert the mounting sleeve into the
dashboard.
For installation in shallow spaces, use the supplied mounting sleeve, If there is enough
space. use the mounting sleeve that came
with the vehicle.
ill)
En
Screw (M4 x 8)
• Make sure that the unit IS installed securely in
place A.n unstable installation may cause skipping or other malfunctions.
DIN Rear-mount
1 Determine the appropriate position
where the holes on the bracket and the
side of the unit match.
Section
'\~
) "t'
2
Tighten two screws on each side.
Screw
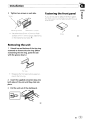
Fastening the front panel
If you do not plan to detach the front panel,
+hn
LI I v
fVf\n+
II VI I l
rl-::lnol
tJUI IL.-l
0':::ln
hn f'::lC'+f"'\nf"'\H
v U I lUI"..,
IU0L\......1 I\""'U
IA/;+h
V¥ILI!
+hA
C"I In
LI I\..- 0UtJ
-_.
(/)
:::T
piled screw.
Mounting bracket
•
Dash board
01'
console
Use either truss (5 mm x 8 mm) or flush
surface (5 mm x 9 mm) screws. depending
on the bracket screw holes. C!J
Screw
Removing the unit
1 Extend top and bottom of the trim ring
outwards to remove the trim ring. (When
reattaching the trim ring, point the side
with the groove down.)
Tnm nng
•
Releasing the front panel allows easier ac'
cess to the trim nng.
2 Insert the supplied extraction keys into
both sides of the unit until they click into
place.
3
Pull the unit out of the dashboard.
En
GD
Appendix
•
J
C-A-d-d-i-ti-o-n-a-I-.-n-fo-rm==a=t=io=n===
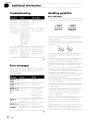
Handling guideline
Troubleshooting
Symptom
Tile display
automatically
I'etu rns to the
orejlnalY diS'
Discs and player
Cause
Action (See)
You did not pel'
fOITn any opela'
tion With I r, about
30 seconds.
Perform operation
I
two logos,
TEXT
I
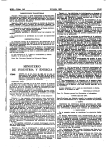
Use 12,cm 01 8,cm CD. Do not use an adapter when
playing 8,cm CDs.
Use onlY conventional. fully Circular diSCS. Do not use
shaped diSCS
sing
You are USI ng a
device. such as a
ceil phone. that
transmits electl'Omagnetic waves
near the unit.
ellSCS featunng either of tol
DIGITAL AUDIO
Select tile
play Deoendillg on
I'ange changes the I'epeat play
range. tile se,
u
!y,
lected range may
change wilen se,
lectlng another
folder or t!'ad, m
when fast tOl"
wald I nn ",'0':01',
n:e ut: IS mal,
function Ing
There IS Inlel"
fel'ence,
Use 0'1
Move electncal de,
Vices that may be
causing the dlte",
terence away hOITI
the unit.
Do not Insed
loading slot.
ng other than a CD Into the CD
Do not use uacked. chipped, warped or otherWise
damaged diSCS as
may damage the player
Unfillalizeci CD,P;CDRvV diSC playback IS not POSS!
ble
Error messages
When you contact yoUI' dealer 01' your nearest
Pioneer Service Center, be sUl'e to note the
error message,
Message
ERROR-11,12,
17,30
AVOid leaVing diSCS In exceSSively hot envll'onments
Ilicluding undel direct sunlight.
Action
Dlliy disc
Clean disc
Do not attach labels, wllte on or apply chemicals to
ti,e surface of the diSCS.
Replace diSC
To clear, a CD. wipe the diSC With a soft cloth outwat'd
from the centel'
Electncal or me,
chailical
Tum tile IgllltlOll
svvltch OFF and
IJack ON. 01 SVNltcl-,
to a dlffelent
soul'ce. then back
to the CD
ERROR-15
The Inselied disc
IS blank
Replace ellsc
ERROR-22, 23
UnsuPPolieci CD
tOITnat
Replace ellsc
AO
CD-ROM
CD,ROM IS I
selied
En
Condensation Illay temporarily I mpal r the piayel's
performance. Lea;e It to adjust to the warmel' tem,
pel'atLlle fOI alJout Olle houl ..Also.
pe any damp
diSCS With a soft cloth,
"',C1"n~r" of diSCS may not be pOSSible because of
diSC cl,ar'actel'lstlcs diSC fOI'mat. recorded appllca,
tlon. playback en'JII'OnITienl. stOl'aDe conditions. and
so or".
ellSC playrJ,3.ck
d
F;;ead
0
(ill
Store diSCS In theil' cases Nhen not In use
Cause'
ERROR-11,12, Scratched disc
17,30
ERROR-10.11,
12,15,17,30,
Do not touch the recOi-cleei surface of the diSCS
Appendix
(-A-d-d-it-i-o-n-a-I-In-f-o-r-m-a-t-io-n-------------- - ) •
"- -
-
-- -- -
- - - - - -- -
- - - -
-
- - - -
--
--
-
./
- -
.-.m
DualDiscs
~
(Q
DualDlscs are two-sided discs that have a recOidable
CD for audio on one side and a I-ecordable DVD for
en'
:::r
SlllCe the CD side of DualDlscs IS not pllyslcaliy compatible with the genel'al CD standard. It may not be
pOSSible to play the CD side with this unit
Flequent loading and ejecting of a DualDlsc may re'
suit In scratches on the disc Serious scratches can
lead to playback problems on thiS unit. In some
cases. a DualDlsc may become stuck In the disc loaelIng slot and Will not eject. To prevent thiS. we recommend you refl-ain fmm uSing DualDlsc with thiS unit.
Please refer to the information fmm the disc rnallUfactUlw for mme detailed Information about DualDIscs.
En
•
Appendix
C·-A-d-d-i-ti-o-n-a-I-In-f-o-r--m-a-t-i-o-n----------- - - )
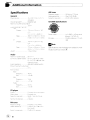
Specifications
AM tuner
General
Power source . • ••........ 14.4 'j DC (10.8
allowable)
Gr'ound:ng system
Negative type
MaXll1lUm cUITent consumption
....... 100 A
Dimensions (W x H x 0)
to 15.1 V
Frequency range
530 kHz to 1 710 kHz
Usable sensitivity... .. 251.N (SiN 20 dB)
..... 62 dB (IHFA network)
Signal-to noise ratio.
CEA2006 Specifications
.. ,,<,o.er~~
011\1
....
...
·ff
178 rnm x 58 mm x 162
CE~_21'fO
mm
(7
\lose
x 2 In. x 6-3/8 In)
188 mm x 58 mm x 15 mm
(7-3/8 In.X 2·1/4 In.x 5/8 In.)
In.
o
~
Power output
!ii
14 W RMS x 4 Channels (4
and;:; 1 % THD+N)
(1
SIN ratio
..... 91 dBA (reference 1 VV into
4Q)
ChassIs
178 mm x 50 mm x 162
mm
(7 In. x 2 In x 6-3/8 In.)
Nose ...................... 170 mm x 48 mm x 15 mm
\6-3/4 in x 1-7/8 In x 5/8 In)
..•.... 13 kg (2.9 Ibs)
ht .
.
Audio
MaXlnlum power output .... 50 VV x 4
Contilluous powel- output .. 22 W x 4 (50 Hz to 15000
Hz. 5 % THO. 4 (1 load. both
channels dllven)
Load impedance
4 n (4 {1 to 8 (1 allowable)
Preout l"aXlmum output level
...................... 2.0 V
Tone cOlltmls:
Bass
Frequency
Gain
100 Hz
:'::12 dB
~i1ld
Frequency
Gain
Treble
Frequency
Galll
1 kHz
=12 dB
10kHz
:::12 dB
CD player
nrY-,n;c;.~t
Usable discs.
.
S,grwl·tollOlse ratio..
Number of channels
diSC auulo
Compact diSC
..94 dB (1 kHz) (IHF-A network)
2 (stereo)
FM tuner
Frequency I-ange
87.9 MHz to 1079 MHz
Usable senSitivity
11 dBf (07
Signal-to nOise ratio
SiN 30 dB)
72 dB
En
.
n.
mono.
netwolk)
BNote
SpeCifications and the design are subject to modifications without notice. ~
Register your product at
Enregistrez votre produit au
Registre su producto en
http://www.pioneerelectronics.com
See "Visit our website" page
Voir fa page "Visitez notre site Web"
Consufte fa pagina sobre "Visite nuestro sitio Web"
PIONEER CORPORATION
4-1, MEGURO 1-CHOME, MEGURO-KU
TOKYO 153-8654, JAPAN
PIONEER ELECTRONICS (USA) INC.
P.O. Box 1540, Long Beach, California 90801-1540, U.S.A.
TEL: (800) 421-1404
PIONEER EUROPE NV
Haven 1087, Keetberglaan 1, B-9120 Melsele, Belgium/Belgique
TEL: (0) 3/570.05.11
PIONEER ELECTRONICS ASIACENTRE PTE. LTD.
253 Alexandra Road, #04-01, Singapore 159936
TEL: 65-6472-7555
PIONEER ELECTRONICS AUSTRALIA PTY. LTD.
178-184 Boundary Road, Braeside, Victoria 3195, Australia
TEL: (03) 9586-6300
PIONEER ELECTRONICS OF CANADA, INC.
300 Allstate Parkway, Markham, Ontario L3R OP2, Canada
TEL: 1-877-283-5901
TEL: 905-479-4411
PIONEER ELECTRONICS DE MEXICO, S.A. de C.V.
Blvd.Manuel Avila Camacho 138 10 piso
Col. Lomas de Chapultepec, Mexico, D.F. 11000
TEL: 55·9178-4270
$tif~~f$}1:l~0~
*.i§j0~ : g~t"$I=P~.Lj::jt~~=f~445nE13ft
~~~:
(02) 2521-3588
$tU~-=f (W;t!) ~~0 ~
~~n~~~/})~;~~i~tltWPJj~I=P/G
9~901-6~
~~~: (0852)
2848-6488
Published by Pioneer Corporation.
Copyright © 2009 by Pioneer Corporation.
All rights reserved.
Publie par Pioneer Corporation. Copyright
© 2009 par Pioneer Corporation. Tous
droits reserves.
Printed in Thailand
Imprime en Thailande
<KOMZX> <09GOOOOO>
<QRD3041-A/N> UC
PIONEER ELECTRONICS (USA) INC.
PIONEER ELECTRONIQUES DU CANADA, INC.
. .
.
GARANTIE L1MITEE
GARANTIE VALIDE SEULEMENT DANS LE PAYS OU LE PRODUIT A ETE ACHETE
GARANTIE
Pioneer Electronics (USA) Inc. (PUSA) et Pioneer Electronique du Canada, Inc. (POC) garantissent que les produits distribues par PUSA aux Etats-Unis et par POC au Canada qui, apres
avoir ete installes et utilises conformement au manuel de I'utilisateur inclus avec I'unite, ne fonctionnent pas de fac;:on appropriee dans des conditions d'utilisation normales en raison d'un
vice de fabrication, seront repares ou remplaces par une unite de valeur comparable, au choix de PUSA ou de POC, sans que vousdeviez payer pour les pieces ou les travaux de reparation.
Les unites ou pieces de rechange fournies en vertu de la presente garantie peuvent etre neuves ou remises neuf, au choix de PUSA ou de POCo
LA PRESENTE GARANTIE L1MITEE S'APPLIQUE AU PROPRIETAIRE INITIALAINSI Qu'A TOUT PROPRIETAIRE SUBSEQUENT DU PRESENT PRODUIT PIONEER PENDANT LA PERIODE DE GARANTIE,
A CONDITION QUE LE PRODUIT AIT ETE ACHETE CHEZ UN DISTRIBUTEUR OU MARCHAND PIONEER AUTORISE AUX ETATS-UNIS OU AU CANADA. VOUS DEVREZ FOURNIR UN RELEVE DE CAISSE
OU UNE AUTRE PREUVE D'ACHAT VALIDE INDIQUANT LA DATE DE L'ACHAT INITIAL OU, SI VOUS LOUEZ LE PRODUIT, VOTRE CONTRAT DE LOCATION INDIQUANT L'ENDROIT ET LA DATE DE
LA PREMIERE LOCATION. SI JAMAIS UN SERVICE DE REPARATION EST REQUIS, LE PRODUIT DOlT ETRE EXPEDIE PENDANT LA PERIODE DE GARANTIE, EN PORT PREPAYE, A L'INTERIEUR DU
PAYS 00 L'ACHAT A ETE EFFECTUE SEULEMENT, TEL QU'IL EST EXPLIQUE DANS LE PRESENT DOCUMENT. VOUS ETES RESPONSABLE DU DEMONTAGE ET DE L'INSTALLATION DU PRODUIT.
PUSA OU POC, LE CAS ECHEANT, PAIERA POUR VOUS RETOURNER LE PRODUIT REPARE OU REMPLACE, A L'INTERIEUR DU PAYS 00 L'ACHAT A ETE EFFECTUE.
a
PERIODE DE GARANTIE DES PRODUITS
Produits stereo pour I'auto
Pieces
Main-d'ceuvre
1 an
1 an
La periode de garantie pour les clients qUllouent Ie prodUit commence Ie jour au Ie produil est utilise pour 18 premiere lois (a) pendant la periode de location au (b) apres la vente au detail, selon ce qui se produit en premier.
ELEMENTS NON COUVERTS PAR LA GARANTIE
UN PRODUIT ACHETE CHEZ UN DISTRIBUTEUR NON AUTORISE N'EST COUVERT PAR AUCUNE GARANTIE EXPRESSE OU IMPLICITE, Y COMPRIS QUELQUE GARANTIE
IMPLICITE DE QUALITE MARCHANDE OU D'ADAPTATION A UN USAGE PARTICULIER QUE CE SOIT. DE PLUS, CE PRODUIT EST STRICTEMENT VENDU " TEL QUEL " ET
" AVEC TOUS SES DEFAUTS EVENTUELS ".
PIONEER N'EST PAS RESPONSABLE DE QUELQUE DOMMAGE CONSECUTIF ET(OU) INDIRECT QUE CE SOIT.
PIONEER NE GARANTIT PAS LES PRODUITS ENUMERES CI-DESSUS LORSQU'ILS SO NT UTILISES A DES FINS COMMERCIALES OU PROFESSIONNELLES, OU AU SEIN
DE TOUTE APPLICATION INDUSTRIELLE OU COMMERCIALE QUE CE SOIT.
LA PRESENTE GARANTIE NE S'APPLIQUE PAS SI LE PRODUIT A lOTIO SOUMIS A UNE PUISSANCE NOMINALE EXCEDANT CELLE QUI A lOTIO ETABLIE DANS LES
DOCUMENTS S'Y APPLIQUANT.
LA PRESENTE GARANTIE NE COUVRE PAS LES TELEVISEURS OU LES ECRANS ENDOMMAGES EN RAISON DE L'APPLICATION D'IMAGES STATIQUES ET 1M MOBILES
PENDANT DE LONGUES PERIODES (IMAGES REMANENTES).
LA PRESENTE GARANTIE NE COUVRE PAS LE COFFRAGE OU LES ELEMENTS ESTHETIQUES, LES ANTENNES INSTALLEES PAR L'UTILISATEUR, LES DOMMAGES AUX
DISQUES OU AUX RUBANS OU DISQUES D'ENREGISTREMENT, LES DOMMAGES AU PRODUIT DECOULANT D'UNE RETOUCHE, D'UNE MODIFICATION NON AUTORISEE
PAR ECRIT PAR PIONEER, D'UN ACCIDENT, D'UN USAGE INAPPROPRIE OU D'UN USAGE ABUSIF, LES DOMMAGES PRODUITS PAR LA FOUDRE OU LA SURTENSION,
LES DOMMAGES SUBSEQUENTS DECOULANT DE FUITES, LES DOMMAGES DECOULANT DE PILES DEFECTUEUSES OU DE L'UTILISATION DE PILES NON
CONFORMES A CELLES QUI SO NT SPECIFIEES DANS LE MANUEL DE L'UTILISATEUR.
LA PRESENTE GARANTIE NE COUVRE PAS LE COUT DES PIECES OU DE LA MAIN-D'CEUVRE QUI SERAIENT AUTREMENT OFFERTES SANS FRAIS EN VERTU DE LA
PRESENTE GARANTIE, SI ELLES SO NT OBTENUES AUPRES D'UNE SOURCE AUTRE QU'UNE SOCIETE DE SERVICE OU AUTRE AUTORISEE OU DESIGNEE PAR
PIONEER. LA PRESENTE GARANTIE NE COUVRE PAS LES DEFECTUOSITES OU LES DOMMAGES CAUSES PAR L'UTILISATION D'UNE MAIN-D'CEUVRE OU DE PIECES
NON AUTORISEES, NI D'UN ENTRETIEN INADEQUAT.
LES NUMEROS DE SERlE MODIFIES, OBLITERES OU ENLEVES ANNULENT LA PRESENTE GARANTIE DANS SA TOTALITE.
INVALIDITE DE TOUTE AUTRE GARANTIE
AUX ETATS-UNIS - PIONEER LIMITE SES OBLIGATIONS EN VERTU DE TOUTE GARANTIE IMPLICITE QUE CE SOIT, Y COMPRIS ENTRE AUTRES LES GARANTIES IMPLICITES
DE QUALITE MARCHANDE OU D'ADAPTATION A UN USAGE PARTICULlER, A UNE PERI ODE N'EXCEDANT PAS LA PERI ODE DE GARANTIE. AUCUNE GARANTIE NE S'APPLIQUE
APRES LA PERIODE DE GARANTIE. CERTAINS ETATS NE PERMETTENT PAS LA LIMITATION DE LA DUREE D'UNE GARANTIE IMPLICITE, ET CERTAINS NE PERMETTENT PAS
L'EXCLUSION OU LA LIMITATION DES DOMMAGES CONSECUTIFS ou IND/RECTS. LES LIMITATIONS ET EXCLUSIONS ETABLIES CI-DESSUS PEUVENT DONC NE PAS
S'APPLIQUER A VOUS. LA PRESENTE GARANTIE VOUS DONNE DES DROITS LEGAUX SPECIFIQUES. VOUS POUVEZ JOUIR D'AUTRES DROtTS, QUI PEUVENT VARIER D'UN
lOTAT A L'AUTRE.
AU CANADA - SOUS RESERVE DE CE QUI EST EXPRESSEMENT STIPULE DANS LES PRESENTES, AUCUNE REPRESENTATION, GARANTIE, OBLIGATION OU CONDITION,
QU'ELLE SOIT IMPLICITE, OBLIGATOIRE OU AUTRE, NE S'APPLIQUE A CE PRODUIT.
SERVICE
Pour profiter du service en vertu de la garantie aux Etats-Unis et au Canada, vous devez presenter votre rei eve de caisse ou, si vous louez Ie produit, votre contrat de location
indiquant I'endroit et la date de la transaction par Ie premier proprietaire.
AUX ETATS-UNIS - Communiquez avec un des partenaires Pioneer suivants pour Ie service.
Votre marchand Pioneer autorise - Votre marchand Pioneer peut reparer ou remplacer votre unite, ou bien vous diriger vers une societe de service Pioneer autorisee. Votre rec;:u
de caisse devrait enumerer ses coordonnees (numeros de telephone et de telecopieur. courriel, etc.).
Votre societe de service autorlsee - Ceile-ci peut reparer la plupart des produits electroniques pour I'auto et vous aviser des options supplementaires qui pourraient s'appliquer.
Veuillez acceder au site Web de Pioneer a www.pioneerelectronics.com.cliquer sur I'onglet " Service and Support" et choisir " Authorized Service Locator" pour trouver la societe
de service Pioneer la plus proche.
Pioneer Electronics Service - Ce service peut vous aviser des options de service optimales pour votre modele et votre emplacement geographique. Veuillez consulter les coordonnees
ci-dessous pour communiquer avec Pioneer par telephone, par courrier ou par Ie biais de son site Web.
AU CANADA - POC a designe un certain nombre de societes de service autorisees partout au Canada si jamais vous avez besoin de services de reparation pour votre produit.
Communlquez avec Pioneer Electronique du Canada (Ies coordonnees se trouvent ci-dessous) pour trouver une societe de service autorisee.
Expedition de votre unite aux fins de service - Si vous expediez I'unite, vous devez I'emballer soigneusement et I'envoyer une societe de service autorisee ou Pioneer,
en port prepaye el selon une methode de transport pouvant etre suivie et assuree. Emballez Ie produit au moyen de materiaux coussines adequats pour eviter les dommages
pendant Ie transport. Incluez votre nom, votre adresse et un numero de telephone ou nous pouvons vous joindre pendant les heures de bureau.
Pour toutes les plaintes et problemes aux Etats-Unis, communiquez avec Ie service de Soutien a la clientele au 1-800-421-1404. Au Canada, communiquez avec Ie groupe de
Satisfaction de la clientele au 1-877-283-5901.
Pour Ie raccordement ou Ie fonctionnement de votre unite, ou pour trouver une societe de service autorisee, appelez ou ecrivez a :
a
AUX ETATS-UNIS
PIONEER ELECTRONICS SERVICE, INC.
P.O. BOX 1760
LONG BEACH, CALIFORNIA 90801
1-800-421-1404
http://www.pioneerelectronics.com
a
AU CANADA
GROUPE DE SATISFACTION DE LA CLIENTELE
PIONEER ELECTRONIQUES DU CANADA, INC.
300 ALLSTATE PARKWAY
MARKHAM, ON L3R OP2
(905) 479-4411
1-877-283-5901
http://www.pioneerelectronics.ca
REGLEMENT DES CON FLITS
AUX ETATS-UNIS - Si un conflit se produit entre vous et Pioneer apres la reponse a une demande initiale taite au service de Soutien a la clientele, vous pouvez avoir
recours au Programme de resolution des plaintes de Pioneer pour resoudre Ie contlit. Ce programme vous est offert sans Irais. Vous devez avoir recours au Programme
de resolution des plaintes avant de vous prevaloir de vos droits ou de chercher reparation en vertu du Titre I de la loi Magnuson-Moss Warranty-Federal Trade Commission
Improvement Act, 15 U.S.C. 2301 et S.S.
Pour avoir recours au Programme de resolution des plaintes, appelez au 1 BOO 421-1404 et expliquez au representant du service a la clientele qui vous repondra Ie
probleme auquel vous taites face et les demarches que vous avez entreprises pour faire reparer Ie produit pendant la periode de garantie, puis donnez-Iui Ie nom du
distributeur / marchand autorise aupres duquel vous vous etes procure Ie produit Pioneer. Une fois que votre plainte a ete expliquee au representant, un numero de
resolution vous sera communique. Pioneer etudiera Ie conflit et, dans un delai de quarante (40) jours apres la reception de votre plainte, (1) repondra a votre plainte
par ecrit pour vous aviser des demarches qU'elie entreprendra pour resoudre Ie contlit, et indiquera com bien de temps ces demarches prendront ; ou (2) repondra
a votre plainte par ecrit pour vous indiquer les raisons pour lesquelles elle n'entreprendra aucune demarche.
AU CANADA - Communiquez avec Ie directeur de la Satisfaction de la clientele au (905) 946-7446 pour discuter de votre plainte et resoudre rapidement Ie probleme.
NO du modele
Date d'achat .
ENREGISTREZ LE LIEU ET LA DATE D'ACHAT POUR REFERENCE ULTERIEURE
NO de serie :.
~
Achete de :
_
PRENEZSOIN DE GARDER CETTE INFORMAllON ETVOTRE REC;;U D'ACHATDANS UN ENDROITSUR
< CRY1276-A/N >
Imprime en Tha"ilande
PIONEER ELECTRONICS (USA) INC.
PIONEER ELECTRONICS OF CANADA, INC.
LIMITED WARRANTY
WARRANTY VALID ONLY IN COUNTRY OF PRODUCT PURCHASE
WARRANTY
Pioneer Electronics (USA) Inc. (PUSA), and Pioneer Electronics Of Canada, Inc. (PaC). warrant that products distributed by PUSA in the U.S.A., and by pac in Canada that fail to
function properly under normal use due to a manufacturing defect when installed and operated according to the owner's manual enclosed with the unit will be repaired or replaced with a
unit of comparable value, at the option of PUSA or pac, without charge to you for parts or actual repair work. Replacement units and/or parts supplied under this warranty may be
new or rebuilt at the option of PUSA or pac.
THIS LIMITED WARRANTY APPLIES TO THE ORIGINAL OR ANY SUBSEQUENT OWNER OF THIS PIONEER PRODUCT DURING THE WARRANTY PERIOD PROVIDED THE
PRODUCT WAS PURCHASED FROM AN AUTHORIZED PIONEER DISTRIBUTORIDEALER IN THE U.S.A. OR CANADA. YOU WILL BE REQUIRED TO PROVIDE A SALES
RECEIPT OR OTHER VALID PROOF OF PURCHASE SHOWING THE DATE OF ORIGINAL PURCHASE OR, IF RENTED, YOUR RENTAL CONTRACT SHOWING THEPLACE
AND DATE OF FIRST RENTAL. IN THE EVENT SERVICE IS REQUIRED, THE PRODUCT MUST BE DELIVERED WITHIN THE WARRANTY PERIOD, TRANSPORTATION PREPAID,
ONLY FROM WITHIN THE COUNTRY OF PURCHASE AS EXPLAINED IN THIS DOCUMENT. YOU WILL BE RESPONSIBLE FOR REMOVAL AND INSTALLATION OFTHE
PRODUCT. PUSA OR POC, AS APPROPRIATE, WILL PAY TO RETURN THE REPAIRED OR REPLACEMENT PRODUCT TO YOU WITHIN THE COUNTRY OF PURCHASE.
PRODUCT WARRANTY PERIOD
Parts
Labor
Car Stereo Products
,
,
,
,
,...............
1 Year
1 Year
The warranty period for retail customers who rent the product commences upon the date product is first put into use (a) during the rental period or (b) retail sale. whichever occurs first.
WHAT IS NOT COVERED
IFTHIS PRODUCT WAS PURCHASED FROM AN UNAUTHORIZED DISTRIBUTOR, THERE ARE NO WARRANTIES, EXPRESSOR IMPLIED, INCLUDING THE IMPUEDWARRANTY
OF MERCHANTABILITY AND THE IMPLIED WARRANTY OF FITNESS FOR A PARTICULAR PURPOSE AND THIS PRODUCTIS SOLD STRICTLY "AS IS" AND 'WITH ALL FAULTS",
PIONEER SHALL NOT BE LIABLE FOR ANY CONSEQUENTIAL ANDIOR INCIDENTAL DAMAGES.
PIONEER DOES NOT WARRANT ANY PRODUCT LISTED ABOVE WHEN IT IS USED IN A TRADE OR BUSINESS OR IN ANY INDUSTRIAL OR COMMERCIAL APPLICATION.
THIS WARRANTY DOES NOT APPLY IFTHE PRODUCT HAS BEEN SUBJECTED TO POWER IN EXCESS OF ITS PUBLISHED POWER RATING.
THIS WARRANTY DOES NOT COVER DISPLAY SCREENS DAMAGED BY STATIC, NON-MOVING, IMAGES APPLIED FOR LENGTHY PERIODS (BURN-IN).
THIS WARRANTY DOES NOTCOVER THE CABINET OR ANY APPEARANCE ITEM, USER ATTACHED ANTENNA, ANY DAMAGE TO RECORDSOR RECORDING TAPES OR DISCS, ANY
DAMAGE TO THE PRODUCT RESULTING FROM ALTERATIONS, MODIFICATIONS NOT AUTHORIZED IN WRITING BY PIONEER, ACCIDENT, MISUSE OR ABUSE, DAMAGE DUE TO
LIGHTNING OR TO POWER SURGES,SUBSEQUENTDAMAGE FROM LEAKING,DAMAGE FROMINOPERATIVEBATTERIES,ORTHEUSEOFBATTERIESNOTCONFORMINGTOTHOSE
SPECIFIED IN THE OWNER'S MANUAL.
THIS WARRANTY OOESNOTCOVERTHECOSTOFPARTSOR LABOR WHICH WOULD BE OTHERWISE PROVIDED WITHOUT CHARGE UNDERTHISWARRANTYOBTAINEDFROM
ANYSOURCEOTHERTHANAPIONEERAUTHORIZEDSERVlCECOMPANYOROTHERDESlGNATEDLOCATlON.THISWARRANTYOOESNOTCOVERDEFECTSORDAMAGECAUSED
BYTHE USE OF UNAUTHORIZED PARTS OR LABOR OR FROM IMPROPER MAINTENANCE.
ALTERED, DEFACED, OR REMOVED SERIAL NUMBERS VOID THIS ENTIREWARRANTY
NO OTHER WARRANTIES
IN THE U.S.A. - PIONEER LIMITS ITS OBLIGATIONS UNDER ANY IMPLIED WARRANTIES INCLUDING, BUT NOT LIMITED TO, THE IMPLIED WARRANTIES OF
MERCHANTABILITY AND FITNESS FOR A PARTICULAR PURPOSE, TO A PERIOD NOTTO EXCEED THE WARRANTY PERIOD. NO WARRANTIES SHALL APPLY AFTER THE
WARRANTY PERIOD. SOME STATES DO NOT ALLOW LIMITATIONS ON HOW LONG AN IMPLIEDWARRANTY LASTS AND SOME STATES DO NOT ALLOW THE EXCLUSIONS
OR LIMITATIONS OF INCIDENTAL OR CONSEQUENTIAL DAMAGES, SO THE ABOVE LIMITATIONS OR EXCLUSIONS MAY NOT APPLY TO YOU. THIS WARRANTY GIVES
YOu SPECiFiC LEGAL RIGHTS AND YOU MAY HAVE OTHER RIGHTS WHICH MAy vARY FRUM STATE TO STATI::.
IN CANADA - EXCEPT AS EXPRESSLY PROVIDED HEREIN, THERE ARE NO REPRESENTATIONS, WARRANTIES, OBLIGATIONS OR CONDITIONS, IMPLIED, STATUTORY
OR OTHERWISE, APPLICABLE TO THIS PRODUCT.
TO OBTAIN SERVICE
In the U.S.A. or Canada to receive warranty service you need to present your sales receipt or your rental contract showing place and date of original owner's transaction.
~
- Please contact one of the following Pioneer partners to obtain service:
Your Authorized Pioneer Dealer - Your Pioneer Dealer may repair or replace your unit, or refer you to an Authorized Pioneer Service Company. Your sales receipt should
list the contact information (phone number, fax. email. etc.) for your Dealer.
Your Authorized Pioneer Service Company - Can perform repairs for most Car Electronics products and can advise other options as applicable. Please access the
Pioneer website at www.pioneerelectronics.com and click on Service and Support and select Authorized Service Locator to find the nearest Pioneer servicer.
Pioneer Electronics Service - Can advise the optimal service option for your model and geographic location. Please reference the information listed below and phone.
email or access the Pioneer website to contact Pioneer.
~
- POC has a number of Authorized Service Companies should your product require service. Contact Pioneer of Canada as listed below to obtain a local service location.
Shipping Your Unit for Service - Please package it carefully and send it, transportation prepaid by a traceable. insured method, to an Authorized Service Company or Pioneer.
Use adequate padding material to prevent damage in transit. Include your name, address and telephone number where you can be reached during business hours.
On all complaints and concerns in the U.S.A. call Customer Support at 1-800-421-1404, or, in Canada, call Customer Satisfaction at 1-877-283-5901.
IN THE USA
For hook-up and operation of your unit or to locate an
Authorized Service Company, please call or write:
PIONEERELECTRONICSSERVICE,INC.
P.O. BOX 1760
LONG BEACH, CALIFORNIA 90801
1-800-421-1404
http://www .pionee re Iectro nics. com
IN CANADA
For additional information on this warranty, please call or write:
CUSTOMERSATISFACTIONGROUP
PIONEER ELECTRONICS OF CANADA INC
300 ALLSTATE PARKWAY'
.
MARKHAM, ON L3R OP2
(905) 479-4411
1-877-283-5901
http://www.pioneerelectronics.ca
DISPUTE RESOLUTION
IN THE U.S.A. - Following our response to any initial request to Customer Support. should a dispute arise between you and Pioneer, Pioneer makes available its Complaint
Resolution Program to resolve the dispute. The Complaint Resolution Program is available to you without charge. You are required to use the Complaint Resolution Program
before you exercise any rights under. or seek any remedies, created by Title I of the Magnuson-Moss Warranty-Federal Trade Commission Improvement Act, 15 U.S.C. 2301 et seq.
To use the Complaint Resolution Program call 1-800-421-1404 and explain to the customer service representative the problem you are experiencing, steps you have taken
to have the product repaired during the warranty period and the name of the authorized Distributor/Dealer from whom the Pioneer product was purchased. After the complaint
has been explained to the representative, a resolution number will be issued. Within 40 days of receiving your complaint. Pioneer will investigate the dispute and will either:
(1) respond to your complaint in writing informing you what action Pioneer will take, and in what time period, to resolve the dispute; or (2) respond to your complaint in writing
informing you why it will not take any action.
IN CANADA - Call the Customer Satisfaction Manager at (905) 946-7446 to discuss your complaint and to obtain a prompt resolution.
RECORD THE PLACE AND DATE OF PURCHASE FOR FUTURE REFERENCE
Model No.
_ _ _ _ _ _ _ _ _ _ _ _ _ _ _ _ Serial No.
Purchase Date
_
Purchased From
KEEP THIS INFORMATION AND YOUR SALES RECEIPT IN A SAFE PLACE
< CRY1276-A/N >
Printed in Thailand