1
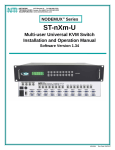
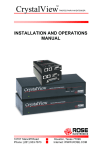
1/9
ノートパソコン( D y n a B o o k S S 3 4 1 0 ) 設定メモ
2000/4/7 情報工学科
§1
Windows98
6. “T o s h i b a H a r d w a r e S e t u p ”と“コントロールパネル”ウィンドウ右上の×のマークをクリ
ックして閉じます.
これで次にコンピュータを起動すると FDD が使えます.
の動作確認
初めてパソコンの電源を入れるとき,または再インストール後に電源を入れたときの設
定の手順を説明します. 詳しいことは取扱説明書の P65-P73 にありますのでそちらを確
認して下さい. ここで必要なものは本体と AC アダプタです.
Windows を終了するにはマウスで [ ス タ ー ト ] をクリックし,メニューの一番下の
" W i n d o w s の 終 了( U ) " をクリックします.Windows の終了 というウィンドウが出ますので "
電 源 を 切 れ る 状 態 に す る ( S ) " をチェックして[ O K ] をクリックします.
==================================================================
1.
2.
本体の電源を入れるとコンピュータが起動します.
Windows セットアップの確認
そのまま < E n t e r > キーを押してしばらく待ちます.
3. ネットワークパスワードの入力
ここは[ キ ャ ン セ ル ] をクリックします.
4. ようこそ
日本語を入力する方法の説明が表示されます. < E s c > キーを押して次へ進みます.
5. Windows98 へようこそ
ここでは名前とふりがなを入力します.まず名前の欄に入力します,漢字で入力した
い場合は< A l t > + < 半/ 全> (< A l t > キーを押しながら< 半/ 全> キー)を押すと漢字の入力モー
ドになります. ふりがなは入力しなくても構いません.
入力が終ったら< E n t e r > キーを押します.
6. Windows ユーザ使用許諾契
Windows98 を利用するための契約内容が表示されます. ここでは" 同 意 す る ( A ) "
の左側の○をチェック(マウスのカーソルを○に合わせてクリック)し,画面右下の" 次 へ
( N ) " をクリックします.
7. セットアップの完了
Windows の設定が完了しました.画面右下の " 完 了 ( F ) " をクリックします.
8. 日付と時刻のプロパティ
日付と時刻が正しいことを確認します.またタイムゾーンの欄が “( G M T + 0 9 : 0 0 ) 東京、
大 阪 、 札 幌 ” になっていることも確認します.
確認が終ったら[ 閉 じ る ] をクリックします.
これで Windows98 の初期設定は終了です.
次にコンピュータから FDD(フロッピーディスクドライブ)を使える設定にします.
1. [ スタート] をクリックしメニューの" 設定( S ) " にマウスを合わせると更にメニューが開き
ますのでその中から" コ ン ト ロ ー ル パ ネ ル ( C ) " をクリックします.
2. “コントロールパネル”ウィンドウの" T o s h i b a H a r d w a r e S e t u p "をダブルクリックします.
3. “T o s h i b a H a r d w a r e S e t u p ”ウィンドウが開きます.USB というタグをクリックし, 設定の
中の USB-FDD Emulation の欄の " E n a b l e " をチェックします.
4. “ T o s h i b a H a r d w a r e S e t u p ”ウィンドウの右下の [ 適用( A ) ] をクリックします.
5. “ 警 告 再 起 動 ” ウィンドウが開きます. [ い い え ( N ) ] をクリックします.
§2
ハードディスクの分割
初めの状態ではハードディスクに Linux をインストールする場所がありません. そこで
Linux をインストールする場所を確保します. 操作方法は<key>で指定されたキーを押す
ことを表しています. また,"何かキーを押します(Press any Key)" という所では< S p a c e > ま
たは< E n t e r > キーを押すようにして下さい.
1. コンピュータにフロッピーディスクドライブを繋ぎます. 次に FIPS 2.0 と書かれたフロ
ッピーディスクをいれて< F > キーを押しながらコンピュータを起動します.
2. 次のコマンドを入力します。
a:¥> f i p s < E n t e r >
FIPS version 2.0, Copyright (C) 1993/94 Arno Schaefer
FAT32 Support Copyright (C) 1997 Gordon Chaffee
DO NOT use FIPS in a multitasking environment like Windows, OS/2 Desqview,
Novell Task manager or the Linux DOS emulator: boot from a DOS boot disk first.
If you use OS/2 or a disk compressor, read the relevant section in FIPS.DOC.
FIPS comes with ABSOLUTELY NO WARRANTY, see file COPYING for details
This is free software, and you are welcome to redistribute it
under certain conditions; again see file COPYING for details.
Press any Key
3. 何かキーを押します
Partition table:
│
│
Start
│
│
End
│ Start │Number of│
Part.│bootable│Head Cyl. sector│System│Head Cyl. sector│ Sector │Sectors │ MB
----------------------------------------------------------------------------1
│
yes│ 1
0
1│ 0Ch│ 254 729
63│
63 │ 11727387│5726
2
│
no│ 0
0
0│ 00h│ 0
0
0│
0 │
0│ 0
3
│
no│ 0
0
0│ 00h│ 0
0
0│
0 │
0│
0
4
│
no│ 0
0
0│ 00h│ 0
0
0│
0 │
0│ 0
Checkong root sector ...
Info: Partition table inconsistency
2/9
FIPS has detected that the 'physical' start or end sector (head/cylinder/
sector) do not mach with the 'logical' start/end sector. This is not
an error since the 'physical' values are redundant and not used anyway.
There are many configurations where the values differ. This message is
meat only to inform you that FIPS has adapted the 'physical' values
according to the current drive geometry. So don't be alarmed by an unexpected cylinder range.
Press any key
4. 何かキーを押します
Partition table:
│
│
Start
│
│
End
│ Start │Number of│
Part.│bootable│Head Cyl. sector│System│Head Cyl. sector│ Sector │Sectors │ MB
----------------------------------------------------------------------------1
│
yes│ 1
0
1│ 0Ch│ 254 729
63│
63 │ 11727387│5726
2
│
no│ 0
0
0│ 00h│ 0
0
0│
0 │
0│ 0
3
│
no│ 0
0
0│ 00h│ 0
0
0│
0 │
0│ 0
4
│
no│ 0
0
0│ 00h│ 0
0
0│
0 │
0│ 0
OK
Press any Key
5. 何かキーを押します
7.
< Y > キーを押します.
documentation (y/n)? y
Writing file a:¥rootboot.000
Enter start cylinder for new partition (94 - 729):
Use the cursor key to choose the cylinder,
Old partition
737.4 MB
Cylinder
94
to continue
New Partition
4988.9 MB
8. 左右の矢印キー< ←> , < →> で次のように変更します. また上下の矢印キー< ↑> ,< ↓>
を押すと Cylinder が 10 毎変化します。
Old partition
3710.3 MB
Cylinder
473
New Partition
2016.0 MB
9. 変更が終ったら < E n t e r > キーを押します。
First cluster: 946972
Last cluster: 1463057
Testing if empty ... OK
Boot sector:
New partition table:
Bytes per sector: 512
Sectors per cluster: 8
Reserved sectors: 32
Number of FATs: 2
Number of rootdirectory entries: 0
Number of sectors (short): 0
Media descriptor byte: F8h
Sectors per FAT: 11442
Sectors per track: 63
Drive heads: 255
Hidden sectors: 63
Number of sectors (long): 11727387
Physical drive numbers: 80h
Signature: 29h
│
│
Start
│
│
End
│ Start │Number of│
Part.│bootable│Head Cyl. sector│System│Head Cyl. sector│ Sector │Sectors │ MB
----------------------------------------------------------------------------1
│
yes│ 1
0
1│ 0Ch│ 254 472
63│
63│ 7598682│3710
2
│
no│ 0 473
1│ 0Ch│ 254 729
63│ 7598745│ 4128705│2015
3
│
no│
0
0
0│
00h│
0
0
0│
0│
0│
0
4
│
no│
0
0
0│
00h│
0
0
0│
0│
0│
0
Checking boot sector ... OK
Checking FAT ... OK
Searching for free space ... OK
Do you want to make a backup copy of your root and boot sector before
proceeding (y/n)?
6. 分割を行う前にバックアップするかを聞いてきます. < Y > キーを押します.
proceeding (y/n)? y
Do you have a bootable floppy disk in drive A: as described in the
documentation (y/n)?
Checking root sector ... OK
Do you want to continue or reedit the partition table (c/r)?_
10. < C > キーを押します.
Do you want to continue or reedit the partition table (c/r)? c
New boot sector: 512
Section per cluster: 8
Reserved sectors: 32
Number of FATs: 2
Number of rootdirectory entries: 0
Number of sectors (short): 0
Media descriptor byte: F8h
Sectors per FAT: 11442
Sectors per track: 63
Drive heads: 255
Hidden sectors: 63
3/9
boot: english ide2=0x1a0,0x3a0
Number of sectors (long): 7598682
Physical drive number: 80h
Signature: 29h
と入力します.
注 意 ! ! “ 0 ” は 数 字 の 0 で す . ま た ” = ” は ” ^ ” ( “ = ” キ ー の 一 つ 右 の キ ー ) です.
3. L A S E R 5 L i n u x
− インストールの手順の説明
Checking boot sector ... OK
Welcome to LASET5 Linux!
Ready to write new partition scheme to disk
Do you want to proceed (y/n)_
This installation process is outlined in detail in the
Official LASER5 Linux Installation Guide available from
LASER5. If you have access to this manual, you should
read the installation section before continuing.
11. < Y > キーを押します.
Do you want to proceed (y/n) y
Repartitioning complete
With FAT32 partitions, you should now run scandisk on the shortened partition.
If you have purchased Official LASER5 Linux, be sure to
register your purchase through our web site,
http://www.laser5.co.jp/support/touroku/
Bye!
"[ O k ] "のまま< S p a c e > キーを押します.
4. K e y b o a r d T y p e −使用するキーボードの種類の設定
Memory allocation error
Cannot load COMMAND system halted
What type of keyboard do you have?
jp106
Jp109
Us
以上でパーティションの切り分けは終了です. 電源を切って終了してください.
= = = = = = = = ==========================================================
§3
BIOS
の設定
Linux をインストールするときに CD-ROM ドライブからプログラムを動かせるようにコン
ピュータの設定を変更します.
1. < E S C > キーを押しながらコンピュータを起動します.
2. しばらくすると <F1> キーを押すように指示が出ます, < F 1 > キーを押すと設定画
面になります.
3. < ↓> キーで P E R I P H E R A L 欄の" U S B - F D D E m u l a t i o n = E n a b l e d "に移動します.
4. < S p a c e > キーで表示を " U S B - F D D E m u l a t i o n = D i s a b l e d " に変更します.
5. < F n > + < ↓ P g D n > で次の画面に移動します.
6. < → > で “ P C C A R D ” の欄に移動します.
7. < S p a c e > で表示を “ P C I C C o m p a t i b l e ” に変更します.
8. < F n > + < → E n d > で設定を終了し < Y > キーを押します.
==================================================================
§4
Laser5 Linux6.0 rel2
日本語用キーボード "j p 1 0 6 " を選択し, "[ O k ] " に移動して< S p a c e > キーを押します.
5. P C M C I A S u p p o r t
Do you need to use PCMCIA devices during the install?
Answer no to this question if only need PCMCIA support
after the install. You do not need install-time PCMCIA
support if you are installing LASER5 Linux on a laptop
with a built-in CDROM drive.
6.
What type of media contains
the packages to be installed?
Local CDROM
Hard drive
7.
1.
CD-ROM を CD-ROM ドライブに入れて, <c> キーを押しながらコンピュータを起動
します.
2.
Welcome to LASER5 Linux!
インストールの説明が(英語で)表示され, 最期 に b o o t : と表示が出ますので, ここで
"L o c a l C D R O M " を選択し, "[ O k ] " の項目に移動して < S p a c e > キーを押します.
Note
Insert your LASER5 CD into your
CD drive now
のインストール
LASER5 Linux6.0 をインストールします. ここでは CD-ROM boot によってインストー
ルをおこないます. インストール中のキー操作は [Tab], [Alt]+[Tab] で項目の移動,
[ S p a c e ] で選択をおこないます. また, 項目の中での移動は矢印キーを使います.
"[ N O ] " の項目に移動して < S p a c e > キーを押します.
Installation Method
− インストール元のデバイスの選択
8.
"[ O k ] " のまま < S p a c e > キーを押します.
I n s t a l l a t i o n P a t h − 新規, アップグレードの確認
Would you like to install a
new system or upgrade a system
which already contains Red Hat
Linux 2.0 or lator?
新規にインストールします. "[ I n s t a l l ] " のまま < S p a c e > キーを押します.
4/9
9.
Installation Class −
"s w a p "パーティションを作成します."[ A d d ] " に移動して < S p a c e > キーを押します.
15. E d i t N e w P a r t i t i o n
"S i z e ( M e g s ) " の欄に 1 2 8 と入力し, "T y p e " の欄で Linux Swap を選択します.
用途別のインストール内容の選択
What type of machine are you
installing? For maximum
flexibility, choose "Custom".
Workstation
Server
Custom
Mount Point:
"[ C u s t o m ] " を選択し, "[ O k ] " に移動して < S p a c e > キーを押します.
10. S C S I C o n f i g u r a t i o n − SCSI アダプタの有無
Do you have any SCSI adapters?
"[ N o ] " のまま < S p a c e > キーを押します.
11. D i s k S e t u p − パーティションの分割(ツールの選択)
Disk Druid is a tool for partitioning and setting up
mount points. It is designed to be easier to use than
Linux's traditional disk partitioning software, fdisk,
as well as more powerful. However, there are some cases
where fdisk may be preferred.
Size (Megs):
128
Grow to fill disk?:[ ]
Allowable Drives:
Device
hda1
hda2
Drive Summaries
Drive
Geom [C/H/S]
hda
[ 730/255/63]
Requested
4000M
1725M
Total
5726M
Used
5726M
Actual
4000M
1725M
Free
0M
[##########]
画面の上の方には設定されたパーティションが表示 され, 画面の中程の "ドライブ
の情報" には使用できるハードディスクとその容量が表示されます. 現在は使用できる
パーティションがありませんので,先ほど分割した hda2 を Linux 用に設定しなおします.
< ↓> キーで ”[ h d a 2 ] “ を選択し, < T a b > キーで”[ D e l e t e ]“ に移動して <Space> キー
を押す.
13. D e l e t e P a r t i t i o n
Are you sure you want to delete
this partition?
"[ Y e s ] " のまま < S p a c e > キーを押します.
14. L A S E R 5 L i n u x ( C ) 1 9 9 9 L A S E R 5
Current Disk Partitions
Mount Point
Device
hda1
hda2
Drive Summaries
Drive
Geom [C/H/S]
hda
[ 730/255/63]
Requested
4000M
1725M
Total
5726M
Used
4000M
Mount Point:
Free
1726M
[######
Used
4000M
Free
1593M
Type
Win95 FAT32
Linux swap
[######
]
Allowable Drives:
Tyoe:
Linux Swap
Linux Native
Dos 16-bit <32M
Dos 16-bit >=32M
[*] had
"[ O k ] " に移動して < S p a c e > キーを押します.
18. L A S E R 5 L i n u x ( C ) 1 9 9 9 L A S E R 5
Setup filesystem
Current Disk Partitions
Mount Point
Device
hda1
hda5
hda6
Drive Summaries
Drive
Geom [C/H/S]
hda
[ 730/255/63]
]
Total
5726M
Actual
4000M
133M
/
Size (Megs):
1
Grow to fill disk?:[* ]
/
Type
Win95 FAT32
Win95 FAT32
Requested
4000M
128M
設定が終ると, パーティションの状態の画面に戻ります. "L i n u x S w a p " というタイプの
パーティションが表示されていることを確認してください. 次に"/ "(root)パーティションを
作成します."[ A d d ] "に移動して< S p a c e > キーを押します.
17. E d i t N e w P a r t i t i o n
まず,"M o u n t P o i n t "に移動して / と入力します.次に"Grow to fill disk? "に移動して
< S p a c e > キーを押すと "* " が表示されこのパーティションに空いている部分が全て割り当
てられます. また"T y p e "の項目が “L i n u x N a t i v e ” になっていることを確認します.
Setup filesystem
Actual
4000M
1725M
Device
hda1
hda5
Drive Summaries
Drive
Geom [C/H/S]
hda
[ 730/255/63]
Type
Win95 FAT32
Win95 FAT32
Linux Swap
Linux Native
Dos 16-bit <32M
Dos 16-bit >=32M
[*] had
Mount Point
"[ D i s k D r u i d ] " のまま < S p a c e > キーを押します.
12. L A S E R 5 L i n u x ( C ) 1 9 9 9 L A S E R 5
Setup filesystem
C u r r e n t D i s k P a r t i t i o n s − 分割状態の確認
Tyoe:
"[ O k ] " の項目に移動して < S p a c e > キーを押します.
16. L A S E R 5 L i n u x ( C ) 1 9 9 9 L A S E R 5
Setup filesystem
Current Disk Partitions
Which tool would you like to use?
Mount Point
Swap Partition
Requested
4000M
1M
128M
Total
5726M
Used
4000M
Actual
4000M
1592M
133M
Free
0M
Type
Win95 FAT32
Linux native
Linux swap
[###########]
これでパーティションの設定は終りです. 2 つのパーティションが登録されていることを
確認してください. "[ O k ] に移動して < S p a c e > キーを押します.
5/9
19. S a v e C h a n g e s
Save changes to partition table(s)?
"[ Y e s ] " のまま < S p a c e > キーを押します.
20. A c t i v e S w a p S p a c e
先程設定した swap パーティションを使用できるように設定します.“/ d e v / h d a 6 ” の先頭
で, < S p a c e > キーを押し, “[ * ] / d e v / h a d 6 ” という表示にします.
What partitions would you lik to use for swap space? This
will destroy any insormation already on the partition.
Device
Size (k)
[*] /dev/hda6
128488
[ ] Check for bad blocks during format
"[ O k ] " の項目に移動して < S p a c e > キーを押します.
21. P a r t i t i o n s T o F o r m a t
フォーマットするパーティションを選択します. “/ d e v / h d a 5 ” の先頭で,< S p a c e > キーを
押し, “[ * ] / d e v / h a d 5 ” という表示にします.
What partitions would you like to format? We strongly suggest
formatting all of the system partitions, including /, /usr,
and /var. There is no need to format /home or /usr/local if
they have already been configures during a previous install.
[*] /dev/hda5
/
[ ] Check for bar blocks during format
"[ O k ] " に移動して < S p a c e > キーを押します.
22. C o m p o n e n t s t o I n s t a l l
ここではどんなコンポーネント(使用するソフトウェア)をインストールするかを選択します.
[ * ] K D E の場所で< S p a c e > キーを押しチェックを外します. また, [ ] C D e v e l o p m e n t と
[ ] D e v e l o p m e n t L i b r a r i e s の場所で < S p a c e > キーを押してチェックします
Choose components to install:
[ ] Printer Support
[*] X Window System
[*] GNOME
[ ] KDE
[*] Mail/WWW/News tools
[ ] DOS/Windows Connectivity
:
:
[*] Emacs
[ ] Xemacs
[*] C Development
[*] Development Libraries
[ ] C++ Development
[ ] GNOME Development
[ ] Kernel Development
[ ] Extra Documentation
[ ] Everything
[ ] Select individual packages
"[ O k ] " に移動して < S p a c e > キーを押します.
23. U n r e s o l v e d D e p e n d e n c i e s
Some of the packages you have selected to
install require packages you have not
selected. If you just select Ok all of
Those required packages will be installed.
Package
Requirement
ghostscript
VFlib
ghostscript
cmpskit
ghostscript
Vflib
[*] Install packages to satisfy dependencies
"[ O k ] " のまま < S p a c e > キーを押します.
24. I n s t a l l l o g
インストール状況を記録しておくファイルの場所が表示されます. うまく動かないときな
どこのファイルを調べると正しくインストールされているか確認できます.
A complete log of your installation
will be in /tmp/install.log after
rebooting your system. You may want to
keep this file for later reference.
"[ O k ] " のまま < S p a c e > キーを押します.
ここでインストールが始まり,10 分程かかります.
25. P r o b i n g R e s u l t
Probing found some type of PS/2
mouse on port psaux.
マウスタイプの自動検出の結果が表示されます. "[ O k ] "のまま< S p a c e > キーを押します.
26. C o n f i g u r e M o u s e
"G e n e r i c M o u s e ( P S / 2 ) " を選択したまま "[ ] E m u l a t e 3 B u t t o n s ? " のところで
< S p a c e > を押し, "[ * ] E m u l a t e 3 B u t t o n s ? " という表示にします.
What type of mouse do you have?
No Mouse
ALPS GlidePoint (PS/2)
ASCII MieMouse (serial)
ASCII MieMouse (PS/2)
ATI Bus Mouse
Generic mouse (serial)
Generic 3 Button Mouse (serial)
Generic Mouse (PS/2)
[*] Emulate 3 Butons?
"[ O k ] " の項目に移動して < S p a c e > キーを押します.
27. N e t w o r k C o n f i g u r a t i o n
LAN 環境のネットワークの設定をします.
Do you want to configure LAN
(not dialup) networking for
your installed system?
"[ Y e s ] " の項目に移動して < S p a c e > キーを押します.
6/9
28. P r o b e
ネットワークカードの自動検出の結果を表示します.
AIntel EtherExpress Pro 100 card
has been found on your system.
"[ O k ] " に移動して < S p a c e > キーを押します.
29. B o o t P r o t o c o l
IP アドレスというコンピュータを認識する番号を自動的に割り当てる設定を行います.
How should the IP information be set? If your system
administrator gave you an IP address, choose static IP.
Static IP address
BOOTP
DHCP
"D H C P " を選択し, "[ O k ] " に移動して < S p a c e > キーを押します.
30. C o n f i g u r e T i m e z o n e s
標準の時間を設定します.矢印キーで J a p a n を選択します.
Format machine time is stored in:
[ ] Hardware clock set to GMT
Indian/Mayotte
Indian/Reunion
Tran
Israel
Jamaica
Japan
"[ O k ] " の項目に移動して < S p a c e > キーを押します.
31. S e r v i c e s
コンピュータを起動したときに自動的に実行するサービスの設定をします.[ * ] a p m d と
[ * ] s e n d m a i l の場所で < S p a c e > キーを押してチェックを外します.
What services should be automatically started?
[ ] apmd
[*] atd
[*] canna
:
:
[ ] rusersd
[ ] rwhod
[ ] sendmail
[ ] smb
[*] sound
[*] syslog
[ ] ypbind
"[ O k ] " の項目に移動して < S p a c e > キーを押します.
32. C o n f i g u r e P r i n t e r
プリンタの設定はしません.
Would you like to configure a printer?
"[ N o ] " に移動して < S p a c e > キーを押します.
33. R o o t P a s s w o r d
設定したコンピュータの管理者(root)のパスワードを設定します. 確認のために
“P a s s w o r d :” と “P a s s w o rd ( a g a i n ) ” の両方に ro o t p s w d と入力してください.
Pick a root password. you must type it
twice to ensure you know what it is and
didn't make a mistake in typing. Remember
that the root password is a critical part
of system security!
Password:
rootpswd
Password (again): r o o t p s w d
"[ O k ] " に移動して < S p a c e > キーを押します.
パスワードが一致しないときは Password Mismatch というエラーが表示されます.
34. A u t h e n t i c a t i o n C o n f i g u r a t i o n
パスワードなどの管理方法について設定します.
[ ] Enable NIS
NIS Domain:
NIS Server: [*] Request via broadcast
or use:
[*] Use Shadow Passwords
[*] Enable MD5 Passwords
"[ O k ] " の項目に移動して < S p a c e > キーを押します.
35. B o o k d i s k
A custom bootdisk provides a way of booting into your Linux
system without deoending on the normal bootloader. This is
useful if you don't want to install lilo on your system,
another operating system removes lilo, or lilo doesn't work
with your hardware configuration. A custom bootdisk can also
be used with the LASER5 rescue image, making it much easier
to recover from severe system failures.
Would you like to create a bootdisk for your system?
"[ N o ] " の項目に移動して < S p a c e > キーを押します.
36. L i l o I n s t a l l a t i o n
lilo(Linux loader) をインストールする先を設定します.
Where do you want to install the bootloader?
/dev/hda
/dev/hda5
Master Boot Record
First sector of boot partition
“/ d e v / h d a M a s t e r B o o t R e c o r d ”を選び"[ O k ]"に移動して < S p a c e > キーを押します.
7/9
Impression 7 Plus 7728D
LCD Panel 1024x768
LCD Panel 640x480
LCD Panel 800x600
:
37. L i l o I n s t a l l a t i o n
起動する際にオプションが必要な OS の設定をします.
A few systems will need to pass special options to
the kernel at boot time for the system to function
properly. If you need to pass boot options to the
kernel, enter them now. If you don't need any or
aren't sure, leave this blank.
"[ O k ] " の項目に移動して < S p a c e > キーを押します.
41. S c r e e n C o n f i g u r a t i o n
ビデオカードの情報を検出するかの確認です.
[ ] Use linear mode (needed for some SCSI drivers)
"[ O k ] " のまま < S p a c e > キーを押します.
38. B o o t a b l e P a r t i t i o n s
Lilo から起動する OS の設定をします.
The boot manager LASER5 user can boot other operating
systems as well. You need to tall me what partitions you
would like to be able to boot and what label you want to
use for each of them.
Device
Partition type
Default Boot label
/dev/hda1
Win95 FAT32
dos
/dev/hda5
Linux native
*
linux
"[ O k ] " のに移動して < S p a c e > キーを押します.
標準でコンピュータの起動時に dos と入力すると Windows が linux と入力すると(何
も入力しないときも) Linux が起動するようになっています.
39. C h o o s e a C a r d
コンピュータのビデオカードの設定をします.矢印キーでこのノートパソコンのビデオカ
ードの型 “T r i d e n t C y b e r 9 5 2 5 ( g e n e r i c ) C y b e r 9 5 2 5 ” を選択します.
Pick a Card from the list below (Or choose "Unlisted Card"
at the botom of the list if your card isn't listed):
2 the Max MAXColor S3 Trio64V+
:
Trident Cyber 9397 (generic)
Trident Cyber 9397 DVD (generic)
Trident Cyber 9525 (g eneric)
Trident CyberBlade (generic)
Trident TGUI9400CXi (generic)
:
Xconfigurator now needs to setup the default resolution and
color depth. most modern PCI video cards can be probed, and
Xconfigurator will automatically determine the best video
mode/color depth possible for your system. There is a chance,
however, this could lock up your system. If you would prefer
to give the required information instead of having it probed,
answer "Don't Probe" to the following question.
"[ P r o b e ] " に移動して < S p a c e > キーを押します.
42. P r o b i n g t o b e g i n
ビデオカードの検出を開始します.
Xconfigurator will now run the X
server you selected to probe
various information about your
video card. It is normal for the
screen to blink several times.
"[ O k ] " のまま < S p a c e > キーを押します.
43. P r o b i n g f i n i s h i e d
検出した結果を使って設定を行います.
Xconfigurator has sucessfully probed your video card. The
default video mode will be:
Color Depth: 16 bits per pixel
Resolution : 1024x768
S3 Trio64V+
Cyber9397
Cyber9397DVD
Do you want to accept this setting, or select for yourself?
Cyber9525
CyberBlade
TGUI9400CXi
"[ O k ] " の項目に移動して < S p a c e > キーを押します.
40. M o n i t o r S e t u p
使用するモニタを選択します.矢印キーで “L C D P a n e l 1 0 2 4 x 7 8 6 ”を選択します.
What type of monitor do you have? If you would rather specify the
sync frequencies of your monitor, choose "Custom" from the list.
Custom
ADI DMC-2304
:
:
IIYAMA TSA4632HT (TFT)
"[ U s e D e f a u l t ] " のまま < S p a c e > キーを押します.
44. S t a r t i n g X
設定した値を使って正しく表示されることを確認します.
Xconfigurator will now start X
to test your configuration.
"[ O k ] " に移動して < S p a c e > キーを押します.
45. C a n y o u s e e t h i s m e s s a g e ?
メッセージが読める場合にはマウスで"[ Y e s ] "をクリックします. 表示がうまくいかない場
合は設定をやり直します.
Automatic timeout in:___ seconds
Yes
No
マウスで"[ Y e s ] "をク リ ッ ク します.
8/9
46. X c o n f i g u r a t o r c a n s e t u p y o u r … …
起動時の状態を設定します.
Xconfigurator can set up your computer to
automatically start X upon booting Would
you like X to start when you reboot?
マウスで "[ N o ] " をク リ ッ ク します.
47. D o n e − インストールの終了
Congratulations, installation is complete.
Remove the boot media and press return to reboot. For
information on fixes which are available for this
release on LASER5 Linux, consult the Errata available
for http://www.laser5.co.jp.
Information on configuring your system is available in
the post install chapter of the Official LASER5 Linux
User's Guide.
"[ O k ] " に移動して < S p a c e > キーを押します.
以上でインストールは終了です. コンピュータは自動的に再起動します.
§5
動作の確認
コンピュータが再起動すると画面に
lilo:
と表示されます. ここで < E n t e r > キーを押すと Linux が起動します.ここで自動的にハ
ードウェア設定のプログラムが起動します.特に設定しません.
Welcome to kudzu
Welcome to Kudzu, the Red Hat Linux hardware detection
and configuration tool.
On the following screens you will be able to configure
any new or removed hardware for yourcomputer
Press any key to
Normal bootup will continue in __ seconds.
何かキーを押します.
Hardware Added
The following hardware has been added to your system:
Intel Corporation:unknown device 8086:7195
You can choose to:
1) Configure the device.
2) Ignore the device. No configuration will be added,
but you will not be prompted if the device is detected
on subsequent reboots.
3) Do nothing. No configuration will be added, and the
device will show up as new if it is detected on
subsequent reboots.
"[ I g n o r e ] " に移動して < S p a c e > キーを押します.
ここで管理者 (root) でログインしてみましょう.
LASER5 Linux 6.0 (Raiden)
Kernel 2.2.5 -22lv3 on an i686
login: root
と入力します. するとパスワードを聞いてきますのでインストールのときに設定したパスワ
ードを入力してください.
password: ********
ログインできたでしょうか?できなかった場合はパスワードを確認してください.
次に Acrobat Reader をインストールします. これは PDF(Portable Document Format)
という形式のファイルを閲覧するためのアプリケーションです. この形式のファイルはコン
ピュータの環境に依存せずに同一のレイアウト表示が可能です.
ここではインターネット上にある Acrobat Reader を直接インストールします. 次のコマ
ンドを入力します.
r p m - i v h f t p : / / m a r k u n .cs.shinshu-u.ac.jp/pub/lecture/acroread.rpm
するとインストール状況が表示され,インストールが終了します.
[user@ ]# r p m - i v h f t p : / / m a r k u n . c s . s h i n s h u - u . a c . j p / p u b / l e c t u r e /acroread.rpm
Retrieving ftp://markun.cs.shinshu-u.ac.jp/pub/lecture/acroread.rpm
Acroread #####################################################
[user@ ]#
今度は X Window System を起動してみましょう.
# startx
<Escape>
と入力します. すると次のような画面表示になります.
9/9
今回は root でログインしたので設定ファイルが自由に書き換えることができ, システ
ムに影響を与えるかもしれませんという注意です. とりあえず “O K ” をクリックします.
主な授業のページ
1. 情報ゼミナール第 I
http://www.cs.shinshu-u.ac.jp/Lecture/SEMI1/
2. 情報ゼミナール第 II
http://www.cs.shinshu-u.ac.jp/Lecture/SEMI2/
3. プログラミング言語
http://caiserver.cs.shinshu-u.ac.jp/c_language/Book/main.html
4. 論理回路
http://www.cs.shinshu-u.ac.jp/Lecture/LogicCirc/index/
5. 工学と微積
http://markun.cs.shinshu-u.ac.jp/learn/biseki/
6. ノートパソコンの情報
http://wwwserve.cs.shinshu-u.ac.jp/Lecture/Notepc/2000/
その他は情報工学科のホームページまたは各授業の教官に確認してください.
これは GNOME というデスクトップ環境です. Windows 95/98/NT のような操作ができ
るようになっています.
次に Netscape を起動してみます. 画面下の中央にある
をクリックします.
“N e t s c a p e : 使用許諾契約” というウィンドウが開きますので [同意する] をクリックしま
す.次に現れる “N e t s c a p e : エラー” のウィンドウは Netscape 用のディレクトリを作成し
たというメッセージなので [ 確 認 ] をクリックします.
情報工学科のホームページを見てみましょう. ホームページの URL(Uniform Resource
Locator) は
http://wwwserve.cs.shinshu-u.ac.jp/
です. < A l t > + < O > キーを押すとページを指定するウィンドウが開きます, ここに上の
URL を入力して [ N a v i g a t o r で開く] をクリックします(または < E n t e r > キーを押す).
“Netscape: エラー” というウィンドウが開いたときは打ち込んだ URL が間違っていま
すのでもう一度 < A l t > + < O > で URL の入力ウィンドウを開き [クリア] をクリックして再
入力するか, 前に入力した URL を直接修正して再度開いてください.
授業ではテキストなどの情報を Web 上で閲覧するようになっています. Netscape で各
授業のページを確認するようにしてください.
参考文献
1. 標準 redhat Linux リファレンス: David Pitts, Bill Ball: インプレス: 1999
2. PC-UNIX 日本語環境 + アプリケーション 徹底入門: 雰山和彦, 岡田 智志:
技術評論社: 1999
参考ホームページ
1. 日本の Linux 情報
http://www.linux.or.jp/
2. JM Project オンラインマニュアル翻訳プロジェクト
http://www.linux.or.jp/JM/
3. 東芝の Linux 関連情報のページ
http://www2.toshiba.co.jp/pc/pr/linux.htm