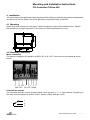
1
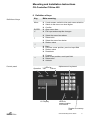
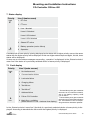
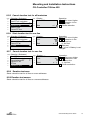
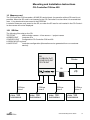
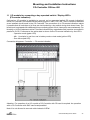
Mounting and Operating instructions CG Controller CGLine 400 Target group: Skilled electricians Mounting and Installation Instructions CG-Controller CGLine 400 Index 1 Safety Notes............................................................................................................ 1.1 Important information about safe operation of an emergency lighting system......... 2 Conformity to standards........................................................................................... 3 Technical data.......................................................................................................... 3.1 Use as prescribed.................................................................................................... 4 Installation................................................................................................................ 4.1 Mounting.................................................................................................................. 4.2 Electrical connection................................................................................................ 5 CG-Controller in the emergency lighting system..................................................... 6 Definition of keys...................................................................................................... 7 Status display........................................................................................................... 7.1 Fault display............................................................................................................. 8 Menu overview......................................................................................................... 8.1 Main screen............................................................................................................. 8.1.1 Jump back to the main screen automatically .......................................................... 8.1.2 LCD back lighting..................................................................................................... 8.2 Main menu............................................................................................................... 8.3 Fault analysis .......................................................................................................... 8.4 Status luminaires..................................................................................................... 8.4.1 Status fault display................................................................................................... 8.5 Test menu................................................................................................................ 8.5.1 Start function test for all luminaires . ....................................................................... 8.5.2 Start function test for one line.................................................................................. 8.5.3 Start duration test for all luminaires ........................................................................ 8.5.4 Cancel duration test shared .................................................................................... 8.5.5 Cancel duration test for all luminaires...................................................................... 8.5.6 Start duration test for one line.................................................................................. 8.5.7 Cancel duration test for one line.............................................................................. 8.5.8 Duration test even.................................................................................................... 8.5.9 Duration test uneven................................................................................................ 8.6 Block / release......................................................................................................... 8.6.1 Block all.................................................................................................................... 8.6.2 Release all............................................................................................................... 8.6.3 Block one line........................................................................................................... 8.6.4 Release one line....................................................................................................... 8.7 Setup CG-Controller................................................................................................ 8.7.1 Select language....................................................................................................... 8.7.2 Time and date.......................................................................................................... 8.7.2.1Changeover to summer time.................................................................................... 8.7.2.2Changeover to winter time....................................................................................... 8.7.3 Next function test (FT)............................................................................................. 8.7.4 Next duration test (DT)............................................................................................. 8.7.4.1Activate shared DT.................................................................................................. 8.7.4.2Main screen for shared DT = active......................................................................... 8.7.4.3Main screen for DT started at the luminaire............................................................. 8.7.4.4Automatic displacement of the next DT after mains failure...................................... 8.7.5 Relais settings.......................................................................................................... 4 4 5 5 6 7 7 7 8 9 10 10 11 12 12 12 12 12 13 13 14 14 14 14 14 15 15 15 15 15 16 16 16 16 16 17 17 17 17 17 17 18 18 18 19 19 19 CEAG Notlichtsysteme GmbH 2 Mounting and Installation Instructions CG-Controller CGLine 400 8.7.5.1Relais selection battery operation............................................................................ 8.7.5.2Relais selection FT runs.......................................................................................... 8.7.5.3Relais selection DT runs.......................................................................................... 8.7.5.4Relais selection com. failure luminaire..................................................................... 8.7.5.5Relais selection luminaire failure............................................................................. 8.7.5.6Relais selection charging failure.............................................................................. 8.7.5.7Relais selection test failure...................................................................................... 8.7.5.8Relais selection RELAIS COMPLETELY OFF......................................................... 8.7.5.9Relais selection STANDARD................................................................................... 8.7.6 Serial number . ........................................................................................................ 8.7.7 Customer service info.............................................................................................. 8.7.8 Password................................................................................................................. 8.7.8.1Activate password.................................................................................................... 8.7.8.2Deactivate password................................................................................................ 8.7.8.3Submenu activate password.................................................................................... 8.7.8.4Menu password request........................................................................................... 8.8 Setup luminaires...................................................................................................... 8.8.1 Automatic search of luminaires................................................................................ 8.8.1.1Submenu automatic search..................................................................................... 8.8.1.2Submenu automatic search All lines........................................................................ 8.8.2 Add luminaire........................................................................................................... 8.8.3 Remove luminaire.................................................................................................... 8.8.4 Luminaires overview................................................................................................ 8.8.4.1Symbol before ID..................................................................................................... 8.8.5 Change luminaire name........................................................................................... 8.8.6 Luminaire versions................................................................................................... 8.8.7 Delete lines.............................................................................................................. 8.8.8 Line names.............................................................................................................. 8.8.9 Address faults list..................................................................................................... 8.8.10 Clear address faults................................................................................................. 8.9 Memory card............................................................................................................ 8.9.1 Display log book....................................................................................................... 8.9.2 Display log book of sum entries............................................................................... 8.9.3 Delete log book........................................................................................................ 8.9.4 Configuration -> SD................................................................................................. 8.9.5 Configuration <- SD................................................................................................. 8.9.6 Configuration made by the PC software.................................................................. 9 LED displays............................................................................................................ 9.1 LED displays operation, test and failure.................................................................. 9.1.1 Control module software (LED displays).................................................................. 9.1.1.1Operation, green LED.............................................................................................. 9.1.1.2Test, yellow LED...................................................................................................... 9.1.1.3Failure, red LED....................................................................................................... 10 Memory card ........................................................................................................... 10.1 SD files..................................................................................................................... 11 I/O-module for connection of an F3-remote indication........................................... 20 20 20 20 20 20 20 21 21 21 21 22 22 22 22 22 23 23 23 23 24 25 25 25 26 26 26 26 27 27 27 27 28 28 28 28 29 30 30 30 30 30 30 31 31 32 CEAG Notlichtsysteme GmbH 3 Mounting and Installation Instructions CG-Controller CGLine 400 1 Safety notes In accordance with specifications, the CG-Controller must be operated in an undamaged and fault-free state! When performing tasks on the emergency lighting system, make certain that the system is disconnected from electrical power! Note the various power supplies for normal and emergency mode in this regard. Before placing the device in service, the emergency lighting system must be tested according to the instructions listed in the „installation“ section of the operating instructions! Please note for all tasks on the device applicable national safety and accident prevention requirements and the following safety instructions in the operating instructions that are identified by a ! You must comply with the national statutes and directives governing - the construction and control of a system for main and emergency lighting. - inspection and safety tests (e. g. for function and duration tests.) 1.1 Important information about safe operation of an emergency lighting system WARNING! This system is part of the emergency and main lighting system and therefore part of the safety equipment of a building or company. Unauthorised and unskilled work on the equipment can lead to the failure of the main and/or emergency lighting system and hence to significant hazards to persons, significant damage to plant and machinery, faults and interruptions in the production process. Once the system has been assembled, connected up and commissioned, the following additional operations must be carried out for normal operation: monitoring and maintaining a record of system functions safety measures during faults and shutdowns carrying out the safety inspections as required by statutes and directives The operator of the emergency lighting system is responsible for organising and supervising this work. The following information must be specified in writing and made available at all times: The nature and extent of the work Documentation of work results Responsibilities and permits for carrying out the work – Which persons may carry out which operation? – Which persons are responsible for supervising the work? Duties of reporting (e. g. in case of faults or function tests) Organisational measures when working on the emergency lighting system. This may include: – Duties of information and reporting on the start, duration and end of the work – Safety measures while the work is being carried out: e. g. standby lighting, power supply isolation and lock-out (e. g. removing the fuses, key- operated switch, safety signage) CEAG Notlichtsysteme GmbH 4 Mounting and Installation Instructions CG-Controller CGLine 400 – – Safety equipment for the personnel carrying out the work on the plant (e. g. suitable work clothing and personal protection equipment) Safety equipment providing protection from hazards caused by adjacent plant. In particular, inspections and safety checks and their documentation must be carried out by specially authorised engineering personnel (in accordance with the national statutes and directives). NOTE! For modifications to the emergency lighting system and the programming and for safety inspections, please contact your local CEAG office or experts of authorised organisations. 2 Conformity to standards In conformity with: DIN EN 50172, DIN VDE 0100-718 und E DIN VDE 0108-100! ATTENTION! CEAG Notlichtsysteme GmbH cann accept no liability and/or give no warranty in respect of any defects that may occur with the supply and installation of CEAG emergency lighting systems and luminaires on the basis of other standards and regulations which are mandatory in complete installation packages in conjunction with CEAG products. 3 Technical Data Power supply voltage: Power consumption (230 V): (24 V): Alarm contact: Display pad: Insulation class: Class of protection acc. to EN 60527: Ambient temperature: rel. humidity: Connection terminals: Weight: Dimensions (L x B x T)/mm: Data CGLine bus Power supply voltage bus: Max. perm. voltage drop: Bus current: 230 V AC ± 10 % or 24 V DC max. 80 mA max. 450 mA 1 x UM, 24 V 0,5 A; free programmable Lighted display, alphanumeric 4 x 20 characters II IP 65 -5 °C ... + 40 °C 0 - 95 %, non condensing max. 2,5 mm² ca. 1,8 kg 184 x 240 x 112 22,5 V DC 13 V 400 mA CEAG Notlichtsysteme GmbH 5 Mounting and Installation Instructions CG-Controller CGLine 400 3.1 Use as prescribed The CG-Controller is designed for monitoring and controlling CEAG CGLine self contained luminaires. Up to 400 CGLine luminaires can be operated in the same simple manner on one controller. Their operation is program controlled. They must be programmed and set up by engineers with specialist knowledge of the legal and technical requirements governing the assembly and operation of lighting systems. The system is built to the latest state of the art and according to the recognised codes of practice in safety engineering. The number of electronic devices in use in recent years has increased sharply, as of course has radio interference, for every electronic device, machine or system emits different types of radiation. Interference can occur especially in today’s highly automated industries. It can lead to malfunctions and even to the failure of entire plants. The overlaying of different types of interference increases the overall level of radiated noise, hence the need to protect all devices from electromagnetic interference (EMI). In industrial process engineering in particular, a high level of immunity is required for electrical instrumentation and control (I&C) equipment. This is why all electronic devices are subject to mandatory CE marking. CEAG products comply with the requirements of EC Directives 89/336/EEC (EMC directive) and 73/23/EEC as amended by Directive 93/68/EEC (low voltage directive) and are entitled to carry the CE marking. If luminaires with electronic ballast comply with the EMC directives, then the interference produced by the high frequency operation of the electronic ballast is within the legal limits. Nevertheless, electronic devices may cause interference in individual cases. Only operate the system and parts connected to it when they are in a technically perfect condition. The applicable work and safety regulations are set out in these assembly and operating instructions and the general and specialist technical guidelines and accident prevention regulations. CEAG can give no warranty or accept any liability for damage or consequential damage caused as a result of improper use, failure to comply with regulations and codes of conduct for the safe operation of the system, unauthorised or inexpert modifications – to the connections and settings of the system, – or for programming the system, operating proscribed or unsuitable devices or groups of devices. CEAG Notlichtsysteme GmbH 6 Mounting and Installation Instructions CG-Controller CGLine 400 4. Installation You must observe the applicable safety requirements for setting up and operating electrical equipment as well as the Device Safety Law and all generally recognised codes of practice! 4.1 Mounting Apply bore holes as shown in the figure. Fasten the device in place with suitable screws. Tighten the screws only to finger tightness. Or fix device on DIN rail! (dimensions in mm) 10 137 5 198 4.2 Electrical Connection Mains connection The device is designed for operation at 230 V AC or 24 V DC. Lines must be connected as shown below. L N PE + – 1 2 3 230 V AC 24 V DC Relais Potential free contact The controller provides a freely programmable circuit contact (1 - 2 - 3, figure above). Energising of the relay can be assigned to various events. See the «Relais settings» menu. 1 2 3 CEAG Notlichtsysteme GmbH 7 Mounting and Installation Instructions CG-Controller CGLine 400 Bus cables The 2-core bus line from the connected CEAG CGLine self contained luminaires must be connected to terminals D1, D2, D3 and D4. 2-core bus connection to line 4 5 CG-Controller in the emergency lighting system Printer - log book - configuration Memory card CGLine Line 1 max. 100 luminaires CGLine Line 2 max. 100 luminaires CGLine Line 3 max. 100 luminaires CGLine Line 4 max. 100 luminaires Cable laying CGLine bus 2-core bus cable, unscreened. Free bus-topology. Length of cable per line Cross section length line in sum 0.5 qmm 450 m 1.800 m 1.0 qmm 900 m 3.600 m 1.5 qmm 1.350 m 5.400 m Data per line Supply voltage bus Max. allowed voltage drop Bus current 22,5 V DC 13 V 400 mA CEAG Notlichtsysteme GmbH 8 Mounting and Installation Instructions CG-Controller CGLine 400 6 Definition of keys Definition of keys Key Menu ENTER Control panel Main meaning If main screen, switch to the main menu selection Switch to the menu one level higher Confirm Open menu item Exit input and accept the changes Select the menu item above Raise value Select the menu item below Reduce value Back Previous cursor position, previous input field Reduce value Deactivate Forward Next cursor position, next input field Raise value Activate LEDs for Operation Test Failure LC-Display Alphanumeric keyboard LEDs for communication CGLine bus Reader for memory card CEAG Notlichtsysteme GmbH 9 Mounting and Installation Instructions CG-Controller CGLine 400 7 Status display Priority Line 2 (main screen) high 1 DT runs 2 FT runs 3 Line 1 blocked Lines 1/2 blocked Lines 1/2/3 blocked Lines 1/2/3/4 blocked 4 Shared DT active low 5 Battery operation (mains failure) 6 Operation If a status with a lower priority is being displayed and a status with a higher priority occurs, the newer status with the higher priority will be displayed. If this new higher status drops out again, the old, lower status will be displayed. As soon as no more status messages are pending, „operation“ is displayed. In the „Status luminaire“ menu line 2 the status of a previously selected device of same priority is displayed. 7.1 Fault display Priority Line 3 (main screen) high 1 No interface card 2 Communication failure 3 Luminaire failure 4 Charging failure 5 Test failure5 6 Test failure6 7 Address failure 8 Failure CG-Controller low 9 blank line = no failure (when shared DT runs = balance time display) 5 The test failure prio 5 gets created at the end of an FT, when the luminaire, due to low battery capacity, could not run the FT. 6 The test failure prio 6 gets created at the end of an DT, when the luminaires fail. The batteries of the corresponding luminaires should be replaced. In the „Status luminaire“ menu line 3 the fault of a previously selected device of same priority is displayed. According to standards the failure with the highest priority is displayed. CEAG Notlichtsysteme GmbH 10 Mounting and Installation Instructions CG-Controller CGLine 400 8 Menu overview Main menu 1. Submenu Luminaire Failure Select line & luminaire Status Luminaire Select line & luminaire Test Menu Block, release 2) Setup CG-Controller 2) Setup Luminaires 2) Start FT all luminaires Start FT line Start DT all luminaires Cancel shared DT 7) Cancel DT Start DT line Cancel DT line DT even DT uneven Block all 2) Release all 2) Block line 2) Release line 2) Status 2) Select language 2) Time and Date 2) Next FT 2) Next DT 2) Relais settings 2) Serial number 2) Customer Service info 2) Password 2) Aut. search of luminaire 2) Add luminaire 2) Remove luminaire 2) Luminaires overview 2) Change luminaire name 2) Luminaire versions 2) Delete line 2) Line names 2) Address faults list 2) Remove address faults 2) Memory Card Display log book 2) Delete log book 2) Configuration−>SD 2) Configuration<− SD 2) CG-Controller Failure 10 CG-Controller failure Listing 2. Submenu Select line Select line Select line Select line All lines or line Select line & luminaire Select line & luminaire ) Menu item is passwort-protected. only shown during a shared DT runs. 10) only shown due to present failure 2 7) Cursor position lower Cursor position higher Select menu item Menu One menu level higher CEAG Notlichtsysteme GmbH 11 Mounting and Installation Instructions CG-Controller CGLine 400 8.1 Main screen Line 1 2 3 4 LC-Display: Controller CGLine 400 Status display Fault display 13:29:17 24.05.2007 Operation: With the key Menu a change into the main menu occurs. Line 1 = Type of CG-Controller Line 2 = Status display (default = operation = no status) Line 3 = Fault display (default = blank line = no failure) can show a bargraph or the luminaire which is even tested Line 4 = Actual time and date 8.1.1 Jump back to the main screen automatically If no key is activated in a submenu for about 3 minutes, the system automatically switches to the main screen. 8.1.2 LCD back lighting When a key is pressed, the display is lit up for about 3 minutes. 8.2 Main menu LineSelection (Main menu) 1 Failure luminaires 2 Status luminaires 3 Test menu 4 Block, release 5 Setup CG-Controller 6 Setup luminaires etc. Menu Back to the main screen = current cursor position Operation: Menu Change to main screen higher lower selects menu item 8.3 Fault analysis All existing failures get displayed. If no failure exists the menu cannot be seen, means is blank. Line 1 2 3 4 5 6 7 Selection (Main menu) Luminaire failure Status luminaires Test menu Block, release Setup CG-Controller Setup luminaires Memory card Display: Str. 1 Adr. 003 7FFFDE „Name of luminaire“ Charging failure Change arrows Line 1 2 3 4 Operation: Menu One menu higher previous failure next failure perhaps details are shown regarding to the selected failure CEAG Notlichtsysteme GmbH 12 Mounting and Installation Instructions CG-Controller CGLine 400 8.4 Status luminaires Status and failures of all luminaires are displayed. Line 1 2 3 4 5 6 7 Selection (Main menu) Luminaire failure Status luminaires Test menu Block, release Setup CG-Controller Setup luminaires Memory card Line 1 2 3 4 Display: Str 1 Adr. 003 7FFFDE „Name of luminaire“ Operation Operation: Menu One menu higher Pos.line:previous line Pos.luminaire:previous luminaire Pos.line:next line Pos.luminaire:next luminaire Select luminaire Select line Battery is charged Battery is not charged 8.4.1 Status fault display Priority Zeile 3 (Anzeige) high 1 Communication failure 2 Luminaire failure 3 Charge failure 4 Mains failure 5 Test ended successfully 6 DT runs (or shared DT runs) 7 FT runs low 8 Status = operation off or Status = operation on Note: If the luminaire is blocked no DT/FT can run. CEAG Notlichtsysteme GmbH 13 Mounting and Installation Instructions CG-Controller CGLine 400 8.5 Test Menu Line 1 2 3 4 5 6 7 Selection (Main menu) Luminaire failure Status luminaires Test menu Block, Release Setup CG-Controller Setup luminaires Memory card Line 1 2 3 4 5 6 7 8 9 Display: Start FT all luminaires Start FT line Start DT all luminaires Cancel shared DT Cancel DT all Start DT line Cancel DT line DT line even DT line uneven Operation: Menu One menu higher Cursor position lower Cursor position higher Select menu item Note: Line 4: „cancel shared DT“ is only displayed when a shared DT runs. 8.5.1Start function test for all luminaires Line 1 2 3 4 5 6 Selection (Submenu) Start FT all luminaires Start FT line Start DT all luminaires Cancel shared DT Cancel DT all Start DT line Line 1 2 3 4 Display: Start FT all luminaires Start n /y Operation: Menu One menu higher / Selection in line 4: „No/Yes“ Start test The manual FT gets started. It gets not started during a DT runs. 8.5.2Start function test for one line Line 1 2 3 4 5 6 Selection (Submenu) Start FT all luminaires Start FT line Start DT all luminaires Cancel shared DT Cancel DT all Start DT line Line 1 2 3 4 Display: Start FT line Line: Start 4 n / y Operation: Menu One menu higher / Selection in line 2: select line 4: „No/Yes“ Start test 8.5.3 Start duration test for all luminaires Line 1 2 3 4 5 6 Selection (Submenu) Start FT all luminaires Start FT line Start DT all luminaires Cancel shared DT Cancel DT all Start DT line Line Display: 1 Start DT 2 3 4 Start all luminaires n / y Operation: Menu One menu higher / Selection in line 4: „No/Yes“ Start test 8.5.4 Cancel shared Duration test If a shared duration test is active (you can see this by checking the main screen regarding the next DT) you can delete it with this menu item. CEAG Notlichtsysteme GmbH 14 Mounting and Installation Instructions CG-Controller CGLine 400 8.5.5 Cancel duration test for all luminaires Line 2 3 4 5 6 7 Selection (Submenu) Start FT line Start DT all luminaires Cancel shared DT Cancel DT all Start DT line Cancel DT line Line 1 2 3 4 Display: Cancel DT Start n / y Operation: Menu One menu higher / Selection in line 4: „No/Yes“ Confirm selection 8.5.6 Start duration test for one line Line 2 3 4 5 6 7 Selection (Submenu) Start FT line Start DT all luminaires Cancel shared DT Cancel DT all DT line Cancel DT line Line Display: 1 Start DT 2 Line: 3 4 Start line 4 n /y Operation: Menu One menu higher / Selection in line 2: select line 4: „No/Yes“ Start test Perh. in line 3: Battery is not charged 8.5.7 Cancel duration test for one line Line 2 3 4 5 6 7 Selection (Submenu) Start FT line Start DT all luminaires Cancel shared DT Cancel DT all BT line Cancel DT line Line 1 2 3 4 Display: Cancel DT line Line: Start 4 n / y Operation: Menu One menu higher / Selection in line 2: Select line 4: „No/Yes“ Confirm selection 8.5.8 Duration test even Starts a duration test for all lines on even addresses. 8.5.9 Duration test uneven Starts a duration test for all lines on uneven addresses. CEAG Notlichtsysteme GmbH 15 Mounting and Installation Instructions CG-Controller CGLine 400 8.6 Block, release Line 1 2 3 4 5 6 7 Selection (Main menu) Luminaire failure Status luminaire Test menu Block, release Setup CG-Controller Setup luminaires Memory card Line 1 2 3 4 Operation: Menu One menu higher Select menu item Display: Block all Release all Block line Release line By means of this remote switch all luminaires or lines can be switched off from afar. Specialty: Luminaires are not able to receive orders when a blocked line gets released during no mains exists. The luminaires stay blocked. The controller displays a „communication failure“. When mains returns the controller gets the information that the line is still blocked, abolishes the „communication failure“ and displays „blocked“. 8.6.1 Block all Line 1 2 3 4 Selection (Submenu) Block all Release all Block line Release line Line 1 2 3 4 Display: Block all Line 1 2 3 4 Display: Release all Line 1 2 3 4 Display: Block line Line Line 1 2 3 4 Display: Release line Line Block all n / y Operation: Menu One menu higher / Selection in line 4: „No/Yes“ Confirm selection n / y Operation: Menu One menu higher / Selection in line 4: „No/Yes“ Confirm selection 8.6.2 Release all Line 1 2 3 4 Selection (Submenu) Block all Release all Block line Release line Release all 8.6.3 Block one line Line 1 2 3 4 Selection (Submenu) Block all Release all Block line Release line Start 4 n / y 8.6.4 Release line Line 1 2 3 4 Selection (Submenu) Block all Release all Block line Release line Start Operation: Menu One menu higher Cursor position lower Cursor position higher / Selection in line 2: Line 1 ... 4 4: „No/Yes“ Confirm selection 4 n / y CEAG Notlichtsysteme GmbH 16 Mounting and Installation Instructions CG-Controller CGLine 400 8.7 Setup CG-Controller Line 1 2 3 4 5 6 7 Selection (Main menu) Luminaire failure Status luminaires Test menu Block, Release Setup CG-Controller Setup luminaire Memory card Line 1 2 3 4 5 6 7 8 Display Select language Time and date Next FT Next DT Relais settings Serial number Customer Service info Password Operation: Menu One menu higher Cursor position lower Cursor position higher Select menu item 8.7.1 Select language Line 1 2 3 4 5 6 7 Selection (Submenu) Select language Time and date Next FT Next DT Relais settings Serial number Customer service info Operation: Menu Accept language / Select lanuage Accept language Line 1 2 3 4 Display Sprache: deutsch Language: english Line 1 2 3 4 Display Time and date 14:15 13.05.2007 change = accept 8.7.2Time and date Line 1 2 3 4 5 6 7 Selection (Submenu) Select language Time and date Next FT Next DT Relais settings Serial number Customer service info Operation: Menu Acception and one menu higher / right / left / Reduce/increase value Acception and one menu higher 8.7.2.1 Changeover to summer time Summer time can be changed over in the submenu ‘Time and date’ by pressing button 7. Time gets risen by 1 hour. Button 7 = PQRS, S = summer time. 8.7.2.2 Changeover to winter time Winter time can be changed over in the submenu ‘Time and date’ by pressing button 9. Time gets reduced by 1 hour. Button 9 = WXYZ, W = winter time. 8.7.3 Next function test (FT) Line 1 2 3 4 5 6 7 Selection (Submenu) Select language Time and date Next FT Next DT Relais settings Serial number Customer service info Line 1 2 3 4 Display: Next FT 14:15 13.05.2007 change Interval in days: 007 Operation: Menu Acception and one menu higher / right/left / Reduce/increase value Acception and one menu higher The automatic FT gets programmed. During a DT runs the automatic FT gets not started! CEAG Notlichtsysteme GmbH 17 Mounting and Installation Instructions CG-Controller CGLine 400 8.7.4 Next duration test (DT) The time of the next automatic start of the battery capacity test gets defined. This test should proceed outside working hours, e. g. 01:00 am, s. IEC60234, chapter 7.2ff ‘Automatic test for battery powered emergency escape lighting’. Line 1 2 3 4 5 6 7 Selection (Submenu) Select language Time and date Next FT Next DT Relais settings Serial number Customer service info Line 1 2 3 4 Display: Next DT 14:15 13.05.2007 change Interval in months: 011 Operation: Menu Acception and one menu higher / right/left / Reduce/increase value Acception and one menu higher Line 1 2 3 4 Display: Shared DT? 24 hours interval all/shared Bedienung: Menu Acception and one menu higher Line 4: yes = activated Line 4: no = deactivated Acception and one menu higher 8.7.4.1 Activate shared DT n/y When selection finishes with n = no = shared DT deactivated, an automatic DT for all luminaires occurs. If the shared DT is activated only luminaires with a specific type of address (e. g. default = even addresses) start the DT at the programmed time (time = DT = DT-time). 24 hours later a DT on the other type of address occurs automatically (e. g. uneven addresses). 8.7.4.2 Main screen for shared DT = active Line 1 2 3 4 Display: Controller CGLine 400 Shared DT runs next DT 23:56h 17:02:11 05.11.2007 Operation: Menu Menu Cancel shared DT While the first half of the shared DT is activated (even addresses) it can be cancelled by „Test menu -> cancel DT“. However, the second half (uneven addresses) follows 24 hours later. If this test should also be cancelled, this can be done by „Test menu ->cancel shared DT“. When the second half is still active (uneven addresses) cancel it by „Test menu -> cancel DT“ CEAG Notlichtsysteme GmbH 18 Mounting and Installation Instructions CG-Controller CGLine 400 8.7.4.3 Main screen for DT started at the luminaire After starting a DT at one luminaire either „DT runs“ or „shared DT runs“ is displayed in the main screen. This depends on how the automatic DT has been programmed, shared or not shared. or: Line 1 2 3 4 Display: Controller CGLine 400 DT runs Line 1 2 3 4 Display: Controller CGLine 400 shared DT runs 16:34:11 13:26:17 04.03.2007 18.08.2007 8.7.4.4 Automatic displacement of the next DT after mains failure In battery operation (failure of mains supply) the „Next DT“ is forwarded by 24 hours to 7 days. After recovery of the mains supply the new start of the next DT is calculated. All future DT´s refer to this date. This function provides that no duration test is started when in the past 24 hours a luminaire was in battery mode. Herefore, the controller asks every luminaire if they were in battery mode during that time before emitting a DT-instruction. This event leads to a log book entry. If in the next 24 hours a new DT can not be started again this leads to a new log book entry, as well. 8.7.5 Relais settings The relais is only activated if enough luminaires exist. Not every failure-event is available as an relaisevent (address-failure, no interface-card, no memory card (failure of CG-Controller) etc.). After selection of the menu-item „Relais“ the switch status gets displayed. Line 1 2 3 4 5 6 7 Selection (Submenu) Select language Time and date Next FT Next DT Relais settings Serial number Customer service info Line 1 2 3 4 Display: ------------------------------Switch status ON Continue with Operation: Continue Line 1 2 3 4 5 6 7 8 9 Display: Battery operation FT runs DT runs Com.fail.luminaire Luminaire failure Charging failure Test failure Relais compl. off STANDARD Operation: Menu Acception and one menu higher / Selection of line (lower/higher) Relais switches = Relais does not switch = CEAG Notlichtsysteme GmbH 19 Mounting and Installation Instructions CG-Controller CGLine 400 8.7.5.1 Relais selection battery operation The relais switches when one ore more luminaires get a mains failure. 8.7.5.2 Relais selection FT runs The relais switches when one or more luminaires run a function test. 8.7.5.3 Relais selection DT runs The relais switches when one or more luminaires run a duration test. 8.7.5.4 Relais selection com. luminaire failure The relais switches when one or more luminaires generate a communication failure at the CG-Controller. This happens when a luminaire, addressed to the CG-Controller, formerly worked but later shows a defect. Same occurs when the CG-S interface respectively the 2-core dataline to the luminaire fails. 8.7.5.5 Relais selection luminaire failure The lamp or the electronic module of the luminaire is defect. 8.7.5.6 Relais selection charging failure The battery or the electronic module of the luminaire is defect. 8.7.5.7 Relais selection test failure 1. Test failure prio. 5 (failure of function, charging too low for testing) At the end of an FT all current luminaire-statusbytes get evaluated. When Bit 1 = ‘luminaire failure’, a luminaire failure gets entered into the log book. When Bit 4 and 7 are set, ‘log book event 0x5D’ gets written (FT failure, sum). 2. Test failure prio. 6 (test failure of a luminaire, Bit 4 in statusbyte) The test failure of a luminaire will be built as follows: During a DT when its end can not be reached (e. g. 3 hours). At the end of an FT all current luminairestatusbytes get evaluated. When Bit 4 = test failure deleted, the end of an DT gets entered into the log book. If the Bit is set a DT test failure -> DT compl. not possible 0 x 5C (battery capacity too low, sum) gets entered into the log book. Battery gets exchanged during the DT. When the yellow LED lights up and the red one blinks it means ‘charge failure’. After the new battery is identified, a test failure exists because the DT doesn´t reach the end. The luminaire shows a DT failure when the green and the yellow LED light up, the CG-Controller than shows ‘test failure’. This ‘test failure’ is shown in the total failure display (prio. 5 ,6). If the luminaire has a ‘luminaire failure’ at the same time this is shown in the total failure display (prio. 3). The ‘test failure’ gets cancelled when a new DT is passed, e. g. after exchanging the battery. CEAG Notlichtsysteme GmbH 20 Mounting and Installation Instructions CG-Controller CGLine 400 8.7.5.8 Relais selection RELAIS COMPL. OFF Sets all relais events on: Relais does not switch = 8.7.5.9 Relais selection STANDARD When one or more of the following status messages occurs the relais switches. No.Status message 1 2 3 4 5 Failure message Com. failure luminaire Luminaire failure Charge failure Test failure 8.7.6 Serial number Line 1 2 3 4 5 6 7 Selection (Submenu) Select language Time and date Next FT Next DT Relais settings Serial number Customer service info Line 1 2 3 4 Selection: Serial-No: 123456/78 Operation: Menu One menu higher One menu higher The serial number of the CG-Controller is only an indication and can not be changed. 8.7.7 Customer service info Line 2 3 4 5 6 7 8 Selection (Submenu) Time and date Next FT Next DT Relais settings Serial number Customer service info Password Line 1 2 3 4 Display: Z726.A Z716.A Z772.0 Z713.A 10.10.2007 10.10.2007 10.10.2007 01.10.2007 Operation: Menu One menu higher One menu higher The software versions are only indications and can not be exchanged! The versions Z716 (interface card), Z772 (memory card), Z713 (I/O-module) and Z712 (LON-module) get read from the sources after a reset and taken over, when not known before. If the interface card (line 2 = Z716), the memory card (line 3 = Z772) or the module in the optional slot (line 4) get not identified correctly, the version is not available. In this case there is a failure of a corresponding component. Line 4 shows: empty = no module in the slot on the left near to the memory card.2 or Z712 LON-module or Z713 IO-module. CEAG Notlichtsysteme GmbH 21 Mounting and Installation Instructions CG-Controller CGLine 400 8.7.8 Password 8.7.8.1 Activate password Line 2 3 4 5 6 7 8 Selection (Submenu) Time and date Next FT Next BT Relais settings Serial number Customer Service info Password 8.7.8.2 Deactivate password Line 1 2 3 4 Display: Password: deactivate activate n/y Operation: Menu One menu higher / right / left One menu higher Line Display: 1 Password 2 activate 3 4 deactivate 8.7.8.3 Submenu activate password Line 1 2 3 4 Display: Password entry 6 digit Code Password: 123456 n/y Operation: Menu One menu higher / right / left One menu higher Operation: 0 ... 9 Entry of digit code Confirmation after entry of digit code The digits get entered by the numeric keypad. 8.7.8.4 Menu password request If the password protection is activated, some functions on the CG-Controller are not possible unless the password has been previously entered. Zeile 1 2 3 4 Anzeige: Passwort Eingabe 6stelliger ZiffernCode Passwort: 123456 Bedienung: 0 ... 9 Entry of digit code Confirmation after entry of digit code For emergency cases: If you have forgotten your password, your dealer can ask for a general password for you from the manufacturer / customer service. CEAG Notlichtsysteme GmbH 22 Mounting and Installation Instructions CG-Controller CGLine 400 8.8 Setup Luminaires 8.8.1 Automatic search of luminaires Luminaires get searched automatically. If the luminaires still exist, they get identified as „existing“ and stay in the system. Line 1 2 3 4 5 6 7 Selection (Main menu) Luminaire failure Status luminaire Test menu Block, release Setup CG-Controller Setup Luminaires Memory card Line 1 2 3 4 Display: Automatic search start n / y Operation: Menu One menu higher Selection yes Selection no 8.8.1.1 Submenu automatic search Line 1 2 3 4 5 6 Selection (Submenu) Automatic search Add luminaire Remove luminaire Luminaires overview Change luminaire name Luminaire versions Line 1 2 3 4 Display: all lines line 1 line 2 line 3 Operation: Menu One menu higher lower higher Confirm selection 8.8.1.2 Submenu automatic search All lines When previously „all lines“ get selected, all luminaires get searched in 4 lines. Line 1 2 3 4 Display: Luminaire address automatic allocation ! ! ! Start Line 1 2 3 4 Display: ==================== Search in line 1 05% ==================== Line 1 2 3 4 Display: Search results line 1 2 3 15 0 0 go on with n / y 4 0 Operation: Menu Stop search Selection yes Selection no Operation: Menu Stop search CEAG Notlichtsysteme GmbH 23 Mounting and Installation Instructions CG-Controller CGLine 400 8.8.2 Add luminaire Line 1 2 3 4 5 6 Selection (Submenu) Automatic search Add luminaire Remove luminaire Luminaires overview Change luminaire name Luminaire versions after selection yes: Line Display: 1 Add luminaire 2 manually 3 4 start Line 1 2 3 4 Displays: enter ID 000 000 Line 1 2 3 4 Display: define address ID Line Luminaire define address: n / y Operation: Menu One menu higher Selection yes Selection no Operation: Menu One menu higher line 2: enter ID Confirm selection = take over FA0056 1 001 Note: By default the first free luminaire place gets displayed. Operation: Menu One menu higher Line 3: Select line Line 4: Select luminaire address higher lower Confirm selection Enter / edit luminaire name (Line 1 Luminaire 001): after return: Line 1 2 3 4 Display: ID FA0056 Line 1 Luminaire 001 Enter name: Line 1 Luminaire 001 Line 1 2 3 4 Display: ------------------------------please wait address allocation ------------------------------- Operation: Menu One menu higher Line 4: edit luminaire name Confirm settings If the ID can not be found or the luminaire does not exist: Line 1 2 3 4 Display: ------------------------------Wrong ID on with menu ------------------------------- Operation: Menu One menu higher CEAG Notlichtsysteme GmbH 24 Mounting and Installation Instructions CG-Controller CGLine 400 8.8.3 Remove luminaire Line 1 2 3 4 5 6 Selection (Submenu) Automatic search Add luminaire Remove luminaire Luminaires overview Change luminaire name Luminaire versions after return: after menu: Line 1 2 3 4 Display: Operation: Remove FA0056 Menu Leave menu Line 1 Luminaire 001 Line 3: Luminaire name Line 1 Luminaire 001 next field Delete n / y previous field lower higher Confirm selection The above menu gets displayed again. The menu gets left. 8.8.4 Luminaires overview Line 1 2 3 4 5 6 Selection (Submenu) Automatic search Add luminaire Remove luminaire Luminaires overview Change luminaire name Luminaire versions Line 1 2 3 4 Display: -----------------------------100 Luminaires Operation: Line 3: Bargraph concerning 400 luminaires Line 1 2 3 4 Display: Luminaires overview 1 2 3 4 70 5 15 10 Operation: Please wait a minute Display: Line Addr. 1 1 1 2 2 1 Operation: Menu Leave menu View of luminaire name and status Line 3: Luminaire name Line 4: Status of luminaire and charge state = Charge state 100% = Charge state less than 100% ------------------------------ View of luminaire name and status: Line 1 2 3 4 ID FA0056 0BFFFF 0AFFF1 8.8.4.1 Symbol in front of ID Battery is charged Battery is not charged * Luminaire failure ? Luminaire has got an address failure or a failure of deleting D Duration test active F Function test active CEAG Notlichtsysteme GmbH 25 Mounting and Installation Instructions CG-Controller CGLine 400 8.8.5 Change luminaire name Line 1 2 3 4 5 6 Selection (Submenu) Automatic search Add luminaire Remove luminaire Luminaires overview Change luminaire name Luminaire versions Line 1 2 3 4 Display: Change luminaire name Line 1 Luminaire 001 Line 1 Luminaire 001 change Operation: Menu One menu higher Line 3: Luminaire name next field previous field higher (Line, luminaire) lower Confirm selection Display: Line Addr. 2 1 1 2 2 1 Operation: Menu Leave menu View of luminaire name and status higher (endless scroll list) lower 8.8.6 Luminaire versions Line 1 2 3 4 5 6 Line Selection (Submenu) 1 Automatic search 2 Add luminaire 3 Remove luminaire Luminaire overview 4 Change luminaire name Luminaire versions Version 17 16 17 8.8.7 Delete lines Line 7 8 9 10 Selection (Submenu) Delete line Line name Address failure list Delete address failure after return: 8.8.8 Line names Line 7 8 9 10 Selection (Submenu) Delete line Line name Address failure list Delete address failure Operation: MenuLeave menu View of luminaire name and status yes no Line 1 2 3 4 Display: Delete line Line 1 2 3 4 Display: All lines Line 1 Line 2 Line 3 Operation: Menu Leave menu Confirm selection higher lower Line 1 2 3 4 Display: -----------------------------ended on with ------------------------------ Operation: Menu Leave menu back Line 1 2 3 4 Display: ------------------------------ Line name Line 1 = line 1 ------------------------------ Operation: brief note Start n/y Display: Operation: Line 1 any button Leave menu Line 2 Line 3 Line 4 The line names only get displayed in this menu. They get defined in the PC-Software. Line 1 2 3 4 CEAG Notlichtsysteme GmbH 26 Mounting and Installation Instructions CG-Controller CGLine 400 8.8.9 Address failure list When luminaires with an address failure exist this can be seen in the main screen, line 3 ‘address failure’ and in the menu ‘Setup luminaires’ the menu level ‘address failure list’. All luminaires with an address failure are shown in a scroll list. Line 7 8 9 10 Selection (Submenu) Delete line Line name Address failure list Delete address failure Line 1 2 3 4 Display: ------------------------------ 4 luminaires ----------------------------------------------------------- Operation: Brief note: Number of luminaires with an address failure Line 1 2 3 4 Display: Line Addr. 1 ? 1 ? 2 ? Operation: Menu Leave menu View of luminaire name and status higher (endless scroll list) lower ID ?FA0056 ?0BFFFF ?0AFFF1 8.8.10 Delete address failure When luminaires with an address failure exist that means that the CG-Controller found luminaires with ID´s during the process of searching, but the addresses have not been overtaken successfully during address allocation by the controller. With the help of this menu level it is possible to delete the address failure, automatically. Previously, a faultless connection should exist. Line 7 8 9 10 Selection (Submenu) Delete line Line name Address failure list Delete address failure Line 1 2 3 4 Display: Allocate luminaires with address failure again? Line 1 2 3 4 Display: ==================== Send Data --> Luminaire 25% line 1 ==================== n/y Operation: MenuLeave menu yes no Operation: Menu cancel 8.9 Memory card 8.9.1 Display log book Operation: Menu One menu higher Line 3: Event previous event 3 next event 4 last event first event 1 + 10 events 2 - 10 events The content of line 4 gets changed with approx. 1 Hz when further details exist (sum inputs after FT and DT). Line 1 2 3 4 5 6 Selection (Submenu) Display log book Display log book of sum Delete log book Configuration −> SD Configuration <− SD Configuration from PC Sof. Line 1 2 Display 24.05.2007 11:31:44 Nr.: 000 128 Luminaire failure line 1 select CEAG Notlichtsysteme GmbH 27 Mounting and Installation Instructions CG-Controller CGLine 400 8.9.2 Display log book of sum entries Line Display Selection (Submenu) 1 Line Addr. Display log book 2 1 1 Display log book of sum 3 1 2 Delete log book 4 Details with Configuration −> SD Configuration <− SD Configuration from PC Sof. Selection, when more than 2 entries exist. The entry. Line 1 2 3 4 5 6 Display of details: 8.9.3 Delete log book Selection (Submenu) Display log book Display log book of sum Delete log book Configuration −> SD Configuration <− SD Configuration from PC Sof. Line 1 2 3 4 5 6 8.9.4 Configuration -> SD Line 1 2 3 4 5 6 Selection (Submenu) Display log book Display log book of sum Delete log book Configuration −> SD Configuration <− SD Configuration from PC Sof. after select yes: Line 1 2 3 4 ID FA0056 BA0000 Operation: Menu One menu higher Shows details of the selected entry blinking cursor in line 1 shows the selected Display Line 1 Addr. 001 FA0056 Line 1 Luminaire 001 Luminaire failure back with Line 1 2 3 4 Display Delete log book Line 1 2 3 4 Display Configuration -> SD write on SD Line 1 2 Display Operation: Menu One menu higher Line 2: Luminaire name Line 3: Event back Operation: Menu One menu higher Confirm selection Selection yes n/y Selection no Note: If the log book entries get deleted without saving them on another medium before, the log book has to be kept acc. to VDE 0108 T100 in another way! 3 4 n/y Operation: Menu One menu higher Confirm selection Selection yes Selection no Operation: Line 3: Bargraph Configuration -> SD The EEPROM gets saved in CONFIGCG.DAT. 8.9.5 Configuration <- SD Line 1 2 3 4 5 6 Selection (Submenu) Display log book Display log book of sum Delete log book Configuration −> SD Configuration <− SD Configuration from PC Sof. Line 1 2 3 4 Display Configuration <- SD read from SD n/y Operation: Menu One menu higher Confirm selection Selection yes Selection no CEAG Notlichtsysteme GmbH 28 Mounting and Installation Instructions CG-Controller CGLine 400 after selection with yes: Line 1 2 3 4 Display With luminaire update? n/y When selection is confirmed with yes, the addresses of the luminaires will be reprogrammed. When selection is confirmed with no, a luminaire configuration is read from the memory card. In this case there is the risk that the existing physical luminaires are not conform to the read configuration. Luminaires existing per SD-configuration get a new address, that means the old one will be deleted and the new one will be programmed. If nothing was changed to the physical constellation between saving and reading of the configuration, the answer here can be ‘no’. than: Line 1 2 Display Configuration <- SD Operation: Line 3: Bargraph 3 4 after reading luminaires get configured: Line Display 1 ---------------------------2 Configured Luminaire 3 Line 3 Luminaire 032 4 ----------------------------- 8.9.6 Configuration made by the PC Software After the input of a SD it will be checked if a new configuration of the PC software exists. Line 1 2 3 4 5 6 Selection (Submenu) Display log book Display log book of sum Delete log book Configuration −> SD Configuration <− SD Configuration from PC Sof. selection with yes: than: Line 1 2 3 4 Display ----------------------------New config. from PC transfered? ----------------------------- Operation: Menu One menu higher Confirm selection Selection yes Selection no Line 1 2 Display Operation: Line 3: Bargraph 3 4 Line 1 2 3 4 than: Line 1 2 3 4 Configuration <- SD Display ---------------------------Configured luminaire Line 3 Luminaire 032 ----------------------------Display ----------------------------write on SD ----------------------------- Operation: Line 3: Bargraph CEAG Notlichtsysteme GmbH 29 Mounting and Installation Instructions CG-Controller CGLine 400 9 LED displays The CG-Controller communicates visible codes by means of 3 LEDs. These are definite by their position and colour. 9.1 LED displays operation, test and failure 9.1.1 Control module software (LED displays) 9.1.1.1 Operation, green LED The control panel of the CG-Controller CGLine shows the „Operation mode“ state with a green LED. LED green on = The entire emergency lighting system is ready for operation. 9.1.1.2 Test, yellow LED The control panel of the CG-Controller CGLine shows the „Test“ state with a yellow LED. LED yellow on = One or more luminaire are in test mode. 9.1.1.3 Failure, red LED The „Failure“ state is indicated by a red LED. LED red on = one or more luminaires are reporting a failure. LED-displays No.: 1 2 3 4 5 6 7 8 9 10 11 One or more self contained luminaires Functiontest Durationtest Blocked Operation Battery mode Communication failure Lamp defect Charging failure Test failure CG-Controller failure Charge state too low for testing Operation LED green on Test mode LED yellow on X X X Failure LED red on X X X X X X X X Notes: A battery operation is indicated as a failure, except durting a FT or DT. If a failure occurs, no „Operation“ is displayed. The yellow LED can be active together with the green or red one. CEAG Notlichtsysteme GmbH 30 Mounting and Installation Instructions CG-Controller CGLine 400 10 Memory card The CG-Controller CGLine needs a 32 MB SD-card at least. An operation without SD-card is not possible. When the SD card is not inserted in the CG-Controller for a short time it is ensured that max. 11 log book entries are saved in the EEPROM. Luminaire names are only saved on the SD, so when the SD card is not inserted in the CG-Controller the names will not be displayed. 10.1 SD files The following files exist on the SD: TEXTE.DAT 400 luminaire names + 4 line names + 1 project names ADDRESS.DAT Luminaire ID´s CONFIGCG.DAT Configuration CG-Controller CGLine 400 LOGBOOK.DATLog book LUMCFG.DAT Luminaire-configuration (Information can be generated from our customer service). SD LOGBOOK.DAT CONFIGCG.DAT TEXTE.DAT Printer SD CGLine Line 1 max. 100 luminaires CGLine Line 2 max. 100 luminaires CGLine Line 3 max. 100 luminaires CGLine Line 4 max. 100 luminaires CEAG Notlichtsysteme GmbH 31 Mounting and Installation Instructions CG-Controller CGLine 400 11 I/O-module for connecting a key-operated switch / Display-LED‘s (F3-remote indication) Optional an I/O-module is available to connect an key-operated switch (F3-remote indication) to the CG-Controller CGLine 400 with the following part no.: 400 71 347 985. The I/O-module is delivered as an installed circuit board in the CG-Controller. The connection of an F3-remote indication makes it possible that all luminaires of all lines can be blocked by a key switch during shut-down times. The block input is equipped with a differential loop monitoring (short circuit, interruption reconnaissance). For blocking a 1 KOhm resistance at the F3 remote indication (key-operated switch )must be connected in parallel to S1/S2. Furthermore, the entire state is shown on the F3-remote indication by the LED´s: - Operation mode (green LED) - Min. 1 luminaire in one line runs in battery mode or test mode (yellow LED) - Sum failure (red LED) Connection diagramm: Controller -> F3-remote indication Attention: For operation of an I/O-module a CG-Controller with SD-card is required. An operation with a CG-Controller with SMC card is not possible! Note: It is not allowed to connect relais instead of LEDs! CEAG Notlichtsysteme GmbH 32 Mounting and Installation Instructions CG-Controller CGLine 400 CEAG Notlichtsysteme GmbH 33 Mounting and Installation Instructions CG-Controller CGLine 400 CEAG Notlichtsysteme GmbH 34 Mounting and Installation Instructions CG-Controller CGLine 400 CEAG Notlichtsysteme GmbH 35 CEAG Notlichtsysteme GmbH Senator-Schwartz-Ring 26 59494 Soest Germany Tel: Fax: Web: Email: +49 (0) 2921/69-870 +49 (0) 2921/69-617 www.ceag.de [email protected] 400 71 860 016(E)/XXX/06.10/WK Cooper Safety Jephson Court Tancred Close Royal Leamington Spa Warwickshire CV31 3RZ United Kingdom Tel: Fax: Web: Email: +44 (0) 1926 439200 +44 (0) 1926 439240 www.cooper-safety.com [email protected]