1
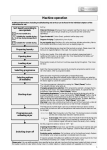
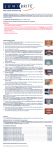
Troubleshooting the
Herbst Appliance
MICHAEL B. ROGERS, DDS
T
he Herbst* is one of the most popular appliances used today for Class II correction
because it is durable and fixed, and therefore
does not require special patient cooperation.
Although problems are infrequent with the use of
today’s improved cements and techniques, any
appliance placed in an active oral environment
will encounter occasional difficulties. This article will offer guidelines on fabricating the Herbst
and troubleshooting problems when they occur.
Solution: If the direct method is being used,
the orthodontist (not an assistant) should superglue the bands or crowns into the impression for
accuracy (Fig. 2). This can be done at the chair
before the appliance is disinfected. After the glue
has dried, vibrate the impression on low while
pouring so that the super-glue bond will not be
broken. Tip: A catalyst such as Zip Kicker** or
Zap** (available in hobby stores) can be sprayed
on the glue to set it up instantly.
Potential Problems
1. Distortion of models.
Solution: Take accurate impressions; pour
alginate impressions immediately, or pour polyvinyl siloxane impressions after 30 minutes. Tip:
Wrap an alginate impression in a wet towel while
it is waiting to be poured (Fig. 1).
2. Improper placement of bands or crowns in
impressions.
*Registered trademark of Dentaurum, Inc., 10 Pheasant Run,
Newtown, PA 18940.
**Pacer Technology, 9420 Santa Anita Ave., Rancho Cucamonga,
CA 91730.
Fig. 2 Bands super-glued in position in polyvinyl
siloxane impression.
Fig. 1 Alginate impression wrapped in wet towel
while waiting to be poured.
268
Fig. 3 Midline deviation marked on laboratory prescription.
© 2002 JCO, Inc.
JCO/MAY 2002
p/u 8/01,
p.495
Dr. Rogers is an Assistant Clinical Professor, Department of Orthodontics, School of Dentistry, Medical College of Georgia, and in the private practice of orthodontics at 3545 Wheeler Road, Augusta, GA
30909. E-mail: [email protected].
3. Midline, overjet, and overbite errors.
Solution: Obtain an accurate wax bite registration, and mark the laboratory prescription
carefully to note the amount of advancement and
any midline deviations (Fig. 3). This will reduce
chairtime at appliance delivery because the rods
and tubes will be cut to the proper length in the
lab. If the midline is off at appliance delivery,
advancement shims (extenders) can be added to
Fig. 4 Shim crimped in place with heavy wire cutter.
correct the deviation. The upper tubes may also
be replaced to correct the midline as necessary.
Tip: The shims should be crimped with a heavy
wire cutter*** to prevent them from coming off
and possibly being swallowed if the appliance
disengages (Fig. 4).
4. Eruption of mandibular bicuspid during
appliance fabrication.
Solution: Note on the laboratory prescription if a bicuspid will erupt while the Herbst is
being fabricated. The lab technician can then
allow for the 1/4-1/2mm of eruption by adjusting
the rest or crossover wire occlusally (Fig. 5). If
this is not done, the Herbst will not seat fully.
5. Loose bands.
Solution: Microetch crowns or bands to
increase surface area and retention. (This is usually done by the lab.) Microetching will also help
the cement adhere to the band instead of the
enamel on removal. Tip: A band or crown that is
too large or that becomes stretched when loose
can be tightened by crimping the gingival margin
with a birdbeak plier (Fig. 6).
***Keiba Heavy Cutting Plier, Part No. PU 266, Great Lakes
Orthodontics, Ltd., 199 Fire Tower Drive, Tonawanda, NY 14150.
Fig. 5 This bicuspid will erupt slightly while
Herbst is being fabricated.
VOLUME XXXVI NUMBER 5
Fig. 6 Band tightened by crimping gingival margin
with birdbeak plier.
269
Troubleshooting the Herbst Appliance
Fig. 7 Ceka Bond applied to screw to keep it from
unseating.
Fig. 9 Archwire covered with plastic tubing to
avoid sore spots.
Fig. 8 Sore spots from transpalatal arch.
Fig. 10 Sore spot from pivot impingement.
6. Cement fractures.
Solution: Use a strong cement such as Fuji
I.**** Etching the teeth with GC Ortho,**** a
10% polyacrylic acid conditioner, will also
improve bond strength. Tip: If an appliance
comes off, the cement can be removed by heating
it slightly with a Bunsen burner or torch and then
dousing it in tap water. The cement will simply
flake off.
7. Loose screws.
Solution: Apply Ceka Bond† to all screws
to prevent them from unscrewing in the mouth
(Fig. 7).
8. Inadequate maxillary molar control.
Solution: Do not use a transpalatal arch,
****GC America, Inc., 3737 W. 127th St., Alsip, IL 60803.
†Preat Corp., Box 1030, Santa Ynez, CA 93460.
270
which can cause sore spots (Fig. 8), facilitate the
development of crossbites, and hinder maxillary
arch expansion and molar rotation. Without a
transpalatal arch, the molars are free to be
expanded, moved distally, or rotated as needed
for Class II correction.
9. Archwire impinging on the oral mucosa.
Solution: Cover the archwire with plastic
tubing (Fig. 9) or closed-coil springs to avoid
sore spots. If possible, use at least an .018" stainless steel archwire to prevent breakage.
10. Impingement on the ascending rami.
Solution: Do not overadvance the mandible
to the point that the Herbst pivots impinge on the
ascending rami (Fig. 10). In severe cases, it may
not be feasible to advance to an edge-to-edge bite
at first, and a gradual advancement with shims
JCO/MAY 2002
Rogers
Fig. 11 Cotton roll attached to appliance with elastic to hold cheek away from pivot.
Fig. 13 Larger mushroom screw can be used in
any quadrant if sore spot develops.
Fig. 14 Broken upper screw head grooved with
bur and unscrewed with scaler.
Fig. 12 Screws covered with Comfort Caps.
(extenders) may be preferable. Tip: Placing the
Herbst screw casing in the center or to the mesial
of the molar will prevent the screw casing from
impinging on the rami.
11. Pivot screw impinging on the cheek.
Solution: To hold the cheek away from the
pivot, a cotton roll can be attached to the appliance with an elastic tied in a slipknot (Fig. 11). If
sore spots develop, the screws can be covered
with Comfort Caps‡ (Fig. 12). Since these stay in
place for only a few days, it is not advisable to
use them on every Herbst case. Mushroom
‡Comfort Solutions, #305 20897 57th Ave., Langley, BC, V3A 8L5
Canada.
VOLUME XXXVI NUMBER 5
screws,†† which have a 2mm greater diameter
than regular Herbst screws, can also be used to
help sore spots heal (Fig. 13). These screws
should not be used routinely, however, because
the larger heads tend to bind on the rods in lateral movements and thus to break off more often.
12. Broken screw heads.
Solution: For a broken upper screw head,
remove the band or crown, groove the screw
stem with an S.S. White RA-35 slow-speed
bur,‡‡ and remove the screw with a scaler or a
small jeweler’s screwdriver (Fig. 14). A broken
††5.5mm hex screw, Ormco/“A” Company, 1717 W. Collins Ave.,
Orange, CA 92867.
‡‡S.S. White, 151 Old New Brunswick Road, Piscataway, NJ
08854.
271
Troubleshooting the Herbst Appliance
Fig. 15 Broken lower screw head removed with
screwdriver.
Fig. 18 Sore spot caused by long rod.
Fig. 19 Elastic placed distal to upper pivot and
mesial to lower pivot to hold appliance together
when patient opens wide.
Fig. 16 Wire spot-welded to broken screw stem.
13. Rods coming out of the tubes.
Solution: Ensure that the rods and tubes are
long enough to prevent the appliance from disengaging in the mouth (Fig. 17). To save chairtime,
the laboratory can cut and polish rods to the correct length.
14. Rod impinging on the oral mucosa.
Solution: Make sure the rod is not too long.
If the rod is causing a sore spot (Fig. 18), it must
be shortened even if the appliance comes apart.
Fig. 17 Rod cut to correct length.
lower screw head can sometimes be unscrewed
in the mouth without removing the appliance
(Fig. 15). Another option: A wire can be spotwelded to the broken stem and then unscrewed
(Fig. 16).
272
15. Bent rods and split tubes.
The Herbst will normally come apart occasionally, but rods bend and tubes split when the
appliance comes apart frequently. If this occurs,
the patient should be seen as soon as possible,
because routine disengagement is the primary
cause of loose and broken appliances.
JCO/MAY 2002
Rogers
Fig. 20 When upper primary second molars are used for anchorage, pivots should be moved about 2mm distally to prevent frequent disengagement.
Fig. 21 Broken wire and pivot and missing crown. Patient destroyed both crown and banded Herbst appliances.
Solution: Make the rods and tubes longer. If
the rods cannot be lengthened because they
would impinge on the cheeks and the tubes cannot be lengthened because the appliance would
be overadvanced, an elastic can be used to help
keep the appliance together (Fig. 19).
16. Frequent disengagement when upper primary second molars are used for anchorage.
If the upper first permanent molars have not
erupted sufficiently for banding, the primary second molars must sometimes be used. Solution:
Move the pivots about 2mm distally on the bands
or crowns (Fig. 20). Moving the pivots distally
VOLUME XXXVI NUMBER 5
allows for longer tubes, which will keep the
appliance from coming apart every time the
patient opens.
17. Chronic and excessive appliance breakage.
Solution: Do not use the Herbst in autistic
children, patients with severe bruxism, or extremely uncooperative children (Fig. 21). The
Herbst, like all other appliances, requires proper
patient selection.
18. Parental misunderstanding about the Herbst
phase of treatment.
Solution: At the exam and/or consultation
273
Troubleshooting the Herbst Appliance
Fig. 22 Signed statement on chart concerning need for second phase of fixed appliance treatment.
appointment, explain that the Herbst is correcting the jaw relationship and that the orthopedic
phase must be followed by an orthodontic phase
to align the teeth. Prevent any misunderstanding
about the need for Phase II treatment with full
appliances by including an appropriate statement
on the patient’s chart and on the contract (Fig.
22).
274
Conclusion
The popular Herbst appliance becomes
even more efficient when these troubleshooting
tips are followed. Knowing what to do in case of
a problem helps avoid an emergency atmosphere
in the office and allows the orthodontist and staff
to gain confidence in incorporating the appliance
into their practice routine.
❑
JCO/MAY 2002