1
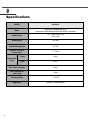
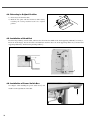
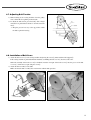
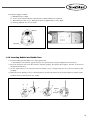
R
User’s
Manual
KM-341BL
High-speed 1-Needle
Lock Stitch
Upper/Lower Feed
Sewing Machine
lity
a
u
tQ
Besst Pricevice
Be st Ser
Be
1. Thank you for purchasing our product. Based on the rich expertise and
experience accumulated in industrial sewing machine production, SUNSTAR
will manufacture industrial sewing machines, which deliver more diverse
functions, high performance, powerful operation, enhanced durability, and
more sophisticated design to meet a number of user’s needs.
2. Please read this user’s manual thoroughly before using the machine. Make
sure to properly use the machine to enjoy its full performance.
3. The specifications of the machine are subject to change, aimed to enhance
product performance, without prior notice.
4. This product is designed, manufactured, and sold as an industrial sewing
machine. It should not be used for other than industrial purpose.
R
Contents
1. Machine Safety Rules ............................................................................................................................ 4
1-1. Transportation .............................................................................................................................................. 4
1-2. Installation ................................................................................................................................................... 4
1-3. Repair ........................................................................................................................................................... 4
1-4. Operation ..................................................................................................................................................... 5
1-5. Safety Devices ............................................................................................................................................. 5
1-6. Location of Warning Marks ........................................................................................................................ 6
1-7. Warning Messages ....................................................................................................................................... 6
2. Entire Configuration ................................................................................................................................ 7
3. Specifications ............................................................................................................................................. 8
4. Installation .................................................................................................................................................... 9
4-1. Where to Install ........................................................................................................................................... 9
4-2. Machine Transportation .............................................................................................................................. 9
4-3. Laying Down Sewing Machine .................................................................................................................. 9
4-4. Returning to Original Position .................................................................................................................. 10
4-5. Installation of Head Part ............................................................................................................................ 10
4-6. Installation of Power Switch Box ............................................................................................................. 10
4-7. Adjusting Belt Tension .............................................................................................................................. 11
4-8. Installation of Belt Cover .......................................................................................................................... 11
4-9. Thread Stand .............................................................................................................................................. 12
4-10. Knee Lifting Pad ..................................................................................................................................... 12
4-11. Oil Supply ................................................................................................................................................ 12
4-12. Inserting Bobbin into Bobbin Case ........................................................................................................ 13
4-13. Test Operation (Pedal Operation) ........................................................................................................... 14
5. Basic Sewing Machine Adjustments .......................................................................................... 15
5-1. Needle Insertion ......................................................................................................................................... 15
5-2. Adjusting Needle and Hook Timing ......................................................................................................... 15
5-3. Adjusting Oil Supply to Hook .................................................................................................................. 16
5-4. Adjusting Lower Thread Spinning ........................................................................................................... 16
5-5. Adjusting Thread Tension ......................................................................................................................... 17
5-6. Adjusting Thread Take-up Spring ............................................................................................................ 17
5-7. Placing Upper Thread ............................................................................................................................... 18
5-8. Adjusting Pressure of Presser Foot ........................................................................................................... 18
5-9. Adjusting Stitch Length ............................................................................................................................ 18
5-10. Adjusting Height of Feed Dog ................................................................................................................ 19
5-11. Adjusting Main and Auxiliary Presser Feet ........................................................................................... 19
6. Errors and Troubleshooting ............................................................................................................. 21
7. Table drawing ........................................................................................................................................... 22
3
Machine Safety Rules
Safety instructions in this manual are defined as Danger, Warning and Caution.
If they are not properly observed, physical injuries or machine damage might occur.
Danger : This mark must be observed. Otherwise, danger could result during machine installation, transportation and
operation.
Warning : When this mark is observed, machine-related injuries could be prevented.
Caution : When this mark is observed, machine errors could be prevented.
1-1) Transportation
Danger
1-2) Installation
Warning
Those, who fully understand the safety rules, should transport the sewing machine. The
following instructions must be observed during transportation:
At least two people should move the machine.
To prevent accidents from occurring during transportation, wipe off the oil put on the
surface of the machine.
The machine may not work properly or break down depending on where it is installed. The
right place of installation should meet the following conditions:
Remove the package and wrappings from the top in order. Take a special notice of the
nails on the wooden box.
Dust and moisture stains and rusts the machine. Install air-conditioners and clean the
machine regularly.
Keep the machine away from direct sunlight.
Leave the left, right and rear sides of the machine at least 50cm away from the wall to
secure sufficient space for repair.
Explosion
Do not use the machine in the atmospheres exposed to the danger of explosion. To avoid
explosion, do not operate this machine in a place where a large quantity of aerosol
products is used or where oxygen is stored, unless there are specific facilities installed to
prevent explosion.
The machine does not provide lightings. End users should install them at their
workplace.
[Note]See “4. Installation” for more details on machine installation.
1-3) Repair
Caution
4
When the machine needs to be repaired, only the designated A/S engineers, who were trained
by Sunstar, should repair the machine.
Before cleaning or repairing the machine, turn off the machine and wait for 4 minutes till
the machine is completely discharged.
The machine specifications and parts should not be altered without prior consultation with
Sunstar. This may pose danger to operation.
When repairing, only the original spare parts produced by Sunstar should be used for
replacement.
Put all safety covers back on the machine after repairing is complete.
1-4) Operation
Warning
KM-341BL Series is an industrial sewing machine designed to conduct pattern sewing using
fabrics and other similar materials. During operation, the following instructions should be
kept in mind:
Read through this manual carefully and completely before operating the machine.
Wear proper clothes for safety.
Keep hands or other body parts away from the machine's operating sections (needle,
hook, take-up, pulley, etc.), when the machine is in operation.
Do not remove safety plates and various covers, while the machine is operating.
Be sure to connect the machine to the grounding conductor.
Turn off the machine before opening the electric boxes including the control box. Make
sure that the power switch is "OFF".
Stop the machine when placing a thread or when checking swing materials.
Do not turn on the machine when stepping on the pedal.
If possible, install the machine away from the place where powerful electromagnetic
waves are generated, such as high-frequency welding machine.
[ Warning ]
Make sure that the motor cover is closed during machine operation.
Turn off the power when checking or adjusting the machine.
1-5) Safety Devices
Safety label : Shows the cautions users should keep in mind during operation
Take-up cover: Prevents human body from contacting thread take-up
Belt cover: Prevents physical injuries from occurring by the belt or clothes from being
stuck in the belt.
Power specification label: Displays safety cautions to prevent electrification
(Power input and use Hz)
Caution
5
1-6) Location of
Caution Marks
Caution marks are attached on the machine for safety.
When operating the machine, carefully read the instructions on the mark.
1-7) Warning
Messages
Caution
1)
2)
6
Entire Configuration
Arm
Bed
Oil Fan
Face Plate
Top Cover
Oil Window
Presser Foot
Knee Lifting Pad
Power Switch
Reverse Lever
Stitch Dial
Pulley
Thread Stand
Safety Devices
Take-up Cover
Belt Cover
7
Specifications
MODEL
KM-341BL
Name
High-speed 1-Needle Lock Stitch
Upper/Lower Feed Sewing Machine with Vertical Large Hook
Needle in Use
DP 17 #23, DB 1 #21
(#20 ~ #24)
Needle Stroke
34.7 mm
Thread Take-up Stroke
71.5 mm
Up/Down Overlap of
Presser Foot
2 ~ 5 mm
Hand
8 mm
Knee
14 mm
Presser Foot
Lifting
8
Max. Fabric Thickness
8 mm
Max. Thickness of
Fabric End
5 mm
Feed Dog Height
1~1.2 mm
Application
Medium ~ Heavy Materials
Installation
[ Caution ]
Sewing machine installation and wiring work should be conducted by qualified engineers.
Since the sewing machine's body weights 50kg or so, at least two persons are needed to install the sewing machine.
Do not turn on the power until the installation is completed.
If the foot pedal is accidentally stepped, the sewing machine can start operation, providing causes for accidents.
When the sewing machine body is laid down or erected straight, use both hands. If only one hand is used, it may cause
injuries such as fingers stuck in the machine.
4-1. Where to Install
1) Do not install the sewing machine next to television,
radio and wireless phones, since they can cause noises to
the sewing machine.
2) Connect the power plug of the sewing machine directly to
the AC outlet. If a multi-tap is used, it may cause
malfunction of the sewing machine.
[ Fig. 1 ]
4-2. Machine Transportation
1) The body of the sewing machine shall be transported by
two persons as in the figure.
[ Fig. 2 ]
4-3. Laying Down Sewing Machine
1) Hold the upper part of the sewing machine body with
two hands and lay it down by pushing it backward.
Then the sewing machine lies down. Make sure that press
the lower part of the plate leg of the sewing machine.
Otherwise, the sewing machine body and the entire plate
leg might fall backward, causing accidents.
[ Fig. 3 ]
9
4-4. Returning to Original Position
1) Clear away tools from the table.
2) Hold the face plate with the left hand, while slowly
returning the sewing machine back to its original
position.
[ Fig. 4 ]
4-5. Installation of Head Part
Insert the hinge rubber into the table, and insert the oil fan into the middle of the head supporting rubber B as in Fig. 5.
Insert the head hinge into the bed hole and install the machine above the head supporting rubber A and the head
supporting rubber B , while inserting the hinge rubber .
[ Fig. 5 ]
4-6. Installation of Power Switch Box
See <Fig.6> when installing the power switch box
install it on the right bottom of the table.
and
[ Fig. 6 ]
10
4-7. Adjusting Belt Tension
1) When looking at the sewing machine from the pulley
side, it looks like it is spinning in the left side.
2) To adjust the belt tension, press the belt with a finger
and when it is pushed down about 15~20 mm, fasten the
nut .
Keep the presser foot stay at the up position, while
the belt is spined for testing.
[ Fig. 7 ]
4-8. Installation of Belt Cover
1) Attach the belt cover A to the sewing machine body using the screw (3EA) and three belt supports .
If the sewing machine is pushed backward a little bit, assembling the belt cover A becomes a bit easier.
When the assembly of the belt cover A is finished, insert the front part of the belt cover C into the groove of the belt
cover A , and fix the rear part using the screw .
2) Attach the belt cover B to the table.
Make sure that the belt cover B does not interfere with the belt operation.
[ Fig. 8 ]
[ Fig. 9 ]
11
4-9. Thread Stand
1) Install the thread stand
on the table as in the figure.
[ Fig. 10]
4-10. Knee Lifting Pad
1) Attach the knee lifting pad to the bottom of the oil fan
as in the figure, and fasten it using the bolt .
2) Loosen the bolt to adjust the position of the knee
lifting pad for user's comfortable operation.
[ Fig. 11 ]
4-11. Oil Supply
[ Caution ]
When oil supply is completed, do not plug in the sewing machine. When the sewing machine is plugged in, and the pedal is
accidentally stepped on, the sewing machine might start, causing injuries.
When dealing with lubricant, wear glasses and gloves to protect eyes and hands. Take caution not to make eyes and skin
contact lubricant. When lubricant is touched, rinse off the smear with a soap and running water. When lubricant touches
eyes, rinse off lubricant in running water and go to hospital to see a doctor.
Do not swallow lubricant. It may cause diarrhea and vomiting. If you swallow lubricant, immediately see a doctor.
Keep lubricant out of reach of children and youth. Keep lubricant stored away from fire.
When it is first time to operate the sewing machine or it is reuse of the sewing machine after a long-term storage, please
supply oil to the machine.
Use original Sunstar lubricant (Lubricant is in the accessory box).
A. Installation of Magnet Removing Chips (Iron Powder)
Attach the magnet removing chips (iron powder), which is inside the accessory box, to the oil pump inside the bed.
Do not remove the magnet to use it for other purpose. If the sewing machine is operated without the magnet, it may
cause malfunction in the machine and negatively affect durability of the machine.
12
B. Lubricant Supply to Oil Fan
a) Fill lubricant up to “High”.
b) Use the oil for Sunstar industrial sewing machine or Shell’s Tellus C10 as lubricant.
c) When lubricant reaches “Low”, lubricant should be resupplied until it reaches “High”.
d) Exchange lubricant oil every two weeks.
Magnet
Oil pump
[ Fig. 12 ]
[ Fig. 13 ]
4-12. Inserting Bobbin into Bobbin Case
1) Insert the bobbin into the bobbin case as in the figure below.
If the bobbin is inserted in the opposite direction, it is spined loosely, causing entanglement of lower thread.
2) Insert the thread into the lower thread tension adjusting spring through the thread path and take out the thread
through the thread hole .
3) Set the output tension to the extent that when the bobbin case is dropped with the end of the thread held, it falls
gradually.
4) When the tension adjusting screw is turned clockwise, the lower thread tension gets stronger. When it is turned counterclockwise, the lower thread tension gets weaker.
Weaker
Stronger
[ Fig. 14 ]
13
4-13. Test Operation (Pedal Operation)
[ Caution ]
During operation, do not touch spinning or moving parts or press them with an object.
It may cause physical injuries or machine breakdowns.
1) Move the pedal at the B position to see if you can
conduct low speed sewing.
2) Move the pedal at the C position to see if you can
conduct high-speed sewing.
3) Step the pedal (B or C position). Stay your feet away
from the pedal and place it at the Neutral A position.
Check whether the needle stops below the surface of the
needle plate (in case of setting up the lower stop position).
[ Fig. 15 ]
14
Basic Sewing Machine Adjustments
5-1. Needle Insertion
Place the long groove of the needle toward the left. Insert
the needle deep into the needle bar hole and fasten the
needle fixing screw .
[ Fig. 16 ]
5-2. Adjusting Needle and Hook Timing
1) Needle Bar Lifting
Turn the pulley to place the needle 2.24mm above the lowest point. In this case the hook point and the middle of the
needle should be aligned. Loosen the fixing screw and set the hook point at the middle of the needle . Adjust the
distance between the hook point and the needle at 0.05~0.1mm.
[ Fig. 17 ]
2) Needle Bar Height
Loosen the tightening screw to adjust the distance
between the upper part of the thread hole and the hook
point at 0.5~1.5mm when the hook point is aligned
with the middle of the needle . Move the needle bar
up or down to adjust the needle bar and fasten the
screw .
[ Fig. 18 ]
15
5-3. Adjusting Oil Supply to Hook
Turn the oil volume adjusting screw , which is inserted in the lower shaft front bushing, clockwise( ). It will release more
oil. Turn the screw counter-clockwise( ) and it will release less oil.
Less
More
[ Fig. 19 ]
5-4. Adjusting Lower Thread Spinning
[ Fig. 20 ]
1)
2)
3)
4)
Insert the bobbin into the thread spinning shaft .
Press the thread spinning lever .
Spin five or six times by hand in the direction of thread spinning in the bobbin and operate the sewing machine.
If the thread spinning does not take place horizontally, loosen the thread guide screw and move the thread guide plate
left or right for adjustment.
5) When the thread is spun around the bobbin a lot, loosen the adjusting screw . When the thread spun around the
bobbin is small, fasten the screw.
16
5-5. Adjusting Thread Tension
Weaker
Stronger
[ Fig. 21 ]
1) Adjust the lower thread tension by slightly turning the tension adjusting screw , so that when the end of thread is picked
up by hand, the thread does not get loose.
The average tension of pulling the thread out of the bobbin case is 30~50g.
2) Lower the presser foot and turn the tension adjusting screw to adjust the upper thread.
5-6. Adjusting Thread Take-up Spring
Large
Small
[ Fig. 22 ]
1) The scope of operation of the thread take-up spring is 7~10mm.
The standard strength of the thread take-up spring twist is 40~60g.
2) When adjusting the scope of operation of the thread take-up spring, loosen the fixing screw for the thread take-up and
turn the thread adjusting device (Adjust the scope of operation to be smaller for heavy materials and vice versa for light
materials.)
3) Adjust strength of the thread take-up spring by inserting a driver into the groove of the thread adjusting device post and
turn it left or right (Adjust strength of the thread take-up spring to be stronger for heavy materials, and vice versa for light
materials.)
17
5-7. Placing Upper Thread
[ Fig. 23 ]
1) Move the thread take-up to the highest position.
2) Insert the thread into the needle from left to right.
5-8. Adjusting Pressure of Pressor Foot
Loosen the fixing nut for the pressure adjusting screw
and turn the pressure adjusting screw left or right to
make the sewing fabric held by the pressor foot. Fasten the
fixing nut .
[ Fig. 24 ]
5-9. Adjusting Stitch Length
1) Match the desired number on the stitch length dial
with the pin above.
The bigger the figure becomes, the bigger the stitch
length becomes.
2) Press the reverse lever by hand for reserve sewing.
This time, the sewing fabric is fed in the opposite way.
When the reverse lever is not pressed, the sewing fabric
is fed in the normal direction.
[ Fig. 25 ]
18
5-10. Adjusting Height of Feed Dog
When the stitch length is maximum and the feed dog is above the needle plate, the maximum height of the feed dog is
1~1.2mm. Loosen the screw and move the feed lift shaft crank left or right to adjust the height of the feed dog.
[ Fig. 26 ]
5-11. Adjusting Main and Auxiliary Presser Feet
1) Alternative Longitudinal Move of Main and Auxiliary Presser Feet
The main presser foot and the auxiliary presser foot move up and down alternatively.
When the main presser foot and the auxiliary presser foot are at the highest position respectively, their
heights should be same or the height of the auxiliary presser foot should be a bit lower. Place the thread take-up at
the lowest position and pull down the presser bar lift . Loosen the screw and adjust the longitudinal movement
adjusting crank left or right (When it is moved to the left, the lift of the auxiliary presser foot grows smaller.)
Left
Right
Uniformity
height
[ Fig. 27 ]
19
2) Longitudinal Operation Range of Main and Auxiliary Presser Feet
[ Fig. 28 ]
The longitudinal operation range of the main presser foot and the auxiliary presser foot range from 2 to 5mm.
Loosen the nut according to the sewing fabric and adjust the presser foot longitudinal movement shaft up or down.
When the sewing fabrics have only small gaps in thickness, the operation range should be set at the minimum level.
(highest position: 5mm, lowest position: 2mm)
3) Adjusting Front/Rear Location of Main Presser Foot
Set the stitch length at the maximum figure and loose the screw to the extent that the rear side of the auxiliary presser
foot is not contacted with the main presser foot . Move the horizontal movement adjusting crank for the presser
foot left or right for adjustment.
Gap
[ Fig. 29 ]
4) Adjusting Feed of Main Presser Foot
The standard ratio of the feed dog feed to the main
presser foot feed is 1:1. Depending on sewing
conditions, the feed volume of the main presser foot can
be different. Loosen the nut and move the horizontal
movement adjusting shaft for the presser foot up or
down.
Small
Large
[ Fig. 30 ]
20
Errors and Troubleshooting
1) Troubleshooting
NO.
Error
Needles are
broken.
Thread is
broken.
Thread tension
is improper.
When sewing
starts, the
upper thread is
escaped or
sewing skip
occurs.
Check
Cause
Handling Measure
Direction and height of
needle insertion
The direction of inserting a needle is
wrong.
Insert the needle in a right direction
and push it into the deepest position.
Needle
A needle is crooked.
Replace the needle.
Feed dog timing
The feed dog timing for needle bar
movement is bad.
Adjust the timing of feed dog.
Lifting of needle bar
The timing of needle and hook is bad.
Adjust the timing of needle and hook.
Height of needle bar
The timing of needle and hook is bad.
Adjust the timing of needle and hook.
Gap between needle
and hook
The timing of needle and hook is bad.
Adjust the timing of needle and hook.
Method of thread
placing
The thread placement is wrong.
Place the thread in the right way.
Needle
The needle is crooked/The tip of the
needle is broken.
Replace the needle.
Direction, height of
needle
The direction of the needle is wrong.
Insert the needle in the right way.
Upper thread tension
The upper thread tension is too
strong.
Adjust the upper thread tension
properly.
Lower thread tension
The lower thread tension is too
strong.
Adjust the lower thread tension
properly.
Movement range of
thread take-up spring
The movement range is too wide.
Adjust the movement range of the
spring.
Thread tension
The upper and lower thread tension
is improper.
Adjust the upper and lower thread
tension.
Tread take-up spring
tension
The tread take-up spring tension is
improper.
Adjust the tread take-up spring
tension.
Gap between opener
and hook
The gap between opener and hook
is improper.
Adjust the gap between opener and
hook.
Direction, height of
needle
The needle position is wrong.
Insert the needle in the right
direction.
Needle
A needle is crooked/ The end of the
needle is broken.
Replace the needle.
Placing the thread
How to place thread is wrong.
Properly place the thread.
Gap between needle
and hook
The timing of thread and hook is
improper.
Adjust the timing of thread and hook.
Check the highest
needle stop position
Reset the position of the needle's
Because the needle's highest stop
highest stop position.
position is not proper, the thread
take-up removes the upper thread by
pulling it when the sewing starts.
21
Table Drawing
22