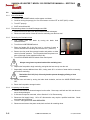
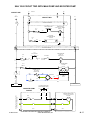
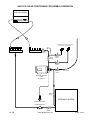
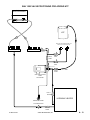
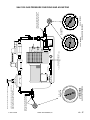
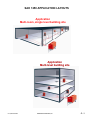
1
WARNING: If the instructions in this manual are not followed exactly, a fire or explosion may result causing property damage, personal injury or loss of life. • Do not store or use gasoline or other flammable vapors and liquids in the vicinity of this or any other appliance. • WHAT TO DO IF YOU SMELL GAS - Do not try to light any appliance - Do not touch any electrical switch; do not use any phone in your building - Immediately call your gas supplier from a neighbor's phone. Follow the gas supplier's instructions. - If you cannot reach your gas supplier, call the fire department • Installation and service must be performed by a qualified installer, service agency, or the gas supplier. Operator Manual available in French language upon request. Call 231-799-9600 X204. Manuel de renseignements disponible en langue francaise sur demande. Appellez le 231-799-9600 poste 204. © 2004 Ground Heaters, Inc. i V. 1, Rev. 02/17/04 24 Hour Technical Assistance 231-799-9600 877-799-9600 This Sahara Air Heater™ Manual Contains The Following 1. Sahara Air Heater™ 1250 Operator’s Manual 2. Customer Delivery Checklist and Warranty* 3. Pump Manufacturer’s Manual 4. Burner Manufacturer's Manual *NOTE To activate the warranty on your new Sahara Air Heater, the Distributor must complete and mail to Ground Heaters, Inc. the Customer Delivery Checklist located directly behind this cover page. © 2004 Ground Heaters, Inc. ii V. 1, Rev. 2/17/04 SN: ____________ - ____________ SAHARA AIR HEATER™ 1250 CUSTOMER Delivery Date: ______ / ______ / ______ DELIVERY CHECKLIST Distributor: Company: Address: City: Phone: Email: ____________________________________ ____________________________________ _________________ State: ___ Zip:______ ________________ Fax:_______________ ____________________________________ Customer: (Buyer) Company: _______________________________________ Address: _______________________________________ City: _________________ State:___ Zip: ________ Phone: ________________ Fax:_________________ Email: _____________________________________ You must complete this form with your customer during delivery process to activate warranty. GIVE one copy to your Customer. KEEP one copy for your (Distributor) file. MAIL one copy to Ground Heaters, Inc. □ Visually inspect the exterior of the machine, paying special attention to those areas that may have been damaged during shipping. Ensure all discrepancies caused by shipping are filed with the freight carrying company. Heat Exchangers: □ HX 200 ______ Qty □ HX 100 ______ Qty □ HX 50 ______ Qty □ Verify proper door(s) operation, locate Operator’s Manual, and perform all steps to verify the following: Section OVERVIEW: 1.1 Locate and explain purpose of external features. 1.2 Locate and explain purpose of internal features. 1.4 Explain purpose and function of gauges, indicators and safety features. □ □ □ □ □ □ □ □ □ □ 2.3 A-14 2.3.1 2.3.2 2.3.2 2.3.3 2.3.4 2.3.4 SETUP: (Explain the following) Care and use of quick-connects and cam-locks. Proper positioning of the Sahara Air Heater 1250 for operation. Loading ramp storage and use. Heat Exchangers positioning and connecting. Proper Heat Transfer Fluid level. Circulation hose unwinding. Control panel switch functions and power connecting. □ □ □ □ 2.4 2.4 2.4 (4) 2.4 (5) 2.4 (6) START UP: (Explain the following) Digital temperature control setting when power is applied and main breakers are switched ON. Circulation pump start up and operating parameters. Burner start up. Heat Exchangers power connecting, blower speed, and temperature setting. □ □ □ □ 2.6 2.6.1 2.6.3 2.6.4 2.6.4 SHUT DOWN: (Demonstrate the following) SAH 1250 and Heat Exchangers shut down. Circulation hose rewinding. Heat Exchangers and ramp storage. Power disconnecting the door locking. Record any discrepancies: ____________________________________________________________________________ Give Operator’s Manual to your customer and explain warranty policy on reverse side of this form. Buyer hereby acknowledges: receipt of the Operator’s Manual from Distributor; explanation of the GHI warranty by Distributor; and the above Sahara Air Heater 1250 is in proper operating condition. _______________________________ Distributor Representative’s Signature _______________ Date _______________________________ _______________ Customer’s (Buyer’s) Signature Date Ground Heaters, Inc. 1271 Judson Rd., Spring Lake, Michigan 49456 p 231-799-9600 f 231-799-9500 www.groundheaters.com © 2004 Ground Heaters, Inc. Tmp One Year Limited Warranty (see your distributor to file warranty claim) Ground Heaters, Inc. warrants that the Products described in this Limited Warranty shall be free of defects in material and workmanship under normal use and service for a period of one year from the date first placed in service. This Limited Warranty is expressly limited to crediting the purchase price of the defective Product or to repairing or replacing the defective Product, at the sole option of Ground Heaters, Inc. This warranty shall not extend to any repair work performed by anyone other than Ground Heaters, Inc. or an authorized representative of Ground Heaters, Inc. Such credit, repair or replacement shall be Ground Heaters, Inc.’s sole obligation and buyer’s exclusive remedy hereunder and shall be conditioned upon Ground Heaters, Inc.’s timely receipt of written notice of the alleged defect and, at Ground Heaters, Inc.’s option, return of such product to Ground Heaters, Inc., FOB its Spring Lake, Michigan, facility. This exclusive remedy shall not be deemed to have failed of its essential purpose provided Ground Heaters, Inc. is willing and able to repair or replace the defective Product or to credit the purchase price within 90 days of the date on which Ground Heaters, Inc. confirms that such products are defective. Use of repair or replacement parts not manufactured by Ground Heaters, Inc. may void this warranty. Ground Heaters, Inc.’s liability hereunder shall be limited to the contract price of that portion of the Product on which such liability is based. The existence of a defect shall be determined by Ground Heaters, Inc. in its sole discretion. GROUND HEATERS, INC. SHALL NOT BE RESPONSIBLE FOR ANY LABOR CHARGES OR LOST HEAT TRANSFER FLUID IN CONNECTION WITH WARRANTY SERVICE. USE OF ANY ANTI-FREEZE OR HEAT TRANSFER FLUID OTHER THAN GROUND HEATERS BRAND HEAT TRANSFER FLUID VOIDS THIS WARRANTY IN ITS ENTIRETY. THIS WARRANTY IS EXCLUSIVE. WARRANTIES OF MERCHANTABILITY AND FITNESS FOR A PARTICULAR PURPOSE, AND WARRANTIES ARISING FROM A COURSE OF DEALING OR USAGE OF TRADE, ARE SPECIFICALLY EXCLUDED, AND THERE ARE NO WARRANTIES EXPRESSED OR IMPLIED OTHER THAN THE LIMITED WARRANTY EXPRESSLY SET FORTH HEREIN. GROUND HEATERS, INC. SHALL NOT BE LIABLE FOR INCIDENTAL, CONSEQUENTIAL, SPECIAL OR OTHER DAMAGES, INCLUDING BUT NOT LIMITED TO DAMAGES FOR LOSS OF PROFITS OR PRODUCTION, OR INJURY TO PERSON OR PROPERTY. WITHOUT LIMITING THE GENERALITY OF THE FOREGOING, GROUND HEATERS, INC. SHALL NOT BE LIABLE FOR ANY CLAIMS BASED ON THE CONDITION, USE OR OPERATION OF THE PRODUCTS, WHETHER BASED ON CONTRACT, TORT OR OTHER THEORIES OF LAW, INCLUDING WITHOUT LIMITATIONS, THEORIES OF NEGLIGENCE. The “Products” covered by this Limited Warranty include all machines manufactured by Ground Heaters, Inc. and sold in the ordinary course of business, and all accessories therefor, which are registered with Ground Heaters, Inc., except for the following components: Heat Transfer Hoses, Tires, Generator Powerheads and Engines. These are considered to be wear items and/or are covered by warranties of the component manufacturer. NOTE: Failure to maintain proper inflation or operating tires at speeds or under loads in excess of those recommended in the operator’s manual may void the tire manufacturer’s warranty. Failure to fully pay for Product will void this Limited Warranty. No agent or employee of Ground Heaters, Inc. is authorized to modify, extend, or otherwise change this limited warranty. Rev. 8-8-03 - kk SN: ____________ - ____________ SAHARA AIR HEATER™ 1250 DISTRIBUTOR DELIVERY CHECKLIST Delivery Date: ______ / ______ / ______ Distributor: Company: Address: City: Phone: Email: ________________________________ Inspector: ___________________________________________ ________________________________ ________________________________ State/Province: _____________ Postal Code: _____________ ________________________________ Fax: _______________________________________________ _______________________________________________________________________________________ You must complete this form within 30 days of delivery date to activate warranty. KEEP one copy for your (Distributor) file. MAIL one copy to Ground Heaters, Inc. If Distributor is placing this unit into rental service, the Customer Delivery Checklist must also be filed with Ground Heaters, Inc. to activate warranty. □ Visually inspect the exterior of the machine, paying special attention to those areas that may have been damaged during shipping. Ensure all discrepancies caused by shipping are filed with the freight carrying company. Heat Exchangers: □ HX 200 ______ Qty □ HX 100 ______ Qty □ HX 50 ______ Qty □ Verify proper door(s) operation, locate Operator’s Manual, and perform all steps to verify the following: Section 2.3 SETUP: □ 2.3.1 Sahara Air Heater is positioned correctly for operation. □ 2.3.2 Loading ramp slides smoothly out of its storage rack. □ 2.3.2 Heat Exchangers roll freely and are free of any shipping damage to exterior or blower components. □ 2.3.3 Verify Heat Transfer Fluid (HTF) level is adequate for operation. □ 2.3.4 Control panel switches are ready for power to be connected. □ 2.3.4 Circulation hose unwinds smoothly. □ 2.2.2 Circulation hose quick-connect fittings separate easily. □ 2.4 Digital temperature control and low water cut-off (LWCO) activate when power is applied and main breakers are switched ON. □ 2.4 (8) All circulation hose connections are free of leaks. 2.4 START UP: □ 2.4 (4) Circulation pump starts and runs with no abnormal noises. □ 2.4 (5) Burner starts and runs with no visible smoke in the exhaust. □ 2.4 (6) Heat Exchangers are connected to power and stepped through all blower speeds without abnormal noise or vibration. TESTING AND INSPECTION: □ 2.4 (7) Gauges and indicators function satisfactorily. □ 2.5 (3) SAH 1250 temperature control shuts down the burner when the set-point is lowered 10ºF (5.5ºC) below fluid temperature. □ 2.5.4 Visually inspect all internal plumbing and hose connections for signs of leakage. □ A-23 SAH 1250 LWCO shuts down the pump and burner when the TEST button is pressed (the LOW HTF LEVEL light will illuminate). 2.6 SHUT DOWN: □ 2.6.1 SAH 1250 and Heat Exchangers shut down normally. Disconnect power cords. □ 2.6.4 Store Heat Exchangers in the trailer, and stow the ramp. Shut and lock all doors. Record any discrepancies: ____________________________________________________________________________ Ensure Operator’s Manual is returned to its holder inside the Sahara Air Heater. Distributor hereby acknowledges receipt of the above specified Sahara Air Heater. Distributor also confirms with her/her signature below that said Sahara Air Heater has been fully inspected and is in proper physical and operating condition. _______________________________ Inspector’s Signature _______________ Date _______________________________ _______________ Distributor Branch Manager’s Signature Date Ground Heaters, Inc. 1271 Judson Rd., Spring Lake, Michigan 49456 p 231-799-9600 f 231-799-9500 www.groundheaters.com © 2004 Ground Heaters, Inc. Tmp. SAHARA AIR HEATER™ MODEL 1250 OPERATOR’S MANUAL LIST OF ABBREVIATIONS LIST OF ABBREVIATIONS The following is a list of abbreviations used throughout the Operator’s Manual: Abbreviation/Symbol Term/Meaning amp. ampere (measurement of electrical current) asl above sea level BTU British Thermal Unit (measurement of heat energy) °C degrees Celsius (metric measurement of temperature) cm centimeter (1/100th of a meter) °F degrees Fahrenheit (measurement of temperature) ft foot/feet (measurement of length/distance) ft2 square foot/square feet (measurement of area) ft-lbs foot pounds (measurement of torque) gph gallons per hour (measurement of liquid flow) GFI Ground Fault Interrupt/interrupter (protection device) GHI Ground Heaters, Incorporated GVWR Gross Vehicle Weight Rating HHS Ground Heaters Hose Handling System HTF Ground Heaters Heat Transfer Fluid hr hour (measurement of time) Hz Hertz (measurement of frequency) ID measurement of Inner Diameter in. inch/inches (measurement of length/distance) kg kilogram (metric measurement of weight) Kilo-Cal Kilo-Calorie = 1000 Calories (metric measurement of heat energy) kPa kilo-Pascals (metric measurement of pressure) kW kilo-Watt (measurement of electrical power) lb pound (measurement of weight) m meter (metric measurement of length/distance) mm millimeter (1/1000th of a meter) psig pounds per square inch gauge (measurement of pressure) Rev. Revision SAH Sahara Air Heater TC Temperature Controller NHTSA National Highway Transportation Safety Administration V. Version VAC Volts, Alternating Current VDC Volts, Direct Current V. 1, Rev. 2/17/04 iii © 2004 Ground Heaters, Inc. SAHARA AIR HEATER™ MODEL 1250 OPERATOR’S MANUAL TABLE OF CONTENTS Page LIST OF ABBREVIATIONS iii INTRODUCTION 1.1 EXTERNAL FEATURES ................................................................................................... 1-1 1.2 INTERNAL COMPONENTS .............................................................................................. 1-2 1.2.1 for Heater with Burner Options .................................................................................... 1-2 1.2.2 Inside Rear Doors........................................................................................................ 1-3 1.3 IDENTIFICATION .............................................................................................................. 1-3 1.4 SAFETY FEATURES......................................................................................................... 1-4 1.5 SAFETY PRECAUTIONS.................................................................................................. 1-4 1.5.1 Operators..................................................................................................................... 1-4 1.5.2 Safe Operation and Maintenance................................................................................ 1-5 1.6 REPAIR PARTS AND ACCESSORIES ............................................................................ 1-5 1.7 MAINTENANCE................................................................................................................. 1-5 1.8 OBTAINING WARRANTY SERVICE ................................................................................ 1-6 START UP, OPERATION AND SHUTDOWN 2.1 SYSTEM CONFIRMATION ADVISORY ........................................................................... 2-1 2.1.1 Standard Configuration Performance.......................................................................... 2-1 2.1.2 Booster Pump Option and Performance ..................................................................... 2-1 2.1.3 Hose Configuration Limitations.................................................................................... 2-1 2.1.4 Crane Lifting ................................................................................................................ 2-1 2.1.5 Insulate the Hoses....................................................................................................... 2-1 CARE AND HANDLING OF HOSE, QUICK-CONNECTS AND CAM-LOCKS................ 2-2 2.2.1 Hose ............................................................................................................................ 2-2 2.2.2 Quick-Connects and Cam-Locks................................................................................. 2-2 2.2.3 Warranty Exclusion...................................................................................................... 2-2 SETUP ............................................................................................................................... 2-2 2.3.1 Positioning ................................................................................................................... 2-2 2.3.2 Unloading HX 200 Heat Exchangers........................................................................... 2-2 2.3.3 Heat Transfer Fluid (HTF) ........................................................................................... 2-3 2.3.4 Deployment of Circulation Hoses ................................................................................ 2-3 2.2 2.3 V. 1, Rev. 2/17/04 iv © 2004 Ground Heaters, Inc. SAHARA AIR HEATER™ MODEL 1250 OPERATOR’S MANUAL TABLE OF CONTENTS (continued) Page 2.3.5 Optional Booster Pump................................................................................................ 2-4 2.3.5.1 Connecting ............................................................................................................ 2-4 2.3.5.2 Start Up ................................................................................................................. 2-4 2.3.5.3 Shutdown............................................................................................................... 2-4 2.3.5.4 Disconnecting ........................................................................................................ 2-4 2.4 START UP ........................................................................................................................ 2-5 2.5 MONITORING OPERATING PARAMETERS.................................................................. 2-5 2.6 UNIT SHUTDOWN ........................................................................................................... 2-6 2.6.1 Burner Shutdown ......................................................................................................... 2-6 2.6.2 Disconnecting Hoses from Heat Exchangers and SAH............................................... 2-6 2.6.3 Rewinding the Circulation Hose................................................................................... 2-6 2.6.4 Completing Unit Shutdown .......................................................................................... 2-6 BURNER ADJUSTMENT AND SHUTDOWN 3.1 NATURAL GAS/LIQUID PROPANE VAPOR.................................................................. 3-1 Burner Adjustment ....................................................................................................... 3-1 3.1.1.1 Fuel Pressure Adjustment ..................................................................................... 3-2 3.1.1.2 Air Setting and Adjustment.................................................................................... 3-2 3.1.1.3 O2 Content Sampling............................................................................................. 3-3 3.1.1.4 Smoke Spot Sampling........................................................................................... 3-3 Burner Shutdown ......................................................................................................... 3-3 3.2 DIESEL/FUEL OIL ........................................................................................................... 3.2.1 Burner Adjustment ....................................................................................................... 3.2.1.1 Fuel Pressure Adjustment ..................................................................................... 3.2.1.2 Air Setting and Adjustment.................................................................................... 3.2.1.3 O2 Content Sampling............................................................................................. 3.2.1.4 Smoke Spot Sampling........................................................................................... 3.2.2 Burner Shutdown ......................................................................................................... 3-4 3-4 3-4 3-4 3-4 3-5 3-5 3.1.1 3.1.2 © 2004 Ground Heaters, Inc. v V. 1, Rev. 2/17/04 SAHARA AIR HEATER™ MODEL 1250 OPERATOR’S MANUAL TABLE OF CONTENTS (continued) Page MAINTENANCE 4.1 ADDING HEAT TRANSFER FLUID ..................................................................................... 4-1 4.1.1 To Clear a LOW HTF LEVEL Condition ................................................................................ 4-1 4.2 BURNER INSTALLATION/CHANGEOVER.................................................................... 4-2 4.2.1 From NG/LP to Diesel/Fuel Oil .................................................................................... 4-2 4.2.1.1 Installation.................................................................................................................... 4-2 4.2.1.2 Setup ........................................................................................................................... 4-3 4.2.2 From Diesel/Fuel Oil to NG/LP .................................................................................... 4-3 4.2.2.1 Installation.................................................................................................................... 4-4 4.2.2.2 Setup ........................................................................................................................... 4-5 4.3 HIGH ELEVATION OPERATIONS .................................................................................. 4-5 4.4 RECOMMENDED FUELS................................................................................................ 4-5 4.5 SUMMER STORAGE INSTRUCTIONS........................................................................... 4-6 4.6 PRE-SEASON MAINTENANCE ...................................................................................... 4-6 TRANSPORTING THE SAH 1250 5.1 TOWING........................................................................................................................... 5-1 5.2 CRANE and AIR LIFTING ............................................................................................... 5-1 5.3 TRANSPORTING on a FLATBED .................................................................................. 5-1 5.4 COMMON MECHANICAL INSPECTIONS PRIOR TO TRANSPORTING ..................... 5-1 TROUBLESHOOTING 6.1 TROUBLESHOOTING CHART ....................................................................................... 6-1 6.2 IF LOW HTF LEVEL and LOW WATER LIGHTS ARE LIT............................................ 6-3 Low Level Shutdown Device ....................................................................................... 6-3 BURNER CONTROL LOCKOUT .................................................................................... 6-3 6.3.1 Gas Burner Control...................................................................................................... 6-3 6.3.2 Oil Burner Control........................................................................................................ 6-3 6.2.1 6.3 V. 1, Rev. 2/17/04 vi © 2004 Ground Heaters, Inc. SAHARA AIR HEATER™ MODEL 1250 OPERATOR’S MANUAL TABLE OF CONTENTS (continued) Page APPENDIX A SAH 1250 CONTROL PANEL EXTERIOR LAYOUT...................................................... A-1 SAH 1250 CONTROL PANEL INTERIOR LAYOUT....................................................... A-2 SAH 1250 DIESEL BURNER SCHEMATIC .................................................................... A-3 SAH 1250 NG/LP BURNER SCHEMATIC ...................................................................... A-4 SAH 1250 CIRCUIT TWO WITH MAIN PUMP AND BOOSTER PUMP......................... A-5 SAH 1250 TRAILER WIRING .......................................................................................... A-6 SAH 1250 TRAILER JUNCTION BOX AND BATTERY WIRING................................... A-7 SAH 1250 CIRCULATION – BOOSTER PUMP MOTOR WIRING................................. A-8 SAH 1250 REWIND MOTOR WIRING............................................................................. A-9 HX 200 HEAT EXCHANGER WIRING DIAGRAM .......................................................... A-10 SAH 1250 VALVE POSITIONING FOR OPTIONAL BOOSTER PUMP USE ................ A-11 SAH 1250 VALVE POSITIONING FOR NORMAL OPERATION ................................... A-12 SAH 1250 VALVE POSITIONING FOR ADDING HTF ................................................... A-13 SAH 1250 QUICK-CONNECT AND CAM-LOCK CARE AND MAINENTANCE ............ A-14 SUGGESTED METHOD FOR SECURING THE SAH 1250 ONTO A TRUCK BED ...... A-15 SAH 1250 GAS BURNER P/N P100-673 COMPONENT IDENTIFICATION.................. A-16 SAH 1250 GAS PRESSURE CHECKING AND ADJUSTING ........................................ A-17 SAH 1250 DIESEL BURNER P/N P100-690 COMPONENT IDENTIFICATION ............ A-18 SAH 1250 SAFETY CONTROLS – NG/LP BURNER CONTROL (P/N P100-338) ........ A-19 SAH 1250 SAFETY CONTROLS – DIESEL BURNER CONTROL (P/N P100-206)...... A-20 SAH 1250 SAFETY CONTROLS - LOW WATER CUT-OFF (P/N P100-198)................ A-21 APPENDIX B SPECIFICATIONS............................................................................................................ B-1 APPENDIX C SAH 1250 APPLICATION LAYOUTS ............................................................................. © 2004 Ground Heaters, Inc. vii C-1 V. 1, Rev. 2/17/04 SAHARA AIR HEATER™ MODEL 1250 OPERATOR’S MANUAL – SECTION 1 INTRODUCTION The Sahara Air Heater™ (SAH) Model 1250 provides temporary heat during construction. Ground Heaters, Inc.’s revolutionary technology enables construction activities to continue throughout the cold weather months. The SAH 1250 provides temporary heat to the workspace easily and economically. The Sahara Air Heater™ Model 1250: • Heats workspace easily & economically: • • • 1.1 Inputs of 745,000 to 1,100,000 BTU/H. Fuel flexible; choice of natural gas, propane or diesel. Takes only minutes to change over from one fuel to another. • Provides dry, hot air – no moisture added to workspace; prevents mold and mildew. • Removes excess moisture from workspace and building materials. • Provides clean air – no combustion by-products in workspace. • Is self-contained – all system components are on one trailer. • Is rental friendly – easy setup and uses only 2 x 20 amp 120 volts AC circuits. • Is multi-functional – with accessories, this system can be used as a surface heater. EXTERNAL FEATURES (Photo 1-1) 1. 3 in. (76 mm) Pintle Style Hitch or Adjustable 2-5/16 in. (59 mm) Ball 2. Lifting Bail 3. Door Tiebacks 4. Lockable Cab Door 5. Loading Ramp Storage 6. Electric Brakes with Breakaway 2 3 4 1 5 1-1 V. 1, Rev. 2/17/04 6 3 © 2004 Ground Heaters, Inc. 1- 1 SAHARA AIR HEATER™ MODEL 1250 OPERATOR’S MANUAL – SECTION 1 1.2 INTERNAL COMPONENTS 1.2.1 for Heater with Burner Options The following components are accessed via the side door: (Photo 1-2) 1. Control Panel 4. Low Heat Transfer Fluid Level Shutdown with Manual Reset 2. Hydronic Heater 5. Gas Train 3. Gas Burner 6. Optional Diesel Burner 1 4 2 5 3 6 1-2 1- 2 Heater with Burner Options © 2004 Ground Heaters, Inc. V. 1, Rev. 2/17/04 SAHARA AIR HEATER™ MODEL 1250 OPERATOR’S MANUAL – SECTION 1 1.2.2 Inside Rear Doors The following components are located inside the rear door: (Photo 1-3) 1. HX 200 Heat Exchangers 2. Cab Interior Light 3. Ramp Alignment Pins 2 1 1-3 3 1.3 IDENTIFICATION The Sahara Air Heater™ Model 1250 serial number is located on the control panel. Always reference the SAH 1250 serial number when ordering parts or requesting technical assistance. V. 1, Rev. 2/17/04 © 2004 Ground Heaters, Inc. 1- 3 SAHARA AIR HEATER™ MODEL 1250 OPERATOR’S MANUAL – SECTION 1 1.4 SAFETY FEATURES Sahara Air Heaters™ are safe, quality equipment. SAH’s are NHTSA compliant, meet all state requirements, and meet all Transport Canada requirements. Specific safety features include: 1. Trailer Brakes: electric with breakaway switch (12 VDC). 2. Hydronic Heater: operates at zero (atmospheric) pressure. 3. Low HTF Level Shutdown: turns off the burner and pumps if Heat Transfer Fluid (HTF) level in the system drops below minimum operating level. Manual reset requirement prevents unsupervised pump/burner start up. 4. Ground Fault Interrupters (GFI): built into control panel to protect all circuits. 5. Circuit Overload Protection: built into control panel to protect all components. 6. Burner Flameout Protection: Primary Controller uses optic flame sensor to turn off burner if burner fails to ignite or upon loss of flame. Manual reset requirement prevents unsupervised restart. 7. Pump Motor Overload Protection: internal thermal overload trip with automatic reset. 8. Burner Motor Overload Protection: internal thermal overload trip with manual reset. 9. Reflective Markers: enhance night identification. 1.5 10. Foot Pedal: for rewind system wired with low voltage (12 VDC) signal to protect personnel from shock hazard should the foot pedal become accidentally immersed in water. 11. Digital Temperature Control: fails safe (Burner Off) upon loss of power or temperature sensor malfunction. SAFETY PRECAUTIONS Ground Heaters, Inc. develops and manufactures equipment that is safe to operate. However, an accident could occur if the Sahara Air Heater™ is used improperly. Safe operation requires that all instructions and precautions be followed. Key safety precautions are posted with decals throughout the machine. Read and understand all material in this Operator’s Manual and on the decals posted on the SAH before attempting to operate it. 1.5.1 Operators There are no published standards or certification requirements for operating portable hydronic heating machines. The following criteria reflect the experience of Ground Heaters, Inc. and should be considered a guide, not a comprehensive requirement. The following operator characteristics will prevent accidents, facilitate satisfactory results, and ensure reliable service from the Sahara Air Heater™: 1. Patience: Insures the system runs at optimum levels; leaks are found and fixed; valves are properly set; and switches are activated properly. 2. Good Hearing, Vision and Smell: Enable operator to assess equipment and detect potential malfunctions. 3. Self Respect: Dresses for the weather; wears eye protection and gloves; and does not take chances with personal safety. Do not operate the SAH while intoxicated or impaired by alcohol or other substances. 4. Careful and Responsible: Insures the machine is operating properly before leaving it unattended; keeps track of fluid levels; locks compartments; conducts operational checks at regular intervals; and ensures proper officials are notified of the machine’s use. 5. Above all, a Sahara Air Heater™ operator reads and understands this Operator’s Manual and the decals posted on the machine. ! 1- 4 Failure to adhere to all safety precautions and recommendations may result in damage to the Sahara Air Heater™, damage to other property, personal injury, or possibly death. © 2004 Ground Heaters, Inc. V. 1, Rev. 2/17/04 SAHARA AIR HEATER™ MODEL 1250 OPERATOR’S MANUAL – SECTION 1 1.5.2 Safe Operation and Maintenance Read and understand all material in this Operator’s Manual and on the decals posted on the Sahara Air Heater™ before attempting to operate it. Keep unauthorized people, especially children, away from the SAH. Keep guards in place. Do not disable safety features. Keep safety and instruction decals clean and legible. Replace damaged decals. Do not operate the burner while the Sahara Air Heater™ is in an enclosed, non-ventilated area. The burner exhaust contains carbon monoxide, an odorless and deadly poisonous gas. Locate the SAH on firm/level ground and chock wheels before operating. ! The Sahara Air Heater™ is not designed to be operated during transit. Do not operate the SAH while it is being towed or carried by truck. Do not smoke while refueling. Do not refuel near open flame or sparks. Clean up fuel spills immediately. Do not transport people in or on the Sahara Air Heater™. If the SAH starts to function improperly, turn off immediately and repair before restarting. Always wear gloves when handling hot or cold components—especially the Circulation Hose. Never loosen or remove Circulation Hose while a pump or the heater is running or when the HTF temperature is above 120ºF (49°C). Do not attempt tire repairs. Have a qualified tire dealer or repair service perform required tire maintenance. Torque for wheel lug nuts should be set at 110 ft-lbs. ! 1.6 Failure to observe these warnings may result in injury or death. REPAIR PARTS AND ACCESSORIES Your Ground Heaters Distributor carries a complete line of parts and accessories needed for all repair or replacement requirements. 1.7 MAINTENANCE All maintenance, with exception of routine lubrication and cleaning, should be performed by a qualified service technician using the Ground Heaters Service Manual. The following preventative maintenance should be performed once per year, or every 1,500 hours, whichever comes first: • • • • V. 1, Rev. 2/17/04 Heater and burner cleaning and inspection (refer to the Service Manual). Low level shutdown operation verification (refer to Section 2 of the Service Manual). Temperature control accuracy and operation verification (refer to Section 2 of the Service Manual). Routine trailer axle maintenance (common mechanical experience). © 2004 Ground Heaters, Inc. 1- 5 SAHARA AIR HEATER™ MODEL 1250 OPERATOR’S MANUAL – SECTION 1 1.8 OBTAINING WARRANTY SERVICE Your satisfaction is important to your Ground Heaters Distributor as well as to Ground Heaters, Inc. Warranty details are explained in the Ground Heaters, Inc. Statement of Warranty found on the reverse side of the Customer Delivery Checklist (located directly behind Operator's Manual cover sheet). All warranty services must be completed by a certified Ground Heaters Distributor service technician. If your Distributor does not satisfactorily resolve the problem, please call Ground Heaters, Inc. at (231) 7999600 for assistance. You will need to provide the following information for assistance: • • • • • Name, address and phone number Machine serial number Date of purchase Distributor name and address (location) Nature of problem Thank you for purchasing a Sahara Air Heater™. Both your Ground Heaters Distributor and Ground Heaters, Inc. want to assist you in every way possible to ensure your complete satisfaction with your purchase. 1- 6 © 2004 Ground Heaters, Inc. V. 1, Rev. 2/17/04 SAHARA AIR HEATER™ MODEL 1250 OPERATOR’S MANUAL – SECTION 2 START UP, OPERATION AND SHUTDOWN 2.1 SYSTEM CONFIRMATION ADVISORY 2.1.1 Standard Configuration Performance A Sahara Air Heater™ should conform to the following system configurations: • up to 5 heat exchangers located no higher than 60 ft (18 m) above the SAH trailer; and • connected with any combination of the standard supplied hose lengths, i.e. 50, 100, and 200 ft (15, 30, and 61 m). A Sahara Air Heater™ equipped with the optional Booster Pump should conform to the following system configurations: • up to 5 heat exchangers located no higher than 100 ft (30 m) above the SAH trailer, provided they are: • connected with any combination of the standard supplied hose lengths, i.e. 50, 100, and 200 ft (15, 30, and 61 m); OR • 2.1.2 if connected to 400 ft (122 m) hose lengths, up to 5 heat exchangers may be placed up to 400 ft (122 m) away from the SAH trailer, provided they are located no higher than 20 ft (6 m) above the trailer. Booster Pump Option and Performance All Sahara Air Heaters™ (SAH) are electrically equipped and plumbed to accept the addition of an optional Booster Pump. (Refer to Section 2.3.5, Optional Booster Pump, for setup instructions.) 2.1.3 Hose Configuration Limitations Do not create long hose lengths by quick-connecting multiple short lengths together. Multiple quickconnects (QC’s) cause a loss of working pressure and restrict flow. 2.1.4 • Regardless of length, no more than two hoses should be quick-connected one way; • Regardless of length, no more than four hoses should be quick-connected two ways; • No more than 400 ft (122 m) one way; • No more than 800 ft (244 m) two ways. Crane Lifting The trailer can be crane-lifted to the top of the vertical structure for heating workspaces. All Sahara Air trailers and heat exchangers are equipped with crane lifting points. 2.1.5 Insulate the Hoses Circulation hoses located outside of the building or space to be heated should be insulated extremely well. Ground Heaters, Inc. recommends wrapping a cut-to-size Red Wave™ blanket over exposed hoses. Secure the wrapped blankets to minimize air infiltration and heat loss. Contact your local Ground Heaters Distributor for additional system configuration advice. V. 1, Rev. 2/17/04 © 2004 Ground Heaters, Inc. 2- 1 SAHARA AIR HEATER™ MODEL 1250 OPERATOR’S MANUAL – SECTION 2 2.2 CARE AND HANDLING OF HOSE, QUICK-CONNECTS AND CAM-LOCKS 2.2.1 Hose Do not drive any vehicles or equipment over the hoses. If hoses must be deployed in traffic areas, construct ramps or guards to protect the hoses from damage. ! 2.2.2 Propylene glycol leaks may discolor floor surface. Provide extra protection and care to hoses when floor cosmetics is critical. Place hoses away from high traffic areas. Quick-Connects and Cam-Locks (Refer to Appendix A-14, SAH 1250 QUICK-CONNECT AND CAM-LOCK CARE AND MAINTENANCE.) 1. Clean • In order to seal properly, quick-connects must be clean and free of sand and dirt particles before they are connected. • Thoroughly rinse each male and female quick-connect in a bucket of clean water before connecting. 2. Care 2.2.3 • Bent, scored or otherwise damaged quick-connects may not operate or seal properly. • To avoid damage, handle the quick-connects carefully: • Do not drop quick-connects on concrete floors or other hard surfaces. • Do not drive any vehicles or equipment over quick-connects. Warranty Exclusion Quick-connects on Sahara Air Heaters™ and Sahara Air accessories damaged by rough use or foreign particles will not be replaced under Ground Heaters, Inc.'s warranty. 2.3 SETUP 2.3.1 Positioning 1. ! 2.3.2 2-1 Main heater unit (trailer) must not be positioned within 12 ft (3.6 m) of fuel source or combustible materials. 2. Position the SAH near a doorway or other opening in the building such that the circulation hoses can readily enter and exit the structure. 3. Chock the wheels to prevent accidental rolling. 4. Use the trailer jack to position the SAH as level as possible. P U L L 2-2 Unloading HX 200 Heat Exchangers 1. 2- 2 Position the right side of the SAH trailer as close as possible to the building to be heated (but not closer than 12 ft [3.6 m]). Remove the aluminum ramp from under the rear of the trailer. (Photos 2-1 and 2-2) © 2004 Ground Heaters, Inc. V. 1, Rev. 2/17/04 SAHARA AIR HEATER™ MODEL 1250 OPERATOR’S MANUAL – SECTION 2 2. Open the rear doors and latch them to the trailer sides. Attach the ramp to either side of the rear door opening and roll out the first two heat exchangers. Move the ramp to the other side of the trailer and roll out the other two heat exchangers. (Photo 2-3) 3. Position the heat exchangers inside the building per your heating plan. (Refer to Appendix C-1, SAH 1250 APPLICATION LAYOUTS.) NOTE: Each heat exchanger must be connected to a separate 15 amp 120 volts AC 60 Hz electrical circuit to power the blower. Use 10 gauge extension cords of no more than 100 ft (30 m) in length. 4. Test the blowers to be sure they run. Slowly step through speeds 1, 2 and 3 to avoid possibly tripping the electrical circuit breakers. Turn the blowers OFF. 2.3.3 2-3 Heat Transfer Fluid (HTF) Open the two left side doors on the trailer and latch them to stay open. Verify the following: • HTF is between MIN and MAX in the sight gauge. (Photo 2-4) NOTE: If fluid level is not above MIN level, refer to Section 4.1, ADDING HEAT TRANSFER FLUID, to correct before attempting to start the burner or HTF pump. • 2.3.4 All control panel switches and both MAIN BREAKER switches are OFF. (Refer to Appendix A-1, SAH 1250 CONTROL PANEL LAYOUT.) Deployment of Circulation Hoses 1. Once the burner has been test fired and properly adjusted, deploy the circulation hoses. The hose reel contains ten pieces of hose i.e. four pieces x 50 ft (15 m); four pieces x 100 ft (30 m); and two pieces x 200 ft (61 m). Partially release the hose reel brake by turning the brake knob counterclockwise and pull the first length of hose off the reel. Disconnect each hose quick-connect as it comes off the reel. 2-4 2. Based on how far away from the SAH trailer each of the heat exchangers has been placed, select the shortest appropriate lengths of hose to run a supply and return line to each heat exchanger. ! Verify that valves #1, #2, and #3 are SHUT. Valves #4, #6 and #7 must be SHUT and LOCKED in the SHUT position (to prevent accidentally opening them). Verify that the male and female cam-lock fittings on valves #6 and #7 are plugged and capped respectively (to prevent accidental injury). (Refer to Appendix A-12, SAH 1250 VALVE POSITIONING FOR NORMAL OPERATION.) 3. After rinsing the QC's in a bucket of water to remove sand/dirt, quick-connect the ends of the supply and return circulation hoses to the supply and return manifolds. The supply manifold has male QC's and the return has female QC's 4. Quick-connect the opposite ends of the supply and return hoses to each of the heat exchangers. Support the QC fittings on the heat exchanger with one hand when making these connections to avoid damaging the radiator. Ensure hoses lay on top of heat exchanger once connection is made to avoid HTF restrictions. V. 1, Rev. 2/17/04 © 2004 Ground Heaters, Inc. 2- 3 SAHARA AIR HEATER™ MODEL 1250 OPERATOR’S MANUAL – SECTION 2 2.3.5 Optional Booster Pump 2.3.5.1 Connecting (Refer to Appendix A-11, SAH 1250 VALVE POSITIONING FOR BOOSTER PUMP USE.) 1. Place the optional booster pump within 10 ft (3 m) of the Sahara booster pump connection points. 2. Remove the hoses and the power cord stowed in the interior of the booster pump enclosure. 3. Ensure that valves #6 & #7 are SHUT and LOCKED. 4. Ensure the BOOSTER PUMP BREAKER switch is OFF. (Refer to booster pump control panel.) 5. Ensure the MAIN PUMP switch is OFF. (Refer to main control panel.) 6. Remove the protective caps from the booster pump connection points on the SAH 1250. 7. Connect the booster pump hoses to the SAH 1250 one at a time by removing the protective cap from the hose cam-lock. Take care not to spill the HTF contained in the booster pump and hose. 8. Engage the hose cam-lock into the appropriate cam-lock on the SAH 1250 and LOCK into place by simultaneously swinging the cam-lock handles to the LOCKED position. (Refer to Appendix A-14, SAH 1250 QUICK-CONNECT AND CAM-LOCK CARE AND MAINTENANCE.) 9. Repeat Step 6 for the remaining hose. 10. UNLOCK and OPEN valves #6 and #7. 11. Plug the booster pump power cord into the booster pump female pigtail provided. (Refer to booster pump control panel.) 12. Connect a heavy duty 10-3 extension cord of no more than 50 ft in length into the booster pump male pigtail provided. (Refer to booster pump control panel.) 13. Connect the extension cord to a 20 amp 120 volts AC 60 Hz electrical circuit (not the same circuit used for the SAH 1250). NOTE: The Booster Pump should only be started after the SAH 1250 has been set up and is ready for use. The on board pump should be started prior to starting the booster pump. The booster pump will only operate when the MAIN PUMP switch is turned ON. (Refer to main control panel.) (Refer to Section 2.4, START UP, for SAH 1250 start up instructions.) 2.3.5.2 Start Up 1. Turn the BOOSTER PUMP BREAKER switch ON. 2. SHUT valve #5. 2.3.5.3. Shutdown 1. Turn the BURNER switch OFF. 2. Continue to operate both pumps until the HTF has cooled to 120ºF (49ºC). 3. Turn the MAIN PUMP switch OFF. (Refer to main control panel.) 4. Turn the BOOSTER PUMP BREAKER switch OFF. (Refer to booster pump control panel.) 5. SHUT and LOCK valves #6 and #7. OPEN valve #5. 2.3.5.4 Disconnecting 1. Disconnect the Booster Pump Hoses one at a time by simultaneously swinging the cam-lock handles to the UNLOCKED position. (Refer to Appendix A-14, SAH 1250 QUICK-CONNECT AND CAMLOCK CARE AND MAINTENANCE.) Take care not to spill the HTF contained in the pump and hose. 2. Engage the protective cap onto the booster pump hose and LOCK into place. 2- 4 © 2004 Ground Heaters, Inc. V. 1, Rev. 2/17/04 SAHARA AIR HEATER™ MODEL 1250 OPERATOR’S MANUAL – SECTION 2 3. Repeat Steps 1 through 2 for the remaining hose. 4. Disconnect the power cord and extension cord. Stow the booster pump power cord and hoses neatly in the booster pump enclosure. 5. Replace the protective caps on the booster pump connection points on the SAH 1250 and LOCK into place. 2.4 START UP 1. Using two separate 20 amp 120 volts AC 60 Hz electrical power circuits, connect one each to the SAH power pigtails marked MAIN POWER 1 and MAIN POWER 2. Route both extension cords into the trailer enclosure through one of the 5 in. square access holes in the floor below the burner (so the doors can be later closed). Use heavy duty 10-3 extension cords of no more than 50 ft in length each and attach the provided Velcro cord connectors to assure that the plugs do not separate. 2. Turn ON both MAIN BREAKERS. Verify that both GFI's are not tripped. LOW LEVEL light will come on for 15 seconds while the low level device cycles through a self test. 3. Verify that the temperature control (green numbers) is set to desired temperature (usually 180ºF [82ºC]). 4. OPEN supply valve #3, and verify that valve #5 is OPEN. Verify that valve #2 is fully closed. Turn ON the PUMP switch. Wait for the pump motor to spool up and attain full RPM. The pressure gauge should read approximately 50 psi. Slowly OPEN valve #2 wide enough to drop the pressure gauge needle to 30 psi. Do not allow the pressure gauge to drop below 30 psi. as this will cause the pump motor to draw excessive current. If the pump fails to start and attain full RPM, the supply voltage is too low. Low voltage could cause the pump fuse located in the control panel to blow. Have a licensed electrician check the circuits to verify that they can supply a minimum of 20 amps and that the voltage does not drop below 110 volts with the pump running. 5. Turn ON the BURNER switch. After a pre-purge, the burner will light. (Refer to Section 3, BURNER ADJUSTMENT AND SHUTDOWN.) 6. Turn ON the blower motor on each heat exchanger. Slowly step through speeds 1, 2 and 3 to avoid possibly tripping the electrical circuit breakers. 7. Periodically verify proper system operation using the dashboard gauges. Adjust valve #2 so that the pressure gauge reads 30 psi. The flow indicator should spin at medium speed. The HTF return temperature should read approximately 40º to 50ºF (22º to 28ºC) less than the supply temperature (red numbers on the control panel). Check each heat exchanger and verify that the thermostats are set at the proper target temperature and that the blowers are running. Output air will increase in temperature as the system warms up. NOTE: Blowers will not run if the heat exchanger thermostats are set too low. 8. Check all hoses and connections to verify that no leaks exist. 2.5 MONITORING OPERATING PARAMETERS The following parameters should be monitored every six to eight hours: 1. Fuel Tank Level Keep track of fuel consumption to plan needed filling schedule. 2. HTF Level Level should remain between MIN and MAX lines on the HTF sight gauge. (Photo 2-4) 3. Hydronic Heater Temperature (HTF outlet temperature as displayed on the Temperature Control): Hydronic heater temperature will operate 40º to 50ºF (22º to 28ºC) greater than return temperature until reaching control set temperature. 4. Plumbing and Fitting Leaks Always check for leaks during each monitoring period. V. 1, Rev. 2/17/04 © 2004 Ground Heaters, Inc. 2- 5 SAHARA AIR HEATER™ MODEL 1250 OPERATOR’S MANUAL – SECTION 2 2.6 UNIT SHUTDOWN 2.6.1 Burner Shutdown 1. Turn OFF the BURNER switch to allow system cool-down. 2. Continue running the pump(s) for 15 to 20 minutes to cool the HTF to 120ºF (49ºC) or lower. 3. Turn OFF pump(s). 4. SHUT valves #2 and #3. 2.6.2 Disconnecting Hoses from Heat Exchangers and SAH 1. Disconnect the hose QC's from the manifold and heat exchangers. 2. Disconnect each section of hose QC's before rewinding onto the hose reel. 2.6.3 Rewinding the Circulation Hose 1. Fully release hose reel brake by turning the brake knob counterclockwise. 2. Turn ON the HOSE REWIND switch. 3. Rinse the female QC of the first hose in a bucket of water to remove sand/dirt before winding onto the hose reel. (Photo 2-5) 4. Remove the foot pedal from storage location and position to allow control of rewind operation. The foot pedal should be placed on a piece of plywood or other material to keep it dry. 2-5 5. Turn ON the REWIND MOTOR switch at the control panel. ! Always wear gloves to protect hands while rewinding hose. 6. Depress the foot pedal to begin rewinding, and guide the hose evenly onto the reel. 7. Sequentially connect additional hose QC's, rinsing each QC in a bucket of water before connecting, and continue rewinding. ! Rewind the final 10 ft (3 m) of hose by hand to prevent damaging a fitting or hose connection. 8. Set the hose reel brake by turning the brake knob clockwise, and turn the HOSE REWIND switch OFF. 9. Return the foot pedal to storage location. 2.6.4 Completing Unit Shutdown 1. Retrieve and reload the heat exchangers into the trailer. Stow ramp, and latch and lock rear doors to secure heat exchangers. 2. If a Booster Pump was connected, refer to Section 2.3.5.4, Disconnecting. 3. Disconnect fuel supply line(s). NG or LP disconnection may require a qualified technician. Check local codes and regulations. 4. Turn OFF cab light and both MAIN BREAKERS. 5. Disconnect and remove the power cords; latch and lock all remaining doors. 2- 6 © 2004 Ground Heaters, Inc. V. 1, Rev. 2/17/04 SAHARA AIR HEATER™ MODEL 1250 OPERATOR’S MANUAL – SECTION 3 BURNER ADJUSTMENT AND SHUTDOWN The Sahara Air Heater™ (SAH) can be operated on natural gas (NG), liquid propane vapor (LP) or diesel/fuel oil (OIL). (Refer to Appendix A-16, GAS, or A-18, DIESEL, for burner component identification.) NOTE: All burners are test fired at Ground Heaters, Inc.'s factory located 600 ft (180 m) above sea level (asl) using NG/LP and winter blend diesel. For NG and LP Burners: The air and/or gas settings are returned to “zero” after factory test firing. A CERTIFIED AND LICENSED GAS TECHNICIAN MUST RECALIBRATE THE BURNER AIR AND FUEL SETINGS TO OBTAIN PROPER COMBUSTION AT YOUR WORK SITE. 1. Burner setup and installation, fuel supply connection, test-firing and burner adjustment MUST BE PERFORMED BY A LICENSED PROFESSIONAL AND MUST CONFORM TO THE REQUIREMENTS OF LOCAL, STATE AND FEDERAL AUTHORITIES. 2. All gas and propane connections must be leak tested prior to placing into service. 3. Main heater unit (trailer) must not be installed within 12 ft (3.6 m) of combustible materials. 4. All gas burners are test fired at Ground Heaters, Inc.'s factory prior to shipment. Ground Heaters technicians have installed an 11/16 in. orifice. This orifice is suitable for burning both NG and LP fuels and does not need to be changed in the field. To ensure proper burner performance and to avoid machine downtime due to heater sooting, burner combustion verification and adjustment must be performed: • before operating at elevations 1,000 ft (305 m) above or below the last adjustment • before starting at a new job site • after any burner maintenance has been performed • after changing fuel type (NG/LP to #2 fuel oil, etc.) • if burner performance is in question for any reason. A Combustion Analyzer, Smoke True Spot Tester and common hand tools will be required. 3.1 NATURAL GAS/LIQUID PROPANE VAPOR 3.1.1 Burner Adjustment Before beginning these steps, it is assumed that the NG/LP burner and gas train have been installed per Section 4.2, BURNER INSTALLATION/CHANGEOVER. NOTE: The use of a high quality combustion analyzer and two manometers (0 to 15 in. water column [WC] and 0 to 30 in. WC) is mandatory. All adjustments must be accomplished by a licensed professional and must conform to the requirements of local, state and federal codes and authorities. Use air damper settings and fuel pressure adjustments to obtain an Exhaust O2 value of 4 to 6% and a smoke spot value of 1 or less. Maintaining O2 in the 4 to 6% range assures that there are no unburned hydrocarbons remaining in the exhaust. Unburned hydrocarbons cause soot production. If the above values cannot be obtained by adjusting the burner air dampers alone, it may be necessary to reduce the firing rate (lower fuel pressure). This is especially true at elevations above 3,000 ft (914 m). V. 1, Rev. 2/17/04 © 2004 Ground Heaters, Inc. 3- 1 SAHARA AIR HEATER™ MODEL 1250 OPERATOR’S MANUAL – SECTION 3 3.1.1.1 Fuel Pressure Adjustment 1. Ensure that the fuel supply source is OFF. 2. Ensure that the gas train inlet ball valve is SHUT. 3. Remove the ¼ in. pressure tap plug located in the gas train inlet ball valve body (opposite of the pilot gas valve). 4. Install a ¼ in. petcock and pipe adapter in the location of the pipe plug to facilitate connecting the 0 to 30 in. WC manometer. Ensure the petcock is SHUT. Do not use pipe dope on this joint. 5. Remove the ¼ in. pressure tap plug located at the end of the “T” fitting just below the gas train union. 6. Install a ¼ in. petcock and pipe adapter in the location of the pipe plug to facilitate connecting the 0 to 15 in. WC manometer. Ensure the petcock is SHUT. Do not use pipe dope on this joint. 7. Loosen the air dampers locking screws enough to provide movement for adjustment. Open the top damper 100% and fully shut the bottom damper. (Refer to Appendix A-16, SAH 1250 GAS BURNER P/N P100-673 COMPONENT IDENTIFICATION.) 8. Turn on the main gas supply. 9. Crack open the installed petcock slowly while continuously monitoring gas pressure. Immediately shut the petcock if the gas pressure climbs past 14 in. WC. Contact your fuel supplier for gas pressure adjustment of no more than 12 to 14 in. WC before proceeding with further adjustment. 10. Once a gas supply pressure of 12 to 14 in. WC has been verified, open the gas train inlet ball valve. 11. Remove the protective cap from the manifold pressure regulator to access the regulator adjusting stem. (Refer to Appendix A-16, SAH 1250 GAS BURNER P/N P100-673 COMPONENT IDENTIFICATION.) 12. Using a screwdriver, adjust the manifold pressure regulator stem until it is no more than ¼ in. below the threaded opening if using LP or no more than ½ in. below the threaded opening if using NG. This will avoid over-firing upon initial start up. 13. Open the gas manifold valve. 14. Turn ON both MAIN BREAKERS. Allow a 15 second time delay for the low heat transfer fluid (HTF) system to recycle and clear. 15. Ensure that the digital temperature control’s green numbers (temperature set-point) are at least 10º to 20ºF (5º to 11ºC) degrees higher than the red numbers (actual HTF temperature). 16. Turn the BURNER switch ON. 17. After a 15 second pre-purge, the burner will begin the ignition sequence; the pilot gas valve will open followed 15 seconds later by the main gas valves (MGV’s). 18. Once the MGV’s open, monitor the manometer connected to the manifold pressure tap and adjust the manifold regulator stem until the following values are obtained: 2 in. WC (LP); 4 in. WC (NG). NOTE: Turn the manifold regulator stem clockwise to increase manifold pressure; turn the stem counter clockwise to reduce the manifold pressure. 19. Once the appropriate fuel pressure is set, proceed with air setting and adjustment. 3.1.1.2 Air Setting and Adjustment Top or bottom air dampers may be opened or closed in amounts sufficient to adjust exhaust 02 levels to 4 – 6% using a combustion analyzer. 3- 2 © 2004 Ground Heaters, Inc. V. 1, Rev. 2/17/04 SAHARA AIR HEATER™ MODEL 1250 OPERATOR’S MANUAL – SECTION 3 3.1.1.3 O2 Content Sampling 1. Follow the combustion analyzer manufacturer’s instructions for pre-purge and exhaust sampling. 2. Sample the exhaust gas by inserting the combustion analyzer sampling probe into the chimney access hole provided through the exhaust guard. The probe must be greater than 5 in. (127 mm) in length for an accurate sampling. Exhaust O2 content must be 4 to 6% for optimum performance and minimum soot production. 3. Several samples should be taken as the heater warms. The final sample should be taken just before the heater reaches 180ºF (82.2ºC). 3.1.1.4 Smoke Spot Sampling 1. Follow the smoke spot tester manufacturer’s instructions for accurate exhaust sampling. 2. Sample the burner exhaust for smoke by inserting the smoke spot sampling probe into the chimney access hole provided through the exhaust guard. The probe must be greater then 5 in. (127 mm) in length for an accurate sampling. Smoke spot production must be 1 or less. 3. Several samples should be taken as the heater warms. The final sample should be taken just before the heater reaches 180ºF (82.2ºC). NOTE: Higher O2 percentage (excess air settings) lowers soot production but raises stack temperature and reduces efficiency. Lower O2 percentage (inadequate air settings) increases efficiency and lowers stack temperature but may cause soot build-up. A burner optimized for clean and efficient operation will have O2 levels of 4 to 6% and a smoke spot value of 1 or less. 4. Loosen the air dampers locking screws enough to provide movement for adjustment. Open the top damper 100% and fully shut the bottom damper. (Refer to Appendix A-16, SAH 1250 GAS BURNER P/N P100-673 COMPONENT IDENTIFICATION.) 5. Adjust the air dampers until combustion parameters fall within the above outlined values. 6. Lock the air dampers in place by tightening the locking screws. 3.1.2 Burner Shutdown 1. Shut down the burner by turning the BURNER switch OFF. 2. Turn both MAIN BREAKERS OFF. 3. Shut OFF the main gas supply. Remove the manometers, petcocks and adapters, and reinstall pipe plugs (use pipe dope). NOTE: Should the burner fail to respond during any of the air adjustments, or if the fuel pressure cannot be adjusted or drifts, discontinue burner setup and contact your Sahara Air 1250 Distributor. V. 1, Rev. 2/17/04 © 2004 Ground Heaters, Inc. 3- 3 SAHARA AIR HEATER™ MODEL 1250 OPERATOR’S MANUAL – SECTION 3 3.2 DIESEL/FUEL OIL 3.2.1 Burner Adjustment Before beginning these steps, it is assumed that the optional diesel burner has been installed per Section 4.2, BURNER INSTALLATION/CHANGEOVER. NOTE: The use of a high quality combustion analyzer and fuel pressure test gauge is mandatory. All adjustments must be accomplished by a licensed professional and must conform to the requirements of local, state and federal codes and authorities. Use air band and shutter settings and fuel pressure adjustments to obtain an Exhaust O2 value of 4 to 6% and a smoke spot value of 1 or less. Maintaining O2 in the 4 to 6% range assures that there are no unburned hydrocarbons remaining in the exhaust. Unburned hydrocarbons cause soot production. If the above values cannot be obtained by adjusting the burner air band and shutters alone, it may be necessary to reduce the firing rate (lower fuel pressure and/or install a smaller nozzle). This is especially true at elevations above 3,000 ft (914 m). 3.2.1.1. Fuel Pressure Adjustment 1. Ensure that the fuel quick-connects are not connected. 2. Remove the ¼ in. pressure tap plug located on the top of the burner fuel pump. 3. Install an adapter to facilitate using a 0 to 300 psi pressure test gauge. Do not use pipe dope. 4. Connect the fuel quick-connects. 5. Turn the BURNER switch ON. 6. The burner will begin a 15 second pre-purge. Monitor the fuel pressure during the pre-purge and make adjustments using the fuel pressure adjusting screw. (Refer to Appendix A-18, SAH 1250 DIESEL BURNER P/N P100-690 COMPONENT IDENTIFICATION.) 7. Turn the adjusting screw clockwise to increase fuel pressure or counter clockwise to decrease fuel pressure until it is stable at 140 psig. 8. Once the fuel pressure is set, proceed with air setting and adjustment. 3.2.1.2 Air Setting and Adjustment Air Band and Shutter may be opened or closed in amounts sufficient to adjust exhaust 02 levels as sampled using a combustion analyzer. (Refer to Appendix A-18, SAH 1250 DIESEL BURNER P/N P100690 COMPONENT IDENTIFICATION.) 3.2.1.3 O2 Content Sampling 1. Follow the combustion analyzer manufacturer’s instructions for pre-purge and exhaust sampling. 2. Sample the exhaust gas by inserting the combustion analyzer sampling probe into the chimney access hole provided through the exhaust guard. The probe must be greater than 5 in. (127 mm) in length for an accurate sampling. Exhaust O2 content must be 4 to 6% for optimum performance and minimum soot production. 3. Several samples should be taken as the heater warms. The final sample should be taken just before the heater reaches 180ºF (82.2ºC). 3- 4 © 2004 Ground Heaters, Inc. V. 1, Rev. 2/17/04 SAHARA AIR HEATER™ MODEL 1250 OPERATOR’S MANUAL – SECTION 3 3.2.1.4 Smoke Spot Sampling 1. Follow the smoke spot tester manufacturer’s instructions for accurate exhaust sampling. 2. Sample the burner exhaust for smoke by inserting the smoke spot sampling probe into the chimney access hole provided through the exhaust guard. The probe must be greater than 5 in. (127 mm) in length for an accurate sampling. Smoke spot production must be 1 or less. 3. Several samples should be taken as the heater warms. The final sample should be taken just before the heater reaches 180ºF (82.2ºC). NOTE: Higher O2 percentage (excess air settings) lowers soot production but raises stack temperature and reduces efficiency. Lower O2 percentage (inadequate air settings) increases efficiency and lowers stack temperature but may cause soot build-up. A burner optimized for clean and efficient operation will have O2 levels of 4 to 6% and a smoke spot value of 1 or less. 4. Loosen the air band and shutter locking screws enough to provide movement for adjustment. (Refer to Appendix A-18, SAH 1250 DIESEL BURNER P/N P100-690 COMPONENT IDENTIFICATION.) 5. Start the burner by turning the BURNER switch ON. The burner will start and begin a 15 second prepurge followed by the ignition sequence. 6. Once the burner lights, sample the exhaust as outlined in Section 3.2.1.1. Adjust the air band and shutter until combustion parameters fall within the above outlined values. 7. Lock the air band and shutter in place by tightening the locking screws. ! 3.2.2 Do not exceed 150 psi fuel pressure Do not set below 100 psi fuel pressure Burner Shutdown 1. Shut down the burner by turning the BURNER switch OFF. 2. Turn both MAIN BREAKERS OFF. 3. Separate fuel quick-connects, and remove the fuel pressure gauge. Reinstall the pressure tap plug. 4. Reconnect both fuel quick-connects. NOTE: You may need to install a smaller nozzle at high elevations or if ambient temperature is below 10ºF (-12ºC). The table below shows the approximate firing rate at various fuel pressures with the 4.5 GPH nozzle: Fuel Pressure psi 100 110 120 125 130 140 V. 1, Rev. 2/17/04 - Firing Rate GPH 4.50 4.72 4.94 5.04 5.13 5.32 © 2004 Ground Heaters, Inc. 3- 5 SAHARA AIR HEATER™ MODEL 1250 OPERATOR’S MANUAL – SECTION 4 MAINTENANCE The Sahara Air Heater™ 1250 (SAH 1250) must be operated only with Ground Heaters Heat Transfer Fluid (HTF). The standard SAH 1250 includes 140 US gallons (530 liters) of HTF for normal operation. Ground Heaters, Inc. recommends that the HTF be replaced every three years to ensure that the corrosion inhibitors are sufficiently active to protect the system components. 4.1 ADDING HEAT TRANSFER FLUID (Refer to Appendix A-13, SAH 1250 VALVE POSITIONING FOR ADDING HTF.) NOTE: Shut down all pumps (including optional booster pump). HTF levels will rise approximately 1 in. (25 mm) per five gallons of HTF added. (If using optional booster pump, refer to Section 2.3.5, Optional Booster Pump.) 4.1.1 To Clear a LOW HTF LEVEL Condition 1. Place an open container of HTF close to the manifold area to facilitate filling. The container must be close enough to allow the 16 ft (4.9 m) fill hose to reach the bottom of the container. 2. Power up the SAH 1250 as directed in Section 2.4, START UP. 3. Ensure that the PUMP and BURNER switches are OFF. 4. Ensure that a least one section of circulation hose is connected to the supply and return manifolds to complete a circulation loop. 5. Verify that valve #3 is shut. 6. Verify that valves #2 and #5 are open. 7. Pull out the fill hose (attached to valve #4). Clean the exterior and remove the fill hose dust cap. 8. Remove the locking pin from fill valve #4. 9. Direct the open end of the fill hose into the opening of the HTF container. 10. Momentarily open fill valve #4 until HTF is observed running out of the fill hose. This will “prime” the fill hose. 11. Quickly close fill valve #4 to avoid over filling the HTF container. 12. Cover the open end of the fill hose to retain HTF after priming. NOTE: If the HTF container height is such that it will not allow gravity flow from the SAH 1250 fill hose, use a separate container with an opening low enough to facilitate priming the fill hose using the method described. 13. Insert the fill hose into the HTF container, ensuring that the hose is not sealed against any interior surface of the container. 14. Open fill valve #4. Immediately lift and hold the LOW LEVEL OVERRIDE switch to begin filling. 15. Continue filling using the LOW LEVEL OVERRIDE switch until fluid is observed in the bottom of the sight gauge. 16. The LOW LEVEL RESET button may now be pressed to clear the low level shutdown condition. It is not necessary to stop the filling process during this step. 17. After the Low Level Shutdown device has cycled through a 15 second self test, the low level condition will clear. V. 1, Rev. 2/17/04 © 2004 Ground Heaters, Inc. 4- 1 SAHARA AIR HEATER™ MODEL 1250 OPERATOR’S MANUAL – SECTION 4 18. The PUMP switch may now be turned ON, and the LOW LEVEL OVERRIDE switch released to finish filling. 19. Continue filling until the HTF level is between the MIN and MAX as observed in the HTF sight gauge. Do not over fill. 20. Once adequate HTF levels are verified in the sight gauge, remove the fill hose from the HTF container but continue running the HTF pump. Elevate and outstretch the fill hose to clear excess fluid from the hose. 21. Close fill valve #4 and insert the locking pin. Open pump suction valve #3. 22. Clean the fill hose exterior and replace the dust cap. Stow the hose neatly in-between the HTF pump and the manifold rack. NOTE: HTF Low Level Shutdown device green and red lights will blink for 15 seconds while device performs self-diagnostic tests. After 15 seconds the red light will go out and the green light will stay on, signaling the unit is ready to operate. The red LOW HTF LEVEL light on the control panel will go out. 4.2 BURNER INSTALLATION/CHANGEOVER 4.2.1 From NG/LP to Diesel/Fuel Oil 1. Burner setup and installation, fuel supply connection, test-firing and burner adjustment should be performed by a licensed professional and must conform to the requirements of local, state and federal authorities. 2. Main heater unit (trailer) must not be installed within 12 ft (3.6 m) of combustible materials. 3. To ensure proper burner performance and to avoid machine downtime due to heater sooting, burner combustion verification and adjustment must be performed: • before operating at elevations 1,000 ft (305 m) above or below the last adjustment. • before starting at a new job site. 1 • after any burner maintenance has been performed. • after changing fuel type (NG/LP to #2 fuel oil, etc.). • if burner performance is in question for any reason . 4. A Combustion Analyzer, Smoke True Spot Tester and common hand tools will be required. 4.2.1.1 3 2 Installation (Photo 4-1) NOTE: All CF800 oil burners are shipped by Ground Heaters, Inc. with the proper nozzle (4.5 GPH 45º solid) installed and the proper pump pressure set (140 psi). 4-1 1. 2. 3. Burner Mounting Flange Burner Air Tube Burner Fuel Pump 1. Slide the flange gasket over the burner air tube and align the gasket with the mounting flange holes. 2. Install the ½ in. insulation and the mounting plate for the oil burner (supplied by GHI when you purchase an oil burner) on the hydronic heater burner mounting plate. 3. Insert the burner air tube into the hydronic heater and attach with the four bolts which have been supplied. 4. Using the supplied 1¼ in. x 5/16 in. bolts, washer and nuts, install the burner support bracket on the trailer floor below the burner. Extend the adjusting rod such that the round pad firmly contacts 4- 2 © 2004 Ground Heaters, Inc. V. 1, Rev. 2/17/04 SAHARA AIR HEATER™ MODEL 1250 OPERATOR’S MANUAL – SECTION 4 the underside of the blower housing on the burner. Tighten the jam nut to keep the support rod from backing off. 5. Attach the 3-pin quick-connect burner power cord leading from the main control panel to the mating part located just below the Honeywell controller on the burner. 6. Plug the male Oil Pre-Heater pigtail attached to the burner into the female Oil Pre-Heater pigtail attached to the main control panel. 7. Route both the supply and return fuel lines from the fuel tank through the 5 in. (127 mm) square access hole in the trailer floor below the burner. 8. Using the quick-connect and hose barb supplied with the oil burner, attach the supply fuel line to the fuel filter on the burner. 9. Attach the return fuel line to the return hose quick-connect and hose barb on the burner. 4.2.1.2 Setup 1. Set the air band at 6 and the air shutter at 6. These initial air settings will be fine tuned later. 2. With fuel in the remote tank, power up the SAH control panel as directed in Section 2.4, START UP.) 3. After the low level device runs through its self diagnostic cycle, the burner should pre-purge and then light. The oil primary control may have to be re-set several times for the initial start up to purge air out of the fuel supply line. 4.2.2 From Diesel/Fuel Oil to NG/LP 1. Burner setup and installation, fuel supply connection, test-firing and burner adjustment should be performed by a licensed professional and must conform to the requirements of local, state and federal authorities. 2. All gas and propane connections must be leak tested prior to placing into service. 3. Main heater unit (trailer) must not be installed within 12 ft (3.6 m) of combustible materials. 4. All gas burners are test fired at Ground Heaters, Inc.'s factory prior to shipment. Ground Heaters technicians have installed an 11/16 in. orifice. This orifice is suitable for burning both NG and LP fuels and does not need to be changed in the field. 5. To ensure proper burner performance and to avoid machine downtime due to heater sooting, burner combustion verification and adjustment must be performed: • before operating at elevations 1,000 ft (305 m) above or below the last adjustment. • before starting at a new job site. • after any burner maintenance has been performed. • after changing fuel type (NG/LP to #2 fuel oil, etc.). • if burner performance is in question for any reason . 6. A Combustion Analyzer, Smoke True Spot Tester and common hand tools will be required. Do not exceed 14 in. water column supply pressure. Excessive pressure will damage the gas train components. ! NG: Do not exceed 4.0 in. water column manifold pressure, as this will over-fire the heater and cause damage. LP: Do not exceed 2.0 in. water column manifold pressure, as this will over-fire the heater and cause damage. V. 1, Rev. 2/17/04 © 2004 Ground Heaters, Inc. 4- 3 SAHARA AIR HEATER™ MODEL 1250 OPERATOR’S MANUAL – SECTION 4 4.2.2.1 Installation (Refer to Appendix A-16, SAH 1250 GAS BURNER P/N P100-673 COMPONENT IDENTIFICATION.) 1. Remove the trailer enclosure lower panel located below the trailer's left side door adjacent to the fender (to provide unrestricted access to the burner mounting plate on the Sahara Air hydronic heater). (Photo 4-2) Remove this panel before removing burner. 2. Verify that the gasket is properly positioned on the mounting flange and burner blast tube. 3. Insert the blast tube into the hydronic heater burner mounting plate and attach with the four bolts which have been supplied. The burner should be oriented with the Power Flame Model JR30A-12 label oriented right side up. 4-2 4. Using the supplied 1¼ in. x 5/16 in. bolts, washers and nuts, install the burner support bracket on the trailer floor below the burner. Extend the adjusting rod such that the square pad firmly contacts the burner support flange. Tighten the jam nut to keep the support rod from backing off. 5. Reinstall the enclosure panel next to the fender. 6. Attach the 3-pin quick-connect burner power cord leading from the main control panel to the connection socket located just behind the blue Honeywell™ burner control. 7. Attach the gas train at the pipe union, with the horizontal portion of the gas train extending toward the tongue of the trailer. Do not use pipe dope on this joint. 8. Attach the 2-pin quick-connect power cord leading from the burner control to the electrical junction box mounted on the gas train. 9. Connect the 90º end of the braided pilot gas line to the fitting provided on the left side of the gas train. do not use pipe dope on this joint. 10. Verify that the two ball valves and the pilot valve on the gas train are turned OFF. 11. Attach the 36 in. x ¼ in. poly vent hose to the main gas pressure regulator vent and route it outside through the 5 in. (127 mm) square access panel in the floor. 12. Attach the 17 in. x ¼ in. poly vent hose to the pilot pressure regulator and route it outside through a slot in the trailer floor along the left side of the trailer. 13. Attach the NG or LP gas supply line to the main gas inlet fitting at the left side of the gas train. This gas line should enter the trailer through the 5 in. (127 mm) square access panel in the floor of the trailer. 4- 4 © 2004 Ground Heaters, Inc. V. 1, Rev. 2/17/04 SAHARA AIR HEATER™ MODEL 1250 OPERATOR’S MANUAL – SECTION 4 4.2.2.2 Setup Open the top burner air inlet damper 100 percent. The bottom air inlet damper should be completely closed. This initial setting will be fine tuned later. ! Do not turn on the gas at this time. NOTE: The gas supply line must be sized such that it is capable of providing a minimum of 1325 CFH NG (or 470 CFH LP vapor) at 12 to 14 in. water column pressure. 4.3 HIGH ELEVATION OPERATIONS 1. The following procedures are recommended when operating the SAH 1250 at elevations higher than 5,000 ft (1,524 m) asl. These procedures keep the SAH 1250 running smoothly and prevent the possibility of premature soot build-up inside the hydronic heater fire tubes. ALL PROCEDURES LISTED BELOW SHOULD BE PERFORMED BY CERTIFIED PERSONNEL AT YOUR GROUND HEATERS DISTRIBUTOR. 2. When operating the SAH 1250 at high elevations, the hydronic heater should be spot checked every 500 hours for sooting or other combustion abnormalities. Combustion Analyzer and Smoke Spot Tester must be used for this test. 3. In addition to air adjustments, fuel pressure may be reduced to a lower pressure. To decrease fuel burning rate, refer to Section 3, BURNER ADJUSTMENT AND SHUTDOWN for fuel pressure adjustment instructions. NOTE: Always verify burner exhaust O2 and smoke levels after completing any adjustments to fuel pressure as directed in either Section 3.1.1, Gas Burner Adjustment or 3.2.1, Diesel Burner Adjustment. 4.4 RECOMMENDED FUELS 1. Sahara Air Heaters™ are typically used outdoors, in cold weather. ! Care must be taken in selecting a fuel blend which will work properly in your jobsite conditions. 2. Diesel fuel will thicken (jell) at low temperatures. Jelling (also known as waxing) may cause the burner not to light and/or fuel pump damage. 3. Contact your local fuel supplier to obtain potential jelling temperatures for your fuel, as specifications for diesel fuel vary from terminal to terminal. Some fuel suppliers may add products such as Valvetech to prevent jelling or Diesel 911 after jelling has occurred. Your fuel supplier should supply this information and make recommendations for the selection and use of such products. 4. If ambient temperatures are such that your fuel supplies cannot insure the fuel will not jell, K1 Kerosene or #1 diesel fuel (dyed K1 for off-road use) must be added by ratio until jelling does not occur. V. 1, Rev. 2/17/04 © 2004 Ground Heaters, Inc. 4- 5 SAHARA AIR HEATER™ MODEL 1250 OPERATOR’S MANUAL – SECTION 4 5. Refer to the Fuel Blend Guide, below; consult your fuel supplier for assistance in calibrating these values to your fuel. Fuel Blend Guide Temperature Range 4.5 Fuel Blend 15º to 30ºF 80% #2 to 20% #1 0º to 15ºF 70% #2 to 30% #1 0º to -15ºF 50% #2 to 50% #1 -15ºF and below 30% #2 to 70% #1 SUMMER STORAGE INSTRUCTIONS 1. Allow the heater to cool sufficiently. Cover the chimney and the burner with plastic wrap or other waterproof material. This will prevent corrosive moisture build-up and blockages caused by animal nests. Burners not installed should be stored in a cool, dry place. 2. Remove emergency break-away battery and store the battery in a cool, dry place. Connect the battery to a trickle charger once every 30 days to maintain full charge. 3. Perform a thorough inspection for leaks, and correct. Double-check that all valves are shut. 4. Shut and lock all doors. 5. Protect the tires from direct sunlight if stored outdoors. NOTE: Do not drain the HTF. corrosion (rusting). 4.6 The heater and plumbing must remain flooded with HTF to prevent PRE-SEASON MAINTENANCE (Refer to Section 3 of the Service Manual for detailed instructions.) 1. Remove all waterproof wrapping or covering from the chimney and burner. 2. Test and reinstall emergency break-away battery. 3. Remove flue door. Inspect fire tubes. Clean out any soot or flaked material. Remount flue door. For Oil Burners: Remove the burner electrode assembly. replacement. Adjust or replace the electrodes as necessary. Replace the nozzle with an exact 4. Remove the burner to inspect and clean the flame head. 5. Replace fuel filter element. 6. Reinstall the electrode assembly and verify the “Z” distance is correctly set. 7. Remount burner using a new burner mounting gasket. 8. Adjust burner settings as directed in Section 3, BURNER ADJUSTMENT AND SHUTDOWN. 9. Verify HTF level. 4- 6 © 2004 Ground Heaters, Inc. V. 1, Rev. 2/17/04 SAHARA AIR HEATER™ MODEL 1250 OPERATOR’S MANUAL – SECTION 5 TRANSPORTING THE SAH 1250 This section describes the three basic methods of SAH 1250 transport and associated precautions. TOWING 5.1 The SAH 1250 is easily towed by a vehicle rated to tow 7,000 lbs (3,175 kg) and fitted with a Class III or above hitch. (Photo 5-1) The SAH 1250 has a tongue weight of 1,120 lbs (508 kg). Towing vehicle must be equipped with an electric brake system controller. NOTE: A trailer plug wiring decal is located on the inside frame wall across from the trailer junction box. (Refer to Appendix A-6, SAH 1250 TRAILER WIRING, and Appendix A-7, SAH 1250 TRAILER JUNCTION BOX AND BATTERY WIRING.) 5-1 CRANE and AIR LIFTING 5.2 The SAH 1250 is equipped with a lifting bale. The lifting bar's multiple holes accommodate various weight loads. ! 5.3 A qualified rigger should set up and perform all rigging. TRANPORTING on a FLATBED The SAH 1250 may be loaded onto a 98 in. (250 cm) or wider flatbed using common-sized loading ramps and docks. The SAH 1250 should be chained down to the flatbed trailer. (Refer to Appendix A-15, SUGGESTED METHOD FOR SECURING THE SAH 1250 ONTO A TRUCK BED.) 5.4 COMMON MECHANICAL INSPECTIONS PRIOR TO TRANSPORTING 1. Trailer lights, brakes, wiring and wheel bearing inspection. ! 2. Tires inflated to proper pressure and free of defects. 1 3 8 3. Plumbing, internal and field hose integrity check. 5 7 4 4. Lug nuts torque value is as directed on wheel decal. (Photo 5-2) 2 5-2 V. 1, Rev. 2/17/04 ! WARNING FAI LURE TO FOLLOW THESE INSTRUCTIONS MAY RESULT IN WHEEL LOSS WHI CH CAN CAUSE I NJURY OR DEATH ! TORQUE WHEEL NUTS TO 90–120 LB- FT BEFORE FIRST ROAD USE. RETORQUE TO 90–120 LB-FT AFTER 10, 25 AND 50 MILES. CHECK PERI ODICALLY THEREAFTER . 6 © 2004 Ground Heaters, Inc. WARNING FAILURE TO FOLLOW THESE INSTRUCTIONS MAY RESULT IN WHEEL LOSS WHICH CAN CAUSE INJURY OR DEATH! TORQUE WHEEL NUTS TO 90–120 LB-FT BEFORE FIRST ROAD USE. RETORQUE TO 90–120 LB-FT AFTER 10, 25 AND 50 MILES. CHECK PERIODICALLY THEREAFTER. Torque the wheel lug nuts sequentially as shown. Torque to the values listed on the Warning decal located on the wheel. 5-1 SAHARA AIR HEATER™ MODEL 1250 OPERATOR’S MANUAL – SECTION 6 TROUBLESHOOTING 6.1 TROUBLESHOOTING CHART (Contact your local Ground Heaters Distributor for situations not covered in this section.) NOTE: Discontinue troubleshooting activities and shut down the Sahara Air Heater™ (SAH) 1250 if one of the following occurs: 1. One of the GFIs trips and will not remain reset. 2. An electric motor "hums" but does not turn. 3. The Burner Safety will not reset when the MANUAL RESET button is pushed. 4. Dark smoke emits from the hydronic heater exhaust. Once the SAH 1250 is shut down, call your local Ground Heaters Distributor for assistance. Symptom Possible Cause Corrective Action Refer To • Verify both MAIN BREAKERS are ON. Heat transfer fluid pump will not start. Heat transfer fluid pump turns but does not start. No power due to incorrect switch • Verify both GFIs are reset. position or protective function. • Verify HTF level is between MIN and MAX level and LOW HTF LEVEL light is not lit. Appendix A-1 Motor internal overload is tripped. • Allow motor to cool; it will reset automatically. ------- Pump motor fuse is blown. • Replace fuse. Appendix A-2 Low voltage caused by inadequate power supply; poor quality; or excessively long extension cords. • Have an electrician verify voltage at control panel is 110 volts (min.) while attempting to start pump motor. • Ensure power cords are at least 10 gauge wire and ≤ 50 ft (15.3 m) in length. ------- • Verify power cords are supplied by separate 20 amp 120 volts AC 60 Hz electrical power circuits. • Have an electrician verify voltage at burner motor is 110 volts (min.) while attempting to start burner motor. • Ensure power cords are at least 10 gauge wire and ≤ 50 ft (15.3 m) in length. Insufficient power supply. Burner motor will not start. • Verify power cords are supplied by separate 20 amp 120 volts AC 60 Hz electrical power circuits. Power supply sufficient but no power to burner motor. V. 1, Rev. 2/17/04 ------- • Call your Ground Heaters Distributor. © 2004 Ground Heaters, Inc. ------- 6- 1 SAHARA AIR HEATER™ MODEL 1250 OPERATOR’S MANUAL – SECTION 6 Symptom Possible Cause Corrective Action Refer To • Verify both MAIN BREAKERS are ON. • Verify both GFIs are reset. Burner motor will not start ( . . .continued) Improper switch position or protective function action. • Verify HTF level is between MIN and MAX level and LOW HTF LEVEL light is not lit. • Verify LOW WATER CUT-OFF is RESET. Burner Safety is tripped as indicated by DIAGNOSTIC light on burner control. • Reset burner safety. • Verify fuel supply is adequate. No fuel. • Verify both fuel line quick-connects are connected (oil burner). Appendix A-1 Appendix A-21 Appendix A-19 or A-20 ------Section 4.2.1 • Have an electrician verify voltage at control panel is 110 volts (min.) while attempting to start burner. Burner safety trips (no flame). Insufficient voltage for ignition. • Ensure power cords are at least 10 gauge wire and ≤ 50 ft (15.3 m) in length. ------- • Verify power cords are supplied by separate 20 amp 120 volts AC 60 Hz electrical power circuits. Burner safety trips (flame occurs). Heat exchanger blower will not start. Hoses will not rewind. Control not sensing flame. • Call your Ground Heaters Distributor. • No electrical power. • Verify 120 volts AC to heat exchanger. • Thermostat or speed selector setting incorrect. • Set thermostat above room temperature. ------- ------- • Set speed selector to desired fan speed. Section 2.6.3 Brake not fully released. • Fully release hose reel brake. Rewind motor is too cold (rewind motor may not start if below 0ºF [-18°C]). • Warm rewind motor. ------- Faulty foot pedal. • Call your Ground Heaters Distributor. ------- If problem is not resolved by performing the above steps, call your Ground Heaters Distributor for assistance. 6- 2 © 2004 Ground Heaters, Inc. V. 1, Rev. 2/17/04 SAHARA AIR HEATER™ MODEL 1250 OPERATOR’S MANUAL – SECTION 6 6.2 IF LOW HTF LEVEL and LOW WATER LIGHTS ARE LIT (Refer to Appendix A-21, SAH 1250 SAFETY CONTROLS – LOW WATER CUT-OFF [P/N P100-198].) Perform the following when LOW HTF LEVEL (refer to control panel) and LOW WATER (LOW LEVEL SHUTDOWN) lights are lit: 1. 2. 3. 4. Turn BURNER, PUMP and REWIND MOTOR switches OFF. Locate and correct cause of low HTF condition (i.e. fix the leak). Restore HTF level to normal operating level per Section 4.1, ADDING HEAT TRANSFER FLUID. Depress MANUAL RESET button to clear low level condition. Reset will complete in 15 seconds. NOTE: Call your Ground Heaters Distributor if HTF level is between MIN and MAX and: • Low Level Shutdown device will not reset; • LOW HTF LEVEL light (refer to control panel) remains on after depressing the Low level Shutdown device RESET button; or • Burner control locks out the burner and will not remain reset. 6.2.1 Low Level Shutdown Device The LOW HTF LEVEL light (refer to control panel) is activated for 15 seconds after initial power up and then goes out. Reset is accomplished by pressing the RESET button for 1 to 2 seconds or by momentarily shutting OFF BREAKER 1. (Refer to control panel.) 6.3 BURNER CONTROL LOCKOUT (Refer to Appendix A-19 and A-20.) (Refer to Appendix A-19, GAS, or A-20, DIESEL, for safety controls component identification.) 6.3.1 Gas Burner Control The POWER light will illuminate only during the heating cycle. After flame is established, the POWER, PILOT, MAIN and FLAME lights should all be illuminated. If flame failure of any nature is sensed during the start up or heating cycle, the control will stop all burner function and begin Lockout mode. Lockout Mode • ALARM light will illuminate • PILOT, FLAME and MAIN lights will go out. Momentarily press the RESET button to clear the lockout condition. 6.3.2 Oil Burner Control The DIAGNOSTIC light (green LED) will illuminate during the heating cycle after the 15 second pre-purge time has elapsed and flame has been established. If flame failure is sensed during the start up or heating cycle, the control will stop all burner function and begin one of three protective modes: 1. Recycle Mode The DIAGNOSTIC light will flash in two second intervals while attempting three automatic restarts. If the flame fails after three successive attempts, the control will go into Lockout mode. 2. Lockout Mode The DIAGNOSTIC light will flash in one-half second intervals. The RESET button must be momentarily pressed to clear the lockout and attempt a burner restart. After three attempts to manually clear the lockout mode, the control will begin Restricted Lockout mode. V. 1, Rev. 2/17/04 © 2004 Ground Heaters, Inc. 6- 3 SAHARA AIR HEATER™ MODEL 1250 OPERATOR’S MANUAL – SECTION 6 3. Restricted Lockout Mode The DIAGNOSTIC light will flash in one-half second intervals. The RESET button must be pressed and held for 30 seconds or until the DIAGNOSTIC light comes on for two seconds and then goes out. The control will return to Restricted Lockout mode with each flame failure until one successful heating cycle has occurred. 6- 4 © 2004 Ground Heaters, Inc. V. 1, Rev. 2/17/04 LIGHT LOW LEVEL SAH 1250 CONTROL PANEL EXTERIOR LAYOUT PANEL EXTERIOR DANGER HAZARDOUS VOLTAGE THERMOCOUPLE FOOT SWITCH TEST o o BREAKER 1 BREAKER 2 RESET REWIND CLUTCH AUX PUMP BURNER OVER TEMP 000000 HOURS GFI 1 LOW HTF LEVEL omron ON PUMP MAIN POWER 2 ON RESET GFI 2 E5CN EMERGENCY SHUTDOWN PROCEDURE ON OFF LOW LEVEL OVERRIDE REWIND MOTOR TEST CONTROL TEMPERATURE ON ON OFF OFF OFF OFF PUMP BURNER HOSE REWIND CAB LIGHT MAIN POWER 1 TM E100-101 Hose Rewind Sw. E100-101 LOW LEVEL OVERRIDE SW. Cab Light Sw. E100-101 LL Override Sw. E100-230 Low HTF Lamp E100-121 LOW HTF LEVEL LAMP DOOR INTERIOR CAB LIGHT SW. TEMPERATURE CONTROL 6 7 8 9 10 Burner Sw. HOSE REWIND SW. 11 12 13 14 15 P/N E100-101 BURNER SW. 1 2 3 4 5 PART Pump Sw. PUMP SW. HOUR METER Temp. Control E100-084 Breaker 1 & 2 E100-123 HR-1 Hour Meter E100-096 Breaker 2 E100-123 GFI 1 & 2 20A E100-093 V.1 Rev. 2/17/04 GFI 1 GFI 2 BREAKER 1 © 2004 Ground Heaters, Inc. HR-1 BREAKER 2 A-1 Note: Upper and lower terminal strip deck. TERMINAL STRIP © 2004 Ground Heaters, Inc. FU4 FU3 LP-CC-3 P/N E100-320 FU2 FNM-1.5 P/N E100-293 LP-CC-15 P/N E100-291 LP-CC-25 P/N E100-319 FU1 2 2 2 2 2 2 2T1 2L2 2L2 302 302 N2 N1 91 202 201 MDL- 1 P/N E100-176 8 93 11 9 9 7 5 5 3 1 1 2L1 2L1 1T2 4L2 L2 L1 203 203 FU5 2 2 2 2 2 2 2T1 2L2 2L2 302 302 N2 N1 91 202 201 UPPER DECK RECTIFIER P/N E100-225 CR-2 10 T-1 REWIND TRANSFORMER P/N E100-220 CIRCULATION PUMP CONTACTOR P/N E100-317 CR-2 BURNER CONTROL RELAY P/N E100-205 CR-1 CR-1 LOW LEVEL RELAY P/N E100-205 ~ + - A-2 ~ LOWER DECK SAH 1250 CONTROL PANEL INTERIOR LAYOUT V.1 Rev. 2/17/04 SAH 1250 DIESEL BURNER SCHEMATIC FROM LINE 17 FROM LINE 17 120VAC N 1 LOW LEVEL RELAY E100-205 LOW LEVEL SHUTDOWN E100-198 ORG RED B C (NOT USED) CR1 2 WHT w CR-1 LOW LEVEL LIGHT E100-353 4 BLK WHT BLK LOW LEVEL OVERRIDE SW. BLK BLK PUMP CONTACTOR E100-317 M1 CIRCULATION PUMP SW. CR1 6 BLK WHT HOUR METER E100-096 CR2 8 9 BLK HR1 P-1 PIN-3 TS-1 200 º E100-143 PRE-HEATER P100-251 BURNER SW. 8 7 RED BLK L1 LIMIT L2 WHT P-1 PIN 2 CAD CELL P100-253 WIRE COLORS BLK = BLACK RED = RED WHT = WHITE BLU = BLUE ORG YEL C+ YEL C- IG BLU IGN. BURNER MOTOR BM ORG BURNER CONTROL P100-206 = ORANGE P-1 PIN-1 T T FUEL SHUTOFF VALVE V VIO JUMPER 8 BURNER CONTROL RELAY E100-205 10 2 CR2 BLU 5 (+) THERMOCOUPLE TYPE T RED 1 2 N.O. 4 (-) 9 TEMP CONTROL E100-084 10 CAB LIGHT SW. CAB LIGHT W V.1 Rev. 2/17/04 © 2004 Ground Heaters, Inc. A-3 SAH 1250 NG/LP BURNER SCHEMATIC FROM LINE 17 N 120VAC 1 LOW LEVEL RELAY E100-205 LOW LEVEL SHUTDOWN E100-198 ORG RED B C (NOT USED) 2 CR1 w LOW LEVEL LIGHT E100-353 4 CR-1 BLK WHT LOW LEVEL OVERRIDE SW. CR1 PUMP CONTACTOR E100-317 M1 CIRCULATION PUMP SW. 6 WHT HOUR METER E100-096 CR2 BURNER CONTROL RELAY 8 9 HR1 WHT P-1 PIN-3 8 BURNER SW. TS 1 P-1 WHT L2 8 7 PIN-2 5 JUMPER 6 IGN. 10 WIRE COLORS BLK = BLACK RED = RED WHT = WHITE BLU = BLUE ORG = ORANGE WHT WHT AIR PROVING SW. 7 BURNER CONTROL P100-338 F PILOT GV 8 UV FLAME SENSOR P-1 PIN-1 WHT WHT MTR3 4 9 MAIN GV 1 G MAIN GV 2 BURNER CONTROL RELAY 10 CR2 BLU 5 (+) THERMOCOUPLE TYPE T RED 1 2 WHT N.O. 4 (-) 9 TEMP CONTROL E100-084 10 CAB LIGHT WHT WHT CAB LIGHT W A-4 2 WHT © 2004 Ground Heaters, Inc. WHT V.1 Rev. 2/17/04 SAH 1250 CIRCUIT TWO WITH MAIN PUMP AND BOOSTER PUMP L2 N2 +120VAC CIRCUIT ONE L1 120VAC CB-2 20A N1 CIRCUIT TWO 1L2 CB1 20A GFI #2 20A. E100-093 M -1 PUMP CONTACTOR FU 1 25A PUMP MOTOR 1.5 HP 15.8 FLA 18.8 SFA M100-647 T1 L1 3L2 2L2 MTR1 LP-CC-25 1L1 FU 5 1A LOW LEVEL SHUTDOWN DEVICE E100-198 4L2 BLK WHT N H MDL-1 GFI #1 20A. E100-093 M -1 Pump Contactor FU 2 L-4 REWIND MOTOR 1/6 HP 2.1A P/N E100-212 Rewind Sw. T-4 3A 5L1 2L1 3L1 MTR2 LP-CC-3 FU 4 T-1 TRANSFORMER E100-220 115 VAC H1 H4 FNM-1.5 4L1 15A REWIND CLUTCH 3.9A, 12VDC P/N M100-108 LP-CC-15 FU 3 1.5A H3 T-1 203 202 BLU BLU RECTIFIER 101 X1 X2 FOOT SW. 12 VAC 80 VA RED 201 1 H2 102 BLU WHT TO LINE 18 TO LINE 18 M-1 PUMP CONTACTOR (MAIN CONTROL PANEL) CONNECT TO 120VAC 20A 60 HZ GFI PROTECTED CIRCUIT BOOSTER PUMP CIRCUIT V.1 Rev. 2/17/04 CB3 L3 20A L-3 T-3 91 YEL 93 WHT BLK GND GRN N3 WHT BOOSTER PUMP MOTOR 1.5 HP 15.8 FLA 18.8 SFA M100-647 93 BLK MTR1 GRN N3 © 2004 Ground Heaters, Inc. WHT A-5 A-6 © 2004 Ground Heaters, Inc. BLU WHT BLK GRN GRN MINIATURE LIGHT, AMBER E100-133 BLK MINIATURE LIGHT, AMBER E100-133 - RIGHT TURN BREAK AWAY SWITCH GRN BRN RED BLK = BROWN BRN BLK = BLUE - BRAKES = YELLOW - NOT USED BLU YEL - NEGATIVE/GROUND - RUNNING LIGHTS = WHITE = GREEN WHT GRN - VEHICLE 12 VOLTS DC - LEFT TURN 7-WAY PLUG WIRING COLORS = BLACK = RED BLK RED WHT - WHT BATTERY + LIGHT, 2 BULB AMBER E100-132 RED BATTERY CHARGER GRN LIGHT, 2 BULB AMBER E100-132 GRN ELECTRIC BRAKES ELECTRIC BRAKES GRN - VEHICLE 12 VOLTS DC - NEGATIVE/GROUND - TRAILER BATTERY LIGHT, 2 BULB AMBER E100-132 = BLACK = WHITE = GREEN LIGHT, 2 BULB AMBER E100-132 BLK WHT GRN BATTERY WIRE COLORS = BROWN BRN LIGHT, 2 BULB RED E100-131 GRN GRN LIGHT, 2 BULB RED E100-131 GRN = BLUE - BRAKES = YELLOW - NOT USED BLU YEL GRN STOP-TURN LIGHT, RED E100-342 LICENSE PLATE LIGHT M100-491 GRN GRN 3 LIGHT COMBO E100-022 STOP-TURN LIGHT, RED E100-342 GRN LIGHT, 2 BULB RED E100-131 BRN GRN GRN LIGHT, 2 BULB RED E100-131 - RIGHT TURN - NEGATIVE/GROUND - RUNNING LIGHTS = WHITE = GREEN WHT GRN - NOT USED - LEFT TURN TRAILER WIRE COLORS = BLACK = RED BLK RED SAH 1250 TRAILER WIRING V.1 Rev. 2/17/04 V.1 Rev. 2/17/04 CABLE TO BATTERY © 2004 Ground Heaters, Inc. CABLE TO BATTERY TEE SPLICE BUTT SPLICE GRN. BLK. WHT. BATTERY CHARGER WHT. WHT. + BLK. - YEL. GRN. BATTERY 12 Volt DC RED BATTERY BOX YEL. NOT USED BLK. NOT USED TRAILER BRN. BLK. RED BLU BLK. = RED = WHITE = GREEN = BLUE - BRAKES = YELLOW - NOT USED = BROWN - RIGHT TURN BLK RED WHT GRN BLU YEL BRN GRN BLK WHT TRAILER WIRE COLORS = BLACK - NOT USED BLU YEL BRN = GREEN = BLACK = WHITE - TRAILER BATTERY - VEHICLE 12 VOLTS DC - NEGATIVE/GROUND BATTERY WIRE COLORS - RUNNING LIGHTS - LEFT TURN - NEGATIVE/GROUND = GREEN = BLUE - BRAKES = YELLOW - NOT USED = BROWN - RIGHT TURN GRN - RUNNING LIGHTS - LEFT TURN - NEGATIVE/GROUND = RED = WHITE RED WHT BLU. 7-WAY PLUG WIRING COLORS = BLACK - VEHICLE 12 VOLTS DC BRN. BLK GRN. TOW VEHICLE BLK WHT RED BRN GRN BLU YEL. NOT USED SAH 1250 TRAILER JUNCTION BOX AND BATTERY WIRING BREAK-AWAY SWITCH A-7 SAH 1250 CIRCULATION - BOOSTER PUMP MOTOR WIRING BLK RED WHT GRN BLU YEL ORG WIRE COLORS = BLACK = RED = WHITE = GREEN = BLUE = YELLOW = ORANGE T-2 POWER CABLE WHT BLK GRN YEL BLK WHT ORG BLU WHITE WITH YELLOW TRACE (X2) BRN T-1 4 3 1 2 J GND BALDOR ELEC. MOTOR CIRCULATION - BOOSTER PUMP ASSY. 1.5 HP 15.8 FLA 18.8 SFA P/N M100-647 POWER CABLE YEL YEL T2 T4 YEL YEL P1 T3 YEL P2 T-2 WHT BLK GRN T-1 GND EMERSON ELEC. MOTOR CIRCULATION - BOOSTER PUMP ASSY. 1.5 HP 15.8 FLA 18.8 SFA P/N M100-647 A-8 © 2004 Ground Heaters, Inc. V.1 Rev. 2/17/04 BLK RED WHT GRN BLU YEL ORG WIRE COLORS = BLACK = RED = WHITE = GREEN = BLUE = YELLOW = ORANGE V.1 Rev. 2/17/04 T-1 T-2 GND BLK WHT GRN BLK BLU ORN RED WHT YEL T3 T1 T5 T4 T2 T6 CAPACITOR GEAR MOTOR P/N E100-212 1/6th HP 120 v. 60 Hz SAH 1250 REWIND MOTOR WIRING POWER CABLE © 2004 Ground Heaters, Inc. A-9 A - 10 RECESSED MALE PLUG P/N E100-335 BLK CAPACITOR 15 MFD X 370VAC P/N M100-646 TEMPERATURE CONTROL P/N M100-740 GRN BRN BRN WHT RED BLU HIGH MEDIUM LOW BLK BLK RED WHT GRN BLU BRN 5 2 C © 2004 Ground Heaters, Inc. WIRE COLORS = BLACK = RED = WHITE = GREEN = BLUE = BROWN BLOWER MOTOR, 1 HP 1075 RPM P/N E100-349 4 3 OFF KNOB P/N M100-648 SPEED SELECTOR SW. P/N E100-334 HX 200 HEAT EXCHANGER WIRING DIAGRAM V.1 Rev. 2/17/04 SAH 1250 VALVE POSITIONING FOR OPTIONAL BOOSTER PUMP USE HX 200 HEAT EXCHANGER BOOSTER PUMP FILL HOSE BOOSTER PUMP CONNECTIONS RETURN MANIFOLD SUPPLY MANIFOLD CHECK VALVE Valve 5 SHUT Valve 6 OPEN Valve 7 OPEN Valve 4 SHUT MAIN CIRCULATION PUMP P/N M100-647 Valve 3 OPEN HYDRONIC HEATER PRESSURE GAUGE FLOW INDICATOR Valve 2 OPEN V.1 Rev. 2/17/04 © 2004 Ground Heaters, Inc. A - 11 SAH 1250 VALVE POSITIONING FOR NORMAL OPERATION HX 200 HEAT EXCHANGER BOOSTER PUMP CONNECTIONS WITH PROTECTIVE CAPS INSTALLED RETURN MANIFOLD SUPPLY MANIFOLD CHECK VALVE Valve 5 OPEN Valve 6 SHUT Valve 7 SHUT Valve 4 SHUT FILL HOSE MAIN CIRCULATION PUMP P/N M100-647 Valve 3 OPEN HYDRONIC HEATER PRESSURE GAUGE FLOW INDICATOR Valve 2 OPEN A - 12 © 2004 Ground Heaters, Inc. V.1 Rev. 2/17/04 SAH 1250 VALVE POSITIONING FOR ADDING HTF SAH 200 HEAT EXCHANGER HTF BOOSTER PUMP CONNECTIONS WITH PROTECTIVE CAPS INSTALLED RETURN MANIFOLD SUPPLY MANIFOLD CHECK VALVE Valve 5 OPEN Valve 6 SHUT Valve 7 SHUT Valve 4 OPEN FILL HOSE MAIN CIRCULATION PUMP P/N M100-647 Valve 3 SHUT HYDRONIC HEATER PRESSURE GAUGE FLOW INDICATOR Valve 2 OPEN V.1 Rev. 2/17/04 © 2004 Ground Heaters, Inc. A - 13 A - 14 © 2004 Ground Heaters, Inc. MALE CAM-LOCK P/N M100-700 Unlock the Cam-Lock by swinging the locking arms outward. Insert the male fitting and lock by simultaneously swinging the arms inward as shown. MALE QUICK CONNECT P/N M100-258 Push back collar to insert male QC. Release to lock as shown. ALWAYS: Keep connection devices free of sand and dirt. Rinse in clear water before and after each use. Inspect seals and gaskets before and after each use. Reinstall caps or protective covers after each use. FEMALE CAM-LOCK P/N M100-728 FEMALE QUICK CONNECT P/N M100-259 VITON GASKET P/N P100-352 NEVER: Drop onto a hard surface such as concrete. Drive over with any size vehicle. Attempt to use damaged connection devices. Attempt to use when contaminated with soil, vegetation or any petroleum product. Attempt to use with damaged or worn seals or gaskets. Lubricate with petroleum products. SAH 1250 QUICK-CONNECT AND CAM-LOCK CARE AND MAINTENANCE V.1 Rev. 2/17/04 ! V.1 Rev. 2/17/04 ! CAUTION: SUPPORT THE SAH 1250 TRAILER TONGUE WITH AN 8X8X12" WOOD SECTION OR EQUIVALENT. DO NOT USE THE JACK FOR THIS PURPOSE SUPPORT BLOCK MUST BE PLACED SQUARELY UNDER REINFORCED TONGUE AREA SUGGESTED METHOD FOR SECURING THE SAH 1250 ONTO A TRUCK BED © 2004 Ground Heaters, Inc. A - 15 A - 16 © 2004 Ground Heaters, Inc. IGNITION TRANSFORMER P/N P100-337 BRAIDED PILOT GAS LINE P/N F100-130 INLET PRESSURE TAP INLET GAS VALVE PILOT GAS SOLENOID VALVE P/N P100-353 AUX GAS VALVE P/N P100-341 RESET POWER PILOT FLAME MAIN ALARM HONEYWELL AIR DAMPERS AIR PROVING SWITCH P/N P100-335 I.R. FLAME SENSOR P/N P100-354 BURNER BLOWER WHEEL P/N P100-334 MAIN GAS VALVE P/N P100-340 BURNER BLOWER MOTOR P100-333 PILOT GAS REGULATOR P/N P100-336 PILOT GAS PETCOCK GAS REGULATOR ADJUSTING STEM PROTECTIVE CAP (THREADED) GAS REGULATOR P/N P100-342 BURNER CONTROL P/N P100-338 MANIFOLD PRESSURE TAP GAS TRAIN UNION MANIFOLD GAS VALVE GAS TRAIN JUNCTION BOX 16/2 MALE PIN PLUG P/N E100-341 SAH 1250 GAS BURNER P/N P100-673 COMPONENT IDENTIFICATION V.1 Rev. 2/17/04 In. WC 14 16 18 12 20 26 28 30 24 12 in. WC MINIMUM 14 in. WC MAXIMUM GAS SUPPLY PRESSURE 10 0 – 30 in. WC MANOMETER INSTALL A PETCOCK AND MANOMETER ADAPTER FITTING IN THE PLACE OF THE SUPPLY PRESSURE TAP PLUG. PILOT GAS PRESSURE TAP PILOT GAS PRESSUREIS PRE-SET TO 4.0 in WC 6 8 In. WC 7 9 10 13 14 15 12 0 – 15 in. WC MANOMETER 6 8 In. WC 7 9 10 NG 4 in. WC MAX 5 GAS MANIFOLD PRESSURE LP 2 in. WC MAX 5 RESET POWER PILOT FLAME MAIN ALARM HONEYWELL INSTALL A PETCOCK AND MANOMETER ADAPTER FITTING IN THE PLACE OF THE MANIFOLD PRESSURE TAP PLUG. 4 INSERT A SCREWDRIVER INTO THE ADJUSTMENT STEM. TURN CLOCKWISE TO INCREASE PRESSURE. TURN COUNTER CLOCKWISE TO DECREASE PRESSURE. 8 6 4 2 0 3 2 1 4 0 © 2004 Ground Heaters, Inc. 3 22 2 11 12 1 V.1 Rev. 2/17/04 11 0 REMOVE THE GAS REGULATOR ADJUSTMENT COVER. SAH 1250 GAS PRESSURE CHECKING AND ADJUSTING 13 14 15 A – 17 140 0 – 300 PSI TEST GAUGE INSTALLED 0 © 2004 Ground Heaters, Inc. 0 30 A - 18 FUEL PUMP P/N P100-359 FUEL SHUT OFF VALVE P/N P100-306 FUEL PRESSURE TEST PORT INCREASE FUEL BLEEDER PORT 16/3 MALE PIN CABLE CONNECTION PORT BURNER MOTOR P/N P100-356 BURNER CONTROL P/N P100-206 BLOWER WHEEL P/N P100-357 ALARM ALARM T T FUEL PRESSURE ADJUSTING SCREW BECKETT CF 800 IGNITION TRANSFORMER P/N P100-355 SAH 1250 DIESEL BURNER P/N P100-690 COMPONENT IDENTIFICATION V.1 Rev. 2/17/04 SAH 1250 SAFETY CONTROLS NG/LP BURNER CONTROL (P/N P100-338) The POWER light will illuminate only during the heating cycle. After flame is established, the POWER, PILOT, MAIN and FLAME lights should all be illuminated. If flame failure of any nature is sensed during the start up or heating cycle, the control will stop all burner function and begin Lockout mode. Lockout Mode ALARM light will illuminate PILOT, FLAME and MAIN lights will go out. Momentarily press the RESET button to clear the lockout condition. WHT P-1 BLK GRN WHT G l2 L2 13 3 14 4 15 WHT BLK BLK 6 BLK BLK 16 5 BLK BLK GAS BURNER CONTROL P/N P100-338 7 18 8 19 9 20 10 21 F 22 AIR SWITCH PILOT GAS VALVE BURNER MOTOR PILOT FLAME IGNITER BLU ORG WHT BLK P-2 GAS TRAIN 17 BLU UV FLAME SENSOR MAIN GAS VALVE WIRE COLORS BLK BLK WHT WHT BLK WHT BLK BLU BLK = BLACK ORG = ORANGE WHT = WHITE AUX GAS VALVE GRN = GREEN BLU = BLUE ORG = ORANGE V.1 Rev. 2/17/04 © 2004 Ground Heaters, Inc. A - 19 SAH 1250 SAFETY CONTROLS DIESEL BURNER CONTROL (P/N P100-206) The Diagnostic light (green LED) will illuminate during the heating cycle after the 15 second pre-purge time has elapsed and flame has been established. If flame failure is sensed during the start up or heating cycle, the control will stop all burner function and begin one of three protective modes: 1. Recycle Mode The STATUS light will flash in two second intervals while attempting three automatic restarts. If the flame fails after three successive attempts, the control will go into Lockout mode. 2. Lockout Mode The STATUS light will flash in ½ second intervals. The RESET button must be momentarily pressed to clear the lockout and attempt a burner restart. After three attempts to manually clear the lockout mode, the control will begin Restricted Lockout mode. 3. Restricted Lockout Mode The STATUS light will flash in ½ second intervals. The RESET button must be pressed and held for 30 seconds or until the STATUS light comes on for two seconds and then goes out. The control will return to Restricted Lockout mode with each flame failure until one successful heating cycle has occurred. DIAGNOSTIC LIGHT RESET BUTTON WHT BLK GRN BLK P-1 WHT BURNER WIRING GRN WIRE COLORS BLK = BLACK RED = RED WHT = WHITE GRN = GREEN BLU = BLUE YEL = YELLOW ORG = ORANGE VIO = VIOLET WHT WHT BLK WHT WHT WHT WHT L-2 T T + - ALARM ALARM Burner Motor BLK BLK RED OIL VALVE BLK ORG VIO VIO L-1 BURNER Honeywell CONTROL Burner P/NControl P100-206 BURNER P100-206 LIMIT VALVE BLK WHT C+ C- IGN INLINE FUEL HEATER (START HELPER) P/N P100-251 A - 20 IGNITION TRANSFORMER BLU © 2004 Ground Heaters, Inc. BLU YEL YEL CAD CELL V.1 Rev. 2/17/04 SAH 1250 SAFETY CONTROLS LOW WATER CUT-OFF (P/N P100-198) NOTE: CONTROL IS SHOWN IN A NON-POWERED STATE LOW WATER CUT-OFF BASIC WIRING DIAGRAM GRN BLU GRN 3 GRN RED B W 1 ORG C 4L2 BLK H 302 WHT N BLU PROBE WIRE CONNECTION GRN LOW LEVEL BLU POWER RESET BUTTON LOW LEVEL SENSOR TEST BUTTON LOW WATER CUT-OFF INTERNAL SCHEMATIC TO LOW LEVEL RELAY CR-1 RED 3 B N.O. W N.C. 110 VOLTS FROM CIRCUIT 1 ORG 1 C BLK 4L2 H WHT 302 N PROBE LOW LEVEL LOGIC MODULE 110 VOLTS FROM CIRCUIT 2 V.1 Rev. 2/17/04 © 2004 Ground Heaters, Inc. GREEN LED WIRE COLORS RED LED BLK = BLACK RED = RED WHT = WHITE GRN = GREEN BLU = BLUE ORG = ORANGE A - 21 SAHARA AIR HEATER™ 1250 OPERATOR'S MANUAL SPECIFICATIONS SPECIFICATIONS Dimensions and Capacities Length 172 in. (437 cm) Width 92 in. (234 cm) Height 80 in. (203 cm) Ground Clearance 9 in. (23 cm) Weight 7,120 lbs (3,230 kg) Heat Transfer Fluid 140 US gallons (530 liters) Pump, 1.5 hp centrifugal 1 Hose 1,000 ft (305 m) 200 ft. (61 m) 2 100 ft. (31 m) 4 50 ft. (15 m) 4 Hose Reel 1 Hose Rewind 120V AC, w/12V DC clutch Circulation Loops 5 Tires LT235/85R16 Hitch 3 in. Pintle or 2-5/16 in. Ball Heat Exchangers, (200,000 BTU/H, 2,670 cfm) 4 Loading Ramp 1 On-Board Manifolds 2 Lifting Bar Standard Performance (choice of fuels) Natural Gas, Input Natural Gas, Output Propane, Input 1,000,000 BTU/H 800,000 BTU/H 1,100,000 BTU/H Propane, Output 880,000 BTU/H Diesel, Input 745,000 BTU/H Diesel, Output 600,000 BTU/H Temperature Controller Digital Fuel Consumption at Full Load: (natural gas) 1,000 CFH (propane) 12 GPH (diesel) 5.32 GPH Electrical Requirement Normal Operating Temp V. 1, Rev. 2/17/04 2 x 20 amps x 120V AC 180ºF (82ºC) © 2004 Ground Heaters, Inc. B-1 SAH 1250 APPLICATION LAYOUTS Maintenance Key Application C - Cleaned inside of tubes and combustion chamber P - Pump pressure checked/adjusted Multi-room, E - Electrode positioning check I single level building site S - Smoke Spot Test performed and recorded - Inspected heat exchanger integrity CO2, Stack Temperature and elevation V - Verified combustion efficiency. Recorded N - Nozzle replaced Ground Heater Serial Number: _ _ _ _ - _ _ _ _ _ Application Multi-level building site MG M S V. 1, Rev. 2/17/04 © 2004 Ground Heaters, Inc. C-1