1
iDataFax User Guide
Clinical DataFax Systems Inc.
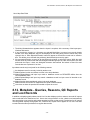
Table of Contents
Table of Contents
iDataFax User Guide
.
.
.
.
.
.
.
.
.
.
.
.
.
.
.
Preface .
.
.
.
.
.
.
.
.
.
.
.
.
.
.
.
.
.
.
Chapter 1. Introduction .
.
.
.
.
.
.
.
.
.
.
.
.
.
.
1.1. What is iDataFax ? .
.
.
.
.
.
.
.
.
.
.
.
.
.
1.2. What type of computer do I need? .
.
.
.
.
.
.
.
.
.
.
1.3. What type of web browser do I need? .
.
.
.
.
.
.
.
.
.
1.4. Is data transmission over the internet secure? .
.
.
.
.
.
.
.
1.5. What kind of response time can I expect? .
.
.
.
.
.
.
.
.
1.6. How complicated is this going to be? .
.
.
.
.
.
.
.
.
.
1.7. Is any patient data stored on my local hard drive? .
.
.
.
.
.
.
1.8. Can anyone impersonate me within iDataFax?
.
.
.
.
.
.
.
1.9. How hard is it to navigate among the various study forms for each patient? .
1.10. Can I use iDataFax for more than one study at a time? .
.
.
.
.
1.11. If I don’t like this, or have time for it, can I switch to faxing?
.
.
.
.
1.12. How do I get started?
.
.
.
.
.
.
.
.
.
.
.
.
.
1.13. After I connect to a study how do I enter patient data?
.
.
.
.
.
1.14. What do I do when I’m finished entering patient data? .
.
.
.
.
.
Chapter 2. A Guided Tour .
.
.
.
.
.
.
.
.
.
.
.
.
.
2.1. Login .
.
.
.
.
.
.
.
.
.
.
.
.
.
.
.
.
.
2.2. User Permissions .
.
.
.
.
.
.
.
.
.
.
.
.
.
.
2.3. Data View
.
.
.
.
.
.
.
.
.
.
.
.
.
.
.
.
2.4. Queries View .
.
.
.
.
.
.
.
.
.
.
.
.
.
.
.
2.5. Reasons View
.
.
.
.
.
.
.
.
.
.
.
.
.
.
.
2.6. Fax View .
.
.
.
.
.
.
.
.
.
.
.
.
.
.
.
.
2.7. Reports View .
.
.
.
.
.
.
.
.
.
.
.
.
.
.
.
2.8. List View .
.
.
.
.
.
.
.
.
.
.
.
.
.
.
.
.
2.9. Status View .
.
.
.
.
.
.
.
.
.
.
.
.
.
.
.
Chapter 3. Using iDataFax .
.
.
.
.
.
.
.
.
.
.
.
.
.
3.1. How do I select the correct patient binder for a new patient?
.
.
.
.
3.2. Can I print a copy of a patient binder? .
.
.
.
.
.
.
.
.
.
3.3. How can I make sure that I’m completing the data forms correctly? .
.
.
3.4. Can I enter a reason to explain an unusual value or a value I have changed?
3.5. Can I use standard missing value codes? .
.
.
.
.
.
.
.
.
3.6. What are queries and where do they come from? .
.
.
.
.
.
.
3.7. How do I find all outstanding queries? .
.
.
.
.
.
.
.
.
.
3.8. How should I respond to queries? .
.
.
.
.
.
.
.
.
.
.
3.9. Can I respond to a query by adding a reason for the data value? .
.
.
3.10. How should I respond to a query if the data field is correct as is? .
.
.
3.11. Can I indicate that a patient assessment is unavailable? .
.
.
.
.
3.12. Can I indicate that a page is unavailable?
.
.
.
.
.
.
.
.
3.13. Do I need to save the changes I have made? .
.
.
.
.
.
.
.
3.14. Can I undo all changes I have just made to a page? .
.
.
.
.
.
3.15. What’s the best way to find all outstanding problems? .
.
.
.
.
.
3.16. Why did my iDataFax session Auto Logout? .
.
.
.
.
.
.
.
3.17. How should I exit from iDataFax ? .
.
.
.
.
.
.
.
.
.
3.18. What should I do if I have questions? .
.
.
.
.
.
.
.
.
.
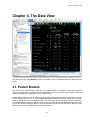
Chapter 4. The Data View .
.
.
.
.
.
.
.
.
.
.
.
.
.
4.1. Patient Binders .
.
.
.
.
.
.
.
.
.
.
.
.
.
.
4.2. Metadata: Queries, Reasons and Missing Values .
.
.
.
.
.
.
4.3. Data Field Colors .
.
.
.
.
.
.
.
.
.
.
.
.
.
.
4.4. Entering Data and Metadata .
.
.
.
.
.
.
.
.
.
.
.
4.5. Saving Data and Metadata
.
.
.
.
.
.
.
.
.
.
.
.
4.6. Correcting Key Fields .
.
.
.
.
.
.
.
.
.
.
.
.
.
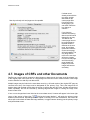
4.7. Images of CRFs and other Documents
.
.
.
.
.
.
.
.
.
4.8. Working with Tasks .
.
.
.
.
.
.
.
.
.
.
.
.
.
-i-
.
.
.
.
.
.
.
.
.
.
.
.
.
.
.
.
.
.
.
.
.
.
.
.
.
.
.
.
.
.
.
.
.
.
.
.
.
.
.
.
.
.
.
.
.
.
.
.
.
.
.
.
.
.
.
.
.
.
.
.
.
.
.
.
.
.
.
.
.
.
.
.
.
.
.
.
.
.
.
.
.
.
.
.
.
.
.
.
.
.
.
.
.
.
.
.
.
.
.
.
.
.
.
.
.
.
.
.
.
.
.
.
.
.
.
.
.
.
.
.
.
.
.
.
.
.
.
.
.
.
.
.
.
.
.
.
.
.
.
.
.
.
.
.
.
.
.
.
.
.
.
.
.
.
.
.
.
.
.
.
.
.
.
.
.
.
.
.
.
.
.
.
.
.
.
.
.
.
.
.
.
.
.
.
.
.
.
.
.
.
.
.
.
.
.
.
.
.
.
.
.
.
.
.
.
.
.
.
.
.
.
.
.
.
.
.
.
.
.
.
1
2
3
3
3
3
3
3
4
4
4
4
5
5
5
5
6
7
7
9
9
12
12
13
15
16
18
19
19
20
20
22
23
24
25
25
26
27
27
28
28
29
29
30
32
32
33
33
34
35
35
36
36
40
42
iDataFax User Guide
4.8.1. Performing Tasks .
.
.
.
.
4.8.2. Defining Tasks .
.
.
.
.
.
4.9. Adhoc Record Selection
.
.
.
.
4.9.1. Changing Mode and Level .
.
.
4.9.2. Select - By Data Fields .
.
.
.
4.9.3. Select - By Data Retrieval File .
.
4.9.4. Select - Batch Validate .
.
.
.
4.10. Using Lookup Tables .
.
.
.
.
4.11. Query Management .
.
.
.
.
4.12. Automatic Resolution of Data Queries .
4.13. Review/Approve Queries and Reasons .
4.14. Transmitting Scanned CRFs .
.
.
4.15. Importing Patient Documents .
.
.
4.16. Data View Menus .
.
.
.
.
.
4.16.1. File Menu .
.
.
.
.
.
.
4.16.2. Edit Menu .
.
.
.
.
.
.
4.16.3. Select Menu .
.
.
.
.
.
4.16.4. Show Menu .
.
.
.
.
.
4.16.5. Patient Menu .
.
.
.
.
.
4.16.6. Assessment Menu .
.
.
.
.
4.16.7. Page Menu
.
.
.
.
.
.
4.16.8. Field Menu
.
.
.
.
.
.
4.16.9. Help Menu
.
.
.
.
.
.
Chapter 5. The Queries View .
.
.
.
.
5.1. The Queries Table .
.
.
.
.
.
5.2. Query Status .
.
.
.
.
.
.
5.3. Queries View Menus
.
.
.
.
.
5.3.1. The Show Menu
.
.
.
.
.
5.3.2. The Query Menu
.
.
.
.
.
Chapter 6. The Reasons View .
.
.
.
.
6.1. The Reasons Table .
.
.
.
.
.
6.2. Reason Status .
.
.
.
.
.
.
6.3. Reasons View Menus .
.
.
.
.
6.3.1. The Show Menu
.
.
.
.
.
6.3.2. The Reason Menu .
.
.
.
.
Chapter 7. The Fax View .
.
.
.
.
.
7.1. The Record Selection Dialog
.
.
.
7.2. Entering New Records .
.
.
.
.
7.3. Entering Refaxed CRFs .
.
.
.
.
7.4. Correcting the Keys .
.
.
.
.
.
7.5. Switching to Data View .
.
.
.
.
7.6. Record Locking in Fax View .
.
.
.
7.7. Fax View Menus
.
.
.
.
.
.
7.7.1. The Select Menu .
.
.
.
.
7.7.2. The Page Menu
.
.
.
.
.
Chapter 8. List View .
.
.
.
.
.
.
8.1. Introduction .
.
.
.
.
.
.
.
8.2. User Preferences .
.
.
.
.
.
8.3. Navigation .
.
.
.
.
.
.
.
8.4. Working on a Task .
.
.
.
.
.
8.5. Selecting Data Fields .
.
.
.
.
8.6. Searching Data Records
.
.
.
.
8.7. Saving Defined Views .
.
.
.
.
8.8. Exporting Data Records .
.
.
.
.
8.9. Exporting a Data Retrieval File .
.
.
8.10. Exporting SAS Data Sets .
.
.
.
.
.
.
.
.
.
.
.
.
.
.
.
.
.
.
.
.
.
.
.
.
.
.
.
.
.
.
.
.
.
.
.
.
.
.
.
.
.
.
.
.
.
.
.
.
.
.
.
.
.
.
.
.
.
.
.
- ii -
.
.
.
.
.
.
.
.
.
.
.
.
.
.
.
.
.
.
.
.
.
.
.
.
.
.
.
.
.
.
.
.
.
.
.
.
.
.
.
.
.
.
.
.
.
.
.
.
.
.
.
.
.
.
.
.
.
.
.
.
.
.
.
.
.
.
.
.
.
.
.
.
.
.
.
.
.
.
.
.
.
.
.
.
.
.
.
.
.
.
.
.
.
.
.
.
.
.
.
.
.
.
.
.
.
.
.
.
.
.
.
.
.
.
.
.
.
.
.
.
.
.
.
.
.
.
.
.
.
.
.
.
.
.
.
.
.
.
.
.
.
.
.
.
.
.
.
.
.
.
.
.
.
.
.
.
.
.
.
.
.
.
.
.
.
.
.
.
.
.
.
.
.
.
.
.
.
.
.
.
.
.
.
.
.
.
.
.
.
.
.
.
.
.
.
.
.
.
.
.
.
.
.
.
.
.
.
.
.
.
.
.
.
.
.
.
.
.
.
.
.
.
.
.
.
.
.
.
.
.
.
.
.
.
.
.
.
.
.
.
.
.
.
.
.
.
.
.
.
.
.
.
.
.
.
.
.
.
.
.
.
.
.
.
.
.
.
.
.
.
.
.
.
.
.
.
.
.
.
.
.
.
.
.
.
.
.
.
.
.
.
.
.
.
.
.
.
.
.
.
.
.
.
.
.
.
.
.
.
.
.
.
.
.
.
.
.
.
.
.
.
.
.
.
.
.
.
.
.
.
.
.
.
.
.
.
.
.
.
.
.
.
.
.
.
.
.
.
.
.
.
.
.
.
.
.
.
.
.
.
.
.
.
.
.
.
.
.
.
.
.
.
.
.
.
.
.
.
.
.
.
.
.
.
.
.
.
.
.
.
.
.
.
.
.
.
.
.
.
.
.
.
.
.
.
.
.
.
.
.
.
.
.
.
.
.
.
.
.
.
.
.
.
.
.
.
.
.
.
.
.
.
.
.
.
.
.
.
.
.
.
.
.
.
.
.
.
.
.
.
.
.
.
.
.
.
.
.
.
.
.
.
.
.
.
.
.
.
.
.
.
.
.
.
.
.
.
.
.
.
.
.
.
.
.
.
.
.
.
.
.
.
.
.
.
.
.
.
.
.
.
.
.
.
.
.
.
.
.
.
.
.
.
.
.
.
.
.
.
.
.
.
.
.
.
.
.
.
.
.
.
.
.
.
.
.
.
.
.
.
.
.
.
.
.
.
.
.
.
.
.
.
.
.
.
.
.
.
.
.
.
.
.
.
.
.
.
.
.
.
.
.
.
.
.
.
.
.
.
.
.
.
.
.
.
.
.
.
.
.
.
.
.
.
.
.
.
.
.
.
.
.
.
.
.
.
.
.
.
.
.
.
.
.
.
.
.
.
.
.
.
.
.
.
.
.
.
.
.
.
.
.
.
.
.
.
.
.
.
.
.
.
.
.
.
.
.
.
.
.
.
.
.
.
.
.
.
.
.
.
.
.
.
.
.
.
.
.
.
.
.
.
42
.
44
.
50
.
50
.
51
.
52
.
53
.
54
.
56
.
58
.
58
.
60
.
62
.
66
.
66
.
67
.
67
.
67
.
68
.
68
.
68
.
69
.
70
.
71
.
71
.
71
.
72
.
72
.
73
.
75
.
75
.
75
.
75
.
76
.
76
.
77
.
79
.
83
.
83
.
84
.
84
.
85
.
85
.
86
.
86
.
87
.
87
.
88
.
88
.
89
.
89
.
90
.
95
.
97
.
98
.
98
.
Table of Contents
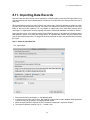
8.11. Importing Data Records
.
.
.
.
.
.
.
.
.
8.12. Metadata - Queries, Reasons, QC Reports and Lost Records
8.13. List View Menus .
.
.
.
.
.
.
.
.
.
.
8.13.1. The Select Menu .
.
.
.
.
.
.
.
.
.
8.13.2. The Show Menu .
.
.
.
.
.
.
.
.
.
Chapter 9. The Reports View .
.
.
.
.
.
.
.
.
.
9.1. Introduction .
.
.
.
.
.
.
.
.
.
.
.
.
9.2. Report Types .
.
.
.
.
.
.
.
.
.
.
.
9.3. Explain - Report Documentation .
.
.
.
.
.
.
.
9.4. Report Options and Database Permissions .
.
.
.
.
9.5. Running Reports
.
.
.
.
.
.
.
.
.
.
.
9.6. Saving Report Lists .
.
.
.
.
.
.
.
.
.
.
Chapter 10. The Status View .
.
.
.
.
.
.
.
.
.
10.1. Introduction .
.
.
.
.
.
.
.
.
.
.
.
10.2. Level & Status .
.
.
.
.
.
.
.
.
.
.
.
10.3. Filtering The Status Report
.
.
.
.
.
.
.
.
10.4. Links .
.
.
.
.
.
.
.
.
.
.
.
.
.
10.5. User Permissions .
.
.
.
.
.
.
.
.
.
.
10.6. New Fax Queue .
.
.
.
.
.
.
.
.
.
.
10.7. Unidentified Fax Router
.
.
.
.
.
.
.
.
.
10.8. Returned QC Reports (plate 501) .
.
.
.
.
.
.
Chapter 11. Unidentified Fax Router .
.
.
.
.
.
.
.
11.1. Introduction .
.
.
.
.
.
.
.
.
.
.
.
11.2. Router Functions .
.
.
.
.
.
.
.
.
.
.
11.3. Restrictions .
.
.
.
.
.
.
.
.
.
.
.
11.4. Starting The Router
.
.
.
.
.
.
.
.
.
.
11.5. The File Menu .
.
.
.
.
.
.
.
.
.
.
.
11.5.1. Update Records .
.
.
.
.
.
.
.
.
.
11.5.2. New Study
.
.
.
.
.
.
.
.
.
.
.
11.5.3. Close Router .
.
.
.
.
.
.
.
.
.
.
11.5.4. Exit .
.
.
.
.
.
.
.
.
.
.
.
.
11.6. The Page Menu .
.
.
.
.
.
.
.
.
.
.
11.6.1. Rotate
.
.
.
.
.
.
.
.
.
.
.
.
11.6.2. Shift .
.
.
.
.
.
.
.
.
.
.
.
.
11.6.3. Flip .
.
.
.
.
.
.
.
.
.
.
.
.
11.6.4. Cut
.
.
.
.
.
.
.
.
.
.
.
.
.
11.6.5. Truncate Length .
.
.
.
.
.
.
.
.
.
11.6.6. Trim Width
.
.
.
.
.
.
.
.
.
.
.
11.6.7. Rotate 90° CW/CCW .
.
.
.
.
.
.
.
.
11.6.8. Rotate 90° CW/CCW and scale
.
.
.
.
.
.
11.6.9. Print .
.
.
.
.
.
.
.
.
.
.
.
.
11.6.10. Export as PDF .
.
.
.
.
.
.
.
.
.
11.6.11. Previous .
.
.
.
.
.
.
.
.
.
.
.
11.6.12. Next .
.
.
.
.
.
.
.
.
.
.
.
.
11.6.13. Context .
.
.
.
.
.
.
.
.
.
.
.
11.6.14. Reset
.
.
.
.
.
.
.
.
.
.
.
.
11.7. The Action Menu .
.
.
.
.
.
.
.
.
.
.
11.7.1. Rotate/Shift/Identify
.
.
.
.
.
.
.
.
.
11.7.2. Move .
.
.
.
.
.
.
.
.
.
.
.
.
11.7.3. Discard .
.
.
.
.
.
.
.
.
.
.
.
Chapter 12. User Preferences .
.
.
.
.
.
.
.
.
.
12.1. Data Window .
.
.
.
.
.
.
.
.
.
.
.
12.2. Image Window
.
.
.
.
.
.
.
.
.
.
.
12.3. Record List
.
.
.
.
.
.
.
.
.
.
.
.
12.4. Query Defaults
.
.
.
.
.
.
.
.
.
.
.
12.5. List View .
.
.
.
.
.
.
.
.
.
.
.
.
- iii -
.
.
.
.
.
.
.
.
.
.
.
.
.
.
.
.
.
.
.
.
.
.
.
.
.
.
.
.
.
.
.
.
.
.
.
.
.
.
.
.
.
.
.
.
.
.
.
.
.
.
.
.
.
.
.
.
.
.
.
.
.
.
.
.
.
.
.
.
.
.
.
.
.
.
.
.
.
.
.
.
.
.
.
.
.
.
.
.
.
.
.
.
.
.
.
.
.
.
.
.
.
.
.
.
.
.
.
.
.
.
.
.
.
.
.
.
.
.
.
.
.
.
.
.
.
.
.
.
.
.
.
.
.
.
.
.
.
.
.
.
.
.
.
.
.
.
.
.
.
.
.
.
.
.
.
.
.
.
.
.
.
.
.
.
.
.
.
.
.
.
.
.
.
.
.
.
.
.
.
.
.
.
.
.
.
.
.
.
.
.
.
.
.
.
.
.
.
.
.
.
.
.
.
.
.
.
.
.
.
.
.
.
.
.
.
.
.
.
.
.
.
.
.
.
.
.
.
.
.
.
.
.
.
.
.
.
.
.
.
.
.
.
.
.
.
.
.
.
.
.
.
.
.
.
.
.
.
.
.
.
.
.
.
.
.
.
.
.
.
.
.
.
.
.
.
.
.
.
.
.
.
.
.
.
.
.
.
.
.
.
.
.
.
.
.
.
.
.
.
.
.
.
.
.
.
.
.
.
.
.
.
.
.
.
.
.
.
.
.
.
.
.
.
.
.
.
.
.
.
.
.
.
.
.
.
.
.
.
.
.
.
.
.
.
.
.
.
.
.
.
.
.
.
.
.
.
.
.
.
.
.
.
.
.
.
.
.
.
.
.
.
.
.
.
.
.
.
.
.
.
.
.
.
.
.
.
.
.
.
.
.
.
.
.
.
.
.
.
.
.
.
.
.
.
.
.
.
.
.
.
.
.
.
.
.
.
.
.
.
.
.
.
.
.
.
.
.
.
.
.
.
.
.
.
.
.
.
.
.
.
.
.
.
.
.
.
.
.
101
.
107
.
109
.
109
.
109
.
110
.
110
.
111
.
111
.
111
.
111
.
112
.
114
.
114
.
115
.
116
.
116
.
116
.
116
.
116
.
116
.
117
.
117
.
117
.
117
.
118
.
119
.
119
.
119
.
119
.
119
.
119
.
119
.
120
.
120
.
120
.
121
.
121
.
121
.
121
.
121
.
121
.
122
.
122
.
122
.
122
.
122
.
123
.
123
.
123
.
124
.
126
.
126
.
126
.
127
.
127
.
iDataFax User Guide
12.6. Screen Options
.
.
.
.
.
.
.
.
.
.
.
12.7. Fax View Options .
.
.
.
.
.
.
.
.
.
.
12.8. Auto Logout .
.
.
.
.
.
.
.
.
.
.
.
Chapter 13. Appendix .
.
.
.
.
.
.
.
.
.
.
.
13.1. Terminology .
.
.
.
.
.
.
.
.
.
.
.
13.2. Common Error and Warning Messages
.
.
.
.
.
13.3. Programs .
.
.
.
.
.
.
.
.
.
.
.
.
13.3.1. DFmkdrf.jnl - make DataFax DRF file from study journals
13.3.2. DFmkdrf.ec - make DataFax DRF file from edit checks .
- iv -
.
.
.
.
.
.
.
.
.
.
.
.
.
.
.
.
.
.
.
.
.
.
.
.
.
.
.
.
.
.
.
.
.
.
.
.
.
.
.
.
.
.
.
.
.
.
.
.
.
.
.
.
.
.
.
.
.
.
.
.
.
.
.
.
.
.
.
.
.
.
.
.
127
.
127
.
128
.
129
.
129
.
130
.
133
.
133
.
136
.
iDataFax User Guide
iDataFax User Guide
Release 4.2.0.0
Copyright © 2011 Clinical DataFax Systems Inc
All rights reserved. No part of this publication may be re-transmitted in any form or by any means, electronic, mechanical, photocopying, recording, or otherwise, without the prior written permission of Clinical
DataFax Systems Inc. Permission is granted for internal re-distribution of this publication by the license
holder and his employees for internal use only, provided that the copyright notices and this permission
notice appear in all copies.
The information in this document is furnished for informational use only and is subject to change without
notice. Clinical DataFax Systems Inc assumes no responsibility or liability for any errors or inaccuracies in
this document or for any omissions from it.
All products or services mentioned in this document are covered by the trademarks, service marks, or
product names as designated by the companies who market those products.
Sep 15, 2011
Abstract
This guide describes the iDataFax tool
-1-
iDataFax User Guide
Preface
Images in this document are screen shots from iDataFax running under Mac OS X. However, functionality
is identical under all operating systems, and images are almost identical, except for window decorations.
Instructions to "select" some object can be carried out either by clicking on the object using the mouse, or
by keyboarding to it and pressing the space or Return key.
Instructions to select Menu > Option refer to the selection of options from the menus at the top of the
screen. For example, to open the Data window, select View > Data.
The instructions contained in this User Guide are intended to describe, in general terms, how data entry is
performed using iDataFax. The guidance provided here is not meant to replace more specific instructions
which may be provided by the sponsor, principal investigator or coordinating center for a particular trial.
-2-
Chapter 1. Introduction
Chapter 1. Introduction
1.1. What is iDataFax ?
iDataFax is a computer program used to enter, review and modify patient data, and to submit it over the
internet to a DataFax server at the study coordinating center. This type of data entry is commonly referred
to as Electronic Data Capture or EDC. iDataFax is part of the DataFax clinical trial management system,
which also supports data collection by fax. Both methods can be used in the same study, but EDC has
often been described as having the advantage of providing immediate help to users, resulting in more
complete and accurate data entry, and fewer queries from the study coordinating center.
To help realize these benefits and facilitate the transition from paper forms to EDC iDataFax has been
designed with:
intuitive navigation, using a patient binder analogy,
data entry screens that match the equivalent paper forms,
help in the form of: status icons, color coding, messages and edit checks,
a Query window used to read and respond to queries from the study coordinating center,
a Reason window used to explain unusual data values (and thus avoid queries), and
a Missing Value window used to mark fields with standard missing value codes
1.2. What type of computer do I need?
Versions of iDataFax exist for: Windows XP and 2000, Mac OS X, Solaris, and Linux. If you plan to use
iDataFax on more than one computer you will need to install the appropriate version on each computer.
1.3. What type of web browser do I need?
iDataFax is a standalone application. It does not reply on a specific web browser. It may be downloaded
and run on your local PC or deployed through an application server hosted by the study sponsor. iDataFax
communicates with the DataFax server using HTTPS on TCP port 443 which is also used by other secure
web services such as online banking. This port must be open on any firewalls between the two systems.
1.4. Is data transmission over the internet
secure?
iDataFax encrypts all internet transmissions using the same technology used by banks and other secure
applications.
1.5. What kind of response time can I expect?
As with all internet applications, this depends primarily on the speed and traffic on your internet connection, and to a lesser extent on the distance between you and the study DataFax server. If you have a cable
or DSL internet connection, you can expect login times in the range of 5 to 20 seconds and then 1 to 4
seconds to display each new page in the data entry window. Once a page is on the screen, moving
between data fields is very fast, with essentially no delay.
-3-
iDataFax User Guide
1.6. How complicated is this going to be?
With a little practice, you should find that completing data collection pages in iDataFax is just as easy as
completing a printed version of the same page. In addition, the guidance provided by color coding (e.g.
illegal values appear red) and the messages displayed by data consistency checks will help you identify
problems which can be corrected immediately or explained by entering a reason for unusual values. This
advantage over paper forms will help you avoid queries and requests for corrections from the study coordinating center, thus saving you time in the long run.
1.7. Is any patient data stored on my local hard
drive?
No - all patient data is sent to and retrieved from the DataFax server at the study coordinating center. As a
result, you can access the study from any computer on which iDataFax has been installed. And different
users can access their studies from the same computer(s). All you need to provide is your login name and
password.
1.8. Can anyone impersonate me within
iDataFax?
Permission to read, write and modify patient data is defined by the study coordinating center for each
iDataFax user. These permissions determine which study, sites, patients, assessments and individual
data pages each user can create, view and modify. It would not be uncommon for more than one person
to have permission to enter data for the same patient at a given clinical site; however, all data entry is
recorded with the user’s login name, date and time; thus a complete history is maintained of all database
transactions. Your login name plus a password constitute your electronic signature. By protecting your
electronic signature, and making sure you logout of iDataFax before leaving a computer workstation, you
can ensure that no one can impersonate you and perform data entry that will be attributed to you.
1.9. How hard is it to navigate among the various
study forms for each patient?
Some of the frustration with EDC systems arises from dissimilarity between paper work sheets and data
screens, and the difficulty in navigating through the windows of an unfamiliar system to find what you
want. By comparison, a patient binder full of printed forms organized by study assessments from beginning to end, with tabs identifying each assessment, is quite easy to use.
iDataFax follows this patient binder analogy. When you open a clinical site (like walking into your office)
you will see a list of patient icons (like patient binders on a shelf). Double clicking a patient icon opens the
binder to reveal the list of assessments that comprise all patient visits from beginning to end of the study.
Double clicking an assessment opens that section of the binder to show the data collection pages for that
assessment. When you are finished reviewing or entering data, double clicking an open assessment or
patient binder will close it. Each assessment, and page within an assessment, has a text label describing
what it is, and colored icons that identify whether it is required or optional, blank or containing data, and, if
data is present, whether it is complete or incomplete.
-4-
1.10. Can I use iDataFax for more than one study at a time?
In addition to the data view, there is a queries view that lets you review data queries from the central office
and jump to each relevant data field, where you can enter a reply or correct the data value.
This familiar organization, along with the use of icons and color, makes navigating the study forms as easy
as using a printed patient binder - perhaps even easier.
1.10. Can I use iDataFax for more than one study
at a time?
Yes. The login screen asks you to specify the name of the DataFax server at the study coordinating
center. Once you connect to the desired server you will see a list of all the studies you are participating in
at that center; thus it is possible to use iDataFax to participate in many different studies being run by many
different coordinating centers. In all cases the software will behave the same; only the study data entry
forms will differ.
1.11. If I don’t like this, or have time for it, can I
switch to faxing?
DataFax is capable of supporting both EDC and faxing data collection forms within the same study, with
no additional study setup work. Further, the design of the paper forms and data screens are identical and
are completed in the same step; thus switching a clinical site from iDataFax to completing and faxing
paper forms is certainly possible, and provides a fall-back position for sites that find EDC too time consuming or problematic for whatever reason. Of course, it is also possible to move in the other direction, switching from faxing to EDC.
1.12. How do I get started?
First you will need to download and install iDataFax following the instructions provided by the study coordinating center. On starting iDataFax, you will see a login screen where you enter the name of the
DataFax server at the study coordinating center, your user login name, and your password, all of which
will be provided by the study coordinating center.
If your login is successful you will then see a list of the studies in which you are participating at the coordinating center, with a status tag indicating whether each study is currently available or off-line for maintenance. If a study is available, double clicking the study name will open the study database.
1.13. After I connect to a study how do I enter
patient data?
If you are not already in the Data view, select it from the View menu in the menubar. The clinical sites in
which you have permission to work will then be listed on the left side of the screen. Double clicking a site
will open it to reveal the list of patient binders. Double clicking a patient binder will open it to reveal the
study assessment tabs, and double clicking a tab will open the assessment to reveal the data entry pages
for that assessment. You can then enter data, add reasons to explain unusual values, and reply to
outstanding queries from central office.
-5-
iDataFax User Guide
When you are finished with a page, to save your work in the study database at coordinating center, click
one of 3 Save buttons at the bottom of the data entry window: Final (to indicate that data entry is
complete), incomplete (to indicate that some fields are incomplete or some queries remain to be
answered), or Pending (to indicate that you have not yet finished your first pass through the page and
want to finish it before it is reviewed by the study coordinating center).
1.14. What do I do when I’m finished entering
patient data?
You can close an assessment by double clicking the open assessment tab, and close a patient by double
clicking the patient icon. Only one patient binder can be open at a time; opening a new one will automatically close the open one (if any). When you are finished entering data for all patients logout by selecting
Exit from the File menu in the menubar.
-6-
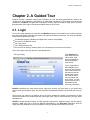
Chapter 2. A Guided Tour
Chapter 2. A Guided Tour
DataFax includes 3 separate internet tools: DFsystem for user and study administration, DFsetup for
creating new study databases, and iDataFax for study data management. This chapter provides a brief
introduction to iDataFax. It begins with a description of how to login to a DataFax study server, and then
describes each of the major components available under the View menu.
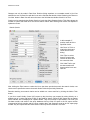
2.1. Login
To work in a study database you must first start iDataFax and login to the DataFax server where the study
data and configuration information are stored. This requires an internet connection. The study coordinating
center will have provided you with:
the iDataFax program (Windows and Apple OS X versions are available),
the name of the DataFax server,
your login name,
your initial password, and
the name of the study (or studies) which you have permission to access on this server.
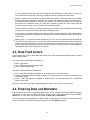
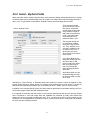
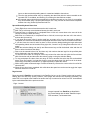
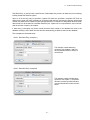
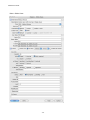
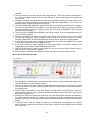
There are 2 steps to the login process, as illustrated below.
In the iDataFax the
login dialog enter the
server name, login
name and password,
and then select the
Login button.
The Login Dialog
If your IT department
has installed a proxy
server (to filter requests
sent to other servers on
the internet) click the
button to the right of
the ’DataFax Server’
name to register the
proxy server. You will
need to contact your IT
department for the
necessary information.
iDataFax remembers the most recent servers (and proxy servers) you have used, so you should only
need to enter this information once, but your login name and password needs to be entered each time you
login.
The first time you connect to a DataFax server you will be prompted to change your password. All data
entered and modified is recorded under each users login name. Thus be careful to protect your login name
and password.
iDataFax includes password aging, an FDA regulatory requirement. Password expiry may be anytime
between 1-9999 days and is set by the DataFax Administrator in the DFsystem application. After the
expiry period has elapsed you will be prompted to reset your password the next time you login.
-7-
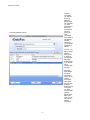
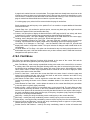
iDataFax User Guide
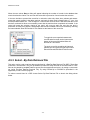
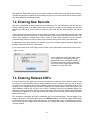
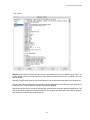
If login is
successful
you will see
the study
selection
dialog with a
list of studies
you have
permission to
access on
the DataFax
server to
which you
have
connected.
Each study is
identified by
number,
name and
current status
(available or
offline).
The Study Selection Dialog
To work on a
study, double
click the
study name,
or select it
and click the
OK button.
Press Cancel
if you decide
not to
continue with
the login.
Note that
both dialogs
include a
Help button
which can be
used to
access this
user guide,
which is also
available
from the Help
menu after
you login.
Thus the user
guide is
always available, even
when you do
not have an
internet
connection.
-8-
2.2. User Permissions
2.2. User Permissions
When iDataFax opens the study you have selected you will have access to only those patient records and
program components that the study managers have granted you permission to use. Typically each participating clinical site will only have access to their own patients, some subset of the available reports, and
may have restrictions on which study forms can be seen, modified, printed and exported, and on which
views are available. The iDataFax views include:
Data - used to enter, modify and review patient data
Queries - used to review and respond to questions from the study coordinating center
Reasons - used to review reasons that were entered to explain particular data values
Fax - used to enter data from CRF images received by fax
Reports - used to run and review study reports
List - used to review and export data records in tabular and SAS formats
Status - used to review data, query and reason status by work flow levels
An overview if the iDataFax views makes up the rest of this tour. For more details see the chapter devoted
to each view.
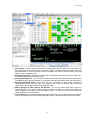
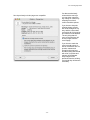
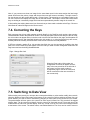
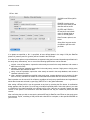
2.3. Data View
The Data View is the primary iDataFax view and is the only view in which patient data, queries and
reasons can be entered and modified.
-9-
iDataFax User Guide
The components of the Data view window (shown above) include the following:
Patient Binders. To enter or review patient data start by selecting a patient binder from the list
displayed on the left side of the screen. Each patient binder contains the data forms (CRFs) for an
individual patient organized in subsections by study visit or assessment. Each binder is represented
by an icon resembling a human head followed by a patient ID number. In the example above the
binder is open for patient ID number 1002. You can open only one binder at a time. This locks the
patient records giving you exclusive access to the binder until you close it. Patients, assessments and
CRF pages are color coded as follows:
green - no problems
red - some data problems exist
orange - data entry was interupted and remains to be completed
The Data Window. The data window is an exact replica of the study paper CRFs. This is where you
enter data values, filling out the form using a keyboard and mouse instead of pen and paper. Data
fields are color coded as follows:
white - legal values
red - illegal values
blue - unresolved queries
orange - query replies and reasons pending central review
- 10 -
2.3. Data View
green - query replies and reasons that have been approved
Queries. Data queries can be attched to any data field, either by someone in the study coordinating
center or by a programmed edit check. Blue fields have an outstanding query which will be displayed
in the Query window (lower left) when you select the field in the Data window. Queries for missing
data and illegal values are automatically resolved and turn green if they are corrected by entering a
legal value.
The button in the Query window can be used to open a text window where you can answer the query.
This turns the data field orange to indicate that the query has been answered and is pending review
by the study coordinating center. If the reply is approved the field will turn green. If the coordinating
center has new questions they will revise the query and the field will again turn blue.
Reasons. You may be able to avoid queries my entering a reason to explain an unusual data value.
To add a reason to a data field, select the field in the data window and then click the button in the
Reason window (lower left) to open a text window where your reason can be typed. Fields with new
reasons will turn orange to indicate they are pending review by the study coordinating center. If the
reason is approved the field will turn green. If the coordinating center has questions they will add a
new query to the field and it will turn blue.
Missing Values. Some studies use standard missing value codes, e.g. NA - not available, ND - not
done, etc. which can be applied to data fields when a data value can not be entered. If standard
missing value codes have been defined a code can be selected for the current data field by clicking
the button in the Missing Value window (bottom left corner of the screen). Fields with missing value
codes turn green and the code label is displayed in the Missing Value window when you move into
the field. You will not be able to add missing value codes to any field that has been defined as essential by the study coordinating center.
Saving Your Work. After making changes to data fields, queries or reasons, you must select one of
the Save buttons at the bottom of the screen to transmit your changes over the internet to the study
server. If you are interupted during new data entry and do not want to loose your work you can save a
partially completed page using the Pending button. If you have completed the page and there are no
illegal values (red) or outstanding queries (blue) you can save your work using the Final button, otherwise you will need to use the Incomplete button. The data is not stored on your personal computer
and will be lost if you do not transmit it using one of the Save buttons. You will be warned if there are
unsaved changes and you try to move off the current page.
Last Save. The record creation and modification timestamps written at the end of each data record
are entered by the DataFax server in server time. Thus regardless of where the data is coming from,
the timestamps in the study database will all be synchronized with the location of the server. As an aid
to end users the ’Last Save’ date and time, shown at the bottom of the screen in Data View, is
displayed in the user’s local time, which is determined from the difference at login between server
time and the system clock on the computer where iDataFax is running. This may not actually be the
user’s local time if the user’s system clock is not up to date, or if the user is running iDataFax from an
application server located in another time zone.
This is the only place where an attempt is made to use local time. List View, audit trail reports, SAS
exports, etc. all use server time.
The Message Window. The message window located below the Save buttons displays the date and
time of the last Save for the current page, and may also display field level help (e.g. legal values for
the current field) that has been specified by the study coordinating center.
Images. iDataFax can store images as well as data. This might include a faxed copy of the paper
CRF or a scanned copy of some medical record or test result. If images have been attached to the
current page the image icon
will appear in the bottom right corner of the screen. Depending on
your user preference settings (see below) you may need to click the image icon to toggle between
data and image views, or the screen may split automatically when you go to a page with images. If
multiple images exist the image icon will be prefixed with another icon containing the number of
- 11 -
iDataFax User Guide
images. Clicking this icon will launch a separate window where you can review all of the images.
Menus. A number of menus are located at the top of the iDataFax window. The example screen, at
the beginning of this tour, illustrates the View menu which is used to switch between the different
views that you have permission to use in the current study. These menus differ by view and are
described in the chapter devoted to each view.
User Preferences. You can customize some aspects of iDataFax behavior using the Preferences
dialog located under the File menu. Once set preferences are preserved across login sessions.
Auto Logout. To meet regulatory and patient confidentiality requirements iDataFax was designed
with an auto-logout feature which closes the screen after a specified period of inactivity. If this occurs
when you have unsaved changes in the current data screen the unsaved changes will be lost, and you will
be warned that this occurred the next time you login to the study and asked if you would like to return to
the page you were on when this happened. You can thus easily return to the page but any unsaved
changes can not be recovered.
Any keyboard input or mouse movement inside the iDataFax window will reset the timer. A default
and maximum time will have been configured by the study coordinating center. You can set the
timeout interval to a value not exceeding this maximum in the user preferences dialog.
2.4. Queries View
The Queries View lists data queries from the study coordinating center.
You can filter the list of queries in various ways to find the ones you are interested in. For example by
selecting Show - Outstanding Queries you can list just those queries that need to be answered. Double
clicking a query opens the data view to the relevant page and puts focus on the data field with the query.
2.5. Reasons View
The Reasons View lists any reasons that have been entered to explain particular data fields.
- 12 -
2.6. Fax View
You can filter the list of reasons by status: outstanding, approved and rejected, and search for reasons
with specified text strings. Double clicking a reason opens the data view to the relevant page and puts
focus on the data field with the reason.
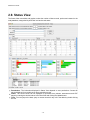
2.6. Fax View
The Fax View is used to enter new data records from paper case report forms (CRFs) that have been
faxed or emailed to the DataFax study server.
- 13 -
iDataFax User Guide
Fax view is identical to the Data view except that the list of patient binders is replaced by a list of faxed
pages that need to be entered. Fax View features include:
Record Selection Options. Typically users will chose to enter a fax at a time and request the oldest
ones first, but it is possible to request only certain CRF forms and to work backwards from newest to
oldest arrivals. These options are specified using the New Record Retrieval Dialog available under
the Select menu.
Intelligent Character Recognition. When a CRF page arrives by fax it is immediately scanned and
read by the ICR software. Thus most data fields, including: numbers, dates, visual analog scales and
check boxes, will already be completed in the data screen. The task of the person using Fax View is
thus to correct any ICR errors or omissions, and to add any missing value codes, reasons or queries
that may be required.
- 14 -
2.7. Reports View
Get Next Set of New Records. When the user is finished with the current set of records, clicking this
button (located below the record list) will release the current set of records and fetch the next set using the
selection method previously specified in the New Record Selection Dialog. But until then the user can
return to any record in the current set to make corrections, which sometimes become apparent as one
works throught the pages in a fax.
Switch to Data View. Clicking this button opens the current patient binder in Data View while
keeping the focus on the current page to show where it belongs in the binder. The user can then check
other data records as needed before switching back to Fax View to complete data entry for the new
page.
2.7. Reports View
The Reports View is used to run DataFax standard and study specific reports.
DataFax Reports. DataFax includes a number of standard reports that can be used in any study.
The list of reports (which you have permission to run) will appear when you select DataFax Reports
(top left).
- 15 -
iDataFax User Guide
Study Reports. Any study specific reports created by the study coordinating center will be listed
when you select Study Reports.
History. Reports that you have already run during the current login session are saved and will be
listed when you select History. Selecting a report in the history list will display the previous output for
that report.
Options. Most reports have a number of options which can be selected from the drop down options
list to control what the report will produce.
Explain. All of the DataFax Reports, and most Study Reports, come with a description of what they
do and how to use the options. This documentation can be reviewed by selecting a report fro the
report list and then clicking the Explain button.
Run. To run a report, select it from the report list and then click the Run button. The output will be
displayed and added to the history list.
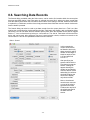
2.8. List View
The List View can be used to review all data records for a specified CRF plate in a table, where each
column is a data field and each row is a data record.
- 16 -
2.8. List View
Permissions. A plate is selected from the list of study plates in the left panel. Only plates which you
have permission to see will be shown, and when a plate is selected, only those records which you
have permission to see will be shown as rows in the table, and columns will be hidden for any data
fields you are not allowed to see.
Selecting Data Fields. Data fields (columns) can be selected and reordered using the Field Selection dialog available under the Select menu.
Selecting Data Records. You can search for data records with specific attributes (e.g. illegal values,
outstanding queries, pending reasons, etc.) using the Search dialog available under the Select menu.
Selecting Predefined Views. Some users may have permission to define views, consisting of
selected data records and data fields, for others to use. Views are created using menu item
’Select-Define Views’ and accessed using ’Select-By View’.
Making Changes to Data, Queries and Reasons. You can not modify data values, queries or
reasons directly in List view, but double clicking on a data field takes you to that field in Data View
where changes can be made (if your permissions allow it). To return to List View from Data View
select the Return to List View button.
User Preferences. The Preferences dialog, located under File menu, includes options for customizing List View including: field color coding, displaying codes vs labels, date formats and column titles.
- 17 -
iDataFax User Guide
2.9. Status View
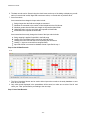
The Status View uses tables and graphs to show the number of data records, queries and reasons in the
study database, categorized by work flow level and record status.
Permissions. The information displayed in Status View depends on user permissions. Counts will
only be displayed for records that you have permission to see.
Filters. The record counts can be displayed for specified sites, patients, assessments and CRF
pages by entering the desired values in the filter fields and clicking the Update button.
Links. You can jump to the data, query or reason records for any cell in the tables by double clicking
the cell.
- 18 -
Chapter 3. Using iDataFax
Chapter 3. Using iDataFax
This chapter explains how to perform a number of common data management tasks. It describes what is
possible in iDataFax, but how these features are applied may differ from one study to another. You may
receive more specific instructions from the coordinating center for your particular study.
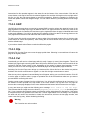
3.1. How do I select the correct patient binder for
a new patient?
In many studies patients are numbered sequentially as they enter the trial, but in some studies patient ID
numbers are random and assigned on study enrollment or randomization. In either case, patient IDs must
be registered in the DataFax study setup at the coordinating center before they will be available in
iDataFax.
The Patient Binder List
To see the patient binders available for your site,
select View > Data. If you work at more than one
study site you will need to double click on a site
to open it. You will then see a list of patient
binders, identified by head icons and patient ID
numbers in ascending numeric order, on the left
side of the screen. Binders that are in use are
represented by an active icon. Unused binders
appear muted with an empty head icon. In most
cases, the first unused binder in this list will be
the correct binder for the next patient. Double
clicking the binder will open it.
Patient - Start New Patient
If the patient ID number you need is not in the
patient binder list, select Patient > Start New
Patient, and enter the patient ID number as
shown in this example. When you select OK, a
new patient binder will be added to the list with
the specified patient ID, and the binder will open
automatically.
Note
If instead of a new patient ID, you
enter one that already exists in the
patient binder list, that binder will
open when you click OK. If the binder
is already in use, the head icon and
one or more of the assessment icons
will be active, not muted and empty.
- 19 -
iDataFax User Guide
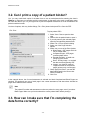
3.2. Can I print a copy of a patient binder?
Yes. You may need blank copies of the data forms to use as worksheets before entering the data in
iDataFax, or because you complete and fax certain pages so that staff at the study coordinating center
can enter the data for you. Or you might want to print a completed assessment so it can be added to the
patient’s medical records.
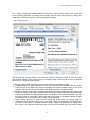
You have 2 options, with very similar dialogs, File > Print (shown below) and File > Save As PDF.
File - Print
To print patient CRFs:
1. Select View > Data to open the data
view
2. Double click the patient binder to open it
3. If you only want to print selected pages
open the corresponding assessments
4. Select File > Print to open this dialog
5. Select one of the Page Selection
options
6. Select one or more of the Print Options:
Blank Pages - CRF pages which do
not yet contain data
Completed Pages - CRF pages
containing data values
Expand text fields - to avoid truncating long text entries
Data + Primary Image - to see both
the data and the supporting CRF
Images - any faxed or scanned
images that exist for the selected
pages (primary only or all images)
7. Check Apply field color if you want the
data fields printed in the current color
shown in iDataFax.
8. Click Print
In the example above, the Current Assessment is selected and both Completed and Blank Pages are
checked. This produces one copy of each page in the current assessment, with data values included on
pages where data has been entered.
Note
The patient ID number and assessment number are printed on every page, even if you select
Blank Pages. Make sure you have selected the correct patient binder before printing it.
3.3. How can I make sure that I’m completing the
data forms correctly?
- 20 -
3.3. How can I make sure that I’m completing the data forms correctly?
Here are the steps we recommend:
1. Double click a patient binder to open it
2. Double click all of the assessments you want to open
3. Click the page you want to start on. It will then appear in the data window. You can go to any page at
any time by clicking it in the patient binder list. Also, the up and down arrow keys can be used to
move through the pages of the all the assessments you opened
4. When you have found a page you want to work on, press the Tab key or click anywhere in the background of the data window. This will put the focus on the first data field at the top of the page, and the
field will be highlighted
5. Complete the first data field using the keyboard to enter text and numbers, or the mouse to select a
choice option or move a visual analog slider. Choice options can also be selected using the number
keys: 1=1st option, 2=2nd option, etc., and visual analog fields can also be completed by using the
right and left arrow keys to move the slider along the scale
6. If a help message has been specified in the study setup it will appear at the bottom of the data
window
7. As you enter values watch the field color. It will change from red (required fields) or yellow (optional
fields) to white when a legal value has been entered. The help message is often used to display the
legal values expected for each field
8. After you complete the first field use the Return or Tab key to move to the next field. Continue in this
way to complete all fields on the page. This will ensure that you walk through all fields in the order
planned by the form’s designer. Some fields may have edit checks that are triggered as you move in
or out of them. Moving through all fields will ensure that all of the edit checks are triggered, and thus
that you will be notified of any problems
9. Some edit checks may also be triggered when you select Final, Incomplete or Pending to save your
changes. But those edit checks which have been setup to trip on field entry or exit will only fire if you
move through the data fields
10. Read any warning or error messages displayed by edit checks carefully, and take any necessary
action to correct or explain any unexpected values
11. You can move backward through the fields using Shift+Tab and Shift+Return
12. When you have completed all of the fields on the page remember to save your work by clicking one of
the 3 Save buttons at the bottom of the screen:
Final - if all fields have been completed and there are no red or blue problem fields
Incomplete - if any field is still incomplete, or there are unresolved queries or illegal values
Pending - if any field is incomplete and you want to complete the page before it is reviewed by
the study coordinating center
Note
Pending can not be used after a page has reached Final or Incomplete status, and Final
can not be used if the page still has problem fields.
13. If you can not locate the problem fields select Page > List All Outstanding Problems on This Page,
and a dialog will appear listing the problems that are preventing you from saving the page with status
Final.
14. After you save a page, the next page that is open in the patient binder list (if any) will be opened in the
data window, with the focus on the first field at the top of the page
15. Continue in this way to complete all pages in the assessment(s) you have opened. Note that those
assessments and pages with a square icon are required, while those with a circle icon are optional
(i.e. not required for all patients). However, an optional page may become required if some specified
condition is met, thus you may find a missing page query on what appears to be an optional page
16. Examine the icons for each page you have completed to confirm that you have saved them with the
correct status. Those with a green check mark have been assigned Final status, those with a red X
are Incomplete, those with a yellow dash have been marked Pending, and any page with an empty
- 21 -
iDataFax User Guide
icon has not yet been completed
17. When you are finished with a patient binder double clicking the head icon will close it. The current
binder will also close if you decide to open a different one. Remember that only one patient binder can
be open at a time, and while you have it open, no one else will be able to use it (except in view only mode)
18. When you are finished entering study data, or if you need to pause for more than a few minutes, exit
from the iDataFax application. Do not leave your PC unattended while you are logged in to the study
database
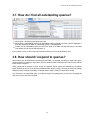
3.4. Can I enter a reason to explain an unusual
value or a value I have changed?
Yes. This is a good way to avoid queries from the study coordinating center. Adding a new reason, or
modifying an existing reason, for any problem field (red or blue), creates a pending reason (orange) which
solves the problem, pending review by the study coordinating center. Dealing with all problem fields this
way will allow you to indicate that you are finished with the page by selecting the Final button when you
save your modifications.
How can you tell if a data field has an associated reason? When the focus rests on a data field, all metadata (queries, reasons and missing values) for that field are shown in the metadata windows below the
patient binder list. If the field already has a reason, it will be displayed in the Reason for Data Value metadata window (illustrated below), otherwise this window will be empty.
The Reason Metadata Window
The reason metadata window shows:
Reason - the reason for the current value in the
data field
Status - when a reason is created or revised it’s
status is set to Pending. On review by central office
staff, status may be changed to Approved or
Rejected.
Created - who created or most recently revised the
reason and when
Reviewed - who most recently set the reason
status to Approved or Rejected and when
To add a new reason or modify an existing one, either click the button in the upper right corner of the
reason metadata window shown above, or select Field > Add Reason for Data Value.
- 22 -
3.5. Can I use standard missing value codes?
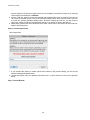
Field - Add Reason for Data Value
The add reason dialog shows:
Field - a label describing the
current field
Old Value - the value the
field had when the page
was opened
Reason - the current reason
(if any) for the old value and
who created it and when.
New Value - the current
value in the data field
Status - new reasons are
created with status pending,
unless the user has permission to approve reasons
Reason - a text widget
where a new reason can be
entered
Some fields may require a reason when you change them. In such cases this dialog will appear automatically when you leave the field. You can then either enter a reason or use the Revert to Old button to undo
the change. Once a reason has been entered the OK button is used to apply it. The new reason will then
appear in the Reason metadata window.
When a reason is created by a user who has permission to approve reasons, the status is automatically
set to approved, but the Status button is active and can be used to change the status of the new reason.
Note
Remember that no changes are saved until you select one of the Save buttons at the bottom of
the data screen. This applies to both data and metadata (queries, reasons and missing
values).
3.5. Can I use standard missing value codes?
Yes. DataFax supports missing value codes which may be predefined for each study to provide standard
accepted reasons for missing data. If missing value codes have been predefined for your study, you can
assign one of them to the current data field by selecting it from the list displayed when you click the button
on the Missing Value metadata window (shown below and located in the bottom left corner of the screen),
or using Field > Mark Field Missing.
- 23 -
iDataFax User Guide
When a missing value code is selected, the field turns green (provided the field does not have some other
problem), which indicates that the field has an approved metadata value. Note that the missing value is
not displayed in the data field; it only appears in the Missing Value metadata window when the field has
the focus in the data window.
After applying a missing value code to a data field in either of these ways keyboard shortcut Control+M
(Command+M on Mac OS X) can be used to apply the same missing value code to other data fields.
If you need to remove a missing value code so you can enter a real data value, select the No Code (reset)
option which appears at the bottom of the list of missing values.
Missing Value Metadata Window
Note
If a data field has been defined as ’essential’ you will not be able to select a missing
value code.
3.6. What are queries and where do they come
from?
Queries are questions about data values that you have entered, or failed to enter. They are always
attached to a data field, either manually by someone at the study coordinating center, or automatically by
edit checks and other programs that check for problems.
There are 4 types of queries:
1.
2.
3.
4.
Data Correction Queries - request a correction to a data value or a blank field
Data Clarification Queries - ask you to reply to a question
Overdue Visit Queries - identify study assessments which should have been performed by now
Missing Page Queries - identify required pages that have not been completed
Data Correction and Data Clarification queries are classified into one of the following general problem
types:
Missing - the field is blank and needs to be completed
Illegal - the field failed the legal range test
Inconsistent - the field contains a value that is inconsistent with the value in some other field
Illegible - a paper CRF page has handwriting which is unclear
Fax noise - a faxed page had transmission errors
Other - some other problem described in the query details
In some cases, such as when the problem type is Missing or Illegal, no further information may be needed
to communicate the problem. But when necessary, the query will include details describing the problem
and might also suggest the expected corrective action.
If a query is attached to a data field, it will be displayed in the Query metadata window when the focus
moves to that field in the data window. If the query is not yet resolved the field will be blue and the query
status will be Outstanding. If the query has been resolved, the field will be green (unless there is another
problem, like a rejected reason) and the query status will be Resolved.
- 24 -
3.7. How do I find all outstanding queries?
3.7. How do I find all outstanding queries?
Select View > Queries to open the queries view
Select Show > Outstanding Queries. All outstanding queries (marked with a red X) will be displayed. If
none are displayed you have no outstanding queries - congratulations!
Double click an outstanding query from the list to jump to the data field with that query in the data
view, where you can review and respond to it
If you resolve a query, it will be removed from the list when you return to the Queries view.
3.8. How should I respond to queries?
Some queries can be resolved by correcting the data field. For example, a missing or illegal value query
can be resolved by entering a legal value. In these cases the field will change from blue to green and no
further action is required.
Other queries ask a question to which a reply is expected. These queries are identified by the phrase
(reply required) at the top of the Query metadata window. When a reply is entered the field turns orange
and query status changes to Pending, to indicate that the reply is ready for central office review.
You can reply to an outstanding query, or modify the reply to a pending query, but you can not change the
reply once a query has been resolved.
- 25 -
iDataFax User Guide
Field - Reply to Query
To reply to a query, click the button in the upper
right corner of the Query metadata window, or
select Field > Reply to Query.
The Query reply dialog shows:
Field - the current field and it’s value
Problem - the problem type: Missing, Illegal,
Inconsistent, Illegible, Fax noise, or Other
Details - a description of the problem (if necessary)
Old Reply - previous reply to this query (if any)
New Reply - a space where the new reply can
be entered
The Query Metadata Window
When the focus moves to a data field which has a
query, the query is displayed in the Query metadata window. If the field does not have a query this
window will be empty.
The Query metadata window contains:
Problem - the problem type
Details - a description of the problem (if any)
Reply - the reply to the query (if any)
Status - the current status of the query
Created - who created the query and when
Resolved - who resolved the query and when
3.9. Can I respond to a query by adding a reason
for the data value?
Yes, and often this will be the best response. Unless a query indicates that a reply is required, adding a
reason to explain the data value is the better solution, because the reasons you enter will not be changed
by the study coordinating center and will thus always be visible in the Reason for Data Value metadata
window, whereas the current query, once resolved, may be replaced by a new query to address a new
problem.
Note
As a general rule, use reasons to explain why data fields have the values they do, and only
reply directly to queries when it is necessary to refer to other data fields, or explain something
not contained in the reason.
- 26 -
3.10. How should I respond to a query if the data field is correct as is?
3.10. How should I respond to a query if the data
field is correct as is?
If a query asks you to correct a data value that is already correct, respond using one or more of the 3
metadata windows:
If the field is blank and an appropriate missing value code is available, select it using the button on the
Missing Value metadata window. If the field is defined as ’essential’, this will not be possible.
To explain why the value is correct as is, add a reason by clicking the button in the Reason for Data
Value metadata window
To reply to the query directly, click the button in the Query metadata window
When you respond in one of these ways, the data field will change from blue to green if the response
resolves the problem, or orange if the response needs to be reviewed by the study coordinating center.
3.11. Can I indicate that a patient assessment is
unavailable?
Yes. A patient assessment might be unavailable for a variety of reasons. The patient might have missed a
clinic visit or refused a particular lab test. In such cases you can indicate that the assessment is lost.
Assessment - Mark Assessment Lost
To mark an assessment lost:
1. Select View > Data to open the data view
2. Double click the patient binder to open it and
display the study assessments
3. Click on the assessment in the patient binder list
4. Select Assessment > Mark Assessment Lost.
This opens the dialog, shown here. After you
select the reason category (Why) and explain
why the assessment is lost (Details) the Save
button will become active
When you click Save all of the pages in the assessment will be marked lost and the lost symbol ’L’ will
appear in the assessment and page list on the left side of the screen.
Whenever a lost record is selected the reason specified when the assessment was marked lost will appear
in the ’Reason’ window in the bottom left corner of the iDataFax window.
If an overdue visit query exists it will be removed when the assessment is marked lost.
Once an assessment has been marked ’Lost’ data entry will be blocked for all pages in the assessment. If
you discover that it was a mistake to mark an assessment lost select the assessment in the record list and
then select Unmark Lost from the Assessment menu. This will remove the ’Lost’ flag and enable data entry
for all pages in the assesment. It is also possible to remove the ’Lost’ flag from individual pages by selecting the page and then selecting Unmark Lost from the Page menu.
- 27 -
iDataFax User Guide
3.12. Can I indicate that a page is unavailable?
Yes. A single page within an assessment might be unavailable while other pages can be completed. This
might arise because the assessment is made up of different exams and some are not relevant for some
reason, or because the patient refused to complete the entire exam. Whatever the reason, individual
pages can be marked lost.
Page - Mark Page Lost
To mark a page lost:
1. Select View > Data to open the data view
2. Double click the patient binder to open it and
display the study assessments.
3. Double click the assessment to open it
4. Click the page you want to mark lost. It will
appear in the data window
5. Select Page > Mark Page Lost. This opens the
dialog, shown here, where you can select the
reason category and enter details describing the
circumstances
6. When you click Mark Page Lost, the lost symbol
’L’ will appear in the page icon
3.13. Do I need to save the changes I have made?
Save Buttons
Yes. None of the changes you make to data fields or metadata (queries, reasons and missing values) will
be saved until you select one of the save buttons at the bottom of the data window. If you try to close the
current page or open a different page without saving changes, a dialog will appear asking if you want to
save or discard your changes before opening the new page.
The Save options include:
Final - use this option if all fields have been completed or explained with reasons, all queries have
been answered, and you know of no other changes that are needed to complete data entry. A green
check mark will appear in the page icon
Incomplete - use this option if any field is still incomplete or any query is still outstanding. A red X will
appear in the page icon
Pending - use this option if you are not finished with the page and want to work on it some more
before it is reviewed by the study coordinating center. A yellow dash will appear in the page icon
There are two restrictions:
1. Pending will not be available once a page has reached Final or Incomplete status if your permissions
only allow Pending to be used during new data entry. If this is the case the Pending button will be
inactive to prevent a mistake
2. Final can not be used if there are any red or blue fields on the page, i.e. any problem fields which
have not been corrected or addressed using one of the 3 metatdata options (i.e. replying to a query,
- 28 -
3.14. Can I undo all changes I have just made to a page?
adding a new reason, or assigning a missing value code). In this situation the Final button will be inactive
When a Patient is Locked
iDataFax uses patient level locking, which ensures that only one user can work in a patient binder at a
time. The binder is locked when you open it and released when you close it. It will also be released if your
iDataFax session times out. If you try to open a patient binder which is locked by another user, a dialog
will appear asking if you want to open it in view only mode. While in view only mode, the Save buttons will
be inactive and a message indicating that the patient is locked by another user will be displayed at the
bottom of the Data window.
Even if you are the only person with permission to enter data into patient binders at you site, remember
that someone at the study coordinating center will have permission to review, and approve or reject, new
reasons for data values and replies to queries that you have entered. This too will lock a patient binder
until the review is completed - typcially only a few minutes.
3.14. Can I undo all changes I have just made to a
page?
Yes, but only if you have not yet selected one of the save buttons. Select Page > Revert to Last Save to
undo all changes to data fields and metadata (queries, reasons and missing values) and return the page
to the state it was in when you opened it. This is the only undo level available. Once you have selected
one of the Save buttons (Final, Incomplete or Pending), you can not revert to a previous state.
3.15. What’s the best way to find all outstanding
problems?
Start by reducing the patient binder list to just those patients that have Incomplete and/or Pending pages.
If no patient binders appear in the list, congratulations - you have no outstanding problems. Otherwise, for
each patient binder proceed as follows:
- 29 -
iDataFax User Guide
1. When you open a patient binder scan the list of assessments for those which are Incomplete (red X)
or Pending (yellow dash)
2. When you open one of these assessments the Incomplete and Pending pages will be identified with
the same red and yellow icons
3. When you select one of these pages look for the red and blue fields. The blue fields have metadata,
either an unresolved query or a rejected reason. The red fields contain illegal values or are required
but currently blank
4. It is possible to save a page with Incomplete status even though it has no red or blue fields. This
might be done when there are optional fields that still need to be completed. Users may have flagged
these fields with reasons, thus it would also be a good idea to review any orange fields
5. If you are able to solve all problems on a page, save your changes using status Final. This will flag
the page with a green check mark indicating that it is done
As shown below, in addition to looking for the red and blue fields, it is possible to get a list of all outstanding problems on the current page.
To list all problems on the current page select
Page > List All Outstanding Problems on This
Page.
3.16. Why did my iDataFax session Auto Logout?
For regulatory reasons, related to confidentiality of patient data and the requirement that data entry must
be attributable to an authorized individual user, you must exit iDataFax as soon as you are finished with it,
or when you need to leave the computer unattended for any reason.
Should an unexpected event or emergency prevent you from logging out, a built-in timer will automatically
log you out after a specified period of inactivity, determined by the study coordinating center.
- 30 -
3.16. Why did my iDataFax session Auto Logout?
Note
If this occurs, any unsaved changes to the last page you were working on will be lost, and the
patient lock will be released so that other authorized users can access the patient binder.
You can change the Auto Logout timer, within limits specified by the study coordinating center, by selecting File > Preferences.
How to prevent an Auto Logout.
Auto Logout Dialog
While the iDataFax application has the focus on
your computer screen, the timer is reset by:
any keyboard action, including just tabbing
through fields
any mouse action, including just moving the
mouse
If you switch to a different application, iDataFax will
loose the focus and the timer will begin to count
down.
Of course, logging out yourself after saving your
work is the best way to avoid an Auto Logout.
If your last iDataFax session timed out, you will see the dialog shown below the next time you login to the
same study, and you will be given the opportunity to return to the same Data, Query or Reason view that
was on screen when the Auto Logout occurred.
Returning After an Auto Logout
If on Auto Logout there were unsaved changes
to a page, the page will be identified by patient
ID number, Assessment number, and Page
number, and you will be able to return to it by
clicking Yes.
Note
If you return to a page after some time has passed, and other users are authorized to modify
the page, some data fields may have been changed since you last saw it. You can tell if this
has occurred by comparing the time shown in the Auto Logout dialog, with the Last Save time
displayed at the bottom of the Data window when you return to the page.
- 31 -
iDataFax User Guide
3.17. How should I exit from iDataFax ?
First make sure that you have saved any changes to the page you are currently working on. If you forget
you will be warned when you try to exit. When you are finished working in a study, you can close the study
or quit the entire iDataFax session.
To close the study but remain connected to the DataFax server so you can select a different study
database to work in, select File > Close Study This will take you back to the same study selection
window that appears during login
To disconnect from the DataFax server and end your current iDataFax session, select File > Exit
3.18. What should I do if I have questions?
First attempt to find an answer within the online User Guide available under the Help menu in the
menubar. If this fails contact the study coordinating center for assistance.
- 32 -
Chapter 4. The Data View
Chapter 4. The Data View
The Data View is the main iDataFax window. It provides access to all patient binders for data entry and
review.
4.1. Patient Binders
The Data View is organized like a bookcase full of patient binders. The binders, represented by people
icons, are nested under the clinical sites, and displayed in a list on the left side of the window. Only sites
and patient binders you are allowed to work in will be visible.
Double clicking a site opens it, revealing the patient binders; and double clicking a binder opens it, revealing the different sections, one for each patient assessment. Assessments can be opened by clicking the
arrow or double clicking the assessment label. This reveals the pages belonging to each assessment.
Only one patient binder can be open at a time, but you can open as many assessments within the binder
as you wish. Double clicking the label for an open assessment, patient or site will close it. Opening a new
binder, or a new site, will automatically close the current one.
- 33 -
iDataFax User Guide
Different icons and colors indicate the status of patients, assessments and pages. Patient icons include:
Empty head - a new binder, not yet started
Green head - no problems, all pages entered so far are complete
Red head - one or more pages are incomplete
Yellow head - one or more pages are pending, and no pages are incomplete
’L’ head - all pages completed so far have been marked lost (i.e. unavailable)
Assessment and page icons use the same colors, with the same meaning, but they come in different
shapes to indicate whether they are required.
Square - a required assessment or page
Circle - an optional assessment or page which may not be relevant for all patients
Diamond - an unexpected assessment or page
A square button at the top of the navigation panel can be used to toggle between patient binder and
record list navigation. The example shown above illustrates patient binder navigation (note: the toggle
button is hidden beneath the View drop-down list). In record list navigation the binders are replaced by
columns showing: record status, site#, patient#, visit#, plate# and workflow level# for all records in the
current patient binder, without needing to open each visit. It can also be used when working on a task set,
in which case only task records are shown.
Visits and the pages within each visit are shown in visitmap order (specified during study setup), regardless of which navigation method is used.
4.2. Metadata: Queries, Reasons and Missing
Values
In addition to having a value, each field in the data window can have other information, referred to as
metadata. If the current field in the data window has metadata, it is displayed in the bottom left corner of
the iDataFax window, below the patient binders. The 3 sub-windows correspond to 3 types of metadata,
which are:
Query - queries are requests for corrections or additional information from the study coordinating
center. A query can be up to 500 characters long and has a status of:
outstanding - the query still needs to be addressed
pending - the query has been addressed but the solution has not yet been reviewed by the study
coordinating center
resolved - the query has been addressed and the solution has been accepted by the study coordinating center
You can reply to a query by clicking the button on the Query window, or selecting Field > Reply to
Query and entering up to 500 characters of text. When a reply is entered, the Query status will
change to Pending.
Some queries do not require a reply and can be resolved simply by correcting the data field. A blank
field with problem type ’missing’, or an illegal field with problem type ’illegal’, can be resolved by entering a legal value.
- 34 -
4.3. Data Field Colors
If a query requests a data correction which cannot be made because the current value is correct, you
can respond either by replying to the query or adding a reason to explain the current value.
Reason - reasons can be entered to explain unusual data values by clicking the button on the Reason
window. A dialog will appear where you can type a reason (500 characters maximum) or select one of
the standard reasons defined for the study. For example, if a field turns red because the value you
have entered is considered illegal, you could add a reason to explain the value which might be
enough to avoid receiving a query from the study coordinating center.
When you add a new reason, or change an existing one, the field will turn orange with status pending
to signal that it should be revewed by the study coordinating center.
If you change a field which already has a reason you will be required to provide a new reason explaining why the value has been changed. This ensures that the reason displayed is always related to the
current value.
Missing Value - if the study has been configured to use one or more predefined reasons explaining
why a field may be missing, you can select one of these reasons using the button on the Missing Value
window, and keyboard shortcut Control+M (Command+M on Mac OS X) can be used to apply the
most recently used missing value code to a new field. However, a missing value can not be assigned to
fields defined by the study coordinator as essential.
4.3. Data Field Colors
Colors indicate the status of data fields and whether they have associated metadata (queries, reasons
and/or missing values).
The colors used for fields without metadata are:
White - legal values
Red - illegal values or blank required fields
Yellow - blank optional fields
The colors used for fields with metadata are:
Blue - fields with outstanding metadata: an unresolved query or a rejected reason
Orange - fields with pending metadata: a reason or query reply that has not yet been reviewed by the
coordinating center
Green - fields with approved metadata: a resolved query, an accepted reason, or a predefined
missing value code
If more than one color might apply, descending priority order is: blue, orange, and then green.
4.4. Entering Data and Metadata
Entering data is very similar to completing paper forms, with a computer mouse and keyboard replacing
pen and ink. You can go to any field by selecting it with the mouse, move to the next field using the Tab or
Return keys, or move back to the previous field using Shift+Tab or Shift+Return.
The current field will be highlighted in the data window. If legal values or other help text has been defined
for the current field it will appear in the bottom right corner of the iDataFax window.
- 35 -
iDataFax User Guide
All entry of data values and metadata (query replies, reasons and missing values) apply to the current
field. So, make sure the correct field is highlighted in the Data window before entering data and metadata.
Choice fields, which allow you to select one of the listed response options, are displayed with a small
circle beside each option. The circle is filled in for the current option, if any. You can select a response
option by clicking on the circle with the mouse, or by using the number keys - 1 for the first option, 2 for the
next, etc. The current option can be removed, returning the field to blank, using the Delete key.
String fields are limited to the printable 7-bit ASCII character set, also known as US-ASCII, used in English
text. Thus currently iDataFax blocks the entry of the accented or unicode characters used in many other
languages. iDataFax also blocks the ’|’ character which is reserved for use as the field delimiter in data
and metadata records.
4.5. Saving Data and Metadata
Changes made to each page need to be saved before you move to the next page. If you click on a different page before saving changes, a dialog will appear asking whether you want to save or discard the
changes you have made.
You can save changes to data and metadata and move the record to the sign-off work flow level by selecting one of the available Save buttons at the bottom of the data window.
Final - data entry is complete; there are no outstanding problems (no red or blue fields)
Incomplete - additional work is needed to complete this page
Pending - use this option during new data entry to indicate that you have not finished your first pass
through the page and want to complete it before it is reviewed by the study coordinating center
Lost - this button is only available on records that have been marked ’Lost’. Use it indicate that you
have completed a task, to move the record to the sign-off work flow level, or to save a query that may
have been added to the patient ID field.
The Lost button will appear and will be the only button available if the page has been marked ’Lost’.
The Final button will be unavailable if the page has any problem fields.
The Incomplete button will be available even if the page has no obvious problem fields. This allows you to
flag a record as in need of additional work even DataFax is not aware of what that work is.
The Pending button will be unavailable if the page has advanced beyond new data entry to Incomplete or
Final status, unless your permissions include ’Data View - with select’. This permission is typically
restricted to study coordinating personnel who may demote problem records to Pending status to exlude
them from statistical analyses until the problem is resolved.
4.6. Correcting Key Fields
Each data record has 4 numeric key fields: study, page, assessment and patient. Together they uniquely
identify each data record in the study database. It is critical that these keys are correct and typically they
will be automatically set to the correct values. But if you discover an error it can be corrected by selecting
Change Keys from the Page menu and using the dialog illustrated below.
- 36 -
4.6. Correcting Key Fields
Page - Change Keys
The study number can only be changed
if the data record has an image. When
the study number is changed all images
are sent to the router and the data
record is deleted from the current study.
It is not possible to move a data record
directly to another study even if you
have the necessary permissions.
Changing any or all of the other 3 keys
(page, assessment and patient) will
move the data record to another patient
binder or another location in the current
patient binder. All queries, reasons and
images will move with the data record.
A reason may be specified to explain
the change. This is optional but recommended.
If OK is selected to confirm the change iDataFax checks to see if the new plate is compatible with the old
one, and also checks to see if a data record with the new keys already exists in the database. You will
then be presented with one of the following 4 confirmation dialogs depending on the result of these 2
checks.
- 37 -
iDataFax User Guide
If the new page has different data fields from the old
one, the existing data,
queries and reasons can
not be transferred and
must be discarded. If this is
the case a warning
message is displayed, as
illustrated in this dialog.
No existing record but pages are incompatible
Click cancel if you do not
wish to continue, or one of
the Save options: Final,
Incomplete or Pending to
proceed with the key
change.
If you check Remain on
this page when it is saved,
the page will be opened in
it’s new location. This is
recommended.
No existing record and pages are compatible
In this example, only the
patient ID is being changed.
Since the pages are the same
they will have the same data
fields and thus it is possible to
transfer the data record to the
new keys.
Click cancel if you do not wish
to continue, or one of the
Save options: Final, Incomplete or Pending to proceed
with the key change.
- 38 -
4.6. Correcting Key Fields
If a data record already
exists with the new keys
you can either cancel the
key change or continue by
selecting one of the 2
conflict resolution options.
New keys already exist but pages are compatible
If you chose to keep the
existing primary record it
will not be changed in any
way, and the current data
record with all of it’s queries
and reasons will be deleted.
The only thing that will
move to the new keys will
be any images from the
current page.
If you chose to make the
current record primary, it
will be moved with all of it’s
queries, reasons and
images to the new keys,
and the existing data record
with all of it’s queries and
reasons will be deleted.
Only images will be
preserved from the existing
record and they will become
secondary.
- 39 -
iDataFax User Guide
New keys already exist and pages are incompatible
If a data record
already exists with the
new keys, and the
data fields on the
current page differ
from those on the
existing page, you
can either cancel the
key change or
continue.
If you chose to
continue the existing
data record will not be
changed in any way.
The data on the
current page can not
be moved because
the data fields are
different on the new
page, thus all data,
queries and reasons
on the current page
will be discarded. The
only thing that will
move to the new keys
will be any images
from the current page;
and if the existing
page already has
images, all moved
images will become
secondary.
4.7. Images of CRFs and other Documents
DataFax can receive and link scanned or faxed images to data records. An image could be a faxed copy
of the original paper case report form or a supporting source document from medical records. Each image
must be linked to one and only one data record.
Multiple images may be linked to the same data record (e.g. all faxed copies of the original CRF page as
corrected over time). One image must be designated as the ’primary’ copy. This is the image that will
appear along with the data record when the screen is split in data and list views. All other images have
status ’secondary’ and can be reviewed by selecting Page-Review Images or clicking the image count
button in Data View.
If one or more images have been linked to the current data record, 2 buttons will appear in the lower right
corner of the screen in Data View:
Clicking the button labelled ’i’ will toggle the primary image
between show and hide. Depending on which option is currently set in User Preferences, the screen will
either split to show both the data and image windows, or toggle between showing just the primary image
and just the data screen.
- 40 -
4.7. Images of CRFs and other Documents
The ’i’ button is prefixed with another button that shows the number of images linked to the current data
record. Selecting this button, or selecting ’Review Images’ from the ’Page’ menu brings up a dialog, illustrated below, which can be used to review and manage the images.
Page - Review Images
This dialog shows all images linked to the current data record. It shows each Image ID, when the image
was received, whether it is the primary (top) or a secondary image, and the Sender ID from the DataFax
server fax log. This dialog can be used to:
Review Images: Select each image in turn from the image list to display that image.
Compare Images: The ’Split’ button has 3 modes: No, Top-Bottom and Left-Right. When the window
is split click on any 2 images in the image list to display them together. Double clicking on one of the
images in the image list can then be used to switch them between the 2 display windows.
Specify the Primary Image: When the dialog opens the primary image is tagged with an asterisk in the
image list. Selecting a secondary image and then clicking the ’Primary’ button will change that image
to primary and demote the original primary image to ’secondary’, but the asterisk remains on the original primary image as a reminder of which image was primary when you opened the dialog. Changes
in image status do not take effect until the ’Apply’ button is selected.
Delete Images: Selecting an image and then clicking the ’Delete’ button will change ’Status’ to
’deleted’ but this will not take effect until you click ’Apply’. Status can be changed from ’deleted’ back
to ’primary’ or ’secondary’ by clicking ’Undelete’, but once ’Apply’ is selected this is no longer possible. If there is more than one image the primary copy can not be deleted until all secondary images
- 41 -
iDataFax User Guide
have been deleted.
Fix Keys: If an image has been linked to the wrong data record you can relink it to the correct record
by selecting ’Fix Keys’ and then entering the correct patient ID, visit and plate numbers. The image
will then be unlinked from the current data record and linked as a secondary image to the new data record.
If necessary you can then open the new record to change the image status from secondary to
primary.
4.8. Working with Tasks
Tasks, comprised of user instructions and record retrieval specifications, can be defined and assigned to
individual users or study roles. Any user with access to Data View can perform tasks but ’Data with Select’
permission is required to define tasks.
4.8.1. Performing Tasks
To perform a task use the Select-By Task menu item to invoke the following dialog.
Select - By Task
To read the task instructions before
launching it select the Instructions
button.
To perform a task double click it in
the list, or select it and click OK.
Only tasks assigned to your login or
study role will be listed in this dialog.
After selecting a task iDataFax sends a request to the study server to get data records that match the task
specifications and then displays the number of records found along with the task instructions as illustrated
below.
- 42 -
4.8.1. Performing Tasks
Task Instructions
Instructions are specified when the
task is created, but can subsequently modified.
Instructions will typically include: a
description of the record selection
criteria, what the user needs to do
with each task record, and what
happens when a task record is
saved.
Selecting OK will retrieve the records that met the task criteria. The record list will include only those sites,
patients and visits that contain task records. If user preference ’open first task record when a task set is
built’ is on, the first task record will open automatically, otherwise a patient binder must be selected to
display the task records.
Task Records
The title shows the current patient ID# and the
current task record and number of task records
for this patient.
The square icon in the title toggles between the
standard patient binder list (shown here) and a
simple list of task records.
Task records are flagged with the letter ’T’ which
changes to lower case ’t’ when the record is
saved. The current ’t/T’ record counts are
displayed at the bottom of the iDataFax window
(not shown).
Use the ’Show All Records for This Patient’
button to open the patient binder and review
other records for the current patient. Clicking this
button again will return to Task Records only.
- 43 -
iDataFax User Guide
More than one user can work on the same task at the same time. Each user gets a list of pointers to the
records currently available for the task, but a patient binder is locked only when it is opened, and only one
user can have the binder locked at a time. Other users will be able to open the binder in view only mode
until the lock is released. Thus the next user to open a binder will get the current version of the data
records, including any changes made by the previous user.
Saving a task record changes the task icon from ’T’ to ’t’, but only for the user who saved the record. Thus
if more than one user is working on the same task at the same time, it is possible that the task will have
been completed by one user before another user opens the patient binder, and that the second user will
thus wonder why the record has been included in the task set. A clue that this may have occurred is
provided by the ’Last Save’ date/time stamp at the bottom of the screen which may indicate that the record
has been modified since the user began working on the task.
When you are finished performing a task use Select-All Records to put the task set away, remove the ’T’
and ’t’ icons from task records, and resume access to all patient binders and data records.
4.8.2. Defining Tasks
Users with permission can define tasks for themselves and other users using the task definition dialog
illustrated below. Only one user can define tasks at a time, but other users can open this dialog in view
only mode.
Select - Define Tasks
Task name, description and instructions
document what the task is about.
User Roles and Logins identify who is
allowed to perform the task.
Owner Roles and Logins identify who is
allowed to modify the task definition. In
addition study administrators have
permission to modify all tasks.
Select a mode, the level you want
records moved to when they are saved,
and whether you want edit checks
enabled or disabled while performing the
task.
The final section (closed in this example)
is for the record retrieval specifications.
They can consist of data, query or reason
criteria, or any standard DataFax or
custom program that outputs a DataFax
retrieval file.
- 44 -
4.8.2. Defining Tasks
Multiple user and owner, login and role names may be entered using a comma delimited list, and ’*’ or ’all’
may be entered to specify all login or role names.
Task ownership specifications are ignored for study users with administrator priviledges (datafax or study
level). These special users can view, edit and delete any task including those created by other users.
Modes include the following:
View - when working in this mode no changes can be made to data or metadata (queries and
reasons), and no changes are made to the work flow level.
Edit - in this mode changes can be made to data and metadata (as permitted by user permissions).
New and modified metadata are saved at the current level of the data record, and the level of the data
record itself remains unchanged.
Modify - in this mode the work flow level is changed to the specified sign off level, but only for those
data and metadata records that are modified. Thus it is possible for data and metadata records to end
up at different levels.
Validate - in this mode the work flow level of data and all metadata records is changed to the specified
sign off level when a Save button (Final, Incomplete or Pending) is selected, regardless of whether or
not any changes were made to data or metadata.
DDE - In double data entry mode the current data values and metadata are hidden until the user exits
each data field whereupon the value entered is compared with the current value in the database. If
they differ a dialog appears asking the user to select the correct value. The user must tab through all
data fields before the record can be saved. On save the data record and all metadata records move to
the sign off level. Field-List DDE Status on This Page can be used to check the changes made so far
and the data fields that remain to be entered, on the current data record.
Sign off level is a number (1-7) which is stored as a special field (DFLEVEL) in each data and metadata
record for work flow management. New data entry is typically saved at level 1. Higher levels are used to
signify that some review task has been completed - analogous to moving paper CRFs from one persons
inbox to another. In the example above, double data entry is performed by selecting records from level 1
and saving them to level 2. Thus each record will only be double entered once, unless it is returned to
level 1 by some event, like a refax.
The task set returned to each user depends on their role permissions, and equals the intersection set
created by the task retrieval criteria and the user’s permissions. Thus you can not grant extra permissions
to a user within a task definition. For example, one task can be defined and used by all of the clinical sites
because each site will only receive the data records they are allowed to see.
The following examples illustrate how data, query, reason and program criteria are used to define the
records to be selected for different tasks.
- 45 -
iDataFax User Guide
Example 1 - Search Data records
This example illustrates a
review task for drugs
recorded on CRF page 4
which have reached workflow level 2 with status
Final. The expression
builder has been used to
select records where the
’check if none’ data field
(MEDNONE) is empty
(code 0) because we only
need to review pages on
which drugs have been
recorded.
To be selected records
must meet all of the specified criteria. The task is
performed in Validate
mode with edit checks
turned on. On saving each
record it will be raised from
level 2 to level 3.
- 46 -
4.8.2. Defining Tasks
Example 2 - Search Queries
This example illustrates a task for
someone who reviews new queries
created by data entry staff during new
data ebtry at level 1, to make sure they
are clear and appropriate before being
sent to the clinical sites in a QC report.
This task should be performed using
the Field - Review Queries & Reasons
dialog so that queries can be saved on
their own, raising them to level 2
without changing the work flow level of
the data records.
- 47 -
iDataFax User Guide
Example 3 - Search Reasons
New reasons entered to explain data
values are set to status Pending with the
expectation that they will be reviewed
and either approved or rejected along
with a query explaining why and requesting a correction or additional information.
Task records = all data records with
reasons that have status Pending. Mode
is set to Modify and the sign off level is
set to 2, but we could also have used
Edit mode which would leave the reasons
at their current work flow level.
As for example 2, this task should also
be performed using the Field - Review
Queries & Reasons dialog.
The following examples illustrate how tasks can be defined by running a program that generates a
DataFax retrieval file as output. DataFax includes 2 standard programs which are designed for this
purpose: DFmkdrf.jnl which selects records form the study journal files and DFmkdrf.ec which selects
records identified by edit checks. We will only show some examples here. A full description of these
programs can be found in the Appendix at the end of this guide. If you need to write a custom program an
explanation of DataFax retrieval files can be found in the DataFax Programmers Guide.
Example 4 - Search by Progran DFmkdrf.jnl
In this example, double data entry is
performed on data records with associated images (-image yes), which were
saved by other users (-xu whoami) at
level 1 (-v 1) with status final or incomplete (-s final,incomplete) at any time
during the study, and still meet these
criteria today (-d 2).
Example 5 - Search by Program DFmkdrf.jnl
If instead of performing double data
entry it is considered adequate to just
review level 1 data entry records and
move them to level 2 the same
retrieval criteria can be used with Validate instead of DDE mode.
- 48 -
4.8.2. Defining Tasks
Example 6 - Search by Program DFmkdrf.jnl
Users sometimes forget exactly what
case they were working on earlier in
the day but want to retrieve it so they
can check something or make a
change. With no deselection (-d)
option specified records will be
retrieved even if subsequently saved
today by someone else.
Example 7 - Search by Program DFmkdrf.ec
This task runs all edit checks (-E ALL)
on plate 1 (-P 1) data records that are
currently at level 1 (-v 1). No edit
check actions are applied. Instead
records will be retrieved if one or more
edit checks would have added a new
query, modified an existing query,
displayed a message, or changed a
data field.
Example 8 - Search by Program DFmkdrf.ec
In this example the edit check (-E
CheckInit) is programmed to check
patient initials and displays a warning
message if they differ from some reference value. In this task it will be run on
all pages used in the study (-P 1-102)
and thus will retrieve all records on
which this message would be
displayed.
The edit check programming language gives the programmer access to all data fields for all plates, visits
and patients, and includes functions that can be used to test for the existence and status of queries and
reasons. Thus it is ideally suited for the definition of tasks that involve complicated record retrieval criteria.
All the programmer needs to do is raise a message using function dfwarning() or create a query using
function dfaddqc() on records that are to be selected, and use function dfbatch() if the edit check is to be
executed only when the task is being performed.
The following example shows how an edit check could be used to find unusually large changes in diastolic
or systolic blood pressure between visits. It could be programmed to add a query if a suspicious change is
found, and to do nothing if a query for this problem has already been added to the blood pressure field in
question.
- 49 -
iDataFax User Guide
In this example edit check (-E
CheckBP) is triggered on page 5 (-P 5)
at all follow-up visits (-S 21-24) which
are currently at level 2 (=v 2).
Example 9 - Search by Program DFmkdrf.ec
By running this edit check in a task the
user can review the blood pressure
readings recorded on the faxed CRF
pages and verify that any unexpected
changes are not the result of data
entry errors.
4.9. Adhoc Record Selection
In addition to using predefined tasks to select data records and set work flow modes and levels, users who
have Data with Select permission can perform adhoc retrievals using the same dialogs that are used to
define tasks. Working in this way requires an understanding of the study work flow plan and is thus most
appropriate for central data management staff. This permission will typically not be enabled for the clinical
sites and thus the features described in this chapter may not be available to all users.
4.9.1. Changing Mode and Level
iDataFax allows you to work in 5 different modes and to keep track of data reviews and other tasks by
moving records from one work flow level to another when a task has been completed.
The default mode, set when iDataFax starts, is Modify and the default sign off level is set to your lowest
write level (defined in your study roles). Mode, sign off validation level, and whether edit checks are on or
off, are also set whenever you perform a task or build an adhoc task set, but they can also be changed at
any time from the Select menu as shown below.
Select - Change Mode & Level
This dialog can be used to change your mode,
sign off work flow level, and to enable or
disable edit checks, but it is only available to
users who have Data with Select permission.
The current mode and sign off level are shown to the left of the Save buttons at the bottom of the screen.
For example, Save m[1->2] indicates that we are in modify mode with a sign off level of 2 and that the data
record is currently at level 1. Modes are identified by the letter m for Modify, e for Edit and v for Validate
and d for DDE.
When in view mode only the current work flow level is shown, e.g. Save [3], and the message view mode
is displayed to the right of the save buttons.
- 50 -
4.9.2. Select - By Data Fields
4.9.2. Select - By Data Fields
Adhoc task sets can be created using the same record selection dialogs already described in the section
on defining tasks. As for predefined task sets, the records in an adhoc task set are also flagged with the ’T’
and ’t’ icons. To get started, choose Select: By Data Fields to launch the dialog shown below.
To be selected a record
must meet all of the specified criteria. Criteria that
are left blank are irrelevant.
In this example, Pages 8
and 9 that are at work flow
Level 1 with status Final
will be selected for all
patients at Sites 1 to 33.
Select - By Data Fields
The selected records will
be reviewed in Validate
mode with a sign off level
of 2. Thus, whether or not
a record is modified, it will
be raised to level 2 if it is
saved using one of the
Save buttons at the bottom
of the screen.
If you select Build Set the
dialog will remain open and
you will be able to add
more records to the adhoc
task set by specifying a
new set of criteria and
again selecting the Build
Set button.
Select Done when you are
finished building your task
set and are ready to review
the records.
Searching by: Data, Queries, or Reasons determines whether the search criteria are applied to data
records, query records or reason records. For example, when searching for records at level 1 you will get
different results depending on whether you are searching for level 1 in data, query or reason records.
In addition to the record selection criteria, this dialog requires specification of the Mode and Sign off Level.
These setting apply to both data and metadata records.
It is important to remember that the modes do not grant any permissions that the user does not already
have. Permission to view and modify data and metadata are controlled by study roles defined and
assigned to users by the study management team. Thus, you will only be able to select records you are
allowed to see, and regardless of the mode you select, you will only be able to modify data and metadata
for which you have modify permission.
- 51 -
iDataFax User Guide
When the user selects Done a dialog will appear indicating the number of records in the database that
match the selection criteria. The user can then select OK to proceed or Cancel to abort the selection.
If the user decides to proceed the record list is reduced to show only those sites, patients and assessments that contain records in the adhoc task set, and each of these levels is flagged with a ’T’ icon. Just
as with predefined tasks, the ’T icon changes to ’t’ when a task record is saved. This shows that the record
has been reviewed but does not necessarily mean that the task has been completed as intended. If the
record still meets the selection criteria for the task it will come up again the next time the task is
performed. All other sites, patients, assessments and records are hidden, but can be revealed by selecting
the button labeled ’Show All Records for This Patient’ at the bottom of the record list.
To toggle the current patient between task
records and all records use the button at the
bottom of the record list labeled Show All
Records for This Patient.
The entire record list containing all sites and
patients can be toggled using the menu items
Show-All Records and Show-Task Records.
4.9.3. Select - By Data Retrieval File
This option can be used to retrieve data records listed in a DataFax Data Retrieval File (DRF). These files
must have a .drf extension. They can be loaded from either the study drf folder or the users local PC. DRF
files can be created by standard DataFax reports (like the example shown below), by saving a current task
set (using File-Save DataFax Retrieval File), by using DFmkdrf.jnl or DFmkdrf.ec (described in the
Appendinx) or with a custom program.
To retrieve records listed in a DRF choose Select: By Data Retrieval File to launch the dialog shown
below.
- 52 -
4.9.4. Select - Batch Validate
Select - By Data Retrieval File
The DRF in this example is named
VDillegal.drf. This is a standard
DataFax DRF which lists illegal visit
dates detected by DataFax report
DF_XXkeys.
Edit mode is specified which means
that the work flow level of existing
data and metadata records will not be
changed.
The Sign off level of 2 will only be
used for any new queries or reasons
that are created during the review.
If the DRF contains a descriptive
header it will be displayed in this
dialog when the file is selected.
If each record in the DRF includes a description (e.g. explaining why it was included) it will be displayed in
the message window at the bottom of iDataFax when a record is selected in the record list. This is
optional and may not be present in all cases.
4.9.4. Select - Batch Validate
The Batch Validate feature is used to move all selected data records to a specified validation level in one
step. Users require permission for Data with Select to use this feature. Data records can only be batch
validated if they meet all of the following criteria:
The user is able to retrieve the records. Records the user does not have permission to get or which
are currently locked by another user can not be batch validated.
Record status is final, incomplete, pending or lost. New records can not be batch validated.
The records are currently at levels for which the user has modify permission.
Users can only move records to levels for which they have write permission.
There are 3 options: move the current page only, move all open pages for the current patient, and move
all records in the current task set (i.e. records flagged ’T’ or ’t’).
- 53 -
iDataFax User Guide
Select - Batch Validate
In this example all open pages for the current
patient will be moved to work flow level 3 when
the Apply button is selected. The open pages
could include assessments opened by: (1) selecting them in the record list, (2) using Patient Expand All Assessments, or (3) as the result of a
predefined or adhoc task.
When the Apply button is selected the specified records are moved immediately. No edit checks are triggered.
4.10. Using Lookup Tables
Some tasks require selecting an item from a pre-defined lookup table. This functionality is implemented in
iDataFax using an edit check to achieve the desired behavior. For example, the edit check might be
programmed to provide the lookup table to only specified users, users with specified roles, or users
performing a specified task, and the lookup table might always appear on entry to some data field or only
when an exact match can not be found automatically.
Regardless of how the edit check is programmed, if a lookup table appears while performing data entry,
the user is able to search the lookup table and select one of it’s entries (rows), or click the Cancel button
to select none of them.
The following example shows a lookup table which has been created for MedDRA coding. The division of
each row into fields, the field labels, the order in which they appear, which fields are shown in the dialog,
and which fields are returned to the edit check when a row is selected are all customizable by the edit
check programmer.
- 54 -
4.10. Using Lookup Tables
Lookup Table Example 1
The top section of the dialog shows the field labels and the field values in the currently selected row. The
bottom section contains a scrolling list of all rows in the lookup table, typically with abbreviated field labels
at the top of each column. If all fields can not be seen clicking ’Show All Fields’ will reduce the display size
of each column to fit them all within the current dialog. The size of each column can be adjusted by right
clicking the vertical line separating the field labels and dragging it left or right.
To search for one or more terms enter them in the Search Terms widget at the top of the dialog, check the
option to find entries that contain ’ANY’ or ’ALL’ of the terms, check the fields to be searched, and then
click ’Find’ or ’Filter’. Find displays the next matching row, while ’Filter’ reduces the table to display all
matching rows.
After reducing the rows to a filtered set you can enter new search terms and search or filter again within
the current rows. Select ’Reset’ to display all rows in the lookup table.
When you have found the correct row either double click it, or single click it and then click ’OK". This will
return your selection to the edit check and put the lookup table away. What happens next depends on
what the edit check is programmed to do. Typically all or some of the fields from the row you selected will
be entered into specified data fields on the current page, but the edit check may be programmed to do
something else.
- 55 -
iDataFax User Guide
If each row in a lookup table has only one field a simpler dialog will appear without the top field display
section. An example appears below.
Lookup Table Example 2
This example shows a
simple lookup table in
which each row has just
one field containing an
investigator name.
Apart from it’s simpler structure this lookup table behaves exactly the same as the MedDRA lookup table
described above.
4.11. Query Management
Queries can be created, modified and deleted by edit checks with no user intervention, or manually by
selecting ’Add Query’, ’Edit Query’ or ’Delete Query’ from the ’Field’ menu to invoke the query dialog illustrated below.
- 56 -
4.11. Query Management
Page - Edit Query
The query dialog has the following components:
Title. The title at the top of the dialog shows the information needed to identify which patient and
study form the query is about.
Field. The field description, as entered in the study setup, identifies the data field in question.
Reported Value. When a new query is create this field shows the value currently recorded in the
data window, but this can be changed by the user. For example, if a date is unclear the user might
enter their best guess in the data window but change the query to indicate that the year was unclear
like this: Jan ??,2009.
Problem. The problem type can be one of: missing, illegal, inconsistent, illegible, fax noise, and
other.
Use. Use can be ’external’ meaning the query is to be directed to the clinical site or ’internal’ indicating it is for the data management center only.
Status. The status of each query is updated as appropriate to one of the following:
New. the query addresses a new problem which has not yet been transmitted to the clinical site.
Revised. the query addresses a revised problem which has not yet been transmitted to the clinical site.
Outstanding. the query has been transmitted to the clinical site but has not yet been resolved.
Pending. the site has responded to the query but the reply has not yet been reviewed by the
data management office.
Resolved NA. the query has been resolved - the requested data or correction is Not Available.
Resolved irrelevant. the query has been resolved - the query was deemed to have been unnecessary.
- 57 -
iDataFax User Guide
Resolved corrected. the query has been resolved - the requested correction or information has
been received.
Type. Type will be ’Correction’ if the query asks for some data correction, or ’Clarification’ if the query
requests additional information.
Details. A description of the problem and the requested resolution can be entered manually or, if
standard queries have been pre-defined, they can be selected by typing a short acronym or using the
Details button to select the query from a lookup table.
Note. An internal note, used only by data management staff, can be entered for any internal pupose,
such as recording special circumstances explaining why or how a query was resolved.
Time Stamps. The creation time stamp is updated when a query is saved with status "New’. The
modification time stamp is updated when a query is saved after modification of any of the fields
described above. The resolution time stamp is updated when Status is changed to one of the 3 resolution types.
OK. Selecting OK saves the query but it is not transmitted to the study database until the data record
is saved.
4.12. Automatic Resolution of Data Queries
Some data queries resolve automatically when the data field is corrected while others do not. For autoresolution to occur all of the following conditions must be met.
Query Use = ’External’
Query Type = ’Correction’
Query Problem = ’Missing’ or ’Illegal’
The data field does not have a Reason with status ’Rejected’
If all of the above criteria are met then:
1. if the study setup includes a legal value specification for the data field, then entry of one of the specified legal values will resolve the query
2. if legal values have not been specified for the data field, then entry of any value will resolve a query
with problem type ’Missing’ but not a query with problem type ’Illegal’.
In addition to the above auto-reolution rules, edit check programmers can resolve queries when certain
conditions are met using the edit check function dfeditqc(). In this case there are no restrictions on the
type of queries that can be resolved, other than those imposed by the edit check programmer.
4.13. Review/Approve Queries and Reasons
Central office review and approval of reasons and query replies can be performed using Field-Review
Queries and Reasons or Field-Approve Queries and Reasons which produce the dialog illustrated below.
The dialog looks the same for these 2 option, but they differ in behavior. The ’Review’ dialog (shown
below) lists all queries and reasons on the current page, while the ’Approve’ dialog lists only those queries
and reasons with status ’Pending’. Also, when a query or reason is changed from status pending to
approved or rejected, it is removed from the ’Approve’ dialog but remains visible in the ’Review’ dialog.
To use this feature start by retrieving the records to be reviewed, and if necessary set the working mode
and level per your study workflow SOPs. Using these dialogs in ’Validate’ mode is generally the best
choice as it allows you to save the data records to also move them to the sign-off work flow level. Next
select the Review or Approve dialog and position it beside the data window. Then as you traverse the data
records, all relevant queries and reason on the current record will appear in the dialog. As you select each
query and reason in the dialog the relevant data field will be highlighted in the data window making it easy
- 58 -
4.13. Review/Approve Queries and Reasons
to see the relevant item.
The Review/Approve dialogs are generally used to review and approve new reasons and query replies,
but as needed you can also modify or even delete queries and reasons if your permissions allow it. There
is one limitation. Changes cannot be made to queries and reasons on ’Pending’ level 0 data records as
this status indicates the user was interrupted during the entry of a new record and intends to complete it
before it is reviewed by study managers.
The 2 buttons below Query Status and Reason Status can be used to save your changes to the current
query or reason before moving on to the next one, or you can delay saving changes until all queries and
reasons on the current data record have been reviewed, in which case an asterisk will appear beside each
query and reason with unsaved changes. The Save button at the bottom of the dialog saves the reason
and query on the current field simultaneously. The Done button dismisses the Review/Approve dialog
without saving any changes.
If you change the status of a query in these dialogs to ’New’ or ’Revised’, or you ’Reject’ a pending reason,
the data field will turn blue, and when the query and reason changes are saved the status of the data
record will also change to ’Incomplete’ (if needed) to signify that it contains one or more outstanding problems. On the other hand, approving all of the query and reason replies on a data record does not automatically make it ’Final’ but does enable the ’Final’ save button which can be selected if you want to change
the data record to status ’Final’.
The Review/Approve dialog allows you to perform work flow management on the metadata independently
of the data records. When you have completed your review of the metadata on a page you can proceed to
the next page in the task set. You do not need to save the data record itself, unless you have made
changes to data fields that you want to keep or you want to change the data record status and/or level.
The work flow level will only be changed on data and meta-data records that you save.
The following example illustrates the Review dialog for a data record which has 2 queries and 3 reasons
attached to 4 data fields. The data field, and the current work flow level and status of each associated
query and reason is shown in the list at the top of the dialog.
- 59 -
iDataFax User Guide
Date of Birth has a
query and a reason, and
a current value of
25/10/42. The query
(generated by an edit
check) was accepted by
user jack on December
13, 2007.
Field - Review Queries and Reasons
Jack corrected a data
entry error for age on
the screening form and
explained this in a
reason. He then
returned to the Date of
Birth field where the edit
check found the
problem now fixed and
thus resolved the query.
The reviewer should
change Reason status
from Pending to
Accepted and save it by
clicking the button below
Reason status. When
this is done the reason
level and status will be
updated in the list at the
top of the dialog.
Saves in this dialog are
immediate but only
effect queries and
reasons; without changing the level of the associated data record.
The Revert button can
be used to undo
changes to data and
metadata on the current
field, but only before
they are saved.
4.14. Transmitting Scanned CRFs
As an alternative to faxing, CRFs can be scanned to a PDF file, and then transmitted to a DataFax server
as described below. When the server receives the PDF it is processed just like an incoming fax. Thus the
pages will not appear in patient binders until they have been reviewed and entered by a user with permission to use ’Fax View’.
- 60 -
4.14. Transmitting Scanned CRFs
Note
DataFax also supports emailing a PDF attachment to datafax@your_server_name, but unlike
email, PDFs transmitted to the server by iDataFax are encrypted using SSL and are thus
secure.
1. CRFs must be scanned in Black & White and saved as a PDF file. The current version of DataFax
does not support color or grey-scale. There is no practical limit on the number of pages that can be
included but of course the time required to transmit the file to the DataFax server will increase with its
size.
2. Start iDataFax and login to the destination DataFax server. Since a PDF is processed just like an
incoming fax it doesn’t matter which study you are using when you transmit a PDF and the PDF can
even contain CRF pages for multiple studies, as long as all pages in the PDF file are for studies that
reside on that DataFax server.
Note
If you use different DataFax servers for different studies, make sure you select the correct
server. Transmitting a PDF to the wrong DataFax server would be the same as sending a
fax to the wrong fax number.
3. Select Submit PDF from the File menu in Data View.
4. This will launch the standard file selection browser on your PC. Use it to select the PDF files you want
to transmit.
5. Next you will see a confirmation dialog identifying the DataFax server and each PDF file you selected
for transmission. After confirming that these are correct, selecting the Transmit button initiates the
transmission, while selecting Quit aborts the operation.
6. You will see a progress bar while each PDF transmission is underway. Pressing the ’Cancel’ on the
progress bar will not stop the current transmission, but will cancel transmission of any remaining
PDFs.
7. When the transmissions are complete the dialog will show the the status of each PDF: ’transmitted’,
’failed’ or ’canceled’. The ’Continue’ button can then be used to select additional PDFs for transmission, and the ’Quit’ button ends the dialog.
To use this feature your study role must include permission for ’iDataFax: Data-Submit PDF’.
This feature is blocked if a study has been ’disabled’ or put into ’read-only’ mode by a study administrator.
If a study is in ’restricted’ mode, PDFs can be submitted by study and DataFax administrators only.
PDFs transmitted to the server from iDataFax are registered in the DataFax fax log, so the ’Context’
option can be used to identify when and how they arrived. Also, just like a fax, the transmitted file is added
to the DataFax fax archive.
- 61 -
iDataFax User Guide
Page - Context
The Context dialog available in ’Fax’ and ’Data’
views shows the date and time the page was
received by the server along with the method and
user, as illustrated here.
4.15. Importing Patient Documents
Unlike ’Submit PDF’, described in the previous section, which sends a PDF to the DataFax server for
processing in ’Fax View’, users with permission to ’Import patient documents’ can import a PDF file and
immediately attach each page to the appropriate data record.
The imported pages may be supporting documentation, e.g. letters, reports, death certificates, etc. or
copies of paper CRFs or worksheets containing patient data.
This feature is launched by selecting ’Import Patient Documents’ from the ’Patient’ menu in Data View. It
first displays the standard file selection dialog, and then when a PDF has been selected, presents the
import dialog illustrated below.
The import dialog contains 2 main sections, a window for reviewing the PDF pages on the right, and a
spreadsheet for identifying the data records they belong to on the left.
- 62 -
4.15. Importing Patient Documents
This feature has 3 modes of operation, chosen from the ’Select task’ list at the top of the import dialog:
Attach all pages to the current data record
To use this option the destination data record must be opened before ’Import Patient Documents’ is
selected. When the import dialog appears the keys identifying the current data record will be
displayed in the spreadsheet and cannot be changed. Simply select the check box beside each page
you want to import, or click the ’Select All’ button to select all pages. Then click the ’Import’ button. A
dialog will appear asking you to re-enter your password. You can still Cancel at this point. If you
proceed and enter your password the selected pages will be imported after which a results dialog will
appear displaying a summary of the transaction including a list of the pages that were imported.
If the current data record had one or more images before import, all imported pages become
secondary images, otherwise the first imported page becomes the primary image and the rest
become secondary. The imported images can be reviewed and the primary/secondary classification
can be changed using the ’Review Images’ dialog, which is selected by clicking on the image count
button at the bottom of the screen or by selecting ’Review Images’ from the "Page’ menu.
Attach each page to the data record identified below
Use this option if the PDF contains pages that belong to a number of different data records. To use
this option you must be able to identify the data record that is to receive each page by entering its
keys: Patient, Plate/Page and Visit/Assessment, in the spreadsheet.
If any of the imported pages are bar-coded to identify where they belong in the patient binders, values
for Plate/Page and Visit/Assessment will be read from the bar codes, otherwise enter the appropriate
numeric value in the spreadsheet, or right click a cell to use the selection dialog. Enter the Plate/Page
number first. The Visit/Assessment selection list will then show only those values that are consistent
with that plate (per the study visit map).
- 63 -
iDataFax User Guide
To prevent errors iDataFax will not allow pages to be imported if they are barcoded with a different
study number. Also, users can only import pages for data records which their study permissions allow
them to modify. If a key field contains a value that is illegal or not permitted the cell will appear purple
and the page selection check box will not be available, unless the problem keys are corrected.
If a page contains a bar code for a different study or the identified record is at a workflow level the
user can not modify, a red X replaces the page selection check box indicating that the page cannot be
imported.
After entering valid keys a check box appears which when checked indicates that the patient binder
can be locked and that the page has been selected for import. If the page can not be imported because
the patient binder is locked by another user a lock icon replaces the check box and the message "This
record is currently locked by another user" is displayed.
When the pages you want to import have been identified and checked click the ’Import’ button and
enter your password. Each page will be attached to the specified data record as a primary or
secondary image, as described for the previous option. The assignment will be displayed in the
results dialog, illustrated below.
If a page is imported for a data record that does not currently exist in the study database, a pending
data record will be created and added to the patient binder.
Import data entry worksheets/CRFs identified below
Use this option if you want to import worksheets or CRFs on which data has been recorded and then
use DataFax’s split-screen data/image feature to enter the data into the corresponding data records.
This option, begins like the previous one: the pages to be imported are identified and selected, the
import button is clicked and the user is prompted to enter their password, after which the selected
pages are imported and the results dialog appears. It differs from the previous option as follows:
Only one page can be imported for each data record. If the same keys are entered in the spreadsheet for a second page, the selection check box will become unavailable for that page.
Each imported page becomes the primary image for its data record. The previous primary image
(if any) becomes secondary.
iDataFax builds a task set of all imported pages, and displays the first task record when the user
closes the results dialog. If any of the imported pages did not have a matching data record before
- 64 -
4.15. Importing Patient Documents
import, a data record with pending status is created and added to the task set.
The user then performs data entry by comparing the data fields with the values recorded on the
imported CRF or worksheet, and entering or correcting the data fields as needed.
All imported pages should be processed before releasing the task set, but if this is not possible
they can be saved using ’File-Save Data Retrieval File’. They can then be retrieved and completed
another time using ’Select-By Data Retrieval File’.
Spread-Sheet Keyboard Short-Cuts
Tab or Right Arrow moves forward across the cells in each row.
Shift-Tab or Left Arrow moves backward across the cells in each row.
Pressing Enter on a Patient cell, or completed Plate or Visit cell, moves down to the next cell in the
column, as does the Down arrow key.
Shift-Enter on a Patient cell, or completed Plate or Visit cell, moves up to the next cell in the column,
as does the Up arrow key.
If you know the numeric value it can be typed into an empty cell or you can over-type to change a
completed cell. Plate and visit labels will be displayed after the numeric value is entered in these cells.
If you don’t know the numeric value for plate or visit a selection dialog showing the legal values and
corresponding labels can be launched using right-click, Control-S or by hitting Enter when the cell is
empty.
Within the selection dialogs use the Up and Down arrow keys to find the desired value and then hit
Enter to select it and close the dialog.
Plate must be entered before Visit, and then only visit numbers that are legal for the specified plate
will be displayed in the visit selection dialog.
To enter the same value in a range of cells in any column first select the cells (click the first cell then
shift-click the last cell) and then enter the value by typing or using the selection dialog.
To copy and paste the values from one range of cells to another first select the cells as described
above, then use Control-C (or right-click-Copy) to copy the values, then click the first cell in the destination range, and finally use Control-V (or right-click-Paste) to paste the values.
While working within a selected range of cells the Delete key removes the current value from all of the
selected cells.
When all keys have been completed with valid values the space bar can be used to toggle the import
selection check box on and off.
Page Context
Pages imported in iDataFax are registered in the DataFax fax log, so the ’Context’ option can be used to
identify when and how they arrived. However, since pages are selected and imported individually, the
entire PDF is not copied to the DataFax fax archive the way it is when a fax arrives or a PDF is transmitted
by the method described in the previous section.
Page - Context
Images imported from iDataFax are identified in
the Context dialog with the label "iDataFax Import
PDF:username", as illustrated here.
- 65 -
iDataFax User Guide
4.16. Data View Menus
This section describes the options available under the menus displayed at the top of the screen. The
specific menus displayed, and the availability of options under each menu, will vary depending on user
permissions and whether an action is allowed at any given time.
4.16.1. File Menu
The File menu is similar for all views (data, queries and reasons) and contains the following items:
Reload ... - users with iDataFax Developer permission can use this option to:
reload lookup tables,
reload edit checks, and
trace edit check execution
These functions make it possible to modify edit check code, republish it and then reload the edit
checks to test the modifications and trace edit check execution as the user enters and exits records
and fields. When working in a production study we recommend using DFedits_test and reloading the
published test file to avoid disrupting the production edit checks seen by other uers.
Save Data Retrieval File - create a DRF file listing the keys of all records in the current task set. This
allows you to reload this same set some time later Using Select-By Data Retrieval File.
Save As PDF... - create a PDF file containing data and/or images from the current patient binder or
task set. Use this option if you want to: print blank CRFs, print fax and data records side by side, or
include data records with the same field color coding used in iDataFax.
Save As Bookmarked PDF... - create a PDF file containing data and/or images from the current
patient binder or task set. This option includes many of the same options as the command line
program DFpdf and includes a navigation sidebar indexed by patient ID, visit and plate. Use this
option to produce a PDF containing any combination of CRF images and data records, to bind specified data fields (e.g. for endpoint ajudication committees), and to password protect the PDF file.
Enter field blinding specifications as follows: plate#s:field#s;plate#s:field#s, and use ’*’ for all plates
and/or all fields. For example: *:8 (blind field 8 on all plates), 1-5:8;9:22-25,33 (blind field 8 on plates
1-5 and fields 22-25 and 33 on plate 9.
Save Task Set... - create a PDF file containing the data record keys, set creation method, set instructions, user name and date for the current task set.
Print... - print blank CRF books with patient ID and visit numbers pre-printed, or pages (containing
data and/or images) from the current patient binder or task set.
Print Task Set... - print the data record keys, set creation method, set instructions, user name and
date for the current task set.
Preferences... - this dialog is used to set user preferences. Changes are applied immediately and
persist the next time you login.
Change Password... - allows you to change your iDataFax login password.
New Study... - allows you to return to the login/study selection dialog and either lauch a new study
session on the current server or launch a new login session. This may be useful if you want to
compare data in 2 different studies, compare information presented in different views (e.g. reports and
data views) within the same study, or compare behavior for 2 login sessions with different study roles
during study setup.
Close Study - closes your connection to the current study and returns to the study selection window,
where a different study may be selected from among those available on the current iDataFax server.
Exit - closes your connection to both the current study and the current iDataFax server, and terminates the iDataFax program.
- 66 -
4.16.2. Edit Menu
4.16.2. Edit Menu
When a field in the data entry window is selected the following Edit menu items become available:
Undo - Undoes the last edit operation performed
Redo - Redoes the last edit operation performed
Cut - Copies the contents of the current field to a buffer, then clears the field
Copy - Copies the contents of the current field to a buffer
Paste - Copies any data previously cut or copied to the current field at the current cursor location
Clear - Removes any data from the current field
Select All - Selects all data in the current field
4.16.3. Select Menu
The Select menu is used to select patients and data records for review. Selected patients and records are
tagged with the letter T (for task).
All Records - Cancel the current selection criteria and return to the normal display showing all patients
and records
By Task - Select data records using a pre-defined task.
By Data Fields - Select data records by: site, patient, assessment, page, level, status, etc. as well as
by metadata (queries and reasons). This option requires permission for Data - with Select.
By Data Retrieval File - Select data records using a pre-defined data retrieval file (filename.drf)
Define Tasks - define tasks for oneself and/or for other users.
Change Mode & Level - DataFax supports 4 working modes and allows records to be moved to specified work flow levels. The supported modes include:
View - when working in this mode users can review patient data but can not make any changes.
Edit - in this mode changes can be made (as permitted by user permissions) but the work flow
level of all data and metadata remains unchanged.
Modify - in this mode the work flow level is changed to the specified sign off level, but only for
those data and metadata records that are modified.
Validate - in this mode the work flow level of data and metadata records is changed to the specified sign off level when the user selects one of the Save buttons (Final, Incomplete or Pending),
regardless of whether or not any changes were made to data or metadata.
Batch Validate - This option can be used to move a set of selected records to a specified work flow
level.
4.16.4. Show Menu
The Show menu is used to determine which patients and data records are listed in the study binder
window. The following choices are available:
All Records - Show all data records, both those included and not included in the current task set.
Task Records - Show only data records that have been assembled in a predefined or adhoc task
using the Select menu options
All Patients - Show all patient binders
Potential Patients - Show only empty patient binders
Enrolled Patients - Show only patient binders that contain data
Complete to Date Patients - Show only patient binders with complete data for all assessments
completed to date
Incomplete to Date Patients - Show only patient binders containing pages marked Incomplete or
Pending
- 67 -
iDataFax User Guide
4.16.5. Patient Menu
The Patient menu includes the following options:
Start New Patient - adds a new patient binder to the current site for a specified patient ID number.
Only patient ID numbers which have been predefined as belonging to the current site, are accepted
Expand All Assessments - opens all assessments in the current patient binder
Collapse All Assessments - closes all assessments in the current patient binder
4.16.6. Assessment Menu
When an assessment is selected in the patient binder window the following options are available:
Add New Assessment - some optional patient assessments may be listed in the patient binder, while
others may be selected from this menu and added to the current patient binder
Mark Assessment Lost - if an entire patient assessment is unavailable (e.g. because the patient
missed the visit) this option can be used to mark it lost. If a special missed visit report page has been
created for the study it will appear and must be completed and saved like any other study page.
If a missed visit report page has not be created for the study a default dialog will appear. In this dialog
you must select a reason from the choice list. Additional text can be entered to explain why the
assessment will not be completed. All required pages in the assessment will then be marked ’Lost’, a
’L’ icon will appear on each of these pages in the record list, data entry will be blocked on all of these
pages, and the reason will then be displayed in the reason window (bottom left corner of the iDataFax
window) whenever one of these pages is selected. To enenable data entry on a page the ’Lost’ flag
must be removed (see below).
If an overdue visit query exists it will be removed when the assessment is marked lost.
Unmark Assessment Lost - this undoes the previous option if the default dialog was used. If a special
missed visit report page has been completed it will remain in the study database, just like any other
study record, unless it is deleted.
4.16.7. Page Menu
The Page menu provides the following options for the current page:
Save - offers the same 3 options provided by the save buttons at the bottom of the window: Final,
Incomplete and Pending
Revert to Last Save - erases all unsaved changes that have been made to the current page
Review Images - displays all images (primary plus all secondaries) and allows user to: select which
image to call primary, delete secondary images, and correct keys on secondary images
Change Keys - this option allows you to correct any errors in the key fields that might have occurred
when a page was saved, including corrections to the study number, patient ID number, assessment
number and page number
Delete This Page - this option is used to delete a data record. When this is done all of the data,
queries, reasons and images associated with the record are deleted. A confirmation dialog is
displayed, and a reason can be entered to explain why the record is being deleted. Both the delete
action and the reason will appear in the audit trail report created by DF_ATmods. Note: permission to
use this option is typically tightly controlled.
Mark Page Lost - if a page is unavailable this option can be used to mark it lost. In the dialog which
appears you must select one of the standard reasons or ’other’; additional details explaining why the
page was lost can be entered in this dialog.
- 68 -
4.16.8. Field Menu
A page that is marked lost can not contain data. Thus pages that have already been saved can not be
marked lost unless the data record is first deleted. Also if data has been entered into data fields on a new
record before it is marked lost the data fields will be cleared when marking it ’Lost’ is confirmed. After a
page is marked lost all data fields become inactive to prevent data entry.
If a missing page query exists it will be removed when the page is marked lost.
Study managers may add a query to the patient ID of Lost records to request additional information
from the clinical site.
Unmark Page Lost - this undoes the previous option, removes any data query that might have been
added to the patient ID field, and enables data entry.
Context - use this option to display the date and time the CRF page arrived (if one exists), and where
it came from (if a source identifier was programmed into the transmitting fax machine).
Show Field Properties - this option displays key properties of all fields defined on the current page,
including: name, description, style, need, type, format and legal values.
List All Outstanding Problems on This Page - lists each field with a problem on the current page
including: required fields that are blank, illegal values, outstanding queries and rejected reasons
List History of All Changes on This Page - runs the DataFax audit trail report DF_ATmods and
displays the results in a separate window. The report includes all changes made to data fields on the
current page.
List DDE Status on This Page - this option can be selected at any time during the performance of a
double data entry task. It lists the fields that have not yet been entered, and the fields that have been
changed from their previous value.
4.16.8. Field Menu
The Field menu provides field-level functions which depend on the state of the current field and the
permissions you have been granted by the study sponsor, including:
Mark Field Missing - used to assign a predefined missing value code to the current field, or to remove
a missing value code previously assigned. Missing values may also be selected using the button on
the Missing Value metadata window in the bottom left corner of the screen. After applying a missing
value code in either of these ways keyboard shortcut Control+M can be used to apply the same
missing value code to other data fields.
Revert to Last Save - used return the current data field to the state it was in when the page was
opened; this includes both the value of the field itself as well as the existence and value of any
reasons and queries associated with the field
Add Reason for Data Value - used to explain the current data value. The reason dialog can also be
invoked by pressing the button on the Reason metadata window in the bottom left corner of the
screen
Delete Reason for Data Value - used to delete the reason on the current data field (note: permission
to use this option is typically tightly controlled)
Reply to Query - used to reply to an unresolved query on the current field. The reply dialog can also
be launched by selecting the button on the Query metadata window in the bottom left corner of the
screen. Some queries can be resolved by correcting the data field and do not require a direct reply. If
the study coordinating center wants a direct reply to the query, the phrase (reply required) will appear
at the top of the Query metadata window
Add Query - used by the study coordinating center to add a query to the current data field
Edit Query - used by the study coordinating center to modify a query on the current data field
Delete Query - used by the study coordinating center to remove a query from the current data field
Approve Queries and Reasons - used by the study coordinating center to approve or reject pending
reasons and query replies, on the current page
Review Queries and Reasons - used by the study coordinating center to review all reasons and
- 69 -
iDataFax User Guide
queries (resolved and unresolved) on the current page
Show Field Properties - this option lists all properties defined on the current data field, including:
name, description, style, need, type, format, legal values, edit checks, etc.
List History of All Changes on This Field - runs the DataFax audit trail report DF_ATmods and
displays the results in a separate window. The report includes all changes made to the data field
which currently has the focus.
4.16.9. Help Menu
The Help menu launches the help viewer application and displays information about iDataFax. It includes:
Topics - launches the online user guide
Color Coding - displays a summary of the colors used and their meaning
Task Instructions - displays the instructions for the current task (if any)
Show Roles - lists the role(s) the user plays in the current study
About iDataFax - displays version and copyright information
- 70 -
Chapter 5. The Queries View
Chapter 5. The Queries View
The Queries View is used to review questions from the study coordinating center.
5.1. The Queries Table
As illustrated above, each query is identified by the patient ID number, assessment and page on which it
occurs. Under the heading Field : Problem the data field is identified along with it’s current value and the
problem type (in brackets). If necessary, this may be followed by a description of the problem or a question from the study coordinating center. The last column shows the current status of each query, when
status was set and by whom, and the current reply made to the query (if any).
Each query is marked with a symbol that shows its current status: a green check mark for resolved
queries, a red x for queries that are outstanding, and a yellow dash for pending queries (i.e. where
someone has responded to the query but the response has not yet been reviewed by the study coordinating center).
When a query is selected, a bounding box is displayed around it, as illustrated above for the 3rd query in
the table.
Double clicking on a query closes Query View and opens Data View with the focus on the field to which
the query is attached. This makes it easy to locate the field that needs to be corrected or to enter a reply to
the query or a reason explaining the data data value.
When you are finished with the data field in Data View the quickest way to return to Queries View is to use
the Return to Query View button located at the bottom of the record navigation list on the left side of the
screen.
5.2. Query Status
Query status has one of 3 possible values:
Outstanding - the query still needs to be addressed
Pending - the query has been addressed and is waiting for someone at the study coordinating center
to review it
Resolved - the problem has been solved. This may occur automatically, as when a legal value is
entered into a field that has a query of problem type ’missing’ or ’illegal’. Or a query may be resolved
by someone at the study coordinating center. Query resolutions are classified in one of 3 ways:
resolved corrected - always the desired solution
- 71 -
iDataFax User Guide
resolved NA - the requested data/information is just not available
resolved irrelevant - it was an unnecessary query to begin with
5.3. Queries View Menus
This section describes the options available under the menu labels: File, View, Show, Query, and Help,
which appear at the top of the screen. The File, View and Help menus are the same across all views and
have already been described above for the Data view. Show and Query are the only menus containing
options specific to the Queries view.
5.3.1. The Show Menu
The Show menu is used to select the queries to be displayed in the queries table. The following options
are available:
All Queries - show all queries
Outstanding Queries - show queries that still need to be addressed
Resolved Queries - show queries that have been resolved
Pending Queries - show queries that are awaiting central office review
Overdue Visit Queries - show outstanding queries for assessments that are overdue
Missing Page Queries - show outstanding queries for pages that need to be completed
Data Correction Queries - show outstanding queries that request data corrections
Data Clarification Queries - show outstanding queries that require a detailed reply
Outstanding Queries Created in the Past - show outstanding queries added in the past 5, 10, 15, 20,
25 or 30 days
Outstanding Queries Created More Than - show outstanding queries that are older than 5, 10, 15, 20,
25 or 30 days
Search Queries - displays a dialog used to search for queries with specified properties as illustrated
below.
- 72 -
5.3.2. The Query Menu
To be selected
a query must
match all of
criteria specified in this
dialog and the
user must have
permission to
view it. Criteria
left empty are
irrelevant to the
search.
If the Filter
option is
selected clicking the Find
button reduces
the query list to
queries that
match the
search criteria,
and the search
dialog closes.
Otherwise
search direction (up or
down) is used
to find the first
match starting
from the top of
the list or from
the currently
selected query
and the Find
button changes
to Find Next.
Searching for a
text match in
the query, note
and reply fields
is case insensitive unless the
match case
option is
selected.
Show - Search Queries
5.3.2. The Query Menu
This menu has only one option, Go To Data Field, and is only available after a query has been selected in
the Queries table. Selecting this option takes you to the Data view, opens the relevant patient binder,
assessment, and page, and places the focus on the field that has the query. This allows you to find,
review, and respond to outstanding queries in the context within which each query was created.
- 73 -
iDataFax User Guide
A quicker way to jump to the relevant data field is to double click on the query in the Queries table.
To return to the queries table after reviewing a query in the Data view, select View > Queries.
- 74 -
Chapter 6. The Reasons View
Chapter 6. The Reasons View
The Reasons View is is used to review reasons that have been added to explain unusual values, add
comments or explain why a data value was changed. This is analogous to comments written in the
margins of a paper case report form.
6.1. The Reasons Table
As illustrated above each reason is identified by the patient ID number, assessment, and page on which it
occurs. Under the heading Field : Reason, the data field is identified, followed by the reason that was
entered to explain the current value. The last column shows the current status of each reason, when the
status was set, and by whom.
When a reason is selected a bounding box is displayed around it, as illustrated above for the 3rd reason in
the table.
6.2. Reason Status
Reason status has one of 3 possible values:
Pending - the reason has not yet been reviewed by the study coordinating center
Approved - the reason has been reviewed and accepted by the study coordinating center
Rejected - the reason has been reviewed but has not been accepted by the study coordinating center.
For example, some data fields may be essential to a study and only accepted as missing in very rare
circumstances. Typically when a reason is rejected the study coordinating center will add a query to
explain why the reason is inadequate
6.3. Reasons View Menus
This section describes the options available under the menu labels: File, View, Show, Reason, and Help,
which appear at the top of the screen. The File, View, and Help menus are the same across all views and
have already been described for the Data view. Show and Reason are the only menus containing options
specific to the Reasons view.
- 75 -
iDataFax User Guide
6.3.1. The Show Menu
The Show menu is used to select the reasons to be displayed in the reasons table. The following options
are available:
All Reasons - show all reasons
Approved Reasons - show reasons that have been approved by the study coordinating center
Rejected Reasons - show reasons that have been rejected by the study coordinating center
Pending Reasons - show reasons that are awaiting central office review
Search Reasons - displays a dialog used to search for reasons containing specified text strings
6.3.2. The Reason Menu
This menu has only one option, Go To Data Field, and is only available after a reason has been selected
in the Reasons table. Selecting this option takes you to the Data view, opens the relevant patient binder,
assessment, and page, and places the focus on the field that has the reason. This allows you to find and
review reasons in the context within which each reason was created.
A quicker way to jump to the relevant data field is to double click on the reason in the Reasons table.
To return to the reasons table after reviewing a reason in the Data view, select the Return to Reason View
button located at the bottom of the record navigation list on the left side of the screen.
- 76 -
Chapter 7. The Fax View
Chapter 7. The Fax View
- 77 -
iDataFax User Guide
Fax View, illustrated above, can be used to enter new data records from paper case report forms (CRFs)
that have been faxed or emailed to the DataFax study server, or to enter new data records from hardcopy
CRF pages you have in hand and do not plan to fax into the system.
When a DataFax server receives a faxed CRF page it reads the bar code to identify the study and CRF
plate, routes the page to the study, and then uses ICR (intelligent character recognition) to read the data
fields and complete a first draft of a new data record. These records are stored outside the study
database. They must be reviewed and saved to the study database to become available to users in Data
View.
- 78 -
7.1. The Record Selection Dialog
DataFax ICR reads check boxes, numbers, dates and visual analog scales, but accuracy depends on how
clearly each field has been completed. Any ICR errors must be corrected, all text fields must be manually
entered, and comments written in the margins should be reviewed and perhaps entered as reasons or
missing value codes.
Use the Tab or Return key to move forward through the data fields, and Shift-Tab or Shift-Return to move
backwards. This will ensure that you trip all field entry and exit edit checks designed to assist data entry.
When necessary the 2 screens will scroll together to show the same data fields in the data and CRF
windows. Occasionally you might also want to use Control-T or Control-B to scroll the CRF image screen
by itself to the top or bottom respectively to check something that has scrolled by. Alternatively, if you have
a large monitor the screen can be split vertically to display a full page on each side (see File-Preferences).
While entering new records clicking ’Previous Set’ moves backward in the list of new records to get an
earlier set, while clicking ’Next Set’ moves forward in the new record list to get the next available set.
Records that have already been entered, or that are currently being entered by another user will be
skipped. The ’Next’ and ’Previous’ direction depends on whether you selected ’oldest to newest’ or
’newest to oldest’ in the record selection dialog (see below). The meaning of ’Set’ also depends on what
you selected in this dialog - it could be one or more faxes or a specified number of records with specified
visit and/or plate numbers.
If you have a stack of CRF pages that need to be entered but not faxed into DataFax you can use Fax
View in Raw Data Entry mode to enter these pages or use Data View to perform the same task. The only
difference is that data entry in Data View is performed within one patient binder at a time, while Fax View
allows you to work outside of the patient binders.
New records are typically saved to the study database at work flow level 1 but it is possible to save new
records directly to other levels. Fax View is typically used only by data entry staff at the study coordinating
center; this option is not normally made available to clinical sites.
7.1. The Record Selection Dialog
Fax View supports 4 options under the Select menu for building a set of records to be entered. These
include: ’Automatic Retrieval’ and ’Manual Retrieval’ for entering data from faxed CRF pages, ’Raw Data
Entry’ for entering data from hardcopy CRF pages held outside of DataFax, and ’By Task’ which applies
automatic record selection rules which have been predefined for a particular user or study role using the
’Define Tasks’ menu option.
’Manual Retrieval’ allows the user to cherry-pick records from the list of faxed pages awaiting data entry,
or search for records with specified plate and/or visit numbers as illustrated in the following example.
- 79 -
iDataFax User Guide
Select - Manual Retrieval
Since plates 1-5 were specified only
these plates were listed when the
’Get List’ button was selected.
If ICR was able to read the key fields
(ID, Visit and Plate) they will appear
beside each fax page name
(yyww/ffffppp, where yy=year,
ww=week, ffff=fax, ppp=page).
Records can be selected individually
using a mouse click to select one
record and Shift-click to select all
records between the last selection
and the Shift-click record, or all
records can be selected using
’Select All’ as shown here.
Finally, to assemble the selected
records click ’OK’.
’Automatic Retrieval’ allows users to get a specified number of faxes, pages or plates at a time, and repeat
this process as desired, by clicking the ’Get Next Set of New Records’ button at the bottom of the record
list. This avoids having to return to the record selection dialog after each set of faxed pages have been
entered.
Select - Automatic Retrieval
The current status of the new record
queue is updated and displayed at the
top of Record Retrieval dialog each
time it is opened. In this example there
are 69 CRF pages awaiting data entry
of which 3 are currently locked by other
users.
We recommend selecting a fax at a
time and processing the oldest faxes
first, but it is possible to select a specified number of pages, to only enter
specified CRF plates, or to enter the
most recent arrivals first.
- 80 -
7.1. The Record Selection Dialog
’Raw Data Entry’ is used to build a specified set of blank data entry screens for data entry from hardcopy
residing outside the DataFax system.
Some or all of the keys may be specified. If patient IDs alone are specified a complete CRF book as
defined in the study visit map (consisting of all required and optional visits and all required, optional and
missed visit plates) will be created for each specified patient ID. A maximum of 999 patient IDs and 10,000
data records can be included in each Raw Data Entry set. If patient ID is not specified the user must indicate the number of cases to be created.
If data entry is interupted, only those records that have been saved to the database will exist in the
database; building a set of blank screens does not automatically put blank records into the database.
Two examples are illustrated below.
Select - Raw Data Entry (example 1)
This example creates data entry
records for visit 0 plates 1 and 2 for
each of patients 55034 to 55039, 12
records in all.
Select - Raw Data Entry (example2)
This example creates 100 data entry
records for visit 0 plate 1. The patient
IDs have not been specified and thus
must be entered before each record is
saved.
- 81 -
iDataFax User Guide
Select - Define Tasks
To define a new task select
’New Task’ from the ’Task’
button and then complete
the task definition dialog.
This example shows a task
created by ’jack’ for users
with the ’Data Manager’
role. Since jack owns the
task only he can modify it.
Users can not enter records in Fax View for which they do not have permission. However it is possible for
a user to select a fax image for which ICR failed to read the keys and then on entering the keys to
discover that they can not save the record. Also if ICR misread the keys a user with limited permissions
may be prevented from seeing a page they should see in the list of faxed pages. These limitations argue
against giving the clinical sites access to Fax View, except perhaps for Raw Data Entry only.
Whether using manual or automatic record retrieval, set the Sign off Level to the work flow level at which
new records are to be saved. Typically level 1 is chosen, but it is possible to save new records to any work
flow level.
New data entry is always performed in Validate mode, which allows records to be saved even if no
changes are made. The mode and work flow levels are shown beside the Save buttons at the bottom of
the screen. For example Save v[0->1] indicates that you are in Validate mode, and that data and
meta-data records will be moved from work flow level 0 to work flow level 1 in the study database, when
the user selects the Final or Incomplete save buttons. New records saved with Pending status (to indicate
that data entry was not completed) are saved to the study database but remain at work flow level 0.
- 82 -
7.2. Entering New Records
The check box, Enable Edit Checks, can be used to enable or disable edit checks during new data entry.
Typically edit checks are enabled during new data entry but you may want to delay them to a later stage in
your data management work flow process.
7.2. Entering New Records
Data entry is performed as already described for the Data View. The main difference is that ICR will have
already completed many of the data fields and thus the task is to compare the ICR reading with what was
written on the CRF page, and to correct any ICR errors and enter any text fields (which are not read by
ICR).
If NA or other missing value codes have been written on the CRF, the corresponding missing value code
can be selected from the Field menu or using the Missing Value widget in the bottom left corner of the
screen. After applying a missing value code in either of these ways keyboard shortcut Control+M
(Command+M on Mac OS X) can be used to apply the same missing value code to other data fields.
If explanations have been printed in the margins, they can be entered using the Reasons widget, also
located in the bottom left corner of the screen.
If you need to know when a CRF page arrived or where it came from select Context from the Page menu.
Page - Context
In this example the current CRF page is page
1 of a 1 page fax. The Sender ID must be
programmed into the sending fax machine; if
not it will be displayed as NA (not available).
The Fax Name is a unique identifier created
by DataFax for each CRF page.
7.3. Entering Refaxed CRFs
It is not unusual for a CRF page to be corrected and refaxed. For each new record, DataFax checks to see
if the keys (ID, Plate and Visit) match an existing database record. If a match is found you will be asked if
you want to load the existing data record (including reasons and queries) into the data entry window. This
will allow you to compare the newly arrived CRF page with the current version of this data record in the
study database. DataFax will not allow you to enter a matching record into the database without first
loading the existing data record. When you save a matching record you will be updating the existing data
record with any changes you make; and the new CRF image will become the primary image associated
with the data record.
The old image is not deleted, and can be reviewed at any time by selecting Page - Review Images or the
image count button in the bottom right corner of the iDataFax window. The ’Review Images’ dialog shows
the date and time each image arrived and allows you to: change which image is classified as the primary
copy, correct keys if an image has become attached to the wrong data record, or delete images that are
no longer needed.
- 83 -
iDataFax User Guide
Note: If you process more than one image for the same data record in the same session the last image
saved will become the primary image and the previous ones will become secondary. The split screen in
fax view shows only the current data record + primary image. Thus returning to a secondary image in the
fax view record list will display the image but not the data record. This helps to ensure that users realize
they are looking at a secondary image which has been superceded by another image in the record list.
If after loading the existing data record you discover that you have made a mistake select Page - Revert to
Initial State to undo all changes to the current record.
7.4. Correcting the Keys
Each new page has 4 keys which together uniquely identify it: the DataFax study number, plate number,
visit/assessment number and patient ID number. The study and plate numbers are always in the bar code,
the visit number can appear either in the bar code or as the first data field on the page, and the patient ID
always appears as the first data field following the visit number. It is critical that these keys are correct,
and they should be carefully checked before a new record is saved to the study database.
If ICR has misread a patient ID or visit number data field, they can be corrected by modifying the data
field, but to correct those keys that appear in the bar code you need to select Change Bar Code from the
Page menu and use the dialog illustrated below.
Page - Change Bar Code
When the Plate and/or Visit number are
changed the correction will appear immediately in the new record list on the left side of
the screen, but if the study number is
changed the page is sent to the router and
will be removed from the new record list of
the current study.
7.5. Switching to Data View
While entering new records you can open the current patient binder to review and/or modify other records,
using the Switch to Data View button at the bottom of the record list. Before switching to Data View you
will be asked if you want to save or discard any changes you have made to the current Fax View record.
The patient binder will then open to the current Fax View record in Data View. This record will be tagged
with the letter T in the record list to identify it as the current Fax View task record. This record can not be
modified while in Data View, and will display: View only: record in use by Fax view in the message window
at the bottom of the screen. The switch button, now labeled Switch to Fax View, can be used to return to
- 84 -
7.6. Record Locking in Fax View
the current Fax View record, and continue with data entry, when you are finished reviewing other records
in Data View.
7.6. Record Locking in Fax View
Each set of CRF pages retrieved using the ’Automatic’ or ’Manual’ method is locked by the user who
selects them. This is a lock on the image ID, not on the keys, which may at this point be blank or incorrect.
These image locks prevent other users from trying to enter the same new pages in Fax View. In large
studies, with 100s of pages arriving each day and several users working together to perform new data
entry, it is best to minimize the number of faxes or pages that each person retrieves at a time. We recommend getting 1 fax at a time.
When entering these records a record level database lock is requested for the key fields (ID, assessment,
plate) as soon as the user moves into a non-key field. You will not be able to change data or metadata, or
save the record, if someone has the patient binder locked in Data View, or if someone is currently entering
another record with the same 3 keys in Fax View. However, it is possible for multiple users, all working in
Fax View, to simultaneously enter new data records with different assessment and/or plate numbers for
the same patient.
The only difference between Raw Data Entry and entering a set of records from faxed CRFs is that Raw
Data Entry records do not have images and thus do not have image locks.
While working in Fax View it is possible to switch to Data View to review and/or modify other records for
the same patient. When a user selects Switch to Data View the record level database lock acquired on the
key fields in Fax View is released, a Data View patient level lock is immediately requested, and the patient
binder is then opened to the same page that was being entered in Fax View. If the patient ID lock is
obtained the user enters Data View in Edit mode with their lowest write level; which means that existing
records which are modified and saved will remain at their current workflow level, and any new data or
metadata data will be saved at the user’s lowest write level.
If the patient ID lock can not be obtained the user can still switch to Data View in View Only mode.
However, because the record level database lock was released it is possible that when you return to Fax
View you will find that you can not continue with data entry because someone else now has the dataabse
lock for that record.
If the patient ID lock is obtained on switching to Data View, any record in the patient binder can be modified (provided the user has modify permission) except for the originating Fax View record, which will be
displayed in View Only mode. This record must be entered in Fax View. You can easily return to it by
selecting Switch to Fax View which takes you back to this record in the Fax View record list.
When a new record is saved in Fax View and the user moves to another record, the database lock is
released and the record becomes available to other users. All saved data records remain in the Fax View
list until they are released or the next set of new records is retrieved. This facilitates returning to a previously entered record to review or modify it. But remember that it is possible to discover that another user
has modified or even deleted the record since you last saved it.
7.7. Fax View Menus
This section describes the options available under the menu labels Select and Page, which appear at the
top of the screen. Only those options which are unique to Fax View are included. All other menus and
options are the same as already described for Data View.
- 85 -
iDataFax User Guide
7.7.1. The Select Menu
The Select menu is used to select pages from the new record queue for data entry. The options include:
Automatic Retrieval - as described above this dialog is used to specify how records are assembled for
data entry.
Manual Retrieval - use this option to display the list of records awaiting data entry and manually select
those you want to enter next.
Raw Data Entry - use this option to build a set of blank records for data entry from hardcopy CRF
pages held outside of DataFax.
By Task - this option allows users to select a predefined new data entry task.
Define Task - use this option to specify a task for new data entry, including: record selection rules,
grant users/roles permission to use the task, user instructions, etc.
Next Set - this option applies the current record retrieval specifications to assemble the next set of
records for new data entry.
Previous Set - this option allows users to return to the previous set of records, but only records still
remaining in the new queue will be displayed; any already entered or now in use by other users can
not be accessed.
7.7.2. The Page Menu
The Page menu includes the following options:
Save - this menu item has pull rights for ’Final’, ’Incomplete’ and ’Pending’ which are equivalent to
saving changes using the buttons at the bottom of the screen.
Revert to Initial State - undoes all changes to the data, queries and reasons on the current page.
Review Images - this option is used to review all of the images attached to the current data record,
and is only available if the current record has more than one image.
Change Bar Code - as described above this dialog is used to make corrections to the values of bar
coded key fields.
Delete This Page - this option deletes the current image from the new fax queue. It can not be undone
within iDataFax but is reversable by a DataFax administrator.
Context - this option shows the arrival date and time, and fax sender ID of the current CRF page
List All Outstanding Problems on This Page - lists each field with a problem on the current page
including: required fields that are blank, illegal values, outstanding queries and rejected reasons
List History of All Changes on This Page - runs the DataFax audit trail report DF_ATmods and
displays the results in a separate window. The report includes all changes made to data fields on the
current page.
- 86 -
Chapter 8. List View
Chapter 8. List View
8.1. Introduction
In Data View only one data record is displayed at a time, but in List View all data records for a selected
CRF page can be reviewed in a spreadsheet where each row is a data record and each column is a data
field. This view is useful for comparing data records, searching for particular values, or scanning for data
problems. Outlier values can be identified by sorting the spreadsheet on any column - just click on the field
name at the top of the column.
As in Data View, the cells in the spreadsheet can be color coded to identify: illegal values (red), outstanding queries (blue), pending reasons and query replies (orange), approved reasons and query replies
(green), and blank optional fields (yellow). Queries, reasons and missing value codes are displayed in the
lower left corner when a cell is selected that has these attributes; and any images associated with a data
record can be reviewed when a record with images is selected.
Unlike Data View, List View does not support data entry, but double clicking any cell in the table will switch
to that data field in Data View where changes can be made. Selecting the Return to List View button in
Data View will take you back to the original cell in List View. Any changes that were made to the data
record, or to it’s queries and reasons, while in Data View will be displayed when you return to that record
in List View.
All data records are retrieved from the DataFax server when you select a new page in List View, thus the
spreadsheet will be up-to-date each time you select a new page. Also, iDataFax retrieves the current
version of each data record when you select it in the spreadsheet, thus again the record will be up-to-date
at that instant. However, changes made since the records were retrieved, arising from other users or batch
edit checks, are not automatically displayed, thus some or all rows in the table may become out of date
while you are viewing them. As needed, you can update all records at any time in List View using the
’Select-Refresh’ menu option.
As in all other views what you see and what you can do will depend on your user permissions, which may
be different for each DataFax study.
Figure 8.1. View - List
- 87 -
iDataFax User Guide
8.2. User Preferences
The List View section of the Preferences dialog, available under the File menu, can be used to customize
the appearance of List View. Preferences can be used to turn field color coding and text expansion on or
off, determine whether field codes or code labels are displayed, select column labels (generic or unique
field names, and field number), and select the display format for date fields. All selections made in the
preferences dialog are study specific and will be retained across iDataFax sessions.
8.3. Navigation
To display the data records stored in the study database for a particular CRF page, select it from the page
list in the left panel. Within the data table you can select any cell with a mouse click, use the left-right
arrows to move across the fields in a data record, and user the up-down arrows to move across data
records.
The default record sort order is ascending by patient ID and ascending within patient by assessment
number. The rows of the data table can be sorted on any column by clicking the column label. Each click
toggles the sort order between ascending and decending. Use shift-click to sort on a second column, in
the current sort order within the currently sorted column.
- 88 -
8.4. Working on a Task
The keys [patient ID, assessment, page] of the current record and the number of data records in the table
are always visible in the upper left corner of the screen. The work flow level at which the current record
was last saved appears along with the date and time at the bottom of the screen. If a Help message has
been defined for the current data field it will be shown in the help message window at the bottom of the
screen, to the right of the Last Save date.
8.4. Working on a Task
If a set of task records was assembled in Data View it remains in effect on switching to List View; only
those CRF pages and data records that met the task criteria will be displayed. To see all CRF plates in the
page list and all data records in the data table select Show-All Pages and Show-All Records respectively.
This does not cancel the task set. Task records can still be identified by the T icon which appears on each
task record in the data table.
To cancel a task and see all data records choose Select-All Records in List View or Data View.
8.5. Selecting Data Fields
To select a subset of the data fields on the current plate, select Select-Field Selection and use the dialog
illustrated below.
Select - Field Selection
Fields can be selected or hidden using the check box beside each field, and reordered by selecting a field
and then moving it up or down using the arrow buttons at the bottom of the field list.
- 89 -
iDataFax User Guide
8.6. Searching Data Records
The Search dialog, available under the Select menu, can be used to find records within the current plate
that meet specified criteria. If the Filter option is selected the record list is reduced to those records that
meet the search criteria when the Filter button at the bottom of the dialog is selected, otherwise this button
is replaced by a Find button, and the focus simply traverses those fields that meet the search criteria each
time the button is pressed.
The Search dialog can also be used to put data records from the current plate into a ’Task’ set. After
entering the record selection criteria selecting the New Task button will display a task confirmation dialog
(where the user can set Mode and Edit Checks options) after which the selected records will be flagged
with the ’T’ icon to show that they belong to a new task set. The Add to Task button will then become
active and can be used, after entering a new set of record selection criteria, to add more records to the
current task set. This can be repeated as needed to build a task set.
Select - Search
In this example the
current record list will
be filtered to show only
those records for which:
fields 8-24 are illegal or
blank but required, site
is 35 and work flow
level is 2-7.
After specifying the
search criteria click the
Filter button to start the
search. A dialog will
appear showing the
number of records that
meet the search criteria
and asking for confirmation before filtering the
record list to display
only these records.
Note: to be selected
records must meet one
or more of the criteria
specified in the Data
Fields section and all of
the criteria specified in
the Data Records
section.
- 90 -
8.6. Searching Data Records
To undo a ’Filter’ and display all data records for the current plate select All Records from the Show menu.
To undo a ’Task’ and remove the ’T’ icon from all records select All Records from the Search menu.
The Search dialog includes an expression editor which can be used to create simple algebraic statements
describing the desired data records. Expressions can be entered directly in the text widget or by clicking
on the Fields, Symbols, Codes and Functions in the appropriate order.
Select - Search Expression Editor
This example
selects men 65
and older, plus
women 70 and
older.
Clicking OK will
add this expression to the Search
dialog.
Numeric Codes and Code Labels
Expressions must be created using code labels, as in the above example for sex, only when
labels are being displayed in List View. If the numeric codes are being displayed expressions
must test for the codes, not the labels.
- 91 -
iDataFax User Guide
Functions:
concat(s1,s2)
Use concat to test the concatenation of 2 strings. e.g. to find records where
the concatination of 2 fields named ’Mtype’ and ’Mnum’ combined to give the
value ’A1234’:
concat($(Mtype),$(Mnum)) == "A1234"
day(n)
Use day to test for a day of the month in a date, e.g. to find records where
’Screen 1 Date’ occurred on or after the 15th of any month:
day($(S1DATE)) >= 15
decimal(n)
Use decimal to test the decimal component of a number, e.g. to find records
where weight is not a whole number:
decimal($(WEIGHT)) > 0
field(s,n)
Use field to test a specified word in a string, e.g. to find records where the 2nd
word in a drug name is "ACID":
field($(DRUGNAME),2) == "ACID"
- 92 -
8.6. Searching Data Records
index(s1,s2)
Use index to find the character position in string s1 where string s2 first occurs.
e.g. in the following statement local variable ’X’ will be set to 3:
number X = index("A56GH9","6GH") ;
int(n)
Use int to test the integer value (truncated) of a field. e.g. to find a patients
current age in years at visit date ’VDATE’ using the patient’s birth date stored
in field ’BDATE’:
number age = int((VDATE-BDATE)/365.25) ;
julian("yyyy/mm/dd")
Use julian to specify a date, e.g. to find records where ’Screen 1 Date’
occurred after Nov.15,2008:
$(S1DATE) > julian("2008/11/15")
length(s)
Use length to test field length, e.g. to find initials shorter than 3 characters
length($(PINIT)) < 3
month(n)
Use month to test for a month in a date, e.g. to find records created in June of
any year:
month($(DFCREATE)) == 6
- 93 -
iDataFax User Guide
substr(s1,n1,n2)
Use substr to test a sub-string of a specified field, e.g. to find records where
the middle patient initial is "X":
substr($(PINIT),2,1) == "X"
time("hh:mm:ss")
Use time to specify a time, e.g. to find records created after 6pm:
time($(DFCREATE)) > time("18:00:00")
today()
Use today to test against todays date, e.g. to find records created today:
julian($(DFCREATE)) == today()
tolower(s)
Use tolower to convert a string to lower case before testing it, e.g. to find
records containing "inuit" in the Race Other field, ignoring case:
tolower($(RACEOTH) == "inuit"
toupper(s)
Use toupper to convert a string to upper case before testing it, e.g. to find
records containing "INUIT" in the Race Other field, ignoring case:
toupper($(RACEOTH) == "INUIT"
- 94 -
8.7. Saving Defined Views
year(n)
Use year to test for a year in a date, e.g. to find records modified in 2008:
year($(DFMODIFY)) == 2008
If the expression builder does not have the capabilities you require, searching can also be performed
using a custom program specified in the last option at the bottom of the Search dialog. Custom programs
must be stored in the study ecbin directory and must generate a DataFax retrieval file as output. DataFax
includes 2 standard programs, DFmkdrf.ec and DFmkdrf.jnl (described in the Appendix), which can also
be used for this purpose.
When searching ’By Program’ the Filter option must be enabled. When the Filter button is selected the
record list will be reduced to show only those records identified by the program. If in addition to the ’By
Program’ option the ’Expression’ builder or any of the other options in the ’Data Records’ section are used,
records will only be selected it they meet all of criteria specified by all of these options. If any of the ’Data
Fields’ options are used the set of records selected will be further reduced to include only those records
that meet at least one of the field level criteria.
8.7. Saving Defined Views
List Views consisting of specified data fields, field order and record selection criteria can be defined for
use by specified users and/or roles using Select-Define Views to bring up the dialog illustrated below.
The steps include the following:
From the top button on the right select ’New View’ then enter a name and description.
select the plate and data fields, in the desired order. If no fields are specified all fields in plate order
will be used.
select list view options. These will override the users Preference settings for List View when the view
is selected.
specify the roles and logins to identify those who can use the view and those who own and thus can
change it.
specify the record selection criteria. If none are specified all data records for the plate will be retrieved
when the task is selected.
if you want the selected records to form a new task set check the ’new task’ option and specify the
task mode, level and whether edit checks are to be executed if the user switches to Data View to
review and perhaps modify a data record. If the ’new task’ option is selected any previous task will be
cancelled when the user selects the view.
- 95 -
iDataFax User Guide
Select - Define Views
- 96 -
8.8. Exporting Data Records
Note
This dialog is only available to users who have ’List - create Views’ permission and can only be
used by one person at a time.
Once views have been defined users can select a view using menu option: Select-By Views which will
display a dialog showing the pre-defined view names and descriptions. The current view if any will be
cancelled when a new view is selected.
If no records meet the selection criteria for a selected view, a dialog will report that no records were found,
the view will be cancelled, and the spreadsheet will return to it’s base state showing all data fields and
data records. The current view can be cancelled at any time to return to the base state by selecting Cancel
View from the Select menu.
Select-Cancel View
Cancelling the current view does not cancel the current task set (if any). The spreadsheet will
return to the base state showing all data fields and data records but any task records will
remain flagged with the ’T’ or ’t’ icon. Clearing the current task set is a separate operation
which can be performed using Select-All Records.
8.8. Exporting Data Records
If you have permission to save data, the records currently displayed in List View can be written to a file on
your local disk by selecting File-Save Data File. The print dialog is illustrated below.
File - Save Data File...
To export the data records displayed in
the List View window specify:
a field delimiter
an output value for data fields in lost
data records
column/field names for first output
row
output data file on local PC
Any data fields which have been hidden using Select-Field Selection will not be exported. A warning
message: ’Warning: Data will be saved with reduced fields!’ will appear at the bottom of the dialog when
this is the case.
- 97 -
iDataFax User Guide
8.9. Exporting a Data Retrieval File
A Data Retrieval File (DRF) containing the key fields of the records currently displayed in List View can be
written to a file on your local disk by selecting File-Save Data Retrieval File and using the dialog illustrated
below.
File - Save Data Retrieval File...
On entering an output directory/folder and pressing Return any existing DRFs in that location will
be listed.
Output can be written to a new DRF or an existing
DRF can be selected and overwritten.
To export the records displayed in the List View
window to a DRF specify:
an output file
a short descriptive label for the DRF
a comment for record level iDataFax help
whether output overwrites or appends to the
output file
An existing DRF can be selected and deleted
using the Delete button.
8.10. Exporting SAS Data Sets
Users with permission can create and export data sets in SAS format to a file location on their local disk by
selecting File-DFsas and using the dialog illustrated below.
For instructions on creating and running DFsas jobs see the DFsas chapter in the DataFax Programmer’s
Guide.
- 98 -
8.10. Exporting SAS Data Sets
File - DFsas ...
iDataFax works with DFsas job files located in the study dfsas directory on the DataFax study server. All
existing DFsas job files are listed when the DFsas window is opened and the list is updated if any new
jobs are added.
Selecting a job file loads it into the text window where it can be edited and saved back to the study server.
Selecting Run executes DFsas for the current job, which creates SAS job and data files and returns them
to the local PC in a .zip file which is stored in the specified RUNDIR.
New DFsas job files can be created by selecting the Add button and using the dialog illustrated below. The
new job file will then appear in the text window and can be edited (as described in the DataFax Programmers Guide) to create the desired DFsas jbo file.
- 99 -
iDataFax User Guide
DFsas - Add
SASJOB: new DFsas job file
name
RUNDIR: location on the
local PC where SAS job and
data files will be stored.
PLATES and FIELDS: a
DFsas job file can include
some or all data fields on
some or all study plates
Date Formats: optional, see
below
String Size: long text can be
truncated or split into multiple fields
If no plates are specified or ’ALL’ is specified, all user defined plates in the range 1-500 plus DataFax
plates 510 (reasons) and 511 (queries) will be included in the DFsas job.
If no date format options are specified dates are exported using the format and imputation specifications in
the study setup. Alternatively, one or more of the following specifications can be selected:
original - turns off imputation, outputs the value exactly as stored in the study database, and creates a
date informat for SAS.
calendar - performs imputation as specified in the study setup, converts 2 digit years to 4 digit years,
and creates a date informat for SAS.
string - turns off imputation, outputs the value exactly as stored in the study database, and creates a
character informat for SAS.
julian - performs imputation as specified in the study setup, converts the date to a big number (of days
since 4712 BC), and does not create an informat statement as SAS does not need one for numbers.
Date imputation can be turned off for all dates, regardless of study setup specifications and regardless of
which date formats are selected, by specifying ’IMPUTE no’ in the global statements.
After saving a DFsas job file it can be executed at any time by selecting the Run button. A confirmation
dialog appears with one option: Force DFsas to include all specified plates. Select this option if you want
to include all of the plates specified in the DFsas job file even if they do not currently contain any data
records. If this option is not selected a SAS data statement will only be created for plates with data
records.
After confirming that you wish to execute the selected DFsas job DataFax runs DFsas on the study server
and returns a .zip file, containing a SAS job file and a data file for each plate, to the specified RUNDIR on
your local PC.
- 100 -
8.11. Importing Data Records
8.11. Importing Data Records
Data from labs and other sources can be imported to a DataFax plate by selecting File-Import Data in List
View and following the steps illustrated below. Permission to use this feature must be granted in the user’s
study role.
Each imported data record may either create a new data record in the study database or replace an existing data record, having the same keys (ID, visit, plate). If a replacement record is imported all of the data
fields on that record are replaced; it is not possible to replace only some fields while leaving others
unchanged. If a replacement record is imported with status=7(delete) the database record will be deleted.
Import options may be set to add the reason ’Set by iDataFax Import’ to any field that is changed, and to
add automatic queries for missing and illegal values. All imported data records, plus any reasons and
queries generated during import, are logged in the study audit trail by date, time and the user performing
the import.
Step 1: Select the Input Data File.
File - Import Data ...
1. First select the import destination, i.e. the database plate.
2. If imports from the same source recur, the mapping of input fields to study database fields (described
in the next step) can be saved to a mapping file and reused.
3. When the input data file is selected the first 3 records are displayed in a preview window.
4. The input field delimiter must be one of: ’|’, comma or tab.
- 101 -
iDataFax User Guide
5. Having field names in the first input row is useful as an aid to field mapping, but it is not necessary.
6. If the date format used in the input data records differs from the format used in the study plate, enter
the input date format to convert dates to the format used in the plate.
7. If the input file is very large, specifying a small number of records to preview allows you to quickly
verify that the mapping and data appear correct before loading all of the input data records.
8. To proceed to the next step select the ’Next: Map data fields’ button in the lower right corner of the
dialog.
Step 2: Map Data Fields.
Next: Map Data Fields
1. To specify the mapping of input fields to database fields simply drag fields from the left panel to the
right panel beside the corresponding Generic Name for the field in the study database; or use the
buttons to move the current input field in the left panel to the next available slot after the current input
field in the right panel. For example, clicking the right-going arrow in the above dialog will move input
field ’9 -SBP2’ to Plate 001 field 16 S1SBP2.
2. The double arrows move all fields to the right panel, or back to the left panel, and can be used when
all fields in the input records exactly match fields in the destination plate.
3. Once moved to the right panel, input data fields can be matched with the correct Generic name by
dragging them with the mouse or by using the up and down arrow buttons.
4. If the input file contains fields that are not included in the plate they can be omitted. It is not necessary
to match and import all fields from the input records.
5. If the plate contains fields that are not included in the input file a value can be specified under ’Value if
not mapped’, otherwise the field will be blank in all imported data records. If the word ’today’ is specified for an un-mapped date field the current server date will be inserted when the data records are
- 102 -
8.11. Importing Data Records
imported.
6. The only field that is required in the input file is the patient ID. The visit key field can be specified in
the ’Value if not mapped’ column, as can any other field that you want to set to the same fixed value for all
input records.
7. Database records for a specified plate and visit can be deleted by importing a file that contains only
the patient ID, and then specifying the relevant visit number and setting status=7 in the ’Value if not
mapped’ column. No other fixed values are required.
8. Plate fields DFRASTER, DFSTUDY and DFPLATE are set automatically and need not be mapped,
but if they are then DFRASTER is treated as a key field which must match an existing record when
importing replacement records in ’Replace’ mode, and must equal ’0000/0000000’ when importing
new records in ’New’ mode.
9. The time stamps, DFCREATE and DFMODIFY can not be mapped. They are completed by the server
when records are imported.
10. The Import dialogs have 2 buttons in the lower right and left corners used to move to the next and
previous step respectively. During mapping the ’Next’ button can be used to review the current
mapping of data records, and the ’Back’ button can then be used to return to the mapping dialog.
11. If other data files with the current mapping will be imported at some point, the mapping can be saved
to a file using ’Map File-Save Current Mapping to File’.
12. If you forgot to specify a saved mapping file in the previous dialog it can also be selected in the
mapping dialog using ’Map File-Read Field Mapping from File’.
13. Use the ’Revert’ button to undo all current mapping so you can start over, and the ’Cancel’ button to
abort the whole ’File-Import Data’ operation.
14. When mapping is complete select the ’Next: Review data’ button to proceed to the next step.
Step 3: Review Input Data Records.
Next: Review Data
1. The spreadsheet, illustrated above, displays each data record. Scrolling left and right allows you to
verify that all fields have been mapped correctly.
2. The ’Get All’ button at the bottom of the dialog indicates that we are looking at the number of records
that were specified for ’Preview’. Selecting ’Get All’ loads the remaining input records as illustrated in
the example below.
3. Problem fields are identified by color using: purple for invalid values which prevent the record from
being imported, yellow for values which will be auto-corrected on import, and red for illegal values,
which will be imported as is.
4. Selecting the ’AutoCorrect’ check box reveals how the yellow fields will be corrected. As illustrated in
the example below the Initials ’sha’ change to ’SHA’ because this field was defined with upper case
mapping, and Age 59.5 is truncated to 59 because this field was defined as a number with no decimal
places.
5. Corrections can be made by editing the values in the spreadsheet. As illustrated in the example
below, Subject ID 91002 was corrected to 01002, and for Subject ID 1005 S1DBP1 was corrected
from 156 to 106.
- 103 -
iDataFax User Guide
6. The data records can be filtered using the check boxes at the top of the dialog to display any combination of records with invalid, illegal and autocorrect values, or records with no problems at all.
7. Auto-Corrections:
Auto-corrections that change the input value include:
Strings longer than the field store length are truncated
Numbers are truncated to the number of decimal places in the field format
Numbers greater than the field store length are imported as blank fields
Undefined codes in choice and check are imported as blank fields
Invalid dates are imported as blank fields
Auto-corrections that merely change the format of the input value include:
String mapping is applied if specified in the field setup
Leading zeros are added where required by the field format
Leading zeros are removed where not required by the field format
Leading ’+’ signs are removed from unsigned fields
Input date format is converted to database format if specified in step 1
Step 4: Get All Data Records.
Get All
1. The ’Next: Save data’ button can be used to either import the records to the study database or save
them to a file on disk.
2. Only valid records displayed in the spreadsheet will be saved, so make sure to select ’Get All’ and
check your ’Filter’ options before proceeding to the next step.
Step 5: Save Data Records.
- 104 -
8.11. Importing Data Records
Next: Save Data
1. If from the ’Next: Save data’ button you select ’Save Records to Local Data File’ you will simply see a
file selection dialog, but if you select ’Save Records to DataFax Database’ you will be presented with
the dialog illustrated above.
2. Select Mode = ’New’ if all input records have keys (ID,visit,plate) that do not already exist in the study
database. When using this mode only new records will be imported; any replacement records will be
rejected.
3. Select Mode = ’Replace’ if all input records have keys (ID,visit,plate) that already exist in the study
database. When using this mode only replacement records will be imported; any new records will be
rejected.
4. Select Mode = ’Merge’ if the input file includes both new and replacement records.
5. Among the Queries options we recommend that you resolve missing and illegal value queries if a
legal value is imported, otherwise the queries will not correspond to the corrected values and will
likely confuse users. None of the other query problem types can be logically auto-corrected in this
way and thus remain unchanged.
6. Queries can also be created automatically during import to flag missing and illegal values. If these
options are selected existing queries will not be modified or replaced, new queries will only be created
for fields that do not already have a query.
7. Selecting the ’Add Reasons’ option adds the reason ’Set by iDataFax Import’ to database fields that
are changed when a replacement record is imported. Reason status can be set to ’Pending’ review, or
’Approved’ requiring no review, but reasons can only be approved is the user has permission to
approve reasons on the records being imported. If this is not the case reasons are created with the
’Pending’ status. Reasons that are created during import replace any existing reasons on the fields
- 105 -
iDataFax User Guide
that are changed. The previous reasons are then only available in the audit trail report or by selecting
’Show History of all Changes’ in iDataFax.
8. Use the ’Task Set’ option to review the imported data records when import is complete. The task set
can contain all imported records or only those missing and illegal values, which might be useful if you want
to review any queries generated during import. As when creating any task set, you also need to
specify the: mode, sign off level and edit check status, to be used on records in the task set.
9. When these options have been completed select ’Next: import data’ to proceed to the final step illustrated in the dialog below.
Step 6: Confirm Import Data.
Next: Import data
1. If you selected the options to create queries and reasons in the previous dialog you will see the
warning messages illustrated above.
2. To start data import enter your password and select ’OK’, or select ’Cancel’ to return to the previous
dialog.
Step 7: Review Results.
- 106 -
8.12. Metadata - Queries, Reasons, QC Reports and Lost Records
Next: Map Data Fields
1. The dialog illustrated above appears when the import is complete, with a summary of the import specifications and results.
2. If any records are rejected, e.g. because you selected Mode:New, but some input records already
existed in the study database, they will be displayed in this dialog along with the reason they were
rejected. Also, a ’Save Rejected Records’ button will appear so that these records can be saved to
disc. This allows you to deal with the problem(s) that blocked import and try again.
3. We recommend keeping a record of all data imports by printing or saving this report. While the audit
trail will show any new records and data changes made during import by: date, time and the user who
performed the import, it does not distinguish between data entered and saved in Data View and
records that were imported in List View.
Input data records may be rejected for the following reasons:
the database record is currently locked by another user
Mode=Replace but the record does not exist in the study database
Mode=Replace/Merge and input keys match a database record but DFRASTER differs from the
current database value
Mode=Replace/Merge and input keys match a database record but input record is identical to the
database record
Mode=New but the record already exists in the study database
Mode=New but DFRASTER is mapped and not equal to 0000/0000000
User does not have the permissions needed to import the record
8.12. Metadata - Queries, Reasons, QC Reports
and Lost Records
In addition to displaying patient data records List View also displays queries, reasons, returned QC reports
and records that have classified as ’lost’. Users who have permission to see a data record automatically
have permission to see queries and reasons attached to fields on that record. Permissions for QC reports
must be granted explicitly through plate 501, otherwise QC reports will not appear in List View. Lost data
records follow the same permissions as regular data records.
- 107 -
iDataFax User Guide
Changes can only be made in Data View. Double clicking anywhere on a metadata record in List View
switches the user to Data View with the focus on the field that was double clicked. Selecting the ’Return to
List View’ button in Data View will return the user to the field that was double clicked in List View.
Queries can be searched using Select-Search to invoke the dialog illustrated below. This dialog shows the
number of queries that meet all of the current search criteria. After entering new criteria click Update to
update the counts.
Search Queries
In this example 47
queries match all of the
specified criteria.
Use ’Save’ or ’Print’ to
output the criteria and
counts shown in this
dialog.
Click ’Filter’ to select
these 47 queries and
remove all others from
the current list view.
Click ’New Task’ to put
the data records with
these queries into a new
task set.
After clicking the Filter button to reduce the list to just those queries that match the search criteria, new
criteria can be specified to narrow the search further within the previously filtered set.
Records matching new search criteria can be added to a current task list by clicking the Add to Task
button.
If you fax or email Quality Control (QC) reports to the sites they may respond by writing directly on a
printed copy of a report and faxing it back to the DataFax system. Returned QC reports are not patient
CRFs and thus are not displayed in a patient binder. They can however be processed in Fax View, just
like data records, and saved in the study database with key fields: ID equal to the QC report number
(composed of the site number and QC report creation date), and Sequence equal to the QC report page
number. Any QC reports that have been saved in this way can be reviewed in List View.
- 108 -
8.13. List View Menus
If you have permission to modify returned QC reports you will be able to correct any errors that might have
been made when the key fields were entered. To make corrections first use ’Select-Change Mode & Level’
to set mode to anything except ’View’, and then use ’Page-Change Keys’ to bring up the Change Keys
dialog.
Like patient data records, QC report pages can be filtered using using the Search dialog, and the current
set of pages can be printed or saved in a PDF file by selecting these options from the File menu.
Work flow tasks can also be performed on QC reports in List View. For example, new QC reports will typically be saved at level 1 when they arrive in Fax View. Someone may then have the task of reviewing
them and moving them to level 2 to indicate that they have been reviewed. To perform this task use
’Select-Change Mode & Level’ to set mode to Validate and Level to 2. Next use ’Select-Search’ to find the
QC report pages that are currently at level 1. Then after reviewing each page, save it by selecting Final or
Incomplete. This will move the page to level 2. You can use the search dialog again at any time to find the
pages that currently have incomplete status.
8.13. List View Menus
This section describes the List view options available under the Select and Show menus which appear at
the top of the screen. The options available under the remaining menus have already been described for
the Data view.
8.13.1. The Select Menu
The Select menu is used to select the data records (rows) and data fields (columns) to be displayed in the
List view table. The options include:
All Records ... - cancel current task set (if any) and show all data records for the CRF page currently
selected in the left panel of the List view dialog. When cancelling a task set a new mode and sign-off
level can be specified in a pop-up dialog.
Field Selection ... - select and arrange the data fields page to be displayed from the current page.
Search ... - specify criteria used to find data records, reduce the rows in the List view table to those
meeting the specified criteria, and/or to create a new task set.
By View ... - select data records (rows) and data fields (columns) using a pre-defined view.
Cancel View - cancel previous By View selection to display all data records and data fields for the
current page.
Refresh - update all data records for the current page from the study server to get new records that
may have been added or changes that may have been saved since the view was opened.
8.13.2. The Show Menu
The Show menu is used to select the study page types and individual records to be displayed in the List
view table. The options include:
All Pages - show all page types defined for the study
Task Pages - show only those page types included in the current task set
All Records - show all data records for the currently selected page type
Task Records - show only those data records included in the current task set
- 109 -
iDataFax User Guide
Chapter 9. The Reports View
9.1. Introduction
Reports will appear as an option under the View menu if you have been granted permission to run one or
more of the standard DataFax reports or study specific reports. Reports can be updated and viewed within
the Reports View and can be printed or saved to a PDF, HTML or text file. The Reports View is illustrated
below.
Figure 9.1. View - Reports
- 110 -
9.2. Report Types
9.2. Report Types
The button above the list of reports has 3 options.
1. DataFax Reports: Selecting this option will list all of the standard DataFax reports for which you have
permission. The standard reports are designed to address common trial management needs, like
summarizing data management status for individual patients and clinical centers.
2. Study Reports: Selecting this option will list the study specific reports, designed by programming staff
at the trial coordinating center, to address needs not covered by any of the standard DataFax reports.
3. History: Each report you run is added to the History list. You can review the output from any report by
opening this list and selecting the report. If you run a large number of reports or the output from some
of your reports is very long you may exhaust the memory cache used to save the output from each
report. If this occurs you will not see any output on selecting some of the older reports from the history
list. But you can re-run reports from within the history list by selecting Run. The report will then run,
with the same options used the first time, unless you change them, and will itself be added to the end
of the history list.
9.3. Explain - Report Documentation
All DataFax reports and most Study reports will include documentation that can be accessed by selecting
the report name and then selecting the Explain button. The documentation generally includes a description
of any options that may be specified before the report is Run and an explanation of the report output.
9.4. Report Options and Database Permissions
Most reports include options that can be used to alter what the report produces. For example DF_PTcrfs
(which displays a summary of CRF status for patients) includes options to specify which patients, visits
and CRF pages are to be included. Report output also depends on your database permissions, and will
only include information based on data records you have permission to read.
Selecting the Options widget displays the entire options list. Selecting an option from the list copies it to
the Specify window with the part you need to change highlighted. For example, the DF_PTcrfs option used
to limit the CRF history to patient visits occuring since a specified date is: -t yy/mm/dd. When this option is
selected it is copied to the Specify window with yy/mm/dd highlighted. Changing this to 07/05/15 yields the
option -t 07/05/15 which limits the output to patient visits which occurred after May 1, 2007.
9.5. Running Reports
Selecting the Run button runs the report with the options currently listed in the Options Specify window
and displays the results in the large scrolling window below the Run button. The output from each new
report replaces the output from the previous report. However, by switching to the History list you can
review the output from all reports you have run since login. The run history is not saved between login
sessions.
The current output in the report window can be printed or saved, in PDF, HTML or text format, by selecting
any of these options from the File menu.
- 111 -
iDataFax User Guide
9.6. Saving Report Lists
A list of commonly executed reports can be saved for later execution by specified users and/or users with
specified roles. You can also specify the user and roles that are permiitted to own and thus modify each
report list you define. The permissions granted at this level do not over-ride the permissions defined in
user roles. If a user lacks permission for any report in a report list the entire list will be unavailable in
iDatafax.
A report list is defined using Select-Define Report List and is subsequently accessed using Select-Report
List. Reports and report options may be added to a report list manually in the dialog shown below, or the
current history list can be used as a starting point and then modified. Begin by selecting the button at the
right end of the ’List Name’ field at the top of the dialog. Then select ’New Report List’ to define the list
manually or ’New Report List from History’ to begin with the reports contained in the current History list.
The following example shows a list of reports used to create and send QC reports to the study sites each
week.
Select - Define Report List
Give each report list a
name and one line
description.
Remeber to include
the desired options for
each report.
Users must have
permission to run
each report in the list.
Owners will be able to
modify the report list.
To access a previously defined report list use Select-Report List to invoke the dialog illustrated below and
select the desired report list.
- 112 -
9.6. Saving Report Lists
Select - Report List
This example has 2 report lists.
The first one has been selected.
The 3 reports it contains are
displayed with their options.
’all reports’ has been selected
thus the reports will be run in
order when ’OK’ is selected. The
output will be added to the current
History list.
The individual reports and report options are displayed for the selected list.
All reports can be executed in the order they appear in the list by selecting Run ’all reports’ and then clicking ’OK’. The output from each report will be added to the current History list. When the last report finishes
the ’History’ section of Report View will open so that the output from each report can be reviewed.
Alternatively, reports can be executed one at a time by selecting the ’selected report’ option, slecting a
report from the list, and then clicking ’OK’.
- 113 -
iDataFax User Guide
Chapter 10. The Status View
10.1. Introduction
The Status View provides a quick overview of the status of the study database and shows a list of users
who are currently working on the study. It can also be used to quickly assemble a set of records to perform
some task by double clicking on any cell in any of the 3 tables.
Figure 10.1. View - Status
- 114 -
10.2. Level & Status
10.2. Level & Status
The Status View displays the number of data records, queries and reasons that are currently stored in the
study database categorized by the work flow level and status with which each record was most recently
saved. Status labels have been shortened as needed to fit within the tables, but the full label can be seen
by hovering over the table labels or selecting the Graphics by status option. Work flow level 0 identifies
new data records that were saved with pending status, and queries for overdue visits. Level 1 is typically
used for new data entry; leaving higher levels for various central office checks and reviews.
- 115 -
iDataFax User Guide
10.3. Filtering The Status Report
When the Status View is first invoked it displays the status of the entire study database. The results
displayed in the tables and graphs can be filtered by study Site, Patient ID, study Assessment (or visit)
and CRF Page. In each case the legal entry is a number, e.g. site number not site name. The button to the
right of each entry widget can be used to display and select valid entries for each specification, except
patient ID. A list of values and ranges can be entered, e.g. Site: 1-9,21,30-44,81,82. Click the Update
button to apply the current filter and the Clear button to remove all filter specifications. After clicking
Update, any filter specifications will remain in effect for the duration of your login session. To reproduce
status for the entire study database select the Clear button and then the Update button.
10.4. Links
You can jump to the records displayed in any cell of the table, including row and column totals, by double
clicking the cell. Double clicking a cell in the Data table will create a Task set containing the records in that
cell and open them in Data View. Double clicking cells in the Queries table opens the task set in Queries
View and double clicking cells in the Reasons table opens the task set in Reasons View. Of course this
only works if the user has permission to use these views.
10.5. User Permissions
The information displayed in Status View depends on user permissions. The tables and graphs include
only records the user has permission to see, and the counts shown for records available in the Unidentified Fax Router and the New Fax Queue will only be displayed if the user has permission to use Fax View
and the Unidentified Fax Router.
10.6. New Fax Queue
The top of the screen Status View displays the number of study CRF pages that have arrived by fax and
are waiting to be reviewed and entered into the study database. These records are not counted in the
Data table. This count is only visible to users who have permission to use Fax View to review and enter
these pages. Double clicking on the count will open Fax View for such users.
10.7. Unidentified Fax Router
At the top of the screen Status View also displays the number of CRF pages that have arrived by fax but
could not be routed to any of the current DataFax databases because the study number could not be identified. These pages need to be reviewed and routed to the appropriate study if they are in fact study CRFs.
This count is only visible to users who have permission to use the Unidentified Fax Router to review and
dispatch these pages. Double clicking on the count will open the Router for such users.
10.8. Returned QC Reports (plate 501)
Status View does not include any QC report pages that have been faxed back from the clinical sites and
stored in the study database as plate 501, nor does it include any queries or reasons that may have been
added to these records. Returned QC reports and any associated metadata can be reviewed in List View.
- 116 -
Chapter 11. Unidentified Fax Router
Chapter 11. Unidentified Fax Router
11.1. Introduction
When DataFax receives pages which it cannot recognize, it stores them in a special folder where they can
be reviewed using the iDataFax router.
Pages need to be routed only if DataFax is unable to find or read the DataFax bar code at the top of the
page. This occurs when there is no bar code (e.g. memos, letters, cover pages), or when the bar code is
obscured (e.g. by fax noise, a coffee stain, something printed over it).
Without a readable bar code DataFax can not identify the study. Thus all unidentified pages are stored in
the same unidentified page folder. If you are running several studies, the individuals who review and identify pages using the router must be sufficiently familiar with all studies to correctly route each page.
Study CRFs are not difficult to identify correctly unless the bar code is missing altogether. In such cases
the contents and design of the CRF may be enough to correctly identify it. If not, selecting Context from
the Page menu can be used to determine where the page came from.
Also, remember that DataFax creates missing plate and over due visit queries for required CRFs and visits
that have not arrived (as specified in the study visit map). Thus queries may be generated for pages that
have been transmitted by the sites but are currently stuck in the router unless such pages are identified
before the DF_QCupdate program is scheduled to run.
While this chapter refers to the processing of unidentified pages received by fax, the same procedures
apply to unidentified pages received by email as .pdf or .tif attachments, or submitted using DFinnotify.rpc,
after being scanned.
11.2. Router Functions
The router is used to:
1.
2.
3.
4.
5.
6.
Review all unidentified pages.
Get context (determine when the fax arrived and where it came from).
Delete pages that are not needed (e.g. fax cover sheets, blank pages).
Print non-CRF pages or save them to a PDF file.
Fix any fax transmission problems (e.g. flip, rotate, truncate, cut).
Identify CRFs and other patient documents and send them to the correct study database.
11.3. Restrictions
Three factors determine what a user can do in the router:
Router Permission. Users with router permission can start the router and view, print, delete and check
the context of all unidentified pages that arrive on the DataFax server. They can also identify and send
pages to any study on the server, even if they have no other study permissions, with the following qualifications.
- 117 -
iDataFax User Guide
Study Status. DataFax and study administrators can place temporary or permanent restrictions on a
study by changing it’s status to: disabled, read-only, restricted (for administrators only), or both restricted
and read-only. Pages cannot be sent to studies that are disabled or in read-write mode.
DataFax and Study Administrators. Only DataFax and study administrators can send pages to a
restricted study. If a study is also in read-only mode, or is disabled, not even administrators can send
pages to the study.
11.4. Starting The Router
Start the router by selecting the Fax Router button located on the study selection dialog that appears right
after the iDataFax login dialog. This button only appears if you have permission to use the router.
Figure 11.1. The main router window.
Each page, shown in the page list on the left side of the screen, is identified by an image name in format
yyww.ffffppp, where yy is the year, ww is the week, ffff is the fax transmission ID, and ppp is the page
number within the transmission. The router can be used simultaneously by multiple users. Pages are
locked and released as the user traverses the page list. When a page is selected it and all other pages in
the same fax transmission are locked preventing other users from processing the same pages.
Small icons show the current status of each page in the page list. Exclamation mark icons identify pages
that are locked by the current user; lock icons identify pages currently locked by other users; and red X
icons identifies pages that have been processed (routed to a study, deleted, or saved). The user’s login
name and the DataFax server name are shown in the title bar, and a similar message bar at the bottom of
the screen shows the number of pages to be routed, the number of pages locked by other users (busy),
and the current image name and size in pixels (width x height).
Router work flow typically proceeds in 3 steps: (1) select a page, (2) perform image processing (e.g. rotation, flip, etc.), and (3) identify the study it belongs to using the widgets at the bottom of the screen, or print
or discard it using the menus at the top of the screen.
- 118 -
11.5. The File Menu
Pages without barcodes may also be identified, provided the user is able to determine the study, plate and
visit numbers using other features. As an aid to identification the image can be resized from 50-200%
using the Zoom option. This has no effect on the size of the image stored in the study database.
If most pages have similar keys the ’Preserve keys’ check box can be used to prevent the key fields
(study, plate and visit) from being cleared when each new page is selected.
If a set of pages all have the same keys and do not require image processing, they can be identified
together in one step by making multiple selections from the page list before clicking the identify button.
The router sends all identified pages, whether barcoded or not, to the new record queue where they are
processed in Fax View, along with pages that were identified automatically from their bar codes.
The rest of this chapter describes the options available under each of the menus at the top of the screen.
11.5. The File Menu
11.5.1. Update Records
Select Update Records from the File menu to update the page list with any unidentified pages that may
have arrived since the current session began.
11.5.2. New Study
Select New Study from the File menu to open the study selection dialog and select a study, while keeping
the router window active.
11.5.3. Close Router
Select Close Router from the File menu to close the router window and return to the iDataFax login dialog.
11.5.4. Exit
Select Exit from the File menu to exit the router and iDataFax.
11.6. The Page Menu
This menu contains a number of functions which allow you to manipulate pages (rotate, shift, flip, cut, truncate, and reset) to clean them up before sending them to the study database.
It also contains functions for turning to the next or previous page, printing pages and determining where
each page came from (context).
11.6.1. Rotate
Select Rotate from the Page menu to correct page skew. This is needed if the page signature line at the
top of a study CRF is not perfectly horizontal. Page skew usually results from failure to adjust the page
guides snugly against the sides of the CRF pages when they are being scanned by the fax machine.
- 119 -
iDataFax User Guide
Instructions for this operation appear in the status line at the bottom of the router window. Click the left
mouse button on the top left end of the horizontal signature line and then click again on the top right end of
this line (or click the right mouse button to cancel this operation). When the operation is complete, the
screen will update to show the realigned image. You can undo a rotation by selecting Reset from the Page
menu.
11.6.2. Shift
Use Shift when the page does not need to be rotated. Shift is used to register the upper-left corner of the
page signature line found at the top of all DataFax CRFs. The upper left corner of this line is used as the
CRF reference point for DataFax ICR and thus must be registered before the page is identified and routed
to the study database. If you fail to do this the ICR software will look for data in the wrong places on the
CRF page and will thus fail to find data fields and will leave them blank.
To shift a page click the left mouse button on the top edge of the horizontal signature line (or click the right
mouse button to cancel this operation). After clicking the left mouse button once, the screen will update
with the shifted image.
If you make a mistake select Reset to undo the shift and try again.
11.6.3. Flip
Selecting Flip from the Page menu turns the page upside down. Selecting it a second time will return the
page to its original position.
11.6.4. Cut
Occasionally you will receive a faxed page which is really 2 pages (or more) joined together. This will be
evident by a page length count far greater than 1050 pixels, and also by the vertical scroll bar which will be
reduced to half the screen length or less, depending on the number of pages joined together. In such
cases you need to cut the one long page into individual pages at the appropriate page boundaries.
Selecting Cut from the Page menu brings up a horizontal line. Move this line to the desired cut position
and then click the left mouse button to register it, or the click the right mouse button to cancel.
After the cut point is registered a second dialog box will appear, asking you to confirm this action. Click OK
to cut the page or Cancel to abort. A page cut operation can not be reversed thus make sure you want to
proceed before confirming this action.
Cutting a page creates 2 pages from the original one. You will see this confirmed by an increase of 1 in
the number of faxes reported in the top border of the router window. The top half of the cut page will
become the current page displayed in the router window and the bottom half will become the next page.
In very rare cases you might see the following error message: error Unable to add new image.
This indicates that the image can not be found in $DATAFAX_DIR/work/fax_log.idx (the faxlog index
file). If you encounter this message contact you DataFax system administrator for assistance. If the faxlog
is complete and the only problem is the index file, it can be regenerated, but if the faxlog is not complete
the audit trail will need to be searched to locate the relevant fax, discover the last page number, and
create a new fax log entry, before reindexing the faxlog.
Warning
The Cut action can not be undone.
- 120 -
11.6.5. Truncate Length
11.6.5. Truncate Length
The size of the page (width x length, in pixels) is shown in square brackets at the bottom of the screen.
After a CRF has been shifted to the top of the page signature line it should not be longer than 10.5 inches.
The resolution of each page is 100 pixels per inch. Thus a length greater than 1050 pixels indicates that
the page is too long. In such cases you should examine the bottom of the page to see if it just contains fax
noise. If it does, select Truncate Length from the Page menu to remove the excess length.
If you make a mistake, select Reset from the Page menu to undo the > Truncate Length operation.
11.6.6. Trim Width
Fax machines that can accommodate pages wider than 8.5 inches require their paper guides set to 8.5
inches for proper scanning of letter-size pages. If the guides are set too wide, the paper can tilt or shift,
resulting in skewed or abnormally wide images. When pages like this are received, they generally appear
in the router because they are wider than the 864 pixel maximum. To route a wide page, you can trim the
width of a page by selecting Trim Width from the Page menu. Two dashed vertical lines appear over the
document spaced 864 pixels apart. Using the mouse, position the lines over the area of the page you want
to preserve. Click the left mouse button to discard the page area which lies outside these two lines, or click
the right mouse button to cancel the operation. If you make a mistake, select > Reset from the Page menu
to undo the > Trim Width operation.
11.6.7. Rotate 90° CW/CCW
You can rotate a page 90° clockwise by selecting Rotate 90° CW, or counter-clockwise by selecting
Rotate 90° CCW, from the Page menu. Each time you select this menu option, the current page is rotated
90° in the specified direction. This is useful when a sender faxes a page to you sideways and you want to
put it into a portrait orientation. If you make a mistake, select > Reset from the Page menu to undo all
operations on the page, or rotate the page in the opposite direction to return it to it’s previous orientation.
11.6.8. Rotate 90° CW/CCW and scale
It is possible to process landscape pages by rotating them into portrait orientation and scaling them to fit
the width of a portrait page. This is achieved using Rotate 90° CW and scale or Rotate 90° CCW and
scale. Select the appropriate menu item to apply the needed rotation. The page will be rotated and then
scaled automatically to fit the width of a portrait US letter page.
11.6.9. Print
To print one or more pages select the page or pages you want to print in the page list, then select Print
from the Page menu to get the standard Print dialog box for your PC.
11.6.10. Export as PDF
To export one or more pages in a PDF file select the page or pages you want to print in the page list, then
select Export as PDF from the Page menu to get the standard file save dialog, and specify the file name
you wish to use.
- 121 -
iDataFax User Guide
11.6.11. Previous
This function moves you to the previous page in the router window.
11.6.12. Next
This function moves you to the next page in the router window.
11.6.13. Context
This function can help you determine where an unidentified page came from. It provides the page number
within the fax, the date and time on which the fax was received, and the G3 sender identification header
from the fax - which is usually the sender’s fax number.
Figure 11.2. The Context window.
If the sender id is unknown, it will be represented by "" following the sender id label. If DataFax can
determine the fax number or email address of the sender’s fax machine, as in the above example, it will
appear following the sender id label.
11.6.14. Reset
Selecting this function, or the ’Reset Image’ button in the bottom right corner of the screen, will undo all
Rotate, Scale, Shift, Flip, Trim and Truncate manipulations that have been made to the current page; the
only exception is Cut, which can not be undone. Reset is performed automatically if you select a different
page before identifying the current one to send it to the desired study database. Once a page has been
identified it is gone and any page manipulations become permanent.
11.7. The Action Menu
This menu contains all of the functions which dispatch and remove pages from the DataFax identify
folder where all unidentified pages are stored. All actions are immediate. Once committed they can not be
undone.
- 122 -
11.7.1. Rotate/Shift/Identify
11.7.1. Rotate/Shift/Identify
Most CRF pages can be cleaned up, identified and routed to the appropriate study database in a single
step by selecting Rotate/Shift/Identify from the Action menu. Follow the directions at the bottom of the
router window to identify the CRF page signature line. The page will then be deskewed and shifted and
another attempt will be made to read the bar code. When this has been done enter or correct the keys
(Study, Plate and Visit) as needed and click the Identify button.
If the plate is defined as having the visit number in the bar code it must be entered before clicking Identify;
an error message will appear if you fail to do this. Alternatively, when the visit number is the first data field
on the plate the Visit key should be left blank, but will be silently ignored if you enter one.
A Right-Click will abort the Rotate/Shift/Identify action. Once the Identify button is selected, the action is
committed and cannot be undone. The page will then be sent for ICR processing and routed to the designated study database. There will be a brief pause while this is being done. Then the page will disappear,
and the next unidentified page will be displayed (if there is one).
11.7.2. Move
Select Move from the Action menu to move a page to a specified file name somewhere on you local PC.
This will display your standard file system navigation dialog used for selecting folders and files. Moved
files are removed from the DataFax server and stored in PNG format on the the users local computer.
11.7.3. Discard
To discard an image, select the image to discard in the page list, then select Discard. A confirmation
dialog will then appear, and if you click ’Yes’ to discard the image it will be permanentaly deleted from the
study server. This can not be undone.
You can discard multiple pages by selecting more than one page from the page list before selecting
Discard.
- 123 -
iDataFax User Guide
Chapter 12. User Preferences
- 124 -
Chapter 12. User Preferences
File - Preferences
Select Preferences from
the File menu to view and
change your iDataFax
preferences. Preferences
are user and study
specific. The default
settings are illustrated
here. Any changes are
applied immediately and
preserved across
sessions. Some preferences may refer to parts of
iDataFax for which you do
not have permission, and
will thus be irrelevant. A
description of each of the
preference settings
appears below.
- 125 -
iDataFax User Guide
12.1. Data Window
expand all assessments when a patient binder is opened - if this preference is not checked patient
binders will open to show all study assessments but all assessments will be closed, whereas with this
preference checked all assessments are also opened to show the CRF pages they contain.
display first page when an assessment is opened - this preference determines whether the data
screen is automatically loaded with the first page of the assessment when a new assessment is
opened.
advance to next field after current field is completed - if this preference is not selected the focus
remains on each field until the user presses the Tab or Return key to advance to the next data field.
open first task record when task set is built - if this preference is selected the first data record is
opened automatically when a new task is selected, otherwise users must open the first task record
manually by selecting the desired patient binder.
warn before opening next patient when traversing task records - this preferences is only relevant to
users who have access to record selection tasks and is used to ensure that the user is aware of transitions from records for one patient to records for a different patient.
retain scroll position when traversing task records - this preferences is only relevant to users who
have access to record selection tasks. It is useful when the task involves a review a fields near the
middle or bottom of the page, as it avoids the normal scroll to the top of each new page.
12.2. Image Window
auto open/close as image is available/unavailable - if this preference is selected faxed/scanned CRF
pages (or other images) are automatically displayed when a page having such images is selected.
When this preference is selected the display method is determined by which of the following options is
selected.
toggle screen between data and image views - switching between data and image views is performed
using the blue image button in the bottom right corner of the screen, but the data view will always
appear on switching to a new page in the patient binder.
split screen: data left, image right - occurs if an image is attached to the current data record
split screen: image left, data right - occurs if an image is attached to the current data record
split screen: data top, image bottom - occurs if an image is attached to the current data record
split screen: image top, data bottom - occurs if an image is attached to the current data record
Sticky toggle: retain data or image view across records - switching between data and image views is
performed using the blue image button in the bottom right corner of the screen, and the last selection
will remain in effect on switching to a new page in the patient binder.
12.3. Record List
Show assessment number:label, number, label - this preference determines how assessments are
identified when a patient binder is opened. Each patient assessment has both a number and a
descriptive label. Both number and label or only one of these can be displayed.
Show page number:label, number, label - this preference determines how the pages within patient
assessments are identified when an assessment is opened. Each page has both a number and a
descriptive label. Both number and label or only one of these can be displayed.
Show site number:label, number, label - this preference determines how sites appear in the record
list. Each site is assigned a number and a descriptive label during study setup. Both number and label
or only one of these can be displayed.
- 126 -
12.4. Query Defaults
12.4. Query Defaults
Use: external or internal - this preference is only relevant to users who are allowed to create new
queries and determines the default usage type set in the query creation dialog. External queries are
directed to the clinical sites, while internal queries are not.
Type: clarification or correction - this preference is only relevant to users who are allowed to create
new queries and determines the default response type set in the query creation dialog. Clarification
queries are used to request a reply to a question, while correction queries are used to request a
correction to one or more data fields.
12.5. List View
show field name: generic or unique, and number:name - this preference is used to specify column
labels for the list view data table. These labels can display the generic or unique field name, and may
also include the field’s data entry tab order number.
show coded field: code or label - this preference determines whether fields that have codes and
labels, e.g. 1=male, 2=female, display the code or the label.
show date field: default, calendar, julian, and apply imputation - dates may be shown exactly as
entered into the study database (defaut), in calendar format (with 4 digit years), or as a julian number.
In addition any imputation rules that have been specified for partial dates may be applied if the calendar or julian format is selected.
show field color coding - each cell in the data table may be displayed in the same color used in Data
View (red=field is illegal or blank but required, etc., see Help-Color Coding).
expand text fields - if cells in the data table are too small to display the entire data field selecting this
preference will expand the cell and display all that it contains when the cell is selected.
12.6. Screen Options
Background color: black, white or color - this preference determines whether data fields are displayed
on a black, white or color background. Color is only useful if color CRFs have been imported in
DFsetup to create the data screen backgrounds. Black is recommended, even with color CRF backgrounds, to reduce eye strain and make data fields and color coding stand out more clearly.
Background type - different versions of some or all of the CRF pages can be imported during study
setup. For example, some CRF pages might be available in multiple languages. This preference
allows the user to select the version of the CRFs to be used for both the data entry screens and when
printing CRFs or creating PDFs.
12.7. Fax View Options
When a CRF page is refaxed users perform duplicate resolution by loading the existing data record,
comparing it with the new fax image, and correcting any data fields that need to be updated. During this
process users can select the image count button at the bottom of the screen to review the previous and
new CRF images. Alternatively either or both of the following preferences can be used to display the
image review dialog automatically:
when the existing record is loaded - useful if you always want to compare the old and new CRF
images before reviewing and correcting any data fields.
when the revised record is saved - use this option if you want to delay image comparision until after
reviewing, correcting and saving the data record.
- 127 -
iDataFax User Guide
12.8. Auto Logout
Exit after 10 minutes of inactivity - study administrators can specify a default and maximum time
period and thus the default may be something other than 10 minutes. Users may change the default
to any value up to the maximum. An automatic timeout, after a period of inactivity, is needed to meet
regulatory requirements and protect patient confidentiality. Remember that any changes to the current
page that have not been saved will be lost if a login session times out.
- 128 -
Chapter 13. Appendix
Chapter 13. Appendix
13.1. Terminology
This section explains some of the terminology used in this manual.
Assessment
An assessment is a set of data collection pages which are completed together at
a specified time, per instructions in the study protocol. Each assessment represents: a clinic visit, a home visit, medical tests, medical records, patient questionnaires, etc.
Electronic Signature
Your electronic signature has two parts - your login name and your password.
You must specify both parts when you log into the study’s DataFax server. All
data collected is recorded under your electronic signature and can be traced in
DataFax audit trail reports.
Final
A page can be saved with status Final if there are no illegal values or unanswered queries from the study coordinating center. iDataFax marks Final pages
with a green check mark. (see also Incomplete and Pending)
Incomplete
A page can be saved with status Incomplete if it has any fields which are incomplete or illegal, or outstanding queries. iDataFax marks Incomplete pages with a
red X. (see also Final and Pending)
Page or Plate
Page and plate are 2 terms used interchangably to refer to a logical grouping of
data items (aka data fields) presented with a layout determined by the study
sponsor, to fit on a single sheet of paper. Each page may stand alone, or pages
may be grouped into multi-page forms. A collection of pages (or forms) constitute
an assessment, and a collection of assessments constitute the patient binder
which holds all study data for an individual patient.
In a paper based approach to data collection, these pages are printed, completed
and faxed to the DataFax system. When using an EDC approach, the same
pages are completed using iDataFax.
Patient
An individual participating in a research project for whom data will be collected is
a patient. Within iDataFax, patients are identified by patient ID number (a unique
numeric identifier), according to conventions established by the study coordinating center.
Patient Binder
A patient binder contains all of the required and optional data collection forms
used to collect study data for an individual patient. Within iDataFax, patient
binders are displayed in a list by patient ID number, with an associated icon that
shows whether the binder is empty or contains recorded data, and whether that
data is currently complete, incomplete or pending.
- 129 -
iDataFax User Guide
Pending
During new data entry a page can be saved with status Pending to indicate that
you are not finished with it and plan to return to it shortly. These pages are saved
at work flow level 0 and do not move to higher levels until they are saved with
status Final or Incomplete. Typically pending pages at level 0 will not be reviewed
by the study coordinating center until they progress to level 1 or higher.
Pages which have progressed beyond level 0 can not return to level 0, but they
can be reset to status Pending to indicate that there is something seriously wrong
which needs to be corrected before the data can be used in statistical reports.
The ability to demote records this way is restricted to users with Data View - with
Select permission. iDataFax marks Pending pages with a yellow dash. (see also
Final and Incomplete)
Query
The study coordinating center may add a query to any data field to request a
correction or clarification. iDataFax colors fields with an outstanding query blue.
When a reply is provided to a query, or a reason is added to explain the field, the
color changes to orange, and when the field has been corrected, or the reply or
reason have been approved, the color changes to green.
Reason
A reason explaining a data value can be added to any data field. This is particularly useful as a way of explaining unusual values and thereby avoiding a data
query from the study coordinating center. iDataFax colors fields with a new
reason orange and gives them a Pending status. If the coordinating center
accepts the reason, the field color changes to green and reason status changes
to Accepted. If they do not accept the reason, field color changes to blue and the
reason status changes to Rejected. A reason can be modified, which starts the
review process over again.
Save
None of the changes you make to a page are sent to the study DataFax server
until you click one of the 3 Save buttons at the bottom of the screen: Final,
Incomplete, or Pending. If you leave the computer without saving your work,
iDataFax will time-out after a few minutes and the changes you made will be lost.
However you will be warned that this has happened the next time you connect to
the study and you can opt to return to the same page.
13.2. Common Error and Warning Messages
This section describes some common messages that users may encounter during their use of iDataFax.
Table 13.1. iDataFax Login
Message:
Server Unreachable! - Check server and/or your
network connection!
Possible Cause:
There is no internet connection available or
server address/name entered is invalid.
Solution:
Confirm that your internet service is functioning
properly. Confirm that you have correctly typed
the DataFax Server name in the login dialog.
Otherwise, contact your iDataFax Study Coordinator or System Administrator.
- 130 -
13.2. Common Error and Warning Messages
Message:
Unable to connect to DataFax server! - Check if
DataFax EDC Service is running!
Possible Cause:
DataFax is not running on the specified server or
DataFax EDC Service is not running.
Solution:
Contact your iDataFax Study Coordinator or
System Administrator and confirm that the
DataFax Server and DataFax EDC Service is
running properly.
Message:
Unable to get a list of studies from the server.
Possible Cause:
The user has not been given access to any
studies in the DFsystem tool or the iDataFax
server or DFedcservice is not running.
Solution:
Contact your iDataFax Study Coordinator or
System Administrator.
Message:
Error: Unable to load study setup file
Possible Cause:
The study Setup file does not exist or is empty.
Solution:
Contact your iDataFax Study Coordinator or
System Administrator.
Message:
Unable to load patients. Please contact iDataFax
system administrator.
Possible Cause:
The DFcenters file does not exist or is empty, or
the user does not have permission to access
patient numbers due to restrictions defined in
their DFsystem user account.
Solution:
Contact the iDataFax Study Coordinator or
System Administrator.
Message:
Unable to load assessments. Please contact
iDataFax system administrator.
Possible Cause:
The DataFax DFvisit_map does not exist or is
empty, or the user may not have permissions to
access the necessary visits and/or plates due to
restrictions defined in their study role.
Solution:
Contact the iDataFax Study Coordinator or
System Administrator.
- 131 -
iDataFax User Guide
Message:
It appears that your computer’s date and time are
incorrect. iDataFax has been set to view only
mode until the date and time are fixed and you
login again.
Possible Cause:
Either iDataFax can not obtain a valid date and
time from the computer on which it is running, or
the value obtained is more than 48 hours ahead
or behind the value obtained from the study
database server.
Solution:
Update the date and/or time on the computer that
is running iDataFax.
Table 13.2. Data Entry
Message:
You have been automatically logged out of your
current session.
Possible Cause:
The user’s iDataFax session has been inactive
for the number of minutes specified by the user’s
Auto Logout setting.
Solution:
Each user can customize the number of minutes
after which the iDataFax auto logout takes effect.
The default Auto Logout setting may be changed
by logging into iDataFax, opening the Preferences dialog from the File menu and changing
the Auto Logout preference.
Message:
The definition of this page has changed. This
page needs to be reviewed centrally before you
can access it again. Please notify your study
coordinator.
Possible Cause:
This message arises when the number of fields
on a page has been changed so that its definition
no longer matches the data already existing in
the database.
Solution:
The data records for the page will need to be
reformatted before you can access them. Contact
your iDataFax Study Coordinator or System
Administrator.
Message:
This page can not be saved with status Final
because of problems identified by edit checks.
- 132 -
13.3. Programs
Possible Cause:
Edit checks that are set to execute upon saving
the page may cause certain data fields to be
marked with an outstanding query or an illegal
data value. If either or both exist, it will not be
possible to save the page with status Final.
Solution:
Review the page for any outstanding queries
(blue fields) and/or illegal data values (red fields),
and either correct those problems or save the
page using Pending or Incomplete status.
Message:
Error in saving record changes. Cause: A valid
date/time stamp could not be created.
Possible Cause:
Either iDataFax can not obtain a valid date and
time from the computer on which it is running, or
the value obtained is more than 48 hours ahead
or behind the value obtained from the study
database server.
Solution:
Update the date and/or time on the computer that
is running iDataFax.
Message:
Field field_name: storing value field_value (which
contains illegal/extra characters) into variable has
altered the value.
Possible Cause:
The field value stored in the study database is
different from the value displayed in the field
widget on screen. The database value may not
match the field format, or may be larger than the
current field store length. The study setup specifications may have been changed to make previously entered values incompatible with the
current field specifications.
Solution:
Reenter the specified fields with values compatible with the current field properties and save the
record to the study database.
13.3. Programs
This section describes the standard DataFax programs available for both adhoc record selection and task
definition.
13.3.1. DFmkdrf.jnl - make DataFax DRF file from study journals
- 133 -
iDataFax User Guide
Program DFmkdrf.jnl processes the study journal (audit trail) files and can be used to identify records
entered by specified users during specified times with specified criteria. Its output includes all records that
match the specified criteria, but any given user will only see those records they have permission to get.
The program usage message follows.
- 134 -
13.3.1. DFmkdrf.jnl - make DataFax DRF file from study journals
DFmkdrf.jnl - make or load a DataFax Retrieval File
USAGE: DFmkdrf.jnl [ DFNUM ] [-t date1-date2 | -days #]
[-u include_users] [-xu exclude_users]
[-v levels] [-s statuses] [-I IDs] [-S SEQs] [-P plates]
[-image yes|no] [-d 1|2]
[-records #] [-cases #] [-put drfname] [-h header]
[-get drfname] [-test]
OPTIONS:
DFNUM
... DataFax study number may be 1st argument or set in
-t yymmdd-yymmdd
... selection period: dates during which records were saved
-days #
... select records saved in the past # days
-u list of users
... select records saved by specified users
-xu list of users ... exclude records saved by specified users
-v # #-#
... select records saved at specified validation levels (0-7)
-s status
... select statuses: final,incomplete,pending,lost
-I # #-#
... select patient ID numbers
-S # #-#
... select sequence/visit/assessment numbers
-P # #-#
... select plate numbers
-image yes|no
... select records with images only, or without images only
-d 1
... deselect if criteria no longer apply at end of selection period
-d 2
... deselect if criteria no longer apply now (journal’s end)
-records #
... maximum number of data records to be included in the drf file
-cases #
... maximum number of patients to be included in the drf file
-put drfname
... write output to a specified drf file in the study drf folder
-h header
... include a descriptive header/title for the drf file
-get drfname
... load an existing drf file from the study drf folder
-test
... check and display record selection options then quit
NOTES:
1. DFNUM does not need to be specified when running DFmkdrf.jnl in iDataFax; or if
environment variable DFNUM is set to the study number when running shell scripts.
2. Input: DFmkdrf.jnl reads the study journal files and thus will not generate correct
output if any of the journals have been removed or truncated.
3. Output: a DRF record is created for journal records that meet all selection options
at some point in the specified time period:
a) -d 0: even if these records no longer meet the selection options (default), or
b) -d 1: if they still meet the selection options at the end of the time period, or
c) -d 2: if they still meet the selection options now.
4. A DRF record is not created for any record deleted after meeting the selection
criteria because a deleted record can not be retrieved from the study database.
5. If the keys (ID,Visit,Plate) are changed after a record meets the selection criteria,
a DRF record will be created for both the old keys and the new keys if they both
correspond to a current data record.
6. The record selection period may be specified using:
yymmdd-yymmdd or yymmdd-today ... a date range, or
yymmdd or today ... a single date
7. If the -drf option is not specified output is written to standard out.
8. If the -cases and -records options are both specified, -cases has priority
EXAMPLES:
Output DRF records for data records in study 253 that were saved with associated
images by jack or dianne at level 1 in Nov. 2007, regardless of whether these
records were subsequently saved by someone else or at different levels or without
an associated image.
DFmkdrf.jnl 253 -image yes -u jack,dianne -v 1 -t 071101-071130
Repeat the above but only create DRF records if the selection critera remain in
effect now, i.e. deselect any records that no longer meet the selection criteria at
the end of the audit trail.
DFmkdrf.jnl 253 -image yes -u jack,dianne -v 1 -t 071101-071130 -d 2
Create a DRF file named myTest.drf for data records in study 253 which were saved
in the past 10 days with visit numbers 1,2 or 50-59 and record status = incomplete
by someone other than the current user.
DFmkdrf.jnl 253 -days 10 -S 1,2,50-59 -s incomplete -xu whoami -put myTest.drf
Load DFunexpected.drf, a DRF file created by DF_QCupdate and stored in the study drf folder.
DFmkdrf.jnl 253 -get DFunexpected.drf
- 135 -
iDataFax User Guide
13.3.2. DFmkdrf.ec - make DataFax DRF file from edit checks
Program DFmkdrf.ec creates a DFbatch file and runs it to identify records with edit checks that would
display a message, create or edit a query or modify a data field were they to be run interactivly. No
changes are made to data or metadata. The only output is a DataFax retrieval file listing the records that
met the specified criteria. Any given user will only see those records they have permission to get. The
program usage message follows.
DFmkdrf.ec - make DRF records by running DFbatch to execute specified edit checks
USAGE: DFmkdrf.ec [ DFNUM ] -P plates -E editchecks [-v levels -s statuses -I IDs -S SEQs]
[-P another batch specification] [-which] [-warn]
OPTIONS:
DFNUM
... DataFax study number
-P Plates
... plate specification starts each new batch specification
-E Edit Checks
... edit check names to be executed on the specified plates
-v # #-#
... select records by specified validation levels (0-7)
-s status
... select records by record status final,incomplete,pending,lost
-I # #-#
... select records by patient ID numbers
-S # #-#
... select records by sequence/visit/assessment numbers
-which msg qc data ... determines EC events that trigger creation of a DRF record
-warn
... display any warning messages generated by DFbatch
-u
... print this usage message and quit
NOTES:
1. iDataFax uses environment variable DFNUM which is set to the current study number.
Only specify DFNUM on the command line when running DFmkdrf.ec from a shell script
or terminal session where DFNUM is not set.
2. Each batch specification must begin with the -P and -E options, in that order.
3. Use -E ALL or -E all to include all edit checks on the specified plates.
4. The -which option determines the conditions under which a DRF record is created.
Edit checks are executed with APPLY=none so no changes are made to the database.
Instead a DRF record is created for the current page if the edit check would do
the following with APPLY turned on:
msg - execute a message function: dferror, dfwarning, dfmessage
qc
- create a new QC note or edit an existing one
data - modify a data field
The default value for the -which opiton is msg qc data, i.e. all 3 triggers apply.
5. The -which option applies to all batches. Only 1 -which option can be specified.
6. Status can be specified using 3.7 or 3.8 terminology, like this:
-s clean,dirty,error,lost or -s final,incomplete,pending,lost
7. Temporary files are created in the study work directory and then removed.
8. User permissions are applied.
EXAMPLES:
Write DRF records to standard out for study 253 if edit check test1 or test2 on plates
1-3 would display a message, add or modify a query or make any changes to a data field.
DFmkdrf.ec 253 -P 1-3 -E test1,test2
Same as the first example but only trigger these edit checks on plate 1 and only for
data records that have status final and are at validation levels 3-6.
DFmkdrf.ec 253 -P 1 -E test1,test2 -s final -v 3-6
Same as previous example but trigger test1 on all plate 1 records and test2 on plate 2-3
records that have status final and are at validation levels 3-6.
DFmkdrf.ec 253 -P 1 -E test1 -P 2-3 -E test2 -s final -v 3-6
Same as the previous example but edit checks test1 and test2 only generate a DRF record
if they would have created a new QC note or modified an existing QC note.
DFmkdrf.ec 253 -P 1 -E test1 -P 2-3 -E test2 -s final -v 3-6 -which qc
Create DRF records for any edit check that would change a data field.
DFmkdrf.ec 253 -P 1-499 -E ALL -which data
- 136 -