1
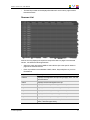
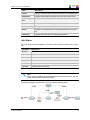
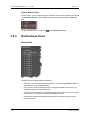
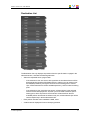
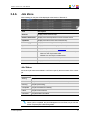
USER MANUAL
XFILE3
Version 1.0 - July 2013
XFile3 - Version 1.00 - User Manual
Copyright
EVS Broadcast Equipment S.A.– Copyright © 2003-2013. All rights reserved.
Disclaimer
The information in this manual is furnished for informational use only and subject to
change without notice. While every effort has been made to ensure that the information
contained in this user manual is accurate, up-to-date and reliable, EVS Broadcast
Equipment cannot be held responsible for inaccuracies or errors that may appear in this
publication.
Improvement Requests
Your comments will help us improve the quality of the user documentation. Do not
hesitate to send improvement requests, or report any error or inaccuracy on this user
manual by e-mail to [email protected].
Regional Contacts
The address and phone number of the EVS headquarters are usually mentioned in the
Help > About menu in the user interface.
You will find the full list of addresses and phone numbers of local offices either at the end
of this user manual (for manuals on hardware products) or at the following page on the
EVS website: http://www.evs.com/contacts.
User Manuals on EVS Website
The latest version of the user manual, if any, and other user manuals on EVS products
can be found on the EVS download center, on the following webpage:
http://www.evs.com/downloadcenter.
I
EVS Broadcast Equipment S.A. - July 2013
II
XFile3 - Version 1.00 - User Manual
Table of Contents
TABLE OF CONTENTS
III
1.
1
INTRODUCTION
1.1. About XFile3
1
1.2. Requirements
1
1.3. Compatibility
2
2.
3
INSTALLATION AND LICENSING
2.1. Software Installation
3
2.2. Licensing
7
3.
9
XFILE3 APPLICATION
3.1. Startup
3.1.1. Startup
9
3.2. Auto Archive Mode
10
3.2.1. Auto Archive Overview
10
3.2.2. Sources Zone
11
3.2.3. Templates Zone
12
3.2.4. Destinations Zone
13
3.2.5. Filters Zone
13
3.2.6. How to Create an Autobackup Rule
16
3.2.7. Job Zone
17
3.3. Archive Mode
20
3.3.1. Archive Overview
20
3.3.2. Source Zone
22
3.3.3. Templates Zone
24
3.3.4. Destinations Zone
25
3.3.5. How to Create Archive Jobs
26
3.3.6. Job Zone
26
3.4. Restore Mode
Table of Contents
9
29
3.4.1. Restore Overview
29
3.4.2. Sources Zone
30
3.4.3. Destinations Zone
32
3.4.4. Options Zone
34
3.4.5. How to Create Restore Jobs
34
3.4.6. Job Zone
35
3.5. Monitoring Mode
37
3.5.1. Monitoring Overview
37
3.5.2. Hard Disk Zone
38
III
EVS Broadcast Equipment S.A. - July 2013
3.5.3. Job Zone
3.6. About Window
IV
Issue 1.11.A
40
44
Table of Contents
XFile3 - Version 1.00 - User Manual
1.
Introduction
1.1.
About XFile3
The purpose of this product is to automatically archive selected content from EVS servers
to the transportable hard drives and enable restoring content from hard drives to EVS
servers.
The main users for XFile3 are:
•
LSM operators.
•
Producers and LSM Operator assistants.
•
Technical truck engineers.
•
Other Production users who manage archive and restore.
The overall workflow implies two roles:
1. Archive existing clips from EVS servers to hard drives.
2. Restore existing files from hard drives to EVS servers.
1.2.
Requirements
Software Requirements
•
Gigabit Ethernet connectivity (up to 10GB Ethernet)
•
Microsoft.Net Framework 4.0
•
Supported Multicam Versions: 11.02.X
Hardware Requirements
•
1. Introduction
EVS XF[2] System
1
EVS Broadcast Equipment S.A. - July 2013
•
OS: Window7 64bits or 32-bits
•
Bi-Core CPU
Issue 1.11.A
Workflow Requirements
•
1.3.
2
It is advised to verify that the XSquare services are fully running before launching
XFile3 operational software.
Compatibility
•
XSecure V1.01.05
•
XSquare V2.1.20
•
XViewer V1.0.0
1. Introduction
XFile3 - Version 1.00 - User Manual
2.
Installation and Licensing
2.1.
Software Installation
To install XFile3, proceed as follows:
1. Run XFile3 installation package and then follow the steps of the Setup wizard and
click Next.
2. Select "I accept the agreement" and click Next.
3. Select the destination directory to install the new software application and then click
Next. The installer proposes a default path for the installation. i.e.: C:\Program
Files(x86)\EVSBroadcast Equipment\XFile3.
2. Installation and Licensing
3
EVS Broadcast Equipment S.A. - July 2013
Issue 1.11.A
4. Select either mode to install. Two modes are available: Full install mode and
Advanced install mode.
◦
Select Full install mode, all the components will be installed in Silent mode
automatically.
◦
Select Advanced install mode, you can customize the components to be installed.
The following steps are the installation process after selecting Advanced install mode.
5. Select the components to install, and then click Next. If you need to update XFile3
only, you can unselect the other three components and click Next.
4
2. Installation and Licensing
XFile3 - Version 1.00 - User Manual
6. Click Browse to select a folder in which XFile3 shortcuts are saved, and then click
Next.
7. Select Create a desktop icon to create a shortcut on the desktop, if unselect, the
shortcut won’t display on the desktop.
Click Next.
2. Installation and Licensing
5
EVS Broadcast Equipment S.A. - July 2013
Issue 1.11.A
8. Click Install and wait until the installation is completed. This can last a couple of
minutes. After that, install XSquare Suite.
9. Select the first option to restart you computer now or select the second option to
restart your computer later. The first option is highly recommended.
And then click Finish to finish installation.
6
2. Installation and Licensing
XFile3 - Version 1.00 - User Manual
All applications are installed successfully.
2.2.
Licensing
The XFile3 software is managed by way of licenses codes managed with the XSecure
application. The required license codes for XFile3 are the following:
Application
Module
Summary
10 XFile
10 Base Module
XFile3 User Application
60 XTAccess
10 Base Package
Background XTAccess transfer agent
60 XTAccess
20 Transcoding
Background XTAccess transcoding engine
170 XViewer
10 Base Package
File Viewer Application Module
When you need to add a new license code, or extend the validity of a temporary license
code, you must use the XSecure Manager application.
To add a new license code, proceed as follows:
1. Run the XSecure Manager application by double-clicking the XSecure Manager
shortcut on your desktop as administrator.
2. Requesting license codes.
a. Fill in the Customer information.
b. Click on the Request button in the lower left corner of the window. This will
generate an XML file that you must send to your EVS support representative
c. Select the location where you would like to save that file, and click on the Save
button.
d. Send this file to your support contact at EVS support representative, specifying
which new license codes or license code extensions you require.
3. Adding License codes.
2. Installation and Licensing
7
EVS Broadcast Equipment S.A. - July 2013
Issue 1.11.A
a. After received another XML file containing the license codes or code extensions
that you have requested. Copy that XML file in a directory that is visible by the
computer where XSecure is installed (using a USB key for instance, or your LAN
network)
b. Click on the Import Key File button in XSecure window. The license codes will
be automatically imported, and a dialog box confirms how many license codes
have been successfully imported.
8
2. Installation and Licensing
XFile3 - Version 1.00 - User Manual
3.
XFile3 Application
3.1.
Startup
3.1.1.
Startup
Double click the XFile3 icon
window.
to open the application. This opens an initialization
The startup sequence will check the status of the background XSquare services as well
as discover the available EVS XT and XS Servers on the same network as the XFile3
host computer.
The Auto Archive Mode is selected by default at startup.
If you re-launch XFile3 after auto-archive rules have been created, you are asked to make
a choice to continue using the previous rules or clear then and start without any rules by
way of a pop up window:
Do you want to carry on using the same auto archive rules?
•
Click Yes to use the same auto archive rule, the old rules are retained.
•
Click No to remove the existing auto archive rules.
Afterwards, pop up window will appear asking: The jobs in rule will be canceled, are you
sure to continue?
3. XFile3 Application
◦
Select Yes to cancel all the existing jobs in rule and open XFile3.
◦
Select No to open XFile3, the old rule is existing.
9
EVS Broadcast Equipment S.A. - July 2013
Issue 1.11.A
3.2.
Auto Archive Mode
3.2.1.
Auto Archive Overview
Auto Archive mode is the default page after startup.
Auto Archive Mode is to automatically archive the source clips from the requested servers
in the requested formats based on rules.
Click
to enter AutoArchive mode.
The screen shot below shows various areas of the Auto Archive Main Window.
10
Area
Name
Description
1
Sources Zone
Area that displays all the detected servers and their clip
structure, including pages and banks.
2
Templates Zone
Area that displays the templates available from the
background running XSquare service manager.
3
Destinations
Zone
Area that displays all the destinations relative to the
selected template.
3. XFile3 Application
XFile3 - Version 1.00 - User Manual
3.2.2.
Area
Name
Description
4
Filters Zone
Area that displays all the filters options to add in the
autobackup rule.
5
Create
autobackup rule
Button to create the autobackup rule.
6
Job Zone
Area that displays all the created rules and all the job status
Sources Zone
The Sources Zone includes the following elements:
•
When select or unselect the parent level, all children will be select or unselect
correspondingly.
•
Select the check box before servers and pages, or just select Select All to select all
the clips in all the available servers.
•
Every server includes 10 pages (from 0-9), every page includes 9 banks (from 1-9),
each bank includes 10 columns(from 0-9).
3. XFile3 Application
11
EVS Broadcast Equipment S.A. - July 2013
3.2.3.
Issue 1.11.A
•
The server name on XFile3 UI is the SDTI network name of server, but if server name
is blank in server,the serverID number will be displayed instead.
•
The total clip number can be displayed besides each server name, page or banks
between brackets.
Templates Zone
The templates zone displays all the templates that can be used while auto archiving clips.
Without Transcoding
•
- Avid MXF OPAtom
•
- EVS MXF
•
- MXF OP1a SMPTE
•
- QuickTime Movie
With Transcoding
•
1080i - AVC - Intra 100 MXF OP1a SMPTE
•
1080i - Avid DNxHD VC -3 100Mbps MXF OP1a SMPTE
•
1080i - DVCPro HD QTMov
•
1080i - MJPEG 4Band XT1 EVS MXF
•
1080i - ProRes 422 LT100 Mbps QTMov
•
720p - AVC-Intra 100 MXF OP1a SMPTE
•
720p - Avid DNxHD VC-3 100Mbps MXF OP1a SMPTE
•
720p - DVCPro HD QTMov
•
720p - MJPEG 4Band XT1 EVS MXF
•
720p - ProRes 422 LT 100 Mbps QTMov
How to Edit Template
To edit template, select a reference template and click on the Edit button
,the
TemplateEditor Window pops up, the user can modify the corresponding values. After
modification, the user is permitted to perform a Save As and create it as a new template
with a new name, or the user may click Cancel to abort this modification.
It is currently not possible to delete any templates defined in the XFile3 version1.
Note
To get more information about editing template, click ?>Help on XSquare
application.
12
3. XFile3 Application
XFile3 - Version 1.00 - User Manual
3.2.4.
Destinations Zone
You must select the corresponding template from Templates Zone before choosing the
required destination(s).
How to Select Destination
To select a destination path, the user clicks Browse
button, the window named
Browse For Folder pops up, select the desired destination path to write the archived
clips to and click OK.
The number of destination fields will vary from the different formats included in the
Template Zone, For example, if the selected template includes destinations, then two
fields will be displayed to be entered.
Example:
If a template has been selected since the last archive, it can still be applied in the next
archive if has not been changed yet.
3.2.5.
Filters Zone
XFile3 allows users to define different filters in Auto Archive Mode. These filters are
additional rule criteria to facilitate very complex jobs if desired.
The Filters Zone includes five kinds of filters:
•
Pref Cam
•
Date&Time
•
Camera
•
Rating
•
Archive Flag
•
Keywords Grid
3. XFile3 Application
13
EVS Broadcast Equipment S.A. - July 2013
Issue 1.11.A
Pref Cam
The Pref Cams filter makes it possible to only include in the autobackup rule, the clips that
were recorded from any camera defined as the first preferential camera (*) or on the
second preferential camera (=). By default, no pref cam is selected, all cameras are
included.
Filter
Description
All cameras are both included in autobackup rule.
Only the first and second preferential cameras are included in
autobackup rule.
Only the first preferential camera is included in autobackup rule.
Only the second preferential camera is included in autobackup rule.
Date&Time
The filter makes it possible to include in the autoarchive rule, the clips that were created
between the required date and time. By default, no date & time is selected.
Filter
Description
The required date is selected with the format:
date/month/year.
The required time is selected with the format:
hour:minute:second.
To set the date, select the date button
then the day of the month.
to activate the calender, select the month and
To set the time, select the time area and input the desired time.
You can click Cancel
to clear the defined date and time.
Note
Date & Time filter is based on Primary TC.
14
3. XFile3 Application
XFile3 - Version 1.00 - User Manual
Camera
The camera filter makes it possible to select the clips to be included in the autoarchive. By
default, the cameras are not selected, all cameras are included.
The different cameras are shown as following:
Filter
Description
A
Backup only clips stored as A clips
B
Backup only clips stored as B clips
C
Backup only clips stored as C clips
D
Backup only clips stored as D clips
E
Backup only clips stored as E clips
F
Backup only clips stored as F clips
Rating
The Rating filter makes it possible to include the autoarchive the clips that were in the
required rating level. By default, no rating is selected, all ratings are included.
Rating
Description
Clips without rating
Clips with rating one
Clips with rating two
Clips with rating three
Archive Flag
The Archive Flag filter makes it possible to include in the autoarchive the clips that were
archived or not archived. By default, no archive flag is selected.
: Only include the clips which are not flagged for archived.
: Only include the clips which are flagged to be archived.
Filter
3. XFile3 Application
Meaning
+
All the clips will be archived, no archive flag selected
+
All the "not flagged to be archived" and "flagged to be archived" clips
will be archived
15
EVS Broadcast Equipment S.A. - July 2013
Filter
Issue 1.11.A
Meaning
+
All the "flagged to be archived" clips will be archived
+
All the "not flagged to be archived" clips will be archived
Keywords Grid
The keywords filter makes it possible to include in the autoarchive only the clips togged
with the selected keywords. By default, no keyword is selected.
Click
to activate Keyword Grid Window.
All the keywords listed in this window are from all the detected servers. The list reflects all
keywords that currently exist on the clips that exist.
The user can select the required keywords in this window.
3.2.6.
How to Create an Autobackup Rule
To create an autoback rule, proceed as follows:
1. Select the source EVS Server and/or Page/Bank to autoarchive. The check boxes of
the pages in the Sources Zone will be selected.
2. Select the template in the Templates Zone to specify the file format.
16
3. XFile3 Application
XFile3 - Version 1.00 - User Manual
3. Select the destinations in the Destinations Zone to specify where clips will be
archived.
4. Select different filters if desired.
5. Click Create autobackup rule. A new rule will be created and displayed in the Job
Zone.
All the clips in the selected pages within the defined filters will automatically be
archived onto the specified destination.
All the previously selected sources will be unselected automatically upon creation of
the rule.
3.2.7.
Job Zone
After creating a new rule, the jobs will be displayed at the bottom of Auto Archive UI.
You can click the arrow beside the rule to fold or unfold the jobs in the rule.
You can also delete a rule or job.
Rule
Every rule includes several values you have defined before creating rules.
Area
Description
Rule Name
The name of rule is defined by a number automatically incremented.
Source
Displays the name of the selected server(s) .
TemplateName Displays the chosen template.
Destination
Displays the selected destination.
From
Displays the starting date and time
To
Displays the ending data and time
Pref Cam
Displays the selected pref cam
Camera
Displays the selected cameras
Rating
Displays the selected rating
Archive
Displays the selected archive flag
Keywords
Displays the selected keywords in Keywords Grid
3. XFile3 Application
17
EVS Broadcast Equipment S.A. - July 2013
Issue 1.11.A
Area
Description
Actions
Area enables you to delete this rule
Status
Displays the number of completed jobs and matching jobs with the
format: n completed jobs/n matching jobs.
Job
All the jobs meet the conditions of the specific rule will be displayed in the rule.
Area
Description
Source
Displays the LSMID of each job.
ClipName
Displays the name of the current archived clip.
Format
Displays the format which has been selected in the Template Zone.
Destination
Displays the destination where the archived clips will be stored.
Remaining _
time
Displays the remaining time of each job.
Speed
Displays the current archiving speed of each job.
Status
Displays the job status, refer to "Job Status" for more details.
Action
Enables you to delete this job or change the priority of the current
job.
Comments
Displays the information from XSquare and XFile3.
Job Status
Six kinds of job status are available in Job Zone to specify the exact status of the current
job.
Job Status
Description
Waiting
The job has been created and stored in the XFile3DataBase.
Scheduled
The job has been sent to XSquare and is scheduled to be proceeded.
Running
The job is processing.
Completed
The job is finished successfully.
Failed
The job is unsuccessful.
cancelled
The job has been cancelled.
Note
When a job is completed, the job will disappear from Job Zone, but you can see
all the completed jobs in Monitoring Mode.
18
3. XFile3 Application
XFile3 - Version 1.00 - User Manual
The following diagram specifies the conversion between different status.
How to Select Jobs
All the selected jobs are highlighted in blue color.
Four possible selection ways are available:
•
Click on one job, then the job will be selected.
•
Click on one job, then press CTRL from keyboard, and simultaneously click other jobs
one by one to add to the selection, with this method, all the clicked jobs will be
selected.
•
Click on one job, then press SHIFT from keyboard, and click any other jobs, then all
the jobs between those two selected jobs will be selected.
•
Press CTRL+A to select all the jobs.
How to Sort Jobs
To sort a column in alphabetical or numerical order,unfold the jobs and click on the column
label to display the arrow buttons
and click again to invert the sorting.
Note
Destination and Action can't be sorted.
How to Cancel Jobs
To cancel jobs, proceed as follows:
1. Select the requested jobs.
2. Right click on the selected jobs and select Cancel.
OR
Click Cancel in Actions column.
3. The status of the job will be cancelled.
3. XFile3 Application
19
EVS Broadcast Equipment S.A. - July 2013
Issue 1.11.A
Note
Only the jobs with Waiting, Scheduled and Running status can be cancelled.
How to Change Job Priority
Changing job priority means moving the selected job to the first position in the Scheduled
job queue for the job to be processed in priority.
To change job priority, proceed as follows:
1. Select the requested jobs.
2. Right click on the selected jobs and select Process ASAP.
OR
Click Process ASAP in Actions column.
3. The job will be processed soon with high priority.
Note
Only the priority of jobs with the Scheduled status can be changed.
3.3.
Archive Mode
3.3.1.
Archive Overview
Archive Mode is used to archive the source clips from the requested servers to the
requested formats and destinations manually.
Click
to enter Archive mode.
The screen shot below shows various areas of Archive Main Window.
20
3. XFile3 Application
XFile3 - Version 1.00 - User Manual
Area
Name
Description
1
Sources Zone
Area that displays all the detected servers and their clip
structures, including the pages and banks
2
Templates Zone
Area that displays the templates available from XSquare.
3
Destinations
Zone
Area that displays all the destinations matching the selected
template.
4
Create Job
Button to create archive job.
5
Job Zone
Area that displays all the created rules and all the job status.
3. XFile3 Application
21
EVS Broadcast Equipment S.A. - July 2013
3.3.2.
Issue 1.11.A
Source Zone
Server List
The Sources Zone includes the following elements:
22
•
When select or unselect the parent level, all children will be select or unselect
correspondingly.
•
Select the check box before servers and pages, or just select Select All to select all
the clips in all the available servers.
•
Every server includes 10 pages (from 0-9), every page includes 9 banks (from 1-9),
each bank includes 10 columns(from 0-9).
•
The server name on XFile3 UI is the SDTI network name of server, but if server name
is blank in server,the serverID number will be displayed instead.
3. XFile3 Application
XFile3 - Version 1.00 - User Manual
•
The total clip number can be displayed besides each server name, page or banks
between brackets.
Sources List
Sources List only displays the clips from the specific banks or pages in the selected
servers, it includes the following elements:
•
Select the check box before LSMID to select all the clips in the specific banks or
pages of the selected servers.
•
Each clip includes some metadata: LSMID, Name, Keywords(from1-5), Archive
Destinations.
Clip Information
Description
LSM ID
Displays ID assigned to the clips using its page, bank, row and
camera number.
Name
Displays the name assigned to the clip.
Keyword1
Displays the first keyword assigned to the clip.
Keyword2
Displays the second keyword assigned to the clip.
Keyword3
Displays the third keyword assigned to the clip.
Keyword4
Displays the fourth keyword assigned to the clip.
Keyword5
Displays the fifth keyword assigned to the clip.
Archive Destination
Displays the path where the backup file is located on local
disks, if backed up previously.
3. XFile3 Application
23
EVS Broadcast Equipment S.A. - July 2013
Issue 1.11.A
How to Sort Clips
To sort a column in alphabetical or numerical order, click on the column label to display
the arrow button
and click again to invert the sorting.
How to Search Clips
To search clips, you only need to input the characters whose name includes this character
in the Quick Search Tool, all the clips include the characters will display on Sources
List.
To clear the search filter, you can click
in the Quick Search Tool.
Note
The above Source List area is the same as that in Restore Mode.
3.3.3.
Templates Zone
The templates zone displays all the templates you will use while archiving clips, after
archiving, all the archived clips can be transferred to the format you selected in the
Template Zone.
Without Transcoding
•
- Avid MXF OPAtom
•
- EVS MXF
•
- MXF OP1a SMPTE
•
- QuickTime Movie
With Transcoding
24
•
1080i - AVC - Intra 100 MXF OP1a SMPTE
•
1080i - Avid DNxHD VC -3 100Mbps MXF OP1a SMPTE
•
1080i - DVCPro HD QTMov
•
1080i - MJPEG 4Band XT1 EVS MXF
3. XFile3 Application
XFile3 - Version 1.00 - User Manual
•
1080i - ProRes 422 LT100 Mbps QTMov
•
720p - AVC-Intra 100 MXF OP1a SMPTE
•
720p - Avid DNxHD VC-3 100Mbps MXF OP1a SMPTE
•
720p - DVCPro HD QTMov
•
720p - MJPEG 4Band XT1 EVS MXF
•
720p - ProRes 422 LT 100 Mbps QTMov
How to Edit Template
To edit template, select a reference template and click on the Edit button
,the
TemplateEditor Window pops up, the user can modify the corresponding values. After
modification, the user is permitted to perform a Save As and create it as a new template
with a new name, or the user may click Cancel to abort this modification.
It is currently not possible to delete any templates defined in the XFile3 version1.
Note
To get more information about editing template, click ?>Help on XSquare
application.
3.3.4.
Destinations Zone
You must select the corresponding template from Templates Zone before choosing the
required destination(s).
How to Select Destination
To select a destination path, the user clicks Browse
button, the window named
Browse For Folder pops up, select the desired destination path to write the archived
clips to and click OK.
The number of destination fields will vary from the different formats included in the
Template Zone, For example, if the selected template includes destinations, then two
fields will be displayed to be entered.
Example:
3. XFile3 Application
25
EVS Broadcast Equipment S.A. - July 2013
Issue 1.11.A
If a template has been selected since the last archive, it can still be applied in the next
archive if has not been changed yet.
3.3.5.
How to Create Archive Jobs
To create archive jobs, proceed as follows:
1. Select the source clips to archive. The check boxes of the pages in the Sources Zone
will be selected. You can select the clips to be archived in the Source List by ticking
the check box.
2. Select the template in the Templates Zone to backup the clips in the selected format.
3. Select the destinations in the Destinations Zone to store the archived clips in the local
destinations.
4. Click Create Job. All the jobs will be created and displayed in the Job Zone.
3.3.6.
Job Zone
After create jobs, all the jobs will display at the bottom of Archive UI.
Job
All the jobs created manually are displayed on the Job Zone.
26
Area
Description
Source
Displays the LSMID of each job
ClipName
Displays the name of the current archived clip.
3. XFile3 Application
XFile3 - Version 1.00 - User Manual
Area
Description
Format
Displays the format which has been selected in the Template Zone.
Destination
Displays the destination where the archived clips will be stored.
Remaining _
time
Displays the remaining time of each job.
Speed
Displays the current archiving speed of each job.
Status
Displays the job status, refer to "Job Status"for more details.
Action
Enables you to delete this job or change the priority of the current
job.
Comments
Displays the information from XSquare and XFile3.
Job Status
Six kinds of job status are available in Job Zone to specify the exact status of the current
job.
Job Status
Description
Waiting
The job has been created and stored in the XFile3DataBase.
Scheduled
The job has been sent to XSquare and is scheduled to be proceeded.
Running
The job is processing.
Completed
The job is finished successfully.
Failed
The job is unsuccessful.
cancelled
The job has been cancelled.
Note
When a job is completed, the job will disappear from Job Zone, but you can see
all the completed jobs in Monitoring Mode.
The following diagram specifies the conversion between different status.
3. XFile3 Application
27
EVS Broadcast Equipment S.A. - July 2013
Issue 1.11.A
How to Select Jobs
All the selected jobs are highlighted in blue color.
Four possible selection ways are available:
•
Click on one job, then the job will be selected.
•
Click on one job, then press CTRL from keyboard, and simultaneously click other jobs
one by one to add to the selection, with this method, all the clicked jobs will be
selected.
•
Click on one job, then press SHIFT from keyboard, and click any other jobs, then all
the jobs between those two selected jobs will be selected.
•
Press CTRL+A to select all the jobs.
How to Sort Jobs
To sort a column in alphabetical or numerical order, click on the column label to display
the arrow buttons
and click again to invert the sorting.
How to Cancel Jobs
To cancel jobs, proceed as follows:
1. Select the requested jobs.
2. Right click on the selected jobs and select Cancel.
OR
Click Cancel in Actions column.
3. The status of the job will be cancelled.
Note
Only the jobs with Waiting, Scheduled and Running status can be cancelled.
How to Change Job Priority
Changing job priority means moving the selected job to the first position in the Scheduled
job queue for the job to be processed in priority.
To change job priority, proceed as follows:
1. Select the requested jobs.
2. Right click on the selected jobs and select Process ASAP.
28
3. XFile3 Application
XFile3 - Version 1.00 - User Manual
OR
Click Process ASAP in Actions column.
3. The job will be processed soon with high priority.
Note
Only the priority of jobs with the Scheduled status can be changed.
3.4.
Restore Mode
3.4.1.
Restore Overview
Click
to enter Restore mode.
Clips can be restored from a local destination to any EVS video server on the network.
The screen shot below shows various areas of Restore Main Window.
Area
Name
Description
1
Sources
Zone
Area that displays all the sources in the detected destinations,
including the local path, folders,subfolders and clips' metadata in
the selected destination or folders.
Area that displays all clips from the selected directories of the
selected hard drives.
2
Destinations Area that displays all the detected servers and their structures,
Zone
including the pages, banks and the metadata of all the clips.
3
Option Zone
3. XFile3 Application
Area that displays the copy type.
29
EVS Broadcast Equipment S.A. - July 2013
3.4.2.
Issue 1.11.A
Area
Name
Description
4
Create Job
Button to create restore jobs.
5
Job Zone
Area that display all the created jobs and status..
Sources Zone
Hard Drive List
Hard Drive List includes the following elements:
30
•
Select the check box before hard drive or folders to select the clips in the selected
hard drive.
•
Click on one folder, then press SHIFT from keyboard, and click any other folders, then
all the folders between those two selected folders will be selected.
•
Each includes several folders and the subfolders.
•
Click Refresh button to refresh the detected hard drives.
3. XFile3 Application
XFile3 - Version 1.00 - User Manual
Sources List
Sources List only displays the clips from the specific banks or pages in the selected
servers, it includes the following elements:
•
Select the check box before LSMID to select all the clips in the specific banks or
pages of the selected servers.
•
Each clip includes some metadata: LSMID, Name, Keywords(from1-5), TC IN,
session metadata, path and Restore Destinations.
Clip Information
Description
LSM ID
Displays ID assigned to the clips using its page, bank, row and
camera letter.
Name
Displays the name assigned to the clip.
Keyword1
Displays the first keyword assigned to the clip.
Keyword2
Displays the second keyword assigned to the clip.
Keyword3
Displays the third keyword assigned to the clip.
Keyword4
Displays the fourth keyword assigned to the clip.
Keyword5
Displays the fifth keyword assigned to the clip.
TC IN
Displays the TC IN assigned to the clip.
Session Metadata
Session metadata includes eight kinds of metadata assigned to
the clip: SessionName, SessionDate, SessionSport,
SessionCompetition, SessionCompetitionLevel,
SessionLocation, SessionTeamA, SessionTeamB.
Path
Displays the file's path.
Restore Destination
Displays the path where the clip will be restored, or has been
restored previously.
3. XFile3 Application
31
EVS Broadcast Equipment S.A. - July 2013
Issue 1.11.A
How to Search Clips
To search clips, you only need to input the characters whose name includes this character
in the Quick Search Tool, all the clips include the characters will display on Sources
List.
To clear the search filter, you can click
3.4.3.
in the Quick Search Tool.
Destinations Zone
Server List
The Server List includes the following elements:
32
•
Select the check box before servers and pages, or just select Select All to select all
the positions in all the available servers.
•
Every server includes 10 pages (from 0-9), every page includes 9 banks (from 1-9),
each bank includes 10 columns(from 0-9).
•
The server name on XFile3 UI is the SDTI network name of server, but if server name
is null in server, the serverID number will be displayed instead.
•
The total clip number can be displayed besides each server name, page or banks
between brackets.
3. XFile3 Application
XFile3 - Version 1.00 - User Manual
Destination List
The Destination List only displays the positions from the specific banks or pages in the
selected servers, it includes the following elements:
•
Select the requested server, page or bank.
◦
If the selection is from one server, all the positions in the selected server will be
displayed at the right side of Destinations Zone. And then you can select one of
the available position by ticking the check box as the starting point to restore
clips, XFile3 restores from the first available position if you don't select a starting
point.
◦
If the selection is from more than one servers, all the positions in the selected
servers will not be displayed out. And then you do not need to select a specifc
starting point, all the clips from the EVS servers will restored from the first
available position and restore the others one by one, all the selected clips will be
restore respectively in all the selected servers.
•
Each position includes some metadata: LSMID, name.
•
A radio button is displayed in front of the empty positions.
3. XFile3 Application
33
EVS Broadcast Equipment S.A. - July 2013
3.4.4.
Issue 1.11.A
Options Zone
Copy Type
You can choose to select the copy types, two copy types are available
Copy Type
Description
Continuous The clips to be restored will be restored to the available positions one by
one from the selected starting point, taking into consideration the filter
options.
Same
Topology
The topology position of all the restored clips will keep the same with that
in EVS server. If the position to be restored is unavailable, the clip will not
be restored. The first clip must correspond to the same page in EVS
server, if not, the clip will not be restored, and other clips will keep the
same topology as well.
Camera Filter
You can choose to restore the specific camera positions only. Only the clips with the
selected cameras will be displayed, all clips in the selected folders are displayed by
default.
3.4.5.
Camera
Description
A
Restore only Camera A clips.
B
Restore only Camera B clips.
C
Restore only Camera C clips.
D
Restore only Camera D clips.
E
Restore only Camera E clips.
F
Restore only Camera F clips.
How to Create Restore Jobs
To create restore jobs, proceed as follows:
1. Select the source clips to restore. The check boxes before the required clips in
Sources Zone will be selected.
2. Select one starting point in Destinations Zone to store the restored clips in the EVS
video server if needed. If you have selected more than one servers, you don't need to
select a specific starting point.
3. Select the Copy Type if needed. By default, Continuous is selected.
4. Select Camera Filter if needed. By default, no camera filter is selected.
5. Click Create Job. All the jobs will be displayed in the Job Zone.
34
3. XFile3 Application
XFile3 - Version 1.00 - User Manual
3.4.6.
Job Zone
After creating job, the jobs will be displayed at the bottom of Restore UI.
Area
Description
Sources
Displays all the selected clips
Restore Destination
Displays the restore positions on the EVS video server
ClipName
Displays the name of the current restored clip.
Remaining _time
Displays the remaining time of each job.
Speed
Displays the current archiving speed of each job.
Status
Displays the job status, refer to"Job Status" for more details.
Transcoded
This area displays the transcoded status of the restored clip.
• With icon: the clip is transcoded.
• Without icon: the clip is not transcoded.
Action
This area enables you to delete this job.
Comments
Displays the information from XSquare.
Job Status
Six kinds of job status are available in Job Zone to specify the exact status of the current
job.
Job Status
Description
Waiting
The job has been created and stored in the XFile3DataBase.
Scheduled
The job has been sent to XSquare and is scheduled to be proceeded.
Running
The job is processing.
Completed
The job is finished successfully.
Failed
The job is unsuccessful.
Cancelled
The job has been cancelled.
Note
When a job is completed, the job will disappear from Job Zone, but you can see
all the completed jobs in Monitoring Mode.
3. XFile3 Application
35
EVS Broadcast Equipment S.A. - July 2013
Issue 1.11.A
The following diagram specifies the conversion between different status.
How to Select Jobs
All the selected jobs are highlighted in blue color.
Four possible selection ways are available:
•
Click on one job, then the job will be selected.
•
Click on one job, then press CTRL from keyboard, and simultaneously click other jobs
one by one to add to the selection, with this method, all the clicked jobs will be
selected.
•
Click on one job, then press SHIFT from keyboard, and click any other jobs, then all
the jobs between those two selected jobs will be selected.
•
Press CTRL+A to select all the jobs.
How to Sort Jobs
To sort a column in alphabetical or numerical order, click on the column label to display
the arrow button
and click again to invert the sorting.
Note
Transcode and Action columscan't be sorted.
How to Cancel Jobs
To cancel jobs, proceed as follows:
1. Select the requested jobs.
2. Right click on the selected jobs and select Cancel.
OR
Click Cancel in Actions column.
3. The status of the job will be cancelled.
36
3. XFile3 Application
XFile3 - Version 1.00 - User Manual
Note
Only the jobs with Waiting, Scheduled and Running status can be cancelled.
How to Change Job Priority
Changing job priority means moving the selected job to the first position in the Scheduled
job queue for the job to be processed in priority.
To change job priority, proceed as follows:
1. Select the requested jobs.
2. Right click on the selected jobs and select Process ASAP.
OR
Click Process ASAP in Actions column.
3. The job will be processed soon with high priority.
Note
Only the priority of jobs with the Scheduled status can be changed.
3.5.
Monitoring Mode
3.5.1.
Monitoring Overview
Click
to enter monitoring mode.
In Monitoring mode, you can see all the available hard disks and all the tasks in both
Archive and Restore Modes.
3. XFile3 Application
37
EVS Broadcast Equipment S.A. - July 2013
3.5.2.
Issue 1.11.A
Area Name
Description
1
Hard Disk Zone
Area to display all the detected hard disks.
2
Task Zone
Area to display all the tasks in Archive and Restore modes.
Hard Disk Zone
Hard Disks
Hard Disks zone displays all the hard disks detected by XFile3.
To eject the hard disk, click on
38
.
3. XFile3 Application
XFile3 - Version 1.00 - User Manual
Storyboard
What Is a Storyboard
A storyboard is a list of clip's content that is delivered with the current selected local hard
drive. When the backup jobs are created, the operator can create it as a HTML file and
store in the desirable position.
How to Create Storyboard
To create storyboard, proceed as follows:
1. Select the source hard drive.
2. Click Create Storyboard, when StoryboardOptionWindow pops up, select the
choose for a requested path to store the storyboard.
3. Click OK, the storyboard will be stored in the requested path. To open this storyboard,
you only need to open the file named Storyboard.html by web browser.
Storyboard displays the following elements of each clip:
Clip Information
Description
Clip ID
Displays the ID assigned to the clip.
Clip Name
Displays the name assigned to the clip.
TC IN
Displays the IN point of the clip assigned to the clip.
Duration
Displays the duration of the clip from IN to OUT assigned to the
clip.
Keyword1
Displas the first keyword assigned to the clip.
Keyword2
Displas the second keyword assigned to the clip.
Keyword3
Displas the third keyword assigned to the clip.
3. XFile3 Application
39
EVS Broadcast Equipment S.A. - July 2013
Issue 1.11.A
Clip Information
Description
Keyword4
Displas the fourth keyword assigned to the clip.
Keyword5
Displas the fifth keyword assigned to the clip.
Creation Date
Time
Displays the Date when the clip was created.
Backup Date Time
Displays the Date when the clip was backkuped.
Metadata Filename Displays the EVS XML file assigned to the clip.
File Size
3.5.3.
Displays the file size assigned to the clip.
Job Zone
All the jobs in Monitoring mode synchronize those in AutoArchive, Archive and Restore
modes, any changes made in Monitoring mode will happen in Monitoring mode as well.
Job Zone displays all the tasks in Archive (AutoArchive & Archive) and Restore modes.
Selection
Description
+
No tasks will be displayed out.
+
All tasks in Archive(autoarchive & archive) and Restore
modes will be displayed out.
+
All tasks in Archive(autoarchive & archive) mode will be
displayed out.
+
All tasks in Restore mode will be displayed out.
Job Zone displays different metadata about each job.
40
3. XFile3 Application
XFile3 - Version 1.00 - User Manual
Metadata
Description
Type
: Archive task(Archive & AutoArchive)
: Restore tasks
LSM_ID
Displays ID assigned to the clips using its page, bank, row and
camera number.
Name
Displays the name assigned to the clip.
Destination
Displays the path where the clip is archived or restore.
Format
Displays the format of the current archived or restored clips.
Remaining_
time
Displays the remaining time of each job.
Status
Displays the job status, refer to "Job Status"for more details.
Actions
Enables you to delete this job or change the priority of the current job.
Job Status
Six kinds of job status are available in Job Zone to specify the exact status of the current
job.
Job Status
Description
Waiting
The job has been created and stored in DataBase.
Scheduled
The job has been sent to XSquare and is scheduled to be proceeded.
Running
The job is processing.
Completed
The job is finished successfully.
Failed
The job is unsuccessful.
Cancelled
The job has been cancelled.
The following diagram specifes the conversion between different status.
How to Select Jobs
All the selected jobs are highlighted in blue color.
Four possible selection ways are available:
3. XFile3 Application
41
EVS Broadcast Equipment S.A. - July 2013
Issue 1.11.A
•
Click on one job, then the job will be selected.
•
Click on one job, then press CTRL from keyboard, and simultaneously click other jobs
one by one to add to the selection, with this method, all the clicked jobs will be
selected.
•
Click on one job, then press SHIFT from keyboard, and click any other jobs, then all
the jobs between those two selected jobs will be selected.
•
Press CTRL+A to select all the jobs.
How to Search Clips
To search clips, you only need to input the characters whose name includes this character
in the Quick Search Tool, all the clips include the characters will display on Sources
List.
To clear the search filter, you can click
in the Quick Search Tool.
How to Sort Jobs
To sort a column in alphabetical or numerical order, click on the column label to display
the arrow button
and click again to invert the sorting.
Note
Action can't be sorted..
How to Cancel Jobs
To cancel jobs, proceed as follows:
1. Select the requested jobs.
2. Right click on the selected jobs and select Cancel.
OR
Click Cancel in Actions column.
3. The status of the job will be cancelled.
Note
Only the jobs with Waiting, Scheduled and Running status can be cancelled.
42
3. XFile3 Application
XFile3 - Version 1.00 - User Manual
How to Change Job Priority
Changing job priority means moving the selected job to the first position in the Scheduled
job queue for the job to be processed in priority.
To change job priority, proceed as follows:
1. Select the requested jobs.
2. Right click on the selected jobs and select Process ASAP.
OR
Click Process ASAP in Actions column.
3. The job will be processed soon with high priority.
Note
Only the priority of jobs with the Scheduled status can be changed.
How to Maintain Database
Click
to enter Database Monitor window.
The window enables you to do the following operations:
•
See the size of DB file
•
See the number of all jobs
•
Delete obsolete jobs: When click on Delete obsolete jobs, all the obsolete jobs will
be deleted.
•
Delete all jobs: When click on Delete all jobs, all the jobs will be deleted.
•
Backup database and logs: When click on Backup database and logs, all XFile3
database and logs will be backuped.
3. XFile3 Application
43
EVS Broadcast Equipment S.A. - July 2013
Issue 1.11.A
How to Delete Obsolete Jobs
To delete obsolete jobs, click on Delete obsolete jobs.
What Are Obsolete Jobs
Obsolete jobs include:
•
Cancelled jobs
•
Failed jobs
•
The source clips related to the jobs have been deleted.
How to Delete All Jobs
To delete all jobs, click on Delete all jobs.
XFile3 will restart after deleting all jobs.
What Are All Jobs
All jobs include all the jobs created from both autoarchive, archive and restore modes.
How to Backup Database and Logs
To backup database and logs, click on Backup database and logs.
How to Clear Finished Jobs
To clear all the finished jobs, click on Clear Finished Jobs
.
What Are Finished Jobs
Finished jobs include the job with the following status:
3.6.
•
Completed
•
Failed
•
Cancelled
About Window
To view product information of the current software version, you just need to click
and then a message box pops up.
44
,
3. XFile3 Application
XFile3 - Version 1.00 - User Manual
Click on User’s manual link to open the PDF version of the current software version.
3. XFile3 Application
45
EVS Broadcast Equipment S.A. - July 2013
46
3. XFile3 Application