1
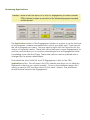
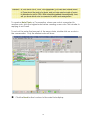
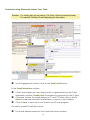
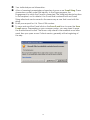
Quick User Guide The Quick User Guide for VohCom Page contains the basic information needed to start using this program. 1 TABLE OF CONTENTS LOGGING ON ..................................................................................................................................... 3 HOME WINDOW ................................................................................................................................. 3 Finding Client Information...........................................................................................................11 ENGAGEMENT WINDOW .................................................................................................................12 Setting Up a Quick Engagement ..............................................................................................12 Linking Documents and Programs ............................................................................................16 Finding Client Information While In an Engagement .............................................................18 Setting Engagement Importance .............................................................................................20 Accessing Applications ...............................................................................................................21 Linking items from your previous system ...................................................................................23 Communicating Internally About Your Task ............................................................................26 Communicating Externally About Your Task............................................................................36 Using Quick Engagements with Phone Calls ...........................................................................41 Utilizing the Recent Engagements List ......................................................................................42 TIME SHEET .........................................................................................................................................44 Tracking Time ................................................................................................................................44 Finalizing Your Time Sheet ...........................................................................................................45 2 LOGGING ON In order to make the most efficient use of Page, it is good practice to log on to both Page and Outlook as soon as you start your workday. Double click the Page icon on your desktop and enter your password to open your Page Home window. HOME WINDOW Understanding and Managing Your Home Window VohCom Page is built around the concept of completing Tasks or Engagements. The Action list, which automatically opens when you log on to Page, is a list of Engagements that require ’action’ from you. This list can also be accessed by pressing the Action button. 3 Each staff member has their own Action list. Generally, changes made in your Action list do not affect others Action lists. Scenario: You log on in the morning. There are a lot of tasks listed in your Action list and you are not sure what to work on first. An Action list may include: • • • Engagements that can be worked on at a later date, Engagements in which you are waiting for someone else to complete their portion of the work, and Engagements that require immediate work. 4 Scenario: You think there are some Engagements that do not need to be worked on right away, but you are not sure. When you have looked at the dates, you realize that some can be done later.. In the Home window: Click on the Critical Date or T Date (target date) column header to sort the Engagements by date (clicking on any column header will sort that column in a logical order with the highlighted items always at the top). Right click on an Engagement that doesn’t need to be done for some time and select Schedule in the drop down menu. 5 In the Schedule window: Select the Date on which you want the Engagement to reappear in your Action list. Enter the number of Hours you expect to work on the Engagement (Page will default to 1.00 hour). It is recommended that you provide a reason as to why you are scheduling this Engagement. Click Save. Engagements that have been Scheduled move from the Action list to the Schedule list. In the Home window, click on the Scheduled button, next to the Action button to see the Scheduled list. Engagements that are near their target date cannot be moved to the Scheduled list. Scheduled Engagements will automatically move back to the Action list on the date you selected when you scheduled them. If you want to return an Engagement to your Action list before the Scheduled date, right click on the item and click Cancel Schedule. 6 Scenario: There are some Engagements that you cannot work on until someone else completes their portion of the work. Fiona needs to complete the work for one of John Smith Ltd.'s Engagements before you can review them. In the Home window: Right click on the task you will not be working on until someone else has done their part. Select Pend in the drop down menu. In the Pend Engagement box click No. The message in the box reminds you that Pend should only be used if you have sent the Engagement to someone else and are waiting for a reply. 7 Click on the Pending button next to the Action button to see the Pending list. Since Pended Engagements do not return to your Action list on a select date, but are intended to be returned to your Action list when someone sends you a note indicating that their work is done, the Pending list should be checked regularly for work that has been overlooked. Engagements will automatically be returned to your Action list when the target date has been reached. If you want to return an Engagement to your Action list before the target date, right click on it and click Un-pend. 8 Scenario: You have reduced the number of Engagements that require immediate work. You need to evaluate the rest before you begin working. E t th t t k til l l t th i For a quick evaluation of the remaining Engagements, click on the Engagement and hold your cursor over the Description column to see the last few notes in the Note section. Scenario: The notes indicate that: • You no longer have any work to do in the John Smith Ltd, Bookkeeping Engagement; • Fiona needs to work on John Smith’s, Process Review before you can review it; and • John Smith’s HST Engagement should have been done already. 9 In the Home window, right click on the Engagement for the options menu: For the Payroll – July 2012 Engagement, select Remove (this option will be available only if you were not one of the staff members assigned to this Engagement or if it has been invoiced). For the T1-Process Review Engagement, select Cancel Notify to remove the green highlighting and Pend to move it to your Pending list until Fiona sends it to you for Review. For the HST - Annual 2011 Engagement, select Importance and then High to add an Importance Icon. Your Action list can include Engagements with: • • • • • Blue Font and a Red Folders indicating they are past their due date or critical date (dates can be changed inside the Engagement), Bold Font indicating there is an unread message inside the Engagement (bold font is cleared from inside the Engagement by clicking on the note), Green Highlighting indicating you have been notified about these and have not yet cancelled the notification, Importance Icon indicating work that is a high, low or rush priority, and Blue Folder indicating that it has been sent for Review. The Reference Guide gives you a quick summary of the meaning of these and other Engagement features. We’ve looked at Engagements in Action lists, Scheduled lists, and Pending lists. Each of these lists are based on the work load of individual staff members. These are the same tasks that are listed in various staff members’ Action lists The Client All list shows all the current Engagements for the client you have selected. On the Client All page you will also see detailed information regarding their accounts receivable and work in process as well as access to the client information section. 10 Finding Client Information Scenario: John Smith Ltd.’s bookkeeper has called with information for the Notice of Objection task and to change the mailing address. Since the Notice of Objection task is not in your Action list, you need to look in the Client All list. In the Home window: Select John Smith Ltd. in the Client drop down menu (to choose a client by their number instead of name, uncheck the ‘By Name’ box to the right of the drop down), OR Click on an Engagement for John Smith Ltd. in your Action list, and click on the Client All button. Click on the Client Information button (this button is also available inside an Engagement) to open the Client Information window and type in a new mailing address. 11 ENGAGEMENT WINDOW Setting Up a Quick Engagement Engagements can be set up for tasks as basic as preparing a letter, or as complex as completing an audit. New Engagements can be set up as needed. Scenario: John Smith Ltd. has asked the firm to prepare an ROE foe their employee, I.M. Dunn. It is expected to take .5 hours to d the work. In the Home window: Select John Smith Ltd. from the Client drop down box. Click on the Engagement button (also know as the Quick Engagement button). 12 In the Quick Engagement window: Enter a brief Description of the work: ROE - Dunn. Beginning the description with the main category to which the work belongs, ROE, makes it easier to find later, in alphabetized lists. Select the Services code: 100 < Bookkeeping> for the ROE. Set the Critical Date by which the task is to be done. Select the Staff member to do the task and assign the Hours it is expected to take. Minutes are listed as fractions of the hour (30 minutes are .5 hours). The search button allows advanced search of staff members by name or position. Click Create. When the Send as Work on Save check box is selected, the Submit To window will open. You do not have to use this option to create an Engagement; however it will allow you the opportunity to add details to the Engagement during the set up process. 13 In the Submit To window: Select the Primary staff member to whom to send the work. Add a Note about the work. In addition to giving the information provided by the client, to the staff member, the note could provide specific instructions about the work required. Click Submit. 14 The Engagement for ROE-Dunn now shows up in the selected staff’s Action lists: • • with Bold font and highlighted in Green in the Action list of the Staff selected as the primary, and highlighted in Green in the Action list of the other Staff selected. A task can be in several Action lists at the same time. REMEMBER • • • An Engagement displayed with Green highlighting indicates that someone has ‘notified’ you about that task. An Engagement displayed in Bold font, alerts you to an unread message related to that task. An Engagement displayed in Blue font, indicates that the due date for completing that particular task is near or has passed. Each Engagement in a list is a doorway to all the information about that particular task. Double click on the ROE - Dunn Engagement for John Smith Ltd. to open the Engagement Window. The Engagement Window is your main work space for the task. Engagements can be accessed from your lists or from the Client All screen. 15 Linking Documents and Programs The WIP (work in progress) tab opens the space where documents and programs, needed for this work, can be linked. Scenario: John Smith Ltd. gave you I. M. Dunn’s payroll records for the last 12 months. You have scanned copies of the records. You also want to create a spreadsheet summary of I. M. Dunn’s payroll records. 16 To link in the scanned records from your folders: Click on the Paperclip. This is your main linking tool. Clicking on this tool gives you access to the shared files stored on your server. Select the payroll records and press the ‘open’ button, to place a link to this information in the WIP workspace. To delete an incorrect link, select the linked document and click on the X. To create a blank an Excel Spreadsheet click on the Spreadsheet button, the Name Year Input window will open. In the File Name window Enter the File Name, Roe Summary. Check the Year. 17 When you press Submit, a new spreadsheet will open. It will be saved and linked into the WIP work space of your current Engagement. The Word button above the Spreadsheet button works the same way. To create an Excel or Word document or spreadsheet from a template, right mouse on the Spreadsheet button and choose from your existing templates. Finding Client Information While In an Engagement Scenario: You need John Smith Ltd.’s address for the ROE. Click on the Client Information button to open the Client Information window. In the Client Information window, the company Address is available in the Main section. 18 If you right mouse in the address widow, you will have the option to copy the address then paste where you need it. Click on Close to go back to your previous window. 19 Setting Engagement Importance Scenario: Since John Smith is out of town for a while, his Short YE Engagement is not as urgent as initially thought. He will not be back for at least a month. In the Engagement window: Right click on the Folder icon and change the Importance level to Normal. This action changes it for your view only. Move the Critical Date and then the Target Date forward (only some staff have permission for this). The Target date can never be later than the Critical date. While in the Engagement, click on the Bold font note to remove the bold, indicating that it has been read and append a note as to why you have changed the ‘importance’ level. Moving forward the dates of overdue Engagements and removing the Bold, changes the Blue and Bold font of Engagements in the Home window. 20 Accessing Applications Scenario: While in the John Smith Ltd.’s Short YE Engagement you need to access CRA’s website to obtain a current list of the installment payment recorded on this account. The Applications section of the Engagement window is a place to go for shortcuts to key programs, websites and application used in your daily work. Look here for the site or program you need. You may need to right click on the button for the choice of a specific version. These links will be the same in every Engagement for your firm and will allow you to continue recording time to an Engagement while completing work outside of Page. These nine buttons can be updated and or changed by the system administrator. From inside the John Smith Ltd. short YE Engagement, click on the CRA Application button. This will launch the CRA website and allow you to utilize the Represent a client as you would normally. Once on the installment page, Print what you need to PDF and then save it in the client’s folders. The document should then be linked to the Engagement. 21 Linking Documents and Programs We discovered earlier training that the WIP (work in progress), Sent, and Received spaces are where the files needed for the task can be linked. Scenario: You linked a document under the Received tab, but since it should actually be in the WIP tab, you need to move it. To move a file from one of the three workspaces to a different one, select it and with your left mouse button held down, drag and drop it into the tab for the other workspace. To create a custom tab, select an item from one of the three workspaces and drag and drop it into the custom tab. The system with prompt you to name this new custom tab. Once you have named it, the item will be linked in the custom area – it will also remain in one of the three standard workspaces. Items can not be linked directly into the custom tabs; they must exist in one of the three workspaces first, but can be brought into the custom tabs after. The placement of items in the custom tabs can be sorted by right clicking on the item and choosing a move option. 22 Linking items from your previous system Scenario: You want to link a document from the file system you used before you switched to Page. Right click on the Paperclip button to open the Copy from Old Folders window. All the documents and sub folders contained in the old folder are displayed in the window. Both documents and Software Program data, can be linked from your old folder system All the documents and sub folders contained in the old folders are displayed in the window. Pink highlight indicates link to a folder. Linking data from software programs, like your Financial Statement or Bookkeeping software, involves an additional step. Before you can finish linking the data, you will be presented with the various programs in your system. Select the one that operates the data you are linking. 23 In the Copy from Old Folders window: Select the file you wish to link (if you want to link documents from other folders, click on the Browse From button to open the Browse for Folder window and find the folder that contains your file. The name of the chosen document will fill the File Name box. The Document Description box will display the folder, in the new file system, where the document will be saved. The Link Engagements section displays the Engagement that document will be linked to, and the tab it will be linked under. Upon linking the selected file is copied to the new file system by default. To move the file instead of copy you will check off the Move file instead of Copy checkbox. Click Save. Save another document, or Close. 24 Scenario: You need to draft an Engagement letter for the Short YE Compilation for John Smith Ltd. Your firm has a standard letter that can be utilized rather than retyping the letter. Right clicking on the Word Document or Excel Document buttons and selecting From Template opens the VohCom Page Templates window. In the Templates window: Select the Template Category, Standard. In the Template list, click on the template you want to use. You may not have the templates listed here since these will be unique for each firm. Confirm the File Name. Click Submit. This process will open up a new Word or Excel Document which will then be linked to the Engagement and saved in your server file system. In addition to linking documents and data, Engagements can also be crosslinked, that is linked into another Engagement. 25 Communicating Internally About Your Task The left side of the Engagement window contains the Notes Section. This section is for communication within your office, about this task. The note from the Engagement Setup is entered automatically when the Engagement is created. The date and time of a note shows at the top of the note. Scenario: While going through the payroll records you scanned that were provided by the client, you realize that there is an error on the second page. You want to make a note of this so it won’t be forgotten and so it is visible to all staff members who look at this file. On the lower left of the Engagement window, the Append button opens the Append Note window. In the Append Note window: Enter the Note about the second page. Check off the Reference Files check box so you can point to the document with the previous year’s page. 26 In the listing of All Files that opens below the note section, select the Payroll Records document. These are all the files that have been linked to this task. Selecting one or more of the files, before you save your note, connects that file to the note. Click Save. The Appended Note is now in the notes section. Anyone who opens this Engagement will be able to see it. 27 In the Engagement window: When you click on the note, the file that was Referenced shows in the Item(s) Linked to Note display window. 28 Scenario: You have completed the spreadsheet summary and are going to send it to the reviewer. In the Engagement window, click on the Review button to open the Submit To window. The Work button functions in the same way as the Review button, except that using the review button causes the folder to change to blue. In the Submit To window: Select your reviewer from the Primary list. Add a Note in the note section. Check off the Reference Files check box. The Reference listings for the Review and Work buttons work much like the listing for the Append button, except that they open to the right of the Submit To section. They look similar to the right side of the Engagement window. Selecting the Summary of Payroll spreadsheet will make it show up in the Note Selection display, while remaining linked in the WIP workspace. 29 Scenario: John Smith Ltd. provided a bag full of disorganized records for their Short YE Engagement. It is your firm’s policy to include details of extra charges on your invoices. In John Smith Ltd.’s 2008 YE Engagement, click on the Append button. In the Append Note window: Enter your Note. Check off the Public Billing Note check box. Click Save. This note will be available to insert into an invoice. The Private Billing Note is to provide information to those making billing decisions, but will not be available for easy insertion into an invoice. 30 Scenario: You’ve added the billing note, but you can’t find it in the Notes Section. You would like to clean up your Notes section. To hide some of the unnecessary notes, right click on the center bar to bring up the Note Detail options. There are eight display options for notes, including Essential Notes and Public Billing Notes Only. Choosing a display method changes your personal note view only, not those of other staff. 31 To clear bold notes that are addressed to you, read the notes and then click on them. To reinstate the bold, right click on the note and select Mark as UnRead. The bold notes can be seen by all staff. 32 The Salmon Coloured Bar at the top of a note turns green when it has been Approved. Right clicking on the bar brings up the Approval menu for the person with Approval permissions. Notes cannot be UnApproved. Using Approve + Work will mark your initials and send to whoever you select, it will also allow you to put a note in. 33 To understand more about the various colours used with the notes, look at the Reference Guide. 34 Scenario: In John Smith Ltd.'s, 2008 YE Engagement, you have sent several notes to Fiona about the work to be done, and you have sent a couple of notes to Ada about a call to CRA. With notes being added chronologically, how will you know which note is connected to which work assignment. To create a Note Chain, or Conversation, where one note is connected to another note, click the original note before creating a new note. This is similar to replying to an E-mail. To sort out the notes that are part of the same chain, double click on a note in the conversation. Only the related notes will show. Click the Back button to return to the main Note display. 35 Communicating Externally About Your Task Scenario: You realize that you are missing I. M. Dunn’s Social Insurance Number. You send Mr. Smith an E-mail requesting the information. In the Engagement window, click on the Send E-mail button. In the E-mail Instructions window: If the E-mail address you are using is in the List generated from the Client Information window, Double click the address to populate it in the To field. Otherwise to enter the email address in TO and CC fields: click on the To Arrow to enter the selected E-mail address, or type in a new address. Click on Save to open up a new E-mail in your E-mail program. The newly opened E-mail will include: The E-mail address entered in the E-mail Instructions window. 36 Your individual pre-set information. A line of seemingly meaningless characters, known as an E-mail String. These characters contain code that identify, to the Page program, the Engagement to which the E-mail is connected. The string includes instructions to the recipient, not to delete it. An E-mail that is returned with an E-mail String attached can be saved in the same way as one that is sent with this string. Enter your request for I. M. Dunn’s SIN number. To save and send the E-mail click on the Save E-mail icon to open the Save E-mail macro. Depending on your company setup, you may need to press the Enable Macro button. The Macro only needs to be enabled once after each time you open a new Outlook session, generally at the beginning of the day. 37 In the Save E-mail window: Check to see that John Smith Ltd. is selected in the Save to Client dropdown box. If your E-mail does not have an E-mail string, you need to select a client. Select the Entire Message option for saving. Enter a File Name following standard file naming conventions. This E-mail could be called To John Smith requesting Dunn SIN Check to see that the Link Engagements for selected client is filled in. The Link box should be checked off, the Sent bullet selected and the ROE - Dunn Engagement selected. Without an E-mail String, this information can be entered manually. The drop down menu will list the available Engagements. Click Save Click Append type a comment to describe what has happened “sent an email to request the SIN for Dunn” as noted below. 38 Click Close. The E-mail will not be sent until you click close; some firms will have to “Allow” the email to be sent as well depending on their system security. The E-mail will be linked in the ROE - Dunn Engagement under the Sent tab. If John Smith provides the requested SIN information using the reply option in his email, the client and Engagement will automatically be selected when you save his response. Like the WIP tab, the Sent and Received tabs open spaces for linking work. While the primary purpose of the Sent and Received spaces is to link documents related to external communication, any document can be linked in any one of these three spaces. 39 Scenario: The bookkeeper for John Smith Ltd. wants to be E-mailed a copy of I. M. Dunn’s payroll information. She needs access to it right away. In John Smith Ltd.'s ROE Engagement, right click on the Summary of Payroll document and select Send To. This opens the Save E-mail window, and also attaches the selected document to the E-mail. This option also works when several documents are selected at once, using your Control or Shift buttons on your keyboard. Follow the procedures you learned earlier to send this email. 40 Using Quick Engagements with Phone Calls Scenario: Smith has just called you. You do not know the reason. In the Client drop down menu, choose Smith, John and click on the Engagement button to open the Quick Engagement window. It is recommended that you do this at the beginning of the call. In the Quick Engagement window: Enter information in the Notes box either during the call, or immediately thereafter. When the call is finished: Fill in the information to create a new Engagement. The time and notes will automatically be added to this Engagement, OR Use the Add the Time and Notes to an Existing Engagement drop down menu to choose an Engagement for the notes, OR Copy the information using your keyboard shortcuts (Ctrl C) and paste it elsewhere, OR Cancel the Quick Engagement and delete the information. 41 Utilizing the Recent Engagements List Scenario: You forget what you were working on before all the phone calls. The Window menu in the top bar opens a list of the last twenty Engagements opened in the current Page session. Selecting one of these opens the Engagement in a separate window, leaving the home window open. Using this menu option, you can open several Engagements at the same time. Time will be tracked in the active Engagement only. 42 Scenario: You want to link John Smith’s 2009 YE Engagement into the 2008 Engagement. Assuming that you have opened the 2008 YE Engagement at some time during the day: In the Window menu, select the 2008 YE Engagement, and move it to one side on your desktop (it cannot be at maximum size). In the Home window, display the Client All list for John Smith Ltd. Drag the 2009 YE Engagement from the Client All list and drop it into the work space in the 2008 YE Engagement. Engagements that have been sent to history can also be linked to other Engagements. While inside an Engagement Select the History tab, choose history, and then click on the Engagement you want to attach. To attach a link to this history Engagement in your current Engagement Simply drag and drop it into the WIP tab. 43 TIME SHEET Tracking Time As soon as Page is opened, the program starts tracking time. The Timer is visible in the top bar of both the Home window and the Engagement window. Open your Time Sheet through the Time & Billing menu. 44 Finalizing Your Time Sheet The Time Sheet lists the time that was recorded in the windows you opened during the day. If your time was accumulating while you were working in an Engagement, the time entry will include the Name of the client and the Engagement/Task in which you did the work. If the time was recorded while you were outside an Engagement, as in when the Home window was open, a Name will be listed, but no Engagement/Task. If the entry is highlighted in orange, it will need to be cleared before the Time Sheet is complete. Some of Page’s features are not available if there are still ’orange’ entries. One way to clear orange highlights is to assign a Services code and provide an explanation for the time entry. 45 Scenario: The time spent in Home Company Inc. was actually about 15 minutes. It was for getting coffee, checking E-mails, etc. In the Time Sheet: Select the unassigned entry for Home Company Inc. Enter the non-billable service code for <Office Miscellaneous>, in the Services box. Unchecking the Desc or Code check box beneath the Services box gives you a drop down menu of available service codes. Enter the explanation, getting coffee, checking emails, etc., in the Billing Message Only box. Check the Hours. Enter .25 for this entry. Time is recorded as a fraction of an hour (30 minutes is recorded as .50, 15 minutes is .25). Click Save. Another way to clear orange highlights is to assign the time to an existing Engagement. 46 Scenario: The time spent for John Smith Ltd. was actually for his HST - Annual 2010 Engagement. In the Time Sheet: Select the unassigned Smith, John, entry. Click on the Engagement drop down menu and select the HST - Annual 2010 Engagement. The associated Services code will automatically show in the Services box. Check the Hours. Click Save. A third way to clear orange highlights is to merge the time with existing time. This can be done even if the time is not highlighted. 47 Scenario: The time spent for John Smith Ltd. should be added to the ROE - Dunn Engagement. In the Time Sheet: Select the unassigned John Smith Ltd. entry. Holding your left mouse button down, drag the time entry onto another time entry and let go. In the Merge window that opens, click Yes. A final way to clear orange highlighted time entries is to select them and press the Delete button. 48 The total Hours on a completed Time Sheet should equal the total hours worked during the day. To see an overview of your time for any given period, select a beginning and an ending date in the boxes below the Report button and click on the Report button. Just as it is a good practice to log on to Page at the beginning of your work day, it is a good practice to exit Page at the end of your work day through your Time Sheet window. Click on the Exit button to close your Time Sheet and log out of Page. If you choose the Close button instead of the Exit button, you will return to the Home window and continue recording time. 49 In review - your timesheets will include Time entries that were recorded while working in an Engagement will include the client Name and the Engagement/Task. • • • Time can accumulate outside of an Engagement. Some of this time will be attached to the default non-billable client and some will automatically be attached to the client as ‘suspended’ WIP. All entries highlighted in orange are unassigned and need to be manually cleared. Using the close button returns you to the Home window where time continues to be added. Using the Exit button closes Page. Green highlights indicate that an Engagement has been fully invoiced. This could have happened during the day, after you worked on it. Blue highlights indicate that an Engagement has been invoiced only part way, it has not been approved. This also could have happened during the day, after you worked on it. You cannot delete these Engagements, but you can adjust the Hours and click Save. Changing the hours does not change the amount of the invoice; however, it will change the write up or write down connected to the invoice. In the Time Sheet window, use the Date drop down menu to view Time Sheets from a previous date. You cannot select a date prior to the Cut Off date. Use your reports function to view time sheets from an earlier date. 50