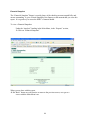
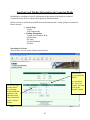
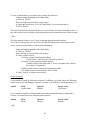
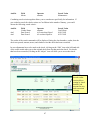
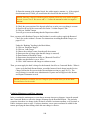
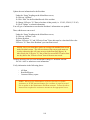
1
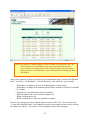
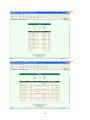
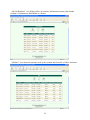
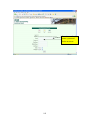
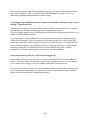
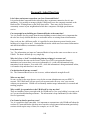
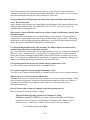
Updating your HDFC’s information using the Balance Sheet
Periodically, you will need to update the Balance Sheet, in order to update your building’s
Saving Account(s) balance(s), and at the end of the year for tax preparation purposes.
After the first time the Balance Sheet is created, each new Balance Sheet will have the original
values for each Asset and Liability itemization appear automatically, for your convenience. You
do not need to change those values unless, of course, the values have changed since the last
created Balance Sheet.
To create a Balance Sheet to update your Savings Account balance,
Under the “Analysis” heading in the Main Menu, in the “Reports” section,
Æ Click on “Balance Sheet”
Æ Click on “Balance Sheet” icon to add a Balance sheet.
Æ Enter the “Period Ending Date.” This should match your Bank Statement ending date.
Æ Click on the “Continue” button to proceed.
Æ Enter the updated balance for each Savings Account
Æ Enter information as necessary for Assets: Building; Building Depreciation; Land
(Remember, if the pre-filled value appears correct, you can leave the pre-filled value. If
the value needs updating, enter the updated values)
Æ Enter information as necessary for Liabilities: Loans Payable; Paid in Capital;
Common Stock (Remember, if the pre-filled value appears correct, you can leave the prefilled value. If the value needs updating, enter the updated values)
Æ Click “View Report” to create the Balance Sheet
To view the Balance Sheet Report,
Under the “Analysis” heading in the Main Menu, in the “Reports” section,
Æ Click on “Balance Sheet”
Æ Click on “Report” of the Balance Sheet that you wish to view. Balance sheets are
displayed according to the Date it was created, and the Period Ending Date.
When you are done with the report,
Æ Hit “Back” button on web browser to return to the previous screen, or to get to a
screen with the Main Menu icon.
83
Financial Snapshot
The “Financial Snapshot” Report is a quick glance of the checking account, unpaid bills, and
arrears outstanding. It gives a literal snapshot of the finances at the moment that you view this
report. It is a good way to assess the HDFC’s financial health.
To view a Financial Snapshot:
Under the “Analysis” heading in the Main Menu, in the “Reports” section,
Æ Click on “Financial Snapshot”
When you are done with the report,
Æ Hit “Back” button on web browser to return to the previous screen, or to get to a
screen with the Main Menu icon.
84
Searching and Finding Information in Connected Books
In addition to searching for specific information in the reports of the Analysis section of
Connected Books, there are other search options to find information.
In this sections we will look at the different search functions and viewing options in Connected
Books in detail.
• Search Page
-Checks
-Cash Transactions
• Finding Information
-Current Unit/ Resident/ Rent
-All Residents
-All Units
-All Unit Residents
-All Rent
Searching for Checks
There are two ways to use the Checks Search feature:
There are two
way to search for
checks.
You can check
the “View All
Checks” box and
click on the
“Search” button.
Or, you can enter
search criteria
(by choosing
search fields and
operators, and
entering search
values) and click
on the “Search”
button.
85
To view all transactions ever posted to this account, check the box:
Under the Banking heading on the Main Menu:
Æ Click on “Checks”
This will bring you to the Checks Search page
Æ Check the box labeled “View All Transactions” (see screen shot above)
Æ Click “Search”
This will yield search results that will show every check that is associated with this account. It
may take several screens to display, depending on how many transactions exist for the account.
--OR-The other method to find or view Checks is through using the Search functions.
To use the search criterion, you can choose search fields and operators, and enter in search
values, and join search clauses to find specific information.
Under the Banking heading on the Main Menu:
Æ Click on “Checks”
This will bring you to the Checks Search page
Æ Choose Search criteria:
Æ Choose a search field from the options:
Check Number, Date Posted, Vendor Name, Memo
Æ Choose a search operator from the options:
Contains, Begins with, Ends with, Is, Is not, Less than/ equal, Greater
than/ equal, is contained in
Æ Enter search values to specify the information to find
Æ Combine search criteria using the And/ Or field
Æ Click “Search” to submit search criteria
Search Examples
If you wished to search for all checks written to Con Edison, you would choose the following
search criteria (note that using the Operator “contains” will yield more results than using “is”):
And/Or
Field
Vendor Name
Operator
contains
Search Value
Con Edison
If you wished to search for all checks that were written towards the Repairs/ Maintenance
account, you would choose the following search criteria:
And/Or
Field
Memo
Operator
contains
Search Value
Repairs
--OR--
86
And/Or
Field
Memo
Operator
contains
Search Value
Maintenance
Combining search criteria together allows you to search more specifically for information. If
you wished to search for checks written to Con Edison in the month of January, you would
choose the following search criteria:
And/Or
And
And
Field
Vendor Name
Date Posted
Date Posted
Operator
contains
is Greater than/ Equal
is Less than/ Equal to
Search Value
Con Edison
01/01/2005
01/31/2005
The results of the search commands will be displayed, listing the check number, vendor, date the
check was posted, amount, memo, and whether or not the check has been reconciled.
In case adjustments have to be made to the check, clicking on the “Edit” icon at the left hand side
of the search results takes you to the original check form for that particular check. For checks
that have been reconciled, clicking on the “Adjust” icon will allow you to access that check.
The Checks
Search results
section allows
sorting by check
number, and
amount for easy
and convenient
viewing.
87
Sorting Search Results
The Search results can be sorted for convenient viewing, by clicking on the options on the top
right hand corner.
You can choose to have checks sorted by number, by clicking Number “Up” or “Down” to view
increasing or decreasing check numbers. You can also choose sorting by check amount, by
clicking Amount “Up” or “Down” to view increasing or decreasing amount values.
88
Searching for Cash Transactions
The All Cash Transactions feature allows you to search for disbursements and credits to the
account. There are two ways to view the All Cash Transactions feature.
To view all transactions ever posted to this account, check the box:
Under the Banking heading on the Main Menu:
Æ Click on All Cash Transactions
Æ Check the box labeled “View All Transactions” (see screen shot above)
Æ Click “Search”
This will yield search results that will show every transaction in this account. It may take several
screens to display, depending on how many transactions exist for the account.
--OR-The other method to view All Cash Transactions is through using the Search functions.
89
To use the search criterion, you can choose search fields and operators, and enter in search
values, and join search clauses to find specific information.
Under the Banking heading on the Main Menu:
Æ Click on All Cash Transactions
Æ Choose Search criteria:
Æ Choose a search field from the options:
Check Number, Date Posted, Vendor Name, Memo, Resident Last Name
Æ Choose a search operator from the options:
Contains, Begins with, Ends with, Is, Is not, Less than/ equal, Greater
than/ equal, is contained in
Æ Enter search values to specify the information to find
Æ Combine search criteria using the And/ Or field
Æ Click “Search” to submit search criteria
Search Examples
If you wished to search for all payment made from a resident named Smith (which would show
up in Connected Books as a deposit from the Resident), you would choose the following search
criteria (note that using the Operator “contains” will yield more results than using “is”):
And/Or
Field
Resident Last Name
Operator
contains
Search Value
Smith
If you wished to search for all checks that are void, you would choose the following search
criteria:
And/Or
Field
Memo
Operator
contains
Search Value
VOID
Combining search criteria together allows you to search more specifically for information. If
you wished to search for payments written from Resident Smith in the month of January, you
would choose the following search criteria:
And/Or
And
And
Field
Resident Last Name
Date Posted
Date Posted
Operator
contains
is Greater than/ Equal
is Less than/ Equal to
90
Search Value
Smith
01/01/2005
01/31/2005
The Search Results with give you information about:
the Bank Account associated with the transaction;
Posting Date the transaction was posted;
Type of transaction (whether it is a Deposit or a Check);
Check number (if there is one);
Vendor/ Payer,
Amount of the transaction,
Memo description,
and whether or not the transaction was Reconciled.
Clicking on the “Edit” icon at the left hand side of the transaction listings takes you to the
original check or deposit form for that particular transaction.
Clicking on the “Search” icon from the Results page takes you to the Search form.
91
Searching through Resident or Unit Information
Once the Tenant and Rent Roll information have been set-up (for more information on setting up
your account, see pages 19 – 29), there are several ways to look at the Resident and Unit
information. These include:
Current Unit/ Resident/ Rent
And four other views:
-All Units
-All Residents
-All Unit Residents
-All Rent
When tenant and rent roll information is set up, Connected Books copies this information into
the four other views. Since the tenant and rent roll information is now in two places, it is
necessary to be sensitive to how edits and updates are made.
These views exist to allow users to view the same information in various ways. For example, if
you wanted just to know if residents are Maintenance Shareholders or Renters, and when each
person moved in, you could go to the “All Residents” view and click on the link to view that
information.
Editing Resident Information
It is important to keep in mind that when making changes to or updating Tenant Information or
Rent Roll Information, you should never make changes or “Edit” without checking the User
Manual or checking in with a UHAB Staff Member.
When a change is made in one of the four “All” views, the change may not be effective until it is
verified in the “Current” views. Unfortunately, there is no definitive section in which you should
“Edit” tenant and rent roll information, and making a change to one section does not guarantee
that the update is effective; this is due to the fact that the information has been copied into the
other sections, allowing you to search and find information.
In cases where there is a Rent Increase in the building, or if a Resident is moving from one
apartment Unit to another, there are specific commands and instructions to add that information
into Connected Books. Those commands can be found in the “Miscellaneous Scenarios” section
on page 110.
NOTE: Edits or changes to tenant or rent roll information must be made in the
“Setup” section of Connected Books in a specific way. To ensure that the
information gets copied over properly from that section into the other views, call the
UHAB Staff and/or check the User Manual carefully before making changes in the
“Current Unit/ Resident/ Rent”; “All Units”; “All Residents”; “All Unit Residents”;
and “All Rents” views. DO NOT edit or make changes to tenant or rent roll
information by yourself.
92
NOTE: Be cautious of making changes to these sections after the initial set-up. Do
NOT edit the arrears information or the rent charge information in this
section without consulting UHAB staff; Changes in this section may affect
other sections of Connected Books, such as the Month-End Closing and Rent
Roll Report.
Some of the scenarios in which you will need to edit information in the “Current Unit/ Resident/
Rent”; “All Units”; “All Residents”; “All Unit Residents”; and “All Rents” views include:
- When there is a change or increase in the Maintenance or Rent charge;
- When there is a change in the amounts paid by Public Assistance or Section 8 on behalf
of a resident;
- When Room Count information needs to be added;
- When the name on the stock certificate changes over;
- When a resident moves out;
- When a resident moves from one apartment to another.
In these cases, changes need to be made in specific sections of the “All” views, and not to the
“Current Unit/ Resident/ Rent” view, although you need to look in that section to make sure that
the update was effective. The various views are displayed on the following pages.
93
The “All Units” view displays the apartment or unit information, including Room Count.
The “All Residents” view displays the tenant information, including contact information.
94
“All Unit Residents” view displays Move in/out dates, Maintenance amount, and whether
resident is a Maintenance Shareholder or a Renter.
“All Rents” view shows the amounts owed by the resident and Section 8 or Public Assistance.
95
96
MISCELLANEOUS SCENARIOS
Using the Bills features
Basically, using the Bills section ensures that Connected Books will give you reminders for bills
that are entered into the system.
How do I enter a check for the bills that I have entered?
You do not need to enter a separate check if a bill has already been entered into the
system. Once you use the “Pay Bill” option, this automatically places the check into the
Checks section of Connected Books.
What is the difference between adding a check and a bill in Connected Books?
In Connected Books, paying a bill and writing a check effectively do the same thing; it
adds the check into the Checks section. The advantage of using the bills feature to add a
check is the reminders that you see when you log into your account.
Entering an Electronic Debit or an Electronic Funds Transfer
Under the “Banking” heading in the Main Menu
Æ Click on “Checks”
Æ Click on “Add Check”
Use the “Check Maintenance Form” to enter in check information
Æ Choose a vendor from the pull-down menu
Æ Enter the check number, but change the number to a sequence that is outside of your
check sequence. For example, you can start with # 0001 or 0002.
NOTE: When entering an electronic debit, it is important to change the check number
to a sequence that is outside the sequence or order of your checks. The idea is to add a
check but make sure that the regular sequence of check numbers is not interrupted.
Æ Enter the date, amount, and memo of the electronic transaction.
Æ Enter account information in the grey table. Account information should appear
automatically for vendors that have been entered. Enter amount and memo.
Æ Click on “Submit” button
You will get a screen confirming that the Check was added.
The next time you add a check, Connected Books will pick up the check number according to the
last check that was entered. To return to the regular sequence of check numbers, change the
check number accordingly on the next check.
When there is another electronic debit to enter into Connected Books, you can use the “sort”
options in the Checks section to determine what the last electronic check number was (see pages
99-102 on Searching for Checks)
97
Voiding a check
You can add a vendor called “VOID” to the Vendor List (especially if you do not want to leave
the vendor name as is on a voided check).
Under the “Set-up” heading on the Main Menu screen,
Æ Click on “Vendor”
Æ Click on “Add Vendor” icon at the top of the screen
Æ In the field that says “Company Name” enter VOID
Æ Scroll down to the field that says “Expense Account”
Æ Choose “Other Expenses”
Æ Write “Voided Check” in the Comments box
Æ Click on the “Add” button to submit this vendor.
Now, you can return to the Main Menu and proceed. When you need to add a Voided check, you
can now choose “VOID” on the vendor list.
Locate the check that’s to be voided (you can refer to the Search commands on pages 99 -102).
Æ Click on “Checks” section to bring you to the Checks Search page and locate the
check to be voided.
Æ Click on the “Edit” icon, to view the original Check Maintenance Form.
Æ On the Check Maintenance Form, leave the “Vendor” and “Date” information as is.
(*Note: you can add a vendor called “VOID” using the directions above)
Æ Change the check “Amount” to “0.00”
Æ In the “Memo” field, enter “VOID”
Æ Make sure the account splits section beneath the Check Form has a “0.00” amount.
Æ Click “Update” to submit the voided check.
Entering a Bounced Check
There are two scenarios which will be detailed in this section,
1- when the building writes a check that bounces (that is, a check that is written out of
the building’s expense account)
2- when a resident writes a check (i.e. for maintenance or rent) and the check (that is, a
check that is income to the building) bounces after the deposit was made
Scenario 1: How to add a check written from the building’s account when it bounces.
This is the scenario when the building writes a check that bounces due to insufficient funds.
If it is not already done, add the original check in the “Checks” section under the “Banking”
heading on the Main Menu screen (for instructions on entering checks, see pages 34-35).
Then, you will need to negate the original check by adding another check, with the
negative dollar amount of the original check.
Under the “Banking” heading on the Main Menu screen,
Æ Click on “Checks”
98
Æ Click on “Add Check”
Æ First, choose the vendor from the pull-down menu,
Æ Enter the date and memo.
Æ For the check number, add a number that deviates from the regular check number
sequence (see section on adding electronic debits for the reasons why this is important).
Æ Enter the amount of the original check, but with a negative amount, i.e., if the original
check amount was $24.00, you would enter this check with the amount $-24.00.
NOTE: Entering a check with the negative amount effectively zeros out the original
check. Be sure to add a “-” before the amount to make it a negative amount.
Æ Enter account information in the grey table. Account information should appear
automatically for vendors that have been entered. Enter amount and memo.
Æ Click on “Submit” button
You will get a screen confirming that the Check was added.
When it is time to do the Bank Reconciliation, you need to record the Bank’s bounced check
charge into the Service Charge field in the Reconciliation section (see page 49-51). The
service charge is recorded as an Administrative Expense and will appear in the Income
and Expense Statement as such.
NOTE: Remember to add the Service Charge to your account when you do the Bank
Reconciliation for the month.
Scenario 2: How to add a resident payment check that was deposited but has bounced
You may encounter a scenario when a resident writes a check for maintenance or rent and the
check bounces after the deposit was made at the bank.
If it is not already done, add the original deposit in the “Deposits” section under the “Banking”
heading on the Main Menu (for instructions on entering deposits, see pages 36-42).
Then, you will need to negate the original deposit by adding a deposit with the negative dollar
amount of the original income check.
Under the “Banking” heading on the Main Menu screen,
Æ Click on “Deposits”
Æ Click on “Add Deposit” which will load the “Deposit Maintenance” screen
Æ Enter the date of the bounced check.
Æ Enter a memo, i.e. “Bounced check”
Æ Enter the total amount in the total deposit ticket box (this should be the negative
amount)
Æ Choose the resident from the pull-down menu
Æ Enter a memo
99
Æ Enter the amount of the original check, but with a negative amount, i.e., if the original
check amount was $350.00, you would enter this check with the amount $-350.00
NOTE: Entering a deposit with the negative amount effectively zeros out the original
deposit/ income check. Be sure to add a “-“ before the amount to make it a negative
amount.
Æ Check the green portion of the deposit splits box to make sure everything is accurate.
Æ Scroll to the top of the screen and click on the “Validate Deposit” link
Æ Click on “Submit” button
You will get a screen confirming that the Deposit was added.
Next, you must add a Resident Charge to the Resident’s record in order to apply the Bounced
Check fees to the resident’s account. For instructions on adding Resident Charges, see
pages 43-44.
Under the “Banking” heading in the Main Menu,
Æ Click on “Resident Charges”
Æ Click on “Add Charge”
Æ Choose the resident’s name from the pull-down menu
Æ Enter post date of charge (date that the charge is assessed)
Æ Enter amount of Resident Charge
Æ Enter memo description for charge as “Bounced Check Fee”
Æ Make sure that Status is set to ‘active.’
Æ Click ‘Add’ button to add charge to resident account.
Then, you must apply the bank’s charge for the bounced check fee to Connected Books. When it
is time to do the Bank Reconciliation, record the bounced check charge into the Service
Charge field on the first screen in the Reconciliation section (see page 49-51). The
service charge is recorded as an Administrative Expense and will appear in the Income
and Expense Statement as such.
NOTE: Remember to add the Service Charge to your account when you do the Bank
Reconciliation for the month.
Updating Maintenance and Rent Amounts:
In the event that the maintenance or rent charge amounts increase or changes, it must be entered
into Connected Books to reflect the change in amount for the Rent Roll Report. This includes
scenarios when there is a change in the Section 8 or Public Assistance amounts, or if Section 8 or
Public Assistance starts or stops. For these situations, a new rent record must be added for the
tenant, specifying the dates during which this rent charge is effective.
100
Update the rent information for the Resident:
Under the “Setup” heading on the Main Menu screen,
Æ Click on “All Rent”
Æ Click “Edit” for the Resident Record of the resident
Æ Change “Effective To” Date to last date of that period (i.e. 1/31/05; 2/28/05; 3/31/05)
Æ Click “Update” to submit information
You will get a confirmation screen that the Resident’s information was updated.
Then, add the new rent record:
Under the “Setup” heading on the Main Menu screen,
Æ Click on “All Rent” icon
Æ Select Resident
ÆEnter “Effective To” and “Effective From” Date; this must be a date that follows the
“Effective To” Date of the Resident’s previous Rent record
NOTE: Please note that there can be no overlap with another Rent record
under Resident’s name. The effective dates of the rent records must not
overlap, otherwise this will cause an error in the Rent Roll Report. In
other words, the “Effective To” date of the first record MUST end at least
one day before the “Effective From” date of the new rent record.
Æ Enter amount of the new rent/ maintenance charge in “Resident Amount”
ÆClick “Add” to submit new rent information
Verify information in the following places:
-
All Rent
Rent Roll Report
Customer History report
NOTE: Whenever the Maintenance or Rent or Section 8 or Public
Assistance or SCRIE amount changes for a resident, it must be treated
like an update to the Maintenance and Rent amounts. Follow the above
instructions to update the assistance amounts in the appropriate boxes.
101
Moving Residents
When residents switch apartments or move from one apartment to another within the
same building. This requires a multi-step process, first to move the resident out of their
current apartment, then to move the resident into another apartment.
Move out resident from the apartment unit that will be vacant.
Under the “Setup” heading on the Main Menu screen,
Æ Click on “Move Out”
Æ Select a Unit Resident from the pull-down menu
Æ Enter move out date (i.e. 1/31/05; 2/28/05; 3/31/05)
Æ Click “Move Out” to move person out
To move another resident into that vacant unit, first move them out of their current unit:
Under the “Setup” Heading on the Main Menu screen
Æ Click on “All Unit Resident”
Æ Click “Edit” for the Resident Record of the resident who’s moving
Æ Change “Move Out Date” to last date of that period (i.e. 1/31/05; 2/28/05; 3/31/05)
Æ Set “Status” of Resident Record to “Inactive”
Æ Click “Update” to submit information
You will get a confirmation screen that the Resident’s information was updated.
Then, move them into the vacant unit:
Click “Search” icon to return to “All Unit Resident” view
Æ Click on “Add Unit Resident” icon
Æ Select a unit from the pull-down menu, in this case, the unit the person is moving into
Æ Select Resident’s name from the pull-down menu
ÆEnter “Move In Date”; this must be a date that follows the Move Out Date of the
Resident’s previous record (there can be no overlap with other record under Resident’s
name)
Æ Enter in any applicable arrears information (Be sure to set the arrears “As of” Date to
the last date of the previous month.
Æ Click “Add”
Update the rent information for the Resident:
Under the “Setup” Heading on the Main Menu screen
Æ Click on “All Rent”
Æ Click “Edit” for the Resident Record of the resident who’s moving
Æ Change “Effective To” Date to last date of that period (i.e. 1/31/05; 2/28/05; 3/31/05)
Æ Click “Update” to submit information
You will get a confirmation screen that the Resident’s information was updated.
Æ Click on “Add Rent” icon
Æ Select Resident from the pull-down menu
ÆEnter “Effective To” and “Effective From” Date; this must be a date that follows the
Effective From Date of the Resident’s previous Rent record (there can be no overlap with
other Rent record under Resident’s name)
102
Æ Enter amount of the new rent/ maintenance charge in “Resident Amount”
ÆClick “Add” to submit new rent information
Verify information in various Resident viewing screens:
- Current Unit/ Resident/ Rent
- All Units
- All Residents
- All Unit Residents
- All Rent
as well as on the Rent Roll Report and Customer History Report.
When a Resident Moves Out
Under the “SetUp” heading on the Main Menu screen,
Æ Click on the “Move Out” link
Æ Use the Move Out Form to select the apartment and name of the Unit Resident that is
moving from the pull-down menu
Æ Enter in the effective date in the “Moved Out On” field.
Æ Click “Move Out”
When a New Resident Moves In
Under the “SetUp” heading on the Main Menu screen,
Æ Click on the “Move In” link
Æ Use the New Resident Move In Form to select the “Unit” from the pull-down menu
that the new resident that is moving into
Æ Enter in the tenant name and contact information in the “Tenant Information” section
into the appropriate fields, including:
• First Name, Last Name, Phone Number, and Resident Amount.
• Enter the “Effective To” Date and “Effective From” Date if that information is
available (NOTE: these fields refer to the move-in or move-out dates).
• Mark the Maintenance/ Rent pull-down menu with the appropriate payment
status. Enter Section 8 information, if applicable.
• Enter any arrears information, and mark the “As of” date to the last day of the
previous month in order for the correct balance to forward to the rest of the
application.
Æ Click on “Add” Button to submit information
103
Setting Up Additional Users on your Connected Books Account
The primary user on the account is the “Administrator”. The Administrator can set up, enter,
edit, and view all information pertaining to their building. The Administrator can add other
Users (who can then access the account), and can grant different User Types for each of those
users.
The User Type controls the levels of access to information of each user, as well as the ability to
setup or edit information.
Under the field “User Type” you can choose “Bookkeeper” “Board/ Shareholder” or “Guest.”
Each of these user types has different access privileges to the software, based on whether or not
the person should be granted editing privileges.
User types
• Administrator
• Bookkeeper
• Board Member/ Shareholder
• Guest
Level of Access
Has Permission to Setup, and Edit Information
Has Permission to Edit Information
Has No Permission to Edit Information
No Permissions; can only view information
There are 2 ways to add a user:
Under the “Administration” heading in the Main Menu
ÆAll Users
Æ Add User
-ORUnder the “Setup” heading in the Main Menu
Æ Users
Then, you can fill out the “User Maintenance Form” to add a user who will have access to the
building’s financial information. Other users must have a different e-mail address and password
than the Administrator’s.
You can add several users to your HDFC account, with different user types specified.
104
Enter the email and
create a password
for the new user.
105
Connected Books Troubleshooting and Help Topics
Schedule a Support Session- This is a feature that allows you the chance to schedule an
appointment with a UHAB Connected Books Staff Member to administer your building. By
scheduling this, you are effectively giving UHAB staff the permission to view your building
data. There are three ways that you can schedule a support session.
One way to schedule a support session is to use the Connected Books form:
Under the Administration Heading in the Main Menu Screen
Æ Click on “Schedule Support Session”
Æ Choose dates during which you would like the Administrator to access your account.
Æ Enter a message for the UHAB administrator.
A second way to schedule a support session is to call the Connected Books Team at UHAB:
Brian Salfas
Emily Ng
212-479-3355
212-479-3318
After business hours, you may leave a voicemail message and UHAB staff members will return
your call as soon as possible the next business day.
A third way to schedule a support session is through the Connected Books online tool. At the
bottom of every Connected Books webpage there is a link to an e-mail address which, when you
can click on it, opens an email from you to: [email protected]. You can also send
an email to Brian Salfas at [email protected].
Accounting Training and Bookkeeping Help
If your building needs additional bookkeeping help, regular Co-op Accounting trainings are held
monthly at the UHAB offices, both downtown and in Harlem. Additional Bookkeeping
assistance is available for an additional fee. Please contact Brian or Venecia for more
information.
Bug information
What is a bug? A software bug is an error, mistake, or failure that prevents it from working as
intended, or produces an incorrect result. Although UHAB and its software developer put a great
deal of testing and planning into the Connected Books software, the process is complex and
unintended things sometimes emerge. In the case that you encounter a bug, an error report or
bug report page will appear and require you to enter information of what happened prior to the
bug occurring. This information helps in preventing that error in the programming, or systemwide error from occurring again.
106
Troubleshooting Questions
I’ve forgotten my password. What do I do?
If you are the Administrator for your building (the person who set up the Connected Books
account on behalf of your building, or is the liason between UHAB and your building), call
UHAB staff at 212-479-3355 and we can help you reset your password.
If you are set up as a “Bookkeeper,” a “Board Member/ Shareholder,” or a “Guest” you can
contact your building’s Connected Books Administrator to reset your password.
I entered in the wrong information but can not delete it. What do I do now?
In most cases, you would be able to edit information in Connected Books, but there are some
cases where you may need to delete information. To delete an item, you will see an icon at the
top of the page with an “X” logo, which says “Delete” beneath the icon. If you do not see the
icon, you will not be able to delete that information. The reason why you can not delete certain
information is due to the security levels of the user type to which you were assigned.
If you can not access the Delete icon, contact the Administrator of your building. If you are the
Administrator User for your building, contact the UHAB staff.
I created a new user profile for a board member/ shareholder but that person has moved
out of my building. How can I delete this person?
Once someone moves out of the building, you should not delete this user. What you can do
instead is mark the user’s record as “Inactive.” This will not delete their entry, but rather they
will no longer be able to log into the account. That way, you can keep the historical record of
who has had access to the building’s information. If that person returns to the building, or moves
in, you can always re-activate their user profile.
A resident has moved out of my building, should I delete this person?
You do not want to delete that person, since that would wipe out the resident from your
Connected Books account as though they had never lived in the building. Since financial
information exists for that person, you won’t actually be able to delete the tenant record; instead
you can follow the instructions to Move that person out of the building (using the Move Out
instructions on page 86 of the manual).
I am having trouble recording a rent/ maintenance charge increase. Ever since I recorded
the increase, my Rent Roll Reports have been messed up. What can I do to fix this?
107
Make sure that you have added the rent change properly; if you have overlapping Rent Charge
dates in the “All Rents” table, it will affect your Rent Roll Report. See page 114-115 for
instructions on updating the Maintenance or Rent charge.
I was using Connected Books, but when I clicked on the Submit/ Add button, I got an error
message. What should I do?
Connected Books usually will tell you when you have made an error that needs to be corrected.
Recognizing error messages will help you figure out what the next step is.
The error message appears in red, and following the instructions in the message will allow you to
submit or add information correctly.
If you encounter a Connected Books Error, you will see an Error Report or Bug Report page,
with an Error ID number. Please record the steps that led up to this error in the text box and
submit the information; having as much information as possible about the events that led to the
error is extremely helpful in preventing this error from occurring in the future. Submitting the
Error Report sends the error information to the Connected Books Bug Team; UHAB is
committed to working to solve bugs that you encounter in Connected Books.
I am getting a message that says “You have been logged off “
Occasionally, when the internet goes down, you may get kicked off of the Connected Books
system. First, please make sure that this is not related to your internet service. If your internet
service seems to be working, it may be a problem with UHAB’s internet service.
If you see this message, log back in to Connected Books with your email address and password.
If it seems that this is happening very frequently, give the Connected Books team at UHAB a
phone call and let us know this is happening repeatedly.
108
Frequently Asked Questions
I don’t have an internet connection; can I use Connected Books?
It is preferred that Connected Books subscribers have an internet connection, but it is not
mandatory. It is possible to arrange with the UHAB staff to use the computer terminals at the
Harlem office Training Room or the Wall Street office. There may also be libraries or
community centers in your neighborhood which have computers with high-speed internet
service.
Can two people in my building use Connected Books at the same time?
Yes it is possible for two people from the same building to enter in data but it is important that
the roles are clearly defined and there are no double entries or missing financial information.
Since each user has a different profile, it is possible for more than one person from the same
building to be logged in at once. Connected Books tracks which users have entered information
and edited information, to minimize confusion.
Is my data safe?
Yes. The information you input on Connected Books is kept on the same server that we use at
UHAB. The data is backed up every single day.
Why don’t I see a “lock” icon indicating that my webpage is a secure one?
Connected Books does not use the Secure Socket Layer (SSL) encryption that financial
institutions use because there is no secure information (i.e. credit card information) being
transmitted via the internet. Even with a SSL, while the information is being transmitted online,
it is bound to skip and therefore is not secure.
Can hackers hack into my account?
No. The Connected Books server site is secure, with an industrial-strength firewall.
Who sees my data?
No one, except for the users that are set up by the account Administrator on your HDFC’s
account. The UHAB staff will not access your account, and will never view your account
without your permission. UHAB will occasionally monitor usage information, for research and
tracking purposes.
Why would I give permission to the UHAB staff to view my data?
There are instances where you might wish for UHAB staff to view your building’s account, such
as if you need troubleshooting assistance. The information is kept confidential (see the Online
Service Agreement).
Can I enter in data for previous years?
Yes, it is possible to back-enter data. It is important to communicate with UHAB staff about the
sections of Connected Books which are more sensitive to back-entered information (particularly
sections which require entry of dates, for example, an “As Of” Date.
109
Back-entering data must be determined at the time of set-up, since the Connected Books is
cumulative and works off of the previous month’s information. For example, you don’t want to
enter data and then decide that you want to include last year’s data.
I keep getting an Error ID message, but I don’t know what I did that could result in an
error. What should I do?
Send a detailed email message to the email address at the bottom of the Connected Books page,
[email protected], or call UHAB at (212) 479-3318. We will try our best to
determine what is causing this error.
Why doesn’t Connected Books connect to my on-line account or debit money directly from
my bank account?
Connected Books is not meant to be an online banking account, therefore it is not capable of
writing checks or performing actions that require communicating with your bank. Since many
buildings have check writing systems and capabilities, it is our goal to make things easier, not
replace the systems which HDFC buildings have implemented.
Is Connected Books linked to my bank accounts? If I make a deposit or transfer will it
automatically reflect in my actual bank accounts?
No, Connected Books is not meant to be an online banking account, it is a financial tracking tool.
When we refer to “writing checks” or “paying bills” or “making deposits” within Connected
Books, these actions must happen independent of the UHAB software, and must occur at your
bank. You would do everything that you normally do to maintain your building’s finances, the
manner of recording and entering information is the main difference.
Can I print payment due invoices for tenants who pay maintenance/ rent?
You can use the Customer History Report as a monthly invoice.
Can I print receipts for tenants who pay maintenance/ rent?
You can use the Customer History Report as a monthly invoice and a record of payment history.
When is the next version of Connected Books due?
Although there is not yet a definite time frame for the next version of Connected Books, UHAB
plans to update the programs, taking into consideration the comments of the users. If there is
anything you would like to be changed or added in the next version please be sure to
communicate that to us.
How do I know what version my computer’s operating system runs on?
Here are instructions from the windows website.
Find Out Which Operating System Your Computer Is Using
Published: August 25, 2004There are many versions of the Microsoft Windows
operating system. You may be using Windows 98, Windows Me, Windows XP, or
another version. To make sure you know which version is on your computer:
1.Click Start, and then click Run.
110
2.In the box, type winver, and then click OK.
The window that appears will show you which version of Windows your computer is
using.
Note: These instructions do not apply to Apple Macintosh computers. To find out which
operating system you are using on an Apple computer, Click on the Apple menu and “Get
information” about the computer.
When I use AOL to log into Connected Books, why is it that some of the features that are
outlined in the User Manual do not work?
AOL sometimes prevents the pop-up windows that are outlined in the Connected Books User
Manual. The following are the instructions to install an Internet web browser onto your
computer so you don’t have to use AOL to access Connected Books.
Go to this website using your AOL window: http://www.mozilla.org/products/mozilla1.x/
Where it says “Download Now,” click on the link that says Windows, English (11.0MB)
A window will ask you if you want to let the program Run, or save it to your computer. Choose
“Run” (it may ask you where you want to install the files). After it is finished Running the
installation, click on the “Open” button. You will now be able to access the internet and
Connected Books using Mozilla Firefox.
Type in the web address for Connected Books: http://www.connectedbooks.coop (You can
“Bookmark” this link, or add it to your “Favorites” folder so you can easily access this site in the
future).
Security
No one is allowed to view your building’s data except for the building Administrator. The
administrator can create other user profiles so that a bookkeeper, board members, and
shareholders can view reports.
UHAB Staff Members will never view your information unless you request support and give
permission for the staff to view your building profile. For information on how to request a
support session, see page 87.
111