1
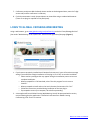
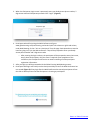
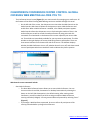
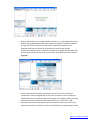
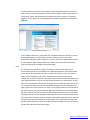
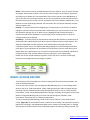
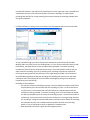
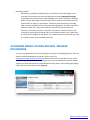
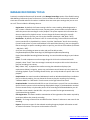
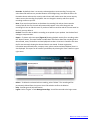
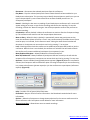
Global Crossing Ready-Access
User Guide
Revised
November 2011
TABLE OF CONTENTS
This User Guide will assist you with understanding the features and functionality available for
Ready-Access and Web Meeting
TERMINOLOGY .............................................................................................................................................. 3
SETTING UP A CONFERENCE CALL (audio only) ............................................................................................ 4
READY ACCESS ACCOUNT OPTIONS .............................................................................................................. 4
READY ACCESS CONTROLS AND COMMANDS .............................................................................................. 4
HELPFUL HINTS FOR USING READY ACCESS .................................................................................................. 5
KEEPING YOUR CONFERENCE SECURE .......................................................................................................... 6
SETTING UP A CONFERENCE CALL (audio and web) ..................................................................................... 6
LOGIN TO GLOBAL CROSSING WEB MEETING .............................................................................................. 7
CHAIRPERSON CONFERENCE CENTER CONTROL .......................................................................................... 9
SHARE DESKTOP APPLICATIONS DURING A GLOBAL CROSSING WEB CONFERENCE ................................. 12
SHOW SLIDE PRESENTATIONS DURING A GLOBAL CROSSING WEB CONFERENCE. ................................... 12
READY ACCESS RECORD .............................................................................................................................. 13
ACCESSING READY ACCESS ARCHIVE .......................................................................................................... 15
MANAGE RECORDINGS ............................................................................................................................... 16
AUDIO CONTROLS ....................................................................................................................................... 18
PARTICIPANT MANAGEMENT ..................................................................................................................... 18
PHONEBOOK ............................................................................................................................................... 20
ACCOUNT OPTIONS..................................................................................................................................... 21
CHAIRPERSON - HOW TO ACCESS GLOBAL CROSSING WEB MEETING....................................................... 22
PATICIPANT - HOW TO JOIN GLOBAL CROSSING WEB MEETING ............................................................... 22
PODCAST FEEDS AND SUBSCRIPTION PAGE ............................................................................................... 23
EDIT RECORDINGS ....................................................................................................................................... 24
HELP ............................................................................................................................................................ 24
TERMINOLOGY
Term
Definition
Access Code
A 7-digit number the chairperson uses to access the
conferencing services and participants use to join a meeting.
Account
Account is the Ready-Access account.
Access Phone Number
The phone number associated to a Ready-Access subscription
that chairpersons and participants dial to join a conference.
Button
A user interface item that appears as a labeled button. For
example:
Chairperson
The organizer/moderator of an audio or web conference. The
chairperson sets up and initiates meetings, and accesses all
conferencing services by entering the passcode.
Chairperson Passcode
A 4-9-digit number the chairperson uses to start an audio or
web conference.
DTMF Commands
These are the phone commands you can push on your
telephone while in conference. For example, the DTMF
command to mute your line in conference is *6.
Meeting
A Ready-Access audio or Web Meeting web conference.
Participant
A person who attends an audio conference or web meeting.
Subscription
Ready-Access information consisting of the Access Phone
Number, Access Code and Chairperson Passcode.
Return to Table of Contents
SETTING UP A CONFERENCE CALL (audio only)
When you are ready for a conference follow these simple steps:
1. Inform all participants of the date and time of the conference.
2. Give all participants your Ready-Access phone number and 7-digit access code.
3. When it is time for your conference, dial in on the Ready-Access phone number, enter your 7digit access code, then listen to the prompts to enter your Chairperson passcode to begin the
conference.
4. Conference participants dial the Ready-Access number all the designated time, enter the 7-digit
access code, and the conference is underway.
READY-ACCESS ACCOUNT OPTIONS
-
-
Change Chairperson passcode—change this periodically to ensure security
Record participant name (on/off)—when set to “on” this allows you to use the Roll Call feature
during a meeting and to use the Name Announce option (see below)
Set conference entry/exit announcement (choose one): Tones, Silence, Name Announce
o To change these settings dial in to Ready-Access; enter your 7-digit access code followed
by your Chairperson passcode; press to change account options and then just follow the
voice prompts.
These options can be changed as often as you like
READY-ACCESS CONTROLS AND COMMANDS
-
As the conference Chairperson, you can control the access to your conference, as well as who
can speak or just listen.
To keep your conference well organized the following commands are available to you at any
time during the conference
They can be activated through the touch-tone phone that you used to initiate the conference or
through your computer via Global Crossing Web Meeting.
Return to Table of Contents
HELPFUL HINTS FOR USING READY-ACCESS
-
-
-
-
-
-
The maximum number of participants that can join the conference (including the Chairperson) is
based on your individual subscription. Anyone trying to join the conference once the maximum
number of participants has been reached will not be able to join.
Learn to use Ready-Access quickly and easily with our tutorial, found at
www.globalcrossing.com/conferencing, under “Audio Conferencing.” You can also find product
feature updates and other news.
If participants dial in before the Chairperson, they will be placed on music hold until the
Chairperson joins the conference.
The Quick Start feature allows conferencing to begin without requiring the Chairperson to start
the meeting. This feature does override the security requirement of Chairperson Passcode entry
to start the conference.*
When the Chairperson hangs up, the conference call will end. To allow the conference to
continue after the Chairperson leaves, he or she should press * 8 early in the conference in case
of an inadvertent disconnection.
The Auto Continuation feature allows all conferences to continue after the Chairperson
disconnects without any additional touch-tone commands.*
When a participant joins or leaves the conference tone is normally heard. Some Ready-Access
subscriptions are configured to record and announce the names of participants as they enter or
leave the conference. When this feature is enabled, a Chairperson or participant can press * 9 to
receive a roll call of everyone on the conference.
To include participants, you can dial out to them after the conference has begun. Press * 1 and
follow the prompts. This is also an alternate method for connecting participants outside North
America.
Return to Table of Contents
KEEPING YOUR CONFERENCE SECURE
Here are a few suggestions for maintaining the security of your conferences
-
-
-
Change your Chairperson passcode number frequently. Follow these steps:
o Dial your Ready-Access phone number
o Enter your 7-digit access code
o Press the # key
o Enter your current Chairperson passcode
o Select Option 2
o Follow the prompts to create a new Chairperson passcode (4-9 digits)
Assign an additional security passcode (4-9 digits) to sensitive conferences. Be sure to inform all
participants of the security passcode before you begin the conference. After you have entered
your 7-digit access code at the start of your conference, you will then be prompted to enter the
security passcode for that conference. If you enter this passcode, everyone that dials into this
conference must also enter the same passcode after entering the usual 7-digit access code.
To ensure maximum security use the lock conference feature; * 4 to lock, * 5 to unlock.
GLOBAL CROSSING WEB MEETING ALLOWS YOU TO:
-
Manage your Ready-Access meeting online using easy point and click conference commands
Show slide presentations and graphics to meeting participants
Share your desktop with meeting participants
Record a conference (audio only or include synchronized slides)
SETTING UP A CONFERENCE CALL (audio and web)
1. If this is your first Ready-Access conference, familiarize yourself with the controls and
capabilities of the standard Ready-Access conference commands.
2. Inform all participants of the date and time of the conference.
3. Give participants your Ready-Access phone number and 7-digit access code.
4. If you are using the Global Crossing Web Meeting slide presentation feature, provide
participants with this URL to join the Web Conference:
http://www.globalcrossing.com/conferencing
5. When it is time for your conference, dial in on the Ready-Access phone number, enter your 7digit access code, then listen to the prompts to enter your Chairperson passcode to begin the
conference.
6. Login to your Global Crossing Web Meeting (see below). If this is your first time using Web
Meeting, allow extra time to download and install the Java plug-in.
Return to Table of Contents
7. Conference participants dial the Ready-Access number at the designated time, enter the 7-digit
access code, and the conference is underway.
8. If a slide presentation is used, the participants can view slides using a standard web browser.
(There are no plug-ins required for the participant).
LOGIN TO GLOBAL CROSSING WEB MEETING
Using a web browser, go to www.globalcrossing.com/conferencing and select ”Start/Manage/Archive”
from under ”Web Meeting” in the ”Quick Links” column on the right side of the page. (Figure 1)
1. If you have not previously installed Java 2 Runtime Environment 1.3 you will receive a message
asking if you would like to begin installation of this plug-in. Click “OK” to start the installation.
o Please read any messages that may appear during the installation process to insure a
complete installation.
o When prompted for a File Download, select “Run this program from its current
location.”
o When prompted to install and run the Java 2 Runtime Environment click “Yes”’
o Follow the instructions provided during installation of the Java plug-in.
o If prompted to restart your computer, do so before proceeding.
2. A Java applet will launch Global Crossing Web Meeting. You will be prompted with a security
notice indicating that the application is verified to have come from Global Crossing
Conferencing. Click “Start” to continue.
Return to Table of Contents
3. When the Chairperson Login screen is presented, enter your Ready-Access phone number, 7digit access code and Chairperson passcode. Click “Login.” (Figure 2)
4. Participants who will be joining the Web Conference will go to
www.globalcrossing.com/conferencing, and under Quick Links column on right hand column,
under Web Meeting, click on “Join as a Participant” from this page. Participants do not need to
install any plug-ins to join the Web conference. They will be prompted to enter your ReadyAccess phone number and 7-digit access code.
o After entering the login numbers, the participant will be prompted to enter their name,
email, phone and company. Only the name is required. Upon completion of the
conference, the Chairperson will receive an email containing all of the participant
registration information.
5. After you login you will be presented with the Global Crossing Web Meeting screens.
6. Participants who login will initially see the Participant Lobby screen if the Web Conference has
not started. (Figure 3) If they login after the Web Conference has started, participants will see
the slide or desktop screen that the Chairperson is showing to participants.
Return to Table of Contents
CHAIRPERSON CONFERENCE CENTER CONTROL GLOBAL
CROSSING WEB MEETING ALLOWS YOU TO:
-
The Conference Control screen (Figure 4) is your main console for managing your conference. All
the features of the Global Crossing Web Meeting service are available through this consol.
o On the left side of the screen, the chairperson can view either the Web Controls or the
Audio Controls. Web Controls allows the chairperson to start a Web Conference and
enable Chat. When a Web Conference is enabled, a list of Web participants appears.
Audio Controls allows the chairperson to see a list showing the number of lines in the
audio conference as well as control the audio conference by using point and click
commands. The thumbnails on the bottom of the screen represent your current slide
set. Those slides are immediately available for you to present to participants. The slide
window on the right displays the current slide being shown to participants. There are
three status indicators on the bottom left side of the screen. The indicator displays
whether the Web Conference is on or off, whether Record is on or off, and shows a total
count of participants who have raised their hand to indicate they have a question.
Web Controls screen commands include:
-
Start Web Conference
o The Start Web Conference button allows you to start a Web Conference. You can
choose to either share Slide, Presentation or Desktop Presentation by selecting the
button on the left. Slide Presentation is the default setting. After starting a Web
Conference, you will be asked if you’d like to assign an optional Web Conference
security passcode (4-9 digits). You may proceed without a passcode by selecting “Start.”
(Figure 5)
o If you assign a Web Conference passcode, be sure to inform all participants of the
security passcode before you begin the conference.
Return to Table of Contents
o
o
o
o
o
o
o
o
o
o
When a Web Conference is started, if Slide Presentation is on, participants will see the
Global Crossing Web Meeting slide that will appear by default in the slide window on
the right side of the Conference Control Screen. If Desktop Presentation is on,
participants will see the left side of the Conference Control Screen and the
Chairperson’s desktop content instead of the Global Crossing Web Meeting slide. They
will not see the participant list unless you select the “Show Web Participants” button.
(Figure 6)
o
If you’re sharing a presentation, participants can press “Full Screen” during the
presentation to see an enlarged slide screen (if the participant’s screen resolution is
1024x768 then they will automatically see the largest view available). When you select
Desktop Presentation, participants will automatically be in “Full Screen” mode.
Participants will see the Chat window unless you have this feature turned off. If the
participant selects the “Full Screen” view, the Chat window may move behind the slide
o
Return to Table of Contents
window. Anytime you send a new message, the Chat window will open on top of the
slide window so that participants do not miss new messages. The participant also has a
“Raise Hand” button that allows them to indicate they have a question. This button
toggles to “Lower Hand” so the participant has the option to withdraw their question.
(Figure 7)
o
-
Chat
o
To end a Web Conference, simply select the “End Web Conference” button or you can
exit the Web Meeting. In either case you will be asked to confirm, to prevent
accidentally ending your Web Conference. If you do confirm, the Web Conference will
end immediately. When a Web Conference is ended, the system will automatically
return participants to the Global Crossing Web page.
The Conference Control Screen (Figure 3) displays a Chat box that allows you to
communicate with all of the participants or a selected participant. Use the drop down
menu next to “All Participants” to select a specific participant's name if you want to
send a private message to that person. Participants can send messages to the
Chairperson; only the Chairperson views these. Chat is automatically enabled when you
start a Web Conference. You can turn off the Chat feature by un-checking the “Enable
Chat” box at the bottom of the screen. You can pull the Chat box out and view it or size
it as a separate window on your screen by double clicking on the arrow button in the
upper right corner of the Chat box. To return it to its original location on the left side of
the control screen, just close the window. When you enable Chat, the Chat Messaging
Window, as well as the Chat Text Box Line that allows participants to enter and send a
message to the host, will be displayed in the lower left corner of the participant screen.
If the participant minimizes the Chat window, it will automatically pop back up once the
chairperson sends a chat message to the participant. If the participant closes the Chat
window, he/she will have to close out of the Full Screen window in order to locate and
use the Chat and Raise Hand function again.
Return to Table of Contents
SHARE DESKTOP APPLICATIONS DURING A READYACCESS WEB CONFERENCE
-
When you select “Desktop Presentation” for application sharing mode, participants will view
your entire desktop. Before sharing your desktop, start any of the applications that you wish to
share with participants. You should also minimize or close any applications that you do not wish
to share. You can switch back to Slide Presentation mode at any time by selecting “Slide
Presentation” on the Web Control screen. During application sharing the conference control
panel is displayed, allowing you to: Stop the web conference, switch back to Slide Presentations,
select the Audio Controls interface, select the “?” help function, view the web participants list
and use the Chat function (by default, Chat is disabled when Desktop Presentation is on, but you
can activate it using the checkbox on the Web Control screen). When you select Desktop
Presentation, participants automatically get switched into full screen mode.
SHOW SLIDE PRESENTATIONS DURING A READY-ACCESS
WEB CONFERENCE
You may show PowerPoint slide sets, GIF (Graphics Interchange Format), JPG (Joint Photographic
Experts Group format), and PNG (Portable Network Graphics format) files. You can use the following
buttons on the Conference Control screen (Figure 3) to manage your presentations:
-
-
-
Slide Deck (Thumbnails) - You can store multiple presentation files in Web Meeting. The files will
remain there until you delete or overwrite them. The slide deck displays a thumbnail-sized
version of your slides. You may right mouse click on any of the thumbnails to open a full
resolution preview of the slide. To present a slide to all participants viewing the web portion of
the conference, simply double-click on the desired slide. That slide will then be sent to all
participants and displayed, at its full resolution, in the conference control window. The slide
deck can be scrolled horizontally to see all the slides contained in your presentations.
New - Allows you to upload a new PowerPoint slide set that replaces the current slide set. The
new presentation will appear in the slide deck as thumbnail images. You can also use the “New”
button to simultaneously upload multiple presentations by using the Shift or Ctrl keys to select
multiple files on your desktop. Note: Anytime you use the “New” button to upload one or many
files simultaneously, it will overwrite any existing slides you have uploaded previously.
Insert - Adds another presentation or image to the current slides. The new presentation file is
inserted directly following the slide that you select (click once to select and it will be highlighted
in red). If you want to add the new presentation to the end of the current slide set, select the
last thumbnail in the slide set, then select “Insert.” You can also use the “Insert” button to
simultaneously upload multiple presentations by using the Shift or Ctrl keys to select multiple
files on your desktop.(Figure 7)
Return to Table of Contents
-
-
-
-
Delete - Removes the currently selected thumbnail from the slide set. You can use the Shift key
to highlight several slides to delete. You may also check the option in the “Delete” popup box
that allows you to delete all of the presentation files currently stored in your Web Meeting. If
you do this after your meeting is finished, none of your presentation content will be stored on
the Global Crossing servers. Note: You will be asked to confirm the deletion. Additionally, if you
delete the current slide being presented, the participants will still see that slide until you have
selected another slide.
Preview - To preview a slide without displaying it to all participants, click once on the slide to
highlight it and then select the preview button. Alternatively, you may move your cursor over
the thumbnail and right click on it. When a slide is highlighted and the preview button is
selected, the slide will be displayed in a new window, at the maximum slide size. Only the
Chairperson will see the preview.
Arrow Keys - To present a slide to all participants viewing the Web Conference, double click on
the desired slide. A Web Conference must be started to present a slide to all participants. The
slide will be displayed at its full resolution in the slide window on the right side of the
Conference Control screen. The slide window always displays the content being presented to
participants. The arrow buttons on the bottom of the Conference Control screen allow you to
display slides in the presentation. You can use the scroll bar next to the thumbnail slide deck to
locate a particular slide, and then double click on it to display it in the slide window.
Helpful Tip: Do not upload extremely large files. The file size limit is currently 27 MB. Large
PowerPoint and image files will take longer to upload.
READY-ACCESS RECORD
-
-
The Chairperson has the capability to record a meeting with full synchronization between the
audio and slide presentation.
You may also start an audio-only recording with Web Meeting (if you are not showing slides).
Anytime you are in “Slide Presentation” mode, showing PowerPoint slides or images during a
recording, they will automatically be synchronized with the audio. If you are in the “Desktop
Presentation” mode, sharing desktop applications during a recording, the playback will show the
Global Crossing Web Meeting slide (or the last slide the Chairperson showed if “Slide
Presentation” was active prior to “Desktop Presentation”).
To start a recording in Web Meeting, check the box next to “Record” on the Audio Control
screen. (Figure 8) You will be asked to enter a name for the recording. This name will be used to
identify the recording in the Manage Recordings system. When the recording starts, a message
will play into the audio conference that notifies participants the meeting is being recorded. The
Return to Table of Contents
recorder will show up in the Audio Control participant list. Fees apply and a new, recorded file is
created each time you select the Record button to initiate a recording. To avoid multiple
recording fees and files for a single meeting, do not start and stop the recording multiple times
during the conference.
-
-
-
If a Web Conference is active, the current slide (in the slide window) will be synchronized with
the audio recording.
As you proceed through your series of slides each slide will be synchronized with the Web
Meeting audio. Any time you are not showing slides, or if you record a conference with no slide
presentation, the Ready-Access screen will appear during playback. To end the recording,
uncheck the ”Record” box on the Audio Control screen. You will be asked to confirm that you
want to end the recording. Any time a recording ends, a message is played into conference
informing all participants that the conference is no longer being recorded. If the Chairperson
exits Web Meeting without ending the recording, the recording will continue until the audio
conference ends. The Chairperson can also end the recording by pressing on the telephone
keypad at any time (see below).
Recording via the telephone
o You may also initiate a recording by pressing * 2 on the telephone keypad. You will then
be prompted to press 1 to continue with the recording (or press * to cancel and return
to conference). A voice prompt will notify the Chairperson and participants that the
conference is being recorded. To end the recording, press * 2 on the telephone keypad.
You will be prompted to press 1 to stop the recording (or press * to cancel and return to
conference). A voice prompt will notify that the conference is no longer being recorded.
If a recording is in progress and the Ready-Access conference call is ended, the recording
will automatically stop. Use a handset whenever possible for best voice recording
quality. If not, sit and speak as closely as possible to a speakerphone
o Mute participants that have a great deal of background noise.
Return to Table of Contents
-
Recording playback
o Recordings are available immediately after the conference ends. Recordings can be
accessed via the Internet (see Accessing Ready-Access Archive/Manage Recordings
section below) and replayed using either RealNetworks® audio or Microsoft® Windows
Media® players. Recordings are stored in MP3 files for superior audio quality and easy
playback with no waiting or interruptions. If slides are presented during a recording,
both the audio and slides are fully synchronized during playback. The audio controls for
playback include: Start, Stop, Pause, Slider bar, Status on content (location and
duration), and Volume control bar. The viewer may jump to a specific location in the
recording by selecting the thumbnail slide in the recording playback screen. Both slides
and audio will be played from that location. The viewer may also use the slider bar to go
to a specific location in the recorded conference.
ACCESSING READY-ACCESS ARCHIVE / MANAGE
RECORDINGS
-
You can access Ready-Access archived recordings by selecting “Start/Manage/Archive” from the
Global Crossing Web Meeting Conference Control screen from
www.globalcrossing.com/conferencing. See Quick Links section on right side of screen, under
Web Meeting. At the Conference Center login screen, enter your Ready-Access phone number,
7-digit access code and Chairperson passcode and click Login button. Select Manage Recordings
from menu box on left side of screen. (Figure 9)
Return to Table of Contents
MANAGE RECORDING TOOLS
Previously recorded conferences will be stored in the Manage Recordings section of the Global Crossing
Web Meeting Conference Center for future use. This list includes the title of each archive, the date and
time it was recorded and a file ID number. In addition there are some report settings that you can turn
on or off. These include the following columns:
-
-
-
-
-
-
-
-
Registration - By default, this feature setting is ON for a new recording. When Registration is
ON, a viewer is asked to enter their name, company name, phone number and email address
when they access the recording for online playback. The system requests this information but
does not require it for playback access. You can change this feature setting for a specific
recording as often as you like, just click on the checkbox (checkmark = ON; blank = OFF).
Notification - By default, this feature is OFF for a new recording. To be notified via email each
time a recorded file is played back by a viewer, check the “Notification” box for that recording.
(You will need to have a current email address on file with Global Crossing.) You can change this
feature setting for a specific recording as often as you like, just click on the checkbox (checkmark
= ON; blank = OFF).
Scroll over the recording you want to select and you’ll be able to select
Play/Download/Email/Show Recording Link/Edit Registration/Rename/Recording
Report/Passcode/Edit Recording/Delete Recording. You can also add recordings to your Podcast
Feeds.
Email – To send recipients an email message along with a link to the selected archive for
playback, select “Email.” Once the message is received, the recipient clicks on the link and can
play the recording in its entirety.
Play – Select “Play” to playback the conference using the selected media player (see
requirements below). Using play, pause, stop, and volume control buttons you can control the
recording playback. If your recording contains slides, you can skip ahead to a specific slide in the
playback
Requirements: You must have either RealNetworks audio or Windows Media Player installed to
play an archived recording. You can choose the format to play the recording in by selecting
“Windows Media” or “Real Audio” from the menu on the right side of the screen.
Download Audio – Download the MP3 file to your PC and store it yourself. You can then delete
the file from the system to eliminate hosting and playback charges. If you download a recorded
file that contains slides, only the audio portion of the recording will be downloaded to your PC.
The slides are not stored in the MP3 file – they are in another file that gets automatically
synchronized during playback.
Edit Registration: This feature enables customization of the registration information required by
participants before they view the recording.
Rename – To change a name of the recorded file select “Rename” and enter a new name for the
recording.
Reports: Generates a report for the selected recording that gives playback information as well
as listener information. The reports can be saved as a text file.
Return to Table of Contents
-
-
-
-
Passcode - By default, there is no security code assigned to a new recording. To assign one,
select Passcode and enter any number between 4 and 9 digits long. Just select the box in the
Passcode column and enter the security code. Viewers will need to enter the current security
code to access the recording for playback. You can change the security code for a specific
recording as often as you like.
Note: If you use the email button to distribute the recording link and you have entered a
security code for the file, the code will automatically appear in the email along with the
recording link. You can edit this email. If you do not want to send the code in the same email as
the link, you may delete it.
Podcast: Check this box to add this recording as an episode in your podcast. Use Podcast Feed
settings to set parameters.
Report – To view a real-time report (Figure 10) showing playback activity for a recording, select
the "Report" button. The report header includes basic information about the recording such as
date created, name, file duration and total playbacks to date. A line item is listed for each time
the file was accessed, showing the date and time it was viewed. If viewer registration
information was collected (name, company name, phone number and email address) then it is
also displayed. This report can be saved to your desktop by selecting the “Save” button in upper
right corner.
Delete – To delete the selected archive recording, select “Delete.” The recording will be
permanently deleted from the system. You will be asked to confirm the deletion.
Help - Provides general help information.
Logout - Select “Logout” to exit Manage Recordings. You will be returned to the login screen.
Return to Table of Contents
AUDIO CONTROLS
-
-
Global Crossing Web Meeting includes integrated, online Ready-Access conference control. This
provides all the tools you need to maintain security, add participants, mute lines and manage a
successful meeting.
To access the Audio Controls screen (Figure 11), select the “Audio Controls” tab located in the
upper left corner of the Conference Controls screen. You can visually monitor status of lines in
the audio conference, identify participants and type in their names. You can mute a participant
by checking the box in the “Mute” (far right) column. The Ready-Access conference command
buttons are located below the list of audio lines in conference.
PARTICIPANT MANAGEMENT
-
Dial – Dials out to new participants during the conference. (Figure 12) As the Chairperson, you
will be taken out of conference and can privately talk with the dialed participant. To have them
join the conference, select “Connect“ or to return to the conference without the participant
select “Disconnect.”
Return to Table of Contents
-
-
-
-
-
-
Disconnect – Disconnects the selected participant from the conference.
Play Name – Plays the selected participant’s name if Name Record has been enabled on your
Ready-Access subscription. This is an easy way to identify the participant on each line so you can
type in the participant’s name. If Name Record has not been enabled you will hear “an
anonymous participant.”
Record – Checking the box starts a recording of your Ready-Access conference call. A screen will
appear asking you to enter a name for the recording and confirm the recording. To stop the
recording, uncheck the “Record” box again. You will be prompted to confirm that you want to
stop the recording.
Continuation – When checked, it allows the conference to continue after the Chairperson hangs
up. The conference will continue until the last participant disconnects.
Mute on Entry – When this box is checked, it automatically mutes new participants as they
enter the conference (there will still be a “tone” entry announcement).The Audio Control screen
must be open, or minimized, for this feature to work. Closing the Audio Control window will
deactivate it. Participants can unmute their own line by pressing * 7 at any time.
Lock – Checking this box locks the conference. No additional participants will be able to join the
conference. When the box is not checked, the conference is unlocked. You will need to unlock
the conference if you want additional participants (or an operator) to join.
Mute/UnMute Participant – Mutes/UnMutes the selected participant.
Mute All/UnMute All – Mutes/UnMutes all participants that are currently in the call with the
exception of the Chairperson. Participants can unmute their own line by pressing *7 at any time.
Operator – Contact a Global Crossing Ready-Access operator. (Figure 13) When this command is
selected, the Chairperson will be offered the option of having the operator join the conferencing
in a private sub conference (private request) or join the conference as a participant (conference
request). (Figure 14)
Help – Provides a file of general help information.
Phonebook – Keeps a record of contact information. See Phonebook section below for more
information.
Options – Allows the Chairperson to change Account Options for the current conference call or
future conference calls. See Options section below for more information.
Manage Recordings – Allows direct access to stored recordings.
Return to Table of Contents
PHONEBOOK
-
The Chairperson has the ability to create a personalized phonebook. Select Phonebook from the
Audio Controls screen. You can add a new contact, edit and delete existing contacts, and dial a
single participant or simultaneously dial out to a 20 participant list. (Figure 15)
-
New – Adds a new entry to the phonebook. (Figure 16) Enter the First Name, Last Name,
Company, Office Phone, Home Phone, Mobile, Other and Email. Click “Save” to add the new
entry. Note: the phonebook will accept international numbers but they must have the 011 prefix
(do not include for U.S. and Caribbean numbers) and should not include other international
dialing code prefixes.
-
Edit – Highlight the contact whose information you want to edit and select the “Edit” command.
-
Remove – Highlight the contact you want to delete from the Dial Participant list and select the
“Delete” command.
Dial – Dials out to the selected participant.
Dial All – Dials out simultaneously to all of the participants included in the Dial Participant list.
-
Delete – Highlight the contact whose information you want to delete and select the “Delete” command.
Add – Highlight the contact you want to add to the Dial Participant list. You can highlight up to 20
participants and then select “Add” to simultaneously add them all to the list.
Return to Table of Contents
ACCOUNT OPTIONS
The Chairperson can change their Account Options by selecting “Options” from the Audio Control
screen. You have the option of changing features for the current call or for future calls. (Figure 17) The
Chairperson can change these settings as often as they like.
-
-
-
-
Entry Announcement – Select Tones, Silent, or Name Announce. If tones are selected, a tone
will sound each time a participant joins or leaves the conference. Name Announce will play each
participant’s recorded name followed by “joined” or “left.”
Enable Name Record – Turn on/off Name Record. When checked, Name Record is on.
Participants will hear a voice prompt that asks them to state their name followed by the # key,
before they are placed into conference. The system records the participant’s response.
Save Settings – When this box is checked, the settings will be saved and will apply to future
conferences. If the box is not checked, the ‘Entry Announcement’ and ‘Name Record’ settings
will apply only to the conference currently in progress.
Quick Start – Turn on/off Quick Start. When checked, Quick Start is turned on. (This feature is
not enabled for all Chairpersons).
Auto-Continuation – Turn on/off Auto-Continuation. When checked, Auto-Continuation is
turned on. (This feature is not enabled for all Chairpersons). When Quick Start is on, AutoContinuation is automatically on also.
EXPERIENCE THE POWER OF REAL-TIME COLLABORATION
VIA THE INTERNET WITH GLOBAL CROSSING WEB
MEETING
-
Make your Ready-Access audio conferences more productive than ever with our powerful
collaboration tool Global Crossing Web Meeting. This Internet-based conferencing solution lets
Return to Table of Contents
you dramatically improve the way you communicate by instantly sharing any document,
presentation or application in real-time.
CHAIRPERSON – HOW TO ACCESS GLOBAL CROSSING
WEB MEETING
1. To start an audio conference, dial your toll-free Ready-Access® conferencing number and enter
your 7 digit Ready-Access® Web Meeting access code when prompted.
2. To start a web conference, go to http://www.globalcrossing.com/conferencing and under Quick
Links section under Web Meeting, click on Start/Manage/Archive and enter your chairperson
access code and passcode in the spaces provided to log into the Conference Center.
3. Click on the Login button to enter the conference center and begin your web conference, which
allows you to manage your meeting invites, recordings and reports. If this is your first time
logging into the service, you will also be prompted to accept a security certificate. Choose Yes to
permanently accept the certificate.
4. Once the Java applet has finished loading, click Start a Meeting to begin your web conference.
5. The Web Meeting log in screen will appear with your Global Crossing Web Meeting credentials
pre-populated. Click the Login button. The Chairperson Conference Controls are displayed on
the next page.
6. Click Start Web Conference to begin your web conference and add additional security codes if
you wish.
7. For assistance anytime using Global Crossing Web Meeting while on your Ready-Access call, dial
on your phone handset. Contact Customer Support at 888.447.1119 in the U.S., 800.668.4703 in
Canada or +1 303.389.4018 in all other countries.
PARTICIPANTS – HOW TO JOIN GLOBAL CROSSING WEB
MEETING
Participants may join by:
1. Going to http://www.globalcrossing.com/conferencing, under Quick Links under Web Meeting,
click on Join as a Participant and enter the Ready-Access Toll free phone number and 7 digit
Return to Table of Contents
access code given to you by the chairperson in the participant login space provided. Click Submit
to enter the conference.
2. You will be taken to the participant registration page. You will be placed into conference and
will see the chairperson’s splash screen. The participant interface is displayed below. If you log
on before the chairperson has started the conference you will be placed into the lobby.
EQUIPMENT/SOFTWARE NEEDS
-
-
Chairperson
o Ready-Access customers are automatically Global Crossing Web Meeting enabled which
allows them to host and create meetings. The Chairperson does not require any further
equipment to use Global Crossing Web Meeting other than a computer, high-speed
Internet connection and browser. There is a browser plug-in required to use Global
Crossing Web Meetings which is downloaded automatically the first time a Chairperson
starts/joins a Web Meeting. There is no charge for the download.
Participant
o In order to participate in a Web Meeting, the participant needs only a computer, highspeed Internet connection and browser. There is a browser plug-in required to use Web
Meeting which is downloaded automatically the first time a participant joins a Web
Meeting. There is no charge for the download.
PODCAST FEEDS AND SUBSCRIPTION PAGE
These features allow you to customize your feed settings and facilitates the feed publishing process to
your subscribers on a regular basis. Once you have customized your podcast, you can publish it by
clicking the Publish Podcast checkbox to generate the URL to your subscription page. You can distribute
the link to this page to potential subscribers. It will walk them through the subscription process. Your
subscribers can subscribe to:
1. Audio & Visual Podcast Feed – Your subscribers can use this option to play your podcast
episodes in iTunes, video-capable iPods, and other portable music players that support video.
2. Audio-Only Podcast Feed – Your subscribers can use this option to play your podcast episodes
on iPods and other music players that do not support video.
3. Online Audio & Video Playback – Your subscribers can use this option to play your podcast
episodes in a web-based feed reader.
ADD RECORDINGS TO YOUR PODCAST FEED
Both audio only and audio and web recordings can be added to your podcast feed. To add recordings:
Return to Table of Contents
1. Click “Manage Recordings” in the Conference Center under Ready-Access® Web Meeting Tools.
2. Locate the recording you want to add to your podcast feed and click the “Podcast” checkbox.
3. An information pop-up titled “Podcast Options” will appear. Fill in the basic information, click “Save.”
EDIT RECORDINGS
You can customize your recording by creating cut points that allow you to remove portions of the
recording for a more professional playback.
1. You must log into the conference center with your credentials, access Manage recordings, and
select a recording, and choose Edit recording.
2. Enter the beginning and ending counter times for the portions of the recording that you want to
remove.
3. When you click on the Add Cut Point button, your selection will be added to the Cut Points list.
Make Cuts button to process your changes. This may take several minutes. Note: You may
create as many cut points as you need to refine your recording.
4. Your playback will now reflect the cuts you have made. If you wish to discard your changes and
return to the original recording, click the Revert to Original button.
HELP
-
A “Help” button is available on selected screens. The Help button provides a file of general help
information
INSTALLING THE JAVA PLUGIN
-
If you do not already have the Java plug-in installed, the Global Crossing Web Meeting service
will automatically install it for you the first time that use Web Meeting. If you encounter
problems with this one-time installation please contact the Ready-Access Help Desk for
assistance.
SYSTEM REQUIREMENTS
-
Chairperson PC requires:
o Windows 98, 2000, NT, XP, Mac OS X 10.2, Linux
Return to Table of Contents
o
-
-
Internet Explorer 5.0 or greater, Netscape Navigator 4.7, Netscape 6.2 or 7.0, Mozilla 1.1
and higher
o JAVA 1.3.1_03 - 1.3.1_08, 1.4.1 (Chairperson will be prompted to download 1.3.1_07 the
first time the service is accessed.) If the Chairperson is using Netscape 6.2, they will
need to download JAVA 1.4.2
o Internet connection (best performance is DSL and above)
Participant PC requires:
o Windows 98, 2000, NT, XP, Mac OS X 10.2, Linux
o Internet Explorer 5.0 or greater, Netscape Navigator 4.0 or greater, Mozilla 1.1 and
higher
o No downloads or special programs are required for participants to view presentations
o Internet connection (dial up will work, but slower on slide updates)
Recording playback requirements:
o Multimedia PC with speakers
o Internet connection
o Windows Media Player or RealNetworks Player
For questions about Ready-Access or Global Crossing Web Meeting, please call 888.447.1119 in the
U.S., 800.668.4703 in Canada, +1 303.389.4018 in all other countries at any time or visit
https://enrollment.themeetingson.com/custcarenumbers/ for a complete list of global tollfree/freephone Customer Care numbers.
Return to Table of Contents