1
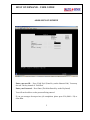
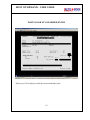
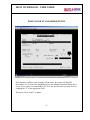
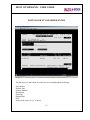
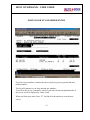
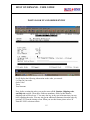
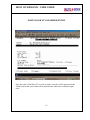
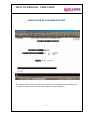
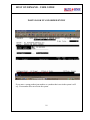
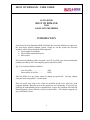
HOST ON DEMAND – USER GUIDE
AUTO SENSE
HOST ON DEMAND
FOR
ASSOCIATE MEMBERS
INTRODUCTION
Auto Sense Host On Demand (HOD) will allow the Associate Members to sign on to
the Auto Sense AS400 computer system. Going live on the system, the associate
members will be able perform the following tasks:
• Check product availability
• Check Jobber and member price
• Place orders
Each Associate Member will be assigned a user ID. It will be your Associate Member
number preceded by AM. The temporary password will be HOD.
E.g.: For Associate Member Number 1
User ID will be……………..:
Password for all will be…….:
AM1
HOD
After the HOD is set up, please ensure to change you password. You may change
your password using option –2 on the menu.
This user guide may seem to be a little too detailed for the users who have good
computer aptitude. Basically most of the options are self explanatory. If you face any
difficulty in understanding what is explained here, or have any problem with Host On
Demand options, please call Kim or Sylvia at head office. For technical support you
may call Rahim or Dave.
1
HOST ON DEMAND – USER GUIDE
AS400 SIGN ON SCREEN
Enter your user ID - Press ‘Field Exit’ (Enter Key on the Numeric Pad). You many
also use Tab key instead of ‘Field Exit’
Enter your Password - Press Enter (The Main Enter Key on the Keyboard)
You will not be able to see the password being entered.
If you get messages about previous job completion, please press F16 (Shift + F4) to
clear them.
2
HOST ON DEMAND – USER GUIDE
AS400 – MENU
Option 1 from this menu allows to look-up parts in the Auto Sense warehouses for
availability, pricing etc. This option also allows you to place orders to the warehouse
at the same time.
3
HOST ON DEMAND – USER GUIDE
PARTS LOOK UP AND ORDER ENTRY
Take Option one from the menu. This screen will be displayed.
Member number will be defaulted to the member accessing the AS400 and to the
closest Auto Sense warehouse.
4
HOST ON DEMAND – USER GUIDE
PARTS LOOK UP AND ORDER ENTRY
For members having more than one branch/store, the Member number will be
defaulted to the main branch. By pressing F4 the user can display all the
branches/stores for the member. See next page.
5
HOST ON DEMAND – USER GUIDE
PARTS LOOK UP AND ORDER ENTRY
The ordering store can be selected by keying ‘X’ on the field provided on the left hand
side of the store details and pressing Enter.
6
HOST ON DEMAND – USER GUIDE
PARTS LOOK UP AND ORDER ENTRY
The store number can also be manually entered in the field for Member Number.
The second field is for the Auto Sense warehouse. Also defaulted to the warehouse
you normally place your stock orders from.
To go to the next screen please ‘Enter’
7
HOST ON DEMAND – USER GUIDE
PARTS LOOK UP AND ORDER ENTRY
Key in the product/part Number and press ‘Enter’. See next page.
The product details will be displayed.
If the part number belongs to more than one product line, a list of product lines will be
displayed and you will have to choose one.
8
HOST ON DEMAND – USER GUIDE
PARTS LOOK UP AND ORDER ENTRY
The following product details will be displayed:
Product Number
Description
Superseding product number (if any).
Member price
Jobber price
Selling unit (order in multiples of)
Stock Unit (priced unit. E.g. EA-Each, PK-Pack, CS-Case, BX-Box, KT-Kit, RL-Roll,
DP-xx, PR-xx, ST-xxx).
Quantity Available – Ontario warehouse and B.C. warehouse.
9
HOST ON DEMAND – USER GUIDE
PARTS LOOK UP AND ORDER ENTRY
Please press F10 to display or hide the Associate Member price.
10
HOST ON DEMAND – USER GUIDE
PARTS LOOK UP AND ORDER ENTRY
Please key in the quantity required and press ‘Enter’. The Qty filled will be displayed.
Press F7 to update.
11
HOST ON DEMAND – USER GUIDE
PARTS LOOK UP AND ORDER ENTRY
If the Quantity available is not enough to fill the order, the system will flag B/O
(backorder) or L/S (Lost Sale) depending on how the Member/Customer Master file is
set up. If you want to override the B/O or L/S for this specific order you may do so by
changing the ‘Y’ to the appropriate field.
Then press ‘Enter’ and F7 to update.
12
HOST ON DEMAND – USER GUIDE
PARTS LOOK UP AND ORDER ENTRY
The line moves to the bottom section of the screen displaying the following:
Line number
Product Line
Product Number
Description
Order Qty
Shipped Qty
Price
Status of the order ( E.g. C-Cancel)
13
HOST ON DEMAND – USER GUIDE
PARTS LOOK UP AND ORDER ENTRY
If you have more numbers, continue the process by Keying in new product line and
product number.
This list will continue as you keep entering new numbers.
You will be able to see a cumulative value of your order on the top right hand side of
the screen. It will be displayed as ‘Order Value’.
When you finish your order. Press ‘F7’ for End of Order and move on to the next
screen.
14
HOST ON DEMAND – USER GUIDE
PARTS LOOK UP AND ORDER ENTRY
It will display the following information on the order you entered:
# of lines in your order
Order Value
Taxes
Total Amount
Now, before creating the order, you need to enter a P.O. Number, Shipping code,
and Ship via sections. These three fields are mandatory fields. In this instance,
shipping code will be always 3. You may also key in any special instructions you may
have regarding the order. You may also put in additional comments about the order by
pressing ‘F9’ from the closing screen. When you use this feature please select ‘B’
from the ‘P/I/B’ selection criteria.
15
HOST ON DEMAND – USER GUIDE
PARTS LOOK UP AND ORDER ENTRY
Once the order is final Press F7 to create an order. An order will be generated in the
AS400 system and a pick ticket will be printed in the Auto Sense warehouse right
away.
16
HOST ON DEMAND – USER GUIDE
PARTS LOOK UP AND ORDER ENTRY
The system will go back to the first screen and will also display the order number that
is created. You may note down the order number for future reference.
17
HOST ON DEMAND – USER GUIDE
PARTS LOOK UP AND ORDER ENTRY
If you enter a wrong product/part number or a number that is not in the system it will
say, ‘Part number does not exist in the system.’
18
HOST ON DEMAND – USER GUIDE
PARTS LOOK UP AND ORDER ENTRY
If you enter a part number that is superseded to or replaced by another number, it will
display the superseding number. You may select the superseding number by pressing
F5. The details for the superseding number will be displayed.
19
HOST ON DEMAND – USER GUIDE
PARTS LOOK UP AND ORDER ENTRY
Once the superseding number is displayed, continue as before.
20
HOST ON DEMAND – USER GUIDE
PARTS LOOK UP AND ORDER ENTRY
If you enter a quantity that is not in multiples of selling unit, it will say: ‘Order
quantity must be in multiples of selling unit. The selling unit will be highlighted for
your immediate attention.
You may change your order quantity and press ‘Enter’ to proceed.
21
HOST ON DEMAND – USER GUIDE
PARTS LOOK UP AND ORDER ENTRY
If you need to make any changes to any line that you have already entered, you may
enter the line number in the field ‘Change/Delete’. Press ‘Enter’ to display the part
number details and make necessary changes or put ‘C’ in the Cancel field and then
press ‘Enter’ again to effect the changes.
See an example on the next two pages.
22
HOST ON DEMAND – USER GUIDE
PARTS LOOK UP AND ORDER ENTRY
For product number 934-100, original quantity entered is 1.
23
HOST ON DEMAND – USER GUIDE
PARTS LOOK UP AND ORDER ENTRY
Part is called back and order qty changed to 2.
24
HOST ON DEMAND – USER GUIDE
PARTS LOOK UP AND ORDER ENTRY
Your screen after changing the order should appear like this.
25
HOST ON DEMAND – USER GUIDE
PARTS LOOK UP AND ORDER ENTRY
When your cursor is in the field ‘Product Line’ you may press ‘F4’ to display a list of
product lines. See next page.
26
HOST ON DEMAND – USER GUIDE
PARTS LOOK UP AND ORDER ENTRY
Select the product line you want by keying an ‘X’ in the field provided on the left
hand side of the product line and ‘Enter’. See next page.
27
HOST ON DEMAND – USER GUIDE
PARTS LOOK UP AND ORDER ENTRY
The desired product line will be selected.
28
HOST ON DEMAND – USER GUIDE
PARTS LOOK UP AND ORDER ENTRY
You may do the same search for product/part numbers when you are in the field
‘Product Number’ by pressing ‘F4’ and then select the desired product number.
29
HOST ON DEMAND – USER GUIDE
PARTS LOOK UP AND ORDER ENTRY
After selecting the product line and product number using search feature. Press ‘Enter’
to continue.
30