1
Cisco Service and Application Module for
IP User Guide
June 2013
Americas Headquarters
Cisco Systems, Inc.
170 West Tasman Drive
San Jose, CA 95134-1706
USA
http://www.cisco.com
Tel: 408 526-4000
800 553-NETS (6387)
Fax: 408 527-0883
Text Part Number: OL-13003-06
THE SPECIFICATIONS AND INFORMATION REGARDING THE PRODUCTS IN THIS MANUAL ARE SUBJECT TO CHANGE WITHOUT NOTICE. ALL
STATEMENTS, INFORMATION, AND RECOMMENDATIONS IN THIS MANUAL ARE BELIEVED TO BE ACCURATE BUT ARE PRESENTED WITHOUT
WARRANTY OF ANY KIND, EXPRESS OR IMPLIED. USERS MUST TAKE FULL RESPONSIBILITY FOR THEIR APPLICATION OF ANY PRODUCTS.
THE SOFTWARE LICENSE AND LIMITED WARRANTY FOR THE ACCOMPANYING PRODUCT ARE SET FORTH IN THE INFORMATION PACKET THAT
SHIPPED WITH THE PRODUCT AND ARE INCORPORATED HEREIN BY THIS REFERENCE. IF YOU ARE UNABLE TO LOCATE THE SOFTWARE LICENSE
OR LIMITED WARRANTY, CONTACT YOUR CISCO REPRESENTATIVE FOR A COPY.
The Cisco implementation of TCP header compression is an adaptation of a program developed by the University of California, Berkeley (UCB) as part of UCB’s public
domain version of the UNIX operating system. All rights reserved. Copyright © 1981, Regents of the University of California.
NOTWITHSTANDING ANY OTHER WARRANTY HEREIN, ALL DOCUMENT FILES AND SOFTWARE OF THESE SUPPLIERS ARE PROVIDED “AS IS” WITH
ALL FAULTS. CISCO AND THE ABOVE-NAMED SUPPLIERS DISCLAIM ALL WARRANTIES, EXPRESSED OR IMPLIED, INCLUDING, WITHOUT
LIMITATION, THOSE OF MERCHANTABILITY, FITNESS FOR A PARTICULAR PURPOSE AND NONINFRINGEMENT OR ARISING FROM A COURSE OF
DEALING, USAGE, OR TRADE PRACTICE.
IN NO EVENT SHALL CISCO OR ITS SUPPLIERS BE LIABLE FOR ANY INDIRECT, SPECIAL, CONSEQUENTIAL, OR INCIDENTAL DAMAGES, INCLUDING,
WITHOUT LIMITATION, LOST PROFITS OR LOSS OR DAMAGE TO DATA ARISING OUT OF THE USE OR INABILITY TO USE THIS MANUAL, EVEN IF CISCO
OR ITS SUPPLIERS HAVE BEEN ADVISED OF THE POSSIBILITY OF SUCH DAMAGES.
CCDE, CCENT, CCSI, Cisco Eos, Cisco Explorer, Cisco HealthPresence, Cisco IronPort, the Cisco logo, Cisco Nurse Connect, Cisco Pulse, Cisco SensorBase,
Cisco StackPower, Cisco StadiumVision, Cisco TelePresence, Cisco TrustSec, Cisco Unified Computing System, Cisco WebEx, DCE, Flip Channels, Flip for Good, Flip
Mino, Flipshare (Design), Flip Ultra, Flip Video, Flip Video (Design), Instant Broadband, and Welcome to the Human Network are trademarks; Changing the Way We Work,
Live, Play, and Learn, Cisco Capital, Cisco Capital (Design), Cisco:Financed (Stylized), Cisco Store, Flip Gift Card, and One Million Acts of Green are service marks; and
Access Registrar, Aironet, AllTouch, AsyncOS, Bringing the Meeting To You, Catalyst, CCDA, CCDP, CCIE, CCIP, CCNA, CCNP, CCSP, CCVP, Cisco, the
Cisco Certified Internetwork Expert logo, Cisco IOS, Cisco Lumin, Cisco Nexus, Cisco Press, Cisco Systems, Cisco Systems Capital, the Cisco Systems logo, Cisco Unity,
Collaboration Without Limitation, Continuum, EtherFast, EtherSwitch, Event Center, Explorer, Follow Me Browsing, GainMaker, iLYNX, IOS, iPhone, IronPort, the
IronPort logo, Laser Link, LightStream, Linksys, MeetingPlace, MeetingPlace Chime Sound, MGX, Networkers, Networking Academy, PCNow, PIX, PowerKEY,
PowerPanels, PowerTV, PowerTV (Design), PowerVu, Prisma, ProConnect, ROSA, SenderBase, SMARTnet, Spectrum Expert, StackWise, WebEx, and the WebEx logo are
registered trademarks of Cisco and/or its affiliates in the United States and certain other countries.
All other trademarks mentioned in this document or website are the property of their respective owners. The use of the word partner does not imply a partnership relationship
between Cisco and any other company. (1002R)
Any Internet Protocol (IP) addresses and phone numbers used in this document are not intended to be actual addresses and phone numbers. Any examples, command display
output, network topology diagrams, and other figures included in the document are shown for illustrative purposes only. Any use of actual IP addresses or phone numbers in
illustrative content is unintentional and coincidental.
Cisco Service and Application Module for IP User Guide
© 2013 Cisco Systems, Inc. All rights reserved.
CONTENTS
About this Guide
Audience
1
1
Documentation Objectives
1
Documentation Organization
2
Documentation Conventions
2
Safety Warnings
3
Related Documentation
9
Obtaining Documentation, Obtaining Support, and Security Guidelines
CHAPTER
1
Cisco Service and Application Module for IP Overview
10
1-1
Cisco Service and Application Module for IP Overview 1-1
Hardware Features 1-3
Backplane Interface 1-4
Line Card Control Processor 1-4
Classification and Distribution Engine 1-4
Network Processor 1-4
Daughter Cards 1-5
Security Processor 1-5
Compact Flash Memory 1-5
Software/Firmware Features 1-6
Packet Egress Through IXP 1-6
MAC Propagation to IXP for IPv4/IPv6 Addresses 1-6
IXP Configuration Using Packet Trailers for CSG2 R5.0 1-6
IPC Load Management 1-7
PPC Configuration File Storage on the Supervisor Engine 1-7
Remote Console and Logging 1-7
Session Support 1-7
Health Monitoring 1-8
High Availability 1-8
Hot Fabric Sync 1-8
IEEE 802.1 Q-in-Q VLAN Tag Termination 1-9
Cisco Software Application Support 1-9
Front Panel Description
Status LED 1-10
1-10
Cisco Service and Application Module for IP User Guide
OL-13003-06
iii
Contents
Reset Button 1-11
USB Port 1-12
RJ-45 Console Connector
1-12
System Requirements and Specifications
System Requirements 1-12
Power Requirements 1-13
Memory Requirements 1-13
Environmental Requirements 1-13
Physical Specifications 1-13
Agency Approvals 1-14
CHAPTER
2
Installing the Cisco SAMI
1-12
2-1
Preparing to Install the SAMI 2-1
Safety Guidelines 2-1
Safety with Equipment 2-2
Safety with Electricity 2-2
Preventing Electrostatic Discharge Damage 2-3
Verifying System and Site Requirements 2-4
Site Requirements 2-4
Unpacking and Checking the Contents of your Shipment
Required Tools 2-5
Reviewing Safety Recommendations 2-5
Installing the SAMI
Removing a SAMI
CHAPTER
3
2-6
2-11
Configuring the Cisco SAMI
Before You Begin
2-5
3-1
3-1
Establishing Console Sessions 3-2
Configuring a Virtual Terminal Line Settings 3-2
Establishing a Console Session with the SAMI LCP
Assigning a Hostname to the SAMI LCP 3-3
Configuring the SAMI Inactivity Timeout 3-3
Establishing a Session with a SAMI PPC 3-4
Assigning a Hostname to a SAMI PPC 3-5
3-2
Enabling the Supervisor to Store PPC Startup Configuration Files
Configuring VLAN Support 3-10
Permitting VLAN Traffic to Cisco SAMI 3-10
Configuring VLANs for the SAMI PPCs 3-11
Creating and Assigning VLANs Groups to the SAMI
3-6
3-11
Cisco Service and Application Module for IP User Guide
iv
OL-13003-06
Contents
Configuring a Switched Virtual Interface on the MSFC
Configuring the VLAN Interfaces on the SAMI PPCs 3-14
Configuring Cisco IOS PPCs 3-14
Configuring COSLI PPCs 3-16
Verifying the Configuration 3-17
Configuring Network Clock Synchronization
3-13
3-19
Configuring Remote Console and Logging 3-20
Configuring RCAL Support on the Supervisor 3-21
Configuring RCAL Support on a SAMI PPC 3-23
Configuring RCAL Support on the SAMI LCP 3-24
Using RCAL 3-24
Configuring the Cisco Software Application on a SAMI PPC
L2 Connectivity Between SAMIs 3-28
4GB DRAM Support 3-29
3-27
SAMI Coredump, Crashinfo and Debuginfo Support 3-29
Debug Info Generation During RF-Induced Reload 3-30
Singleip 3-30
CHAPTER
4
Maintaining and Monitoring the Cisco SAMI
4-1
Upgrading the SAMI Software 4-1
Verifying the SAMI Software Versions 4-2
Upgrading the SAMI Bundle from the Supervisor Engine
Managing the SAMI LCP Software 4-4
Saving and Viewing the LCP Configuration File 4-4
Saving the LCP Configuration File in Flash Memory
Viewing the LCP Configuration File 4-5
Using the SAMI LCP File System 4-5
Listing the Files in a Directory 4-6
Deleting Files 4-7
Viewing, Deleting, and Copying Core Dump Files 4-8
4-3
4-5
Manually Upgrading an LCP ROMMON Image 4-9
Verifying the LCP Software Version 4-9
Upgrading the LCP ROMMON Image When Using a Sup720/RSP720
Upgrading the LCP ROMMON Image When Using a Sup32 4-11
Manually Upgrading a PPC ROMMON Image
Reallocating SAMI PPC IO Memory
4-13
Recovering the SAMI 4-14
Recovering from a PPC Lockout
4-14
4-9
4-12
Cisco Service and Application Module for IP User Guide
OL-13003-06
v
Contents
Recovering—Session Loss 4-17
Recovering—LCP ROMMON or an Unstable LCP Image
Recovering—No Usable Image on the SAMI CF: 4-19
4-17
Configuring, Exporting, and Importing RSA Keys on a SAMI PPC
Establishing a Console Connection on the SAMI
4-20
4-23
Configuring Health Monitoring 4-24
PPC Health Monitoring 4-24
LCP Health Monitoring 4-27
Monitoring the SAMI
4-27
APPENDIX
A
Using the Command-Line Interfaces A-1
Using the Supervisor and SAMI Cisco IOS PPC CLI A-2
Getting Help A-2
Understanding Cisco IOS Command Modes A-2
Command-Line Completion A-4
Undoing a Command or Feature A-4
Saving Configuration Changes A-5
Using the Cisco SAMI LCP and COSLI PPC CLIs A-5
Using the SAMI LCP and COSLI PPC CLI Commands A-6
Getting CLI Help A-8
Using the ROM-Monitor CLI A-8
APPENDIX
B
Supervisor Console Commands
APPENDIX
C
SAMI Cisco IOS PPC Commands
APPENDIX
D
SAMI COSLI PPC Commands
APPENDIX
E
SAMI LCP Commands
B-1
C-1
D-1
E-1
Network Processor Console Command
E-45
GLOSSARY
Cisco Service and Application Module for IP User Guide
vi
OL-13003-06
About this Guide
This preface discusses the objectives, audience, organization, and conventions of this document.
Note
Use this document along with the documents listed in the “Related Documentation” section
on page 9.
•
Audience, page 1
•
Documentation Objectives, page 1
•
Documentation Organization, page 2
•
Documentation Conventions, page 2
•
Safety Warnings, page 3
•
Related Documentation, page 9
•
Obtaining Documentation, Obtaining Support, and Security Guidelines, page 10
Audience
This user guide is written for network administrators and other people who are responsible for setting
up, installing, configuring, and maintaining the Cisco Service Application Module for IP (SAMI).
Only trained and qualified service personal (as defined in IEC 60950 and AS/NZS3260) should install,
replace, or service the equipment described in this user guide.
Documentation Objectives
This user guide provides an overview of the Cisco SAMI, including its physical and functional features.
Instructions on how to install and remove the SAMI, how to load images onto the module, and how to
complete the initial configuration required for the SAMI to operate in your Cisco 7600 Series Router are
included.
Note
This document does not include configuration information for the Cisco software application running on
the SAMI processors. For configuration on this, see the documentation for that application and refer to
the “Related Documentation” section on page 9.
Cisco Service and Application Module for IP User Guide
OL-13003-06
1
About this Guide
Documentation Organization
This user guide is organized as follows:
Chapter
Chapter Title
Description
1
Cisco Service and
Application Module for
IP Overview
Describes the SAMI architecture, software and hardware
features, and system requirements.
2
Installing the Cisco SAMI Describes general safety recommendations, site
preparations, required tools and equipment, and provides
steps to install, remove, and verify the installation of a
SAMI in your Cisco 7600 Series Router.
3
Configuring the Cisco
SAMI
Describes how to complete the configuration required to
for the SAMI to operate in the Cisco 7600 Series Router.
4
Maintaining and
Monitoring the Cisco
SAMI
Describes how to maintain and monitor the SAMI,
including the steps on how to upgrade the SAMI software,
and configure maintenance-related functions such as
monitoring path health and allocating processor memory.
Appendix A
Using the Command-Line Provides basic information about using the various
Interfaces
command-line interfaces (CLIs).
Appendix B
Supervisor Console
Commands
Lists the commands supported at the Cisco Supervisor in
support of the Cisco SAMI, including the command syntax,
usage guidelines, and examples.
Appendix C
SAMI Cisco IOS PPC
Commands
Lists the commands supported at the SAMI Cisco IOS PPC
console in support of Cisco IOS software applications,
including the command syntax, usage guidelines, and
examples.
Appendix D
SAMI COSLI PPC
Commands
Lists the commands supported at the SAMI COSLI PPC
console in support of Cisco software applications,
including the command syntax, usage guidelines, and
examples.
Appendix E
SAMI LCP Commands
Lists the commands supported at the SAMI LCP console,
including the command syntax, usage guidelines, and
examples.
Documentation Conventions
This guide uses the following conventions:
Convention
Description
boldface font
Commands and keywords; user-entered text.
italic font
Variables for which you supply values.
[
Keywords or arguments that appear within square brackets are optional.
]
{x | y | z}
A choice of required keywords appears in braces separated by vertical bars. You must select one.
screen font
Examples of information displayed on the screen.
Cisco Service and Application Module for IP User Guide
2
OL-13003-06
About this Guide
Convention
Description
boldface screen
Examples of information you must enter.
font
<
>
Nonprinting characters (for example, passwords) appear in angle brackets.
[
]
Default responses to system prompts appear in square brackets.
Note
Timesaver
Tip
Caution
Means take note. Notes contain helpful suggestions or references to material not covered in the user
guide.
Means the described action saves time.
Means the following information will help you solve a problem.
Means be careful “to avoid any action” that could result in equipment damage or loss of data.
Safety Warnings
Safety warnings appear throughout this user guide in procedures that, if performed incorrectly, might
harm you. A warning symbol precedes each warning statement. The safety warnings provide safety
guidelines that you should follow when working with any equipment that connects to electrical power
or telephone wiring. Included in the warnings are translations in several languages.
Cisco Service and Application Module for IP User Guide
OL-13003-06
3
About this Guide
Warning
IMPORTANT SAFETY INSTRUCTIONS
This warning symbol means danger. You are in a situation that could cause bodily injury. Before you
work on any equipment, be aware of the hazards involved with electrical circuitry and be familiar
with standard practices for preventing accidents. Use the statement number provided at the end of
each warning to locate its translation in the translated safety warnings that accompanied this
device. Statement 1071
SAVE THESE INSTRUCTIONS
Waarschuwing
BELANGRIJKE VEILIGHEIDSINSTRUCTIES
Dit waarschuwingssymbool betekent gevaar. U verkeert in een situatie die lichamelijk letsel kan
veroorzaken. Voordat u aan enige apparatuur gaat werken, dient u zich bewust te zijn van de bij
elektrische schakelingen betrokken risico's en dient u op de hoogte te zijn van de standaard
praktijken om ongelukken te voorkomen. Gebruik het nummer van de verklaring onderaan de
waarschuwing als u een vertaling van de waarschuwing die bij het apparaat wordt geleverd, wilt
raadplegen.
BEWAAR DEZE INSTRUCTIES
Varoitus
TÄRKEITÄ TURVALLISUUSOHJEITA
Tämä varoitusmerkki merkitsee vaaraa. Tilanne voi aiheuttaa ruumiillisia vammoja. Ennen kuin
käsittelet laitteistoa, huomioi sähköpiirien käsittelemiseen liittyvät riskit ja tutustu
onnettomuuksien yleisiin ehkäisytapoihin. Turvallisuusvaroitusten käännökset löytyvät laitteen
mukana toimitettujen käännettyjen turvallisuusvaroitusten joukosta varoitusten lopussa näkyvien
lausuntonumeroiden avulla.
SÄILYTÄ NÄMÄ OHJEET
Attention
IMPORTANTES INFORMATIONS DE SÉCURITÉ
Ce symbole d'avertissement indique un danger. Vous vous trouvez dans une situation pouvant
entraîner des blessures ou des dommages corporels. Avant de travailler sur un équipement, soyez
conscient des dangers liés aux circuits électriques et familiarisez-vous avec les procédures
couramment utilisées pour éviter les accidents. Pour prendre connaissance des traductions des
avertissements figurant dans les consignes de sécurité traduites qui accompagnent cet appareil,
référez-vous au numéro de l'instruction situé à la fin de chaque avertissement.
CONSERVEZ CES INFORMATIONS
Warnung
WICHTIGE SICHERHEITSHINWEISE
Dieses Warnsymbol bedeutet Gefahr. Sie befinden sich in einer Situation, die zu Verletzungen
führen kann. Machen Sie sich vor der Arbeit mit Geräten mit den Gefahren elektrischer Schaltungen
und den üblichen Verfahren zur Vorbeugung vor Unfällen vertraut. Suchen Sie mit der am Ende jeder
Warnung angegebenen Anweisungsnummer nach der jeweiligen Übersetzung in den übersetzten
Sicherheitshinweisen, die zusammen mit diesem Gerät ausgeliefert wurden.
BEWAHREN SIE DIESE HINWEISE GUT AUF.
Cisco Service and Application Module for IP User Guide
4
OL-13003-06
About this Guide
Avvertenza
IMPORTANTI ISTRUZIONI SULLA SICUREZZA
Questo simbolo di avvertenza indica un pericolo. La situazione potrebbe causare infortuni alle
persone. Prima di intervenire su qualsiasi apparecchiatura, occorre essere al corrente dei pericoli
relativi ai circuiti elettrici e conoscere le procedure standard per la prevenzione di incidenti.
Utilizzare il numero di istruzione presente alla fine di ciascuna avvertenza per individuare le
traduzioni delle avvertenze riportate in questo documento.
CONSERVARE QUESTE ISTRUZIONI
Advarsel
VIKTIGE SIKKERHETSINSTRUKSJONER
Dette advarselssymbolet betyr fare. Du er i en situasjon som kan føre til skade på person. Før du
begynner å arbeide med noe av utstyret, må du være oppmerksom på farene forbundet med
elektriske kretser, og kjenne til standardprosedyrer for å forhindre ulykker. Bruk nummeret i slutten
av hver advarsel for å finne oversettelsen i de oversatte sikkerhetsadvarslene som fulgte med denne
enheten.
TA VARE PÅ DISSE INSTRUKSJONENE
Aviso
INSTRUÇÕES IMPORTANTES DE SEGURANÇA
Este símbolo de aviso significa perigo. Você está em uma situação que poderá ser causadora de
lesões corporais. Antes de iniciar a utilização de qualquer equipamento, tenha conhecimento dos
perigos envolvidos no manuseio de circuitos elétricos e familiarize-se com as práticas habituais de
prevenção de acidentes. Utilize o número da instrução fornecido ao final de cada aviso para
localizar sua tradução nos avisos de segurança traduzidos que acompanham este dispositivo.
GUARDE ESTAS INSTRUÇÕES
¡Advertencia!
INSTRUCCIONES IMPORTANTES DE SEGURIDAD
Este símbolo de aviso indica peligro. Existe riesgo para su integridad física. Antes de manipular
cualquier equipo, considere los riesgos de la corriente eléctrica y familiarícese con los
procedimientos estándar de prevención de accidentes. Al final de cada advertencia encontrará el
número que le ayudará a encontrar el texto traducido en el apartado de traducciones que acompaña
a este dispositivo.
GUARDE ESTAS INSTRUCCIONES
Varning!
VIKTIGA SÄKERHETSANVISNINGAR
Denna varningssignal signalerar fara. Du befinner dig i en situation som kan leda till personskada.
Innan du utför arbete på någon utrustning måste du vara medveten om farorna med elkretsar och
känna till vanliga förfaranden för att förebygga olyckor. Använd det nummer som finns i slutet av
varje varning för att hitta dess översättning i de översatta säkerhetsvarningar som medföljer denna
anordning.
SPARA DESSA ANVISNINGAR
Cisco Service and Application Module for IP User Guide
OL-13003-06
5
About this Guide
Cisco Service and Application Module for IP User Guide
6
OL-13003-06
About this Guide
Aviso
INSTRUÇÕES IMPORTANTES DE SEGURANÇA
Este símbolo de aviso significa perigo. Você se encontra em uma situação em que há risco de lesões
corporais. Antes de trabalhar com qualquer equipamento, esteja ciente dos riscos que envolvem os
circuitos elétricos e familiarize-se com as práticas padrão de prevenção de acidentes. Use o
número da declaração fornecido ao final de cada aviso para localizar sua tradução nos avisos de
segurança traduzidos que acompanham o dispositivo.
GUARDE ESTAS INSTRUÇÕES
Advarsel
VIGTIGE SIKKERHEDSANVISNINGER
Dette advarselssymbol betyder fare. Du befinder dig i en situation med risiko for
legemesbeskadigelse. Før du begynder arbejde på udstyr, skal du være opmærksom på de
involverede risici, der er ved elektriske kredsløb, og du skal sætte dig ind i standardprocedurer til
undgåelse af ulykker. Brug erklæringsnummeret efter hver advarsel for at finde oversættelsen i de
oversatte advarsler, der fulgte med denne enhed.
GEM DISSE ANVISNINGER
Cisco Service and Application Module for IP User Guide
OL-13003-06
7
About this Guide
Cisco Service and Application Module for IP User Guide
8
OL-13003-06
About this Guide
Related Documentation
For additional information that might be helpful when installing and configuring the Cisco SAMI in your
Cisco 7600 Series Router, refer to the following:
•
Cisco Service and Application Module for IP Memory Upgrade Installation Note
•
Cisco 7600 Series Router platform:
– Release Notes for Cisco IOS Release 12.2SR for the Cisco 7600 Series Routers
– Cisco 7600 Series Router Installation Guide
– Cisco 7600 Series Router Module Installation Guide
– Cisco 7600 Series Router Cisco IOS Command Reference
– Cisco 7600 Series Router Cisco IOS System Message Guide
– For information about MIBs, refer to:
http://www.cisco.com/public/sw-center/netmgmt/cmtk/mibs.shtml
These documents are available at:
– Cisco 7600 Series Router home page on Cisco.com
Products & Solutions > Products > Routers and Routing Systems > 7600 Series Routers
– Cisco 7600 Series Router technical documentation on Cisco.com
Products & Solutions > Products > Routers and Routing Systems > 7600 Series Routers >
in the Technical Documentation & Tools box on the right of the page, Cisco 7600 Series
Routers
•
Cisco mobile wireless software applications that are supported on the Cisco SAMI include:
– Cisco Wireless Security Gateway
Cisco 7600 Wireless Security Gateway, Release 2.0 Configuration Guide (and above)
Release Notes for the Cisco 7600 Wireless Security Gateway, Release 2.0 (and above)
– Cisco Broadband Wireless Gateway (formerly the Cisco ASN Gateway)
Cisco Broadband Wireless Gateway for IOS Release 12.4(15)XL1 (and above)
Cisco Broadband Wireless Gateway 1.1 Command Reference, IOS Release 12.4(15)XL1
(and above)
– Cisco Content Services Gateway (2nd Generation CSG2)
Release Notes for Cisco Content Services Gateway - 2nd Generation
Cisco Content Services Gateway - 2nd Generation Installation and Configuration Guide
– Cisco Gateway GPRS Support Node (GGSN)
Release Notes for Cisco GGSN Release 8.0 on the Cisco SAMI, Cisco IOS Release 12.4(15)XQ
(and above)
Cisco GGSN Release 8.0 Configuration Guide, Cisco IOS Release 12.4(15)XQ (and above)
Cisco GGSN Release 8.0 Command Reference, Cisco IOS Release 12.4(15)XQ (and above)
Cisco Service and Application Module for IP User Guide
OL-13003-06
9
About this Guide
– Cisco Mobile Wireless Home Agent (HA)
Cisco Mobile Wireless Home Agent Feature for IOS 12.4(15)XM
Command Reference for Cisco Mobile Wireless Home Agent Feature for Cisco IOS
Release 12.4(15)XM
Release Notes for the Cisco Mobile Wireless Home Agent Feature for Cisco IOS Release
12.4(15)XM
– Cisco IP Transfer Point, Cisco IOS Release 12.2(25)IRA and above
http://www.cisco.com/en/US/products/sw/wirelssw/ps1862/products_feature_guides_list.html
– Cisco Packet Data Serving Node (PDSN)
Cisco Packet Data Serving Node (PDSN) Release 3.5 for Cisco IOS Release 12.4(15)XN
Cisco PDSN Command Reference for IOS Release 12.4(15)XN
Obtaining Documentation, Obtaining Support, and Security
Guidelines
For information on obtaining documentation, obtaining support, providing documentation feedback,
security guidelines, and also recommended aliases and general Cisco documents, see the monthly
What’s New in Cisco Product Documentation, which also lists all new and revised Cisco technical
documentation, at:
http://www.cisco.com/en/US/docs/general/whatsnew/whatsnew.html
Cisco Service and Application Module for IP User Guide
10
OL-13003-06
CH A P T E R
1
Cisco Service and Application Module for IP
Overview
This chapter describes the Cisco Service and Application Module for IP (SAMI).
•
Cisco Service and Application Module for IP Overview, page 1-1
•
Front Panel Description, page 1-10
•
System Requirements and Specifications, page 1-12
Cisco Service and Application Module for IP Overview
The following versions of the Cisco SAMI are available:
•
Cisco Service and Application Module for IP (WS-SVC-SAMI-BB-K9)
•
spare Cisco Service and Application Module for IP (WS-SVC-SAMI-BB-K9=)
Additionally, a 4-GB memory option is available (MEM-SAMI-6P-4GB).
SAMI 4.0 will support 4GB DIMMs in addition to the presently supported 2GB DIMMs.
The SAMI hardware limits the number of ranks to 2.
Note
Please reference the documentation for the Cisco software application you are using to determine if the
4-GB memory option is supported.
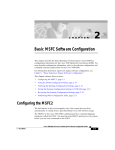
The Cisco SAMI, is a high-performance Cisco software application module that occupies one slot in the
Cisco 7600 Series Router platform.
With an IXP2800 network processor flow-distributor running at 1.4 GHz, and six PowerPCs (PPC)
running an instance of the same version of a Cisco software application at 1.25 GHz, the Cisco SAMI
offers a parallel architecture for Cisco software applications such as the Cisco Content
Services Gateway - 2nd Generation (CSG2), the Cisco Gateway GPRS Support Node (GGSN), the Cisco
Mobile Wireless Home Agent (HA), the Cisco Wireless Security Gateway (WSG), the Cisco Broadband
Wireless Gateway and Cisco IP Transfer Point (ITP), and the Cisco Long Term Evolution (LTE) Gateway
products.
A session to each Cisco software application on a SAMI PCC can be established from the supervisor to
configure, monitor, and troubleshoot the application.
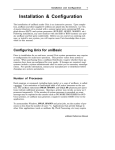
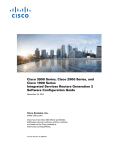
Figure 1-1 illustrates the SAMI architecture:
Cisco Service and Application Module for IP User Guide
OL-13003-06
1-1
Chapter 1
Cisco Service and Application Module for IP Overview
Cisco Service and Application Module for IP Overview
Figure 1-1
SAMI Architecture
DB1 Console
Proc 3
Gi0/0
Proc 4
Gi0/0
Proc 5
Bootflash
Bootflash
Crossbar switch
Crossbar switch
Switch Fabric Interface
Proc 6
Gi0/0
Proc 7
Gi0/0
Proc 8
EOBC
DDR
Bootflash
DDR
Daughter Board 2
Gi0/0
Module Console
DDR
Bootflash
DDR
Bootflash
DDR
Bootflash
Processor 0
Gi0/0
Line Card Control Processor
Crossbar switch
Daughter Board 1
Compact
Flash
DDR
DB2 Console
NP1 Console
Proc 2
Network Processor
NP2 Console
Security Processor
201747
Proc 1
Network Processor
Cisco Service and Application Module for IP User Guide
1-2
OL-13003-06
Chapter 1
Cisco Service and Application Module for IP Overview
Cisco Service and Application Module for IP Overview
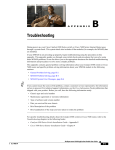
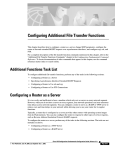
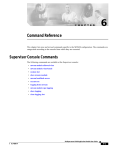
Figure 1-2 illustrates the flow of data on the SAMI.
Figure 1-2
SAMI Data Flow
Backplane
SAMI Base Card
Backplane interface
16bps Tx/Rx
LCP
IXP0
CDE
Security
Processor
IXP1
DC0
DC1
PPC 0
PPC 1
FPGA
PPC 2
PPC 0
PPC 1
PPC 2
201918
FPGA
The following sections describe the primary SAMI hardware and software features:
•
Hardware Features, page 1-3
•
Software/Firmware Features, page 1-6
Hardware Features
The SAMI provides the following hardware features:
•
Backplane Interface, page 1-4
•
Line Card Control Processor, page 1-4
•
Classification and Distribution Engine, page 1-4
•
Network Processor, page 1-4
•
Daughter Cards, page 1-5
Cisco Service and Application Module for IP User Guide
OL-13003-06
1-3
Chapter 1
Cisco Service and Application Module for IP Overview
Cisco Service and Application Module for IP Overview
Backplane Interface
The SAMI backplane interface is a switch fabric-enabled interface, with a supported bandwidth of
16 Gbps TX/RX.
Line Card Control Processor
On the SAMI, a BCM1250 dualcore CPU running at 700 MHz provides the following functionality as
the line card control processor (LCP):
•
Brings up the module and various basecard elements and the SAMI daughter cards (DC0 and DC1).
•
Interfaces with compact flash to store and retrieve daughter card images.
•
Interfaces with supervisor engine during an image bundle upgrade, and automatically upgrades the
PPC ROMMON images during the upgrade.
•
Provides an Ethernet Out-of-Band Channel (EOBC) interface to the daughter card PPCs that
supports features such as the session command, the execute-on command, and the remote console
and logging (RCAL) feature.
•
Monitors the module (for example, temperature and path health) and manages the various
components on the module.
•
Provides a 32-bit 33 MHz PCI interface to the network processor (IXP1) and daughter cards (DC0
and DC1).
•
Sends error messages to the supervisor engine.
Classification and Distribution Engine
The SAMI classification and distribution engine (CDE) classifies and distributes packets to various
source and destinations on the board and provides the Cisco 7600 Series Router chassis backplane
interface.
The data flows (Figure 1-2 on page 1-3) are as follows:
•
Backplane interface to the network processor (IXP0/1)—Ingress traffic is forwarded to IXPs based
on the CDE VLAN destination configuration.
•
Network processor (IXP0/1 to daughter card 1 (DC0) and daughter card 2 (DC1)—IXP0 classifies
traffic and forwards to DC0/DC1 PPCs.
•
DC0/DC1 to backplane interface—Egress traffic is forwarded to backplane interface. For some
applications such as PDSN, LTE PGW and LTE SGW, and the CSG 2, DC0/DC1 also sends packets
to Network Processor. Details are available in the respective applications guides.
•
LCP to/from DC0/DC1—Control/management traffic.
•
DC0 to DC1/DC1 to DC0—Inter-processor, inter-daughter card Cisco software application traffic.
Network Processor
A Intel IXP2800 network processor (IXP0/1) on the baseboard load balances which classifies ingress
packets for forwarding to the PPCs on the daughter cards.
Cisco Service and Application Module for IP User Guide
1-4
OL-13003-06
Chapter 1
Cisco Service and Application Module for IP Overview
Cisco Service and Application Module for IP Overview
Daughter Cards
The two SAMI daughter cards (DC0 and DC1) provide the following primary components:
•
First In, First Out (FIFO) queuing interfaces to the baseboard.
•
Complex programmable logic device (CPLD) that provides peripheral access.
•
Field programmable gate array (FPGA) that classifies and forwards ingress traffic from the network
processor to the PPCs, and forwards of egress traffic from the PPCs to the backplane interface.
•
Six PowerPC (PPC) SC8548H CPUs at 1.25 GHz that support:
– 2 GB double data rate 2 (DDR2) synchronous dynamic RAM (SDRAM) per PPC at 250
megahertz (MHz), upgradable to one 4 GB dual in-line memory module (DIMM) each.
– SAMI is enhanced with 4GB DRAM memory modules for each PPC giving a total of 24GB
memory per card. But, the available memory is limited to 3264MB per PPC (19GB per card),
due to the limitation of 32 bit architecture of the PPC.
– 32 MB bootflash in which to store ROMMON, nonvolatile variables, crashinfo, and user
filesystems.
– One instance of the same Cisco software application image. (Six instances of the same image
per SAMI.)
Each PPC on a SAMI runs the same version of a Cisco software application image. This is the
default installation during an image upgrade. Different Cisco software application images can run
on separate SAMIs within the same Cisco 7600 chassis.
There are two types PPC operating systems that can run on the Cisco SAMI PPCs - the Cisco IOS
or the Common OS Services Linux Infra (COSLI) operating system. The Cisco software application
determines the PPC operating system used.
All PPCs can function together as one entity.
The supervisor engine and the SAMI can be configured to store the running configuration of each
PPC on the supervisor engine, enabling a SAMI to be replaced while retaining PPC configurations.
•
Daughter card data path—32-bit FIFO at 125 MHz DDR (8 Gbps).
•
PPC data path—16-bit FIFO at 125 MHz single data rate (SDR) (2 Gbps).
Security Processor
The Nitrox-II security processor is used for packet encryption and decryption, as well as encapsulation
and decapsulation offload.
Compact Flash Memory
Configuration, software images, and core files are stored in the compact flash memory.
To generate core files from the TP, configure the singleip tftp-baseport port command. This command
is available for single IP SAMI
Cisco Service and Application Module for IP User Guide
OL-13003-06
1-5
Chapter 1
Cisco Service and Application Module for IP Overview
Cisco Service and Application Module for IP Overview
Software/Firmware Features
Note
Support for the following features is dependent upon the Cisco software application running on the Cisco
SAMI PPCs. To determine if a Cisco SAMI feature is supported by the application, refer to the
application documentation.
The SAMI provides the following software features:
•
PCI Based IXP IPC
•
Configuring Multiple IXPs
•
Packet Egress Through IXP, page 1-6
•
MAC Propagation to IXP for IPv4/IPv6 Addresses, page 1-6
•
IXP Configuration Using Packet Trailers for CSG2 R5.0, page 1-6
•
IPC Load Management, page 1-7
•
PPC Configuration File Storage on the Supervisor Engine, page 1-7
•
Remote Console and Logging, page 1-7
•
Session Support, page 1-7
•
Health Monitoring, page 1-8
•
High Availability, page 1-8
•
Hot Fabric Sync, page 1-8
•
IEEE 802.1 Q-in-Q VLAN Tag Termination, page 1-9
•
Cisco Software Application Support, page 1-9
Packet Egress Through IXP
This feature allows an enabled packet to go through IXP in the PPC egress path. Whether the packet goes
through IXP is determined internally by the application running over the PPC.
MAC Propagation to IXP for IPv4/IPv6 Addresses
This feature enables propagation of MAC addresses to the IXP. In the IXP dataplane, when the IXP
forwards the packet, it needs to know the MAC address of the next-hop. The MAC resolver helps by
maintaining an updated record of IP to MAC mapping using the data from ARP/IPv6 ND. It shares this
MAC information with the IXP, which in turn helps the IXP to pick up the destination MAC for the
packet.
This feature is an internal feature used to facilitate datapath acceleration, and not configurable by the
user.
IXP Configuration Using Packet Trailers for CSG2 R5.0
The Packet Trailers feature allows the CSG to add additional data at the end of an IP packet. The CSG
may use this to share some data with the IXP to facilitate an acceleration path. This feature is an internal
feature used to facilitate datapath acceleration, and not configurable by the user.
Cisco Service and Application Module for IP User Guide
1-6
OL-13003-06
Chapter 1
Cisco Service and Application Module for IP Overview
Cisco Service and Application Module for IP Overview
IPC Load Management
The IPC Management feature identifies and monitors resources that are critical for the IPC. The number
of IPC messages on the Cisco CSG2 application is expected to be high, thus the need to manage those
messages.
PPC Configuration File Storage on the Supervisor Engine
The PPC Configuration File Storage on the Supervisor feature enables the startup configuration file of
each of the SAMI PPCs to be stored in the supervisor engine bootflash. This feature enables a SAMI in
a specific slot to be replace without losing the configurations associated with each of the PPCs on the
SAMI.
For information about enabling this feature, see “Enabling the Supervisor to Store PPC Startup
Configuration Files” section on page 3-6.
Remote Console and Logging
Remote console and logging (RCAL) enables operators to use the supervisor engine console as a single
connection point from which to access the LCP and the PPCs on the SAMI daughter cards to control
debugging, display show commands, and view logging output for the PPCs on the SAMI.
For information about configuring RCAL support, see “Configuring Remote Console and Logging”
section on page 3-20.
Session Support
From the supervisor engine console, sessions to the SAMI LCP, network processor (IXP0), and the PPCs
can be established.
Note
The Cisco software application running on the SAMI PPCs might not support a console connection. To
determine if an application supports a connection, see the documentation for that application (see the
“Related Documentation” section on page 9).
Specifically, the following sessions, listed by number, can be established:
Session #
Component
0
LCP
1
IXP0
2
IXP1 (for future use)
3
DC0, PPC0
4
DC0, PPC1
5
DC0, PPC2
6
DC1, PPC0
7
DC1, PPC1
8
DC1, PPC2
Cisco Service and Application Module for IP User Guide
OL-13003-06
1-7
Chapter 1
Cisco Service and Application Module for IP Overview
Cisco Service and Application Module for IP Overview
For information about establishing sessions, see “Establishing Console Sessions” section on page 3-2.
For information on establishing a console connection, see “Establishing a Console Connection on the
SAMI” section on page 4-23.
Health Monitoring
A SAMI PPC can be configured to send probes to monitor the health of its path to the network processor,
or to monitor the health of all paths to the supervisor engine.
If a PPC does not receive a response to a probe that it has sent, it determines that there is an issue with
a path. If this condition occurs, the PPC can be configured to send a notification to the LCP that instructs
the LCP to reset the SAMI.
For more information about configuring health monitoring on the SAMI, see the “Configuring Health
Monitoring” section on page 4-24.
High Availability
High availability is provided through a stateful switchover redundancy scheme on the supervisor engine.
For information on configuring redundancy on the Cisco 7600, refer to the Cisco 7600 router
documentation in the “Related Documentation” section on page -9.
Hot Fabric Sync
The switch fabric module functionality is built into the Supervisor Engine 720 and the RSP720. When a
supervisor engine switchover occurs, a fabric switchover also occurs. During this process, the line cards
must resynchronize with the new active switch fabric. The Hot Fabric Sync feature, which is enabled by
default, keeps both the active and standby fabric in sync at the same time, minimizing the switchover
time and thereby minimizing any impact on switch fabric traffic. To verify the fabric sync status of active
and standby supervisors, enter the show fabric status command.
Cisco Service and Application Module for IP User Guide
1-8
OL-13003-06
Chapter 1
Cisco Service and Application Module for IP Overview
Cisco Service and Application Module for IP Overview
With Cisco IOS 12.2(33)SRC on the supervisor, this feature is supported on the Cisco 7603-S,
Cisco 7604, Cisco 7606-S, and Cisco 7609-S routers. With Cisco IP Transfer Point, Cisco IOS Release
12.2(25)IRA or later, the Hot Fabric Sync feature is supported on the SAMI.
For more information about the Hot Fabric Sync feature, refer to the Cisco 7600 documentation in the
“Related Documentation” section on page -9.
IEEE 802.1 Q-in-Q VLAN Tag Termination
The Cisco SAMI supports IEEE 802.1Q-in-Q VLAN Tag Termination.
Encapsulating IEEE 802.1Q VLAN tags within 802.1Q enables service providers to use a single VLAN
to support customers who have multiple VLANs. The IEEE 802.1Q-in-Q VLAN Tag Termination feature
on the subinterface level preserves VLAN IDs and keeps traffic in different customer VLANs segregated.
For information about configuring IEEE 802.1Q-in-Q VLAN Tag Termination support, see the
Cisco IOS LAN Switching Configuration Guide, Release 12.2SR.
Cisco Software Application Support
Each of the PPCs on a SAMI runs an instance of the same version of a Cisco software application image.
Multiple SAMIs running a different Cisco software application on its PPCs can be implemented within
the same chassis.
Note
There are two types PPC operating systems that can run on the Cisco SAMI PPCs - the Cisco IOS or the
Common OS Services Linux Infra (COSLI) operating system. The Cisco software application
determines the PPC operating system used.
The list of Cisco software applications supported on SAMI includes, but is not limited to, the following
Cisco software applications:
Note
•
Cisco Wireless Security Gateway, Release 1.0 or later.
•
Cisco Broadband Wireless Gateway, Cisco IOS Release 12.4(15)XL1 or later.
•
Cisco Content Services Gateway 2, Cisco IOS Release 12.3(11)MD or later.
•
Cisco GPRS Gateway Support Node, Cisco IOS Release 12.4(15)XQ or later.
•
Cisco Home Agent, Cisco IOS Release 12.4(15)XM or later.
•
Cisco IP Transfer Point, Cisco IOS Release 12.2(25)IRA or later.
•
Cisco Packet Data Serving Node, Cisco IOS Release 12.4(15)XR or later.
The features supported on the Cisco SAMI PPC are dependent on the Cisco software application running
on the SAMI PPCs. Refer to the Cisco software application documentation to determine if a feature is
supported by the SAMI for the application.
See the “Related Documentation” section on page 9 for a list of documents related to the Cisco software
applications.
Cisco Service and Application Module for IP User Guide
OL-13003-06
1-9
Chapter 1
Cisco Service and Application Module for IP Overview
Front Panel Description
Front Panel Description
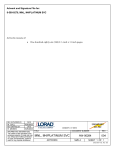
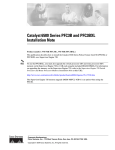
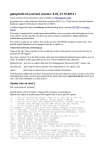
Figure 3 illustrates the front panel of the SAMI.
Figure 3
SAMI Front Panel
Reset button
US
AT
ST
SHUTDOWN
MODULE
CONSOLE
USB
APPLICATION CONTROL ENGINE SERVICE MODULE
Status LED
USB port
(not used)
201919
ACE10-6500-K9
RJ-45 Console
connector
This section describes the following components on the front panel:
•
Status LED, page 1-10
•
Reset Button, page 1-11
•
USB Port, page 1-12
•
RJ-45 Console Connector, page 1-12
Status LED
When you power on the SAMI, it initializes various hardware components and communicates with the
supervisor engine. The status LED indicates supervisor engine operations and initialization results.
During the normal initialization sequence, the status LED changes from off to red, orange, and green.
Note
For information about supervisor engine LEDs, see the Cisco 7600 Series Router Module Installation
Guide.
Table 1 describes status LED operation.
Cisco Service and Application Module for IP User Guide
1-10
OL-13003-06
Chapter 1
Cisco Service and Application Module for IP Overview
Front Panel Description
Table 1
Status LED Description
LED Color
Description
Off
Indicates one of the following conditions:
•
The SAMI is waiting for the supervisor engine to provide power.
•
The SAMI is offline.
•
The SAMI is not receiving power, which may be caused by one of the following:
– Power is not available to the module.
– Module temperature is over the limit.
Enter the show environment temperature mod command at the supervisor
engine command-line interface (CLI) to display the temperature of each of
the four sensors on the module.
Red
Orange
Indicates one of the following conditions:
•
The SAMI is released from reset by the supervisor engine and is booting.
•
The boot code failed to run.
Indicates one of the following conditions:
•
The SAMI is initializing hardware or communicating with the supervisor engine.
•
A fault occurred during the initialization sequence.
•
The SAMI failed to download its Field Programmable Gate Arrays (FPGAs) at
startup. The module continues with the remainder of the initialization sequence
and provides the module online status from the supervisor engine.
•
The SAMI has not received the module online status from the supervisor engine.
This problem may be caused by the supervisor engine detecting a failure in an
external loopback test that it issued to the module.
Green
The SAMI is operational; the supervisor engine has provided module online status.
Green to
Orange
The SAMI is disabled through the supervisor engine CLI using the no power enable
module command.
Reset Button
Caution
Do not remove the SAMI from the Cisco 7600 Series Router until the module has shut down completely
and the status LED is orange. To avoid damaging the SAMI, you must correctly shut down the module
before you remove it from the chassis or before you disconnect the power. You may damage the SAMI
if you remove it from the switch before it completely shuts down.
The Reset button manually shuts down the SAMI. To properly shut down the SAMI to prevent data loss,
enter the no power enable module command in configuration mode at the router CLI.
If the SAMI fails to respond to this command, shut down the module by using a small pointed object
(such as a paper clip) to access the Reset button on the front panel of the SAMI. The shutdown procedure
may take several minutes. The Status LED turns off when the module shuts down.
Cisco Service and Application Module for IP User Guide
OL-13003-06
1-11
Chapter 1
Cisco Service and Application Module for IP Overview
System Requirements and Specifications
USB Port
The USB port is not used.
RJ-45 Console Connector
In general, the SAMI RJ-45 console port is not used except for possibly some specific cases of
troubleshooting and recovery that might require accessing the LCP through the external console port.
System Requirements and Specifications
The following sections describe the system requirements and specifications for the SAMI:
•
System Requirements, page 1-12
•
Power Requirements, page 1-13
•
Memory Requirements, page 1-13
•
Environmental Requirements, page 1-13
•
Physical Specifications, page 1-13
•
Agency Approvals, page 1-14
System Requirements
Note
The supervisor engine module and its Cisco IOS software image is dependent on the supervisor engine
being used and the Cisco software application running on the Cisco SAMI processors.
For the hardware and software requirements of the Cisco software application you are running on the
Cisco SAMI, refer to the documentation for that application.
Before you install the SAMI with preloaded software in the Cisco 7600 series router chassis, ensure that
the chassis contains the following:
•
Any module that has ports to connect to the server and client networks.
•
Supervisor Engine 720, with a Multilayer Switch Feature Card, running Cisco IOS
Release 12.2(33)SRB1 and later.
or
Cisco 7600 Series Supervisor Engine 32, with a Multilayer Switch Feature Card, running Cisco
IOS Release 12.2(33)SRC and later. Supervisor Engine 32 support requires LCP ROMMON Version
12.2[121] and later on the Cisco SAMI.
For details on upgrading the Cisco IOS release running on the supervisor engine, refer to the
“Upgrading to a New Software Release” section in the Release Notes for Cisco IOS Release 12.2SR.
For information about verifying and upgrading the LCP ROMMON image on the Cisco SAMI, see
the “Manually Upgrading an LCP ROMMON Image” section on page 4-9.
The SAMI occupies a single slot in the Cisco 7600 Series Router chassis.
Cisco Service and Application Module for IP User Guide
1-12
OL-13003-06
Chapter 1
Cisco Service and Application Module for IP Overview
System Requirements and Specifications
The maximum number of SAMIs supported in one chassis is dependent on the Cisco software
application running on the SAMI PPCs. Therefore, for the maximum number of SAMIs supported in a
chassis, refer to the application documentation (see the “Related Documentation” section on page 9).
For more information on the Cisco 7600 Series Router, see the Cisco 7600 Series Router Installation
Guide:
http://www.cisco.com/en/US/products/hw/routers/ps368/prod_installation_guides_list.html
Power Requirements
The SAMI operates on power supplied by the Cisco 7600 Series Router. The SAMI power consumption
is 300 watts (1024 BTU/hr).
Memory Requirements
The SAMI memory is not configurable.
Environmental Requirements
Table 1-2 lists the environmental requirements for the SAMI.
Table 1-2
SAMI Environmental Requirements
Item
Specification
Temperature, ambient operating
0o to 40oC (32o to 104.5oF)
Temperature, ambient nonoperating
–40o to 70oC (40o to 158oF)
Humidity (RH), ambient (noncondensing)
operating
10% to 90%
Nonoperating relative humidity (noncondensing) 5% to 97%
Altitude
15,000 ft. above sea level (non-operational)
9,800 ft. above sea level (operational)
Airflow
350 LFM
Physical Specifications
Table 1-3 lists the physical specifications of the SAMI.
Table 1-3
SAMI Physical Specifications
Item
Specification
Dimensions (H x W x D)
1.2 x 14.4 x 16 in (3.0 x 35.6 x 40.6 cm)
Weight
12.15 lb.
Cisco Service and Application Module for IP User Guide
OL-13003-06
1-13
Chapter 1
Cisco Service and Application Module for IP Overview
System Requirements and Specifications
Agency Approvals
Emissions:
•
CE marking
•
EN 55022, 1998, class A
•
CISPR22, 1997, class A
•
AS/NZS CISPR 22 class A
•
CFR47, Part 15, class A
•
ICES 003 class A
•
VCCI Class A
•
EN61000-3-2 Harmonic Current Emission
•
EN61000-3-3 Voltage Fluctuation and Flicker
Immunity:
•
CE Marking
•
CISPR24, ITE-Immunity characteristics, Limits and methods of measurement
•
EN 55024, ITE-Immunity characteristics, Limits and methods of measurement
•
EN50082-1, Electromagnetic compatibility - Generic immunity standard
•
EN 300 386 Telecommunications Network Equipment (EMC)
•
EN61000-6-1 Generic Immunity Standard
Cisco Service and Application Module for IP User Guide
1-14
OL-13003-06
CH A P T E R
2
Installing the Cisco SAMI
This chapter provides information on installing the Cisco Service and Application Module for IP (SAMI)
in a Cisco 7600 Series Router chassis and includes the following topics:
•
Preparing to Install the SAMI, page 2-1
•
Installing the SAMI, page 2-6
•
Removing a SAMI, page 2-11
Preparing to Install the SAMI
This section provides information about preparing your site for installation. It includes the following
sections:
•
Safety Guidelines, page 2-1
•
Verifying System and Site Requirements, page 2-4
•
Unpacking and Checking the Contents of your Shipment, page 2-5
•
Required Tools, page 2-5
•
Reviewing Safety Recommendations, page 2-5
Safety Guidelines
Before you begin installing the SAMI, review the safety guidelines in this section to avoid injuring
yourself or damaging the SAMI.
Follow the “Reviewing Safety Recommendations” section on page 2-5 for specific safety information
when installing the SAMI in a Cisco 7600 Series Router chassis.
Caution
The SAMI is not hot-swappable. Do not remove the SAMI from the chassis until the SAMI has shut
down completely and the status LED is orange or off. If you remove the SAMI from the chassis before
it completely shuts down, you can damage the SAMI.
Cisco Service and Application Module for IP User Guide
OL-13003-06
2-1
Chapter 2
Installing the Cisco SAMI
Preparing to Install the SAMI
Safety with Equipment
Warning
Read the installation instructions before connecting the system to the power source. Statement 1004
The following guidelines help ensure your safety and protect the equipment. This list is not all- inclusive
of all potentially hazardous situations, so be alert.
•
Always disconnect all power cords and interface cables before moving the system.
•
Never assume that power is disconnected from a circuit; always check.
•
Keep the chassis area clear and dust-free during, before, and after installation.
•
Keep tools and assembly components away from walk areas where you or others could fall over
them.
•
Do not work alone if potentially hazardous conditions exist.
•
Do not perform any action that creates a potential hazard to people or makes the equipment unsafe.
•
Carefully examine your work area for possible hazards, such as moist floors, ungrounded power
extension cables, and missing safety grounds.
•
Do not wear loose clothing that may get caught in the chassis.
•
Wear safety glasses when working under conditions that may be hazardous to your eyes.
Safety with Electricity
Warning
Before performing any of the following procedures, ensure that power is removed from the DC circuit.
Statement 1003
Warning
This unit is intended for installation in restricted access areas. A restricted access area can be
accessed only through the use of a special tool, lock and key, or other means of security.
Statement 1017
Warning
Before working on equipment that is connected to power lines, remove jewelry (including rings,
necklaces, and watches). Metal objects will heat up when connected to power and ground and can
cause serious burns or weld the metal object to the terminals. Statement 43
Warning
Before working on a chassis or working near power supplies, unplug the power cord on AC units;
disconnect the power at the circuit breaker on DC units. Statement 12
Warning
Do not work on the system or connect or disconnect cables during periods of lightning activity.
Statement 1001
Cisco Service and Application Module for IP User Guide
2-2
OL-13003-06
Chapter 2
Installing the Cisco SAMI
Preparing to Install the SAMI
Follow these guidelines when working on equipment powered by electricity:
•
Locate the room’s emergency power-off switch. Then, if an electrical accident occurs, you can
quickly turn off the power.
•
Before working on the system, turn off the DC main circuit breaker and disconnect the power
terminal block cable.
•
Disconnect all power before doing the following:
– Working on or near power supplies
– Installing or removing a router chassis or network processor module
– Performing most hardware upgrades
•
Never install equipment that appears damaged.
•
Carefully examine your work area for possible hazards, such as moist floors, ungrounded power
extension cables, and missing safety grounds.
•
Never assume that power is disconnected from a circuit; always check.
•
Never perform any action that creates a potential hazard to people or makes the equipment unsafe.
•
If an electrical accident occurs, proceed as follows:
– Use caution, and do not become a victim yourself.
– Turn off power to the router.
– If possible, send another person to get medical aid. Otherwise, determine the condition of the
victim, and then call for help.
– Determine whether the person needs rescue breathing or external cardiac compressions; then
take appropriate action.
In addition, use the following guidelines when working with any equipment that is disconnected from a
power source, but still connected to telephone wiring or network cabling:
•
Never install telephone wiring during a lightning storm.
•
Never install telephone jacks in wet locations unless the jack is specifically designed for it.
•
Never touch un-insulated telephone wires or terminals unless the telephone line is disconnected at
the network interface.
•
Use caution when installing or modifying telephone lines.
Preventing Electrostatic Discharge Damage
Electrostatic discharge (ESD) can damage equipment and impair electrical circuitry. ESD can occur
when electronic printed circuit cards are improperly handled and can cause complete or intermittent
failures. Always follow ESD prevention procedures when removing and replacing modules:
Caution
•
Ensure that the router chassis is electrically connected to earth ground.
•
Wear an ESD-preventive wrist strap, ensuring that it makes good skin contact. Connect the clip to
an unpainted surface of the chassis frame to channel unwanted ESD voltages safely to ground. To
guard against ESD damage and shocks, the wrist strap and cord must operate effectively.
•
If no wrist strap is available, ground yourself by touching a metal part of the chassis.
For the safety of your equipment, periodically check the resistance value of the antistatic wrist strap. It
should be between 1 and 10 Mohm.
Cisco Service and Application Module for IP User Guide
OL-13003-06
2-3
Chapter 2
Installing the Cisco SAMI
Preparing to Install the SAMI
Verifying System and Site Requirements
Before you install the SAMI:
•
Verify that the system requirements for the SAMI, including hardware, software, and environmental
requirements, are met—See the “System Requirements and Specifications” section on page 1-12).
•
Prepare the site (as defined in the site requirements) and review the installation plans or method of
procedures (MOPs)—See the “Site Requirements” section on page 2-4.
•
Unpack and inspect the module—See the “Unpacking and Checking the Contents of your Shipment”
section on page 2-5.
•
Gather tools and test equipment required to properly install the module—See the “Required Tools”
section on page 2-5.
Site Requirements
Typically, you should have prepared the installation site beforehand. As described previously, part of
your preparation includes reviewing installation plans or MOPs. An example of a MOP (pre-installation
checklist of tasks and considerations that must be addressed and agreed upon before proceeding with the
installation) is as follows:
Note
The example assumes that you are installing the Cisco 7600 Series Router chassis as well as the SAMI
at the same time. However, the example MOP can be simplified to accommodate just the SAMI.
1.
Assign personnel.
2.
Determine protection requirements for personnel, equipment, and tools.
3.
Evaluate potential hazards that may affect service (Cisco 7600 Series Router chassis).
4.
Schedule time for installation.
5.
Determine any space requirements (Cisco 7600 Series Router chassis).
6.
Determine any power requirements (Cisco 7600 Series Router chassis).
7.
Identify any required procedures or tests.
8.
On an equipment plan, make a preliminary decision that locates each SAMI that you plan to install.
9.
Read this user guide.
10. Modify the preliminary plan, if necessary.
11. Verify the list of replaceable parts for installation (screws, bolts, washers, and so on) so that the parts
are identified (Cisco 7600 Series Router chassis).
12. Check the required tools list to make sure the necessary tools and test equipment are available (see
the “Required Tools” section on page 2-5).
13. Perform installation.
Cisco Service and Application Module for IP User Guide
2-4
OL-13003-06
Chapter 2
Installing the Cisco SAMI
Preparing to Install the SAMI
Unpacking and Checking the Contents of your Shipment
The shipping package for the SAMI is designed to reduce the possibility of product damage associated
with routine handling experienced during shipment. To reduce the potential damage to the product,
transport the SAMI in its Cisco specified packaging. Failure to do so may result in damage to the SAMI.
Also do not remove the SAMI from its shipping container until you are ready to install it.
Note
Do not discard the packaging materials used in shipping your SAMI. You will need the packaging
materials in the future if you move or ship your SAMI.
Required Tools
Use the following tools to install the SAMI.
Warning
Note
Only trained and qualified personnel should install, replace, or service this equipment.
Statement 1030
Before installing the SAMI, you must install the Cisco 7600 Series Router chassis and at least one
supervisor engine. For information on installing the switch chassis, refer to the appropriate
Cisco 7600 Series Router documentation listed in the “Related Documentation” section on page 9.
These tools are required to install the SAMI into the Cisco 7600 Series Router chassis:
•
Flat-blade screwdriver
•
Phillips-head screwdriver
•
Wrist strap or other grounding device
•
Antistatic mat or antistatic foam
Reviewing Safety Recommendations
As described in the “Safety Warnings” section on page 3, safety warnings appear throughout this user
guide in procedures that, if performed incorrectly, may harm you. A warning symbol precedes each
warning statement (see the “Safety Guidelines” section on page 2-1 for general safety information for
installing your SAMI in a Cisco 7600 Series Router chassis).
The following safety recommendations are specific to your SAMI installation.
Warning
Before you install, operate, or service the system, read the Site Preparation and Safety Guide. This
guide contains important safety information you should know before working with the system.
Statement 200
Warning
Only trained and qualified personnel should be allowed to install, replace, or service this equipment.
Statement 1030
Cisco Service and Application Module for IP User Guide
OL-13003-06
2-5
Chapter 2
Installing the Cisco SAMI
Installing the SAMI
Warning
Invisible laser radiation may be emitted from disconnected fibers or connectors. Do not stare into
beams or view directly with optical instruments. Statement 1051
Warning
During this procedure, wear grounding wrist straps to avoid ESD damage to the SAMI. Do not directly
touch the backplane with your hand or any metal tool, or you could shock yourself. Statement 181
Warning
Blank faceplates and cover panels serve three important functions: they prevent exposure to
hazardous voltages and currents inside the chassis; they contain electromagnetic interference (EMI)
that might disrupt other equipment; and they direct the flow of cooling air through the chassis. Do not
operate the system unless all SAMIs, faceplates, front covers, and rear covers are in place.
Statement 1029
Installing the SAMI
This section describes how to install the SAMI into a Cisco 7600 Series Router chassis.
Caution
The Cisco 7600 Series Router supports hotswapping. However, the SAMI does not support hot
swapping. Do not remove the SAMI from the chassis until the module has shut down completely and the
status LED is orange or off. If you remove the SAMI from the chassis before it completely shuts down,
you can damage the SAMI.
Caution
To prevent ESD damage, handle the SAMI by the edges only.
Caution
During this procedure, wear grounding wrist straps to avoid ESD damage to the modules.
Caution
Do not directly touch the backplane with your hand or any metal tool, or you may shock yourself.
Cisco Service and Application Module for IP User Guide
2-6
OL-13003-06
Chapter 2
Installing the Cisco SAMI
Installing the SAMI
To install the SAMI into Cisco 7600 Series Router chassis, perform these steps:
Step 1
Choose a slot for the SAMI.
The Cisco 7600 Series Routers include the Cisco 7604, Cisco 7606, Cisco 7609, and Cisco 7613 routers.
In these router chassis, the slots can be used as follows:
•
Cisco 7604 (four horizontal slots)
– Slot 1, the top-most slot, is reserved for the Supervisor 720 engine.
– Slot 2 can be used for a redundant supervisor engine.
– If a redundant supervisor engine is not required, slots 2 through 4 are available for modules. If
a redundant supervisor is required, slots 3 and 4 are available for modules.
•
Cisco 7606 (six horizontal slots) and the Cisco 7609 (nine vertical slots)
– Slot 5 is reserved for the Supervisor 720 engine.
– Slot 6 can be used for a redundant supervisor engine.
– If a redundant supervisor engine is not required, the following slots are available for modules:
Slots 1 through 4 and slot 6 on the 6-slot chassis
Slots 1 through 4 and slots 6 through 9 on the 9-slot chassis
– If a redundant supervisor engine is required, the following slots are available for modules:
Slots 1 through 4 on the 6-slot chassis
Slots 1 through 4 and slots 7 through 9 on the 9-slot chassis
•
Cisco 7613 (13 horizontal slots)
– Slot 7 is reserved for the Supervisor 720 engine.
– Slot 8 can be used for a redundant supervisor engine.
– If a redundant supervisor engine is not required, slots 1 through 6 and slots 8 through 13 are
available for modules. If a redundant supervisor engine is required, slots 1 through 6 and slots
9 through 13 are available for modules.
•
Empty slots on all Cisco 7600 Series Router chassis require filler panels to maintain consistent
airflow through the chassis.
Step 2
Verify that there is enough clearance to accommodate any interface equipment that you will connect
directly to the module ports. If possible, place the modules between empty slots that contain only the
module filler panels.
Step 3
Verify that the captive installation screws are tightened on all modules installed in the chassis. This
action ensures that the EMI gaskets on all modules are fully compressed to maximize the opening space
for the new or replacement module.
Note
Step 4
If the captive installation screws are loose, the EMI gaskets on the installed modules push
adjacent modules towards the open slot, reducing the opening size and making it difficult to
install the replacement module.
Remove the filler panel by removing the two Phillips pan-head screws from the filler panel.
Cisco Service and Application Module for IP User Guide
OL-13003-06
2-7
Chapter 2
Installing the Cisco SAMI
Installing the SAMI
Step 5
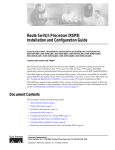
Open both ejector levers fully on the module (Figure 2-1 on page 2-8).
Figure 2-1
Positioning the Module in a Horizontal Slot Chassis
Insert module
between slot guides
EMI gasket
3
4
5
6
4
5
6
WS-X6K-SUP2-2GE
1
ST
AT
US
SY
ST
OL
EM
T
E
NS
CO
R
M
PW
GM
SE
Switch
100%
T
Load
CONSOLE
PORT
MODE
RE
PORT 1
PORT 2
CONSOLE
SUPERVISOR2
PCMCIA
EJECT
1%
WS-X6K-SUP2-2GE
2
ST
AT
US
SY
ST
OL
EM
T
E
NS
CO
R
PW
M
GM
SE
Switch
100%
T
Load
CONSOLE
PORT
MODE
RE
PORT 1
PORT 2
CONSOLE
SUPERVISOR2
PCMCIA
EJECT
1%
3
4
FAN
STATUS 5
6
WS-X6224
AT
US
AC
TI
VE
SE
LE
24 PORT 100FX
NE
EMI gasket
CT
XT
58569
ST
o
o
INPUT
OK
FAN
OK
OUTPUT
FAIL
INPUT
OK
FAN
OK
OUTPUT
FAIL
WS-C6500-SFM
US
AT
ST
E
TIV
AC
SWITCH FABRIC MDL
Ejector lever fully
extended
Step 6
Position the modules in the slot (Figure 2-1). Make sure that you align the sides of the module carrier
with the slot guides on each side of the slot.
Cisco Service and Application Module for IP User Guide
2-8
OL-13003-06
Chapter 2
Installing the Cisco SAMI
Installing the SAMI
Step 7
Carefully slide the module into the slot until the EMI gasket along the top edge of the module makes
contact with the module in the slot above it and both ejector levers have closed to approximately
45 degrees with respect to the module faceplate (Figure 2-2).
Figure 2-2
Clearing the EMI Gasket in a Horizontal Slot Chassis
WS-X6K-SUP2-2GE
T
M
LE
G
O
US
EM
M
T
AT
NS
R
ST
SE
ST
SY
CO
PW
RE
1
Switch
100%
CONSOLE
Load
CONSOLE
PORT
MODE
SUPERVISOR2
PORT 1
PCMCIA
PORT 2
EJECT
1%
WS-X6K-SUP2-2GE
NK
LI
T
M
LE
G
O
US
EM
M
T
AT
NS
R
ST
SE
ST
SY
CO
PW
RE
2
Switch
100%
CONSOLE
SUPERVISOR2
CONSOLE
PORT
MODE
NK
LI
Load
PORT 1
PCMCIA
PORT 2
EJECT
1%
NK
LI
NK
LI
3
Press down
4
FAN
STATUS 5
Press down
WS-X6224
S
TU
STA
VE
TI
AC
CT
LE
SE
24 PORT 100FX
XT
NE
6
3
4
WS-C6500-SFM
5
5
SWITCH FABIR
6
Step 8
Caution
Step 9
ST
D MDL
AT
US
AC
TIV
E
1 mm Gap between the module
EMI gasket and the
module above it
58570
4
6
Using the thumb and forefinger of each hand, grasp the two ejector levers and press down to create a
small (0.040 inch [1 mm]) gap between the EMI gasket and the module above it (Figure 2-2).
Do not press down too hard on the levers because you might bend or damage them.
While pressing down, simultaneously close the left and right ejector levers to fully seat the module in
the backplane connector. The ejector levers are fully closed when they are flush with the module
faceplate (see Figure 2-3).
Cisco Service and Application Module for IP User Guide
OL-13003-06
2-9
Chapter 2
Installing the Cisco SAMI
Installing the SAMI
Figure 2-3
Ejector Levers Fully Closed in a Horizontal Slot Chassis
WS-X6K-SUP2-2GE
T
M
LE
G
O
US
EM
M
T
AT
NS
R
ST
SE
ST
SY
CO
PW
RE
1
Switch
100%
CONSOLE
SUPERVISOR2
Load
CONSOLE
PORT
MODE
PORT 1
PCMCIA
PORT 2
EJECT
1%
WS-X6K-SUP2-2GE
LI
T
M
LE
G
O
US
EM
M
T
AT
NS
R
ST
SE
ST
SY
CO
PW
RE
2
Switch
100%
CONSOLE
SUPERVISOR2
NK
LI
PORT 1
PCMCIA
NK
Load
CONSOLE
PORT
MODE
PORT 2
EJECT
1%
LI
NK
LI
NK
3
4
FAN
STATUS 5
WS-C6500-SFM
ST
AT
US
AC
TIV
CT
LE
SE
E
SWITCH FABRIC MDL
XT
NE
58571
6
Ejector levers flush
with module faceplate
Note
Step 10
Failure to fully seat the module in the backplane connector can result in error messages.
Tighten the two captive installation screws on the module. Make sure the ejector levers are fully closed
before tightening the captive installation screws.
When you install a SAMI into the router chassis, it runs a startup sequence that requires no intervention.
At the successful conclusion of the startup sequence, the green status LED lights and remains on. If the
status LED is not green or is off, see “Status LED” section on page 1-10 to determine the module status.
This completes the SAMI installation procedure.
Cisco Service and Application Module for IP User Guide
2-10
OL-13003-06
Chapter 2
Installing the Cisco SAMI
Removing a SAMI
Removing a SAMI
This section describes how to remove an existing module from a Cisco 7600 Series Router chassis.
Caution
The SAMI is not hot-swappable. Do not remove the SAMI from the chassis until the SAMI has shut
down completely and the status LED is orange or off. If you remove the SAMI from the chassis before
it completely shuts down, you can damage the SAMI.
Warning
During this procedure, wear grounding wrist straps to avoid ESD damage to the SAMI. Do not directly
touch the backplane with your hand or any metal tool, or you could shock yourself.
Statement 181
Warning
Before you install, operate, or service the system, read the Site Preparation and Safety Guide. This
guide contains important safety information you should know before working with the system.
Statement 200
Warning
Invisible laser radiation may be emitted from disconnected fibers or connectors. Do not stare into
beams or view directly with optical instruments. Statement 1051
To remove a module from the router chassis, perform these steps:
Step 1
Shut down the SAMI by completing the following tasks:
a.
Enter the show module command and verify the SAMI status is OK.
b.
Shut down the SAMI using the hw-module module mod-num shutdown command in privileged
EXEC mode. Verify that the SAMI shuts down using the show module command to verify the
module status is ShutDown and the status LED is orange. Shutdown might take several minutes.
c.
Power down the SAMI using the no power enable module slot command in global configuration
mode. Verify that the SAMI powers down using the show module command to verify the module
status is PwrDown and the status LED is off. Do not remove the SAMI from the switch until the
status LED is off.
Caution
When you enter the no power enable module slot command to power down a module, the module
configuration files are not saved. Therefore, ensure all configuration files are saved before issuing the
no power enable module slot command.
Step 2
Verify that the captive installation screws on all of the modules in the chassis are tight. This step assures
that the space created by the removed module is maintained.
Note
If the captive installation screws are loose, the electromagnetic interference (EMI) gaskets on
the installed modules will push the modules toward the open slot, reducing the opening size and
making it difficult to remove the module.
Cisco Service and Application Module for IP User Guide
OL-13003-06
2-11
Chapter 2
Installing the Cisco SAMI
Removing a SAMI
Step 3
Loosen the two captive installation screws on the module.
Caution
Use grounding wrist straps connected to a captive installation screw on an installed module or power
supply when removing a module. At all other times (shipping, storage, and so on) keep the modules in
their static-shielding protective bags.
Step 4
Place your thumbs on the left and right ejector levers, and simultaneously rotate the levers outward to
unseat the module from the backplane connector.
Step 5
Grasp the front edge of the module and slide the module part all the way out of the slot. Place your other
hand under the module to support the weight of the module. Do not touch the module circuitry.
Step 6
Place the SAMI on an antistatic mat or antistatic foam, or immediately reinstall it in another slot.
Warning
Blank faceplates (filler panels) serve three important functions: they prevent exposure to hazardous
voltages and currents inside the chassis; they contain electromagnetic interference (EMI) that might
disrupt other equipment; and they direct the flow of cooling air through the chassis. Do not operate
the system unless all modules and faceplates are in place. Statement 1051
Step 7
If the slot is to remain empty, install a module filler panel to keep dust out of the chassis and to maintain
proper airflow through the chassis.
Cisco Service and Application Module for IP User Guide
2-12
OL-13003-06
CH A P T E R
3
Configuring the Cisco SAMI
This chapter describes how to configure the Cisco Service and Application Module for IP (SAMI). It
includes the following sections:
•
Before You Begin, page 3-1
•
Establishing Console Sessions, page 3-2
•
Enabling the Supervisor to Store PPC Startup Configuration Files, page 3-6 (Required)
•
Configuring VLAN Support, page 3-10 (Required)
•
Configuring Network Clock Synchronization, page 3-19
•
Configuring Remote Console and Logging, page 3-20
•
Configuring the Cisco Software Application on a SAMI PPC, page 3-27 (Required)
•
4GB DRAM Support, page 3-29
•
SAMI Coredump, Crashinfo and Debuginfo Support, page 3-29
For a description of some of the commands used in this chapter, see Appendix A, “Using the
Command-Line Interfaces.”
To locate documentation about other commands that appear in this chapter, refer to the Cisco 7600 Series
Internet Router IOS Software Configuration Guide.
Before You Begin
Before configuring the SAMI, ensure that you have reviewed the following sections:
•
System Requirements and Specifications, page 1-12
•
Using the Command-Line Interfaces, page A-1
•
Establishing Console Sessions, page 3-2
Cisco Service and Application Module for IP User Guide
OL-13003-06
3-1
Chapter 3
Configuring the Cisco SAMI
Establishing Console Sessions
Establishing Console Sessions
When configuring the SAMI in your Cisco 7600 Series Router, you establish a console session with the
SAMI LCP and PPCs and enter commands.
To establish a session with a SAMI LCP or PPC, complete the tasks in the following sections:
•
Configuring a Virtual Terminal Line Settings, page 3-2
•
Establishing a Console Session with the SAMI LCP, page 3-2
•
Establishing a Session with a SAMI PPC, page 3-4
Configuring a Virtual Terminal Line Settings
Line configuration mode commands allow you to configure the virtual terminal line settings which are
used solely to control inbound Telnet connections.
Note
Typically, vty0 and line 66 are used for session command support from supervisor.
To configure the virtual terminal line settings for the session command to a remote console, use the
following commands from the supervisor console:
Step 1
Sup> enable
Enables privileged EXEC mode.
Step 2
Sup# line vty line-number
[ending-line-number]
Identifies a specific line for configuration and enters
line configuration collection mode where:
•
line-number—Relative number of the terminal
line (or the first line in a contiguous group) that
you want to configure when the line type is
specified. Numbering begins with zero.
•
ending-line-number—(Optional) Relative
number of the last line in a contiguous group
that you want to configure. If you omit any
keyword, then line-number and
ending-line-number are absolute rather than
relative line numbers.
Establishing a Console Session with the SAMI LCP
Establishing a console session with the SAMI LCP is not required to set up the SAMI in the Cisco 7600
Series Router chassis, however, you can establish a session to perform various maintenance tasks
(manage files or issue show commands), and you can configure a hostname for the SAMI LCP that
assists you in keeping track when you have sessions to multiple SAMIs open. From the SAMI LCP
console, you can also configure the amount of time that a session can remain inactive before it is
closed (inactivity timeout).
A session to the LCP console can be established from the supervisor or from a serial console connected
to the front panel of the SAMI. For information about establishing a session using a connected serial
console, see the “Establishing a Console Connection on the SAMI” section on page 4-23.
Cisco Service and Application Module for IP User Guide
3-2
OL-13003-06
Chapter 3
Configuring the Cisco SAMI
Establishing Console Sessions
To establish a console session to the SAMI LCP from the supervisor, use the following commands:
Step 1
Sup> enable
Enables privileged EXEC mode.
Step 2
Sup# session slot slot_number processor 0
Establishes a session to the LCP on the SAMI,
where:
•
slot_number—Number of the slot in which the
SAMI is installed.
•
proc_number—Number of the LCP, which is 0.
Note
One session per processor can be
established.
Assigning a Hostname to the SAMI LCP
The hostname is used for the command line prompts and default configuration filenames. If you establish
sessions to multiple devices, the hostname helps you keep track of where you enter commands. By
default, the hostname for the the SAMI LCP is “switch.”
To configure a hostname for the SAMI LCP, from the LCP console, use the following commands:
Step 1
switch# configure
Enables configuration mode.
Step 2
switch(config)# hostname name
New hostname for the SAMI LCP. Enter a case
sensitive text string that contains from 1 to
32 alphanumeric characters.
For example, to change the hostname of the SAMI LCP from switch to host1, enter:
switch# configure
switch(config)# hostname host1
host1(config)#
Configuring the SAMI Inactivity Timeout
By default, the inactivity timeout value is 5 minutes. You can modify the length of time that can occur
before the SAMI automatically logs off an inactive session by using the login timeout command in
configuration mode.
To specify the length of time a session can be idle before the SAMI logs off the inactive session, use the
login timeout command in configuration mode, from the LCP console:
Step 1
switch# configure
Enables configuration mode.
Step 2
switch(config)# login timeout minutes
Length of time a session can be idle before the SAMI
terminates the session. Valid entries are 0 to
60 minutes. A value of 0 instructs the never to
timeout. The default is 5 minutes. To restore the
default timeout value, use the no form of the
command.
Cisco Service and Application Module for IP User Guide
OL-13003-06
3-3
Chapter 3
Configuring the Cisco SAMI
Establishing Console Sessions
To display the value configured for the inactivity timer, use the show login timeout command in EXEC
mode from the LCP console:
Step 1
switch# show login timeout
Displays the value configured for the inactivity
timer.
For example, to specify a timeout period of 10 minutes, enter:
switch# configure
switch(config)# login timeout 10
To display the configured login time value, use the show login timeout command in EXEC mode. For
example, enter:
switch# show login timeout
Login Timeout 10 minutes.
Establishing a Session with a SAMI PPC
Note
Under certain conditions such as low processor memory, a session to the SAMI might fail. If this occurs,
you will need to use the physical front-panel console connections to access the SAMI (see “Establishing
a Console Connection on the SAMI” section on page 4-23).
To establish a session with a SAMI PPC from the supervisor engine console, use the following
commands:
Step 1
Sup> enable
Enables privileged EXEC mode.
Step 2
Sup# session slot slot_number
processor proc_number
Establishes a session to a PPC on the SAMI, where:
•
slot_number—Number of the slot in which the
SAMI is installed.
•
proc_number—Number of the PPC on the
SAMI. Valid values are 3 through 8.
Note
One session per processor can be
established.
When you establish a session with a Cisco IOS PPC, the default session prompt is “router.”
When you establish a session with a COSLI PPC, the default session prompt is “switch.”
Cisco Service and Application Module for IP User Guide
3-4
OL-13003-06
Chapter 3
Configuring the Cisco SAMI
Establishing Console Sessions
Assigning a Hostname to a SAMI PPC
Assigning a hostname to the SAMI PPCs helps you keep track of the PPC sessions.
To assign a hostname to a Cisco IOS PPC, use the following command, in global configuration mode:
Step 1
Sup# session slot slot_number processor
proc_number
Establishes a session to a PPC on the SAMI, where:
•
slot_number—Number of the slot in which the
SAMI is installed.
•
proc_number—Number of the PPC on the
SAMI. Valid values are 3 through 8.
One session per processor can be established.
Step 2
Router> enable
Enters privilege EXEC mode.
Step 3
Router# config
Enters global configuration mode.
Step 4
Router(config)# hostname name
New hostname for the PPC. Enter a case sensitive
text string that contains from 1 to 32 alphanumeric
characters.
In the following example, a session with Cisco IOS PPC 3 on a SAMI in slot 6 is established, and the
hostname is changed to “PPC3.”
Sup> enable
Sup# session slot slot_number processor proc_number
Router# enable
Router# configure
Router(config)# hostname PPC3
PPC3(config)#
To assign a hostname to a COSLI PPC, use the following command, in global configuration mode:
Step 1
Sup# session slot slot_number processor
proc_number
Establishes a session to a PPC on the SAMI, where:
•
slot_number—Number of the slot in which the
SAMI is installed.
•
proc_number—Number of the PPC on the
SAMI. Valid values are 3 through 8.
One session per processor can be established.
Step 2
switch# config
Enters global configuration mode.
Step 3
switch(config)# hostname name
New hostname for the PPC. Enter a case sensitive
text string that contains from 1 to 32 alphanumeric
characters.
Cisco Service and Application Module for IP User Guide
OL-13003-06
3-5
Chapter 3
Configuring the Cisco SAMI
Enabling the Supervisor to Store PPC Startup Configuration Files
In the following example, a session with Cisco COSLI PPC 3 on a SAMI in slot 6 is established, and the
hostname is changed to “PPC3.”
Sup> enable
Sup# session slot slot_number processor proc_number
switch# config
switch(config)# hostname PPC3
PPC3(config)#
Enabling the Supervisor to Store PPC Startup Configuration Files
The Configuration File Storage on Supervisor feature enables you to configure the supervisor engine to
save and store the startup configuration file of each of the PPCs on the SAMI in the supervisor’s
bootflash memory.
Note
The Configuration File Storage on Supervisor feature only stores the PPC startup configuration files.
Crypto configurations, such as RSA key generation for Secure Shell (SSH) is stored locally on
nvram:private-config. Therefore, if a SAMI card containing crypto configuration needs to be replaced,
the crypto configuration must be reapplied by either by manually reconfiguring it on the new card, or by
exporting the crypto configuration to the supervisor and then importing the configuration onto the new
card. For information on exporting and importing the crypto configuration, see “Configuring, Exporting,
and Importing RSA Keys on a SAMI PPC” section on page 4-20.
Note
For information about using the bootflash on a supervisor engine, see the Cisco 7600 Series Cisco IOS
Software Configuration Guide.
The ability to store PPC startup configuration files on the supervisor enables a SAMI to be replaced
while retaining the configurations associated with each of the PPCs on the module.
When a SAMI is inserted into the Cisco 7600 Series Router chassis, an empty configuration file is
automatically created for each of the PPCs with the following naming convention:
SLOTxSAMICy.cfg
where x is the number of the chassis slot in which the SAMI is installed and y is the PPC number
(numbers 3 through 8) on the SAMI.
When a PPC comes up, it copies its configuration file from the supervisor bootflash and uses it. When
you save the configuration changes on a PPC using the write memory command, the configuration file
in the supervisor bootflash is updated.
The following example shows the configuration files stored on the supervisor module for PPCs of a
SAMI installed in slot 9 of a Cisco 7600 Series Router chassis:
Sup# dir bootflash:
Directory of bootflash:/
172 -rw42
173 -rw42
174 -rw42
175 -rw42
176 -rw42
177 -rw42
Mar
Mar
Mar
Mar
Mar
Mar
8
8
8
8
8
8
2007
2007
2007
2007
2007
2007
12:30:07
12:30:07
12:30:07
12:30:07
12:30:07
12:30:07
-07:00
-07:00
-07:00
-07:00
-07:00
-07:00
SLOT9SAMIC3.cfg
SLOT9SAMIC4.cfg
SLOT9SAMIC5.cfg
SLOT9SAMIC6.cfg
SLOT9SAMIC7.cfg
SLOT9SAMIC8.cfg
Cisco Service and Application Module for IP User Guide
3-6
OL-13003-06
Chapter 3
Configuring the Cisco SAMI
Enabling the Supervisor to Store PPC Startup Configuration Files
Note
If a standby supervisor engine is installed, the bootflash on the standby supervisor engine backs up the
SAMI PPC configuration files that are on the active supervisor. If a difference is detected between
corresponding files on the active and standby supervisor engines, the file in the bootflash of the active
supervisor engine is copied over the file in the bootflash of the standby supervisor engine. This compare
and copy operation occurs after a SAMI is replaced or when the active supervisor engine detects that a
standby supervisor engine has been installed.
Caution
If a standby supervisor engine does not exist, periodically copy the SAMI PPC configuration files from
the bootflash of the active supervisor engine to a TFTP server. Failure to take this precaution might result
in the loss of the SAMI PPC configuration files if a supervisor engine failure should occur.
Configuration File Storage and the Remote Copy Protocol
The remote copy protocol (RCP) is used to read and write the PPC configuration files between the SAMI
and the supervisor.
The RCP server, configured on the supervisor, accepts the RCP requests from the RCP client, which is
configured on each the PPCs on the SAMI. The PPCs use their internal Ethernet Out of Band Channel
(EOBC) IP address (address format 127.0.0.slot_num proc_num) when sending read/write requests to
the RCP server.
To enable PPC configuration files to be stored on the supervisor, on the supervisor, you must first enable
RCP support for each of the SAMI PPCs using the ip rcmd remote-host enable global configuration
command—six ip rcmd remote-host enable configuration statements for each SAMI installed in the
router chassis.
Note
To facilitate the process of enabling RCP support for each of the PPCs, we recommend that you create
an access list on the supervisor engine that permits RCP requests from all IP addresses that begin with
the internal EOBC IP address of the PPCs (127*), and specify the access list when configuring the
ip rcmd remote host enable command on the supervisor.
To configure an access list permitting the RCP requests from all SAMI PPCs, use the following
commands from the supervisor engine console:
Command
Purpose
Step 1
Sup> enable
Enables privileged EXEC mode.
Step 2
Sup# configure terminal
Enters global configuration mode.
Cisco Service and Application Module for IP User Guide
OL-13003-06
3-7
Chapter 3
Configuring the Cisco SAMI
Enabling the Supervisor to Store PPC Startup Configuration Files
Step 3
Command
Purpose
Sup(config)# access-list
access-list-number permit source
Configures the access list mechanism for filtering
frames where:
•
access-list-number is the number that identifies
the access list.
•
permit is the keyword option to specify to
permit the frames if conditions are matched.
•
source is the number of the network or host from
which the packet is being sent. There are two
alternative ways to specify the source:
– Use a 32-bit quantity in four-part,
dotted-decimal format.
– Use the any keyword as an abbreviation for
a source and source-wildcard of 0.0.0.0
255.255.255.255.
Step 4
Sup(config-ip-acl) exit
Exits access-list configuration mode.
To enable RCP and apply the access list when configuring the remote hosts (the Cisco software
application running on the SAMI PPCs) that can execute commands using RCP, use the following
commands from the supervisor engine console:
Command
Purpose
Step 1
Sup> enable
Enables privileged EXEC mode. Enter your
password if prompted.
Step 2
Sup# configure terminal
Enters global configuration mode.
Step 3
Sup(config)# ip rcmd rcp-enable
Configures the supervisor engine to allow remote
hosts to copy files to and from using RCP.
Cisco Service and Application Module for IP User Guide
3-8
OL-13003-06
Chapter 3
Configuring the Cisco SAMI
Enabling the Supervisor to Store PPC Startup Configuration Files
Step 4
Step 5
Command
Purpose
Sup(config)# ip rcmd remote-host
local-username {ip-address | host-name |
access-list} remote-username [enable
[level]]
Creates an entry for a remote host in a local
authentication database so that the remote host can
execute commands using RCP where:
Sup(config-ip-acl) exit
•
local-username is the name of the SAMI PPC on
the local router.
•
ip-address is the IP address of the remote host
from which the local router will accept remotely
executed commands.
•
host-name is the name of the remote host.
•
access-list is the name of an access list of
remote hosts.
•
remote-username is the name of the SAMI PPC
on the remote host.
•
enable enables the PPC to execute privileged
EXEC commands using rsh, or to copy files to
the router using rcp.
•
level is the privilege level assigned to the PPC.
The default is 15, the highest level.
Exits global configuration mode.
For example:
•
To create an access-list that when applied will permit RCP requests from all SAMI PPCs, enter the
following commands on the supervisor:
Sup> enable
Sup# configure terminal
Sup(config)# access-list 24 permit 127.0.0.0 0.0.0.255
Sup(config)# exit
•
To configure the supervisor engine to allow remote hosts to copy files to and from using RCP, and
to define the remote hosts allowed to use RCP, enter the following commands on the supervisor:
Sup> enable
Sup# configure terminal
Sup(config)# ip rcmd rcp-enable
Sup(config)# ip rcmd remote-host * 24 * enable
Sup(config)# exit
Note
The asterisks (*) are specified for the ip rcmd remote-host command local-username and
remote-user name to enable any user for the 127.0.0.xy addresses so that all SAMIs are
supported.
Cisco Service and Application Module for IP User Guide
OL-13003-06
3-9
Chapter 3
Configuring the Cisco SAMI
Configuring VLAN Support
Configuring VLAN Support
The SAMI does not include any external physical interfaces to receive traffic from clients and servers.
Instead, it uses internal VLAN interfaces.
Before configuring VLAN support, note the following:
•
You must configure virtual LANs (VLANS) on the Cisco 7600 Series Router and assign physical
interfaces to the VLAN before you configure VLANs for the SAMI PPCs. The VLAN IDs for the
router and for the PPCs must be the same. For details on configuring VLANs on the Cisco 7600
Series Router, refer to the Cisco 7600 Series Cisco IOS Software Configuration Guide.
•
If the Multilayer Switch Function Card (MSFC) (Supervisor Engine 720 only) is used as the
next-hop router on either the subscriber-side VLAN or the network-side VLAN, then a
corresponding Layer 3 VLAN interface must be configured.
To enable VLAN traffic, you must complete the following:
•
On the supervisor:
– Configure a VLAN and VLAN interface for each PPC.
– Assign the VLANs to a VLAN group.
– Associate the group to a SAMI installed in the chassis.
– Configure a default gateway VLAN
•
On the SAMI PPCs:
– Configure the corresponding VLAN interfaces. (All VLAN interfaces are routed mode
interfaces.)
– Define the default gateway on each SAMI PPC
– Configure a static route
To configure VLAN support between the supervisor engine and the SAMI PPCs, complete tasks in the
following sections:
•
Permitting VLAN Traffic to Cisco SAMI, page 3-10 (Required)
•
Configuring a Switched Virtual Interface on the MSFC, page 3-13 (Optional)
•
Configuring the VLAN Interfaces on the SAMI PPCs, page 3-14 (Required)
Permitting VLAN Traffic to Cisco SAMI
In order for the PPCs on the SAMI to receive traffic from the supervisor engine, complete the following
tasks on the supervisor engine:
•
Configure a VLAN for each SAMI PPC
•
Assign the VLANs to a VLAN group
•
Determine which VLAN groups you want to allow to which SAMI
•
Assign the VLAN groups to the SAMIs
•
Configure a default gateway VLAN
After the VLAN configuration has been completed on the supervisor engine, establish a session with
each of the PPCs on the SAMI, and configure the corresponding VLAN interface on the PPC.
Cisco Service and Application Module for IP User Guide
3-10
OL-13003-06
Chapter 3
Configuring the Cisco SAMI
Configuring VLAN Support
Configuring VLANs for the SAMI PPCs
To configure the VLANs for each SAMI PPC on the supervisor, use the following commands on the
supervisor engine console:
Command
Purpose
Step 1
Sup> enable
Enables privileged EXEC mode. Enter your
password if prompted.
Step 2
Sup# configure terminal
Enters global configuration mode.
Step 3
Sup(config)# vlan vlan-id
Configures a VLAN where vlan-id is the number of
the VLAN. Valid values are from 1 to 4094.
Step 4
Sup(config-vlan)# description
interface_description
(Optional) Provides a description for the VLAN.
Step 5
Sup(config-vlan)# end
Exits VLAN configuration mode.
For example:
•
To create VLANs 71 to 76 on the supervisor, enter the following commands:
Sup> enable
Sup# configure terminal
Sup(config)# vlan 71
Sup(config-vlan) exit
Sup(config)# vlan 72
Sup(config-vlan) exit
Sup(config)# vlan 73
Sup(config-vlan) exit
Sup(config)# vlan 74
Sup(config-vlan) exit
Sup(config)# vlan 75
Sup(config-vlan) exit
Sup(config)# vlan 76
Sup(config-vlan) exit
Creating and Assigning VLANs Groups to the SAMI
The PPC VLANs on a SAMI must be assigned to the same VLAN group. You cannot assign the same
VLAN to multiple groups, however, you can assign a group to multiple SAMIs.
By default, one switched virtual interface (SVI) (required if the supervisor participates in Layer-3
forwarding) can exist between an MSCFC and a SAMI. However, on the SAMI, you must create multiple
SVIs, therefore you must enable multiple SVIs to be configured using the
svclc multiple-vlan-interfaces command.
To assign VLANs to a SAMI, use the following commands at the supervisor engine console:
Step 1
Sup> enable
Enables privileged EXEC mode.
Step 2
Sup# configure terminal
Enters global configuration mode.
Cisco Service and Application Module for IP User Guide
OL-13003-06
3-11
Chapter 3
Configuring the Cisco SAMI
Configuring VLAN Support
Step 3
Step 4
Sup(config)# svclc vlan-group
vlan_group_number vlan_range
Sup(config)# svclc module slot_num
vlan-group group_number_range
Assigns the VLANs to a group.
•
vlan_group_number—Number of the VLAN
group.
•
vlan_range—Number of the VLAN or VLANs
identified as a single number (n), as a range of
numbers (n-x), or as separate numbers, or range
of numbers, separated by commas (for example,
5,7-10,13,45-100).
Assigns VLAN groups to the SAMI, where:
•
slot_number—Number of the slot in which the
SAMI is installed. To display slot numbers and
modules in the chassis, use the show module
privilege EXEC command.
•
group_number_range—VLAN group number
identified as a single number (n), as a range of
numbers (n-x), or as separate numbers, or range
of numbers, separated by commas (for example,
3,5,7-10). Only VLAN groups created using the
svclc vlan-group global configuration
command can specified.
Note
One VLAN group can be assigned to
multiple SAMIs.
Cisco Service and Application Module for IP User Guide
3-12
OL-13003-06
Chapter 3
Configuring the Cisco SAMI
Configuring VLAN Support
For example:
•
To create a VLAN group, group 50, with a VLAN range of 71 to 76, enter the following commands:
Sup> enable
Sup# configure terminal
Sup(config)# svclc vlan-group 50 71-76
•
To assign VLAN group 50 to the SAMI in slot 5, enter:
Sup(config)# svclc module 5 vlan-group 50
•
To enable multiple SVIs to be configured for a SAMI, enter:
Sup(config)# svclc multiple-vlan-interfaces
•
To view the group configuration for the SAMI and the associated VLANs, enter:
Sup(config)# exit
Sup# show svclc vlan-group
•
To view VLAN group numbers for all modules, enter:
Sup# show svclc module
Configuring a Switched Virtual Interface on the MSFC
Note
For Layer-2 forwarding, configuring a switched virtual interface (SVI) is not required for allowing
VLAN traffic to the SAMI PPCs. Configuring a SVI is only required if the supervisor engine participates
in Layer-3 forwarding.
The SVI configuration defines the Layer 3 instance on the MSFC (the router). If you assign the VLAN
used for the SVI to a SAMI PPC, then the MSFC routes between the SAMI PPC and other Layer 3
VLANs.
By default, only one SVI can exist between a MSFC and a SAMI. However, on each SAMI, you need to
configure multiple SVIs for unique VLANs.
To configure the SVI and enable multiple SVIs to be configured for a SAMI, use the following
commands at the supervisor engine console:
Command
Purpose
Step 1
Sup> enable
Enables privileged EXEC mode.
Step 2
Sup# configure terminal
Enters global configuration mode.
Step 1
Sup(config)# svclc
multiple-vlan-interfaces
Enables multiple SVIs to be configured for a SAMI.
Step 2
Sup(config)# interface vlan vlan_number
Creates or accesses a dynamic SVI where
vlan-number is the number of the VLAN. Valid
values are from 1 to 4094.
Step 3
Sup(config-if)# ip address ip_address
vlan vlan_number
IP address and IP subnet for this interface.
Step 4
Sup(config-if)# no shutdown
Enables the interface.
Cisco Service and Application Module for IP User Guide
OL-13003-06
3-13
Chapter 3
Configuring the Cisco SAMI
Configuring VLAN Support
For example:
•
To enable multiple SVIs to be configured for a SAMI and to configure the SVI on the MSFC, enter
the following commands:
Sup> enable
Sup# configure terminal
Sup(config)# svclc multiple-vlan-interfaces
Sup(config)# interface vlan 100
Sup(config-if)# ip address 127.0.0.0 255.255.255.0
Sup(config-if)# no shutdown
•
To view the SVI configuration, enter:
Sup(config-if)# exit
Sup(config)# exit
Sup# show interface vlan 100
Configuring the VLAN Interfaces on the SAMI PPCs
The way you configure the VLAN interfaces on the SAMI PPCs is dependent on the PPC operating
system being used by the Cisco software application.
If your application is using Cisco IOS, see “Configuring Cisco IOS PPCs” section on page 3-14.
If you application is using COSLI, see “Configuring COSLI PPCs” section on page 3-16.
Configuring Cisco IOS PPCs
To complete the configuration tasks for VLAN support, on each SAMI PPC, complete the following:
•
Configure an interface to the PPCs corresponding VLAN created on the supervisor engine.
•
Enable IEEE 802.1Q encapsulation on the interface.
•
Configure a static route for traffic to the PPC.
To configure a SAMI Cisco IOS PPC, use the following commands beginning in privilege EXEC mode
at the supervisor engine console:
Command
Purpose
Step 1
Sup> enable
Enables privileged EXEC mode.
Step 2
Sup# configure terminal
Enters global configuration mode.
Step 3
Sup# session slot slot_number
processor proc_number
Establishes a session to a PPC on the SAMI, where:
•
slot_number—Number of the slot in which the
SAMI is installed.
•
proc_number—Number of the PPC on the
SAMI. Valid values are 3 through 8.
One session per processor can be established.
Step 4
Router> enable
Enables privileged EXEC mode.
Step 5
Router# configure terminal
Enters global configuration mode.
Cisco Service and Application Module for IP User Guide
3-14
OL-13003-06
Chapter 3
Configuring the Cisco SAMI
Configuring VLAN Support
Command
Purpose
Step 6
Router(config)# interface gigabitethernet
Specifies a subinterface on which IEEE 802.1Q is
used.
Step 7
Router(config-if)# encapsulation dot1Q
vlan_id
Defines the encapsulation format as IEEE 802.1Q
(dot1q), and specifies the VLAN identifier
(configured on the supervisor engine).
Step 8
Router(config-if)# ip address ip-address
mask
Sets a primary IP address for the interface.
Step 9
Router(config-if)# exit
Exits interface configuration mode.
Step 10
Router(config)# ip route
Creates a static route for traffic to the PPC.
For example:
•
To create two interfaces on PPC3 (on a SAMI in slot 5) on which IEEE 802.1Q is enabled, enter the
following commands:
Sup# session 5 processor 3
Router> enable
Router(config)# interface GigabitEthernet0/0
Router(config-if)# no ip address
Router(config-if)# exit
Router(config)#
Router(config)# interface GigabitEthernet0/0.310
Router(config-if)# encapsulation dot1Q 310
Router(config-if)# ip address 10.3.10.1 255.255.255.0
Router(config-if)# exit
Router(config)#
Router(config)# interface GigabitEthernet0/0.401
Router(config-if)# encapsulation dot1Q 401
Router(config-if)# ip address 10.4.1.1 255.255.255.0
Router(config-if)# exit
Router(config)#
•
To verify the interface configurations, enter:
Router(config)# exit
Router# show interface
Cisco Service and Application Module for IP User Guide
OL-13003-06
3-15
Chapter 3
Configuring the Cisco SAMI
Configuring VLAN Support
Configuring COSLI PPCs
To complete the configuration tasks for VLAN support, on each of the SAMI PPCs, complete the
following tasks:
•
Configure an interface to the corresponding VLAN created on the supervisor engine
•
Configure a default gateway.
To configure a SAMI COSLI PPCs, use the following commands beginning in privilege EXEC mode at
the supervisor engine console:
Command
Purpose
Step 1
Sup> enable
Enables privileged EXEC mode.
Step 2
Sup# configure terminal
Enters global configuration mode.
Step 3
Sup# session slot slot_number
processor proc_number
Establishes a session to a PPC on the SAMI, where:
•
slot_number—Number of the slot in which the
SAMI is installed.
•
proc_number—Number of the PPC on the
SAMI. Valid values are 3 through 8.
One session per processor can be established.
Step 4
switch# config
Enters configuration mode.
Step 5
switch(config)# interface vlan number
Creates a VLAN interface for the specified VLAN,
and enters interface configuration mode.
Step 6
switch(config-if)# description
interface_description
(Optional) Provides a description for the interface.
Step 7
switch(config-if)# ip address ipv4-addr
Assigns an IPv4 address to the VLAN interface for
connectivity. This IP address will be used by the IKE
and ESP traffic from the end points.
Step 8
switch(config-if)# no shutdown
Enables the VLAN interface.
Step 9
switch(config-if)# do show interface vlan
number
Verifies that the VLAN is active.
Note
When you are in a configuration mode, you
can use the do command to use a show
command or any other command that is only
available in EXEC mode.
Step 10
switch(config-if)# do ping ip_address
Verifies network connectivity.
Step 11
switch(config-if)# do show arp
Displays the ARP table.
Step 12
switch(config-if)# exit
Exit interface configuration mode.
Step 13
switch(config)#ip default-gateway ip-addr
Defines a default gateway (router) when IP routing
is disabled.
Cisco Service and Application Module for IP User Guide
3-16
OL-13003-06
Chapter 3
Configuring the Cisco SAMI
Configuring VLAN Support
For example:
•
To create a VLAN interface on PPC3 on a SAMI in slot 5, enter the following commands:
Sup# session slot 5 processor 3
switch> config
switch(config)# interface vlan71
switch(config-if)# ip address 10.22.22.2/32
switch(config-if)# exit
•
To configure a default gateway, enter the following commands:
Sup# session slot 5 processor 3
switch> config
switch(config)# ip default-gateway 88.88.38.100
•
To verify the interface configuration of VLAN71, enter:
switch# show interface vlan71
Verifying the Configuration
To verify the configuration on the supervisor engine, use the following show commands:
Note
In the following examples, the SAMI is installed in slot 2 of the chassis.
•
show spanning-tree vlan
The following example shows how to display the spanning tree state for the specified VLAN.
Sup> show spanning-tree vlan 46
VLAN0046
Spanning tree enabled protocol rstp
Root ID
Priority
32814
Address
0011.5ddb.fc00
This bridge is the root
Hello Time
2 sec Max Age 20 sec Forward Delay 15 sec
Bridge ID
Priority
32814 (priority 32768 sys-id-ext 46)
Address
0011.5ddb.fc00
Hello Time
2 sec Max Age 20 sec Forward Delay 15 sec
Aging Time 300
Interface
Role Sts Cost
Prio.Nbr Type
------------------- ---- --- --------- -------- -------------------------------Te2/1
Desg FWD 2
128.257 Edge P2p
Sup>
•
show sami module
The following example shows how to display the trunk and VLAN configuration.
Sup> show sami module 2 port 1 state
SAMI module 2 data-port 1:
Switchport: Enabled
Administrative Mode: trunk
Operational Mode: trunk
Administrative Trunking Encapsulation: dot1q
Operational Trunking Encapsulation: dot1q
Negotiation of Trunking: Off
Access Mode VLAN: 1 (default)
Cisco Service and Application Module for IP User Guide
OL-13003-06
3-17
Chapter 3
Configuring the Cisco SAMI
Configuring VLAN Support
Trunking Native Mode VLAN: 1 (default)
Trunking VLANs Enabled: 1,10,46,220,250,301,501,1100,2066
Pruning VLANs Enabled: 2-1001
Vlans allowed on trunk:1,10,46,220,250,301,501,1100,2066
Vlans allowed and active in management domain: 1,10,46,220,250,301,501,1100,2066
Vlans in spanning tree forwarding state and not pruned:
1,10,46,220,250,301,501,1100,2066
Sup>
The following example shows how to display SAMI port traffic:
Sup> show sami module 2 port 1 traffic
Specified interface is up line protocol is up (connected)
Hardware is c7600 10Gb 802.3, address is 0030.f275.c3de (bia 0030.f275.c3de)
MTU 1500 bytes, BW 10000000 Kbit, DLY 10 usec,
reliability 255/255, txload 1/255, rxload 1/255
Encapsulation ARPA, loopback not set
Keepalive set (10 sec)
Full-duplex, 10Gb/s
input flow-control is on, output flow-control is unsupported
Last input never, output 00:00:47, output hang never
Last clearing of "show interface" counters 1d02h
Input queue: 0/2000/0/0 (size/max/drops/flushes); Total output drops: 0
Queueing strategy: fifo
Output queue: 0/40 (size/max)
5 minute input rate 0 bits/sec, 0 packets/sec
5 minute output rate 0 bits/sec, 0 packets/sec
730149 packets input, 0 bytes, 0 no buffer
Received 0 broadcasts, 0 runts, 0 giants, 0 throttles
0 input errors, 0 CRC, 0 frame, 0 overrun, 0 ignored
0 input packets with dribble condition detected
22035 packets output, 0 bytes, 0 underruns
0 output errors, 0 collisions, 0 interface resets
0 babbles, 0 late collision, 0 deferred
0 lost carrier, 0 no carrier
0 output buffer failures, 0 output buffers swapped out
Sup>
•
show svclc module
The following example shows how to display the SVCLC module traffic:
Sup> show svclc module 2 traffic
Module 4:
Specified interface is up line protocol is up (connected)
Hardware is C6k 10000Mb 802.3, address is 001f.ca08.892c (bia 001f.ca08.892c)
MTU 1500 bytes, BW 10000000 Kbit, DLY 10 usec,
reliability 255/255, txload 1/255, rxload 1/255
Encapsulation ARPA, loopback not set
Keepalive set (10 sec)
Full-duplex, 10Gb/s
input flow-control is on, output flow-control is unsupported
Last input never, output 00:00:57, output hang never
Last clearing of "show interface" counters 1d02h
Input queue: 0/2000/0/0 (size/max/drops/flushes); Total output drops: 0
Queueing strategy: fifo
Output queue: 0/40 (size/max)
5 minute input rate 0 bits/sec, 0 packets/sec
5 minute output rate 0 bits/sec, 0 packets/sec
732861 packets input, 0 bytes, 0 no buffer
Received 0 broadcasts, 0 runts, 0 giants, 0 throttles
0 input errors, 0 CRC, 0 frame, 0 overrun, 0 ignored
0 input packets with dribble condition detected
22116 packets output, 0 bytes, 0 underruns
Cisco Service and Application Module for IP User Guide
3-18
OL-13003-06
Chapter 3
Configuring the Cisco SAMI
Configuring Network Clock Synchronization
0
0
0
0
output errors, 0 collisions, 0 interface resets
babbles, 0 late collision, 0 deferred
lost carrier, 0 no carrier
output buffer failures, 0 output buffers swapped out
Sup>
This example shows how to display SVCLC module VLAN group configuration:
Sup> show svclc module 2 vlan-group
Module Vlan-groups
------ ----------02
100,101,102
Sup>
Configuring Network Clock Synchronization
If the supervisor engine is not already configured as a Cisco Network Time Protocol (NTP) client,
configure it as an NTP master clock to which the applications running on the SAMI PPCs can
synchronize themselves.
To configure the supervisor engine as an NTP client, use the following commands in global
configuration mode at the supervisor engine console:
Step 1
Sup(config)# ntp master
Configures an NTP master clock to which peers
synchronize themselves.
Step 2
Sup(config)# ntp update-calendar
Periodically updates the hardware clock (calendar)
from an NTP time source.
To enable a Cisco software application running on a SAMI PPC to synchronize its software clock with
the one in the supervisor engine, use the following commands beginning in privileged EXEC mode at
the supervisor engine console:
Step 1
Sup# session slot slot_number processor
proc_number
Establishes a session to a PPC on the SAMI, where:
•
slot_number—Number of the slot in which the
SAMI is installed.
•
proc_number—Number of the PPC on the
SAMI. Valid values are 3 through 8.
One session per processor can be established.
Step 2
Router> enable
Note
Enters privilege EXEC mode.
If establishing a session to a COSLI
PPC, skip this step and proceed to
Step 3.
Cisco Service and Application Module for IP User Guide
OL-13003-06
3-19
Chapter 3
Configuring the Cisco SAMI
Configuring Remote Console and Logging
Step 3
Router# config
Enters global configuration mode.
Step 4
Router(config)# ntp server 127.0.0.xy
Enables the software clock to be synchronized by a
Network Time Protocol (NTP) time server where:
Note
•
x is the slot in which the supervisor engine is
installed.
•
y identifies the supervisor engine—1 for
Supervisor Engine 720.
For NTPv4, the NTP synchronization takes more time to complete unlike NTPv3, which synchronizes
in seconds or in a maximum of 1 to 2 minutes. The acceptable time for synchronization in case of NTPv4
is 15 to 20 minutes.
To achieve faster NTP synchronization, enable the burst or iburst mode by using the burst or iburst
keyword. With the burst or iburst mode configured, NTP synchronization takes about 1 to 2 minutes
to sync.
Step 1
Sup# ntp server [burst] [iburst]
burst enables burst mode. Burst mode allows the
exchange of eight NTP messages (instead of two)
during each poll interval in order to reduce the effects
of network jitter.
iburst enables initial burst (iburst) mode. Iburst
mode triggers the immediate exchange of eight NTP
messages (instead of two) when an association is first
initialized. This feature allows rapid time setting at
system startup or when an association is configured.
For further details, please refer to the Cisco IOS Network Management Command Reference for NTP
commands.
Configuring Remote Console and Logging
The command line interface (CLI) is the primary interface for configuring and managing the SAMI
processors. The CLI is designed for a single processor system, therefore, on a multiprocessor system
such as the SAMI, managing and monitoring the processors on a module requires that you establish a
session with each processor.
For a description of the various Cisco SAMI CLIs, see “Using the Command-Line Interfaces” section
on page A-1.
Establishing a session with each PPC on each SAMI in a Cisco 7600 Series Router chassis. can be a
cumbersome task. To facilitate the management and monitoring of the multiple SAMI processors, the
remote console and logging (RCAL) feature enables you to use the supervisor console as a single
connection point, from which you can control debugging, display show command output, and view
logging output from all the PPCs on a SAMI (and/or all SAMIs in a chassis) without having to establish
a session with each PPC.
To use RCAL to manage and monitor SAMI processors, complete the tasks in the following sections:
•
Configuring RCAL Support on the Supervisor, page 3-21
Cisco Service and Application Module for IP User Guide
3-20
OL-13003-06
Chapter 3
Configuring the Cisco SAMI
Configuring Remote Console and Logging
•
Configuring RCAL Support on a SAMI PPC, page 3-23
•
Using RCAL, page 3-24
Configuring RCAL Support on the Supervisor
The supervisor functions as the RCAL client—receiving messages sent by the SAMI processors. When
configuring a supervisor as an RCAL client, you specify the port on which to receive system messages
from the SAMI processors, and configure the level of messages to receive and display (levels below are
filtered).
To configure the supervisor as an RCAL client, use the following commands beginning in global
configuration mode at the supervisor console:
Command
Purpose
Step 1
Sup# configure terminal
Enters global configuration mode.
Step 2
Sup(config)# logging listen
udp_port
Configures the port on which the supervisor listens for system
messages from the SAMI processors on which RCAL is enabled.
Note
Step 3
Sup(config)# sami module
{mod_num | all {cpu {cpu_num
| all} logging severity
The UDP port specified must match the port specified on
the SAMI processors using the logging main-cpu global
configuration command. We recommend that you use
port 4000. If a port other than 4000 is used, RCAL to
SAMI processor 0 does not work.
Specifies the RCAL server (or servers) from which to receive
system messages, and configures the level of system messages to
receive on the supervisor, where:
•
mod_num—Number of the slot in which the SAMI is
installed.
•
all—Specifies all SAMIs installed in the chassis.
•
cpu {cpu-num | all}
– cpu_num—Number of the processor (0 for LCP and 3
through 8 for PPCs)
– all—Specifies all processors.
•
logging severity—Specifies the severity level for which the
supervisor receives and displays messages. Messages of
lower severity than the configured level are filtered.
By default, the supervisor receives all system messages sent
by SAMI processors.
To define the level of messages sent by a processor to the
supervisor, establish a session with the processor and use the
logging main-cpu global configuration command.
For a list of severity levels, see Table 3-1.
Step 4
Sup(config)# exit
Exits global configuration mode.
Table 3-1 lists the logging levels.
Cisco Service and Application Module for IP User Guide
OL-13003-06
3-21
Chapter 3
Configuring the Cisco SAMI
Configuring Remote Console and Logging
Table 3-1
Severity Level Definitions
Level
Description
0—emergencies
System unusable
1—alerts
Immediate action required
2—critical
Critical condition
3—errors
Error conditions
4—warnings
Warning conditions
5—notifications
Normal bug significant condition
6—informational
Informational messages
7—debugging
Debugging messages
Cisco Service and Application Module for IP User Guide
3-22
OL-13003-06
Chapter 3
Configuring the Cisco SAMI
Configuring Remote Console and Logging
Configuring RCAL Support on a SAMI PPC
Note
By default, RCAL support is enabled on SAMI COSLI PPCs. Therefore, to use RCAL, no configuration
tasks are required on the SAMI COSLI PPC.
When RCAL is enabled on a SAMI PPC, the SAMI PPC functions as an RCAL server. When configuring
a SAMI PPC to function as an RCAL server, you can define the level of system messages to send to the
RCAL client.
By default, RCAL is enabled on PPCs 3 through 8 using port 4000 for severity level errors (level 3) and
the EXEC command.
Note
The log level defined on the supervisor when specifying an RCAL client (sami module global
configuration command) can be used to filter out all of the messages below a certain severity level.
To configure RCAL support on a SAMI PPCs 3 through 8, use the following commands beginning in
privileged EXEC mode at the supervisor console:
Command
Purpose
Step 1
Sup# session slot slot_number
processor proc_number
Establishes a session to a SAMI PPC.
Step 2
Router> enable
Enters privilege EXEC mode.
Step 3
Router# configure
Enters global configuration mode.
Step 4
Router(config)# logging
main-cpu udp_port [log_level]
ip_address
Enables logs to be generated and sent to the supervisor at and
above the specified level.
By default, RCAL is enabled on a processor and the processor
sends messages for level 3 and above. For a list of severity levels,
see Table 3-1.
Note
Step 5
Router(config)# exit
The UDP port specified must match the port specified on
the supervisor. By default, port 4000 is used. Optionally,
a VLAN IP address can be specified for transporting this
traffic from PPCs 3-8.
Exits global configuration mode.
Cisco Service and Application Module for IP User Guide
OL-13003-06
3-23
Chapter 3
Configuring the Cisco SAMI
Configuring Remote Console and Logging
Configuring RCAL Support on the SAMI LCP
To configure RCAL support on the SAMI LCP (processor 0), use the following commands beginning in
privileged EXEC mode at the supervisor console:
Command
Purpose
Step 1
Sup# session slot slot_number
processor 0
Establishes a session to the SAMI LCP.
Step 2
switch# config
Enters global configuration mode.
Step 3
switch(config)# logging
enable
Enables logging to send syslog messages to one or more output
locations.
Step 4
switch(config)# logging
supervisor level
Sets the severity level at which syslog messages are sent to the
supervisor. The default is level 3.
Using RCAL
After the supervisor and SAMI processors are enabled for RCAL, you can execute certain commands to
the SAMI LCP or SAMI PPC directly from the supervisor console. The command set that you can issue
depends on whether you are executing the commands remotely to a SAMI LCP or SAMI PPC.
Table 3-2 lists the command sets that you can execute remotely from the supervisor to a
SAMI PPC (processor numbers 3 through 8).
Table 3-2
PPC RCAL Command Set
Command
Description
clear
Clears counters and statistics
debug
Enables debugging functions
dir
Lists files in a file system
log dir
Logs the dir command to syslog
log show
Logs the show command to syslog
log systat
Logs the systat command to syslog
ping ip_address
Executes a ping on a remote processor
set memory
Executes the set memory debug command
show
Displays running system information
systat
Displays information about terminal lines
undebug
Disables debugging functions
Table 3-3 lists the command sets that you can execute remotely from the supervisor to a
SAMI LCP (processor number 0).
Cisco Service and Application Module for IP User Guide
3-24
OL-13003-06
Chapter 3
Configuring the Cisco SAMI
Configuring Remote Console and Logging
Table 3-3
LCP RCAL Command Set
Command
Description
clear
Clears counters and statistics
confreq
Sets the config register for processors
console-select
Specifies console selection for front panel
consoles DB1 and DB2
reload
Reloads the entire SAMI or SAMIs
show
Displays system information
To execute a command to a SAMI PCC from the supervisor, use the following commands beginning in
privileged EXEC mode from the supervisor console:
Step 1
Sup> enable
Enables privileged EXEC mode.
Step 2
Sup# configure terminal
Enters global configuration mode.
Step 3
Sup(config)# execute-on
{{slot_num [, slot_number] |
all-mwams | all-samis}
{cpu_number [,cpu_num] | all
| all-ppc} command}}
Executes commands remotely when RCAL is enabled, where:
Note
•
slot_num—Specifies the number of the slot in which the
module is installed. Optionally, you can specify additional
slot numbers, separated by a comma (,).
•
all-mwam—Specifies all Cisco Multiprocessor WAN
Application Modules (MWAMs) in the chassis.
•
all-sami—Specifies all SAMIs in the router chassis.
•
cpu_num—Specifies the processor number. Valid values for
a SAMI are 0 for the LCP and 3 through 8 for the PPCs. Valid
values for an MWAM are 1 for the control CPU and 2
through 7 for the processors.
•
all—Executes the command on all processors.
•
all-ppc—Executes the command on all SAMI processors 3
through 8.
•
command—Specifies the command to execute on the
processor remotely. Table 3-2 lists commands supported for
the PPC. Table 3-3 lists supported LCP commands.
When you specify a keyword option that applies to multiple processors (all-mwam, all-sami, all, and
all-ppc), the command is executed on active processors but is not executed on processors that are
inactive. To show the processor state, use the show logging slot command.
Cisco Service and Application Module for IP User Guide
OL-13003-06
3-25
Chapter 3
Configuring the Cisco SAMI
Configuring Remote Console and Logging
Logs received by the supervisor are prefixed with hostname information that identifies which PPC
generated the log.
For example:
•
Processor 5 on a SAMI in slot 6 generates the following error message:
SAMI 06/5: 00:02:05: %SNMP-5-MODULETRAP: Module 6 [Up] Trap
•
Processor 4 on a SAMI in slot 2 generates the following debug message:
SAMI 02/4: 00:03:42: ICMP: echo reply sent, src 10.10.10.2, dst 10.10.10.1
At the supervisor, the logs can be directed to one or more destinations including console, buffer, or
syslog.
Usage Notes
When using RCAL, note the following:
•
To prevent the supervisor CPU from being overloaded when the command output is expected to
exceed more than 100 lines, two options are available:
a. Ensure that the logging console feature is configured as follows:
no logging console guaranteed
This configuration allows the output to be dropped when the console backs up. This is the
default configuration.
b. Configure the logging console debug as follows:
no logging console debug
This configuration directs the output to other logging endpoints, such as buffer or syslog.
•
To display logging information for all PPCs on all SAMIs in a router chassis with one command
from the supervisor:
a. Configure the PPCs to locally store logs (in each processor).
b. Set the buffer logging level on each processor to include the required level of information (the
default setting is the debug level).
c. Display the logs for all the PPCs for all SAMIs in the router chassis, enter the following
commands:
Sup# execute-on all-samis all-ppc show logging
Cisco Service and Application Module for IP User Guide
3-26
OL-13003-06
Chapter 3
Configuring the Cisco SAMI
Configuring the Cisco Software Application on a SAMI PPC
•
To display the software image versions running on all the PPCs in a chassis with one command from
the supervisor, use the following command:
Sup# execute-on all-samis all-ppc show version
----------- Slot 3/CPU 3, show ver------------Cisco Internetwork Operating System Software
IOS (tm) SAMI Software (SAMI-G7IS-M), Experimental Version
----------- Slot 3/CPU 4, show ver------------Cisco Internetwork Operating System Software
IOS (tm) SAMI Software (SAMI-G7IS-M), Experimental Version
Tip
To minimize command output, you can use the pipe ( | ) support to include only lines of text that match
the regular expression following the pipe. For example:
Sup# execute-on |
To display logging status and counters for all processors on a SAMI using RCAL, use the
show logging slot command.
Configuring the Cisco Software Application on a SAMI PPC
To configure a Cisco software application on a SAMI PPC, use the following commands beginning in
global configuration mode at the supervisor console:
Step 1
Command
Purpose
Sup# session slot slot_number processor
proc_number
Establishes a session to a PPC on the SAMI, where:
•
slot_number—Number of the slot in which the
SAMI is installed.
•
proc_number—Number of the PPC on the
SAMI. Valid values are 3 through 8.
One session per processor can be established.
Step 2
Router> enable
Note
Enters privilege EXEC mode.
If establishing a session to a COSLI
PPC, skip this step and proceed to
Step 3.
Step 3
Router# config
Enters global configuration mode.
Step 4
Router(config)#
Configure the application as outlined in the
application documentation.
Refer to the Cisco software application
documentation (see the “Related Documentation”
section on page 9).
Step 5
Router(config)# exit
Exits global configuration mode.
Step 6
Router# copy running-config
startup-config
Copies the running configuration to NVRAM on the
SAMI (if in local mode) or supervisor bootflash (if in
supervisor mode).
Cisco Service and Application Module for IP User Guide
OL-13003-06
3-27
Chapter 3
Configuring the Cisco SAMI
Configuring the Cisco Software Application on a SAMI PPC
The following example shows how to establish a session to a SAMI Cisco IOS PPC and begin
configuring a Cisco software application:
Sup> enable
Sup# session slot 6 processor 4
The default escape character is Ctrl-^, then x.
You can also type 'exit' at the remote prompt to end the session
Trying 127.0.0.64 ... Open
Router> enable
Router# config
Enter configuration commands, one per line.
Router(config)#
End with CNTL/Z.
Enter application configuration commands. For information on configuring your application, see the
documentation for the application list in “Related Documentation” section on page -9.
Router(config)# exit
Note
In the example above, the “64” part of IP address indicates slot 6, processor 4.
The following example shows how to make a backup of the configuration after the application is
configured.
Router# copy running-config startup-config
Destination filename [startup-config]?
L2 Connectivity Between SAMIs
SAMI does not support L2 connectivity among processors of the same card. The only exception to this
is if the SAMI is running the Cisco Broadband Wireless Gateway 2.0 image, and the Supervisor is
running SRE.
If you require connectivity among processors of the same card, then it needs to be provided at L3, with
the Supervisor routing packets between the different SAMI processors. This requires the following
configurations on the Supervisor and the SAMI processors.
1.
The IP addresses used for inter-processor connectivity have to be from different IP subnets.
2.
Each processor needs to have a different VLAN (i.e., different Gi0/0 sub-interface) for the purpose
of inter-processor connectivity. In order to force the inter-processor traffic to be routed at L3 by the
Supervisor, each processor should only contain the sub-interface corresponding to its own VLAN.
3.
On the Supervisor, L3 VLAN interfaces need to be configured corresponding to each of the 6
VLANs configured on the SAMI processors in the previous step.
4.
IP connectivity between the SAMI processor sub-interface and the corresponding L3 VLAN
interfaces on the Supervisor needs to be verified for all SAMI processors.
5.
Either static routes need to be configured on the Supervisor, or a dynamic routing protocol needs to
be run on the Supervisor, and each of the SAMI processors to enable the Supervisor to route traffic
between the subnets corresponding to each SAMI processor.
Cisco Service and Application Module for IP User Guide
3-28
OL-13003-06
Chapter 3
Configuring the Cisco SAMI
SAMI Coredump, Crashinfo and Debuginfo Support
4GB DRAM Support
The SAMI platform supports 4GB DIMMs. Refer to your specific Cisco software application
documentation to determine if the application supports 4GB DIMMs.
•
Changes are downward compatible—the same image supports 2GB and 4GB configurations.
•
Because of the larger available memory, the IOS “Check heaps” process requires higher usage of the
CPU. This is reflected as a higher average use of the CPU depending on the heap usage.
•
There is no upgrade procedure for 4GB DIMMS. You will have to order and install new cards to
upgrade to the 4GB.
SAMI Coredump, Crashinfo and Debuginfo Support
When any of the processors crash ( PPC or IXP), the LCP collects the crashinfo and debuginfo files from
each of the processors and bundles it together in a tar file. The tar file is stored in the directory core: in
the LCP. Execute command dir core: from the LCP to check for the crashinfo files.
The .tar file contains the following information:
•
Crashinfo of the PPC crashed and debuginfo of the rest.
•
LCP debuginfo.
•
Crashinfo of IXP1 and IXP2.
•
IXP coredumps ( see the“exception ixp” section on page E-17 to enable coredump collection for
IXPs).
The tar filename will have the following format
crashinfo_collection-%Y%m%d-%H%M%S.tar
So, for example, crashinfo_collection-20100506-160941.tar means the tar file was created on May 6,
2010 at 16:09:41 hours
The following list identifies the contents of the above example tar file. In this instance, processor 3
reloads. Additionally, IXP coredump collection is enabled for both IXPs
crashinfo_proc3_20100506-160534
debuginfo_proc4_20100506-160535
debuginfo_proc5_20100506-160535
debuginfo_proc6_20100506-160535
debuginfo_proc7_20100506-160536
debuginfo_proc8_20100506-160536
debuginfo_proc0-20100506-160941
coredump_proc1-20100506-160941.gz
coredump_proc2-20100506-160941.gz
qnx_1_mecore_ucdump
qnx_2_mecore_ucdump
Note
Please ensure that you have enough space in LCP core:/ directory to store the tar file.
Cisco Service and Application Module for IP User Guide
OL-13003-06
3-29
Chapter 3
Configuring the Cisco SAMI
SAMI Coredump, Crashinfo and Debuginfo Support
•
To find out how much free space is available, use the dir core: command from the LCP console.
•
To delete files from LCP core use the delete core: filename command.
•
To delete all the files at once use the clear core command.
Debug Info Generation During RF-Induced Reload
An RF-Induced reload occurs when the redundancy facility identifies a failure in the system. For
example, when there is a communication issues between the redundant systems. Previously, the SAMI
would simply reload, and the information about the condition of the system before the SAMI reloaded
were lost. Now, the SAMI can write debug info during RF-Induced reload. This provides information
regarding the state of the system before the SAMI reloaded. Debuginfo generation will lead to a slower
reload of the SAMI.
Singleip
Redundancy-Facility induced reloads cause the PPCs and LCP to write debuginfo, and the IXP to write
crashinfo and coredump if configured. All of the debuginfo, crashinfo and coredump files are collected
and stored together as crashinfo_collection.tar in the LCP core directory. This behaviour is similar to
the behaviour seen in the case of PPC - IXP Health-monitoring failure.
Cisco Service and Application Module for IP User Guide
3-30
OL-13003-06
CH A P T E R
4
Maintaining and Monitoring the Cisco SAMI
The following sections describe procedures you can use to maintain and monitor a Cisco Service and
Application Module for IP (SAMI):
•
Upgrading the SAMI Software, page 4-1
•
Managing the SAMI LCP Software, page 4-4
•
Manually Upgrading an LCP ROMMON Image, page 4-9
•
Manually Upgrading a PPC ROMMON Image, page 4-12
•
Reallocating SAMI PPC IO Memory, page 4-13
•
Configuring, Exporting, and Importing RSA Keys on a SAMI PPC, page 4-20
•
Establishing a Console Connection on the SAMI, page 4-23
•
Recovering the SAMI, page 4-14
•
Establishing a Console Connection on the SAMI, page 4-23
•
Configuring Health Monitoring, page 4-24
•
Monitoring the SAMI, page 4-27
Upgrading the SAMI Software
The SAMI is shipped preloaded with the operating system software. However, to take advantage of new
features and enhancements, you can upgrade your SAMI with later versions of software as they become
available.
The SAMI software is delivered as a bundle of images for the SAMI base card and daughter card
components. Each image in the bundle has its own version and release number that is used during the
upgrade process to determine if an image needs to be installed or not.
Note
The SAMI image bundle is named c7svcsami-feature-mz, where feature is the name of the Cisco
software application.
Cisco Service and Application Module for IP User Guide
OL-13003-06
4-1
Chapter 4
Maintaining and Monitoring the Cisco SAMI
Upgrading the SAMI Software
Specifically, the SAMI bundle includes the following software and firmware images:
•
Line control processor (LCP) operating system and ROMMON image
•
Network processor (IXP/XScale) QNX image and IXP microcode image
•
Classification and distribution engine (CDE) field programmable gate array (FPGA) images (CDE1
and CDE2)
•
Cisco software application image (running on the PPC) and ROMMON image
•
Daughter card ROMMON image
•
Daughter card FPGA image
•
Nitrox II microcode
When an upgrade is initiated, the version and release numbers of the images in the newer bundle are
compared to the versions currently running. If the version of an existing image is different than that in
the new bundle, the image only is automatically upgraded.
Upgrading in a Redundant Configuration
To minimize any disruption to existing network traffic during a software upgrade or downgrade, deploy
your SAMIs in a redundant configuration.
The following steps provide an overview of the upgrade process in a redundant configuration.
1.
Upgrade the active SAMI first.
2.
Reboot the active SAMI after the software installation. When you reboot the active SAMI, it fails
over to the standby module and existing traffic continues without interruption.
3.
Upgrade the new active SAMI.
4.
Reload the active SAMI after the redundant module is up and the high availability (HA) state is hot.
When you reboot this SAMI, a similar failover occurs and again, the existing traffic continues. The
original, active SAMI is active again.
Verifying the SAMI Software Versions
To verify the version of the SAMI software from the supervisor console, use the show module command:
Sup# show module
Mod Ports Card Type
Model
--- ----- -------------------------------------- -----------------4
1 SAMI Module (CSG2)
WS-SVC-SAMI-BB-K9
6
2 Supervisor Engine 720 (Active)
WS-SUP720-3BXL
7
48 SFM-capable 48-port 10/100 Mbps RJ45
WS-X6548-RJ-45
9
1 SAMI Module (GENERIC)
WS-SVC-SAMI-BB-K9
Serial No.
----------SAD1140096M
SAD083400U3
SAD0611007M
SAD095003X1
Mod MAC addresses
Hw
Fw
Sw
Status
--- ---------------------------------- ------ ------------ ------------ ------4 001d.45f9.0922 to 001d.45f9.0929
2.2
8.7(0.5-Eng) 3.0(0)W1(0.0 Ok
6 0011.21b9.ac20 to 0011.21b9.ac23
4.0
8.1(3)
12.2(2007052 Ok
7 0002.7ee1.f010 to 0002.7ee1.f03f
4.2
6.3(1)
8.7(0.22)FW6 Ok
9 0001.0002.0003 to 0001.0002.000a
1.0
8.7(0.5-Eng) 3.0(0)W1(0.0 Ok
Mod
---4
4
6
Sub-Module
--------------------------SAMI Daughterboard 1
SAMI Daughterboard 2
Policy Feature Card 3
Model
-----------------SAMI-DC-BB
SAMI-DC-BB
WS-F6K-PFC3BXL
Serial
Hw
Status
----------- ------- ------SAD113909PZ 1.1
Ok
SAD113909U5 1.1
Ok
SAD083903ML 1.3
Ok
Cisco Service and Application Module for IP User Guide
4-2
OL-13003-06
Chapter 4
Maintaining and Monitoring the Cisco SAMI
Upgrading the SAMI Software
6
9
9
Mod
---4
6
7
9
Sup#
MSFC3 Daughterboard
SAMI Daughterboard 1
SAMI Daughterboard 2
WS-SUP720
SAMI-DC-BB
SAMI-DC-BB
SAD083606TK
SAD110709TS
SAD110709SF
2.1
0.701
0.701
Ok
Ok
Ok
Online Diag Status
------------------Pass
Pass
Pass
Pass
To verify the version of the SAMI image from the LCP console, use the show version command:
switch# show version
> Cisco Application Control Software (ACSW) TAC support:
> http://www.cisco.com/tac Copyright (c) 2002-2006, Cisco Systems, Inc.
> All rights reserved.
> The copyrights to certain works contained herein are owned by other
> third parties and are used and distributed under license.
> Some parts of this software are covered under the GNU Public License.
> A copy of the license is available at
> http://www.gnu.org/licenses/gpl.html.
>
> Software
>
loader:
Version 12.2[121]
Note
The show version command displays the software version of the LCP image, not the version of the
SAMI bundle.
Upgrading the SAMI Bundle from the Supervisor Engine
To upgrade the SAMI image bundle, perform the following tasks on the supervisor engine console:
Command
Purpose
Step 1
Sup> enable
Enters privileged EXEC mode.
Step 2
Sup# upgrade hw-module
slot slot_num
software url/filename
Copies the bundle from the specified URL to the compact flash
on the SAMI in the specified slot and sets the initialization
parameters.
Step 3
Sup# hw-module module
slot_num reset
Reloads the entire SAMI (turns off the power and then on) from
the new source file.
Note
Step 4
Sup# show upgrade software
progress
The SAMI automatically boots from the new source file.
Displays status of the image upgrades that are occurring.
Cisco Service and Application Module for IP User Guide
OL-13003-06
4-3
Chapter 4
Maintaining and Monitoring the Cisco SAMI
Managing the SAMI LCP Software
For example, to upgrade the image bundle on a SAMI in slot 2 of a Cisco 7600 Series Router chassis,
enter the following commands from the supervisor engine.
Sup> enable
Sup# upgrade hw-module slot 2 software tftp://10.1.1.1/c7svcsami-ipbase-mz.bouncer.070724
Loading c7svcsami-ipbase-mz.bouncer.070724 from <TFTP SERVER IPADDRESS> (via Vlan10):
!!!!!!!!!!!!!!!!!!!!!!!!!!!!!!!!!!!!!!!!!!!!!!!!!!!!!!!!!!!!!!!!!!!!!!!!!!!!!!!!!!!!!!!!!!
[OK - 34940891 bytes]
Sup# hw-module module 2 reset
Proceed with reload of module?[confirm]
% reset issued for module 2
Sup#
Sup# show upgrade software progress
Slot
Software File
9
c7svcsami-ipbase-mz.bouncer.070724
When an upgrade is initiated using the upgrade hw-module command, many processes occur
automatically, including configuring the SAMI to automatically boot using the new image.
(You can use the show running-config command and the show start up config commands from the LCP
console to view this boot line configuration).
Additionally, the following commands can be used manage SAMI image files.
Managing the SAMI LCP Software
This section provides a brief overview on how to manage the software running on the SAMI LCP.
This section includes the following topics:
•
Saving and Viewing the LCP Configuration File, page 4-4
•
Using the SAMI LCP File System, page 4-5
•
Viewing, Deleting, and Copying Core Dump Files, page 4-8
Saving and Viewing the LCP Configuration File
Upon startup, the SAMI LCP loads the startup-configuration file stored in flash memory (nonvolatile
memory) to the running-configuration stored in RAM (volatile memory).
Use the show startup-config command in EXEC mode to display the contents of the startup-config file
(see the “Viewing the LCP Configuration File” section on page 4-5).
When you make configuration changes, the LCP places those changes in a virtual running-configuration
file called the running-config. When you enter a CLI command, the change is made only to the
running-configuration file in volatile memory. Before you log out or reboot the SAMI, copy the contents
of the running-config file to the startup-config file (startup-config) to save configuration changes to flash
memory. The LCP uses the startup-configuration file on subsequent reboots.
This section includes the following topics:
•
Saving the LCP Configuration File in Flash Memory, page 4-5
•
Viewing the LCP Configuration File, page 4-5
Cisco Service and Application Module for IP User Guide
4-4
OL-13003-06
Chapter 4
Maintaining and Monitoring the Cisco SAMI
Managing the SAMI LCP Software
Saving the LCP Configuration File in Flash Memory
After you create or update the running-configuration file in RAM (volatile memory), save the contents
to the startup-configuration file in flash memory (non-volatile memory) on the SAMI LCP. To copy the
contents of the running-configuration file to the startup-configuration file, use the copy running-config
startup-config command from EXEC mode.
The syntax for the command is:
copy running-config startup-config
For example, to save the running-configuration file to the startup-configuration file in flash memory,
enter:
switch# copy running-config startup-config
You can also use the write memory command to copy the contents of the running-configuration file to
the startup-configuration file. The write memory command is equivalent to the copy running-config
startup-config command.
The syntax for the command is:
write memory
Viewing the LCP Configuration File
To display the running-configuration file, use the show running-config command in EXEC mode. The
SAMI LCP does not display default configurations in the running-configuration file.
Note
The write terminal command can also be used to display the running-configuration file. The
write terminal command is equivalent to the copy running-config command.
Use the following commands to view the content of the running- and startup-configuration file:
•
To view the running-configuration file, use the show running-config command.
•
To view the startup-configuration file, use the show startup-config command.
The syntax for the show startup-config command is as follows:
show startup-config
Using the SAMI LCP File System
Flash memory stores the operating system, startup-configuration file, core dump files, system message
log files, for example, on the SAMI LCP. Flash memory comprises a number of individual file systems,
or partitions, that include this data.
The file systems, or partitions, contained in the LCP include:
•
disk0:—Contains all startup-configuration files, software licenses, system message log files, SSL
certificates and keys, and user-generated data for all existing contexts on the LCP.
•
image:—Contains the system software images.
•
core:—Contains the core files generated after each time the LCP becomes unresponsive.
•
volatile:—Contains the files residing in the temporary (volatile:) directory. The volatile directory
provides temporary storage; files in temporary storage are erased when the LCP reboots.
Cisco Service and Application Module for IP User Guide
OL-13003-06
4-5
Chapter 4
Maintaining and Monitoring the Cisco SAMI
Managing the SAMI LCP Software
The LCP provides a number of useful commands to help you manage software configuration and image
and files.This section provides a series of procedures to help you manage files on the LCP. It includes
the following procedures:
•
Listing the Files in a Directory
•
Deleting Files
Listing the Files in a Directory
To display the directory contents of a specified file system, use the dir command in EXEC mode. This
command displays a detailed list of directories and files contained within the specified file system on the
LCP, including names, sizes, and time created. You may optionally specify the name of a directory to list.
The syntax for this command is:
dir {core: | disk0:[directory/][filename] | image:[filename] | volatile:[filename]}
The keywords and arguments are:
•
core:—Displays the contents of the core: file system.
•
disk0:—Displays the contents of the disk0: file system.
•
image:—Displays the contents of the image: file system.
•
volatile:—Displays the contents of the volatile: file system.
•
directory/—(Optional) Displays the contents of the specified directory.
•
filename—(Optional) Displays information relating to the specified file, such as file size and the
date it was created. You can use wildcards in the filename. A wildcard character (*) matches all
patterns. Strings after a wildcard are ignored.
For example, to list the files in the disk0: file system, enter:
switch# dir disk0:
7465
2218
1654692
1024
1024
1024
12
7843
4320
1024
Jan
Mar
Feb
Feb
Jan
Mar
Jan
Mar
Jan
Jan
03
07
27
16
01
13
30
09
05
01
00:13:22
18:38:03
21:42:07
12:47:24
00:02:07
13:53:08
17:54:26
22:19:56
14:37:52
00:02:28
2000
2006
2006
2006
2000
2006
2006
2006
2000
2000
C2_dsb
ECHO_PROBE_SCRIPT4
c6ace-t1k9_dplug-mzg.3.0.0_A0_2.44.bin
core_copies_dsb/
cv/
dsb_dir/
messages
running-config
startup-config
www/
Usage for disk0: filesystem
4254720 bytes total used
6909952 bytes free
Cisco Service and Application Module for IP User Guide
4-6
OL-13003-06
Chapter 4
Maintaining and Monitoring the Cisco SAMI
Managing the SAMI LCP Software
For example, to list the core dump files in flash memory, enter:
switch# dir core:
253151
262711
250037
Mar 14 21:23:33 2006 0x401_vsh_log.8249.tar.gz
Mar 15 21:22:18 2006 0x401_vsh_log.15592.tar.gz
Mar 15 18:35:27 2006 0x401_vsh_log.16296.tar.gz
Usage for core: filesystem
1847296 bytes total used
64142336 bytes free
65989632 bytes available
Alternately, you can list files in a SAMI directory from the supervisor console using the dir sami#
privileged EXEC command.
The syntax for this command is:
dir sami#slot_num {-fs:image/ | -fs:core/}
The keywords and arguments are:
•
slot_num—Number of the slot in which the SAMI is installed.
•
image:—Displays the contents of the SAMI image: file system.
•
core:—Displays the contents of the SAMI core: file system.
Deleting Files
To delete a file from a specific file system in the SAMI LCP, use the delete command in EXEC mode.
When you delete a file, the SAMI erases the file from the specified file system.
The syntax for this command is:
delete {core:filename | disk0:[directory/]filename | image:filename | volatile:filename}
The keywords and arguments are:
•
core:filename—Deletes the specified file from the core: file system (see the “Viewing, Deleting, and
Copying Core Dump Files” section on page 4-8).
•
disk0:[directory/]filename— Deletes the specified file from the disk0: file system (for example, a
packet capture buffer file or system message log).
•
image:filename—Deletes the specified file from the image: file system.
•
volatile:filename—Deletes the specified file from the volatile: file system.
For example, to delete a copy of the running-configuration file called MY_RUNNING-CONFIG1 from
the MYSTORAGE directory on the disk0: file system, enter:
switch# delete disk0:MYSTORAGE/MY_RUNNING-CONFIG1
Alternately, you can delete files from a SAMI directory from the supervisor console using the delete
sami# privileged EXEC command.
Cisco Service and Application Module for IP User Guide
OL-13003-06
4-7
Chapter 4
Maintaining and Monitoring the Cisco SAMI
Managing the SAMI LCP Software
The syntax for this command is:
delete sami#slot_num {-fs:image/ | -fs:core/}filename
The keywords and arguments are:
•
slot_num—Number of the slot in which the SAMI is installed.
•
image:—Deletes the specified file from the SAMI image: file system.
•
core:—Deletes the specified file from the SAMI core: file system.
•
filename—Name of the file that you want to delete. You can use wildcards in the filename. A
wildcard character (*) matches all patterns. Strings after a wildcard are ignored.
Viewing, Deleting, and Copying Core Dump Files
A core dump occurs when the SAMI experiences a fatal error. The SAMI LCP writes information about
the fatal error to the core: file system in flash memory before a switchover or reboot occurs. The core:
file system is the storage location for all core files generated during a fatal error. Three minutes after the
SAMI reboots, the saved last core is restored from the core: file system back to its original RAM
location. This restoration is a background process and is not visible to the user.
You can view the list of core files in the core: file system by using the dir core: command in EXEC
mode.
Note
Core dump information is for Cisco Technical Assistance Center (TAC) use only. If the SAMI becomes
unresponsive, you can view the dump information in the core through the show cores command.
We recommend contacting TAC for assistance in interpreting the information in the core dump.
The timestamp on the restored last core file displays the time when the SAMI booted up, not when the
last core was actually dumped. To obtain the exact time of the last core dump, check the corresponding
log file with the same process identifier (PID).
To delete a core dump file from the core: file system in flash memory, use the delete core: command.
To view the core dump files available in flash memory, use the dir core: command.
The syntax for the command is:
delete core:filename
The filename argument specifies the name of a core dump file located in the core: file system.
For example, to delete the file 0x401_VSH_LOG.25256.TAR.GZ from the core: file system, enter:
switch# delete core:0x401_VSH_LOG.25256.TAR.GZ
To copy a core dump file from the core: file system from the supervisor console, use the copy sami#
privileged EXEC command.
The syntax for the command is:
copy sami#slot_number{-fs:core/filename dest-file}
The keywords and arguments are:
•
slot_num—Number of the slot in which the SAMI is installed.
•
core:/filename—Name of the core dump file in the core directory.
•
dest-file—Name of the destination file.
Cisco Service and Application Module for IP User Guide
4-8
OL-13003-06
Chapter 4
Maintaining and Monitoring the Cisco SAMI
Manually Upgrading an LCP ROMMON Image
Manually Upgrading an LCP ROMMON Image
If the Cisco SAMI bundle contains an LCP ROMMON image, you can use the reprogram bootflash
fur-image command to upgrade the LCP ROMMON image with the one in the bundle.
Note
Caution
The LCP ROMMON image might not be bundled in earlier versions of the Cisco SAMI image.
The reprogram bootflash command is for use by trained Cisco personnel only. Entering this command
may cause unexpected results. Do not attempt to use the reprogram bootflash command without
guidance from Cisco support personnel.
This section includes the following procedures:
•
Verifying the LCP Software Version, page 4-9
•
Upgrading the LCP ROMMON Image When Using a Sup720/RSP720, page 4-9
•
Upgrading the LCP ROMMON Image When Using a Sup32, page 4-11
Verifying the LCP Software Version
To verify the version of the LCP image currently installed on your SAMI, use the show version
command at the LCP console:
switch# show version
Cisco Application Control Software (ACSW) TAC support:
http://www.cisco.com/tac Copyright (c) 2002-2006, Cisco Systems, Inc.
All rights reserved.
The copyrights to certain works contained herein are owned by other
third parties and are used and distributed under license.
Some parts of this software are covered under the GNU Public License.
A copy of the license is available at
http://www.gnu.org/licenses/gpl.html.
Software
loader:
Version 12.2[120]
Upgrading the LCP ROMMON Image When Using a Sup720/RSP720
To reprogram the Field Upgradable (FUR) partition of the LCP ROMMON image when using a
Sup720/RSP720, use the reprogram bootflash fur-image command at the LCP console:
switch# reprogram bootflash fur-image
Warning: This command will affect rommon image and can render the machine unbootable
Continue? [y/n]: y
Warning: DO NOT power down or reboot system while programming ...
Upgrading rommon. Please wait ....
Validating Image Header - OK
Cisco Service and Application Module for IP User Guide
OL-13003-06
4-9
Chapter 4
Maintaining and Monitoring the Cisco SAMI
Manually Upgrading an LCP ROMMON Image
itasca_reprogram_erase_magic: erasing rommon magic Erase from 0x2e42f000 to 0x2e42f01f
In blocks of 131072 bytes
Erase flash addr: 0x2e42f000
Begin Programming FLASH: 4 bytes
Programming
Programming leftover bytes 4
Read leftover bytes 4
padded size = 4
Flash Program Done!
itasca_reprogram_erase_magic: erase succesful!
Erase from 0x2e30f000 to 0x2e40efff
In blocks of 131072 bytes
Erase flash addr: 0x2e30f000
Erase flash addr: 0x2e32f000
Erase flash addr: 0x2e34f000
Erase flash addr: 0x2e36f000
Erase flash addr: 0x2e38f000
Erase flash addr: 0x2e3af000
Erase flash addr: 0x2e3cf000
Erase flash addr: 0x2e3ef000
Begin Programming FLASH: 1048576 bytes
Programming
!!!!!!!!!!!!!!!!!!!!!!!!!!!!!!!!!!!!!!!!!!!!!!!!!!!!!!!!!!!!!!!!!!!!!!!!!!!!!!!!!!!!!!!!!!
!!!!!!!!!!!!!!!!!!!!!!!!!!!!!!!!!!!!!!!!!!!!!!!!!!!!!!!!!!!!!!!!!!!!!!!!!!!!!!!!!!!!!!!!!!
!!!!!!!!!!!!!!!!!!!!!!!!!!!!!!!!!!!!!!!!!!!!!!!!!!!!!!!!!!!!!!!!!!!!!!!!!!!!!!!!!!!!!!!!!!
!!!!!!!!!!!!!!!!!!!!!!!!!!!!!!!!!!!!!!!!!!!!!!!!!!!!!!!!!!!!!!!!!!!!!!!!!!!!!!!!!!!!!!!!!!
!!!!!!!!!!!!!!!!!!!!!!!!!!!!!!!!!!!!!!!!!!!!!!!!!!!!!!!!!!!!!!!!!!!!!!!!!!!!!!!!!!!!!!!!!!
!!!!!!!!!!!!!!!!!!!!!!!!!!!!!!!!!!!!!!!!!!!!!!!!!!!!!!!!!!!!!!!!!!!!!!!!!!!!!!!!!!!!!!!!!!
!!!!!!
Flash Program Done!
upgrd FUR: Check sum passed: bootflash = 0, expected = 0
itasca_reprogram_erase_magic: stamp rommon magic Erase from 0x2e42f000 to 0x2e42f01f
In blocks of 131072 bytes
Erase flash addr: 0x2e42f000
Begin Programming FLASH: 4 bytes
Programming
Programming leftover bytes 4
Read leftover bytes 4
padded size = 4
Flash Program Done!
itasca_reprogram_stamp_magic: write succesful!
Upgrading done. Next boot will run desired rommon.
switch#
Cisco Service and Application Module for IP User Guide
4-10
OL-13003-06
Chapter 4
Maintaining and Monitoring the Cisco SAMI
Manually Upgrading an LCP ROMMON Image
Upgrading the LCP ROMMON Image When Using a Sup32
To reprogram the Field Upgradable (FUR) partition of the LCP ROMMON image when using a Sup32
when the current LCP ROMMON is Version 12.2[120] or earlier, complete the following steps:
Step 1
Bring up the SAMI.
Scenario 1:The SAMI PPCs came up fine from the LCP console. This scenario applies to most of the
Cisco applications.
Verify that the state of the processors is UP.
Sup(config)# session slot slot-num processor 0
login: admin
login: admin
switch# show sami processors
Processor number STATUS
3
UP
(0x00010000)
4
UP
(0x00010000)
5
UP
(0x00010000)
6
UP
(0x00010000)
7
UP
(0x00010000)
8
UP
(0x00010000)
Scenario 2: The SAMI is reloading by itself. Wait for the following message to display on the supervisor
that indicates that the LCP (processor 0) is in safe mode (PPCs are kept in reset). This scenario applies
to Cisco applications such as the Cisco Content Services Gateway - 2nd Generation (CSG2).
%SAMI-1-SAMI_SYSLOG_ALERT: SAMI 3/0: %SAMI-1-730207: SAMI User Space: ALERT: Exceeded
maximum boot retries forbooting daughter cards,Now processor 0 is in safe mode for
debugging only
Verify that the state of the processors is UNKNOWN.
Sup# session slot slot-num processor 0
login: admin
Password: admin
switch# show sami processors
Processor number STATUS
===========================================
3
UNKNOWN
(0x00000000)
4
UNKNOWN
(0x00000000)
5
UNKNOWN
(0x00000000)
6
UNKNOWN
(0x00000000)
7
UNKNOWN
(0x00000000)
8
UNKNOWN
(0x00000000)
Scenario 3: The SAMI is not reloading by itself. This scenario might apply to non-CSG2 applications.
Verify that the state of the processors is UNKNOWN.
Sup# session slot slot-num processor 0
login: admin
Password: admin
switch# show sami processors
Processor number STATUS
===========================================
3
UNKNOWN
(0x00000000)
4
UNKNOWN
(0x00000000)
Cisco Service and Application Module for IP User Guide
OL-13003-06
4-11
Chapter 4
Maintaining and Monitoring the Cisco SAMI
Manually Upgrading a PPC ROMMON Image
5
6
7
8
Step 2
UNKNOWN
UNKNOWN
UNKNOWN
UNKNOWN
(0x00000000)
(0x00000000)
(0x00000000)
(0x00000000)
Reprogram the Field Upgradable (FUR) partition of the LCP ROMMON image using the reprogram
bootflash fur-image command at the LCP console.
switch# reprogram bootflash fur-image
Manually Upgrading a PPC ROMMON Image
Caution
Typically, there is no need to manually upgrade the SAMI PPC ROMMON images. The images are
upgraded automatically during the SAMI upgrade process (see the “Upgrading the SAMI Software”
section on page 4-1). However, if an automatic upgrade fails, you can upgrade the PPC ROMMON
manually.
Caution
Do not try this process on a live network. ROMMON upgrade procedures causes the PPCs to be reloaded.
During the SAMI image upgrade process, the version of an image included in the bundle is compared to
the version currently running on the SAMI component. If the two versions differ, then the image is
automatically upgraded to the new image in the bundle.
To manually upgrade a PPC ROMMON image, complete the following tasks, beginning in privileged
EXEC mode on the supervisor engine console:
Command
Purpose
Step 1
Sup# copy tftp://tftp
ip_address/rommon-image
sami-image/rommon-image
Copies the ROMMON image to the LCP image directory on the
SAMI.
Step 2
Sup# session slot slot_number
processor proc_number
Establishes a session with the LCP on the SAMI, where:
Step 3
switch# upgrade-rommon
rommon-image-name all-ppc
•
slot_number—Number of the slot in which the SAMI is
installed.
•
proc_number—Number of the LCP (PPC0).
Executes a ROMMON upgrade on all of the PPCs on the SAMI
where the rommon-image-name is the name of the ROMMON
image in the SAMI software bundle.
For example, to perform a PPC ROMMON image upgrade, use the following commands:
Sup> enable
Sup# copy tftp://10.1.1.1/rommon-image sami#2-fs:image/rommon-image
Sup# session 2 processor PPC0
switch# upgrade-rommon rommon-image all-ppc
Cisco Service and Application Module for IP User Guide
4-12
OL-13003-06
Chapter 4
Maintaining and Monitoring the Cisco SAMI
Reallocating SAMI PPC IO Memory
Reallocating SAMI PPC IO Memory
Note
Reallocating SAMI PPC IO Memory is supported on SAMI Cisco IOS PPCs only.
Each of the PPCs on a SAMI has 2GB or 4GB DRAM. In PPCs with 2GB DRAM, 64 MB is allocated
for IO memory by default. For SAMIs with 4GB DRAM, the default iomem size is specific to
application. However, you can use the memory-size iomem command to reallocate the IO memory from
the total available DRAM space. The no form of the iomem command returns to the default memory
allocation.
Note
Caution
Each application has different IO memory requirements. Please consult the application configuration
and user guides for recommendations on IO memory and minimum DRAM required.
It is not recommended that you change the IO memory allocation without careful consideration of the
network requirements.
To reallocate memory on each of the PPCs (processors 3 through 8), use the memory-size iomem
command to reallocate memory on each of the PPCs (processors 3 through 8). The memory-size iomem
command cannot be used to configure the memory allocation on the LCP (processor 0).
After the I/O memory is configured using the memory-size iomen command, the remaining DRAM
memory is used for processor memory.
After you configure the memory allocation, the configuration must be saved and the PPC reloaded for
the configuration to take effect.
To reallocate the IO memory on a PPC, use the following commands:
Command
Purpose
Step 1
Sup> enable
Enters privileged EXEC mode.
Step 2
Sup# session slot slot_num processor
proc_number
Establishes a session with a PPC on the SAMI,
where:
•
slot_number—Number of the slot in which the
SAMI is installed.
•
proc_number—Number of the PPC on the
SAMI. Valid values are 3 through 8.
One session per processor can be established. To end
a session, enter exit.
Step 3
Router> enable
Enters privilege EXEC mode.
Step 4
Router# configure
Enters global configuration mode.
Step 5
Router(config)# memory-size iomem 64
Allocates 64 MB of the DRAM memory to I/O
memory and the remaining to processor memory.
Step 6
Router(config)# exit
Exits global configuration mode.
Cisco Service and Application Module for IP User Guide
OL-13003-06
4-13
Chapter 4
Maintaining and Monitoring the Cisco SAMI
Recovering the SAMI
Command
Purpose
Step 7
Router# write memory
Saves the changes to the running configuration to the
startup configuration file.
Step 8
Router# reload
Reloads the PPC or the entire SAMI.
Depending on the requirements of the Cisco software
application running on the SAMI PPCs, the reload
command might reload the single PPC or the entire
module. For example, when issued from the PPC
running a distributed application such as the Cisco
Content Services Gateway - 2nd Generation (CSG2),
the reload command reloads the entire module.
Recovering the SAMI
This section includes the following recovery procedures:
•
Recovering from a PPC Lockout, page 4-14
•
Recovering—Session Loss, page 4-17
•
Recovering—LCP ROMMON or an Unstable LCP Image, page 4-17
Recovering from a PPC Lockout
Occasionally, you might be unable to log into a SAMI PPC, either because of a configuration mistake,
or because you have forgotten the password.
You can recover from this condition using the Break key during the boot process. This is the standard
password recovery method supplied by the Cisco software running on the PPC. Additionally, because
the SAMI PPC configuration files are stored on the supervisor, password recovery is also possible by
modifying the configuration file of a PPC on supervisor.
Cisco Service and Application Module for IP User Guide
4-14
OL-13003-06
Chapter 4
Maintaining and Monitoring the Cisco SAMI
Recovering the SAMI
Using Break to Recover from PPC Lockout
To recover from a lockout by sending the Break key, complete the following steps:
Step 1
Command
Purpose
telnet> send break
Connects to the console and sends the Break key as
the supervisor engine boots from ROMMON to
Cisco application software.
Note
Break is enabled for 60 seconds after boot up
is initiated.
The ROMMON breaks out of the booting process
and provides the ROMMON prompt.
Step 2
Sets the config-register and forces the supervisor
engine to produce a configuration dialog. This
method assures that you do not see the existing
configurations or passwords without knowing the
password.
rommon# confreg
After the supervisor is up, use cut and paste or the
tftp command to copy the configurations to the
supervisor engine and then to NVRAM.
Step 3
Resets (or power cycles) to enable the new
configuration to take effect.
rommon# reset
The following example illustrates using a break to recover from a PPC lockout:
Router#
System Bootstrap, Version 12.3(20070512:064259) [BLD-bouncer.nightly 101], DEVELOPMENT
SOFTWARE
Copyright (c) 1994-2007 by cisco Systems, Inc.
BOUNCER platform with 1048576 Kbytes of main memory
Image:c7svcsami-ipbase-mz.bouncer.070724.p1p3
Self decompressing the image : ##########################################################
[OK]
telnet> send break
Restricted Rights Legend
Use, duplication, or disclosure by the Government is
subject to restrictions as set forth in subparagraph
(c) of the Commercial Computer Software - Restricted
Rights clause at FAR sec. 52.227-19 and subparagraph
(c) (1) (ii) of the Rights in Technical Data and Computer
Software clause at DFARS sec. 252.227-7013.
cisco Systems, Inc.
170 West Tasman Drive
San Jose, California 95134-1706
Cisco IOS Software, SAMI Software (SAMI-M), Version 12.4(nightly.2070512) NIGHTLY BUILD,
synced to bouncer BOUNCER_NIGHTLY_061020
Copyright (c) 1986-2007 by Cisco Systems, Inc.
Compiled Sat 12-May-07 03:03 by userA
Image text-base: 0x400120D4, data-base: 0x40FCB5E0
hw_version is 3, 256 sectors, 32M flash used.
Cisco Service and Application Module for IP User Guide
OL-13003-06
4-15
Chapter 4
Maintaining and Monitoring the Cisco SAMI
Recovering the SAMI
Initializing flashfs...
*** System received an abort due to Break Key ***
signal= 0x3, code= 0x500, context= 0x434b62f8
PC = 0x40cf5878, Vector = 0x500, SP = 0x43199ad4
rommon 1 > confreg 0x2142
You must reset or power cycle for new config to take effect
rommon 2 > reset
Modifying the Configuration File to Recover from a PPC Lockout
To recover from a PPC lockout by modifying the configuration file stored on the supervisor engine,
complete the following steps:
Command
Purpose
Step 1
Sup# dir bootflash:filename.cfg
Copies the configuration file from supervisor engine
to a UNIX machine to edit it.
Step 2
Sup# copy tftp:dir
tftpboot/username/configs/filename.cfg
bootflash:filename.cfg
Copies the configuration file back to the supervisor
engine after editing it.
Step 3
Sup# hw-module module mod_num reset
Reloads the entire SAMI.
The following example illustrates modifying a configuration file to recover from a PPC lockout:
Sup# dir bootflash:SLOT1SAMIC3.cfg
Directory of bootflash:/SLOT1SAMIC3.cfg
151
-rw-
265291
May 13 2007 22:48:31 +00:00
SLOT1SAMIC3.cfg
65536000 bytes total (11841704 bytes free)
Sup# copy bootflash:/SLOT1SAMIC3.cfg
tftp://1o.10.0.254/auto/tftp-blr-users3/username/configs/SLOT1SAMIC3.cfg
Address or name of remote host [9.10.0.254]?
Destination filename [auto/tftp-blx-users3/username/configs/SLOT1SAMIC3.cfg]?
!!!
265291 bytes copied in 0.416 secs (637719 bytes/sec)
Sup# copy tftp://10.10.0.254/tftpboot/username/configs/SLOT1SAMIC3.cfg
bootflash:SLOT1SAMIC3.cfg
Destination filename [SLOT1SAMIC3.cfg]?
%Warning:There is a file already existing with this name
Do you want to over write? [confirm]
Accessing tftp://10.10.0.254/auto/tftp-blx-users3/username/configs/SLOT1SAMIC3.cfg...
Loading auto/tftp-blx-users3/username/configs/SLOT1SAMIC3.cfg from 9.10.0.254 (via
Vlan10): !!
[OK - 265271 bytes]
265271 bytes copied in 1.308 secs (202807 bytes/sec)
Sup#
Cisco Service and Application Module for IP User Guide
4-16
OL-13003-06
Chapter 4
Maintaining and Monitoring the Cisco SAMI
Recovering the SAMI
sup# dir bootflash:SLOT1SAMIC3.cfg
Directory of bootflash:/SLOT1SAMIC3.cfg
152
-rw-
265271
May 14 2007 02:41:03 +00:00
SLOT1SAMIC3.cfg
65536000 bytes total (11576304 bytes free)
Sup#
Sup# hw-module module 1 reset
Sup#
Recovering—Session Loss
If the session between the supervisor engine and a SAMI PPC fails, you can use the following steps to
try to recover the session and collect information that can be useful in determining the cause of the
session loss.
When a session is lost, the following error message displays:
sami: No response from IOS processor x, resetting processor
To try to recover a PPC session and collect troubleshooting information, use the following command in
privileged EXEC mode from the supervisor engine console:
Command
Purpose
Sup# hw-module module mod-num reset
Resets the SAMI by powering it down and up.
The following example illustrates powering down and resetting a SAMI in slot 5 of the router chassis:
Sup> enable
Sup# hw-module module 5 reset
Sup#
Recovering—LCP ROMMON or an Unstable LCP Image
If the SAMI LCP (processor 0) is in ROMMON, the upgrade command from the supervisor is failing,
or when there is not a usable image on the SAMI, you can use the following procedure to recover the
SAMI.
If the output from the show module command issued from the supervisor indicates the SAMI status is
“other,” and the module is not coming out of this state, first verify that the LCP is in ROMMON by
issuing the following commands from the supervisor:
Command
Purpose
Step 1
Sup# remote login switch
Accesses the switch processor.
Step 2
Sup-sp# svclc console sami_slot_num
Establishes a session with the LCP console if the
LCP is in ROM-monitor state.
Cisco Service and Application Module for IP User Guide
OL-13003-06
4-17
Chapter 4
Maintaining and Monitoring the Cisco SAMI
Recovering the SAMI
The following example illustrates accessing the switch processor:
Sup> remote login switch
processor
Trying switch...
Entering CONSOLE for Switch
Type "^C^C^C" to end this session
The following example illustrates establishing a session with an LCP console that is not in ROMMON.
If the LCP is not in ROMMON, the LCP should be functioning properly and you can use the session slot
command to access the LCP console.
Sup-sp# svclc console 3
processor 0 console
Card in slot 3 is not in ROMMON.
The following example illustrates establishing a session with an LCP console that is in ROMMON. If
the LCP is in ROMMON, proceed to loading a SAMI using an image on the supervisor:
Sup-sp# svclc console 3
Entering svclc ROMMON of slot 3 ...
Type “end” to end the session.
processor 0 is in ROMMON.
rommon 2> end
processor 0 ROMMON tunneling session
End of tunneling command.
Sup-sp#exit
Supervisor RP processor
Sup#
If an image uploaded to the LCP is failing, the following procedure can be used to recover the LCP by
rebooting it from a stable image on the supervisor.
If an image uploaded to the SAMI using upgrade command is failing, or if the SAMI does not have a
valid usable image, or to reboot a SAMI whose LCP in ROMMON, complete the following steps to
reboot using a stable image loaded directly from supervisor engine.
To reboot an LCP using a stable image on the supervisor engine, complete the following steps:
Command
Purpose
Step 1
Sup# boot device module slot_num
disk0:image_name
Sets the boot variable for the SAMI LCP.
Step 2
Sup# hw-module module slot_num boot eobc
Boots using the image downloaded through EOBC.
Step 3
Sup# hw-module module slot_num reset
Resets the module by turning the power off and then
on.
Step 4
Sup# upgrade hw-module slot sami_slot_num
software disk0:image_name
Copies the bundle from the specified URL to the
compact flash on the SAMI in the specified slot and
sets the initialization parameters.
Note
This command is required to ensure that
future reboots of the SAMI will
automatically come up with the specified
image.
Cisco Service and Application Module for IP User Guide
4-18
OL-13003-06
Chapter 4
Maintaining and Monitoring the Cisco SAMI
Recovering the SAMI
The following example illustrates rebooting a SAMI in slot 3 using an image on the supervisor:
Sup>
Sup#
Sup#
Sup#
boot device module 3 disk0:c7svcsami-ipbase-mz.bouncer.070724.p1p3
hw-module module 3 boot eobc
hw-module module 3 reset:
upgrade hw-module slot sami_slot_num software disk0:image_name
To display the software image on the LCP, use the show version command in EXEC mode.
switch# show version
Recovering—No Usable Image on the SAMI CF:
If the SAMI LCP (PPC 0) is in ROMMON, the upgrade command from the supervisor is failing, or when
there is not a usable image on the SAMI, the following procedure can be used to recover the SAMI.
1.
If the output from the show module command issued from the supervisor indicates the SAMI status
is “other,” and the module is not coming out of this state, first verify that the LCP is in ROMMON
by issuing the following commands from the supervisor:
Sup# remote login switch
processor
Trying switch...
Entering CONSOLE for Switch
Type "^C^C^C" to end this session
The following example illustrates establishing a session with an LCP console that is not in
ROMMON. If the LCP is not in ROMMON, the LCP should be functioning properly and you can
use the session slot command to access the LCP console.
Sup-sp# svclc console 3
processor 0 console
Card in slot 3 is not in ROMMON.
The following example illustrates establishing a session with an LCP console that is
in ROMMON. If the LCP is in ROMMON, proceed to loading a SAMI using an image on the
supervisor:
Sup-sp# svclc console 3
Entering svclc ROMMON of slot 3 ...
Type “end” to end the session.
processor 0 is in ROMMON.
rommon 1> end
processor 0 ROMMON tunneling session
End of tunneling command.
Sup-sp#exit
Supervisor RP processor
Sup#
2.
To reboot an LCP using a stable image on the supervisor engine, complete the following steps:
The following example illustrates rebooting a SAMI in slot 3 using an image on the supervisor:
Sup(config)# boot device module 3
disk0:c7svcsami-ipbase-mz.bouncer.070724.p1p3
Sup# hw-module module 3 boot eobc
Sup# hw-module module 3 reset:
Sup# upgrade hw-module slot 3 software disk0:image_name
Cisco Service and Application Module for IP User Guide
OL-13003-06
4-19
Chapter 4
Maintaining and Monitoring the Cisco SAMI
Configuring, Exporting, and Importing RSA Keys on a SAMI PPC
Configuring, Exporting, and Importing RSA Keys on a SAMI PPC
Note
The Configuring, Exporting, and Importing RSA Keys feature is supported only on the SAMI Cisco IOS
PPCs.
The Configuration File Storage on Supervisor feature only stores the PPC startup configuration files.
Crypto configurations, such as the RSA key generation for Secure Shell (SSH) is stored locally on
nvram:private-config. Therefore, if a SAMI card that contains crypto configuration needs to be replaced,
the crypto configuration must reapplied by either by manually reconfiguring it on the new card, or by
exporting the crypto configuration to the supervisor and then importing the configuration onto the new
card.
For information about the Configuration File Storage on Supervisor feature, see the “Enabling the
Supervisor to Store PPC Startup Configuration Files” section on page 3-6.
The following steps configure, export, and import RSA keys on a SAMI PPC (PPC3):
Step 1
Complete the required configuration for SSH on the PPC.
Router(config)#hostname PPC3
PPC3(config)#interface gigabitEthernet 0/0.11
PPC3(config-if)#encapsulation dot1Q 11
Note
If the interface doesn't support baby giant frames maximum MTU of the interface has to be reduced by
4 bytes on both sides of the connection to properly transmit or receive large packets. Please refer to
Cisco IOS documentation on configuring IEEE 802.1Q VLANs.
PPC3(config-if)#ip address 1.1.1.13 255.255.255.0
PPC3(config-if)#no shut
PPC3(config-if)#exit
PPC3(config)#ip ssh
PPC3(config)#ip ssh version 2
Please create RSA keys (of atleast 768 bits size) to enable SSH v2.
PPC3(config)#crypto key generate rsa exportable label sshkeys ?
encryption
Generate a general purpose RSA key pair for signing and
encryption
general-keys Generate a general purpose RSA key pair for signing and
encryption
modulus
Provide number of modulus bits on the command line
signature
Generate a general purpose RSA key pair for signing and
encryption
storage
Store key on specified device
usage-keys
Generate separate RSA key pairs for signing and encryption
<cr>
PPC3(config)#crypto key generate rsa exportable label sshkeys modulus 1024
The name for the keys will be: sshkeys
% The key modulus size is 1024 bits
% Generating 1024 bit RSA keys, keys will be exportable...[OK]
PPC3(config)#
SAMI 1/3: *Mar
PPC3(config)#
1 00:02:43.419: %SSH-5-ENABLED: SSH 2.99 has been enabled
Cisco Service and Application Module for IP User Guide
4-20
OL-13003-06
Chapter 4
Maintaining and Monitoring the Cisco SAMI
Configuring, Exporting, and Importing RSA Keys on a SAMI PPC
PPC3(config)#username username password 0 password
PPC3(config)#enable password 0 lab
PPC3(config)#aaa new-model
PPC3(config)#end
Step 2
Verify that SSH is enabled.
PPC3#show crypto key mypubkey rsa
% Key pair was generated at: 00:02:43 UTC Mar 1 2002
Key name: sshkeys
Storage Device: private-config
Usage: General Purpose Key
Key is exportable.
Key Data:
30819F30 0D06092A 864886F7 0D010101 05000381 8D003081 89028181
6494169A 94419B29 5E99C04E FB7DD3D3 534F5FD5 E26CAB01 DF7F2582
7DE3D94A 770CAE9A A1B73F1D 16CF283C 6C68C023 78B1DC3A BB7021A7
AE2F9591 1AF03D63 DE31A35C 8B41EB4C EAD3C1C9 528FD804 DF5032A6
87816716 9CC746D9 79597478 842BED0D CDE8F77A E1E0D535 ABD478B9
% Key pair was generated at: 00:00:03 UTC Mar 1 2002
Key name: sshkeys.server
Temporary key
Usage: Encryption Key
Key is not exportable.
Key Data:
307C300D 06092A86 4886F70D 01010105 00036B00 30680261 00C96B2B
6810BFE7 9211CB43 7671E7A1 BC51C393 076FEF75 1ADE8114 03293B1A
F31AFC90 791342C0 3E9F3C1D AB5058B1 8B08698F AAF79D43 7469DDEB
33708E1B 0AA5F8D8 54364C8A E184A61C 203C2265 2C6FFA66 C3020301
PPC3#
PPC3#show ip ssh
SSH Enabled - version 2.99
Authentication timeout: 120 secs; Authentication retries: 3
Step 3
00A4B01C
C8763CAE
75ECD3A8
A9EE53FF
E5020301 0001
768F0C3B
F2A1ECD0
A1A1D3E8
0001
Save the configuration using the write memory command so that the startup configuration is stored on
the supervisor, and the crypto configuration is stored on NVRAM.
PPC3#dir nvram:
Directory of nvram:/
126
127
1
2
-rw----rw----
580
5
0
4
<no
<no
<no
<no
date>
date>
date>
date>
startup-config
private-config
ifIndex-table
rf_cold_starts
131072 bytes total (128387 bytes free)
% Unknown command or computer name, or unable to find computer address
PPC3#
PPC3#write memory
Writing bootflash:SLOT1SAMIC3.cfg !
Writing slavebootflash:SLOT1SAMIC3.cfg %rcp: slavebootflash:SLOT1SAMIC3.cfg: No such file
or directory
%Error opening rcp://*****@127.0.0.61/slavebootflash:SLOT1SAMIC3.cfg (Undefined error)
Building configuration...
[OK]
PPC3#
SAMI 1/3: *Mar 1 00:08:46.151: %C6K_SAMI_CENTRALIZED_CONFIG-6-UPLD_SUCCESS: Success:
config uploaded to supervisor bootflash:
SAMI 1/3: *Mar 1 00:08:46.175: %C6K_SAMI_CENTRALIZED_CONFIG-4-UPLD_FAILURE_STDBY: Failed
to upload config to rcp://[email protected]/slavebootflash:SLOT1SAMIC3.cfg.
Cisco Service and Application Module for IP User Guide
OL-13003-06
4-21
Chapter 4
Maintaining and Monitoring the Cisco SAMI
Configuring, Exporting, and Importing RSA Keys on a SAMI PPC
slavebootflash: is hosted on the standby supervisor engine. Failure to write to
slavebootflash: or slavebootdisk: may be safely ignored when there is no standby
supervisor engine. Otherwise, this should be considered as an error, check for space on
standby supervisor engine, squeeze standby supervisor engine's slavebootflash: if needed.
SAMI 1/3: *Mar 1 00:08:46.175: %C6K_SAMI_CENTRALIZED_CONFIG-6-UPLOAD_SUCCEEDED: config
uploaded to 1 supervisor file system(s)
PPC3#
PPC3#dir nvram:
Directory of nvram:/
126
127
1
2
-rw----rw----
580
1906
0
4
<no
<no
<no
<no
date>
date>
date>
date>
startup-config
private-config
ifIndex-table
rf_cold_starts
131072 bytes total (126486 bytes free)
PPC3#
Step 4
Export the RSA keys to the supervisor using RCP:
PPC3(config)# crypto key export rsa sshkeys pem url
rcp://[email protected]/bootflash:SLOT1SAMIC3PRIV.cfg 3des myrsakeys
% Key name: sshkeys
Usage: General Purpose Key
Exporting public key...
Address or name of remote host [127.0.0.61]?
Destination username [sami]?
Destination filename [bootflash:SLOT1SAMIC3PRIV.cfg.pub]?
% File 'bootflash:SLOT1SAMIC3PRIV.cfg.pub' already exists.
% Do you really want to overwrite it? [yes/no]: yes
Writing bootflash:SLOT1SAMIC3PRIV.cfg.pub Writing file to
rcp://[email protected]/bootflash:SLOT1SAMIC3PRIV.cfg.pub!
Exporting private key...
Address or name of remote host [127.0.0.61]?
Destination username [sami]?
Destination filename [bootflash:SLOT1SAMIC3PRIV.cfg.prv]?
% File 'bootflash:SLOT1SAMIC3PRIV.cfg.prv' already exists.
% Do you really want to overwrite it? [yes/no]: yes
Writing bootflash:SLOT1SAMIC3PRIV.cfg.prv Writing file to
rcp://[email protected]/bootflash:SLOT1SAMIC3PRIV.cfg.prv!
PPC3(config)#
Step 5
Replace the SAMI as necessary. Verify that the startup-config is restored and no crypto configurations
are present:
PPC3#show crypto key mypubkey rsa
PPC3#
Step 6
Import the keys stored on supervisor:
PPC3(config)# crypto key import rsa sshkeys exportable url
rcp://[email protected]/bootflash:SLOT1SAMIC3PRIV.cfg myrsakeys
% Importing public General Purpose key or certificate PEM file...
Address or name of remote host [127.0.0.61]?
Source username [sami]?
Source filename [bootflash:SLOT1SAMIC3PRIV.cfg.pub]?
Reading file from rcp://[email protected]/bootflash:SLOT1SAMIC3PRIV.cfg.pub!
% Importing private General Purpose key PEM file...
Address or name of remote host [127.0.0.61]?
Cisco Service and Application Module for IP User Guide
4-22
OL-13003-06
Chapter 4
Maintaining and Monitoring the Cisco SAMI
Establishing a Console Connection on the SAMI
Source username [sami]?
Source filename [bootflash:SLOT1SAMIC3PRIV.cfg.prv]?
Reading file from rcp://[email protected]/bootflash:SLOT1SAMIC3PRIV.cfg.prv!
% Key pair import succeeded.
PPC3(config)#
SAMI 1/3: *Mar
PPC3(config)#
Step 7
1 00:06:42.323: %SSH-5-ENABLED: SSH 2.99 has been enabled
Verify that the crypto configurations have imported successfully:
PPC3#show crypto key mypubkey rsa
% Key pair was generated at: 00:06:42
Key name: sshkeys
Storage Device: not specified
Usage: General Purpose Key
Key is exportable.
Key Data:
30819F30 0D06092A 864886F7 0D010101
6494169A 94419B29 5E99C04E FB7DD3D3
7DE3D94A 770CAE9A A1B73F1D 16CF283C
AE2F9591 1AF03D63 DE31A35C 8B41EB4C
87816716 9CC746D9 79597478 842BED0D
% Key pair was generated at: 00:06:42
Key name: sshkeys.server
Temporary key
Usage: Encryption Key
Key is not exportable.
Key Data:
307C300D 06092A86 4886F70D 01010105
A4C8CBAC 6F2E5BBF E724229B 17B607F8
662ABF9D B871E087 9808E1CB BA361F44
22DB2A11 DF26632E 54B36C0F 8205EF14
UTC Mar 1 2002
05000381 8D003081
534F5FD5 E26CAB01
6C68C023 78B1DC3A
EAD3C1C9 528FD804
CDE8F77A E1E0D535
UTC Mar 1 2002
89028181
DF7F2582
BB7021A7
DF5032A6
ABD478B9
00A4B01C
C8763CAE
75ECD3A8
A9EE53FF
E5020301 0001
00036B00
069AA2C7
439940BC
80B1ED6C
009D6B6B
DD47D2C8
B6F0EB30
81020301
AF9B407C
E6F29884
7747DF42
0001
30680261
67DEB599
3D6129BA
BC3FFF81
PPC3#show ip ssh
SSH Enabled - version 2.99
Authentication timeout: 120 secs; Authentication retries: 3
PPC3#
Step 8
Verify SSH:
7600#ssh -v 2 -l <username> 1.1.1.13
Password:
PPC3>enable
Password:
PPC3#
Establishing a Console Connection on the SAMI
You can establish a direct serial connection between your terminal and the SAMI LCP by making a serial
connection to the console port on the front of the SAMI. The console port is an asynchronous RS-232
serial port with an RJ-45 connector. Any device connected to this port must be capable of asynchronous
transmission. Connection requires a terminal configured as 9600 baud, 8 data bits, 1 stop bit, no parity.
After connected, use any terminal communications application to establish a session with a SAMI PPC.
A connection to a SAMI PPC requires that the PPC be configured to be accessible from the console port
using the console-select db1 or console-select db2 command. For information on the console-select
commands, see the “SAMI LCP Commands” section on page E-1.
Cisco Service and Application Module for IP User Guide
OL-13003-06
4-23
Chapter 4
Maintaining and Monitoring the Cisco SAMI
Configuring Health Monitoring
The following procedure uses HyperTerminal for Windows to establish a session with the SAMI:
1.
Launch HyperTerminal. The Connection Description window appears.
2.
In the Name field, enter a name for your session.
3.
Click OK. The Connect To window appears.
4.
From the drop-down list, choose the COM port to which the device is connected.
5.
Click OK. The Port Properties window appears.
6.
Set the port properties:
– Baud Rate = 9600
– Data Bits = 8
– Flow Control = none
– Parity = none
– Stop Bits = 1
7. To connect, click OK.
8. To access the CLI prompt, press Enter.
switch login:
After a session is established, choose Save As from the File menu to save the connection description.
Saving the connection description has the following two advantages:
•
The next time you launch HyperTerminal, the session is listed as an option under Start > Programs
> Accessories > HyperTerminal > Name_of_session. This option lets you reach the CLI prompt
directly without going through the configuration steps.
•
You can connect your cable to a different device without configuring a new HyperTerminal session.
If you use this option, make sure that you connect to the same port on the new device as was
configured in the saved HyperTerminal session. Otherwise, a blank window appears without a
prompt.
Configuring Health Monitoring
The following sections discuss the two types of health monitoring on the Cisco SAMI:
•
PPC Health Monitoring, page 4-24
•
LCP Health Monitoring, page 4-27
PPC Health Monitoring
Note
By default, health monitoring is enabled on SAMI COSLI PPCs. Therefore, to use the Health Monitoring
feature, no configuration tasks are required on the SAMI COSLI PPC.
PPC health monitoring is configured on the SAMI PPCs. When configured, the PPC monitors the health
of a path by sending probes to a destination and waiting for a response. If the PPC does not receive a
response to a probe that it has sent, it determines that the path is not healthy and sends a notification to
the SAMI LCP, which then initiates a module reload.
Cisco Service and Application Module for IP User Guide
4-24
OL-13003-06
Chapter 4
Maintaining and Monitoring the Cisco SAMI
Configuring Health Monitoring
The PPC uses the following two categories to identify the health of a path:
•
Passed—The PPC receives a valid response to a probe that it has sent.
•
Failed—The PPC does not receive a valid response to a probe or is unable to reach a destination for
a specified number of retries.
To enable health monitoring on the Cisco IOS PPC, complete the following steps:
Step 1
Command
Purpose
Sup# session slot slot_number
processor proc_number
Establishes a session to a PPC on the SAMI, where:
•
slot_number—Number of the slot in which the SAMI is
installed.
•
proc_number—Number of the PPC on the SAMI. Valid
values are 3 through 8.
One session per processor can be established.
Step 2
Router> enable
Enters privilege EXEC mode.
Step 1
Router# sami
health-monitoring {ixp1 |
ixp2}
Enables health monitoring on the paths between the PPC and IXP1
and IXP2 (future).
By default, health monitoring is enabled for IXP1 and disabled for
IXP2.
Step 2
Step 3
Router# sami
health-monitoring probe
ip-address [interval seconds]
[retries number]
Router# sami
health-monitoring {ixp1 |
ixp2 | probe} reset
Enables health monitoring on all of the paths between the PPC and
the supervisor, where:
•
ip-address—Destination IP address on the supervisor. The IP
address must be in the global vrf table and a suitable local ip
address will be used to reach the remote probe address on
supervisor
•
interval seconds—Interval, in seconds, between probes. A
valid value is a number between 1 and 600.
•
retries number—Number of times a probe can be resent
before it is marked as failed. A valid value is a number
between 10 and 100.
Configures the module to be reset when a path has failed, where:
•
ixp1—Resets the module if a check to IXP1 fails.
•
ixp2—Resets the module if a check to IXP2 fails (future).
•
probe—Resets the module if a check to the supervisor fails.
To display health monitoring status and counters on a Cisco IOS PPC, use the following command in
privilege EXEC mode:
Step 1
Command
Purpose
Router# show sami
health-monitoring
Displays health monitoring status and counters for the path to
IXP1, IXP2 (future), and the supervisor.
Cisco Service and Application Module for IP User Guide
OL-13003-06
4-25
Chapter 4
Maintaining and Monitoring the Cisco SAMI
Configuring Health Monitoring
For example:
•
To enable a Cisco IOS PPC, hostname “PPC4” to monitor the health of the path to IXP1, monitor
the health of the path to the supervisor, and to reset the module if the sanity check to the supervisor
module fails, enter the following commands:
PPC4# sami health-monitoring ixp1
PPC4# sami health-monitoring probe ip-address [interval seconds] [retries number]
PPC4# sami health-monitoring probe reset
•
To show health monitoring-related counters and status, enter the following command:
PPC4#show sami health-monitoring
IXP1: DISABLED
0/0 Missed/Rcvd consecutive responses
0/0 Missed/Rcvd cumulative responses
0 Failed to send
IXP2: DISABLED
0/0 Missed/Rcvd consecutive responses
0/0 Missed/Rcvd cumulative responses
0 Failed to send
ICMP PROBE: PROBING
0/0 Missed/Rcvd consecutive responses
10/8 Missed/Rcvd cumulative responses
40 Failed to send
When you view the show sami health-monitoring command output, note that:
– IXP1, IXP2, ICMP PROBE status can be one of the following:
- PROBING—Health monitoring is enabled, no responses received or failed to send a message
on previous resend expiration.
- ACTIVE—Response to probe received from peer.
- FAILED—No response received. Communication failed with peer.
- DISABLED—Health monitoring is disabled.
– Missed consecutive responses—Indicates the consecutive number of responses missed. This
counter starts at 0 and is incremented each time a response is missed until timeout expiry. This
counter is reset each time a response is received or if the PPC fails to send a message.
– Rcvd consecutive responses—Indicates the consecutive number of messages sent. This counter
starts at 0 and is incremented each time a valid response is received. It is reset each time a
response is missed until timeout expiry or if the PPC fails to send a message.
– Missed/Rcvd cumulative responses—Free running counter of total responses missed or received
until timeout expiry.
– Failed to send counter—Incremented each time a message cannot be sent upon resend timer
expiration and if the health monitoring is administratively enabled. This can happen due to no
IO memory, no suitable local IP address, and so on.
Cisco Service and Application Module for IP User Guide
4-26
OL-13003-06
Chapter 4
Maintaining and Monitoring the Cisco SAMI
Monitoring the SAMI
LCP Health Monitoring
LCP health monitoring is not configurable. It is a default function performed on the LCP.
When a PPC fails, LCP health monitoring either reloads the PPC or the entire SAMI depending on the
application running on the SAMI PPCs. For example, if the Cisco Content Services Gateway - 2nd
Generation (CSG2) application is running on the SAMI PPCs, the LCP reloads the entire module if a
PPC fails. If a mobile wireless gateway such as the Cisco Gateway GPRS Support Node (GGSN) is
running on the SAMI PPCs, the LCP reloads only the PPC that is failing.
Additionally, when a PPC has not booted for a specific amount of time (the default is 15 minutes), LCP
health monitoring reloads that PPC (or the entire module if running the Cisco CSG2 application). If a
PPC never comes up, the LCP notes that the PPC does not come up, and upon the next reload of the LCP,
if another PPC never comes up, the LCP increments a safe counter. When the safe counter reaches 3, the
LCP will not start the PPCs and enters safe mode. When the SAMI enters safe mode, a message displays
that indicates the SAMI is running in safe mode. When in safe mode, you can perform debugging.
When the LCP enters safe mode, it resets the safe counter to zero so that on next reboot, the SAMI PPCs
will boot as normal.
Monitoring the SAMI
Use the following list of show commands to monitor the SAMI.
For a description of these commands, their keywords and variables, see Appendix A, “Using the
Command-Line Interfaces.”
Monitoring a SAMI from the Supervisor Console
The following privilege EXEC commands can be used to monitor SAMI activity from the supervisor
engine console:
Command
Description
clear sami module
Clears SAMI traffic counters.
show inventory
Displays the product inventory list of all Cisco
products that are installed in a networking device.
show logging slot
Displays logging status and counters for all
processors on a SAMI using RCAL.
show logging summary
Displays logging status and counters for all
processors on all SAMIs in a chassis using RCAL.
show login timeout
Displays the login session idle timeout value.
show module
Displays module status and information.
show sami module
Displays traffic counters for a SAMI.
show svclc module
Displays all VLAN groups associated with a
module.
show svclc vlan-group
Displays the group configuration for the SAMI
and the associated VLANs.
show upgrade software progress
Displays information about the progress of
software upgrades.
Cisco Service and Application Module for IP User Guide
OL-13003-06
4-27
Chapter 4
Maintaining and Monitoring the Cisco SAMI
Monitoring the SAMI
Monitoring the SAMI from the LCP Console
The following privilege EXEC commands can be used to monitor SAMI activity from the SAMI LCP
console:
Command
Description
show cde health
Displays the CDE health.
show cde stats {cumulative | delta}
Displays either cumulative CDE counters or the delta
counters from previous invocation of the show cde stats
command.
show cde vlan vlan_id
Provides VLAN mapping for the specified VLAN ID. This
is either IXP0 or CP. CP indicates LCP.
show daughtercard registers
Displays the field programmable gate array (FPGA) or
complex programmable logic device (CPLD) registers for
a daughter card on the SAMI.
show daughtercard statistics
Displays the field programmable gate array (Kabob)
statistics for one of the daughter cards on the SAMI.
show login timeout
Displays the login session idle timeout value.
show running-config
Displays the running configuration information.
show startup-config
Displays information about the startup configuration.
show tech-support
Displays information that is useful to technical support
when reporting a problem.
show version
Displays information about the currently loaded software
version along with hardware and device information.
Monitoring SAMI from the Cisco IOS PPC Console
The following privilege EXEC commands can be used to monitor SAMI activity from a SAMI Cisco IOS
PPC console:
Command
Description
show platform
Displays platform information.
show sami health monitoring
Displays health monitoring status and counters for the
paths to the IXP1, IXP2 (future), and the supervisor.
show sami info
Displays information about the startup configuration.
show sami ipcp ipc
Display counters specific to IPCP interprocessor
communication (IPC) for the IXP or PPCs.
show sami ipcp statistics
Displays the counters for IPCP packet counters processed
to and from IPCP peers.
Cisco Service and Application Module for IP User Guide
4-28
OL-13003-06
Chapter 4
Maintaining and Monitoring the Cisco SAMI
Monitoring the SAMI
Monitoring SAMI from the COSLI PPC Console
The following privilege EXEC commands can be used to monitor SAMI activity from a SAMI COSLI
PPC console:
Command
Description
show arp
Displays the current active IP address-to-MAC address
mapping in the Address Resolution Protocol (ARP) table,
statistics, or inspection or timeout configuration.
show buffer
Displays the contents of the trace buffer.
show bufferlist
Displays the names of all trace buffers.
show clock
Displays the current date and time settings of the system
clock.
show copyright
Displays the software copyright information for the PPC.
show crashinfo
Displays the contents of the crash file stored in Flash
memory.
show debug
Displays debug flags.
show eventlog
Displays the event log.
show gfastats
Displays the current gianfar Ethernet driver traffic
counters.
show hosts
Displays the hosts on a PPC.
show icmp statistics
Displays the Internet Control Message Protocol (ICMP)
statistics.
show interface
Displays interface information.
show ip interface brief
Displays a brief configuration and status summary of all
interfaces or a specified VLAN.
show ip interface vlan
Displays a configuration and status summary of a specified
VLAN.
show ixpstats
Displays the contents of the IXP stastistics file.
show logging
Displays the current syslog configuration and syslog
messages.
show processes
Displays general information about all of the processes
running on the PPC.
show running-config
Displays the running configuration of a PPC.
show snmp
Displays the Simple Network Management Protocol
(SNMP) statistics and configured SNMP information.
show startup-config
Displays the startup configuration of a PPC.
show system
Displays the system information of a PPC.
show tcp statistics
Displays Transmission Control Protocol (TCP) statistics.
show tech-support
Displays information that is useful to technical support
when reporting a problem with your PPC.
show telnet
Displays information about the Telnet session
show terminal
Displays the console terminal settings.
Cisco Service and Application Module for IP User Guide
OL-13003-06
4-29
Chapter 4
Maintaining and Monitoring the Cisco SAMI
Monitoring the SAMI
Command
Description
show udp statistics
Display UDP statistics.
show version
Displays the version information of system software that is
loaded in flash memory and currently running on the PPC.
show vlans
Displays the VLANs on the PPC downloaded from the
supervisor engine.
Cisco Service and Application Module for IP User Guide
4-30
OL-13003-06
A P P E N D I X
A
Using the Command-Line Interfaces
This appendix describes how to use the various command-line interfaces (CLI) from which you
configure and monitor the SAMI.
To implement and maintain a Cisco SAMI in your Cisco 7600 Series Router, and configure the
Cisco IOS mobile wireless application running on the SAMI PPCs, you use the command-line interfaces
of the following components:
Note
•
Supervisor
•
SAMI LCP
•
SAMI Cisco IOS PPC
•
SAMI COSLI PPC
The CLI of the supervisor and SAMI PPCs is the standard Cisco IOS software CLI. The CLI of the SAMI
LCP and the SAMI COSLI PPC is a line-oriented user interface that uses similar syntax and other
conventions to the Cisco IOS CLI, but the SAMI LCP and COSLI PPC operating system is not a version
of Cisco IOS software. Therefore, do not assume that a Cisco IOS command works or has the same
function when executed from the SAMI LCP console.
For information about establishing a session with each of these CLIs, see the “Establishing Console
Sessions” section on page 3-2.
For overview information on using various CLIs, see the following sections:
•
Using the Supervisor and SAMI Cisco IOS PPC CLI, page A-2
•
Using the Cisco SAMI LCP and COSLI PPC CLIs, page A-5
•
Using the ROM-Monitor CLI, page A-8
Cisco Service and Application Module for IP User Guide
OL-13003-06
A-1
Appendix A
Using the Command-Line Interfaces
Using the Supervisor and SAMI Cisco IOS PPC CLI
This section is intended as a quick reference, not as a step-by-step explanation of using the Cisco IOS
software command line interface on the supervisor console, and the Cisco IOS PPC console.
For a list of the Cisco IOS supervisor and SAMI Cisco IOS PPC commands, see Appendix B,
“Supervisor Console Commands” and Appendix C, “SAMI Cisco IOS PPC Commands.”
This section includes the following topics about using the Supervisor and SAMI Cisco IOS PPC
consoles:
•
Getting Help, page A-2
•
Understanding Cisco IOS Command Modes, page A-2
•
Command-Line Completion, page A-4
•
Undoing a Command or Feature, page A-4
•
Saving Configuration Changes, page A-5
If you have never used the Cisco IOS software, or need a refresher, take a few minutes to read this section
before you proceed to the command reference section. Understanding these concepts saves you time as
you begin to use the CLI.
Getting Help
Use the question mark (?) and arrow keys to help you enter commands:
•
For a list of available commands, enter a question mark:
Sup> ?
•
To complete a command (see the “Command-Line Completion” section on page A-4), enter a few
known characters followed by a question mark (with no space):
Sup> s?
•
For a list of command variables, enter the command followed by a space and a question mark:
Sup> show ?
•
Note
To re-display a command you previously entered, press the up arrow key. You can continue to press
the up arrow key for more commands.
If a hostname is already configured, the hostname appears at the prompt instead of router or sup.
Understanding Cisco IOS Command Modes
Two primary modes of operation exist within the Cisco IOS software (running on the supervisor and
SAMI PPC): user EXEC mode and privileged EXEC mode. When you first connect to the router, you
are placed in the user EXEC mode.
The show commands in user EXEC mode are limited to a few basic levels. You cannot edit or view
configurations at this stage; you can only view the router status and other miscellaneous information.
Editing the router’s configuration requires you to be in privileged EXEC mode. To enter this mode, use
the enable command (Table A-1 on page A-3).
Cisco Service and Application Module for IP User Guide
A-2
OL-13003-06
Appendix A
Using the Command-Line Interfaces
You can always tell whether you are in user EXEC mode or privileged EXEC mode by looking at the
router prompt. User EXEC mode has a > at the end; privileged EXEC mode prompt has a # at the end.
In privileged EXEC mode, the user interface is further divided into different submodes. Each command
mode permits you to configure different components on your router. The commands available at any
given time depend on which mode you are currently in. Entering a question mark (?) at the prompt
displays a list of commands available for each command mode.
Tip
If you are familiar with UNIX, you can equate privileged EXEC mode to “root” access. You could also
equate it to the administer level in Windows 2000/NT. In this mode, you have permission to access
information inside the router, including configuration commands. However, you cannot type
configuration commands directly. Before you can change the router’s configuration, you must enter the
global configuration mode of privileged EXEC mode by entering the command configure terminal
(Table A-1 on page A-3).
Table A-1
Timesaver
Common Command Modes
Command Mode
Access Method
Router Prompt
Displayed
User EXEC
Log in.
Router>
Privileged EXEC
From user EXEC mode, Router#
enter the enable
command.
To exit to user EXEC
mode, use the disable,
exit, or logout
command.
Global configuration
From the privileged
EXEC mode, enter the
configure terminal
command.
To exit to privileged
EXEC mode, use the exit
or end command, or
press Ctrl-Z.
Interface configuration
Router(config-if)#
From the global
configuration mode,
enter the interface type
number command, such
as interface serial 0/0.
Router(config)#
Exit Method
Use the logout
command.
To exit to global
configuration mode, use
the exit command.
To exit directly to
privileged EXEC mode,
press Ctrl-Z.
Each command mode restricts you to a subset of commands. If you experience trouble entering a
command, check the prompt, and enter the question mark (?) for a list of available commands. You
might be in the incorrect command mode, or using the incorrect syntax.
Cisco Service and Application Module for IP User Guide
OL-13003-06
A-3
Appendix A
Using the Command-Line Interfaces
In the following example, notice how the prompt changes after each command to indicate a new
command mode:
Sup> enable
Password: <enable password>
Sup# configure terminal
Enter configuration commands one per line. End with CNTL/Z.
Sup(config)# interface gigabitEthernet 0/0
Sup(config-if)# no shutdown
Sup(config-if)# exit
Sup(config)# exit
Sup# DEC 24 07:16:15:079 %SYS-5-CONFIG_I: Configured from console by console
The last message is normal and does not indicate an error. Press Return to get the Router# prompt.
Note
You can press Ctrl-Z in any mode to immediately return to privileged EXEC mode (Router#), instead
of entering exit, which returns you to the previous mode.
Command-Line Completion
Command-line completion makes the Cisco IOS software CLI more user-friendly. It saves you
keystrokes and assists if you cannot remember a command syntax.
In the following example, notice how the command configure terminal is done:
Sup> enable
Password: <enable password>
Sup# config t
Sup(config)#
The Cisco IOS software expands the command config t to configure terminal.
Another form of command-line completion is the use of the Tab key. If you start a command by entering
the first few characters, you can press the Tab key. As long as there is only one match, the Cisco IOS
software completes the command: for example, if you key in sh and press Tab, the Cisco IOS software
completes the sh with show. If Cisco IOS software does not complete the command, you can enter a few
more letters and try again.
Undoing a Command or Feature
To undo a command you entered or to disable a feature, enter the keyword no before most commands;
for example, no ip routing.
Cisco Service and Application Module for IP User Guide
A-4
OL-13003-06
Appendix A
Using the Command-Line Interfaces
Saving Configuration Changes
To save your configuration changes to a configuration file stored on the supervisor, so the changes are
not lost if a system reload or power outage occurs, you must enter the copy running-config
startup-config or write memory commands .
For example:
Sup# copy running-config startup-config
Building configuration...
or
Sup# write memory
Building configuration...
It might take a minute or two to save the configuration to the supervisor. After the configuration is saved,
the following appears:
[OK]
Sup#
Now that you have learned some Cisco IOS software basics, you can begin to configure SAMI in your
router using the Cisco IOS software CLI on the supervisor engine and the SAMI PPCs.
Remember that:
•
You can use the question mark (?) and arrow keys to help you enter commands.
•
Each command mode restricts you to a set of commands. If you have difficulty entering a command,
check the prompt and then enter the question mark (?) for a list of available commands. You might
be in the wrong command mode or using the wrong syntax.
•
To disable a feature, enter the keyword no before the command; for example, no ip routing.
•
You must save your configuration changes to NVRAM so the changes are not lost if there is a system
reload or power outage.
To begin configuring the SAMI, proceed to the “Configuring the Cisco SAMI” chapter.
Using the Cisco SAMI LCP and COSLI PPC CLIs
Note
For a list of the Cisco SAMI COSLI LCP commands, see Appendix D, “SAMI COSLI PPC Commands.”
For a list of Cisco SAMI PPC commands, see Appendix E, “SAMI LCP Commands.”
When you log in to the SAMI LCP or a SAMI COSLI PPC, by default you are in EXEC mode. The EXEC
mode prompt begins with the hostname, followed by the pound sign (#).
switch#
EXEC mode has a set of commands allowing you to perform maintenance procedures. To access
configuration mode, use the configure command. This mode is identified by a (config) prompt. For
example:
switch# configure
switch(config)#
Cisco Service and Application Module for IP User Guide
OL-13003-06
A-5
Appendix A
Using the Command-Line Interfaces
Configuration mode has a set of commands allowing you to configure the SAMI LCP or COSLI PPC,
and access subordinate configuration modes. When you access any of the subordinate configuration
modes, the mode name is appended to the (config) prompt. For example, when you access interface
configuration mode from configuration mode, the prompt changes to (config-if).
To exit a configuration mode and access the previous mode, use the exit command. To exit any
configuration mode and return to EXEC mode, press Ctrl-Z or use the end command.
Using the SAMI LCP and COSLI PPC CLI Commands
Table A-2 lists CLI keyboard shortcuts to help you enter and edit command lines on the SAMI LCP or
SAMI COSLI PPCs. For further information on using the CLI commands, see the following sections:
•
Editing the Command Line, page A-7
•
Using EXEC Mode Commands in a Configuration Mode, page A-7
•
Understanding CLI Syntax Checking and Error Messages, page A-7
•
Using the Question Mark (?), page A-8
•
Using the Tab Key, page A-8
Table A-2
CLI Command Keyboard Shortcuts
Action
Keyboard Shortcut
Cancel the current operation, additional display of MORE output, or
delete the current line.
Ctrl-C
Change
The word at the cursor to lowercase.
Esc-L
The word at the cursor to uppercase.
Esc-U
A character to the left of the cursor.
Ctrl-H, Delete, or
Backspace
All characters from the cursor to the beginning of
the line.
Ctrl-U
Delete
All characters from the cursor to the end of the line. Ctrl-K
All characters from the cursor to the end of the
word.
Esc-D
The word to left of the cursor.
Ctrl-W or Esc-Backspace
Display the
buffers
Next line.
Ctrl-N or Down-Arrow
Previous line.
Ctrl-P or Up-Arrow
Display MORE
output
Exit from MORE output.
q, Q, or Ctrl-C
Next additional screen. The default is one screen.
To display more than one screen, enter a number
before pressing the Spacebar.
Spacebar
Next line. The default is one line. To display more Enter
than one line, enter the number before pressing the
Enter key.
Enter an Enter or Return key character.
Ctrl-M
Expand the command or abbreviation.
Ctrl-I or Tab
Cisco Service and Application Module for IP User Guide
A-6
OL-13003-06
Appendix A
Using the Command-Line Interfaces
Table A-2
CLI Command Keyboard Shortcuts (continued)
Action
Move the cursor
Keyboard Shortcut
One character to the left (back).
Ctrl-B or Left Arrow
One character to the right (forward).
Ctrl-F or Right Arrow
One word to the left (back), to the beginning of
current or previous word.
Esc-B
One word to the right (forward), to the end of the
current or next word.
Esc-F
To the beginning of the line.
Ctrl-A
To the end of the line.
Ctrl-E
Redraw screen at the prompt.
Ctrl-L or Ctrl-R
Return to the EXEC mode from any configuration mode.
Ctrl-Z
Return to the previous mode or exit from the CLI from EXEC mode.
exit command
Transpose a character at the cursor with a character to left of the cursor. Ctrl-T
Editing the Command Line
The SAMI LCP or SAMI COSLI CLI allows you to view all previously entered commands with the up
arrow. After you examine a previously-entered command, you can move forward in the list using the
down arrow.
When you view a command you wish to reuse, you can edit it or press the Enter key to execute it.
Using EXEC Mode Commands in a Configuration Mode
When you are in a configuration mode, you may need to use a show command or any other command
that is only available in EXEC mode. To enter an EXEC command in any configuration mode, use the
do command. The syntax for this command is:
do exec_command_string
The exec_command_string argument is the EXEC mode command you want to execute.
For example, to display the running configuration in configuration mode, enter:
switch(config)# do show running-config
Understanding CLI Syntax Checking and Error Messages
If you enter an invalid or incomplete command, the CLI responds with a pointer (^) and an error message.
The following example shows the CLI response when you enter an invalid command:
switch# test
^
% invalid command detected at ‘^’ marker.
The following example shows the CLI response when you enter an incomplete command:
switch(config)# interface
^
% incomplete command detected at ‘^’ marker.
Cisco Service and Application Module for IP User Guide
OL-13003-06
A-7
Appendix A
Using the Command-Line Interfaces
Getting CLI Help
The CLI provides several types of context-sensitive help, as described in the following sections:
•
Using the Question Mark (?)
•
Using the Tab Key
Using the Question Mark (?)
The question mark (?) character allows you to get the following type of help about a command at the
command line:
Question Mark Usage
Command Help Type
? at command prompt
All commands for that mode
command ?
Any keywords, options, or object names for
a command
command keyword ?
Any keywords, options, or object names for
a command
command-abbrev ?
All commands that begin with specific letters
Using the Tab Key
When you press the Tab key or Ctrl-I at the end of a unique command or option abbreviation, the CLI
completes the command or options for you. For example:
switch# sh<Tab>
switch# show
Pressing the Tab key or Ctrl-I keys also completes an option up to the point where it is unique. If
multiple commands have the same abbreviation that you entered, the CLI lists all of these commands.
Using the ROM-Monitor CLI
The ROM-monitor is a ROM-based program that executes upon platform power-up, reset, or when a fatal
exception occurs. The router enters ROM-monitor mode if it does not find a valid software image, if the
NVRAM configuration is corrupted, or if the configuration register is set to enter ROM-monitor mode.
From the ROM-monitor mode, you can load a software image manually from flash memory, from a
network server file, or from bootflash.
You can also enter ROM-monitor mode by restarting and pressing the Break key during the first
60 seconds of startup.
Note
The Break key is always enabled for 60 seconds after rebooting, regardless of whether the Break key is
configured to be off by configuration register settings.
After you are in ROM-monitor mode, the prompt changes to rommon 1>. Enter a question mark (?) to
see the available ROM-monitor commands.
Cisco Service and Application Module for IP User Guide
A-8
OL-13003-06
A P P E N D I X
B
Supervisor Console Commands
Note
Additional Cisco IOS commands used with this product (those that already exist and have not been
modified) are documented in the Cisco IOS Release 12.2 command reference publications.
The following commands, listed in alphabetical order, are introduced or modified in Cisco IOS
Release 12.2(33)SRC and later to support the SAMI platform, and are supported at the supervisor engine
console:
•
boot device module, page B-3
•
bouncer-program-summit, page B-4
•
clear logging slot, page B-6
•
clear sami module, page B-8
•
copy sami#, page B-10
•
delete sami#, page B-11
•
dir sami#, page B-12
•
encapsulation dot1q, page B-14
•
execute-on, page B-16
•
hw-module boot, page B-19
•
hw-module reset, page B-21
•
hw-module shutdown, page B-22
•
logging listen, page B-26
•
power enable, page B-27
•
sami module, page B-28
•
session slot, page B-30
•
show logging slot, page B-34
•
show logging summary, page B-37
•
show sami module, page B-44
•
show svclc module, page B-45
•
show upgrade software progress, page B-47
•
show vlans dot1q, page B-48
Cisco Service and Application Module for IP User Guide
OL-13003-06
B-1
Appendix B
•
svclc console, page B-52
•
svclc module, page B-53
•
svclc multiple-vlan-interfaces, page B-54
•
svclc vlan-group, page B-56
•
upgrade hw-module, page B-57
Supervisor Console Commands
The following Cisco IOS software commands, listed in alphabetical order, are not new or modified. They
are included in this reference section because they are useful for configuring and managing the SAMI.
•
hw-module reset, page B-21
•
ip rcmd rcp-enable, page B-23
•
ip rcmd remote-host, page B-24
•
show inventory, page B-31
•
show module, page B-41
Cisco Service and Application Module for IP User Guide
B-2
OL-13003-06
Appendix B
Supervisor Console Commands
boot device module
boot device module
To set the boot variable for the SAMI LCP, use the boot device module command in global configuration
mode:
boot device module slot_num {disk0: | disk1: | sup-:}image_name
Syntax Description
slot_num
Number of the slot in which the module resides.
disk0:
Sets the boot variable to disk0:.
disk1:
Sets the boot variable to disk1:.
sup-bootflash:
Sets the boot variable to sup-bootflash:.
image_name
Name of the SAMI image bundle.
Defaults
This command has no default setting.
Command Modes
Global configuration
Command History
Release
Modification
12.2(33)SRB1
This command was integrated into Cisco IOS Release 12.2(33)SRB1.
12.2(33)SRC
This command was integrated into Cisco IOS Release 12.2(33)SRC.
12.2(33)SRD
This command was integrated into Cisco IOS Release 12.2(33)SRD.
Usage Guidelines
To set the boot variable for the LCP and the image using the boot device module command, the SAMI
LCP must be at the ROM-monitor prompt. This command does not work with the supervisor bootflash:
file system.
Examples
The following example shows how to set the boot variable if the LCP is in slot 3:
Router(config)#boot device module 3 disk0:c6ace-t1k9-mz.3.0.0_A1_4.bin
Device BOOT variable = disk0:c6ace-t1k9-mz.3.0.0_A1_4.bin
Warning: Device list is not verified
Router#
Related Commands
Command
Description
boot eobc:
Boots the SAMI from the image on the supervisor engine. (This is a SAMI
LCP ROM monitor command.)
hw-module boot eobc
Boots using an image downloaded through EOBC.
Cisco Service and Application Module for IP User Guide
OL-13003-06
B-3
Appendix B
Supervisor Console Commands
bouncer-program-summit
bouncer-program-summit
To program all registers to increase the tolerance band for voltage fluctuations, use the
bouncer-program-summit privileged EXEC command.
bouncer-program-summit
Syntax Description
There are no keywords or arguments for this command.
Defaults
There are no default values.
Command Modes
Privileged EXEC.
Command History
Release
Modification
12.4(24)MD,
12.4(24)MDA,
12.4(24)MDB,
12.4(24)YE,
12.4(24)T4A
This command was introduced as a workaround in the listed releases.
Usage Guidelines
Caution
Examples
Use this command only if the SAMI reloads or fails to bootup citing FRU power failure errors.
You should only execute this command under the supervision of TAC during a maintenance window.
Execute the command on processor 0 of the affected SAMI cards .
Here is an example configuration.
Load the image with the fix:
ABHV-SUP# upgrade hw-module slot 2 software
tftp://202.153.144.25/abhv/c7svcsami-noapp-mz-3_2
Loading abhv/c7svcsami-csg-mz from 202.153.144.25 (via Vlan75):
!!!!!!!!!!!!!!!!!!!!!!!!!!!!!!!!!!!!!!!!!!!!!!!!!!!!!!!!!!!!!!!!!!!!!!!!!!!!!!!!!!!!!!!!!!
!!!!!!!!!!!!!!!!!!!!!!!
[OK - 28823127 bytes]
% Waiting for upgrade to be committed..
% Sofware upgrade completed.
% Please reset hw-module to load the upgraded software.
ABHV-SUP#hw-module module 2 reset
Proceed with reload of module?[confirm]
ABHV-SUP#
Session to processor 0 of SAMI (username: admin password: admin):
Cisco Service and Application Module for IP User Guide
B-4
OL-13003-06
Appendix B
Supervisor Console Commands
bouncer-program-summit
ABHV-SUP#session slot 2 processor 0
The default escape character is Ctrl-^, then x.
You can also type 'exit' at the remote prompt to end the session
Trying 127.0.0.20 ... Open
ABHV-LCP-2 login: admin
Password:admin
Bad terminal type: "network". Will assume vt100.
Cisco Application Control Software (ACSW)
TAC support: http://www.cisco.com/tac
Copyright (c) 2002-2008, by Cisco Systems, Inc. All rights reserved.
The copyrights to certain works contained herein are owned by
other third parties and are used and distributed under license.
Some parts of this software are covered under the GNU Public
License. A copy of the license is available athttp://www.gnu.org/licenses/gpl.html.
Service and Application Module for IP (SAMI)
Utility Console
ABHV-LCP-2#
Execute the bouncer-program-summit command:
ABHV-LCP-2# bouncer-program-summit
This must be performed only in a maintenance window with assistance from TAC. Are you sure
you want to continue? [no] yes
ABHV-LCP-2#
Note
In rare cases, if the programming or verification of summit registers fails for some reason, a message
will be printed asking you to execute the command again. Please retry the same command.
Exit and reload the card:
ABHV-LCP-2# exit
Connection to 127.0.0.20 closed by foreign host
ABHV-SUP#hw-module module 2 reset
Proceed with reload of module?[confirm]
ABHV-SUP#
Cisco Service and Application Module for IP User Guide
OL-13003-06
B-5
Appendix B
Supervisor Console Commands
clear logging slot
clear logging slot
To clear logging status counters from the logging buffer, use the clear logging slot command in
privileged EXEC mode.
clear logging slot slot_number counts
Syntax Description
slot_number
Number of the slot in which the SAMI is installed.
counts
Clears the logging status counters.
Defaults
No default behaviors or values exist.
Command Modes
Global configuration
Command History
Release
Modification
12.2(14)ZA4
This command was introduced.
12.2(33)SRB1
This command was integrated into Cisco IOS Release 12.2(33)SRB1.
12.2(33)SRC
This command was integrated into Cisco IOS Release 12.2(33)SRC.
12.2(33)SRD
This command was integrated into Cisco IOS Release 12.2(33)SRD.
Usage Guidelines
Use this command to clear the logging status counters that display when you use the show logging
command.
Note that the clear logging slot command only clears the counters displayed by the
show logging command. The clear logging slot command does not clear the control information
displayed in the show logging command output, such as send and receive sequence numbers.
Specifically, the clear logging slot command clears the following counters displayed by the
show logging command:
•
kpa_missed
•
cmd_timeouts
•
logger_events
•
bad_info
•
seq_errors
•
reset_count
Cisco Service and Application Module for IP User Guide
B-6
OL-13003-06
Appendix B
Supervisor Console Commands
clear logging slot
Examples
The following example illustrates the results of issuing the No defaultclear logging slot counts
command to clear the counters for a module in slot 5:
Sup# clear logging slot 5 counts
Clear logging buffer [confirm]
Sup#
Related Commands
Command
Description
logging buffered
Logs messages to an internal buffer.
show logging
Displays the state of logging (syslog).
Cisco Service and Application Module for IP User Guide
OL-13003-06
B-7
Appendix B
Supervisor Console Commands
clear sami module
clear sami module
To clear the counters displayed by the show interface privileged EXEC command, use the clear sami
module in privileged EXEC mode.
clear sami module slot_number [port port_number] traffic
Syntax Description
slot_number
Number of the slot in which the SAMI is installed.
port port_number
(Optional) Number of the data port on the SAMI.
traffic
Clears traffic counters.
Defaults
No default behavior or values exist.
Command Modes
Privileged EXEC
Command History
Release
Modification
12.2(33)SRC
This command was introduced.
12.2(33)SRD
This command was integrated into Cisco IOS Release 12.2(33)SRD.
Usage Guidelines
Use this command to clear the traffic counters displayed by the show sami module privileged EXEC
command.
Examples
The following example illustrates how to use the clear sami module command:
Sup#show sami module 2 port 1 traffic
Specified interface is up line protocol is up (connected)
Hardware is c7600 10Gb 802.3, address is 0030.f276.41e4 (bia 0030.f276.41e4)
MTU 1500 bytes, BW 10000000 Kbit, DLY 10 usec,
reliability 255/255, txload 1/255, rxload 1/255
Encapsulation ARPA, loopback not set
Full-duplex, 10Gb/s
input flow-control is on, output flow-control is unsupported
202 packets input
0 input errors,
0 CRC
6 packets output
Sup#clear sami module 2 port 1 traffic
Clear "show interface" counters on this
Sup#
Sup#show sami module 2 port 1 traffic
Specified interface is up line protocol
Hardware is c7600 10Gb 802.3, address
MTU 1500 bytes, BW 10000000 Kbit, DLY
reliability 255/255, txload 1/255,
Encapsulation ARPA, loopback not set
interface [confirm]
is up (connected)
is 0030.f276.41e4 (bia 0030.f276.41e4)
10 usec,
rxload 1/255
Cisco Service and Application Module for IP User Guide
B-8
OL-13003-06
Appendix B
Supervisor Console Commands
clear sami module
Full-duplex, 10Gb/s
input flow-control is on, output flow-control is unsupported
0 packets input
0 input errors,
0 CRC
0 packets output
Related Commands
Command
Description
show sami module
Displays traffic counters on the SAMI.
Cisco Service and Application Module for IP User Guide
OL-13003-06
B-9
Appendix B
Supervisor Console Commands
copy sami#
copy sami#
To copy a SAMI coredump file from the core directory on a SAMI, use the copy sami# command in
privileged EXEC mode.
copy sami#slot_number{-fs:core/file-name dest-file}
Syntax Description
slot_number
Number of the slot in which the SAMI is installed.
core/file-name
Name of the file containing crash information in the core directory on the
SAMI.
dest-file
Name of the destination file.
Defaults
No default behavior or values exist.
Command Modes
Privileged EXEC
Command History
Release
Modification
12.2(33)SRB1
This command was introduced.
12.2(33)SRC
This command was integrated into Cisco IOS Release 12.2(33)SRC.
12.2(33)SRD
This command was integrated into Cisco IOS Release 12.2(33)SRD.
Usage Guidelines
Use this command to copy the coredump file from the core directory to a destination file.
Examples
The following example illustrates how to use the copy sami# command:
Sup# copy sami#7-fs:core/crashinfo tftp://64.102.16.25/operatorA/
Address or name of remote host [64.102.16.25]?
Destination filename [operatorA/crashinfo]?
!!!!!!
1048576 bytes copied in 2.568 secs (408324 bytes/sec)
Related Commands
Command
Description
delete sami#
Deletes files in the SAMI image: or core directory.
dir sami#
Lists the files in the image: or core: directories on a SAMI.
Cisco Service and Application Module for IP User Guide
B-10
OL-13003-06
Appendix B
Supervisor Console Commands
delete sami#
delete sami#
To delete the files the image: or core: directories on a SAMI, use the dir sami# command in privileged
EXEC mode.
delete sami#slot_number{-fs:image/ | -fs:core/}file-name
Syntax Description
slot_number
Number of the slot in which the SAMI is installed.
image/
Specifies the file is located in the image directory.
core/
Specifies the file is located in the core directory.
file_name
Name of the file to delete.
Defaults
No default behavior or values exist.
Command Modes
Privileged EXEC
Command History
Release
Modification
12.2(33)SRB1
This command was introduced.
12.2(33)SRC
This command was integrated into Cisco IOS Release 12.2(33)SRC.
12.2(33)SRD
This command was integrated into Cisco IOS Release 12.2(33)SRD.
Usage Guidelines
Use this command to delete a file in the image: or core directory of a SAMI.
Examples
The following example illustrates how to use the delete sami# command:
Sup# delete sami#7-fs:image/sb-csg2-mzg.bin
Delete filename [image/sb-csg2-mzg.bin]?
Delete sami#7-fs:image/sb-csg2-mzg.bin? [confirm]
Sup# delete sami#7-fs:core/crashinfo
Delete filename [core/crashinfo]?
Delete sami#7-fs:core/crashinfo? [confirm]
Related Commands
Command
Description
copy sami#
Copies a SAMI coredump file from the core directory.
dir sami#
Lists the files in the image: or core: directories on a SAMI.
Cisco Service and Application Module for IP User Guide
OL-13003-06
B-11
Appendix B
Supervisor Console Commands
dir sami#
dir sami#
To list the files in the image: or core: directories on a SAMI, use the dir sami# command in privileged
EXEC mode.
dir sami#slot_number{-fs:image/ | -fs:core/}
Syntax Description
slot_number
Number of the slot in which the SAMI is installed.
image/
Lists the SAMI image directory.
core/
Lists the SAMI core directory.
Defaults
No default behavior or values exist.
Command Modes
Privileged EXEC
Command History
Release
Modification
12.2(33)SRB1
This command was introduced.
12.2(33)SRC
This command was integrated into Cisco IOS Release 12.2(33)SRC.
12.2(33)SRD
This command was integrated into Cisco IOS Release 12.2(33)SRD.
Usage Guidelines
Use this command to list the image: or core directory files of a SAMI.
Examples
The following example illustrates how to use the dir sami#-fs:image command:
Sup# dir sami#7-fs:image/
Directory of sami#7-fs:image/
16 ---- 36514563 Jan 1 2000 00:23:56 +00:00 itasca_diag33.mz
17 ---- 27281352 Jan 1 2000 00:25:12 +00:00 c6ace-t1k9-mz.3.0.0_A1_1a.bin
18 ---- 35067659 Nov 10 2006 16:26:52 +00:00 sb-csg2-mzg.shyeh.bin
19 ---- 34592592 Nov 9 2006 21:21:52 +00:00 sb-csg2-mzg.csg2-bundle.061108.nvfix
20 ---- 8230260 Nov 8 2006 17:31:26 +00:00 svcsami-csg-mz.unit_test
21 ---- 393216 Nov 8 2006 18:32:08 +00:00 BOUNCER_RM.bin_061108
22 ---- 1654432 Oct 25 2006 18:11:46 +00:00 sb-csg2_dplug-mzg.bin.061025
1024000000 bytes total (496435200 bytes free)
Sup# dir sami#7-fs:core/
Directory of sami#7-fs:core/
13 ---- 1048576 Nov 4 2006 04:51:25 +00:00 crashinfo
12 ---- 1048576 Nov 4 2006 04:45:33 +00:00 crashinfo.old
14 ---- 27691 Nov 10 2006 16:44:55 +00:00 0x701_ppc_dnld_daemon_log.995.tar.gz
15 ---- 27725 Nov 10 2006 17:54:01 +00:00 0x801_ppc_dnld_daemon_log.995.tar.gz
19 ---- 70793 Oct 25 2006 01:15:37 +00:00 0x901_ppc_dnld_daemon_log.995.tar.gz
21 ---- 71707 Oct 25 2006 16:12:30 +00:00 0x901_ppc_dnld_daemon_log.997.tar.gz
203097088 bytes total (199715840 bytes free)
Cisco Service and Application Module for IP User Guide
B-12
OL-13003-06
Appendix B
Supervisor Console Commands
dir sami#
Related Commands
Command
Description
copy sami#
Copies a SAMI coredump file from the core directory.
delete sami#
Deletes files in the SAMI image: or core directory.
Cisco Service and Application Module for IP User Guide
OL-13003-06
B-13
Appendix B
Supervisor Console Commands
encapsulation dot1q
encapsulation dot1q
To enable IEEE 802.1Q encapsulation of traffic on a specified subinterface in a virtual LAN (VLAN),
use the encapsulation dot1q command in subinterface configuration modes. To disable IEEE 802.1Q
encapsulation, use the no form of this command.
encapsulation dot1q vlan-id second-dot1q {any | vlan-id | vlan-id |
vlan-id-vlan-id[,vlan-id-vlan-id]}
no encapsulation dot1q vlan-id second-dot1q {any | vlan-id | vlan-id |
vlan-id-vlan-id[,vlan-id-vlan-id]}
Syntax Description
any
Sets the inner VLAN ID value to a number that is not configured on any
other subinterface.
vlan-id
Virtual LAN identifier. The allowed range is from 1 to 4094. For the IEEE
802.1Q-in-Q VLAN Tag Termination feature, the first instance of this
argument defines the outer VLAN ID, and the second and subsequent
instances define the inner VLAN ID.
second-dot1q
Supports the IEEE 802.1Q-in-Q VLAN Tag Termination feature by
allowing an inner VLAN ID to be configured.
-
Hyphen must be entered to separate inner and outer VLAN ID values that
are used to define a range of VLAN IDs.
,
(Optional) Comma must be entered to separate each VLAN ID range from
the next range.
Defaults
IEEE 802.1Q encapsulation is disabled.
Command Modes
Subinterface configuration
Command History
Release
Modification
12.0(1)T
This command was introduced.
12.1(3)T
The native keyword was added.
12.2(2)DD
Support was added for this command in interface range configuration mode.
12.2(4)B
This command was integrated into Cisco IOS Release 12.2(4)B.
12.2(8)T
This command was integrated into Cisco IOS Release 12.2(8)T.
12.3(7)T
The second-dot1q keyword was added to support the IEEE 802.1Q-in-Q
VLAN Tag Termination feature.
12.3(7)XI1
This command was integrated into Cisco IOS Release 12.3(7)XI and
implemented on the Cisco 10000 series routers.
12.2(28)SB
This command was integrated into Cisco IOS Release 12.2(28)SB.
12.2(31)SB2
This command was integrated into Cisco IOS Release 12.2(31)SB2.
Cisco Service and Application Module for IP User Guide
B-14
OL-13003-06
Appendix B
Supervisor Console Commands
encapsulation dot1q
Usage Guidelines
Release
Modification
12.2SX
This command is supported in the Cisco IOS Release 12.2SX train. Support
in a specific 12.2SX release of this train depends on your feature set,
platform, and platform hardware.
12.2(33)SRC
This command was integrated into Cisco IOS Release 12.2(33)SRC.
Cisco IOS XE Release
2.2
This command was integrated into Cisco IOS XE Release 2.2.
12.2(33)SRD
This command was integrated into Cisco IOS Release 12.2(33)SRD.
Subinterface Configuration Mode
After a subinterface is defined, use the encapsulation dot1q command to add outer and inner VLAN ID
tags to allow one VLAN to support multiple VLANs. You can assign a specific inner VLAN ID to the
subinterface; that subinterface is unambiguous. Or you can assign a range or ranges of inner VLAN IDs
to the subinterface; that subinterface is ambiguous.
Use the second-dot1q keyword to configure the IEEE 802.1Q-in-Q VLAN Tag Termination feature.
802.1Q in 802.1Q (Q-in-Q) VLAN tag termination adds another layer of 802.1Q tag (called “metro tag”
or “PE-VLAN”) to the 802.1Q tagged packets that enter the network. Double tagging expands the VLAN
space, allowing service providers to offer certain services such as Internet access on specific VLANs for
some customers and other types of services on other VLANs for other customers.
Examples
The following example shows how to terminate a Q-in-Q frame on an unambiguous subinterface with an
outer VLAN ID of 100 and an inner VLAN ID of 200:
Router(config)# interface gigabitethernet1/0/0.1
Router(config-subif)# encapsulation dot1q 100 second-dot1q 200
The following example shows how to terminate a Q-in-Q frame on an ambiguous subinterface with an
outer VLAN ID of 100 and an inner VLAN ID in the range from 100 to 199 or from 201 to 600:
Router(config)# interface gigabitethernet1/0/0.1
Router(config-subif)# encapsulation dot1q 100 second-dot1q 100-199,201-600
Cisco Service and Application Module for IP User Guide
OL-13003-06
B-15
Appendix B
Supervisor Console Commands
execute-on
execute-on
To execute a command on a processor remotely when the remote console and logging (RCAL) feature
is enabled, use the execute-on command in privileged EXEC mode.
execute-on {{slot_number [, slot_number] | all-mwams | all-samis} {cpu_number [,cpu_num] | all
| all-ppc} remote-command}
Syntax Description
slot_number
Number of the slot in which the module is installed. Optionally, you can
specify additional slot numbers, separated by a comma (,).
all-mwams
Specifies all Cisco Multiprocessor WAN Application Modules (MWAMs)
in the chassis.1
all-samis
Specifies all SAMIs in the chassis.
cpu_number
Number of the processor. Valid values for a SAMI are 0 for the LCP and 3
through 8 for the PPCs. Valid values for an MWAM are 1 for the control
CPU and 2 through 7 for the processors.
all
Specifies all processors.
all-ppc
Specifies all PPC processors 3 through 8.
remote-command
The remote command to execute on the processor.
The following commands are supported:
•
debug
•
dir
•
sami (SAMI only)
•
show
•
systat
•
undebug
•
ping
•
log {show | systat | dir}
1. When using the all option, the command is executed on all active processors but is not executed on processors that are
inactive. To show the processor state, use the show logging slot command.
Defaults
No default behavior or values exist.
Command Modes
Privileged EXEC
Command History
Release
Modification
11.2(14)ZA4
This command was introduced.
12.3(5a)B
This command was integrated into Cisco IOS Release 12.3(5a)B and RCAL
support for processor control commands was added.
12.2(33)SRB1
This command was integrated into Cisco IOS Release 12.2(33)SRB1.
Cisco Service and Application Module for IP User Guide
B-16
OL-13003-06
Appendix B
Supervisor Console Commands
execute-on
Usage Guidelines
Release
Modification
12.2(33)SRC
This command was integrated into Cisco IOS Release 12.2(33)SRC.
12.2(33)SRD
This command was integrated into Cisco IOS Release 12.2(33)SRD.
Use this command to execute a command on one or all processors of one or all SAMIs or MWAMs in a
chassis, and to monitor and maintain information. The RCAL feature allows you to issue commands
remotely without having to log in to a processor directly.
Table B-1 lists the command sets that you can execute remotely from the supervisor to a
SAMI PPC (processor number 3 through 8).
Table B-1
PPC RCAL Command Set
Command
Description
debug
Enables debugging functions
dir
Lists files in a file system
log dir
Logs the dir command to syslog
log show
Logs the show command to syslog
log systat
Logs the systat command to syslog
ping ip_address
Executes a ping on a remote processor
show
Displays running system information
systat
Displays information about terminal lines
undebug
Disables debugging functions
Table B-2 lists the command sets that you can execute remotely from the supervisor to a
SAMI LCP (processor number 0).
Table B-2
LCP RCAL Command Set
Command
Description
clear
Clears counters and statistics
console-select
Specifies console selection for front panel
consoles DB1 and DB2
reload
Reloads the entire SAMI or SAMIs
command show
Displays SAMI remote commands
When the execute-on command is issued with an all keyword option specified, the specified command
is executed on active processors. Inactive processors are ignored.
To determine if the processor is active, use the show logging command.
To determine the escape sequence for your console/vty connection, use the show line line_number
command.
This command requires that the RCAL feature be enabled.
Cisco Service and Application Module for IP User Guide
OL-13003-06
B-17
Appendix B
Supervisor Console Commands
execute-on
Examples
The following example illustrates how to use the execute-on command:
Sup# execute-on all-samis all-ppc show proc cpu | inc CPU
----------- Slot 2/CPU 3, show proc cpu | inc CPU----------------------- Slot 2/CPU 3, show processes cpu ------------CPU utilization for five seconds: 0%/0%; one minute: 0%; five minutes: 0%
----------- Slot 2/CPU 4, show processes cpu ------------CPU utilization for five seconds: 16%/15%; one minute: 15%; five minutes: 15%
----------- Slot 2/CPU 5, show processes cpu ------------CPU utilization for five seconds: 0%/0%; one minute: 0%; five minutes: 0%
----------- Slot 2/CPU 6, show processes cpu ------------CPU utilization for five seconds: 0%/0%; one minute: 0%; five minutes: 0%
----------- Slot 2/CPU 7, show processes cpu ------------CPU utilization for five seconds: 0%/0%; one minute: 0%; five minutes: 0%
----------- Slot 2/CPU 8, show processes cpu ------------CPU utilization for five seconds: 0%/0%; one minute: 0%; five minutes: 0%
Sup# execute-on 2 3 show version
----------- Slot 2/CPU 3, show version------------Cisco IOS Software, SAMI Software (SAMI-CSG-M), Version 12.4(nightly.CSG2070509) NIGHTLY
BUILD, synced to bouncer BOUNCER_NIGHTLY_061020
Copyright (c) 1986-2007 by Cisco Systems, Inc.
Compiled Wed 09-May-07 03:11 by user
ROM: System Bootstrap, Version 12.3(20070509:064827) [BLD-bouncer_csg.nightly 101],
DEVELOPMENT SOFTWARE
SAMI2 uptime is 5 hours, 22 minutes
System returned to ROM by reload at 08:21:10 EDT Wed May 9 2007
System restarted at 08:26:03 EDT Wed May 9 2007
System image file is "c7svcsami-csg-mz.bouncer_csg.070509.p1p3"
Cisco Systems SAMI (MPC8500) processor (revision 0.702) with 983040K/65536K bytes of
memory.
Processor board ID SAD1042040X
FS8548H CPU at 1250MHz, Rev 2.0, 512KB L2 Cache
1 Gigabit Ethernet interface
65536K bytes of processor board system flash (AMD S29GL256N)
Configuration register is 0x1
Sup#
Cisco Service and Application Module for IP User Guide
B-18
OL-13003-06
Appendix B
Supervisor Console Commands
hw-module boot
hw-module boot
To specify the boot options for the module through the power management bus control register, use the
hw-module boot command in privileged EXEC mode.
hw-module module num boot [value] {config-register | eobc | flash image | rom-monitor}
Syntax Description
module num
Specifies the number of the module to apply the command.
boot value
(Optional) Literal value for the module's boot option; valid values are from
0 to 15. See the “Usage Guidelines” section for additional information.
config-register
Boots using the module’s config-register value.
eobc
Boots using an image downloaded through EOBC.
flash image
Specifies the image number in the module’s internal flash memory for the
module’s boot option; valid values are 1 and 2.
rom-monitor
Stays in ROM-monitor mode after the module resets.
Defaults
This command has no default settings.
Command Modes
Privileged EXEC
Command History
Release
Modification
12.2(18)SXF
Support for this command was introduced on the Supervisor Engine 720.
12.2(33)SRA
This command was integrated into Cisco IOS Release 12.2(33)SRA.
12.2(33)SRB1
This command was integrated into Cisco IOS Release 12.3(22)SRB1.
12.2(33)SRC
This command was integrated into Cisco IOS Release 12.2(33)SRC.
12.2(33)SRD
This command was integrated into Cisco IOS Release 12.2(33)SRD.
Usage Guidelines
The valid values for the boot value argument are as follows:
0—Specifies the module’s config-register value.
1—Specifies the first image in the flash memory.
2—Specifies the second image in the flash memory.
3—Stays in ROM-monitor mode after the module reset.
4—Specifies the download image through EOBC.
Cisco Service and Application Module for IP User Guide
OL-13003-06
B-19
Appendix B
Supervisor Console Commands
hw-module boot
Examples
This example shows how to reload the module in slot 6 using the module’s config-register value:
Sup# hw-module module 1 boot config-register
Sup#
This example shows how to reload the module in slot 3 using an image downloaded through EOBC:
Sup# hw-module module 1 boot eobc
Sup#
Related Commands
Command
Description
show module
Displays the module status and information for all modules in the chassis.
Cisco Service and Application Module for IP User Guide
B-20
OL-13003-06
Appendix B
Supervisor Console Commands
hw-module reset
hw-module reset
To reset the entire module by turning the power off and then on, use the hw-module reset command in
privileged EXEC mode.
hw-module module slot_number reset
Syntax Description
module num
Defaults
No default behavior or values exist.
Command Modes
Privileged EXEC
Command History
Release
Modification
12.2(14)SX
Support for this command was introduced on the Supervisor Engine 720.
12.2(33)SRB1
This command was integrated into Cisco IOS Release 12.3(22)SRB1.
12.2(33)SRC
This command was integrated into Cisco IOS Release 12.2(33)SRC.
12.2(33)SRD
This command was integrated into Cisco IOS Release 12.2(33)SRD.
Usage Guidelines
Number of the slot in which the module that you want to reset is installed.
Valid values depend on the chassis that is used. For example, in a 13-slot
chassis, valid values for the module number are from 1 to 13.
The hw-module reset command resets the module by turning the power off and then on. The reset
process requires several minutes.
This command is typically used in the upgrade process to switch between Application Partition (AP) and
Maintenance Partition (MP) images or to recover from a shutdown.
Examples
The following example illustrates how to reset a module in slot 3:
Sup# hw-module rmodule 3 reset
Cisco Service and Application Module for IP User Guide
OL-13003-06
B-21
Appendix B
Supervisor Console Commands
hw-module shutdown
hw-module shutdown
To shut down the module, use the hw-module shutdown command in privileged EXEC mode.
hw-module module slot_number shutdown
Syntax Description
module slot_number
Defaults
No default behavior or values exist.
Command Modes
Privileged EXEC
Command History
Release
Modification
12.2(14)SX
Support for this command was introduced on the Supervisor Engine 720.
12.2(33)SRB1
This command was integrated into Cisco IOS Release 12.3(22)SRB1.
Number of the slot in which the module that you want to shut down is
installed. Valid values depend on the chassis that is used. For example, if
you have a 13-slot chassis, valid values for the module number are from 1
to 13.
12.2(33)SRC
This command was integrated into Cisco IOS Release 12.2(33)SRC.
12.2(33)SRD
This command was integrated into Cisco IOS Release 12.2(33)SRD.
Usage Guidelines
If you enter the hw-module shutdown command to shut down the module, you will have to enter the no
power enable module command and the power enable module command to restart (power off and then
power on) the module.
Examples
This example shows how to shut down and restart a module in slot 3:
Sup# hw-module module 3 shutdown
Sup# no power enable module 3
Sup# power enable module 3
Cisco Service and Application Module for IP User Guide
B-22
OL-13003-06
Appendix B
Supervisor Console Commands
ip rcmd rcp-enable
ip rcmd rcp-enable
To configure the Cisco IOS software to allow remote users to copy files to and from the router using
remote copy protocol (RCP), use the ip rcmd rcp-enable command in global configuration mode. To
disable RCP on the device, use the no form of this command.
ip rcmd rcp-enable
no ip rcmd rcp-enable
Syntax Description
This command has no arguments or keywords.
Defaults
To ensure security, RCP is not enabled by default.
Command Modes
Global configuration
Command History
Release
Modification
10.1
This command was introduced.
Usage Guidelines
To allow a remote user to execute RCP commands on the router, you must also create an entry for the
remote user in the local authentication database using the ip rcmd remote-host command.
The no ip rcmd rcp-enable command does not prohibit a local user from using RCP to copy system
images and configuration files to and from the router.
To protect against unauthorized users copying the system image or configuration files, the router is not
enabled for RCP by default.
Examples
The following example illustrates how to use the ip rcmd rcp-enable command:
Sup# ip rcmd rcp-enable
Related Commands
Command
Description
ip rcmd remote-host
Creates an entry for the remote user in a local authentication database so
that remote users can execute commands on the router using remote shell
protocol (RSH) or remote shell protocol (RCP).
Cisco Service and Application Module for IP User Guide
OL-13003-06
B-23
Appendix B
Supervisor Console Commands
ip rcmd remote-host
ip rcmd remote-host
To create an entry for the remote user in a local authentication database so that remote users can execute
commands on the router using remote shell protocol (rsh) or remote copy protocol (rcp), use the ip rcmd
remote-host command in global configuration mode. To remove an entry for a remote user from the
local authentication database, use the no form of this command.
ip rcmd remote-host local-username {ip-address | host-name} remote-username [enable [level]]
no ip rcmd remote-host local-username {ip-address | host-name} remote-username
[enable [level]]
Syntax Description
local-user-name
Name of the user on the local router. You can specify the router name as the
username. This name must be communicated to the network administrator
or to the user on the remote system. To be allowed to remotely execute
commands on the router, the remote user must specify this value correctly.
ip-address
IP address of the remote host from which the local router accepts remotely
executed commands. Either the IP address or the hostname is required.
host-name
Name of the remote host from which the local router accepts remotely
executed commands. Either the hostname or the IP address is required.
remote-username
Name of the user on the remote host from which the router accepts remotely
executed commands.
enable [level]
(Optional) Specifies to enable the remote user to execute privileged EXEC
commands using rsh or to copy files to the router using rcp. The range is
from 1 to 15. The default is 15. For information on the enable level, refer to
the privilege level global configuration command in the Release 12.2
Cisco IOS Security Command Reference.
Defaults
No entries are in the local authentication database.
Command Modes
Global configuration
Command History
Release
Modification
10.1
This command was introduced.
Usage Guidelines
A TCP connection to a router is established using an IP address. Using the hostname is valid only when
you are initiating an rcp or rsh command from a local router. The hostname is converted to an IP address
using DNS or host-name aliasing.
To allow a remote user to execute rcp or rsh commands on a local router, you must create an entry for
the remote user in the local authentication database. You must also enable the router to act as an rsh or
rcp server.
Cisco Service and Application Module for IP User Guide
B-24
OL-13003-06
Appendix B
Supervisor Console Commands
ip rcmd remote-host
To enable the router to act as an:
•
RSH server—Issue the ip rcmd rsh-enable command.
•
RCP server—Issue the ip rcmd rcp-enable command.
The router cannot act as a server for either of these protocols unless you explicitly enable the capacity.
A local authentication database, which is similar to a UNIX .rhosts file, is used to enforce security on
the router through access control. Each entry that you configure in the authentication database identifies
the local user, the remote host, and the remote user. To permit a remote user of rsh to execute commands
in privileged EXEC mode or to permit a remote user of rcp to copy files to the router, specify the enable
keyword and level. For information on the enable level, refer to the privilege level global configuration
command in the Release 12.2 Cisco IOS Security Command Reference.
An entry that you configure in the authentication database differs from an entry in a UNIX .rhosts file.
Because the .rhosts file on a UNIX system resides in the home directory of a local user account, an entry
in a UNIX .rhosts file need not include the local username; the local username is determined from the
user account. To provide equivalent support on a router, specify the local username along with the remote
host and remote username in each authentication database entry that you configure.
For a remote user to be able to execute commands on the router in its capacity as a server, the local
username, host address or name, and remote username sent using the remote client request must match
values configured in an entry in the local authentication file.
A remote client host should register with DNS. The Cisco IOS software uses DNS to authenticate the
remote hostname and address. Because DNS can return several valid IP addresses for a hostname, the
Cisco IOS software checks the address of the requesting client against all of the IP addresses for the
named host returned by DNS. If the address sent by the requester is considered invalid, that is, it does
not match any address listed with DNS for the hostname, the software rejects the remote-command
execution request.
If no DNS servers are configured for the router, then that device cannot authenticate the host. In this case,
the Cisco IOS software sends a broadcast request to attempt to gain access to DNS services on another
server. If DNS services are not available, you must use the no ip domain-lookup command to disable
the attempt to gain access to a DNS server by sending a broadcast request.
If DNS services are not available and, therefore, you bypass the DNS security check, the software
accepts the request to remotely execute a command only if all three values sent with the request match
exactly the values configured for an entry in the local authentication file.
Examples
The following example illustrates how to use the ip rcmd remote-host enable command:
Sup# ip rcmd remote-host * 24 * enable
Related Commands
Command
Description
ip rcmd rcp-enable
Configures the Cisco IOS software to allow remote users to copy files to
and from the router.
Cisco Service and Application Module for IP User Guide
OL-13003-06
B-25
Appendix B
Supervisor Console Commands
logging listen
logging listen
To configure the port on which the supervisor receives system messages from SAMI processors when
using the remote console and logging (RCAL) feature, use the logging listen command in global
configuration mode. To remove this configuration, use the no form of the command.
logging listen udp_port
no logging listen udp_port
Syntax Description
udp_port
UDP port on the supervisor on which to listen for system messages from the
SAMI processors.
The UDP port must match the port specified on the processors using the
logging main-cpu command. We recommend that you use port 4000. If a
port other than 4000 is used, RCAL to the SAMI LCP (processor 0) will not
work.
Defaults
No default behavior or values exist.
Command Modes
Global configuration
Command History
Release
Modification
12.2(14)ZA4
This command was introduced.
12.2(33)SRB1
This command was integrated into Cisco IOS Release 12.2(33)SRB1.
12.2(33)SRC
This command was integrated into Cisco IOS Release 12.2(33)SRC.
12.2(33)SRD
This command was integrated into Cisco IOS Release 12.2(33)SRD.
Usage Guidelines
The UDP port must be in the range of 4000 to 10000 and be a multiple of 100.
The UDP port must match the port specified on the processors using the logging main-cpu command.
We recommend that you use port 4000.
If a port other than 4000 is used, RCAL to the SAMI LCP (processor 0) does not work.
Examples
The following example illustrates how to use the logging listen command:
Sup# logging listen 4000
Cisco Service and Application Module for IP User Guide
B-26
OL-13003-06
Appendix B
Supervisor Console Commands
power enable
power enable
To power on the modules, use the power enable command in global configuration mode. To power off
a module, use the no form of this command.
power enable module slot
Syntax Description
slot
Defaults
No default behavior or values exist.
Command Modes
Global configuration
Command History
Release
Modification
12.2(14)SX
Support for this command was introduced on the Supervisor Engine 720.
12.2(33)SRB1
This command was integrated into Cisco IOS Release 12.2(33) SRB1.
12.2(33)SRC
This command was integrated into Cisco IOS Release 12.2(33)SRC.
12.2(33)SRD
This command was integrated into Cisco IOS Release 12.2(33)SRD.
Usage Guidelines
Number of the slot in which the module is installed. Valid values are 1 to
13, depending on the chassis being used.
When you enter the:
•
no power enable command to power off a module, the module's configuration is not saved.
•
no power enable to power off an empty slot, the configuration is saved.
The slot argument designates the number of the slot in which the module is installed. Valid values for
slot depend on the chassis that is used. For example, in a 13-slot chassis, valid values for the module
number are from 1 to 13.
Examples
This example shows how to power on a module that was previously powered off:
Sup(config)# power enable module 5
Sup(config)#
This example shows how to power off a module:
Sup(config)# no power enable module 5
Sup(config)#
Cisco Service and Application Module for IP User Guide
OL-13003-06
B-27
Appendix B
Supervisor Console Commands
sami module
sami module
To define a remote console and logging (RCAL) server (or servers), and to specify the level of messages
to receive and display system message, use the sami module logging command in global configuration
mode. To remove the configuration, use the no form of the command.
sami module {mod_num | all {cpu {cpu_num | all} logging severity
no sami module {mod_num | all {cpu {cpu_num | all} logging severity
Syntax Description
mod_num
Number of the slot in which the SAMI is installed.
all
Specifies all SAMIs installed in the chassis.
cpu {cpu-num | all}
Defines the RCAL server, where
logging severity
•
cpu-num—Number of the processor (0 for LCP and 3 through 8 for
PPCs)
•
all—Specifies all processors.
Specifies the severity level for which the supervisor receives and displays
messages. Messages of lower severity than the configured level are filtered.
Defaults
By default, the supervisor receives all system messages sent by SAMI processors.
Command Modes
Global configuration
Command History
Release
Modification
12.2(33)SRB1
This command was introduced.
12.2(33)SRC
This command was integrated into Cisco IOS Release 12.2(33)SRC.
12.2(33)SRD
This command was integrated into Cisco IOS Release 12.2(33)SRD.
Usage Guidelines
Use this command to define RCAL servers and specify the severity level for which messages are received
and displayed.
The level of messages sent by a processor to the supervisor is defined on the processor using the
logging main-cpu global configuration command.
Table B-3 lists and defines the severity levels of the messages.
Table B-3
Message Severity Level Definitions
Level
Description
0—emergencies
System unusable
1—alerts
Immediate action required
2—critical
Critical condition
Cisco Service and Application Module for IP User Guide
B-28
OL-13003-06
Appendix B
Supervisor Console Commands
sami module
Table B-3
Examples
Message Severity Level Definitions (continued)
Level
Description
3—errors
Error conditions
4—warnings
Warning conditions
5—notifications
Normal bug significant condition
6—informational
Informational messages
7—debugging
Debugging messages
The following example illustrates how to use the sami module cpu logging command set for debugging:
Sup# sami module 5 | cpu 3 logging 7
Cisco Service and Application Module for IP User Guide
OL-13003-06
B-29
Appendix B
Supervisor Console Commands
session slot
session slot
To establish a session with a processor on the SAMI, use the session slot command in privileged EXEC
mode.
session slot mod_num processor processor_num
Syntax Description
mod_num
Number of the slot in which the module is installed.
processor_num
ID of the processor with which you want to establish a session. For the
SAMI, valid values are 0 (the LCP), and 3 through 8.
Defaults
No default behavior or values exist.
Command Modes
Privileged EXEC
Command History
Release
Modification
12.2(9)ZA
This command was introduced.
12.2(33)SRB1
This command was integrated into Cisco IOS Release 12.2(33)SRB1.
12.2(33)SRC
This command was integrated into Cisco IOS Release 12.2(33)SRC.
12.2(33)SRD
This command was integrated into Cisco IOS Release 12.2(33)SRD.
Usage Guidelines
Use the session slot command to establish a console session with a processor (line control
processor [LCP] or PowerPC [PPC]) on the SAMI.
To end the session, enter the exit command.
Examples
The following example shows how to open a session with PPC3 on a SAMI installed in slot 2 of the
chassis:
Sup# session slot 2 processor 3
The default escape character is Ctrl-^, then x.
You can also type 'exit' at the remote prompt to end the session
Trying 127.0.0.23 ... Open
PPC3> enable
Password:
PPC3# exit
[Connection to 127.0.0.23 closed by foreign host]
Sup#
Cisco Service and Application Module for IP User Guide
B-30
OL-13003-06
Appendix B
Supervisor Console Commands
show inventory
show inventory
To display the product inventory list of all Cisco products that are installed in a networking device, use
the show inventory command in privileged EXEC mode.
show inventory [entity]
Syntax Description
entity
Defaults
No default behavior or values exist.
Command Modes
Privileged EXEC
Command History
Release
Modification
12.3(4)T
This command was introduced.
12.2(33)SRB1
This command was integrated into Cisco IOS Release 12.3(33)SRB1.
12.2(33)SRC
This command was integrated into Cisco IOS Release 12.2(33)SRC.
12.2(33)SRD
This command was integrated into Cisco IOS Release 12.2(33)SRD.
Usage Guidelines
(Optional) Name of a Cisco entity (for example, chassis, backplane,
module, or slot).
The show inventory command retrieves and displays inventory information about each Cisco product in
the form of a Cisco Unique Device Indentifier (UDI).
The UDI is a combination of three separate data elements:
•
product identifier (PID)—Name by which the product can be ordered. The PID is also called the
Product Name or Part Number. You can use this identifier to order a replacement part.
•
version identifier (VID)—Version of the product. Each time a product is revised, the VID is
incremented.
•
serial number (SN)—Vendor-unique serialization of the product.
Each manufactured product has a unique serial number assigned at the factory; this number
identifies a specific instance of a product. This number cannot be changed.
The UDI refers to each product as an entity. Some entities, such as a chassis, have subentities, such as
slots. Each entity displays on a separate line.
Examples
The following is sample output from the show inventory command without any arguments specified.
Sup# show inventory
NAME: "CISCO7613", DESCR: "Cisco Systems Cisco 7600 13-slot Chassis System"
PID: CISCO7613
, VID:
, SN: SAL083014CF
NAME: "WS-C6K-VTT 1", DESCR: "VTT FRU 1"
Cisco Service and Application Module for IP User Guide
OL-13003-06
B-31
Appendix B
Supervisor Console Commands
show inventory
PID: WS-C6K-VTT
, VID:
, SN: SMT0829G582
NAME: "WS-C6K-VTT 2", DESCR: "VTT FRU 2"
PID: WS-C6K-VTT
, VID:
, SN: SMT0829B510
NAME: "WS-C6K-VTT 3", DESCR: "VTT FRU 3"
PID: WS-C6K-VTT
, VID:
, SN: SMT0829B486
NAME: "WS-C6513-CL 1", DESCR: "CXXXX Clock FRU 1"
PID: WS-C6513-CL
, VID:
, SN: SMT0827B366
NAME: "WS-C6513-CL 2", DESCR: "CXXXX Clock FRU 2"
PID: WS-C6513-CL
, VID:
, SN: SMT0827B234
NAME: "module 1", DESCR: "WS-SVC-CSG-1 4 ports Content Services Gateway Rev. 1.4"
PID: WS-SVC-CSG-1
, VID:
, SN: SAD0846034C
NAME: "module 2", DESCR: "WS-SVC-SAMI-BB 1 ports Service and Application Module for IP
(SAMI) Rev. 0.702"
PID: WS-SVC-SAMI-BB
, VID: VXX, SN: SAD1042040X
NAME: "module 6", DESCR: "Cisco 7600 / Catalyst 6500 Services SPA Carrier Card-400 Rev.
1.0"
PID: 7600-SSC-400
, VID: V01, SN: JAB100900CF
NAME: "SPA subslot 6/1", DESCR: "IPSec Shared Port Adapter with 2 Gbps DES/3DES/AES"
PID: SPA-IPSEC-2G
, VID: V01, SN: JAB100605N7
NAME: "module 7", DESCR: "WS-SUP720-3BXL 2 ports Supervisor Engine 720 Rev. 3.0"
PID: WS-SUP720-3BXL
, VID:
, SN: SAD08320GDX
NAME: "msfc sub-module of 7", DESCR: "WS-SUP720 MSFC3 Daughterboard Rev. 2.1"
PID: WS-SUP720
, VID:
, SN: SAD08270B3S
NAME: "switching engine sub-module of 7", DESCR: "WS-F6K-PFC3BXL Policy Feature Card 3
Rev. 1.3"
PID: WS-F6K-PFC3BXL
, VID:
, SN: SAD0832014M
NAME: "module 8", DESCR: "WS-SUP720-3BXL 2 ports Supervisor Engine 720 Rev. 3.0"
PID: WS-SUP720-3BXL
, VID:
, SN: SAD081402MM
NAME: "msfc sub-module of 8", DESCR: "WS-SUP720 MSFC3 Daughterboard Rev. 2.0"
PID: WS-SUP720
, VID:
, SN: SAD08130CE8
NAME: "switching engine sub-module of 8", DESCR: "WS-F6K-PFC3BXL Policy Feature Card 3
Rev. 1.1"
PID: WS-F6K-PFC3BXL
, VID:
, SN: SAD08130EH1
NAME: "module 10", DESCR: "WS-SVC-MWAM-1 3 ports MWAM Module Rev. 4.0"
PID: WS-SVC-MWAM-1
, VID:
, SN: SAD083904YM
NAME: "module 11", DESCR: "WS-SVC-MWAM-1 3 ports MWAM Module Rev. 4.0"
PID: WS-SVC-MWAM-1
, VID:
, SN: SAD08340BTT
NAME: "module 12", DESCR: "WS-X6748-GE-TX CEF720 48 port 10/100/1000mb Ethernet Rev. 2.0"
PID: WS-X6748-GE-TX
, VID:
, SN: SAL08342NZP
NAME: "switching engine sub-module of 12", DESCR: "WS-F6700-CFC Centralized Forwarding
Card Rev. 2.0"
PID: WS-F6700-CFC
, VID:
, SN: SAL08280AK9
Cisco Service and Application Module for IP User Guide
B-32
OL-13003-06
Appendix B
Supervisor Console Commands
show inventory
NAME: "module 13", DESCR: "WS-X6408A-GBIC 8 port 1000mb GBIC Enhanced QoS Rev. 3.1"
PID: WS-X6408A-GBIC
, VID:
, SN: SAL08342N59
NAME: "PS 1 WS-CAC-3000W", DESCR: "AC power supply, 3000 watt 1"
PID: WS-CAC-3000W
, VID:
, SN: SNI0812AL43
NAME: "PS 2 WS-CAC-3000W", DESCR: "AC power supply, 3000 watt 2"
PID: WS-CAC-3000W
, VID:
, SN: AZS09250H6G
Sup#
Table 4 describes the fields shown in the show inventory command output.
Table 4
show inventory Field Descriptions
Field
Description
Name
Name of the component
Description
Description of the component
PID
Product identifier
VID
Version identifier
SN
Serial number
Cisco Service and Application Module for IP User Guide
OL-13003-06
B-33
Appendix B
Supervisor Console Commands
show logging slot
show logging slot
To display logging status and counters for all processors on a SAMI using the remote command and
logging (RCAL) feature, use the show logging slot command in privileged EXEC mode.
show logging slot slot_number
Syntax Description
slot_number
Defaults
No default behavior or values exist.
Command Modes
Privileged EXEC
Command History
Release
Modification
12.2(14)ZA4
This command was introduced.
12.2(14)ZA5
This command was integrated into Cisco IOS 12.2(14)ZA5.
Number of the slot in which the SAMI is installed. A valid value is a number
between 3 and 8.
12.2(33)SRB1
This command was integrated into Cisco IOS 12.3(33)SRB1.
12.2(33)SRC
This command was integrated into Cisco IOS Release 12.2(33)SRC.
12.2(33)SRD
This command was integrated into Cisco IOS Release 12.2(33)SRD.
Usage Guidelines
Use the show logging slot command to collect logging status and counters for all PPCs on a SAMI using
the RCAL feature (without having to establish a session with a PPC).
Examples
The following example shows how to collect status and counters for the processors on a SAMI installed
in slot 2 of a chassis:
Sup# show logging slot 2
CPU: 02/0
State: ACTIVE
ttynum: -1
timeouts:
0
sequence errors:
0
send seq:
226
Current queue count:
0
Command Active: No
Logging Level: emergencies
logevents:
0
reset count:
7 KPA_missed:
tty recv seq:
0 log recv seq:
IP addr: 127.0.0.20
CPU: 02/1
State: INIT
Command Active: No
ttynum: -1
Logging Level: emergencies
timeouts:
0 logevents:
0
sequence errors:
0 reset count:
0 KPA_missed:
send seq:
0 tty recv seq:
0 log recv seq:
Current queue count:
0 IP addr: 0.0.0.0
CPU: 02/2
ttynum: -1
timeouts:
State: INIT
0
0
0
0
Command Active: No
Logging Level: emergencies
0 logevents:
0
Cisco Service and Application Module for IP User Guide
B-34
OL-13003-06
Appendix B
Supervisor Console Commands
show logging slot
sequence errors:
send seq:
Current queue count:
0 reset count:
0 tty recv seq:
0 IP addr: 0.0.0.0
0 KPA_missed:
0 log recv seq:
CPU: 02/3
State: ACTIVE
Command Active: No
ttynum: -1
Logging Level: emergencies
timeouts:
0 logevents:
0
sequence errors:
0 reset count:
8 KPA_missed:
send seq:
221 tty recv seq:
0 log recv seq:
Current queue count:
0 IP addr: 127.0.0.23
CPU: 02/4
State: INIT
Command Active: No
ttynum: -1
Logging Level: emergencies
timeouts:
0 logevents:
0
sequence errors:
0 reset count:
0 KPA_missed:
send seq:
0 tty recv seq:
0 log recv seq:
Current queue count:
0 IP addr: 0.0.0.0
CPU: 02/5
State: INIT
Command Active: No
ttynum: -1
Logging Level: emergencies
timeouts:
0 logevents:
0
sequence errors:
0 reset count:
0 KPA_missed:
send seq:
0 tty recv seq:
0 log recv seq:
Current queue count:
0 IP addr: 0.0.0.0
CPU: 02/6
State: INIT
Command Active: No
ttynum: -1
Logging Level: emergencies
timeouts:
0 logevents:
0
sequence errors:
0 reset count:
0 KPA_missed:
send seq:
0 tty recv seq:
0 log recv seq:
Current queue count:
0 IP addr: 0.0.0.0
CPU: 02/7
State: INIT
Command Active: No
ttynum: -1
Logging Level: emergencies
timeouts:
0 logevents:
0
sequence errors:
0 reset count:
0 KPA_missed:
send seq:
0 tty recv seq:
0 log recv seq:
Current queue count:
0 IP addr: 0.0.0.0
CPU: 02/8
State: INIT
Command Active: No
ttynum: -1
Logging Level: emergencies
timeouts:
0 logevents:
0
sequence errors:
0 reset count:
0 KPA_missed:
send seq:
0 tty recv seq:
0 log recv seq:
Current queue count:
0 IP addr: 0.0.0.0
0
0
20
0
0
0
0
0
0
0
0
0
0
0
Table 5 describes the fields that display in the show logging slot command output.
Table 5
show logging slot Field Descriptions
Field
Description
CPU
Number of the processor on the SAMI. Valid values are 0 through 8,
where 0 is the LCP, 1 and 2 are IXP1 and IXP2, and 3 through 8 are
the six PPCs.
State
Current state of the processor. Valid values are:
Command Active
•
ACTIVE
•
INIT
RCAL is active.
Cisco Service and Application Module for IP User Guide
OL-13003-06
B-35
Appendix B
Supervisor Console Commands
show logging slot
Table 5
show logging slot Field Descriptions (continued)
Field
Description
ttynum
Line number of the user with an active command on the processor. A
value of -1 indicates no user.
Logging Level
Indicates the maximum severity level at which the supervisor
displays logger messages from an SAMI.
timeouts
Number of occurrences of remote command execution time-out.
logevents
Serial number.
sequence errors
Protocol sequence errors caused by an overrun or a time-out.
reset count
KPA_missed
send seq
tty recv seq
log recv seq
Current queue count
Number of messages received at the supervisor and queued to be
processed (logged/displayed).
IP addr
IP address of the SAMI processor.
Cisco Service and Application Module for IP User Guide
B-36
OL-13003-06
Appendix B
Supervisor Console Commands
show logging summary
show logging summary
To display logging status and counters for all processors on all SAMIs in a chassis using the remote
console and logging (RCAL) feature, use the show logging summary command in privileged EXEC
mode.
show logging summary
Syntax Description
This command has no arguments or keywords.
Defaults
No default behavior or values exist.
Command Modes
Privileged EXEC
Command History
Release
Modification
12.2(14)ZA4
This command was introduced.
12.2(14)ZA5
This command was integrated into Cisco IOS 12.2(14)ZA5.
12.2(33)SRB1
This command was integrated into Cisco IOS 12.3(33)SRB1.
12.2(33)SRC
This command was integrated into Cisco IOS Release 12.2(33)SRC.
12.2(33)SRD
This command was integrated into Cisco IOS Release 12.2(33)SRD.
Usage Guidelines
Use this command to collect logging status and counters for all PPCs on all SAMIs in a chassis using
the RCAL feature (without establishing a session).
Examples
The following example shows how to collect status and counters for the processors on all SAMIs
installed in a chassis:
Sup# show logging summary
CPU: 02/0
State: ACTIVE
Command Active: No
ttynum: -1
Logging Level: emergencies
timeouts:
0 logevents:
0
sequence errors:
0 reset count:
7 KPA_missed:
send seq:
232 tty recv seq:
0 log recv seq:
Current queue count:
0 IP addr: 127.0.0.20
CPU: 02/1
State: INIT
Command Active: No
ttynum: -1
Logging Level: emergencies
timeouts:
0 logevents:
0
sequence errors:
0 reset count:
0 KPA_missed:
send seq:
0 tty recv seq:
0 log recv seq:
Current queue count:
0 IP addr: 0.0.0.0
CPU: 02/2
State: INIT
Command Active: No
ttynum: -1
Logging Level: emergencies
timeouts:
0 logevents:
0
sequence errors:
0 reset count:
0 KPA_missed:
0
0
0
0
0
Cisco Service and Application Module for IP User Guide
OL-13003-06
B-37
Appendix B
Supervisor Console Commands
show logging summary
send seq:
Current queue count:
0 tty recv seq:
0 IP addr: 0.0.0.0
0 log recv seq:
CPU: 02/3
State: ACTIVE
Command Active: No
ttynum: -1
Logging Level: emergencies
timeouts:
0 logevents:
0
sequence errors:
0 reset count:
8 KPA_missed:
send seq:
227 tty recv seq:
0 log recv seq:
Current queue count:
0 IP addr: 127.0.0.23
CPU: 02/4
State: INIT
Command Active: No
ttynum: -1
Logging Level: emergencies
timeouts:
0 logevents:
0
sequence errors:
0 reset count:
0 KPA_missed:
send seq:
0 tty recv seq:
0 log recv seq:
Current queue count:
0 IP addr: 0.0.0.0
CPU: 02/5
State: INIT
Command Active: No
ttynum: -1
Logging Level: emergencies
timeouts:
0 logevents:
0
sequence errors:
0 reset count:
0 KPA_missed:
send seq:
0 tty recv seq:
0 log recv seq:
Current queue count:
0 IP addr: 0.0.0.0
CPU: 02/6
State: INIT
Command Active: No
ttynum: -1
Logging Level: emergencies
timeouts:
0 logevents:
0
sequence errors:
0 reset count:
0 KPA_missed:
send seq:
0 tty recv seq:
0 log recv seq:
Current queue count:
0 IP addr: 0.0.0.0
CPU: 02/7
State: INIT
Command Active: No
ttynum: -1
Logging Level: emergencies
timeouts:
0 logevents:
0
sequence errors:
0 reset count:
0 KPA_missed:
send seq:
0 tty recv seq:
0 log recv seq:
Current queue count:
0 IP addr: 0.0.0.0
CPU: 02/8
State: INIT
Command Active: No
ttynum: -1
Logging Level: emergencies
timeouts:
0 logevents:
0
sequence errors:
0 reset count:
0 KPA_missed:
send seq:
0 tty recv seq:
0 log recv seq:
Current queue count:
0 IP addr: 0.0.0.0
CPU: 10/1
State: ACTIVE
Command Active: No
ttynum: -1
Logging Level: emergencies
timeouts:
0 logevents:
0
sequence errors:
0 reset count:
4 KPA_missed:
send seq:
232 tty recv seq:
0 log recv seq:
Current queue count:
0 IP addr: 127.0.0.101
CPU: 10/2
State: ACTIVE
Command Active: No
ttynum: -1
Logging Level: emergencies
timeouts:
0 logevents:
0
sequence errors:
0 reset count:
4 KPA_missed:
send seq:
226 tty recv seq:
0 log recv seq:
Current queue count:
0 IP addr: 127.0.0.102
CPU: 10/3
State: ACTIVE
Command Active: No
ttynum: -1
Logging Level: emergencies
timeouts:
0 logevents:
0
sequence errors:
0 reset count:
4 KPA_missed:
send seq:
227 tty recv seq:
0 log recv seq:
0
20
0
0
0
0
0
0
0
0
0
0
0
0
0
0
0
0
0
Cisco Service and Application Module for IP User Guide
B-38
OL-13003-06
Appendix B
Supervisor Console Commands
show logging summary
Current queue count:
0 IP addr: 127.0.0.103
CPU: 10/4
State: ACTIVE
ttynum: -1
timeouts:
0
sequence errors:
0
send seq:
226
Current queue count:
0
Command Active: No
Logging Level: emergencies
logevents:
0
reset count:
4 KPA_missed:
tty recv seq:
0 log recv seq:
IP addr: 127.0.0.104
CPU: 10/5
State: ACTIVE
Command Active: No
ttynum: -1
Logging Level: emergencies
timeouts:
0 logevents:
0
sequence errors:
0 reset count:
4 KPA_missed:
send seq:
227 tty recv seq:
0 log recv seq:
Current queue count:
0 IP addr: 127.0.0.105
CPU: 10/6
State: ACTIVE
Command Active: No
ttynum: -1
Logging Level: emergencies
timeouts:
0 logevents:
1
sequence errors:
0 reset count:
4 KPA_missed:
send seq:
226 tty recv seq:
0 log recv seq:
Current queue count:
0 IP addr: 127.0.0.106
CPU: 10/7
State: INIT
Command Active: No
ttynum: -1
Logging Level: emergencies
timeouts:
0 logevents:
0
sequence errors:
0 reset count:
0 KPA_missed:
send seq:
0 tty recv seq:
0 log recv seq:
Current queue count:
0 IP addr: 0.0.0.0
CPU: 11/1
State: ACTIVE
Command Active: No
ttynum: -1
Logging Level: emergencies
timeouts:
0 logevents:
0
sequence errors:
0 reset count:
4 KPA_missed:
send seq:
231 tty recv seq:
0 log recv seq:
Current queue count:
0 IP addr: 127.0.0.111
CPU: 11/2
State: ACTIVE
Command Active: No
ttynum: -1
Logging Level: emergencies
timeouts:
0 logevents:
0
sequence errors:
0 reset count:
4 KPA_missed:
send seq:
226 tty recv seq:
0 log recv seq:
Current queue count:
0 IP addr: 127.0.0.112
CPU: 11/3
State: ACTIVE
Command Active: No
ttynum: -1
Logging Level: emergencies
timeouts:
0 logevents:
0
sequence errors:
0 reset count:
4 KPA_missed:
send seq:
227 tty recv seq:
0 log recv seq:
Current queue count:
0 IP addr: 127.0.0.113
CPU: 11/4
State: ACTIVE
Command Active: No
ttynum: -1
Logging Level: emergencies
timeouts:
0 logevents:
0
sequence errors:
0 reset count:
4 KPA_missed:
send seq:
226 tty recv seq:
0 log recv seq:
Current queue count:
0 IP addr: 127.0.0.114
CPU: 11/5
State: ACTIVE
Command Active: No
ttynum: -1
Logging Level: emergencies
timeouts:
0 logevents:
0
sequence errors:
0 reset count:
4 KPA_missed:
send seq:
227 tty recv seq:
0 log recv seq:
Current queue count:
0 IP addr: 127.0.0.115
0
0
0
0
0
0
0
0
0
0
0
0
0
0
0
0
0
0
Cisco Service and Application Module for IP User Guide
OL-13003-06
B-39
Appendix B
Supervisor Console Commands
show logging summary
CPU: 11/6
State: ACTIVE
ttynum: -1
timeouts:
0
sequence errors:
0
send seq:
227
Current queue count:
0
Command Active: No
Logging Level: emergencies
logevents:
1
reset count:
4 KPA_missed:
tty recv seq:
0 log recv seq:
IP addr: 127.0.0.116
CPU: 11/7
State: INIT
Command Active: No
ttynum: -1
Logging Level: emergencies
timeouts:
0 logevents:
0
sequence errors:
0 reset count:
0 KPA_missed:
send seq:
0 tty recv seq:
0 log recv seq:
Current queue count:
0 IP addr: 0.0.0.0
0
0
0
0
Sup#
Table 6 describes the fields shown in the show logging slot command display.
Table 6
show logging slot Field Descriptions
Field
Description
CPU
Number of the processor on the SAMI. Valid values are 0 through 8,
where 0 is the LCP, 1 and 2 are IXP1 and IXP2 (future), and 3
through 8 are the six PPCs.
State:
Current state of the processor. Valid values are:
•
ACTIVE
•
INIT
Command Active
Whether remote console and logging (RCAL) is enabled. Possible
values are Active or No.
ttynum
Line number of the user with an active command on the processor. A
value of -1 indicates no user.
Logging Level
Indicates the maximum severity level at which the supervisor
displays logger messages from an SAMI.
timeouts
Number of occurrences of remote command execution time-out.
logevents
Serial number.
sequence errors
Protocol sequence errors caused by an overrun or a time-out.
reset count
KPA_missed
send seq
tty recv seq
log recv seq
Current queue count
Number of messages received at the supervisor and queued to be
processed (logged/displayed).
IP addr
IP address of the SAMI processor.
Cisco Service and Application Module for IP User Guide
B-40
OL-13003-06
Appendix B
Supervisor Console Commands
show module
show module
To display module status and information, use the show module command in privileged EXEC mode.
show module [mod-num | all | power | provision | version]
Syntax Description
mod-num
(Optional) Number of the module.
all
(Optional) Displays information for all modules.
power
(Optional) Displays administration and operating status.
provision
(Optional) Displays status about the module processing.
version
(Optional) Displays version information.
Defaults
No default behavior or values exist.
Command Modes
Privileged EXEC
Command History
Release
Modification
12.2(14)SX
Support for this command was introduced on the Cisco Supervisor Engine
720.
12.2(17d)SXB
This command was integrated into Cisco IOS Release 12.2(17d)SXB.
12.2(18)SXF5
This command was integrated into Cisco IOS Release 12.2(18)SXF5 and
the power keyword was added.
12.2(33)SRB1
This command was integrated into Cisco IOS Release 12.2(33)SRB1.
12.2(33)SRC
This command was integrated into Cisco IOS Release 12.2(33)SRC.
12.2(33)SRD
This command was integrated into Cisco IOS Release 12.2(33)SRD.
Usage Guidelines
In the Mod Sub-Module fields, the show module command displays the supervisor engine number, with
the uplink daughter card's module type and information appended.
If a SAMI is installed in the router chassis, the slot number in which the SAMI is installed will also
display in the Mod Sub-Module fields, with the SAMI daughter cards’ model type and information
appended.
Note
When the SAMI status and the sub-module status for both daughter cards display as “Ok,” the SAMI
module is online.
Entering the show module command with no arguments is the same as entering the show module all
command.
Cisco Service and Application Module for IP User Guide
OL-13003-06
B-41
Appendix B
Supervisor Console Commands
show module
Examples
This example shows how to display information for all modules on a router that is configured with a
Cisco Supervisor Engine 720:
Sup# show module
Mod Ports Card Type
Model
--- ----- -------------------------------------- -----------------4
1 SAMI Module (CSG2)
WS-SVC-SAMI-BB-K9
6
2 Supervisor Engine 720 (Active)
WS-SUP720-3BXL
7
48 SFM-capable 48-port 10/100 Mbps RJ45
WS-X6548-RJ-45
9
1 SAMI Module (GENERIC)
WS-SVC-SAMI-BB-K9
Serial No.
----------SAD1140096M
SAD083400U3
SAD0611007M
SAD095003X1
Mod MAC addresses
Hw
Fw
Sw
Status
--- ---------------------------------- ------ ------------ ------------ ------4 001d.45f9.0922 to 001d.45f9.0929
2.2
8.7(0.5-Eng) 3.0(0)W1(0.0 Ok
6 0011.21b9.ac20 to 0011.21b9.ac23
4.0
8.1(3)
12.2(2007052 Ok
7 0002.7ee1.f010 to 0002.7ee1.f03f
4.2
6.3(1)
8.7(0.22)FW6 Ok
9 0001.0002.0003 to 0001.0002.000a
1.0
8.7(0.5-Eng) 3.0(0)W1(0.0 Ok
Mod
---4
4
6
6
9
9
Sub-Module
--------------------------SAMI Daughterboard 1
SAMI Daughterboard 2
Policy Feature Card 3
MSFC3 Daughterboard
SAMI Daughterboard 1
SAMI Daughterboard 2
Mod
---4
6
7
9
Sup#
Online Diag Status
------------------Pass
Pass
Pass
Pass
Model
-----------------SAMI-DC-BB
SAMI-DC-BB
WS-F6K-PFC3BXL
WS-SUP720
SAMI-DC-BB
SAMI-DC-BB
Serial
Hw
Status
----------- ------- ------SAD113909PZ 1.1
Ok
SAD113909U5 1.1
Ok
SAD083903ML 1.3
Ok
SAD083606TK 2.1
Ok
SAD110709TS 0.701 Ok
SAD110709SF 0.701 Ok
This example shows how to display information for a specific module:
Sup# show module 2
Mod Ports Card Type
Model
Serial No.
--- ----- -------------------------------------- ------------------ ----------5
2 Supervisor Engine 720 (Active)
WS-SUP720-BASE
SAD0644030K
Mod MAC addresses
Hw
Fw
Sw
Status
--- ---------------------------------- ------ ------------ ------------ ------5 00e0.aabb.cc00 to 00e0.aabb.cc3f
1.0
12.2(2003012 12.2(2003012 Ok
Mod
--5
5
Sub-Module
--------------------------Policy Feature Card 3
MSFC3 Daughtercard
Model
--------------WS-F6K-PFC3
WS-SUP720
Serial
Hw
Status
--------------- ------- ------SAD0644031P
0.302
Ok
SAD06460172
0.701
Mod Online Diag Status
--- ------------------5 Not Available
Sup#
Cisco Service and Application Module for IP User Guide
B-42
OL-13003-06
Appendix B
Supervisor Console Commands
show module
This example shows how to display module version information:
Sup# show module version
Mod Port Model
Serial #
Versions
--- ---- ------------------ ----------- -------------------------------------2 0
WS-X6182-2PA
4 16
WS-X6816-GBIC
WS-F6K-DFC3A
6 2
Hw : 1.0
Fw : 12.2(20030125:231135)
Sw : 12.2(20030125:231135)
SAD04400CEE Hw : 0.205
SAD0641029Y Hw : 0.501
Fw : 12.2(20020828:202911)
Sw : 12.2(20030125:231135)
WS-X6K-SUP3-BASE
SAD064300GU Hw : 0.705
Fw : 7.1(0.12-Eng-02)TAM
Sw : 12.2(20030125:231135)
Sw1: 8.1(0.45)KIS
WS-X6K-SUP3-PFC3
SAD064200VR Hw : 0.701
Fw : 12.2(20021016:001154)
Sw : 12.2(20030125:231135)
WS-F6K-PFC3
9 48
SAD064300M7 Hw : 0.301
WS-X6548-RJ-45
SAD04490BAC Hw : 0.301
Fw : 6.3(1)
Sw : 7.5(0.30)CFW11
Sup#
This example shows how to display administration and operating status of modules:
Sup# show module power
Mod
--1
4
5
Card Type
-------------------------------------SFM-capable 48-port 10/100 Mbps RJ45
SFM-capable 16 port 1000mb GBIC
Supervisor Engine 720 (Active)
Admin Status
-----------on
on
on
Oper Status
-----------on
on
on
Sup#
This example shows how to display module provisioning information:
Sup# show module provision
Module
1
2
3
4
5
6
7
8
9
10
11
12
13
Provision
dynamic
dynamic
dynamic
dynamic
dynamic
dynamic
dynamic
dynamic
dynamic
dynamic
dynamic
dynamic
dynamic
Sup#
Cisco Service and Application Module for IP User Guide
OL-13003-06
B-43
Appendix B
Supervisor Console Commands
show sami module
show sami module
To display SAMI traffic counters, use the show sami module command in privileged EXEC mode.
show sami module slot_number [ port port_number] traffic
Syntax Description
slot_number
Number of the slot in which the SAMI is installed.
port port_number
(Optional) Number of the data port on the SAMI.
traffic
Displays traffic counters.
Defaults
No default behavior or values exist.
Command Modes
Privileged EXEC
Command History
Release
Modification
12.2(33)SRC
This command was introduced.
12.2(33)SRD
This command was integrated into Cisco IOS Release 12.2(33)SRD.
Usage Guidelines
Use this command to display the traffic counters of a SAMI.
Examples
The following example illustrates how to use the counters displayed by the show sami module
command:
Sup#show sami module 2 port 1 traffic
Specified interface is up line protocol is up (connected)
Hardware is c7600 10Gb 802.3, address is 0030.f276.41e4 (bia 0030.f276.41e4)
MTU 1500 bytes, BW 10000000 Kbit, DLY 10 usec,
reliability 255/255, txload 1/255, rxload 1/255
Encapsulation ARPA, loopback not set
Full-duplex, 10Gb/s
input flow-control is on, output flow-control is unsupported
202 packets input
0 input errors,
0 CRC
6 packets output
Related Commands
Command
Description
clear sami module
Clears traffic counters on the SAMI.
Cisco Service and Application Module for IP User Guide
B-44
OL-13003-06
Appendix B
Supervisor Console Commands
show svclc module
show svclc module
To view the state or traffic statistics for the backplane port of the module, use the show svclc module
command in privileged EXEC mode.
show svclc module module_number {state | traffic | vlan-group}
Syntax Description
module_number
Number of the slot in which the module is installed.
state
Displays state-related statistics.
traffic
Displays traffic-related statistics.
vlan-group
Displays the group configuration for the SVCLC module, and the
associated VLANs.
Defaults
No default behavior or values exist.
Command Modes
Privileged EXEC
Command History
Release
Modification
12.2(33)SRB1
This command was integrated into Cisco IOS Release 12.2(33)SRB1.
12.2(33)SRC
This command was integrated into Cisco IOS Release 12.2(33)SRC.
12.2(33)SRD
This command was integrated into Cisco IOS Release 12.2(33)SRD.
Usage Guidelines
Note
Examples
Use this command to display the state or traffic statistics for the backplane port of the module.
If the module is running a software application that supports Layer 2 Transparent Bridging, the
show svclc module command displays SVCLC traffic information for the seven TenGigabitEthernet
interfaces that are automatically created by the supervisor engine module for Layer 2 Transparent
Bridging-enabled applications.
The following example illustrates how to use the show svclc module command to display the SVCLC
module traffic:
Sup> show svclc module 4 traffic
SAMI Module 4:
Specified interface is up line protocol is up (connected)
Hardware is c7600 10Gb 802.3, address is 0030.f275.c3de (bia 0030.f275.c3de)
MTU 1500 bytes, BW 10000000 Kbit, DLY 10 usec,
reliability 255/255, txload 1/255, rxload 1/255
Encapsulation ARPA, loopback not set
Full-duplex, 10Gb/s
input flow-control is on, output flow-control is unsupported
123 packets input
Cisco Service and Application Module for IP User Guide
OL-13003-06
B-45
Appendix B
Supervisor Console Commands
show svclc module
0 input errors, 0 CRC
7 packets output
svclc module 4:
Sup>
This example shows how to display SVCLC module VLAN group configuration:
Sup> show svclc module 2 vlan-group
Module Vlan-groups
------ ----------02
100,101,102
Sup>
Cisco Service and Application Module for IP User Guide
B-46
OL-13003-06
Appendix B
Supervisor Console Commands
show upgrade software progress
show upgrade software progress
To display information about the progress of a software upgrade, use the show upgrade software
progress command in privileged EXEC mode.
show upgrade software progress
Syntax Description
This command has no arguments or keywords.
Defaults
No default behavior or values exist.
Command Modes
Privileged EXEC
Command History
Release
Modification
12.2(33)SRB1
This command was integrated into Cisco IOS Release 12.2(33)SRB1.
12.2(33)SRC
This command was integrated into Cisco IOS Release 12.2(33)SRC.
12.2(33)SRD
This command was integrated into Cisco IOS Release 12.2(33)SRD.
Usage Guidelines
Use this command to display the status of any software upgrades in progress.
Examples
The following example illustrates the results of issuing the show upgrade software process command:
Sup# show upgrade software progress
% There is no software upgrade in progress.
Sup# show upgrade software progress
Slot
Software File
9
sb-csg2-mzg.bin
Related Commands
Command
Description
upgrade hw-module
Upgrades the software image on a module.
Cisco Service and Application Module for IP User Guide
OL-13003-06
B-47
Appendix B
Supervisor Console Commands
show vlans dot1q
show vlans dot1q
To display statistics about 802.1Q VLAN subinterfaces, use the show vlans dot1q command in
privileged EXEC mode.
show vlans dot1q [internal | interface-type interface-number.subinterface-number [detail] |
outer-id [interface-type interface-number | second-dot1q [inner-id | any]] [detail]]
Syntax Description
internal
(Optional) Displays internal QinQ VLAN tag termination information.
Used for troubleshooting purposes. The QinQ VLAN Tag Termination
feature on the subinterface level preserves VLAN IDs and keeps traffic in
different customer VLANs segregated.
interface-type
(Optional) Interface type.
interface-number
(Optional) Interface number.
.subinterface-number
(Optional) Subinterface number in the range 1 to 4294967293. A period (.)
must be entered between the interface-number argument and the
subinterface-number argument.
detail
(Optional) Displays detailed information.
outer-id
(Optional) Outer VLAN identifier. The allowed range is from 1 to 4095.
second-dot1q
(Optional) Displays inner VLAN subinterface information.
inner-id
(Optional) Inner VLAN identifier. The allowed range is from 1 to 4095.
any
(Optional) Displays information for all the inner VLAN subinterfaces
configured as “any.”
Note
The any keyword is not supported on a subinterface configured for
IPoQinQ because IP routing is not supported on ambiguous
subinterfaces.
Command Modes
Privileged EXEC
Command History
Release
Modification
12.3(7)T
This command was introduced.
12.3(7)XI7
This command was integrated into Cisco IOS Release 12.3(7)XI7 and
implemented on the Cisco 10000 series routers.
12.2(31)SB2
This command was integrated into Cisco IOS Release 12.2(31)SB2.
12.2(33)SRC
This command was integrated into Cisco IOS Release 12.2(33)SRC.
12.2(33)SRD
This command was integrated into Cisco IOS Release 12.2(33)SRD.
Usage Guidelines
If no arguments or keywords are entered, statistics for all of the 802.1Q VLAN IDs are displayed.
The any keyword is not supported for IPoQinQ because IP routing is not supported on ambiguous
subinterfaces. However, the second-dot1q inner-id keyword and argument can be used on IPoQinQ for
a specific inner VLAN ID that is not an ambiguous subinterface.
Cisco Service and Application Module for IP User Guide
B-48
OL-13003-06
Appendix B
Supervisor Console Commands
show vlans dot1q
Examples
The output from the show vlans dot1q command displays the statistics for all the 802.1Q VLAN IDs.
Only the outer VLAN IDs are displayed here.
Router# show vlans dot1q
Total statistics for 802.1Q VLAN 1:
441 packets, 85825 bytes input
1028 packets, 69082 bytes output
Total statistics for 802.1Q VLAN 101:
5173 packets, 510384 bytes input
3042 packets, 369567 bytes output
Total statistics for 802.1Q VLAN 201:
1012 packets, 119254 bytes input
1018 packets, 120393 bytes output
Total statistics for 802.1Q VLAN 301:
3163 packets, 265272 bytes input
1011 packets, 120750 bytes output
Total statistics for 802.1Q VLAN 401:
1012 packets, 119254 bytes input
1010 packets, 119108 bytes output
Table 7 describes the significant fields shown in the display.
Table 7
show vlans dot1q Field Descriptions
Field
Description
Total statistics for 802.1Q
VLAN 1
Statistics are shown for the VLAN ID with the specified outer ID.
packets
Number of packets encapsulated by the 802.1Q QinQ VLAN.
bytes input
Number of bytes input.
bytes output
Number of bytes output.
The following sample output from the show vlans dot1q command displays the statistics for the 802.1Q
VLAN subinterface configured on Gigabit Ethernet interface 5/0:
Router# show vlans dot1q GigabitEthernet 5/0.1011001
GigabitEthernet5/0.1011001 (101/1001)
1005 packets, 122556 bytes input
1023 packets, 125136 bytes output
Table 8 describes the significant fields shown in the display.
Table 8
show vlans dot1q (subinterface) Field Descriptions
Field
Description
GigabitEthernet5/0.1011001
(101/1001)
Statistics are shown for subinterface Gigabit Ethernet 5/0.1011001
with an outer VLAN ID of 101 and an inner VLAN ID of 1001.
packets
Number of packets encapsulated by the 802.1Q QinQ VLAN.
bytes input
Number of bytes input.
bytes output
Number of bytes output.
Cisco Service and Application Module for IP User Guide
OL-13003-06
B-49
Appendix B
Supervisor Console Commands
show vlans dot1q
The following sample output from the show vlans dot1q command displays the summary statistics for
all of the VLAN subinterfaces under the physical interface Gigabit Ethernet 5/0 that have an outer VLAN
ID of 101:
Router# show vlans dot1q 101 GigabitEthernet 5/0
Total statistics for 802.1Q VLAN 101 on GigabitEthernet5/0:
5218 packets, 513444 bytes input
3042 packets, 369567 bytes output
The following sample output from the show vlans dot1q command displays the individual subinterface
statistics and summary statistics for all the VLAN subinterfaces under the physical interface Gigabit
Ethernet 5/0 that have an outer VLAN ID of 101:
Router# show vlans dot1q 101 GigabitEthernet 5/0 detail
GigabitEthernet5/0.101 (0)
3220 packets, 269148 bytes input
1008 packets, 119622 bytes output
GigabitEthernet5/0.1019999 (101/1-1000,1003-2000)
0 packets, 0 bytes input
3 packets, 1143 bytes output
GigabitEthernet5/0.1011001 (101/1001)
1005 packets, 122556 bytes input
1023 packets, 125136 bytes output
GigabitEthernet5/0.1011002 (101/1002)
1005 packets, 122556 bytes input
1008 packets, 123666 bytes output
Total statistics for 802.1Q VLAN 101 on GigabitEthernet5/0:
5230 packets, 514260 bytes input
3042 packets, 369567 bytes output
The following sample output from the show vlans dot1q command displays the statistics for an outer
VLAN and inner VLAN ID combination. This is a summary that displays the total for all the
subinterfaces on the router that are configured with the specified IDs.
Note
When multiple inner VLANs are used, the statistics displayed are at subinterface-level granularity, not
VLAN-ID granularity. For example, when a range of inner VLAN IDs is assigned to a subinterface, the
statistics are reported only at the subinterface level. Statistics are not available for each inner VLAN ID.
Router# show vlans dot1q 101 second-dot1q 1001 detail
GigabitEthernet5/0.1011001 (101/1001)
1005 packets, 122556 bytes input
1023 packets, 125136 bytes output
Total statistics for Outer/Inner VLAN 101/1001:
1005 packets, 122556 bytes input
1023 packets, 125136 bytes output
The following sample output from the show vlans dot1q command displays the statistics for a specific
outer VLAN ID of 301 and an inner VLAN ID of any. This is a summary that displays the total for all
of the subinterfaces on the router that are configured with the specified IDs.
Router# show vlans dot1q 301 second-dot1q any
GigabitEthernet5/0.301999 (301/any)
0 packets, 0 bytes input
3 packets, 1128 bytes output
Cisco Service and Application Module for IP User Guide
B-50
OL-13003-06
Appendix B
Supervisor Console Commands
show vlans dot1q
Total statistics for Outer/Inner VLAN 301/"any":
0 packets, 0 bytes input
3 packets, 1128 bytes output
The following sample output from the show vlans dot1q command displays some internal information
about the QinQ subsystem and is used for troubleshooting purposes (typically by Cisco engineers):
Router# show vlans dot1q internal
Internal VLAN representation on FastEthernet0/0:
VLAN Id: 1
(.1Q, Fa0/0)
VLAN Id: 201 (.1Q-in-.1Q tree, 3 elements)
Inner VLAN Id: (0
-0
) Fa0/0.201
dot1q software subblock bitlist missing
Inner VLAN Id: (2001-2001) Fa0/0.2012001
2001
Inner VLAN Id: (2002-2002) Fa0/0.2012002
2002
"any" Fa0/0.201999
VLAN Id: 401 (.1Q-in-.1Q tree, 3 elements)
Inner VLAN Id: (0
-0
) Fa0/0.401
dot1q software subblock bitlist missing
Inner VLAN Id: (100 -900 ) Fa0/0.4019999
100-900,1001-2000
Inner VLAN Id: (1001-2000) Fa0/0.4019999
100-900,1001-2000
Internal VLAN representation on GigabitEthernet5/0:
VLAN Id: 1
(.1Q, Gi5/0)
VLAN Id: 101 (.1Q-in-.1Q tree, 5 elements)
Inner VLAN Id: (0
-0
) Gi5/0.101
dot1q software subblock bitlist missing
Inner VLAN Id: (1
-1000) Gi5/0.1019999
1-1000,1003-2000
Inner VLAN Id: (1001-1001) Gi5/0.1011001
1001
Inner VLAN Id: (1002-1002) Gi5/0.1011002
1002
Inner VLAN Id: (1003-2000) Gi5/0.1019999
1-1000,1003-2000
VLAN Id: 301 (.1Q-in-.1Q tree, 1 elements)
Inner VLAN Id: (0
-0
) Gi5/0.301
dot1q software subblock bitlist missing
"any" Gi5/0.301999
Cisco Service and Application Module for IP User Guide
OL-13003-06
B-51
Appendix B
Supervisor Console Commands
svclc console
svclc console
To establish a session with the LCP console when the LCP is in ROM-monitor state, use the
svclc console command in privileged EXEC mode.
svclc console slot
Syntax Description
slot
Defaults
No default behavior or values exist.
Command Modes
Privileged EXEC
Command History
Release
Modification
12.2(33)SRB1
This command was integrated into Cisco IOS Release 12.2(33)SRB1.
12.2(33)SRC
This command was integrated into Cisco IOS Release 12.2(33)SRC.
12.2(33)SRD
This command was integrated into Cisco IOS Release 12.2(33)SRD.
Usage Guidelines
Number of the slot in which the module is installed.
To establish a session with the LCP when the LCP is in ROM-monitor state, use the svclc console
command.
If the LCP is in ROM-monitor state, the module status displays as other in the show module command
output.
Examples
The following example illustrates how to use the svclc console command:
Sup# svclc console 3
Cisco Service and Application Module for IP User Guide
B-52
OL-13003-06
Appendix B
Supervisor Console Commands
svclc module
svclc module
To assign a VLAN group to a SAMI, use the svclc module command in global configuration mode. To
remove the VLAN assignment, use the no form of the command.
svclc module module_number vlan-group group_number_range
no svclc module module_number vlan-group group_number_range
Syntax Description
module_number
Number of the slot in which the SAMI is installed.
vlan-group
group_number_range
VLAN group number identified as a single number (n), as a range of
numbers (n-x), or as separate numbers, or range of numbers, separated by
commas (for example, 3,5,7-10).
Only VLAN groups created using the svclc vlan-group global
configuration command can be specified.
Defaults
No default behavior or values exist.
Command Modes
Global configuration
Command History
Release
Modification
12.2(33)SRB1
This command was integrated into Cisco IOS Release 12.2(33)SRB1.
12.2(33)SRC
This command was integrated into Cisco IOS Release 12.2(33)SRC.
12.2(33)SRD
This command was integrated into Cisco IOS Release 12.2(33)SRD.
Usage Guidelines
Use this command to apply a VLAN group created using the svclc module command to a SAMI. This
is the allowed VLAN.
One VLAN group can be assigned to multiple SAMIs.
Examples
The following example shows how to assign VLAN groups 50 and 52 to a SAMI installed in slot 5 of
the chassis:
Sup(config)# svclc module 5 vlan-group 50,52
Related Commands
Command
Description
svclc vlan-group
Assigns VLANs to a VLAN groups.
svclc
multiple-vlan-interfaces
Enables multiple SVIs to be configured for a SAMI.
Cisco Service and Application Module for IP User Guide
OL-13003-06
B-53
Appendix B
Supervisor Console Commands
svclc multiple-vlan-interfaces
svclc multiple-vlan-interfaces
To enable multiple switched virtual interfaces (SVIs) to be configured for a SAMI, use the
svclc multiple-vlan-interfaces command in global configuration mode. To remove this configuration,
use the no form of the command.
svclc multiple-vlan-interfaces
no svclc multiple-vlan-interfaces
Syntax Description
This command has no keywords or arguments.
Defaults
No default behavior or values exist.
Command Modes
Global configuration
Command History
Release
Modification
12.2(33)SRB1
This command was integrated into Cisco IOS Release 12.2(33)SRB1.
12.2(33)SRC
This command was integrated into Cisco IOS Release 12.2(33)SRC.
12.2(33)SRD
This command was integrated into Cisco IOS Release 12.2(33)SRD.
Usage Guidelines
The SVI configuration defines the Layer 3 instance on the MSFC (the router). If you assign the VLAN
used for the SVI to a SAMI PPC, then the MSFC routes between the SAMI PPC and other Layer 3
VLANs.
By default, only one SVI can exist between the MSFC and a SAMI. However, you must configure
multiple SVIs for unique VLANs on each SAMI.
Note
Examples
For Layer 2 forwarding, configuring a switched virtual interface (SVI) is not required for allowing
VLAN traffic to the SAMI PPCs. Configuring a SVI is only required if the supervisor participates in
Layer 3 forwarding.
The following example illustrates how to use the svclc multiple-vlan-interfaces command:
Sup> enable
Sup# configure terminal
Sup(config)# svclc multiple-vlan-interfaces
Sup(config)# interface vlan 100
Sup(config-if)# ip address 127.0.0.0 255.255.255.0
Sup(config-if)# no shutdown
Cisco Service and Application Module for IP User Guide
B-54
OL-13003-06
Appendix B
Supervisor Console Commands
svclc multiple-vlan-interfaces
Related Commands
Command
Description
svclc module vlan-group
Assigns a VLAN group to a SAMI.
svclc vlan-group
Assigns VLANs to a VLAN group.
Cisco Service and Application Module for IP User Guide
OL-13003-06
B-55
Appendix B
Supervisor Console Commands
svclc vlan-group
svclc vlan-group
To assign VLANs to a group, use the svclc vlan-group command in global configuration mode. To
remove the configuration, use the no form of this command.
svclc vlan-group group_number vlan_range
no svclc vlan-group group_number vlan_range
Syntax Description
group_number
Number of the group.
vlan_range
Number of the VLAN or VLANs identified as a single number (n), as a
range of numbers (n-x), or as separate numbers, or range of numbers,
separated by commas (for example, 5,7-10,13,45-100).
Defaults
No default behavior or values exist.
Command Modes
Global configuration
Command History
Release
Modification
12.2(33)SRB1
This command was integrated into Cisco IOS Release 12.2(33)SRB1.
12.2(33)SRC
This command was integrated into Cisco IOS Release 12.2(33)SRC.
12.2(33)SRD
This command was integrated into Cisco IOS Release 12.2(33)SRD.
Usage Guidelines
Use this command to assign VLANs to a group.
You can create one or more VLAN groups, and then assign the groups to the SAMI. You cannot assign
the same VLAN to multiple groups; however, you can assign multiple groups to a SAMI. VLANs that
you want to assign to multiple SAMIs, for example, can reside in a separate group from VLANs that are
unique to each SAMI.
Examples
The following example illustrates how to assign VLANs 50, 56, and 57 to VLAN group 50:
Sup(config)# svclc vlan-group 50 55-57
Related Commands
Command
Description
svclc
multiple-vlan-interfaces
Enables multiple SVIs to be configured for a SAMI.
svclc module vlan-group
Assigns a VLAN group to a SAMI.
Cisco Service and Application Module for IP User Guide
B-56
OL-13003-06
Appendix B
Supervisor Console Commands
upgrade hw-module
upgrade hw-module
To upgrade the software image on a module, use the upgrade hw-module command in privileged EXEC
mode.
upgrade hw-module slot slot_number software url/filename
Syntax Description
slot slot_number
Number of the slot in which the SAMI is installed.
software
Specifies that a software file will be downloaded
url/file-name
Location and name of the file you want to use to upgrade the SAMI.
Defaults
No default behavior or values exist.
Command Modes
Privileged EXEC
Command History
Release
Modification
12.2(33)SRB1
This command was integrated into Cisco IOS Release 12.2(33)SRB1.
12.2(33)SRC
This command was integrated into Cisco IOS Release 12.2(33)SRC.
12.2(33)SRD
This command was integrated into Cisco IOS Release 12.2(33)SRD.
Usage Guidelines
Use this command to copy a bundle image from a specified URL to the compact flash of a SAMI installed
in a specific slot of the router chassis.
Note
Examples
This command is required to ensure that future reboots of the SAMI will automatically come up
with the specified image.
The following example illustrates how to use the upgrade hw-module command:
Sup# upgrade hw-module slot 9 software tftp.10.102.16.25/sb-csg2-mzg.bin
Loading sb-csg2-mzg.bin from 64.102.16.25 (via FastEthernet2/6):
!!!!!!!!!!!!!!!!!!!!!!!!!!!!!!!!!!!!!!!!!!!!!!!!!!!!!!!!!!!!!!!!!!!!!!!!!!!!!!!!!!!!!!!!!!
!!!!!!!!!!!!!!!!!!!!!!!!!!!!!!!!!!!!!!!!!!!!!!!!!!!!!!!!!
[OK - 37541640 bytes
Related Commands
Command
Description
show upgrade
software progress
Displays the progress of module upgrades.
Cisco Service and Application Module for IP User Guide
OL-13003-06
B-57
Appendix B
Supervisor Console Commands
upgrade hw-module
Cisco Service and Application Module for IP User Guide
B-58
OL-13003-06
A P P E N D I X
C
SAMI Cisco IOS PPC Commands
The following commands, listed in alphabetical order, are introduced or modified for the Cisco SAMI
Cisco IOS PPCs and are supported at the SAMI Cisco IOS PPC console:
•
clear sami ixp statistics egress, page C-3
•
clear sami pci ipc statistics, page C-4
•
config-register, page C-5
•
confreg, page C-6 (ROM monitor command)
•
debug ethernet-interface, page C-7
•
debug sami health-monitoring, page C-8
•
debug sami ipcp, page C-10
•
debug sami ip hidden, page C-11
•
debug sami mac-resolver, page C-12
•
debug sami pci ipc, page C-13
•
debug sami pkttrailer, page C-14
•
debug sami pkttrailer dump, page C-15
•
debug sami rcal-client, page C-16
•
logging main-cpu, page C-17
•
sami health-monitoring, page C-19
•
sami health-monitoring probe, page C-20
•
sami health-monitoring reset, page C-21
•
show interface, page C-22
•
show platform, page C-24
•
show sami config-mode, page C-25
•
show sami health-monitoring, page C-26
•
show sami info, page C-28
•
show sami ipcp statistics, page C-29
•
show sami ixp, page C-30
•
show sami ixp statistics, page C-31
•
show sami ixp trailerstats, page C-33
Cisco Service and Application Module for IP User Guide
OL-13003-06
C-1
Appendix C
•
show sami mac-resolver dest-addr-list, page C-34
•
show sami mac-resolver next-hop list, page C-36
•
show sami pci ipc statistics, page C-37
Note
SAMI Cisco IOS PPC Commands
This section does not contain commands specific to the Cisco software application image
bundled with the SAMI software. For a description of the commands supported by the Cisco
software application image on your SAMI, see the documentation for the Cisco software
application you are using.
Cisco Service and Application Module for IP User Guide
C-2
OL-13003-06
Appendix C
SAMI Cisco IOS PPC Commands
clear sami ixp statistics egress
clear sami ixp statistics egress
To clear the statistics corresponding to number of packets forwarded to IXP in the egress path, use the
clear sami ixp statistics egress privileged EXEC command.
clear sami ixp statistics egress
Syntax Description
This command has no keywords or arguments.
Defaults
No default behavior or values exist.
Command Modes
Privileged EXEC
Command History
Release
Modification
SAMI Release 3.4
This command was introduced in the Cisco CSG2 Release 5.0.
Usage Guidelines
Use this command to clear the statistics corresponding to number of packets forwarded to IXP in the
egress path.
Examples
This example shows how to clear the statistics forwarded to IXP in the egress path:
Router# clear sami ixp statistics egress
Cisco Service and Application Module for IP User Guide
OL-13003-06
C-3
Appendix C
SAMI Cisco IOS PPC Commands
clear sami pci ipc statistics
clear sami pci ipc statistics
To clear the statistics corresponding to PCI-based IXP IPC, use the clear sami pci ipc statistics
privileged EXEC command.
clear sami pci ipc statistics
Syntax Description
This command has no keywords or arguments.
Defaults
No default behavior or values exist.
Command Modes
Privileged EXEC
Command History
Release
Modification
SAMI Release 3.4
This command was introduced in conjunction with the CSG2 Release 5.0.
Examples
This example shows how to clear the PCI statistics for IPC with IXP:
Router#clear sami pci ipc statistics
Cisco Service and Application Module for IP User Guide
C-4
OL-13003-06
Appendix C
SAMI Cisco IOS PPC Commands
config-register
config-register
To change the configuration register settings, use the config-register command in global configuration
mode.
config-register value
Syntax Description
value
Defaults
The default is 0x2102, which causes the processor to boot from flash memory and the Break key to be
ignored.
Command Modes
Global configuration
Command History
Release
Modification
Release 1.0
This command was integrated into Cisco SAMI Release 1.0.
Usage Guidelines
Hexadecimal or decimal value that represents the 16-bit configuration
register value that you want to use the next time the router is restarted. The
value range is from 0x0 to 0xFFFF (0 to 65535 in decimal).
Use the config-register command to change the configuration register settings for a PPC.
The following bits of the configuration register are supported:
Examples
Bit No.
Hex Value
Meaning
00-03
0x00
Stays at the system ROM monitor prompt.
00-03
0x02
Upon crash/reload, gets the Cisco software application
image from LCP bundle for booting.
05
0x200
Front panel UART acts as auxiliary and on-board UART
acts as console. (ROM monitor supports console only.
Cisco IOS supports both console and auxiliary.)
06
0x0040
Ignores NVRAM contents
08
0x0100
Ignores send break
11-12
0x0800-0x1000
Console line speed
In the following example, the configuration register is set to boot the system image from flash memory:
Router(config)# config-register 0x2102
Cisco Service and Application Module for IP User Guide
OL-13003-06
C-5
Appendix C
SAMI Cisco IOS PPC Commands
confreg
confreg
To change the configuration register settings from ROM monitor, use the config-register command.
confreg value
Syntax Description
value
Defaults
The default is 0x2102, which causes the processor to boot from flash memory and the Break key to be
ignored.
Command Modes
ROM monitor
Command History
Release
Modification
Release 1.0
This command was integrated into Cisco SAMI Release 1.0.
Usage Guidelines
Examples
Hexadecimal or decimal value that represents the 16-bit configuration
register value that you want to use the next time the router is restarted. The
value range is from 0x0 to 0xFFFF (0 to 65535 in decimal).
The following bits of the configuration register are supported:
Bit No.
Hex Value
Meaning
00-03
0x00
Stays at the system ROM monitor prompt.
00-03
0x02
Upon crash/reload, gets the Cisco software application
image from LCP bundle for booting.
05
0x200
Front panel UART acts as auxiliary and on-board UART
acts as console. (ROM monitor supports console only.
Cisco IOS supports both console and auxiliary.)
06
0x0040
Ignores NVRAM contents
08
0x0100
Ignores Send Break
11-12
0x0800-0x1000
Console line speed
In the following example, the configuration register is set to boot the system image from flash memory:
rommon 1> confreg 0x2102
Cisco Service and Application Module for IP User Guide
C-6
OL-13003-06
Appendix C
SAMI Cisco IOS PPC Commands
debug ethernet-interface
debug ethernet-interface
To debug Ethernet interface events, use the debug ethernet-interface command in privileged EXEC
mode. Use the no form of this command to disable debugging output.
debug ethernet-interface
no debug ethernet-interface
Syntax Description
This command has no keywords or arguments.
Defaults
No default behavior or values exist.
Command Modes
Privileged EXEC
Command History
Release
Modification
Release 1.0
This command was integrated into Cisco SAMI Release 1.0.
Usage Guidelines
Use this command to provide non-IP control protocol (IPCP) packet level debugs at the First In First
Out (FIFO) interface.
Examples
This example shows how to enable debugging of Ethernet interface events and provides a sample of the
output:
Router# debug ethernet-interface
Ethernet network interface debugging is on
Router# RX:(D)b000.0000.0ffc (S)0000.0000.0000 (T)0x4000 (L)92 (IP)0.0.0.80 (TL)6
RX:(D)b800.0000.0ffc (S)0000.0000.0000 (T)0x4000 (L)92 (IP)0.0.255.255 (TL)57344
RX:(D)c800.0008.0000 (S)0000.0000.0000 (T)0x6000 (L)124 (IP)0.0.255.255 (TL)3225
<... output truncated ...>
Router#
Cisco Service and Application Module for IP User Guide
OL-13003-06
C-7
Appendix C
SAMI Cisco IOS PPC Commands
debug sami health-monitoring
debug sami health-monitoring
To display information health-monitoring processing (from the PPC to IXP path or all paths from the
PPC to the supervisor), use the debug sami health-monitoring command in privileged EXEC mode. To
remove this configuration, use the no form of the command.
debug sami health-monitoring [probe | IXP]
no debug sami health-monitoring [probe | IXP]
Syntax Description
probe
Enables debugging of health-monitoring events occurring on the path
between the PPC and the IXP.
IXP
Enables debugging of health-monitoring events occurring on all paths
between the PPC and the supervisor.
Defaults
Disabled.
Command Modes
Privileged EXEC
Command History
Release
Modification
Release 1.0
This command was introduced.
Usage Guidelines
Use this command to enable debugging related to data path sanity monitoring sent to probe the path to
an IXP or to probe all paths between the PPC and the supervisor.
Examples
The following example illustrates how to use the debug sami health-monitoring command.
Router# debug sami health-monitoring IXP
Cisco Service and Application Module for IP User Guide
C-8
OL-13003-06
Appendix C
SAMI Cisco IOS PPC Commands
debug sami health-monitoring
debug sami health-monitoring
To display message-level debugging related to health-monitoring processing (from the PPC to IXP path
or all paths from the PPC to the supervisor), use the debug sami health-monitoring command in
privileged EXEC mode. To remove this configuration, use the no form of the command.
debug sami health-monitoring [probe | IXP] message
no debug sami health-monitoring [probe | IXP] message
Syntax Description
probe
Enables message-level debugging of health-monitoring events occurring on
the path between the PPC and the IXP.
IXP
Enables message-level debugging of health-monitoring events occurring on
all paths between the PPC and the supervisor.
Defaults
Disabled.
Command Modes
Privileged EXEC
Command History
Release
Modification
Release 1.0
This command was introduced.
Usage Guidelines
Use this command to enable message-level debugging related to data path sanity monitoring sent to
probe the path to an IXP or to probe all paths between the PPC and the supervisor.
Examples
The following example illustrates how to use the debug sami health-monitoring command.
Router# debug sami health-monitoring probe message
Cisco Service and Application Module for IP User Guide
OL-13003-06
C-9
Appendix C
SAMI Cisco IOS PPC Commands
debug sami ipcp
debug sami ipcp
To information about IP control protocol (IPCP) communication used for Ethernet Out of Band
Channel (EOBC) and inter-processor traffic, use the debug sami ipcp command in privileged EXEC
mode. To disable debugging, use the no form of this command.
debug sami ipcp {errors | events | packet} [src 0x1-0x3f | ixp | ppc# | bcm >] [dstn 0x1-0x3f | ixp
| ppc# | bcm>] [ssap 0-255] [dsap 0-255]
Syntax Description
errors
Specifies error messages.
events
Specifies event information.
packet
Specifies packet information.
src 0x1-0x3f
(Optional) Specifies to display information about source communication
where:
dstn 0x1-0x3f
•
ipx—Specifies the network processor
•
ppc_num—Specifies a PPC.
•
bcm—Specifies the LCP.
(Optional) Specifies to display information about destination
communication where:
•
ipx—Specifies the network processor
•
ppc_num—Specifies a PPC.
•
bcm—Specifies the LCP.
ssap 0-255
source service access point (SSAP).
dsap 0-255
destination service access point (DSAP).
Defaults
No default behavior or values exist.
Command Modes
Privileged EXEC
Command History
Release
Modification
Release 1.0
This command was introduced.
Usage Guidelines
Use this command to enable debugging for IPCP communication used for EOBC and inter processor
traffic
Examples
The following example illustrates how to use the debug sami ipcp command.
Router# debug sami ipcp
Cisco Service and Application Module for IP User Guide
C-10
OL-13003-06
Appendix C
SAMI Cisco IOS PPC Commands
debug sami ip hidden
debug sami ip hidden
To enabling debugging for traffic processing to/from the 127.0.0.0 network use the debug sami
ip hidden command in privileged EXEC mode. To turn off the debug function, use the no form of this
command.
debug sami ip hidden
no debug sami ip hidden
Syntax Description
This command has no keywords or arguments.
Defaults
No default behavior or values exist.
Command Modes
Privileged EXEC
Command History
Release
Modification
Release 1.0
This command was introduced.
Usage Guidelines
Use this command to enable the RCAL feature debugging for the127.0.0.0 network.
Examples
The following example illustrates how to use the debug sami ip hidden command.
Router# debug sami ip hidden
Cisco Service and Application Module for IP User Guide
OL-13003-06
C-11
Appendix C
SAMI Cisco IOS PPC Commands
debug sami mac-resolver
debug sami mac-resolver
To enable debugging for MAC-resolver feature, use the debug sami mac-resolver privileged EXEC
command.
debug sami mac-resolver {errors | events}
Syntax Description
errors
Enable error level logs for mac resolver.
events
Enable logs corresponding to mac-resolver processing.
Defaults
If no keyword is provided, both error and events logs are enabled.
Command Modes
Privileged EXEC
Command History
Release
Modification
SAMI Release 3.4
This command was introduced in conjunction with the Cisco LTE Release
1.0.
Usage Guidelines
This command enables debugging capabilities of MAC resolver feature. MAC resolver is an important
feature that facilitates datapath forwarding capabilities in IXP.
Examples
Here is an example of the debug sami mac-resolver command:
Router#debug sami mac-resolver errors
Router#debug sami mac-resolver events
Router#debug sami mac-resolver
Cisco Service and Application Module for IP User Guide
C-12
OL-13003-06
Appendix C
SAMI Cisco IOS PPC Commands
debug sami pci ipc
debug sami pci ipc
To enable logging for the PCI-based IPC with IXP, use the debug sami pci ipc privileged EXEC
command.
debug sami pci ipc {errors | events | msgs}
Syntax Description
errors
Enables error level logs for PCI based IXP IPC.
events
Enables logs corresponding to PCI based IXP IPC processing.
msgs
Enable logs to dump messages received over PCI for IXP IPC.
Defaults
If no keyword is provided, both error and events logs are enabled.
Command Modes
Privileged EXEC
Command History
Release
Modification
SAMI Release 3.4
This command was introduced in conjunction with the CSG2 Release 5.0,
and the Cisco LTE Release 1.0.
Examples
Here is an example of the debug sami pci ipc command:
Router#debug sami pci ipc errors
Router#debug sami pci ipc events
Router#debug sami pci ipc msgs
Cisco Service and Application Module for IP User Guide
OL-13003-06
C-13
Appendix C
SAMI Cisco IOS PPC Commands
debug sami pkttrailer
debug sami pkttrailer
To enable debugging capabilities in packet trailer processing, use the debug sami pkttrailer privilieged
EXEC command.
debug sami pkttrailer {errors | events | cr }
Syntax Description
errors
Enables error logs in packet trailer processing.
events
Enables logs corresponding to packet trailer processing in platform driver.
Defaults
If no keyword is provided, logs for both error and events are enabled.
Command Modes
Privileged EXEC
Command History
Release
Modification
SAMI Release 3.4
This command was introduced in conjunction with the CSG2 Release 5.0.
Usage Guidelines
This command enables debugging capabilities in packet trailer processing. Packet trailer is an integral
part of CSG2 Release 5.0, where additional data is send to the IXP at the end of the packet to configure
acceleration parameters for a flow.
This command would have an impact on the datapath performance of the SAMI processors. You should
only use the command when directed to do so by Cisco Technical Assistance Center (TAC) engineers.
Examples
Here is an example of the debug sami pkttrailer command:
Router#debug sami pkttrailer errors
Router#debug sami pkttrailer events
Router#debug sami pkttrailer
Cisco Service and Application Module for IP User Guide
C-14
OL-13003-06
Appendix C
SAMI Cisco IOS PPC Commands
debug sami pkttrailer dump
debug sami pkttrailer dump
To dump packet trailer data in the ingress and egress directions for IXP, use the debug sami pkttrailer
dump privileged EXEC command.
debug sami pkttrailer dump [{ingress | egress | cr }]
Syntax Description
ingress
Dumps packet trailer data received in ingress.
events
Dumps packet trailer data received in egress.
Command Default
If no keyword is provided, packet trailer dump is enabled in both egress and ingress directions.
Command Modes
Privileged Exec
Command History
Release
Modification
SAMI Release 3.4
This command was introduced in conjunction with the CSG2 Release 5.0.
Usage Guidelines
This command impacts the datapath performance of the SAMI processors. You should only use this
command when directed to do so by Cisco Technical Assistance Center (TAC) engineers.
Examples
Here is an example of the debug sami pkttrailer dump command:
Router#debug sami pkttrailer dump
Router#debug sami pkttrailer dump ingress
Router#debug sami pkttrailer dump egress
Cisco Service and Application Module for IP User Guide
OL-13003-06
C-15
Appendix C
SAMI Cisco IOS PPC Commands
debug sami rcal-client
debug sami rcal-client
To enable client-related remote console and logging (RCAL) debugging, use the debug sami rcal-client
command in privileged EXEC mode.
debug sami rcal-client
no debug sami rcal-client
Syntax Description
This command has no keywords or arguments.
Defaults
No default behavior or values exist.
Command Modes
Privileged EXEC
Command History
Release
Modification
Release 1.0
This command was introduced.
Usage Guidelines
Use this command to enable/disable server-related RCAL debugging.
Examples
The following example illustrates how to use the debug sami rcal-client command.
Router# debug sami rcal-client
Cisco Service and Application Module for IP User Guide
C-16
OL-13003-06
Appendix C
SAMI Cisco IOS PPC Commands
logging main-cpu
logging main-cpu
To enable logs to be generated and sent to the supervisor for all events at and above the specified
log-level, use the logging-main-cpu command in privileged EXEC mode. To turn off log generation, use
the no form of this command.
logging-main-cpu udp-port log-level [ip-addr]
no logging-main-cpu udp-port log-level [ip-addr]
Syntax Description
udp-port
UDP port number from which to send messages.
log-level
Level of messages to send to the supervisor.
ip-addr
(Optional) VLAN IP address for transporting this traffic from processors 3
through 8.
Defaults
The RCAL feature is enabled on a processor and the processor sends messages for level 3 and above.
Command Modes
Privileged EXEC
Command History
Release
Modification
Release 1.0
This command was integrated into Cisco SAMI Release 1.0.
Usage Guidelines
This command enables log generation to the supervisor for all events at and above the log-level value.
The UDP port specified must match the port specified on the supervisor. By default, port 4000 is used.
This is the recommended port. Optionally, a VLAN IP address can be specified for transporting this
traffic from PPCs 3-8.
The following table defines the severity levels:
Table C-1
Severity Level Definitions
Level
Description
0—emergencies
System unusable
1—alerts
Immediate action required
2—critical
Critical condition
3—errors
Error conditions
4—warnings
Warning conditions
5—notifications
Normal bug significant condition
6—informational
Informational messages
7—debugging
Debugging messages
Cisco Service and Application Module for IP User Guide
OL-13003-06
C-17
Appendix C
SAMI Cisco IOS PPC Commands
logging main-cpu
Examples
The following example illustrates how to use the logging main-cpu command.
Router# logging main-cpu 4000
Cisco Service and Application Module for IP User Guide
C-18
OL-13003-06
Appendix C
SAMI Cisco IOS PPC Commands
sami health-monitoring
sami health-monitoring
To enables health monitoring on the paths between the PPC and IXP1 and IXP2 (future), use the sami
health-monitoring command in privilege EXEC mode. To remove the configuration, use the no form of
this command.
sami health-monitoring {ixp1 | ixp2}
no sami health-monitoring {ixp1 | ixp2}
Syntax Description
ixp1
Specifies to monitor the health of the path to IXP1.
ixp2
Specifies to monitor the health of the path to IXP1.
Note
This keyword option is intended for future use.
Defaults
By default, health monitoring is enabled for IXP1 and disabled for IXP2.
Command Modes
Global configuration
Command History
Release
Modification
Release 1.0
This command was introduced.
Usage Guidelines
Use this command to enable sanity monitoring on the path from the PPC to IXP1.
Health monitoring is configured on the SAMI PPC. The PPC tracks the health of a path by sending
probes to a destination and waiting for a response. If the PPC does not receive a response to a probe, it
determines that the path is not healthy and sends a notification to the SAMI LCP, which then initiates a
module reload.
The PPC identifies the health of a path in the following categories:
•
Passed—The PPC returns a valid response.
•
Failed—The PPC did not receive a valid response to a probe or was unable to reach a destination for
a specified number of retries.
When a PPC is configured for health monitoring, it sends active probes periodically to determine the
state of a path.
Examples
The following example illustrates how to use the sami health-monitoring command.
Router(config)# sami health-monitoring ipx1
Cisco Service and Application Module for IP User Guide
OL-13003-06
C-19
Appendix C
SAMI Cisco IOS PPC Commands
sami health-monitoring probe
sami health-monitoring probe
To enable health monitoring on all paths between the PPC and the supervisor, use the sami
health-monitoring probe command. To remove the configuration, use the no form of the command.
sami health-monitoring probe ip address [interval seconds] [retries number}
Syntax Description
ip address
Destination IP address on the supervisor. The IP address must be in the
global vrf table and there will need to be a suitable local ip address that can
be used to reach the remote probe address on supervisor.
interval seconds
Interval, in seconds, between probes. A valid value is a number between 1
and 600.
retries number
Number of times a probe can be resent before it is marked as failed. A valid
value is a number between 10 and 100.
Defaults
No default behavior or values exist.
Command Modes
Global Configuration
Command History
Release
Modification
Release 1.0
This command was introduced.
Usage Guidelines
Use this command to enable health monitoring on all the paths between the PPC and the supervisor.
Health monitoring is configured on the SAMI PPC. The PPC tracks the health of a path by sending
probes to a destination and waiting for a response. If the PPC does not receive a response to a probe, it
determines that the path is not healthy and sends a notification to the SAMI LCP, which then initiates a
module reload.
The PPC identifies the health of a path in the following categories:
•
Passed—The PPC returns a valid response.
•
Failed—The PPC did not receive a valid response to a probe or was unable to reach a destination for
a specified number of retries.
When a PPC is configured for health monitoring, it sends active probes periodically to determine the
state of a path.
Examples
The following example illustrates how to use the sami health-monitoring probe command.
Router(config)# sami health-monitoring probe 10.1.1.14 interval 250 retries 25
Cisco Service and Application Module for IP User Guide
C-20
OL-13003-06
Appendix C
SAMI Cisco IOS PPC Commands
sami health-monitoring reset
sami health-monitoring reset
To configure the module to be reset when a path failure has occurred, use the sami health-monitoring
probe reset command in privileged EXEC mode. To remove this configuration, use the no form of the
command.
sami health-monitoring {ipx1 | ixp2 | probe} reset
Syntax Description
ixp1
Resets the module when a check to IXP1 fails.
ixp2
Resets the module when a check to IXP2 fails. This keyword option is
intended for future use.
probe
Resets the module when a check to the supervisor fails.
Defaults
No default behavior or values exist.
Command Modes
Global configuration
Command History
Release
Modification
Release 1.0
This command was introduced.
Usage Guidelines
Use this command to configure the module to be reset when a path failure has occurred.
Health monitoring is configured on the SAMI PPC. The PPC tracks the health of a path by sending
probes to a destination and waiting for a response. If the PPC does not receive a response to a probe, it
determines that the path is not healthy and sends a notification to the SAMI LCP, which then initiates a
module reload.
The PPC identifies the health of a path in the following categories:
•
Passed—The PPC returns a valid response.
•
Failed—The PPC did not receive a valid response to a probe or was unable to reach a destination for
a specified number of retries.
When a PPC is configured for health monitoring, it sends active probes periodically to determine the
state of a path.
Examples
The following example illustrates how to use the sami health-monitoring reset command.
Router(config)# sami health-monitoring probe reset
Cisco Service and Application Module for IP User Guide
OL-13003-06
C-21
Appendix C
SAMI Cisco IOS PPC Commands
show interface
show interface
To display the statistics of the two IXP interface on the SAMI, use the show interface command in
privileged EXEC mode.
show interface
Syntax Description
This command has no keywords or arguments.
Defaults
No default behavior or values exist.
Command Modes
Privileged EXEC
Command History
Release
Modification
CSG2 Release 6.0 and
LTE Release 2.0
This command was introduced.
Usage Guidelines
show interface will also show the IXP interaface’s packet count, byte count , packet rate, and data rate.
Examples
The following example displays the output for the show interface command:
Router#show interfaces
Interface-IXP1 is up, line protocol is up
Hardware is Bouncer IXP1, address is 0023.5e25.9a32 (bia 0023.5e25.9a32)
MTU 0 bytes, BW 10000000 Kbit/sec, DLY 0 usec,
reliability 255/255, txload 1/255, rxload 1/255
Encapsulation ARPA, loopback not set
Last input never, output never, output hang never
Last clearing of "show interface" counters never
Input queue: 0/75/0/0 (size/max/drops/flushes); Total output drops: 0
5 minute input rate 0 bits/sec, 19 packets/sec
5 minute output rate 0 bits/sec, 19 packets/sec
346569 packets input, 0 bytes, 0 no buffer
Received 0 broadcasts, 0 runts, 0 giants, 0 throttles
0 input errors, 0 CRC, 0 frame, 0 overrun, 0 ignored
0 input packets with dribble condition detected
345883 packets output, 0 bytes, 0 underruns
0 output errors, 0 collisions, 0 interface resets
0 unknown protocol drops
0 unknown protocol drops
0 babbles, 0 late collision, 0 deferred
0 lost carrier, 0 no carrier
0 output buffer failures, 0 output buffers swapped out
Interface-IXP2 is up, line protocol is up
Hardware is Bouncer IXP2, address is 0023.5e25.9a32 (bia 0023.5e25.9a32)
MTU 0 bytes, BW 10000000 Kbit/sec, DLY 0 usec,
reliability 255/255, txload 1/255, rxload 1/255
Encapsulation ARPA, loopback not set
Cisco Service and Application Module for IP User Guide
C-22
OL-13003-06
Appendix C
SAMI Cisco IOS PPC Commands
show interface
Last input never, output never, output hang never
Last clearing of "show interface" counters never
Input queue: 0/75/0/0 (size/max/drops/flushes); Total output drops: 0
5 minute input rate 0 bits/sec, 11 packets/sec
5 minute output rate 0 bits/sec, 11 packets/sec
200341 packets input, 0 bytes, 0 no buffer
Received 0 broadcasts, 0 runts, 0 giants, 0 throttles
0 input errors, 0 CRC, 0 frame, 0 overrun, 0 ignored
0 input packets with dribble condition detected
200341 packets output, 0 bytes, 0 underruns
0 output errors, 0 collisions, 0 interface resets
0 unknown protocol drops
0 unknown protocol drops
0 babbles, 0 late collision, 0 deferred
0 lost carrier, 0 no carrier
0 output buffer failures, 0 output buffers swapped out
GigabitEthernet0/0 is up, line protocol is up
Hardware is MPC8500_FIFO_ETSEC, address is 0023.5e25.9a32 (bia 0023.5e25.9a32)
MTU 1500 bytes, BW 2000000 Kbit/sec, DLY 10 usec,
Cisco Service and Application Module for IP User Guide
OL-13003-06
C-23
Appendix C
SAMI Cisco IOS PPC Commands
show platform
show platform
To display platform information, use the show platform command.
show platform [cookie | fpga | cpld]
Syntax Description
cookie
Displays information provided by the dump.
fpga
Displays field programmable gate array (FPGA)-related registers.
cpld
Displays complex programmable logic device (CPLD)-related registers.
Defaults
No default behavior or values exist.
Command Modes
Privileged EXEC
Command History
Release
Modification
Release 1.0
This command was introduced.
Usage Guidelines
Use this command to provide a dump of various registers and other platform specific information.
Examples
The following example illustrates how to use the initial part of the show platform command.
Router# show platform
Interrupt Throttling:
Throttle Count = 00000000
Netint usec
= 00001000
Active
=
0
Longest IRQ
= 00000367
Timer Count
= 00000000
Netint Mask usec = 00000200
Configured
=
1
The following example illustrates how to use the IXP0 part of the show platform command.
CDE IXP0 INTERFACE
======================
Packets received
Packets transmitted
Num bad pkts recvd on fast
Num bad pkts recvd on slow
Num bad pkts recvd on fast
Num bad pkts recvd on slow
IXP0 Fast VOQ status
IXP0 BRCM VOQ status
IXP0 pull status
IXP0 spi src status
IXP0 spi snk status
spi
spi
spi
spi
channel0
channel8
channel2
channel4
[empty]
[empty]
0
0
0
0
0
0
[not full]
[not full]
[pulling]
[healthy]
[healthy]
Cisco Service and Application Module for IP User Guide
C-24
OL-13003-06
Appendix C
SAMI Cisco IOS PPC Commands
show sami config-mode
show sami config-mode
To display the configuration mode of a PowerPC (PPC), use the show sami config-mode command.
show sami config-mode
Syntax Description
This command has no keywords or arguments.
Defaults
No default behavior or values exist.
Command Modes
Privileged EXEC
Command History
Release
Modification
Release 1.0
This command was introduced.
Usage Guidelines
Use the show sami config-mode command to display the configuration mode of the PPC.
Supervisor is currently the only supported configuration mode.
Examples
The following example illustrates how to use the show sami config-mode command.
Router# show sami config-mode
sami config-mode supervisor
===========================================================
Cisco Service and Application Module for IP User Guide
OL-13003-06
C-25
Appendix C
SAMI Cisco IOS PPC Commands
show sami health-monitoring
show sami health-monitoring
To display health monitoring status and counters for the path to IXP1, IXP2 (future), and the supervisor,
use the show sami health-monitoring command.
show sami health-monitoring [ixp | processor]
Syntax Description
ixp
Displays health monitoring status and counters for the path to IXP1 or IXP2
(future).
processor
Displays health monitoring status and counters for the path to the
supervisor.
Defaults
No default behavior or values exist.
Command Modes
Privileged EXEC
Command History
Release
Modification
Release 1.0
This command was introduced.
Usage Guidelines
Use this command to display counters specific to health monitoring for the path to the IXPs or the path
to the supervisor.
Examples
The following example shows how to display health monitoring-related counters and status:
Router#show sami health-monitoring
IXP1: DISABLED
0/0 Missed/Rcvd consecutive responses
0/0 Missed/Rcvd cumulative responses
0 Failed to send
IXP2: DISABLED
0/0 Missed/Rcvd consecutive responses
0/0 Missed/Rcvd cumulative responses
0 Failed to send
ICMP PROBE: PROBING
0/0 Missed/Rcvd consecutive responses
10/8 Missed/Rcvd cumulative responses
40 Failed to send
Cisco Service and Application Module for IP User Guide
C-26
OL-13003-06
Appendix C
SAMI Cisco IOS PPC Commands
show sami health-monitoring
Table 2 describes the fields shown in the display.
Table 2
show sami health monitoring Field Descriptions
Field
Description
IXP1:
IXP2:
ICMP PROBE:
Indicates the status of health monitoring. Possible values are:
•
PROBING—Health monitoring is enabled, no responses
received or failed to send a message on previous resend
expiration.
•
ACTIVE—Response to probe received from peer.
•
FAILED—No response received. Communication failed with
peer.
•
DISABLED—Health monitoring is disabled.
Missed consecutive responses
Consecutive number of responses missed. This counter starts at 0 and
is incremented whenever a response is missed until timeout expiry.
This counter is reset whenever a response is received or when the
PPC fails to send a message.
Rcvd consecutive responses
Consecutive number of messages sent. This counter starts at 0 and is
incremented whenever a valid response is received. It is reset
whenever a response is missed until timeout expiry or when the PPC
fails to send a message.
Missed/Rcvd cumulative
responses
Free running counter of total responses missed or received until
timeout expiry.
Failed to send counter
Number of times a message cannot be sent upon resend timer
expiration and when the health monitoring is administratively
enabled. This can happen due to no IO memory, no suitable local IP
address, etc.
Cisco Service and Application Module for IP User Guide
OL-13003-06
C-27
Appendix C
SAMI Cisco IOS PPC Commands
show sami info
show sami info
To display detailed information about the SAMI, use the show sami info command.
show sami info
Syntax Description
This command has no keywords or arguments.
Defaults
No default behavior or values exist.
Command Modes
Privileged EXEC
Command History
Release
Modification
Release 1.0
This command was introduced.
Usage Guidelines
Use the show sami info command to display information about the SAMI.
Examples
The following examples illustrates how to use the show sami info command.
Router# show sami info
Slot Number:
4
Daughtercard Number:
1
Processor/Session Number:
3
PPC Number:
1
Active Supervisor EOBC address: 127.0.0.71
Active PPC EOBC address:
127.0.0.43
Daughter Board Identifier:
P3 (2GB)
Daughter Board Hardware Version:10000
Cisco Service and Application Module for IP User Guide
C-28
OL-13003-06
Appendix C
SAMI Cisco IOS PPC Commands
show sami ipcp statistics
show sami ipcp statistics
To display the counters for IP control protocol (IPCP) packets processed to and from IPCP peers, use the
show sami ipcp statistics command.
show sami ipcp statistics
Syntax Description
This command has no keywords or arguments.
Defaults
No default behavior or values exist.
Command Modes
Privileged EXEC
Command History
Release
Modification
Release 1.0
This command was introduced.
Usage Guidelines
Use the show sami ipcp statistics command to display counters of IPCP packets received and sent to
IPCP peers.
Examples
The following examples illustrate the show sami ipcp statistics command.
Router# show sami ipcp statistics
IPCP Statistics Summary:
Tx
Tx-ERR
Rx
Rx-ERR
===========================================================
303681
0
452316
0
===========================================================
Router#
Cisco Service and Application Module for IP User Guide
OL-13003-06
C-29
Appendix C
SAMI Cisco IOS PPC Commands
show sami ixp
show sami ixp
To display the counters of IP control protocol (IPCP) packets processed to and from a SAMI daughter
card, use the show sami ixp command in privileged EXEC mode.
show sami ixp {1 | 2}
Syntax Description
ixp
Displays IPC counters for the IXP.
processor
Displays IPC counters for the PPC.
Defaults
No default behavior or values exist.
Command Modes
Privileged EXEC
Command History
Release
Modification
Release 1.0
This command was introduced.
This command is enhanced to display inband packets forwarded and
received to and from IXP1 and IXP2 with trailer.
Usage Guidelines
Use the show sami ixp command to display counters of IXP packets received and sent to the IXP.
Examples
The following examples illustrate the show sami ipcp statistics command.
Router# show sami ixp 1
IPCP Statistics Summary:
Tx
Tx-ERR
Rx
Rx-ERR
===========================================================
303681
0
452316
0
===========================================================
Router#
Cisco Service and Application Module for IP User Guide
C-30
OL-13003-06
Appendix C
SAMI Cisco IOS PPC Commands
show sami ixp statistics
show sami ixp statistics
To display IPC statistics for IXP, and also display important tables of the IXPs, use the show sami ixp
statistics privileged EXEC command.
show sami ixp statistics
Syntax Description
There are no keywords or arguments for this command.
Defaults
No default behavior or values exist.
Command Modes
Privileged EXEC
Command History
Release
Modification
SAMI 1.0
This command was introduced.
SAMI 3.4
This command was modified in conjunction with CSG2 Release 5.0 to
display statistics for packets forwarded to IXP in the egress path.
SAMI 4.0
This command was modified in conjunction with CSG2 Release 6.0 to
display number of Async messages received from IXP and interface
statistics of the IXP in 64bit format (show interfaces statistics shows IXP
interface statistics in 32bit format). This provides more accurate statistics.
The output also displays the number of messages queued to process path
and NETS interrupt path for processing.
Usage Guidelines
This command displays IPC statistics for IXP and also displays important tables of the IXPs.
Examples
The following example illustrates the show sami ixp statistics command.
SAMI-PPC3#show sami ixp statistics
-----------------------------IPC IXP 1 Stats
-----------------------------SAMI-PPC3#show sami ixp statistics
-----------------------------Interface - IXP1
-----------------------------Pkts rx = 733325
Pkts tx0 = 83087
Pkts tx1 = 0
Bytes rx = 0
Bytes tx0 = 0
Bytes tx1 = 0
-----------------------------Interface - IXP2
Cisco Service and Application Module for IP User Guide
OL-13003-06
C-31
Appendix C
SAMI Cisco IOS PPC Commands
show sami ixp statistics
-----------------------------Pkts rx = 650249
Pkts tx0 = 0
Pkts tx1 = 0
Bytes rx = 0
Bytes tx0 = 0
Bytes tx1 = 0
-----------------------------IPC IXP 1 Stats
-----------------------------ixp communications
ixp sends = 73, retries = 0 send failures = 0
ixp info sem fail = 0
get buffer fail = 0, timeout = 0
ixp packets received = 73
out of sequence = 0
with unknown error id = 0
ixp response code:
no error = 56
unknown command = 0
no resource = 0
bad parameter = 0
already existed = 1
not found for deletion = 1
unknown error = 0
ixp input trace messages = 0
pkts egress through ixp = 20
async messages from ixp = 100
queued to nets = 60
queued to process = 40
-----------------------------IPC IXP 2 Stats
-----------------------------ixp communications
ixp sends = 73, retries = 0 send failures = 0
ixp info sem fail = 0
get buffer fail = 0, timeout = 0
ixp packets received = 73
out of sequence = 0
with unknown error id = 0
ixp response code:
no error = 56
unknown command = 0
no resource = 0
bad parameter = 0
already existed = 1
not found for deletion = 1
unknown error = 0
ixp input trace messages = 0
pkts egress through ixp = 0
async messages from ixp = 100
queued to nets = 70
queued to process = 30
-----------------------------IXP Stats Update Counters
Cisco Service and Application Module for IP User Guide
C-32
OL-13003-06
Appendix C
SAMI Cisco IOS PPC Commands
show sami ixp trailerstats
show sami ixp trailerstats
To show statistics corresponding to the packet trailers (these statistics are cumulative of IXP1 and IXP2),
use the show sami ixp trailerstats command in Privileged EXEC mode.
show sami ixp trailerstats
Syntax Description
There are no keywords or arguments for this command.
Defaults
No default behavior or values exist.
Command Modes
Privileged EXEC
Command History
Release
Modification
This command was introduced.
Usage Guidelines
Examples
Use the show sami ixp trailersets command to display statistics corresponding to the packet trailers.
These statistics are cumulative of IXP1 and IXP2. The following list identifies the statistics that are
displayed:
•
Number of packet received with trailer.
•
Number of packet on which trailer was written by application.
•
Number of packets transmitted with trailer.
•
Number of packets for which trailer write failed due to space not available in data buffer.
•
Number of packets for which trailer write failed due to trailer size >
MAX_BOUNCER_TRAILER_BYTES.
•
Number of packets for which trailer write failed due to insufficient pak subblock resources.
The following example illustrates the show sami ixp trailersets command.
Cisco Service and Application Module for IP User Guide
OL-13003-06
C-33
Appendix C
SAMI Cisco IOS PPC Commands
show sami mac-resolver dest-addr-list
show sami mac-resolver dest-addr-list
To display all the address(es) registered by the application along with the VRF tableid, callback
functions address, callback parameters address, next hop IP and ref count, use the show sami
mac-resolver dest-addr-list command in privileged EXEC mode.
show sami mac-resolver dest-addr-list [ip]
Syntax Description
ip
Defaults
If no keyword is provided, the mac resolver entries for all the registered IP's are dumped.
Command Modes
Privileged EXEC
Command History
Release
Modification
SAMI Release 3.4
This command was introduced in conjunction with the Cisco LTE 1.0
Release.
(optional) IPv4/IPv6 address for which data is required.
Usage Guidelines
If given, the ip keyword displays only those entries whose destination IP matches with the given IP.
Examples
Here is an example of the
SAMI#show sami mac-resolver dest-addr-list
Table Id Ref-Count Dest IP
via Nexthop IP
0
1
0
1
0
1
20.20.20.51
via 20.20.20.51
2001::10
via 2001::10
100.0.0.1
via 20.20.20.51
There are 3 elements in the list
show sami mac-resolver dest-addr-list 2001::10
Table Id Ref-Count Dest IP
via Nexthop IP
0
1
2001::10
via 2001::10
Cisco Service and Application Module for IP User Guide
C-34
OL-13003-06
Appendix C
SAMI Cisco IOS PPC Commands
show sami mac-resolver dest-addr-list
There are 1 elements in the list with IP 2001::10
show sami mac-resolver dest-addr-list 20.20.20.51
Table Id Ref-Count Dest IP
via Nexthop IP
0
1
20.20.20.51
via 20.20.20.51
There are 1 elements in the list with IP 20.20.20.51
Cisco Service and Application Module for IP User Guide
OL-13003-06
C-35
Appendix C
SAMI Cisco IOS PPC Commands
show sami mac-resolver next-hop list
show sami mac-resolver next-hop list
To display the next-hop IP, ref count, mac address, table ID and the encapsulation type, use the show
sami mac-resolver next-hop list in privileged EXEC mode.
show sami mac-resolver next-hop list [ip]
Syntax Description
ip
Defaults
If no keyword is provided, the mac resolver entries for all the registered IP's are dumped.
Command Modes
Privileged EXEC
Command History
Release
Modification
Release 3.4
This command was introduced in conjunction with the Cisco LTE 1.0
Release.
(optional) IPv4/IPv6 address for which data is required.
Usage Guidelines
If given, displays the entries whose next-hop IP matches to the given IP.
Examples
Here is an example of the show sami mac-resolver next-hop list command:
SAMI#show sami mac-resolver next-hop-list
TableId IP Address
0
0
20.20.20.51
2001::10
MAC Addr
0200.0200.0200
1
0200.0200.0200
Enctype
Ref-count
2
1
1
There are 2 elements in the list
show sami mac-resolver next-hop-list 2001::10
TableId IP Address
MAC Addr
Enctype
Ref-count
0
0200.0200.0200
1
1
2001::10
There are 1 elements in the list with IP 2001::10
Cisco Service and Application Module for IP User Guide
C-36
OL-13003-06
Appendix C
SAMI Cisco IOS PPC Commands
show sami pci ipc statistics
show sami pci ipc statistics
To display statistics corresponding to IPC with IXP using PCI, use the show sami pci ipc statistics
privileged EXEC command.
show sami pci ipc statistics
Syntax Description
There are no keywords or arguments for this command.
Defaults
There are no default values.
Command Modes
Privileged EXEC
Command History
Release
Modification
SAMI Release 3.4
This command was introduced in conjunction with the CSG2 Release 5.0.
SAMI Release 4.0
This command was modified for LTE Release 2.0 to include some new
counters.
Examples
Here is an example of the show sami pci ipc statistics command:
SAMI#show sami pci ipc statistics
----------- Slot 2/CPU 3, show sami pci ipc statistics ------------From PROC 3 To IXP1:
Tx-fn = 132
Msgs sent = 132
Msgs over I2R = 132
DMA Attempts = 10
Tx-ring full = 0
DMA ctx failures = 0
No Rx Buffers = 0
Rx-fn = 132
Msgs received = 140
Msgs over I2P = 8
DMA Success = 10
Rx-ring empty = 0
Invalid data = 0
Backpressure triggered= 0
Backpressure state = INACTIVE
Num of msgs requeued for backpressure = 0
From PROC 3 To IXP2:
Tx-fn = 132
Msgs sent = 132
Msgs over I2R = 132
DMA Attempts = 0
Tx-ring full = 0
DMA ctx failures = 0
No Rx Buffers = 0
Rx-fn = 132
Msgs received = 132
Msgs over I2P = 0
DMA Success = 0
Rx-ring empty = 0
Invalid data = 0
Backpressure triggered= 0
Backpressure state = INACTIVE
Num of msgs requeued for backpressure = 0
----------- Slot 2/CPU 4, show sami pci ipc statistics -------------
Cisco Service and Application Module for IP User Guide
OL-13003-06
C-37
Appendix C
SAMI Cisco IOS PPC Commands
show sami pci ipc statistics
From PROC 4 To IXP1:
Tx-fn = 132
Msgs sent = 132
Msgs over I2R = 132
DMA Attempts = 10
Tx-ring full = 0
DMA ctx failures = 0
No Rx Buffers = 0
Rx-fn = 132
Msgs received = 140
Msgs over I2P = 8
DMA Success = 10
Rx-ring empty = 0
Invalid data = 0
Backpressure triggered= 0
Backpressure state = INACTIVE
Num of msgs requeued for backpressure = 0
From PROC 4 To IXP2:
Tx-fn = 132
Msgs sent = 132
Msgs over I2R = 132
DMA Attempts = 0
Tx-ring full = 0
DMA ctx failures = 0
No Rx Buffers = 0
Rx-fn = 132
Msgs received = 132
Msgs over I2P = 0
DMA Success = 0
Rx-ring empty = 0
Invalid data = 0
Backpressure triggered= 0
Backpressure state = INACTIVE
Num of msgs requeued for backpressure = 0
----------- Slot 2/CPU 5, show sami pci ipc statistics ------------From PROC 5 To IXP1:
Tx-fn = 132
Msgs sent = 132
Msgs over I2R = 132
DMA Attempts = 10
Tx-ring full = 0
DMA ctx failures = 0
No Rx Buffers = 0
Rx-fn = 132
Msgs received = 140
Msgs over I2P = 8
DMA Success = 10
Rx-ring empty = 0
Invalid data = 0
Backpressure triggered= 0
Backpressure state = INACTIVE
Num of msgs requeued for backpressure = 0
From PROC 5 To IXP2:
Tx-fn = 132
Msgs sent = 132
Msgs over I2R = 132
DMA Attempts = 0
Tx-ring full = 0
DMA ctx failures = 0
No Rx Buffers = 0
Rx-fn = 132
Msgs received = 132
Msgs over I2P = 0
DMA Success = 0
Rx-ring empty = 0
Invalid data = 0
Backpressure triggered= 0
Backpressure state = INACTIVE
Num of msgs requeued for backpressure = 0
----------- Slot 2/CPU 6, show sami pci ipc statistics ------------From PROC 6 To IXP1:
Tx-fn = 132
Msgs sent = 132
Msgs over I2R = 132
DMA Attempts = 10
Tx-ring full = 0
Rx-fn = 132
Msgs received = 140
Msgs over I2P = 8
DMA Success = 10
Rx-ring empty = 0
Cisco Service and Application Module for IP User Guide
C-38
OL-13003-06
Appendix C
SAMI Cisco IOS PPC Commands
show sami pci ipc statistics
DMA ctx failures = 0
No Rx Buffers = 0
Invalid data = 0
Backpressure triggered= 0
Backpressure state = INACTIVE
Num of msgs requeued for backpressure = 0
From PROC 6 To IXP2:
Tx-fn = 132
Msgs sent = 132
Msgs over I2R = 132
DMA Attempts = 0
Tx-ring full = 0
DMA ctx failures = 0
No Rx Buffers = 0
Rx-fn = 132
Msgs received = 132
Msgs over I2P = 0
DMA Success = 0
Rx-ring empty = 0
Invalid data = 0
Backpressure triggered= 0
Backpressure state = INACTIVE
Num of msgs requeued for backpressure = 0
----------- Slot 2/CPU 7, show sami pci ipc statistics ------------From PROC 7 To IXP1:
Tx-fn = 132
Msgs sent = 132
Msgs over I2R = 132
DMA Attempts = 10
Tx-ring full = 0
DMA ctx failures = 0
No Rx Buffers = 0
Rx-fn = 132
Msgs received = 140
Msgs over I2P = 8
DMA Success = 10
Rx-ring empty = 0
Invalid data = 0
Backpressure triggered= 0
Backpressure state = INACTIVE
Num of msgs requeued for backpressure = 0
From PROC 7 To IXP2:
Tx-fn = 132
Msgs sent = 132
Msgs over I2R = 132
DMA Attempts = 0
Tx-ring full = 0
DMA ctx failures = 0
No Rx Buffers = 0
Rx-fn = 132
Msgs received = 132
Msgs over I2P = 0
DMA Success = 0
Rx-ring empty = 0
Invalid data = 0
Backpressure triggered= 0
Backpressure state = INACTIVE
Num of msgs requeued for backpressure = 0
----------- Slot 2/CPU 8, show sami pci ipc statistics ------------From PROC 8 To IXP1:
Tx-fn = 132
Msgs sent = 132
Msgs over I2R = 132
DMA Attempts = 10
Tx-ring full = 0
DMA ctx failures = 0
No Rx Buffers = 0
Rx-fn = 132
Msgs received = 140
Msgs over I2P = 8
DMA Success = 10
Rx-ring empty = 0
Invalid data = 0
Backpressure triggered= 0
Backpressure state = INACTIVE
Num of msgs requeued for backpressure = 0
Cisco Service and Application Module for IP User Guide
OL-13003-06
C-39
Appendix C
SAMI Cisco IOS PPC Commands
show sami pci ipc statistics
From PROC 8 To IXP2:
Tx-fn = 132
Msgs sent = 132
Msgs over I2R = 132
DMA Attempts = 0
Tx-ring full = 0
DMA ctx failures = 0
No Rx Buffers = 0
Rx-fn = 132
Msgs received = 132
Msgs over I2P = 0
DMA Success = 0
Rx-ring empty = 0
Invalid data = 0
Backpressure triggered= 0
Backpressure state = INACTIVE
Num of msgs requeued for backpressure = 0
Cisco Service and Application Module for IP User Guide
C-40
OL-13003-06
A P P E N D I X
D
SAMI COSLI PPC Commands
The following commands, listed in alphabetical order by mode, are introduced for the Cisco SAMI
Common OS Services Linux Infra (COSLI) and are supported at the SAMI PPC console.
•
clear cores, page D-4
•
clear crashinfo:, page D-5
•
clear eventlog, page D-6
•
clear screen, page D-7
•
clock summer-time, page D-8
•
clock timezone, page D-10
•
config, page D-13
•
copy core:, page D-14
•
copy crashinfo:, page D-16
•
copy disk0:, page D-18
•
copy running-config, page D-20
•
copy startup-config, page D-21
•
copy tftp:, page D-26
•
debug, page D-27
•
delete, page D-28
•
dir, page D-29
•
dumpcore process, page D-30
•
end, page D-31
•
exit, page D-32
•
hostname, page D-33
•
interface, page D-34
•
ip address, page D-36
•
ip default gateway, page D-37
•
ip domain-list, page D-38
•
ip domain-lookup, page D-39
•
ip domain-name, page D-40
Cisco Service and Application Module for IP User Guide
OL-13003-06
D-1
Appendix D
•
ip name-server, page D-41
•
logging, page D-42
•
mkdir, page D-43
•
move, page D-44
•
mtu, page D-45
•
ping, page D-46
•
show arp, page D-48
•
show bufferlist, page D-51
•
show clock, page D-52
•
show clock, page D-52
•
show copyright, page D-53
•
show crashinfo, page D-54
•
show debug, page D-55
•
show eventlog, page D-56
•
show gfarstats, page D-58
•
show hosts, page D-60
•
show icmp statistics, page D-61
•
show interface, page D-62
•
show ip interface brief, page D-65
•
show ip interface vlan, page D-66
•
show ixpstats, page D-67
•
show logging, page D-68
•
show processes, page D-69
•
show running-config, page D-70
•
show snmp, page D-71
•
show startup-config, page D-73
•
show system, page D-74
•
show tcp statistics, page D-75
•
show tech-support, page D-76
•
show telnet, page D-78
•
show terminal, page D-79
•
show udp statistics, page D-80
•
show version, page D-81
•
show vlans, page D-83
•
snmp-server community, page D-84
•
snmp-server contact, page D-85
•
snmp-server enable traps, page D-86
•
snmp-server host, page D-87
SAMI COSLI PPC Commands
Cisco Service and Application Module for IP User Guide
D-2
OL-13003-06
Appendix D
SAMI COSLI PPC Commands
•
snmp-server location, page D-89
•
terminal, page D-90
•
telnet maxsessions, page D-92
•
traceroute, page D-93
•
username, page D-95
Cisco Service and Application Module for IP User Guide
OL-13003-06
D-3
Appendix D
SAMI COSLI PPC Commands
clear cores
clear cores
To clear all of the core dumps stored in the core: file system, use the clear cores command.
clear cores
Syntax Description
This command has no keywords or arguments.
Command Modes
EXEC
Command History
Release
Modification
COSLI 1.0
This command was introduced.
Usage Guidelines
To view the list of core files in the core: file system, use the dir core: command.
To delete a specific core dump file from the core: file system, use the delete core: command.
Note
Examples
The PPC creates a core dump when it experiences a fatal error. Core dump information is for Cisco
Technical Assistance Center (TAC) use only. We recommend that you contact TAC for assistance in
interpreting the information in the core dump.
To clear all core dumps, enter:
switch# clear cores
Related Commands
delete
dir
Cisco Service and Application Module for IP User Guide
D-4
OL-13003-06
Appendix D
SAMI COSLI PPC Commands
clear crashinfo:
clear crashinfo:
To clear crash files, use the clear crashinfo: command.
clear crashinfo: [filename]
Syntax Description
filename
Command Modes
EXEC
Command History
Release
Modification
COSLI 1.0
This command was introduced.
(Optional) Name of the crash file. Valid value is a file name up to 80 characters.
Usage Guidelines
To delete files containing crash information, use the clear crashinfo: command. To clear a specific file,
use the clear crashinfo: command with a file name specified.
Examples
To clear all crashinfo files, enter:
switch# clear crashinfo:
Related Commands
delete
dir
Cisco Service and Application Module for IP User Guide
OL-13003-06
D-5
Appendix D
SAMI COSLI PPC Commands
clear eventlog
clear eventlog
To clear the event log, use the clear eventlog command.
clear eventlog
Syntax Description
This command has no keywords or arguments.
Command Modes
EXEC
Command History
Release
Modification
COSLI 1.0
This command was introduced.
Usage Guidelines
Examples
Use the clear eventlog command to clear the event log.
To clear the display screen, enter:
switch# clear eventlog
Related Commands
This command has no related commands.
Cisco Service and Application Module for IP User Guide
D-6
OL-13003-06
Appendix D
SAMI COSLI PPC Commands
clear screen
clear screen
To clear the display screen, use the clear screen command.
clear screen
Syntax Description
This command has no keywords or arguments.
Command Modes
EXEC
Command History
Release
Modification
COSLI 1.0
This command was introduced.
Usage Guidelines
Examples
Use the clear screen command to clear the display screen.
To clear the display screen, enter:
switch# clear screen
Related Commands
This command has no related commands.
Cisco Service and Application Module for IP User Guide
OL-13003-06
D-7
Appendix D
SAMI COSLI PPC Commands
clock summer-time
clock summer-time
To configure a COSLI PPC to change the time automatically to summer time (daylight saving time), use
the clock summer-time command. Use the no form of this command to remove the clock summer-time
setting.
clock summer-time {daylight_timezone_name start_week start_day start_month start_time
end_week end_day end_month end_time daylight_offset | standard time_zone}
no clock summer-time
Syntax Description
Command Modes
daylight_timezone_name
8-letter name of the time zone (for example, PDT) to be displayed when
summer time is in effect.
start_week
Start week for summer time, ranging from 1 through 5.
start_day
Start day for summer time, ranging from Sunday through Saturday.
start_month
Start month for summer time, ranging from January through December.
start_time
Start time (military time) in hours and minutes.
end_week
End week for summer time, ranging from 1 through 5.
end_day
End day for summer time, ranging from Sunday through Saturday.
end_month
End month for summer time, ranging from January through December.
end_time
End time (military format) in hours and minutes.
daylight_offset
Number of minutes to add during summer time. Valid entries are from
1 to 1440. The default is 60.
standard time_zone
Sets the daylight time to a standard time zone that includes an
applicable daylight time start and end range along with a daylight offset.
Enter one of the following well-known time zones:
•
ADT—Atlantic Daylight Time: 2 a.m. first Sunday in April—2
a.m. last Sunday in October, + 60 minutes
•
AKDT—Alaska Standard Daylight Time: 2 a.m. first Sunday in
April—2 a.m. last Sunday in October, + 60 minutes
•
CDT—Central Daylight Time: 2 a.m. first Sunday in April—2 a.m.
last Sunday in October, + 60 minutes
•
EDT—Eastern Daylight Time: 2 a.m. first Sunday in April—2 a.m.
last Sunday in October, + 60 minutes
•
MDT—Mountain Daylight Time: 2 a.m. first Sunday in April—
2 a.m. last Sunday in October, + 60 minutes
•
PDT—Pacific Daylight Time: 2 a.m. first Sunday in April—2 a.m.
last Sunday in October, + 60 minutes
Configuration mode
Cisco Service and Application Module for IP User Guide
D-8
OL-13003-06
Appendix D
SAMI COSLI PPC Commands
clock summer-time
Command History
Release
Modification
COSLI 1.0
This command was introduced.
Usage Guidelines
The first part of the command specifies when summer time begins, and the second part of the command
specifies when summer time ends. All times are relative to the local time zone; the start time is relative
to standard time and the end time is relative to summer time. If the starting month is after the ending
month, the COSLI PPC assumes that you are located in the southern hemisphere.
Examples
To specify that summer time begins on the first Sunday in April at 02:00 and ends on the last Sunday in
October at 02:00, with a daylight offset of 60 minutes, enter:
switch(config)# clock summer-time Pacific 1 Sun Apr 02:00 5 Sun Oct 02:00 60
To remove the clock summer-time setting, enter:
switch(config)# no clock summer-time
Related Commands
show clock
clock timezone
Cisco Service and Application Module for IP User Guide
OL-13003-06
D-9
Appendix D
SAMI COSLI PPC Commands
clock timezone
clock timezone
To set the time zone, use the clock timezone command. Use the no form of this command to configure
independent server groups of Terminal Access Controller Access Control System Plus (TACACS+),
Remote Authentication Dial-In User Service (RADIUS), or Lightweight Directory Access Protocol
(LDAP) servers.
clock timezone {zone_name {+ | –} hours minutes} | {standard time_zone}
no clock timezone
Syntax Description
Command Modes
zone_name 8-letter name of the time zone (for example, PDT) to be displayed when the time zone is
in effect.
hours
Hours offset from Coordinated Universal Time (UTC).
minutes
Minutes offset from UTC. Range is from 0 to 59 minutes.
standard
time_zone
Sets the time to a standard time zone that include an applicable UTC hours offset. Enter
one of the following well-known time zones:
•
ACST—Australian Central Standard Time as UTC + 9.5 hours
•
AKST—Alaska Standard Time as UTC –9 hours
•
AST—Atlantic Standard Time as UTC –4 hours
•
BST—British Summer Time as UTC + 1 hour
•
CEST—Central Europe Summer Time as UTC + 2 hours
•
CET—Central Europe Time as UTC + 1 hour
•
CST—Central Standard Time as UTC –6 hours
•
EEST—Eastern Europe Summer Time as UTC + 3 hours
•
EET—Eastern Europe Time as UTC + 2 hours
•
EST—Eastern Standard Time as UTC –5 hours
•
GMT—Greenwich Mean Time as UTC
•
HST—Hawaiian Standard Time as UTC –10 hours
•
IST—Irish Summer Time as UTC + 1 hour
•
MSD—Moscow Summer Time as UTC + 4 hours
•
MSK—Moscow Time as UTC + 3 hours
•
MST—Mountain Standard Time as UTC –7 hours
•
PST—Pacific Standard Time as UTC –8 hours
•
WEST—Western Europe Summer Time as UTC + 1 hour
•
WST—Western Standard Time as UTC + 8 hours
Configuration mode
Cisco Service and Application Module for IP User Guide
D-10
OL-13003-06
Appendix D
SAMI COSLI PPC Commands
clock timezone
Command History
Usage Guidelines
Release
Modification
COSLI 1.0
This command was introduced.
The COSLI PPC keeps time internally in Universal Time Coordinated (UTC) offset, so this command is
used only for display purposes and when the time is set manually.
Table 4-1 lists common time zone acronyms used for the zone_name argument.
Table 4-1
Acronym
Time Zone Acronyms
Time Zone Name and UTC Offset
Europe
BST
British Summer Time as UTC + 1 hour
CET
Central Europe Time as UTC + 1 hour
CEST
Central Europe Summer Time as UTC + 2 hours
EET
Eastern Europe Time as UTC + 2 hours
EEST
Eastern Europe Summer Time as UTC + 3 hours
GMT
Greenwich Mean Time as UTC
IST
Irish Summer Time as UTC + 1 hour
MSK
Moscow Time as UTC + 3 hours
MSD
Moscow Summer Time as UTC + 4 hours
WET
Western Europe Time as UTC
WEST
Western Europe Summer Time as UTC + 1 hour
United States and Canada
AST
Atlantic Standard Time as UTC –4 hours
ADT
Atlantic Daylight Time as UTC –3 hours
CT
Central Time, either as CST or CDT, depending on the place and time of
the year
CST
Central Standard Time as UTC –6 hours
CDT
Central Daylight Saving Time as UTC –5 hours
ET
Eastern Time, either as EST or EDT, depending on the place and time of
the year
EST
Eastern Standard Time as UTC –5 hours
EDT
Eastern Daylight Saving Time as UTC –4 hours
MT
Mountain Time, either as MST or MDT, depending on the place and time
of the year
MDT
Mountain Daylight Saving Time as UTC –6 hours
MST
Mountain Standard Time as UTC –7 hours
PT
Pacific Time, either as PST or PDT, depending on the place and time of the
year
PDT
Pacific Daylight Saving Time as UTC –7 hours
Cisco Service and Application Module for IP User Guide
OL-13003-06
D-11
Appendix D
SAMI COSLI PPC Commands
clock timezone
Table 4-1
Time Zone Acronyms (continued)
Acronym
Time Zone Name and UTC Offset
PST
Pacific Standard Time as UTC –8 hours
AKST
Alaska Standard Time as UTC –9 hours
AKDT
Alaska Standard Daylight Saving Time as UTC –8 hours
HST
Hawaiian Standard Time as UTC –10 hours
Australia
Examples
CST
Central Standard Time as UTC + 9.5 hours
EST
Eastern Standard/Summer Time as UTC + 10 hours (+11 hours during
summer time)
WST
Western Standard Time as UTC + 8 hours
To set the time zone to PST and to set an UTC offset of –8 hours, enter:
switch(config)# clock timezone PST -8 0
To remove the clock time-zone setting, enter:
switch(config)# no clock timezone PST -8 0
Related Commands
show clock
clock summer-time
Cisco Service and Application Module for IP User Guide
D-12
OL-13003-06
Appendix D
SAMI COSLI PPC Commands
config
config
To enter configuration mode while in EXEC mode, use the configure command.
config [terminal]
Syntax Description
terminal
Defaults
No default behavior or values.
Command Modes
EXEC
Command History
Release
Modification
COSLI 1.0
This command was introduced.
Usage Guidelines
(Optional) Enables you to configure the system from the terminal.
To return to the EXEC mode from the configuration mode, use the exit command.
To execute an EXEC mode command from any of the configuration modes, use the do version of the
command.
Examples
To enter configuration mode from EXEC mode, enter:
switch# config
switch(config)#
Related Commands
exit
Cisco Service and Application Module for IP User Guide
OL-13003-06
D-13
Appendix D
SAMI COSLI PPC Commands
copy core:
copy core:
To copy a core file to a remote server, use the copy core: command.
copy core:filename {disk0:[path/]filename | tftp://server[:port]/path[/filename]}
Syntax Description
filename1
Filename of the core dump residing on the PPC in flash
memory. Use the dir core: command to view the core
dump files available in the core: file system.
disk0:[path/]filename2
Specifies that the file destination is the disk0: directory of
the current context and the filename for the core. If you do
not provide the optional path, the PPC copies the file to
the root directory on the disk0: file system.
tftp://server[:port]/path[/filename]
Specifies the Trivial File Transfer Protocol (TFTP)
network server and optional renamed core dump.
Command Modes
EXEC
Command History
Release
Modification
COSLI 1.0
This command was introduced.
Usage Guidelines
To display the list of available core files, use the dir core: command. Copy the complete filename (for
example, 0x401_vsh_log.25256.tar.gz) into the copy core: command.
When you select a destination file system using tftp:, the PPC does the following:
•
Prompts you for your username and password if the destination file system requires user
authentication.
•
Prompts you for the server information if you do not provide the information with the command.
•
Copies the file to the root directory of the destination file system if you do not provide the path
information.
Cisco Service and Application Module for IP User Guide
D-14
OL-13003-06
Appendix D
SAMI COSLI PPC Commands
copy core:
Examples
To copy a core file from the PPC to a remote TFTP server, enter:
switch# copy core:ppc3_crash.txt tftp://192.168.1.2
Enter the destination filename[]? [ppc3_crash.txt]
Enter username[]? user1
Enter the file transfer mode[bin/ascii]: [bin]
Password:
Passive mode on.
Hash mark printing on (1024 bytes/hash mark).
Note
Related Commands
The bin (binary) file transfer mode is intended for transferring compiled files (executables). The ascii
file transfer mode is intended for transferring text files, such as config files. The default selection of bin
should be sufficient in all cases when copying files to a remote FTP server.
dir
Cisco Service and Application Module for IP User Guide
OL-13003-06
D-15
Appendix D
SAMI COSLI PPC Commands
copy crashinfo:
copy crashinfo:
To copy a crash file to a remote server, use the copy crashinfo: command.
copy crashinfo:filename {disk0:[path/]filename | tftp://server[:port]/path[/filename]}
Syntax Description
filename1
Filename of the crash file residing on the PPC in flash
memory. Use the dir crashinfo: command to view the
crash files available in the crashinfo: file system.
disk0:[path/]filename2
Specifies that the file destination is the disk0: directory of
the current context and the filename for the core. If you do
not provide the optional path, the PPC copies the file to
the root directory on the disk0: file system.
tftp://server[:port]/path[/filename]
Specifies the Trivial File Transfer Protocol (TFTP)
network server and optional renamed crash file.
Command Modes
EXEC
Command History
Release
Modification
COSLI 1.0
This command was introduced.
Usage Guidelines
To display the list of available crash files, use the dir crashinfo: command. Copy the complete filename
(for example, 0x401_vsh_log.25256.tar.gz) into the copy crashinfo: command.
When you select a destination file system using tftp:, the PPC does the following:
•
Prompts you for your username and password if the destination file system requires user
authentication.
•
Prompts you for the server information if you do not provide the information with the command.
•
Copies the file to the root directory of the destination file system if you do not provide the path
information.
Cisco Service and Application Module for IP User Guide
D-16
OL-13003-06
Appendix D
SAMI COSLI PPC Commands
copy crashinfo:
Examples
To copy a crash file from the PPC to a remote TFTP server, enter:
switch# copy crashinfo:ppc3_crash.txt tftp://192.168.1.2
Enter the destination filename[]? [ppc3_crash.txt]
Enter username[]? user1
Enter the file transfer mode[bin/ascii]: [bin]
Password:
Passive mode on.
Hash mark printing on (1024 bytes/hash mark).
Note
Related Commands
The bin (binary) file transfer mode is intended for transferring compiled files (executables). The ascii
file transfer mode is intended for transferring text files, such as config files. The default selection of bin
should be sufficient in all cases when copying files to a remote FTP server.
dir
Cisco Service and Application Module for IP User Guide
OL-13003-06
D-17
Appendix D
SAMI COSLI PPC Commands
copy disk0:
copy disk0:
To copy a file from one directory in the disk0: file system of flash memory to another directory in disk0: or a
network server, use the copy disk0: command.
copy disk0:[path/]filename1 {disk0:[path/]filename2 | tftp://server[:port]/path[/filename] |
running-config | startup-config}
Syntax Description
disk0:[path/]filename1
Specifies the name of the file to copy in the disk0: file
system. Use the dir disk0: command to view the files
available in disk0:. If you do not provide the optional path,
the PPC copies the file from the root directory on the
disk0: file system.
disk0:[path/]filename2
Specifies that the file destination is the disk0: directory of
the current context and the filename for the core. If you do
not provide the optional path, the PPC copies the file to the
root directory on the disk0: file system.
tftp://server[:port]/path[/filename]
Specifies the Trivial File Transfer Protocol (TFTP)
network server and optional renamed file.
running-config
Specifies to replace the running-configuration file that
currently resides on the PPC in volatile memory.
startup-config
Specifies to replace the startup-configuration file that
currently resides on the PPC in flash memory.
Command Modes
EXEC
Command History
Release
Modification
COSLI 1.0
This command was introduced.
Usage Guidelines
When you select a destination file system using tftp:, the PPC does the following:
•
Prompts you for your username and password if the destination file system requires user
authentication.
•
Prompts you for the server information if you do not provide the information with the command.
•
Copies the file to the root directory of the destination file system if you do not provide the path
information.
Cisco Service and Application Module for IP User Guide
D-18
OL-13003-06
Appendix D
SAMI COSLI PPC Commands
copy disk0:
Examples
To copy the file called SAMPLEFILE to the MYSTORAGE directory in flash memory, enter:
switch# copy disk0:samplefile disk0:MYSTORAGE/SAMPLEFILE
Related Commands
dir
Cisco Service and Application Module for IP User Guide
OL-13003-06
D-19
Appendix D
SAMI COSLI PPC Commands
copy running-config
copy running-config
To copy the contents of the running configuration file in RAM (volatile memory) to the startup configuration
file in flash memory (nonvolatile memory) or a network server, use the copy running-config command.
copy running-config {disk0:[path/]filename | startup-config |
tftp://server[:port]/path[/filename]}
Syntax Description
disk0:[path/]filename
Specifies that the running configuration is copied to a file
on the disk0: file system. If you do not provide the
optional path, the PPC copies the file to the root directory
on the disk0: file system.
startup-config
Copies the running configuration file to the startup
configuration file.
tftp://server[:port]/path[/filename]
Specifies the Trivial File Transfer Protocol (TFTP)
network server and optional renamed file.
Command Modes
EXEC
Command History
Release
Modification
COSLI 1.0
This command was introduced.
Usage Guidelines
Examples
When you select a destination file system using tftp:, the PPC does the following:
•
Prompts you for your username and password if the destination file system requires user
authentication.
•
Prompts you for the server information if you do not provide the information with the command.
•
Copies the file to the root directory of the destination file system if you do not provide the path
information.
To save the running-configuration file to the startup-configuration file in flash memory on the PPC,
enter:
switch# copy running-config startup-config
Related Commands
show running-config
show startup-config
Cisco Service and Application Module for IP User Guide
D-20
OL-13003-06
Appendix D
SAMI COSLI PPC Commands
copy startup-config
copy startup-config
To merge the contents of the startup configuration file into the running configuration file or copy the startup
configuration file to a network server, use the copy startup-config command.
copy startup-config {disk0:[path/]filename | running-config |
tftp://server[:port]/path[/filename]}
Syntax Description
disk0:[path/]filename
Specifies that the startup configuration is copied to a file
on the disk0: file system. If you do not provide the
optional path, the PPC copies the file to the root directory
on the disk0: file system.
running-config
Merges contents of the startup configuration file into the
running configuration file.
tftp://server[:port]/path[/filename]
Specifies the Trivial File Transfer Protocol (TFTP)
network server and optional renamed file.
Command Modes
EXEC
Command History
Release
Modification
COSLI 1.0
This command was introduced.
Usage Guidelines
Examples
When you select a destination file system using tftp:, the PPC does the following:
•
Prompts you for your username and password if the destination file system requires user
authentication.
•
Prompts you for the server information if you do not provide the information with the command.
•
Copies the file to the root directory of the destination file system if you do not provide the path
information.
To merge the contents of the startup-configuration file into the running-configuration file in flash
memory, enter:
switch# copy startup-config running-config
Related Commands
show startup-config
Cisco Service and Application Module for IP User Guide
OL-13003-06
D-21
Appendix D
SAMI COSLI PPC Commands
copy-sup
copy-sup
To copy files and running configurations to and from the SUP, use the copy-sup command in privileged
EXEC mode.
copy-sup src_file dst_file
Syntax Description
src_file
Specifies the source file.
dst_file
Specifies the destination file.
Command Default
This command is disabled by default.
Command Modes
Privileged EXEC
Command History
Release
Modification
WSG Release 3.0
This command was introduced.
Usage Guidelines
You can run the copy-sup command in single entity mode.
If the source file is the running-config or a file from one of the following PPC filesystems:
log:
core:
disk0:
Then the destination file is a file at one of the following SUP filesystems:
bootdisk-sup:
bootflash-sup:
disk0-sup:
If the source file is a file from one of the following SUP filesystems:
bootdisk-sup:
bootflash-sup:
disk0-sup:
Then the destination file can be the running-config or a file at one of the following PPC filesystems:
log:
core
disk0:
This command will attach the slot#ppc# tag for either entity all or entity none modes (i.e.
SLOT3SAMIC3_ ) to the front of the file name saved at the SUPs. The commmand will also attach the
“.cfg” tag to the end of the file name when you save the running configuration file to the SUPs.
Cisco Service and Application Module for IP User Guide
D-22
OL-13003-06
Appendix D
SAMI COSLI PPC Commands
copy-sup
You do not need to type in the tags when you specifiy the source or destination file names for copy-sup.
The tags are automatically generated by the command.
The directory names used by this command that refer to the SUP filesystems are:
disk0-sup:
bootdisk-sup:
bootflash-sup:
Examples
Here are examples of the copy-sup command:
copy-sup ?
bootdisk-sup:
Select source file system at the SUP
bootflash-sup: Select source file system at the SUP
core:
Select source file system
disk0-sup:
Select source file system at the SUP
disk0:
Select source file system
log:
Select source file system
running-config Copy running configuration to destination
switch# copy-sup running-config ?
bootdisk-sup:
Select destination file system at the SUP
bootflash-sup: Select destination file system at the SUP
disk0-sup:
Select destination file system at the SUP
switch# copy-sup running-config disk0-sup: ?
<cr> Carriage return.
switch# copy-sup running-config disk0-sup:
Copy File to the Sup
A file at the PPC can be copied to the SUP's disk0, bootflash (or bootdisk) directory:
switch# copy-sup src_file sup-disk0:filename | sup-bootflash:filename |
sup-bootdisk:filename
If the remote filename is not specified, this command will prompt you for the remote file name to be used
on the SUP.
Example 1 (entity none mode):
switch# copy-sup log:messages sup-disk0:myLogMessages
Copying operation succeeded.
switch#
Example 2 (entity node mode):
switch# copy-sup log:messages sup-bootflash:
Enter the destination filename[]?myLogMessages
Copying operation succeeded.
switch#
The following file on the SUP will be created as the result of above command:
bootflash:myLogMessages
Example 3 (entity all mode):
Switch(mode-all)#copy-sup log:messages sup-bootflash:myLogMessages
The following example files are created on the SUP:
SLOT3SAMIC3_myLogMessages
SLOT3SAMIC4_myLogMessages
Cisco Service and Application Module for IP User Guide
OL-13003-06
D-23
Appendix D
SAMI COSLI PPC Commands
copy-sup
SLOT3SAMIC5_myLogMessages
SLOT3SAMIC6_myLogMessages
SLOT3SAMIC7_myLogMessages
SLOT3SAMIC8_myLogMessages
Copy Running Config File to the Sup
Here are examples of the copy-sup command used to copy running configurations to the SUP:
switch# copy-sup running-config sup-disk0:filename | sup-bootflash:filename |
sup-bootdisk:filename
If the remote filename is not specified, this command prompts you for the remote file name to be used
on the SUP. The configuration files at the SUP have the “.cfg.” attached.
Example 1 (entity none mode):
switch# copy-sup running-config sup-bootflash:myconfig
Copying operation succeeded.
switch#
The following file is created on the SUP as the result of the previous command (for example, the
command is entered from slot#3/ppc#5):
bootflash:SLOT3SAMIC5_myconfig.cfg
Example 2 (entity all mode):
switch# copy-sup running-config sup-bootflash:myconfig
Copying operation succeeded.
switch#
The following files are created on the SUP as the result of the previous command:
bootflash:SLOT3SAMIC3_myconfig.cfg
bootflash:SLOT3SAMIC4_myconfig.cfg
bootflash:SLOT3SAMIC5_myconfig.cfg
bootflash:SLOT3SAMIC6_myconfig.cfg
bootflash:SLOT3SAMIC7_myconfig.cfg
bootflash:SLOT3SAMIC8_myconfig.cfg
Copy File from the Sup
Here are examples of the copy-sup command used to copy files from the SUP:
If the remote or local file names are not specified, this command prompt you for the local and remote
file names to be copied.
Example 1 (entity none mode),
switch# copy-sup sup-bootflash:myFileAtSup disk0:myFile
Copying operation succeeded.
The following file from the SUP is copied as the result of the previous command:
bootflash:myFileAtSup
Example 2 (entity all mode),
switch# copy-sup sup-bootflash:myFileAtSup disk0:myFile
Copying operation succeeded.
The following file from the SUP will be copied as the result of above command:
bootflash:myFileAtSup
Cisco Service and Application Module for IP User Guide
D-24
OL-13003-06
Appendix D
SAMI COSLI PPC Commands
copy-sup
Each PPC will have the file disk0:myFile.
Copy Running Config file from the Sup
Here are examples of the copy-sup command used to copy running configuration files from the SUP:
switch# copy-sup sup-disk0:filename | sup-bootflash:filename | sup-bootdisk:filename
running-config
If the remote file name is not specified, this command will prompt the user for the remote config file
name to be copied.
Example 1 (entity none mode),
switch# copy-sup sup-bootflash:myConfig running-config
Copying operation succeeded.
As the result of issuing the previous command, the following file from the SUP is copied (for example,
the command is entered from slot#3/ppc#5), and the current running configuration is replaced with it:
bootflash:SLOT3SAMIC5_myConfig.cfg
Example 2 (entity all mode),
switch# copy-sup sup-bootflash:myConfig running-config
Copying operation succeeded.
The following files from the SUP will be copied as the result of above command:
bootflash:SLOT3SAMIC3_myConfig.cfg
bootflash:SLOT3SAMIC4_myConfig.cfg
bootflash:SLOT3SAMIC5_myConfig.cfg
bootflash:SLOT3SAMIC6_myConfig.cfg
bootflash:SLOT3SAMIC7_myConfig.cfg
bootflash:SLOT3SAMIC8_myConfig.cfg
The running configuration of each of the PPCs is replaced by the corresponding file.
Cisco Service and Application Module for IP User Guide
OL-13003-06
D-25
Appendix D
SAMI COSLI PPC Commands
copy tftp:
copy tftp:
To copy a file, software image, running-configuration file, or startup-configuration file from a remote
Trivial File Transfer Protocol (TFTP) server to a location on the PPC, use the copy tftp: command.
copy tftp://server[:port]/path[/filename] {disk0:[path/]filename | image:[image_name] |
running-config | startup-config}
Syntax Description
tftp://server[:port]/path[/filename]
Specifies the TFTP network server and optional renamed file.
disk0:[path/]filename
Specifies that the file destination is the disk0: directory of the
current context and the filename. If you do not provide the
optional path, the PPC copies the file to the root directory on the
disk0: file system.
image: [image_name]
Specifies to copy a system software image to flash memory. Use
the boot system command in configuration mode to specify the
BOOT environment variable. The BOOT environment variable
specifies a list of image files on various devices from which the
PPC can boot at startup. The image_name argument is optional.
If you do not enter a name, the PPC uses the source filename.
running-config
Specifies to replace the running-configuration file that currently
resides on the PPC in RAM (volatile memory).
startup-config
Specifies to replace the startup-configuration file that currently
resides on the PPC in flash memory (nonvolatile memory).
Command Modes
EXEC
Command History
Release
Modification
COSLI 1.0
This command was introduced.
Usage Guidelines
Use the copy tftp: command to copy a file from a remote TFTP server to a location on the PPC.
Examples
To copy a startup-configuration file from a remote TFTP server to the PPC, enter:
switch# copy tftp://192.168.1.2/startup_config_PPC3 startup-config
Related Commands
show running-config
show startup-config
Cisco Service and Application Module for IP User Guide
D-26
OL-13003-06
Appendix D
SAMI COSLI PPC Commands
debug
debug
To enable syslog debugging functions on a PPC, use the debug command.
debug logging level num
Syntax Description
level num
Defaults
No default behavior or values.
Command Modes
EXEC
Command History
Release
Modification
COSLI 1.0
This command was introduced.
Specifies the level of syslog debugging. Valid value is a number 1 to 9.
Usage Guidelines
Because debugging output is assigned high priority in the CPU process, it can diminish the performance
of the router or even render it unusable. For this reason, use debug commands only to troubleshoot
specific problems or during troubleshooting sessions with Cisco technical support staff. Moreover, it is
best to use debug commands during periods of lower network traffic and fewer users. Debugging during
these periods decreases the likelihood that increased debug command processing overhead will affect
system use.
Examples
To enable syslog debugging to level 5, enter:
switch# debug logging level 5
Related Commands
show debug
Cisco Service and Application Module for IP User Guide
OL-13003-06
D-27
Appendix D
SAMI COSLI PPC Commands
delete
delete
To delete a specified file in the PPC file system, use the delete command.
delete {core:filename | disk0:[path/]filename}
Syntax Description
core:filename
Deletes the specified file from the core: file system.
disk0:[path/]filename
Deletes the specified file from the disk0: file system. If you do not
specify the optional path, the PPC looks for the file in the root directory
of the disk0: file system.
Defaults
No default behavior or values.
Command Modes
EXEC
Command History
Release
Modification
COSLI 1.0
This command was introduced.
Usage Guidelines
If you do not specify a filename with the file system keyword, you will be prompted for a filename.
To display the list of files that reside in a file system, use the dir command.
Examples
To delete the file 0x401_VSH_LOG.25256.TAR.GZ from the core: file system, enter:
switch# delete core:0x401_VSH_LOG.25256.TAR.GZ
Related Commands
dir
Cisco Service and Application Module for IP User Guide
D-28
OL-13003-06
Appendix D
SAMI COSLI PPC Commands
dir
dir
To display the contents of a specified PPC file system, use the dir command.
dir {core: | crashinfo: | disk0: | log:}
Syntax Description
core:
Displays the contents of the core: file system.
crashinfo:
Displays the contents of the crashinfo: file system.
disk0:
Displays the contents of the disk0: file system.
log:
Displays the contents of the log: file system.
Defaults
No default behavior or values.
Command Modes
EXEC
Command History
Release
Modification
COSLI 1.0
This command was introduced.
Usage Guidelines
To delete a file from a file system, use the delete command.
To delete all core dumps, use the clear cores command.
Examples
To display the contents of the drive0: file system, enter:
switch# dir disk0:
Related Commands
clear cores
delete
Cisco Service and Application Module for IP User Guide
OL-13003-06
D-29
Appendix D
SAMI COSLI PPC Commands
dumpcore process
dumpcore process
To manually generate a core dump for a PPC process, use the dumpcore process command in EXEC
mode.
dumpcore process process-name pid pid
Syntax Description
process process-name
Name of the process for which you want to manually generate a core dump.
Enter the name of a process up to 80 characters.
pid pid
Process instance identifier (PID).
Defaults
No default behavior or values.
Command Modes
EXEC
Command History
Release
Modification
COSLI 1.0
This command was introduced.
Usage Guidelines
Use the dumpcore process command to manually generate a core dump for PPC process.
Examples
To manually generate a debug core file for PPC processes, enter:
switch# dumpcore process bash pid 419
Related Commands
clear cores
delete
show processes
Cisco Service and Application Module for IP User Guide
D-30
OL-13003-06
Appendix D
SAMI COSLI PPC Commands
end
end
To exit from configuration mode and return to EXEC mode, use the end command.
end
Syntax Description
This command has no keywords or arguments.
Command Modes
Configuration mode
Command History
Release
Modification
COSLI 1.0
This command was introduced.
Usage Guidelines
Examples
You can also press Ctrl-Z or enter the exit command to exit configuration mode.
To exit from configuration mode and return to EXEC mode, enter:
switch(config)# end
switch#
Related Commands
This command has no related commands.
Cisco Service and Application Module for IP User Guide
OL-13003-06
D-31
Appendix D
SAMI COSLI PPC Commands
exit
exit
To exit from the current mode and return to the previous mode, use the exit command.
exit
Syntax Description
This command has no keywords or arguments.
Command Modes
All configuration modes
Command History
Release
Modification
COSLI 1.0
This command was introduced.
Usage Guidelines
In configuration mode, the exit command transitions to the EXEC mode.
In EXEC mode, logs out of the CLI session.
In all other configuration modes, the exit command transitions to the previous configuration mode.
You can also press Ctrl-Z, enter the end command, or enter the exit command to exit configuration
mode.
Examples
To exit from configuration mode and return to EXEC mode, enter:
switch(config)# exit
switch#
To exit from interface configuration mode and return to configuration mode, enter:
switch(config-if)# exit
switch(config)#
Related Commands
This command has no related commands.
Cisco Service and Application Module for IP User Guide
D-32
OL-13003-06
Appendix D
SAMI COSLI PPC Commands
hostname
hostname
To specify a hostname for the COSLI PPC, use the hostname command. The hostname is used for the
command line prompts and default configuration filenames. If you establish sessions to multiple devices,
the hostname helps you track where you enter commands. Use the no form of this command to reset the
hostname to the default of switch.
hostname name
no hostname [name]
Syntax Description
name
Command Modes
Configuration mode
Command History
Release
Modification
COSLI 1.0
This command was introduced.
Usage Guidelines
New hostname for the COSLI PPC. Enter a case-sensitive text string that contains from 1 to
32 alphanumeric characters.
By default, the hostname for the COSLI PPC is switch.
The hostname is used for the command line prompts and default configuration filenames. If you establish
sessions to multiple devices, the hostname helps you track where you enter commands.
Examples
To change the hostname of the COSLI PPC from switch to PPC_5, enter:
switch(config)# hostname PPC_5
PPC_5(config)#
Related Commands
This command has no related commands.
Cisco Service and Application Module for IP User Guide
OL-13003-06
D-33
Appendix D
SAMI COSLI PPC Commands
interface
interface
To create a VLAN interface, use the interface command. The CLI prompt changes to (config-if). Use
the no form of this command to remove the interface.
interface vlan number
no interface vlan number
Syntax Description
number
Command Modes
Global configuration
Command History
Release
Modification
COSLI 1.0
This command was introduced.
WSG Release 3.0
The ipv6 address and alias keywords were added.
Usage Guidelines
Assigns the VLAN to the context and accesses interface configuration mode
commands for the VLAN. The number argument is the number for a VLAN
assigned to the PPC. Valid value is a number between 2 and 4094.
Use the interface vlan command to configure a VLAN interface on a PPC.
Cisco WSG Release 3.0 and above allows you to configure an IPv6 address and alias on the interface.
Each interface is allowed to have one or both IPv4 address/alias and IPv6 address/alias.
While in interface configuration mode, you can use the following commands:
Note
•
alias—Alias IPv4 address for the interface
•
do—Issue EXEC mode command from configuration mode
•
end—Exit configuration mode
•
description—Description for the interface
•
ip address—IPv4 address for the interface
•
ipv6 address—IPv6 address for the interface
•
ipv6 alias—Alias IPv6 address for the interface
•
mtu—Maximum Transmission Unit (MTU) for the interface
•
no—Negate an interface configuration command or return it to its default value
•
shutdown—Shut down the interface
•
vrf—Specify the VRF for the interface
This CLI is a node-specific command and cannot be executed under entity-all mode.
Cisco Service and Application Module for IP User Guide
D-34
OL-13003-06
Appendix D
SAMI COSLI PPC Commands
interface
Examples
To create VLAN interface 100 and access interface configuration mode, enter:
switch(config)# interface vlan 100
switch(config-if)# ipv6 ?
address
IPv6 address of interface
alias
IPv6 alias address of interface
wsg(config-if)# ipv6 address ?
<X:X:X::X/n> Enter an IPv6 prefix
wsg(config-if)# ipv6 address 2001:88:88:94::/96 ?
<cr>
Carriage return
autoconfig
Obtain address using auto configuration
wsg(config-if)# ipv6 alias ?
<X:X:X::X/n> Enter an IPv6 prefix
Each interface is allowed to have one or both IPv4 address/alias and IPv6 address/alias. For example,
interface vlan 10
ip address 10.10.10.3 255.255.255.0
alias 10.10.10.1 255.255.255.0
ipv6 address 2001:88:88:94::4/96
ipv6 alias
2001:88:88:94::1/96
Related Commands
show interface
Cisco Service and Application Module for IP User Guide
OL-13003-06
D-35
Appendix D
SAMI COSLI PPC Commands
ip address
ip address
To set or modify an IP address for an interface, use the ip address command in interface configuration
mode. To remove an IP address or disable IP processing, use the no form of this command.
ip address ip-address mask
no ip address
Syntax Description
ip-address
IPv4 address.
mask
Mask for the associated IP subnet.
Defaults
No IP address is defined for the interface.
Command Modes
Interface configuration
Command History
Release
Modification
COSLI 1.0
This command was introduced.
Usage Guidelines
To configure an IPv4 address for the VLAN interface on a PPC, use the ip address interface
configuration command.
Examples
To configure an IP address for interface VLAN 100, enter the following commands:
switch(config)# interface vlan 100
switch(config-if)# ip address ip address
Related Commands
show interface
Cisco Service and Application Module for IP User Guide
D-36
OL-13003-06
Appendix D
SAMI COSLI PPC Commands
ip default gateway
ip default gateway
To define or change a default gateway (router), use the ip default gateway command. To disable this
function, use the no form of this command.
ip default gateway ip-address
no ip default gateway ip-address
Syntax Description
ip-address
Command Modes
Configuration mode
Command History
Release
Modification
COSLI 1.0
This command was introduced.
IPv4 address of the default gateway.
Usage Guidelines
Define default gateway using the ip default gateway command.
Examples
For example, to configure a default gateway with 192.31.7.18 as its IP address, enter:
switch(config)# ip default gateway 192.31.7.18
Related Commands
show running-config
Cisco Service and Application Module for IP User Guide
OL-13003-06
D-37
Appendix D
SAMI COSLI PPC Commands
ip domain-list
ip domain-list
To configure a domain name search list, use the ip domain-list command. The domain name list can
contain a maximum of three domain names. Use the no form of this command to remove a domain name
from the list.
ip domain-list name
no ip domain-list name
Syntax Description
name
Command Modes
Configuration mode
Command History
Release
Modification
COSLI 1.0
This command was introduced.
Usage Guidelines
Domain name. Enter an unquoted text string with no spaces and a maximum of
85 alphanumeric characters.
You can configure a Domain Name System (DNS) client on the SAMI COSLI PPC to communicate with
a DNS server to provide hostname-to-IP-address translation for hostnames in CRLs for the client
authentication feature. For unqualified hostnames (hostnames that do not contain a domain name), you
can configure a default domain name or a list of domain names that the PPC can use to:
•
Complete the hostname
•
Attempt a hostname-to-IP-address resolution with a DNS server
If you configure both a domain name list and a default domain name, the PPC uses only the domain name
list and not the single default name. After you have enabled domain name lookups and configured a
domain name list, the PPC uses each domain name in turn until it can resolve a single domain name into
an IP address.
Examples
For example, to configure a domain name list, enter:
switch(config)# ip domain-list cisco.com
switch(config)# ip domain-list abc.com
switch(config)# ip domain-list xyz.com
To remove a domain name from the list, enter:
switch(config)# no ip domain-list xyz.com
Related Commands
show running-config
ip domain-lookup
ip domain-name
Cisco Service and Application Module for IP User Guide
D-38
OL-13003-06
Appendix D
SAMI COSLI PPC Commands
ip domain-lookup
ip domain-lookup
To enable the PPC to perform a domain lookup (host-to-address translation) with a DNS server, use the
ip domain-lookup command. By default, this command is disabled. Use the no form of this command
to return the state of domain lookups to the default value of disabled.
ip domain-lookup
no ip domain-lookup
Syntax Description
This command has no keywords or arguments.
Command Modes
Configuration mode
Command History
Release
Modification
COSLI 1.0
This command was introduced.
Usage Guidelines
You can configure a Domain Name System (DNS) client on the PPC to communicate with a DNS server
to provide hostname-to-IP-address translation for hostnames in CRLs for the client authentication
feature.
Before you configure a DNS client on the PPC, ensure that one or more DNS name servers are properly
configured and are reachable. Otherwise, translation requests (domain lookups) from the DNS client will
be discarded. You can configure a maximum of three name servers. The PPC attempts to resolve the
hostnames with the configured name servers in order until the translation succeeds. If the translation
fails, the PPC reports an error.
For unqualified hostnames (hostnames that do not contain a domain name), you can configure a default
domain name or a list of domain names that the PPC can use to do the following:
Examples
•
Complete the hostname
•
Attempt a hostname-to-IP-address resolution with a DNS server
For example, to enable domain lookups, enter:
switch(config)# ip domain-lookup
To return the state of domain lookups to the default value of disabled, enter:
switch(config)# no ip domain-lookup
Related Commands
show running-config
ip domain-list
ip domain-name
ip name-server
Cisco Service and Application Module for IP User Guide
OL-13003-06
D-39
Appendix D
SAMI COSLI PPC Commands
ip domain-name
ip domain-name
To configure a default domain name, use the ip domain-name command. The domain name list can
contain a maximum of three domain names. Use the no form of this command to remove a domain name
from the list.
ip domain-name name
no ip domain-name name
Syntax Description
name
Command Modes
Configuration mode
Command History
Release
Modification
COSLI 1.0
This command was introduced.
Default domain name. Enter an unquoted text string with no spaces and a
maximum of 85 alphanumeric characters.
Usage Guidelines
The DNS client feature allows you to configure a default domain name that the PPC uses to complete
unqualified hostnames. An unqualified hostname does not contain a domain name (any name without a
dot). When domain lookups are enabled and a default domain name is configured, the PPC appends a
dot (.) and the configured default domain name to the unqualified host name and attempts a domain
lookup.
Examples
For example, to specify a default domain name of cisco.com, enter:
switch(config)# ip domain-name cisco.com
In the above example, the PPC appends cisco.com to any unqualified host name in a CRL before the PPC
attempts to resolve the host name to an IP address using a DNS name server.
To remove the default domain from the configuration, enter:
switch(config)# no ip domain-name cisco.com
Related Commands
show running-config
ip domain-list
ip domain-lookup
Cisco Service and Application Module for IP User Guide
D-40
OL-13003-06
Appendix D
SAMI COSLI PPC Commands
ip name-server
ip name-server
To configure a DNS name server on the PPC, use the ip name-server command. You can configure a
maximum of three DNS name servers. Use the no form of this command to remove a name server from
the list.
ip name-server ip_address
no ip name-server ip_address
Syntax Description
ip_address
Command Modes
Configuration mode
Command History
Release
Modification
COSLI 1.0
This command was introduced.
IPv4 address of a name server. Enter the address in dotted decimal notation (for
example, 192.168.12.15). You can enter up to three name server IP addresses in
one command line.
Usage Guidelines
To translate a hostname to an IP address, you must configure one or more (maximum of three) existing
DNS name servers on the PPC. Ping the IP address of each name server before you configure it to ensure
that the server is reachable.
Examples
For example, to configure three name servers for the DNS client feature, enter:
switch(config)# ip name-server 192.168.12.15 192.168.12.16 192.168.12.17
To remove a name server from the list, enter:
switch(config)# no ip name-server 192.168.12.15
Related Commands
show running-config
(config) ip domain-lookup
Cisco Service and Application Module for IP User Guide
OL-13003-06
D-41
Appendix D
SAMI COSLI PPC Commands
logging
logging
To configure the IP address of the external logging server, use the logging command in global
configuration mode. Use the no form of the command to remove the IP address.
logging {ip A.B.C.D | ipv6 X:X:X::X | lineread}
no logging {ip A.B.C.D | ipv6 X:X:X::X | lineread}
Syntax Description
A.B.C.D
Specifies the IPv4 address of the external logging server.
X:X:X::X
Specifies the IPv6 address of the external logging server.
lineread
Configures the number of lines to read from the log.
Value between 1 to 100000.
Defaults
By default, this command is not configured.
Command Modes
Global configuration
Command History
Release
Modification
COSLI 1.0
This command was introduced.
WSG Release 3.0
Added support for IPv6.
Usage Guidelines
Examples
None.
The following example configures 5000 lines to be read:
switch(config)# logging lineread 5000
Related Commands
show logging
Cisco Service and Application Module for IP User Guide
D-42
OL-13003-06
Appendix D
SAMI COSLI PPC Commands
mkdir
mkdir
To create a new directory in disk0:, use the mkdir disk0: command.
mkdir disk0:[path/]directory_name
Syntax Description
[path/]directory_name
Defaults
No default behavior or values.
Command Modes
EXEC
Command History
Release
Modification
COSLI 1.0
This command was introduced.
Name that you assign to the new directory. Specify the optional path if you
want to create a directory within an existing directory.
Usage Guidelines
If a directory with the same name already exists, the PPC does not create the new directory and a
“Directory already exists” message appears.
Examples
To create a directory in disk0: called TEST_DIRECTORY, enter:
switch# mkdir disk0:TEST_DIRECTORY
Related Commands
dir
rmdir
Cisco Service and Application Module for IP User Guide
OL-13003-06
D-43
Appendix D
SAMI COSLI PPC Commands
move
move
To move a file between directories in the disk0: file system, use the move disk0: command.
move disk0:[/file_path/][filename] disk0:[/destination_path/][filename]
Syntax Description
disk0:
Indicates the disk0: file system of the current context.
file_path
(Optional) Path of the source directory.
filename
(Optional) Name of the file to move in the disk0: file system.
destination_path
(Optional) Path of the destination directory.
filename
(Optional) Name of the file in the destination directory.
Defaults
No default behavior or values.
Command Modes
EXEC
Command History
Release
Modification
COSLI 1.0
This command was introduced.
Usage Guidelines
If a file with the same name already exists in the destination directory, that file is overwritten by the file
that you move.
Examples
To move the file called SAMPLEFILE in the root directory of disk0: to the MYSTORAGE directory in
disk0:, enter:
switch# move disk0:SAMPLEFILE disk0:MYSTORAGE/SAMPLEFILE
Related Commands
dir
Cisco Service and Application Module for IP User Guide
D-44
OL-13003-06
Appendix D
SAMI COSLI PPC Commands
mtu
mtu
To adjust the maximum packet size or maximum transmission unit (MTU) size, use the mtu command
in interface configuration mode. To restore the MTU value to its original default value, use the no form
of this command.
mtu bytes
no mtu
Syntax Description
mtu
Defaults
1500
Command Modes
Interface configuration
Command History
Release
Modification
COSLI 1.0
This command was introduced.
MTU size, in bytes. Configures the MTU size, in bytes. The valid values are from
64 to 9216.
Usage Guidelines
To configure am MTU size for the VLAN interface on a PPC, use the mtu interface configuration
command.
Examples
The following example specifies an MTU of 1976 for VLAN 100:
switch(config)# interface vlan 100
switch(config-if)# mtu 1976
Related Commands
show interface
Cisco Service and Application Module for IP User Guide
OL-13003-06
D-45
Appendix D
SAMI COSLI PPC Commands
ping
ping
To verify the connectivity of a remote host or server by sending echo messages from the PPC, use the
ping command.
ping [A.B.C.D [vrf vrfname] | X:X:X::X] [count count] [size size]
Syntax Description
A.B.C.D
IPv4 address of the remote host to ping.
vrfname
Specifies the name of the VRF to ping.
X:X:X::X
IPv6 address of the remote host to ping.
count
Specifies the number of echo messages to sent from the PPC.
size
Specifies the size of the messages sent.
Defaults
None.
Command Modes
EXEC
Command History
Release
Modification
COSLI 1.0
This command was introduced.
WSG Release 3.0
Added support IPv6 and VRF.
Usage Guidelines
The ping command sends an echo request packet to an address from the PPC and then awaits a reply.
The ping output can help you evaluate path-to-host reliability, delays over displaying the name of the
current directory and the path, and whether the host can be reached or is functioning.
To terminate a ping session before it reaches its timeout value, press Ctrl-C.
Enter the ping command without specifying an IP address to customize the ping session by entering
values such as the repeat count, datagram size, etc.
Examples
To ping a server with an IP address of 196.168.1.2 using the default ping session values, enter:
switch# ping 196.168.1.2
To ping a server and change the ping session values, enter:
switch# ping
Target IP address: 172.5.31.152
Repeat count [5]:
Datagram size [100]:
PING 1.5.31.152 (1.5.31.152): 100 data bytes
ping: sendto: Network is unreachable
Cisco Service and Application Module for IP User Guide
D-46
OL-13003-06
Appendix D
SAMI COSLI PPC Commands
ping
In WSG Release 3.0 and above, you can ping an IPv4 or IPv6 address:
switch# ping ?
<A.B.C.D>|<X:X:X::X>
Enter an IP address
switch# ping 2001:88:88:94::1 count 3
PING 2001:88:88:94::1 (2001:88:88:94::1): 56
64 bytes from 2001:88:88:94::1: seq=0 ttl=64
64 bytes from 2001:88:88:94::1: seq=1 ttl=64
64 bytes from 2001:88:88:94::1: seq=2 ttl=64
data bytes
time=0.7 ms
time=0.5 ms
time=0.6 ms
You can also ping a specific IPv4 VRF:
switch# ping 196.168.1.2 vrf red
Related Commands
There are no related commands.
Cisco Service and Application Module for IP User Guide
OL-13003-06
D-47
Appendix D
SAMI COSLI PPC Commands
show arp
show arp
To display the current active IP address-to-MAC address mapping in the Address Resolution
Protocol (ARP) table, statistics, or inspection or timeout configuration, use the show arp command.
show arp [|] [>]
Syntax Description
|
(Optional) Pipe character (|) for enabling an output modifier that filters
the command output. For a complete description of the options available
for filtering the command output, see the show command.
>
(Optional) Greater-than character (>) for enabling an output modifier
that redirects the command output to a file. For a complete description
of the options available for redirecting the command output, see the
show command.
Defaults
No default behavior or values.
Command Modes
EXEC
Command History
Release
Modification
COSLI 1.0
This command was introduced.
Usage Guidelines
The show arp command without options displays the active IP address-to-MAC address mapping in the
ARP table.
Examples
To display the current active IP address-to-MAC address mapping in the ARP table, enter:
switch# show arp
Context Admin
========================================================================================
IP ADDRESS
HWTYPE MAC-ADDRESS
FLAG MASK
InterfaceType
========================================================================================
127.0.0.28
ether
00:01:02:03:04:05
CM
eth0
127.0.0.27
ether
00:01:02:03:04:05
CM
eth0
127.0.0.51
ether
00:01:02:03:04:05
CM
eth0
127.0.0.24
ether
00:01:02:03:04:05
CM
eth0
127.0.0.26
ether
00:01:02:03:04:05
CM
eth0
127.0.0.25
ether
00:01:02:03:04:05
CM
eth0
========================================================================================
Cisco Service and Application Module for IP User Guide
D-48
OL-13003-06
Appendix D
SAMI COSLI PPC Commands
show arp
Table 2 describes the fields in the show arp command output.
Table 2
show arp Command Field Descriptions
Field
Description
Context
The current context—Admin.
IP ADDRESS
The IP address of the system for ARP mapping
HWTYPE
MAC-ADDRESS
The MAC address of the system mapped to the IP address.
FLAG
MASK
InterfaceType
Related Commands
The type of ARP entry. The possible types are LEARNED,
GATEWAY, INTERFACE, VSERVER, RSERVER, and NAT.
There are no related commands.
Cisco Service and Application Module for IP User Guide
OL-13003-06
D-49
Appendix D
SAMI COSLI PPC Commands
show buffer
show buffer
To display the contents of the trace buffer, use the show buffer command.
show buffer name
Syntax Description
name
Defaults
No default behavior or values.
Command Modes
EXEC
Command History
Release
Modification
COSLI 1.0
This command was introduced.
Name of the trace buffer to display.
Usage Guidelines
The show buffer command is intended for use by trained Cisco personnel for troubleshooting purposes
only.
Examples
To display the control plane buffer event history, enter:
switch# show buffer
Related Commands
This command has no related commands.
Cisco Service and Application Module for IP User Guide
D-50
OL-13003-06
Appendix D
SAMI COSLI PPC Commands
show bufferlist
show bufferlist
To displays the names of all trace buffers, use the show buffer command.
show bufferlist [|] [>]
Syntax Description
|
(Optional) Pipe character (|) for enabling an output modifier that filters
the command output. For a complete description of the options available
for filtering the command output, see the show command.
>
(Optional) Greater-than character (>) for enabling an output modifier
that redirects the command output to a file. For a complete description
of the options available for redirecting the command output, see the
show command.
Defaults
No default behavior or values.
Command Modes
EXEC
Command History
Release
Modification
COSLI 1.0
This command was introduced.
Usage Guidelines
The show bufferlist command is intended for use by trained Cisco personnel for troubleshooting
purposes only.
Examples
To display the control plane buffer event history, enter:
switch# show bufferlist
======================
Buffer Name List
======================
Related Commands
This command has no related commands.
Cisco Service and Application Module for IP User Guide
OL-13003-06
D-51
Appendix D
SAMI COSLI PPC Commands
show clock
show clock
To display the current date and time settings of the system clock, use the show clock command.
show clock [|] [>]
Syntax Description
|
(Optional) Pipe character (|) for enabling an output modifier that filters the
command output. For a complete description of the options available for
filtering the command output, see the show command.
>
(Optional) Greater-than character (>) for enabling an output modifier that
redirects the command output to a file. For a complete description of the
options available for redirecting the command output, see the show
command.
Defaults
No default behavior or values.
Command Modes
EXEC
Command History
Release
Modification
COSLI 1.0
This command was introduced.
Usage Guidelines
To configure the system clock setting, use the clock command in the EXEC mode.
Examples
To display the current clock settings, enter:
switch# show clock
Fri Feb 13 19:18:13 UTC 2009
Related Commands
clock summer-time
clock timezone
Cisco Service and Application Module for IP User Guide
D-52
OL-13003-06
Appendix D
SAMI COSLI PPC Commands
show copyright
show copyright
To display the software copyright information for the PPC, use the show copyright command.
show copyright [|] [>]
Syntax Description
|
(Optional) Pipe character (|) for enabling an output modifier that filters the command output.
For a complete description of the options available for filtering the command output, see the
show command.
>
(Optional) Greater-than character (>) for enabling an output modifier that redirects the
command output to a file. For a complete description of the options available for redirecting
the command output, see the show command.
Defaults
No default behavior or values.
Command Modes
EXEC
Command History
Release
Modification
COSLI 1.0
This command was introduced.
Usage Guidelines
Use the show copyright command to display the copyright information for the SAMI PPC.
Examples
To display the PPC software copyright information, enter:
switch# show copyright
Related Commands
This command has no related commands.
Cisco Service and Application Module for IP User Guide
OL-13003-06
D-53
Appendix D
SAMI COSLI PPC Commands
show crashinfo
show crashinfo
To display the contents of the crash file stored in Flash memory, enter the show crashinfo command in
EXEC mode.
show crashinfo [filename]
Syntax Description
filename (Optional) Name of the crash file.
Defaults
No default behavior or values.
Command Modes
EXEC
Command History
Release
Modification
COSLI 1.0
This command was introduced.
Usage Guidelines
The first string of the crash file is “: Saved_Crash” and the last string is “: End_Crash”.
If there is no crash data saved in flash, or if the crash data has been cleared by entering the
clear crashinfo command, the show crashinfo command displays an error message.
Examples
To display the PPC software copyright information, enter:
switch# show crashinfo
Related Commands
This command has no related commands.
Cisco Service and Application Module for IP User Guide
D-54
OL-13003-06
Appendix D
SAMI COSLI PPC Commands
show debug
show debug
To display debugging flags that have been set on a PPC, use the show debug command.
show debug [|] [>]
Syntax Description
|
(Optional) Pipe character (|) for enabling an output modifier that filters the
command output.
>
(Optional) Greater-than character (>) for enabling an output modifier that
redirects the command output to a file.
Defaults
No default behavior or values
Command Modes
EXEC
Command History
Release
Modification
COSLI 1.0
This command was introduced.
Usage Guidelines
The show debug command lists debugging flags that have been set on the PPC.
Examples
To display the debug flags set on a PPC, enter:
switch# show debug
No debug flag set
Related Commands
This command has no related commands.
Cisco Service and Application Module for IP User Guide
OL-13003-06
D-55
Appendix D
SAMI COSLI PPC Commands
show eventlog
show eventlog
To display the event log, use the show eventlog command in EXEC mode.
show eventlog [|] [>]
Syntax Description
|
(Optional) Pipe character (|) for enabling an output modifier that filters the
command output.
>
(Optional) Greater-than character (>) for enabling an output modifier that
redirects the command output to a file.
Defaults
No default behavior or values
Command Modes
EXEC
Command History
Release
Modification
COSLI 1.0
This command was introduced.
Usage Guidelines
The show eventlog command lists system events that have occurred on the PPC.
Examples
To display a list of events that have occurred on a PPC, enter:
switch# show eventlog
Feb 13 06:40:06 cpu0 notice syslog-ng[380]: syslog-ng starting up; version=\'2.0.9\'
Feb 13 06:40:06 cpu0 info kernel: Using MPC8548 BOUNCER machine description
Feb 13 06:40:06 cpu0 info kernel: Memory CAM mapping: CAM0=1024Mb, CAM1=0Mb, CAM2=0Mb
residual: 0Mb
Feb 13 06:40:06 cpu0 notice kernel: Linux version
2.6.21_mvlcge500-octeon-mips64_octeon_v2_be (vvaidhya@srg-mcs-3) (gcc version 4.2.0
(MontaVista 4.2.0-16.0.23.custom 2008-07-02)) #1 Mon Feb 9 16:03:50 PST 2009
Feb 13 06:40:06 cpu0 debug kernel: Found legacy serial port 0 for
/soc8548@f7000000/serial@4500
Feb 13 06:40:06 cpu0 debug kernel: mem=f7004500, taddr=f7004500, irq=0, clk=500000000,
speed=9600
Feb 13 06:40:06 cpu0 debug kernel: Found legacy serial port 1 for
/soc8548@f7000000/serial@4600
Feb 13 06:40:06 cpu0 debug kernel: mem=f7004600, taddr=f7004600, irq=0, clk=500000000,
speed=9600
Feb 13 06:40:06 cpu0 debug kernel: Entering add_active_range(0, 262144, 524288) 0 entries
of 256 used
Feb 13 06:40:06 cpu0 debug kernel: Top of RAM: 0x80000000, Total RAM: 0x40000000
Feb 13 06:40:06 cpu0 debug kernel: Memory hole size: 1024MB
Feb 13 06:40:06 cpu0 warning kernel: Zone PFN ranges:
Feb 13 06:40:06 cpu0 warning kernel: DMA
262144 ->
524288
Feb 13 06:40:06 cpu0 warning kernel: Normal
524288 ->
524288
Feb 13 06:40:06 cpu0 warning kernel: early_node_map[1] active PFN ranges
Feb 13 06:40:06 cpu0 warning kernel: 0:
262144 ->
524288
Cisco Service and Application Module for IP User Guide
D-56
OL-13003-06
Appendix D
SAMI COSLI PPC Commands
show eventlog
Feb 13 06:40:06 cpu0
Feb 13 06:40:06 cpu0
Feb 13 06:40:06 cpu0
Feb 13 06:40:06 cpu0
Feb 13 06:40:06 cpu0
Feb 13 06:40:06 cpu0
Feb 13 06:40:06 cpu0
Feb 13 06:40:06 cpu0
f7040000, max 1 CPUs
Feb 13 06:40:06 cpu0
Feb 13 06:40:06 cpu0
Feb 13 06:40:06 cpu0
Feb 13 06:40:06 cpu0
Feb 13 06:40:06 cpu0
Feb 13 06:40:06 cpu0
524288 bytes)
Feb 13 06:40:06 cpu0
262144 bytes)
Feb 13 06:40:06 cpu0
59168k reserved, 92k
Feb 13 06:40:06 cpu0
Feb 13 06:40:06 cpu0
Feb 13 06:40:06 cpu0
Feb 13 06:40:06 cpu0
Feb 13 06:40:06 cpu0
Feb 13 06:40:06 cpu0
Related Commands
debug kernel: On node 0 totalpages: 262144
debug kernel: DMA zone: 2048 pages used for memmap
debug kernel: DMA zone: 0 pages reserved
debug kernel: DMA zone: 260096 pages, LIFO batch:31
debug kernel: Normal zone: 0 pages used for memmap
warning kernel: Built 1 zonelists. Total pages: 260096
notice kernel: Kernel command line:
info kernel: mpic: Setting up MPIC \" OpenPIC \" version 1.2 at
info kernel: mpic: ISU size: 80, shift: 7, mask: 7f
info kernel: mpic: Initializing for 80 sources
warning kernel: PID hash table entries: 4096 (order: 12, 16384 bytes)
debug kernel: time_init: decrementer frequency = 62.500000 MHz
debug kernel: time_init: processor frequency
= 1250.000000 MHz
warning kernel: Dentry cache hash table entries: 131072 (order: 7,
warning kernel: Inode-cache hash table entries: 65536 (order: 6,
info kernel: Memory: 989056k/1048576k available (49876k kernel code,
data, 127k bss, 47140k init)
debug kernel: Calibrating delay loop... 124.92 BogoMIPS (lpj=249856)
info kernel: Security Framework v1.0.0 initialized
info kernel: SELinux: Initializing.
debug kernel: SELinux: Starting in enforcing mode
warning kernel: Mount-cache hash table entries: 512
info kernel: NET: Registered protocol family 16
This command has no related commands.
Cisco Service and Application Module for IP User Guide
OL-13003-06
D-57
Appendix D
SAMI COSLI PPC Commands
show gfarstats
show gfarstats
To display the current gianfar Ethernet driver traffic counters, use the show gfarstats command in EXEC
mode.
show gfarstats [|] [>]
Syntax Description
|
(Optional) Pipe character (|) for enabling an output modifier that filters the
command output.
>
(Optional) Greater-than character (>) for enabling an output modifier that
redirects the command output to a file.
Defaults
No default behavior or values
Command Modes
EXEC
Command History
Release
Modification
COSLI 1.0
This command was introduced.
Usage Guidelines
The show gfarstats command lists gianfar Ethernet driver traffic counters.
Examples
To display a list of counters, enter:
switch# show gfarstats
Detailed stats:
rx-dropped-by-kernel
rx-large-frame-errors
rx-short-frame-errors
rx-non-octet-errors
rx-crc-errors
rx-overrun-errors
rx-busy-errors
rx-babbling-errors
rx-truncated-frames
ethernet-bus-error
tx-babbling-errors
tx-underrun-errors
rx-skb-missing-errors
tx-timeout-errors
rx-packets-in-ring0
rx-packets-in-ring1
tx-rx-64-frames
tx-rx-65-127-frames
tx-rx-128-255-frames
tx-rx-256-511-frames
tx-rx-512-1023-frames
tx-rx-1024-1518-frames
=
=
=
=
=
=
=
=
=
=
=
=
=
=
=
=
=
=
=
=
=
=
0
0
0
0
0
0
0
0
0
0
0
0
0
0
16652586
0
0
250478
2117440
2793415
28
20
Cisco Service and Application Module for IP User Guide
D-58
OL-13003-06
Appendix D
SAMI COSLI PPC Commands
show gfarstats
tx-rx-1519-1522-good-vlan
rx-bytes
rx-packets
rx-fcs-errors
receive-multicast-packet
receive-broadcast-packet
rx-control-frame-packets
rx-pause-frame-packets
rx-unknown-op-code
rx-alignment-error
rx-frame-length-error
rx-code-error
rx-carrier-sense-error
rx-undersize-packets
rx-oversize-packets
rx-fragmented-frames
rx-jabber-frames
rx-dropped-frames
tx-byte-counter
tx-packets
tx-multicast-packets
tx-broadcast-packets
tx-pause-control-frames
tx-deferral-packets
tx-excessive-deferral-packets
tx-single-collision-packets
tx-multiple-collision-packets
tx-late-collision-packets
tx-excessive-collision-packets
tx-total-collision
reserved
tx-dropped-frames
tx-jabber-frames
tx-fcs-errors
tx-control-frames
tx-oversize-frames
tx-undersize-frames
tx-fragmented-frames
Related Commands
=
=
=
=
=
=
=
=
=
=
=
=
=
=
=
=
=
=
=
=
=
=
=
=
=
=
=
=
=
=
=
=
=
=
=
=
=
=
0
478941470
4069674
0
0
0
0
0
0
0
0
0
0
15061
0
0
0
0
197681758
1515087
0
0
0
0
0
0
0
0
0
0
0
0
0
0
0
43
2773
0
This command has no related commands.
Cisco Service and Application Module for IP User Guide
OL-13003-06
D-59
Appendix D
SAMI COSLI PPC Commands
show hosts
show hosts
To display the hosts on a PPC, use the show hosts in EXEC mode.
show hosts
Syntax Description
This command has no arguments or keywords.
Defaults
No default behavior or values
Command Modes
EXEC
Command History
Release
Modification
COSLI 1.0
This command was introduced.
Usage Guidelines
The show hosts command lists the name servers and their corresponding IP addresses. It also lists the
hostnames, their corresponding IP addresses, and their corresponding aliases (if applicable) in a host
table summary.
Examples
To display a list of hosts on a PPC, enter:
switch# show hosts
Entering func dns_show_config at line [734]
==== Param info ====
No flag: FALSE, CMI mesg type: 0, Shell_type: 1, Submode_context: 0
Parameter Count: 1, Command Id: 104, MTS Q: 3
Session id: , Username: , Debug_flag: 0, filter: 0 Prc_mode: 3
Sup state: 1, User mode state: 1, Is_admin: 1
Exec_filter_mode: 0, Script_mode: 0
Vty ID: /dev/pts/0 User Perms Mask:0
Permitted vsans: 0-4095
Ascii Gen: FALSE
Ascii command: Info flags: 0x0
Param Arg [0]. Token id: 104 NULL
command line of pinfo has value [show hosts]
Default domain is not set
Name/address lookup uses domain service
Name servers are 255.255.255.255
Related Commands
This command has no related commands.
Cisco Service and Application Module for IP User Guide
D-60
OL-13003-06
Appendix D
SAMI COSLI PPC Commands
show icmp statistics
show icmp statistics
To display the Internet Control Message Protocol (ICMP) statistics, use the show icmp statistics command.
show icmp statistics [|] [>]
Syntax Description
|
(Optional) Pipe character (|) for enabling an output modifier that filters the
command output.
>
(Optional) Greater-than character (>) for enabling an output modifier that
redirects the command output to a file.
Command Modes
EXEC
Command History
Release
Modification
COSLI 1.0
This command was introduced.
Usage Guidelines
Use the show icmp-statistics command to view ICMP statistics.
Examples
To display ICMP statistics, enter:
switch# show icmp statistics
----------------------------------------------ICMP Statistics :
----------------------------------------------Rx
Tx
Total Messages
:
0
0
Errors
:
0
0
Echo Request
:
0
0
Echo Reply
:
0
0
Unreachable
:
0
0
TTL Expired
:
0
0
Redirect
:
0
0
Address Mask
:
0
0
Param problem
:
0
0
Source quench
:
0
0
Time stamp
:
0
0
-----------------------------------------------
Related Commands
There are no related commands.
Cisco Service and Application Module for IP User Guide
OL-13003-06
D-61
Appendix D
SAMI COSLI PPC Commands
show interface
show interface
To display interface information, use the show interface command.
show interface [vlan number] [|] [>]
Syntax Description
vlan number
(Optional) Displays the statistics for the specified VLAN.
|
(Optional) Pipe character (|) for enabling an output modifier that filters the
command output. For a complete description of the options available for filtering the
command output, see the show command.
>
(Optional) Greater-than character (>) for enabling an output modifier that redirects
the command output to a file. For a complete description of the options available for
redirecting the command output, see the show command.
Defaults
No default behavior or values.
Command Modes
EXEC
Command History
Release
Modification
WSG Release 1.0
This command was introduced.
WSG Release 3.0
IPV6 statistics were added.
Usage Guidelines
To display all of the interface statistical information, enter the show interface command without using
vlan optional keyword.
Examples
To display all of the interface statistical information, enter:
switch# show interface
eth0
Link encap:Ethernet HWaddr 00:1F:CA:08:89:2E
inet addr:127.0.0.23 Bcast:127.0.0.255 Mask:255.255.255.0
UP BROADCAST RUNNING MULTICAST MTU:9560 Metric:1
RX packets:376394 errors:0 dropped:0 overruns:0 frame:0
TX packets:35455 errors:0 dropped:0 overruns:0 carrier:0
collisions:0 txqueuelen:1000
RX bytes:109038474 (103.9 MiB) TX bytes:4452754 (4.2 MiB)
Base address:0x4000
eth0.121
Link encap:Ethernet HWaddr 00:1F:CA:08:89:2E
inet addr:1.5.31.122 Bcast:1.5.255.255 Mask:255.255.0.0
UP BROADCAST RUNNING MULTICAST MTU:1500 Metric:1
RX packets:0 errors:0 dropped:0 overruns:0 frame:0
TX packets:5405 errors:0 dropped:0 overruns:0 carrier:0
collisions:0 txqueuelen:0
RX bytes:0 (0.0 b) TX bytes:324300 (316.6 KiB)
Cisco Service and Application Module for IP User Guide
D-62
OL-13003-06
Appendix D
SAMI COSLI PPC Commands
show interface
To display the details, statistics, or IP information for all or a specified VLAN interface (51 in this
example), enter:
wsg# show interface vlan 51
vlan [51] is administratively up
Hardware type: VLAN
MODE: UNKNOWN
IPv4 Address = [51.51.51.4] netmask = [255.255.255.0]
IPv6 Address = fe80::21b:2aff:fe65:fa56/64
VRF: global
FT Status: non redundant
Description:
MTU: 1500 bytes
295165 unicast packets input, 23950072 bytes
0 multicast, 84326 broadcast
0 input errors, 0 unknown, 0 ignored
6 unicast packets output, 468 bytes
0 multicast, 0 broadcast
0 output errors, 0 ignored
Table 4-3 describes the fields in the show interface command output.
Table 4-3
show interface vlan Command Field Descriptions
Field
Description
VLAN_name
Status of the specified VLAN: either up or down.
Hardware type is
Hardware type of the interface: VLAN.
Mode
Mode associated with the VLAN. A bridge-group VLAN
is displayed as transparent. A routed VLAN is displayed as
routed. Otherwise, this field displays the value “unknown.”
IP Address
IPv4 address of the interface.
Netmask
Interface netmask.
FT status
Status of whether the interface is redundant.
Description
Description for the VLAN.
MTU
Configured MTU in bytes.
# unicast packets
input, # bytes
Total number of incoming unicast packets and number of
bytes.
# multicast, #
broadcast
Total number of incoming multicast and broadcast packets.
# input errors, #
unknown, #
ignored
Total number of errors for incoming packets, including
numbers for packets that are unknown, and ignored.
# unicast packets
output, # bytes
Total number of outgoing unicast packets and number of
bytes.
# multicast, #
broadcast
The total number of outgoing multicast and broadcast
packets.
# output errors, #
unknown
Number of errors for outgoing packets, including unknown
packets.
Cisco Service and Application Module for IP User Guide
OL-13003-06
D-63
Appendix D
SAMI COSLI PPC Commands
show interface
Related Commands
There are no related commands.
Cisco Service and Application Module for IP User Guide
D-64
OL-13003-06
Appendix D
SAMI COSLI PPC Commands
show ip interface brief
show ip interface brief
To display a brief configuration and status summary of all interfaces or a specified VLAN, enter:
show ip interface brief [vlan number]
Syntax Description
number
Defaults
None.
Command Modes
EXEC
Command History
Release
Modification
WSG Release 1.0
This command was introduced.
WSG Release 3.0
Added support for IPv6.
Displays the statistics for the specified VLAN.
Usage Guidelines
Use the show ip interface brief command to display a brief configuration and status summary of all the
interfaces or a specified VLAN.
Examples
To display a brief configuration and status summary of all the interfaces, enter:
switch# show ip interface brief
Interface
IP-Address
vlan
51
51.51.51.4
fe80::21b:2aff:fe65:fa56/64
Status
administratively up
Protocol
up
Table 4-4 describes the fields in the show ip interface brief command output.
Table 4-4
Related Commands
show ip interface brief Command Field Descriptions
Field
Description
Interface
VLAN number.
IP Address
IPv4/IPv6 address(es) for the VLAN interface.
Status
Status of the specified VLAN—either up or down.
Protocol
Status of the line protocol—either up or down.
There are no related commands.
Cisco Service and Application Module for IP User Guide
OL-13003-06
D-65
Appendix D
SAMI COSLI PPC Commands
show ip interface vlan
show ip interface vlan
To display a configuration and status summary of a specified VLAN, enter:
show ip interface vlan number
Syntax Description
number
Defaults
None.
Command Modes
EXEC
Command History
Release
Modification
WSG Release 1.0
This command was introduced.
WSG Release 3.0
Added IPv6 statistics.
Displays the statistics for the specified VLAN.
Usage Guidelines
Use the show ip interface vlan command to display a configuration and status summary of a specified
VLAN.
Examples
To display a brief configuration and status summary of all the interfaces, enter:
switch# sh ip interface vlan 51
Vlan51 is up, line protocol is up
IP Address is 51.51.51.4
IPv6 address is fe80::21b:2aff:fe65:fa56/64
Broadcast Address is 255.255.255.0
Address determined by setup command
MTU is 1500 bytes
Related Commands
There are no related commands.
Cisco Service and Application Module for IP User Guide
D-66
OL-13003-06
Appendix D
SAMI COSLI PPC Commands
show ixpstats
show ixpstats
To display the contents of the IXP stastistics file, use the show ixpstats command in EXEC mode.
show ixpstats [|] [>]
Syntax Description
|
(Optional) Pipe character (|) for enabling an output modifier that filters the
command output.
>
(Optional) Greater-than character (>) for enabling an output modifier that
redirects the command output to a file.
Command Modes
EXEC
Command History
Release
Modification
COSLI 1.0
This command was introduced.
Usage Guidelines
Use the show ixpstats command to view the contents of the IXP statistics file.
Examples
To display IXP statistics, enter:
switch# show ixpstats
Statistics at the IXP processor
--------------------------------Statistics for Module: RX
Output Packets
Missing SOP
Incorrect Port Number
Unexpected SOP
Drops - No Buffer
SPI4 Length Error
SPI4 Parity Error
SPI4 Aborts
Statistics for Module: TX0
Input Packets
Table 0 (Port 2) TX'ed
Table 1 (Port 4) TX'ed
Table 2 (Port 8) TX'ed
Table 3 TX'ed (unused)
SPI-4 flow control
13856661
0
0
0
0
0
0
0
1349186
674596
674581
9
0
0
....
Related Commands
There are no related commands.
Cisco Service and Application Module for IP User Guide
OL-13003-06
D-67
Appendix D
SAMI COSLI PPC Commands
show logging
show logging
To display the current syslog configuration and syslog messages, use the show logging command.
show logging {config [|] [>] | message {all cpuid cpu-id | module mod-id}}
Syntax Description
config
Displays syslog configuration.
message
Displays syslog messages.
cpu-id
Displays syslog messages for a specific CPU ID.
mod-id
Displays sysog messages for a specific module ID.
|
Pipe character (|) for enabling an output modifier that filters the command output.
For a complete description of the options available for filtering the command output,
see the show command.
>
Greater-than character (>) for enabling an output modifier that redirects the
command output to a file. For a complete description of the options available for
redirecting the command output, see the show command.
Defaults
None.
Command Modes
EXEC
Command History
Release
Modification
COSLI 1.0
This command was introduced.
WSG Release 3.0
Added external IPv6 logging information.
Usage Guidelines
To enable system logging, use the logging configuration command. The show logging command lists the
current syslog messages and identifies which logging command options are enabled.
Examples
To display the syslog configuration, enter:
wsg# show logging config
Ext logging server IP: 1.1.1.1
Ext logging server IPv6: 2001:88:88:94::1
Number of lines read log: 100
Related Commands
logging
Cisco Service and Application Module for IP User Guide
D-68
OL-13003-06
Appendix D
SAMI COSLI PPC Commands
show processes
show processes
To display general information about all of the processes running on the PPC, use the show processes
command. The show processes command displays summary CPU information for the SiByte 1250
Processor.
show processes [|] [>]
Syntax Description
This command has no arguments or keywords.
Defaults
No default behavior or values.
Command Modes
EXEC
Command History
Release
Modification
COSLI 1.0
This command was introduced.
Usage Guidelines
Examples
The displayed system processes information is at the CPU system level (the total CPU usage) and is not on a
per-context level.
To display information about the memory processes for the SiByte Processor, enter:
switch# show processes
PID
State PC
----- ----- -------1
S 1f89b7b0
2
S
0
3
S
0
4
S
0
5
S
0
6
S
0
7
S
0
8
S
0
9
S
0
10
S
0
11
S
0
12
S
0
13
S
0
14
S
0
15
S
0
38
S
0
...
Related Commands
TTY
----
Process
------------(init)
(posix_cpu_timer)
(softirq-high/0)
(softirq-timer/0)
(softirq-net-tx/)
(softirq-net-rx/)
(softirq-block/0)
(softirq-tasklet)
(softirq-sched/0)
(softirq-rcu/0)
(watchdog/0)
(desched/0)
(events/0)
(khelper)
(kthread)
(kblockd/0)
show tech-support
Cisco Service and Application Module for IP User Guide
OL-13003-06
D-69
Appendix D
SAMI COSLI PPC Commands
show running-config
show running-config
To display the running configuration of a PPC, use the show running-config command.
show running-config [|] [>]
Syntax Description
This command has no keywords or arguments.
Defaults
No default behavior or values.
Command Modes
EXEC
Command History
Release
Modification
COSLI 1.0
This command was introduced.
Usage Guidelines
Use the show running-config command to display the running configuration of a PPC.
Examples
To display the entire running configuration, enter:
switch# show running-config
Generating configuration........
hostname PPC3
interface vlan 121
ip address 172.5.31.122 255.255.0.0
interface vlan 2
no ip address
shutdown
ip default-gateway 172.5.31.21
snmp-server community private rw
snmp-server location "san"
snmp-server contact "abc"
ipsec local-identity id-type fqdn id wsg.cisco.com
Related Commands
show startup-config
Cisco Service and Application Module for IP User Guide
D-70
OL-13003-06
Appendix D
SAMI COSLI PPC Commands
show snmp
show snmp
To display the Simple Network Management Protocol (SNMP) statistics and configured SNMP
information, use the show snmp command.
show snmp [community | host ] [|] [>]
Syntax Description
community
Displays SNMP community strings.
host
Displays the configured SNMP notification recipient host, the User Datagram
Protocol (UDP) port number, the user, and the security model.
|
Pipe character (|) for enabling an output modifier that filters the command output.
For a complete description of the options available for filtering the command output,
see the show command.
>
Greater-than character (>) for enabling an output modifier that redirects the
command output to a file. For a complete description of the options available for
redirecting the command output, see the show command.
Defaults
PPC community strings display.
Command Modes
EXEC
Command History
Release
Modification
WSG Release 1.0
This command was introduced.
WSG Release 3.0
Added IPv6 statistics.
Usage Guidelines
By default, this command displays the PPC contact, the PPC location, the packet traffic information,
community strings, and the user information. You can configure the PPC to display specific SNMP
information by including the appropriate keyword.
Examples
To display SNMP statistics and configured SNMP information, enter:
switch# show snmp
sys contact: cis
sys location: san
0 SNMP packets input
0 Bad SNMP versions
0 Unknown community name
0 Illegal operation for community name supplied
0 Encoding errors
0 Number of requested variables
0 Number of altered variables
0 Get-request PDUs
0 Get-next PDUs
0 Set-request PDUs
0 SNMP packets output
Cisco Service and Application Module for IP User Guide
OL-13003-06
D-71
Appendix D
SAMI COSLI PPC Commands
show snmp
0
0
0
0
0
0
Too big errors
No such name errors
Bad values errors
General errors
Response PDUs
Trap PDUs
switch# show snmp host
Host
____
2001:88:88:94::1
Related Commands
Port
____
162
Version
_______
v1
Type
____
trap
CommName
______
v2
snmp-server community
snmp-server host
Cisco Service and Application Module for IP User Guide
D-72
OL-13003-06
Appendix D
SAMI COSLI PPC Commands
show startup-config
show startup-config
To display the PPC startup configuration, use the show startup-config command in EXEC mode.
show startup-config [|] [>]
Syntax Description
|
(Optional) Pipe character (|) for enabling an output modifier that filters the
command output. For a complete description of the options available for
filtering the command output, see the show command.
>
(Optional) Greater-than character (>) for enabling an output modifier that
redirects the command output to a file. For a complete description of the
options available for redirecting the command output, see the show
command.
Defaults
No default behavior or values.
Command Modes
EXEC
Command History
Release
Modification
COSLI 1.0
This command was introduced.
Usage Guidelines
To clear the startup configuration, use the clear startup-config command.
To copy the running configuration to the startup configuration, or copy the startup configuration to the
running configuration, use the copy running-config command.
Examples
To display information about the startup configuration, enter:
switch# show startup-config
hostname PPC3
interface vlan 121
ip address 172.5.31.122 255.255.0.0
interface vlan 2
no ip address
shutdown
ip default-gateway 172.5.31.21
snmp-server community private rw
snmp-server location "san"
snmp-server contact "abc"
ipsec local-identity id-type fqdn id wsg.cisco.com
Related Commands
show running-config
Cisco Service and Application Module for IP User Guide
OL-13003-06
D-73
Appendix D
SAMI COSLI PPC Commands
show system
show system
To display the PPC system information, use the show system command.
show system {internal sysmgr service {all [details] | local [details] | name service | not-running
[details] | pid service-pid | running [details] | uuid service-uuid} | resources | uptime} [|] [>]
Syntax Description
internal sysmgr service
Displays Cisco internal system-related functions.
The internal sysmgr service keywords and related keywords, options,
and arguments are intended for use by trained Cisco personnel for
troubleshooting purposes only.
resources
Displays system-related CPU and memory statistics.
uptime
Displays how long the PPC has been up and running.
|
(Optional) Pipe character (|) for enabling an output modifier that filters
the command output.
>
(Optional) Greater-than character (>) for enabling an output modifier that
redirects the command output to a file.
Command Modes
EXEC
Command History
Release
Modification
COSLI 1.0
This command was introduced.
Usage Guidelines
The show system internal sysmgr service keyword option, and its related keywords, options, and
arguments are intended for use by trained Cisco personnel for troubleshooting purposes only.
Examples
To display system-related and CPU and memory statistics, enter:
switch# show system resources
Load average:
1 minute: 1.15
5 minutes: 1.09
15 minutes: 1.02
Total number of processes
:
77 total, 2 running
CPU states :
0.0% user,
0.0% kernel,
100.0% idle
Memory usage:
1012K total,
330K used,
682K free
0K buffers,
141K cache
To display how long the PPC has been up and running, enter:
switch# show system uptime
System start time:
System uptime:
Kernel uptime:
PPC3#
Related Commands
Fri Feb 13 06:40:39 2009
4 days, 8 hours, 25 minutes, 0 seconds
4 days, 8 hours, 25 minutes, 46 seconds
This command has no related commands.
Cisco Service and Application Module for IP User Guide
D-74
OL-13003-06
Appendix D
SAMI COSLI PPC Commands
show tcp statistics
show tcp statistics
To display Transmission Control Protocol (TCP) statistics, use the show tcp statistics command.
show tcp statistics [|] [>]
Syntax Description
|
(Optional) Pipe character (|) for enabling an output modifier that filters the
command output.
>
(Optional) Greater-than character (>) for enabling an output modifier that
redirects the command output to a file.
Command Modes
EXEC
Command History
Release
Modification
COSLI 1.0
This command was introduced.
Usage Guidelines
To display TCP statistics, use the show tcp statistics command.
Examples
To display TCP statistics, enter:
switch# show tcp statistics
----------------------------------------------TCP Statistics :
------------------------------------------------Rcvd
: 3996 total , 0 errors
Sent
: 2958 total , 0 RST flag segment
7 active opens , 4 passive opens
Connections : 4 attempts-failed , 0 established resets , 1 currently established
-----------------------------------------------
Related Commands
There are no related commands.
Cisco Service and Application Module for IP User Guide
OL-13003-06
D-75
Appendix D
SAMI COSLI PPC Commands
show tech-support
show tech-support
To display information that is useful to technical support when reporting a problem with your PPC, use
the show tech-support command.
show tech-support [details] [|] [>]
Syntax Description
details
(Optional) Provides detailed information for each of the show commands described
below in the “Usage Guidelines” section.
|
(Optional) Pipe character (|) for enabling an output modifier that filters the command
output.
>
(Optional) Greater-than character (>) for enabling an output modifier that redirects
the command output to a file.
Command Modes
EXEC
Command History
Release
Modification
COSLI 1.0
This command was introduced.
Usage Guidelines
The show tech-support command is useful when collecting a large amount of information about your
PPC for troubleshooting purposes with Cisco technical support. The output of this command can be
provided to technical support representatives when reporting a problem.
The show tech-support command displays the output of several show commands at once. The output
from this command varies depending on your configuration. The default output of the show
tech-support command includes the output of the following commands:
•
show version—See the show version command.
•
show clock—See the show clock command.
•
show running-config—See the show running-config command.
•
show startup-config—See the show startup-config command.
Explicitly set the terminal length command to 0 (zero) to disable autoscrolling and enable manual
scrolling. Use the show terminal command to view the configured terminal size. After obtaining the
output of this command, reset your terminal length as required.
You can save the output of this command to a file by appending > filename to the show tech-support
command. If you save this file, verify that you have sufficient space to do so as each of these files may
take about 1.8 MB.
Examples
To display the summary version of the technical support report, enter:
switch# show tech-support
Cisco Service and Application Module for IP User Guide
D-76
OL-13003-06
Appendix D
SAMI COSLI PPC Commands
show tech-support
Related Commands
show clock
show running-config
show startup-config
show version
Cisco Service and Application Module for IP User Guide
OL-13003-06
D-77
Appendix D
SAMI COSLI PPC Commands
show telnet
show telnet
To display the information about the Telnet session, use the show telnet command.
show telnet [maxsessions] [|] [>]
Syntax Description
maxsessions
(Optional) Displays the maximum number of enabled Telnet sessions.
|
(Optional) Pipe character (|) for enabling an output modifier that filters the
command output. For a complete description of the options available for
filtering the command output, see the show command.
>
(Optional) Greater-than character (>) for enabling an output modifier that
redirects the command output to a file. For a complete description of the
options available for redirecting the command output, see the show
command.
Command Modes
EXEC
Command History
Release
Modification
COSLI 1.0
This command was introduced.
Usage Guidelines
Examples
If you do not include the optional maxsessions keyword, the PPC displays the following Telnet
information:
•
Session ID—Unique session identifier for the Telnet session
•
Remote host—IP address and port of the remote Telnet client
•
Active time—Time since the Telnet connection request was received by the PPC
To display the current Telnet information, enter:
switch# show telnet
Max Sessions not configured
----------------------------------------------------------SessionId
Host:Port
Active-Time
----------------------------------------------------------29965
127.0.0.51:28673
0 Yrs 0 Days 00:19:59
Related Commands
telnet
Cisco Service and Application Module for IP User Guide
D-78
OL-13003-06
Appendix D
SAMI COSLI PPC Commands
show terminal
show terminal
To display the console terminal settings, use the show terminal command.
show terminal [internal info] [|] [>]
Syntax Description
internal info
(Optional) Displays terminal internal information.
|
(Optional) Pipe character (|) for enabling an output modifier that filters the
command output. For a complete description of the options available for
filtering the command output, see the show command.
>
(Optional) Greater-than character (>) for enabling an output modifier that
redirects the command output to a file. For a complete description of the
options available for redirecting the command output, see the show
command.
Command Modes
EXEC
Command History
Release
Modification
COSLI 1.0
This command was introduced.
Usage Guidelines
Use the show terminal command to display the console terminal settings.
Examples
To display the console terminal settings, enter:
switch# show terminal
TTY: /dev/pts/0 Type: "vt100"
Length: 27 lines, Width: 80 columns
Session Timeout: None
Related Commands
terminal
Cisco Service and Application Module for IP User Guide
OL-13003-06
D-79
Appendix D
SAMI COSLI PPC Commands
show udp statistics
show udp statistics
To display User Datagram Protocol (UDP) statistics, use the show udp statistics command.
show udp statistics [|] [>]
Syntax Description
|
(Optional) Pipe character (|) for enabling an output modifier that filters the command
output.
>
(Optional) Greater-than character (>) for enabling an output modifier that redirects the
command output to a file.
Command Modes
EXEC
Command History
Release
Modification
COSLI 1.0
This command was introduced.
Usage Guidelines
Use the show udp statistics command to display UDP statistics.
Examples
To display UDP statistics, enter:
swtich# show udp statistics
Related Commands
There are no related commands.
Cisco Service and Application Module for IP User Guide
D-80
OL-13003-06
Appendix D
SAMI COSLI PPC Commands
show version
show version
To display the version information of system software that is loaded in flash memory and currently
running on the PPC, use the show version command.
show version[|] [>]
Syntax Description
|
(Optional) Pipe character (|) for enabling an output modifier that filters the
command output. For a complete description of the options available for
filtering the command output, see the show command.
>
(Optional) Greater-than character (>) for enabling an output modifier that
redirects the command output to a file. For a complete description of the
options available for redirecting the command output, see the show
command.
Command Modes
EXEC
Command History
Release
Modification
COSLI 1.0
This command was introduced.
Usage Guidelines
The show version command also displays information related to the following PPC hardware
components:
•
Slot number—Slot number that the SAMI occupies on the Catalyst 6500 series chassis.
•
CPU—Number of CPUs and type and model
•
Memory—Total and shared volatile memory
•
Flash memory—Total and used flash memory
Use the show version command to verify the software version on the PPC before and after an upgrade.
Examples
To display the software version information, enter:
switch# show version
Image Version
Image version:
1.0.0
Software Version
Linux version 2.6.21_mvlcge500-octeon-mips64_octeon_v2_be (vvaidhya@srg-mcs-3) (gcc
version 4.2.0 (MontaVista 4.2.0-16.0.23.custom 2008-07-02)) #1 Mon Feb 9 16:03:50 PST 2009
Hardware Version
Cisco Service and Application Module for IP User Guide
OL-13003-06
D-81
Appendix D
SAMI COSLI PPC Commands
show version
Hardware version:
processor
: 0
cpu
: e500v2
clock
: 1250.000000MHz
revision
: 2.0 (pvr 8021 0020)
bogomips
: 124.92
timebase
: 62500000
platform
: MPC8548 BOUNCER
Machine
: Bouncer - MPC8548
clock
: 1250MHz
PVR
: 0x80210020
SVR
: 0x80390020
PLL setting
: 0x5
Memory
: 1024 MB
MemTotal:
1036548 kB
MemFree:
863888 kB
Buffers:
0 kB
Cached:
143456 kB
SwapCached:
0 kB
Active:
24500 kB
Inactive:
120816 kB
SwapTotal:
0 kB
SwapFree:
0 kB
Dirty:
0 kB
Writeback:
0 kB
AnonPages:
1880 kB
Mapped:
2396 kB
Slab:
6928 kB
SReclaimable:
3372 kB
SUnreclaim:
3556 kB
PageTables:
188 kB
NFS_Unstable:
0 kB
Bounce:
0 kB
CommitLimit:
518272 kB
Committed_AS:
31056 kB
VmallocTotal: 2048000 kB
VmallocUsed:
18148 kB
VmallocChunk: 2029796 kB
Procnum:
3
Slotnum:
2
Application Versions
No application.
Linux version 2.6.21_mvlcge500-octeon-mips64_octeon_v2_be (vvaidhya@srg-mcs-3) (gcc
version 4.2.0 (MontaVista 4.2.0-16.0.23.custom 2008-07-02)) #1 Mon Feb 9 16:03:50 PST 2009
Kernel uptime:
Related Commands
4 days, 8 hours, 29 minutes, 44 seconds
show tech-support
Cisco Service and Application Module for IP User Guide
D-82
OL-13003-06
Appendix D
SAMI COSLI PPC Commands
show vlans
show vlans
To display the VLANs on the PPC downloaded from the supervisor engine, use the show vlans command.
show vlans [|] [>]
Syntax Description
|
(Optional) Pipe character (|) for enabling an output modifier that filters the
command output. For a complete description of the options available for
filtering the command output, see the show command.
>
(Optional) Greater-than character (>) for enabling an output modifier that
redirects the command output to a file. For a complete description of the
options available for redirecting the command output, see the show
command.
Command Modes
EXEC
Command History
Release
Modification
COSLI 1.0
This command was introduced.
Usage Guidelines
Use the show vlans command to display a list of VLANs downloaded from the supervisor engine on the
SAMI PPC.
Examples
To display the VLANs on the PPC downloaded from the supervisor engine, enter:
switch# show vlans
Vlans configured on SUP for this module
vlan192-193 vlan333
Related Commands
This command has no related commands.
Cisco Service and Application Module for IP User Guide
OL-13003-06
D-83
Appendix D
SAMI COSLI PPC Commands
snmp-server community
snmp-server community
To create or modify Simple Network Management Protocol (SNMP) community names and access
privileges, use the snmp-server community command. Each SNMP device or member is part of a
community. An SNMP community determines the access rights for each SNMP device. SNMP uses
communities to establish trust between managers and agents. Use the no form of this command to
remove an SNMP community.
snmp-server community community_name [ro | rw]
no snmp-server community community_name [ro | rw]
Syntax Description
Command Modes
Caution
Command History
community_name
SNMP community name for this system. Enter an unquoted text
string with no space and a maximum of 32 alphanumeric characters.
ro
(Optional) Allows read-only access for this community.
rw
(Optional) Allows read and write access for this community.
Configuration mode
If you change the SNMP engine ID, all configured SNMP users become invalid. You must recreate all
SNMP users by using the snmp-server community command in configuration mode.
Release
Modification
COSLI 1.0
This command was introduced.
Usage Guidelines
After you create or modify a community, all SNMP devices assigned to that community as members have
the same access rights (as described in RFC 2576). The COSLI PPC supports read-only access to the
MIB tree for devices included in this community.
Examples
To specify an SNMP community called SNMP_Community1, which is a member of the user group, with
read-only access privileges for the community, enter:
switch(config)# snmp-server community SNMP_Community1
To remove an SNMP community, enter:
swtich(config)# no snmp-server community SNMP_Community1
Related Commands
snmp-server host
Cisco Service and Application Module for IP User Guide
D-84
OL-13003-06
Appendix D
SAMI COSLI PPC Commands
snmp-server contact
snmp-server contact
To specify the contact information for the Simple Network Management Protocol (SNMP) system, use
the snmp-server contact command. You can specify information for only one contact name. Use the no
form of this command to remove an SNMP contact.
snmp-server contact contact_information
no snmp-server contact
Syntax Description
contact_information
Command Modes
Configuration mode
Command History
Release
Modification
COSLI 1.0
This command was introduced.
SNMP contact information for this system. Enter a text string with a
maximum of 240 alphanumeric characters, including spaces. If the
string contains more than one word, enclose the string in quotation
marks (“ ”). You can include information on how to contact the
person; for example, you can include a phone number or an e-mail
address.
Usage Guidelines
You can specify only one contact name per SNMP system.
Examples
To specify SNMP system contact information, enter:
switch(config)# snmp-server contact “User1 [email protected]”
To remove the specified SNMP contact information, enter:
switch(config)# no snmp-server contact
Related Commands
snmp-server host
Cisco Service and Application Module for IP User Guide
OL-13003-06
D-85
Appendix D
SAMI COSLI PPC Commands
snmp-server enable traps
snmp-server enable traps
To enable the COSLI PPC to send Simple Network Management Protocol (SNMP) traps and informs to
the network management system (NMS), use the snmp-server enable traps command. This command
enables both traps and inform requests for the specified notification types. Use the no form of this
command to disable the sending of SNMP traps and inform requests.
snmp-server enable traps [interface | snmp authentication | syslog ]
no snmp-server enable traps [interface | snmp authentication | syslog]
Syntax Description
interface
Enables the sending of SNMP interface traps. If no type is specified,
the COSLI PPC sends all notifications.
snmp authentication
Enables the sending of SNMP agent authentication traps.
syslog
Enables the sending of SNMP syslog traps.
Command Modes
Configuration mode
Command History
Release
Modification
COSLI 1.0
This command was introduced.
Usage Guidelines
To configure the COSLI PPC to send the SNMP notifications, specify at least one snmp-server enable
traps command. To enable multiple types of notifications, you must enter a separate snmp-server
enable traps command for each notification type.
If you enter the snmp-server enable traps command without any keywords, the COSLI PPC enables all
notification types and traps.
The snmp-server enable traps command is used with the snmp-server host command. The
snmp-server host command specifies which host receives the SNMP notifications. To send
notifications, you must configure at least one SNMP server host.
Examples
To enable the COSLI PPC to send interface traps to the SNMP host “myhost,” enter:
switch(config)# snmp-server host myhost.cisco.com
switch(config)# snmp-server enable traps interface
To disable SNMP server interface notifications, enter:
switch(config)# no snmp-server enable traps interface
Related Commands
snmp-server host
Cisco Service and Application Module for IP User Guide
D-86
OL-13003-06
Appendix D
SAMI COSLI PPC Commands
snmp-server host
snmp-server host
To specify which host receives Simple Network Management Protocol (SNMP) notifications, use the
snmp-server host command. To send notifications, you must configure at least one SNMP host using
the snmp-server host command. Use the no form of this command to remove the specified host.
snmp-server host host_address {community-string_username | informs | traps | version {1
{udp-port} | 2c {udp-port}}}
no snmp-server host host_address {community-string_username | informs | traps | version {1
{udp-port} | 2c {udp-port}}}
Syntax Description
host_address
IP address of the host (the targeted recipient). Enter the address in
dotted-decimal IP notation (for example, 192.168.11.1).
community-string_username
SNMP community string or username with the notification operation
to send. Enter an unquoted text string with no space and a maximum
of 32 alphanumeric characters.
informs
Sends SNMP inform requests to the identified host, which allows for
manager-to-manager communication. Inform requests can be useful
when you need more than one NMS in the network.
traps
Sends SNMP traps to the identified host. An agent uses a trap to tell
the NMS that a problem has occurred. The trap originates from the
agent and is sent to the trap destination, as configured within the
agent itself. The trap destination is typically the IP address of the
NMS.
version
Specifies the version of SNMP used to send the traps. SNMPv3 is the
most secure model because it allows packet encryption with the priv
keyword.
1
Specifies SNMPv1. This option is not available for use with SNMP
inform requests. SNMPv1 has one optional keyword (udp-port) that
specifies the port UDP port of the host to use. The default is 162.
2c
Specifies SNMPv2C. SNMPv2C has one optional keyword
(udp-port) that specifies the port UDP port of the host to use. The
default is 162.
Command Modes
Configuration mode
Command History
Release
Modification
COSLI 1.0
This command was introduced.
Usage Guidelines
None.
Cisco Service and Application Module for IP User Guide
OL-13003-06
D-87
Appendix D
SAMI COSLI PPC Commands
snmp-server host
Examples
To specify the recipient of an SNMP notification, enter:
switch(config)# snmp-server host 172.168.1.1 traps version 2c abcddsfsf udp-port 500
To remove the specified host, enter:
switch(config)# no snmp-server host 192.168.1.1 traps version 2c abcddsfsf udp-port 500
Related Commands
snmp-server enable traps
Cisco Service and Application Module for IP User Guide
D-88
OL-13003-06
Appendix D
SAMI COSLI PPC Commands
snmp-server location
snmp-server location
To specify the Simple Network Management Protocol (SNMP) system location, use the snmp-server
location command. You can specify only one location. Use the no form of this command to remove the
SNMP system location.
snmp-server location location
no snmp-server location
Syntax Description
location
Command Modes
Configuration mode
Command History
Release
Modification
COSLI 1.0
This command was introduced.
Physical location of the system. Enter a text string with a maximum
of 240 alphanumeric characters, including spaces. If the string
contains more than one word, enclose the string in quotation marks
(“ ”).
Usage Guidelines
You can specify only one location per SNMP system.
Examples
To specify SNMP system location information, enter:
switch(config)# snmp-server location “RTP, NC”
To remove the specified SNMP system location information, enter:
switch(config)# no snmp-server location
Related Commands
snmp-server community
Cisco Service and Application Module for IP User Guide
OL-13003-06
D-89
Appendix D
SAMI COSLI PPC Commands
terminal
terminal
To configure the terminal display settings, use the terminal command.
terminal {length lines | no | session-timeout minutes | terminal-type text | width characters}
Syntax Description
length lines
Sets the number of lines displayed on the current terminal screen. This command is
specific to the console port only. Telnet and Secure Shell (SSH) sessions set the
length automatically. Valid entries are from 0 to 511. The default is 24 lines. A value
of 0 instructs the COSLI PPC to scroll continuously (no pausing) and overrides the
terminal width value. If you later change the terminal length to any other value, the
originally configured terminal width value takes effect.
no
Negates a command or sets it back to its default value.
session-timeout Specifies the session timeout value in minutes to configure the automatic logout time
minutes
for the current terminal session on the PPC. When you exceed the time limit
configured by this command, the PPC closes the session and exits. The range is 0 to
525600. The default value is inherited from the value that is configured for the login
timeout command. If you do not configure a value for the login timeout command,
the default for both commands is 5 minutes. You can set the terminal
session-timeout value to 0 to disable this feature so that the terminal remains active
until you choose to exit the PPC. The PPC does not save this change in the
configuration file.
terminal-type
text
Specifies the name and type of the terminal used to access the PPC. If a Telnet or
SSH session specifies an unknown terminal type, the PPC uses the VT100 terminal
by default. Specify a text string from 1 to 80 alphanumeric characters.
width
characters
Sets the number of characters displayed on the current terminal screen. This
command is specific to only the console port. Telnet and SSH sessions set the width
automatically. Valid entries are from 24 to 512. The default is 80 columns.
Command Modes
EXEC
Command History
Release
Modification
COSLI 1.0
This command was introduced.
Usage Guidelines
Use the show terminal command to display the current terminal settings.
All terminal parameter-setting commands are set locally and do not remain in effect after you end a
session. You must perform this task at the EXEC prompt at each session to see the debugging messages.
Cisco Service and Application Module for IP User Guide
D-90
OL-13003-06
Appendix D
SAMI COSLI PPC Commands
terminal
Examples
To specify the VT100 terminal, set the number of screen lines to 35, and set the number of characters to
250, enter:
switch# terminal terminal-type vt220
switch# terminal length 35
switch# terminal width 250
To specify a terminal timeout of 600 minutes for the current session, enter
switch# terminal session-timeout 600
To set the width to 100 columns, enter:
switch# terminal width 100
To set the width to its default of 80 columns, enter:
switch# terminal no width
Related Commands
show terminal
Cisco Service and Application Module for IP User Guide
OL-13003-06
D-91
Appendix D
SAMI COSLI PPC Commands
telnet maxsessions
telnet maxsessions
To control the maximum number of Telnet sessions allowed for each context, use the telnet maxsessions
command. By default, a PPC supports 16 concurrent Telnet management sessions. Use the no form of
this command to revert to the default number of Telnet sessions.
telnet maxsessions sessions
no telnet maxsessions
Syntax Description
sessions
Command Modes
Configuration mode
Command History
Release
Modification
COSLI 1.0
This command was introduced.
WSG Release 3.0
This command was modified to include IPv6 addresses.
Maximum number of concurrent Telnet sessions allowed for the associated
context. The range is from 1 to 16 Telnet sessions. The default is 16.
Usage Guidelines
A PPC supports a total maximum of 256 concurrent Telnet sessions.
Examples
To set the maximum number of concurrent Telnet sessions to 3 in the Admin context, enter:
switch(config)# telnet maxsessions 3
To revert to the default of 16 Telnet sessions for the Admin context, enter:
switch(config)# no telnet maxsessions
Related Commands
show telnet
Cisco Service and Application Module for IP User Guide
D-92
OL-13003-06
Appendix D
SAMI COSLI PPC Commands
traceroute
traceroute
To discover the route that packets actually take when traveling to their destination address, use the
traceroute command in user EXEC or privileged EXEC mode.
traceroute [A.B.C.D [vrf vrfname] | X:X:X::X] [size size]
Syntax Description
A.B.C.D
IPv4 address of the remote destination.
vrfname
Specifies the name of the destination VRF.
X:X:X::X
IPv6 address of the remote destination.
size
Specifies the size of the messages sent.
Command Modes
EXEC
Command History
Release
Modification
WSG Release 3.0
Added support for IPv6 and VRF.
Usage Guidelines
The traceroute command works by taking advantage of the error messages generated by routers when a
datagram exceeds its hop limit value.
The traceroute command starts by sending probe datagrams with a hop limit of 1. Including a hop limit
of 1 with a probe datagram causes the neighboring routers to discard the probe datagram and send back
an error message. The traceroute command sends several probes with increasing hop limits and displays
the round-trip time for each.
The traceroute command sends out one probe at a time. Each outgoing packet might result in one or more
error messages. A time-exceeded error message indicates that an intermediate router has seen and
discarded the probe. A destination unreachable error message indicates that the destination node has
received and discarded the probe because the hop limit of the packet reached a value of 0. If the timer
goes off before a response comes in, the traceroute command prints an asterisk (*).
The traceroute command terminates when the destination responds, when the hop limit is exceeded, or
when the user interrupts the trace with the escape sequence. By default, to invoke the escape sequence,
type Ctrl-^ X—by simultaneously pressing and releasing the Ctrl, Shift, and 6 keys, and then pressing
the X key.
When not specified, the protocol argument is determined by the software examining the format of the
destination argument. For example, if the software finds a destination argument in IP format, the
protocol value defaults to IP.
Examples
To trace the route to the IPv6 address:
switch# traceroute 2001:88:88:94::1
traceroute to 2001:88:88:94::1 (2001:88:88:94::1) from 2001:88:88:94::4, 30 hops max, 16
byte packets
1 2001:88:88:94::1 (2001:88:88:94::1) 0.668 ms 0.385 ms 0.319 ms
Cisco Service and Application Module for IP User Guide
OL-13003-06
D-93
Appendix D
SAMI COSLI PPC Commands
traceroute
To define an IPv4 address in a specific VRF:
switch# traceroute 192.168.2.1 vrf red
Cisco Service and Application Module for IP User Guide
D-94
OL-13003-06
Appendix D
SAMI COSLI PPC Commands
username
username
To configure the SSH username, use the username configuration command. Use the no form of the
command to remove a user.
username name password 0 unencrypted
username name password 5 encrypted
no username name
Syntax Description
name
The name of the user. Maximum number of characters is 32.
unencrypted
The unencrypted password. Maximum number of characters is 32.
encrypted
The encrypted password. Maximum number of characters is 64.
Command Modes
Global configuration
Command History
Release
Modification
WSG 3.0
This command was introduced.
Usage Guidelines
The first variant of the command takes an unencrypted password and subsequently encrypts it. When it
is displayed using the show running-configuration command, the console displays the encrypted
version.
The second variant requires an encrypted password, and is used mainly to transfer a login/password to a
different card. Unencrypted passwords will never be displayed.
The no form of this command does not require including the password.
The maximum length for the name is 32 characters. The maximum length for the unencrypted password
is also 32 characters. The maximum length for the encrypted password is 64 characters. For all of these
fields, permitted characters are standard alphanumeric characters with the exception of “]”, “?”, “$”,
TAB, and spaces.
Examples
Here is an example of the username command:
switch(config)# username test1 password 5 f2500a1a1dJID.4KVT0YvcPR.E98f/
Cisco Service and Application Module for IP User Guide
OL-13003-06
D-95
Appendix D
SAMI COSLI PPC Commands
username
Cisco Service and Application Module for IP User Guide
D-96
OL-13003-06
A P P E N D I X
E
SAMI LCP Commands
The following commands, listed in alphabetical order, are introduced or modified for the Cisco SAMI,
and are supported at a SAMI LCP console:
•
boot eobc:, page E-3 (LCP ROM monitor command)
•
clear cde, page E-4
•
clear cores, page E-5
•
clear daughtercard fpga statistics, page E-6
•
confreg (LCP ROM monitor), page E-8
•
console-select, page E-9
•
debug sami bouncer_svc, page E-10
•
debug sami dc_health, page E-11
•
debug sami ppc_download, page E-12
•
debug sami session_agent, page E-13
•
delete, page E-14
•
dir, page E-15
•
erase ppc-flash, page E-16
•
exception ixp, page E-17
•
hostname, page E-18
•
interface, page E-19
•
ip route, page E-21
•
processor config-register, page E-22 (LCP ROM monitor command)
•
processor config-register, page E-22
•
reload, page E-24
•
reload sami processor, page E-25
•
reprogram bootflash, page E-26
•
set cde destindex, page E-27
•
set cde vlan, page E-28
•
show cde, page E-30
•
show cde destindex, page E-32
Cisco Service and Application Module for IP User Guide
OL-13003-06
E-1
Appendix E
•
show cde vlan, page E-33
•
show daughtercard fpga statistics, page E-34
•
show daughtercard registers, page E-35
•
show login timeout, page E-36
•
show running-config, page E-37
•
show startup-config, page E-39
•
show tech-support, page E-40
•
show version, page E-42
•
upgrade-rommon, page E-43
•
write, page E-44
SAMI LCP Commands
Cisco Service and Application Module for IP User Guide
E-2
OL-13003-06
Appendix E
SAMI LCP Commands
boot eobc:
boot eobc:
To boot the SAMI from the image on the supervisor engine, use the boot eobc: ROM-monitor command.
boot eobc:
Syntax Description
This command has no keywords or arguments.
Defaults
No default behavior or values exist.
Command Modes
ROM monitor
Command History
Release
Modification
Release 1.0
This command was integrated into Cisco SAMI Release 1.0.
Usage Guidelines
Use the boot eobc: command to boot the SAMI using the image on the supervisor engine.
Examples
The following example shows how to boot the SAMI from the image on the supervisor engine:
rommon 1> boot eobc:
Related Commands
Command
Description
boot device module
Sets the boot variable for the SAMI LCP. (This is supervisor console
command.)
Cisco Service and Application Module for IP User Guide
OL-13003-06
E-3
Appendix E
SAMI LCP Commands
clear cde
clear cde
To clear the classification and distribution engine (CDE) statistics and interrupt counts, use the clear cde
command.
clear cde {interrupt | stats}
Syntax Description
interrupt
Clears the CDE interrupt counts.
stats
Clears the CDE statistics.
Defaults
No default behavior or values exist.
Command Modes
EXEC
Command History
Release
Modification
Release 1.0
This command was integrated into Cisco SAMI Release 1.0.
Usage Guidelines
Note
Examples
This command clears the statistics and counts that display using the show cde command.
This command is for use by trained personnel for troubleshooting purposes only.
To clear the CDE interrupt counts, enter:
switch# clear cde interrupt
Related Commands
Command
Description
show cde
Displays CDE statistics and counts.
Cisco Service and Application Module for IP User Guide
E-4
OL-13003-06
Appendix E
SAMI LCP Commands
clear cores
clear cores
To clear all of the core dumps stored in the core file system, use the clear cores command.
clear cores
Syntax Description
This command has no keywords or arguments.
Defaults
No default behavior or values exist.
Command Modes
EXEC
Command History
Release
Modification
Release 1.0
This command was integrated into Cisco SAMI Release 1.0.
Usage Guidelines
To view the list of core files in the core file system, use the dir core command.
To save a copy of a core dump to a remote server before clearing it, use the copy capture command.
To delete a specific core dump file from the core file system, use the delete core command.
Note
Examples
The SAMI creates a core dump when it experiences a fatal error. Core dump information is for Cisco
Technical Assistance Center (TAC) use only. We recommend that you contact TAC for assistance in
interpreting information in a core dump.
To clear all core dumps, enter:
switch# clear cores
Related Commands
Command
Description
delete
Deletes core dumps stored in the core.
dir
Displays core dumps stored in the core.
Cisco Service and Application Module for IP User Guide
OL-13003-06
E-5
Appendix E
SAMI LCP Commands
clear daughtercard fpga statistics
clear daughtercard fpga statistics
To clear all field programmable gate array (FPGA) statistics for a SAMI daughter card, use the
clear daughtercard fpga statistics command.
clear daughtercard card_number fpga statistics
Syntax Description
card number
Defaults
No default behavior or values exist.
Command Modes
EXEC
Command History
Release
Modification
Release 1.0
This command was introduced.
Number of the card for which you want to clear FPGA-related statistics. A valid
value is 1 or 2.
Usage Guidelines
This command clears the statistics displayed by the show daughtercard fpga statistics command.
Examples
To clear all FPGA statistics on SAMI daughter card 1, enter:
switch# clear daughtercard 1 fpga statistics
Related Commands
Command
Description
show daughtercard
fpga statistics
Displays the FPGA statistics for a SAMI daughter card.
Cisco Service and Application Module for IP User Guide
E-6
OL-13003-06
Appendix E
SAMI LCP Commands
config-register
config-register
To change the configuration register settings of the SAMI LCP, use the config-register command.
config-register value
Syntax Description
value
Configuration register value that you want to use next time you restart the
SAMI LCP. The supported values are:
•
0—Upon reboot, the SAMI LCP boots to ROM monitor and remains in
ROM monitor mode at startup.
•
1—Upon reboot, the SAMI LCP boots the system image identified in the
Boot environment variable.
Defaults
This command has no default.
Command Modes
Configuration
Command History
Release
Modification
Release 1.0
This command was integrated into Cisco SAMI Release 1.0.
Usage Guidelines
The config-register command affects only the configuration register bits that control the boot field and
leaves the remaining bits unaltered.
To configure the SAMI LCP to autoboot the system image identified in the boot environment variable,
use the config-register command and set the configuration register to 1.
Examples
The following example sets the boot field in the configuration register to boot the system image
identified in the Boot environment variable upon reboot:
switch(config)# config-register 1
Command History
Command
Description
boot system image
Specifies the system image that the router loads at startup.
processor
config-register
Sets the configuration register for the SAMI PPCs.
Cisco Service and Application Module for IP User Guide
OL-13003-06
E-7
Appendix E
SAMI LCP Commands
confreg (LCP ROM monitor)
confreg (LCP ROM monitor)
To change the configuration register settings while in ROM monitor mode, use the confreg command in
ROM monitor mode.
confreg value
Syntax Description
value
Configuration register value that you want to use next time you restart the
SAMI LCP. The supported values are:
•
0—Upon reboot, the SAMI LCP boots to ROM monitor and remains in
ROM monitor mode at startup.
•
1—Upon reboot, the SAMI LCP boots the system image identified in the
BOOT environment variable.
Defaults
This command has no default.
Command Modes
ROM monitor
Command History
Release
Modification
Release 1.0
This command was integrated into Cisco SAMI Release 1.0.
Usage Guidelines
The config-register command affects only the configuration register bits that control the boot field and
leaves the remaining bits unaltered.
Examples
The following example sets the boot field in the configuration register to boot the system image
identified in the Boot environment variable upon reboot:
rommon 1># confreg 1
Related Commands
Command
Description
boot eobc:
Boots the SAMI from the image on the supervisor engine.
Cisco Service and Application Module for IP User Guide
E-8
OL-13003-06
Appendix E
SAMI LCP Commands
console-select
console-select
To configure a SAMI powerPC (PPC) on daughter card 1 to be accessible from the console port on the
SAMI front panel, use the console-select db1 command.
console-select {db1 processor_number | db2 processor_number}
Syntax Description
Defaults
db1 processor_number
Number of the PPC on daughter card 1 to be connected to the console
port on daughter card 1. A valid value is a number between 3 and 5.
db2 processor_number
Number of the PPC on daughter card 2 to be connected to the console
port on daughter card 2. A valid value is a number between 6 and 8.
Daughter card 1—Console 3 is connected to the daughter card 1 console port on the SAMI front panel.
Daughter card 2—Console 6 is connected to the daughter card 2 console port on the SAMI front panel.
Command Modes
Configuration
Command History
Release
Modification
Release 1.0
This command was introduced.
Usage Guidelines
Use this command to configure one of the three PPCs on daughter card 1 of a SAMI to be accessible
externally using the daughter card console port on the SAMI front panel.
By default, PPC 3 can be accessed by console port for db1 and PPC 6 can be accessed by console port
of db2. After a different PPC is configured to be accessible from the console port on the SAMI front
panel using the console-select commands, the newly configured PPC will continue to be accessible
across router reloads.
Examples
To configure the PPC4 on daughter card 1 to be accessible from the daughter 1 console port on the SAMI
front panel, enter:
switch(config)# console-select db1 4
Cisco Service and Application Module for IP User Guide
OL-13003-06
E-9
Appendix E
SAMI LCP Commands
debug sami bouncer_svc
debug sami bouncer_svc
To display information on bouncer svc daemon processing, use the debug sami bouncer_svc command
in privileged EXEC mode. To disable debugging output, use the no form of this command.
debug sami bouncer {errors | events | packets}
no debug sami bouncer {errors | events | packets}
Syntax Description
errors
Displays errors.
events
Displays events.
packet
Displays information per-packet.
Defaults
No default behavior or values exist.
Command Modes
EXEC
Command History
Release
Modification
Release 1.0
This command was introduced.
Usage Guidelines
Use the debug sami bouncer_svc command to view bouncer svc daemon debugging information.
Examples
The following example shows events that occur during bouncer svc daemon processing.
switch# debug sami bouncer_svc events
Cisco Service and Application Module for IP User Guide
E-10
OL-13003-06
Appendix E
SAMI LCP Commands
debug sami dc_health
debug sami dc_health
To display information on sami cd health daemon processing, use the debug sami dc_health command
in privileged EXEC mode. To disable debugging output, use the no form of this command.
debug sami dc_health {errors | events}
no debug sami dc_health {errors | events}
Syntax Description
errors
Displays errors.
events
Displays events.
Defaults
No default behavior or values exist.
Command Modes
EXEC
Command History
Release
Modification
Release 1.0
This command was introduced.
Usage Guidelines
Use the debug sami dc_health command to view sami cd health daemon debugging information.
Examples
The following example shows events that occur during sami cd health processing.
switch# debug sami dc_health events
Cisco Service and Application Module for IP User Guide
OL-13003-06
E-11
Appendix E
SAMI LCP Commands
debug sami ppc_download
debug sami ppc_download
To display information on ppc download daemon processing, use the debug sami ppc_download
command in privileged EXEC mode. To disable debugging output, use the no form of this command.
debug sami ppc_download {errors | events}
no debug sami ppc_download {errors | events}
Syntax Description
errors
Displays errors.
events
Displays events.
Defaults
No default behavior or values exist.
Command Modes
EXEC
Command History
Release
Modification
Release 1.0
This command was introduced.
Usage Guidelines
Use the debug sami ppc_download command to view ppc download daemon debugging information.
Examples
The following example shows errors that occur during ppc download daemon processing.
switch# debug sami ppc_download errors
Cisco Service and Application Module for IP User Guide
E-12
OL-13003-06
Appendix E
SAMI LCP Commands
debug sami session_agent
debug sami session_agent
To display information on session agent daemon processing, use the debug sami session_agent
command in privileged EXEC mode. To disable debugging output, use the no form of this command.
debug sami session-agent {errors | events | packets}
no debug sami session-agent {errors | events | packets}
Syntax Description
errors
Displays errors.
events
Displays events.
packet
Displays information per-packet.
Defaults
No default behavior or values exist.
Command Modes
EXEC
Command History
Release
Modification
Release 1.0
This command was introduced.
Usage Guidelines
Use the debug sami session-agent command to view session agent daemon debugging information.
Examples
The following example shows errors that occur during session agent processing.
switch# debug sami session_agent errors
Cisco Service and Application Module for IP User Guide
OL-13003-06
E-13
Appendix E
SAMI LCP Commands
delete
delete
To delete a specific file in the LCP file system, use the delete command.
delete {core:filename | disk0:[path/]filename | image:filename | volatile:filename}
Syntax Description
core:filename
Deletes the specified file from the core file system.
disk0:[path/]filename
Deletes the specified file from the disk0 file system. If you do not
specify the optional path, the LCP looks for the file in the root directory
of the disk0 file system.
image:filename
Deletes the specified file from the image file system.
volatile:filename
Deletes the specified file from the volatile file system.
Defaults
No default behavior or values exist.
Command Modes
EXEC
Command History
Release
Modification
Release 1.0
This command was integrated into Cisco SAMI Release 1.0.
Usage Guidelines
To delete a specific file from the LCP file system, use the delete command.
If you do not specify a filename with the file system keyword, the SAMI LCP prompts you for a
filename.
To display the list of files that reside in a file system, use the dir sami# command.
Examples
The following example shows how to delete a file named “0x401_VSH_LOG.25256.TAR.GZ” from the
core file system:
switch# delete core:0x401_VSH_LOG.25256.TAR.GZ
Related Commands
Command
Description
dir
Displays the contents of a specified SAMI LCP file system.
Cisco Service and Application Module for IP User Guide
E-14
OL-13003-06
Appendix E
SAMI LCP Commands
dir
dir
To list files in the various file systems on the LCP, use the dir command.
dir {core: | disk0: | image: | volatile}
Syntax Description
core:
Displays the contents of the core: file system.
disk0:
Displays the contents of the disk0: file system.
image:
Displays the contents of the image: file system.
volatile:
Displays the contents of the volatile: file system.
Defaults
No default behavior or values exist.
Command Modes
EXEC
Command History
Release
Modification
Release 1.0
This command was integrated into Cisco SAMI Release 1.0.
Usage Guidelines
Use the dir command to list the files in the various file systems on the SAMI LCP.
To delete a file from a file system, use the delete command. To delete all core dumps, use the clear cores
command.
Examples
The following example shows how to display the contents of the disk0 file system:
switch# dir disk0:
Related Commands
Command
Description
delete
Deletes a specified file in the SAMI LCP file system.
more
Displays the contents of a file.
Cisco Service and Application Module for IP User Guide
OL-13003-06
E-15
Appendix E
SAMI LCP Commands
erase ppc-flash
erase ppc-flash
To erase the ROM monitor area of a SAMI powerPC (PPC) boot flash and program ROM monitor using
the default image in the SAMI software bundle, use the erase ppc-flash command.
erase ppc-flash [image_name:] {ppc_number | all-ppc}
Syntax Description
image_name:
Name of the ROM monitor image in the SAMI software bundle.
ppc_number
Erases the ROM monitor area of the PCC boot flash and programs ROM
monitor with the default image on a specific PCC. Enter a between value 3
and 8.
all-ppc
Erases the ROM monitor area of the PCC boot flash and programs ROM
monitor with the default image on all the SAMI PPCs.
Defaults
No default behavior or values exist.
Command Modes
EXEC
Command History
Release
Modification
Release 1.0
This command was introduced.
Usage Guidelines
Use the erase ppc-flash command to erase the ROM monitor area of the PPC boot flash and program
ROM monitor using the default image in the SAMI software bundle.
Examples
To erase the ROM monitor area of the boot flash on PCC 6 and program ROM monitor using the image
in the SAMI software bundle, enter:
switch# erase ppc-flash image_name 6
Related Commands
This command has no related commands.
Cisco Service and Application Module for IP User Guide
E-16
OL-13003-06
Appendix E
SAMI LCP Commands
exception ixp
exception ixp
To enable a coredump to be collected from IXP, use the exception ixp command in configuration mode.
Use the no form of the command to disable collecting coredump information.
exception ixp IXP-Proc
no exception ixp
Syntax Description
IXP-Proc
Defaults
none
Command Modes
Configuration
Command History
Release
Modification
SAMI Release 4.0
This command was introduced in conjunction with Cisco CSG2
Release 6.0, and LTE Release 2.0.
Usage Guidelines
IXP processor number ( 1 or 2 ).
The coredump gets stored under “crashinfo_collection-XXXXX-YYYY.tar”, which resides on LCP
“dir:core”. The naming convention for the coredump file is as below :coredump_proc<Num>- XXXXX-YYYY.gz
where
Num -- Represents either 1 or 2 depending on IXP1 or IXP2 respectively
XXXXX-YYYY-- Represents the timestamp
Caution
Examples
Collecting IXP coredump will increase reboot time by an average of 4 to 5 minutes.
To change the hostname of the SAMI LCP from host1 to SAMI1-LCP, enter:
switch(config)# hostname SAMI1-LCP
SAMI_LCP(config)# exception ixp 1
exception ixp 2
Cisco Service and Application Module for IP User Guide
OL-13003-06
E-17
Appendix E
SAMI LCP Commands
hostname
hostname
To change the hostname of the SAMI LCP, use the hostname command. Use the no form of this
command to reset the hostname to the default of switch.
hostname name
no hostname name
Syntax Description
name
Defaults
The hostname is host1.
Command Modes
Configuration
Command History
Release
Modification
Release 1.0
This command was integrated into Cisco SAMI Release 1.0.
Usage Guidelines
New hostname for the SAMI LCP. Enter a case-sensitive text string that
contains from 1 to 32 alphanumeric characters.
By default, the hostname for the SAMI LCP is host1.
The hostname is used for the command line prompts and default configuration filenames. If you establish
sessions to multiple devices, the hostname helps you track where you enter commands.
Examples
To change the hostname of the SAMI LCP from host1 to SAMI1-LCP, enter:
switch(config)# hostname SAMI1-LCP
SAMI_LCP(config)#
Related Commands
This command has no related commands.
Cisco Service and Application Module for IP User Guide
E-18
OL-13003-06
Appendix E
SAMI LCP Commands
interface
interface
To create a bridge-group virtual interface (BVI) or VLAN interface, use the interface command. To
remove the interface, use the no form of this command.
interface {bvi group_number | vlan number}
no interface {bvi group_number | vlan number}
Note
Syntax Description
If a VLAN interface is configured on the LCP, then a sub-interface for the same VLAN should not be
configured on the PPCs.
bvi group_number
Creates a BVI for a bridge group and accesses interface configuration mode
commands for the BVI. The group_number argument is the bridge-group
number configured on a VLAN interface.
vlan number
Assigns the VLAN to the context and accesses interface configuration mode
commands for the VLAN. The number argument is the number for a VLAN
assigned to the SAMI LCP.
Defaults
No default behavior or values exist.
Command Modes
Configuration
Command History
Release
Modification
Release 1.0
This command was integrated into Cisco SAMI Release 1.0.
Usage Guidelines
Use the interface command to create a BVI or VLAN interface.
When entered, the command prompt changes to (config-if).
Examples
To assign VLAN interface 100 to the Admin context and access interface configuration mode, enter:
switch(config)# interface vlan 100
switch(config-if)#
Cisco Service and Application Module for IP User Guide
OL-13003-06
E-19
Appendix E
SAMI LCP Commands
interface
Related Commands
Command
Description
clear interface
Resets the hardware logic on an interface.
show interface
Displays statistics for all interfaces configured on the router or access
server.
Cisco Service and Application Module for IP User Guide
E-20
OL-13003-06
Appendix E
SAMI LCP Commands
ip route
ip route
To configure a default or static IP route, use the ip route command. Use the no form of this command
to remove a default or static IP route from the configuration.
ip route dest_ip_prefix netmask gateway_ip_address
no ip route dest_ip_prefix netmask gateway_ip_address
Syntax Description
dest_ip_prefix
IP address for the route. The address that you specify for the static route is the
address that is in the packet before entering the SAMI LCP and performing
network address translation.
netmask
Subnet mask for the route.
gateway_ip_address IP address of the gateway router (the next-hop address for this route). The
gateway address must be in the same network as specified in the ip address
command for a VLAN interface.
Defaults
No default behavior or values exist.
Command Modes
Configuration
Command History
Release
Modification
Release 1.0
This command was integrated into Cisco SAMI Release 1.0.
Usage Guidelines
The default route identifies the router IP address to which the SAMI LCP sends all IP packets for which
it does not have a route.
Dynamic routing is not supported. You must use static routes for any networks to which the SAMI LCP
is not directly connected; for example, use a static route when there is a router between a network and
the SAMI LCP.
The SAMI LCP supports up to eight equal cost routes on the same interface for load balancing.
Routes that identify a specific destination address take precedence over the default route.
Examples
To configure a default route, set the IP address and the subnet mask for the route to 0.0.0.0. For example,
if the SAMI LCP receives traffic that it does not have a route, it sends the traffic out the interface to the
router at 192.168.4.8, enter:
switch(config)# ip route 0.0.0.0 255.255.255.0 192.168.4.8
Cisco Service and Application Module for IP User Guide
OL-13003-06
E-21
Appendix E
SAMI LCP Commands
processor config-register
processor config-register
To change the configuration register settings of a SAMI PPC, use the processor config-register
configuration command.
processor {proc_number | all-ppc} config-register value
no processor {proc_number | all-ppc} config-register value
Syntax Description
proc_number
Number of the PPC on the SAMI for which you want to change the
configuration register settings. Valid values are 3 through 8.
all-ppc
Sets the configuration register settings for all of the PPCs.
config-register value
Hexadecimal value that represents the 16-bit configuration register value
that you want to use the next time the router is restarted. The value range is
from 0x0 to 0xFFFF.
Defaults
0—The front panel connection rather than the on-the-board connection will make the PPCs
automatically load the Cisco software application image upon startup.
Command Modes
Configuration
Command History
Release
Modification
Release 1.0
This command was integrated into Cisco SAMI Release 1.0.
Usage Guidelines
You can modify the boot method that a SAMI PPC uses at the next startup by setting the boot field in
the software configuration register. The configuration register identifies how the PPC should boot and
where the system image is stored. You can modify the boot field to force a PPC to boot a particular
system image at startup instead of using the default system image.
The processor config-register command affects only the configuration register bits that control the boot
field and leaves the remaining bits unaltered.
Cisco Service and Application Module for IP User Guide
E-22
OL-13003-06
Appendix E
SAMI LCP Commands
processor config-register
Examples
The following example sets the boot field in the configuration register to boot the system image
identified in the BOOT environment variable upon reboot for PPC 5:
switch(config)# processor 5 config-register 1
Related Commands
Command
Description
confreg
Set the configuration register settings of a SAMI PPC.
Cisco Service and Application Module for IP User Guide
OL-13003-06
E-23
Appendix E
SAMI LCP Commands
reload
reload
To reload the configuration on the SAMI LCP, use the reload command.
reload
Syntax Description
This command has no keywords or arguments.
Defaults
No default behavior or values exist.
Command Modes
EXEC
Command History
Release
Modification
Release 1.0
This command was integrated into Cisco SAMI Release 1.0.
Usage Guidelines
Caution
Examples
The reload command reboots the SAMI LCP and performs a full power cycle of both the hardware and
software. The reset process can take several minutes. Any open connections with the SAMI are dropped
after you enter the reload command.
Configuration changes that have not been written to flash memory are lost during a reload. Before
reloading, enter the copy running-conf startup-config command to save a copy of the running
configuration to the startup configuration in flash memory. If you fail to save your running configuration
changes, the SAMI LCP reverts to the last saved version of the startup configuration when restarted.
To execute a soft reboot, enter:
switch# reload
This command will reboot the system
Save configurations for all the contexts. Save? [yes/no]: [yes]
Related Commands
Command
Description
show running-config
Displays the running configuration information on the SAMI LCP.
show startup-config
Displays information about the startup configuration on the SAMI LCP
Cisco Service and Application Module for IP User Guide
E-24
OL-13003-06
Appendix E
SAMI LCP Commands
reload sami processor
reload sami processor
To reload a specific SAMI powerPC (PPC), use the reload sami processor command.
reload sami processor {ppc_num | all-ppc}
Syntax Description
ppc_num
Specifies the specific PPC. Enter a value 3 through 8.
all-ppc
Specifies that the ROM monitor image on all PPCs be upgraded.
Defaults
No default behavior or values exist.
Command Modes
EXEC
Command History
Release
Modification
Release 1.0
This command was introduced.
Usage Guidelines
Caution
Note
Examples
The reload sami processor command reboots a single SAMI PPC. The reload process can take several
minutes. Any open connections with the SAMI PPC are dropped after you enter the reload sami
processor command.
Configuration changes that have not been written to flash memory are lost during a reload. Therefore,
before reloading, enter the copy running-conf startup-config command to save a copy of the running
configuration to the startup configuration in flash memory. If you fail to save your running configuration
changes, the PPC reverts to the last saved version of their startup configuration when restarted.
This command is not available for distributed Cisco software applications such as the Cisco Content
Services Gateway - 2nd Generation.
To reload processor 4 on a SAMI, enter:
switch# reload sami processor 4
Related Commands
Command
Description
show running-config
Displays the running configuration information on the SAMI LCP.
show startup-config
Displays information about the startup configuration on the SAMI LCP
Cisco Service and Application Module for IP User Guide
OL-13003-06
E-25
Appendix E
SAMI LCP Commands
reprogram bootflash
reprogram bootflash
To reprogram the Field Upgradable (FUR) partition of the rommon image on the LCP, use the
reprogram bootflash command with the fur-image keyword specified.
reprogram bootflash fur-image
Syntax Description
fur-image
Command Modes
EXEC
Command History
Release
Modification
Release 2.0
This command was introduced.
Reprograms the rommon image FUR partition.
Usage Guidelines
The reprogram bootflash command is for use by trained Cisco personnel only. Entering this command
may cause unexpected results. Do not attempt to use the reprogram bootflash command without
guidance from Cisco support personnel.
Examples
To reprogram the rommon image FUR partition on the image: file system, enter:
switch# reprogram bootflash fur-image
Related Commands
This command has no related commands.
Cisco Service and Application Module for IP User Guide
E-26
OL-13003-06
Appendix E
SAMI LCP Commands
set cde destindex
set cde destindex
To set the destination index table from index x to y to one of several options, use the set cde destindex
command in EXEC configuration mode. Use the no form of the command to disable this feature.
set cde destindex x [to y] [cp | ixp0 | ixp1 | nitrox | dc1 | dc2 | invalid]
no set cde destindex
Syntax Description
cp
Sets CDE destination for packets in the VLAN to Proc 0 (LCP).
ixp0
Sets CDE destination for packets in the VLAN to IXP0.
ixp1
Sets CDE destination for packets in the VLAN to IXP1.
nitrox
Sets CDE destination for packets in the VLAN to Nitrox (Used only in specific
SAMI applications).
dc1
SAMI daughtercard 1.
dc2
SAMI daughtercard 2.
invalid
No destination.
Command Default
The default value is invalid..
Command Modes
This command is available in Processor 0 (LCP) console, and not under configuration mode.
Command History
Release
Modification
Release 3.4
This command was introduced.
Usage Guidelines
This command is only available with the debug plugin for the LCP.
Examples
Here is an example of the set cde destindex command:
SAMI-slot8# set cde destindex 0 to 4 dc2
dest index 3 lsb 0 - 4 dest dc2
Cisco Service and Application Module for IP User Guide
OL-13003-06
E-27
Appendix E
SAMI LCP Commands
set cde vlan
set cde vlan
To configure vlan destinations for packets in a VLAN(s) to one of several options, use the set cde vlan
command in privileged EXEC mode.
set cde vlan x [cp | ixp0 | ixp1 | nitrox | dc1 | dc2 | invalid | gtpipdesthash | ipsrchash ]
Syntax Description
vlan id
VLAN id or a range of VLAN ids.
cp
Sets CDE destination for packets in the VLAN to Proc 0 (LCP).
ixp0
Sets CDE destination for packets in the VLAN to IXP0.
ixp1
Sets CDE destination for packets in the VLAN to IXP1.
nitrox
Sets CDE destination for packets in the VLAN to Nitrox (Used only in specific
SAMI applications).
dc1
SAMI Daughtercard 1.
dc2
SAMI Daughtercard 2.
invalid
No destination.
gtpipdesthash
CDE Destination is set to IXP. The destination IXP (IXP0/IXP1) to which CDE
would send packets in the VLAN is identified by doing a hash in destination IP
address in the packet and in case of GTP packet, hash over GTP port.
ipsrchash
CDE Destination is set to IXP. The destination IXP (IXP0/IXP1) to which CDE
would send packets in the VLAN is identified by doing a hash in source IP
address in the packet.
Command Default
By default, CDE destinations in enhanced CDE (version 406 onwards) is set to gtpipdesthash. For
previous versions of CDE, the CDE destination is set to ixp0 by default.
Command Modes
EXEC
Command History
Release
Modification
SAMI Release 3.4
This command was introduced in conjunction with the CSG2 Release
5.0, and the Cisco LTE Release 1.0.
Usage Guidelines
Caution
Examples
Here is an example of the set cde vlan command:
This command has a direct impact on the packet processing in SAMI PPC and IXP processors.
You should only use this command when directed by Cisco Technical Assistance Center
(TAC) engineers.
SAMI-LCP# set cde vlan 100 ixp1
This can drastically affect the way system behaves.Are you sure? [yes/no] [no] yes
vlan 100 dest ixp1
Cisco Service and Application Module for IP User Guide
E-28
OL-13003-06
Appendix E
SAMI LCP Commands
set cde vlan
SAMI-LCP# set cde vlan 101 gtpipdesthash
This can drastically affect the way system behaves.Are you sure? [yes/no] [no] yes
vlan 101 dest gtpipdesthash
SAMI-LCP#set cde vlan 102 to 105 ipsrchash
This can drastically affect the way system behaves.Are you sure? [yes/no] [no] yes
vlan 102 - 105 dest ipsrchash
If a vlan in the range is being used by the LCP (proc 0), a warning is issued that the particular vlan is
being used by the LCP and that VLAN is dropped from the configuration. The sample output of the
command is as follows:
SAMI-LCP# set cde vlan 7 to 12 ixp1
vlan 7 - 12 dest ixp1
Warning: vlan 10 is being used by proc 0 and this CLI will not update it.
Please use 'set cde vlan 10' to override.
SAMI-LCP# set cde vlan 10 ixp1
Cisco Service and Application Module for IP User Guide
OL-13003-06
E-29
Appendix E
SAMI LCP Commands
show cde
show cde
To display the classification and distribution engine (CDE) register values, use the show cde command.
show cde {all | count | dist | hash index_number | health | interrupts | reg cde_number register |
stats {cumulative | stats} | vlan vlan_number} [|] [>]
Syntax Description
all
Displays all CDE register values.
count
Displays the cumulative count of the CDE interrupts.
dist
Displays the CDE distribution type.
hash index_number Displays the hash distribution table. Enter a value from 0 to 31.
health
Displays the CDE health.
interrupts
Displays the CDE interrupts.
reg
Displays the specified CDE register.
cde_number
CDE number.
register
Register value. Enter a hexadecimal value from 0x0 to 0x1d9.
stats
Displays the specified CDE statistics.
cumulative
Displays the cumulative CDE statistics from the last invocation of the show cde
command.
stats
Displays the delta CDE statistics from the last invocation of the show cde
command.
vlan vlan_number
Displays the VLAN distribution table for the specified VLAN. For SAMI, this
will be either IXP0 or CP (the LCP). Enter the desired VLAN number.
|
(Optional) Pipe character (|) for enabling an output modifier that filters the
command output. For a complete description of the options available for filtering
the command output, see the show command.
>
(Optional) Greater-than character (>) for enabling an output modifier that
redirects the command output to a file. For a complete description of the options
available for redirecting the command output, see the show command.
Defaults
No default behavior or values exist.
Command Modes
EXEC
Command History
Release
Modification
Release 1.0
This command was integrated into Cisco SAMI Release 1.0.
Usage Guidelines
This command is for use by trained Cisco personnel for troubleshooting purposes only. You can also use
the show cde vlan command to verify if the CDE is programmed correctly for the subscriber VLAN.
Cisco Service and Application Module for IP User Guide
E-30
OL-13003-06
Appendix E
SAMI LCP Commands
show cde
Examples
To display all of the CDE register values, enter:
switch# show cde all
Related Commands
Command
Description
clear cde
Clear the CDE statistics and interrupt counts.
Cisco Service and Application Module for IP User Guide
OL-13003-06
E-31
Appendix E
SAMI LCP Commands
show cde destindex
show cde destindex
To display the destination index table for all indices x to y, use the show cde destindex command in
EXEC mode.
show cde vlan x [to y]
Syntax Description
There are no arguments or keywords.
Defaults
0 <= x <= y <= 7
Command Modes
EXEC
Command History
Release
Modification
SAMI Release 3.4
This command was introduced in conjunction with the CSG2 Release
5.0, and the Cisco LTE Release 1.0.
Usage Guidelines
Examples
To display destinations for all vlans from x to y enter:
slot8# show
Destination
Destination
Destination
Destination
Destination
Destination
Destination
Destination
cde destindex 0 to 7
index & 0x7 == 0 -->
index & 0x7 == 1 -->
index & 0x7 == 2 -->
index & 0x7 == 3 -->
index & 0x7 == 4 -->
index & 0x7 == 5 -->
index & 0x7 == 6 -->
index & 0x7 == 7 -->
daughter
daughter
daughter
daughter
daughter
ixp1
ixp0
ixp1
card
card
card
card
card
2
2
2
2
2
Cisco Service and Application Module for IP User Guide
E-32
OL-13003-06
Appendix E
SAMI LCP Commands
show cde vlan
show cde vlan
To display destinations for the specified VLANs, use the show cde vlan command in EXEC mode.
show cde vlan vlan_id [ to vlan_id ]
Syntax Description
vlan_id
Defaults
No default behavior or values exist.
Command Modes
EXEC
Command History
Release
Modification
SAMI Release 3.4
This command was introduced in conjunction with the CSG2 Release
5.0, and the Cisco LTE Release 1.0.
VLAN id, or a range of VLAN ids for which output is needed.
Usage Guidelines
Examples
To display destinations for all vlans from x to y enter:
SAMI-LCP# show cde vlan 7 to 12
Vlan 7 --> ixp1
Vlan 8 --> ixp0
Vlan 9 --> gtpipdesthash
Vlan 10 --> ipsrchash
Vlan 11 --> cp
Vlan 12 --> ixp1
Cisco Service and Application Module for IP User Guide
OL-13003-06
E-33
Appendix E
SAMI LCP Commands
show daughtercard fpga statistics
show daughtercard fpga statistics
To display the field programmable gate array (FPGA) statistics for a daughter card on the SAMI, use the
show daughtercard fpga statistics command.
show daughtercard card_number fpga statistics
Syntax Description
card number
Defaults
No default behavior or values exist.
Command Modes
EXEC
Command History
Release
Modification
Release 1.0
This command was introduced.
Number of the daughter card for which you want to display FPGA-related
statistics. A valid value is 1 or 2.
Usage Guidelines
If a daughter card number is not specified, the FPGA statistics for both daughter cards will display.
Examples
To display the FPGA statistics for daughter card 2, enter:
switch# show daughtercard 2 fpga statistics
Related Commands
Command
Description
clear daughtercard
fpga statistics
Clears all FPGA statistics for a SAMI daughter card
show daughtercard
registers
Displays FPGA or complex programmable logic device (CPLD) registers
for a SAMI daughter card.
Cisco Service and Application Module for IP User Guide
E-34
OL-13003-06
Appendix E
SAMI LCP Commands
show daughtercard registers
show daughtercard registers
To display the field programmable gate array (FPGA) or complex programmable logic device (CPLD)
registers for a daughter card on the SAMI, use the show daughtercard registers command.
show daughtercard card_number [fpga | cpld] registers
Syntax Description
card number
Daughter card for which you want to display registers. Enter 1 or 2.
fpga
(Optional) Displays FPGA-related registers.
cpld
(Optional) Displays CPLD registers.
Defaults
No default behavior or values exist.
Command Modes
EXEC
Command History
Release
Modification
Release 1.0
This command was introduced.
Usage Guidelines
If a daughter card number is not specified, the FPGA and/or CPLD registers for both daughter cards will
display.
Examples
To display the FPGA counters for daughter card 2, enter:
switch# show daughtercard 2 fpga registers
Related Commands
Command
Description
clear daughtercard
fpga statistics
Clears all FPGA statistics for a SAMI daughter card
show daughtercard
fpga statistics
Displays FPGA statistics for a SAMI daughter card.
Cisco Service and Application Module for IP User Guide
OL-13003-06
E-35
Appendix E
SAMI LCP Commands
show login timeout
show login timeout
To display the amount of time, a session can remain inactive before it is ended (the login session idle timeout
value), use the show login timeout command.
show login timeout
Syntax Description
This command has no keywords or arguments.
Defaults
No default behavior or values exist.
Command Modes
EXEC
Command History
Release
Modification
Release 1.0
This command was integrated into Cisco SAMI Release 1.0.
Usage Guidelines
To configure the login timeout value, use the login timeout command in configuration mode.
Examples
To display the login timeout value, enter:
switch# show login timeout
Related Commands
Command
Description
login timeout
Modifies the length of time that a user can be idle before the LCP terminates
the console, Telnet, or SSH session.
Cisco Service and Application Module for IP User Guide
E-36
OL-13003-06
Appendix E
SAMI LCP Commands
show running-config
show running-config
To display the running configuration information on the SAMI LCP, use the show running-config
command.
show running-config [aaa | access-list | action-list | class-map | context | dhcp | domain | ft |
interface | object-group | parameter-map | policy-map | probe | resource-class | role |
rserver | serverfarm | sticky] [|] [>]
Syntax Description
aaa
(Optional) Displays authentication, authorization, and accounting (AAA)
information.
action-list
(Optional) Displays action list information.
access-list
(Optional) Displays access control list (ACL) information.
class-map
(Optional) Displays the list of all class maps configured for the current context. The
SAMI LCP also displays configuration information for each class map listed.
context
(Optional) Displays the list of contexts configured on the SAMI LCP. The SAMI
LCP also displays the resource class (member) assigned to each context. The
context keyword only works from within the admin context.
dhcp
(Optional) Displays Dynamic Host Configuration Protocol (DHCP) information.
domain
(Optional) Displays the list of domains configured for the current context. The
SAMI LCP also displays configuration information for each domain listed.
ft
(Optional) Displays the list of redundancy or fault-tolerance (ft) configurations
configured for the current context. The SAMI LCP also displays configuration
information for each ft configuration listed.
interface
(Optional) Displays interface information.
object-group
(Optional) Displays object group information.
parameter-map (Optional) Displays parameter map information.
Defaults
policy-map
(Optional) Displays policy map information.
probe
(Optional) Displays probe information.
resource-class
(Optional) Displays resource class information.
role
(Optional) Displays the list of roles configured for the current context. The SAMI
LCP also displays configuration information for each role on the list.
rserver
(Optional) Displays rserver information.
serverfarm
(Optional) Displays server farm information.
sticky
(Optional) Displays sticky information.
|
(Optional) Pipe character (|) for enabling an output modifier that filters the
command output. For a complete description of the options available for filtering the
command output, see the show command.
>
(Optional) Greater-than character (>) for enabling an output modifier that redirects
the command output to a file. For a complete description of the options available for
redirecting the command output, see the show command.
No default behavior or values exist.
Cisco Service and Application Module for IP User Guide
OL-13003-06
E-37
Appendix E
SAMI LCP Commands
show running-config
Command Modes
EXEC
Command History
Release
Modification
Release 1.0
This command was integrated into Cisco SAMI Release 1.0.
Usage Guidelines
The show running-config command is a context-sensitive command.
Use the copy capture command to do the following:
Examples
•
Save a copy of the running configuration to a file on one or more destination locations.
•
Save the running configuration as the startup configuration.
•
Save the startup configuration as the running configuration.
To display the entire running configuration, enter:
switch# show running-config
Related Commands
Command
Description
show startup config
Displays information about the startup configuration on the SAMI LCP
show tech-support
Displays information that is useful to technical support when reporting a
problem with your SAMI LCP
write
Manages persistent and nonpersistent configuration information
Cisco Service and Application Module for IP User Guide
E-38
OL-13003-06
Appendix E
SAMI LCP Commands
show startup-config
show startup-config
To display information about the startup configuration on the SAMI LCP, use the show startup-config
command.
show startup-config [|] [>]
Syntax Description
|
(Optional) Pipe character (|) for enabling an output modifier that filters the
command output. For a complete description of the options available for
filtering the command output, see the show command.
>
(Optional) Greater-than character (>) for enabling an output modifier that
redirects the command output to a file. For a complete description of the
options available for redirecting the command output, see the show
command.
Defaults
No default behavior or values exist.
Command Modes
EXEC
Command History
Release
Modification
Release 1.0
This command was integrated into Cisco SAMI Release 1.0.
Usage Guidelines
To clear the startup configuration, use the clear startup-config command. To copy the running
configuration to the startup configuration, or copy the startup configuration to the running configuration,
use the copy running-config command.
Examples
To display information about the startup configuration, enter:
switch# show start-config
Related Commands
Command
Description
clear startup-config
Clears the startup configuration.
show running-config
Displays information about the running configuration on the SAMI LCP.
Cisco Service and Application Module for IP User Guide
OL-13003-06
E-39
Appendix E
SAMI LCP Commands
show tech-support
show tech-support
To display information that is useful to technical support when reporting a problem with your
SAMI LCP, use the show tech-support command.
show tech-support [details] [|] [>]
Syntax Description
details
(Optional) Provides detailed information for each of the show commands described
below in the “Usage Guidelines” section.
|
(Optional) Pipe character (|) for enabling an output modifier that filters the command
output. For a complete description of the options available for filtering the command
output, see the show command.
>
(Optional) Greater-than character (>) for enabling an output modifier that redirects
the command output to a file. For a complete description of the options available for
redirecting the command output, see the show command.
Defaults
No default behavior or values exist.
Command Modes
EXEC
Command History
Release
Modification
Release 1.0
This command was integrated into Cisco SAMI Release 1.0.
Usage Guidelines
The show tech-support command is useful when collecting a large amount of information about your
SAMI LCP for troubleshooting purposes with Cisco technical support. The output of this command can
be provided to technical support representatives when reporting a problem.
The show tech-support command displays the output of several show commands at once. The output
from this command varies depending on your configuration. The default output of the show
tech-support command includes the output of the following commands:
•
show environment—See the show environment command.
•
show hardware—See the show hardware command.
•
show interface—See the show interface command.
•
show process—See the show processes command.
•
show running-config—See the show running-config command.
•
show version—See the show version command.
Explicitly set the terminal length command to 0 (zero) to disable autoscrolling and enable manual
scrolling. Use the show terminal command to view the configured terminal size. After obtaining the
output of this command, reset your terminal length as required.
Cisco Service and Application Module for IP User Guide
E-40
OL-13003-06
Appendix E
SAMI LCP Commands
show tech-support
You can save the output of this command to a file by appending > filename to the show tech-support
command. If you save this file, verify that you have sufficient space to do so as each of these files may
take about 1.8 MB.
Examples
To display the summary version of the technical support report, enter:
switch# show tech-support
Related Commands
Command
Description
show interface
Displays the statistics for all interfaces configured on the SAMI LCP.
show running-config
Displays information about the running configuration on the SAMI LCP
show version
Displays information about the currently loaded software version along with
hardware and device information.
Cisco Service and Application Module for IP User Guide
OL-13003-06
E-41
Appendix E
SAMI LCP Commands
show version
show version
To display the version information of system software that is loaded in flash memory and currently
running on the SAMI LCP, use the show version command.
show version| >
Syntax Description
|
(Optional) Pipe character (|) for enabling an output modifier that filters the
command output. For a complete description of the options available for
filtering the command output, see the show command.
>
(Optional) Greater-than character (>) for enabling an output modifier that
redirects the command output to a file. For a complete description of the
options available for redirecting the command output, see the show
command.
Defaults
No default behavior or values exist.
Command Modes
EXEC
Command History
Release
Modification
Release 1.0
This command was integrated into Cisco SAMI Release 1.0.
Usage Guidelines
The show version command also displays information related to the following SAMI hardware
components:
•
Slot number—Slot number that the SAMI LCP occupies on the Cisco 7600 series chassis.
•
CPU—Number of CPUs and type and model
•
Memory—Total and shared volatile memory
•
Flash memory—Total and used flash memory
Use the show version command to verify the software version on the SAMI LCP before and after an
upgrade.
Examples
To display the software version information, enter:
switch# show version
Cisco Service and Application Module for IP User Guide
E-42
OL-13003-06
Appendix E
SAMI LCP Commands
upgrade-rommon
upgrade-rommon
To upgrade the ROM monitor of one or more of the SAMI PPCs with a specific ROM monitor image,
use the upgrade-rommon command.
upgrade-rommon rommon_image {ppc_num | all-ppc}
Syntax Description
rommon_image
Name of the ROM monitor image available in the SAMI software bundle.
ppc_num
Specifies the specific PPC. Enter a value 3 through 8.
all-ppc
Specifies that the ROM monitor image on all PPCs be upgraded.
Defaults
No default behavior or values exist.
Command Modes
EXEC
Command History
Release
Modification
Release 1.0
This command was introduced.
Usage Guidelines
Use this command to upgrade the ROM monitor of one or more of the SAMI PPCs with a specific ROM
monitor image.
Examples
To upgrade the ROM monitor image on SAMI PPC 3, enter:
switch# upgrade-rommon image_name 3
Related Commands
This command has no related commands.
Cisco Service and Application Module for IP User Guide
OL-13003-06
E-43
Appendix E
SAMI LCP Commands
write
write
To manage persistent and nonpersistent configuration information, use the write command.
write {erase | memory [all] | terminal}
Syntax Description
erase
Erases the entire startup configuration with the exception of any configuration that
affects the loader functionality. The startup configuration then reverts back to the
factory-default values. The running configuration is not affected.
memory
Writes the running configuration to the startup configuration.
all
(Optional) Writes configurations for all existing contexts. This keyword is available
only in the Admin context.
terminal
Writes the running configuration to the terminal.
Defaults
No default behavior or values exist.
Command Modes
EXEC
Command History
Release
Modification
Release 1.0
This command was integrated into Cisco SAMI Release 1.0.
Usage Guidelines
The different versions of this command require the following user role or feature in your user role:
•
write erase—Admin user
•
write mem—config-copy feature
•
write all—Admin user
To write the running configuration to the startup configuration, you can also use the
copy running-config startup-config command. To erase the startup configuration, you can also use the
clear startup-config command. To display the running configuration, you can also use the show
running-config command.
Examples
To write running configuration to the startup configuration, enter:
switch# write memory
Related Commands
Command
Description
clear startup-config
Command to clear the startup configuration.
show running-config
Command to display information about the running configuration on the SAMI
LCP
Cisco Service and Application Module for IP User Guide
E-44
OL-13003-06
Appendix E
SAMI LCP Commands
Network Processor Console Command
Network Processor Console Command
The following command is supported at the IXP console:
•
shutdown, page E-46
Cisco Service and Application Module for IP User Guide
OL-13003-06
E-45
Appendix E
SAMI LCP Commands
shutdown
shutdown
To shut down the network processor (IXP) on the SAMI, use the shutdown command.
shutdown
Syntax Description
shutdown
Defaults
No default behavior or values exist.
Specifies shutdown.
Command Modes
Command History
Release
Modification
Release 1.0
This command was introduced.
Usage Guidelines
Use this command to shutdown the network processor (IXP) on the SAMI.
Examples
The following examples illustrates how to use the shutdown command.
shutdown
Cisco Service and Application Module for IP User Guide
E-46
OL-13003-06
GLOSSARY
A
AAA
Authentication, Authorization, and Accounting. Network security services that provide the primary
framework to set up access control on a router or access server. AAA is an architectural framework and
modular means of configuring three independent, but closely related security functions in a consistent
manner. It is flexible, scalable, and supports multiple authentication methods.
B
BCM
Broadcom.
C
CCIE
Cisco Certified Internetwork Expert. The CCIE program offers various CCIE certification in lab testing
centers worldwide. This certification gives you an excellent opportunity to demonstrate your technical
expertise, and can serve as an alternative to other CCIE designations toward fulfilling Cisco partner
requirements.
CDE
Classification and Distribution Engine.
CDMA
Code Division Multiple Access. An access technology that combines each phone call with a code that
only one cellular phone extracts from the air.
CLI
Command Line Interface. An interface that uses commands entered on a command line to configure
and maintain network elements. You use the CLI to access the Cisco IOS software.
CP
CSG2 Control Processor.
CPLD
Complex Programmable Logic Device.
CSG2
Content Services Gateway - version 2.
D
DDR
Double Data Rate (RAM).
Cisco Service and Application Module for IP User Guide
OL-13003-06
GL-1
Glossary
E
ECC
Error-Correcting Code. Memory that corrects errors on the fly.
EOBC
Ethernet Out of Band Channel.
ETSI
European Telecommunications Standards Institute. The European Telecommunications Standards
Institute (ETSI) is an independent, non-profit organization, whose mission is to produce
telecommunications standards for today and for the future. ETSI is officially responsible for standardization
of Information and Communication Technologies (ICT) within Europe. These technologies include
telecommunications, broadcasting, and related areas, such as intelligent transportation and medical
electronics.
F
FIFO
First In First Out.
FPGA
Field Programmable Gate Array.
FUR
Field-Upgradeable ROMMON.
G
GGSN
Gateway GPRS Support Node. A wireless gateway that allows mobile cell phone users to access the
public data network.
GPRS
General Packet Radio Service. A service designed for GSM networks. GPRS is standardized by the
European Telecommunications Standards Institute (ETSI). Cisco Systems’ GPRS solution enables
mobile wireless service providers to supply their mobile subscribers with packet data services. A GPRS
network has two essential elements: Serving GPRS Support Node (SGSN) and Gateway GPRS Support
Node (GGSN).
H
HA
Home Agent. The Home Agent maintains mobile user registrations and tunnels packets destined for the
mobile to the PDSN/FA (Packet Data Serving Node/Foreign Agent). It supports reverse tunneling, and
can securely tunnel packets to the PDSN using IPSec. Broadcast packets are not tunneled. Additionally,
the HA performs dynamic home address assignment for the mobile. Home address assignment can be
from address pools configured locally, through either DHCP server access, or from the AAA
(Authentication, Authorization, and Accounting) server
HSRP
Hot Standby Router Protocol. A Cisco routing protocol for fault-tolerant IP routing that enables a set
of routers to work together to present the appearance of a single virtual router to the hosts on a LAN;
used in environments where critical applications are running and fault-tolerant networks have been
designed.
Cisco Service and Application Module for IP User Guide
GL-2
OL-13003-06
Glossary
I
ICMP
Internet Control Message Protocol. A protocol that supports packets containing error, control, and
informational messages.
ICT
Information and Communication Technologies. Through its core activities, working groups, and regional
nodes, successfully served as a multi-stakeholder mechanism to facilitate and promote collaborative
initiatives at the regional, subregional, and national levels and to mobilize new public and private resources
to support information and communication technologies-for-development programs and projects. The ICT
Task Force facilitated the pooling of relevant experience of both developed and developing countries and the
sharing of lessons learned in introducing and promoting ICT.
IOS or Cisco IOS
Cisco Internet Operating System. Cisco system software that provides common functionality,
scalability, and security for all products under the CiscoFusion architecture. Cisco IOS allows
centralized, integrated, and automated installation and management of internetworks, while ensuring
support for a wide variety of protocols, media, services, and platforms.
IPSec
Internet Protocol Security. IPSec is the network layer crypto platform for Cisco’s security platforms (Cisco
IOS Software, PIX, and so on). Originally described in RFCs 1825-1829, which are now obsolete, IPSec is
currently discussed in a number of documents presented by the IETF IP Security Working Group. IPSec
currently supports IP version 4 unicast packets. IPv6 and multicast support is coming later.
IPSec has the following strengths over current Cisco crypto offerings:
Multivendor: Since the IPSec framework is standardized, customers are not locked into any
specific vendor's product. You will find IPSec on routers, firewalls, and client desktops (Windows,
Mac, and so on).
Scalability: IPSec was designed with large enterprises in mind and therefore, it has “built-in” key
management.
IXP
Intel IXP2800 Network Processor.
Cisco Service and Application Module for IP User Guide
OL-13003-06
GL-3
Glossary
M
MIB
Management Information Base.
MSFC2
Multilayer Switch Feature Card 2. The Multilayer Switch Feature Card 2 quadruples the control plane
and software forwarding performance of a Multilayer Switch Feature Card. The Multilayer Switch
Feature Card 2 adds the following enhancements to the features already offered by the Multilayer
Switch Feature Card:
• Four times the control plane and forwarding performance of the MSFC
•
Support for Error-Correcting Code (ECC) DRAM with option to upgrade to 256 or 512 MB
•
Full Internet routing-table support
•
Support for 1000 terminated virtual LANs (VLANs)
•
Field-replaceable unit for Supervisor Engine 1A already equipped with MSFC
•
Enhanced Web Cache Control Protocol Version 2 (WCCPv2) and Cisco IOS server load balancing
(SLB) performance
•
Enhanced multicast performance
MWAM
Multi-processor Wan Application Module.
MWG
Mobile Wireless Group.
N
NE
Network Element. A single piece of telecommunications equipment used to perform a function or
service integral to the underlying network.
NTP
Network Time Protocol. NTP is a utility for synchronizing system clocks over the network, providing
a precise time base for networked workstations and servers. In the NTP model, a hierarchy of primary
and secondary servers pass timekeeping information by way of the Internet to cross-check and correct
errors arising from equipment or propagation failures.
P
PDSN
Packet Data Serving Node. A node that provides the primary wireless mobile data access to the Internet
and intranets using the CDMA2000 Radio Access Network environment.
PPC
Power PC.
Q
QoS
Quality of Service. Measure of performance for a transmission system that reflects its transmission
quality and service availability.
Cisco Service and Application Module for IP User Guide
GL-4
OL-13003-06
Glossary
R
RCAL
Remote CLI And Logging.
RCP
Route Processor Redundancy.
ROMMON
ROM-monitor. The ROM-monitor is a ROM-based program that is involved at power-up or reset, or
when a fatal exception error occurs. The switch enters ROMMON mode if the switch does not find a
valid software image, if the NVRAM configuration is corrupted, or if the configuration register is set
to enter ROMMON mode. From the ROMMON mode, you can load a software image manually from
Flash memory, from a network server file, or from bootflash. You can also enter ROMMON mode by
restarting the switch and pressing Ctrl-C during the first five seconds of startup. When you enter
ROMMON mode, the prompt changes to rommon 1>. Use the ? command to see the available
ROMMON commands.
RPR+
Route Processor Redundancy Plus. A redundant processor module that contains the CPU, system
software, and most of the memory components that are used in a router. Sometimes called a supervisory
processor. The RPR+ has the following additional benefits over an RPR: reduced switchover time,
installed module are not reloaded, allows OIR (On-line Insertion and Removal) for maintenance,
synchronization of OIR events, and manual user-initiated switchover using the redundancy
force-switchover command.
S
SAMI
Service Application Module for IP.
SANOS
Linux based Storage Area Network Operation System .
SEEPROM
Serial Electrically Erasable Programmable Read Only Memory.
SLB
Server Load Balancing. The Server Load Balancing feature is a Cisco IOS-based solution that provides
server load balancing. This feature allows you to define a virtual server that represents a cluster of real
servers, known as a server farm. When a client initiates a connection to the virtual server, the IOS SLB load
balances the connection to a chosen real server, depending on the configured load balance algorithm or
predictor.
SNMP
Simple Network Management Protocol. A common method by which network management
applications can query a management agent using a supported management information base.
SP
Switch Processor.
SSA
Super Santa Ana Asic.
SSG
Service Selection Gateway. A Cisco product that provides flexible service selection, connectivity to
multiple networks, and RADIUS proxy capability.
SSO
Stateful Switch Over.
SUP
Supervisor.
Cisco Service and Application Module for IP User Guide
OL-13003-06
GL-5
Glossary
Supervisor
Hardware complex/card responsible for controlling and managing the system.
SVCLC
SerViCe Line Card.
T
TCB
Transmission Control Block or Transaction Control Block. It remembers incoming and outgoing
requests, providing reliable retransmission of proxied requests and returning the best final response or
responses back upstream. One transaction encompasses the received request, the request or requests (if
forked) forwarded downstream, responses received from downstream hosts, and the best response returned
upstream.
TP
CSG2 Traffic Processor.
U
UDP
User Datagram Protocol. A layer 4 IP protocol that provides for exchange of datagrams without
acknowledgements or guaranteed delivery.
V
VLAN
Virtual Local Area Network.
Cisco Service and Application Module for IP User Guide
GL-6
OL-13003-06
Glossary
W
WCCPv2
Web Cache Control Protocol Version 2. The Web Cache Communication Protocol (WCCP) feature
allows you to use a Cisco Cache Engine to handle web traffic, reducing transmission costs and
downloading time. This traffic includes user requests to view pages and graphics on World Wide Web
servers, whether internal or external to your network, and the replies to those requests. When you
request a page from a web server (located in the Internet), the router sends the request to a cache engine.
If the cache engine has a copy of the requested page in storage, the cache engine sends you that page.
Otherwise, the cache engine retrieves the requested page and the objects on that page from the web
server, stores a copy of the page and its objects, and forwards the page and objects to you.
WCCP transparently redirects Hypertext Transfer Protocol (HTTP) requests from the intended server
to a cache engine. You do not know that the page came from the cache engine rather than the originally
requested web server.
WCCP v2 now contains the following new features:
•
Multiple router support
•
Improved security
•
Faster throughput
•
Redirection of multiple TCP port-destined traffic
•
Load distributing applications capability
•
Client IP addressing transparency
Cisco Service and Application Module for IP User Guide
OL-13003-06
GL-7
Glossary
Cisco Service and Application Module for IP User Guide
GL-8
OL-13003-06