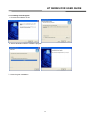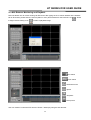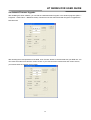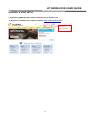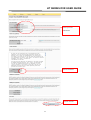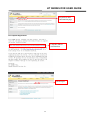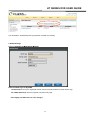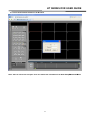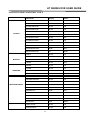
1
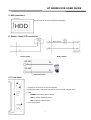
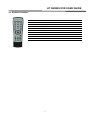
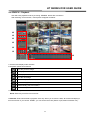
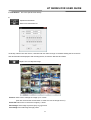
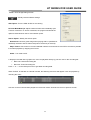
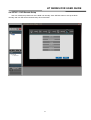
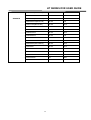
HT SERIES DVR USER GUIDE
DATE: 2010/12/22 VER 1.1
INDEX
1. Features
4
2. Hardware Overview
6
2-1 Front Panel
7
2-2 Rear Panel
8
2-3. Remote Controller
9
10
3. System Overview
3-1. General Usage Information
10
3-2 LIVE Mode
11
3-2 SETUP Mode
15
3-2-1 DISPLAY
15
3-2-2 Record
16
3-2-3 Device
21
3-2-4. NETWORK
25
3-2-5. SYSTEM
28
32
3-3 Search mode
3-3-1. Search Selection Type
32
3-3-2. Play Mode
34
35
4. Remote software
4-1. Installing Client Program
36
4-2. How to Use remote Program
37
4-3. Site - Connecting the DVR
41
4-4. Favorite – multiple DVR connection
42
4-5 SEARCH – Playback
44
4-6 SETUP – DVR Remote Setup
47
4-7 Web Browser Monitoring and Playback
48
4-8 Mobile Phone Viewing
49
4-9 Network Firmware Upgrade
50
APPENDIX A DDNS SETUP
52
APPENDIX B
HDD COMPATIBLE TABLE
58
APPENDIX C
TROUBLESHOOTING
60
1
HT SERIES DVR USER GUIDE
Specifications
MODEL NO.
HT-04
4
Camera input
1 BNC or 1 VGA, Selectable
Output
Audio input / Output
4 RCA /1 RCA
Sensor In/Alarm out
1(NC, NO selectable)/ 1(Relay Output)
Embedded Linux OS
Operating System
Real Time
Display Speed
Display Resolution
720 X 480(NTSC), 720 X 576(PAL)
Display Split screen
1,4, Sequence
Compression Format
H.264 (DSP)
4 LEVEL
Picture quality
(Super, High, Medium, Low)
120 FPS(CIF)
NTSC
60 FPS(Half-D1) + 3 FPS(CIF)
Recording
30 FPS(D1) + 3 FPS(CIF)
Speed
100 FPS(CIF)
PAL
50 FPS(Half-D1) + 3 FPS(CIF)
25 FPS(D1) + 3 FPS(CIF)
1,4
Playback Display
Calendar, Event
Search mode
Playback Speed
Normal, REW & FF [Recorded Speed x2, x4, x8, x16,x32,x64,x1/2,x1/4],
Frame to Frame, Pause
Network Interface
Ethernet, PPPoE
Network Protocol
TCP/IP, HTTP, DHCP
Application
Windows 2000 / XP / Vista (PC Client system& IE)
Internet Explorer
Web Browser
Backup
Network, USB 2.0Thumb Drive
Supports 1 SATA HDD
HDD
12V / 3.3A
Power Consumption
5 ~40
Operating Temperature
Relative Humidity
Maximum 80% non-condensing
337(W) x 256(D) x 60(H)
Dimension(mm)
Weight(N.W)
(41~104F)
Approx. 1.8kgs / 4 lbs (W/O HDD)
2
HT SERIES DVR USER GUIDE
Warnings
Installation and servicing should be performed by qualified and experienced personnel only.
DVR should always remain OFF during any installation process
Product Components
The package contains the main unit and its components as specified below. When you purchase the unit,
please check to ensure the components specified below are included:
DVR Set X1
Client Software CD X1
Remote Control X1
Battery1.5V (AAA) X2
User Manual X1
Power Adapter X1
Power Cord X1
3
HT SERIES DVR USER GUIDE
1. Features
Excellent picture quality
Allow recording and reviewing in high quality digital image based on H.264 compression method.
High reliability
With Embedded hardware and software design, this maintains higher product reliability compared to common
PC type products.
Support Non-English Character and Input for Camera Titles
User can define his own language OSD camera title besides English.
Pentaplex System
Pentaplex System allows recording, backup, networking and playback simultaneously.
Selectable recording setup
For recording methods, users can select frame rate, resolution and video quality individually in order to be
appropriate for user's environment.
Remote monitoring
User can search or monitor recorded images remotely by installing exclusive client program on PC via internet
network.
Backup
User can backup the recorded file with USB pen drive.
Audio recording
User can record four audio inputs simultaneously. Moreover, user can also listen to the audio in search, live
monitoring and play mode.
Various recording methods
DVR unit provides multiple recording methods including manual recording, dates & days recording,
hourly schedule recording and sensor & motion detection recording.
Various total monitoring features
DVR unit provides an overall and economical security system through various sensor inputs and contact
output control.
4
HT SERIES DVR USER GUIDE
Display information in easy-to-understand information method
This DVR unit enhanced user friendly display information such as date, time, recording method, recording
frame number, HDD capacity in monitoring, recording and playing mode.
Software Deinterlacing to Enhance Live and Playback Quality
Support 3G Mobile Phone Viewing (iPhone, Blackberry, Android, Windows Mobile, JAVA,
Symbian OS)
5
HT SERIES DVR USER GUIDE
2. Hardware Overview
A. Front Panel
B. Rear Panel
Rear panel
Sensor input / Relay output / RS-485
6
HT SERIES DVR USER GUIDE
C. HDD Installation
Remove top cover of the DVR and install HDD
D. Sensor / Relay/ PTZ connection
Sensor Input
Relay Output
PTZ connection
2-1 Front Panel
1. IR Sensor: IR receiver for remote controller
2. USB Connectors: USB ports connection for mouse and USB pen drive
3. LED :
POWER: Indicates power on status
HDD: Indicates recording status
NET: Indicates network status
4. LCD on/off switch.
7
HT SERIES DVR USER GUIDE
2-2 Rear Panel
Label
VIDEO INPUT
Operation
4 connectors for video input.
Connect camera output to Video-in (NTSC/PAL)
CRT OUTPUT
Connector for CRT TV.
VGA OUTPUT
Connector for VGA monitor
AUDIO
4 Audio Inputs and 1 Audio Output
SENSOR IN
Connection for sensor device.
ALARM OUT
One Alarm device output. On/Off switching by using relay. 1A, 24V or 0.5A,125V
RS-485
Connect to PTZ camera,+PTZ D+
LAN
RJ45 connector for LAN connection.
DC 12V
Use 12V DC supplied adapter ONLY.
/ - PTZ D-
NOTE:
For 4 Channel DVR model, please select either LCD PANEL or CRT monitor before power up the
system.
DO NOT CHANGE THIS SETTING WHEN DVR UNIT IS ON.
8
HT SERIES DVR USER GUIDE
2-3. Remote Controller
PTZ
Backup
OSD
Lock
Numbers
ID
Menu
Exit
Direction
Enter PTZ mode
Enter Backup mode
Display current DVR settings through GUI
Log off current user
Press number button to select channel
Select remote control ID (Click ID button and then number)
Enter Setup menu
Exit
Control direction
Enter
9
HT SERIES DVR USER GUIDE
3. System Overview
3-1. General Usage Information
The STANDARD series DVR can be operated with a mouse or remote controller under the four main modes
listed below:
Live Mode – Allow user to view all live operating cameras and access to Pan/Tilt camera controls.
In
addition, system status information will be shown during live mode.
Setup Mode – Allow user to customize settings for Live viewing, Recording, Backup, and Camera related
devices under the Setup Mode.
Search Mode – Allow user to review all recorded footage by using a calendar or event based search.
Backup Mode – Allow user to archive desired data to a preferred supported media. (ex. CD, DVD, USB
Backup, Remote Client Software, etc.)
Password Protection
The DVR unit is protected by user ID and password system in order to prevent unauthorized operation.
(Factory Default settings are blank for these fields).
IDs and Passwords should be managed by a system administrator ONLY. Different users may be assigned
with different levels authorities to the DVR.
10
HT SERIES DVR USER GUIDE
3-2 LIVE Mode
In this section, user will learn how to split the video mode into 1, 4, 6, 8, 9, 12, 16, as well as auto sequencing,
PTZ Control, Mouse control, Setup configurations and Backup.
1) Live View Status
Live View indicators allow user to view the current status of the DVR system.
Recording indicator
Event recording indicator
Motion detection indicator
Sensor activation indicator
2) Live Menu Bar
Live Menu Bar allows user to view DVR system status and use the shortcut.
Screen Split mode change
Date / Time
Lock/ Unlock indicator
Sequence activation
Audio out channel
Hard drive usage
Scheduler activation indicator
11
HT SERIES DVR USER GUIDE
3) Live Popup Menu
User may bring up the Live Popup menu by right-clicking (mouse) anywhere on Live Screen. By using the
Live Popup Menu, user can enter any configuration and settings immediately.
3-1) LIVE Mode Feature
1) Split
Modify Live View split screen.
4CH
: 1/4 Split Mode
8CH
: 1/4/6/8/9 Split Mode
16CH
: 1/4/6/8/9/13/16 Split Mode
2)
Instant Replay
Instant Replay provides a very convenient method to catch the abrupt accident immediately. During live
viewing, user can enter the playback screen directly and use related functions to playback.
12
HT SERIES DVR USER GUIDE
3) PTZ (Pan, Tilt and Zoom)
Press ‘PTZ’ button to enter PTZ mode. For Menu setting, user may set it by pressing the button as displayed
at bottom of window.
•
User can set the direction of camera by using the arrow buttons.
Zoom +/-
Zoom in/out with mouse or play
/backward buttons on the remote
controller.
Focus +/-
Adjust the focus with mouse or slow
buttons on the remote controller.
Iris +/-
Adjust the iris with mouse or ff/rew
buttons on the remote controller.
Camera[0]: When select “Camera[0]” using mouse or “0” button on the remote control in PTZ mode, it can be
changed to other camera
Setup[Menu]: When select “Setup[Menu]” using mouse or “Menu” button on the remote controller in PTZ
mode, PTZ setup window will appear. User can set the pan and tilt speed, 32 preset name and tour sequence
as well as dwelling time.
13
HT SERIES DVR USER GUIDE
Preset [Enter]: User can enter the preset number using the keypad or “” button on the remote controller.
RUN: Enter preset number first, and press “Run” using mouse.
SET: Use the arrow buttons to set the direction, followed by preset number, and
press “Set” to save this preset.
CLEAR: Enter preset number first, and press “Clear” to delete preset.
4) Sequence
Sequence Mode On /Off: Switches screens as set on Dwell time under Screen Setup
5) OSD
Display current DVR settings such as current date & time, System Lock Setting, HDD usage, Video Loss
Check, Sensor ON/OFF, Motion Detection Check, Recording Status and Schedule Feature Usage information
on GUI by pressing INFO button. Press INFO button twice to close this GUI.
※ GUI (Graphic User Interface): Display current status on monitor as images
※ OSD (On Screen Display): Display current status on monitor as character
6) Lock/Log In
Log off current user and lock the DVR unit from any further configuration until next Administrator logs in.
7) Zoom
Digital zoom (up to 2x) on live screen for selected channel and control the position by dragging the mouse.
14
HT SERIES DVR USER GUIDE
3-2 SETUP Mode
Access Setup menu by right clicking on mouse button.
3-2-1 DISPLAY
Configure OSD, Main Display and Color Control settings.
1) OSD
User may configure Date Format / Time Format / Language / Alpha Blending / OSD / Information Bar options.
Date Format: Select from YYYY/MM/DD, MM/DD/YYYY, DD/MM/YYYY format.
Time Format: 24HR – 24 hour military time format
12HR(AM/PM) – 12 Hour separated by AM/PM format
Language : Select system language.
Alpha Blending: Adjust transparency of System Menu.
OSD : Turn OSD On/Off.
Information Bar: Turn Menu Bar information On/Off.
Default
: Default all configurations back to Factory Settings.
Apply
: Save current configuration.
2) Main Display
Configure Monitor output, Switching Dwell
Time settings. Monitor option is only available
for 8 and 16ch DVR unit.
15
HT SERIES DVR USER GUIDE
Monitor: Select monitor output between VGA and composite. The screen size will be optimized with the
selected monitor.
Switching Dwell Time: Setup channels switching time.
3) Color Control
Adjust camera color display.
Adjust camera image by channels.
- Contrast: Adjust contrast of camera.
- Brightness: Adjust brightness of camera.
- Saturation: Adjust saturation of camera.
- Hue: Adjust color of camera.
3-2-2 Record
Configure Event In, Record, Group, Holiday settings.
1) Record
Setup the DVR recording variables and Scheduler.
[Scheduler Off]
Allow user to set normal recording and event recording individually.
16
HT SERIES DVR USER GUIDE
1) Rec Type: Select conti (continuous), event, C/E(conti and event) and none(not recording) recording.
2) Audio Rec: Enable/ Disable audio recording.
3) Continuous Recording:
Resolution: Select recording resolution.
-- CIF
: 360X240 (NTSC)/ 360X288 (PAL)
-- 2CIF : 720X240 (NTSC)/ 720X288 (PAL)
-- D1
:720X480 (NTSC)/ 720X576 (PAL)
NOTE: D1 resolution = 2 x 2CIF resolution = 4 x CIF resolution
FPS: Setup recording frame rate per channel.
Total number of frames used cannot exceed:
-- CIF resolution:
-- 2CIF resolution:
120fps (4CH) / 127fps (8CH) / 135fps (16CH)
4CH : 60fps (2CIF) + 3fps (CIF)
8CH : 60fps (2CIF) + 7fps (CIF)
16CH : 60fps (2CIF) + 15fps (CIF)
-- D1 resolution:
4CH : 30fps (D1) + 3fps (CIF)
8CH : 30fps (D1) + 7fps (CIF)
16CH : 30fps (D1) + 15fps (CIF)
NOTE: D1 resolution = 2 x 2CIF resolution = 4 x CIF resolution
For example (16 CH):
Scenario:
If user selects:
CH1
--
D1 resolution : 2fps
CH2
-- 2CIF resolution : 5fps
CH3~16 -- CIF resolution: 3fps
Total frame rates used in CIF= CH1+ CH2 +CH3~16
= (4 x 2fps) + (2 x 5fps) + (14 x 3fps)
= 74fps, which is less that 135fps
= Valid
Quality: Setup picture quality from Super, High, Medium and Low.
NOTE: As quality gets higher, screen quality gets better. However, saving period gets shorter
because the file size gets larger.
17
HT SERIES DVR USER GUIDE
4) Event Recording
Event setup method is the same as Conti Recording method. Conti Recording and Event Recording can
be operated simultaneously. When there is no event occurs, DVR unit will record under Conti recording mode
and vice versa.
-
Duration(sec): Set post event recording time. User can choose from 1~60 seconds.
-
Pre alarm(sec): Set pre event recording time. User can choose from 1~5 seconds.
* Event recording has higher priority in recording. In C/E recording mode, DVR unit will follow continuous
recording setup in normal condition and switch to event recording setup when event occurs.
* For convenience, user can use the ‘Apply All’ menu to apply the settings to other channels at once.
[Scheduler On]
Allow user to set recording weekly and reduce unnecessary time period of recording. In Scheduler window,
days, channels and recording information for each channel are displayed at bottom of window.
<How to set the weekly scheduler>
1. Tick 'Scheduler' to 'On'.
2. Use mouse to check group color and click time zone.
3. Press the time bar (UNLOCK first) to set the detailed time.
4. Using mouse to change the group of the selected area.
5. Check “Holiday” to activate ‘Holiday’ scheduler.
18
HT SERIES DVR USER GUIDE
2) Group
With this menu, user can set the group using the scheduler. The settings are similar to “Record” menu.
In recording, Schedule recording has a highest priority. Therefore, once weekly scheduler has been activated,,
user are not allow to record manually.
3) Holiday
User is able to setup the Holiday recording date manually.
19
HT SERIES DVR USER GUIDE
4) Event In
User can setup sensor input and motion detection setup in the menu. User can also setup each channel
individually. Each channel may be configured to M (Motion) / S (Sensor) / (Both)
For example:
Event Input
Event Ch
Record Ch
Sensor or Motion
Ch 1
Ch1 / Ch2 /Ch3
Event Input
Event Ch
Record Ch
Motion
Ch 4 or Ch5 or Ch6 Ch4
NOTE: Only Event 1 is allowed to select (Motion or Sensor), and other channels select “M” to
trigger recording
Event Recording Summary:
Event Input
Motion Detection Sensor Setting
Motion recording
M
ON
OFF
Sensor detection recording
S
OFF
ON
Motion or Sensor Recording
ON
ON
*Although user set Motion Detection and Sensor Setting to On in Event menu, if Event Input in Rec Menu is
set to None, it will only detect the event but not recording.
20
HT SERIES DVR USER GUIDE
3-2-3 Device
Configure and view Camera, Audio, Motion Detection, Alarm Out, PTZ settings
1) Camera
User may configure and/or view camera video type and general camera configuration.
Name: Define the camera title.
Disable: Disable current camera. It is useful when camera input signal is weak.
Covert: Hide current camera from Live view but does not interrupt recording.
2) Audio
Audio Out: Select which audio output channel during Live View.
21
HT SERIES DVR USER GUIDE
3) Motion Detection
Change settings for Motion Grid selection and Sensitivity Level
Sensitivity: Select motion detection sensitivity level
All On: Activate motion detection in all area.
All Off: Deactivate motion detection in all area.
4) Alarm Out
There are 3 alarm trigger types such as sensor input, motion detection and video loss. This setting is related
to which trigger will activate the action such as Relay, Popup, and Buzzer Alarm Out. Each alarm trigger type
has an individual Duration value.
4CH Alarm out OSD page
22
HT SERIES DVR USER GUIDE
8/16CH alarm out OSD page
Duration Time vary from 5 seconds to 60 seconds
Sensor Type:
Selectable option is N.O. (Normally Open) / N.C. (Normally Close)
23
HT SERIES DVR USER GUIDE
5) PTZ
Configure Pan/Tilt/Zoom camera for control via DVR System and Remote client software
Driver: Select correct protocol for DVR unit to communicate with PTZ cameras.
Please contact PTZ camera manufacturer to find out the correct default protocol.
Driver
Baudrate
PELCO D type
9600~2400
PELCO P type
2400
PANASONIC
2400~19200
ORIENTAL
2400(Fixed)
LPT-A100L
9600(Fixed)
LG-SD110
2400~19200
6) Controller
Setup the ID of remote control. If there are few DVRs present in one location, user can control each DVR
separately by using different remote control ID on each DVR.
Use the ID setup and number key to set the ID of remote control on the remote controller. User may check the
ID by pressing the remote control key. The ID should be the same between the DVR and remote control.
24
HT SERIES DVR USER GUIDE
3-2-4. NETWORK
Configure and view Status, Address, Port, DDNS, E-mail settings
1) Address
Configure Network information for Remote client connection
DVR Name: Assigned a title for the DVR unit.
Type: Choose between Ethernet and PPPoE network environment.
DHCP: Set to use DHCP or not (On/Off).
Note: Please consult your network administrator for DHCP support.
IP: Set IP Address
Subnet Mask: Set Subnet Mask address
Gateway: Set Gateway address
DNS IP: Set DNS address
2) Port
Setup 4 individual ports for remote watching, searching, setup and web browser viewing.
25
HT SERIES DVR USER GUIDE
3) DDNS
DVR unit supports the automatic DDNS service using DYNDNS server.
4) Status
Display network information such as how many connections and what is the action of each connection. This
allows user to have better security management.
Connected IP: Display all remote login IP address.
Watch User: Display number of connections for live viewing.
Search User: Display number of connections for playback.
Setup User: Display number of connections for DVR setup.
Note: Total maximum connections at the same time: 4 users
26
HT SERIES DVR USER GUIDE
5) E-mail
E-mail ON: Enable / Disable event E-mail notification function
To: Recipient Email address
From: Sender Email address
Port: SMTP server port
Authentication: Check if SMTP server requires Authenticate Sender information
SSL: Check if SMTP server requires SSL
Account: Sender email login ID
Password: Sender email login password
Duration: Set sends e-mail duration when event triggered
E-mail Test: Send testing e-mail to recipient Email address
Event Set: Set event e-mail type
NOTE: Due to one sensor hardware limitation for 4/8/16CH, only Channel 1 is allowed to select sensor
type.
27
HT SERIES DVR USER GUIDE
3-2-5. SYSTEM
Configure and view system Date/Time, User Authority, Storage, System Log, Firmware settings
1) Date/Time
Time Zone: Setup current time zone. This must be set correctly if you using the NTP function.
Daylight Saving Time: Enable day light saving time automatically.
NTP (Network Time Protocol) Server: This function is to change the time of DVR automatically via network.
Press ‘Sync’ button to synchronize time with Time server
NTP Check: Set automatic network time sync schedule. (None / 12Hours / 1day / 2days /
3days / 1 week)
2)
User Authority
Setup user authorities such as Setup, Search, Backup, PTZ, Network and camera control individually.
ID: Use virtual keyboard to input user ID
Password: Setup user login password
28
HT SERIES DVR USER GUIDE
Camera: Setup which cameras are allowed to view for login user
3) Storage
Storage 1: Display the information and usage of the hard disk drives.
NOTE: Press ‘Format’ button on each HDD will only format that particular HDD.
Total: Display Total HDDs being used for the product.
NOTE: Press ‘Format’ button on here will format all HDDs drive.
HDD Overwrite: Enable when user wants to continue recording if HDD is full.
Auto Deletion: Select the holding period of the data(1 day~3 month). If you choose ‘OFF’, the DVR will keep
the maximum data according to the HDD capacity.
29
HT SERIES DVR USER GUIDE
4) S.M.A.R.T
S.M.A.R.T. (Self-Monitoring Analysis and Reporting Technology). It was created to monitor the disk status.
S.M.A.R.T:
Check Day: Set HDD checking data
Boot message: Set alarm output condition for boot error
Temperature:
Check time: Set the duration time to check HDD temperature
Limit: Set alarm output condition of HDD temperature
Alarm out: Set the alarm output method for S.M.A.R.T
S.M.A.R.T(error/Test): show the information for boot error
Temperature : Show the HDD temperature
5) System Log
User may view all System administration log from Setup ◊ System ◊ System Log
Export: Allow user to backup all system log data to USB pen drive.
30
HT SERIES DVR USER GUIDE
6) Firmware
Allow user to view current DVR unit firmware version, upgrading firmware, Export or Import and Default DVR
Configuration.
Upgrade Steps:
1. Copy the upgrade file to the USB pen drive(file will be:xxxxx.fwr format)
2. Connect USB pen drive to the DVR unit front panel
3. Enter menusystemfirmware page and press “Upgrade” button, then select upgrade file from USB pen
drive.
Note: The Upgrade process takes 6~10 minute. Do not interrupt the upgrade procedure!
DVR will reboot automatically after upgrading. DO NOT REBOOT MANUALLY!
7) Shut Down
You may safely shutdown the DVR by entering Setup System Shutdown.
Note: DVR will lose 1 second of the recording data if power down the DVR unit directly
31
HT SERIES DVR USER GUIDE
3-3 Search mode
Search mode consists two different modes of searching. The video data can be searched by Time or Event.
3-3-1. Search Selection Type
1) Time Based search selection
1. Select the date you wish to view by selecting a Date from Calendar
2. Select the time you wish to view by selecting a time from Time Line, or click “ + “ or “ - “ to get detailed
time line
3. Preview panel above the time bar will show the preview of the selected video
4. Choose ‘Play’ to play in full screen mode. User can control the playback speed in here.
Refresh: Reload all data list.
Option: Select Default search options such as time, type, and Deinterlacer
Import: Import recorded data from external USB device
32
HT SERIES DVR USER GUIDE
Backup: Backup recorded data to external USB device
Select backup period, channels and press
“Estimation” to calculate file size.
Press “start “to start backup recording data
Play: Load playback data to full screen mode.
Exit: Exit to Live video mode
Backup player:
While making backup, the player program
will be written into the USB stick as well
2) Event Based Search Selection
1. Select search date from calendar
2. Event log will be displayed according to the chosen date
3. Preview panel above the Event Log will show preview of selected video
4. Event log can be searched by the event type:
33
HT SERIES DVR USER GUIDE
3-3-2. Play Mode
1
2
3
45
67
8
1. Split Screen
2. Sequence
3. FB (Fast Rewind): ×2, 4, 8, 16, 32, 64 times faster
4. Playback: Rewind in normal speed
5. SB (Slow Rewind): x1/2, 1/4
6. STILL (Pause) / play Frame by frame
7. SF (Slow Forward): x1/2, 1/4
8. Play: Forward in normal speed
9. FF (Fast Forward): FF×2, 4, 8, 16, 32, 64 times faster
10. Stop: Stop playing and returns to LIVE Screen.
11. Status information
By Right-Clicking anywhere on Play mode Screen, user may view the Live Popup Menu.
34
9 10
11
HT SERIES DVR USER GUIDE
4. Remote software
This Remote Client software program allows user to connect and operate the DVR unit from any place over
internet via PC.
CLIENT PC REQUIREMENT
CPU and VGA are critical for playing recorded file and recording performance. Therefore, user must use the
recommended PC hardware to avoid experiencing low image quality or unable to view live image issue.
Client S/W requires large amount of CPU to send and receive data. Therefore, it is highly recommended
not to run other application program (such as antivirus software) at the same time.
Recommended Client PC Specification:
- CPU: Intel Core2 Due CPU or higher
- RAM: 1GB or higher
- VGA: Memory 256MB or higher
-
LAN : In 10/100 network environment, 100Mbps or higher environment
-
DirectX9.0 or higher,
Minimum Client PC Specification
- CPU : Pentium
2.0GHz or higher
- RAM : 512MB or higher
- VGA : Memory 64MB or higher
-
LAN : In 10/100 network environment, 100Mbps or higher environment
-
DirectX9.0 or higher,
In ‘Favorite mode’, CPU occupancy will increase according to the number of remote connections.
Recommended VGA display card
- Chipset from nVIDIA: GeForce 4- Higher than 64MB
- Chipset form ATI: Radeon - Higher than 64MB
- Chipset from MATROX: G450 - Higher than 64MB
- Chipset from Intel: Higher than 64MB
Fail to meet these requirements might cause the program errors, low screen quality like black & white screen,
unable to playback in proper 256 bits color.
35
HT SERIES DVR USER GUIDE
4-1. Installing Client Program
1. Execute the software on CD
2. Select destination folder to install the program
3. Finish Program Installation
36
HT SERIES DVR USER GUIDE
4-2. How to Use remote Program
Execute the client software and followed by correct password (default is null).
1. Display panel to show live and playback images
2. Setting button:
Password Setup: Allow user to change the password settings.
Start – Require password input when remote software startup.
Setting – Require password input in order to enter system setup.
Dialog – If you choose the ‘Dialog’, You can set the DVR using dialog windows.
Language – Choose the language of remote software
37
HT SERIES DVR USER GUIDE
3).
WATCH MODE : Live screen.
FAVORITE MODE : Connect to multiple DVR (up to 64)
SEARCH MODE : Playback Screen
SETUP MODE : Setup the connected DVR
Connect or Disconnect the connected DVR
4).
Favorite: User may use this feature to setup a list of IP Addresses which frequently use for your
convenient use.
Site: Display the DVR list you want connect.
Add: Add new IP Address.
Edit: Edit IP Addresses and other connection information on the list.
Delete: Remove saved list.
Detect: Detect all DVRs which connect to same router.
Display & PTZ Control: Change the control window after connection established.
38
HT SERIES DVR USER GUIDE
4-2-1 Display & PTZ Control:
Allow user to display and control the PTZ cameras.
1. Channel selection
2. Display mode selection
3. PTZ control: Control the PTZ camera.
4. Snap Shot: Save a snapshot with JPG or BMP format.
Refer to 5-2-6.
5. Option: Enter setup setting.
OSD Option: Turn OSD On/Off on live viewing.
Favorite Mode Max Fps: Adjust the maximum frame rate individually upon ‘Favorite’ connection. If
‘AUTO’ is chosen, the program will choose the optimum rates based on the PC and network speed.
Search Option: Select the search option
Deinterlacer: Remove the tail when playing in D1 (720X480 or 720X576) resolution and low frame rate
(below 10 frames per second).
Skip P Frame: Use narrow bandwidth network such as PSTN to makes possible real time playback by
skipping the P frame.
Audio: Enable sound on/off.
39
HT SERIES DVR USER GUIDE
5).
Display the network speed and frame rates per channel.
Site mode – Send up to 7.5 frames per second on 16 channel screen in Watch mode
and 30 frames per second on 1channel screen.
Favorite mode – Send 30 frames per second in each channel. However, it is depend on the network speed
and PC computing power.
6).
Select ‘EVENT’ to display all event logs.
Select ‘SYSTEM’ to display all system logs.
EVENT Log: Display motion detection, sensor, text in etc.
SYSTEM Log: Display DVR time change, DVR Power Off etc.
Note: All logs data are retrieved from remote software, not from DVR unit.
40
HT SERIES DVR USER GUIDE
4-3. Site - Connecting the DVR
Click ‘Add’ button at lower right corner on initial screen to add DVRs.
Group: Setup group of DVRs. User can choose either the existing group or create a new DVR Group with
‘New’ button.
Name: Create the name of the DVR.
IP Address:
Set the IP address of DVR.
Port: Set the port number of DVR.
Num Channel: Set numbers of exact DVR channels what you want to register.
ID: Enter user ID.
Password: Enter DVR password.
Another method to add the DVR is to use the ‘Detect’ function. In ‘Detect’ window, it shows all the DVRs which
connected in the same network. Choose any IP and click the ‘add’ button to add the DVR to the ‘Site’ list.
Choose the DVR on the ‘Site’ list and click ‘Connect’ button or drag to the main screen. User will see the live
screen of the selected DVR.
User can connect to many DVR at the same time by choosing ‘Favorite’ button, and also make the favorite
DVR group.
41
HT SERIES DVR USER GUIDE
4-4. Favorite – multiple DVR connection
In Favorite Mode, User can make the favorite multiple connection lists by pressing the ‘Add’ button or
dragging from the ‘Site’ lists.
If you press the ‘Add’ button in Favorite Mode, the upper window will appear. The left side of the window
shows the DVR list what you registered in site menu and the right side of the window shows the Favorite list
which you want to edit.
If you want to make the Favorite list, drag and drop the wanted DVR from the left list to the right channel
number and the selected DVR will be registered to the Favorite list. And also you can register the individual
channel not the whole DVR.
After making the Favorite list, set the list name and press the ‘OK’ button to save the list.
If you press the connect button after selecting the Favorite list, the below window appears and you can watch
simultaneously up to 64 channels.
NOTE: This favorite mode only can be adapted to the ‘Watch’ mode, not a ‘Search’ mode and ‘Setup’
42
HT SERIES DVR USER GUIDE
mode.
You can register the DVR or individual channel to the Favorite list directly not to make the list. You can just
drag and drop the wanted DVR or channel from the right window to the wanted left channel. It will
automatically connect to the selected DVR or channel.
If you click the mouse right button from the upper screen and select the ‘Add To Favo List’, the favorite editing
window appears and you can add the new connection to the list.
43
HT SERIES DVR USER GUIDE
4-5 SEARCH – Playback
User will enter playback mode by choosing ‘SEARCH’ button after connection.
After selecting ‘Control’ button, control panel will appear as below:
1. Channel and display mode selection
2. Playback speed control buttons
Go to the previous image
Pause playback
Normal playback
Go to the next image
Fast rewind. (1x, 2x, 4x, 8x,16x, 32x, 64x faster)
Rewind slowly.(1/2x,1/4x slower)
Forward slowly.(1/2x,1/4x slower)
Fast forward. (1x, 2x, 4x, 8x,16x, 32x,64x faster)
3. Time: Search by hour.
Event: Search by event file from event list.
4 Calendar: Select desire date to playback video clip. When you choose the date, all the lists will display in
time bar window. If you choose ‘EVENT’, you can search the event (Sensor Input, Motion Detection etc.).
44
HT SERIES DVR USER GUIDE
5. Time Search:
Go to the specific time directly.
6.
: Update all information.
: Save in AVI format into PC
To backup, select From and To time, channels and click ‘Start’ to begin. It will start sending the file to the PC
and all information be displayed. After sending the file, choose the filename and folder.
: Capture Live or Playback image.
Zoom In: Allow user to enlarge the image up to 4 times.
(Left click and hold the mouse button in order to move the image around.)
Zoom Out: Allow user to reduce the image by ½ times.
Save Image: Save image as picture (bmp or jpg) format.
Print Image: Print still image through printer.
45
HT SERIES DVR USER GUIDE
Close : Close Image Dialog window.
: Modify remote software settings.
OSD Option: Turn the OSD On/Off on live viewing.
Favorite Mode Max Fps: Adjust maximum frame rate individually upon
‘Favorite’ connection. If ‘AUTO’ is selected, the program will decide the
optimum rates based on the PC and network speed.
Search Option : Modify the search option.
Deinterlacer: Remove ghost image when playing with D1 (720X480 or
720X576) resolution and low frame rate (below 10 frames per second).
Skip P Frame: Check when in narrow bandwidth network environment such as PSTN. It makes it possible
to real time playback by skipping the P frame.
Audio : Turn audio on/off.
7. Displays recorded files in graphic bar. User can playback directly by just one click on the recording bar.
•
Blue color: Normal Recording file
•
Red color: Event Recording file.
Press “+” or “-“ on the left-top time bar to get detail recording data.
When ‘EVENT’ is selected on Calendar window, the following event lists will appear. User can playback by
choosing the event.
Left click on the mouse will allow playback in full screen mode. Click twice to return to previous screen.
46
HT SERIES DVR USER GUIDE
4-6 SETUP – DVR Remote Setup
User can modify the preferences of the DVR unit remotely. Click ‘SETUP’ button to set up the DVR
remotely and user will see the identical setup GUI of the DVR.
47
HT SERIES DVR USER GUIDE
4-7 Web Browser Monitoring and Playback
DVR unit allows user to remote viewing via IE browser. After typing the IP or domain address at the address
bar in IE browser, please enter the user ID (admin or user) and Password for the DVR unit. Hit “
to begin remote viewing or hit “
” button
“ button to playback image.
:time search
:Event search
:Refresh time bar
:Option
:Snapshot
:Save picture
User can monitor /control the PTZ camera / Search / backup by using the web browser
48
HT SERIES DVR USER GUIDE
4-8 Mobile Phone Viewing
DVR system allows user to view live image via 3G mobile phone.
1. Enter DVR IP address on the mobile phone browser
with http:// ip address :port /mobile.html format.
For example:http://122.147.154.249:8001/mobile.html , which
8001 is referred to DVR web port
2. Enter DVR system ID and Password. Select camera channel and
hit “Login”.
3. Please allow 3~5 second for Mobile phone to buffer the image.
NOTE:
1. Mobile phone image download speed is depend on mobile
carrier download bandwidth and signal performance.
2. The maximum download speed is 1 FPS
49
HT SERIES DVR USER GUIDE
4-9 Network Firmware Upgrade
After installing the client software, you can find the ‘NetDownloader Program’ in the window programs (Start ->
Programs -> DVR Client -> NetDownLoader). Please execute the ‘Net Downloader Program’ to upgrade the
DVR firmware.
After entering the IP and password of the DVR, click ‘Connect’ button to communicate with your DVR unit. You
can check the model name and the current version. If you cannot see the model name and current version,
you should check the network and try again.
50
HT SERIES DVR USER GUIDE
After connection established, click ‘OPEN’ button on the ‘NetDownloader’ program and select the update file.
Press ‘START’ button to begin the process. You will see the below download window on the DVR screen.
WARNING!!!
DO NOT INTERRUPT THE DOWNLOAD PROCEDURE. IT WILL DAMAGE THE DVR UNIT IF FAIL TO DO
SO.
DVR WILL REBOOT AUTOMATICALLY AFTER DOWNLOAD COMPLETED. DO NOT REBOOT
MANUALLY!
51
HT SERIES DVR USER GUIDE
APPENDIX A DDNS SETUP
1. Registering DDNS (Dynamic Domain Name Server) in Dyndns.com
A. Register your DDNS host in Dyndns website ( http://www.dyndns.com )
Click here to
Create Account
52
HT SERIES DVR USER GUIDE
Create your user
information.
Tick the checkbox
Create Account
53
HT SERIES DVR USER GUIDE
You will see this
confirmation page
B. Complete Registration:
Click this link to
confirmation
Click Login
54
HT SERIES DVR USER GUIDE
C. Add Host Name
Click “Add Host
Services” to add a
HOST name
1
2
3
1) Create your preferred name of your Hostname.
Note: Hostname can be difference from your Dyndns account user name. It is recommended to use the
'dyndns.org' as extension.
2) Click the 'Use auto detected IP address XX.XX.XXX.XXX' and you will see your WAN IP appear in
the column.
3) Click 'Create Host' button to proceed.
55
HT SERIES DVR USER GUIDE
Your Hostname 'XXXXXX.dyndns.org' had been created successfully.
2. DDNS Settings
A. Go to DVR SETUP
NETWORK
DDNS.
B. Select DDNS Type as DynDNS.
Domain Name: Input your registered domain name in Dyndns website. (ex:test.dvrdns.org)
ID / DDNS Password: Same as register in dyndns web page
Press Apply and OK button to save changes.
56
HT SERIES DVR USER GUIDE
3. Connect with Remote Software or IE Browser
Note : 8001 is referred to web port. User can obtain this information from DVR Setup
Network
Port
57
HT SERIES DVR USER GUIDE
APPENDIX B HDD COMPATIBLE TABLE
Model Name
HITACHI
MAXTOR
SAMSUNG
Capacity
Buffer
HDS728080PLAT20
80 GB
2M
HDS721680PLAT80
80 GB
8M
HDT722516DLAT80
160 GB
8M
HDS722516DLAT80
160 GB
8M
HDT722525DLAT80
250 GB
8M
HDT725025VLAT80
250 GB
8M
HDS722525VLAT80
250 GB
8M
HDT725032VLAT80
320 GB
8M
HDP725050GLAT80
500 GB
8M
HDS725050KLAT80
500 GB
8M
HDP72505DGLA360
500GB
16M
HDS721010KLA330
1TB
32MB
6Y080L0
80 GB
2M
6B160P0
160 GB
2M
6Y200P0
250 GB
8M
6L300R0
300 GB
16 M
SP0822N
80 GB
2M
SP1604N
160 GB
2M
SP2514N/OMD
250 GB
8M
HD300LD
300 GB
8M
WD1600BB-22GUA0
160 GB
2M
WD2000BB-00GUA0
200 GB
8M
WD2500BB-00KEA0
250 GB
8M
250 GB
8M
WD2500AAKS
250GB
16M
WD3202ABYS
320GB
16M
WD5000AACS
500GB
16M
WD7500AACS
750GB
16M
WD10EACS
1TB
16M
WD15EADS
1.5TB
32MB
WESTERN DIGITAL WD2500JB
ST3800-12ACE
80 GB
2M
ST31200-25ACE
120 GB
2M
58
HT SERIES DVR USER GUIDE
SEAGATE
ST3160815AS(Barracuda)
160 GB
8M
ST3160815AV
160 GB
8M
ST3250820AV(Surveillance)
250 GB
8M
ST3250820ACE(Barracuda)
250 GB
8M
ST3250410AS(Barracuda)
250 GB
16 M
ST3300831ACE
300 GB
8M
ST3300820ACE
300 GB
8M
ST3300831ACE
300 GB
16 M
ST3400832ACE
400 GB
8M
ST3400820ACE
400 GB
8M
ST3400620A
400 GB
16 M
ST3500630AV(Surveillance)
500 GB
16 M
ST3500630A
500 GB
16 M
HDS725050KLAT80
500 GB
8M
ST3750840ACE
750 GB
8M
ST3750640A
750 GB
16 M
ST31000340SV
1TB
32M
59
HT SERIES DVR USER GUIDE
APPENDIX C TROUBLESHOOTING
1). Why DVR cannot be powered up?
ANS: Please make sure the power adapter and power cable are properly connected. If both checked,
replace another power adapter.
2). There is no image on monitor
ANS: Please make sure the monitor is ON. For 4CH model, video output switch needs to be flipped to
correct output.
3). Why can’t I connect to DVR with Client Program or web browser?
ANS: Please make sure the DVR unit is connected the network. For WAN connection, user needs to
perform port forwarding in the router.
4). Why the Motion Detection does not work well?
ANS: Please make sure the image is not too bright or dark and try to adjust the sensitivity level. Besides,
check the distance of the cameras installed.
5). Why is there a delay between Live screen and actual condition during remote monitoring?
ANS: Due to buffering Live images, there might be changes with actual condition. (1~2 sec).
6). Why the remote monitoring quality does not work as well as Live screen?
ANS: Please make sure the PC specifications and VGA Card specifications are appropriate. (Refer to
recommended Client PC specifications section)
60